How to set up server-side tracking
Server-side tracking emerged in 2020 with the server-side Google Tag Manager release. It came as a response to growing limitations in client-side data collection. Basically, to set up server-side tracking, you should follow these steps below.
- Begin by creating and configuring a server Google Tag Manager container, which can be done efficiently with the help of Stape.
- Add a custom domain to set up first-party cookies and bypass browser cookie limitations.
- Configure data transfer from your web container to the server container with the help of Stape to improve conversion tracking accuracy and reduce data loss caused by ad blockers or browser privacy settings.
- Test, debug, and enable monitoring to ensure your setup works correctly.
- Extend your setup by connecting other marketing or analytics platforms that work with server-side GTM.
In this blog post we will explain in detail how to implement server-side tracking with Stape. We'll also present different use cases and the advantages of server-side tracking with Stape services and briefly overview some of the most popular platforms that support server-side tagging.
What is server-side tracking?
With server-side tracking, your website first sends data to the cloud server. Next, the cloud server distributes the data you want to share between third-party vendors and tracking platforms according to your container settings. In other words, you control what data you send to your analytics or ad platform and what you don't. This is why setting up server-side tracking is one of the most reliable and privacy-friendly solutions for tracking user behavior without relying on cookies.
Compared to client-side tracking, it provides more accurate data collection and conversion tracking, extended cookie lifetime, reduced impact of ad blockers, better control over data, improved website page load time, hiding tracking IDs and secret API keys, and more.
Stape Academy
If you really wish to master server-side tracking setup, check out Stape Academy. In our server-side tagging course, you will learn how to configure sGTM, extend cookie lifetime, integrate other platforms, etc. You can find our webinar recordings in the Stape Academy, too. Our courses are free for all registered users. And if you are not a part of the Stape community yet, it's never too late to join.
How to implement server-side tracking with Google Tag Manager container
There are several tools you can use for setting up server-side tagging. Our choice is the server Google Tag Manager container. The main advantages of using sGTM, in our opinion, are:
- Easy to use.
- Transparent and convenient.
- No additional costs. You should pay only for servers, no fees for using sGTM interface.
- Version control system.
- Any changes can be easily undone and returned to an earlier state, as well as keep track of who made the changes, where, and when.
- Multi-user mode.
The first step when starting with server-side tagging is configuring the sGTM container.
With Stape, you can set up a tagging server for your sGTM container in one click. All you need to do is:
Create a Google Tag Manager server container
➡️ Note
Before setting up your server-side Google Tag Manager container, it’s important to have web GTM container configured, because:
- The web container collects events, parameters and user interactions on your website.
- And sends this data to your server-side container.
Please follow the official Google documentation.
1. Select your GTM account → Click Admin → Click + next to the Container name.
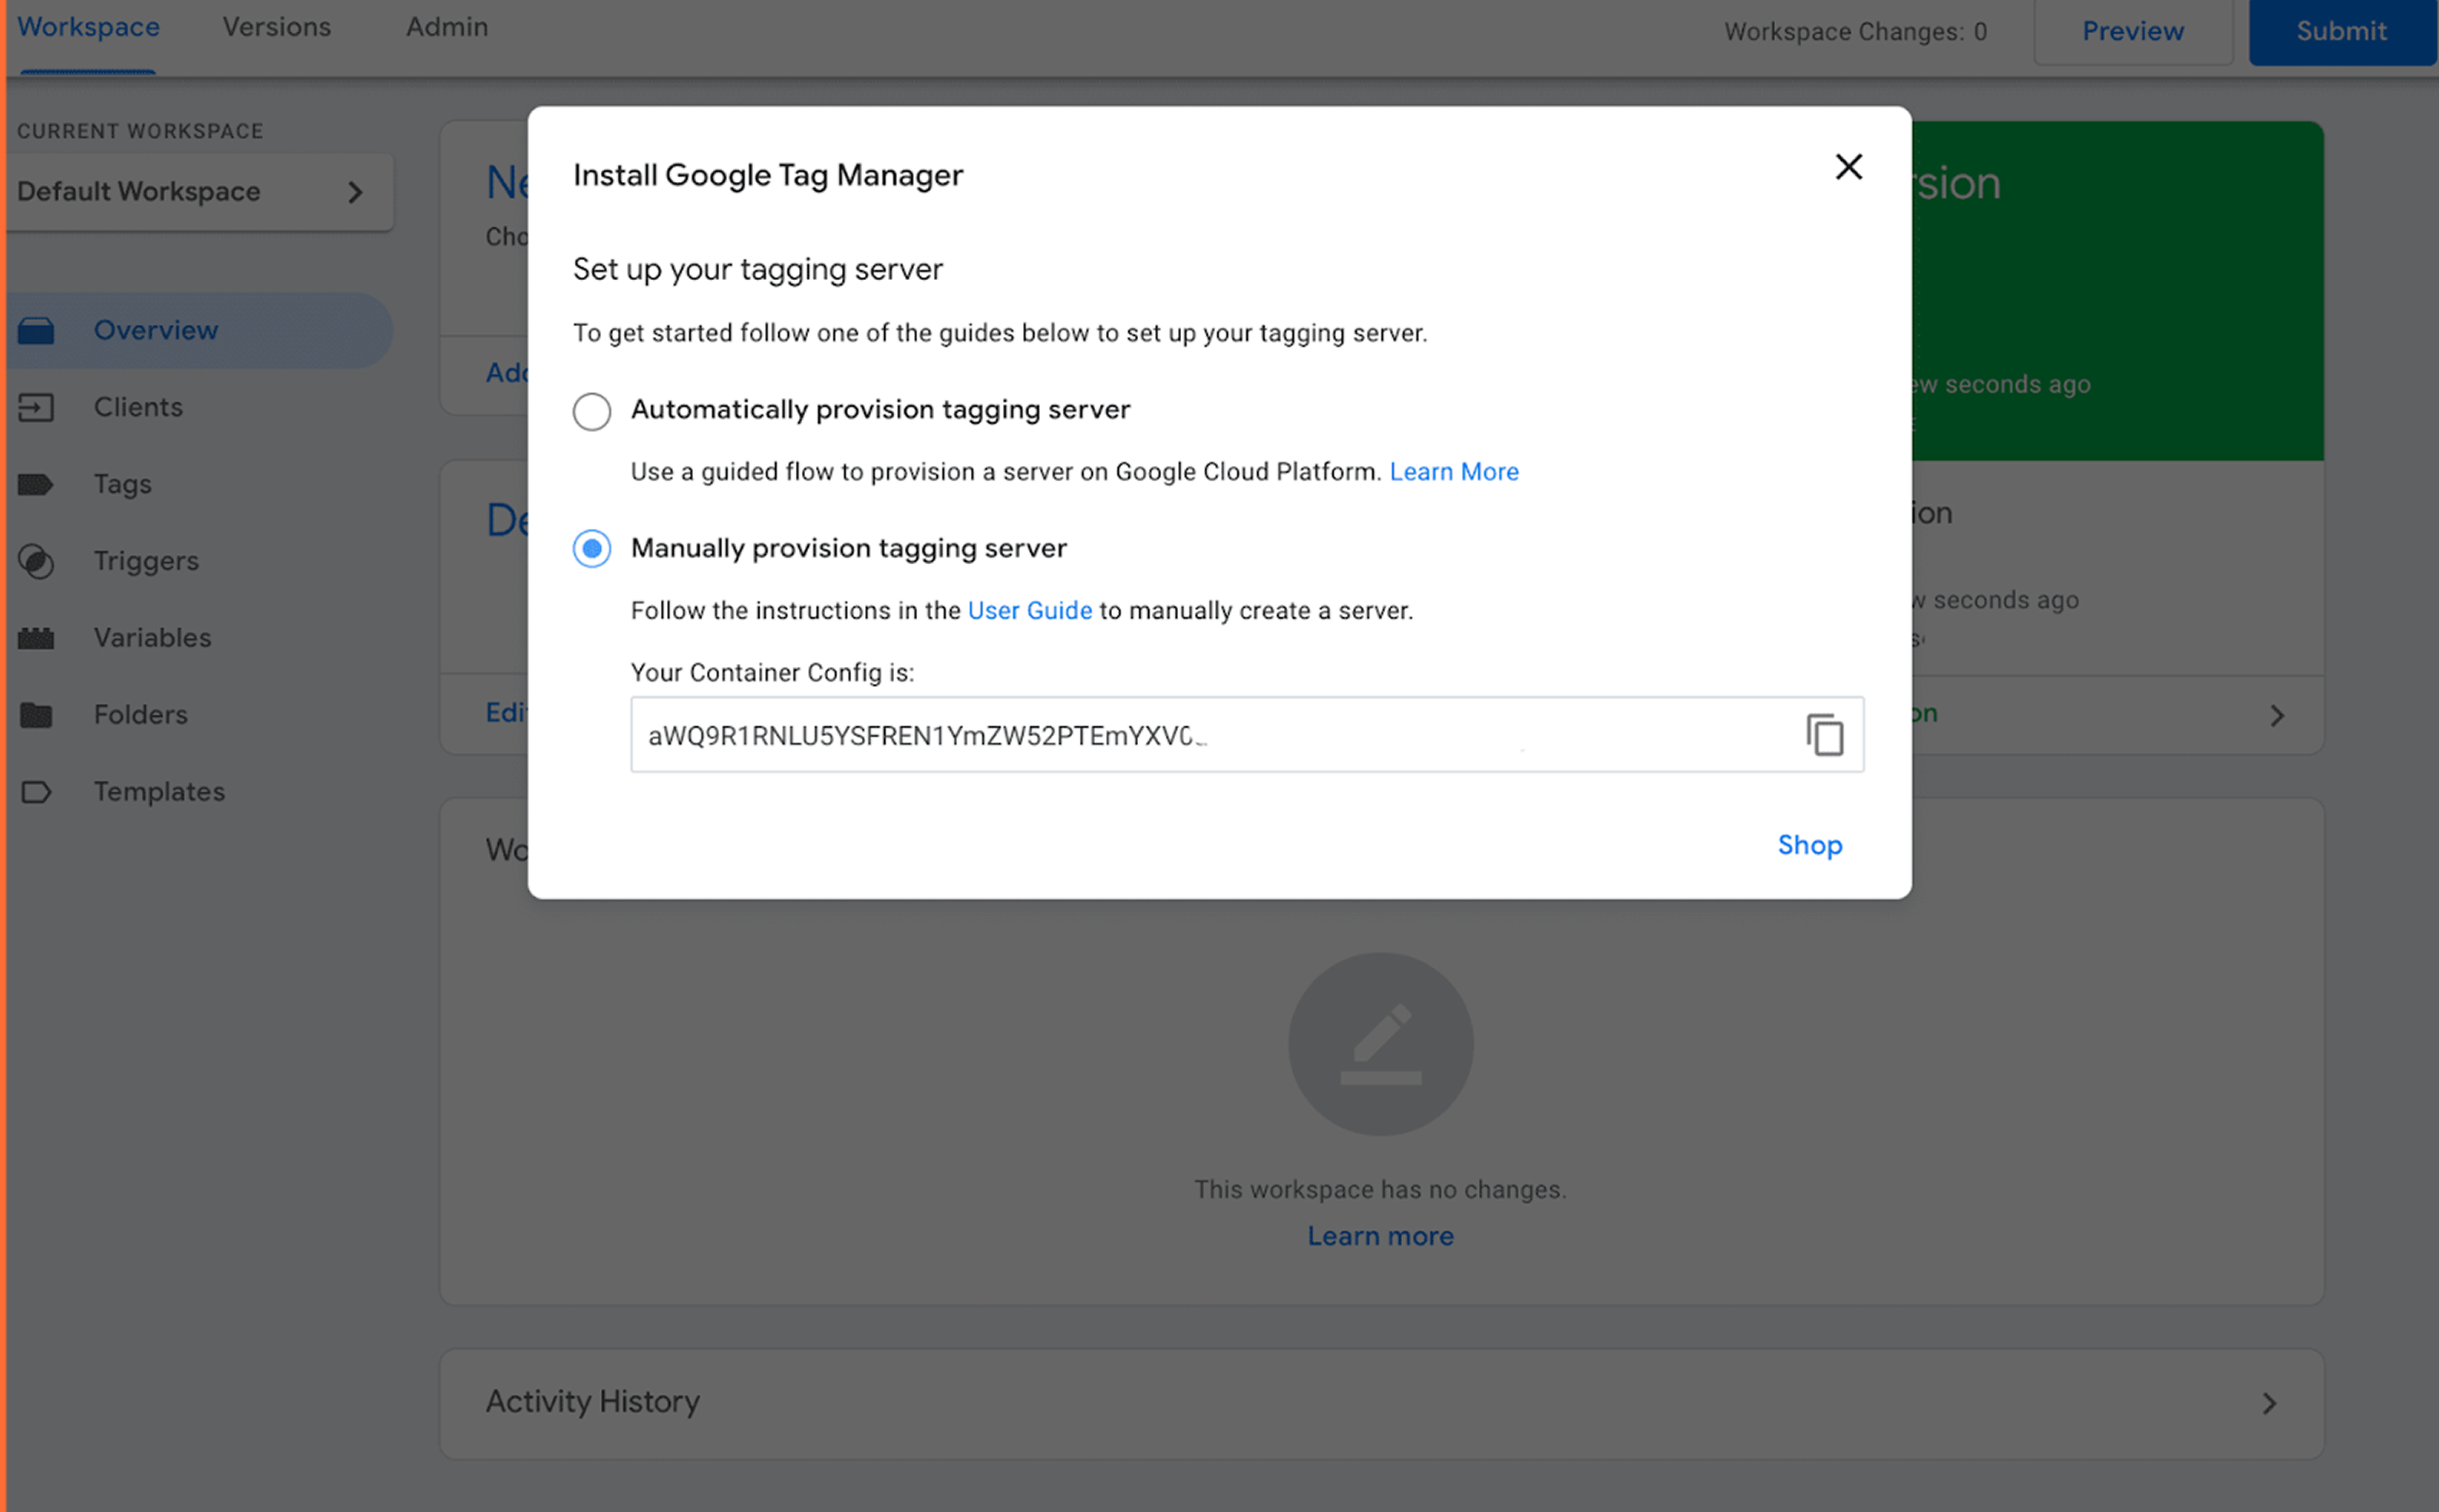
2. Add Container Name → Under Target platform, choose Server. Click Create.
3. Choose Manually provision tagging server. Copy your container config. We will need it in the following steps.
Create a container in Stape
1. Go to stape.io and create an account or log in.
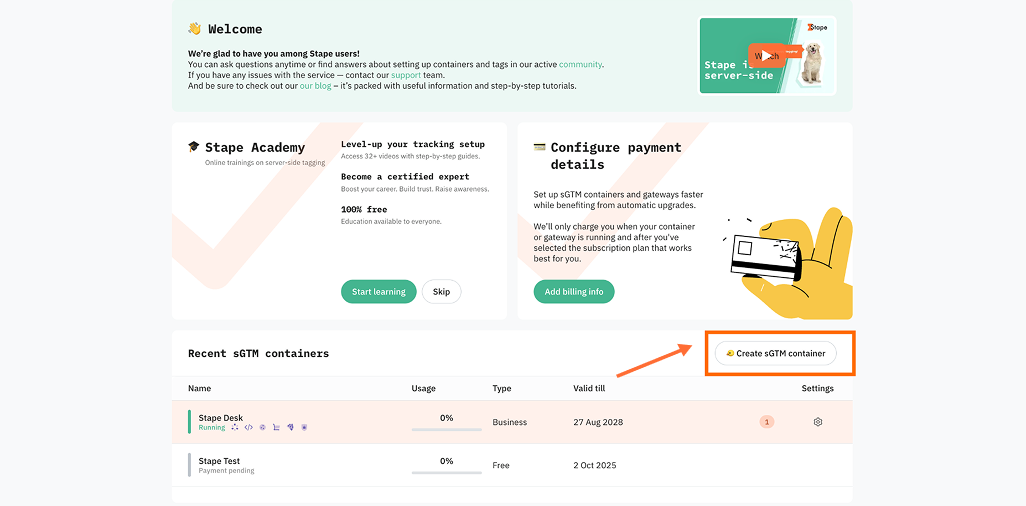
2. Click Create sGTM container on the main page.
3. Enter your container details.
- Container name - give your container a name (for convenience, we recommend using the same name you gave to the server container in GTM).
- Container configuration - paste the Container Config data that you copied from the Install Google Tag Manager pop-up. If you lost it, go to Google Tag Manager → click Admin → click Container settings → copy the string under Container Configuration.
- Server location - for best performance, choose the server location that’s closest to where most of your clients are. See the list of available server locations here. Also, you can opt for the Global multi-zone server location option if you have traffic from different regions. It will automatically route incoming requests to the nearest available zone based on the user’s IP address.
Then click Create Container.
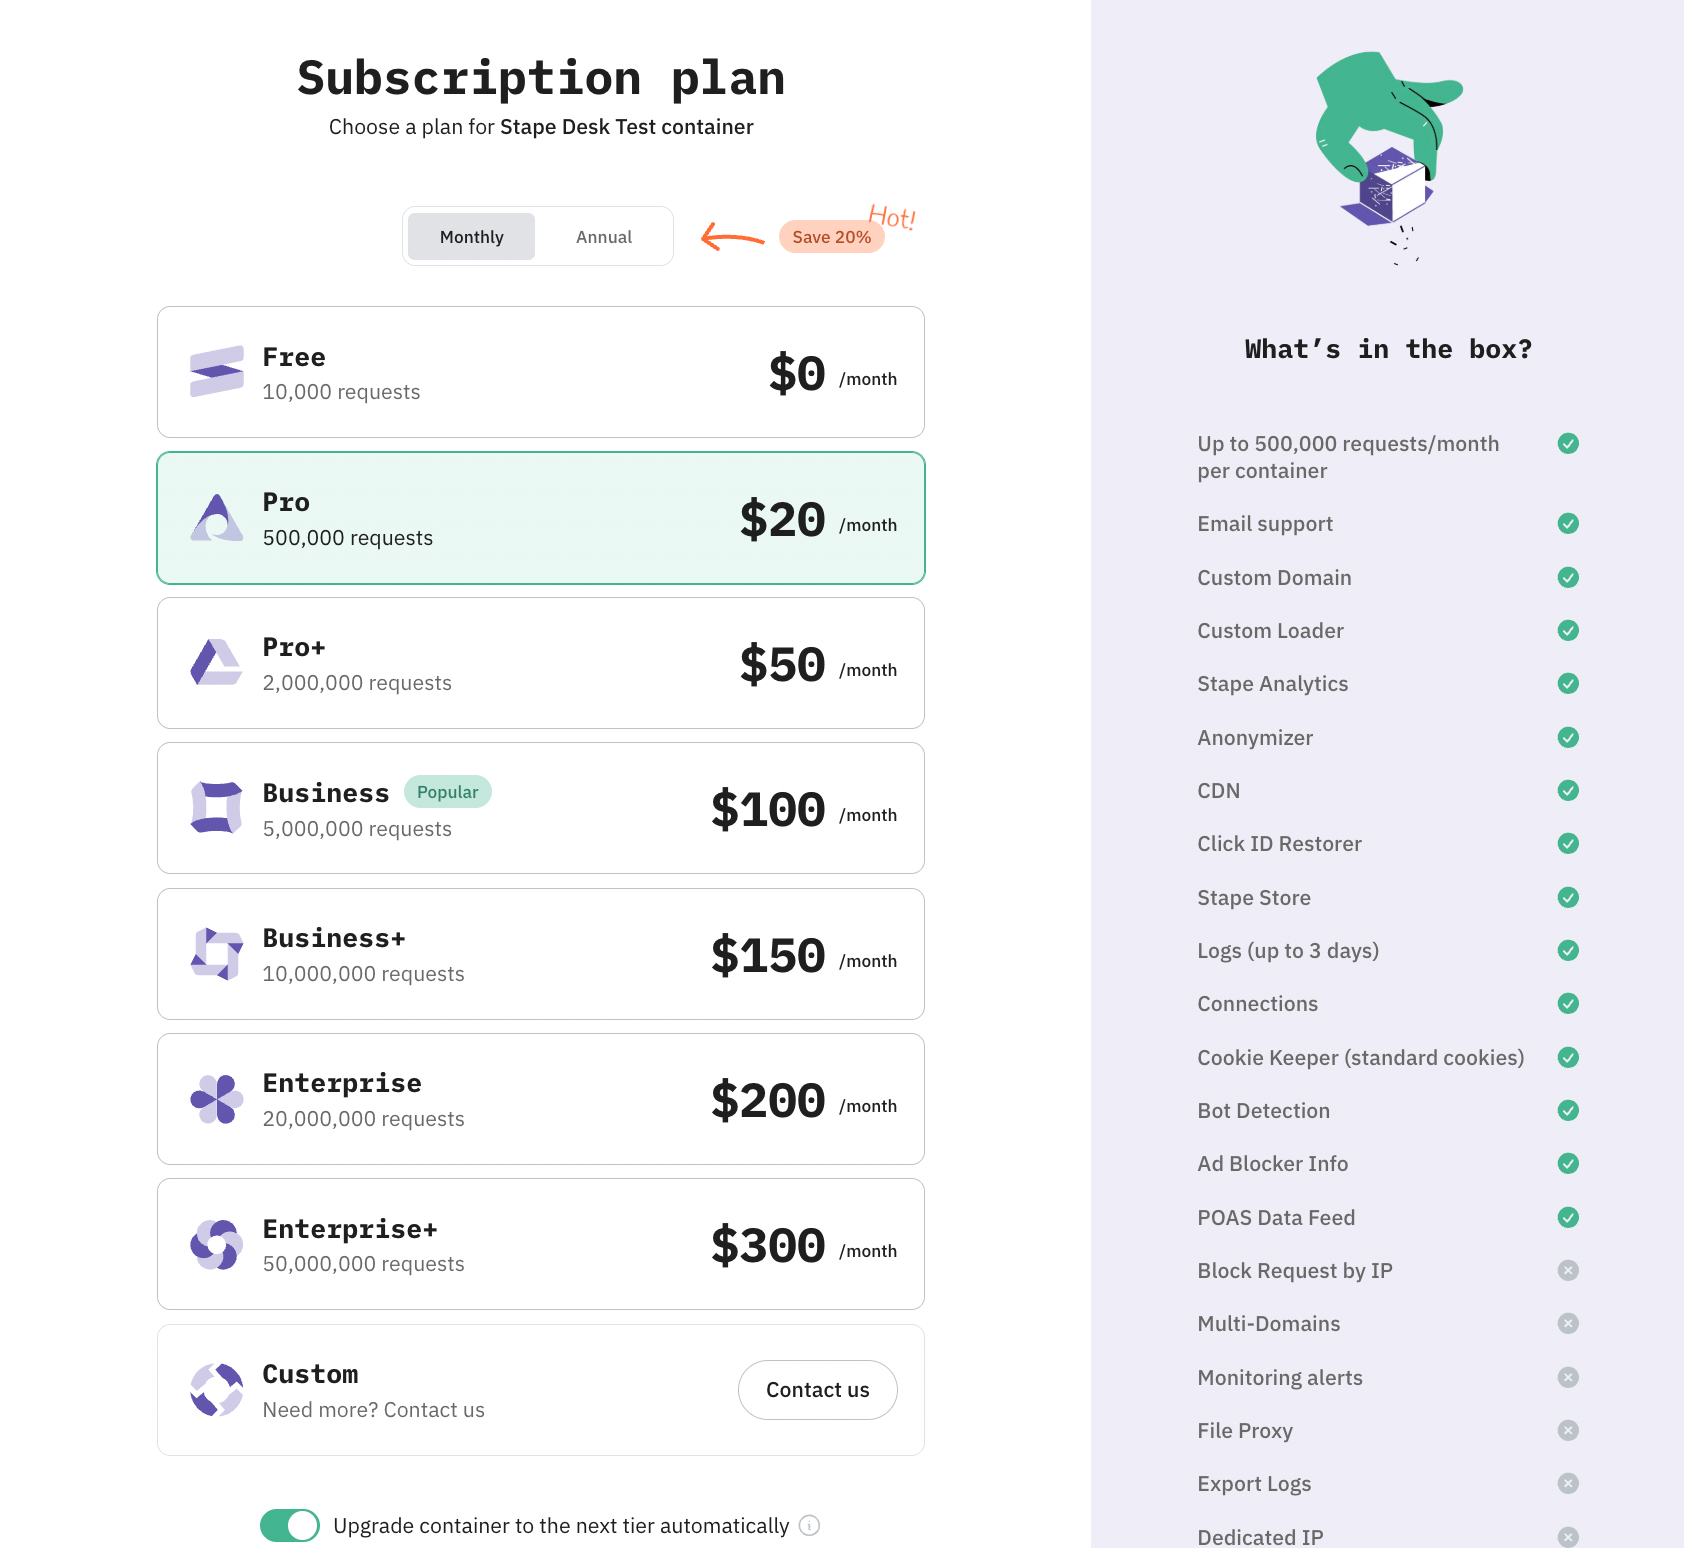
4. Choose a plan for your container. You can start with a Free plan. Click Continue with a Free plan.
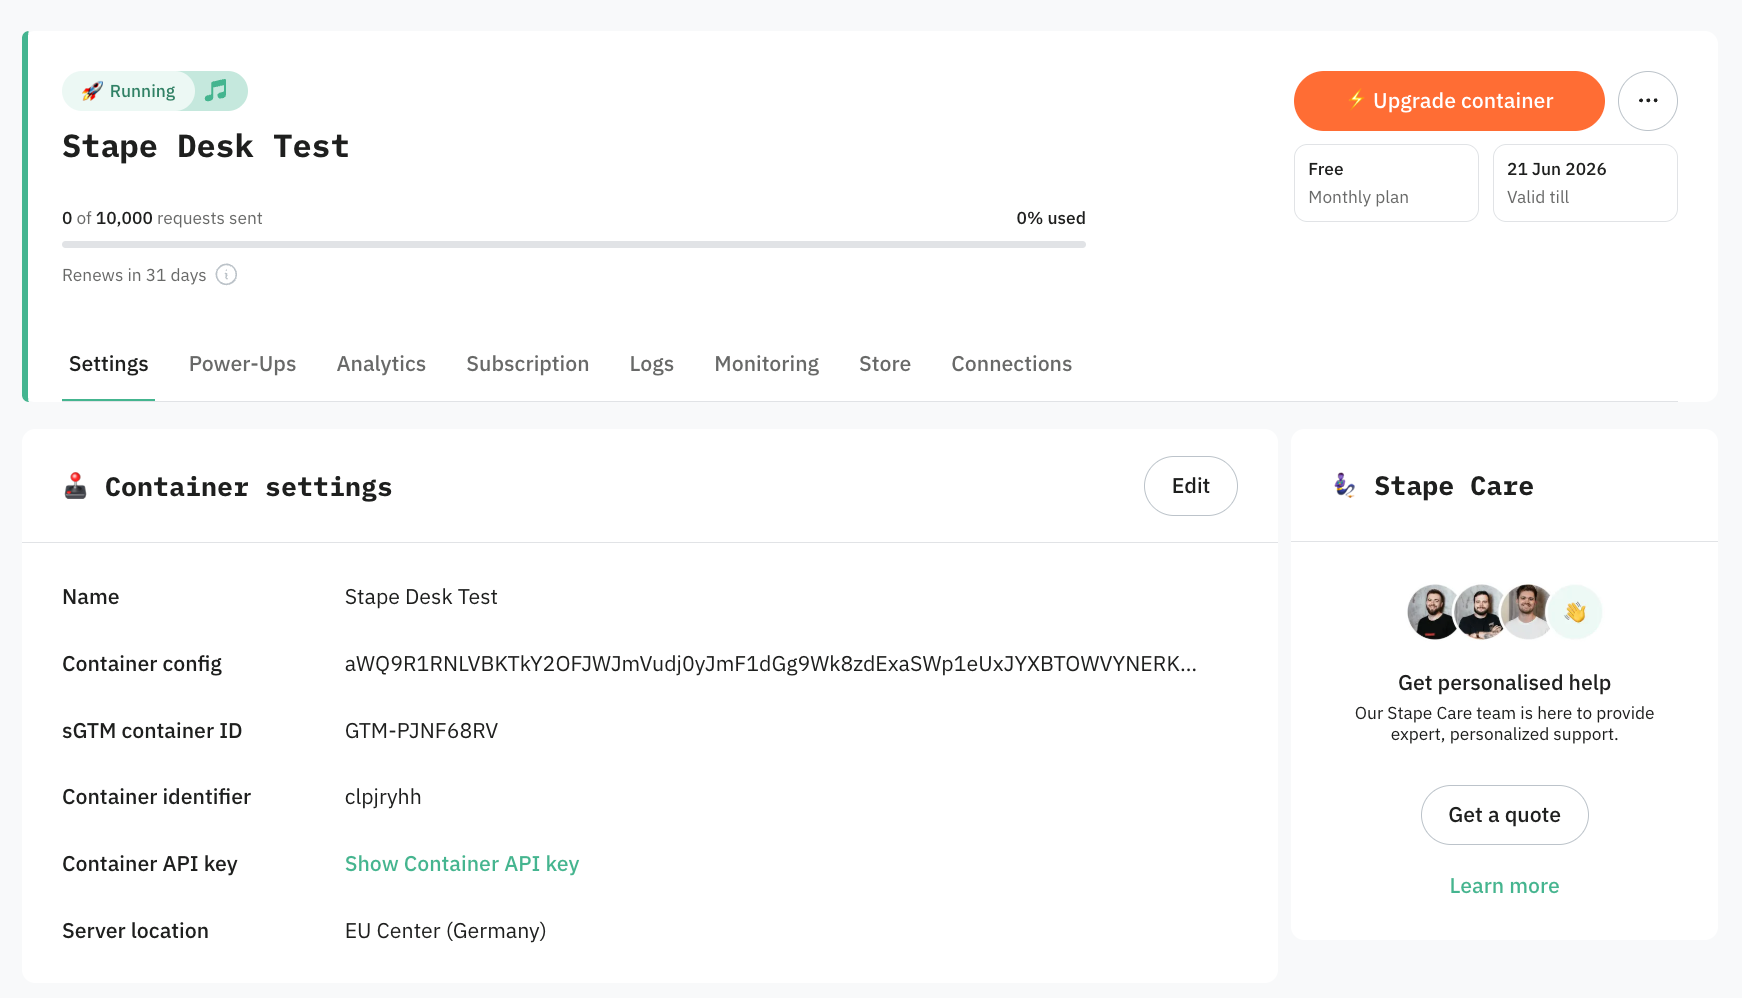
5. You will see the status of your container, container config, and plan name. It takes around 5 minutes to deploy a server container.
Please reload the page to update the status. If the Google Tag Manager server-side setup was done correctly, you should see the status Running.
Set up custom domain
Use a custom tagging server URL, also called a custom domain, to set first-party cookies. This URL should use the same root domain as your website. For example, if your website is `example.com`, your tagging server URL can be `ss.example.com`.
There are three ways to set up a custom domain:
- Same origin – tagging server shares the exact domain and path with your site. Read more on how to set up a custom domain with the same origin.
- Subdomain – tagging server runs on a subdomain of your root domain. In this article we will guide you through this setup.
- Default domain – no custom domain; uses the standard Stape-provided address.

Step 1. Add your custom domain
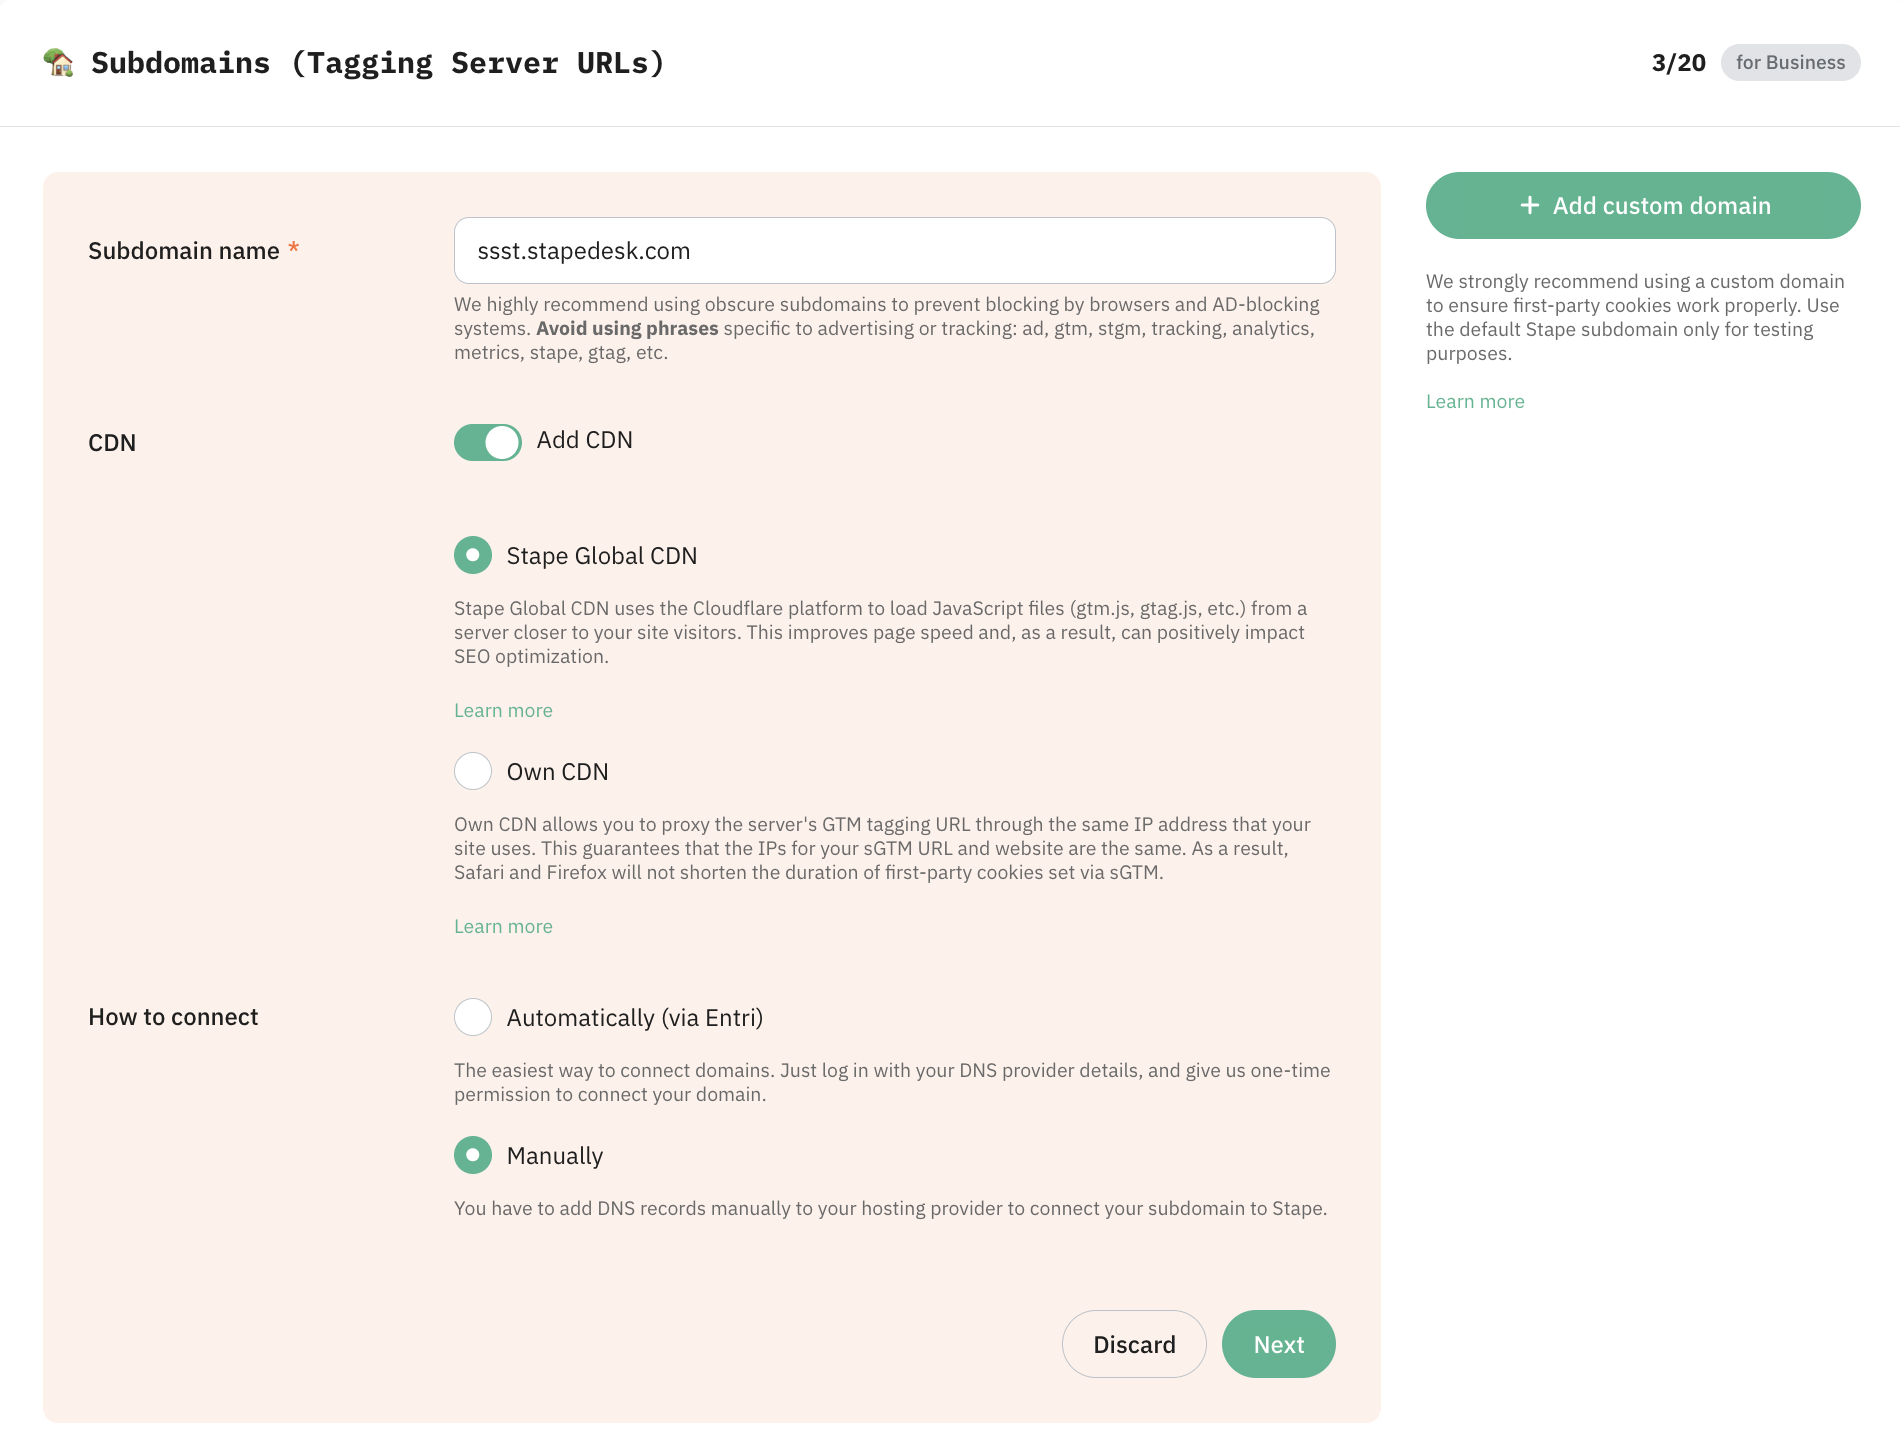
Сhoose your container on Stape, scroll down, and click Add custom domain.
Add Subdomain name - it can be any name that works for you, just be sure to avoid using phrases specific to advertising or tracking: ad, gtm, stgm, tracking, analytics, metrics, stape, gtag, etc.
Step 2. Add CDN
A Content Delivery Network (CDN) distributes your website's assets across a global network of servers to reduce latency and improve load times for users in different locations. It is useful if your audience is geographically distributed or if you want to improve cookie tracking and data accuracy.
By default, the CDN is disabled, which means JavaScript files (like gtm.js, gtag.js, and analytics.js) are served directly from the server location where your sGTM container is hosted. Effectively, it bypasses both Stape Global CDN and Own CDN options and gives you a direct, unproxied connection between your site and the sGTM container.
| Important: please consider your country's privacy regulations before setting up a CDN. |
To enable the CDN, click the Add CDN toggle and select one of the following options:
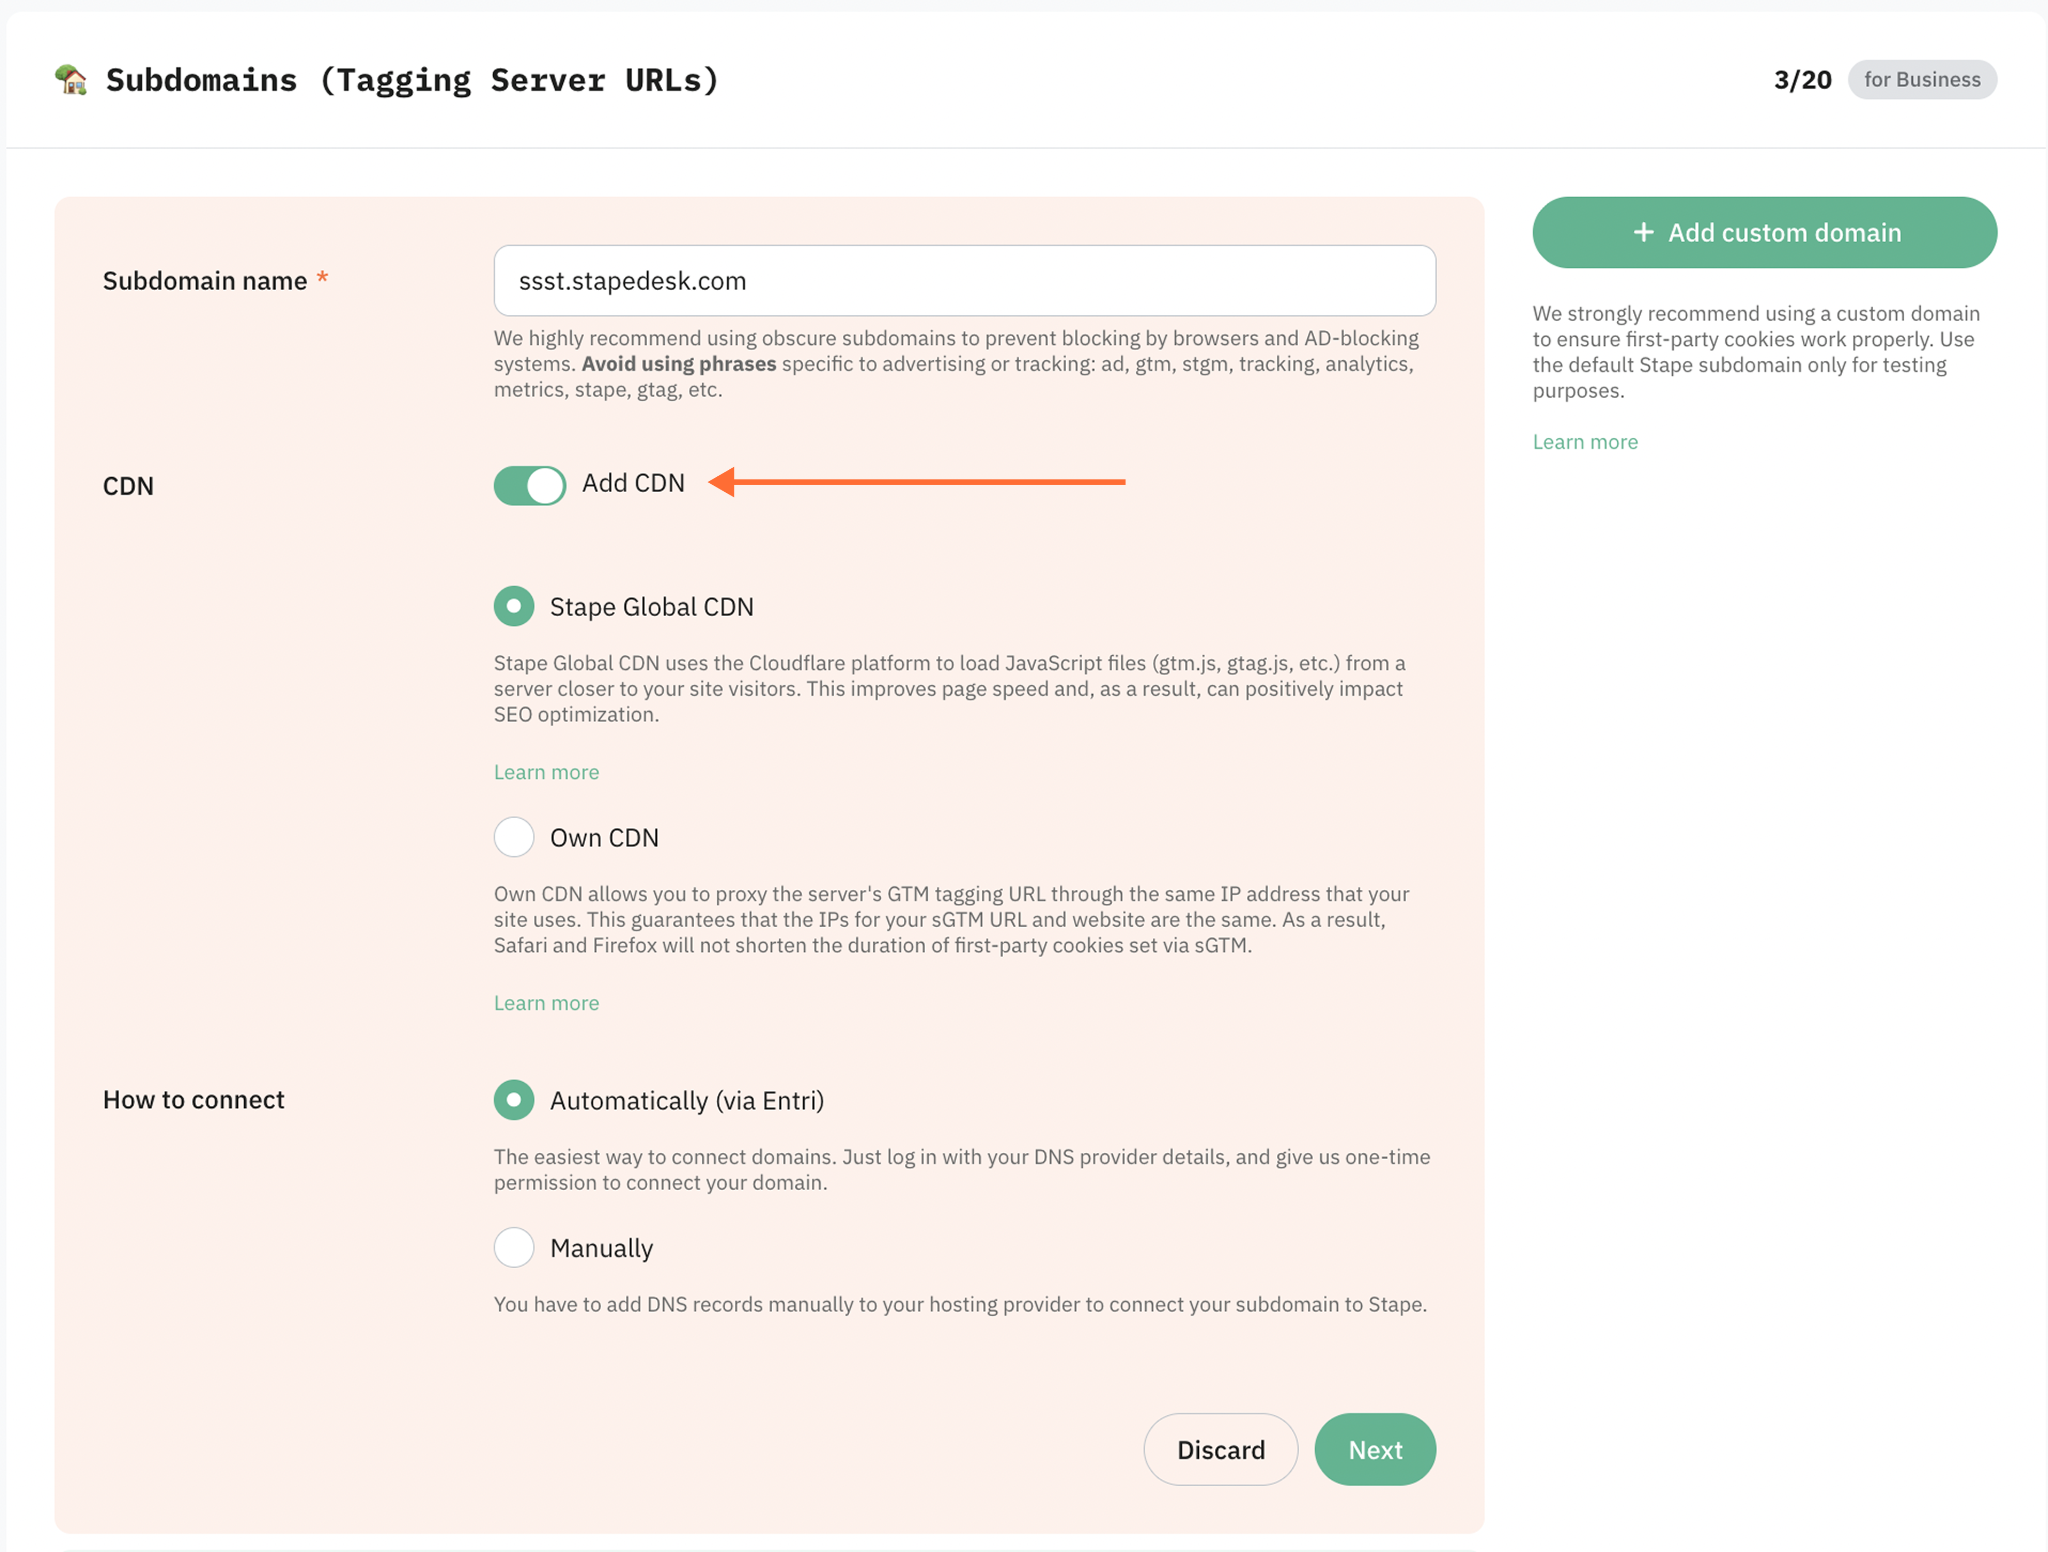
- Stape Global CDN - loads scripts from a server closest to your website visitor's location, which reduces latency and improves page load times for geographically distributed audiences. We will use the Stape Global CDN in our setup. This feature is free and available for all Stape sGTM containers.
- Own CDN (incompatible with the Automatically (via Entri) connection option) - helps route sGTM custom domain and proxy sGTM traffic through the DNS provider of your website. In this case, the IP addresses of your website and the custom domain of the sGTM will match, and server-side cookies will be considered as first-party. As a result, it gives the ability to increase cookie duration.
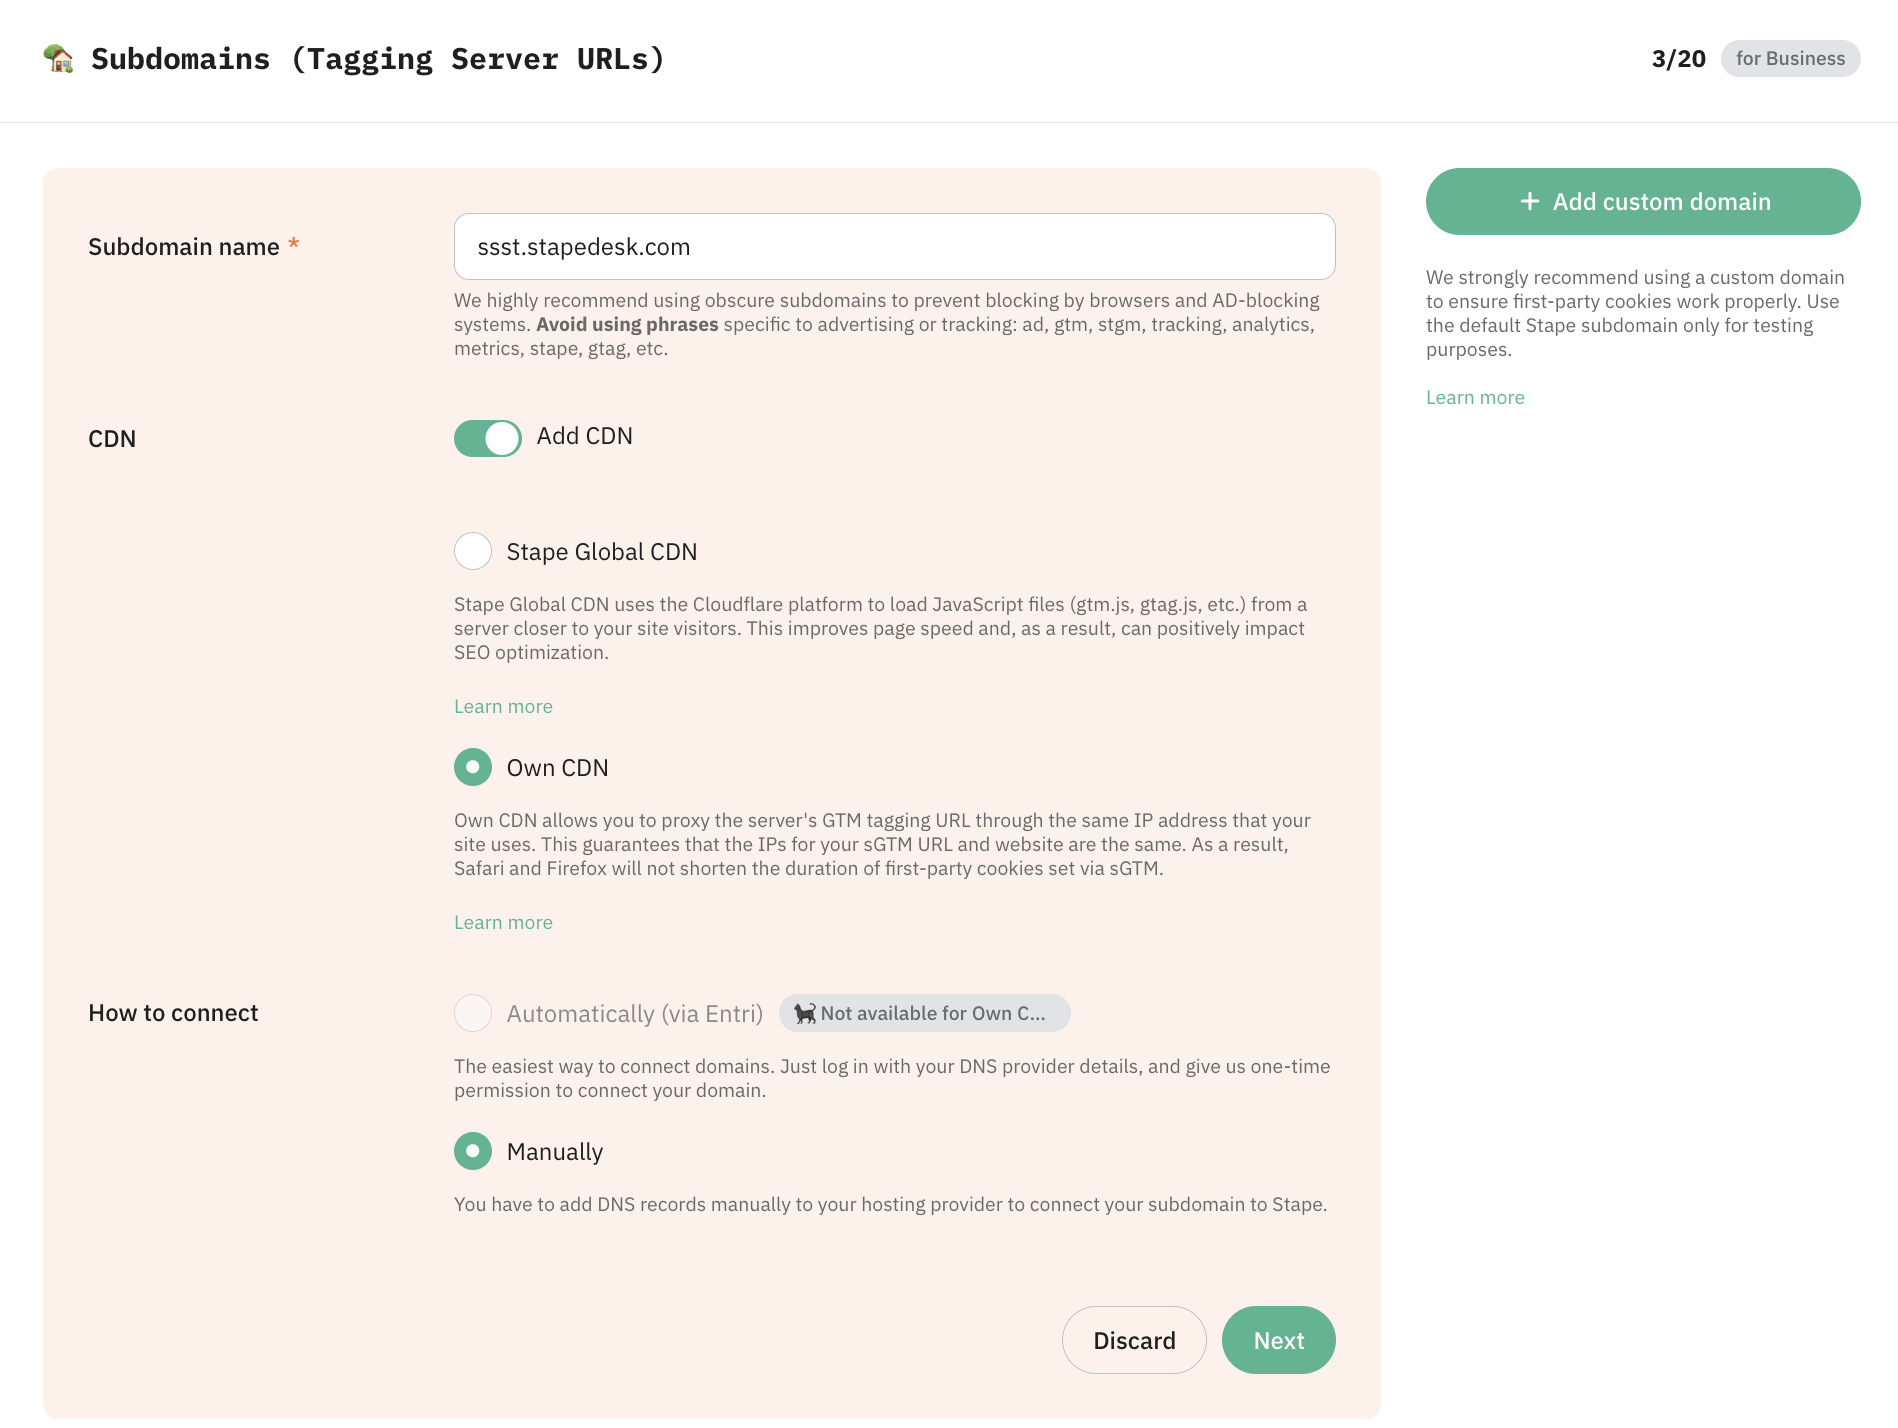
Step 3. Select the "How to connect" method
Next, in the How to connect section, there are two ways of connecting a custom domain to your container:

- Automatically (via Entri)
The easiest way to connect domains. Log in with your DNS provider details via Entri, and give us one-time permission to connect your domain. That's it, you can proceed directly to Step 5 to verify your domain; no manual configuration is required.
- Manually
With this option, you have to add DNS records manually to your hosting provider to connect your subdomain to Stape.
After you add a custom subdomain to your container, you will see DNS records that should be created to verify the custom domain. The DNS record depends on the server location and the CDN option you choose. In the next step, we show how to add DNS records.
Step 4. Add DNS records (for the manual connection method)
By default, subdomain verification is performed with CNAME records, but you can verify your subdomain with A and AAAA records if you need to (usually in cases when you need to avoid adding duplicated records).
We will cover both options below with a step-by-step guide on how to create records using Cloudflare. But you can use any other provider.
Adding a custom domain with a CNAME record
CNAME record(s) setup
You must create one CNAME record if you do not use Stape Global CDN and two records if you use Stape Global CDN.
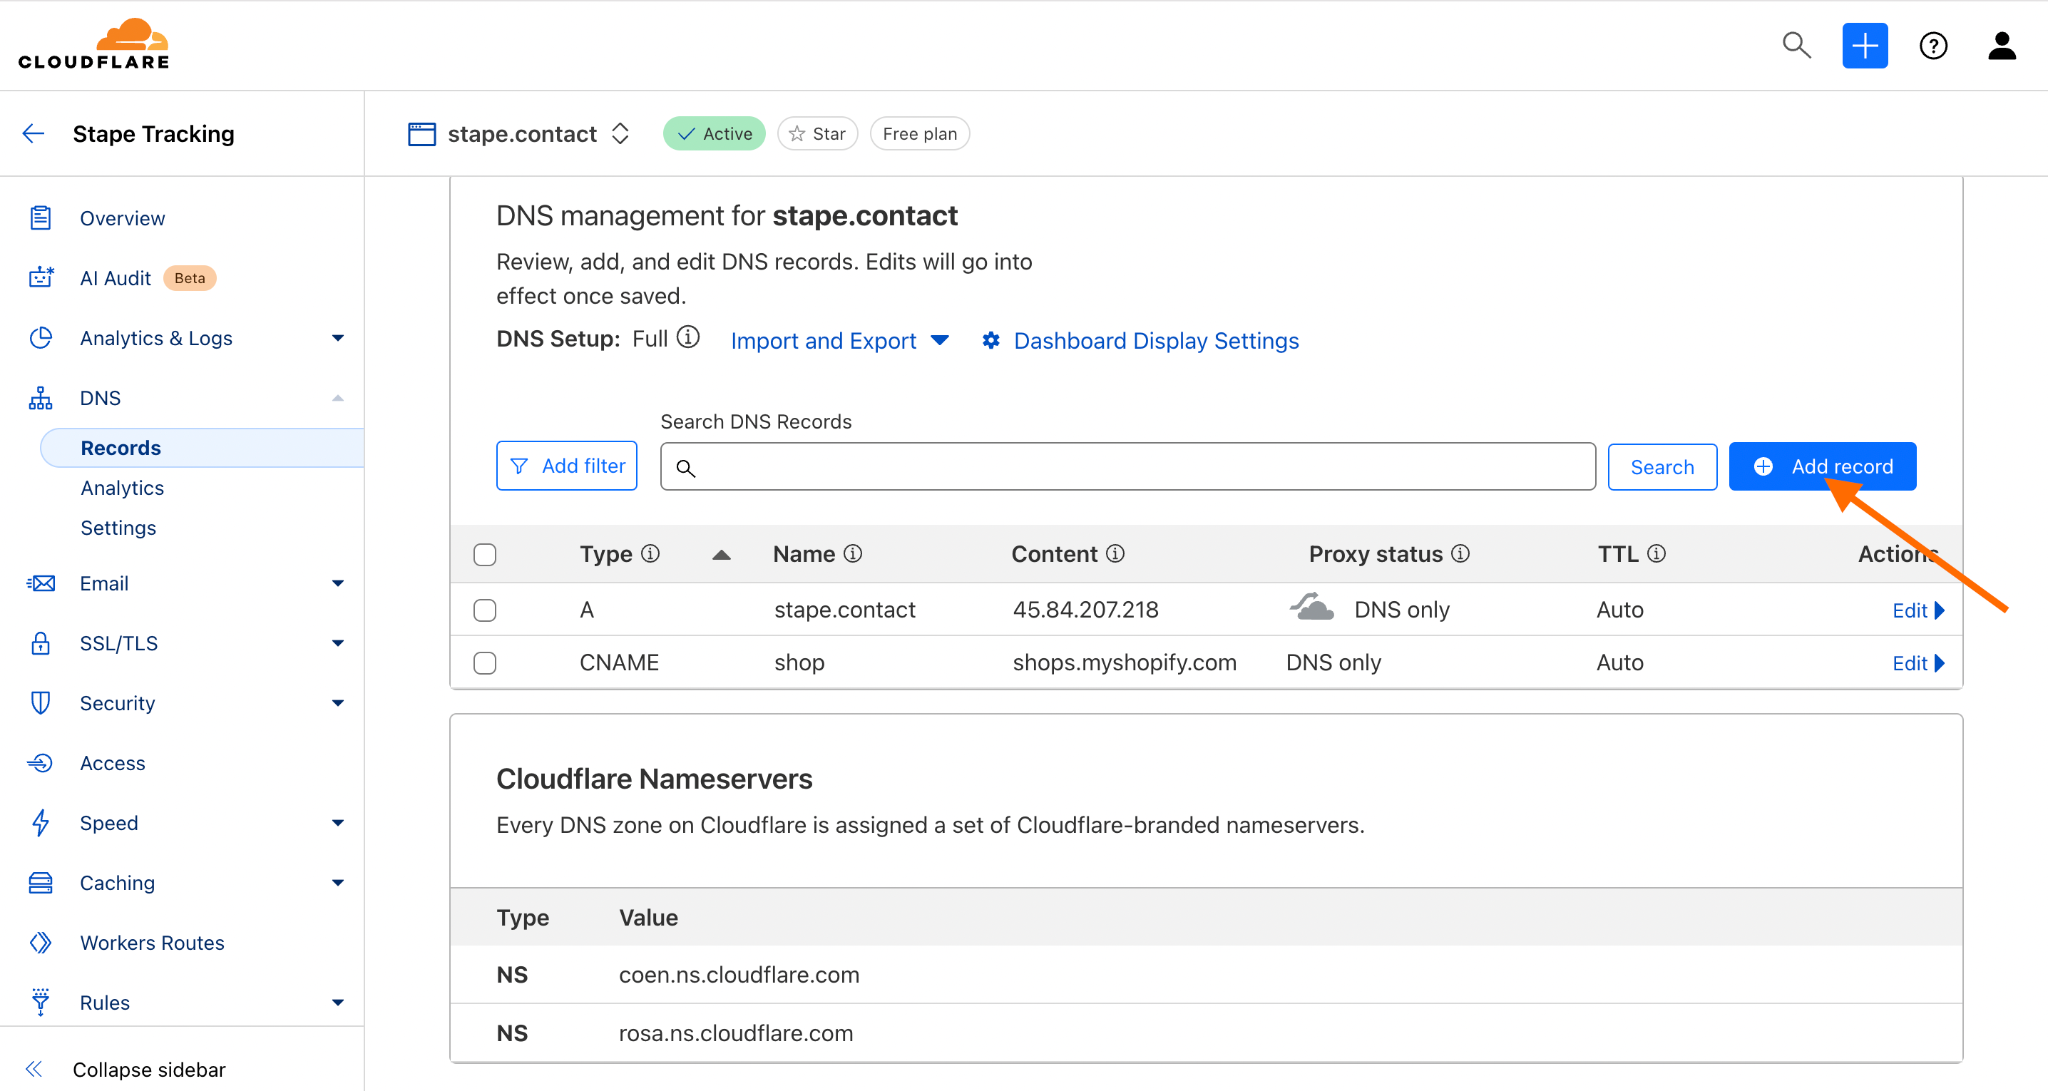
1. Log in to your domain name service and create a new DNS record for the subdomain you want to use. To do it, click three dots and choose Configure DNS next to your domain name on the account home page.
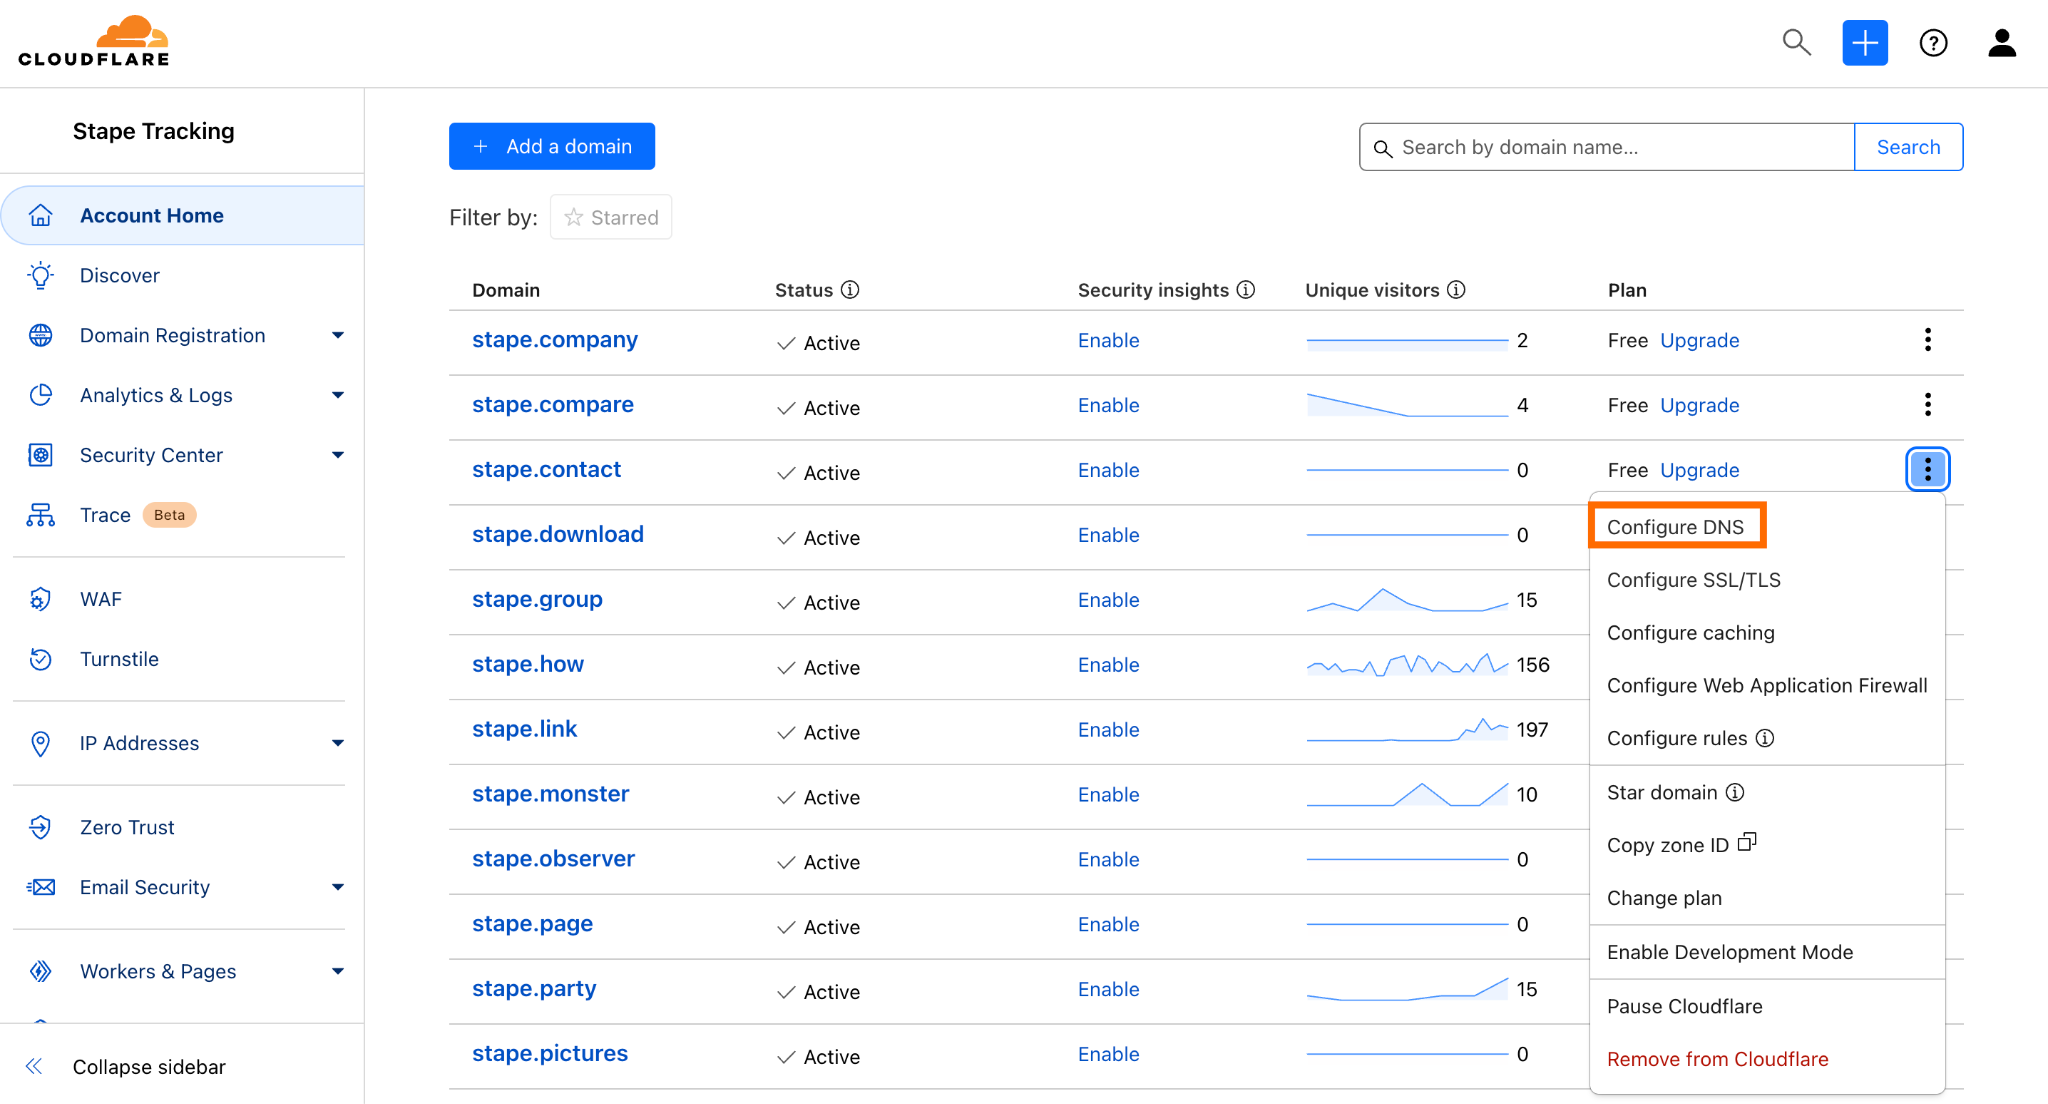
2. Click Add record.

3. Go back to your Stape account and input the record you see in the account. Make sure that the Proxy status is turned off.
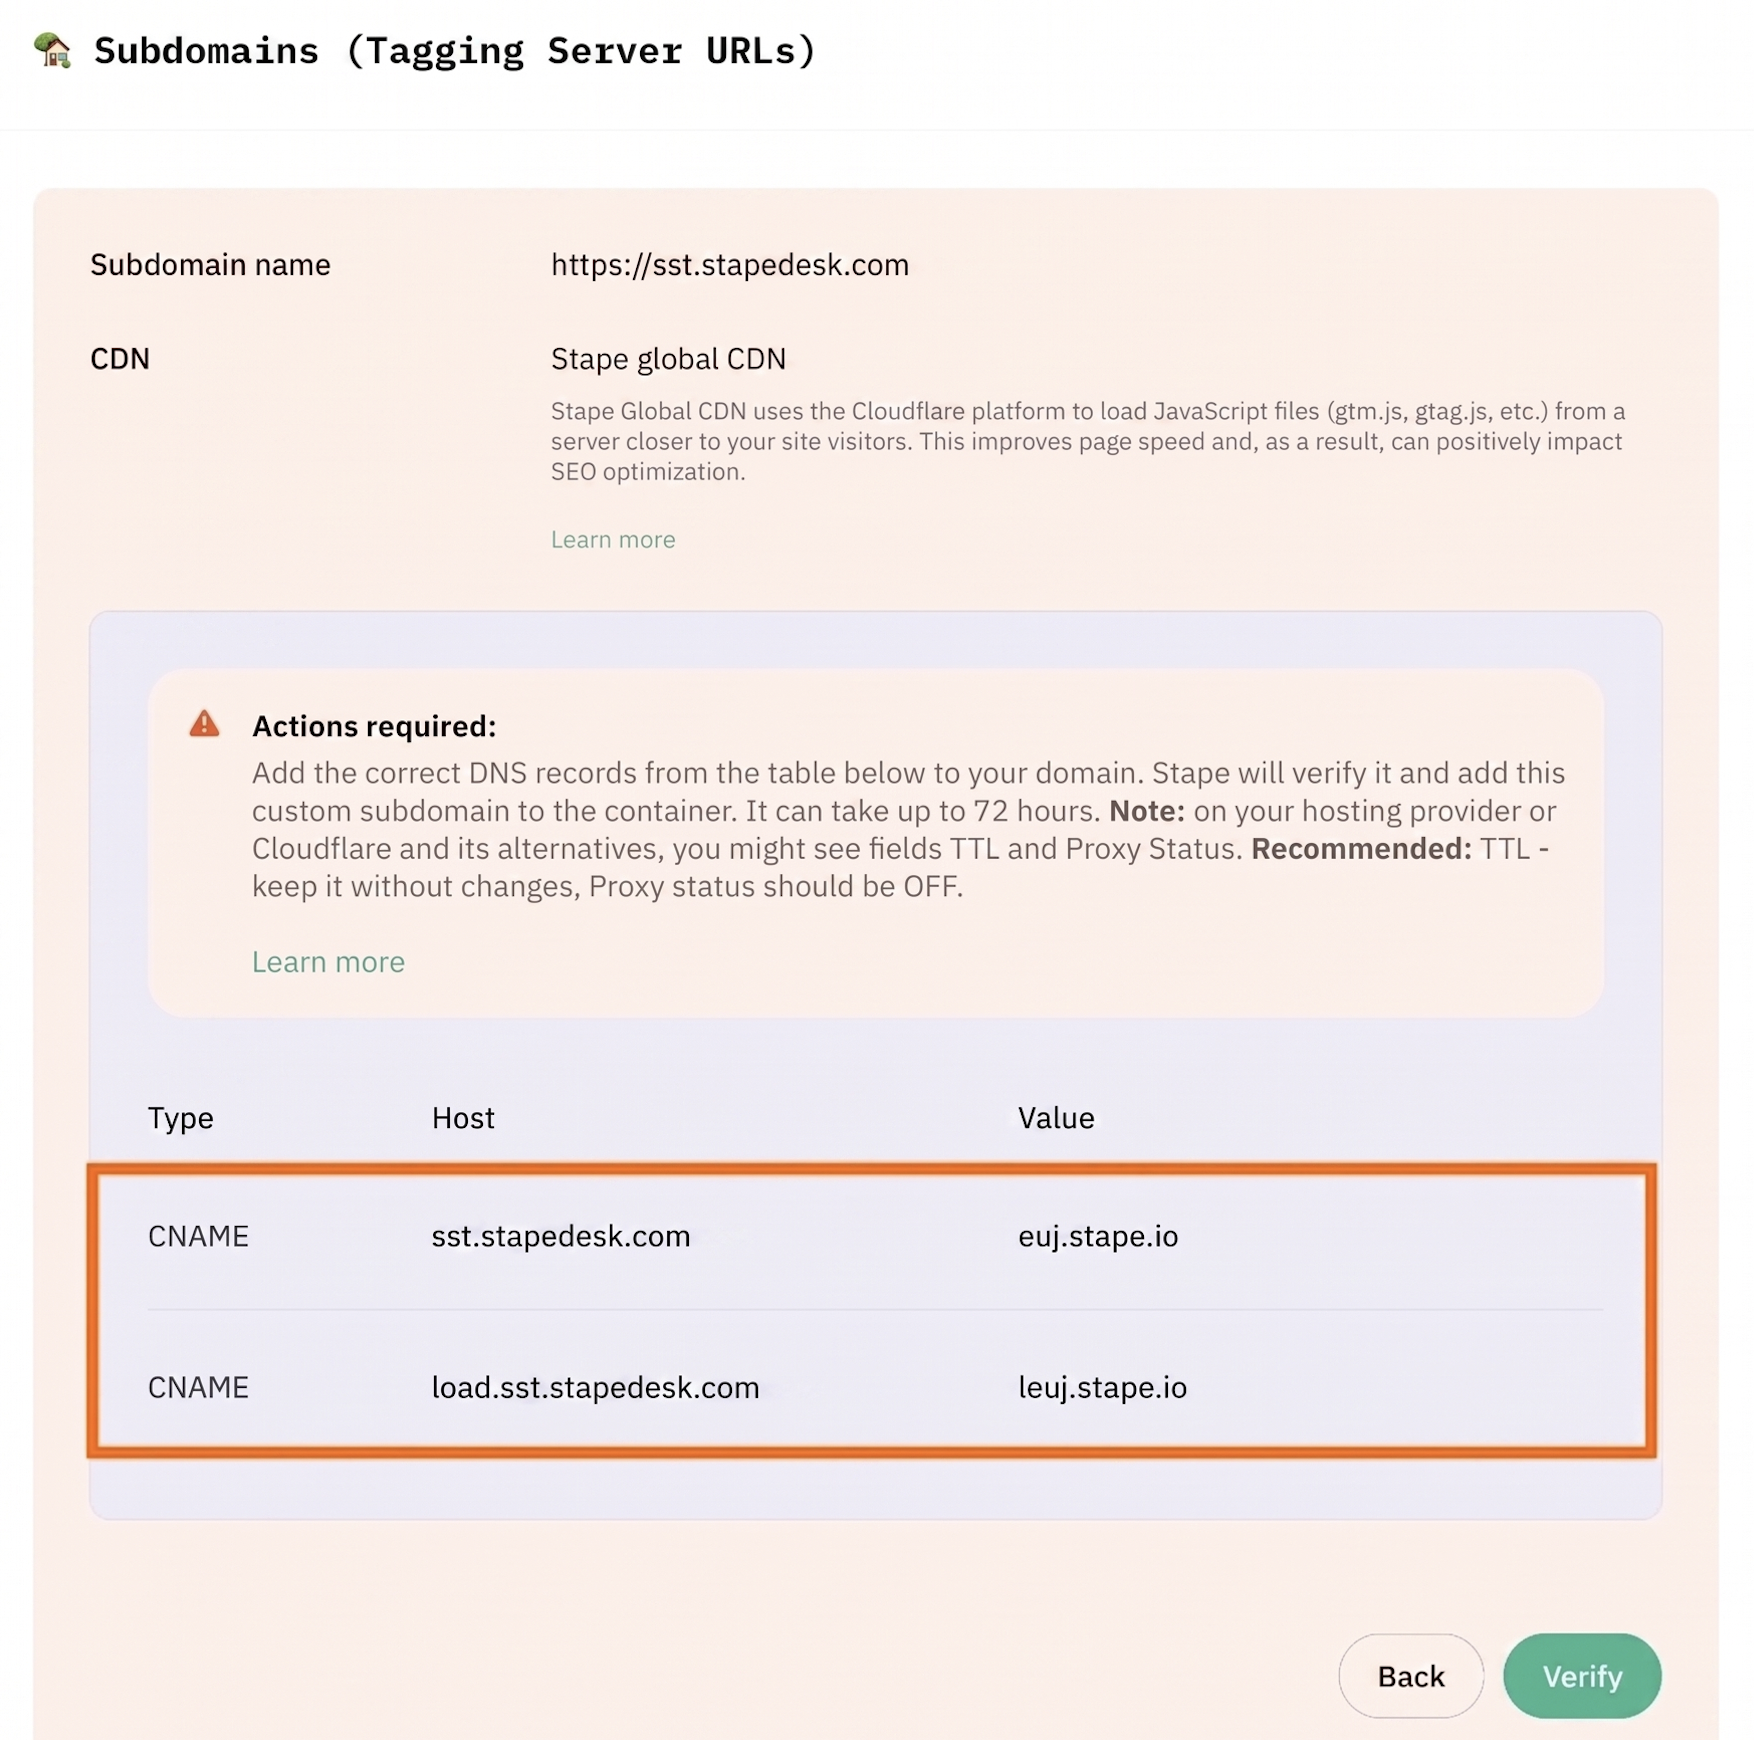
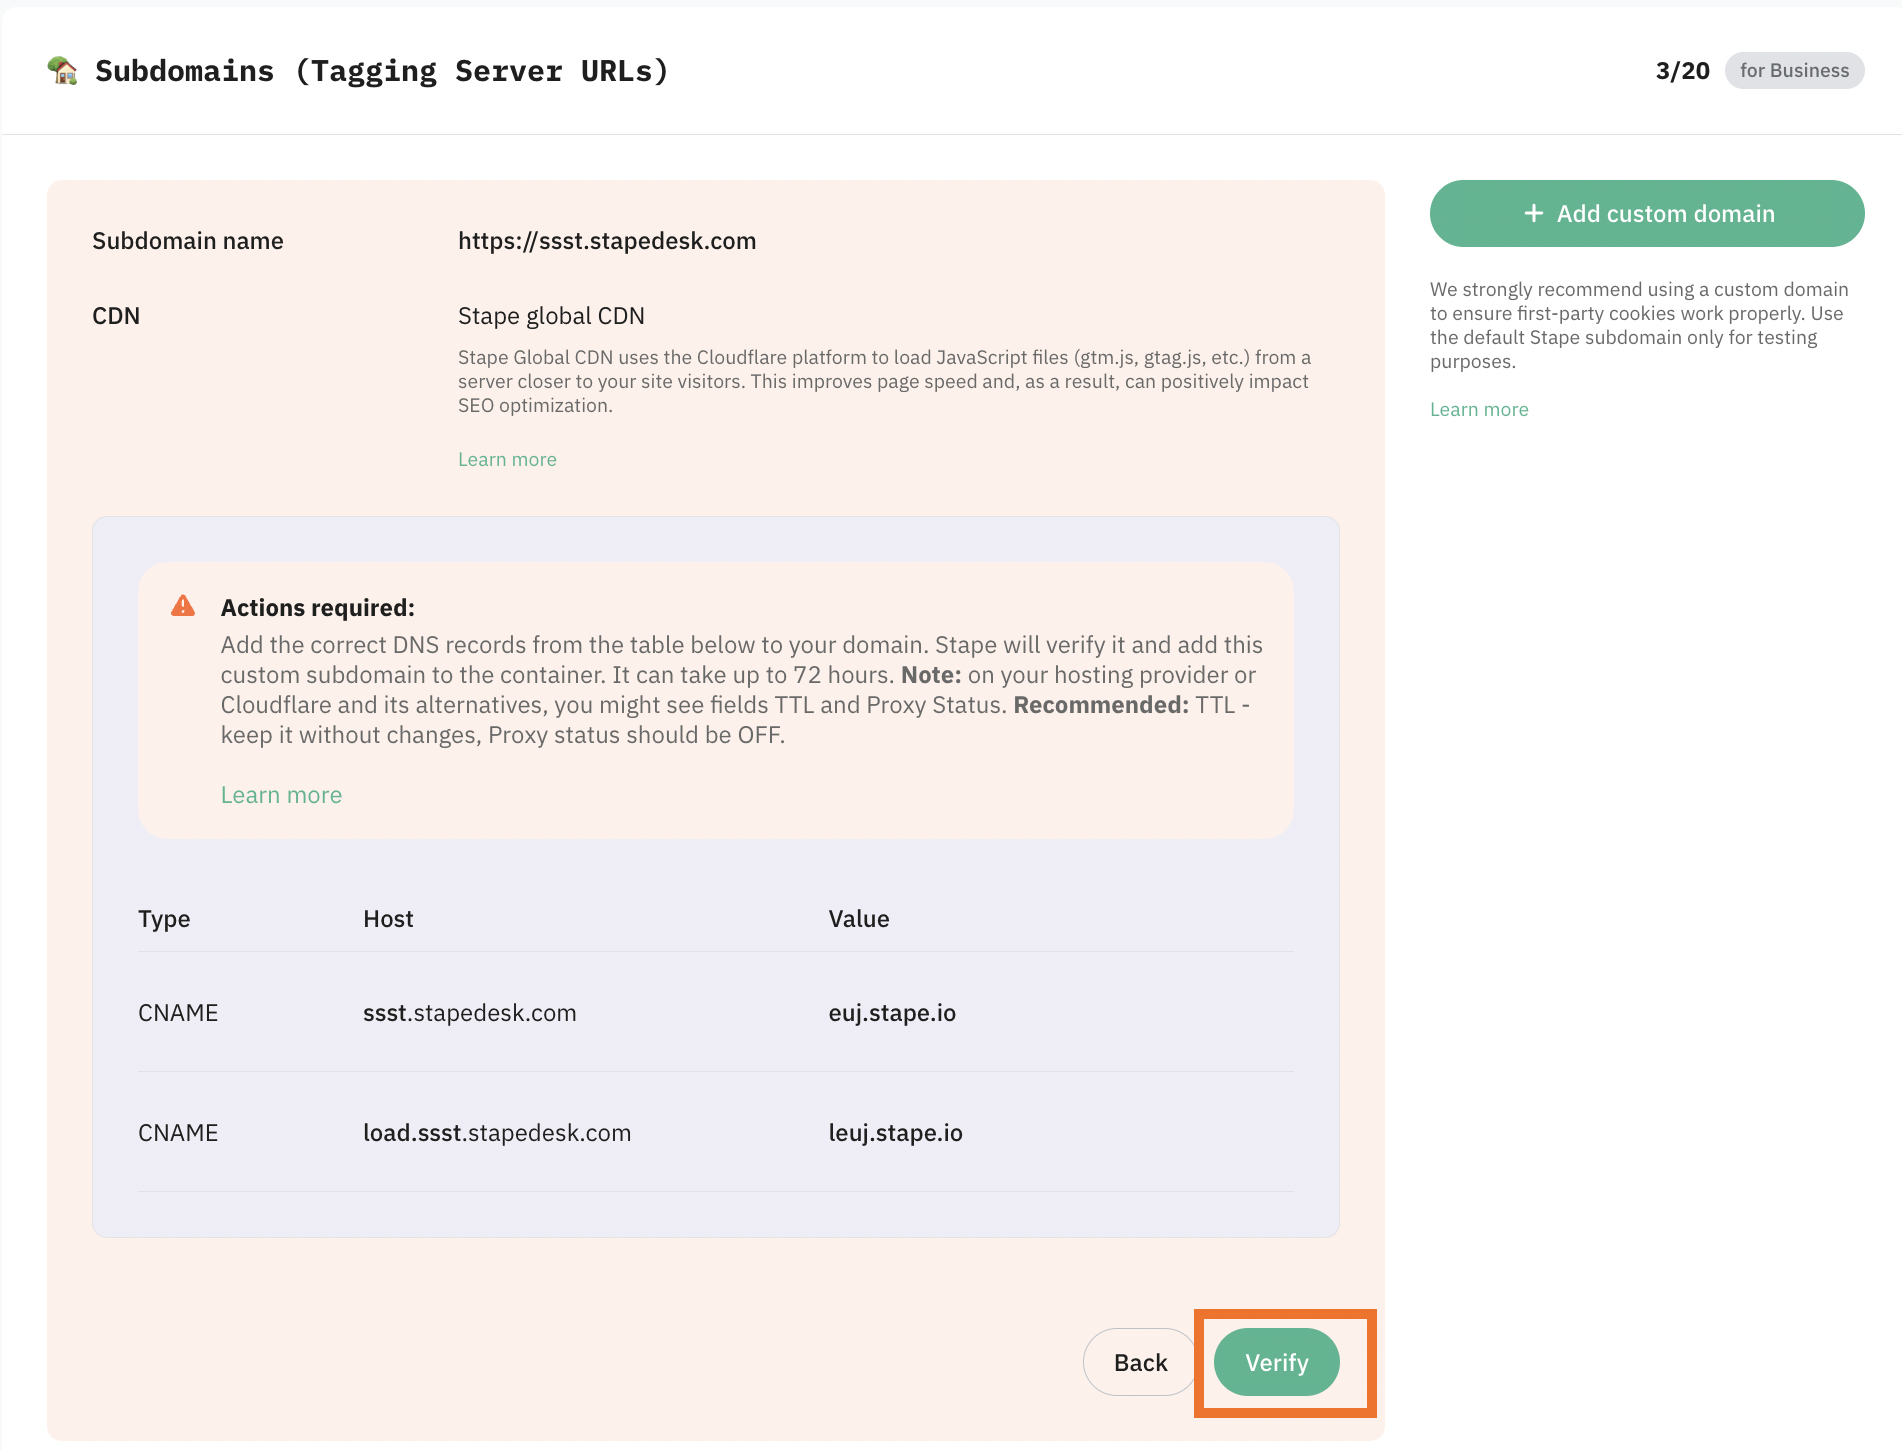
We use Stape Global CDN, so we create two CNAME records:


Adding a custom subdomain with A and AAAA records
| Please note that A/AAAA records are incompatible with enabled CDN. |
A/AAAA records setup
1. If you need to verify your custom subdomain using A and AAAA records, add the custom subdomain to the container and make sure that the CDN toggle is switched off.
Click Advanced settings and tick the Use A records instead of CNAME records box. You will see DNS records that you should add inside your Stape container. The DNS records you should configure vary depending on the server location.
2. Log in to your DNS account and add the records you see in your Stape account. On the account home page, next to your domain name, click three dots and choose Configure DNS.

3. Click Add record.
4. Then, create the records you see in your Stape account. Make sure that the Proxy status is turned off.
Take the values for your DNS records from the Stape account:
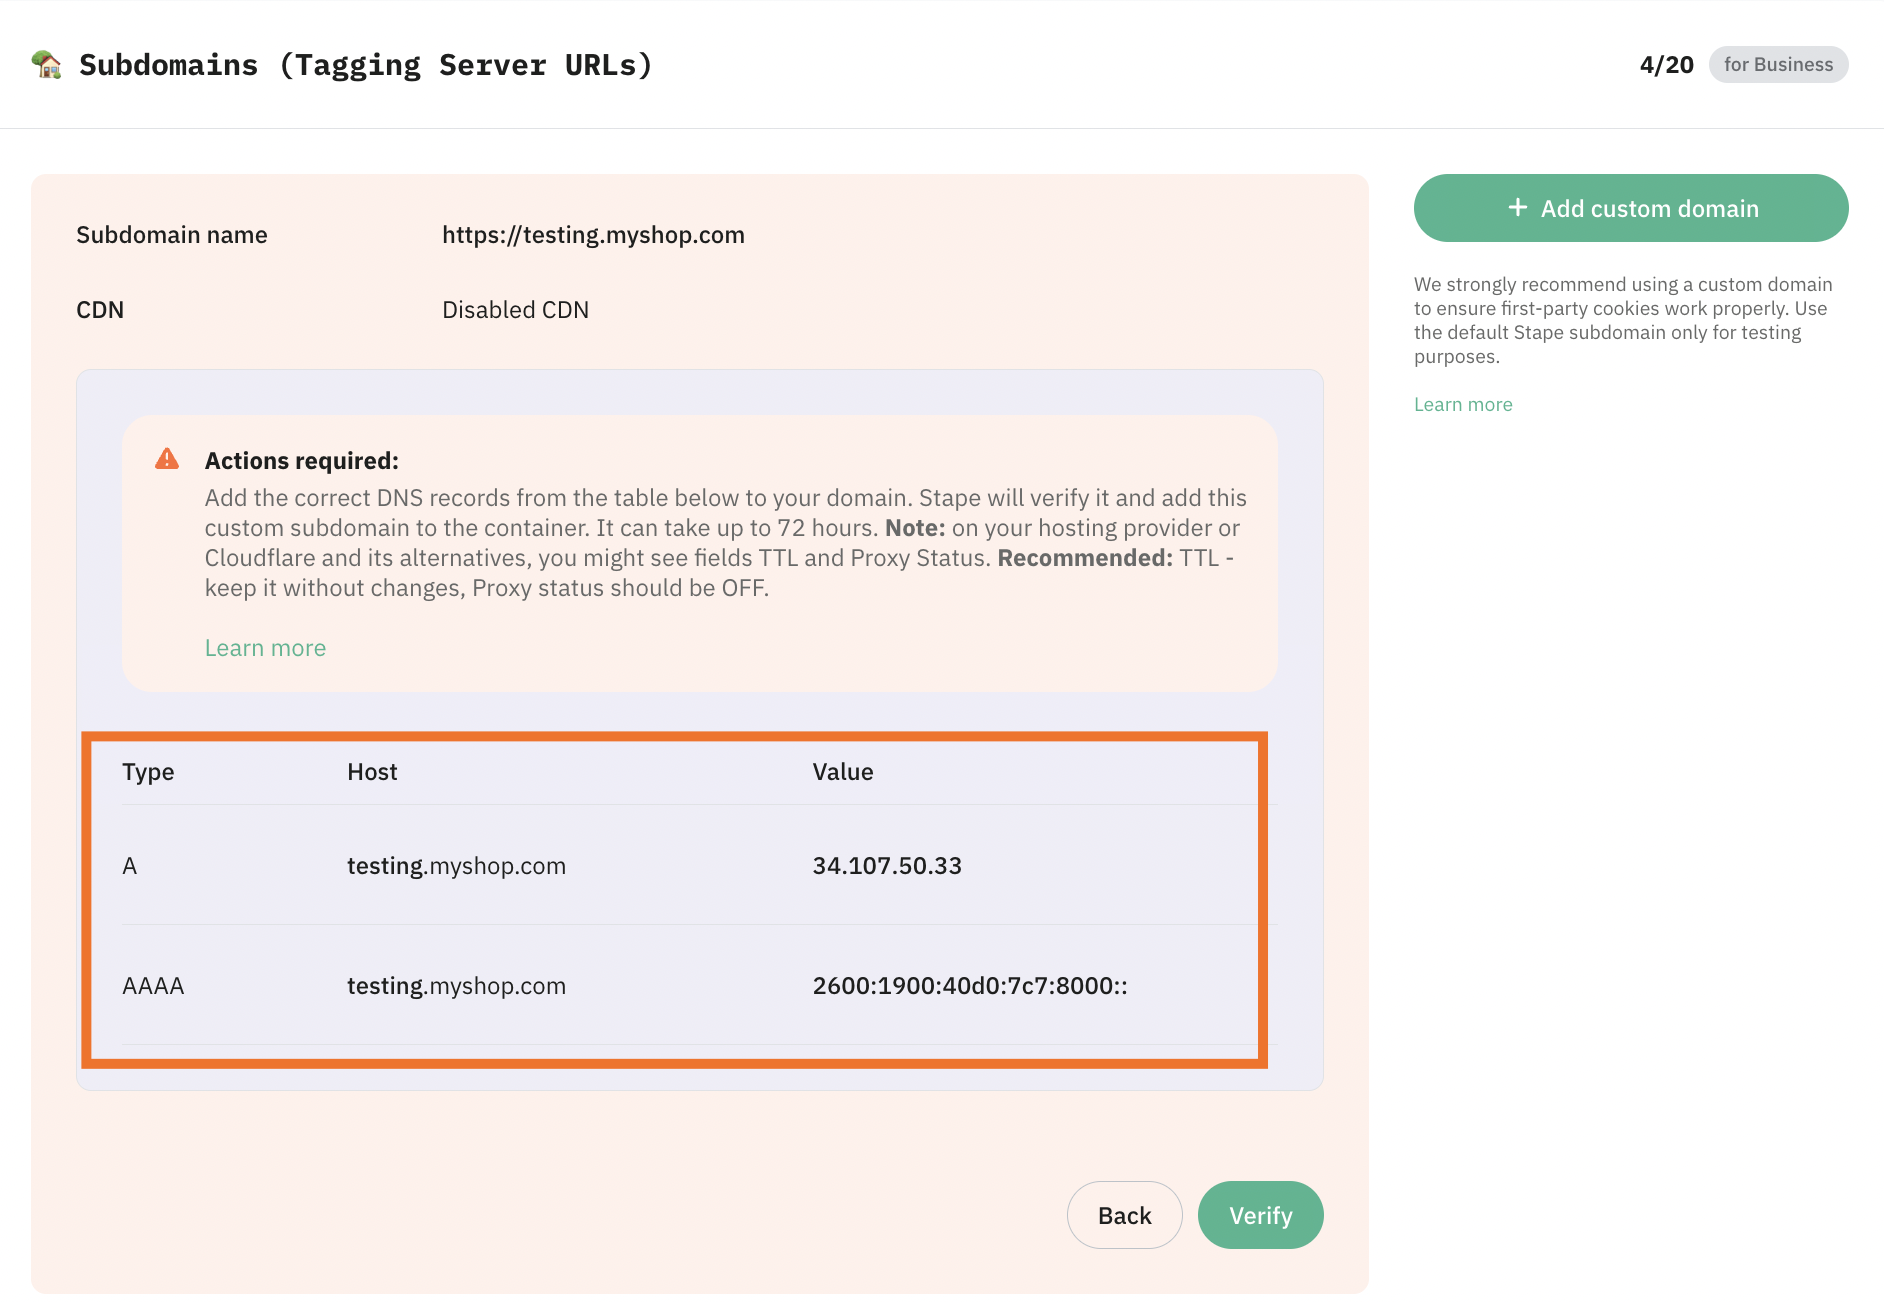
As a result, you will get two DNS records:


Step 5. Verify your domain
Once you've entered the DNS records to your DNS provider, return to the Stape container page where you've been configuring the custom domain and click Verify.
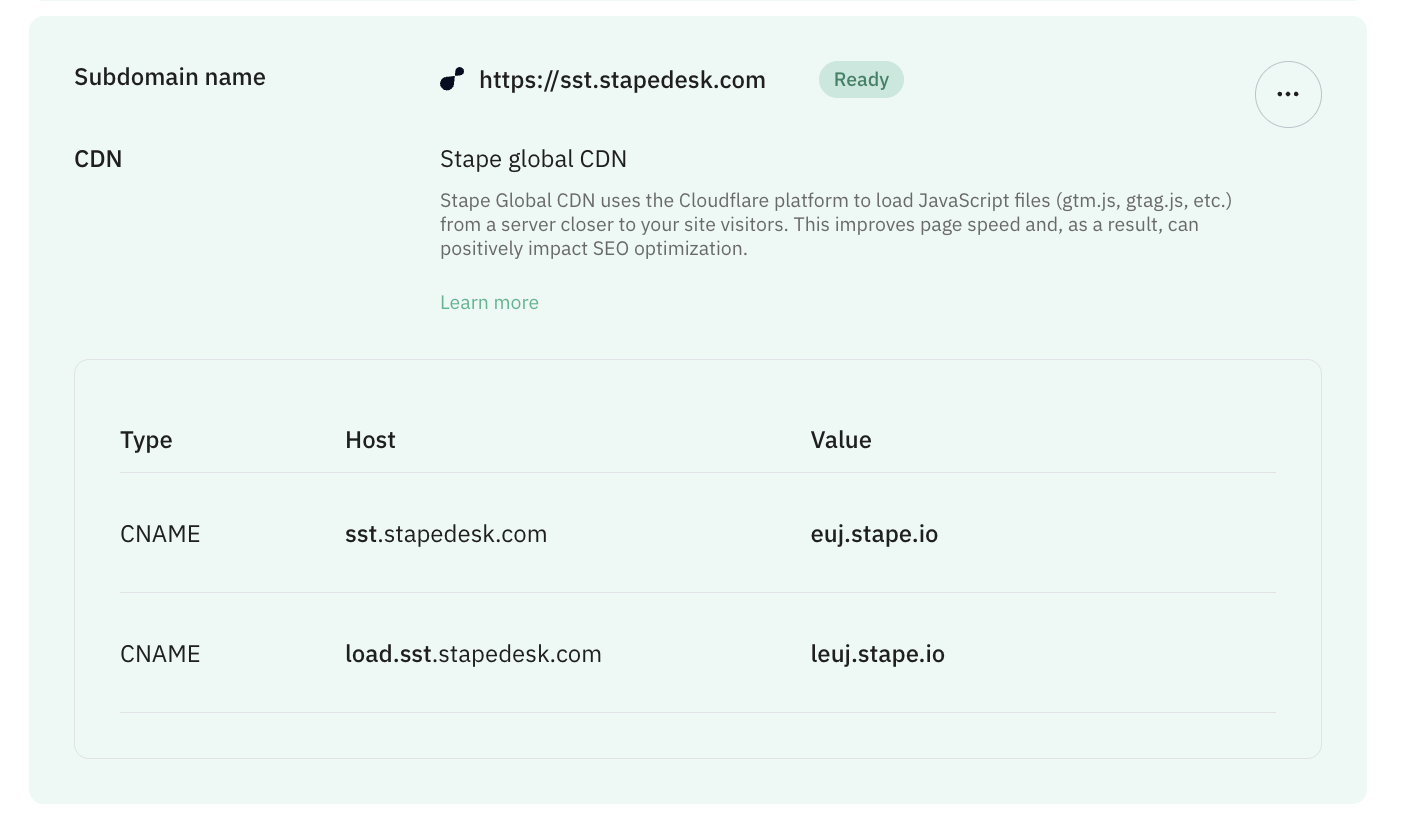
Wait for Stape to finish verifying your custom domain (when the container status bar changes from Verifying to Ready). Usually, it takes 2-3 hours to verify the custom domain. For some DNS providers, verifying records might take up to 72 hours. We will email you once the custom domain is verified or any error is detected.
If you face any problems with domain verification, please follow our guide on troubleshooting a custom domain.
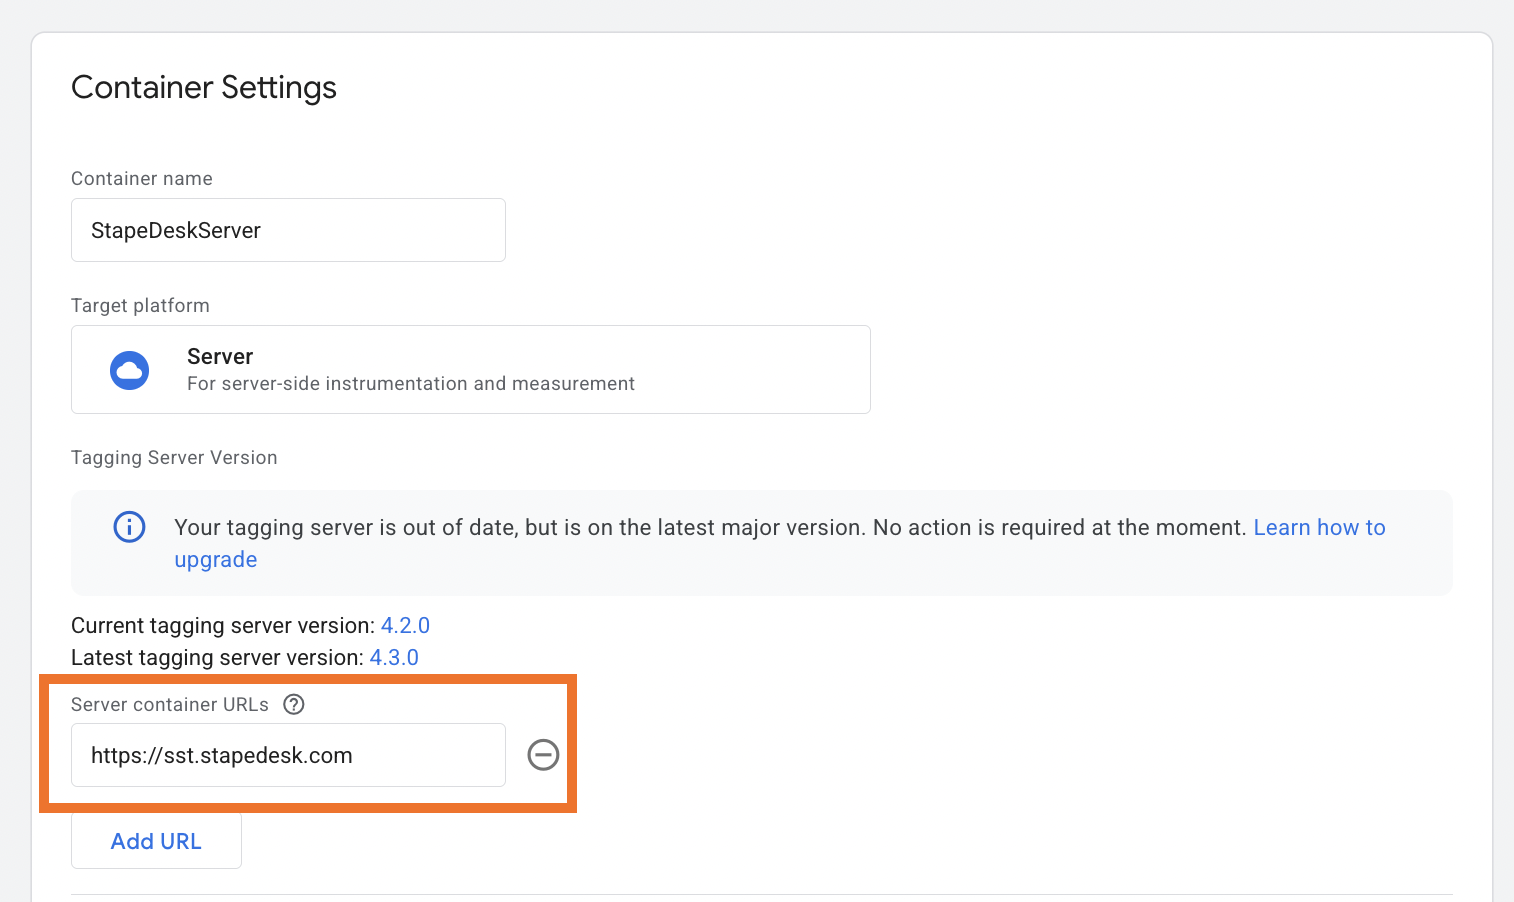
Step 6. Add tagging server URL and update your website script
Go to your Google Tag Manager server container → Admin → Container Settings → change Tagging server URL to your subdomain.
Update the script
If you use a custom domain, updating the Web GTM script on your website is highly recommended. This tweak will load gtm.js from your domain. To do so, replace the default domain googletagmanager.com with the custom domain you set up in the previous step.
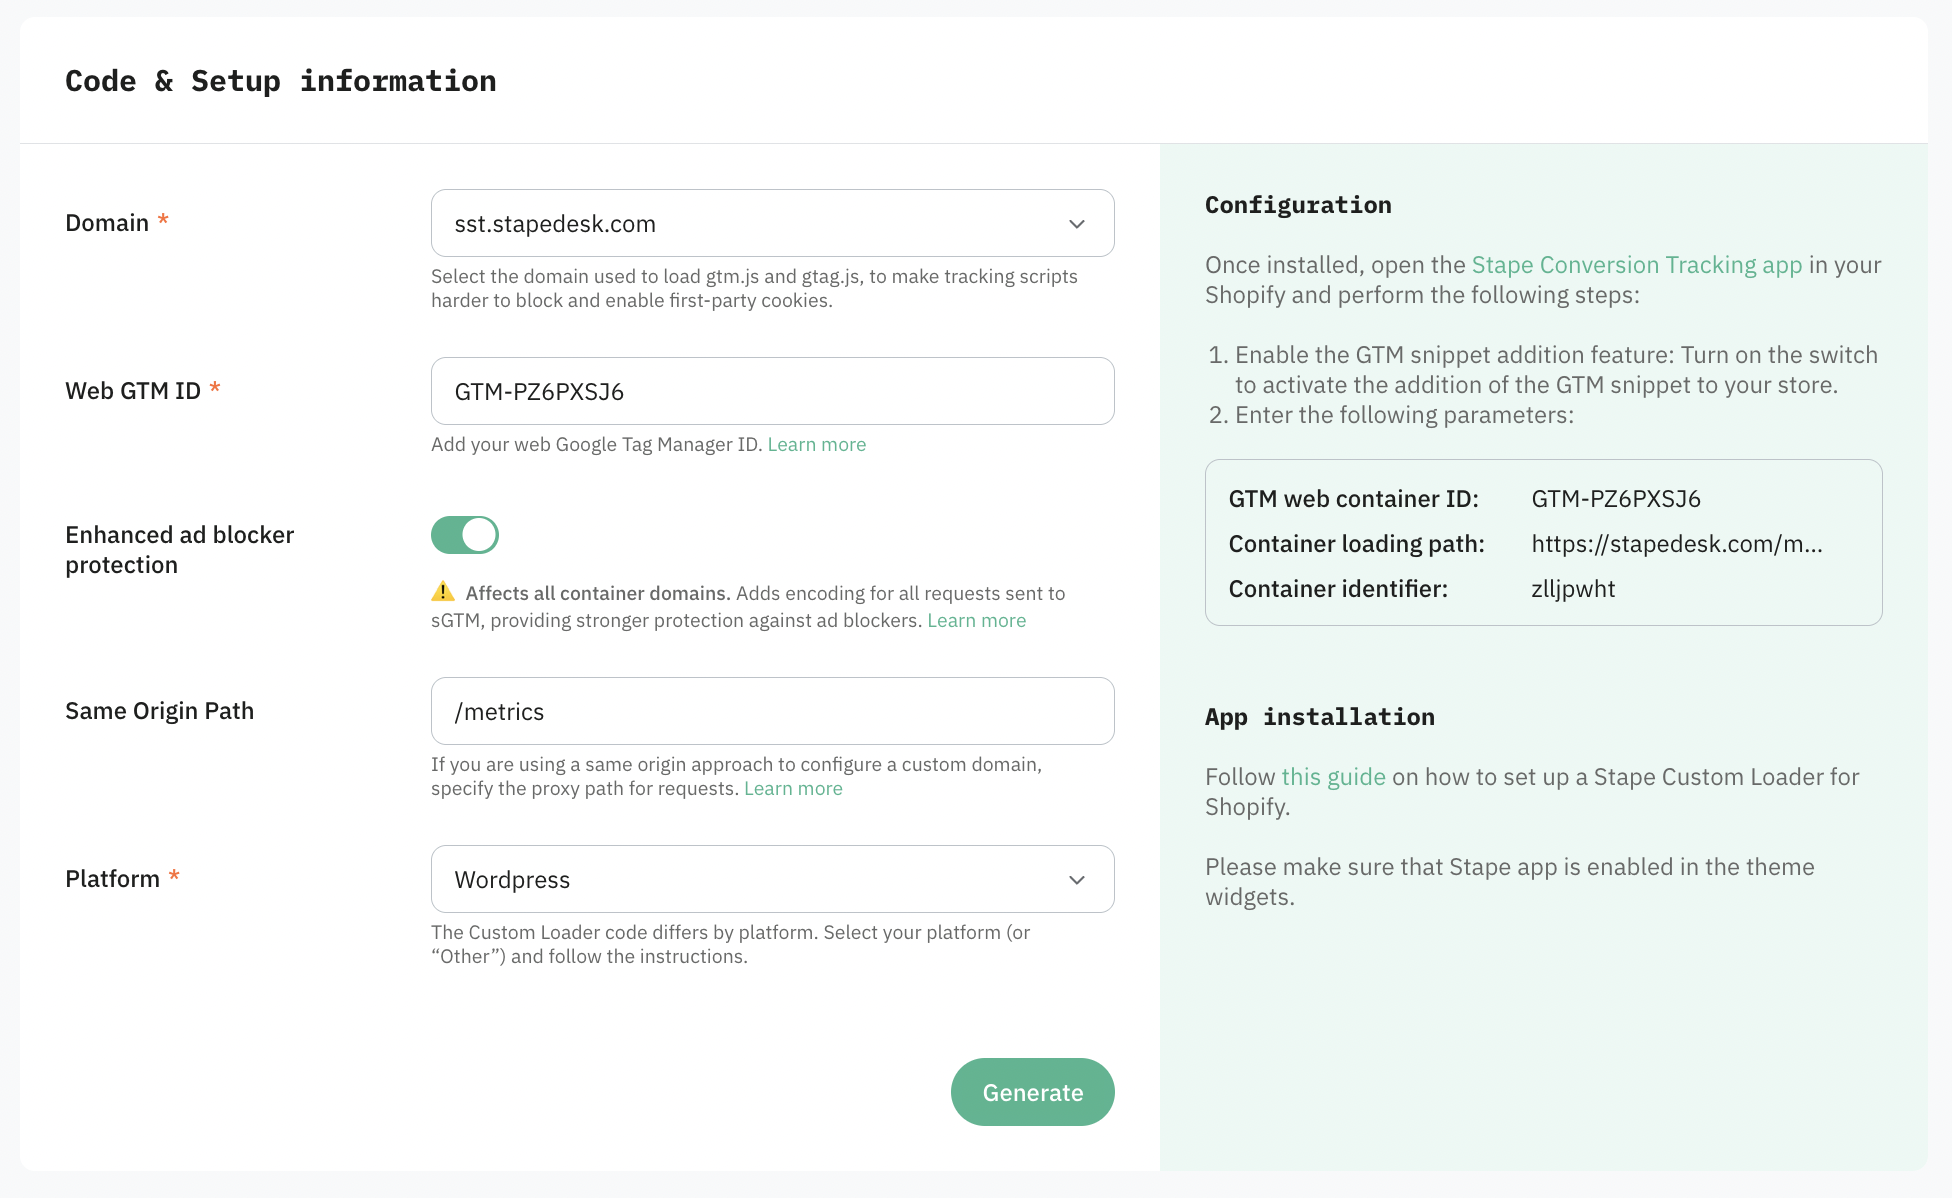
Alternatively, you can automate this process with the Custom Loader power-up. Instead of manually editing the GTM script, Custom Loader generates a ready-to-use code snippet that loads GTM and GA4 scripts directly from your custom domain. This saves your time, makes your tracking scripts more resilient to ad blockers, and assures all cookies are treated as first-party.
And all is done!
From our point of view, configuring a custom domain with the same origin domain is the best option because it helps to prolong cookie lifetime in all browsers. However, this method is technically advanced and requires CDN or a load balancer.
If you can't configure the same origin domain, we have solutions for prolonging cookie lifetime in Safari: Own CDN and Cookie Keeper.
Why Stape is the easiest and cheapest way to start with server-side tracking
With Stape, you can set up server GTM in less than 1 minute, and we are the cheapest solution on the market. Stape is affordable because we buy servers in bulk and for an extended period. Plus, we optimize our servers to work only with Google Tag Manager.
Besides that, we have other advantages:
1. Custom gtm.js and gtag.js loader. It helps you make Google Tag Manager and/or Analytics 4 scripts more resistant to adblockers.
2. Global CDN. Allows for faster js files serving by using a server that resides closer to your site visitor. It results in an improved page speed that might positively affect organic ranking.
3. Logs. A handy feature when setting up or troubleshooting server-side tagging. It helps to figure out what data was sent to the server and how it got processed. For example, you can check if all purchase events had 200 status (meaning they were correctly handled) or check all requests with a 500 response code (an error occurred).
4. Preview header. It helps see all of your incoming requests in the sGTM debugger when the request was sent not from web GTM.
You can read about all of the advantages of server-side tracking with Stape in our blog, as well.
Our team of experts is always happy to help new users get started with tracking and answer any questions.
For high-volume websites, we offer custom plans. Feel free to use the pricing calculator to estimate the best plan for your site.
Set up server Google Analytics 4
In this chapter, we will briefly cover the server-side GA4 setup.
If you do not have server-side GA4 configured yet, follow the steps below:
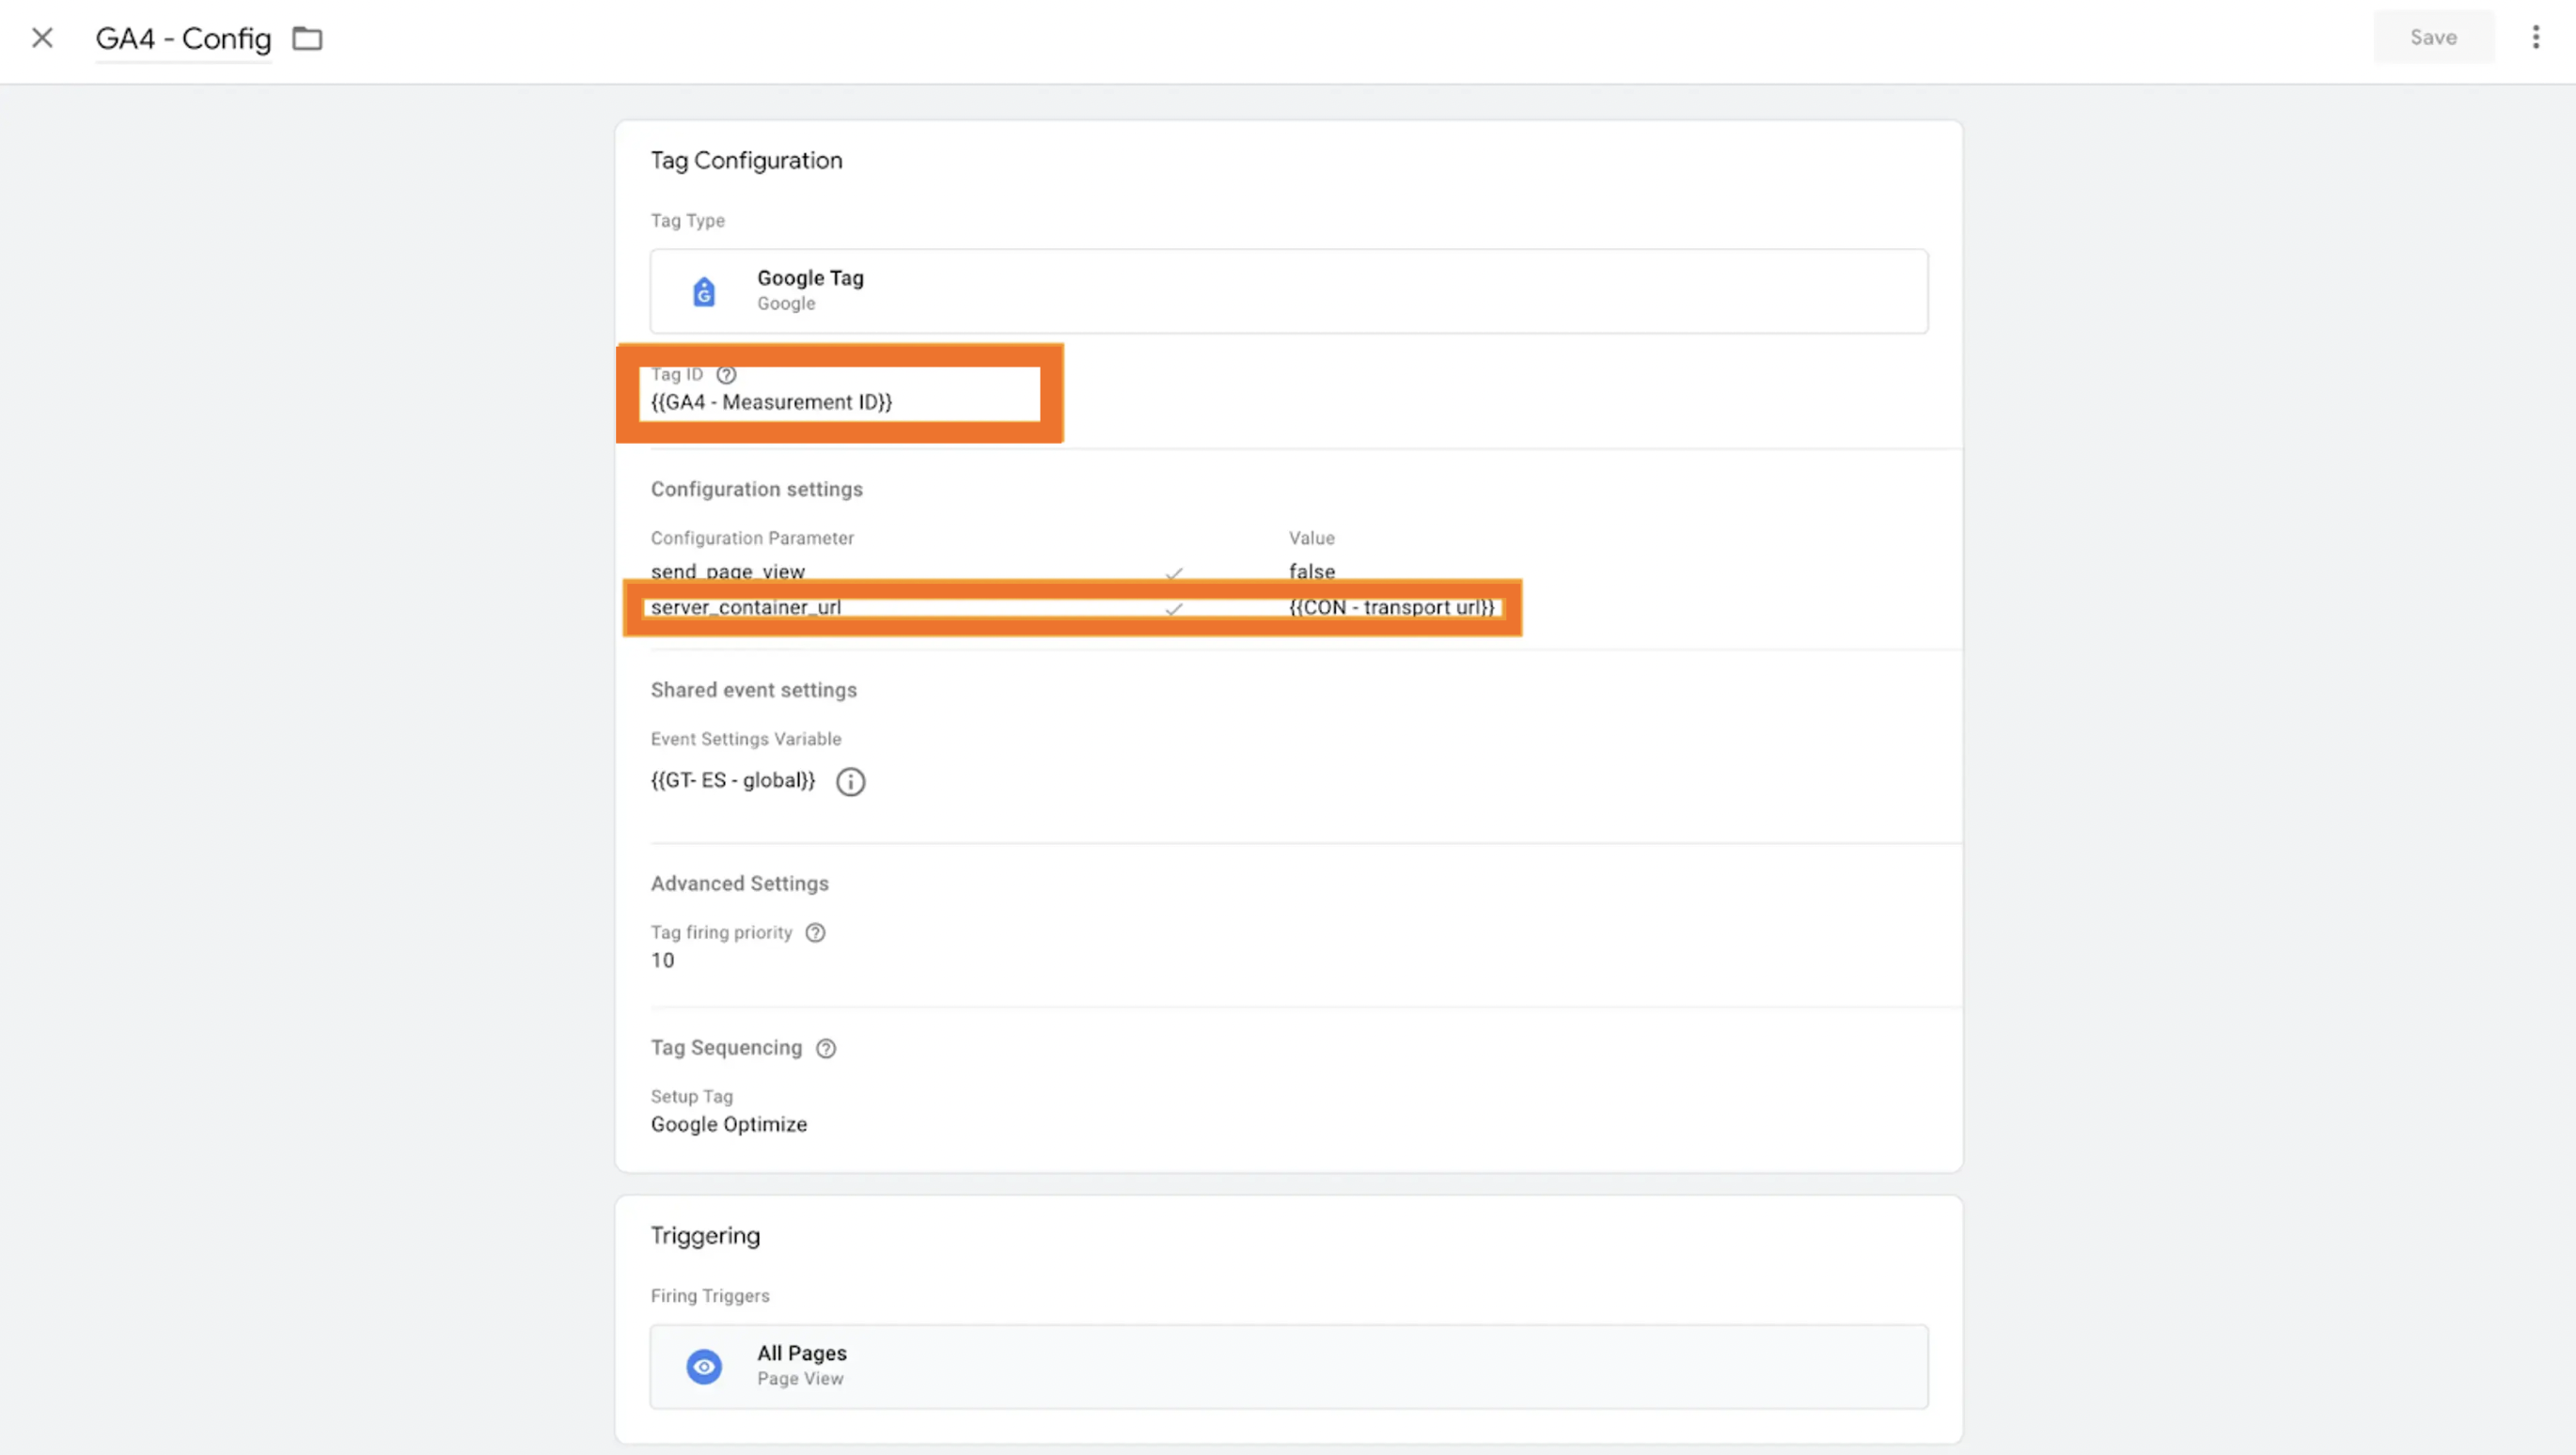
1. Inside the Web container, create a new tag of the tag type Google Tag.
Add your Google Tag ID and a trigger to GA4 tag (it usually should trigger on all page views).
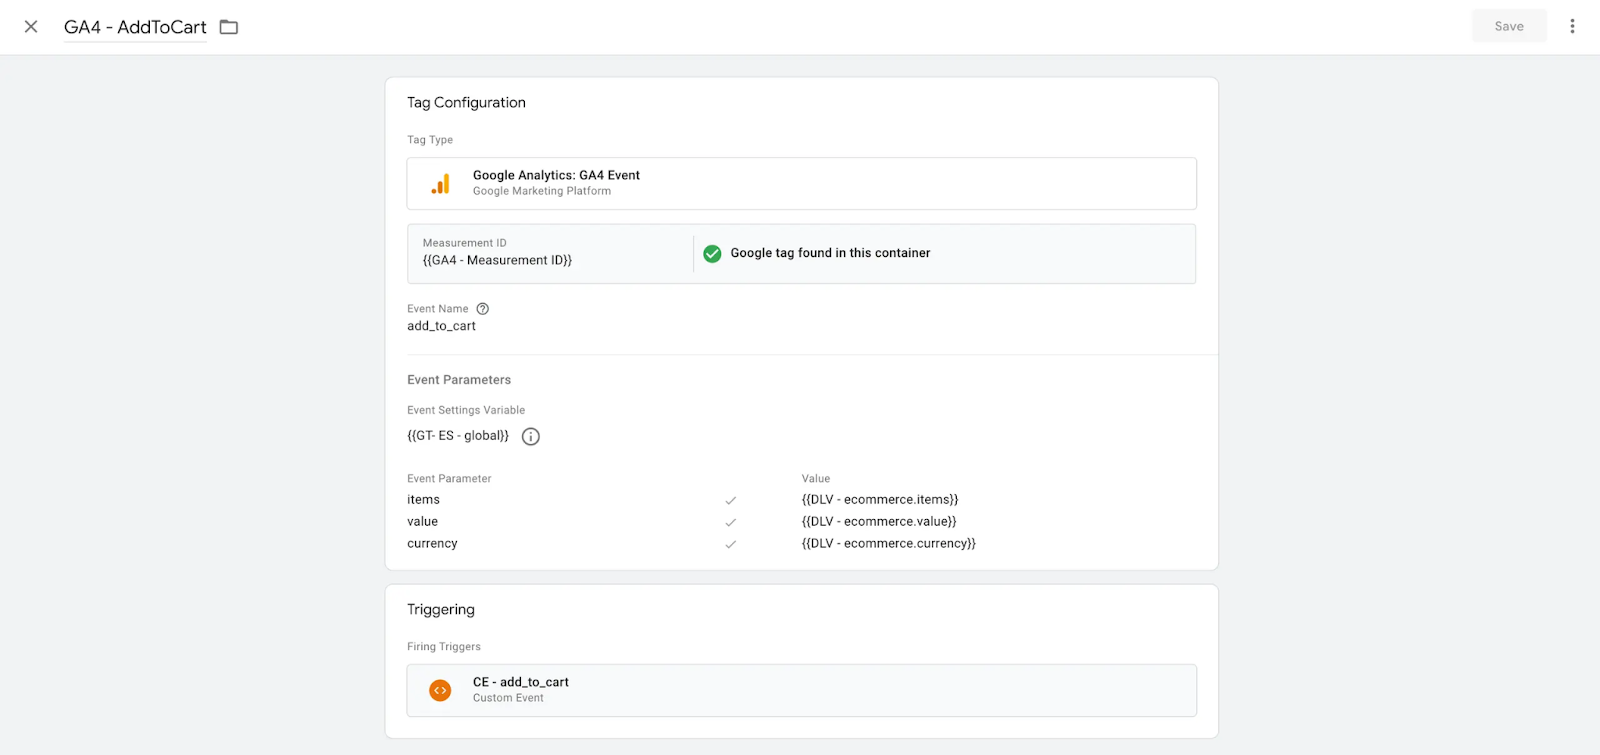
2. Go to the Tags section and create a new tag with the tag type Google Analytics: GA4 Event. Add your GA4 ID and the event name.

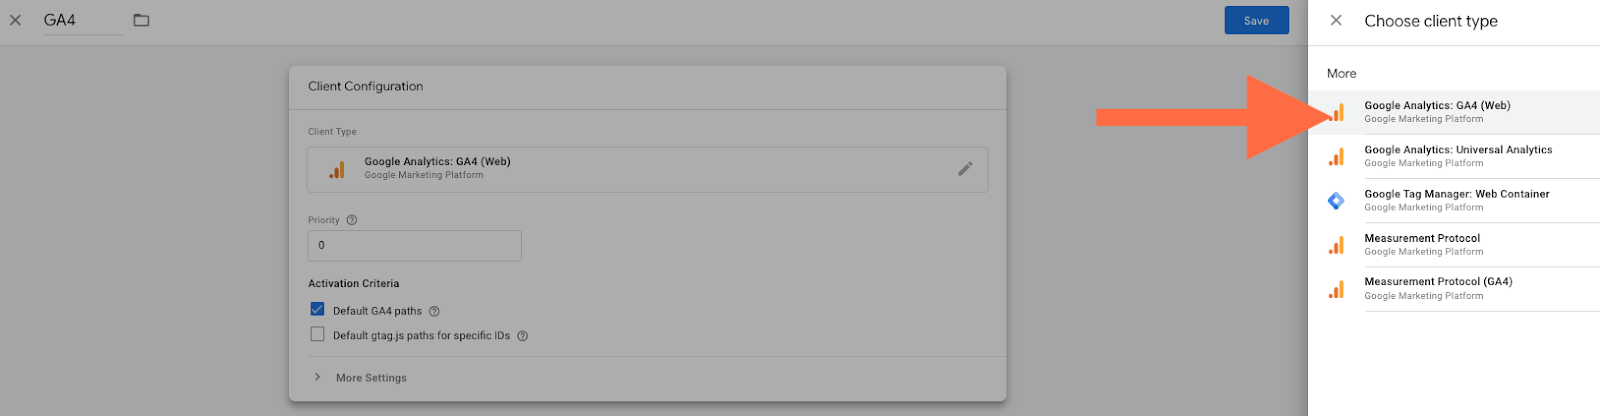
3. Go to your Google Tag Manager Server container. Click Clients and New.
4. Choose Google Analytics: GA4 (web) and click Save.
5. Go to Tags and click New.
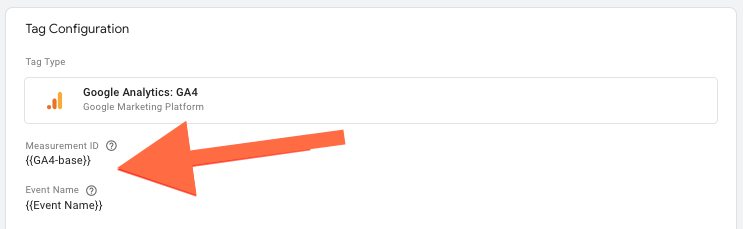
6. Choose Google Analytics: GA4.
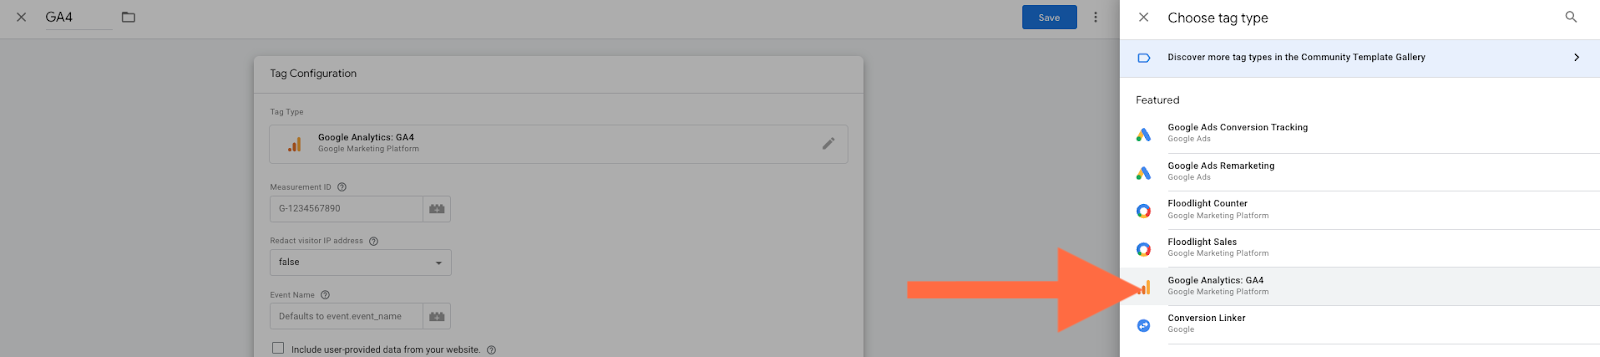
7. Add Measurement ID and Event Name.
- You can add Measurement ID as a variable or if the event came from a GA4 web tag or leave this field blank to inherit the measurement ID of the event.
- We recommend using standard event names whenever possible, but you can use custom ones, too. If this field is blank, the value of the event_name parameter will be sent.
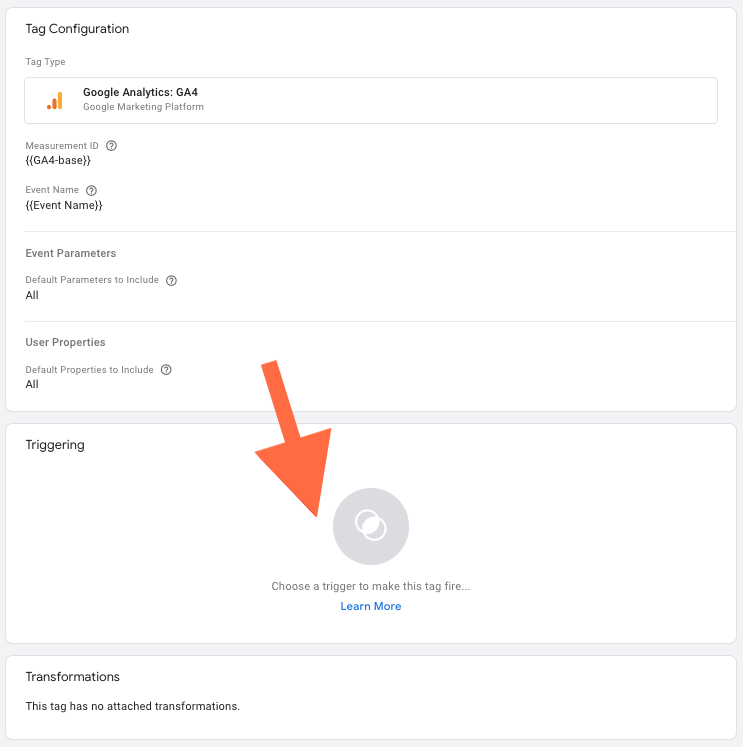
8. Click Triggering.
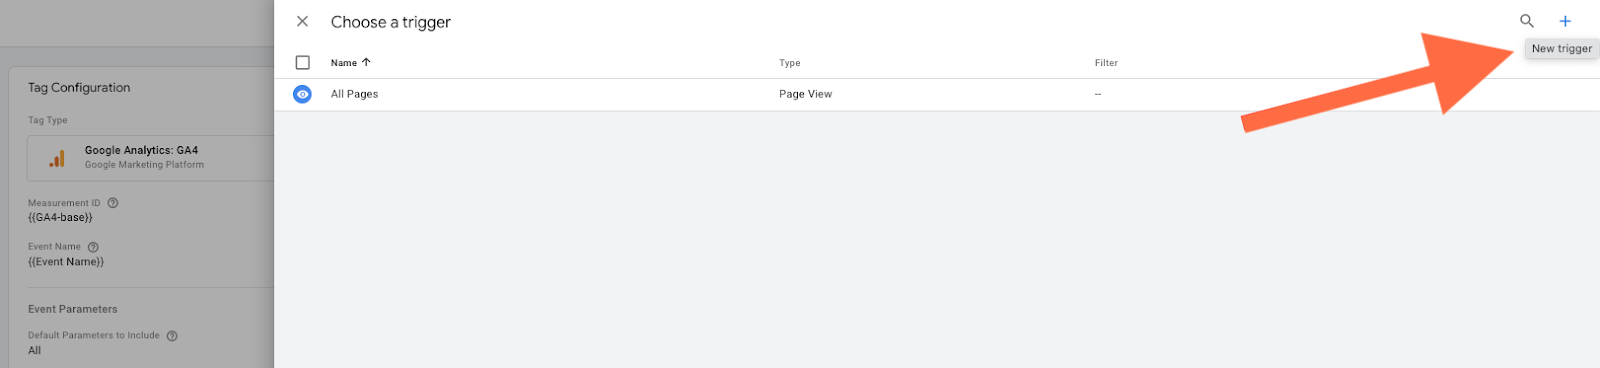
9. Create triggers for the tag. Client name should equal GA4. Example:
Click +
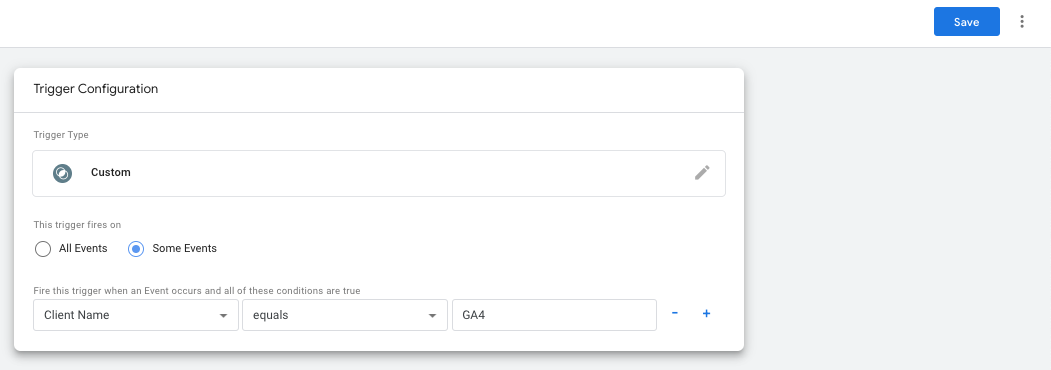
Choose Custom type → click Some events → choose Client Name in built-in variables → set Equals GA4 (the name of your GA4 client) → click Save.
10. Open web and server GTM debuggers and test the setup.
Open the Server container preview mode and check that you see GA4 requests. Publish updates inside server and web Google Tag Manager containers.
Set up server-side tracking for Google Ads
In this chapter, we will briefly cover how to set up server-side tracking for Google Ads.
First thing to know is that server-side Google Ads tracking can work only using server GA4 requests. It means that you must set up server-side Google Analytics 4 before proceeding to server-side Google Ads.
Basically, your main setup steps are:
1. Ensure that server-side Google Analytics 4 is set up correctly.
2. In the server container, set up the Conversion Linker tag. This tag should trigger on all pageviews.
3. Set up Google Ads remarketing tag in server GTM. All you need to do is add a Conversion ID and choose a trigger that must use GA4 requests. You might also decide to send dynamic remarketing event data and provide custom parameters.
4. Create a new Google Ads Conversion Tracking tag in the Server container → add Conversion ID and Conversion Label similarly to the web Google Ads tag setup.
Then you have an option to add Product and User Data (similarly to how Facebook Conversions API works). If you send user and product data from the web to the server, you can enable these checkboxes and select event data as the data source.
Set up server-side tracking for Facebook Ads
Unlike Google platforms, Facebook recommends using both web and server tracking. The main advantage of the web+server method is that it still utilizes 3rd party cookies (when possible). The main benefit of the server only approach is that it reduces the number of 3rd party java scripts on your site and allows you to strictly control what data was sent to FB. So it's up to you to decide whether to use web+server FB tracking or server only.
Setting up Facebook Conversions API is more complicated since it requires event deduplication (when using the web+server method), sending user parameters, such as email, phone number, first/last name, etc.
Debugging and monitoring server-side tracking setup
Debugging and monitoring are essential for a successful server-side tracking implementation.
1. Open preview mode in web and server containers.
- Go to Google Tag Manager.
- Open your server GTM container → click Preview.
- In a different browser tab, open your web GTM container → click Preview → enter your website’s URL.
This will start the web debug session. Your website will open in a new window with the GTM debug panel active at the bottom.
2. Trigger a request from your website.
- Perform actions that trigger tags. By simply loading the page, you’ve triggered the page_view event. Other simple possible actions include reloading the page or clicking a button. Such events will show in your debugger.
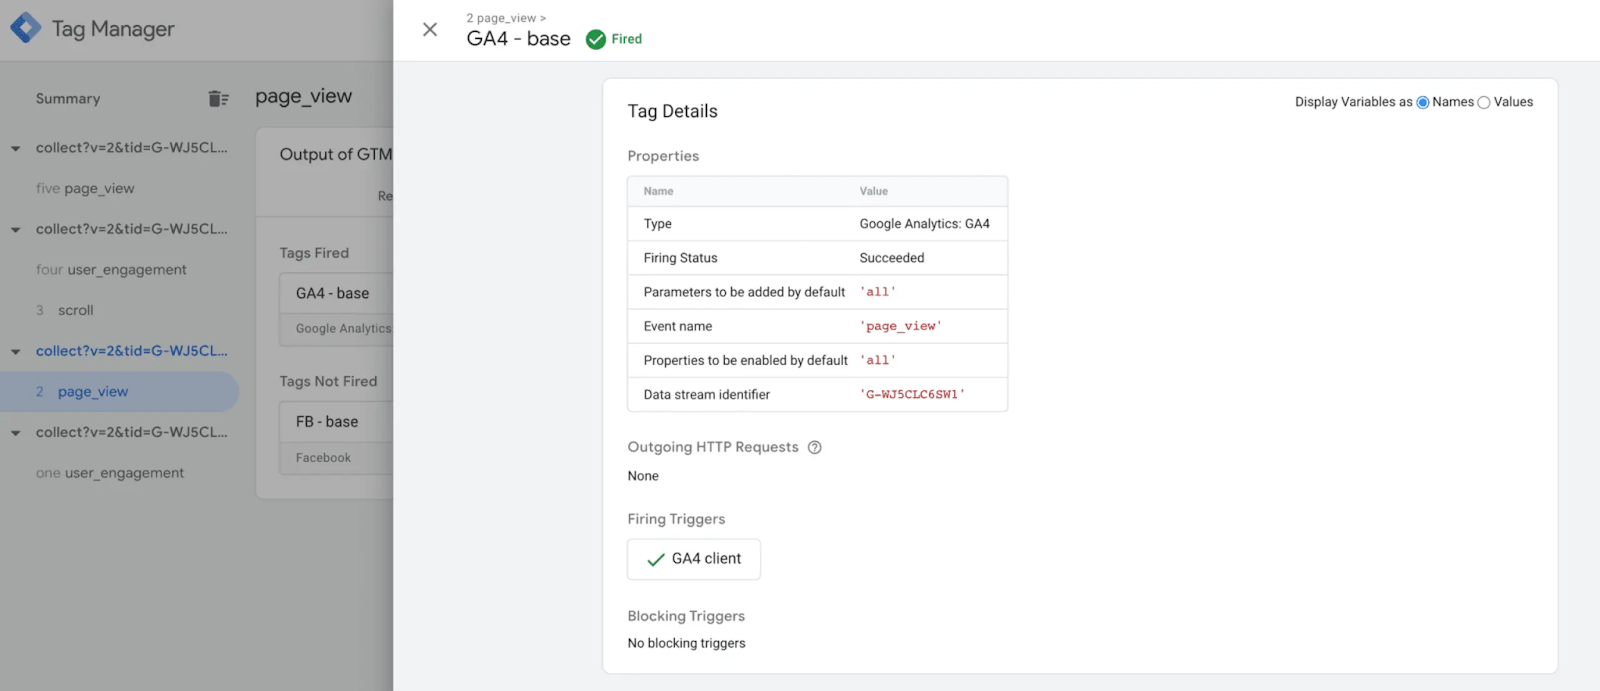
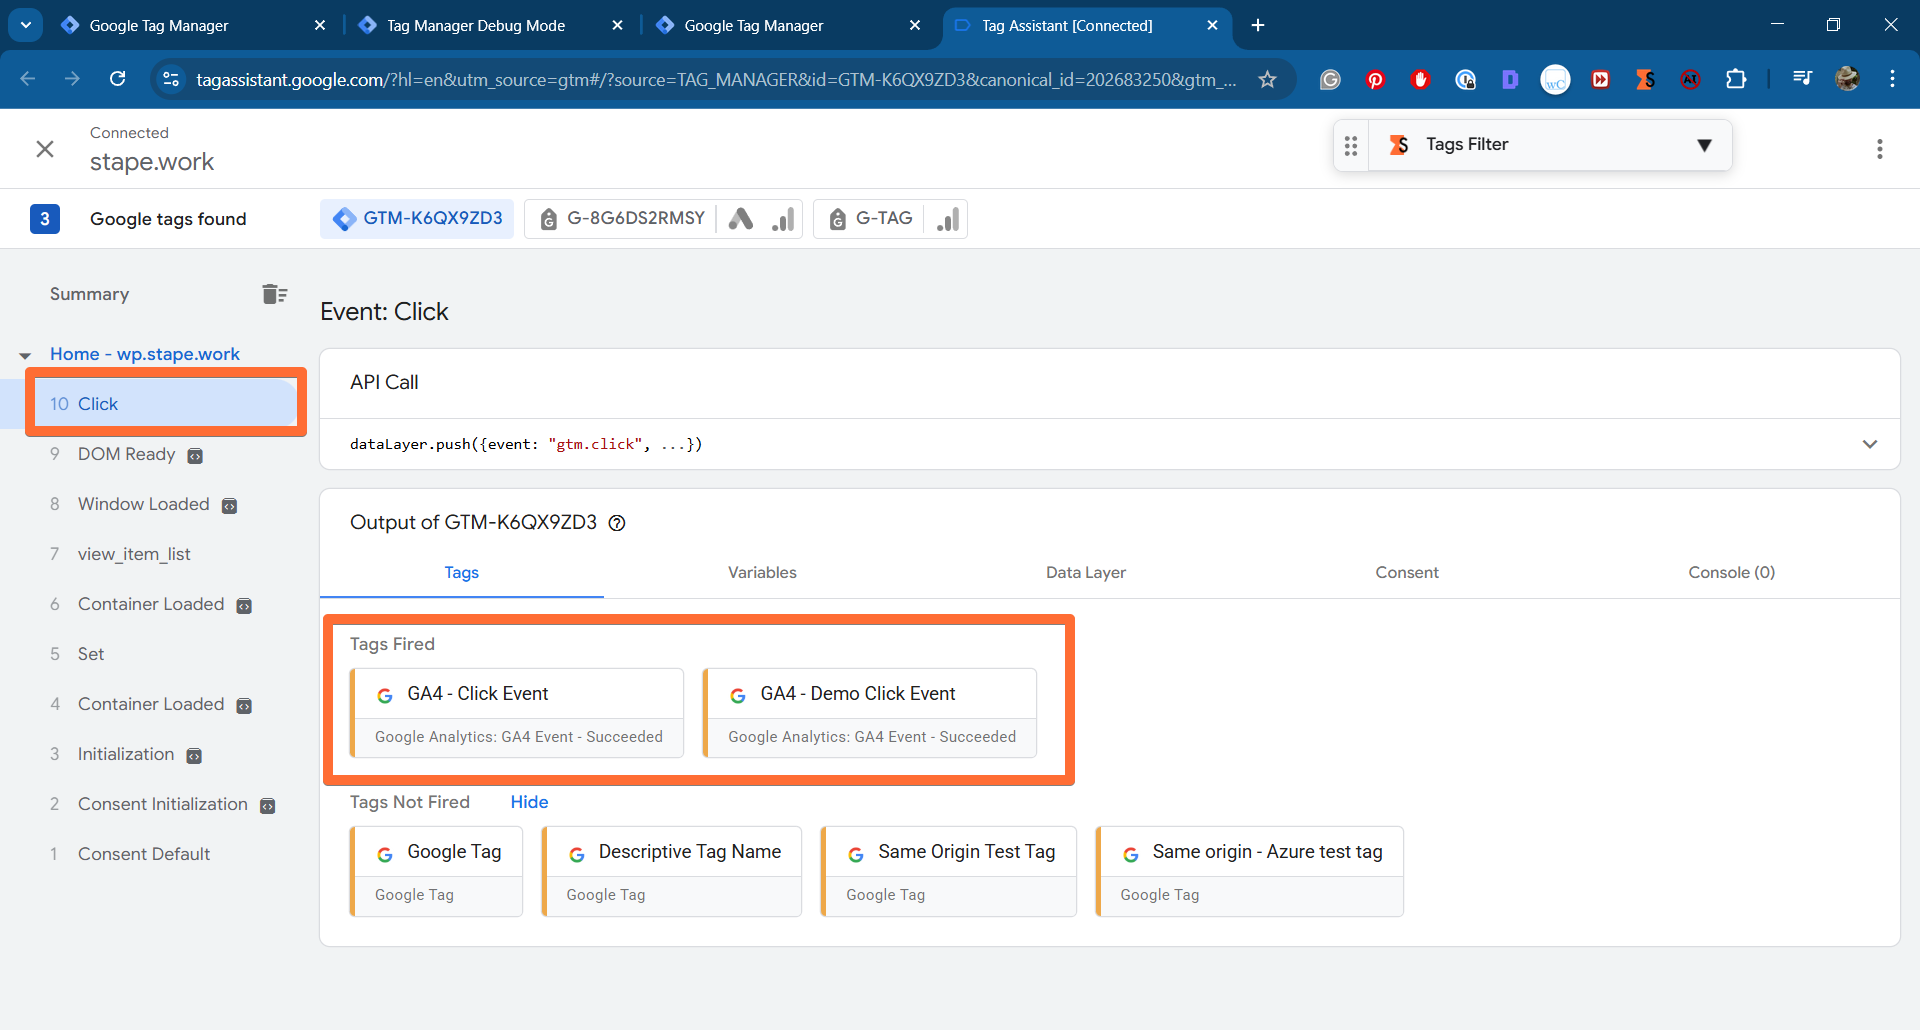
- In web GTM Preview, click on the event. Under Tags Fired, find the tag you configured to send data to your server (e.g., Google Analytics 4 tag). If it fired, it means a request was successfully sent to your server container.
3. Check incoming requests in the server GTM Preview.
- Go back to the server GTM Preview tab you opened in the first step.
- If you see events coming from your website domain, the setup works and requests are successfully reaching your sGTM container hosted on Stape.
- Click on the incoming request. Check the Tags Fired tab to see that your server-side tags (like the GA4 tag) have activated.
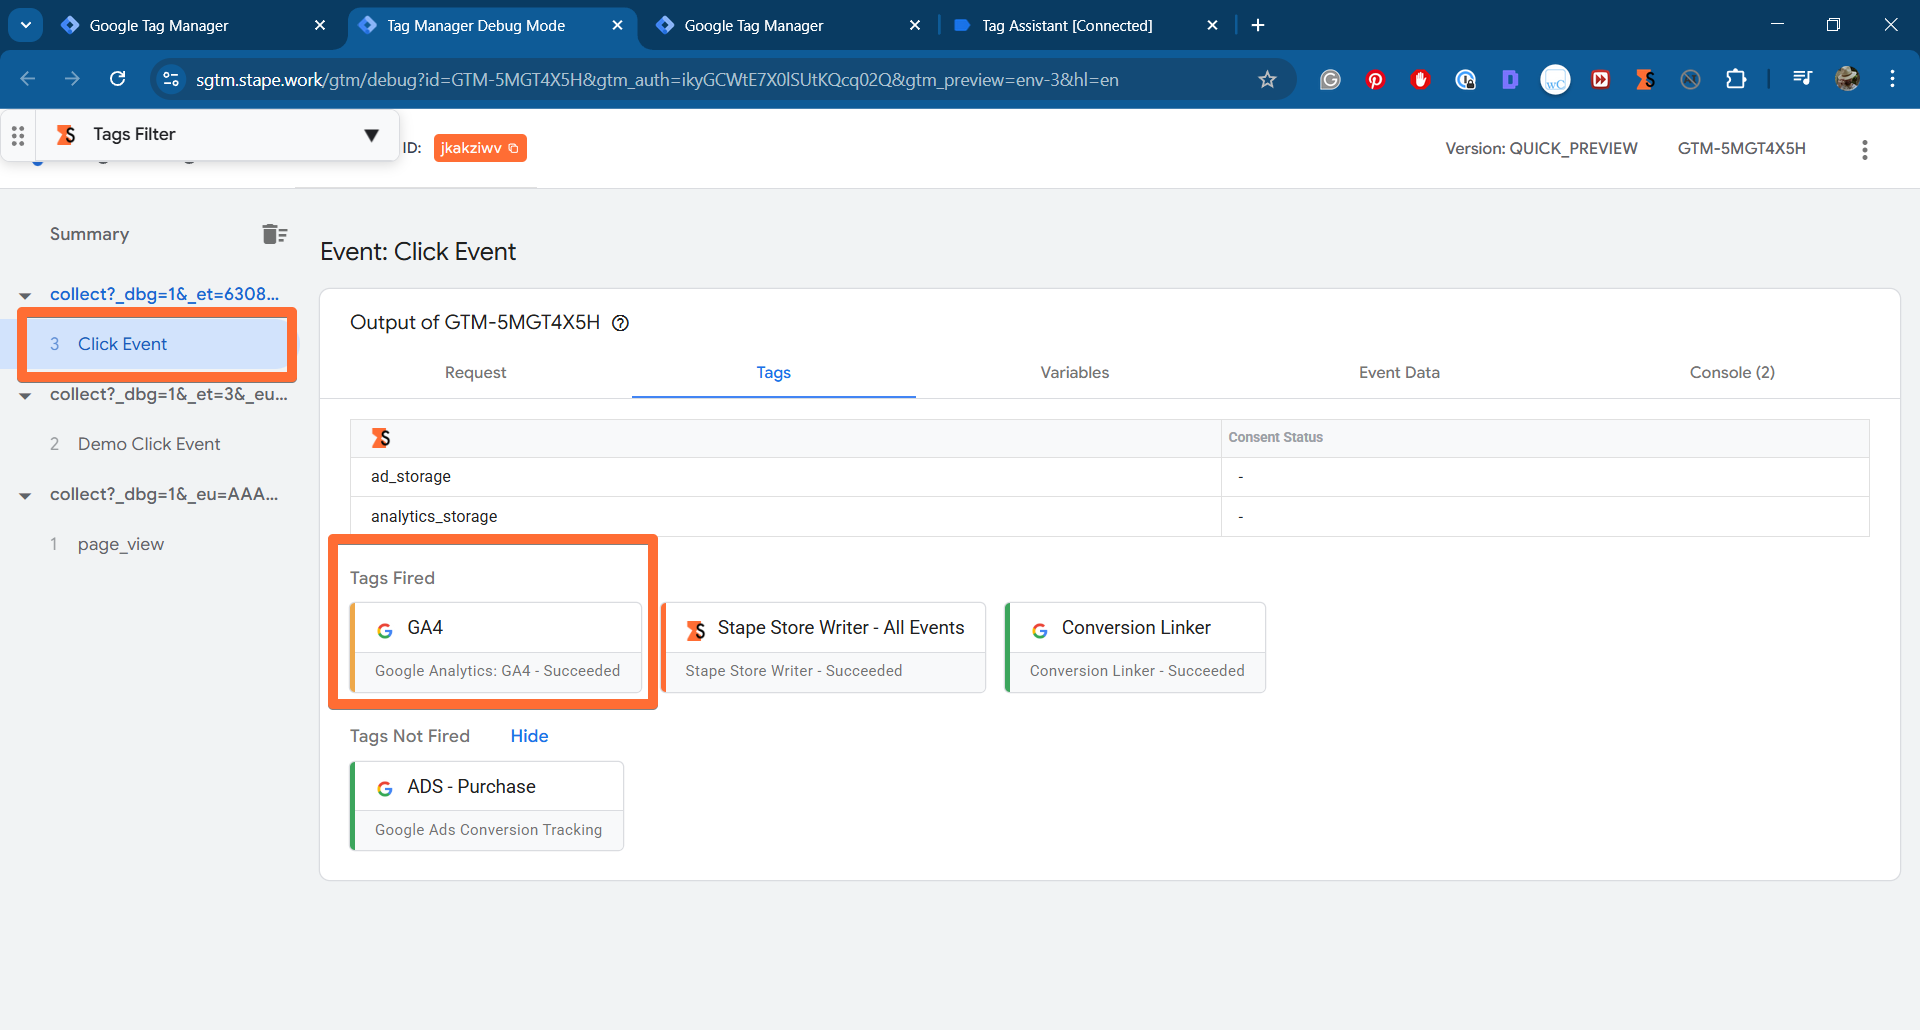
- In the fired tag, check the Outgoing HTTP Requests tab to see the request that your server container successfully sent to Google Analytics.
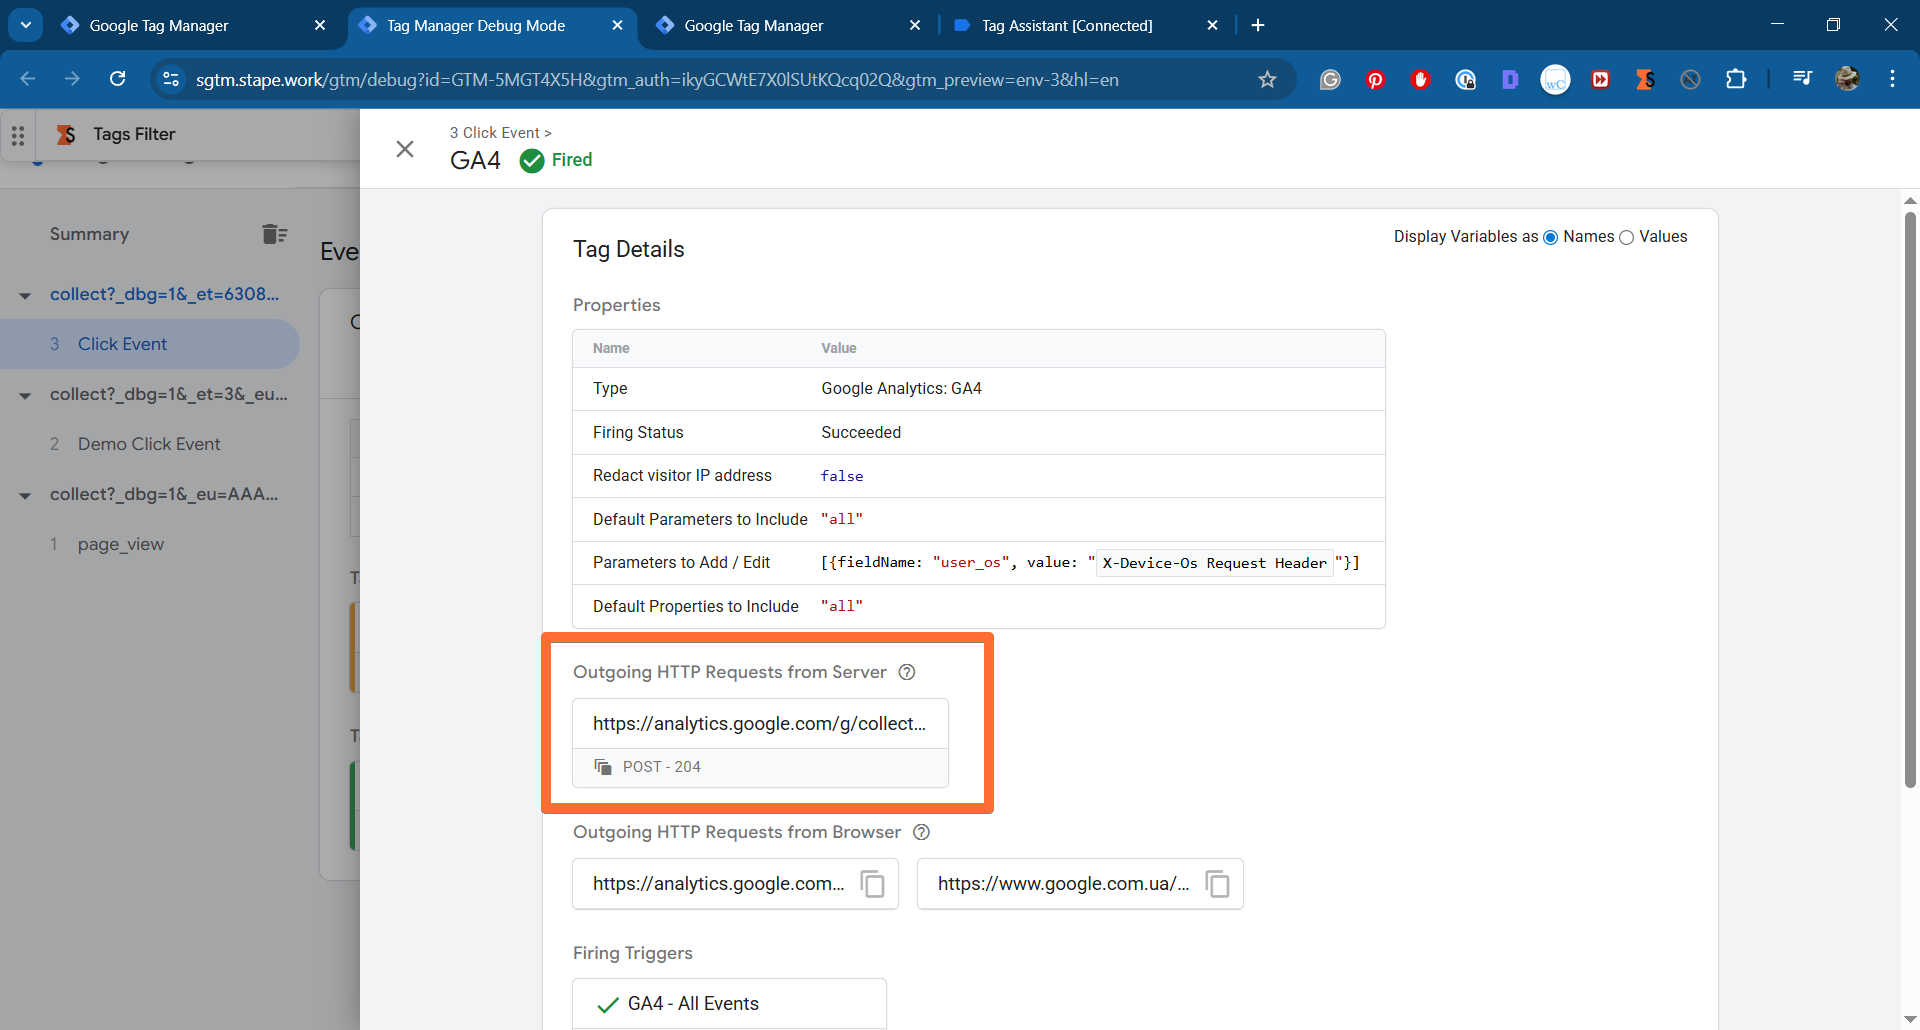
If you see that outgoing request, it means that the event data has passed from your website, through your server container, and on to the final destination.
Additional tools useful for debugging
Beyond the debugger, several additional tools support debugging an sGTM setup – covering everything from request-level detail to overall site tracking health. Which one to use depends on the data source and what you're trying to verify.
- Stape GTM Helper – a free Chrome extension that makes GTM's preview mode easier to use, with no sign-up or paid plan required. It color-codes tags by platform so you can instantly spot which ones failed, cleans up messy JSON and URL data into readable tables, and shows whether a visitor gave tracking consent – all directly inside the preview screen.
- Stape logs – a feature that keeps a record of the requests your server container sends and receives, so you can review what data was sent and what came back. Click into any logged request to see its full details when something needs troubleshooting.
- Logger tag – a tag for server-side GTM that logs requests to your server container, including POST request bodies (not captured by default logs), helping you track down issues. It sends logs to Console, Stape Store, BigQuery, or elsewhere.
- sGTM Preview Header – a power-up that lets you see requests in the sGTM debugger even when they don't come from your web GTM container, like webhooks, APIs, or CRM events. Pair it with a Data Client to debug webhooks specifically.
- Monitoring – a feature that checks your server container's logs and sends you an email if something goes wrong – like a sudden drop in events, a spike in errors, or missing requests – so you can catch problems early.
- Website Tracking Checker – a free tool that scans your site to assess tracking health across analytics, advertising, cookies, and SEO. Provides a score along with actionable recommendations to improve data accuracy and overall tracking performance.
Advanced server-side tracking setup
With sGTM hosting complete, the next steps are: connecting data platform accounts, learning the platform in depth, knowing where to get help, and optionally using tools that speed up further configuration.
1. Verify the setup with the Website Tracking Checker
Before moving forward, confirm everything was configured correctly using the Website Tracking Checker – a free tool that scans your website to assess tracking health across analytics, advertising, cookies, and SEO, and provides a score with actionable recommendations to improve data accuracy and overall performance.
2. Set up server-side tracking for popular platforms
Once your server container is set up, you can now configure tags for the various platforms you use.
The most popular platform integrations are as following:
| Social media advertising | Meta Conversions API Meta Custom Audience Snapchat Conversions API TikTok Events API X Conversion API |
| Advertising platforms | Google Ads Google Data Manager API – Conversion Events Google Data Manager API – Customer Match Amazon Conversions API Spotify Xandr Outbrain Taboola RevContent |
| Affiliate marketing | Rakuten Awin Conversion API Impact Refersion Tradedoubler Affiliate FutureEffinity |
| Analytics | Mixpanel Pirsch Analytics Amplitude Analytics Piano Analytics |
| CRM and marketing automation | HubSpot ActiveCampaign Customer.io Klaviyo Mailchimp Braze Omnisend Postscript |
| Communication and notifications | Slack Telegram Twilio SMS SendGrid Mailgun |
| Data storage and productivity | Google Sheets Google Firestore |
3. Set up Stape power-ups and other features
Power-ups are additional features that extend server-side tagging functionality. They're designed to be simple to enable and generally don't require developer involvement, except in more advanced setups.
| Power-up | Description | Availability |
| Custom GTM and GA4 Loader | Changes gtm.js/gtag.js paths to resist ad blockers and tracking prevention | Free |
| Cookie Keeper | Extends first-party cookie lifespan on browsers with ITP (e.g., Safari 16.4) | Pro plan+ |
| Anonymizer | Anonymizes user data sent to Google Analytics | Free |
| Multi Domains | Maps multiple custom domains to a single server GTM container | Business plan+ |
| POAS Data Feed | Sends actual profit to ad platforms and analytics tools through sGTM | Pro plan + |
| Enricher | Enriches event data with user data that was collected earlier | Business plan+ |
Stape includes several other features that extend and simplify a server-side tracking setup – from data storage to performance monitoring.
Stape Store – Stape's built-in database for writing, reading, and syncing data within the server GTM container. Functions similarly to Firebase, storing data as JSON documents .
Monitoring – lets you set custom alert rules on sGTM and server-side tag performance, so you're notified automatically when something needs attention (e.g., a spike in 4xx/5xx error codes or a shift in event volume), rather than having to catch it manually.
Stape Analytics – shows how effectively server-side tracking is performing, compared to a standard client-side setup.
4. Get help – Helpdesk, community & 24/7 support
If something doesn't work, or you're just not sure how to move forward, Stape offers a few different ways to get help – pick whichever fits how you like to solve problems.
- 24/7 support – direct assistance via email or support ticket for Stape-related questions.
- Stape Community – a space to discuss platform setups, analytics integrations, and consent management, exchange knowledge, and get support for technical issues.
5. Learn by yourself - Stape Academy
Stape Academy – a free learning hub for marketers, founders, and non-technical teams, covering server-side tracking setup without requiring a developer. Includes video lessons, tests, and a certificate upon completion. Covers:
- Installing and configuring a GTM server container.
- Connecting platforms like Meta, GA4, TikTok, and others.
- Using Stape power-ups such as Cookie Keeper and Custom Loader.
- Testing, debugging, and optimizing the setup over time.
6. Easier way to set up server-side tracking
Manual setup works well for a first container but can become time-consuming when repeated across multiple sites, clients, or platforms. For those planning to create additional containers, or who found the manual setup process complex, Stape offers two solutions to speed things up.
Tracking Setup Assistant – generates personalized web and server GTM container templates, free, fast, and code-free. Instead of manually building tags, triggers, clients, and variables for each platform, it produces ready-to-use containers based on the CMS, business type, and platforms selected.
How to use:
- Answer a quick questionnaire about your CMS, business type, and tracking needs
- Select marketing platforms – choose the tools you use, like GA4, Google Ads, Meta, TikTok, or others
- Fill in credentials – enter the required IDs, tokens, and API keys to connect your accounts
- Generate and import templates – instantly get ready-made GTM containers, import them into your workspace, and start tracking
CRM & CMS app integrations – connect server-side tracking directly to your platform without a developer.
- CMS apps plug into e-commerce/website platforms (Shopify, WordPress, etc.) and automatically wire up server-side tracking for that platform – pulling in e-commerce event data, extending cookie lifespans, and similar setup work that would otherwise require manual configuration.
- CRM apps connect to a business's CRM (HubSpot, Salesforce, etc.) and watch for changes in the sales pipeline – like a lead becoming a customer – then automatically send that as a conversion event to ad platforms (Meta, Google), so ad platforms know a sale actually happened, without a developer building that data pipeline manually.
Conclusion
Setting up server-side tracking is a great way to improve your website’s performance and get more accurate data. This blog post gathered general information needed to get started with server-side tracking. Here we covered setting up Server Google Tag Manager, Server Google Analytics 4, server-side Google Ads, server-side Facebook Ads, and other platform integrations with advanced options. Server-side tagging has many actual and potential use cases. We have a blog post covering server-side tracking use cases in detail.
So, don’t hesitate to contact us to get assistance with your server-side tracking implementation. We are experts in server-side tracking and can help you to dive into the world of tags.

Comments