How to connect your site with Hubspot using server-side tracking
Ira Holubovska
AuthorHubSpot is an excellent tool for marketers. One of the best features I like about HubSpot is having customer data collected in a single place. It allows tracking your campaign success and customer journey without any problems.
It is no secret that one of the crucial customer data sources is the website. But creating a complete user persona one step before the purchase can be challenging, especially without the HubSpot integration. Fortunately, we can help you find a way around it.
We created a Google Tag Manager server template to integrate the site with Hubspot, create new and update existing contacts, and track custom behavioral events.
Here we will discuss how to use the HubSpot tag for the Google Tag Manager server container to enjoy the benefits of a marketing automation platform without sacrificing the data you need and to make informed decisions about your campaign’s success.
Why should you integrate your site with Hubspot?
Marketers want to increase their website conversion rates. They can do this by analyzing customer interactions with the site and tracking them before and after the purchase. This way, they can identify the factors that influence the user’s decision-making.
As mentioned before, having all the relevant customer information collected in one place is one of the perks of the HubSpot integration and reasons why people tend to choose it over other tools.
HubSpot has many integration options for the most popular platforms like Google Analytics, Facebook, etc. These integrations allow you to attribute ads directly to the Hubspot contacts who interact with them. But how do you add contacts to HubSpot? That’s a relatively easy task if you use HubSpot forms. But what if you have custom contact forms or a CMS that is not easy to integrate with Hubspot?
One of the options is to upload contacts into HubSpot manually. However, it may lead to errors like forgetting to add important contact information.
We have a solution for this — a server-side tag for HubSpot. With our tag for the Google Tag Manager server container, you can integrate your site with HubSpot.
GTM server tag for HubSpot allows to:
1. Create new contacts
2. Update existing contacts
3. Add behavioral events
4. Track ecommerce events
The HubSpot tag for the Google Tag Manager server container communicates with the HubSpot API and adds the information you send. That is a secure and reliable way to send user data since the communication is done on the server-side, without using the browser and JavaScript. By using the HubSpot tag for the Google Tag Manager server container, you can ensure that the information you send to HubSpot is safe and can’t be blocked.
How to connect your website with Hubspot using server-side tracking
2. Send required data to the server container. We have blog posts that describe two methods: sending data using server-side GA4 configuration or using Data Tag.
3. Add the HubSpot tag to your server GTM container.
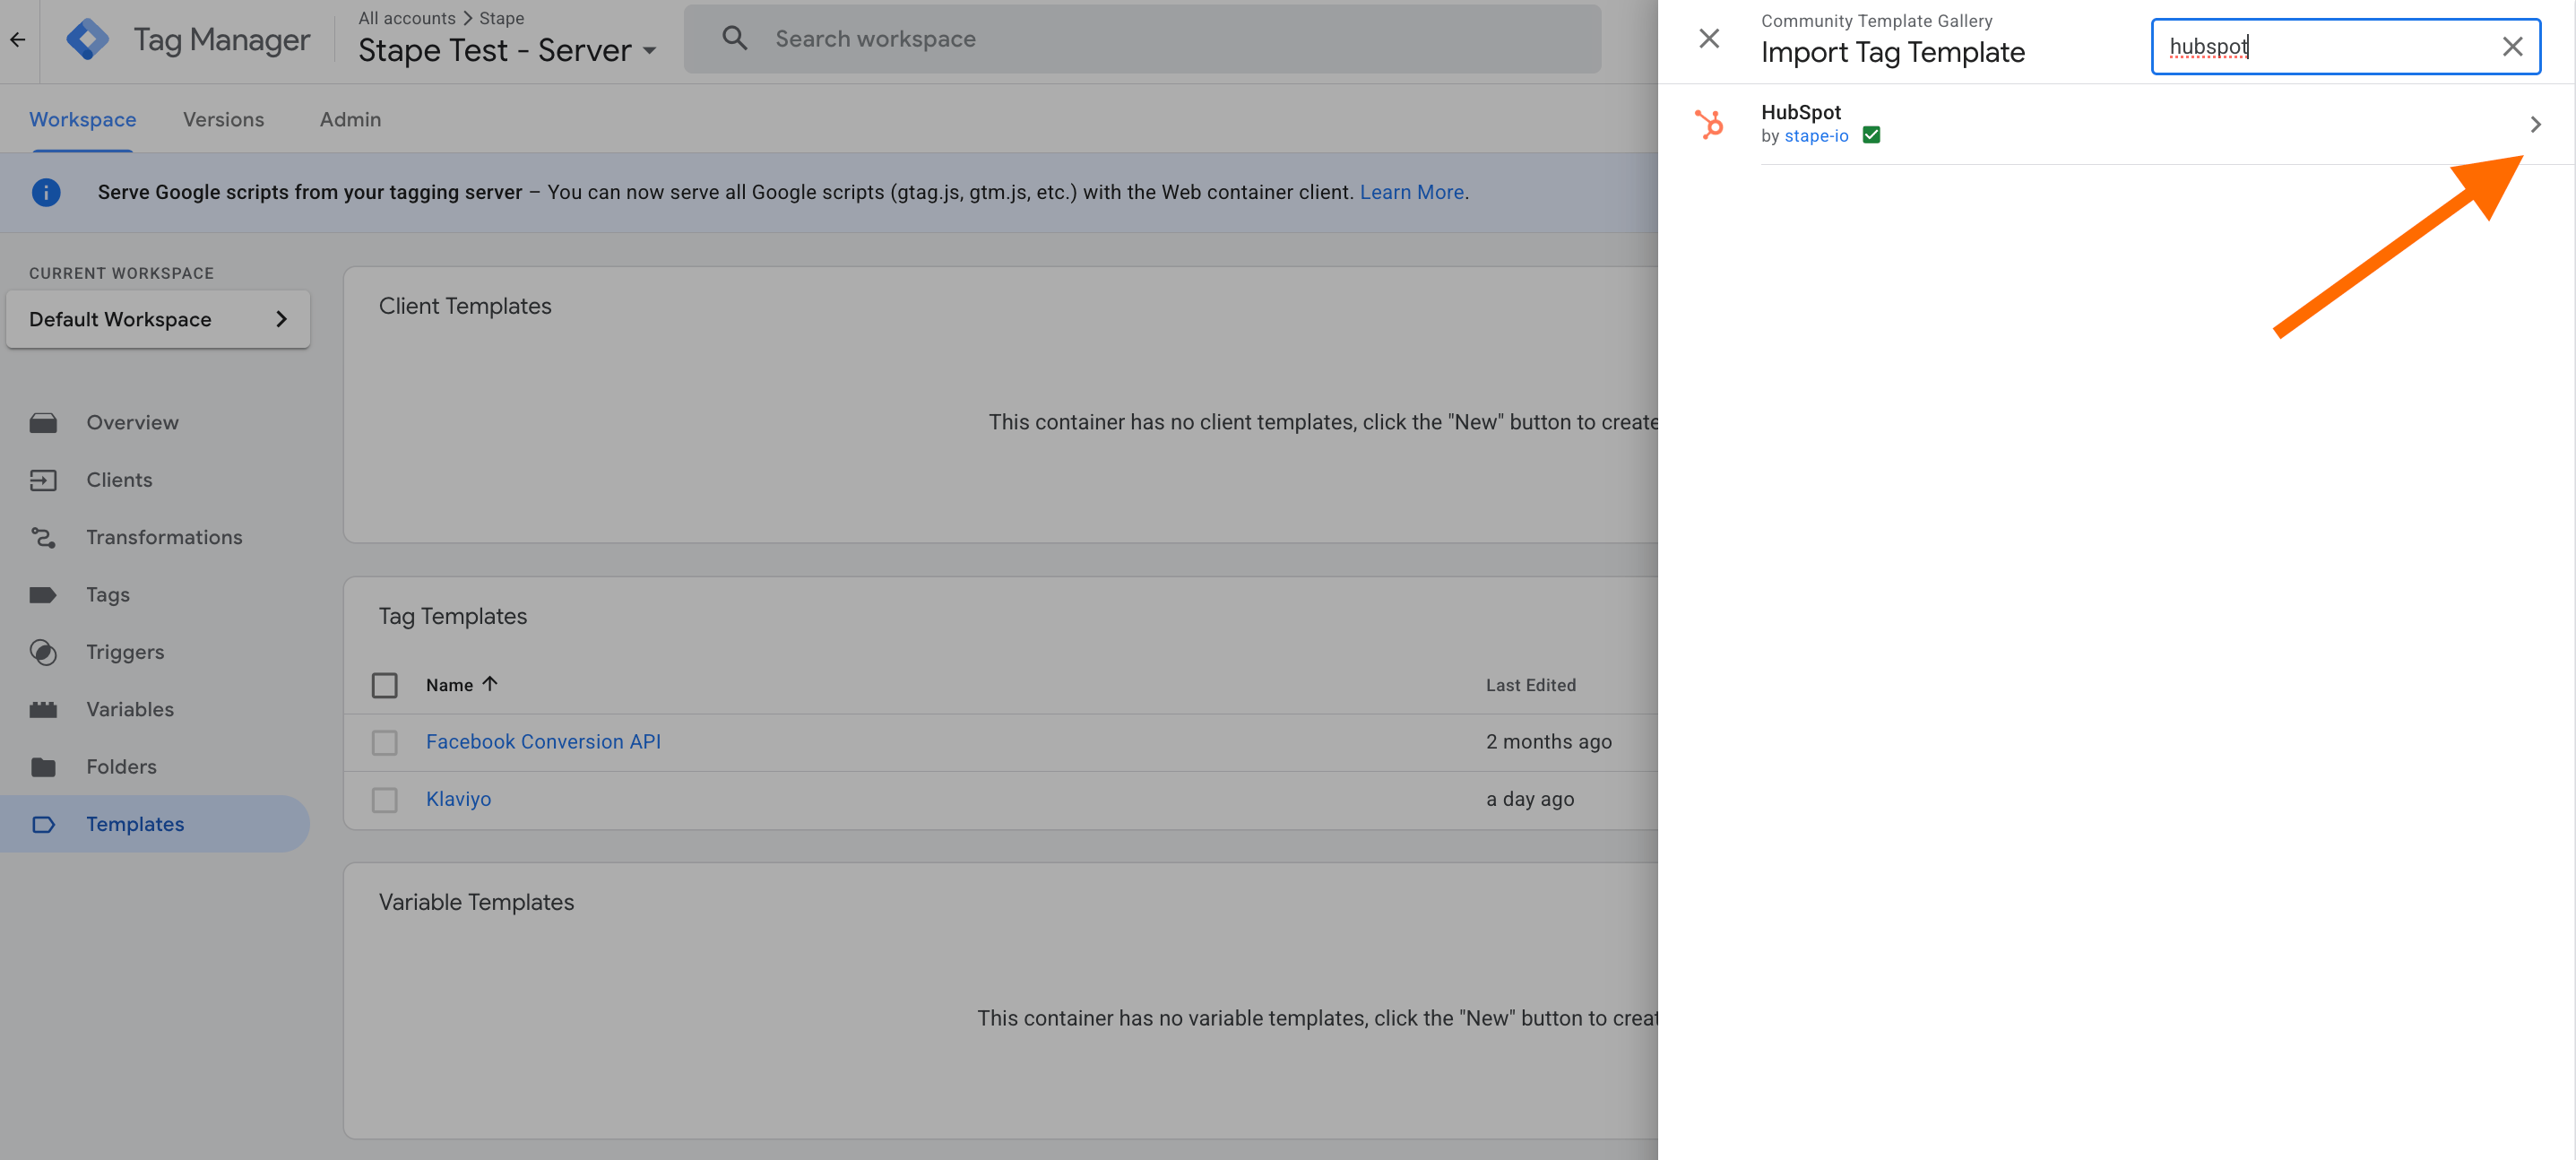
In the server GTM container, go to Templates → Tag Templates → Search Gallery → search for HubSpot → add a tag to your workspace.
How to create or update Hubspot contact?
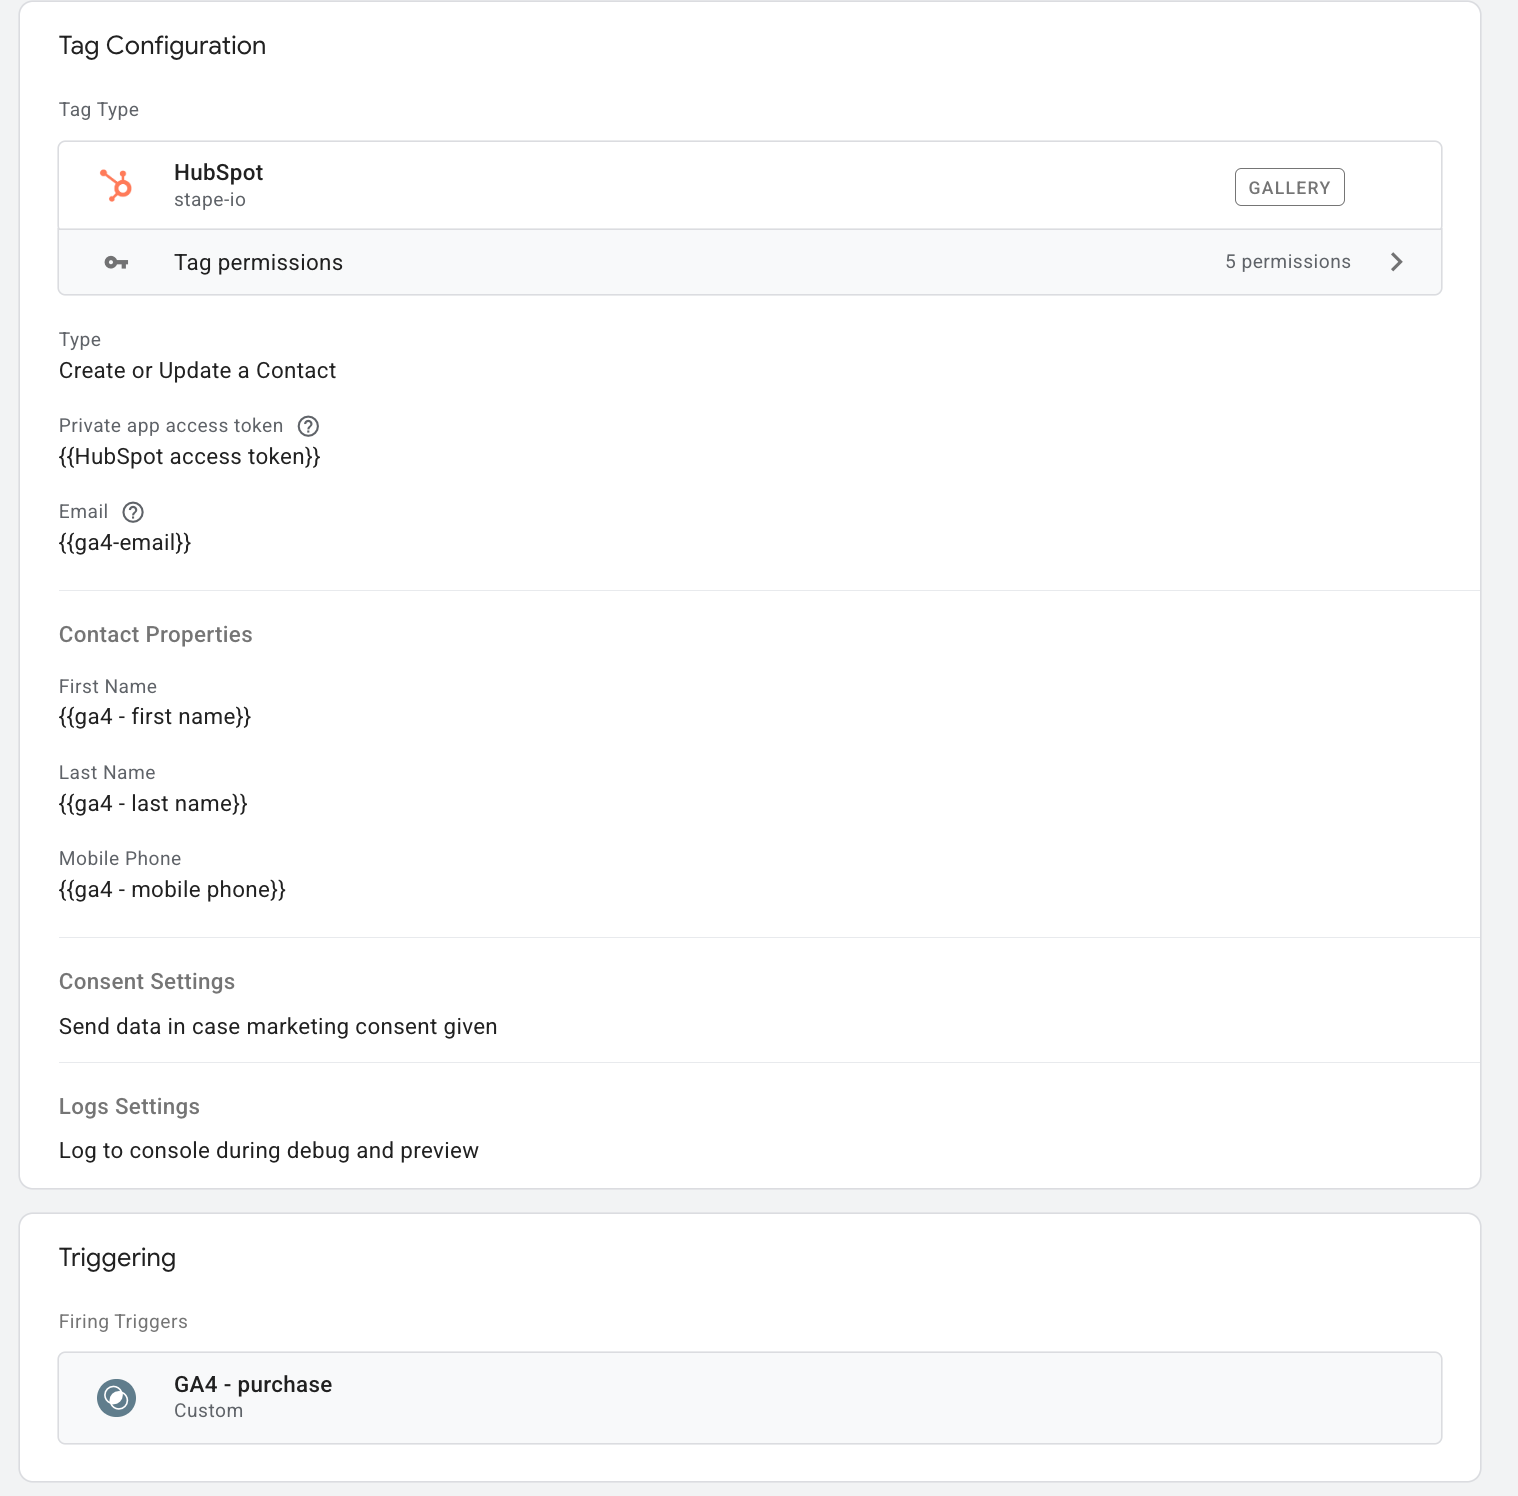
4. Create a new tag in the server container → Select tag type HubSpot → Select action type → If you select Create or Update a contact, add Private app access token (check HubSpot documentation on access tokens), and user email variable → You can add event information and send custom parameters. Refer to this HubSpot documentation for assigning custom parameters → Add a trigger to this tag and save.
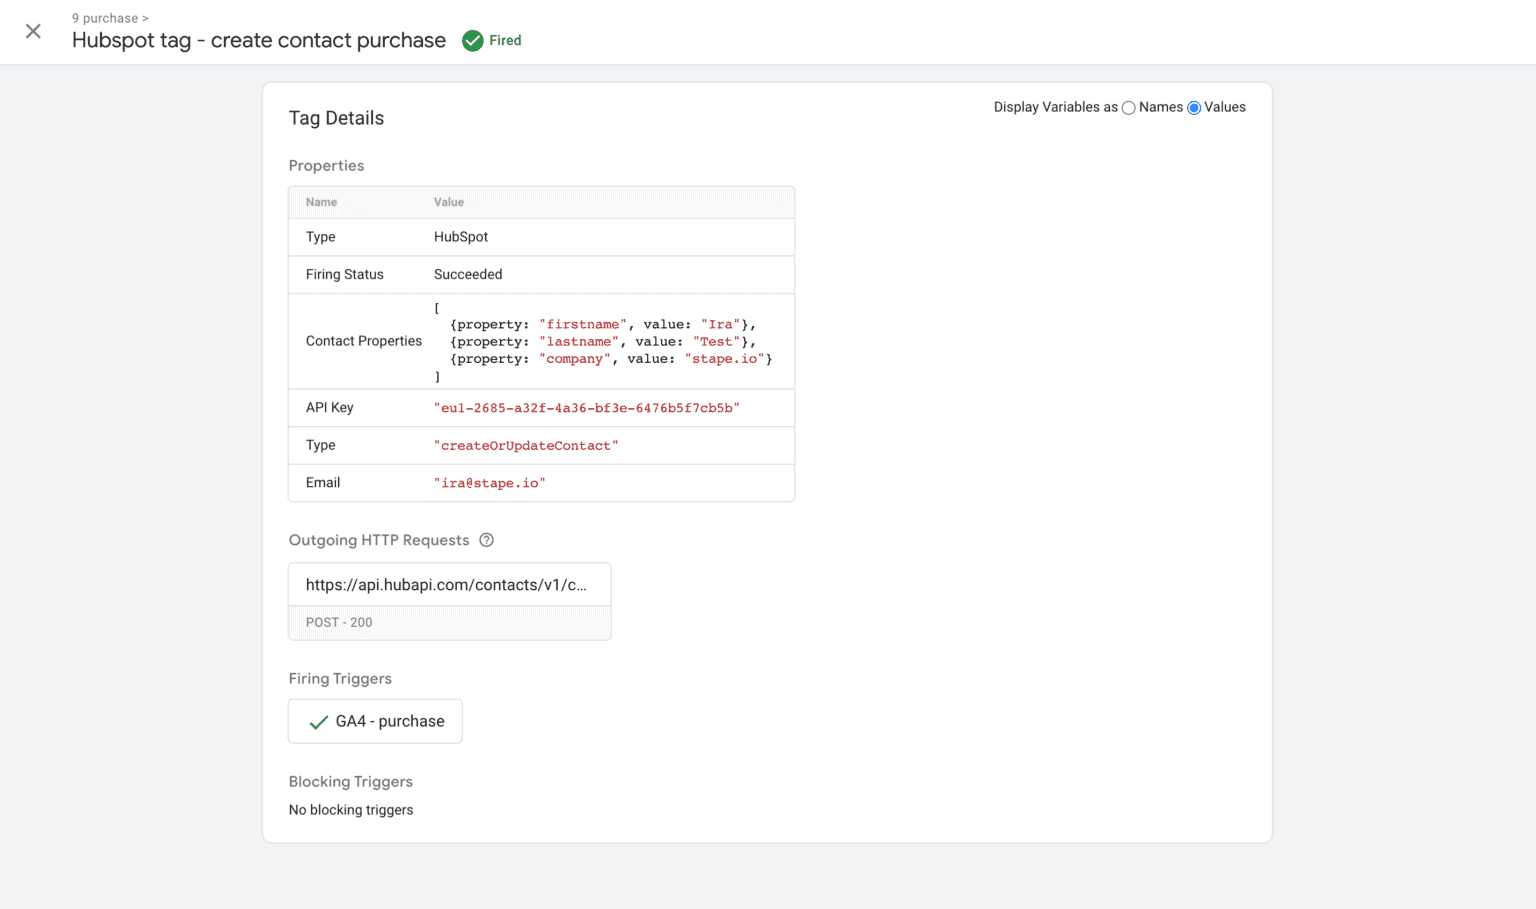
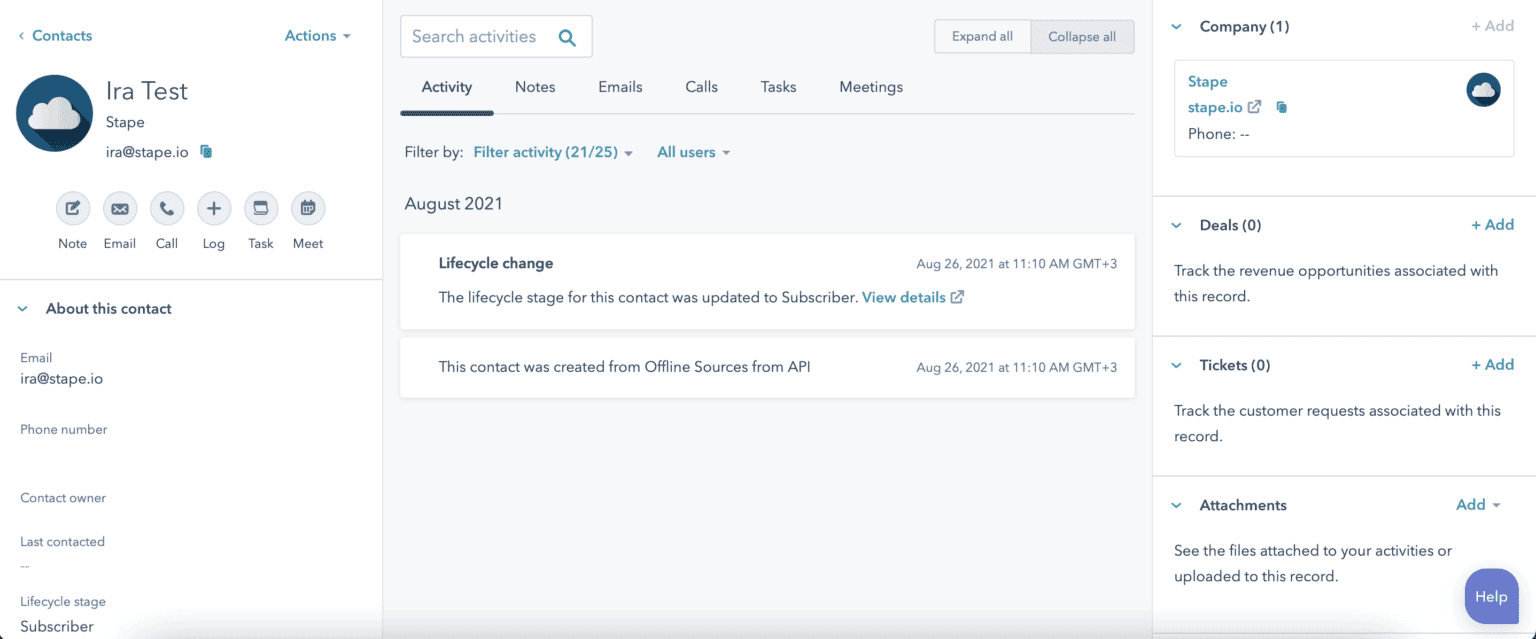
5. Open the preview mode and test the event. Check that contact was created in HubSpot.
How to track custom behavioral events in Hubspot?
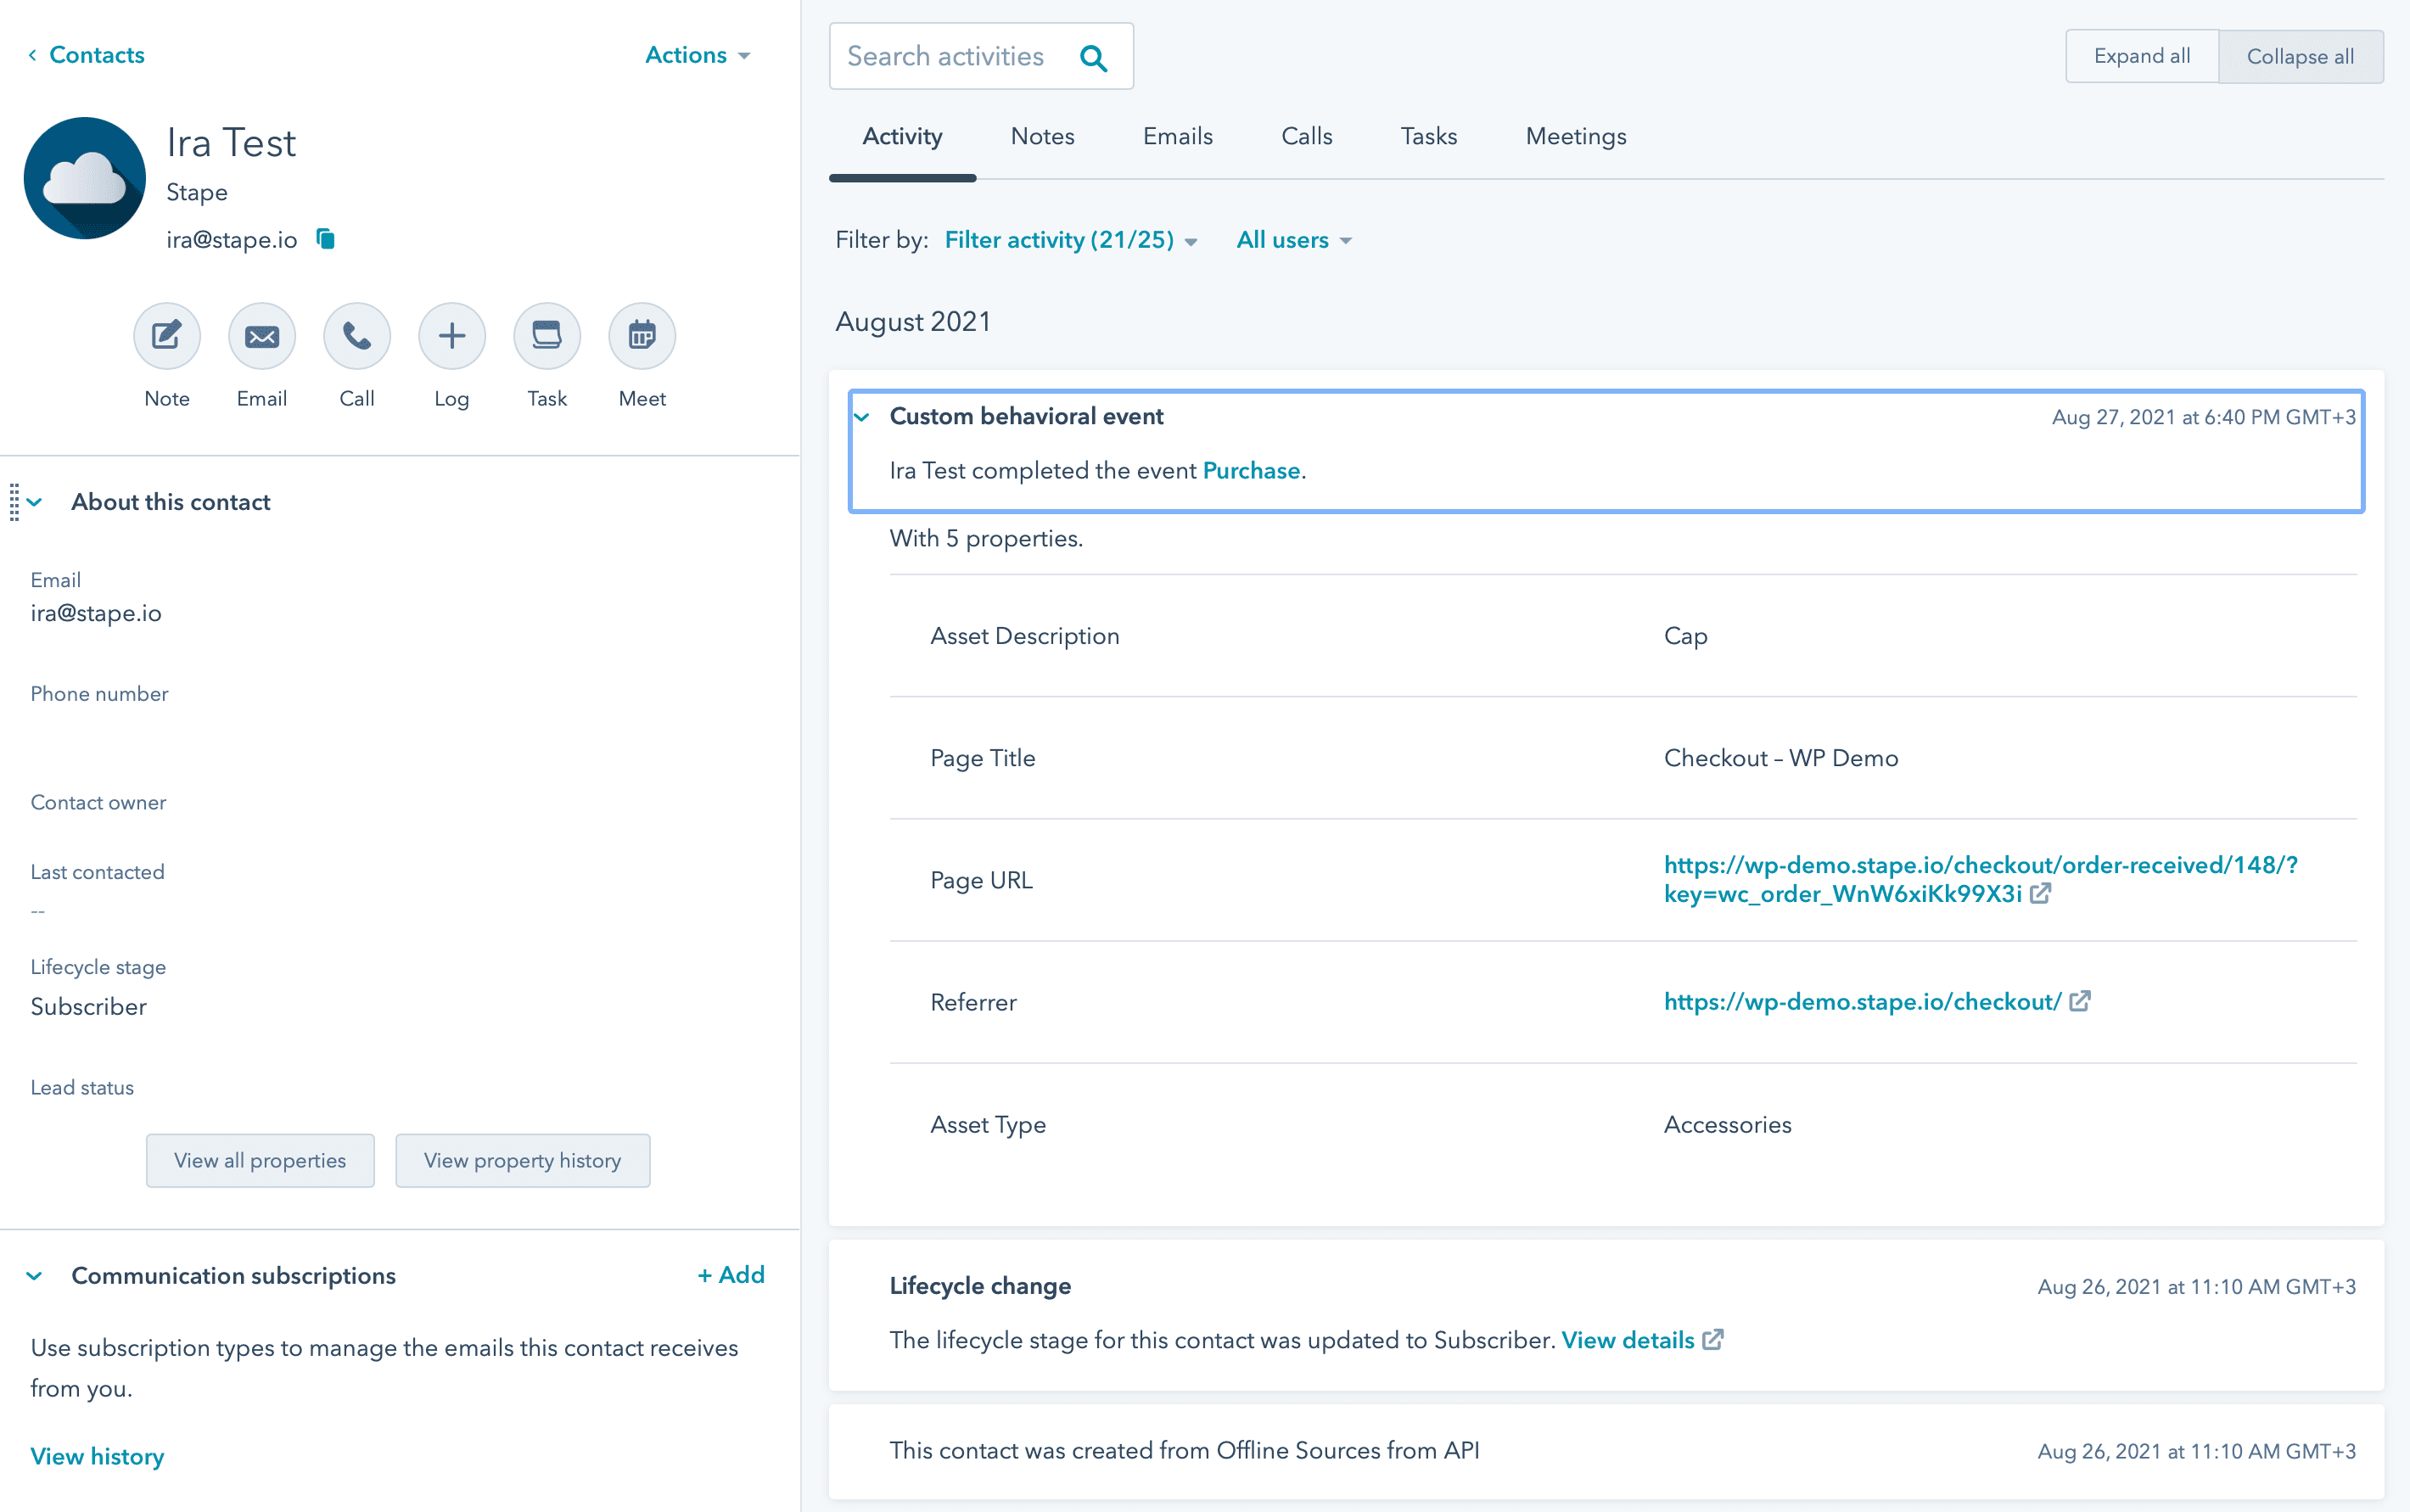
6. Create a new HubSpot tag → Select Track Custom Behavioral Event → Add Private app access token (check HubSpot documentation on access tokens) → Add a variable that contains contact email → Add Custom Behavioral Event Parameters.
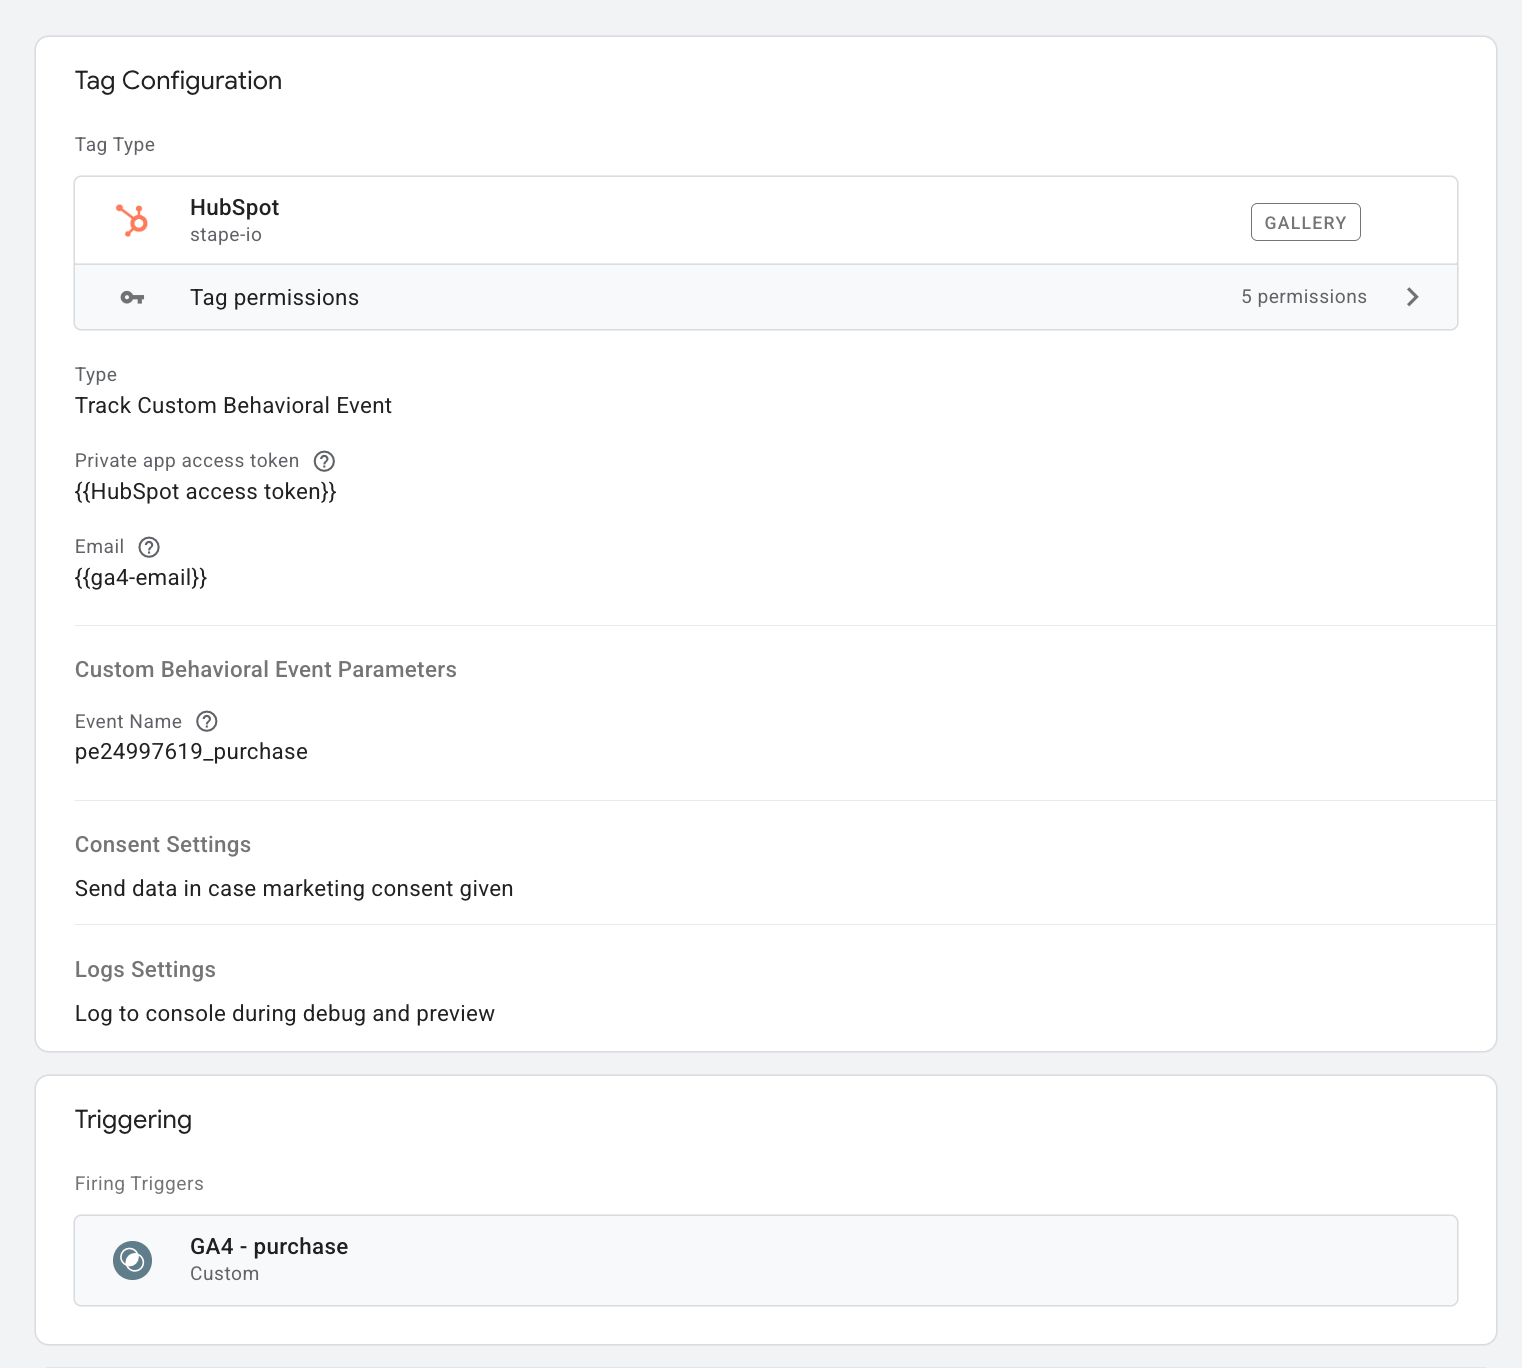
Before adding custom behavioral event parameters, you need to create them in HubSpot. Follow these instructions on how to create behavioral events in HubSpot.
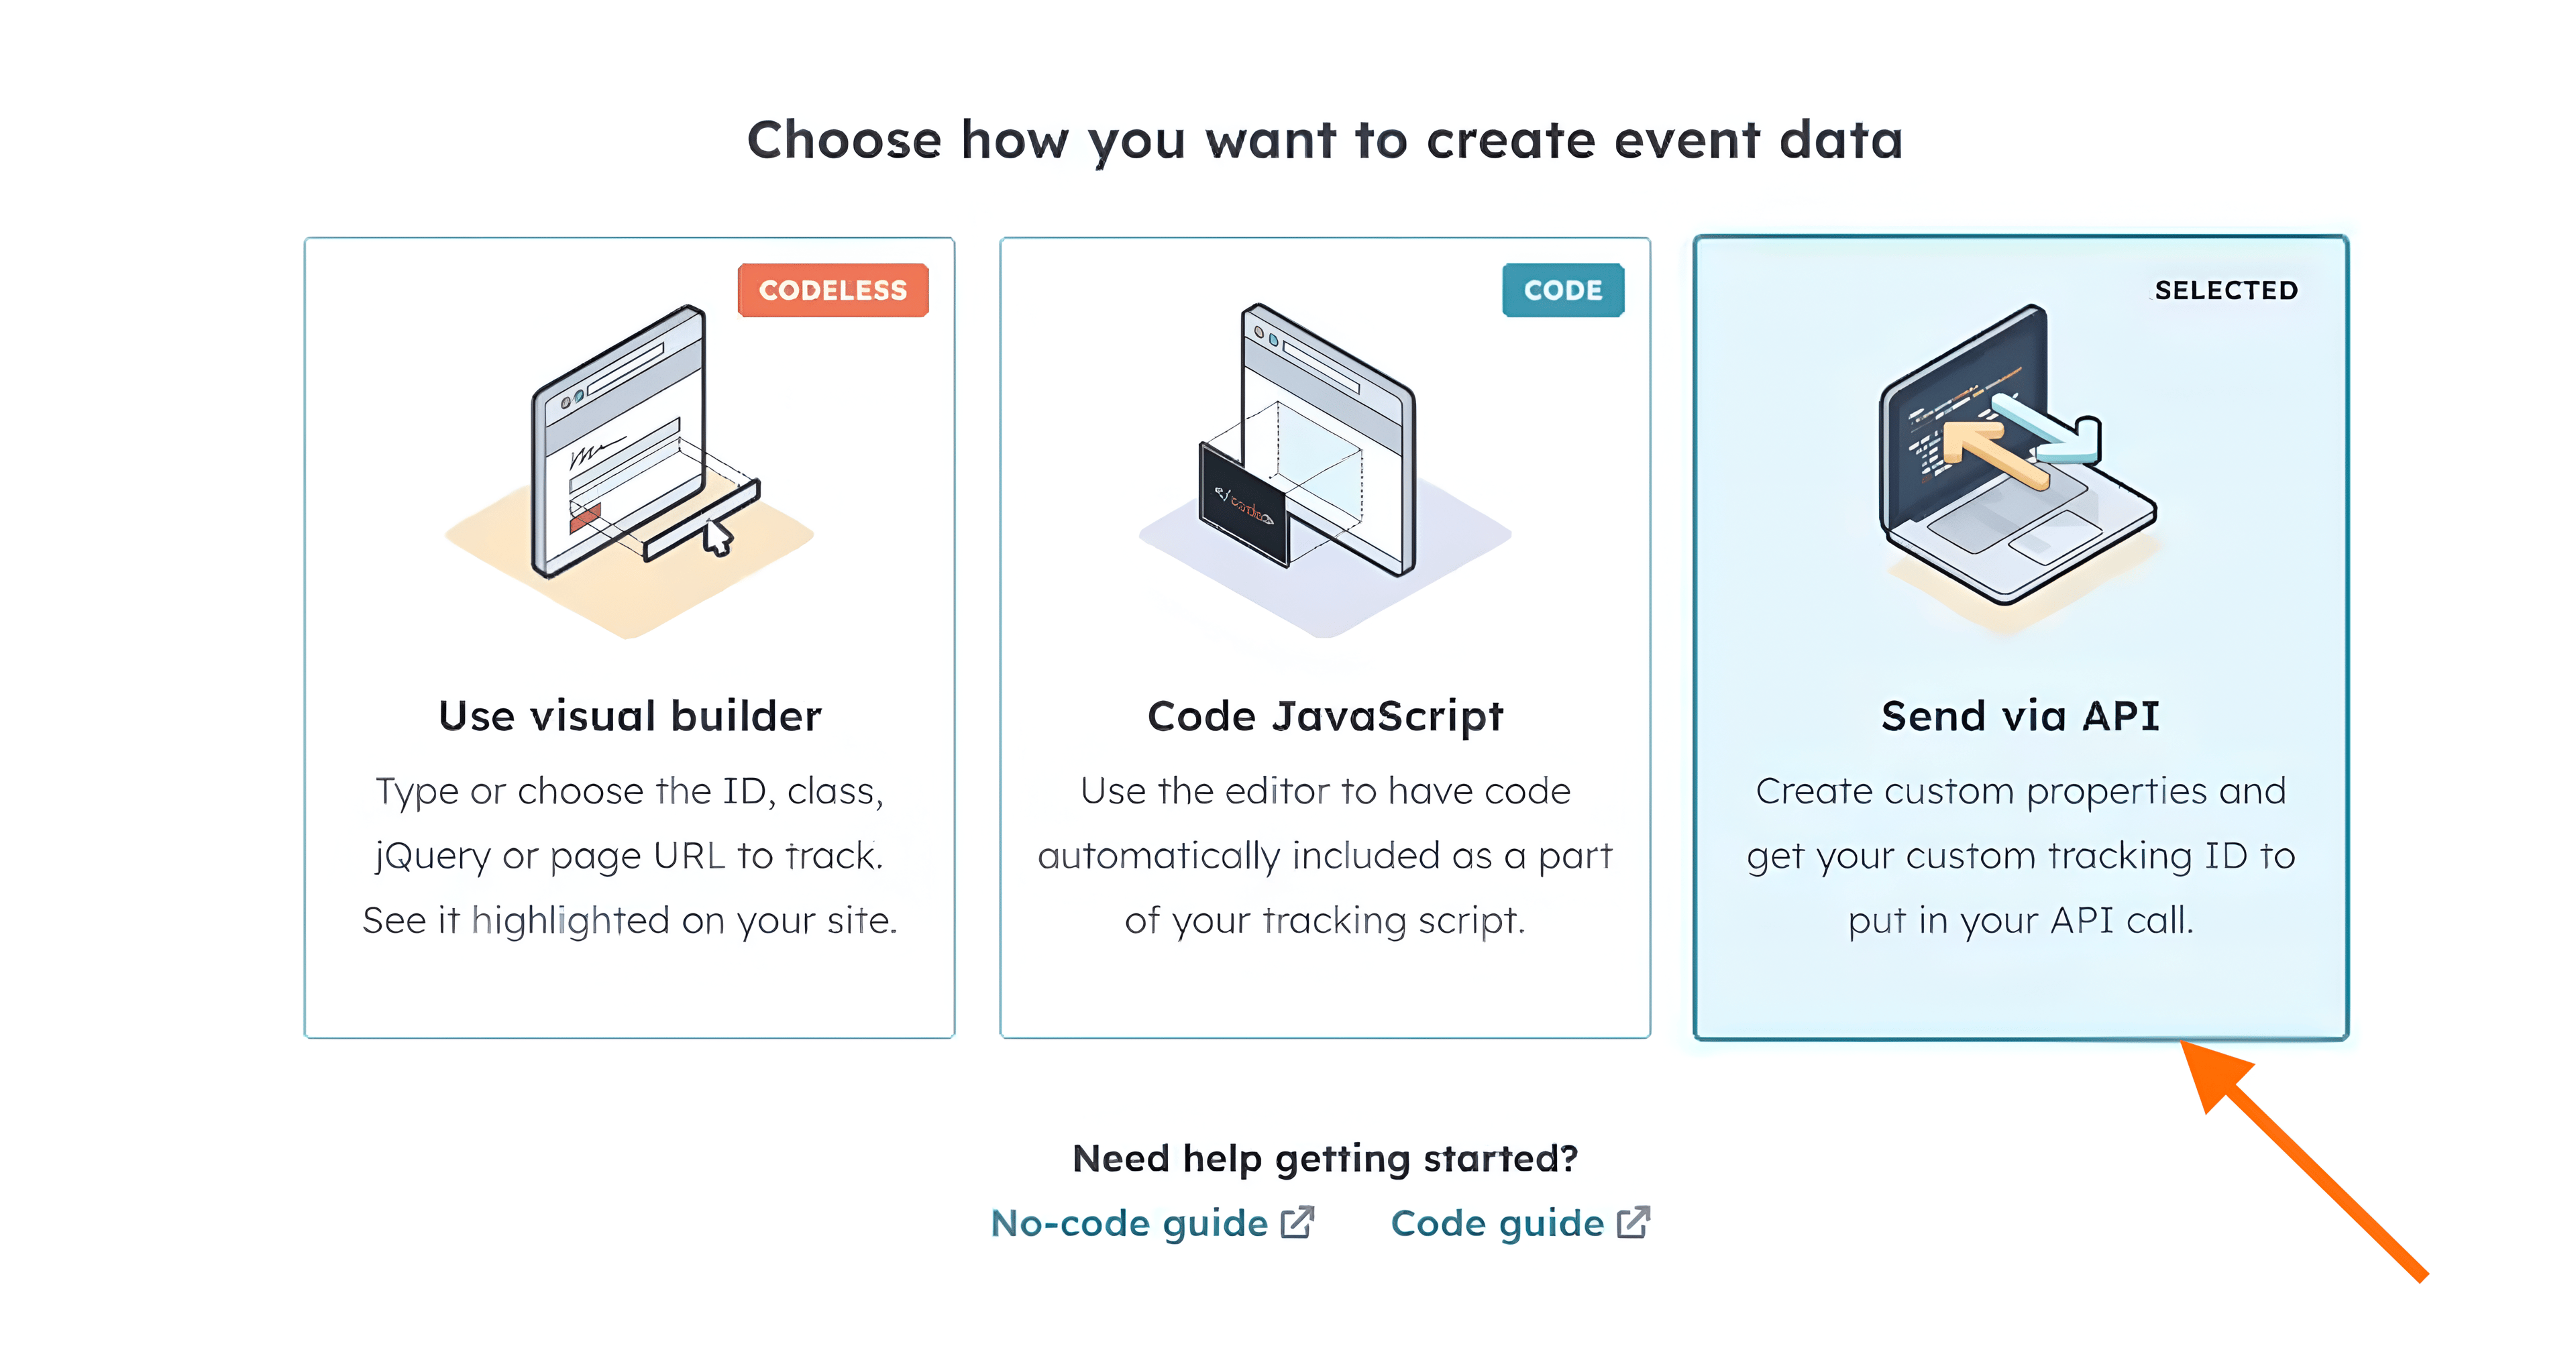
Please note: if you opt for the “Use visualizer” option (as recommended in HubSpot documentation), you will be able to set up Visited URL or Clicked element event types only. If you need to configure other types of events, select the “Send via API” option.
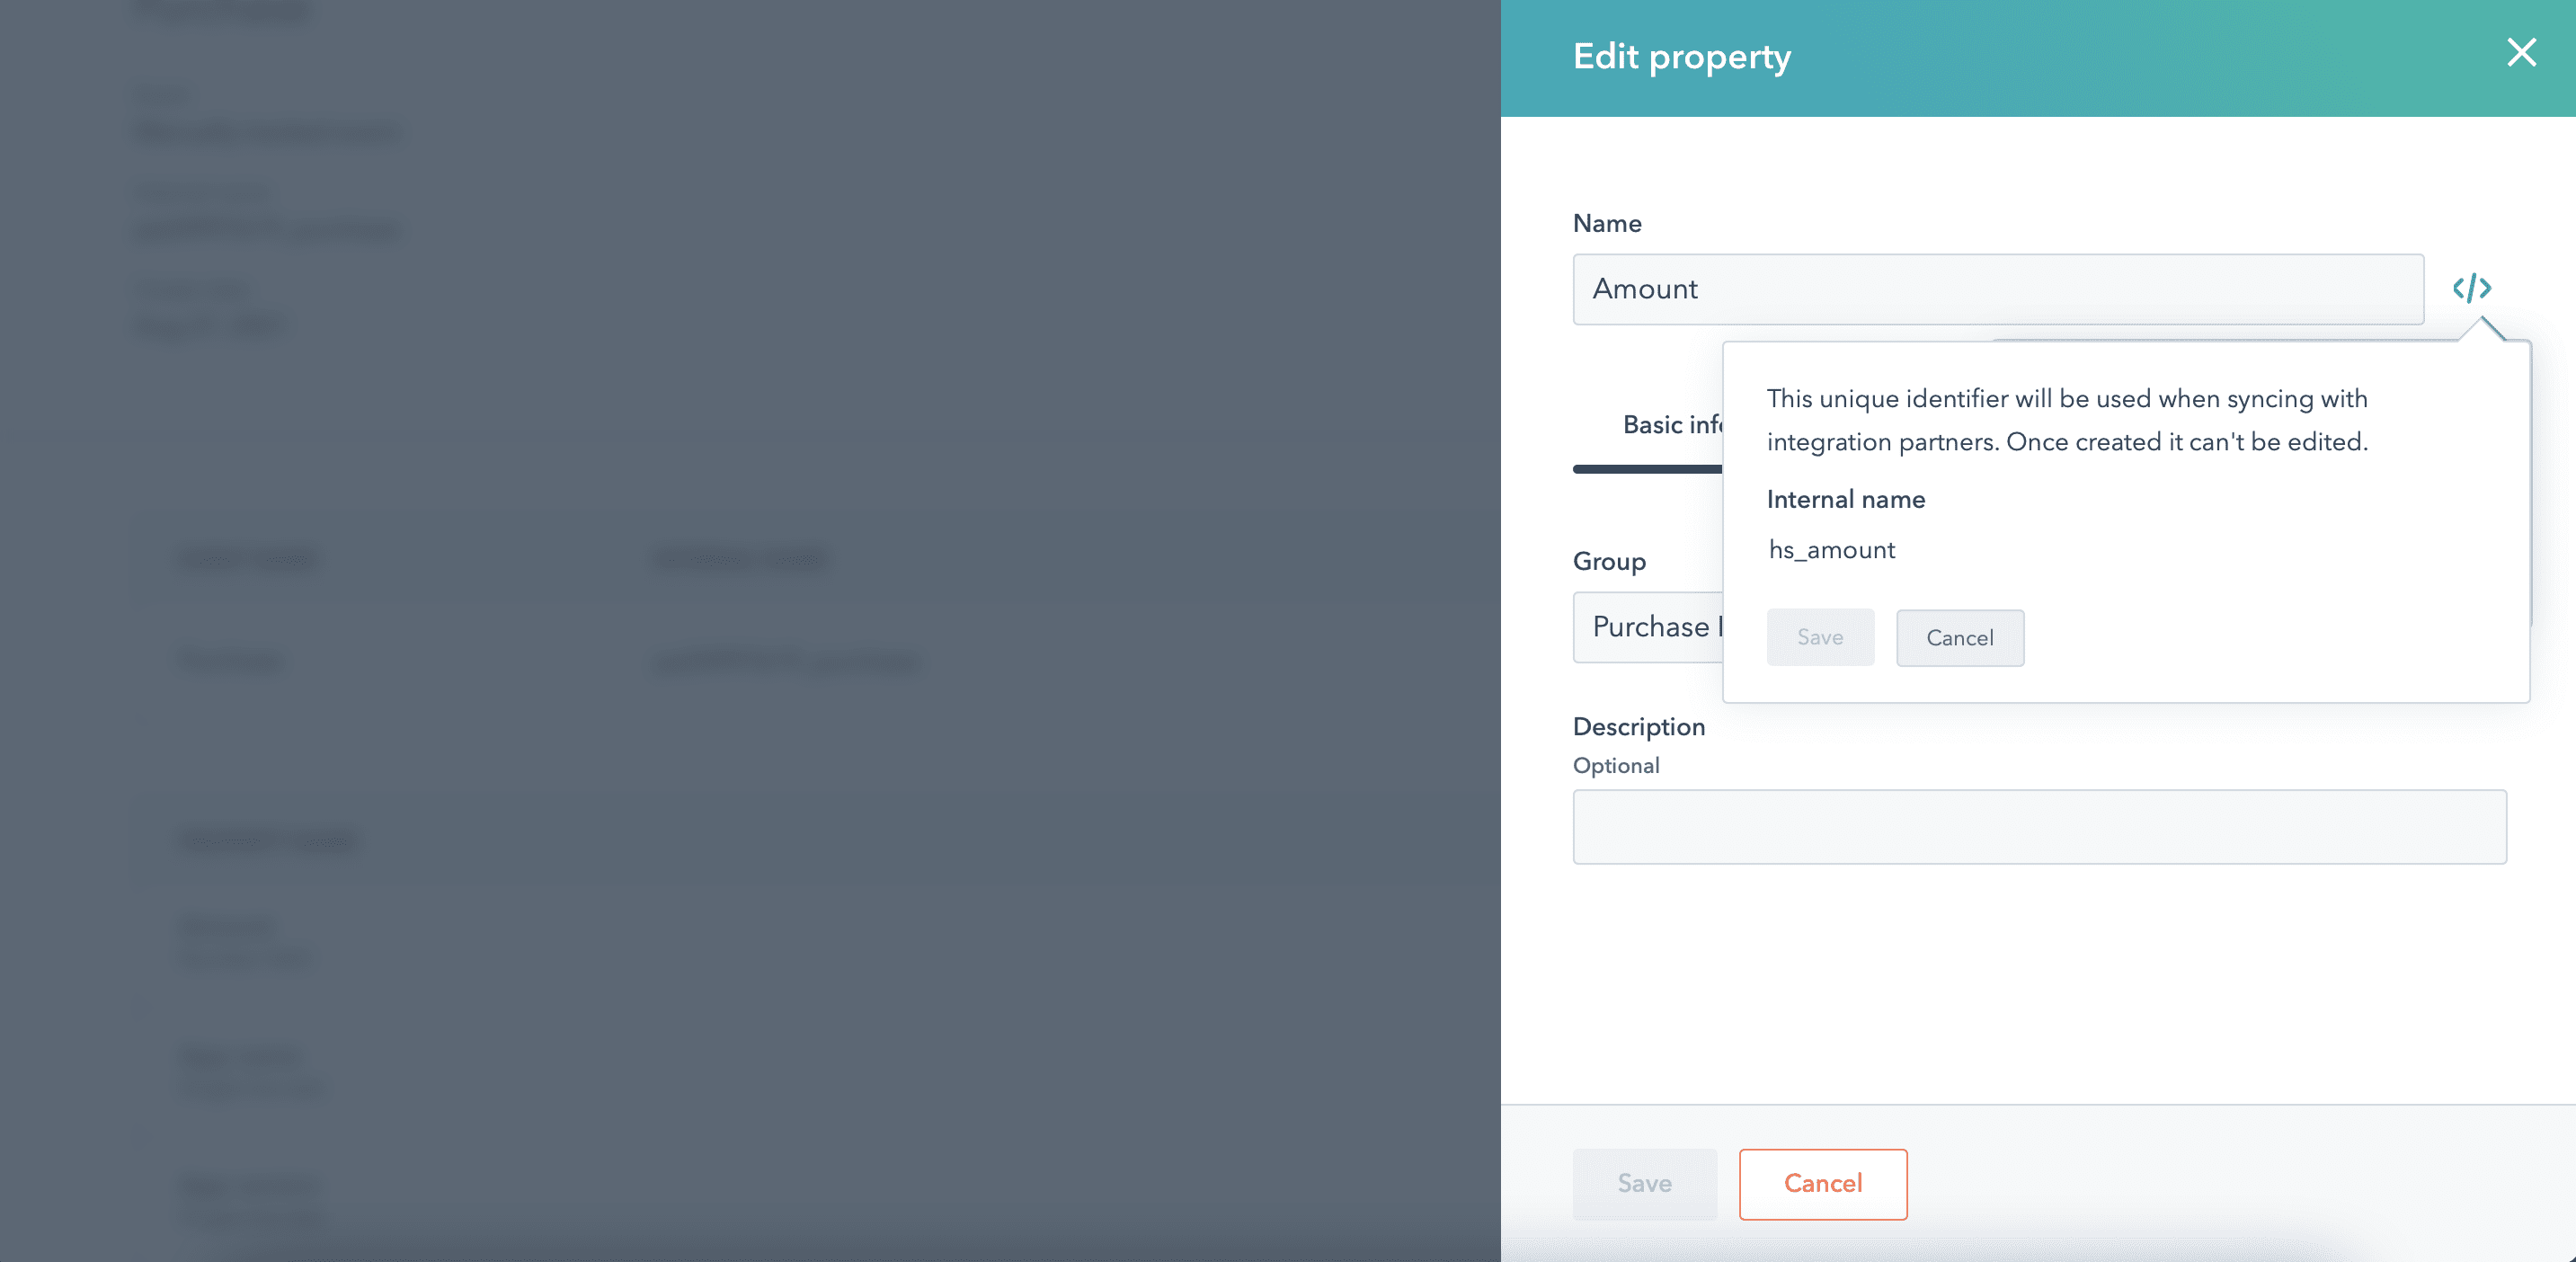
Note that you need to add event names and property names in the Internal name format. To find an internal property name, click on the </> on the right side.
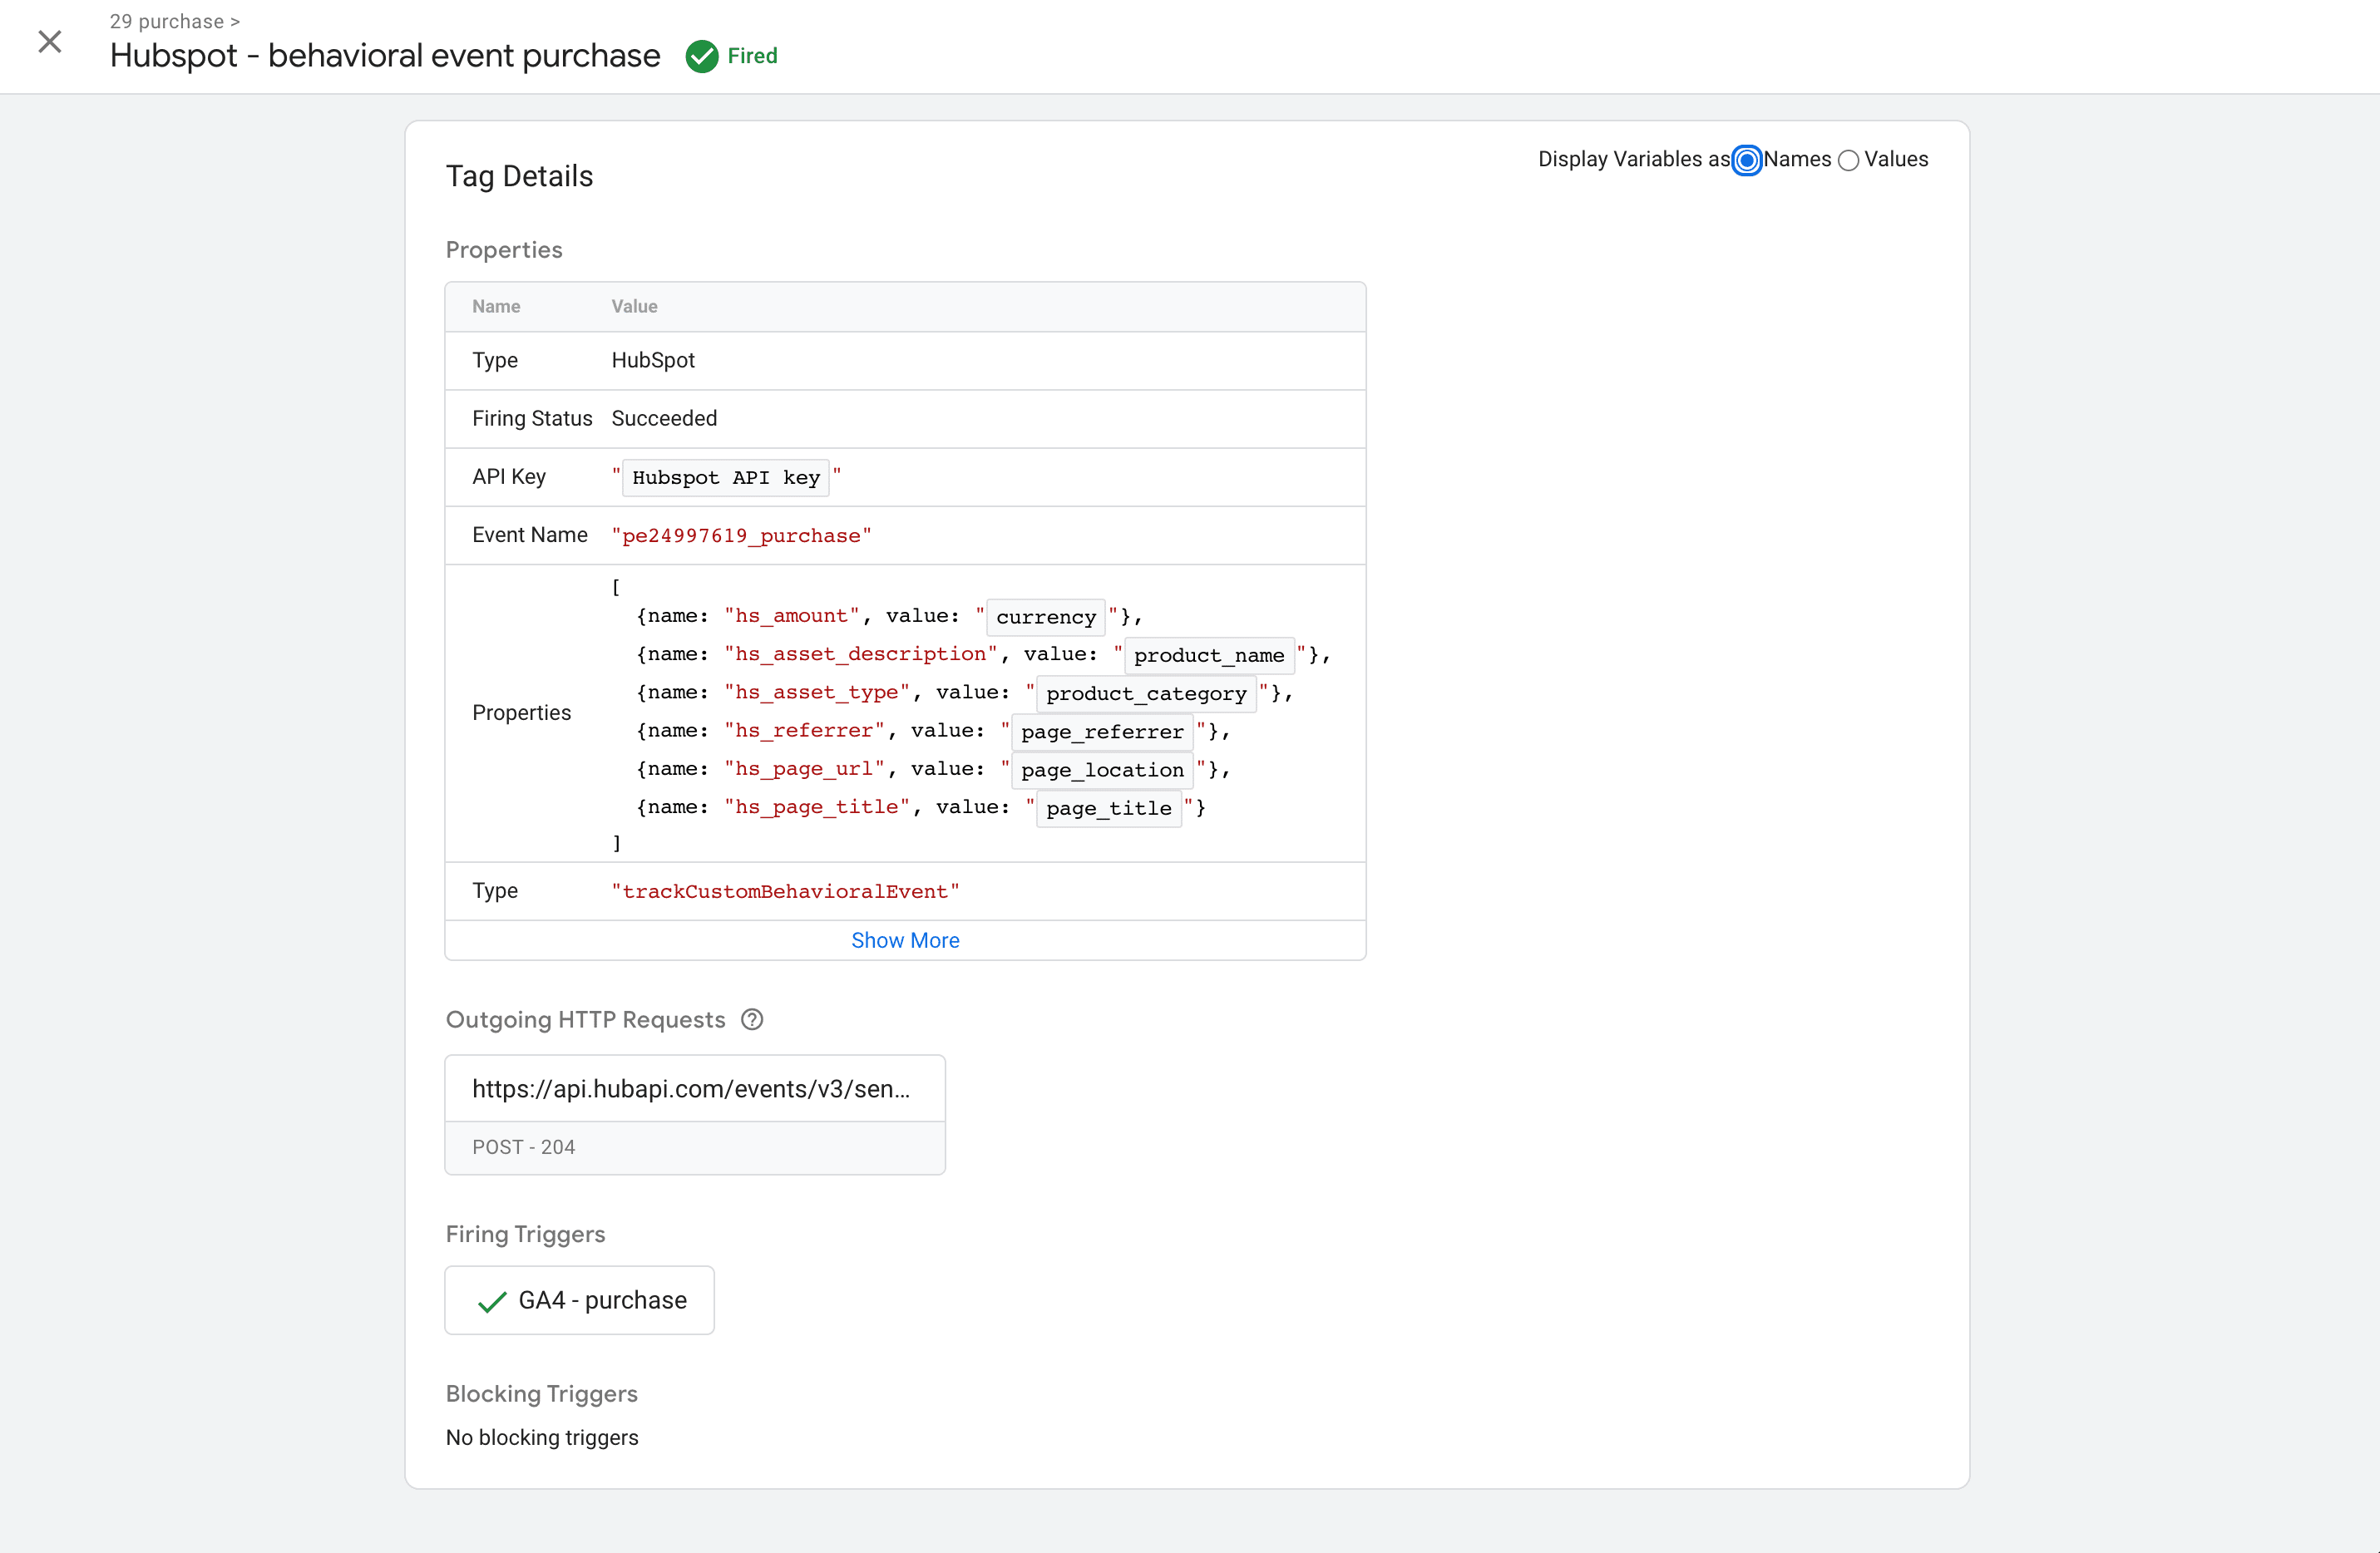
7. Test HubSpot behavioral event tag that you’ve recently set up. You should see that tag triggers in the GTM server container and events are associated with the contact in HubSpot.
How to identify logged-in users on external websites?
HubSpot provides an API endpoint that can identify logged-in users on external websites. This endpoint is useful primarily for its “conversations” feature (chat). It’s available for a Professional or enterprise-level HubSpot subscription.
When a user logs into a non-HubSpot site, their name and email can be sent to the HubSpot endpoint, allowing HubSpot to recognize them. This ensures that the responder knows their identity when the user starts a chat. Additionally, identified users can be used for CTA targeting - for example, displaying a pop-up only to users who are not logged in.
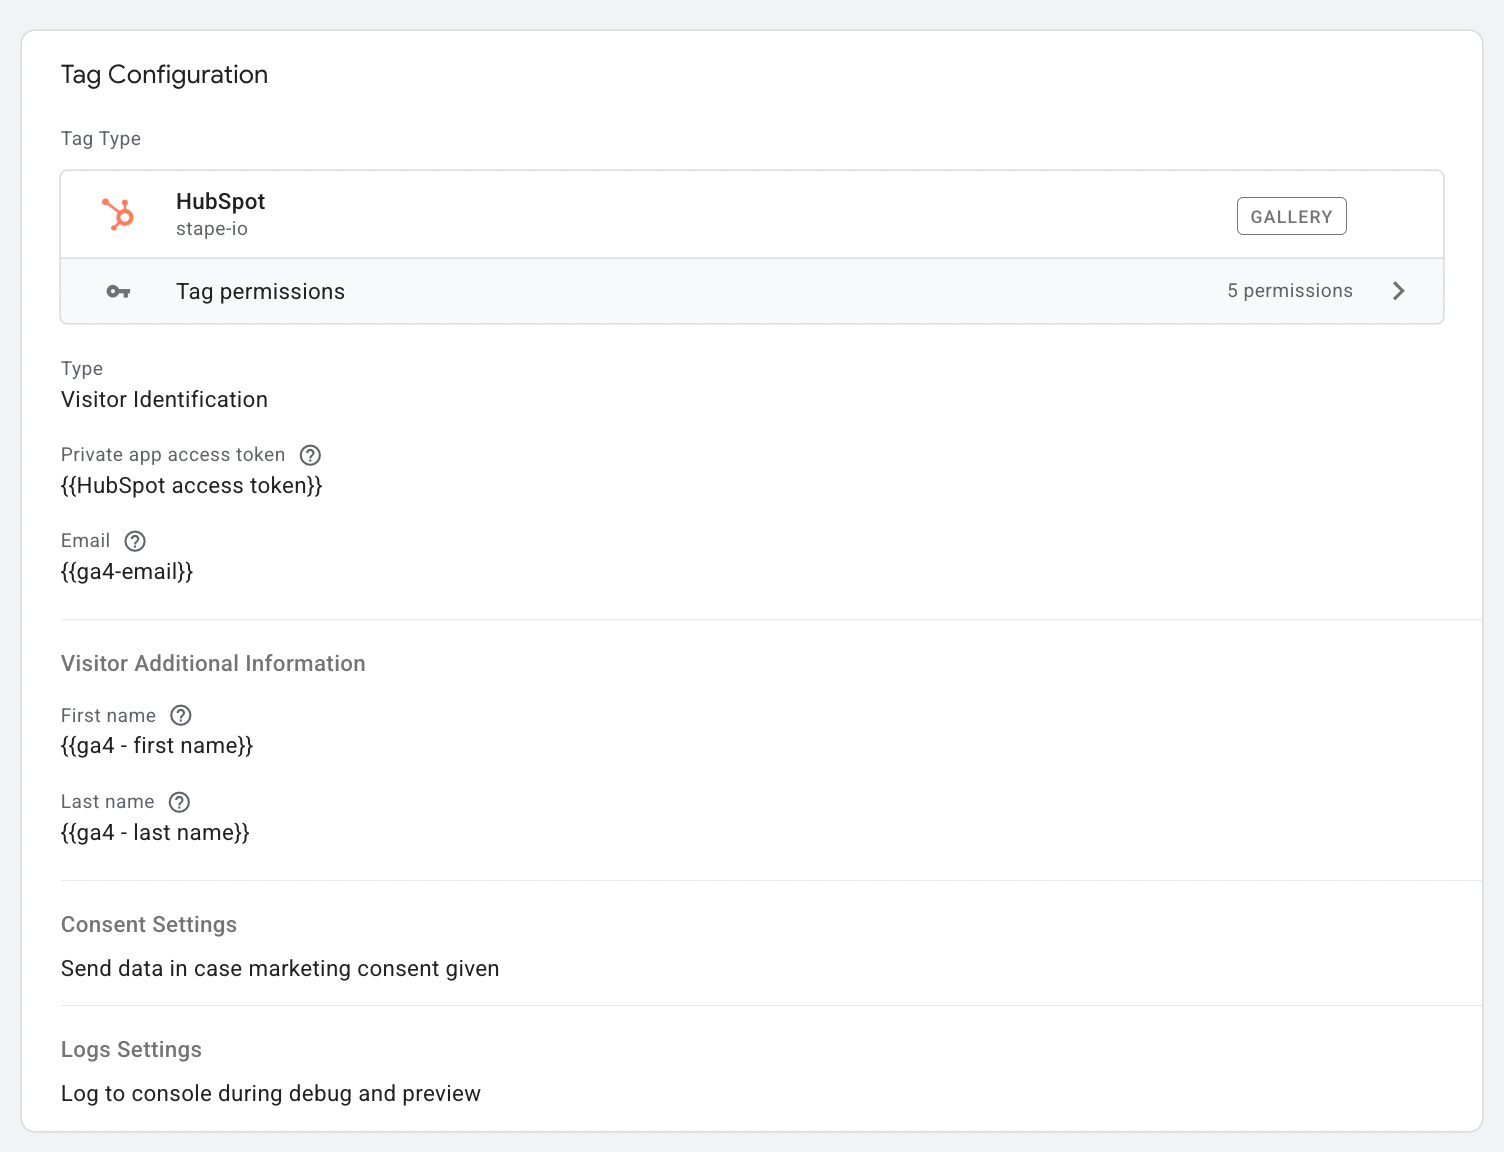
To set up logged-in users' identification, choose “Visitor Identification” as a tag type → Add Private app access token (check HubSpot documentation on access tokens) → Add a variable that contains the contact email → Add variables with the first and last name of a visitor.
How to track ecommerce events in HubSpot?
Using a tag, you can track the following ecommerce events:
- Log in
- Checkout
- Purchase
- Remove from cart
- Add to cart
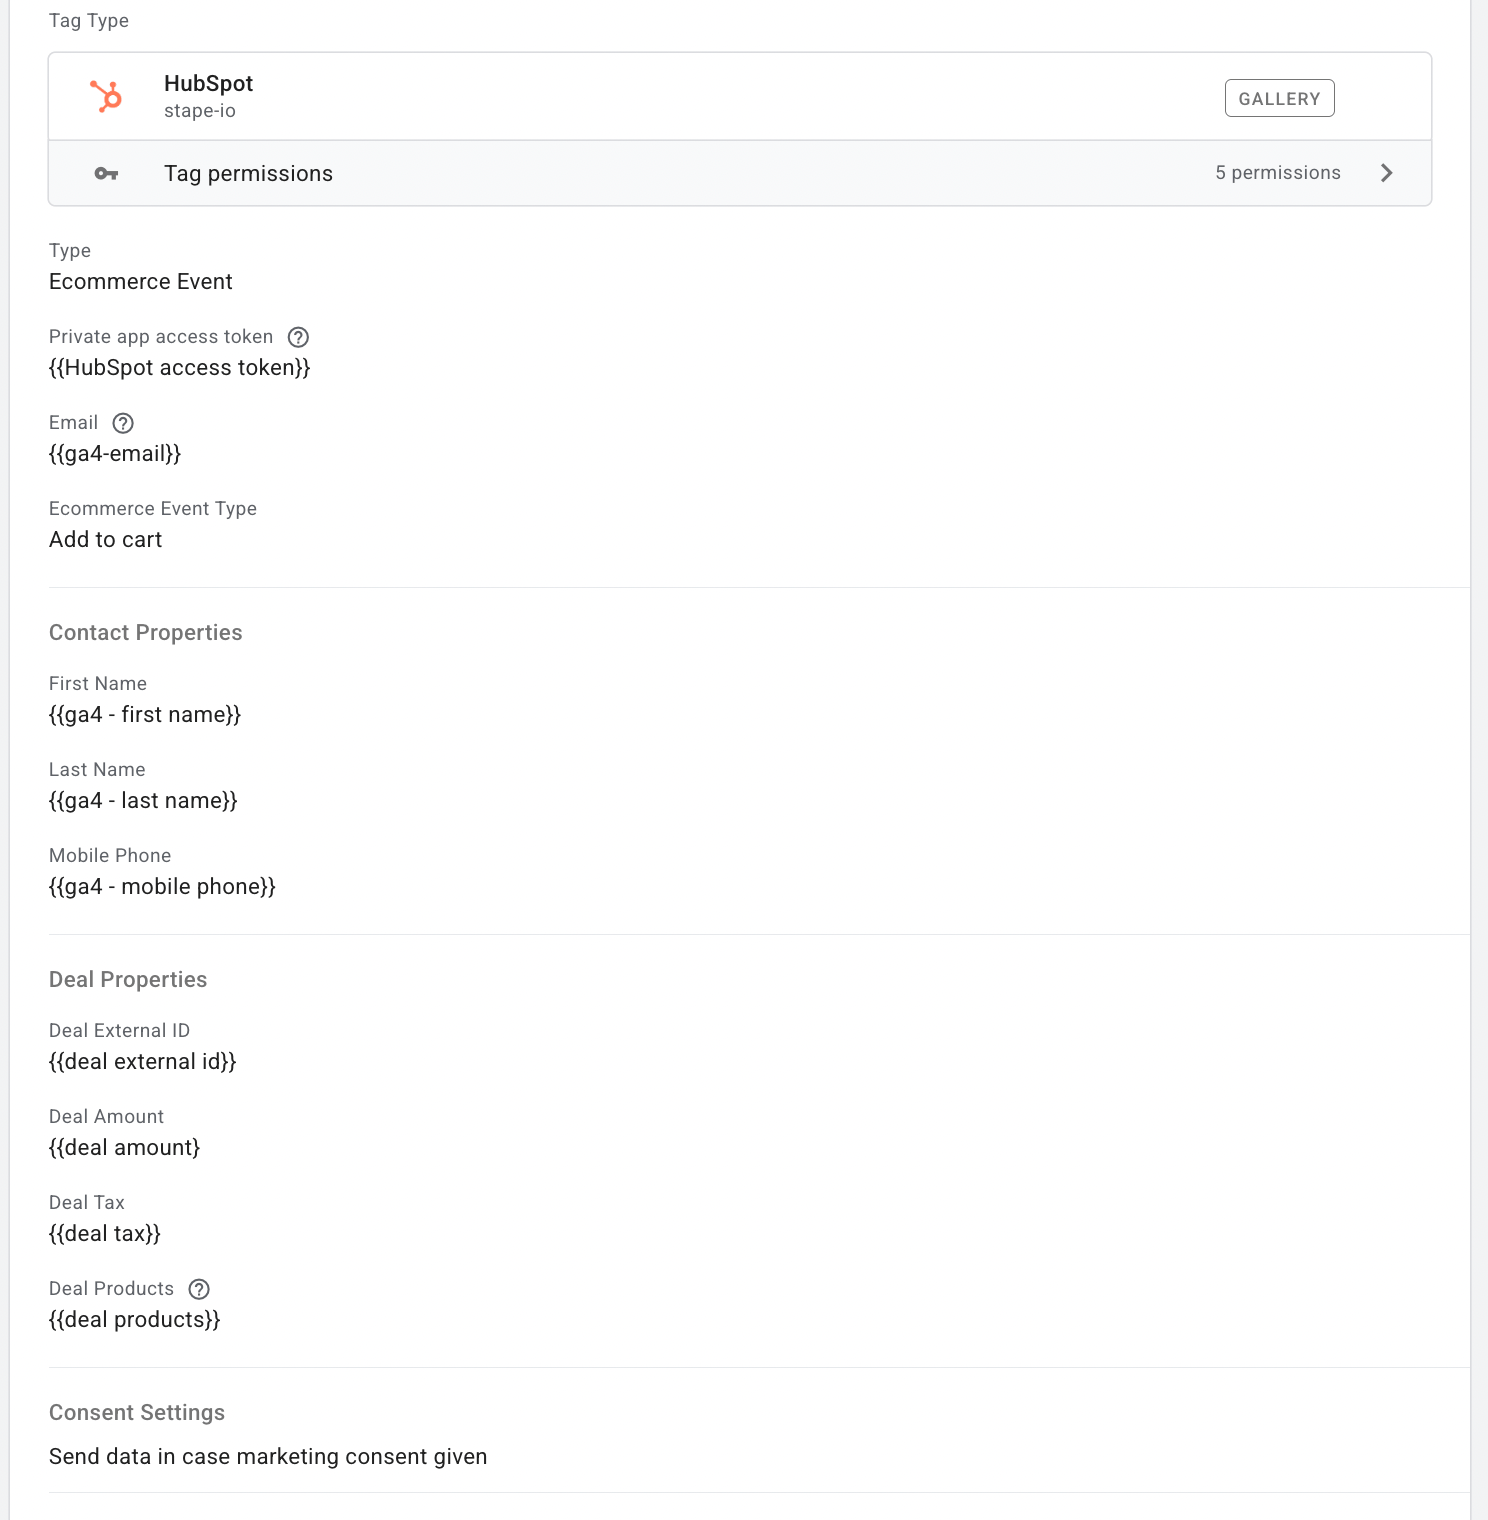
To configure it, create a new tag → Add HubSpot as a tag type → Select Ecommerce Event → Add Private app access token (check HubSpot documentation on access tokens) → Add a variable that contains contact email → from the drop-down list select the ecommerce event you want to track.
To identify the user who triggers the event, fill out Contact Properties and/or Deal Properties (based on what user type you’re targeting the action). Besides pre-configured properties, you can also add custom ones.
Add a trigger for the tag.
How to create or update a HubSpot custom object?
HubSpot custom objects are helpful to store data that doesn't fit into the standard objects (Contacts, Companies, Deals, and Tickets) that HubSpot provides. The tag allows you to record new objects and update existing ones.
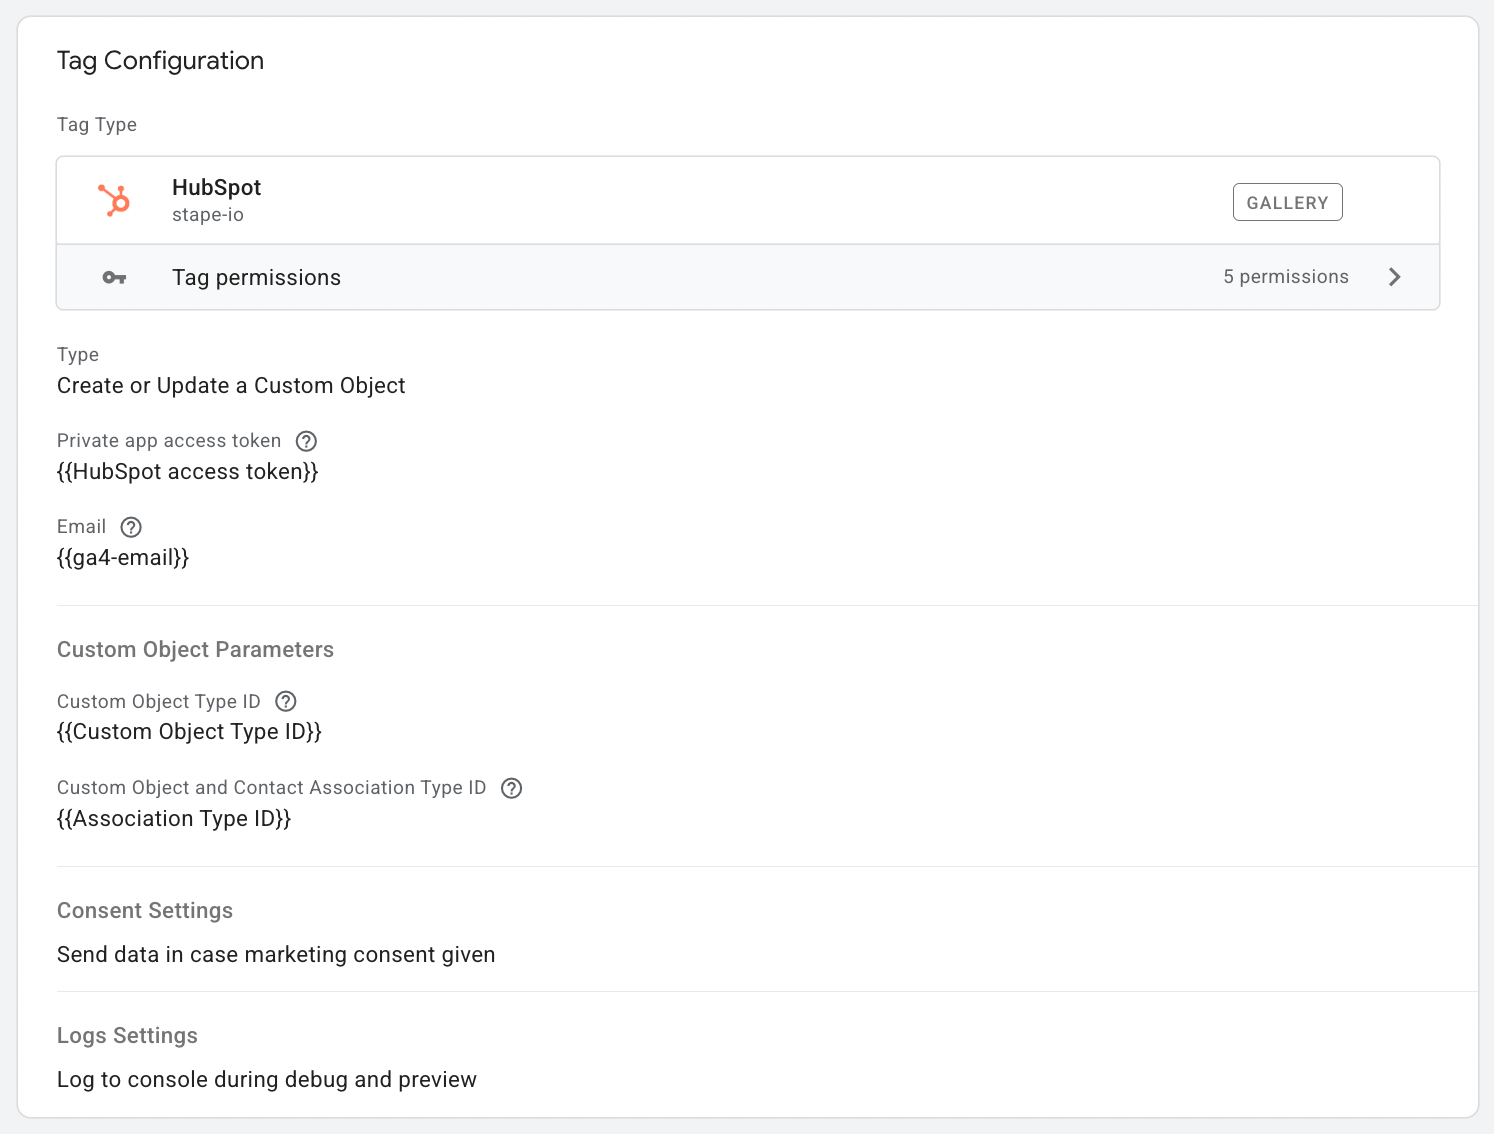
To configure such a tracking, create a new tag → Add HuSpot as a tag type → Select Create or Update a Custom Object → Add Private app access token (check HubSpot documentation on access tokens) → Add a variable that contains contact email.
Add Custom Object Parameters to identify the objects you are tracking:
- Custom Object Type ID - is a unique identifier found in the URL when viewing your custom object's dashboard in HubSpot.
You can find it in the URL - It immediately follows /objects/
For example: in the URL https://app.hubspot.com/contacts/5555555/objects/**2-1234567**/views/all/list, the Custom Object Type ID is 2-1234567.
- Custom Object and Contact Association Type ID - identifies the specific relationship between your Custom Object and the Contact Object.
Check HubSpot’s documentation to locate the Association Type ID.
Add a trigger for a tag.
Conclusion
Server-side tracking is a relatively new and exciting solution in the world of web analytics. It allows you to have more reliable website tracking and set up integrations to help your business work more efficiently. All you need to do is feed relevant data to the server container then use server-side tags to send these data to the endpoint you want.
Interested in setting up server-side tracking on your site? Contact us today so we can get started setting up this powerful tool for your business website!
Got any questions?
We can provide you with assistance! Click Get help, fill up the form, and we will send you a quote.

Comments