Apr 16, 2025
Sending data from the Google Tag Manager web container to the server container
Written by
Ira Holubovska
Updated Jul 14, 2026 comments
Having reliable data in the server Google Tag Manager is a key to accurate server-side GTM tagging. One of the most popular ways to send data from web to server GTM is by setting up server-side Google Analytics 4. GA4 has its limitations. That is why we created Data Tag and Data Client that should work together to deliver event and user data from web to server GTM.
In this article, I want to show you how to use Data Tag. This custom tag sends parameters from the Google Tag Manager Web Container to the Server Container. When used together with the Data Client for the Google Tag Manager server container, it allows sending data layer variables, custom parameters, and other data from the web to the server container. As a result, Data Client retrieves information from the Data Tag into the Google Tag Manager Server Events.
How to use Stape Data Tag and Data Client [Step-by-step guide]
How to send data from the Google Tag Manager web to the server container
The server container has no direct access to browser-side data – such as the data layer, cookies, or page context – so this data must be explicitly sent from the web container. Two methods are available for this:
- Data Tag, paired with Data Client in the server container to receive and parse its requests, sends data layer variables and other parameters independently of any specific platform;
- Google Analytics 4, which sends data via a Google Tag configured with the server container's URL. Both methods are covered below.
Send data from web to server container via Data tag
Step 1. Install the Data Tag template:
- 1.Click on the Tags menu.
- 2.Click New.
- 3.Open your web Google Tag Manager container's Templates section → add Data Tag from the template gallery.
- 4.Click on the Tag Configuration tab.
- 5.Click Discover more tag types in the Community Template Gallery → search for Data Tag → click Add to workspace → click Add.
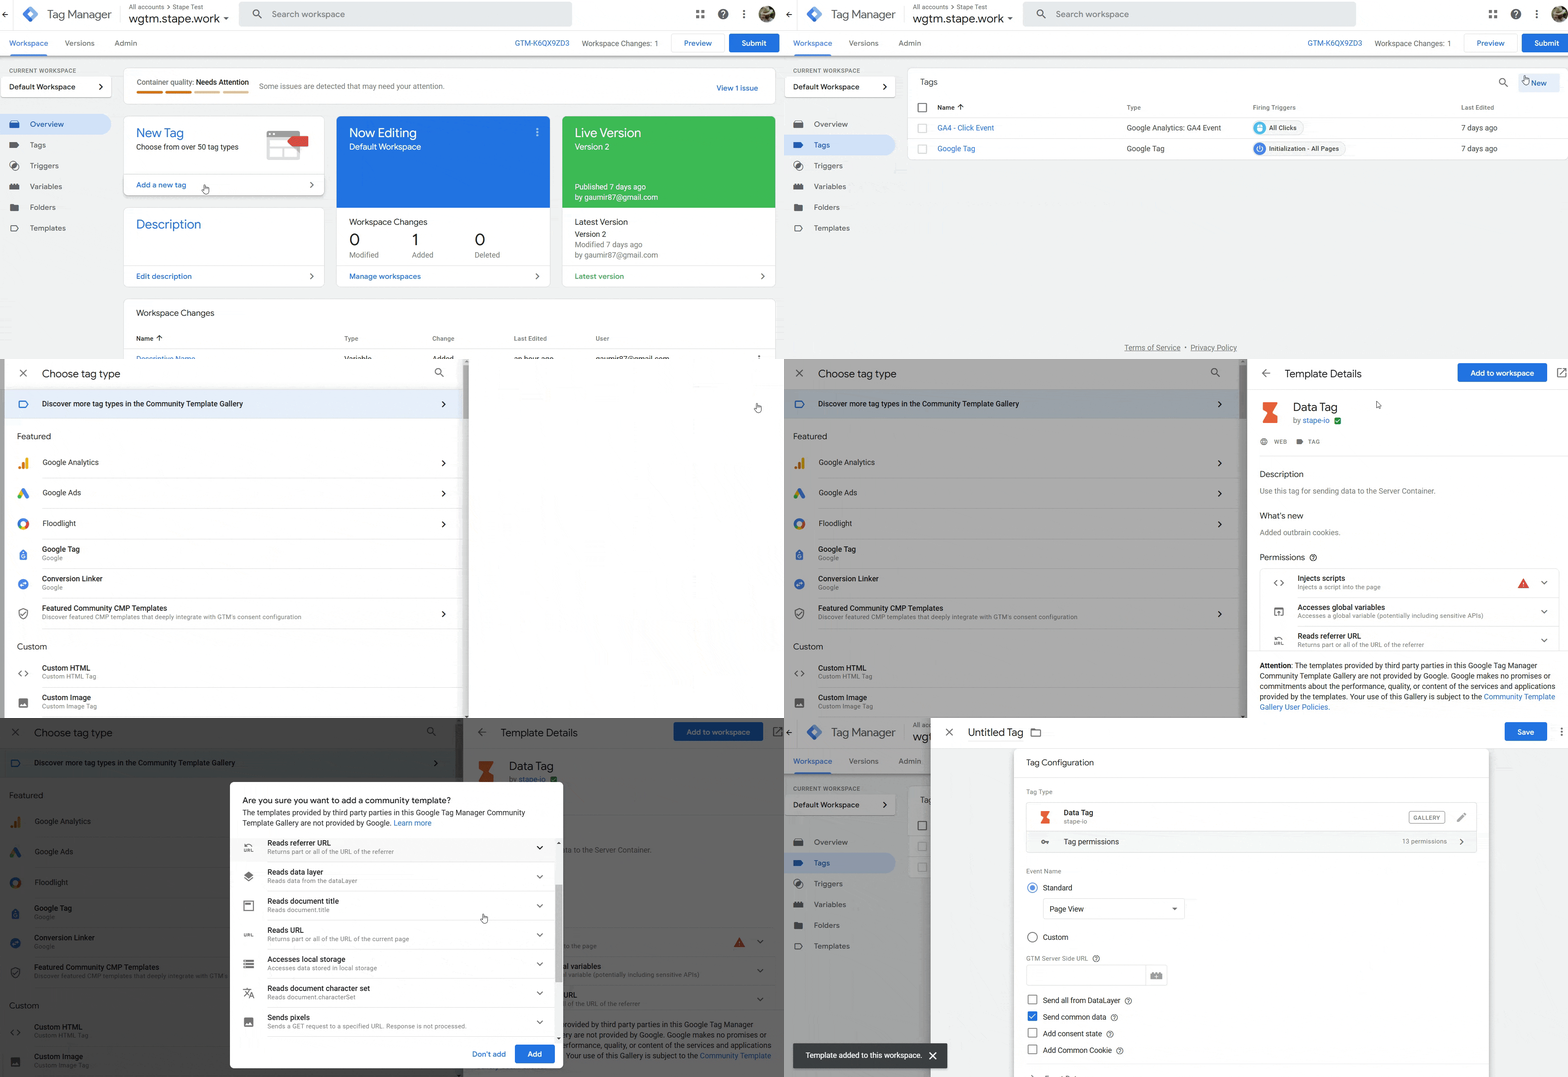
Step 2. Next, we’ll configure Data Tag for the pageview event:
- 1.Under Event Name, you can select a standard event name, add a custom event name, or add a dynamic event name using {{Event}} variable.
- 2.Enter your GTM Server Side URL (you can find your GTM server-side URL inside the stape.io account by opening the sGTM container and checking the Domain section.)
- 3.Tick how you would like the data to be sent:
- 3.1.Send all from the DataLayer - will send all the information you have in the web GTM data layer to server GTM events data.
- 3.2.Send common data - adds to the request page_location, page_path, page_hostname, page_referrer, page_title, page_encoding, screen_resolution, viewport_size.
- 3.3.Add consent state - adds consent_state object to the request. Including following properties: ad_storage, analytics_storage, functionality_storage, personalization_storage, security_storage.
- 3.4.Add Common Cookie - the tag will send common cookies in eventData to avoid some e-commerce platform’s limitations. For example, this is required for events that work on Shopify checkout pages.
- 3.1.
- 4.Under Event Data, you can add any manual data to the request. You can also apply transformation (like hashing, trimming, etc) or store data.
- 5.Under User Data, you can send user parameters and apply transformation or store data.
- 6.Under Settings and Advanced Settings, you will find exactly that - advanced configuration options. Unless you know what you’re doing, it’s best not to modify these settings.
- 7.Give your tag a descriptive name and click Save.
Step 3. Next, you can configure the Data Tag for other events. The example below shows how to configure e-commerce events when Data Layer is available.
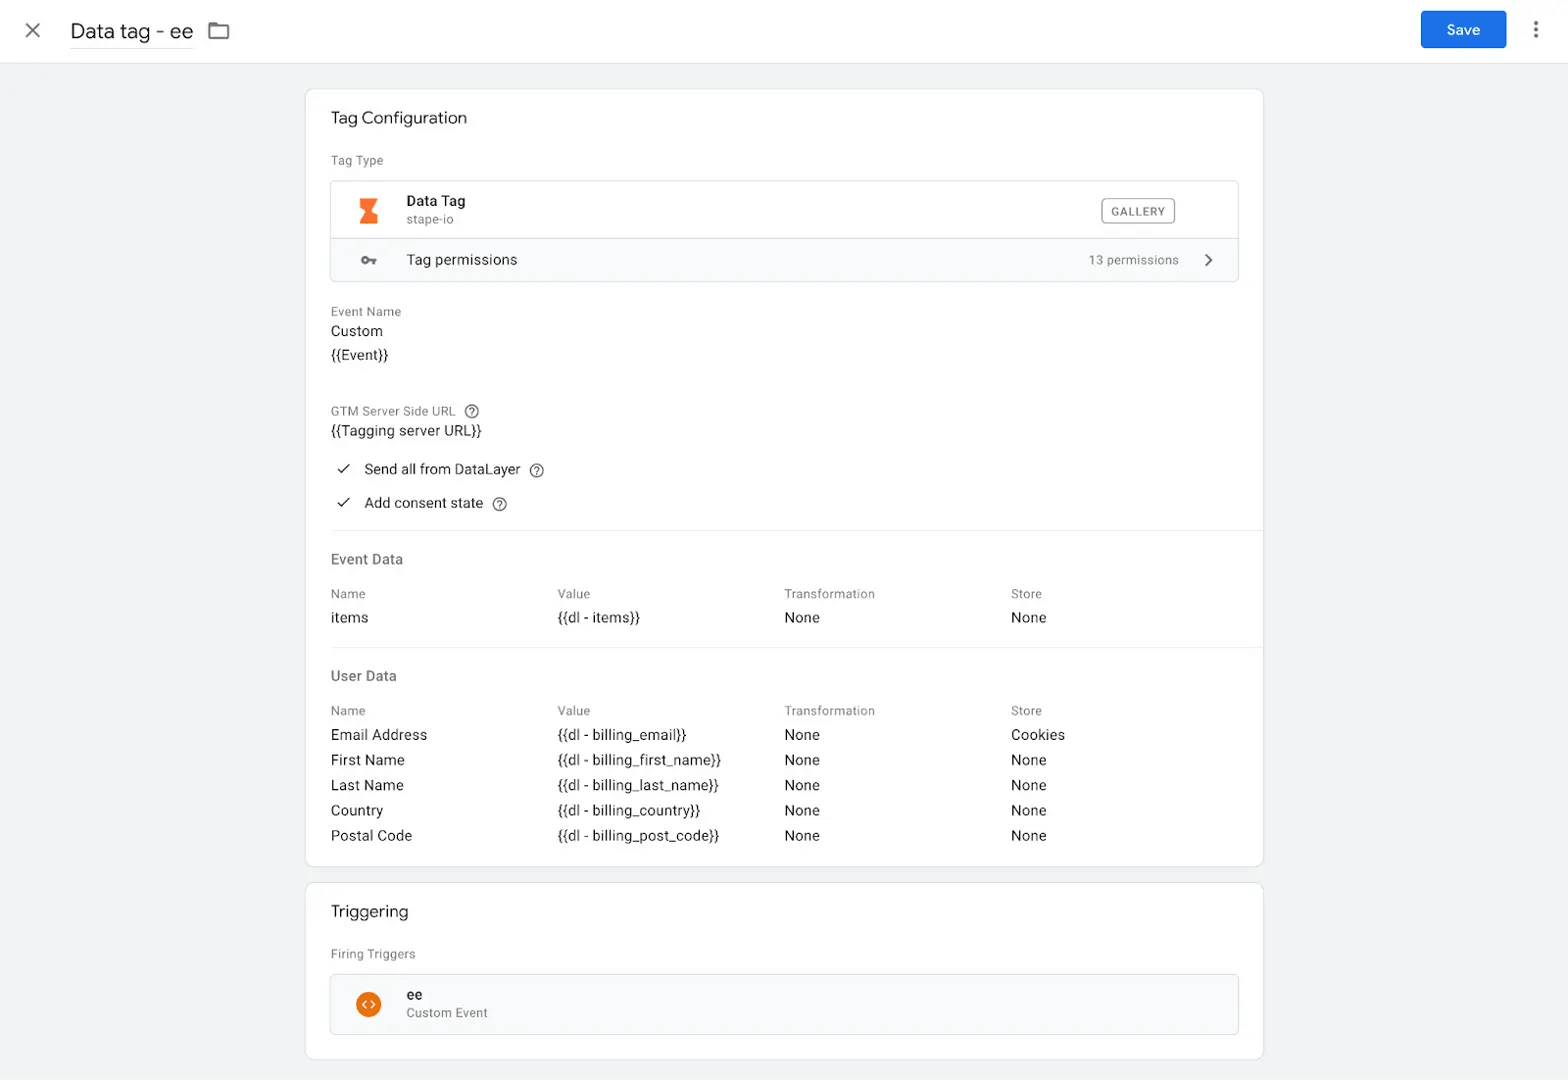
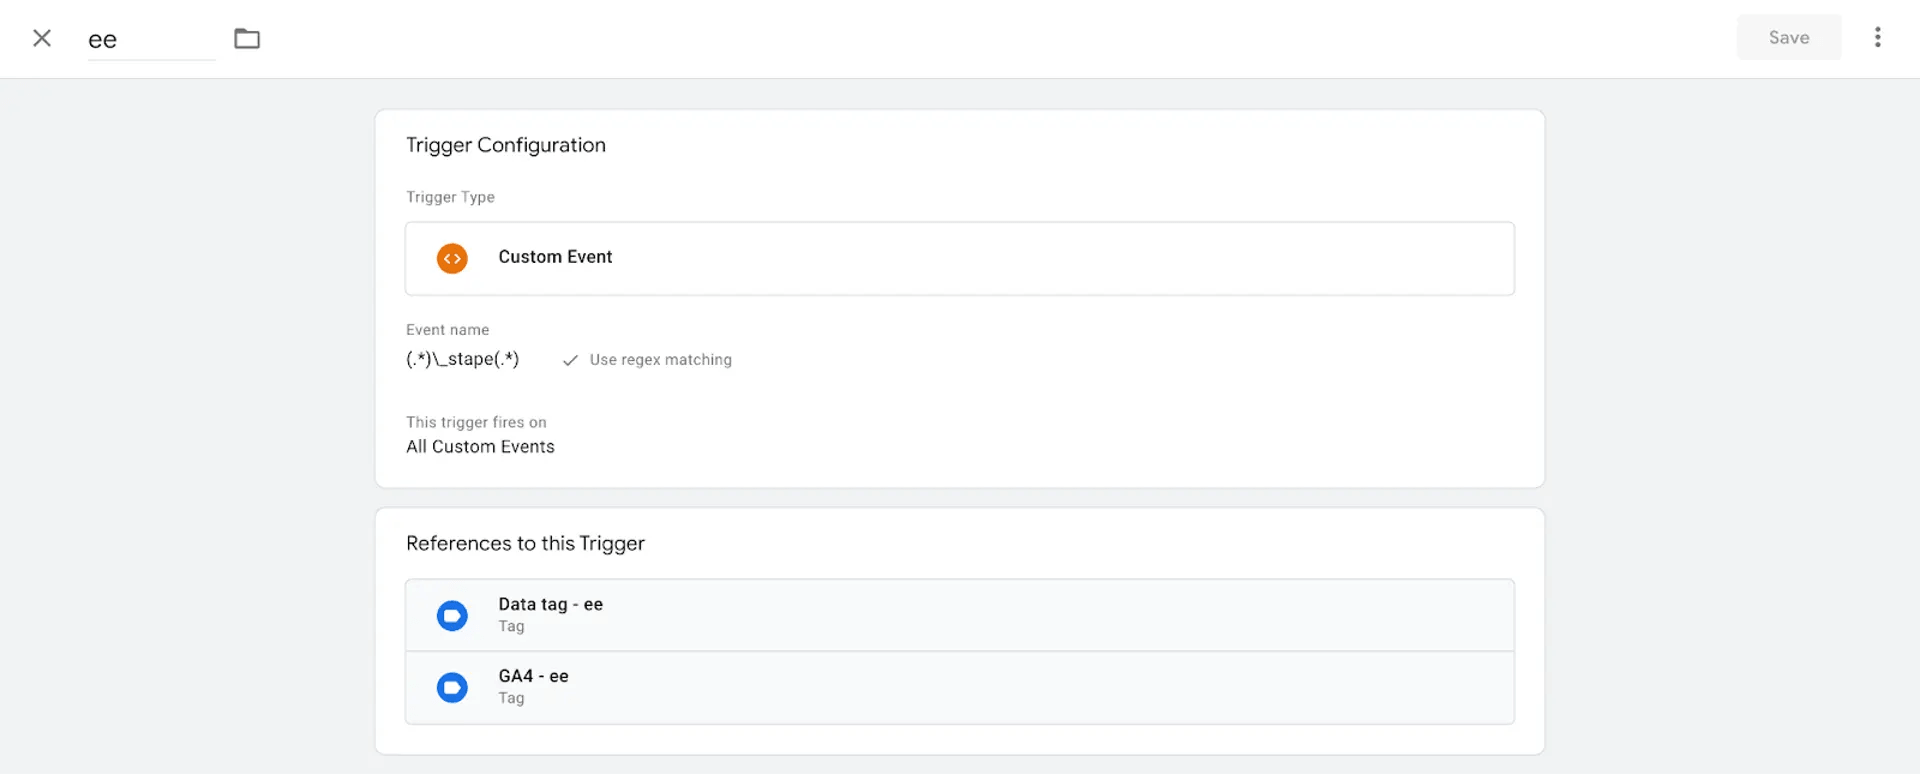
This tag triggers each e-commerce event in the Data Layer. In this example, all e-commerce events end with _stape, so we’re using a regex that includes all events that contain _stape.
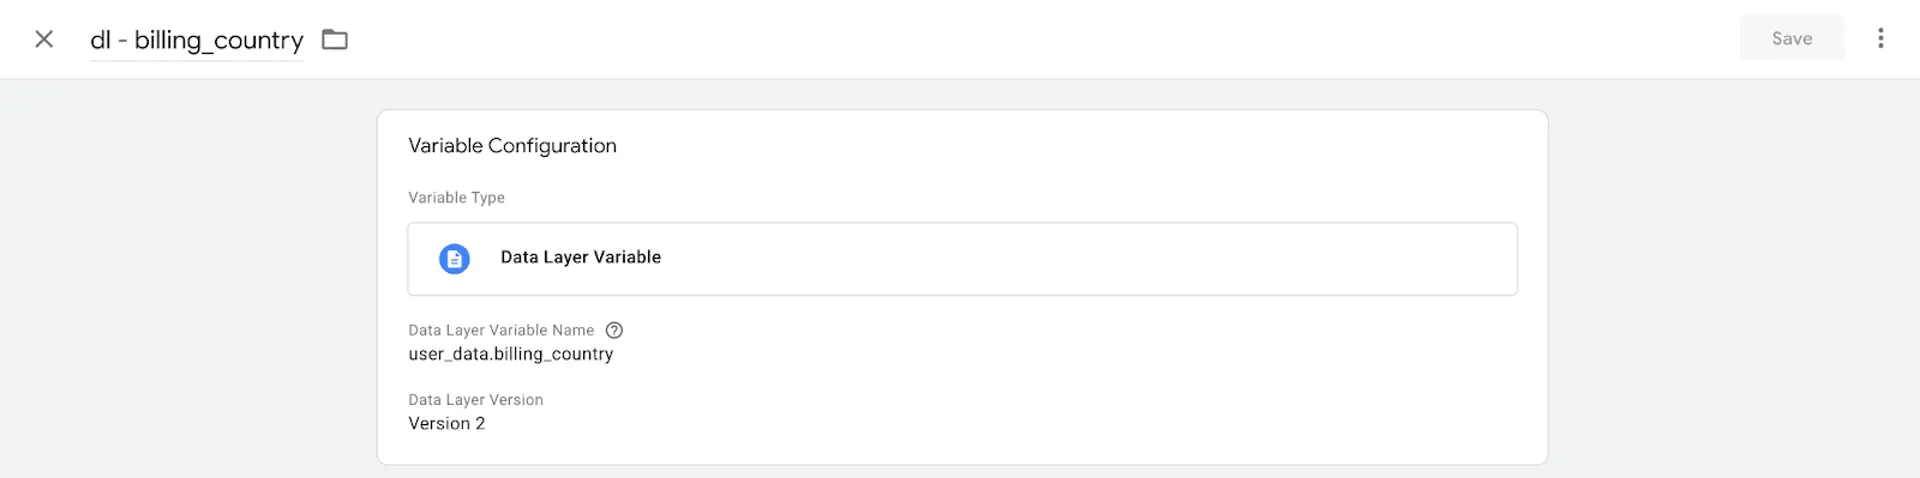
Example of the variable that extracts user data from the Data Layer.
Step 4. Next, download Data Client from the GitHub:
- 1.Follow this link.
- 2.Click Code → Download ZIP.
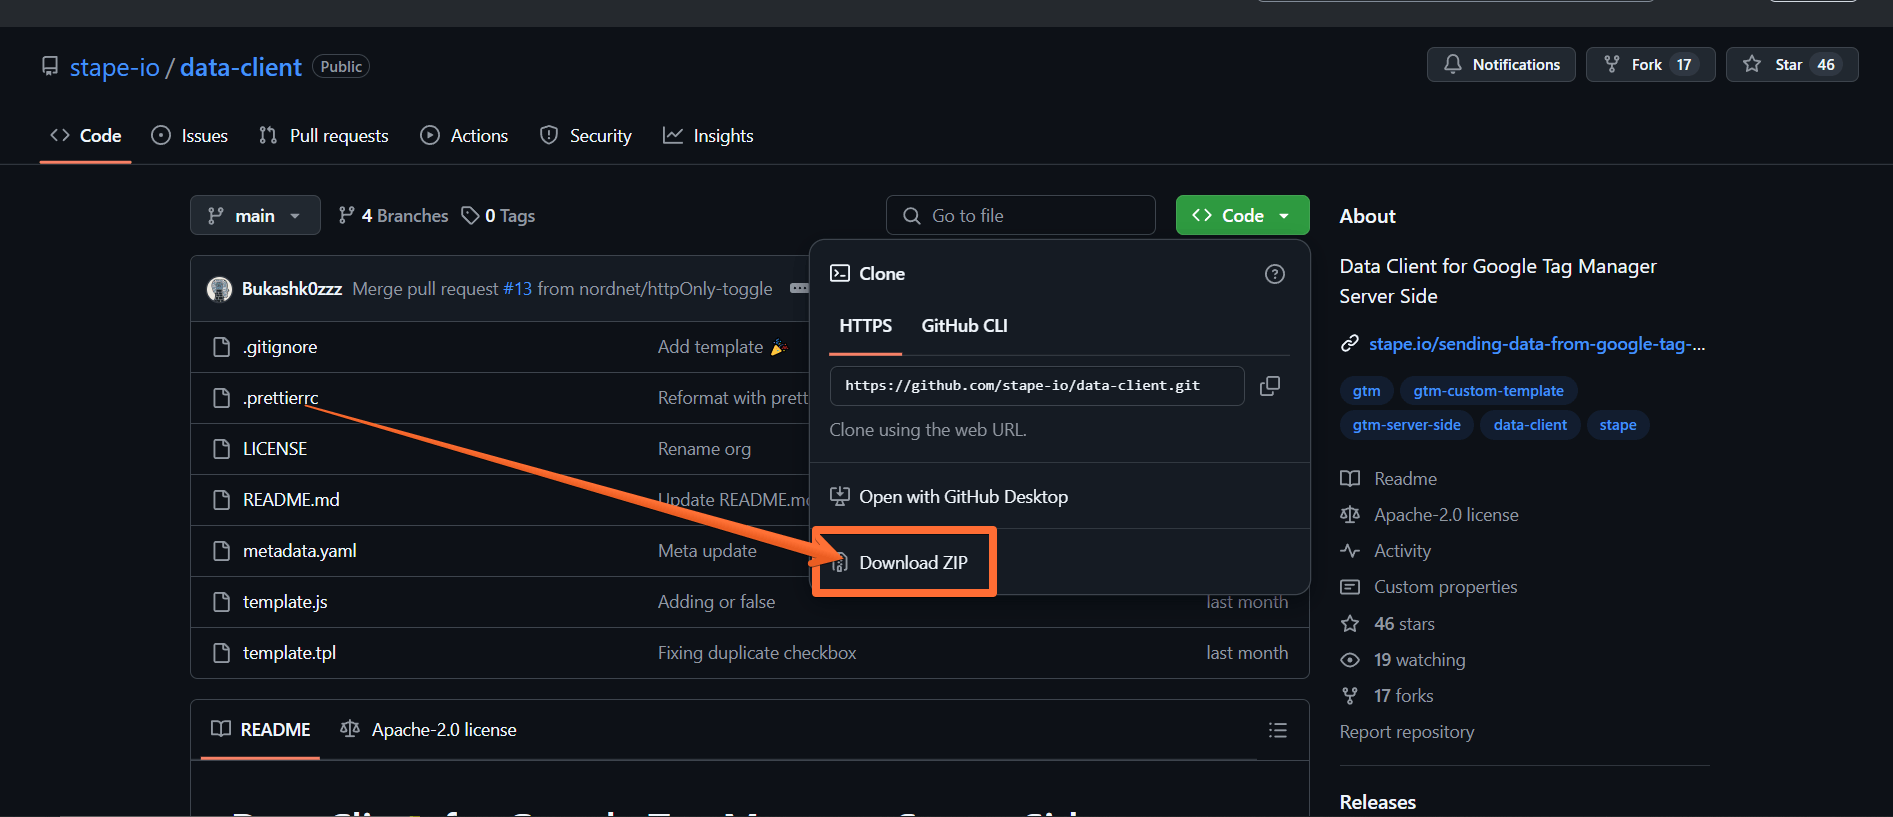
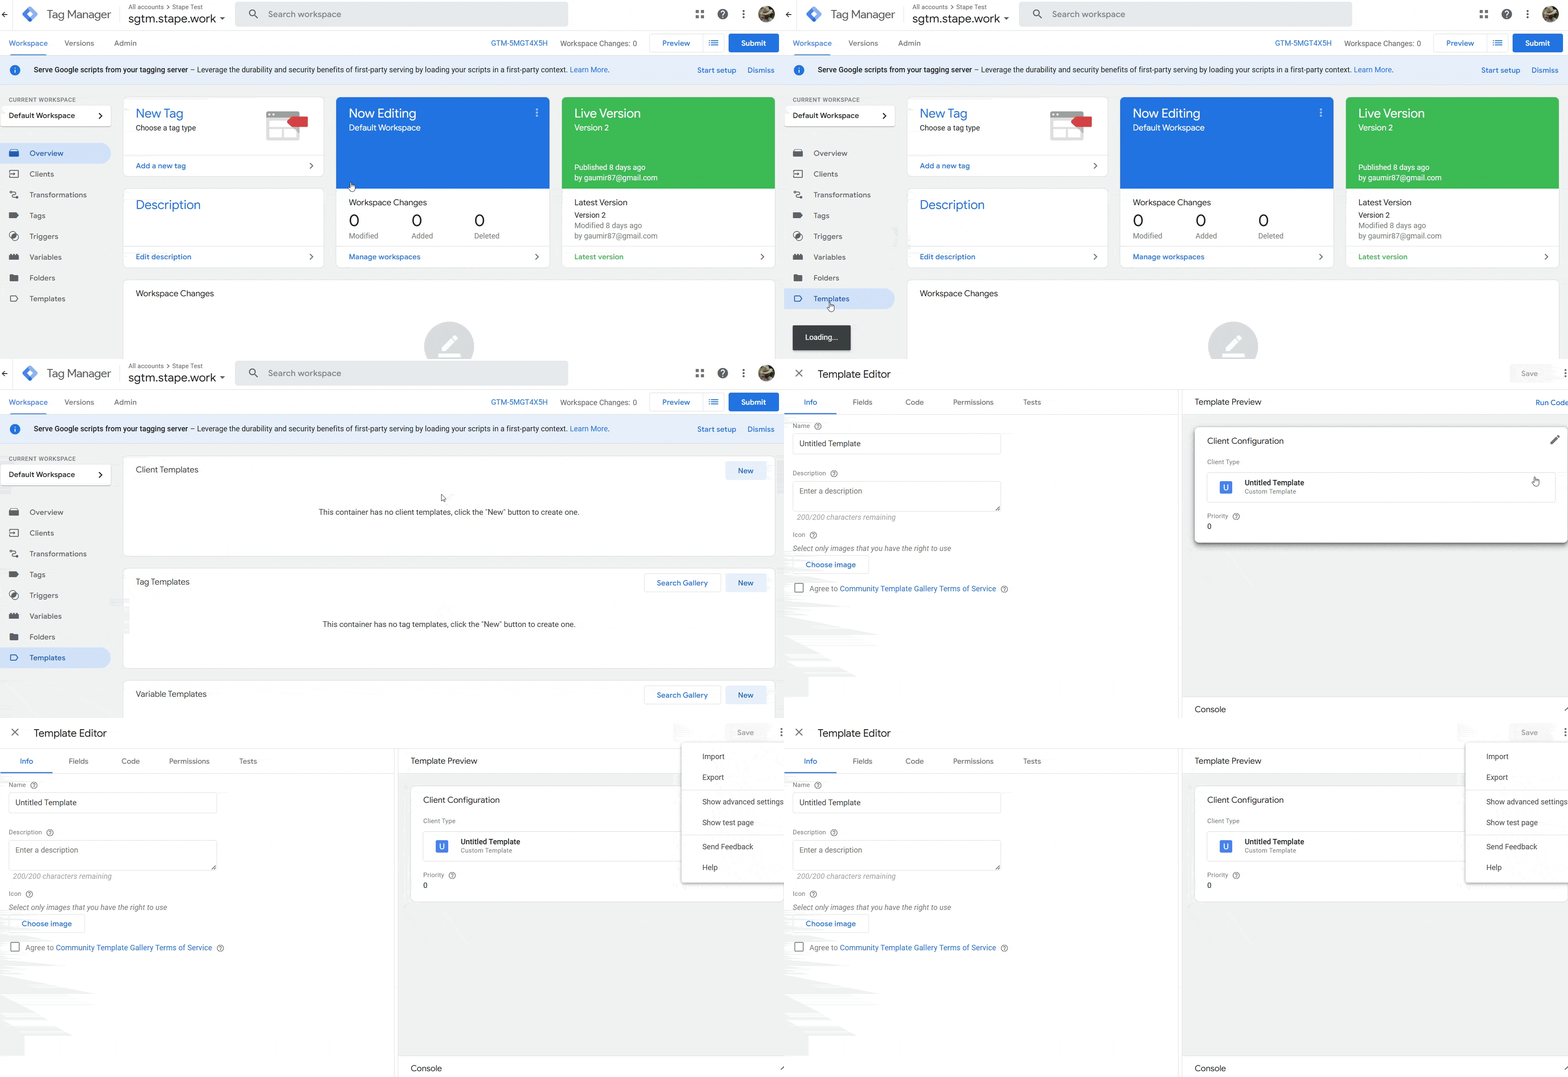
Step 5. Now to import the Data Client:
- 1.Open your server Google Tag Manager container.
- 2.Click Templates.
- 3.Under Clients, click New.
- 4.Click three dots in the top right corner.
- 5.Click Import and select the Data Client you downloaded from GitHub (you may have to unzip the archive first.)
- 6.Once the import is done, click Save.
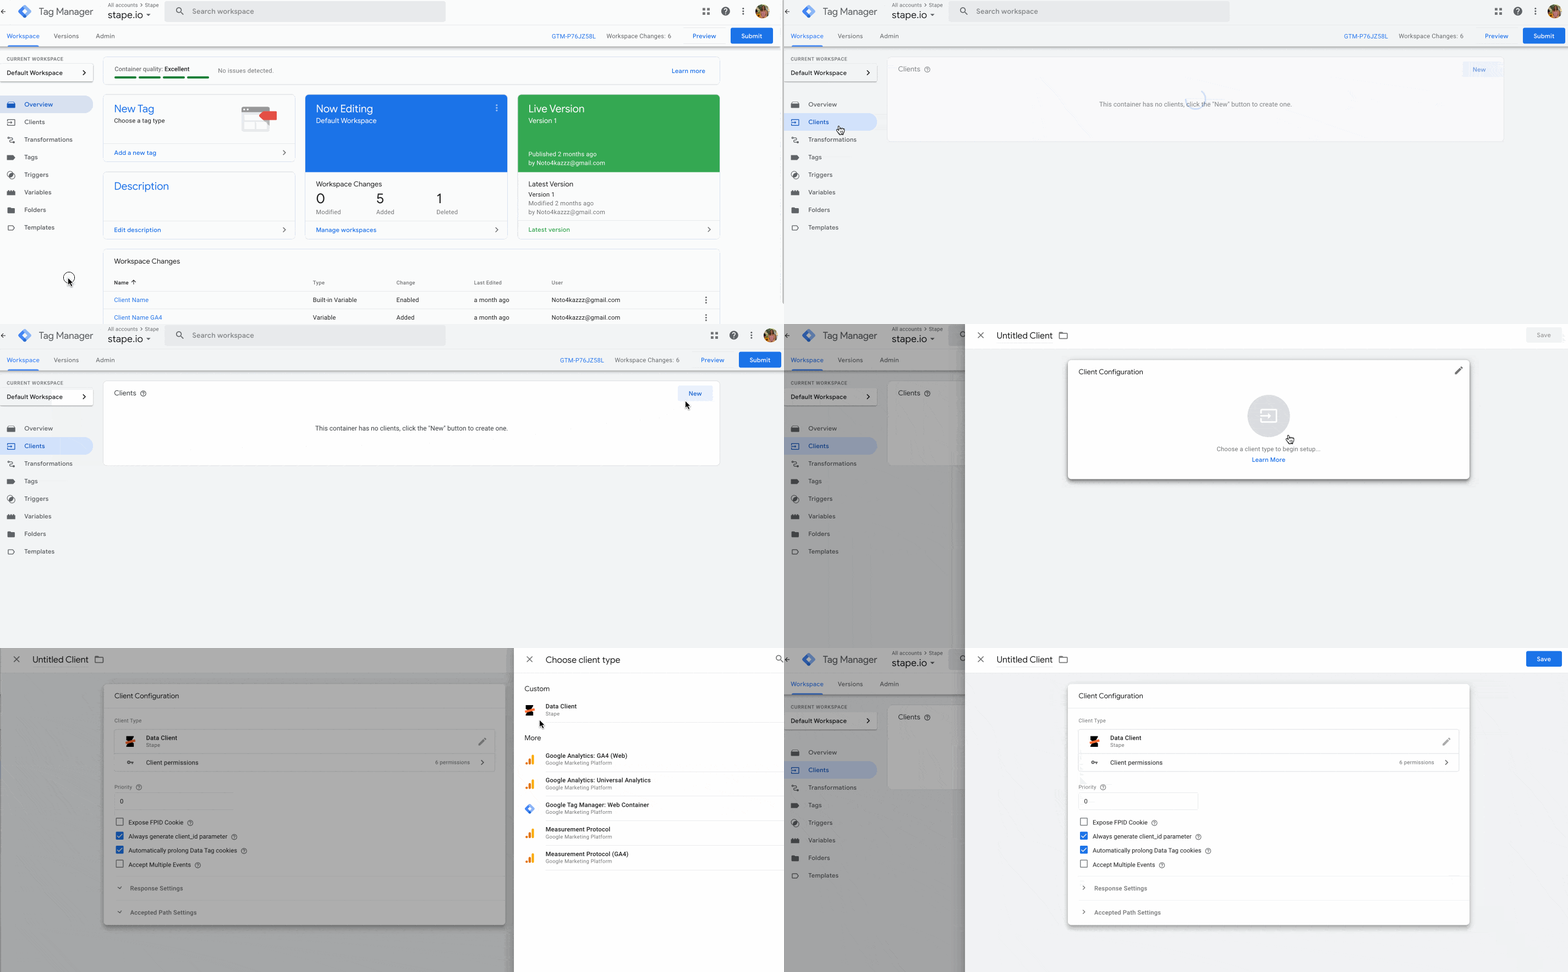
Step 6. Open the Clients tab and click New → choose Data Client → click Save.
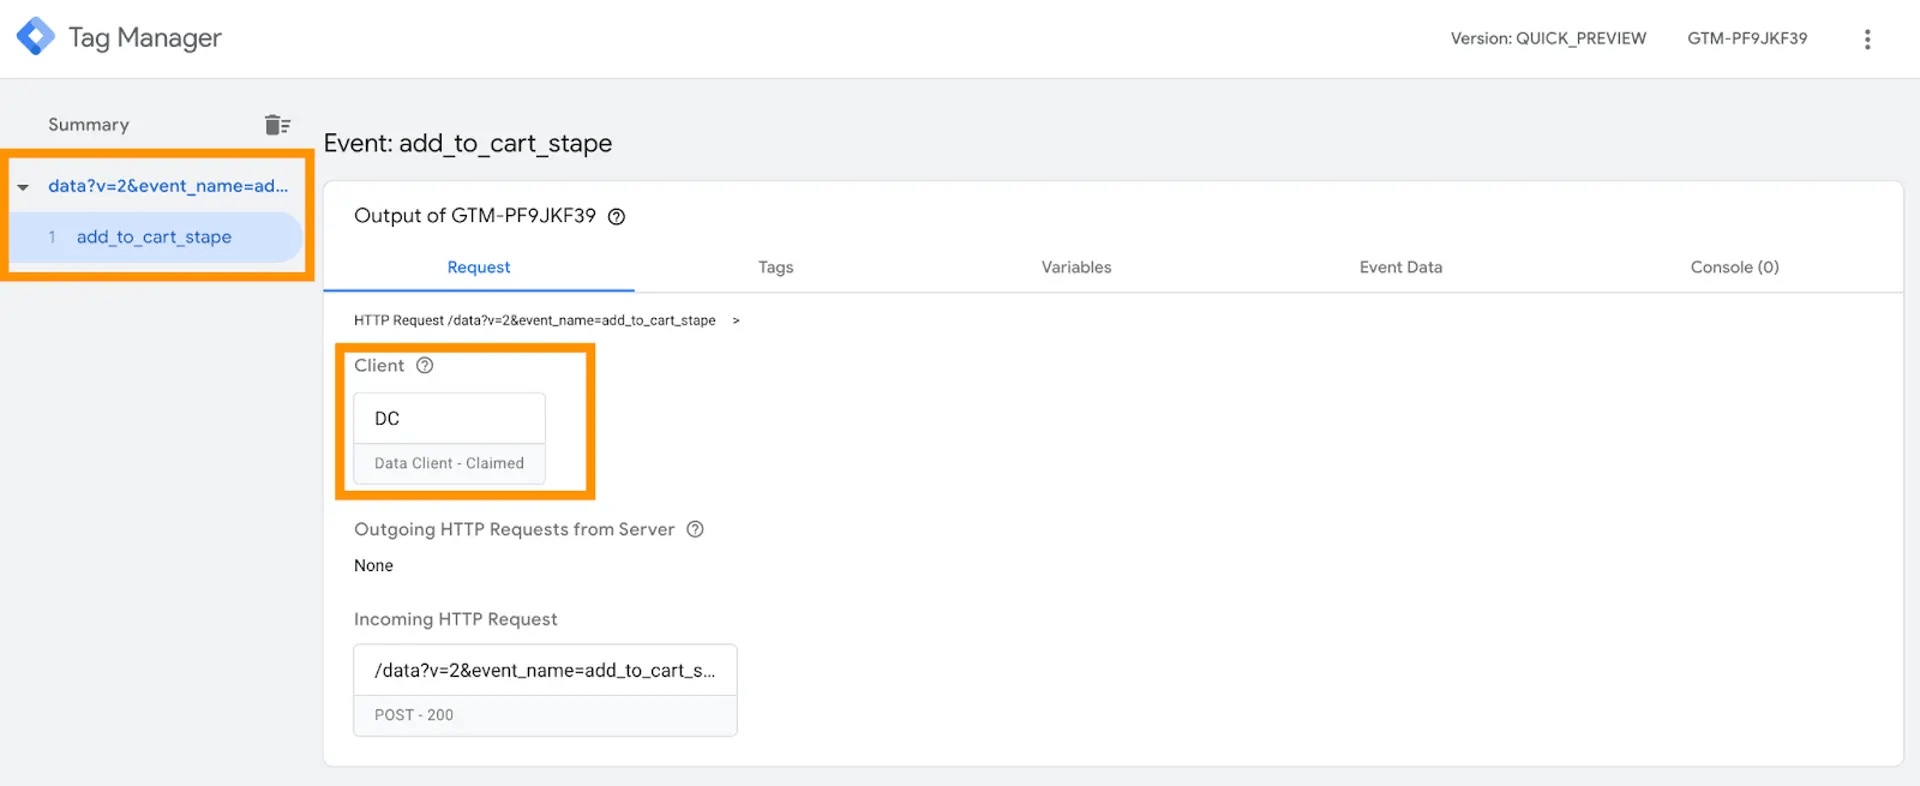
Step 7. Open web and server GTM preview screens and test the setup. You should see Data Tag triggered in the web GTM container and Data Client parsed Data Tag requests in the sGTM.
How to send data from web to server container via Google Analytics 4
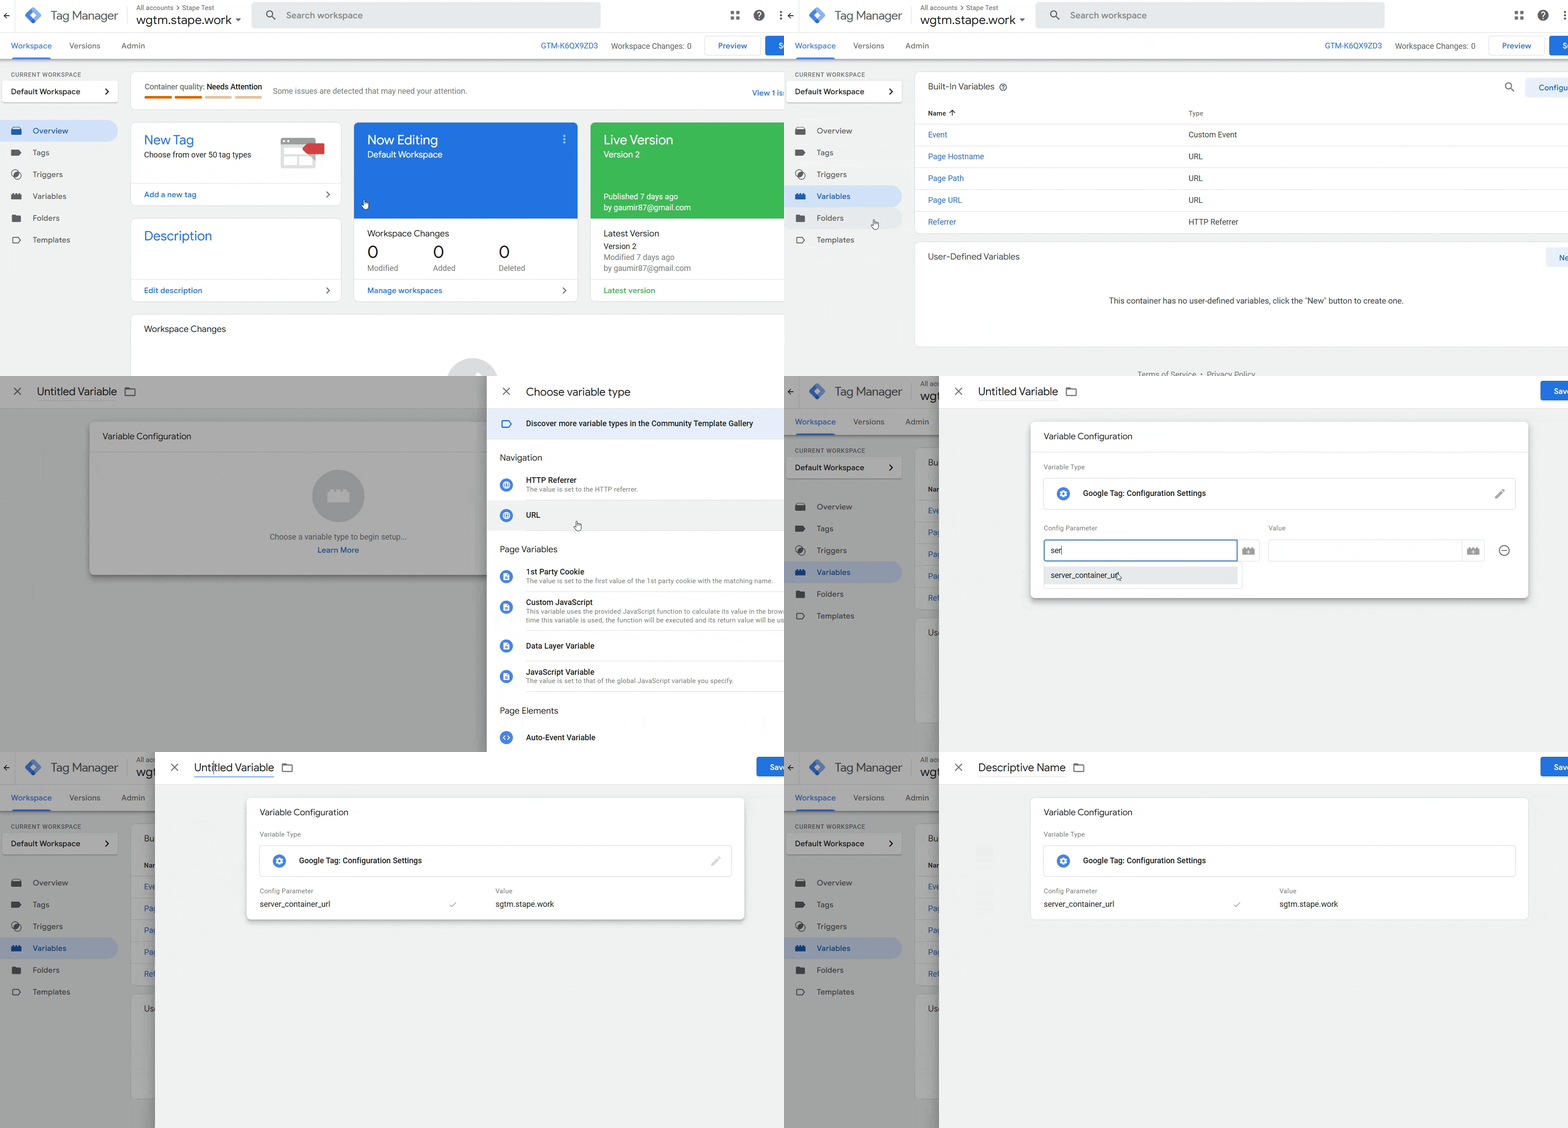
Step 1. Create a configuration variable for the server container URL. To do that:
- 1.Click on the Variables menu.
- 2.Click New under the User-Defined Variable bar.
- 3.Click on the Variable Configuration bar.
- 4.Select the type Google tag: Configuration settings.
- 5.Click Add parameter.
- 6.Enter the following parameters:
- 6.1.Config Parameter: server_container_url.
- 6.2.Value: the URL of your Tag Manager server container.
- 6.1.
- 7.Give your variable a descriptive name and click Save.
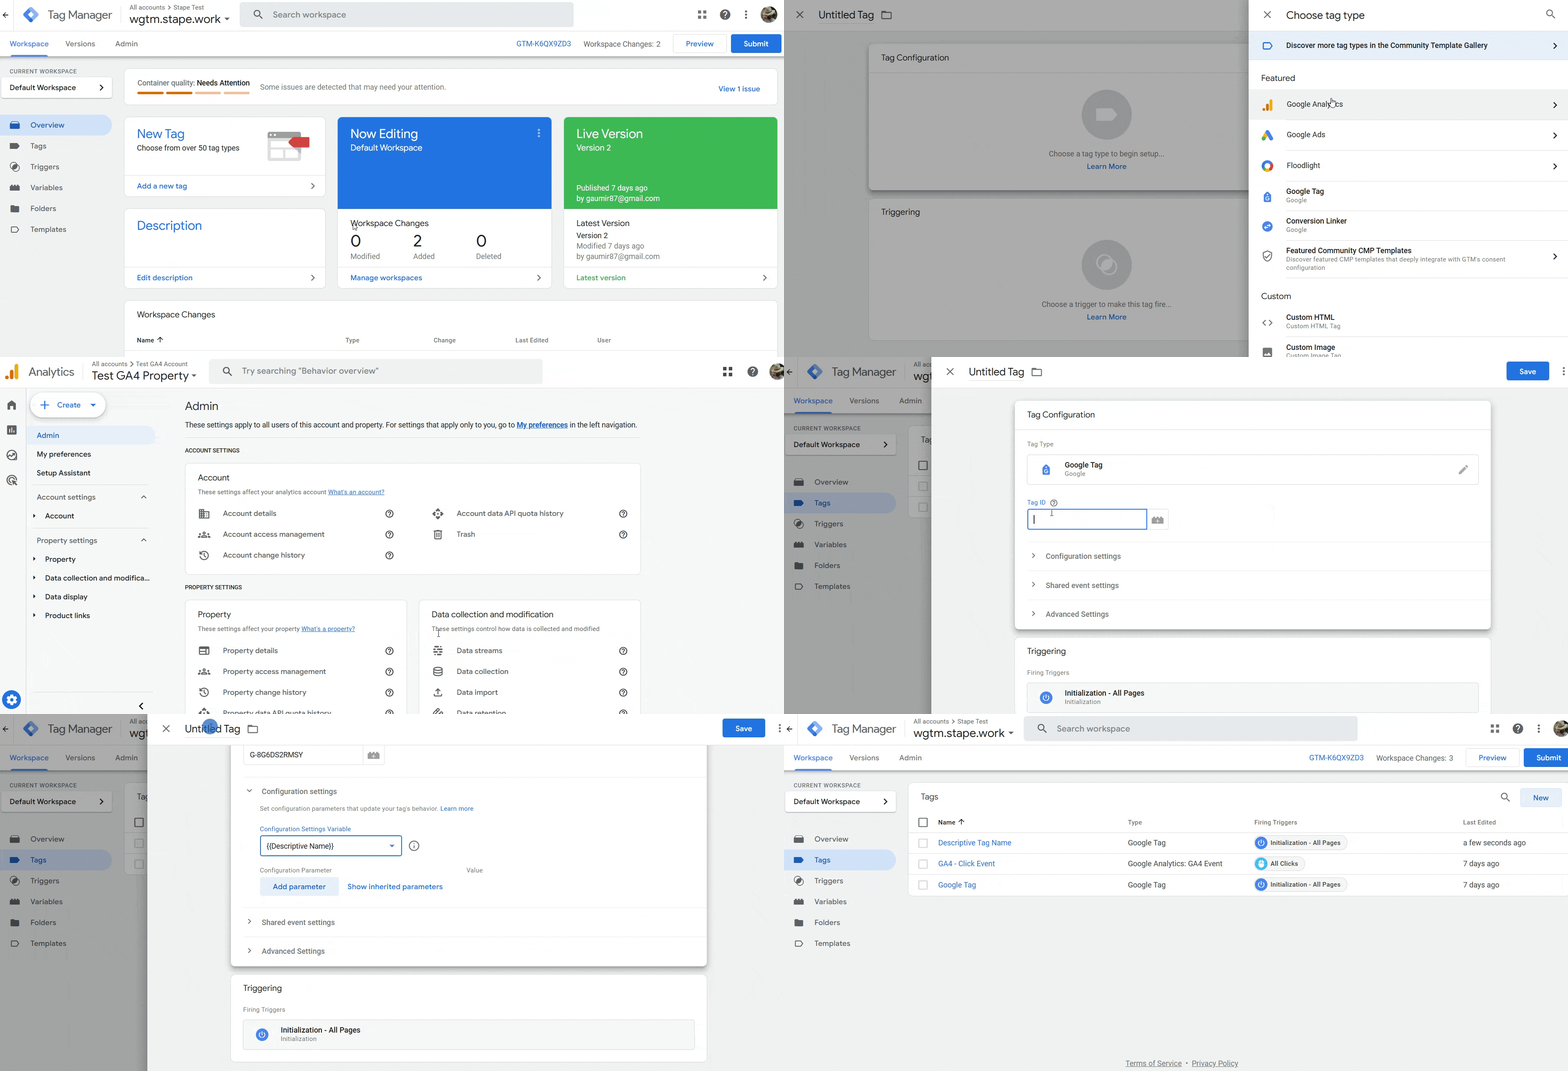
Step 2. Create a Google Analytics 4 tag:
- 1.Click on the Tags menu.
- 2.Click New.
- 3.Click on the Tag Configuration tab.
- 4.Select Google Analytics → Google Tag.
- 5.Under Tag ID, enter the ID from your GA4 account (to find it, go to your GA4 → click Admin → Data streams → select the stream → see Measurement ID.)
- 6.Under Configuration settings, select the server container variable you created earlier.
- 7.Under Triggering, make sure the option Initialization - All pages trigger is selected.
- 8.Give your tag a descriptive name and click Save.
- 9.Click Publish for the container to go live.
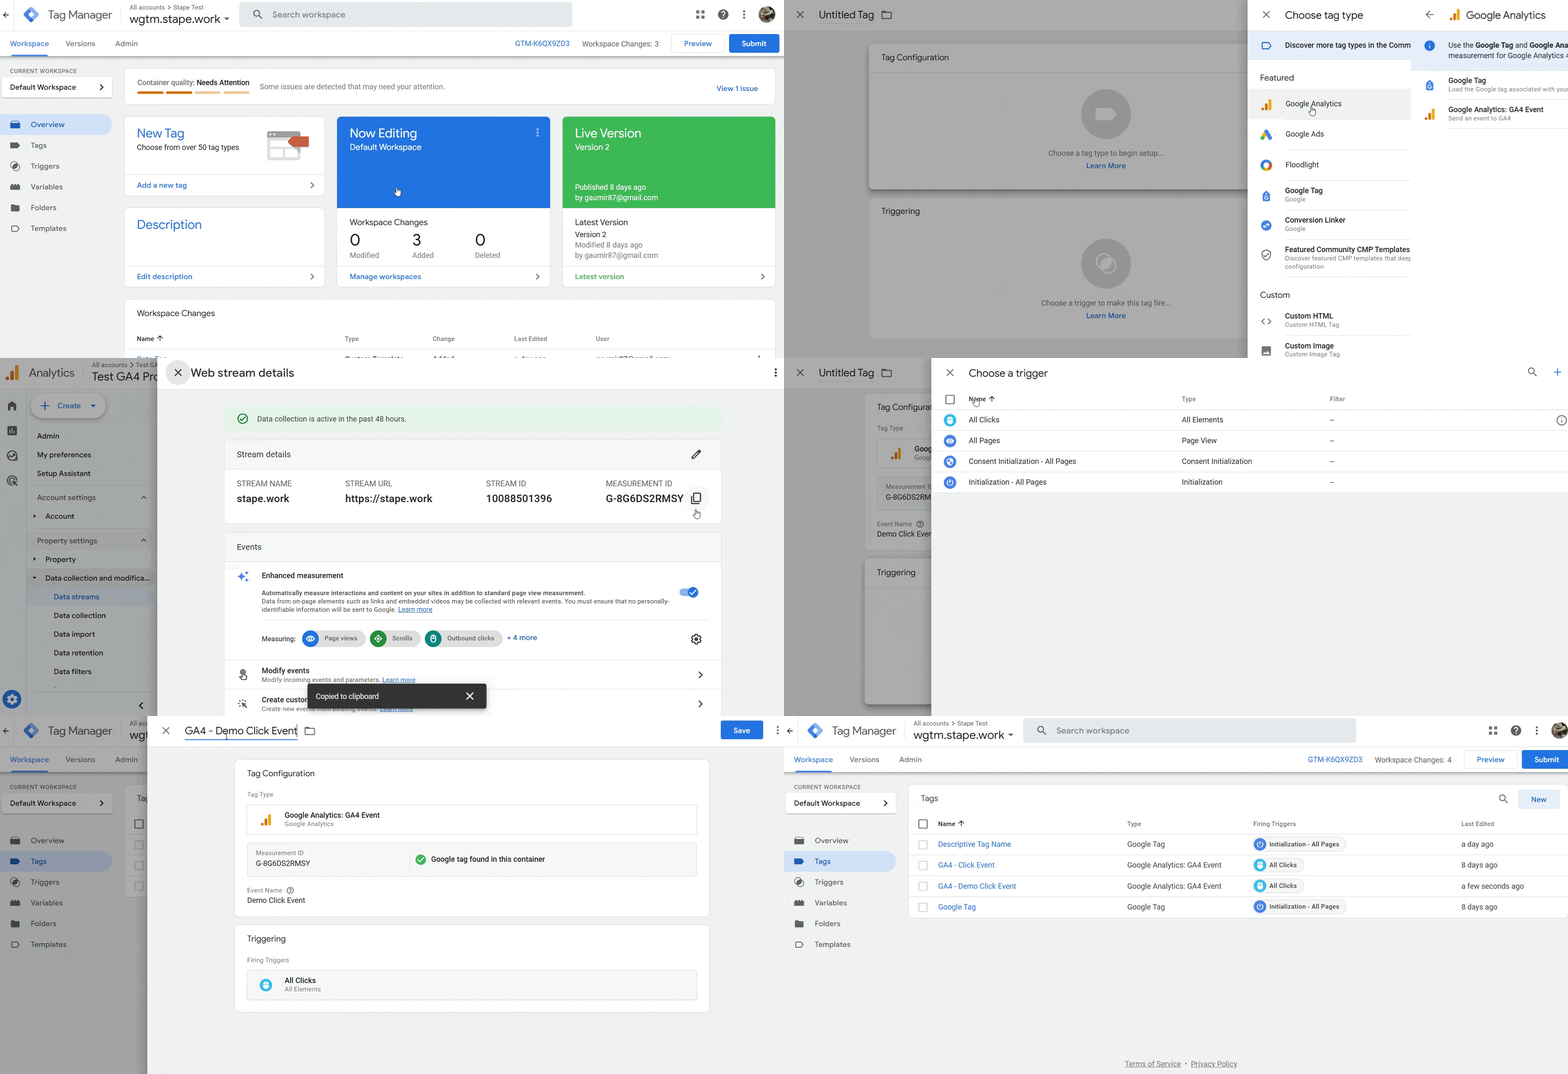
Step 3. Next, let’s see how to create a GA4 event, using the All Clicks event as an example:
- 1.Click on the Tags menu.
- 2.Click New.
- 3.Click on the Tag Configuration tab.
- 4.Select Google Analytics → Google Analytics: GA4 Event.
- 5.Enter your Measurement ID (from the GA4 Data streams menu.)
- 6.Give your event a descriptive name.
- 7.Click Triggering → All Clicks.
- 8.Give the tag a descriptive name.
- 9.Click Save.
Setting up conversion tracking with various platforms
Next, you'll need to configure sending your event data to your marketing / analytics platform. Exact steps will depend on your choice of platform. Check out our guides on the popular platforms for more information:
Data Tag use cases
1. Data layer from the web to the server container.
The first use case that comes to mind is sending a data layer from the web container to the server. With the help of this data, you can feed additional parameters to your server-side tags.
On the screenshot below, I used these settings to send the data layer to the server container:
- Custom event: {{event}}
- Enabled send all from data layer
- Enabled send common data
This data tag fires on all enhanced e-commerce events.
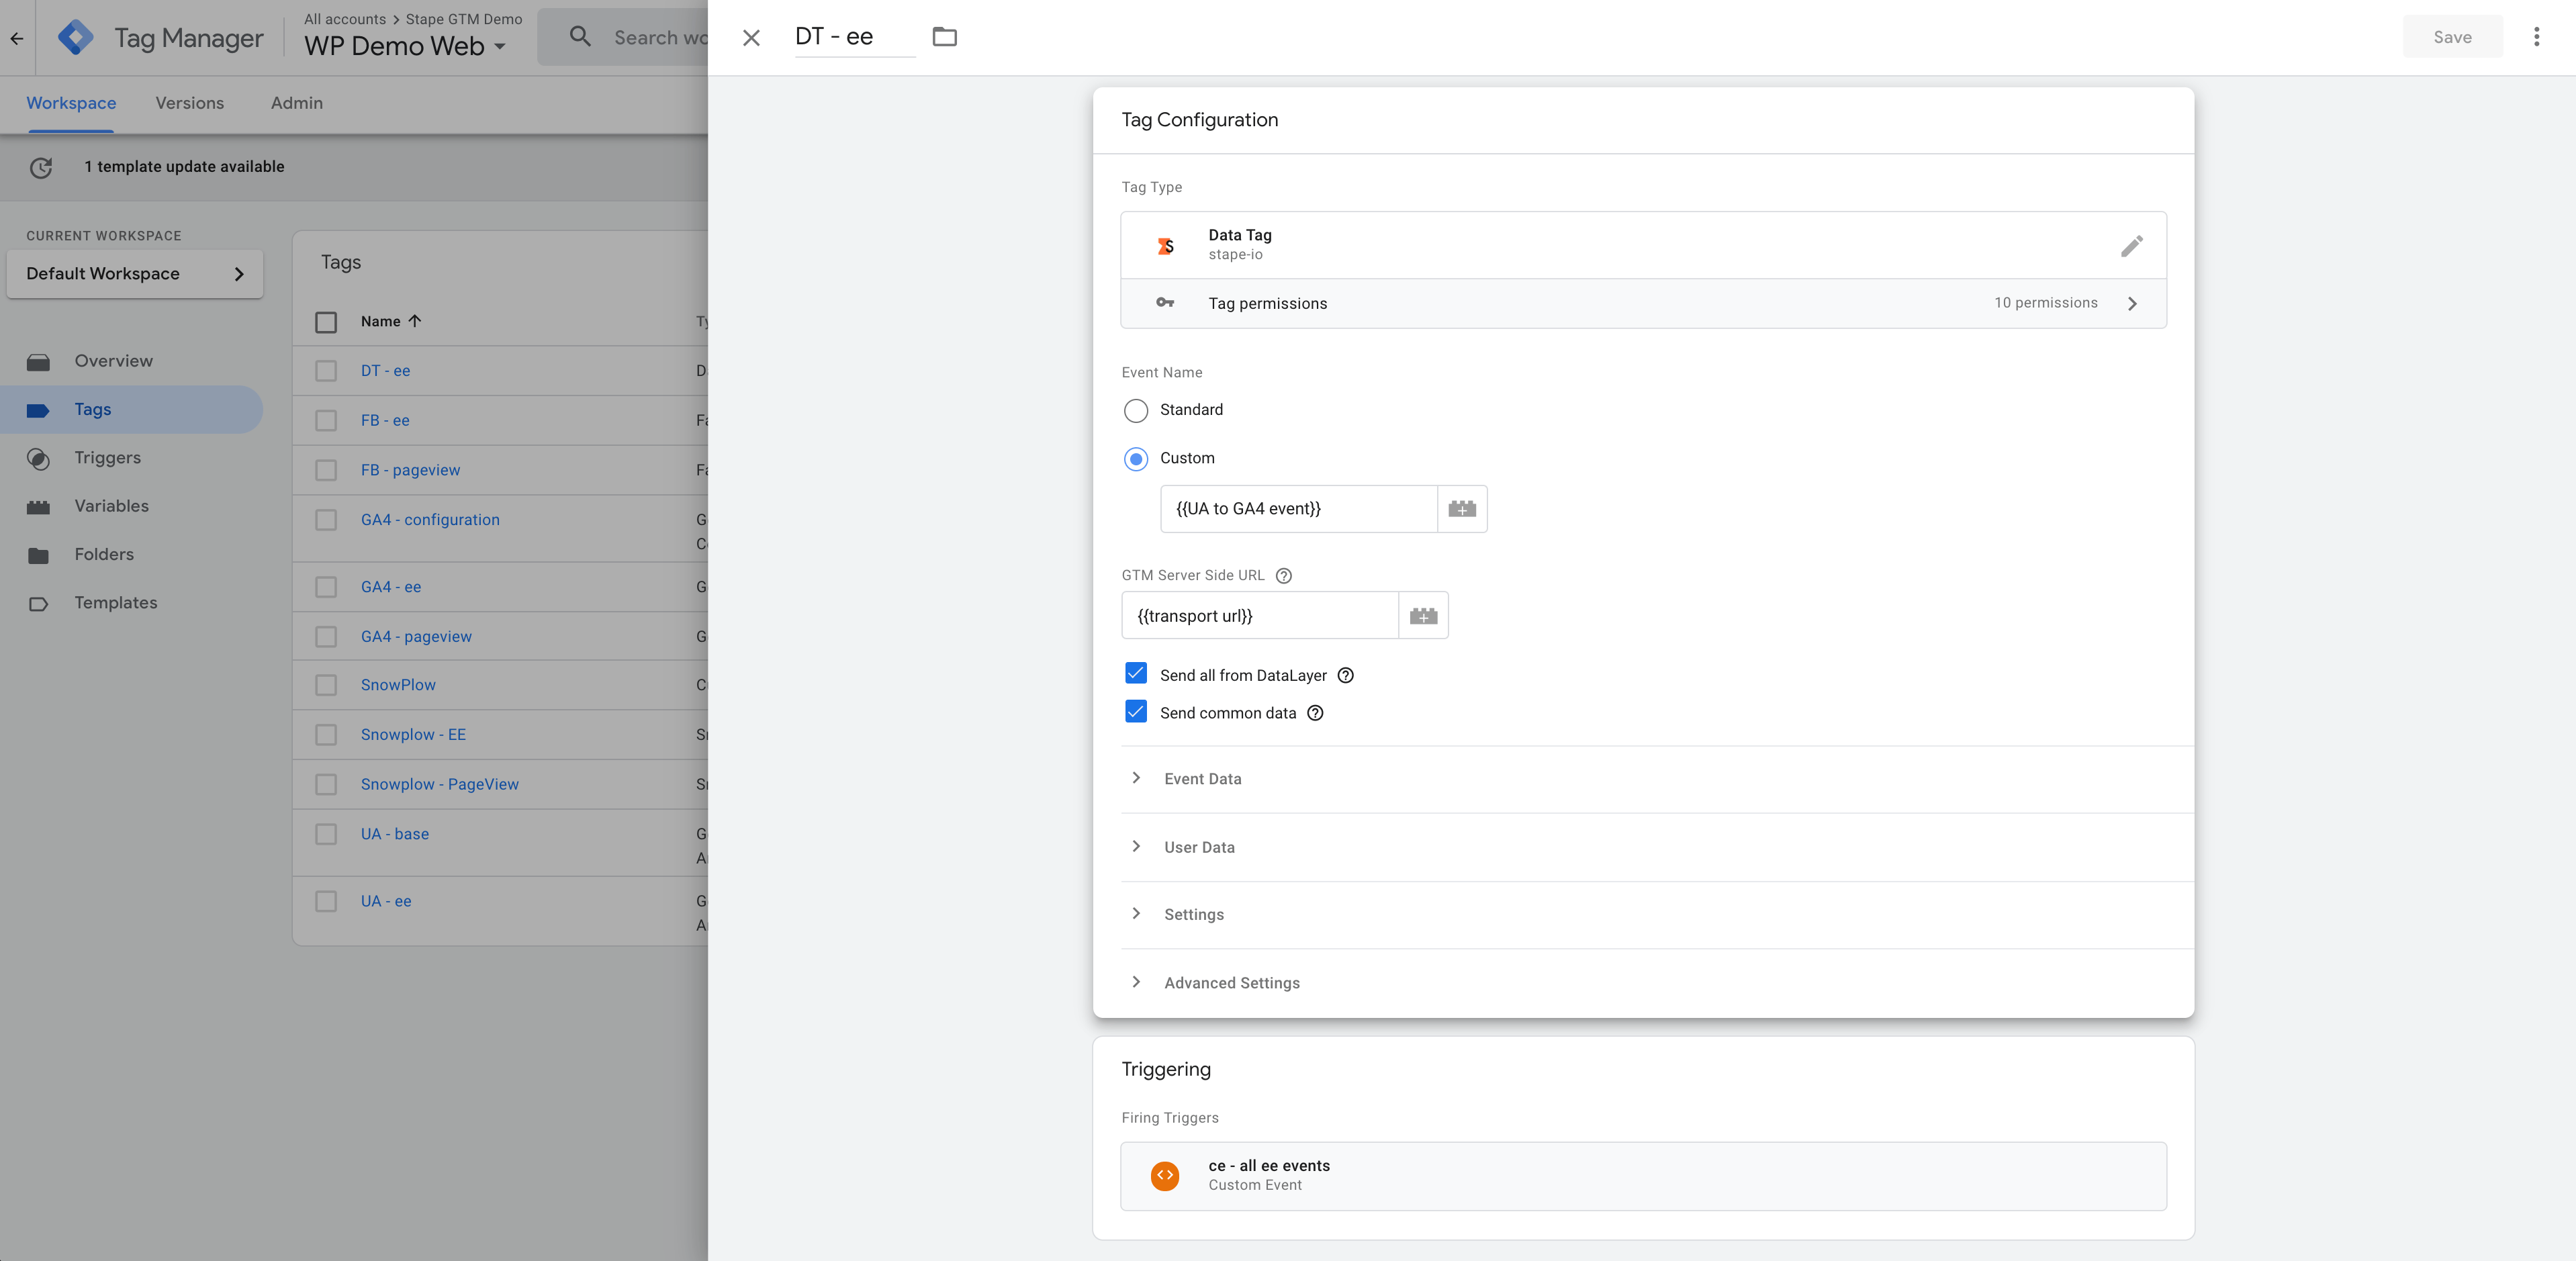
In the server container preview mode, you will see that Data Tag sent requests on all e-commerce events, and Data Client received and processed these requests inside the server container. If I click on the event name and check event_data, you should see all the parameters from the web data layer.
2. Sending User Data to Facebook Conversion API.
Let’s say that you want to send user data like the first name, last name, or email to Facebook Conversion API to increase your event match quality. You can use Data Tag for that. And if you are using our tag to set up a Facebook conversion API tag, the FB tag will automatically capture user data from the Data Tag.
I wanted to send the user email, first name, and last name together with the checkout events in the examples below. I added the user data to the Data Tag on the Web Google Tag Manager container. I’m using static parameters for the test, but you can pass these parameters dynamically using variables. Our Facebook tag automatically captures user parameters from the Data Client and sends hashed information to Facebook.
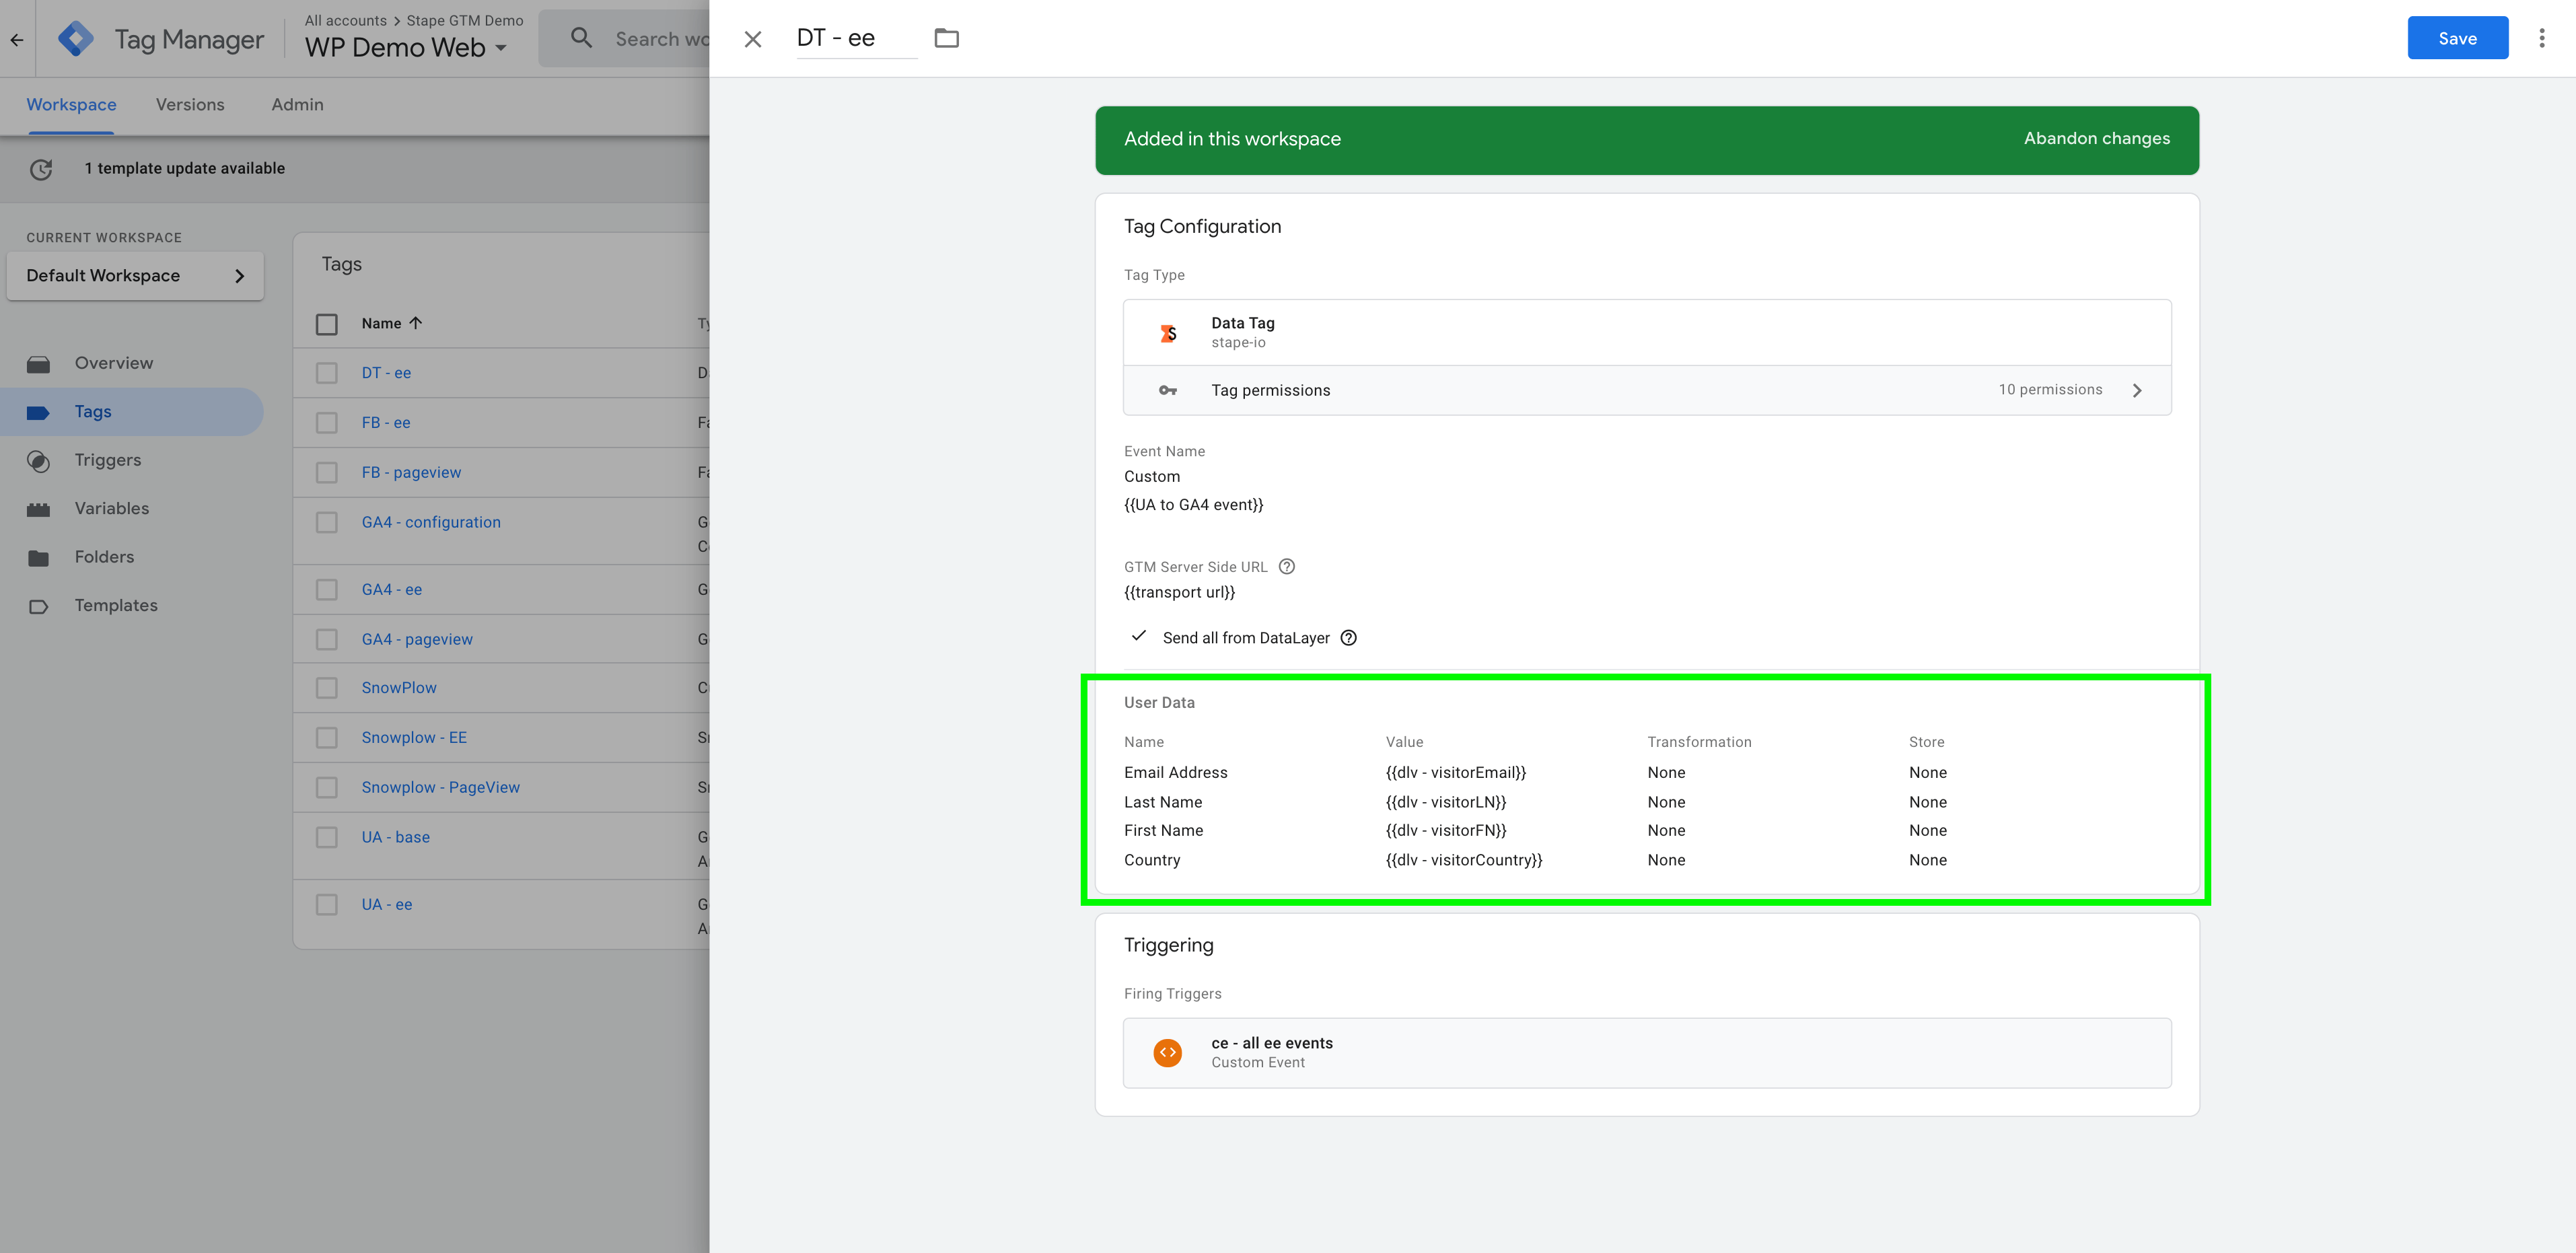
To double-check if Facebook received these parameters, you can add Facebook test ID to the Facebook server tag and check which parameters Facebook sees in the events manager testing tool.
3. Send custom data from the Web container to any other servers.
You can send data from the Google Tag Manager web container to your CRM, Slack, webhooks, etc. This example shows you how to send information about a new purchase on your site to the Slack channel.
1. Make sure that you send the correct information from the Google Tag Manager web container using Data Tag.
3. Inside the server container, create a new tag and choose a tag type HTTP Request.
4. In the destination URL, add the URL that you’ve generated on Slack.
5. HTTP method POST.
6. In the Request body, add text and parameters that you want to send to Slack.
{“text”: “New Purchase \n email: {{email}} \n transation_id: {{transaction ID}} \n purchase_value: {{transaction ID}}”}
4. Store data.
If you work with Google Tag Manager quite often, then there has been a time when the data layer (or any other variable) had to be passed on from one page of your site to another.
Unfortunately, Google Tag Manager doesn’t have an option to store data and pass it between site pages. For example, it’s possible to send a user email only when it exists on the page. But what if user data is not available on the thank you page, and it can be captured only from the page before the thank you page?
Using a data tag, you can store any variables you want to pass to other pages.
As an example, I will use an assessment built with Instapage. We needed to set up a lead event for the Facebook conversion API. While submitting the assessment, the user had to enter details like email, phone number, first name, etc. This user information was available on the assessment pages but not on the thank you page.
To have a high event match quality score on Facebook, you should send user parameters together with the CAPI event. That is why I used Data Tag to store user data in the local storage. I created a Submit application Data tag that takes user parameters from the data layer and stores them in the Local Storage. This tag triggers when a user clicks on the submit assessment button.
To enable data storing in the Data Tag, select the storing option next to the data you want to store.
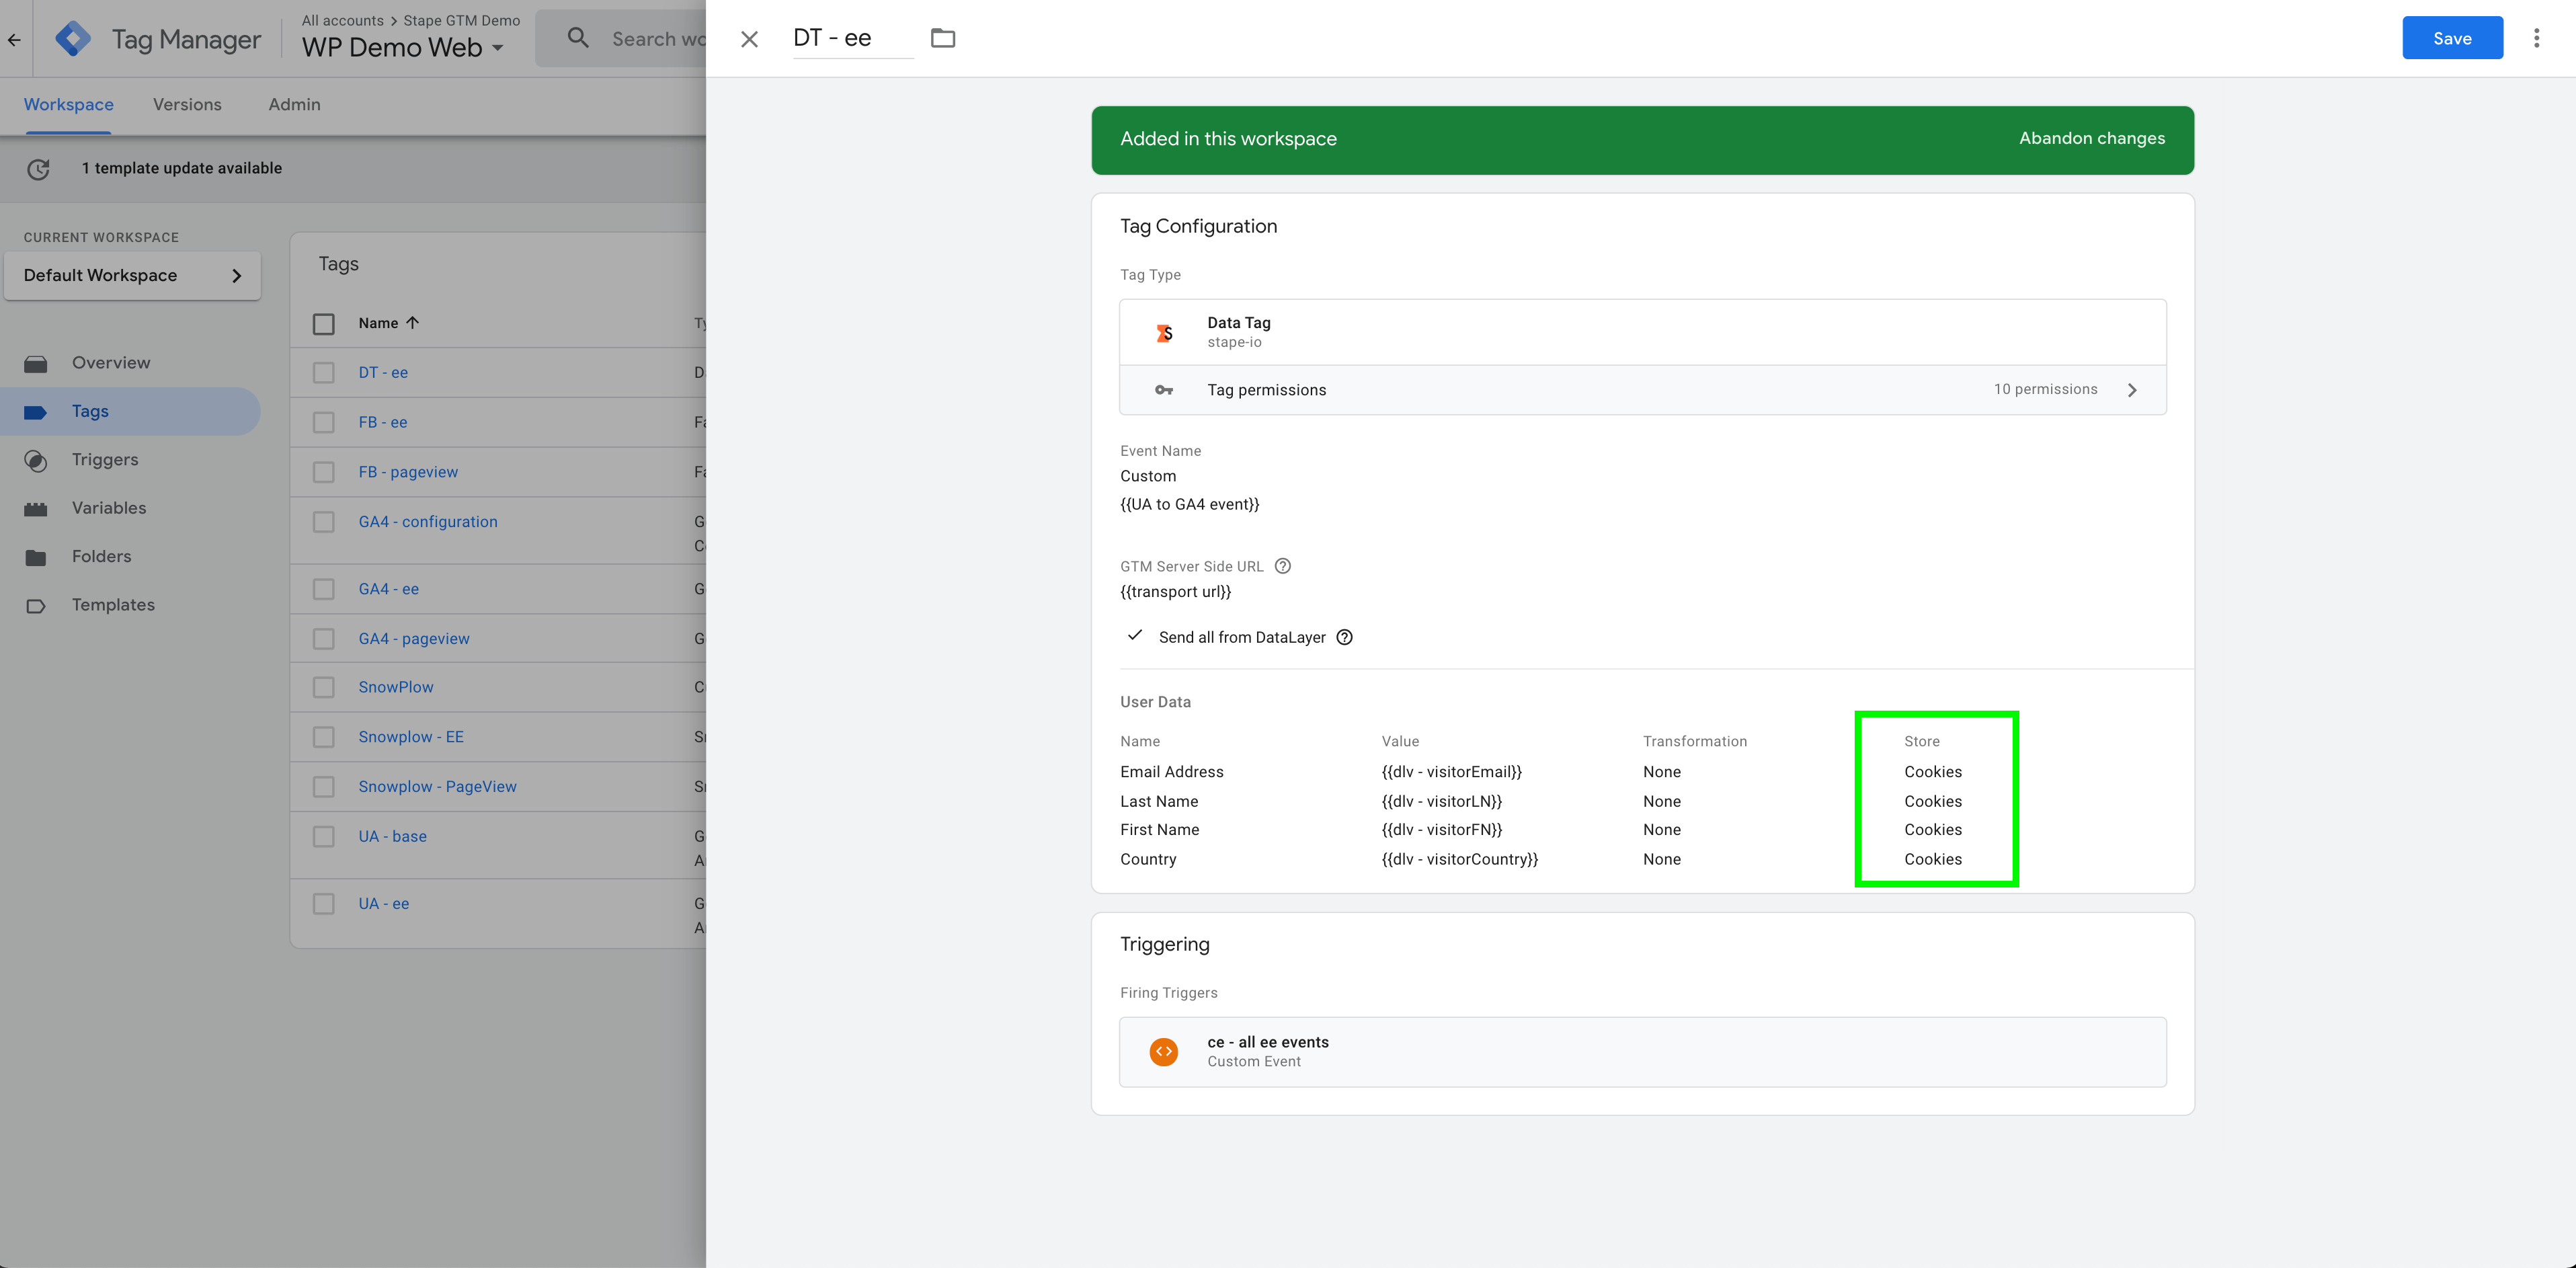
Then, I added a new variable type in the web container (you can download it using this link.) Create new variables for all data that you stored.
And finally, I created a Lead Data Tag that sends stored data to the server container.
5. Retrieve any incoming request.
You can use Data Client to retrieve any incoming requests. To do that, you need to modify Path Settings. It can be used, for example, to retrieve data from Webhooks. We have this article that describes how to use incoming webhooks.
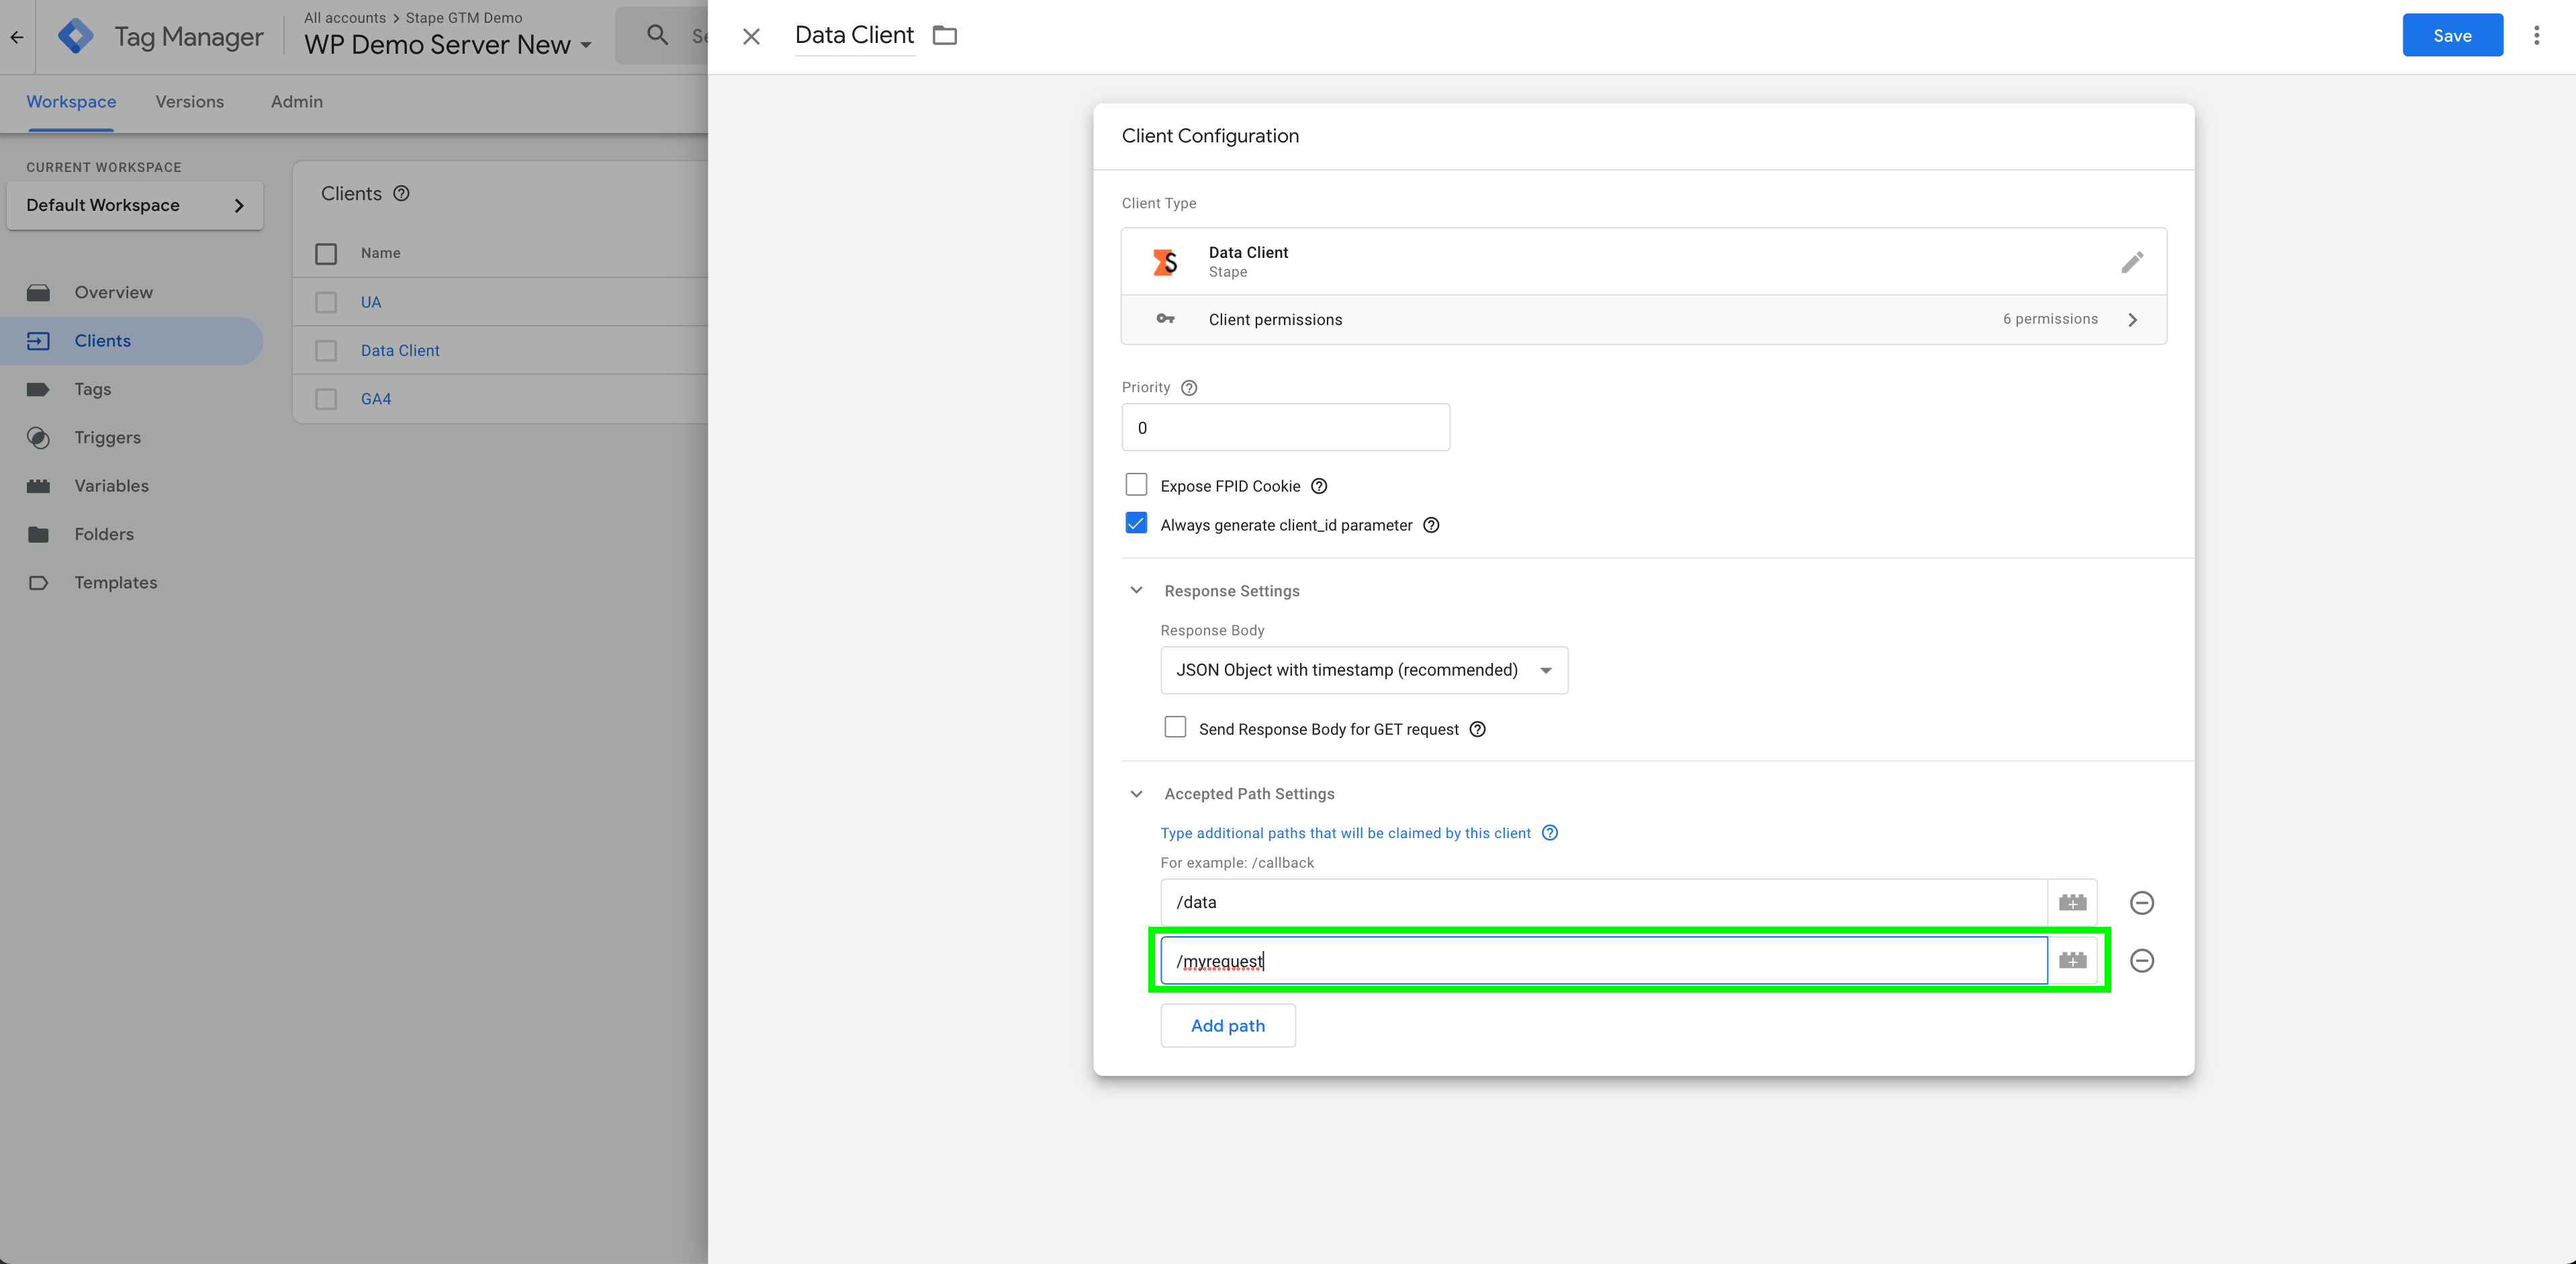
If you can’t see Data Tag requests inside the server container, it might be because of the following reason: Data Client is not published. Open Server container and publish Data Client.
Conclusion
Data Tag and Data Client will give a solid source of information to feed into the tags you use inside the server container. With the help of this tag, you can move faster in the deployment of new server-side tracking and technologies. This tag will save time and cost for both IT and marketing – a clear win-win!
Want to switch to server-side?
You can do it for free at Stape! Click Try for free and explore the advantages!
Try for freeRecommended for you
Blog
Avoid Google Tag Manager and GA4 blocking by ad blockers
Discover how ad blockers interfere with Google Tag Manager and GA4, and how server-side tracking with Stape's Custom Loader ensures reliable data collection.
Jul 22, 2026

Comments