Send data from CRM to Facebook Conversions API using webhooks
The Facebook Conversions API is a powerful tool that allows you to track your website's visitors and their activity on your site. This data can then be used to create custom audiences, test out different versions of ads, or even provide insights into who might be interested in the product.
The Google Tag Manager server container is the most widely used method for integrating the Facebook Conversions API. However, there are other options available, such as using Zapier, direct integration, CRM integrations, and more.
There are many Facebook Conversions API integration methods, each with pros and cons. You can check out our article explaining how to set up Facebook CAPI using a GTM server container. This blog post describes how you can send data from your CRM to the Facebook Conversions API using webhooks.
The benefits of integrating CRM with the Facebook Conversions API
How people interact with your business can be difficult to fully understand using just the Facebook Pixel. While the Facebook Pixel helps track user behavior and attribute more conversions to Facebook ads, it doesn't give the complete picture of the customer journey.
Companies may receive a decent number of offline orders or leads. For instance, purchases may be initiated online but completed in-store or through a call center.
The Facebook Pixel tracks online activity through the web browsers your customers use when they visit your website. In contrast, the Conversions API, when integrated with your CRM, allows you to send activity data directly from your CRM. This gives you greater control over the types of activity you can measure both online and offline.
Most popular cases of using CRM webhooks to send data to Facebook CAPI
One of the most popular use cases for integrating CRM with Facebook CAPI is tracking purchases from phone calls. Some people may see your ad on Facebook and click on the ad, but then they might have some questions about products or services. That is why they may contact your business and make purchases over the phone.
In this situation, Facebook significantly impacted a user's purchase decision. But it will never be attributed to any of your campaigns. Integrating CRM with Facebook will give you more information about what campaigns and ads drive conversions, including offline conversions.
The second use case involves tracking purchases that are confirmed by the client separately. In this case, you can send webhooks whenever the order status is updated to "confirmed."
Another popular way of using webhooks is to track payments from PayPal or Stripe. If a purchase happened on PayPal or Stripe's domain, you can't access the user and product data, hence you can't send it to FB. The easiest way to track PayPal or Stripe transactions on Facebook is using webhooks.
Stape Conversion Tracking CRM apps for sending data from CRM to Facebook
The Stape Conversion Tracking CRM apps create an integration between your CRM and the Meta platform. They transmit data on lead status updates to the platforms you need through a secure, server-side connection (configured via Meta CAPI Gateway, Signals Gateway, or a server GTM container).
By sharing insights into lead actions after ad interactions, Meta can better analyze user behavior and identify audiences most likely to convert into customers.
In addition, the apps for HighLevel and HubSpot CRMs can create Customer Match Lists in Google Ads. The data from the list can then be used for Smart Bidding and campaign optimization.
Learn more about these apps and how to set them up in our configuration guides:
How to send Webhooks from CRM to Facebook Conversions API
2. Copy the tagging server URL in the stape.io admin console.
3. Create a webhook. Paste this tagging URL in the Delivery URL of your webhook and add a path that will differentiate this particular webhook from the other webhooks.
Webhooks can be set up in various ways, depending on your system. This can be done on your backend, or perhaps your CRM/CMS system supports the webhooks you need. The best approach is to reach out to your developer to help you set this up properly.
The webhook should be triggered when a record in your database transitions to the desired status (e.g., purchase, or hot lead). It needs to be in JSON format and sent to the URL of your container (e.g., /data or /any_path which you add in Data Client, as described in the next section).
The webhook should include as much user data as possible (such as email, phone, and other relevant details) along with conversion data that can be used for your campaigns or remarketing. At a minimum, the webhook should include the value and currency parameters to ensure accurate CPA/ROAS tracking and other similar metrics.
In our case, it's:
Tagging_url https://ottpwgmj.eu.stape.io
Path: /order_created

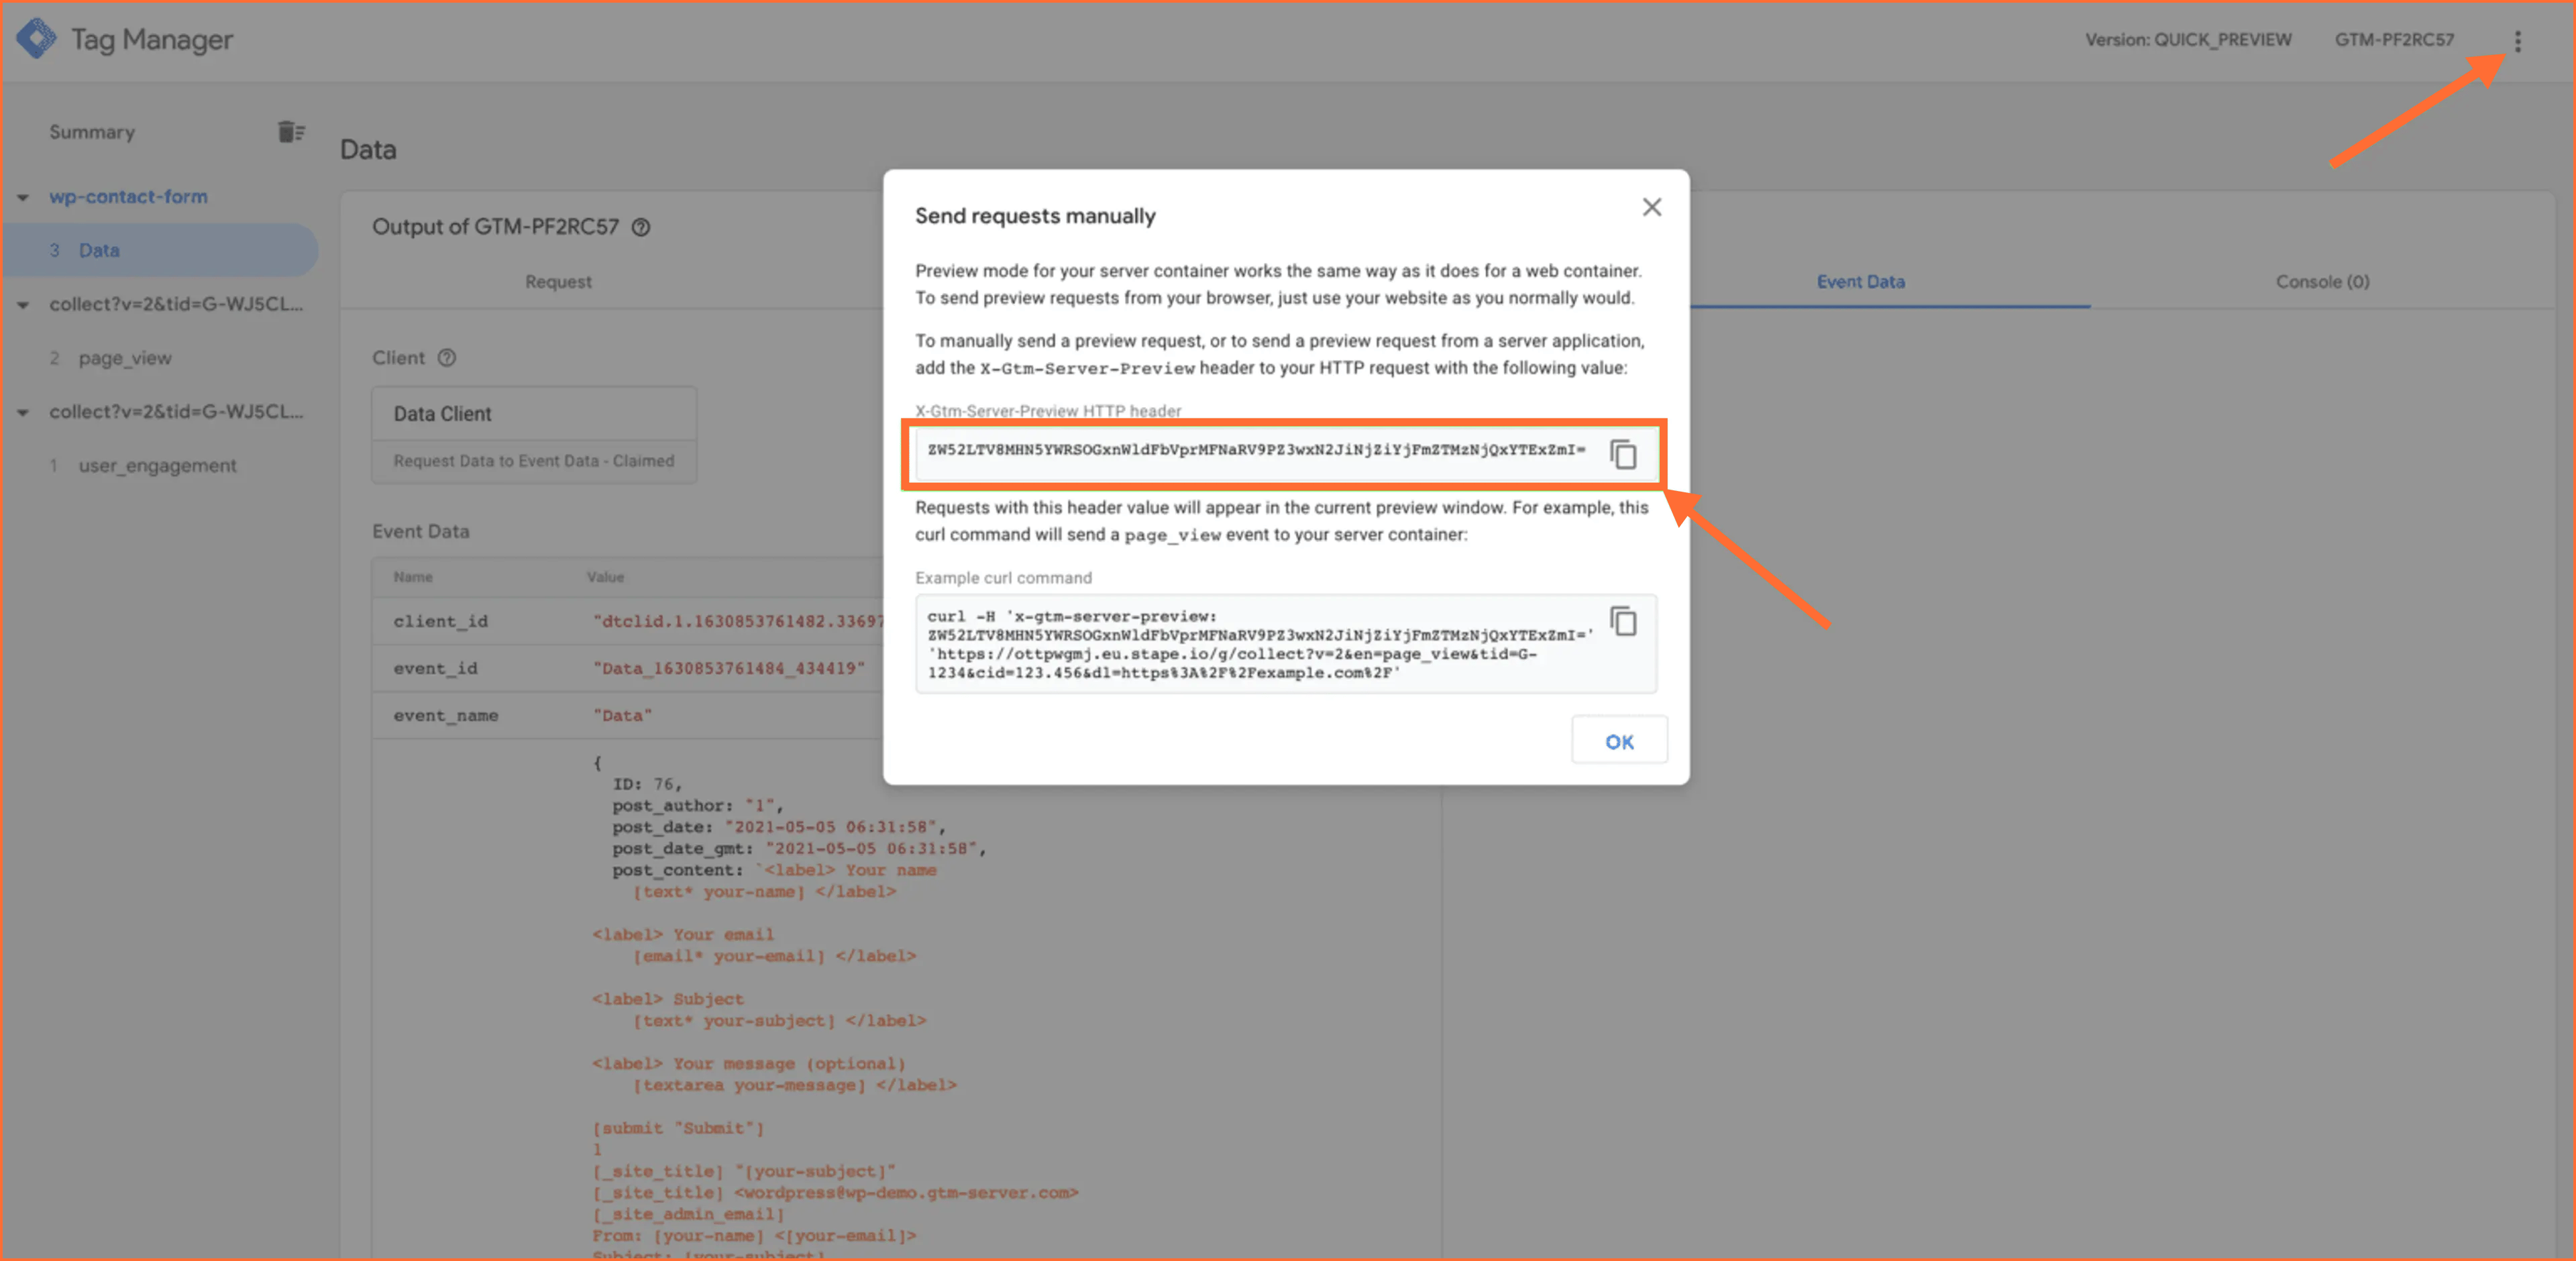
4. Open the preview mode of the GTM server container → Click three dots at the top right corner → Click Send requests manually → Copy the X-Gtm-Server-Preview HTTP header.
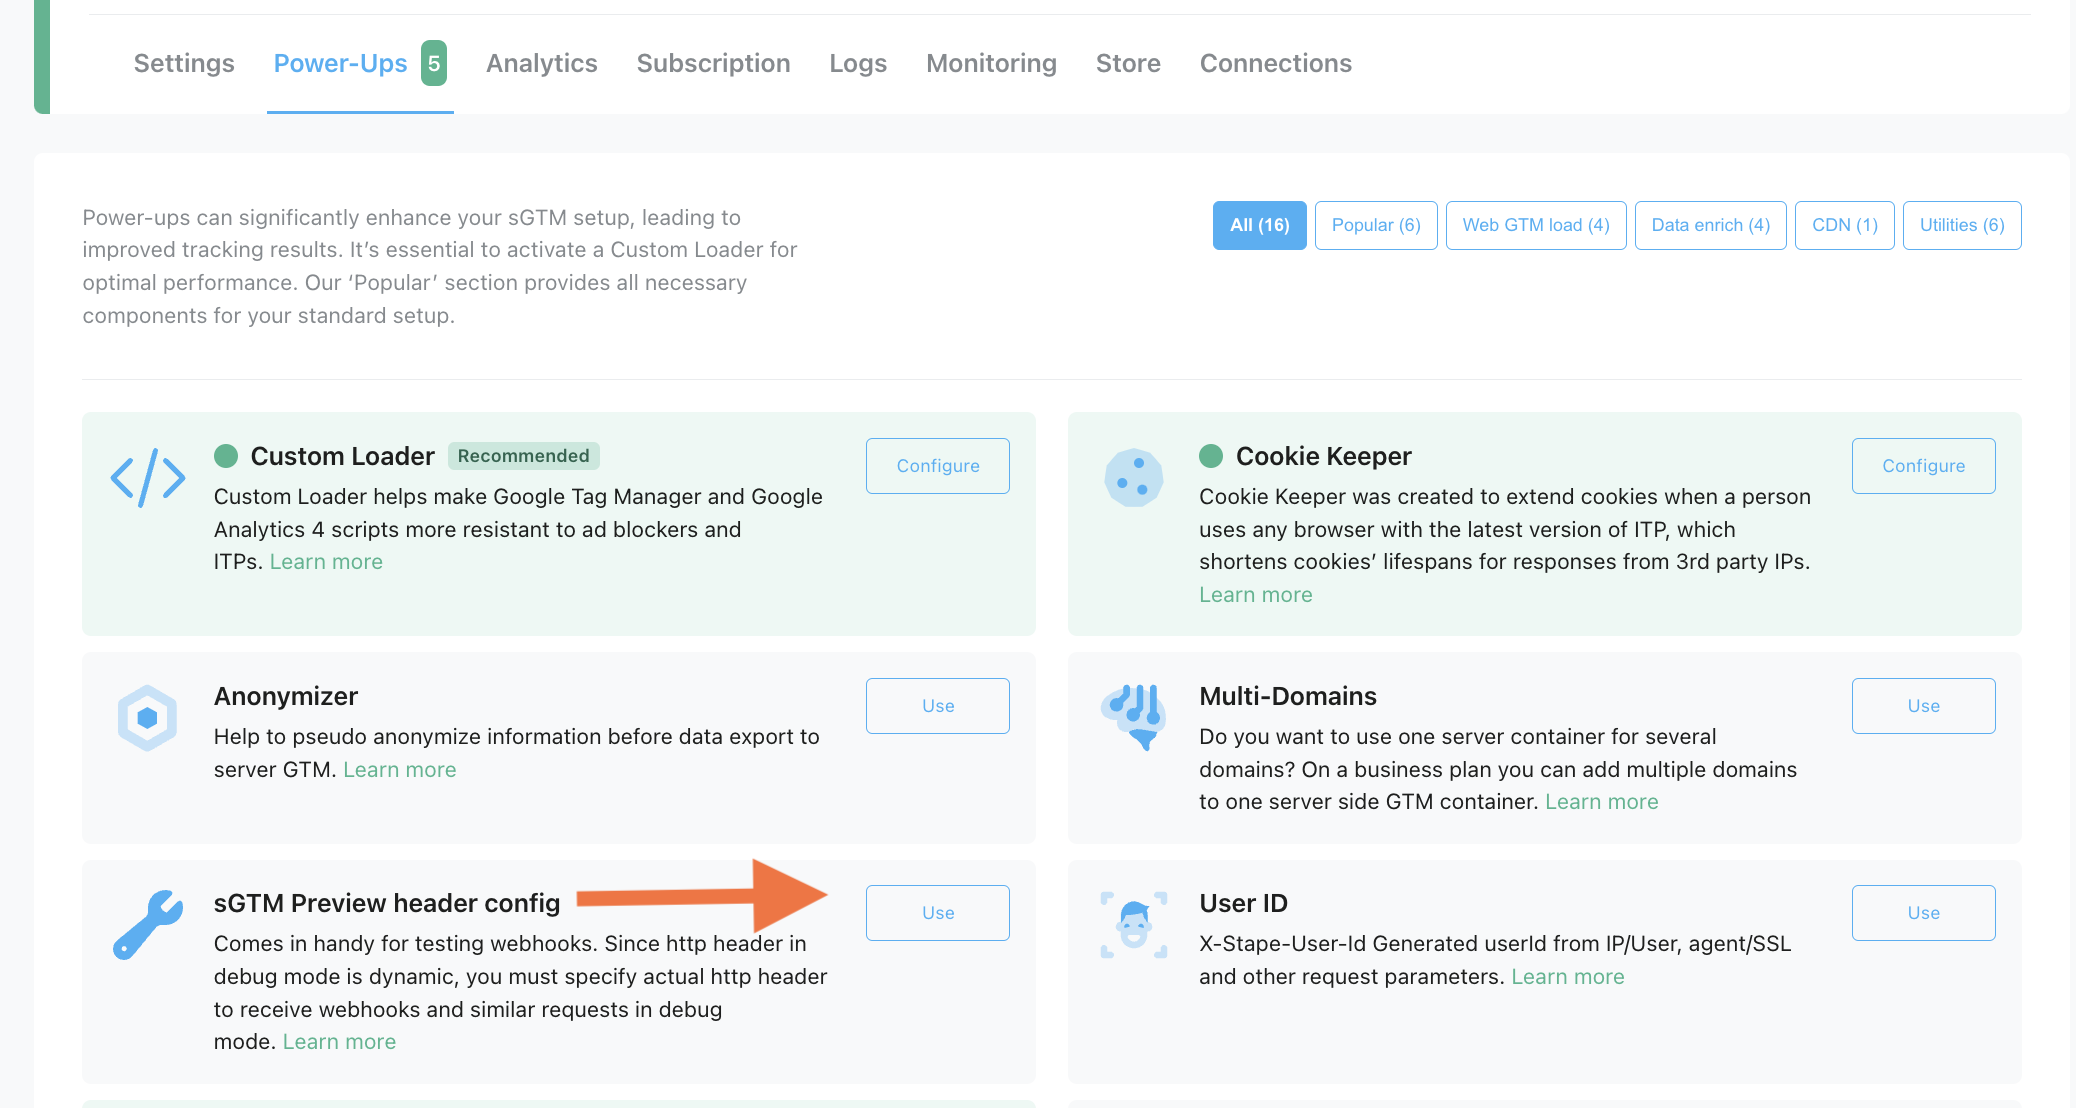
5 Log in to your stape.io account → Click Power-ups on the right side of the container → Click sGTM Preview header config → Paste the X-Gtm-Server-Preview HTTP header that you’ve copied in step #4.
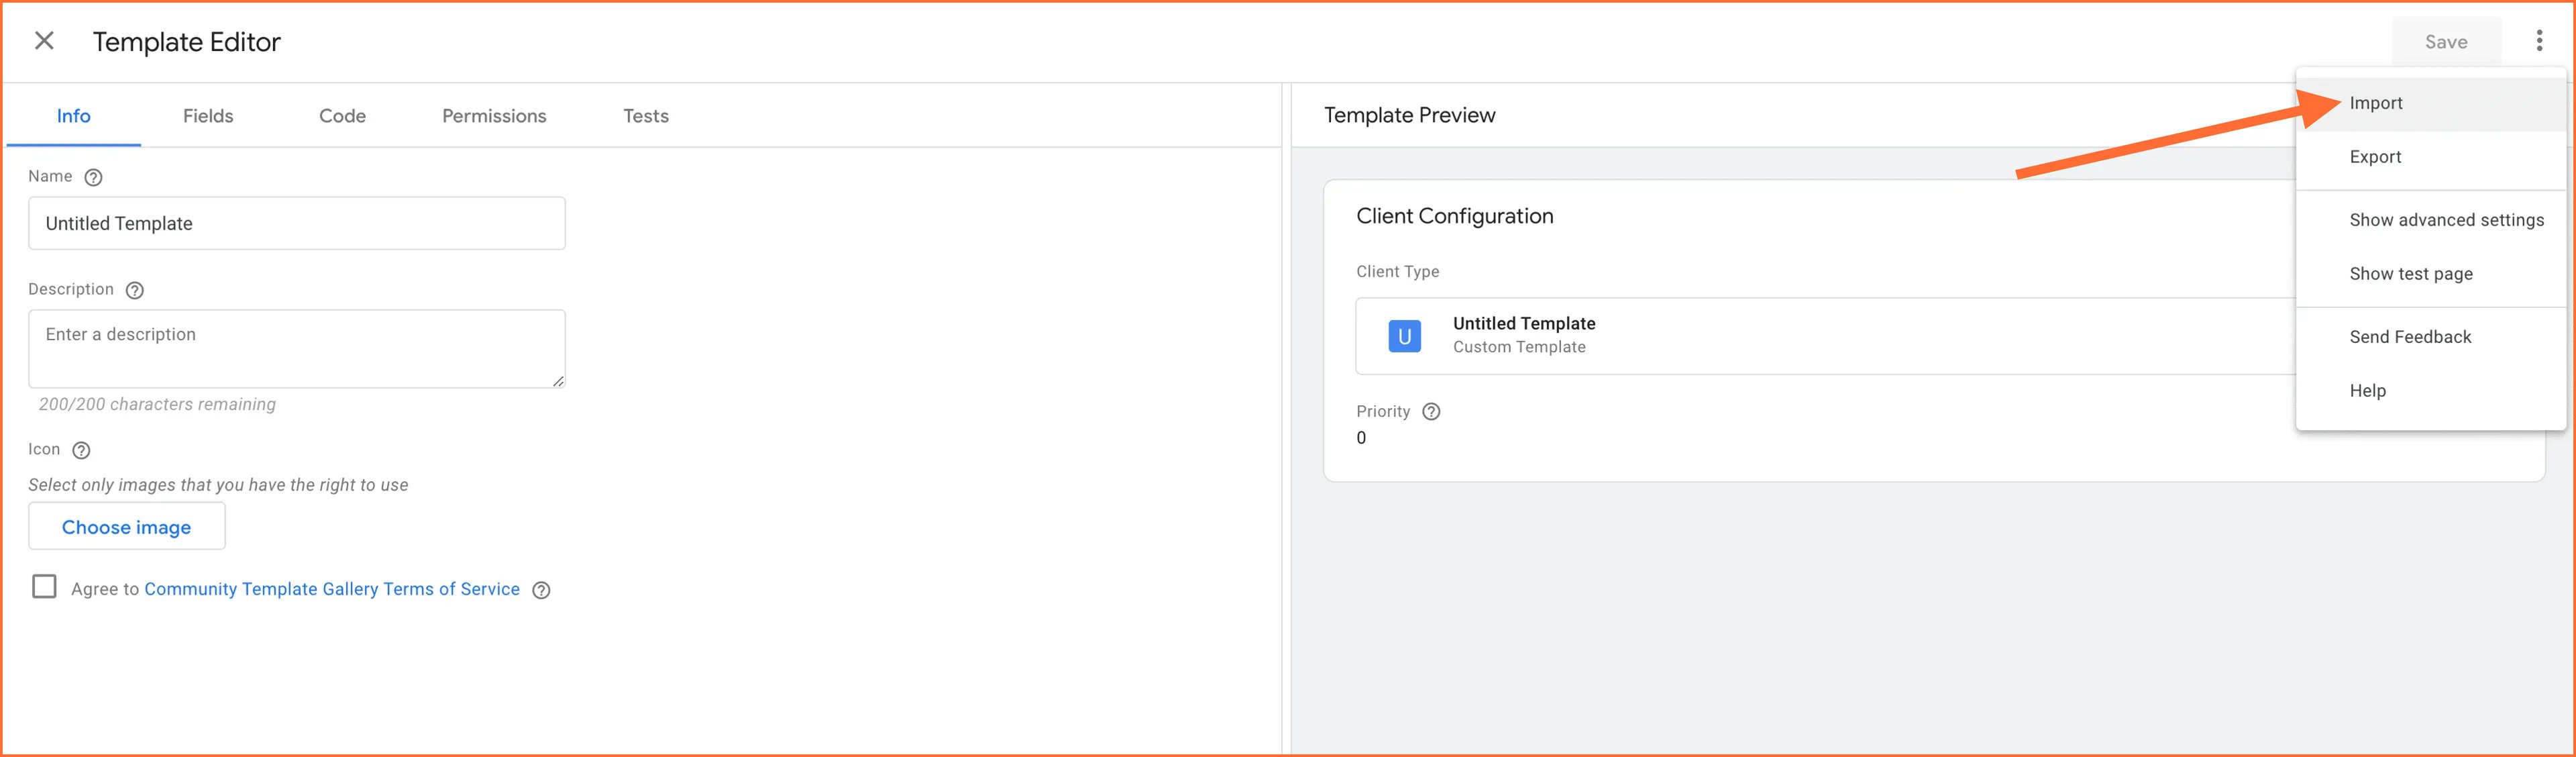
6. In this step, we will set up a Client in the GTM server container that will listen to the requests sent by the webhook. First of all, download Data Client from GitHub → Open Templates tag in the GTM server container → Click new → Import Data Client → Click save and publish the server container. It is required to publish a data client the first time you add it. Otherwise, you'll see a CORS error in the console.
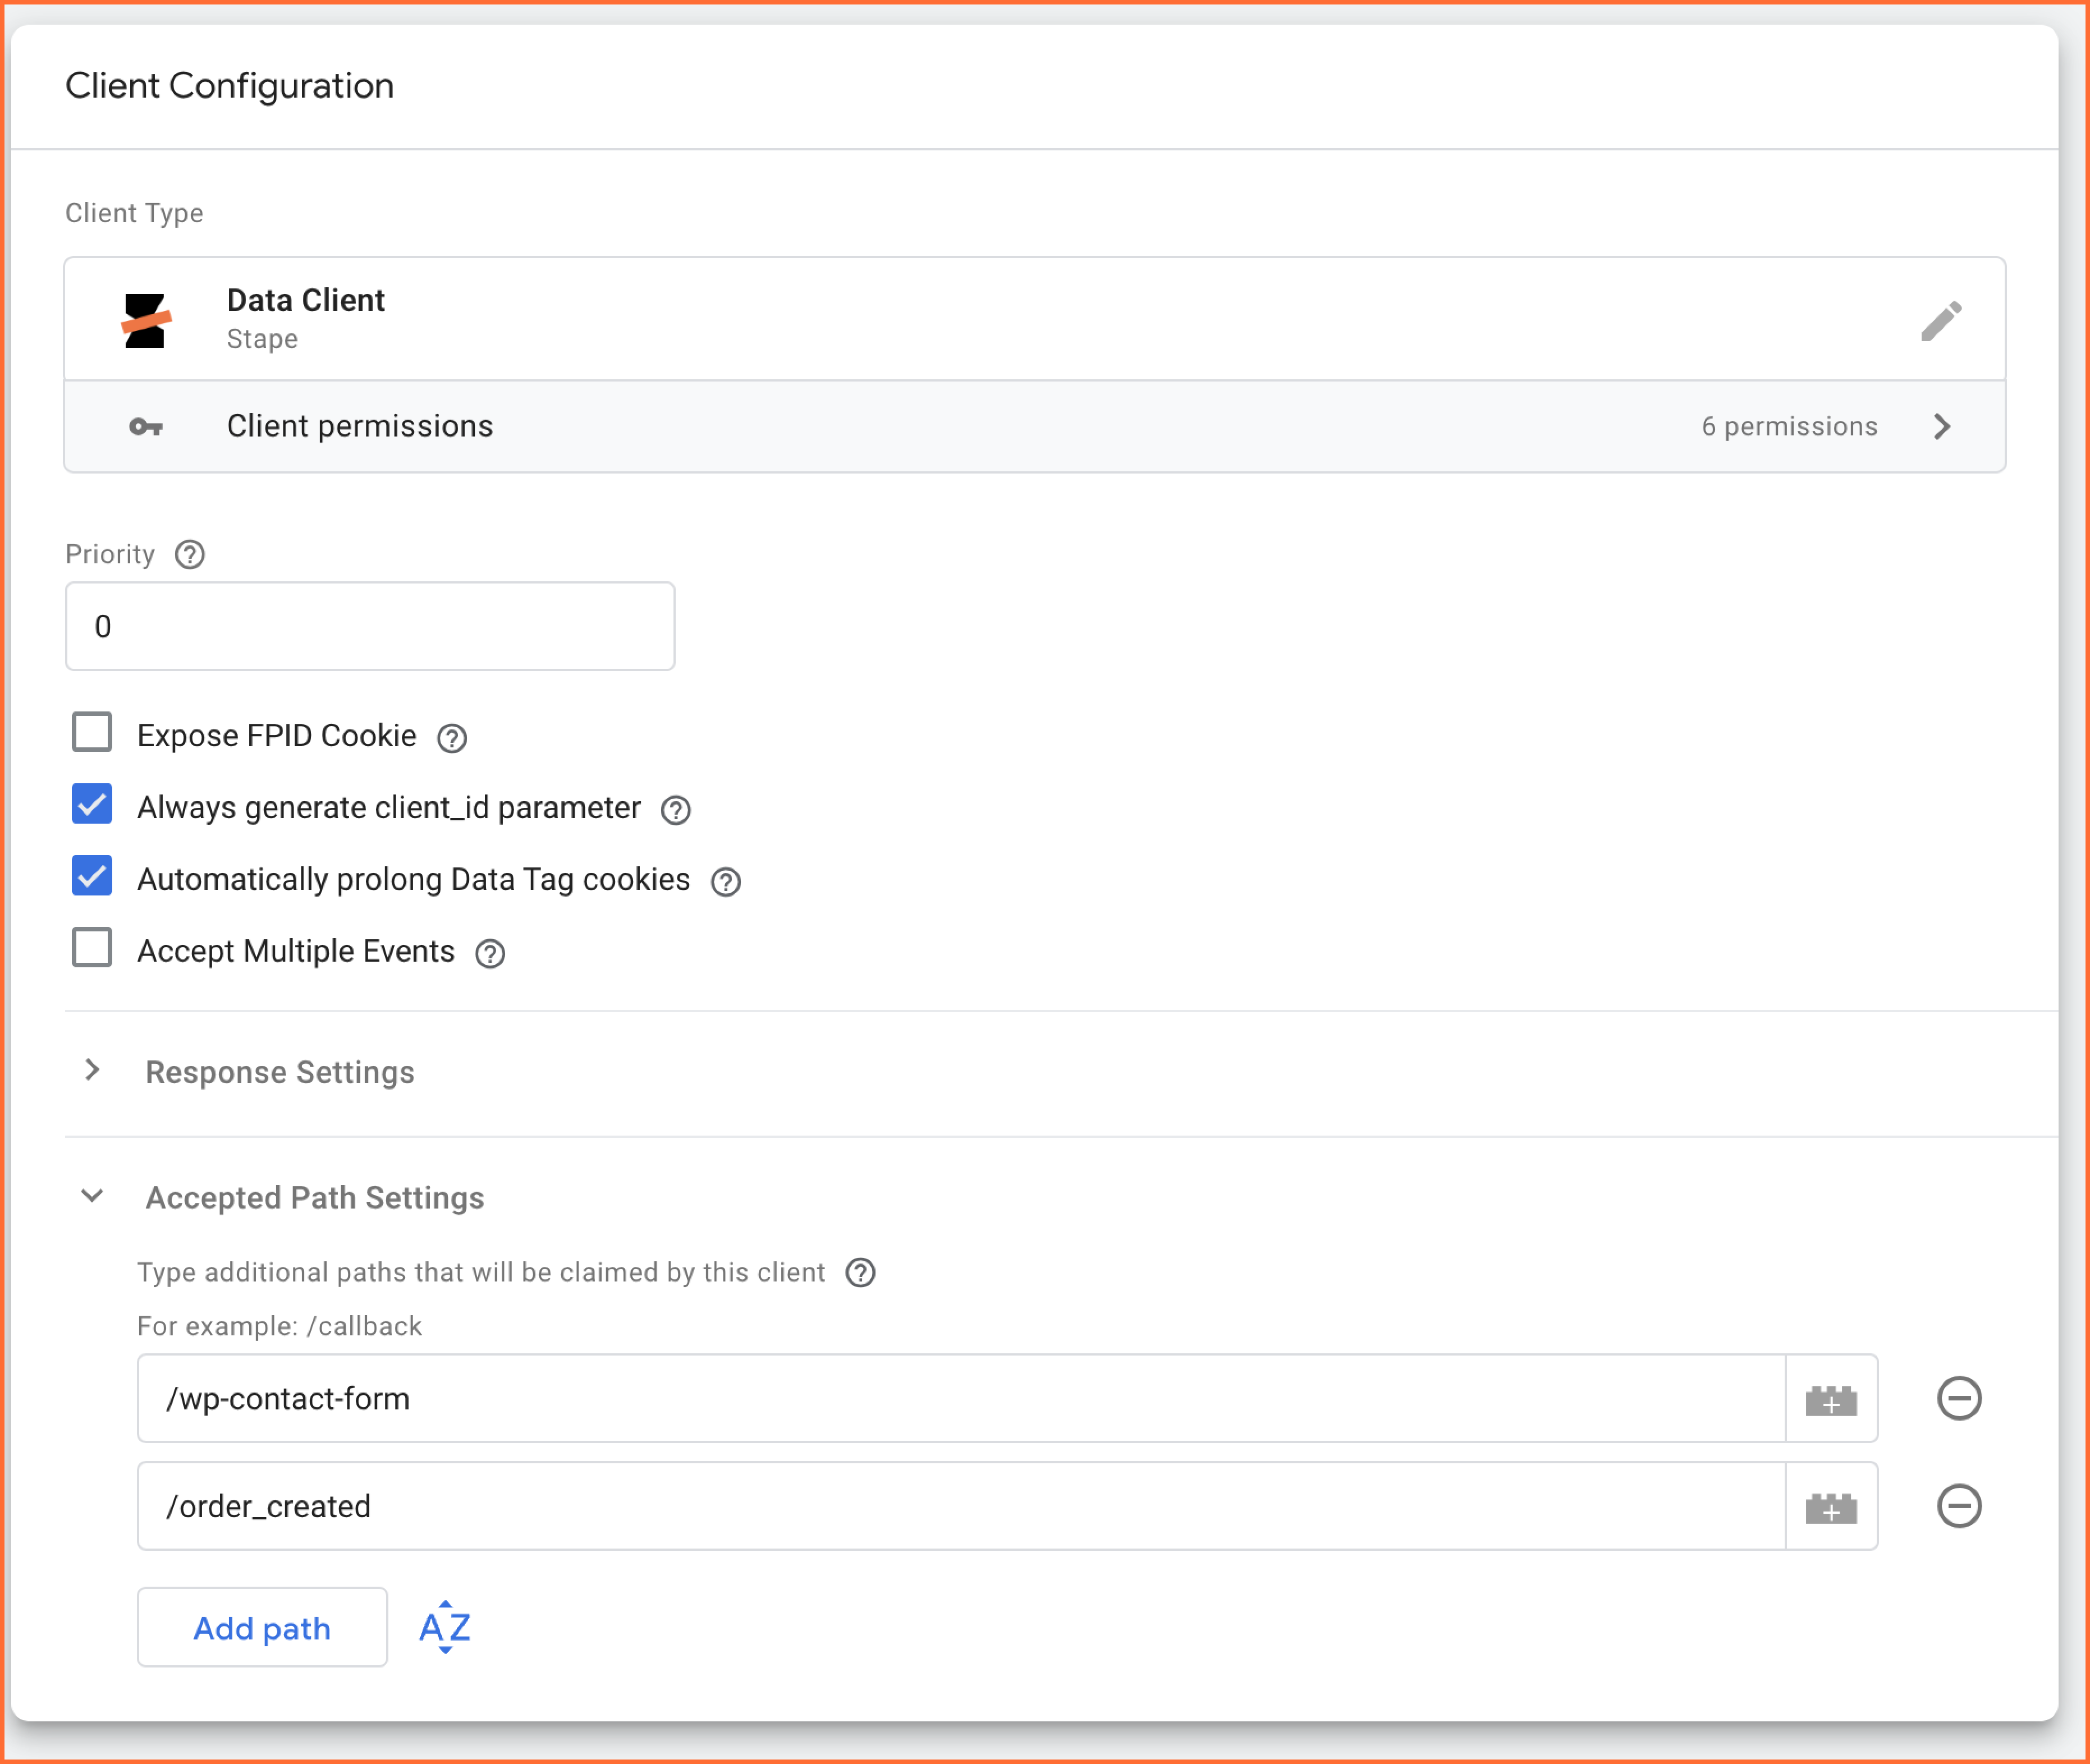
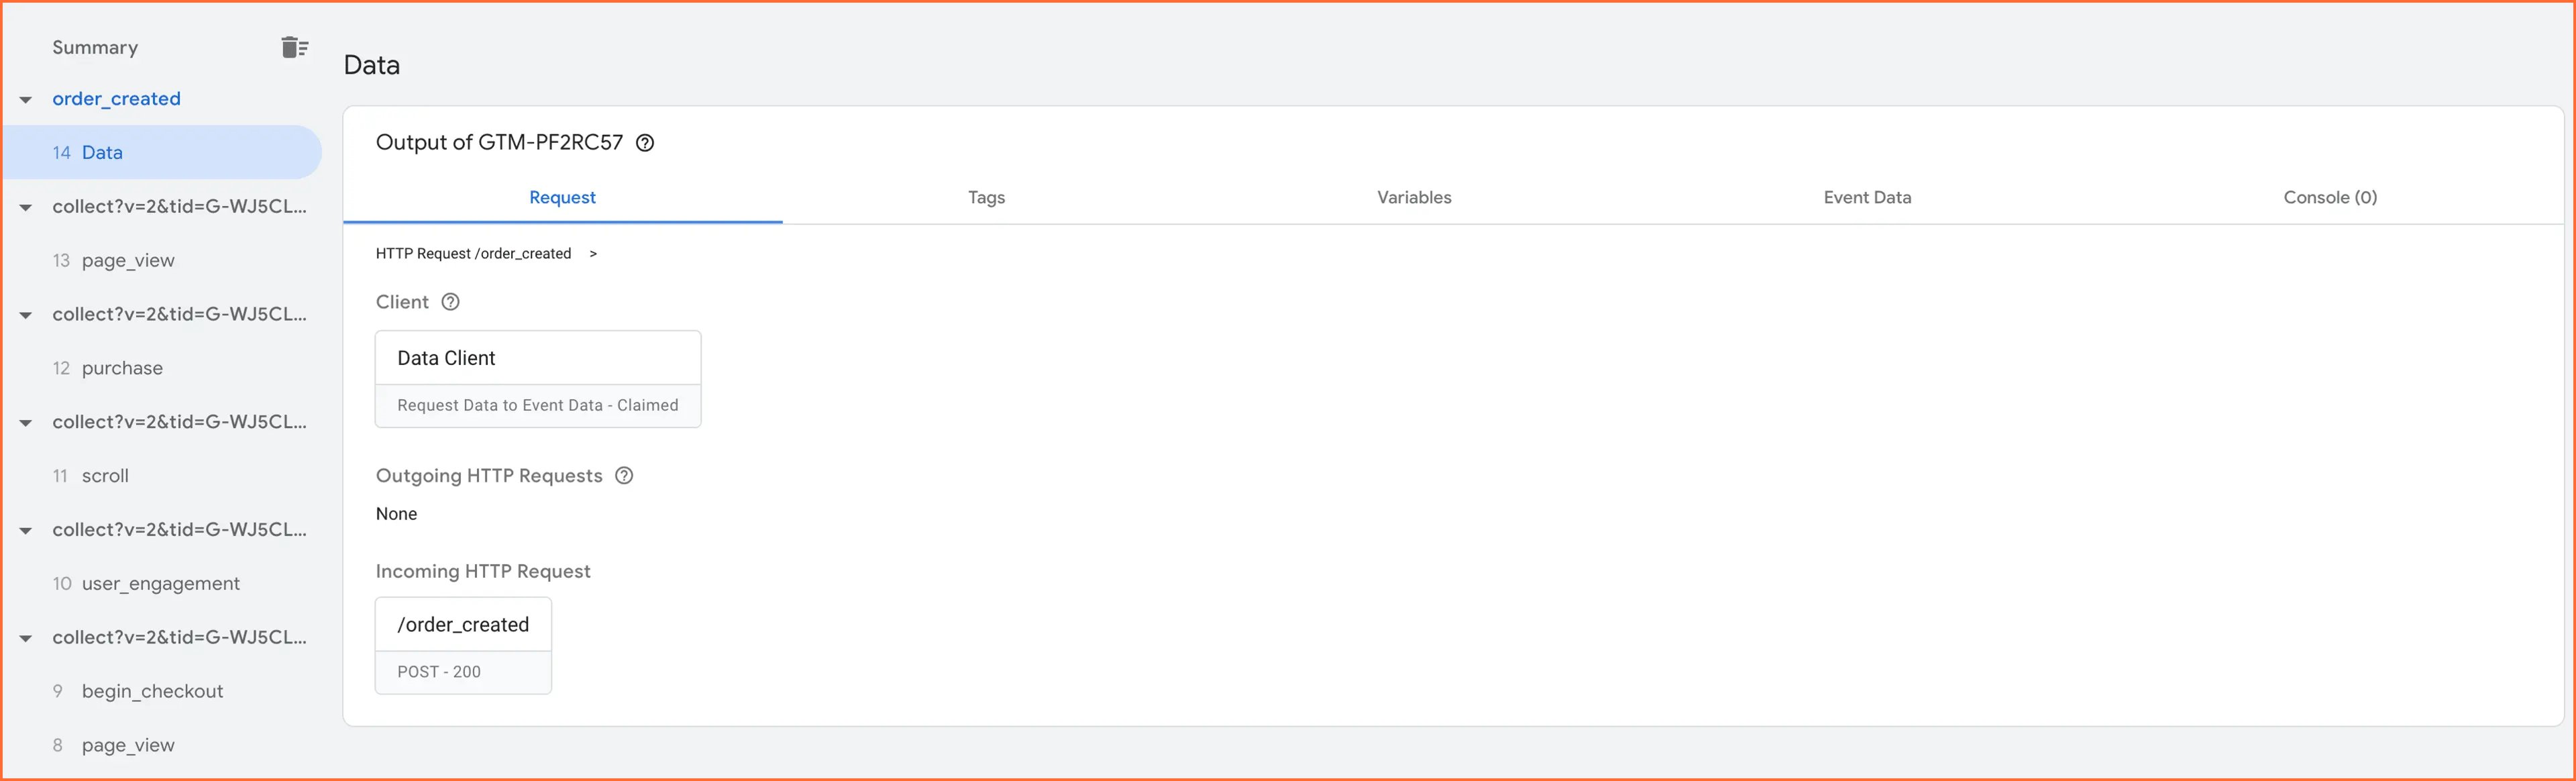
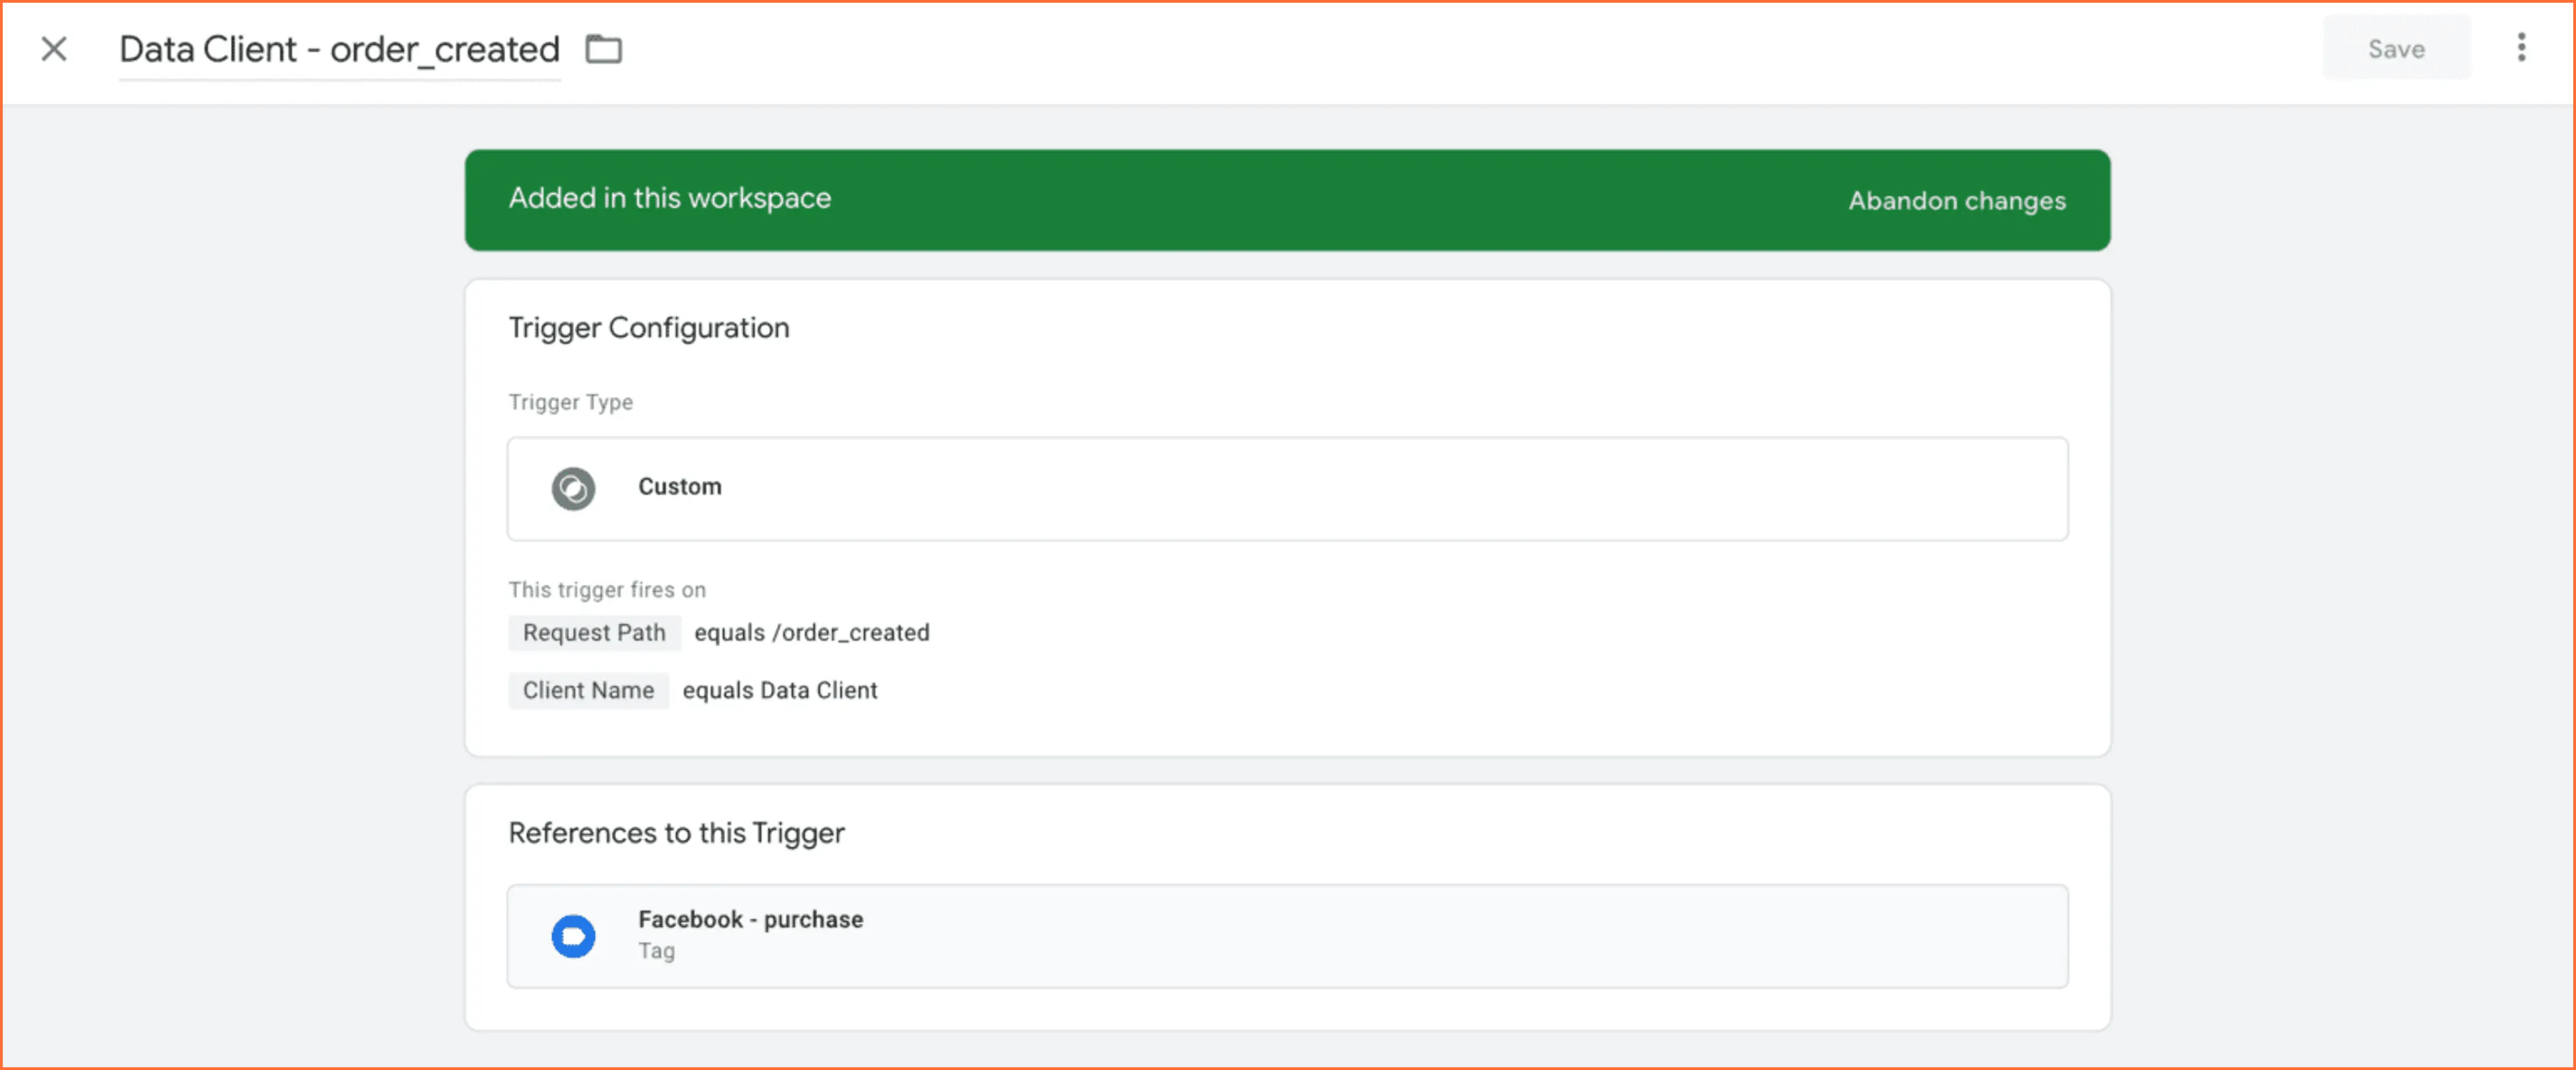
7. Set up a Data Client. Open a Client tab → Click New → Select type Data Client → Open More Settings → Add the webhook path that you’ve added in step 3 → Save.
8. Open the GTM server preview mode and trigger the action that sends the webhook to the URL of your container. Now you should see that Data Client claimed a webhook request. Click the Event Data tab, and you will see the webhook data.
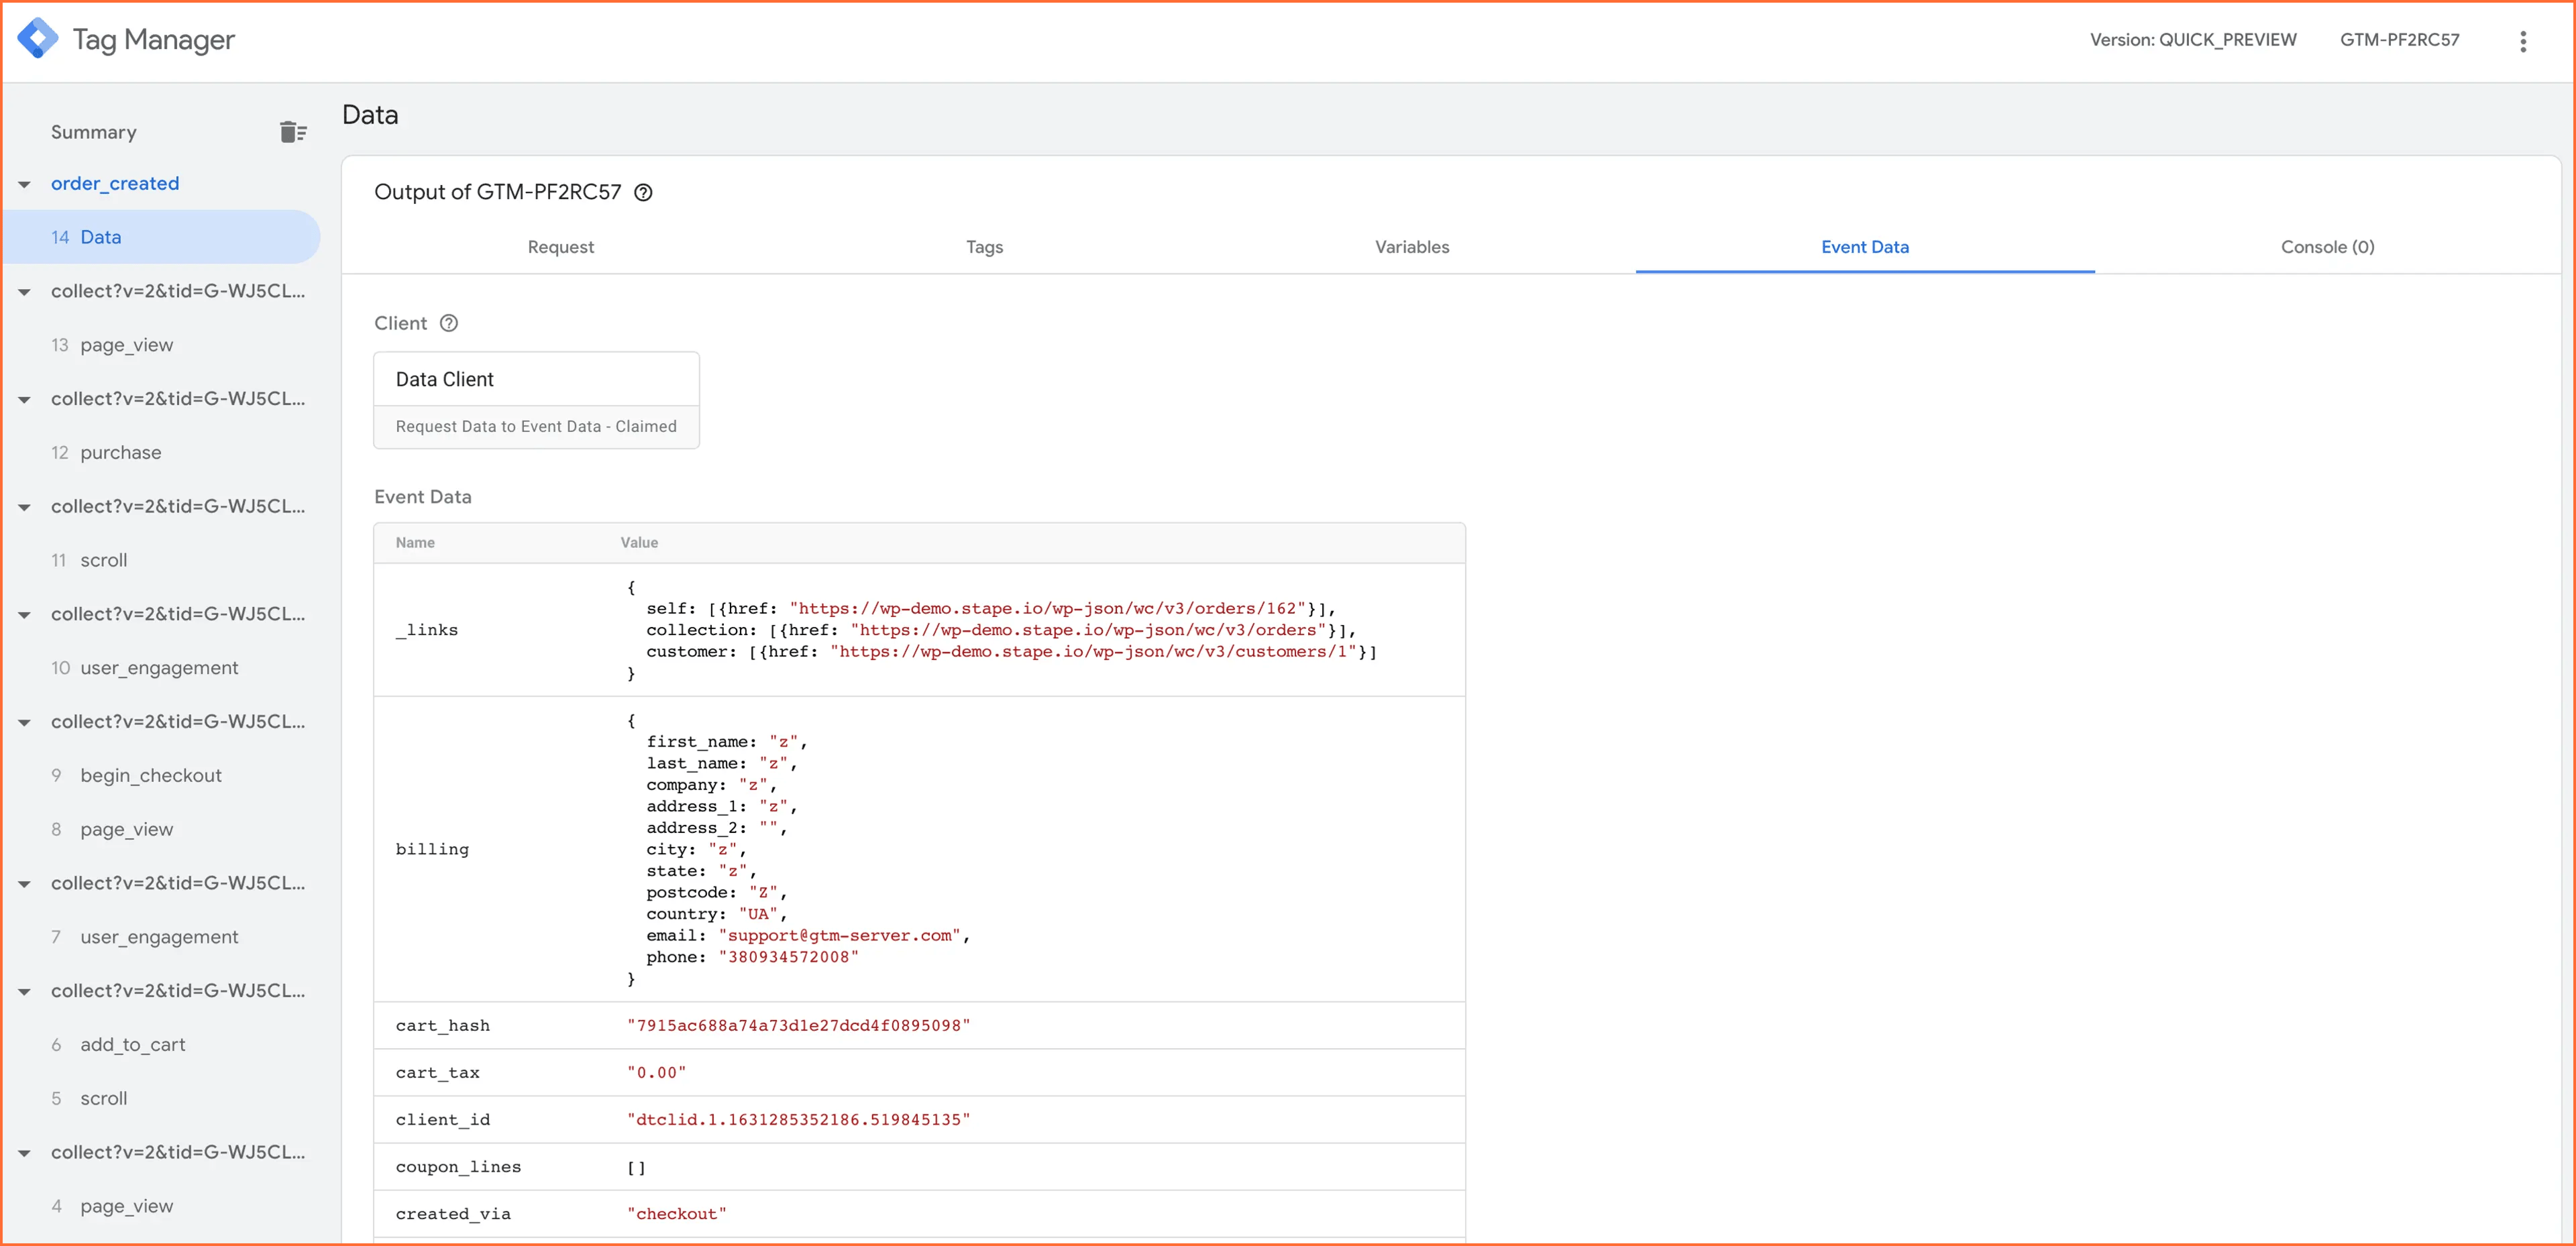
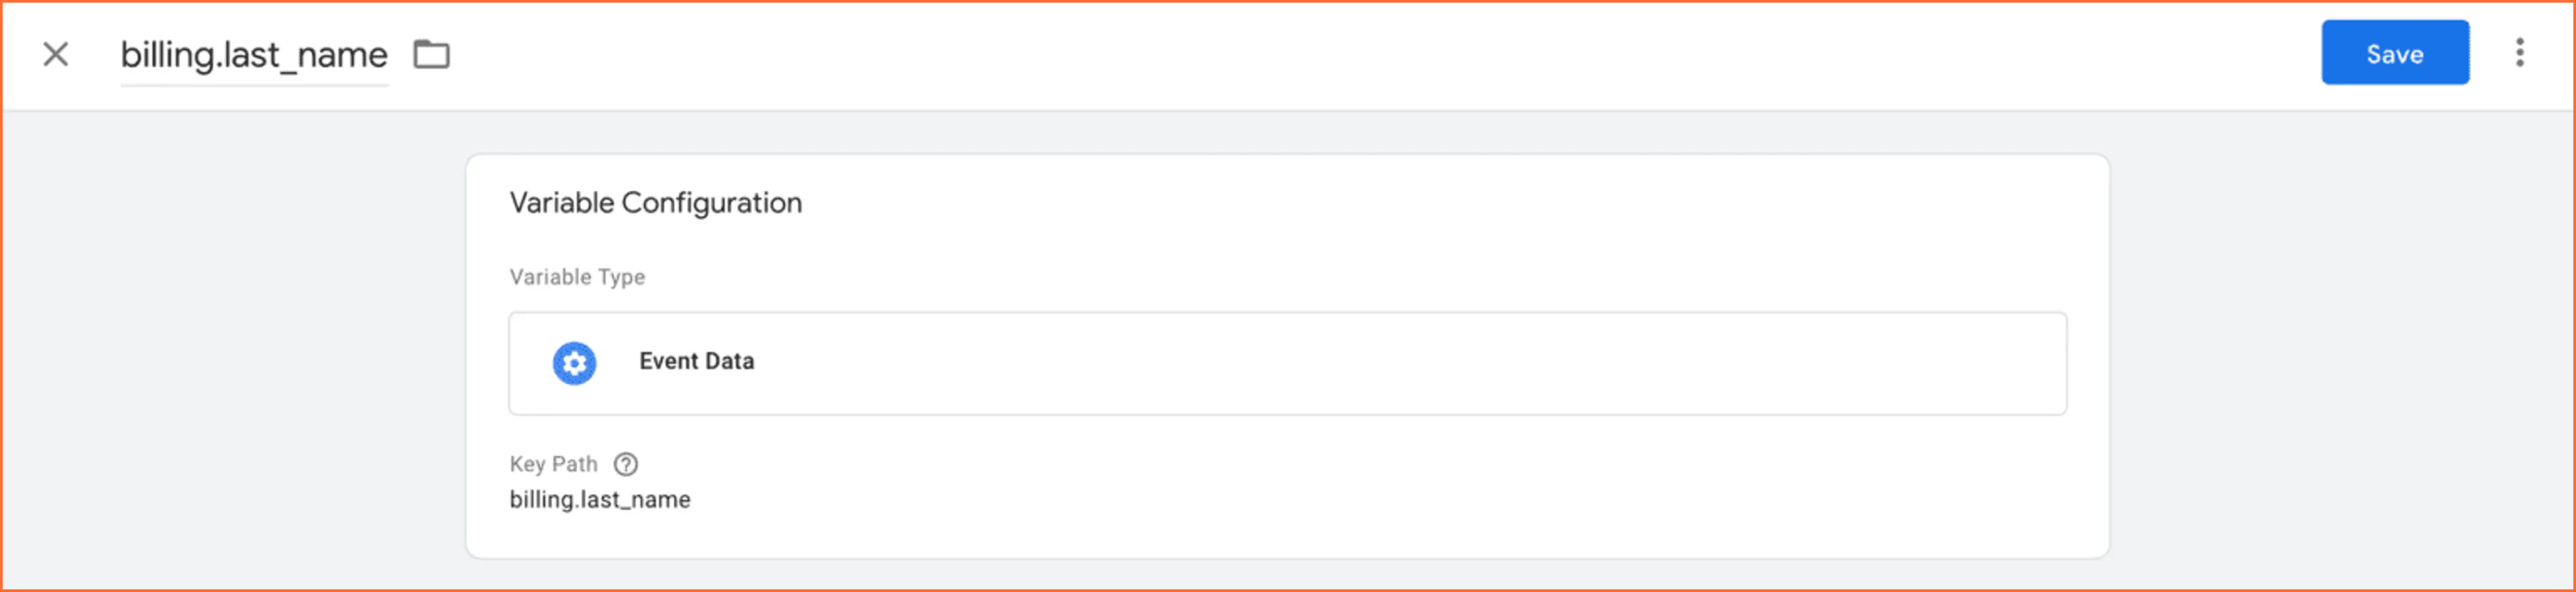
9. In preview mode, under the Event Data tab, you can see all the available data in the webhook. For each variable you want to use to set up the Facebook Conversions API, follow these steps: open the Variables tab → New variable → Variable type Event Data → Set up event variables for each variable you want to use to set up the Facebook Conversions API.
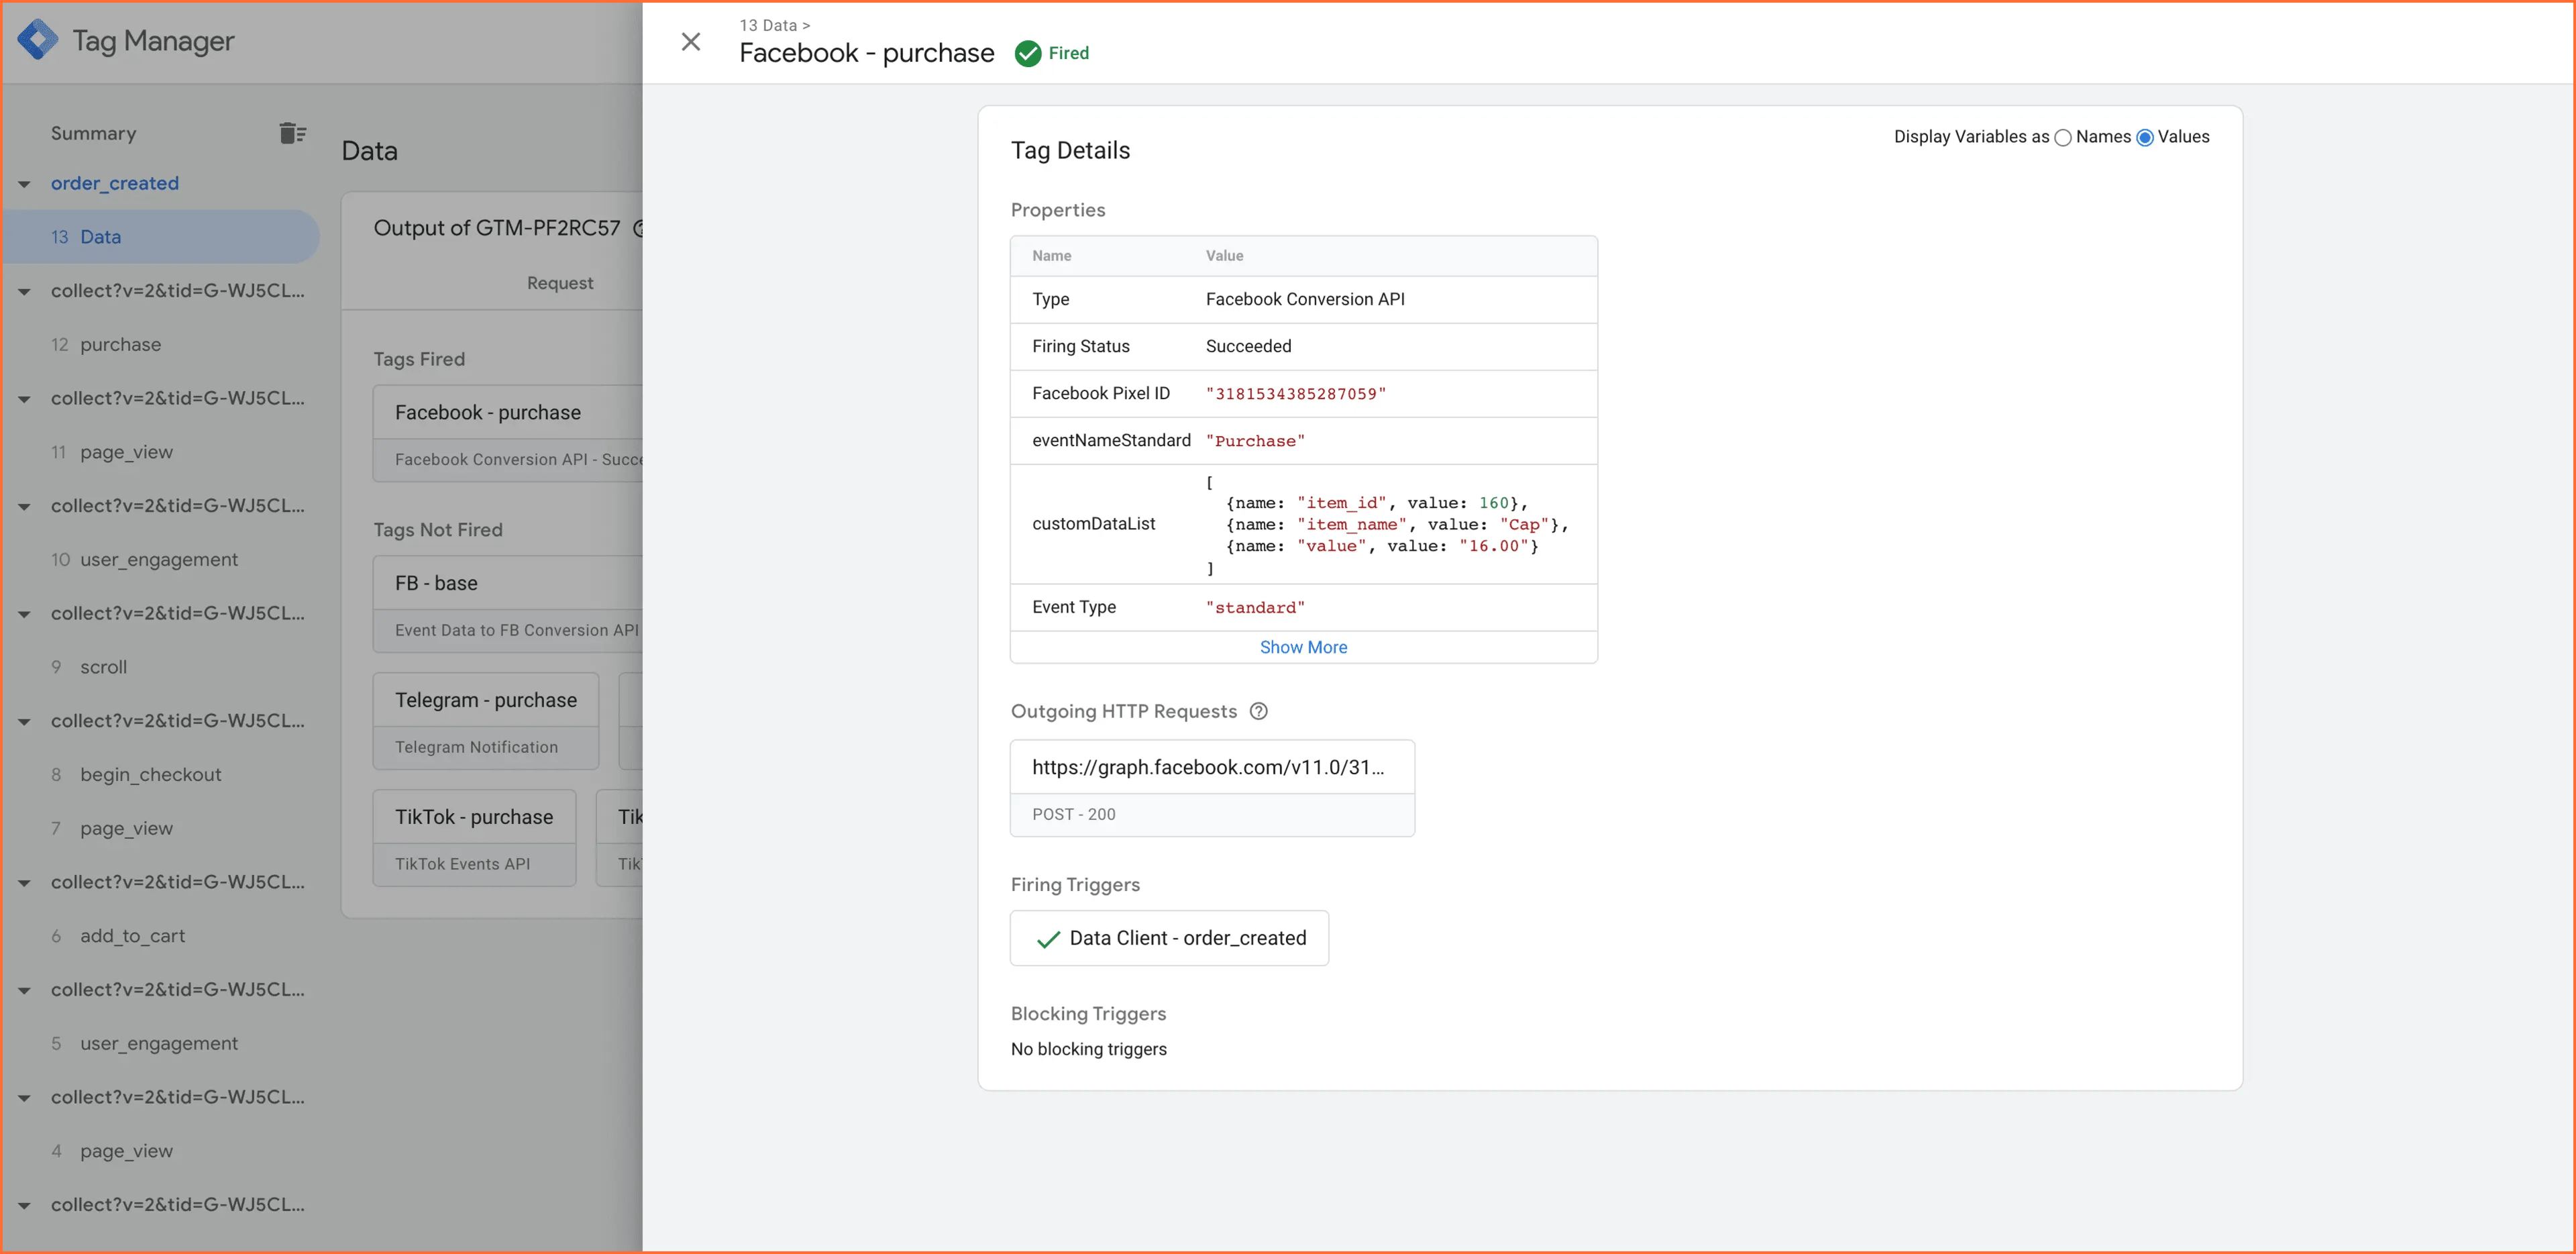
10. Set up Facebook Conversions API for the webhook that you've created. Create a new tag → Tag the Facebook Conversions API → In the Setup Method, select override → Select the event name → Add the parameters you want to send to the FB API.
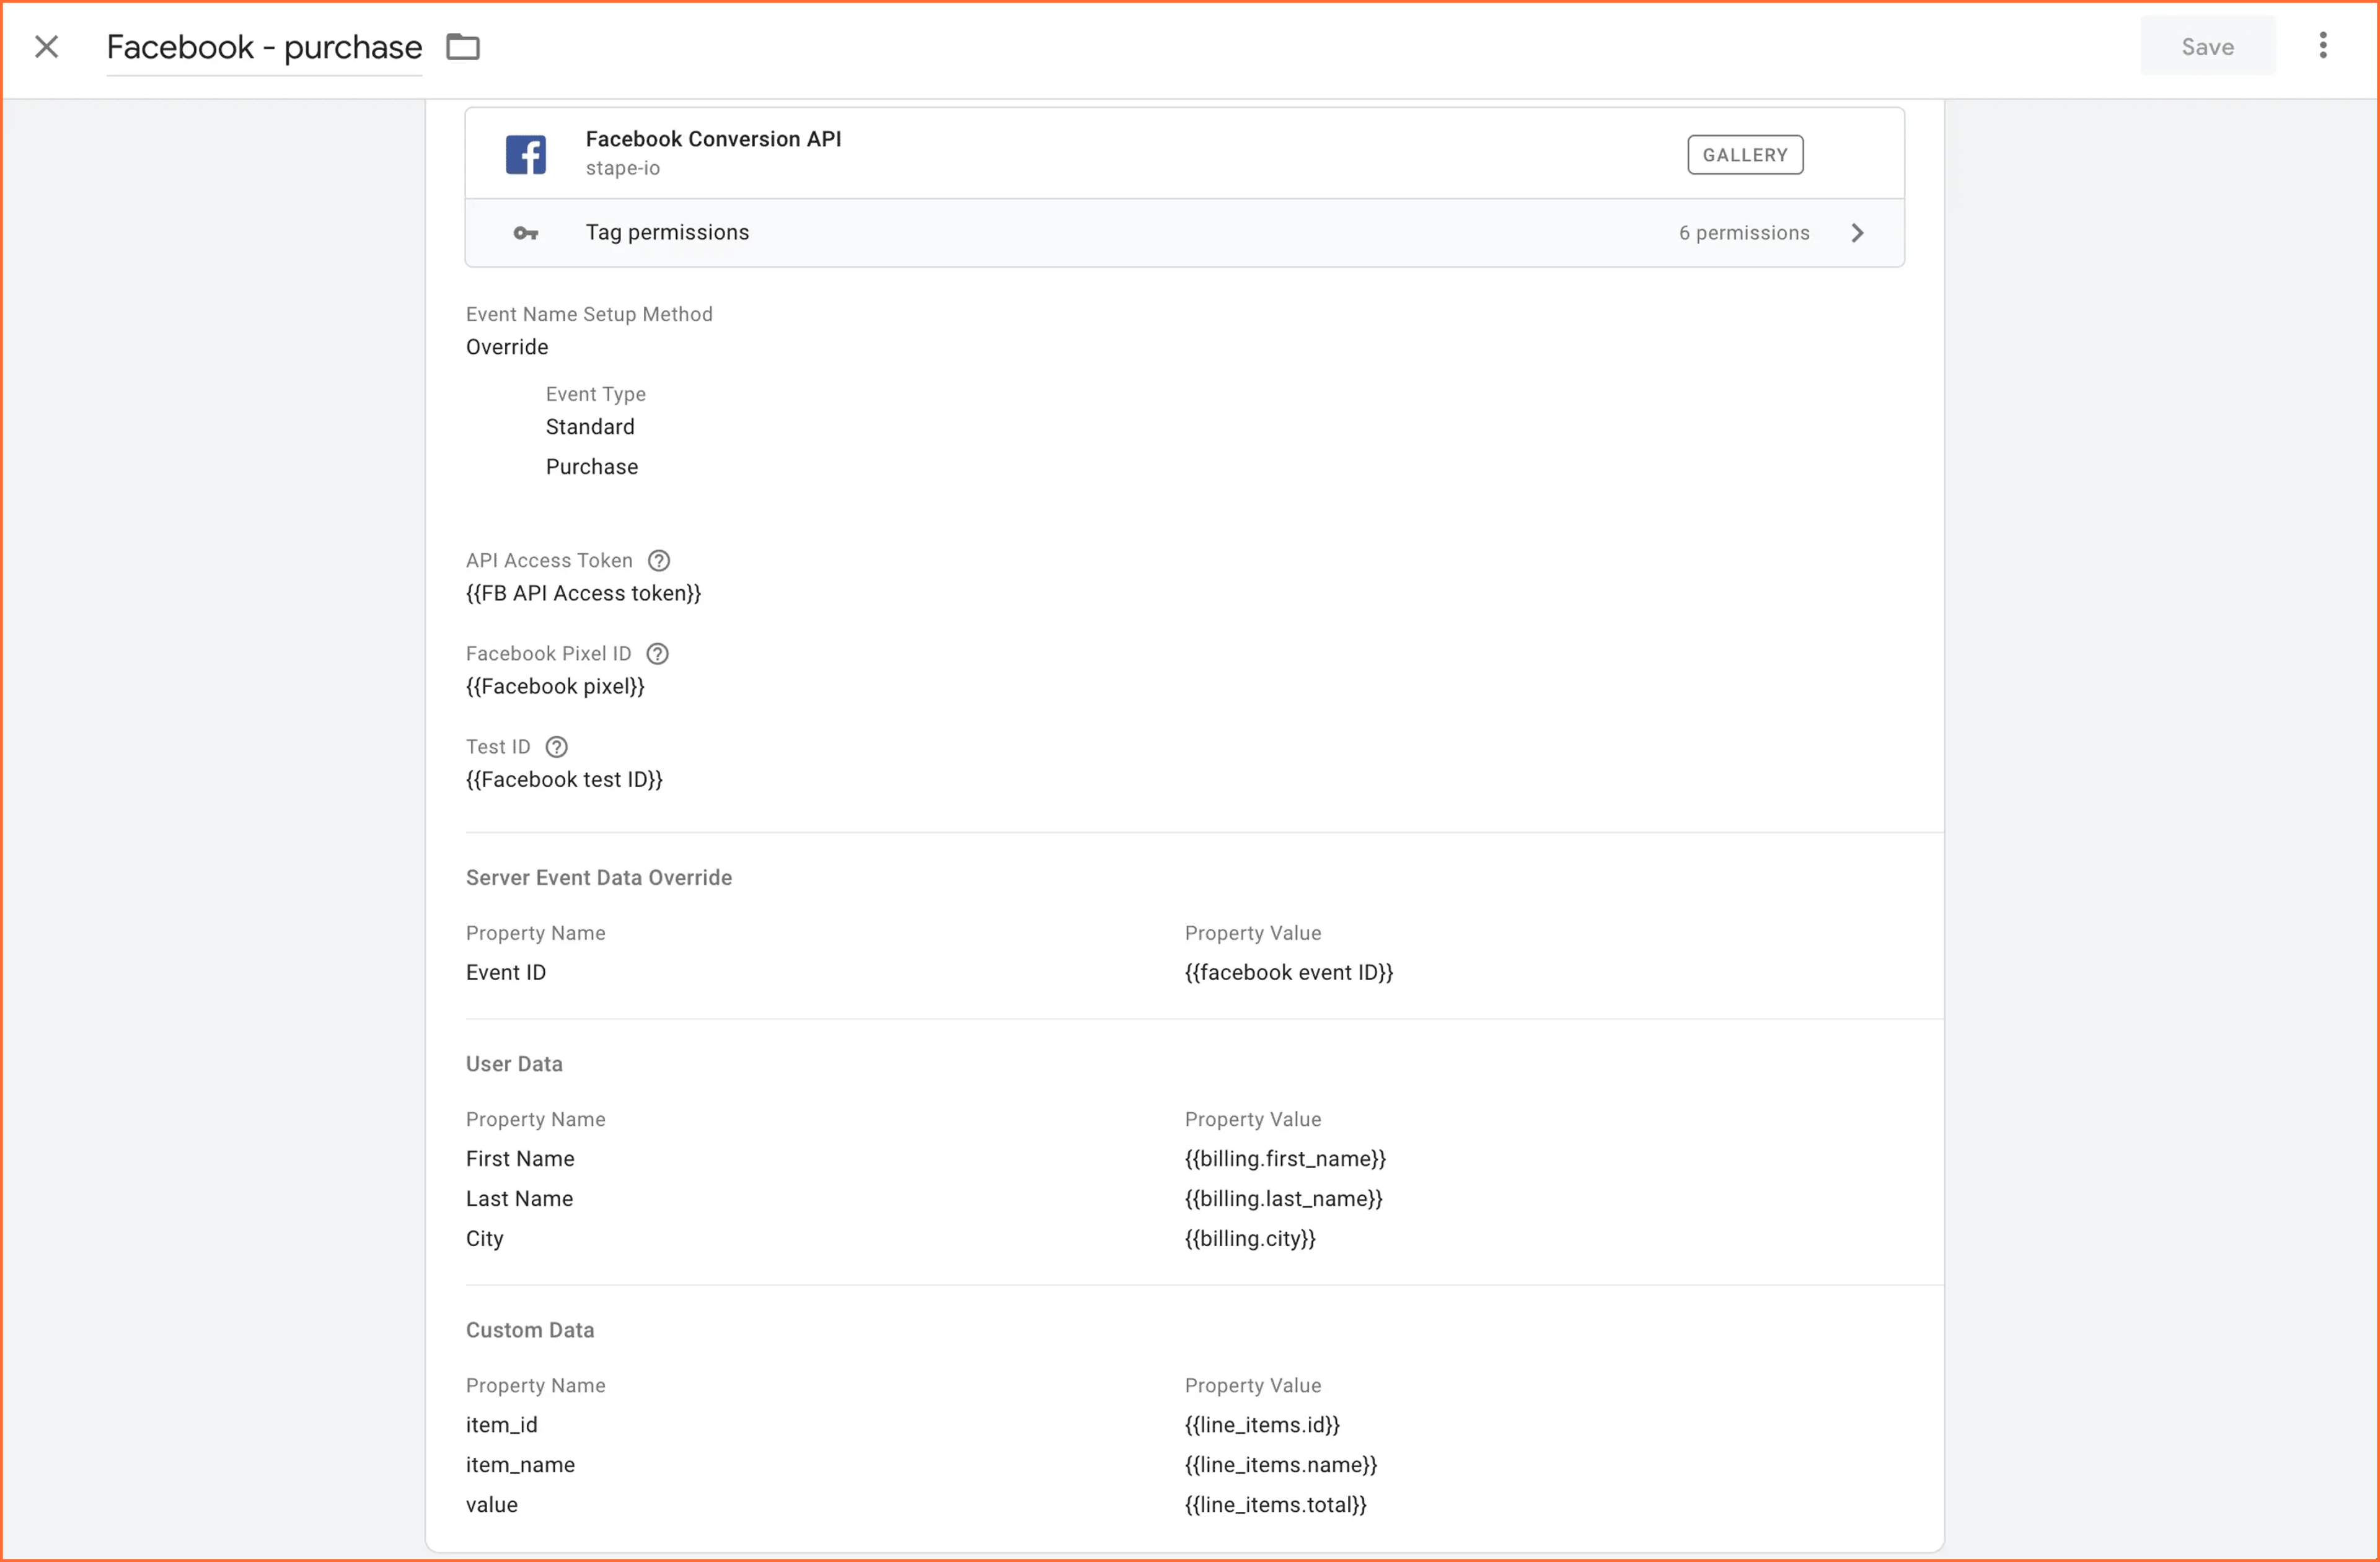
11. Set up a trigger for this tag. In our case, the FB purchase will trigger when the request path equals /order_created and Client Name equals Data Client.
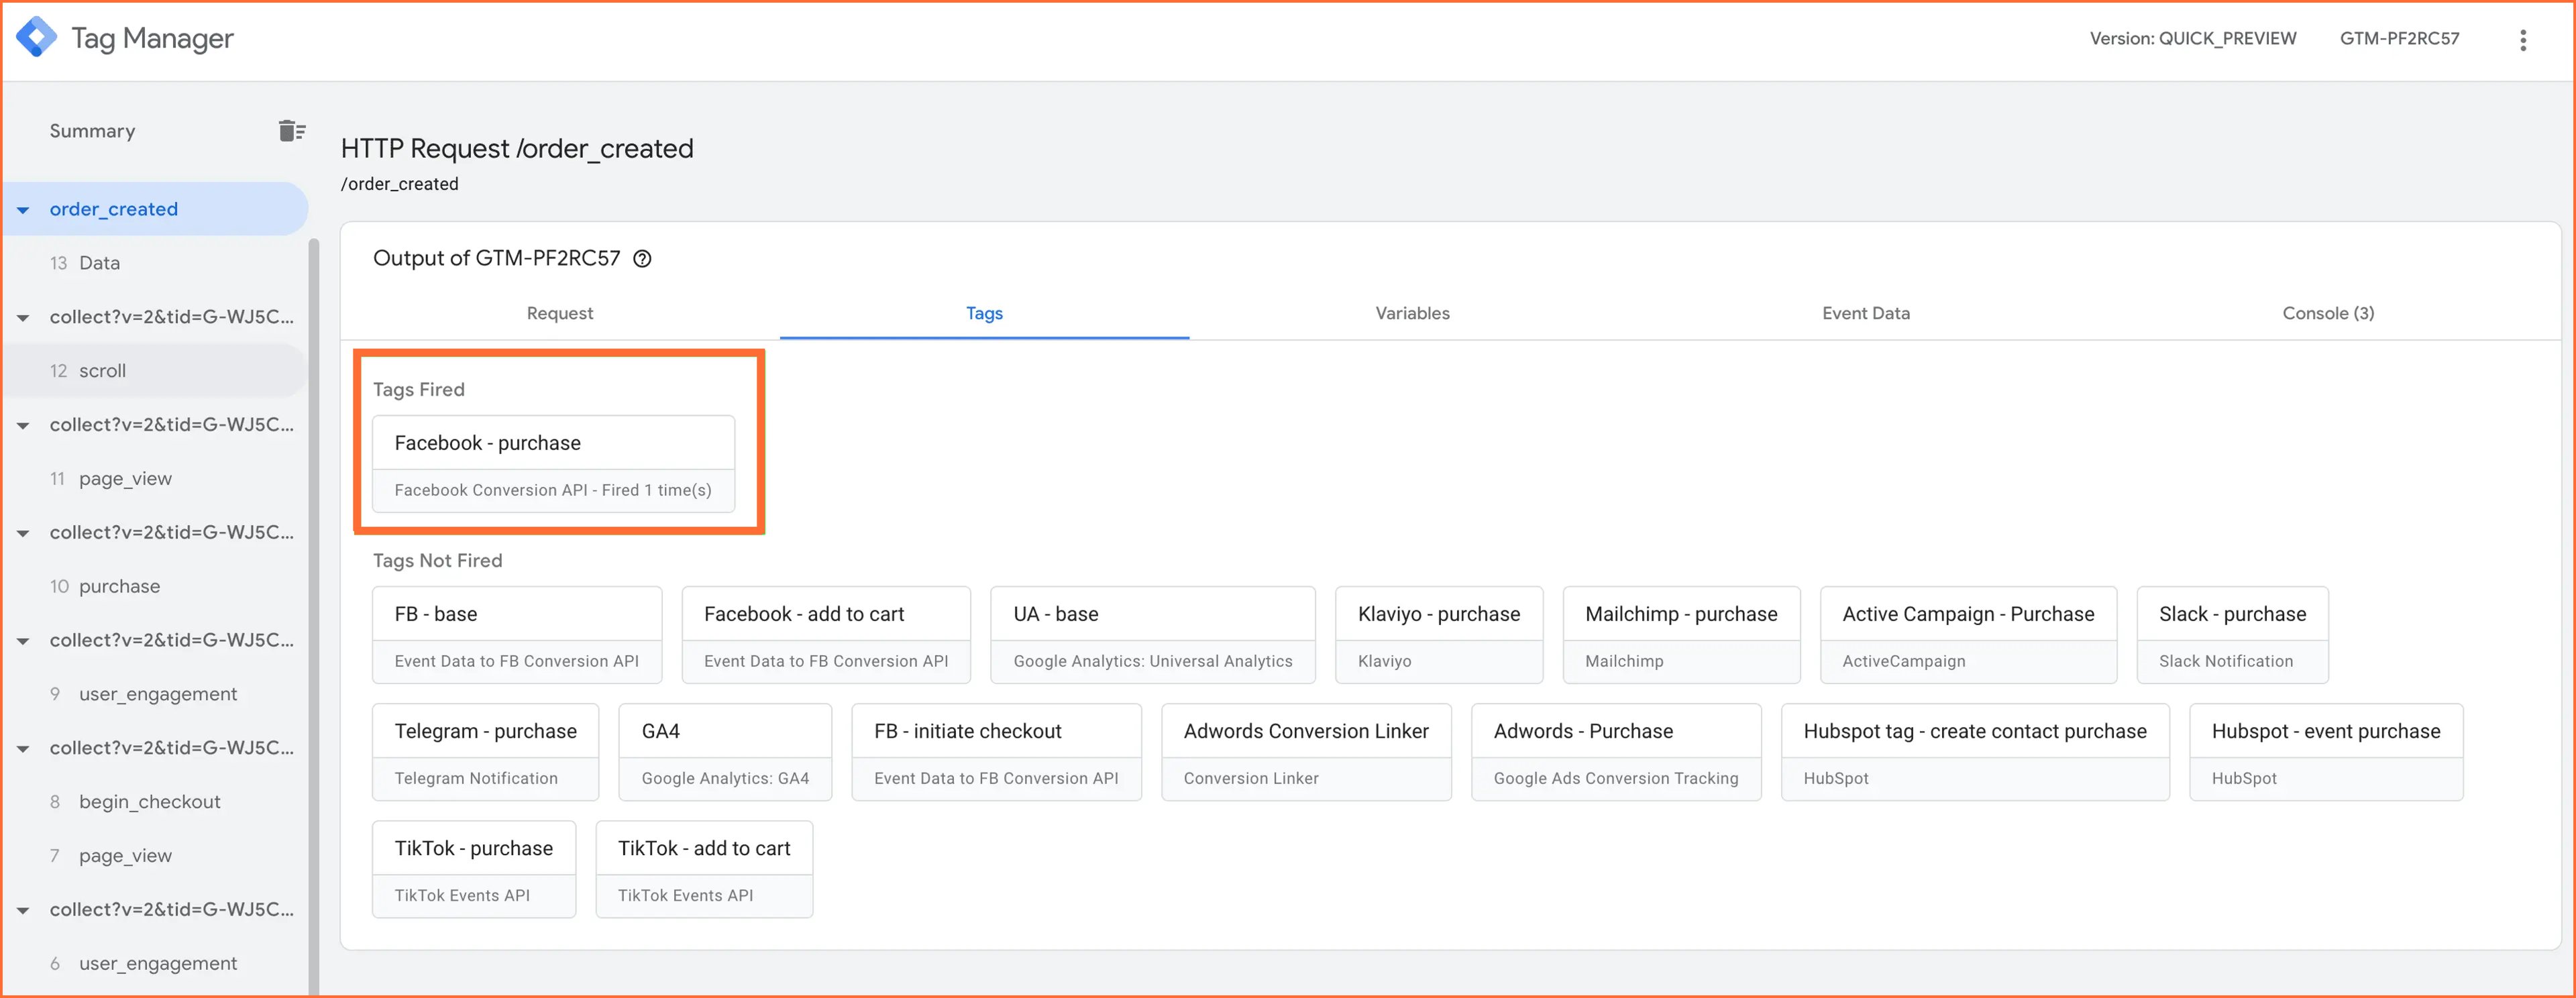
12. Test Facebook CAPI tag.
13. If everything worked correctly, remove Preview Header that you've added on step #5 from the stape.io admin and publish changes you’ve made in the GTM server container. If you have any issues with the FB CAPI tag, check this blog post on how to debug your setup.
Conclusion
Data from your CRM system can be sent to the Facebook Conversions API using webhooks, without needing any coding skills. This is done through the Google Tag Manager server container. This means the data from your CRM can serve as a valuable source for Facebook custom audiences and conversions. With Stape.io, you can easily test webhooks in the Google Tag Manager server container.
Got confused?
All it takes is a few simple questions. Click Get help, fill up the form, and we will send you a quote.

Comments