What are webhooks, webhook servers, and how to use
Among the numerous business process automation tools, a webhook server plays a key role in enabling real-time data exchange between applications. It receives incoming HTTP requests triggered by lightweight, event-driven code blocks called webhooks, and processes them the moment a specific event happens. By setting up webhooks, you can streamline processes that usually depend on manual input, ultimately saving time and energy.
In this blog post, we will explain what webhooks are, why they're the perfect choice for your flexibility, how they work, and their use in server-side tracking.
What are webhooks
In a nutshell, a webhook is a piece of program code. It usually consists of the following parts:
- Webhook URL: indicates your desired request destination.
- Body (payload): holds the actual data or details you want to send to another app.
- Header: defines the structure or encoding of the message content, such as whether it's in JSON or XML format (these two are the most popular ones because they present data in a way that is easy for other applications to manipulate with).
- Request method: usually POST, but depending on the nature of the request, GET, PUT, or DELETE can be used, too.
Webhooks are automated messages sent from web applications to other web applications. It is a powerful tool that allows developers to inform multiple services of updated content or user data. This allows web pages to remain in sync, as webhooks enable developers to connect two web services quickly and automatically transfer information between them in real time. Webhooks can be used for almost anything, including push notifications when an item has been shipped or sending payment information when a purchase has been made. Webhooks provide ease and convenience without needing manual input or middleware software, making web development smoother than ever.
What is a webhook server
A webhook server is an application that listens for incoming HTTP requests, typically POST requests, sent by other applications when specific events occur. Think of it as an automated notification system between software. When something happens in one system (e.g., a new user signs up, a payment is processed, code is pushed to a repository), that system sends a message (the webhook) to a predefined URL where the webhooks server is listening. The server then processes this incoming information to trigger actions in another system.
Purpose of a webhook server
The main purpose of a webhook server is to enable real-time or near real-time communication and automation between different software applications or services. They achieve this by:
- Decoupling systems: applications don't need to be tightly integrated or constantly query each other for updates. They can react to events as they happen.
- Efficiency: webhooks eliminate the need for continuous polling, which consumes resources and can introduce delays. With webhooks, data is pushed instantly.
- Automation: webhooks are a cornerstone of automation. For instance, a new sale in an eCommerce platform (event) can trigger a webhook to a server that then updates inventory, notifies the shipping department, and adds the customer to a mailing list, all automatically.
- Extensibility: webhooks allow developers to extend the functionality of applications by reacting to their events in custom ways.
How webhooks work
Webhooks work on a simple yet effective principle:
- Registration: to get started with server-side webhook hosting, you must first decide which application you want to trigger and which application will receive your webhooks. Typically, the sending application is referred to as the ‘source’ while the receiving application is referred to as the ‘destination.’ Once you have chosen both applications, you register a specific URL with the source application. This URL points to the webhook server. You also specify which events you want it to notify you about.
- Event occurrence: a webhook is triggered when an event that you are interested in occurs on your site, CRM, chatbot, or other systems. For example, a person wrote a comment or added a new product to the product accounting system. When this event occurs, the server creates an HTTP request and sends it to the address specified by the customer to receive webhooks. For example, a person wrote a comment or added a new product to the product accounting system
- HTTP request: the source application automatically creates and sends an HTTP POST request (though other methods can sometimes be used) to the registered URL of the webhook server. This request contains a payload, usually in JSON or XML format, with details about the event.
- Server reception and processing: the webhook server, which is constantly listening at the specified URL, receives this HTTP request.
- Action execution: upon receiving the webhook, the server processes the payload. Based on the information received, it can then perform predefined actions. This could involve updating a database, sending a notification (like an email or a chat message), triggering a build process, or initiating any other automated workflow. The user can also configure webhooks so that events on some sites trigger actions on other sites. For example, a person creates an order in the online store → the system sends a webhook to the owner's app → the app notifies the owner and sends the person an estimate.
- Response (optional): the webhooks server typically sends an HTTP response back to the source application to acknowledge receipt of the webhook (e.g., a 200 OK status). This confirms that the message was successfully delivered. If the source application doesn't receive this acknowledgment, it might try resending the webhook.
How can I use webhooks?
There are many scenarios to utilize webhook servers, some of which are:
- Continuous integration/continuous deployment (CI/CD): when code is pushed to a repository (like GitHub or GitLab), a webhook can notify a CI/CD server (e.g., Jenkins, GitLab CI) to automatically start a build and deployment process.
- Payment gateways: services like Stripe or PayPal use webhooks to notify a merchant's server about payment statuses (e.g., successful payment, failed payment, subscription renewal).
- Content management systems (CMS): when content is updated in a headless CMS, a webhook can trigger a rebuild of a static website.
- Communication platforms: incoming messages or events in chat applications (like Slack or Discord) can be sent via webhooks to other services for logging, analysis, or automated responses.
- Customer relationship management (CRM): updates in a CRM (e.g., new lead, deal stage changed) can trigger webhooks to synchronize data with marketing automation tools or other sales platforms.
- IoT devices: IoT devices can send data to a webhook server when certain sensor readings cross a threshold or an event occurs.
Webhooks and server-side tracking
Using webhooks in server-side tracking is surprisingly simple. With webhooks, data can automatically be sent to the server Google Tag Manager container every time an event or action takes place on your website.
The most common use case of webhook in server-side tagging is sending webhooks from the CRM or CMS. For example, whenever a user is created, updated, an order placed, etc., you can send this data to server GTM.
Case study: 50% increase in tracked events: webhooks setup for HandyHand and HappyHelper | Obsidian Digital
- Challenge: unifying fragmented user journeys and attributing final service payments to ad clicks, especially with Safari's strict cookie limitations blocking data accuracy.
- Solution: a server-side webhook solution using Stape's Data Client and Stape Store to link initial online bookings to the final payment confirmation.
- Results: a 50% increase in tracked events and the ability to accurately calculate ROI by linking marketing spend to finalized transactions.
Benefits of webhooks for events tracking
With the help of webhooks, you can track events that happen not on your website or app. Things like sales in offline stores or phone leads - all this data can be sent to advertising platforms using webhooks and server-side tagging.
Imagine this scenario: a user stumbling across your advertisement online, clicks through, and arrives on your website. After some exploring, they had queries regarding the product, so they decided to give you a call. Customer service representatives answered all the questions, and a user placed an order by phone.
In this case, one particular campaign is responsible for the order, but how can you track it? The most obvious way is to ask clients how they find your website. They might say something like an online ad or tell the platform where they saw it. But this information won’t help to understand which campaign or ad set was responsible for the conversion.
Tracking such orders is possible with the help of webhooks and server-side tagging. Whenever a new phone order is created in the CRM, you can send a webhook to server Google Tag Manager with all the order and customer details. After the server GTM gets this data, you can distribute it to the advertising network. If the ad network can match a user who made an offline purchase to a user who saw your ad, this order will be reflected as an offline conversion to a corresponding campaign.
Webhooks vs API
An Application Programming Interface (API) and a webhook both facilitate communication between software systems, but they do so with different communication patterns.
An API is a set of defined rules and protocols allowing one software application to interact with another. It acts like a menu at a restaurant: you, as the client, make specific requests (e.g., "get me customer data," "create a new order") to a server. This process is called polling. The server then processes your request and provides a response, also known as the payload. This communication is request-driven; the client initiates the interaction and actively pulls information from the server or pushes data to it. The client decides when to ask for updates.
A webhook, often referred to as reverse API or push API, represents a push mechanism or an event-driven notification. Instead of the client constantly asking for updates, the server proactively sends data to the webhook listener when a specific event occurs within the server's system. It's like a delivery service: the server sends a package of information to your designated address only when something new happens. The client doesn't need to ask; they receive the information right when it becomes available.
The core distinction lies in who initiates the interaction: with an API, the client makes a request; with a webhook, the server sends a notification when an event takes place. APIs are for asking questions or giving commands; webhooks are for being informed automatically about events.
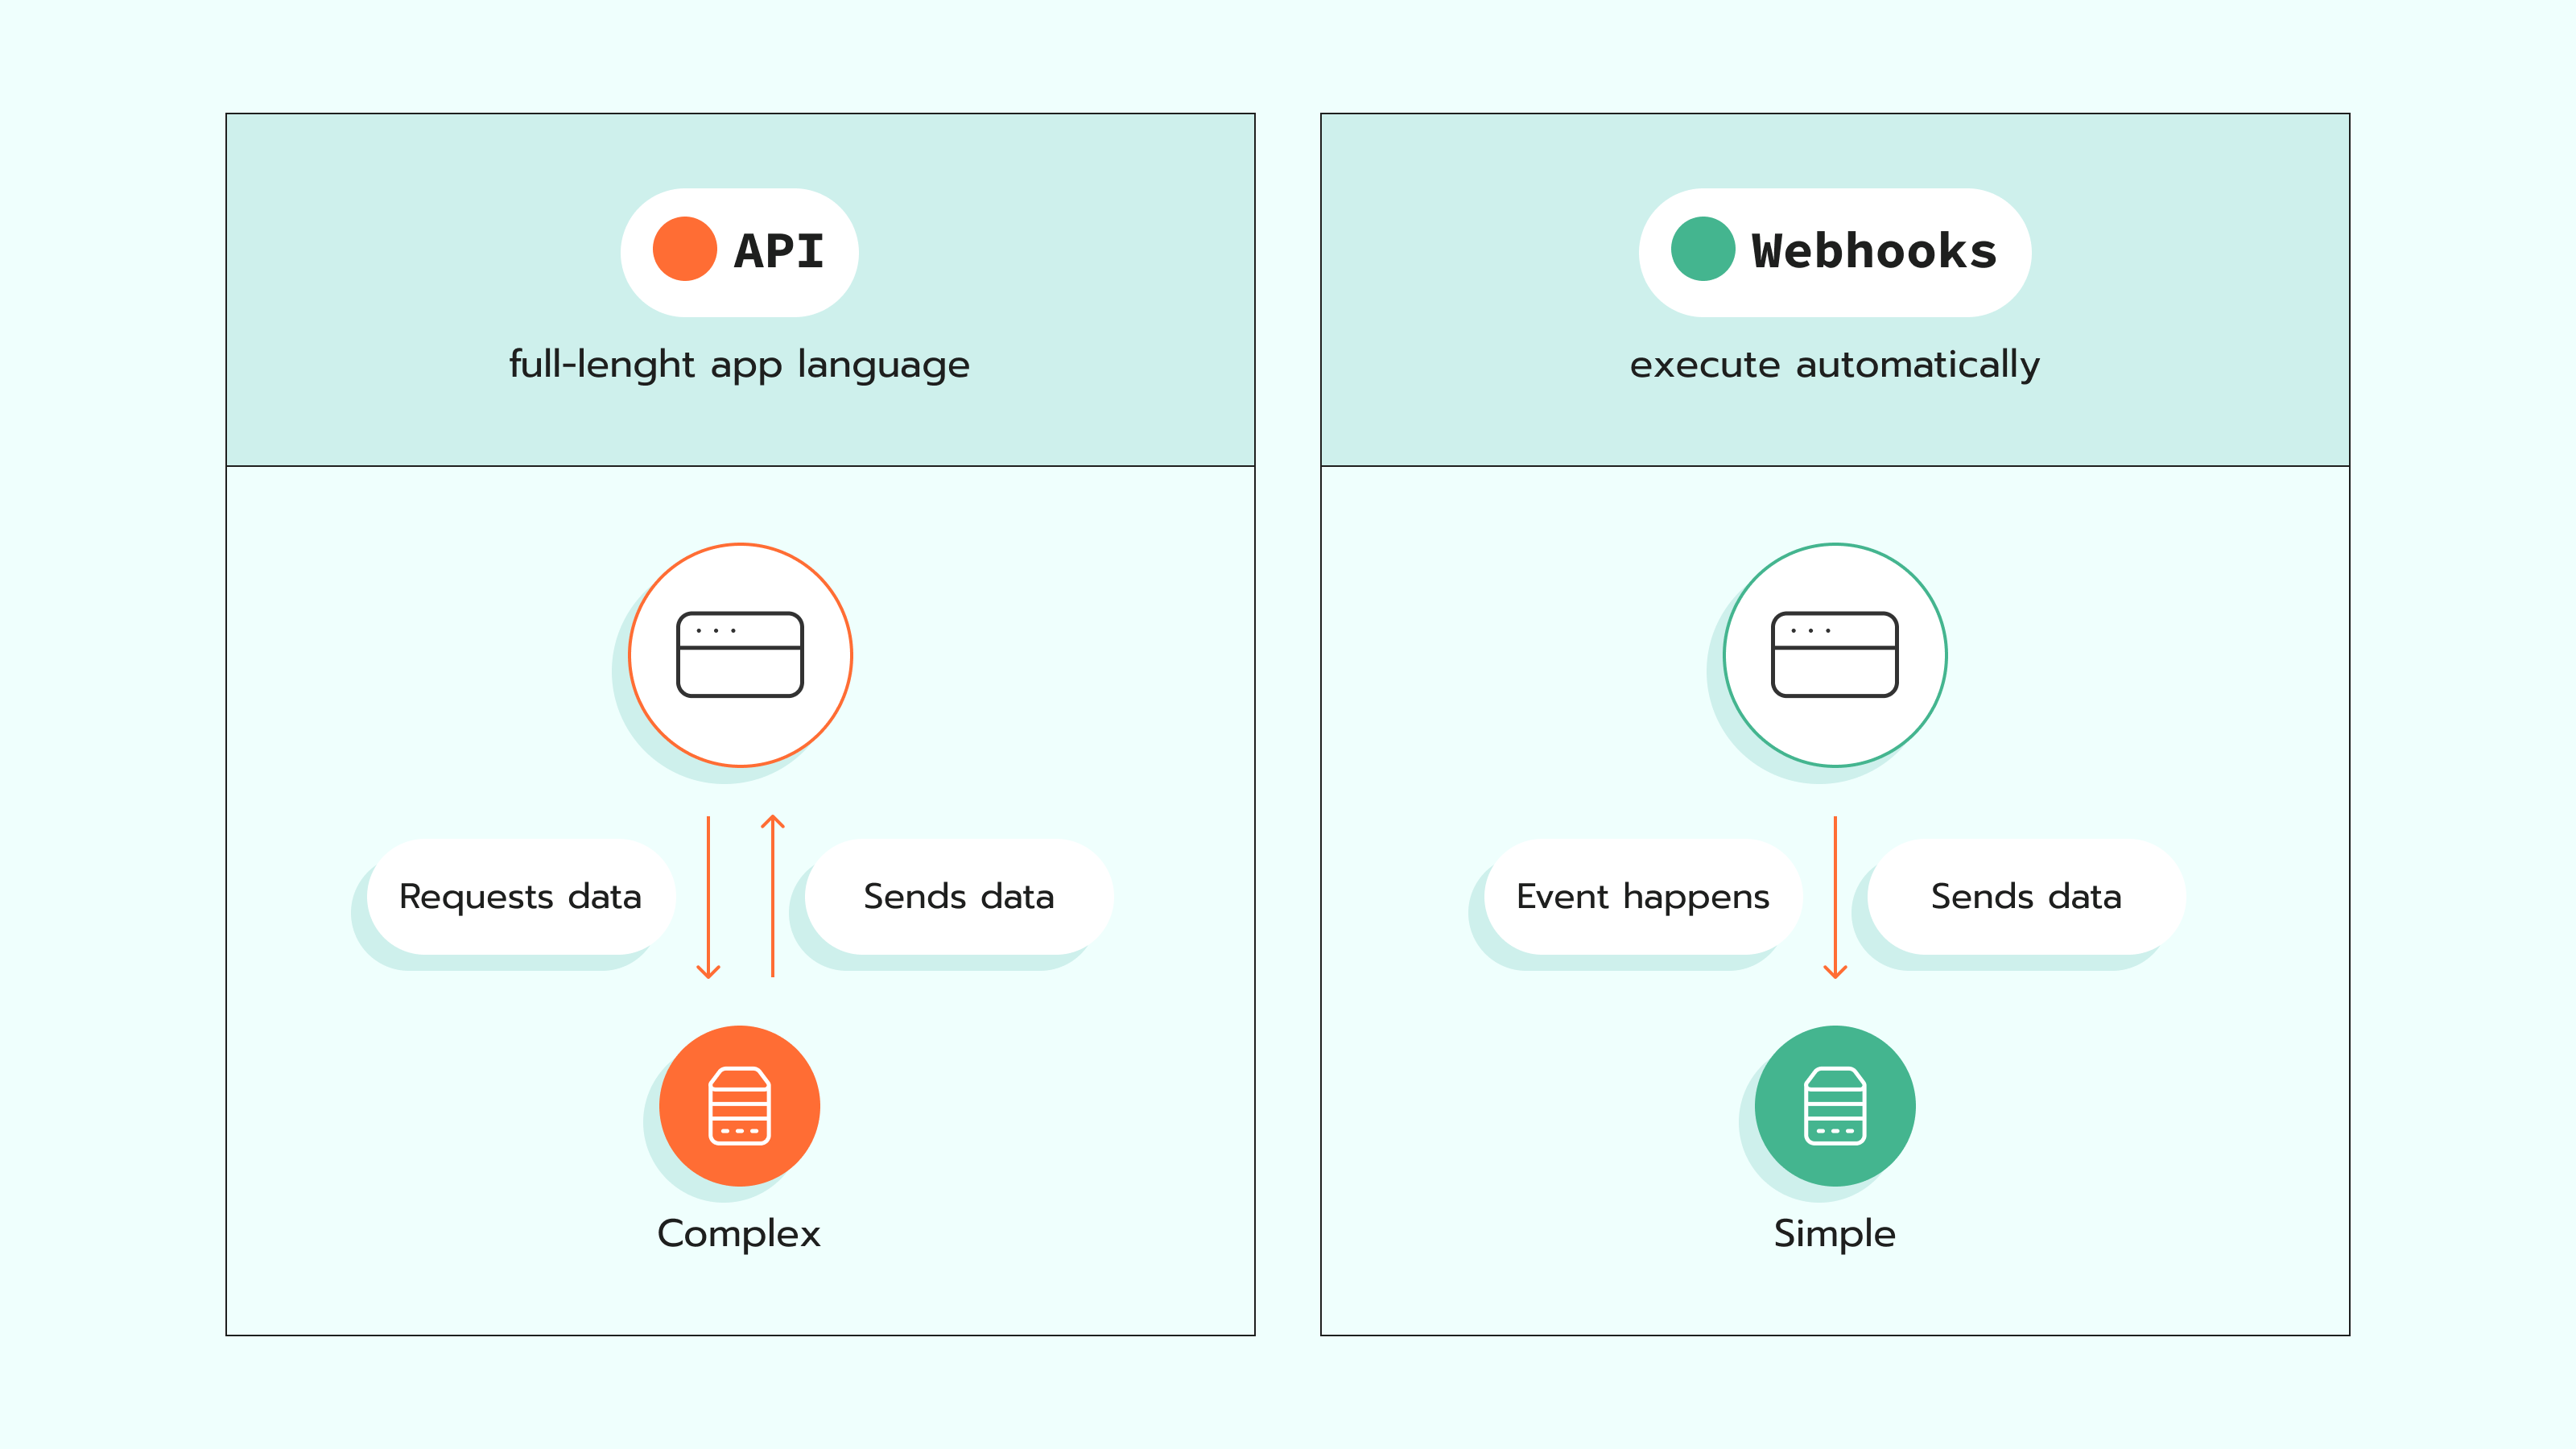
With all that said, you should be aware that webhooks themselves are not APIs and do not substitute them. Instead, they work together. In other words, in order to use webhooks, your system must have a running API already.
Webhooks alternative
Stape has developed Conversion Tracking CRM apps that automatically send lead status updates to required platforms or generate Customer Match lists in Google Ads. That's a quicker and more convenient way to configure offline data tracking. So far, the limited list of CRMs is supported.
Learn more about these apps and how to set them up in our configuration guides:
How to set up webhooks for event tracking
The reason why using webhooks in sGTM can help to track conversions more accurately and improve conversion attribution is obvious. So let's dive into details on how to set up webhooks in sGTM.
Using webhooks offers significant advantages for effective conversion attribution and precise event tracking. This approach enables direct, event-driven data transmission from your source systems, bypassing traditional client-side limitations. Generally, to set up webhooks for event tracking, you should:
- Identify the system where your events occur and configure it to dispatch webhooks for specific events (e.g., a new user registration, a purchase).
- Establish a webhook listener or server at a designated URL, which will receive these incoming event notifications.
- Program your listener to extract relevant data from the received webhook payload and forward it to your chosen analytics or tracking system for storage and analysis.
These steps are quite uniform for all systems, but the setup details may differ. In this chapter, we will explain in detail how to set up and use webhooks in sGTM.
1. How to send webhooks to sGTM
Check your CRM or CMS for a native plugin or functionality that supports webhooks. The most popular one does. Once you've found it, create a webhook for the event you want to track. In the webhook settings, add your server-side tagging URL with the path that will distinguish your webhook.
In our case:
https://ss.wp-demo.stape.io is the server-side tagging URL
/order_created is the path that differentiates my webhook that sends data whenever an order is placed.

2. How to see webhook data in sGTM
Sending webhook data from CRM or CMS is relatively easy. However, you need to see webhook data in the sGTM debugger to set up tags accurately. The chances that one can set up tags without using a debugger are low.
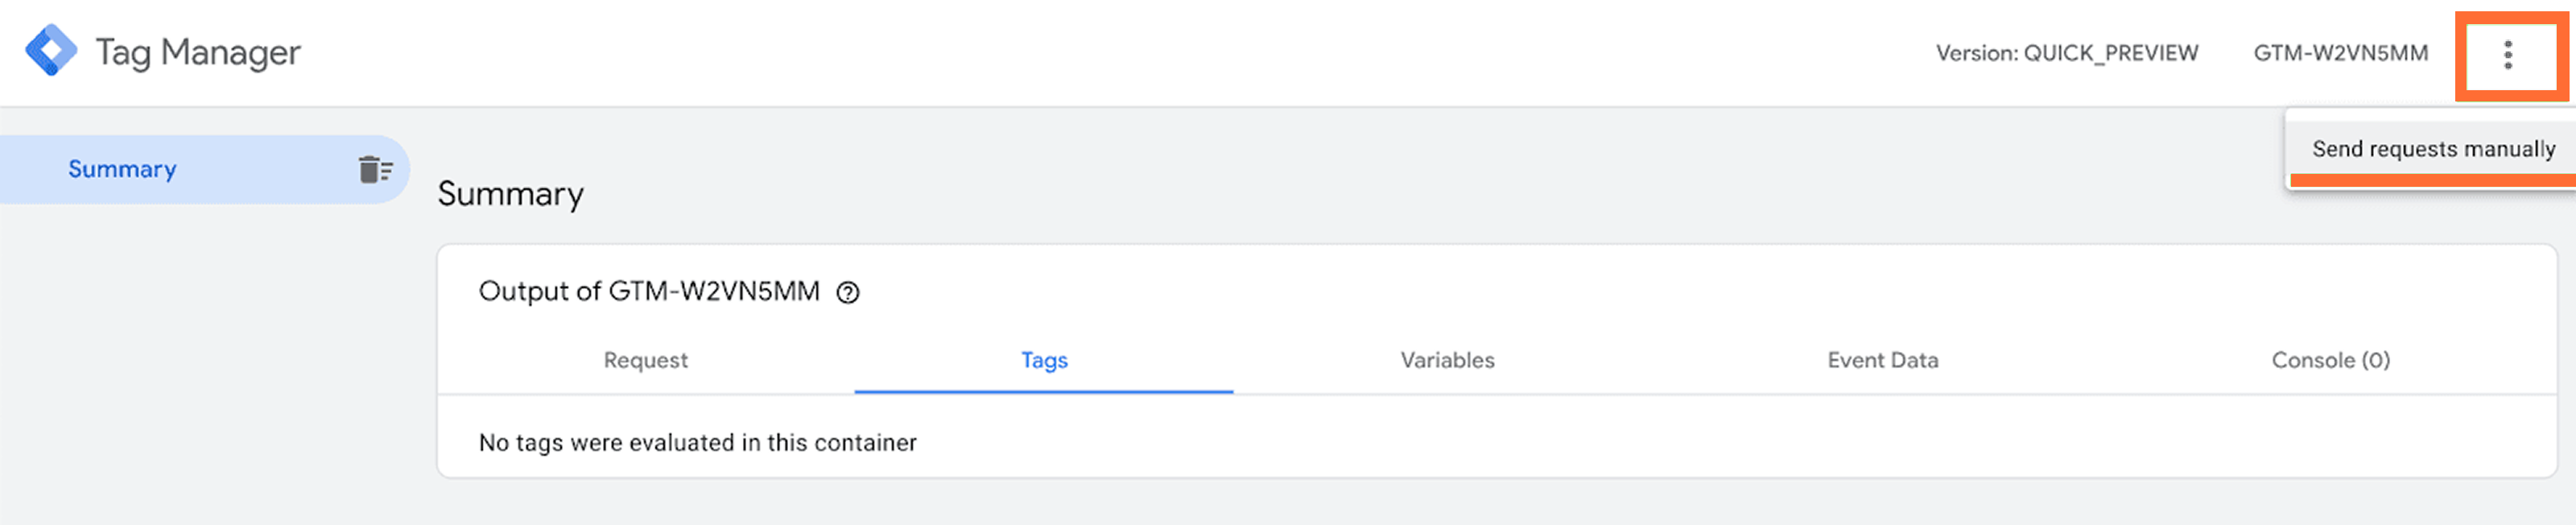
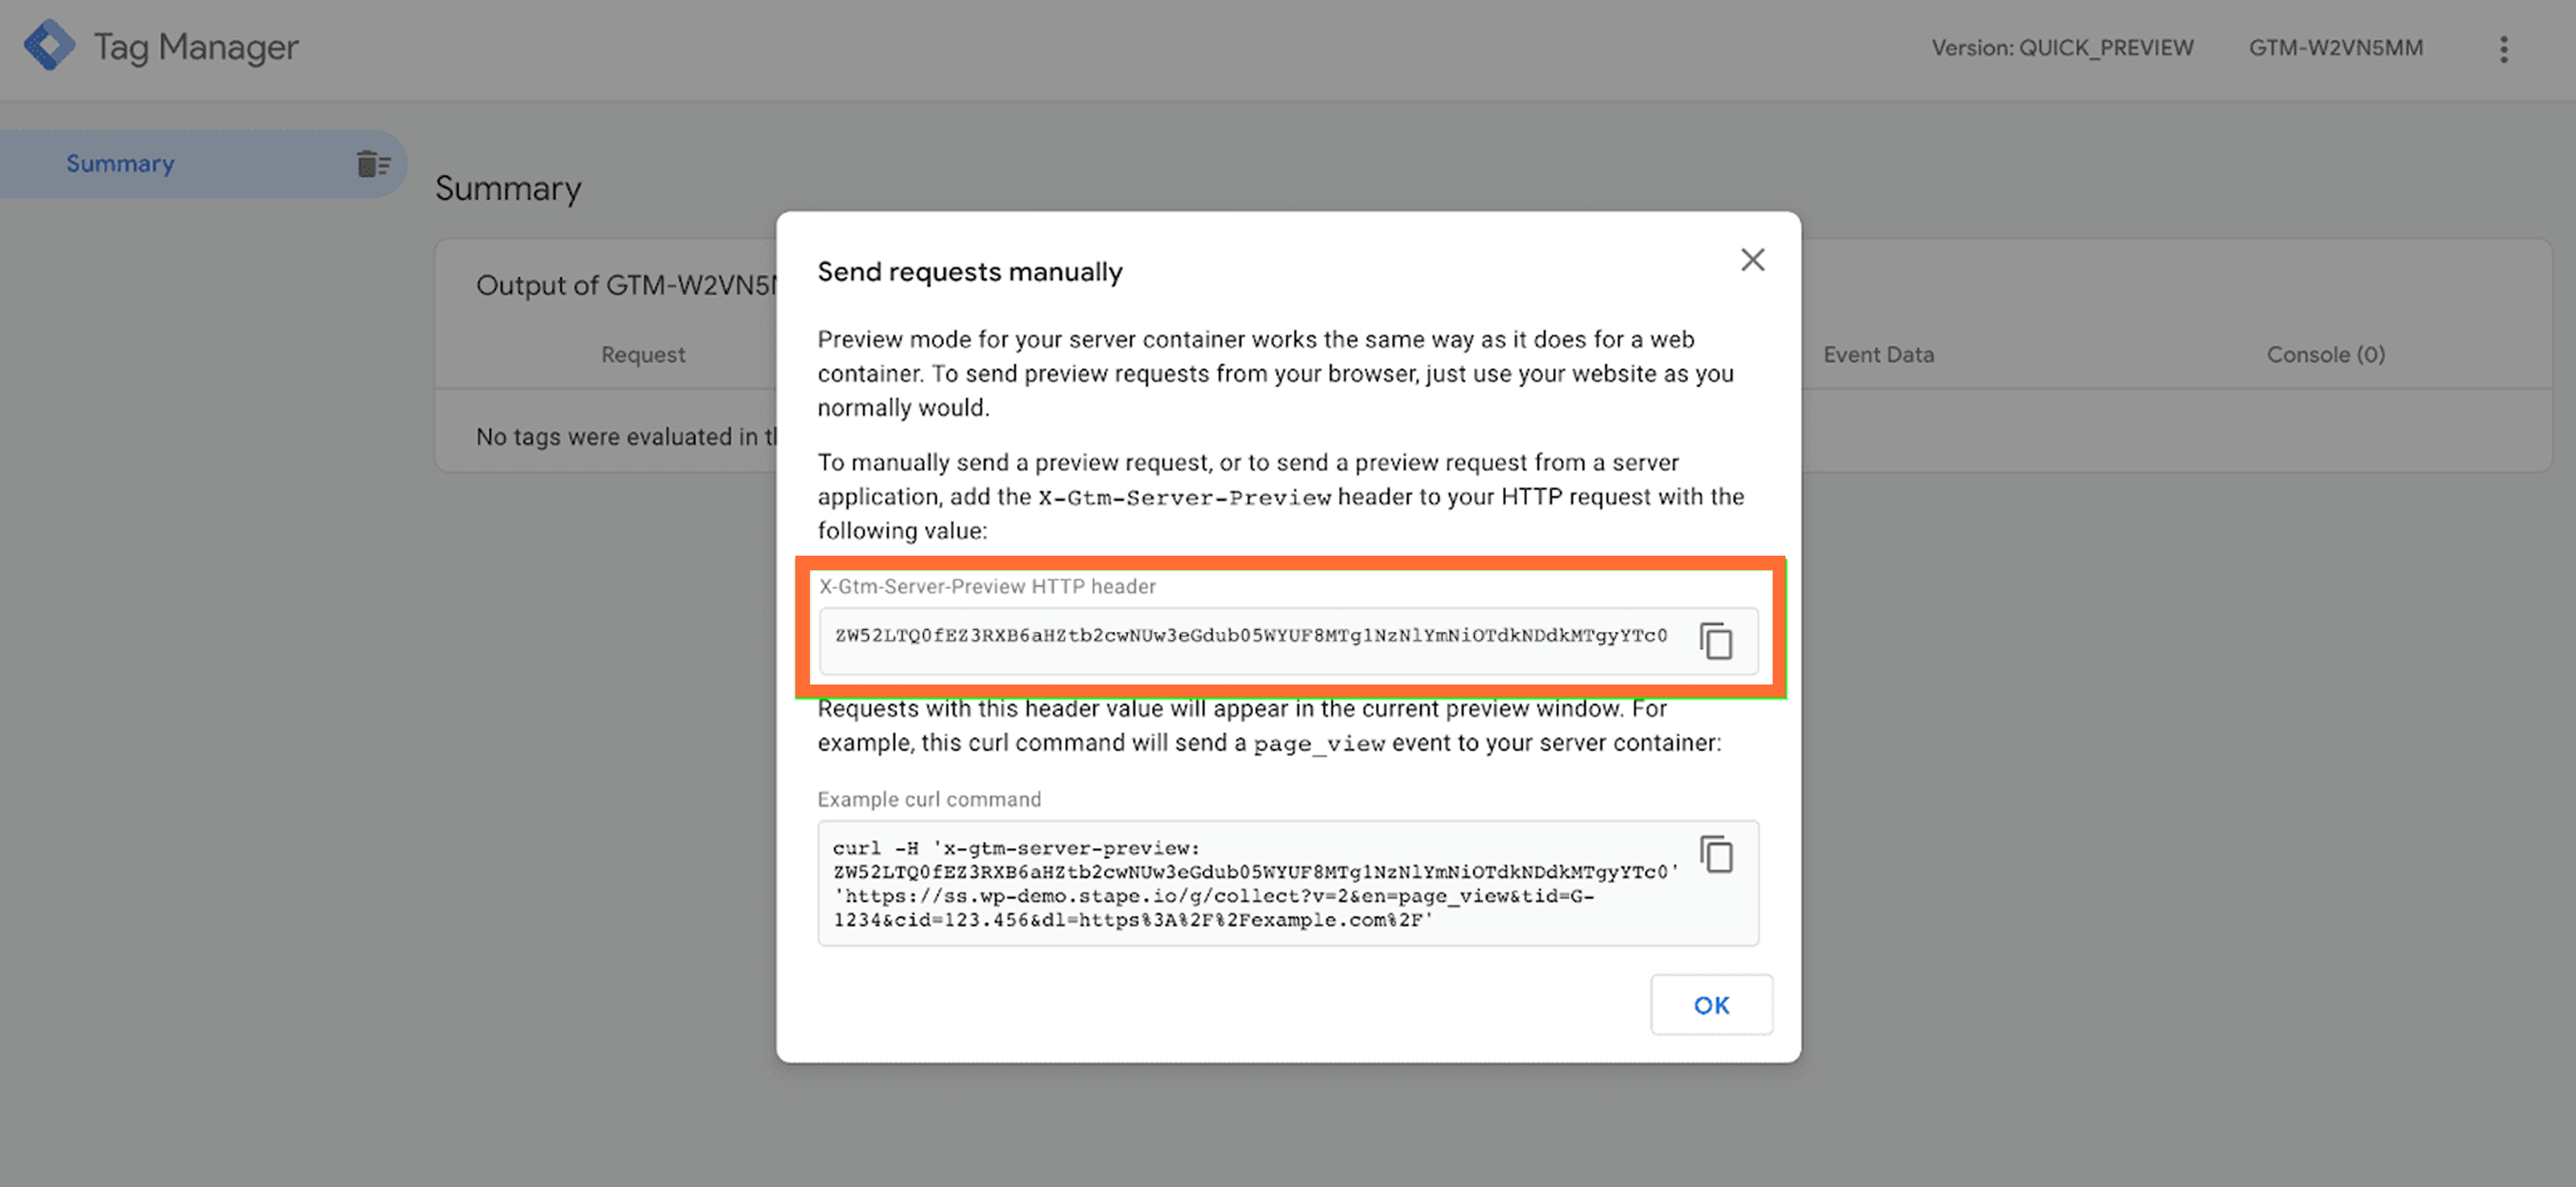
By default, you can't see webhook data in sGTM. To make it visible, we need to use Preview HTTP header functionality in the sGTM debugger and Stape.
To enable the sGTM preview header open your server Google Tag Manager container → click Preview → click three dots in the top right corner → click Send requests manually → copy X-Gtm-Server-Preview HTTP header.
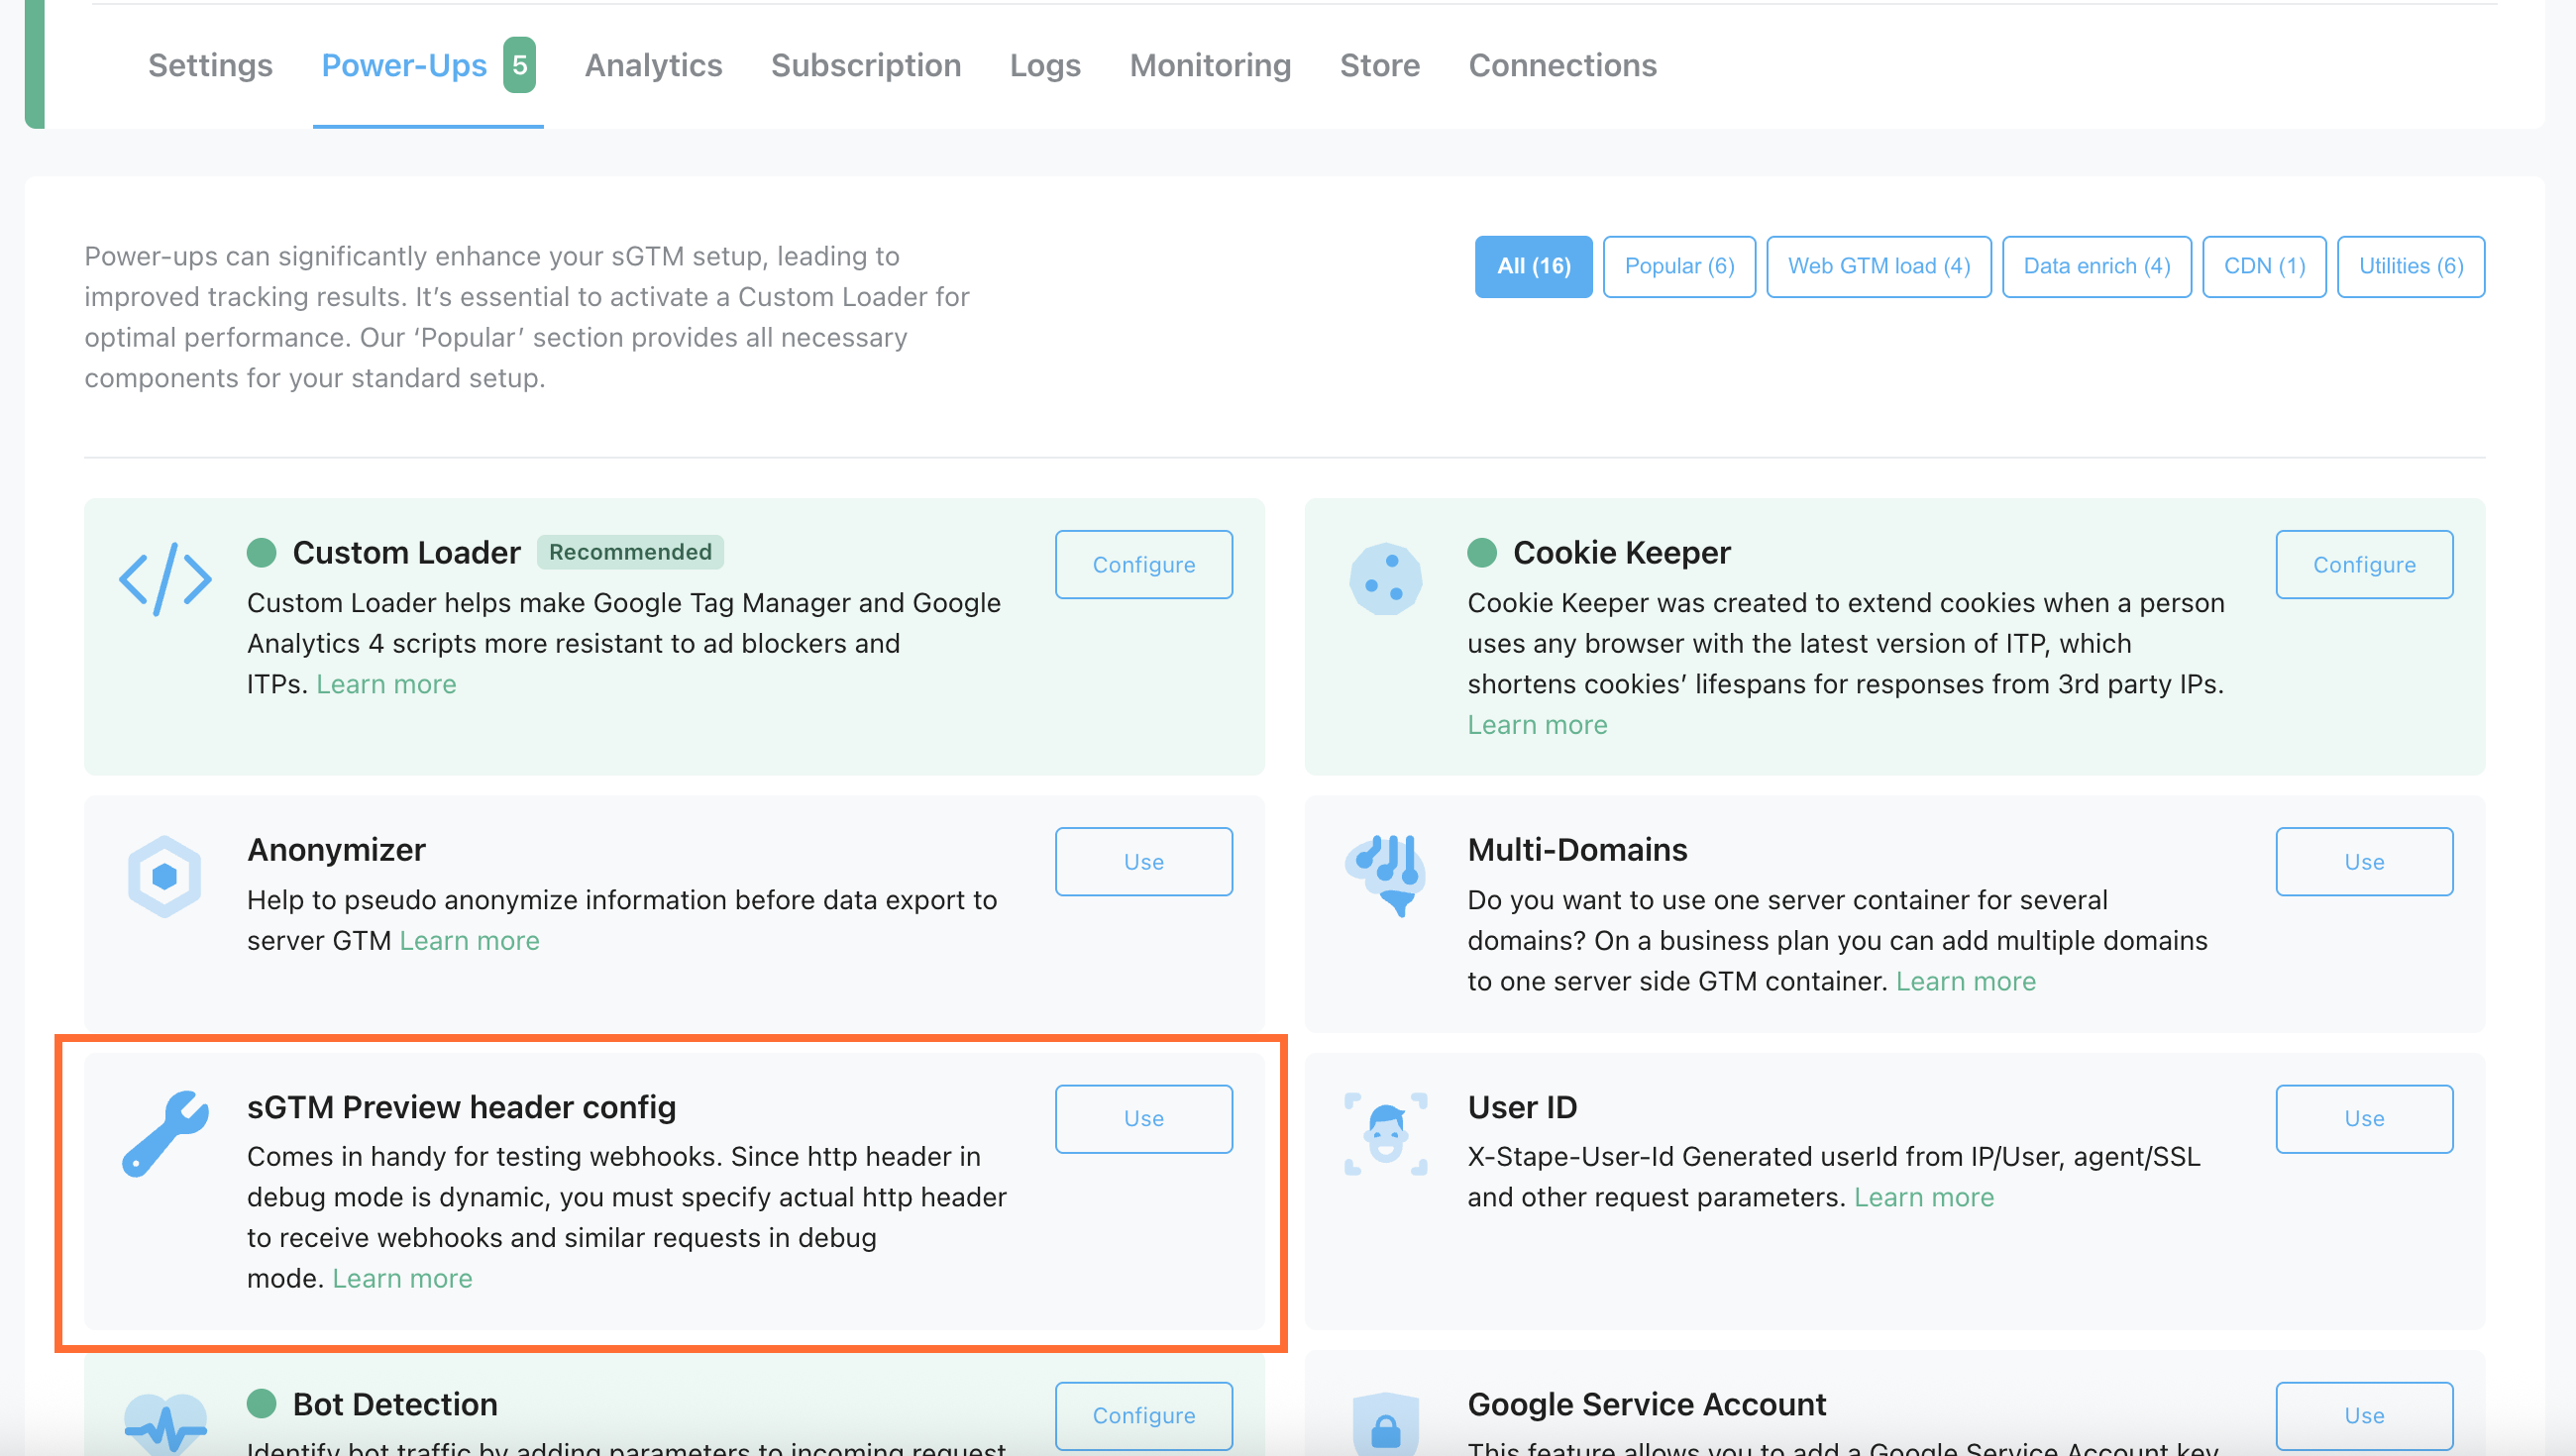
Log in to your Stape account, open the sGTM container, go to Power-Ups and click Use sGTM Preview header config.
Paste the Preview HTTP header you've copied from the server Google Tag Manager debugger and click Save.
The above steps will allow you to see webhook data in the server Google Tag Manager debugger. After you've done the setup, remove Preview Header from Stape sGTM Power-ups. Our system automatically removes the Preview Header 1 hour after you’ve enabled it.
3. How to process webhook data in server Google Tag Manager
The last preparation step before you can eventually send webhook data to the advertising or analytics platform is to process webhook data in sGTM. We will do so with the help of Stape’s Data Client.
In sGTM, clients are responsible for claiming requests and processing request data to event data.
Import Data Client to your sGTM container. The first step would be to download Data Client from GitHub. Then, go to the sGTM container, open the Templates sections, and click New client.
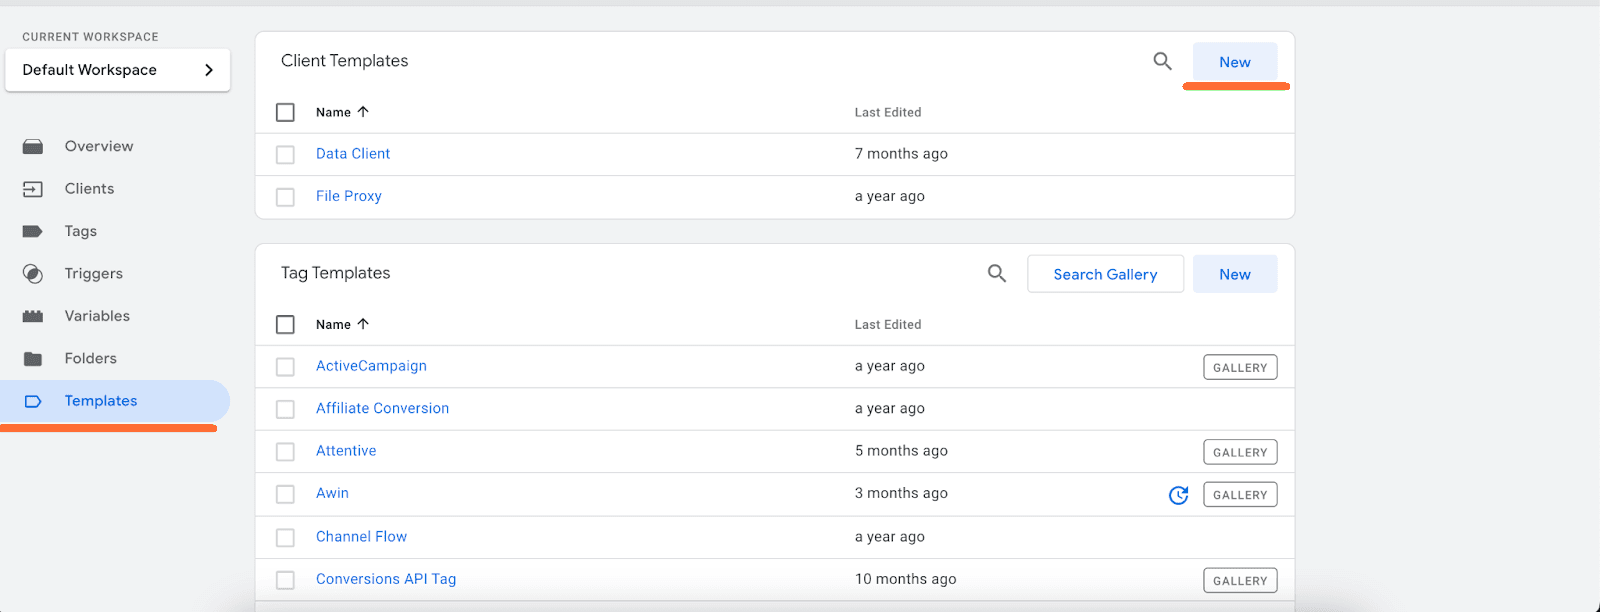
Click three dots and then Import. Next, select the Data Client template you downloaded from GitHub and save it.
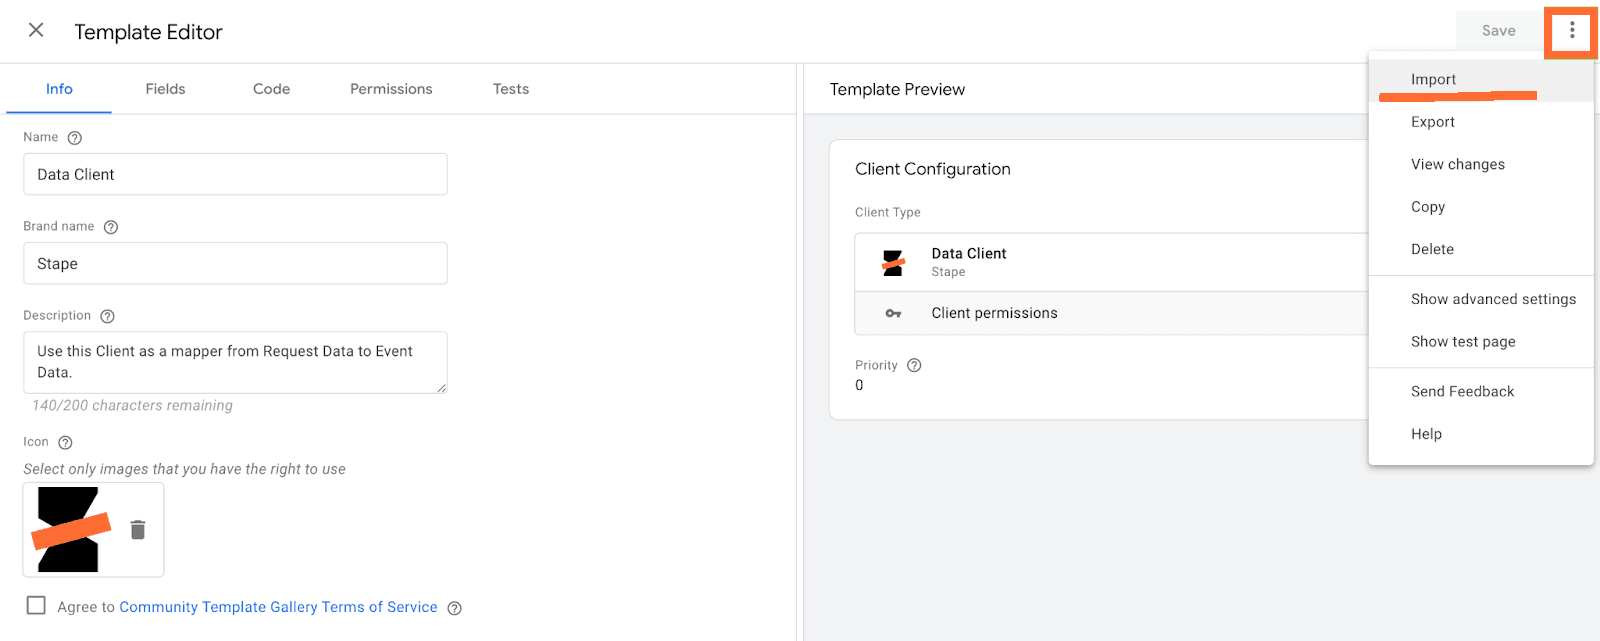
Go to the Clients tab and create a new Client. Select Client type - Data Client, add client name, and scroll to Accepted Path Settings. Add a path that differentiates your webhook. In my case, it's /order_created and click Save.
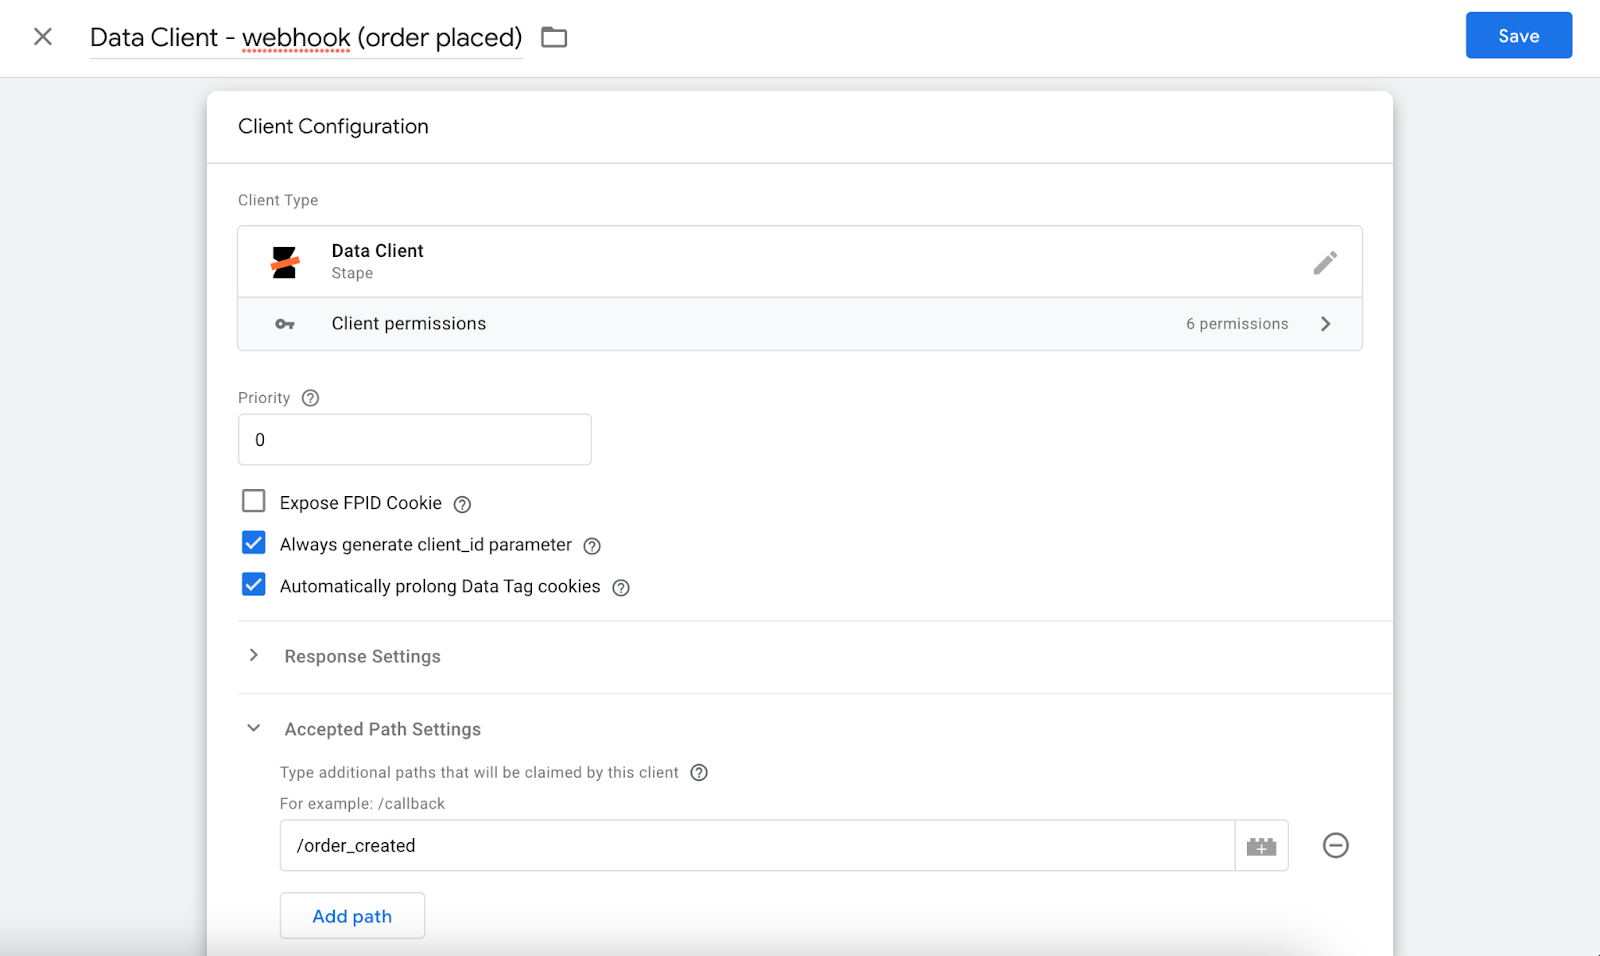
Once done, open sGTM and test that the webhook was sent and the Data Client processed the requests successfully.
4. How to use webhook data for setting sGTM tags
This step highly depends on your goals and technology stack. For example, you can send offline events to Facebook offline tracking or Google Offline Conversions API. Or you can notify your sales or marketing department about new orders using Slack or Telegram tag for sGTM.
FAQs
How to use webhooks in marketing?
Webhooks automate marketing workflows by triggering actions, such as sending welcome emails upon new sign-ups or updating CRM records after a purchase, based on real-time events. This allows for instant reactions to customer interactions without manual intervention.
How to create a webhook server?
To build a webhook server, you should develop an application that exposes an HTTP endpoint, configured to listen for incoming event notifications and then execute predefined operations based on the received data. This program handles the incoming HTTP requests and processes their payloads.
Can I build my own webhook?
Yes, you can create a system to emit webhooks by programming it to dispatch HTTP requests containing event information to a specified destination URL whenever relevant occurrences take place within your application. You can also configure a webhook listener to react to external system events.
How can Stape help with a webhook server?
Stape can assist by providing a platform for server-side tagging, which enables the creation of custom webhook endpoints for sending data to other systems or acting as a receiver for event notifications without relying on client-side code. This capability allows for more controlled and secure data flows. Also, you can process webhook data in your sGTM container with the help of Stape Data Client template.
Conclusion
Webhooks offer an easy and convenient way to receive real-time notification updates for web-based activities, allowing companies to respond and act upon those notifications with minimal effort quickly. Additionally, webhooks are a secure way of sharing information with other web services like marketing or analytics platforms, as they don't require developers or programmers to provide users with access credentials or sensitive data.
If you feel confused - do not hesitate to contact Stape support. We will be more than happy to help you.
Want to switch to server-side?
You can do it for free at Stape! Click Try for free and explore the advantages!

Comments