Facebook offline conversion using server GTM
Marketers who run Facebook Ads often search for better ways to track results and improve campaign performance. Accurate tracking helps measure real actions and optimize ads that bring results. But tracking has become harder with privacy updates and browser limits.
After privacy changes, many advertisers started using the Facebook Conversions API to send data directly from backend to Meta. This helps fix data loss and improve Facebook offline conversion tracking quality.
Another option is Facebook offline tracking, also called offline conversions. It uses first-party data like CRM or in-store sales that are not blocked by cookies or privacy settings. This method keeps tracking consistent across both online and offline activities.
In this guide, we show how to send offline events from your CRM or POS to a server Google Tag Manager container via webhooks, then forward them to Meta through the Conversions API.
What is Facebook offline conversions?
Facebook offline conversions help track actions that happen outside your website, like in-store or phone sales. It is part of Facebook offline tracking and lets you connect real sales with your Meta Ads results.
You can upload or send offline event data to Facebook using the Facebook Сonversions API. Meta matches this data to people who saw or clicked your ads. When a match is found, the action is counted as an offline conversion Facebook Ads event.
Today, customer journeys often include many touchpoints before a sale. That's why many marketers use offline conversion tracking as an extra layer of analysis when checking campaign performance across both online and offline actions.
There are several ways to start offline tracking on Facebook or integrate your CRM with Meta:
- Manual upload using a CSV file
- Built-in a custom integration
- Connectors like Zapier
Each option has its limits. Custom Facebook offline conversion integration needs developer time to build a connector between your CRM or POS and Meta. Tools like Zapier make it easier, but can be costly if you send many events. Manual upload through CSV takes time and often causes errors.
Stape offers two methods to configure Facebook offline conversion tracking:
- using Stape Conversion Tracking CRM apps (HubSpot, Pipedrive, HighLevel, Zoho, and Salesforce)
- a server-side Google Tag Manager (GTM) container tags.
Stape Conversion Tracking CRM Apps
Stape has developed a suite of CRM applications designed to send offline conversion data from your CRM directly to the Meta platform. These apps can send lead status updates from CRMs to the platforms you need and automatically generate Customer Match lists in Google Ads.
Find out the configuration guides below:
Using webhooks
If among the CRMs supported by Stape's apps, there is no one you use, you can easily set up Facebook offline conversion tracking with webhooks. In this article, we focus on the benefits and show the configuration process in detail.
Why use Facebook offline tracking?
There might be multiple reasons to use Facebook offline tracking.
- Measure events more accurately
- Create quality custom and lookalike audiences
- Optimize campaigns towards the best performing ads and ad sets
- Increase ROAS of FB campaigns
Even if you already use the Facebook Conversions API, setting up offline tracking through server GTM can still help.
It lets Meta receive data about purchases or signups that happen outside your website, like in-store or phone sales. The more complete data you send to Meta, the more precisely its algorithm can learn who is most likely to convert next. This often improves audience quality and overall ad performance.
Offline tracking can also help fill reporting gaps caused by iOS privacy settings. When a person who opted out of app tracking makes a purchase, the Facebook Pixel won't record it. But if your CRM sends this sale to server GTM, Meta can still match it with someone who saw your ad, without using device identifiers. This gives you more complete reports without breaking privacy rules.
Another massive benefit of Facebook offline tracking is that it's still eligible for a 28-day attribution window. While with FB pixel or FB CAPI, the maximum you can get is a 7-day attribution.
Step 1: Configure webhooks
Below, we will consider setting up webhooks in WordPress using Stape's plugin for WordPress. If you are using another content management system, you will need to do the same - configure the webhook.
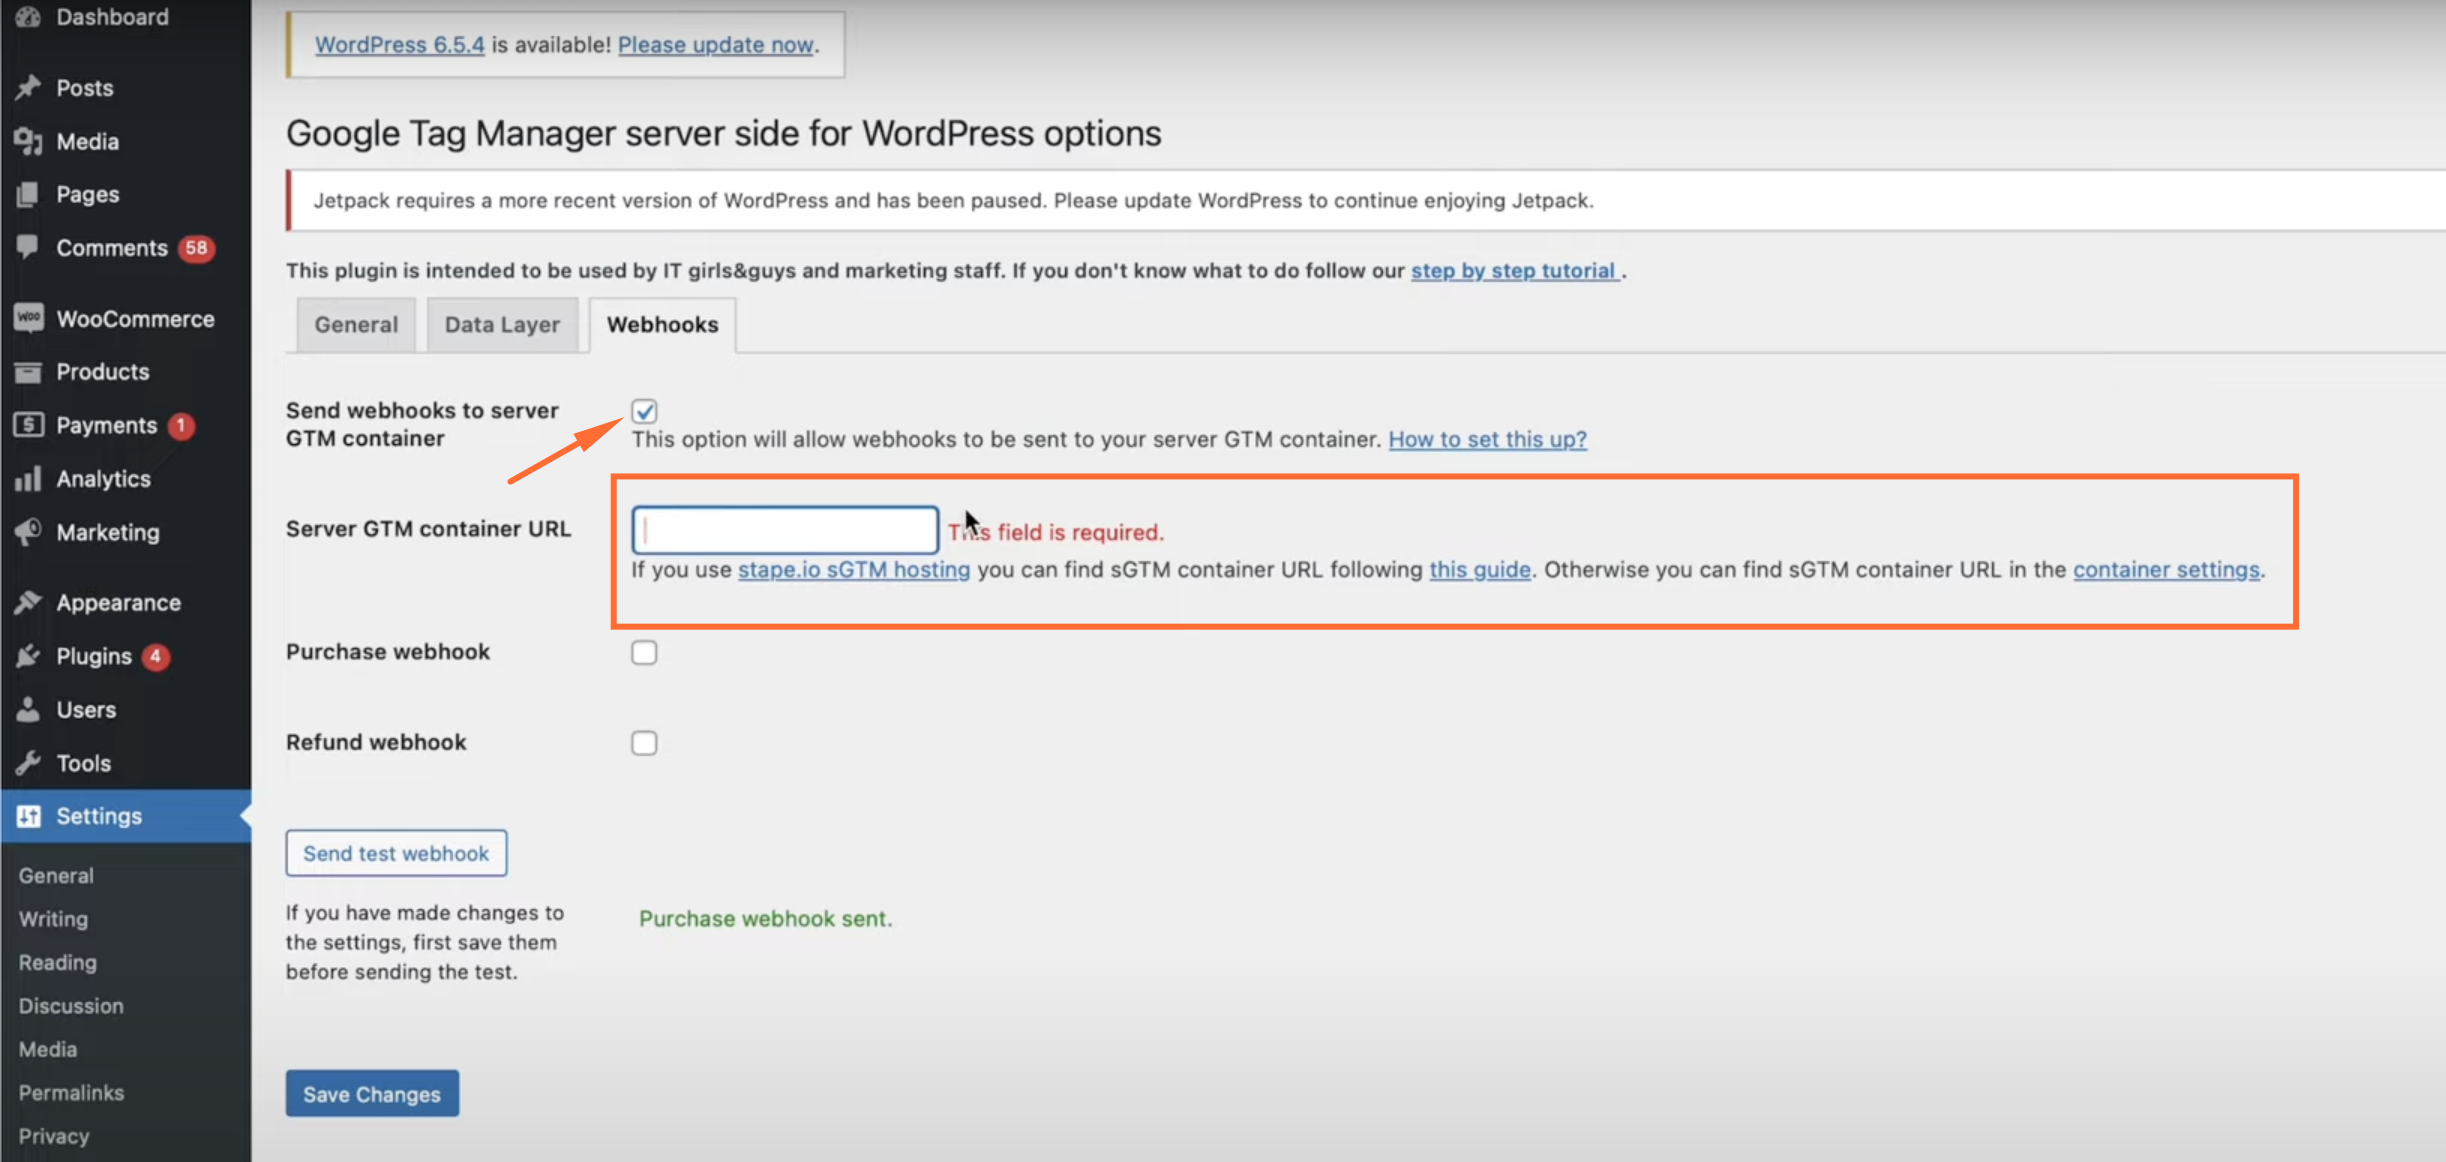
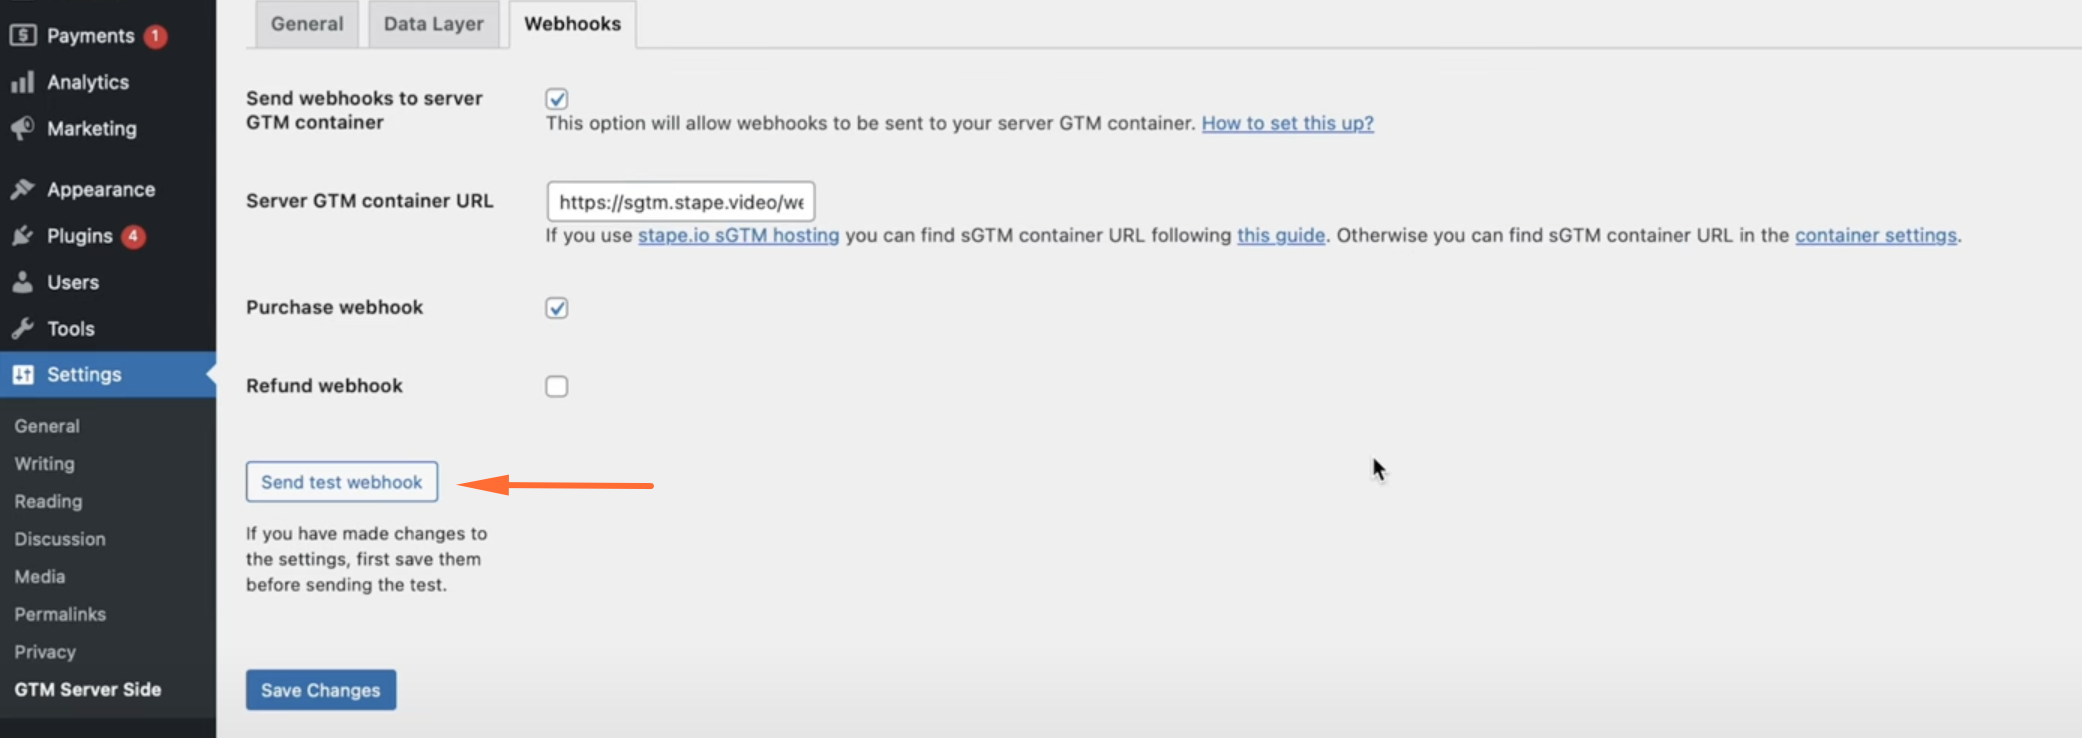
1.1 Go to the “Settings” section → “Webhooks” tab.
Enable the “Send webhooks to server GTM container” checkbox and add “Server GTM container URL”.
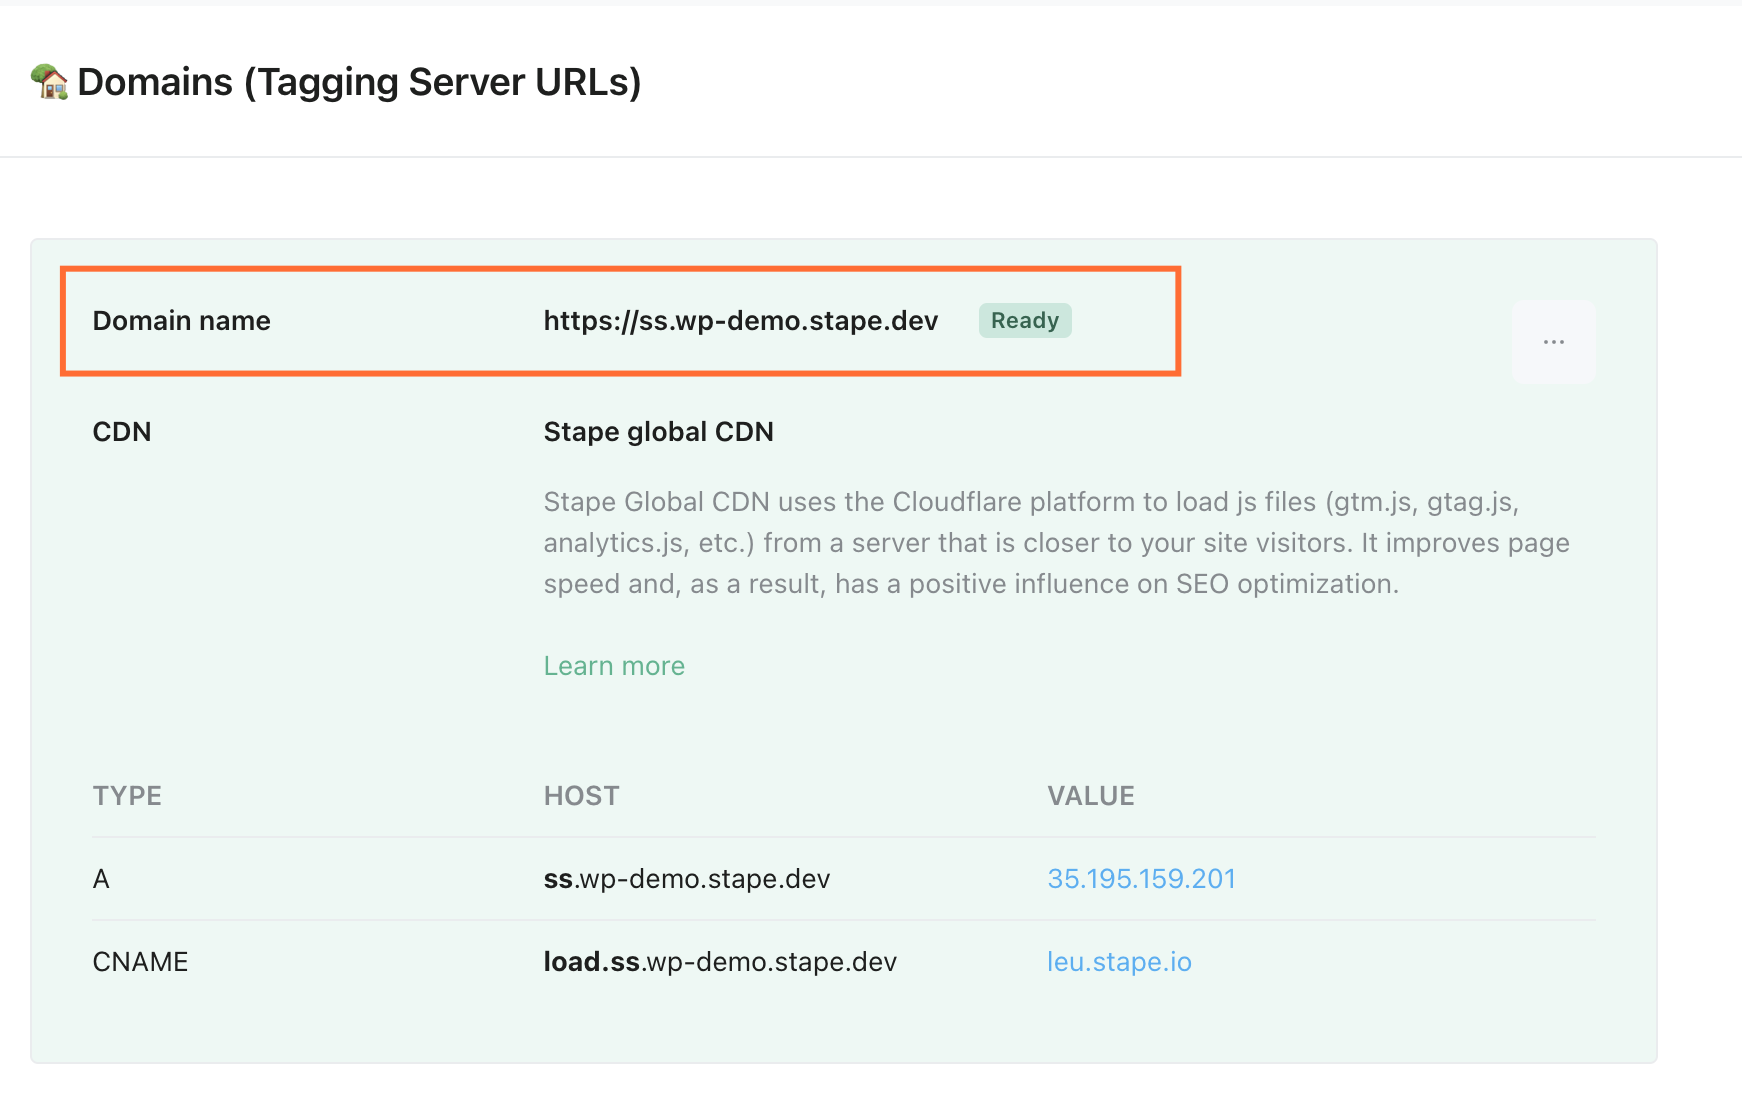
1.2 To find the server GTM container URL, go to the Stape admin → open container → copy “Domain name” in the section “Domains (Tagging Server URLs)”.
Please note:
Example:
https://ss.wp-demo.stape.dev/webhook
1.3 Enable checkboxes “Purchase webhook” or “Refund webhook” if it works for your case. Click “Save changes”.
Step 2: Enable the preview of webhooks in server GTM
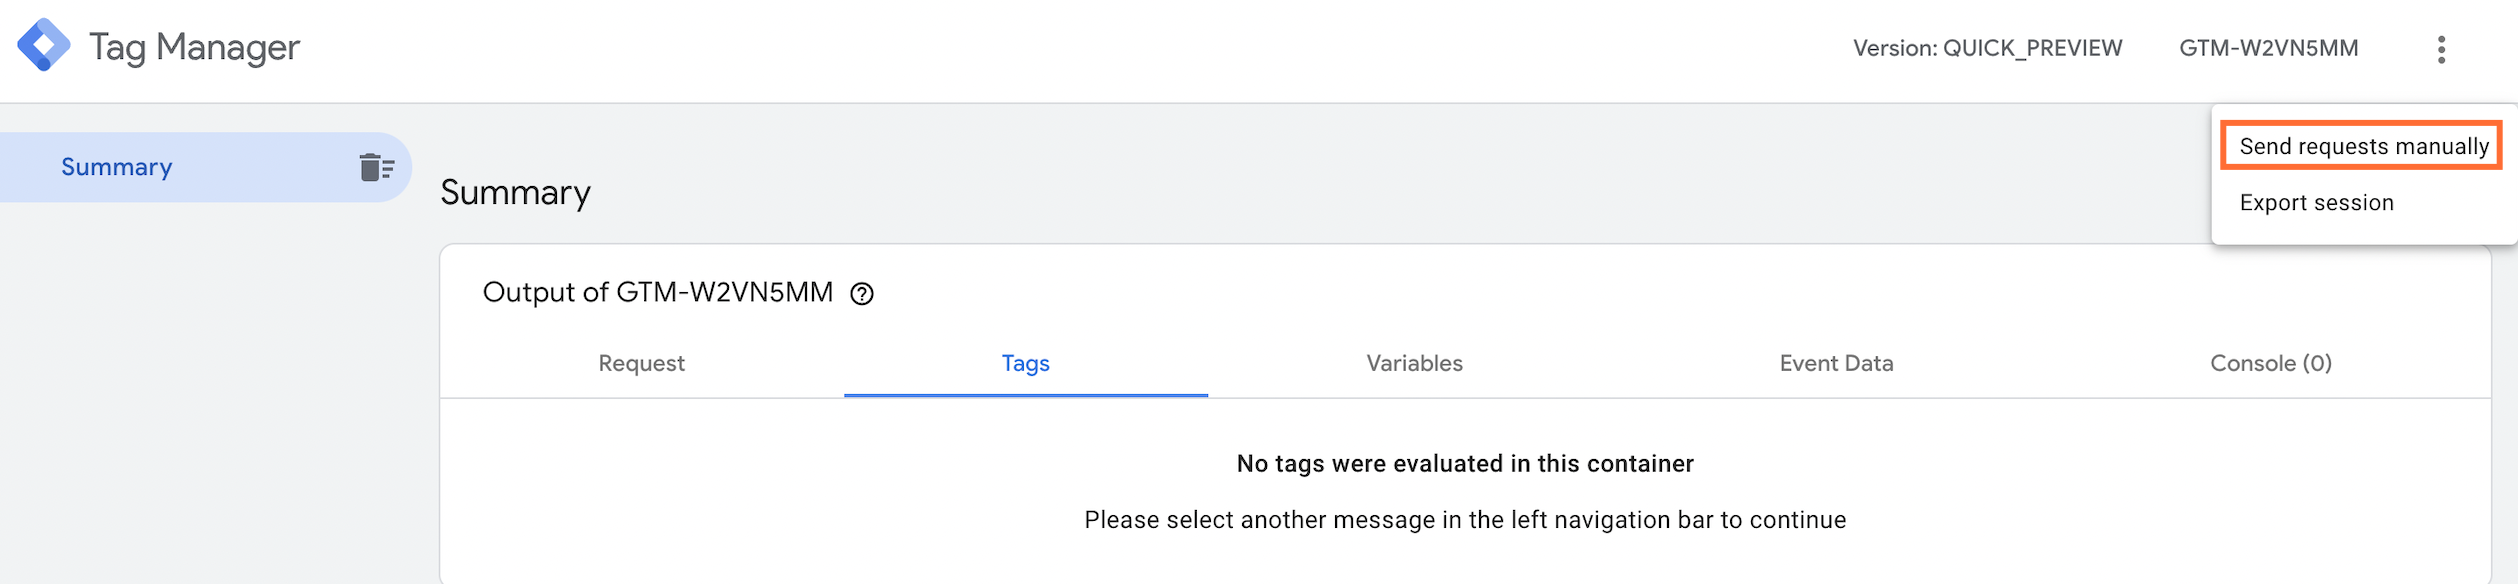
2.1 Open Debug and Preview Mode in server GTM → click on three dots in the upper right corner → “Send requests manually”.
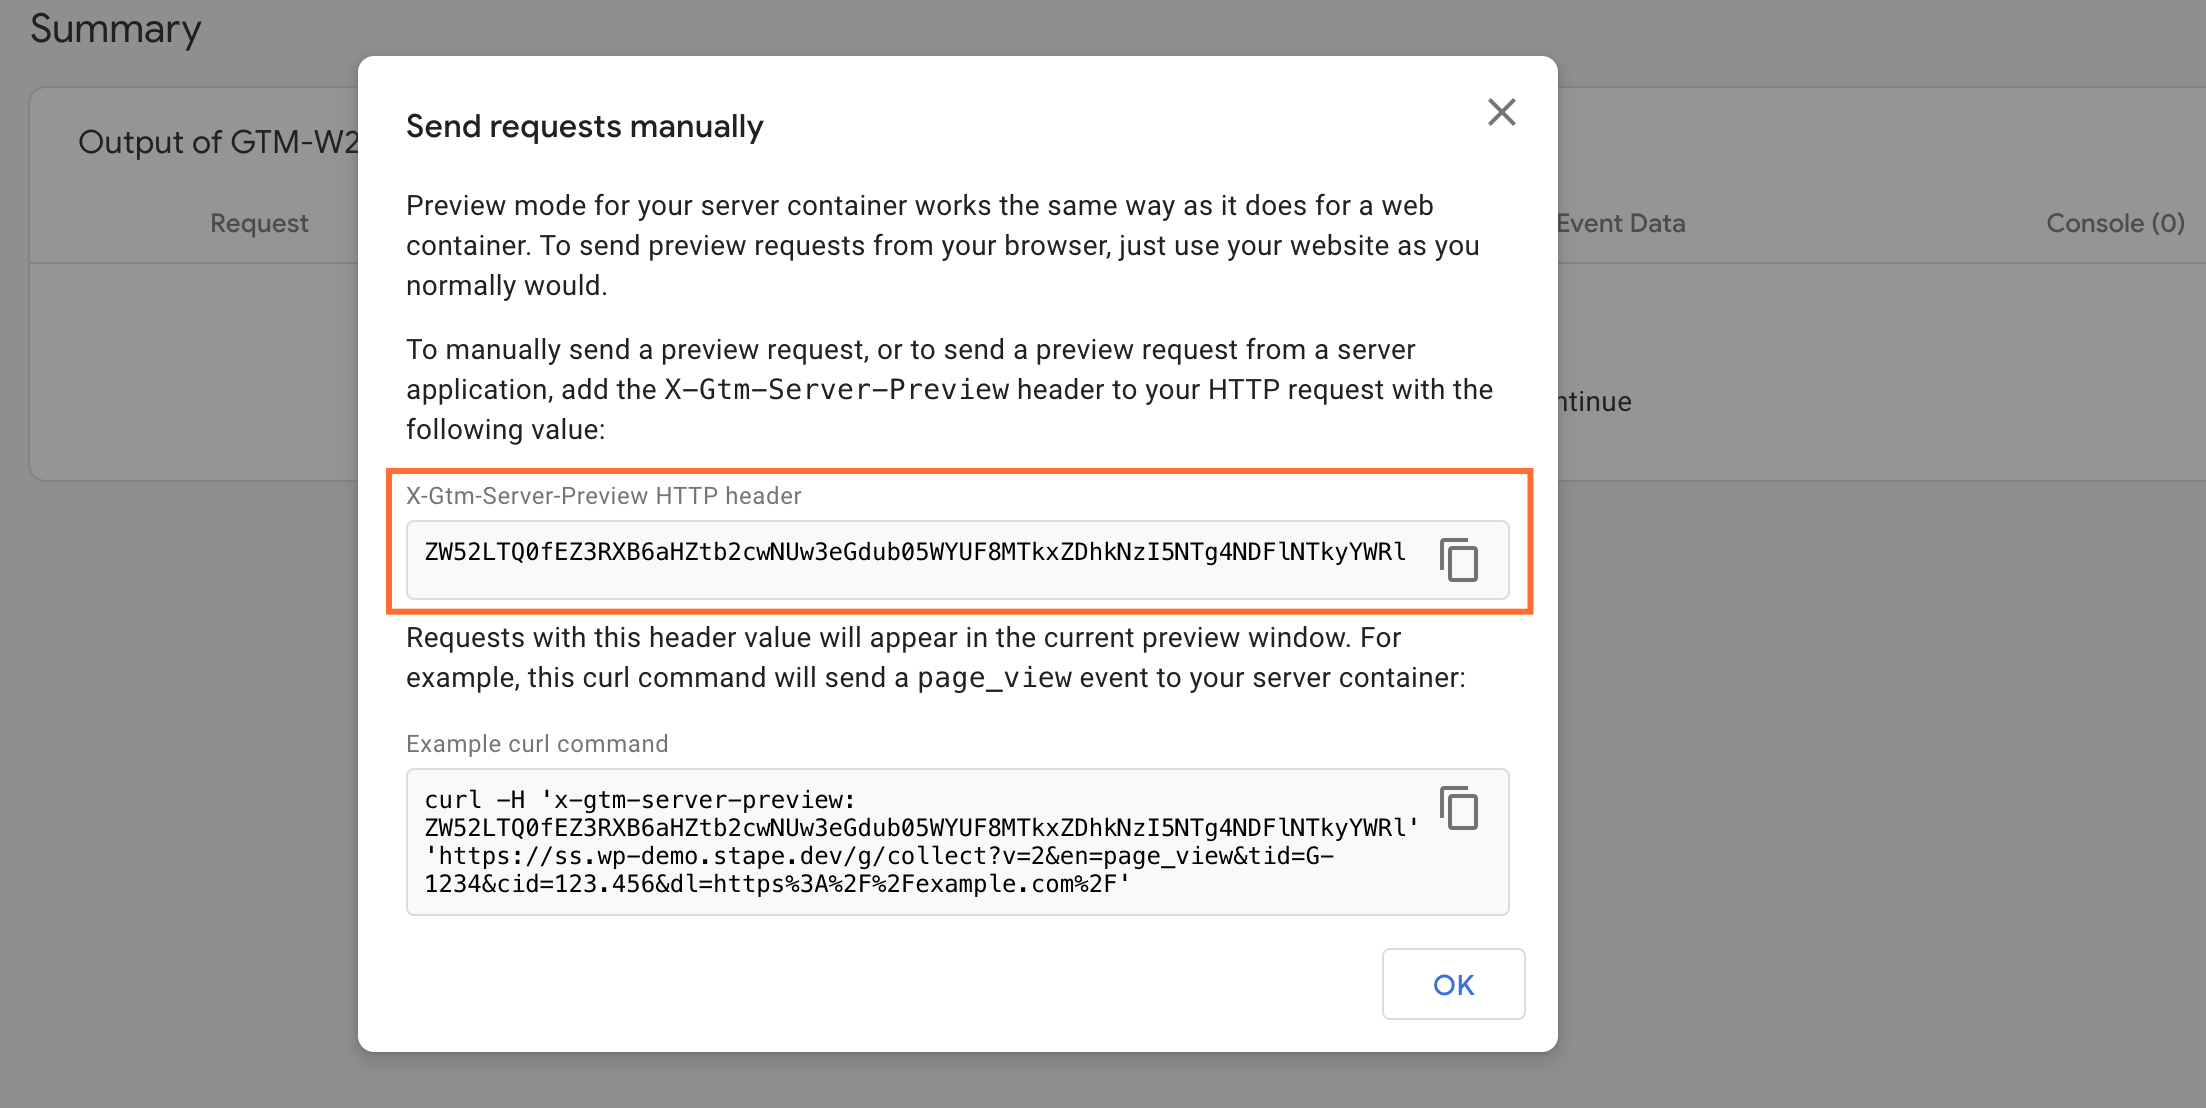
2.2 Copy X-Gtm-Server-Preview HTTP header.
2.3 Go to the Stape admin account → Power-ups → click “Configure” next to sGTM Preview header config.
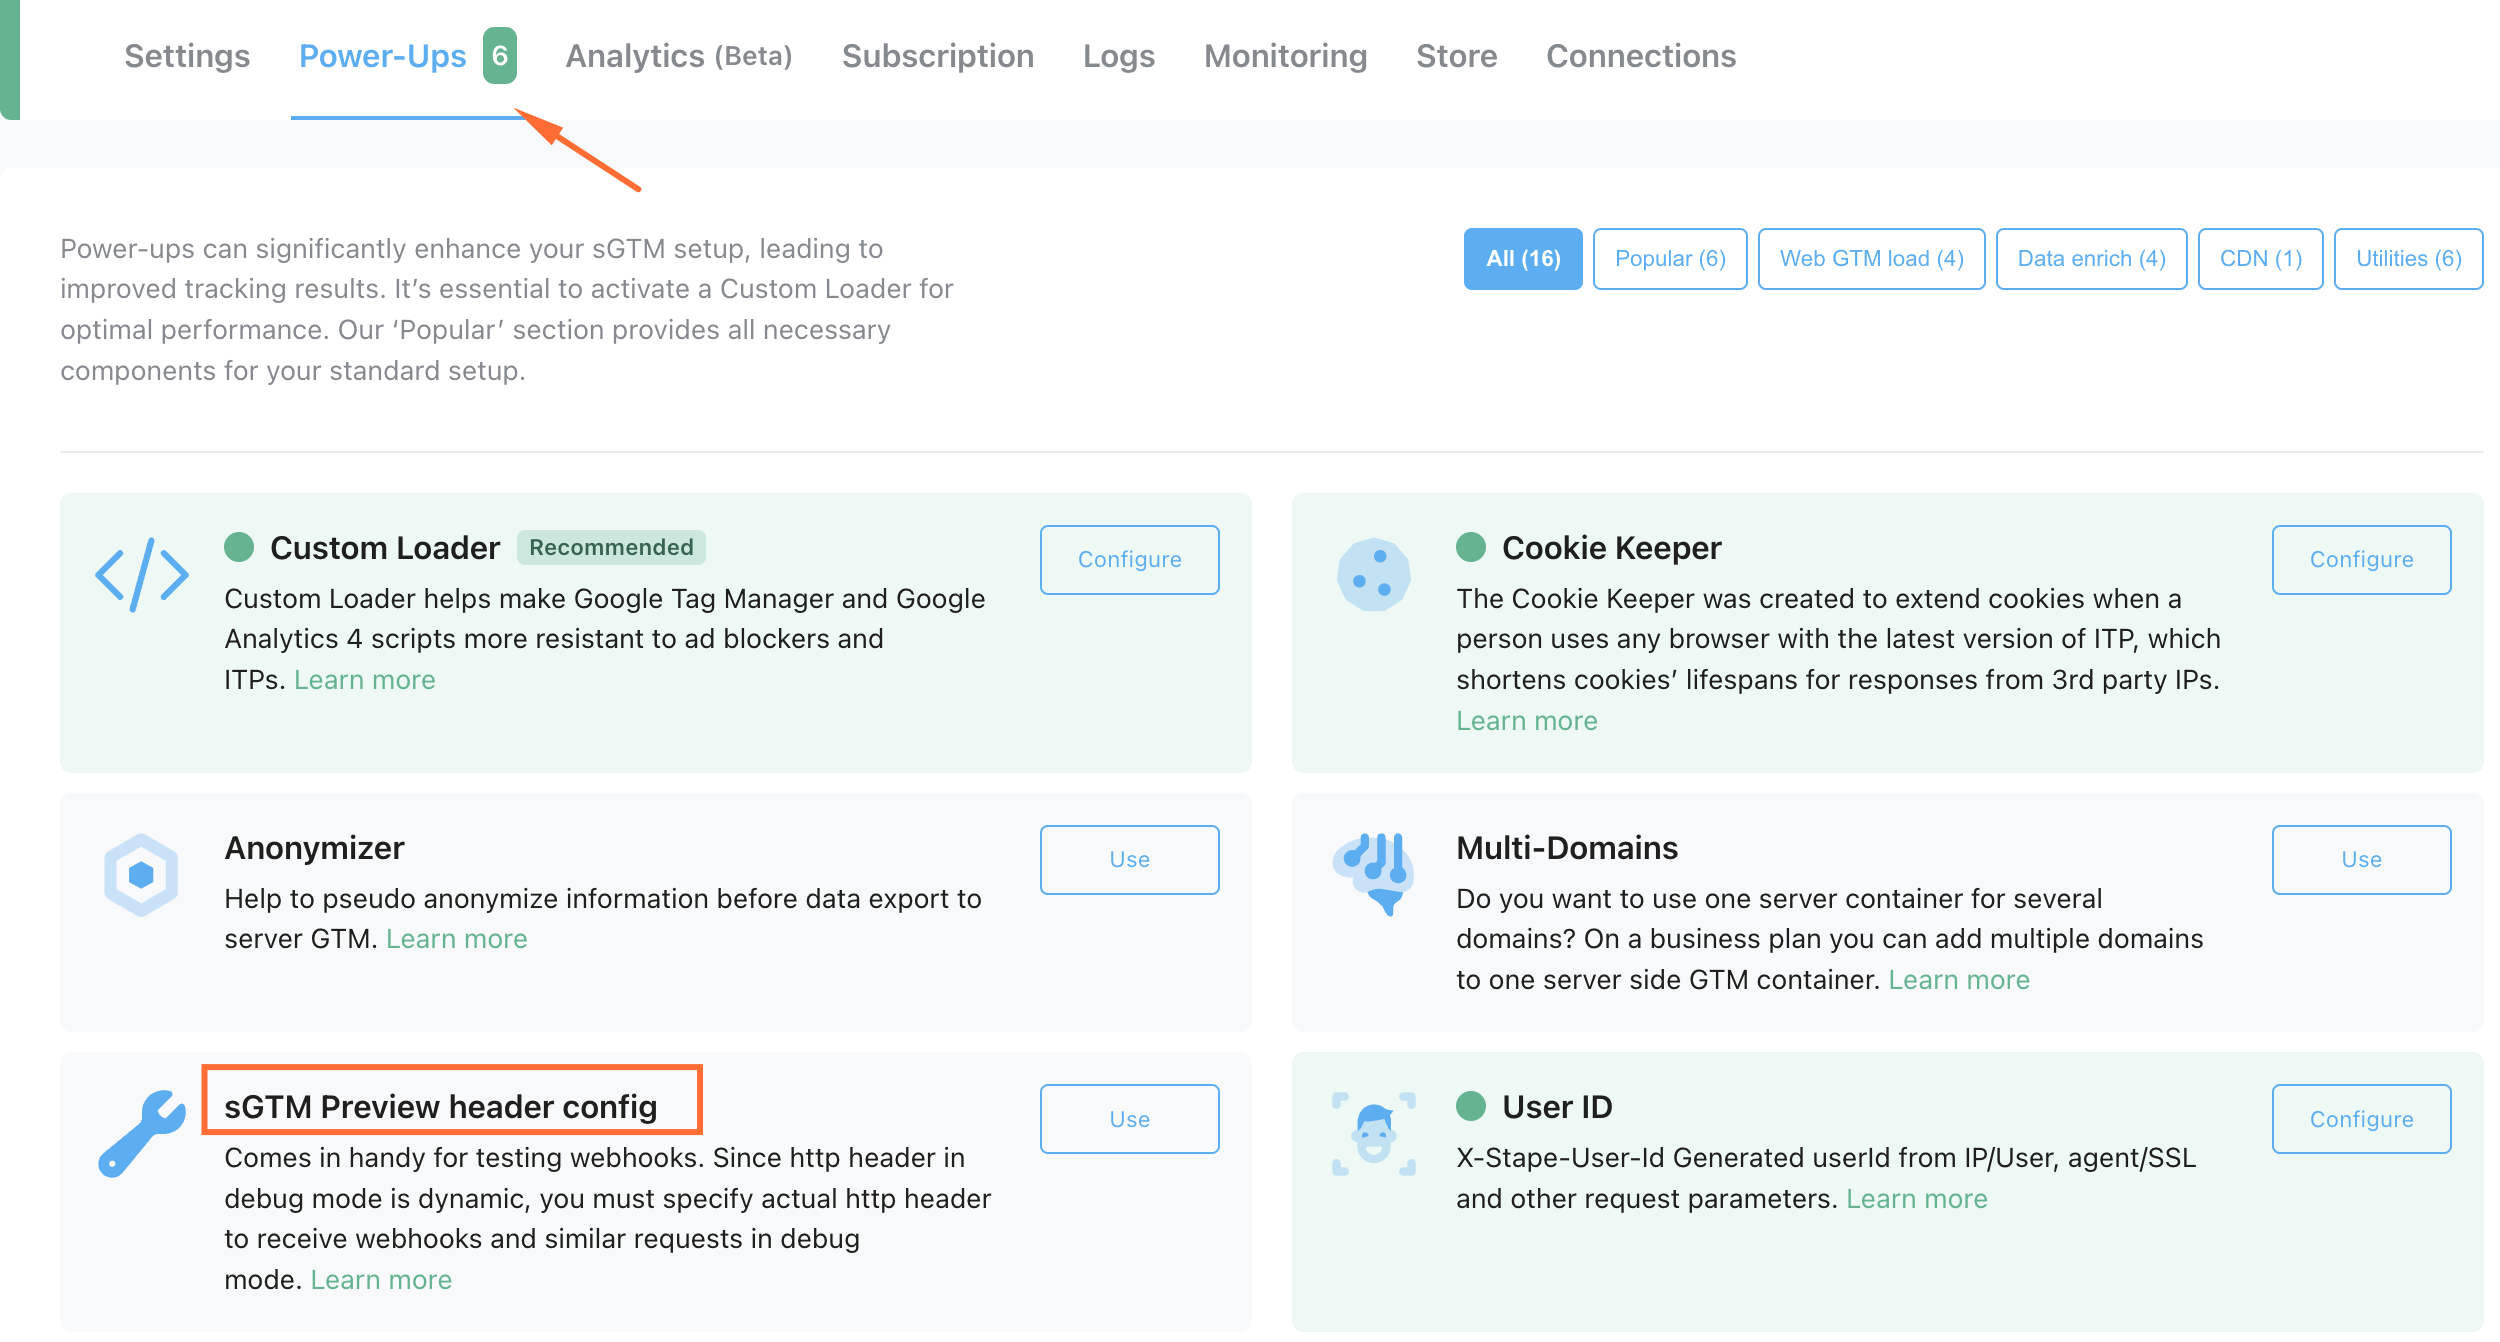
2.4 Enable the power-up and paste the X-Gtm-Server-Preview HTTP header from server GTM.
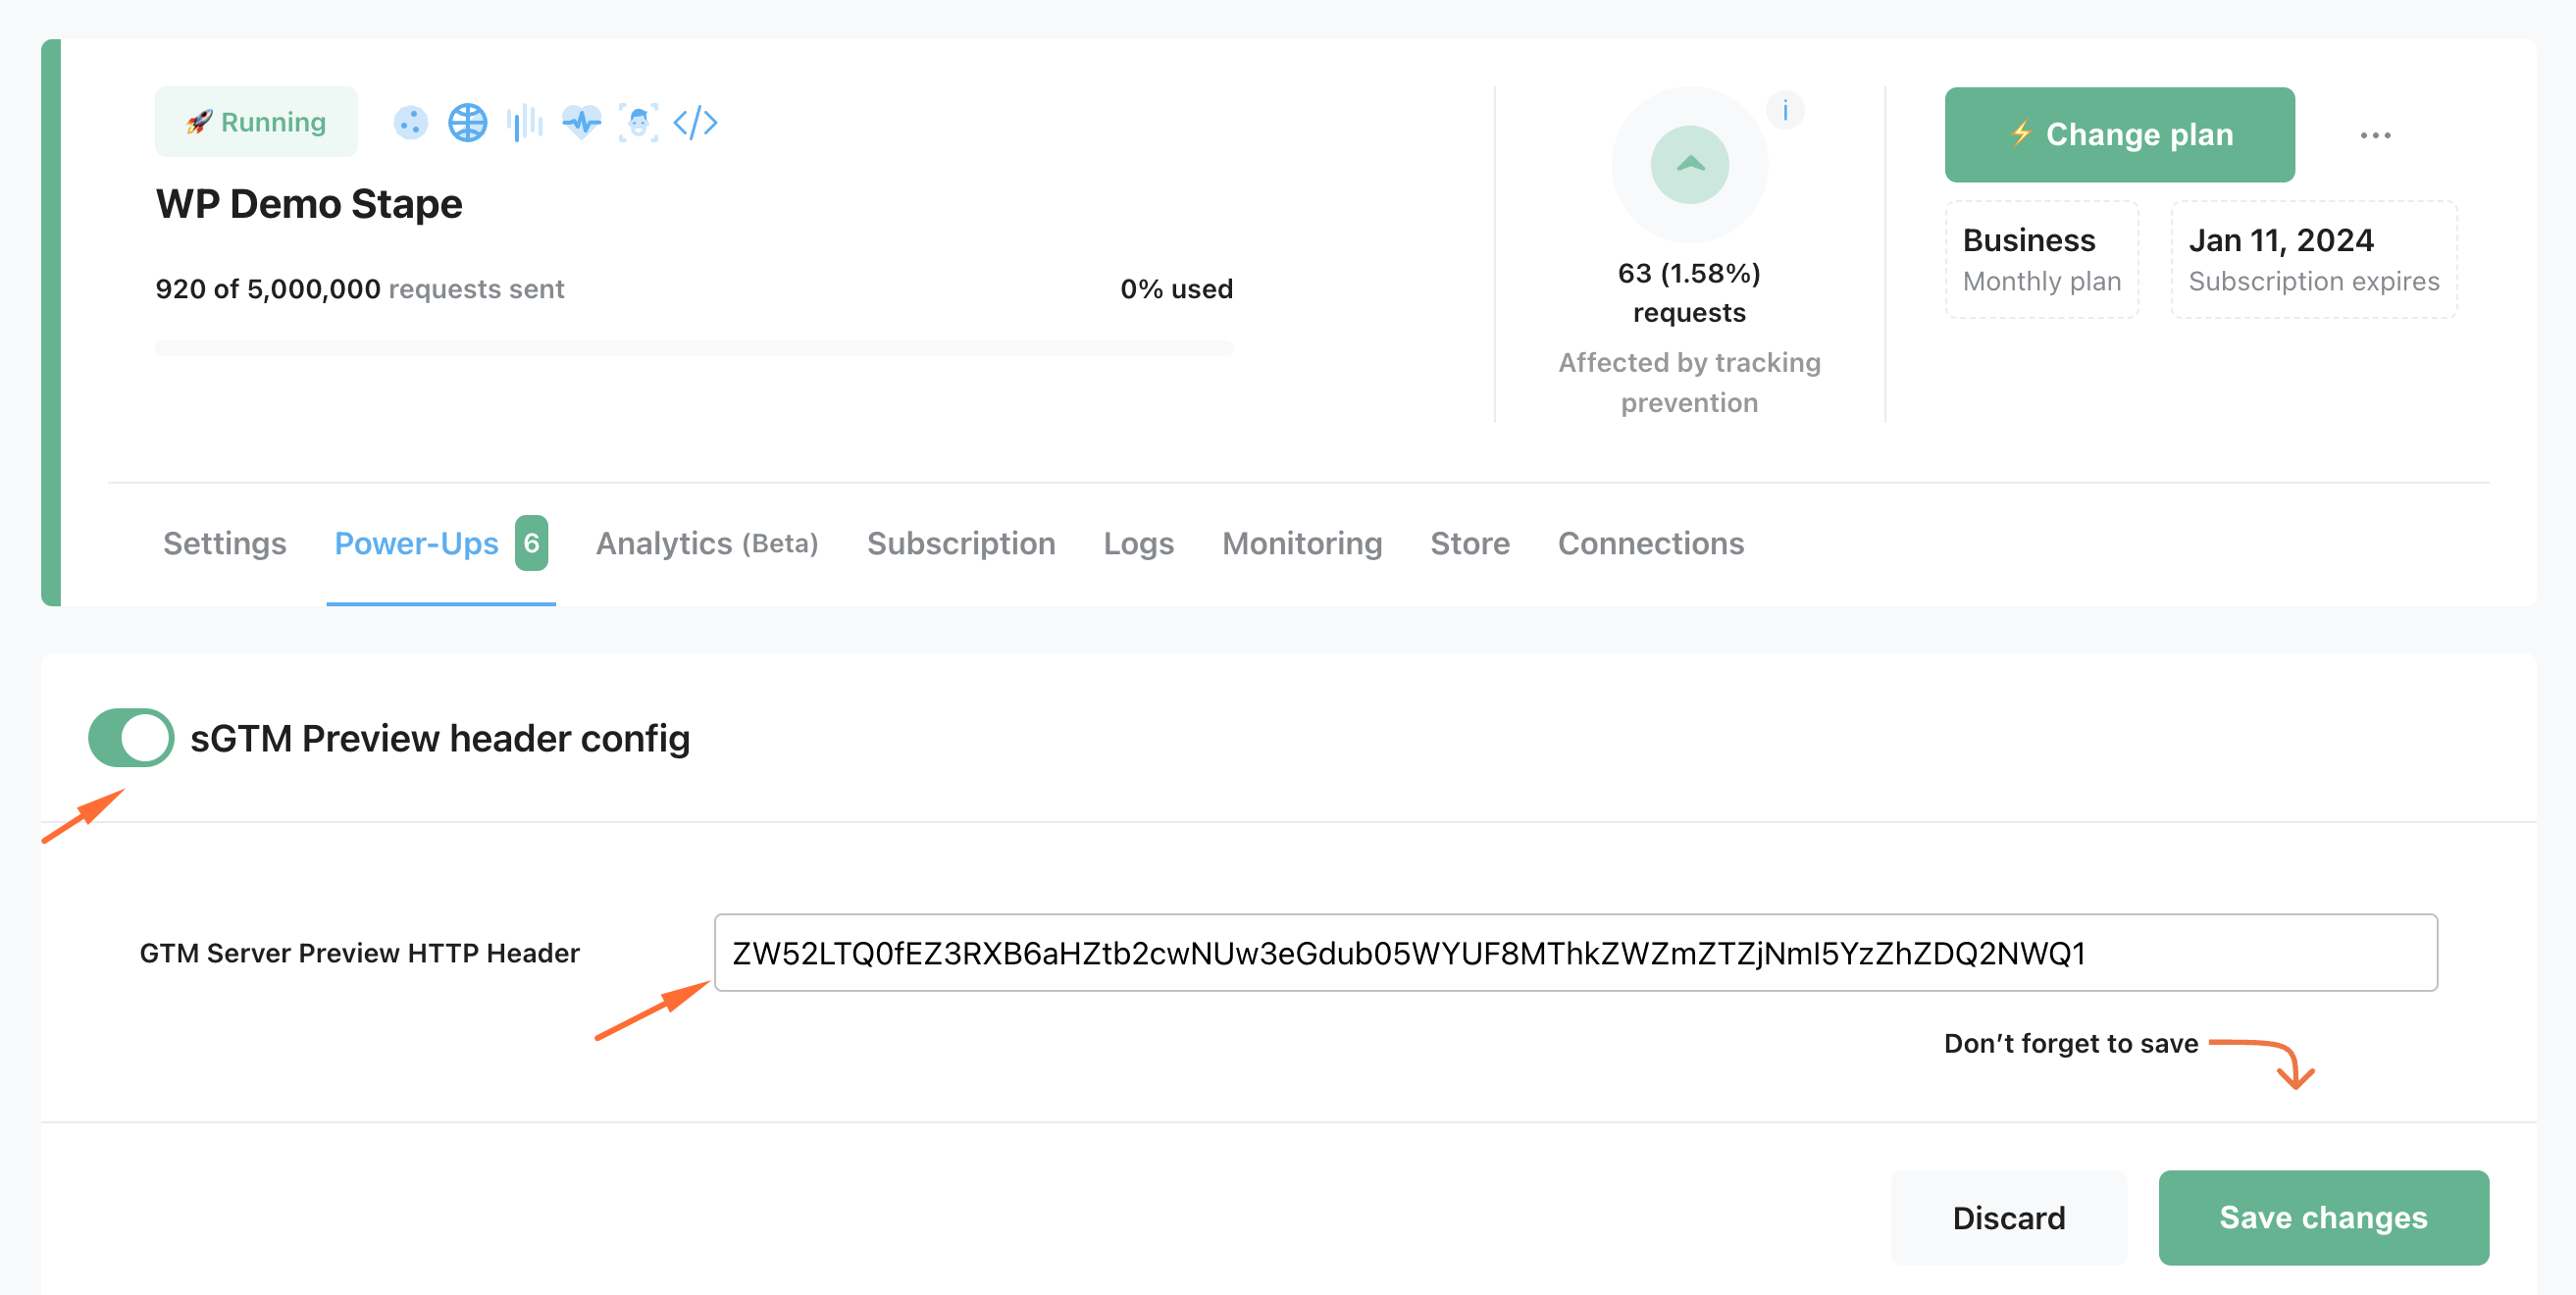
2.5 Click “Save Changes”.
Step 3: Add Data Client in sGTM
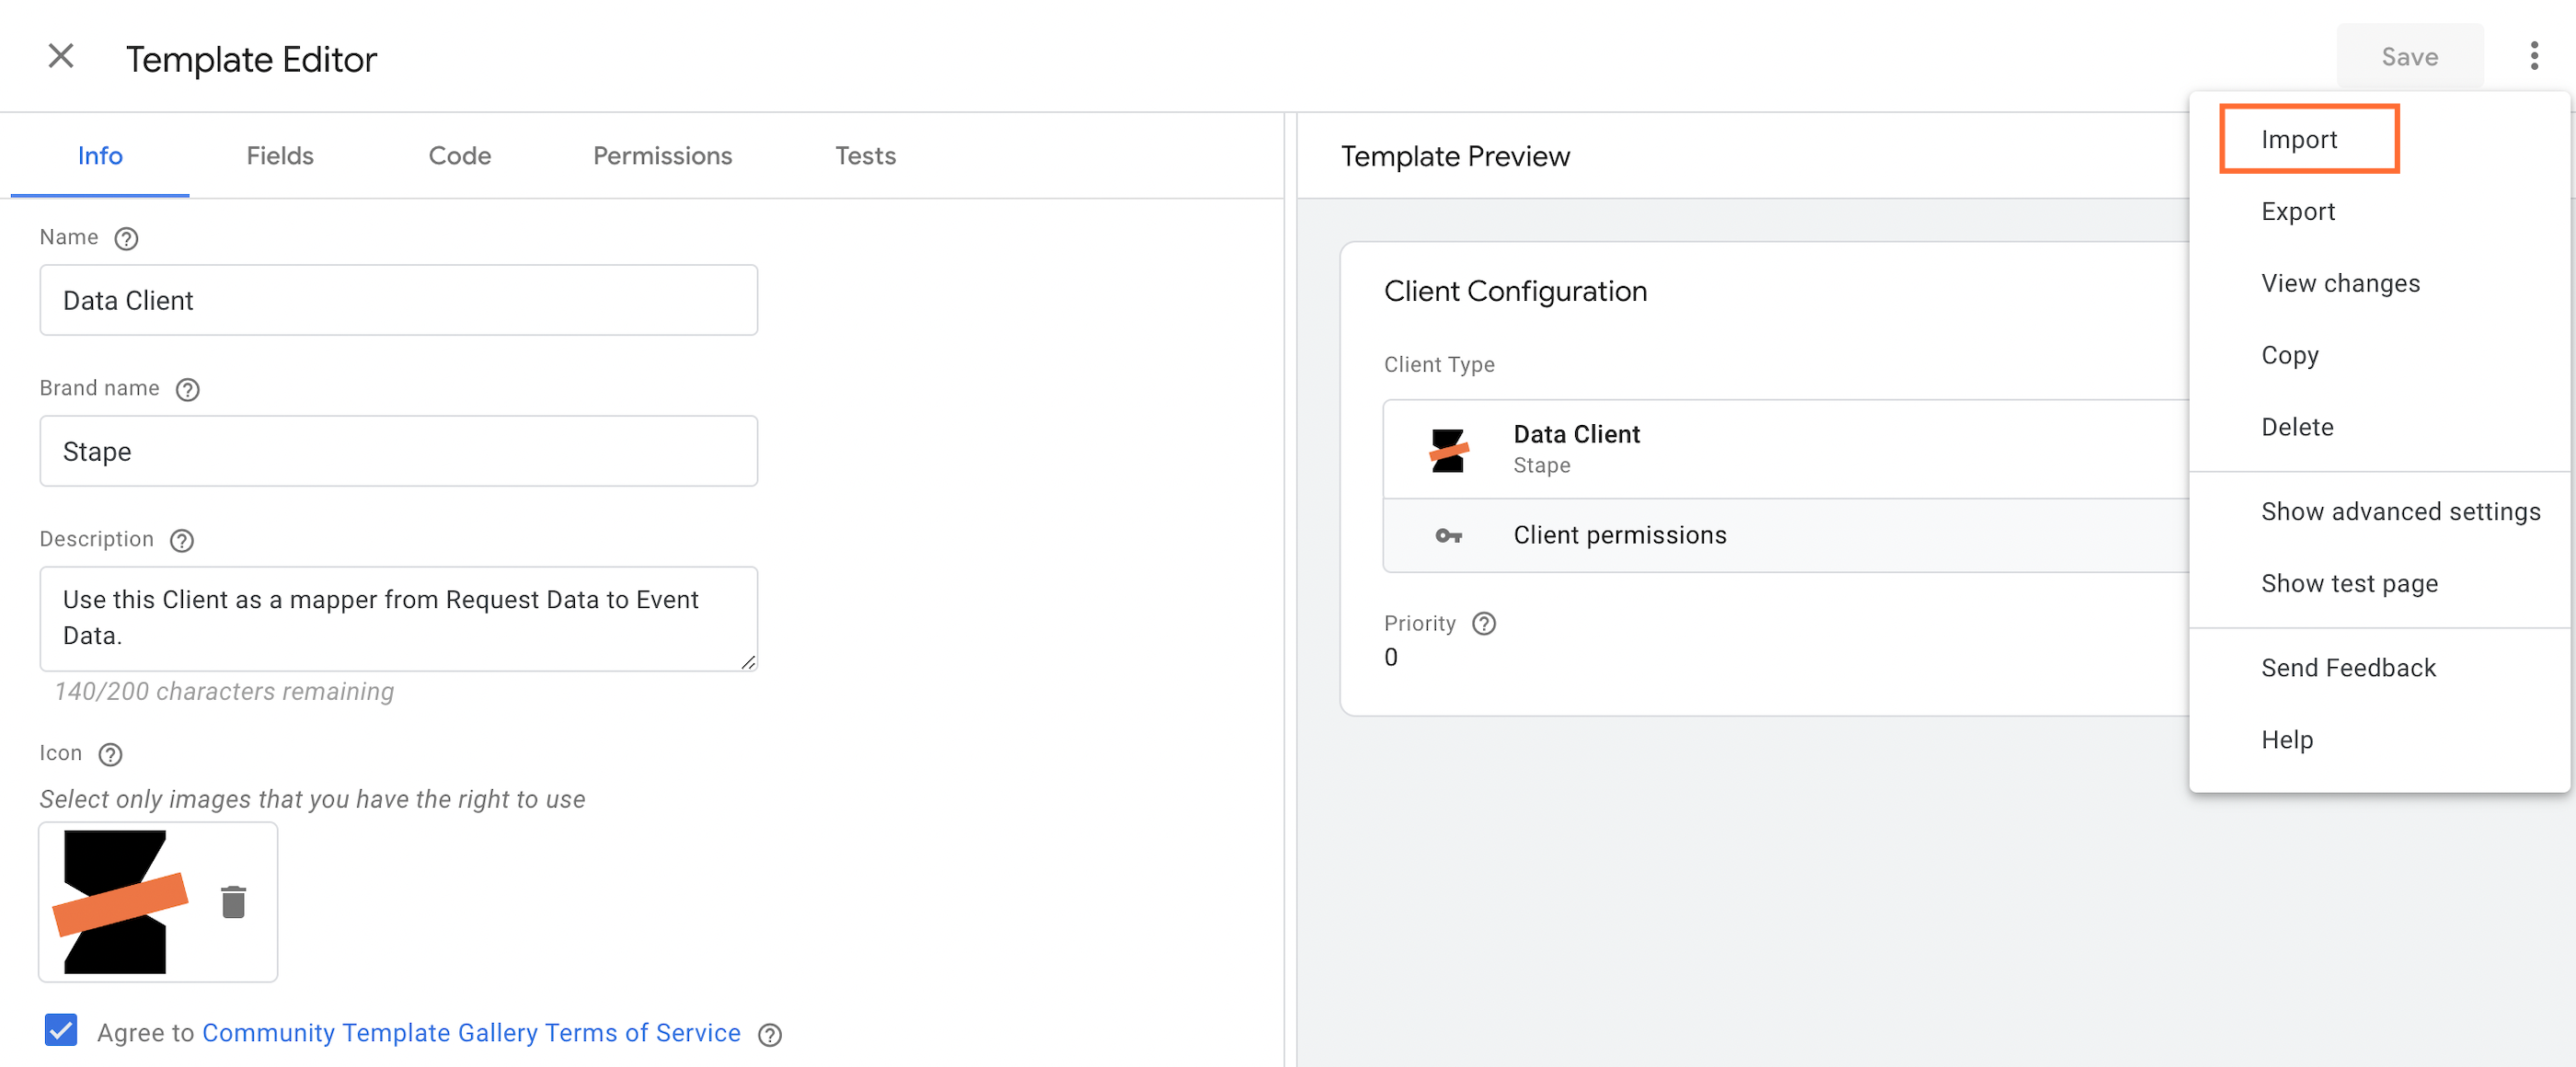
3.1 Download Data Client from GitHub.
3.2 Go to server GTM → Templates → Client Templates → click “New”. Import the template you downloaded from GitHub.
3.4 Go to the “Clients” section → click “New” → select “Data Client” as Client Type.
Make sure you added the path of the webhooks you configured when creating a webhook in the section “Accepted Path Settings.” In our case, it is “/webhook.”
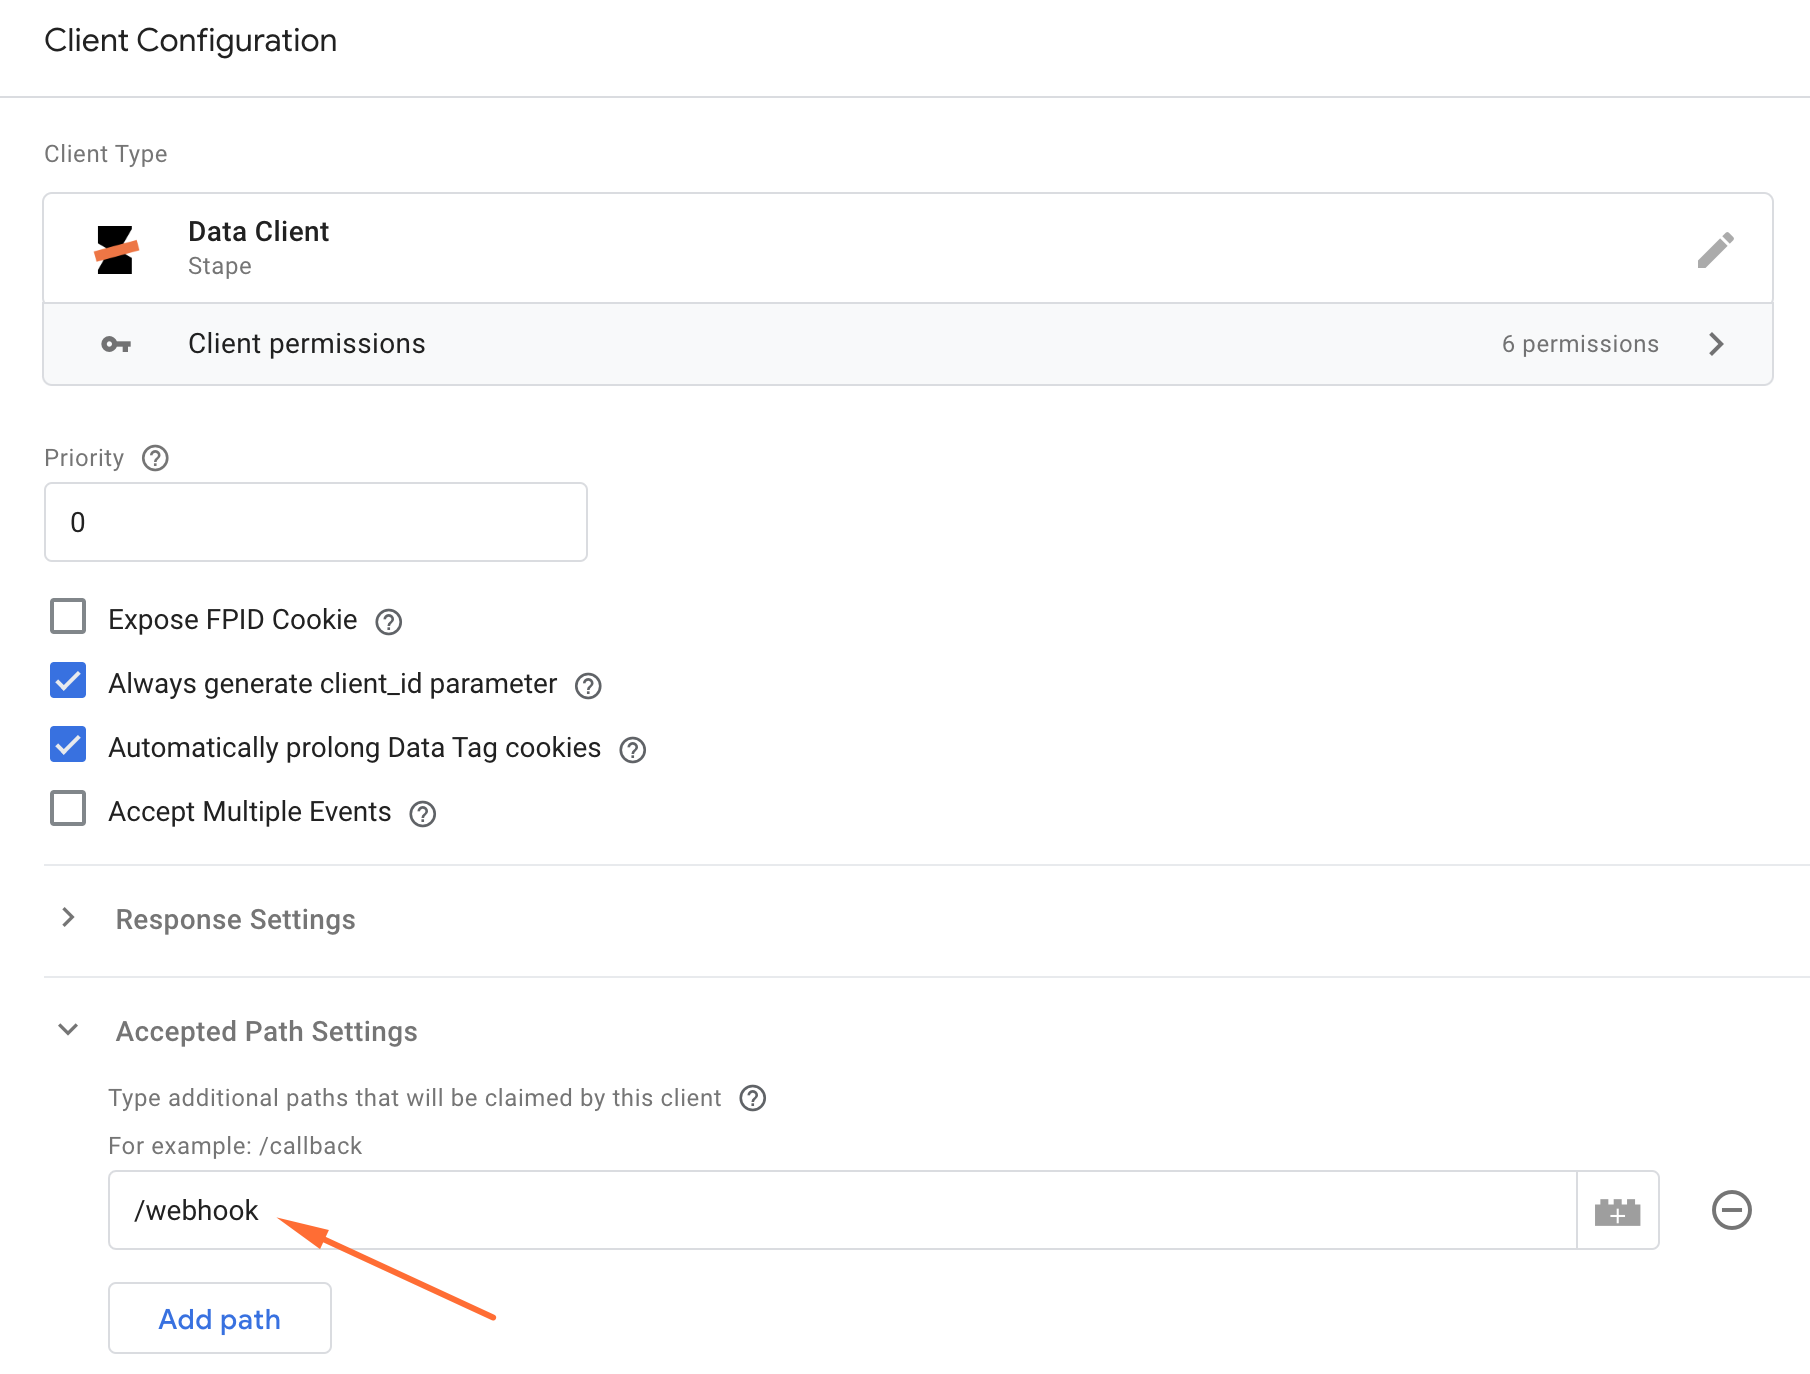
This way, the Data Client will listen to all requests containing “/webhook” and retrieve data from this request.
How to set up Facebook offline conversions tracking using sGTM
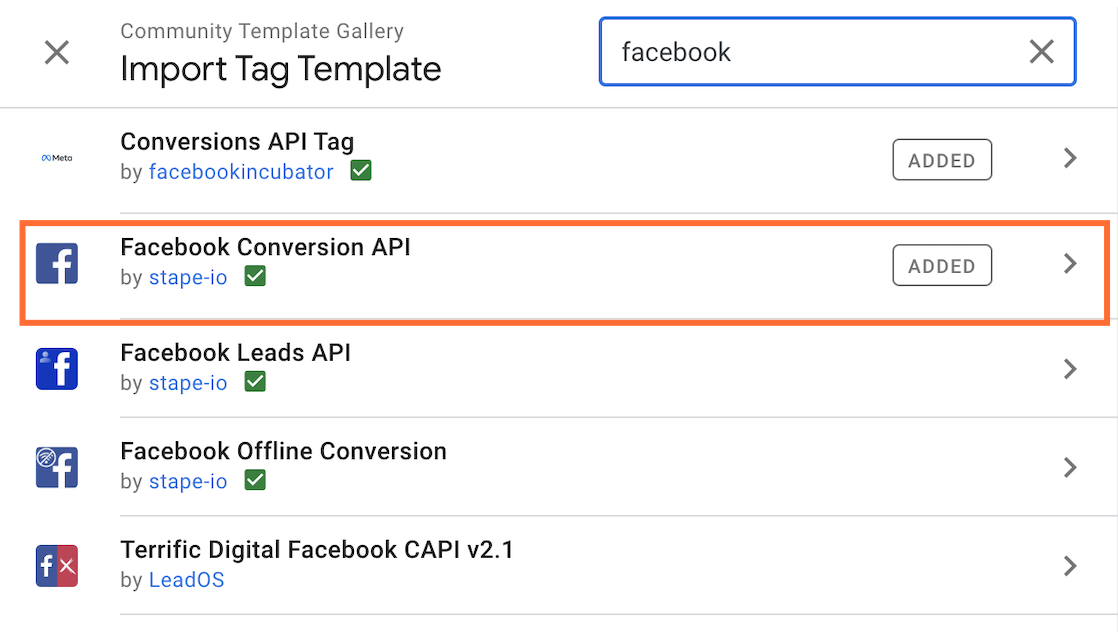
1. In the server GTM, go to the section “Templates” → Tag Templates section → Search Gallery.
Add the ‘Facebook Conversions API’ tag template from the server Google Tag Manager Template Gallery.
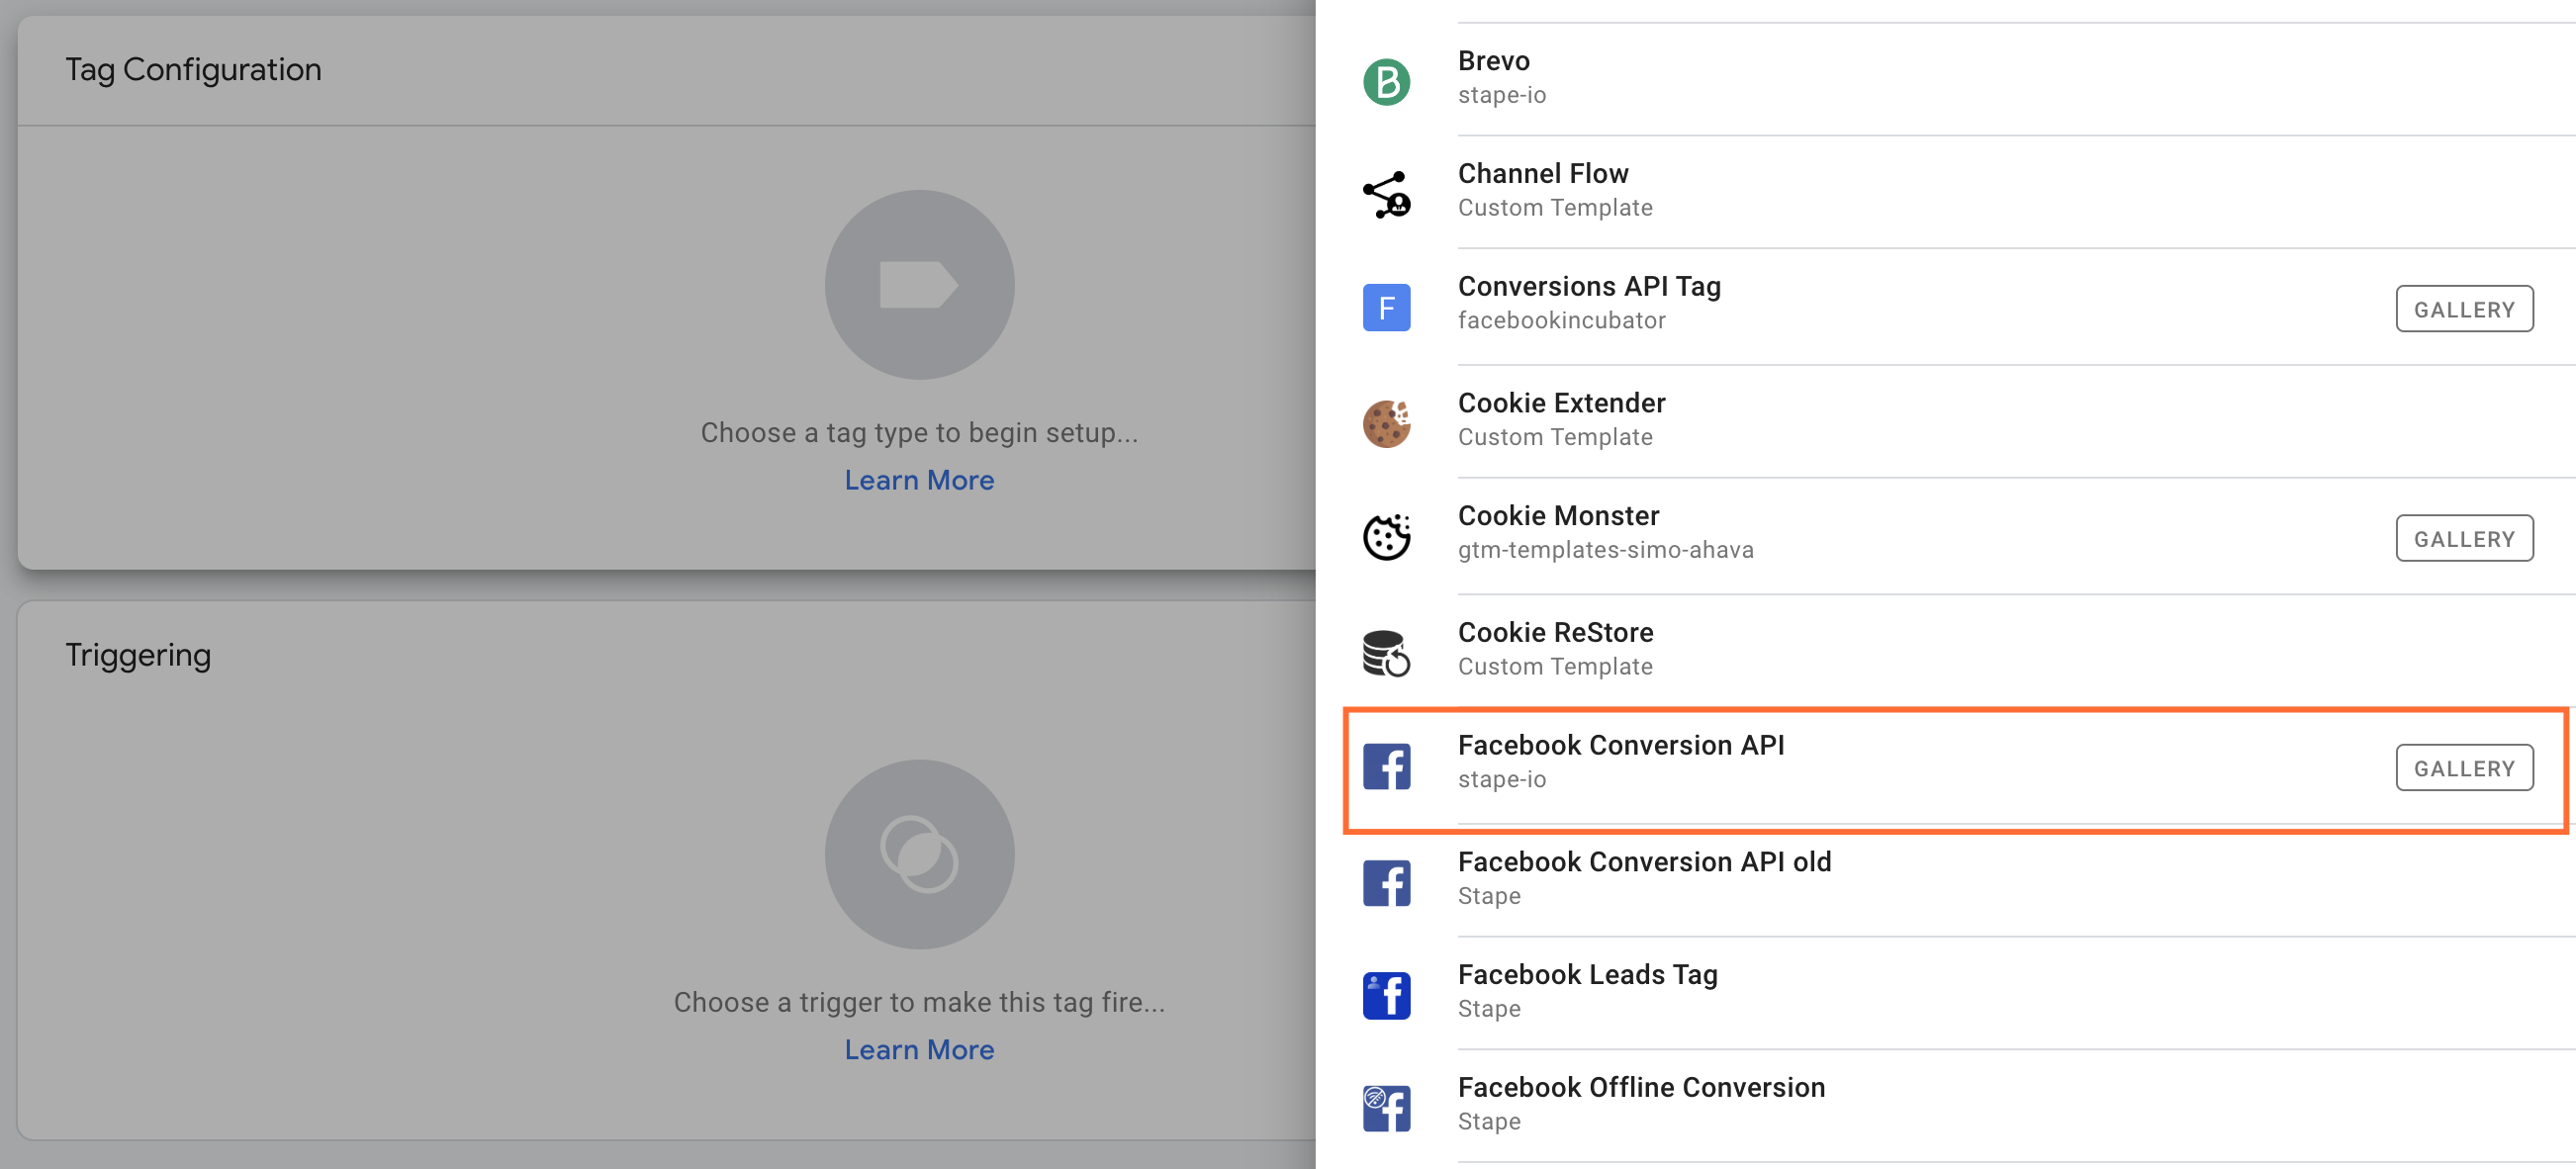
2. Go to the Tags section → click “New” → select “Facebook Conversions API” as Tag Configuration.
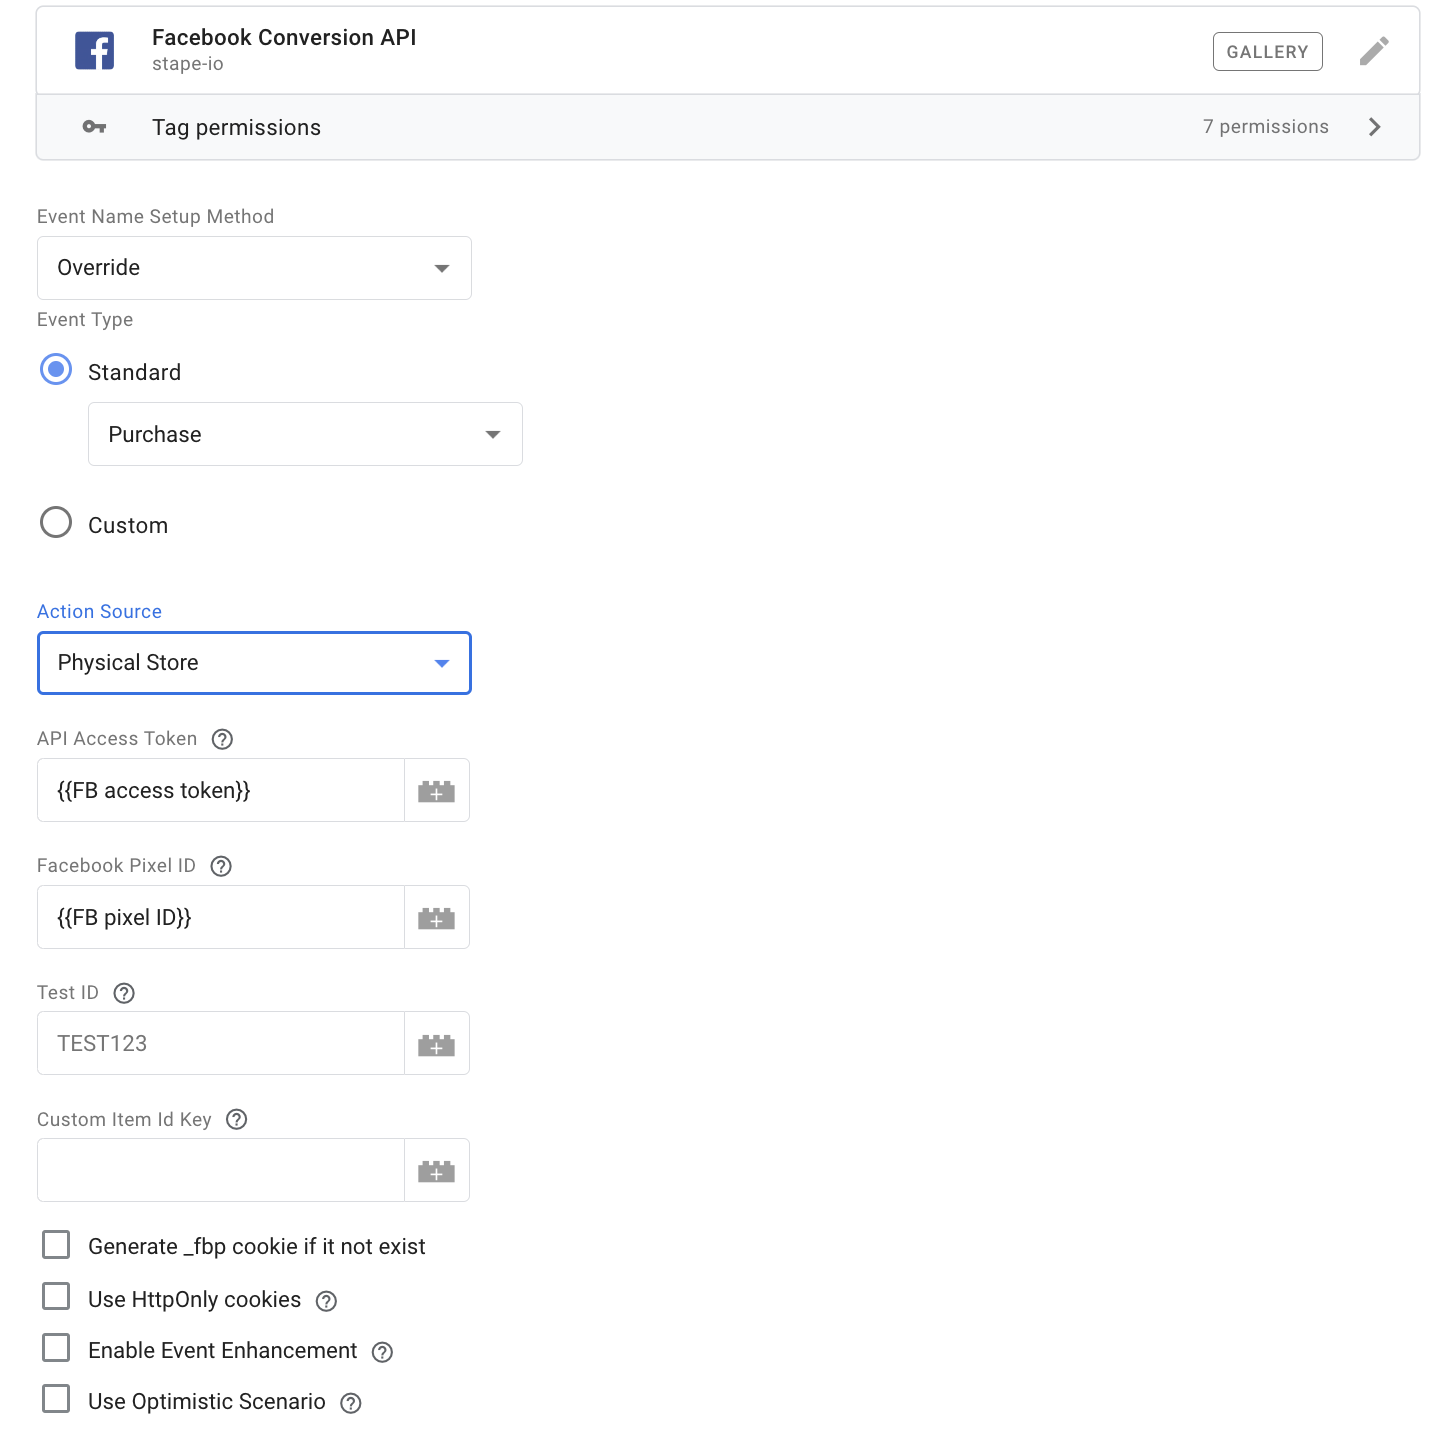
3. Configure the tag.
3.1 Choose “Event Name Setup Method”:
- Inherit from client - with this option, the tag will parse all the data that it finds inside the event data and send it to Facebook.
- Override - manually map the data from the webhook.
3.2 Choose the “Event Type” and “Action Source” from the list that fits your case.
3.3 Add “API Access Token” and “Facebook Pixel ID”.
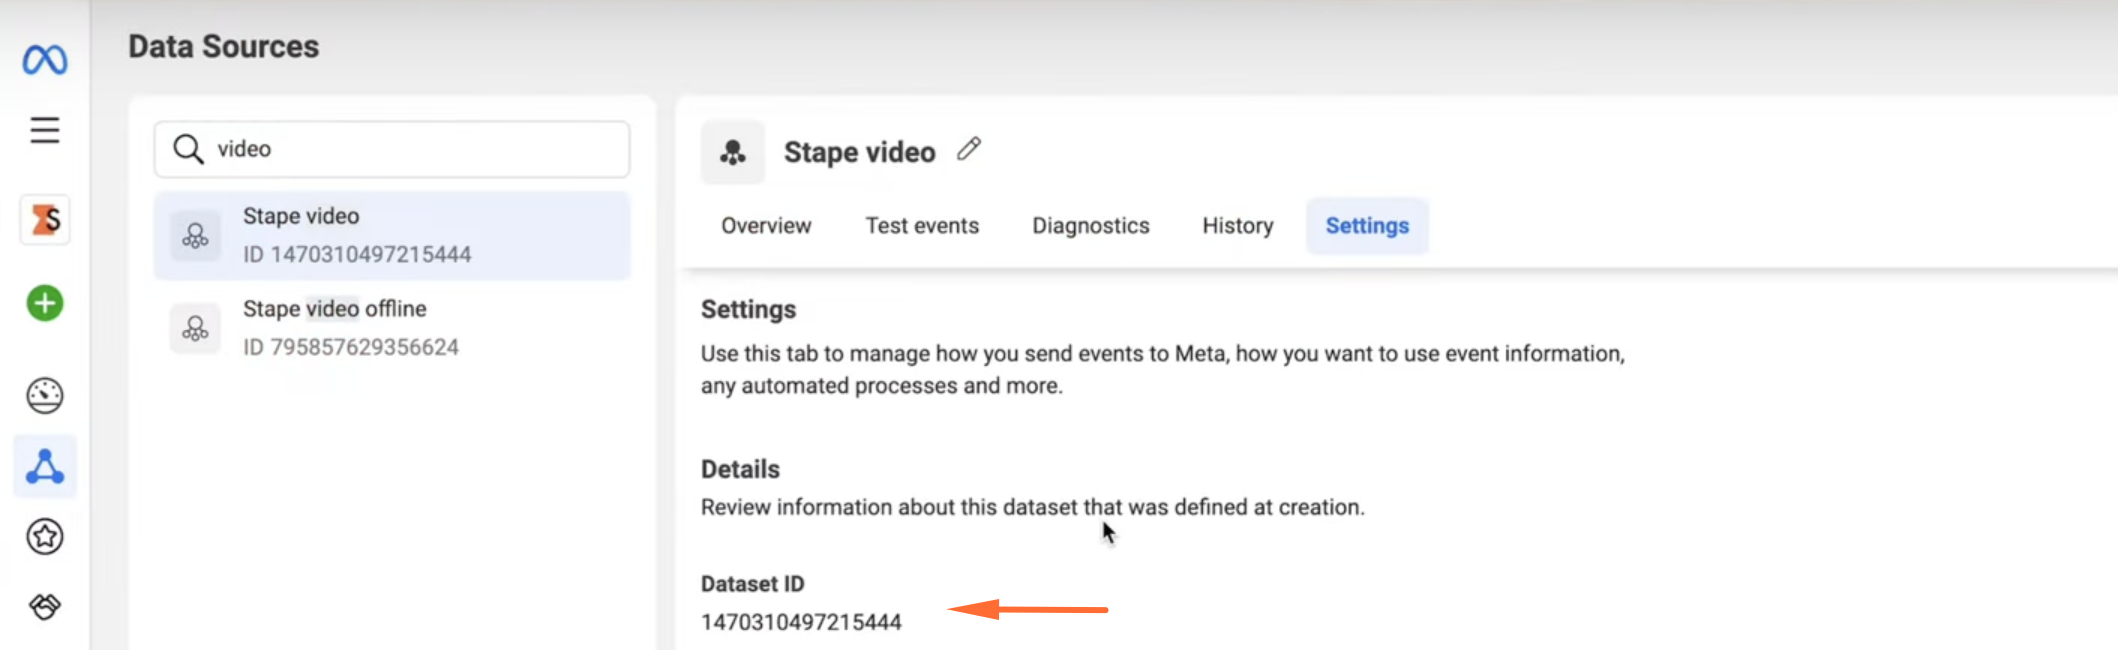
To find “Facebook Pixel ID” go to your Business Manager → Events Manager → Data Sources → copy Dataset ID.
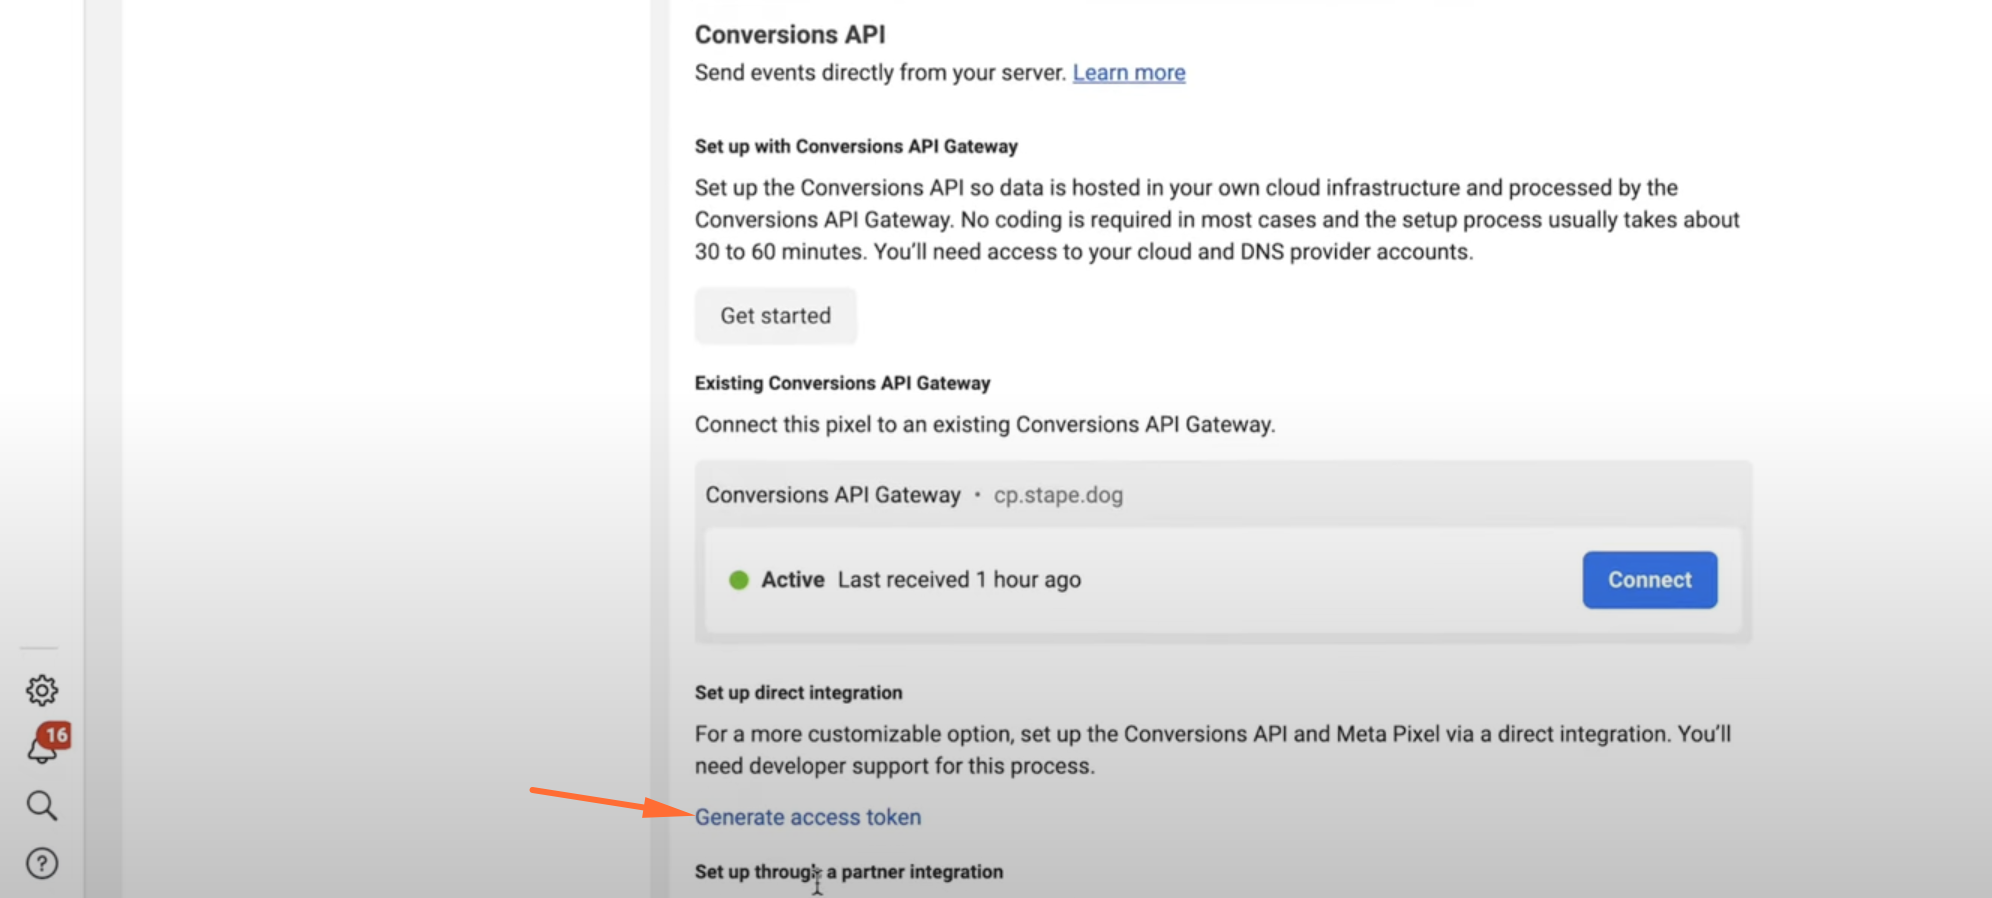
To find “API Access Token” scroll down and find “Generate access token”.
That's the basic tag configuration if you want to send users or some custom data, you can set it up in the sections of the tag.
Below is an example of Facebook Conversions API Tag configuration:
4. Add the trigger.
Trigger Type: Custom Event
Event name: specify your event name (in our case, it is “purchase)
This trigger fires on: Some Custom Events
Condition: Client Name equals Data Client

Test the Facebook Conversions API tag
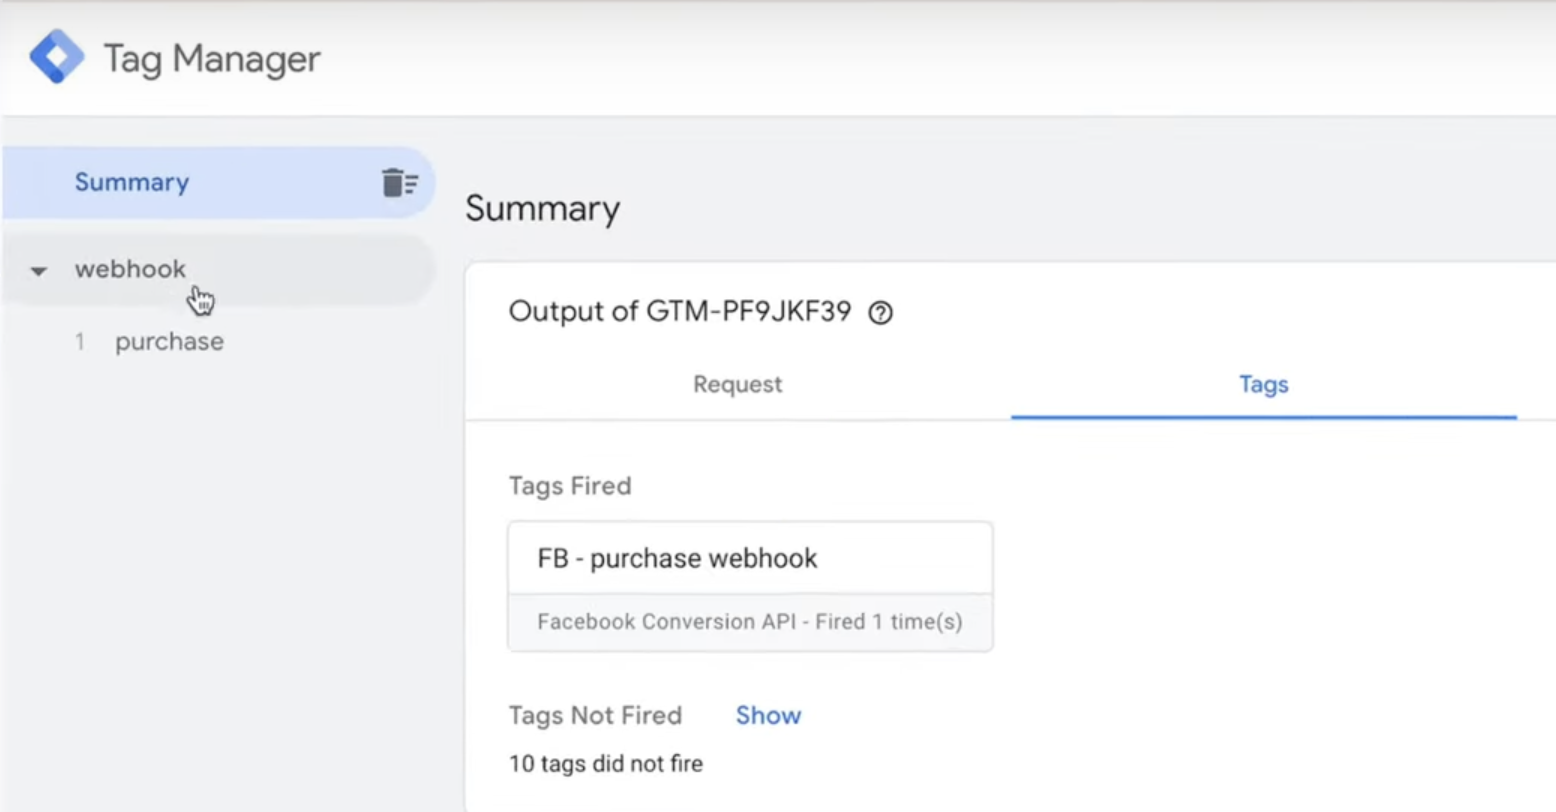
1. Open Preview and Debug Mode in server GTM.
2. Go to WordPress Setting tab and click on “Send test webhook”.
3. See the webhook in Preview and Debug Mode.
How to improve Event Match Quality when offline data is incomplete
Meta offline conversion tracking and CAPI performance rely on matching signals such as _fbp, _fbc, email address, phone number, and other user identifiers. These signals are used by Meta to calculate EMQ and improve attribution accuracy.
However, offline systems such as CRM, POS, or webhook-based workflows often don’t pass the full set of identifiers that were originally collected on the website. As a result, conversion events may be sent with only partial user data, which leads to reduced match rates.
A server-side enrichment with Enricher power-up by Stape can solve this limitation. Our solution is able to link offline events to previously stored user profiles. When a conversion event arrives, it is matched using identifiers such as email or external ID, and any missing Meta identifiers collected during earlier sessions can be restored and added to the event.
This results in more complete conversion data sent to Meta, which can improve EMQ and overall attribution accuracy.
FAQs
What are Facebook offline conversions?
The Facebook offline conversions tracking helps send sales or signups that happen outside your website, like in-store or phone orders, to Meta Ads. It makes Facebook offline tracking possible by sending offline event data safely through a server. You can connect it with Google Tag Manager or use a webhook integration from your CRM. This setup improves Facebook offline conversion tracking and keeps your results complete.
How do you measure offline conversations with Facebook?
Here is a simple flow to measure offline conversions with Facebook:
- Capture the sale in your CRM or POS with
event_name, event_time, value, currency, order_id, and customer identifiers like email or phone. - Send a webhook from your CRM to server GTM, then forward it to Facebook through Conversions API, or send it directly to Facebook Conversions API.
- Hash customer fields before sending, and use a consistent
event_idto deduplicate against Pixel or other CAPI events. - Check results in Events Manager under the offline conversions columns. Data is now sent to Datasets through Conversions API, not Offline Event Set.
- Monitor match rate, attribution windows, and revenue totals to confirm that Facebook offline conversion tracking reflects real outcomes.
How do I track offline events in Meta?
To set up Facebook offline tracking, you need:
- Create a Dataset in Events Manager and connect it to the right ad accounts.
- Build a Facebook offline conversion integration using server GTM, or call the API directly. Many teams prefer webhooks for Facebook Conversions API integration from the CRM to server GTM for stability.
- Map fields carefully, for example, Purchase or Lead as event_name, value, currency, and customer identifiers like email or phone. Use a consistent event_id for deduplication.
- Test in Test Events, then enable it in production.
- In Ads Manager, add columns for offline conversion Facebook ads and check the attribution window.
Conclusion
Facebook offline conversions is one of the ways to boost your FB campaign results and improve attribution. Though offline conversions only are not enough for proper FB tracking and audience collection, it might be an excellent addition to your existing FB pixel tracking and FB CAPI.
Using webhooks plus a Facebook Conversions API tag in your server Google Tag Manager container, you can set up offline conversions with less manual work. Remember to follow offline conversions best practices to improve the efficiency of your setup.
If you need help setting up server-side tagging, we are here to help!
Need help with setting up server-side tagging?
All it takes is a few simple questions. Click Get A Quote, fill-up the form, and we will send you a quote.

Comments