Klaviyo is a marketing platform built for ecommerce businesses that want to use their customer data to send smarter emails and texts. It helps brands create personalized campaigns based on real behavior – like browsing activity, purchases, or engagement – so they can drive more sales and build stronger relationships. With Klaviyo, companies can automate key messages, track performance, and grow their audience without relying on guesswork.
Klaviyo server-side tracking is a method of sending website event data – such as product views, cart additions, and purchases – directly from a server to Klaviyo’s API, bypassing the browser. This setup is typically implemented using server-side Google Tag Manager (sGTM) and platforms like Stape. By handling data on the server, businesses avoid issues caused by browser limitations, ad blockers, and cookie restrictions, ensuring that key user actions are reliably captured and sent to Klaviyo.
Unlike client-side tracking, which relies on JavaScript running in the user’s browser, server-side tracking allows for greater control over what data is sent and when. It improves event accuracy, enhances attribution, and supports better compliance with data privacy regulations. With Stape’s server-side Klaviyo tag, brands can track events without depending on Klaviyo.js, reduce frontend script load, and maintain clean, consistent data flow into their Klaviyo account.
Klaviyo’s website event tracking allows you to create segments and launch automated flows based on how users behave on your site. There are many use cases – for example, if someone adds a product to their cart but doesn’t complete the purchase, you’ll want to remind them what they left behind. That’s where Klaviyo’s event tracking comes in. To trigger a personalized email for abandoned carts, you first need to send a custom event from your site that includes key product details – such as the product name, URL, image, and more. There are several ways to send website events to Klaviyo: JavaScript requests, server-side requests, or via a server Google Tag Manager container.
Klaviyo’s website event tracking is essential for delivering personalized, behavior-based marketing that drives revenue. By capturing user actions – like product views, add-to-cart events, and purchases – you can trigger automated emails or SMS messages tailored to where each customer is in their journey. This makes your marketing more relevant, timely, and effective.
Without proper event tracking, you miss out on opportunities to recover abandoned carts, re-engage inactive users, or recommend products based on browsing behavior. Server-side tracking via sGTM ensures this data is collected reliably, even when browser-based tracking is blocked, helping you maintain performance and improve marketing results.
1. Improved data accuracy. Server-side tracking bypasses browser limitations, ad blockers, and cookie restrictions – ensuring that important events like purchases or cart updates are reliably captured and sent to Klaviyo.
2. Better performance. Offloading tracking logic from the browser to the server reduces the impact on page load times. Unlike Klaviyo’s JavaScript library, which can be heavy, server-side tracking improves site speed and user experience.
3. Enhanced attribution. Accurate, uninterrupted event tracking helps Klaviyo correctly attribute revenue, engagement, and other actions to specific campaigns – even when client-side tracking fails.
4. Easier compliance & control. Server-side setups allow you to manage what data is collected, stored, and sent, making it easier to comply with privacy regulations like GDPR or CCPA.
5. No developer required (with sGTM). Using tools like Stape with server Google Tag Manager, you can implement server-side tracking without writing code. Everything is managed through the sGTM interface.
| Event Name | Type | Description |
| Viewed Product | Ecommerce | Triggered when a user views a product page. Used for product recommendations. |
| Added to Cart | Ecommerce | Fires when a user adds an item to their cart. Enables abandoned cart flows. |
| Started Checkout | Ecommerce | Tracks the start of the checkout process. Used for checkout reminders. |
| Placed Order | Ecommerce | Captures when an order is completed. Triggers confirmation and post-purchase flows. |
| Fulfilled Order | Ecommerce | Indicates an order has been shipped or delivered. Used for shipping updates. |
| Cancelled Order | Ecommerce | Marks when a user cancels an order. Useful for customer recovery or feedback. |
| Opened Email | Engagement | Logged when a Klaviyo email is opened (via tracking pixel). |
| Clicked Email | Engagement | Captures when a link in an email is clicked. Great for engagement segments. |
| Signed Up | Custom | Tracks account or newsletter signups. Useful for welcome flows. |
| Subscribed to SMS | Custom | Marks user opt-in for SMS marketing. |
| Visited Pricing Page | Custom | Tracks visits to key pages like pricing or features. Often used in SaaS flows. |
| Completed Survey | Custom | Captures post-purchase feedback or satisfaction surveys. |
| Watched Video | Custom | Logs engagement with video content (e.g., product or onboarding videos). |
1. Check if you have already installed Google Tag Manager server container.
2. Make sure your Google Tag Manager web container has all the info needed about the user. Perhaps, this data will be in the GTM variables or data layer as you already set up Google Analytics or Facebook tracking inside Google Tag Manager Web container.
3. Send required data from the web GTM container to the server container. There are two ways on how to send data to server GTM:
– Data Tag and Data Client. We recommend using Data Tag/Data Client because Data Tag has a built-in feature to store user data. It will help to track Klaviyo events more accurately by storing user email.
4. Add Klaviyo tag to the server container using the server Template Gallery.
5. Create a new tag in the server container → Tag type Klaviyo.
6. Configure the tag.
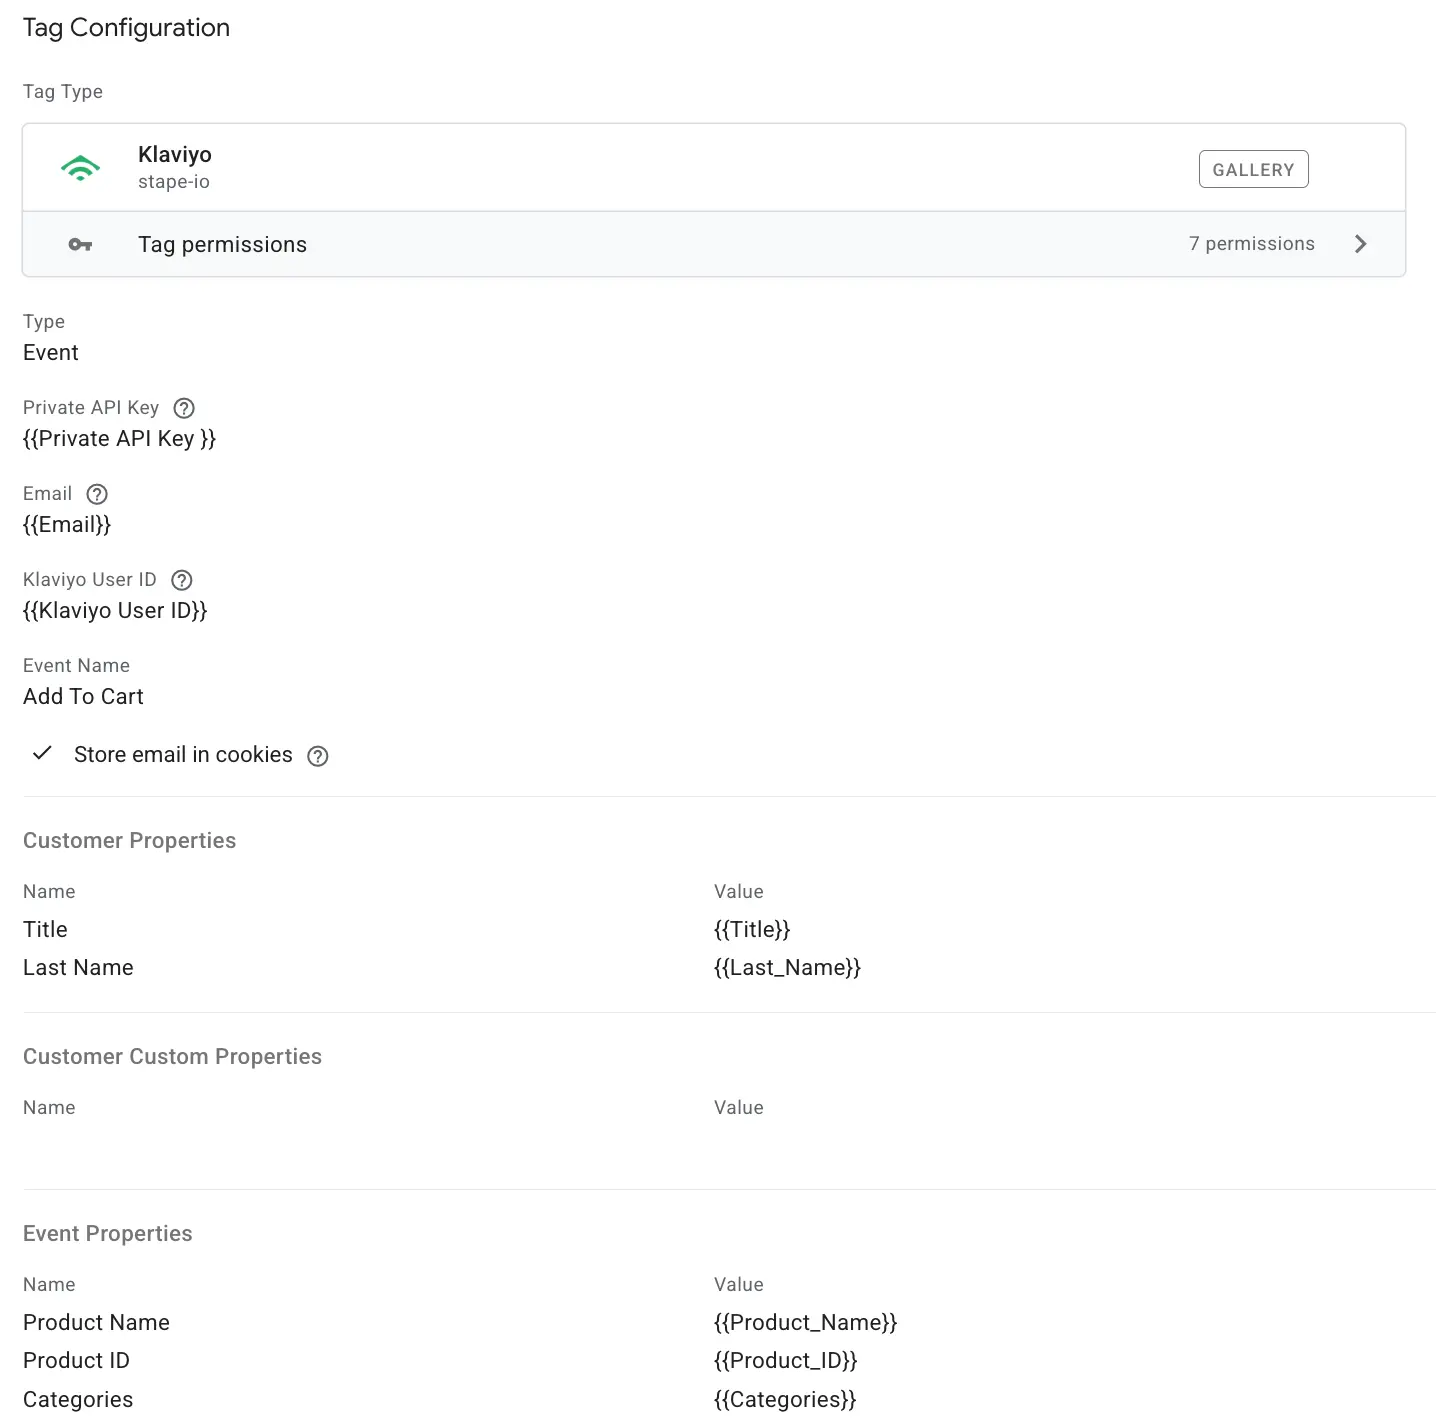
6.1 Type - from the drop-list select the type of action you want to track:
6.2 Private API Key - the key allows reading data from Klaviyo and manipulating sensitive objects, such as lists. To find the Private API Key, please refer to Klaviyo’s documentation on Private API Key. This parameter will be required regardless of the action type you’ve chosen to configure the tag.
6.3 Email - add a variable with a user email.
6.4 Klaviyo User ID - is a unique identifier for the user’s profile, automatically generated by Klaviyo.
6.5 Event name (if selected “Event” action type) - specify the event type you want to track. In the previous section, we listed the events you can track with a tag.
6.6 List ID (if selected “Add to list” action type) - to get the List ID, please refer to Klaviyo documentation on List ID.
6.7 Use Optimistic Scenario - if checked, the tag will call gtmOnSuccess() immediately without waiting for the API response. While this speeds up the sGTM response time, your tag will always report a successful firing status, even if the API call itself failed.
6.8 Store email in cookies - if the email is submitted, store it in a cookie and use this stored value as a fallback when the email is missing during the current event, profile creation, or update.
6.9 Add event/customer properties that you want to send.
Here is an example of tag configuration:

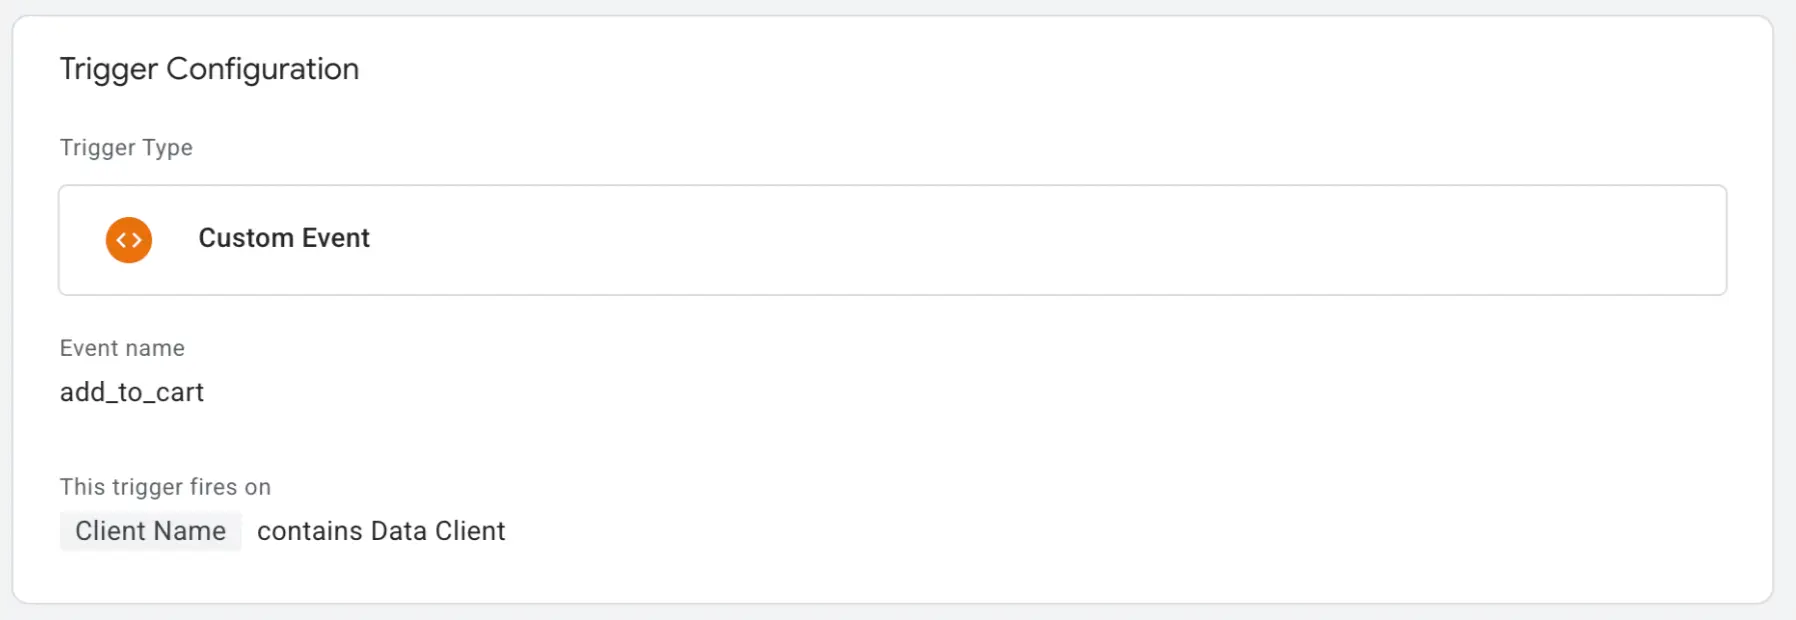
7. Add trigger. In our case, this tag triggers on a custom event add to cart, claimed by Data Client.

8. Test the event that you’ve set up. You should see that the Klaviyo tag is triggered in the server container and the event was associated with the Klaviyo contact.
There is no need for custom code or long waiting times for the next release when using the Klaviyo tag for server Google Tag Manager to set up events tracking. The integration allows you to build advanced flows and custom emails, plus it’s quick and easy if you are familiar with server-side tracking!
We can help you to do that! Click Get A Quote, fill up the form, and we will send you a quote.
Comments