How to set up GTM on Shopify (all options explained)

Tymofii Sankov
AuthorKey takeaways
Google Tag Manager is the control center for every tracking tag on a Shopify store. Whether you need to manage Google Analytics, Google Ads, Meta Pixel, etc., GTM gives you a single interface to deploy, update, and monitor all of them without touching store code every time. For many merchants, a proper Shopify GA4/GTM setup is the foundation for accurate data analytics in eCommerce and campaign optimization. In 2026, with Shopify's Checkout Extensibility migration deadlines, tighter browser privacy restrictions, and the deprecation of older tracking methods, knowing how to install GTM on Shopify has never been more critical. Generally, it can be configured in several ways, and this guide covers the most effective of them.
Benefits of using Google Tag Manager on Shopify
Google Tag Manager is widely adopted across the Shopify ecosystem. It is particularly valuable for stores that need reliable measurement, consistent data collection, and greater control over how marketing technologies are deployed. Using GTM offers several significant benefits for a Shopify store.
- Faster tag deployment. GTM allows for faster implementation of tracking tags. Adding or updating marketing tags - whether for Google Ads, Meta, TikTok, or anything else - happens inside GTM's interface instead of requiring theme file edits for each change.
- Centralized control. GTM simplifies tag management across Shopify stores by providing a single location to manage all tracking scripts. It reduces errors by centralizing tag management, eliminating version drift and redundant code across pages. Moreover, it helps you to keep the overall logic unified, even though Shopify forces you to split your tracking between the storefront and the checkout sandbox via Shopify custom pixel GTM setup.
- Standardized data collection. GTM can pull out data from a unified data layer (created by solutions like Stape’s app for Shopify) that provides a consistent source of data. This makes it easier to send accurate and structured information to analytics, while keeping cross-channel reporting more consistent.
- Easier campaign rollouts. New pixels or conversion tracking setups deploy uniformly across storefront, collection, product, checkout pages, and order status pages once configured properly.
- Performance gains. Consolidating tracking scripts into one GTM container reduces duplicate script loads. GTM improves page performance by loading tags asynchronously, helping Core Web Vitals scores on product and collection pages.
- Privacy and consent. Google Tag Manager works with consent banners and can respect Shopify's customer privacy API when configured correctly. In 2026, this matters for GDPR, CCPA, and similar regulations - tags fire only when user consent preferences allow it.
Considering all these benefits, GTM is, if not a default requirement, then a highly desired tool for any Shopify merchant serious about reliable measurement, campaign optimization, and privacy-aware data collection.
4 Shopify GTM methods compared
As of 2026, there are four reliable and effective ways to set up GTM on Shopify. Each has distinct advantages depending on your technical skill level, Shopify plan, and tracking requirements. Below is a comparison, followed by a detailed breakdown of each approach.
| Method | Coverage | Data quality | Typical use case |
|---|---|---|---|
| Manual GTM + Checkout Extensibility | Full storefront + checkout events (with Customer Events) | High | Merchants who want full control over tags, custom events, and integrations with multiple marketing platforms. |
| GTM App | Storefront, with checkout support depending on the app | Medium–High | Small to medium-sized stores looking for a quick, no-code GTM implementation without editing theme files. |
| Server-side GTM (e.g., Stape Conversion Tracking app) | Full customer journey with client-side and server-side event processing | Very High | Growing or enterprise stores focused on advanced analytics, attribution, advertising performance, and first-party data strategies. |
| Google & YouTube App (Alternative) | GA 4, Google Ads, Merchant Center, and standard ecommerce events | High | Merchants using only Google's ecosystem who want a simple, officially supported tracking solution without GTM. |
Manual GTM installation and Checkout Extensibility
Many Shopify GTM tutorials used to instruct installing Google Tag Manager in both theme.liquid (storefront) and checkout.liquid (checkout) template files to track the complete customer journey. However, we have already mentioned the migration earlier, and here is the point: checkout.liquid is moved to legacy and is substituted with a more secure and standardized framework under the name of Checkout Extensibility. Thus, here are the guidelines on what you need to do now to GTM to the checkout/thank you page and configure everything properly.
1. Create a Google Tag Manager container and copy the GTM snippet you get (you will need it in step 3).
2. Proceed to the Shopify store → Themes. There, select the needed Theme, click ‘...’, and open the tab Edit Code.
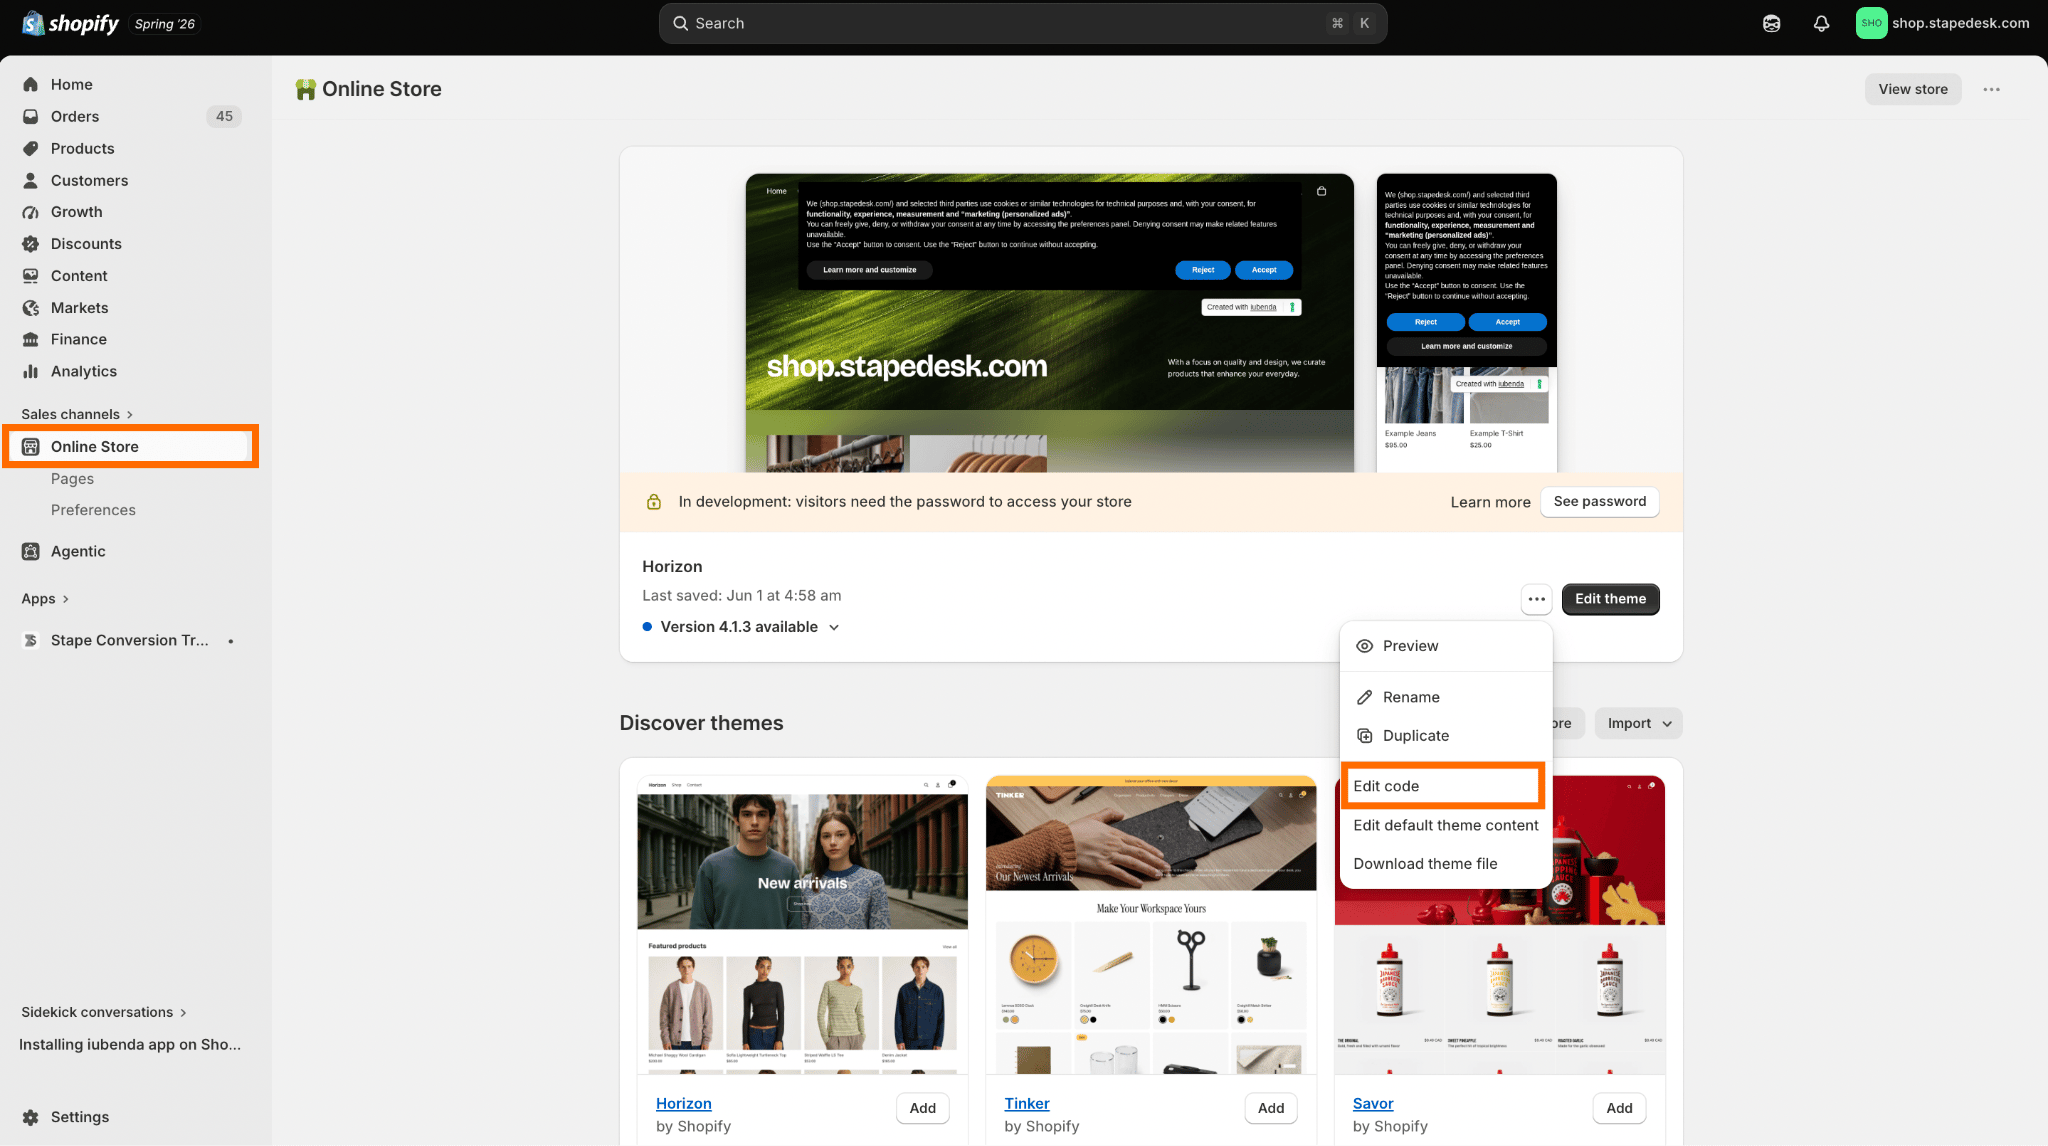
3. Open the theme.liquid template and add the GTM snippet in it (<script> snippet right after opening the head tag, and <noscript> snippet right after opening the body tag). Save and publish the changes.
4. Now, get to your Shopify admin and navigate to Settings → Customer Events. There, click Add Custom Pixel.
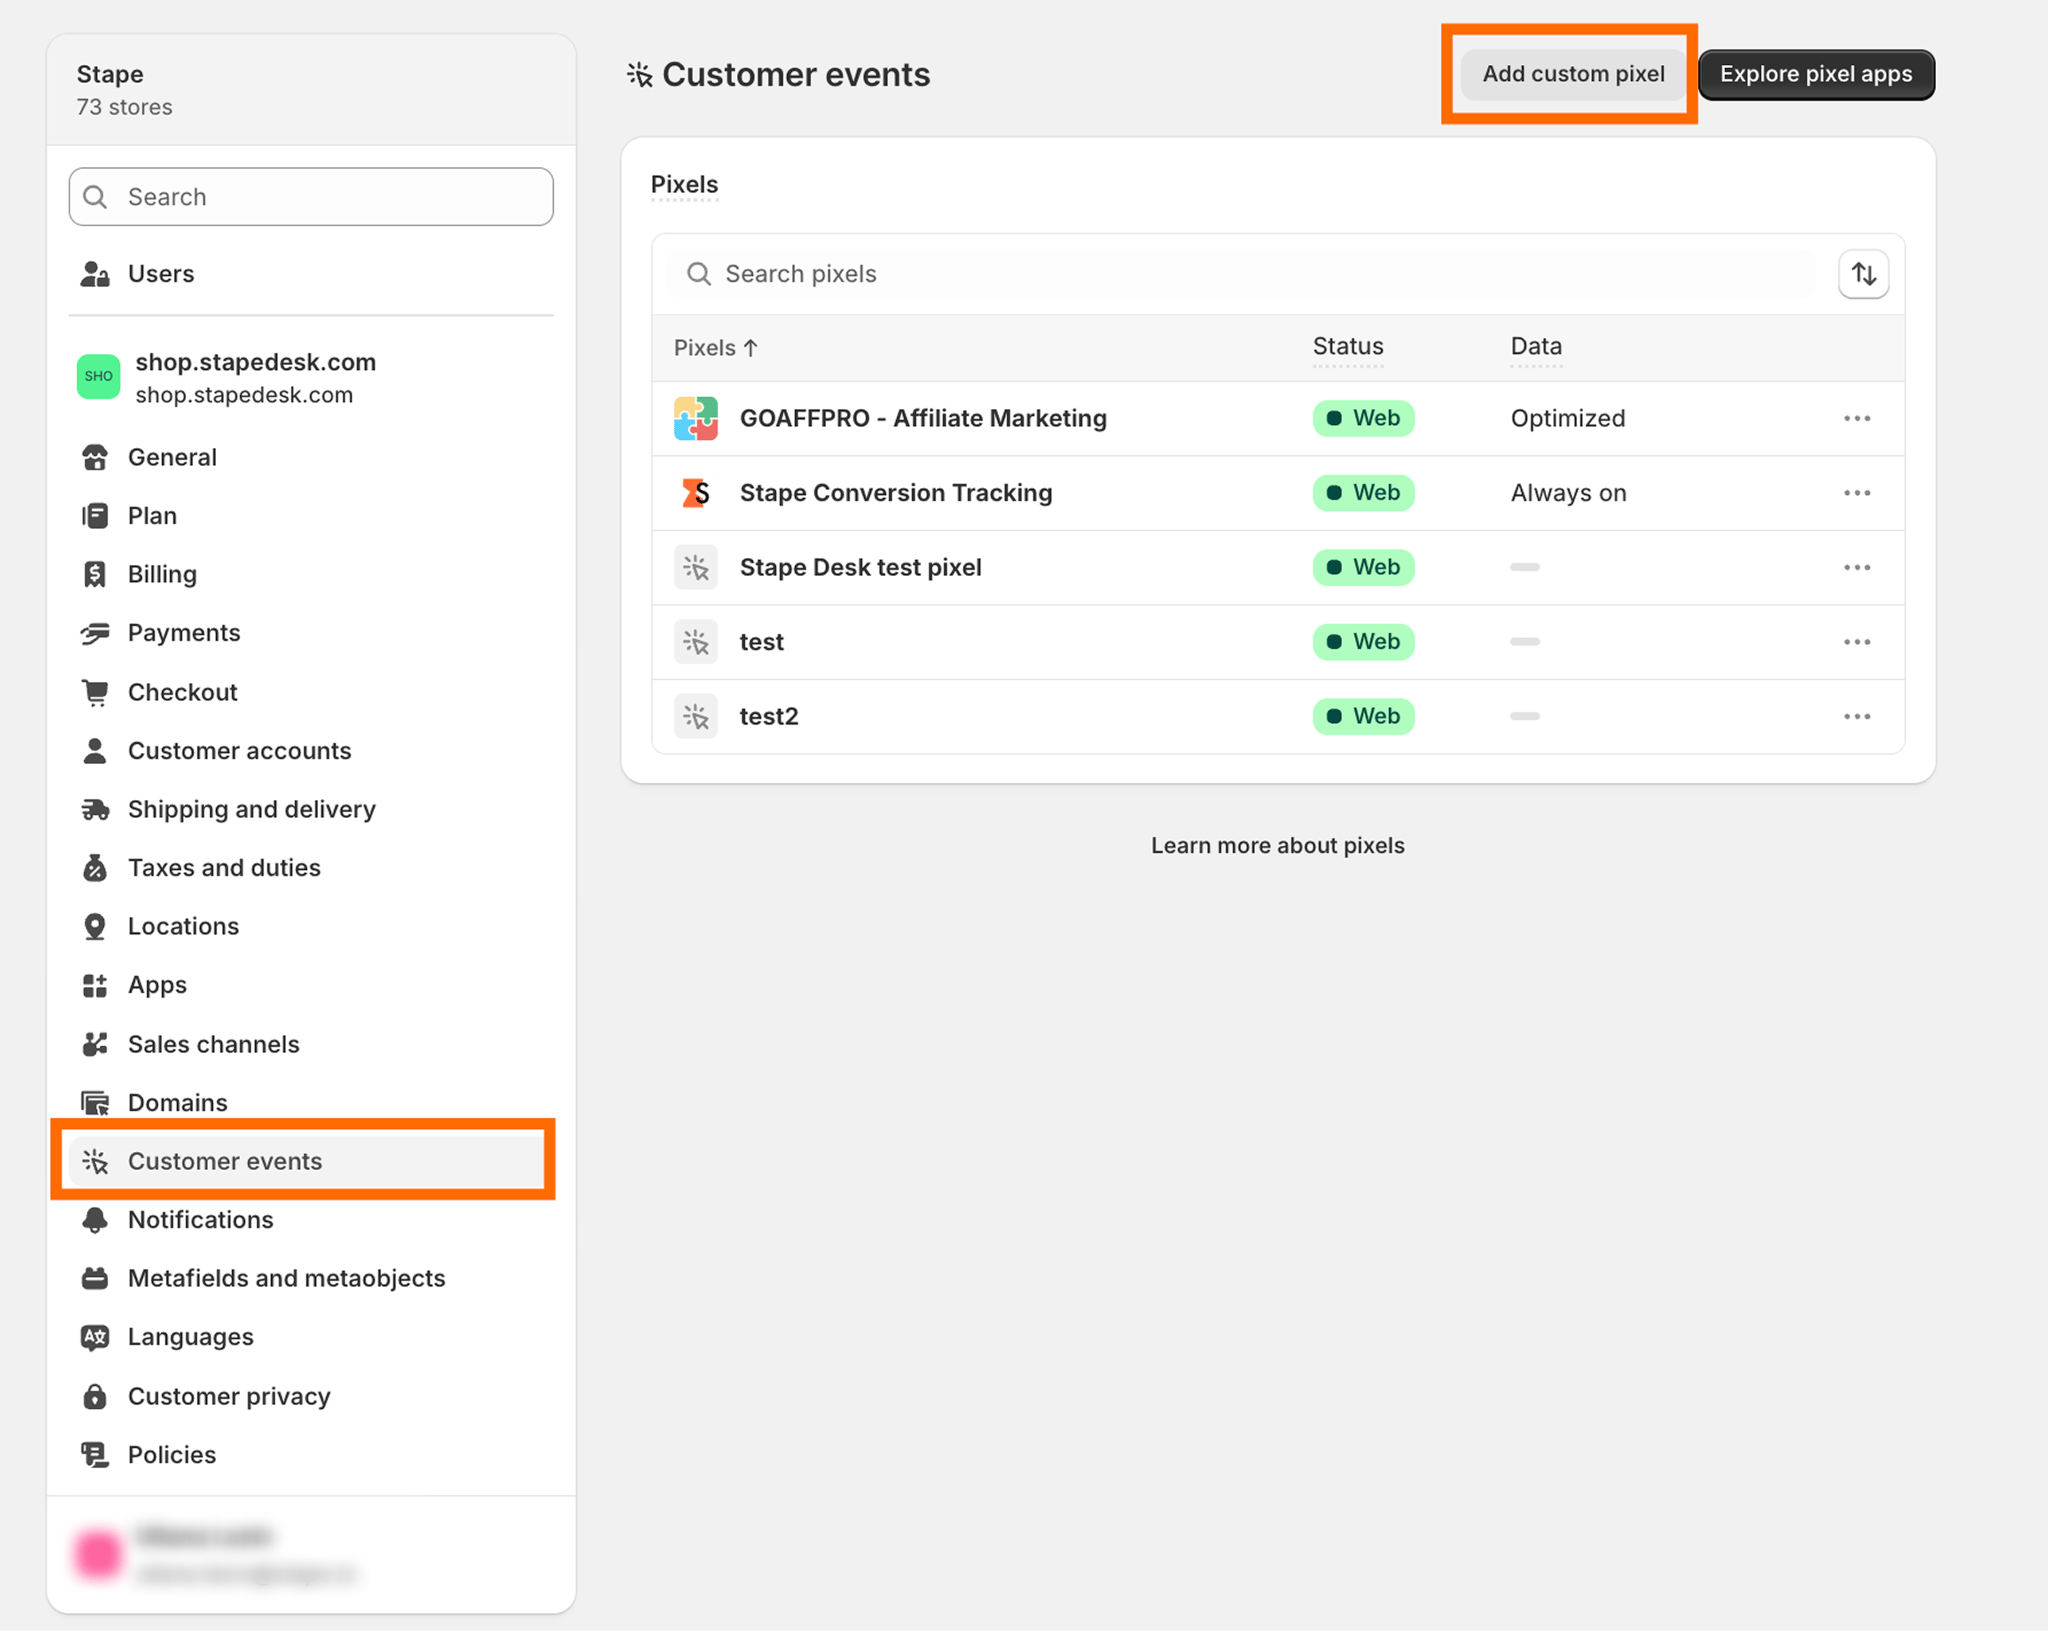
5. Subscribe to the needed Shopify events by using analytics.subscribe().
6. Push every event to the GTM web container data layer within the pixel sandbox (which will forward the data to your server GTM container if you are using server-side tracking). Publish the custom pixel.
After every publishing, it is highly recommended to launch preview mode and verify that the mapped checkout events are received correctly.
The conceptual difference from the legacy approach is that Checkout Extensibility works with Customer Events and Custom Web Pixels. By combining it with a standard storefront GTM, you remain compatible with Shopify’s modernized architecture and can still measure the entire customer journey.
GTM App
If you’d rather not edit the Shopify store theme files or work with custom code, you can use dedicated Shopify GTM apps. Such applications simplify the process of GTM implementation by adding it to the storefront automatically. In many cases, they even generate a data layer and automatically link the container with Customer Events. In other words, GTM Apps are an ideal solution for those who want a quicker result with significantly less technical fuss. The installation process is usually very simple and consists of only a few steps.
- Find the needed GTM app in the Shopify Store and install it.
- Open the app and enter your GTM container ID.
- Configure the tracking settings inside the app (you often only need to choose between Yes and No options).
- Save the configuration and publish the changes.
- Verify if everything operates properly via GTM Preview Mode.
Using a dedicated app is usually the fastest and easiest way to set everything up, but it offers significantly fewer flexibility and customization opportunities than other methods. Depending on the app, you may have limited control over the data layer, cut access to custom events, or be unable to configure the GTM and Shopify connection on a more advanced level. Consider them iOS, while other options are Android.
Thus, when choosing an app, review its features, compatibility with Checkout Extensibility, and other nuances. In other words, ensure that you won't find yourself in a situation where you have installed an app and cannot do anything you need with it.
| Check out our guide to Shopify tracking myths and misconceptions. It explains what Shopify's checkout restrictions mean, how Custom Web Pixels and GTM work together, and where native apps may limit your tracking flexibility. |
An upgrade to server-side GTM with Stape’s Conversion Tracking App
For those merchants who want to go even further and improve the data quality, attribution, and long-term tracking reliability, a switch to server GTM is the most logical step. Not to configure everything manually, you can use the Stape Conversion Tracking app, which automates most of the required steps and makes your switch to server-side as painless as possible.
Check the comparison of server-side tagging with the client-side alternative to see why the latter is no longer enough.
Unlike all other GTM apps Shopify has, the one from Stape does not simply add a container to your storefront. It establishes a bridge between your website and the server container, which is to be hosted in advance, of course. All customer interactions are first collected in the browser, then sent to the server container, where they can be enriched and reviewed for personal data before being sent to GA4, Google Ads, Meta, or any other platform. If you decide to use the Conversion Tracking app, read our detailed guide on how to configure server-side tracking for Shopify.
Important note: adding GTM to Shopify only establishes a connection; it is not responsible for tracking or sending the events on its own. To establish proper tracking, you need to configure tags and triggers in the GTM. Then, you can use Setup Wizard to add the needed tags and triggers to the container, or do that manually if you want and can.
Alternative: use Shopify’s Google & YouTube App
If your primary goal is to connect your Shopify store with Google Services, such as GA4, Google Ads, or Google Merchant Center, GTM might not be needed at all. Shopify Google & YouTube app covers all the needs in this aspect and provides an officially supported Shopify Google Ads integration that minimizes manual work and automatically configures all needed Google services. The overall configuration process is very straightforward.
1. Find and install the Google & YouTube app from the Shopify App Store.
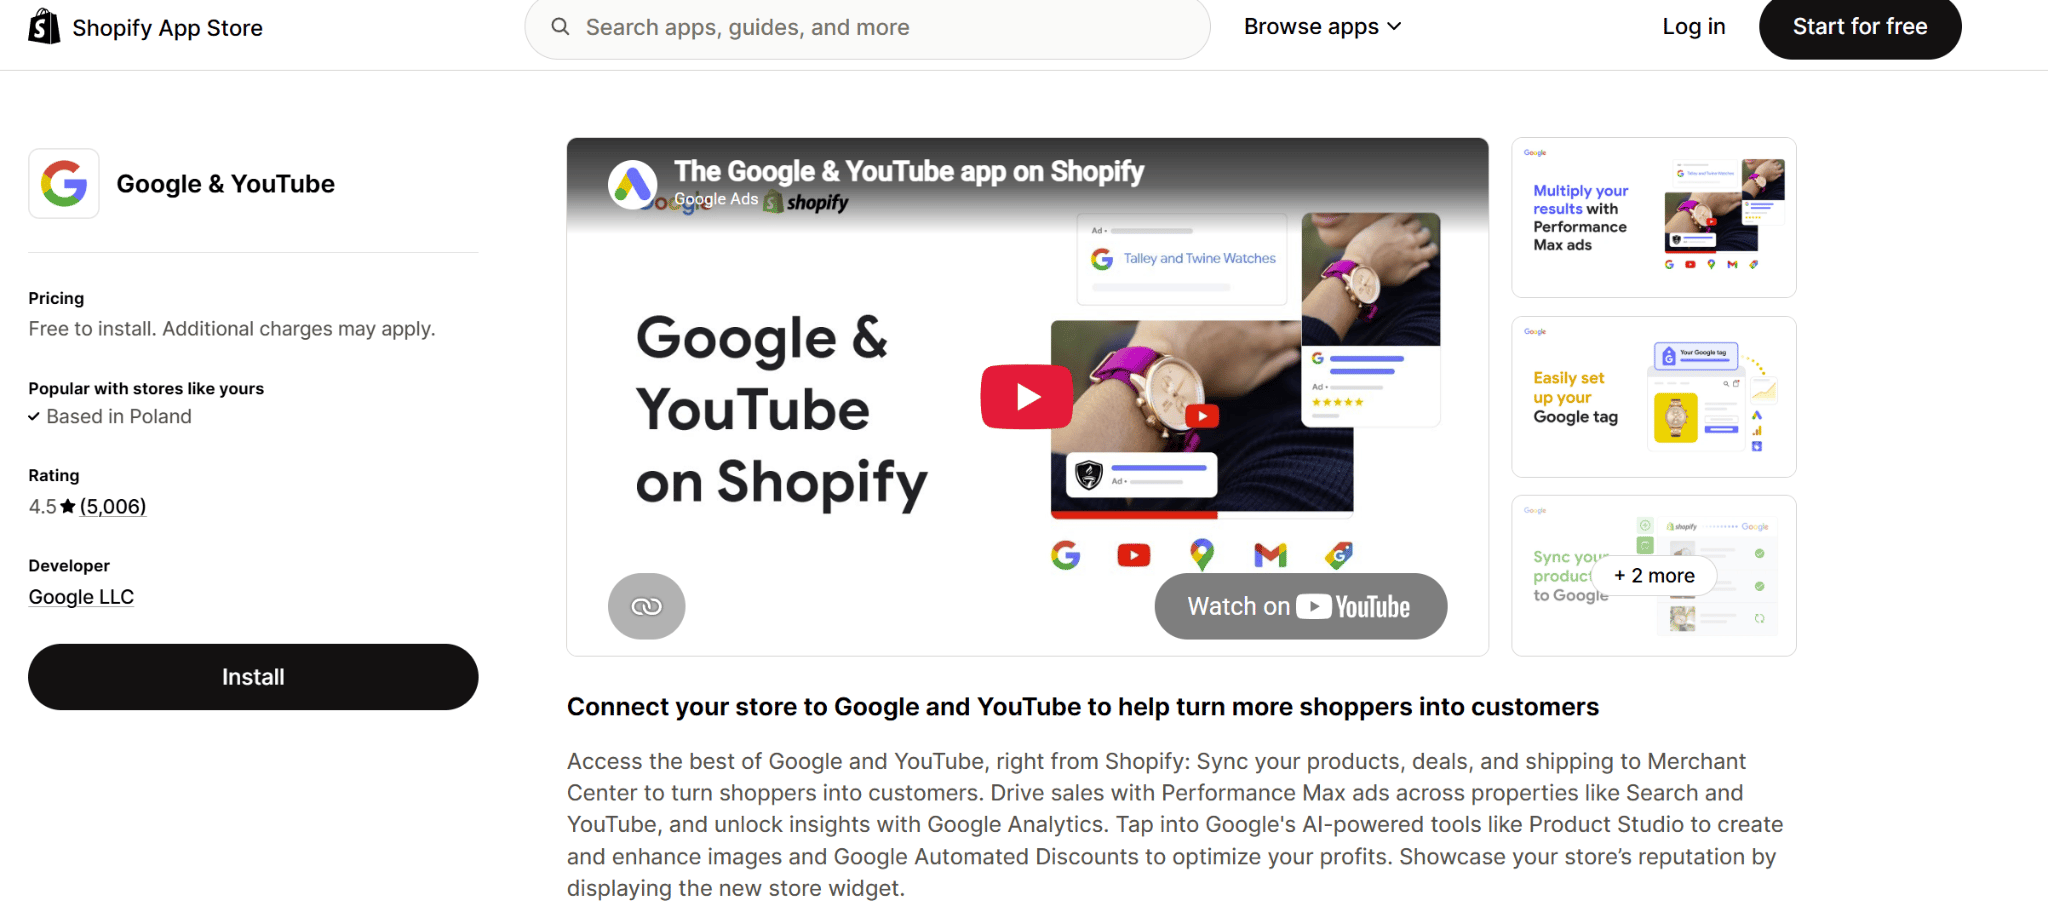
2. Connect your Google account with your Shopify store.
3. Link or create your Google Analytics 4 property, Google Ads account, and Google Merchant Center account.
4. Configure your synchronization and advertising preferences.
5. Publish the integration and verify that data is being received in GA4 and Google Ads.
This official integration automates the deployment of Google tags while providing native support for standard eCommerce tracking. For merchants figuring out how to set up Google Analytics 4 without coding knowledge, this is a highly convenient solution. Since Shopify and Google actively maintain this bridge, it ensures long-term compatibility with ongoing architectural shifts, such as the transition to Checkout Extensibility and the unified Customer Events framework.
An important point in this case is, however, that this app only works with Google’s ecosystem. Unlike GTM, it does not provide a centralized platform for managing all the tags or creating custom triggers and variables. You can use it in combination with GTM, but in this case, you need to ensure that Google events are not duplicated.
Shopify data layer for GTM explained
Finding out how to add Google Tag Manager to a Shopify store is only half of the work. To be able to accurately track eCommerce activity, GTM needs to access structured information about what visitors do on your page. This information is provided through the data layer - a structured JavaScript object that stores page details, customer interactions, and eCommerce data in a format that GTM can process and send to analytics and advertising platforms.
A well-implemented Shopify GTM data layer is far more reliable than extracting information directly from page elements. Instead of relying on the layout or HTML structure of your store, GTM reads consistent, structured data that can be used to trigger tags and send data to platforms such as Google Analytics 4, Google Ads, and other marketing tools. On Shopify, there are two primary approaches to filling the data layer:
- Storefront theme implementation. Shopify's Liquid templates can add information about pages, products, collections, carts, and other storefront interactions to the data layer. This allows GTM to track customer activity throughout the shopping experience using structured, reliable data.
- Customer Events and custom web pixels. As part of Shopify's Checkout Extensibility framework, Customer Events provide standardized information about key actions, including checkout and purchase events. These events can be added to your data layer, extending ecommerce tracking beyond the storefront and into the checkout flow.
You can set up the data layer manually or even hire someone to do that for you. However, the easiest way is to use a dedicated app for that. Stape Conversion Tracking App is a great choice for this, and it creates the data layer and populates it with essential events automatically.
One of the biggest advantages of a standardized data layer is consistency. Using the same event names and parameter structure across your Shopify store allows GTM variables, triggers, and tags to be reused across multiple platforms, reducing implementation effort and improving.
Testing and verifying your GTM installation
After finishing your Shopify GTM integration, it's important to verify that your implementation is working correctly before publishing your container or relying on the collected data. A few minutes spent testing can help you identify missing events, duplicate tags, or configuration issues that may affect your analytics. Use the following checklist to validate your setup:
1. Install Chrome Extension. This is a key tool you need to have in the first place to make all the next stages more effective and informative.
2. Launch GTM Preview Mode. In Google Tag Manager, click Preview and connect to your Shopify store. Browse several pages, including the homepage, product pages, collections, and the cart, to confirm that the GTM container loads successfully.
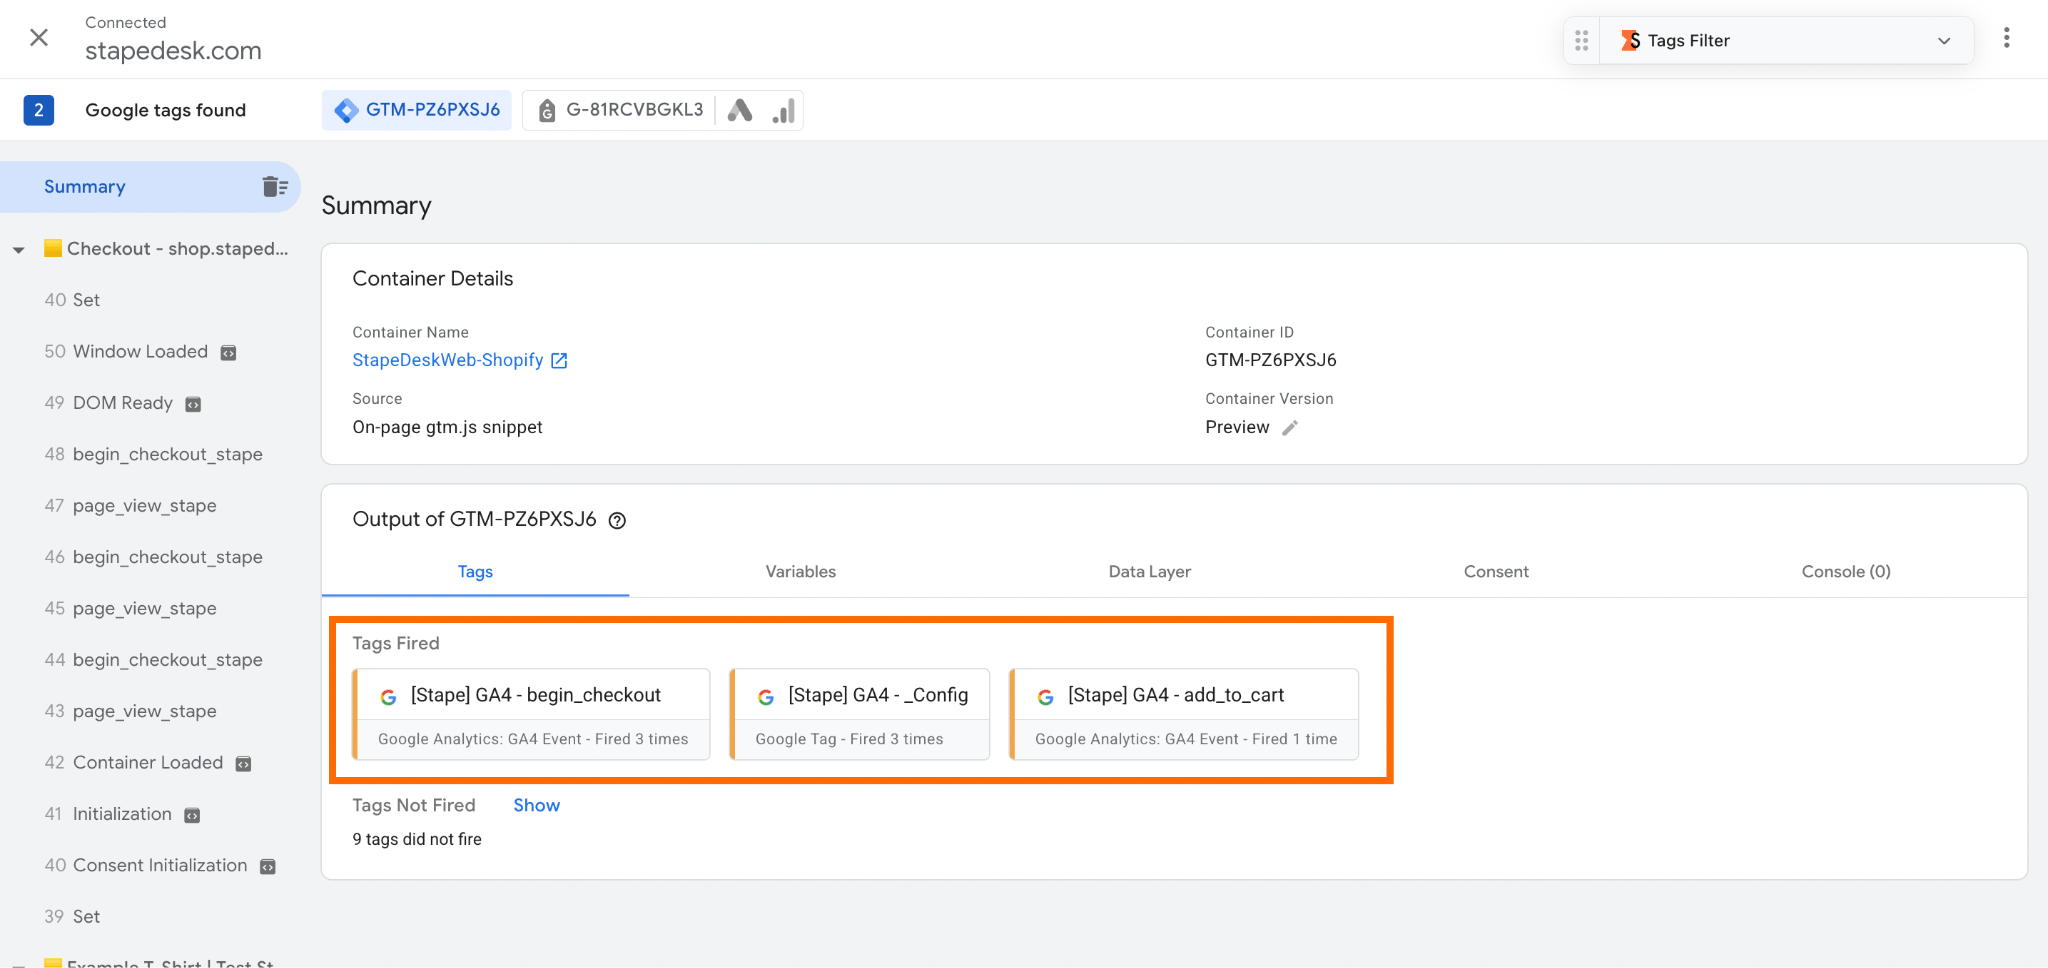
3. Verify data layer events. Check that key ecommerce events - such as product views, add-to-cart actions, checkout starts, and purchases - are available and trigger at the appropriate points in the customer journey.
4. Check GA4 DebugView. Open Google Analytics 4 and navigate to Admin → DebugView to confirm that events sent from tags in GTM are arriving correctly and include the expected ecommerce parameters.
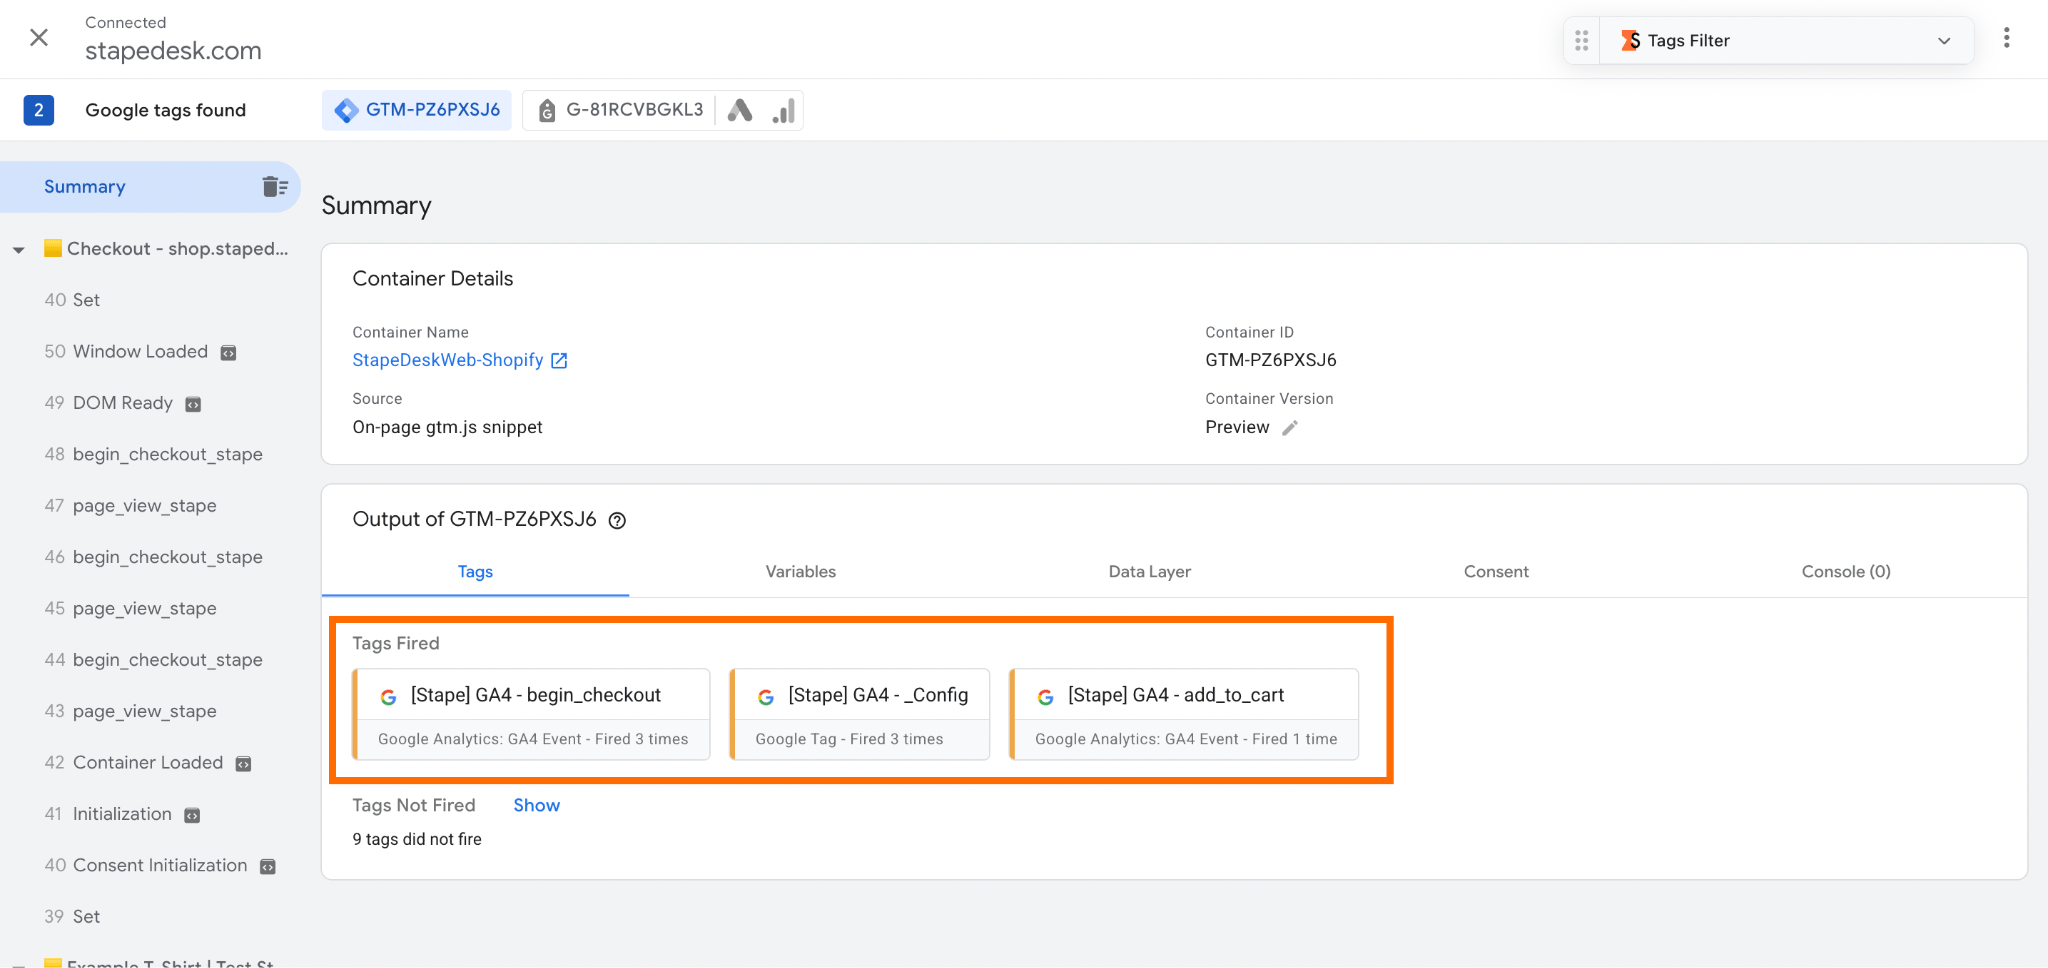
5. Complete a test purchase. Place a test order using Shopify's test payment gateway or another testing method. Verify that checkout and purchase events are captured correctly and that transaction values, currency, and purchased items are reported accurately.
6. Watch for duplicate events. If you're using multiple tracking solutions - such as Shopify's Google & YouTube app and GTM tracking setup - confirm that events such as page_view and purchase are recorded only once. Duplicate events are one of the most common causes of inaccurate reporting.
7. Review your container before publishing. Resolve any errors or warnings identified during testing, then publish your GTM container and monitor your analytics over the following days to ensure data continues to flow as expected.
Regular testing shouldn't stop after the initial setup. Whenever you update your Shopify theme, introduce new apps, modify your data layer, or change your GTM configuration, repeat these verification steps to ensure your tracking remains accurate and reliable.
We would also like to warn you that the storefront does not always send the consent data to checkout if a cookie banner is used. Thus, it is a great idea to spend a couple of more minutes to check this and fix the consent-to-checkout transfer issue in the initial stages.
Common mistakes and troubleshooting
Even a correctly installed Google Tag Manager container can produce inaccurate data if it's misconfigured. Should your events appear not as expected, review the following common issues before making further changes.
Duplicate events
Duplicate page_view, add_to_cart, or purchase events are among the most common tracking problems on Shopify. They typically occur when multiple solutions send the same data - for example, a manual GTM implementation running alongside Shopify's Google & YouTube app, a GTM app, or another tracking plugin. Review your implementation and ensure each event is sent from only one source.
Missing ecommerce events
If product views, checkout events, or purchases aren't appearing in your analytics platform, verify that your data layer contains the required ecommerce information and that your GTM triggers are configured correctly. If you're tracking checkout activity, confirm that your Customer Events and Custom Web Pixels are configured and published.
Incorrect data layer values
Missing product IDs, incorrect prices, or incomplete transaction details can lead to inaccurate reports. Check that your data layer consistently provides the required information for every ecommerce event and follows Google's recommended ecommerce structure.
Tags not firing
If tags don't fire when expected, use GTM Preview Mode to identify the cause. Review your triggers, variables, and tag conditions, and make sure any consent requirements are respected before the tags are allowed to run.
Container not detected
If GTM Preview Mode cannot connect to your store, verify that the container snippets have been installed correctly and that you're using the correct GTM container ID. Theme changes, unpublished themes, or app conflicts can also prevent the container from loading.
Checkout tracking is not working
Modern Shopify stores rely on Checkout Extensibility for checkout measurement. If checkout or purchase events are missing, confirm that your Shopify GTM Custom Pixel is subscribed to the appropriate Customer Events and that the events are being passed to your data layer.
Data doesn't appear in Google Analytics 4
Remember that some reports in Google Analytics 4 are not updated in real time. Use DebugView to verify that events are arriving immediately after they are fired. If events appear in DebugView but not in standard reports, allow additional time for processing before assuming the implementation is incorrect.
Most GTM Shopify store issues can be identified using GTM Preview Mode, GA4 DebugView, and a test purchase. Taking the time to validate your implementation after every major change will help ensure your analytics remain accurate as your store evolves.
FAQ
Can I add Google Tag Manager to Shopify without coding?
Yes, you can install GTM on Shopify by using an app that automatically adds a GTM container to your store. If you want to go deeper and further, use the Stape Conversion Tracking app in combination with a server-side tracking setup. Although it requires a bit more manual work, the tracking results are also expected to be much better.
Why isn’t GTM preview mode working on Spotify?
The first thing you need to verify is whether the correct GTM container is installed and published. Next, review the ID, unpublished theme changes, conflicting tracking apps, or consent tracking that block certain tags or totally prevent previewing. These are the first diagnostic steps to be done.
Is server-side GTM better than client-side GTM for Shopify?
The simplest answer is yes, it is, but a wider answer should focus on your business needs. Client GTM is often enough for small and medium-sized stores, especially considering that it is easier to implement. Server-side GTM, however, is recommended for bigger businesses that operate more data and more money; it provides greater control over data collection, better resilience against ad blockers and browser restrictions, as well as enhances attribution and conversion measurement.
Do I need to get Shopify Plus to use Google Tag Manager?
No, you can add GTM to Shopify on all plans. Initially, checkout customization required Shopify Plus, but the Checkout Extensibility framework makes it also available for all merchants. Thus, no advanced plans are needed to use GTM.

Comments