Oct 19, 2026
Shopify cookie banner: Stape's CMP setup and debugging
Written by
Uliana Lesiv
Published Nov 19, 2026 comments
Key takeaways
- A cookie banner collects visitors' consent choices; a CMP also stores and manages preferences, communicates them to third-party tools, and controls tracking based on consent.
- Shopify's built-in cookie banner manages consent for Shopify-specific tools, but if you use tools like GA4, Google Ads, Meta, etc., the built-in banner isn’t sufficient.
- Shopify merchants can face several consent management challenges, including unsynchronized consent statuses between the CMP and Shopify, and consent not being transferred to checkout.
- Stape’s CMP addresses these challenges through Shopify Customer Privacy API integration, Custom Loader deployment, and support for Google Consent Mode v2.
- Stape’s CMP should be combined with server-side tracking to improve data collection, provide more control over shared data, and reduce the number of third-party scripts running in visitors' browsers.
- To properly configure consent management on the website, you should also set up the relevant integrations and GTM tags, select the appropriate consent settings, and test consent signals across GTM, and Shopify checkout.
🤔 Who will find this article helpful? This article will be useful for Shopify store owners, data tracking specialists and marketers who struggle to manage cookie consent across storefront and checkout, and need CMP configuration and debugging guidelines.
Difference between Shopify Consent Management Platform and Shopify cookie banner
A Shopify cookie banner is a notice displayed to visitors. It explains how the store uses cookies and other tracking technologies. Visitors accept, reject, or manage their privacy preferences using it.
A Consent Management Platform (CMP) is a broader solution that handles user consent. It collects and stores visitors' consent choices, applies them to scripts and integrations configured on the website.
In other words, a cookie banner is a part of a CMP. A CMP includes a banner and also provides the technical functionality to manage consent.
| Shopify cookie banner | Shopify CMP |
| Displays a consent notice to visitors | Manages the full consent process |
| Lets visitors accept or reject cookies | Stores and manages consent preferences |
| Provides a way to update cookie preferences | Communicates consent choices to third-party tools |
| May have limited integration options | Can support integrations with analytics, advertising, and privacy platforms |
Shopify already offers a built-in cookie banner through its customer privacy settings. It manages consent for Shopify-specific tools (such as Shopify cookies and pixels). However, third-party scripts and pixels configured on your website need additional configuration to respect visitors' choices.
If you use different tracking and advertising tools, such as Google Analytics, Google Ads, Meta Pixel, and TikTok Pixel, you need greater control over how consent is collected, stored, and shared. To manage user consent, a CMP configuration is needed. A CMP connects the consent banner with tracking tools. When a visitor makes a consent choice using a cookie banner, the CMP passes that data to the configured platforms and prevents non-essential tracking where consent is required.
When does Shopify store require a cookie consent banner?
A Shopify cookie consent banner must be configured when the website uses cookies or similar tracking technologies that are subject to consent requirements under privacy laws. This mainly depends on where your website visitors are located and what types of cookies the store uses.
For example, if your Shopify store targets users in the European Union (EU) or European Economic Area (EEA), the data tracking and processing must be compliant with GDPR and ePrivacy regulations. They require you to obtain visitors' consent before setting non-essential cookies (advertising, analytics, and tracking cookies that are not necessary for the website to run). The same principle applies to visitors in the United Kingdom under UK GDPR and PECR.
In some US states, you may need to provide visitors with a way to opt out of the sale or sharing of personal information or targeted advertising. Among the most well-known regulations in the USA are the following:
- California Consumer Privacy Act (CCPA) – gives California residents the right to opt out of the sale or sharing of their personal information, including sharing for cross-context behavioral advertising.
- Colorado Privacy Act (CPA) and Connecticut Data Privacy Act (CTDPA) – provide Colorado and Connecticut residents with the right to opt out of the sale of their personal data and its use for targeted advertising.
👉To learn about privacy regulations (in particular, the ones listed above) and how they affect website tracking, check out our guide on how global data privacy laws affect user tracking strategies.
What to look for in a Shopify cookie consent banner
Tracking and consent management is more complex on Shopify than with other platforms. When comparing Shopify cookie consent banner solutions, check how it handles integrations and consent signals, not just how the notice looks. Here are some important features to look for:
✅ Shopify Customer Privacy API integration. The CMP should be able to synchronize visitors' consent preferences with Shopify's privacy settings.
✅ Google Consent Mode v2 support. If you use Google Analytics or Google Ads, the CMP should be able to communicate the relevant consent signals to Google tags.
✅ Third-party script control. Look for options to block non-essential scripts until the required consent is given. Check whether you need to configure scripts manually.
✅ Integration with the tracking setup. If you use GTM, have configured server-side tracking, and/or advertising platforms, make sure the CMP can communicate consent choices to these tools.
✅ Compliance with relevant privacy regulations. Make sure the solution supports the privacy regulations that apply to your website and visitors.
✅ Consent records. Look for a platform that allows you to store and review consent interactions when you need to troubleshoot the setup or maintain records.
✅ Support for opt-out requirements. If your store serves US audiences, check whether the solution supports relevant opt-out signals and frameworks, such as Global Privacy Control (GPC) and IAB Global Privacy Platform (GPP).
Do you need a Shopify cookie banner app?
You can find various cookie banner apps in the Shopify App Store. These apps can help you display cookie consent notices, collect visitors' privacy preferences, and manage consent for analytics and advertising tools.
However, there are some drawbacks worth considering, among them:
- Additional scripts can affect website performance. Some cookie banner apps load external JavaScript files and third-party resources. Depending on how they are implemented, these scripts can increase page load time.
- Limited control over tracking. Not every cookie banner app provides sufficient control over third-party scripts and pixels. If you use Google Analytics, Google Ads, Meta Pixel, or server-side tracking, you may need additional configuration to ensure that these tools respect visitors' consent choices.
- Compatibility issues with other tracking solutions. A cookie banner app may conflict with existing GTM configurations, other privacy tools, or Shopify's built-in consent functionality.
A separate Shopify cookie banner app isn't always necessary. For example, Stape's CMP allows Shopify merchants to configure and manage cookie consent directly through their Stape account. It doesn't require installing an additional Shopify app.
Stape's CMP for Shopify store owners
Stape’s CMP is especially useful for Shopify merchants who have configured multiple analytics and advertising platforms and/or track data on the server-side with Stape. The CMP is integrated directly into your Stape account and is available for all Stape users without a CMP license fee.
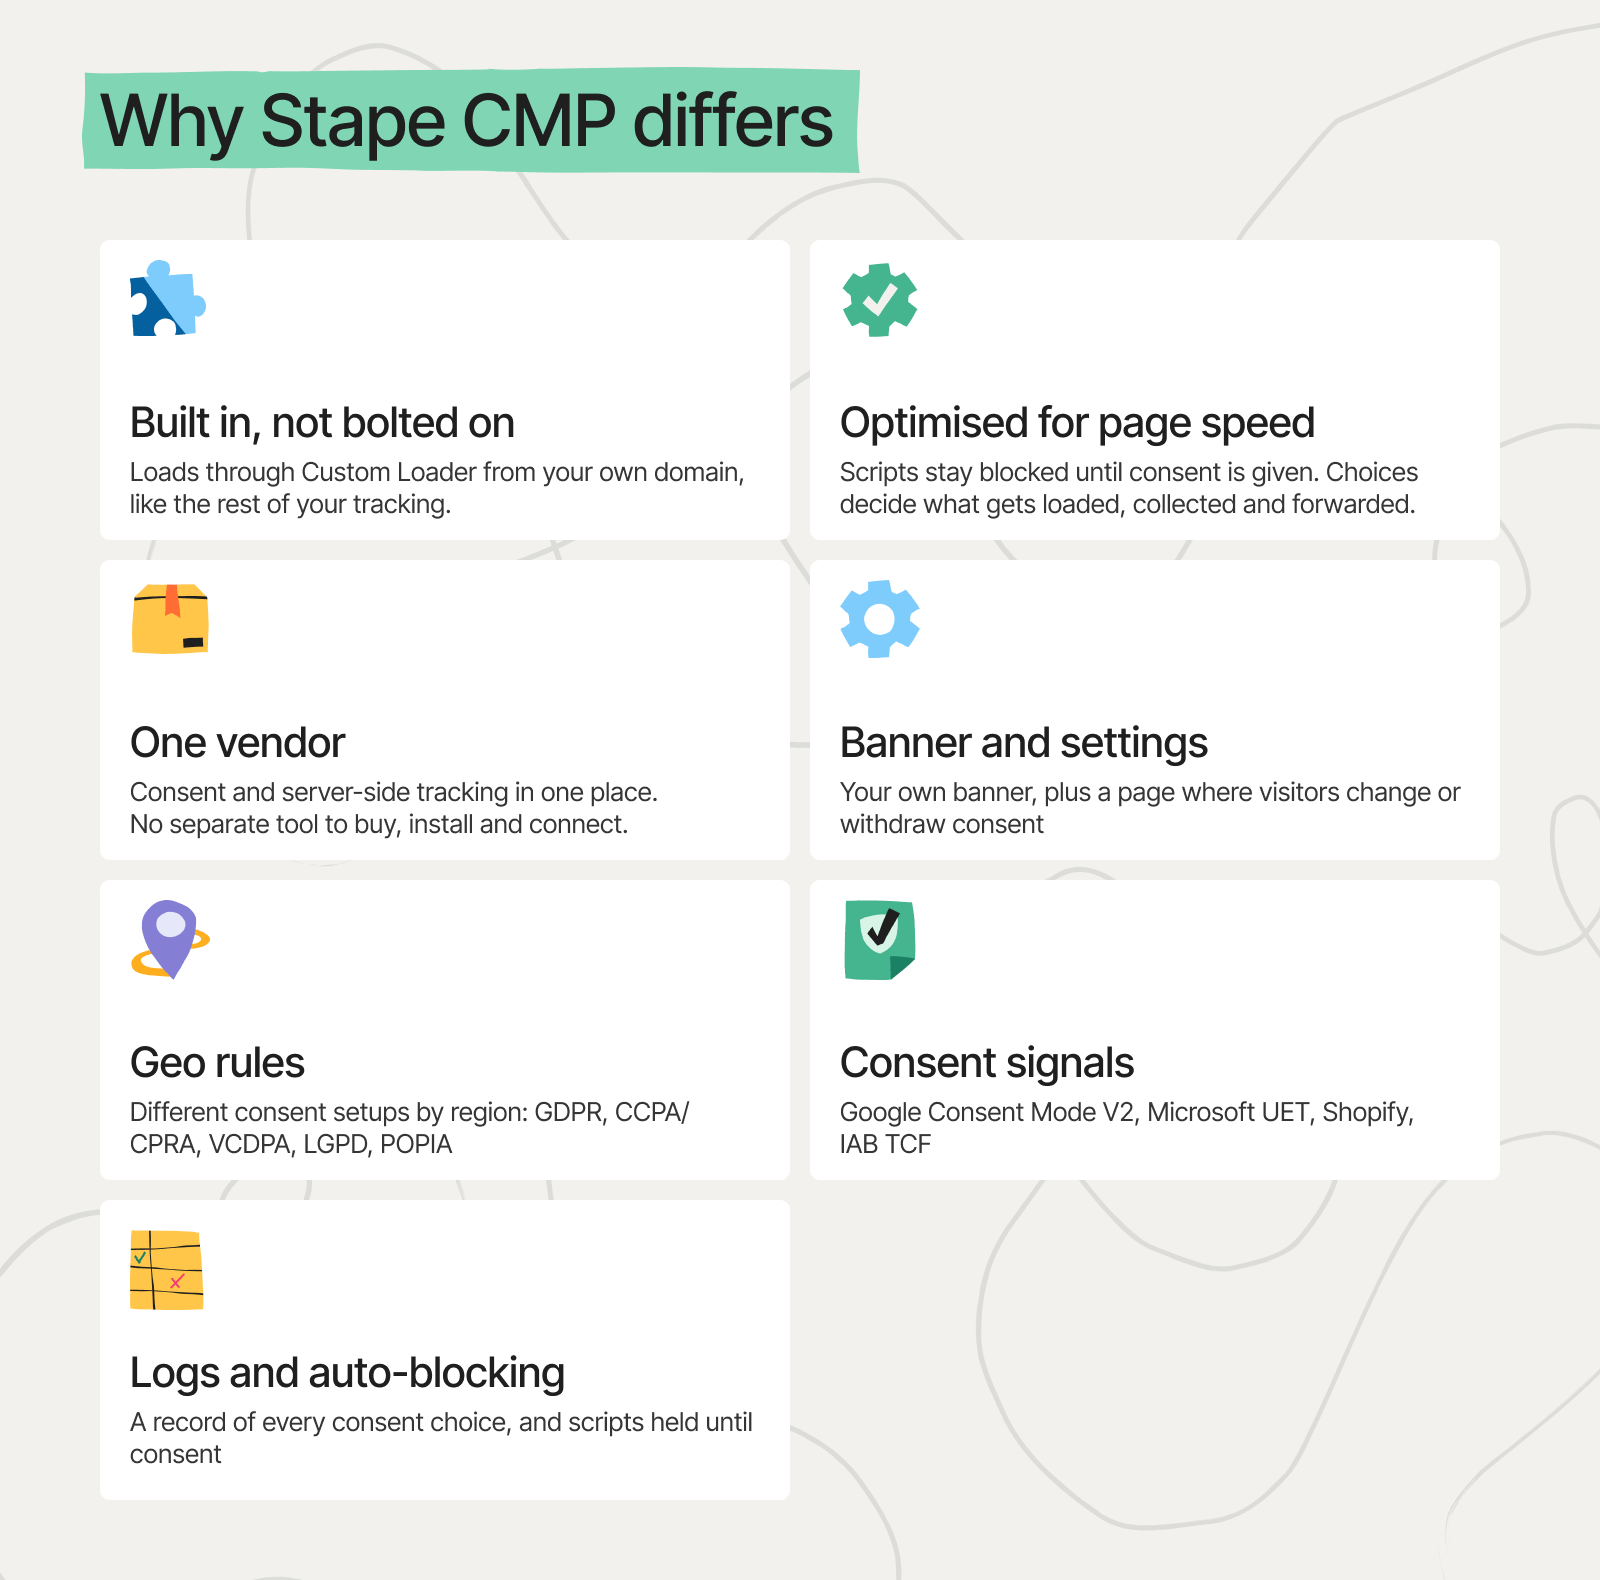
One of the most outstanding features of Stape's CMP is that it is loaded through Custom Loader and served from your own domain instead of using a third-party domain (which can be blocked by ad blockers). In this way, the CMP becomes a part of your server-side tracking infrastructure.
If you’re new to server-side tracking, click on the collapse element below to see a quick overview of this tracking method and the benefits it provides for your Shopify store:
Common consent management problems Shopify merchants run into
As customers configured Stape's Conversion Tracking app for Shopify, our team supported them throughout the setup process. During these conversations, many questions went beyond the app itself and touched on broader consent management challenges Shopify merchants face. We used these insights and feedback to develop Stape’s CMP with a focus on some of the most common issues. Below, we'll look at these challenges and explain how Stape’s CMP helps address them.
Consent statuses aren't synchronized between the CMP and Shopify
Shopify uses the Customer Privacy API to manage privacy preferences across Shopify services. If third-party consent management systems don't share consent information via Shopify's Customer Privacy API, they may have different records of a visitor's choice.
Depending on the store's privacy configuration, Shopify may block data tracking even though the visitor has already granted consent through the CMP. This can lead to data discrepancies.
How Stape CMP addresses this issue
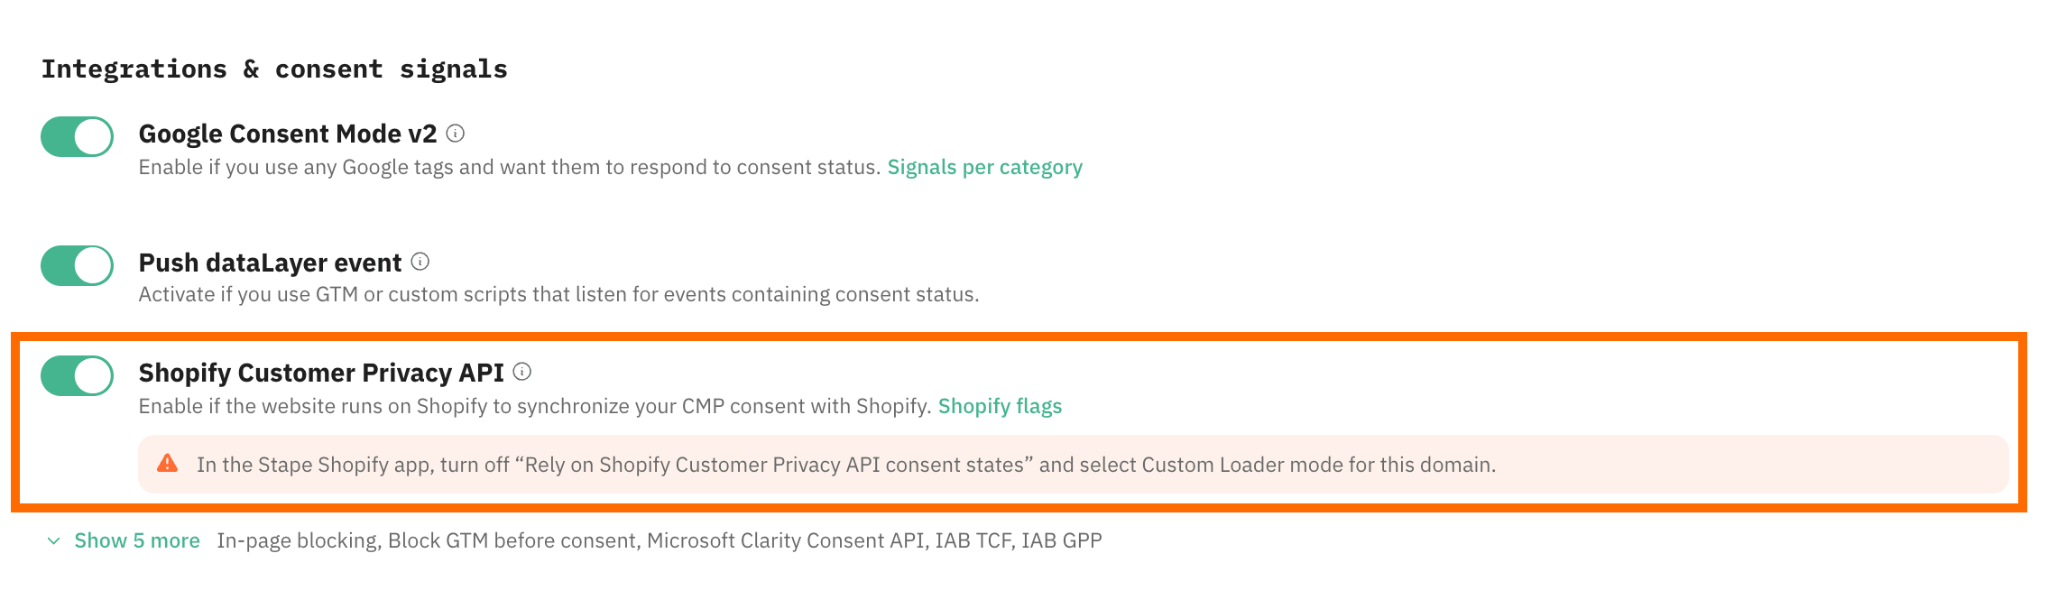
Stape CMP supports integration with the Shopify Customer Privacy API, so visitors' consent choices in the cookie banner are also reflected in Shopify's privacy settings.
The consent status isn't automatically transferred to the checkout page
Shopify storefront and checkout use different environments. That’s the reason why a consent choice made on the storefront isn't always automatically available during checkout. As a result, the third-party platforms can receive an incorrect consent status or set consent to “Denied” by default. One of our customers had this issue after configuring a third-party CMP for Shopify.
The problem was in the integration method – the merchant had added a CMP via editing theme.liquid on Shopify. After moving the CMP initialization to a GTM tag, the consent statuses became available in checkout.
How Stape CMP addresses this issue
Since Stape’s CMP is deployed through Custom Loader, it’s completely integrated into your setup. There’s no need to edit theme.liquid. The visitor's consent choice made on the storefront is applied in checkout as well.
Google Consent Mode v2 is difficult to configure correctly
Configuring Google Consent Mode v2 on Shopify can be challenging, especially when a store uses GTM, server-side tracking, and a third-party CMP. These components need to work together and exchange the correct consent information.
For example, some cookie banner solutions automatically block GTM until visitors grant consent. At first glance, it seems like an effective way to prevent tracking before consent. However, it can interfere with Google Consent Mode v2, especially if you use Advanced Consent Mode. Advanced Consent Mode requires Google tags to load before visitors make their consent choices, so Google tags can send cookieless pings to Google’s tools.
How Stape CMP addresses this issue
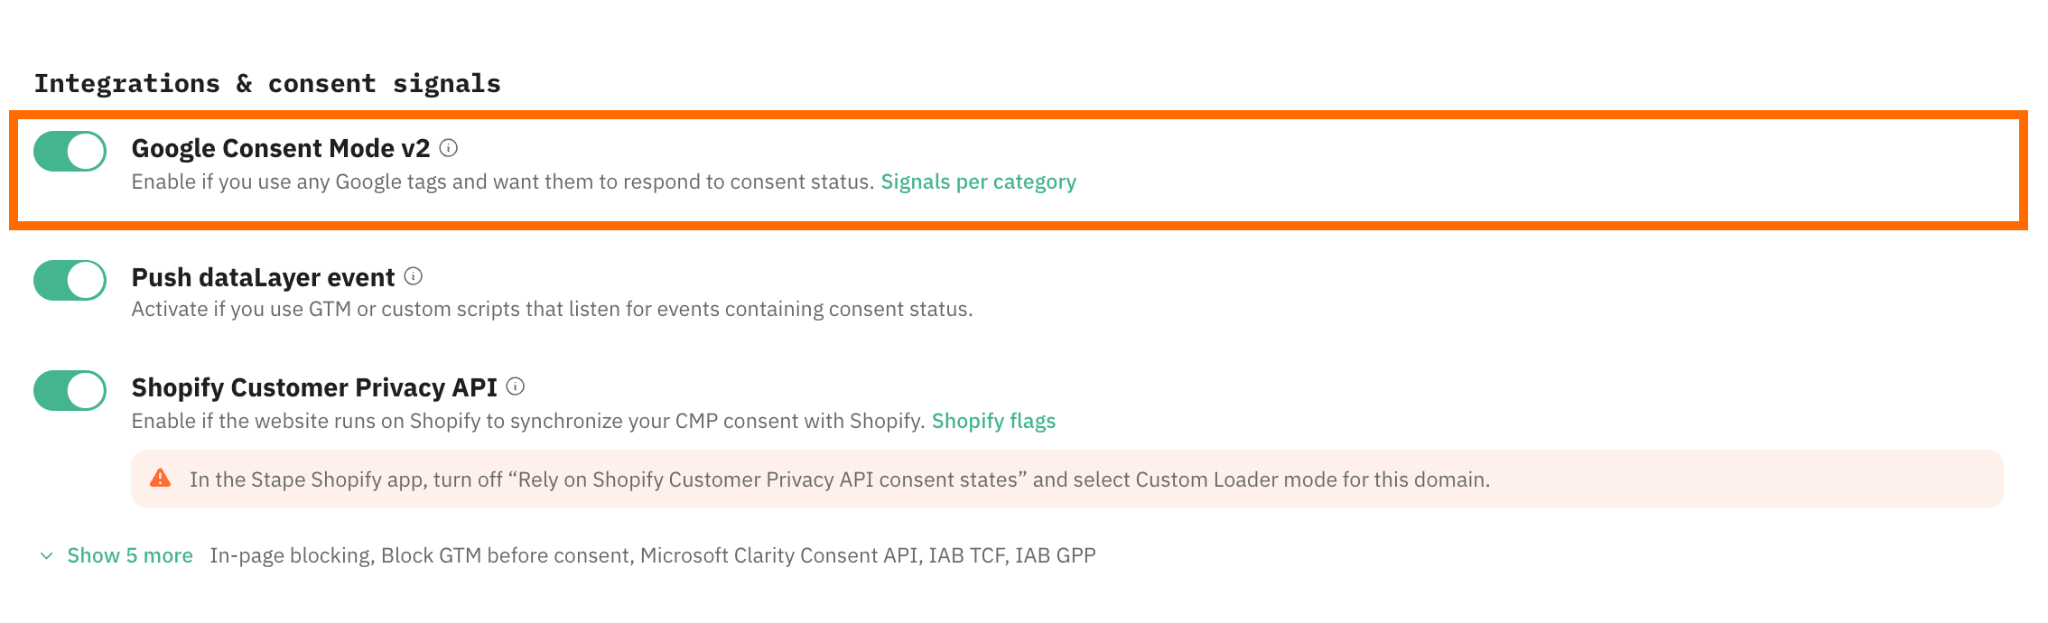
Stape CMP supports Google Consent Mode v2 and allows you to communicate visitors' consent choices to Google tags.
How to configure Stape's CMP for Shopify
Before starting, make sure you have a Stape account and have implemented the Custom Loader power-up in the sGTM container hosted on Stape.
Configure data tracking with the Setup Wizard!
Use the Setup Wizard to configure your web and server-side GTM templates from scratch. Connect the Shopify store and get your tracking up and running for free.
Start by activating a CMP configuration in your account:
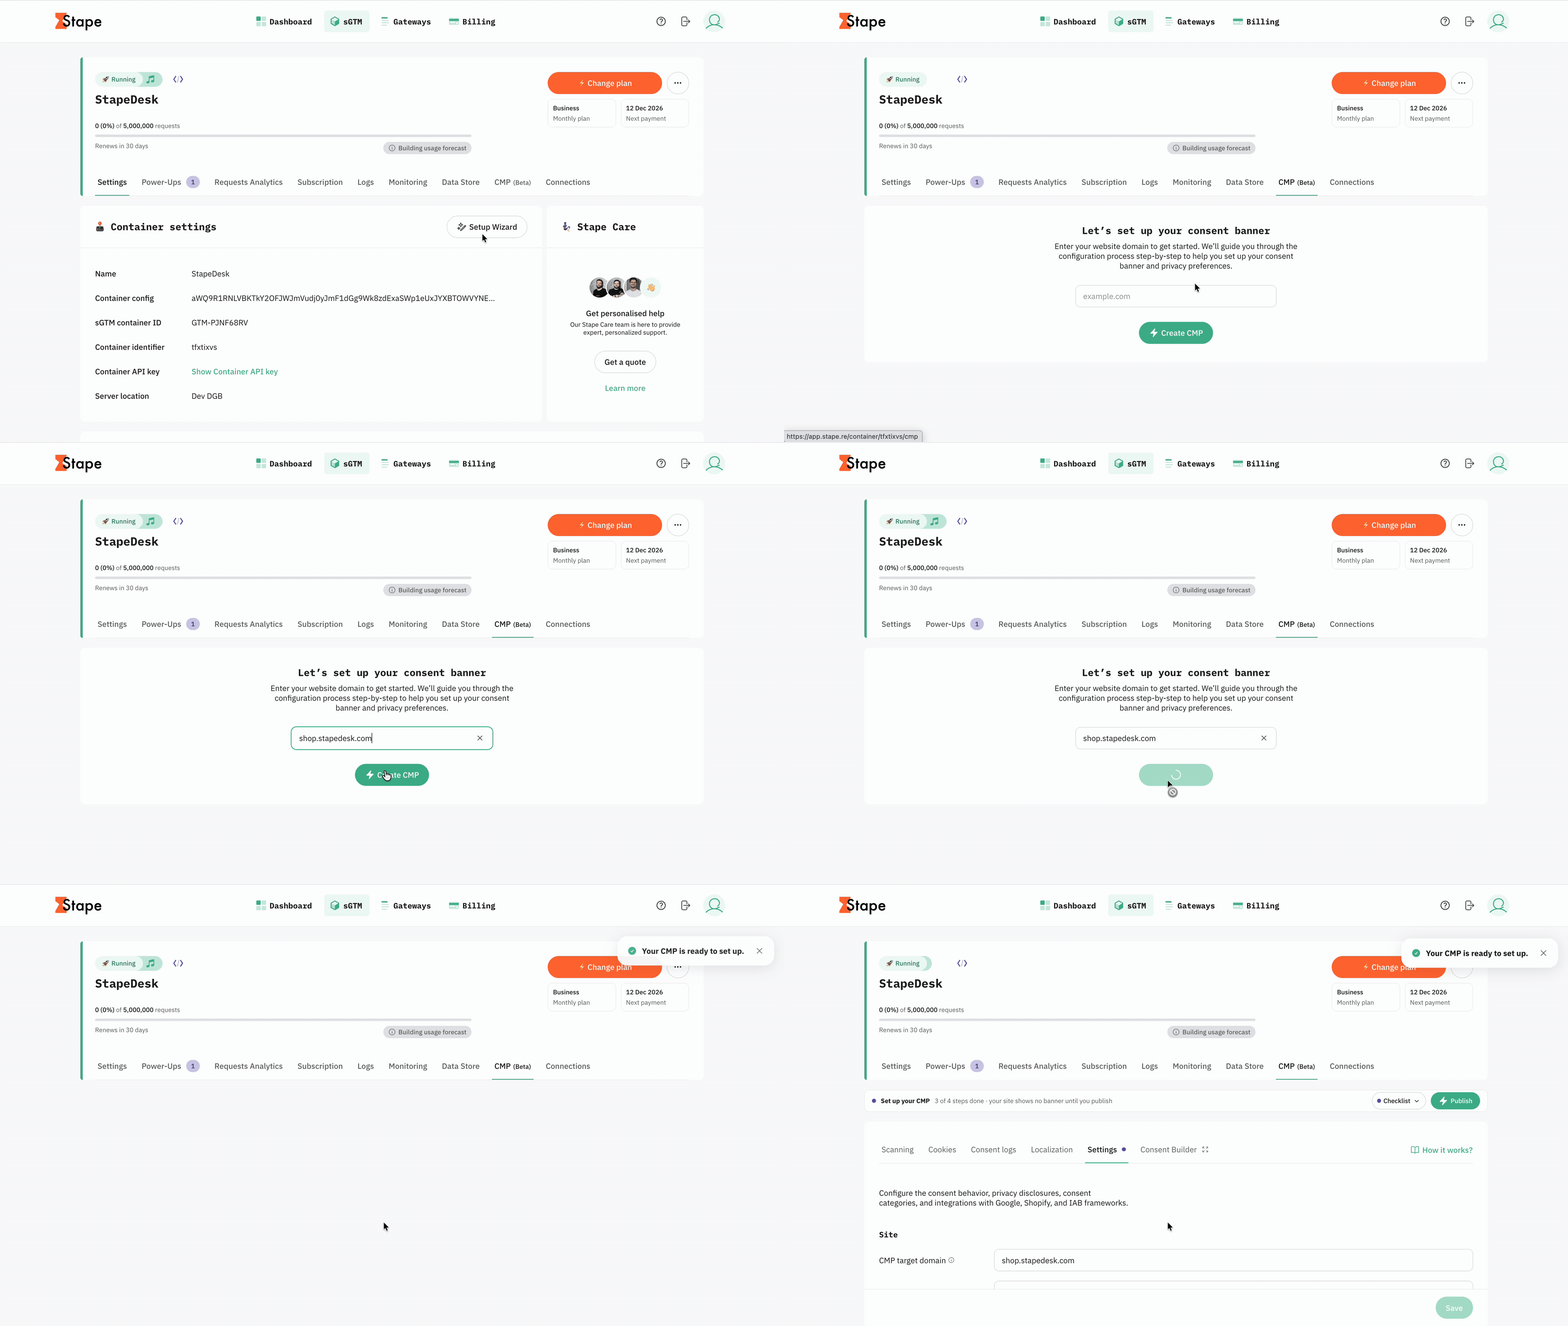
Log in to your Stape account → click on your sGTM container → open the CMP section in your Stape account → add the website URL and click “Create CMP” to start a CMP configuration.
Note: in this article, we are going to cover the key points most relevant to Shopify stores; for general CMP configuration, including cookie scanning, consent categories, banner customization, regional settings, and other integrations, please refer to our CMP configuration guide on our helpdesk.
1. In the "Integrations & consent signals" be sure to enable Shopify Customer Privacy API toggle. It allows Stape CMP to synchronize visitors' consent preferences with Shopify.
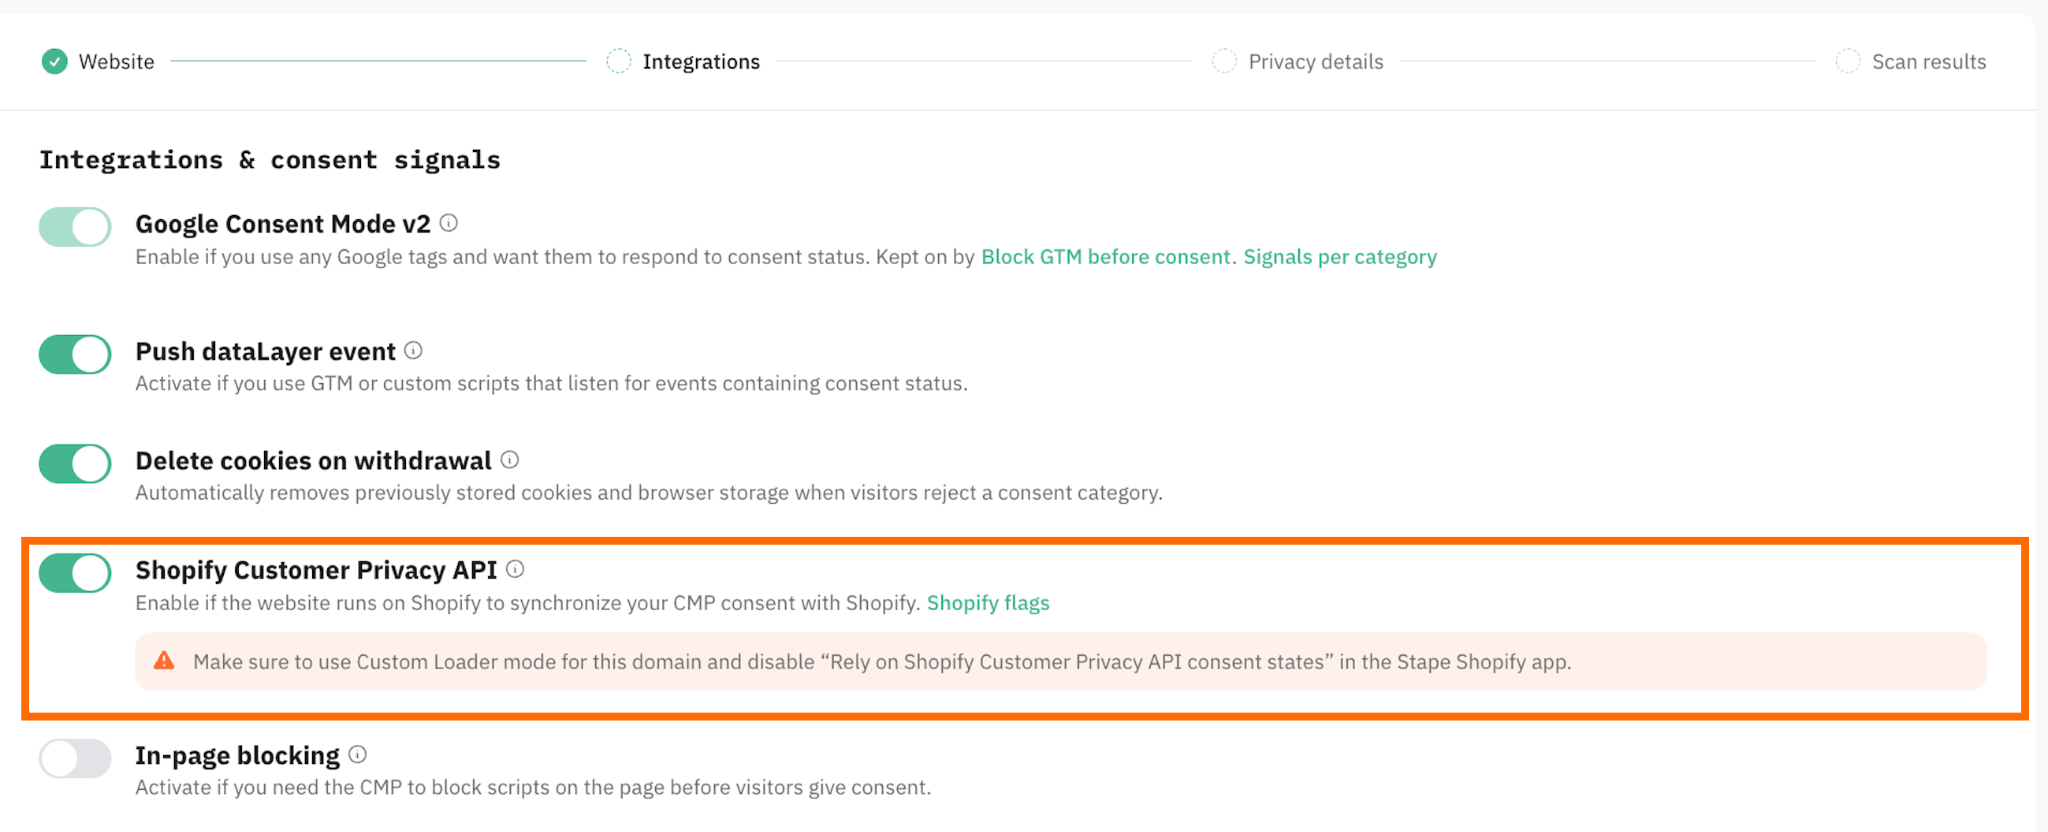
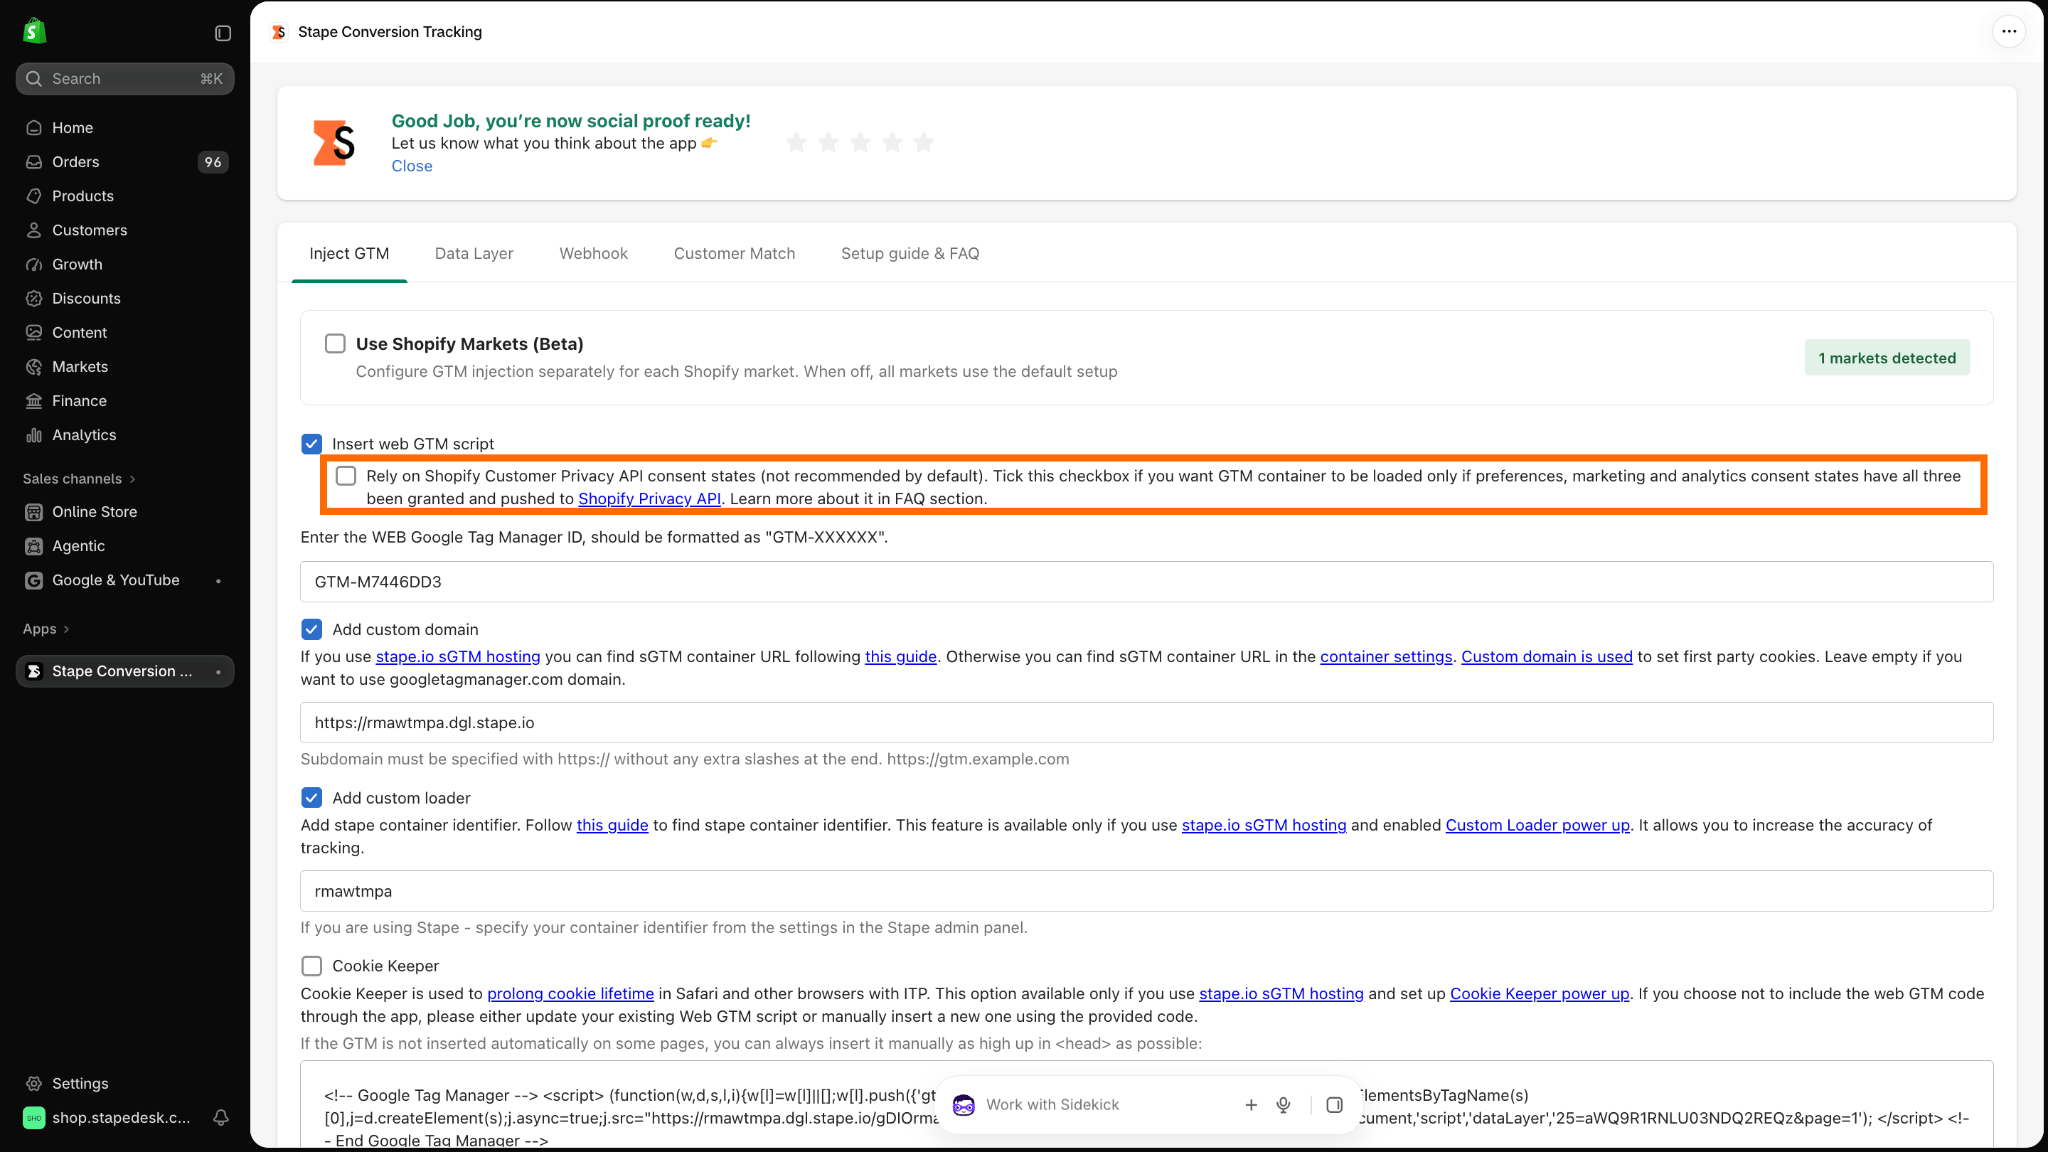
2. Navigate to the Stape Conversion Tracking app for Shopify, in its settings make sure that option "Rely on Shopify Customer Privacy API consent states" is turned off.
If you don't disable the checkbox, the Shopify app may prevent GTM from loading whenever a visitor rejects even one consent category. As a result, the Custom Loader won't load either, meaning the CMP script won't be initialized and the consent banner won't be displayed. This creates a loop: visitors cannot see the consent banner or update their preferences, while GTM and the Custom Loader are blocked.
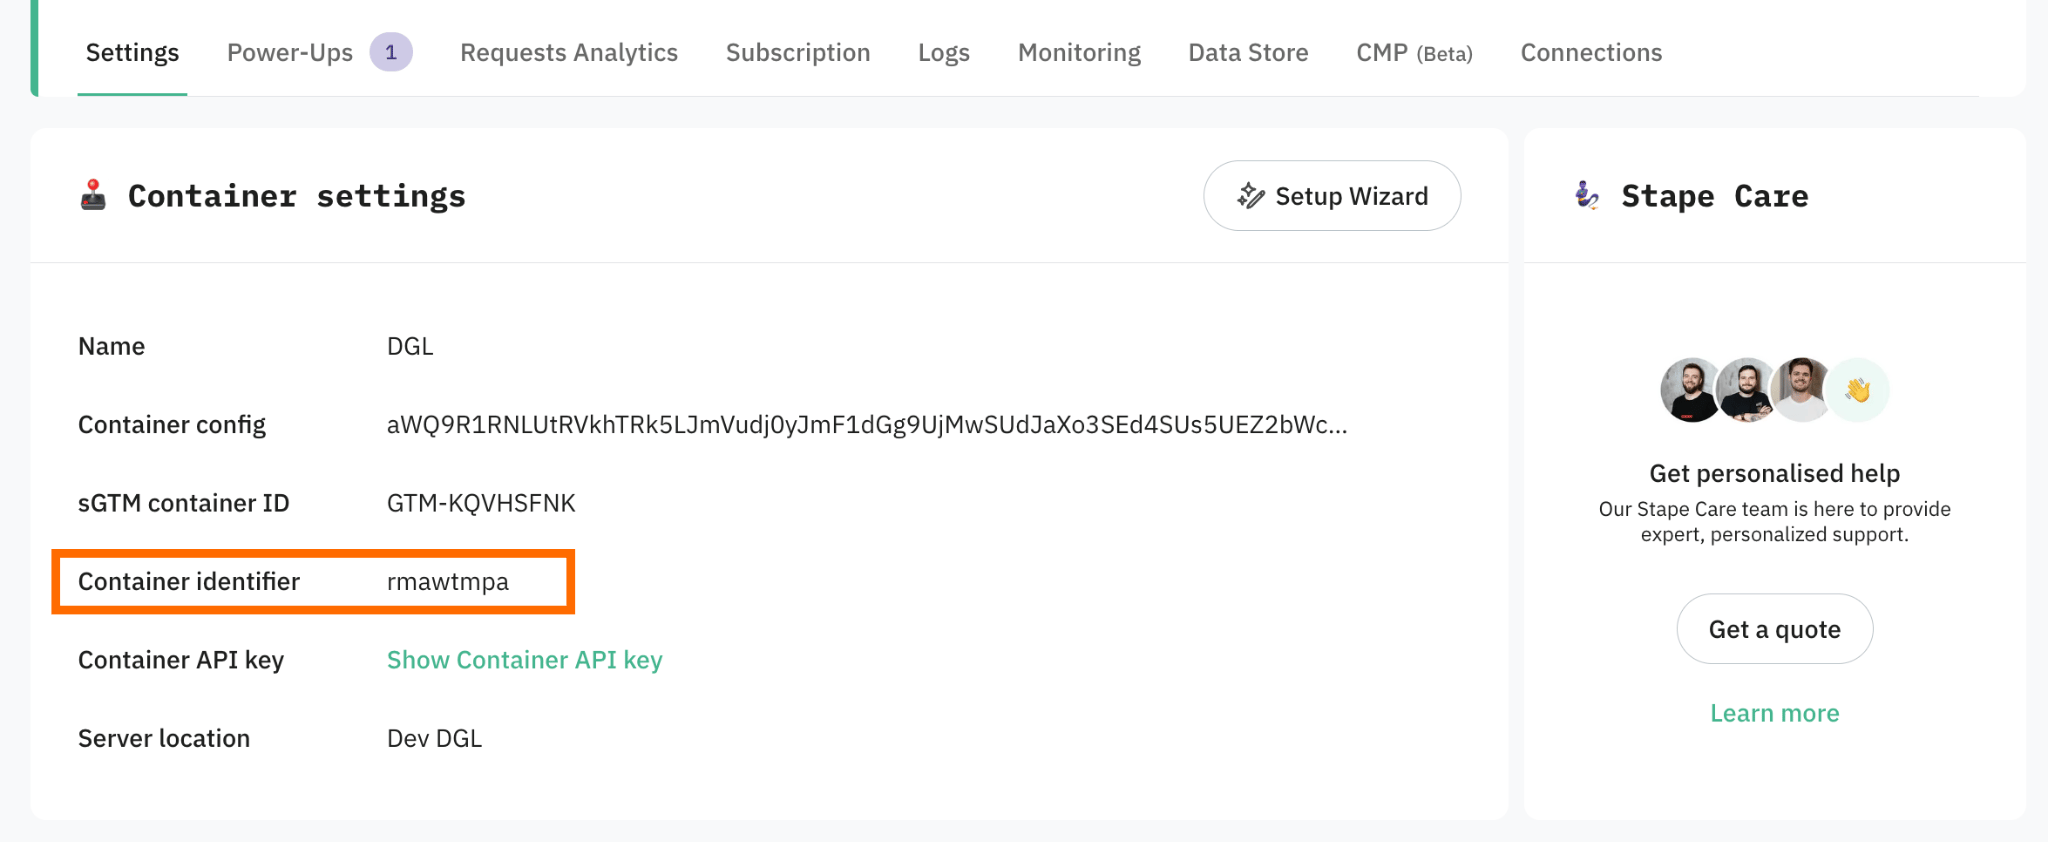
Be sure to add a correct Container identifier (if you host a few containers on Stape). The Container identifier can be found in the "Settings" tab of sGTM container.
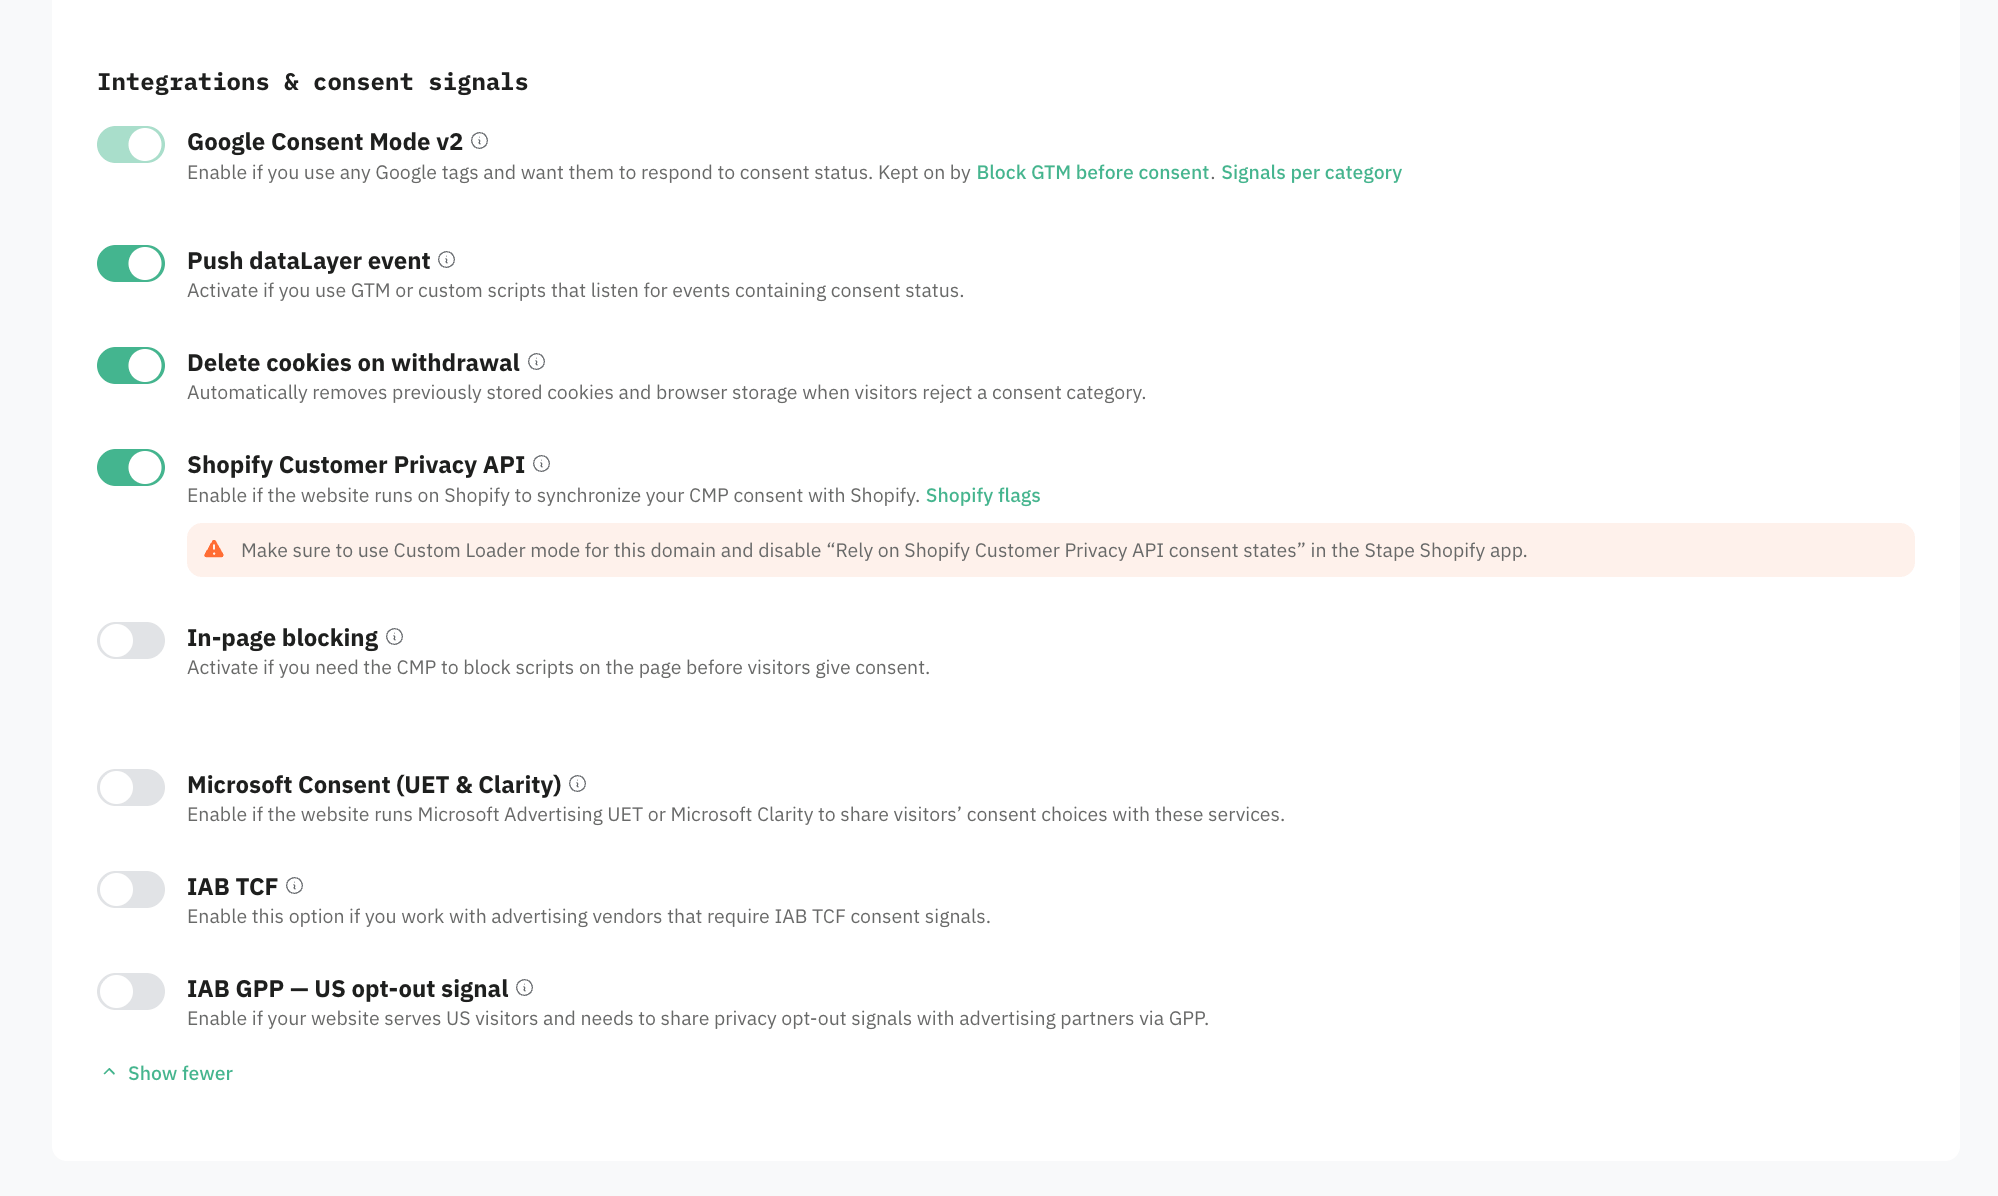
3. Enable toggles that correspond to your Shopify tracking setup.
- Google Consent Mode v2 – if you use Google tags, such as Google Analytics or Google Ads.
- Push dataLayer event – if you use GTM or custom scripts that need to receive CMP consent updates.
- Delete cookies on withdrawal – automatically deletes cookies, localStorage, and sessionStorage items linked to denied consent categories when preferences change or pages load. Useful for ensuring tracking data is removed after consent withdrawal.
- In-page blocking – if you load tracking scripts directly in your website's HTML or through other systems that don't support consent-based blocking through GTM.
- Microsoft Clarity/UET Consent API – if you use Microsoft Clarity or Microsoft Advertising UET tags and want to send them visitors' consent choices.
- IAB TCF and IAB GPP - US opt out signal – refer to businesses that work with advertising vendors.
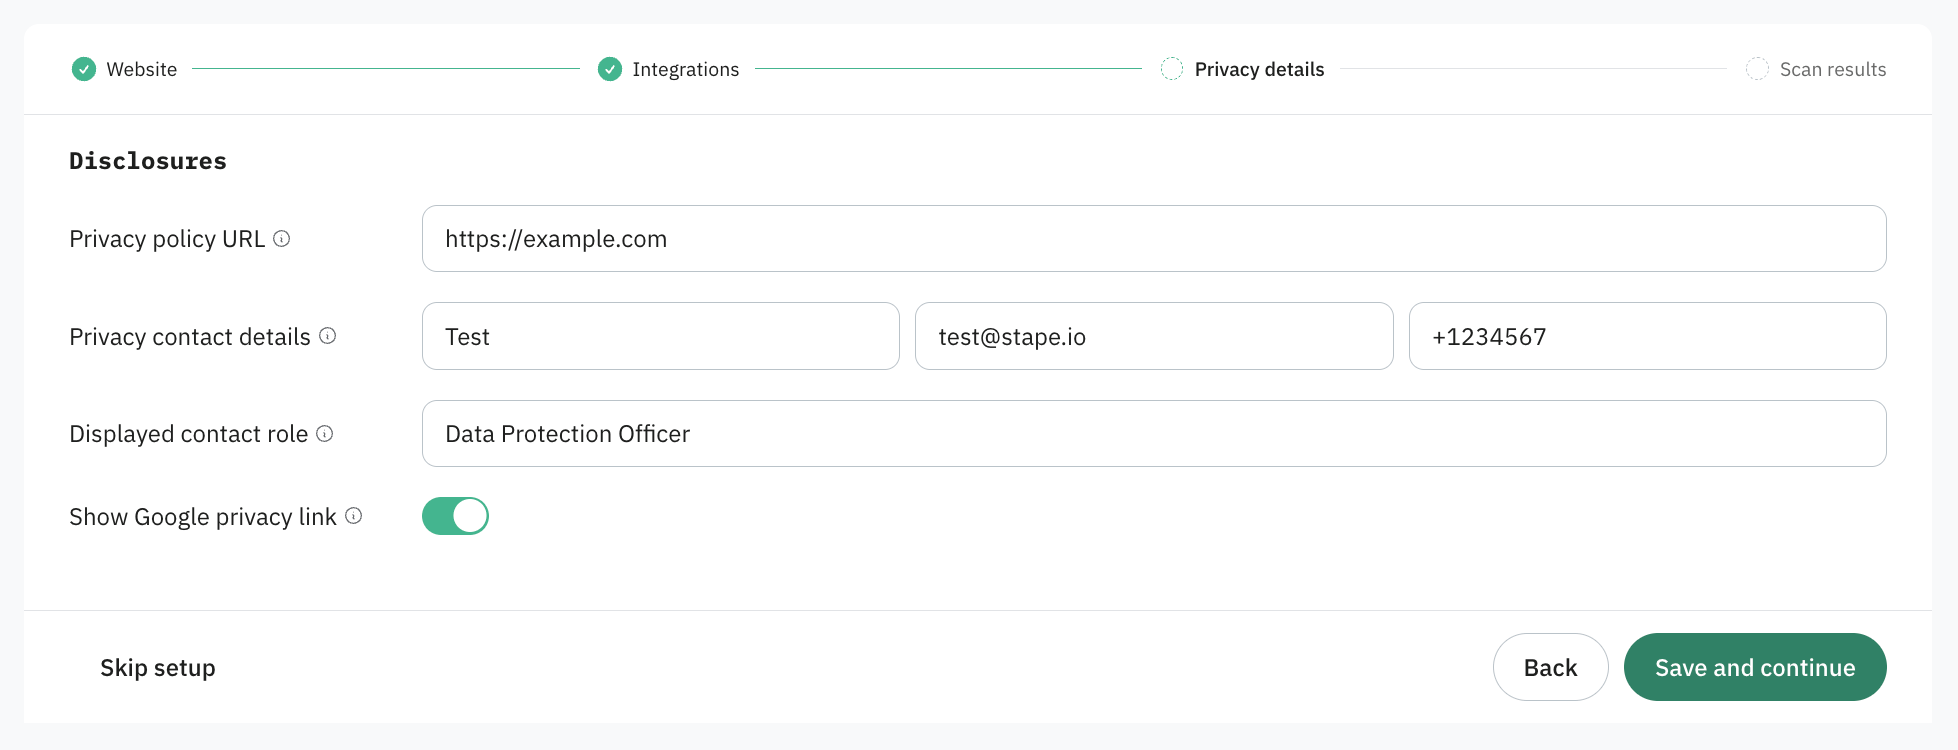
4. Specify the privacy-related information that will be presented to website visitors:
- Privacy Policy URL – enter the URL of your website’s privacy policy. This link will appear in the consent banner so visitors can review how their personal data is handled.
- Privacy Contact Details – provide contact information visitors can use for privacy-related questions or personal data requests.
- Displayed Contact Role – add a label for the privacy contact shown in the consent banner, such as “Data Protection Officer,” “Privacy Team,” or “Privacy Contact.”
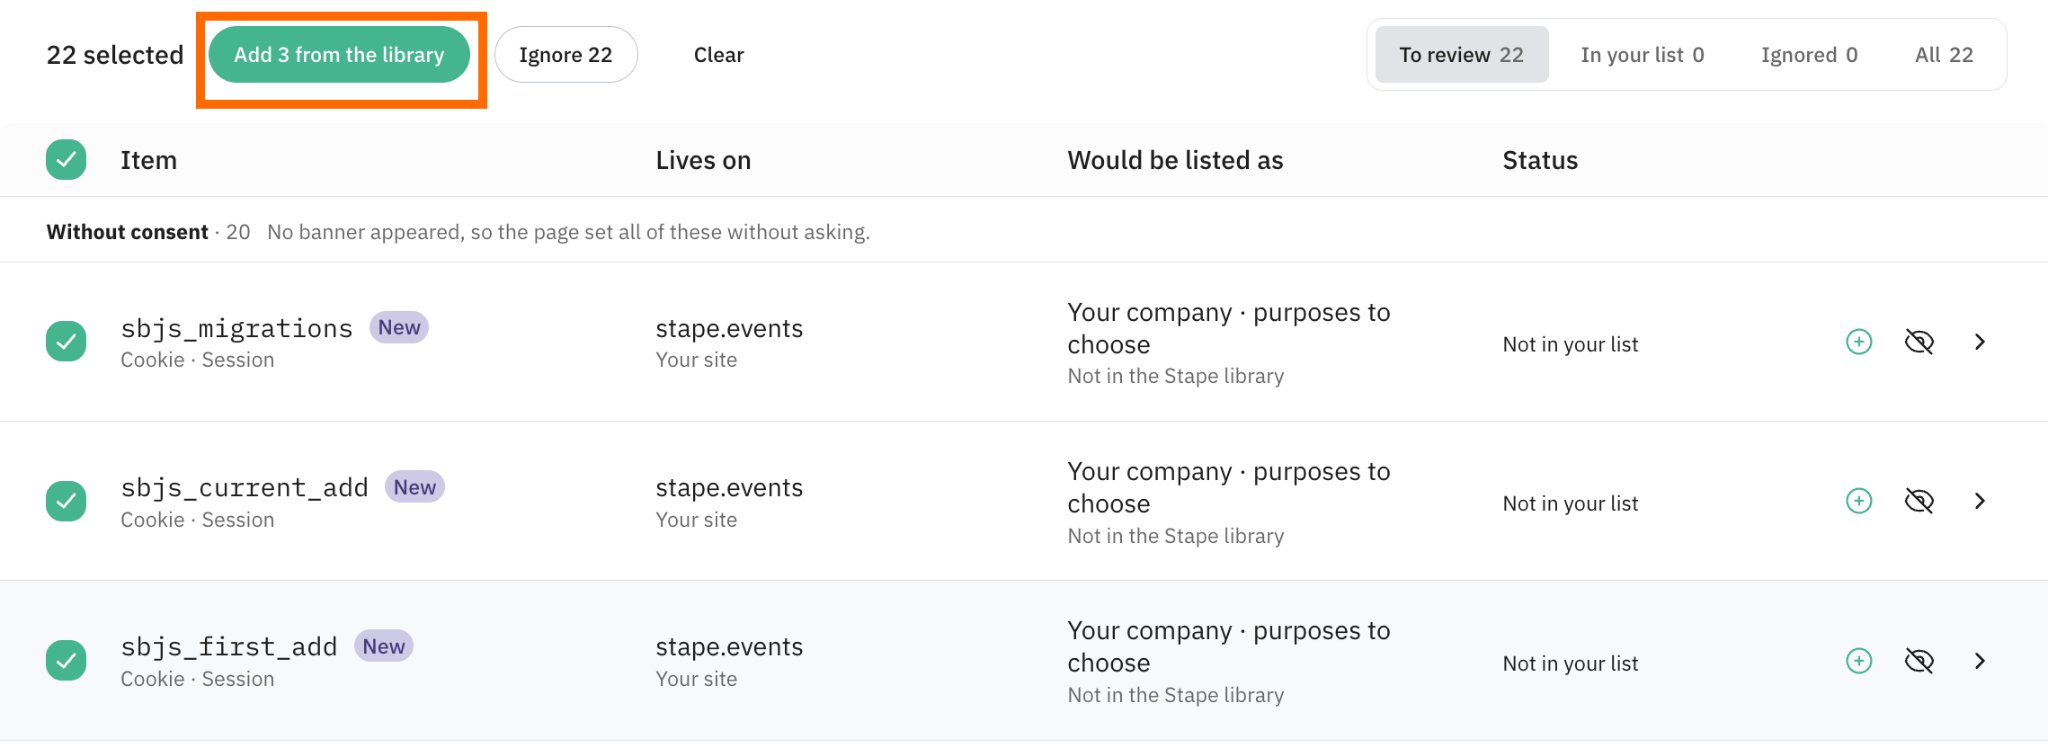
5. Check the scanning results and add the detected cookies to the library in a few clicks.
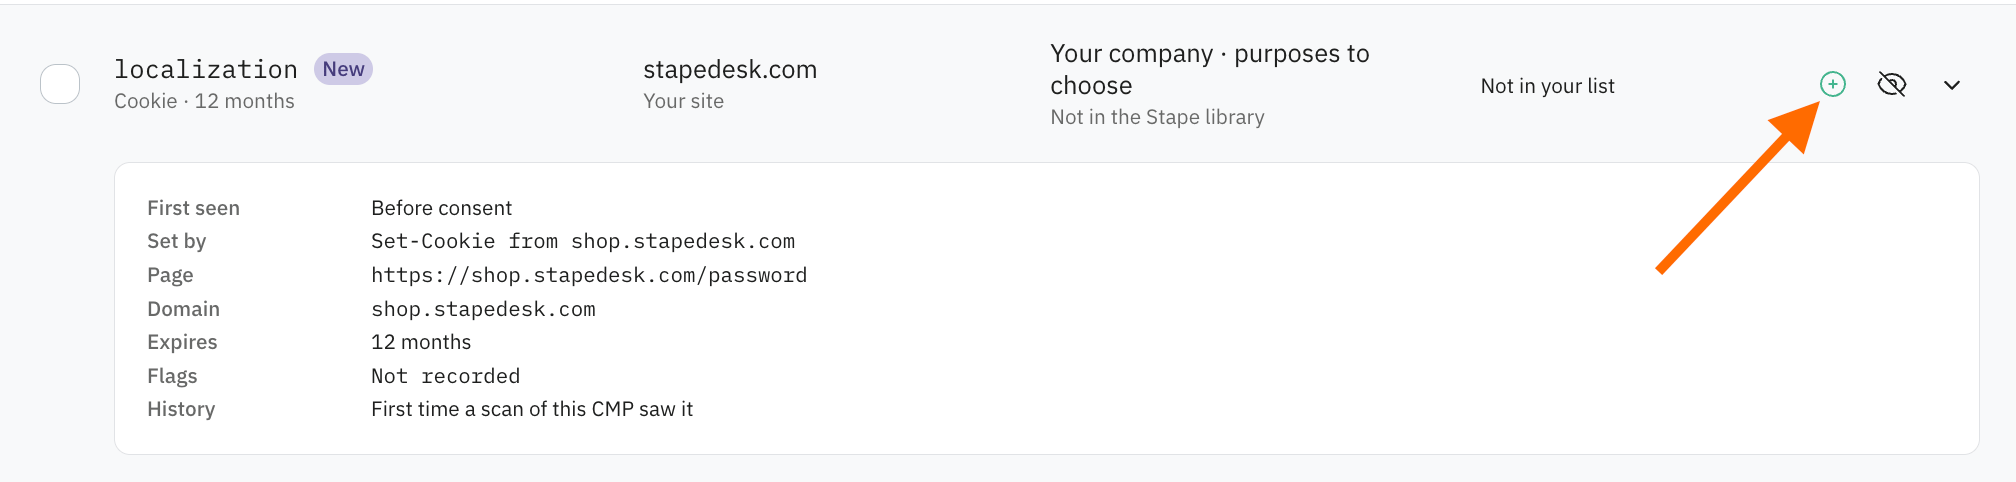
If some cookies aren’t available in Stape library, you can add them manually by clicking “+”. Be sure to select a provider and purpose then click “Create”.
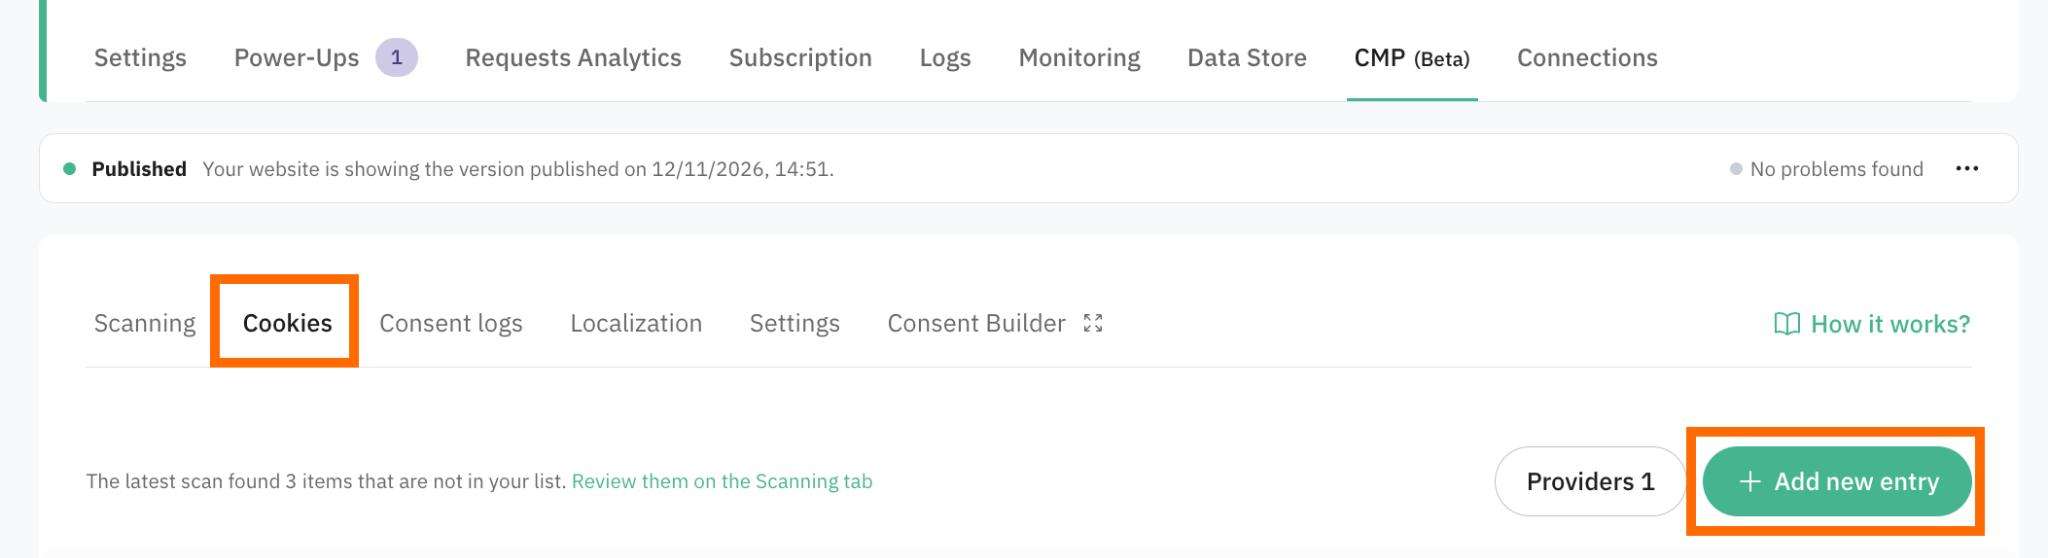
You can always add a new cookie manually in the “Cookies” tab if needed.
6. In the “Consent Builder” you can adjust the cookie banner design and review how it will look based on the regulation, device type.
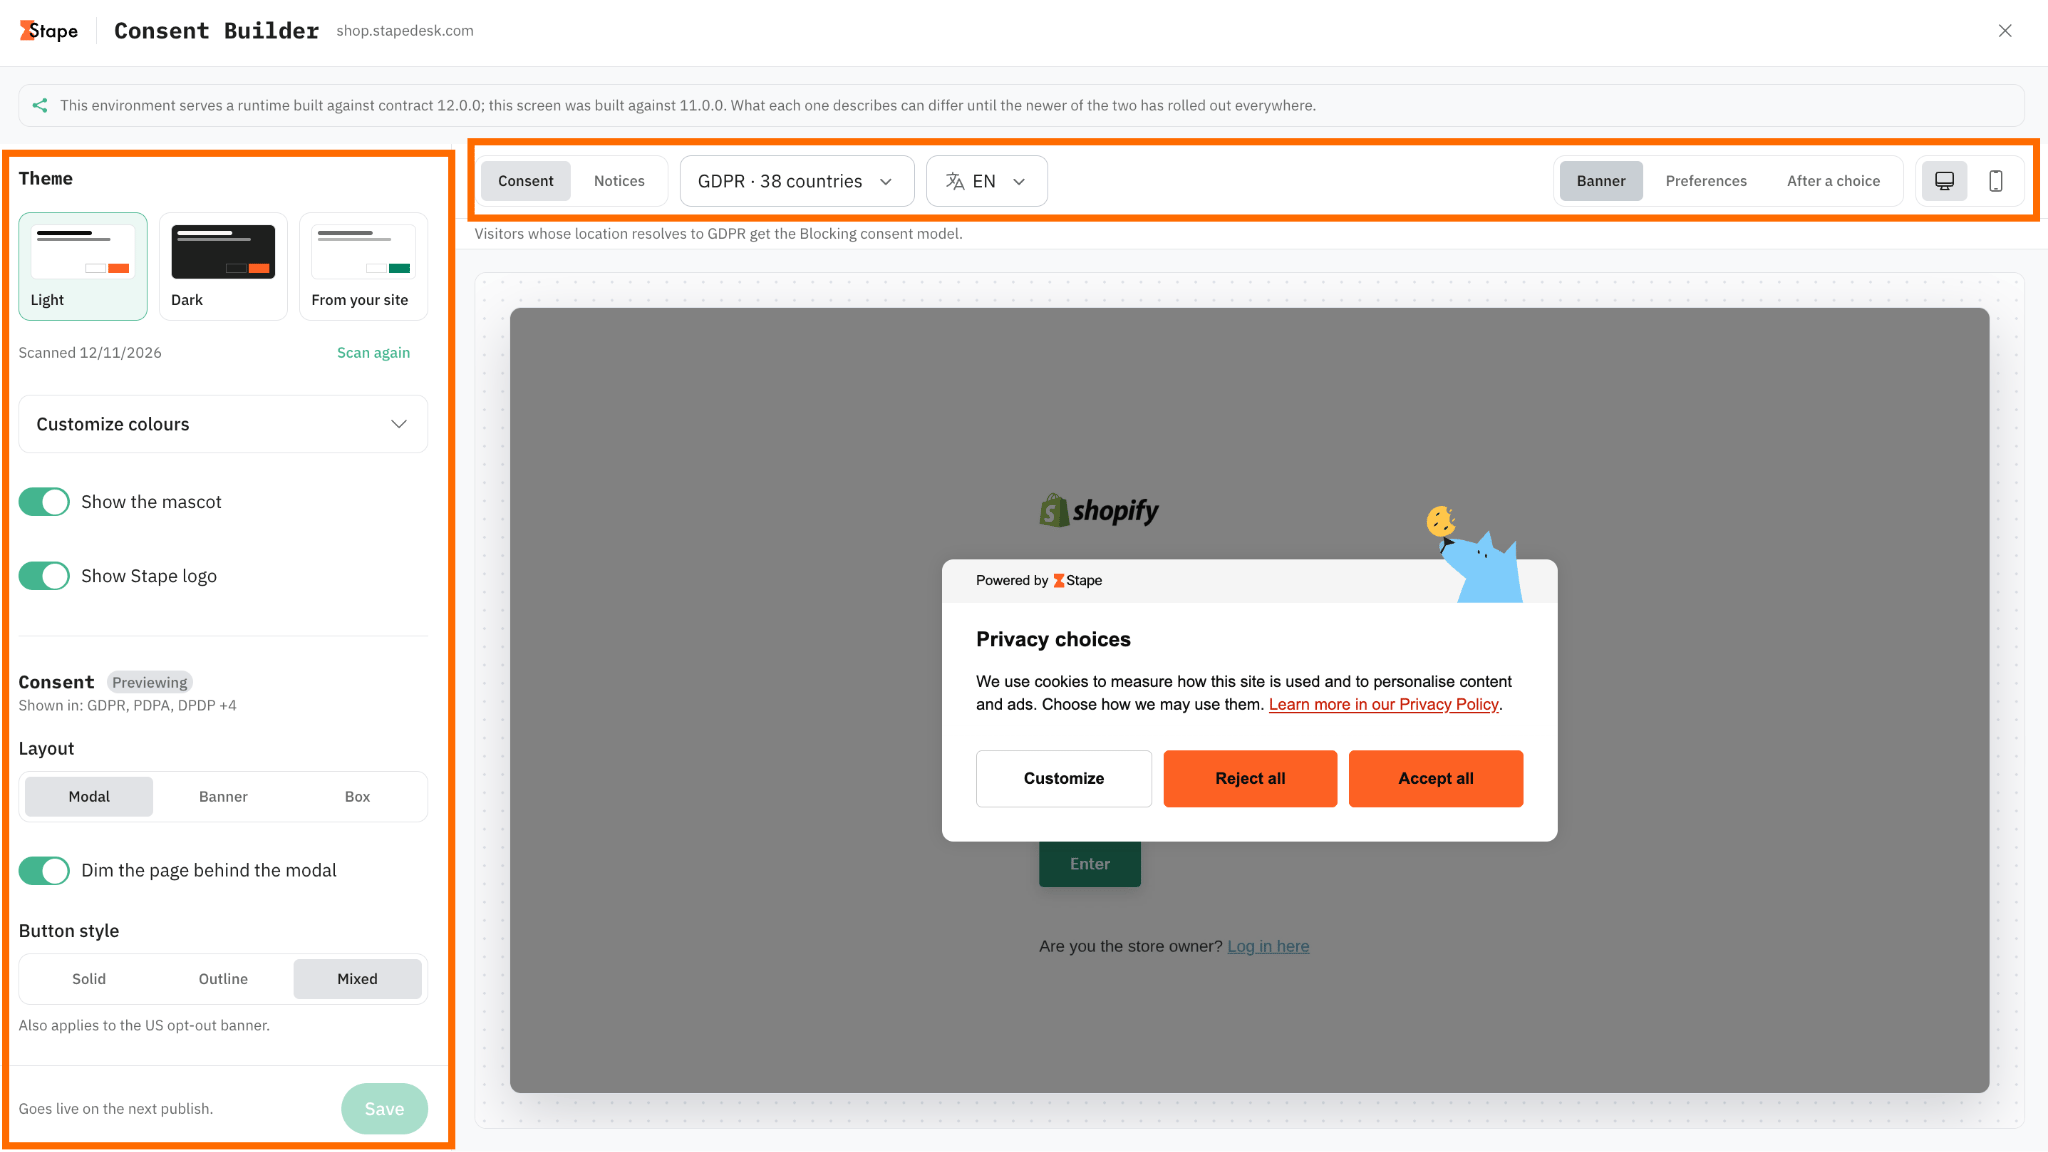
These are the basic settings; if you don’t need to display the banner in other languages, manually add cookies or change existing settings, click “Publish”.
After publishing, adjust web GTM settings (we explain how to do it in the text step).
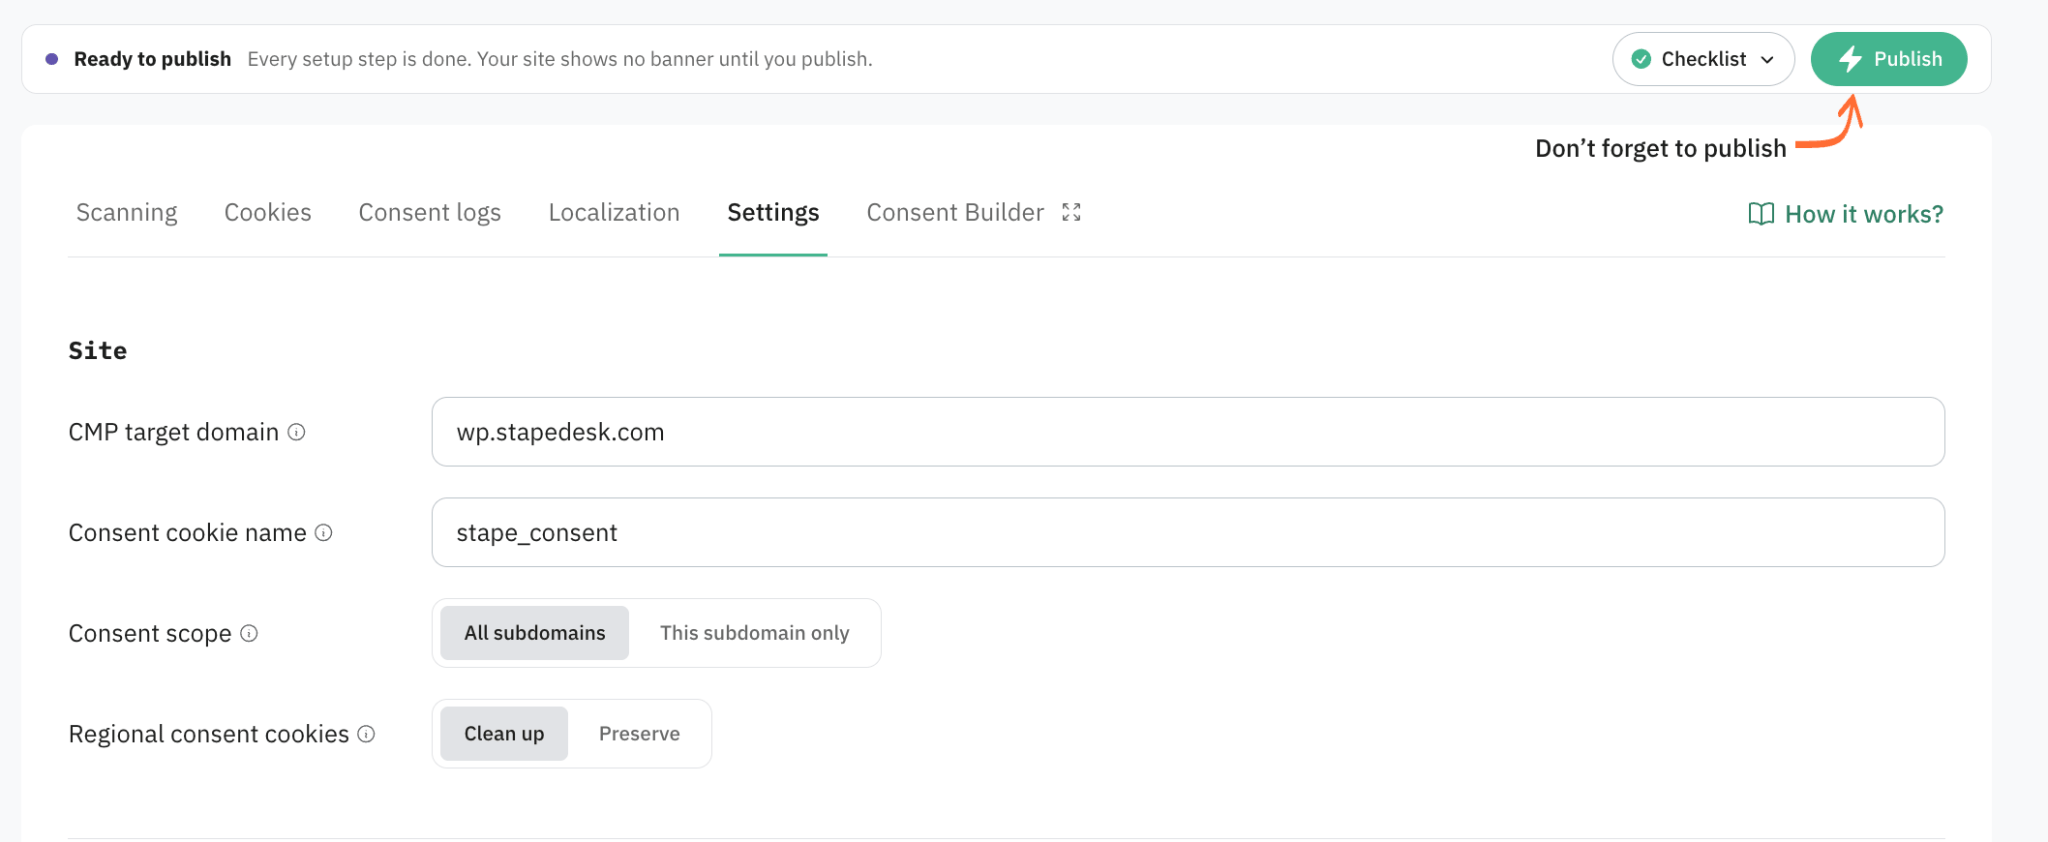
7. Adjust web GTM settings.
Stape CMP doesn’t require additional tags or platform app configuration. However, to ensure compliant tracking, you must adjust the relevant tags in your web GTM container.
The required setup depends on the integrations enabled in the “Integrations & Consent Signals” config section and the tags used on your website.
Click on the relevant collapse elements to configure the web GTM settings:
Test CMP configuration for Shopify store
For convenient debugging, we will use the Stape Chrome extension. It will enable the debugging of the checkout page and it also offers other useful debugging features, including entity filtering, request URL formatting, website tracking scanning and evaluation, and displaying consent status in server GTM.
For more information on the extension’s features, see the Stape Chrome extension guide.
1. Run Preview mode in both your web and server GTM containers.

2. Interact with the banner (e.g., accept or deny all cookies).
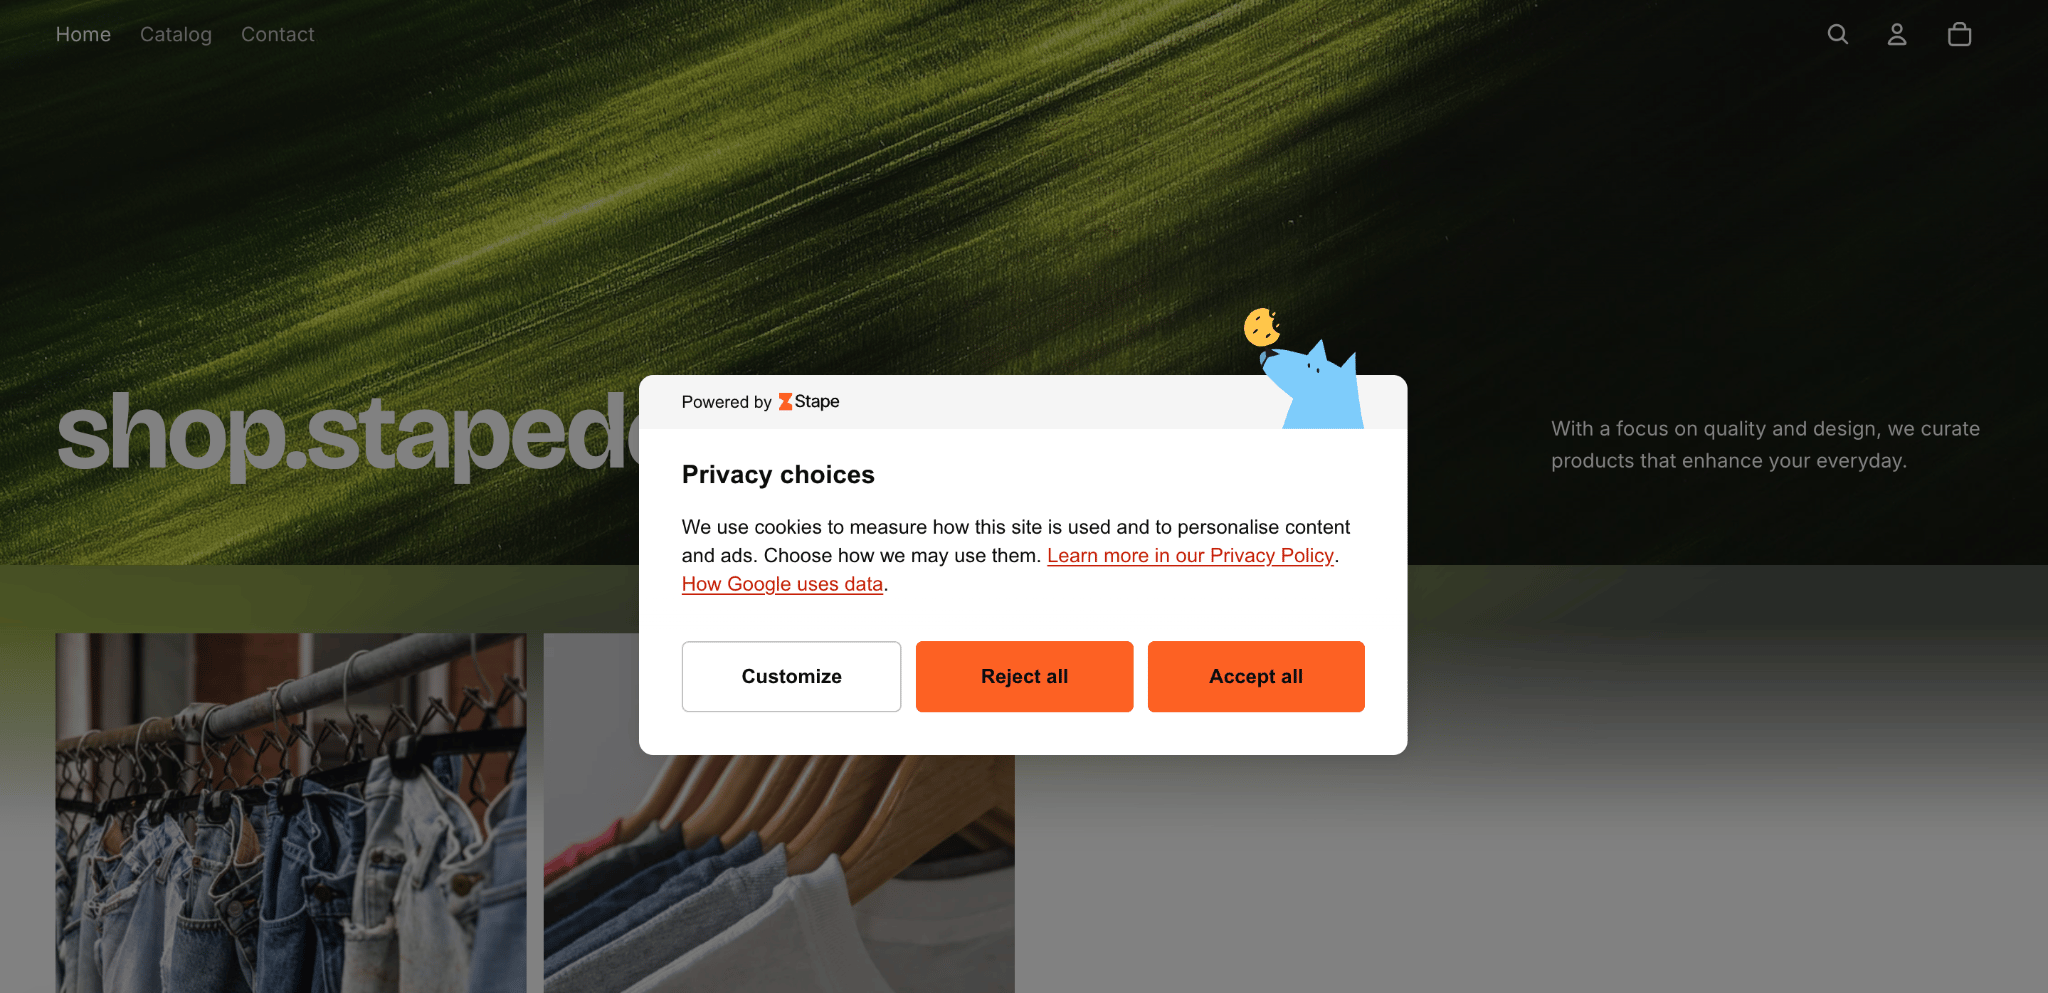
3. Return to the Preview window of the web GTM container.
If you enabled the Push dataLayer event option in Stape's CMP settings, the stape_cmp_consent_update event should also appear after the Consent Update event.
If you configured web GTM using the Setup Wizard, the stape_consent_update event will be pushed instead.
Open the relevant event and navigate to the Consent tab. Check the following:
- Default Statuses (first column): All consent types should show Denied, according to the default consent settings configured in Stape's CMP.
- On-page Update (second column): Shows the consent changes made by the visitor through the cookie banner.
- Current State (third column): Displays the visitor's current consent status.
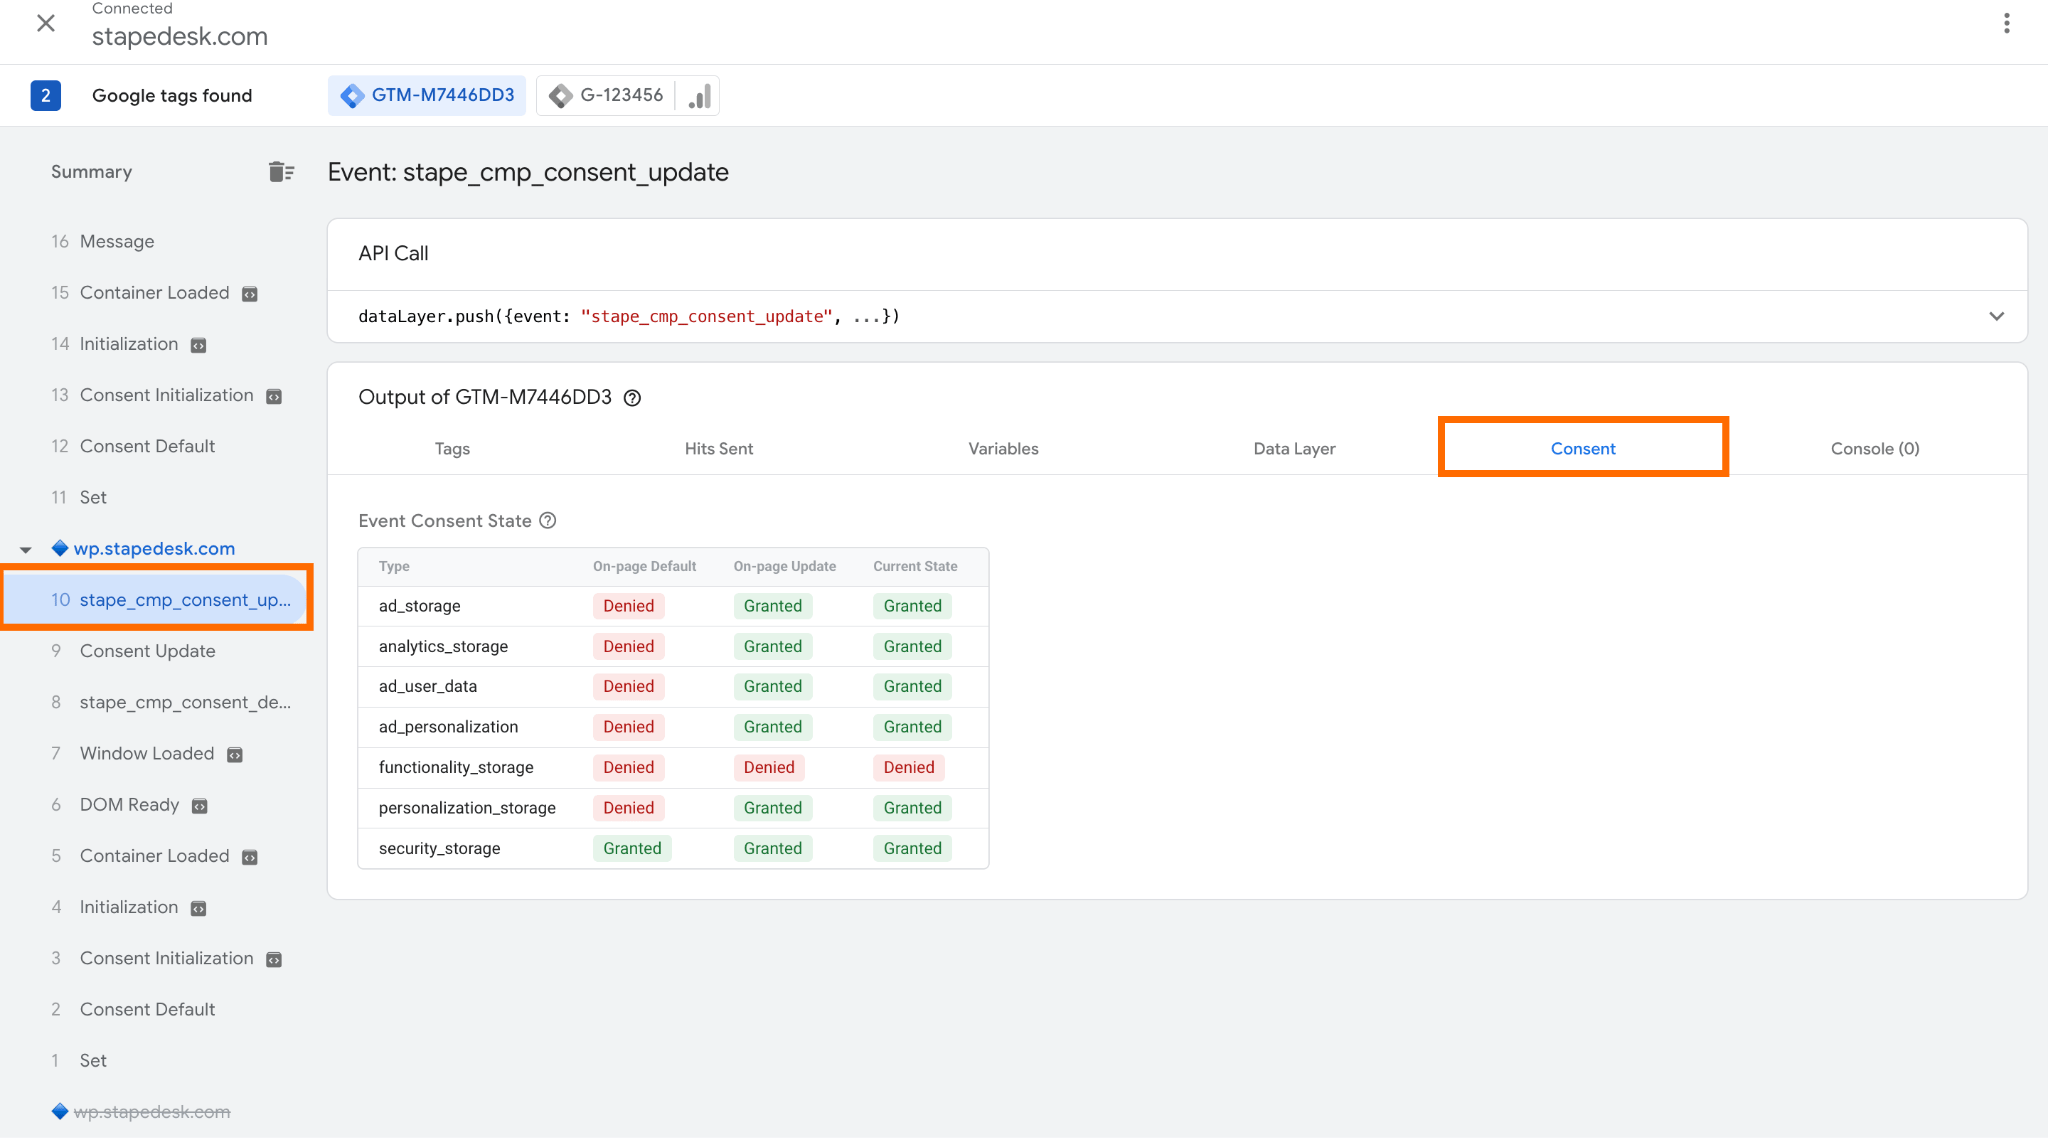
Make sure the consent state is updated before any other tracking events are processed (such as page_view or add_to_cart). This ensures that analytics and marketing tags respect the visitor's consent preferences from the beginning of the session.
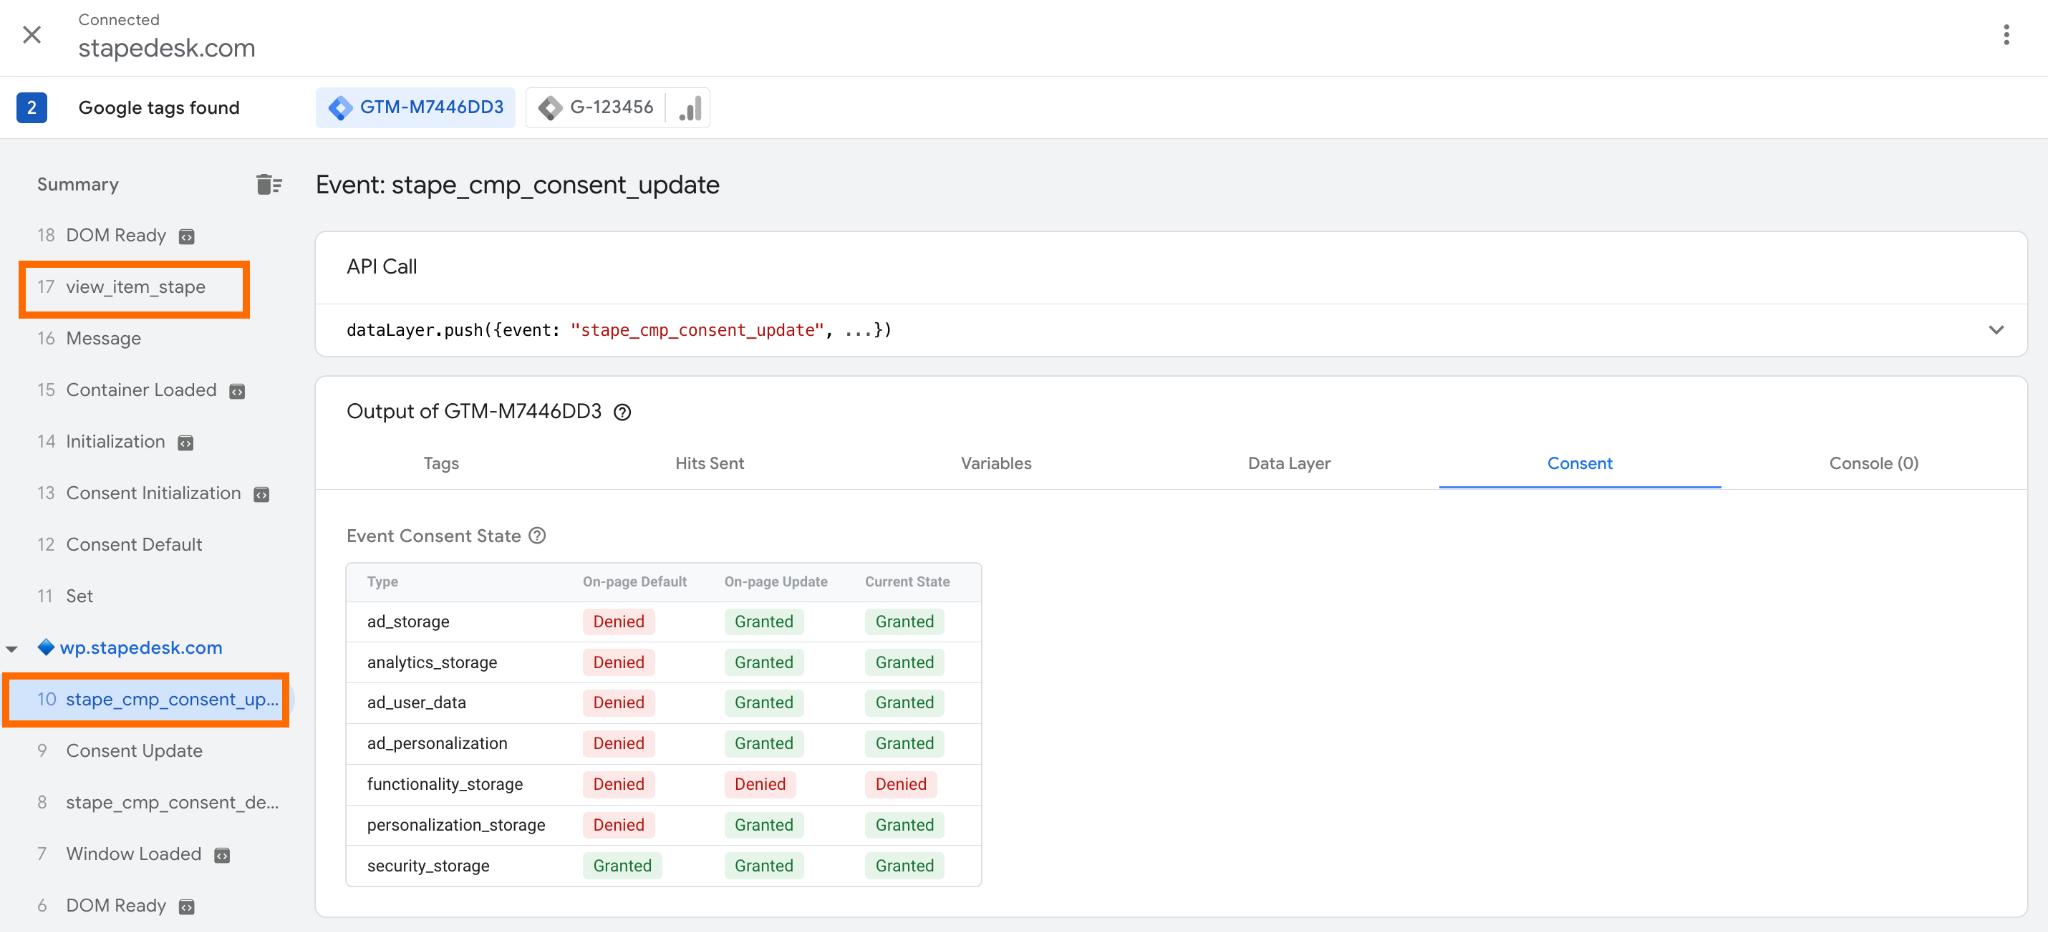
If visitors change their preferences in the cookie banner, for example, by rejecting previously accepted cookie categories, the stape_cmp_consent_update event should fire again.
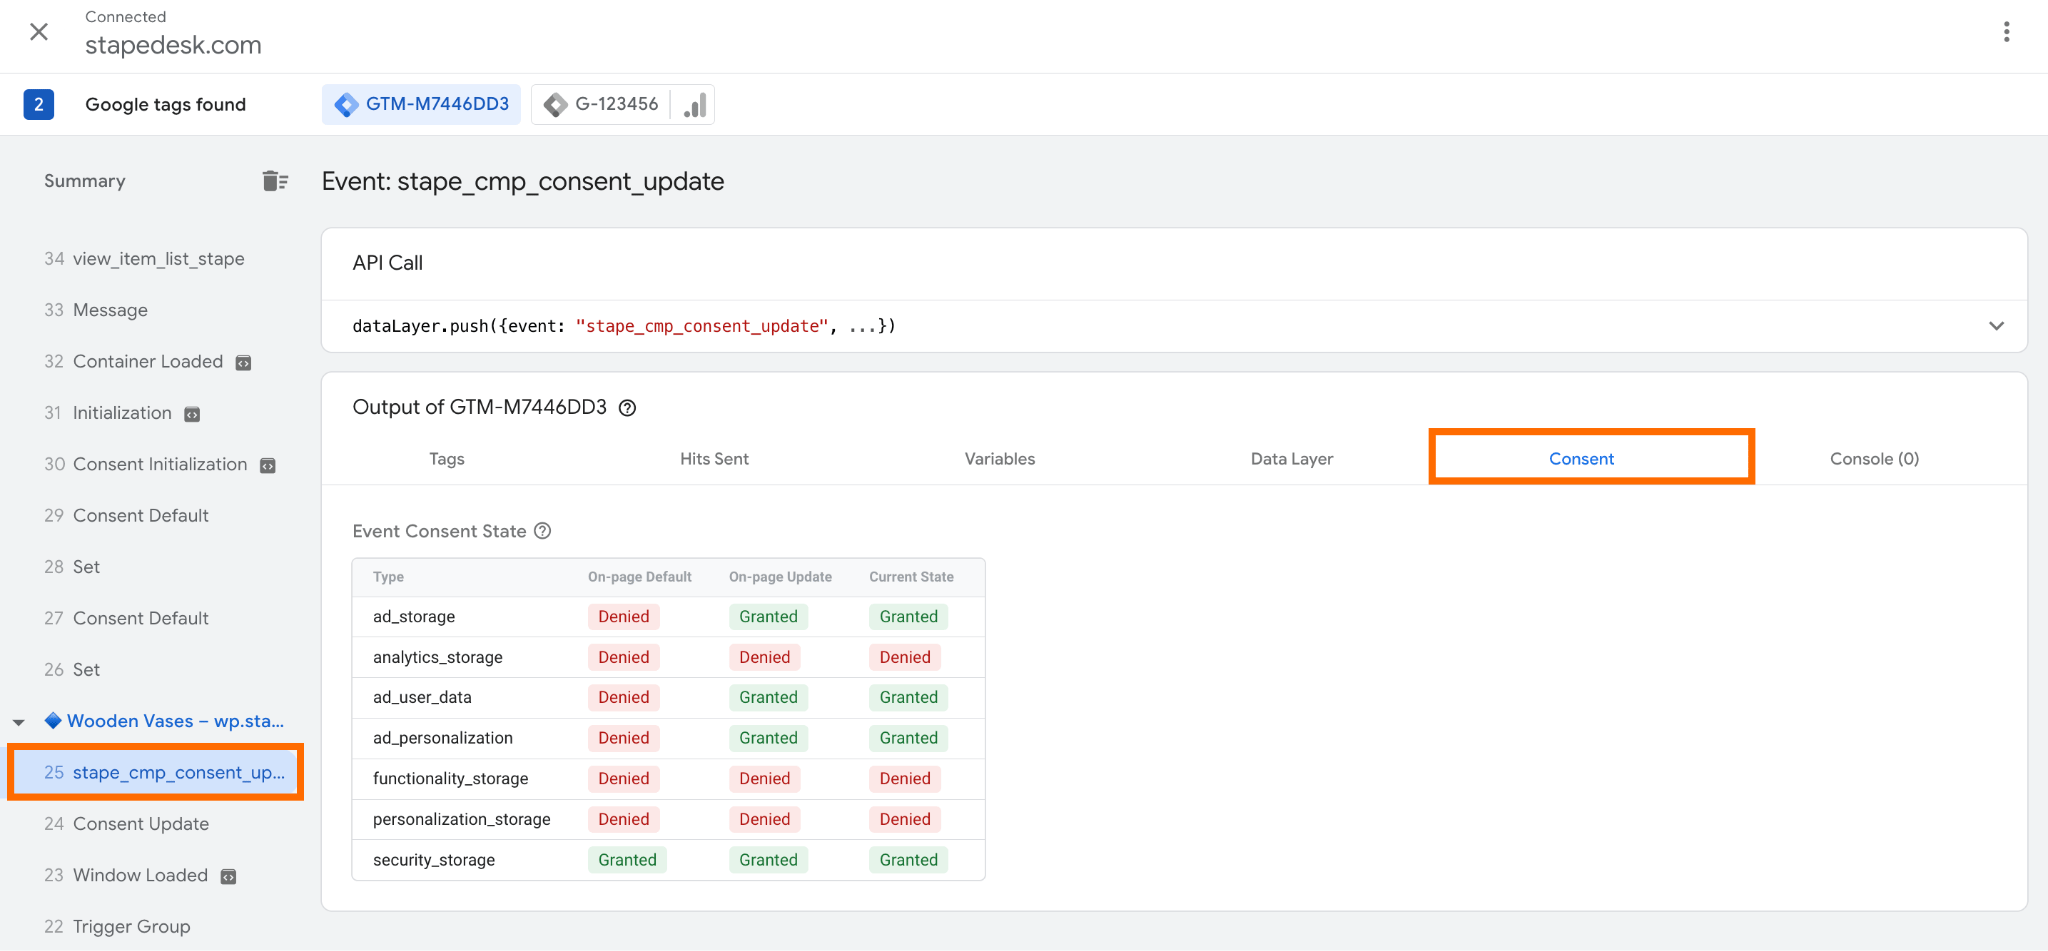
The values in the Consent tab should then reflect the visitor's updated consent preferences.
4. Check whether the consent is transferred to the checkout page.
Due to Shopify restrictions (Shopify Customer Privacy API, Checkout Extensibility, and Web Pixels sandboxing), checkout events may not appear in the GTM Preview window.
The consent statuses can be checked via running the following command in the console:
google_tag_data.ics.entries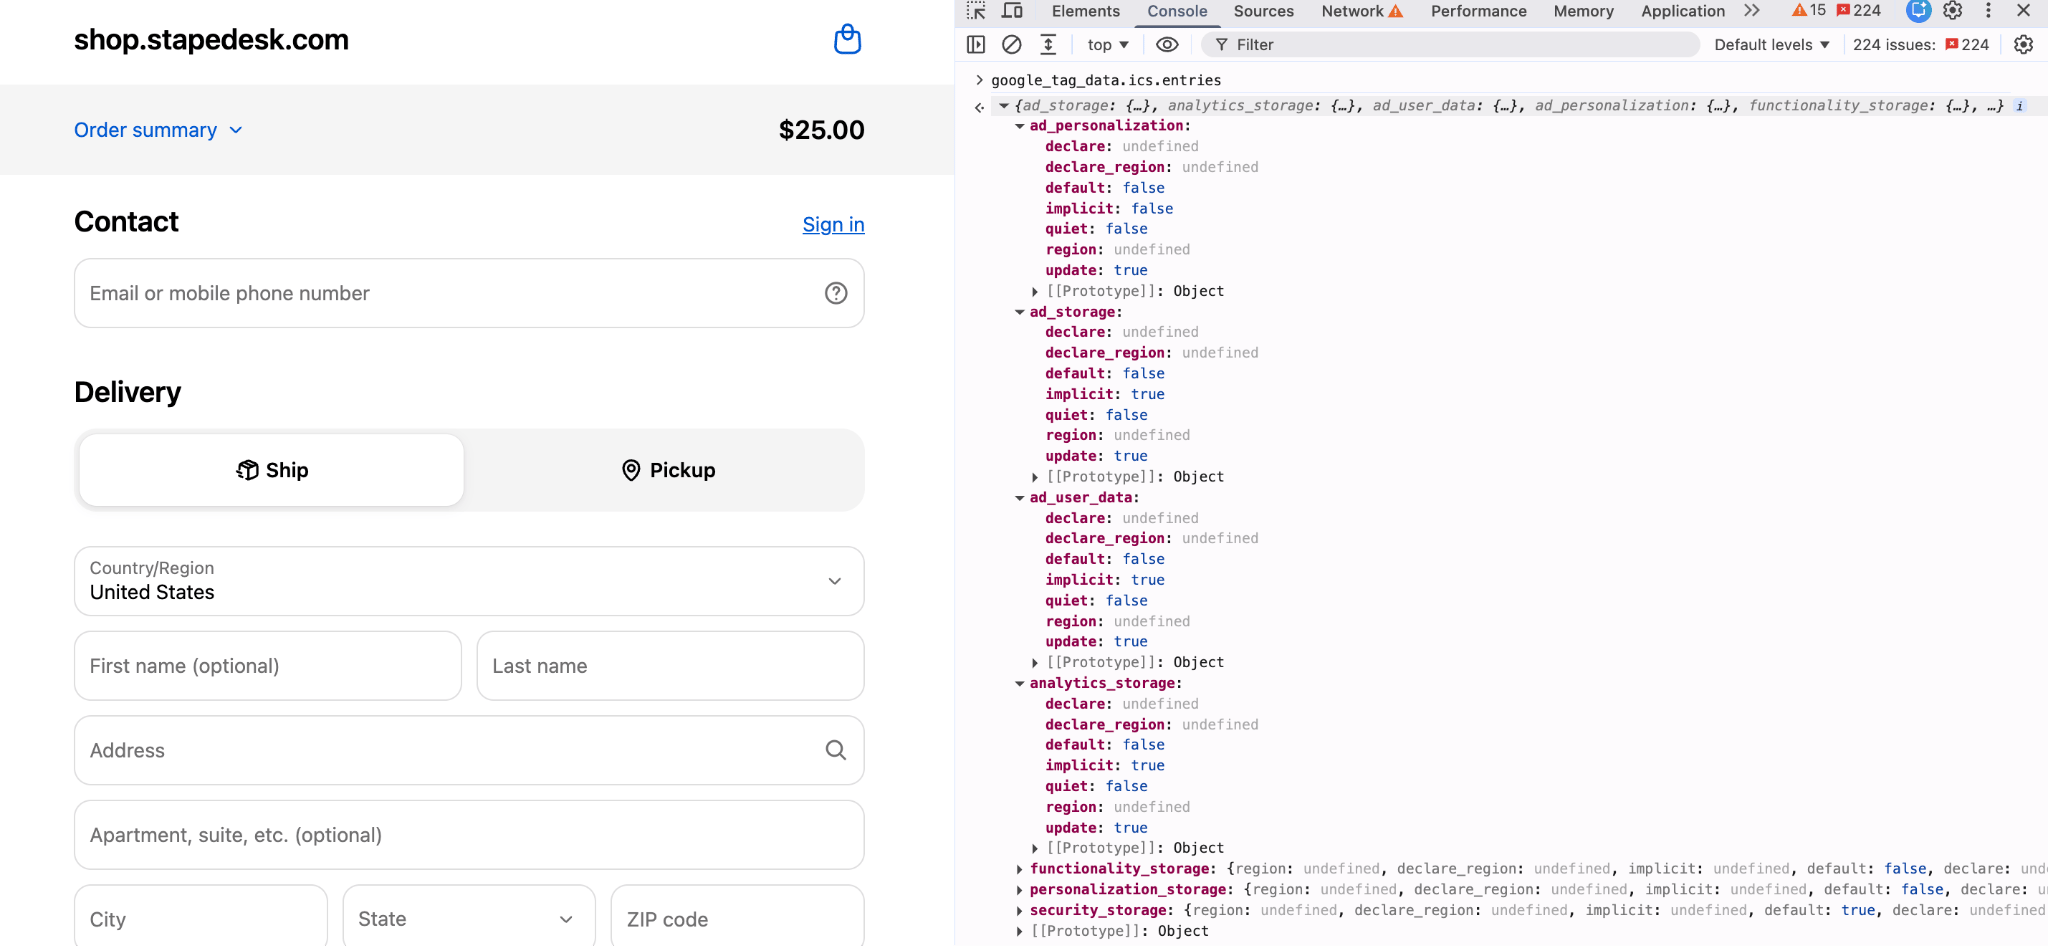
You can also use the Stape GTM Helper Chrome extension to manually inject the tracking snippet into the page.
Open the Inject GTM tab → click Enable injection → enter your domain name and GTM ID → save the changes.
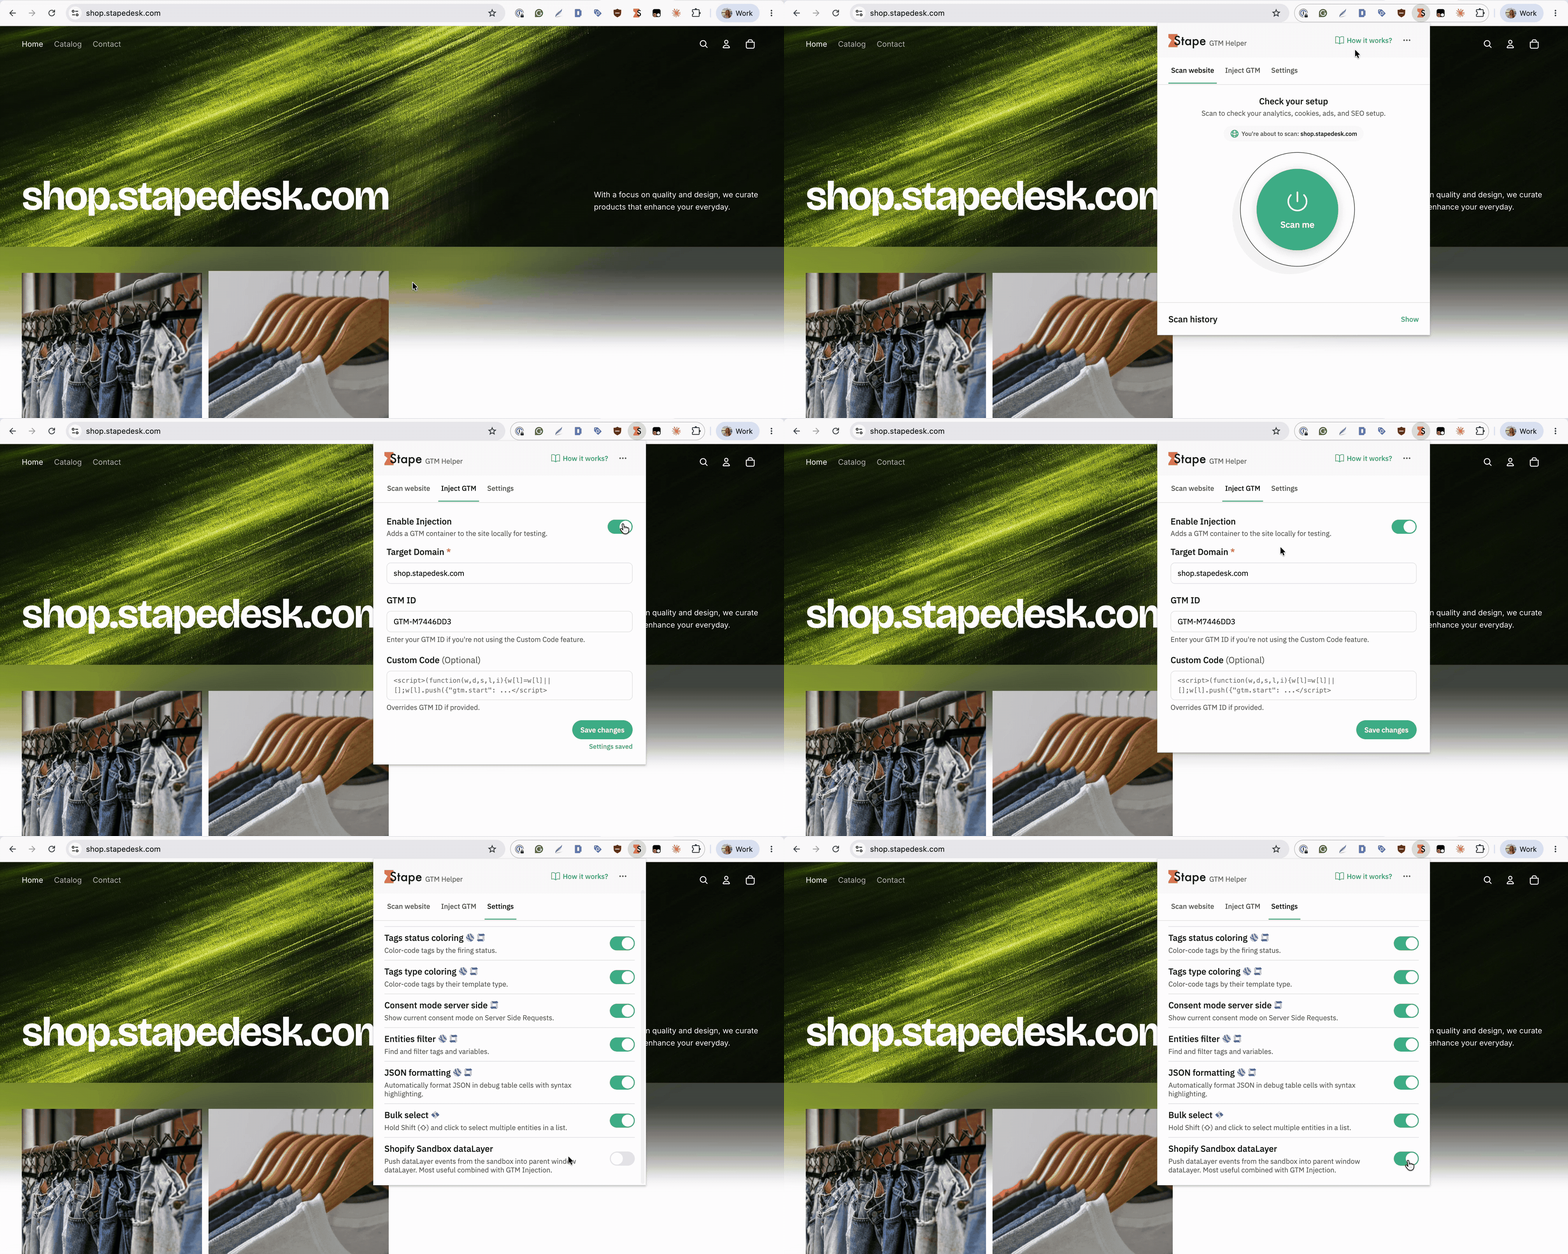
5. Check Consent Status in server GTM.
Next, check the consent status in the Preview mode of your server GTM container.
Due to sGTM limitations, consent status is not displayed in Preview by default. However, checking it is important because browsing data received by the server container may subsequently be sent to third-party platforms.
The previously mentioned Stape GTM Helper Chrome extension can help display this information.
To enable it open the extension's Settings tab → enable Consent mode server side.
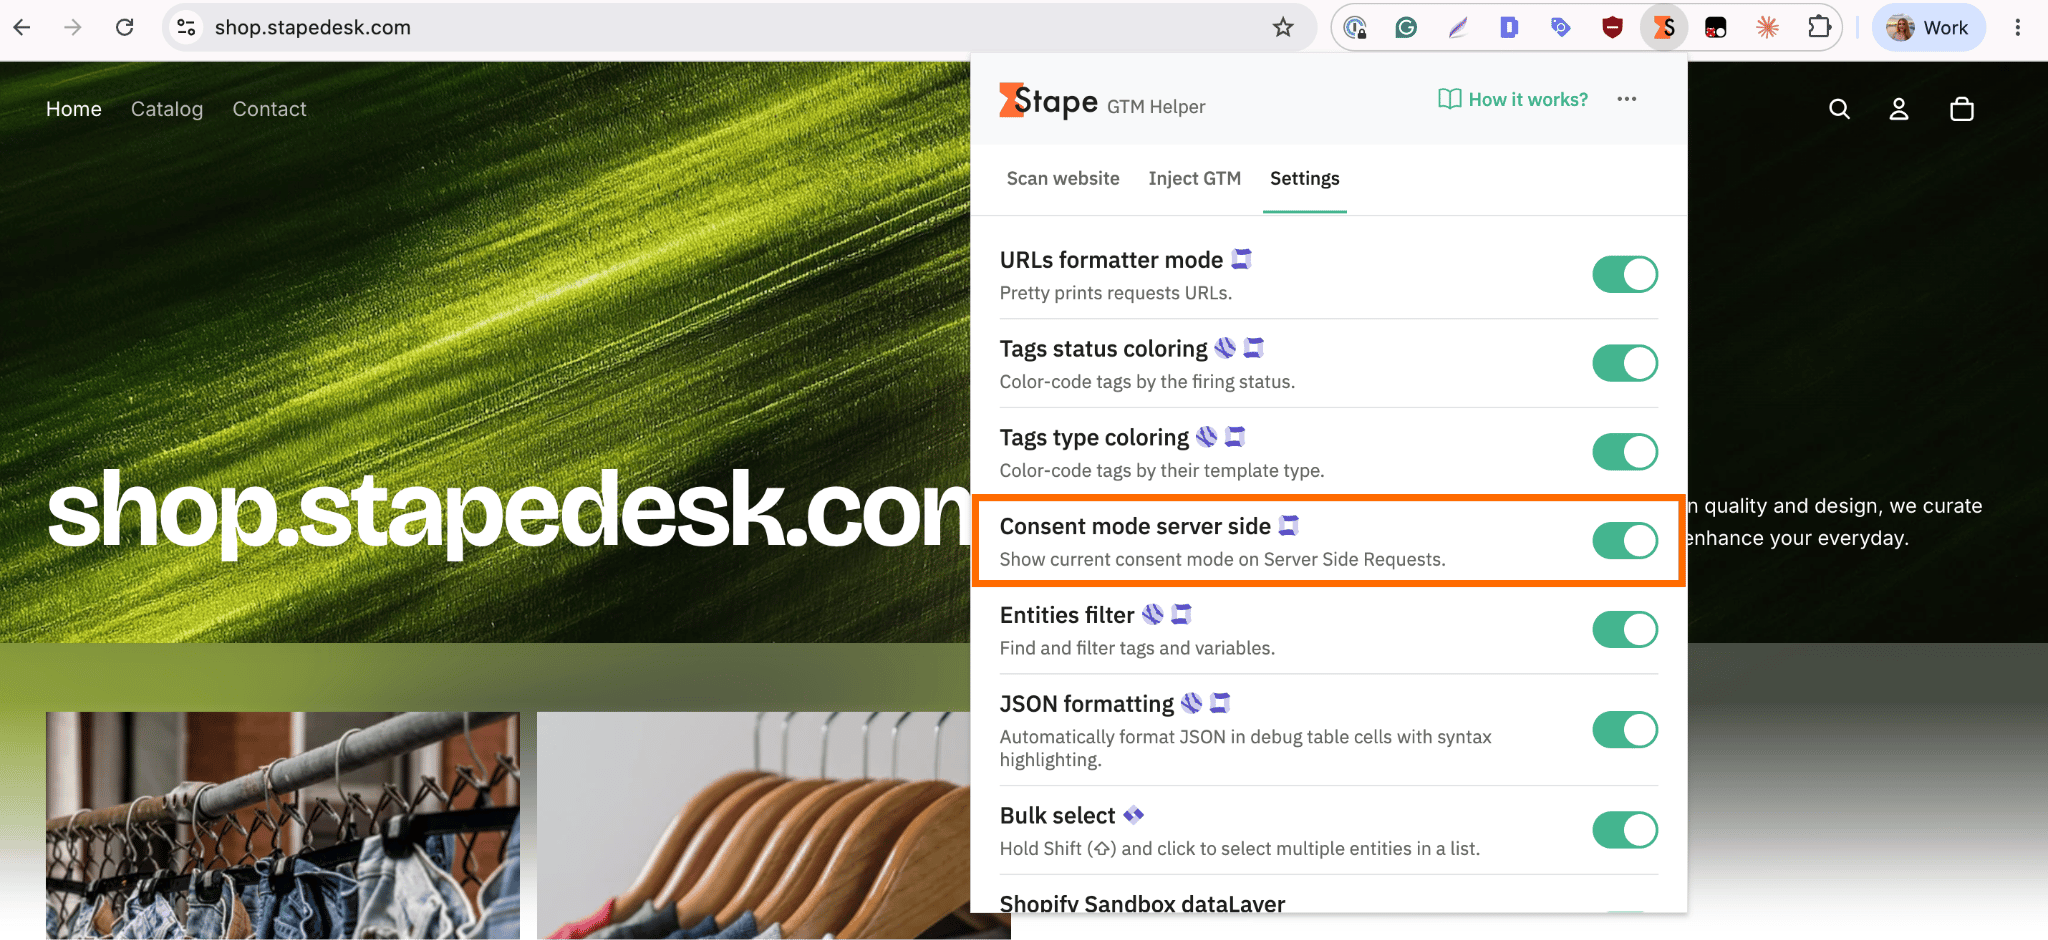
Check whether the server GTM Preview receives requests with the same consent statuses as those displayed in web GTM.
This ensures that consent information is correctly passed between the containers and that tracking respects visitors' privacy choices.
Consent logs
The Stape’s CMP has a Consent logs tab.
The primary use case for Consent logs is regulatory compliance. They provide documented evidence of visitors' consent decisions, helping website owners demonstrate that they comply with privacy requirements and can prove that consent was collected appropriately if requested by regulators or during an audit. Stape retains consent logs for 3 years.
Besides the primary case, you can use it also during testing and after your cookie banner goes live.
It allows you to review consent records received by the server GTM container from Stape's CMP. These records help verify visitors' consent decisions, troubleshoot consent-related issues, and ensure consent information is correctly passed to your tracking setup.
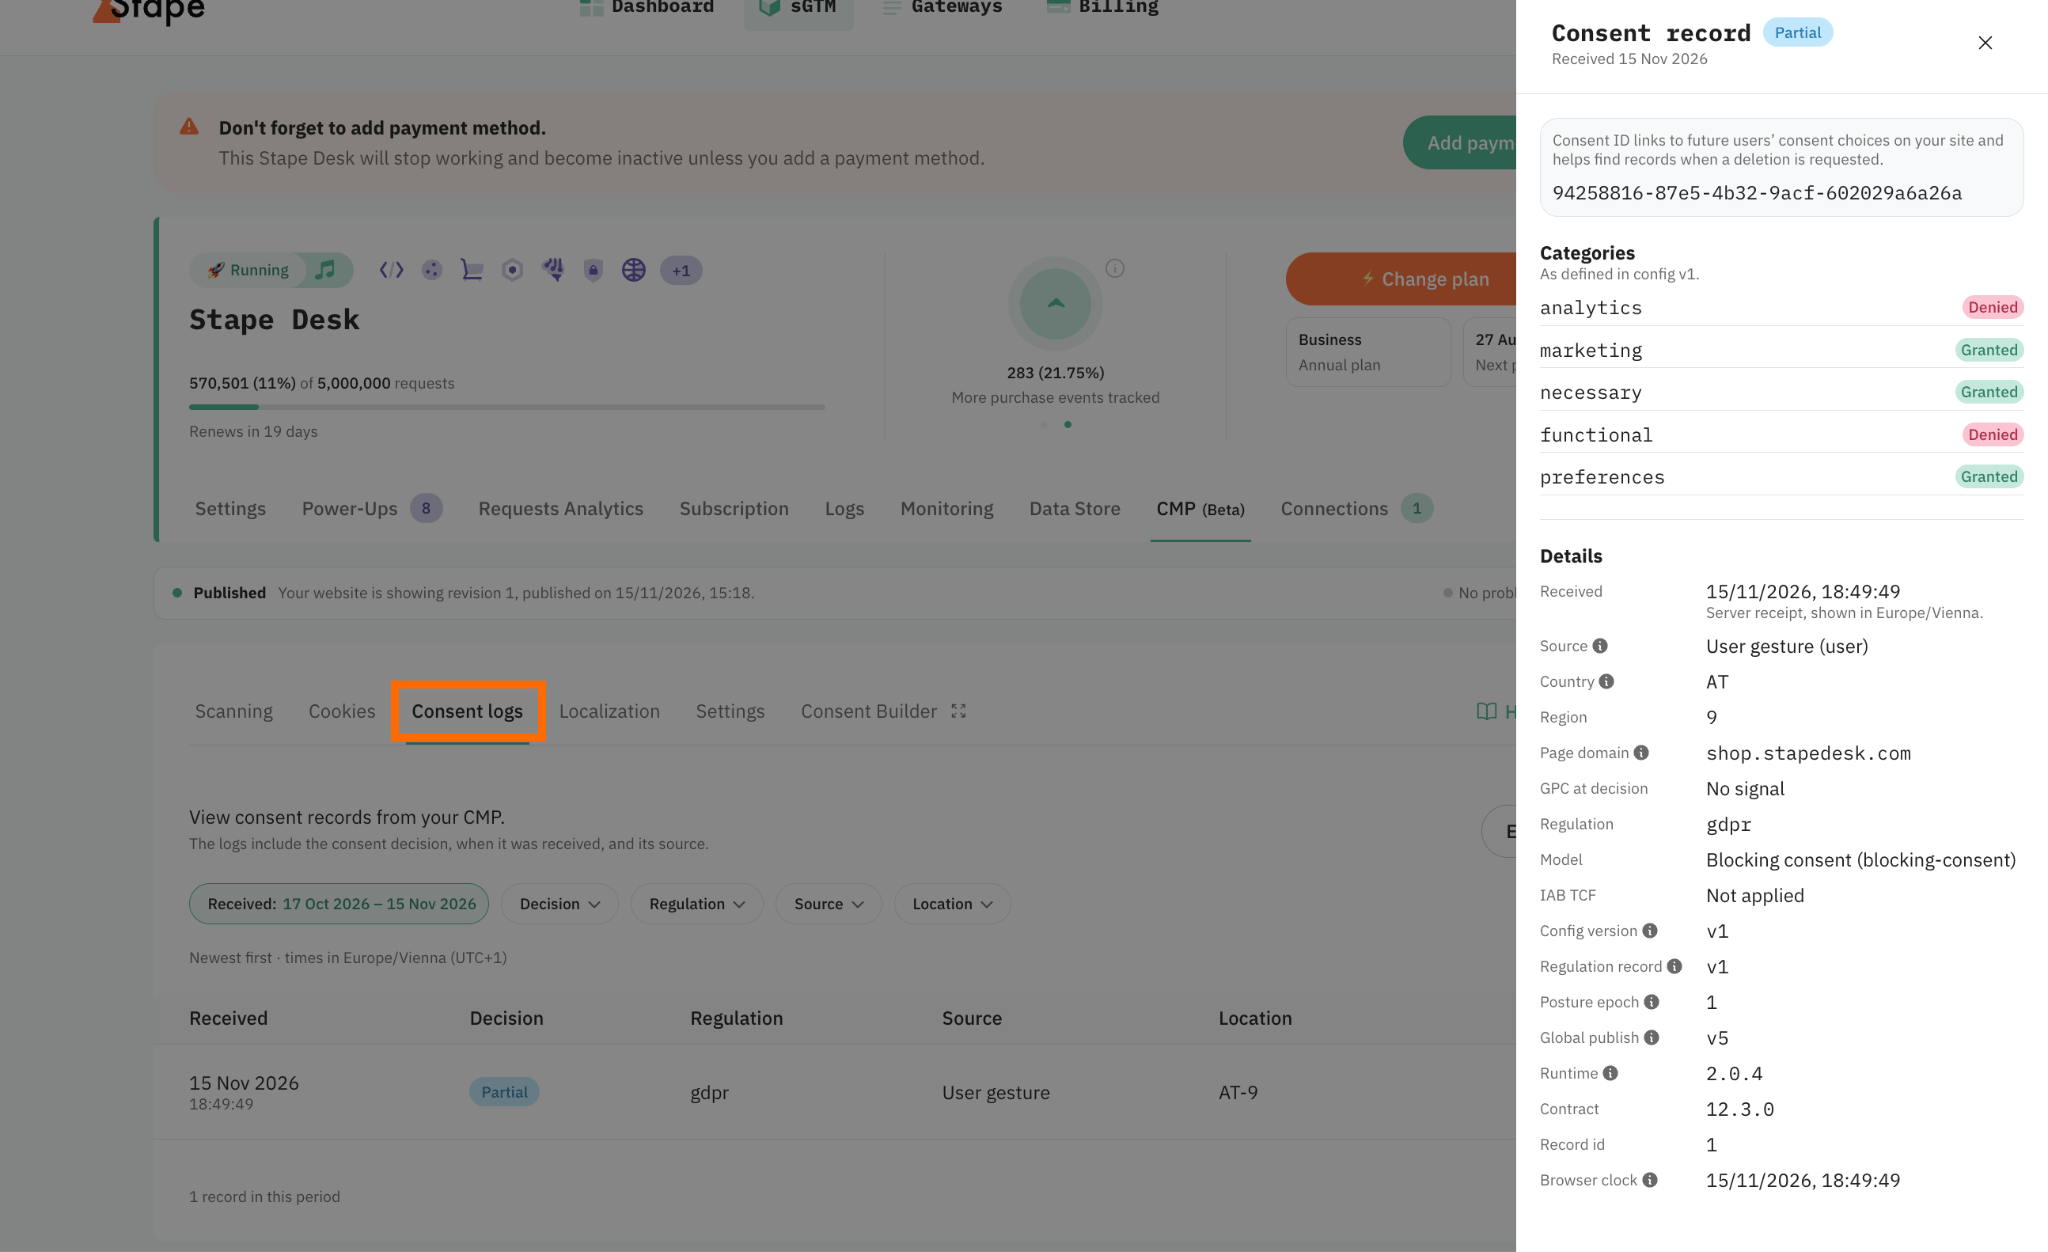
Use Consent logs to:
- Verify that consent decisions are successfully reaching your server GTM container.
- Investigate incorrect consent statuses or unexpected tracking behavior.
- Review consent choices associated with a specific visitor.
Conclusion
Stape's CMP helps Shopify merchants the typical challenges that they usually encounter. Its Custom Loader deployment, Shopify Customer Privacy API integration, and support for Google Consent Mode v2 makes it a suitable Shopify cookie banner GDPR and other data privacy regulations solution. With the right configuration and thorough debugging, you can build a tracking setup that respects website visitors’ consent choices and get a reliable data collection.
Want to start on the server side?
Try for freeRecommended for you
Sep 28, 2026
Blog
Shopify same-origin tracking: checkout limits and fixes
Shopify checkout blocks same-origin tracking requests. Learn why and how a hybrid setup solves this problem.
Oct 19, 2026

Comments