How to set up Stape's Consent Management Platform (CMP)
Updated Nov 15, 2026
This guide explains how to configure the Stape Consent Management Platform (CMP), customize the consent banner, and connect consent settings to the website’s tracking setup. The guide also covers how to test the configuration and review consent records.
Before you begin
Make sure you have:
- An active Stape account.
- A server GTM container configured and hosted on Stape.
- Custom Loader power-up activated and implemented for the sGTM container.
Custom Loader is required to deploy Stape CMP. It runs the CMP script from your website's domain, so it becomes a part of the server-side tracking infrastructure.
How to access Stape’s CMP?
To start configuring the CMP:
- 1.
- 2.Open the sGTM container where you want to configure consent management.
- 3.Navigate to the “CMP” tab.
- 4.Add the website domain where the cookie banner should be displayed, and click “Create CMP” to start the configuration.
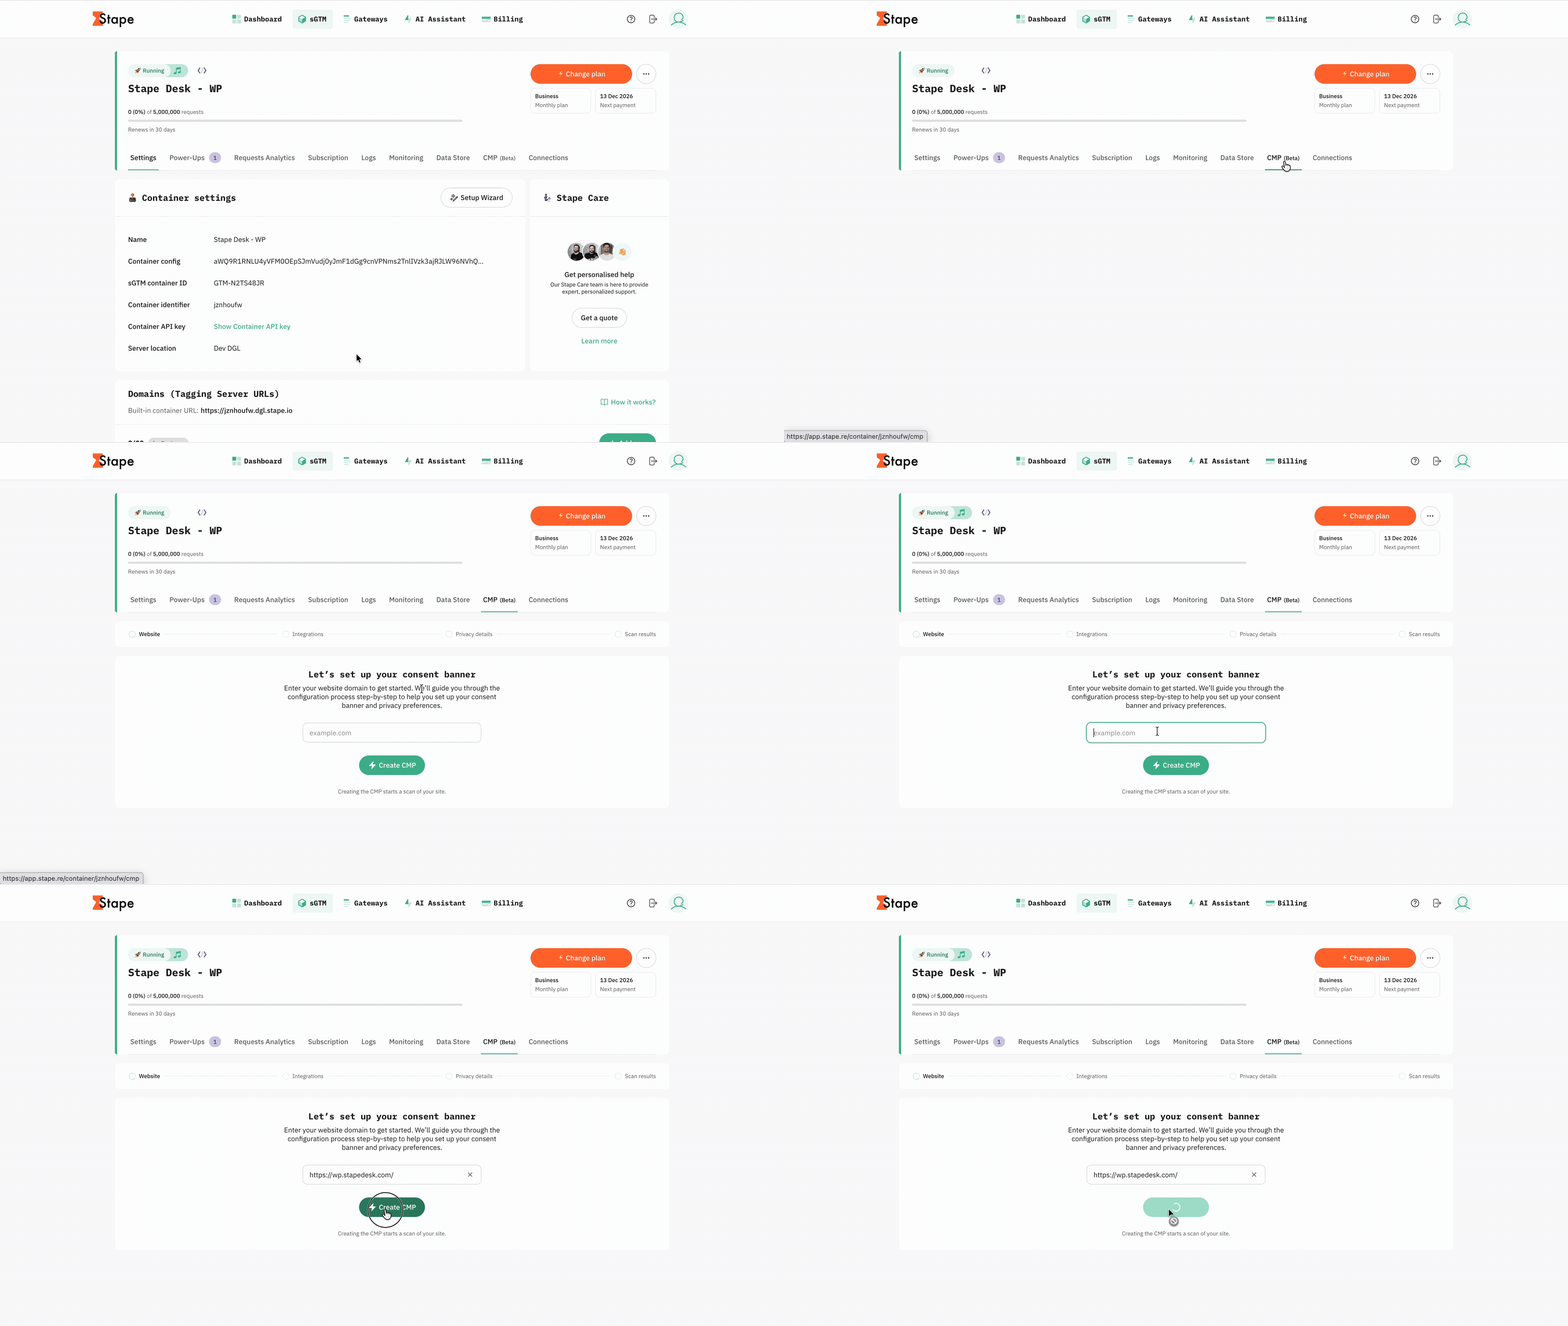
Configure consent banner with Stape’s CMP
Step 1. Configure the integrations and consent signals
Configure this section to connect the CMP with your tracking setup and advertising or analytics platforms.
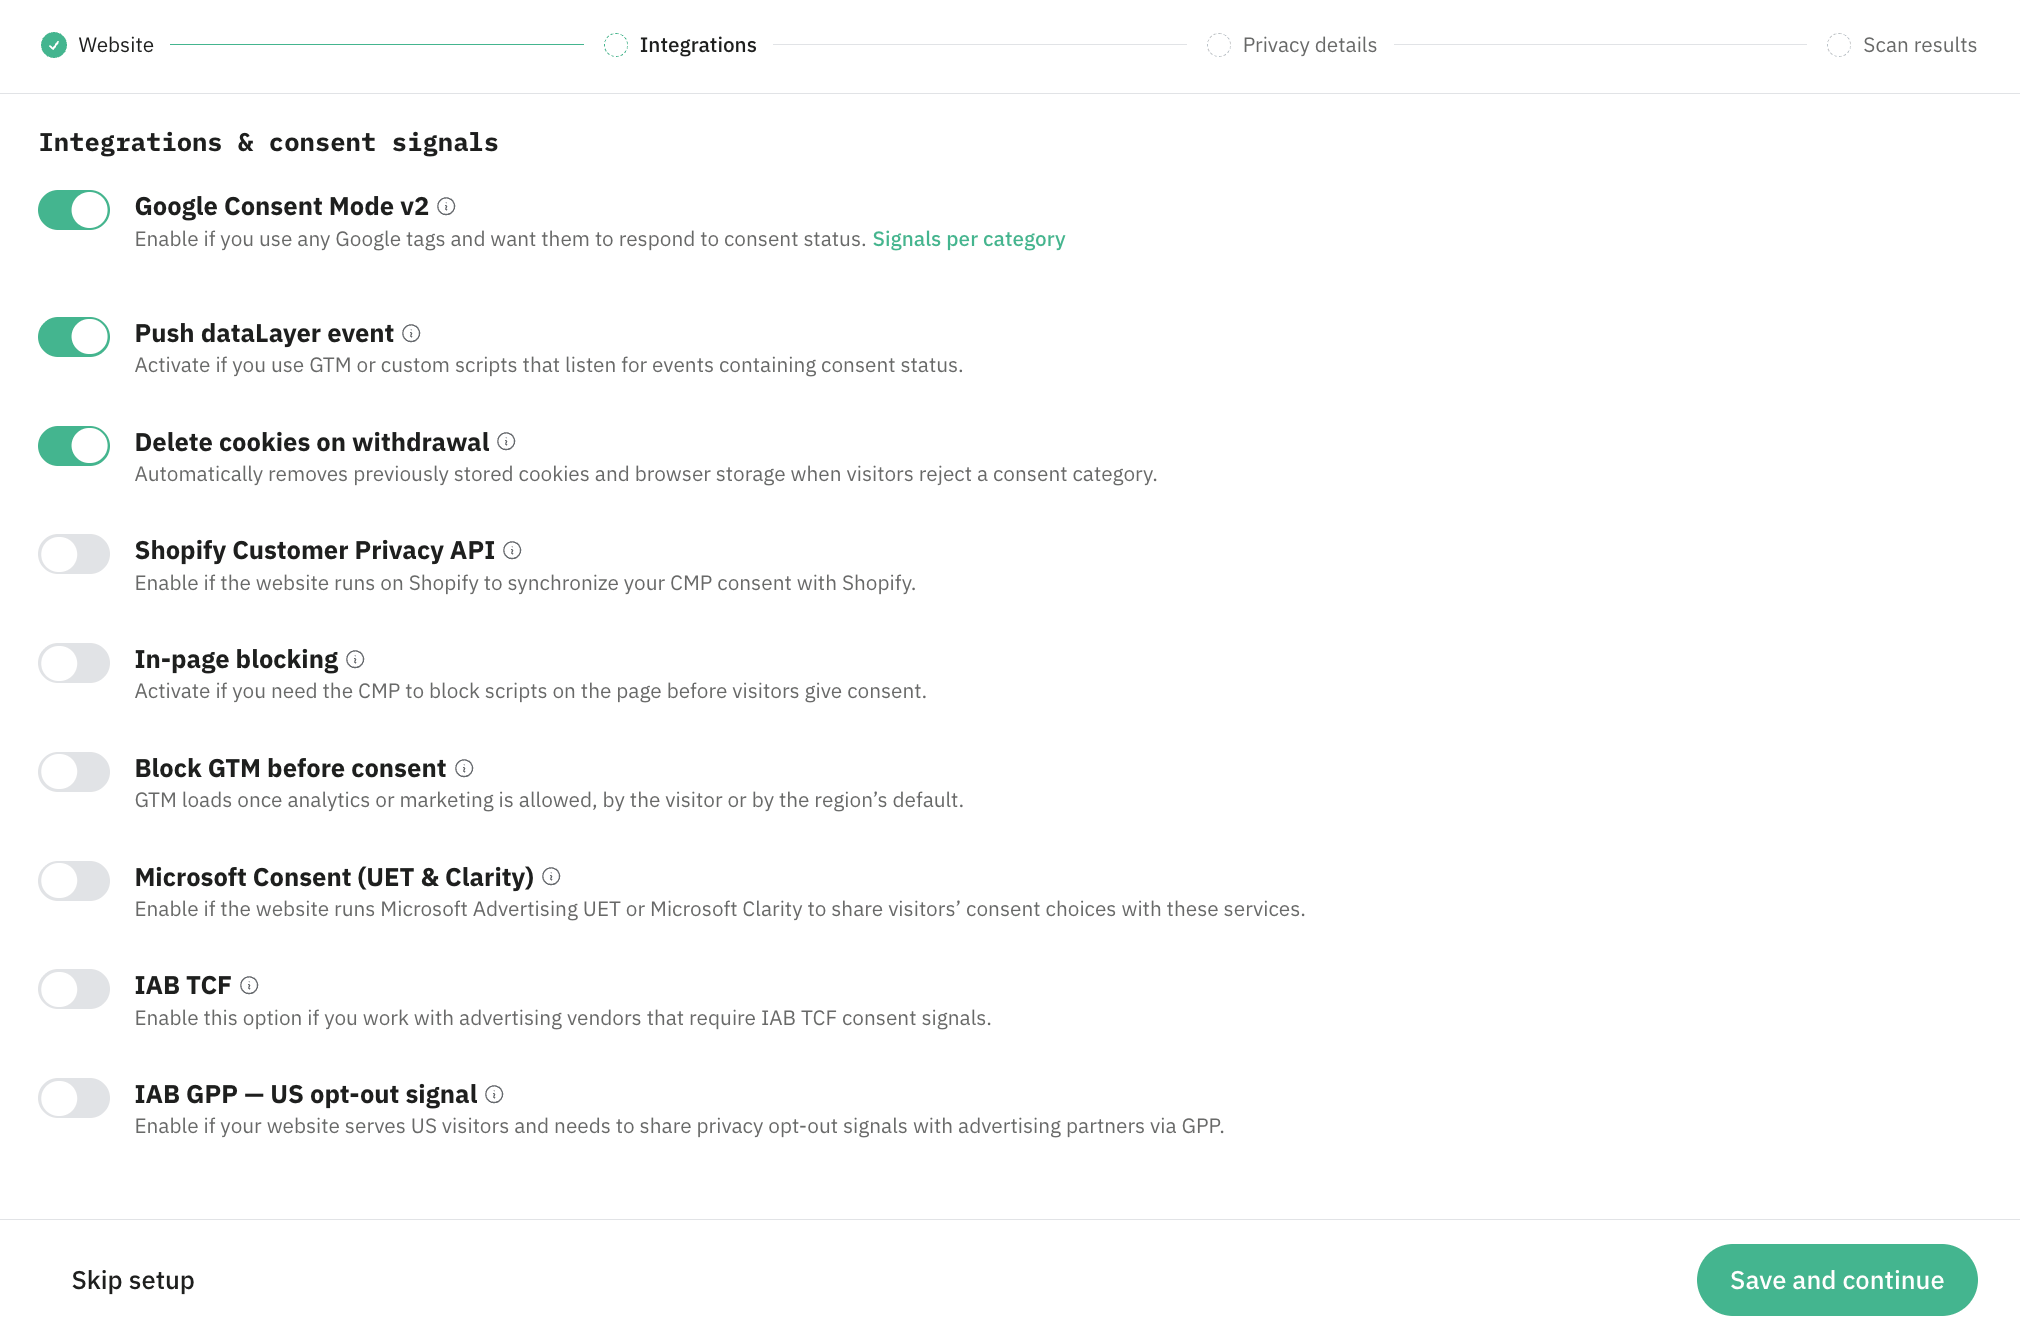
Enable an integration only if your website uses the corresponding platform or needs the related consent functionality:
1.1 Google Consent Mode v2 – sends consent signals to Google tags so they can adjust their behavior based on visitors' choices.
Enable this if you use Google tags, such as Google Analytics or Google Ads, and want them to receive consent signals from the CMP. For more details on Google Consent Mode v2, refer to Stape’s guide.
1.2 Push dataLayer event – the CMP will push the following events to the dataLayer:
- stape_cmp_consent_default
- stape_cmp_consent_update
The events contain each category's consent status.
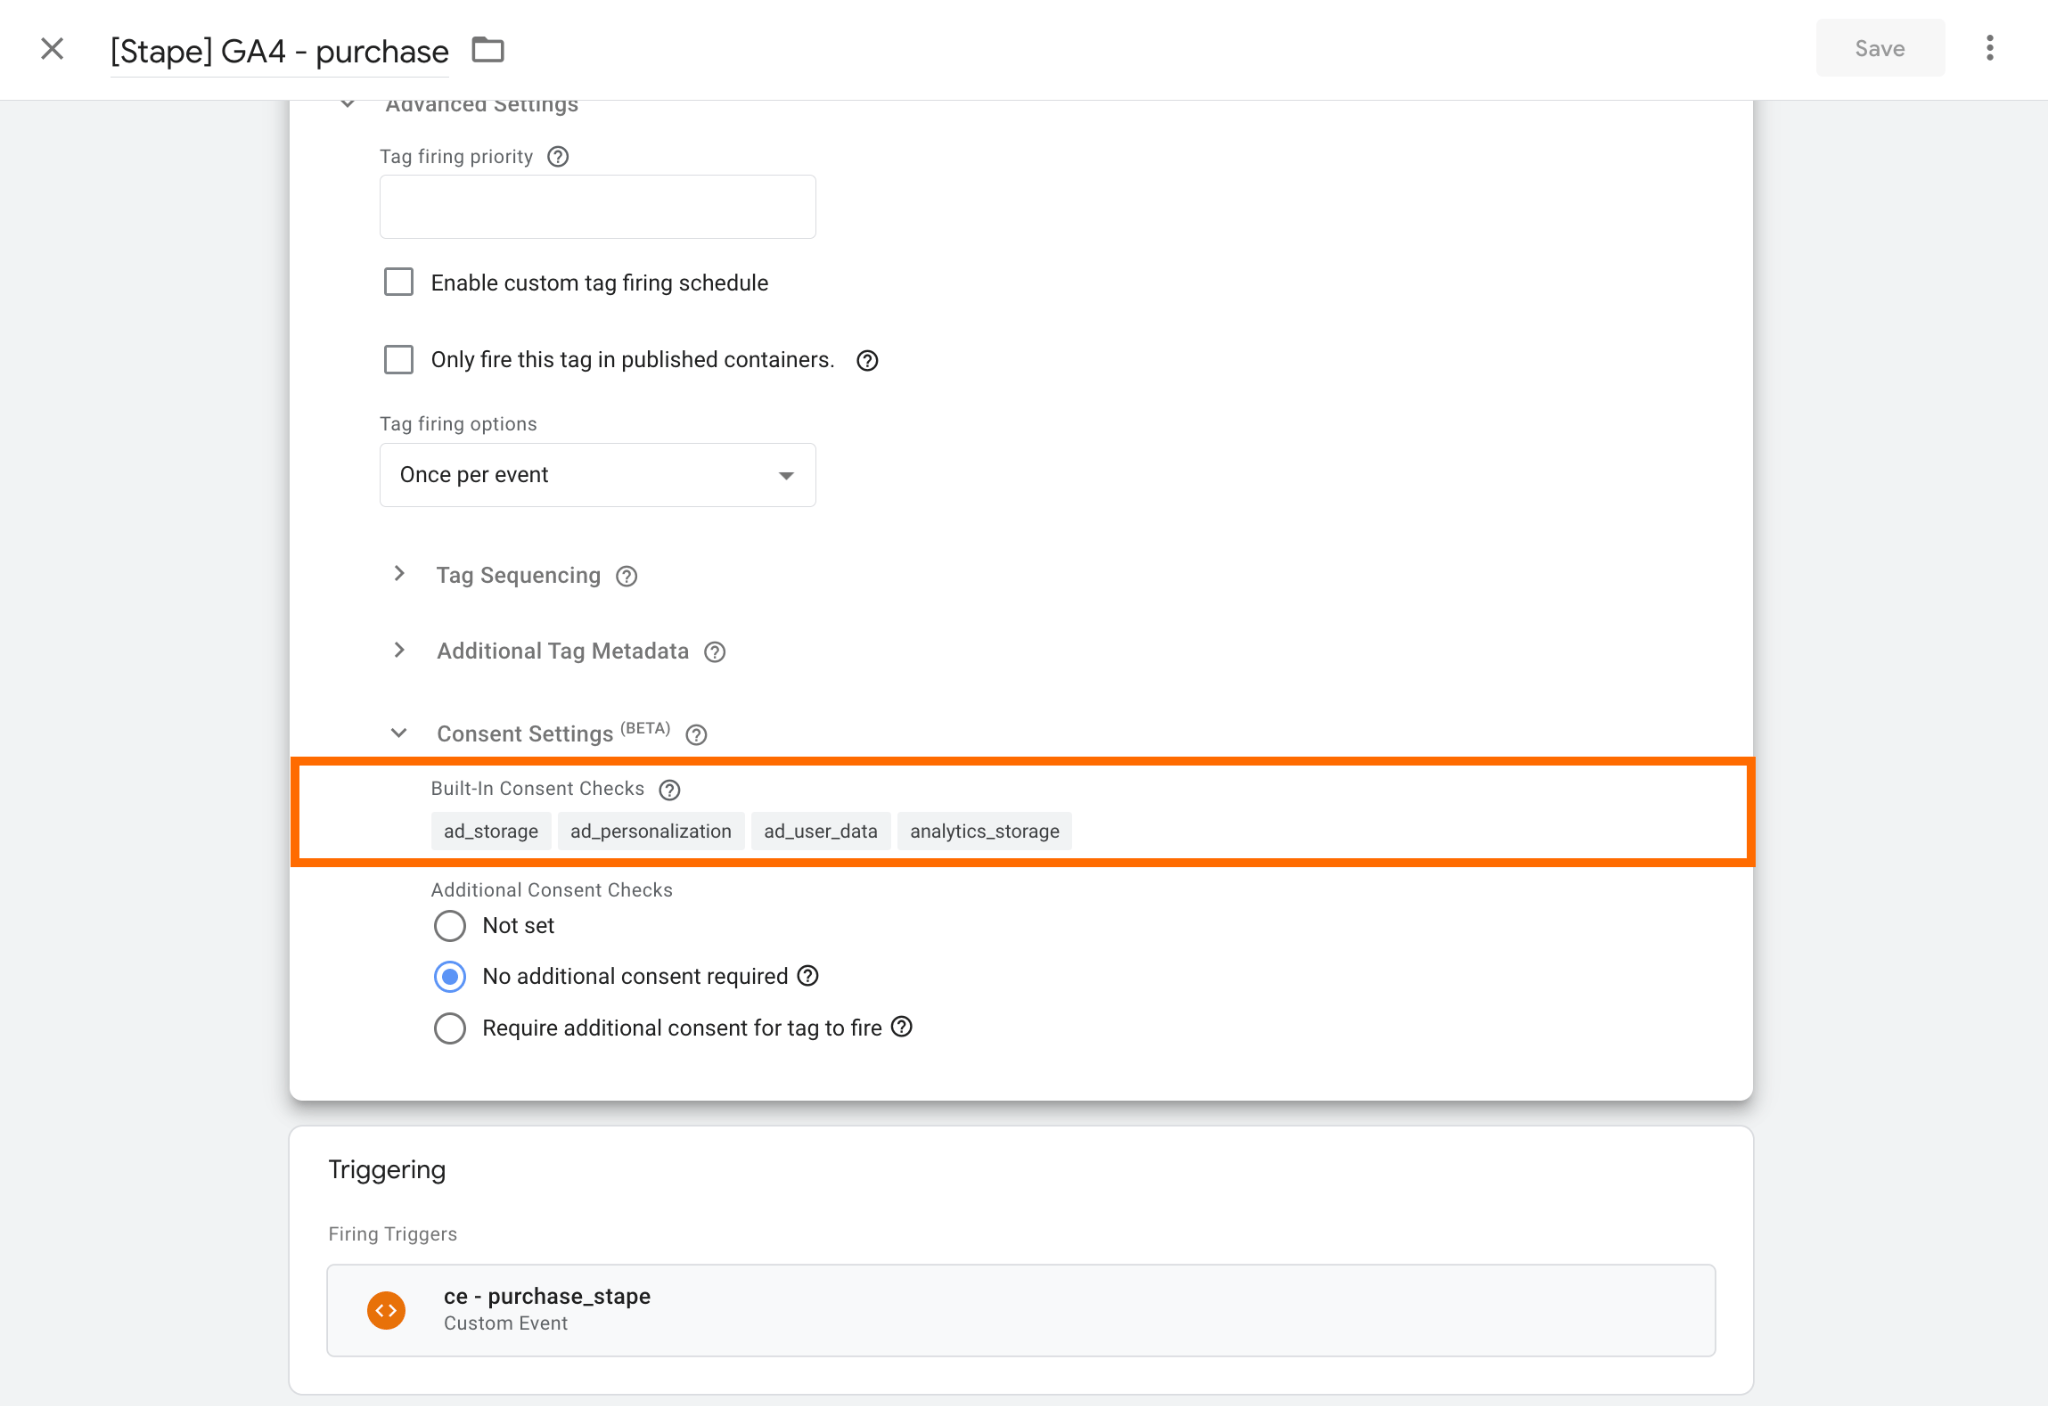
Enable this if you use Google Tag Manager or custom scripts that don’t automatically modify their behavior based on the user's consent. Google’s tags have this automatic functionality; if other tags in web GTM have “Built-in Consent Check,” as shown in the screenshot below, the option “Push dataLayer event” can be omitted.
1.3 Delete cookies on withdrawal – if enabled, this option automatically deletes cookies and browser storage items associated with categories the visitor has denied consent to. The deletion runs on every page load and whenever the visitor changes their consent preferences, without requiring a page reload. It applies to the cookies, localStorage, and sessionStorage items listed in your cookie inventory.
HttpOnly cookies and the cookies set by other domains cannot be deleted.
This feature is particularly useful when:
- Visitors may withdraw or change their consent preferences after initially accepting cookies.
- Your website uses analytics, advertising, or marketing technologies that store cookies or data in browser storage.
- You want to prevent previously stored tracking data from remaining in the visitor's browser after consent is withdrawn.
- You need to ensure that your website consistently respects visitors' updated privacy choices.
1.4 Shopify Customer Privacy API – synchronizes visitors' consent choices with Shopify's customer privacy settings.
Enable this if your website runs on Shopify. The option allows the CMP to synchronize visitors’ consent choices with Shopify’s customer privacy settings.
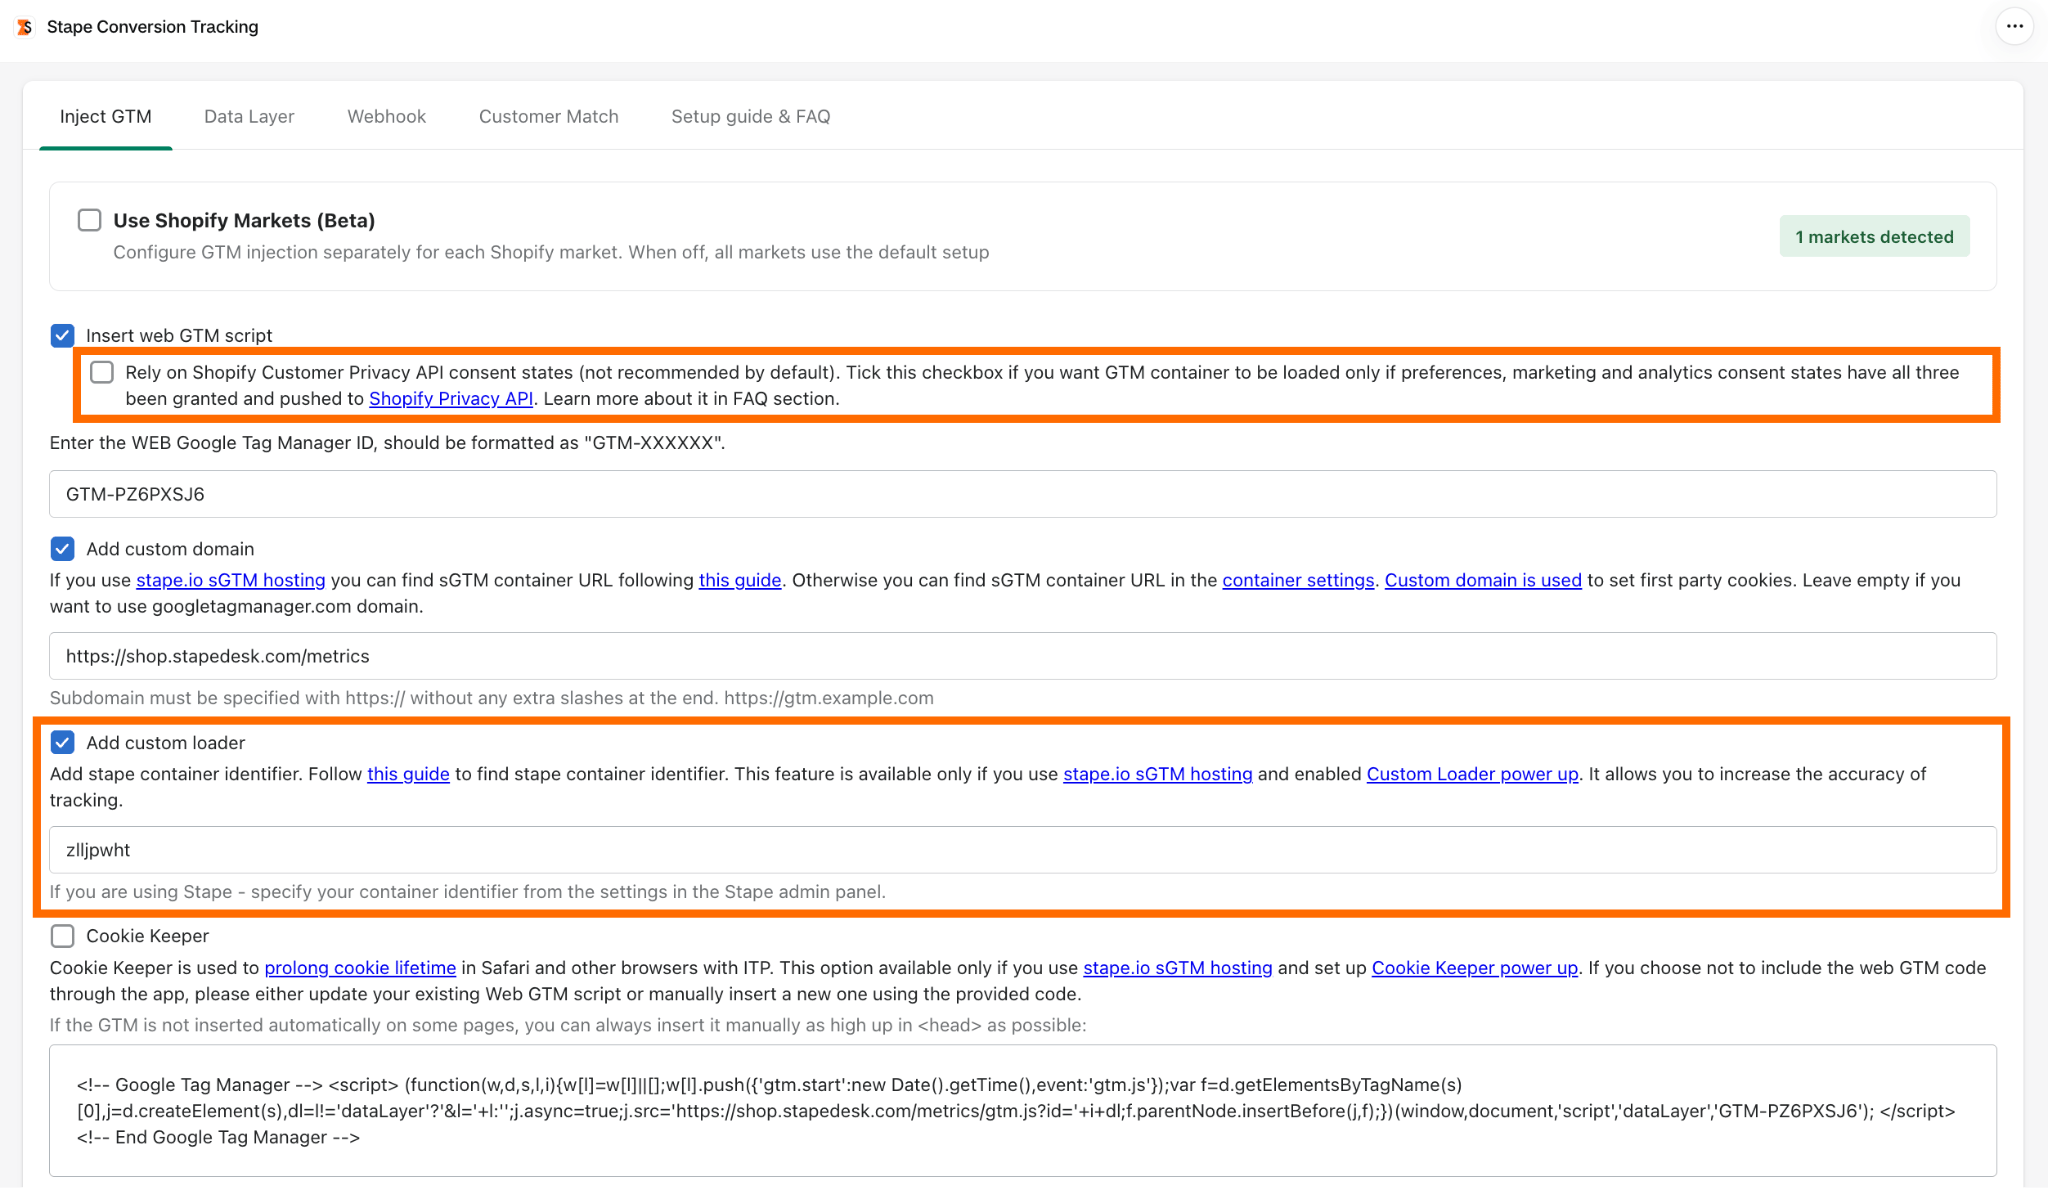
Be sure to turn off the “Rely on Shopify Customer Privacy API consent states” option in the Stape’s Conversion tracking app for Shopify and select “Custom Loader mode” for this domain.
1.5 In-page blocking – prevents selected scripts from running until visitors grant the required consent.
Enable this if your website loads scripts directly in the page HTML or through a system that doesn’t support consent-based blocking through GTM.
After enabling, the script will be generated. It must mark the original script tags on the website with the CMP blocking attributes and assign the appropriate consent categories.
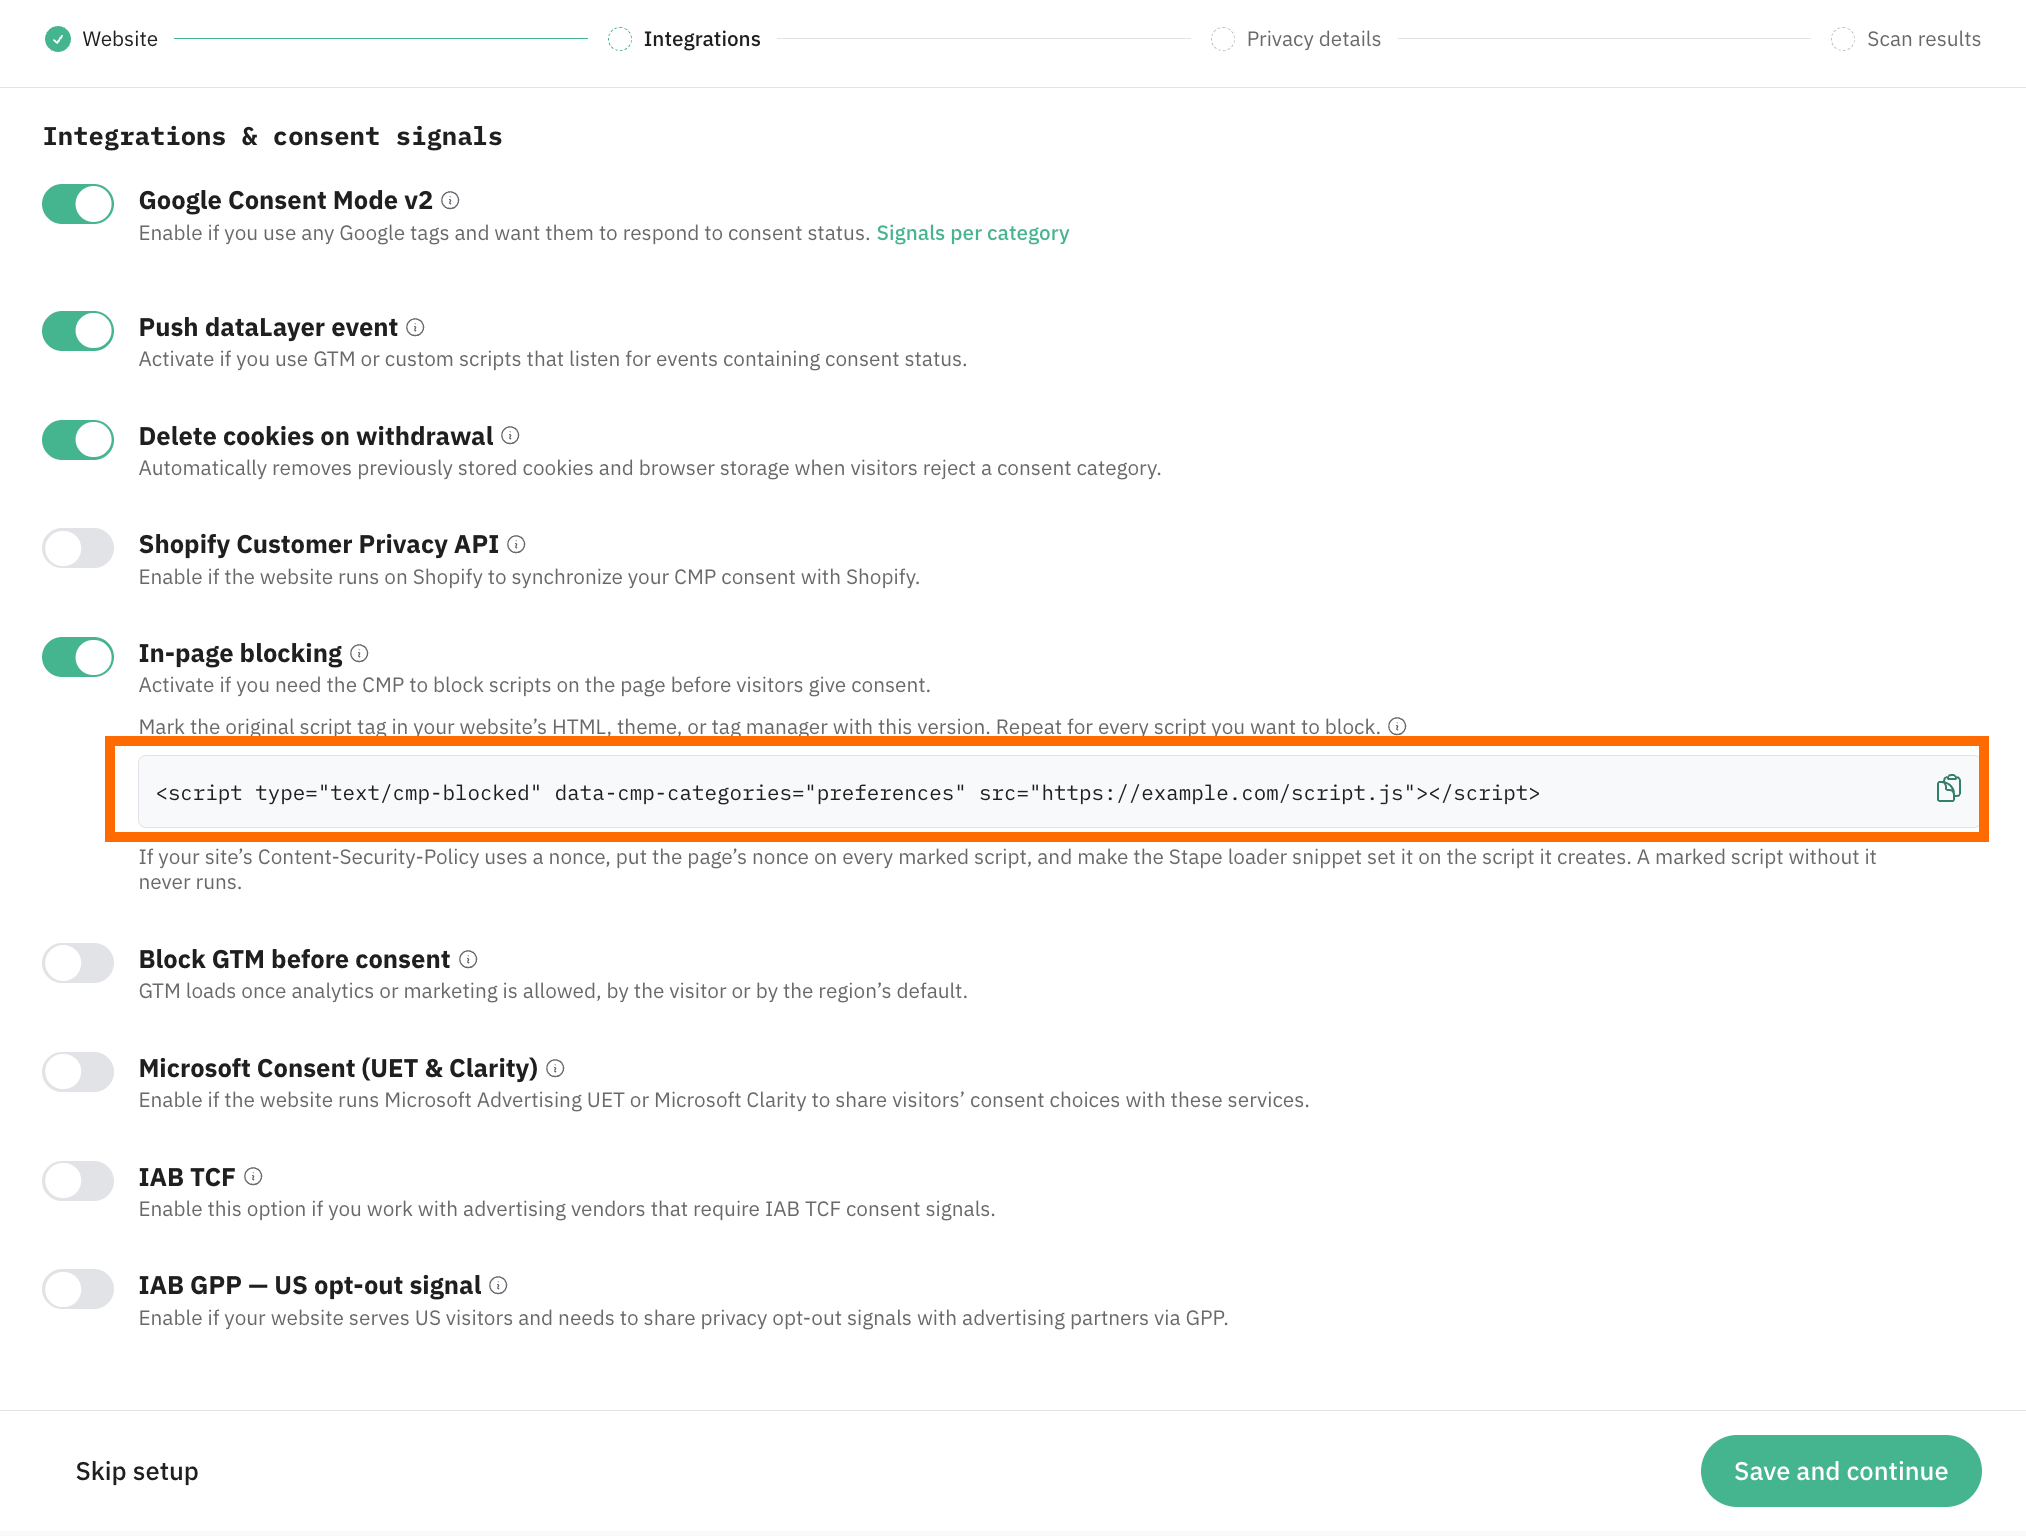
1.6 Block GTM before consent (available if Google Consent Mode v2 is activated) – prevent GTM from loading until the visitor grants consent for Analytics or Marketing. If enabled, Google tags won't run before consent and won't send cookieless pings during that period.
Especially useful for businesses that handle sensitive personal data or operate in highly regulated sectors, such as healthcare, legal services, and financial services.
1.7 Microsoft Consent (UET & Clarity) – enable this toggle if your website uses Microsoft Clarity or Microsoft Advertising UET tags.
Stape's CMP sends these services the analytics and advertising consent choices based on website visitors’ consent categories. For visitors from the EEA, the UK, and Switzerland, Microsoft Clarity collects only cookieless data until the user grants the required consent.
1.8 IAB Transparency and Consent Framework (TCF) – enables standardized consent signaling to participating advertising vendors. Configure the relevant purposes, vendors, special features, and publisher settings.
Enable this toggle if your website uses programmatic advertising or works with advertising vendors that require standardized consent signals under the IAB TCF.
Click on the collapse element below for detailed configurations:
1. 9 IAB GPP — US opt-out signal – enables the CMP to store and communicate applicable US privacy signals through the GPP framework.
Enable this option if your website or organization is subject to US state privacy laws and needs to collect, store, and communicate applicable privacy opt-out signals through the IAB Global Privacy Platform (GPP).
Once done, click “Save and continue”.
Step 2. Add privacy details
Specify the privacy-related information that will be presented to website visitors. The disclosures explain how visitors’ personal data is collected, used, stored, and shared.
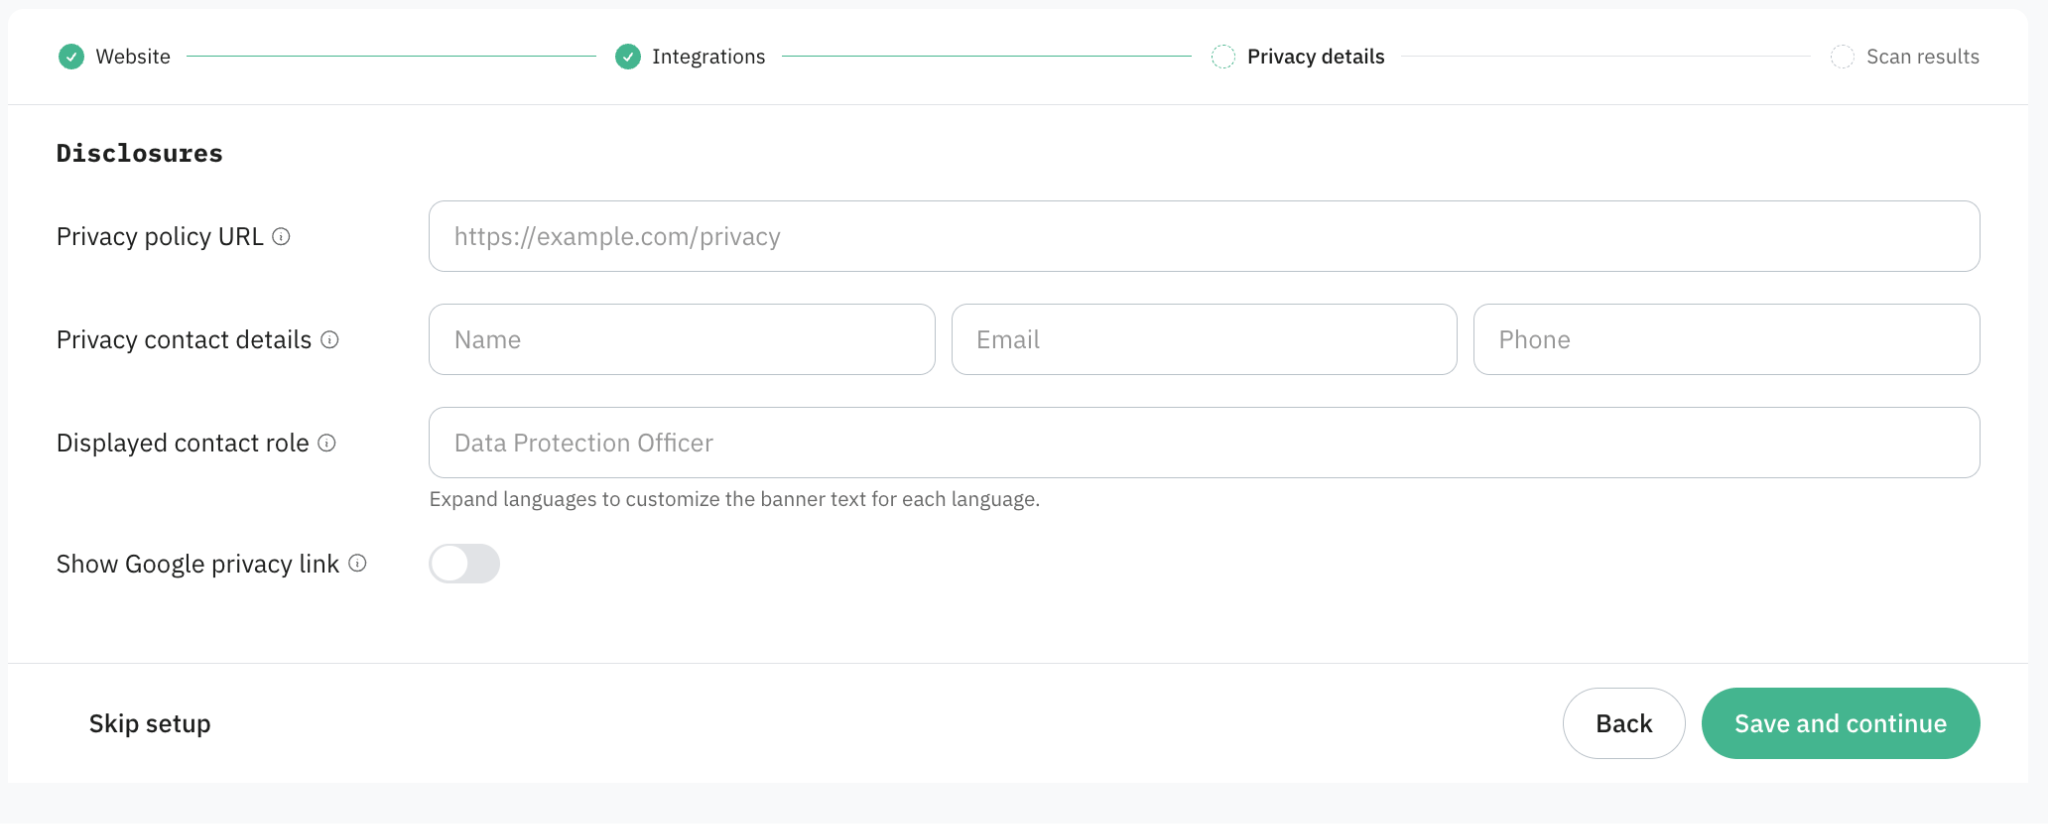
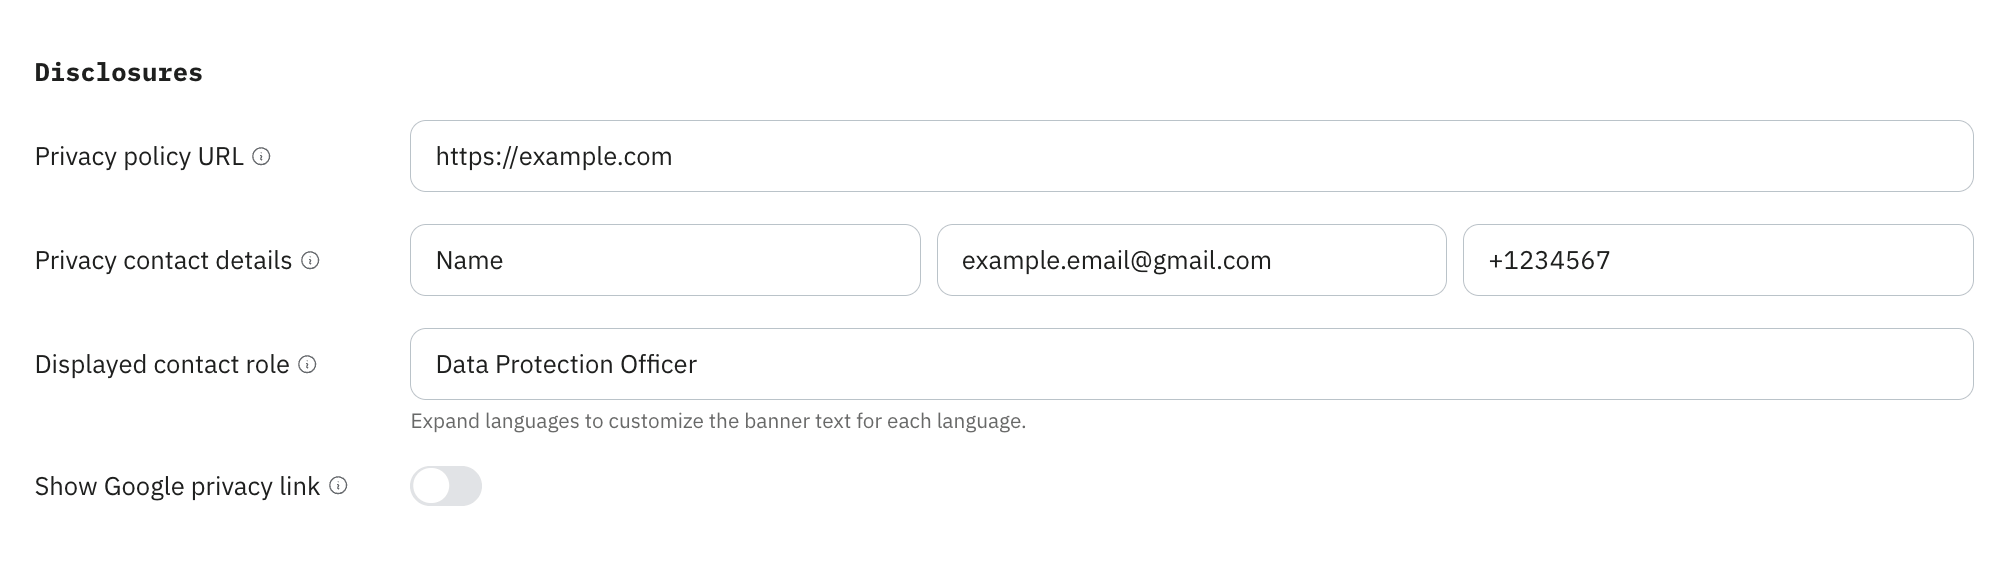
2.1 Privacy policy URL – enter the URL of the page where your website’s privacy policy is published. This page explains how your website collects, uses, stores, and protects visitors’ personal data.
The link added in this field will be displayed in the consent banner so visitors can review the privacy practices. If your website doesn’t have a privacy policy page yet, create and publish one before configuring this field.
2.2 Privacy contact details – specify the contact information visitors can use to reach you with questions or requests about their personal data and privacy.
2.3 Displayed contact role – add the label that identifies the privacy contact in your consent banner, such as “Data Protection Officer,” “Privacy Team,” or “Privacy Contact.” The label appears next to the contact details and is customized for each banner language.
If your business doesn’t have a privacy team or Data Protection Officer, use a general label such as “Privacy Contact.”
2.4 Show Google privacy link – enable this option to display a link to Google’s privacy information in the consent banner, next to the website’s privacy policy link.
Enable it if your website uses Google platforms, such as Google Analytics or Google Ads, and you want to give visitors direct access to Google’s privacy information from the consent banner.
The link to Google’s privacy information is not displayed in banners that use the IAB Transparency and Consent Framework (TCF).
Once done, click “Save and continue”.
Step 3. Check the scan results
The scanning identifies available storage and tracking technologies (such as cookies) that are implemented on the website.
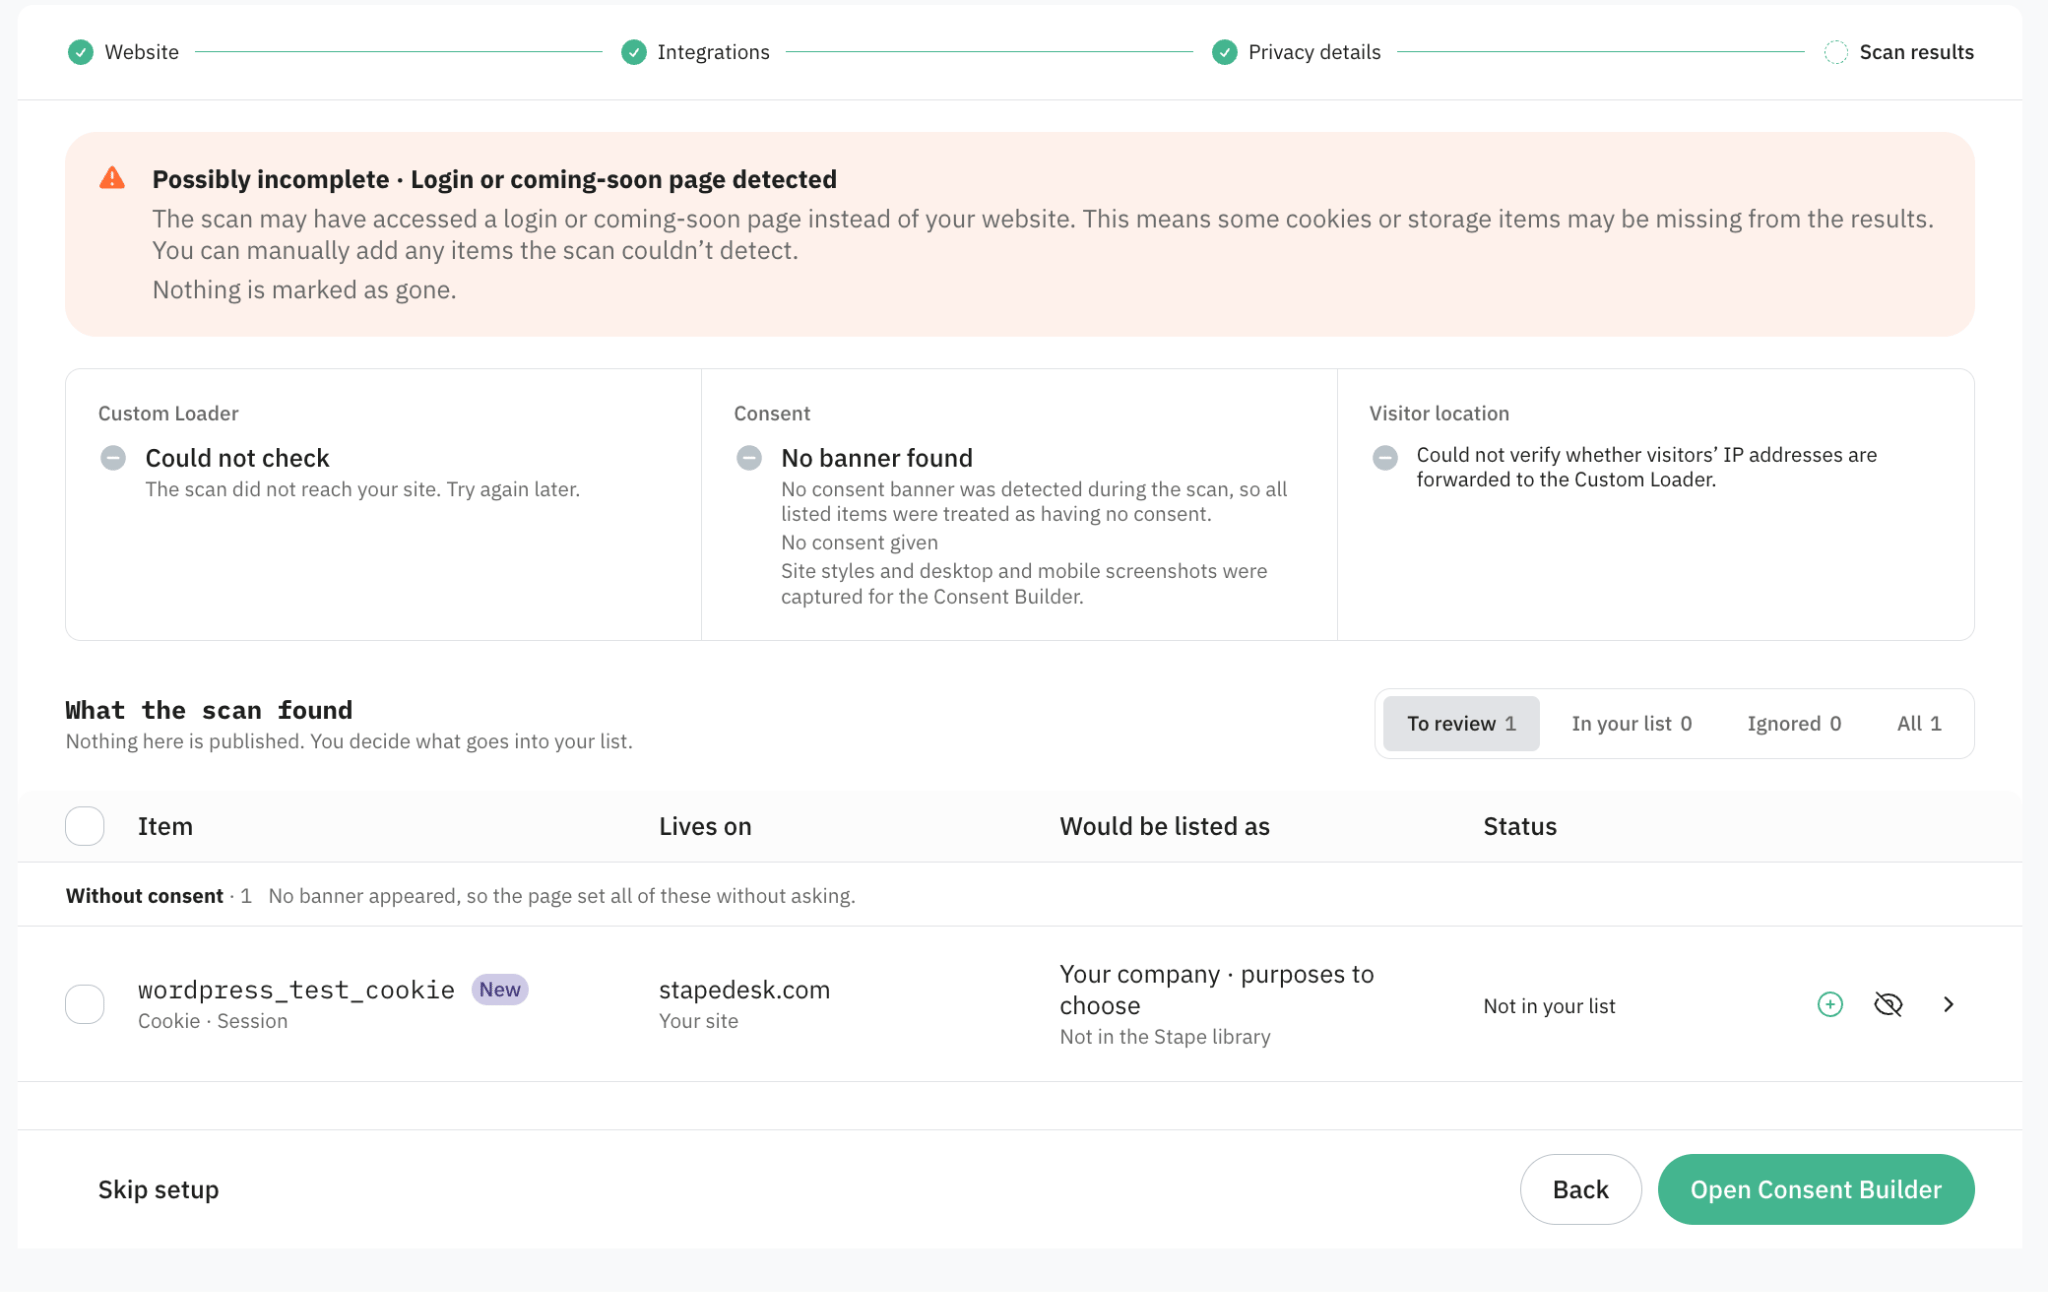
3.1 Review the detected cookies and other storage entries.
3.2 The entries that are in the Stape library can be added to your cookie inventory in one click.
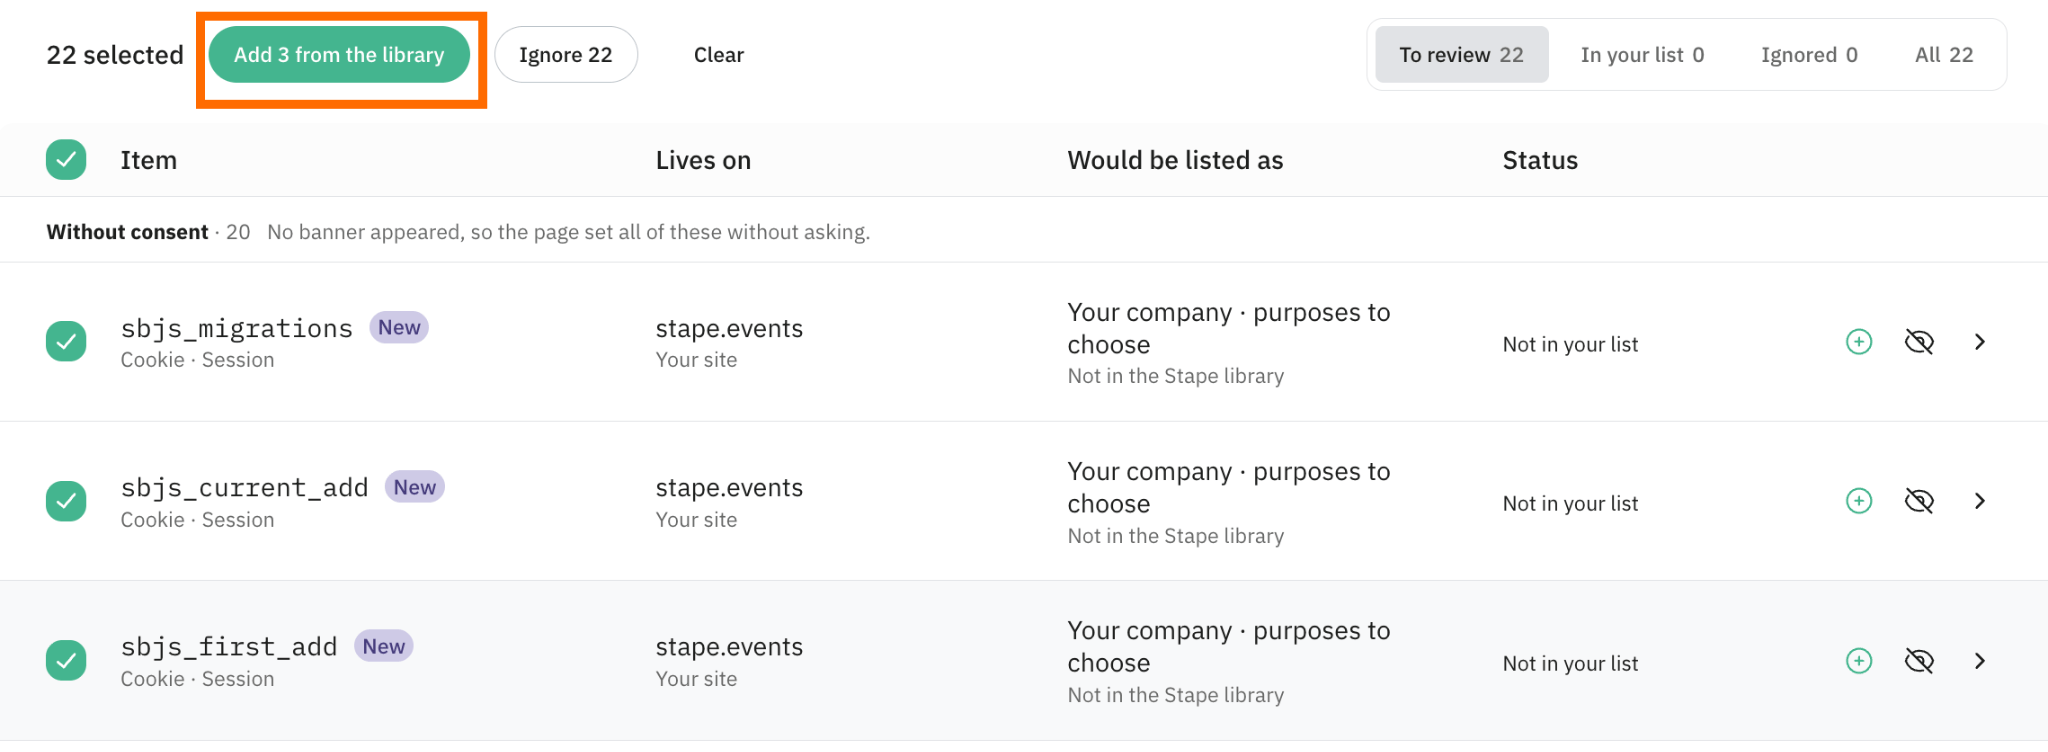
Review the entries that are missing from your CMP configuration or require additional information. Add or update entries where necessary. For more details, click on the collapse element below:
Once done, click “Open Consent Builder”.
Step 4. Customize the cookie banner
Customize the banner's appearance to match your website using settings in the “Consent Builder” tab.
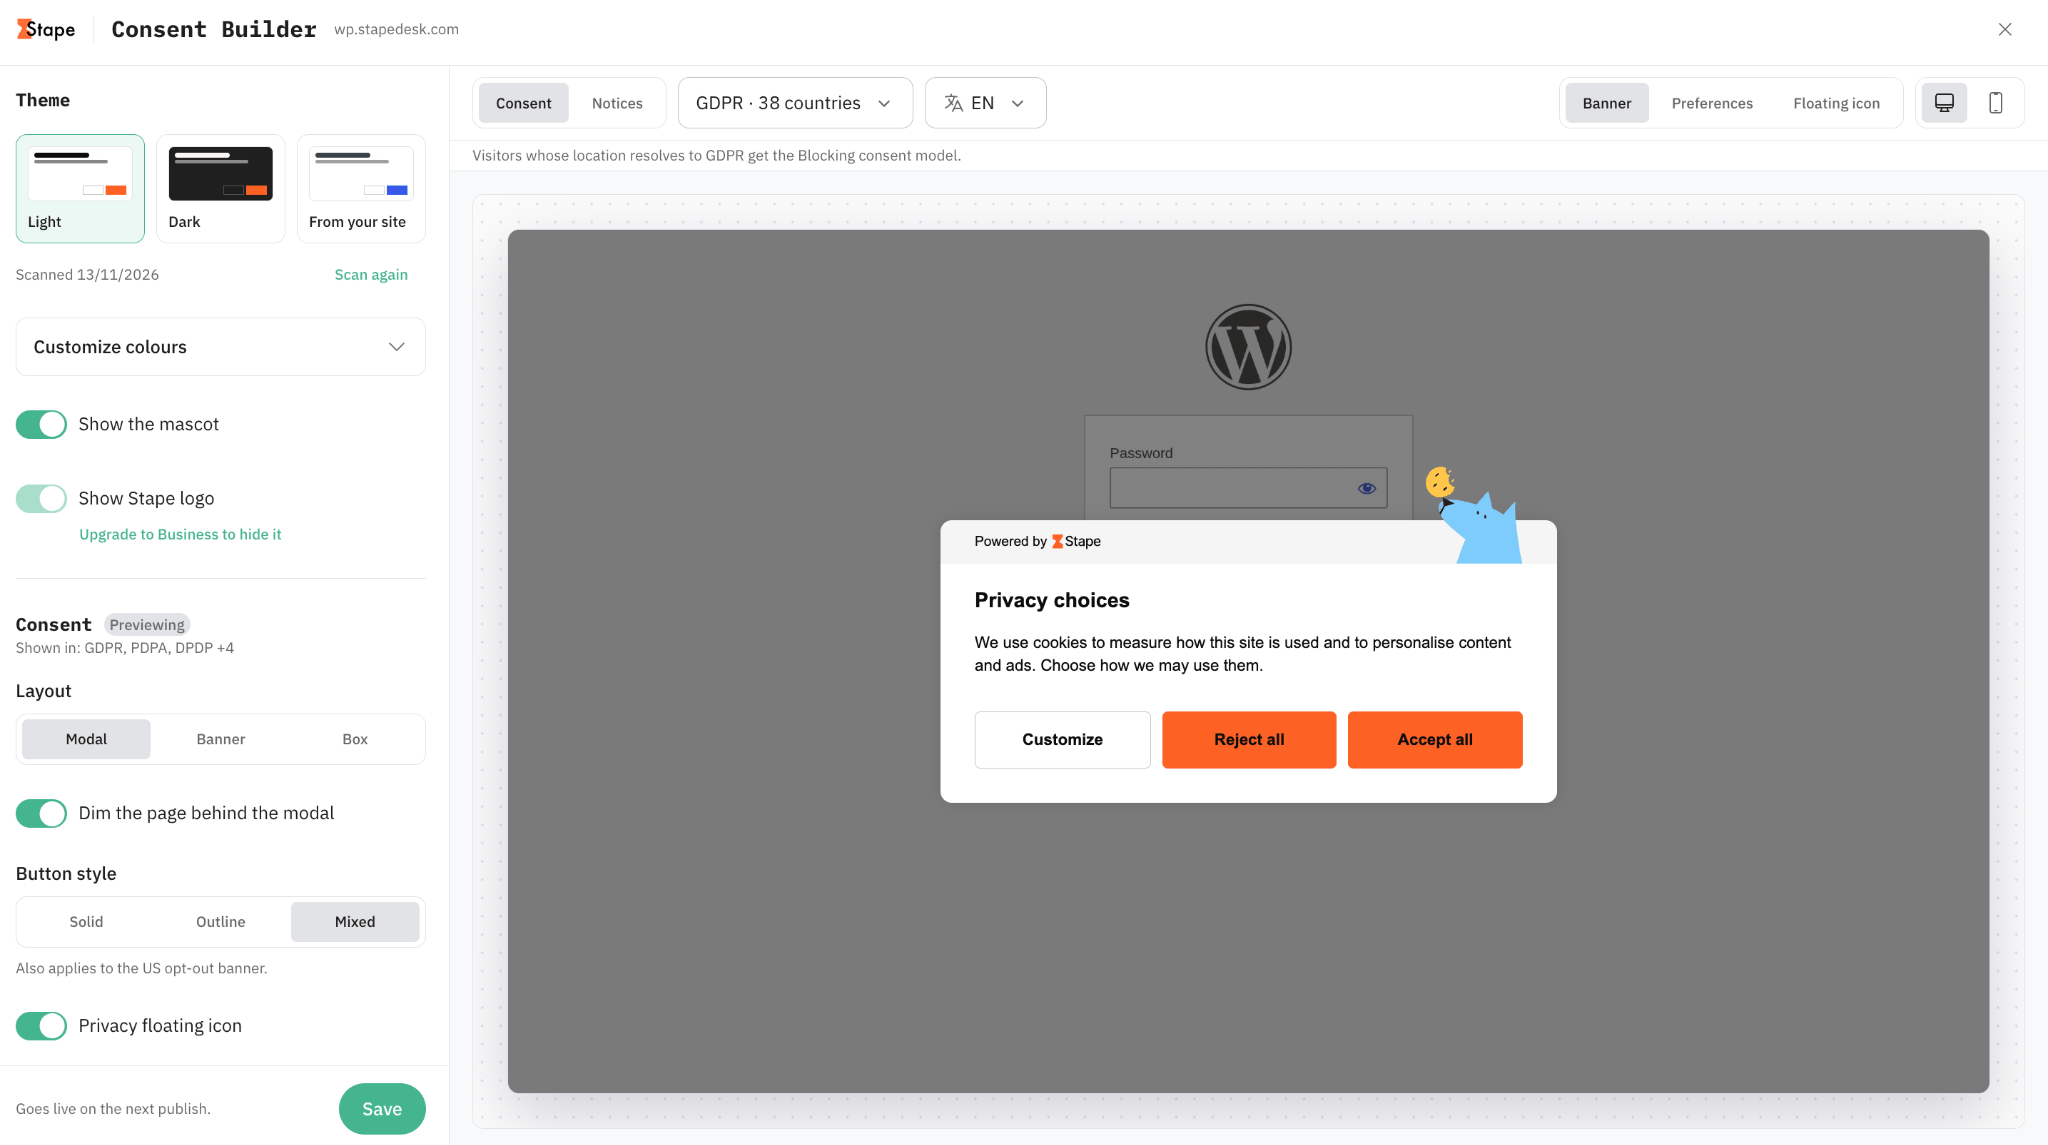
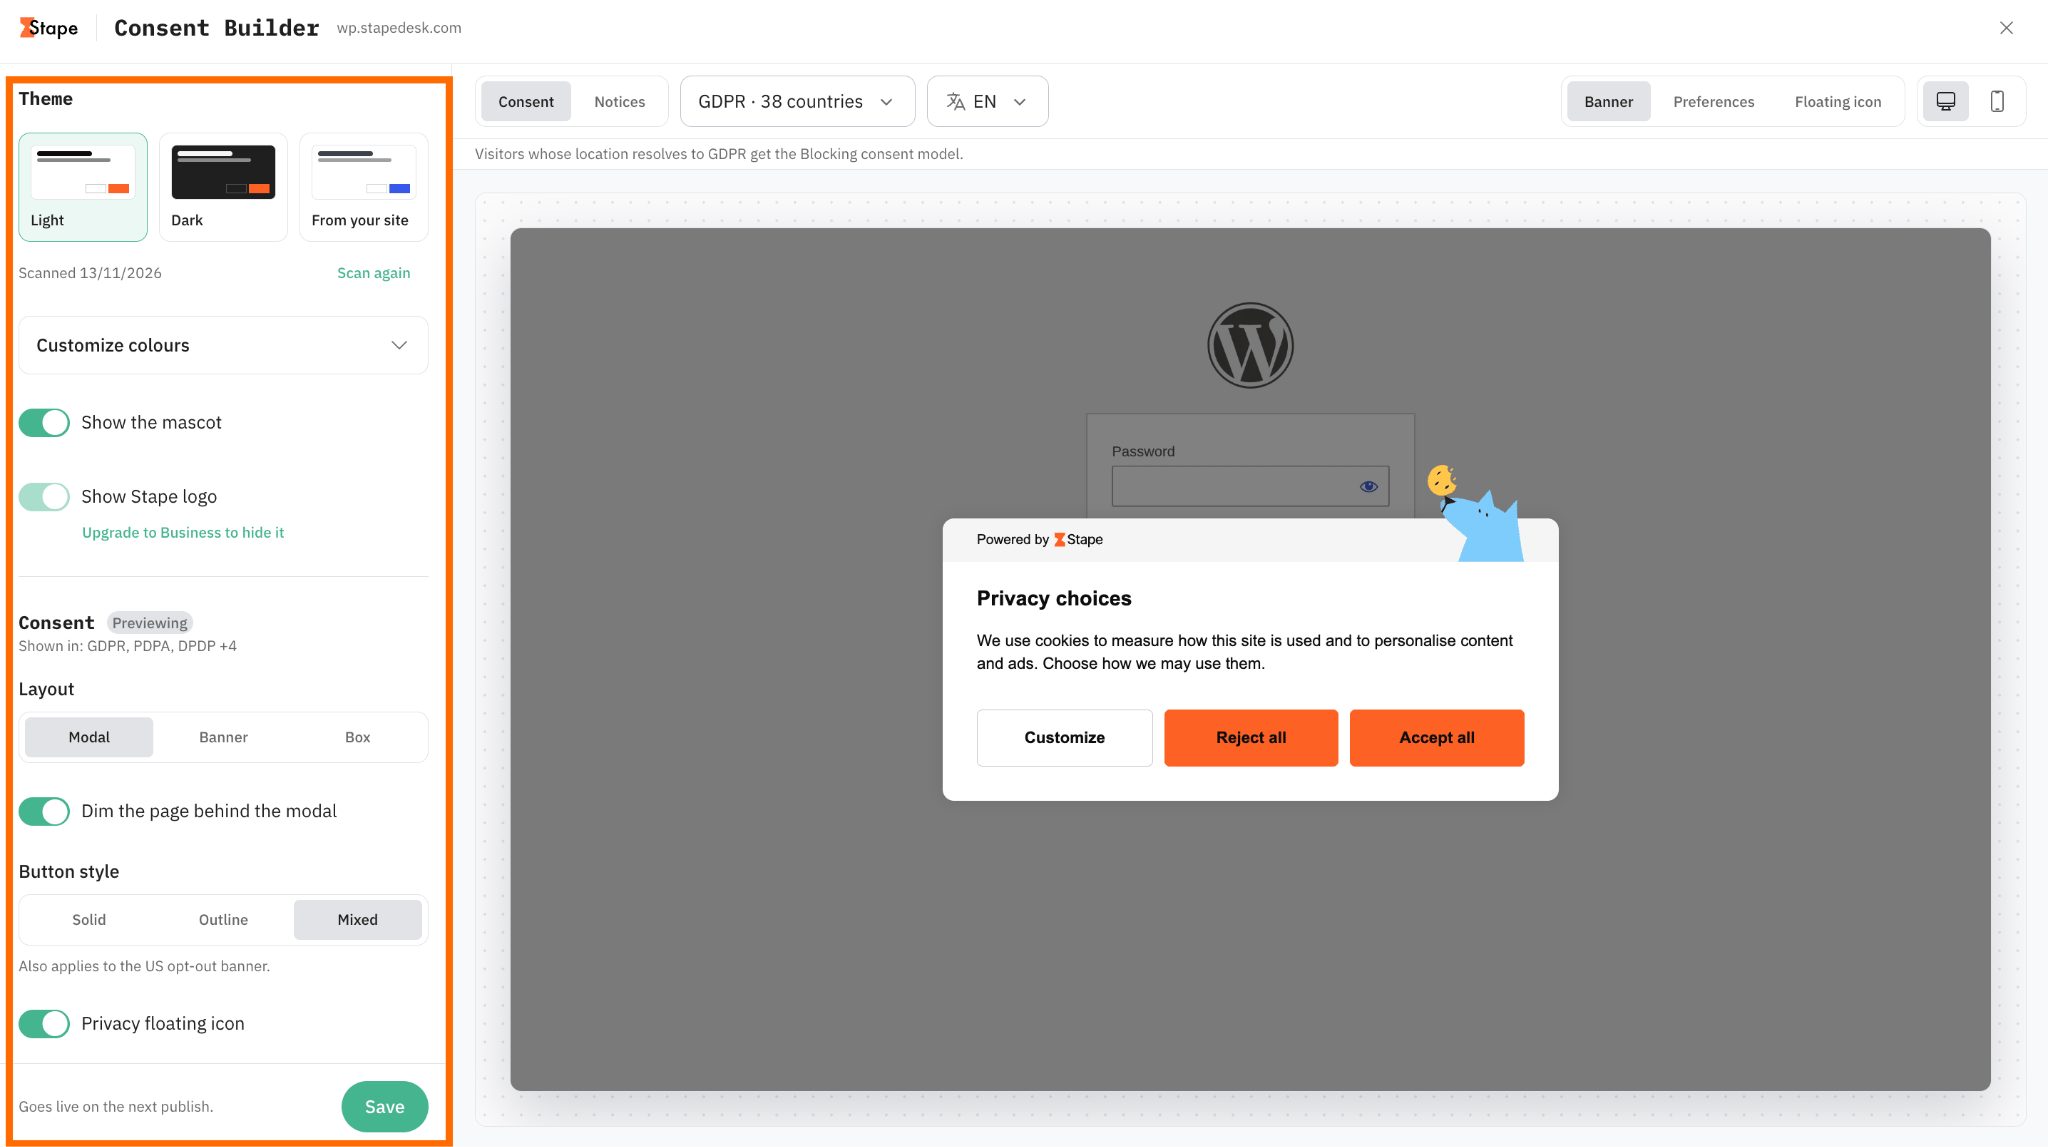
4.1 Select the banner type you need to edit (Consent or Notices).
4.2 If multiple regulations and /or banner languages apply to the website, review and edit them one by one.
4.3 Use the available tabs to switch between the banner, preferences window, floating icon, and Global Privacy Control (GPC) interface.
Also, preview how the consent interface looks on different devices using the preview controls.
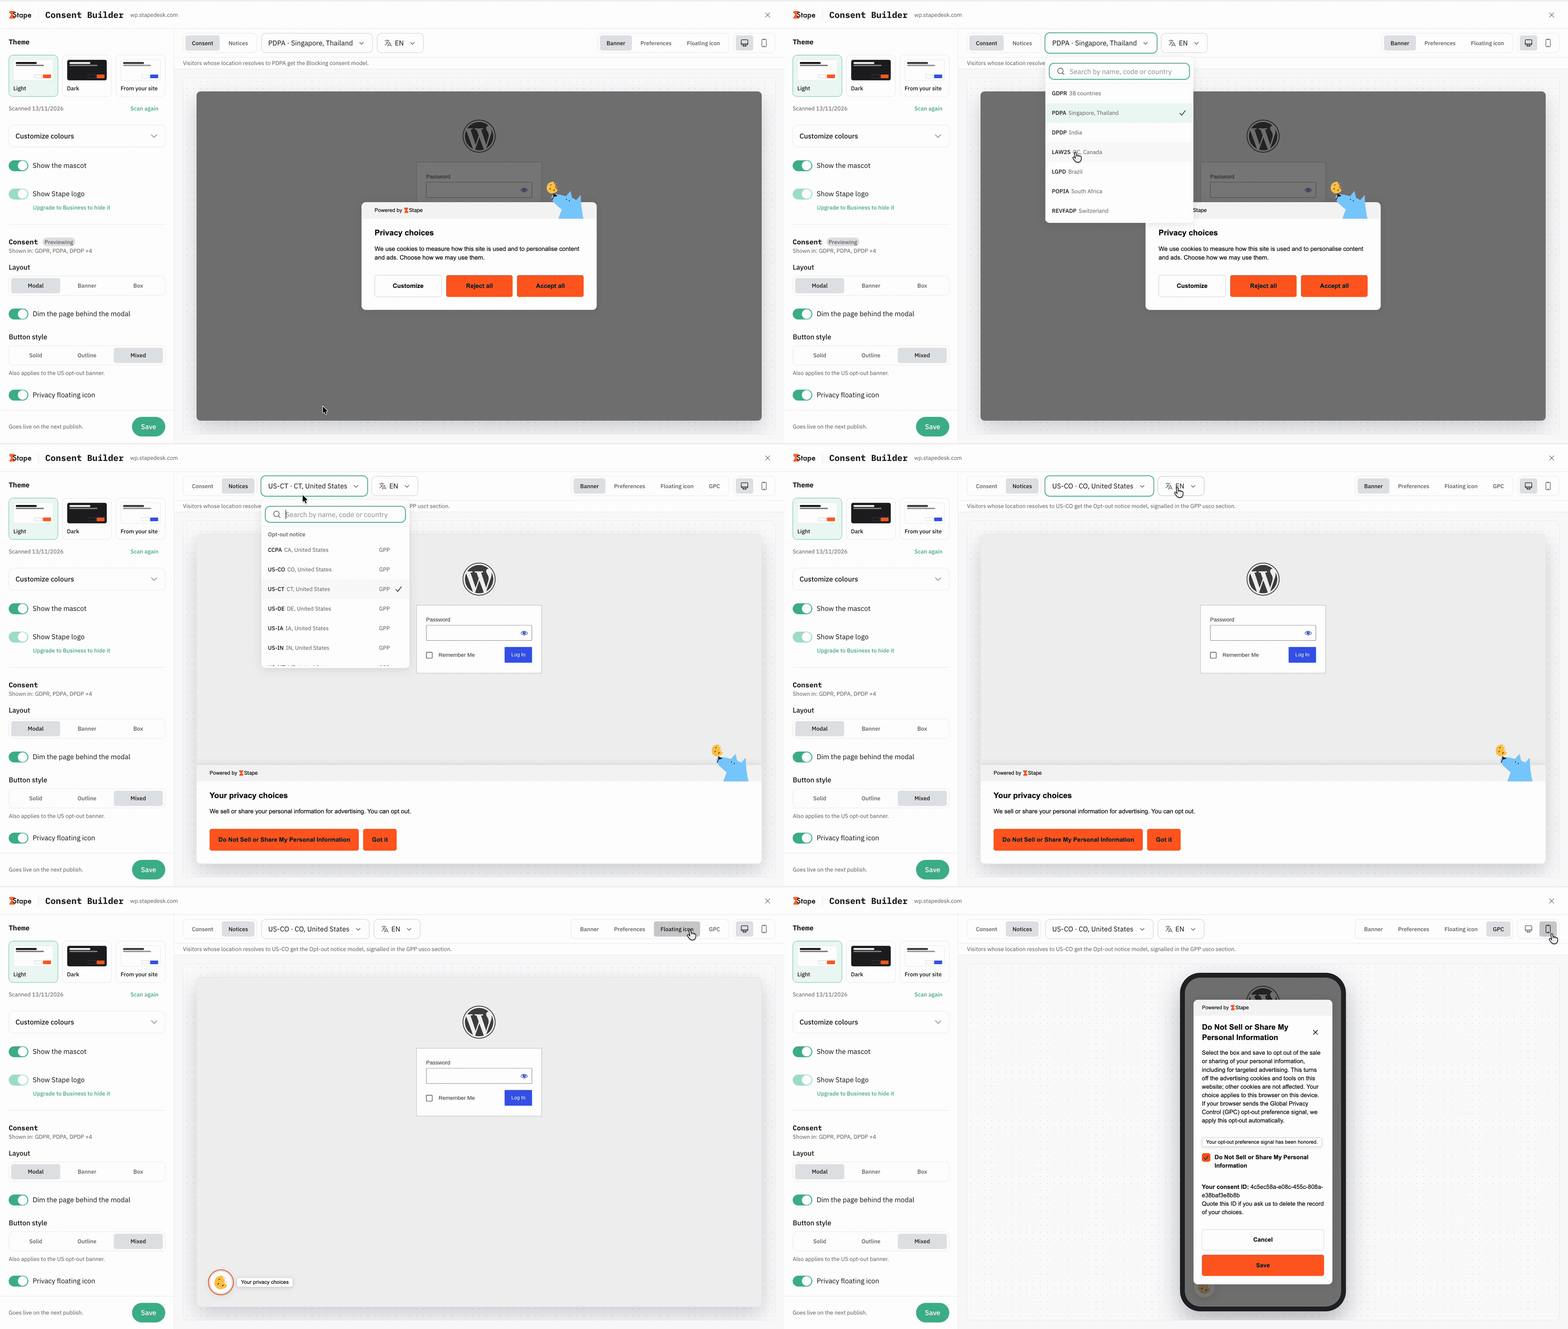
4.4 For each regulation and/or language, there are available customization options on the Consent Builder’s left side:
- Select the theme and customize the banner colors to align with the website interface.
- Manage the mascot and Stape logo (available from the Business plan).
- Adjust the layout, position, and style of the consent and/or notices banner.
Once done, click “Save” and close the “Consent Builder”.
These are the basic settings; if you don’t need to display the banner in other languages, manually add cookies or change existing settings, click “Publish”.
After publishing, adjust web GTM settings (Step 6 of this guide).
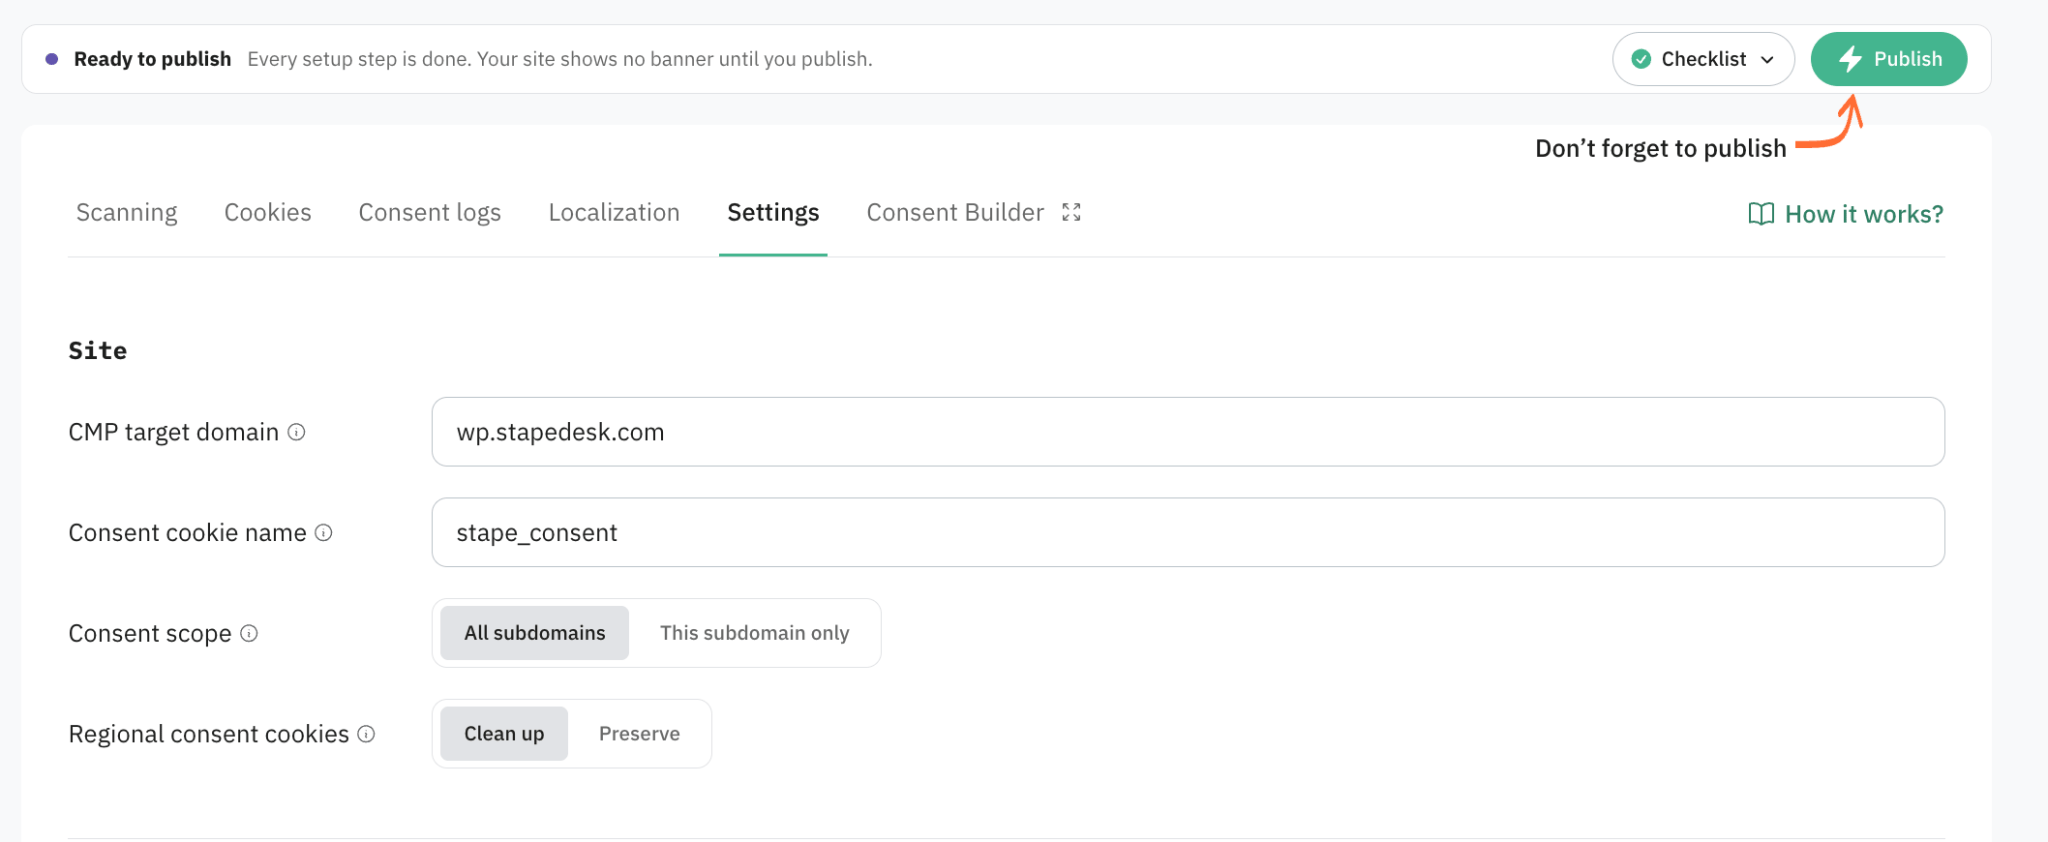
Step 5. Update settings and localize the banner (optional)
Settings tab
Site
In this section, you can specify the website where the CMP will be displayed and how visitors' consent preferences are stored.
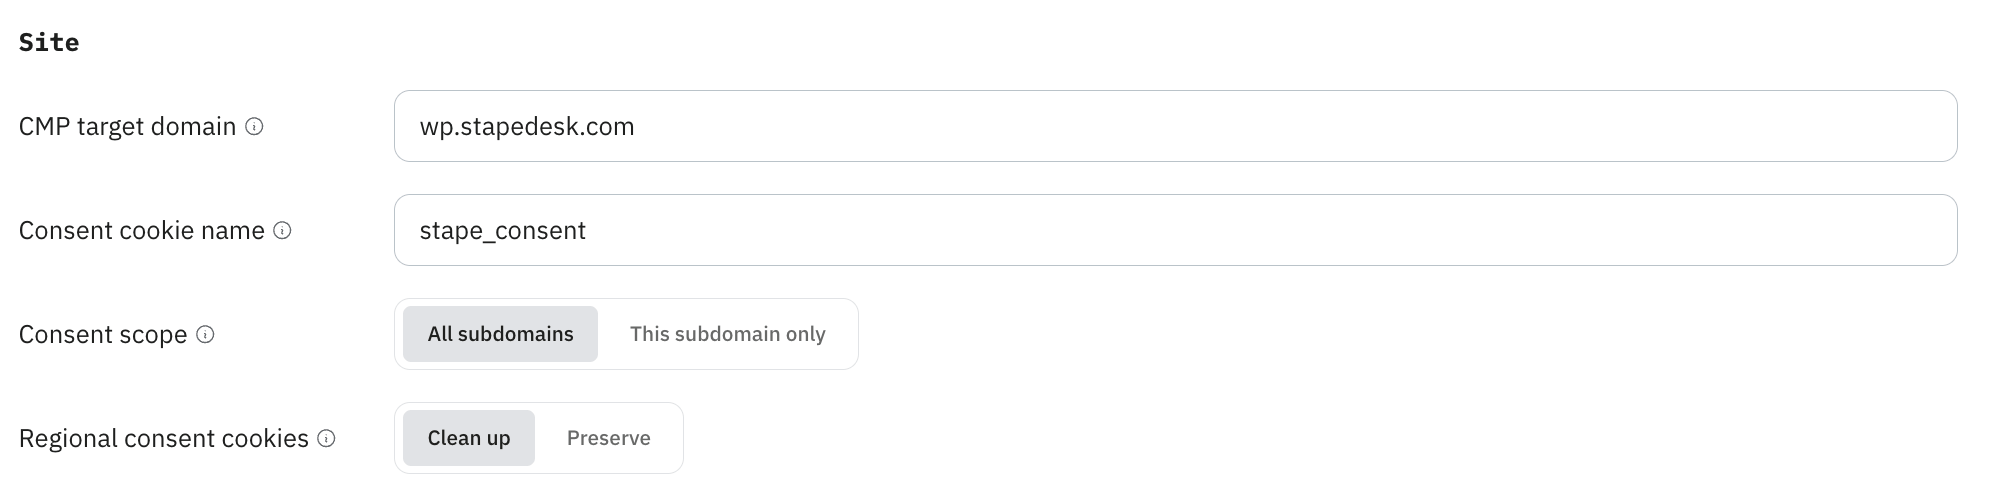
5.1 CMP target domain – by default, here’s the domain that was provided before clicking "Create CMP". If needed, specify a new website domain where the consent banner will appear.
5.2 Consent cookie name – specify the name of the cookie used to store visitors' consent preferences. By default, a cookie named stape_consent will be set.
Stape’s CMP also sets stape_cmp_audit_pending. It’s a temporary buffer cookie used to store consent log records until they are successfully sent to Stape. If a record cannot be delivered immediately, it remains stored in this cookie and is retried later. The cookie is deleted once the record has been successfully delivered.
5.3 Consent scope – choose whether visitors' consent preferences should apply across all subdomains or only the current subdomain.
- All subdomains – visitors make a consent choice once, and their preferences apply across the configured domain and its subdomains.
- This subdomain only – visitors make a separate consent choice on each subdomain, and preferences are stored independently.
5.4 Regional consent cookies – choose what happens to consent cookies created by a banner for another region when a visitor enters the current region.
- Clean up – consent cookies created by a banner for another region are removed when a visitor first switches to a different region.
Clean up option is recommended if you want visitors to make a fresh consent decision when they enter a region with different consent rules. For example, a visitor first visits your website from the US and later visits it from the EU. The CMP removes consent cookies created for the previous region, so the visitor can see the EU consent banner and make a new choice.
- Preserve – keep these cookies on the visitor's device, but don't treat them as trusted consent records or display them to the visitor.
Preserve option can be useful if you want to retain the existing cookies without letting them determine the visitor's consent in the new region.
Visitors
Configure how the CMP handles visitors based on their geographic location and the privacy regulations that apply to them.
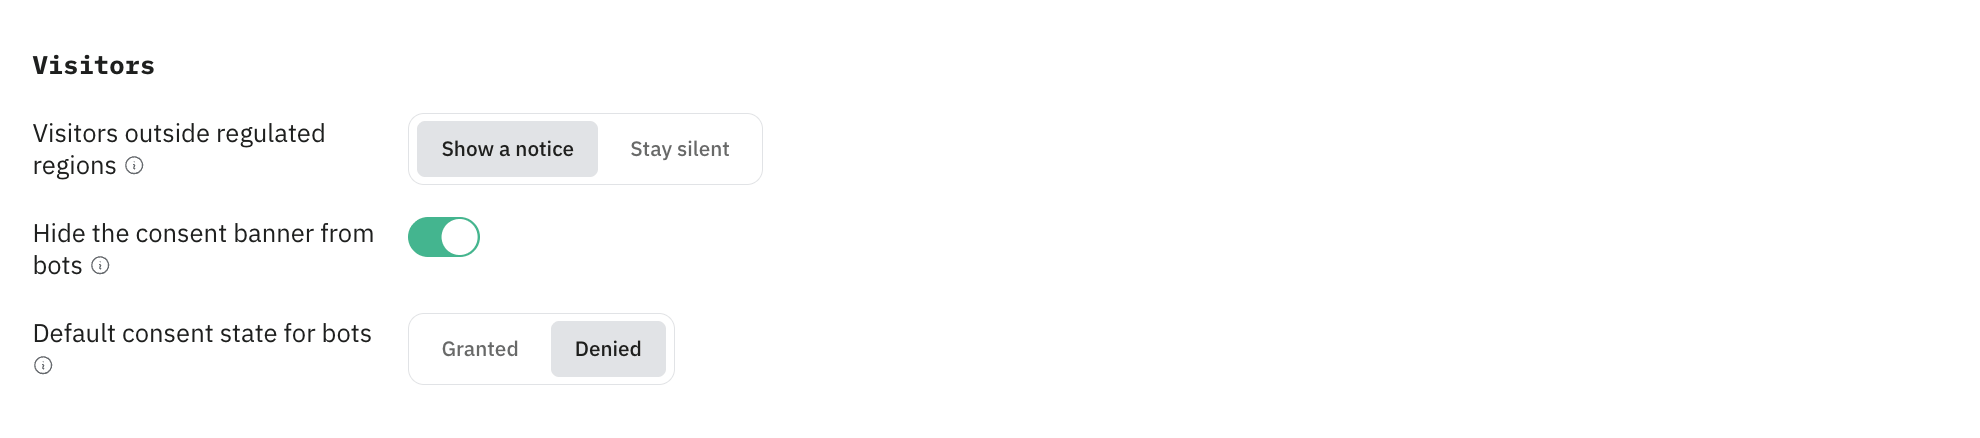
5.5 Visitors outside regulated regions – choose how the CMP handles visitors who aren’t covered by any of the regulatory regions configured in the settings. For these visitors, consent is initially treated as granted, and tags can run regardless of whether the visitor makes a choice.
- Show a notice – display a short, dismissible notice without blocking tags. When the visitor dismisses the notice, the CMP records an implied decision and doesn’t display the notice again.
- Stay silent – don’t display a banner on the visitor’s first visit. No consent decision is recorded until the visitor opens their consent preferences and makes a choice.
5.6 Hide the consent banner from bots – if enabled, the consent banner won’t be displayed to bots and crawlers. Enable this option if your website receives regular traffic from search engine crawlers, monitoring tools, or other automated services, and you don’t need these visits to generate consent records.
This setting applies to traffic identified as bots. If a real visitor is incorrectly identified as a bot, they may not see the consent banner.
5.7 Default consent state for bots – choose the consent state that tags receive when a bot or crawler visits your website.
- Granted – allow tags to run for detected bots. Choose Granted if search engine crawlers or other automated tools need tags to run to render pages, generate previews, or perform automated checks.
- Denied – prevent tags from running for detected bots, reduce unnecessary requests, and avoid collecting analytics or advertising data from automated traffic.
Disclosures
Here, you can update the privacy details. The section displays the same fields as explained in Step 2 of this guide.
Consent categories
Use "Consent categories" to organize cookies and tracking technologies into categories based on their purpose and manage how visitors can consent to them.
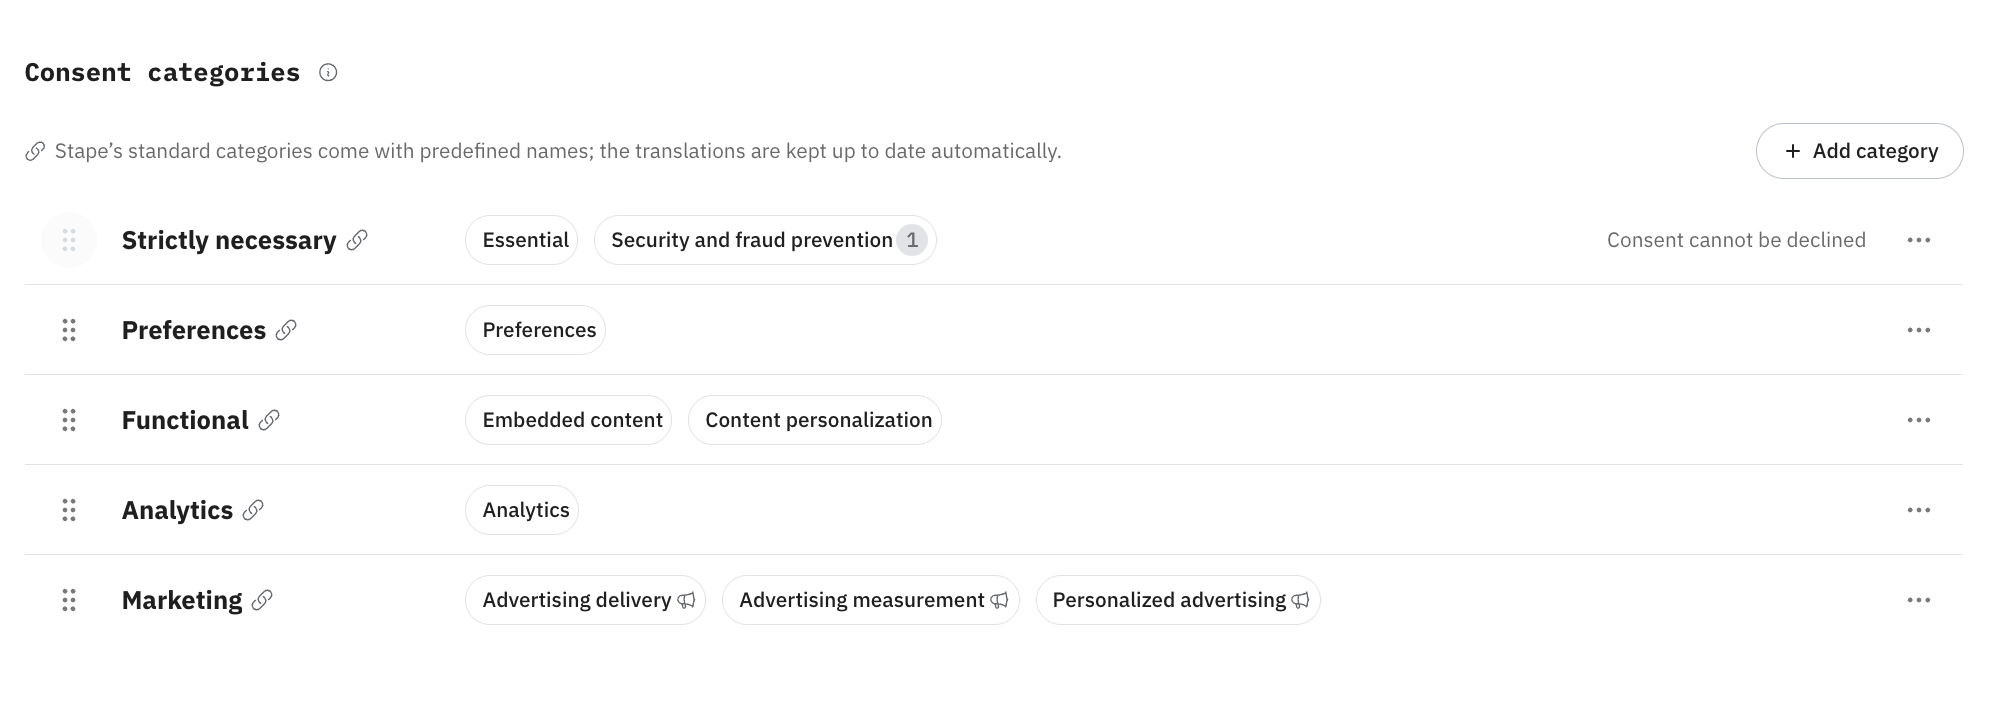
5.8 Configure the consent categories visitors can accept or reject in the banner and preferences window. Each category groups related purposes and tracking technologies. Visitors can grant or reject consent for a category using the corresponding toggle.
Stape provides default categories with settings:
- Strictly necessary – covers cookies and other storage that are essential for your website to function or provide a service requested by the visitor. These technologies are typically required for core features such as security, session management, and network communication. Website visitors can’t decline this consent category by default.
- Preferences – cookies that remember visitors’ choices and settings, such as language, region, or display preferences, to provide a more personalized experience.
- Functional – covers technologies that enable additional website features and services, such as embedded content, interactive features, or third-party tools. These may improve the visitor experience but aren’t essential for the website’s basic operation.
- Analytics – technologies (such as cookies) used to collect information about how visitors use the website; for example, pages viewed, traffic sources, and interactions. This data helps understand website performance and improve the user experience.
- Marketing – covers technologies used for advertising, ad personalization, retargeting, and measuring advertising performance. These technologies may track visitors across websites or services to build advertising profiles.
These categories’ wording and translations are maintained by Stape and updated automatically. To customize a category, click the three dots next to the category → select “Edit” → click “Unlink” below the category name to start editing.
Once unlocked, it becomes a custom category, and its wording and translations are no longer updated automatically by Stape.
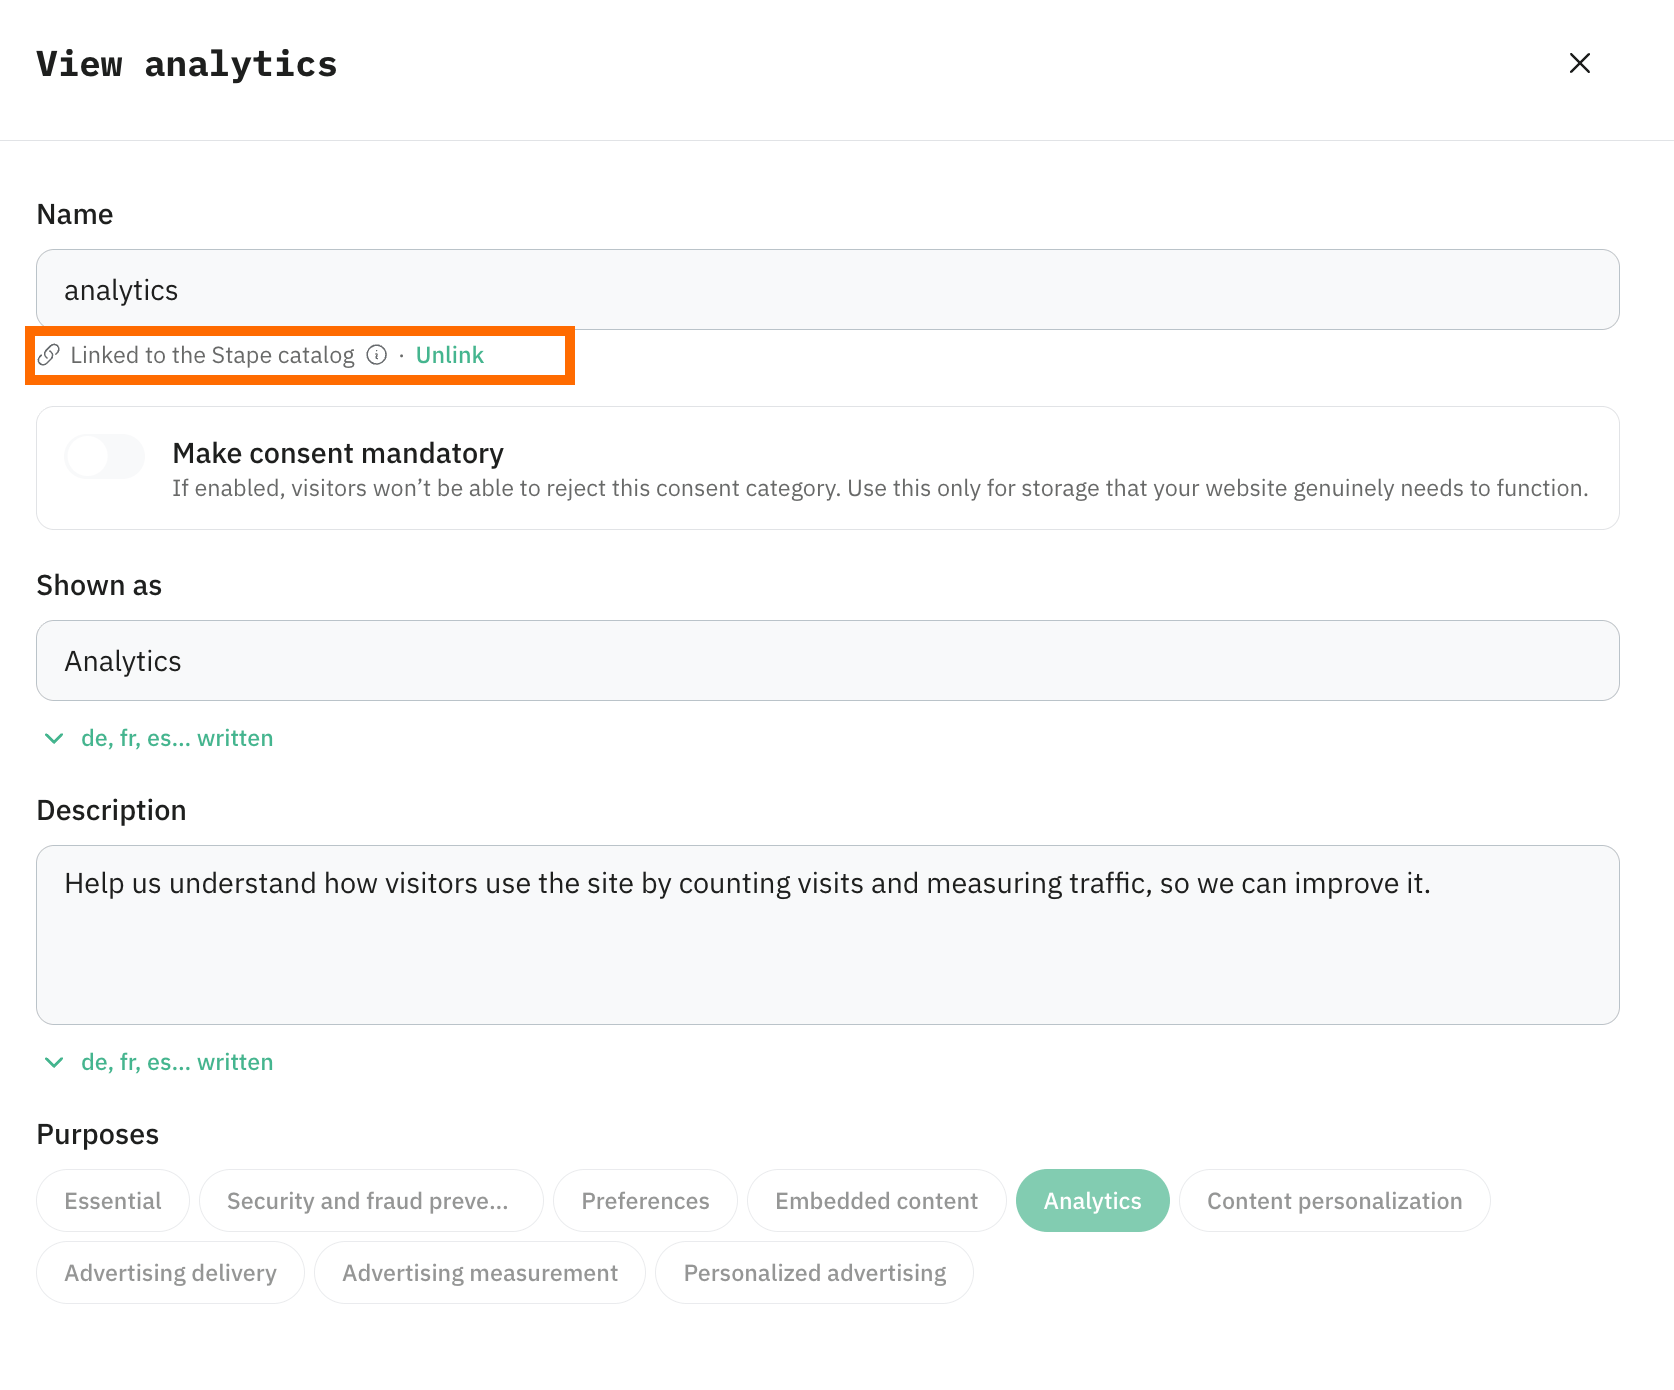
If the standard list of categories doesn’t cover some specific cases, you can add a custom consent category by clicking “Add category.” Click on the collapse element below to see more details on how to create a new category:
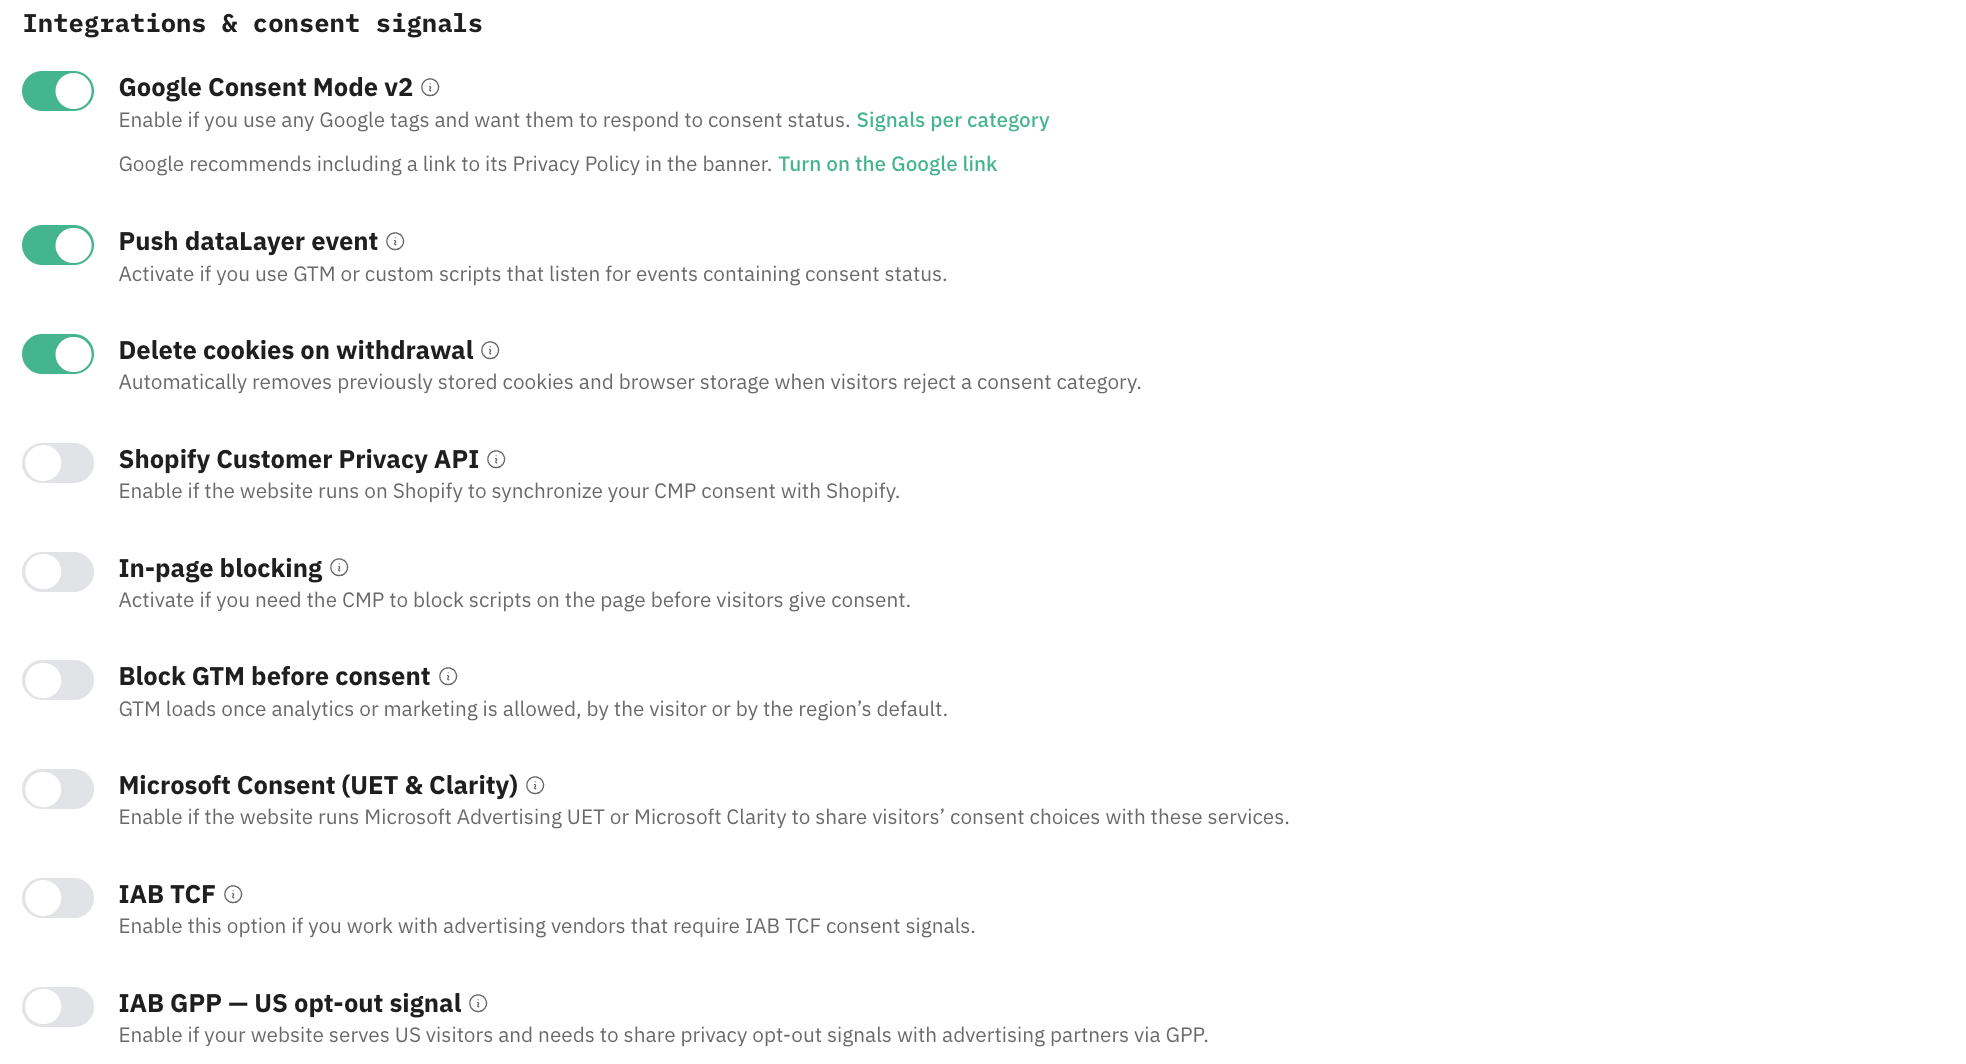
Integrations & consent signals
Here, you can update the integrations and consent signals details. The section displays the same fields as shown in Step 1 of this guide.
Localization tab
If website visitors come from multiple regions, you can configure different consent experiences based on their geographic location in the “Localization” tab.
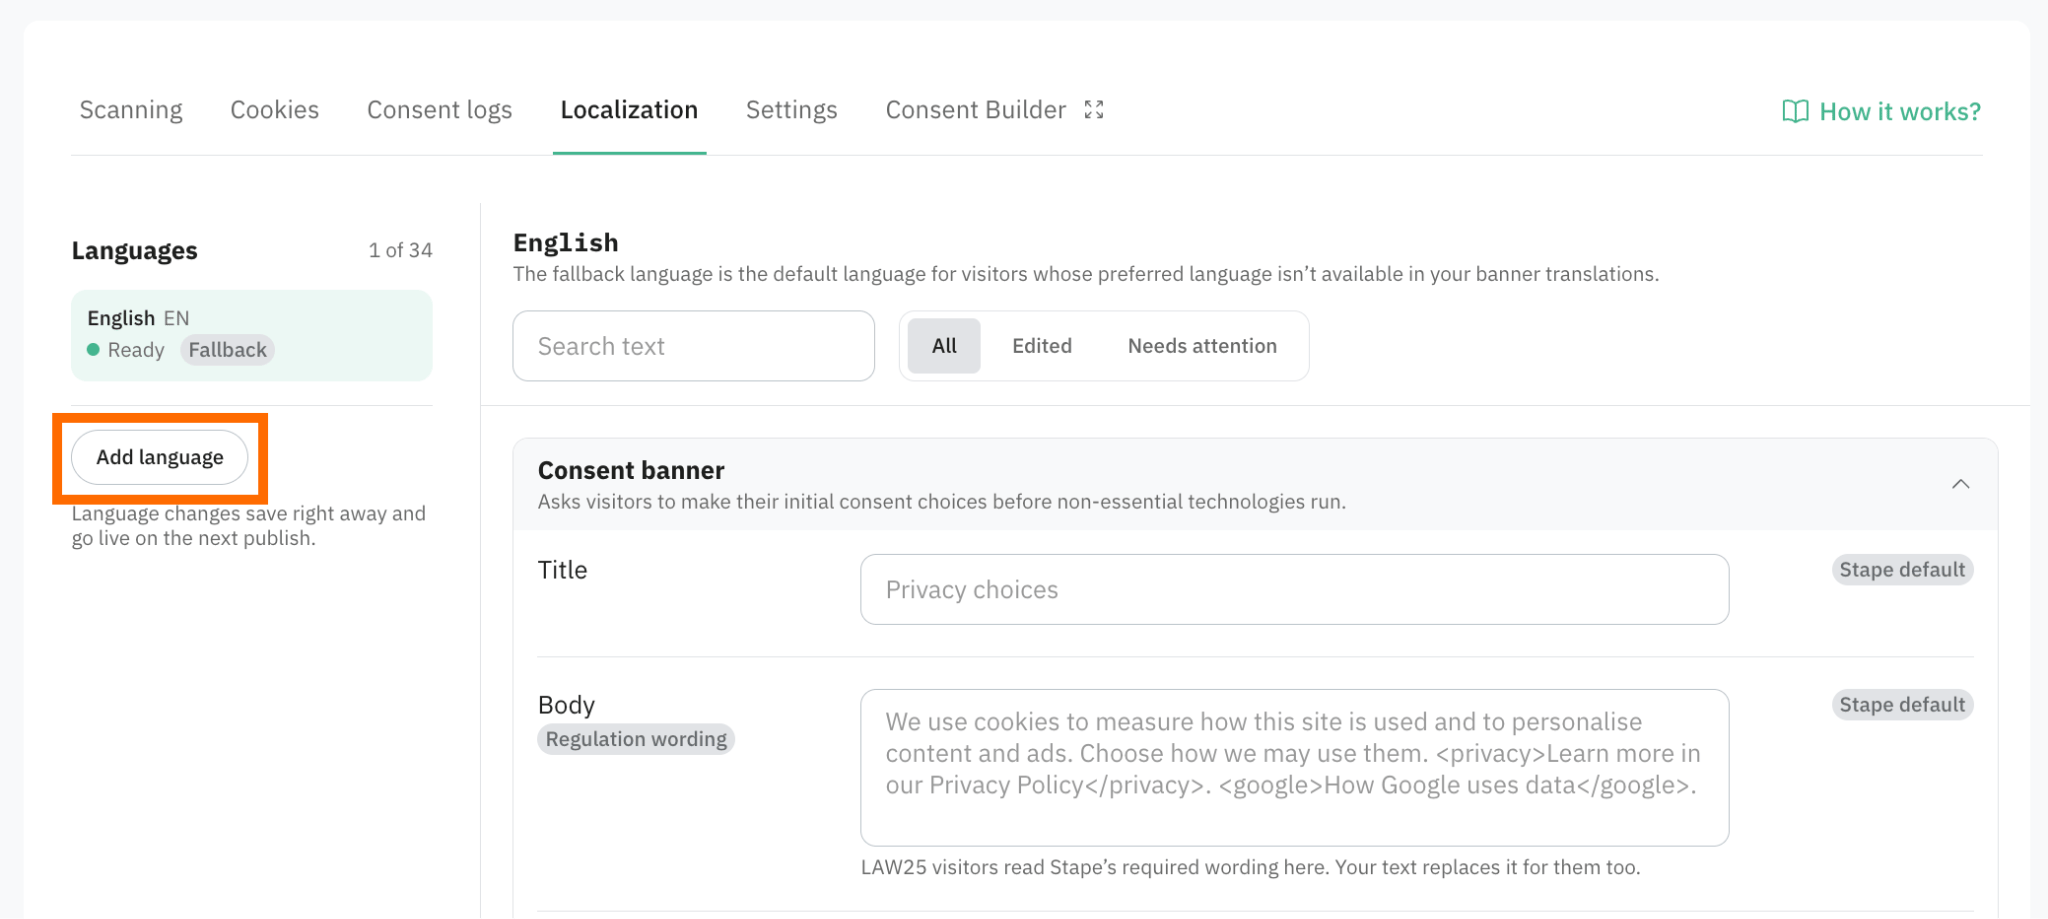
5.9 To configure a consent banner in different languages, click “Add language” and select the needed one from the list.
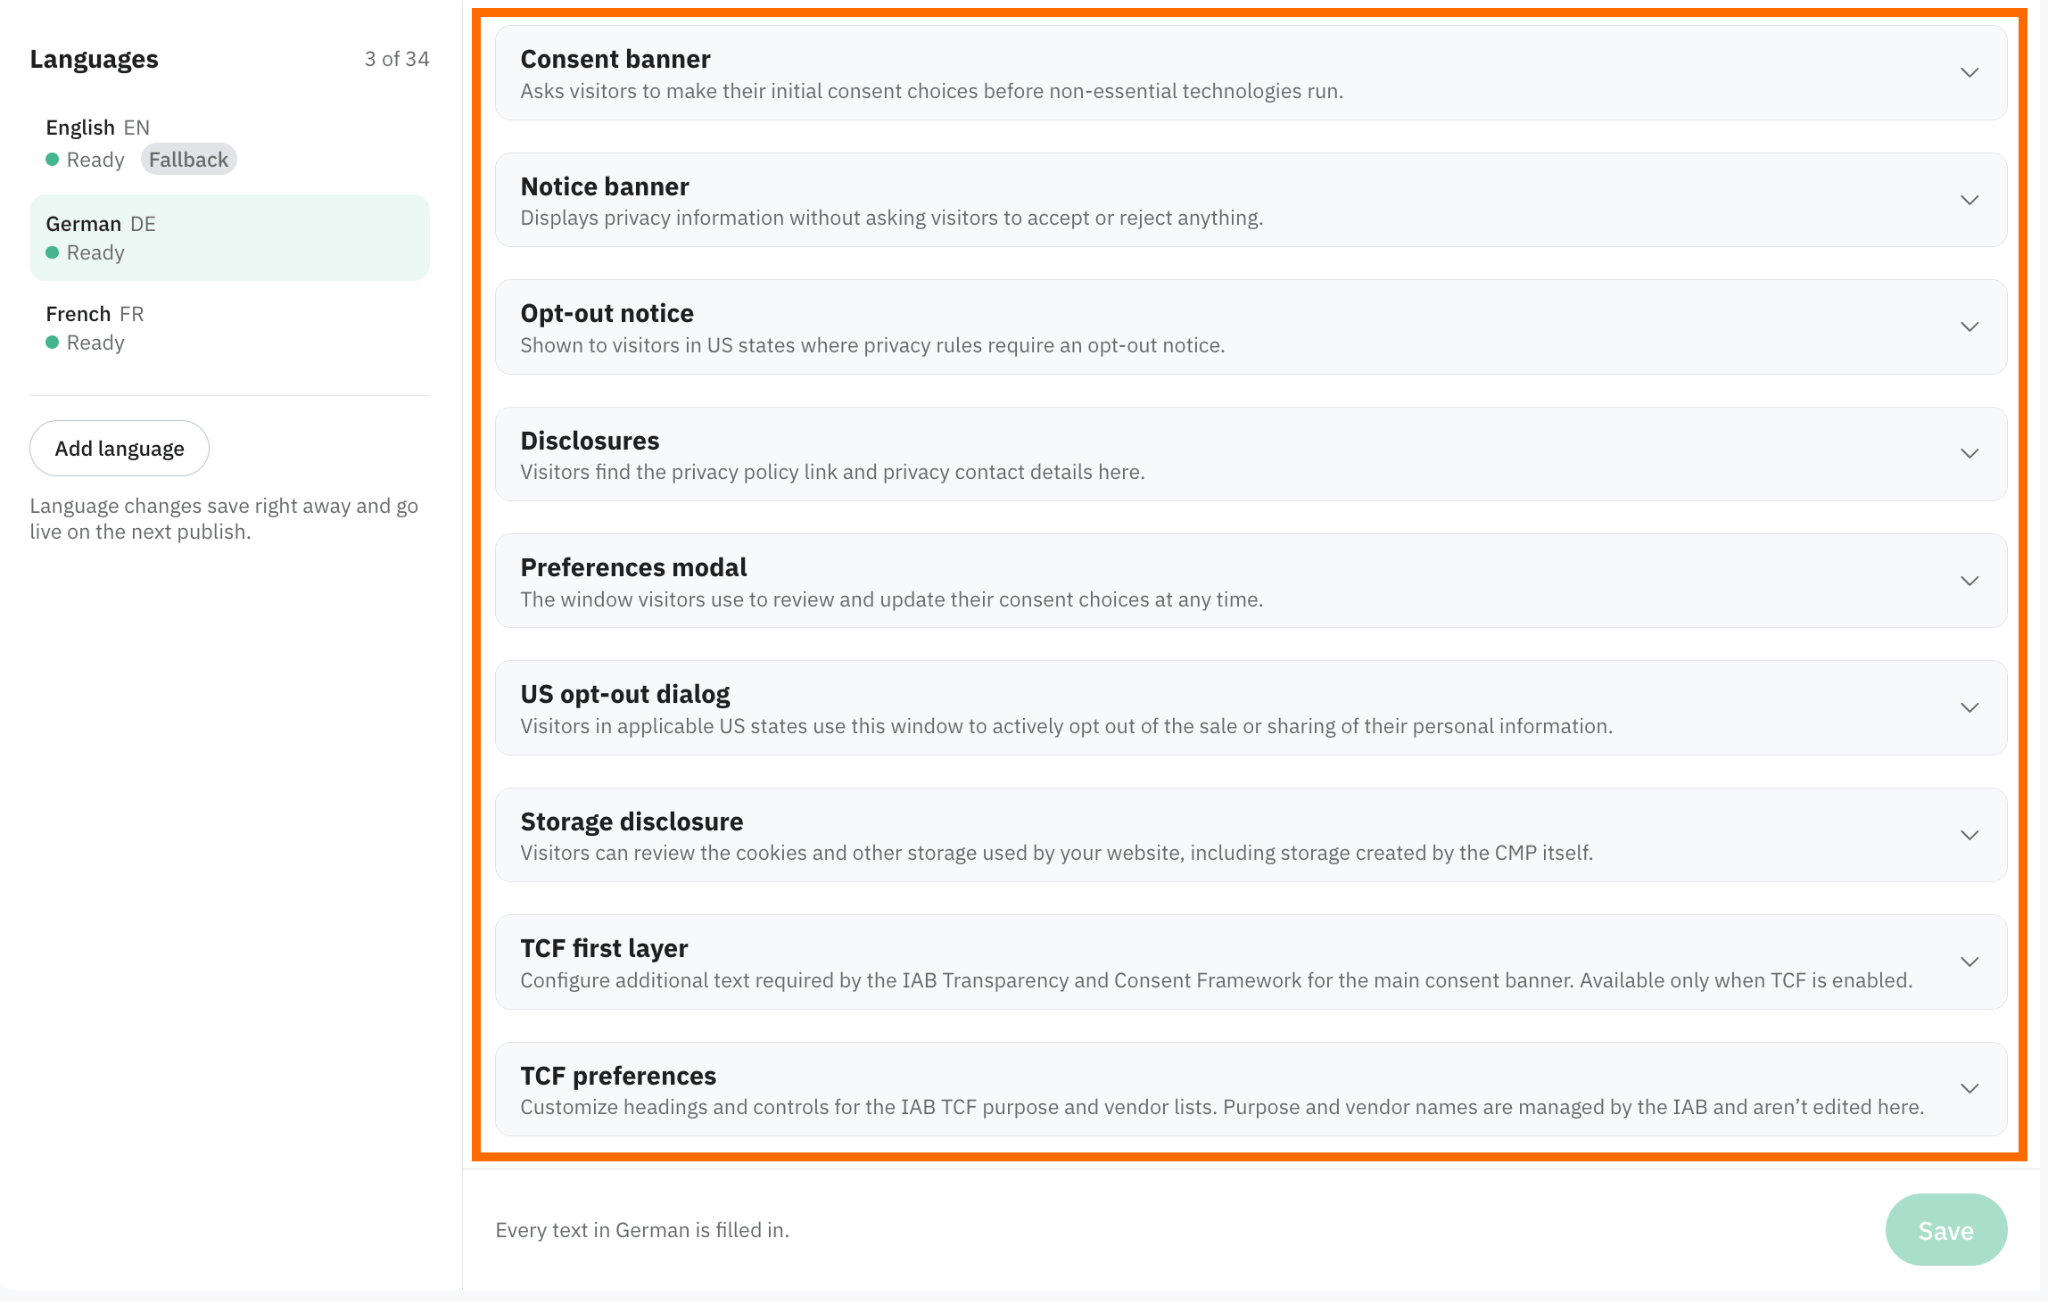
5.10 Open the language settings and select the entity you want to customize.
Expand the needed type of banner (e.g., consent banner, notice banner, opt-out notice, etc.) and fill out the fields.
For example, you can configure a consent banner for visitors covered by GDPR in Germany and an opt-out experience for visitors covered by applicable US state privacy laws.
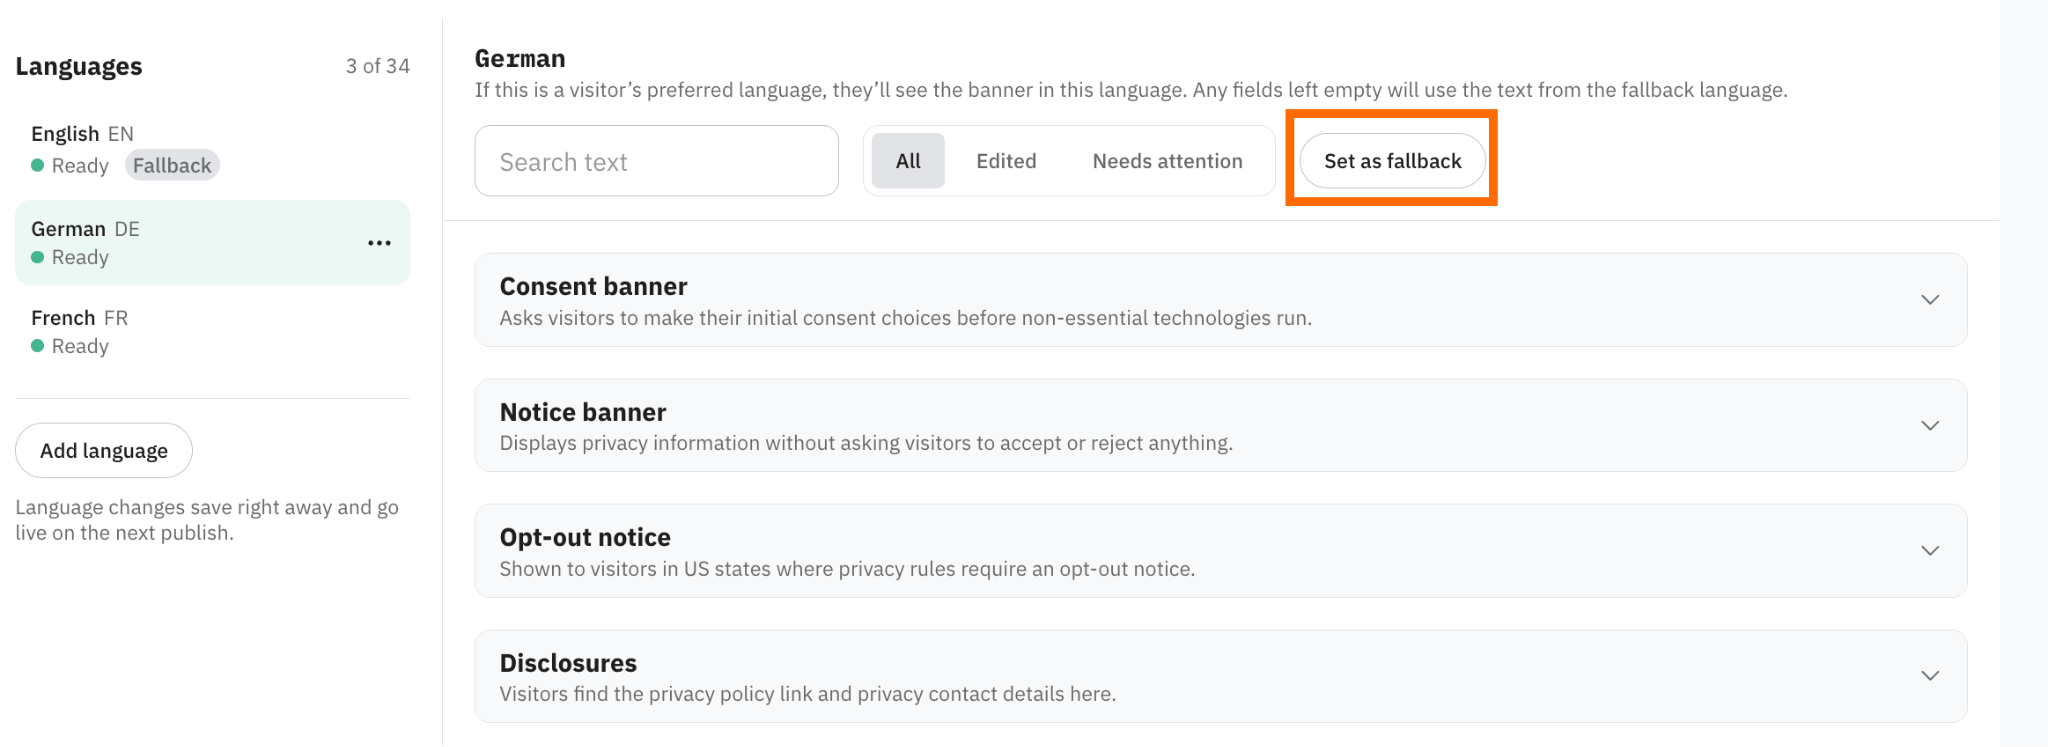
5.11 Set preferred Fallback language – select the default language displayed to visitors when their preferred language is not available among the configured banner translations.
By default, the fallback language is set to English. To change it, open the language you need and click “Set as fallback”.
Cookie tab
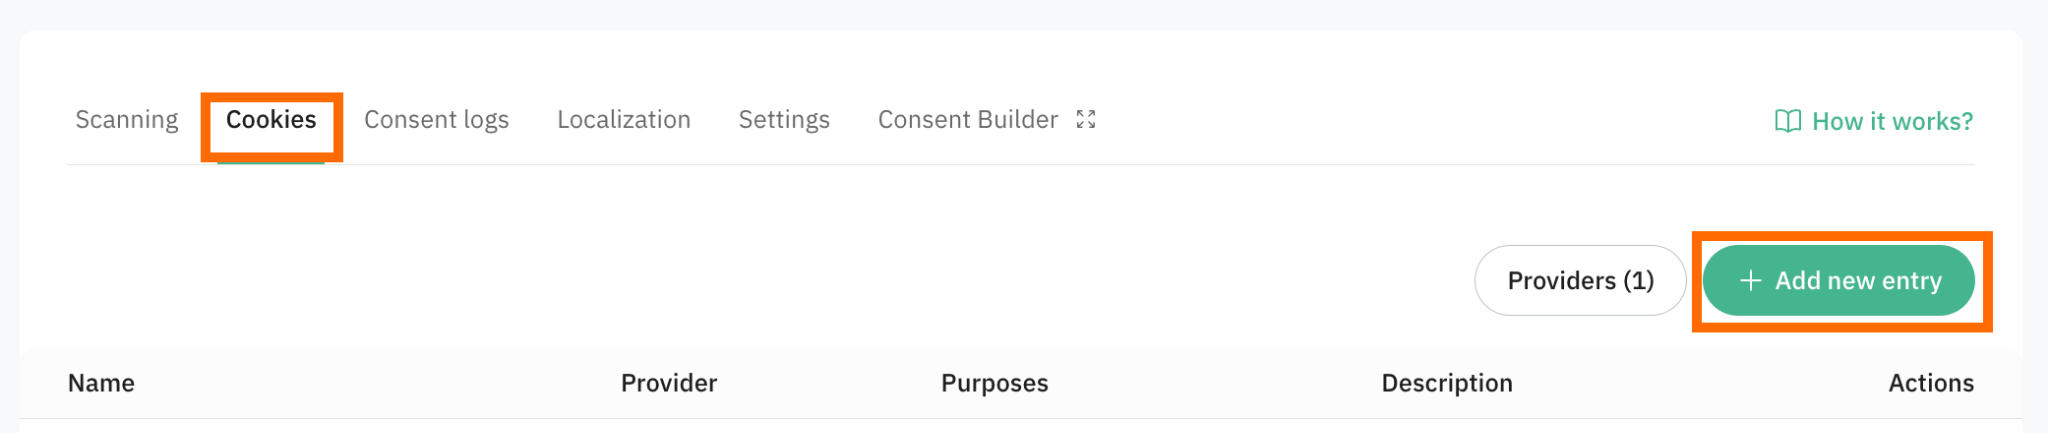
If the scanner didn’t detect some storage/tracking technology or you need to add the cookie manually, navigate to the “Cookies” tab and click “Add new entry”.
Step 6. Adjust web GTM settings
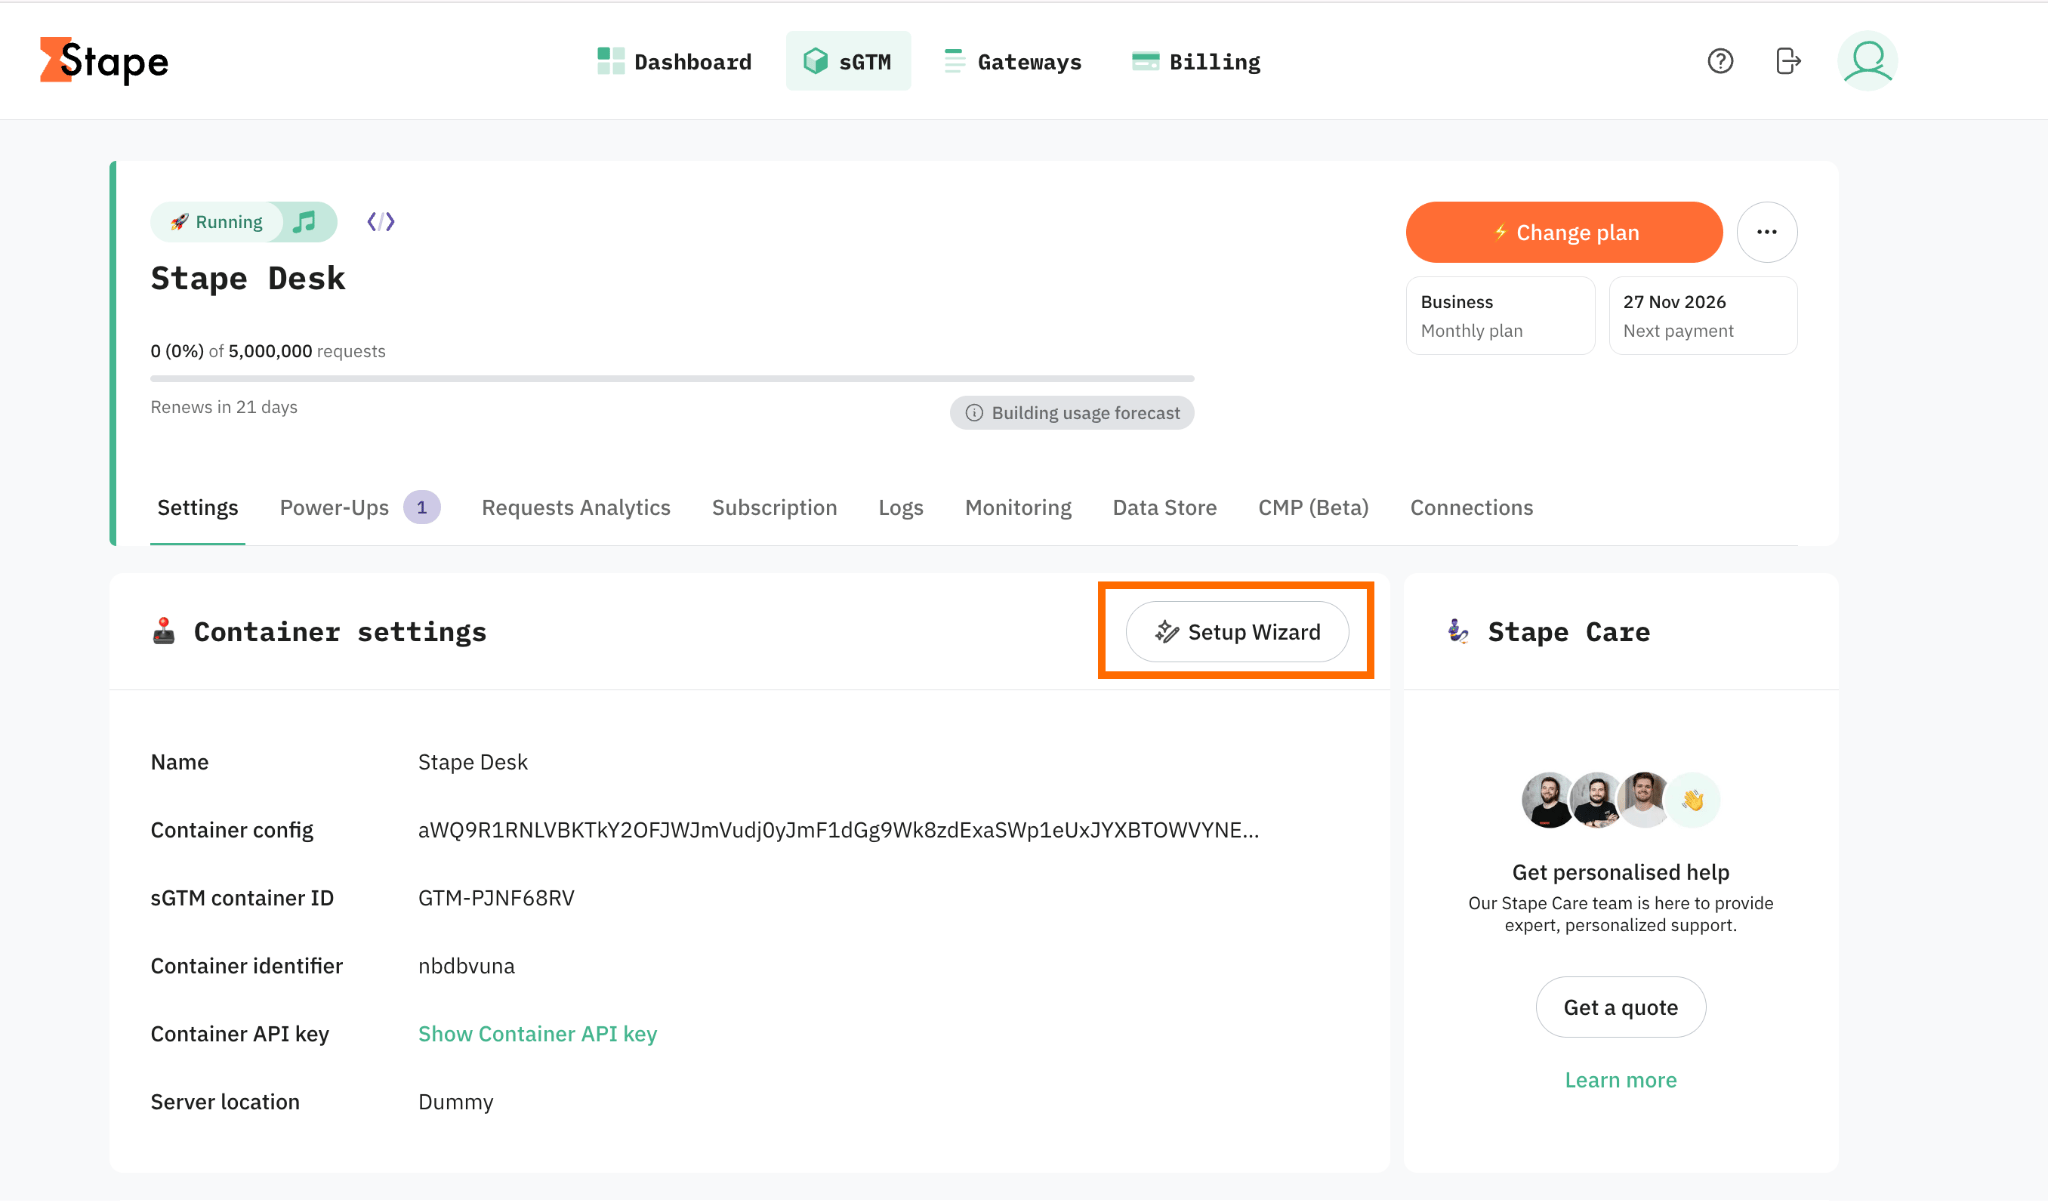
To automatically add necessary configurations in GTM containers, as well as configure tracking for required platforms from scratch, use Stape’s free tool – Setup Wizard.
Enabling Stape’s CMP doesn’t require any tags or platform app configuration. However, to ensure compliant tracking, you need to adjust platform tags in the web GTM container.
The required configuration depends on the integrations you enabled in the “Settings” → “Integrations & consent signals” section in the CMP tab of your Stape account and the tags used on your website.
Click on the relevant collapse elements to configure the web GTM settings:
Test the banner configuration
To simplify the debugging process, it’s recommended to use the Stape GTM Helper Chrome extension.
When debugging consent settings, this extension allows you to view consent statuses in the server GTM container preview, a feature that is not available by default in GTM.
The Stape GTM Helper also provides several other useful debugging features, including an entity filter, request URL formatter, website tracking scanner, and evaluator. For a detailed overview of all available features, refer to our Stape Chrome extension guide.
Follow the steps below to debug your consent banner implementation.
- 1.Enable Preview Mode in both GTM containers
Open Preview Mode in both your web GTM container and server-side GTM container.

2. Verify the default consent in web GTM
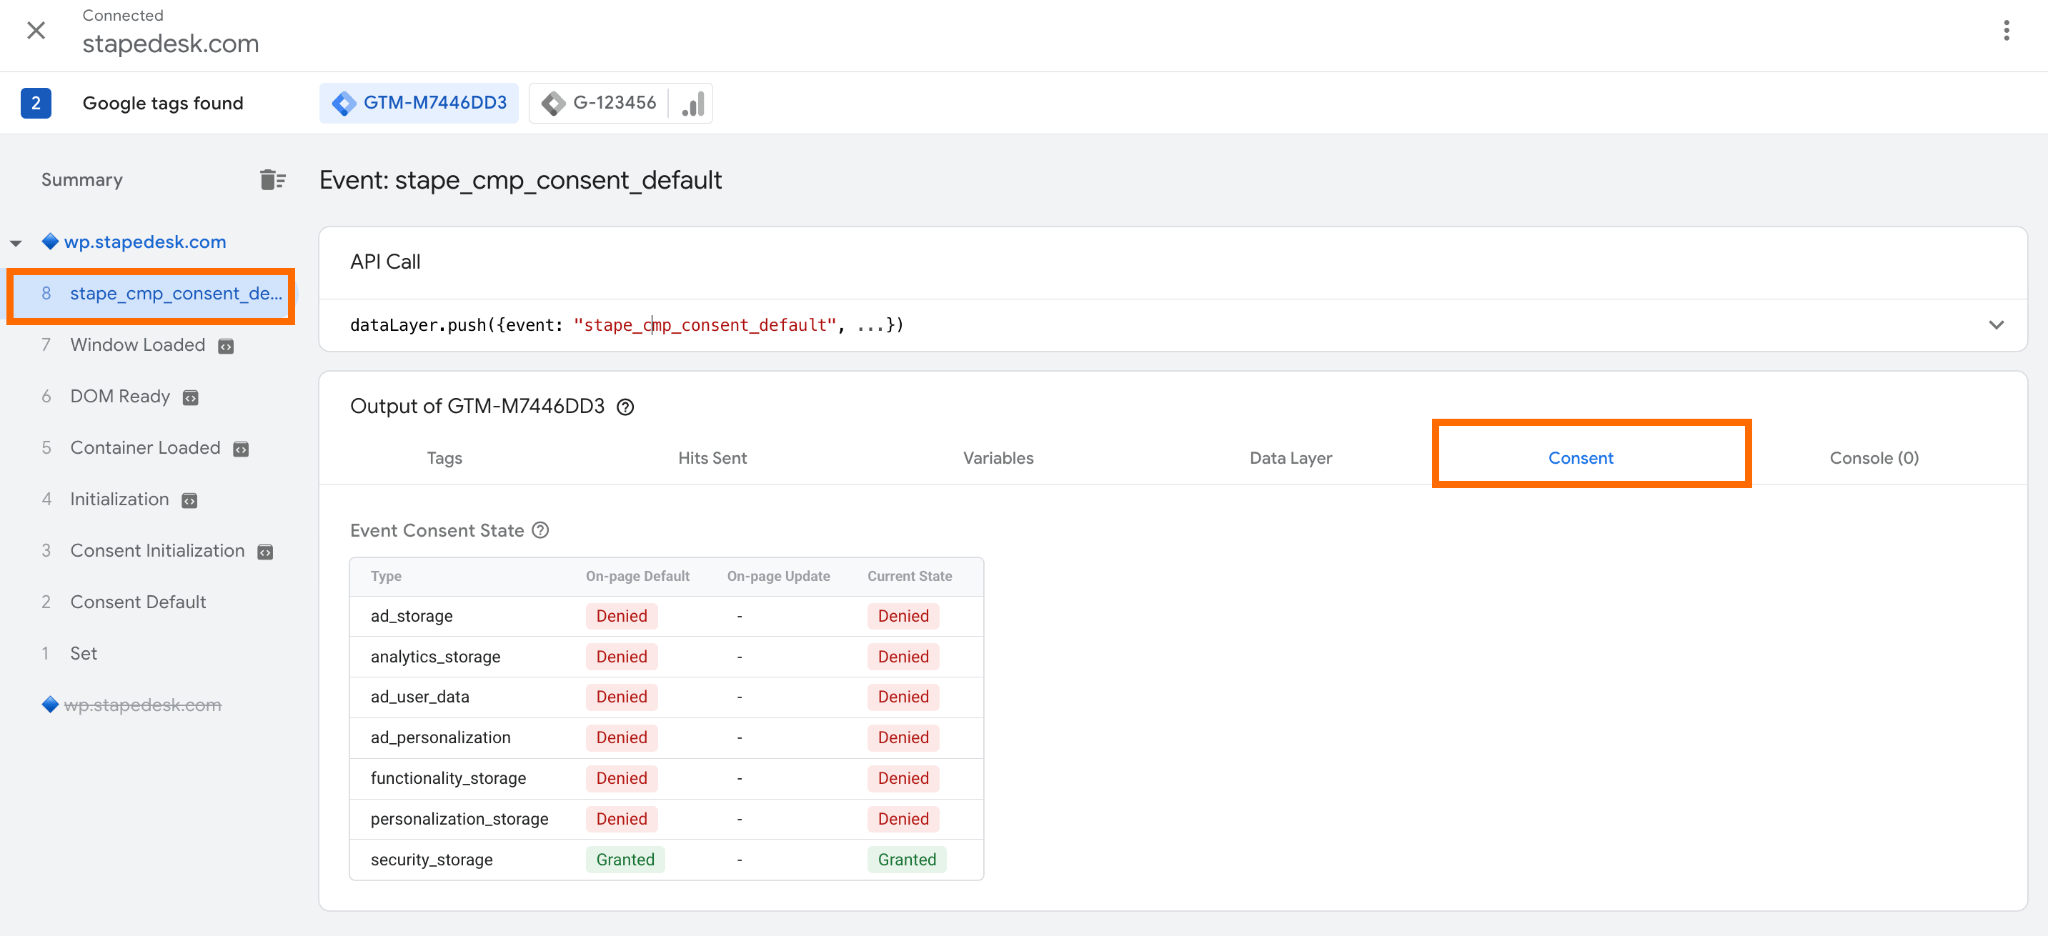
The Consent Default event should appear as one of the first.
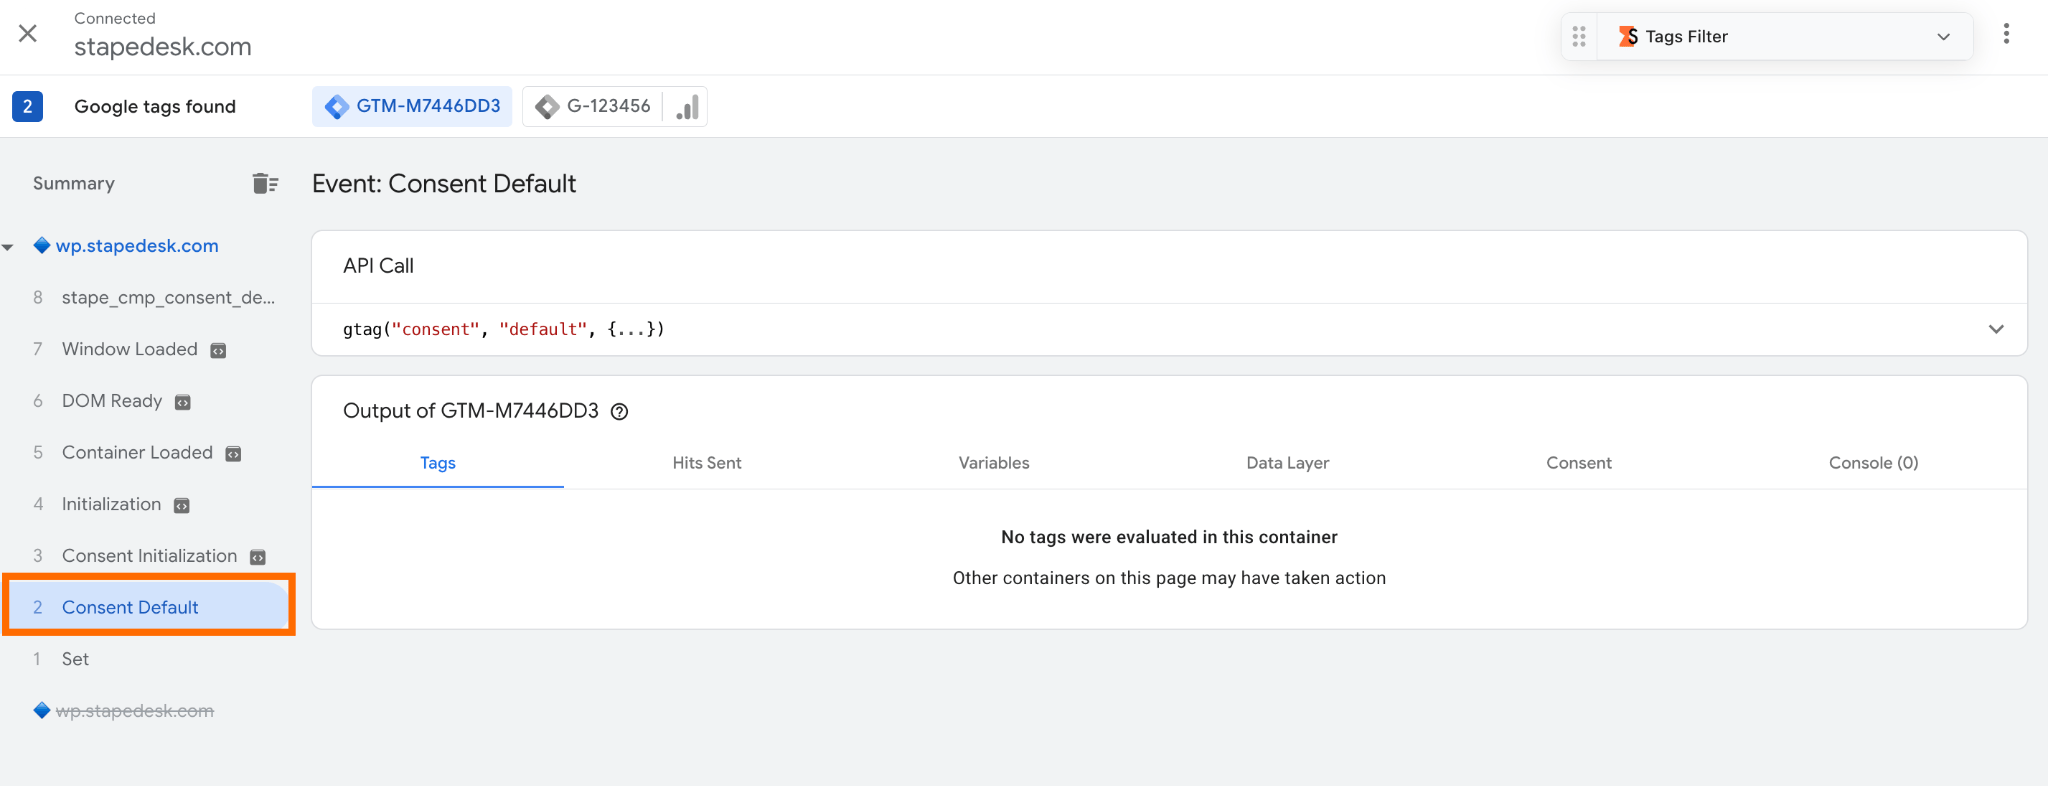
Also, before firing tags, Stape’s CMP event should be pushed – stape_cmp_consent_default. Navigate to the “Consent” tab and ensure that the “On-page Default” settings match the default consent choices configured in your CMP.
3. Interact with the banner
Visit your website and interact with the banner. For example, accept all cookies or reject selected cookie categories.
4. Verify the Stape’s CMP update event and consent statuses
Return to the Preview window of the web GTM container.
If you enabled the “Push dataLayer event” option in CMP configuration, you should also see the stape_cmp_consent_update event appear after the Consent Update event.
Note: If the web configuration was added with the help of the Setup Wizard, the stape_consent_update event will be pushed instead.
Open the stape_cmp_consent_update event and navigate to the Consent tab.
Verify the following:
- Default Statuses (first column). All consent types should be set according to the default consent configuration of the CMP.
- On-page Update (second column). Displays the consent changes made by the visitor through the cookie banner.
- Current State (third column). Reflects the visitor's current consent status.
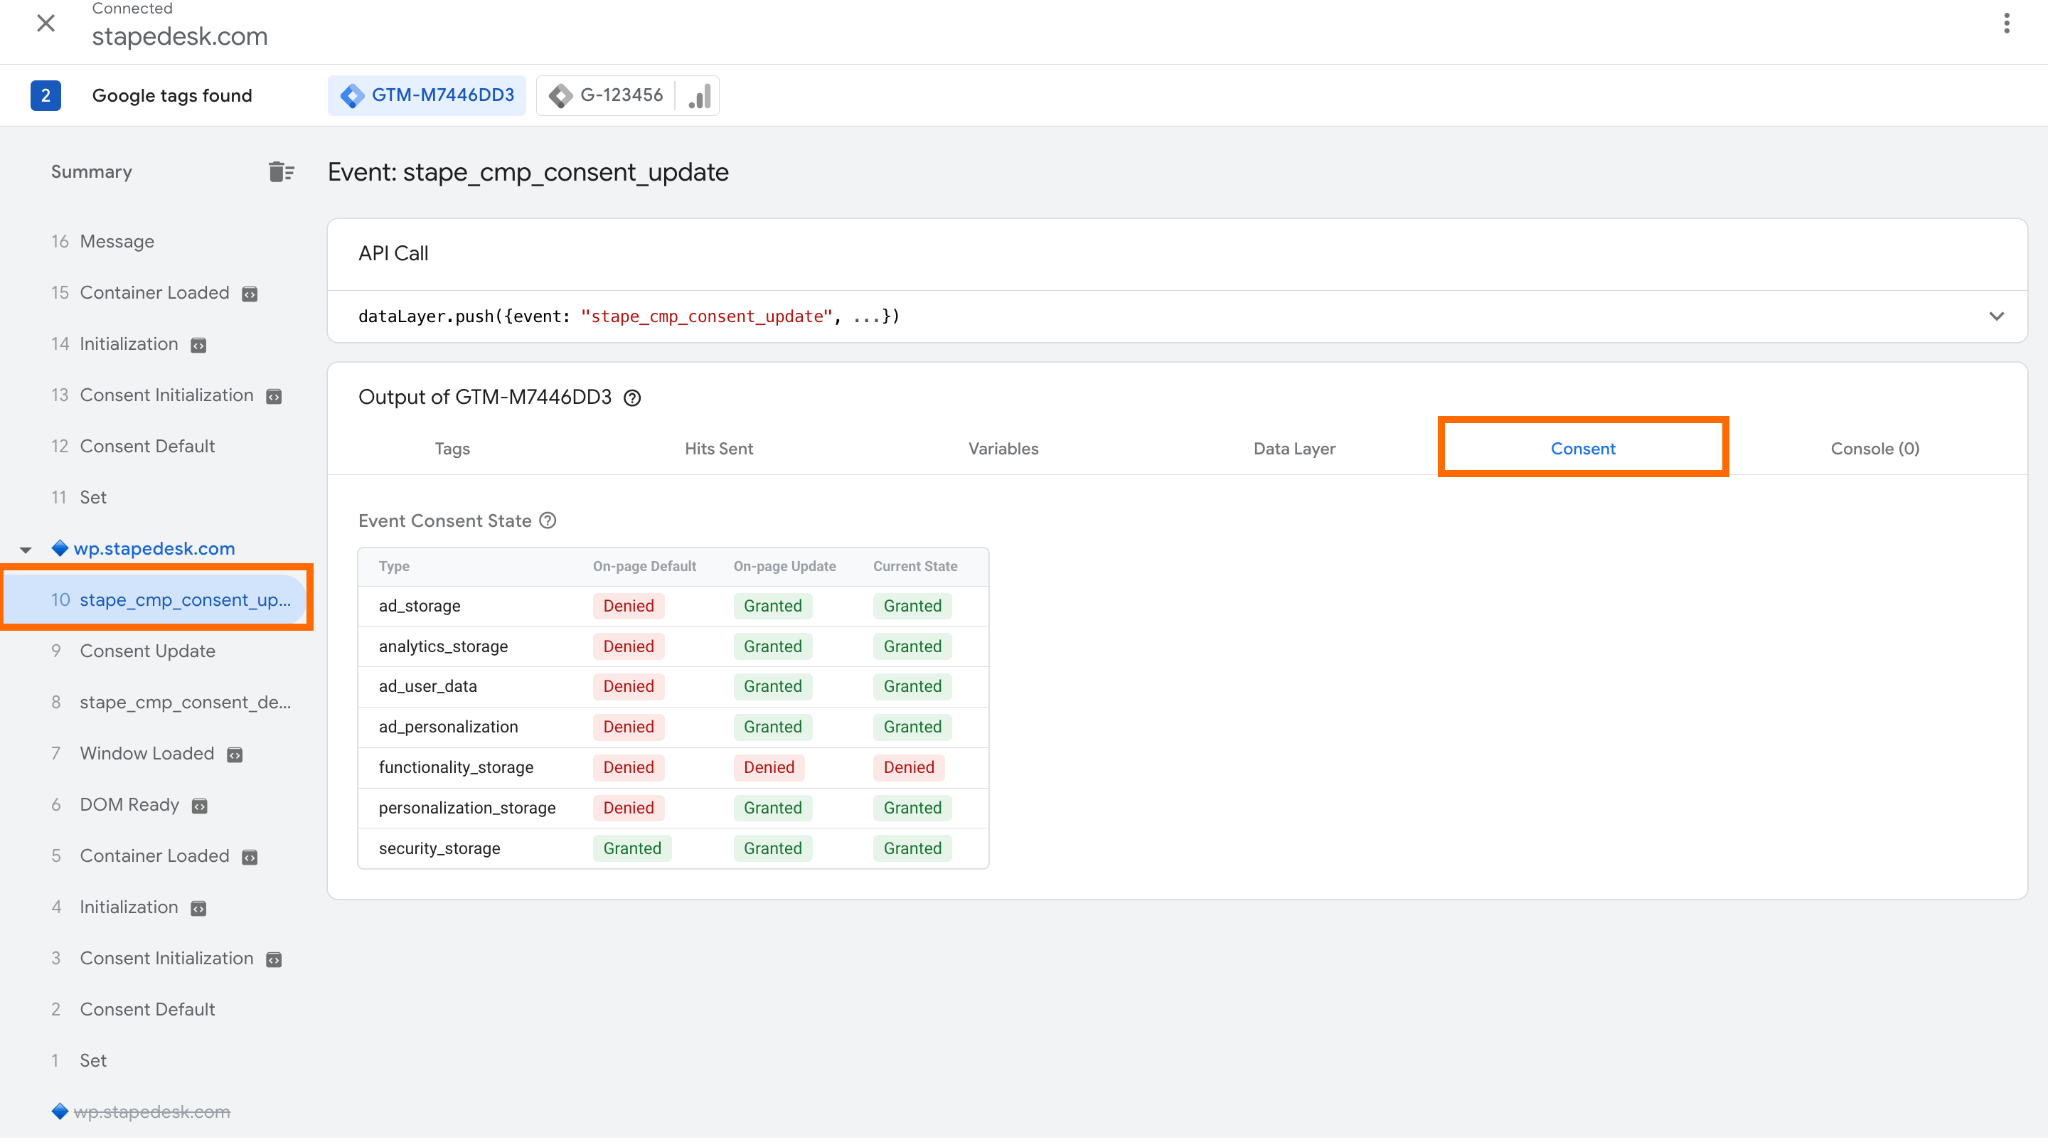
Confirm that the consent state is updated before other tracking events are processed (such as page_view, add_to_cart, etc.). In this way, you can be sure that analytics and marketing tags respect the visitor's consent preferences from the beginning of the session.
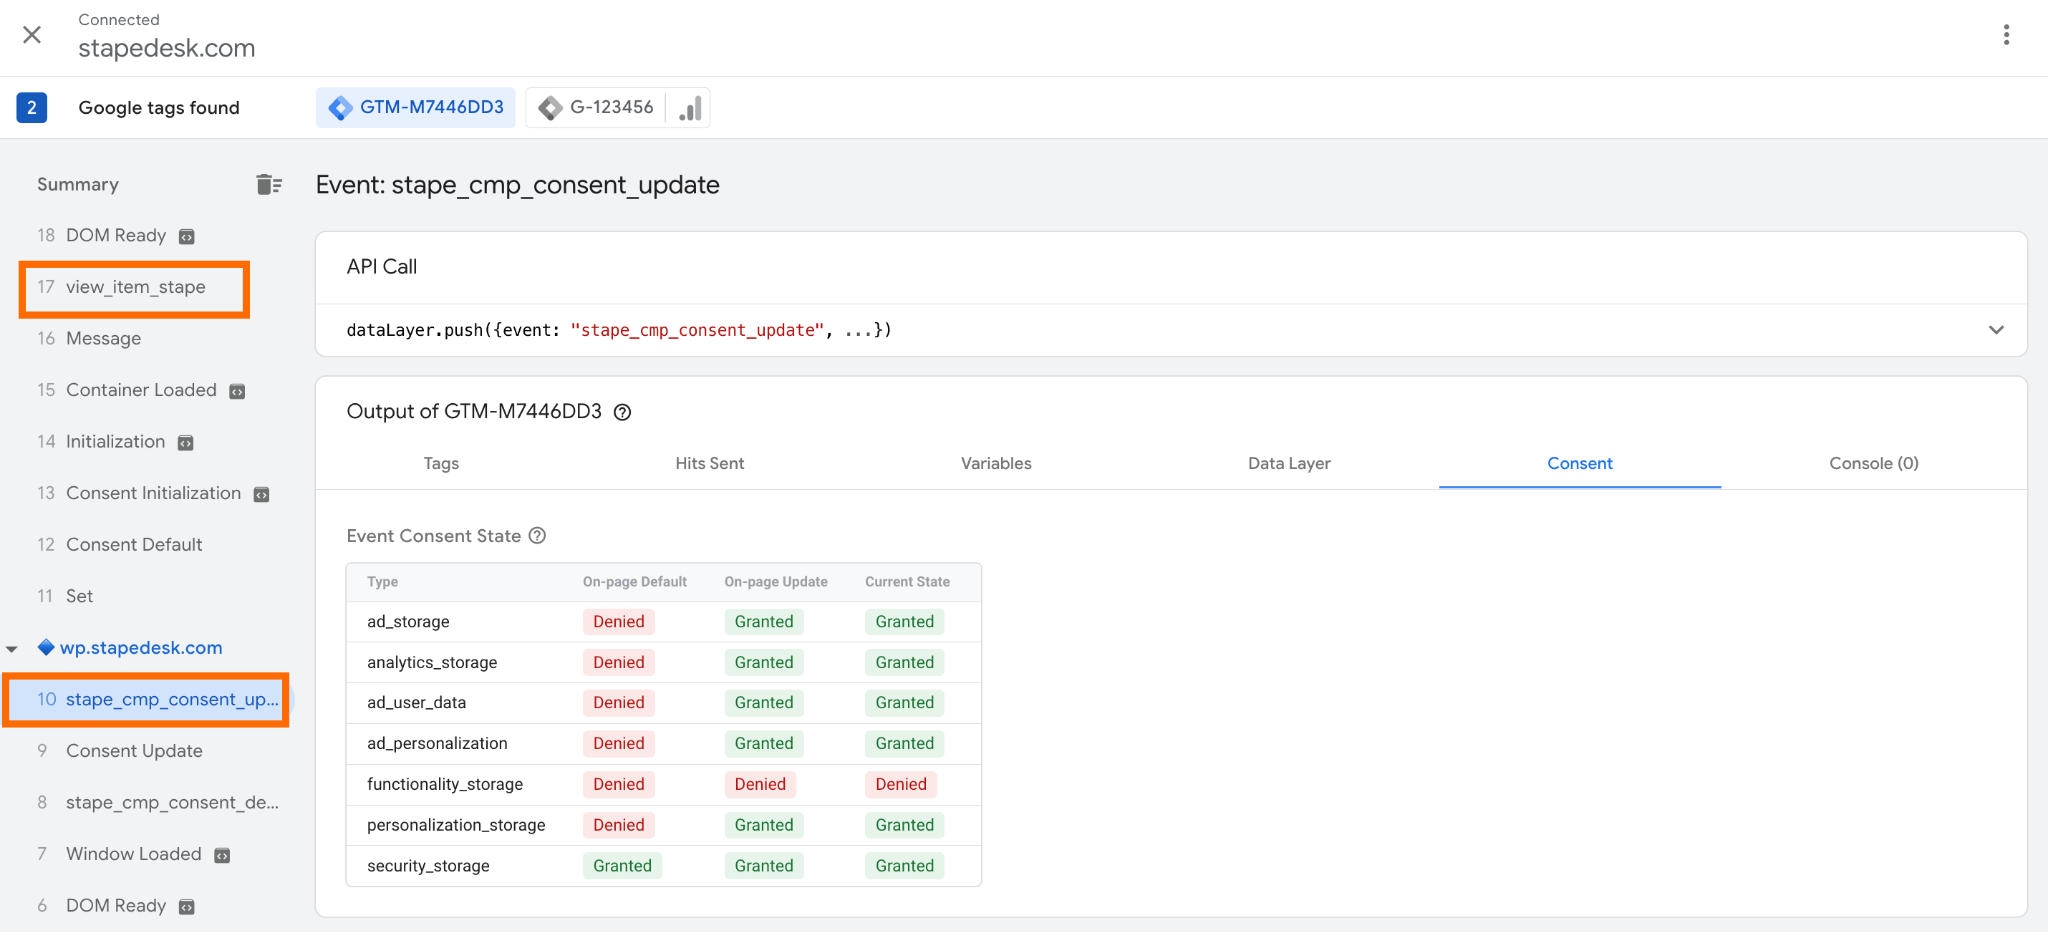
If you change your preferences in the cookie banner, for example, by rejecting previously accepted cookie categories, the stape_cmp_consent_update event should fire again.
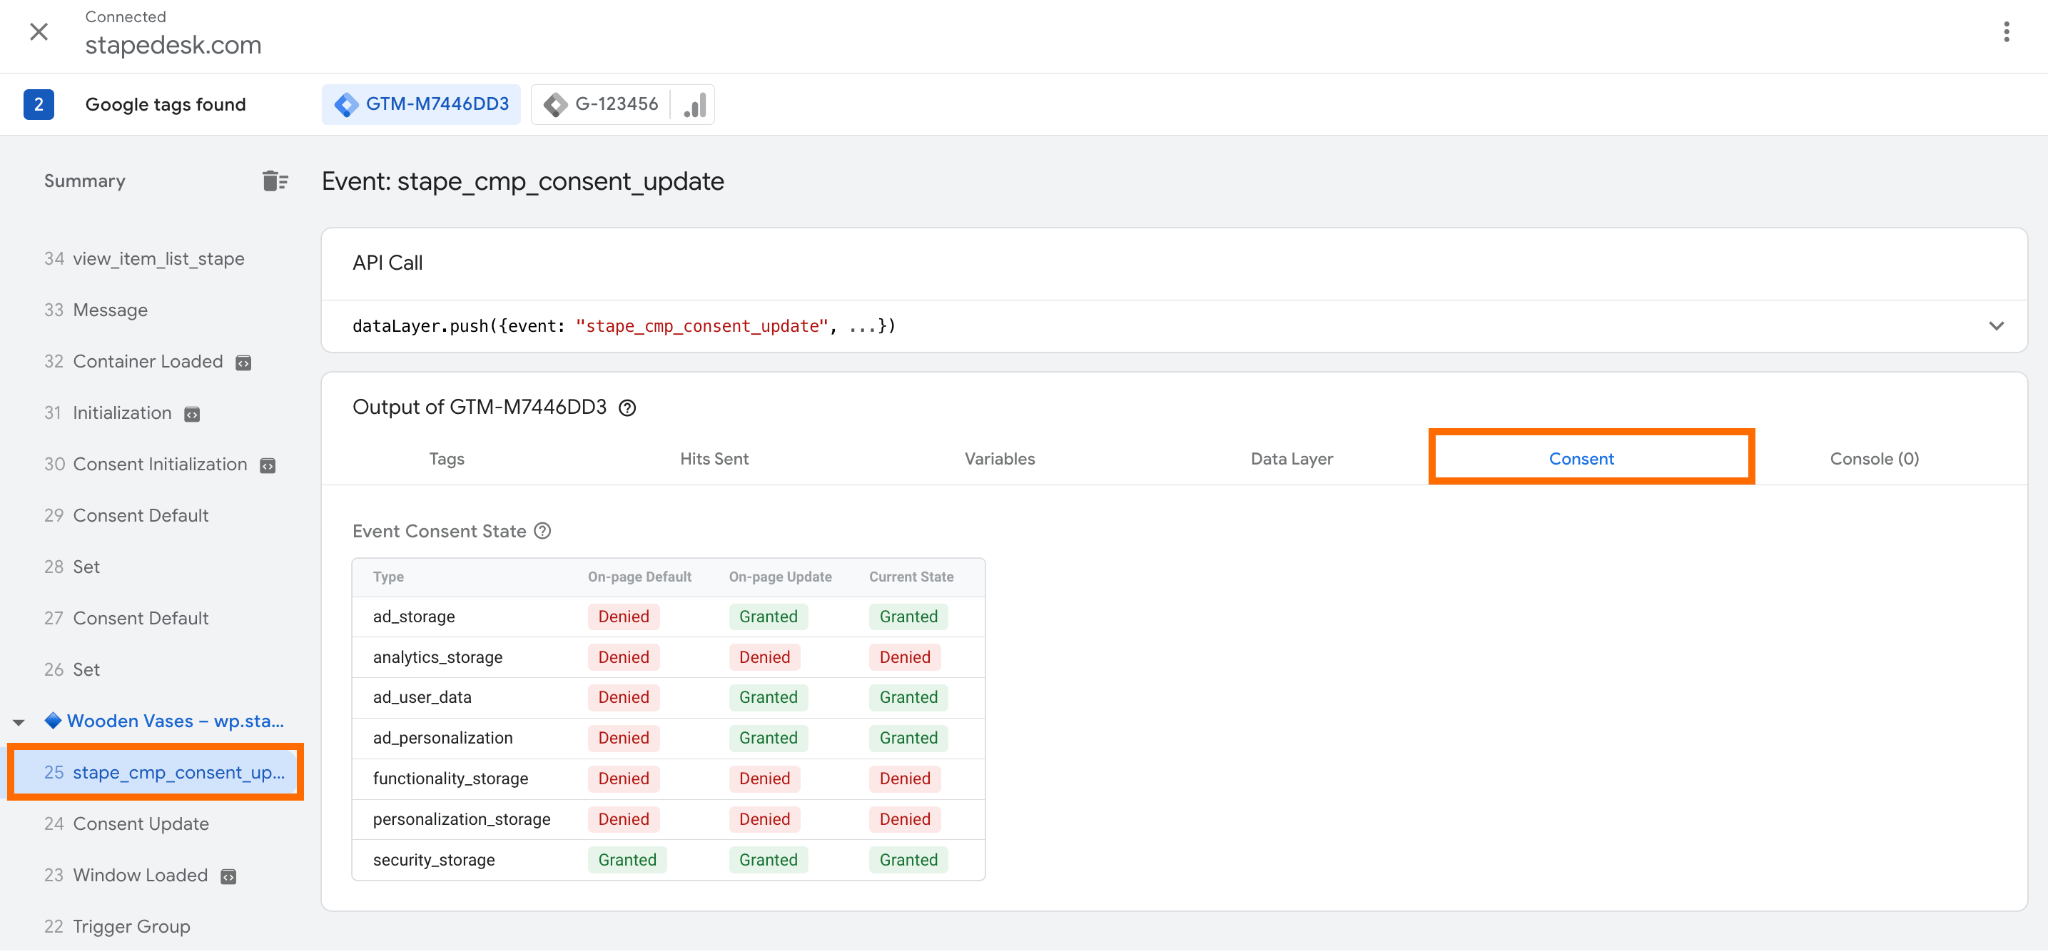
The corresponding values in the Consent tab should then reflect the updated preferences.
5. Verify consent statuses in the server GTM container
Confirm that consent information is correctly passed from your web GTM container to the server GTM container.
To do this, first open the Stape GTM Helper extension and enable the Consent mode server-side toggle.
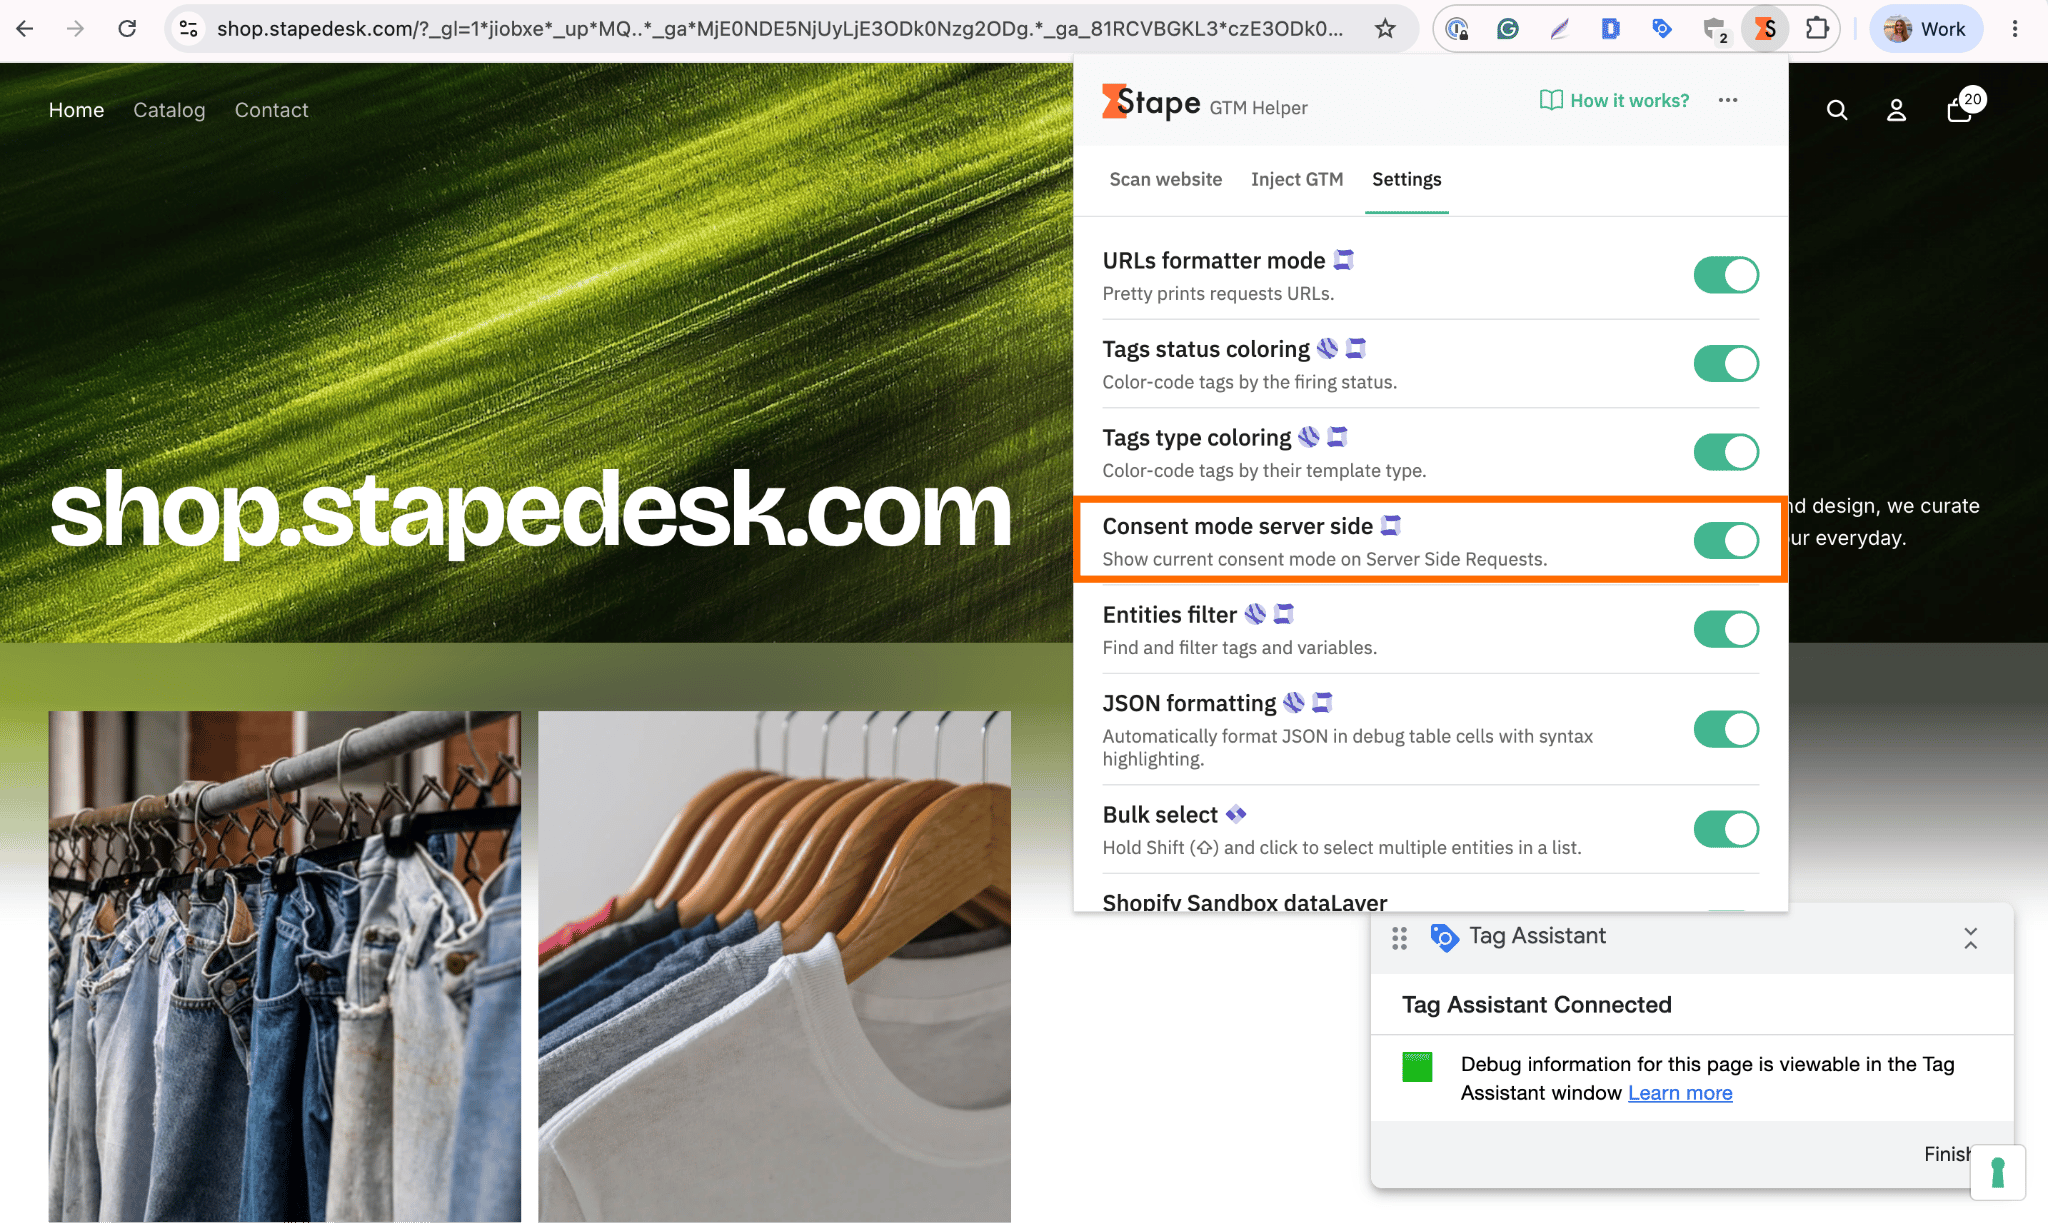
Next, navigate to the server-side GTM Preview window and open the latest event.
Check the consent statuses for:
ad_storageanalytics_storage
Make sure that both values match the corresponding consent statuses displayed in the web GTM Preview.
If the values match, this confirms that the consent information is correctly sent from the web GTM container to the server GTM container.
Test the banner for visitors from each configured region and verify that the correct consent experience appears.
Consent logs
Using the “Consent logs” tab of the CMP will be helpful as part of the test process, as well as after going live with the banner.
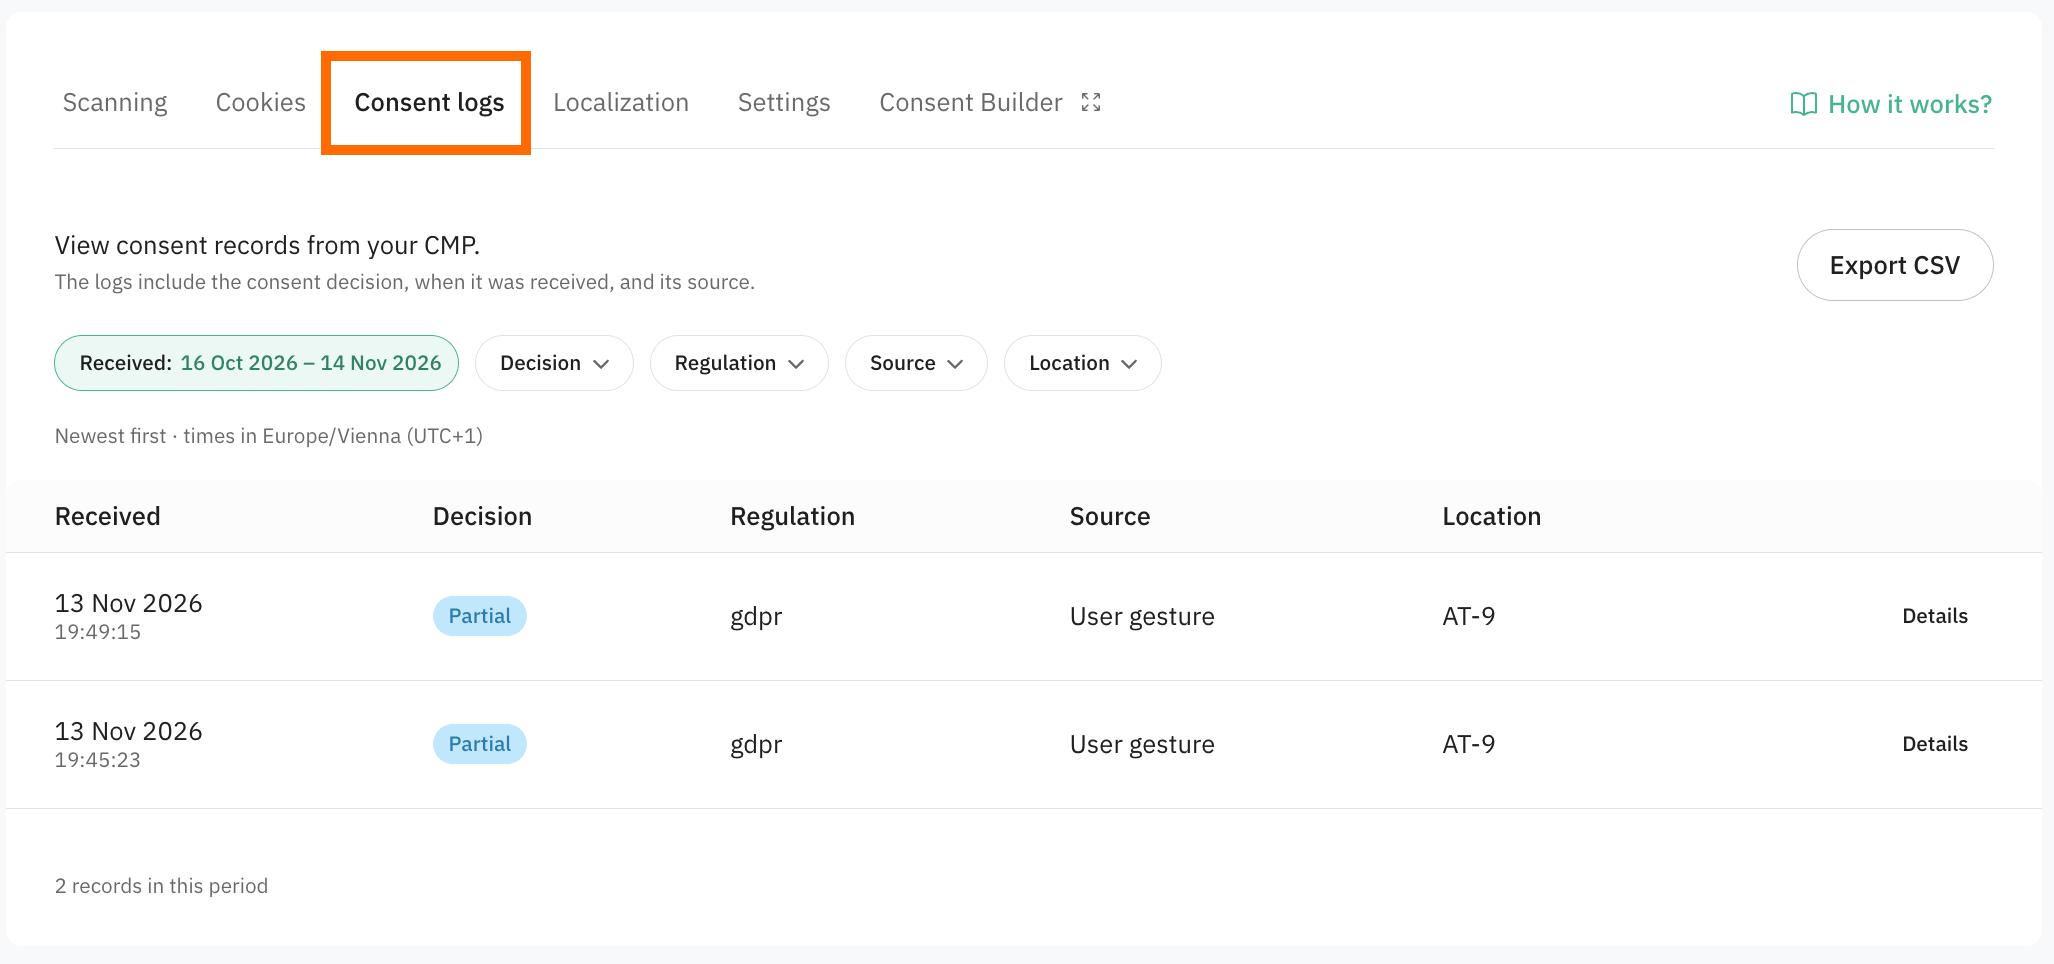
These records help you verify visitors’ consent decisions, investigate consent-related issues, and check how consent choices are being communicated to your tracking setup.
Consent records are retained for 3 years from the date they are created.
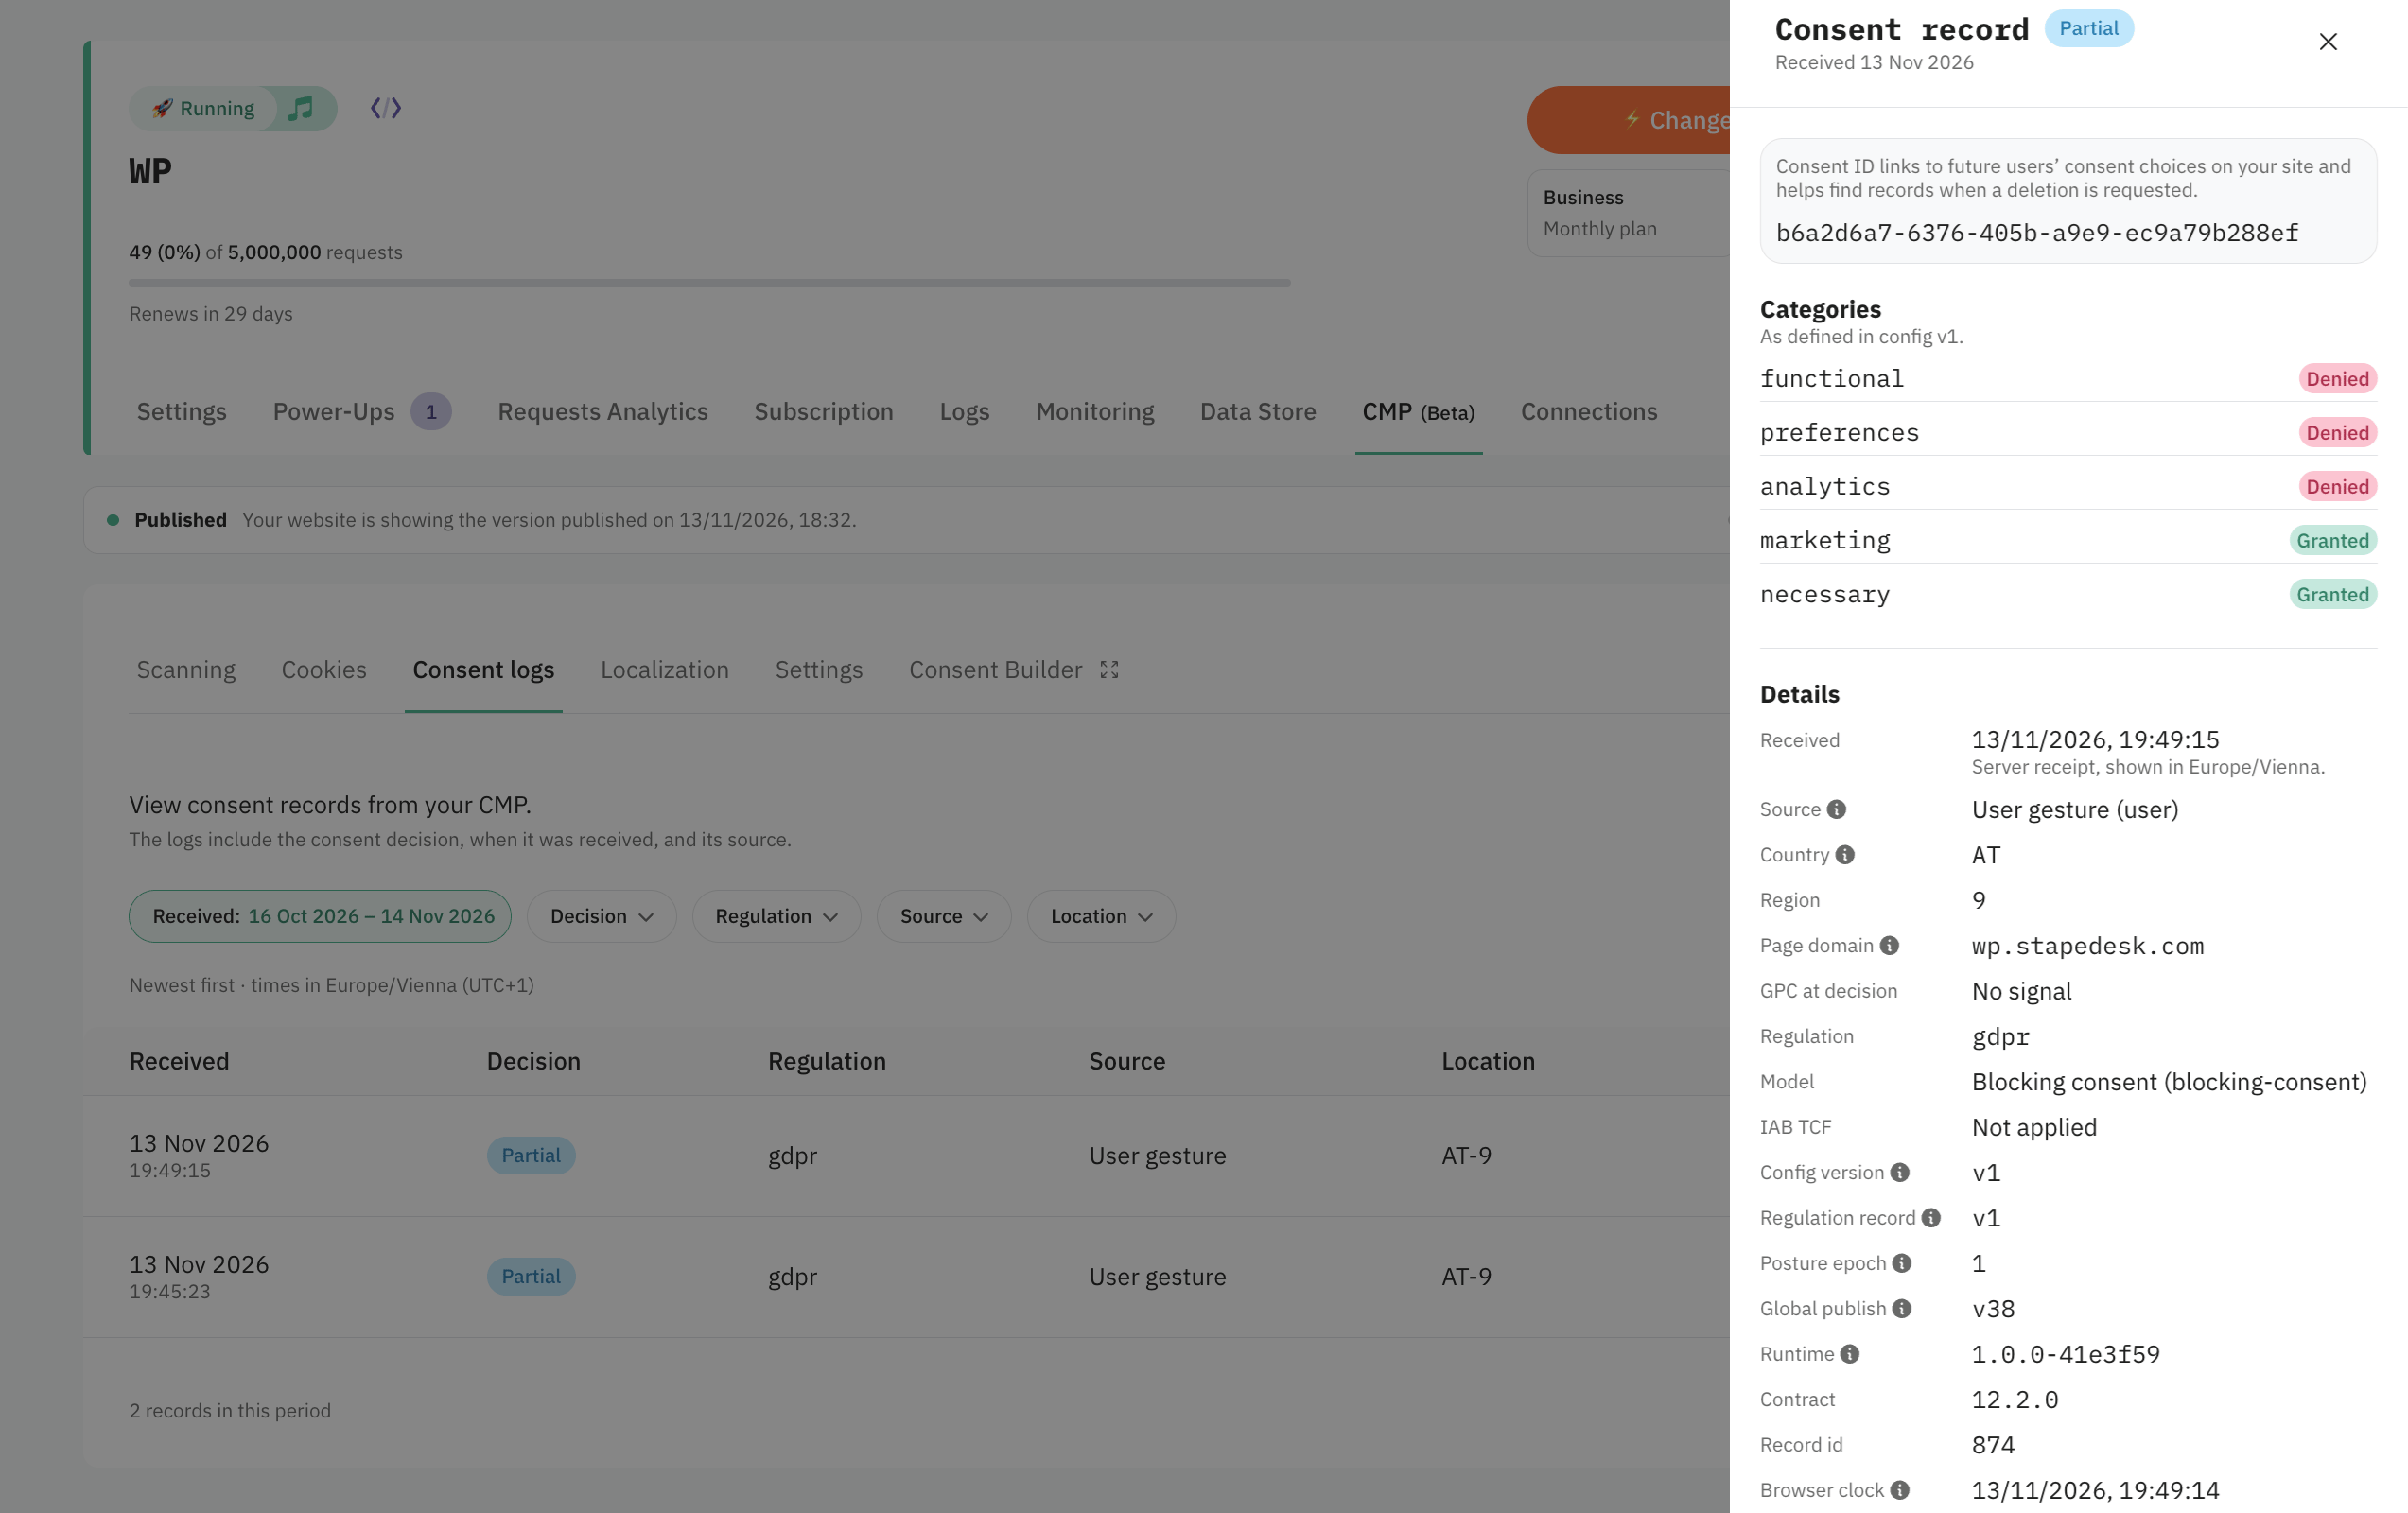
Each record includes details such as:
- Consent decision – the visitor’s consent choices for the configured categories.
- Date and time – when the consent record was received by the container.
- Source – where the consent decision originated.
- Country – the visitor’s country, determined from the request.
- Page domain – the domain where the consent decision was made. The full page path isn’t included.
- GPC status – whether the Global Privacy Control signal was detected when the decision was recorded.
- TCF data – available TCF information, if TCF is enabled and relevant data is present.
- Configuration version – the CMP configuration version associated with the record.
Use Consent Logs when you need to:
- Check whether consent decisions are reaching your server GTM container.
- Investigate why a visitor’s consent status or tracking behavior appears incorrect.
- Review consent choices associated with a particular visitor.
- Verify that consent records contain the expected information, including regional and TCF data where applicable.
Each consent record includes a Consent ID. If a visitor requests deletion of their consent records, provide the Consent ID from any one of their records to identify the records associated with that visitor.
Was this article helpful?
Comments