Jul 22, 2026
How to set up Google Analytics 4: 2026 guide
Written by
Maryna Semidubarska
Updated Sep 15, 2026 comments
Key takeaways:
- GA4 tracks website and app activity through events, such as page views, form submissions, and purchases.
- You can add GA4 through an integration in Shopify, WordPress, or Wix, by placing the Google tag in the website code, or through a Google Tag Manager web container.
- You can then route the data through Stape Gateway or a server Google Tag Manager for server-side tagging.
- The best setup depends on how much control, flexibility, and technical support your business needs.
Google Analytics 4 (GA4) helps you understand how people use your website and which actions support your marketing goals. A good setup helps GA4 record the correct website actions, avoid duplicate or missing events, respect user consent, and create reports your team can use.
What is Google Analytics 4 and why it matters in 2026
Google Analytics 4 is Google’s current analytics platform for websites and apps. It collects data through events, such as a page view, form submission, login, or purchase. Each event can include parameters that add useful details, for example, the page URL, product name, value, or traffic source.
GA4 organizes data through three main levels:
- An account normally represents the business that owns the data.
- A property contains data that should be analyzed together.
- A data stream receives data from a website or app.
GA4 matters in 2026 because Universal Analytics no longer processes new data. Businesses now use GA4 to measure website and app activity, build audiences, analyze attribution, and connect analytics data with products such as Google Ads.
The quality of the setup matters as much as the tool itself. A duplicated tag can report two page views instead of one. A broken purchase event can report the wrong revenue. Missing consent signals can affect data collection and advertising features.
Businesses use server-side tracking to collect more complete data and control what reaches Google Analytics. The browser sends each tracking request to a server container first, where you can filter or enrich the data based on your business and privacy needs. The server container then forwards the processed events to GA4. This setup can also help you create more resilient first-party cookies.
Consider this before you start GA4 setup
Decide what you need to measure
Write down the actions that support the business before creating tags. Examples include:
- A lead form submission.
- A booked call.
- An account registration.
- Adding a product to the cart.
- Starting checkout.
- Completing a purchase.
- Renewing a subscription.
This becomes your tracking plan. It stops the property from filling up with events that nobody uses.
Plan the property structure
Keep data together when it belongs to the same logical user journey and business. Keep it separate when access, ownership, branding, or reporting needs are different.
For connected domains, such as a main website and a separate checkout domain, you can usually use one web stream with cross-domain measurement. Cross-domain measurement helps GA4 recognize one user and one session while the person moves between the domains.
Plan consent settings before publishing the tag
GA4 does not collect or manage users’ consent choices. Your consent banner or consent management platform (CMP) collects each user’s choice and passes the corresponding consent state to Google tags through Google Consent Mode V2. Google tags then adjust their behavior based on that state.
Set up and test consent before publishing your GA4 tag. Do not install analytics first and add consent later, especially if your website receives visitors from regions with privacy and consent requirements.
Check what is already installed
Before adding GA4, check whether it is already installed through your CMS or website builder, a plugin, the website code, or a Google Tag Manager web container.
Running the same Measurement ID through a plugin, website code, and GTM at the same time can create duplicate events.
3 key GA4 configuration routes
| Option | How it works | Main value |
| Google tag through a CMS or website code | The website sends data directly to Google Analytics | A quick setup for basic website measurement |
| Google Tag Manager web container | GTM loads the Google tag and controls event tags and triggers | Central management of GA4 events and marketing tags |
| Server-side setup | Website requests pass through a server before GA4 | Better data quality, stronger privacy controls, less tracking work in the browser, and more resilient first-party data collection through the website’s own domain |
How to set up Google Analytics 4 step by step
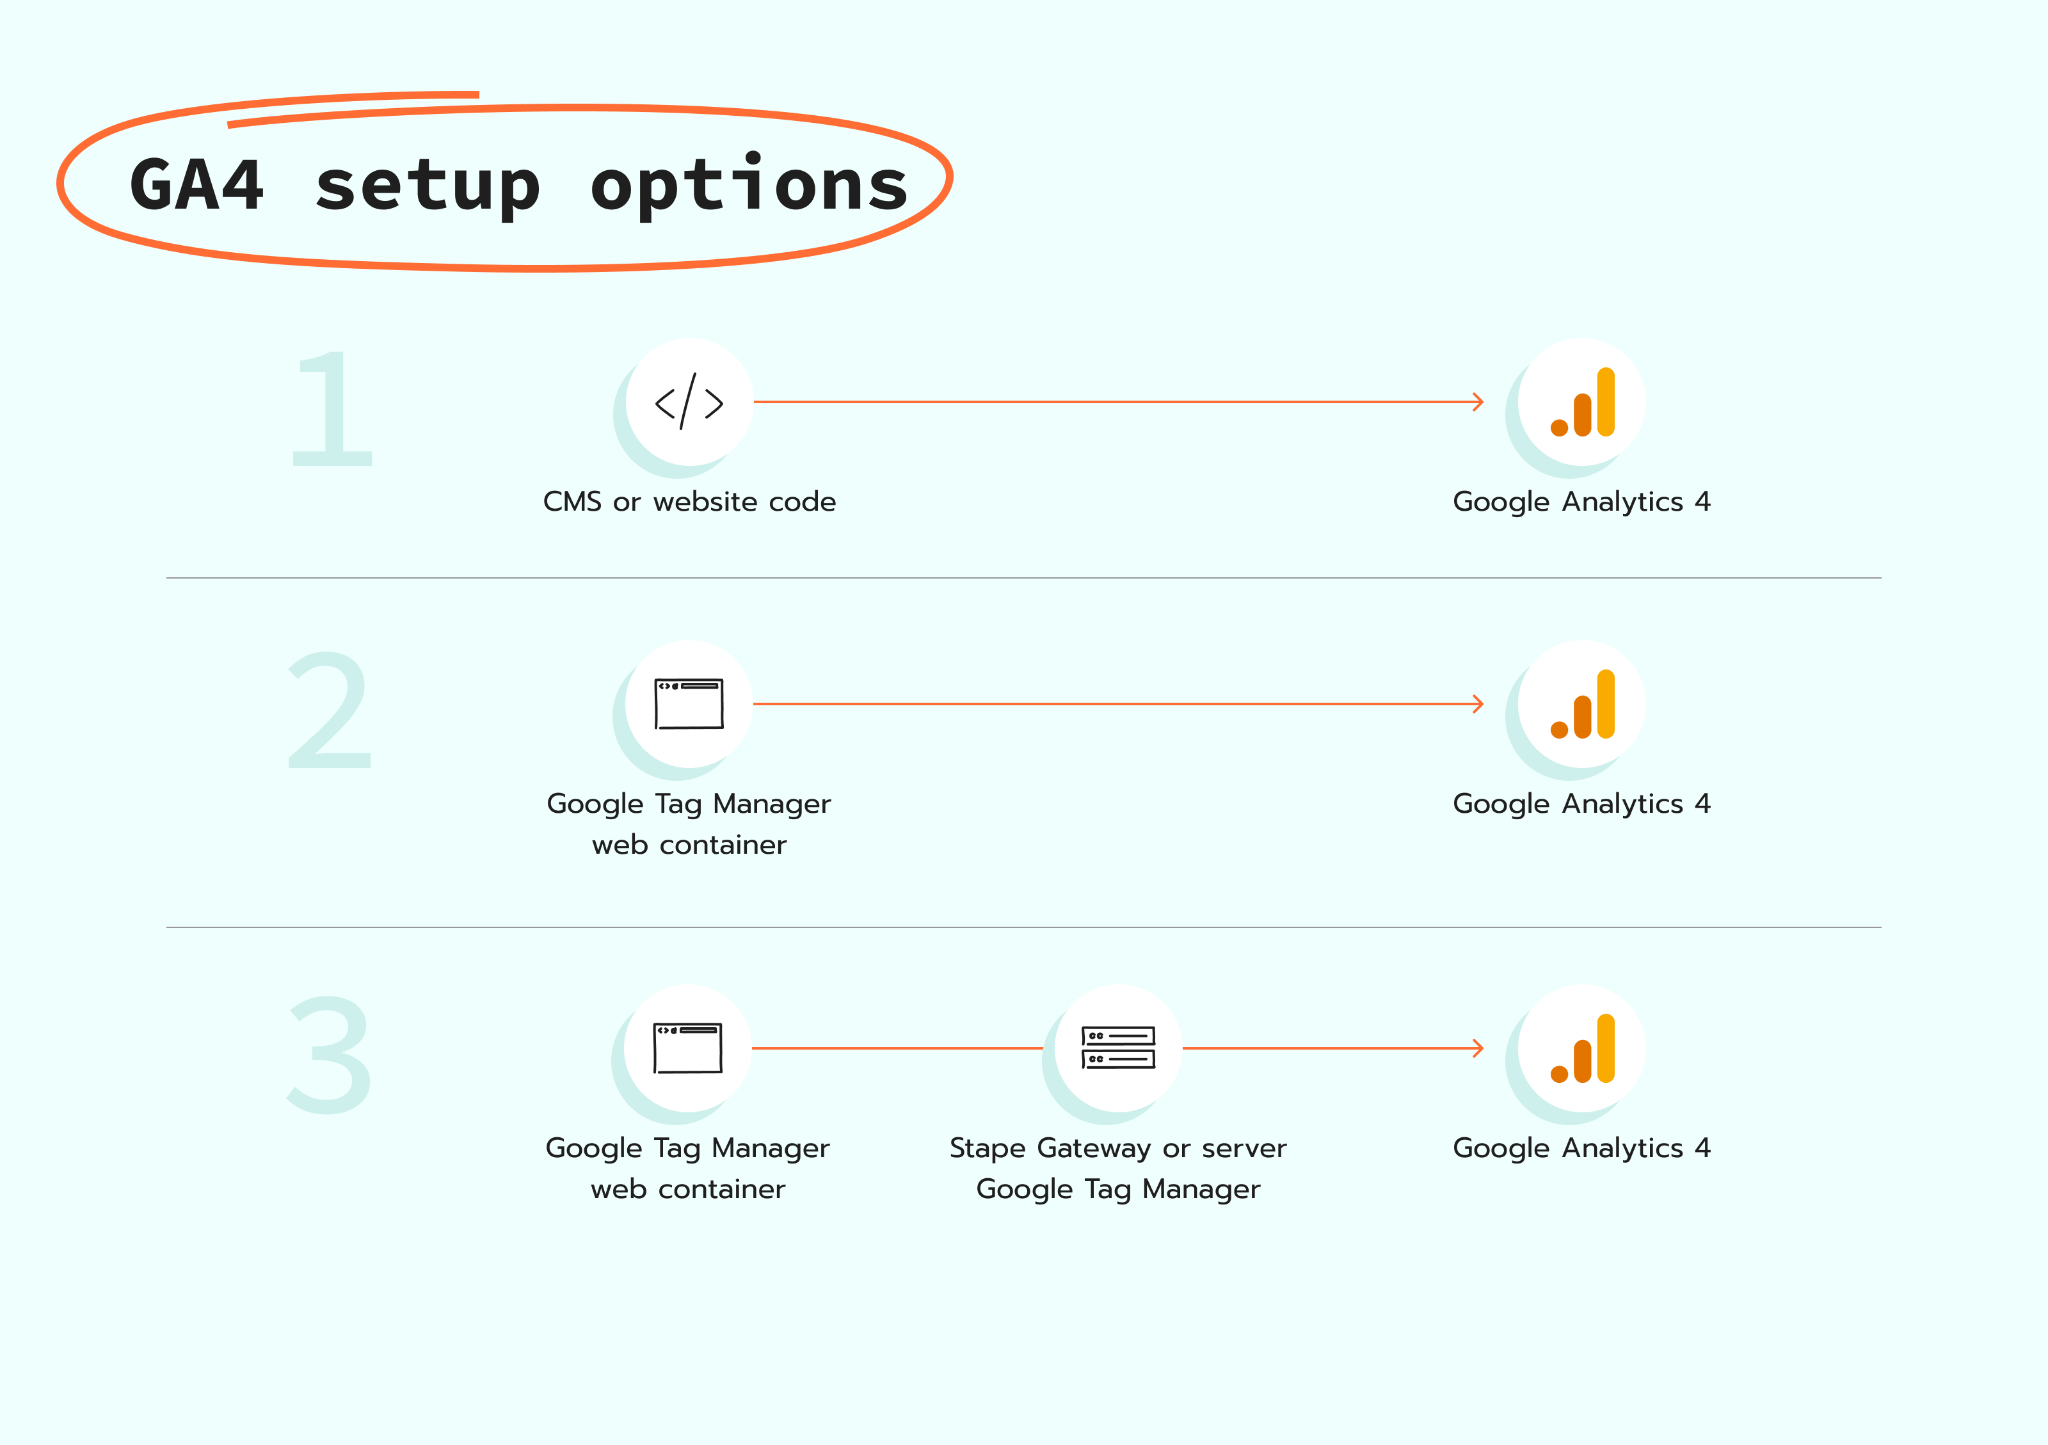
You can add GA4 through a website platform, directly in the website code, or with a Google Tag Manager web container. You can also extend the setup with server-side tracking through Stape Gateway or server Google Tag Manager. The account and data stream steps are the same for every option. After that, this guide explains each setup route one by one.
Step 1. Create a Google Analytics account
Go to Google Analytics and sign in with the Google account that will own and manage the setup.
In the bottom-left corner, click Admin. At the top of the Account column, click Create, then select Account. Enter the business name and review the account data-sharing options.
Do not create a new account when the business already has a suitable one. One account can contain several properties.
Step 2. Create a GA4 property
In Admin, select Create, then Property.
Add:
- A clear property name.
- The correct reporting time zone.
- The business currency.
- The industry and business details.
- The main business objective.
The reporting time zone decides which day receives an event. The currency affects how GA4 displays revenue values, so both settings should be correct from the beginning.
Step 3. Create a web data stream
Under Data collection and modification, open Data streams and select Web.
Enter the main website address and give the stream a clear name. Leave Enhanced Measurement enabled for now. You can review each Enhanced Measurement option later.
After creating the stream, GA4 will show its Measurement ID. It starts with G-, for example: G-ABC1234567. The Measurement ID tells the Google tag where to send the website’s data.
Your GA4 property and web data stream are now ready. Next, choose how to connect your website to GA4. The following options explain each setup route, from a CMS or website code to Google Tag Manager and server-side tracking.
Option 1. Set up GA4 through a CMS or website builder
Some website platforms provide a field for a Google tag ID or GA4 Measurement ID.
- 1.Copy the ID that starts with
G-. - 2.Open the analytics or integrations settings in your CMS.
- 3.Paste the ID into the Google Analytics field.
- 4.Save and publish the changes.
- 5.Test the website in GA4 Realtime.
This route works well when the platform has a reliable native GA4 integration, and you only need basic measurement. However, if your store requires detailed eCommerce event tracking beyond standard page views, you might consider upgrading to a dedicated Shopify Google Tag Manager setup for much greater flexibility and control.
Option 2. Install the Google tag manually
Use the manual method when the website does not support a native integration, and you do not want to use GTM.
- 1.In Google Analytics, click Admin in the bottom-left corner.
- 2.Under Data collection and modification, select Data streams.
- 3.Click the web data stream for your website.
- 4.Under Google tag, click View tag instructions.
- 5.Open the Install manually tab.
- 6.Copy the full Google tag snippet.
- 7.Paste it immediately after the opening
<head>element on every website page. - 8.Publish the website changes.
- 9.Return to the installation instructions, enter your website URL under Test your website, and click Test.
Google advises against adding more than one Google tag for the same setup to each page.
A developer will normally handle this route. Future event changes can also require code updates, which is why marketing teams often choose GTM instead.
Option 3. Set up GA4 with a Google Tag Manager web container
First, create a GTM account and web container, then install the web container on every page of the website.
Then configure GA4:
- 1.In Google Analytics, open Admin and go to Data streams.
- 2.Select the website’s web data stream.
- 3.Copy the Measurement ID, which starts with
G-. - 4.Open the Google Tag Manager web container.
- 5.Go to Tags and click New.
- 6.Name the tag, for example, GA4 - Google tag.
- 7.Open Tag Configuration and select Google Tag.
- 8.Enter the GA4 Measurement ID in the Tag ID field.
- 9.Do not add anything under Configuration settings.
- 10.Open Triggering and select Initialization - All Pages.
- 11.Click Save.
- 12.Click Preview, enter the website URL, and select Connect.
- 13.Open the website and confirm in Tag Assistant that the Google tag fires during the Initialization event.
- 14.Return to Google Tag Manager and click Submit.
- 15.Select Publish and Create Version, add a version name, and click Publish.
- 16.Open the Realtime report in GA4 and confirm that the visit appears.
Google’s current setup instructions use a Google Tag with the Initialization - All Pages trigger.
Do not install the same GA4 setup directly in the website code and through Google Tag Manager. Using both methods can send duplicate data.
This setup installs the main Google tag and collects standard information such as page views. Actions such as form submissions, booked calls, account registrations, and purchases require additional event tracking.
Option 4. Set up server-side GA4 with Stape Gateway
Stape Gateway provides a simpler and faster route to server-side tracking for GA4 and Google Ads. It works with the GTM web container configured in Option 3, so you do not need to manually create GA4 clients, server tags, or triggers.
Before continuing, complete Option 3 and use GTM Preview to confirm that the Google tag fires correctly. You should also check the GA4 Realtime report to make sure GA4 receives your website visit.
Read a step-by-step guide on how to set up Stape Gateway.
Option 5. Set up GA4 with server Google Tag Manager
Server Google Tag Manager gives you more control over how website data reaches GA4 and other platforms. Requests first go to the server container, where you can filter events, enrich their data, remove information you do not want to share, and choose which platforms receive each event.
This option is more flexible than Stape Gateway because it is not limited to GA4 and Google Ads. You can use the same server container to configure tracking for Meta, TikTok, and other platforms, with separate tags and rules for each destination. It is a better fit when you need advanced data control or plan to expand your server-side tracking setup, although it requires more technical work.
Read a step-by-step guide on how to set up GA4 with server Google Tag Manager.
Advanced option: send backend events with Measurement Protocol
Google Analytics Measurement Protocol sends events to GA4 through Hypertext Transfer Protocol (HTTP) requests. It is useful for offline actions and server events, such as a lead being qualified in a customer relationship management system or a refund being completed in a backend.
Google states that Measurement Protocol should support normal website or app tagging, rather than replace it. A Measurement Protocol-only setup can provide partial reporting because some information depends on the browser tag or app software development kit.
This route normally requires a developer. Events must include the correct user, session, consent, event, and eCommerce information to connect properly with the online journey.
Verify your GA4 installation
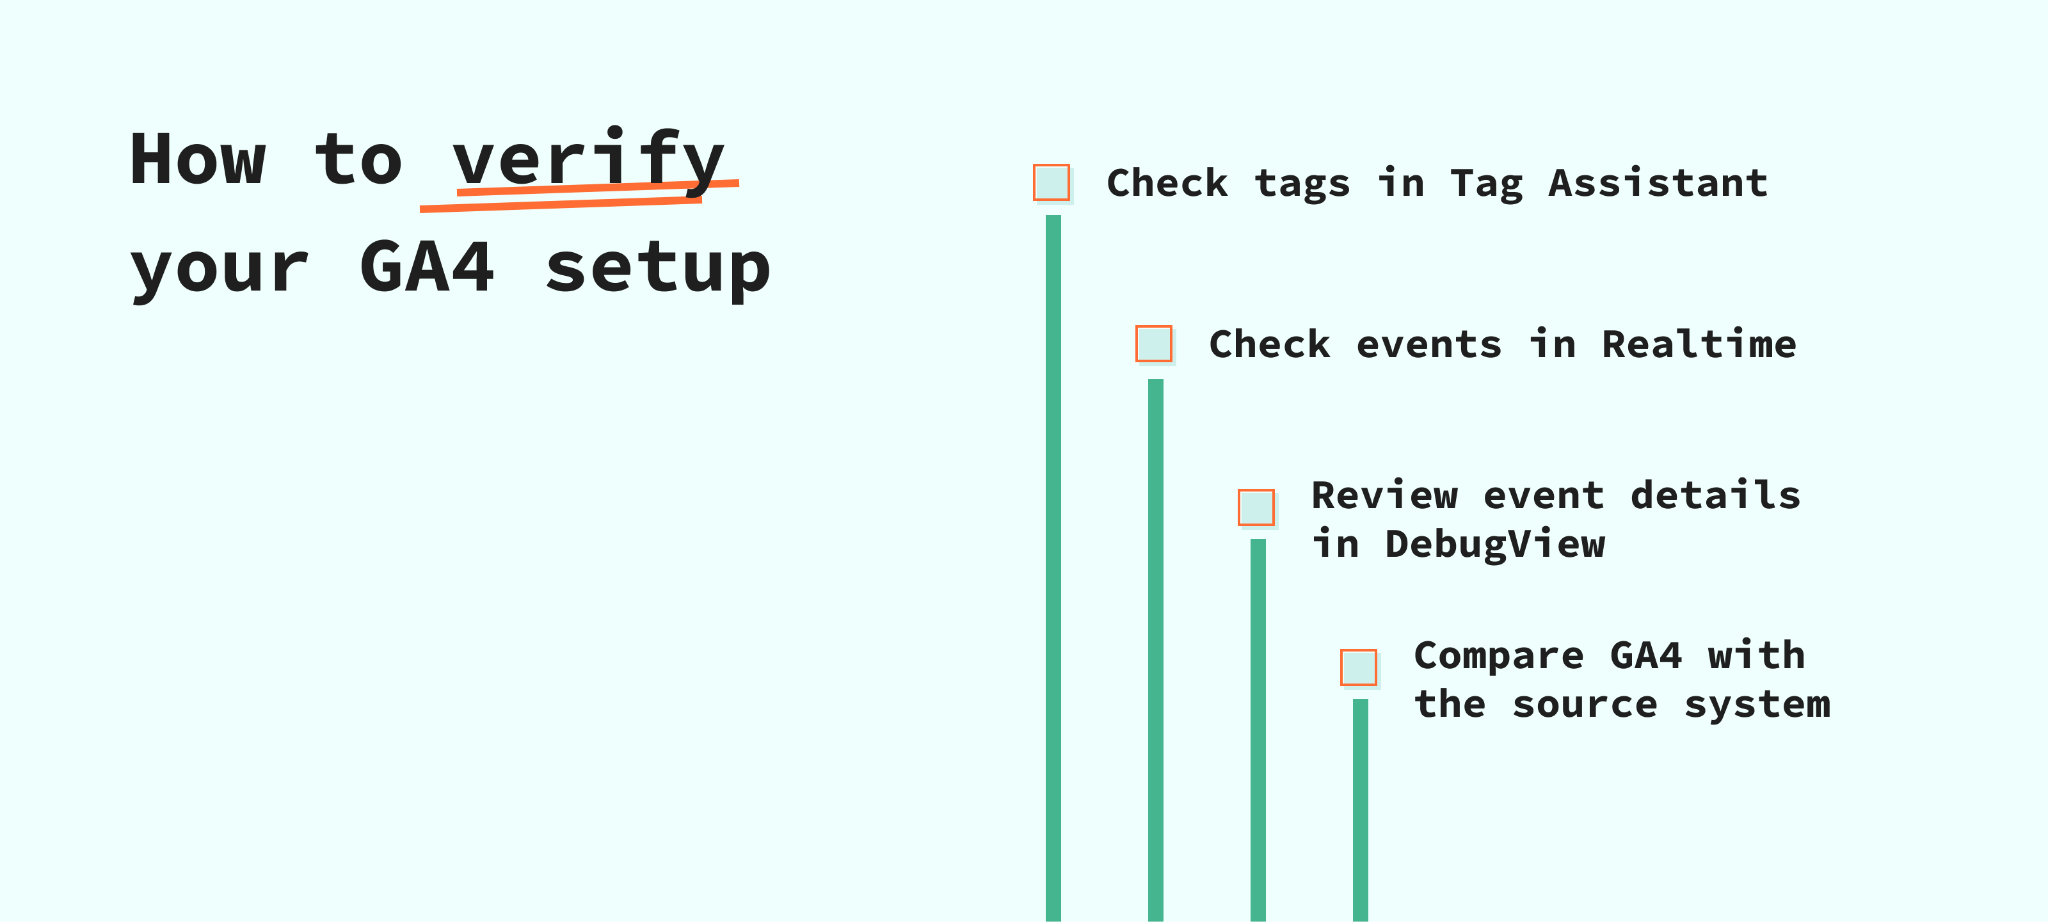
Check Tag Assistant
For GTM installations, open Preview mode and connect Tag Assistant to the website.
Confirm that the Google tag fires once on the expected pages. Test several page types, including the homepage, product pages, forms, checkout, and confirmation pages.
Check the Realtime report
Open Reports, then Realtime.
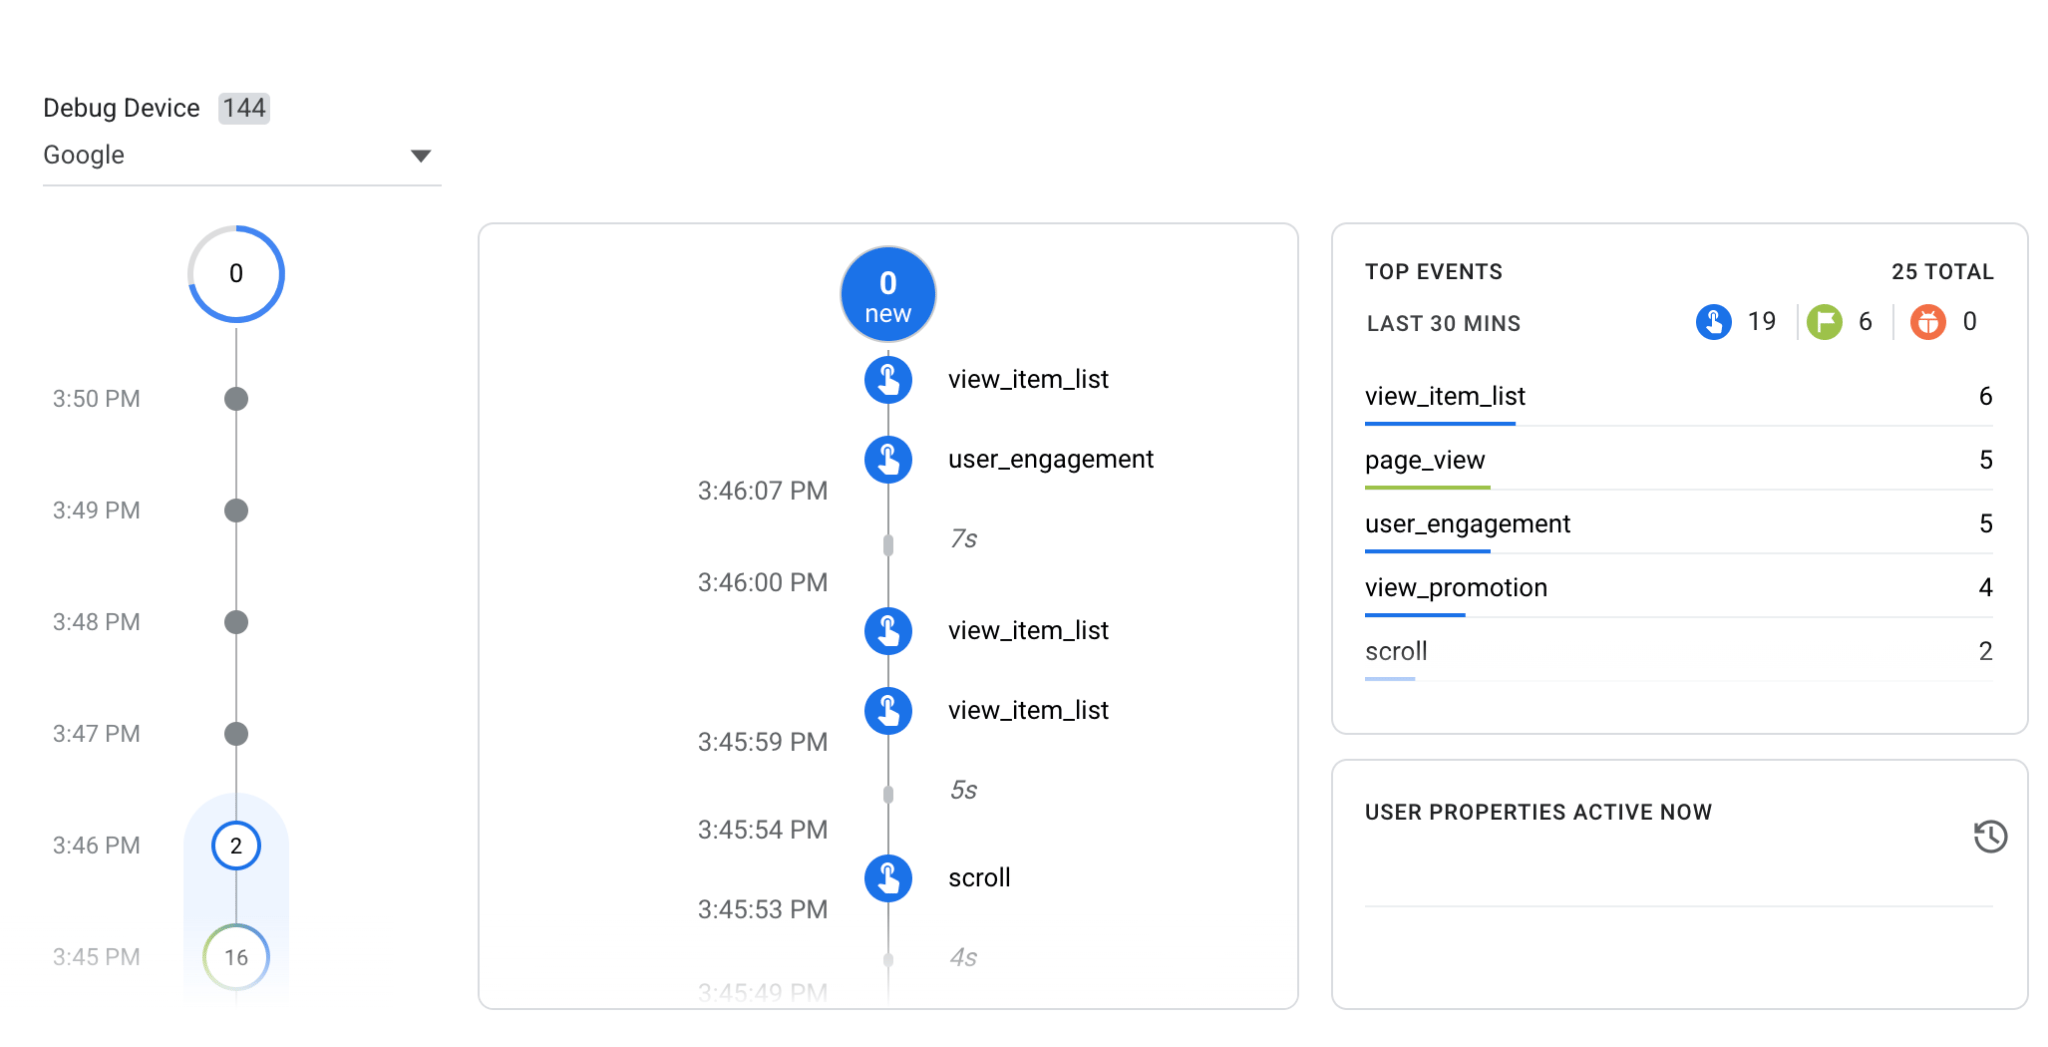
Visit the website from a test device and perform several actions. Realtime shows activity from the last 30 minutes and is useful for confirming that GA4 is receiving events.
Check DebugView
Enable debug mode through Tag Assistant or your testing setup, then open DebugView in GA4.
DebugView shows the events sent by one test device and lets you inspect their order and parameters. It is especially useful for checking forms, eCommerce events, event names, values, and currencies.
Check browser requests
Open the browser’s developer tools and use the Network tab to find GA4 collection requests.
For server-side tracking, confirm that GA4 requests use the first-party tagging URL configured for your setup. If you use server Google Tag Manager, open the server container Preview mode and confirm that it receives and processes the request. If you use Stape Gateway, follow the testing steps in the Gateway setup guide.
Compare GA4 with the source system
GA4 should be compared with the system that records the business results.
For example:
- Compare purchases with the eCommerce platform.
- Compare leads with the customer relationship management system.
- Compare bookings with the booking platform.
- Compare subscription payments with the payment system.
The numbers will not always match exactly because the systems collect and process data differently. Large or sudden differences still need investigation.
Google notes that standard reports and explorations can take 24 to 48 hours to process fully. Use Realtime and DebugView for immediate installation checks.
Essential GA4 configuration settings after installation
Review Enhanced Measurement
Enhanced Measurement can collect several website interactions without extra code. These include page views and optional events for scrolls, outbound clicks, site search, video engagement, file downloads, and form interactions.
Open the web data stream and review every option. Disable an event when another tool or custom tag already measures the same action, as two implementations can create duplicates.

Set important actions as key events
A key event is an event that represents an important business result.
Common examples include:
generate_lead
sign_up
purchase
book_appointment
subscribe
Any collected event can be marked as a key event. Do not mark every event as important. A page view or scroll is normally an interaction, not a final business result.
Set the data retention period
Standard GA4 properties offer two user and event data retention options: 2 months and 14 months.
The setting affects explorations and funnel reports, but it does not remove historical data from standard aggregated reports. Choose 14 months when the business needs longer user-level analysis and its privacy policy supports that period.
Filter internal traffic carefully
Internal visits from employees, developers, and agencies can change website results.
GA4 lets you identify internal traffic with Internet Protocol (IP) address rules and exclude it through a data filter. Start with the filter in Testing mode. An active exclusion filter permanently removes matching incoming data from Analytics and BigQuery.
Configure unwanted referrals
Payment providers, login systems, and external booking tools can appear as referral sources when users return to your website. If these services should not receive marketing credit, add their domains to the unwanted referrals list.
To add a domain:
- 1.Go to Admin → Data streams.
- 2.Open your web data stream.
- 3.Select Configure tag settings → Show all → List unwanted referrals.
- 4.Choose a match type and enter the domain.
- 5.Click Save.
After you save the change, GA4 will continue collecting the user’s events but will no longer attribute the session to the matching domain.
Use the unwanted referrals list only for domains that support the customer journey without introducing the user to your business. For example, a payment provider may send the user away from your website during checkout and return them after payment. The provider should not replace the original traffic source, such as Google Ads or organic search, so adding its domain to the list protects the correct attribution.
This setting does not filter traffic. If the referrals come from bots or spam, adding the domain to the unwanted referrals list will only change the reported source. The unwanted traffic will still appear in GA4. To identify and remove bot or spam referrals from your GA4 reports, follow our guide to filtering bot traffic in GA4.
Set up cross-domain measurement
Use cross-domain measurement when a user moves between connected domains during one journey.
This is common when a company uses:
- A main website and a separate checkout.
- A website and an external booking domain.
- Several domains that form one customer experience.
Without this configuration, GA4 can identify the same visitor as two users and two sessions.
Connect Google Ads
Link your Google Ads account to the GA4 property so data can move between both platforms. This allows you to view Google Ads campaign data in GA4, create Google Ads conversions from GA4 key events, and use relevant conversions for bidding.
Choose events that represent completed business outcomes. For example, use a successful form submission rather than the button click that happens before it. Do not set both actions as primary conversions, as Google Ads could treat one customer result as two separate actions.
For detailed instructions on creating, testing, and improving your conversion setup, use our Google Ads conversion tracking guide.
Configure consent mode
Connect your consent management platform (CMP) to Google Consent Mode so Google tags receive each user’s consent choice. Consent Mode does not replace the consent banner or collect consent itself. It changes how Google tags behave after the CMP communicates whether the user accepted or rejected each data category.
For users in the European Economic Area, configure the analytics_storage, ad_storage, ad_user_data, and ad_personalization signals. Test the setup after accepting all cookies, rejecting them, and changing individual preferences. Then check Consent settings in GA4 to confirm that the web data stream receives the required signals.
Our Google Consent Mode V2 guide explains the available implementation options, consent signals, and testing process in more detail.
GA4 setup checklist
Use this checklist after setting up GA4 through a Google Tag Manager web container. It covers the main checks explained in this guide.
Check the installation
- Confirm that the web container is installed and published.
- Check that the Google tag uses the correct Measurement ID and fires once.
- Make sure GA4 is not also installed through another method.
Test the data
- Check the setup in Preview, Realtime, and DebugView.
- Test the main events from your tracking plan.
- Compare leads or purchases with the source system.
Review GA4 settings
- Review Enhanced Measurement and key events.
- Test internal traffic filters before activating them.
- Configure unwanted referrals and cross-domain measurement when needed.
Check Google Ads and consent
- Link the correct Google Ads account and import only the intended conversions.
- Confirm that your consent management platform sends the required consent signals.
- Test accept, reject, and custom consent choices.
FAQs
Want to start on the server side?
Try for freeRecommended for you
Sep 16, 2026
Blog
What is event tracking in GA4: a guide to boosting your data insights
GA4 event tracking helps monitor user interactions, analyze data, and optimize marketing strategies. Set up accurate data collection with ease!
Sep 16, 2026

Comments