How to build a tagging strategy for reliable tracking
Maryna Semidubarska
AuthorAnalytics tagging is adding small pieces of code, called tags, to your site so tools like Google Analytics or ad platforms can track what people do. These tags capture events such as page views, clicks, or purchases and send them into your analytics and ads accounts. When managed through Google Tag Manager or a similar tool, tagging becomes easier to set up, check, and adjust over time.
If you are a marketer or business owner, you want analytics you can trust. You also want ad platforms to learn from real actions, and, of course, you want your fixes to take minutes, not days. A good tagging strategy gives you that. It makes sure all your tools call the same action by the same name, so reports match everywhere. It gives you a clear process to set up and update tags directly in your tag manager. And it leaves you room to switch to server delivery later, when you want cleaner data and more control.
The goal of a tagging strategy is to make sure every tool calls the same action by the same name, so reports match everywhere. It also gives you a clear process to update tags directly in your tag manager and leaves room to switch to server delivery later, when you need cleaner data and more control.
If you are a marketer or business owner, you want analytics you can trust. You also want ad platforms to learn from the actions of your customers, and you want fixes to take just couple of minutes. A good analytics tagging strategy gives you that.
What is analytics tagging?
Analytics tagging means choosing the actions you want to track, giving each action one clear name, and setting up tags so those actions are sent to your analytics and ad tools with all the necessary details. Each action becomes an event with parameters that explain context and value. A purchase carries value and currency. A form tells you if it was started or submitted. A video stores title, time, and percent watched. When names and parameters stay consistent, your reports stay comparable, and your team gets clear insights into customer data.
To make this work, most teams manage their events with Google Tag Manager (GTM). In GTM containers you can create tags for GA4, Google Ads, Meta, LinkedIn, TikTok, and other platforms, whether you use only client-side tagging or add server-side tracking for more control and reliability. The browser setup sends data straight to platforms, while the server setup adds an extra processing step for more accuracy, control, and privacy benefits. This is also where you can set up cookieless tracking in Google Analytics 4, making your data more resilient against browser restrictions while keeping reporting consistent. The principle stays the same across both setups: choose actions that directly help you answer business questions, use the same event name for the same action in every tool, and include parameters that give enough detail to understand the action. For example, if you track purchases, use “purchase” as the name in GA4, Google Ads, and Meta, and always send order value and currency as parameters. This way, your reports match, and you can compare results between platforms without confusion.
How does data tagging work?
Data tagging works by tracking an action, triggering a tag, and sending the event to a destination platform. Think in three layers: a user acts, a tag listens, and a destination receives the event.
First, there is an action: a click on a button, a form submission, a product view, or a payment. Your site pushes details into the dataLayer or makes them available for GTM to read. Triggers check if the action matches your rules. If it does, a tag fires and adds the parameters you’ve configured. These parameters can include value, currency, item_id, page_location, coupon, or any other details coming from the dataLayer.
The tag then sends the event to a platform like GA4, Meta, Google Ads, or to your server container. If you have server-side tracking in place, the event is processed in a cloud server before it is sent to ad and analytics platforms. This flow also helps with privacy-friendly methods like cookieless targeting.
That’s the cycle. Action → trigger → tag → destination. Every event you track will pass through this same sequence.
Why create a website tagging strategy?
If you run tags without a plan, over time, you end up with duplicates, unclear names, and reports that don’t match between tools. It becomes harder to know what’s really happening and even harder to fix.
A simple strategy can change that. It sets one naming standard, lists the events that matter and the parameters they need, and explains who owns which tags and how changes are shipped. A tagging strategy keeps everyone aligned.
With a clear framework, you can work faster. When you add a new page, you reuse events you already have. When you launch a new campaign, you map it to the same parameters you use everywhere else. This way, ad platforms get the same values every time, and their optimization works better. Keeping all consent rules in one place makes it easier to update them and reduces the risk of mistakes.
A strategy also helps you decide what not to track. If an event does not help you make a decision, you remove it. That means fewer things to manage and more time for important things.
3 steps to create a tagging plan
When creating a tagging plan, you want a simple guide your team can open on a busy day and follow without having to come back to you. It should say what to track, what each event is called, which details to send, and where the data goes.
The three steps below take you from business goals to a tested setup you can use. When something changes later, you will only update the document with your tagging plan, and everything else will stay in sync.
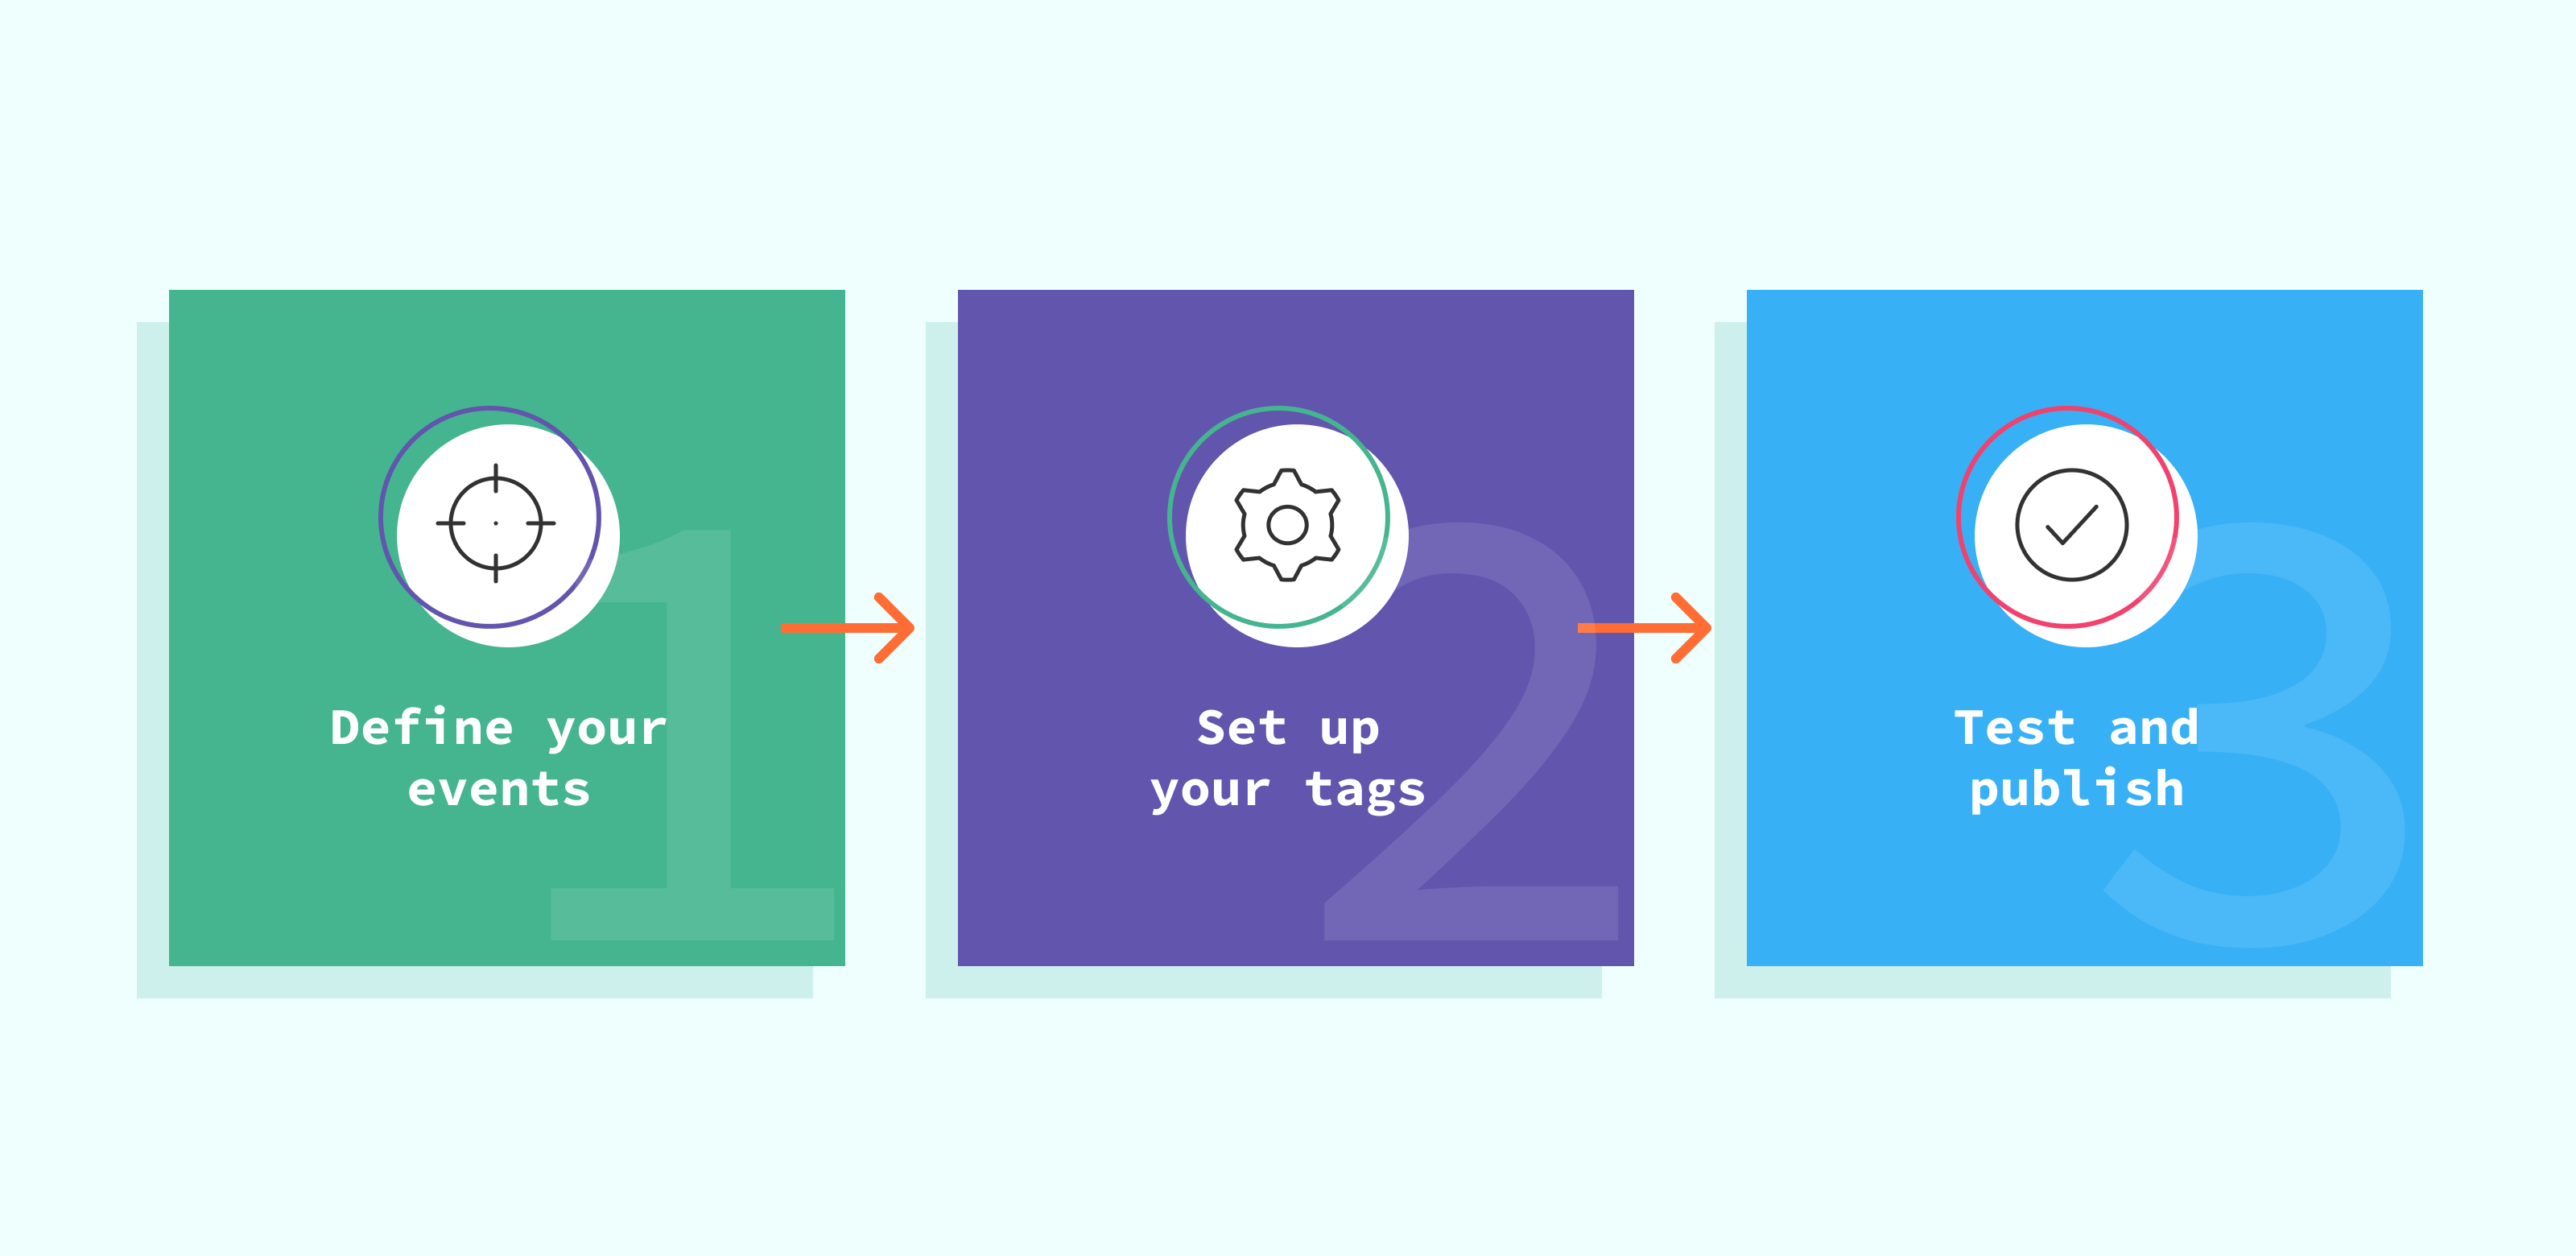
Step 1. Define outcomes and map events.
Start from outcomes you care about. A paid order, a booked demo, a qualified lead, a trial activation? For each outcome, write the path of micro events that lead there. For Ecommerce, that is view_item, add_to_cart, begin_checkout, purchase. For lead generation, that can be view_content, generate_lead, schedule_call. For a deeper look at turning those leads into customers, see our lead acquisition guide.
Then add the parameters that make the event useful: value, currency, where the product was shown on your site (for example, search_results or homepage_recommendations), transaction_id, coupon, and content_ids when relevant.
Step 2. Set taxonomy and governance.
Choose one naming standard and keep it the same everywhere, so events and parameters mean the same thing across GA4, Google Ads, and Meta. Use lowercase with underscores for names like purchase, generate_lead, value, and currency, and write a short definition for each event that explains when it should fire and which parameters are required, including formats such as ISO currency codes and numeric values without symbols.
Decide who can add, change, or remove tags.
Add clear consent rules that state which tags wait for analytics consent and which wait for marketing consent, and prevent duplicates for revenue events by using a unique transaction_id and checking that it has not been seen before, even on page reloads.
Finally, set allowed values for key fields so validation is straightforward and mistakes are seen early.
Step 3. Implement and test across environments.
Start with variables so the data you need is available, then set triggers to define when an event should fire, and finish with tags that deliver the event to each tool. Then test in GTM preview and in platform diagnostics with real values, and check how tags behave when a user does not give consent.
When the flow looks right, publish to staging and compare event counts and parameter fill rates with your baseline, then promote to production with a clear version name and description, keeping a rollback version ready in case results shift after release.
Before you publish, confirm the version name and description in GTM, verify that staging and production keys are correct, click through key flows to check consent behavior, refresh the thank-you page to confirm purchase deduplication, and open GA4, Meta, and Google Ads diagnostics to see the required parameters for each event.
Main data tagging tools
Most tracking updates happen in the web container, which you manage through GTM. When you need more reliable delivery and better control over what data is sent, a server container in Server GTM adds that extra step before events reach each platform. Stape Gateway then provides a managed connection for GA4 and Google Ads, helping you set everything up quickly and reduce the amount of ongoing maintenance. From there, Conversions APIs for Meta, TikTok, and other platforms send conversions through server endpoints, making sure they arrive even when browser tracking is blocked or limited.
For analytics, GA4 works well for most teams. If you want more reliability, you can set up GA4 server-side tracking with Stape Gateway, which ensures conversions are delivered even when browser tracking is blocked.
Once your tracking setup is in place, you can use debugging tools such as Tag Assistant, Meta Test Events, TikTok Events Manager, or the browser console to check if events are firing correctly. After testing, tools like Tracking Checker by Stape helps you see if everything is all right with your setup.
Before launching, mark your key GA4 events as conversions and confirm that values match correctly. In Meta, pass parameters like content_type and content_ids to improve dynamic ads and audience matching. In Server GTM, log both incoming and outgoing requests so you can easily see if data is missing. In Stape Gateway, use presets for GA4 and Google Ads to avoid manual errors and keep settings consistent across environments.
What to include in your tagging plan?
A good tagging plan is short and practical. It lists the outcomes you want to measure and the events that prove them. Each event has a clear name, a short description of when it should fire, and the parameters it needs, such as value, currency, or transaction_id. Trigger rules are written in easy language so anyone can follow them. For example, a purchase fires on the thank-you page only when a new transaction_id is present.
Your plan should also describe consent behavior for each tag group. It should set rules for data quality, including the allowed values and formats for important fields. Every destination for your events needs to be mapped, whether it is GA4, Google Ads, Meta, TikTok, your CRM, or a warehouse, and assign ownership so it is clear who can add, change, or remove tags.
To maintain accuracy, include test cases for critical events to confirm your setup works after any changes. Prepare rollback steps to restore a previous version if something breaks, and keep a change log with dates and authors to track all updates. Finally, archive unused events and update parameters as platforms or product flows change to ensure your tagging remains accurate over time.
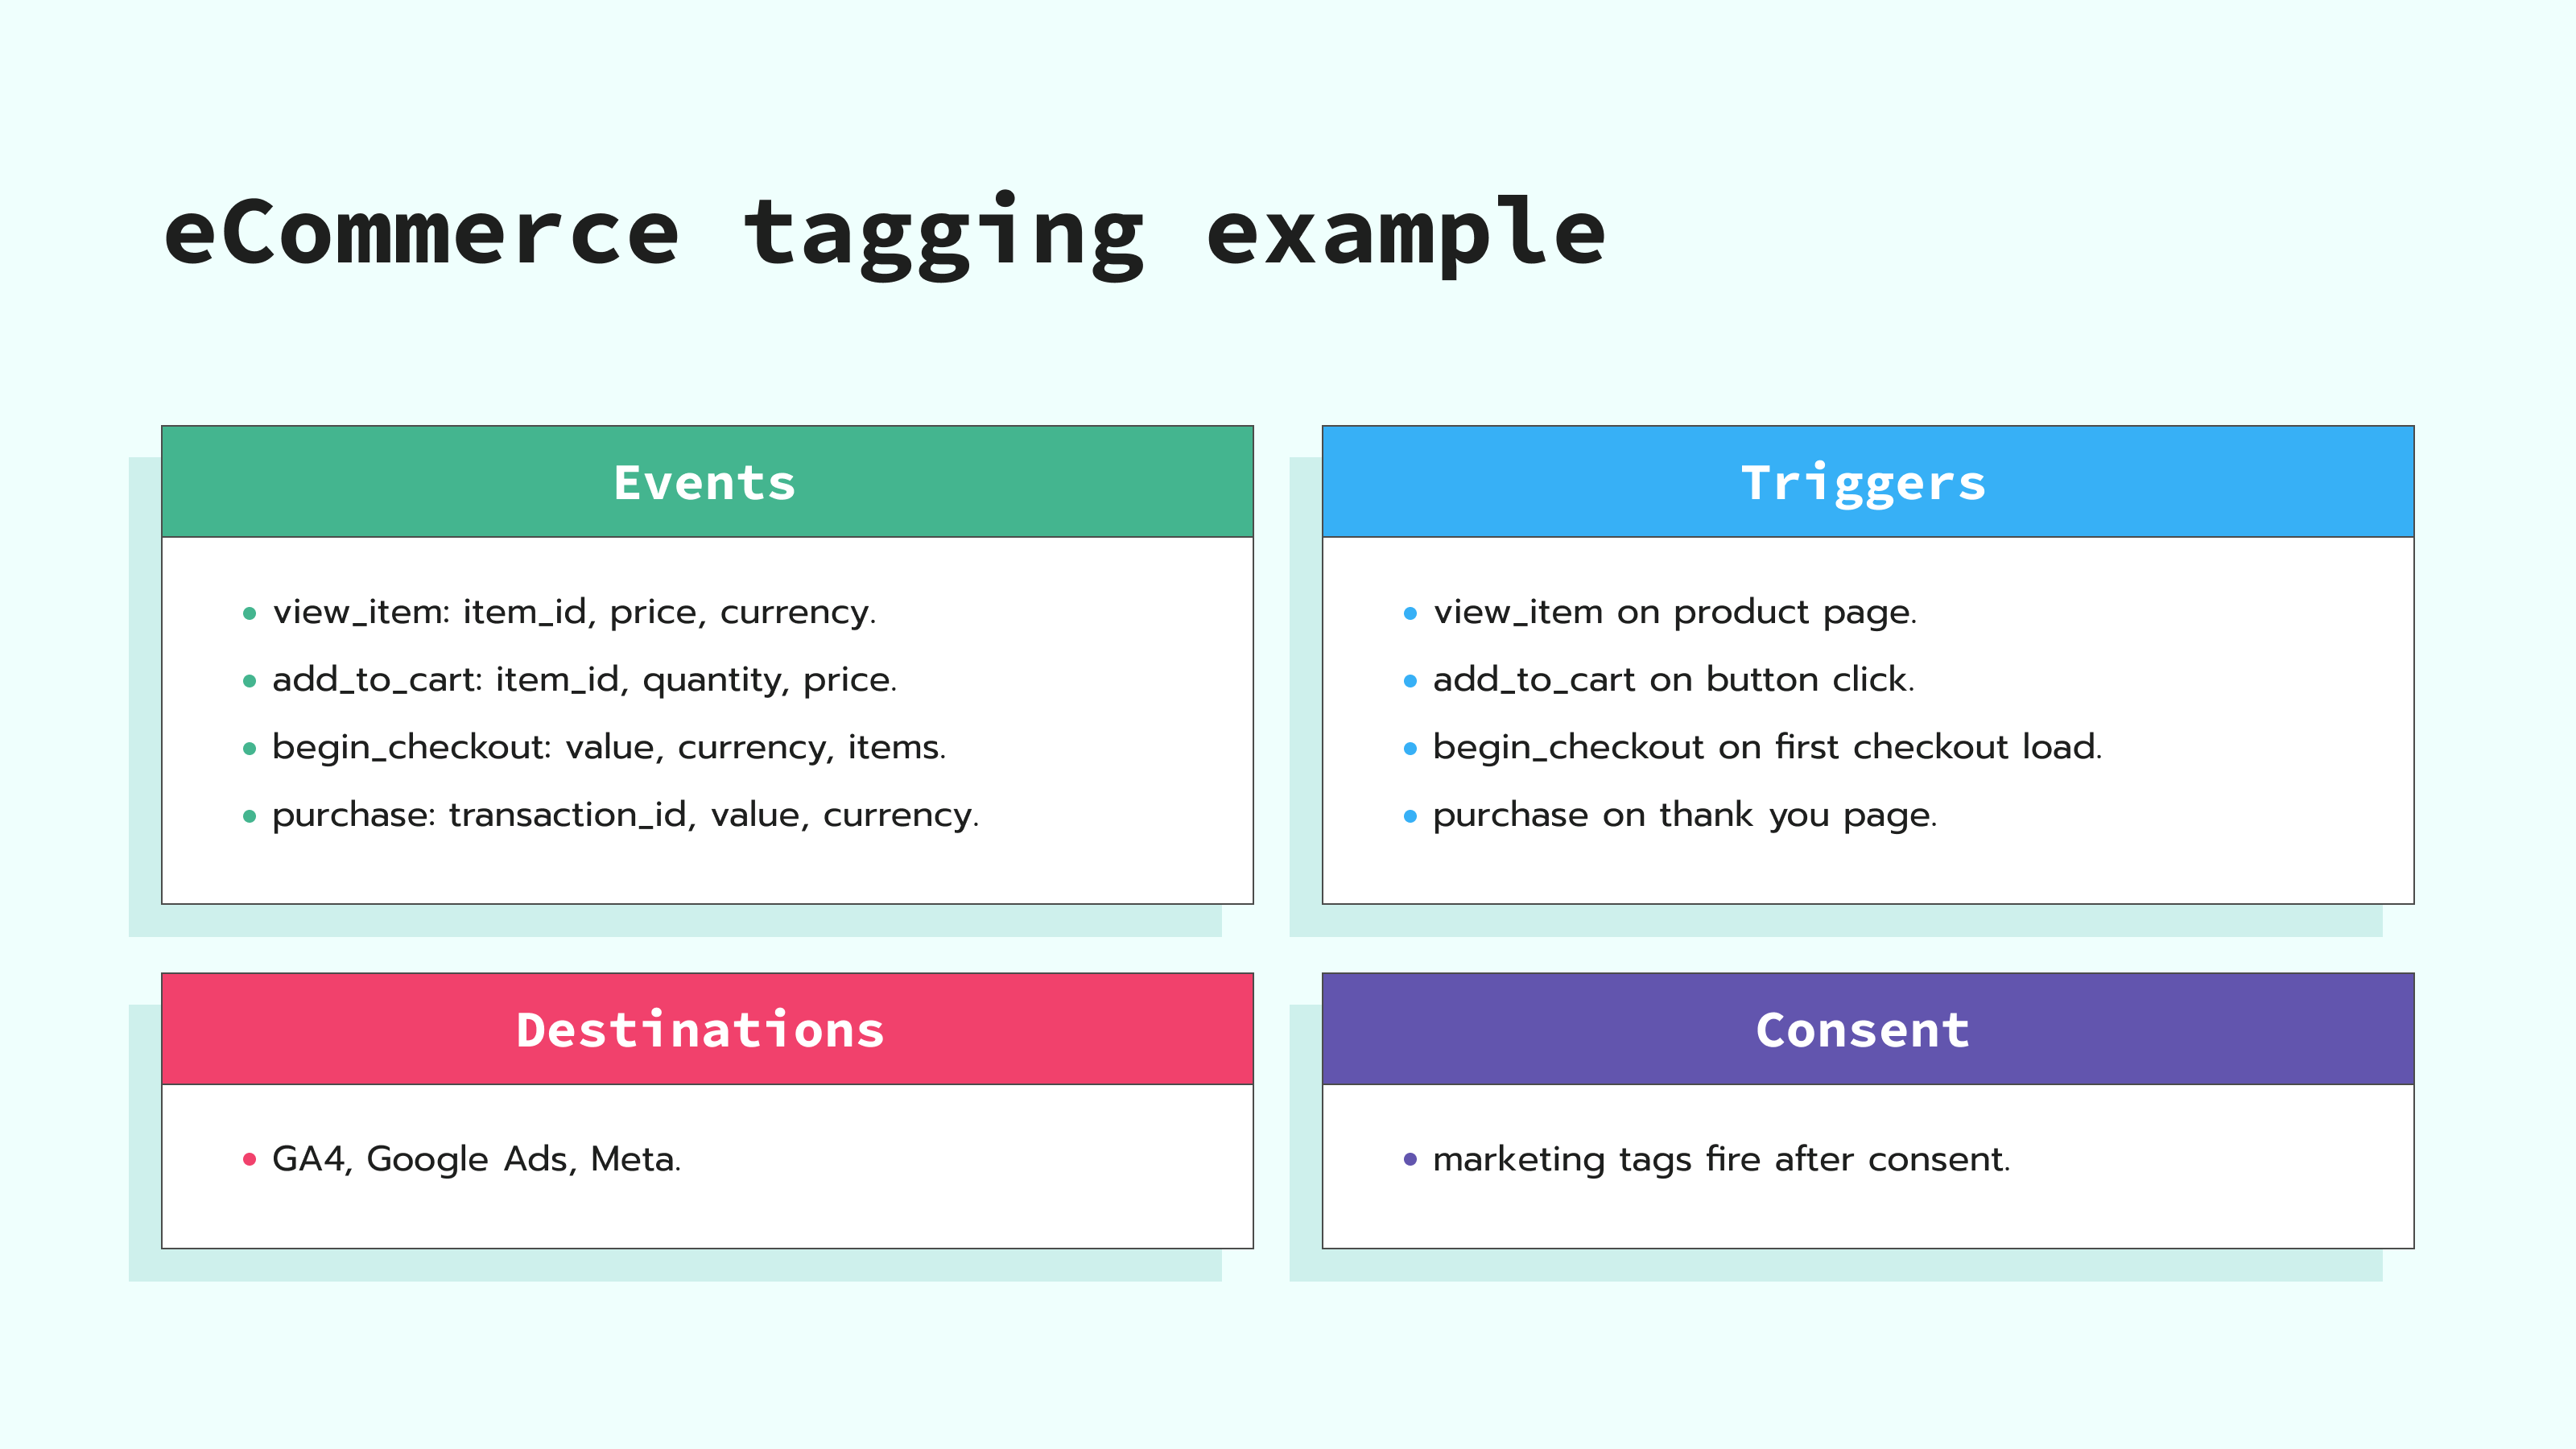
Tagging strategy example
This template is a simple starting point for Ecommerce tracking. It keeps GA4, Google Ads, and Meta using the same event names, and sends purchases through server GTM with one transaction_id, so reports match. Consent and monitoring are set up from the start, making it easier to handle privacy updates and platform changes. Add it to your plan, edit the events, currencies, and policies for your store, and you’ll spend less time fixing problems.
Scenario
An Ecommerce site sends events to GA4, Google Ads, and Meta, and builds dashboards in Looker Studio. The goal is steady bidding signals, clear reporting, fewer last-minute fixes, and faster changes.
Outcomes
Purchases are tracked with value and currency so that GA4 can show the average order value. Lists of past visitors are created based on what products they looked at and how recently they visited, so ads can bring them back to buy. Over time, you can see if these visitors are becoming more likely to purchase or if your ads need adjusting.
Core events and parameters
- view_item with item_id, item_name, category, price, and currency.
- add_to_cart with item_id, item_name, quantity, price, and currency.
- begin_checkout with value, currency, items, and coupon.
- purchase with transaction_id, value, currency, items, shipping, tax, coupon, and affiliation.
Triggers
- view_item fires on product detail when item_id is present.
- add_to_cart fires on the button click and when the cart quantity increases.
- begin_checkout fires on the first load of the checkout page.
- purchase fires on the thank-you page when a new transaction_id appears.
Destinations
- GA4 receives all events for reporting.
- Google Ads receives purchase and begin_checkout for bidding, which helps improve PPC performance.
- Meta receives view_content, add_to_cart, initiate_checkout, and purchase from the same triggers, so event names stay the same across platforms.
Consent
Marketing tags only run after the user gives marketing consent, and they also follow the rules you’ve configured in your setup. The same goes for analytics tools that follow the consent rules you set. Always check the laws in your region, like GDPR in the EU or CCPA in California, and the privacy rules of the platforms you use. Then test both consent-given and consent-declined paths to ensure that the setup works according to the user's consent status.
Implementation notes
- Use the same item IDs on your site, in GA4, and ad platforms so events match.
- Hash user identifiers before sending them to the server if required by privacy laws or by the rules of the platforms you use.
- Send purchases through the server GTM and forward them to Meta and Google Ads with the same transaction_id to get more accurate GA4 and GAds server-side tracking and better campaign performance.
- Track events in the browser and send the same events through the server if the platform recommends combining both methods. In that case, make sure deduplication is set up correctly. For Google Ads, create separate conversion goals if needed. If you send everything into one goal without deduplication, you’ll end up with overreporting.
- Log both incoming and outgoing requests in the server GTM.
- In Stape Gateway, use presets for GA4 and Google Ads so you don’t need to change the settings yourself each time.
Monitoring
- Use Tracking Checker by Stape to analyze the tracking health of your website and understand how to improve tracking quality for both web and server-side tracking.
- Use the Monitoring feature to set up alerts that notify you if the number of purchases in a day drops below your usual level. This helps you spot tracking problems or sales issues quickly.
Audience example
Build an audience of people who viewed two or more products but didn’t purchase within seven days. Leave out recent coupon users, since they are less likely to pay full price again soon. Show a special offer only for products where the profit after costs is still good, so you spend ad budget where it can actually bring in revenue, and help platforms learn faster.
Common analytics tagging mistakes to avoid
Small tracking mistakes can build up over time and cause big problems in your reports. Here are the most common ones to watch for, and how to keep your data clean from the start.
No ownership
When no one is responsible for managing tags, they can be changed or broken without anyone noticing. Make sure someone in your team is in charge of reviewing all tags regularly.
Event overload
Creating too many custom events makes reports hard to read and understand. Start with a small set of important events, and add more only when there’s a reason.
Inconsistent names
Using different names for the same action splits your data and breaks reports. Use the same event names everywhere so your tracking stays clear.
Missing consent logic
If tags fire before you have the right consent, you risk collecting data you shouldn’t, and your reports will be messy. Add consent checks and test both consent-given and consent-declined paths.
Double-counted purchases
If purchases are sent twice, your revenue and conversion numbers will be wrong. Use the transaction_id to make sure each purchase is counted only once.
Incomplete or incorrect parameters
Events without important details, like value or item information, give ad platforms less to work with. Always fill in the key fields so bidding and analysis can be accurate.
One-time setup approach
Tracking is not “set and forget.” Platforms update, and your setup needs to keep up. Schedule regular reviews so your setup keeps working as expected.
No staging
Publishing changes without testing them first can break your tracking. Use a test environment and version control so you can check everything before it goes live.
How to measure digital tagging results, based on a case study
There are three things to measure: platform health, business results, and speed of change.
Platform health shows if your setup works as it should.
✅Check tag coverage. See how many key actions people take on your site, like viewing a product or making a purchase, trigger the events you set up to track those actions.
✅Check event accuracy. Make sure each event includes all the details you decided to track, like product name, price, and currency.
✅Check delivery reliability. Compare how many events reach the platforms with how many were sent from your site.
✅Check privacy compliance. Confirm all events follow consent rules when they come from actual people using your site, not from tests or automated tools.
Business results show whether having more accurate data improves your sales or helps you reach your other goals.
✅Watch conversion contribution. See how many purchases, leads, or sign-ups happen after you update your tracking to keep the data accurate as your site and platforms change.
✅Watch cost outcomes. Check if your CPA or ROAS changes after making sure each tracked event has all the correct information, such as product ID, price, currency, and other details. Better data helps platforms spend budget where it brings more value, which is key if you want to improve Google Ads performance.
✅Watch audience quality. See if lists of people who have already visited your site get bigger and lead to more sales when the event details you send stay consistent.
Speed of change shows how fast you can act.
✅Track the time it takes to add a new event, fix a broken tag, or detect an outage. If these numbers go down, your setup works well. If they go up, look for blockers.
Keep it visible with a small dashboard.
✅Create a small dashboard with event counts, parameter fill rates, and before-versus-after conversion numbers to get a simple view of your eCommerce performance analytics.
✅Compare results before and after a new release. Keep a simple diary of what you changed to see if conversions improved.
✅Set targets, such as a 95%+ data fill rate. You want your data to be consistently reliable and not miss important information.
✅Act fast. If numbers drop below your targets, check the same day.
Case study: retail brand moves purchase tracking to the server
The McGen Digital team was sending only browser-based purchase events, which often led to missing data and inconsistent matching. To fix this, they moved both purchase and initiate_checkout to a server route, kept the same transaction_id, and sent user identifiers only when consent was given. Within two weeks, Meta matched more conversions and kept learning stable, while Google Ads received more consistent data for Smart Bidding. This change led to a 22% drop in cost per conversion and an 8.2 out of 10 quality score in Event Manager. Web tags kept tracking activity on the site, while the server route sent the same data to ad platforms.
This approach is a practical example of how server-side tracking works to improve data reliability without changing how on-site analytics run.
Outro
A tagging strategy keeps your analytics reliable and helps ad platforms learn from the actions of your customers. By using consistent event names, complete parameters, and clear consent rules, you avoid messy reports and wasted budget.
And configuring server-side tracking makes conversions more resilient to browser privacy restrictions and ad blockers, so they don’t get lost.
Also, when your tagging plan is documented, tested, and monitored, you spend less time fixing issues and more time acting on clean data.

Comments