A guide on how to set up Google Ads conversion tracking in 2026
In this article, we will discuss everything you need to know about Google Ads conversion tracking: from what it is to how to set it up in the most effective way. Thus, if you are a newbie in the sphere, keep reading from the very beginning. On the other hand, if the word “conversions” does not puzzle or scare you, feel free to hop to the setup guides, valuable insights, and recommendations.
What is a conversion in Google Ads?
In Google Ads, a conversion is any valuable action a user takes after clicking on your advertisement or interacting with it in any other way. In other words, it is the reason you launch any campaign, its goal, and a sign of success. Depending on your business, a conversion can be called:
- purchase;
- registration;
- form submission;
- subscription to a newsletter;
- a download, etc.
Google Ads conversions are an essential metric for any online business. It allows you to understand how successful your product is and adjust your strategic planning accordingly. The more precisely conversions are tracked, the better you can understand how successful everything is going and whether all your efforts meet their goals. Moreover, Google Ads has algorithms that automatically adjust your campaigns and focus on the audiences that are more likely to interact with your ad and drive more conversions, improving your ROI in such a way.
When it comes to the types of conversions Google Ads can track, several types are commonly highlighted.
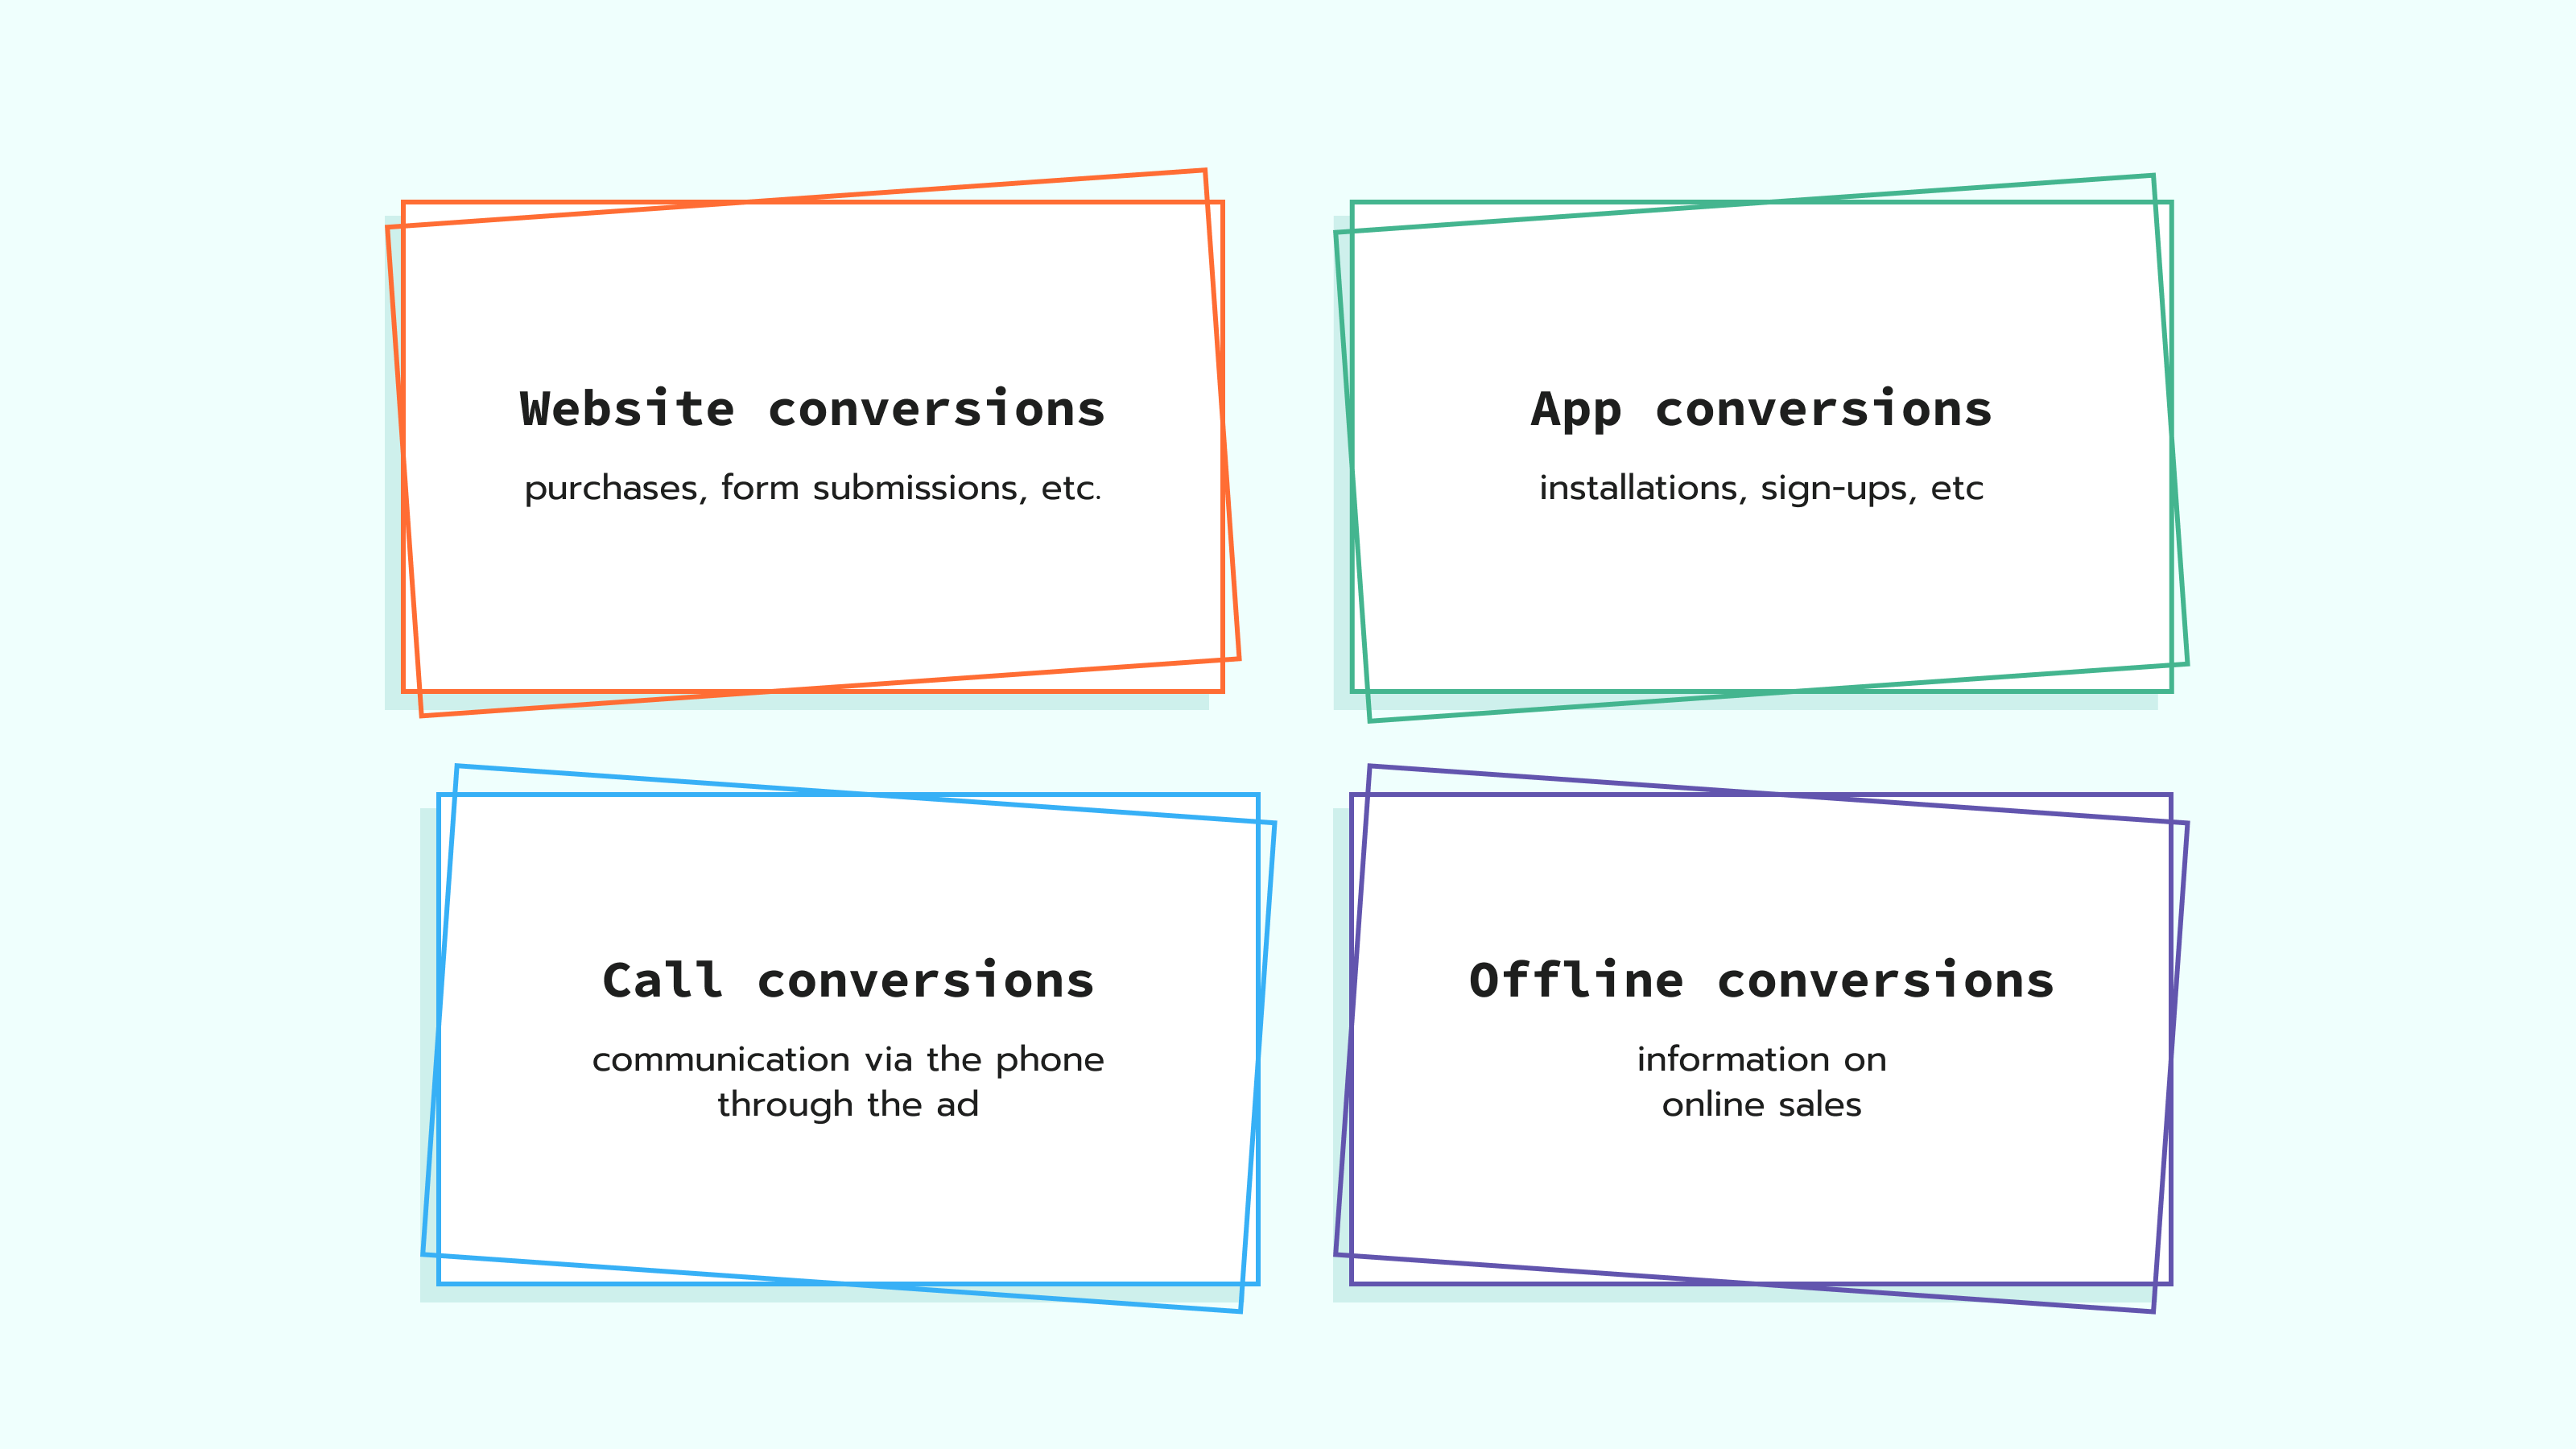
When all the possible information about different types of conversions is combined and analyzed, a holistic picture of how a business operates is created. This is the first and one of the most significant steps in further scaling and development.
What is Google Ads conversion tracking?
Google has developed the Google Ads conversion tracking analytics tool as a means for businesses to get reports on useful actions and user interactions with the ads. Its ultimate aim is to optimize ad campaigns and increase the number of conversions. In other words, track conversions to get more conversions.
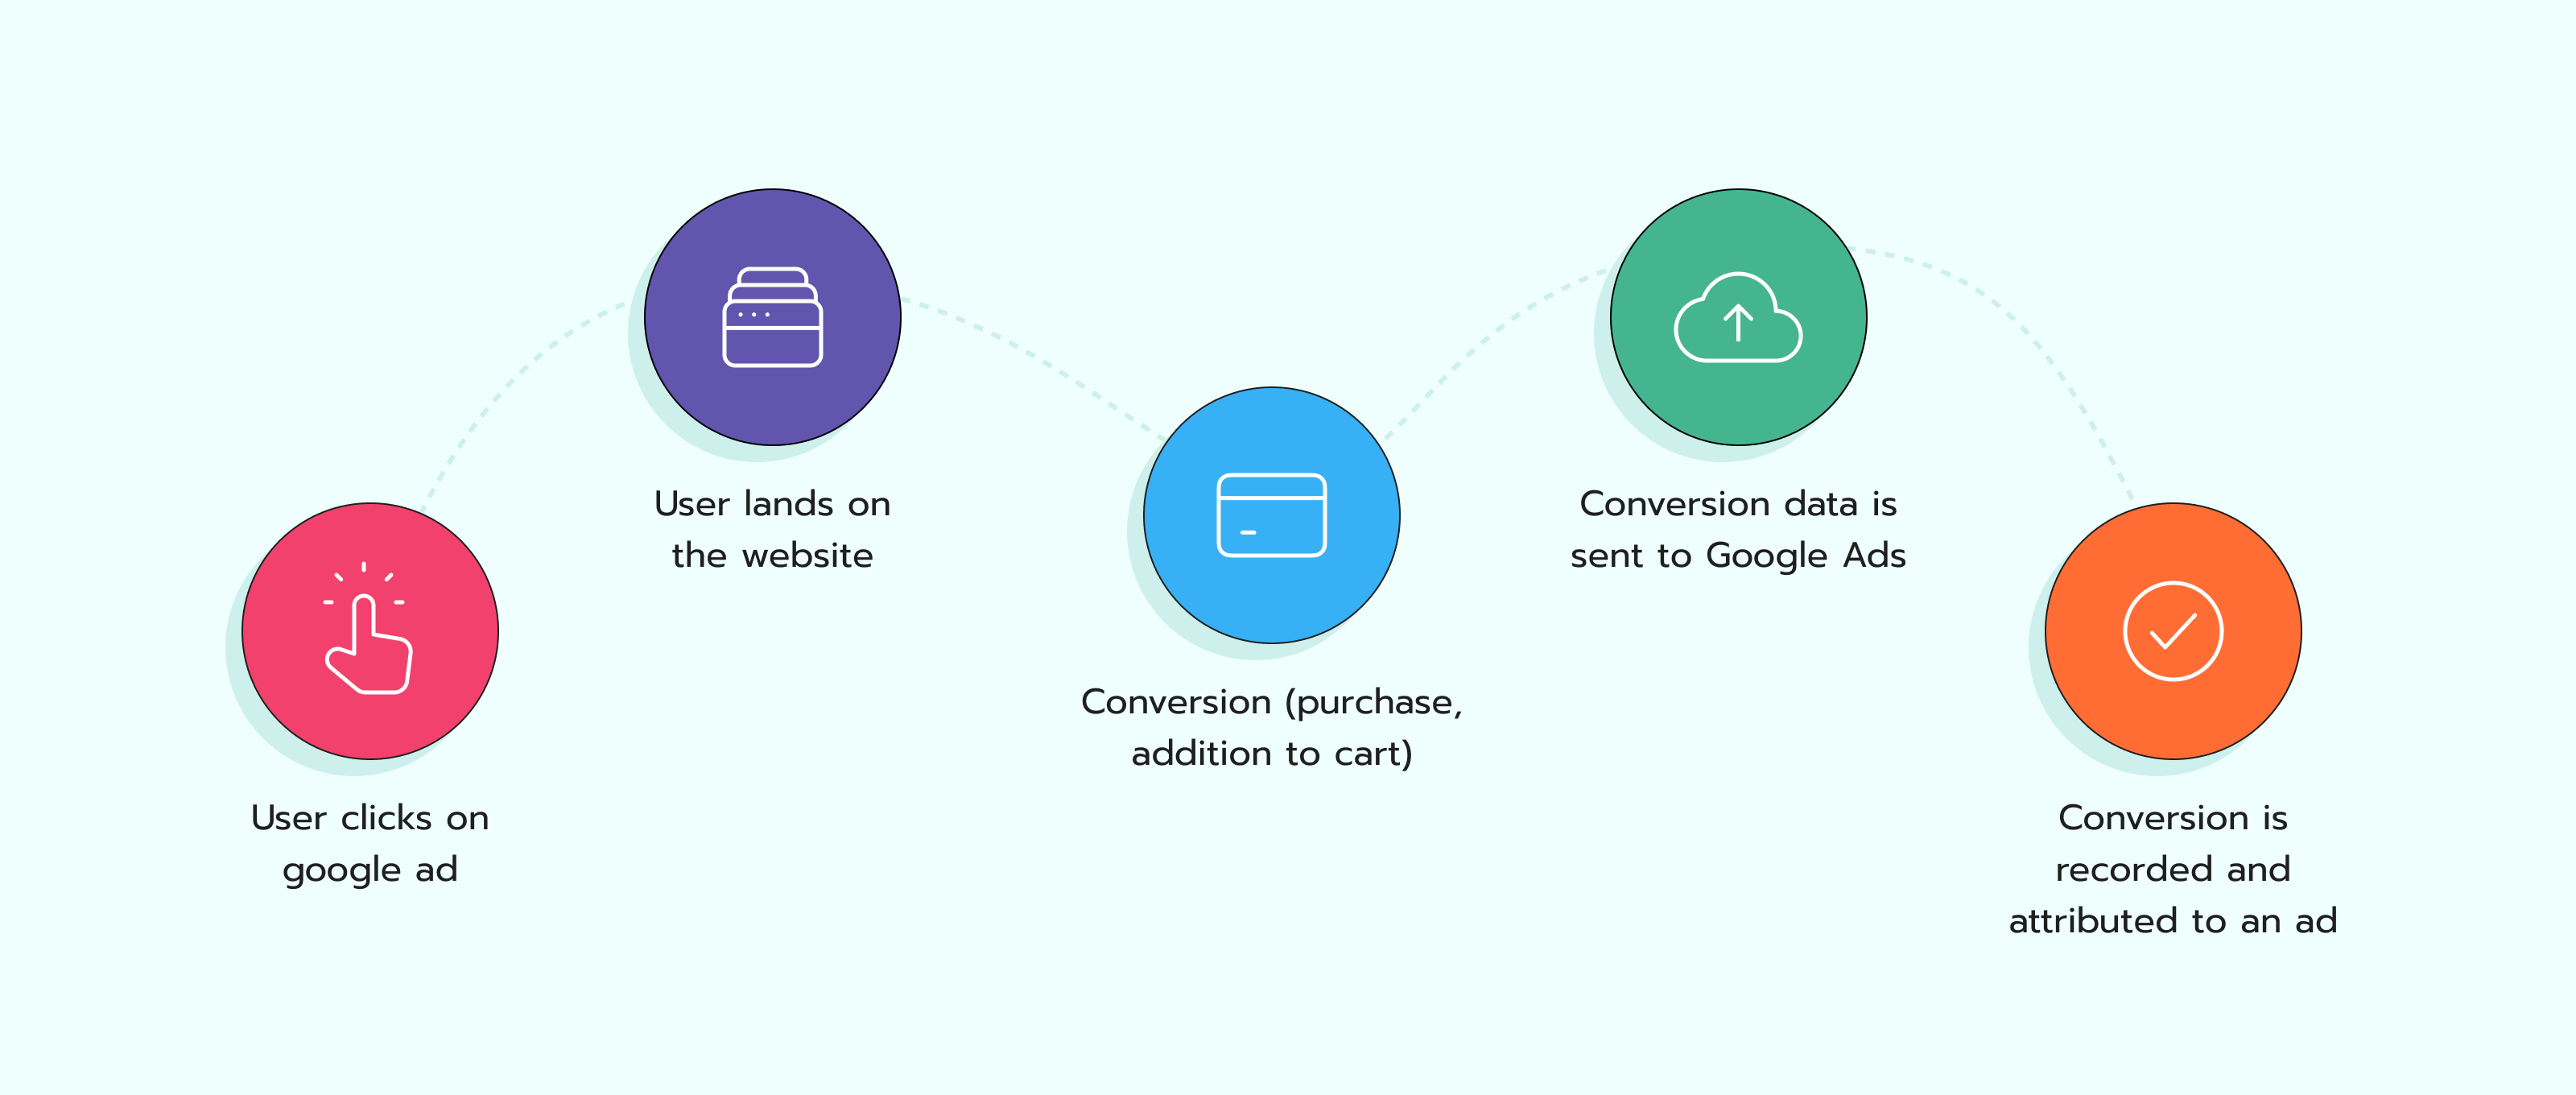
The conversion tracking tool’s activity can be divided into 3 steps, none of which can be ignored if you want to get decent analytical results in the end.
- Set up the actions to track. You need to explain to the tool which actions should be considered conversions: downloads, installs, page visits, etc. This is done via creating a conversion action in the Google Account.
- Set the tags. You cannot proceed without a Google Ads conversion pixel. It should be placed on the page where a user is redirected right after the conversion. This pixel will record the success and share this record with Google Ads. Before you can see your conversion data in Google Ads, your conversion pixel must be correctly placed to record the success. However, if your pixel is active but you're not seeing clicks, the issue might be deeper in your ad tagging. Check our guide on what to do if your click tag is broken to ensure your attribution stays accurate.
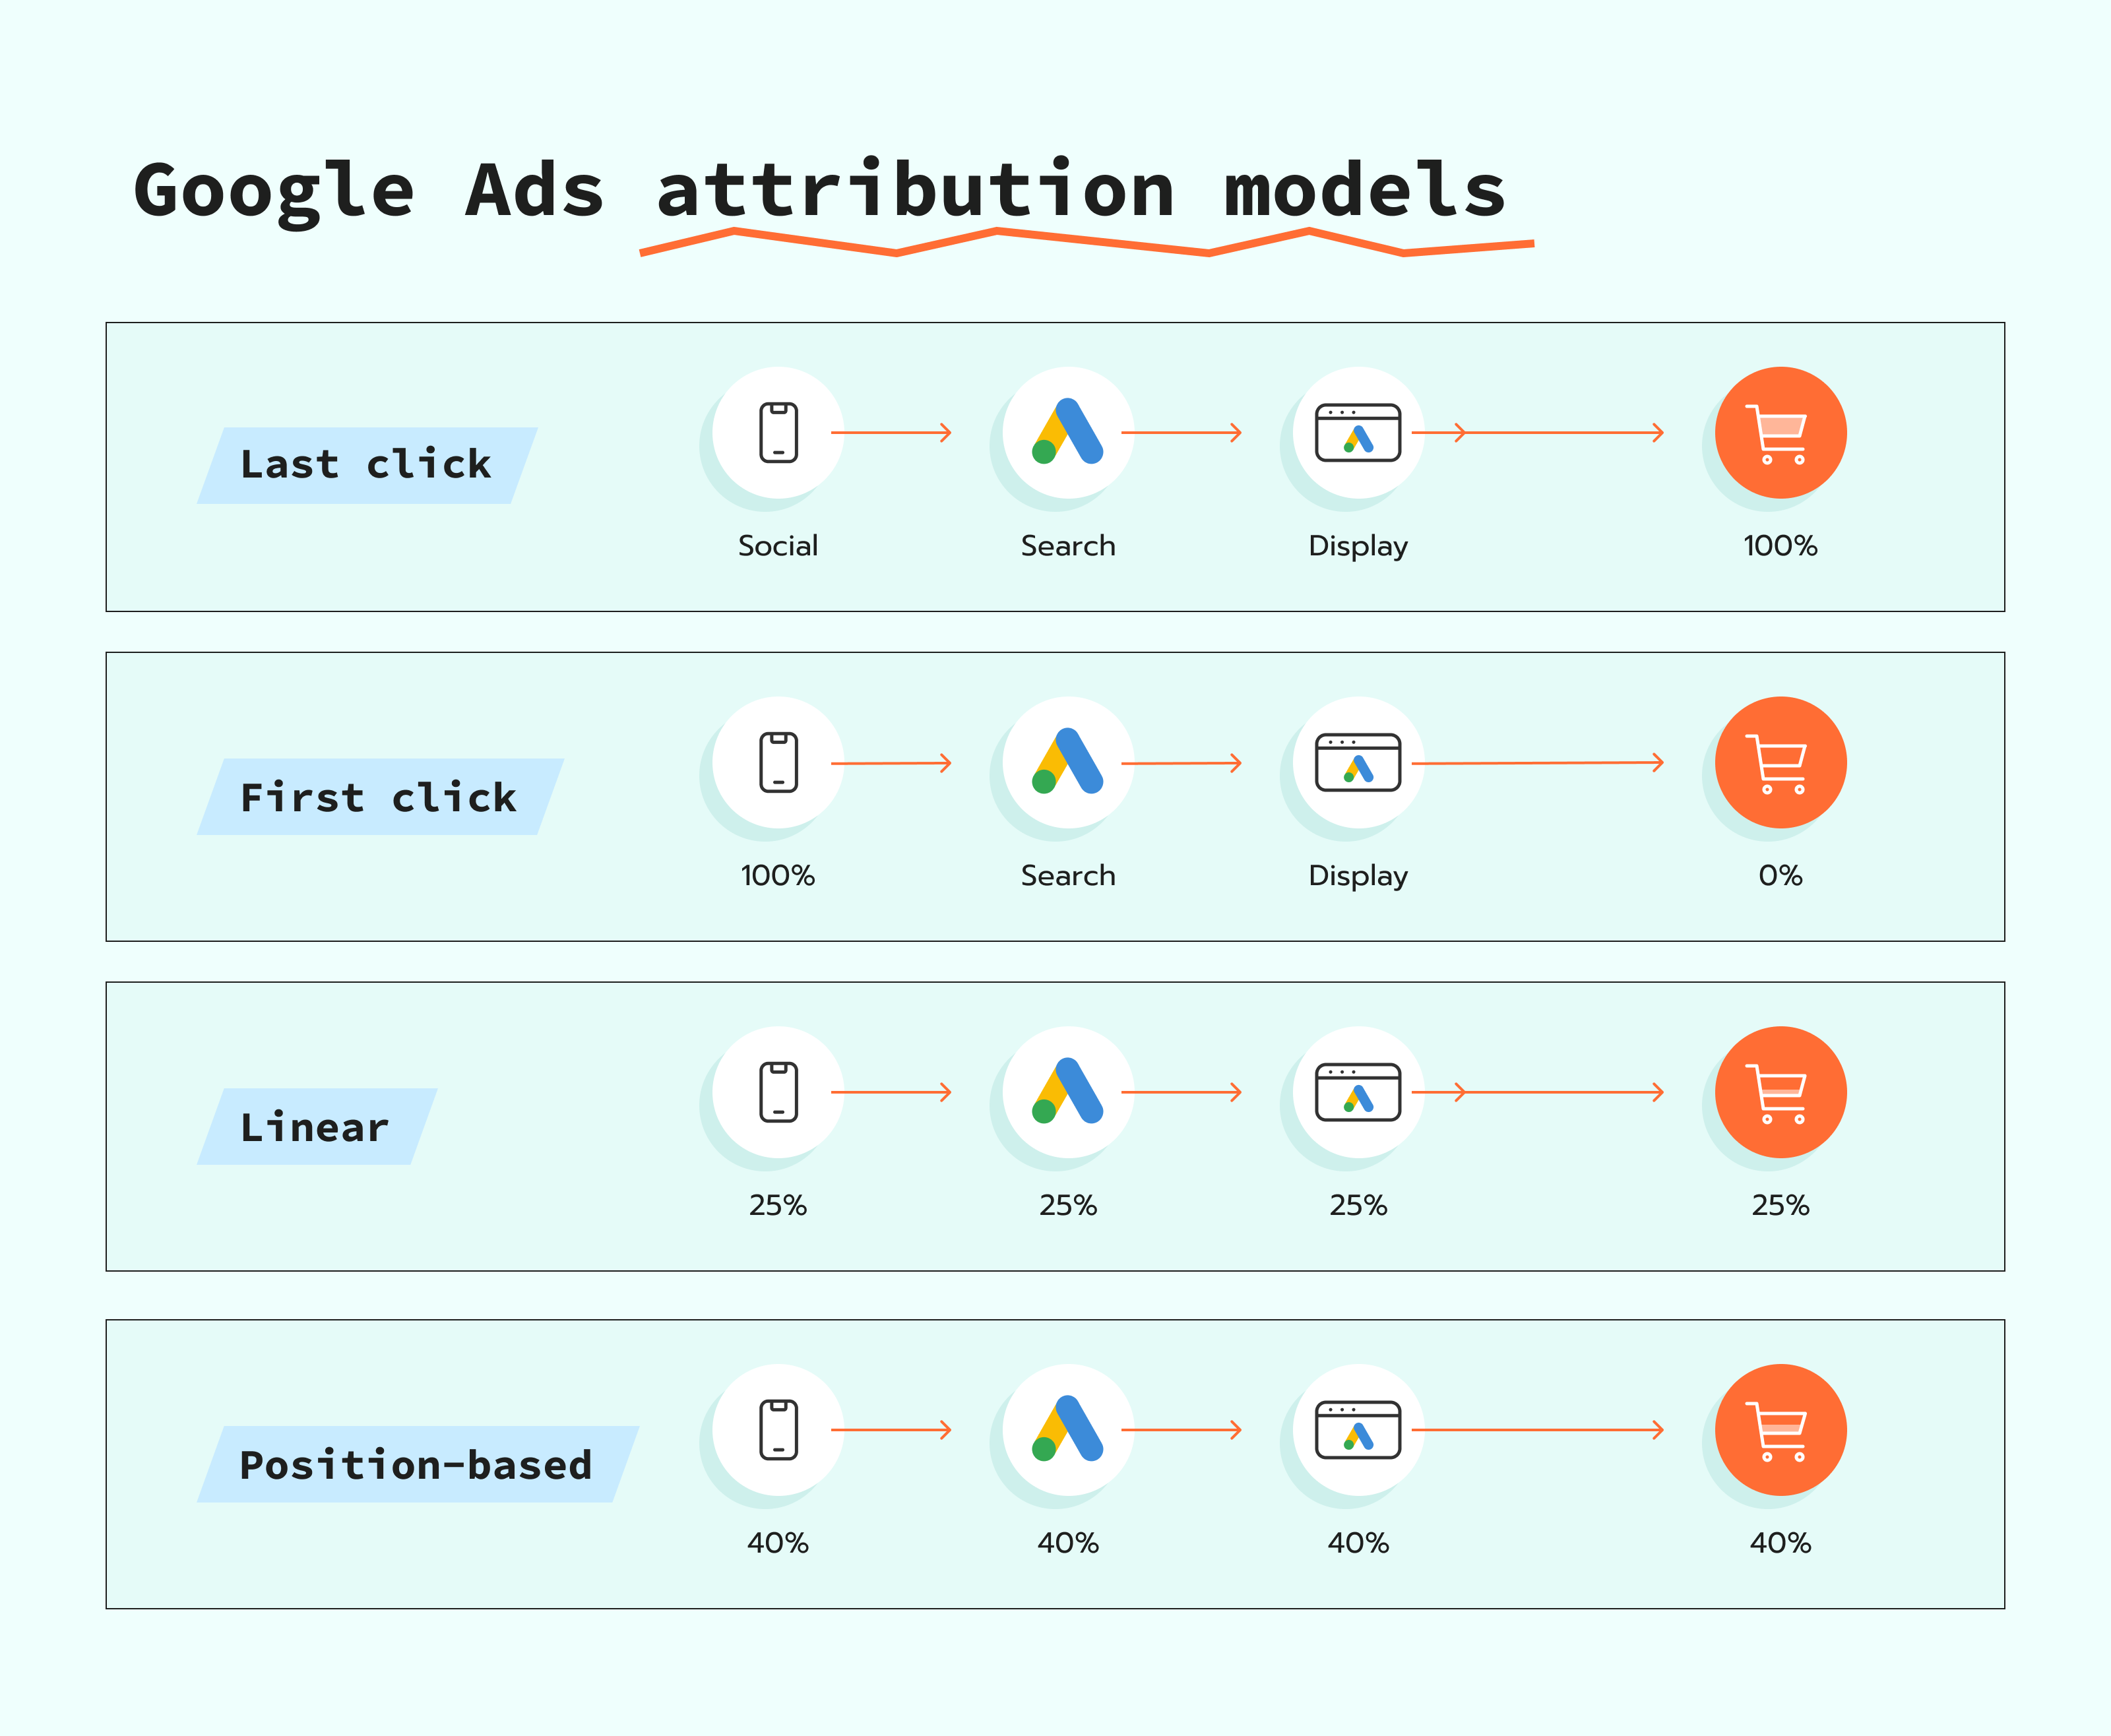
- Attribution process. Google Ads uses attribution models to understand which campaign led to the conversion and reports on it. Based on the selected attribution model, it assigns credit to different ad interactions and helps to identify the most effective touchpoints that can be used for further ad optimization.
An important note: this is not the guide on how to set up conversion tracking in Google Ads; this is a general explanation of the process’s logic. Detailed guides on how to configure it will be provided later.
Benefits of Google Ads conversion tracking explained
Conversion tracking is the only way to measure the effectiveness of a particular ad or advertisement campaign. With its help, marketers can see the exact actions taken by users after clicking on their ad and assess whether these actions correspond with their expectations. If they do not, it signals that something in the campaign or ad should be changed. It is not the only advantage of the tool, nor is it the only reason for its popularity. Below you can find a table with all the benefits and useful features Google Ads conversion tracking provides its clients with.
| ROI improvement | Indirectly, but detailed reports on conversions received from Google Ads conversion tracking influence the ROI. The more detailed analytics marketers have, the better they can optimize the campaigns, and the higher ROI they can get. |
| Automatic optimization of the campaigns | Google Ads has automated bidding strategies for campaign optimization. For instance, you can set a certain CPA or Maximum conversions as your goal, and the campaign will be adjusted to meet these goals based on conversion tracking results. |
| Targeting optimization | Conversion tracking provides useful insights into customer preferences and behaviour, which helps marketers better understand which audiences to focus on to maximize results. |
| Ability to track offline conversions | Google Ads offline conversion tracking is something that people who are only focused on online businesses do not even think of. However, those who also have offline conversions can manually upload a report to the system and consider it in the analytics results. |
| Remarketing opportunities | You can track the steps at which people dropped out of the funnel and later retarget them with another ad or campaign, which will increase the chances for them to finish the conversion. |
In short, conversion tracking in Google Ads is the mechanism that allows businesses to measure, optimize, and tune their advertising campaigns to maximize their effectiveness. It is wrong to say that without conversion tracking any business is doomed to failure, but it definitely makes things more effective.
How do you set up conversion tracking in Google Ads?

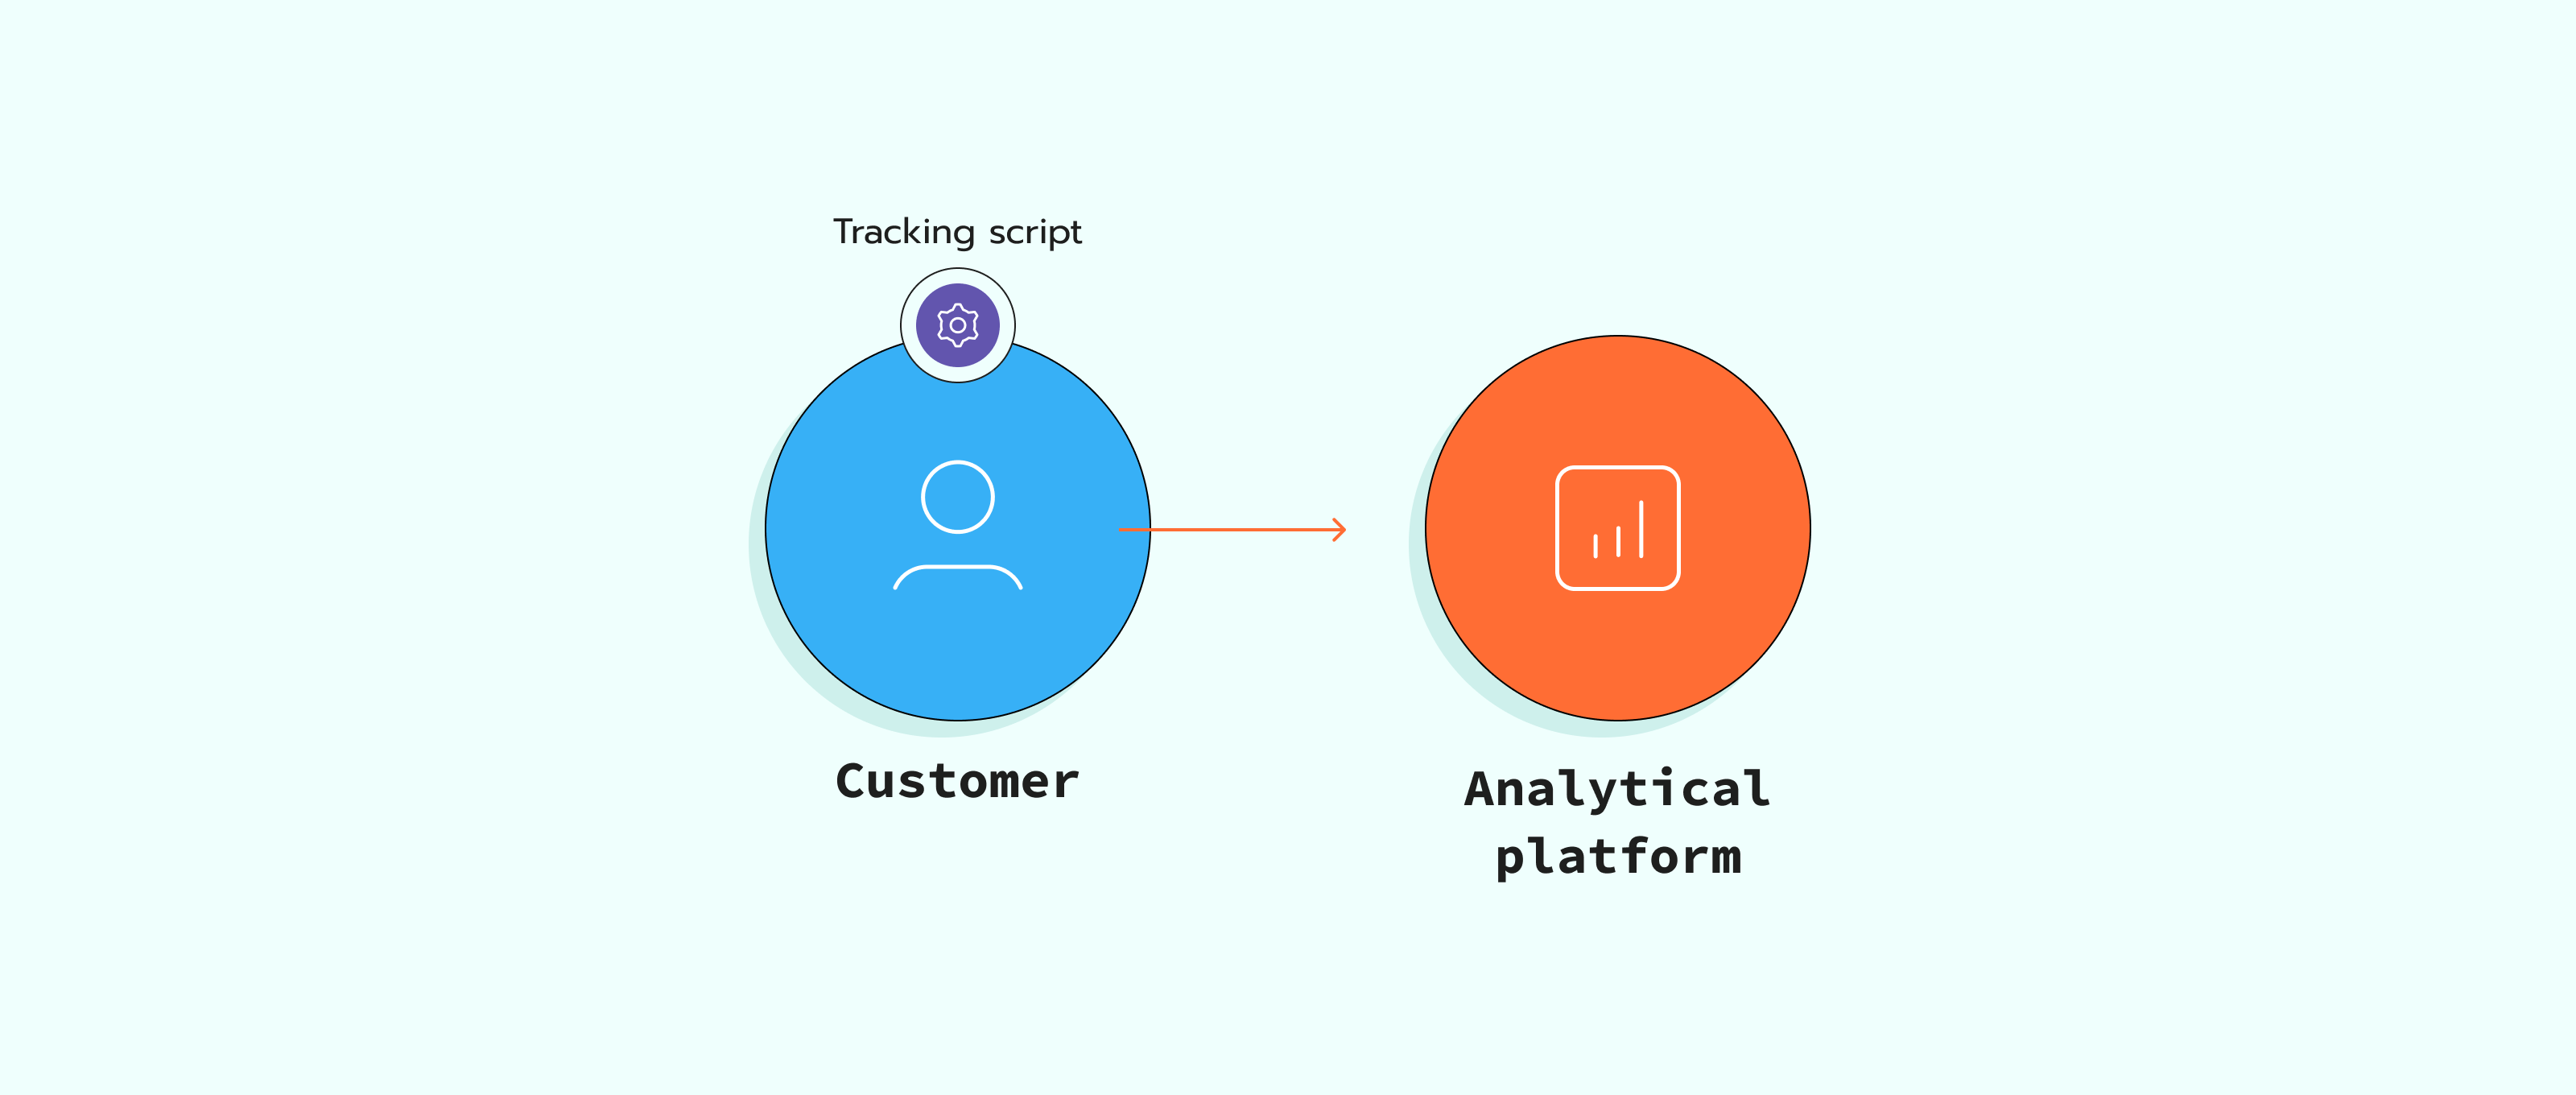
There are two main methods for setting up Google Ads tracking for conversions: on the client’s side and using a server-side tracking setup. Client-side tracking is a more widespread method so far, which involves placing the Google AdWords pixel on the website. Whenever a user does anything, their action is sent to Google Ads directly. This method has a significant downside, though: it can be stopped from execution by ad blockers and browser ITPs, which is why nowadays it is not considered very reliable.
An alternative method that keeps gaining popularity is server-side tracking. The issues mentioned above usually have minimal influence on data integrity when data gathering happens on the server level. First, there are from a few to none tracking scripts requiring execution on the client’s side, and second, data can be adjusted on the server to meet the privacy policies requirements.
Configure Google Ads conversion tracking on the client side
To set up conversion tracking on Google Ads, you need to configure the conversion tracking tag and add it to your website. This tag is often called a tracking pixel, but in fact, its functionality has gone beyond. Calling it a pixel is more like a tribute to traditions. Here is a step-by-step guide on setting it up using Google Ads conversion tracking GTM (the most convenient method as of today).
1. Create a conversion action in Google Ads. Click on the “+” → conversion action, and then select the website where you want to track conversions, and fill in the required details.
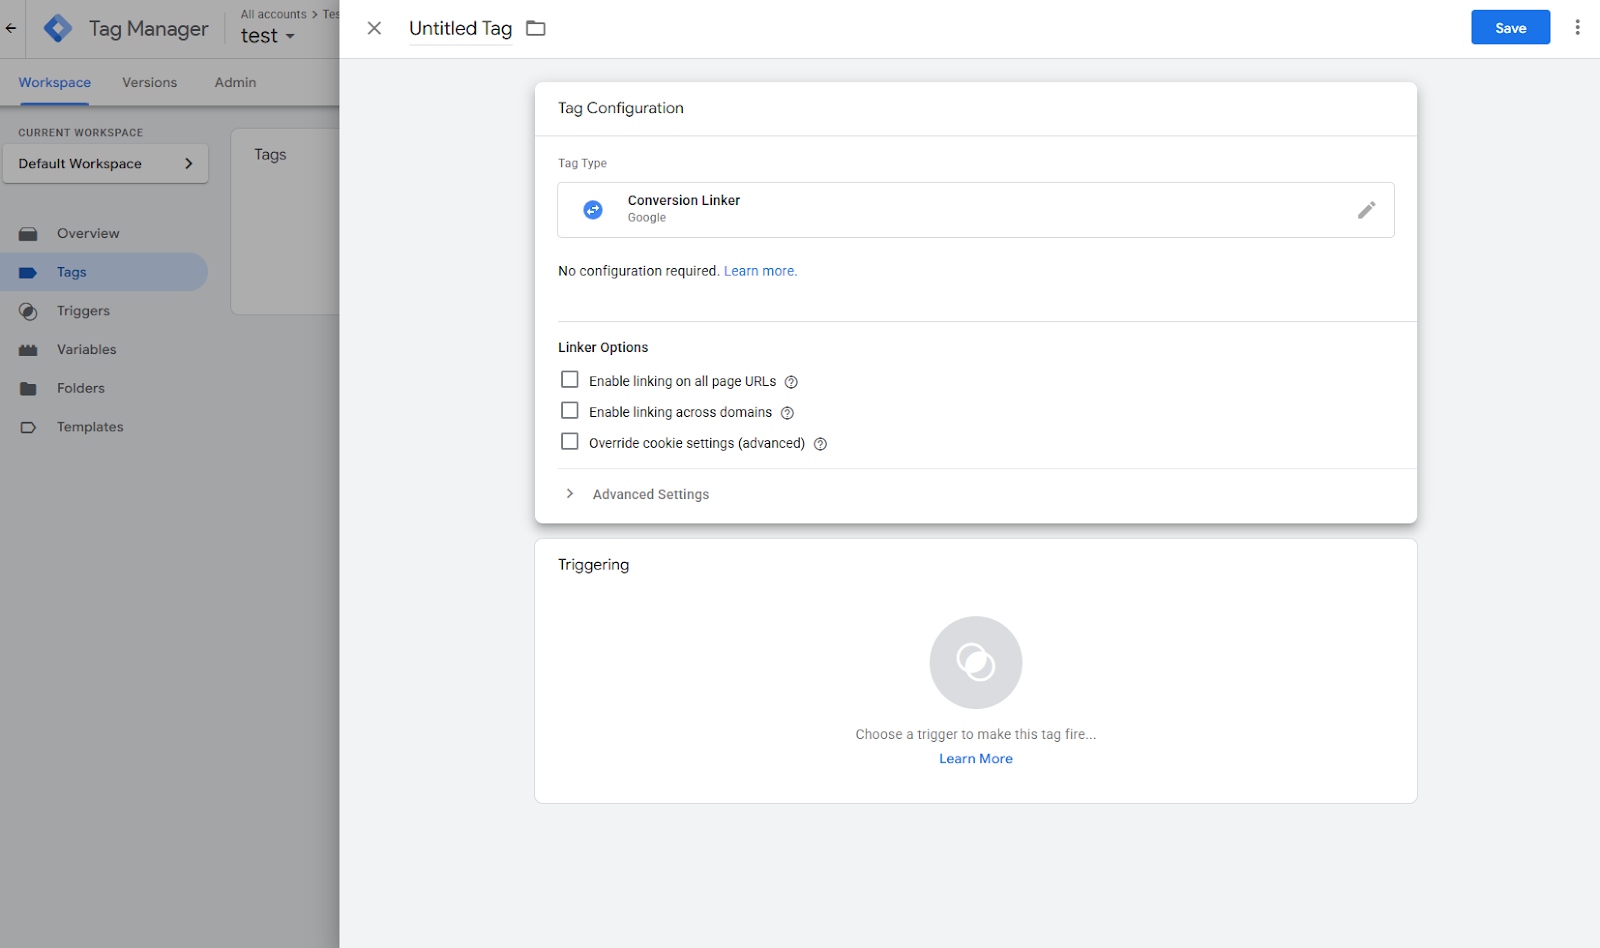
2. Add the conversion linker tag in GTM. It is also essential to set it to fire on all pages. This tag stores the necessary information, such as cookies or local storage items, for further attribution on conversion events.
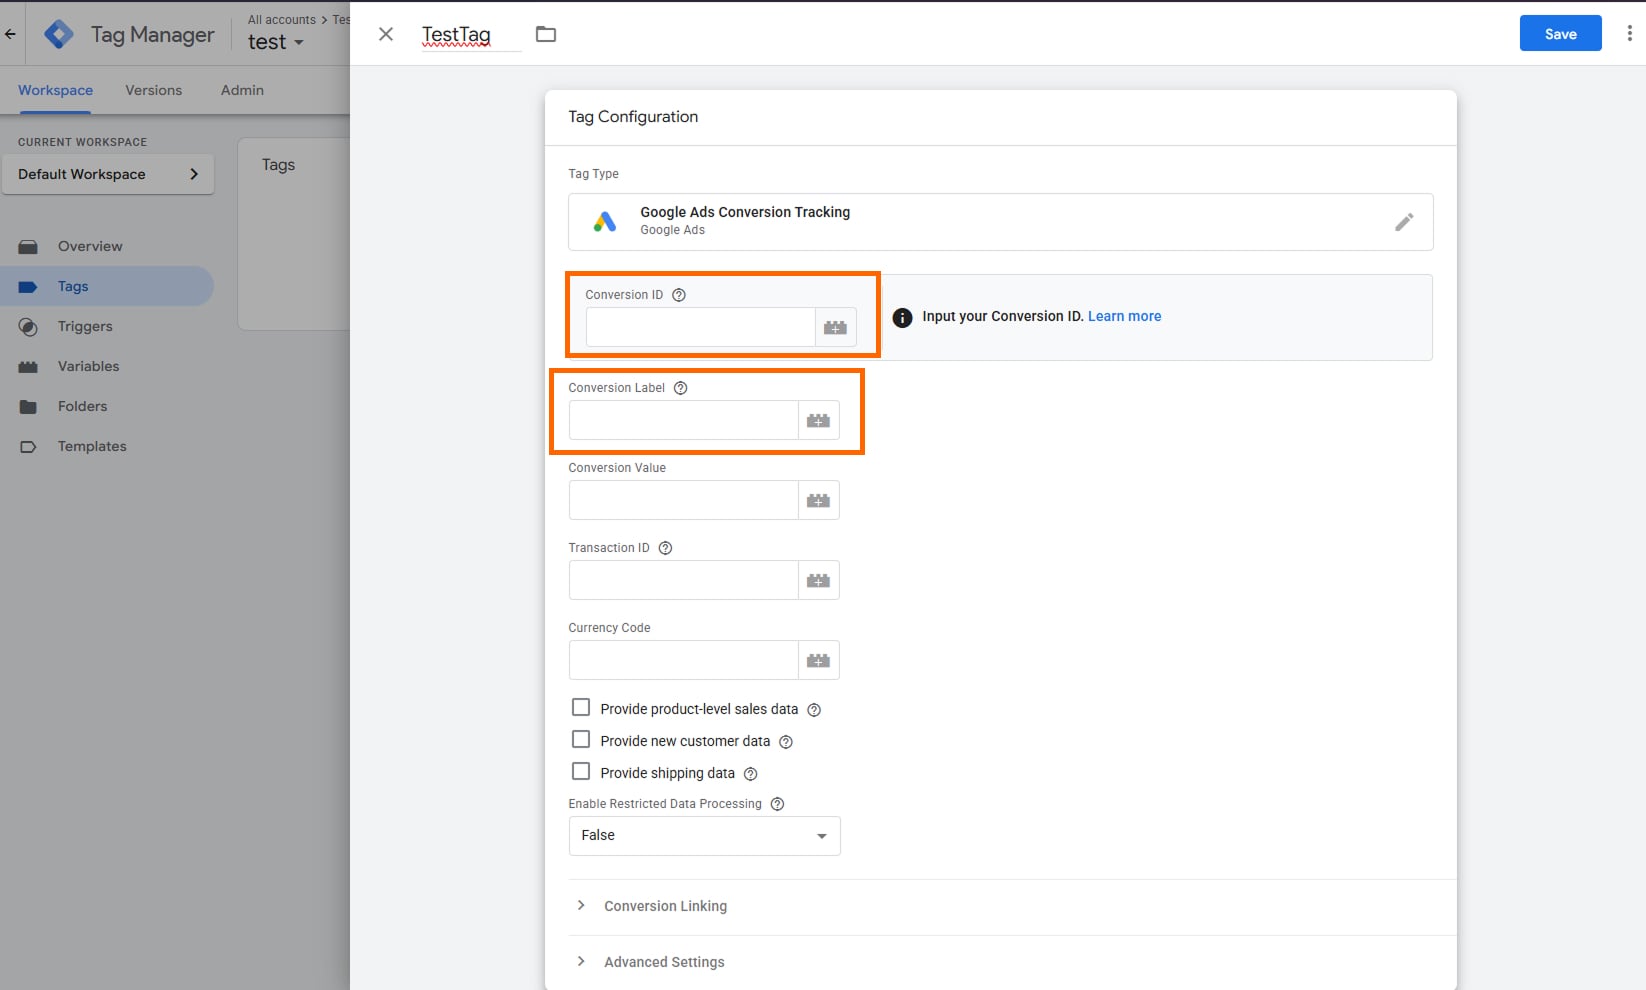
3. Create the Google Ads conversion tag in Google Tag Manager. Log into your GTM account and create a new tag there (Add New Tag button). After you name it, proceed to Tag Configuration → Google Ads Conversion Tracking. Here, you need to paste the Google Ads conversion ID and label. You get both after you create an event in your Google Ads account.
4. Set up the trigger for the conversion. Proceed to triggering and select when you want your conversion to trigger. Here, you can choose one of the existing triggers or create a custom one.
5. Final steps. Save the changes, submit them, and use the built-in GTM preview mode to check if the tag operates correctly and on the needed page.
Google provides valuable hints and guidelines throughout the whole process of setting up Google Ads conversion tracking via tag manager, so even if this is your first time creating an event, you should be fine. We have a more detailed guide on how to set up a web GTM container, so if you have any issues with the process, do not hesitate to check it.
Configure Google Ads conversion tracking on the server side
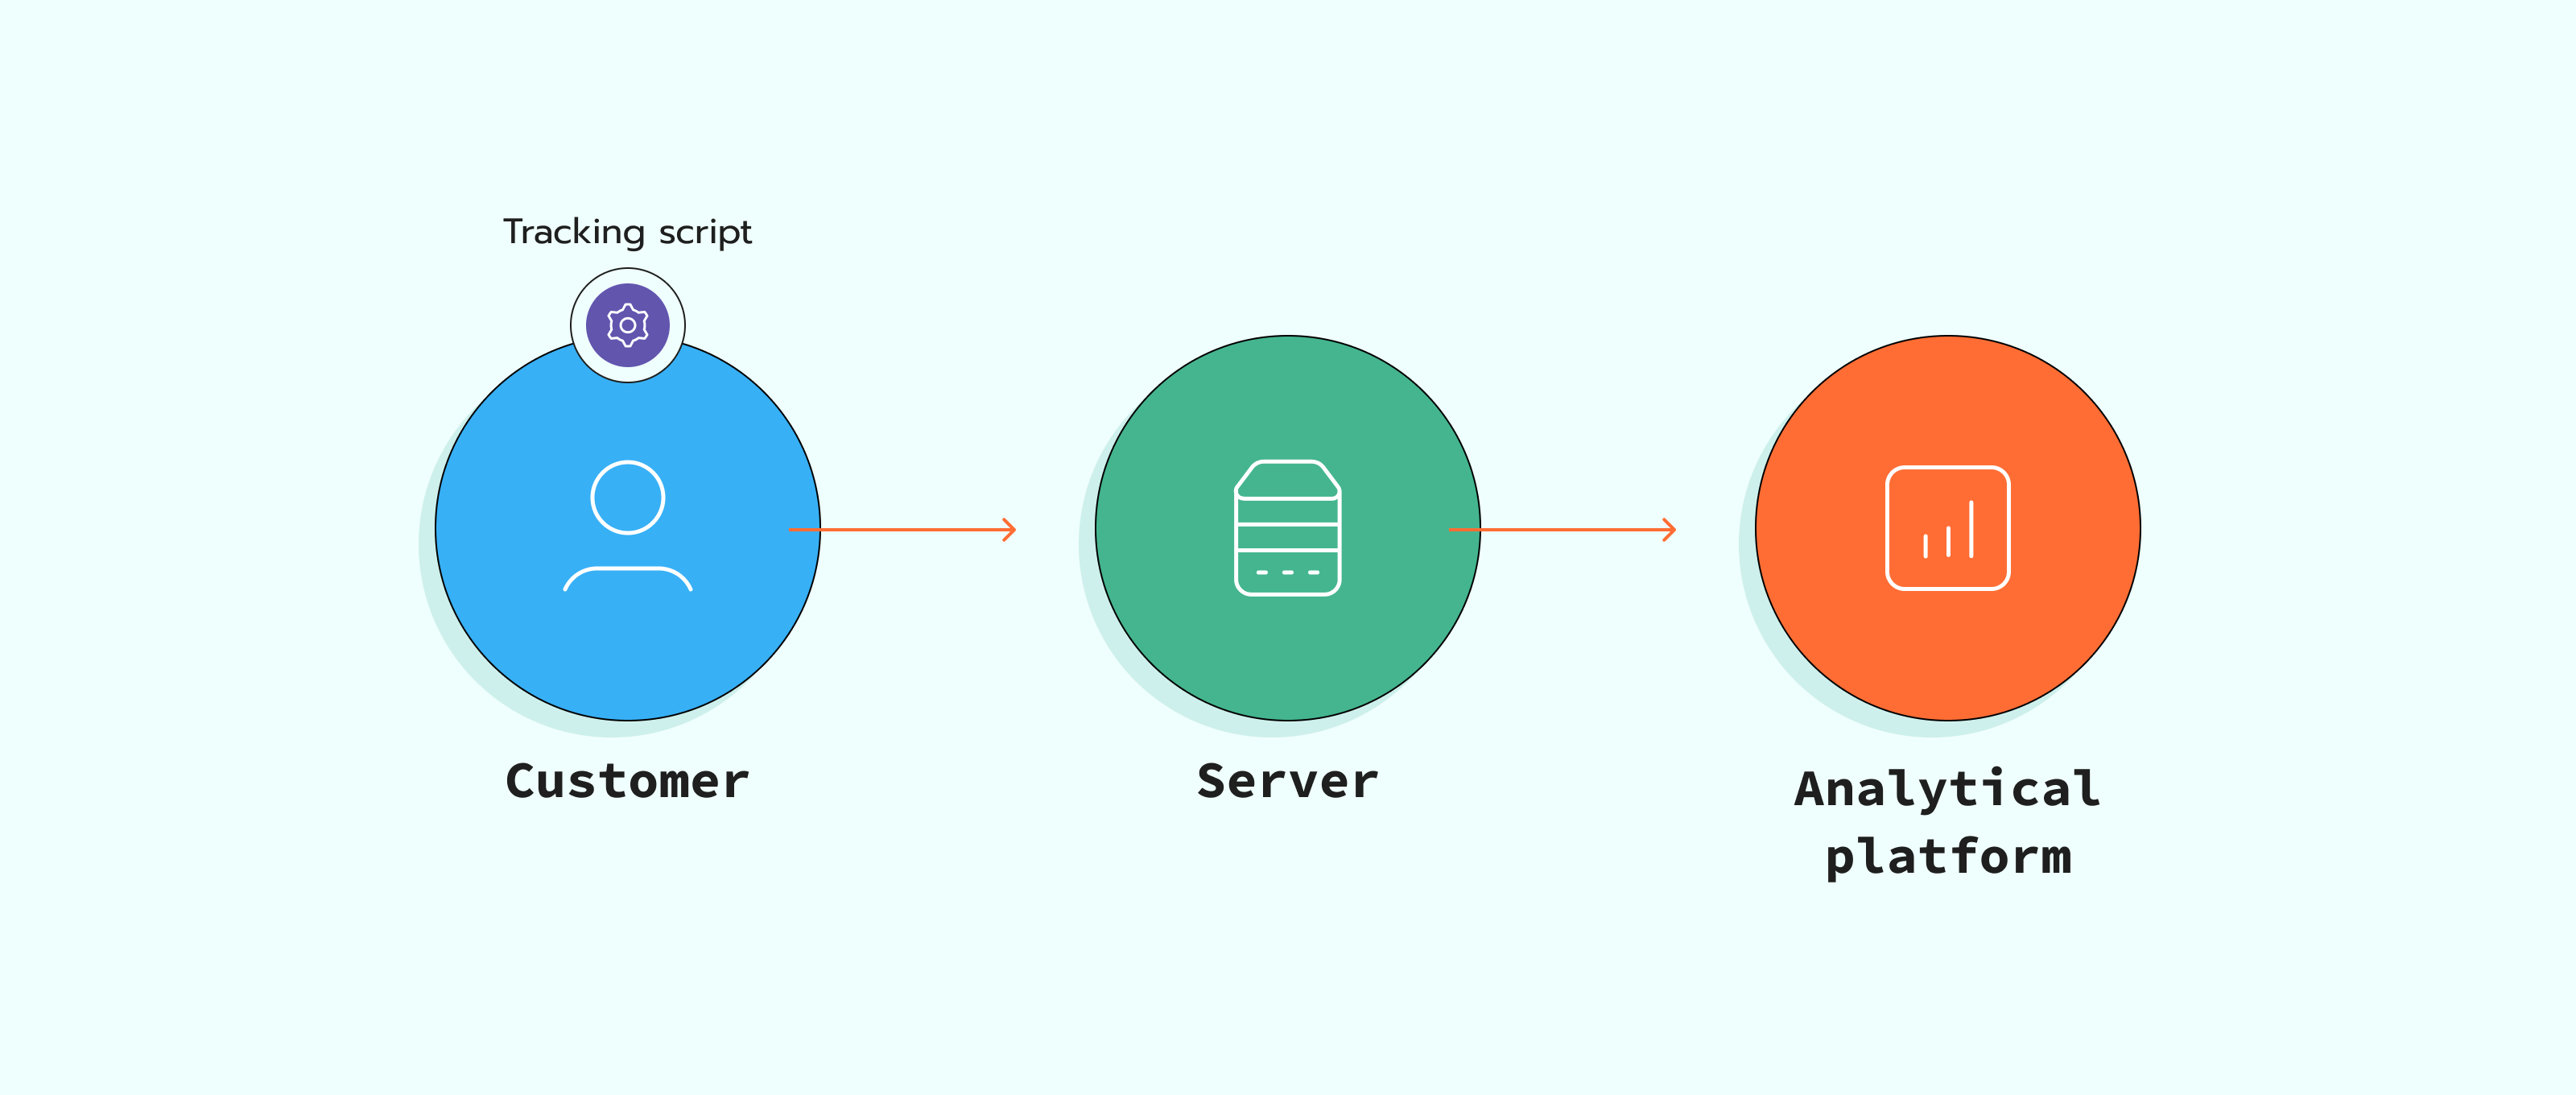
When configuring Google Ads server-side tracking, the main difference is that the web container sends tracked data to the server container, not directly to the analytics platform. Thus, you need to set up the server GTM and redirect the data from its web counterpart to it.
- Preparation step. Create a new server GTM container in your Google Tag Manager account. Select “Server” as its type. When done, deploy it to a cloud provider or use a hosting service like ours.
- Add the conversion linker tag in the server GTM. As with client-side tracking, a linker tag is also required for server setup. It will store storage items and marketing cookies to attribute them with the conversion events, same as in the case with client-side tracking.
- Redirect tracking data to the server. In your web GTM container, add a tag that will send data to the sGTM endpoint (it is recommended to stick to GA4 tracking tags if you work with Google Ads), and provide the link to the server where the server container is hosted.
- Configure the Ad Conversion tag. Select the Google Ads Conversion tag template in the GTM library, add Ads Conversion ID and Label, and provide all other required parameters (currency, conversion value, etc.).
To optimize based on profit, POAS Data Feed can supply margin-based conversion values instead of only revenue.
When done, add an event trigger to this tag.
Do not forget to use the preview mode in server GTM to test how your setup operates and fix any problems before it goes live. An important note: the steps described above are the basic flow only. Check a detailed step-by-step guide on how to set up conversion tracking for Google Ads to see the basic and advanced instructions on how to configure and get the maximum from it.
Advanced tracking techniques for 2026
One of the main trends in 2025 was switching to using Google Tag Manager instead of manually adding tracking scripts to the website code. The best thing about this is that marketers or analysts can control the process of Google Ads conversion tracking via Google Tag Manager and not bother the developers when they need to change or add something. It also centralizes work with all the tags, whether it is Google Ads and Google Analytics 4, Facebook, TikTok, or any other platform.
Using Google Ads conversion tracking for eСommerce is a vast field for exploration. While you can learn a lot about how to set it up for specific platforms like WooCommerce, a general rule of thumb is to use pre-built GTM templates to simplify and optimize your work. We have a detailed explanation of how to work with GTM templates for WooCommerce. For WooCommerce stores, the WooCommerce server-side tracking setup should include purchase value, currency, order ID, and refund checks before events reach Google Ads.
Looking ahead to 2026, tracking setups are expected to become more structured and less dependent on the browser alone. More companies are combining browser-based tracking with server-side processing to reduce data loss caused by ad blockers and browser restrictions. At the same time, greater emphasis is being placed on first-party data, consent-aware tracking, and cleaner data pipelines that pass only necessary information to advertising platforms. As a result, Google Tag Manager is increasingly used not just as a tag manager, but as a central control point for managing how data is collected, filtered, and sent across marketing and analytics tools in a more reliable and privacy-conscious way.
Common issues and troubleshooting to be aware of
Google Ads conversion tracking is not overly complicated, but some issues can arise while using it. We would like to highlight 3 most common problems users can face.
Tracking not firing
The conversion occurs, but the conversion tag does not fire. In this case, the first thing to do is check whether all the triggers are set up correctly. If so, check the page for JS errors that can block the tag execution. Alternatively, switching to GTM would decrease the chances of such errors appearing significantly.
No conversion data is shown in Google Ads
If you have just finished configuring the setup, do not panic. Allow around 24 hours for the first conversions to appear. If waiting does not help, check whether your Google Ads account is configured correctly. Most likely, the issue is there.
Duplication
When you realize that the numbers you get are unrealistic and your conversions can be counted more than once, implement transaction or conversion IDs to enable event deduplication.
Google Ads Conversion tracking Google Tag Manager: real Stape users' problems solved
A user setting up Google Ads Conversion tracking in Google Tag Manager with server-side tagging couldn’t get conversions or GA4 working correctly. In the full thread, the issue was simply configuration: the Conversion Linker needs to be in the server container when using server-side Google Ads tags. GA4 events and Google Ads conversions can fire from the same action, but with different triggers. The best practice is to track GA4 in the web container and route events to the server container, where the Google Ads conversion tag handles them.
FAQs
How do you test Google Ads conversion tracking?
How to test Google Ads conversion tracking is a logical question that arises after configuring any new setup. First of all, GTM has a convenient preview mode. If you choose the method without Google Tag Manager, the Google Tag Assistant Chrome Extension is always a great alternative. Activate it in the browser and check whether the conversion tag fires correctly.
What should you do if Google Ads conversion tracking is not working?
If you encounter problems with Google Ads conversion tracking, the first and main step is to check whether the conversion tracking tag, events, and triggers are configured correctly. The next step is to check JavaScript for errors. A good idea is also to check if the tracking script is blocked by something, and if yes, the best solution is to switch to server-side tracking.
How to optimize conversion tracking for maximum ROI?
It is a very vast and complex question that deserves a guide on its own. In short, server-side tracking should be the first step, as it would allow you to plan your campaigns better and allocate budget properly. The server-side setup makes this possible thanks to the more holistic tracking data received.
How do you track conversion status in Google Ads?
The easiest way to check a conversion status is to monitor its status in Google Ads interface. Another useful tool - Google Ads reports, which allow you to check how many conversions were attributed to specific ads or keywords.
How to track call conversion in Google Ads?
To track call conversions on Google Ads, you must create a call conversion on Google Ads, add Google forwarding numbers to your website, and then track conversions in your account.

Comments