Jul 21, 2026
Shopify server-side tracking setup
Written by
Ivanna Holubovska
Updated Oct 19, 2026 comments
Server-side tracking is an excellent data collection method for Shopify stores, since it ensures accurate conversion tracking and compliance with privacy regulations like GDPR. With challenges such as ad blockers, browser restrictions, and cookie limitations, server-side tracking provides a more reliable solution.
Unlike traditional client-side tracking, which collects data from the user's browser via JavaScript tags, server-side tracking moves this process to your server. For anyone running a Shopify store, this means you can avoid data loss and get a clearer, more secure picture of what's happening, which ultimately helps you make better business decisions and improve your store's performance.
| Related: Advertising monitoring guide in 2026. |
Your Shopify store sells more than your ad platforms know
Sign up for Stape and send purchase and other eCommerce events from Shopify to Google, Meta, and more.
What is server-side tracking
Server-side tracking is a modern approach to data collection that shifts the tracking process from a user's browser to a secure server. Instead of sending information like pageviews, conversions, or clicks directly from the browser to analytics and advertising platforms, this data is first routed through your own cloud server. This extra step helps ensure more accurate data by reducing the impact of browser restrictions, third-party cookie limitations, and ad blockers. It also allows you to extend cookie lifetimes and streamline data delivery to platforms like Google Analytics, Meta, TikTok, and others.
It provides a stronger foundation for privacy compliance and lets you customize the data flow to match your business needs. Tools like Google Tag Manager's server container make it easier to implement, especially when combined with services like Stape that handle the server setup. Overall, server-side tracking is a powerful way to future-proof your analytics and improve the reliability of your marketing data.
Benefits of using server-side tagging for Shopify
Server-side tagging can turbocharge the success of your marketing campaigns with precise conversion tracking and user analysis. However, taking full advantage requires a meticulous setup - something nobody should overlook.
1. Better data accuracy. Server-side tagging can help ensure more accurate data collection by reducing the risk of data loss or errors caused by ad blockers, browser extensions, or other client-side factors.
2. Accurate conversion attribution. Due to increased cookie lifetime and user data sent through the server, advertising networks can more accurately attribute conversions to marketing campaigns. This is especially useful when sending server-side events to Facebook Conversion API for Shopify, improving ad targeting, conversion attribution, and campaign ROI.
3. More flexibility in data handling and privacy management. Server-side tagging gives you more control over how data is processed and shared. You can apply filters, modify event data, and ensure that only necessary information is sent to third parties — all from a centralized tagging server. This flexibility makes it easier to align with privacy regulations like GDPR and CCPA while maintaining data quality and customer trust.
4. Consolidated data management. Route all your marketing and analytics data through one central server endpoint. This centralization reduces debugging and troubleshooting time by up to 50%, managing multiple integrations, reduces complexity from numerous tags, and ensures consistent, accurate information flows to all your advertising partners.
5. Enhanced data enrichment. Unlike browser-side tracking, server-side tagging lets you add more valuable data to your conversion events from sources like your CRM or inventory systems. Combining online and offline insights helps you build stronger audience segments and personalize your marketing more effectively.
6. Minimized risk of data manipulation. Since conversion events transmit directly from your secure server, they're far less vulnerable to external manipulation by malicious scripts or browser extensions. This direct, secure channel ensures the integrity and trustworthiness of your tracking data, providing a clean and reliable dataset for all your needs.
How to set up server-side tagging on your Shopify store
Via Stape's Conversion Tracking app
One of the most efficient ways to implement server-side tracking on Shopify is by using Stape's Conversion Tracking app. Its main purpose is to simplify the setup by injecting the Custom Loader and Cookie Keeper, and by configuring a reliable Data Layer based on native Shopify events. While the app itself doesn't send data directly to the server container, it lays the groundwork for accurate tracking by enabling your web container to capture events and pass them to server-side GTM. This reduces manual coding, speeds up implementation, and helps ensure tracking works correctly even in environments with browser restrictions - improving data quality and conversion attribution.
Case study: 36% more conversions with server-side Google Ads tracking for Shopify | Lars Friis
- Challenge: a doubt about the value of upgrading to server-side tracking from a standard client-side Shopify setup.
- Solution: running a comparative experiment between the default Shopify app and the server-side configuration using Stape Conversion Tracking app for Shopify and Client simulator to capture orders directly from Shopify backend.
- Results: 36% more Google Ads conversions tracked in the server-side setup thanks to recovered data from Safari users and missed receipt pages.
Read more about Google Ads Conversion Optimisation for Shopify Store in our blog article.
| Start tracking in minutes. Stape Conversion Tracking for Shopify with Setup Assistant sets up server-side GTM, creates key eCommerce events automatically, and loads ready-made tags for Google, Meta, TikTok, and more. Events run through Stape’s server-side tracking platform, so you record more conversions and improve ROAS. |
Via Shopify directly
A slightly more advanced method for Shopify server-side tracking is using Shopify's native capabilities like webhooks and Shopify Flow. This approach gives more flexibility for tracking backend-triggered events that may not be captured by browser-based tracking. However, both this method and solutions like Stape ultimately require server infrastructure and similar sGTM configuration.
The main difference lies in how events are triggered - with Shopify Flow or webhooks, events originate from Shopify's backend, while with tools like Stape, events are still triggered in the browser but routed through your tagging server. Both options involve configuring server-side GTM and ensuring proper formatting, deduplication, and consistency of the data.
Shopify server-side tracking with Stape's Conversion Tracking app step-by-step setup
Webinar
Before you begin
If you want to use functionalities such as the Custom Loader and Cookie Keeper power-ups, or Customer Match, you need to have an sGTM container hosted on Stape. You will also need GA4 or Data tags configured in a web GTM. If you don’t have this, follow the Get started with sGTM hosting instructions.
How to set up the app
- 1.Log in to your Shopify account.
- 2.Go to Apps and search for the Stape Conversion Tracking app.
- 3.Click Install.
General
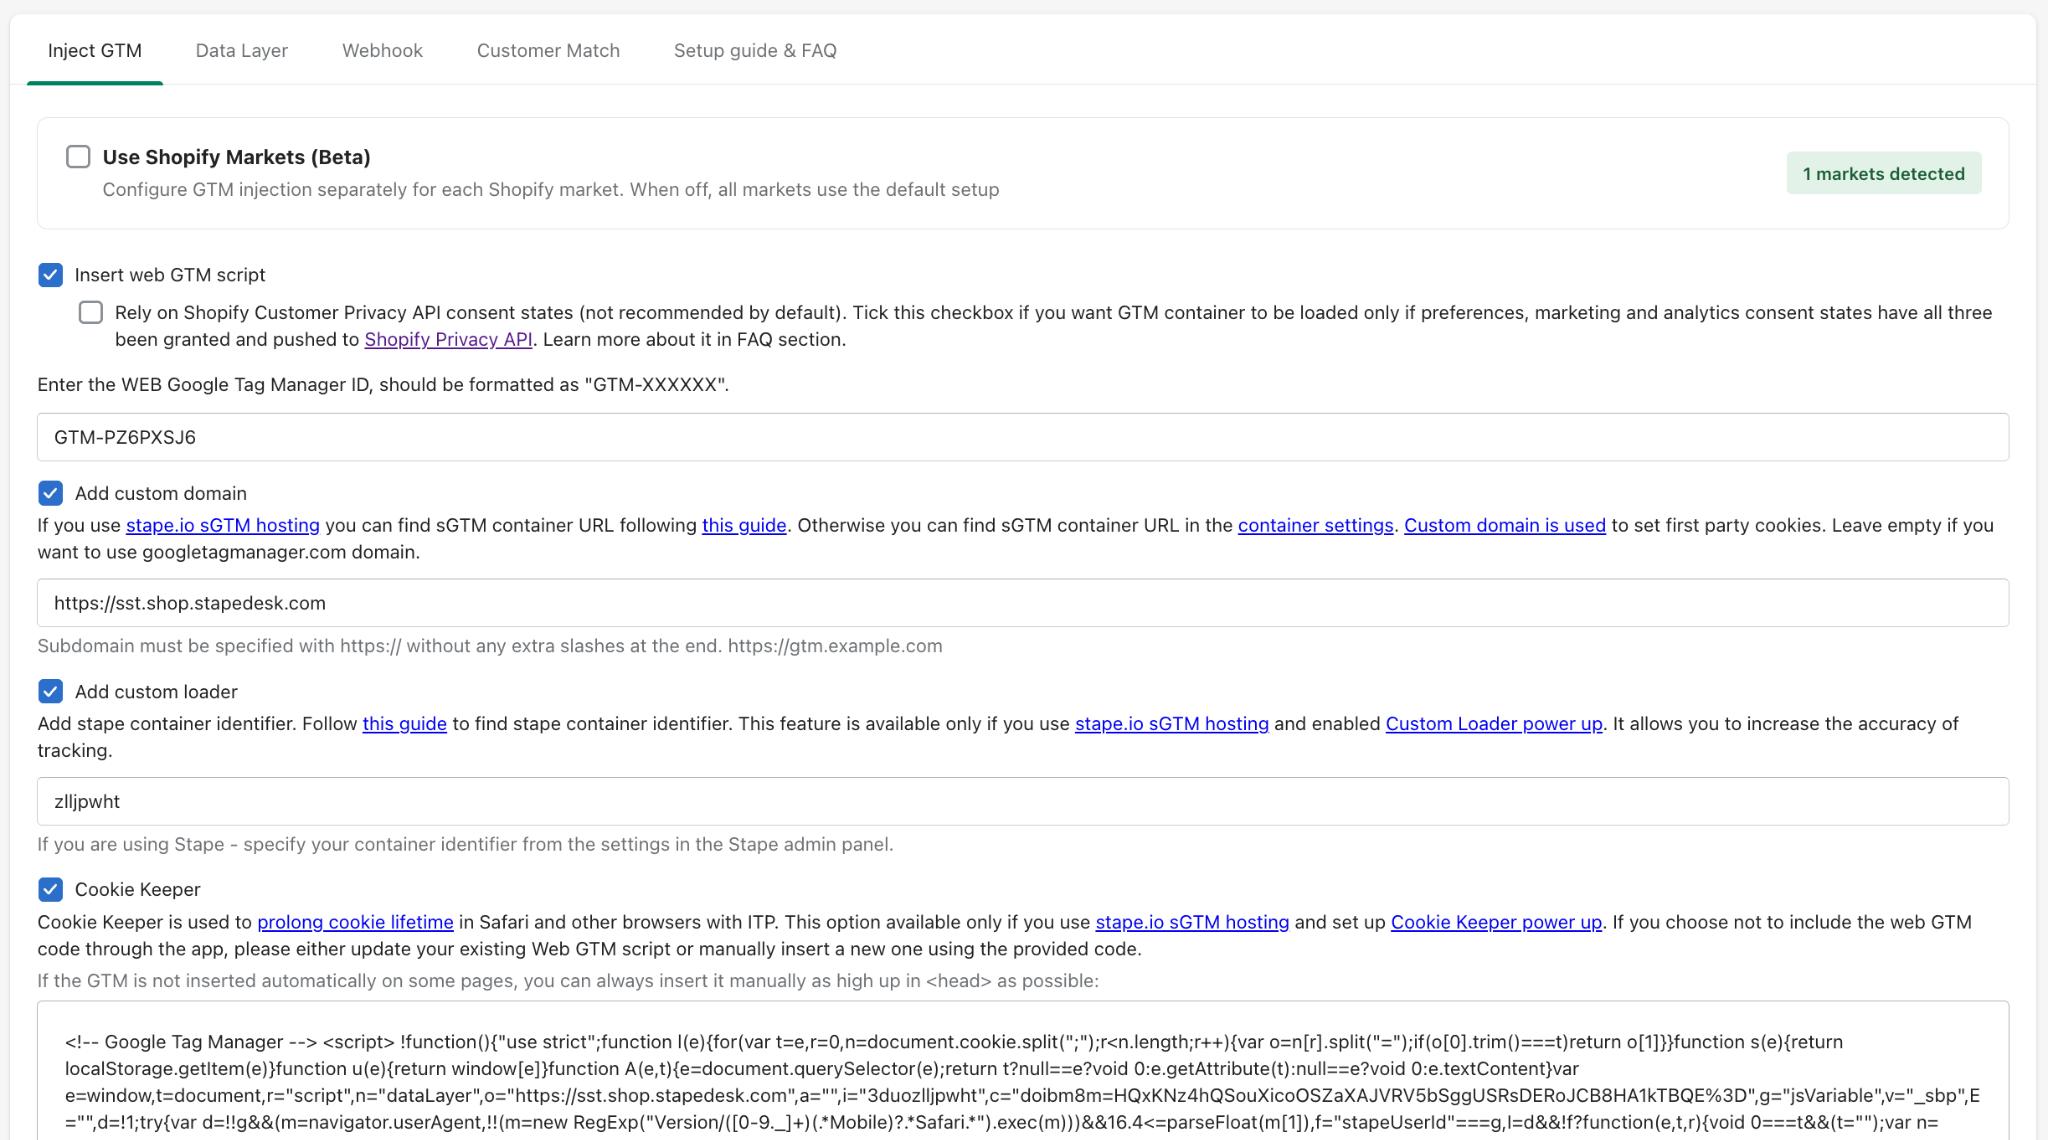
- 1.Open the app and configure the General tab:
- Use Shopify Markets (Beta) – check the box if you have multiple Shopify markets. Using the feature, you can configure GTM injection separately for each Shopify market. If the feature is disabled, all markets use the default setup.
- Insert GTM snippet – automatically adds the snippet with JavaScript code to every page on your website.
- Enter the WEB Google Tag Manager ID – specify the Web container ID.
- Add custom domain – specify the custom domain (optional). In this case requests go through your tagging subdomain, so cookies stay first-party.
Keep in mind that checkout sandbox restrictions can affect the requests sent to your tagging server. Read our guide to Shopify same-origin tracking and the recommended storefront/checkout configuration before choosing your tracking endpoint.
- Add custom loader – specify Stape container identifier (optional). The
gtm.jsscript loads from your domain instead of Google’s, which helps the script get past ad blockers. Custom Loader needs to be turned on in your Stape account to use it.
- Select whether to use the Cookie Keeper. Cookie Keeper needs to be enabled in your Stape account to use it.
2. Click Save.
Data Layer
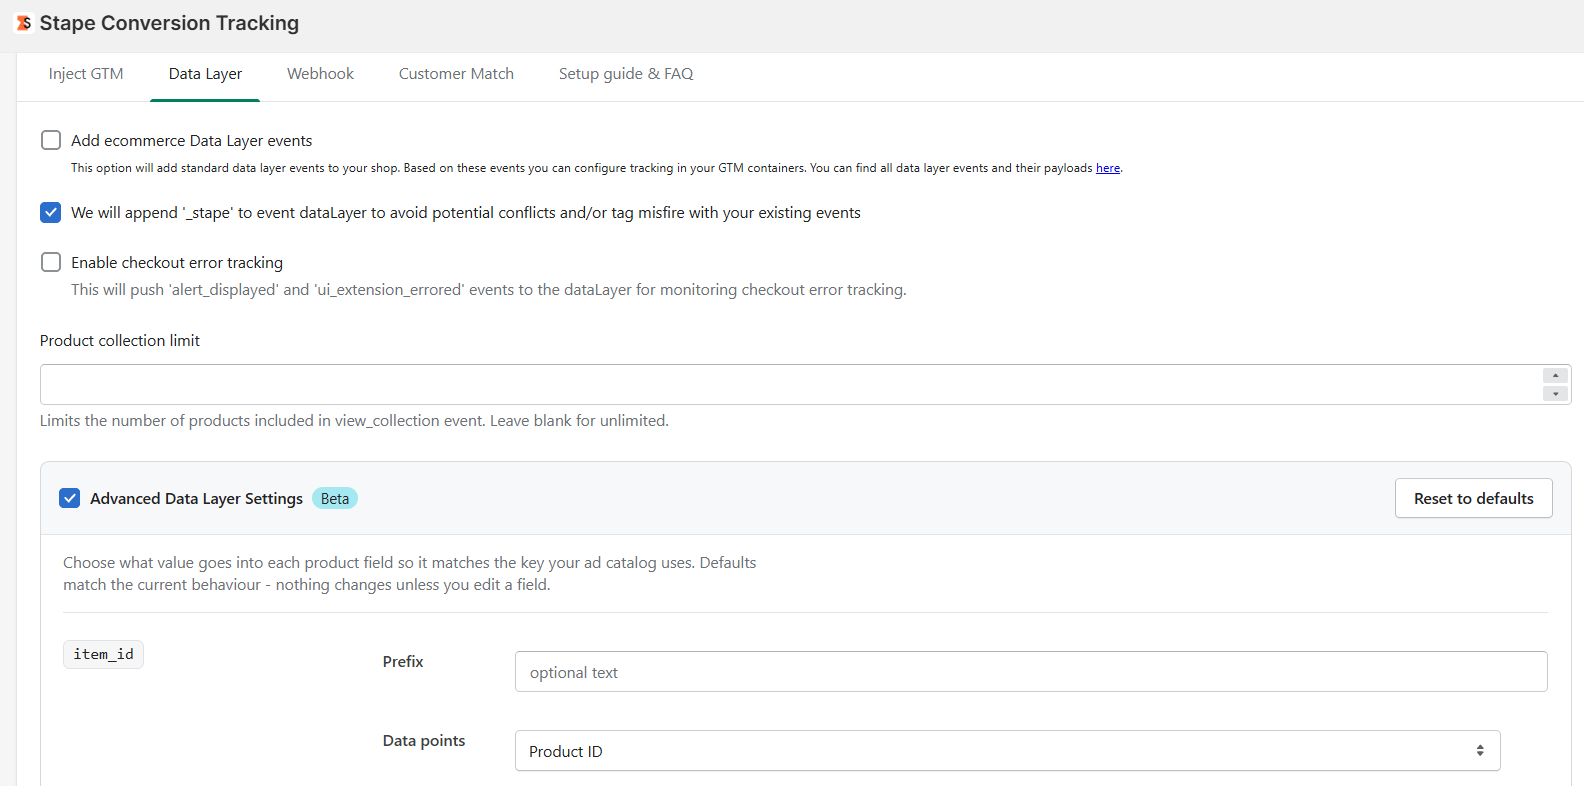
- 1.Configure the Data Layer tab:
- Add ecommerce Data Layer events – add standard data layer events to your shop.
- Append '_stape' to event dataLayer – adds
_stapeto event names so they don’t clash with existing dataLayer pushes, potentially triggering your tags twice. When it’s unchecked, event names are pushed as per GA4 schema. - Enable checkout error tracking – enable dataLayer events that signify checkout errors to make debugging easier.
- Product collection limit – set the limit for products included in
view_collectionevent. - Advanced Data Layer Settings – allows you to customize how product parameters (
item_id, item_sku, item_brand, and item_category) are sent to match your ad catalog keys. This allows you to add a Prefix, combine Data points, or change the default Sources.
2. Click Save.
3. Activate the Data Layer.
3.1. Activate the Add ecommerce Data Layer events checkbox and configure additional settings.
3.2. Save changes.
3.3. Copy the code for the custom pixel in the box below on the data layer tab and follow the instructions to add and activate it.
In the Customer privacy section, under Permission spoiler, please make sure to select Not required. The code snippet only generates the Data Layer; it doesn't set any cookies or report any data to third parties.
In the Data Layer tab of the app, there is also an option Log events to console (Dev), which is a debugging option for developers and store admins. When enabled, it logs eCommerce events in the browser console, shows event payloads sent to the GTM/Stape server container for verification, and helps debug Data Layers.
This option is for development only and should be disabled in production to avoid unnecessary console logging.
Webhooks
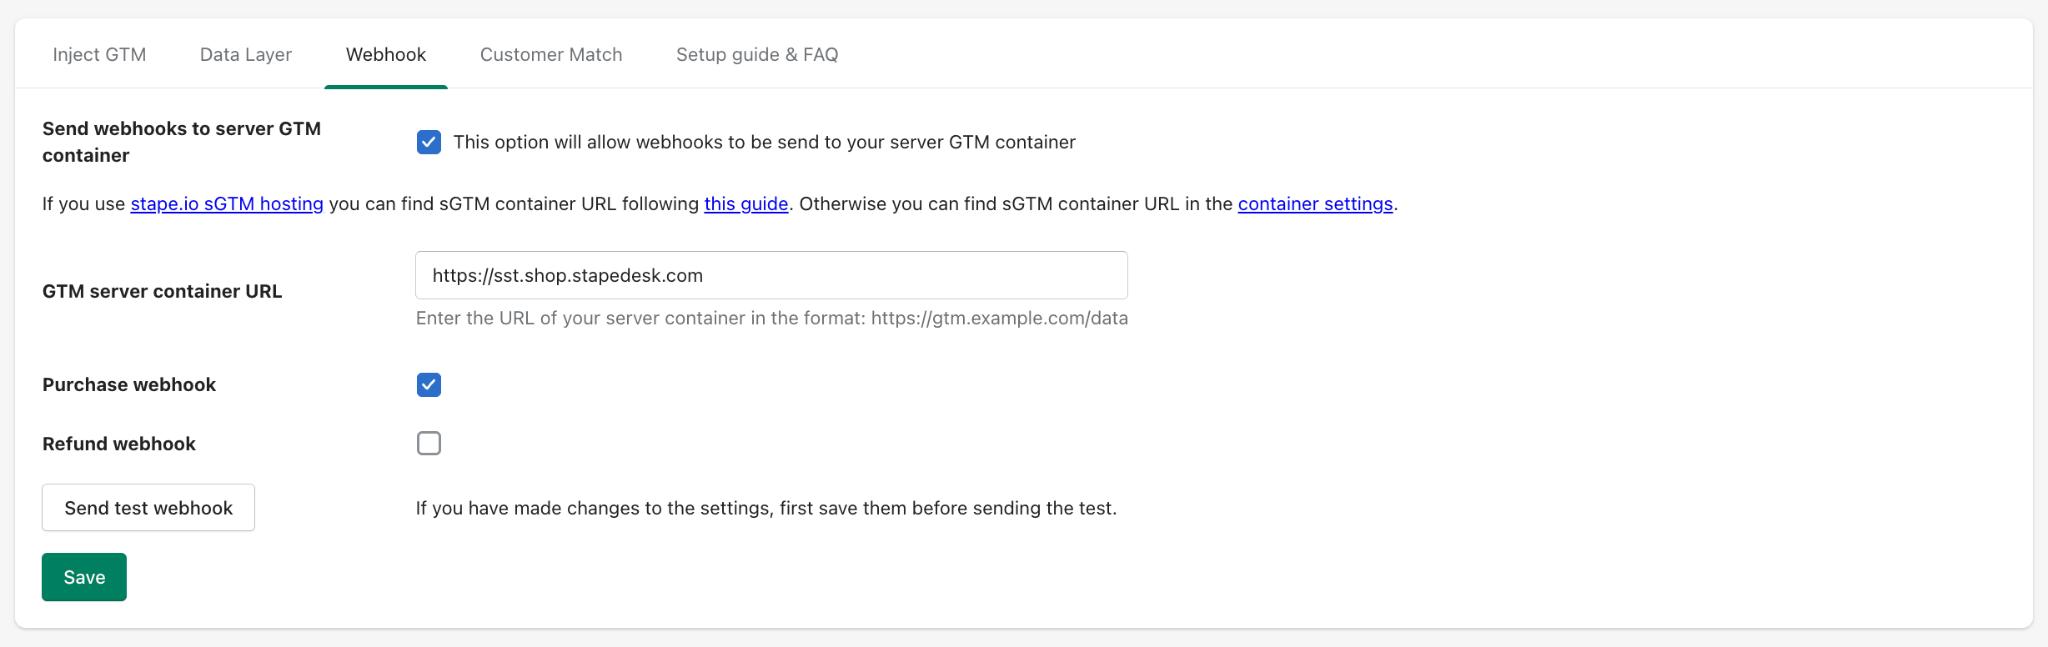
- 1.Configure the Webhooks tab. Webhooks are useful for events outside the website (for example, phone or offline sales).
- Enable Send webhooks to sGTM container.
- Add your GTM server container URL.
- Choose the webhooks:
- Purchase webhook – send a purchase event when a new order is created.
- Refund webhook – send a refund event when an order is refunded.
2. Click Save.
Note:
Shopify webhooks don’t include cookie data, which is essential for accurate platform tracking. We recommend using them as a secondary option, primarily in cases where standard online tracking is not feasible, such as for offline or phone sales.
Customer Match
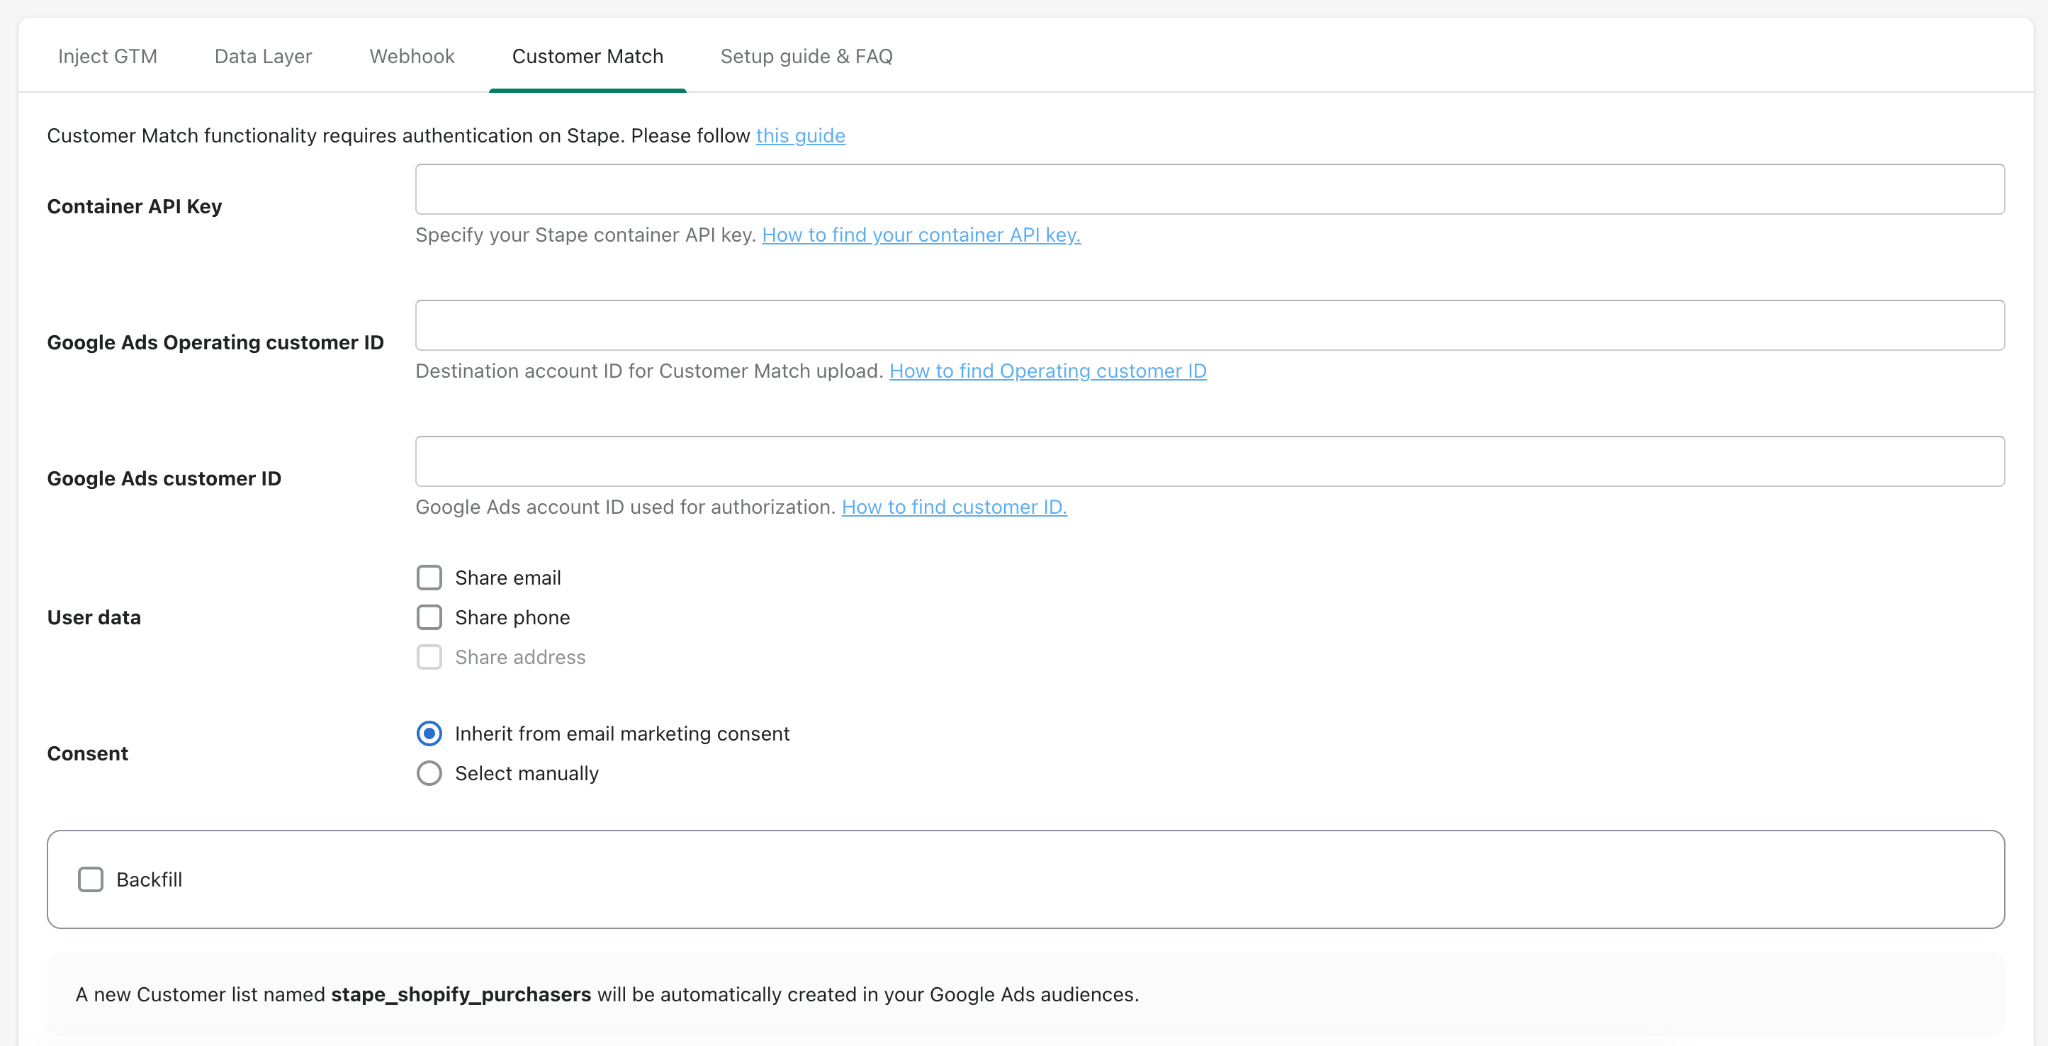
- 1.If you’re using Google Ads, configure Customer Match:
- Container API Key – specify your Stape container API key.
- Google Ads Operating customer ID – specify your operating customer ID.
- Google Ads customer ID – specify your customer ID.
- Select which User data to share.
- Consent – select whether to inherit the consent from email marketing, or set it manually.
- Backfill – if checked, the app scans your existing database and retroactively syncs all past contacts, leads, or customers who already match your configured trigger criteria/statuses into the Google Ads Customer Match list.
2. Click Save.
Testing
Debugging a GTM download
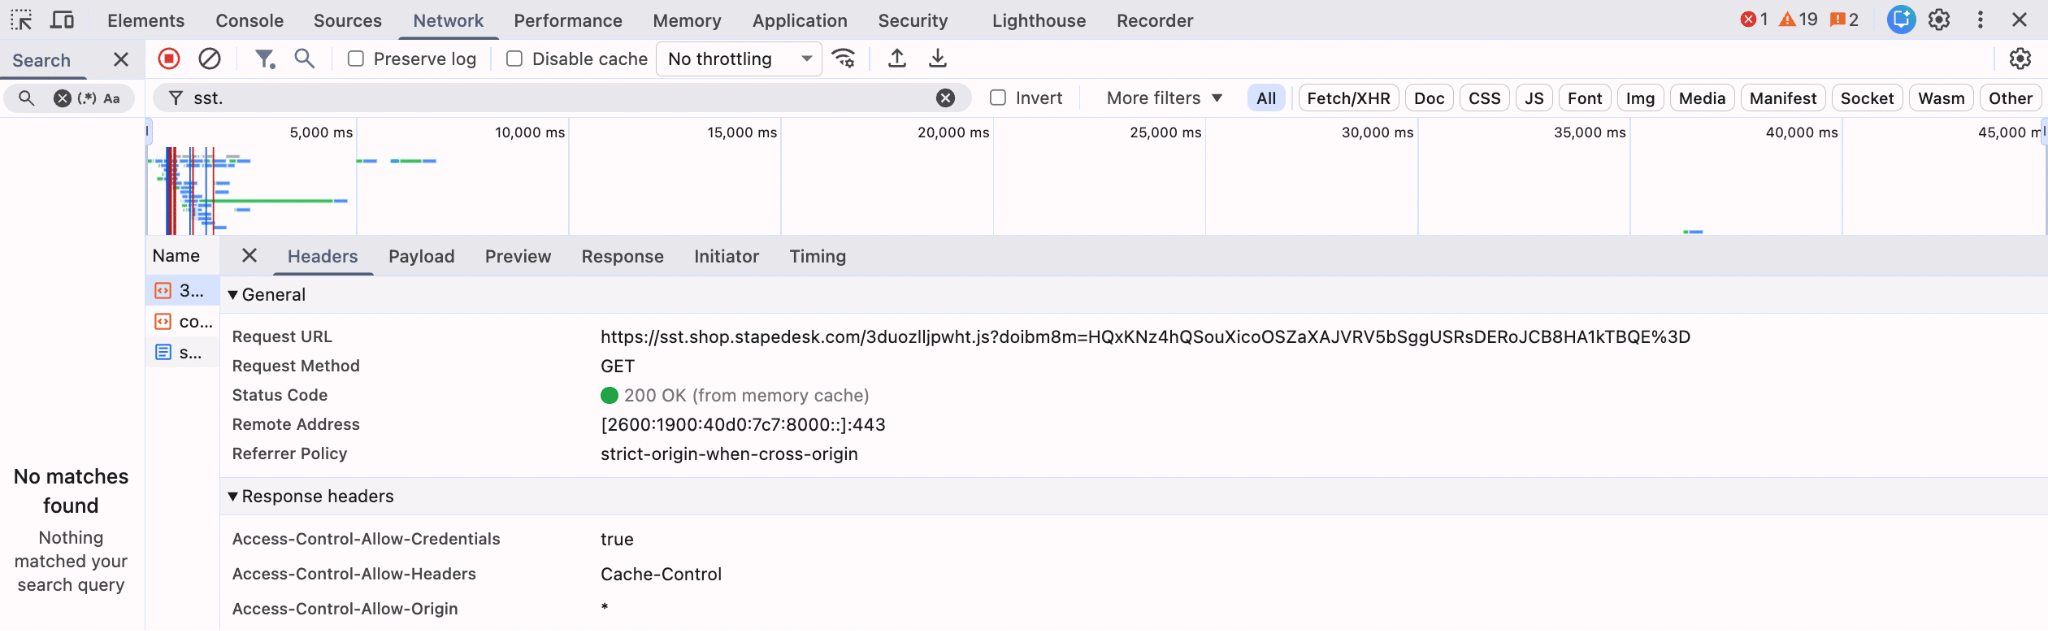
After activation or any changes, it is recommended to check if your container is actually uploaded to the site.
To do this, go to any page on your site, open your browser console, and in the network tab, filter by your subdomain/tagging server URL. You should see a request like in the following screenshot with a response status 200:
Debugging data layer checkout events
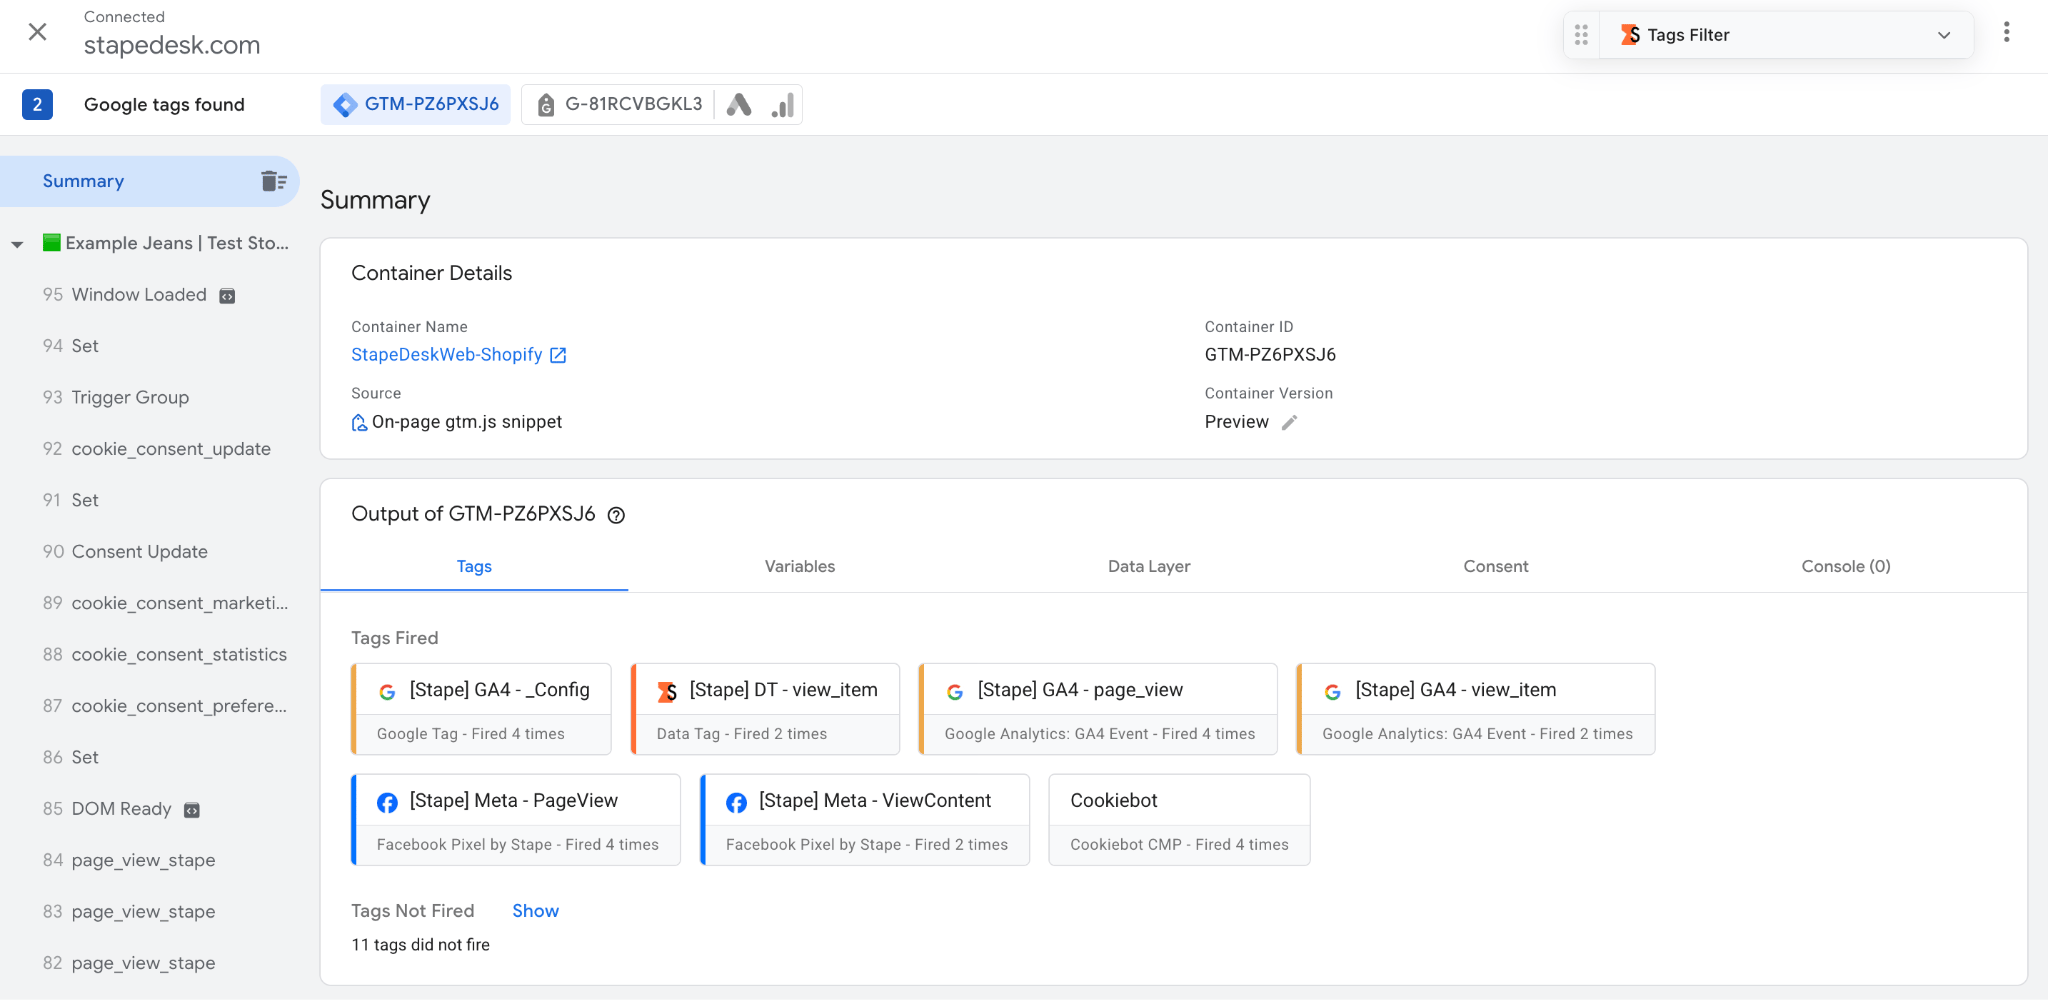
With events that happen before the checkout page, everything works like on any other platform - you can launch a preview of your GTM web container and find all the events you do:
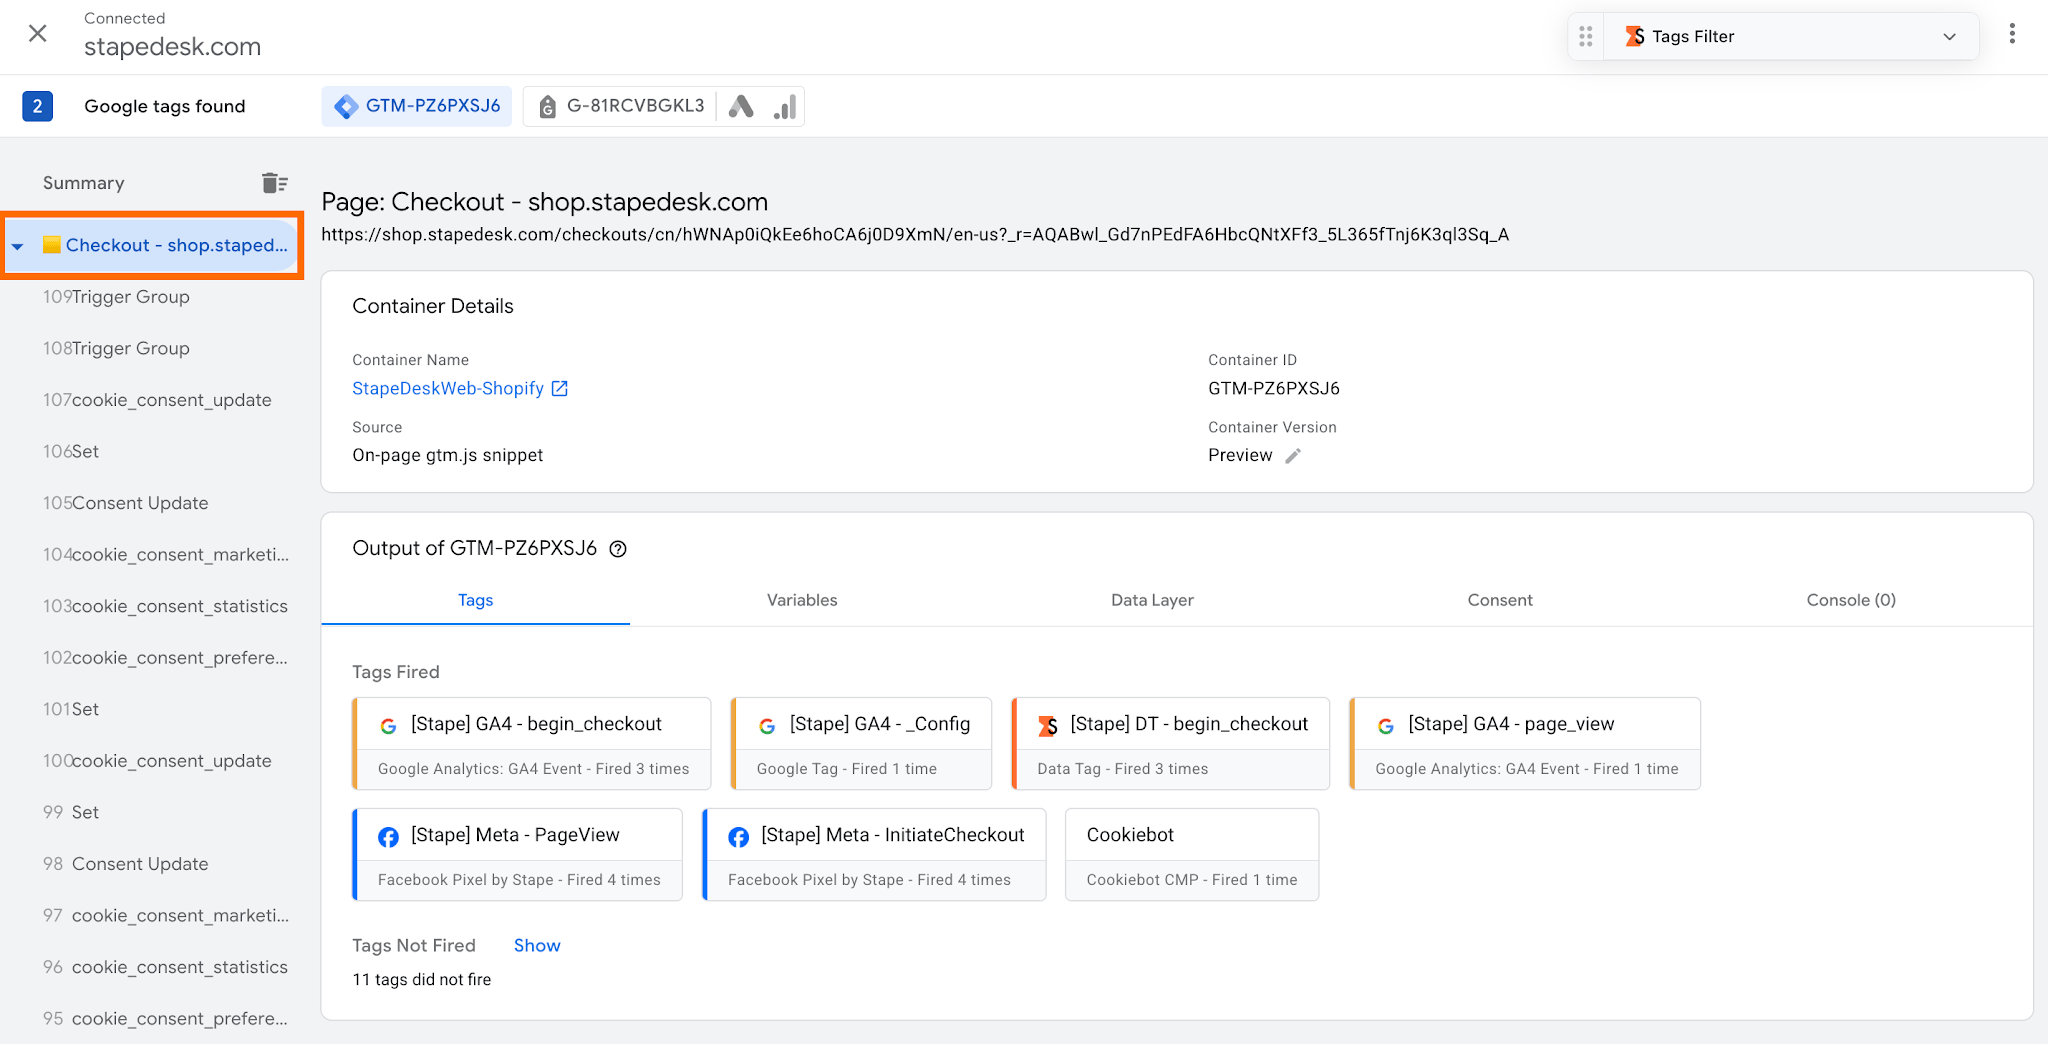
The checkout events won't be displayed in GTM Preview due to the isolated environment on these pages that blocks unrestricted DOM manipulation or script injection, including the GTM snippet.
But you can manually insert the snippet on the checkout page using the Stape GTM Helper Chrome extension:
- After running Preview Mode in GTM, turn on the toggle Shopify Sandbox dataLayer in the Settings tab of the extension.
- In the tab Inject GTM, click Enable injection, add your domain name, and GTM ID. Save changes.
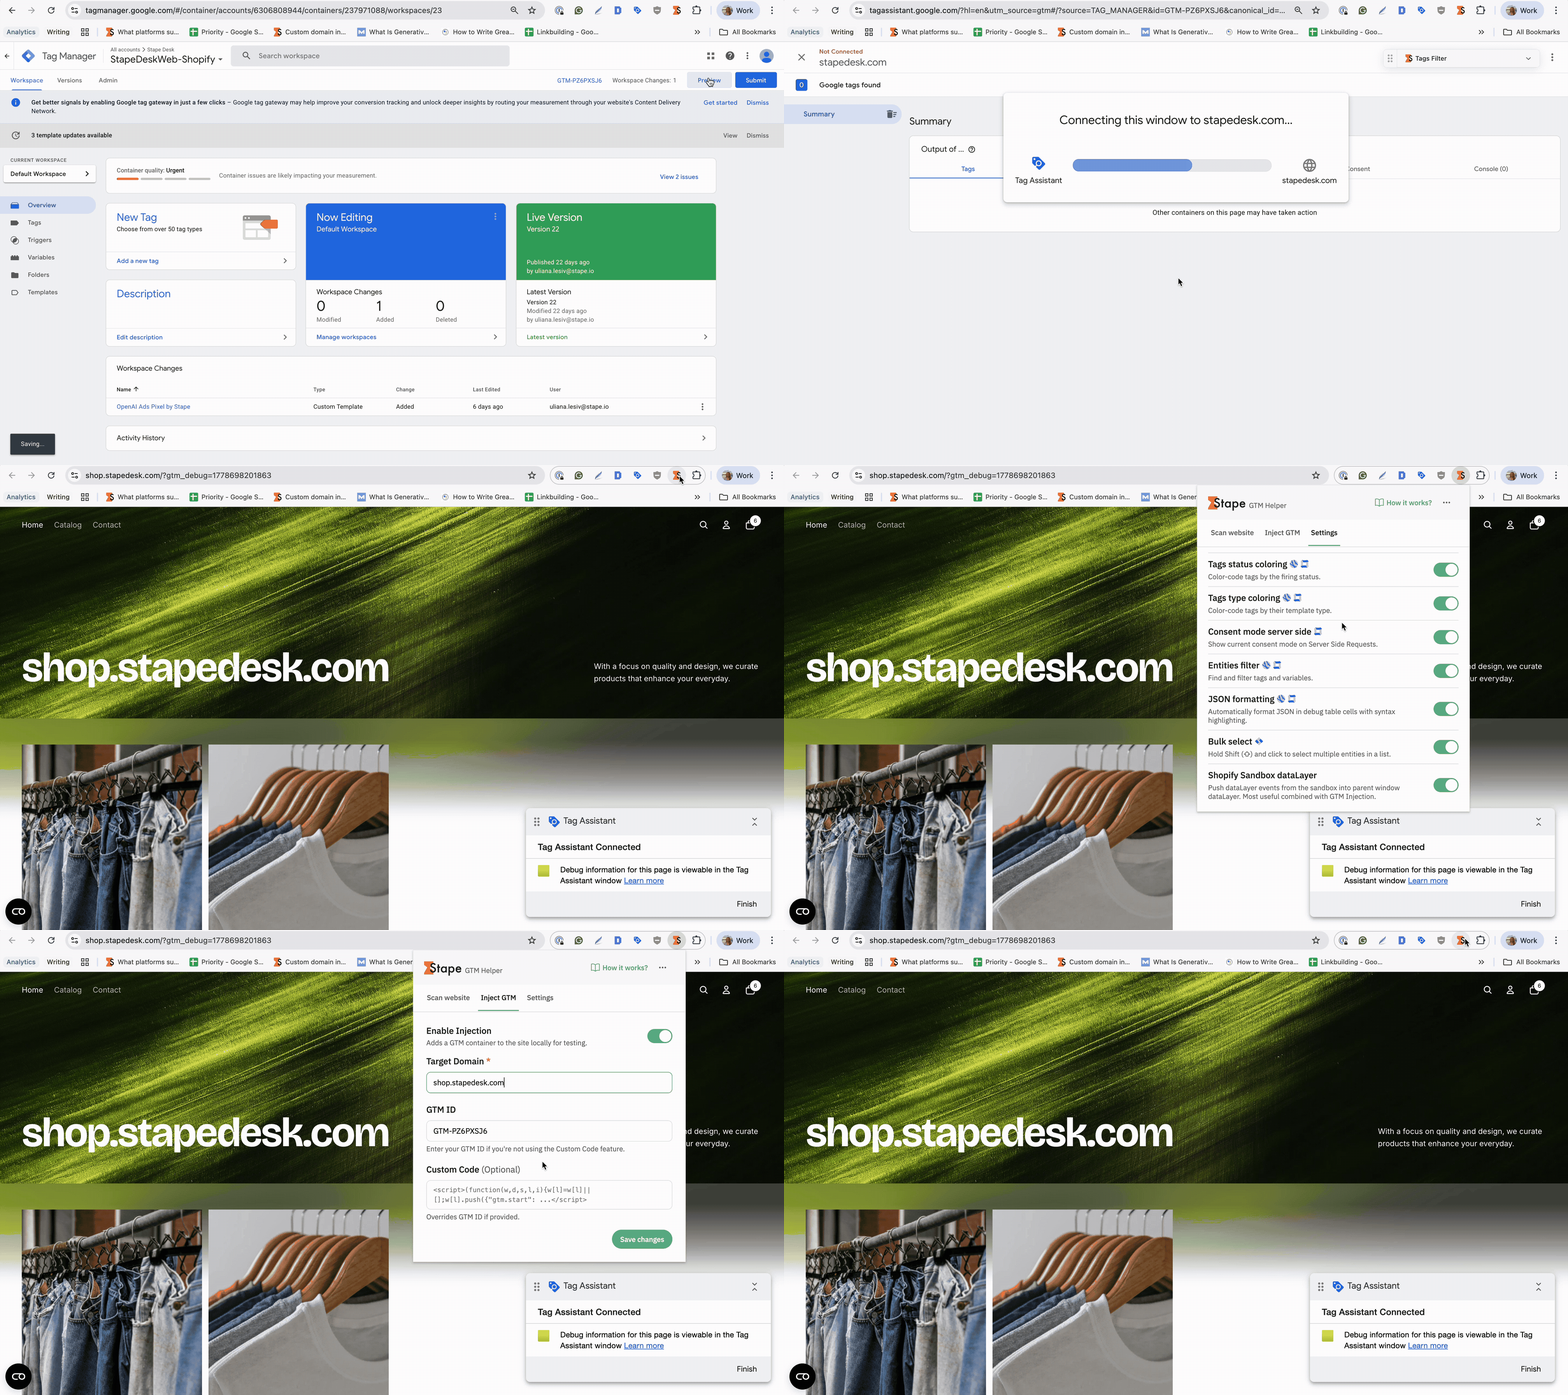
Now, the events on the checkout page will display in GTM Preview.
Shopify server-side tracking: real Stape users' problems solved
A user running Shopify server-side tracking with Stape noticed one store’s Google Ads server-side purchase conversions were underreporting compared to the client-side setup, while another identical store performed correctly. In the full thread, possible causes included parallel GA4 tags sending events directly to GA, consent management issues, or Google Ads account restrictions. The solution was to check GA4 initialization, consent settings, and data mapping in triggers and lookup tables, ensuring server-side tags fire correctly for each domain. Using a single server container for multiple stores works if mapping is configured properly.
| Our guide to Shopify tracking myths and misconceptions breaks down common assumptions about checkout tracking, Custom Web Pixels, GTM, native Shopify apps, and debugging. It can help you understand which limitations are real, which are outdated, and what you can still achieve with the right tracking setup. |
FAQ
Conclusion
Server-side tagging is quickly becoming an essential tool, making your conversion tracking and analytics much more precise. For Shopify users, the Conversion Tracking App makes this powerful setup surprisingly straightforward. It helps you get tracking running fast, even with custom domains, and ensures your data moves smoothly.
By extending cookie life and pushing back against browser privacy features, these tools guarantee your advertising and marketing platforms get truly dependable information. If you're looking for an easy, quick way to get better tracking insights on Shopify, Stape is a solid choice. Test it out yourself now - we know you won't be disappointed!
Want to start on the server side?
Try for freeRecommended for you
Solutions
Facebook Conversions API for Shopify
Facebook Conversions API for Shopify is essential for businesses looking to increase sales with social media marketing and PPC campaigns.
Sep 15, 2026

Comments