Server-to-server tracking: what it is and how to set it up
Server-to-server tracking sends data directly between servers without depending on browser scripts, cookies, or other client-side tech.
In some setups, the browser still collects data but sends it to a cloud server first before it reaches tools like Google Analytics or Meta.
In other setups, like pure server-to-server tracking, the data is sent directly from one backend system to another without the browser being involved at all.
This blog post explains how to set up server-to-server tracking with Google Tag Manager's server container.
We'll explore its benefits, and how you can implement it to gain deeper insights into your analytics while maintaining user privacy and data integrity.
What is server-to-server tracking in Google Tag Manager?
Server-to-server tracking in Google Tag Manager (GTM) is an effective feature that allows you to collect data on your website without relying on client-side scripts. This method helps reduce the impact on page loading speed and provides more control over data collection. By implementing server-to-server tagging, you can ensure that your data collection processes are less affected by ad blockers and browser restrictions.
There are two types of server-to-server tracking with GTM:
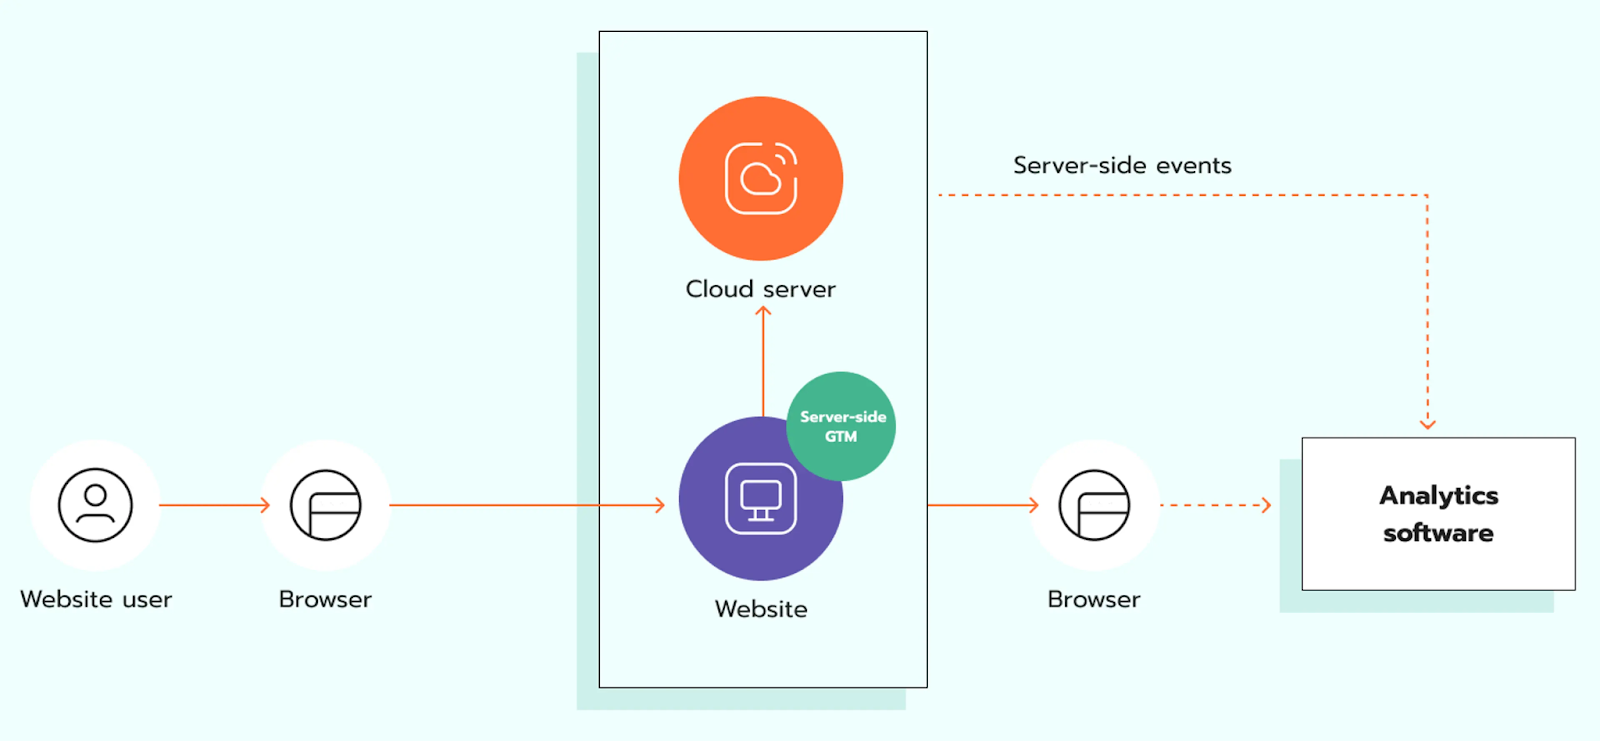
Hybrid (web + server). This setup uses both web and server containers.
You send data from the browser to the cloud server using GA4 or Data Tag/Data Client, then forward it to tools like Google Analytics.
You'll need to configure both containers, set up hosting (e.g. Google Cloud or Stape), and use a custom domain.
Pure server-to-server. Data goes straight from one server to another without touching the browser. It's harder to set up in GTM, since delivery and debugging depend on sending webhooks from systems like your CRM or CMS.
So, how does it work? In server-to-server tracking, there is an intermediary (typically the Google Tag Manager cloud server). Instead of the browser sending the request directly (like with client-side tracking), the request is routed to the cloud server first. The cloud server processes the request and then forwards it to the third-party system (e.g., Google Analytics).
The benefits of S2S tracking
- Reliability. This method is more reliable and secure and less susceptible to issues like browser restrictions, ad blockers, or cookie consent requirements. With the help of Stape’s Custom Loader power-up, you can make the tracking scripts less visible to ad blockers.
- Track offline events. Webhooks enable the capture of offline interactions like store sales or phone orders, integrating this data with online platforms.
- Accurate conversion attribution. Webhooks include more even data than web events, giving the advertising network more parameters for conversion attrition and allowing for reliable S2S conversion tracking.
- Improves data security. Server-to-server tagging with webhooks offers a more secure way to handle data, which is particularly important for customer privacy and compliance with data regulations.
How to set up S2S tracking
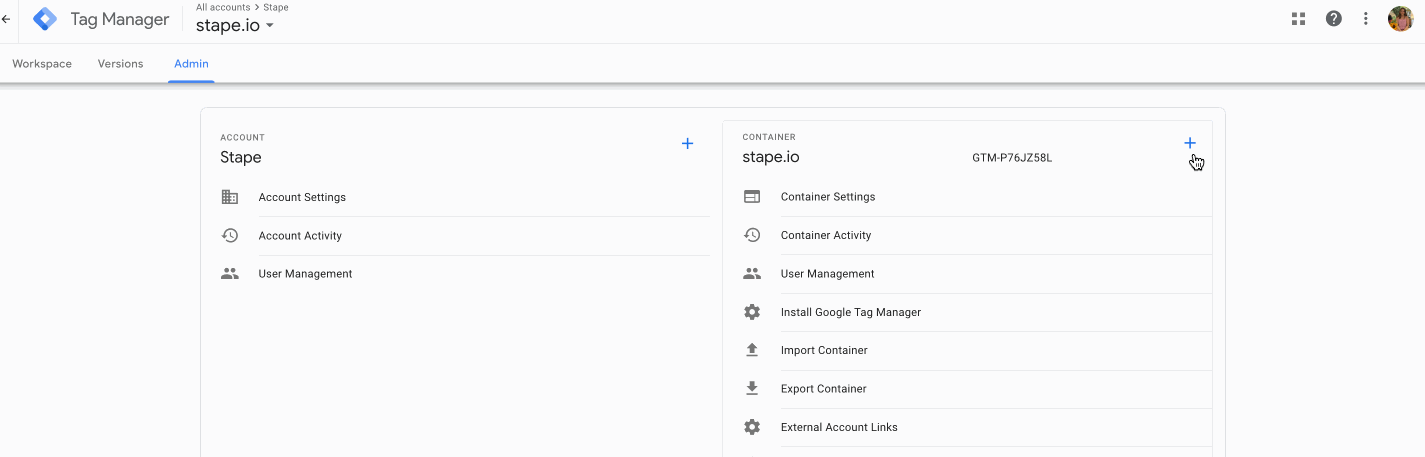
Step 1. Create a server container in Google Tag Manager
- Select your GTM account → Click Admin → Click + next to the Container name.
2. Add Container Name → under Target platform, choose Server. Click Create.
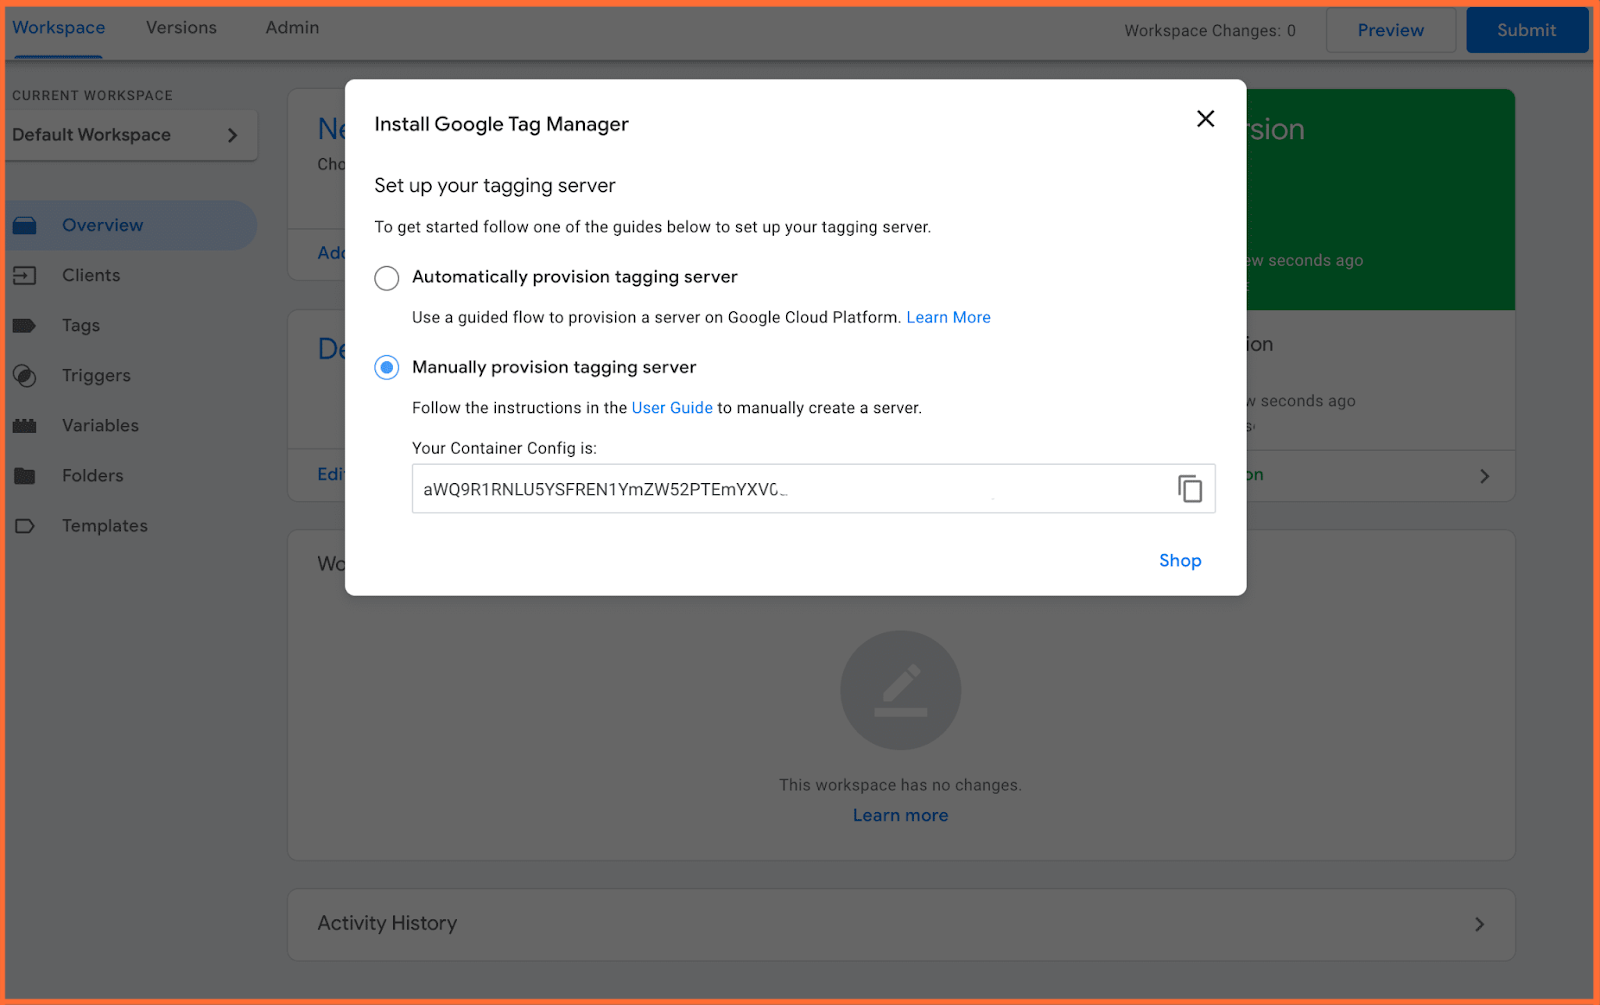
3. Choose Manually provision tagging server. Copy your container config. We will need it in the following steps.
Step 2. Create a Stape account to host your server GTM container
1. Go to Stape and create an account or log in. You can try our service for free and explore the benefits of Stape hosting for the GTM server.

2. Click the button Create container.
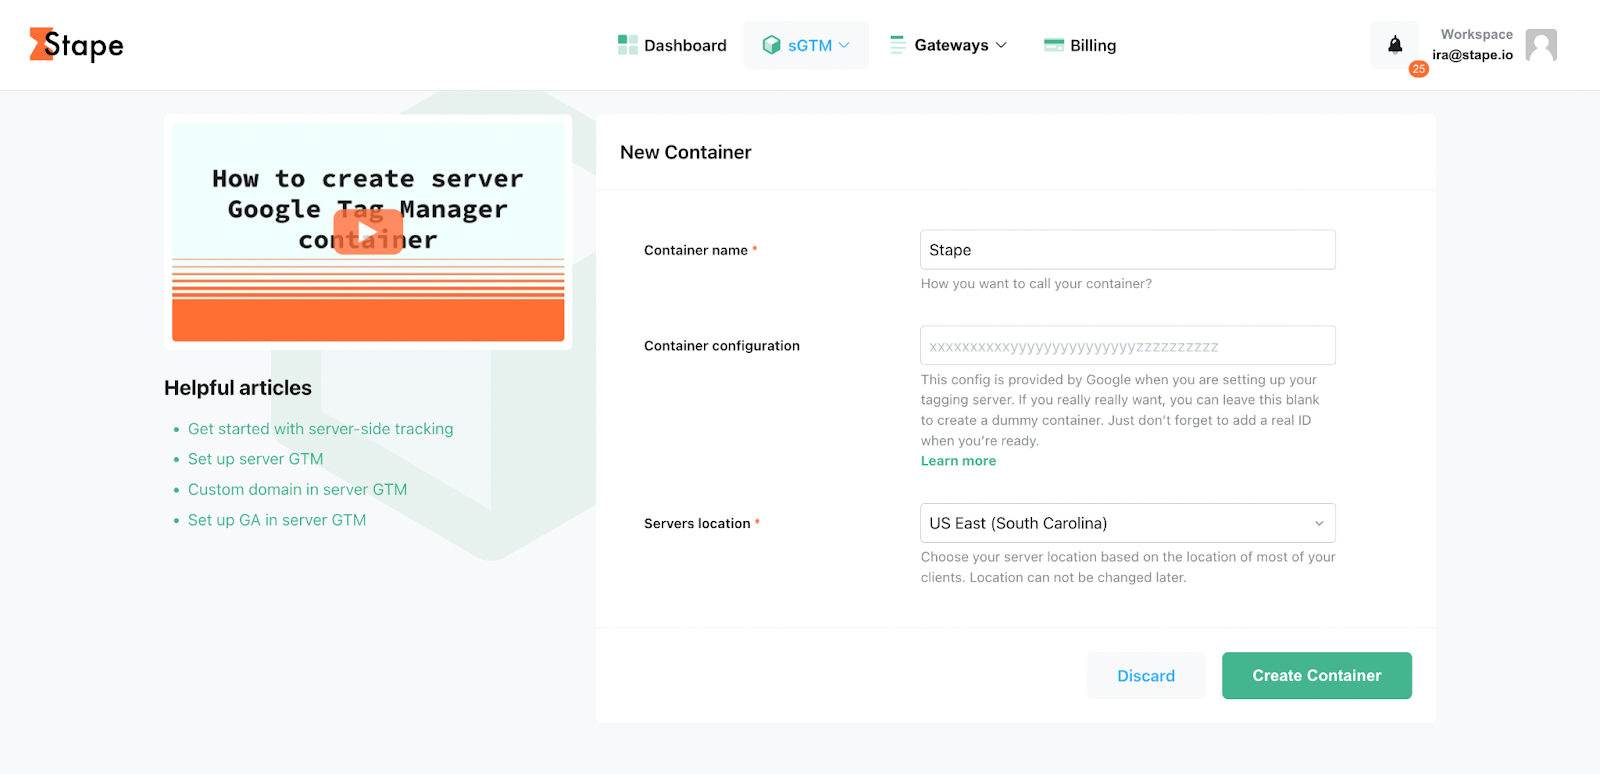
3. Enter your container details:
- Container name. The name does not necessarily have to be the same as the container name in your server GTM.
- Container configuration. Paste the Container Config you copied from your Google Tag Manager Server Container.
Then, set up a custom domain inside GTM to enable first-party cookie tracking.
This helps platforms recognize the data as coming from your own domain, improving accuracy and compliance.
- Server location. Select your server location based on the location of most of your clients. The location can not be changed later.
You’ll also need to configure DNS settings and SSL for your custom domain.
Stape can manage these automatically, or you can do it manually.
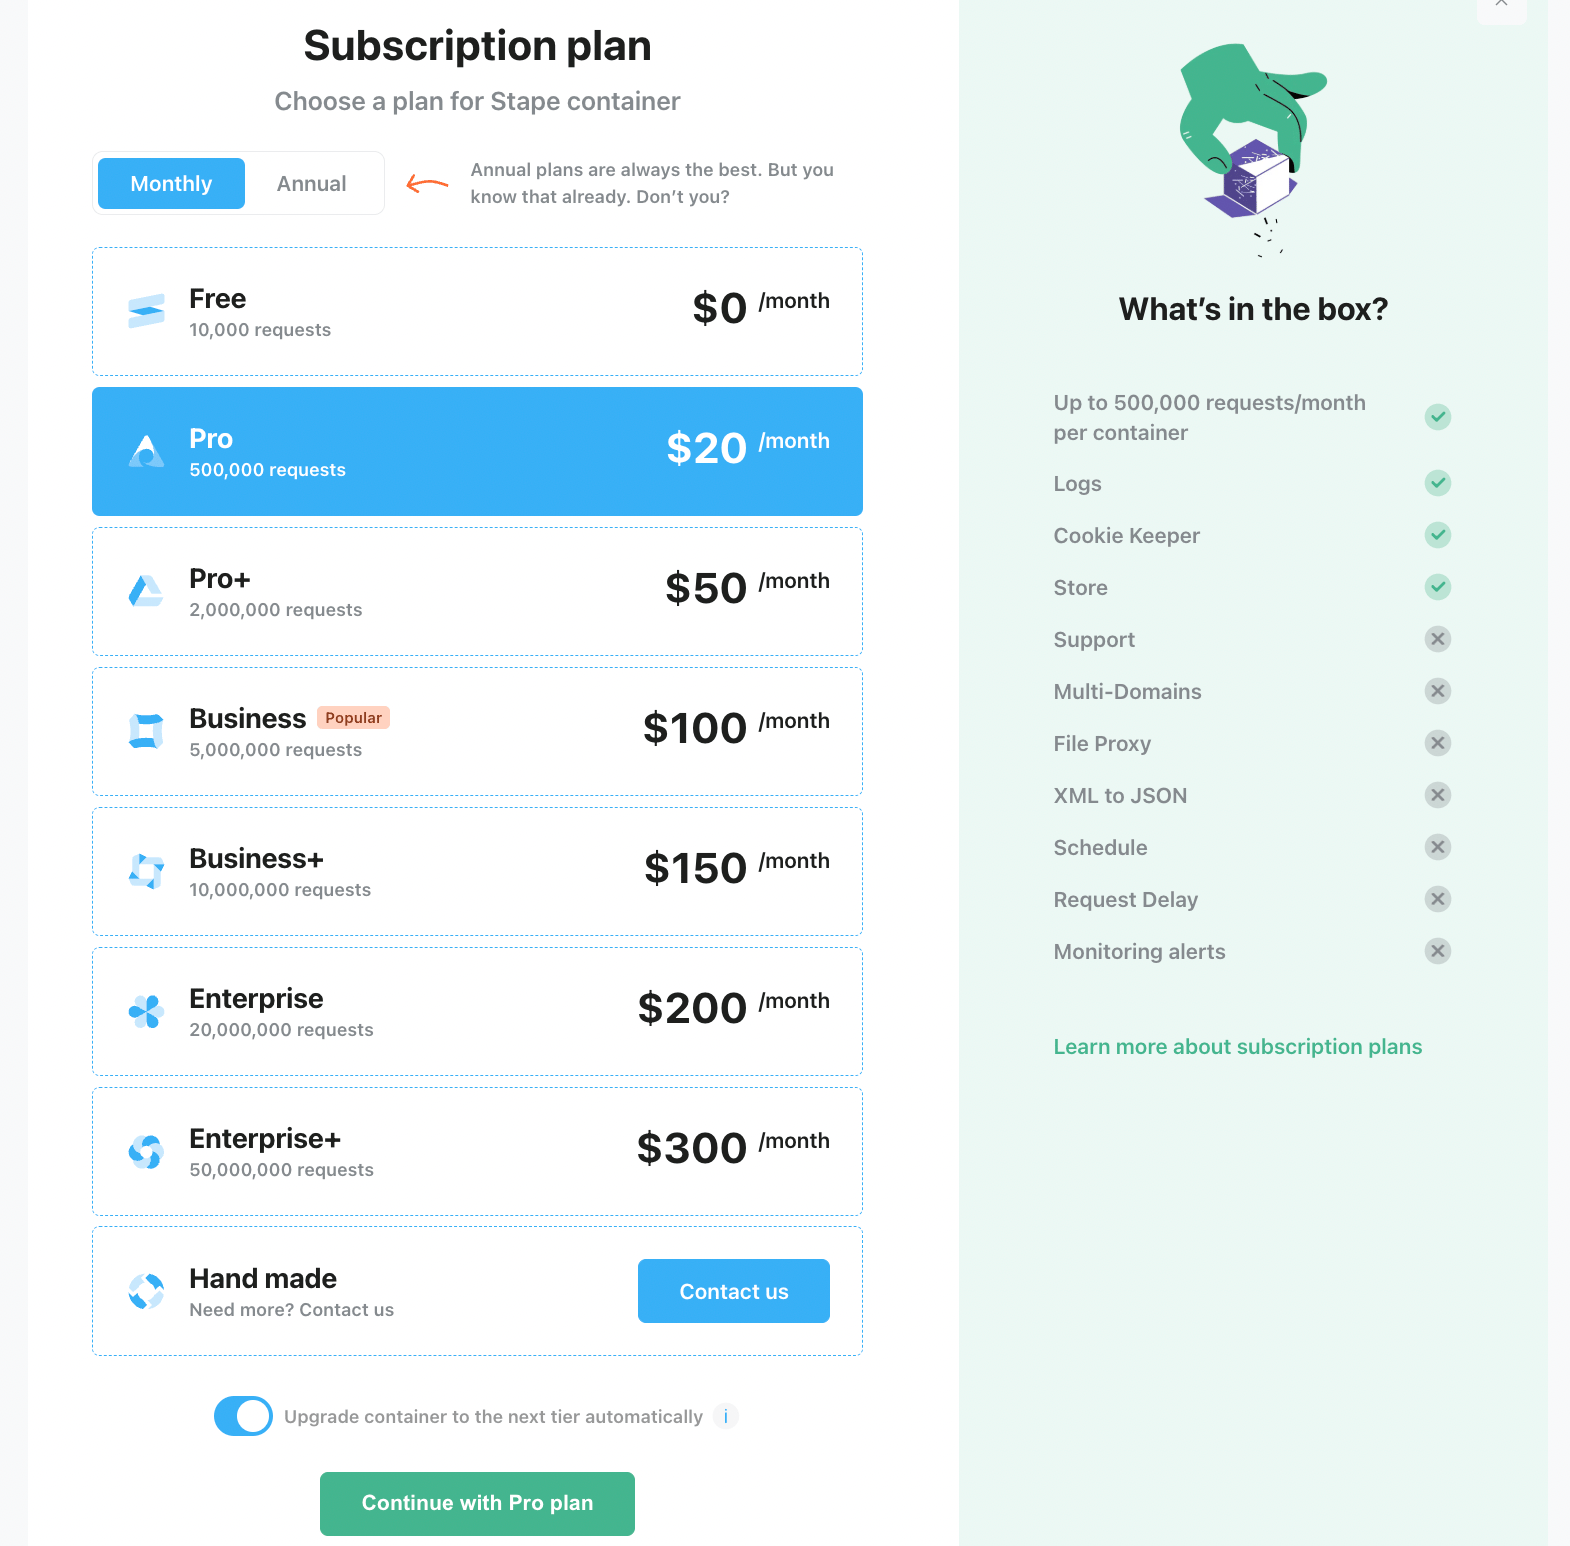
4. Choose a plan for your container. You can start with a Free plan. Click Continue with a Free plan.
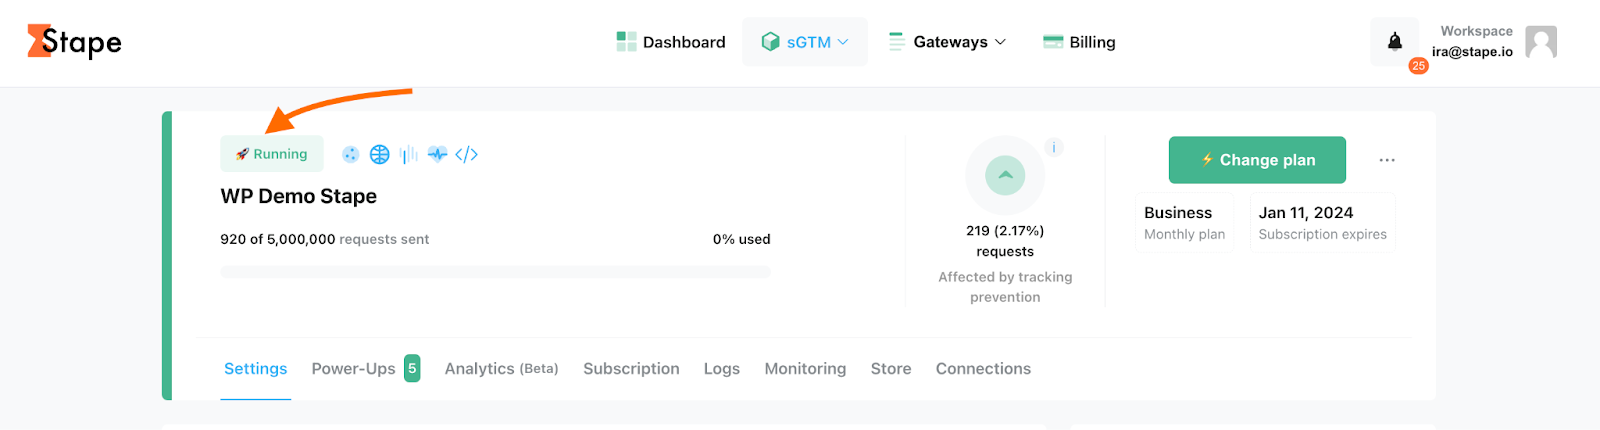
You will see the status of your container, container config, and plan name. It takes around five minutes to deploy a server container. Please reload the page to update the status.
Once the container is running, enable Server-Managed cookies in your GA4 settings to avoid browser restrictions like ITP.
If the setup was done correctly, you should see the status Running.
Step 3. Configure tags, triggers, and variables
Once your server container is ready, you configure tags to send data, triggers to determine when those tags should fire, and variables to store the dynamic information your tags and triggers rely on. For example, tags might send purchase data to Google Analytics, triggers would control when that happens, and variables could capture user session details from requests. This setup allows you to manage data collection with precision and flexibility.
Note:
By following these steps, you can successfully set up a server container in Google Tag Manager, enabling you to leverage the full benefits of server-to-server tagging.
This server-side setup will help you collect accurate data, improve website performance, and enhance user privacy, ensuring your analytics strategy is effective and compliant with modern standards.
| Check the list of Stape’s GTM templates for both server and web GTM containers. |
Ways of sending server data to sGTM
You can send data to sGTM without using the browser. Here are the most common methods:
- CRM webhooks
Send offline events like sales or signups directly from your CRM. sGTM preview header by Stape makes webhook setup easier in sGTM.
- Payment processors (e.g. Stripe, PayPal)
Track events like subscriptions, upsells, or refunds using webhooks from your payment tools.
- CMS platforms (e.g. Shopify, WordPress, Magento 2)
Use Stape CMS integrations to send purchase or user data directly to sGTM.
- Stape SDKs
Send data from mobile or backend apps using Stape’s SDK for iOS, Android, PHP, Node.js, or Flutter.
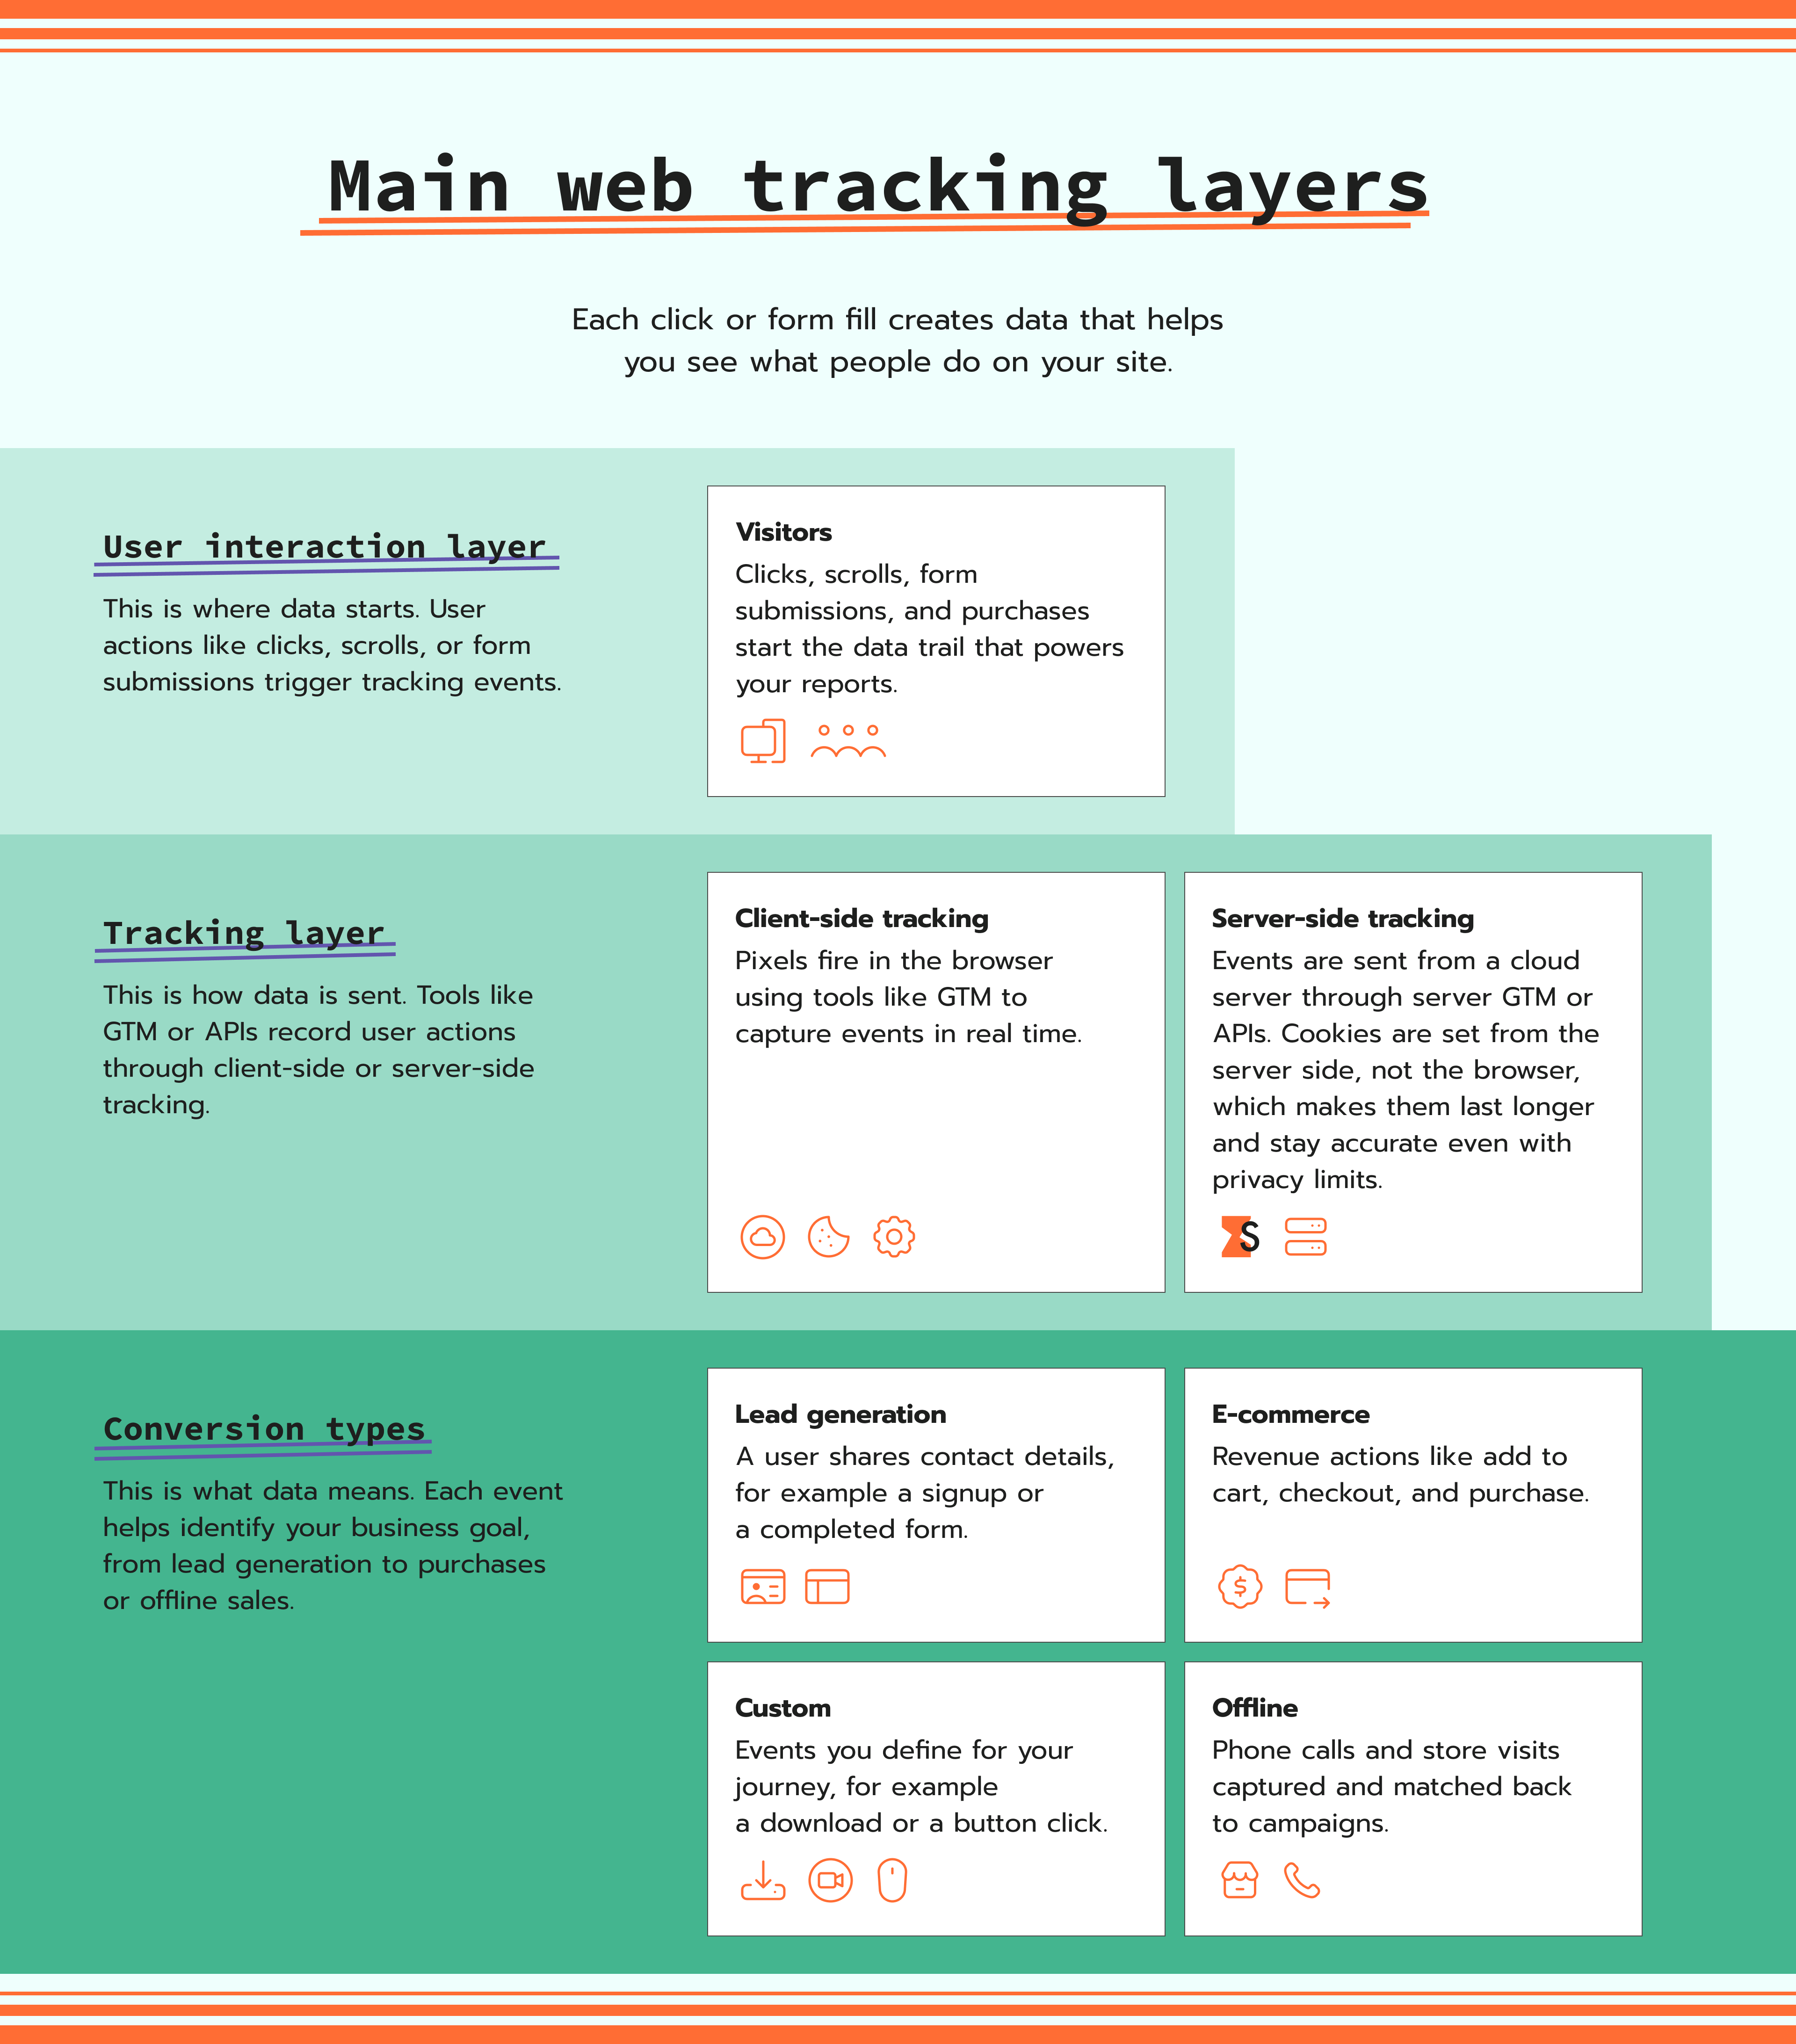
It's also worth noting that if you visualize the entire concept of web tracking as a system of interconnected layers, the value of S2S setup becomes easier to understand. When you shift a part of the data flow away from the browser and into backend infrastructure, you gain more control over data quality, routing, and compliance, without breaking the overall tracking architecture.
Conclusion
Server-to-server tracking improves data accuracy and security by reducing reliance on the browser.
However, it's not always possible to use a pure S2S setup with every platform.
For example, Google Ads depends on GA4 events, which still require some client-side data.
To work around this, you can combine S2S with web+server tracking or use offline conversions to import events directly into Google Ads.
This guide showed how to send data to sGTM and how to set up a working S2S configuration using Stape.
The most technical part is debugging webhook data, where Stape sGTM Preview Header config power-up and Data Client are especially helpful.
Server containers help keep your tracking effective by collecting more complete data while remaining privacy-compliant.

Comments