Server-side Google Analytics 4 for Shopify
Google Analytics 4 (GA4) became the most popular web analytics tool after Universal Analytics was switched off in the summer of 2023 for most users. So if you had planned on implementing GA4 on your Shopify store, setting up server-side Google Analytics 4 might be an excellent choice since server-side tracking is more adapted to modern tracking restrictions.
Server-side Google Analytics 4 will help trace user behavior more accurately and, in turn, make better decisions geared toward improved customer experience and eCommerce success. To understand which metrics matter most for your store, check out our guide on eCommerce KPIs.
This blog post will walk you through setting up server-side Google Analytics 4 using the Stape's Conversion Tracking app.
Understanding the benefits of using server-side Google Analytics 4
The difference between new and old versions of Google Analytics is huge since Universal Analytics is sessions based, while Google Analytics is event-based. And underway the feedback of users who started implementing GA4 could be better since the product is relatively new, which means it needs some features and has some bugs.
Together with the new version of Google Analytics, another main change in the world of tracking is server-side tracking. Server-side Google Analytics 4 (GA4) has several benefits over traditional client-side tracking. It complements tools like Shopify Conversion API to enhance tracking consistency across platforms.
Here are some of the key benefits of server-side tracking:
- Improved data accuracy: Server-side tracking ensures data is collected and processed. It eliminates discrepancies caused by ad blockers, client-side scripts, and other monitoring issues. In practice, this looks like the Transparent Digital Services GA4 implementation on Stape, where GA4 recorded 4,512 purchases after the new setup.
- Better user privacy: Server-side tracking allows you to maintain user anonymity, protecting users' personally identifiable information (PII) and adhering to privacy regulations like GDPR and CCPA.
- With server-side tracking, you have greater control over the data you collect and how you use it. For example, custom data streams can track specific events, user behavior, and other data points.
- Integration with other data sources: Server-side tracking can be integrated with other data sources, such as customer relationship management (CRM) systems, to create a complete view of user behavior and improve analytics insights.
Overall, server-side Google Analytics 4 provides more accurate, secure, and customizable tracking options that can help you improve your analytics insights and make better business decisions.
Configure Stape's Conversion Tracking app for Shopify
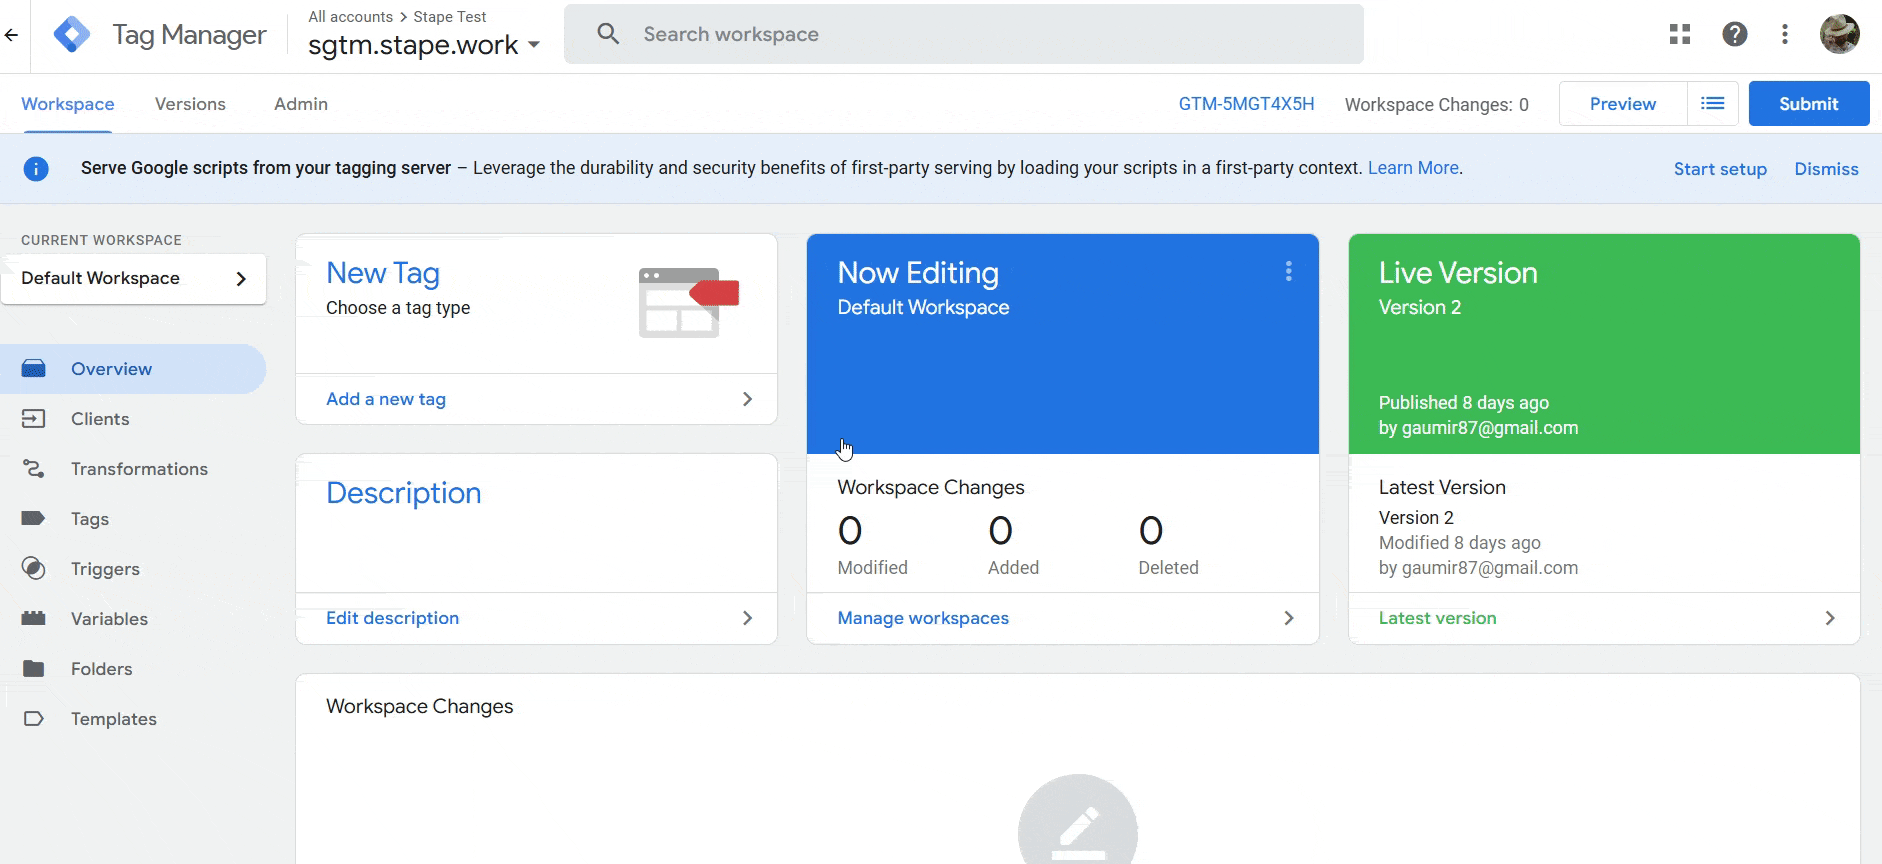
Step 1. Create a Google Tag Manager server container
➡️ Note
Before setting up your server-side Google Tag Manager container, it’s important to have web GTM container configured, because:
- The web container collects events, parameters and user interactions on your website.
- And sends this data to your server-side container.
Please follow the official Google documentation.
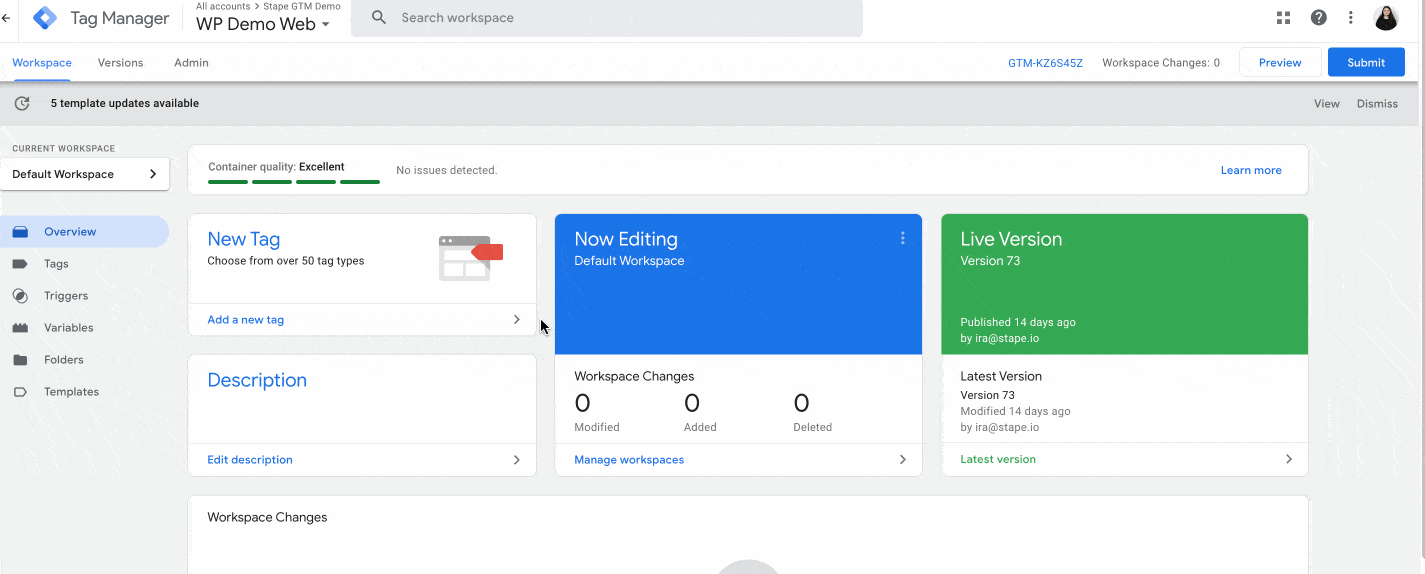
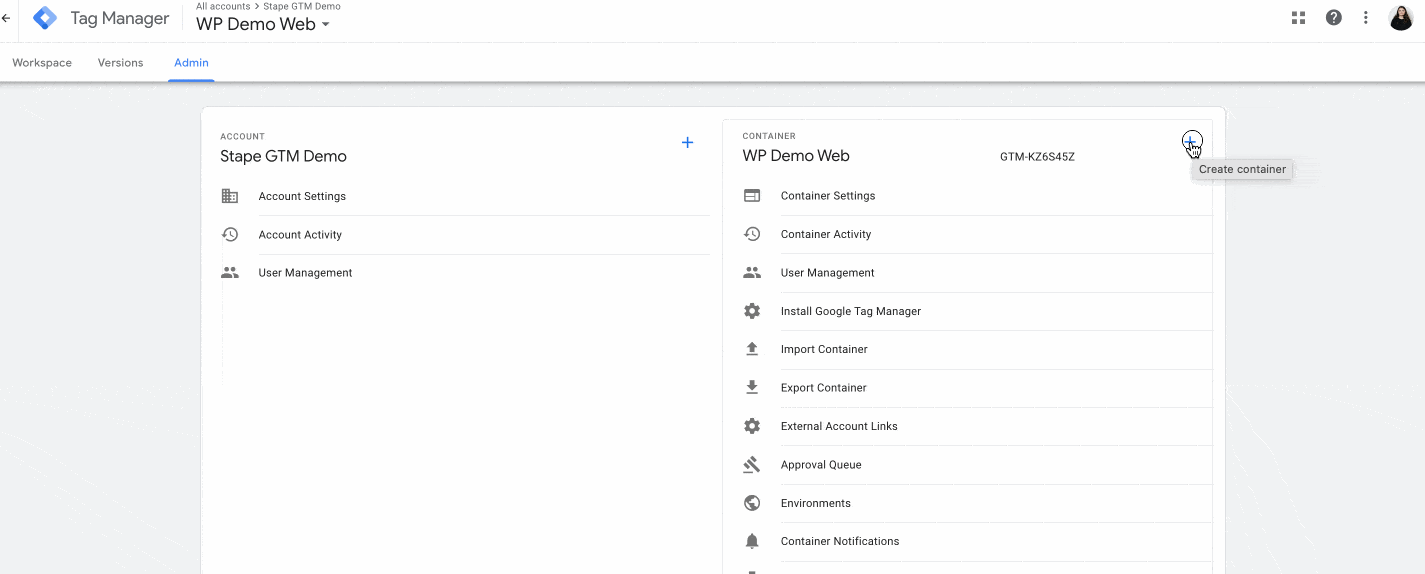
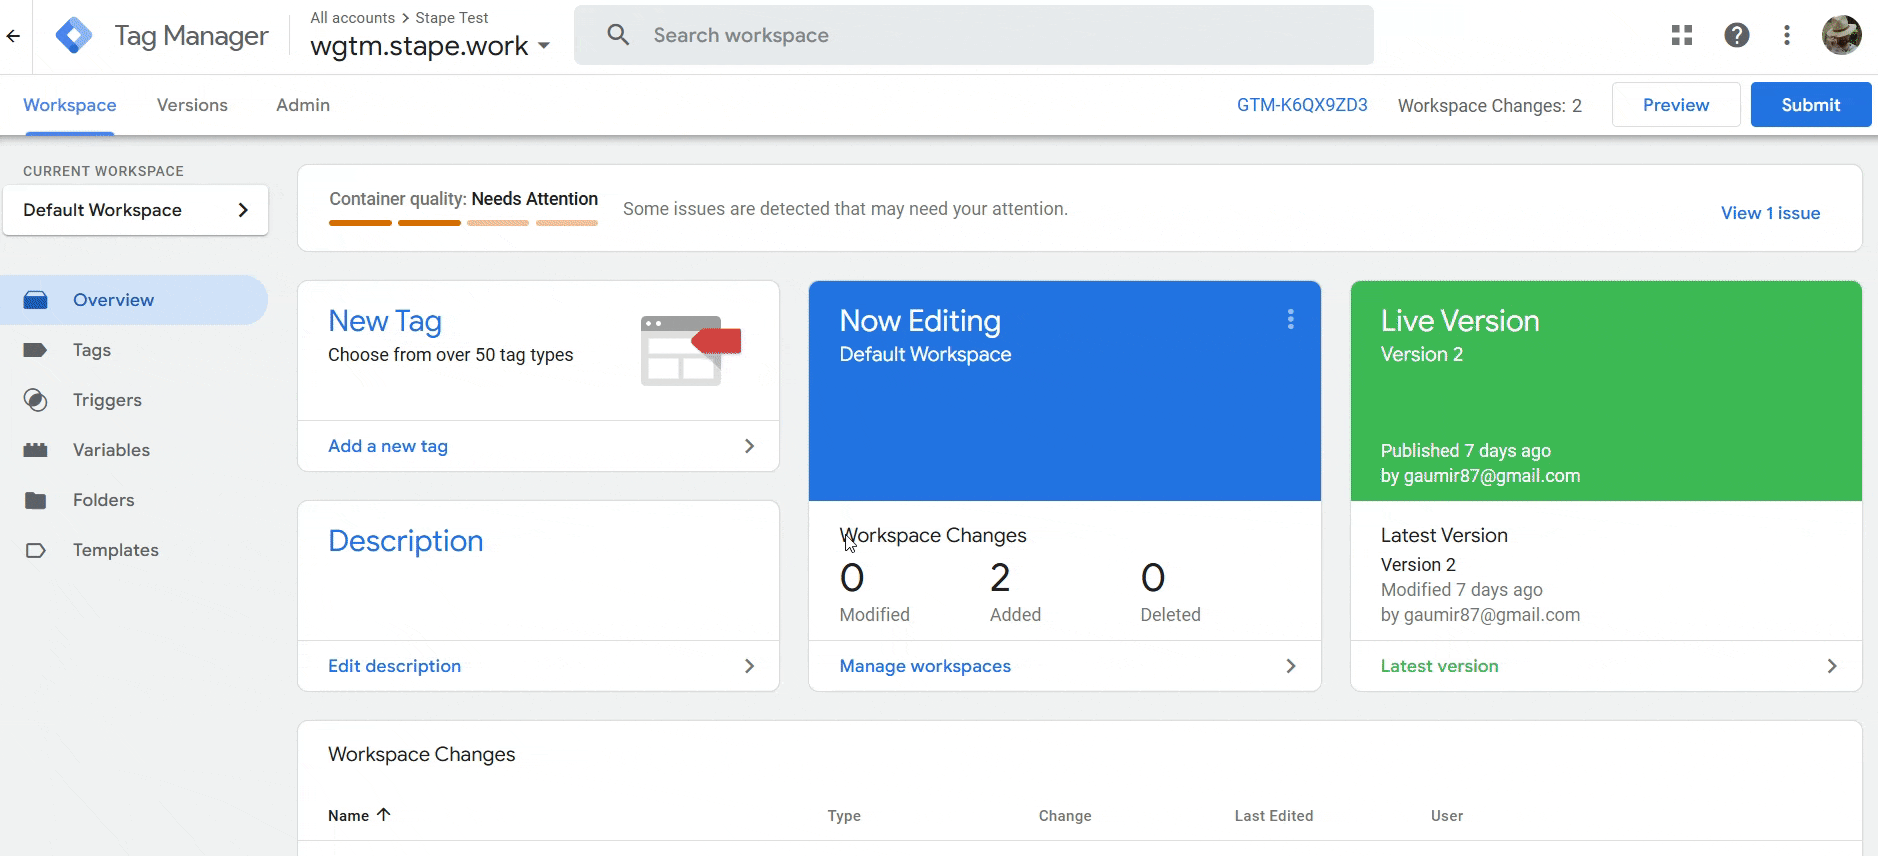
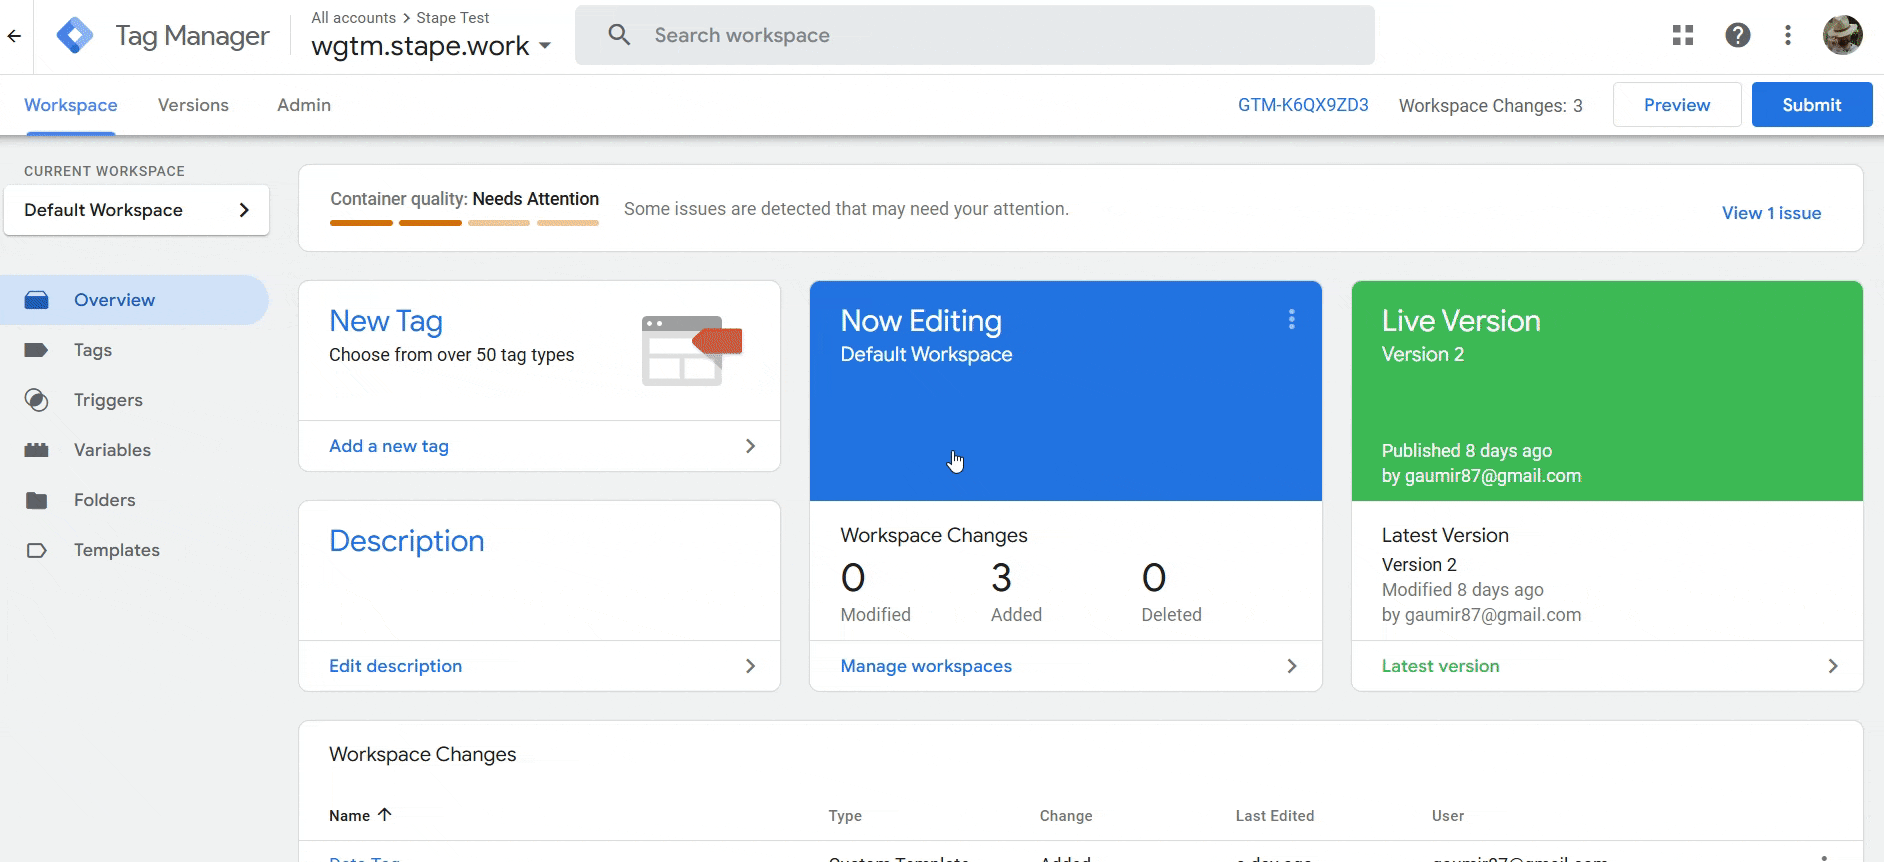
1. Select your GTM account → Click Admin → Click + next to the Container name.
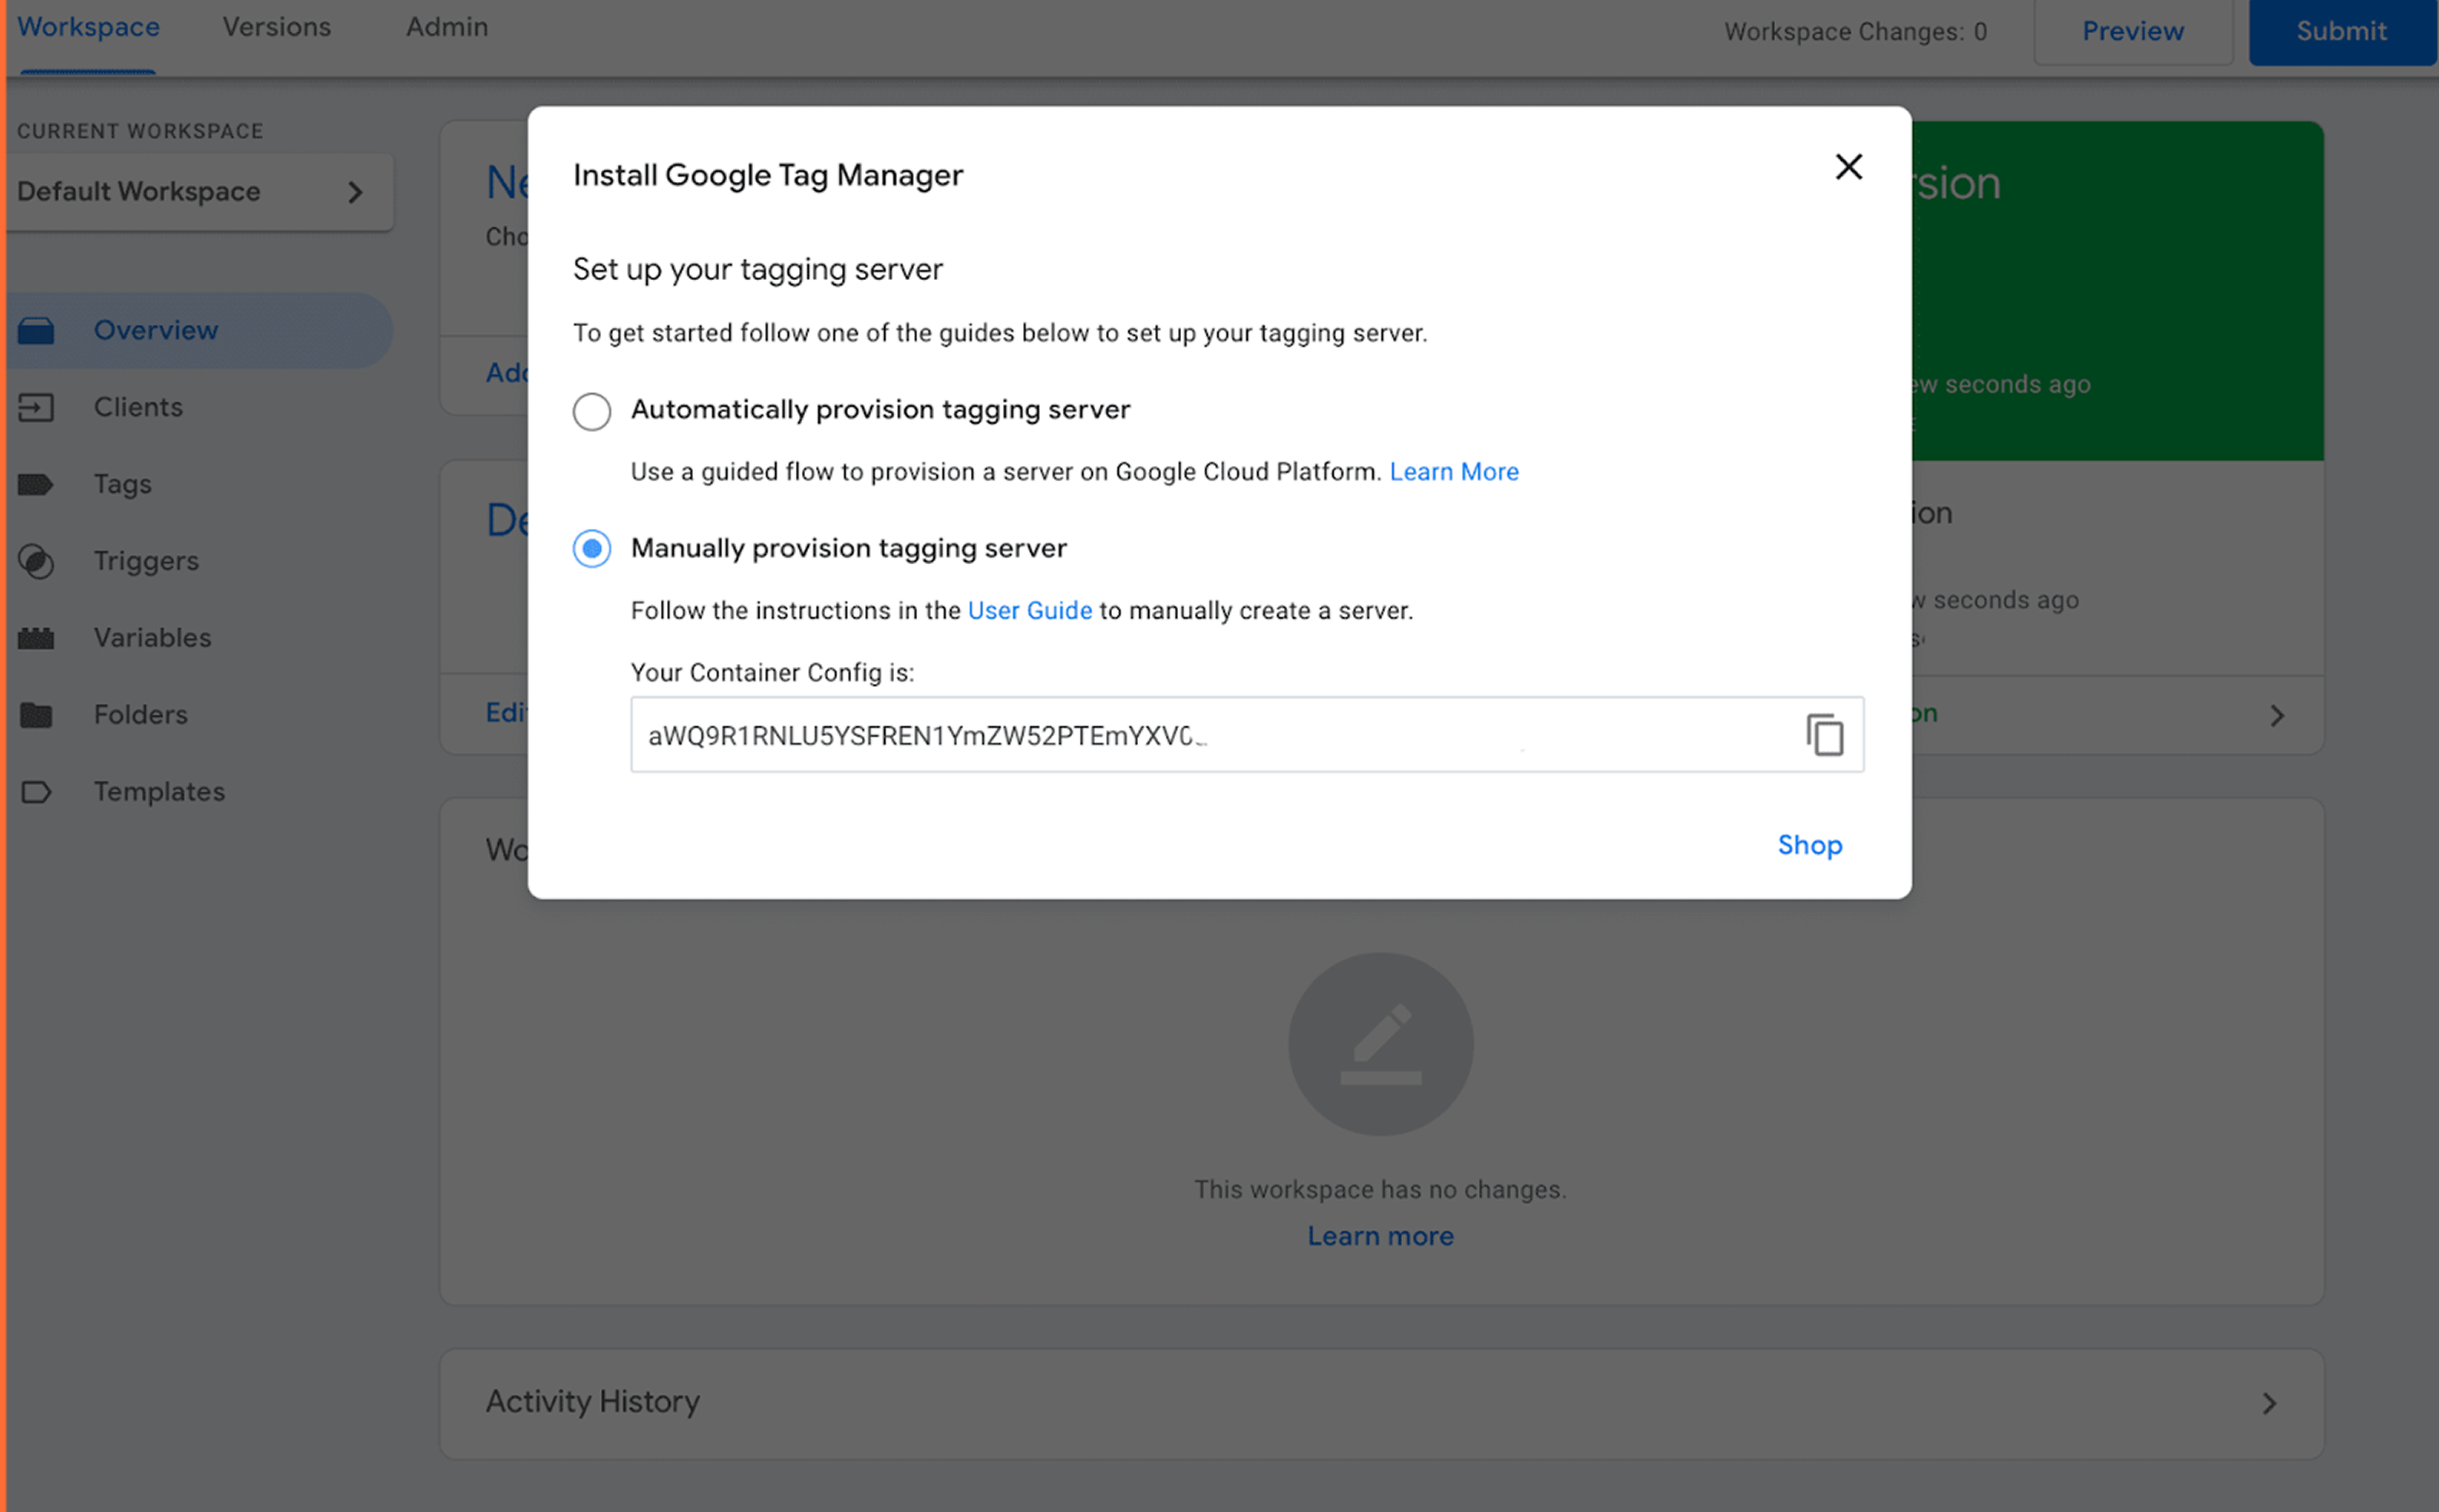
2. Add Container Name → Under Target platform, choose Server. Click Create.
3. Choose Manually provision tagging server. Copy your container config. We will need it in the following steps.
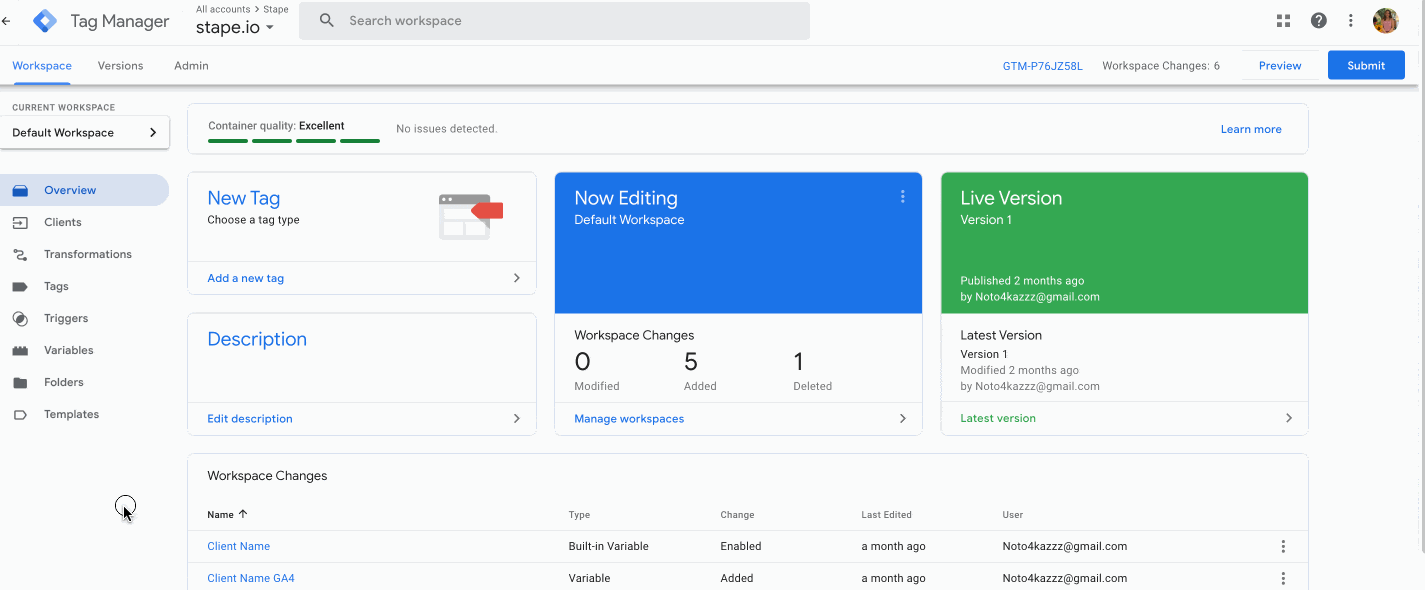
Step 2. Create a Stape account to host your server GTM container
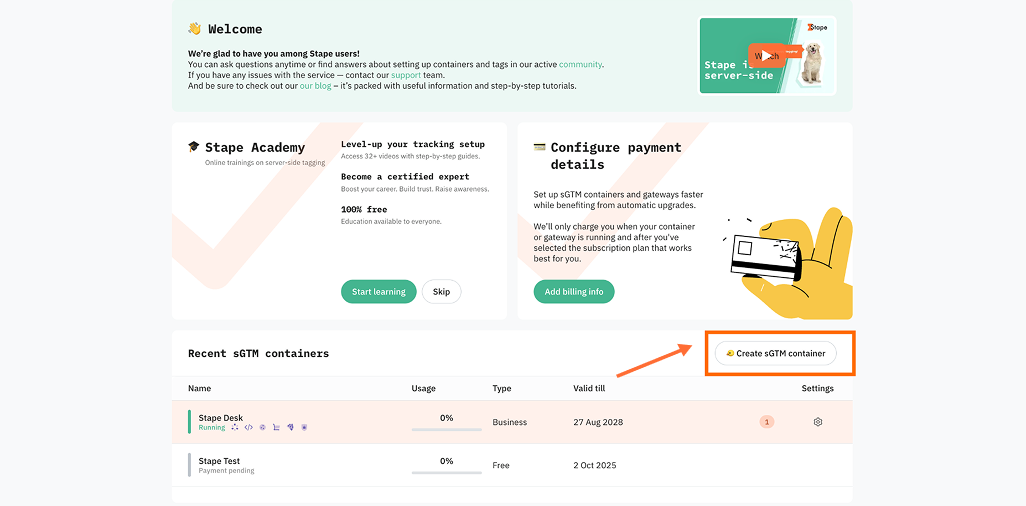
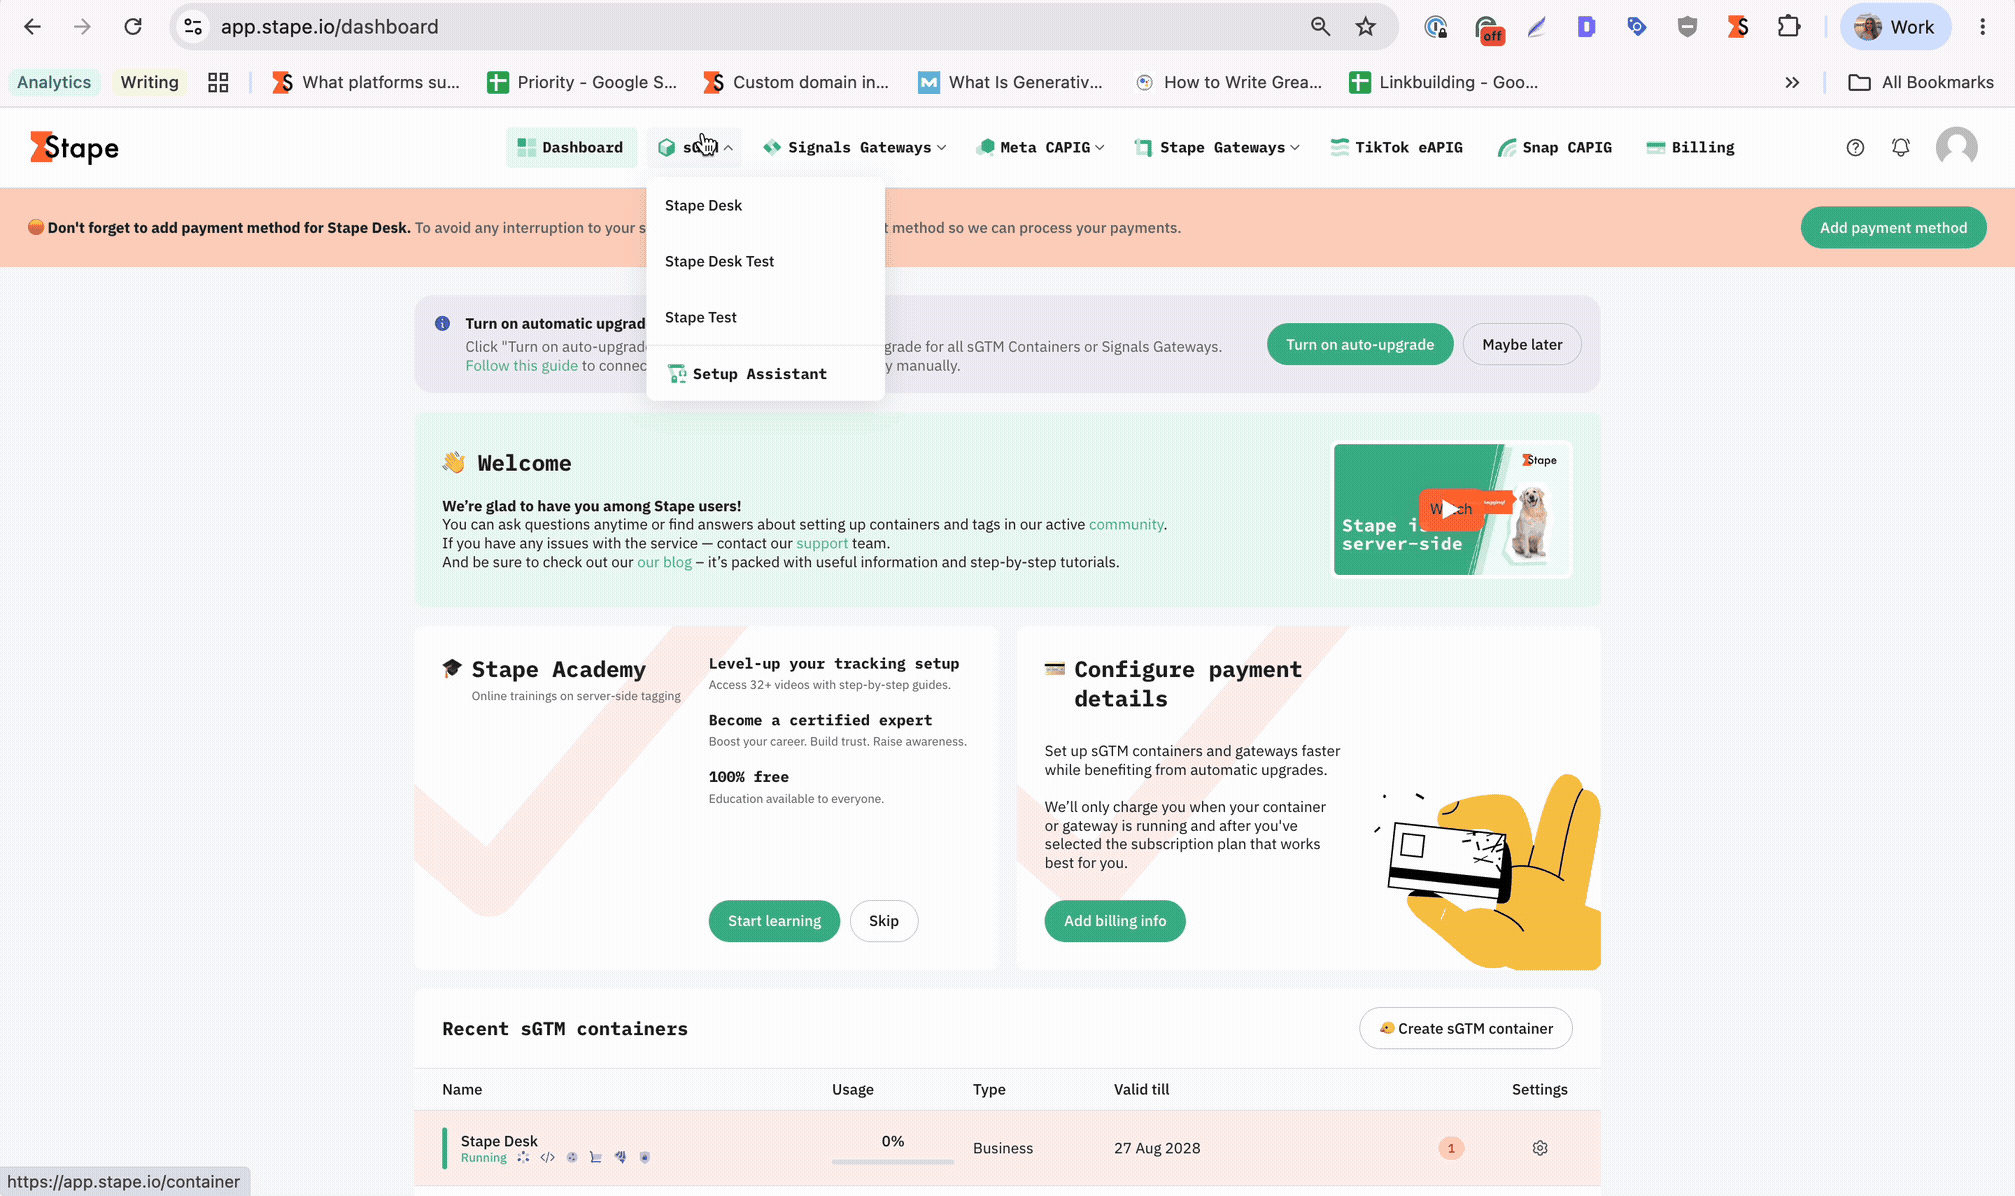
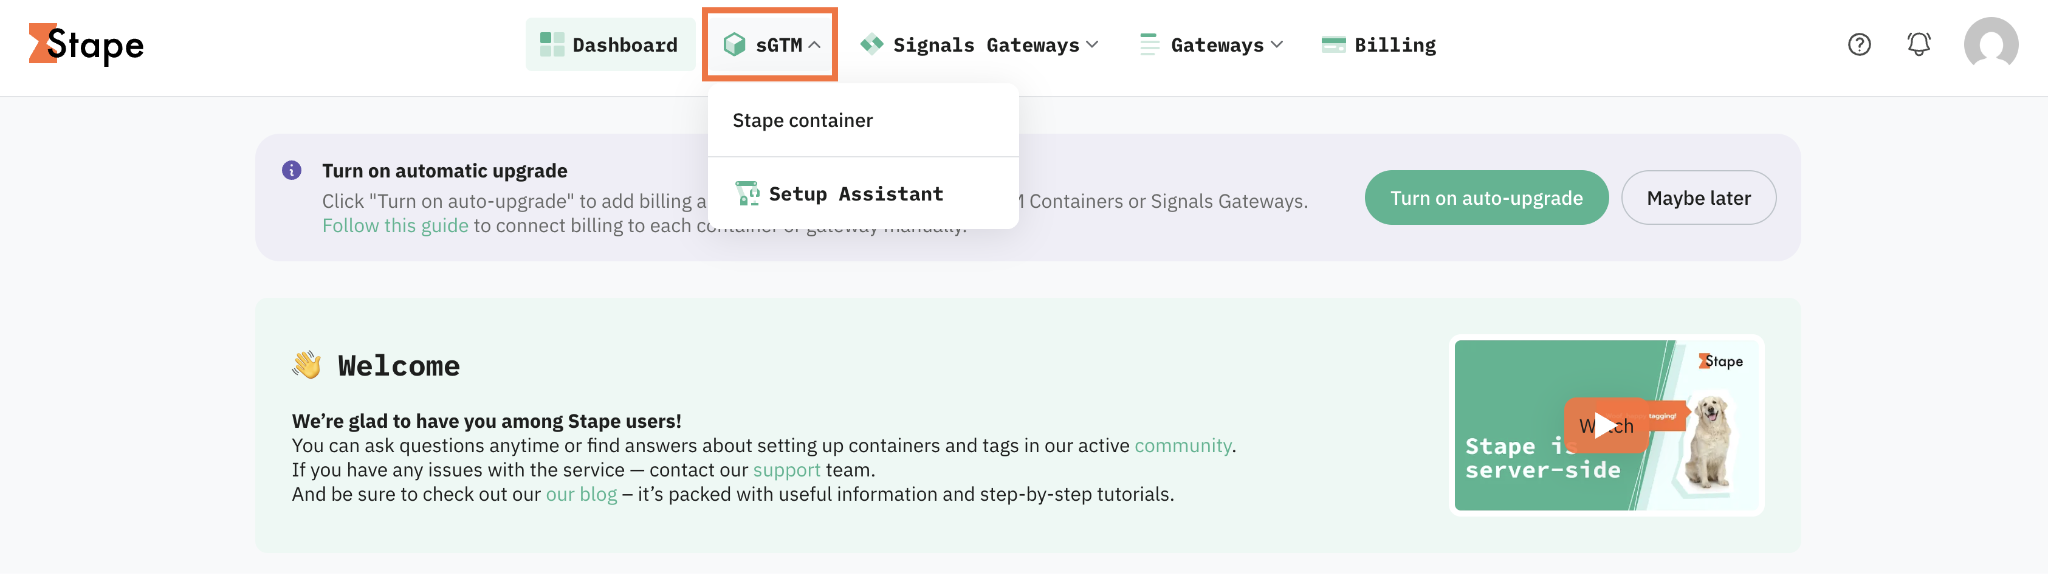
1. Go to stape.io and create an account or log in.
2. Click Create sGTM container on the main page.
3. Enter your container details.
- Container name - give your container a name (for convenience, we recommend using the same name you gave to the server container in GTM).
- Container configuration - paste the Container Config data that you copied from the Install Google Tag Manager pop-up. If you lost it, go to Google Tag Manager → click Admin → click Container settings → copy the string under Container Configuration.
- Server location - for best performance, choose the server location that’s closest to where most of your clients are. See the list of available server locations here. Also, you can opt for the Global multi-zone server location option if you have traffic from different regions. It will automatically route incoming requests to the nearest available zone based on the user’s IP address.
Then click Create Container.
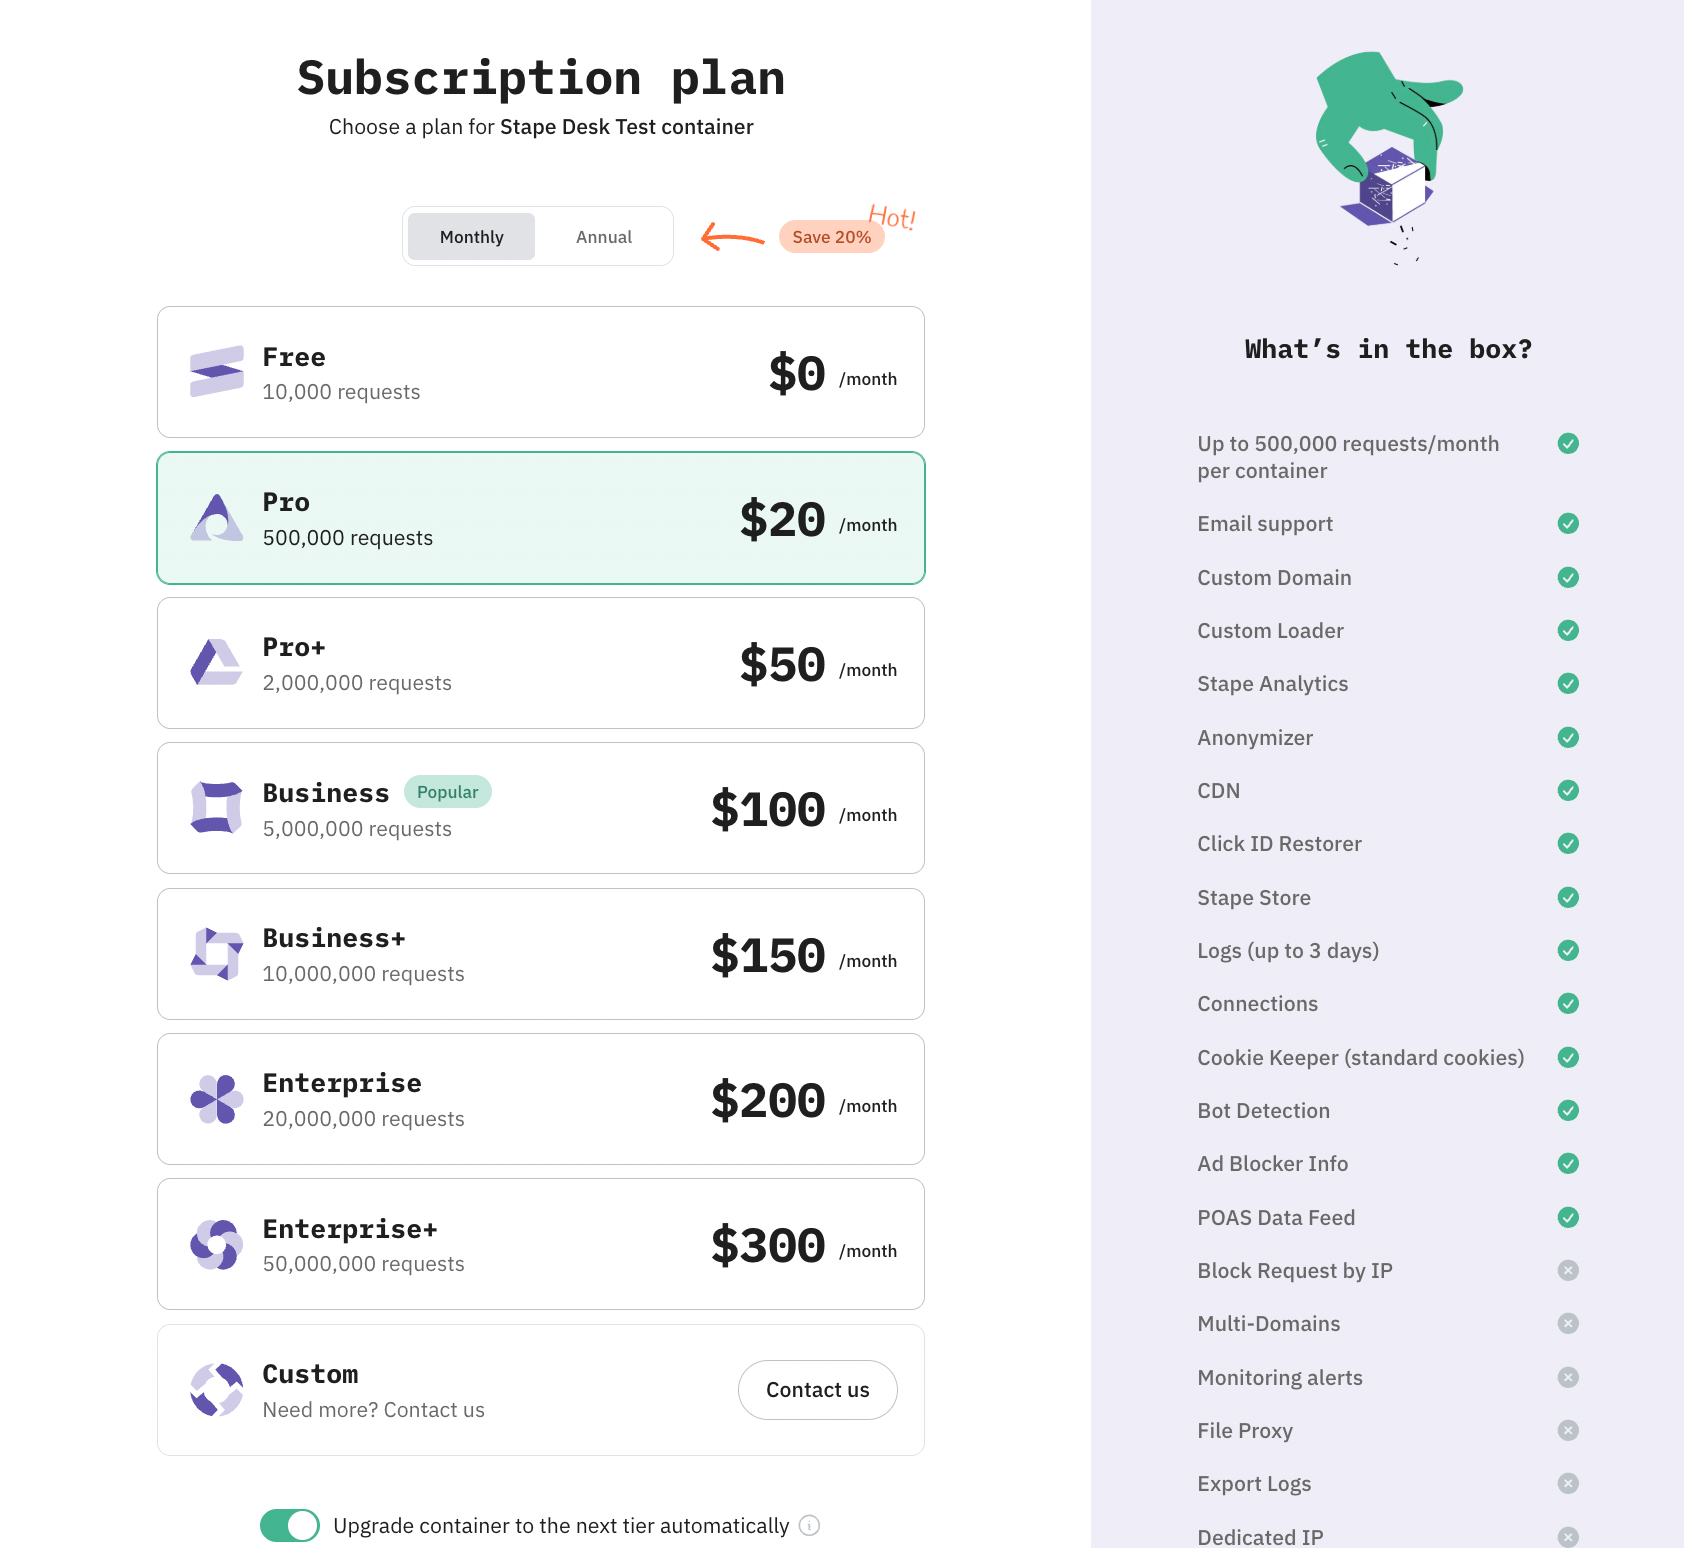
4. Choose a plan for your container. You can start with a Free plan. Click Continue with a Free plan.
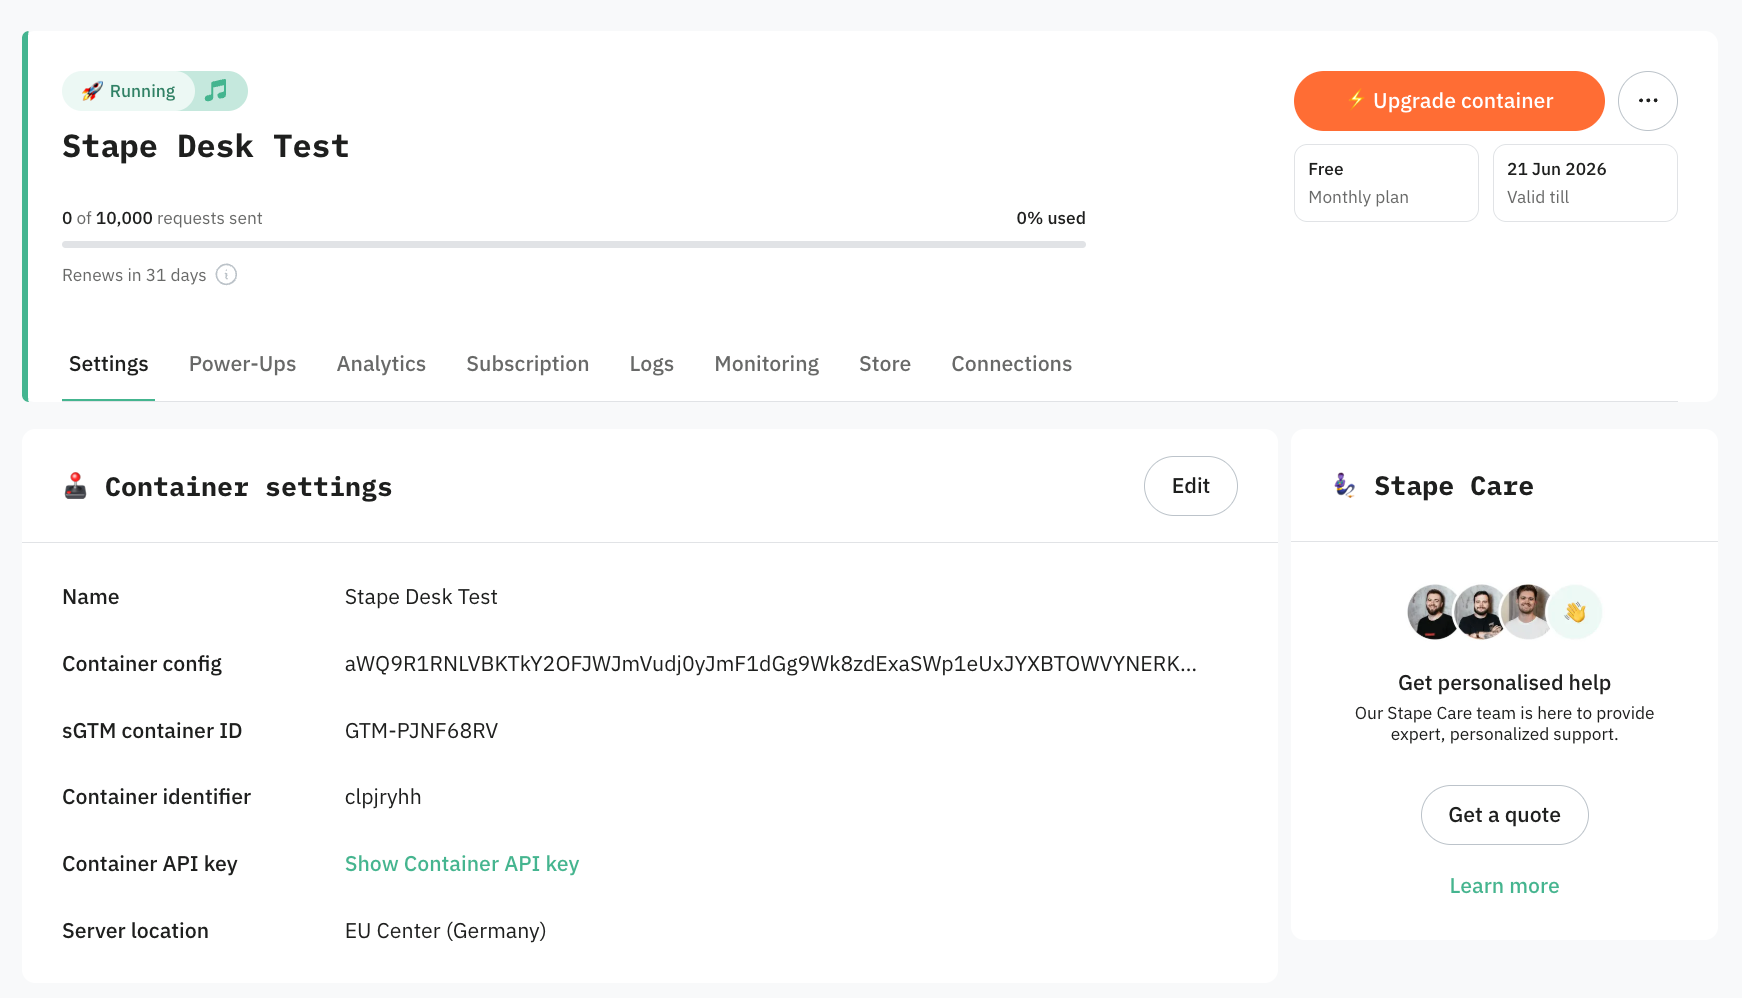
5. You will see the status of your container, container config, and plan name. It takes around 5 minutes to deploy a server container.
Please reload the page to update the status. If the Google Tag Manager server-side setup was done correctly, you should see the status Running.
Step 3. Create a Custom tagging server URL
Use a custom tagging server URL, also called a custom domain, to set first-party cookies. This URL should use the same root domain as your website. For example, if your website is `example.com`, your tagging server URL can be `ss.example.com`.
There are three ways to set up a custom domain:
- Same origin – tagging server shares the exact domain and path with your site. Read more on how to set up a custom domain with the same origin.
- Subdomain – tagging server runs on a subdomain of your root domain. In this article we will guide you through this setup.
- Default domain – no custom domain; uses the standard Stape-provided address.

Step 1. Add your custom domain
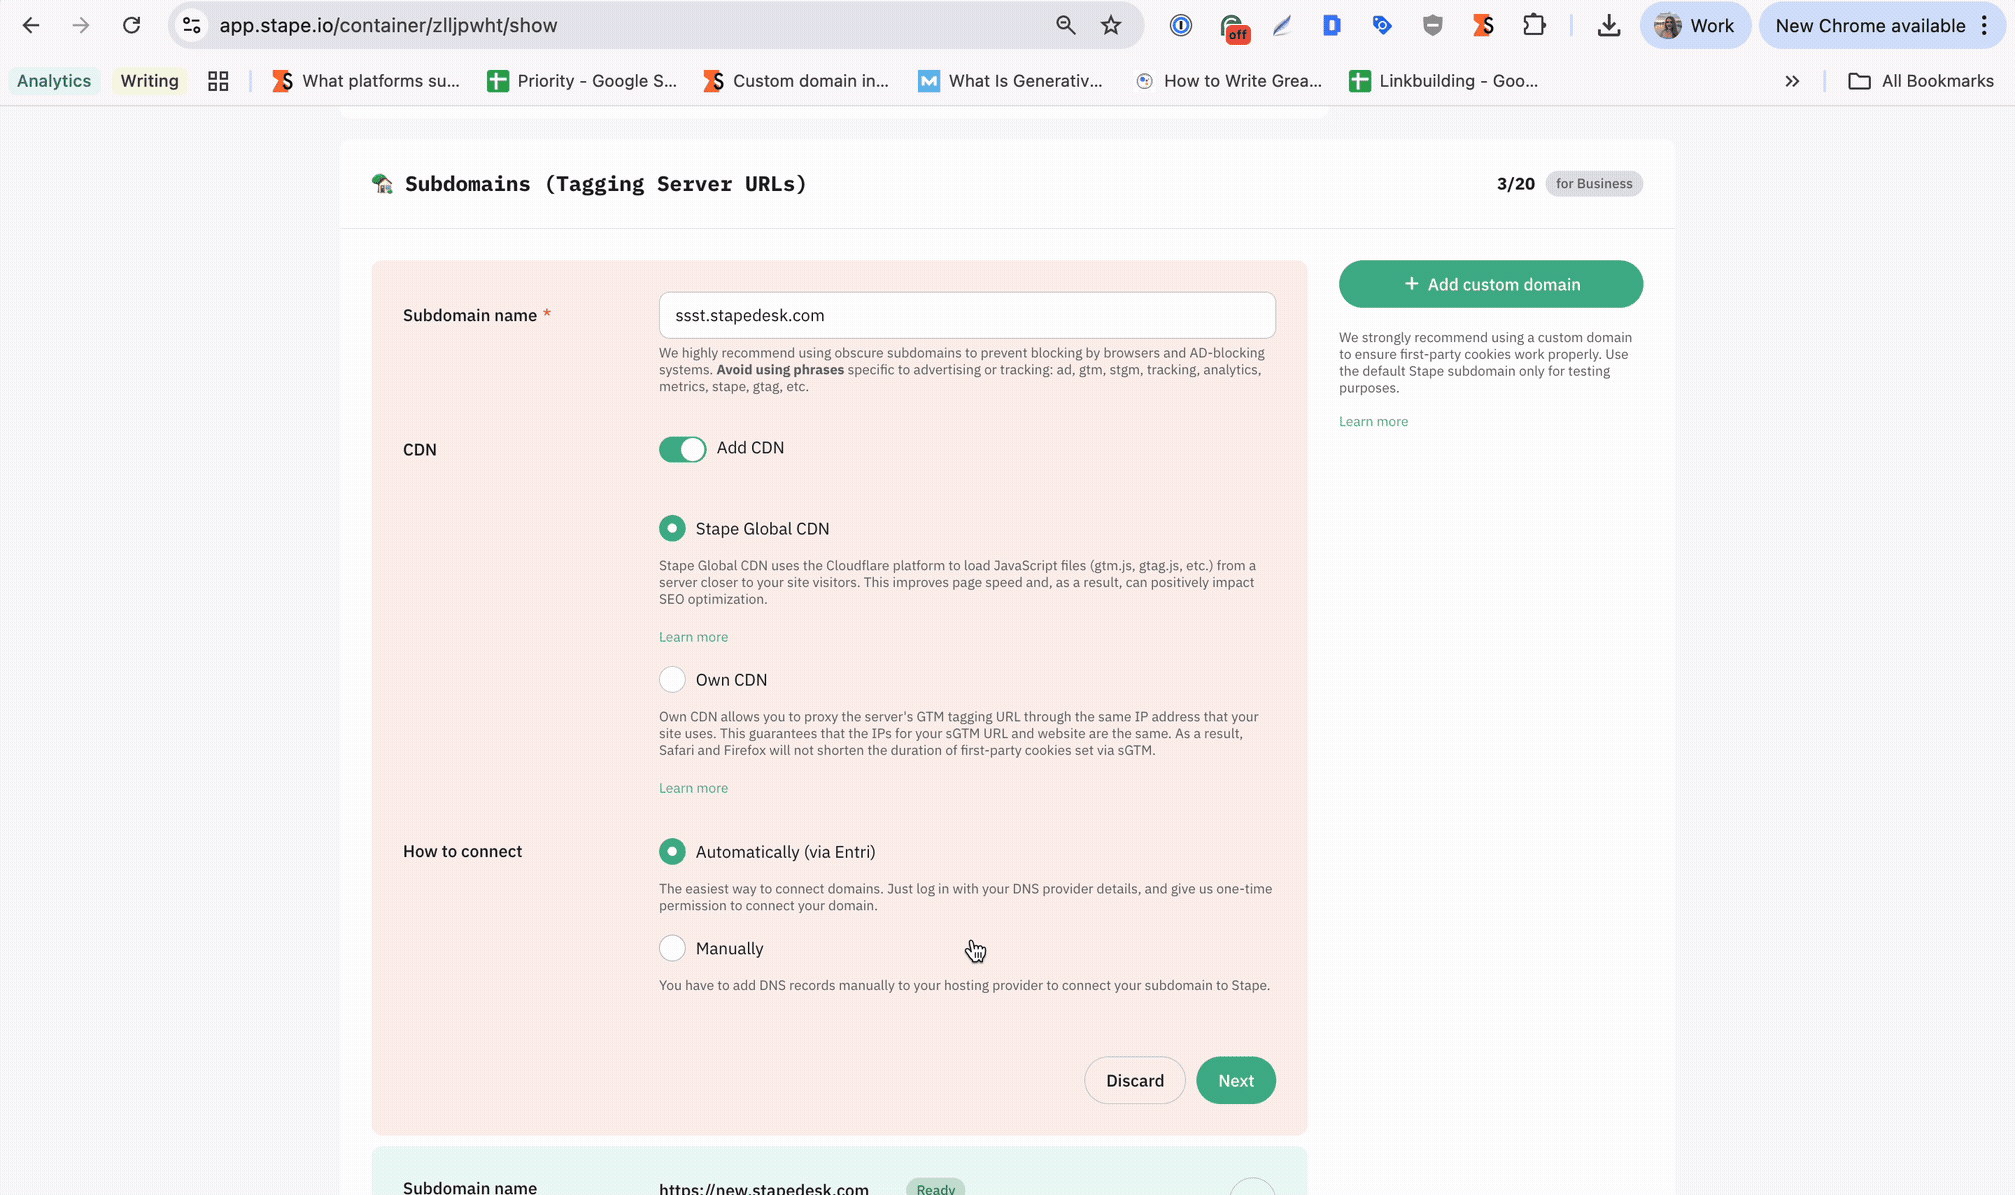
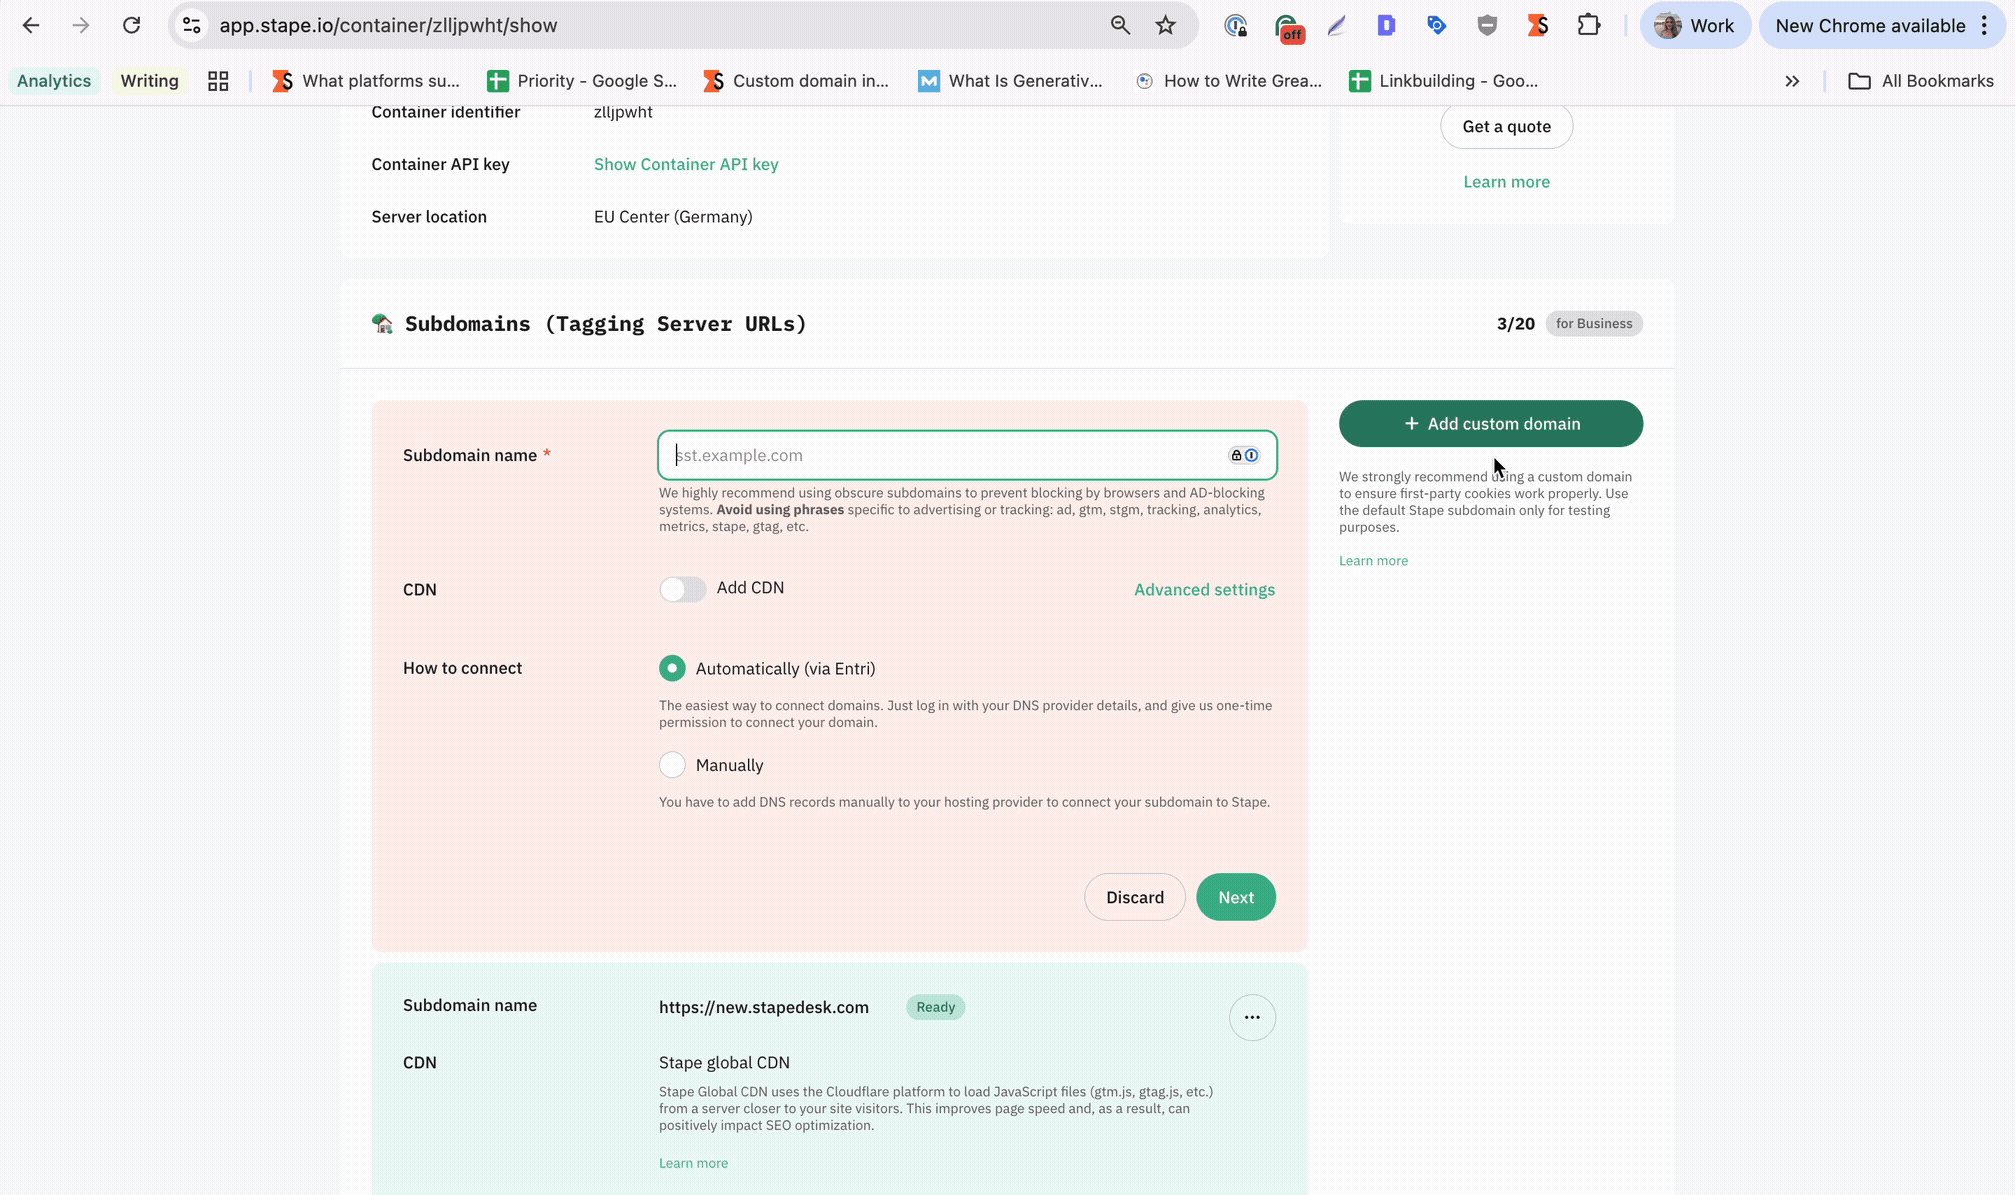
Сhoose your container on Stape, scroll down, and click Add custom domain.
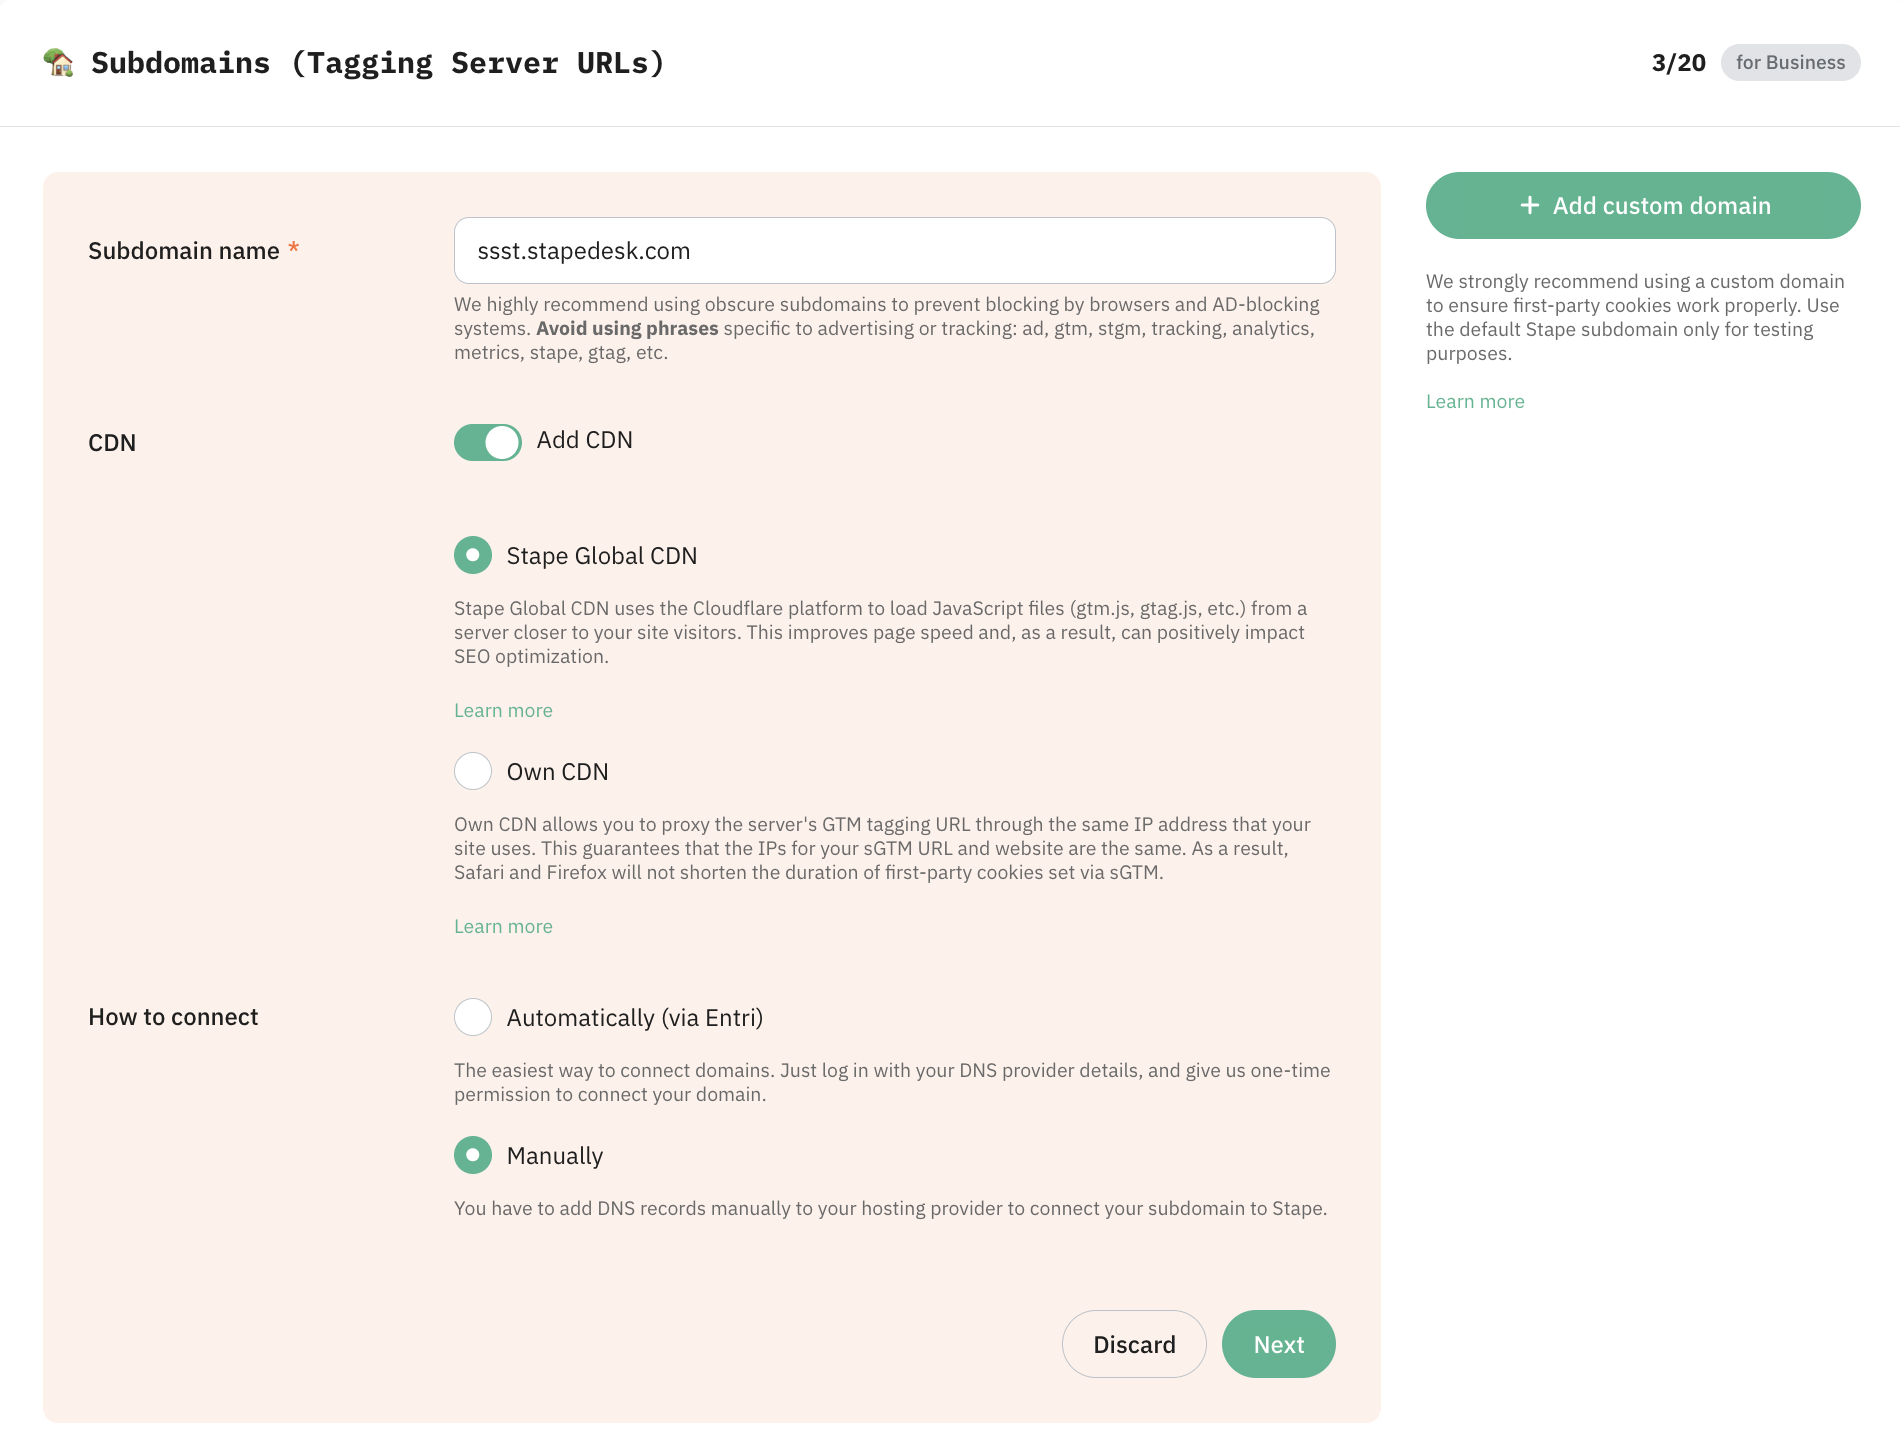
Add Subdomain name - it can be any name that works for you, just be sure to avoid using phrases specific to advertising or tracking: ad, gtm, stgm, tracking, analytics, metrics, stape, gtag, etc.
Step 2. Add CDN
A Content Delivery Network (CDN) distributes your website's assets across a global network of servers to reduce latency and improve load times for users in different locations. It is useful if your audience is geographically distributed or if you want to improve cookie tracking and data accuracy.
By default, the CDN is disabled, which means JavaScript files (like gtm.js, gtag.js, and analytics.js) are served directly from the server location where your sGTM container is hosted. Effectively, it bypasses both Stape Global CDN and Own CDN options and gives you a direct, unproxied connection between your site and the sGTM container.
| Important: please consider your country's privacy regulations before setting up a CDN. |
To enable the CDN, click the Add CDN toggle and select one of the following options:
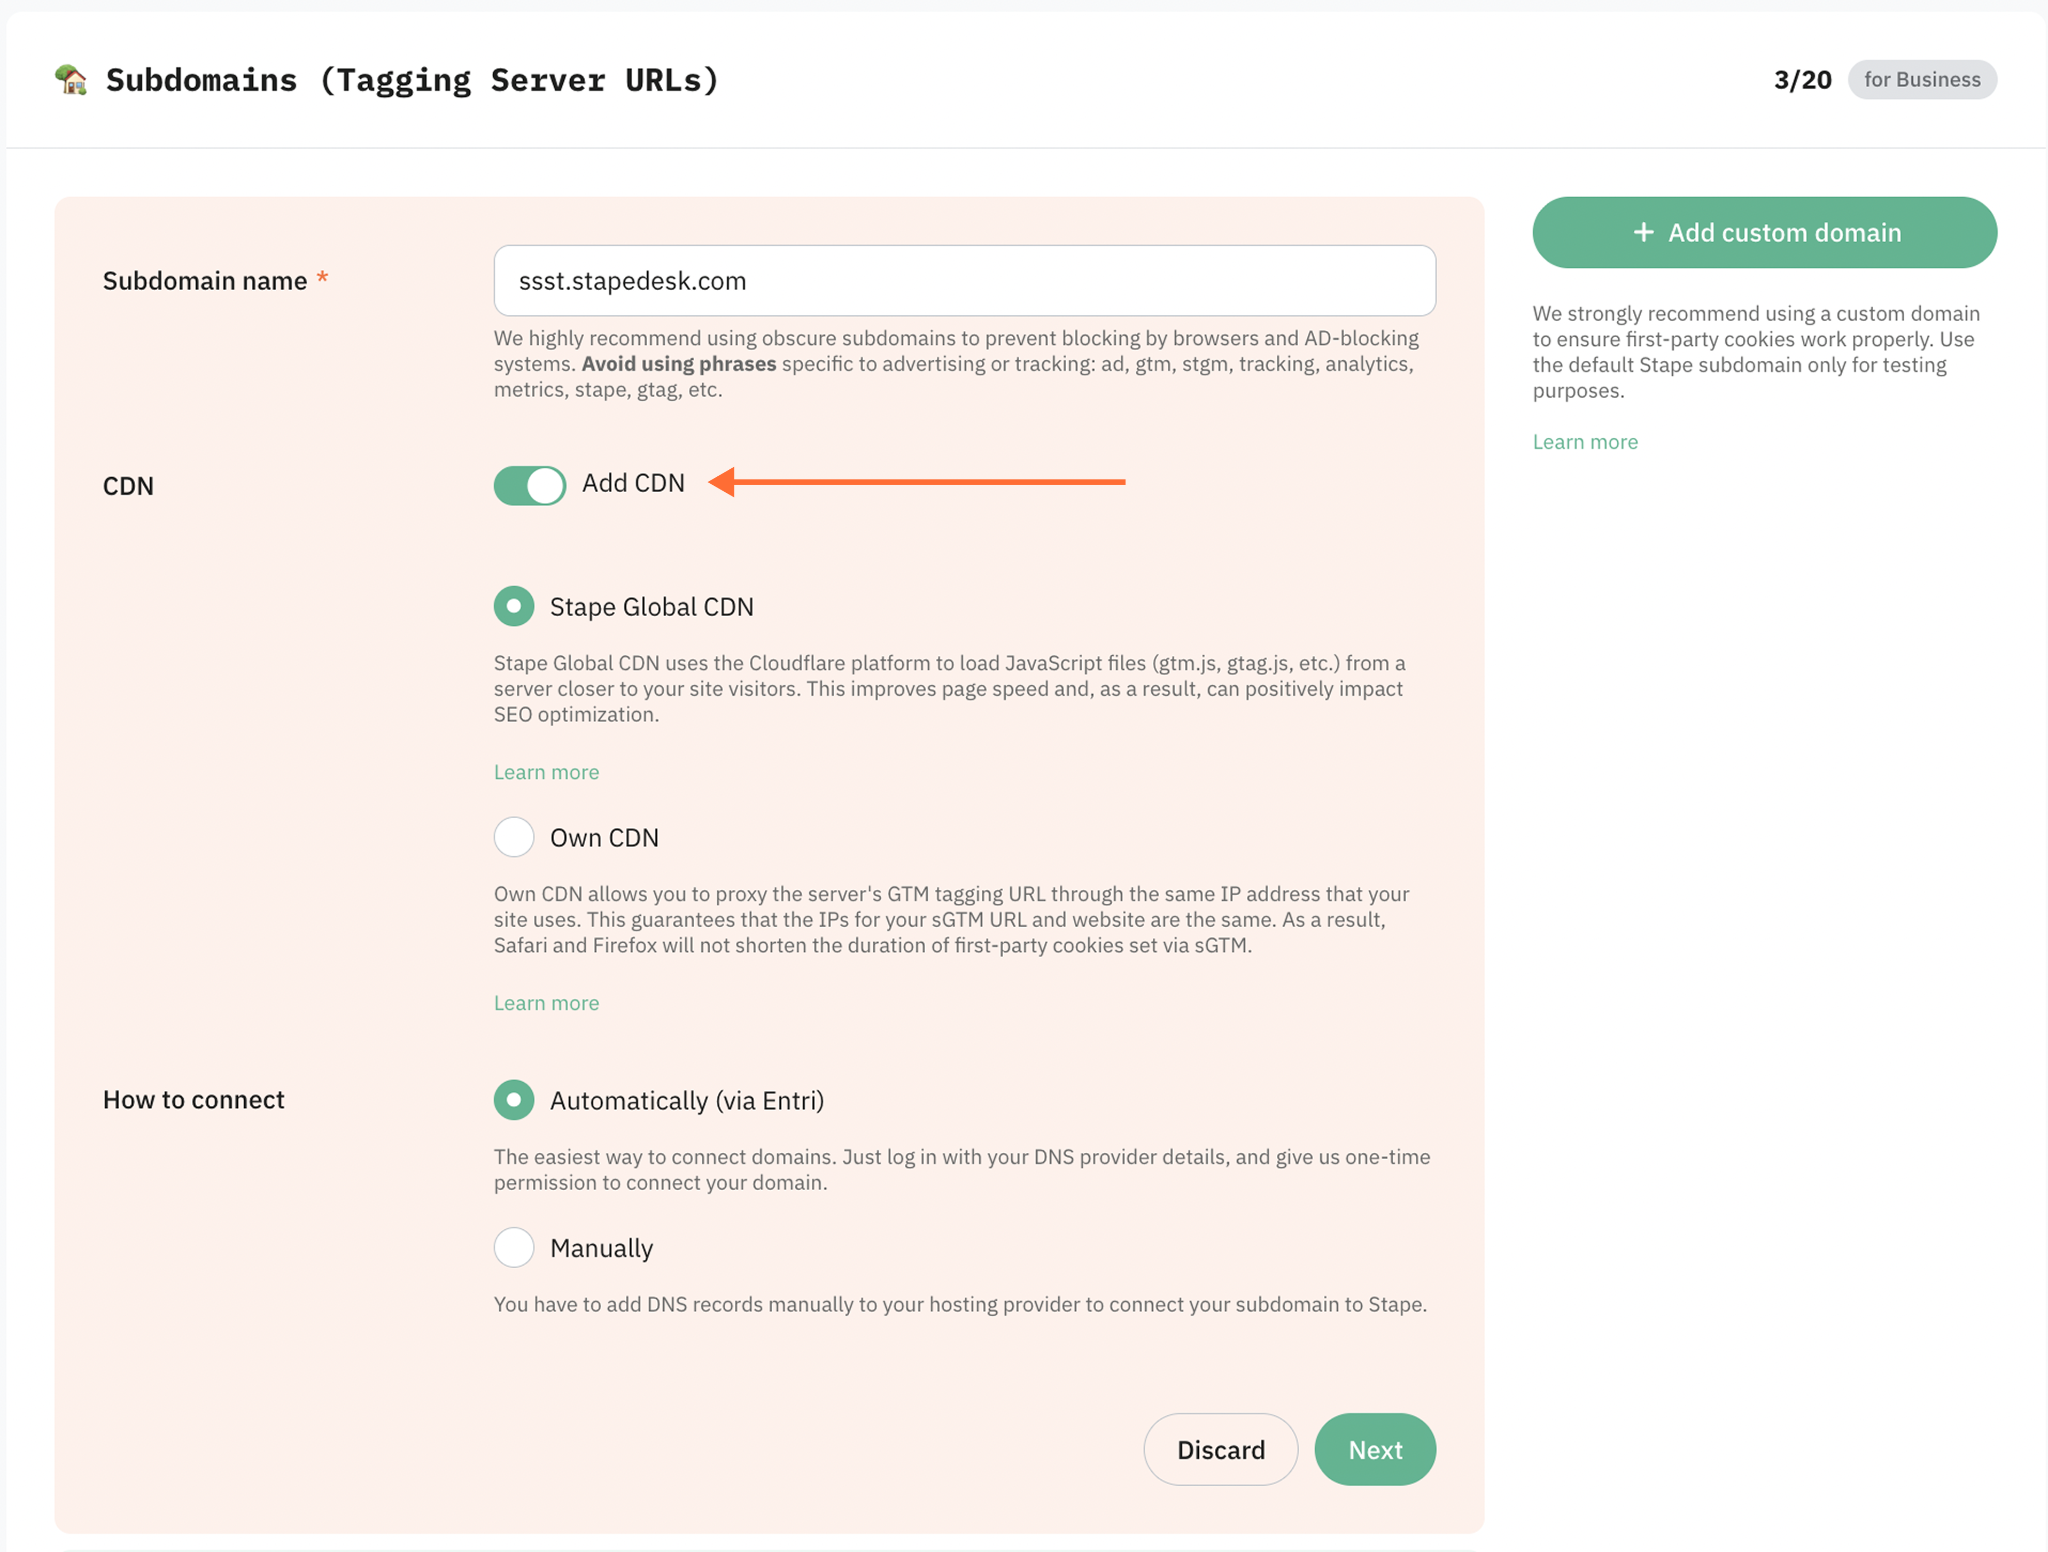
- Stape Global CDN - loads scripts from a server closest to your website visitor's location, which reduces latency and improves page load times for geographically distributed audiences. We will use the Stape Global CDN in our setup. This feature is free and available for all Stape sGTM containers.
- Own CDN (incompatible with the Automatically (via Entri) connection option) - helps route sGTM custom domain and proxy sGTM traffic through the DNS provider of your website. In this case, the IP addresses of your website and the custom domain of the sGTM will match, and server-side cookies will be considered as first-party. As a result, it gives the ability to increase cookie duration.
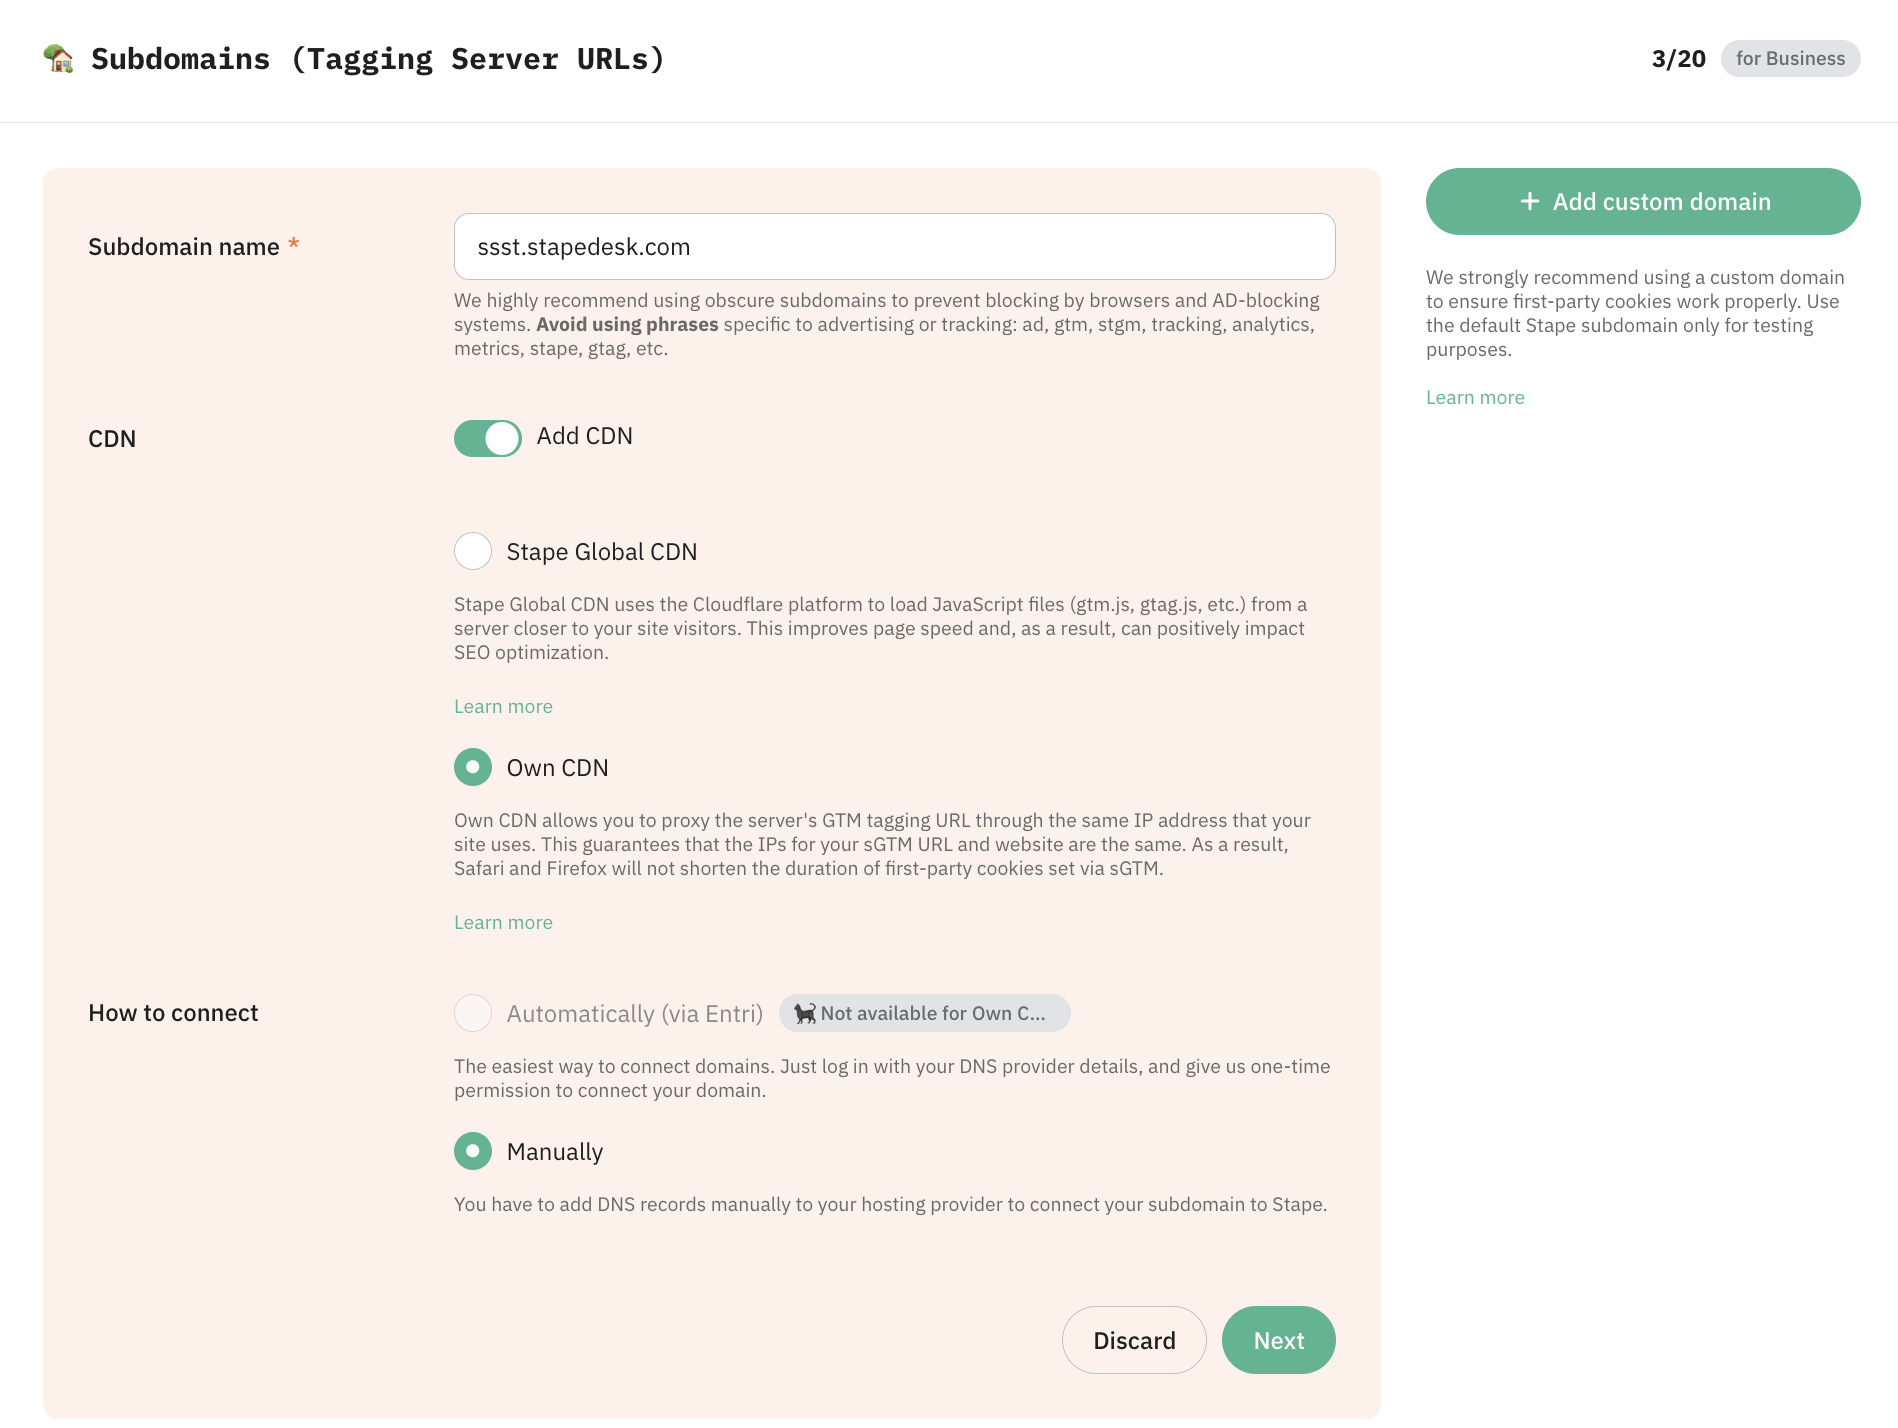
Step 3. Select the "How to connect" method
Next, in the How to connect section, there are two ways of connecting a custom domain to your container:

- Automatically (via Entri)
The easiest way to connect domains. Log in with your DNS provider details via Entri, and give us one-time permission to connect your domain. That's it, you can proceed directly to Step 5 to verify your domain; no manual configuration is required.
- Manually
With this option, you have to add DNS records manually to your hosting provider to connect your subdomain to Stape.
After you add a custom subdomain to your container, you will see DNS records that should be created to verify the custom domain. The DNS record depends on the server location and the CDN option you choose. In the next step, we show how to add DNS records.
Step 4. Add DNS records (for the manual connection method)
By default, subdomain verification is performed with CNAME records, but you can verify your subdomain with A and AAAA records if you need to (usually in cases when you need to avoid adding duplicated records).
We will cover both options below with a step-by-step guide on how to create records using Cloudflare. But you can use any other provider.
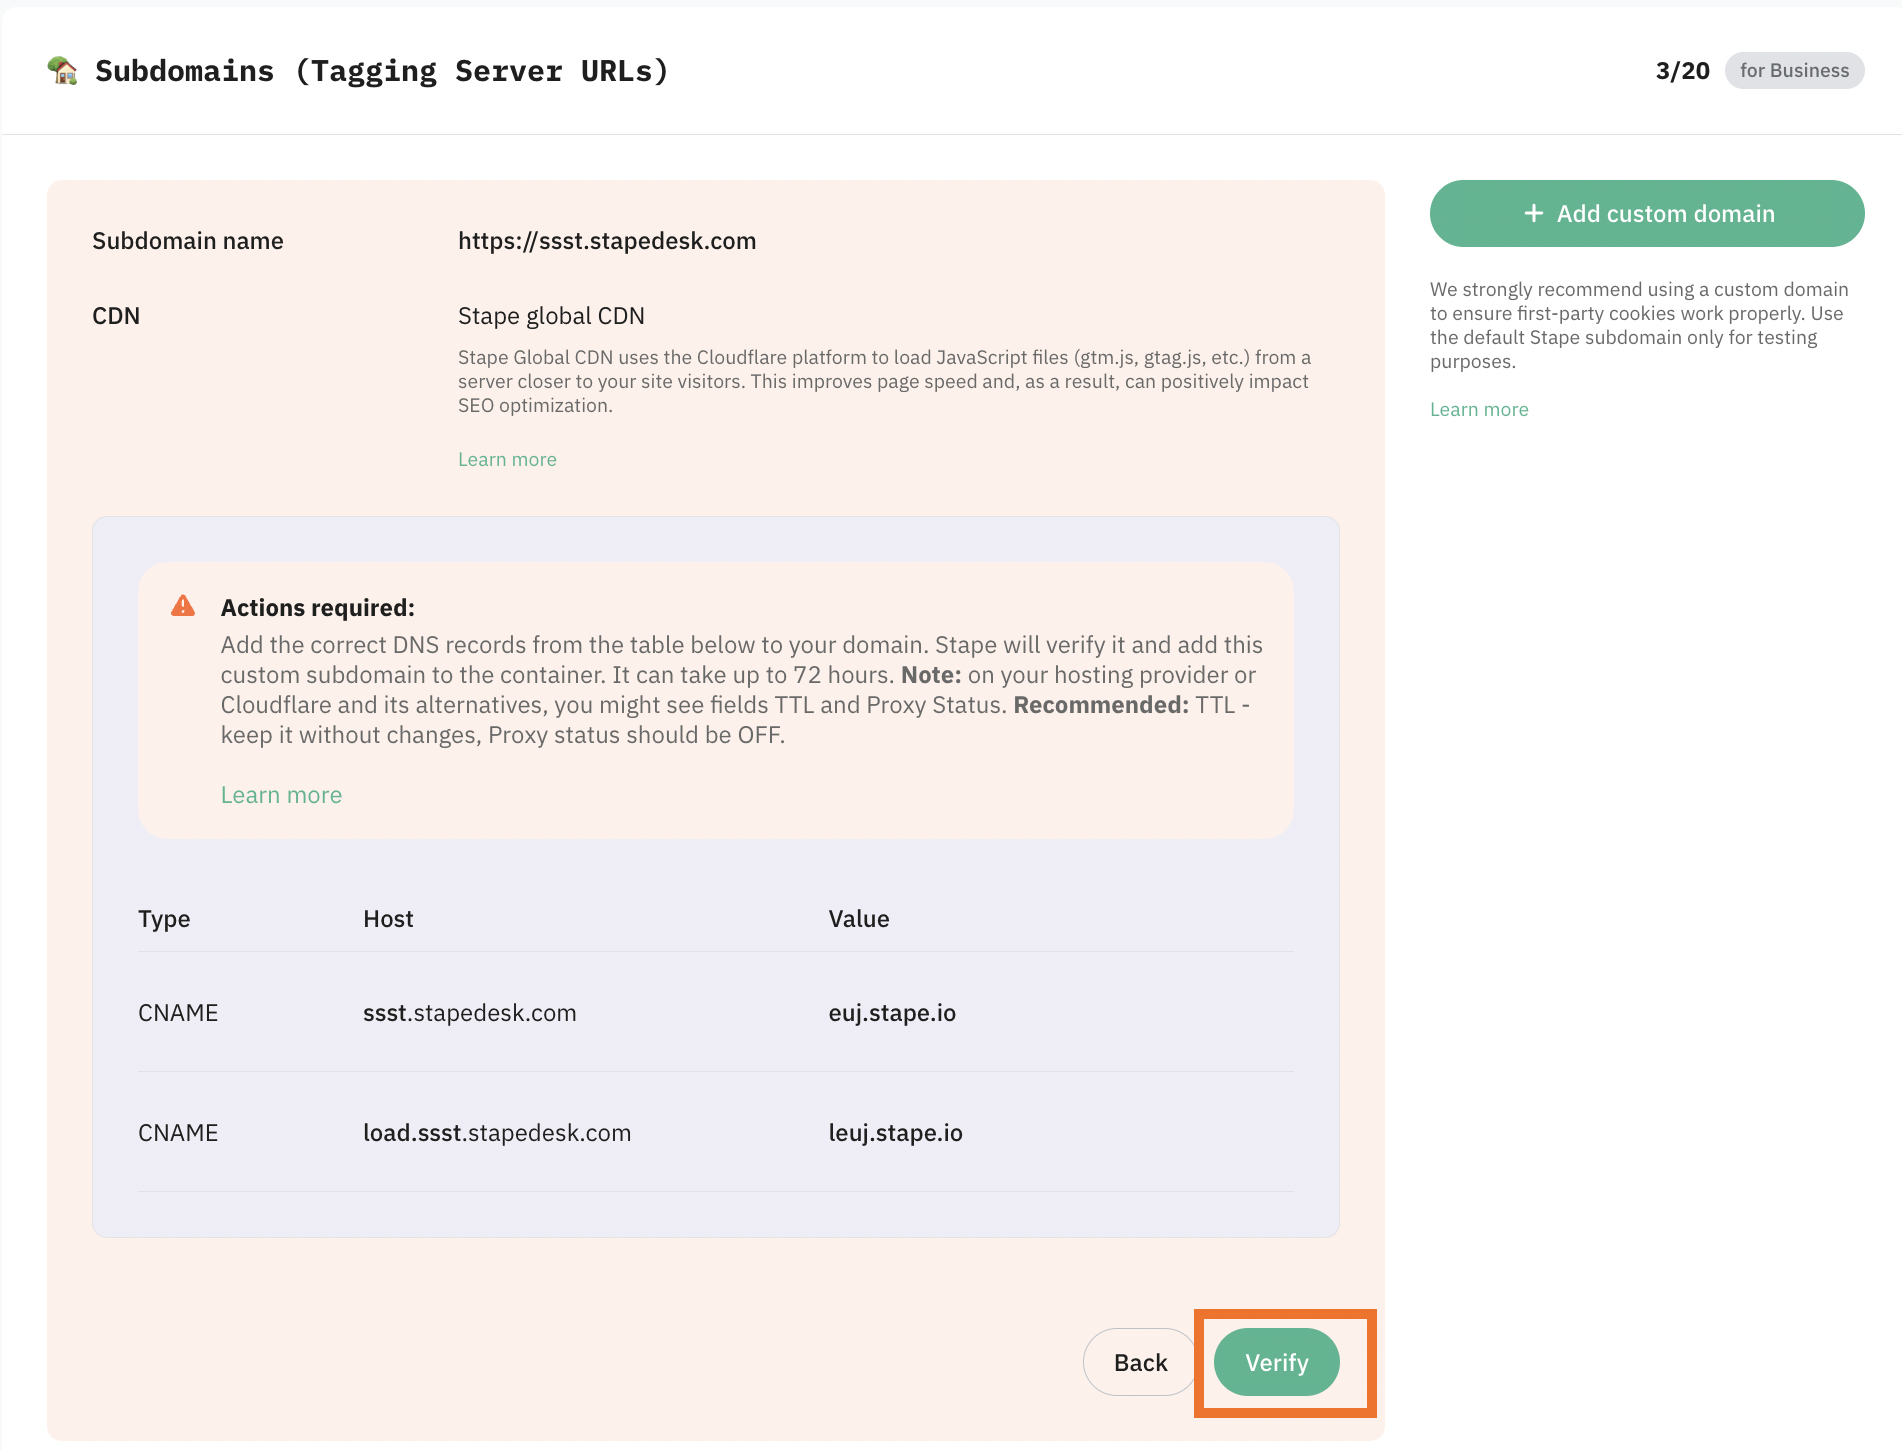
Adding a custom domain with a CNAME record
CNAME record(s) setup
You must create one CNAME record if you do not use Stape Global CDN and two records if you use Stape Global CDN.
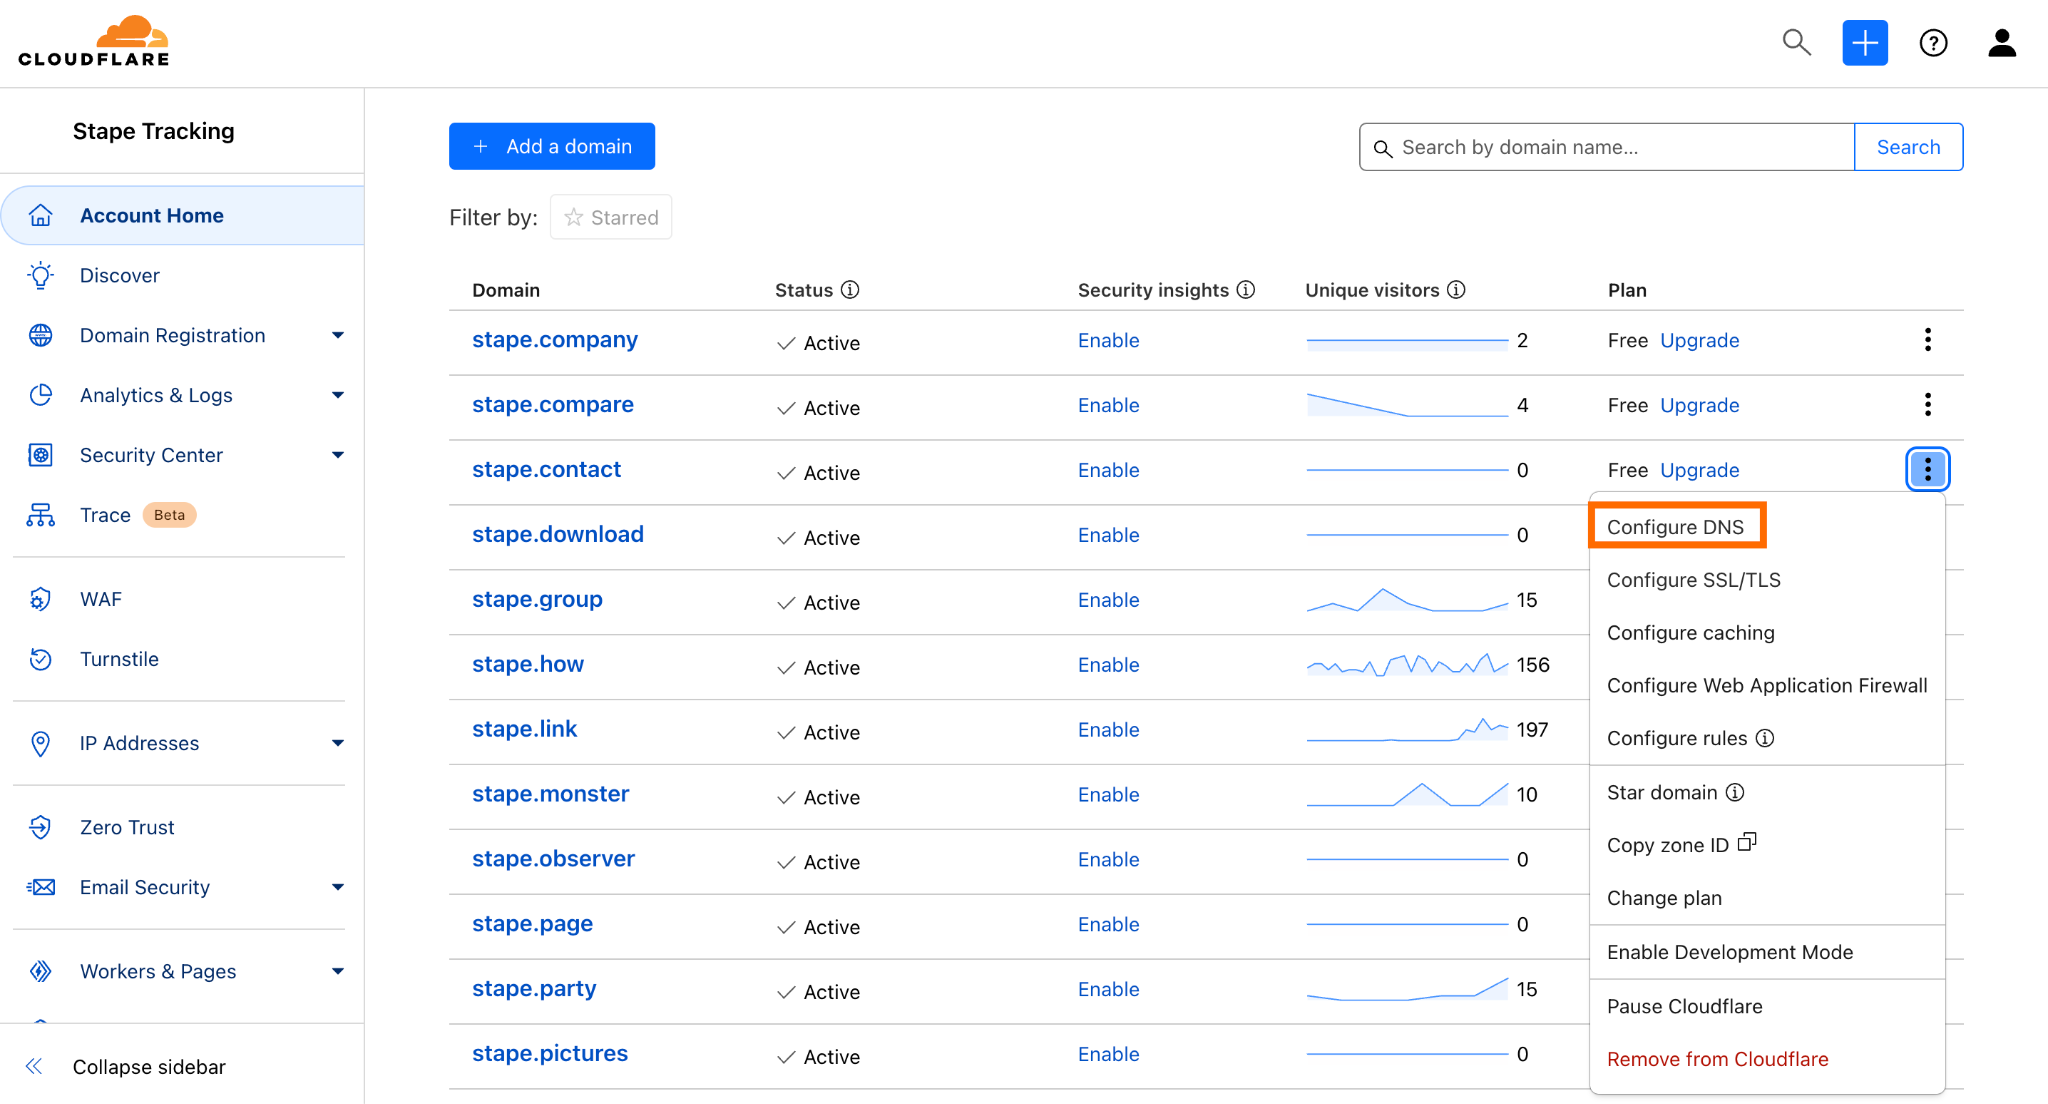
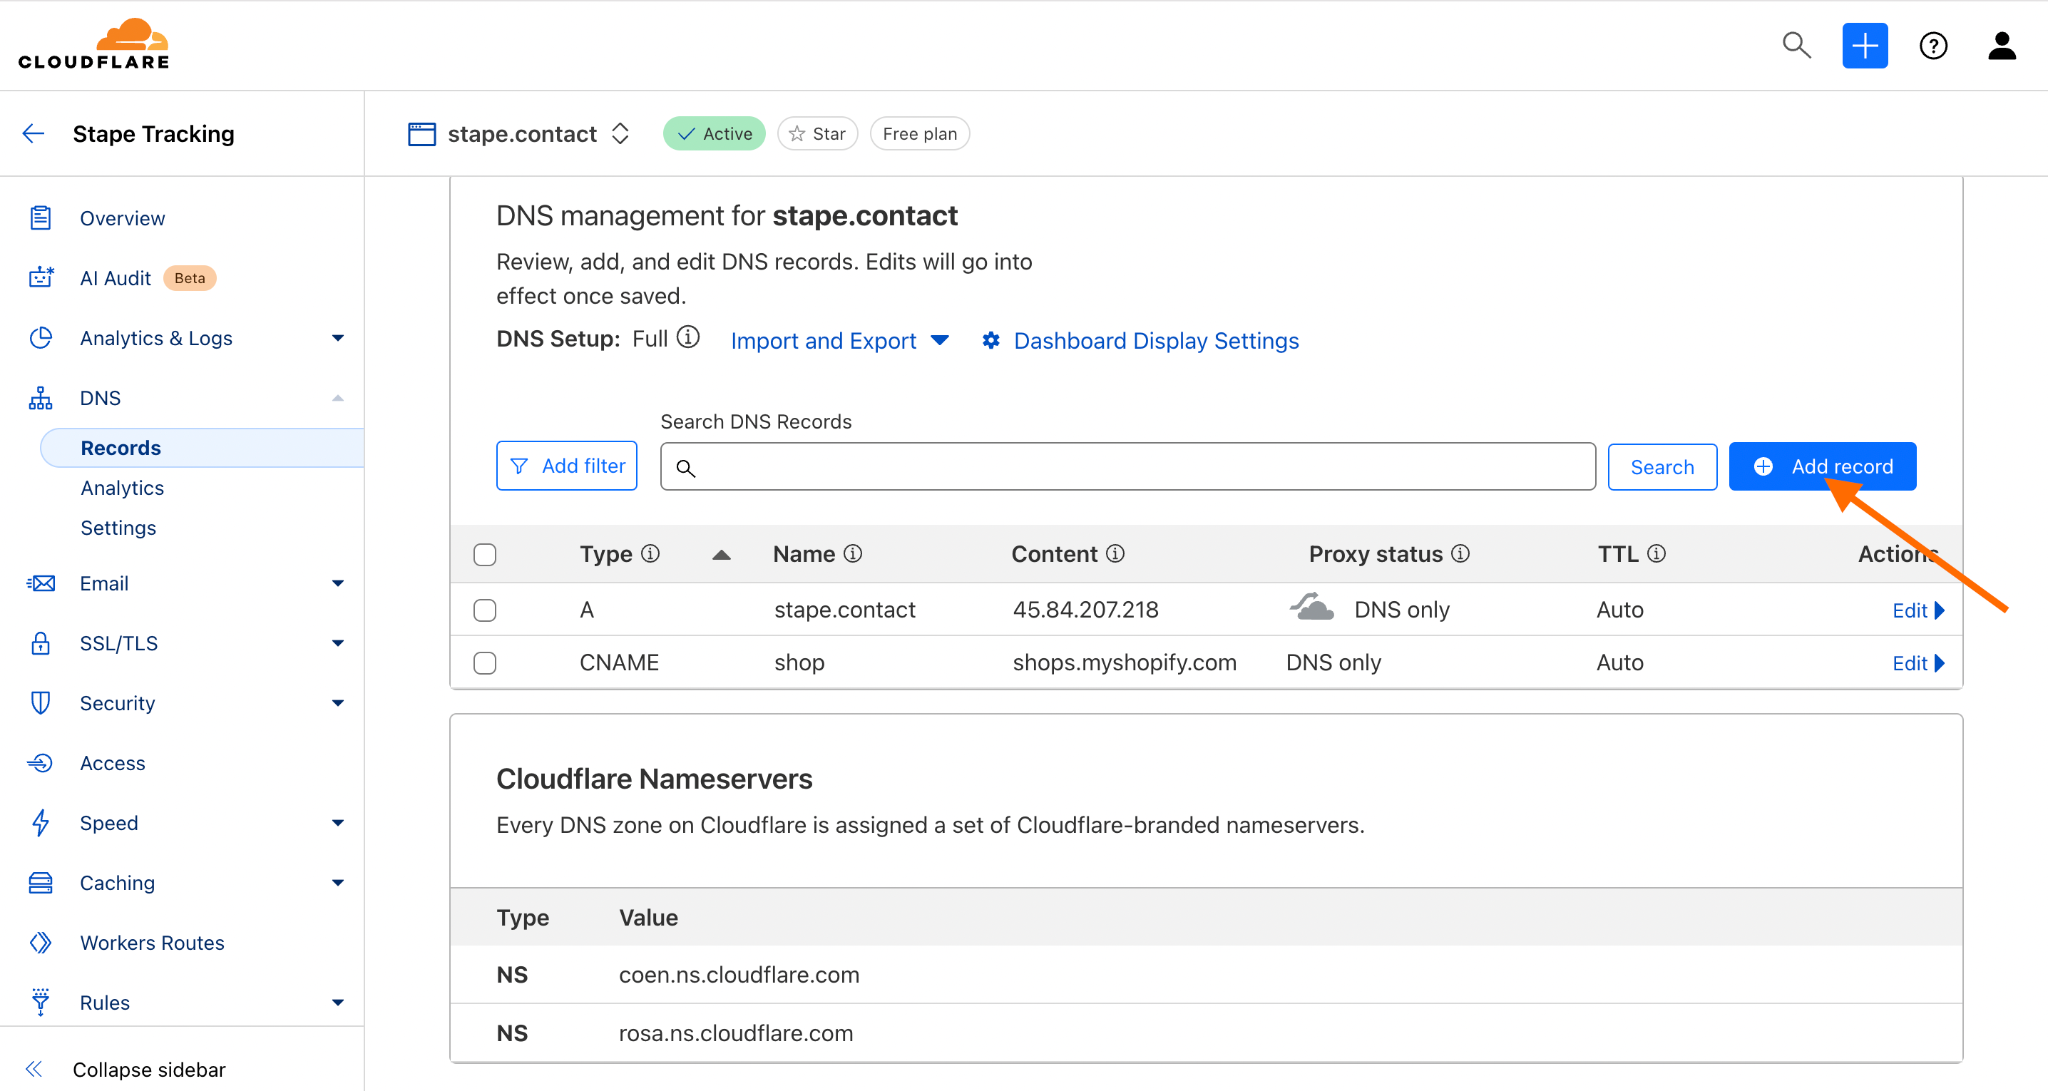
1. Log in to your domain name service and create a new DNS record for the subdomain you want to use. To do it, click three dots and choose Configure DNS next to your domain name on the account home page.
2. Click Add record.

3. Go back to your Stape account and input the record you see in the account. Make sure that the Proxy status is turned off.
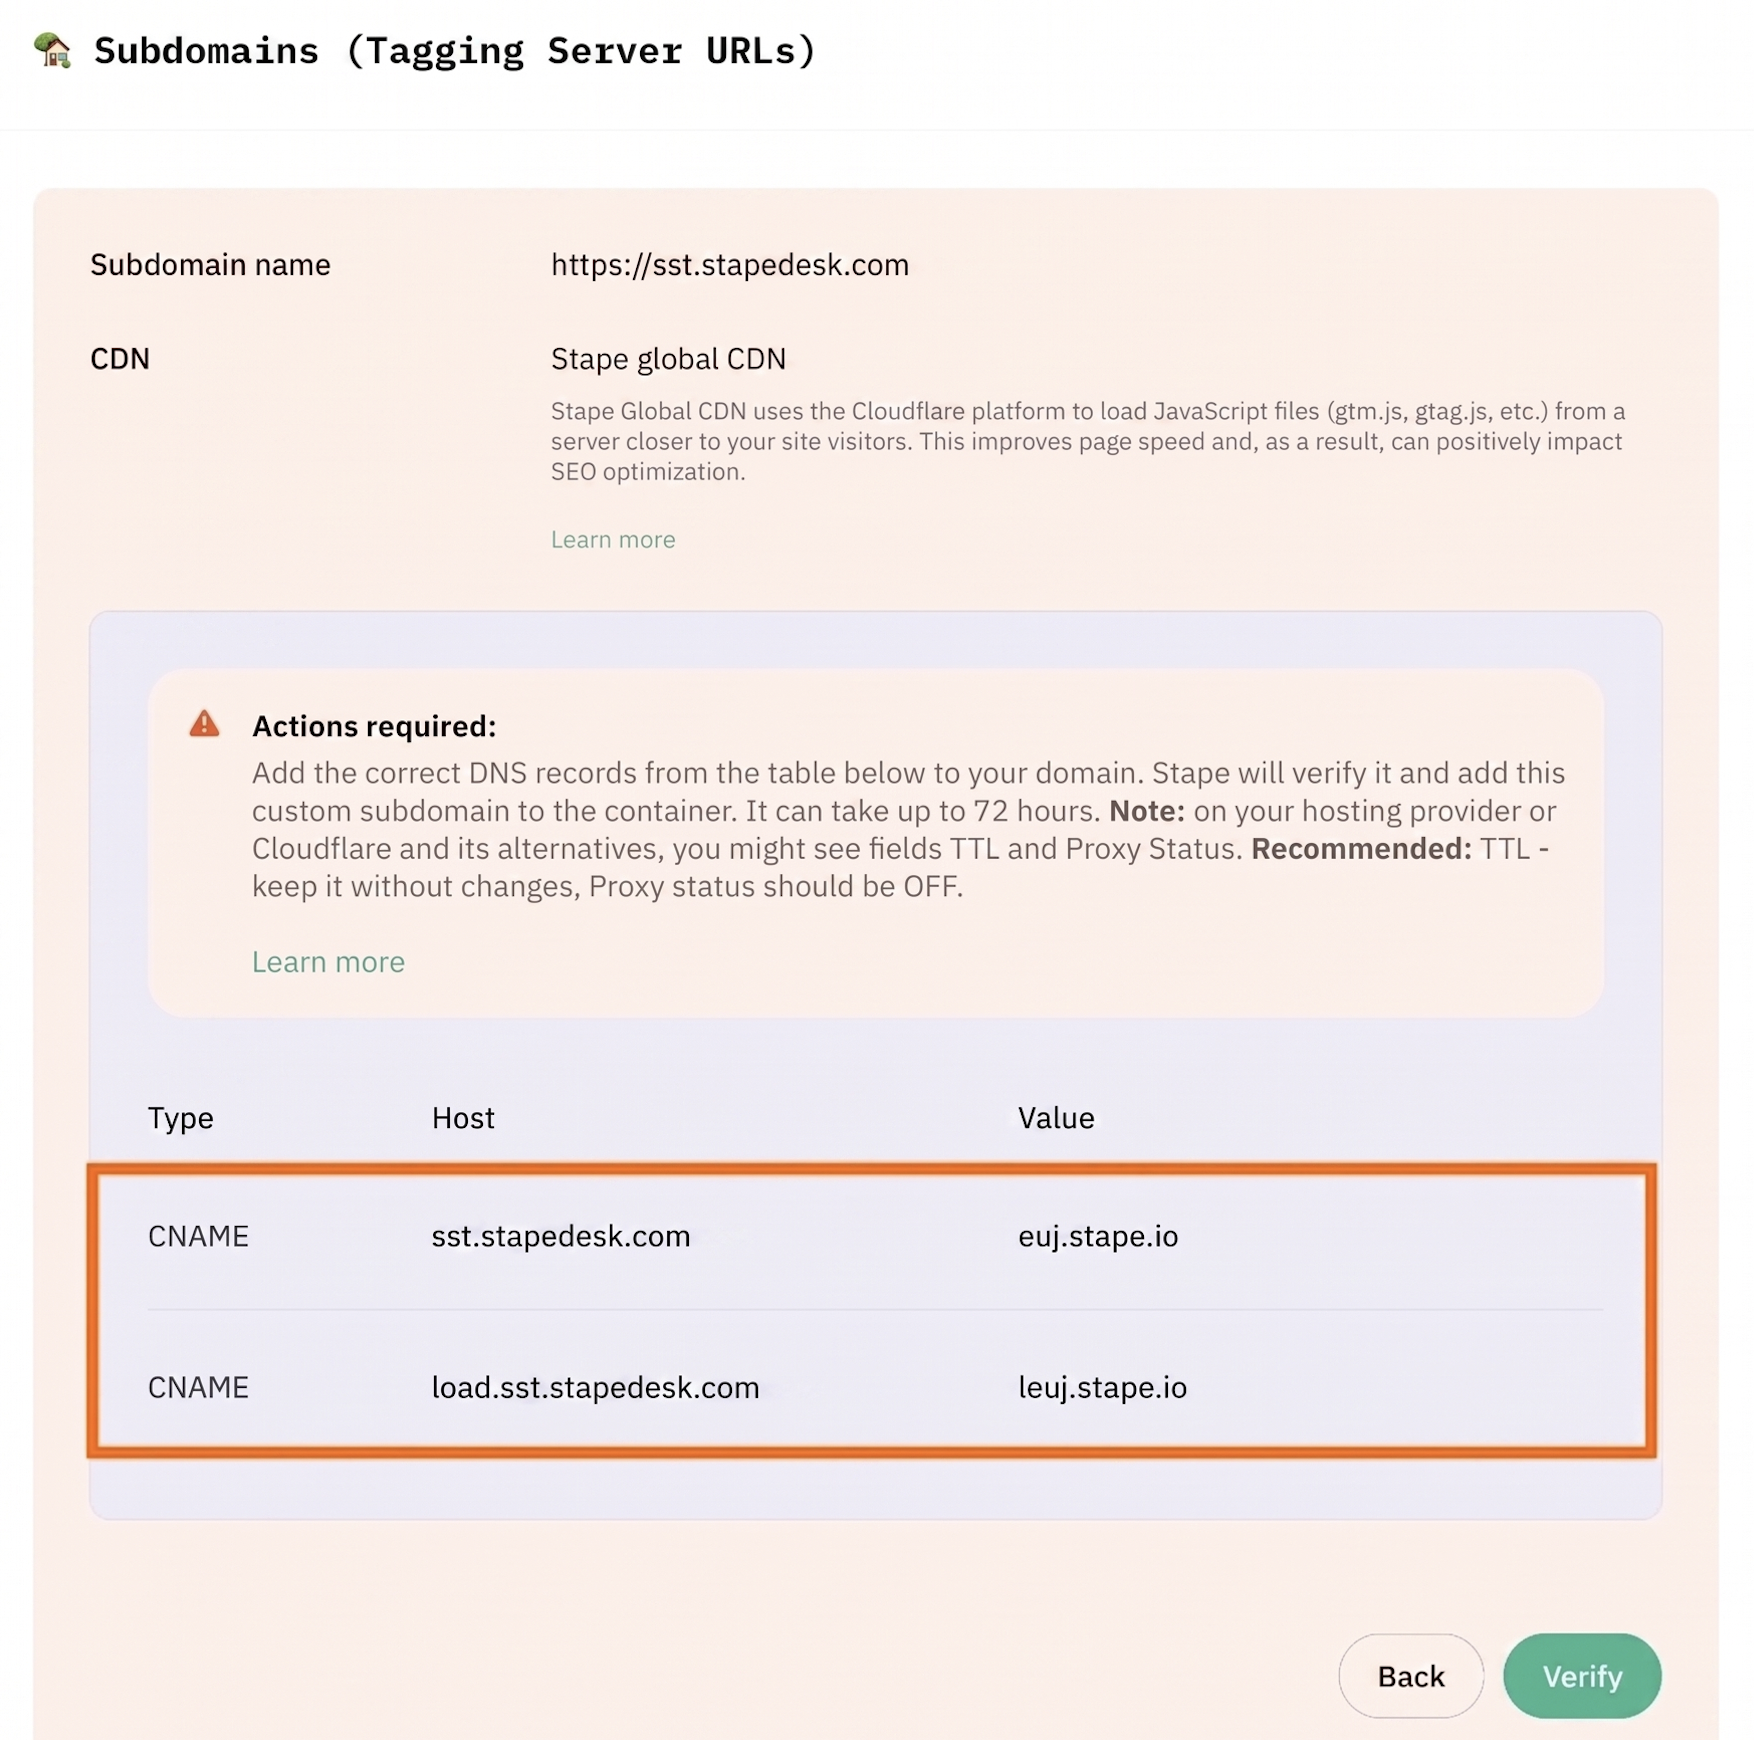
We use Stape Global CDN, so we create two CNAME records:


Adding a custom subdomain with A and AAAA records
| Please note that A/AAAA records are incompatible with enabled CDN. |
A/AAAA records setup
1. If you need to verify your custom subdomain using A and AAAA records, add the custom subdomain to the container and make sure that the CDN toggle is switched off.
Click Advanced settings and tick the Use A records instead of CNAME records box. You will see DNS records that you should add inside your Stape container. The DNS records you should configure vary depending on the server location.
2. Log in to your DNS account and add the records you see in your Stape account. On the account home page, next to your domain name, click three dots and choose Configure DNS.

3. Click Add record.
4. Then, create the records you see in your Stape account. Make sure that the Proxy status is turned off.
Take the values for your DNS records from the Stape account:
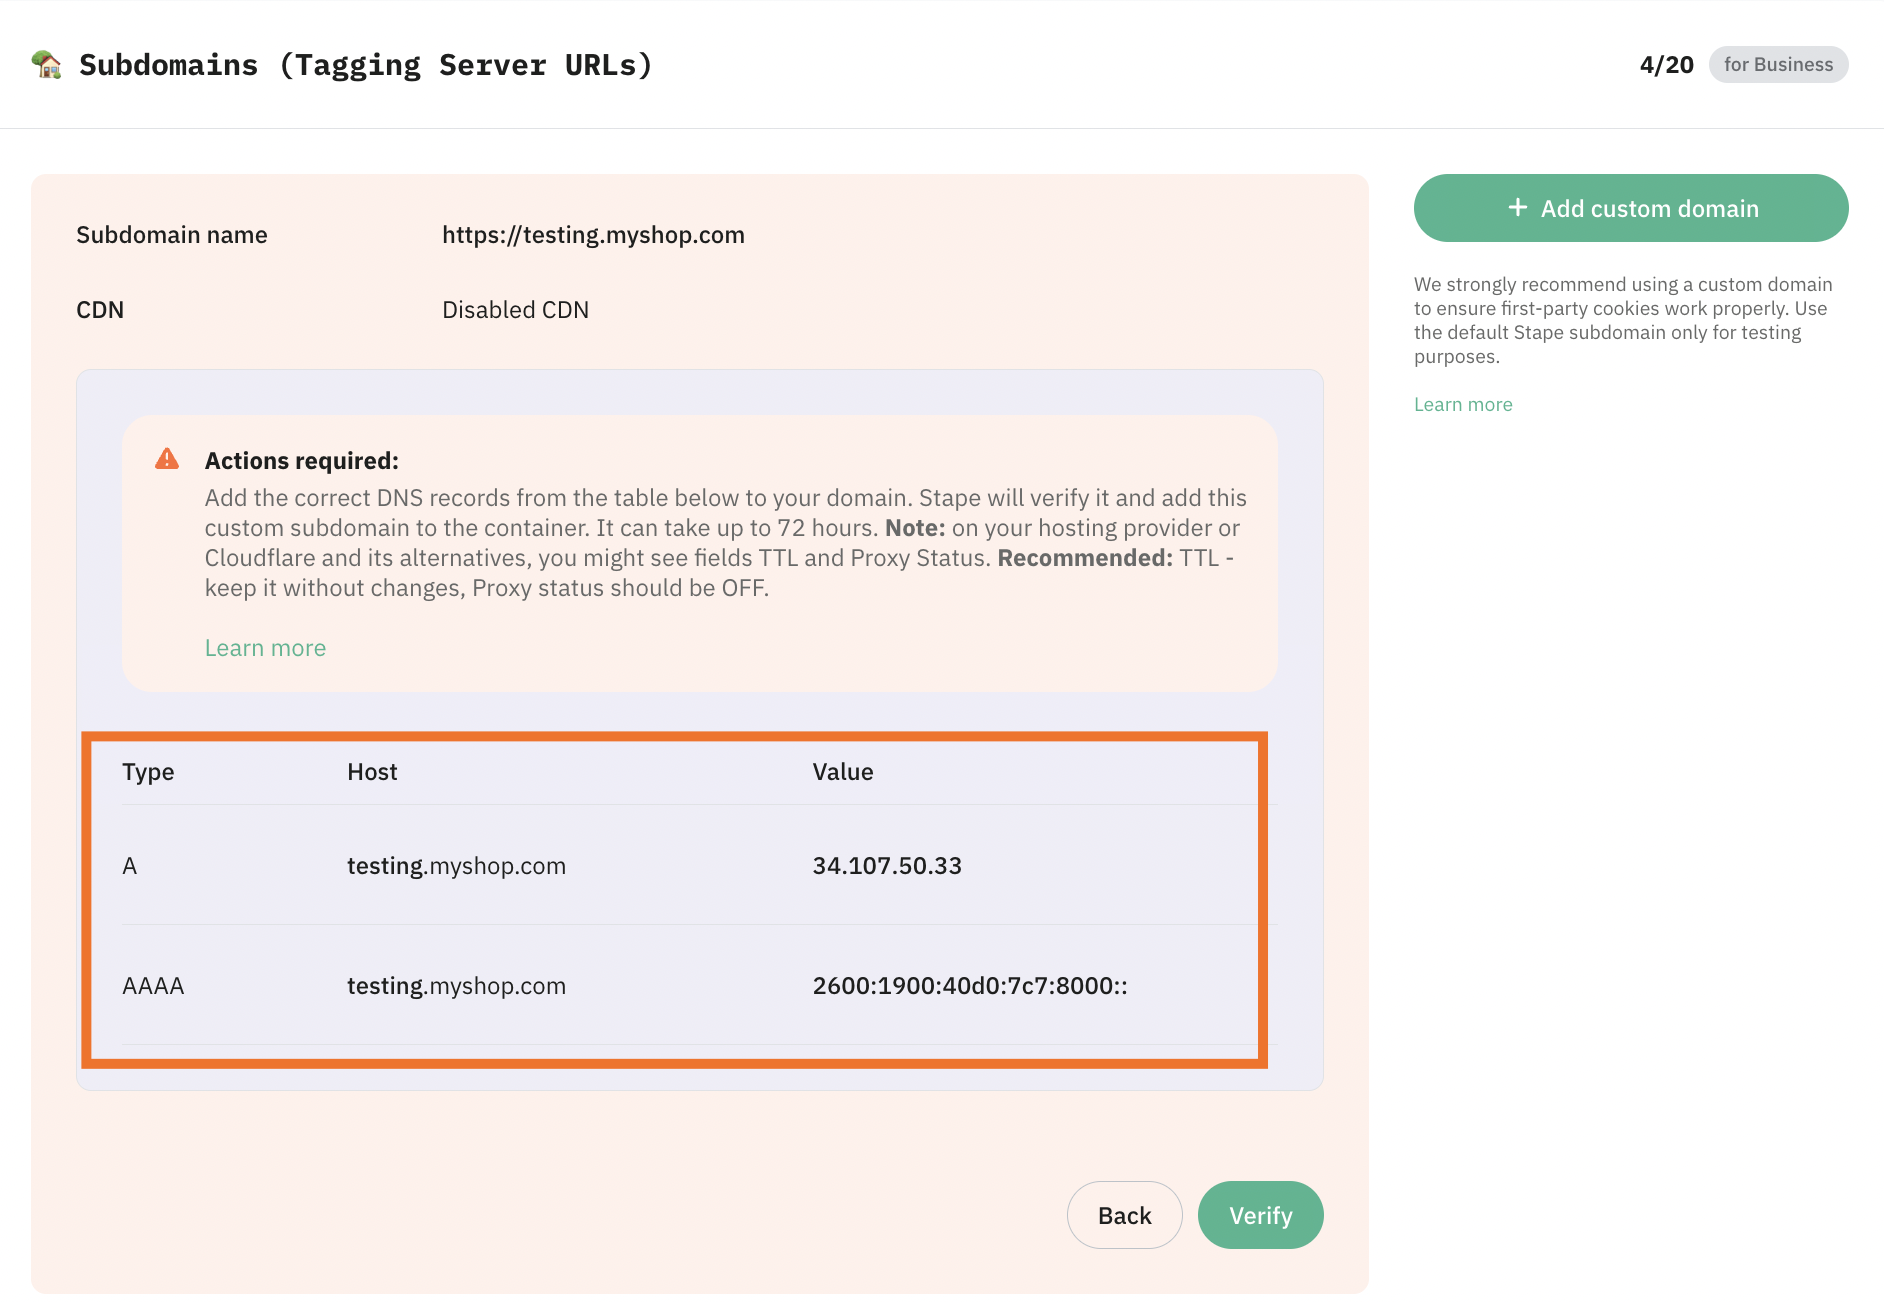
As a result, you will get two DNS records:


Step 5. Verify your domain
Once you've entered the DNS records to your DNS provider, return to the Stape container page where you've been configuring the custom domain and click Verify.
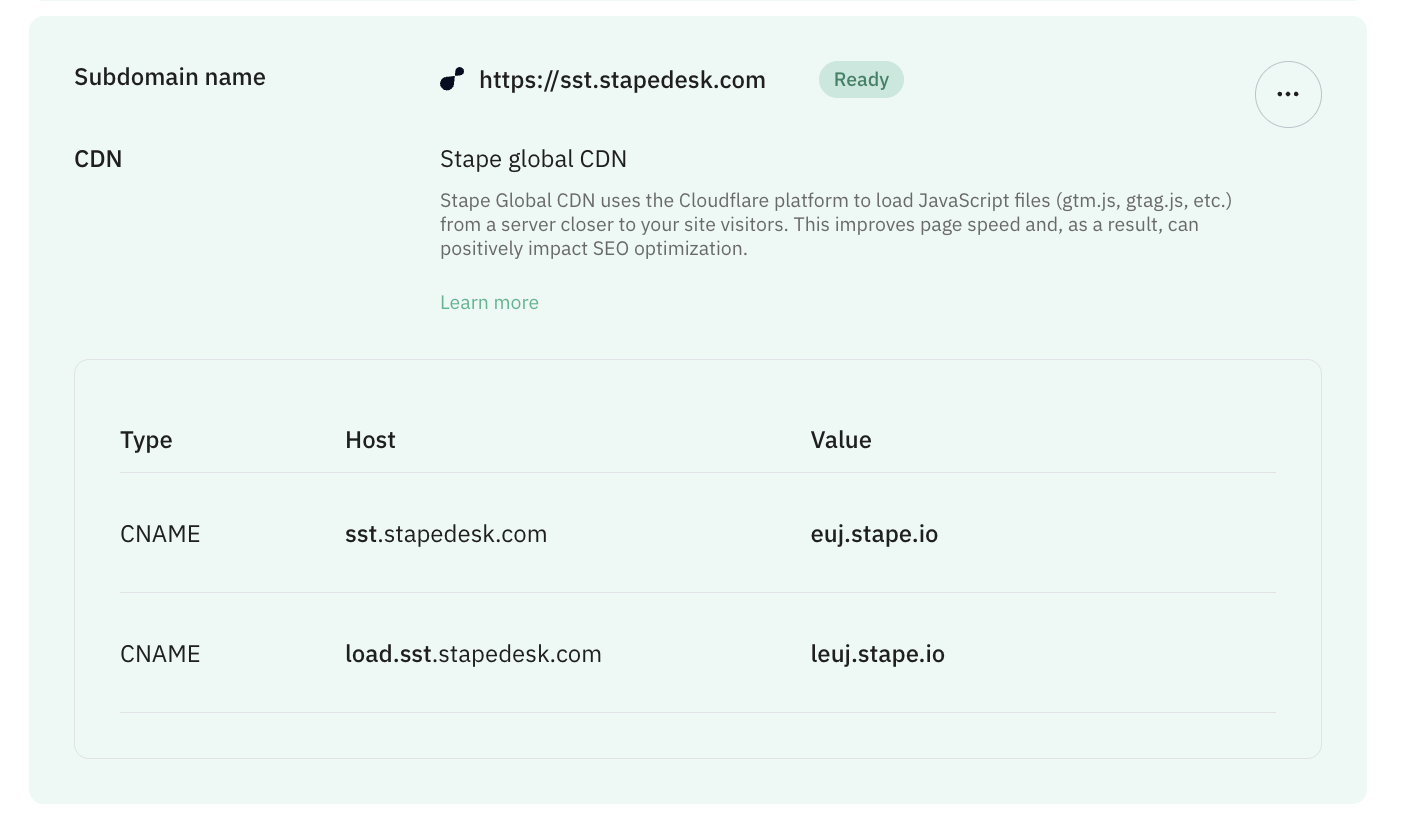
Wait for Stape to finish verifying your custom domain (when the container status bar changes from Verifying to Ready). Usually, it takes 2-3 hours to verify the custom domain. For some DNS providers, verifying records might take up to 72 hours. We will email you once the custom domain is verified or any error is detected.
If you face any problems with domain verification, please follow our guide on troubleshooting a custom domain.
Step 6. Add tagging server URL and update your website script
Go to your Google Tag Manager server container → Admin → Container Settings → change Tagging server URL to your subdomain.
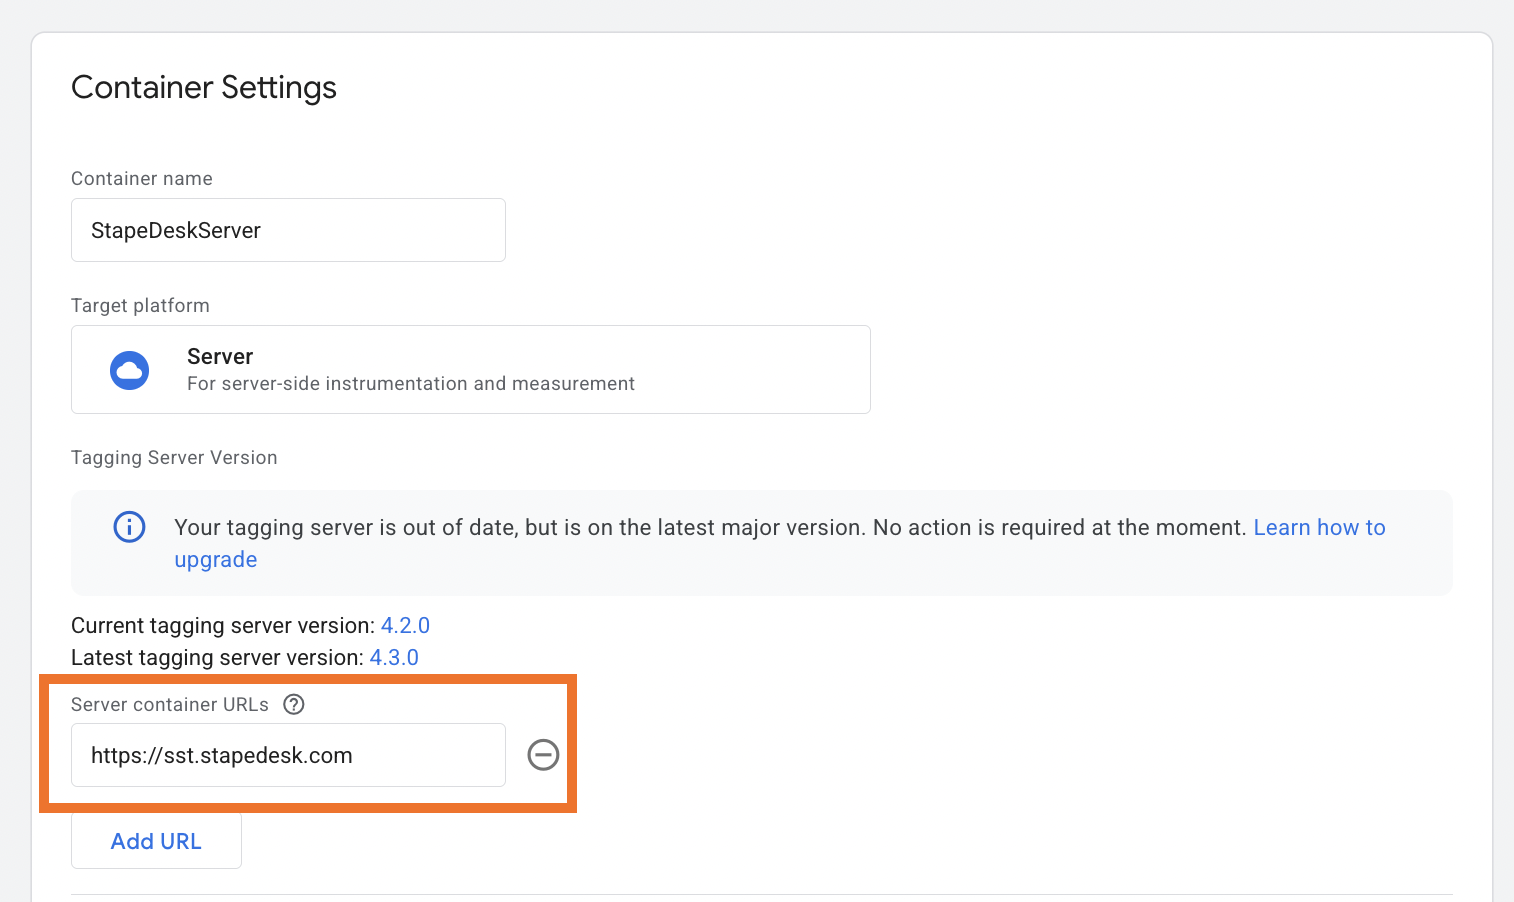
Update the script
If you use a custom domain, updating the Web GTM script on your website is highly recommended. This tweak will load gtm.js from your domain. To do so, replace the default domain googletagmanager.com with the custom domain you set up in the previous step.
Alternatively, you can automate this process with the Custom Loader power-up. Instead of manually editing the GTM script, Custom Loader generates a ready-to-use code snippet that loads GTM and GA4 scripts directly from your custom domain. This saves your time, makes your tracking scripts more resilient to ad blockers, and assures all cookies are treated as first-party.
Step 4. Set up a Custom Loader
Custom Loader modifies gtag.js and gtm.js loading paths to resist ad blockers and ITPs, potentially increasing data volume by up to 40%.
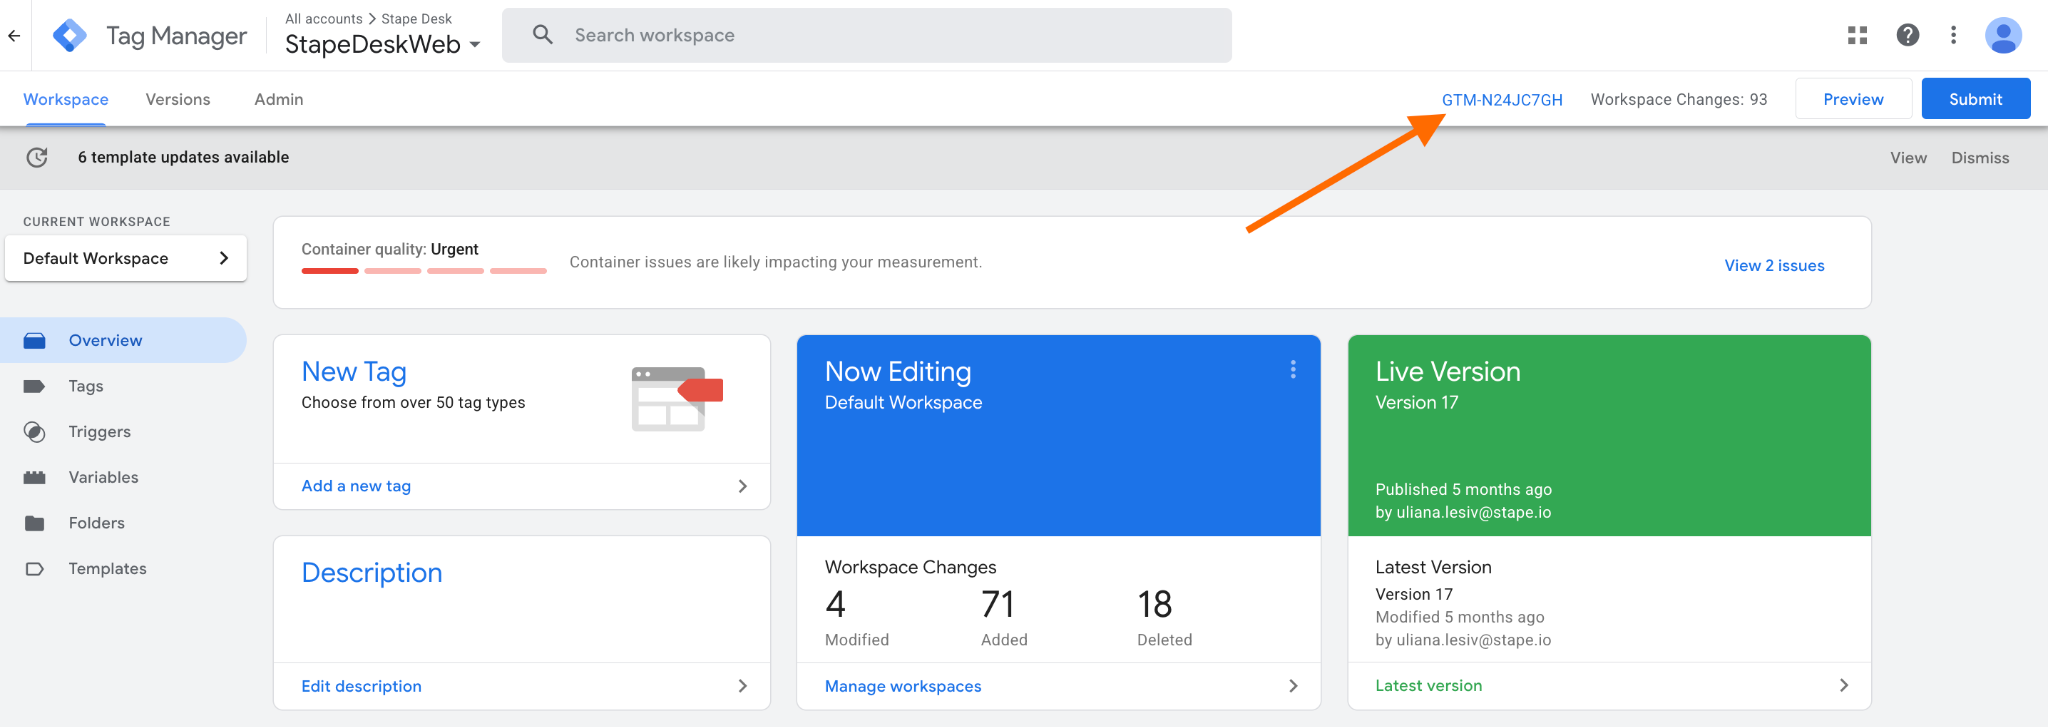
4.1 Find and copy your web GTM ID in GTM. To find GTM ID log in to your Google Tag Manager account and open a Web GTM container. In the top right corner (next to the Submit and Preview buttons) you’ll see some short text that starts with "GTM-" and then contains some letters/numbers.

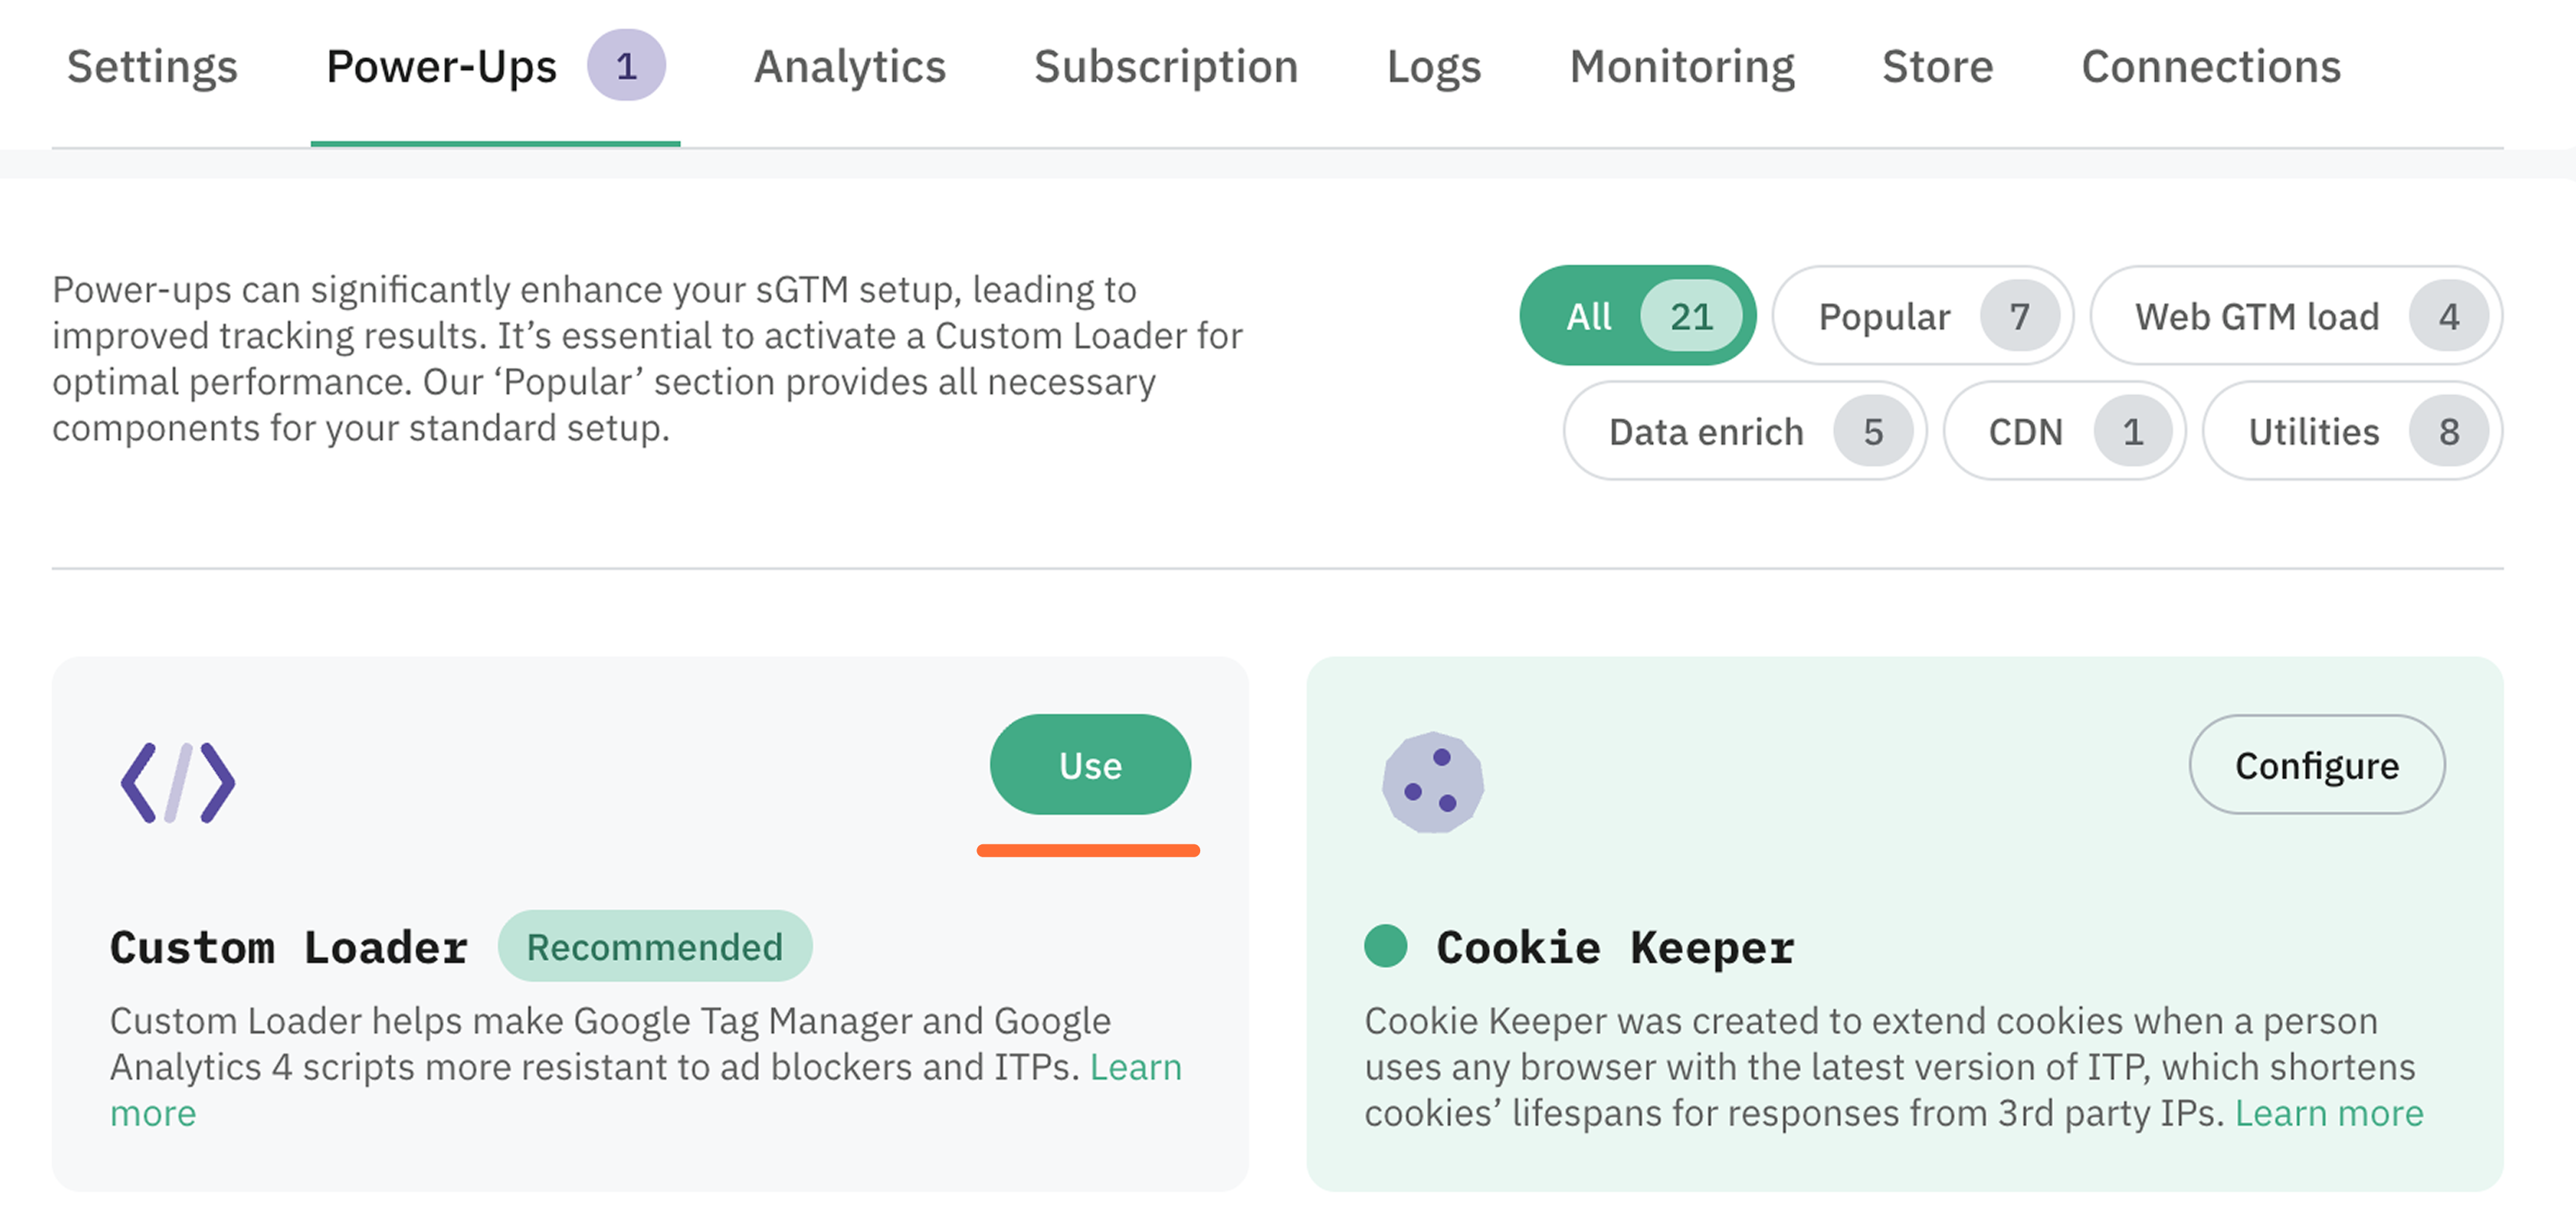
4.2 Open your sGTM container on Stape → Click Power-Ups.
Find Custom Loader and click Use.
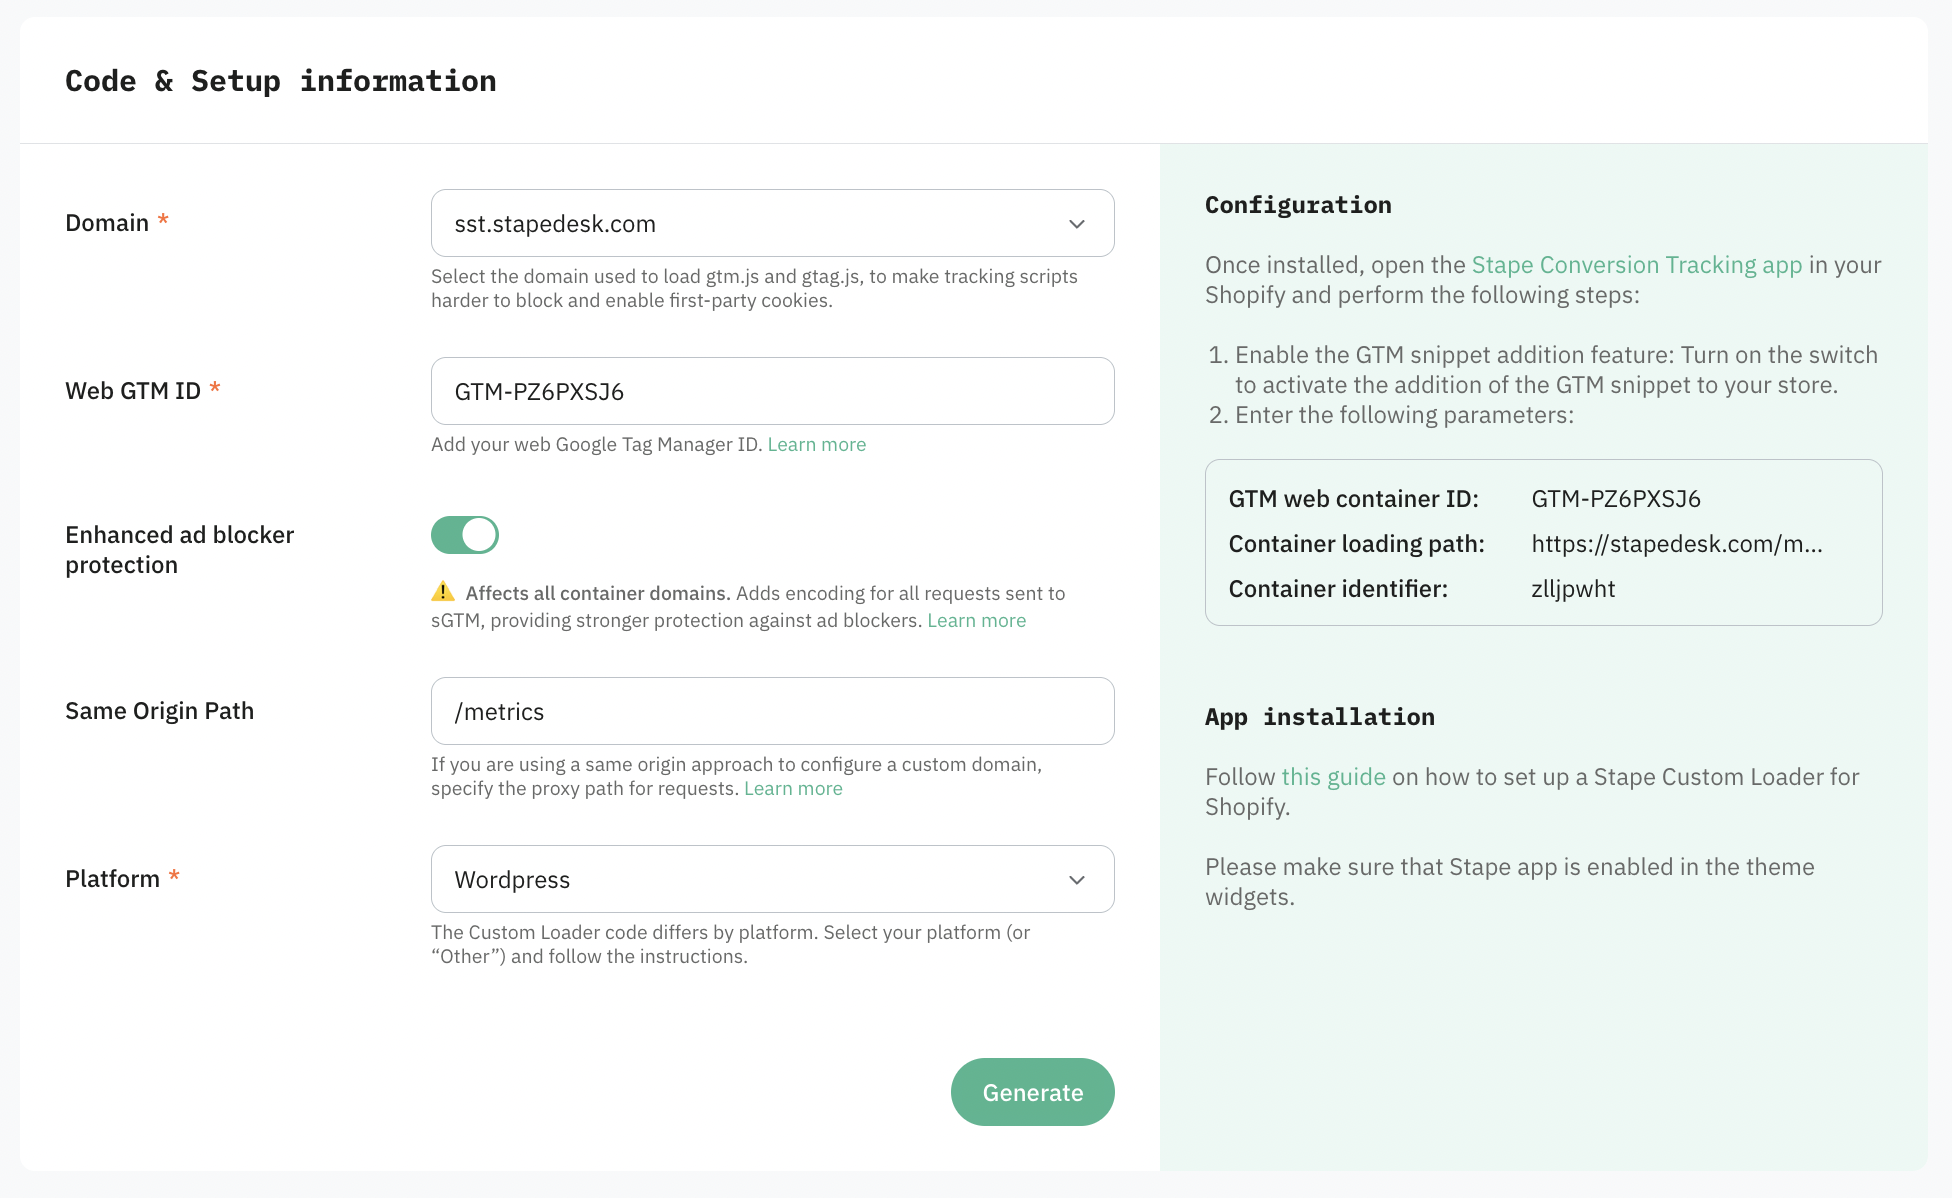
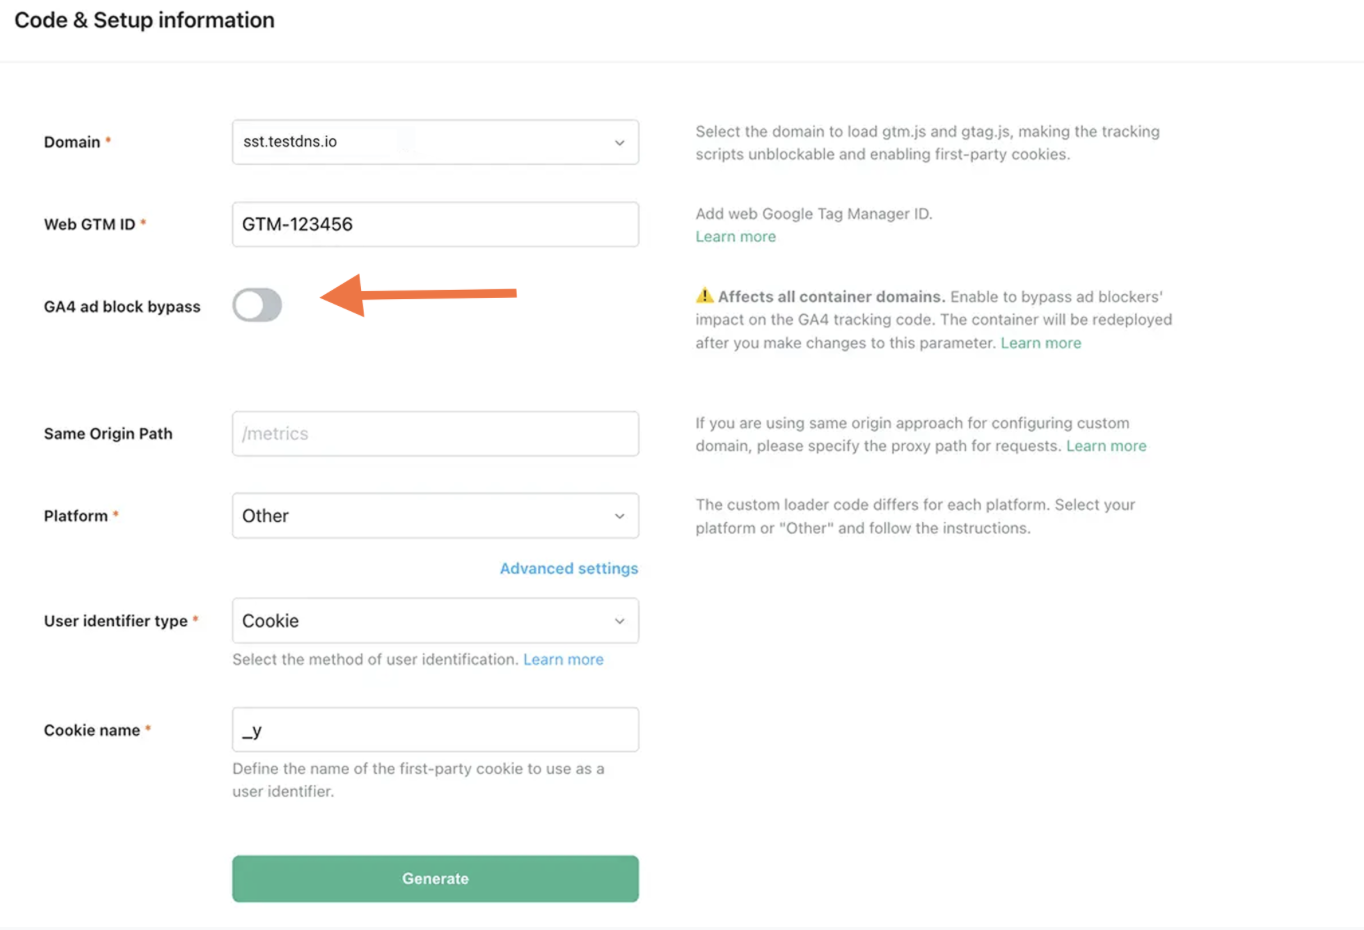
4.3 Add the following settings:
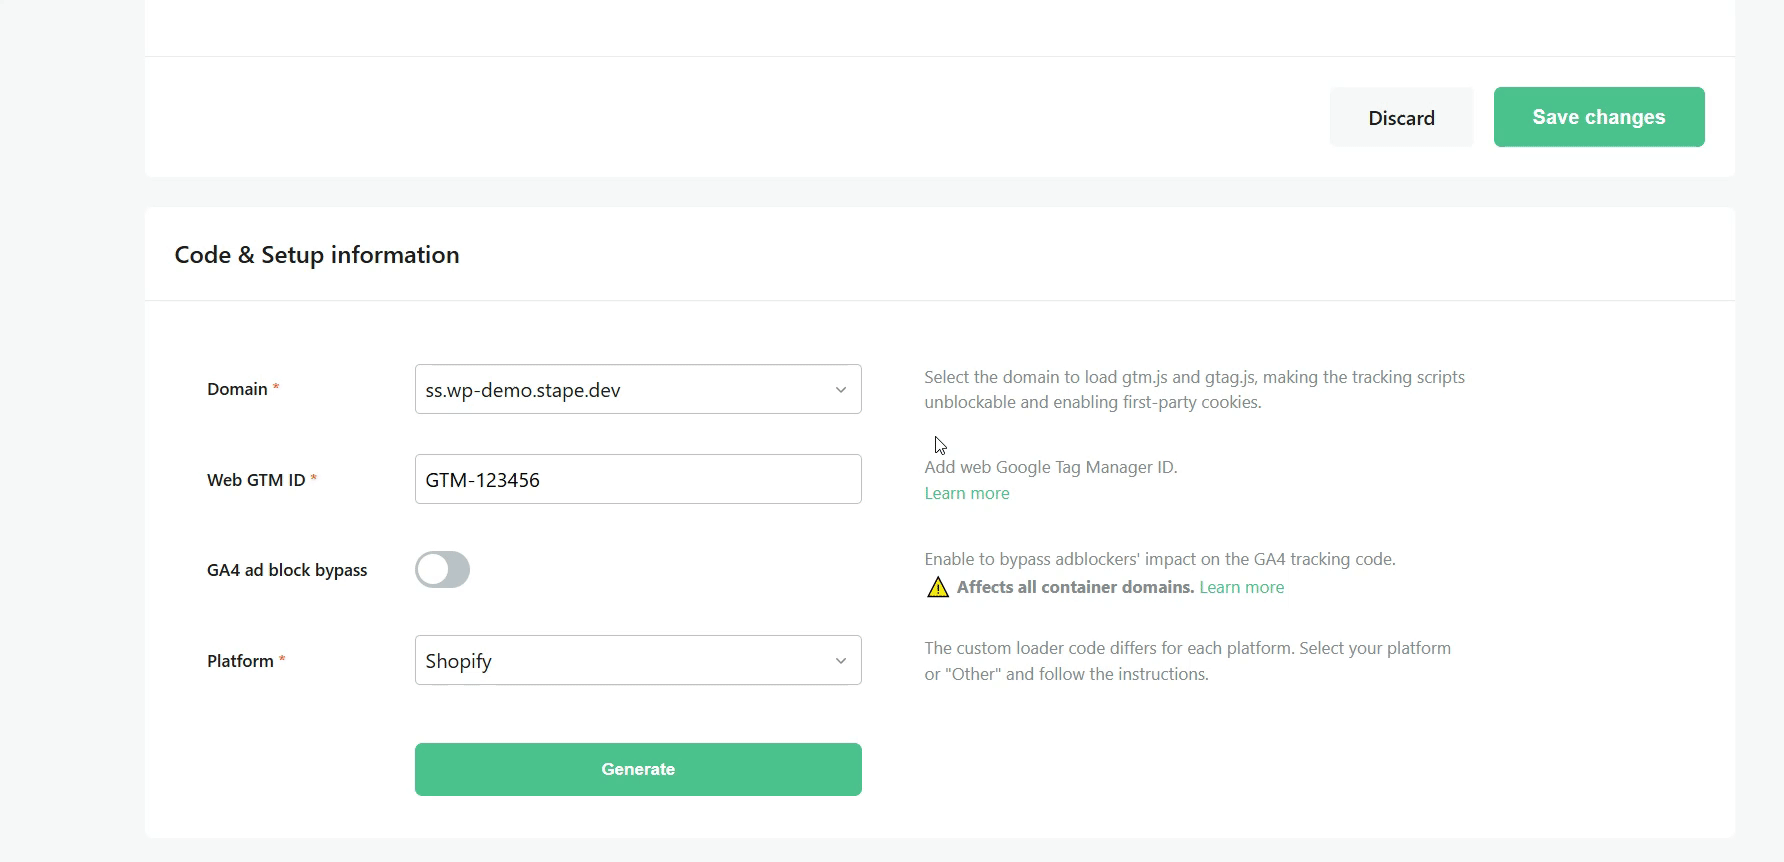
Domain - from the list of domains connected to your container, select the necessary ones.
Web GTM ID - add web Google Tag Manager ID. Check out how to find web GTM ID in our guide.
GA4 ad block bypass - enables bypassing adblockers' impact on the GA4 tracking code. Note that this setting will affect all container domains. Be sure to debug both the web and server GTM containers after enabling this toggle.
Same Origin Path - if you are using same origin approach for configuring custom domain, please specify the proxy path for requests.
Platform - the Custom Loader code differs for each platform. Select "Shopify".
4.4 Once you’ve entered all the Code & Setup information, click the Generate button.
4.5 Follow the instructions on the Configuration panel to set up Custom Loader in your app.
Step 5. Configure Shopify app
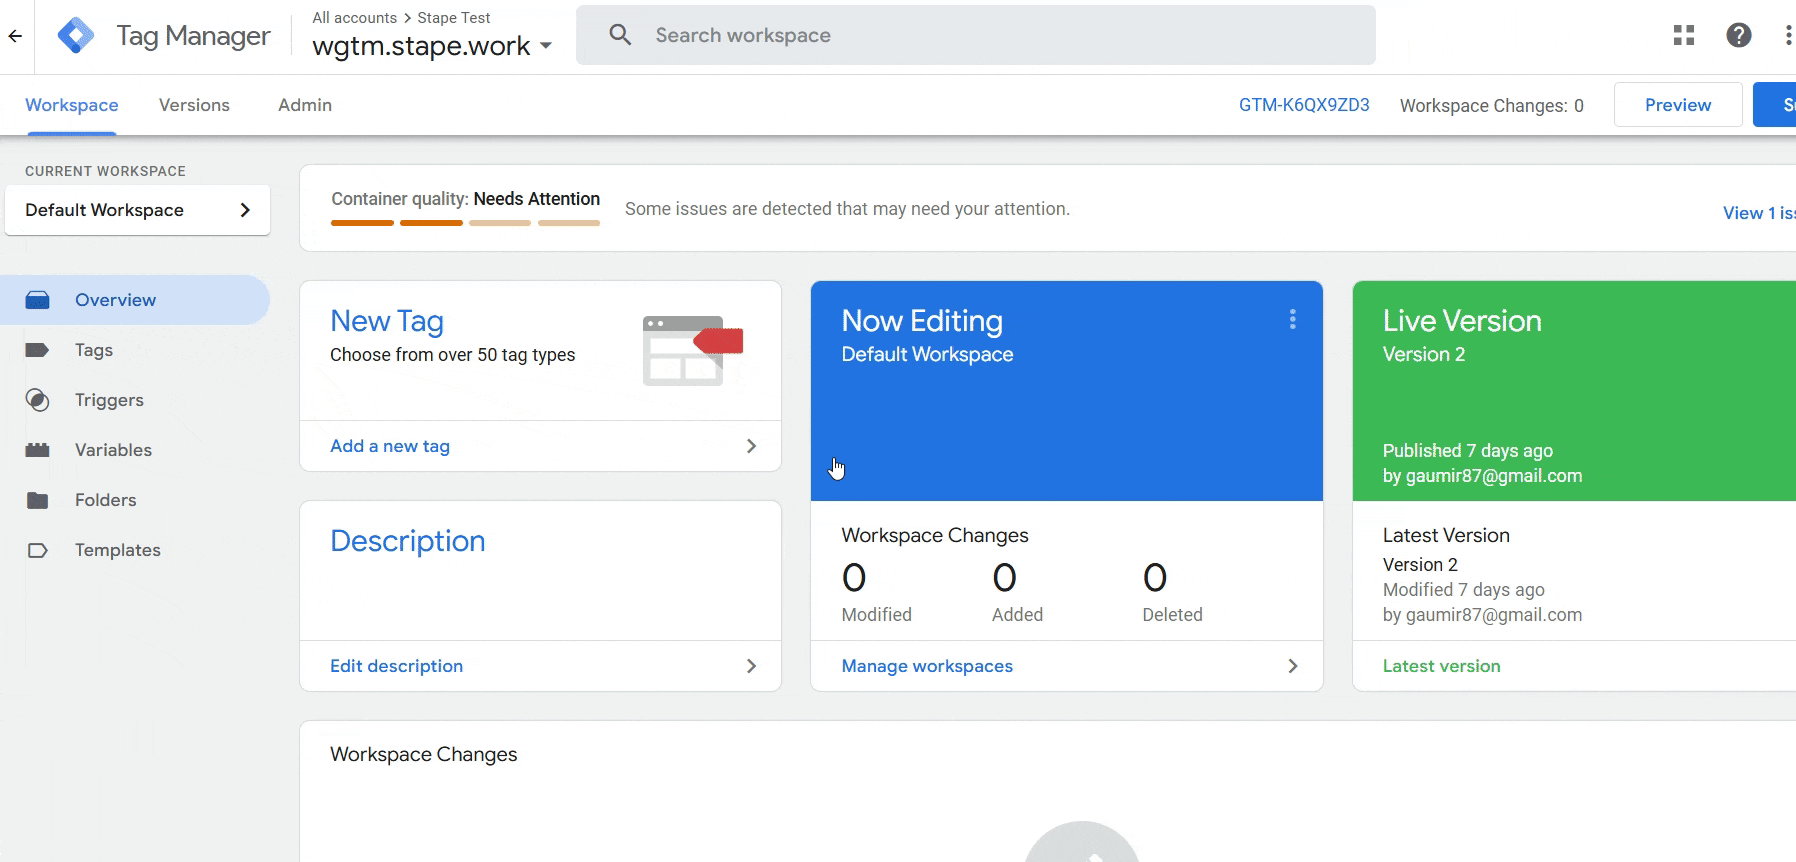
Step 1. Set up the server Google Tag Manager container on Stape
Expand the collapse element below for the detailed guide on how to do it.
How to configure the server GTM container
Step 1. Create a Google Tag Manager server container
➡️ Note
Before setting up your server-side Google Tag Manager container, it’s important to have web GTM container configured, because:
- The web container collects events, parameters and user interactions on your website.
- And sends this data to your server-side container.
Please follow the official Google documentation.
1. Select your GTM account → Click Admin → Click + next to the Container name.
2. Add Container Name → Under Target platform, choose Server. Click Create.
3. Choose Manually provision tagging server. Copy your container config. We will need it in the following steps.
Step 2. Create a Stape account to host your server GTM container
1. Go to stape.io and create an account or log in.
2. Click Create sGTM container on the main page.
3. Enter your container details.
- Container name - give your container a name (for convenience, we recommend using the same name you gave to the server container in GTM).
- Container configuration - paste the Container Config data that you copied from the Install Google Tag Manager pop-up. If you lost it, go to Google Tag Manager → click Admin → click Container settings → copy the string under Container Configuration.
- Server location - for best performance, choose the server location that’s closest to where most of your clients are. See the list of available server locations here. Also, you can opt for the Global multi-zone server location option if you have traffic from different regions. It will automatically route incoming requests to the nearest available zone based on the user’s IP address.
Then click Create Container.
4. Choose a plan for your container. You can start with a Free plan. Click Continue with a Free plan.
5. You will see the status of your container, container config, and plan name. It takes around 5 minutes to deploy a server container.
Please reload the page to update the status. If the Google Tag Manager server-side setup was done correctly, you should see the status Running.
Step 2. Add and configure Stape's Conversion Tracking app for Shopify
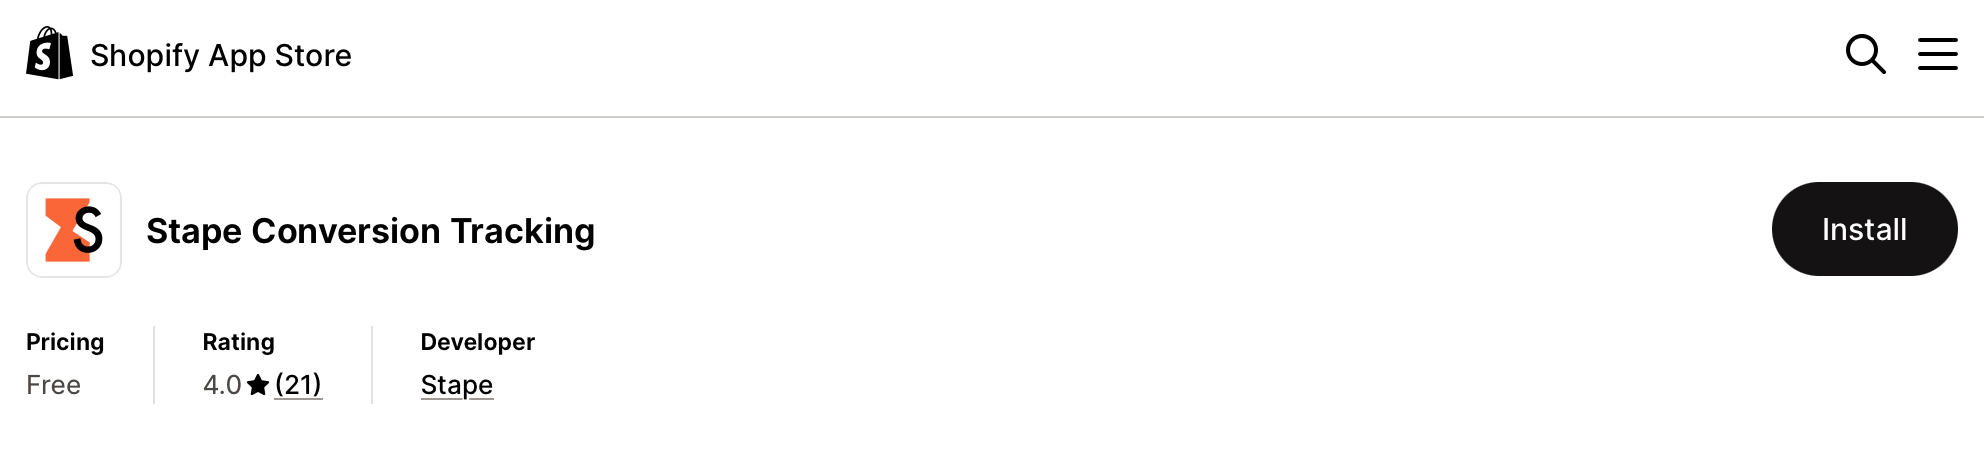
2.1 Install the Stape Conversion Tracking app in the store
The Stape's Conversion Tracking app for Shopify can be installed for free from the Shopify marketplace
2.2 Configure General tab
In the Generate tab are all the settings related to adding the GTM snippet on all pages of your Shopify shop in a way that makes it resistant to ad blockers / ITP / cookie lifetime limitations before installing it on all pages of your Shopify shop.
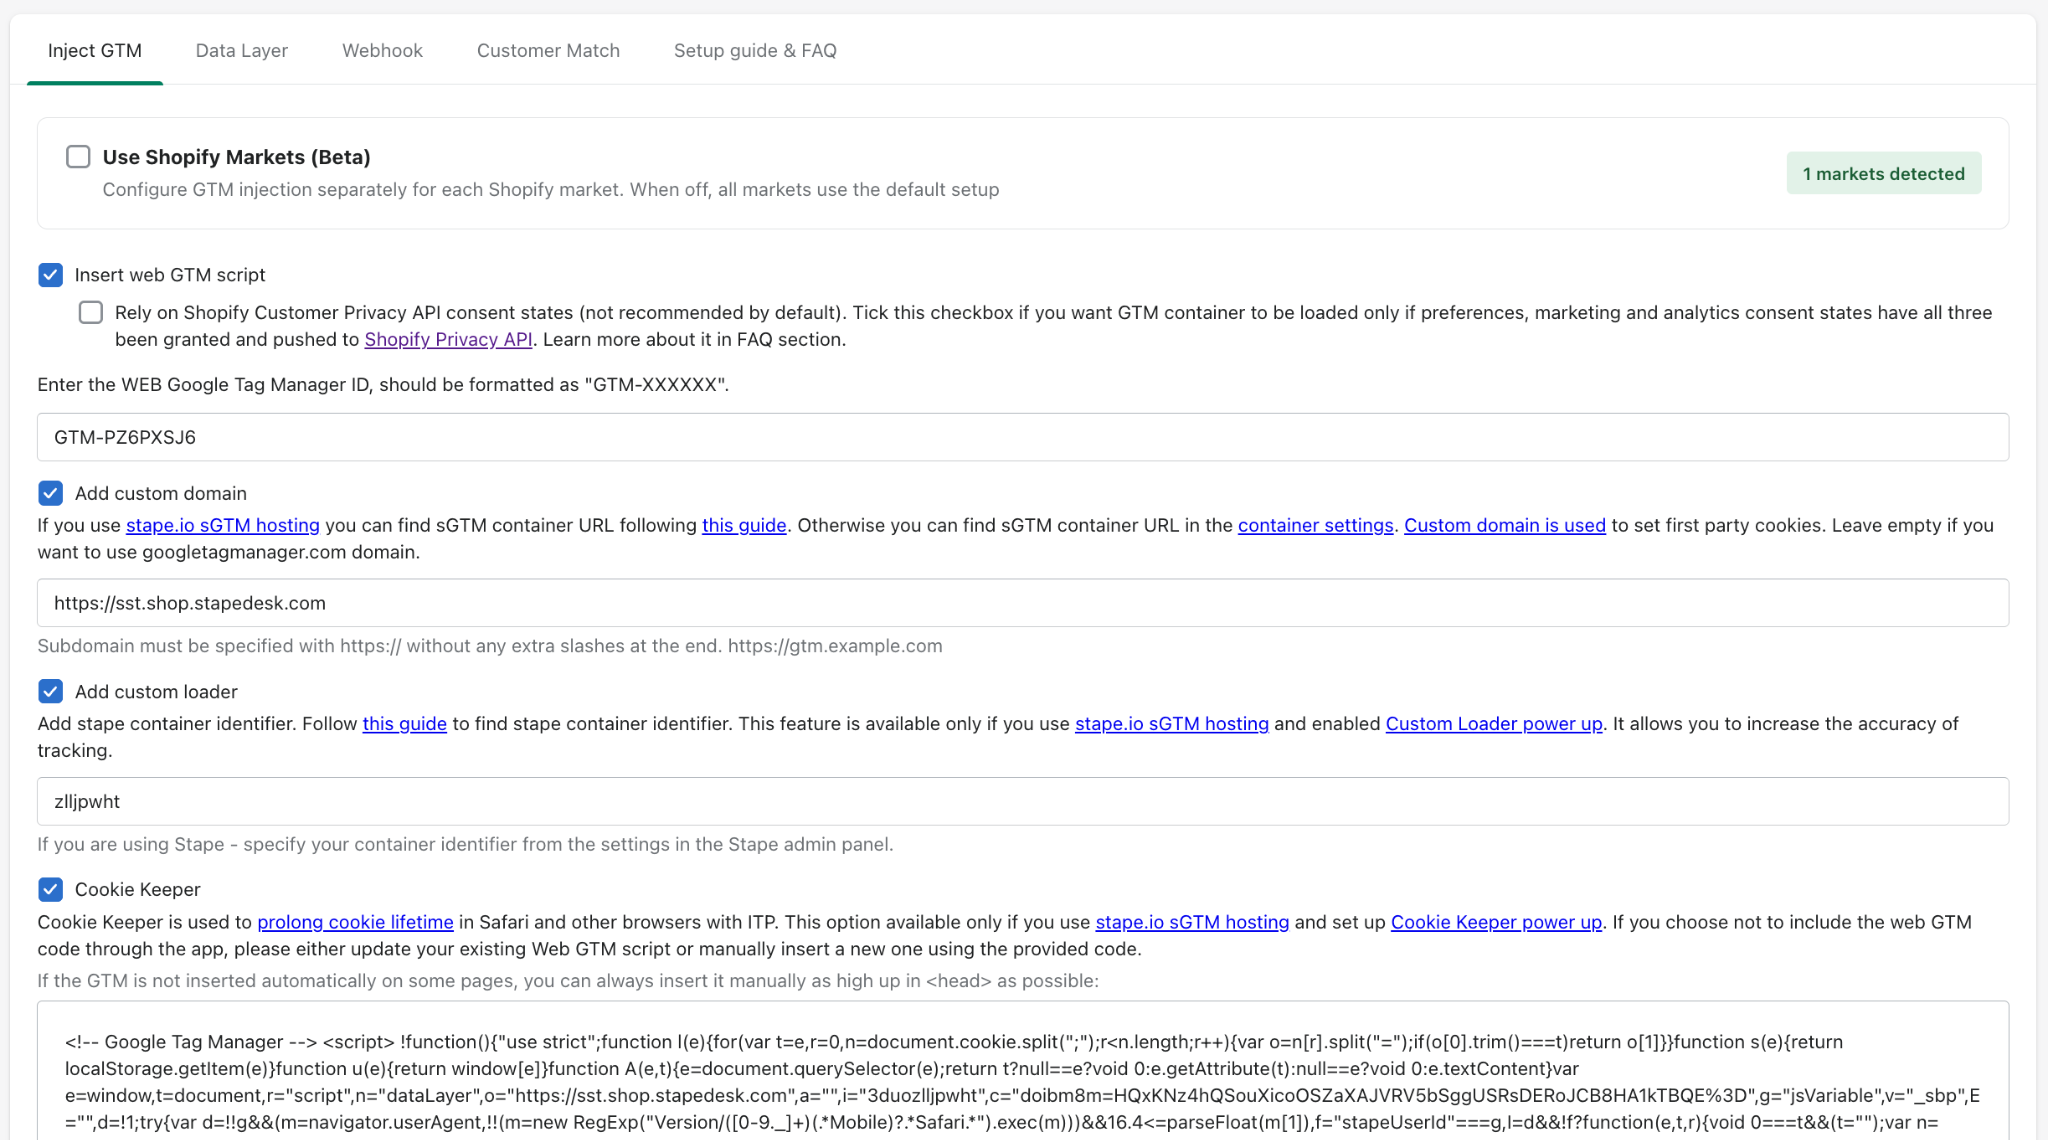
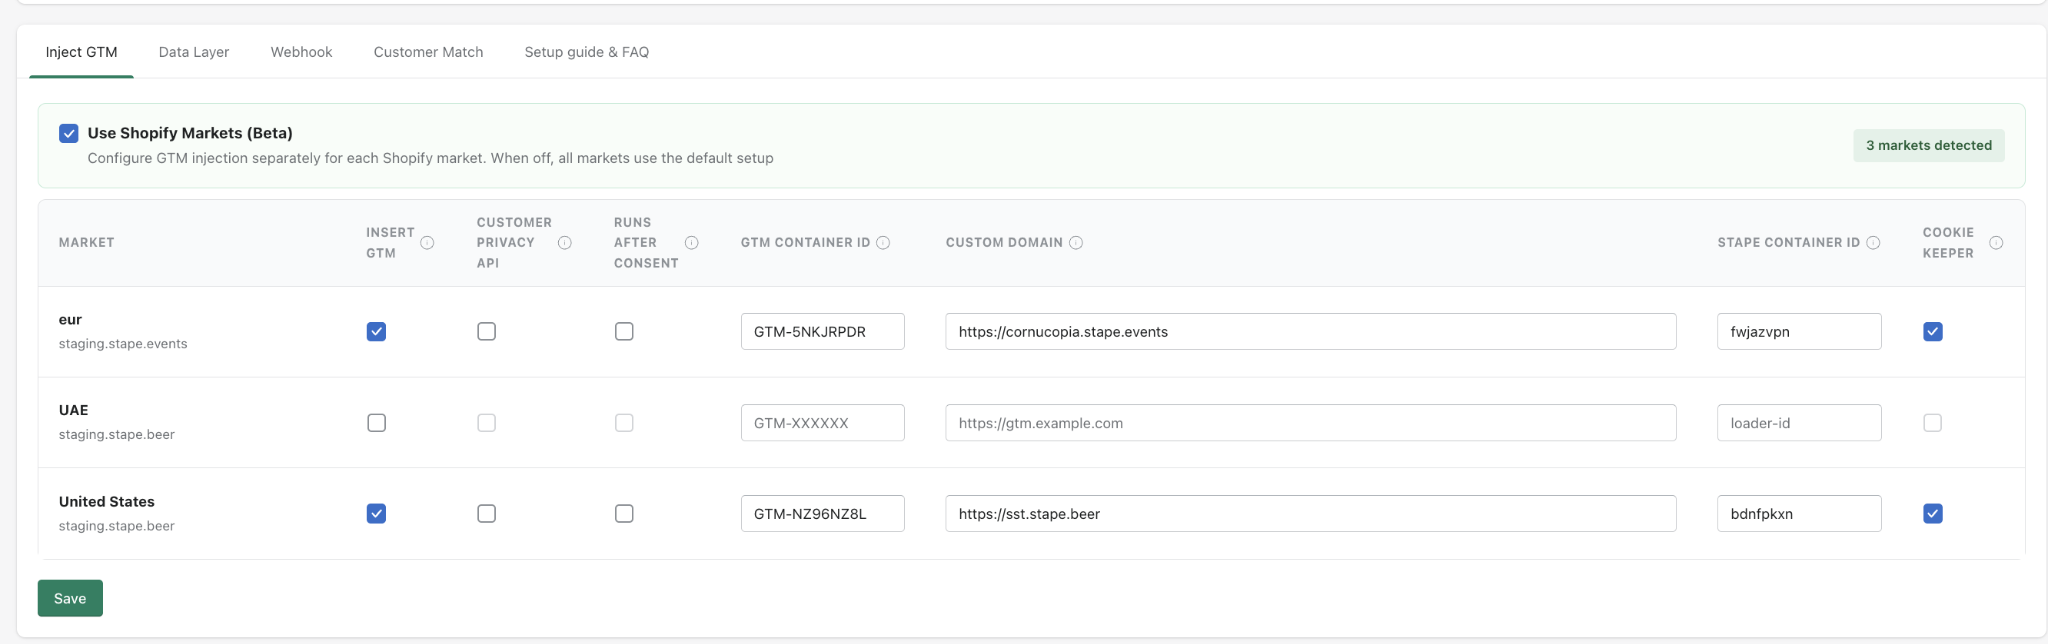
- Use Shopify Markets
Check the box if you have multiple Shopify markets. Using the feature, you can configure GTM injection separately for each Shopify market. If the feature is disabled, all markets use the default setup.
When enabled, you will see the fields required to configure for each market:
- Insert GTM - if checked, the GTM snippet is added to each website page.
- GTM container ID - the ID from your web GTM container.

- Customer privacy API - if enabled, the app holds GTM loading until the visitor accepts cookies through Shopify's Customer Privacy banner. By default, the option isn't recommended.
- Custom domain, Stape container ID, and Cookie Keeper - the fields are associated with server-side tracking; you need to configure them if you use/going to use the server-side setup. Below, we explain where to find values for each field.
- GTM web container ID
Here, you need to specify your GTM web container ID.
- Custom domain
It is extremely important to use your own subdomain for first-party cookies to work correctly and for tracking to work in general. If you do not already have a subdomain added to your sGTM container, you can follow the guide on custom domains to add it.
- Custom Loader
Its use is highly recommended to increase protection against ad blockers.
Click on the corresponding check box and specify your Stape container identifier. To find it, log in to your Stape account, select the sGTM container, and find the container identifier in the Settings section.
- Cookie Keeper
The power-up allows you to minimize the impact of the latest ITP restrictions. Before activating this feature via the app, make sure you have it enabled in Stape in your container. To configure Cookie Keeper, click on the collapse element below and follow the instructions:
How to configure Cookie Keeper
1. Log in to your Stape account and select your sGTM container from the dashboard.
2. Go to Power-ups and click Use next to the Cookie Keeper panel.
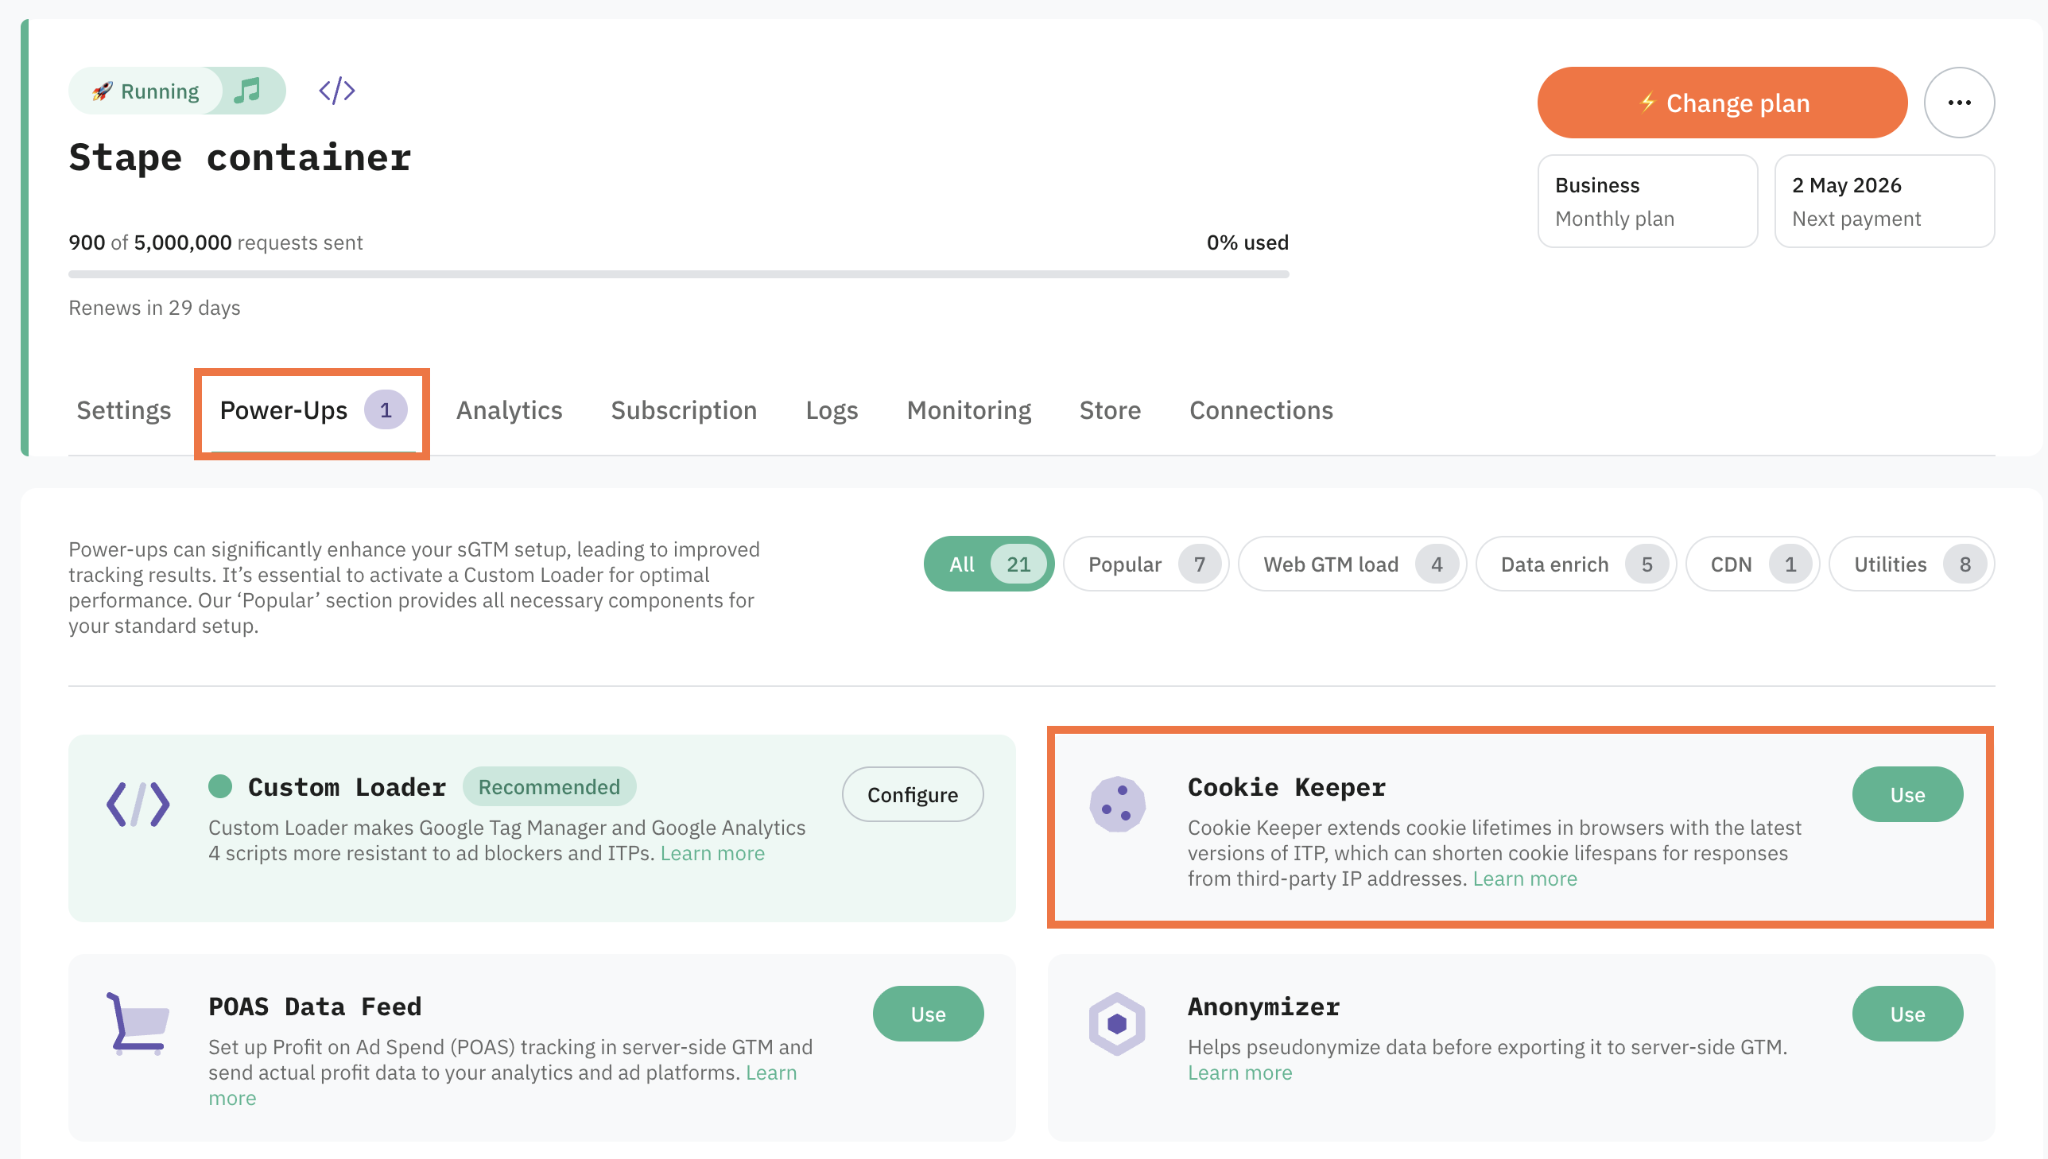
3. Toggle the Cookie Keeper switch to enable it.

4. Under Standard cookies, select which cookies to extend.
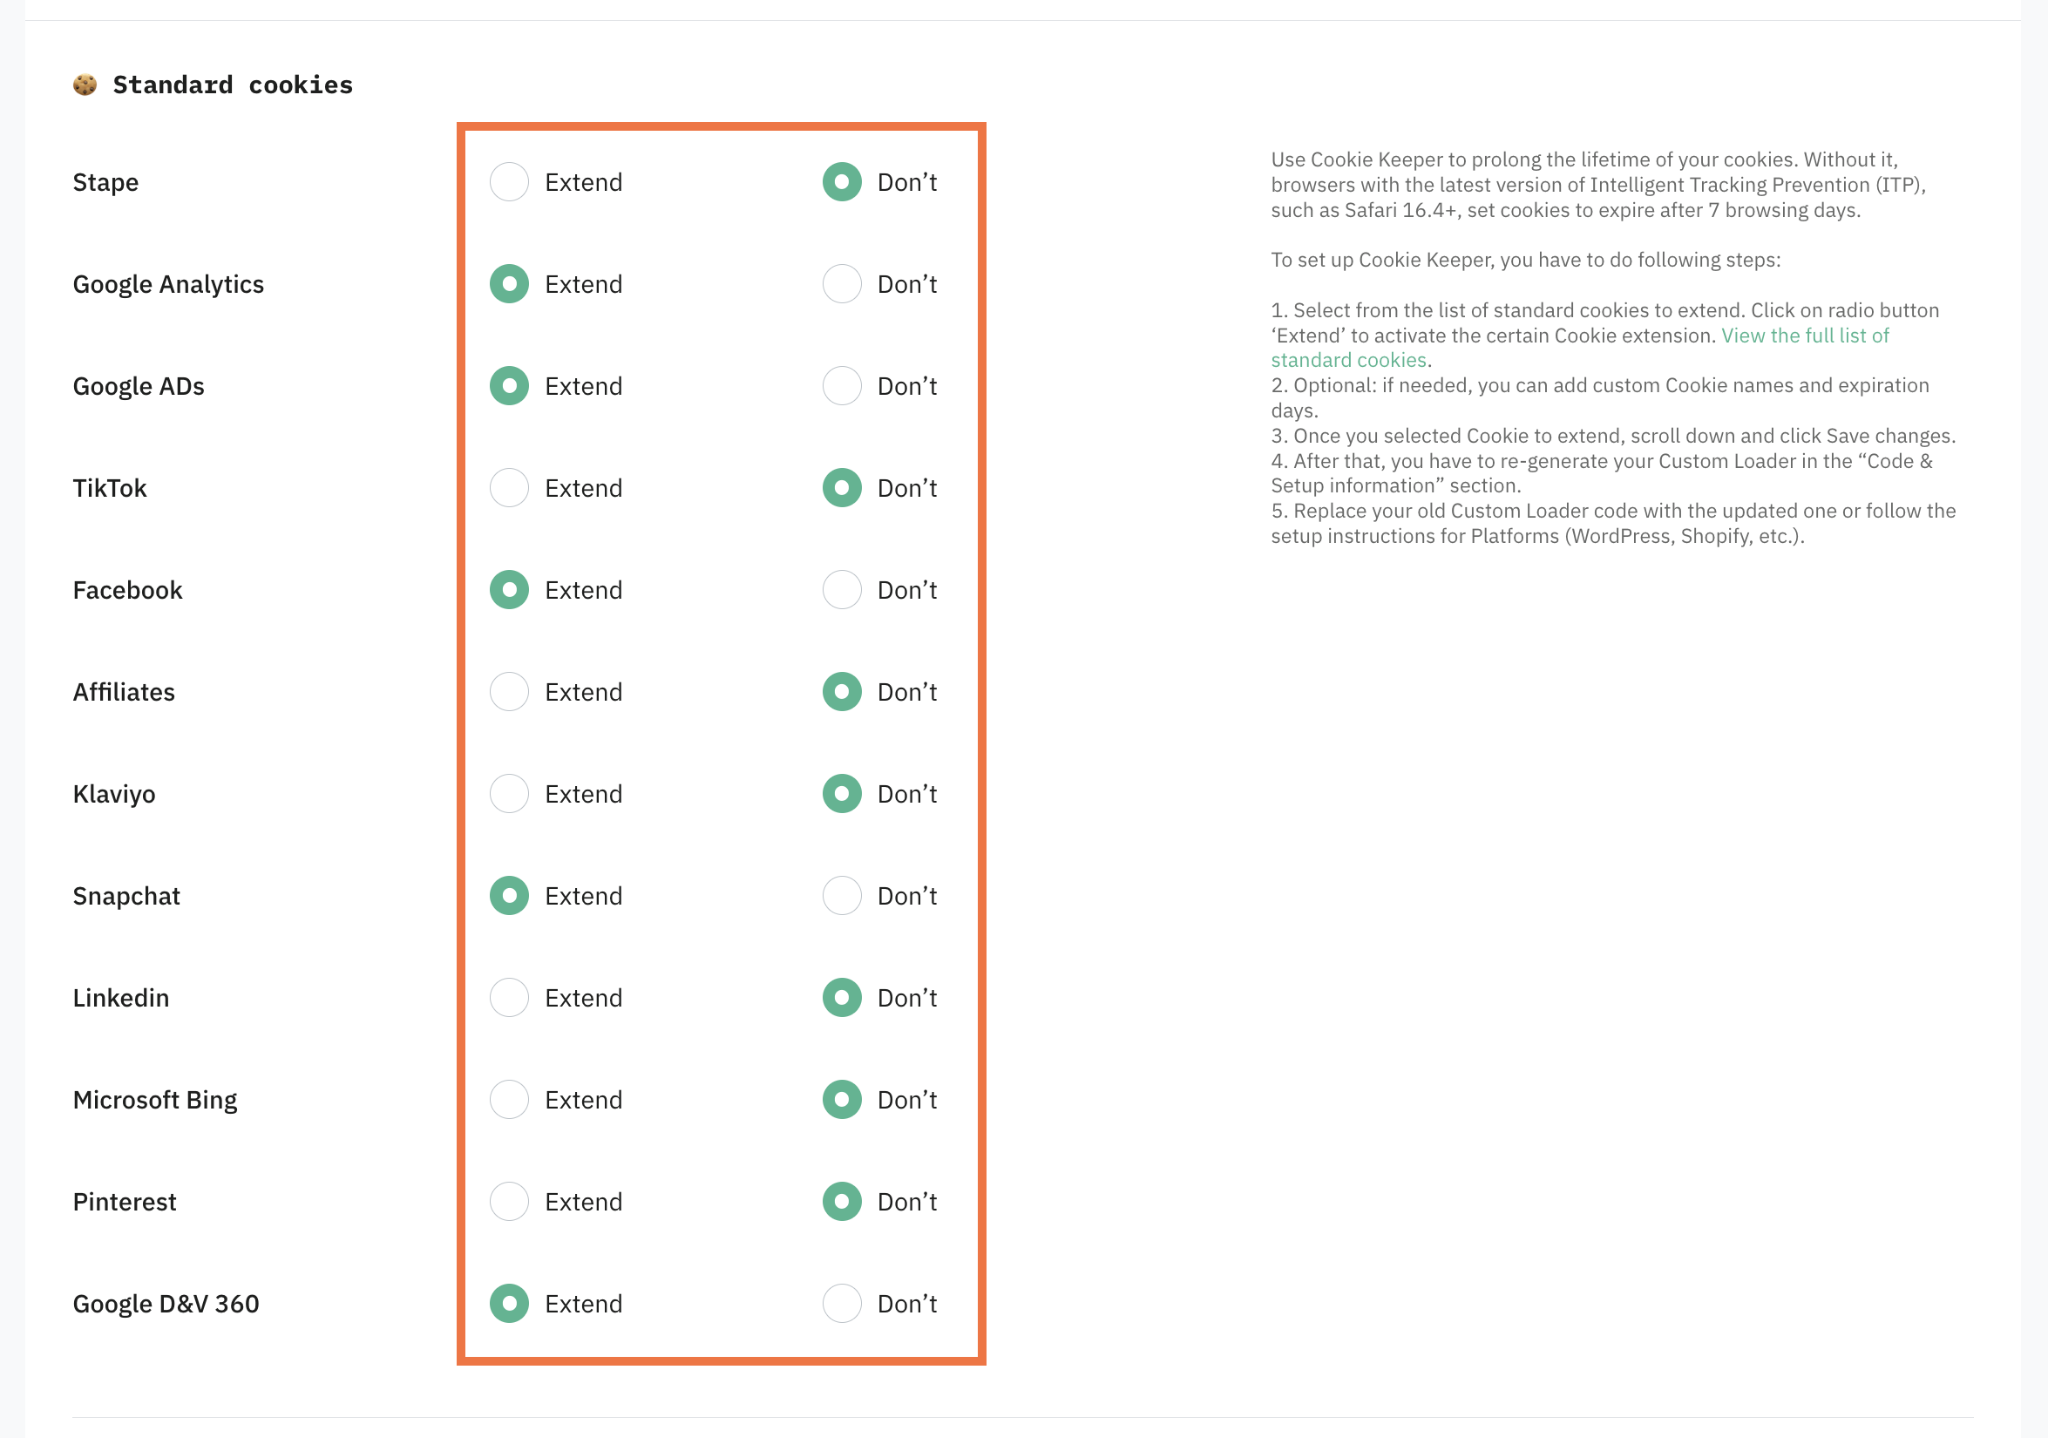
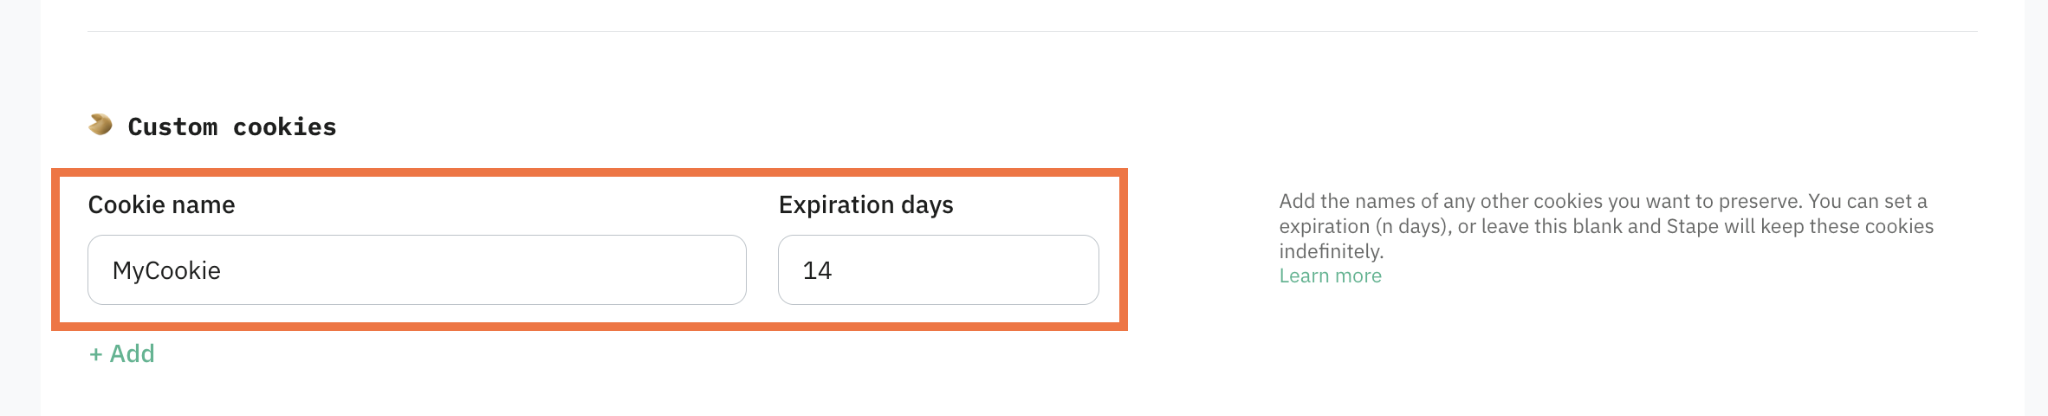
Custom cookies
If the cookies you need aren't in the standard list, you can configure custom cookies. Enter the cookie name and optionally set an expiration in days (leave blank to keep indefinitely).
5. Click Save changes.
Test the setup
The steps below use the Google Analytics _ga cookie as an example, but you can apply the same flow for any platform. To test the flow, make sure you've set up at least one GA4 tag.
- Open the Safari browser. The version shouldn't be older than 16.4. To confirm the version, click Safari in the menu bar and select About Safari.
- Enter your site's URL with the appended
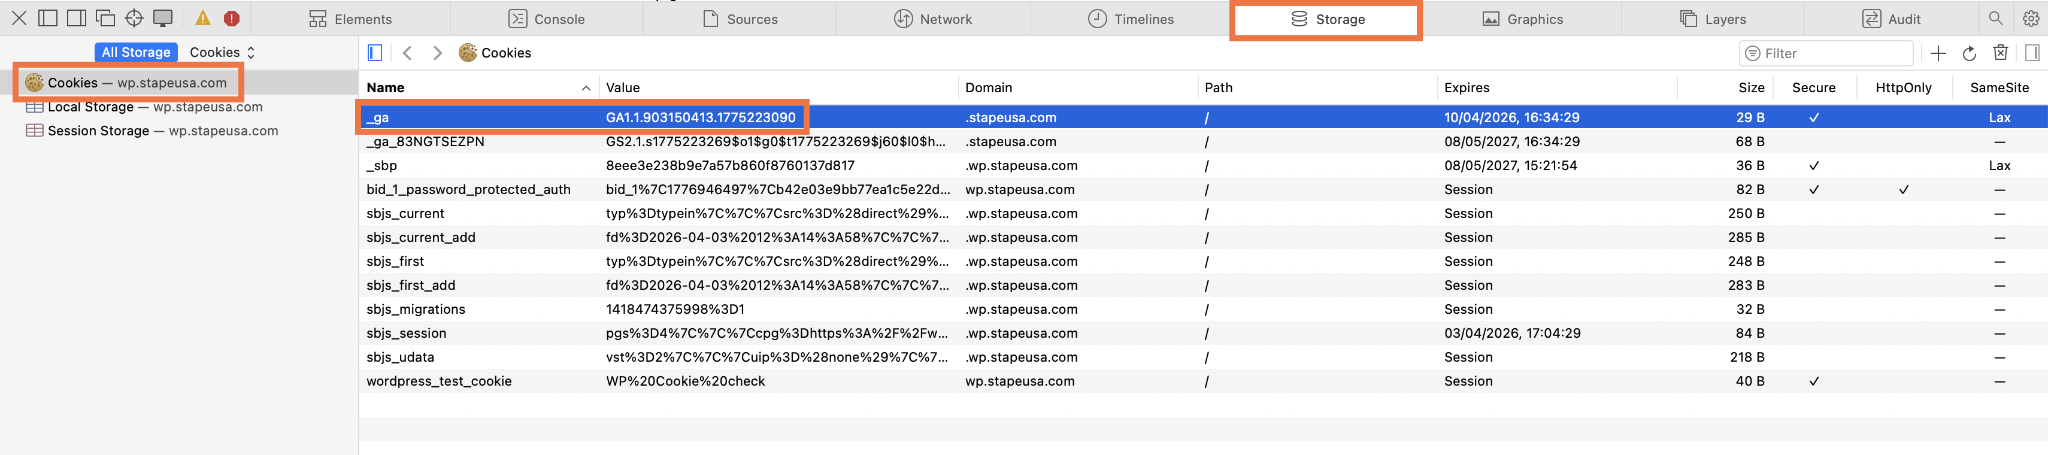
?galid=test123_ga - Right-click the page → Inspect Element → Storage tab → Cookies.
- Locate
_ga - Refresh the page twice.
- Confirm the
_ga
- GTM snippet block
Here you can take the GTM snippet to install it on pages that are outside of your Shopify theme (such as pages made by third-party apps like Zipify).
2.3 Set up Data Layer tab
In the Data Layer tab, you can find the data layer events to activate and configure. The second box gives you control over whether event names get the _stape suffix to prevent any clashes in GTM. If it's off, events keep their normal names.
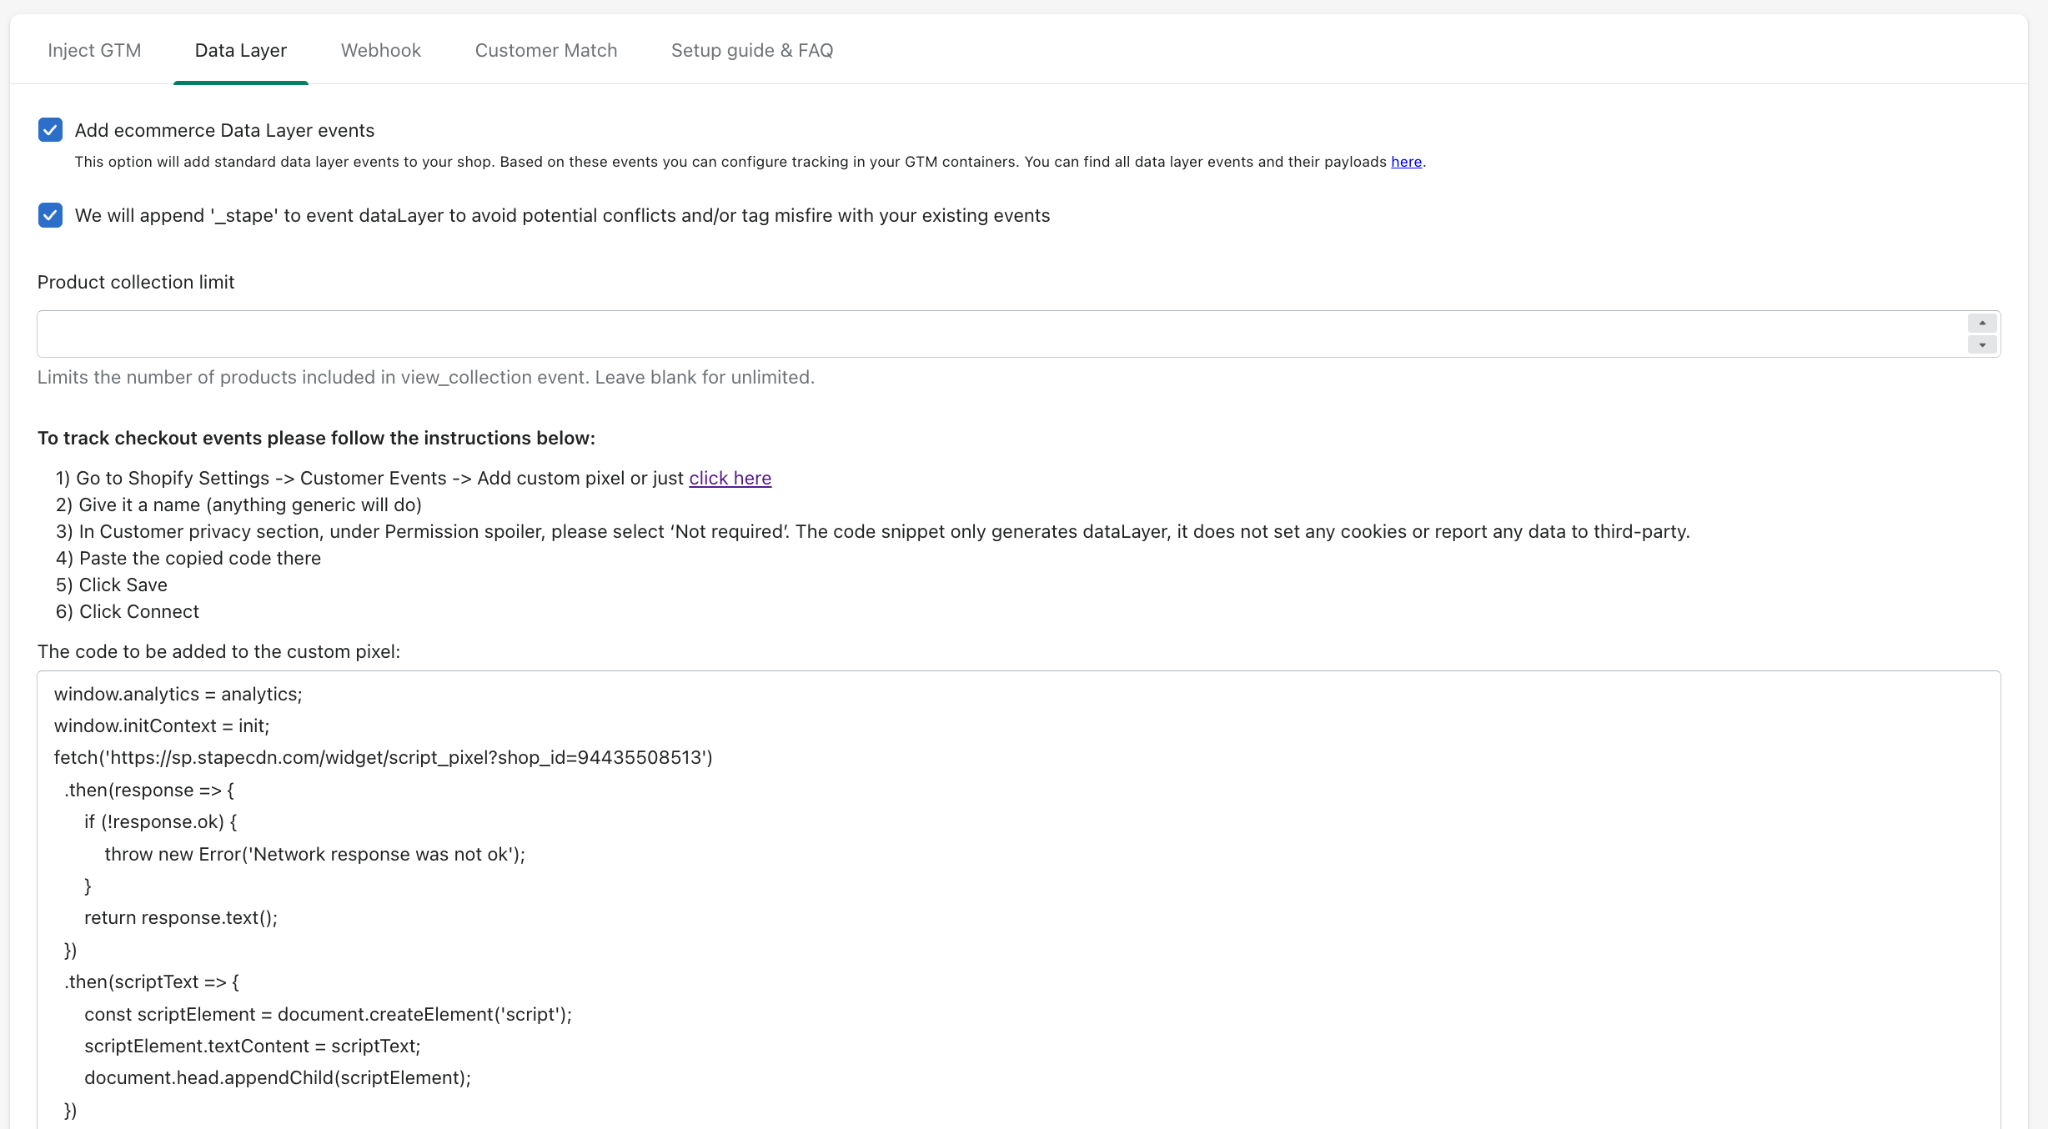
Data layer activation:
- Activate the Add ecommerce Data Layer events checkbox.
- Save changes.
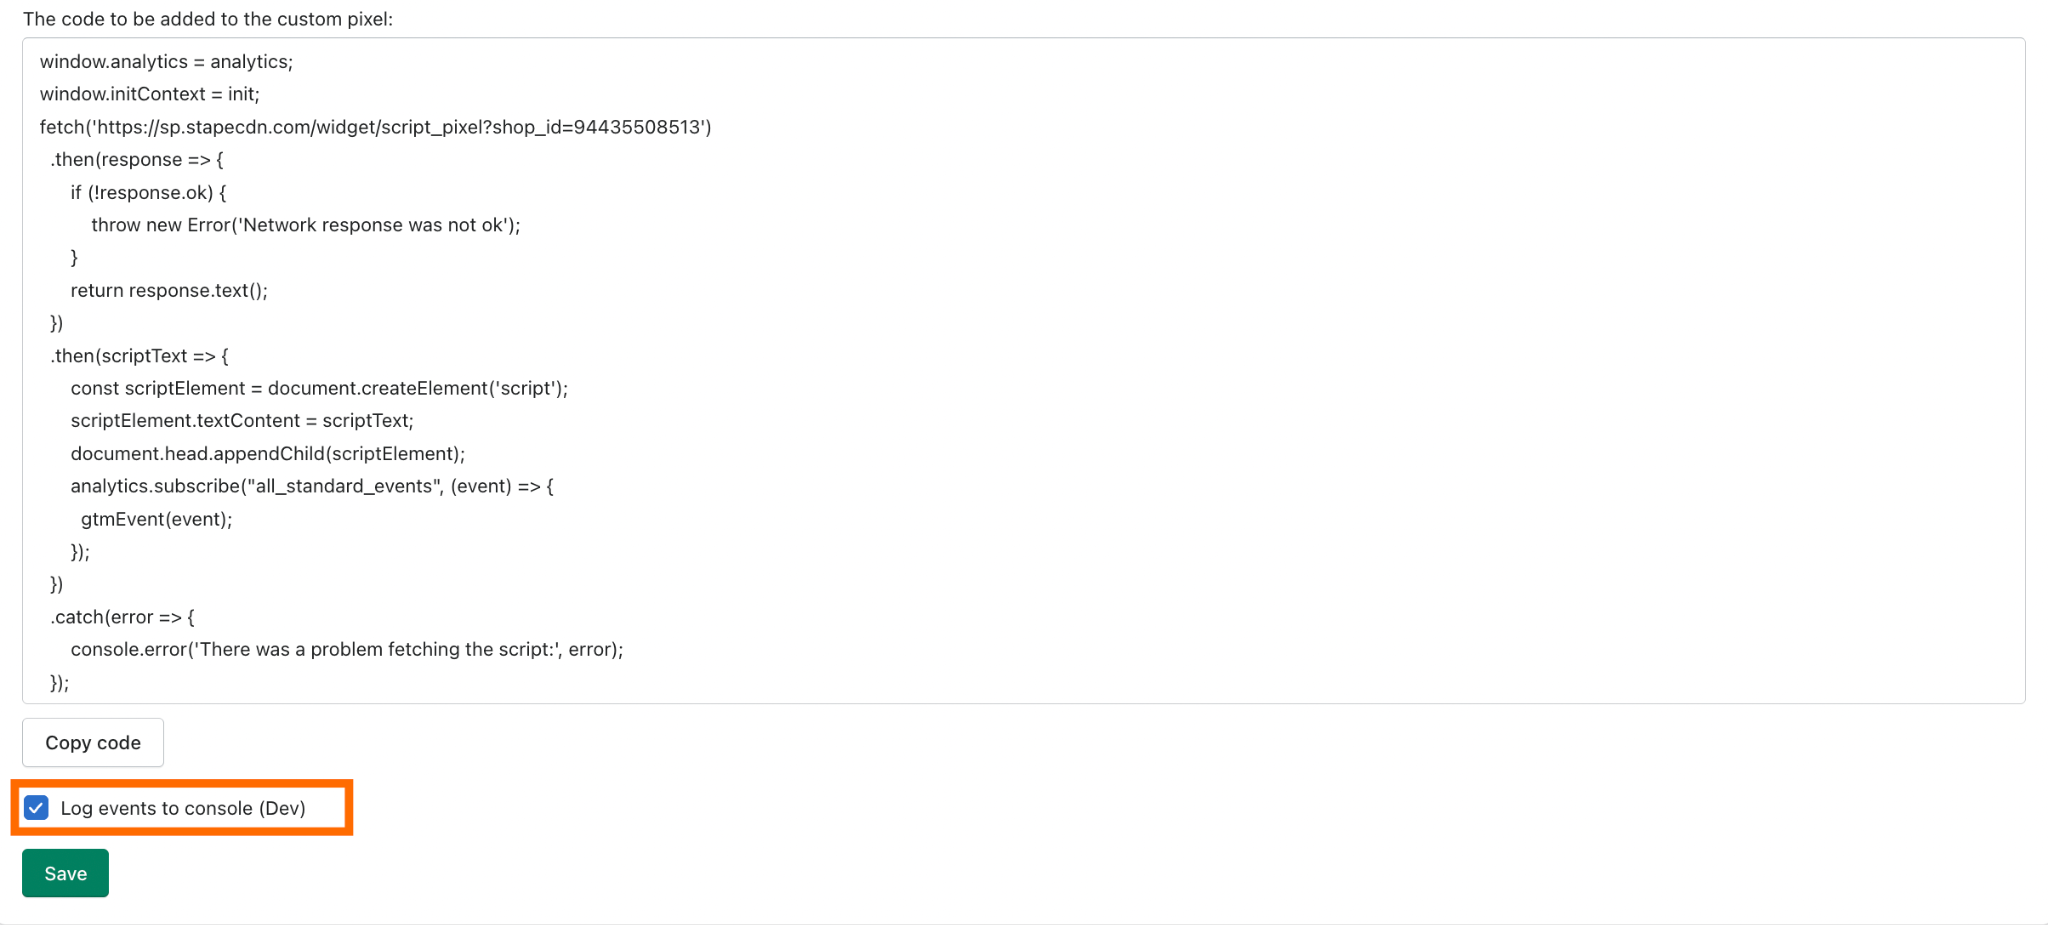
- Copy the code for the custom pixel in the box below on the data layer tab and follow the instructions to add and activate it.
In the Customer privacy section, under Permission spoiler, please make sure to select Not required. The code snippet only generates the Data Layer; it does not set any cookies or report any data to third parties.
In the Data Layer tab of the app, there is also an option Log events to console (Dev), which is a debugging option for developers and store admins. When enabled, it logs eCommerce events in the browser console, shows event payloads sent to the GTM/Stape server container for verification, and helps debug Data Layers.
This option is for development only and should be disabled in production to avoid unnecessary console logging.
2.4 Configure Webhooks tab
Webhook events are configured in the Webhook tab.
Note: the problem with webhooks on Shopify is that they don't contain any cookie data, which is crucial for tracking any platform, so using webhook events is only recommended as a last resort if you, for some reason, can't track it online.
This tab is where the webhook events are configured.
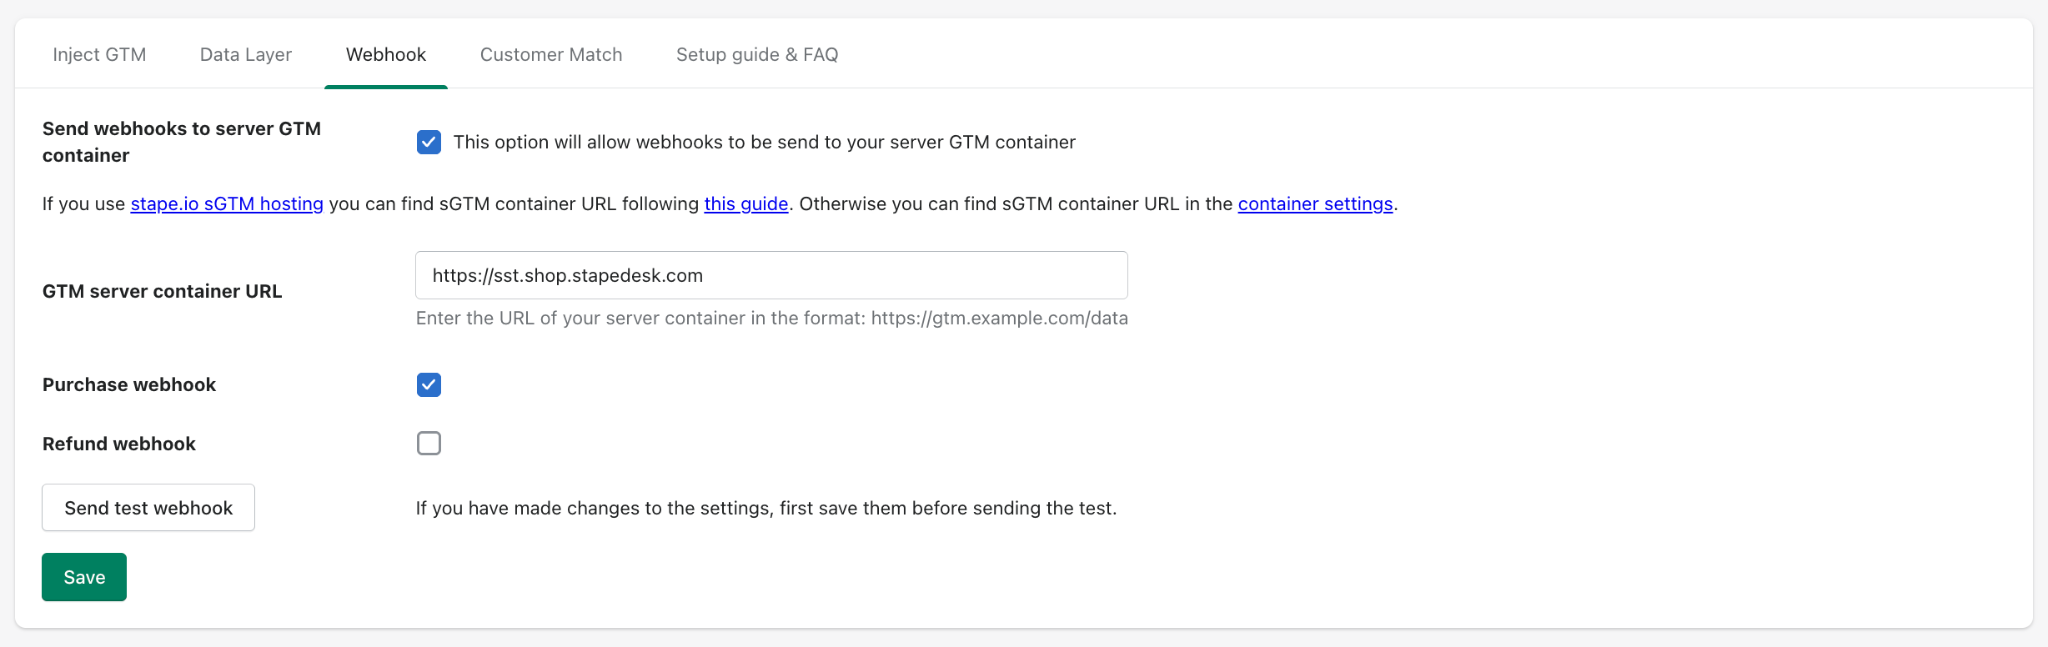
To activate a webhook, you need to activate the checkbox, specify the URL of the server GTM container, and /path where the webhooks should be sent.
You can subscribe to webhooks when a new order is created or when a refund is made on an order.
Here are some useful blog posts we have about using and debugging webhooks:
2.5 The Customer Match tab
It allows you to automatically populate and update the Customer Match lists in Google Ads.
Skip the configuration in this tab if you don't run Google Ads campaigns or don't use Customer Match lists.
Step 3. Send data to the server Google Tag Manager container
The server container has no direct access to browser-side data – such as the data layer, cookies, or page context – so this data must be explicitly sent from the web container. Two methods are available for this:
- Data Tag, paired with Data Client in the server container to receive and parse its requests, sends data layer variables and other parameters independently of any specific platform;
- Google Analytics 4, which sends data via a Google Tag configured with the server container's URL. Both methods are covered below.
Send data from web to server container via Data tag
Step 1. Install the Data Tag template:
- Click on the Tags menu.
- Click New.
- Open your web Google Tag Manager container's Templates section → add Data Tag from the template gallery.
- Click on the Tag Configuration tab.
- Click Discover more tag types in the Community Template Gallery → search for Data Tag → click Add to workspace → click Add.

Step 2. Next, we’ll configure Data Tag for the pageview event:
- Under Event Name, you can select a standard event name, add a custom event name, or add a dynamic event name using {{Event}} variable.
- Enter your GTM Server Side URL (you can find your GTM server-side URL inside the stape.io account by opening the sGTM container and checking the Domain section.)
- Tick how you would like the data to be sent:
- Send all from the DataLayer - will send all the information you have in the web GTM data layer to server GTM events data.
- Send common data - adds to the request page_location, page_path, page_hostname, page_referrer, page_title, page_encoding, screen_resolution, viewport_size.
- Add consent state - adds consent_state object to the request. Including following properties: ad_storage, analytics_storage, functionality_storage, personalization_storage, security_storage.
- Add Common Cookie - the tag will send common cookies in eventData to avoid some e-commerce platform’s limitations. For example, this is required for events that work on Shopify checkout pages.
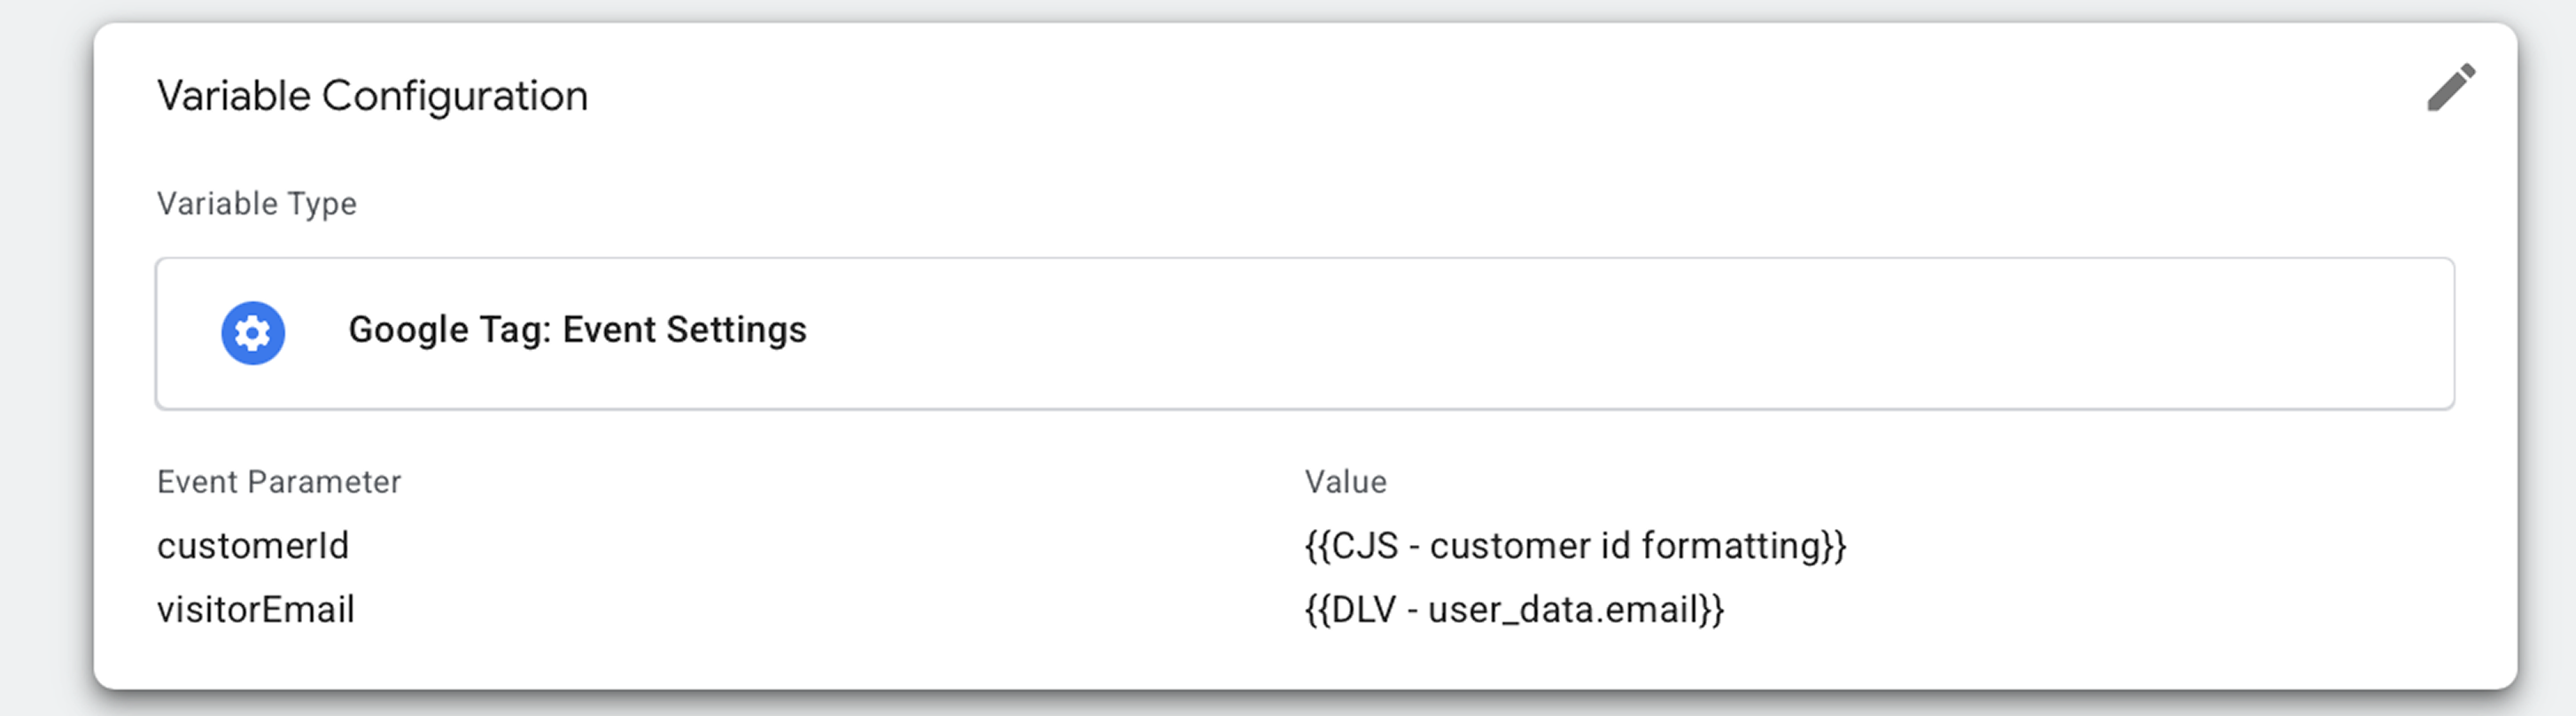
- Under Event Data, you can add any manual data to the request. You can also apply transformation (like hashing, trimming, etc) or store data.
- Under User Data, you can send user parameters and apply transformation or store data.
- Under Settings and Advanced Settings, you will find exactly that - advanced configuration options. Unless you know what you’re doing, it’s best not to modify these settings.
- Give your tag a descriptive name and click Save.
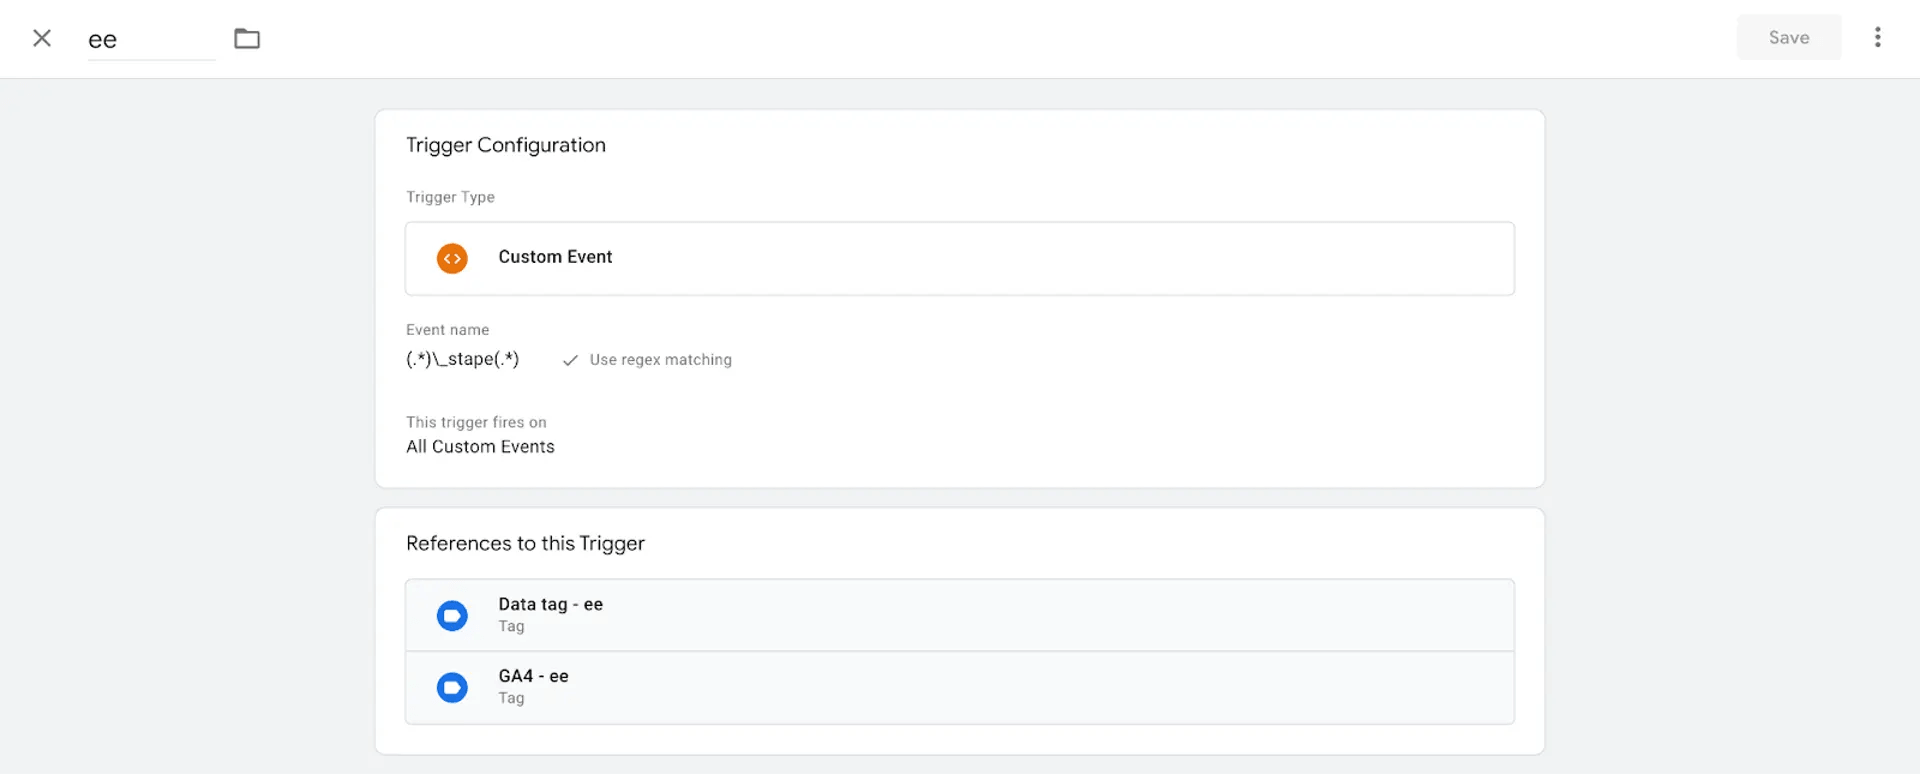
Step 3. Next, you can configure the Data Tag for other events. The example below shows how to configure e-commerce events when Data Layer is available.

This tag triggers each e-commerce event in the Data Layer. In this example, all e-commerce events end with _stape, so we’re using a regex that includes all events that contain _stape.
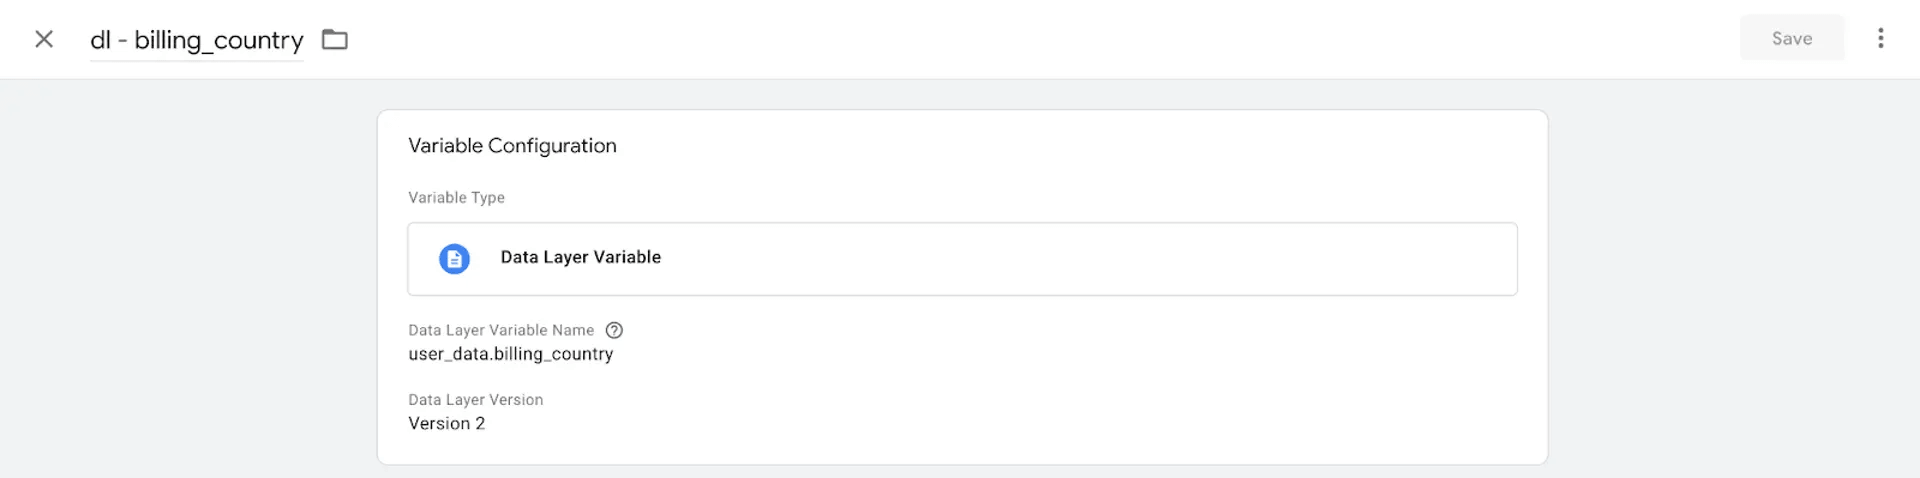
Example of the variable that extracts user data from the Data Layer.
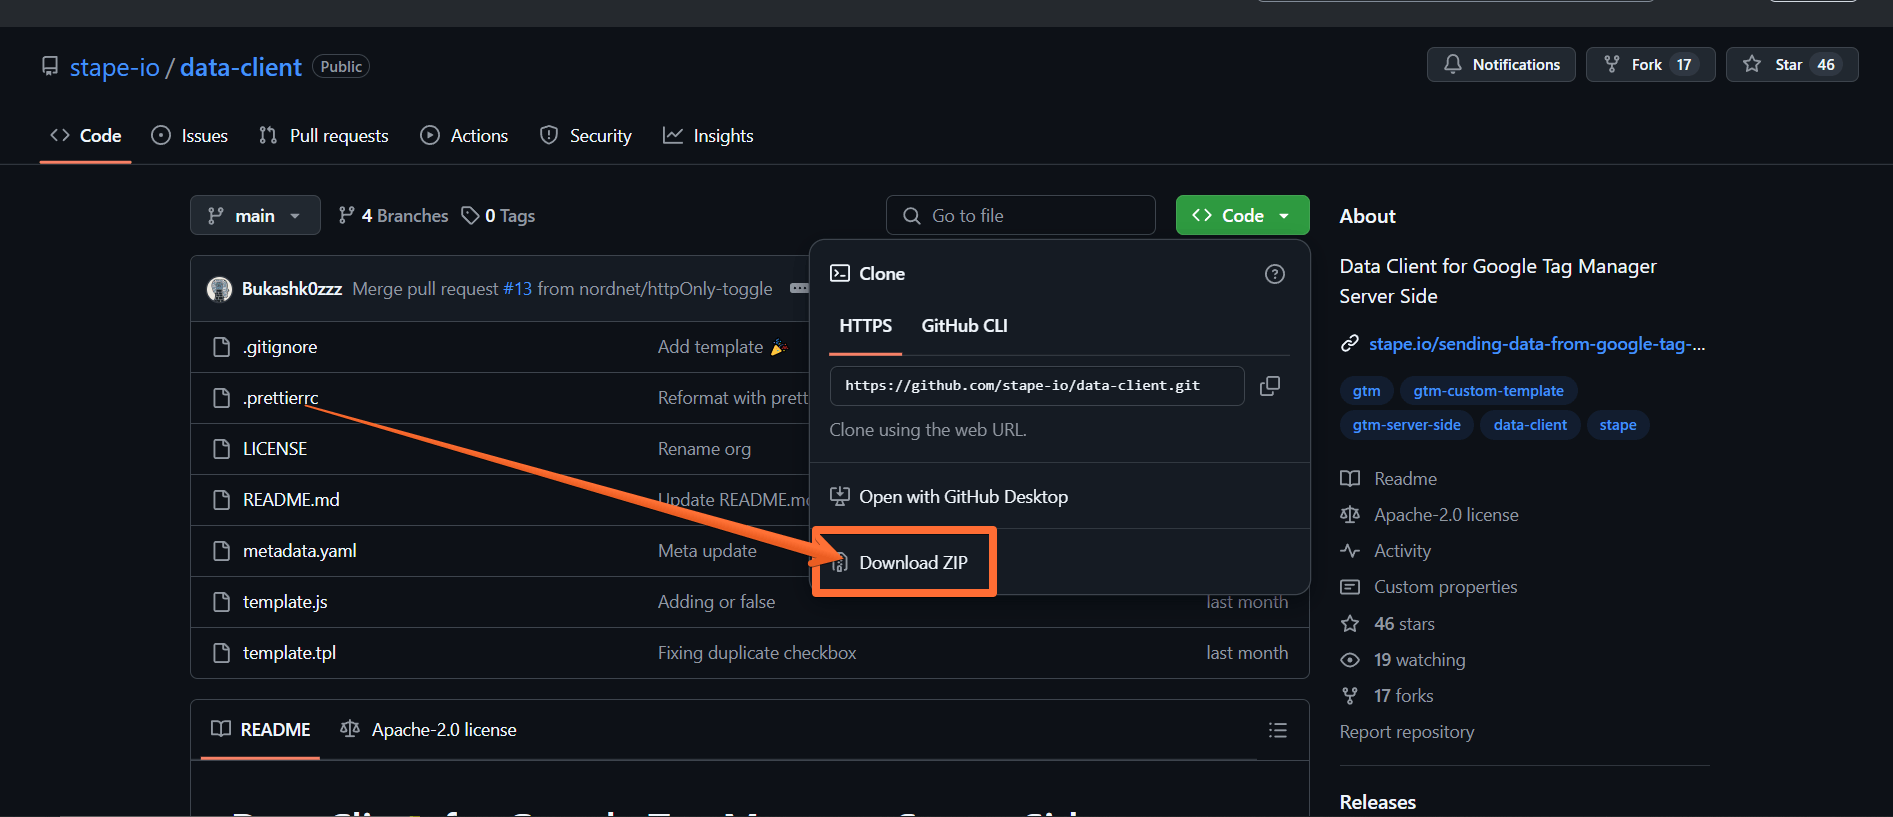
Step 4. Next, download Data Client from the GitHub:
- Follow this link.
- Click Code → Download ZIP.
Step 5. Now to import the Data Client:
- Open your server Google Tag Manager container.
- Click Templates.
- Under Clients, click New.
- Click three dots in the top right corner.
- Click Import and select the Data Client you downloaded from GitHub (you may have to unzip the archive first.)
- Once the import is done, click Save.
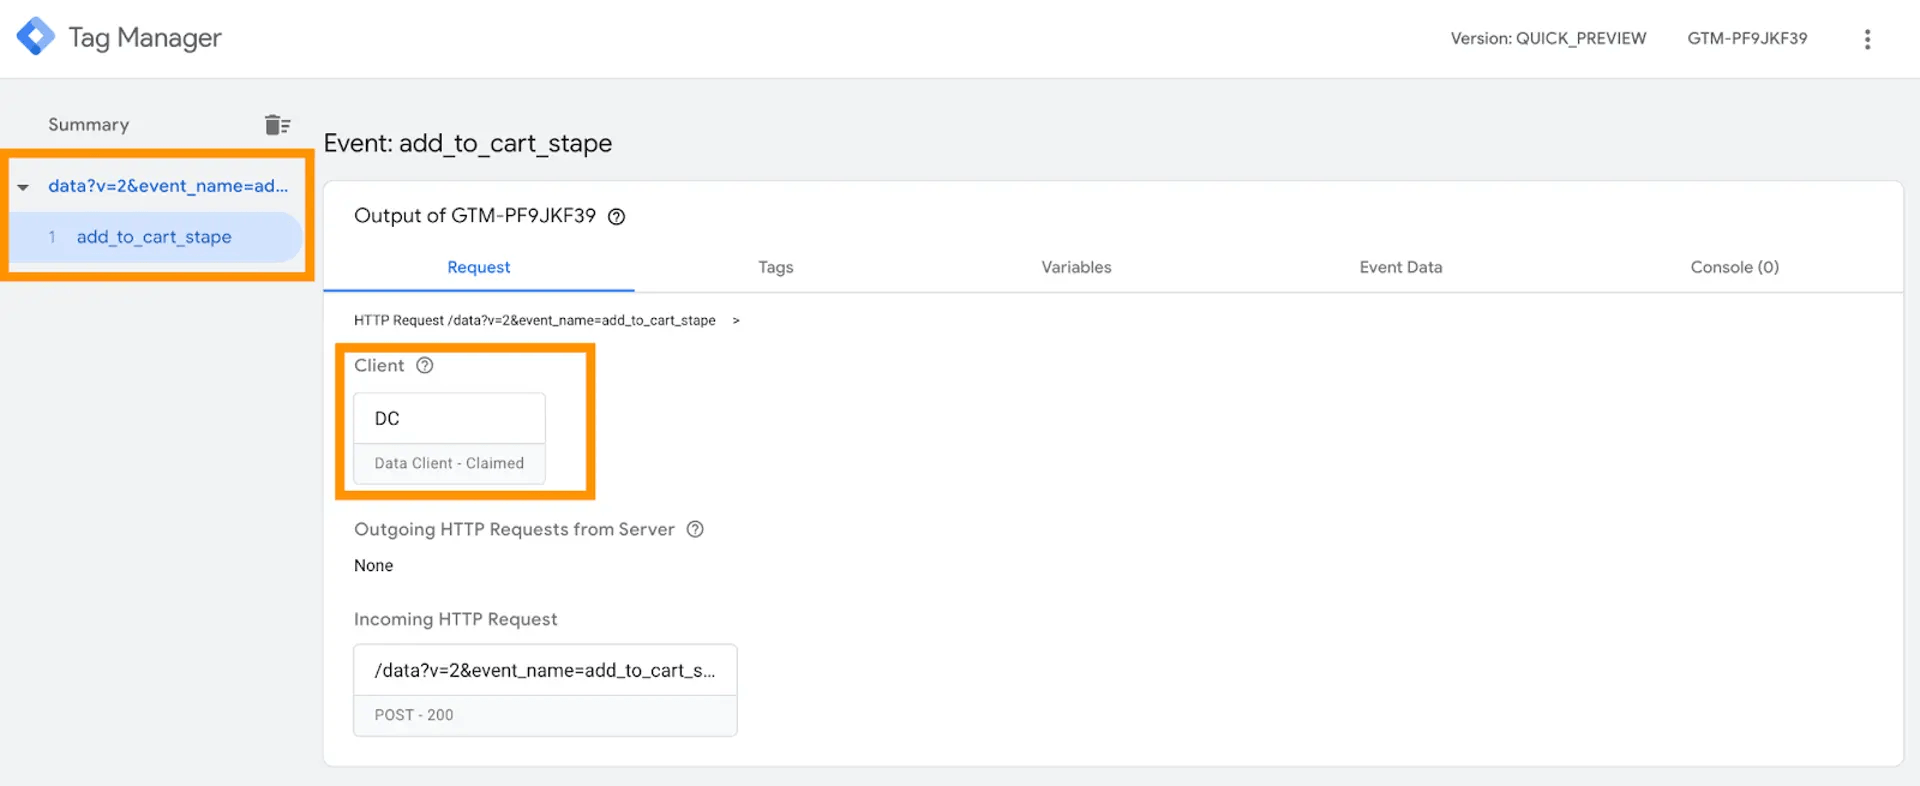
Step 6. Open the Clients tab and click New → choose Data Client → click Save.
Step 7. Open web and server GTM preview screens and test the setup. You should see Data Tag triggered in the web GTM container and Data Client parsed Data Tag requests in the sGTM.
How to send data from web to server container via Google Analytics 4
Step 1. Create a configuration variable for the server container URL. To do that:
- Click on the Variables menu.
- Click New under the User-Defined Variable bar.
- Click on the Variable Configuration bar.
- Select the type Google tag: Configuration settings.
- Click Add parameter.
- Enter the following parameters:
- Config Parameter: server_container_url.
- Value: the URL of your Tag Manager server container.
- Give your variable a descriptive name and click Save.
Step 2. Create a Google Analytics 4 tag:
- Click on the Tags menu.
- Click New.
- Click on the Tag Configuration tab.
- Select Google Analytics → Google Tag.
- Under Tag ID, enter the ID from your GA4 account (to find it, go to your GA4 → click Admin → Data streams → select the stream → see Measurement ID.)
- Under Configuration settings, select the server container variable you created earlier.
- Under Triggering, make sure the option Initialization - All pages trigger is selected.
- Give your tag a descriptive name and click Save.
- Click Publish for the container to go live.
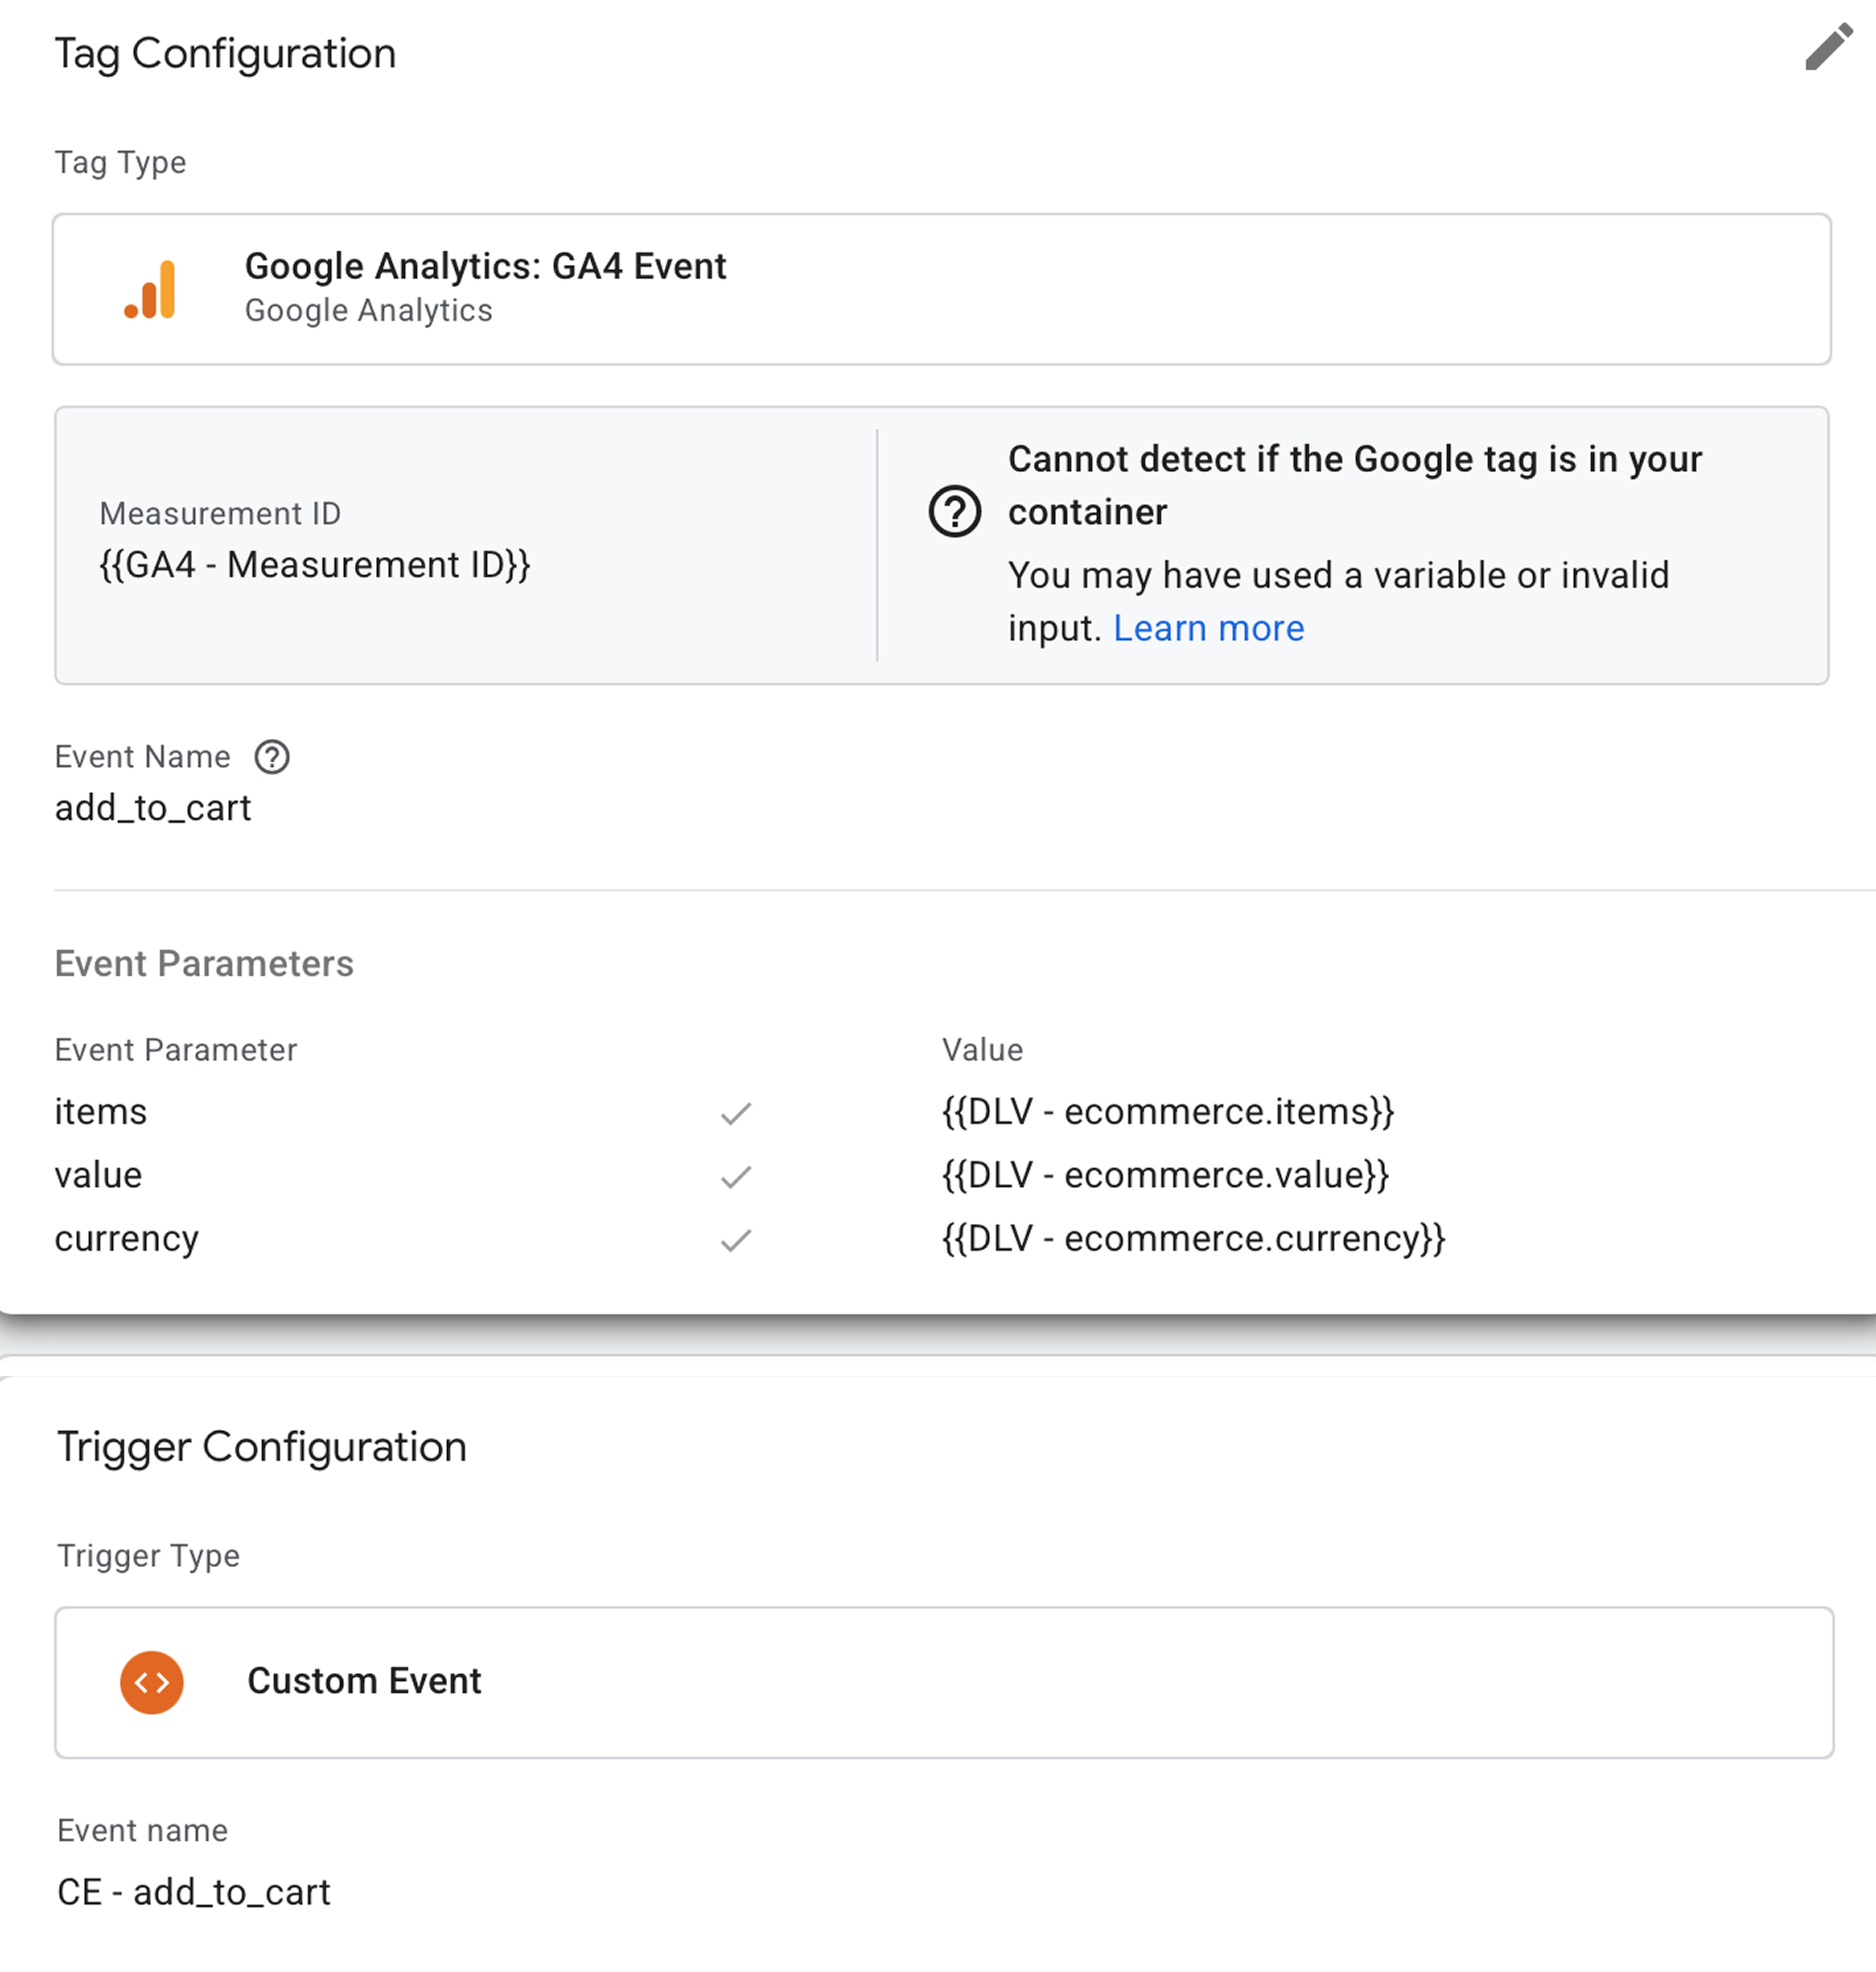
Step 3. Next, let’s see how to create a GA4 event, using the All Clicks event as an example:
- Click on the Tags menu.
- Click New.
- Click on the Tag Configuration tab.
- Select Google Analytics → Google Analytics: GA4 Event.
- Enter your Measurement ID (from the GA4 Data streams menu.)
- Give your event a descriptive name.
- Click Triggering → All Clicks.
- Give the tag a descriptive name.
- Click Save.
Setting up conversion tracking with various platforms
Next, you'll need to configure sending your event data to your marketing / analytics platform. Exact steps will depend on your choice of platform. Check out our guides on the popular platforms for more information:
Step 4. Test the app configuration
Debugging a GTM download
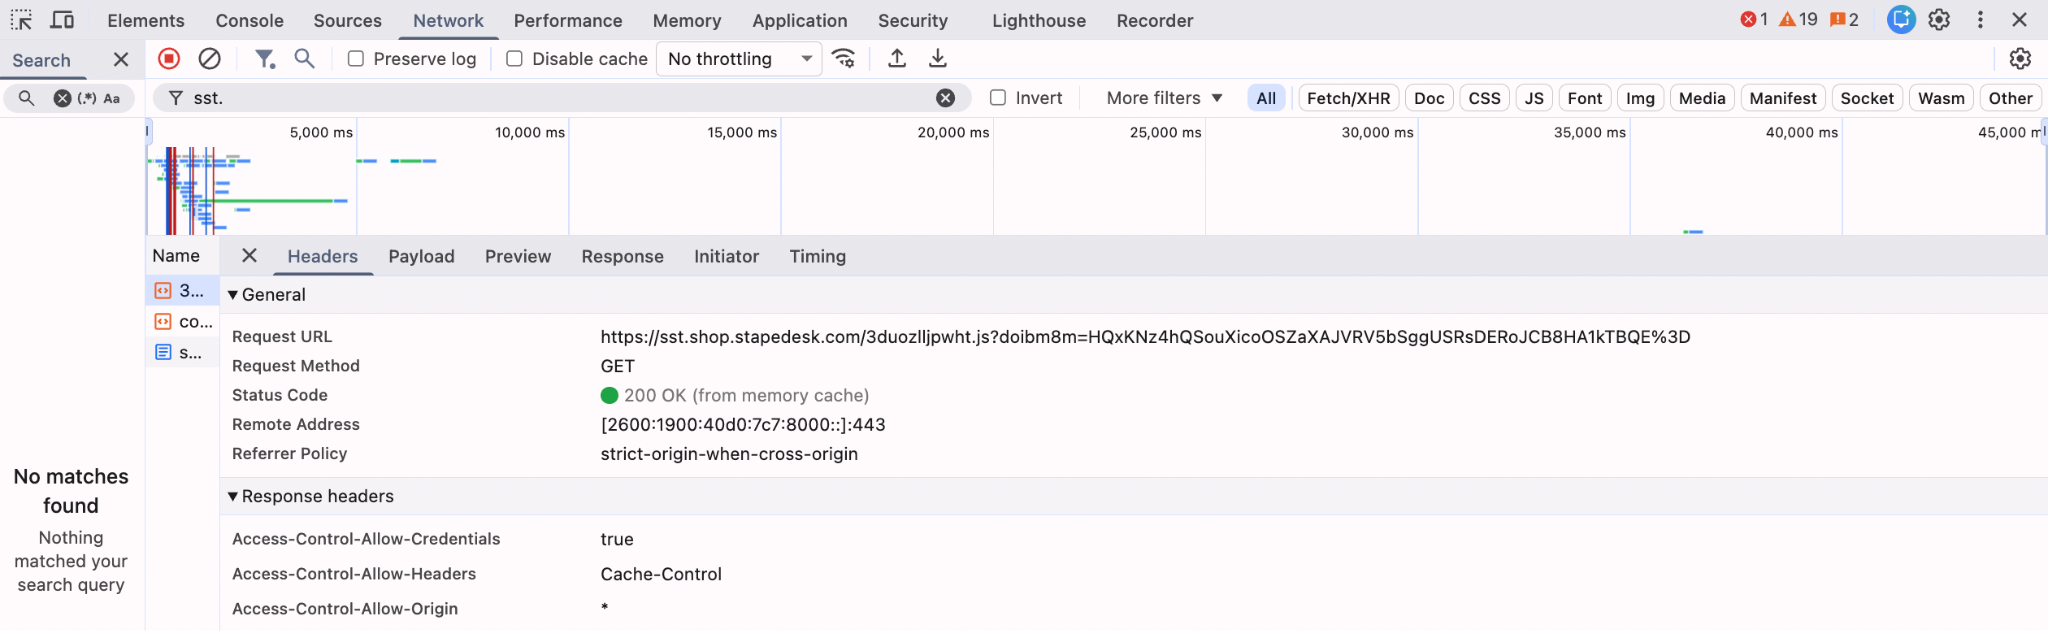
After activation or any changes, it is recommended to check if your container is actually uploaded to the site.
To do this, go to any page on your site, open your browser console, and in the network tab, filter by your subdomain/tagging server URL. You should see a request like in the following screenshot with a response status 200:
Debugging data layer checkout events
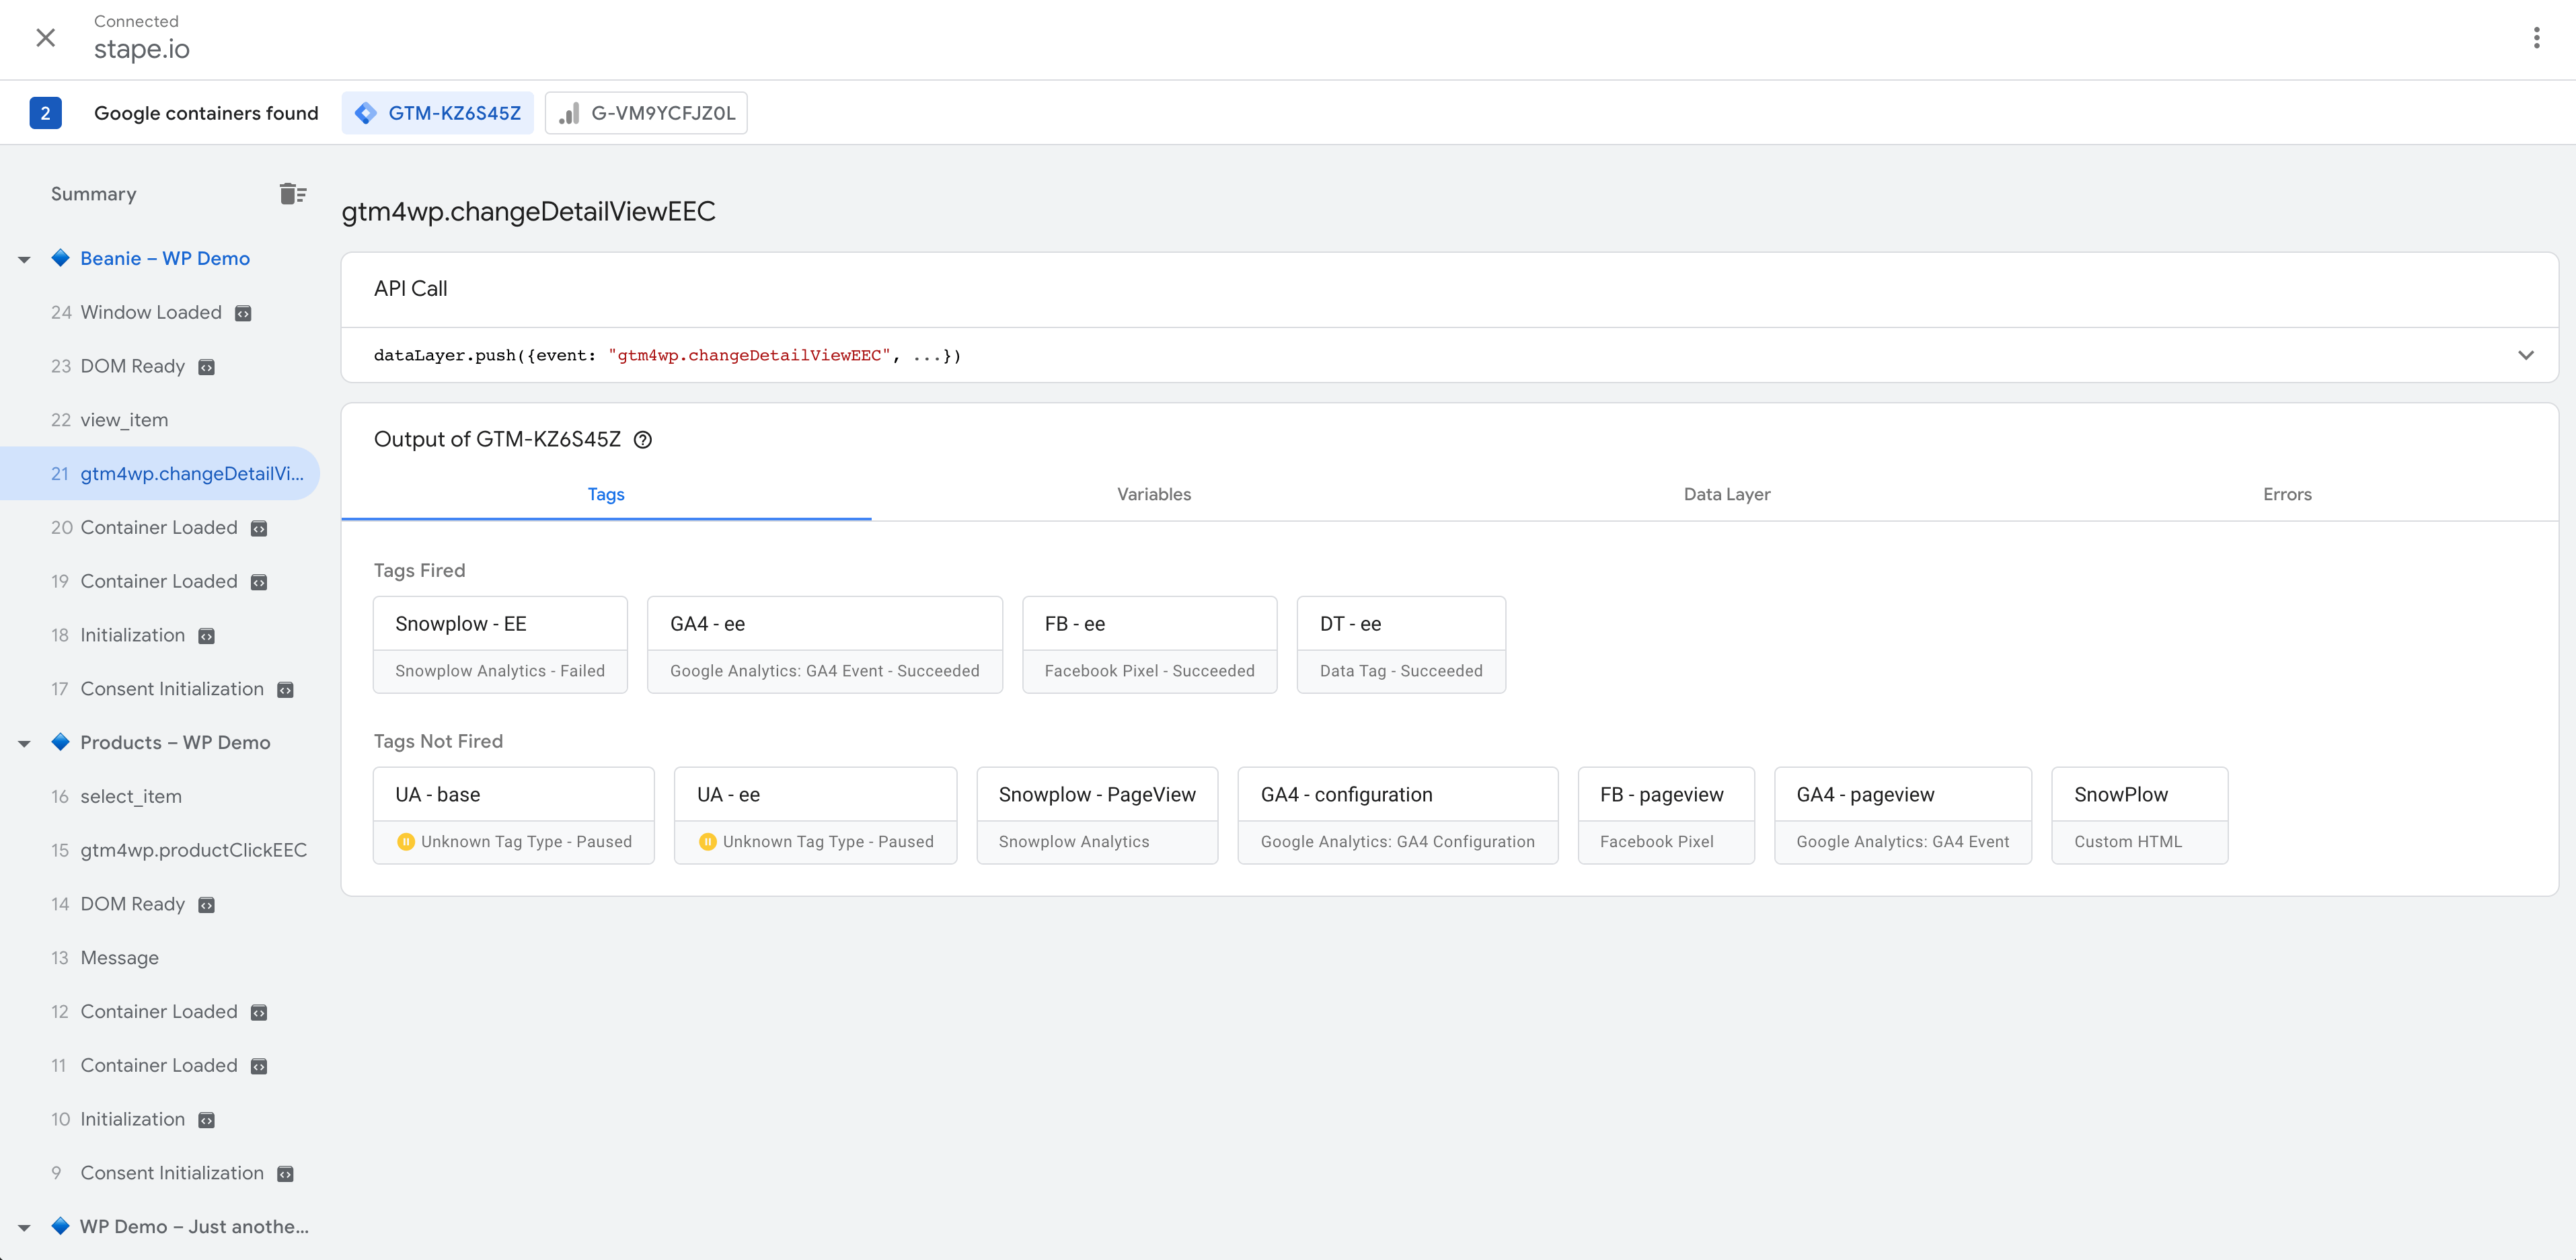
With events that happen before the checkout page, everything works like on any other platform - you can launch a preview of your GTM web container and find all the events you do:
The checkout events won't be displayed in GTM Preview due to the isolated environment on these pages that blocks unrestricted DOM manipulation or script injection, including the GTM snippet.
But you can manually insert the snippet on the checkout page using the Stape GTM Helper Chrome extension:
- After running Preview Mode in GTM, turn on the toggle Shopify Sandbox dataLayer in the Settings tab of the extension.
- In the tab Inject GTM, click Enable injection, add your domain name, and GTM ID. Save changes.
Now, the events on the checkout page will display in GTM Preview.
Step 6. Configure Google Analytics 4
There can be two scenarios:
6.1 If you already configured Google Analytics 4 inside your web GTM container, all you need to do is:
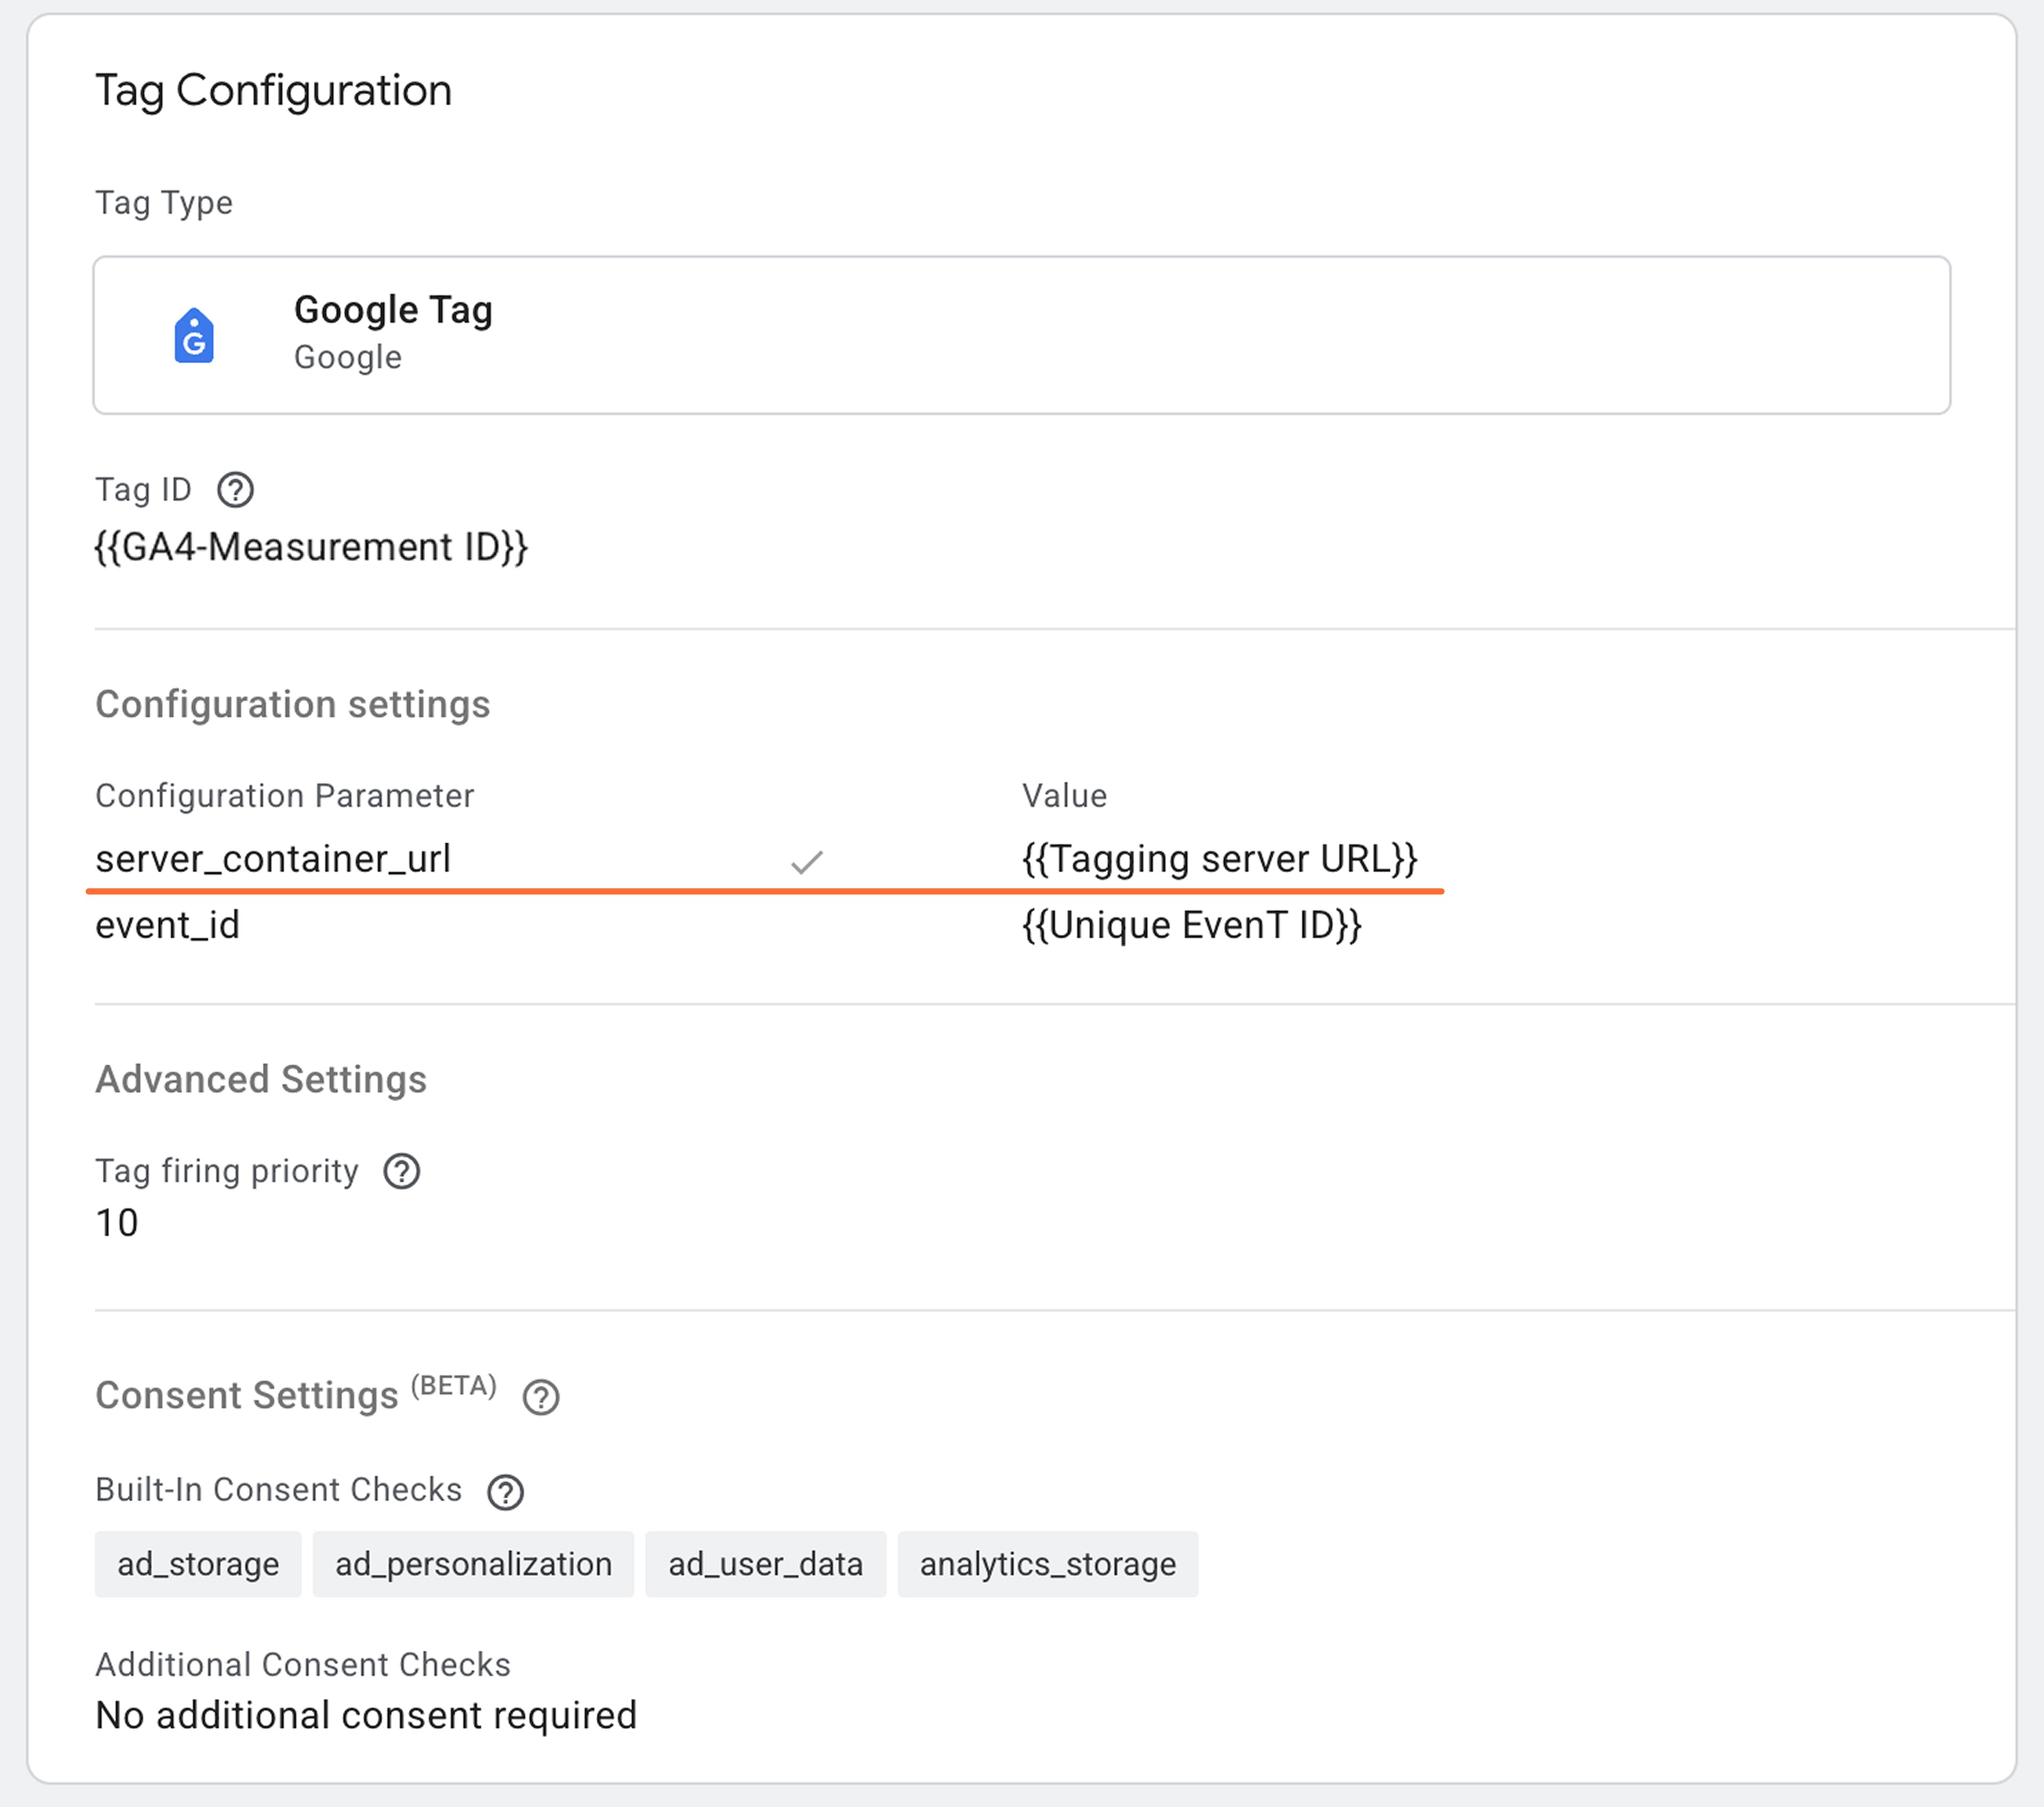
6.1.1 Add your server container URL to Google Tag settings. In the configuration settings, add the configuration parameter server_container_url and add your tagging server URL as a value.

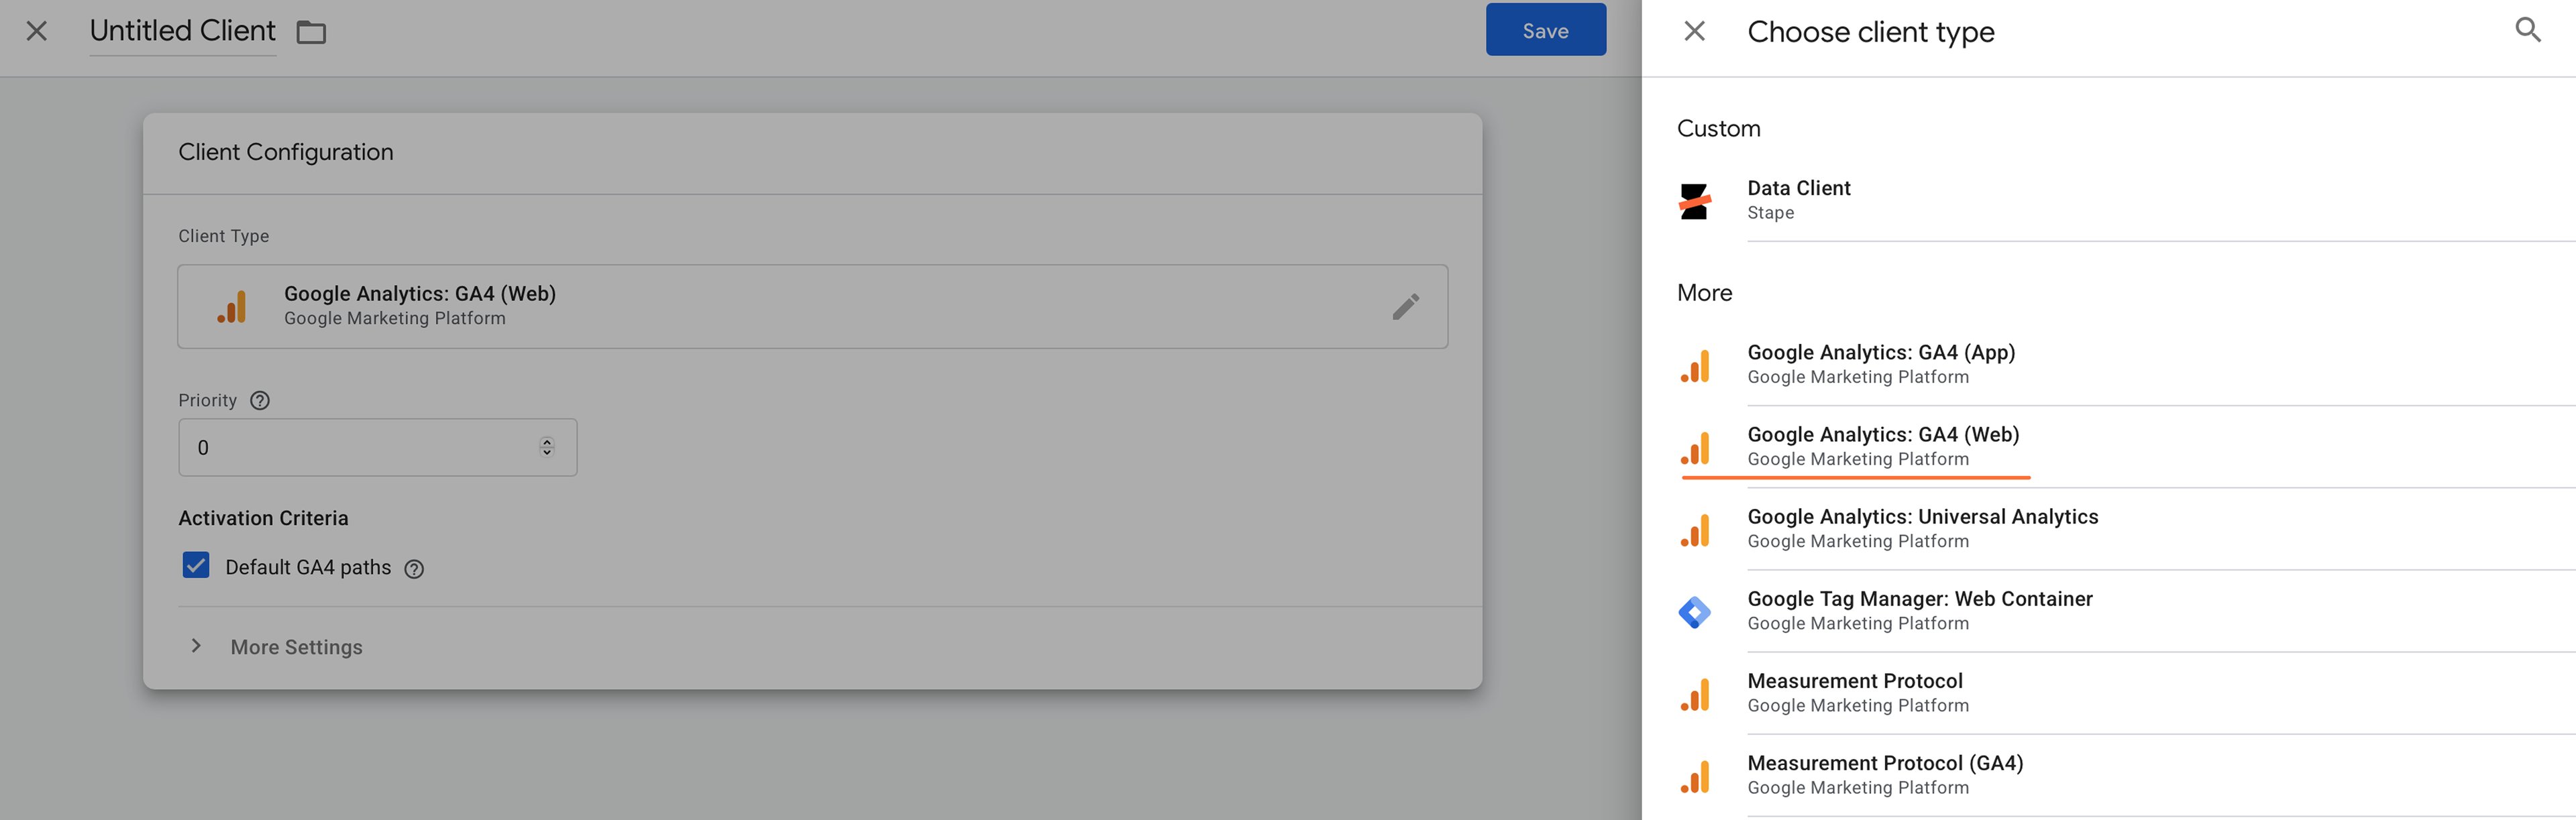
6.1.2 Create Google Analytics 4 client in server GTM container. To do so, open the clients’ section → Create New client → Select client type Google Analytics: GA4 (Web) → Add client name and click Save.
You can also read more on region-specific parameters in our blog.
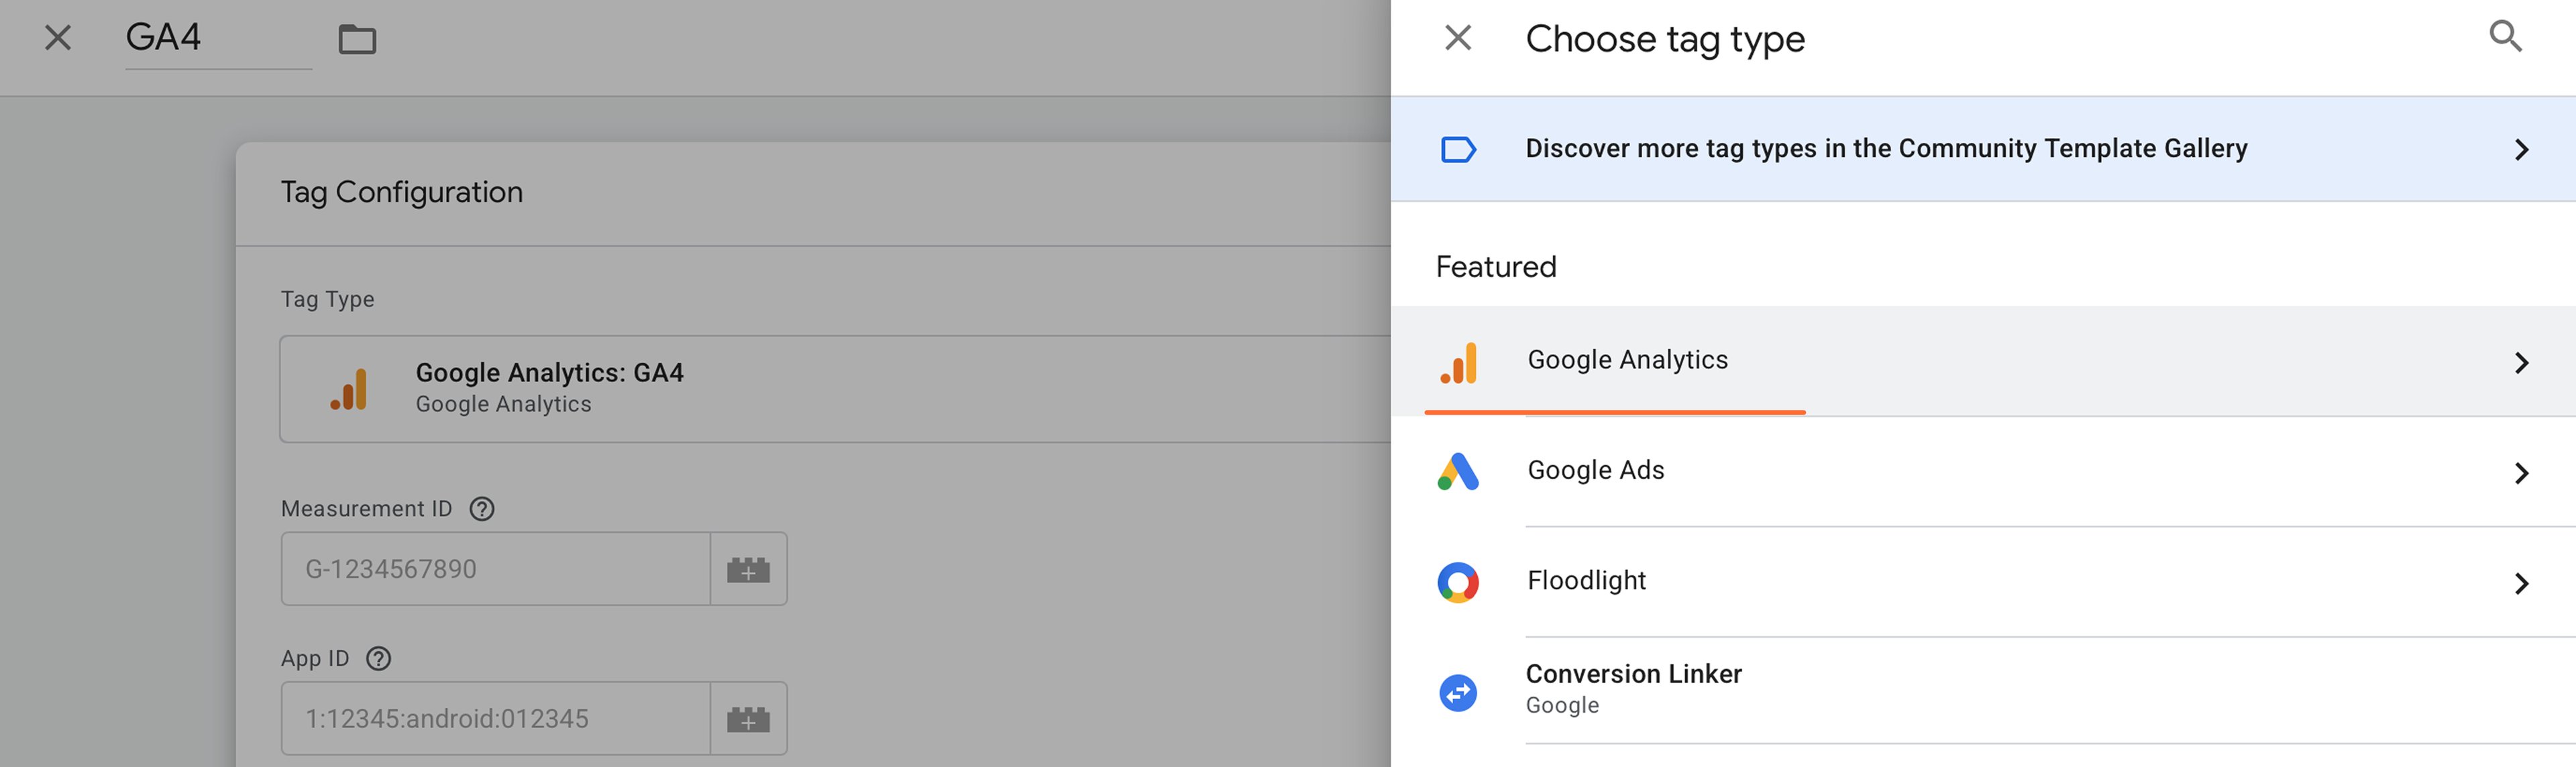
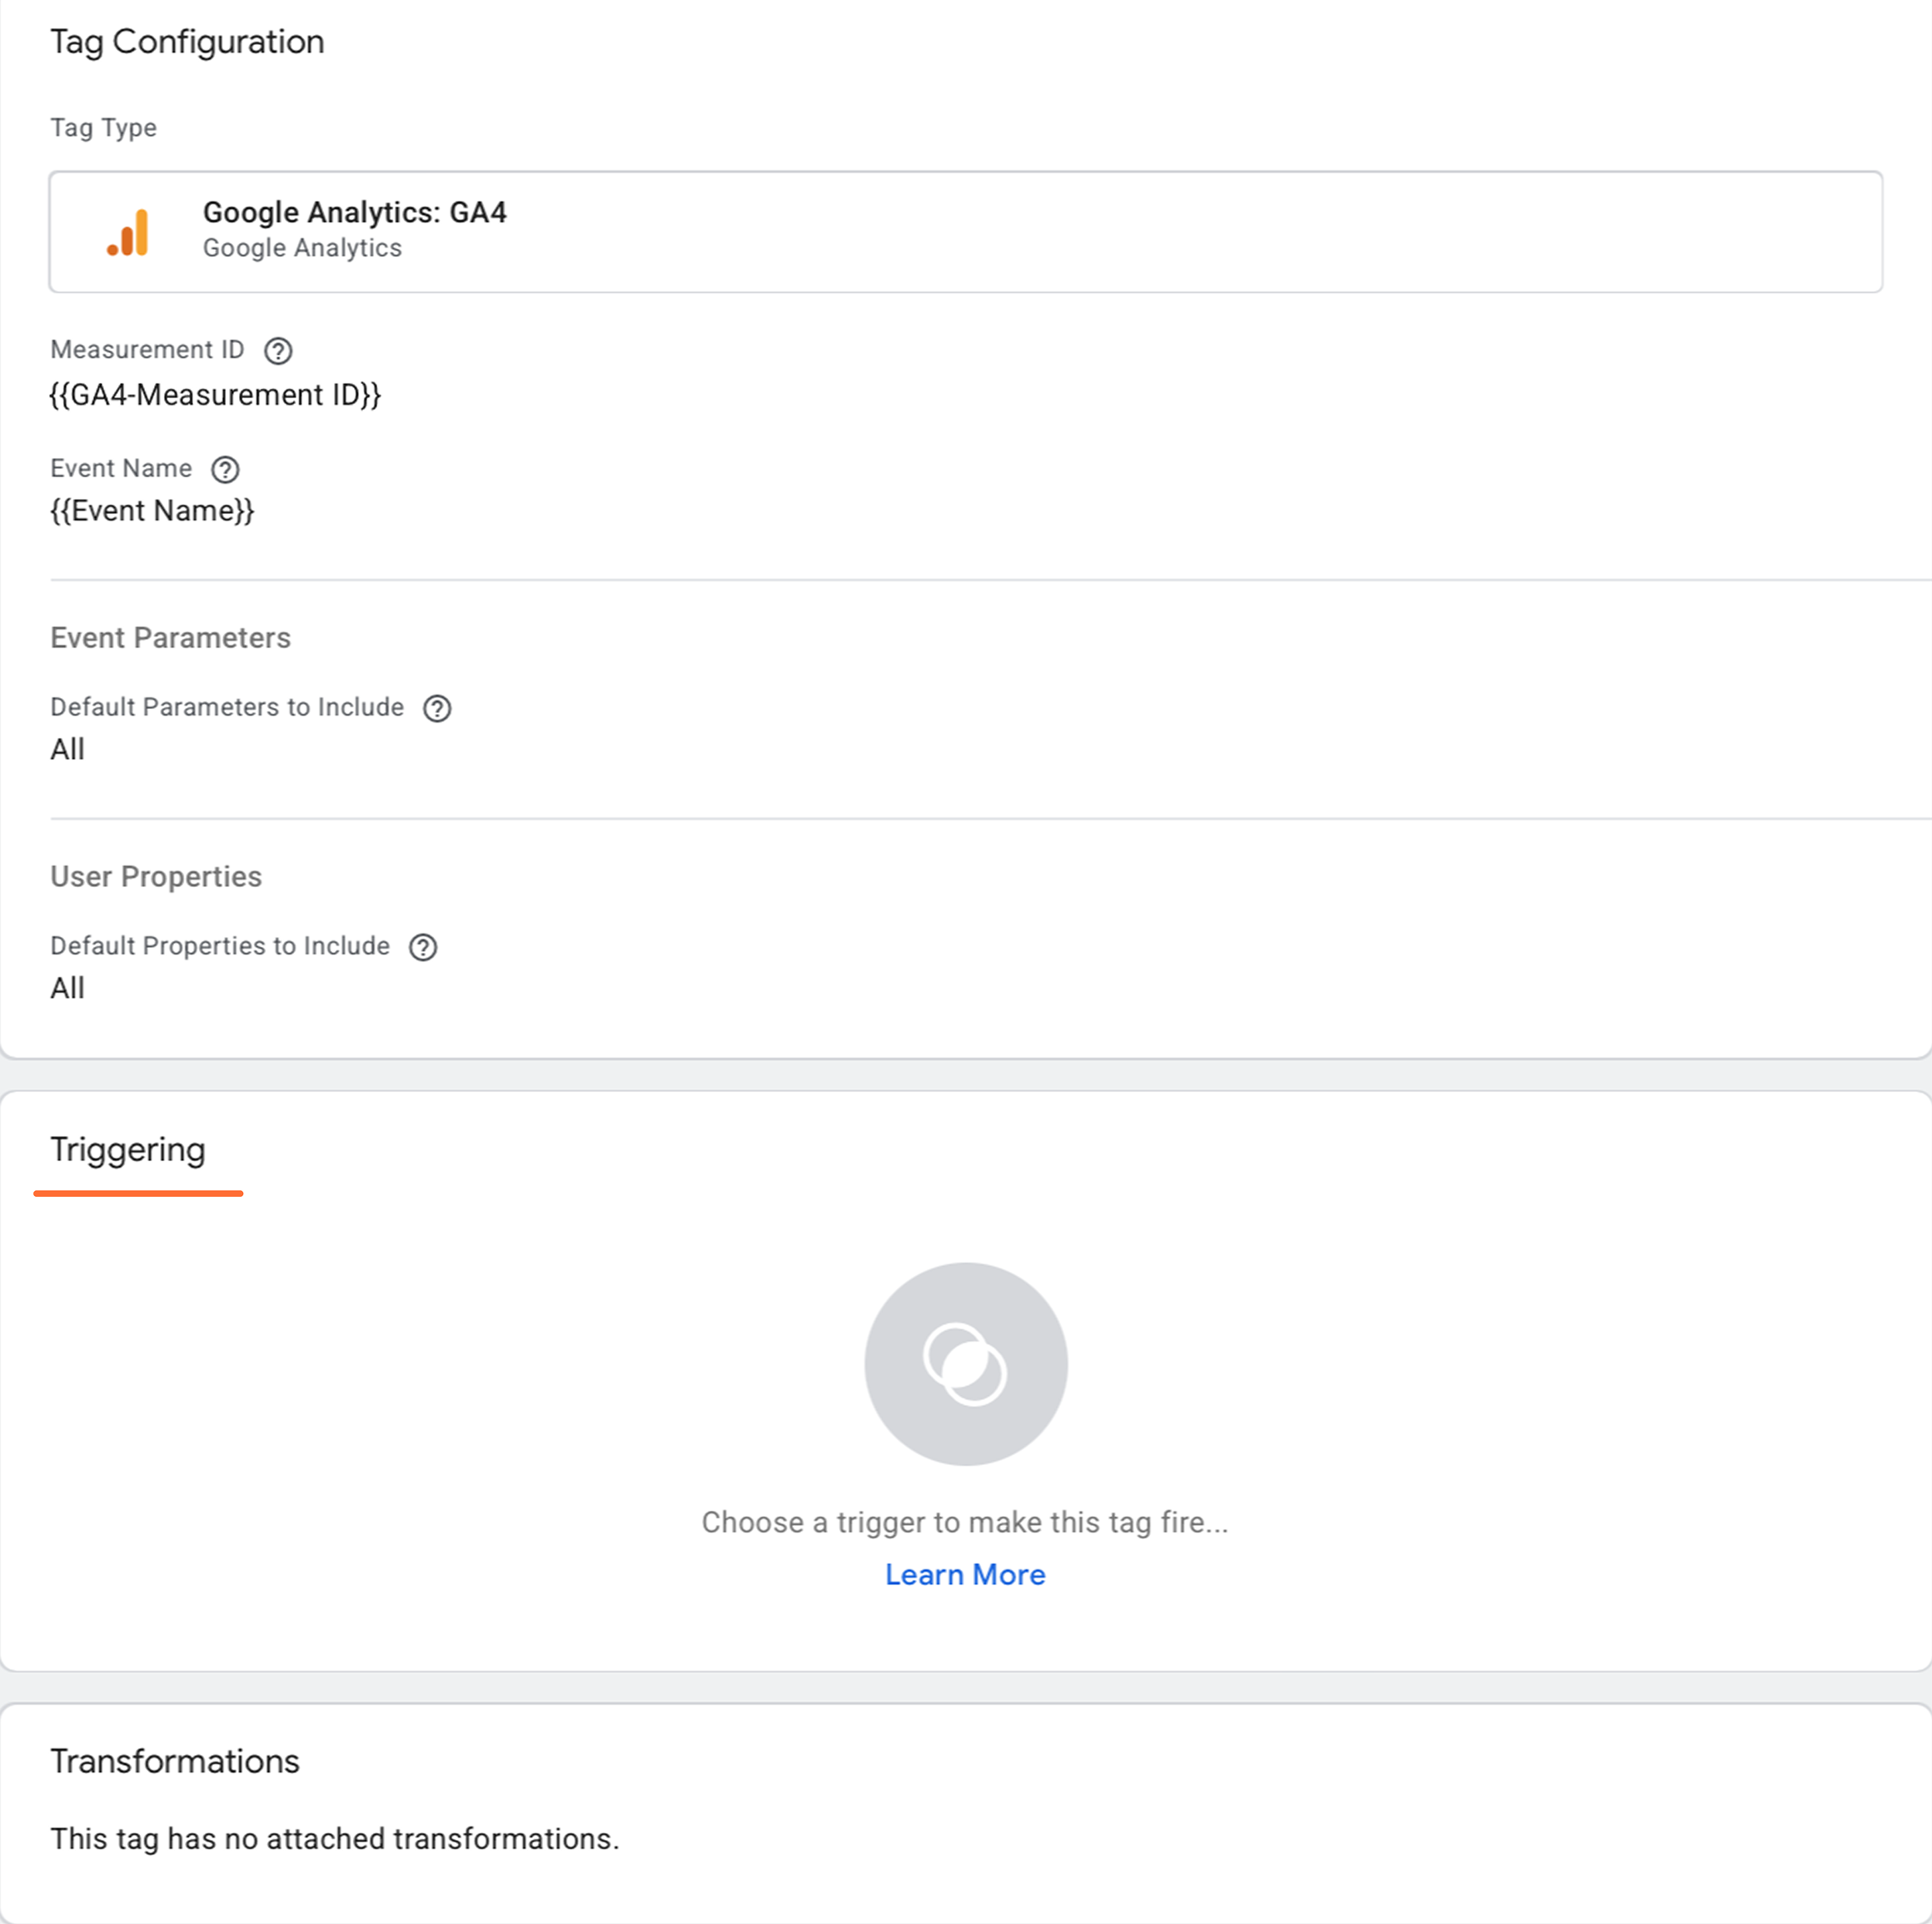
6.1.3 In the server GTM container create a new tag with the tag type Google Analytics: GA4
6.1.4 Add Measurement ID and Event Name.
Measurement ID - follow this guide to find GA4 ID. You can add it as variable or if the event came from a GA4 web tag, you can leave this field blank to inherit the measurement ID of the event.
Event Name - the event name to send to Google. See the recommended events for more information. If this field is blank, the value of the event_name parameter will be sent.

6.1.5 Click Triggering and configure a trigger with the trigger type Custom that will fire every time when client name equals GA4 (or the name of the GA4 client that you’ve specified on the step 2.b) → Click Save.

6.2 If you do not have GA4 configured, follow the below steps:
6.2.1 Inside the Web container, create a new tag of the tag Type Google Tag. Add your Google Tag ID.
Add trigger to GA4 tag. It usually should trigger on all page views.

You can also create a Google Tag: Configuration Settings variable that will predefine Google Tag settings if you need to use multiple Google Tags on your website and do not want to add settings for each tag manually.
These parameters can, for example, define whether you want to send a page view event every time a Google Tag triggers, set UTM parameters, set client ID, etc. There is a list of standard Google Tags configuration parameters.
6.2.2 To set up the GA4 event tracking, go to the tags section and create a new tag with the tag type Google Analytics: GA4 Event. Add your GA4 ID and the event name; there is a list of standard event names.
6.2.3 Go to your Google Tag Manager Server container. Click Clients and New.

6.2.4 Choose Google Analytics: GA4 (web) and click Save.
6.2.5 Go to Tags and click New.

6.2.6 Choose Google Analytics: GA4.
6.2.7 Add Measurement ID and Event Name.
Measurement ID - follow this guide to find GA4 ID. You can add it as a variable or if the event came from a GA4 web tag, you can leave this field blank to inherit the measurement ID of the event.
Event Name - the event name to send to Google. See the recommended events for more information. If this field is blank, the value of the event_name parameter will be sent.

6.2.8 Click Triggering.
6.2.9 Create triggers for the tag. Client name should equal GA4. Example:
Click +

Choose Custom type → click Some events → choose Client Name in built-in variables → set Equals GA4 (the name of your GA4 client) → click Save.

6.2.10 Open web and server GTM debuggers and test the setup.
Open the Server container preview mode and check that you see GA4 requests. Publish updated inside server and web Google Tag Manager containers.
To compare revenue with actual margin, POAS Data Feed can add profit-based values to the purchase data you send to GA4.
Step 7. Update the tagging server URL of your Google Tag in the web GTM
Add the following record inside your Google Tag in the web Google Tag Manager container.
Configuration parameter: server_container_url
Value is your domain name in Stape admin
Step 8. How to test your GA4 server-side setup
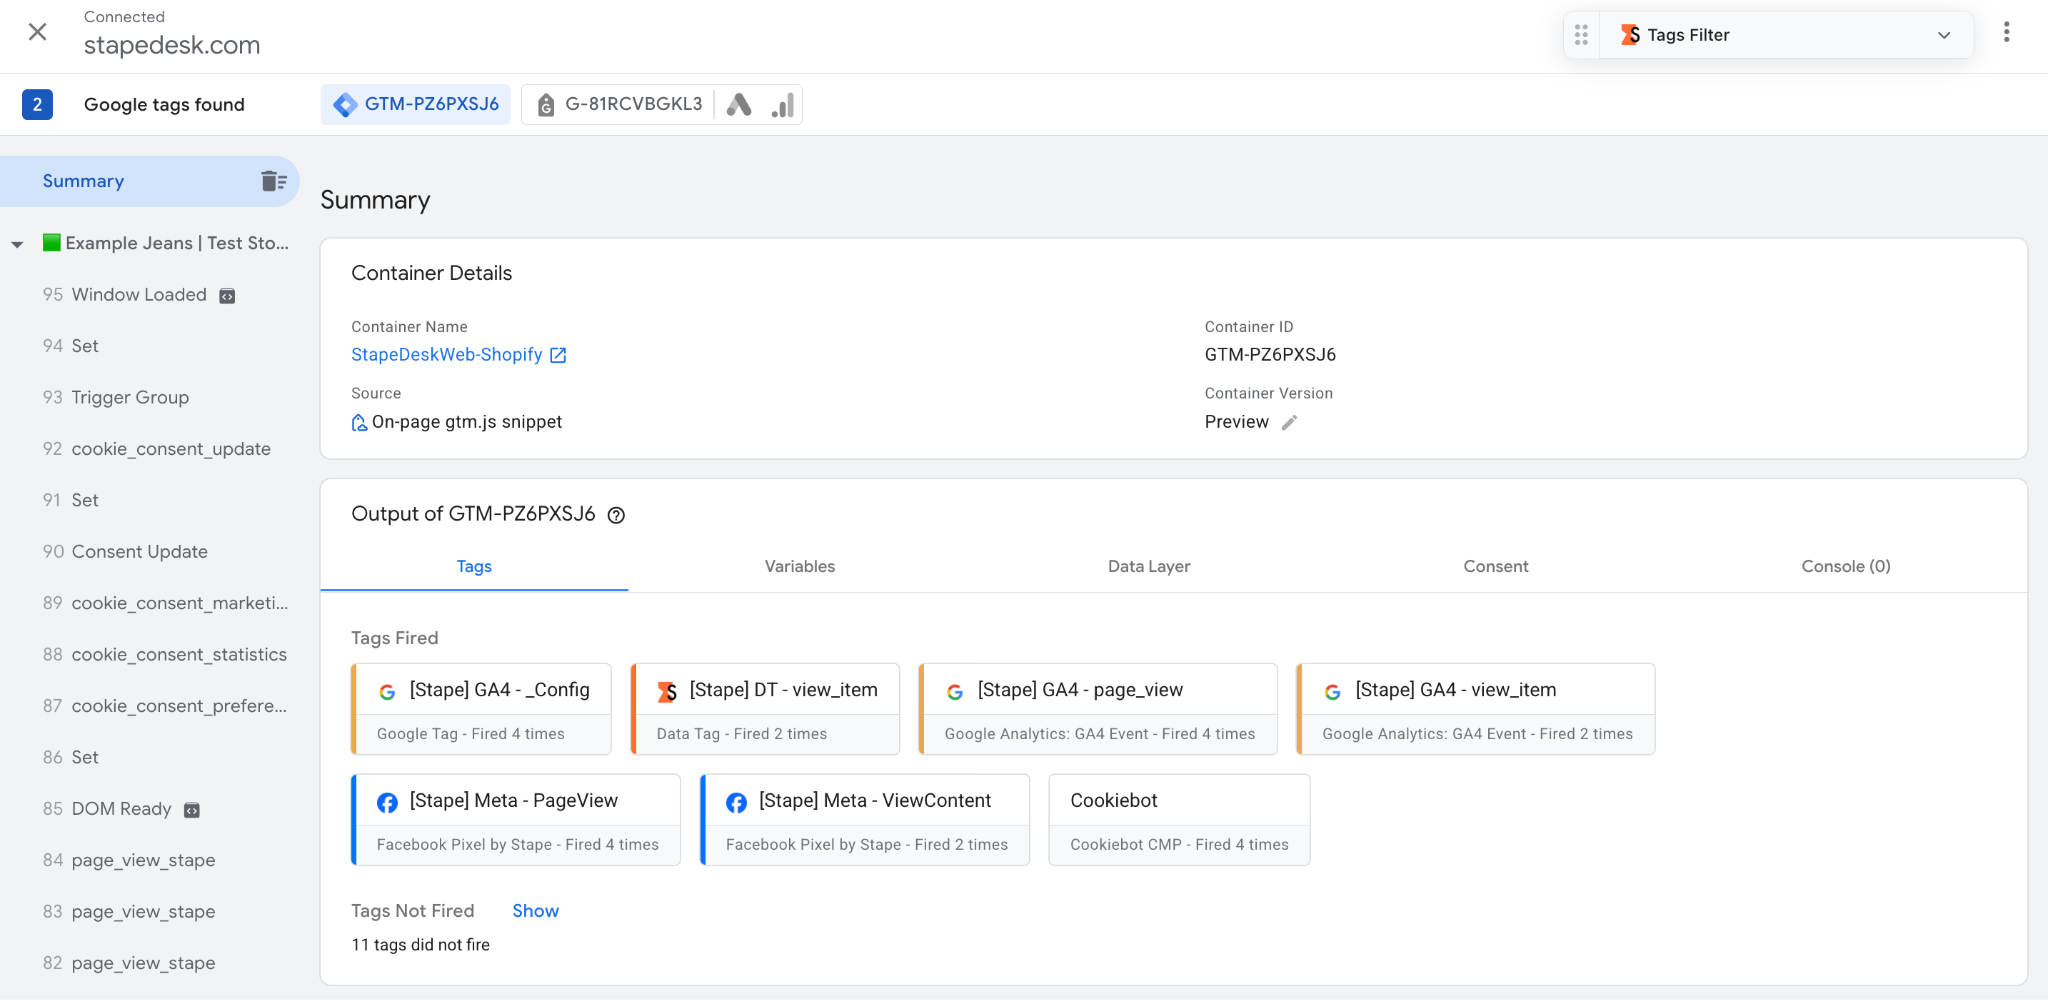
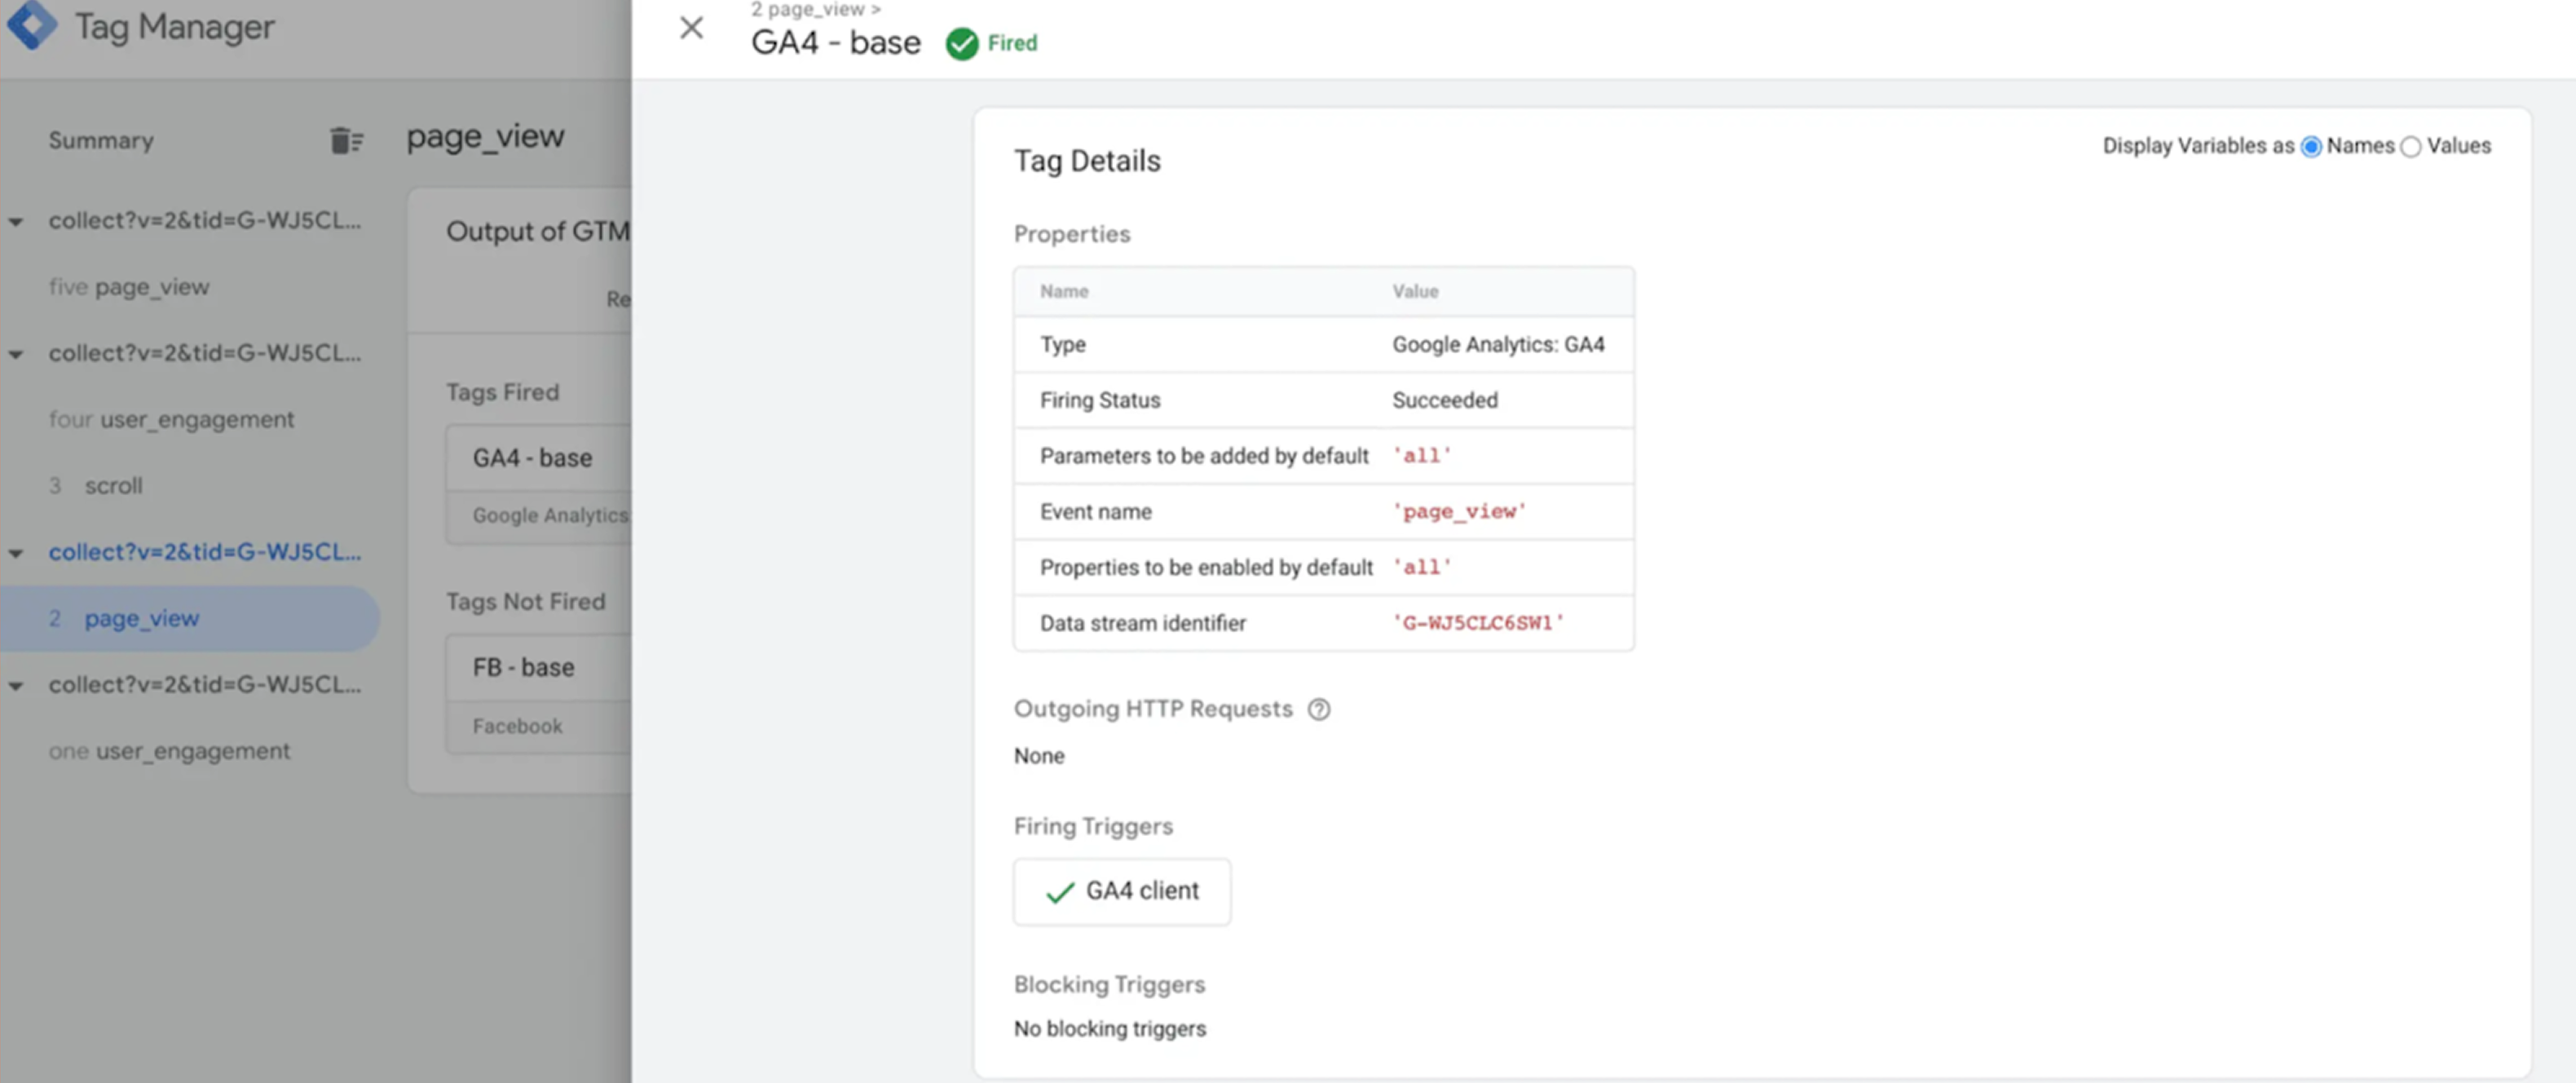
8.1 Use Google Tag Manager Server-Side Container Preview and GA4 Debug Mode
We suggest starting with the Tag Manager preview and debug mode to ensure that your tags are triggering when they should. GTM debug tool will show you which tags and events were added to the site and whether they fired or not on particular pages/triggers.
Tag manager server container debug mode works similarly to web debugger. Just click the preview button on the top right corner. Then, navigate to the different pages and click on the button or perform events set up in the server container.
Return to the Tag Manager debugger and check which tags and events were triggered and if all required parameters were sent to the dataLayer. If everything works correctly, we can move to the next step.
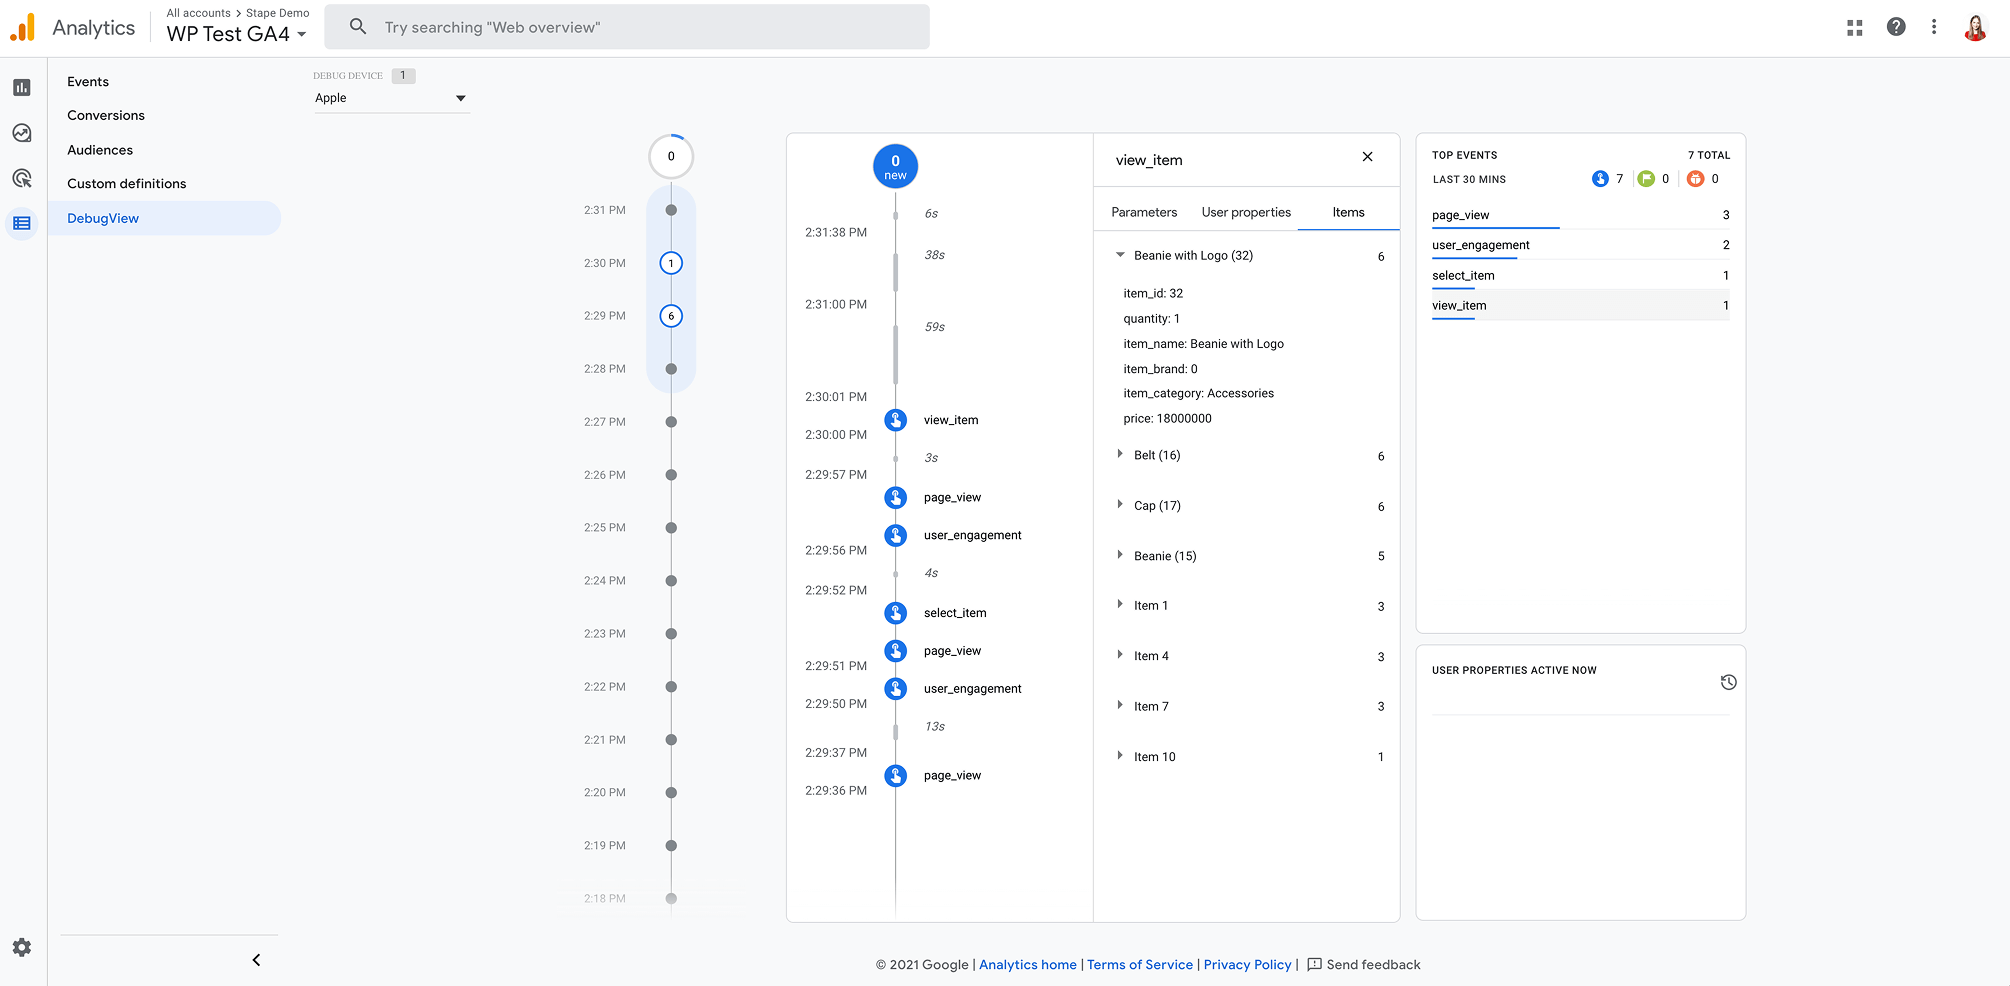
GA4 has it's debug view that will show you all events, event parameters and user data that we processed by GA4. To find GA4 debugger click Configure → Debug view.
8.2 Check if GA4 sends requests from the correct tagging URL
To ensure that requests are sent from a custom tagging URL, you’ll need to dive deeper into the developer’s zone. We’ll need Chrome or Safari developer tools here (you can use other browsers as well).
On Mac, you can access the developer tool by clicking command+option+I or click the right mouse button, then Inspect.
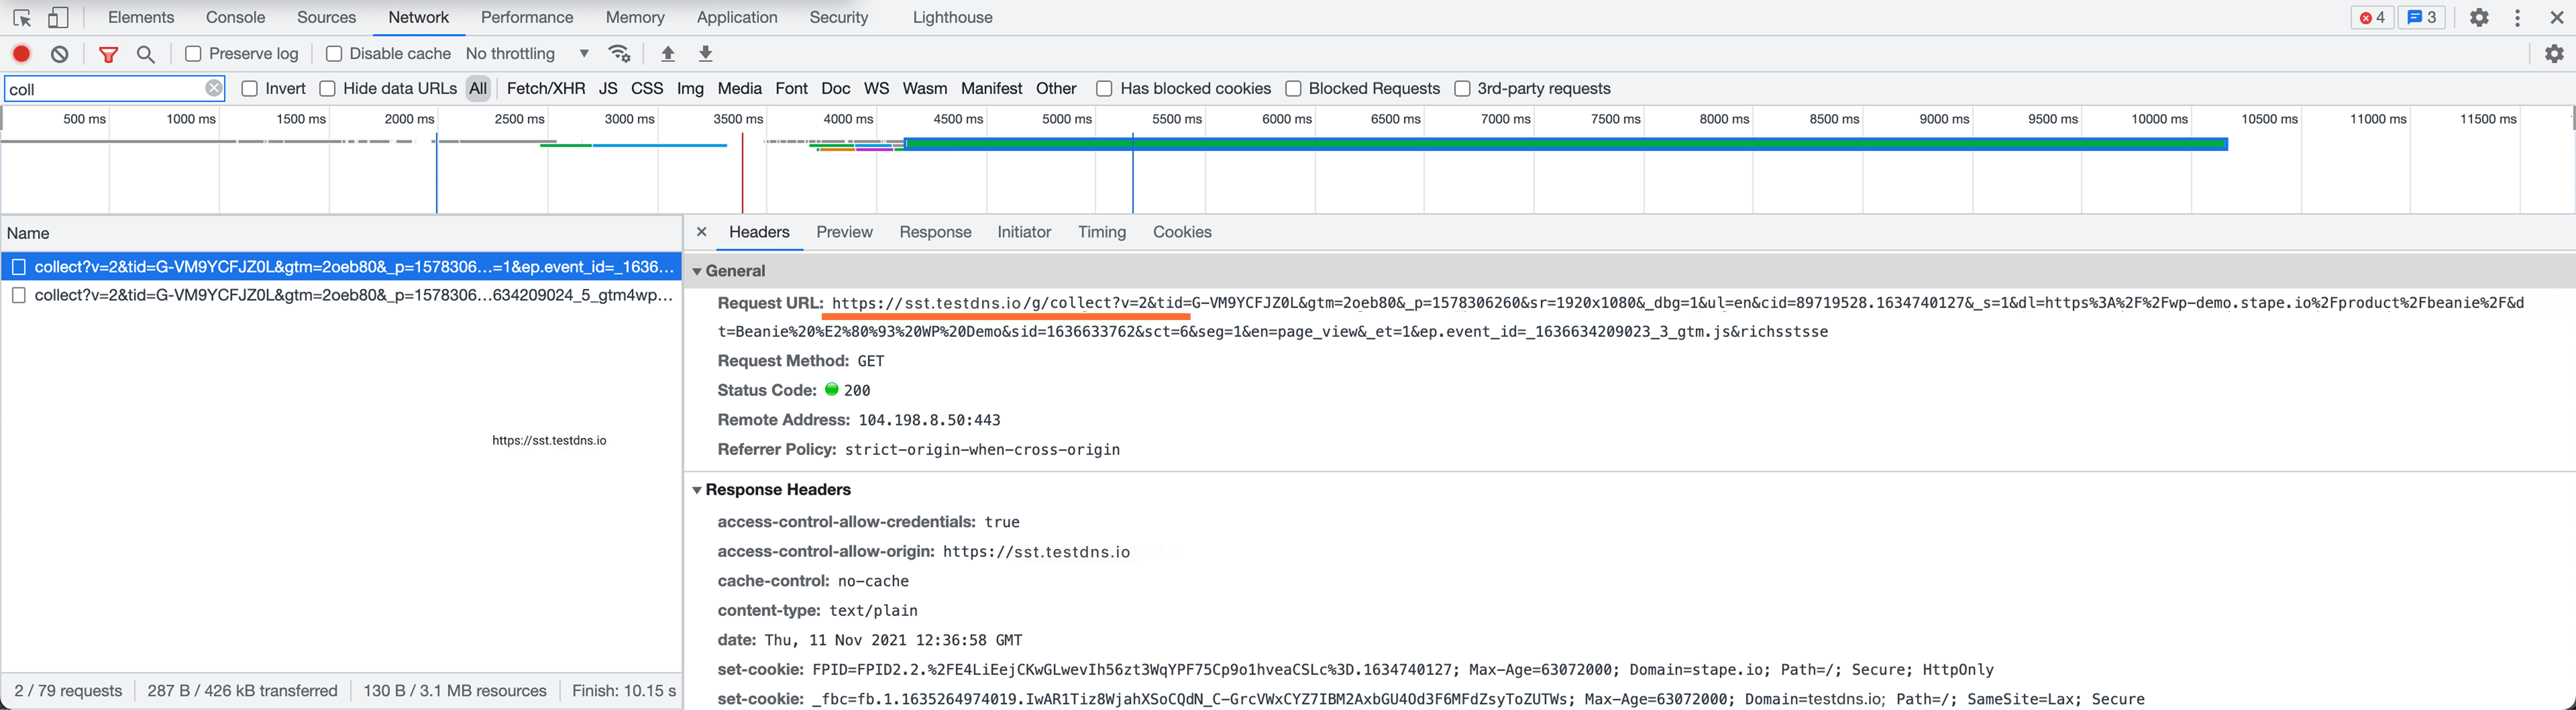
Once you’ve opened the developer tools, go to the Network tab and refresh the page. Use the filter and type collect to find GA4 requests. Click on a GA4 request and check the Request URL and parameters on the right to confirm that hits are being sent to your server-side tagging domain (the same URL configured in the server container and GA4 tag/variable).
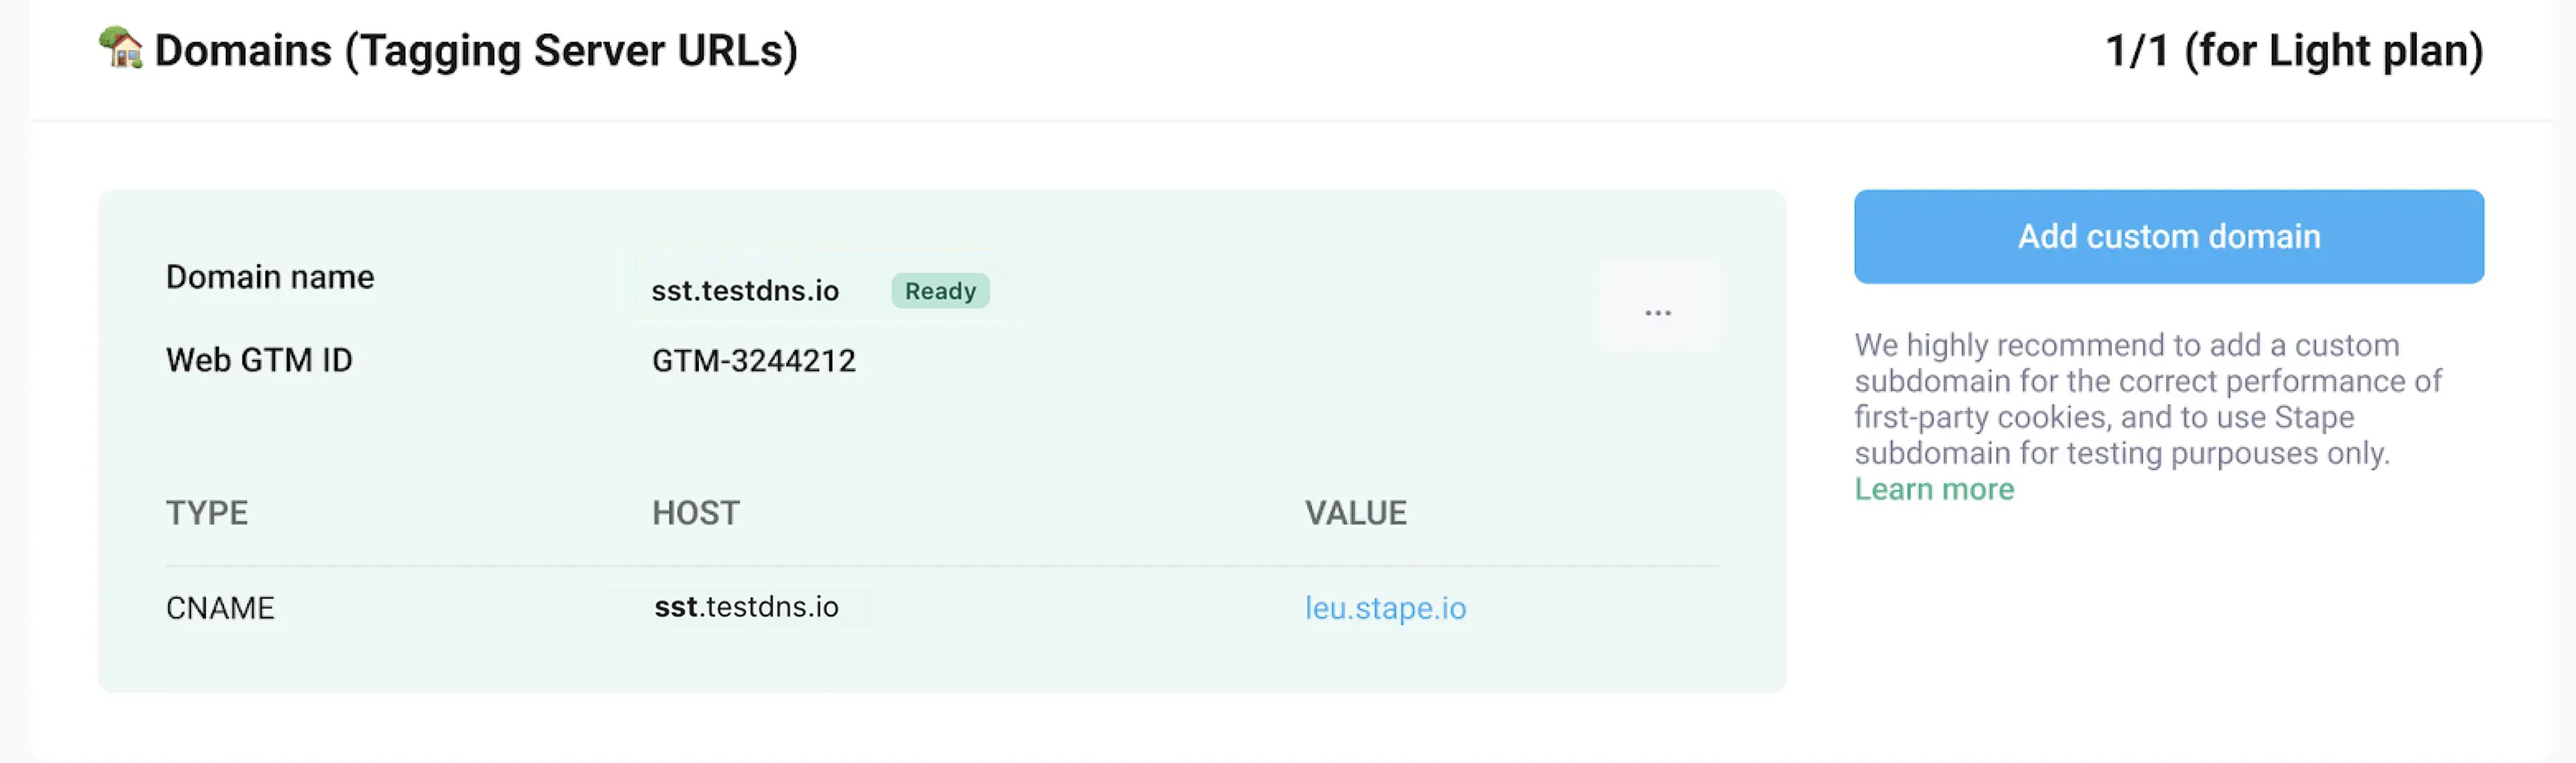
Keep in mind that you may not see collect requests if GA4 ad block bypass is enabled. In that case, it’s recommended to look for requests directly via your server-side subdomain (for example, sst.testdns.io) instead of relying on the default collect filter.
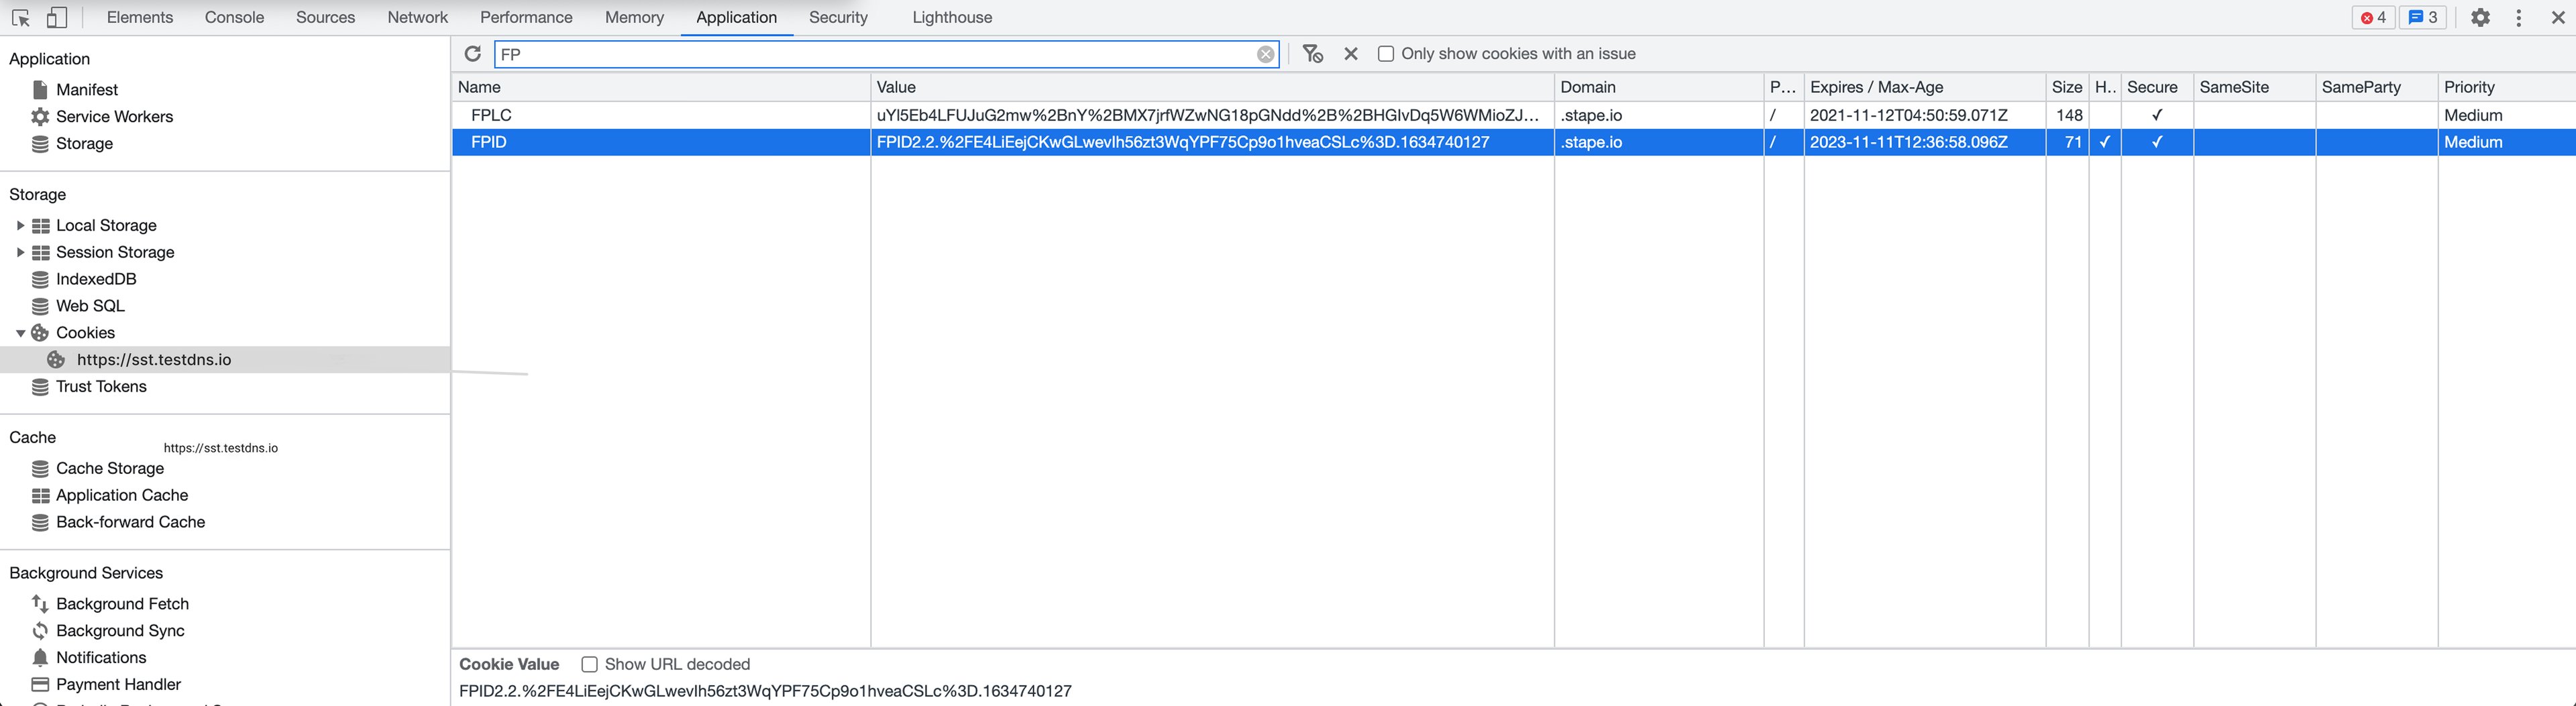
8.3 Check server-side cookies
Note: cookies will be extended only if you are using a custom subdomain inside the tagging URL. For instance, your website URL is example.com. Then, the custom domain for tagging URL should look like gtm.example.com.
Go to the application tab inside the developer tool that you’ve used in step two. Click Storage → Cookies. On the right side, you will find cookies named FPID; check the date in the column “expires”. This way, cookies should be extended up to 2 years. I am writing this post in February 2021, and my cookie will expire in February 2023. If you are not using server-side tracking and a custom tagging URL located under your main domain, Safari will decrease your cookie lifetime to 1 or 7 days. If you see that cookies were not extended, go to the GA4 client inside the server container, click more settings and check what Server Cookie Settings look like on the screenshot below. Or make sure that you are using a custom tagging URL that looks like gtm.yourdomain.com.
Conclusion
Implementing server-side Google Analytics 4 for Shopify is an effective method to enhance your business’s online presence. It offers many exciting features that allow you to understand and track user behavior more accurately.
With this blog post, setting up the connection between Google Analytics 4 and Shopify via the Conversion Tracking app can be quickly achieved. The few simple steps outlined here make this process both easy and efficient.
Doing so will allow you to take careful advantage of all its benefits with minimal effort. So why wait? Start optimizing your store today - feel free to reach out if you need help understanding or implementing how to set up server-side Google Analytics 4 for Shopify using the Conversion Tracking app.
Ready to test server-side tagging?
Click Try for free , and configure your setup with Stape in no time.

Comments