Sep 15, 2026
Shopify data layer guide: what it is, why it matters & best setup methods
Written by
Tymofii Sankov
Published Aug 4, 2026 comments
Key takeaways
- A Shopify data layer is a JavaScript object that stores structured ecommerce data and makes it available to analytics and advertising platforms.
- It improves tracking accuracy by providing consistent information about products, carts, customers, and user interactions.
- While Shopify's native GA4 integration is suitable for basic analytics, a custom data layer offers greater flexibility, works seamlessly with Google Tag Manager, and is almost a must for server-side tracking.
- The easiest way to implement a Shopify data layer is with a dedicated app. Manual implementation best fits highly customized tracking requirements, but is technically more complex and more expensive.
- Regular testing, proper checkout tracking, and compliance with privacy and consent requirements are essential for reliable eCommerce analytics.
Understanding what happens between a customer’s visit to your Shopify store and the moment that information appears in Google Analytics isn't as straightforward as many of us might wish. The mere integration of GA4, Matomo, or any other analytics tool doesn’t guarantee that you're collecting all the necessary information for measuring product success, marketing activities, or conversions.
This is the place where the Shopify data layer comes into play. It makes the structured information about customers' actions available to GA4, Meta Ads, and other platforms directly or via Google Tag Manager. Be it the optimization of purchase behavior or ad performance, having the relevant data is the key to making better decisions.
In this article, we will discuss the essence of the data layer Shopify, its importance in eCommerce, what kind of data it may contain, as well as what options you have for the implementation itself. It is worth noting that we will mostly talk about the data layer-GTM combination, as it is a more modern and accurate approach to tracking. We will also cover the differences between various ways of implementation, touch checkout tracking, and discuss how it can be tested properly.
What is a Shopify data layer?
Shopify data layer is a JavaScript object where the information about your store, products, customers, and all their interactions is stored in a structured and unified format. Google Analytics 4, Google Ads, Meta Ads, and other services can use the information they get from the data layer via GTM (or pull it out directly) to track user behavior across your website.
You can imagine a data layer as a huge pool inhabited only by certain, specifically bred types of fish. Instead of gathering no-one-knows-what from everywhere possible (read, store pages) and hoping for luck, analytics and advertising tools can get exactly what they need from the data layer in a standardized format. This way, data accuracy is improved, and the overall tracking setup becomes easier to maintain.
The pool analogy wasn’t random. It is important to highlight that the Shopify data layer does not perform any actions on its own. It is a storage from which a tool like GTM, Matomo, or GA4 can receive the information and use it further. For instance, a simple action of adding a product to a cart sends the product ID, name, price, currency, quantity, and many other details to the data layer. GTM can then read this information and use it to trigger the add_to_cart event in any attached analytics platform.
A logical question may arise: “Well, we’ve been working without a data layer for years, and we are good”. Well, two comments from Stape:

Without a data layer, you basically scrape data from your websites using custom scripts. Such an approach actually works, but it requires a lot of manual support (basically, this configuration breaks every time the page structure changes), and its effectiveness leaves a lot of space for improvements. A well-structured data layer is much more stable. It becomes a massive foundation for eCommerce tracking and can grow together with your marketing stack.
Do you need a Shopify data layer?
In fact, it is always better to have a data layer than not to have one. However, whether it is worth bothering with depends on your tracking requirements. For the basic traffic and sales reports, the default Shopify integrations may be enough. On the other hand, if you operate with several platforms, are used to GTM, or even think about switching to server-side tracking, having a dedicated data layer would be a huge boost.
As your store grows and tracking setup becomes more advanced, a data layer is necessary to ensure flexibility and consistency required for advanced eCommerce analytics. Of course, you may rely on several independent integrations and even be more or less satisfied with them. A single and scalable foundation, however, would always be a better choice for all your marketing and measuring efforts.
What information does a Shopify data layer contain?
We could say “everything you need” and conclude the section here. Let’s, however, dive a bit deeper into the matter. The data layer is quite a flexible thing that highly depends on what you need and what you put in it. The exact information available is determined by the tracking method chosen, configuration, etc., but the final purpose is always the same: to provide analytics with structured and standardized data. The data layer information, commonly known as Shopify data layer variables, can be grouped into several categories, based on what they refer to.
Store data
The store-level variables offer some broad data on your Shopify store and the visited page. The purpose of using these variables is to provide context for the event being tracked. Common store data includes:
store_name;shop_id;currency;language;page_location;page_type.
These variables provide essential context required for any eCommerce event and are responsible for consistent reporting across different analytics platforms.
Product data
Product information is one of the most valuable parts of a Shopify enhanced eCommerce data layer. It enables analytics platforms to identify exactly which products customers interact with throughout their shopping journey. Typical product variables include:
item_id;item_name;item_brand;item_category;price;quantity.
This information helps you with analysis of product performance, purchasing behavior, and merchandising based on dependable eCommerce data.
Cart data
The cart variables reflect information about the user’s current cart, which gets modified with the addition, deletion, or editing of product quantities. Cart variables contain useful information on user shopping behavior prior to purchase. They usually include:
cart_value;currency;Item_countproduct list;discount_value.
These variables help you to understand when your potential customers leave the sales funnel and how you can convert more people.
Customer data
Depending on the way you implement and configure your system, the data layer may also contain information about your customer. This will help you to differentiate between various users and segment your audience more precisely. Usage of customer data with Facebook, for instance, can greatly increase Event Match Quality, and for Google Ads it “unlocks” enhanced conversions. Some examples of customer data are:
customer_id;email_address;first_name;last_name;phone;address.
Be aware, though, that it is crucial for you to comply with privacy legislation and not disclose personal data without having a corresponding legal ground for it.
eCommerce events
Along with variable storage, the data layer also captures user interactions in the form of eCommerce events. Such events provide information about what has happened and all the details necessary for measuring that interaction. Some of the most common eCommerce events are:
view_item;add_to_cart;view_cart;begin_checkout;add_shipping_info;add_payment_info;purchase.
Combined, such events and variables create a full picture of the entire customer journey, from viewing products to adding things to the cart, which is crucial for analyzing marketing efficiency.
Shopify native GA4 integration vs. custom data layer
Shopify offers a direct integration with Google Analytics 4 using the Google & YouTube app, which makes it easy to set up tracking for basic eСommerce metrics right away. The events are sent directly to analytics, without a Shopify GA4 data layer even needed. This tool works perfectly well for most small shops to analyze traffic, sales, etc.
Such simplicity and approachability, though, comes at a price. The app lacks flexibility, which may hit you when your needs become more advanced, and you require more control over the collected events, tracked parameters, etc.
This is when a custom data layer actually becomes a great solution - it acts as a centralized eCommerce data source and can be configured according to your needs. Yes, this would need more effort and expertise, but the result is worth it. Plus, having a data layer makes your tracking much easier to maintain, especially if you're working with Google Tag Manager and/or server-side tagging.
How to set up a Shopify data layer
There are several main ways to create and configure a Shopify data layer. The right choice depends on the level of your technical expertise, resources you have, and the tracking needs to be covered.
If your goal is to set up a GA4 data layer in Shopify quickly, without writing and maintaining custom code, a dedicated app is definitely the best option. Manual implementation provides more flexibility and control, but is more expensive and complex to implement. In addition to that, we can hardly come up with a situation where such an approach brings significant advantages over an app, so we would recommend the first method in 99% of cases.
Method 1: using a Shopify app (recommended)
A Shopify app is the quickest and the most reliable method of implementation. Such solutions create (in most cases) and populate it automatically with the chosen eCommerce information. In addition to that, it follows Shopify updates, decreasing maintenance efforts and reducing risks of tracking issues caused by store updates.
Stape Conversion Tracking app
Stape Conversion Tracking app is one of the easiest ways to set up a data layer compatible with GTM for your Shopify store. In addition to automating the creation of the structured data layer, it works both on the client and server sides, which makes this app an appropriate solution for those who want to have reliable analytics and scalable integration.
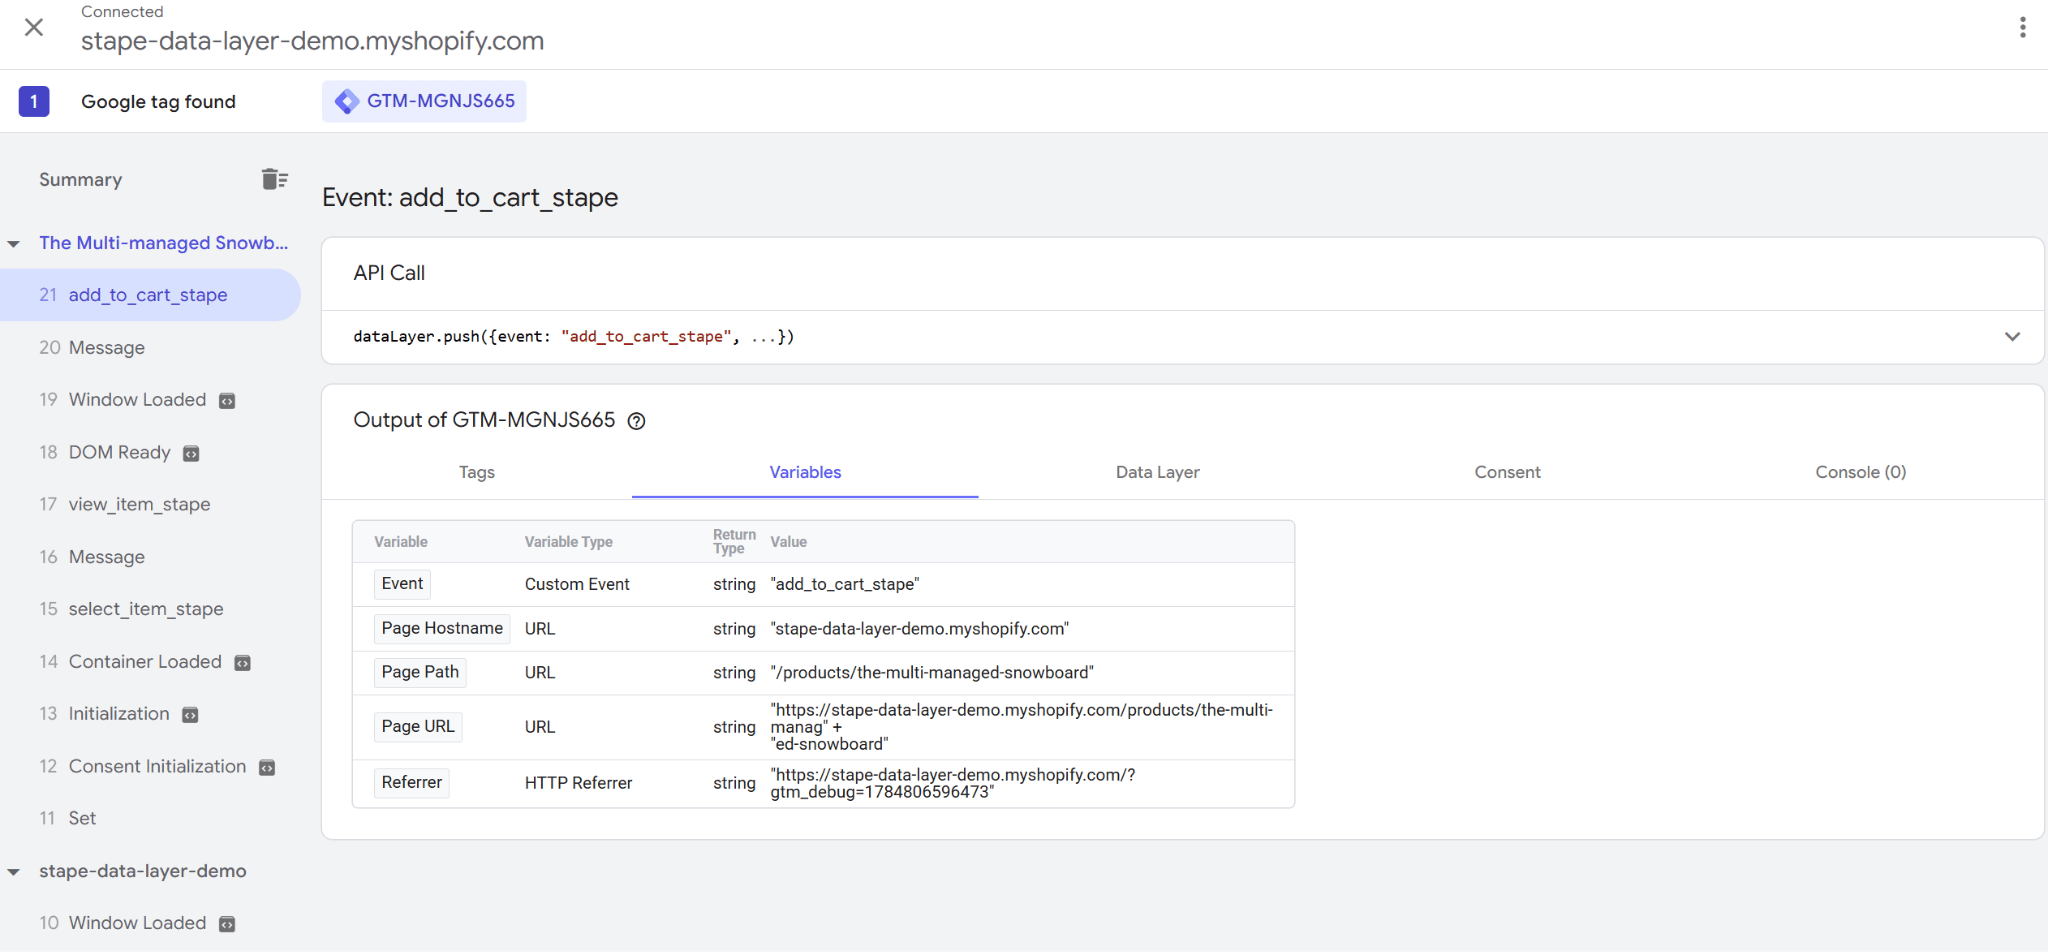
Our app creates the data layer (if needed) and fills it with eСommerce events and parameters that could be later transferred to GA4, Google Ads, Meta Ads, TikTok Ads, and many other marketing tools via GTM. To ensure proper matching across different platforms, use the Advanced Data Layer feature and customize the item parameters (item_id, item_sku, item_brand, and item_category). As a result, you get the Shopify Google Tag Manager data layer, which is a single point of information for your tracking implementation. All this with minimal configuration, by the way - you simply install the app from the Shopify store and follow the instructions.
Check our guide on how to set up server-side tracking for Shopify with the Stape Conversion Tracking app.
Method 2: manually add a data layer to Shopify
If you want full control over the process, the best way is to build your own Shopify data layer. The process usually includes writing custom Shopify data layer code to create it and populate it with the needed events. Next, you need to add it to the theme, custom web pixels, events, and GTM, depending on your exact configuration.
It is recommended for developers or business owners who have specific needs (add additional attributes or integrate with proprietary systems) when it comes to tracking. At Stape, we are your developers, and we have created the Stape Conversion Tracking App (check method 1), so we will not write a detailed manual for manual creation here. Those who know - they know; those who don’t - don’t bother. Stick to the Stape Conversion Tracking app and be happy.

Method 3: work with a Shopify developer or agency
Someone who will develop and manage Shopify data layer on your behalf might be a valid solution if you need a custom implementation but lack the technical skills needed to do it yourself. A developer will be able to create a custom data layer, set up eCommerce events, connect several marketing platforms, and make sure that your implementation is compatible with Google Tag Manager and server-side tracking.
Although it will definitely require a significant piece of your budget, sometimes it might pay off to go this way, especially if you run a large business with highly customized Shopify stores and unusual tracking requirements. Alternatively, you can always return to method 1.
Shopify checkout & purchase tracking explained
Checkout is the final and most valuable stage in the customer journey; that is why Shopify data layer checkout tracking is so important. Even though product views and add to cart actions may indicate customer intent, actions such as checking out and buying prove whether customers actually converted and how much revenue those conversions generated.
If implemented correctly, the Shopify purchase data layer will store information about all the key moments of the customer journey, like starting the checkout process, providing the shipping and payment details, and purchasing. This will allow your analytics tools to track each step of the checkout journey and identify where the customers drop out of the funnel. In such a way, you will get the most important information for optimizing customer experience. Thus, a properly configured data layer for Shopify should include:
- Transaction ID;
- Purchase value;
- Currency;
- Tax (if relevant);
- Shipping cost (if relevant);
- Discount value (if relevant);
- Purchased products;
- Product quantity.
As purchases affect the revenue report, advertisement optimization, and ROAS calculation directly, it is important to make sure that these events fire just once and include all transaction details. Otherwise, small discrepancies in tracking can result in duplicate conversions or a lack of revenue in your reports.
Data privacy & consent in the Shopify data layer
When it comes to consent, one important distinction is that the data layer itself doesn't send information to analytics platforms. Instead, tools like Google Tag Manager read the data layer and determine which events and parameters are sent. Therefore, your GTM container should be configured to fire tags only after the appropriate consent has been granted and to transfer only the data required for each analytics or advertising platform.
It's also considered a best practice to avoid storing personally identifiable information, such as email addresses, phone numbers, or full names, in the data layer unless it's absolutely necessary and you have a valid legal basis to process it. Keeping your data layer limited to the information required for analytics and marketing not only supports compliance with regulations such as GDPR and CCPA but also reduces the risk of exposing sensitive customer data.
Using a dedicated app to create and populate the data layer solves almost all such issues, and this is one more reason to stick to such a solution.
Testing and debugging your Shopify data layer
After implementing your Shopify data layer, verify that the expected events appear in the data layer and contain the correct variables before relying on the data for reporting or campaign optimization. Google Tag Manager's Preview mode is one of the most useful tools for this, as it lets you inspect the data layer in real time and confirm that events such as view_item, add_to_cart, and purchase contain the needed parameters, such as transaction ID, currency, product price, quantity, etc.
It is also a great idea to do the same check when the data reaches your analytics platform. For instance, you can launch GA4 DebugView and confirm that the same events and parameters you send from the data layer are received by the analytics. Regular testing is essential to notice missing variables, duplicated events, and other issues on time and fix them before they start affecting your reports or advertising campaigns.
Check our detailed Shopify tracking debugging guide and familiarize yourself with the tiniest nuances and the most modern approaches to this procedure.
Conclusion
Shopify data layer is a JavaScript object that serves as a solid and unified foundation for accurate eCommerce tracking. The main reason why such an approach is so popular is that it ensures consistency across analytics and marketing platforms. While it can be configured manually, it is better and easier to use a dedicated application that will automatically create the data layer and populate it with needed events. This will help you make better-informed business and marketing decisions based on more accurate data.
Want to start on the server side?
Try for freeRecommended for you
Sep 2, 2026
Blog
How to set up GTM on Shopify (all options explained)
Learn how to set up Google Tag Manager on Shopify for accurate ecommerce tracking, better data quality, and reliable analytics with this detailed guide.
Sep 17, 2026

Comments