Debugging Shopify tracking with web and server GTM: a complete guide
Written by
Luc Nugteren
If your server-side tagging for Shopify 'works' in preview but breaks in production, you've already met the problem this guide solves.
Shopify is a fantastic ecommerce platform. But its tracking architecture has one quirk that catches almost every marketer and developer off guard: the checkout runs inside a sandbox.
That Sandbox is great for security and stability, but terrible for debugging tracking. Your GTM container behaves one way in regular preview mode, then differently on the live checkout. Consent states get reset. DataLayer events go missing. And you only notice when conversions stop showing up in Google Ads or Meta.
Debugging Shopify tracking is therefore a different exercise than debugging tracking on any other ecommerce platform. You need to validate behavior in two places: inside the sandboxed checkout (where Shopify actually runs your container via the Custom Pixel), and inside your server GTM container (where the consent state and event data ultimately land).
This guide walks through the full debugging process I use for every Shopify build. It combines web GTM Preview Mode, the Stape GTM Helper Chrome extension, and server GTM Preview Mode via Stape’s sGTM Preview Header power-up into a single workflow.
It works for any Shopify store running web + server GTM via Stape.
Why standard GTM preview falls short on Shopify
Outside of Shopify, you fire up GTM preview mode, debug your dataLayer events, and you're done. On Shopify, that doesn't work for two reasons:
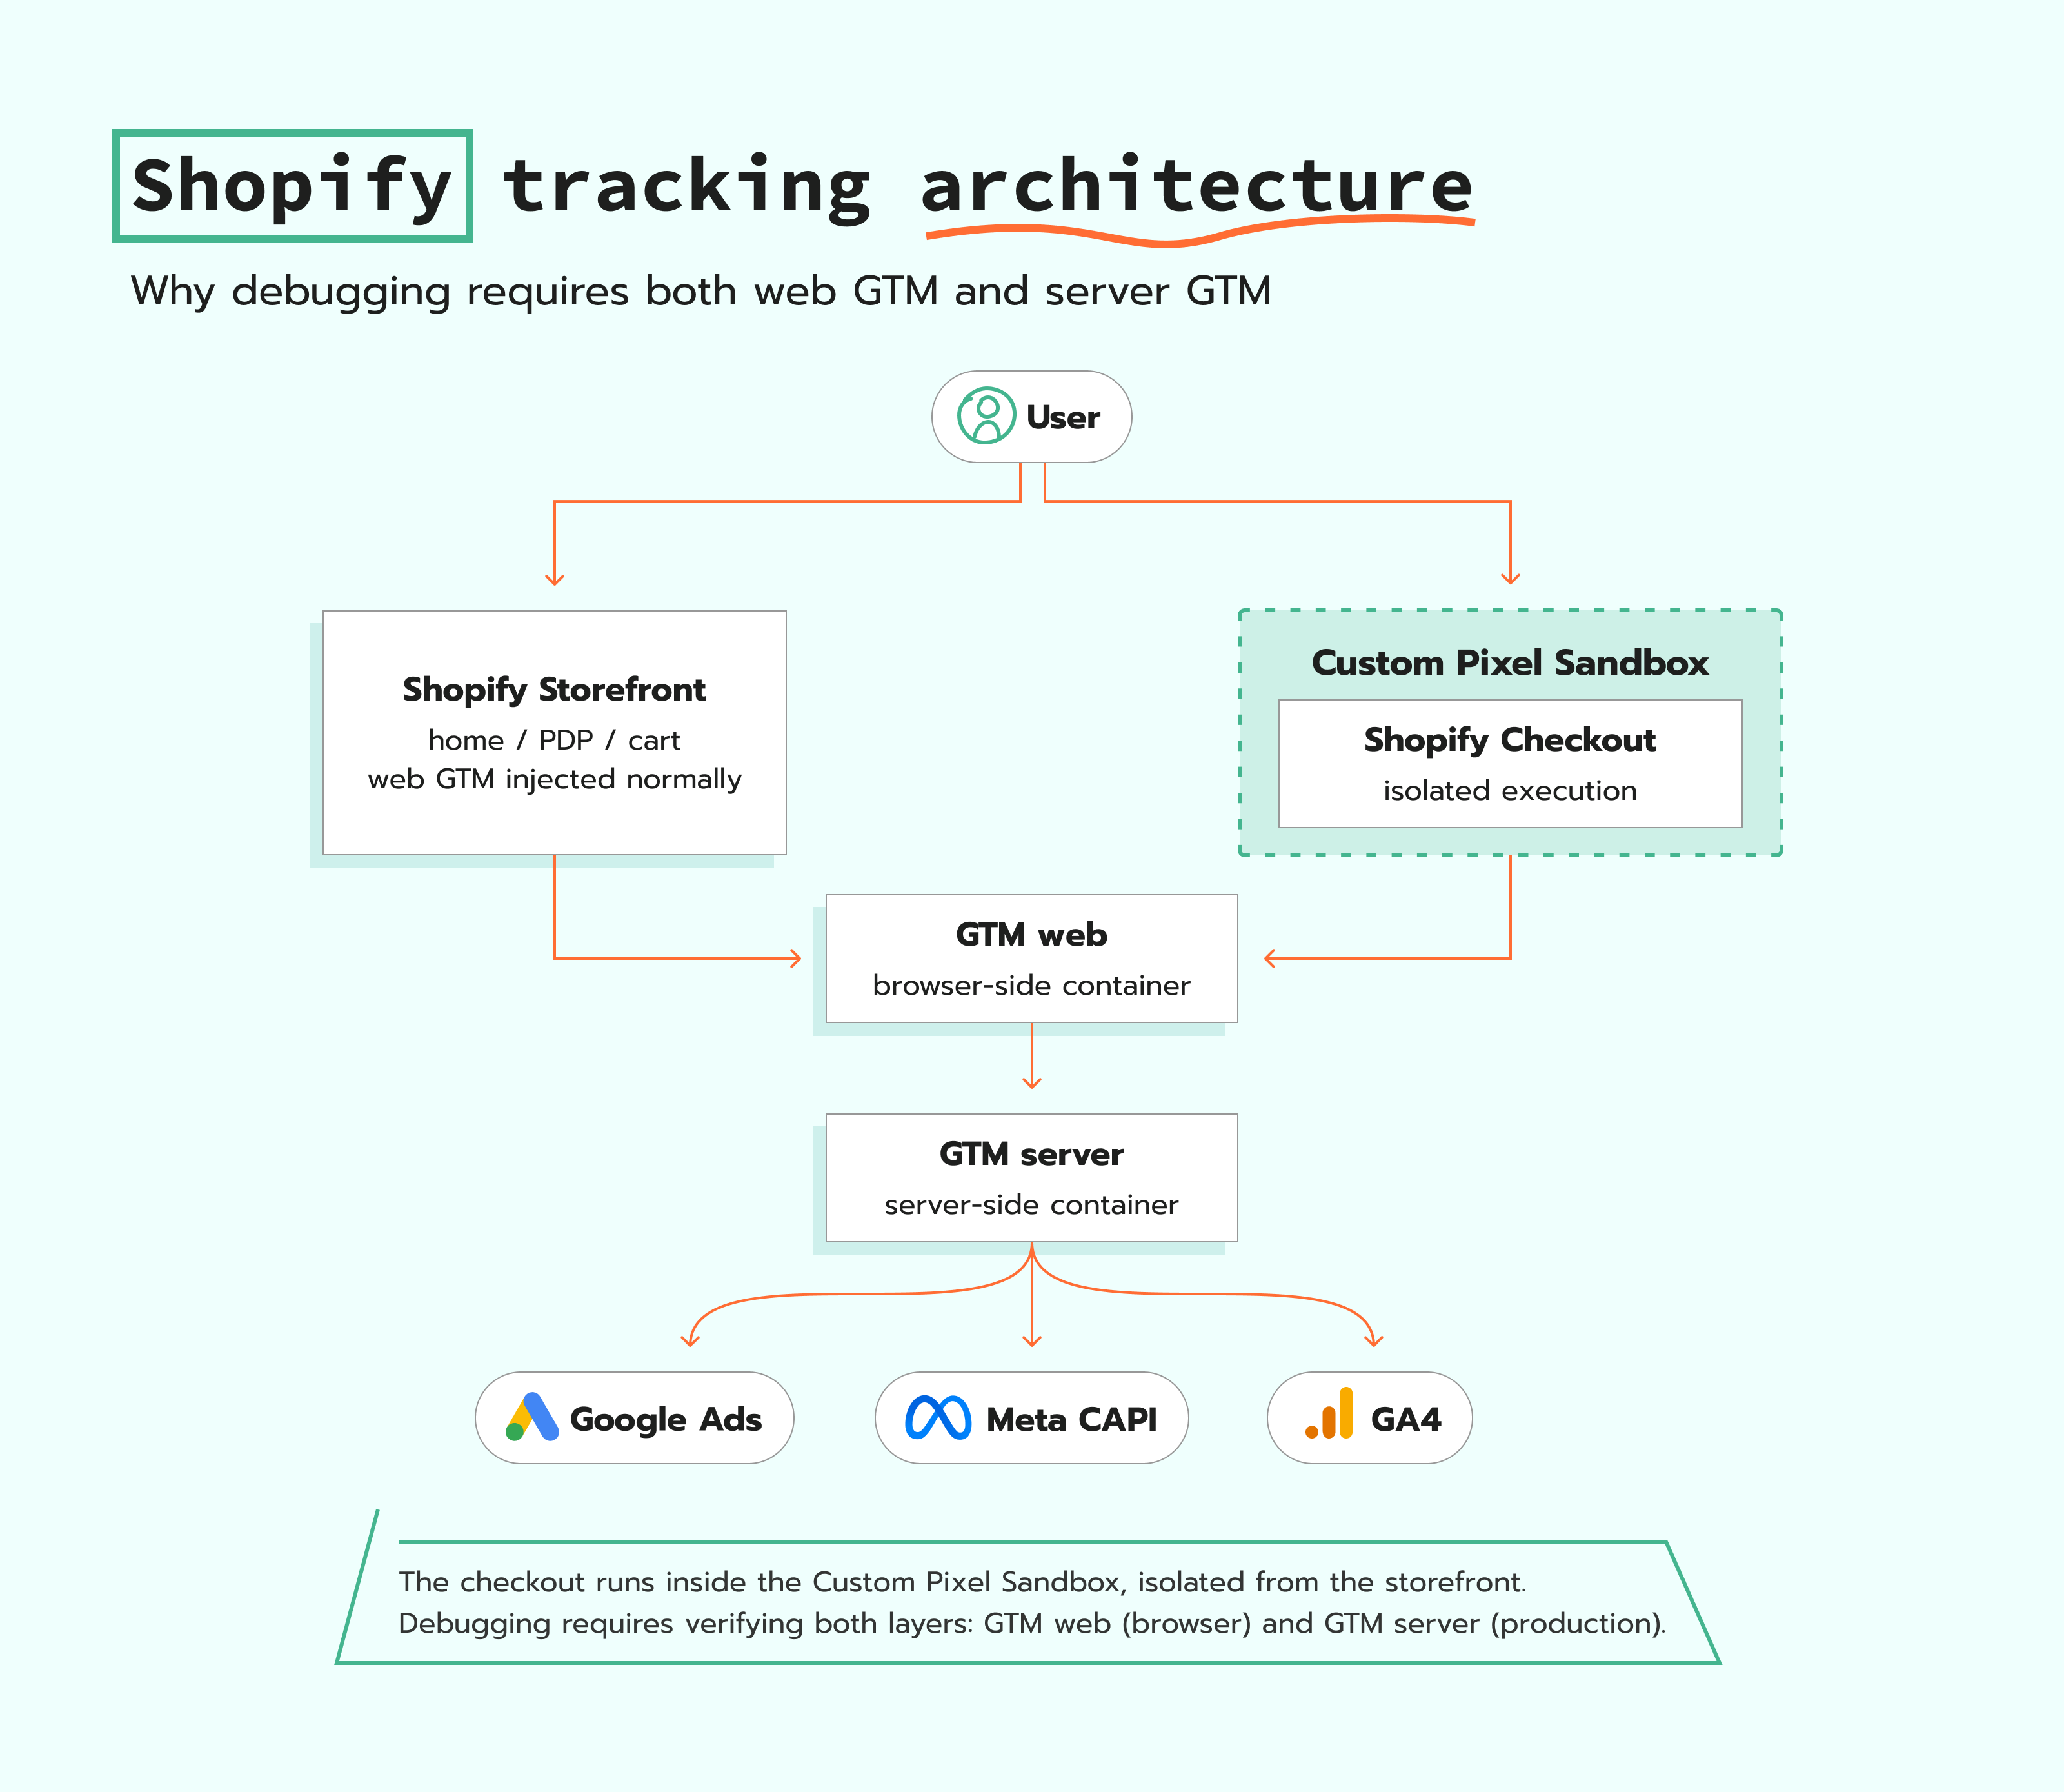
- 1.Custom Pixels run inside a sandboxed environment. Shopify isolates third-party scripts in the checkout, which means your GTM container is loaded inside an iframe-like Sandbox with restricted access to the page.
- 2.Checkout consent state behaves differently than the storefront. The consent object that Shopify passes to your container doesn't always survive the transition between storefront and checkout. Consent Mode flags can flip silently between pages.
Standard GTM preview mode bypasses the Sandbox entirely. It loads your container in a fresh debug context, with full access to the page. That's useful for verifying your tags exist, but it doesn't represent reality. Your tags might fire in preview, then never fire in production. Or they might fire with the wrong consent state.
To truly verify a Shopify tracking setup, you need to debug the real production behavior, while still having visibility into events. That's what the workflow below is designed to do.
System overview
The debugging flow has two steps:
- 1.Web GTM debugging with the Stape GTM Helper extension, to verify that your Shopify Custom Pixel is firing dataLayer events as expected.
- 2.Server GTM debugging via preview headers, to verify that those events reach your tagging server with the correct consent state and parameters.
Each step covers a different layer:
→ GTM web verifies if your custom pixel is working.
→ GTM server verifies if your custom pixel is working in production.
Combining both gives you the full picture. This is not achievable when solely using web GTM.
Step 1: debugging via web GTM
The first step verifies that your Shopify Custom Pixel is receiving Shopify Customer Events and feeding the corresponding data into web GTM.
By default, GTM preview mode injects your container outside of the Custom Pixel Sandbox. To debug it inside the Sandbox (closer to production behavior), you need the Stape GTM Helper.
Setup:
- 1.Download and pin the Stape GTM Helper Chrome extension.
- 2.Open web GTM preview mode for your Shopify container.
- 3.In the Stape GTM Helper extension, enable GTM injection and enter your web GTM container ID.
- 4.In the Stape GTM Helper settings, enable Shopify Sandbox dataLayer. This toggle is off by default. Without it, checkout events stay inside the Custom Pixel sandbox and your injected GTM won't see them.
- 5.Navigate to your Shopify store. Add a product to your cart. Proceed through checkout.
- 6.Switch back to the GTM preview tab to inspect events.
What to look for:
→ Ecommerce dataLayer events firing in sequence: page_view, view_item, add_to_cart, begin_checkout, add_payment_info, purchase.
→ Correct ecommerce parameters in each event: transaction_id, value, currency, and an items array containing item_id, item_name, price, and quantity.
→ User data parameters if you're sending Enhanced Conversions in Google Ads or Meta CAPI signals: email, phone, first_name, last_name, address fields.
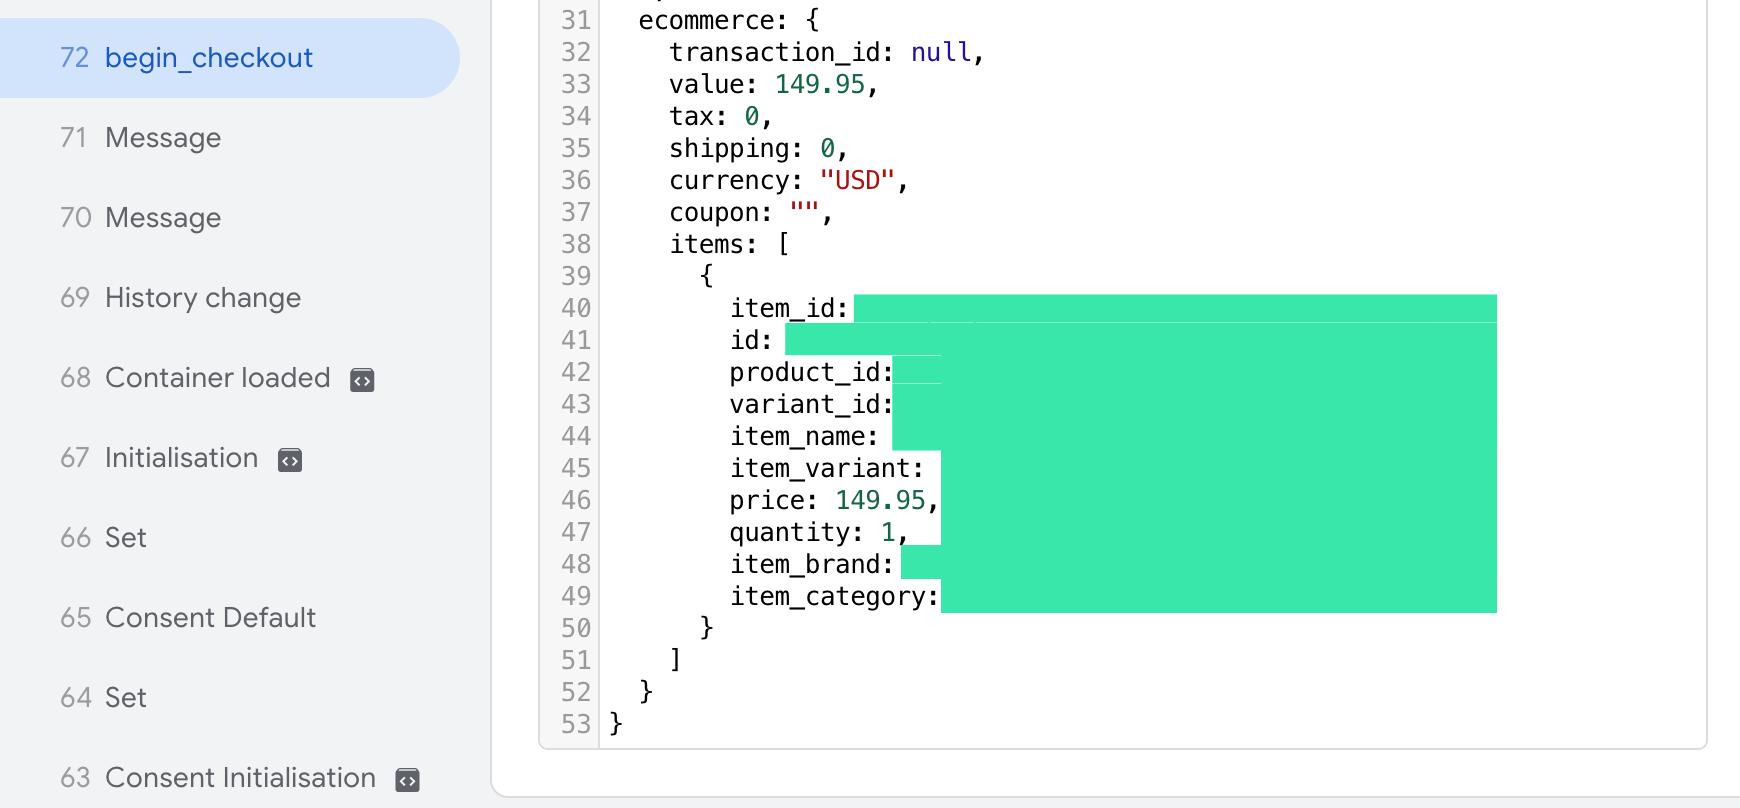
This verifies your Custom Pixel is feeding the right data into web GTM. But it's not enough on its own.
Why? Because the Stape GTM Helper still injects the GTM code outside the Shopify Sandbox manually. The real Custom Pixel install can still behave differently in production, especially around consent. To check that, you need to move to server GTM debugging.
Step 2: debugging via server GTM
This is where most issues actually surface, and where most people stop debugging too early.
Setup:
- 1.Open server GTM preview mode for your Shopify container.
- 2.Click the server preview tab, then copy the HTTP server preview header.
- 3.In Stape, go to your container's Power-ups and open the sGTM preview config. Paste the preview header there.
- 4.Publish both your web and server GTM containers, if you haven't already. This is critical: the production Custom Pixel must reference a published web GTM version.
- 5.Open a clean Chrome window (not preview mode). Browse your Shopify store from the homepage through to checkout. Complete a test purchase.
What to look for in server GTM preview:
→ Checkout ecommerce events appearing in the event stream: begin_checkout, add_payment_info, purchase.
→ Consent state parameter (x-ga-gcs) behaving dynamically. It should change based on the user's consent choice (e.
→ Client ID (x-ga-cid) consistent across the entire session, from storefront to checkout.
→ Currency, value, and items parameters arriving intact in the purchase event.
→ Your ad platform tags (Google Ads, Meta CAPI, GA4) firing with the right values.
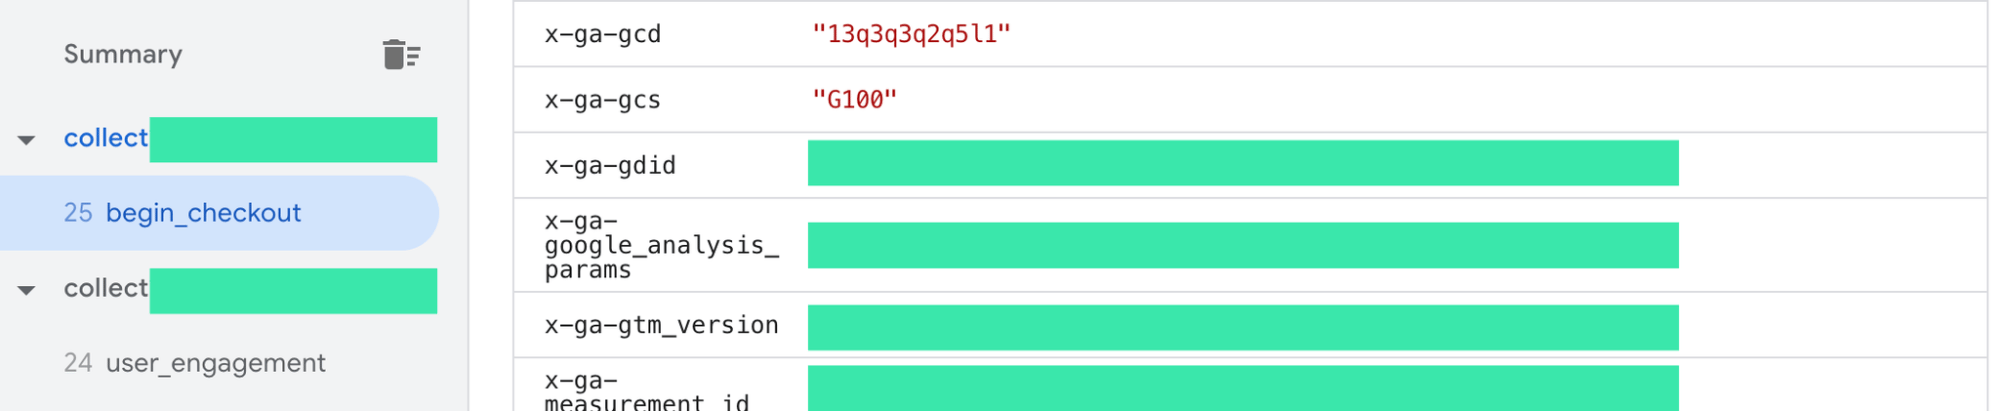
The Stape sGTM preview power-up is what makes this possible. Without it, the production Custom Pixel can't communicate with your preview session, because the preview header would normally only be set in a GTM preview tab.
This step is what verifies the real production path. It confirms your Custom Pixel works inside the Shopify Sandbox, that consent states survive the storefront-to-checkout transition, and that all your downstream tags receive what they expect.
Common issues this workflow catches
A few patterns I see repeatedly when running this debug flow on client setups:
- Consent state stuck at
G100on checkout. The storefront banner sets consent correctly, but the checkout doesn't carry the consent object through. Usually a misconfigured Custom Pixel or a banner integration issue. - Missing
itemsarray on purchase. The Custom Pixel sends a purchase event, but with an empty or malformed items array. Often caused by an outdated Custom Pixel template. - Different
client_idon storefront vs. checkout. Indicates the GA4 cookie isn't surviving the cross-domain hop into checkout. Breaks session attribution and inflates new user counts in GA4. - Tags firing in web GTM preview but not in production sGTM. A clear signal the Sandbox is blocking something. This is the exact case that this two-step workflow surfaces.
Conclusion
Web GTM preview alone is not enough to debug Shopify tracking. The Sandbox makes too many things behave differently in production, especially around consent.
By combining:
- Web GTM preview + Stape GTM Helper for in-Sandbox event visibility, and
- Server GTM preview + Stape sGTM preview header for end-to-end production verification
...you get the full picture. You can confirm exactly what your Custom Pixel is doing, what consent state it's sending, and what your ad platform tags will actually receive.
If you run Shopify with web + server GTM, this should be your default debugging workflow. It's the only one that reflects production reality.
Want to join the server side?
Try for freeRecommended for you
Sep 2, 2026
Blog
Set up Google Ads conversion tracking for Shopify
Configure Google Ads conversion tracking for a Shopify store using the standard client-based approach or more modern server-side tracking technology.
Oct 15, 2026

Comments