Oct 15, 2026
Shopify Customer Events explained & setup guide
Written by
Tymofii Sankov
Published Sep 15, 2026 comments
Key takeaways:
- Shopify Customer Events provide structured data on customer interactions across the storefront and checkout, which pixels can use for analytics and advertising.
- Standard events cover common eCommerce actions, while custom events extend the setup for tracking store-specific interactions.
- Customer Events can work with both app and custom pixels, and you can integrate them with Google Tag Manager to manage tracking across multiple platforms.
- Customer Events provide interaction data, while server-side tracking gives you more control over how this data is processed and delivered to analytics and advertising platforms.
Shopify merchants rely on customer data to understand how visitors interact with their stores and measure the performance of their marketing campaigns. However, collecting this data is becoming more challenging as traditional tracking signals disappear. Official statistics show that 95% of advertising and data decision-makers expect continued signal loss, including identifiers such as third-party cookies and device IDs. Shopify Customer Events offer a framework for working with customer activity, considering the new specifics. In this guide, we'll take a closer look at this functionality, its setup, and its role in your tracking infrastructure.
What are Shopify Customer Events?
An event in the Shopify ecosystem is a customer's action taken at any stage of their journey. These events turn all interactions into structured data checkpoints that describe, step by step, what is happening in your store.
Before this system was introduced, all the tracking was done manually through the code. Customer events enabled shop owners to minimize manual work by connecting to the Customer Events Framework, which provides more accurate, structured event data. Roughly speaking, Customer Events can be divided into two types:
- Shopify standard events are predefined and cover common customer interactions across the storefront and checkout:
page_viewed,product_viewed,product_added_to_cart,checkout_completed, etc. - Custom events are needed when there is no standard event available for the type of interaction you want to track specifically for your project.
Roughly speaking, all standard events are Customer Events, but not all Customer Events are standard. We will cover both types and their differences later in this guide, so do not panic yet. Things are simpler than they seem.
Data gathered through this framework can be later used for advertising, analytics, and other marketing purposes. However, it is important to clarify that Customer Events do not do analytics or advertising on their own. To understand their role in data tracking, let's first dissect how they work.
How Shopify Customer Events work
The basic logic behind Customer Events is quite straightforward. When a customer performs an action in your store, Shopify identifies it and pushes a corresponding event. A connected pixel can then use the event data and send the required information to an analytics or advertising platform.
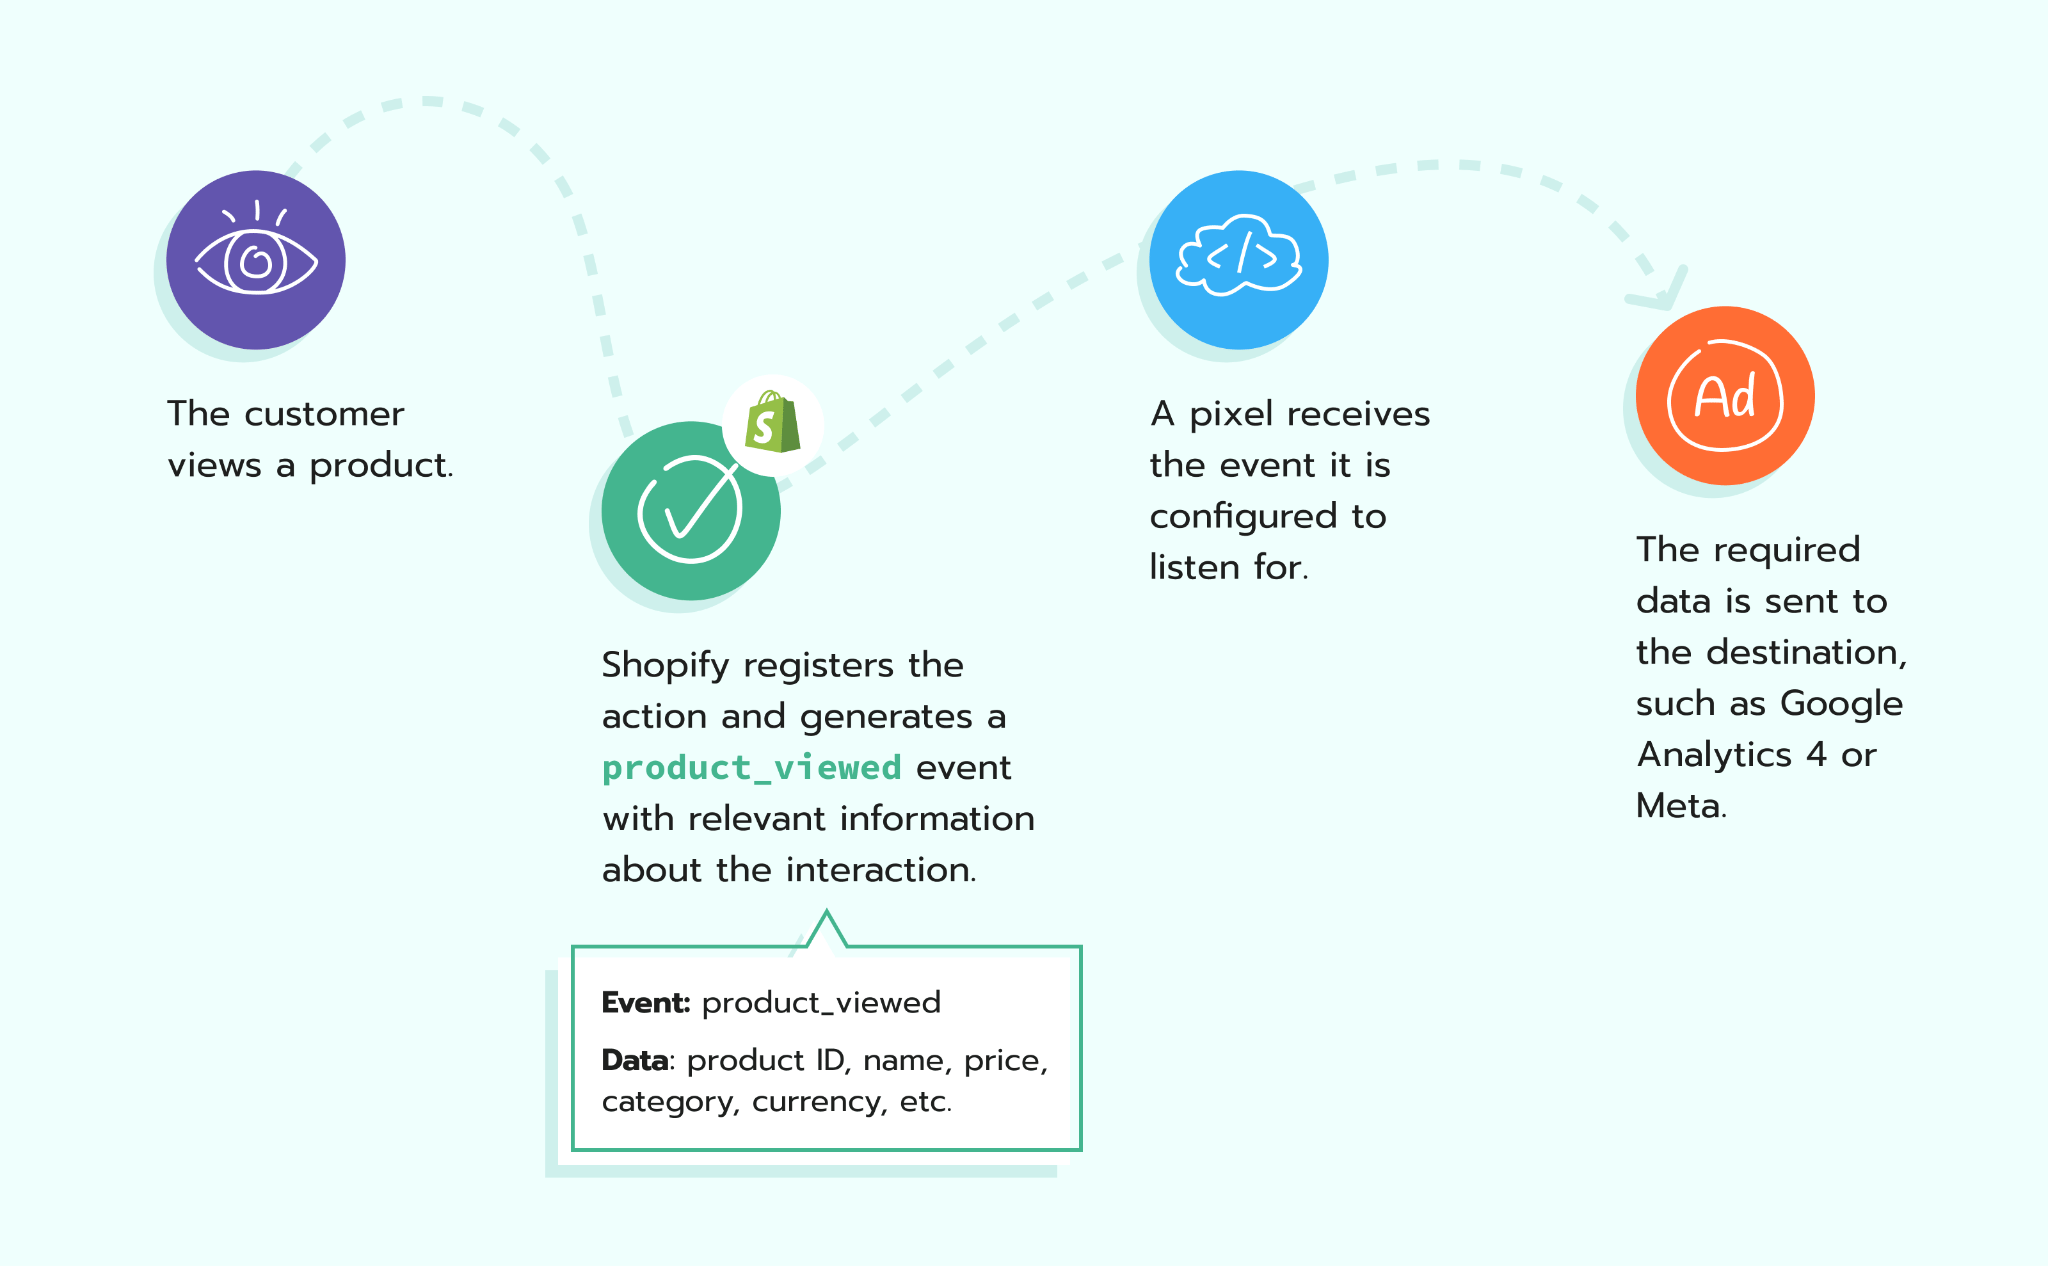
Other customer actions covered by standard events, such as adding to cart and completing a purchase, are recorded in the same way, providing a consistent structure for the collected data. This means you do not need to set up a separate mechanism to detect the same customer actions on every third-party platform you work with.
Shopify standard events: full reference list
Shopify has a set of predefined standard events that cover the main customer interactions with your store across the storefront and checkout. Each event corresponds to a specific action, such as viewing a product, starting checkout, or completing a purchase. This gives you a ready-to-use set of events for tracking the most important stages of the customer journey.
| Event name | Description |
|---|---|
alert_displayed | Alert message, alert type, affected field/target, and its value |
cart_viewed | Cart contents, quantities, estimated costs, and cart attributes |
checkout_address_info_submitted | Checkout information, including available billing/shipping address and checkout details |
checkout_completed | Checkout and purchase information, including products, totals, discounts, shipping, and transaction details |
checkout_contact_info_submitted | Checkout information, including available customer contact and checkout details |
checkout_shipping_info_submitted | Checkout information, including shipping and delivery details |
checkout_started | Checkout information, including products, prices, discounts, and available customer details |
collection_viewed | Collection information and the product variants included in the collection |
page_viewed | No additional event-specific data; page information such as URL and title is available through the event context |
payment_info_submitted | Checkout information associated with the payment step |
product_added_to_cart | Added product/variant, quantity, and line cost |
product_removed_from_cart | Removed product/variant, quantity, and line cost |
product_viewed | Product variant information, including product details |
search_submitted | Search query and product variants returned by the search |
This set of events covers most basic customer interactions typically tracked in eCommerce analytics and advertising. They are called standard events because Shopify automatically creates and recognizes them for common customer actions, using a consistent naming convention and data structure. However, some stores may have specific tracking requirements that are not covered by this standard set. In such cases, custom events can be created to track additional interactions.
Standard events vs. custom events
Let's say that your store has a configurator that allows customers to create a product based on their own needs and requirements (e.g., table length, width, height, color, etc.). You want to track how many customers complete the configuration and proceed to purchase, but there is no standard event that captures this interaction. In this case, you can create a custom event and configure which information it should include when triggered. The main difference here is the level of control you have over the event:
- you can create an understandable name based on the type of interaction you track;
- you can define exactly when the event is published;
- you can specify what data is included in the event.
Once you publish the custom event, a pixel can subscribe to it in the same way it does to standard events and use its data for analytics or advertising. This way, you can extend the basic set of Shopify events to meet your specific tracking needs.
IMPORTANT!
Custom events do not replace the standard set. You can use both together, and if a standard event already covers the interaction you need, there is usually no reason to create a custom one. Consider custom events as additional flexibility for specific tracking requirements rather than a must-have for every Shopify store.
Shopify app pixels vs. custom pixels
Shopify allows you to work with Customer Events through two types of pixels: app pixels and custom pixels. Both can access Customer Events and use their data for tracking, but the practical difference lies in how they are added, configured, and maintained.
App pixels are provided through Shopify apps and built by app developers using the Web Pixels API. From a store owner's perspective, most of the technical implementation and maintenance happen on the developer's side. You install and configure the corresponding app, while its pixel handles the supported tracking functionality in the background.
Custom pixels let you add your own code via the Customer Events section in Shopify. This provides greater control over the implementation and allows you to adapt tracking to your specific requirements. At the same time, setting up and maintaining a custom pixel usually requires more technical knowledge.
| App pixels | Custom pixels | |
|---|---|---|
| Setup | Is added automatically by a Shopify app | Code is added manually through Customer Events |
| Technical knowledge | Usually minimal | It is best to have JavaScript knowledge and a basic understanding of how tracking happens |
| Control | Depends on the app's functionality | Greater control over implementation |
| Maintainance | Is primarily handled on the app developer’s side | Managed on your side as a part of your tracking setup |
| Best for | Fast integrations via Shopify apps | Custom integrations and specific tracking requirements |
In practice, this does not mean that you need to choose one over the other. If you have specific tracking requirements, app and custom pixels can coexist in the same store. Moreover, custom pixels can also be used in more advanced tracking setups that combine Shopify Customer Events with Google Tag Manager and server-side tracking, which we will discuss later in this article.
How to set up Shopify Customer Events
There is no Customer Events Shopify activation button in your store settings. The platform automatically publishes standard events, and your task is to configure how you want to use this data.
How to use Shopify Customer Events with Google Tag Manager
Google Tag Manager is not required to use Shopify Customer Events. A pixel can send collected data directly to an analytics or advertising platform. However, if you work with several platforms or already manage your tracking through GTM, adding it to the setup can make the whole process easier to manage.
How Shopify Customer Events work with GTM
In this setup, GTM sits between the data collected from your Shopify store and the analytics or advertising platforms where you want to use it. The general flow looks like this:
Customer action → Shopify Customer Event → Custom pixel → Data Layer → Google Tag Manager → Analytics and advertising platforms
The custom pixel subscribes to the required Shopify pixel events and makes its data available to your tracking setup through the Data Layer. GTM can then use this information to trigger the appropriate tags and send the required data to GA4, Google Ads, Meta, or other platforms.
You can build this connection manually if you have enough technical knowledge to correctly subscribe to the events, structure their data, and make it available to GTM. Alternatively, you can use the Stape Conversion Tracking app to simplify the process. The app can generate the custom pixel needed to create eCommerce Data Layer events and add your web GTM container to the Shopify store. The general setup looks like this:
- 1.Install the Stape Conversion Tracking app and add your web GTM container ID.
- 2.Enable the eCommerce Data Layer functionality in the app.
- 3.Copy the generated custom pixel code.
- 4.In Shopify, go to Settings → Customer events → Add custom pixel.
- 5.Paste the generated code, save it, and connect the pixel.
- 6.Test the setup to verify that the expected eCommerce events are available in GTM.
Once the connection is working, you can configure the required tags, triggers, and variables in GTM to work with the needed platforms.
Why use GTM with Shopify Customer Events?
Adding GTM gives you more control over how Shopify Customer Events are used after they are collected. This provides several practical benefits:
- Centralized tracking management: manage tags for GA4, Google Ads, Meta, and other platforms from the same GTM container.
- Greater flexibility: control which events activate particular tags and what information is sent to each destination.
- Easier updates: make many tracking changes in GTM without modifying your Shopify custom pixel each time.
This makes GTM especially useful as your tracking setup grows and you start working with more platforms. At the same time, the flexibility of such a setup makes correct configuration and testing particularly important.
Common Shopify Customer Events mistakes
Shopify Customer Events simplify access to customer activity data, but the quality of your tracking still depends on how you configure and use them. Here are some common mistakes to avoid.
Creating unnecessary custom events
If Shopify already provides a standard event for the interaction you need to track, there is usually no reason to recreate it as a custom event. Doing so adds unnecessary complexity and makes your tracking setup harder to manage.
Tracking the same event through multiple integrations
App pixels, custom pixels, and GTM can coexist in the same store, but you need to make sure they do not send the same event to the same platform twice. For example, tracking a purchase through both an app integration and GTM may result in duplicate conversions and inaccurate reporting.
Ignoring customer privacy settings
When configuring pixels, consider what data they collect and when they are allowed to operate based on your customer privacy settings and applicable consent requirements. Connecting a pixel alone does not mean that every event should always be sent.
Skipping testing after setup
A connected pixel does not necessarily mean that everything works correctly. Test the main customer actions in your store, such as viewing a product, adding it to the cart, starting checkout, and completing a purchase. Then verify that the expected events and data reach the intended platforms. Stape's Chrome Extension can simplify this process by providing a more convenient way to inspect and debug your tracking setup.
It is always better to take several extra checks and steps during the configuration and testing to avoid getting incorrect or duplicated data affecting your analytics later. If you face any issues at a later stage, check our debugging guide.
How Shopify Customer Events work with server-side tracking
It is essential to distinguish here that Shopify Customer Events and server-side tracking are not alternatives. Customer Events provide information about interactions, while server-side tracking changes how this data is processed and delivered to analytics and advertising platforms.
When tracking requests are sent directly from the user's browser to platforms such as GA4, Google Ads, or Meta, they remain affected by ad blockers, browser restrictions, and network issues. Server-side tracking adds another layer to the process. If you extend the GTM setup described above with server-side tracking, the flow looks like this:
Customer action → Shopify Customer Event → Custom pixel → GTM → Server GTM → Analytics and advertising platforms
This approach can help you:
- reduce data loss associated with browser-side tracking;
- control data before it is sent by validating, modifying, or enriching it;
- manage data distribution to different platforms from the server container.
The Stape Conversion Tracking app can connect the Shopify eCommerce events discussed earlier with your GTM setup. You can then extend this architecture with a server GTM container hosted on Stape, combining Shopify Customer Events with server-side tracking in the same setup.
Learn more about the benefits of server-side tracking and why it may be worth switching to it if you haven't done this yet.
Conclusion
Shopify Customer Events provide a unified foundation for tracking customer interactions across your store. For many businesses, standard events and available app integrations, such as a native Shopify GA4 integration, may already cover essential tracking needs, while custom events and pixels allow the setup to scale to meet more specific requirements. The important part is not to make tracking more complex than necessary, but to choose an implementation that matches the platforms you use and the data you actually need. As your requirements expand, Customer Events can also be integrated into a broader setup with Google Tag Manager and server-side tracking, giving you more control over your marketing and analytics data.
Want to start on the server side?
Try for freeRecommended for you
Sep 17, 2026
Blog
Shopify data layer guide: what it is, why it matters & best setup methods
Learn how a Shopify data layer works, what variables it contains, and compare the best setup methods for accurate eCommerce tracking.
Aug 4, 2026

Comments