Meta CAPI for Shopify via server GTM

Ivanna Holubovska
Author| Set up tracking without extra work. With Stape's Conversion Tracking app for Shopify and Setup Assistant, you can install server-side GTM in minutes, get all core eCommerce events created automatically, and load prebuilt tags for Google, Meta, TikTok, and more. Events run through Stape’s server-side tracking platform, letting you recover up to 40% more conversions and increase ROAS. |
Step 1. Configure server Google Tag Manager container
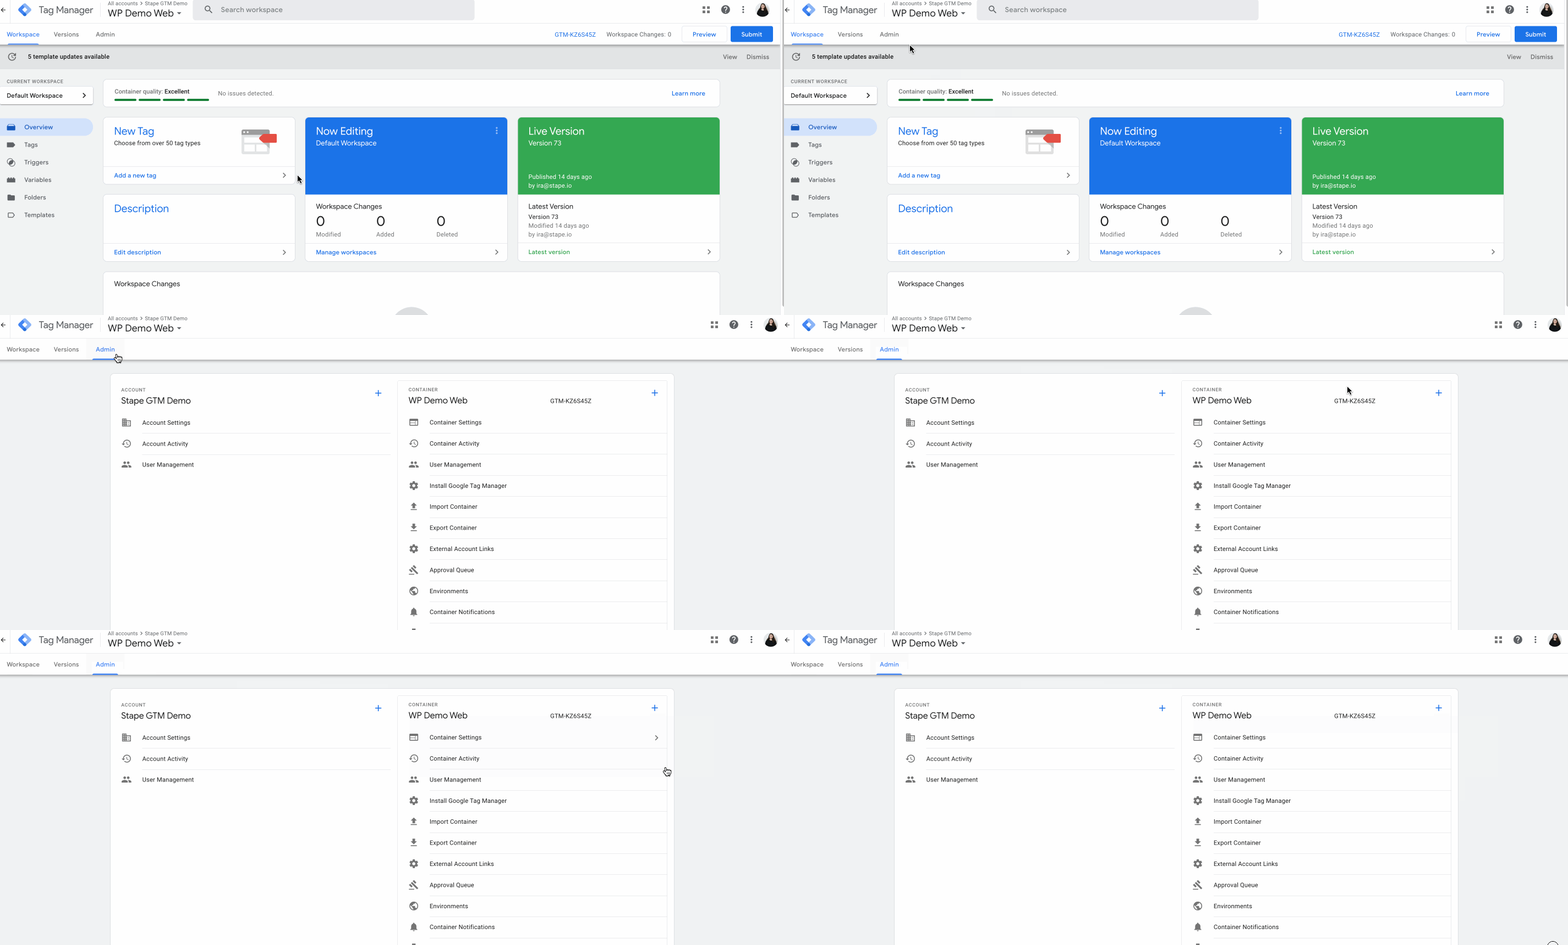
1.1. Open your WEB Google Tag Manager container.
Click Admin. Under the container column, click +
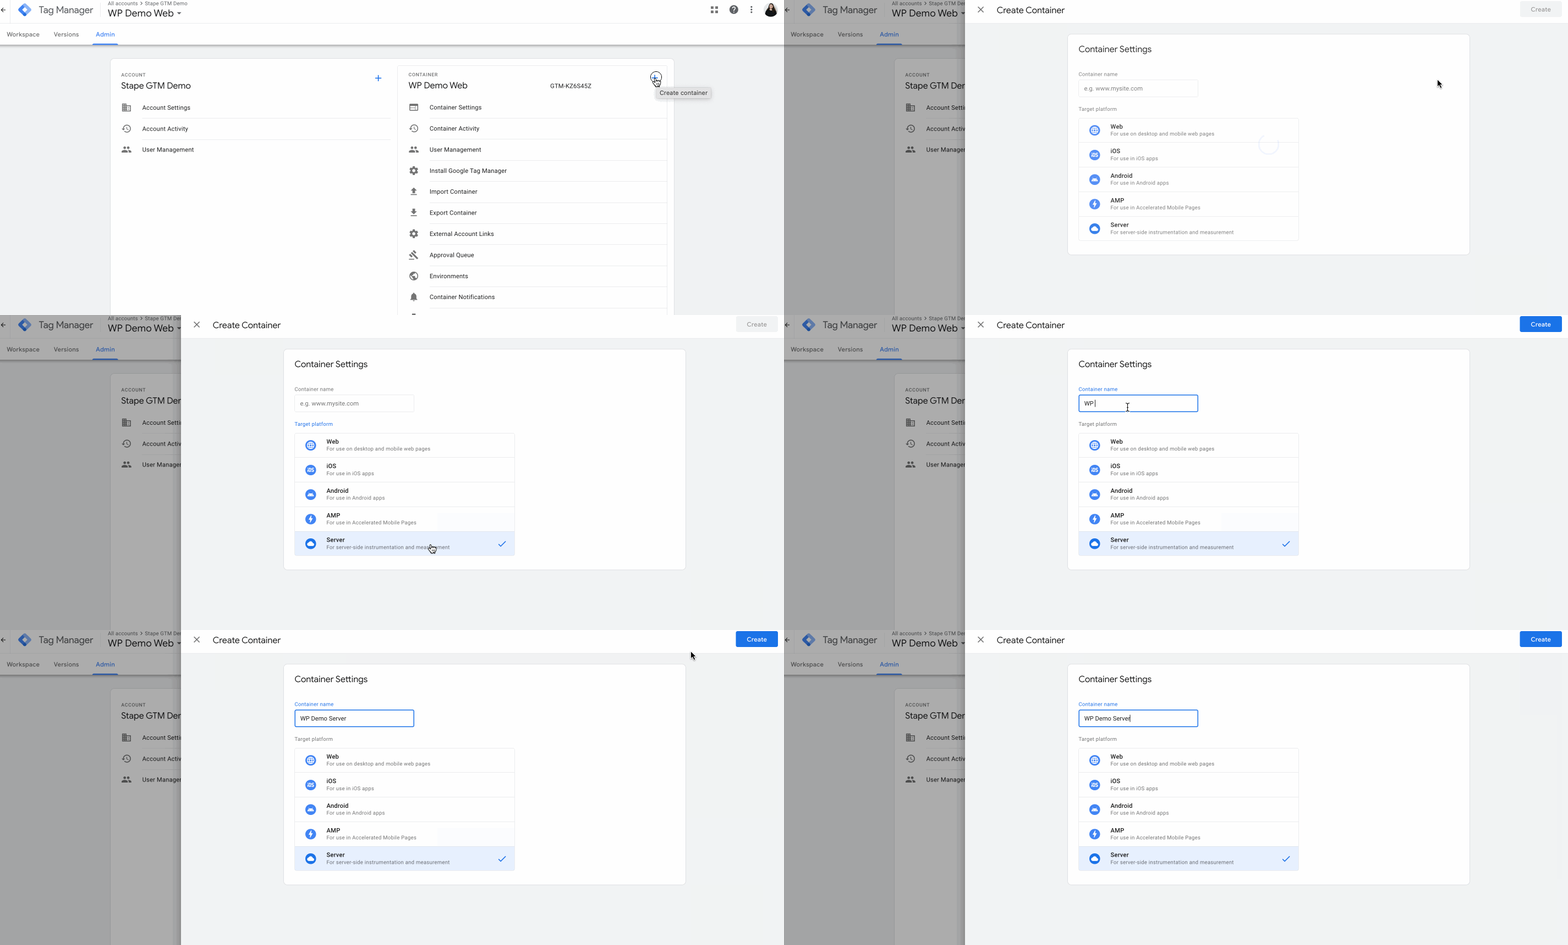
1.2. Type the container name, choose Server, and click Create.
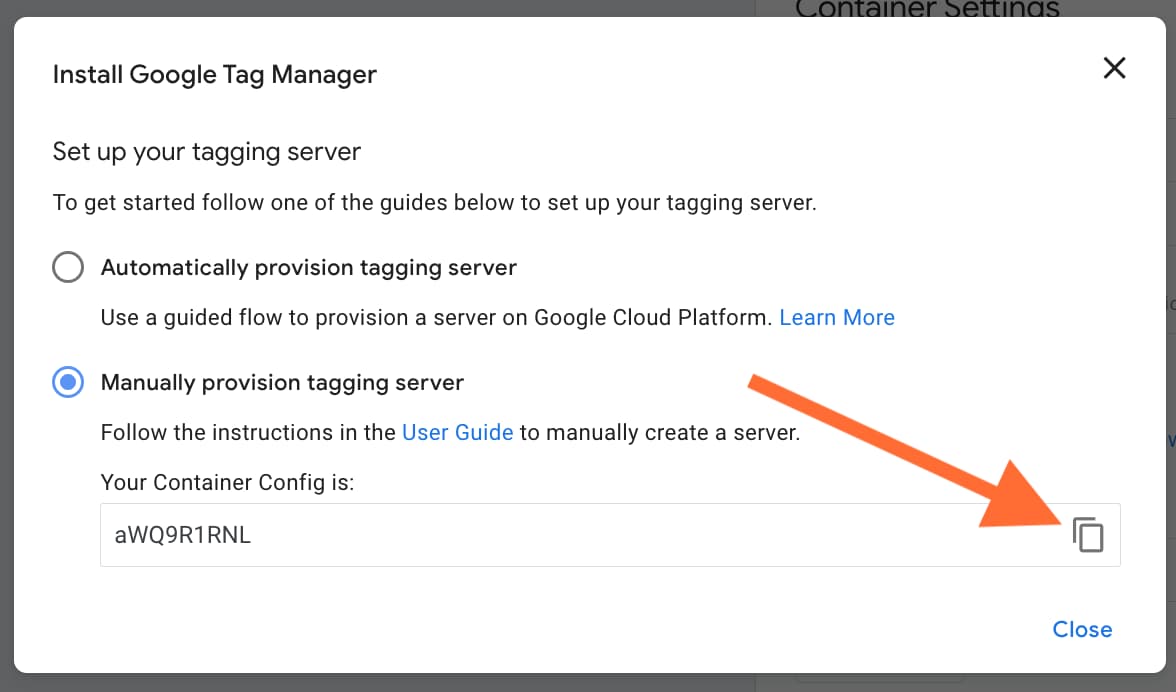
1.3. Choose Manually provision tagging server, copy your container config and paste it in any text editor. We will need it for the next steps.
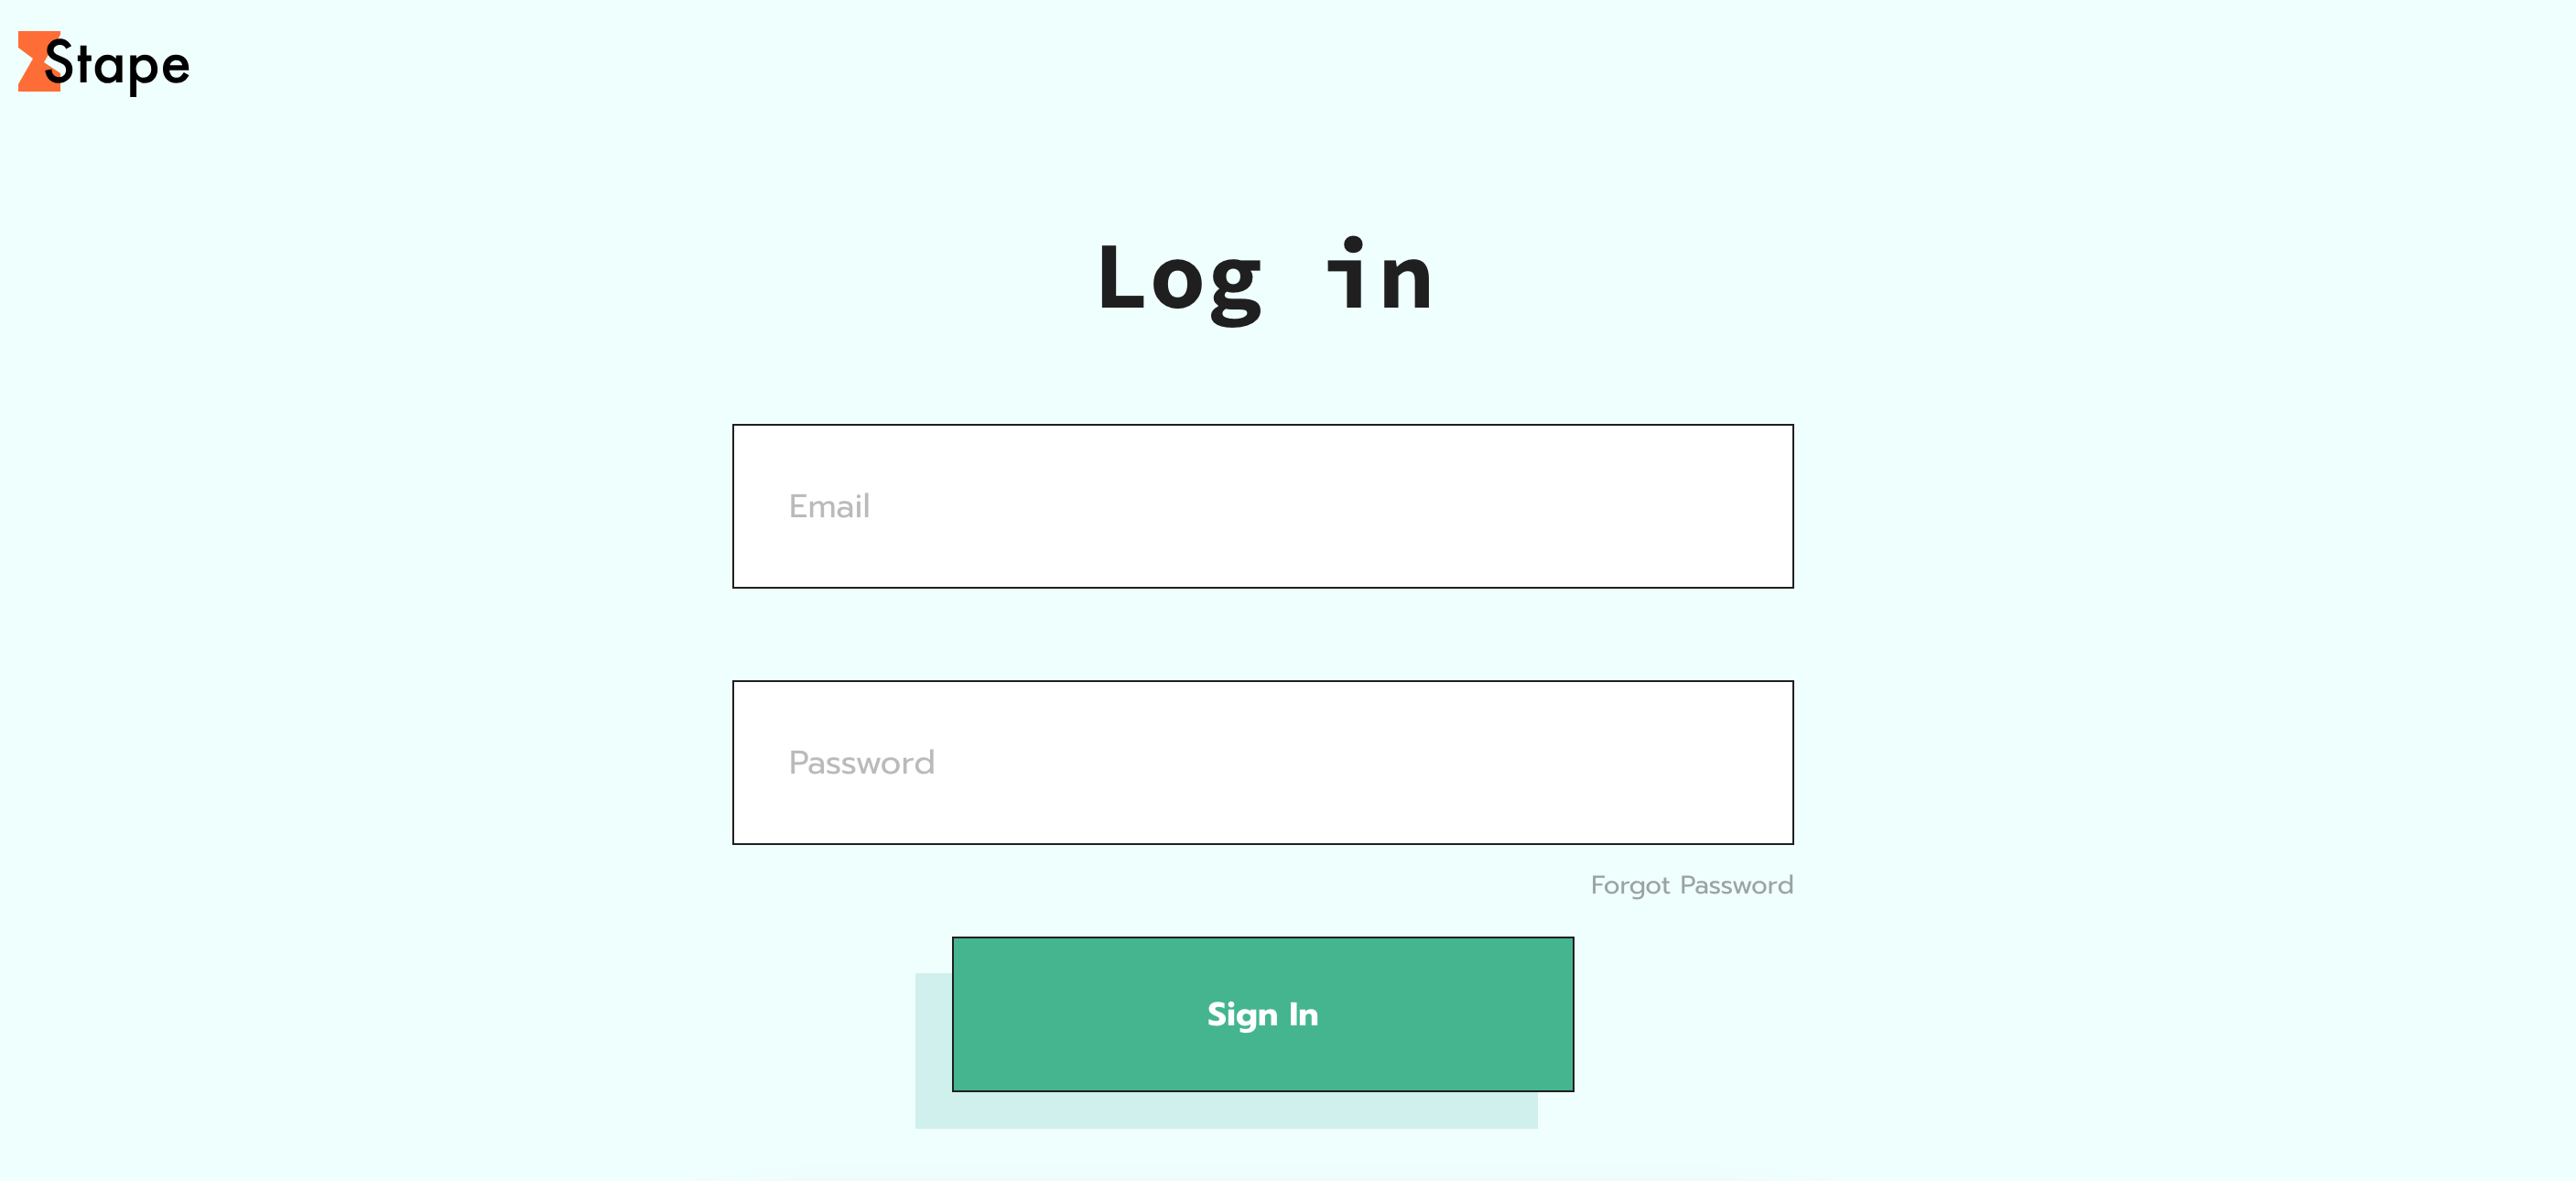
1.4. Create a stape.io account or log in to your existing one.
1.5. In Stape’s admin dashboard click Create container on the top right.

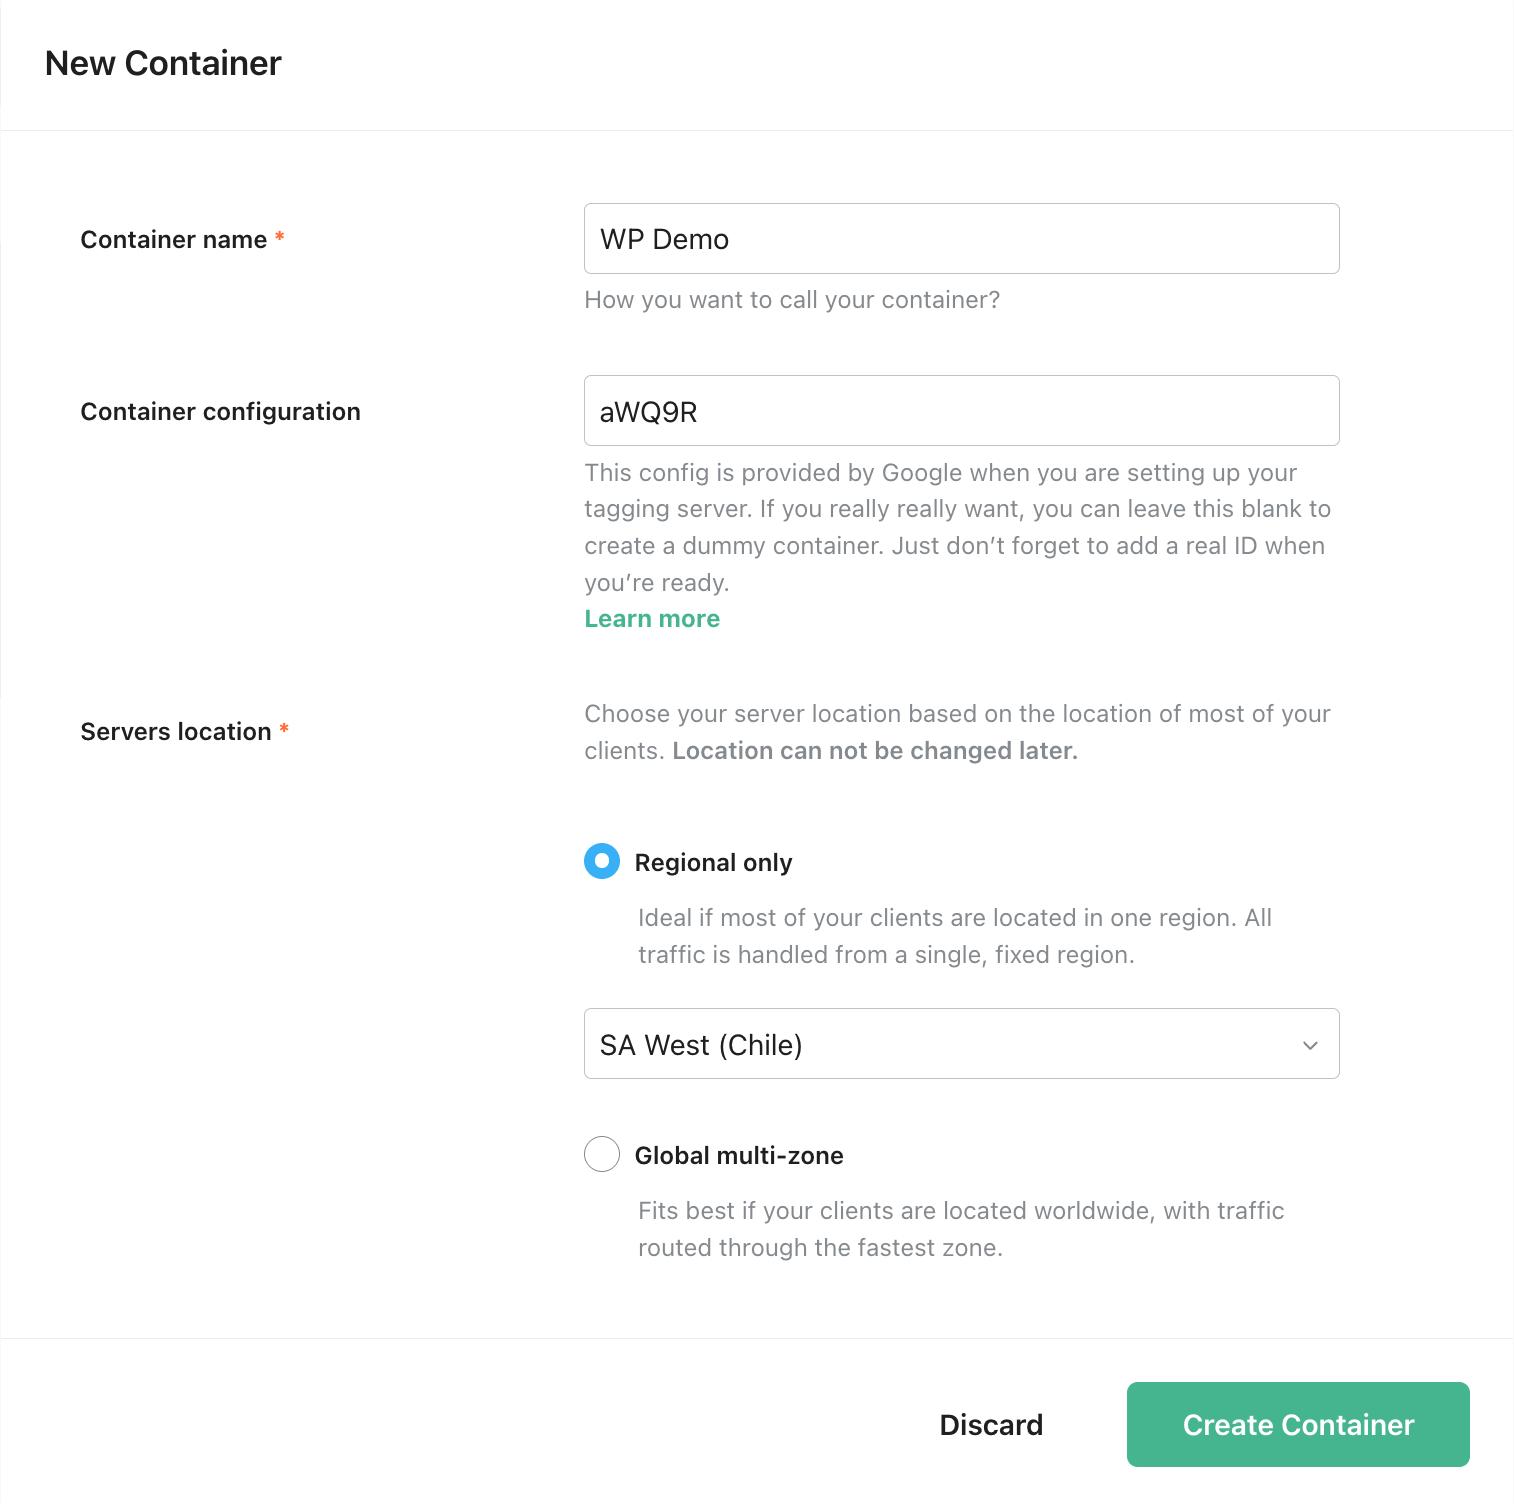
1.6. Enter your container details:
- Container name. The name does not necessarily have to be the same as the container name in your server GTM.
- Container configuration - paste Container Config that you copied from your Google Tag Manager Server Container.
- Server location - for best performance, choose the server location that’s closest to where most of your clients are. See the list of available server locations here. If you have traffic from different regions, you can select the Global multi-zone server location option. It will automatically route incoming requests to the nearest available zone based on the user’s IP address.
Then click Create Container.
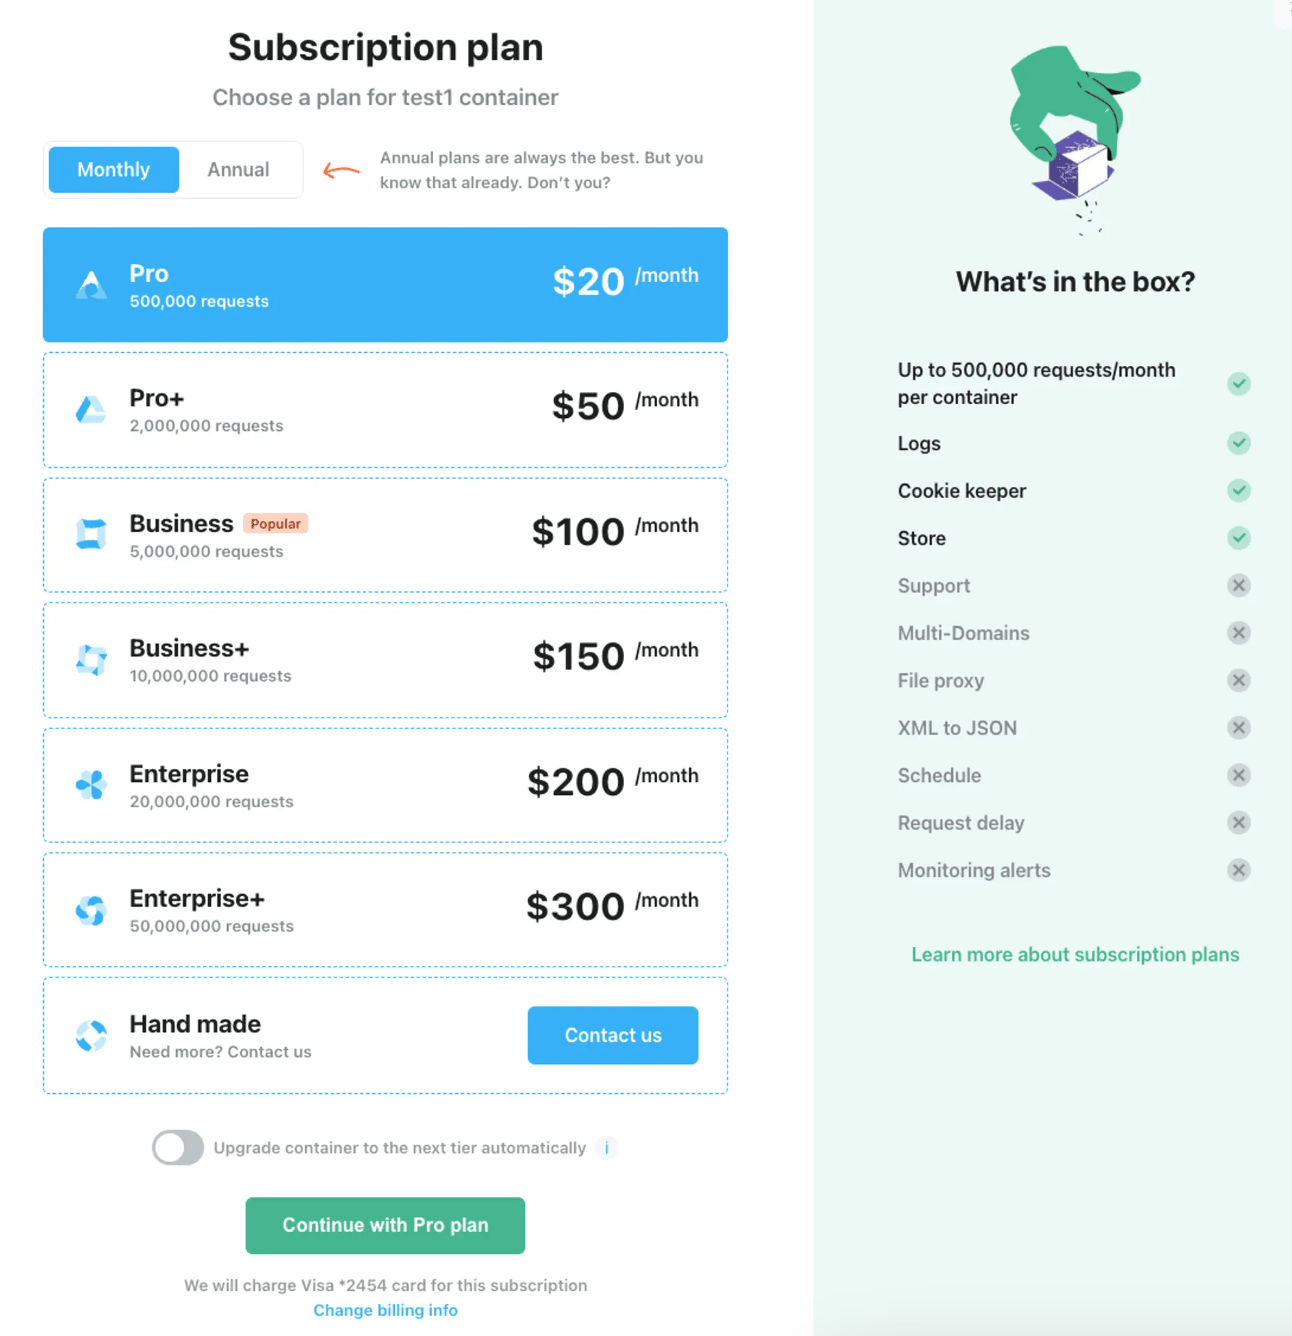
1.7. Choose a plan for your container. You can start with a Free plan.
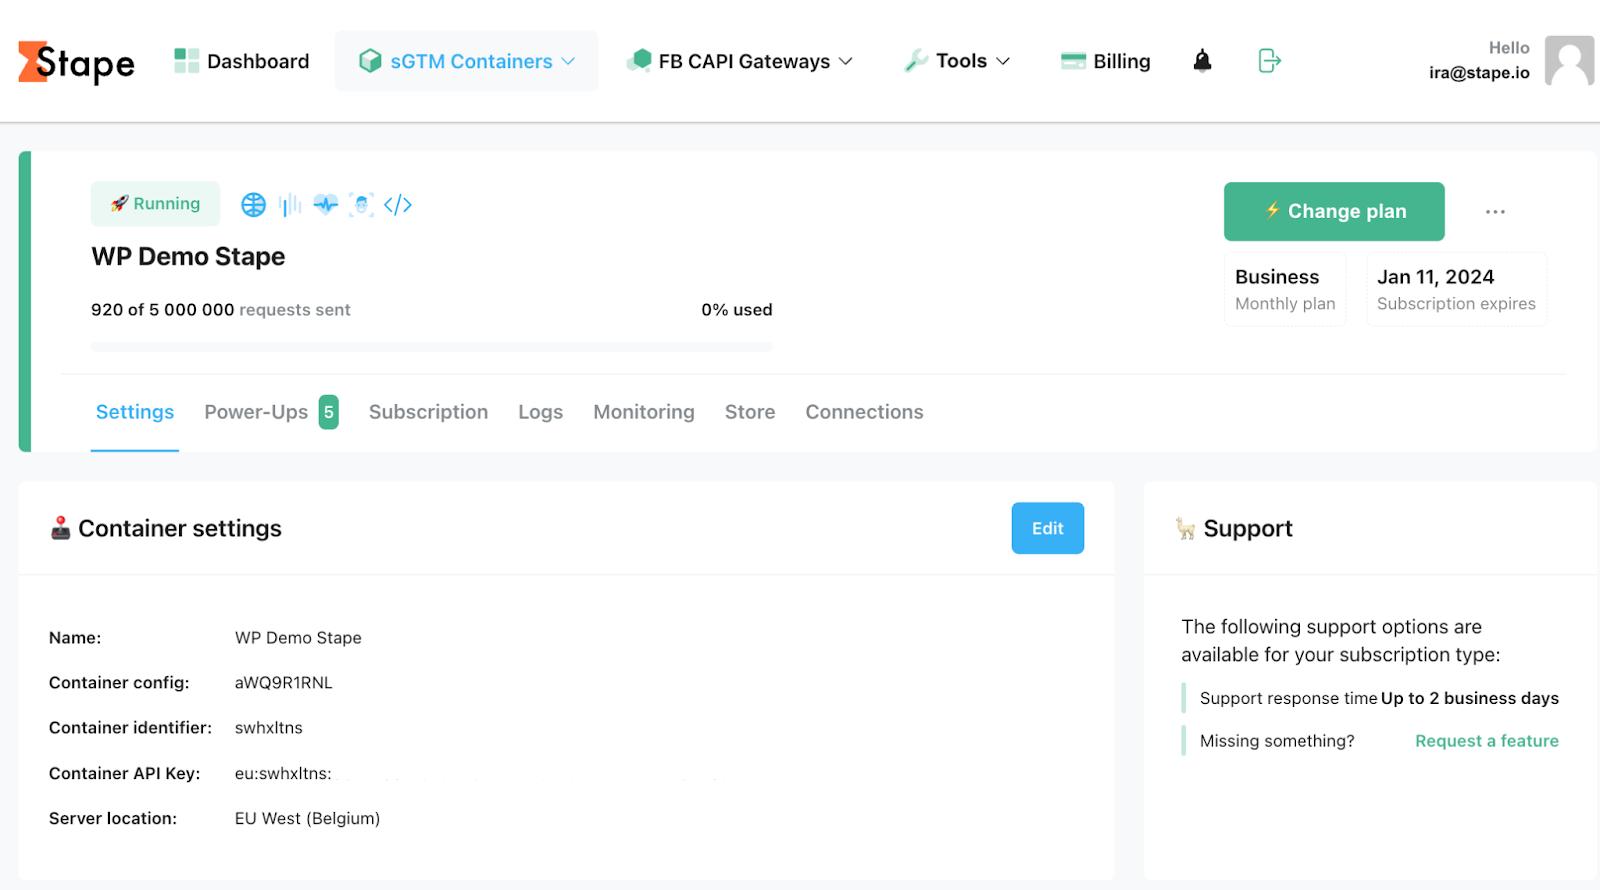
1.8. You will see the status of your container, container config, and plan name.
It takes around 5 minutes to deploy a server container. Please reload the page to update the status. If the Google Tag Manager server-side setup was done correctly, you should see the status “Running”.
Step 2. Set up Custom Loader in Stape admin
| Custom Loader modifies gtag.js and gtm.js loading paths to resist ad blockers and ITPs, potentially increasing data volume by up to 40%. |
2.1. Find and copy your WEB GTM ID in GTM.
To find GTM ID log in to your Google Tag Manager account and open a Web GTM container. In the top right corner (next to the Submit and Preview buttons) you’ll see some short text that starts with "GTM-" and then contains some letters/numbers.

2.2. Go to Power-ups and click Use next to the Custom Loader panel.
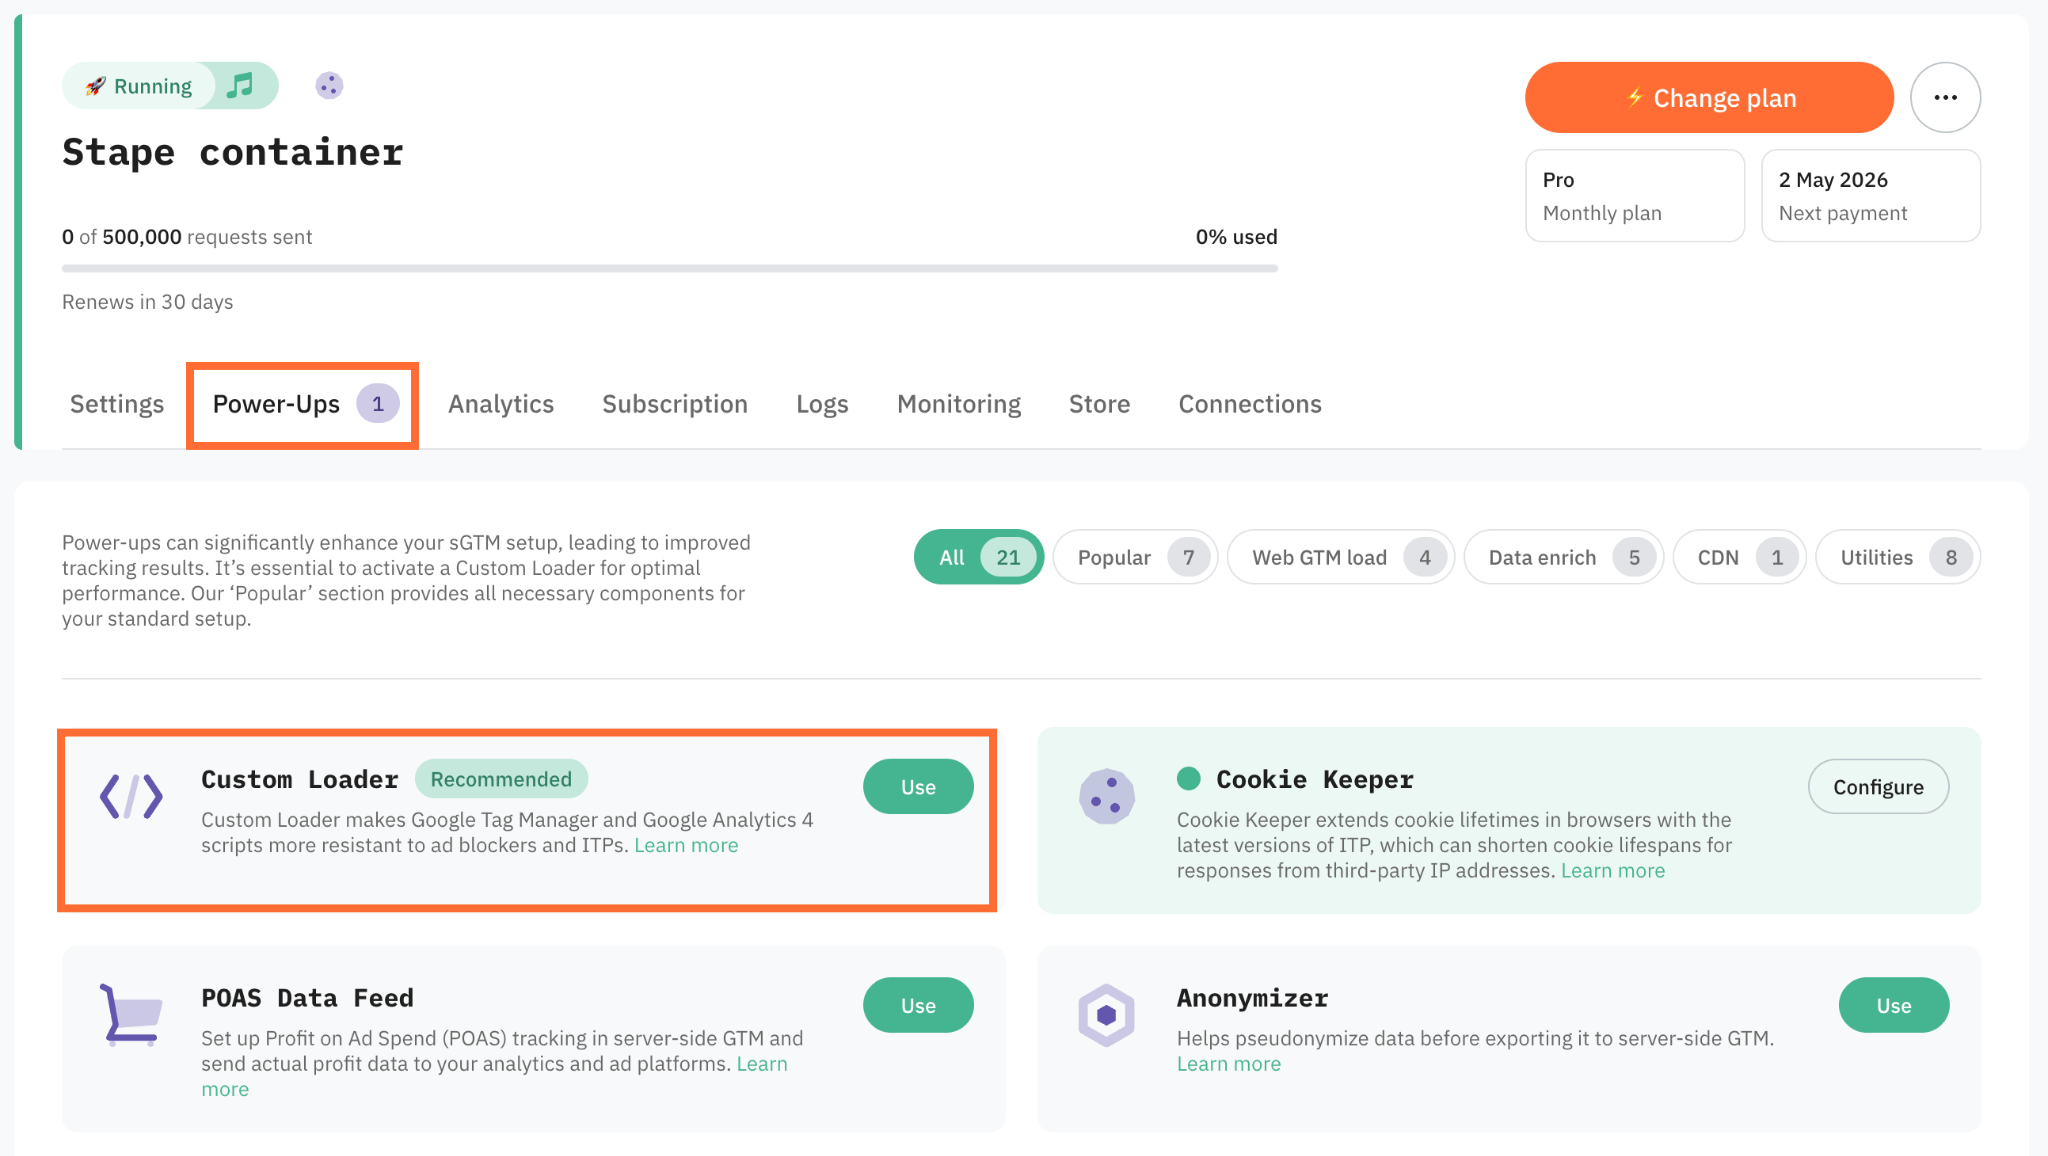
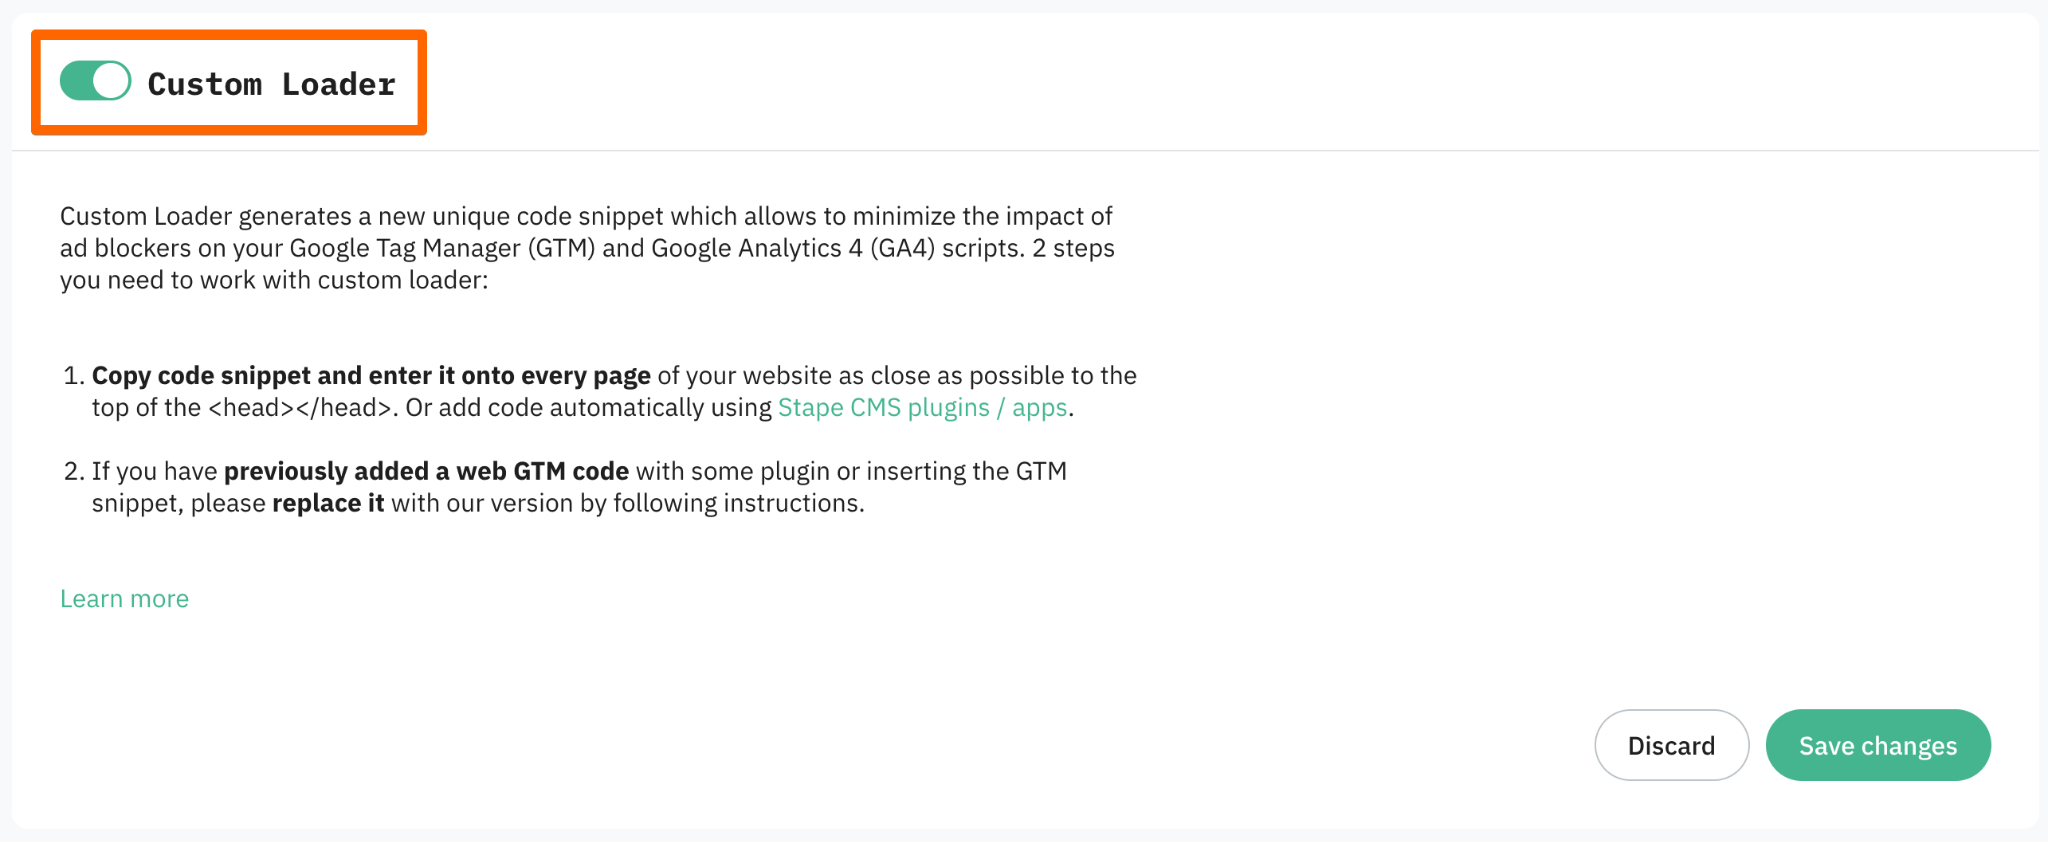
2.3. Toggle the Custom Loader switch to enable it and click Save changes.
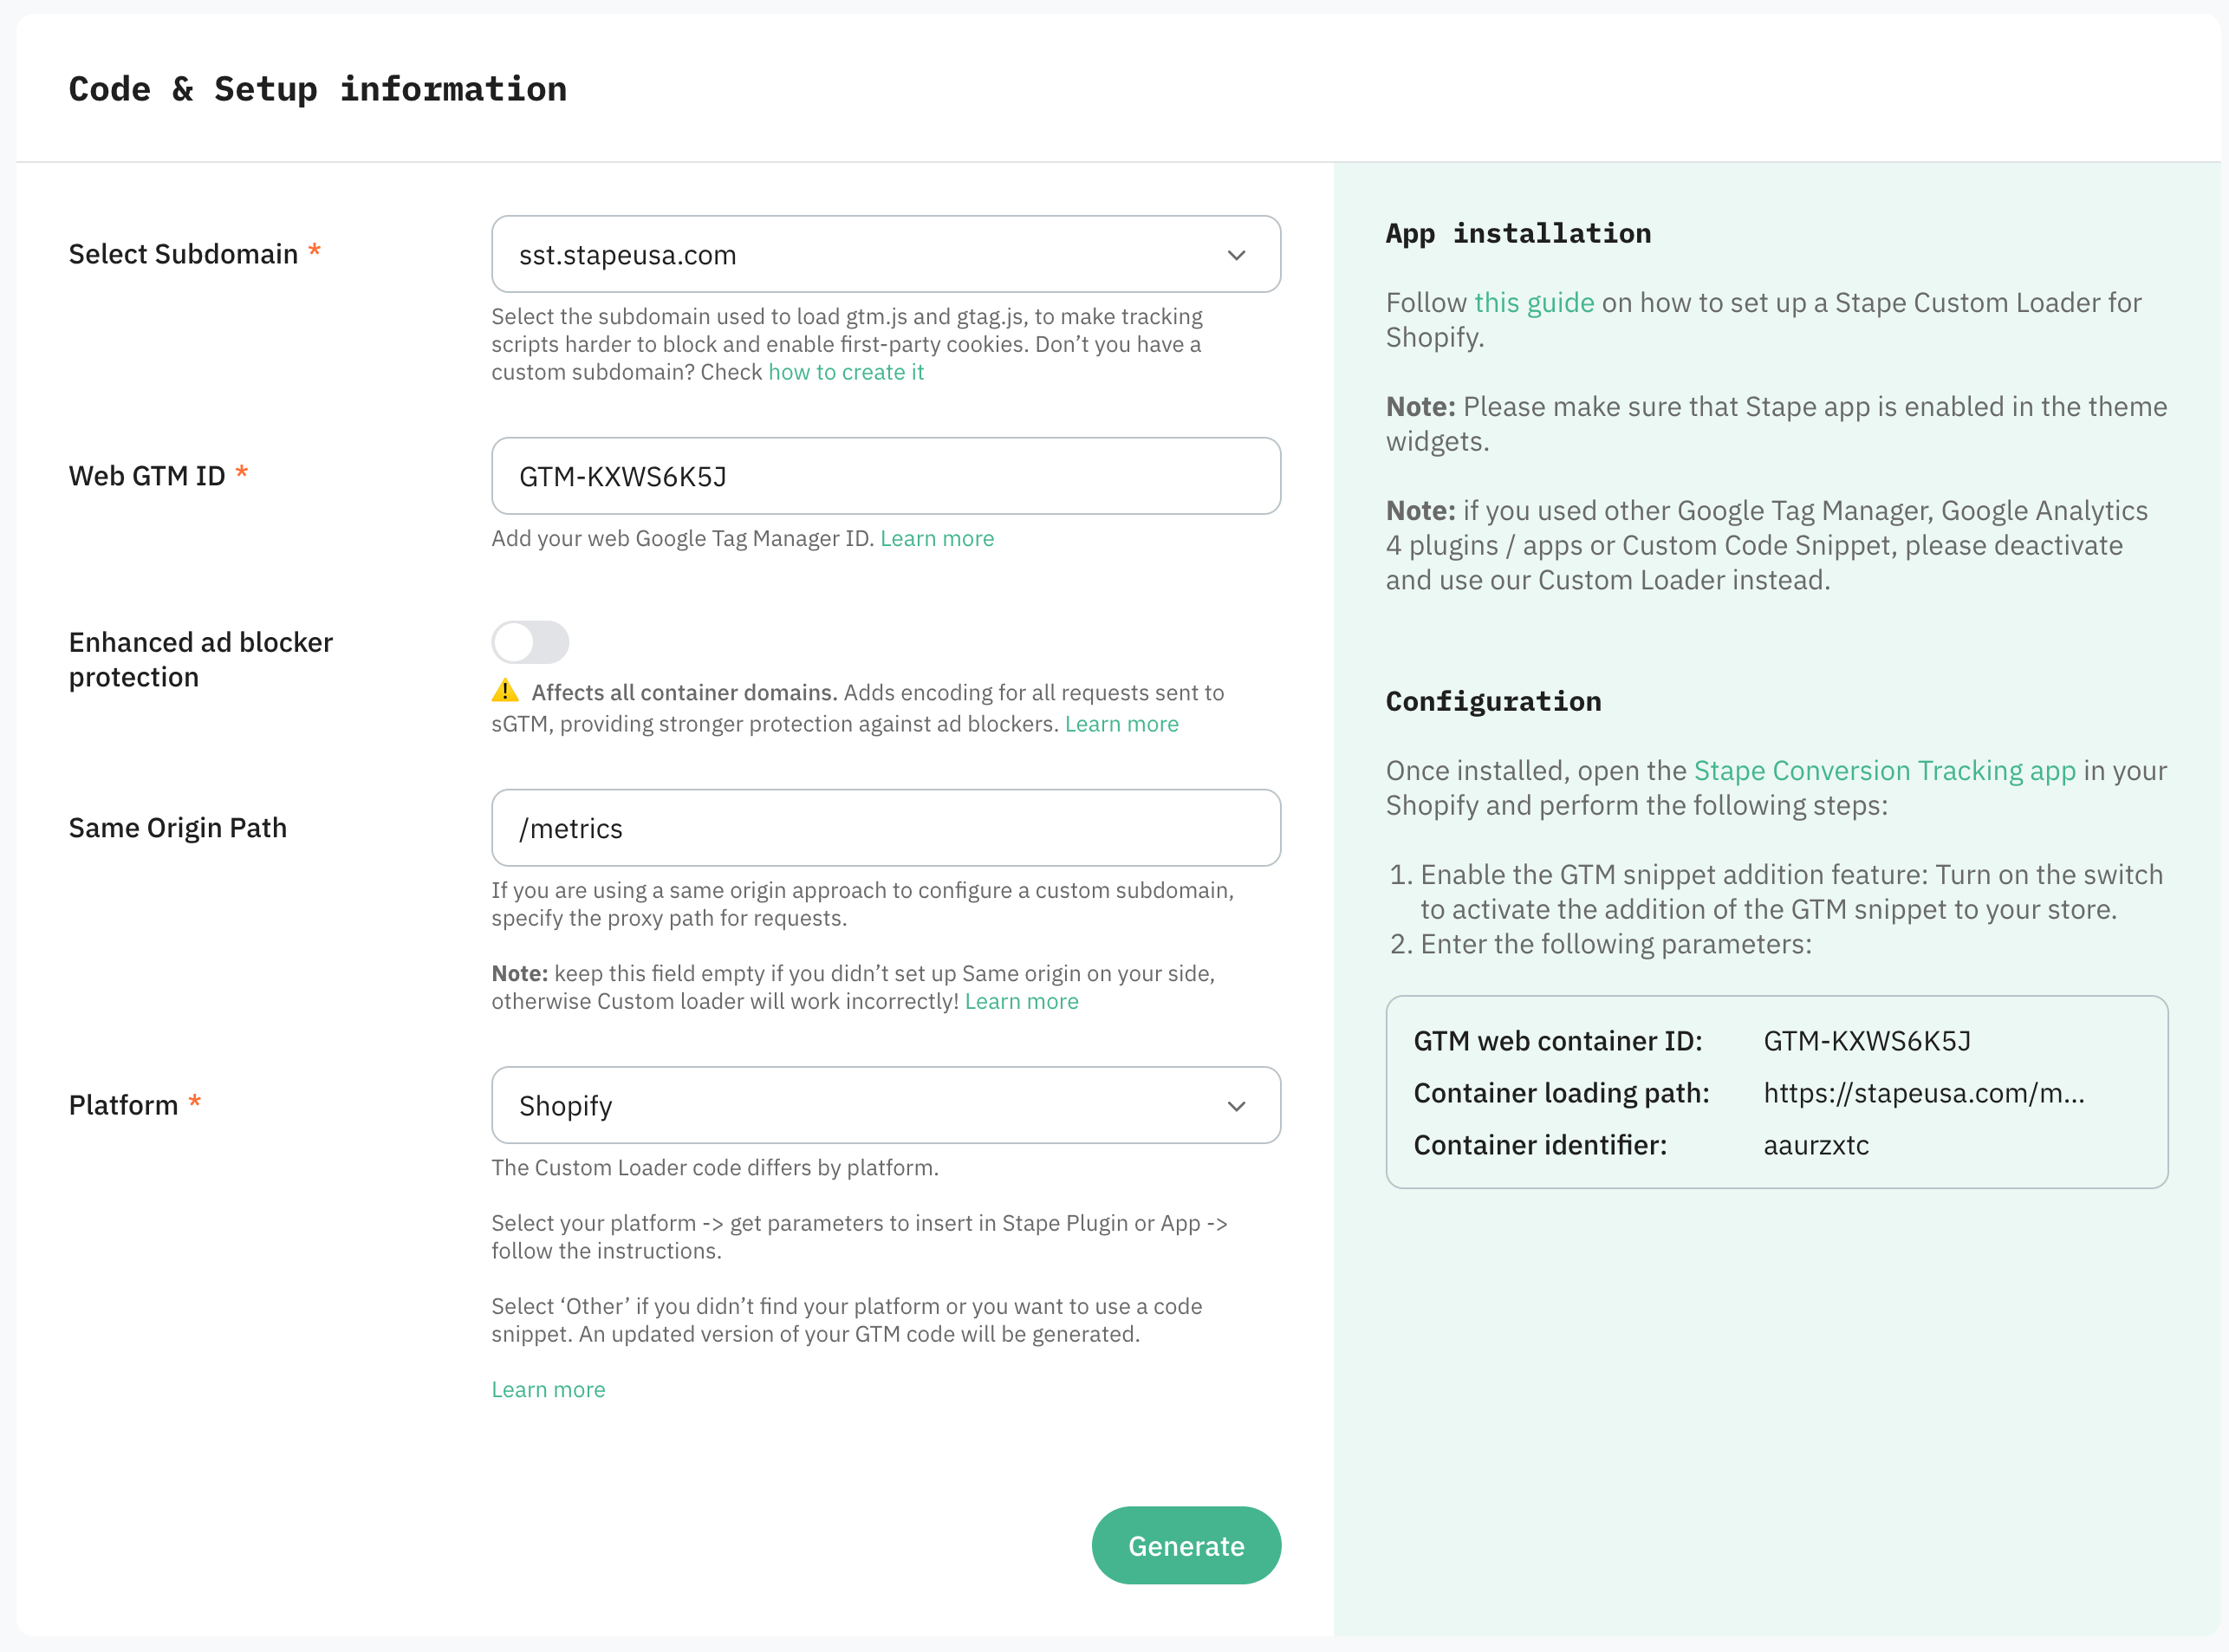
2.4. In the Code & Setup information section, configure the following settings:
- Domain - select one of the domains linked to your container.
- Web GTM ID - enter your web Google Tag Manager ID.
- Enhanced ad blocker protection - when enabled, all requests to your sGTM server are encrypted so ad blockers can’t block them based on request patterns. Learn more about the enhanced ad blocker protection.
- Same Origin Path - if you use the same-origin approach, enter the path here so both GTM and gtag.js load through it.
- Platform - Select Shopify and click Generate. You’ll get configuration and app installation instructions in the Configuration panel for your selected platform. Follow the app installation guide.
Step 3. Configure Stape's Conversion Tracking App for Shopify
Before you begin
If you want to use functionalities such as the Custom Loader and Cookie Keeper power-ups, or Customer Match, you need to have an sGTM container hosted on Stape. You will also need GA4 or Data tags configured in a web GTM. If you don’t have this, follow the Get started with sGTM hosting instructions.
How to set up the app
- Log in to your Shopify account.
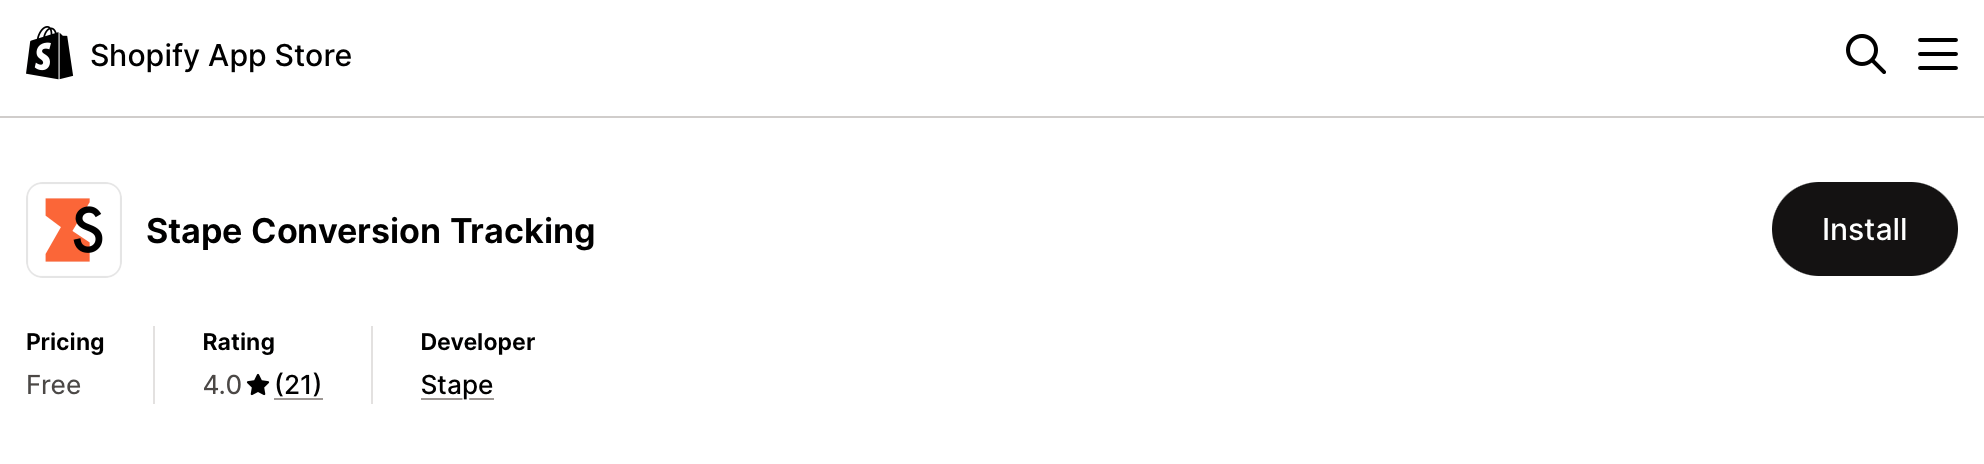
- Go to Apps and search for the Stape Conversion Tracking app.
- Click Install.
General
- Open the app and configure the General tab:
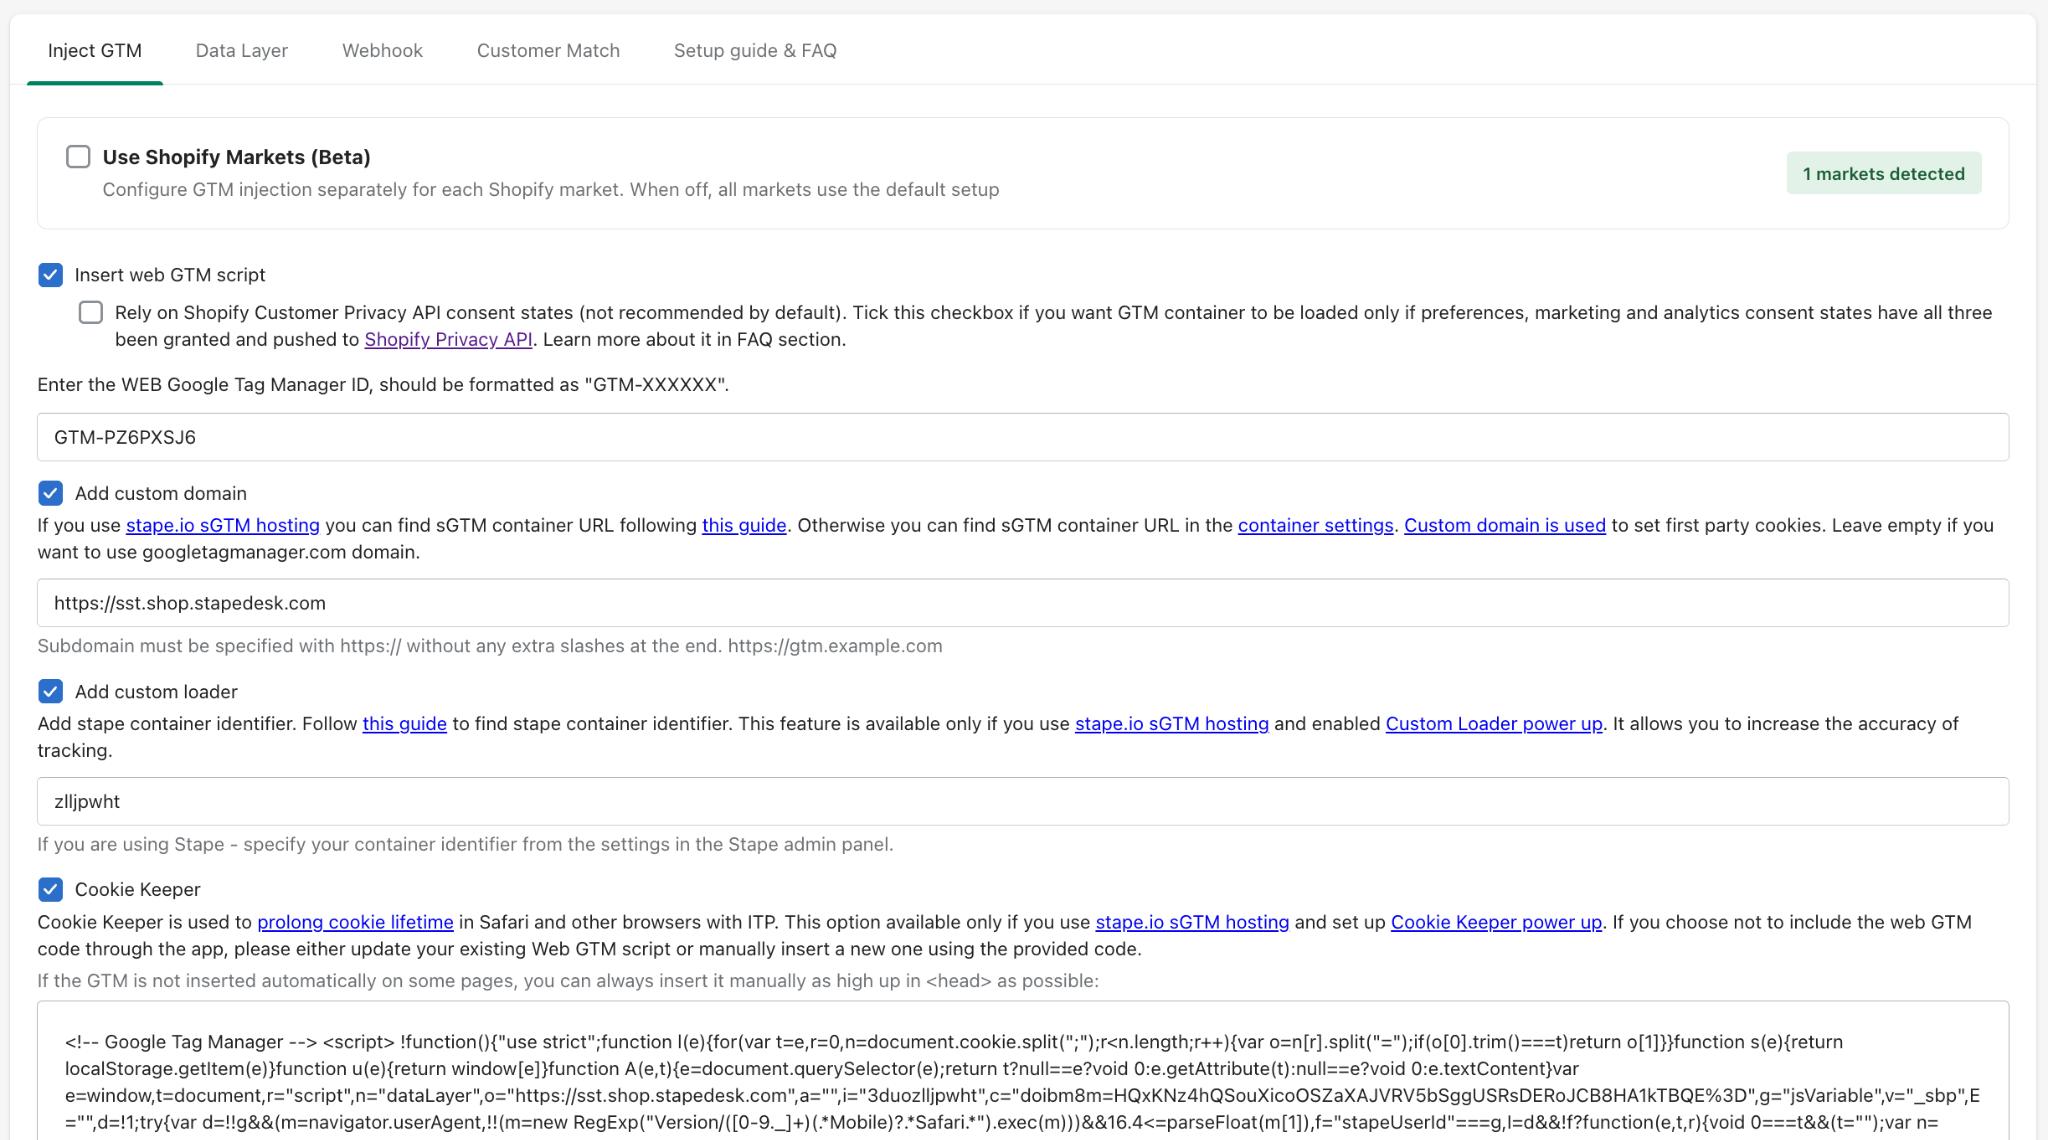
- Use Shopify Markets (Beta) – check the box if you have multiple Shopify markets. Using the feature, you can configure GTM injection separately for each Shopify market. If the feature is disabled, all markets use the default setup.
- Insert GTM snippet – automatically adds the snippet with JavaScript code to every page on your website.
- Enter the WEB Google Tag Manager ID – specify the Web container ID.
- Add custom domain – specify the custom domain (optional). In this case requests go through your tagging subdomain, so cookies stay first-party.
- Add custom loader – specify Stape container identifier (optional). The
gtm.js
- Select whether to use the Cookie Keeper. Cookie Keeper needs to be enabled in your Stape account to use it.
2. Click Save.
Data Layer
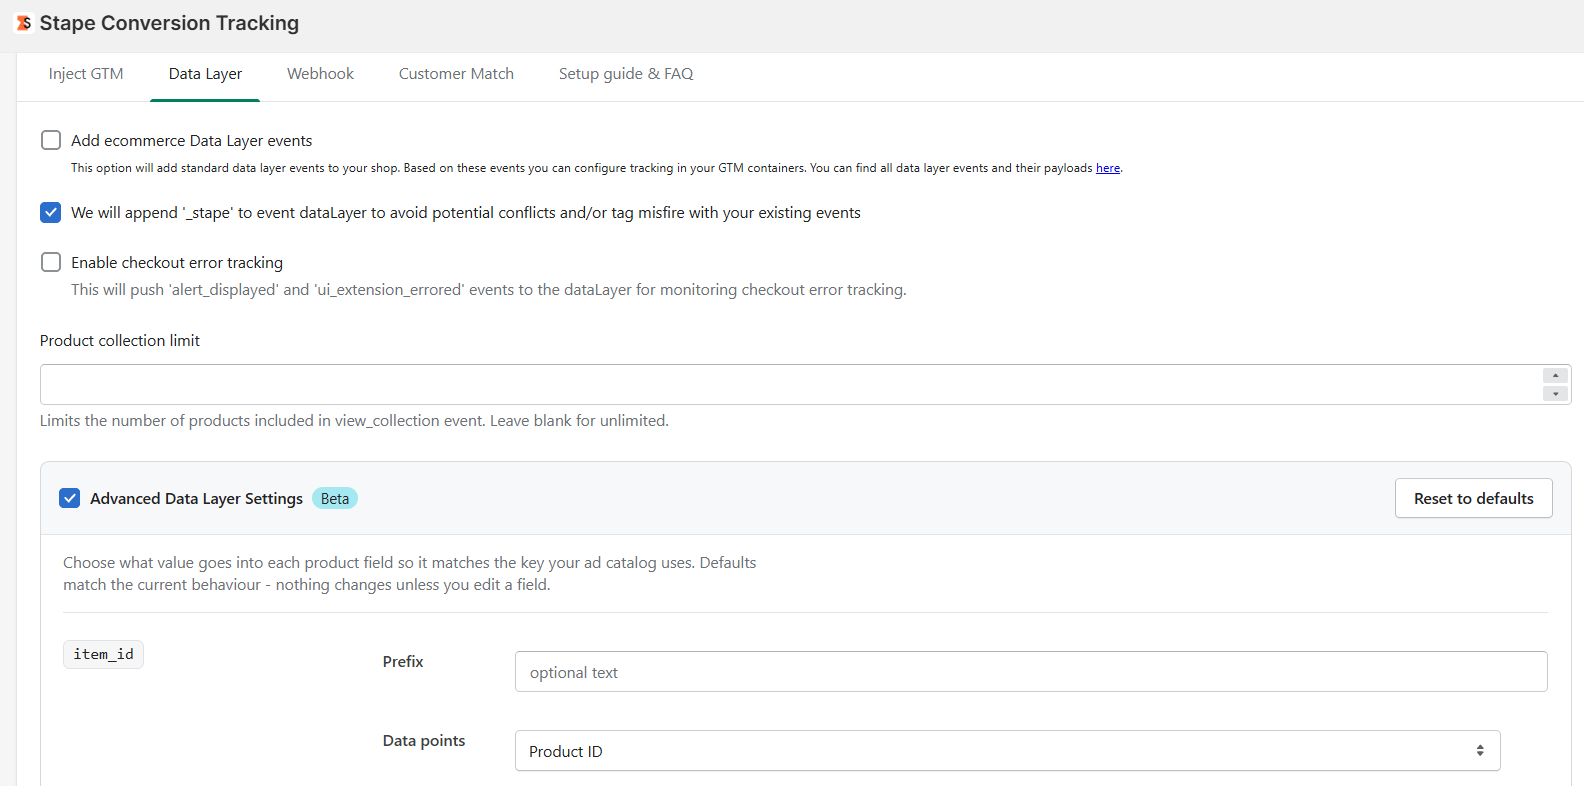
- Configure the Data Layer tab:
- Add ecommerce Data Layer events – add standard data layer events to your shop.
- Append '_stape' to event dataLayer – adds
_stapeto event names so they don’t clash with existing dataLayer pushes, potentially triggering your tags twice. When it’s unchecked, event names are pushed as per GA4 schema. - Enable checkout error tracking – enable dataLayer events that signify checkout errors to make debugging easier.
- Product collection limit – set the limit for products included in
view_collectionevent. - Advanced Data Layer Settings – allows you to customize how product parameters (
item_id, item_sku, item_brand, and item_category) are sent to match your ad catalog keys. This allows you to add a Prefix, combine Data points, or change the default Sources.
2. Click Save.
3. Activate the Data Layer.
3.1. Activate the Add ecommerce Data Layer events checkbox and configure additional settings.
3.2. Save changes.
3.3. Copy the code for the custom pixel in the box below on the data layer tab and follow the instructions to add and activate it.
In the Customer privacy section, under Permission spoiler, please make sure to select Not required. The code snippet only generates the Data Layer; it doesn't set any cookies or report any data to third parties.
In the Data Layer tab of the app, there is also an option Log events to console (Dev), which is a debugging option for developers and store admins. When enabled, it logs eCommerce events in the browser console, shows event payloads sent to the GTM/Stape server container for verification, and helps debug Data Layers.
This option is for development only and should be disabled in production to avoid unnecessary console logging.
Webhooks
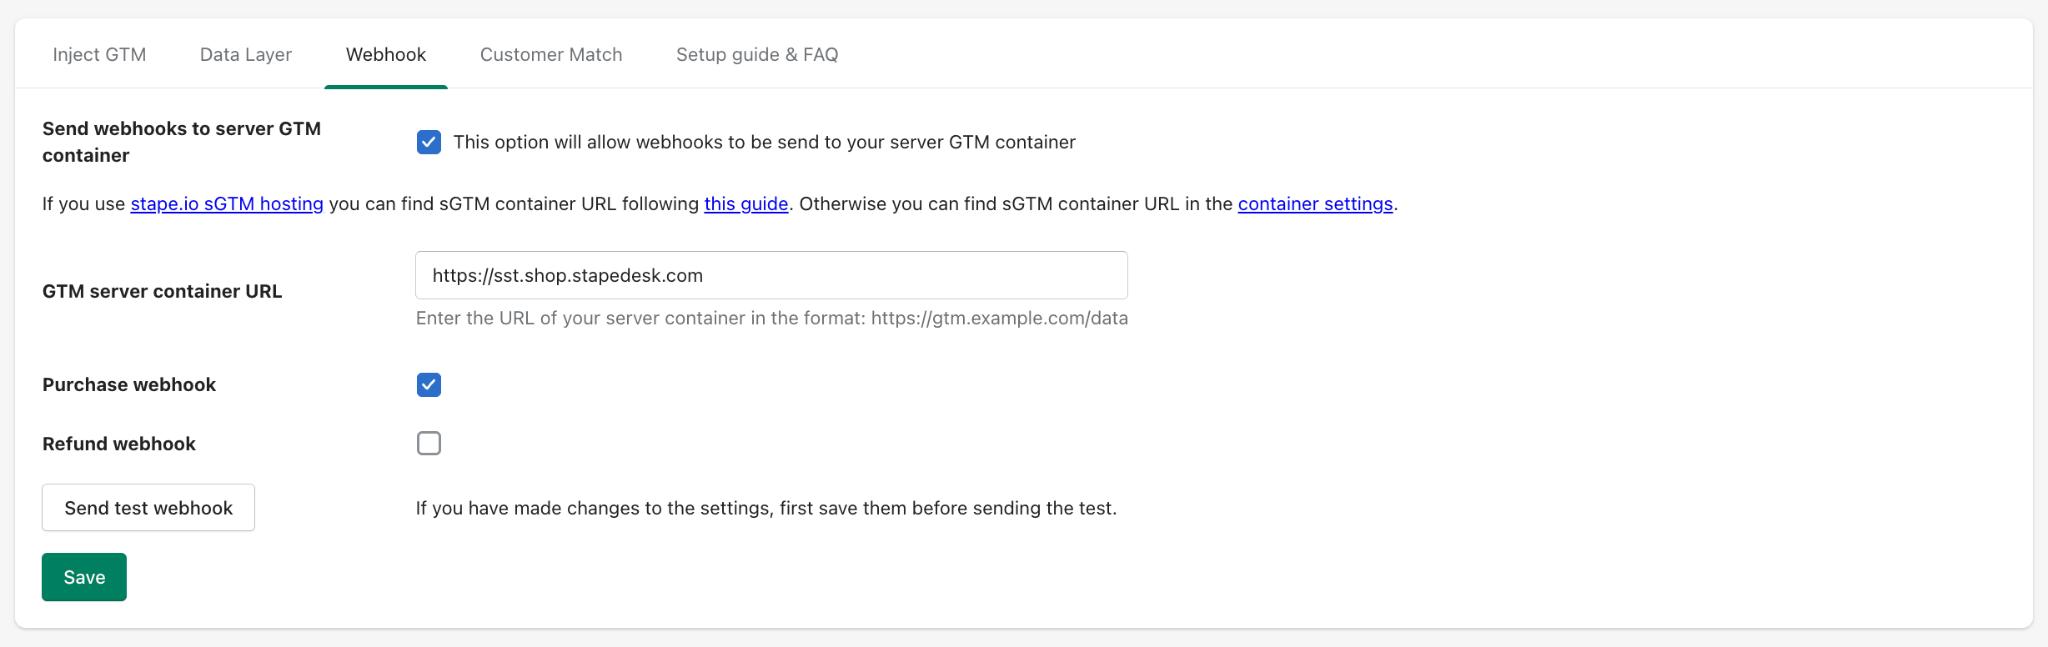
- Configure the Webhooks tab. Webhooks are useful for events outside the website (for example, phone or offline sales).
- Enable Send webhooks to sGTM container.
- Add your GTM server container URL.
- Choose the webhooks:
- Purchase webhook – send a purchase event when a new order is created.
- Refund webhook – send a refund event when an order is refunded.
2. Click Save.
Note:
Customer Match
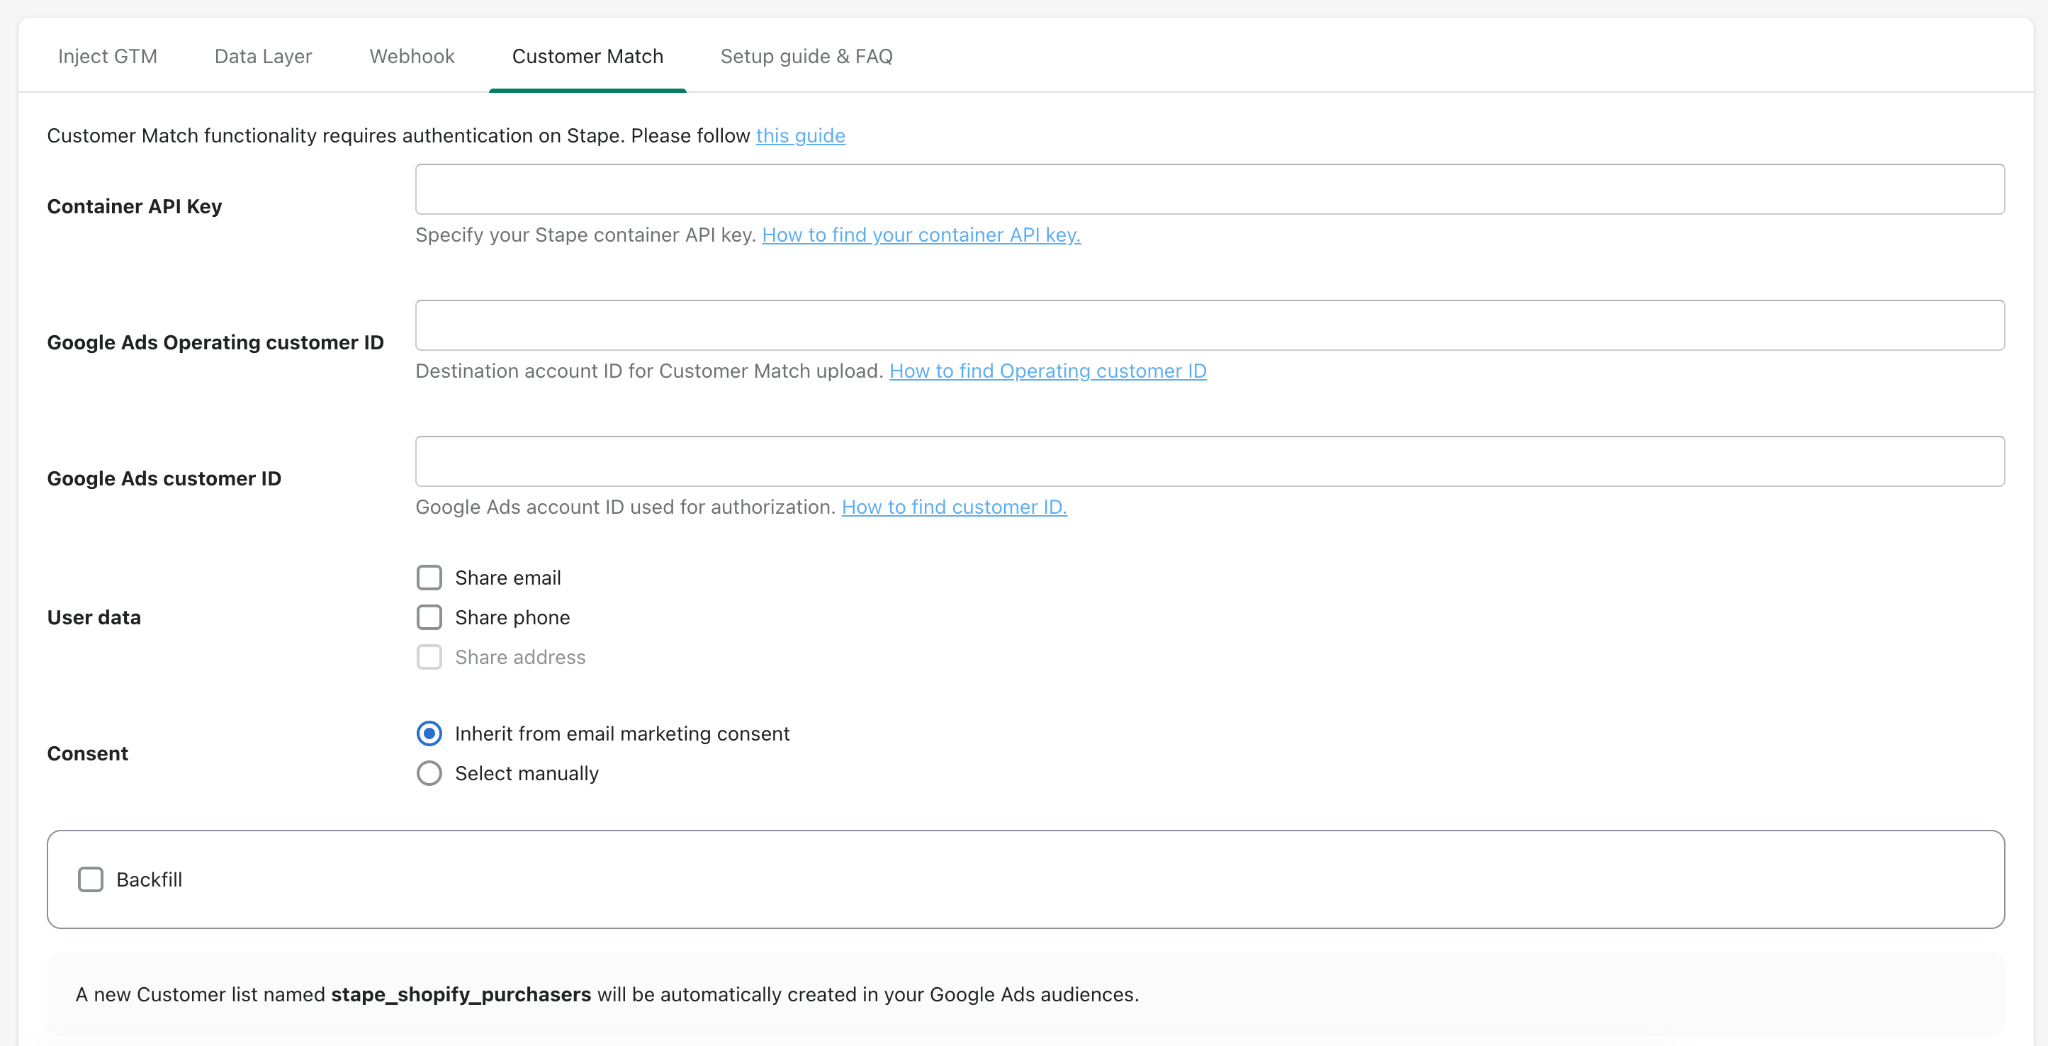
- If you’re using Google Ads, configure Customer Match:
- Container API Key – specify your Stape container API key.
- Google Ads Operating customer ID – specify your operating customer ID.
- Google Ads customer ID – specify your customer ID.
- Select which User data to share.
- Consent – select whether to inherit the consent from email marketing, or set it manually.
- Backfill – if checked, the app scans your existing database and retroactively syncs all past contacts, leads, or customers who already match your configured trigger criteria/statuses into the Google Ads Customer Match list.
2. Click Save.
Testing
Debugging a GTM download
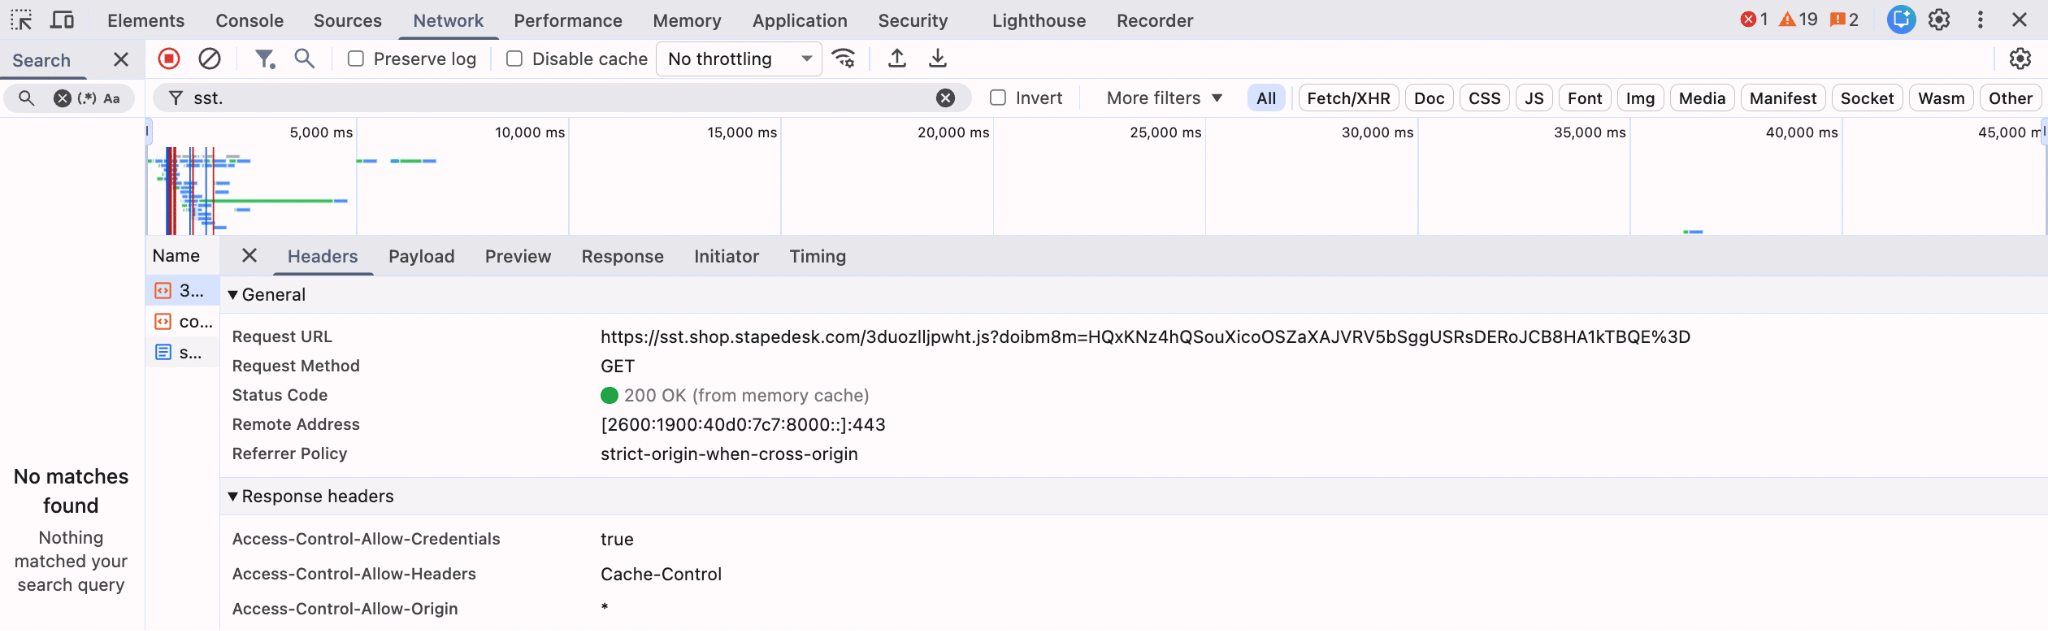
After activation or any changes, it is recommended to check if your container is actually uploaded to the site.
To do this, go to any page on your site, open your browser console, and in the network tab, filter by your subdomain/tagging server URL. You should see a request like in the following screenshot with a response status 200:
Debugging data layer checkout events
With events that happen before the checkout page, everything works like on any other platform - you can launch a preview of your GTM web container and find all the events you do:
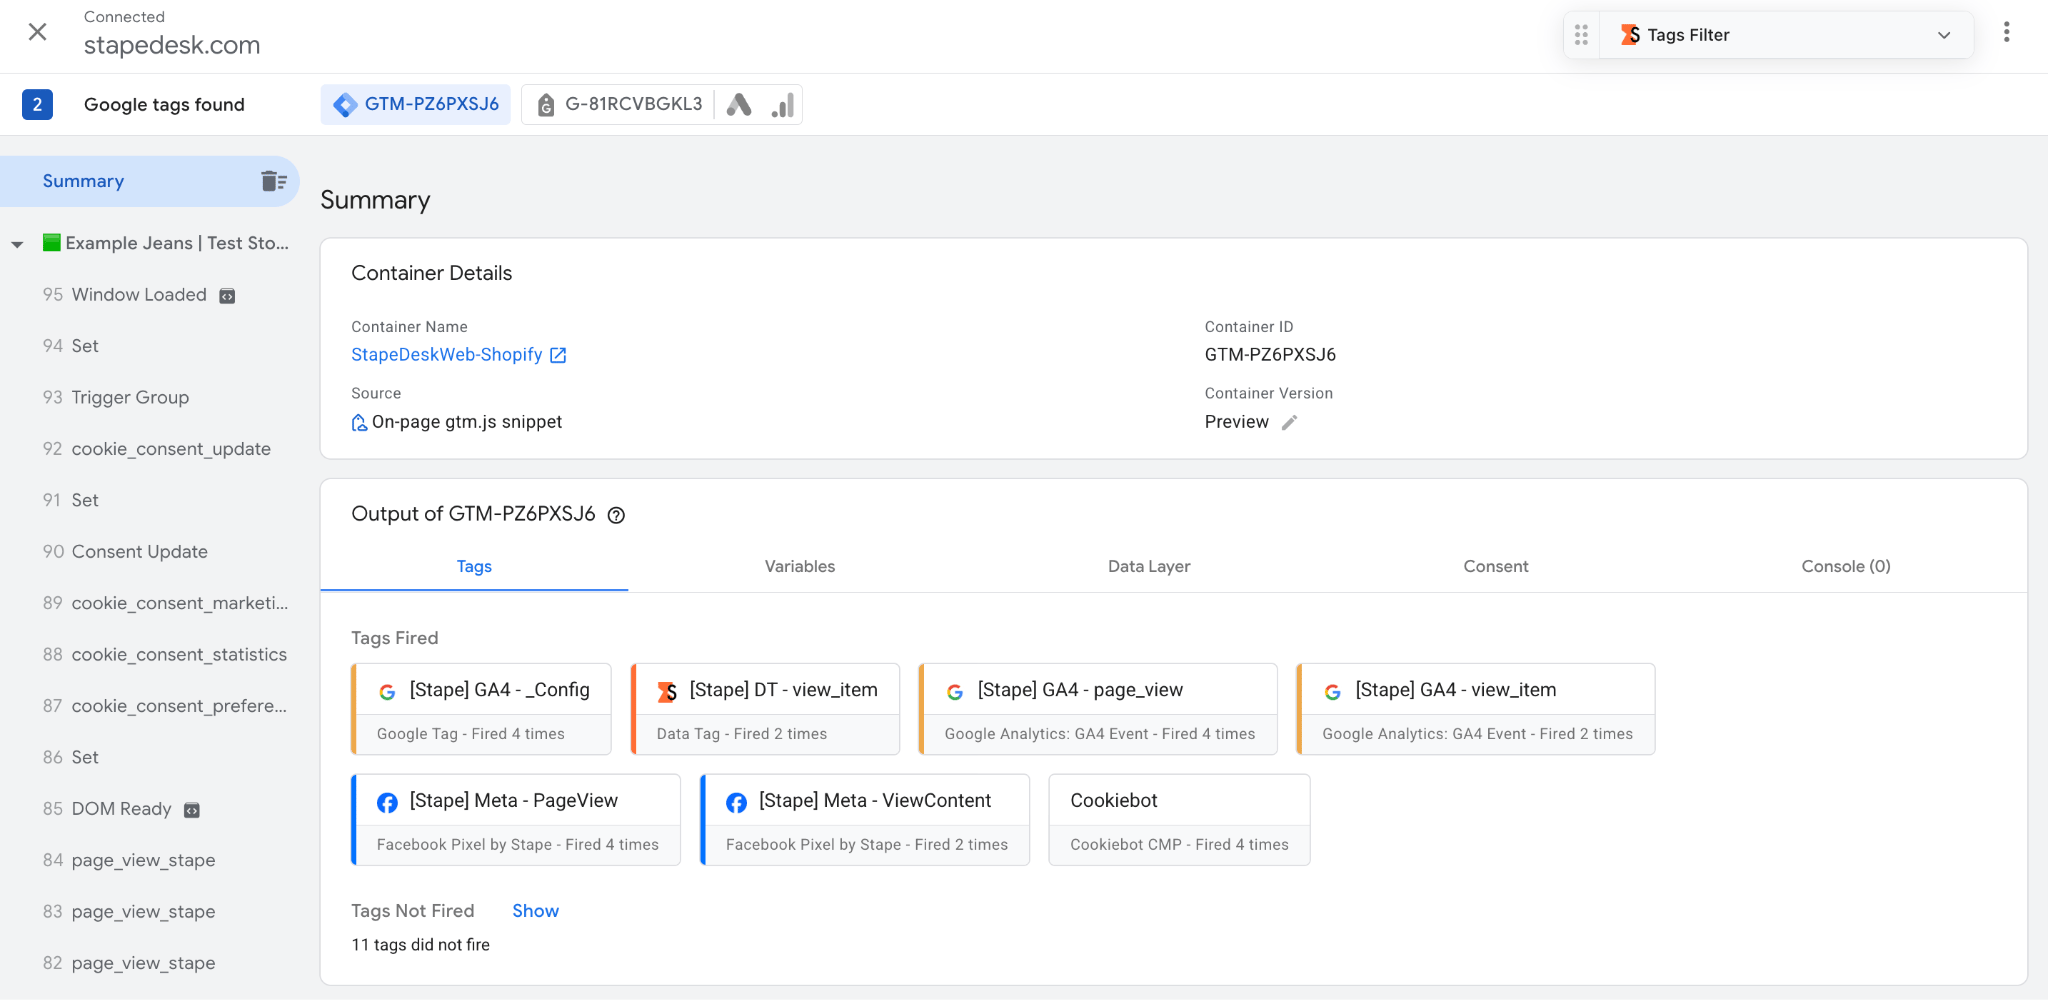
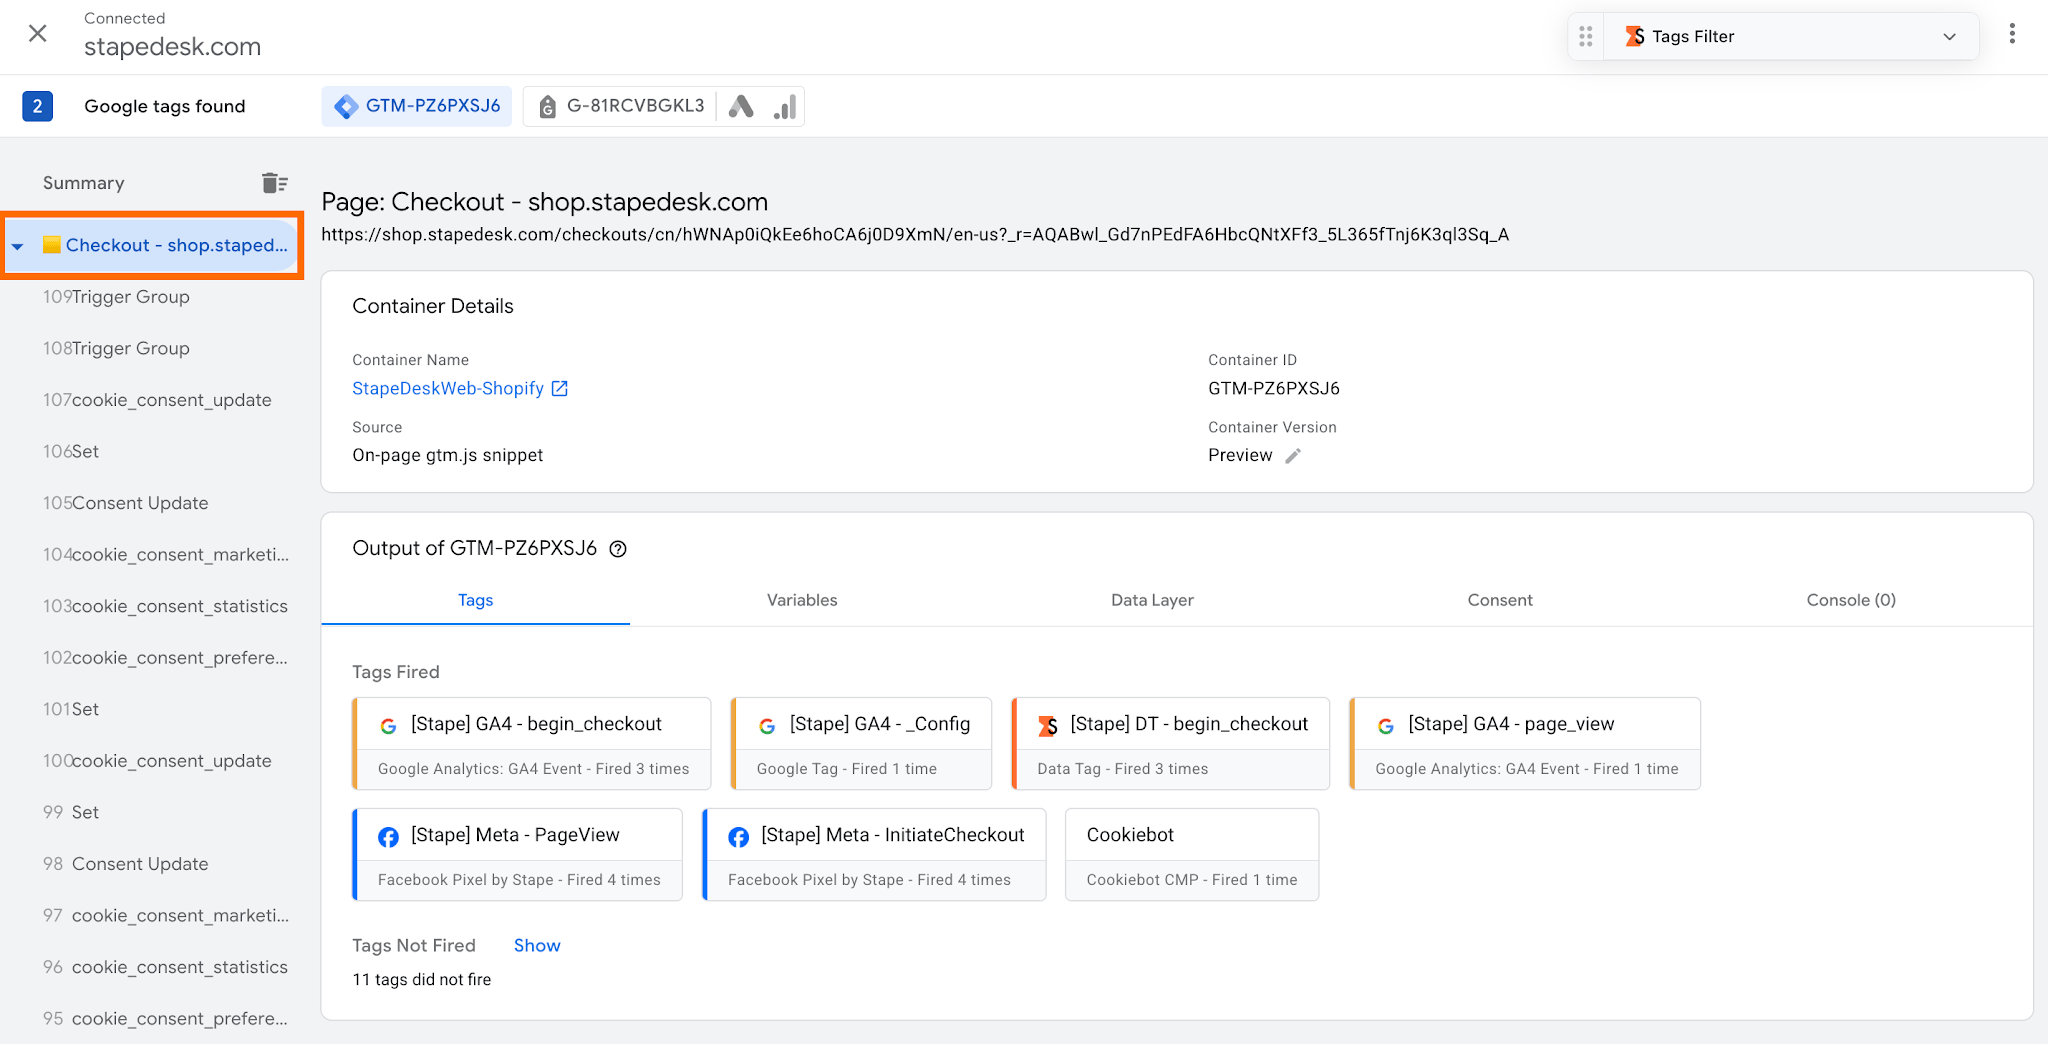
The checkout events won't be displayed in GTM Preview due to the isolated environment on these pages that blocks unrestricted DOM manipulation or script injection, including the GTM snippet.
But you can manually insert the snippet on the checkout page using the Stape GTM Helper Chrome extension:
- After running Preview Mode in GTM, turn on the toggle Shopify Sandbox dataLayer in the Settings tab of the extension.
- In the tab Inject GTM, click Enable injection, add your domain name, and GTM ID. Save changes.
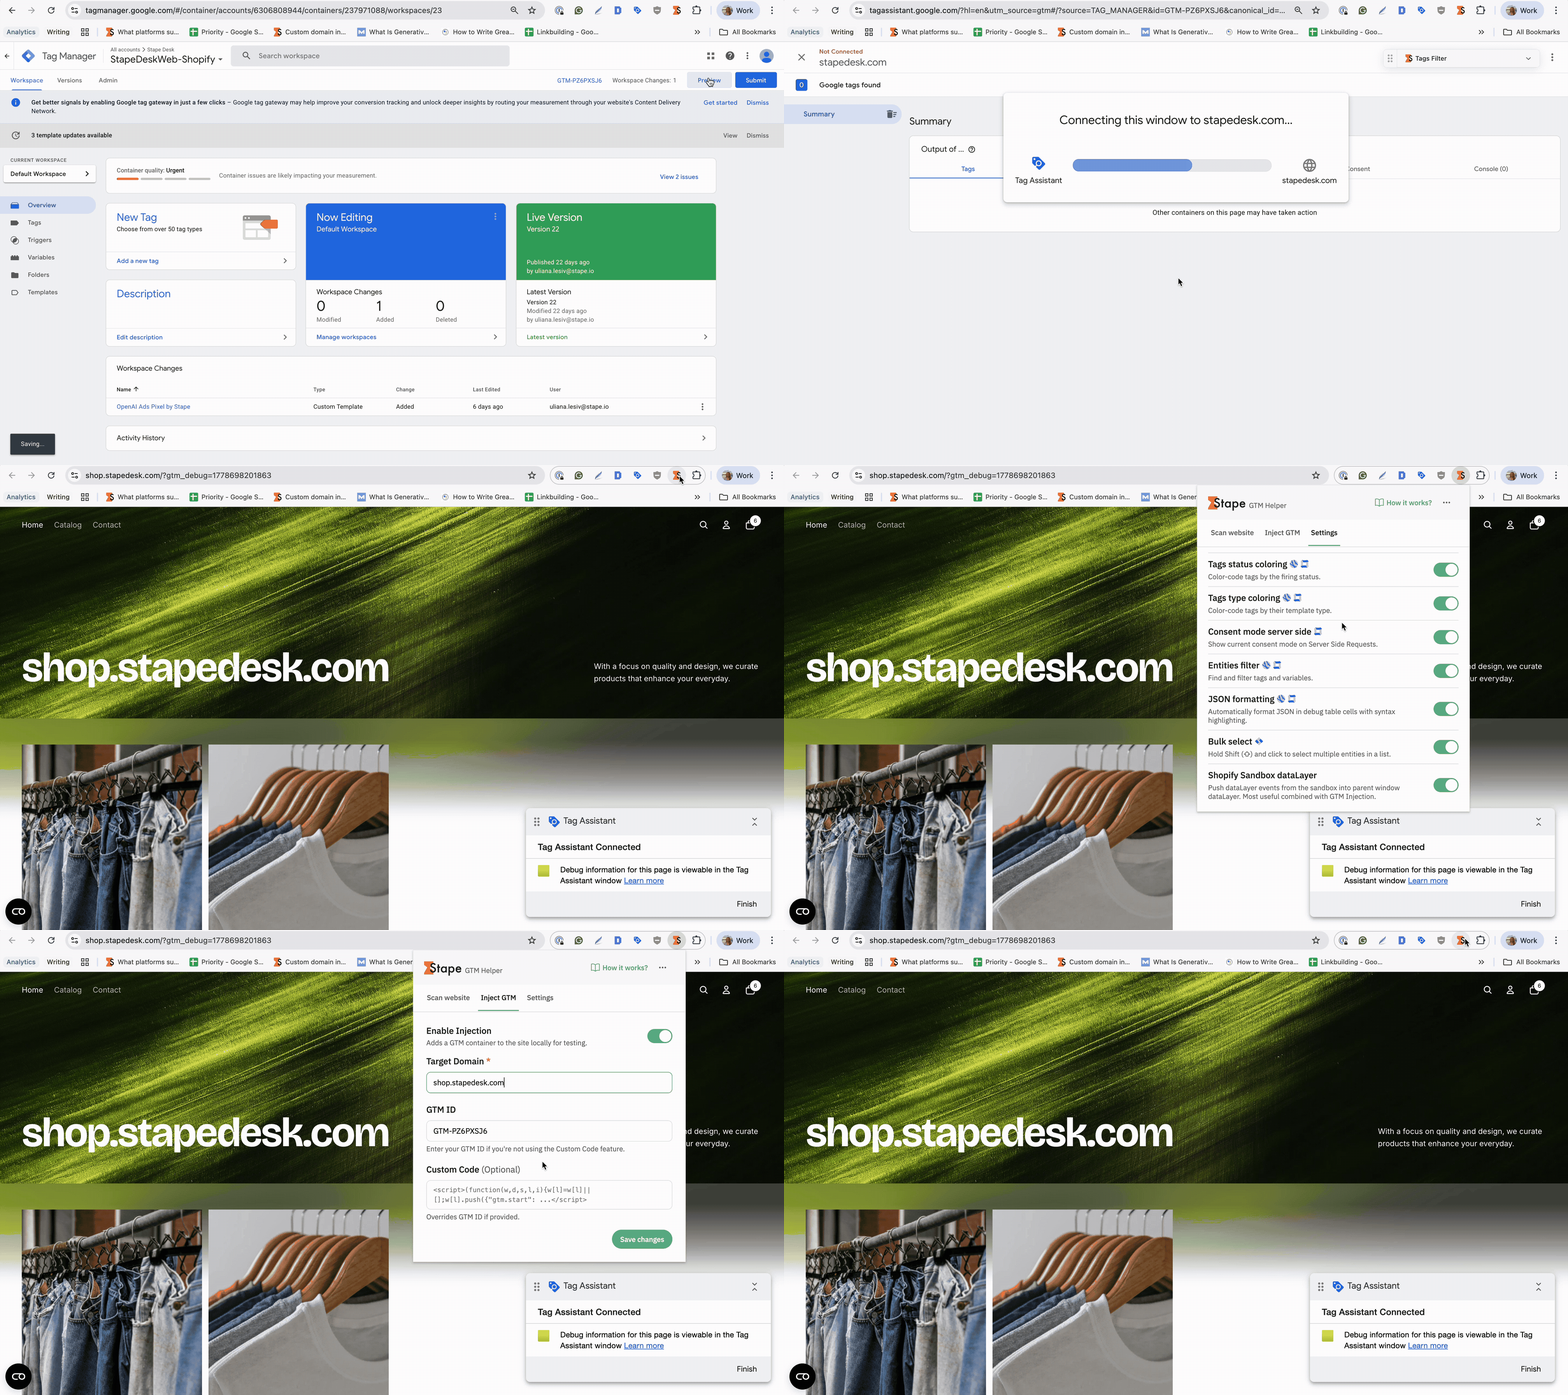
Now, the events on the checkout page will display in GTM Preview.
Step 4. Download and Import container templates from our GitHub
4.1. Download GTM templates for Shopify on our GitHub.
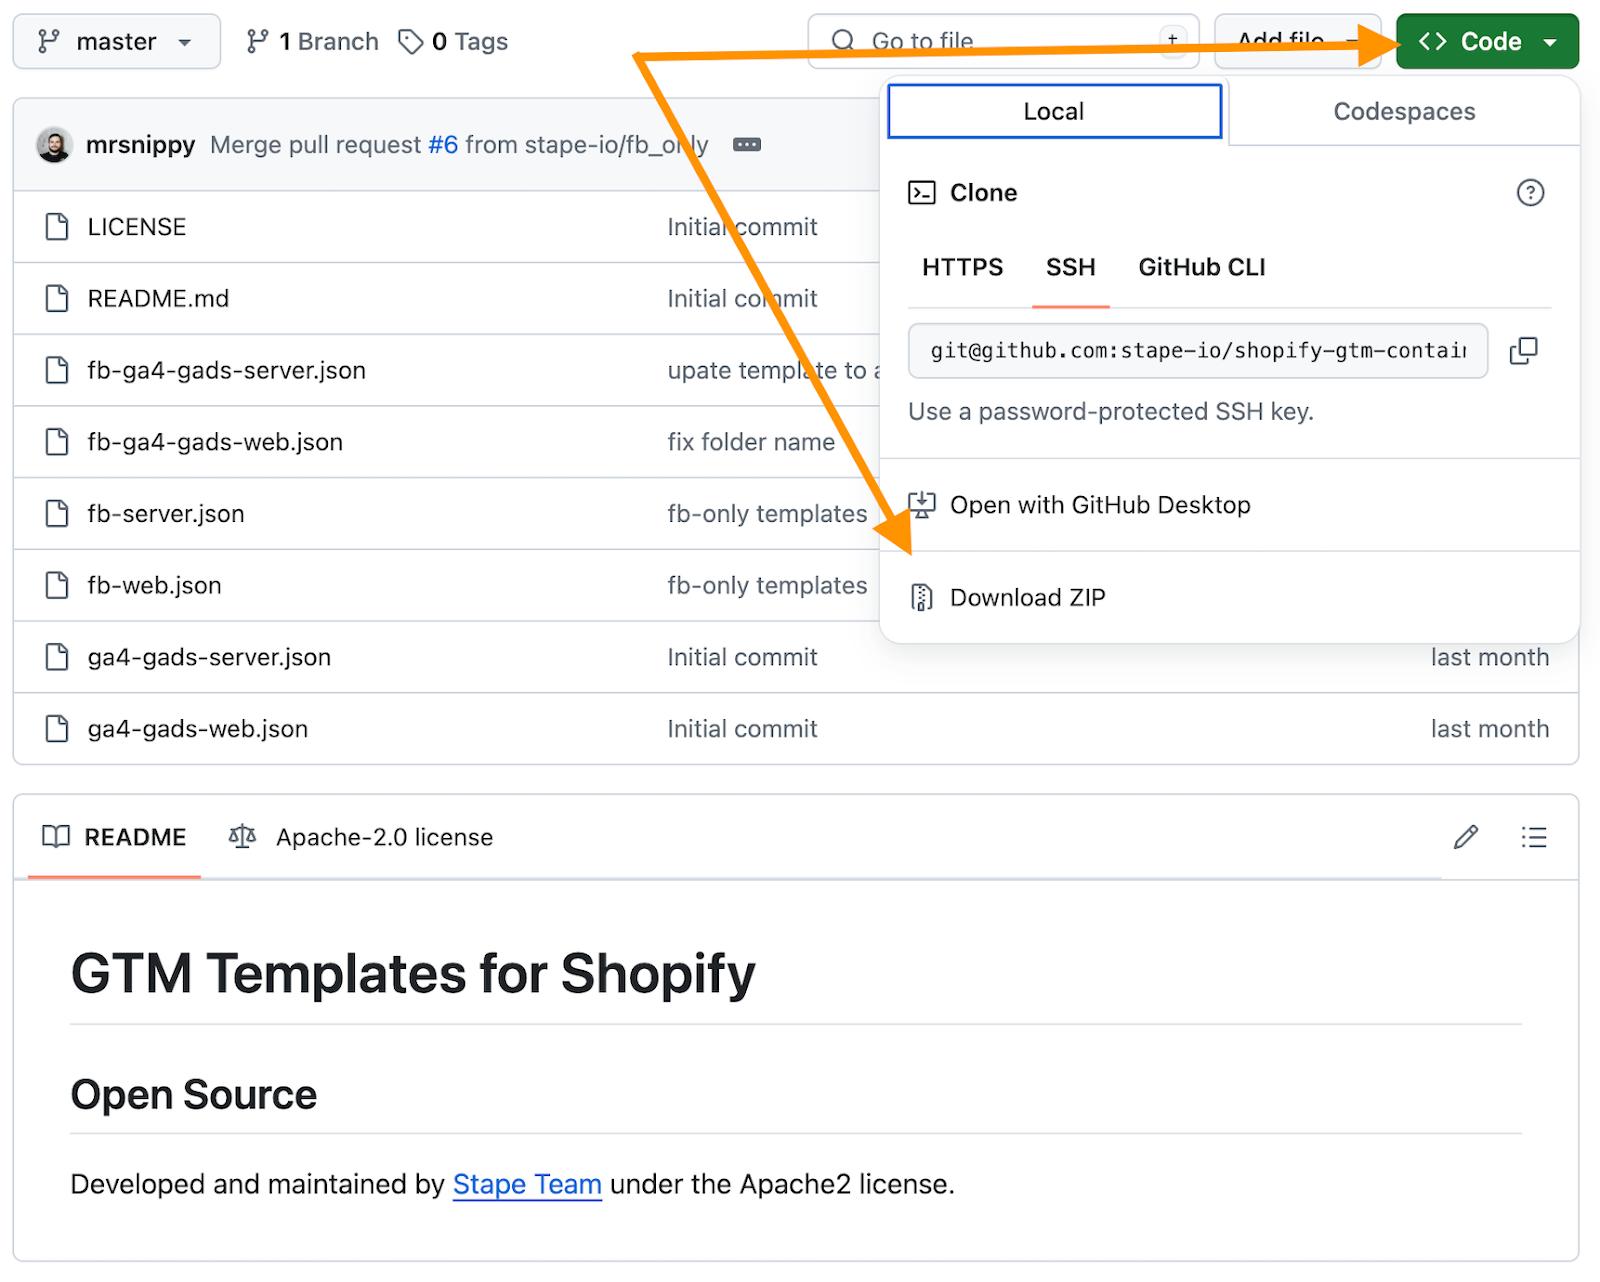
4.2. You should import the templates in both your web and server container on GTM (process is the same across the two). You need to go Admin → Import Container:
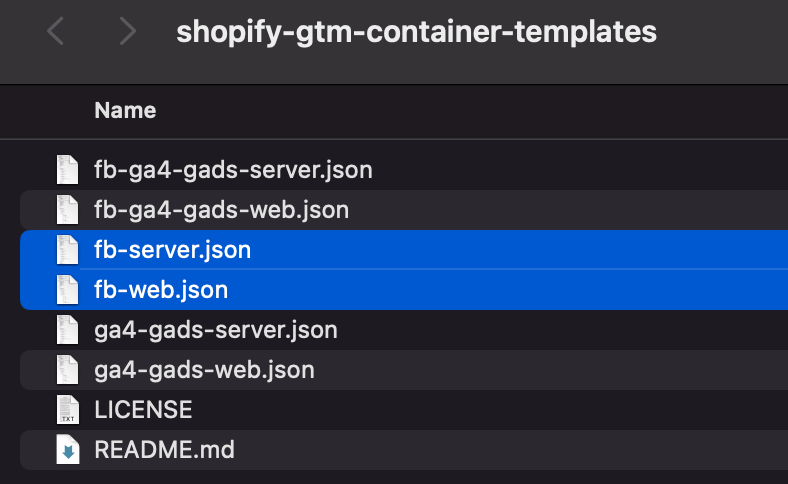
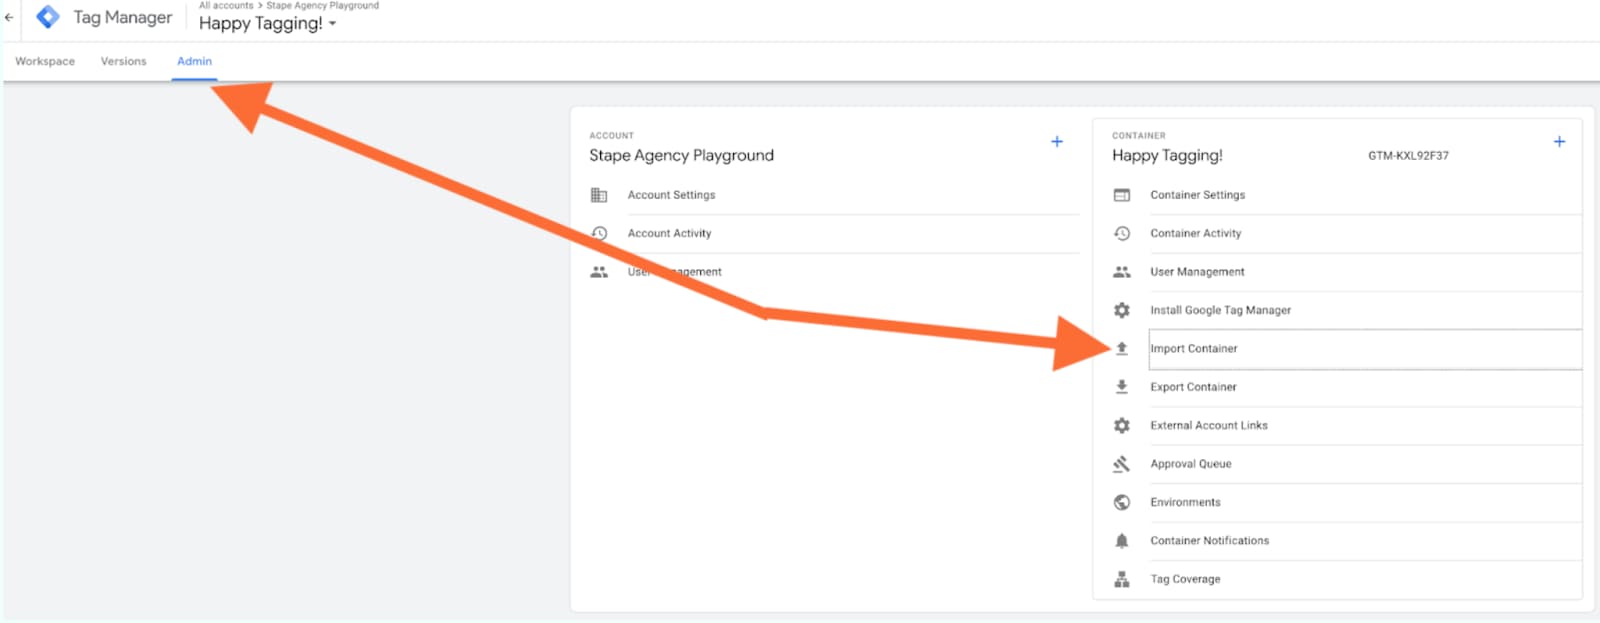
4.3. Select your template file (make sure the template matches the container type - web/server).
4.4. Pick a workspace for this import (you can create a new one for this specific purpose).
4.5. Select Overwrite or Merge.
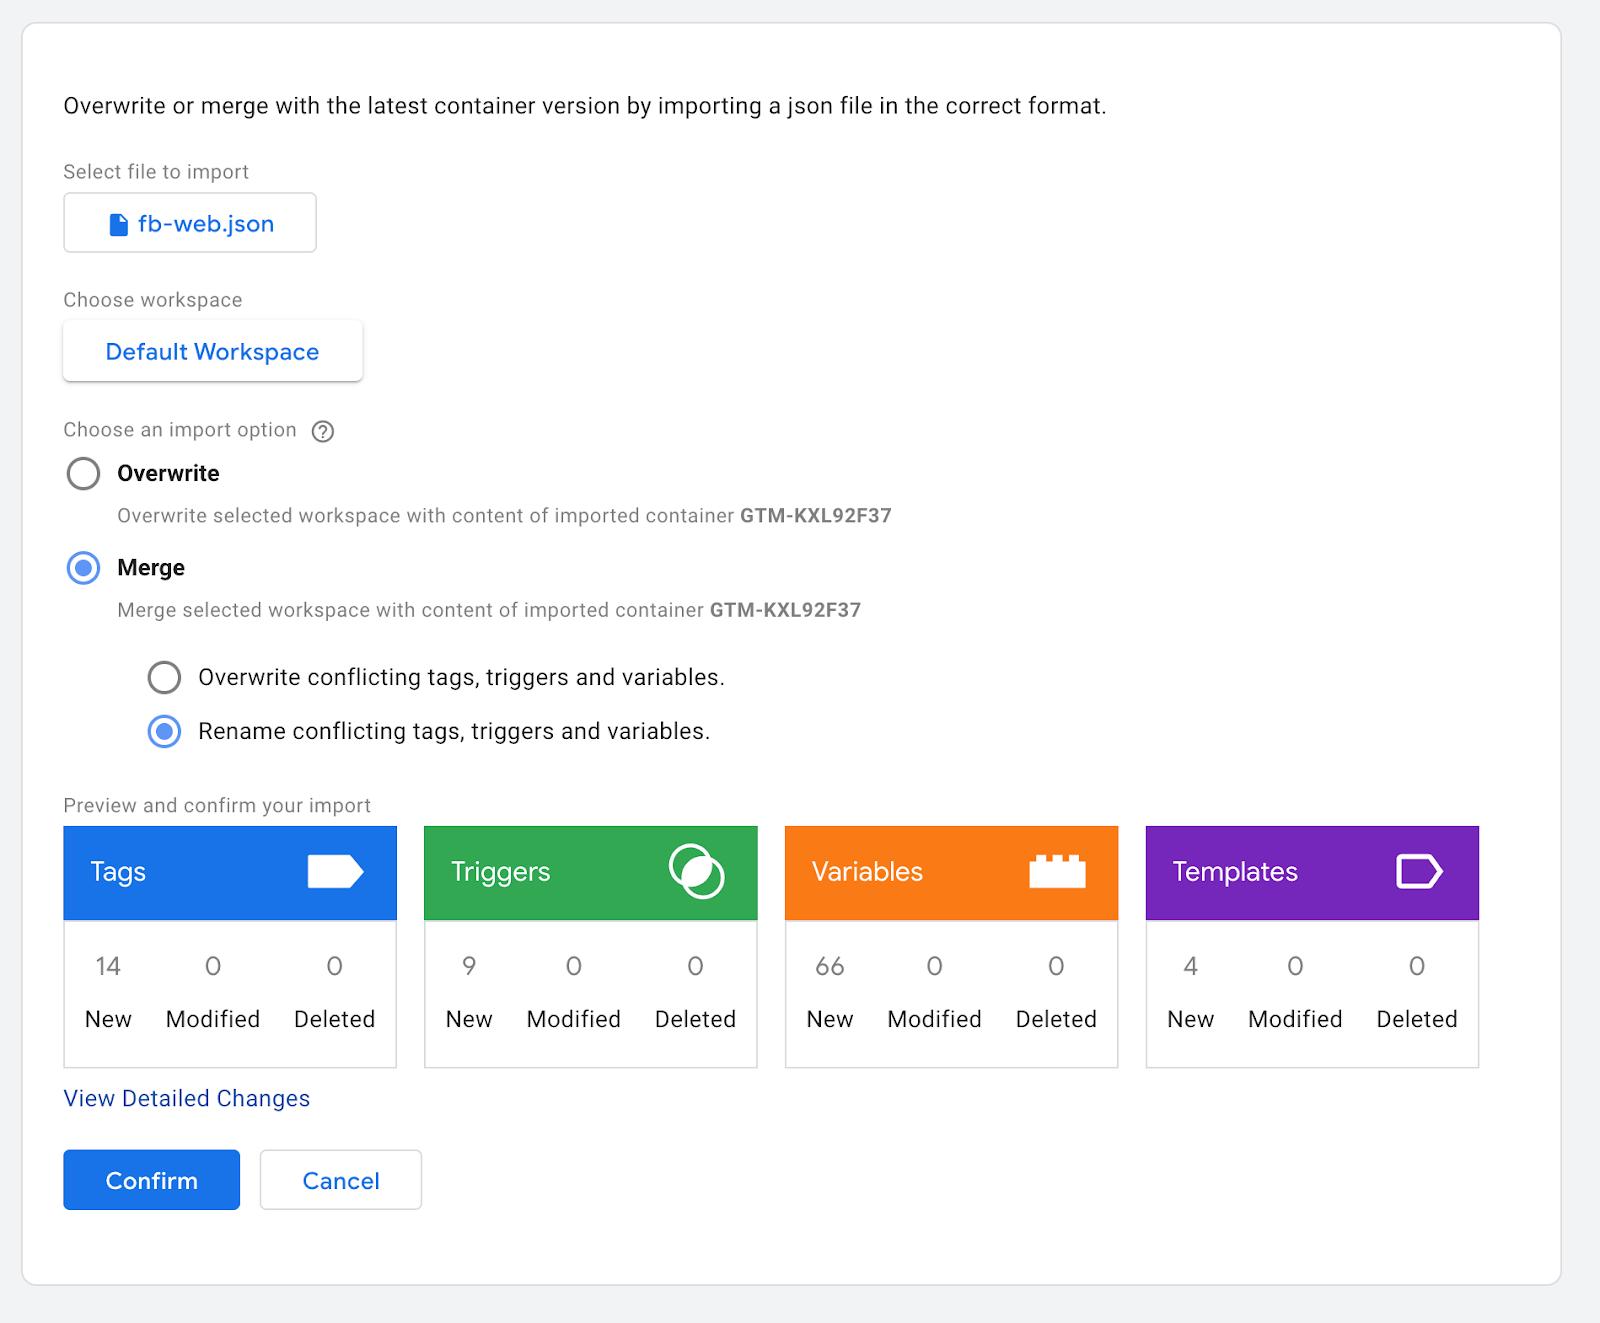
| “Overwrite” option should only be used in a fresh, empty container or if you are absolutely certain you want to do it. For this demo we’re using Merge, with “Rename conflicting tags, triggers and variables” option selected. This way, if there are any conflicts - GTM will just rename the tags, thus not touching any of the existing entities you have in your container. |
Step 5. Сonfigure GTM container templates
5.1. Templates are fully built, so triggers, payloads, and event names are all taken care of for you.
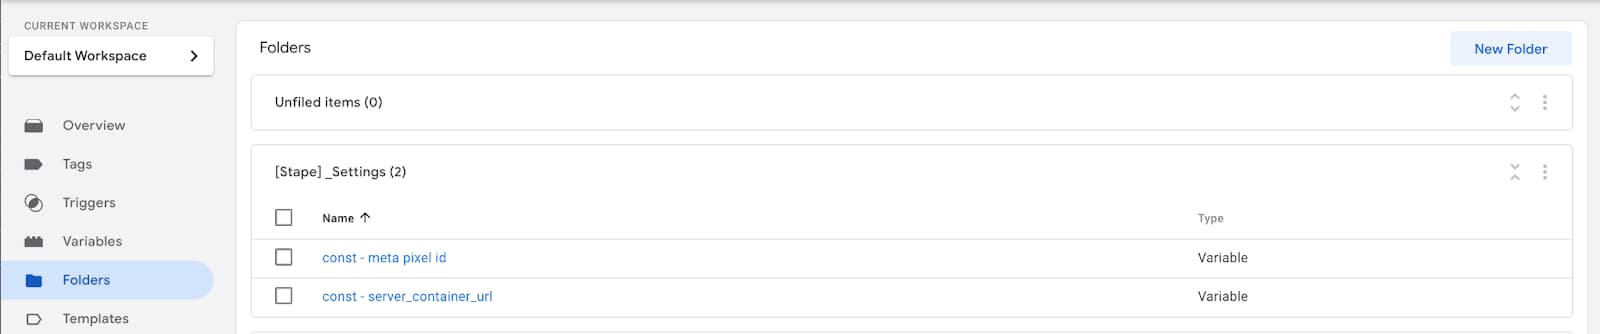
You just need to input your specific destinations, ids, API keys etc. We’ve tried to make it as comfortable as possible, so in both containers (web and server), you will find a folder called “[Stape] _Settings”.
Web
Server
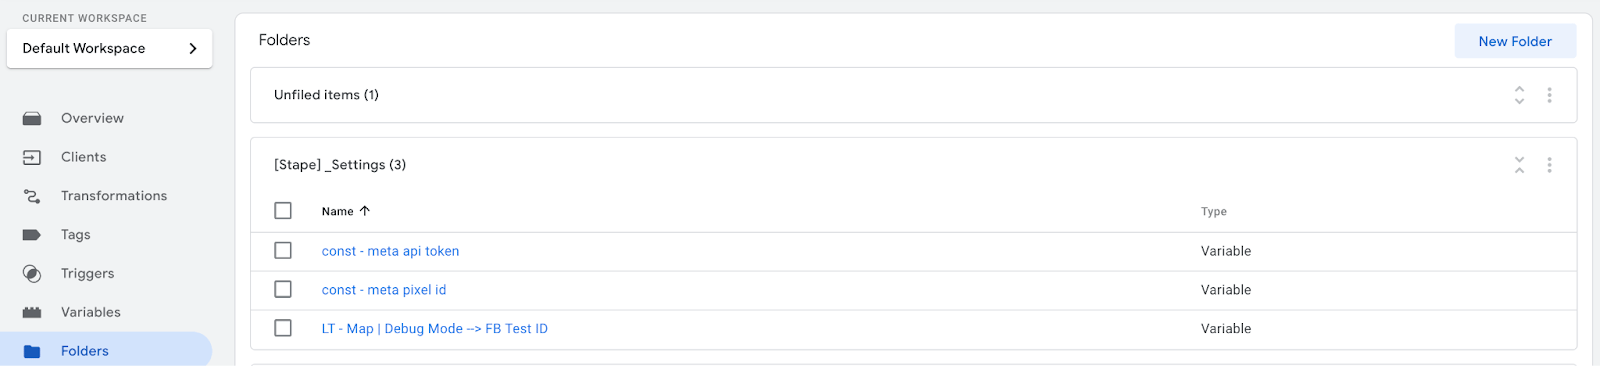
All these variables are already referenced in tags that use them; you just need to give them proper values, for example:
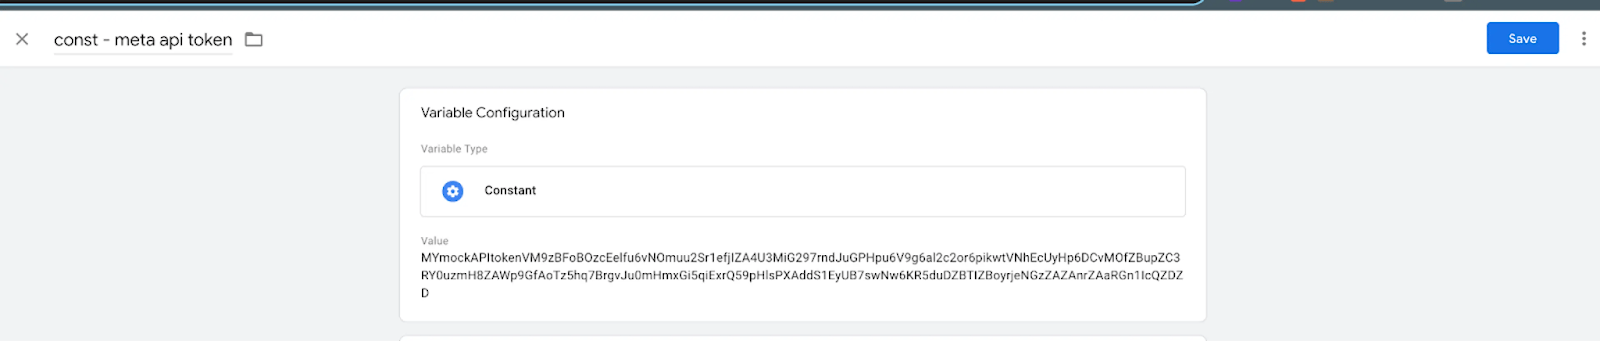
5.2. Pixel ID and API token can found in your pixel settings:
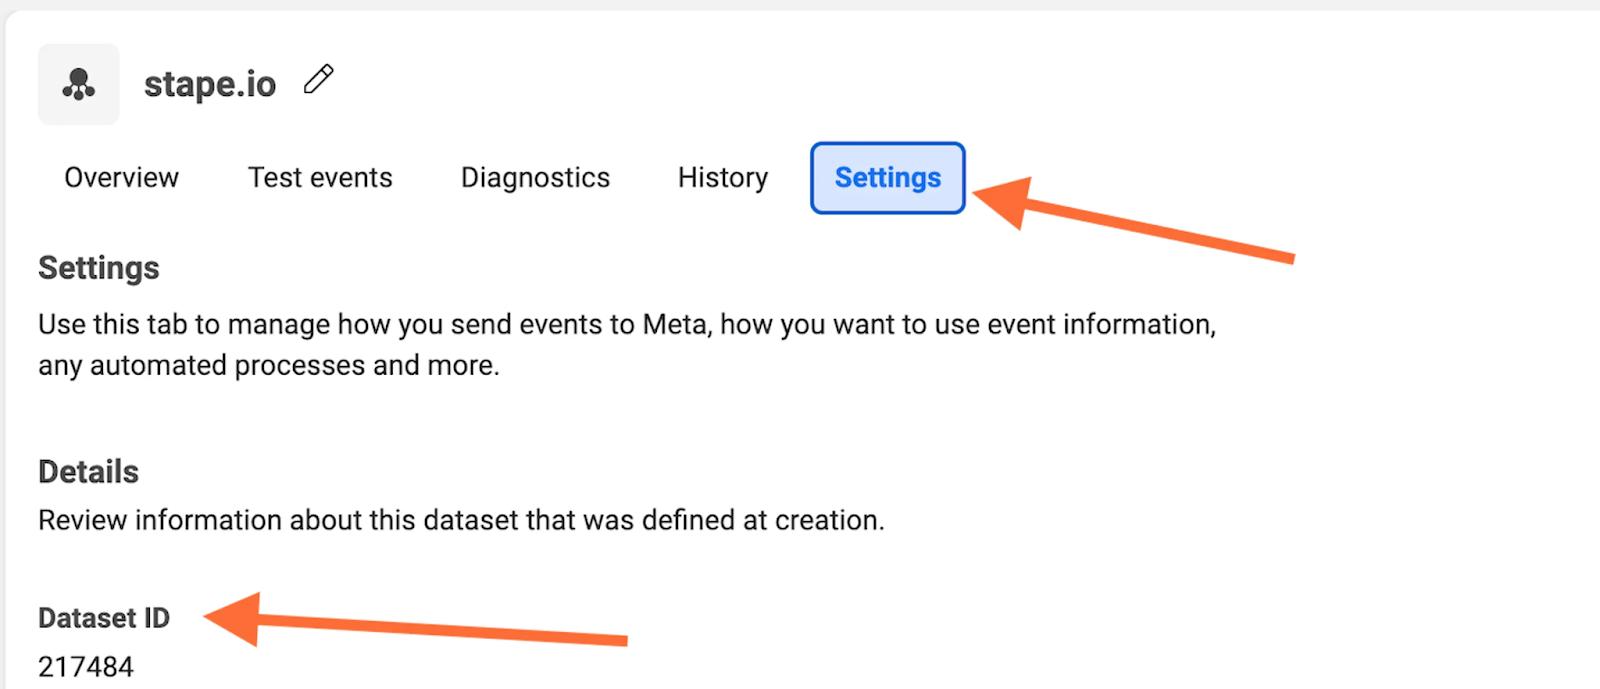
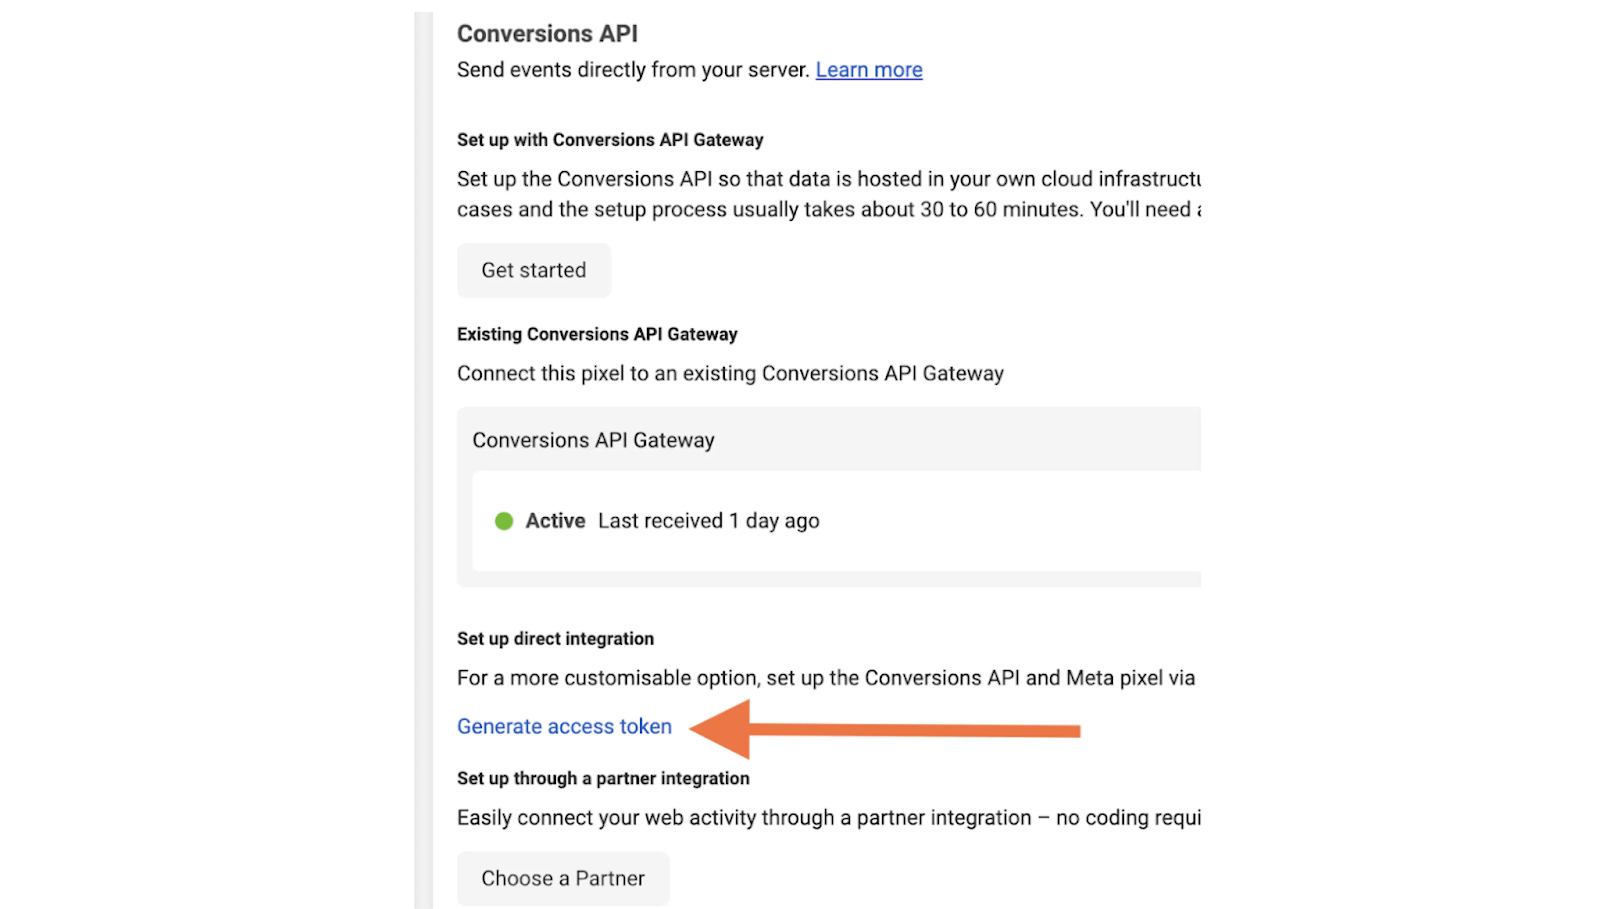
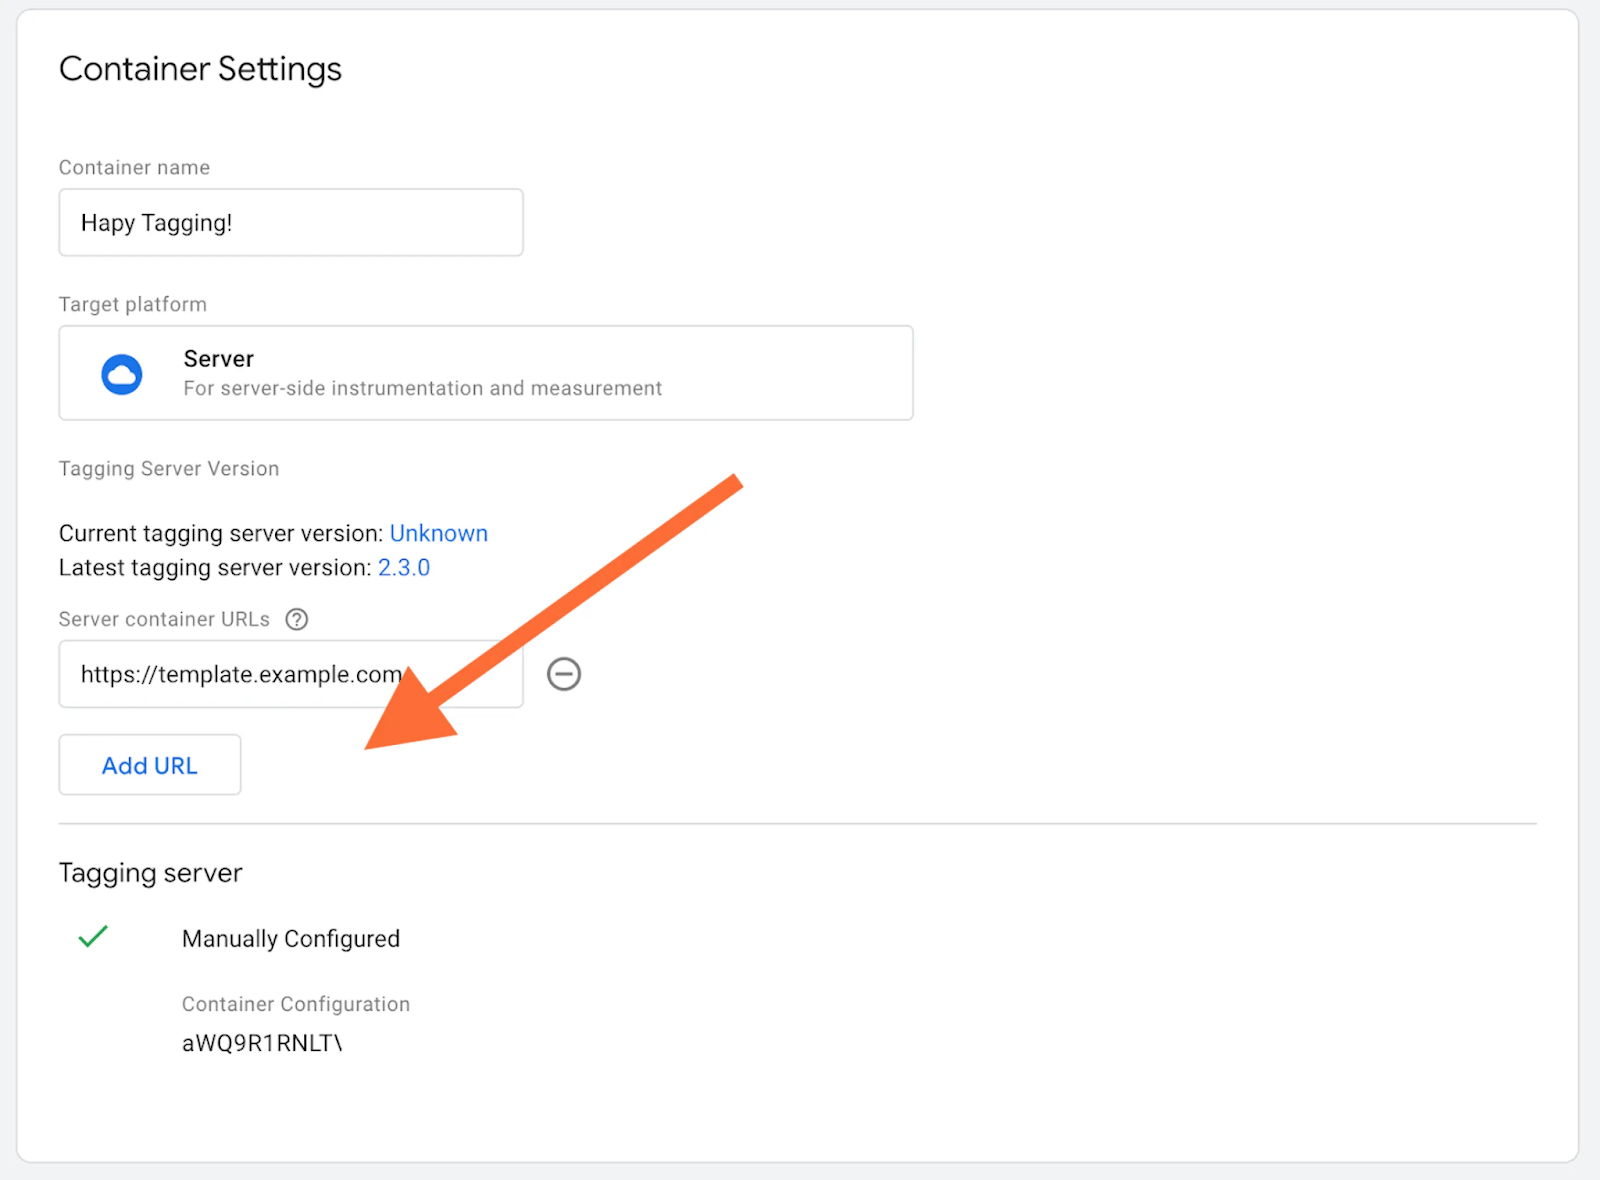
5.3. Once you’ve changed all these variables and saved them, your last step (assuming this a new container) is to add a preview URL in your server container by going to Admin → Container Settings. If the container is not new, just skip this step.
Step 6. Test the setup
Facebook provides the ability to test Browser and Server events. That is very useful if you set up Facebook pixel using GTM Server for the first time and wish to check that all data tracked correctly. When working on a Shopify store, this process is often referred to as setting up the Facebook CAPI Shopify, since events are sent server-side instead of relying only on the browser.
6.1. First, you need to obtain test_event_code. For this, you need to log into your Facebook manager, choose the data source that you liked to test, and open the tab “Test events”. There you will find the test event code. It can look like this: TEST2120
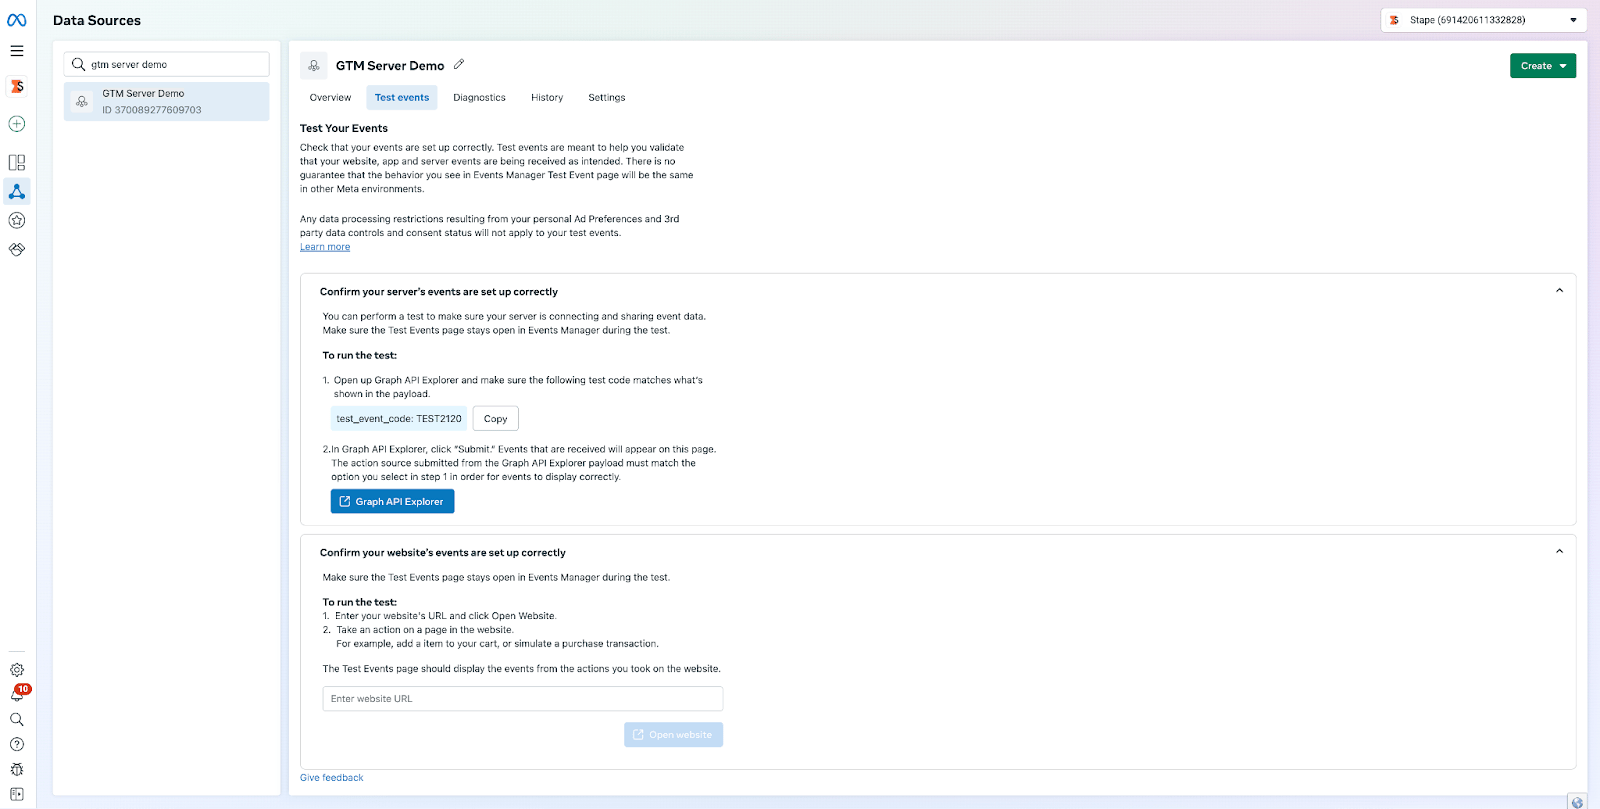
Note: TEST id will change once in a couple of hours, if your debug sessions are spread in time make sure to check the value you’re using is still valid.
6.2. Fill the LT - Map | Debug Mode → FB Test ID variable, in your server container, with the test event code that you get from the previous step.
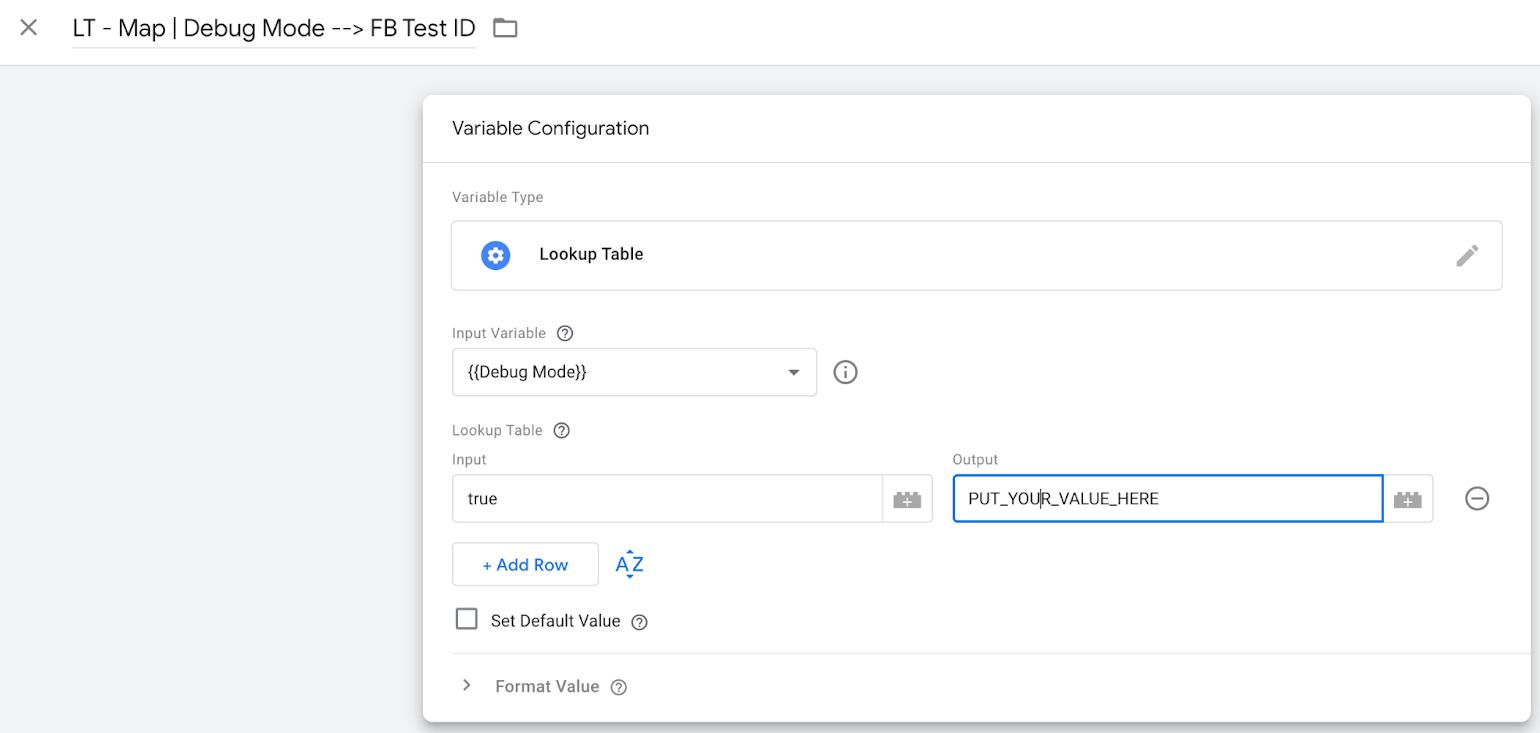
This variable is already referenced in all Facebook tags. Variable will also only populate the tag in preview mode, so you don’t necessarily need to remove it before going live.
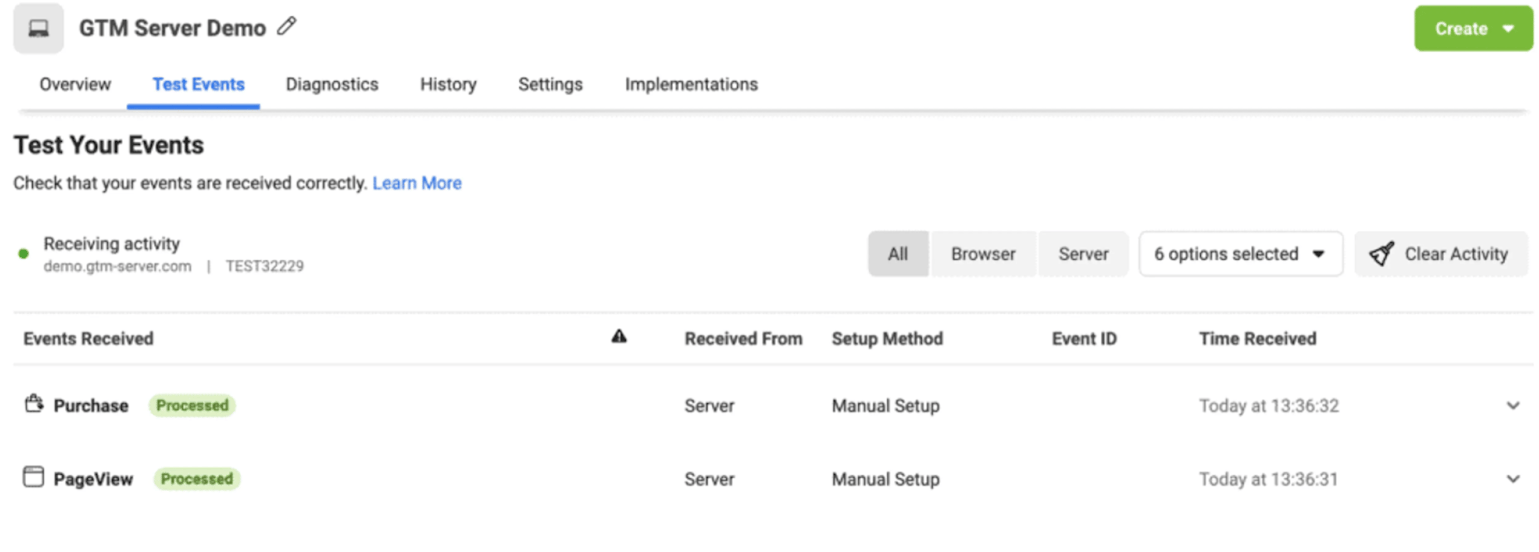
6.3. Launch preview mode on both your containers (web & server) If done right, you will see both web and server test events on the Facebook Test Event page.

Comments