Meta omnichannel ads guide: sync online & offline conversions
Uliana Lesiv
AuthorKey takeaways
Use case for omnichannel tracking and optimization
Some industries combine online and offline channels; examples of such industries include retail, travel, telecommunications, and restaurants. They run ad campaigns online, but have some users who make purchases in brick-and-mortar stores.
In such scenarios, tracking and optimizing only website purchases means you’re missing the full value of advertising. When a customer sees the ad, researches online, and then goes into your store to buy, that sale often goes unnoticed in ad campaign optimization. As a result, the strategic decisions are made on online-only data.
Why does omnichannel matter?
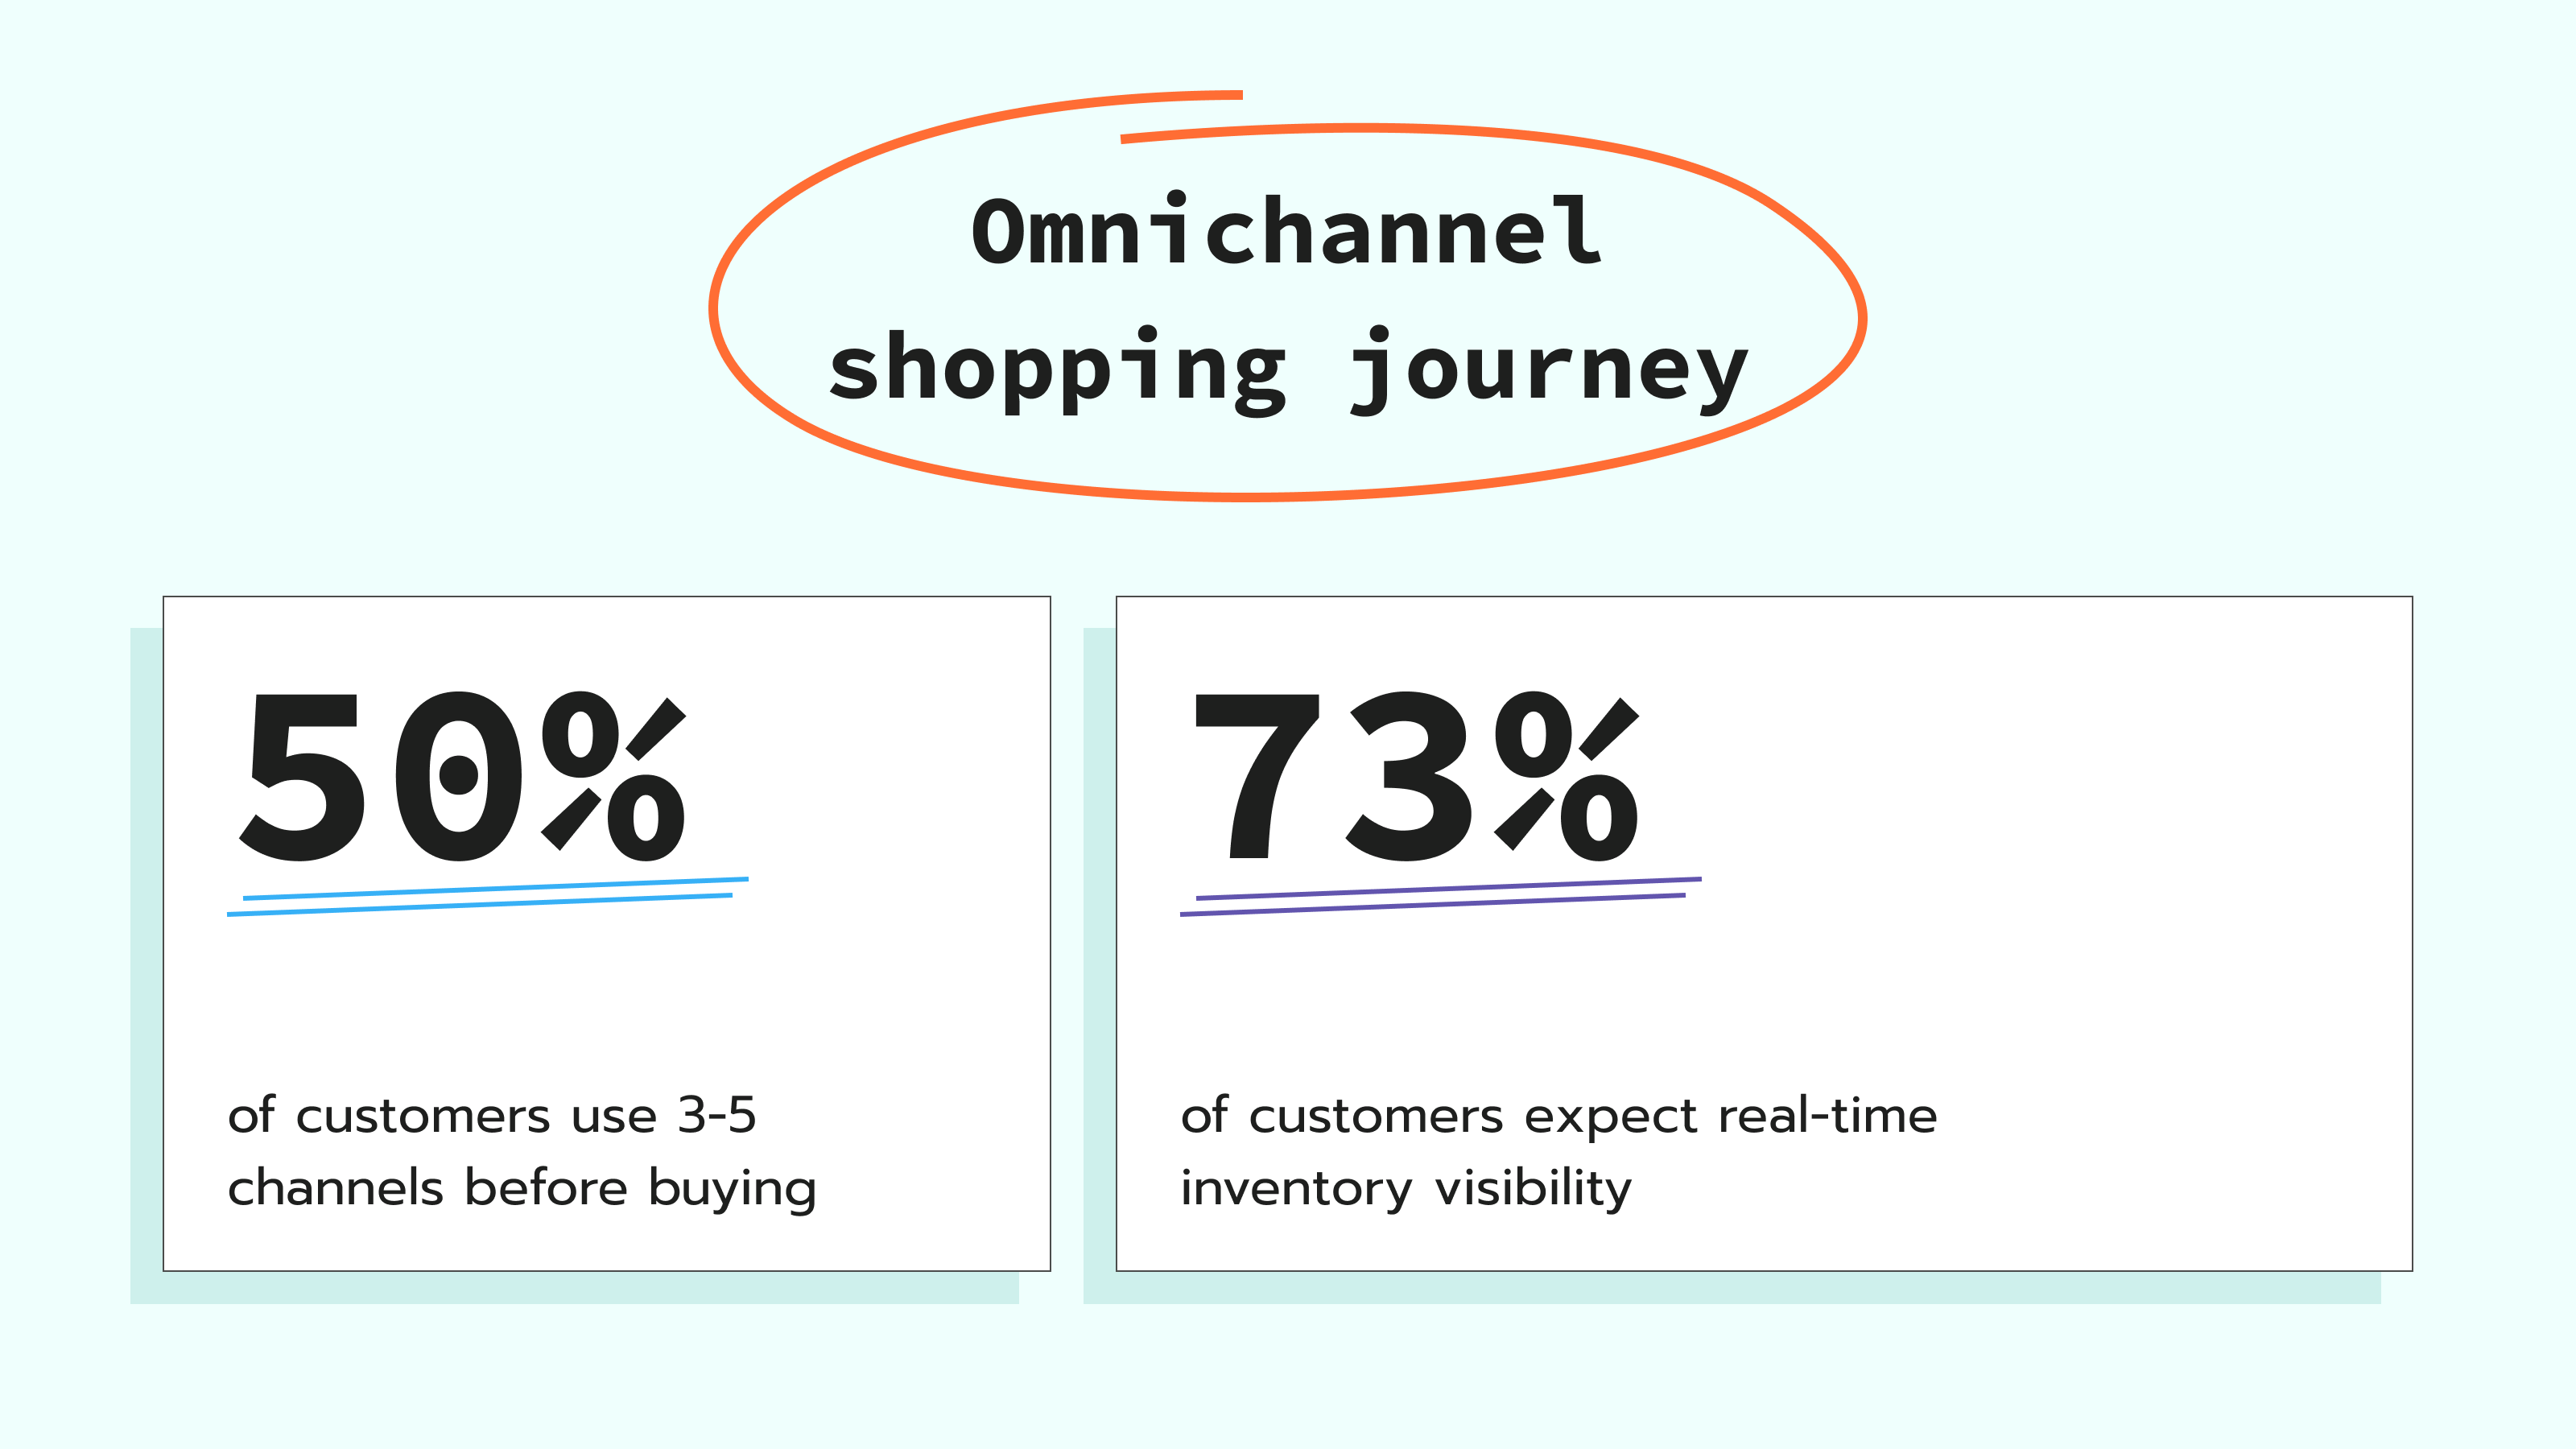
It gives a more complete picture of how your customers buy. New Store's global omnichannel report shows that 50% of customers use from three to five channels per journey before buying. In addition, customers expect a smooth omnichannel experience; according to the PYMNTS Global Digital Shopping Index report, 73% of users expect real-time visibility into both online and in-store inventory. These statistics highlight how today’s online and in-store customer journeys have become connected.
Meta Ads omnichannel solution
To address the need to track and optimize based on omnichannel interactions (not online-only), Meta launched Omnichannel ads. The solution helps optimize across both website and in-store outcomes in one sales campaign, instead of splitting budgets. It was recently moved out of beta. Availability varies by market and account eligibility; check Ads Manager/your representative for enablement.
You may see minimum signal-quality requirements in Events Manager (e.g., an offline event quality score target). At the moment of writing the article, there is a requirement for an offline data quality score; you need to have at least an 8.5 score. The threshold can vary as the product evolves; use Events Manager eligibility prompts as the source of truth.
When running Omni ads, you need to have both online and offline signals connected. Together, these signals help improve targeting, attribution, and overall campaign performance by giving Meta a more complete understanding of customer interactions across channels.
In this article, we will consider available options for configuring online signals as well as what Conversions API for offline events is, and how to configure Omnichannel ads in Meta.
Online signals: Pixel and Conversions API for web
Online signals capture customer actions that took place on your website (e.g., page views, purchases, form submissions, or add-to-cart events). There are two ways to track online signals:
- Client-side only with Meta Pixel
- Hybrid approach with Meta Pixel + Meta Conversions API
The Meta Pixel sends data on user behavior directly from the browser to Meta. When you add the Conversions API, event data is also sent directly from your server — creating a more reliable setup that's less affected by ad blockers and browser restrictions.
✍️ Note:
Using both solutions together helps ensure that your campaigns continue to receive high-quality conversion signals. With such signals, Meta can optimize ad targeting more effectively and maximize campaign outcomes.
To learn more about the benefits of the Meta Conversions API for sending online signals and how to set it up, please refer to our guide on the Meta Conversions API.
Conversions API for offline events and why it is required
While the Meta Pixel tracks activity on your website, CAPI for offline events is a server-to-server integration that reports conversions that happened outside the website (e.g., in-store purchases). It sends data from your Point of Sale (POS) system or CRM directly to Meta. Using identifiers such as hashed email addresses or phone numbers, CAPI can match in-store transactions with users who previously interacted with your ads on Meta platforms.
To be eligible for omnichannel optimization, advertisers typically need a reliable, ongoing feed of offline events; in many cases, this is implemented via Conversions API (offline).
Manual uploads of CSV files may not meet eligibility requirements and can limit campaign optimization. Such an approach to data collection reflects Meta’s machine learning needs in a constant stream of data (which is complicated by manual file uploads) to understand which users are worth your budget.
Methods to track offline events using CAPI
Before configuring the Conversions API for offline events, you need to select the method that works best for your case. There are such options available:
| Method | Opt for the method if you are | Setup complexity | Find out more about the method |
| Stape's Conversion Tracking CRM Apps | - using one of the CRMs: HubSpot, Salesforce, Pipedrive, Zoho, and HighLevel - planning/already configured server-side tracking solution for website (Meta CAPI, Meta CAPIG, Signals Gateway) | Low | 1. Stape's Conversion tracking apps: use cases and benefits 2. List of currently available apps |
| Send via webhook | - using the CRM not presented on the list above - using POS, or a custom solution - not going to implement a server-side tracking solution for website tracking | Medium | 1. Meta offline conversion using server GTM 2. What are webhooks, and how to use them |
Want to try the server side?Sign up now!
Omnichannel campaign configuration step-by-step
Step 1. Configure offline conversions tracking
Based on the method that works for your case, configure CAPI offline events tracking. The guidance can be found in the corresponding collapse element:
Stape's Conversions CRM apps configuration
Prerequisites
To complete the configuration, you will need the following:
- Stape account (create an account if you don't have one yet).
- Have configured one of the server-side tracking solutions:
- Meta Conversions API Gateway. Best option for businesses that run ad campaigns only on Meta Ads. Check how to configure the Meta Conversions API Gateway in our guide. There is a 7-day free trial, after which the price starts from $10 per Pixel.
- Signals Gateway. Best option for businesses that need to send data to various destinations, e.g., Meta, BigQuery, and custom endpoints. Find out more about Signals Gateway and how to configure it in our article. There is a free plan for 10,000 events. The price for paid plans starts from $20 per month.
- Server GTM container. Best option for businesses that require setting server-side tracking for numerous platforms and look for a solution that allows for high setup customization. See the detailed guide on how to configure the server GTM container. There is a free plan for 10,000 requests. The price for paid plans starts from $20 per month.
How to configure the app
Based on the server-side tracking solution you've chosen, the configuration will slightly differ. The process consists of the following steps:
- App installation. Authorize the connection between Stape and CRM.
- Connection & authentication. Link it to your Stape account - add API keys and Meta details.
- Event mapping. Specify the offline action from CRM equals which Meta event.
We have detailed guides explaining each step based on your CRM and server-side tracking solution you use:
Webhook configuration
Prerequisites
To complete the configuration, you will need the following:
1. Stape account (create an account if you don't have one yet).
✍️Note:
2. Web and server GTM containers configured.
4. Configured one of Stape's CMS apps.
How to configure webhooks
1. Configure the "Webhooks" section of your CMS app.
We will show how to configure it, taking the WooCommerce app as an example, but the setup is the same for other apps.
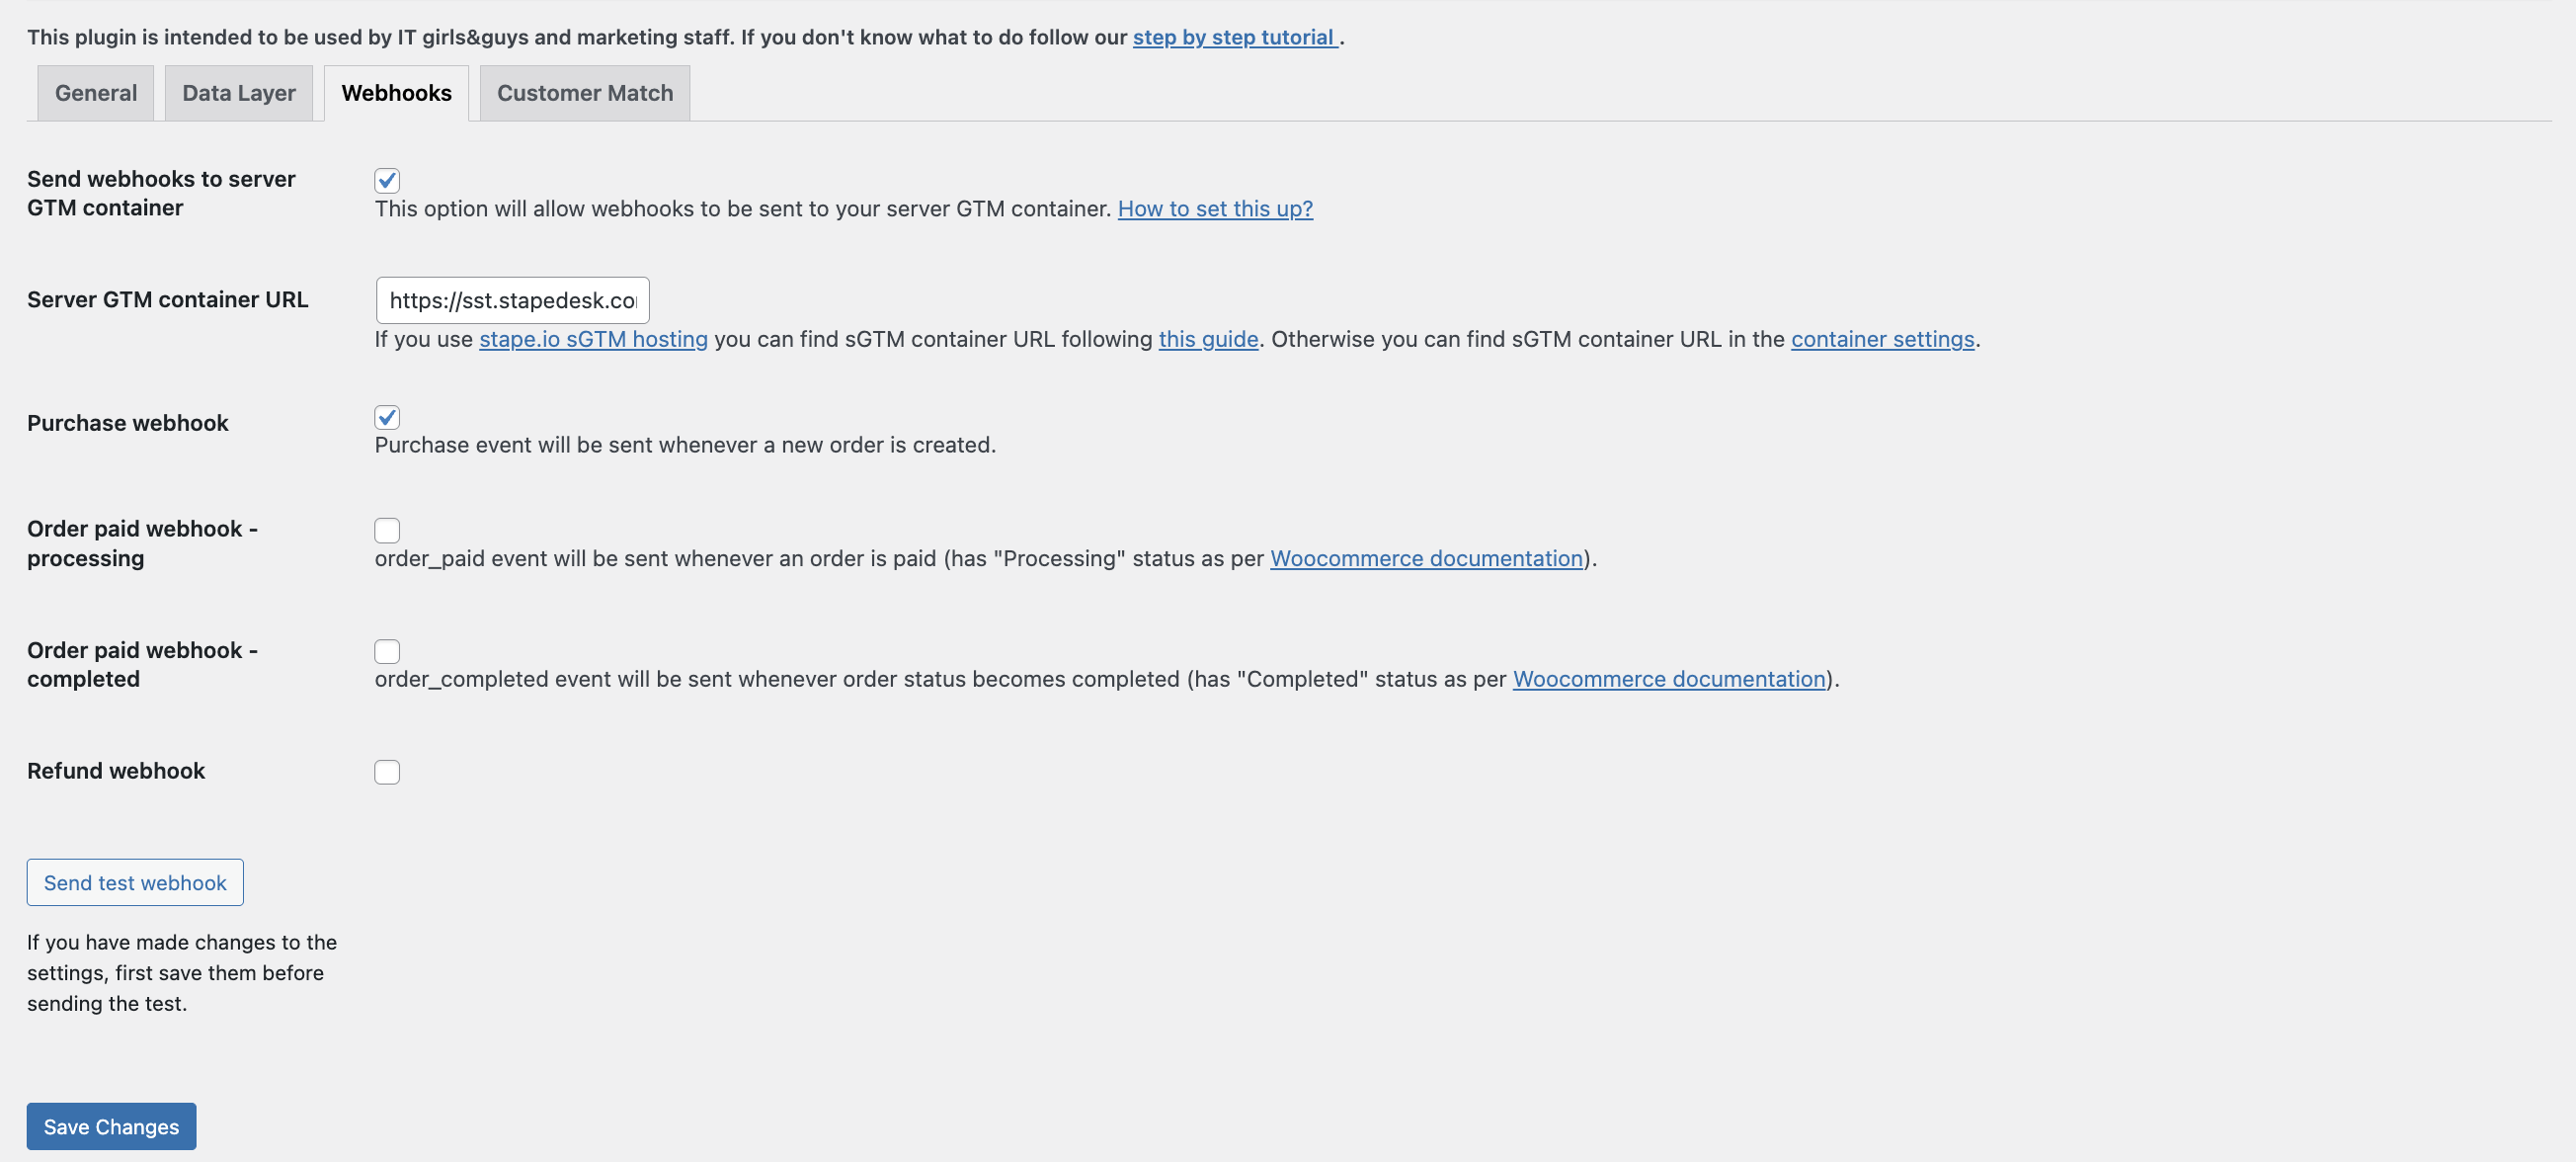
Go to the section "Webhooks" and check the box "Send webhooks to server GTM container". Also, add your "Server GTM container URL". Here is a detailed guide on how to find the container URL. Add a path for a webhook at the end of the container URL.
Example:
https://sst.stapedesk.com/webhook
Check the boxes next to webhook types you want to send (e.g., purchase, refund).
Click "Save".
2. Enable preview of webhook in sGTM.
By default, sGTM ignores the external signals (offline conversions) in the preview window because it doesn't know they are part of your testing session. So, you need to enable it.
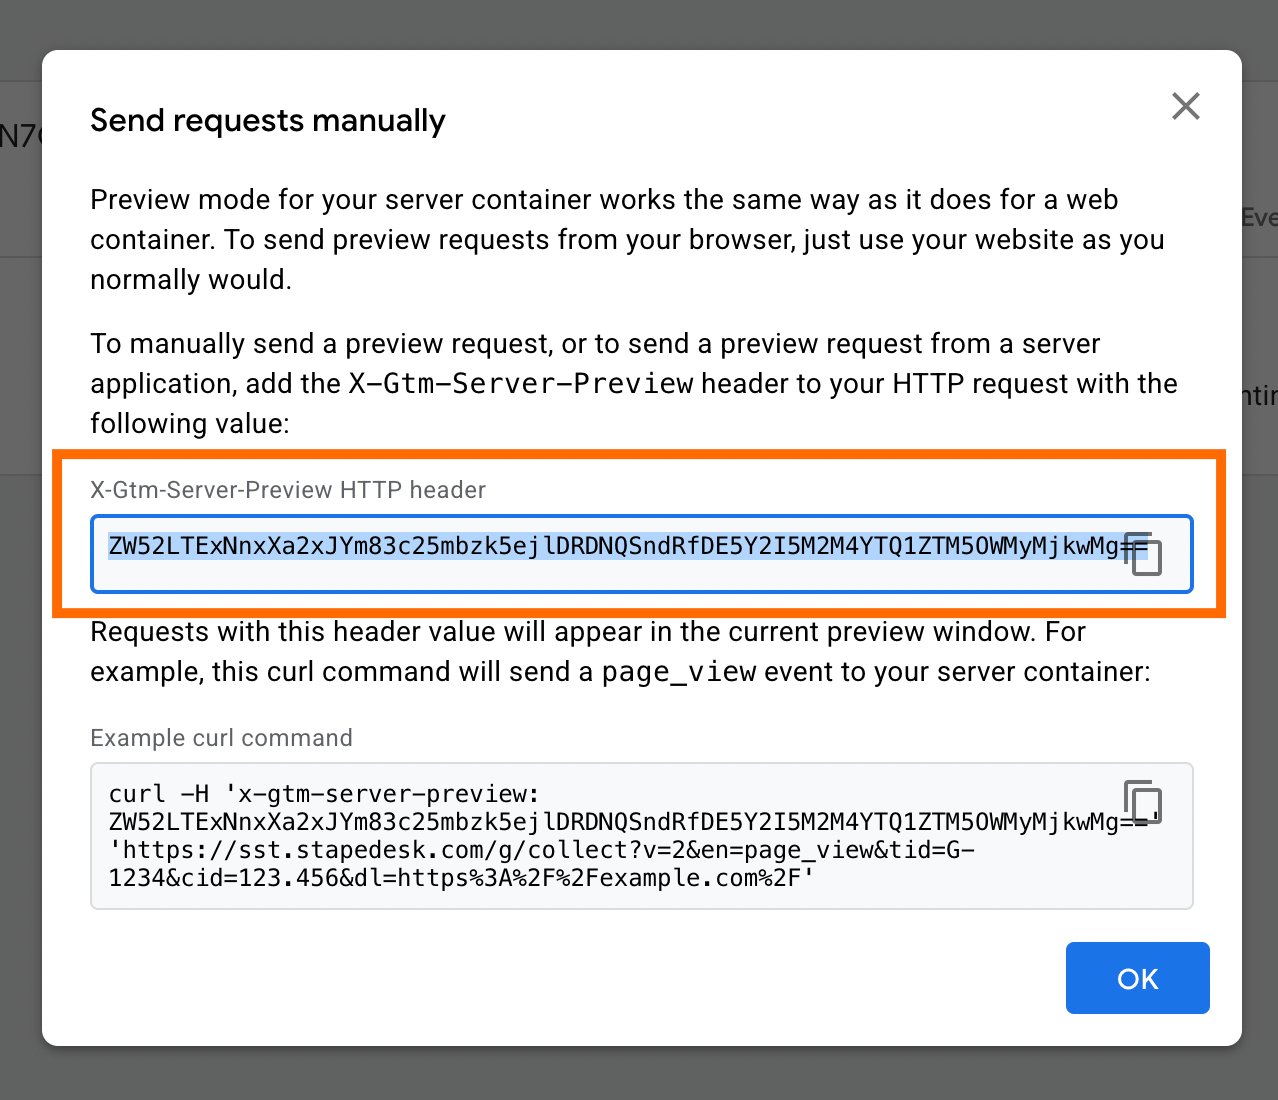
Open Debug and Preview Mode in server GTM → click on three dots in the upper right corner → click “Send requests manually”.
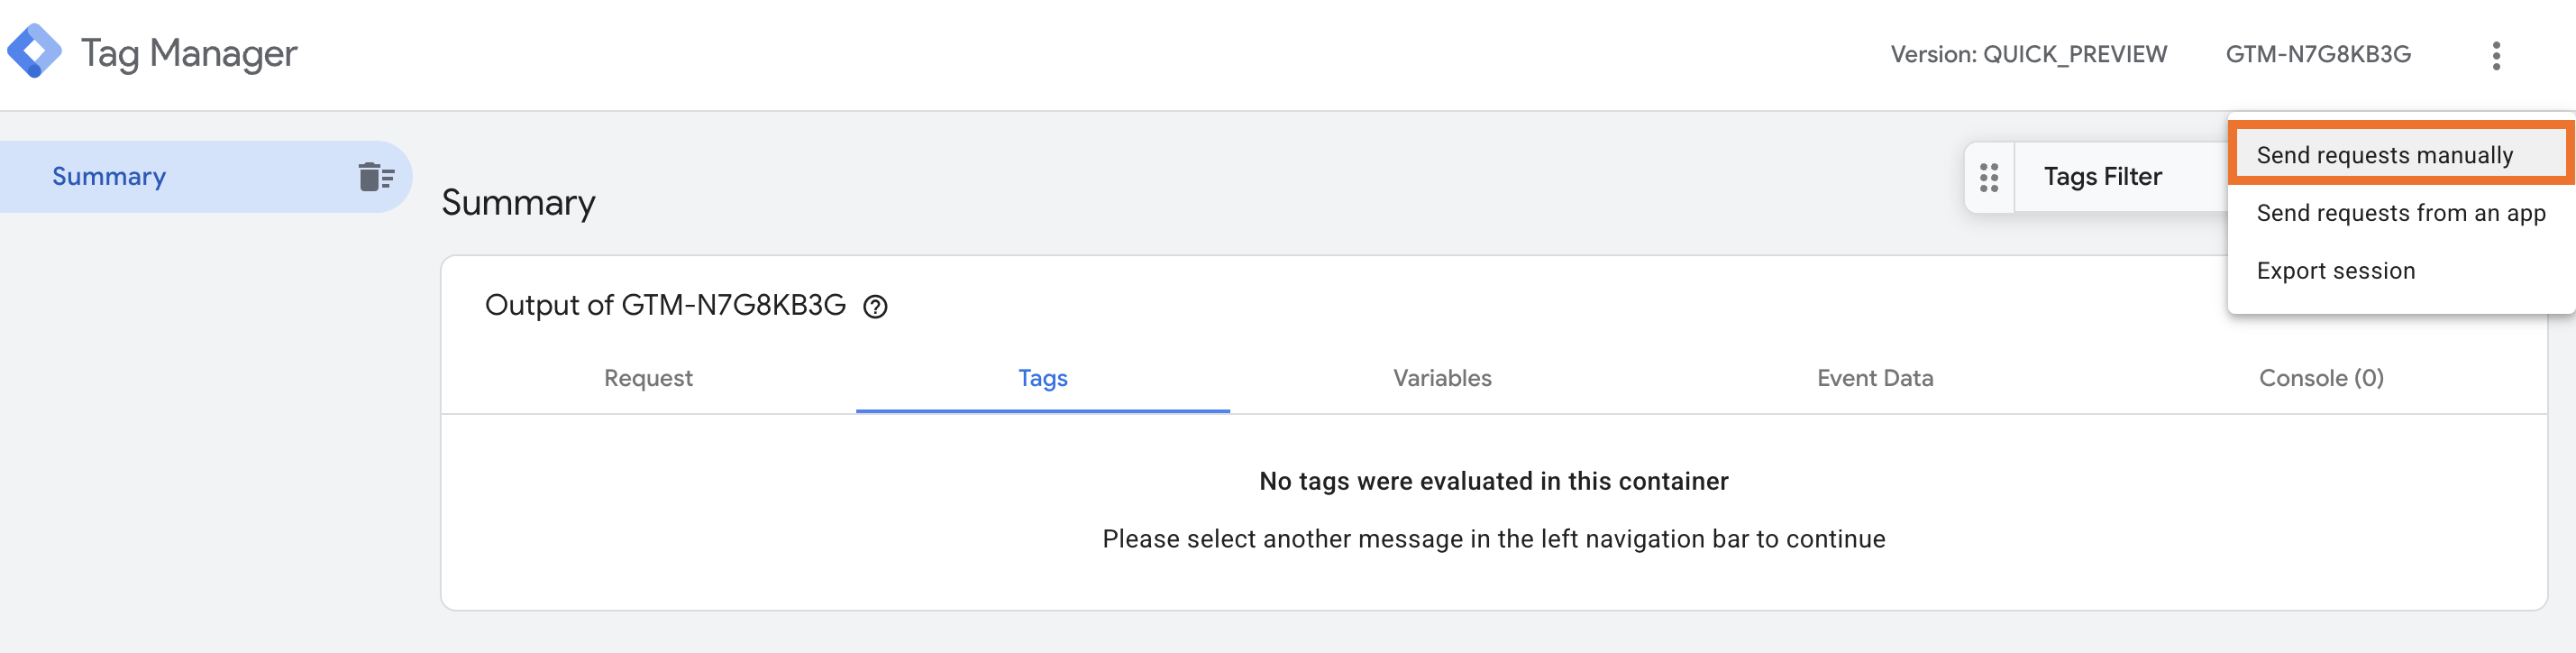
From the pop-up window, copy "X-Gtm-Server-Preview HTTP header".
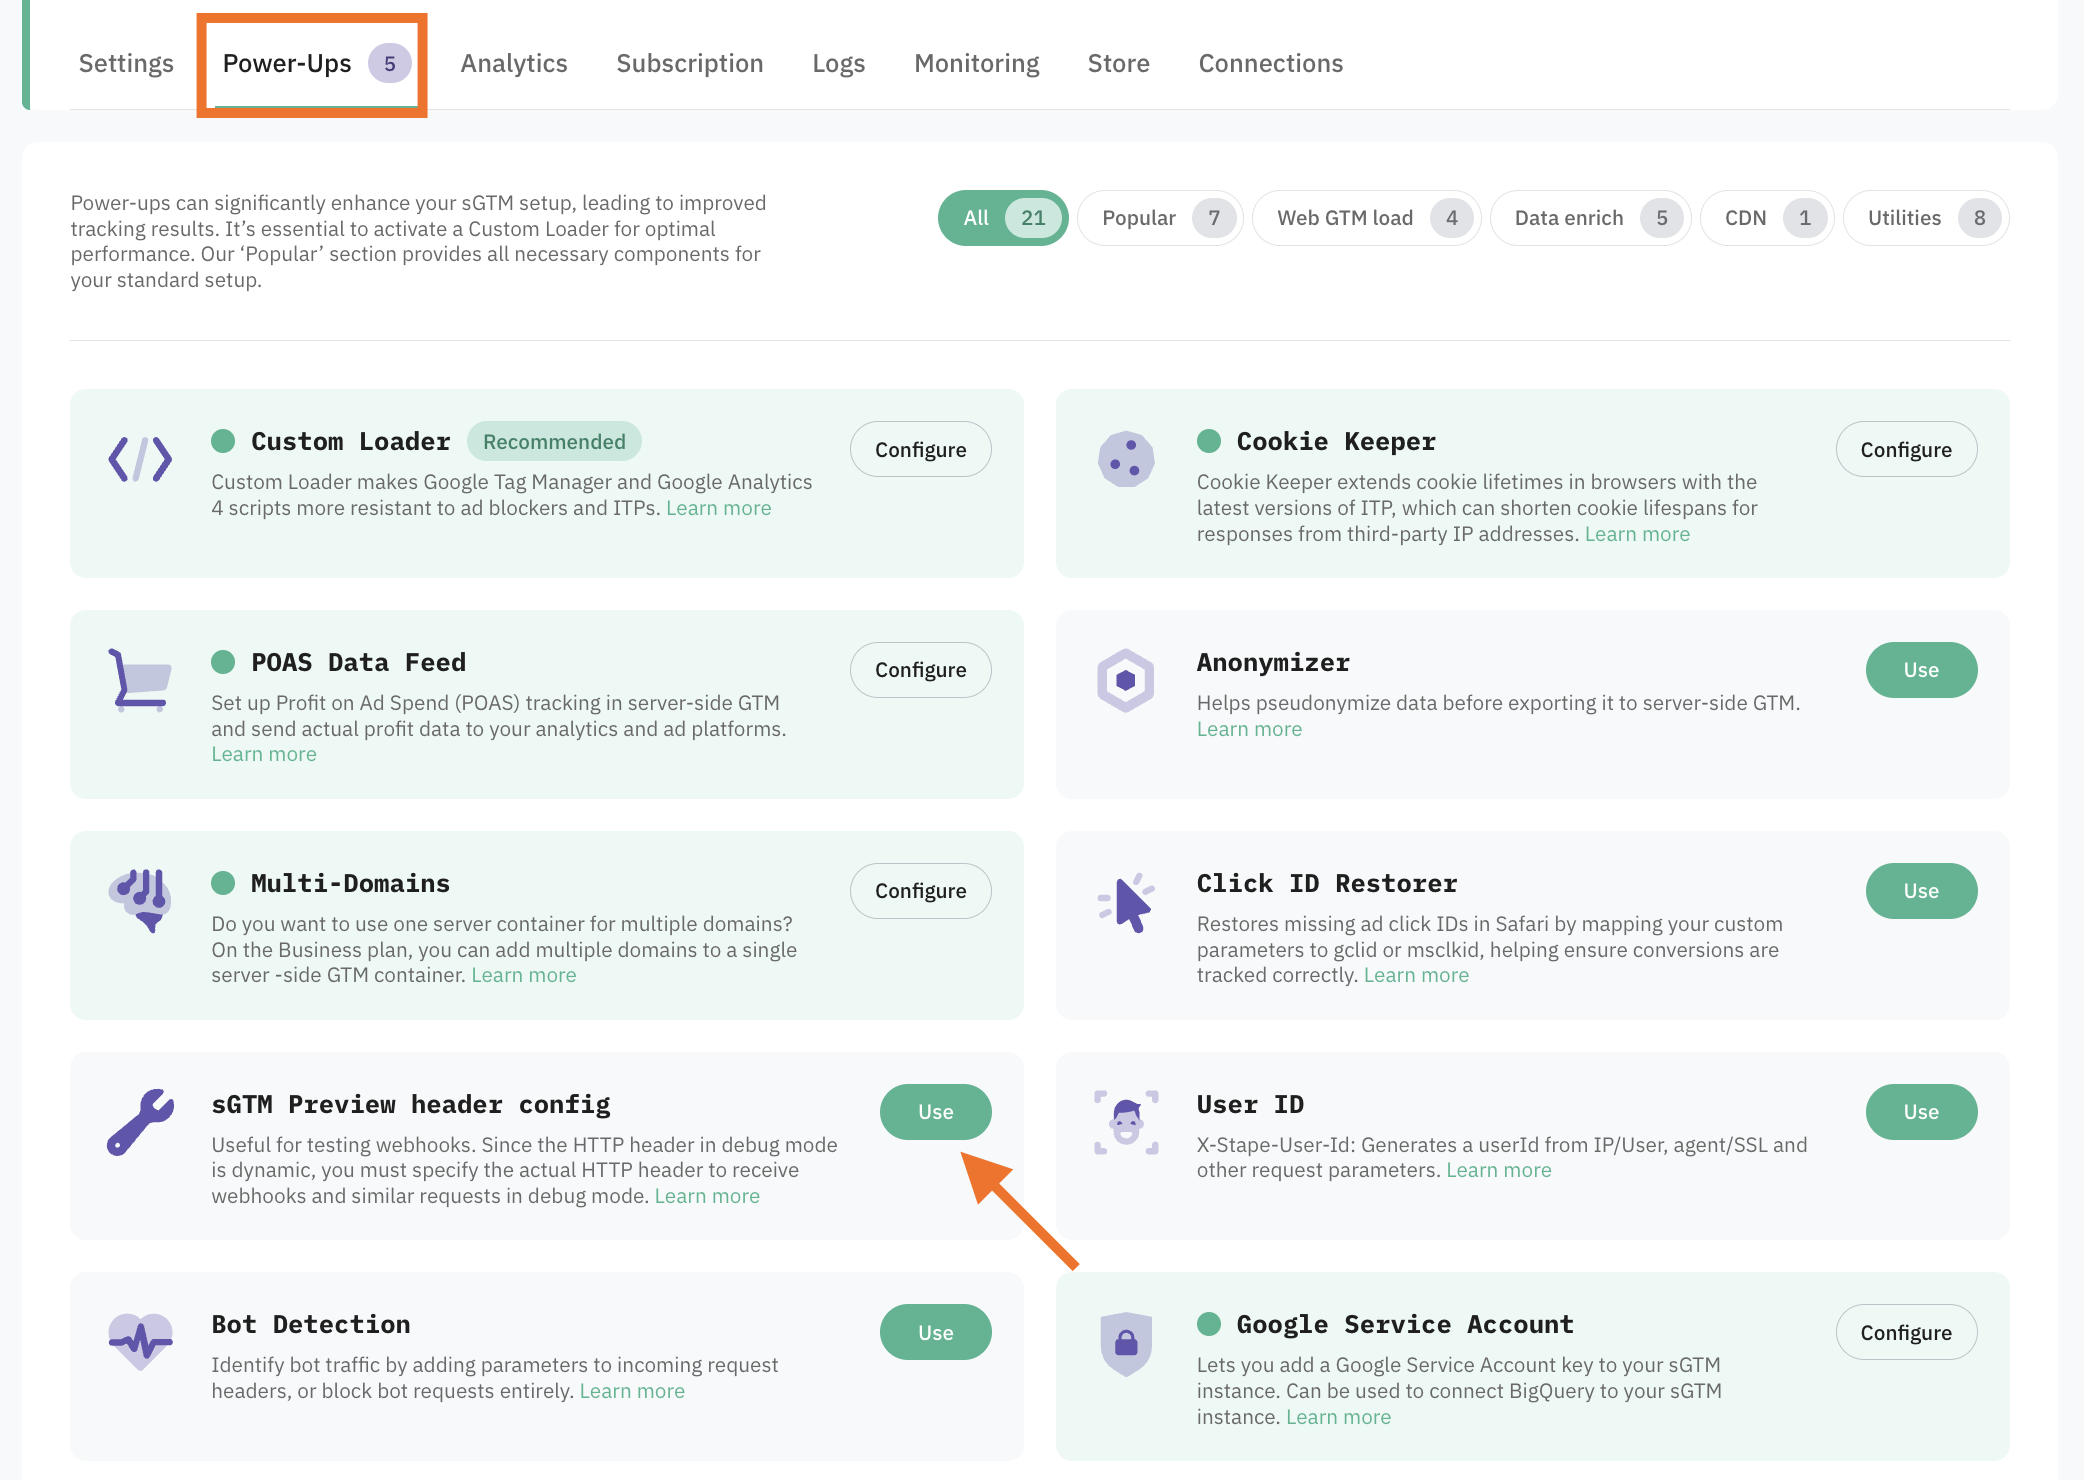
3. Activate Stape's sGTM Preview header config power-up.
The power-up will add a unique identification to your requests so that you can see it in Debug mode.
Open your sGTM container on Stape → click on "Power-Ups" section → click "Use" next to "sGTM Preview header config".
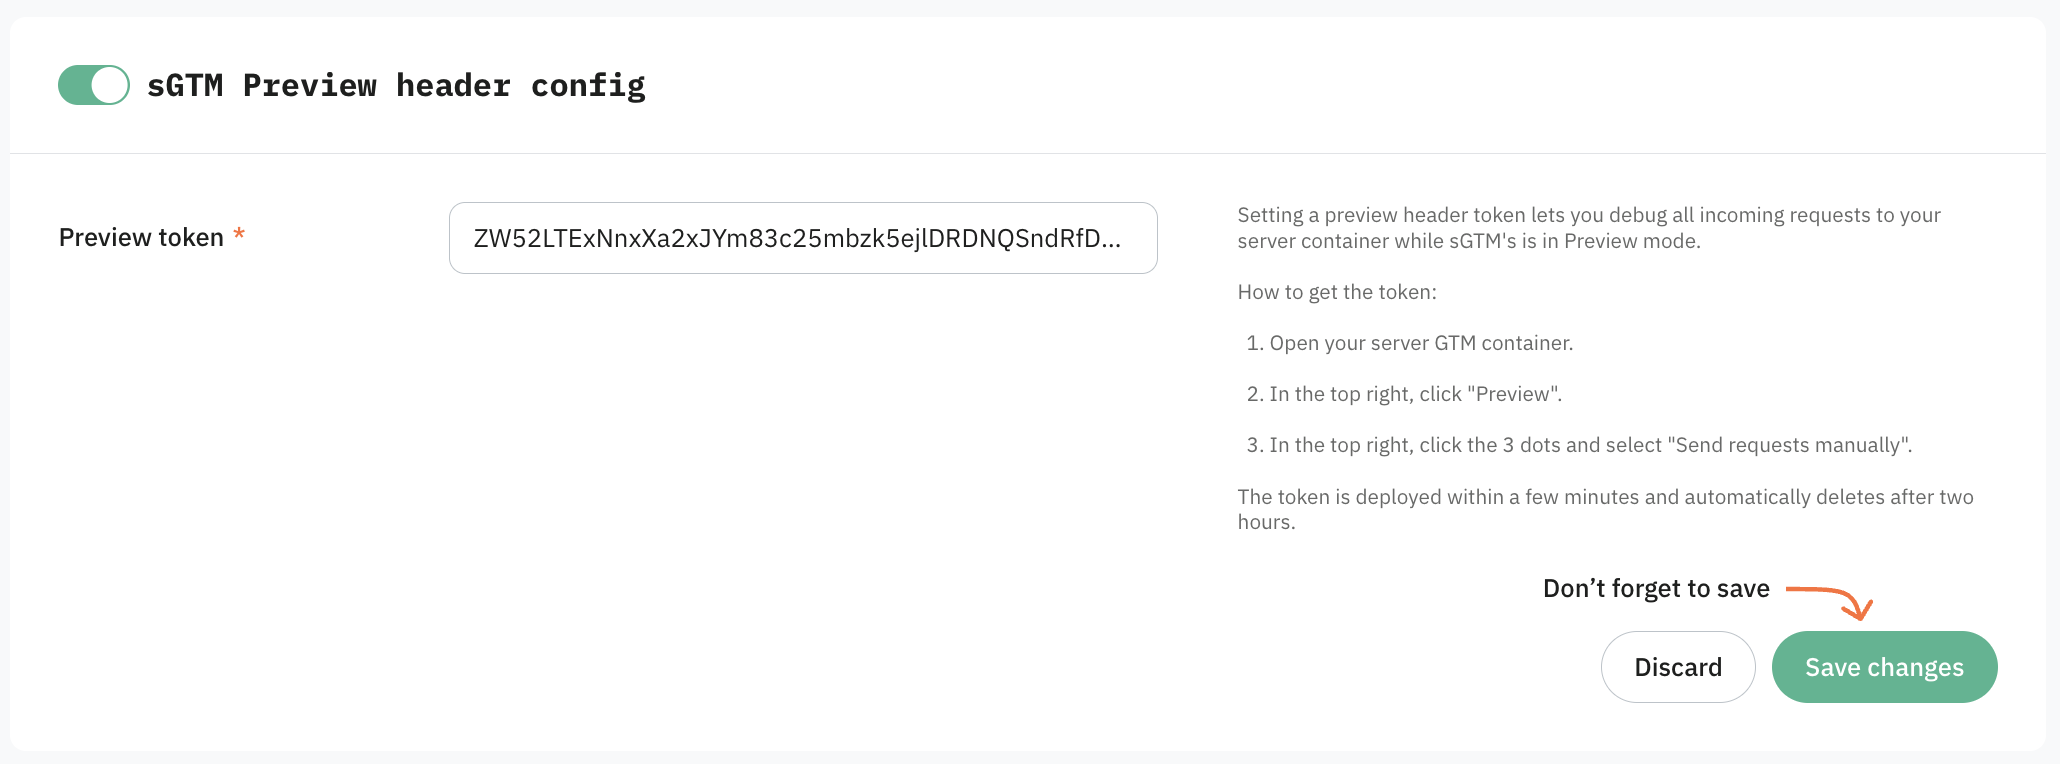
Enable the power-up by turning on the toggle and adding "Preview token", which you've copied from sGTM in the previous step. Click "Save changes".
4. Add Data Client in sGTM.
Download the Data Client template from GitHub and unzip the file.
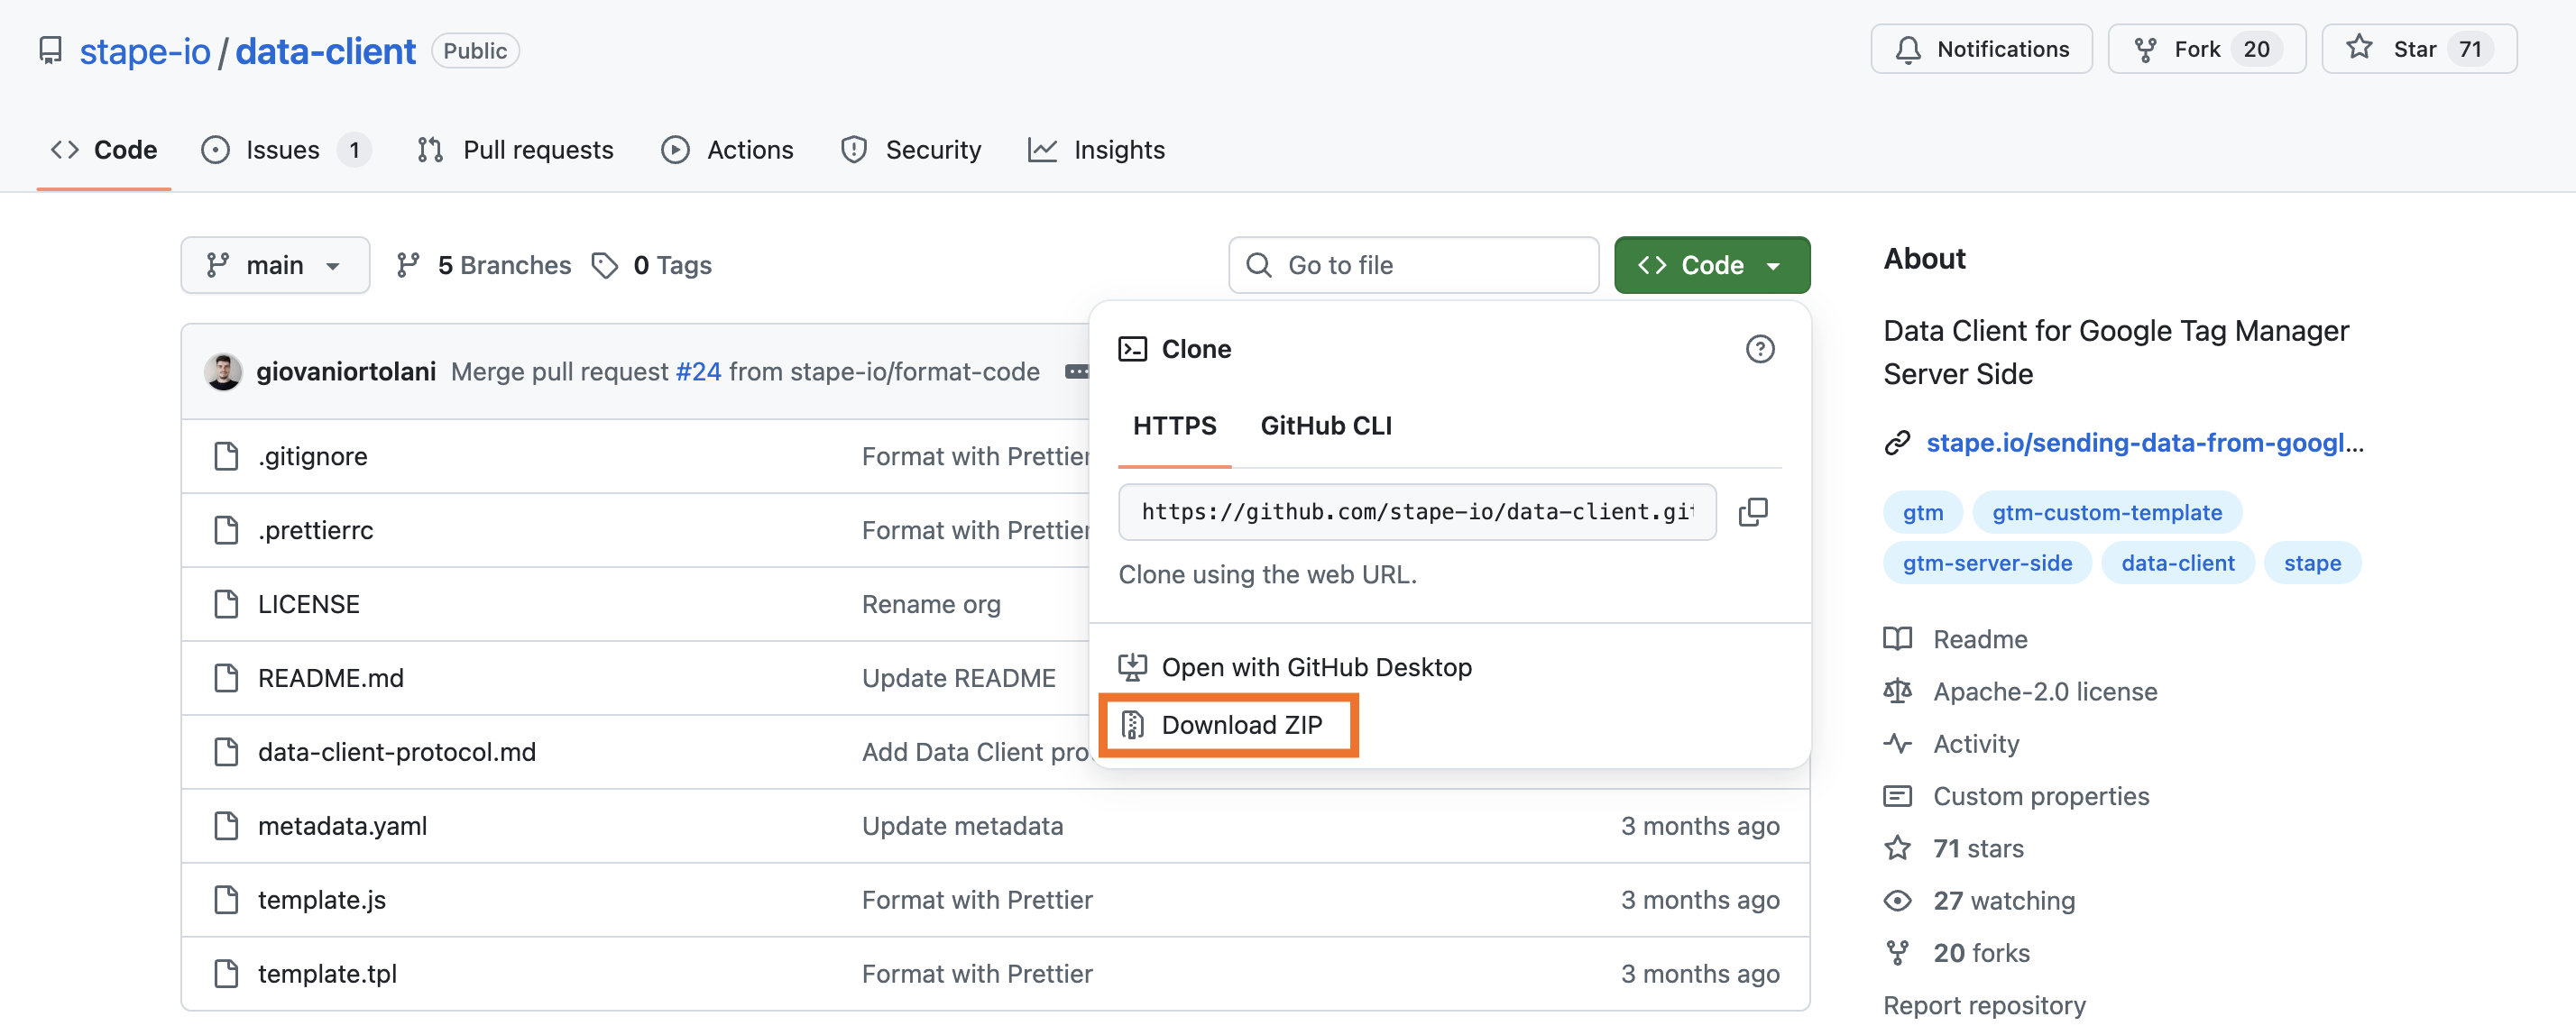
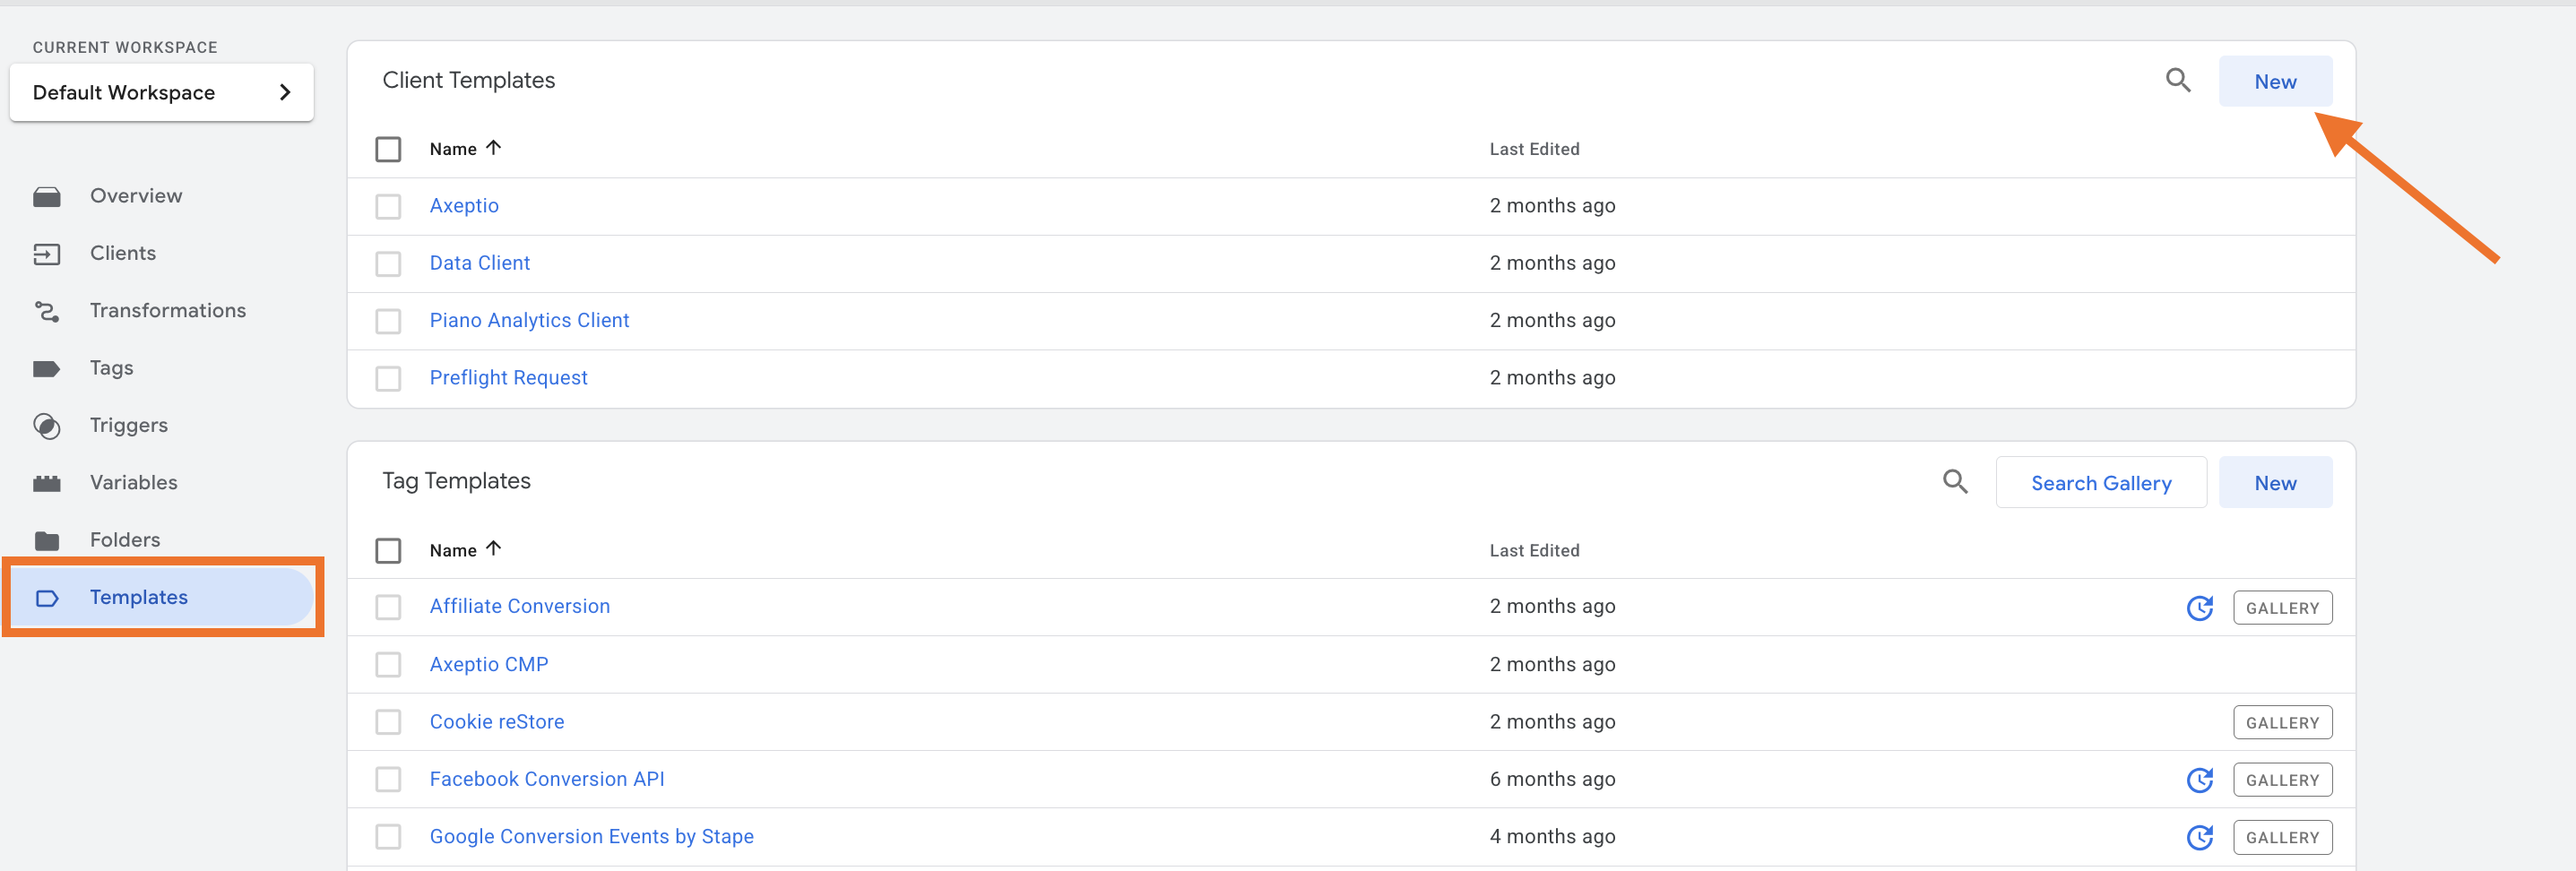
Add the template into your server GTM container: go to Templates → Client Templates → click “New”. Import the template you downloaded from GitHub.
Go to the Clients section of sGTM → click "New" → select "Data Client".
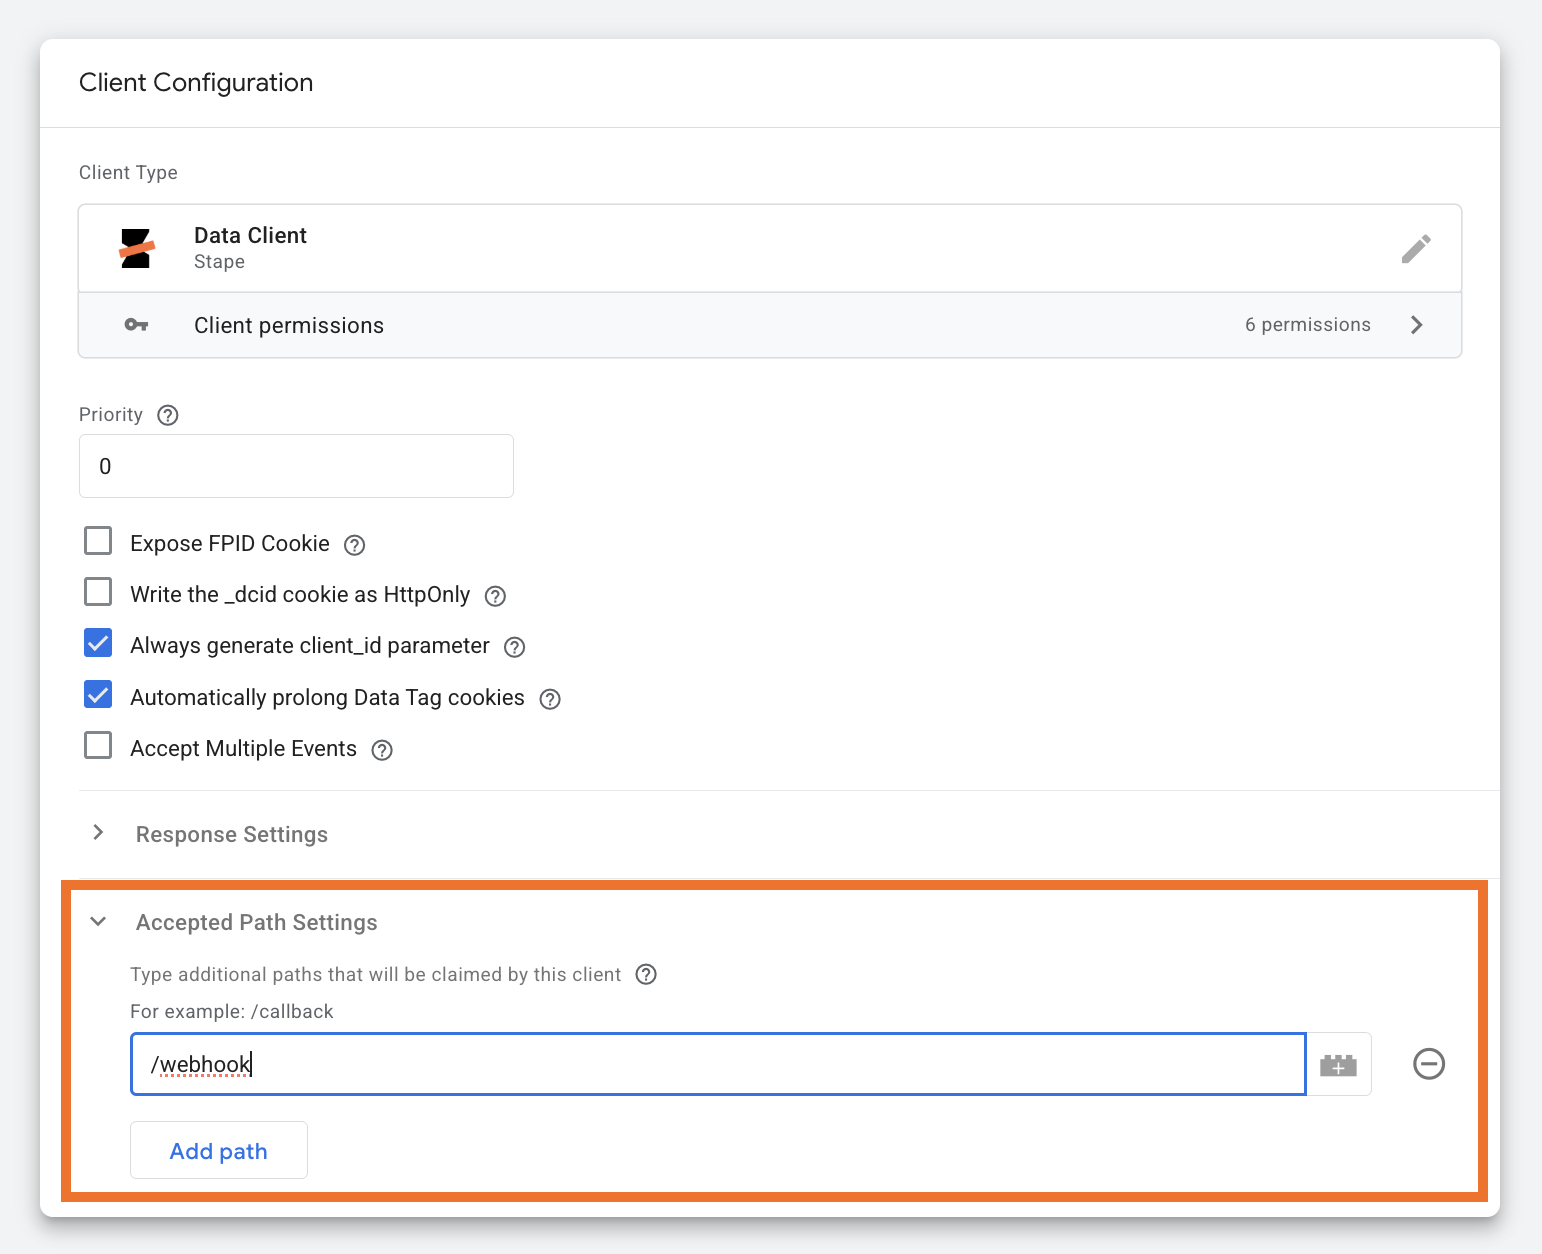
Add the path of the webhook(s) in the Data Client's section “Accepted Path Settings”, which you specified in the CMS app. In our case, it is “/webhook”. Save changes.
This way, the Data Client will listen to all requests that contain your webhook path and retrieve data from the request.
5. Add the Facebook Conversion API tag template to sGTM.
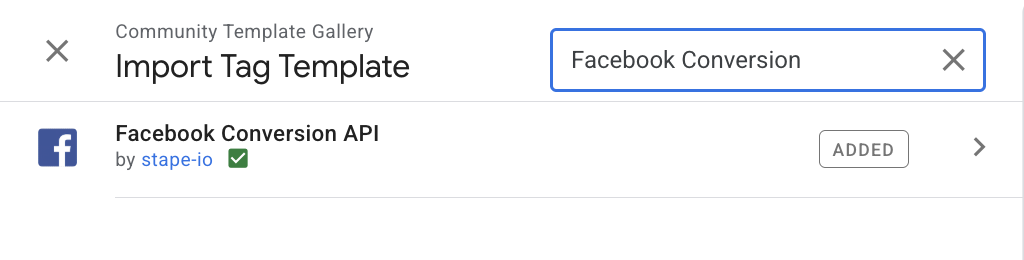
Go to Templates of sGTM → Tag Templates → Search Gallery → add the Facebook Conversion API tag.
6. Create a new tag and configure it.
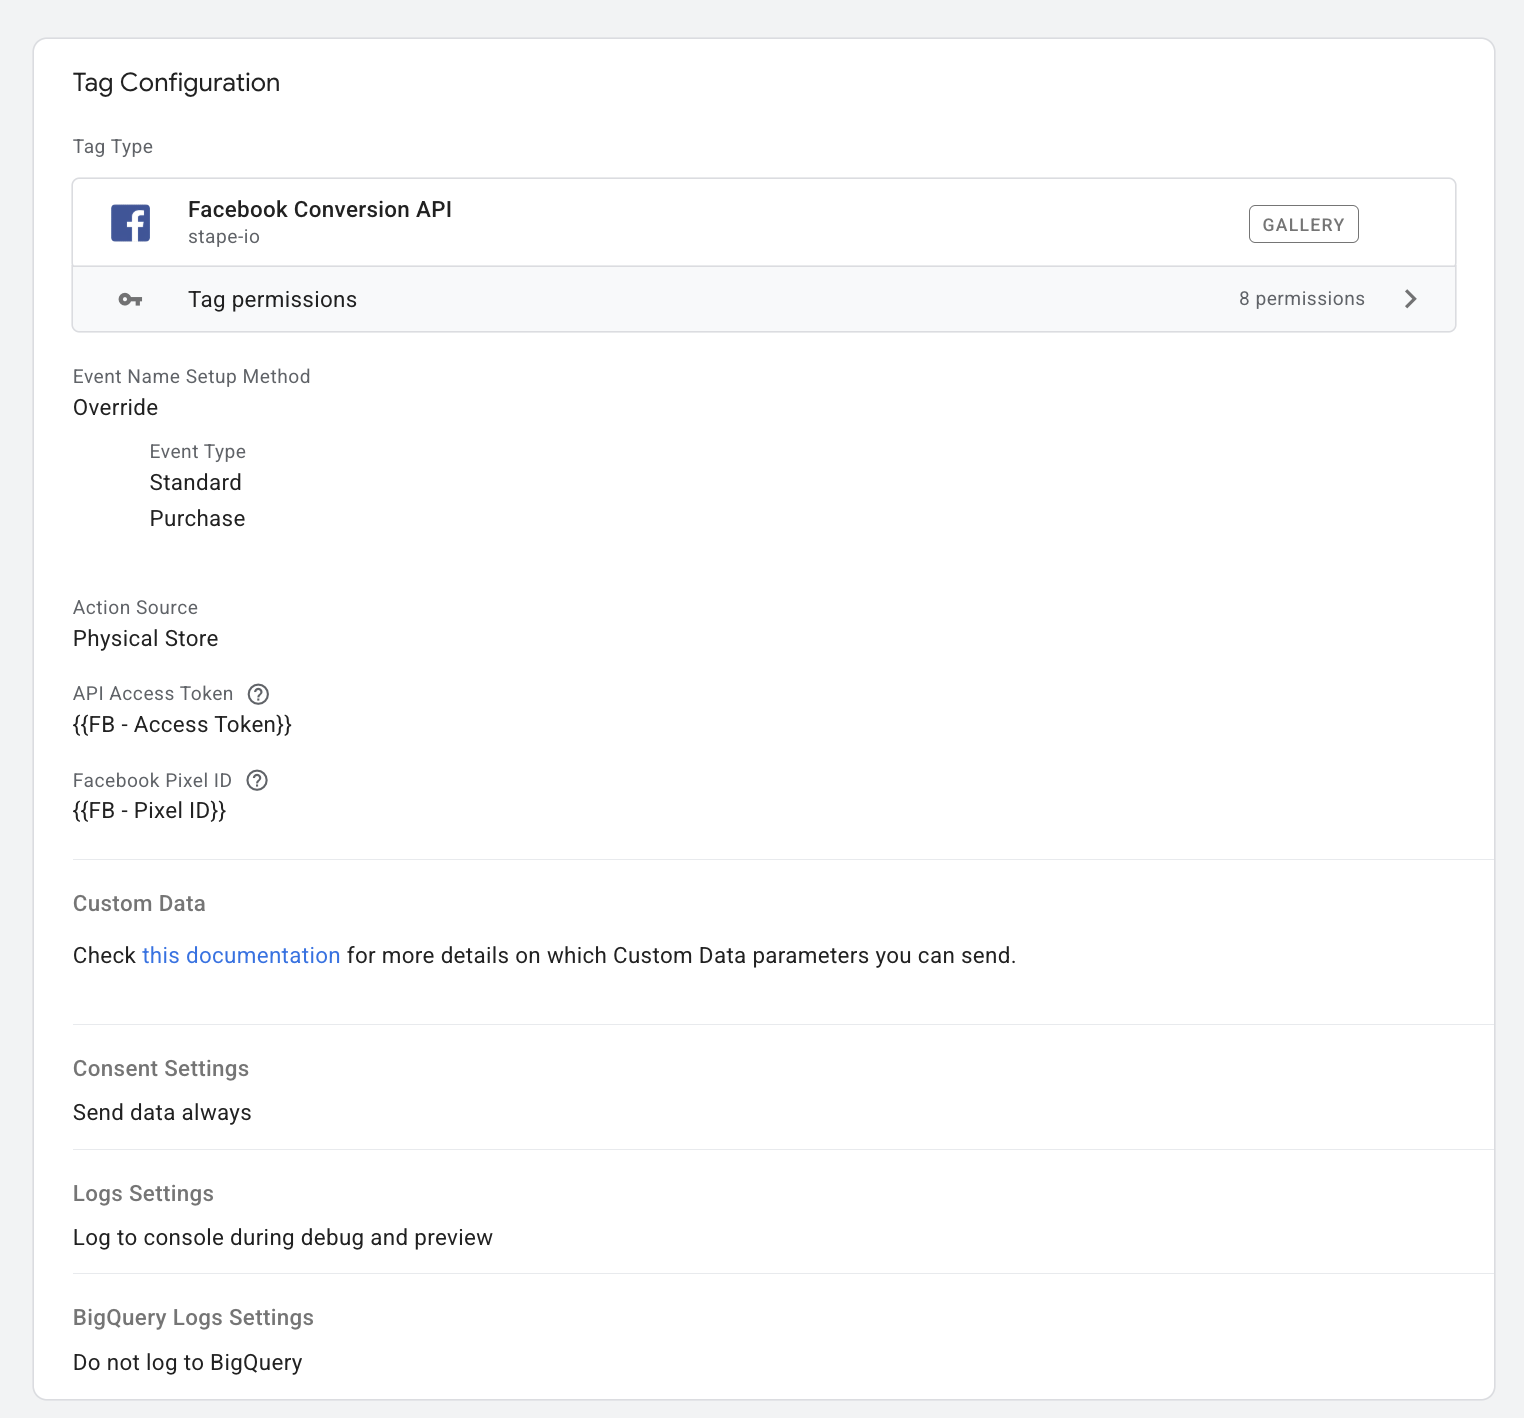
Go to the Tags section → click “New” → select “Facebook Conversion API” as Tag Configuration.
Add the following configurations:
- Event Name Setup Method: Override (manually map the data from the webhook).
- Event Type: select the one that fits your case, or add a custom event type.
- Action Source: it should be something that meets your case. For offline events, it is usually a physical store.
- API Access Token & Facebook Pixel ID: In our guide, you can find details on how to find the API Access Token and Facebook Pixel ID.
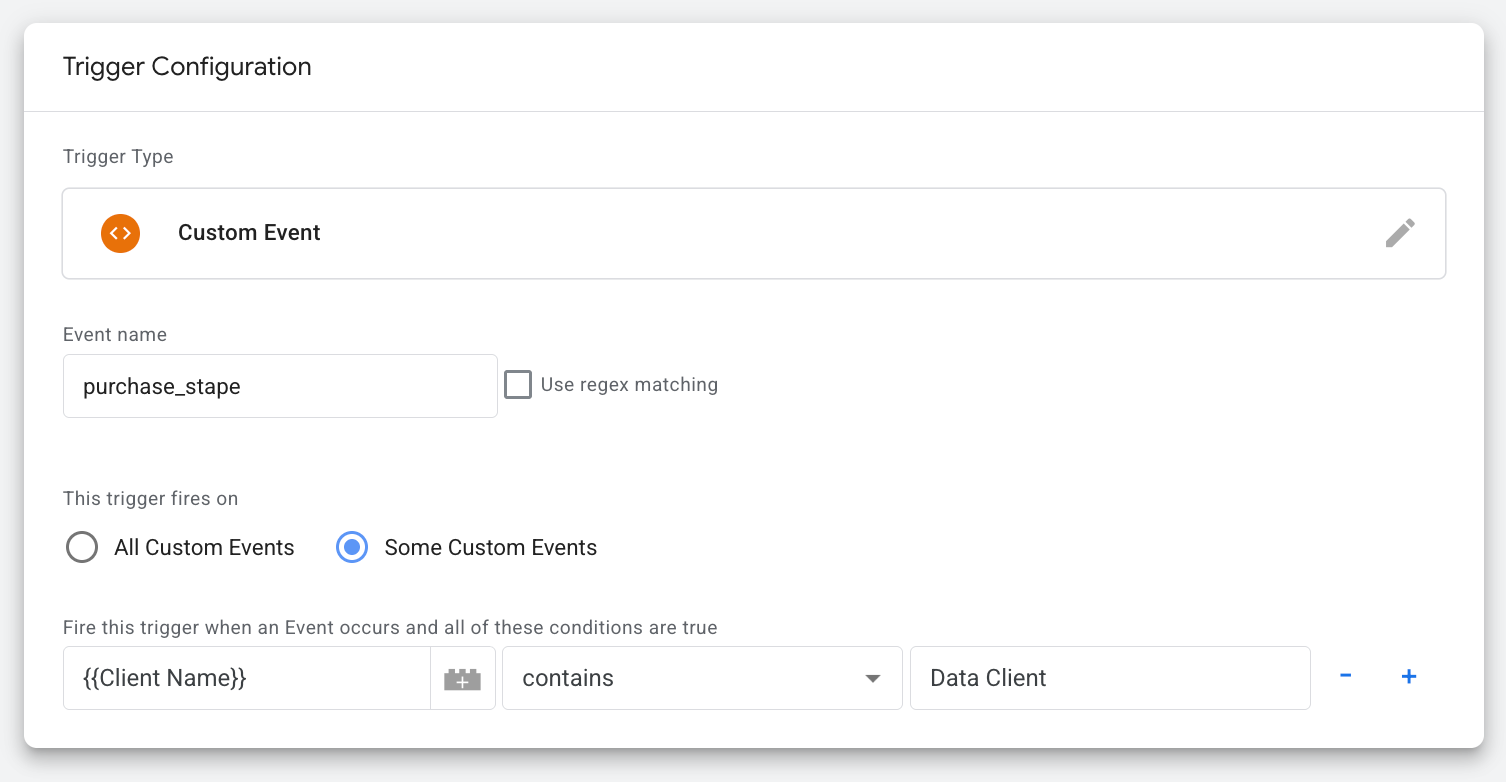
7. Add a trigger for a tag.
Use the following configurations for a trigger:
- Trigger Type: Custom Event
- Event name: specify your event name (in our case, it is “purchase_stape”)
- This trigger fires on: Some Custom Events
- Condition: Client Name contains Data Client
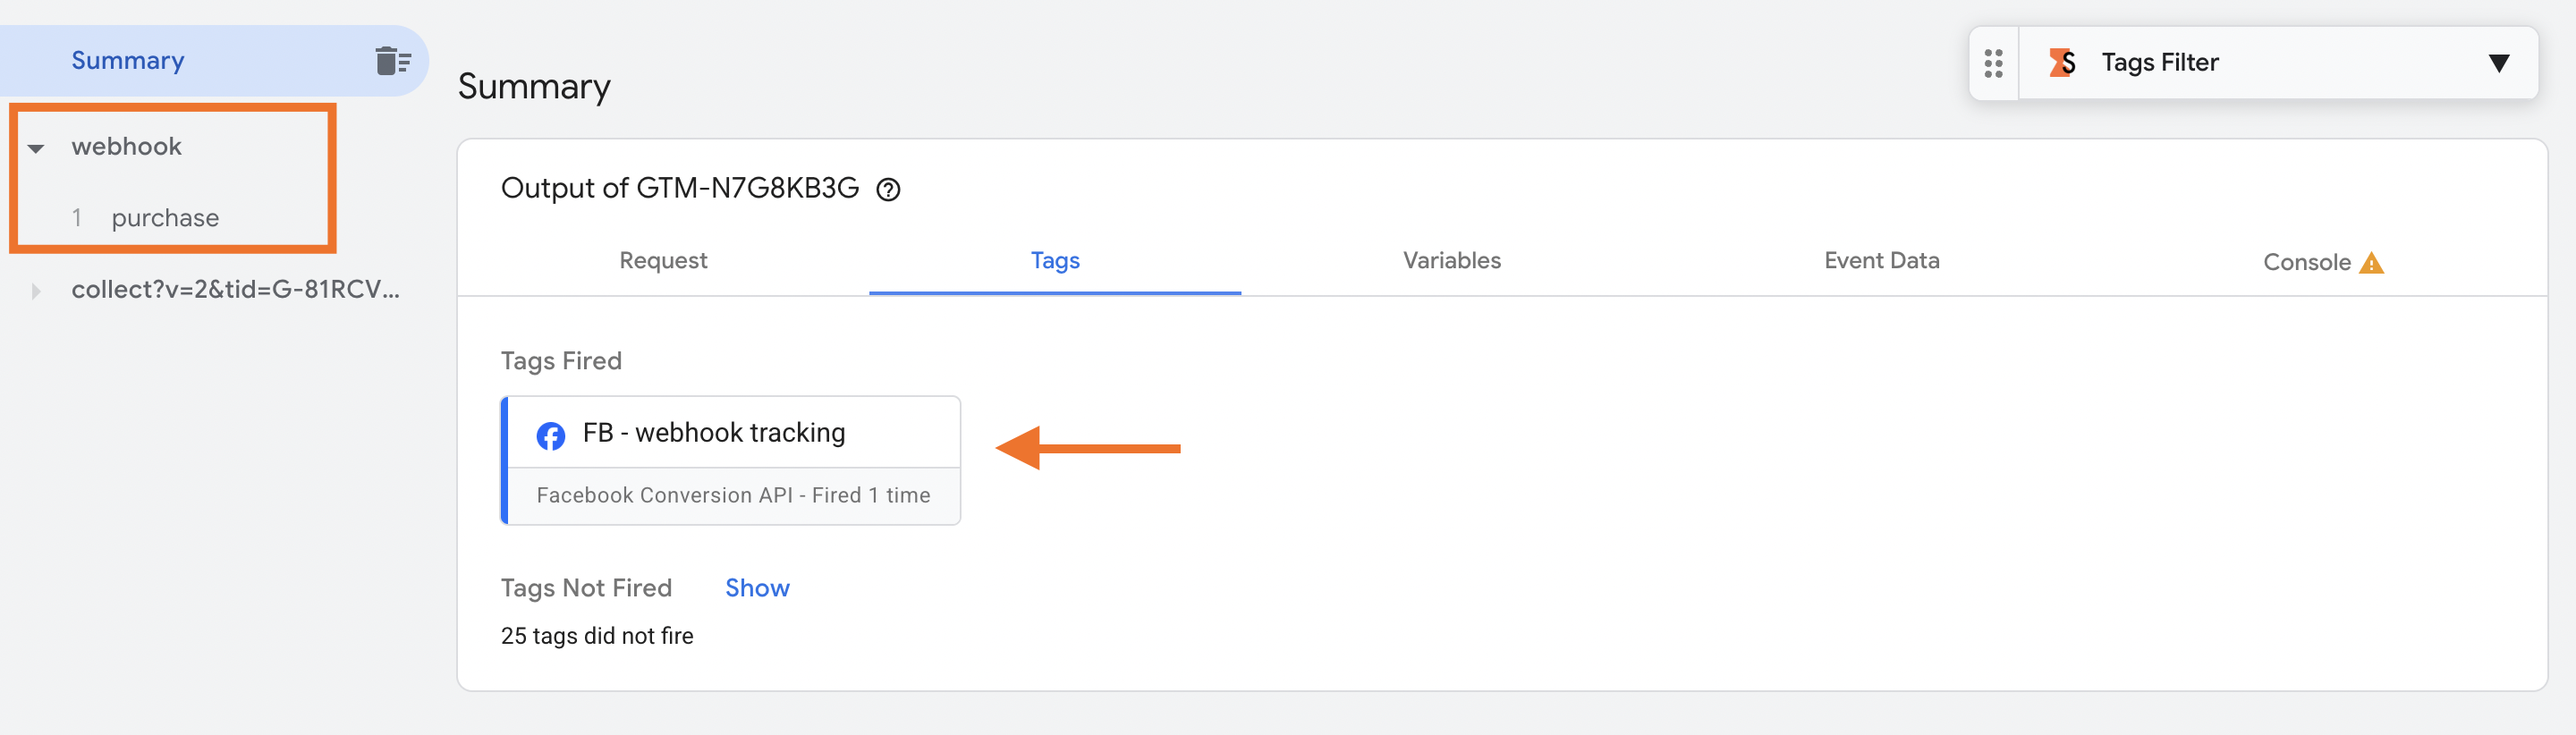
8. Test the configuration.
Open Preview and Debug Mode in the server GTM.
Go to your CMS app → "Webhooks" tab → click “Send test webhook”.

See the webhook in Preview and Debug Mode:
Step 2. Connect the required datasets to the ad account
Connecting the datasets is required to grant permission for attribution/optimization using offline events. By linking the dataset to your ad account, you give Meta permission to match your offline customer data (like hashed emails from your POS/CRM) against the data that the platform has on users' online behaviour.
Keep in mind that match quality varies; send multiple high-quality identifiers where permitted, and monitor match diagnostics in Events Manager.
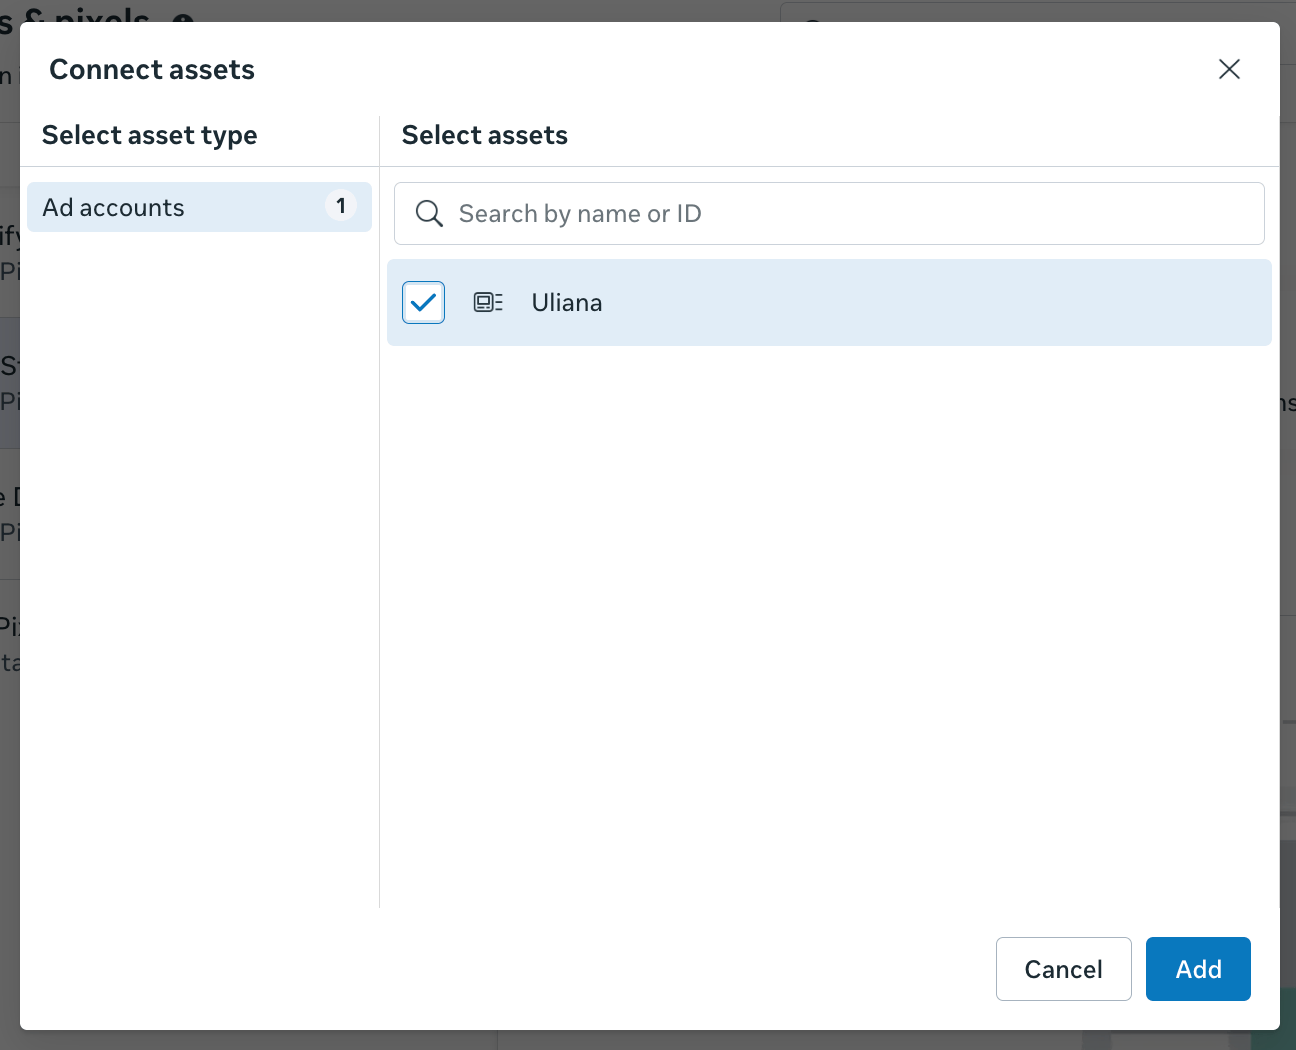
To add the dataset to an ad account, go to Meta Business Settings → click on "Data Sources" → select "Datasets & pixels" → select the dataset you use for receiving offline CAPI events → click on "Connected assets" tab → Connect assets.

Select the account and click "Add".
Step 3. Check offline data quality score, improve if needed
Note:
To configure a Meta omnichannel campaign, you need to have an offline data quality score of 8.5 or higher.
3.1 Check your offline data quality score to see if you can use the omnichannel ad campaign type. Go to Events Manager → Overview → click on the required dataset → click on the conversion you need → click "View details".
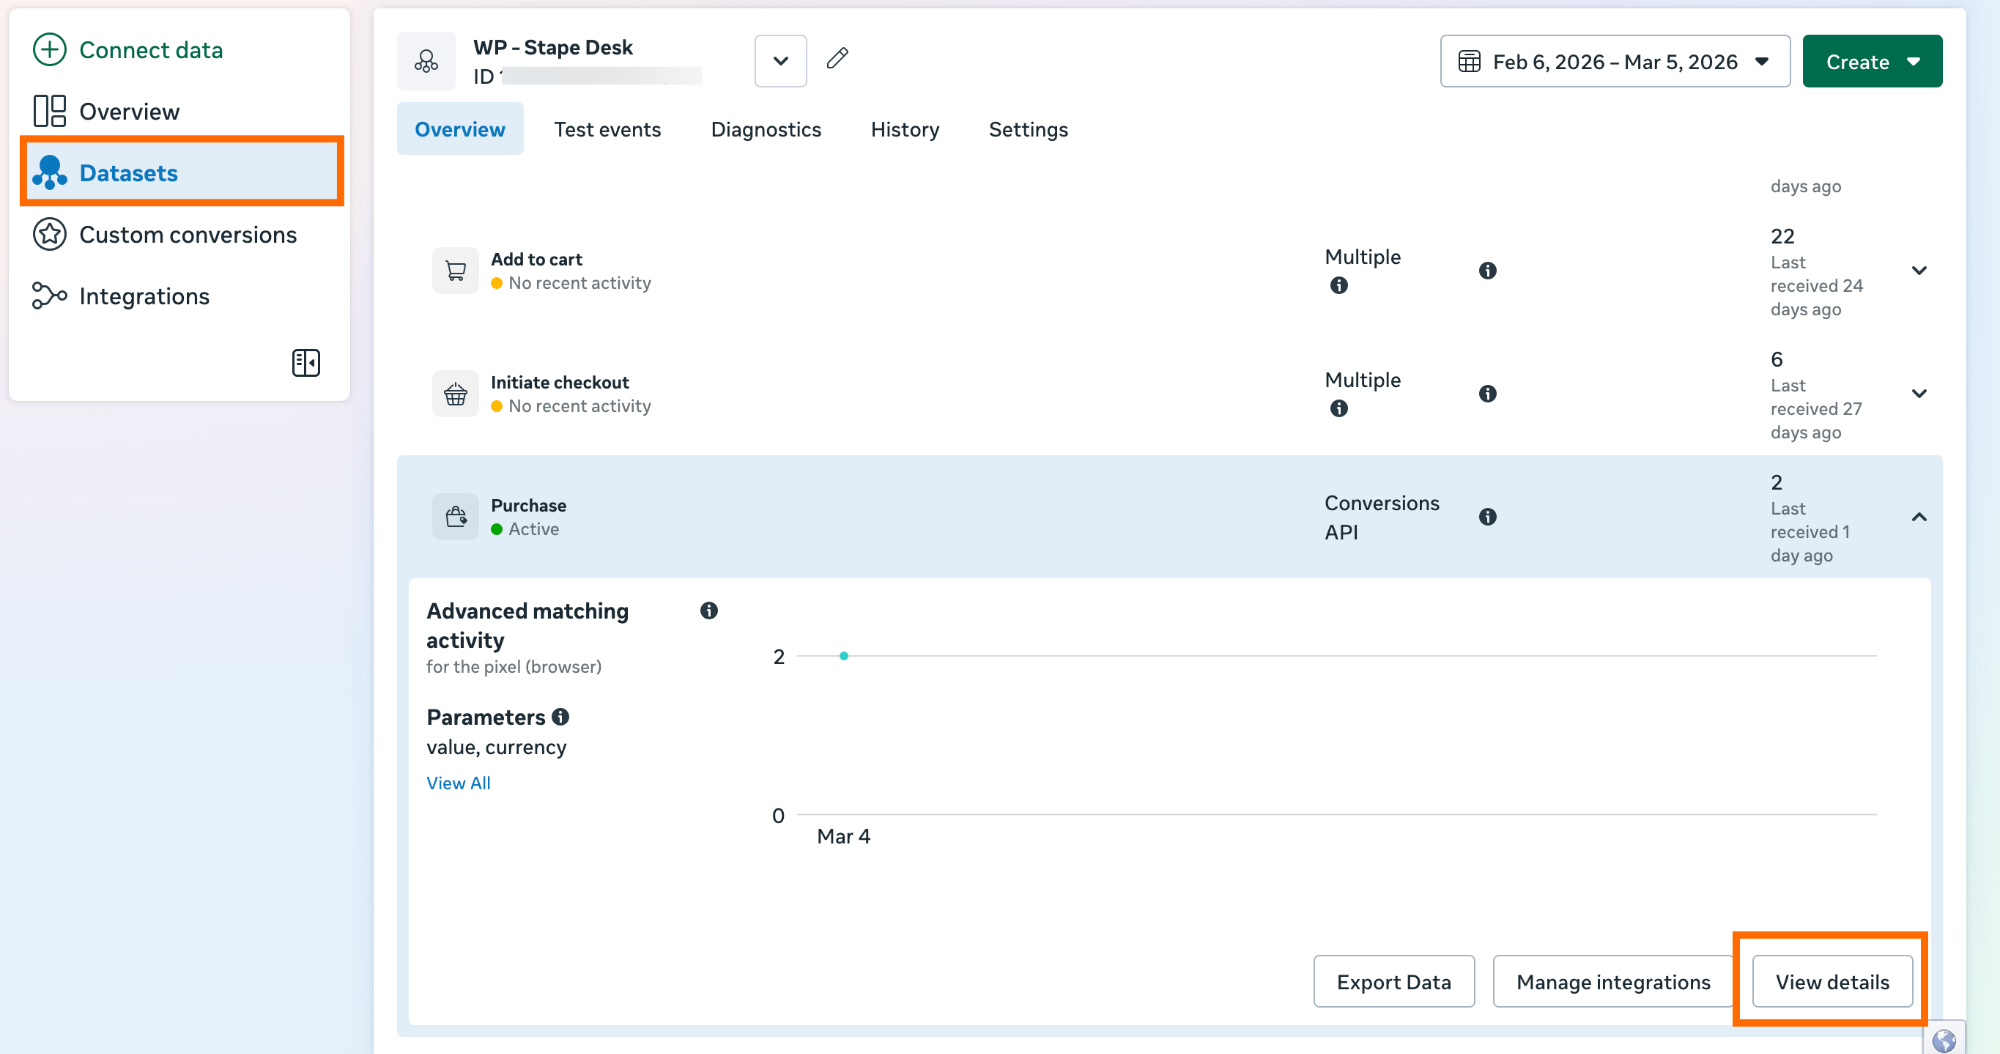
3.2 Navigate to the "Event Quality" tab in a pop-up window. Here you will see the Event Quality Score.
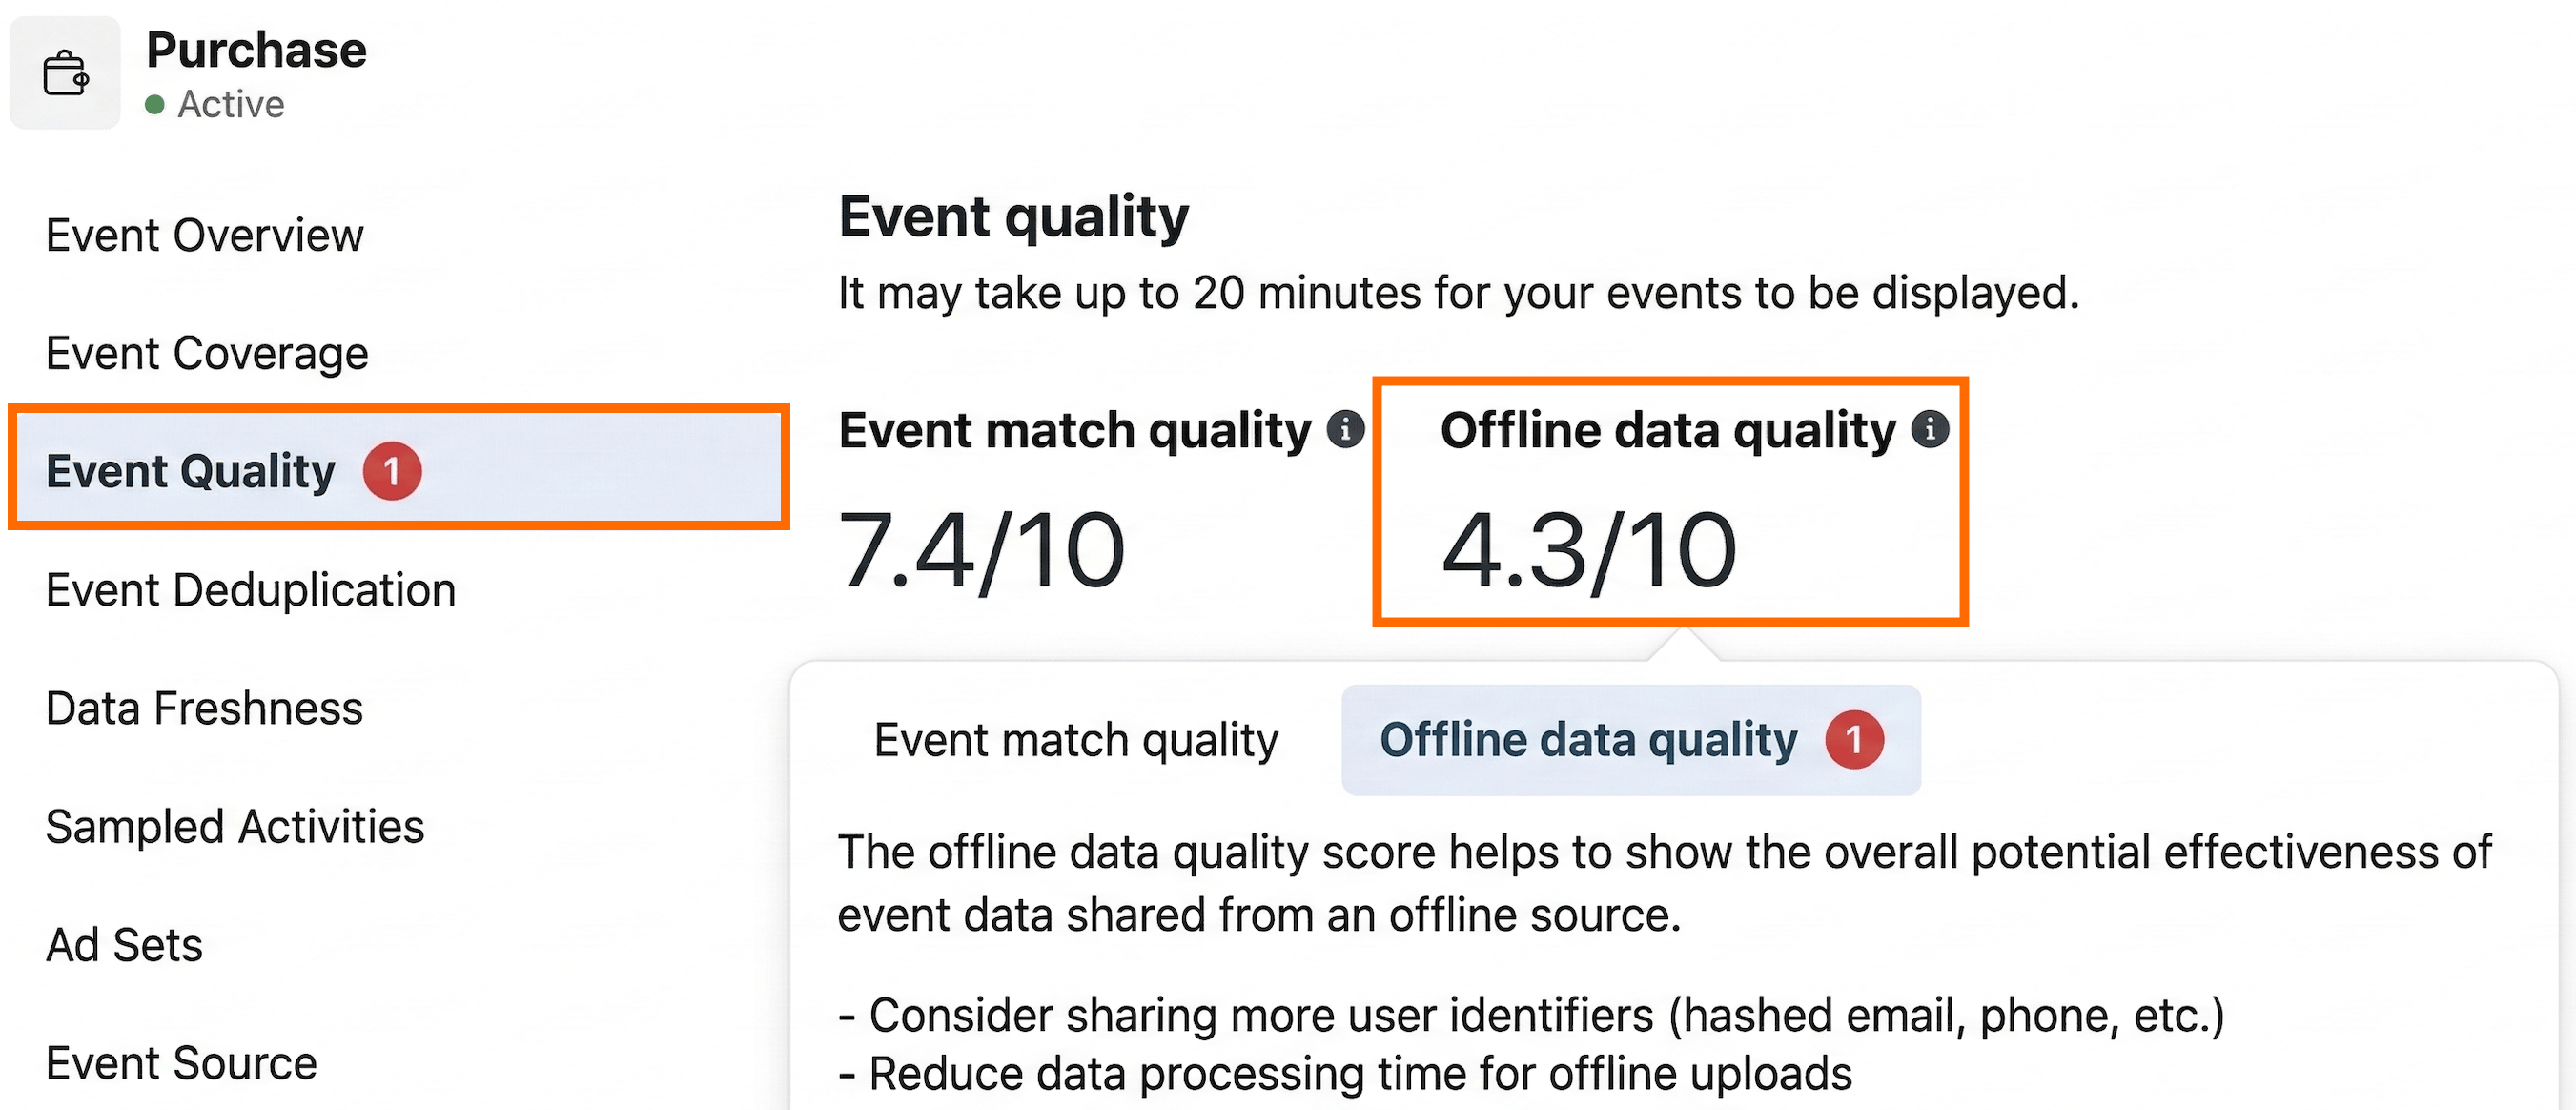
If the score is below 8.5, follow the recommendations from the collapse element to improve it:
Tips to improve Event Match Quality Score
The key factor affecting the score is data freshness. Meta requires data from the past 3.5 days to maintain a stable learning phase for its algorithms. If you are using a CRM app or a webhook, this requirement must be met, as the app/webhook sends data after it is received from the CRM or POS system (if you have some custom restrictions on sending data, be sure to remove them).
Below are some tips to improve the score:
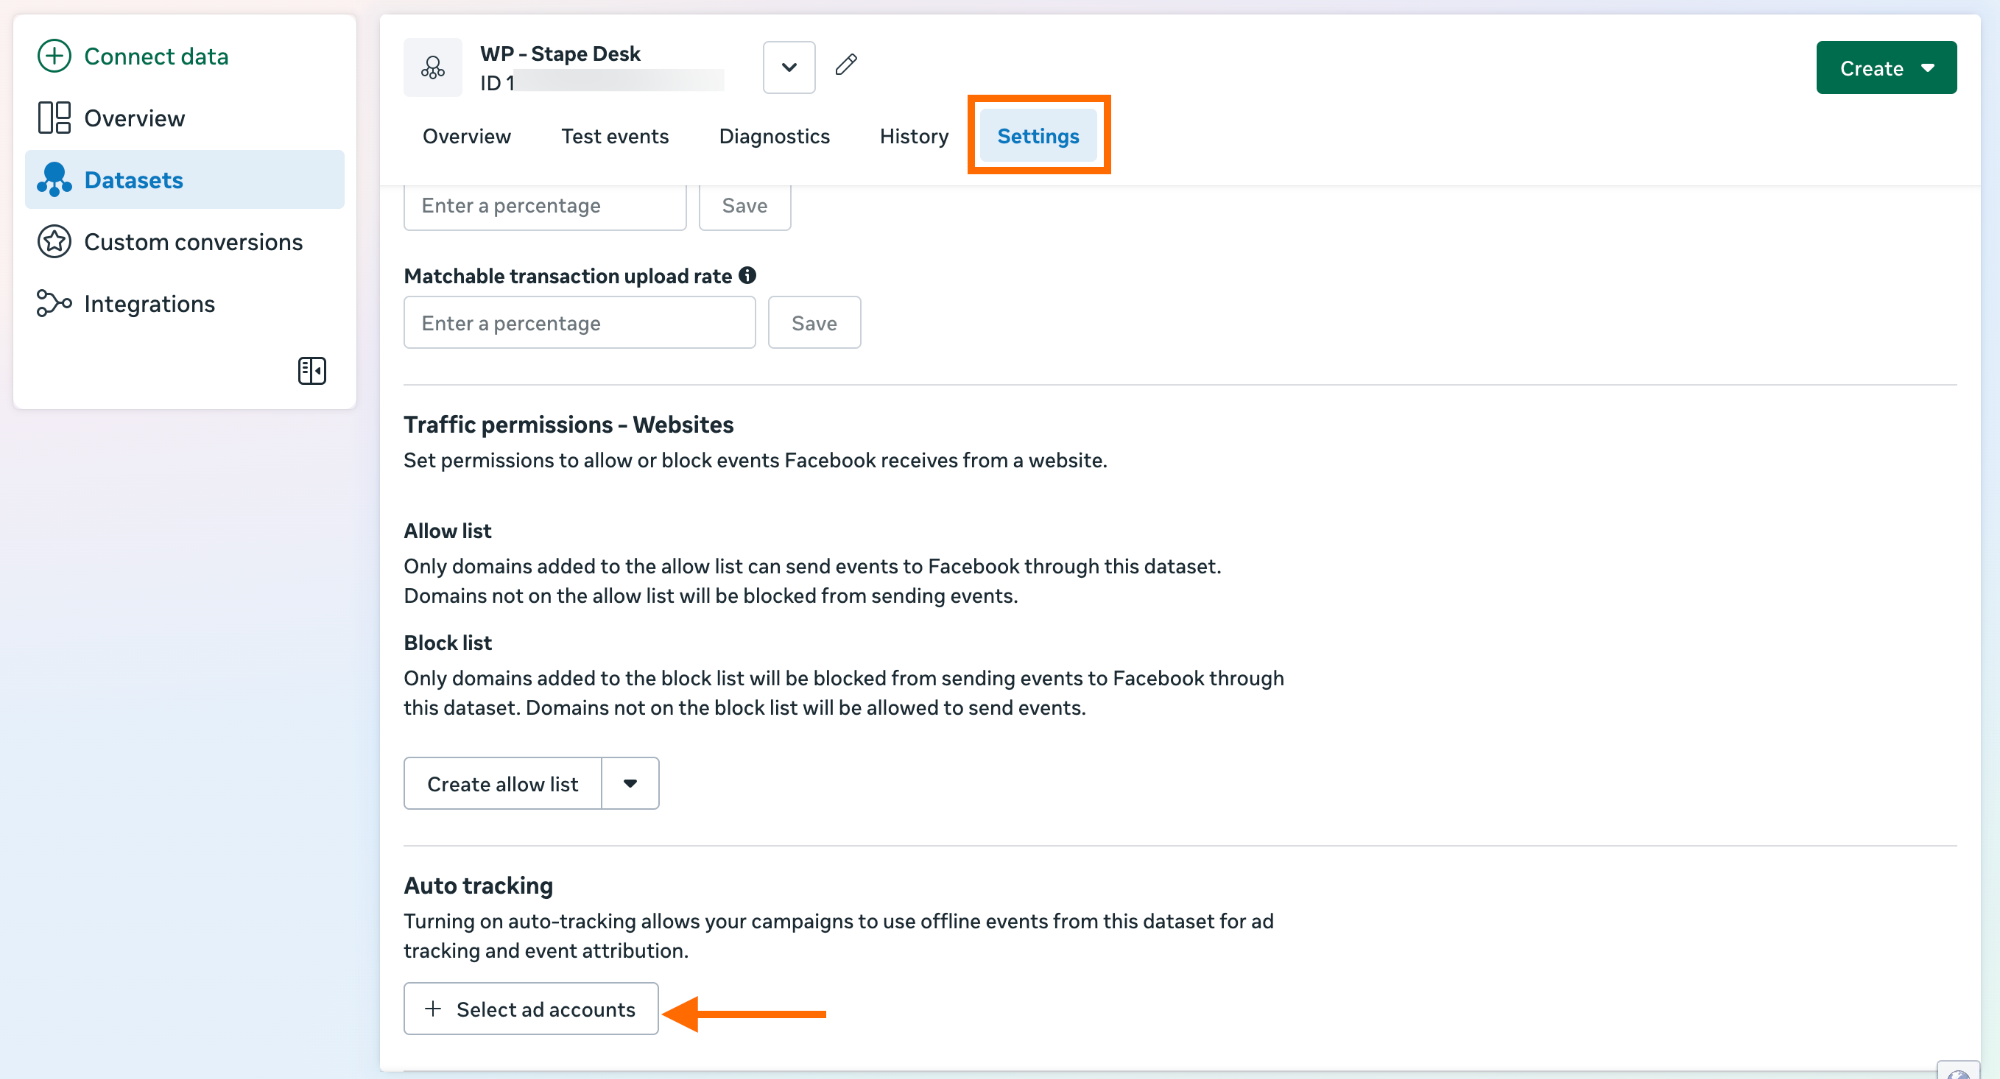
1. Enable auto-tracking for offline events
Go to Meta Events Manager → in the "Overview" section select the required dataset → navigate to the "Settings" section of a pixel → scroll to the "Auto tracking" section → click "Select an ad account".
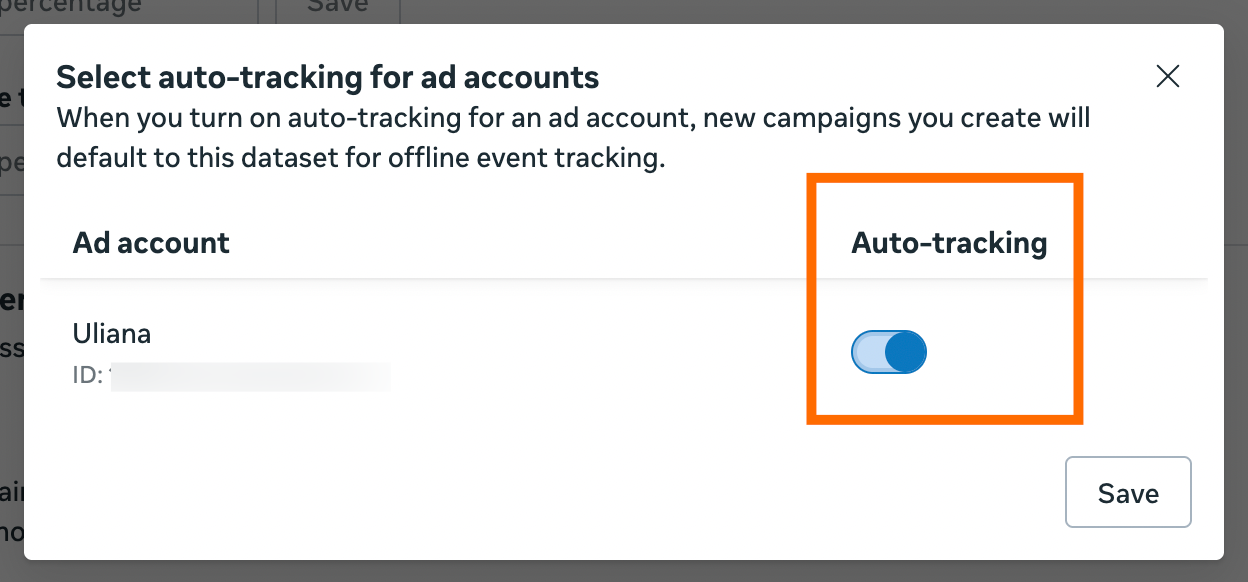
Turn on the "Auto-tracking" toggle.
2. Validate the offline data you send to Meta.
Check whether your data meets Meta's standards. Some of the key areas are the following:
- Emails must be all lowercase and stripped of any whitespace.
- Phone numbers must include the country code and be in E.164 format (e.g., +15551234567). Without dashes, dots, and brackets.
- Ensure PII (names, emails, phones) is hashed (SHA-256) before sending. If you're using Stape’s CRM apps, this is handled for you by default.
- Purchase prices must be in the correct format - without zero or negative values.
- Check whether data contains mandatory parameters: event_name: (e.g., Purchase), event_time: (Unix timestamp of the actual sale), action_source (must be set to physical_store for offline events).
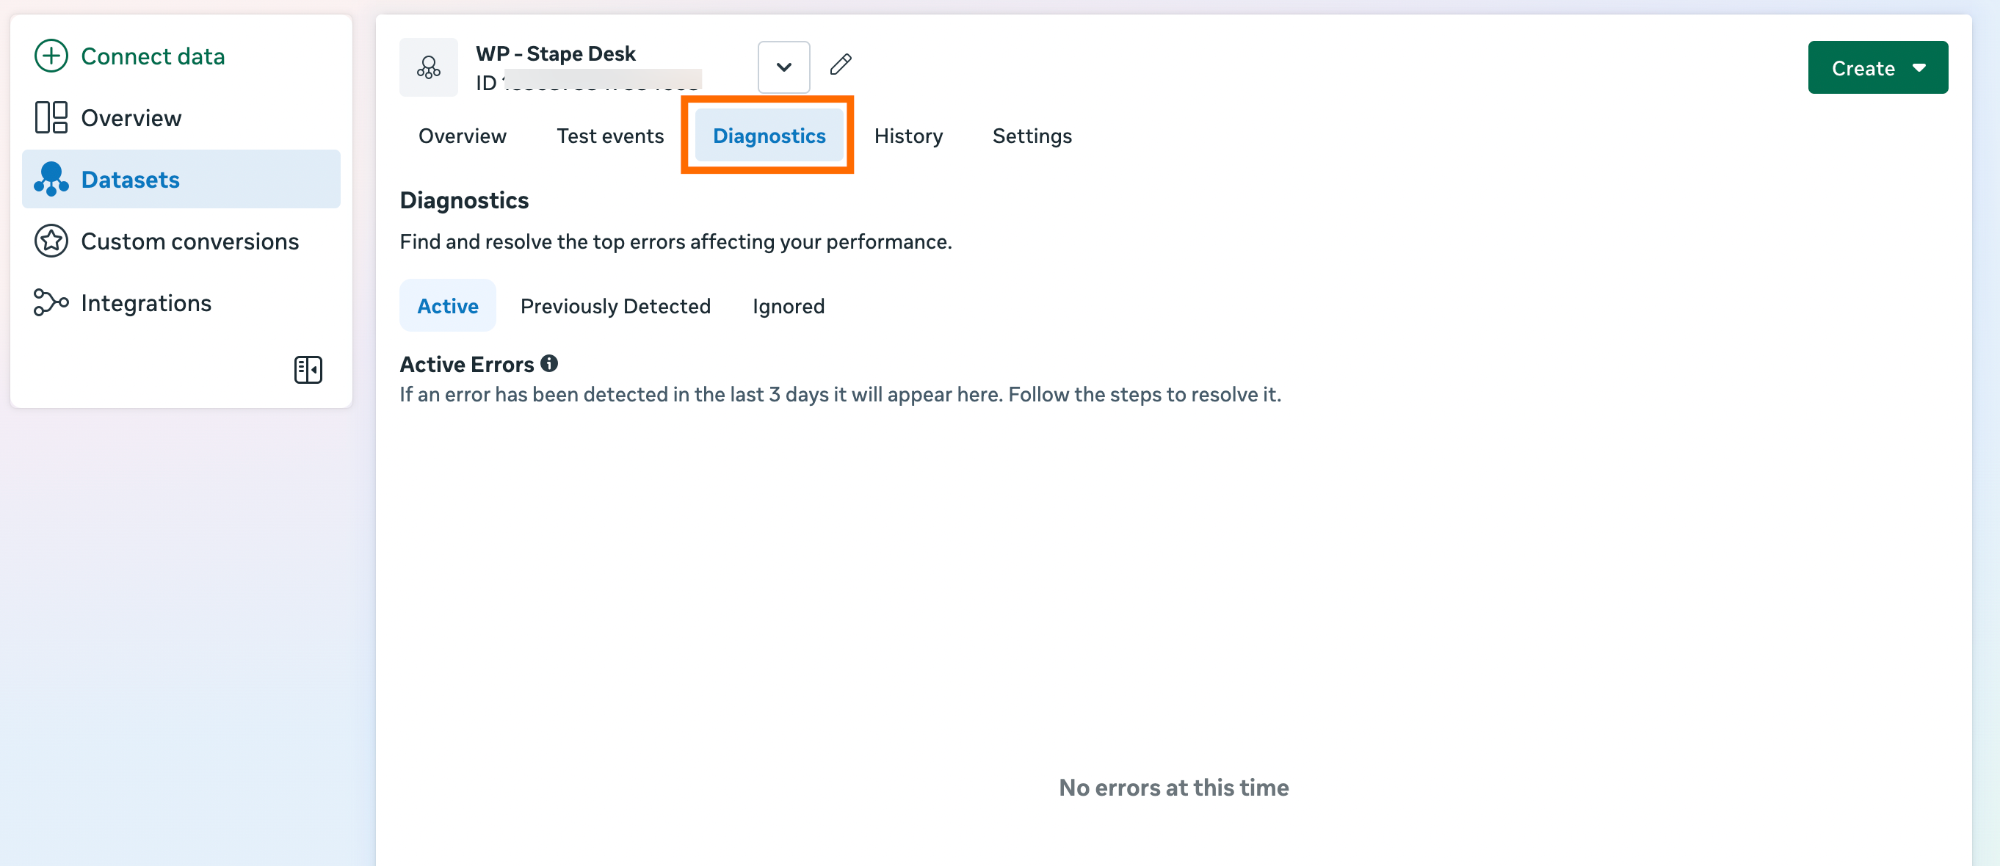
3. Check and monitor the health of your dataset setup.
Go to "Events Manager" → click on your "Dataset" → "Diagnostics" tab. If you see some errors, fix them.
Step 4. Create an omnichannel campaign in Meta Ads
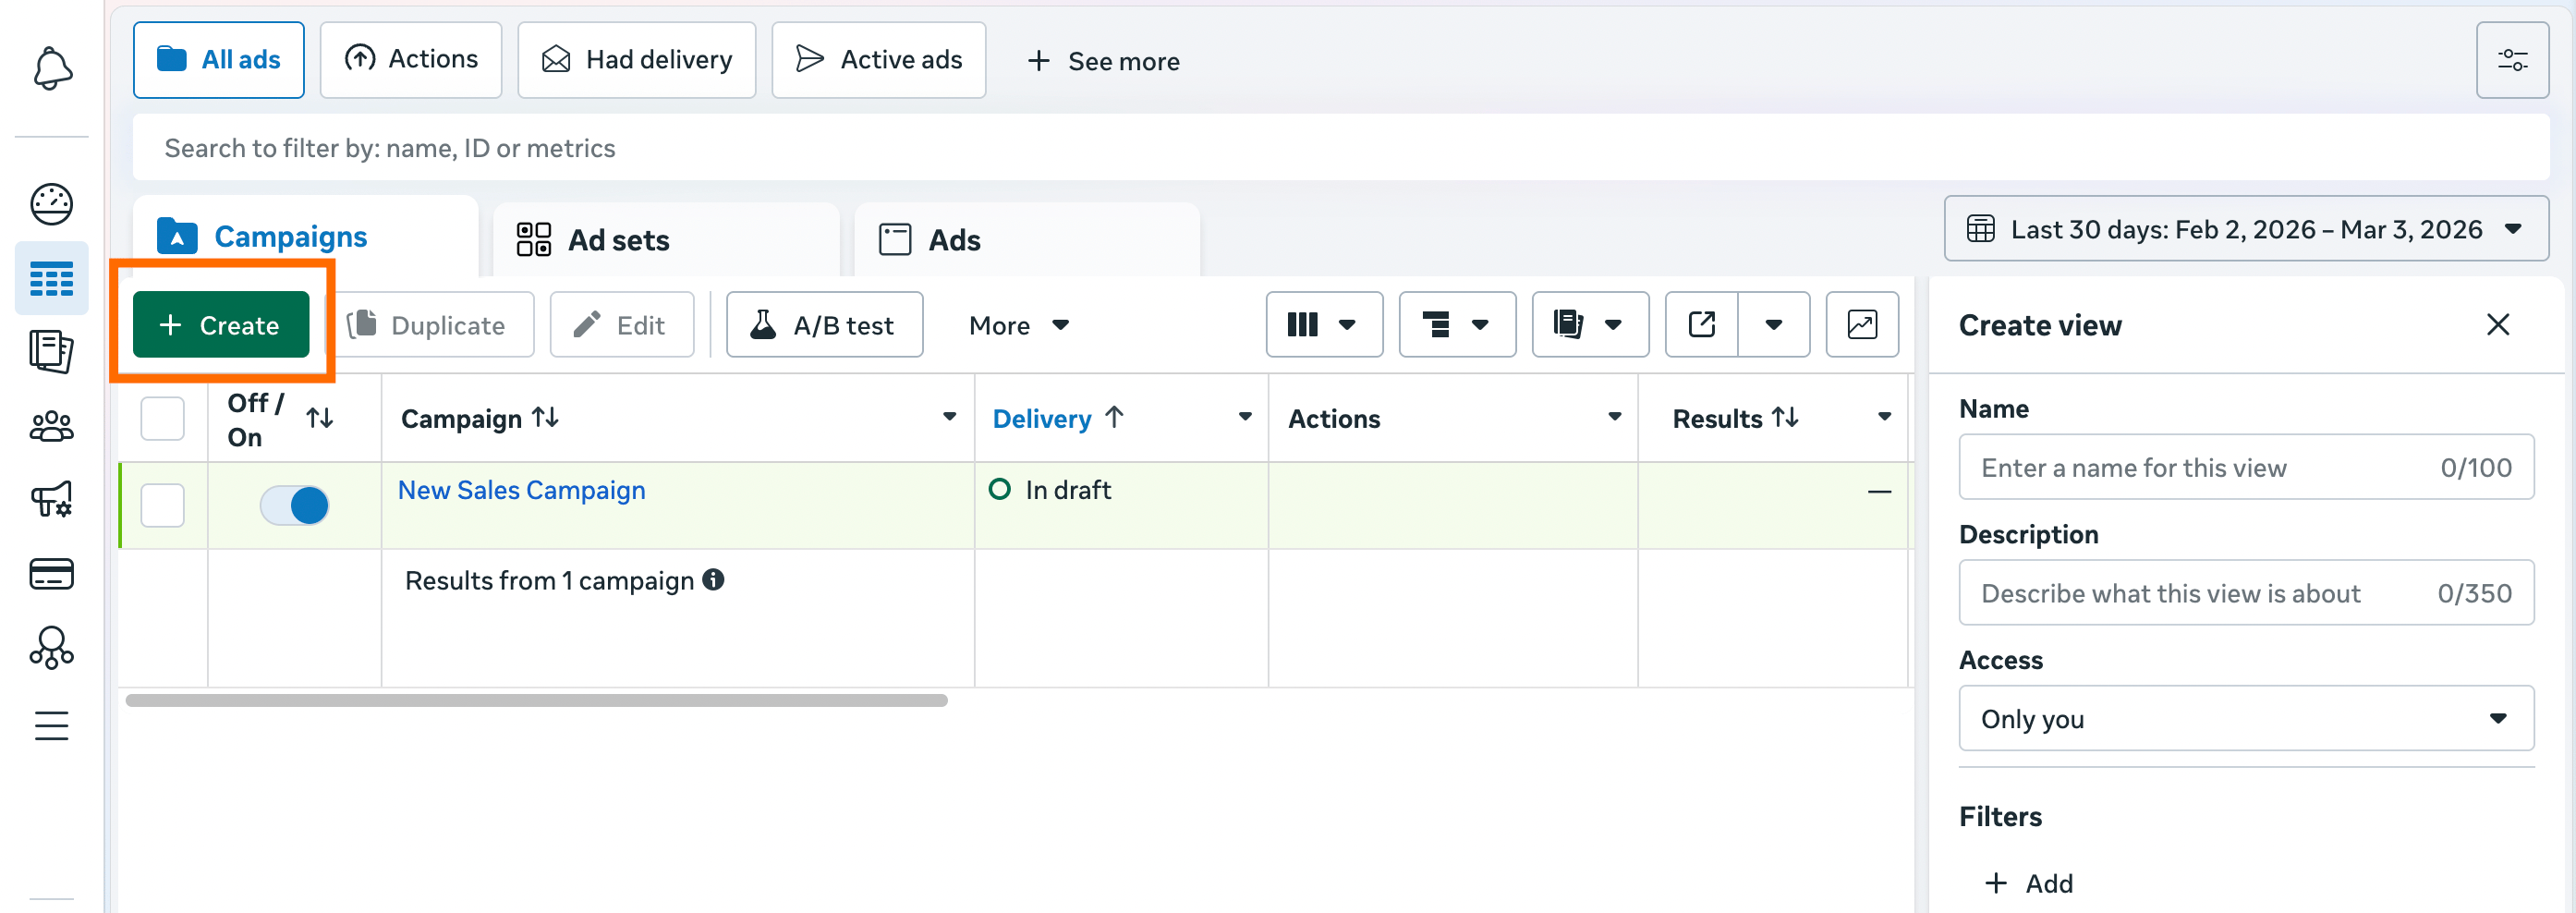
4.1 To create an omnichannel campaign, go to Ads Manager → click "Create".
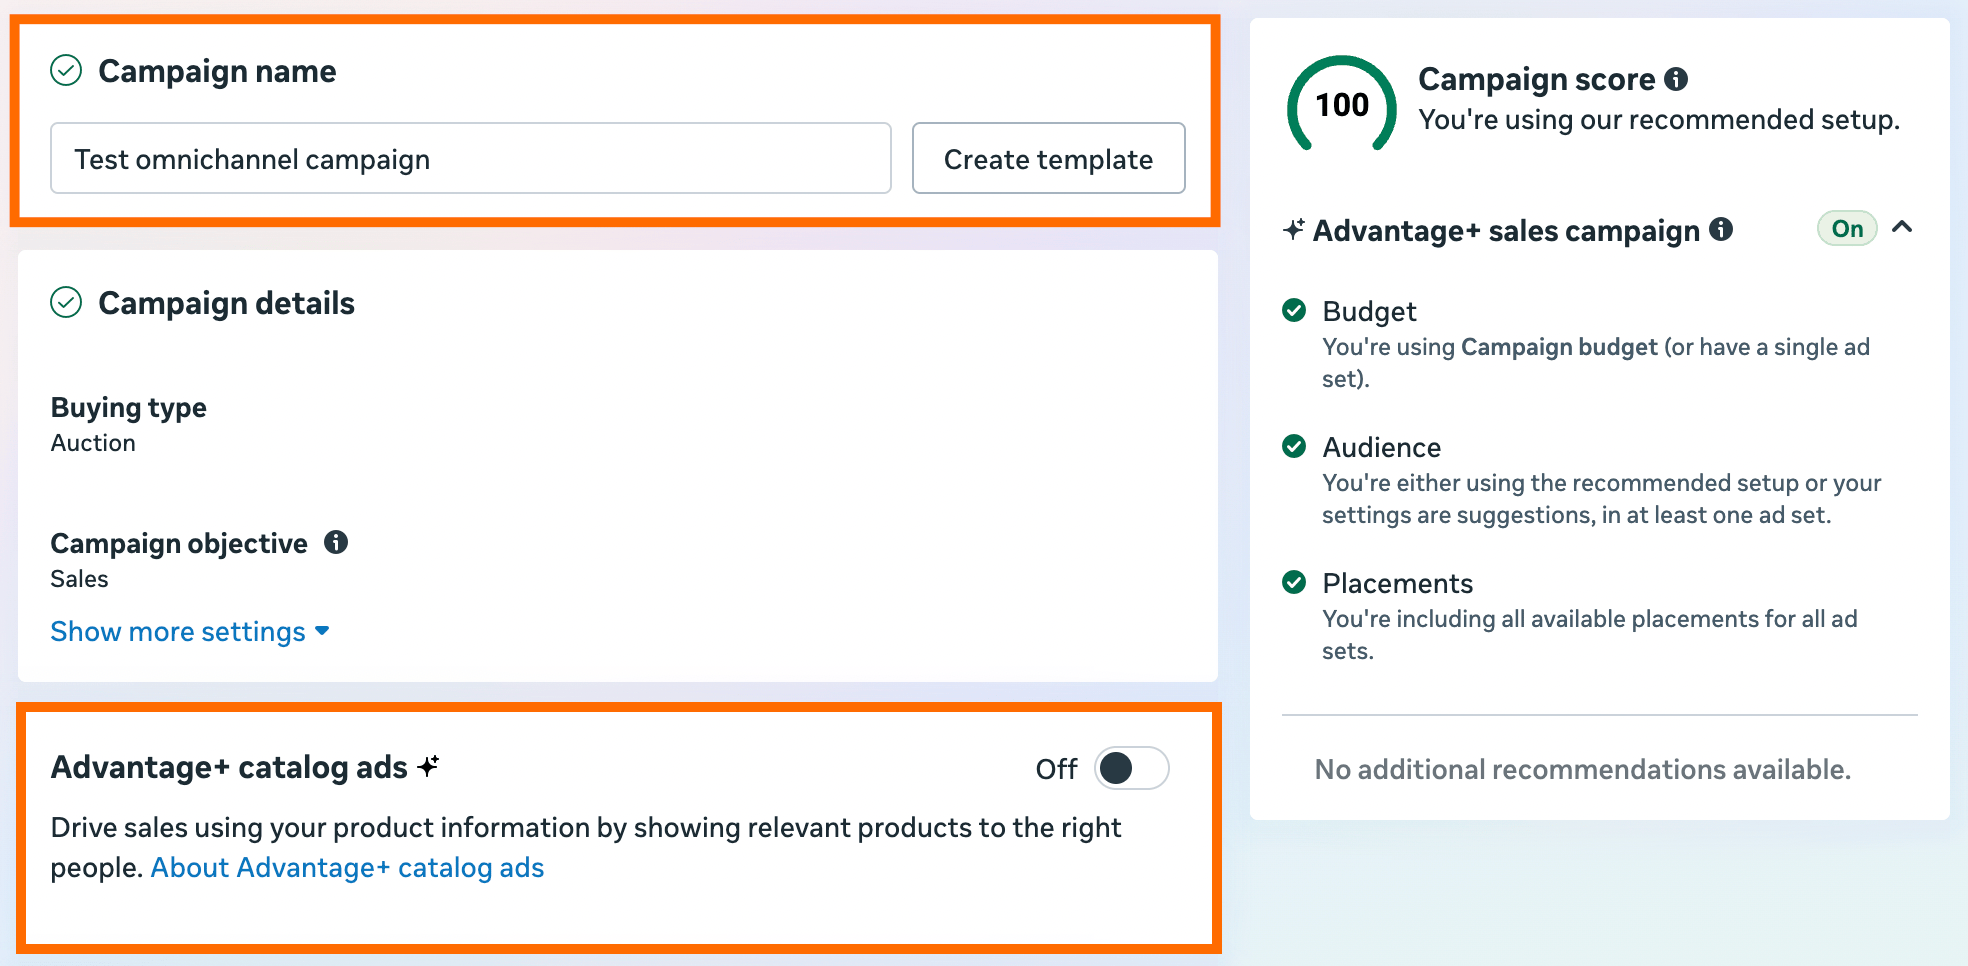
4.2 Choose "Sales" as a campaign objective → click "Next" → on the screen, add the Campaign name.
Meta also provides an option to turn on Advantage+ catalog ads - an automated format that provides personalized product ads from your catalog to users. To do it, Meta uses its machine-learning optimization. Enable Advantage+ catalog ads if you have a catalog and want dynamic product delivery; otherwise, stick with a single image/video.
4.3 Set the campaign budget, add other configurations that meet your needs, and click "Next".
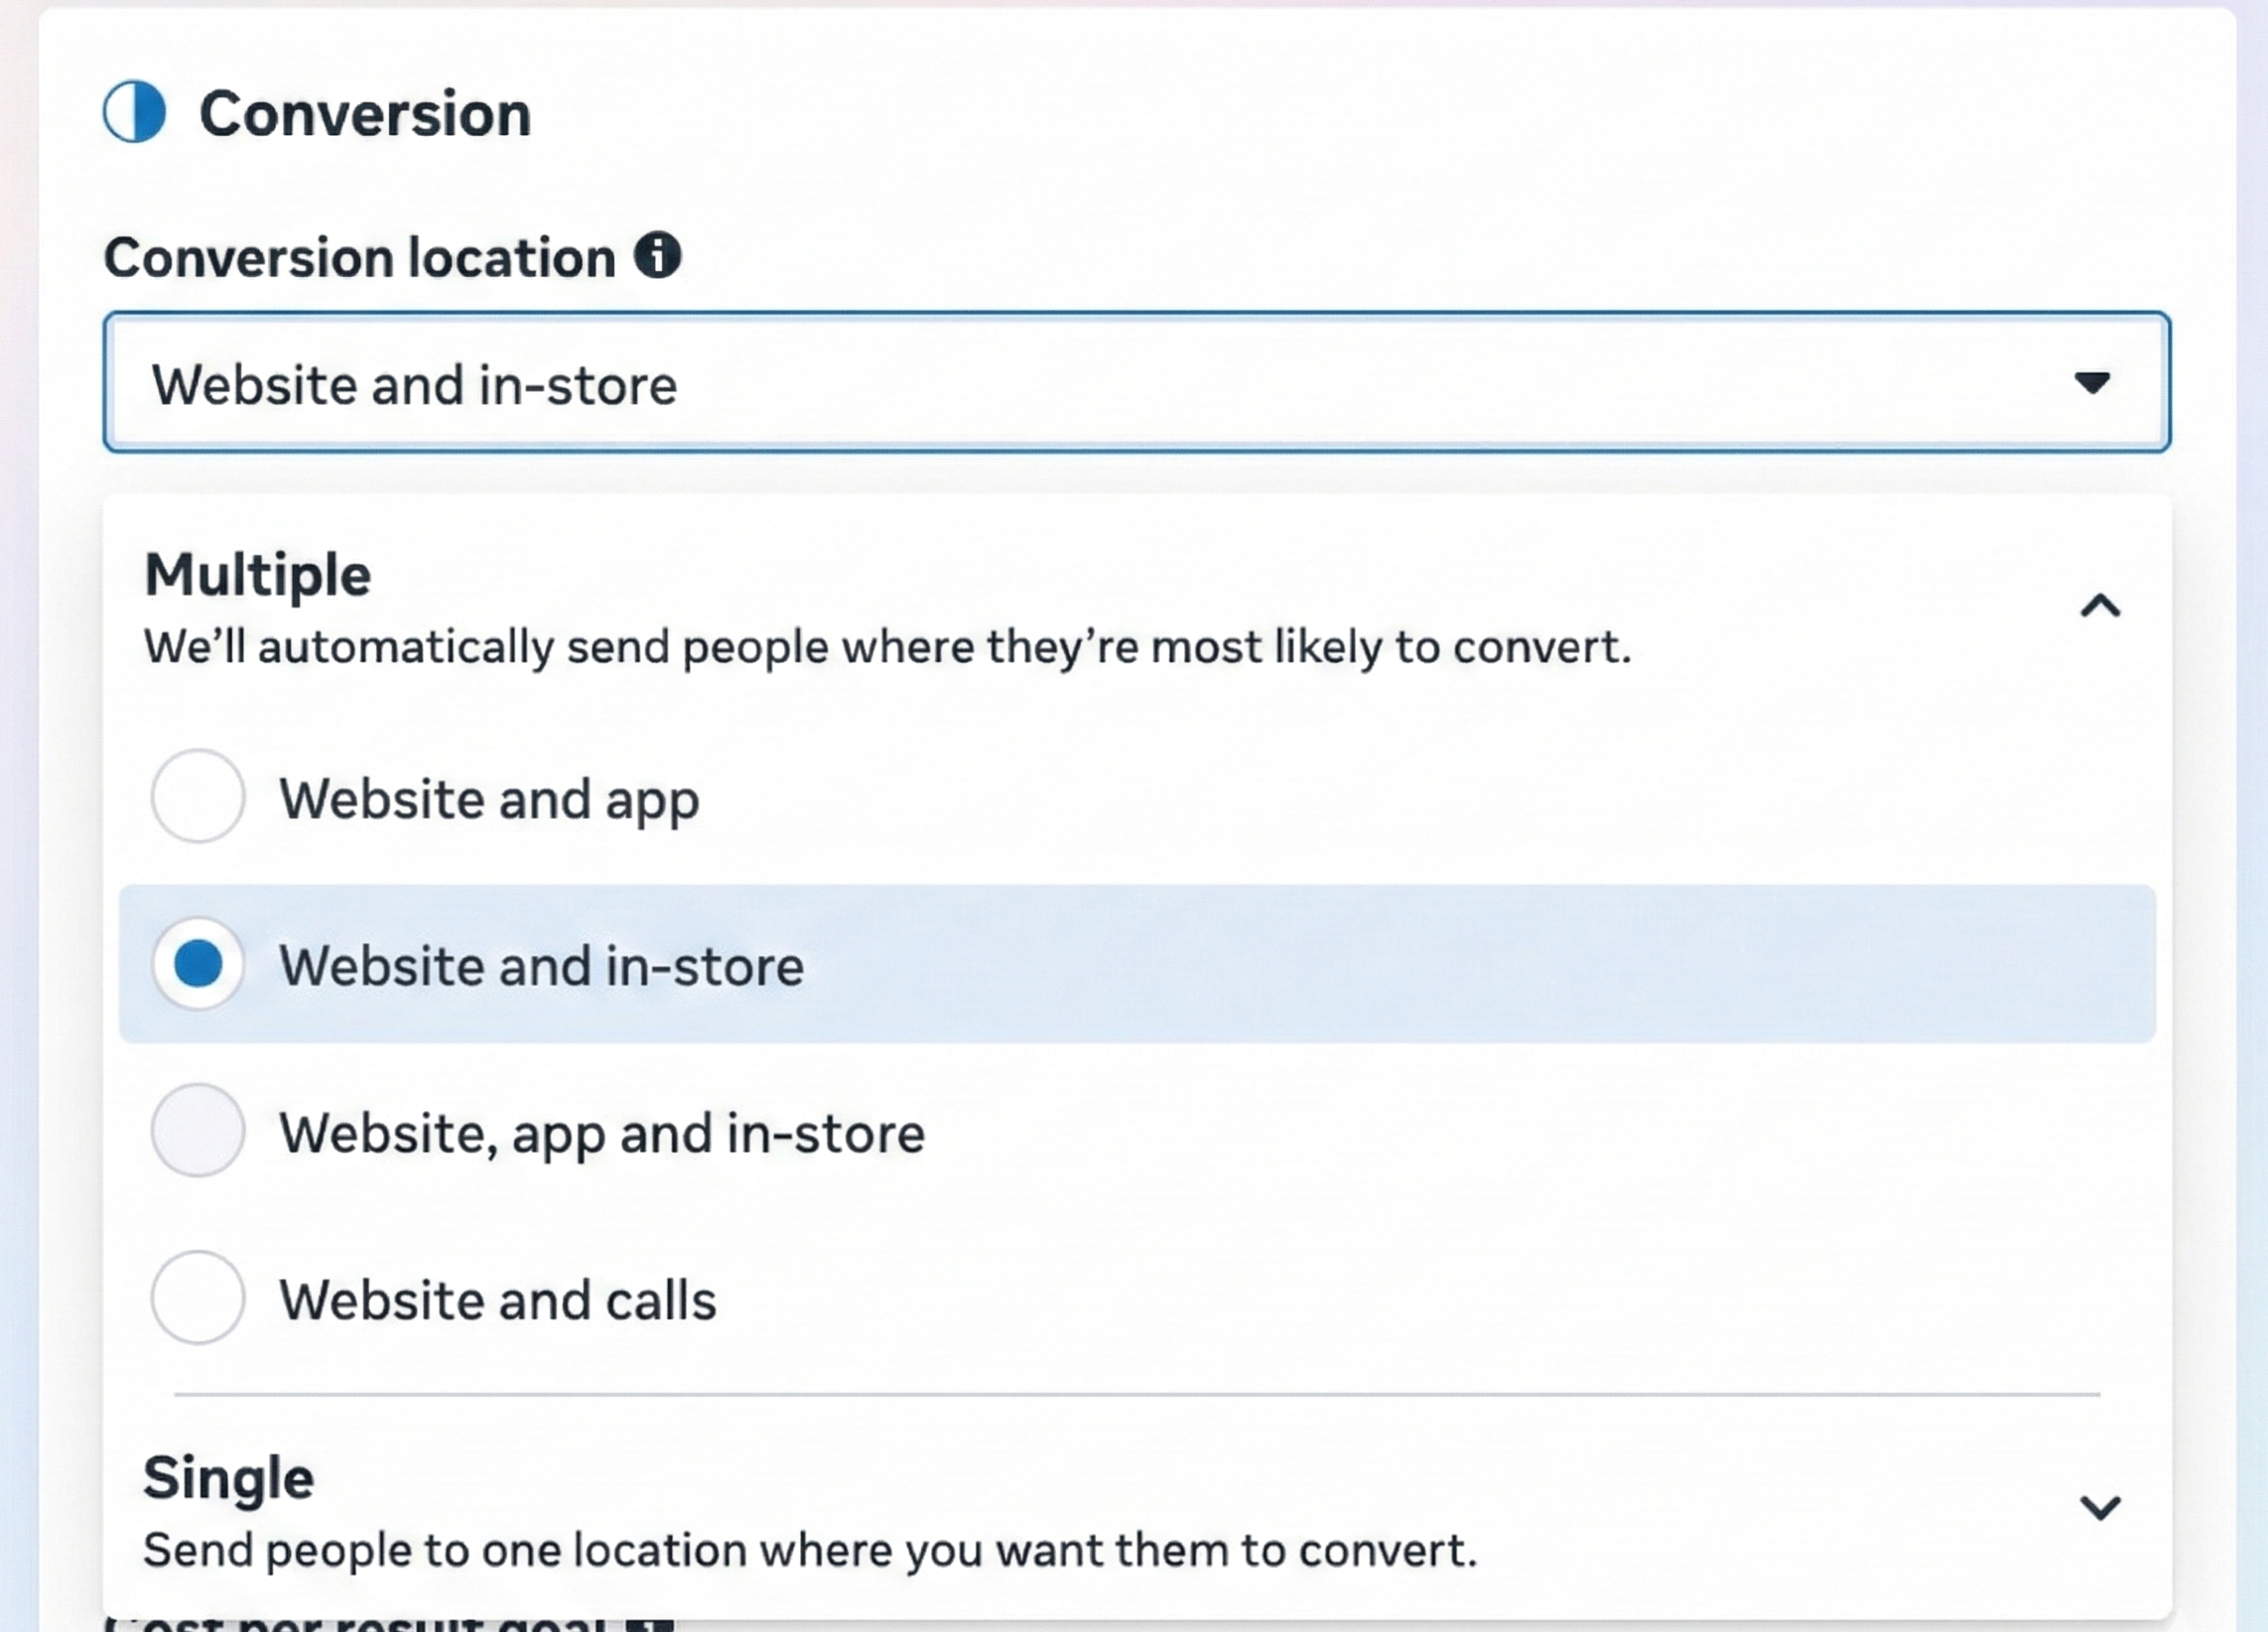
4.4 On this step, select "Website and in-store" or "Website, app and in-store" as Conversion location.
After choosing the Conversion location, the performance goal will automatically be set to maximize the number of conversions, and the conversion event will default to Purchase. You won’t be able to select a different performance goal or conversion event.
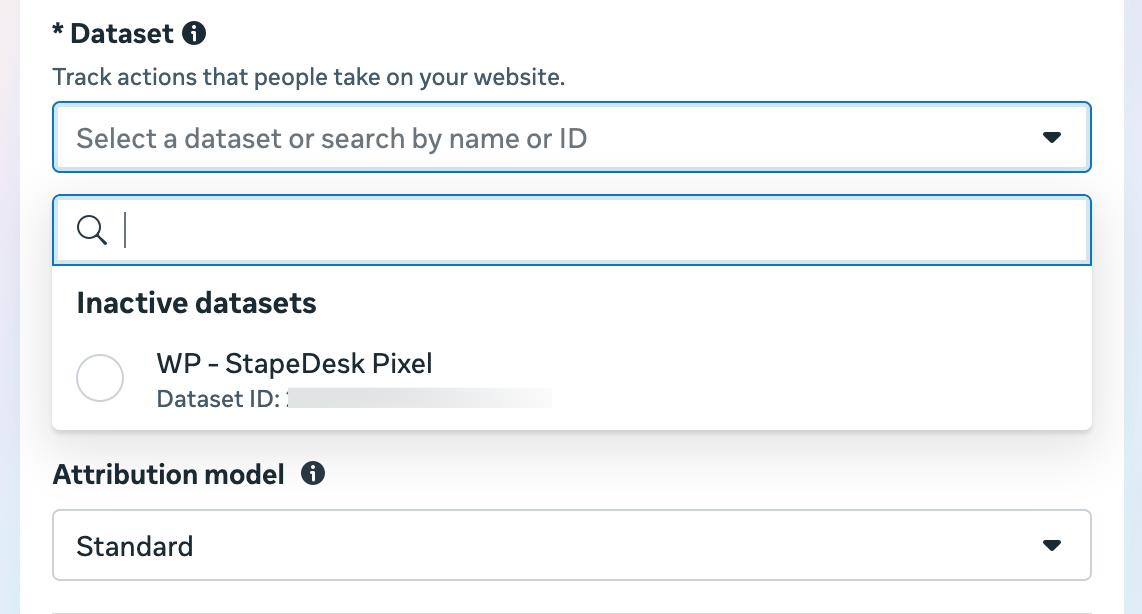
4.5 In the "Dataset," select the dataset that receives both website and offline events. "Purchase" will be chosen by default as the conversion event.
Configure the ad campaign according to your needs.
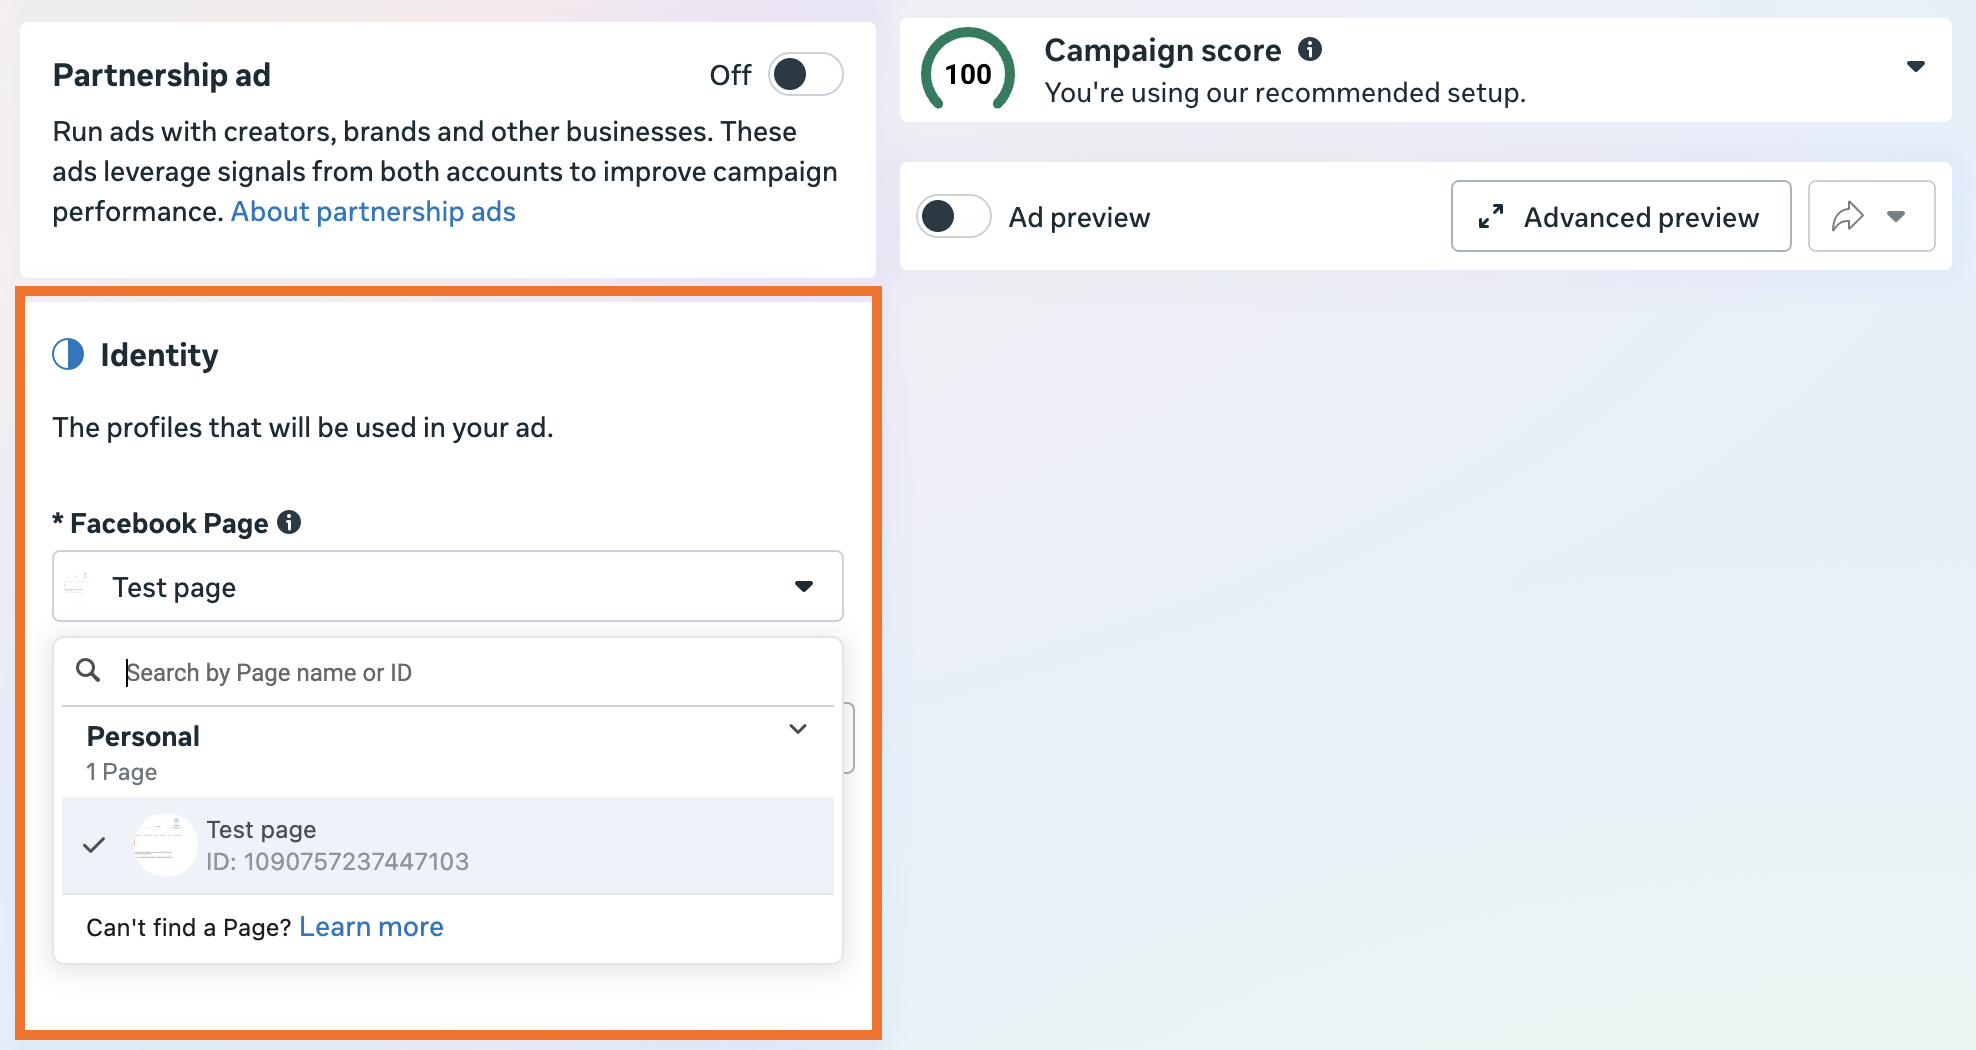
4.6 On the next step, select or create a Meta page that has a store Pages structure. If you've selected Advantage+ catalogue ads, skip this step.
4.7 In the Ad setup, select Manual upload as your media setup and Single image or video as your format. If you've selected Advantage+ catalogue ads, skip this step.
Complete the campaign configuration and publish the campaign.
| For more details on the omnichannel campaign configuration, check Meta's documentation. |
Step 5. Test and measure omnichannel campaign performance
Once the setup is complete, the next step is to validate that the configuration works properly and sends reliable signals.
Start by checking your offline signal quality (offline data quality score) to ensure attribution/measurement is consistent and signals keep flowing.
Note:
Next, check that product and inventory information is up to date. If omnichannel features such as local inventory visibility are enabled, items should appear correctly in real time, so that the customer experience is consistent across channels.
After confirming that the campaign setup is functioning as expected, evaluate its impact on business. A good practice is to run an omnichannel campaign alongside your standard campaigns. Such an approach allows you to compare performance and understand whether omnichannel optimization works for your case. In fact, it is a controlled experiment: you will need to either compare an omni campaign directly against your current ads or set a baseline to see the value of omnichannel for your case.
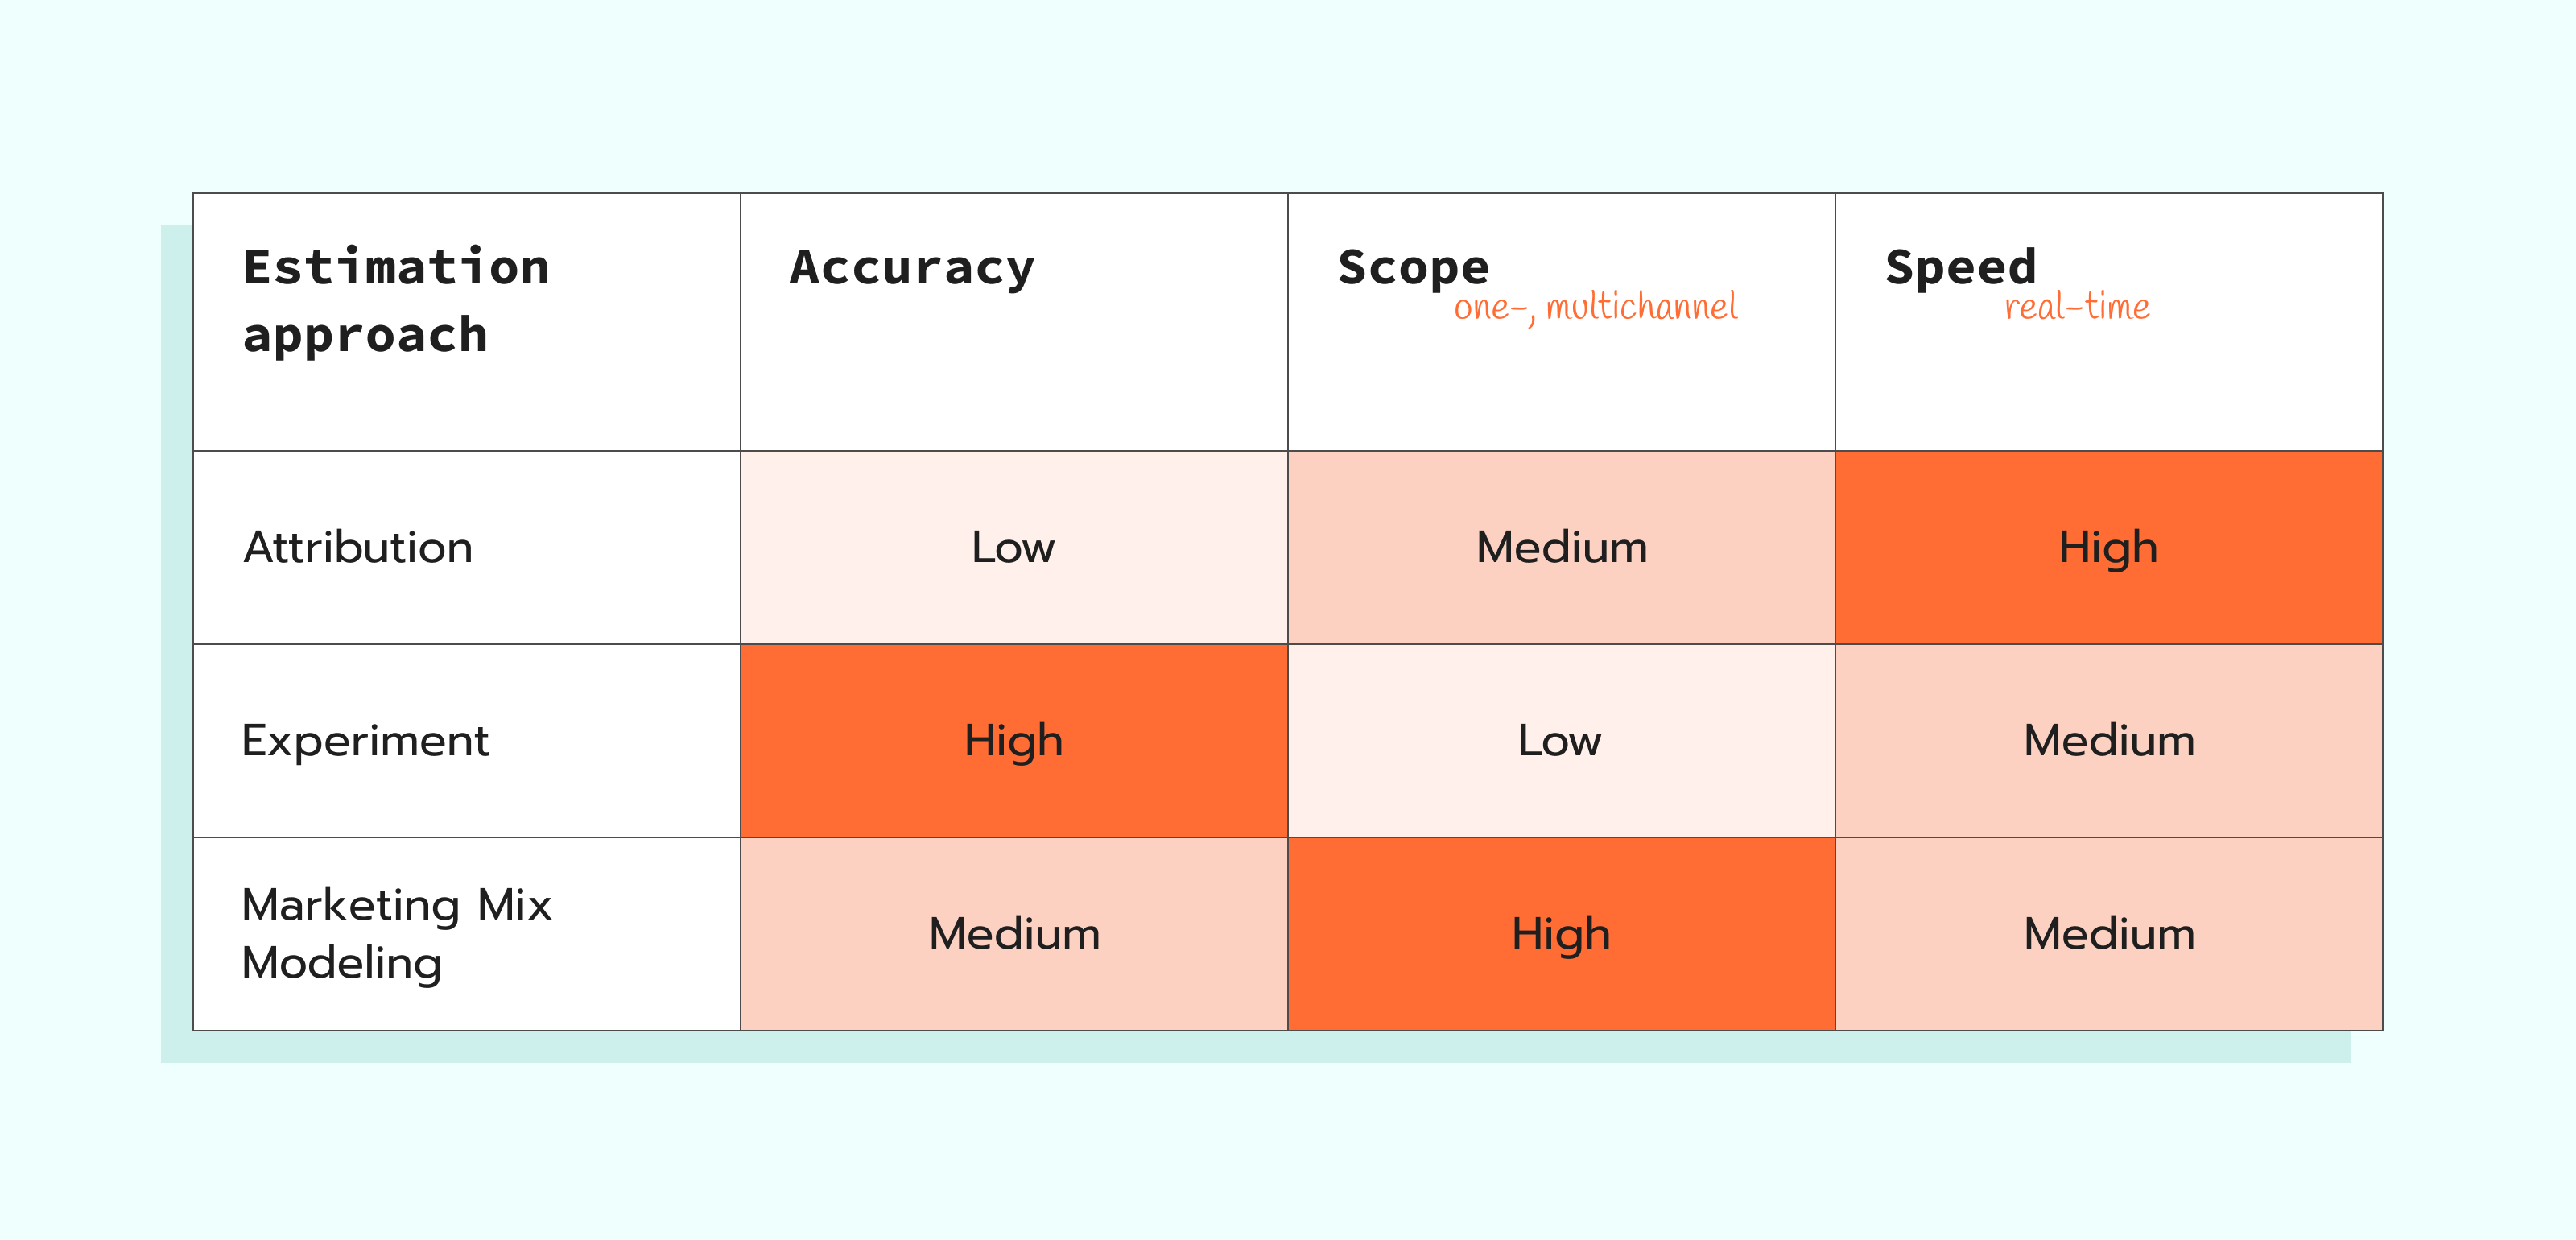
Finally, we recommend using Marketing Mix Modeling (MMM) in your measurement framework. It will help you understand how your Meta spend is affecting your business compared to other channels (like physical stores or other digital platforms).
What results to expect
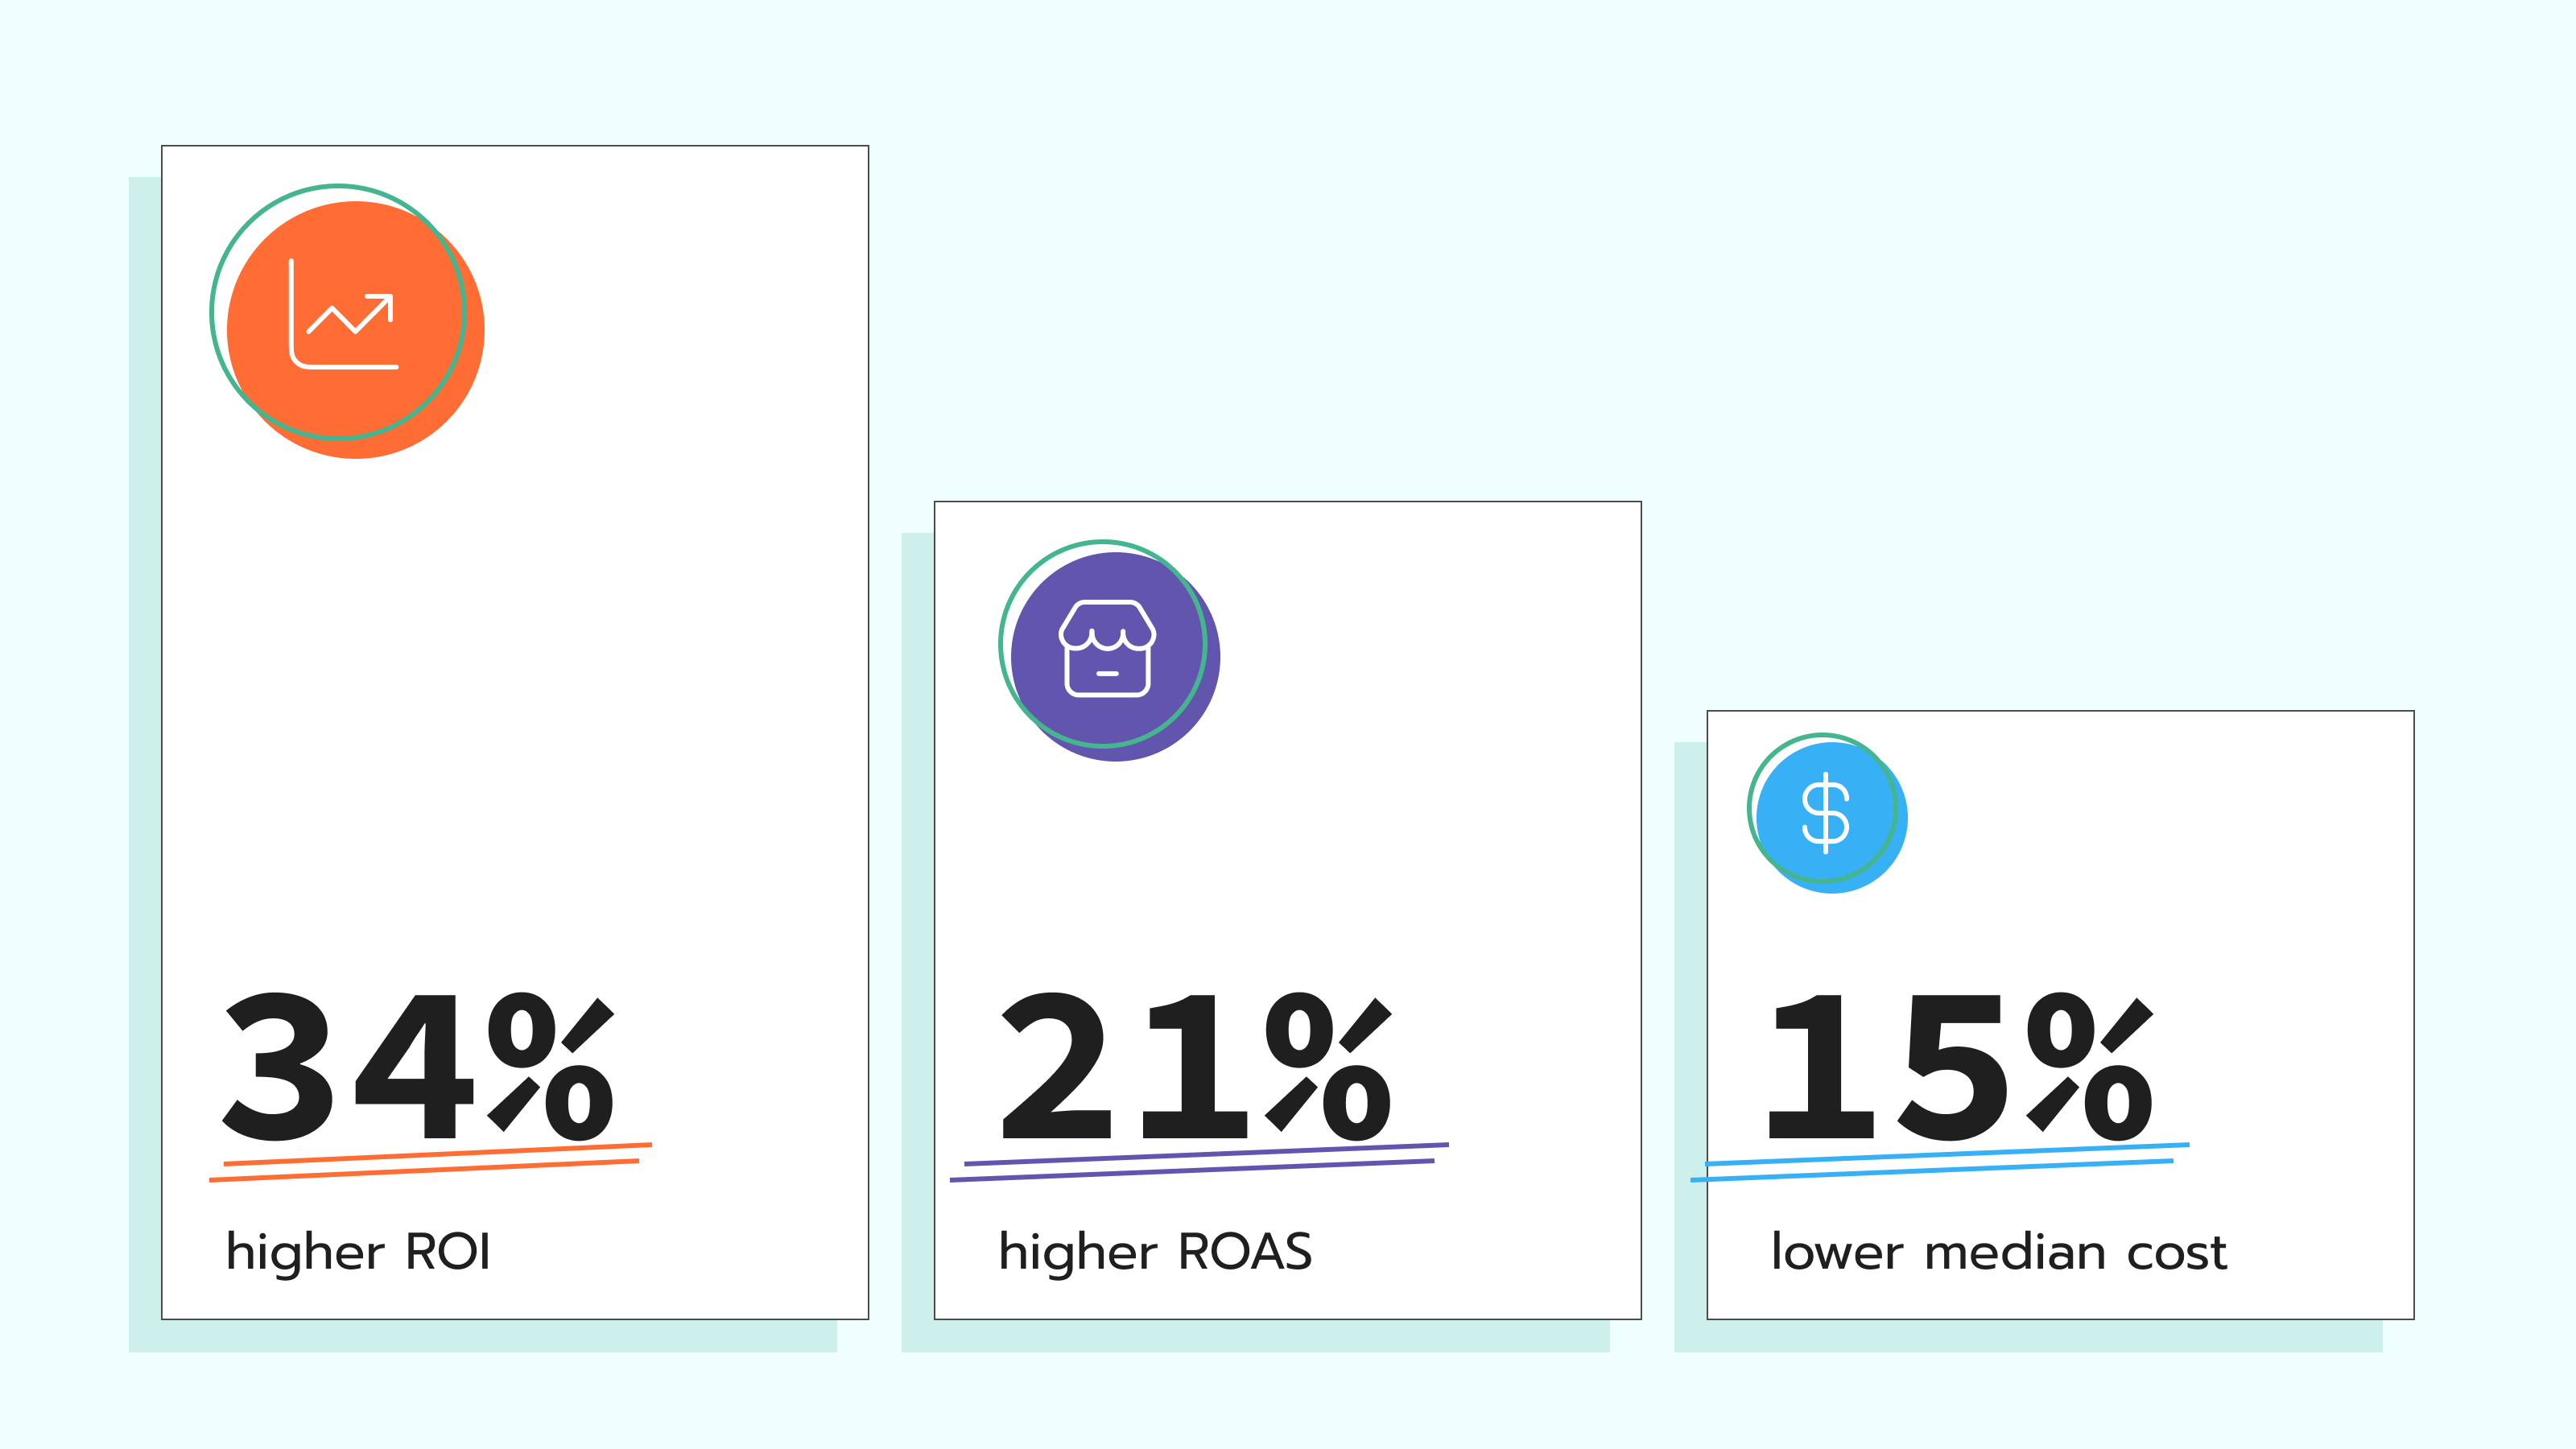
Based on initial tests, businesses that run omnichannel campaigns can expect growth across several performance indicators:
- Efficiency. Advertisers see a 15% lower median cost per omnichannel purchase compared to web-only optimization [1].
- Higher Return on Investment (ROI). The tests show a 34% increase in ROI on average. With omnichannel campaigns, the system can better identify high-value customers [2].
- Incremental growth. Optimizing for both online and offline signals, the companies have achieved a 21% higher store incremental ROAS [3].
References
- Statistical meta-analysis of 27 (for omnichannel) and 25 (for offline) split studies that ran between October 2024 and March 2025 from global retail advertisers that passed QA.
- Analytic Partners, ROI Genome Intelligence report, Omnichannel and a brave new world, 2021.
- Statistical meta-analysis of 19 (for omnichannel) and 17 (for offline) conversion lift studies that ran between October 2024 and March 2025 from global retail advertisers that passed QA.
Best practices for running omnichannel campaigns
Use Conversions API for both online and offline events
Configuring Conversions API for online events isn’t mandatory to run omnichannel campaigns, but it is highly recommended as a best practice for improved performance. Due to server-side connection, you can track data more precisely and get a clearer picture of the customer journey.
With both online and offline events feeding the algorithm via Conversions API, Meta's algorithms can better identify high-value customers and provide effective results across all touchpoints.
👉 Find out more on Meta Conversions API in our guide.
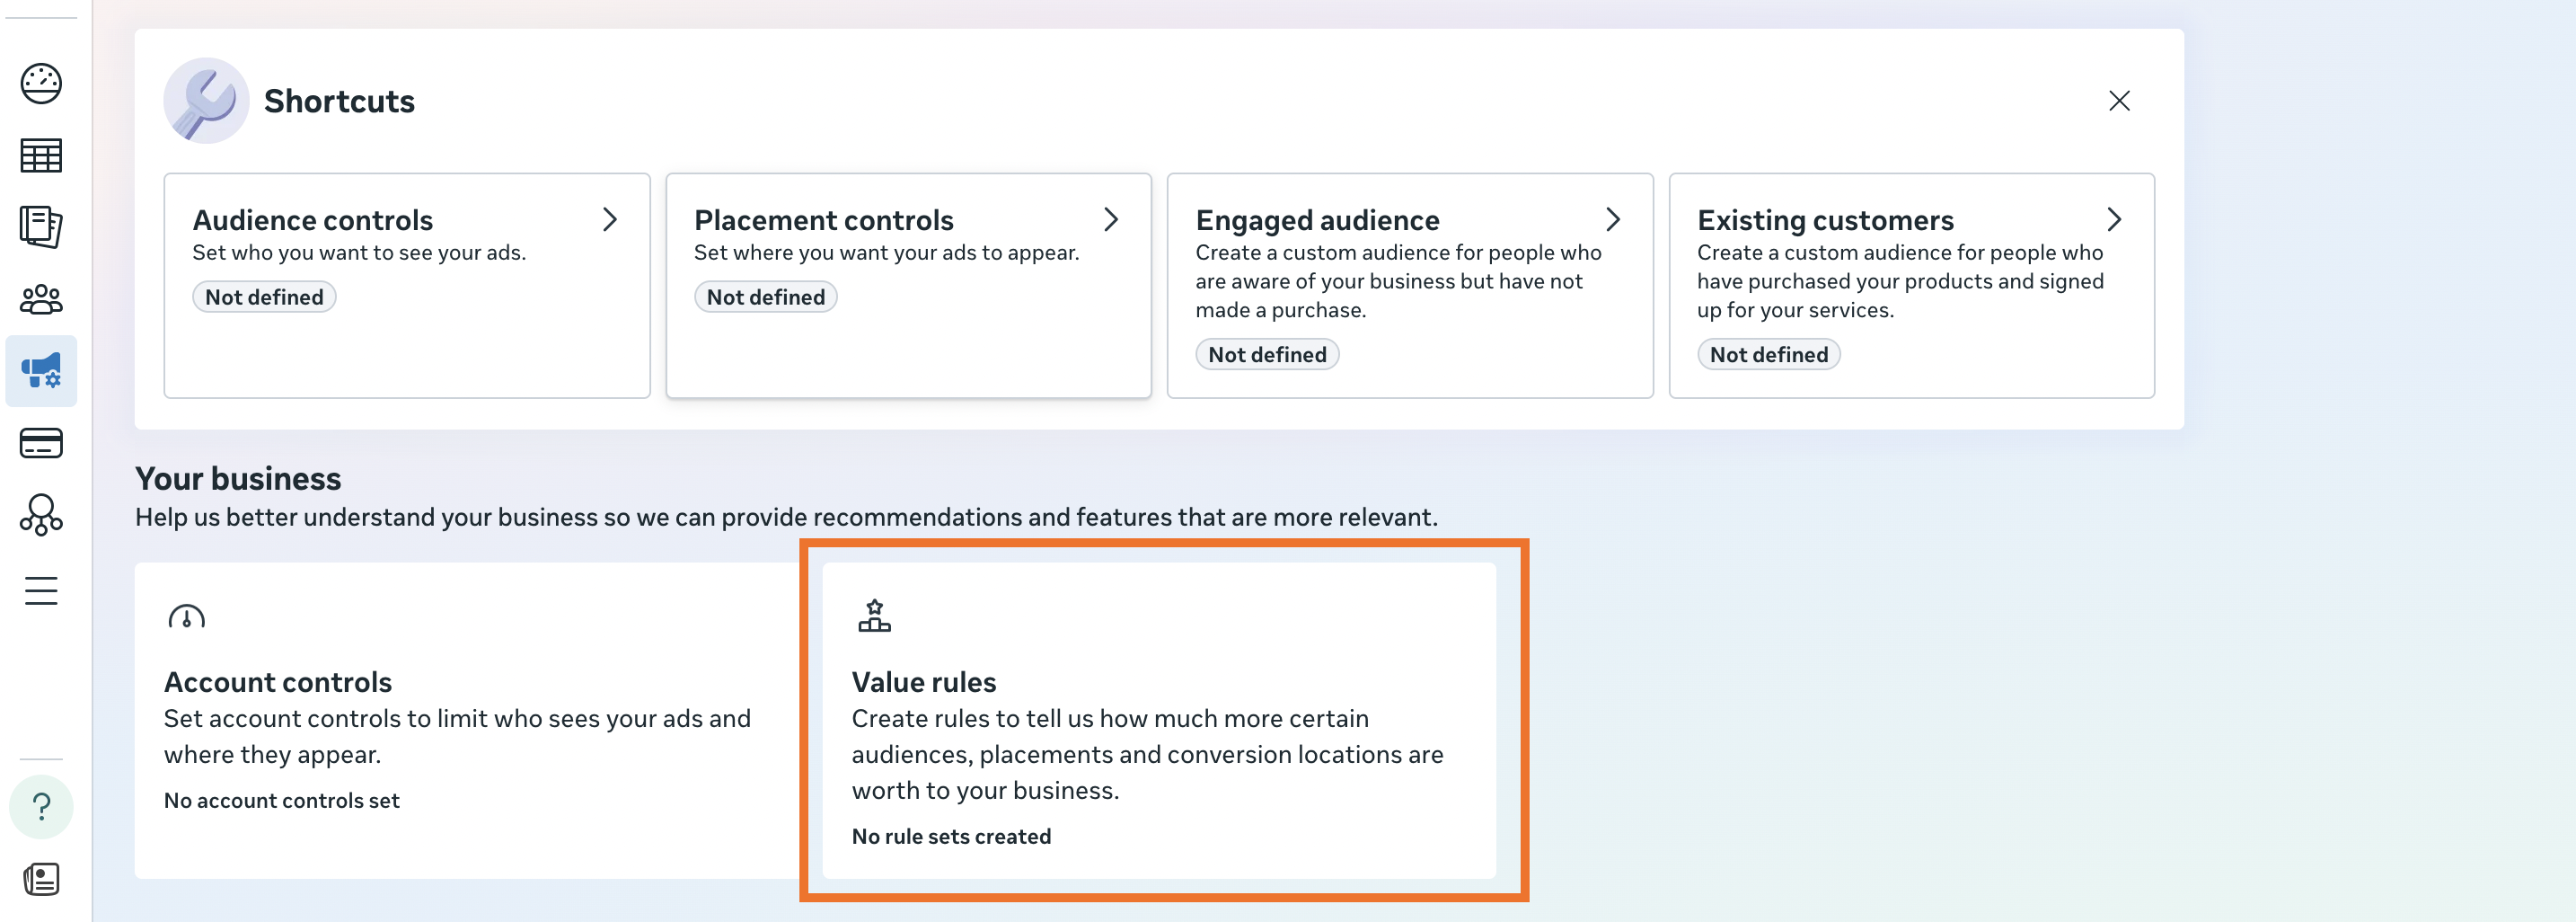
Configure Conversion Location Value Rules
Setting up Conversion Location Value Rules helps Meta algorithms optimize campaigns for the outcomes that matter most in each location. You can set values to specific stores or regions, for example, high-margin products or stores with strategic importance.
👉 Meta has a detailed guide on how to configure value rules.
To make the rollout easier, we’ve also prepared a practical Meta Omnichannel Ads playbook covering the requirements, setup steps, and best practices. You can download it below.
Final words
Omnichannel ad campaigns can be highly valuable for businesses that work across both online and offline channels. With CAPI for offline events, these businesses can better understand the full customer journey and optimize campaigns for both web and in-store outcomes.
Initial tests show significant improvements in efficiency and ROI, but it is important to remember that these results are not universal. The impact of omnichannel optimization can vary depending on your specific business model, customer behavior, and industry. Running controlled experiments is highly recommended. Testing is the only way to understand how the campaign performs for your case.

Comments