Meta Custom Audiences guide: how to create and automate
Uliana Lesiv
AuthorKey takeaways:
- Meta Custom Audiences is a targeting feature that allows you to reach people who have already interacted with your business.
- Using Facebook Custom Audiences lets you target high-intent users and optimize conversion rates.
- First-party data audiences outperform cookie-based targeting in accuracy and match quality.
- Customer List audiences are persistent, precise, and ideal for retention and upselling.
- Automating audience updates eliminates manual CSV uploads and keeps targeting up to date.
- Server-to-Meta integrations help you create a scalable, privacy-resilient marketing strategy. That’s why Stape has created a Meta connection and tag to automatically update Custom Audiences in Meta.
Strategies for using Facebook Custom Audiences
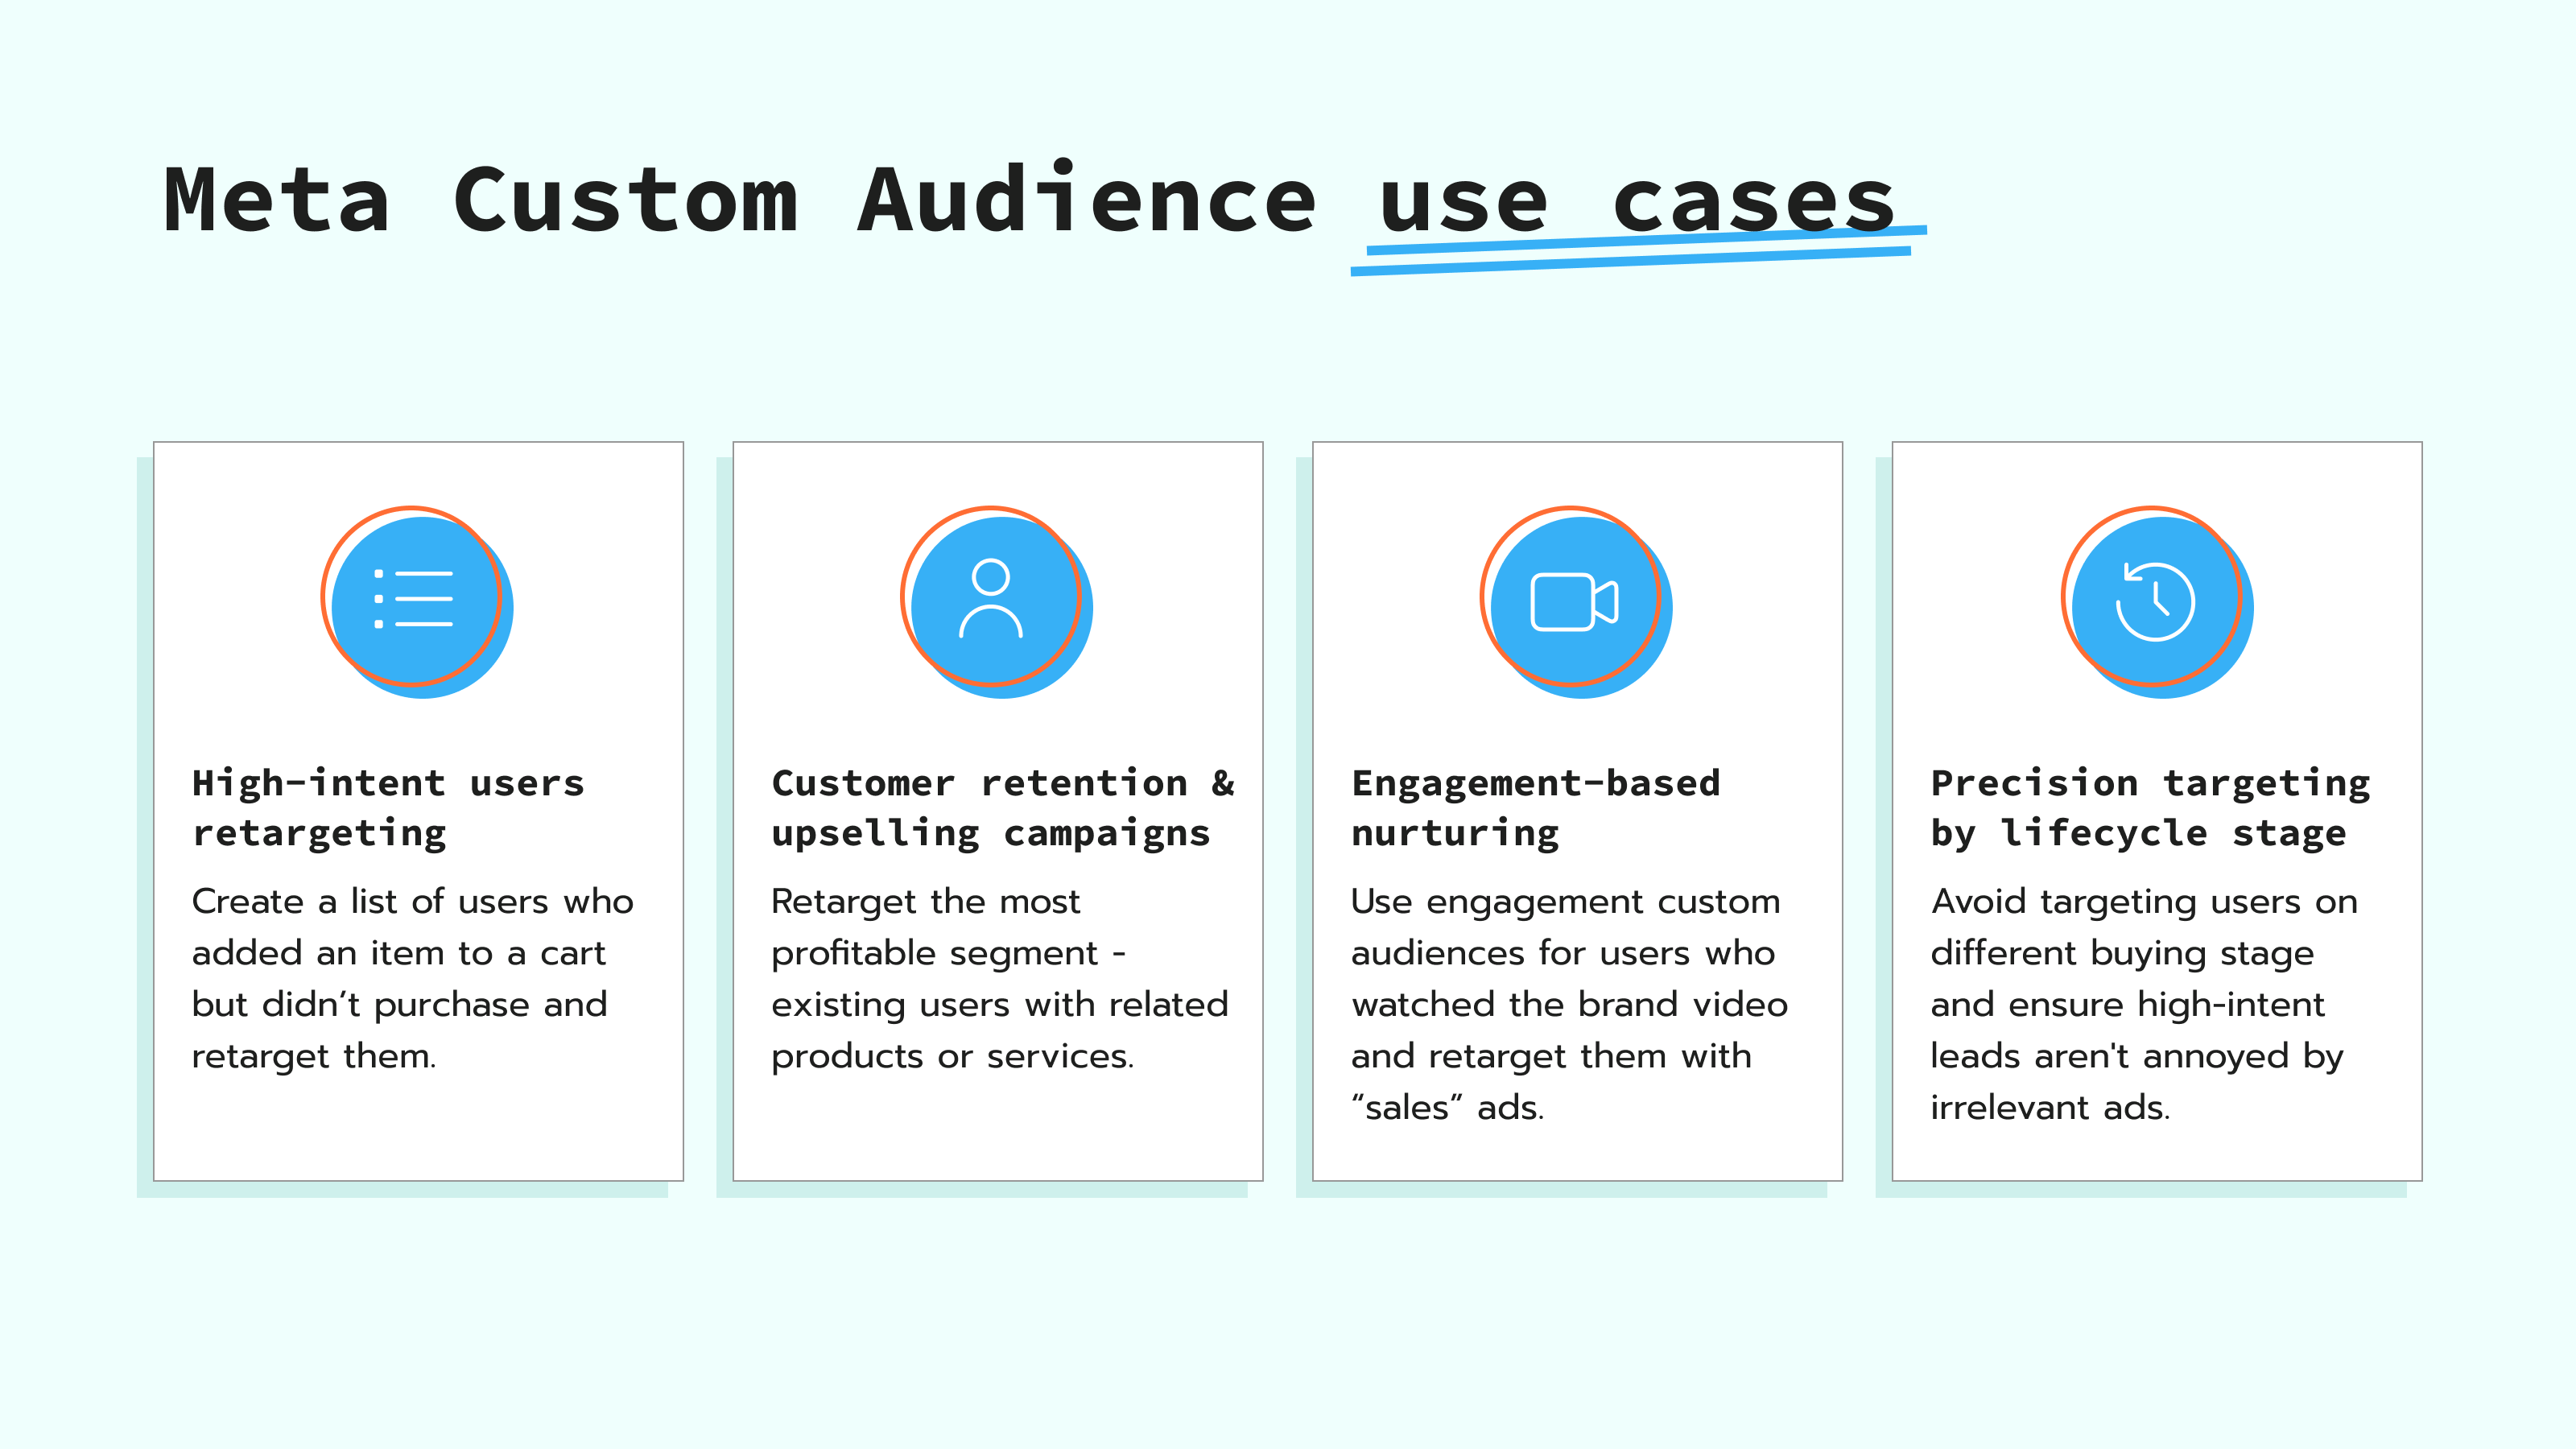
Marketers are using Facebook Custom Audiences to improve their marketing campaigns and conversion rates. Here are the key use cases of custom audiences:
- High-intent users retargeting. As an example, you can create an audience filled with data on users who added to cart in the last 7–14 days, but didn't purchase. Retargeting such "warm audiences" usually leads to increased conversions.
- Customer retention & upselling campaigns. The existing customers are typically the most profitable audience for the business. After the purchase, you can retarget the customers with the products or services related to the one they bought.
- Engagement-based nurturing. Some users who interact with your ad aren't ready to buy the product. For example, you can use engagement custom audiences for users who watched 50% or 75% of your brand video on Meta and retarget them with a more sales-focused ad campaign.
- Precision targeting by lifecycle stage. Also, you can set up to avoid targeting a specific audience while running the campaigns. For example, if you are running a "research stage" ad campaign, you can exclude users who have already added an item to a cart. This prevents redundant targeting and ensures high-intent leads aren't annoyed by irrelevant ads.
Facebook custom audience types comparison
Creating a Facebook Custom Audience includes selecting a source, such as website traffic or customer lists, and specifying audience rules in Meta Ads Manager. This section is aimed at helping you select the one that fits your needs. Meta divides Custom Audience types into two groups:
- Your sources - data you own and control. It works for businesses that have their own website, and interacting with Meta ads is one of the touches on the website visitors' journey. Opting for "Your sources" can show the whole customer journey and supply the necessary data to Meta for audience targeting.
- Meta sources - activity that happens on Meta's end. These types of sources will be helpful for smaller businesses that have no website and use Meta Shops (check out option within Meta) or lead forms running Facebook Lead Ads.
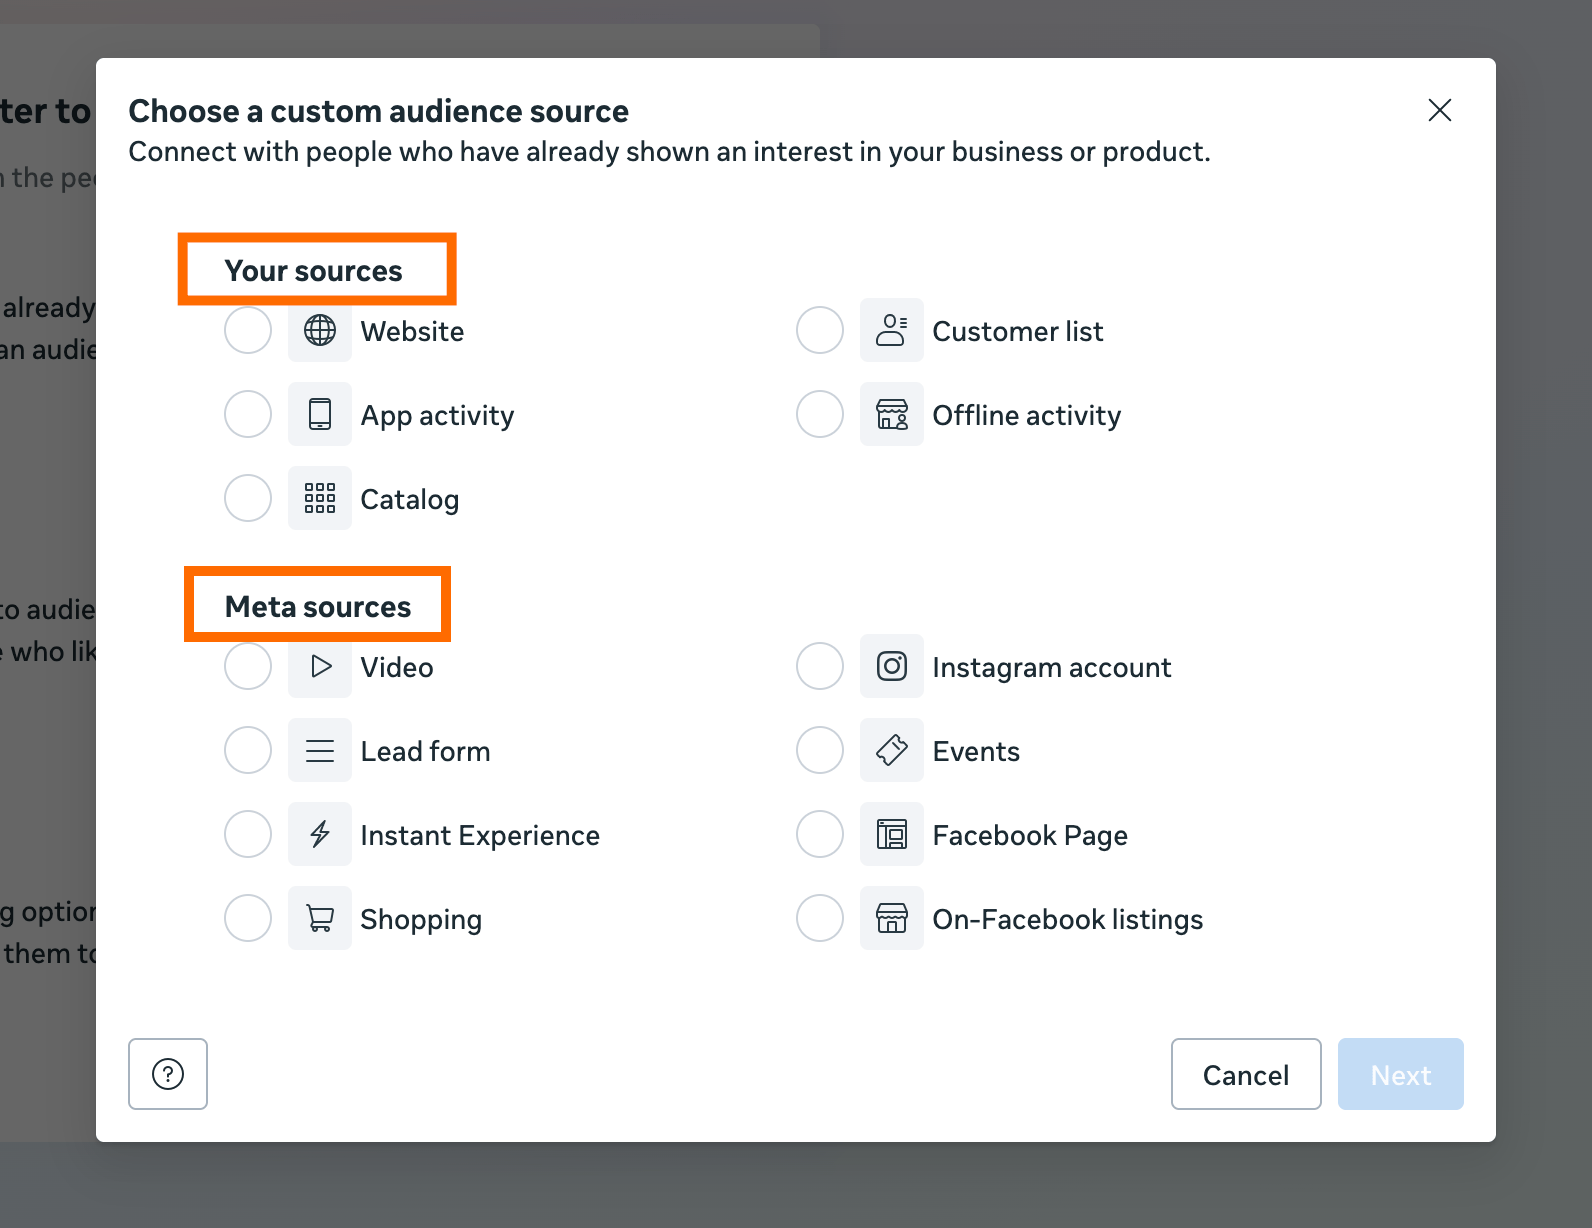
We will focus on the "Your sources" options comparison as they are more complex and popular among marketers. You have a choice among five options:
| Data accuracy | Maintenance | Best for | |
| Website/App activity | Low with Pixel setup High with Meta CAPIG | Low (need to configure events tracking) | Direct retargeting (e.g, retarget users who added items to cart but didn’t purchase) |
| Catalog | Medium (the risk of ID mismatch between site & feed) | Medium (with CMS direct integration) | Personalized reminders, cross-selling |
| Customer list | Medium (if manually uploading CSV files) High (if automated) | High (if manually upload CSV file) Low (automatic update with sGTM tag) | Syncing user segments with Meta in real-time |
| Offline activity | Medium (if manually uploading CSV files) High (if automated) | High (if manually upload CSV file) Low (if automated) | Offline events, such as in-store or phone purchases |
The data accuracy and maintenance highly depend on the implementation method. Server-side tracking is a helpful technology to achieve precise data, as it firstly sends data to sGTM, which is hosted in a cloud server, and only then to the analytics services you use. The cloud server becomes a proxy between a website (or another data source) and external tracking tools like Meta. In this way, the data becomes less affected by ad blockers and browser restrictions, allowing you to achieve 15%-30% more complete data in Meta Events Manager.
As for the "Your sources" data collection automation, there are also tools that allow you make it easier - configure them once, and they update Meta Custom Audiences automatically. In this article, we focus on such an auto-update configuration. The setup of server-side tracking for Meta is more complex than client-side, but in the long run, it allows you to automate the data flows and improve audience targeting.
A better source type to send data to Meta
For the purpose of this article, we will focus on creating a customer list custom audience, as it:
- Uses first-party data that won't be blocked while transferring. Client-side tracking (the Meta Pixel) is often blocked by adblockers or browser restrictions. Since you send customer identifiers (like email or phone) directly to Meta, no browser or operating system can "block" the data transfer.
- Provides high match quality and accuracy. Instead of Meta figuring out who a visitor is based on their IP address or cookies, you are providing a direct match with first-party data. Using a server-side sync allows you to send identifiers (email or first and last name), which can improve your Event Match Quality (EMQ) score.
- Allows easy automation of first-party data sending to Meta. If configured with Stape's server GTM tag, you don't need to figure out Meta's guidelines on CSV files and manually upload CSV files every week; your Meta audiences remain updated 24/7. You can configure this setup even if you aren't using Stape (explain in detail below).
Event-based (Pixel/CAPI) vs. List-based (Custom Audience Tag)
You may wonder about the difference between using the Meta Custom Audiences tag and the Facebook Conversions API Tag. Both methods have their own applications, but they share some similarities and help achieve the same goal, just in different ways.
Using Pixel/CAPI
With this method, you send events and parameters to Meta. Based on those events, you create audiences directly within the Meta platform. Within its interface, you define rules that determine which users should be included.
Meta automatically manages audience membership according to the rules you configure and the events it receives.
There is a time limit here - the maximum retention period for users is 180 days.
Examples:
- People who triggered a Purchase event with a content_id equal to 123.
- People who triggered AddToCart but did not trigger Purchase in the last 7 days.
Using the Custom Audiences Tag
When using this method, the audience logic is defined before the data is sent to Meta. Instead of Meta deciding whether a user belongs to an audience, your sGTM determines this and sends the user directly to a specific audience.
In other words, the decision logic moves from Meta to your tagging infrastructure.
Unlike the Pixel/CAPI approach, there is no expiration window. Users remain in the audience unless you remove them. This method also allows you to actively remove users from an audience when certain conditions are met - functionality that Pixel/CAPI audiences do not provide.
Examples:
- People who match a specific CRM condition are sent to audience 123ABCD.
- People who fulfill a specific lifecycle stage are removed from audience FOOBAR555.
Generally, event-based audiences created through Pixel/CAPI cover most common use cases and are simpler to manage. But the Custom Audience tag is superior for permanent retention and precise exclusion logic that exceeds the 180-day window.
But if you select other sources, extend the collapse element below to see what solutions can help you improve the quality of the data you collect and automate the Custom Audiences setup:
Solutions for other Meta Custom Audience sources
The section will focus on improving data quality and automation of data sending if you select Website/App activity or Offline activity while configuring Custom Audiences in Meta.
Website/App activity
To improve the data quality for website custom audience and track activity of users who visited specific web pages, you can opt for starting 7-days free trial on Meta CAPIG (an easier-to-implement solution compared to Meta CAPI). It provides a server-side solution without complex configuration of the server GTM container and protects your data from ad blockers and browser restrictions. As a result, you automatically send to Meta more precise data compared to using Meta Pixel alone.
Offline activity custom audience
Instead of downloading data on offline conversions from your CRM platform, formatting the data, and uploading CSV files manually to Meta or relying on webhooks, you can use CRM apps by Stape. When a purchase is logged in the CRM, Stape’s app automatically sends the data to your chosen platform (Meta in this case).
Here is the list of supported CRM apps:
How to create a Custom Audience in Meta and automatically update it?
Step 1. Create a custom audience
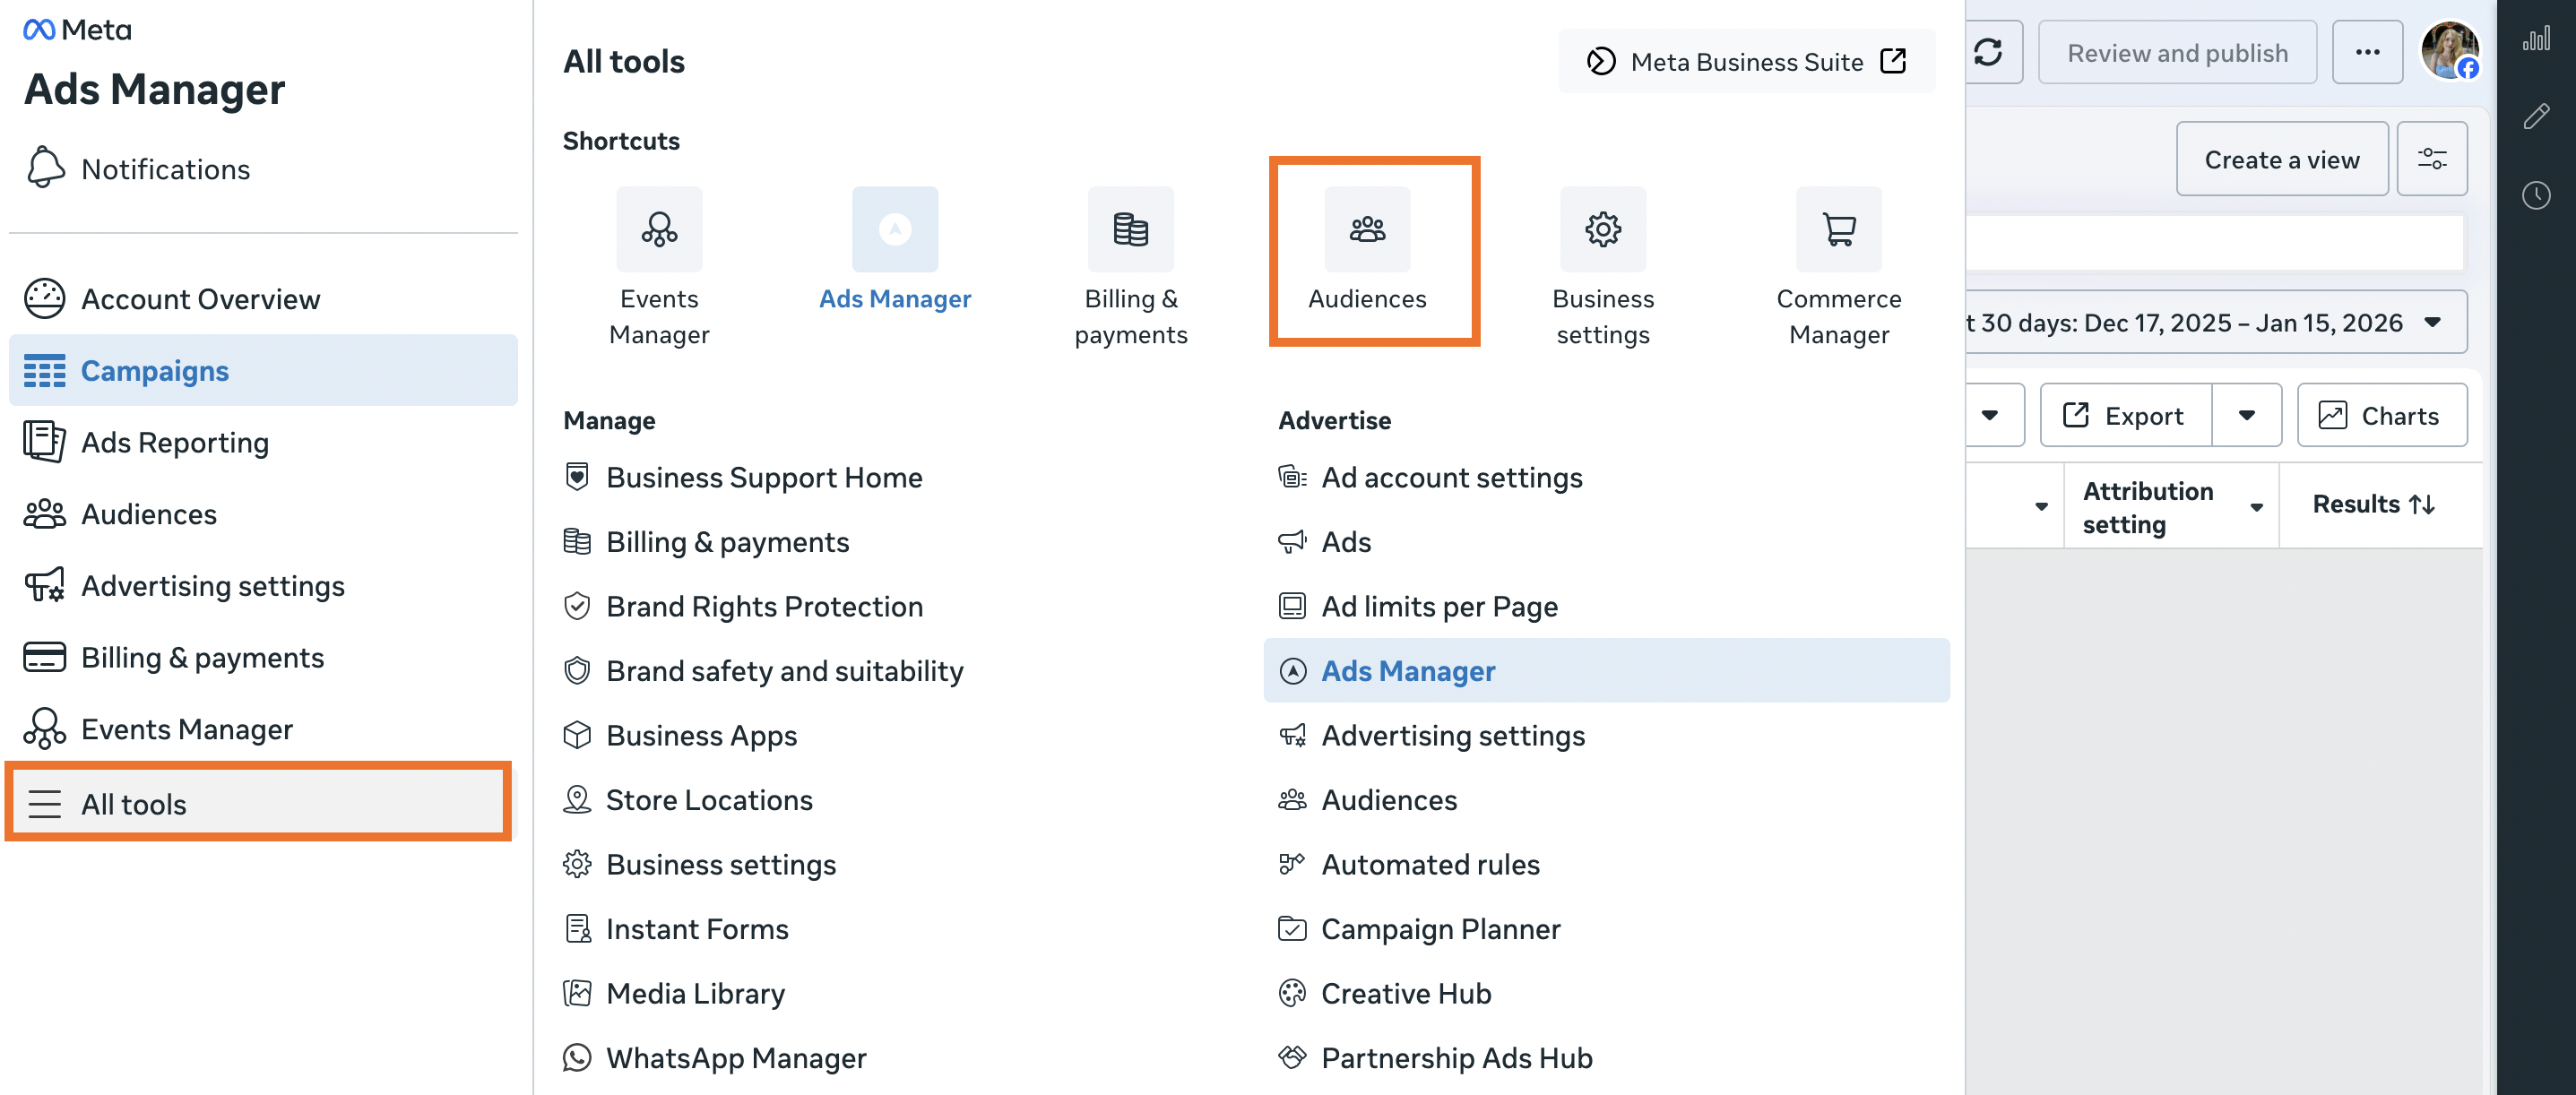
1.1 Open your Meta Ads Manager, click "All Tools" and navigate to the "Audiences" section.
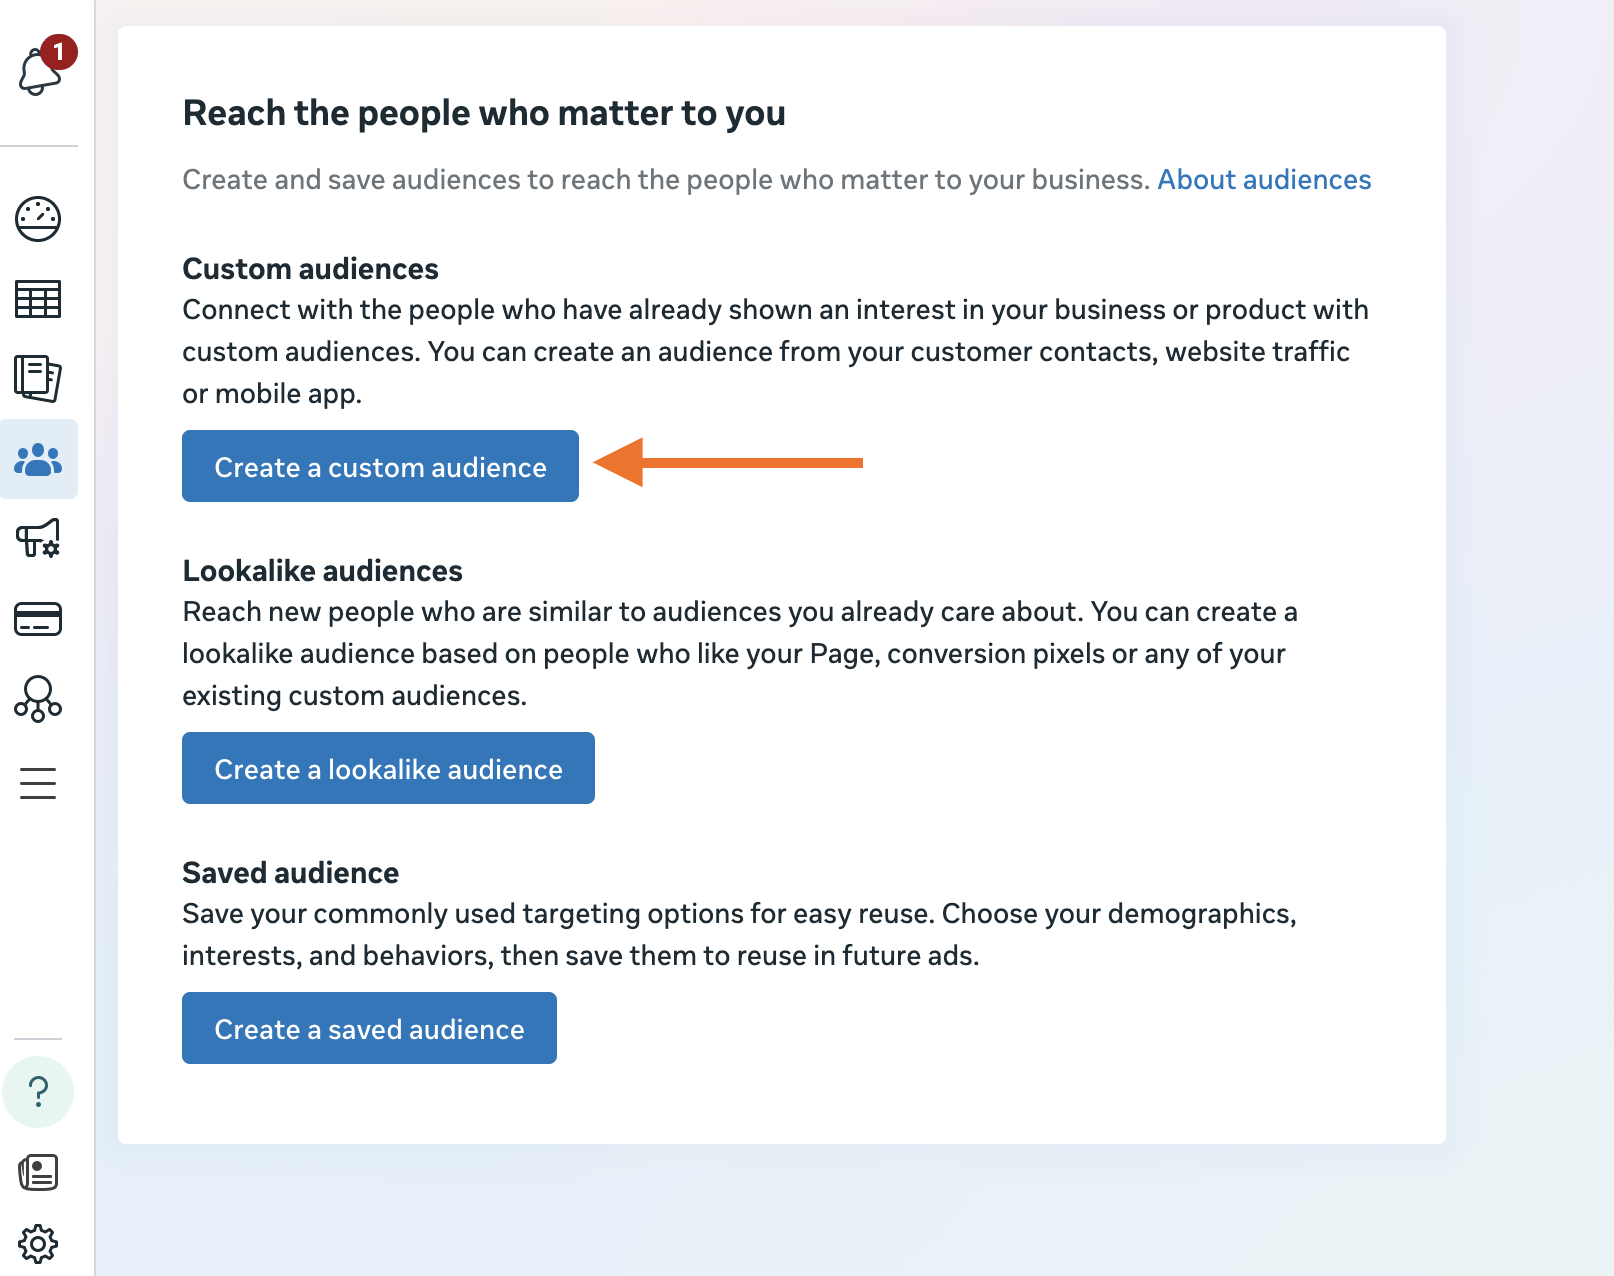
1.2 Create a new custom audience. To do it, click Create audience button.
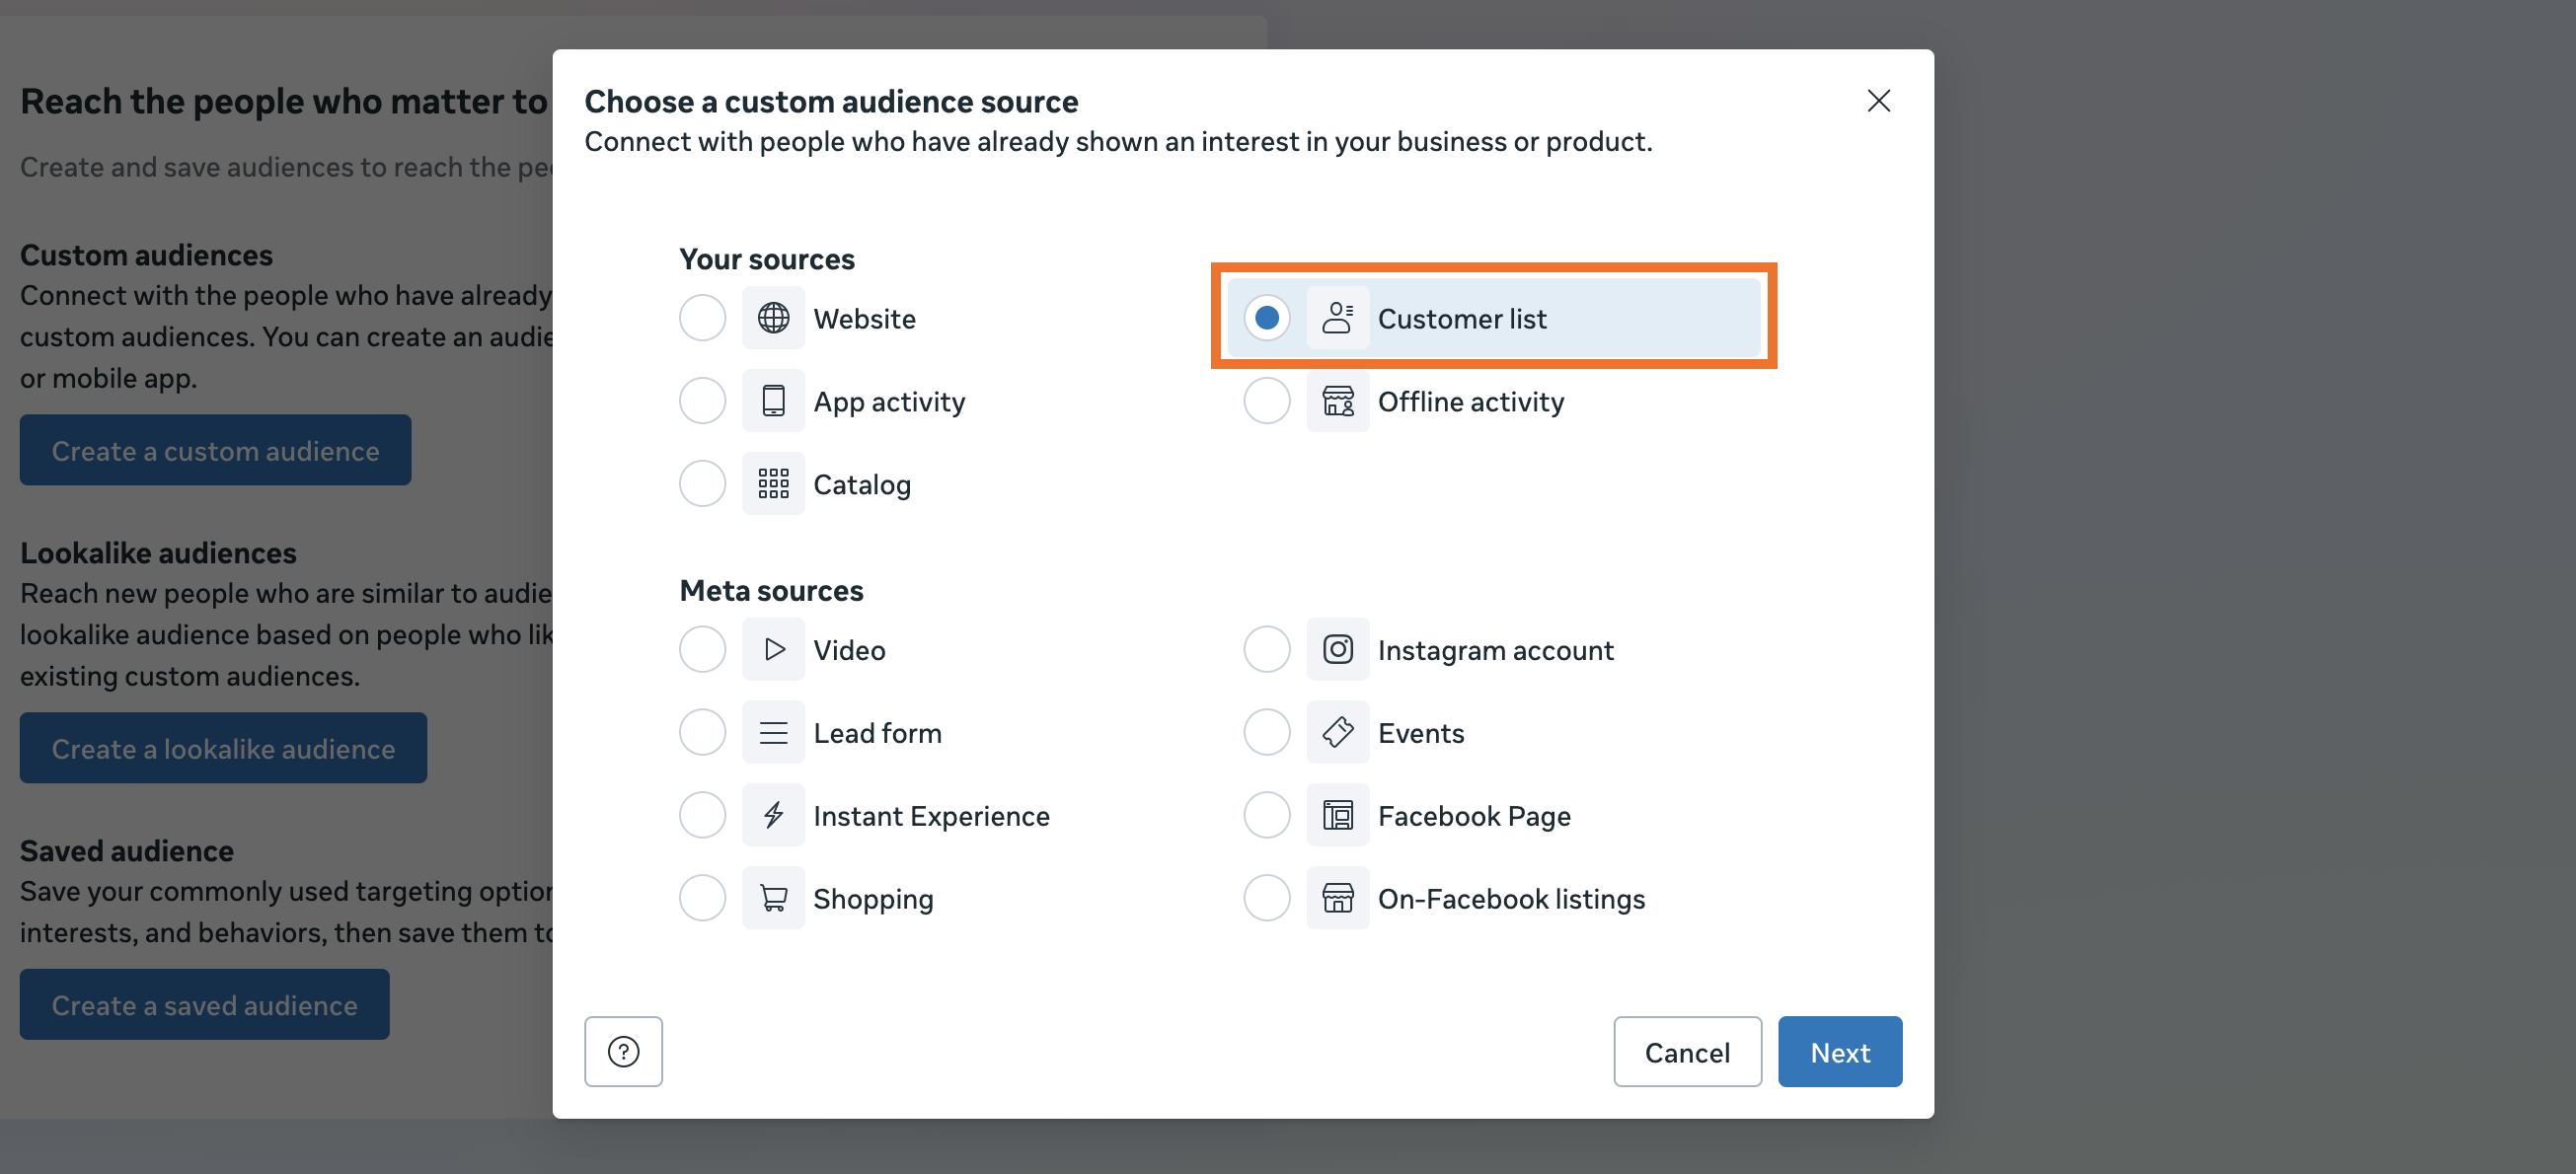
1.3 Select "Customer List" on the next step.
Stape's Meta Custom Audiences tag, which we will configure in the following steps, is designed to interact with Meta’s Marketing API to automatically add or remove users from a customer list.
Unlike website-based audiences that rely on cookies and expire after a set time (e.g., 30-180 days), a Customer List audience is persistent. Once a user is added via the Stape tag, they stay in that audience until you remove them.
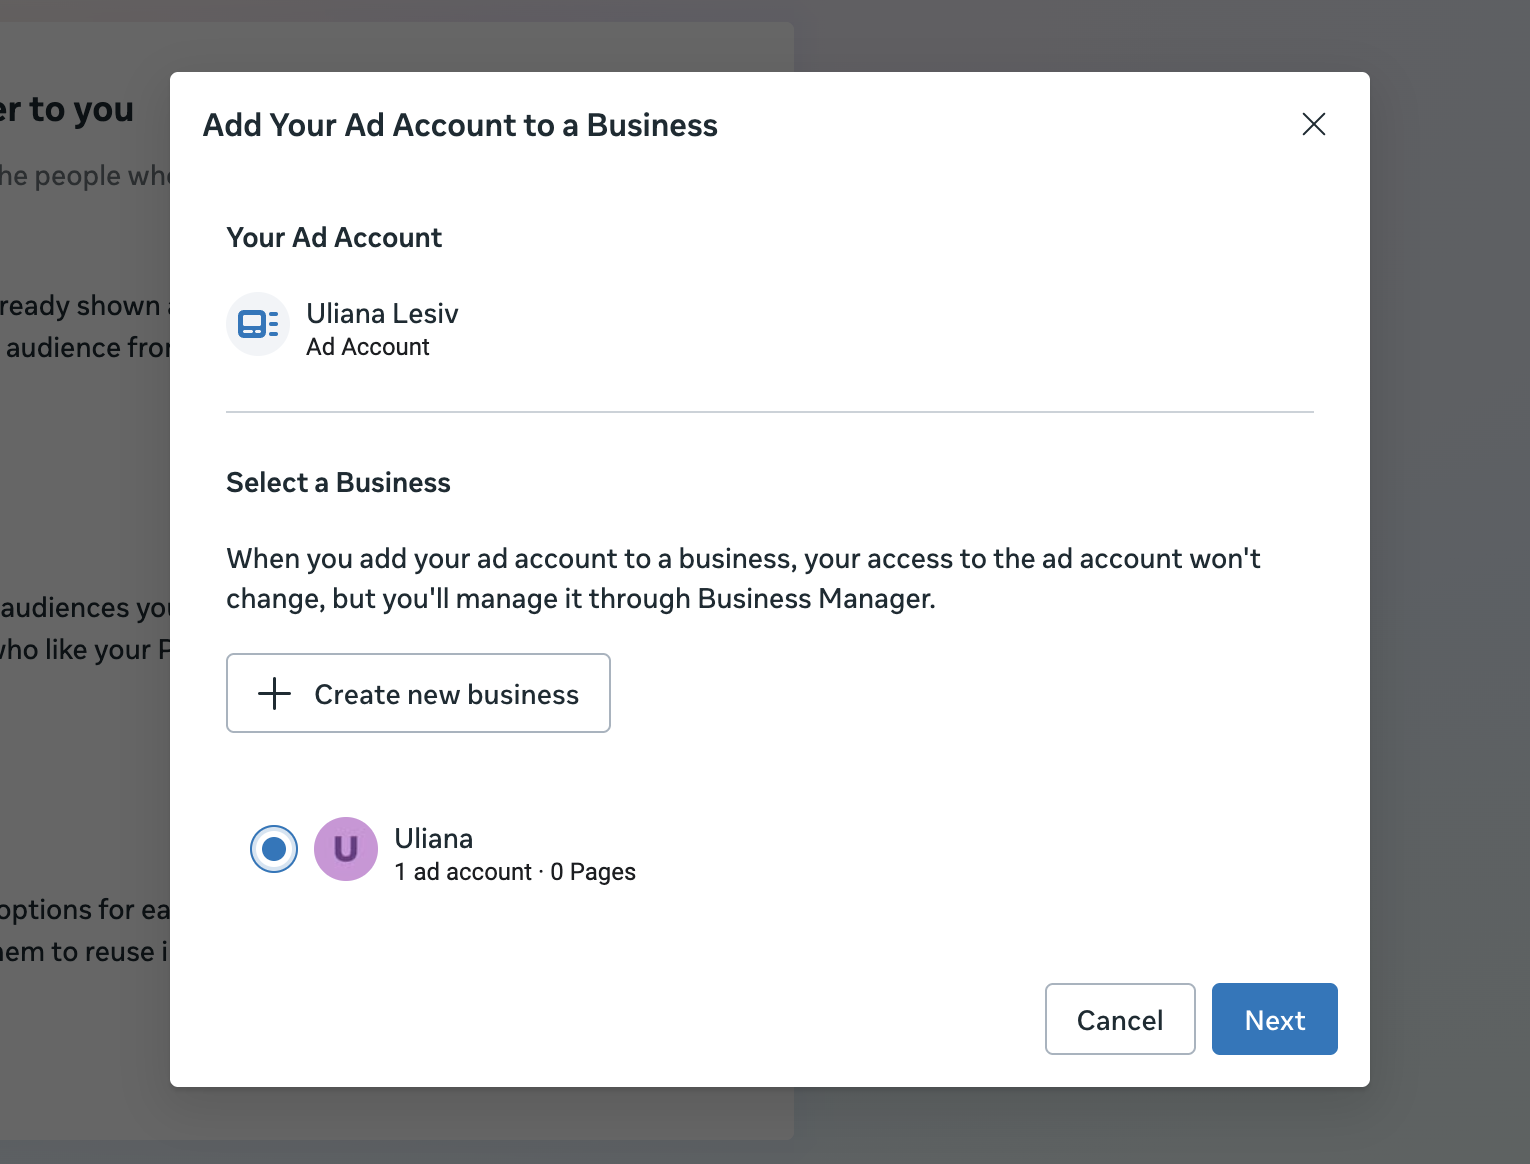
1.4 On the next screen, you may be asked to add your Ad Account to a Business. Be sure to select the Ad Account that belongs to the Business Manager where you will create the System User, if you don’t use Stape (below, we explain in detail whether you need to create a System User and how to do it).
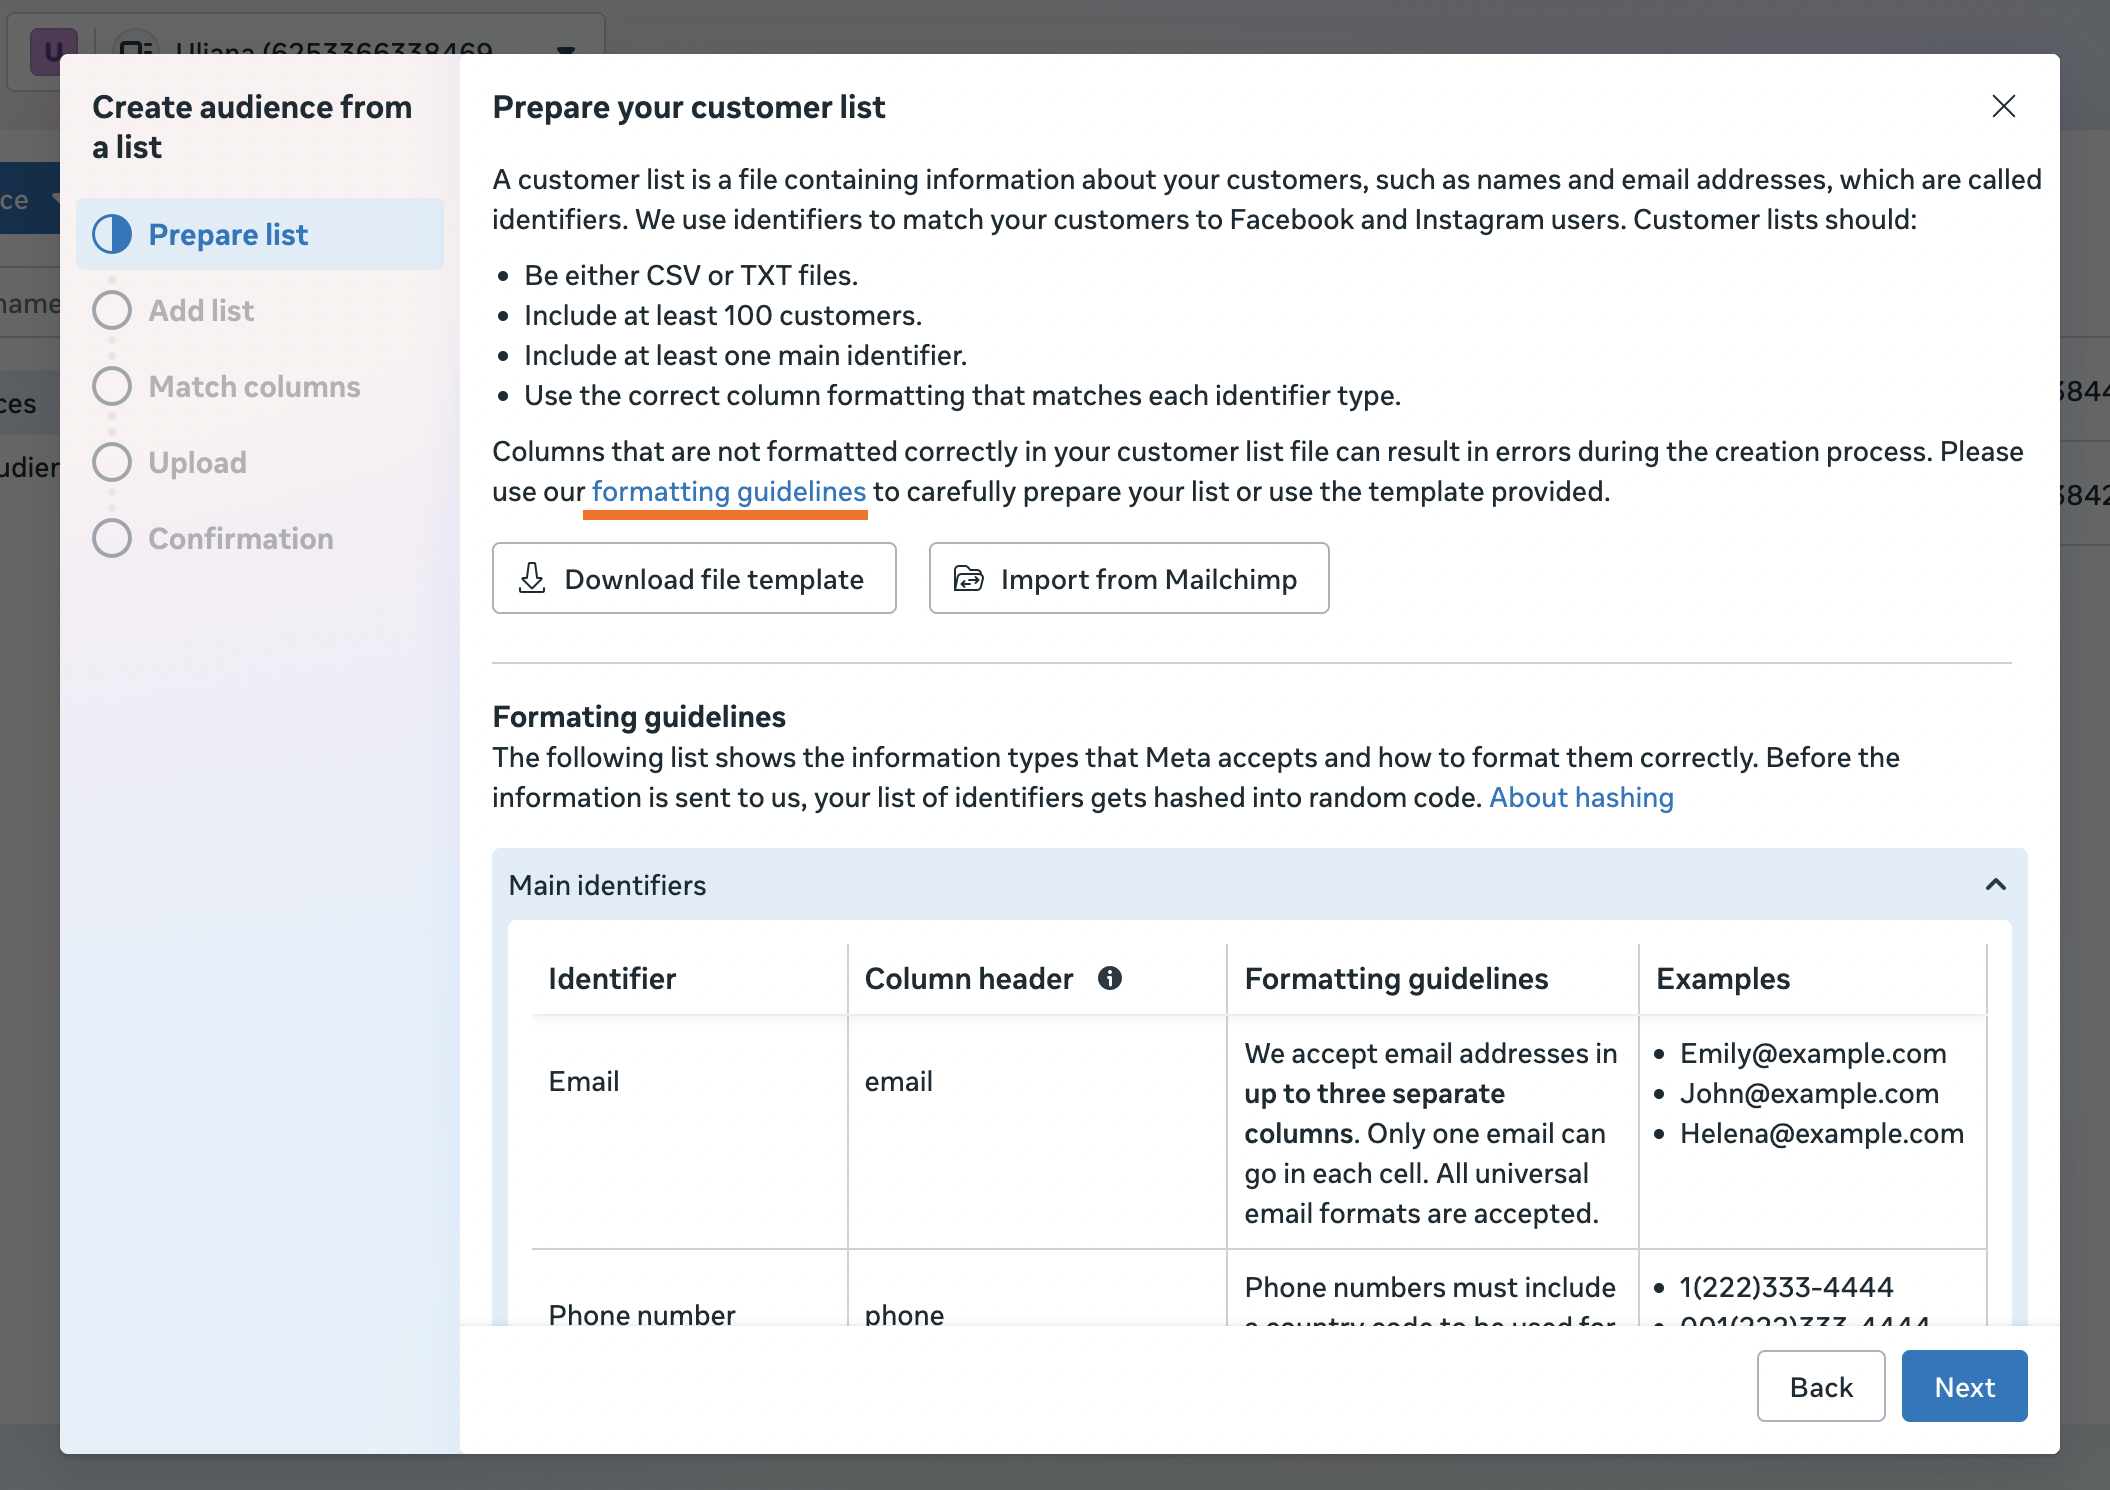
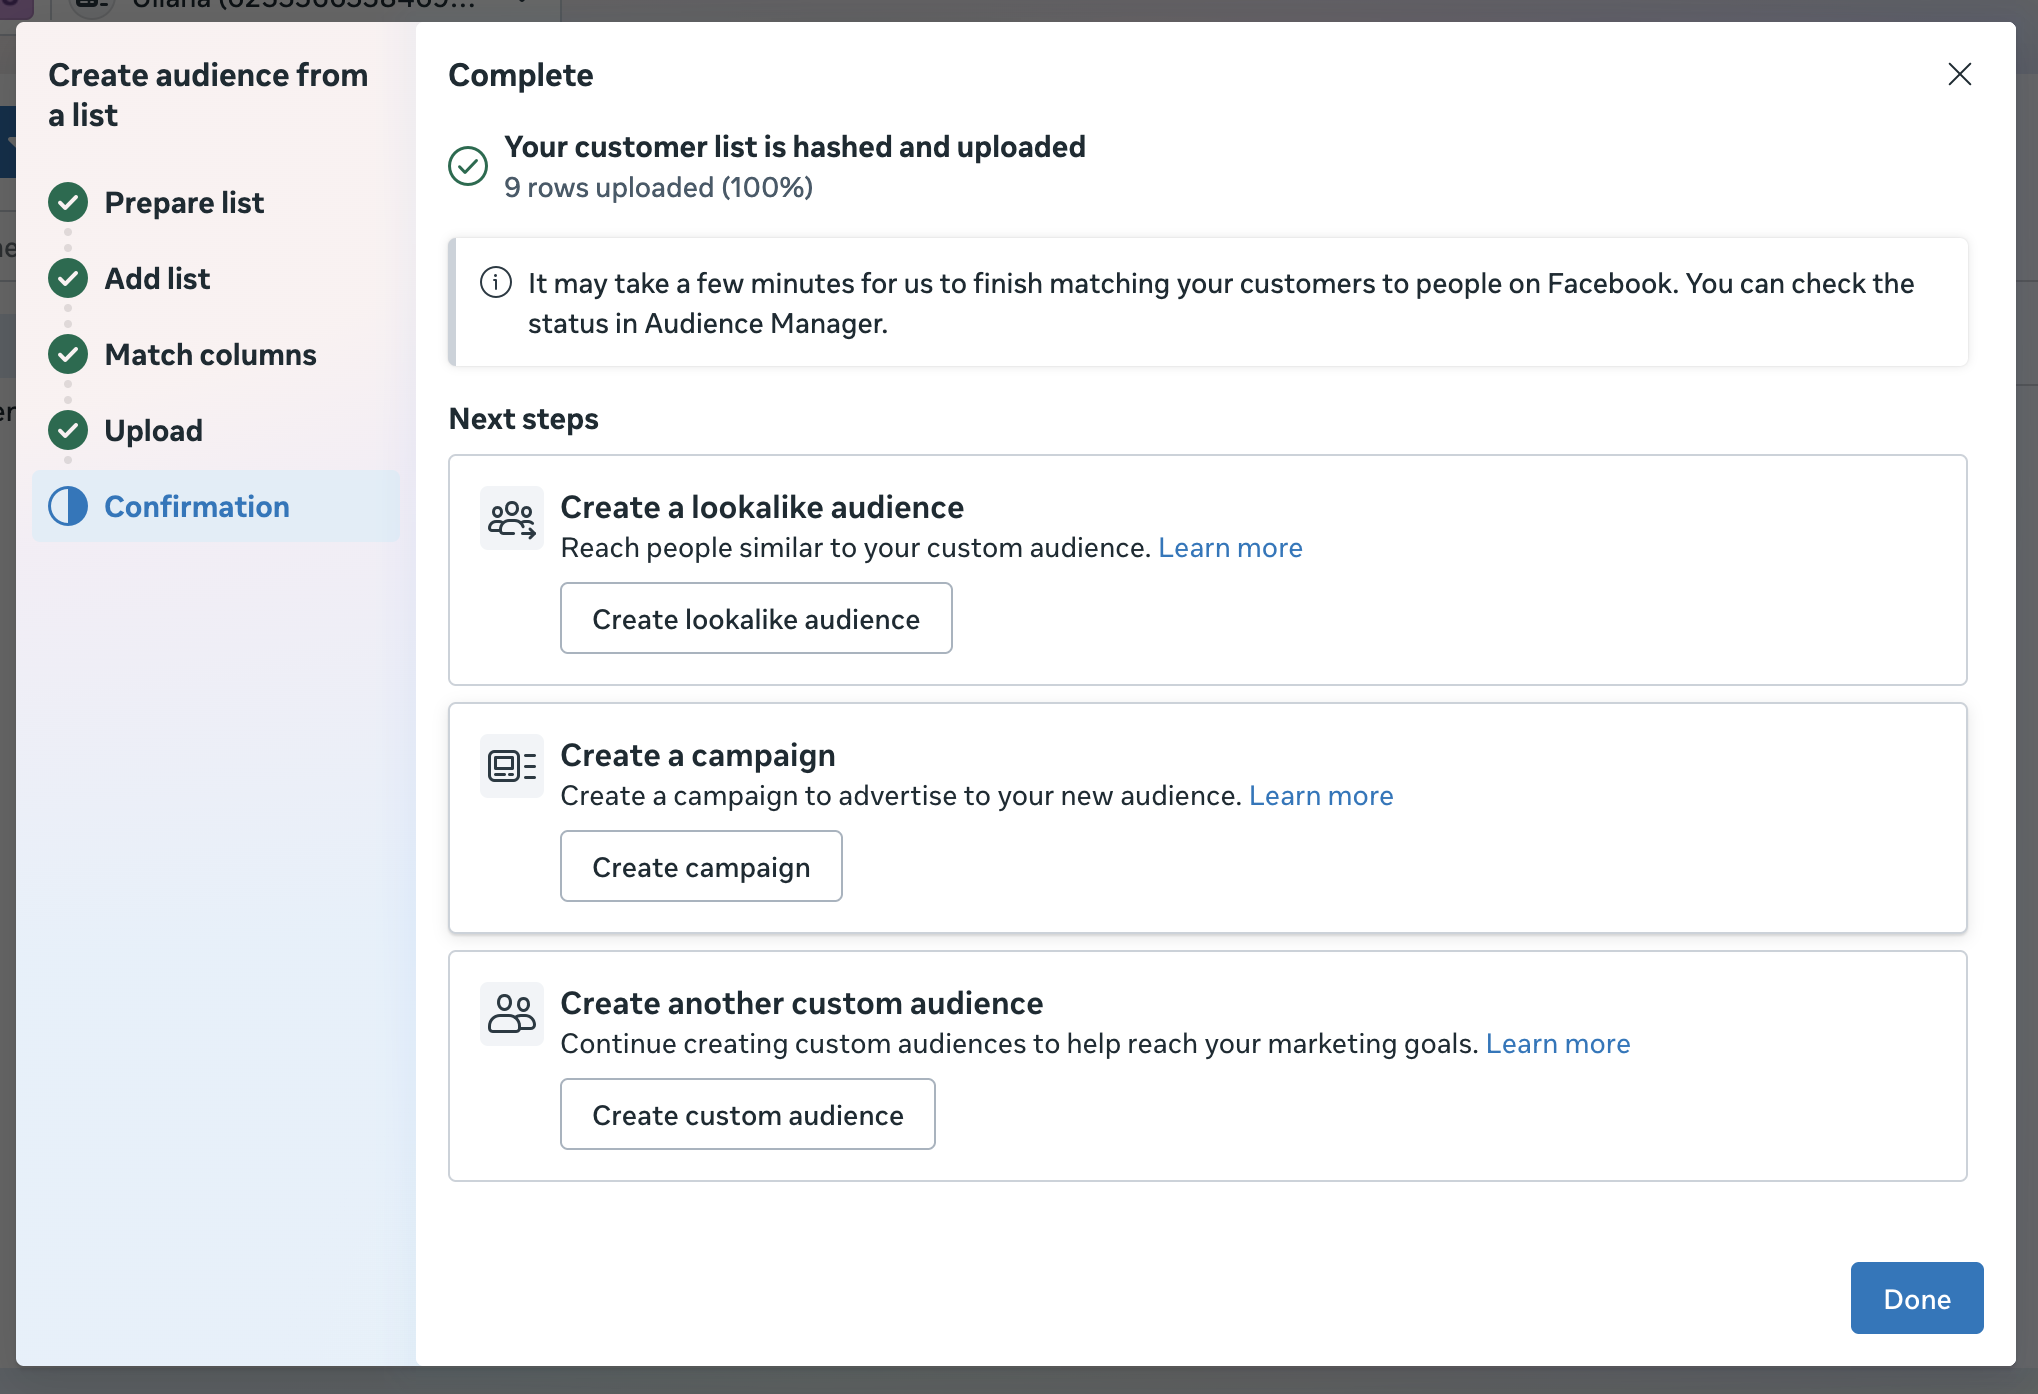
1.5 In the next step, Meta provides formatting guidelines for the CSV file. You should prepare the file and regularly update it. But if you configure automatic data sending to Meta, you can skip preparing the file. In the following steps, we show a workaround to configure the audience.
1.6 Click on the tab "Paste comma-separated values" and add some dummy data, like your email. Sometimes, this field may not work. If you encounter such a problem, click the "Upload a file" tab and upload this CSV file. The file contains an example with correct formatting.
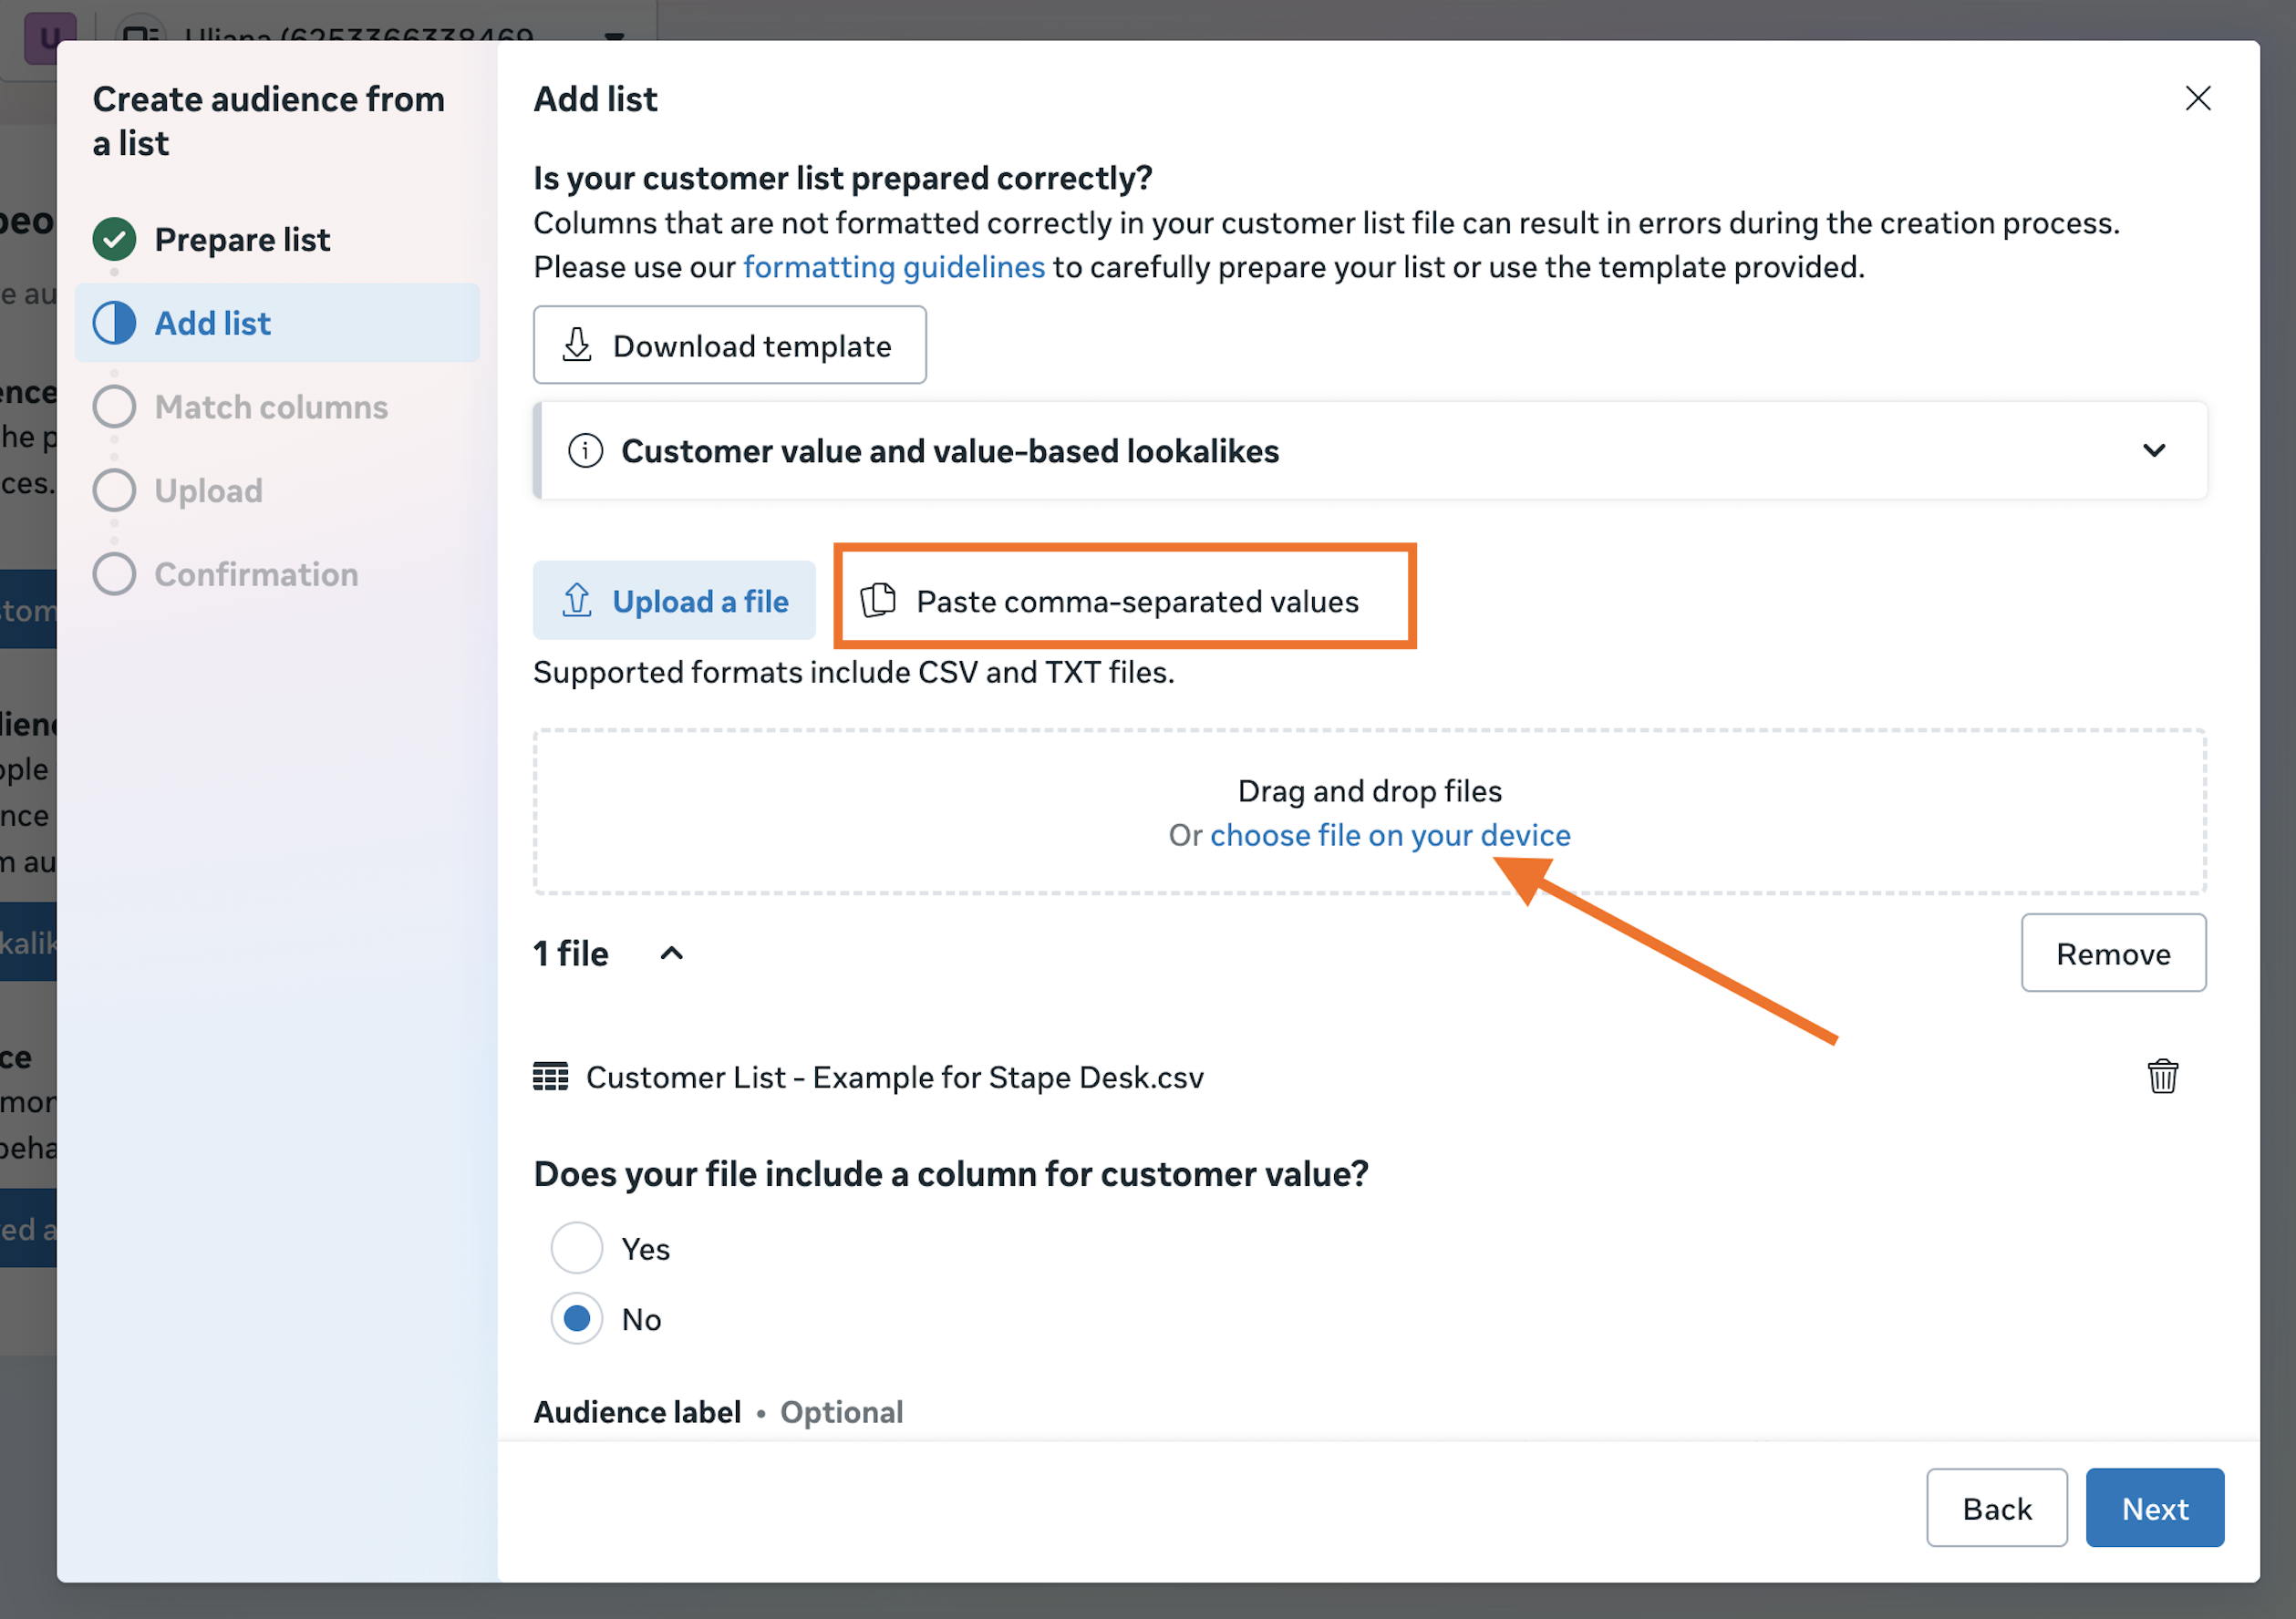
1.7 Click "Import and create" and in the very end click "Done".
Step 2. Ensure you have everything required to configure automatic data sending
To complete the setup, you will need to have:
- Configured server GTM container.
| ✍️Note: if you don’t track data on the server-side, you can test how it works for you right now! We provide a free plan for websites with up to 10,000 requests per month. |
- Configured data sending from the web to the server GTM container. You can set it up using server-side Google Analytics 4 or Data Tag/Data Client.
Step 3. Select and configure an authentication method for Meta
You must choose and configure one of the following authentication methods:
- Use Stape’s connection (recommended) - the easiest option. Just enable the Meta Connection in your Stape admin account.
- Use your own Meta credentials - select this option if you’re not using Stape’s services or are on a free Stape plan.
Meta Connection by Stape
Sign in to the Meta Connection from the Stape admin panel.
Log in to your Stape account, open the required container, go to the Connections tab, and click Sign in next to Meta. Use an account that has access to the Meta Ads where you need to update the custom audience.

Own Meta credentials
Step 1. Create Meta app
1.1 Create an account or log in to the Meta Portal for Developers.
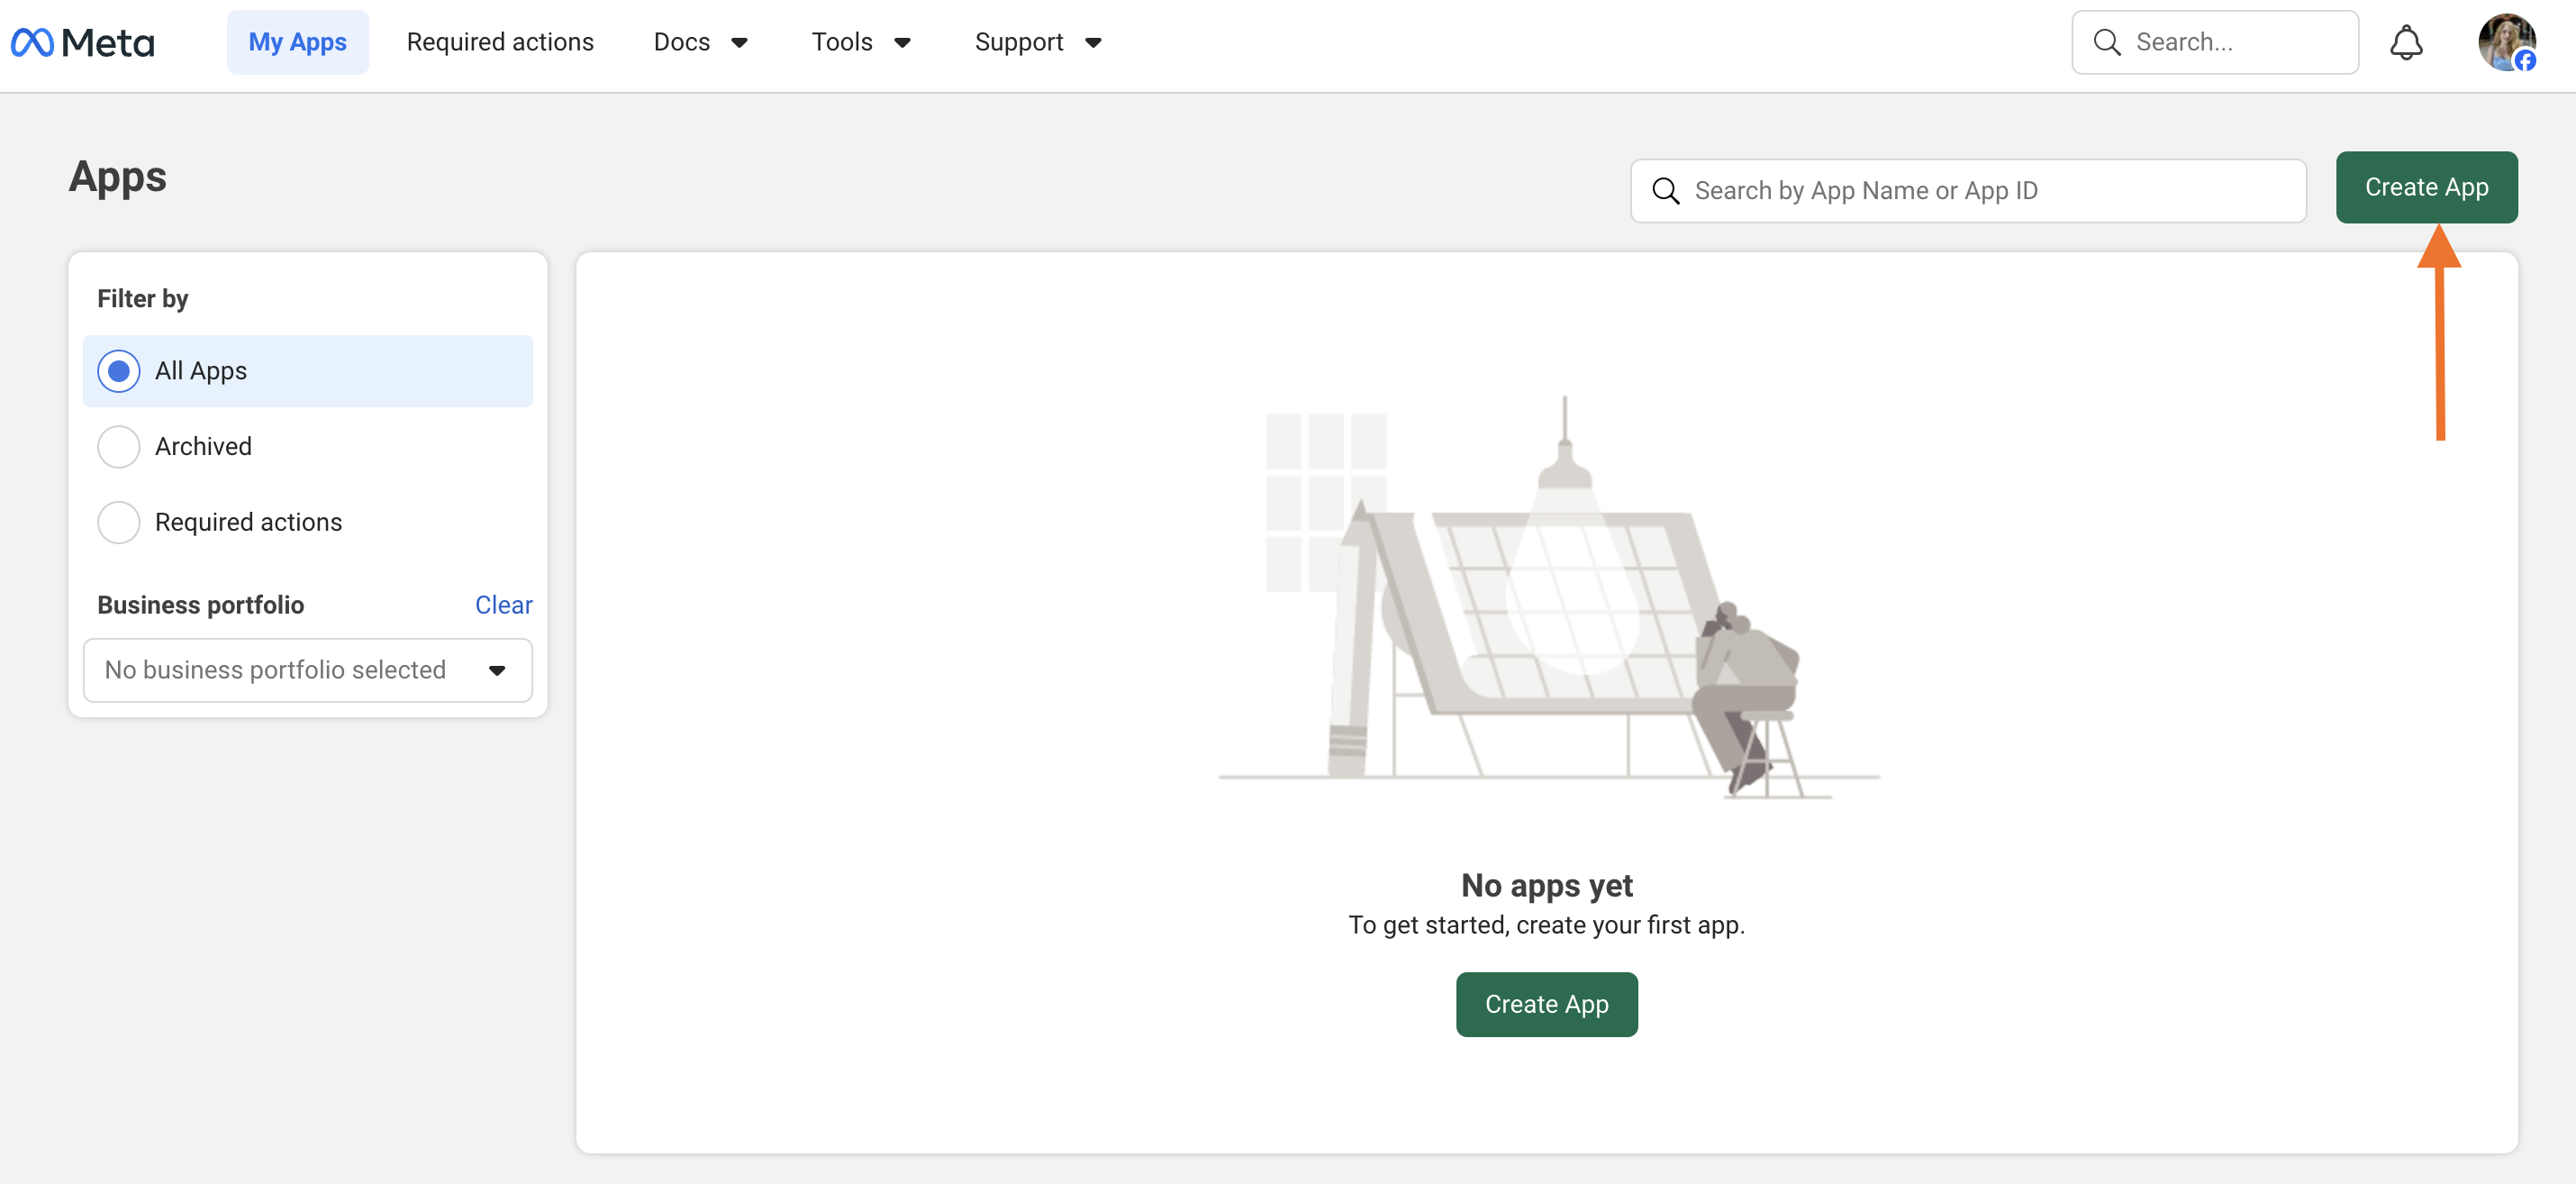
1.2 Click “Create App”.
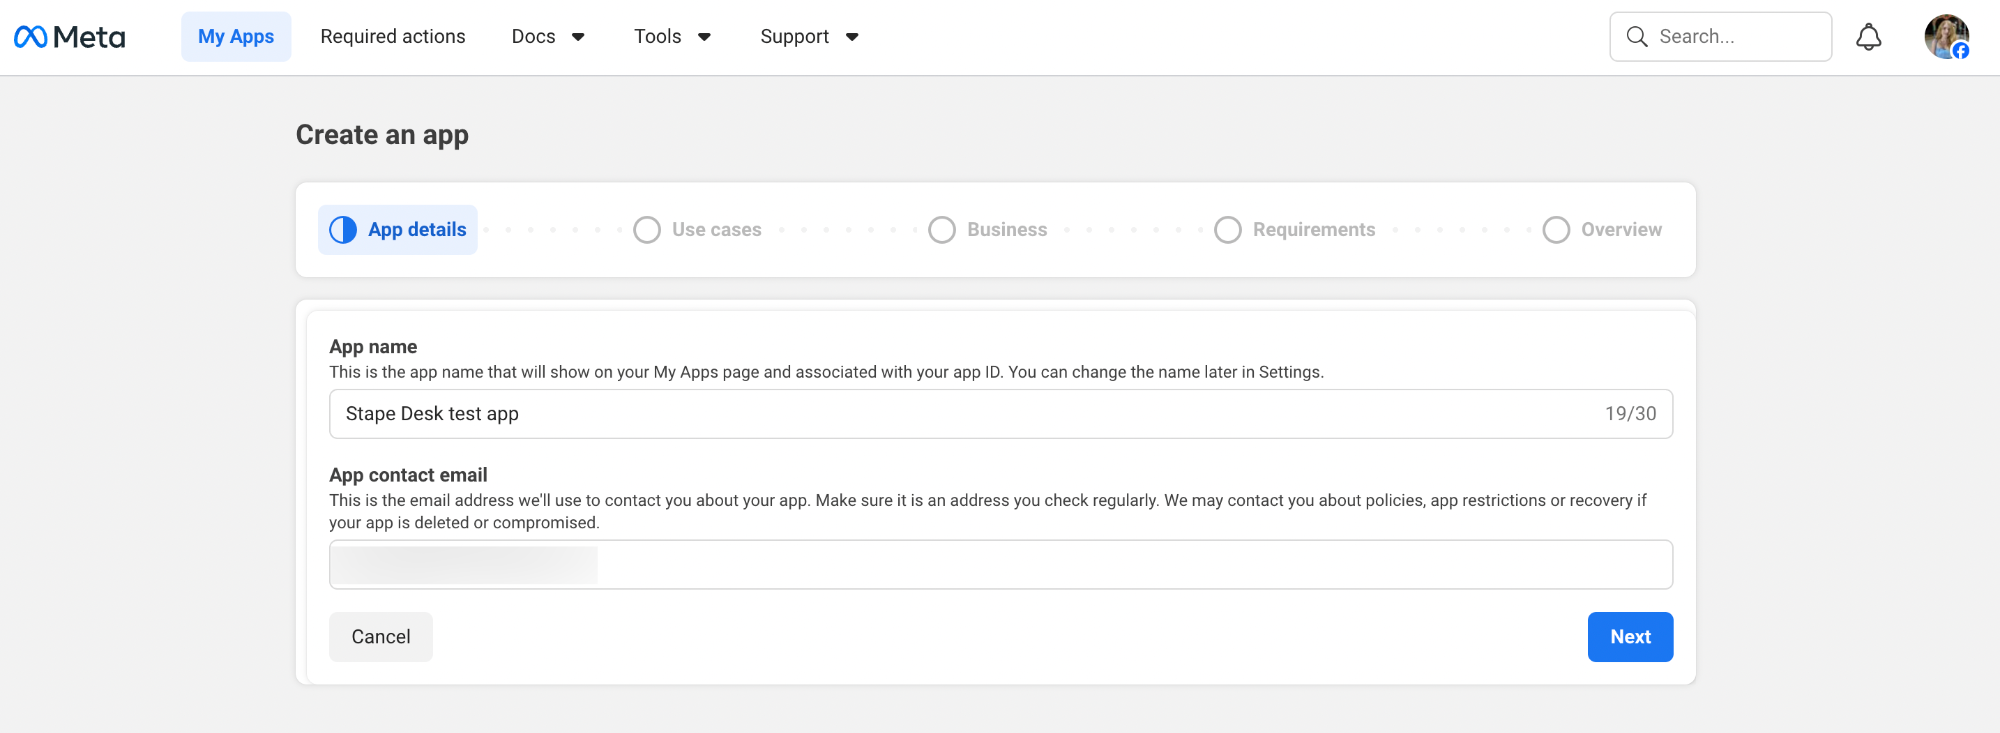
1.3 On the first step, add the name for the app you are creating and ensure your App contact email is correct.
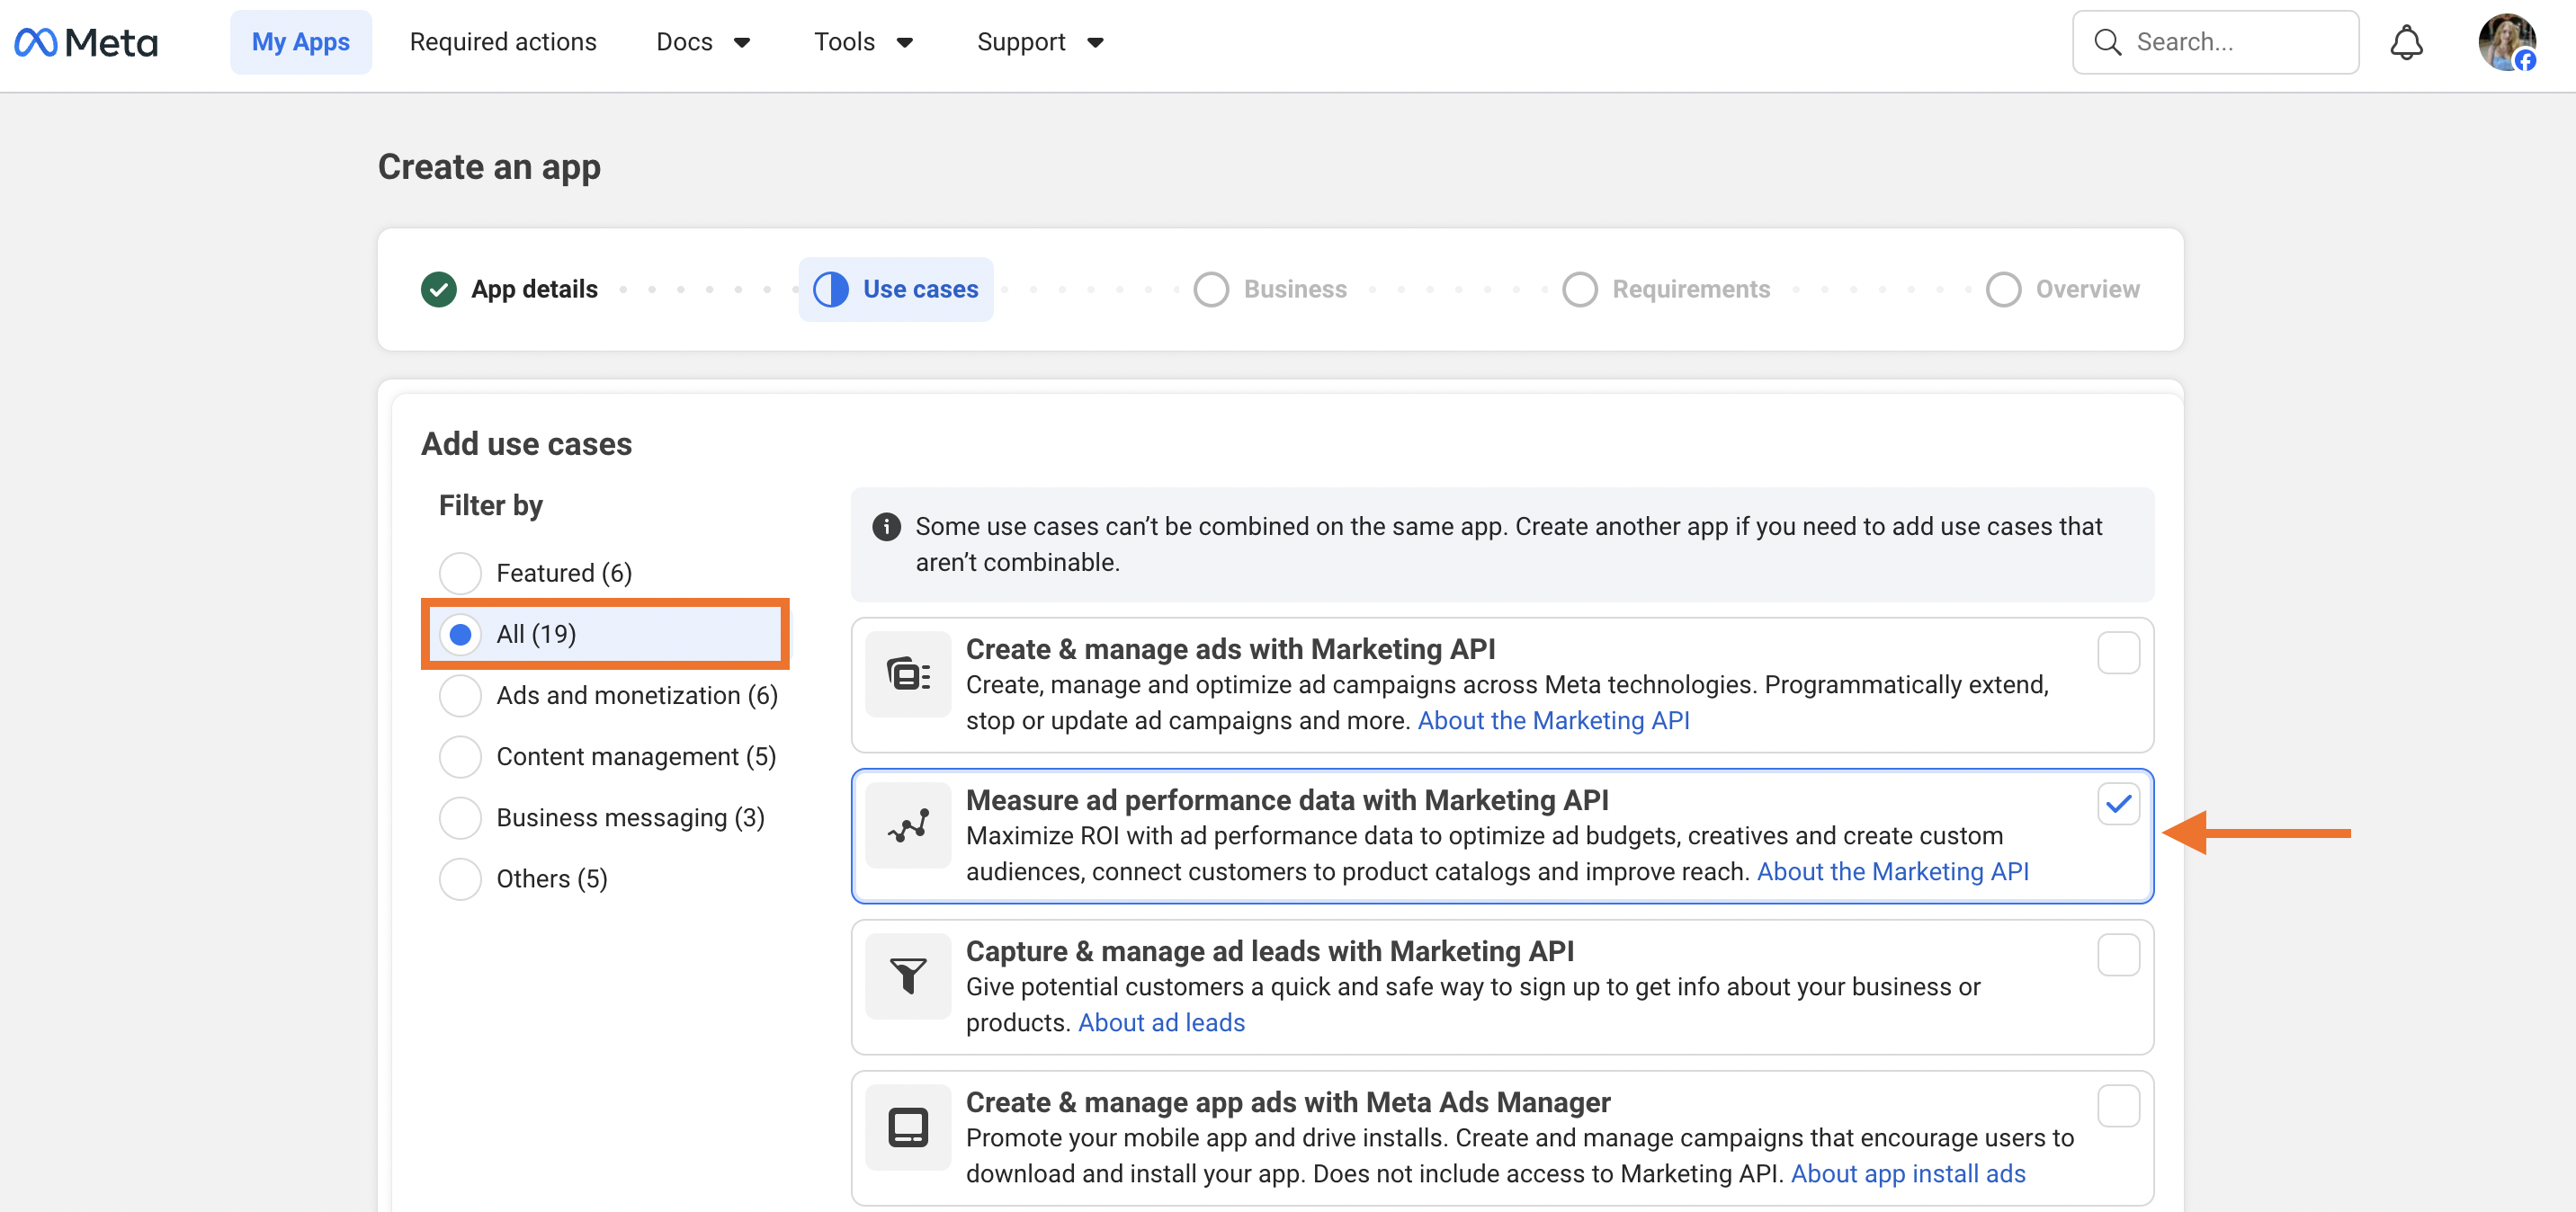
1.4 Click “All” on the next step and select the ”Measure ad performance data with Marketing API” as use case. Click “Next”.
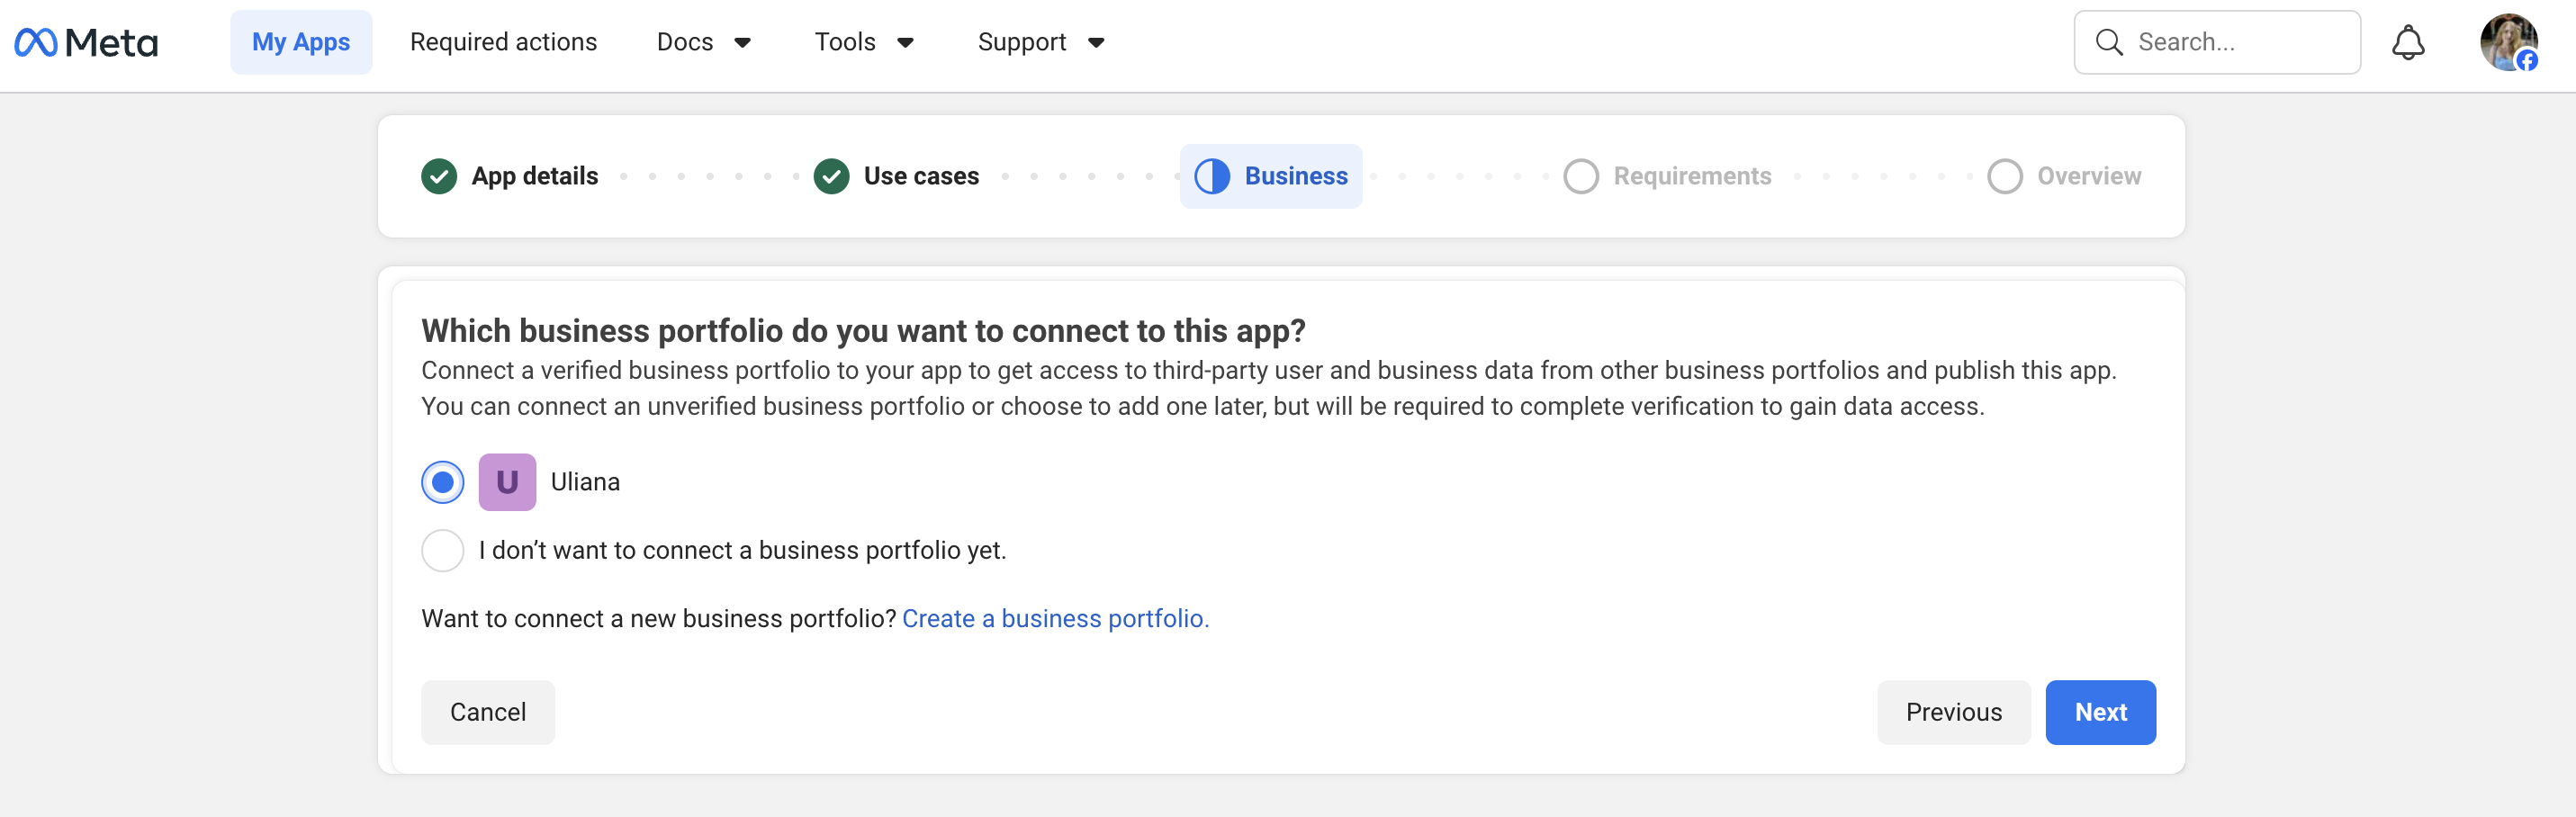
1.5 Select the business portfolio from the list if you have more than one. It must be the Business Account that owns the Ad Account and will contain the System User.
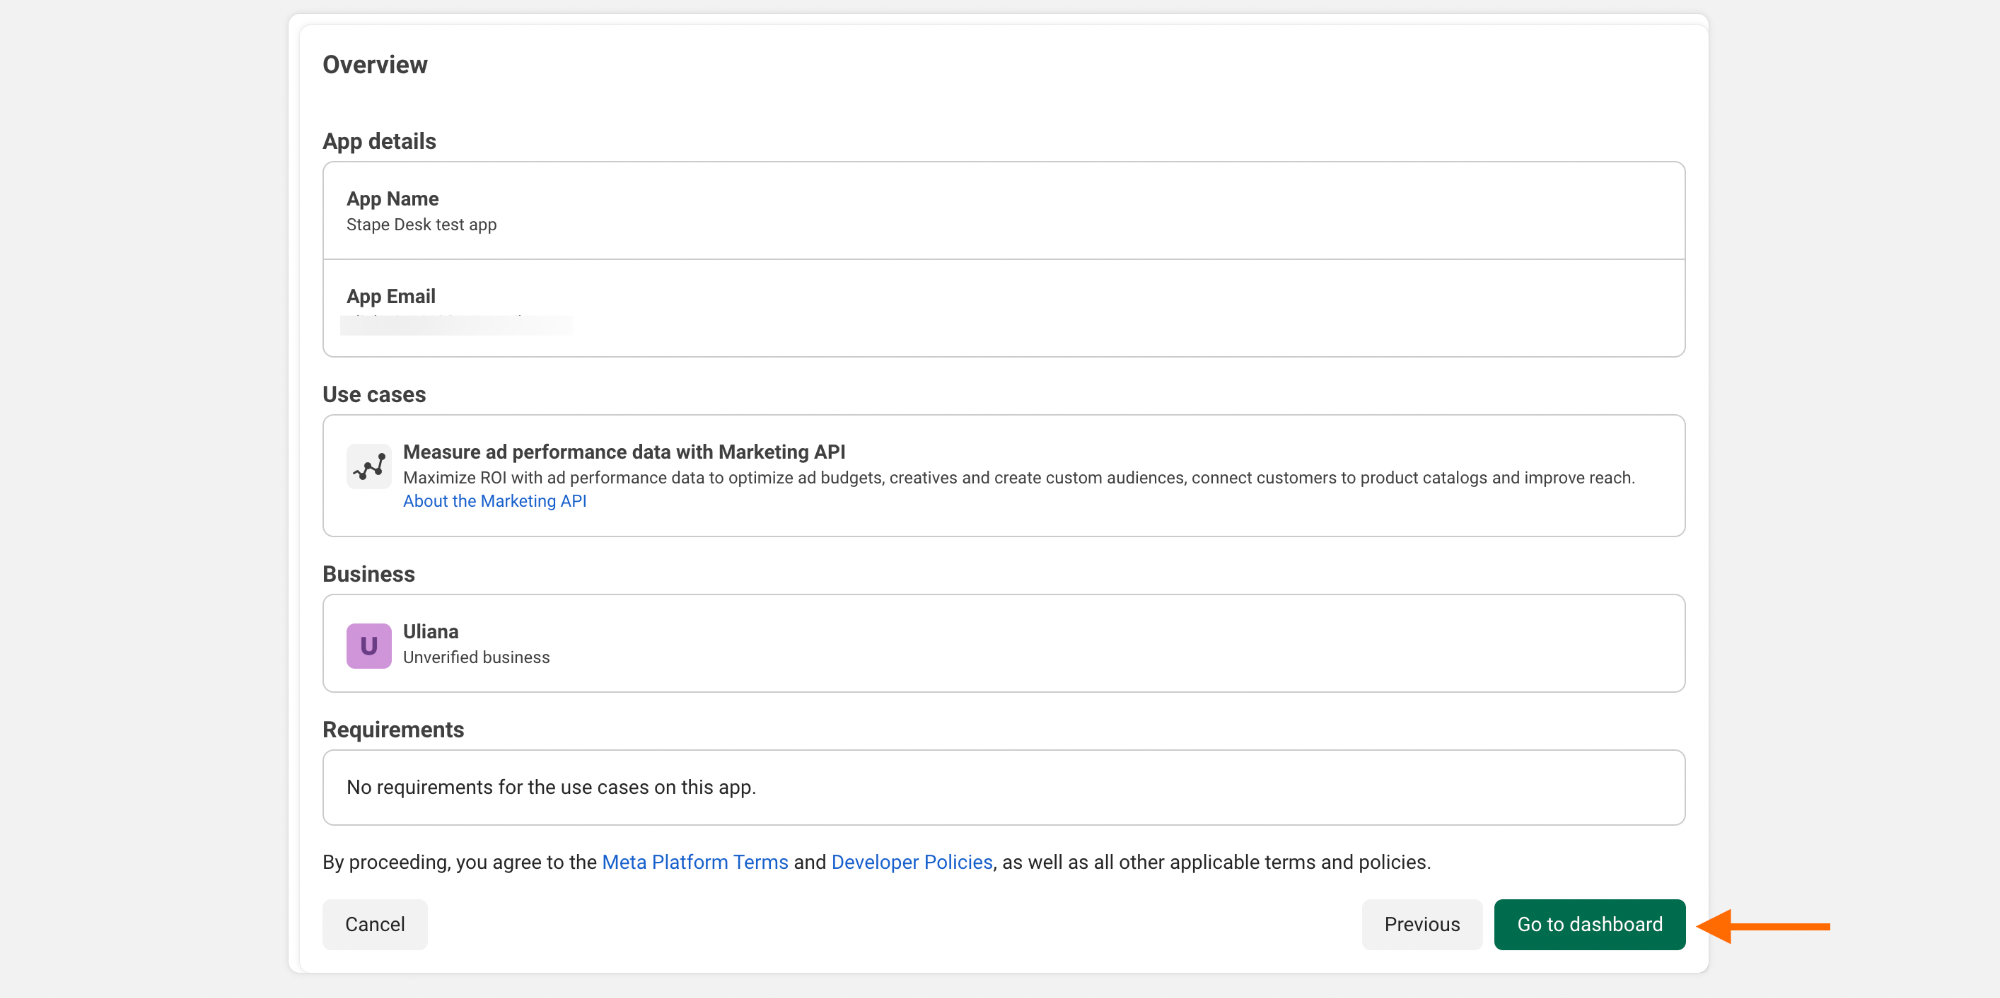
1.6 Once done, check the data and click “Go to dashboard”.
| Note: If you cannot create it, this likely means a system user already exists, and your account limit has been reached, or you do not have the necessary permissions (Admin access to the Business Manager account is required). |
Step 2. Generate the System User Token
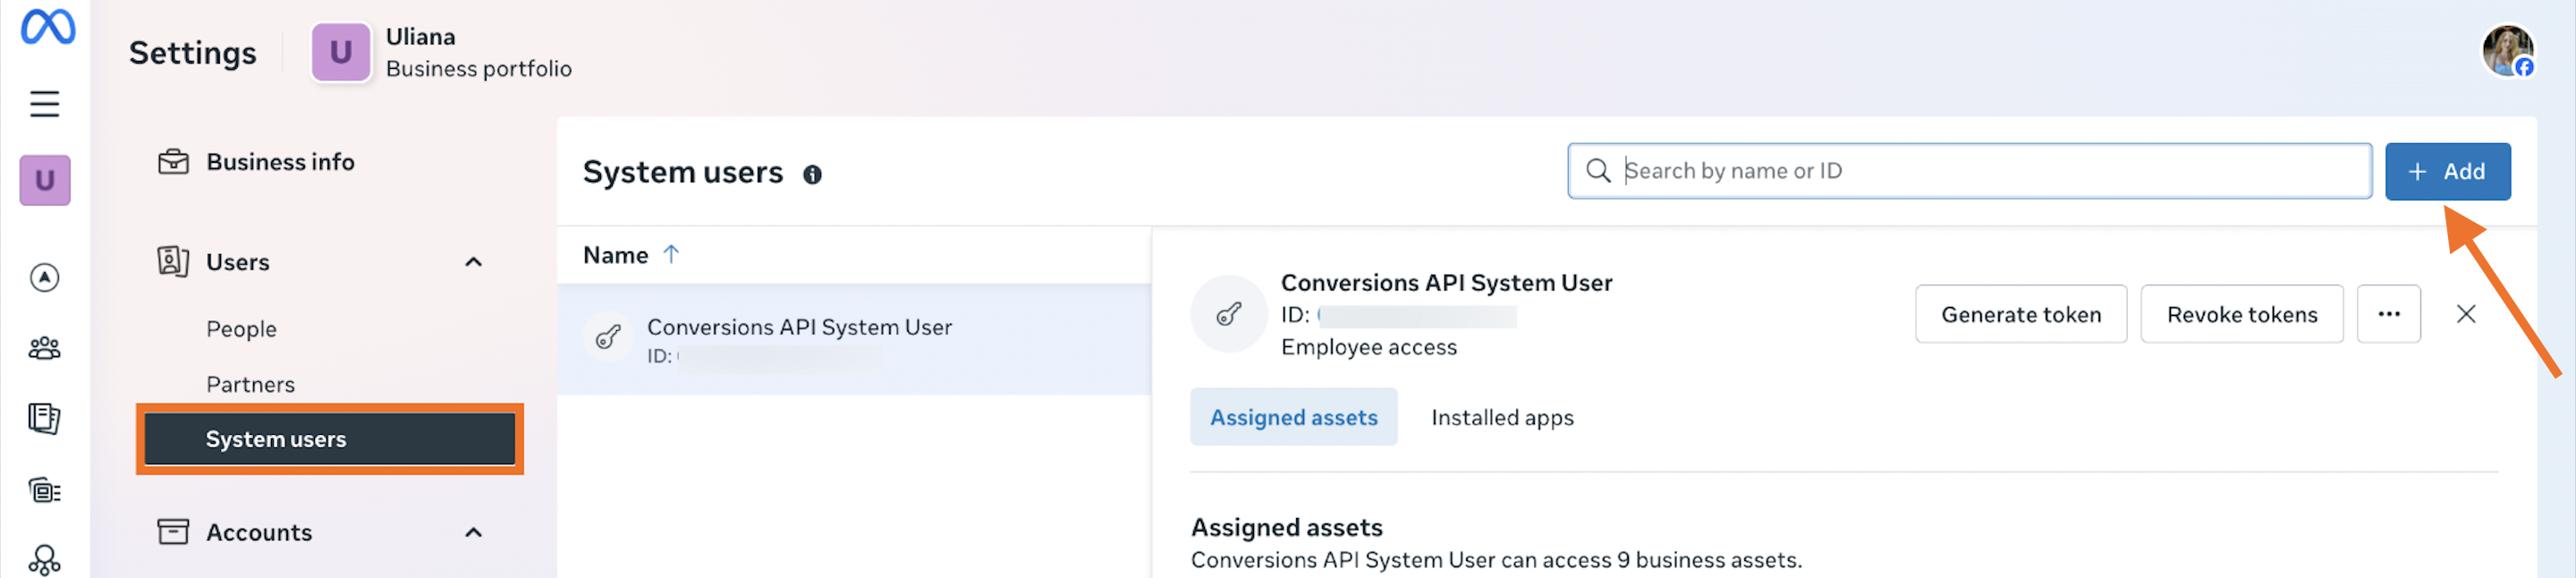
2.1 Go to Meta Business Settings → Users → System users → click “Add”.
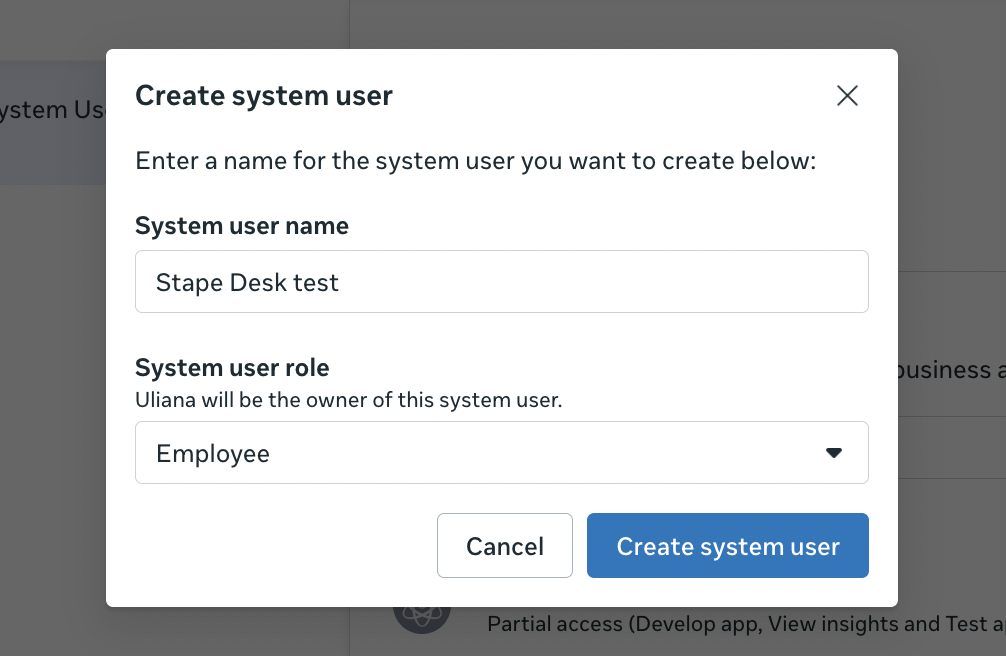
2.2 Add the name for your System User and assign it the Employee role. Employee role is sufficient for audience management. Use Admin if full ad account control is needed. Click “Create system user”.
| Note: If you can’t create it, you’ve either reached your account’s system user limit or you don’t have Admin permissions in the Business Manager account. |
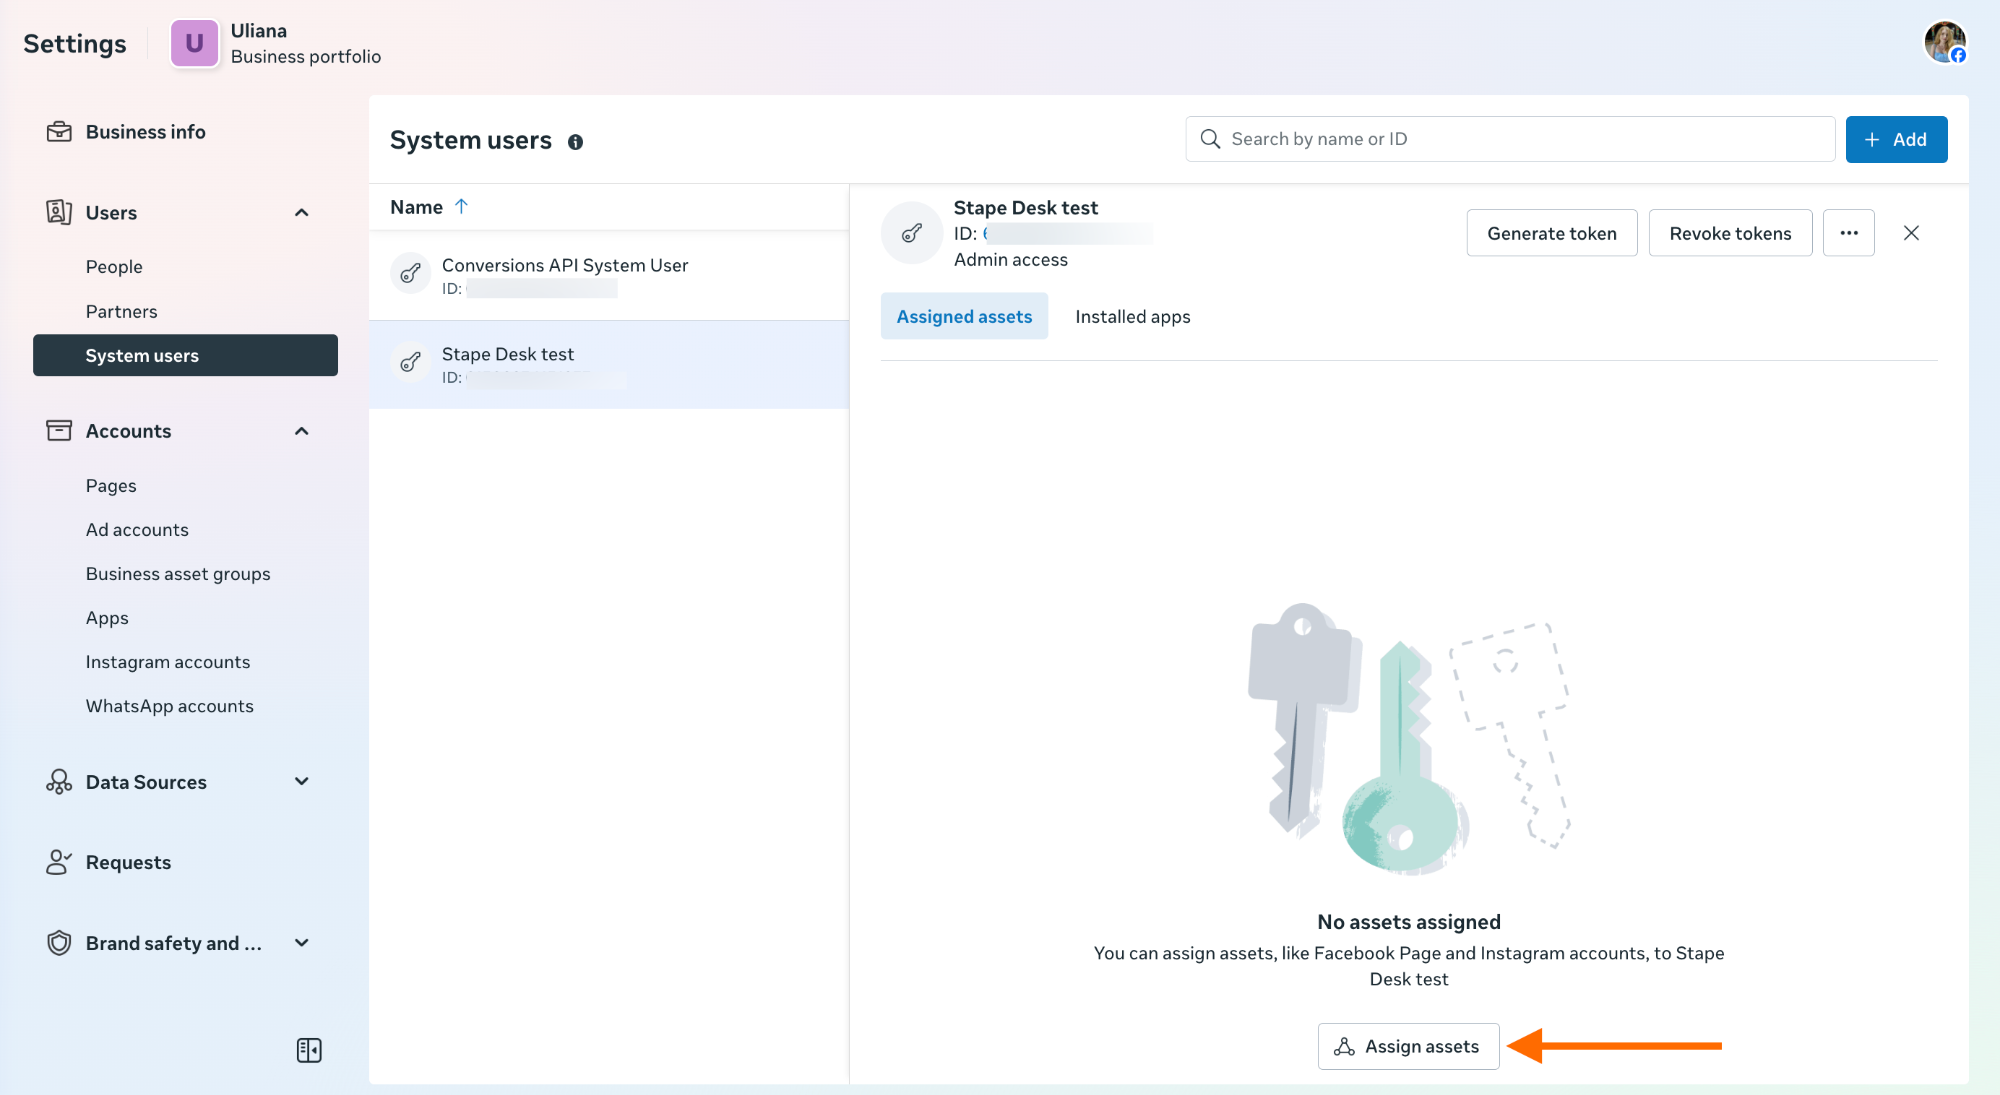
2.3 Open the system user you’ve just created and click “Assign assets”.
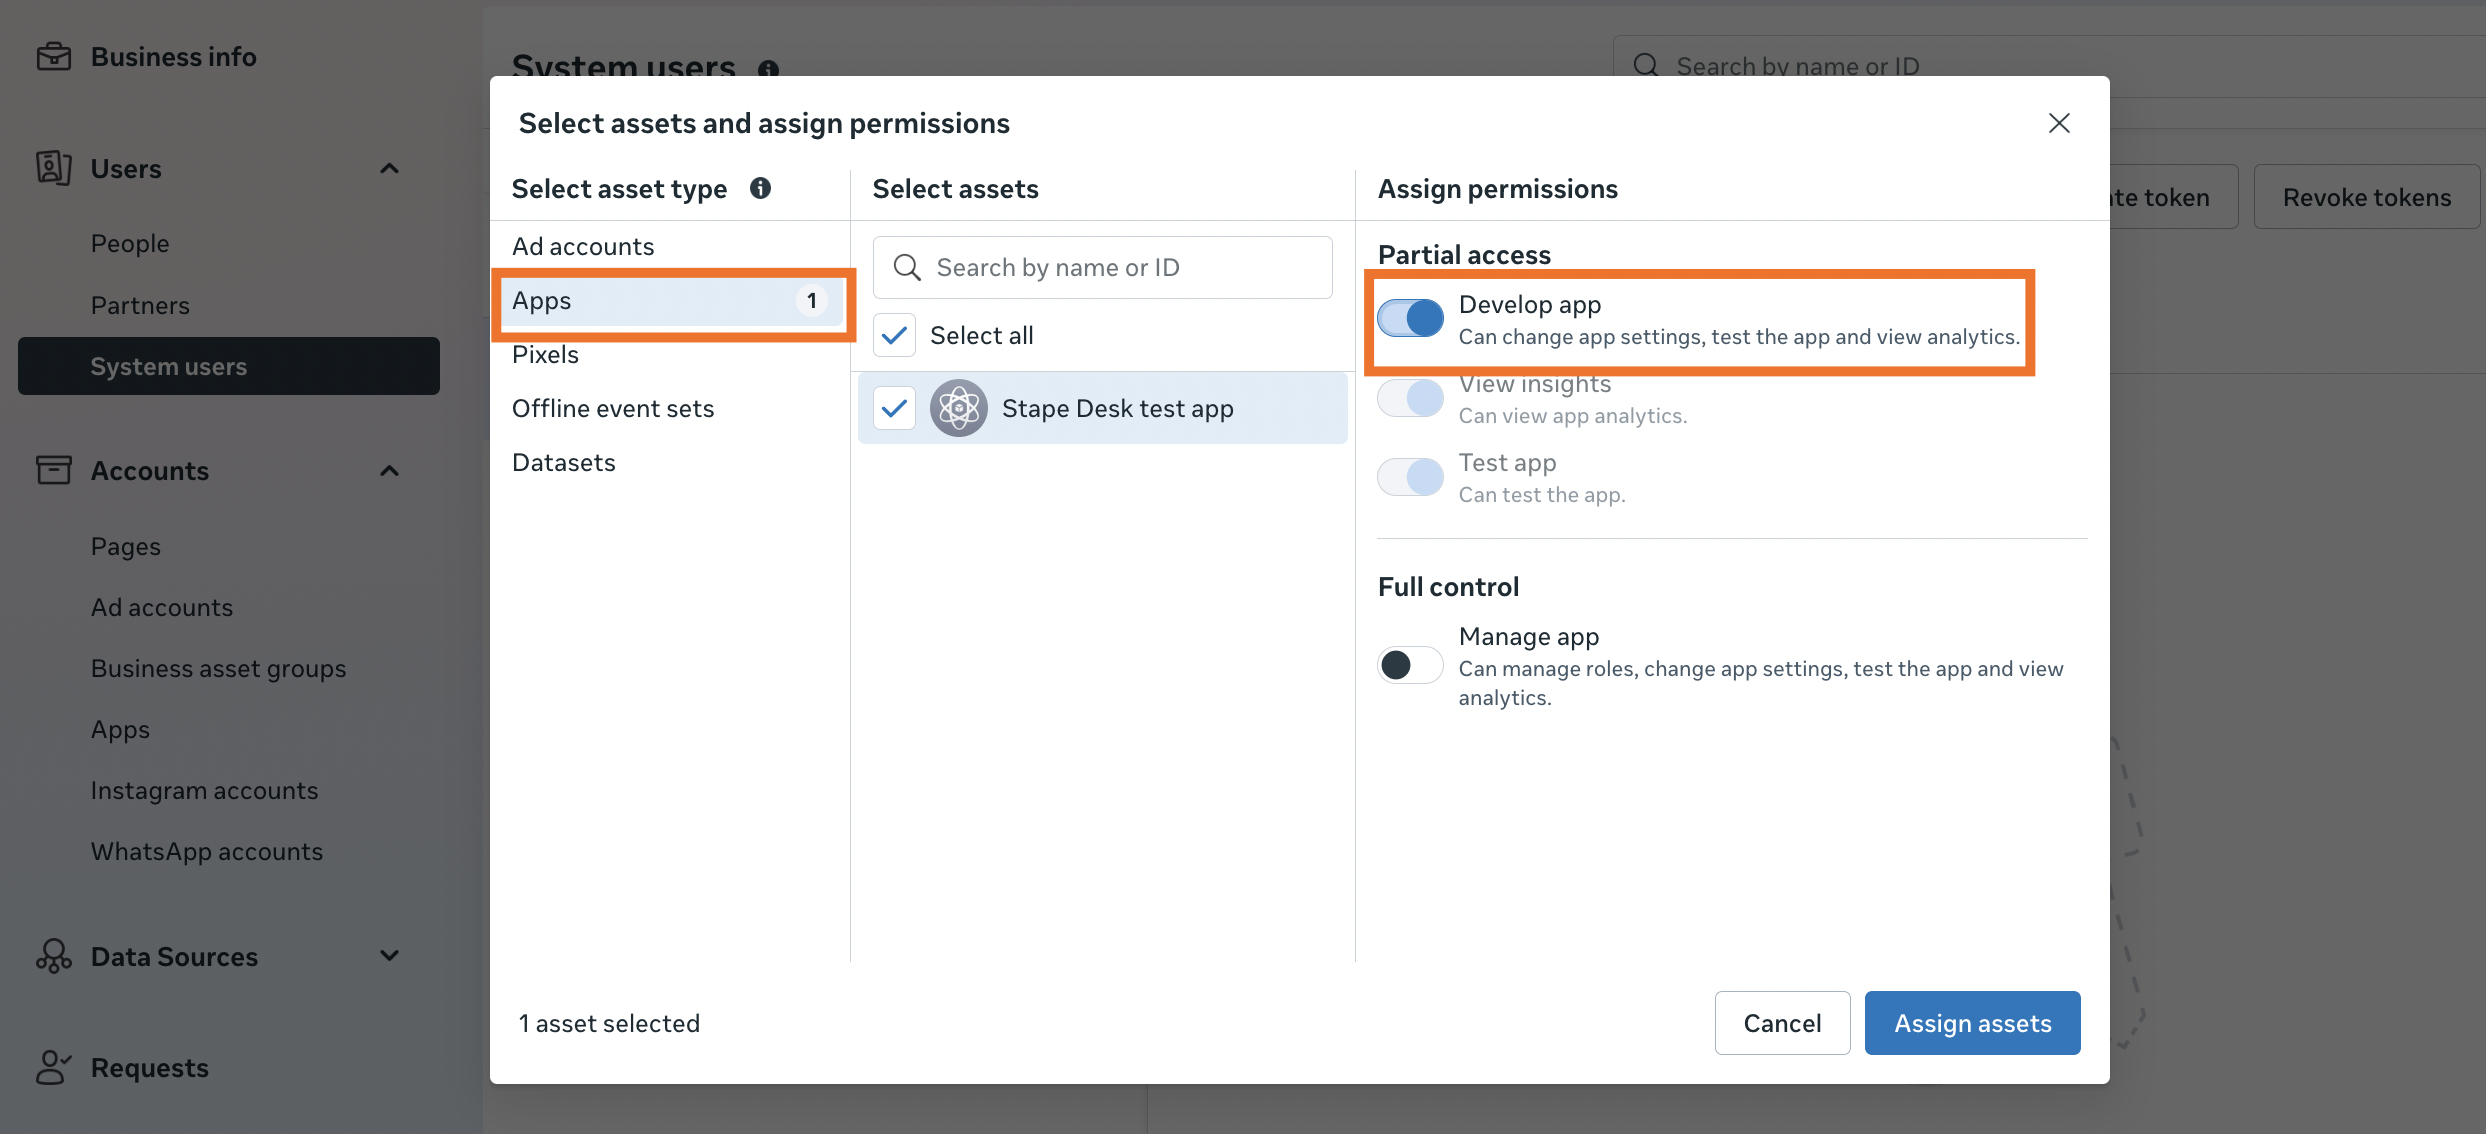
2.4 Click on the “Apps” on the left, choose the app you created in the previous step, and enable the “Develop app” permission. Click “Assign assets”.
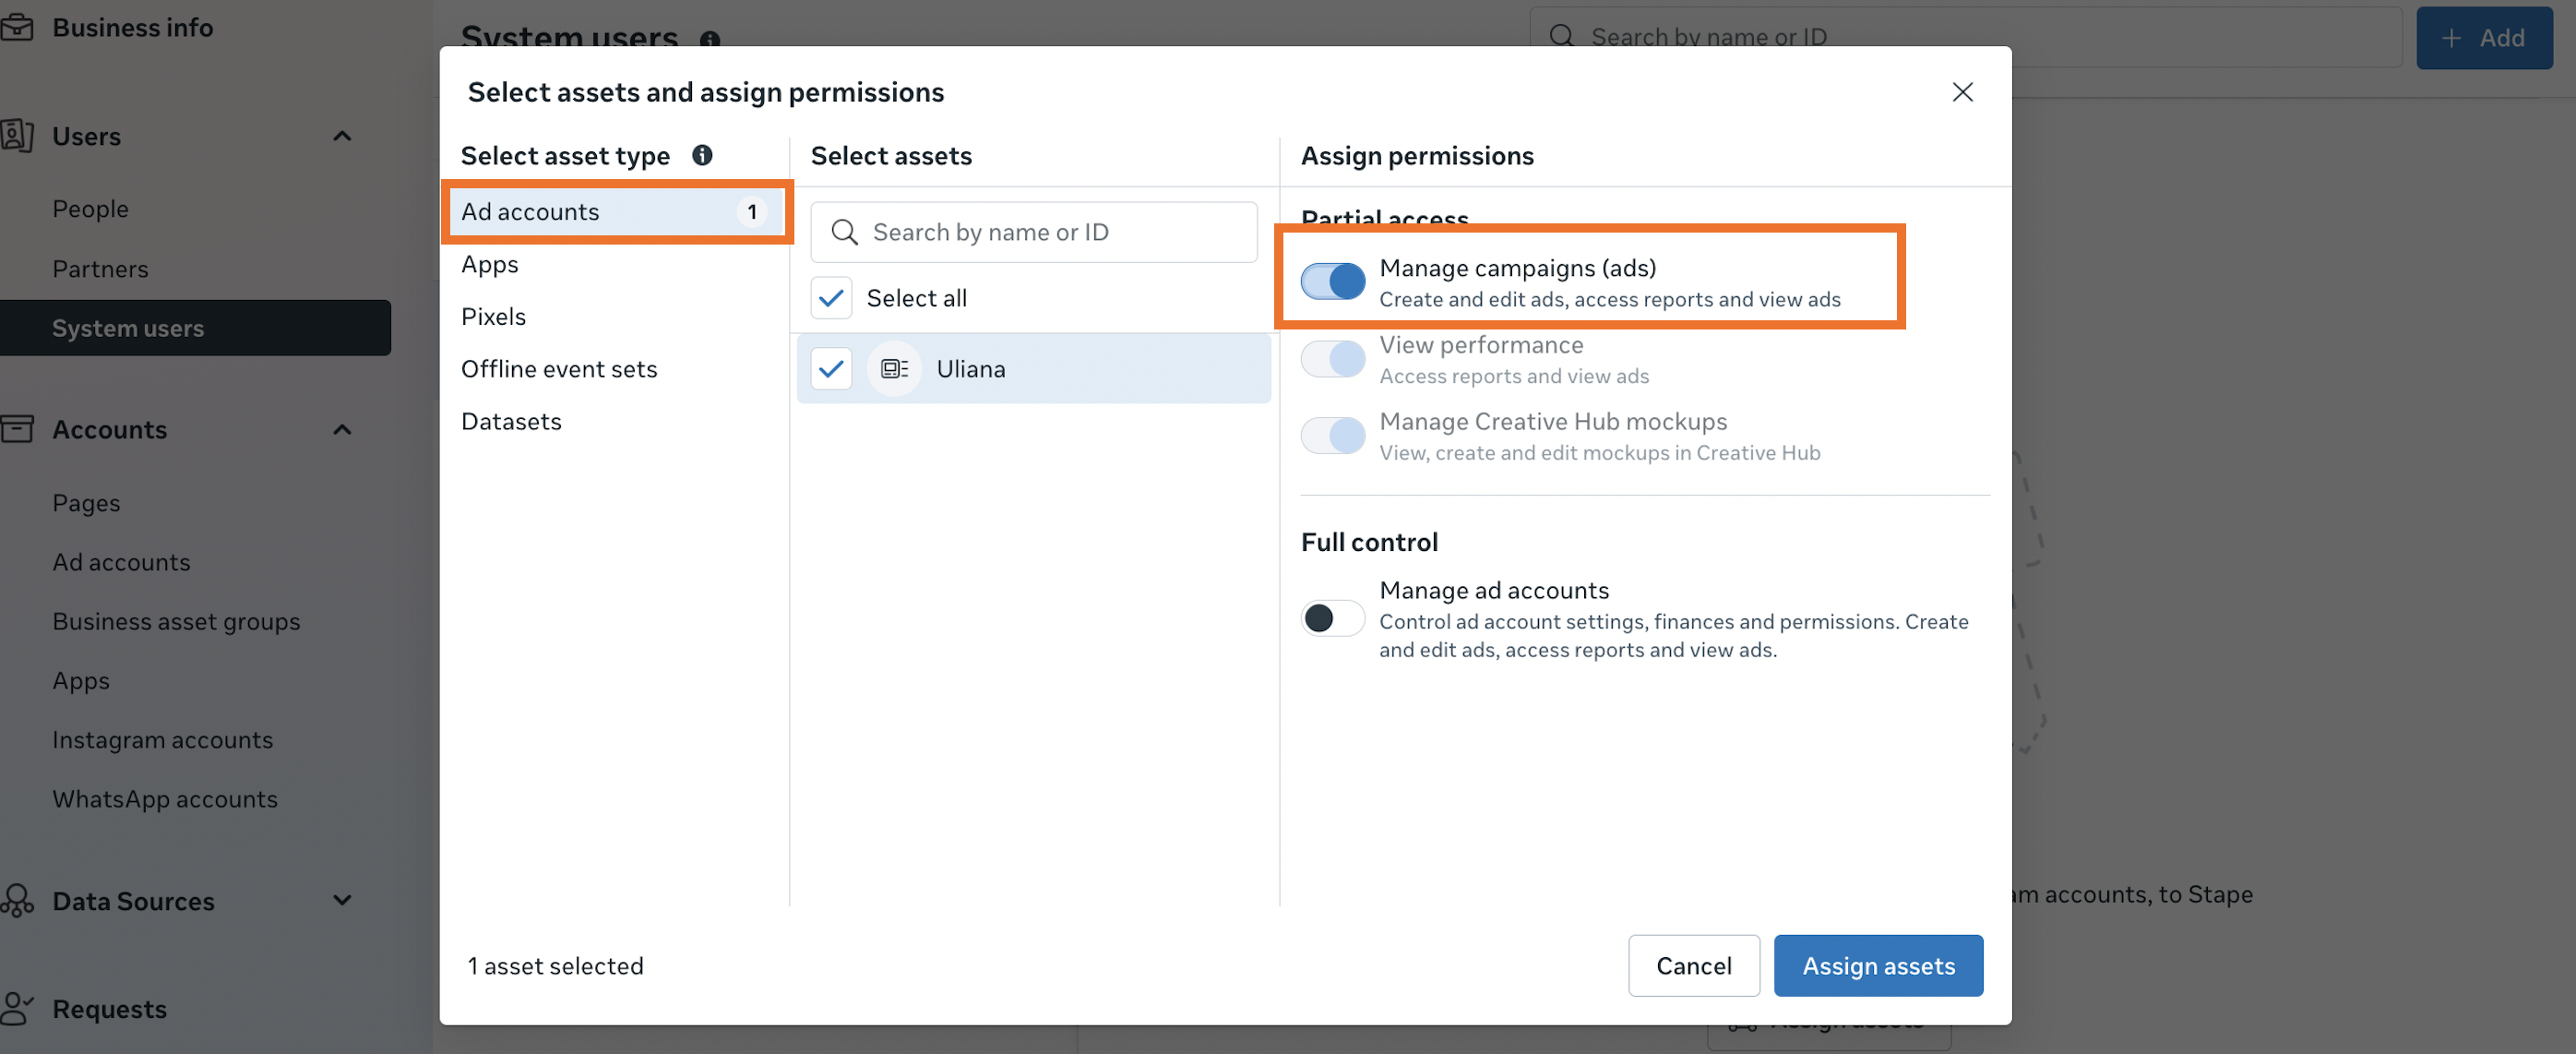
2.5 Click “Assign assets” again. Select the “Ad accounts” asset type, check the target Ad Account(s), and enable the “Manage campaigns (ads)” permission. Click “Assign assets”.
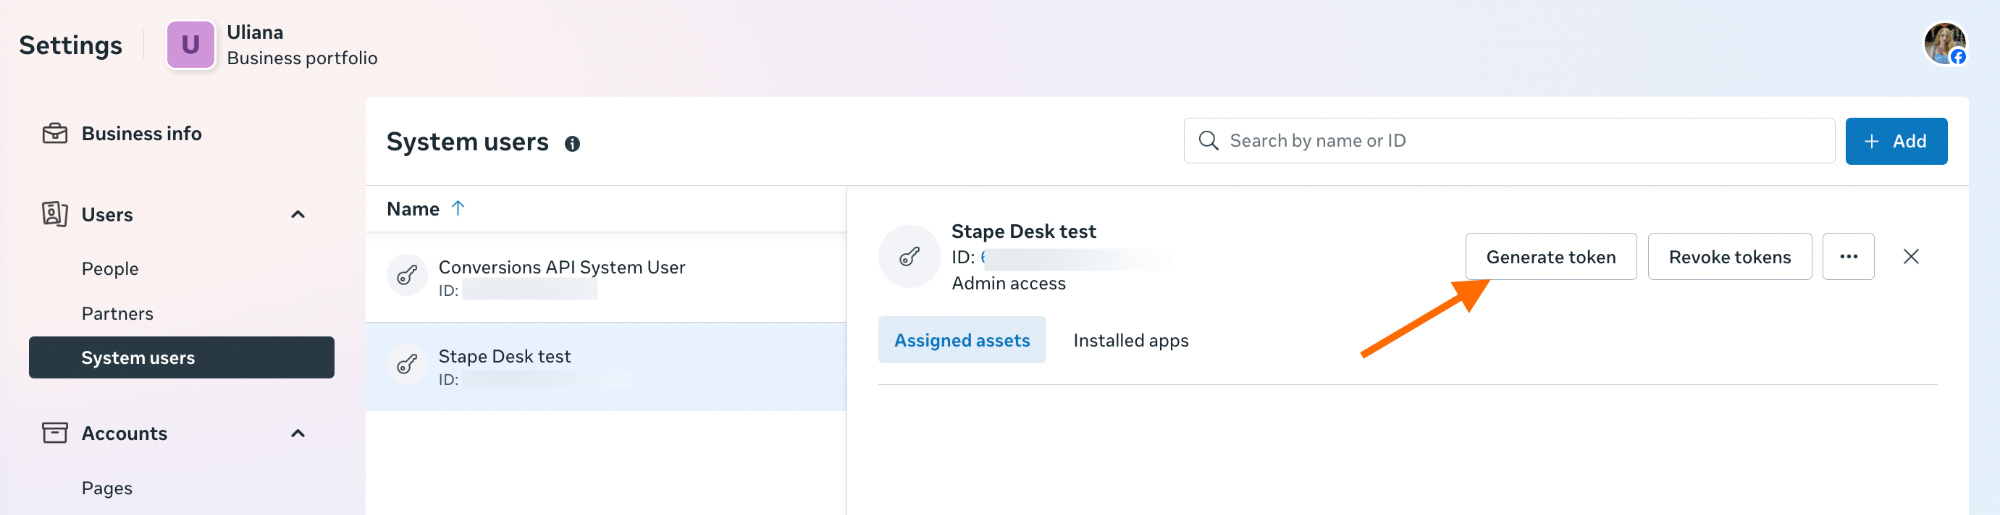
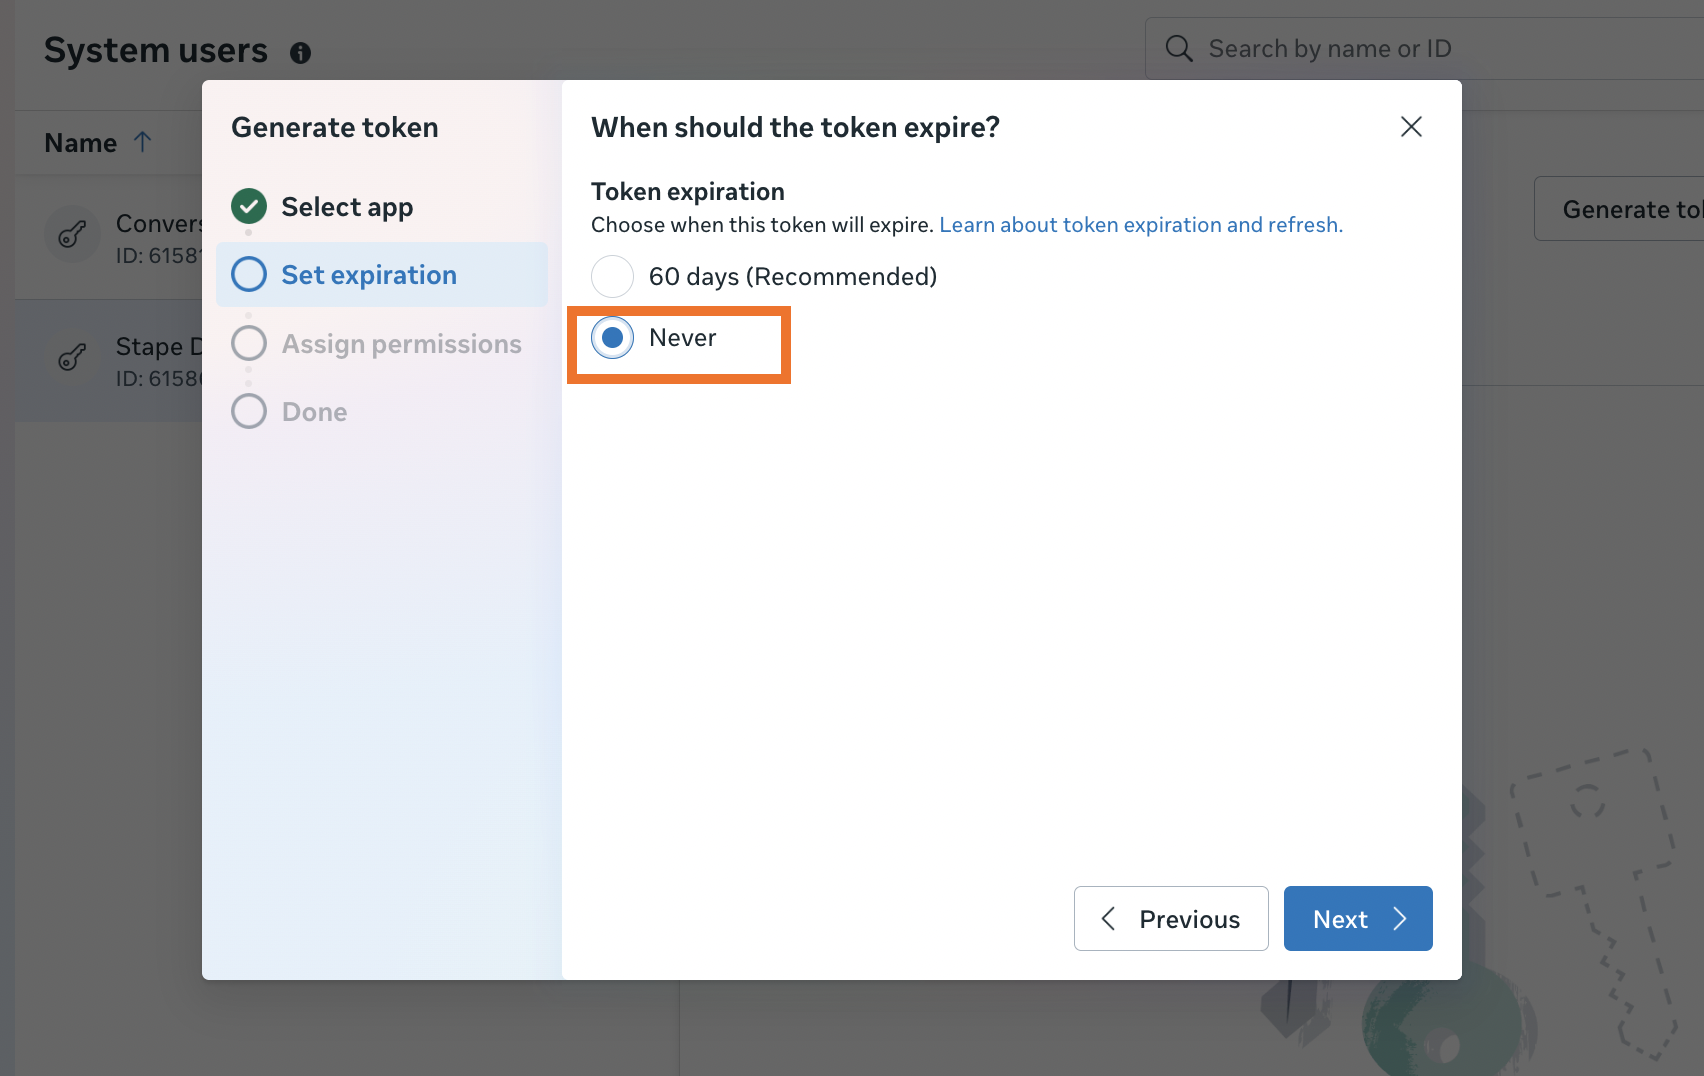
2.6 Within your system user, click “Generate token”.
2.7 From the drop-down list, select an app you’ve created. On the next step, select “Never” as token expiration.
2.8 From the list, select “ads_management” permission.
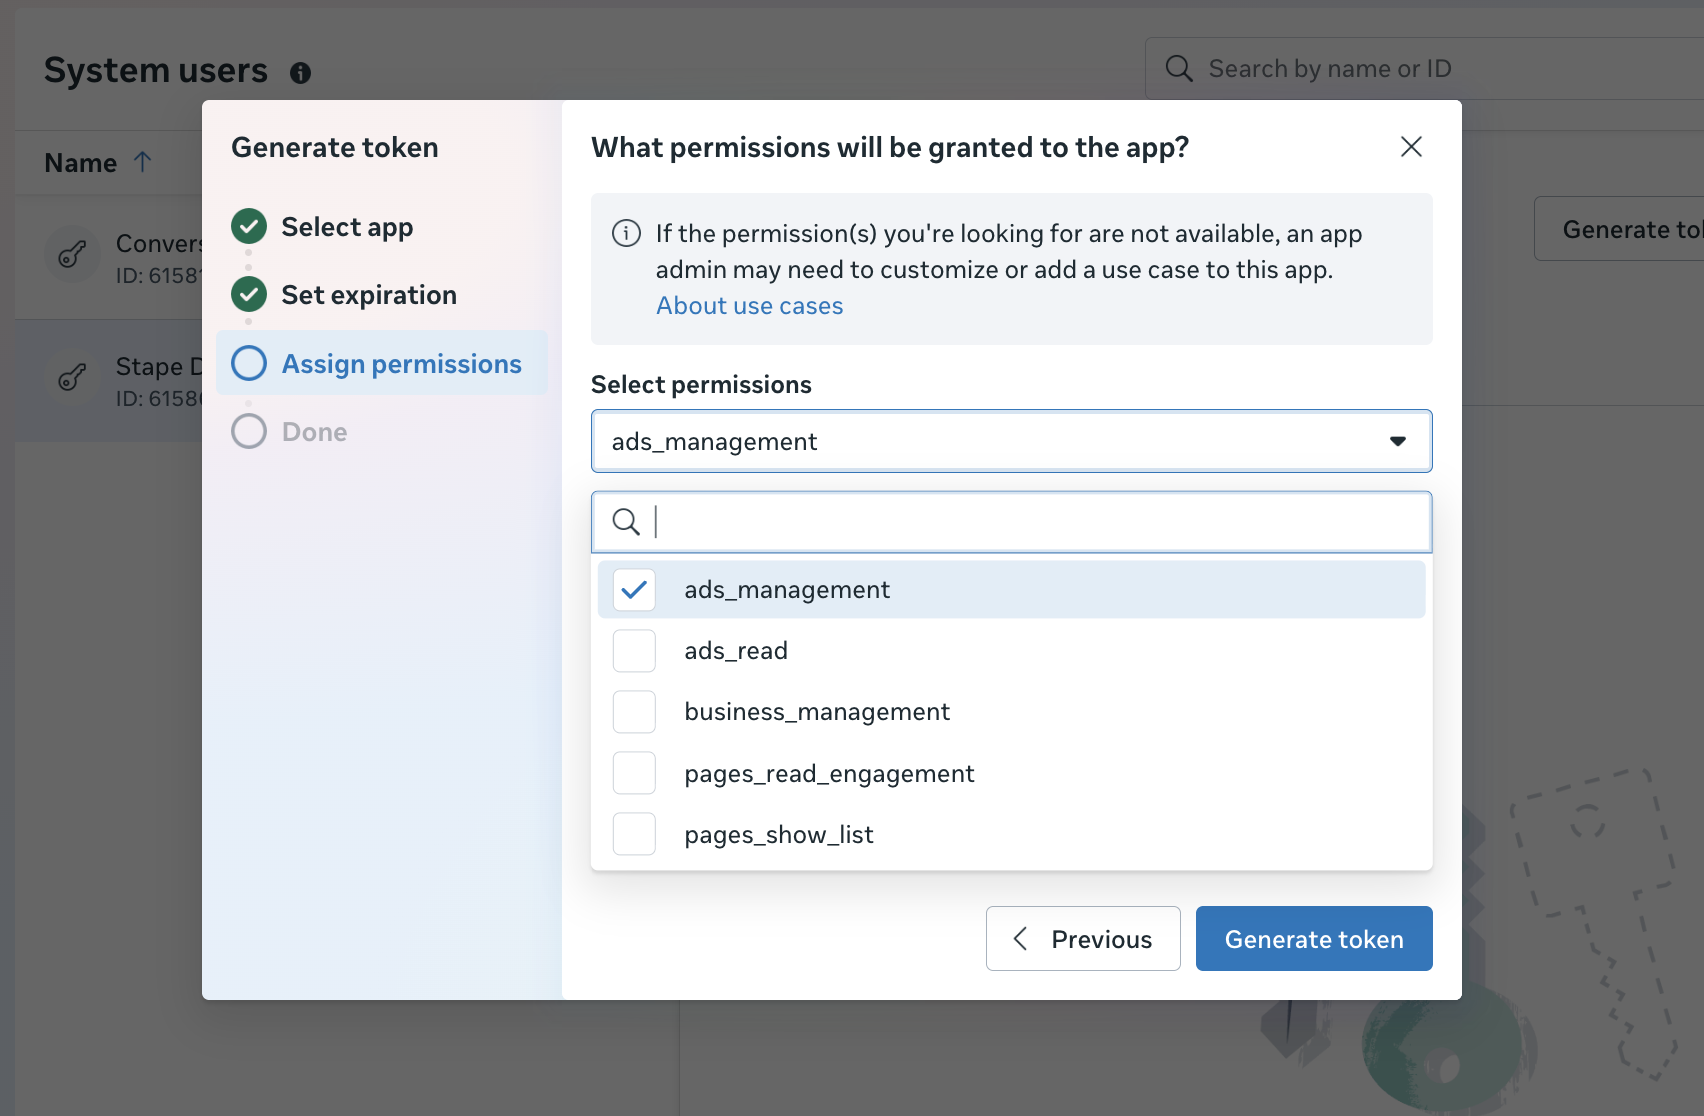
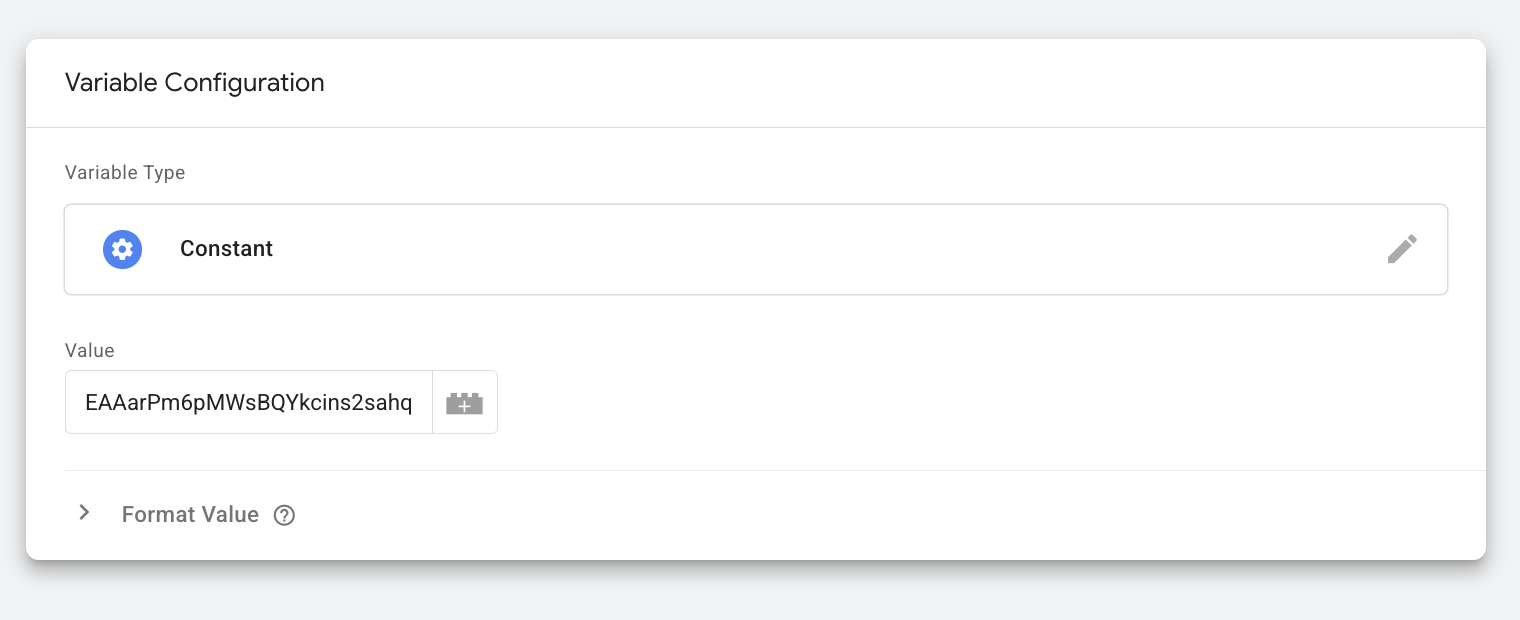
And click “Generate token”. Copy and save the token in a secure place. For example, add it as a constant variable in the server GTM container. You will need the token while configuring a tag.
If you go with Meta Connection by Stape, you can use our CRM apps (at no charge). In this case, you should opt for the Meta Custom Audience connection method within the app, and you don’t need to configure the tag in sGTM as we describe below.
Currently, we have the integration available in the following apps:
Step 4. Configure the Meta Custom Audience tag
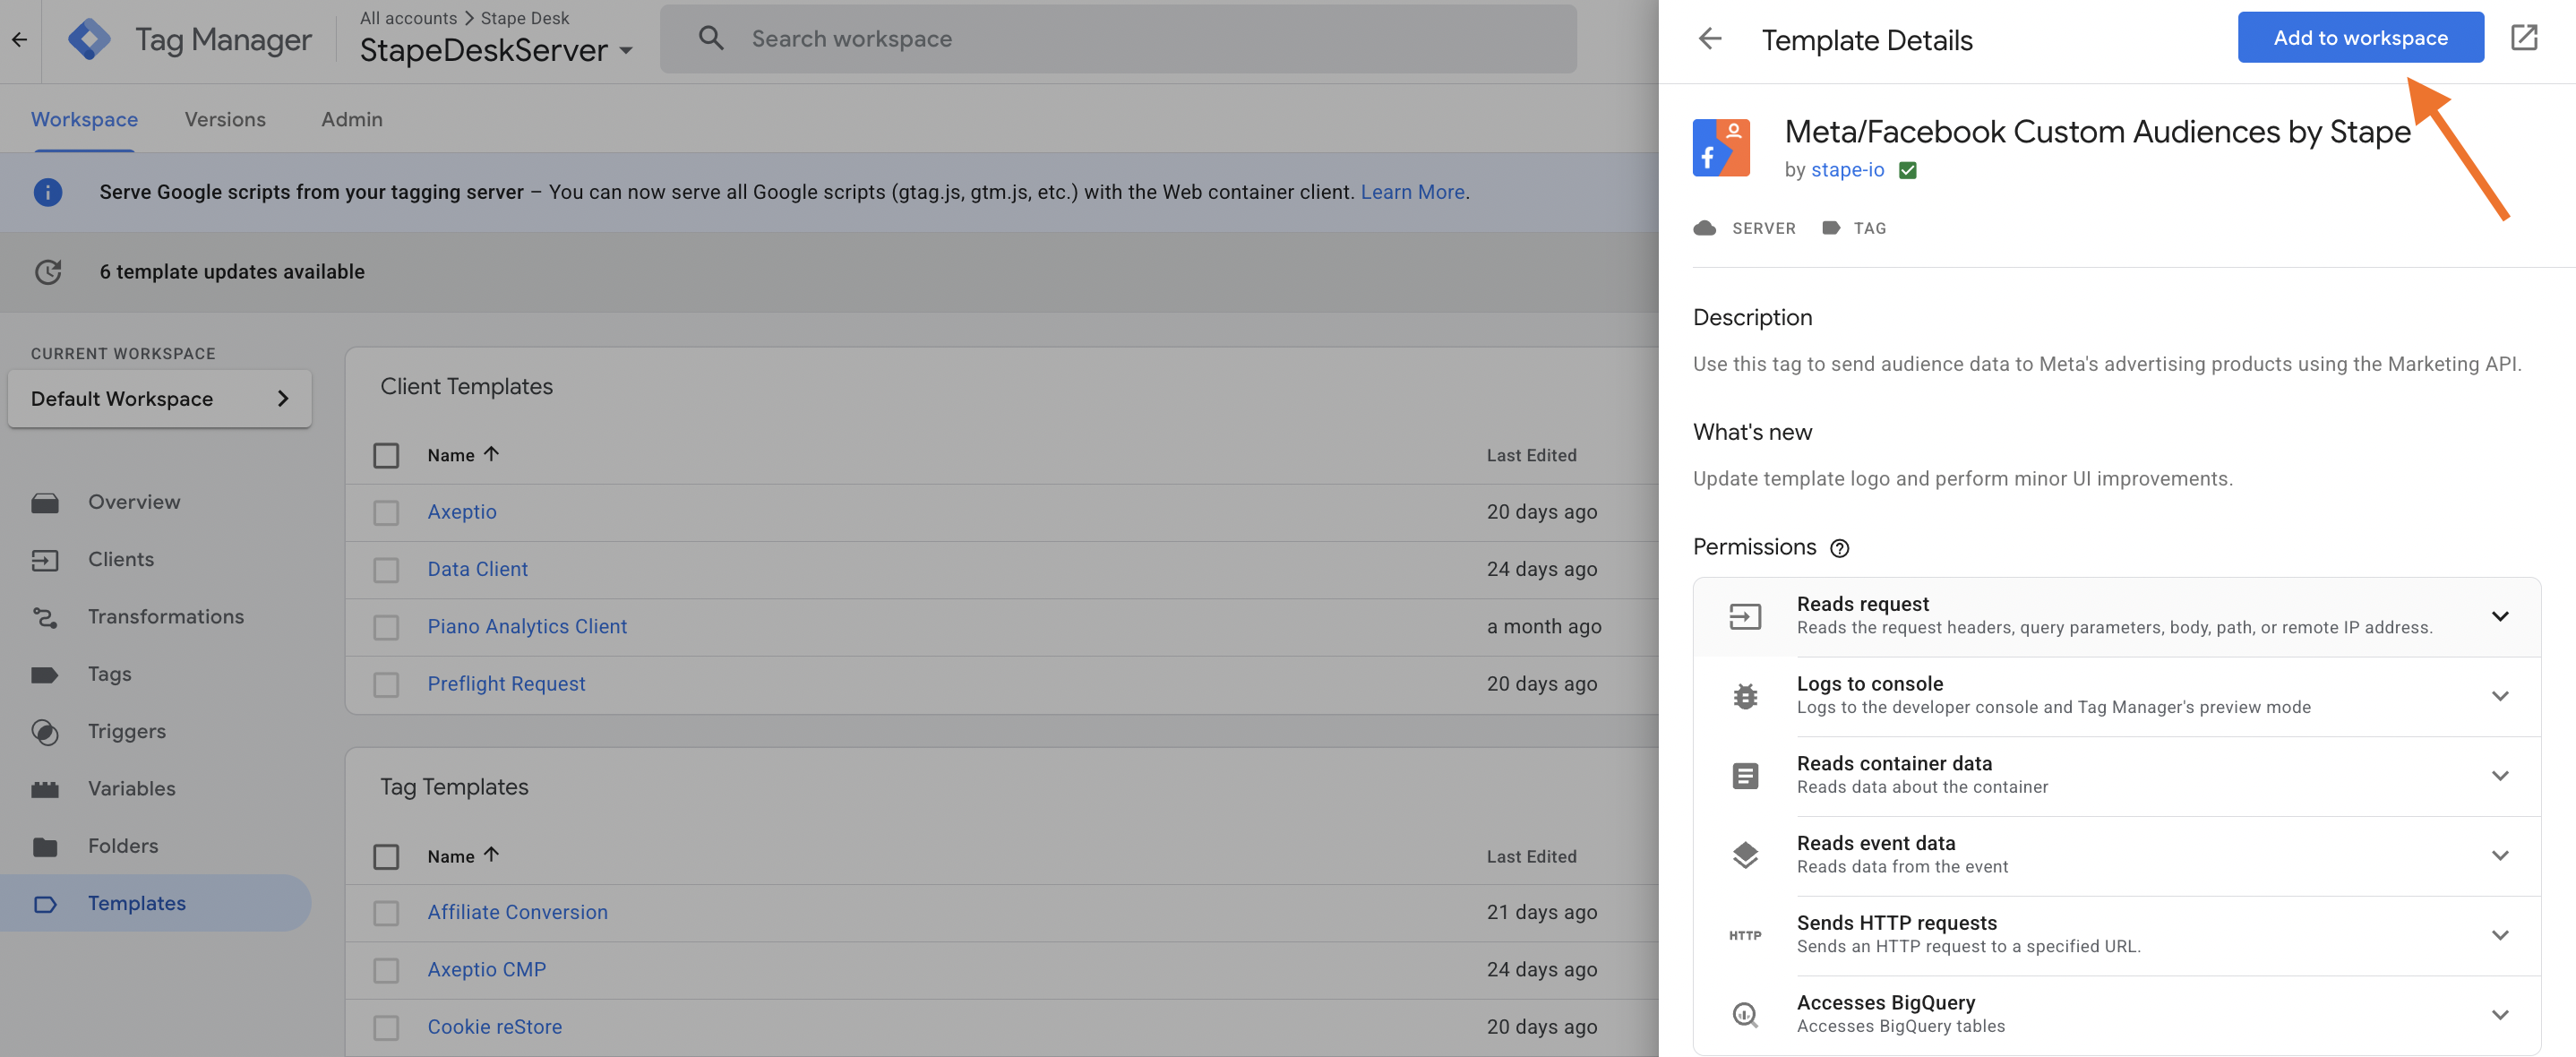
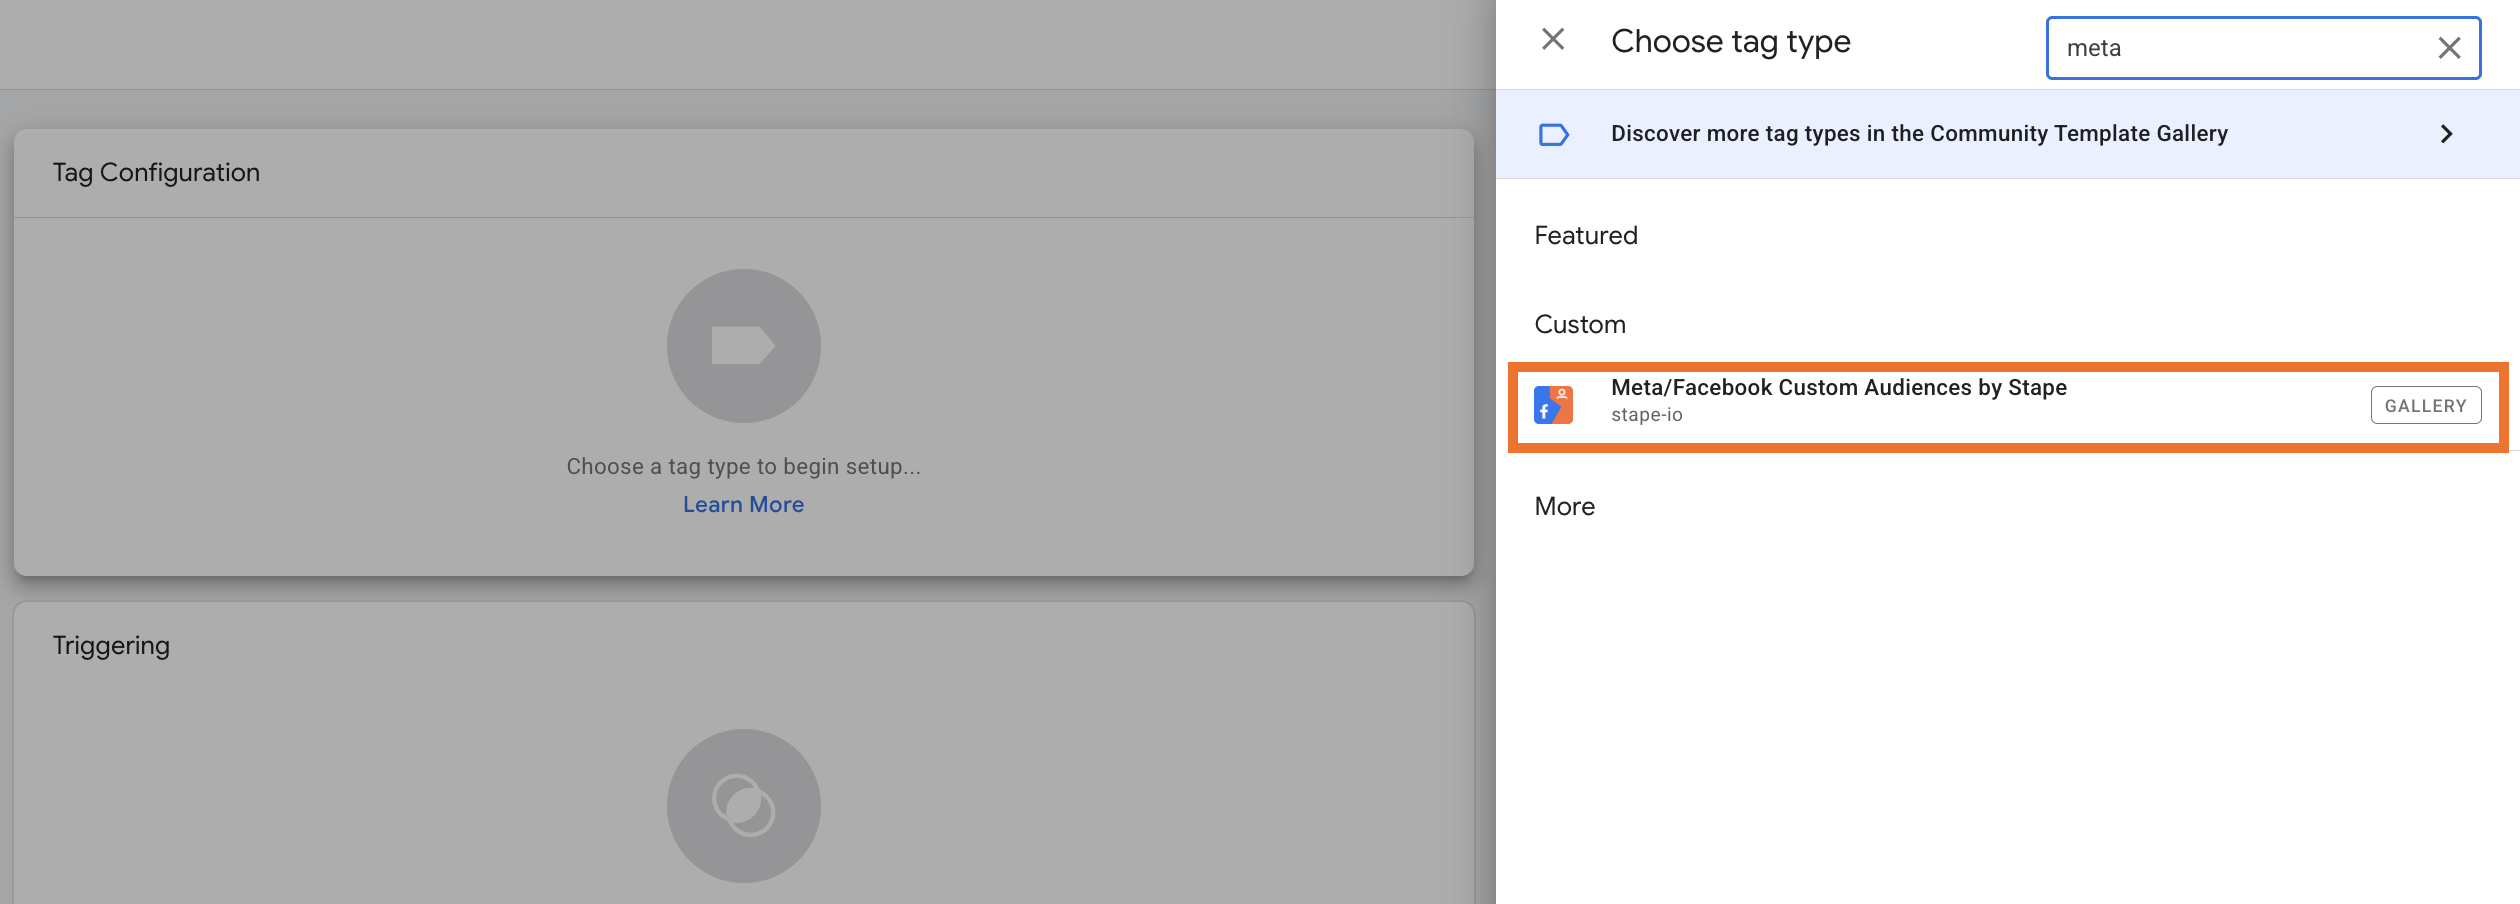
4.1 Add the Meta/Facebook Custom Audience tag to your workspace.
Go to your server GTM container → Templates section → next to Tags click "Search Gallery" → find "Meta/Facebook Custom Audiences by Stape" → click "Add to workspace".
4.2 Create a new tag.
Navigate to the Tags section of the server GTM → New → select the tag you just added as tag type.
4.3 Configure the tag.
4.3.1 Action - select the operation you want a tag to perform: add to audience data, remove from audience, or remove from all audiences.
4.3.2 Authentication Type - select the one based on your choice in step 3.
4.3.3 Add Audience ID and Access token.
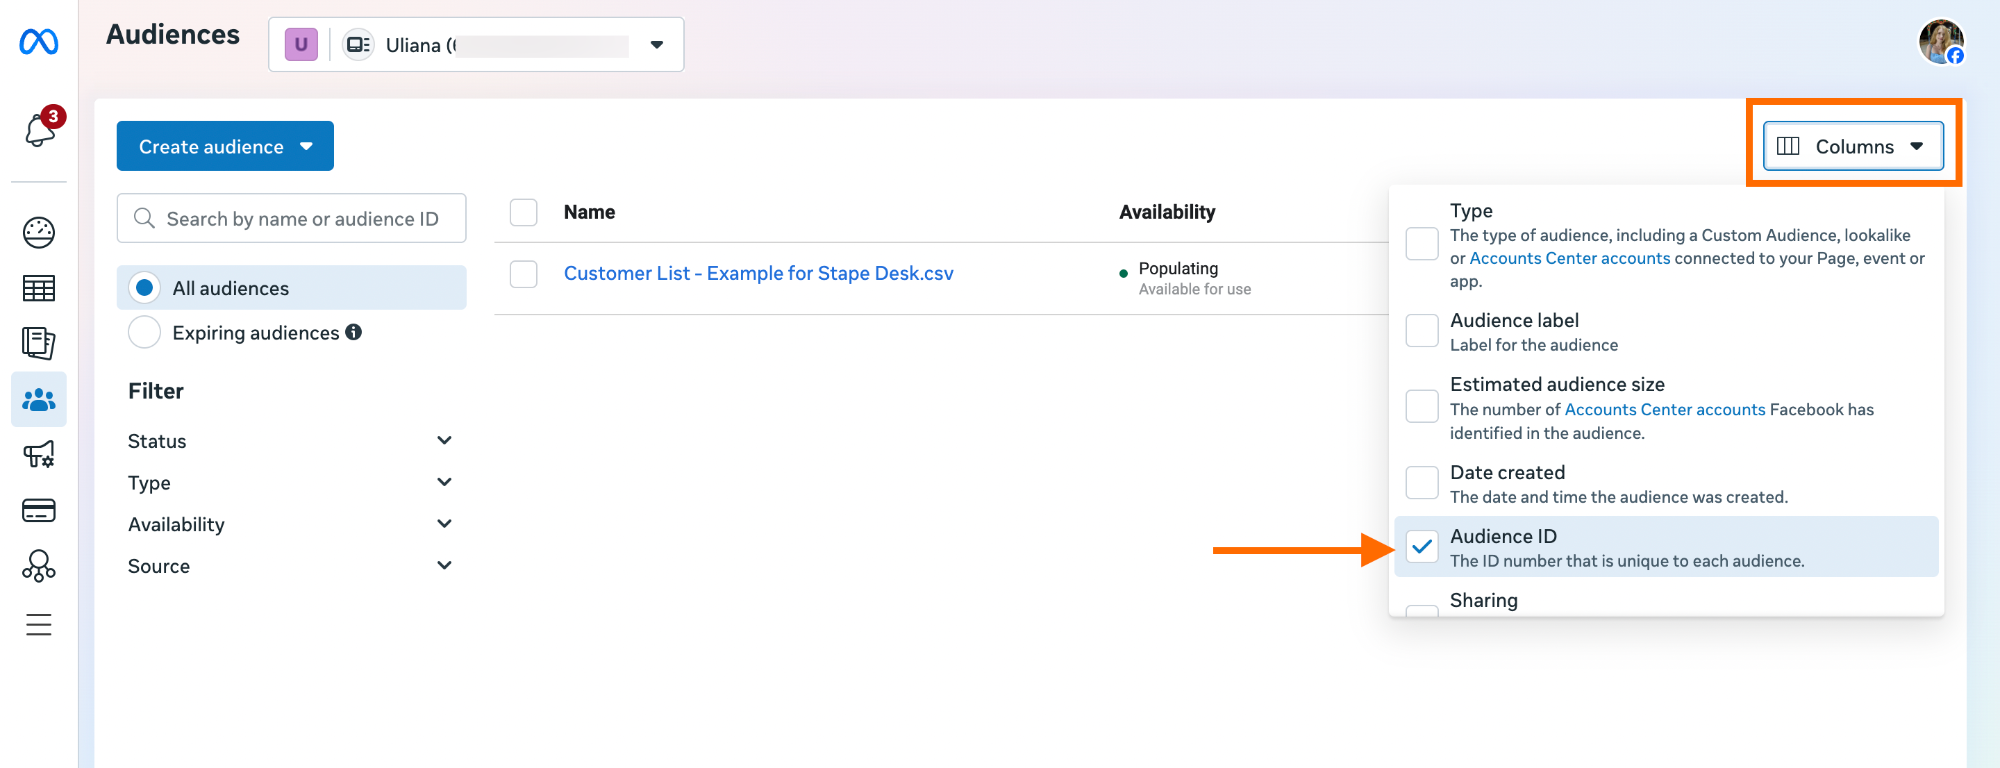
- Audience ID - go to Audiences section → click on "Columns", check the box next to "Audience ID". When the column appears, copy the ID for the required custom audience.
- Access token - it applies to you if you selected your own credentials as the authorization method. We've explained in detail how to obtain it in the previous step in the collapse element "Own Meta credentials".
4.3.4 Audience members.
The tag can be configured to send data for either a single user or multiple users in one request.
- Single User. Manually enter identifiers for one user using the UI input fields.
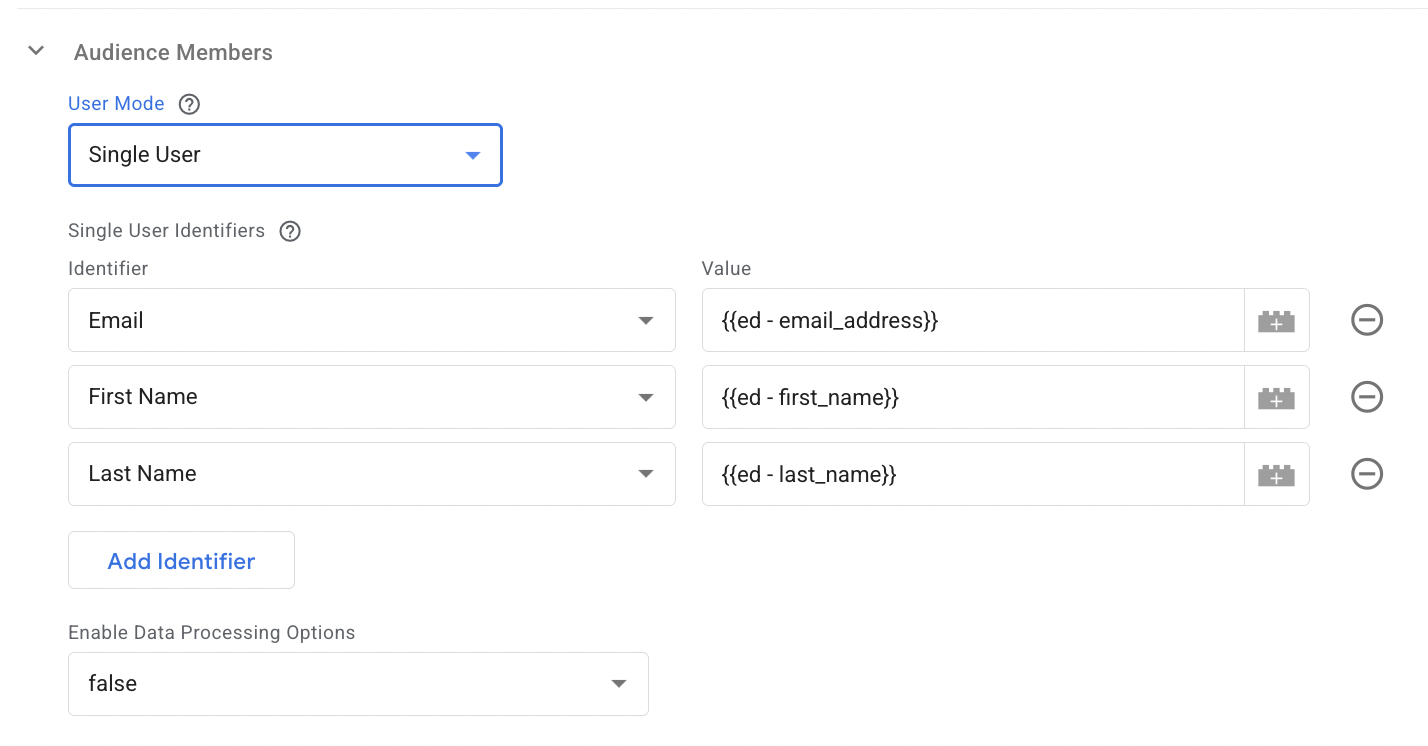
Enable Data Processing Options - to support compliance with U.S. state privacy regulations (Limited Data Use), you can enable data processing settings and specify the applicable Country and State.
- Multiple Users. Submit a pre-formatted array of audience members along with a corresponding schema. Each request can include up to 10,000 audience members.
Provide a comma-separated list or array defining the order and type of user identifiers (e.g., EMAIL, PHONE, FN, LN).
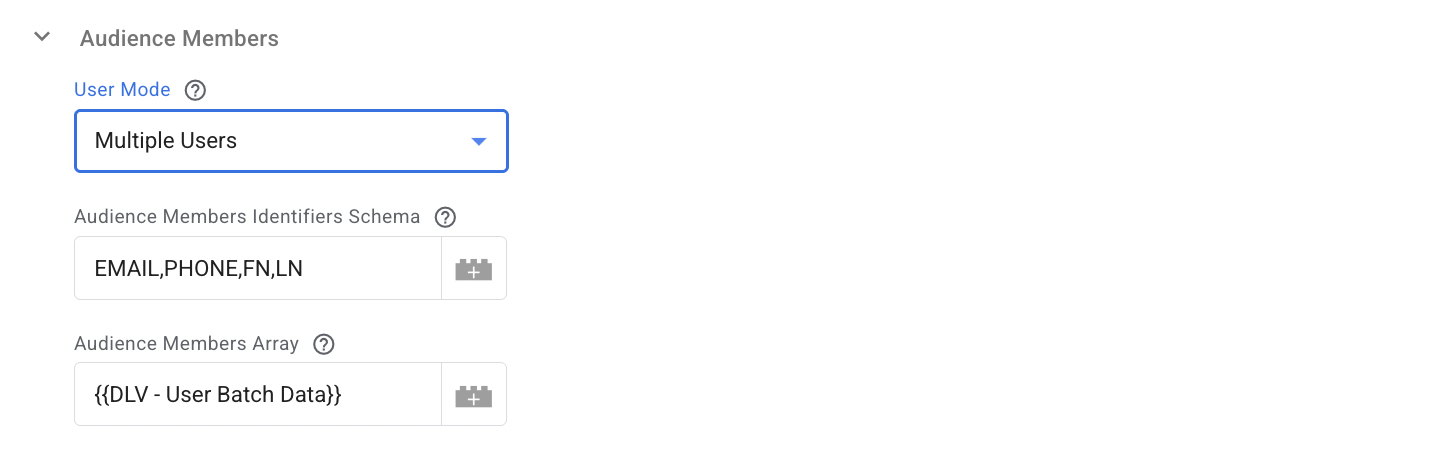
Here is an example of tag configuration:

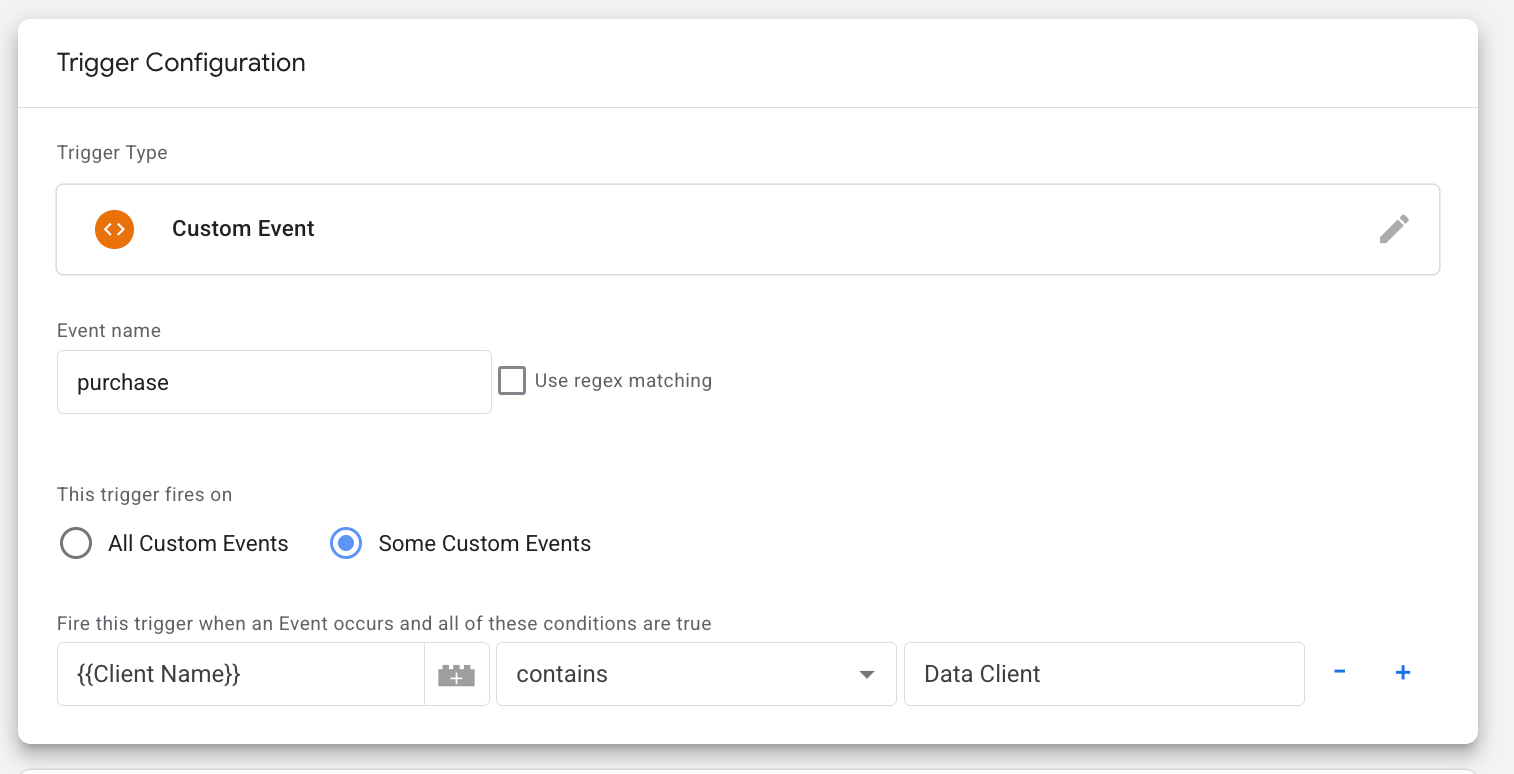
4.3 Add a trigger for the tag.
Specify the condition when you want your tag to fire and send data to the Meta custom audience. In our case, it is a purchase. You can use various triggers, such as purchase event, lead form interaction, or any Facebook event (e.g., add to cart, complete registration) to build custom audiences for targeting/retargeting.
We added the following configurations for a trigger:
- Trigger type: Custom Event
- Event name: purchase
- Trigger fires on: Client Name contains Data Client
Step 5. Test the configuration
| 💡Pro tip: For easier GTM debugging, use the Stape GTM Helper Chrome extension, designed to enhance the debugging experience in Google Tag Manager. It provides color-coded views for GTM tags and server-side requests and helps quickly identify failed tags. Learn more about the Stape GTM Helper features in our post. |
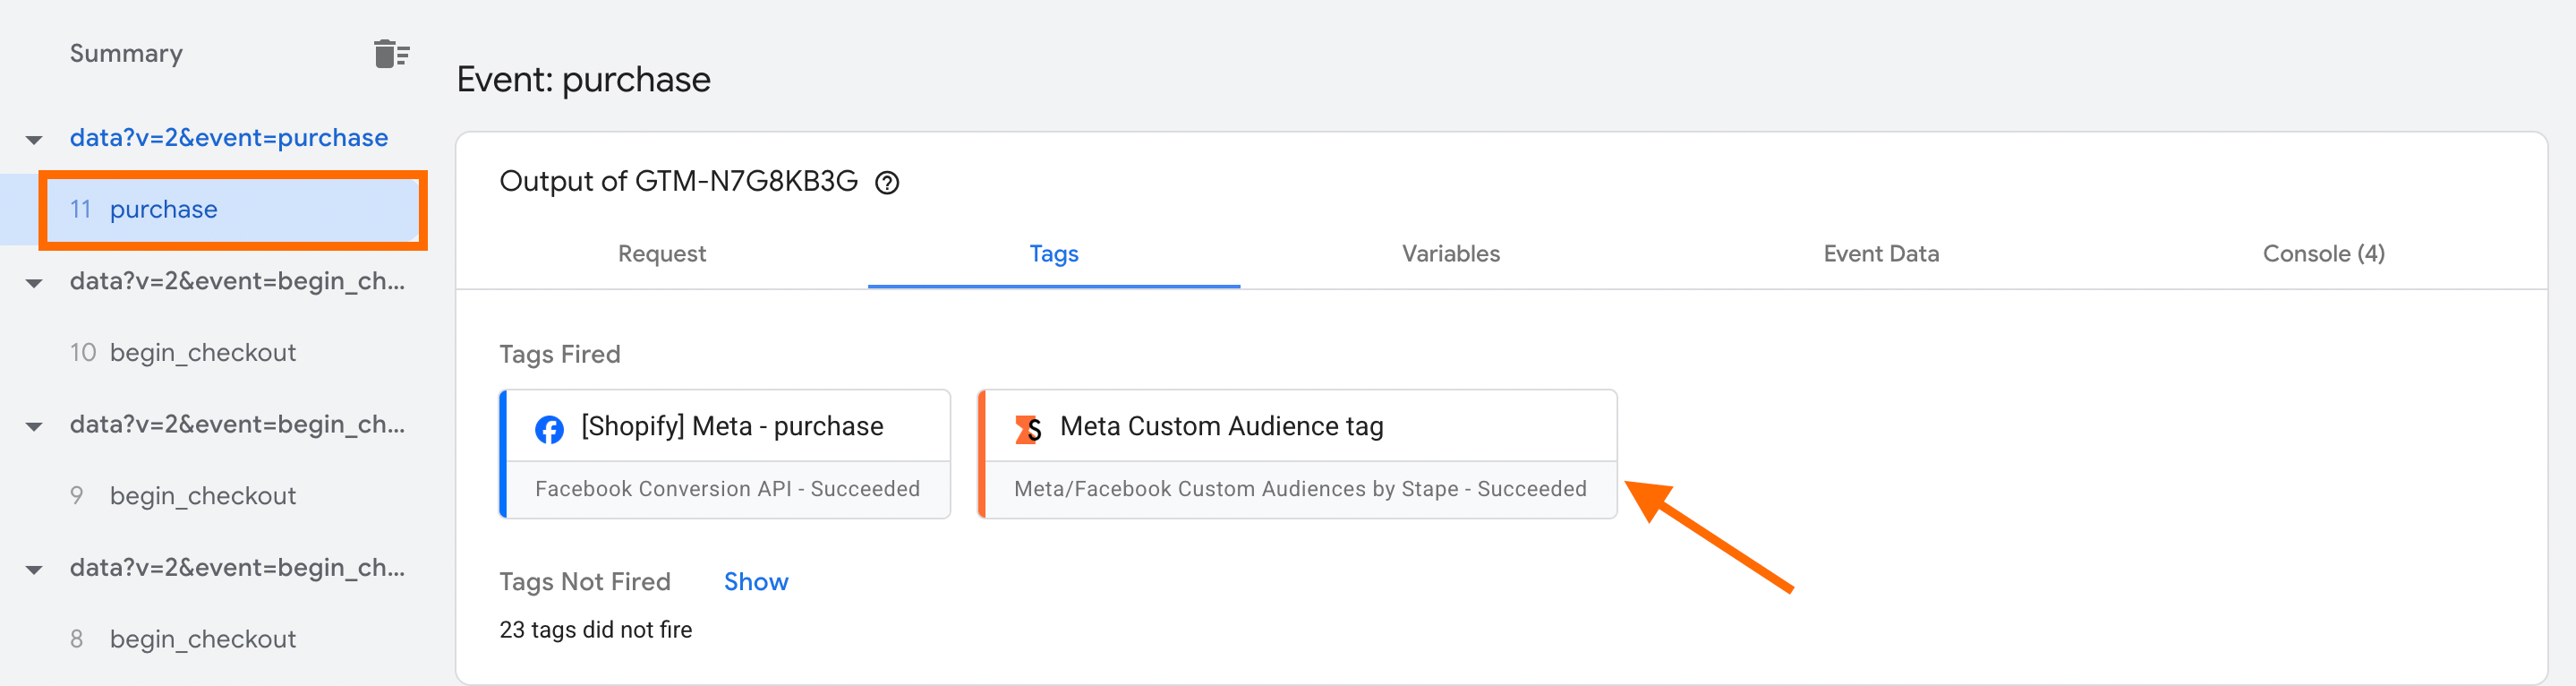
5.1 Run Preview mode in both web and server GTM containers.

5.2 Trigger the event you specified in the trigger configuration. In our case, it is a purchase. Find your event on the left-hand menu and click on the Stape's tag you've configured.
5.3 Click on "Outgoing HTTP Requests from Server" - this is the request that is being sent to Meta.
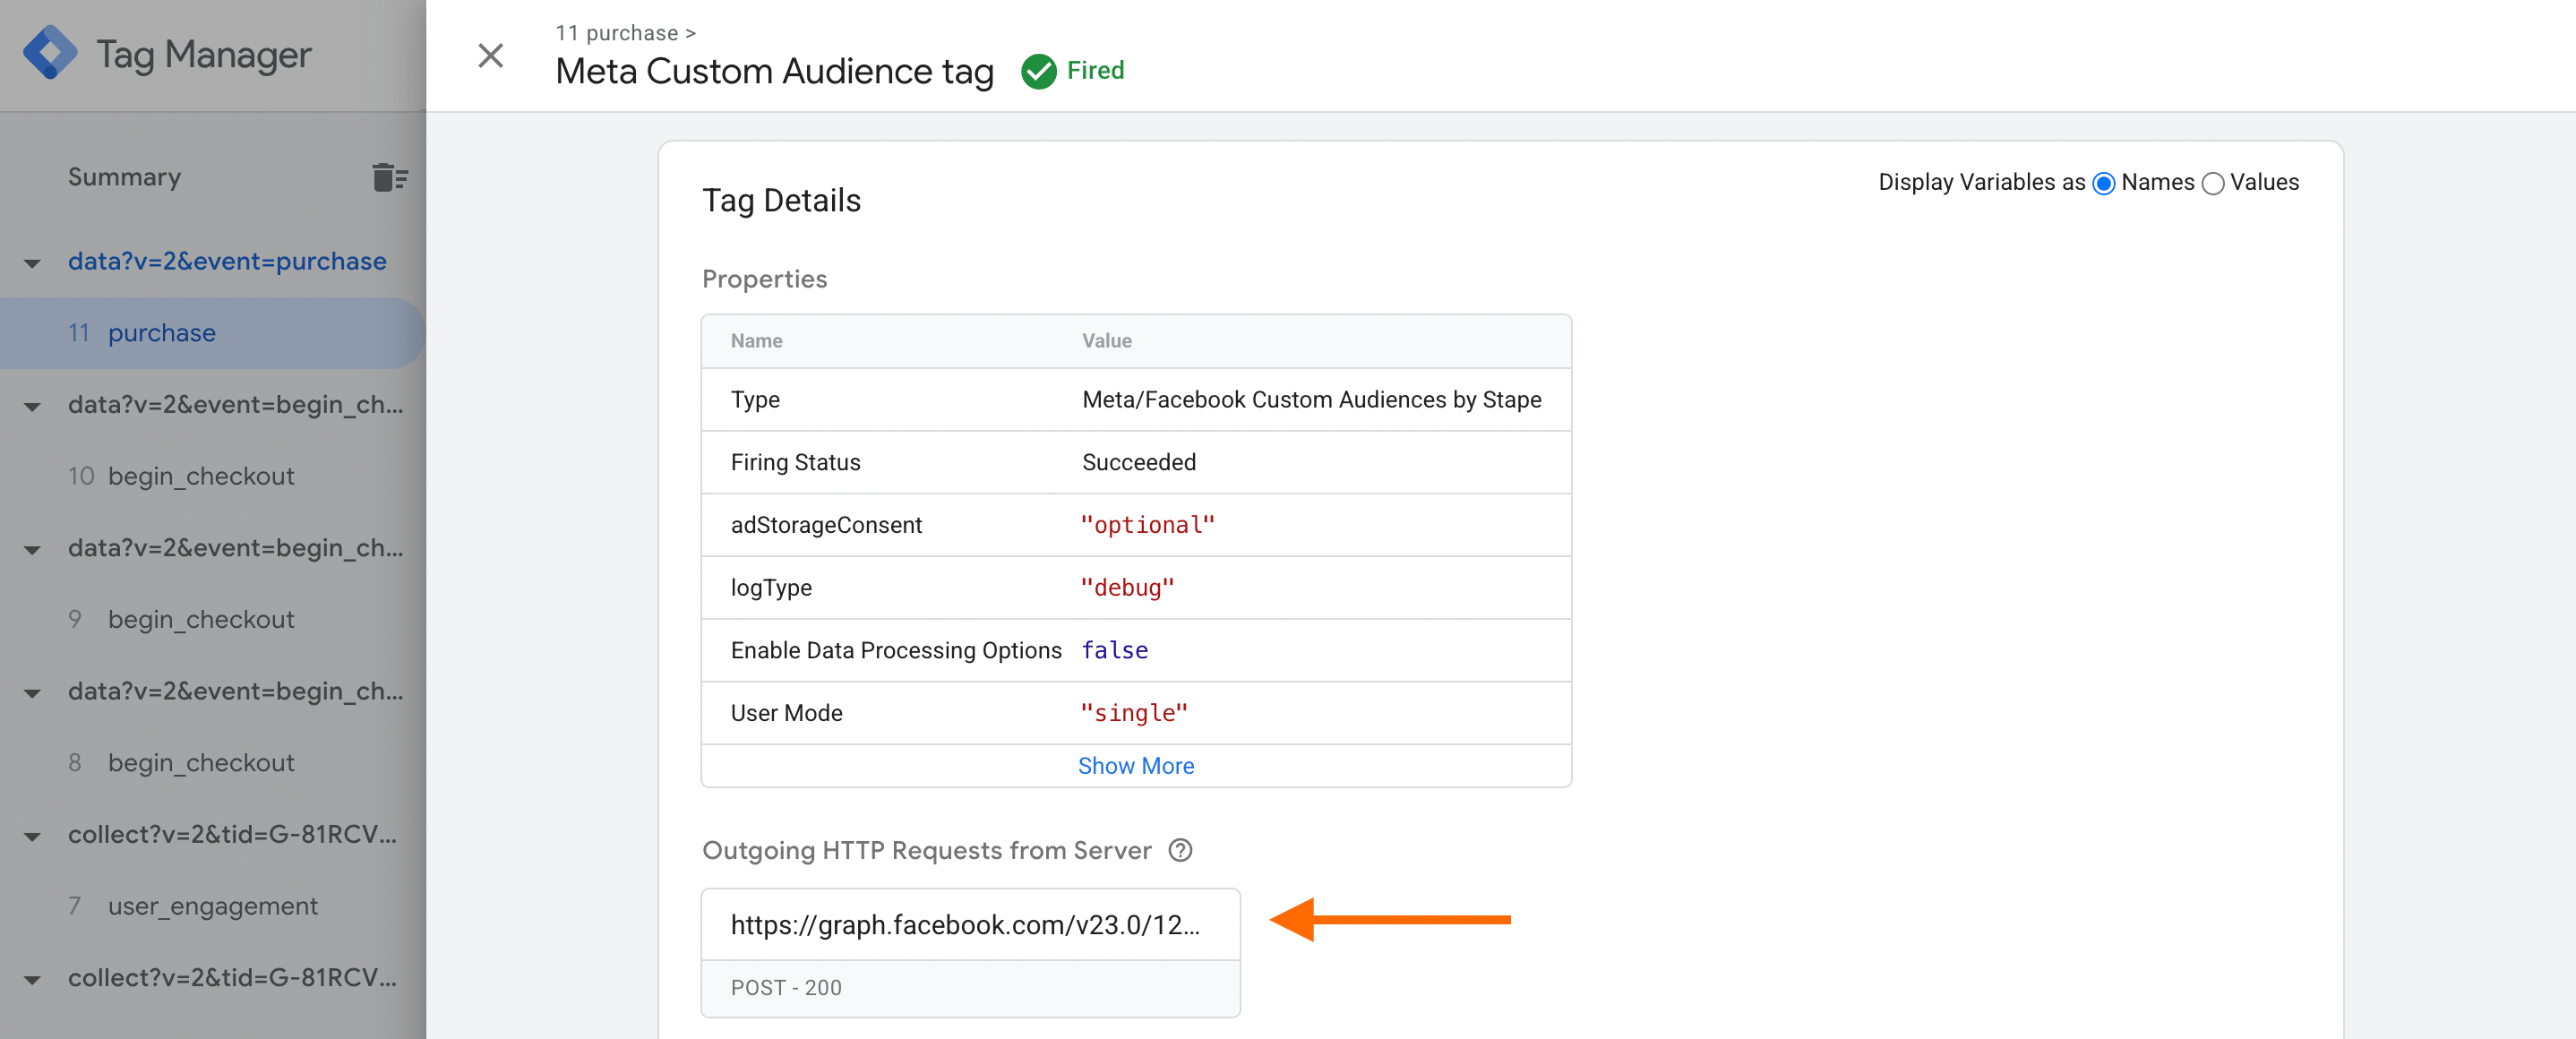
In the request body, you will see "hashed" strings instead of the actual email or name. It is important to clarify that this happens before the data leaves the server to ensure Meta receives it in the required secure format.
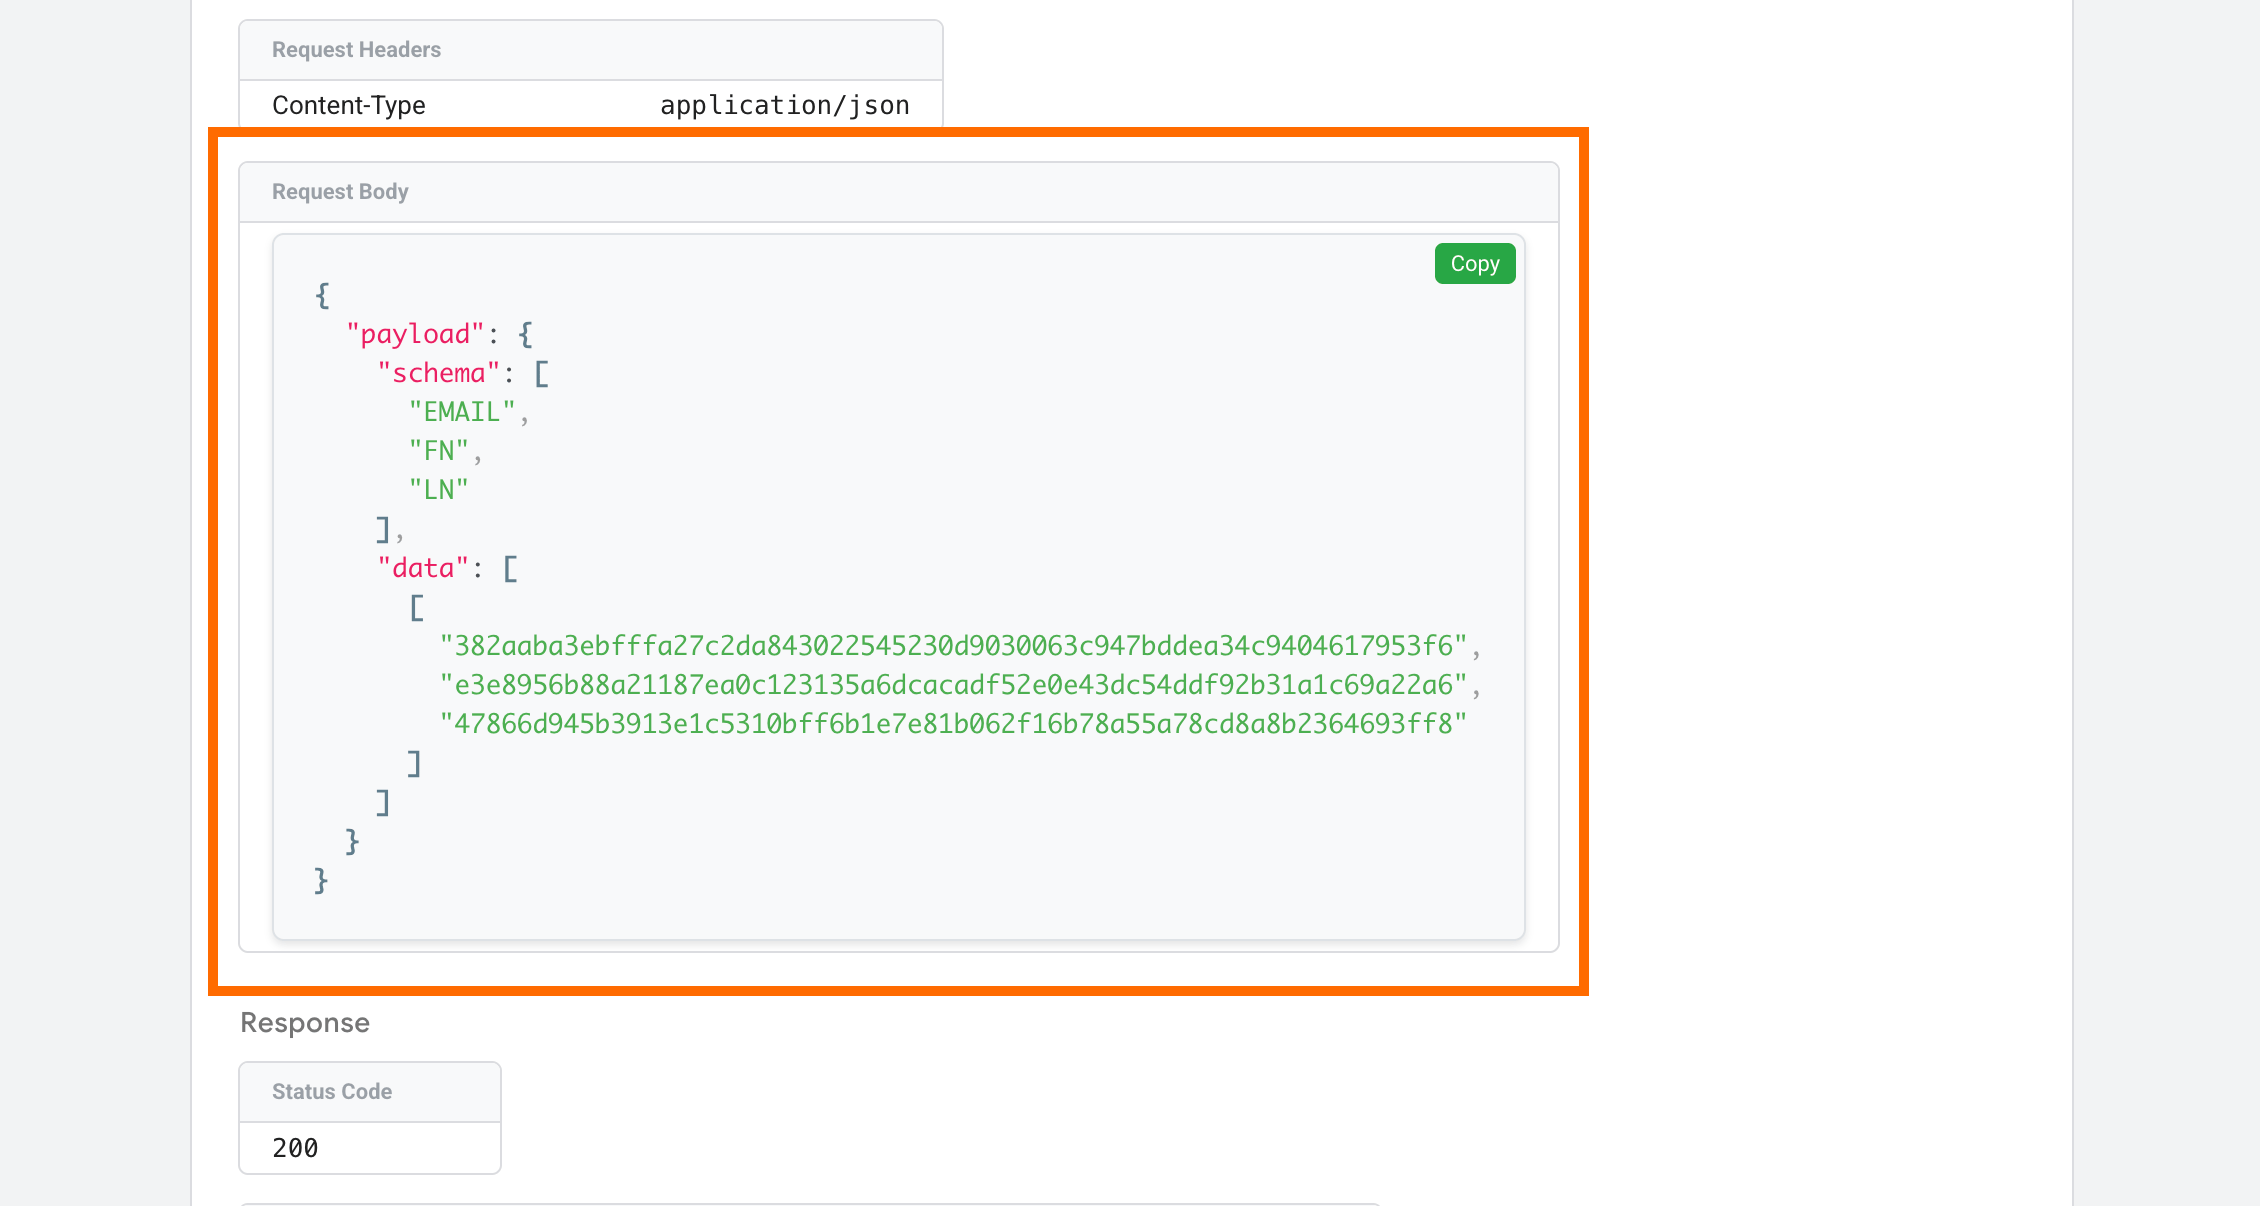
The actual data that Meta will receive and process can be viewed in the tag details:
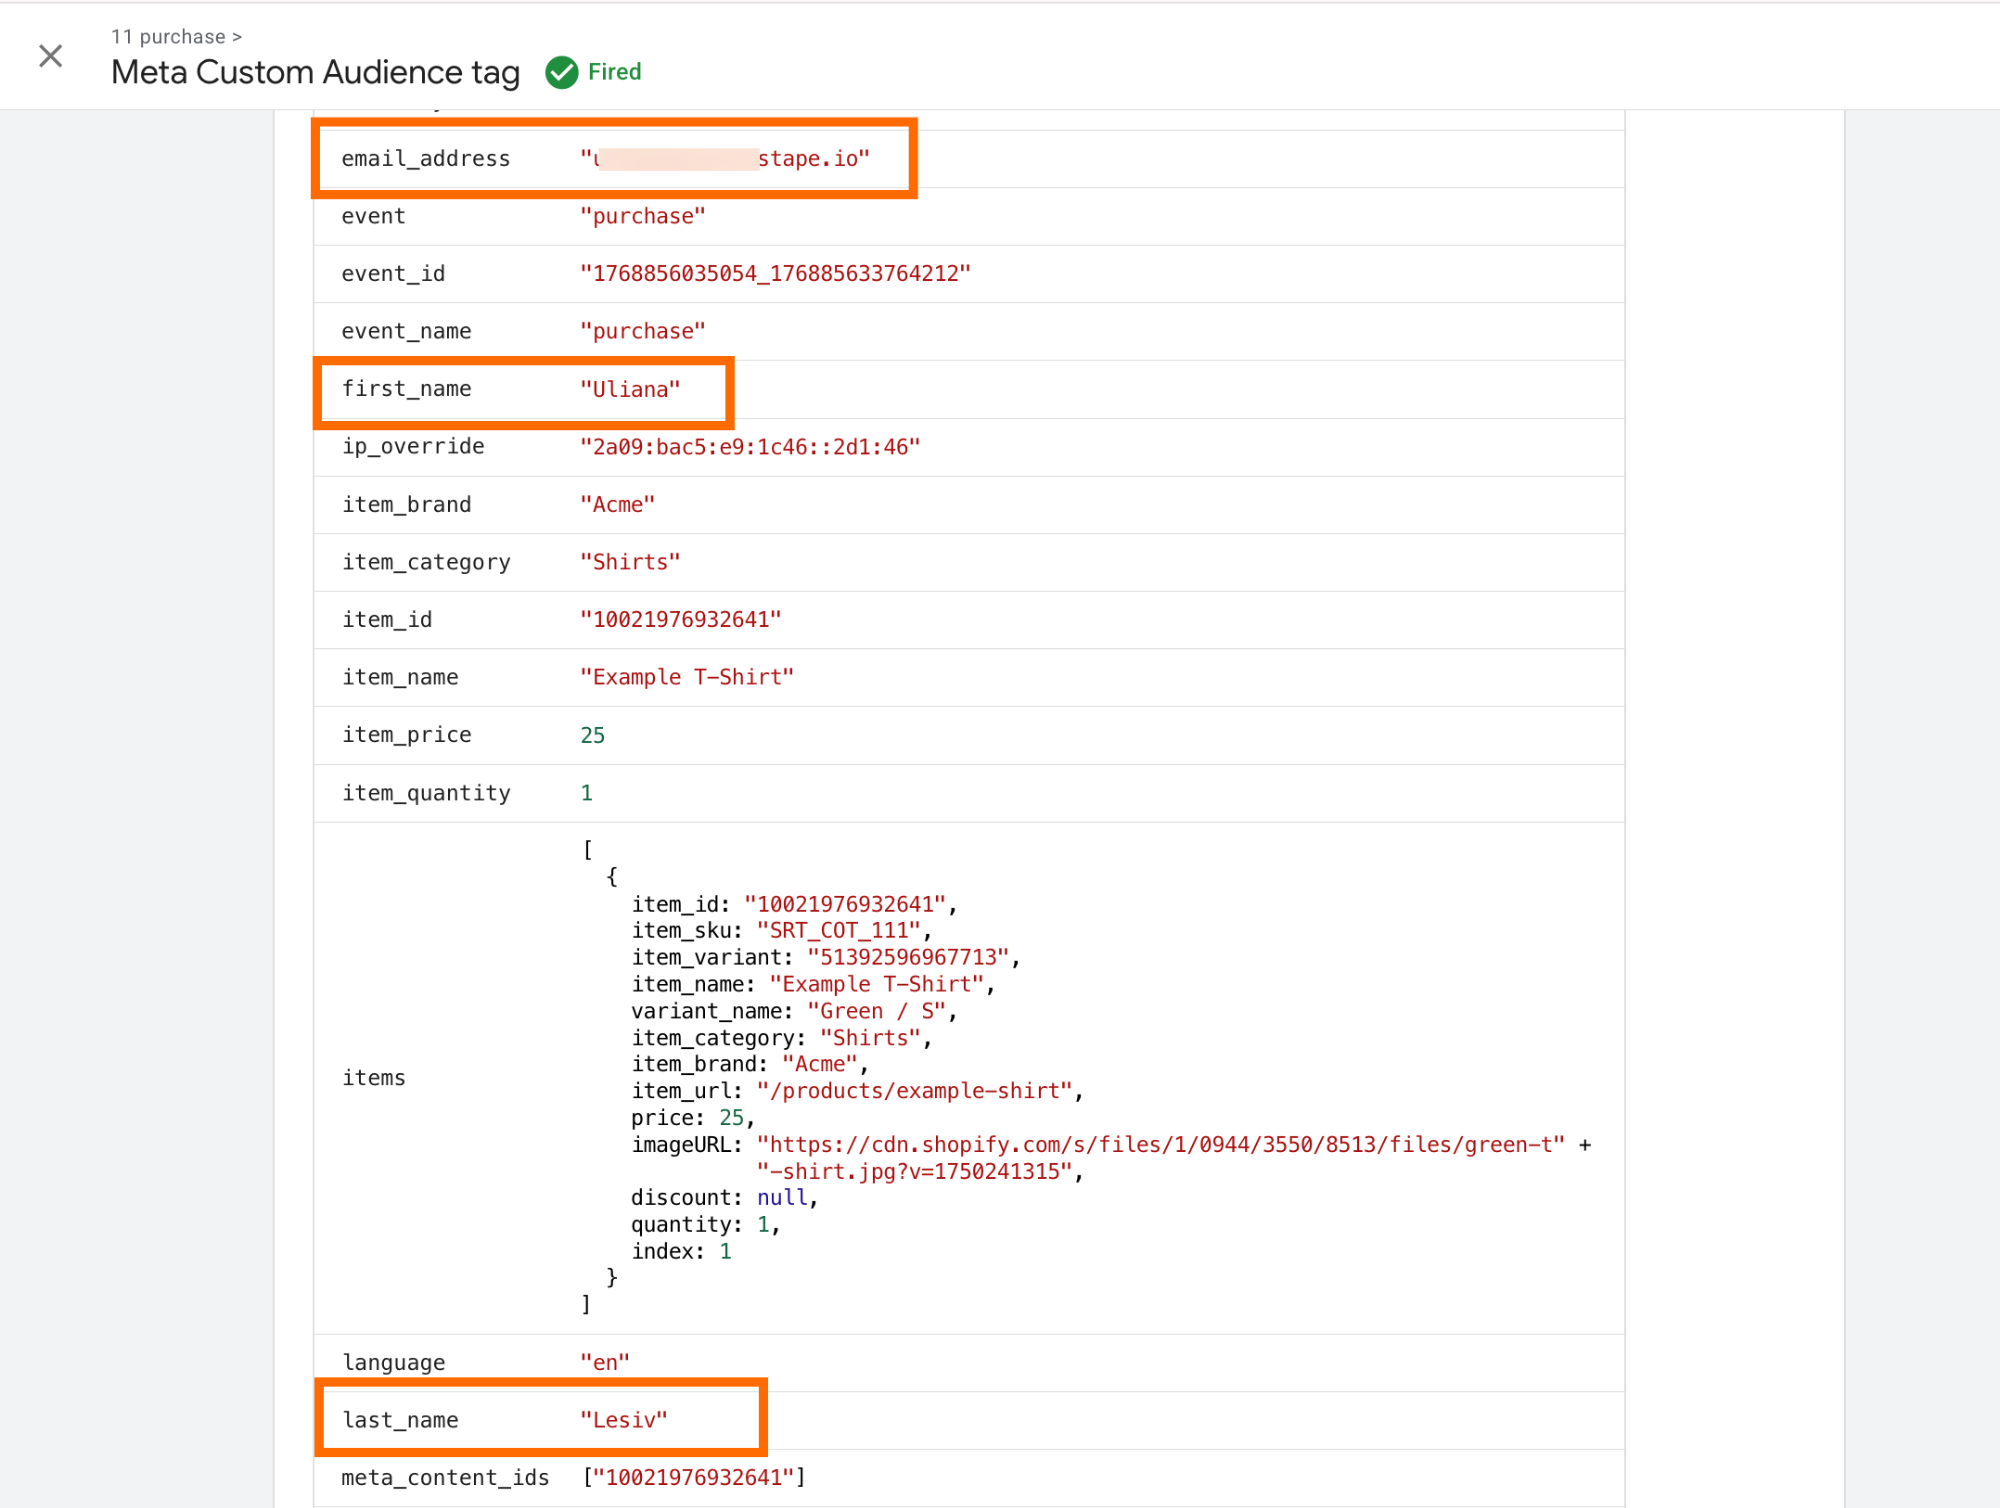
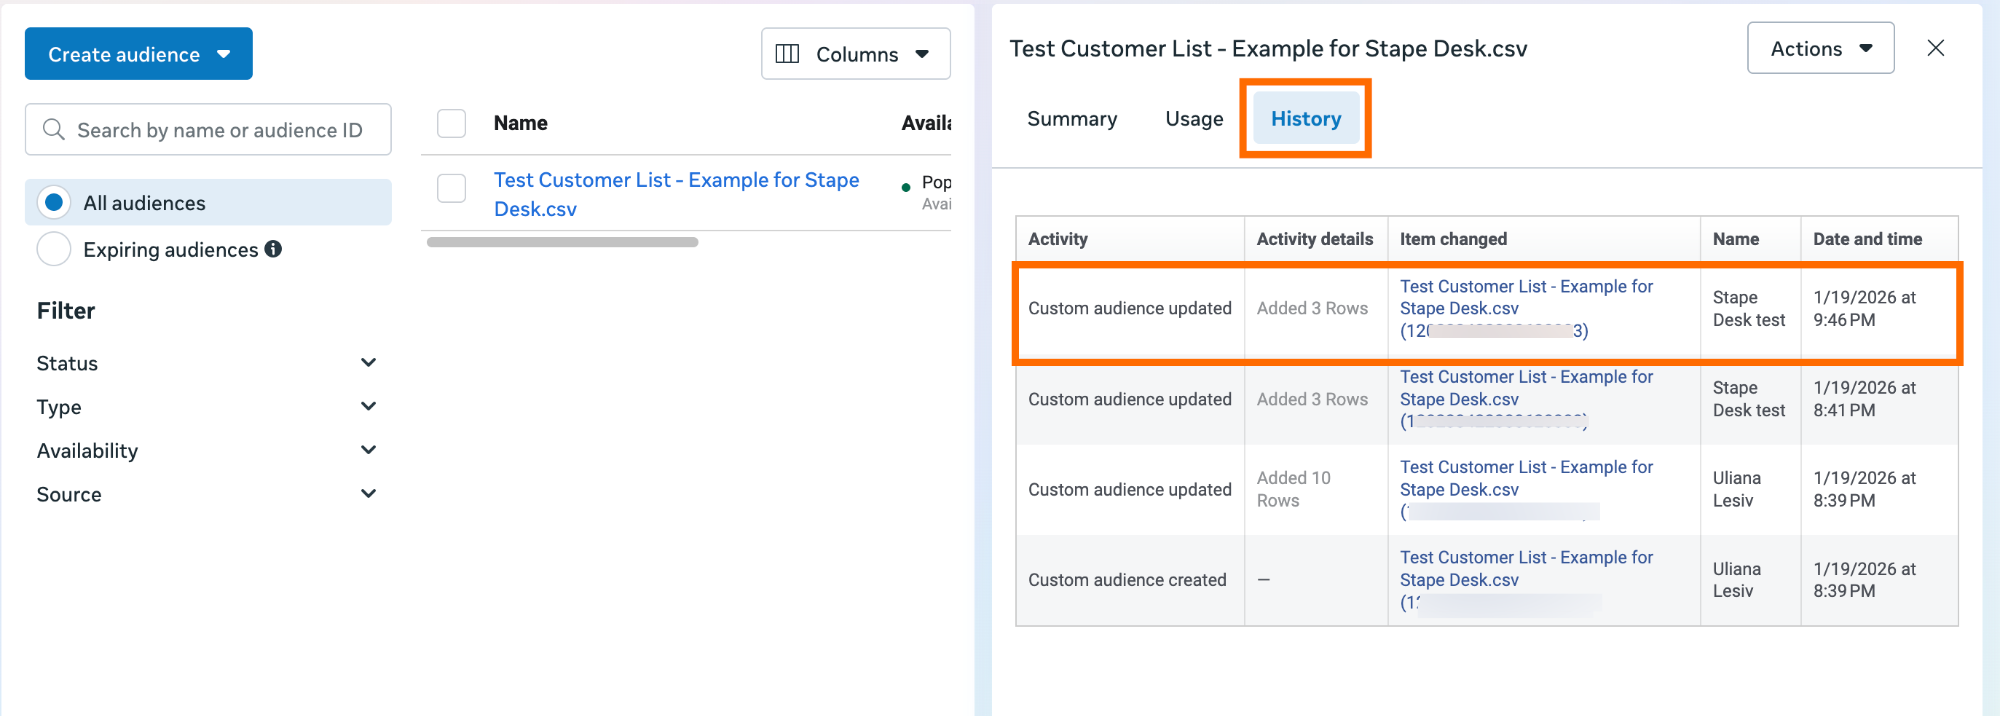
5.4 Check whether Meta actually receives the data.
Go to Audiences → click on the custom audience you send data to → navigate to the tab "History" → there you should see an update.
In case of difficulties with testing the configuration, refer to our guide on debugging and monitoring server-side configuration.
Final thoughts
Meta Custom Audiences allow you to target users based on their specific stage in the customer journey. However, the effectiveness of these audiences is entirely dependent on the integrity of your data; if your tracking is blocked by browsers or limited by cookies, your audiences will be incomplete.
By moving the data flow from the client’s browser to a server-side environment, you reduce the impact of tracking restrictions and ensure Meta receives a complete picture of your customer interactions. Stape's solutions eliminate the need to manually manage CSV files and also provide the precise data needed to scale your campaigns.

Comments