Microsoft Ads UET Conversion API tag
Updated Nov 20, 2026
The Microsoft Ads UET Conversion API tag by Stape helps send conversion data to Microsoft Ads from your server Google Tag Manager (sGTM) container. It uses Microsoft's Conversion API to transmit events server-to-server, reducing reliance on browser-based tracking and improving conversion tracking accuracy when cookies are limited or restricted.
- The tag supports event deduplication between browser-side UET and server-side CAPI events to prevent duplicate conversion reporting.
- It supports multiple user identifiers, including hashed email, phone number, Click ID (
msclkid), Anonymous ID, and External ID, to improve user matching and remarketing. - It lets you configure event types, UET Tag IDs, authorization tokens, event parameters, e-commerce data, consent settings, and automatic parameter mapping from GA4 or Data Tag events.
Before you begin
To use this tag, you'll need Google Tag Manager web and server containers, as well as a configured server container and custom domain in Stape, and a configured Microsoft UET tag. Please follow these guides if you don’t have any of those:
In addition, you’ll need to configure sending data to the server GTM container. The most popular options for sending data to sGTM are Google Analytics 4 and Data Tag/Data Client. For more information, read the Send data to server container article.
How to set up the Microsoft Ads UET Conversion API tag
1. Add Microsoft Ads Conversion API tag to your workspace. Go to your server GTM container → Templates section → Search gallery → search for "Microsoft Ads UET Conversion API by Stape" → click "Add to workspace".

2. Create a new tag.
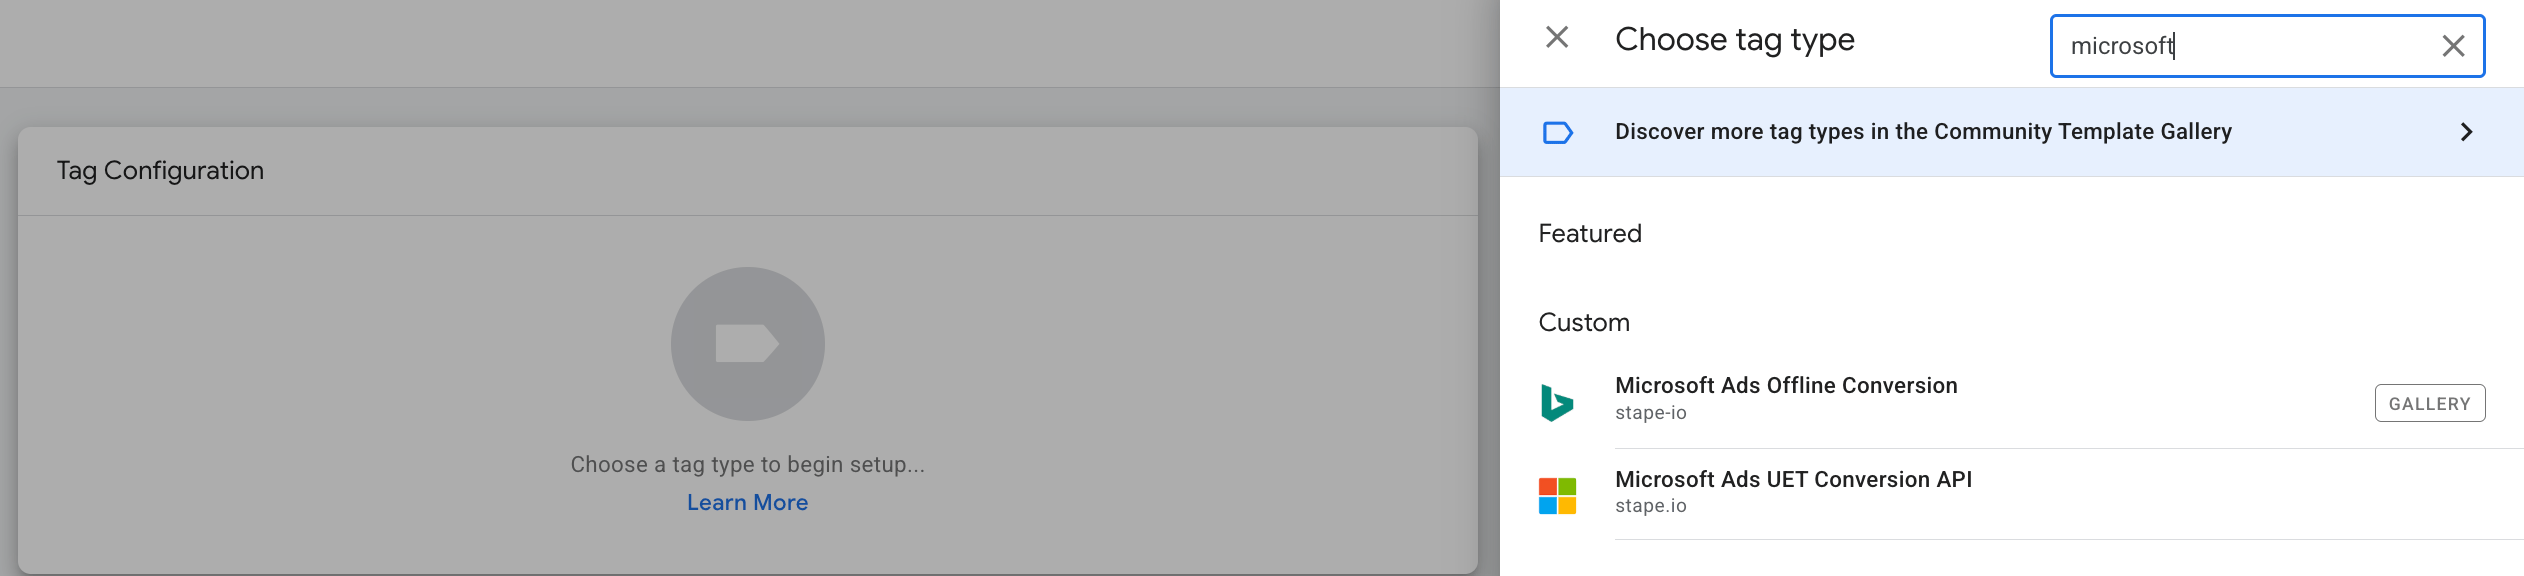
In the "Tags "section, click "New" → as tag configuration select "Microsoft Ads UET Conversion API".
3. Configure the tag.
Required tag settings
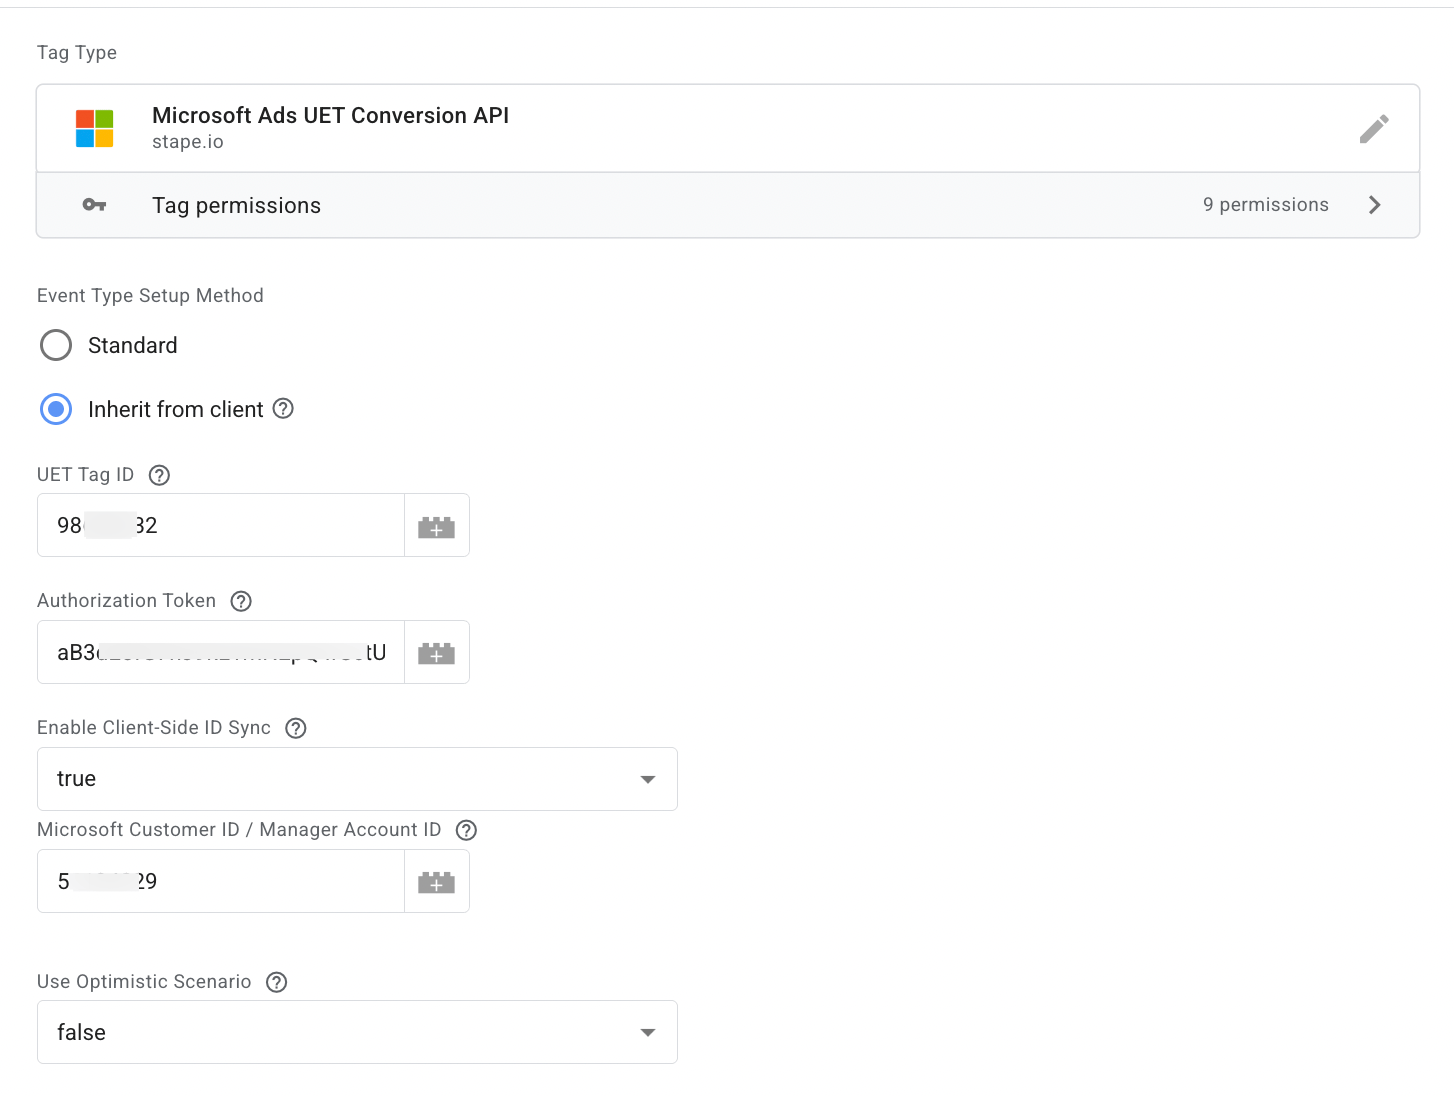
3.1 Select Event Type Setup Method - "Standard" setup method will manually configure events, while "Inherit from client" will automatically map from GA4/Data tag event payloads.
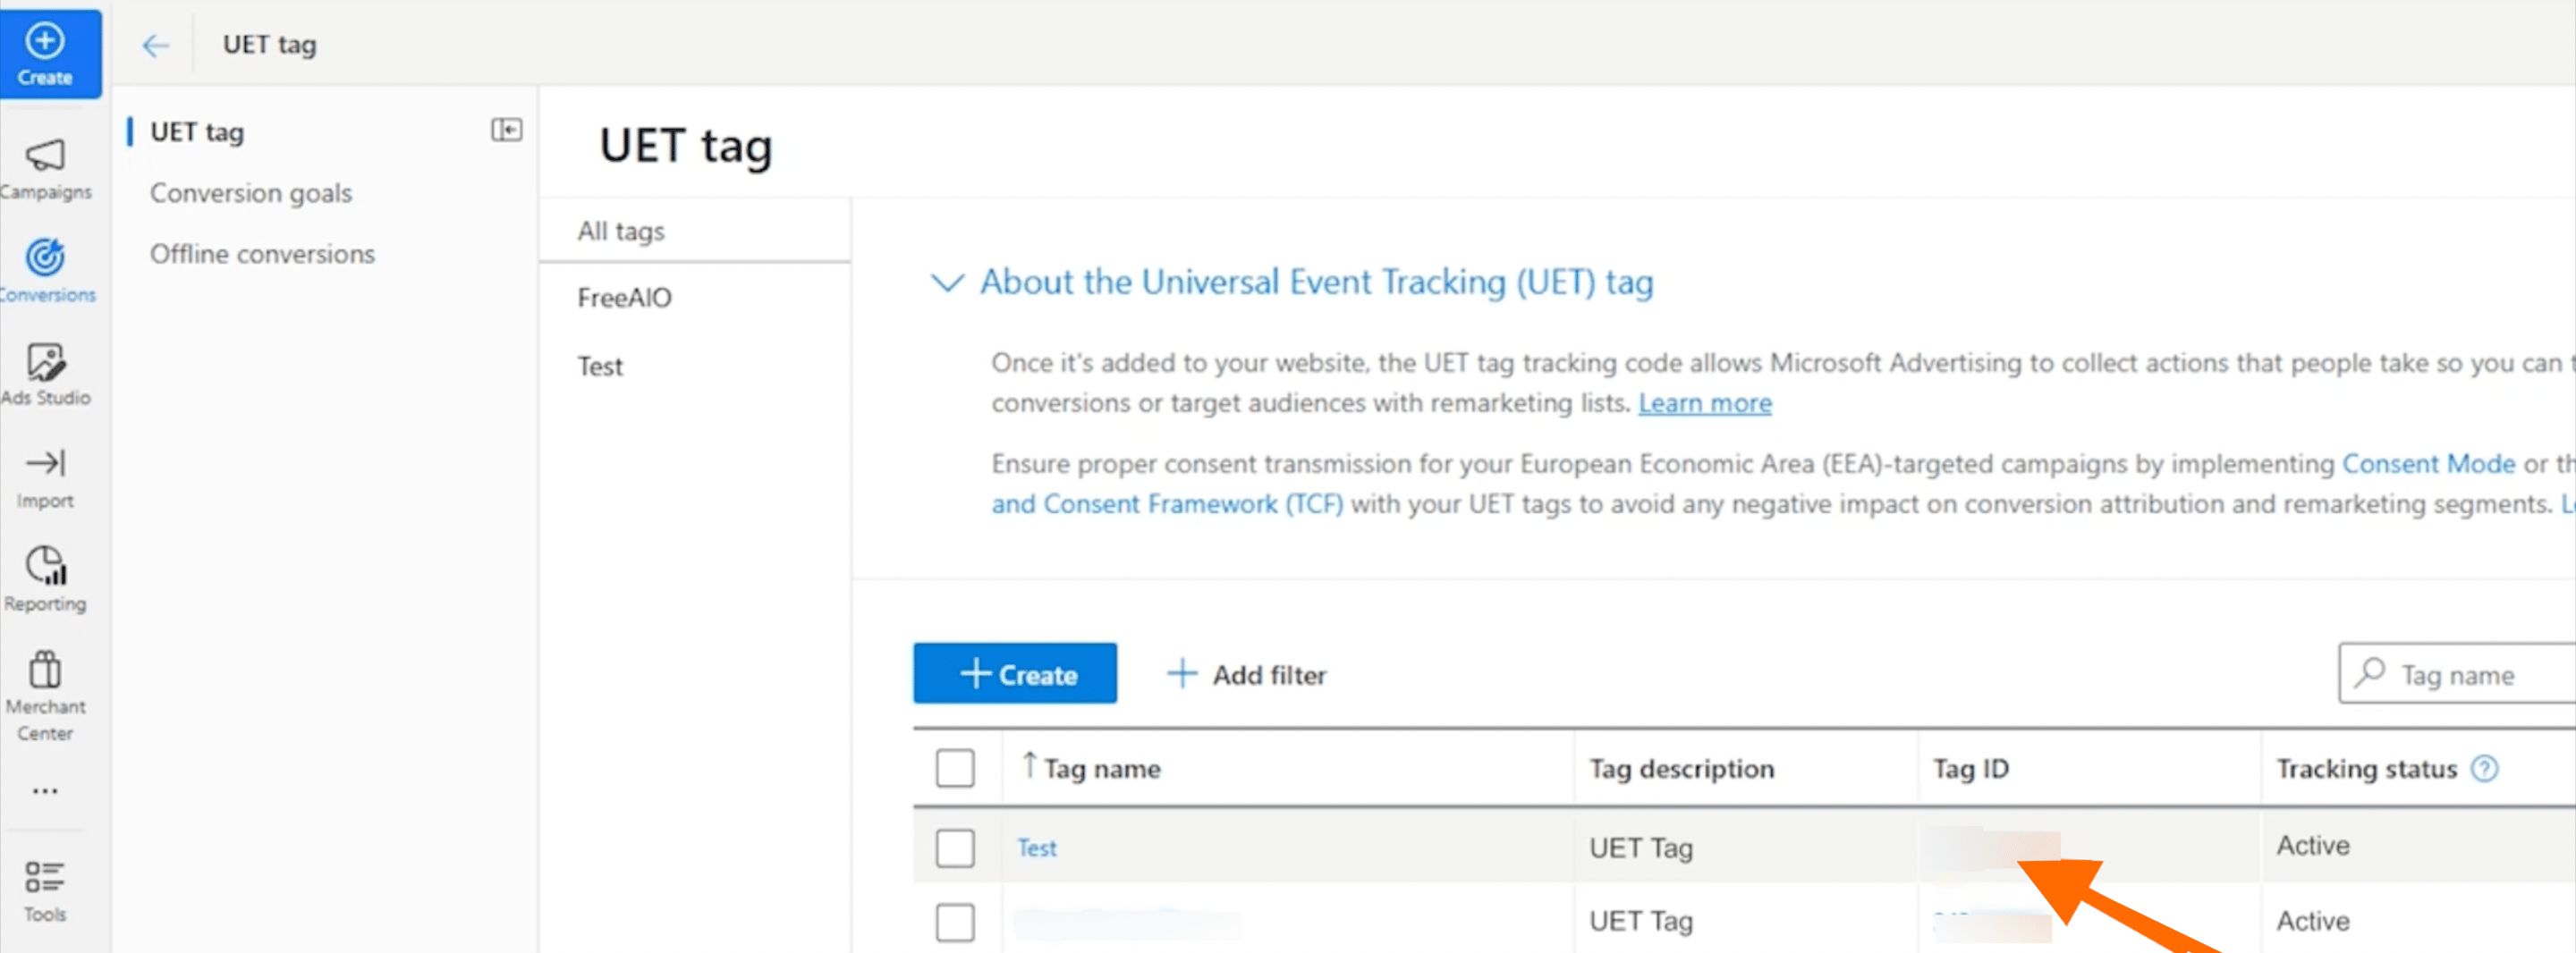
3.2 Add UET Tag ID - the value can be found in the Microsoft Ads account → Conversions → UET tag → Tag ID.
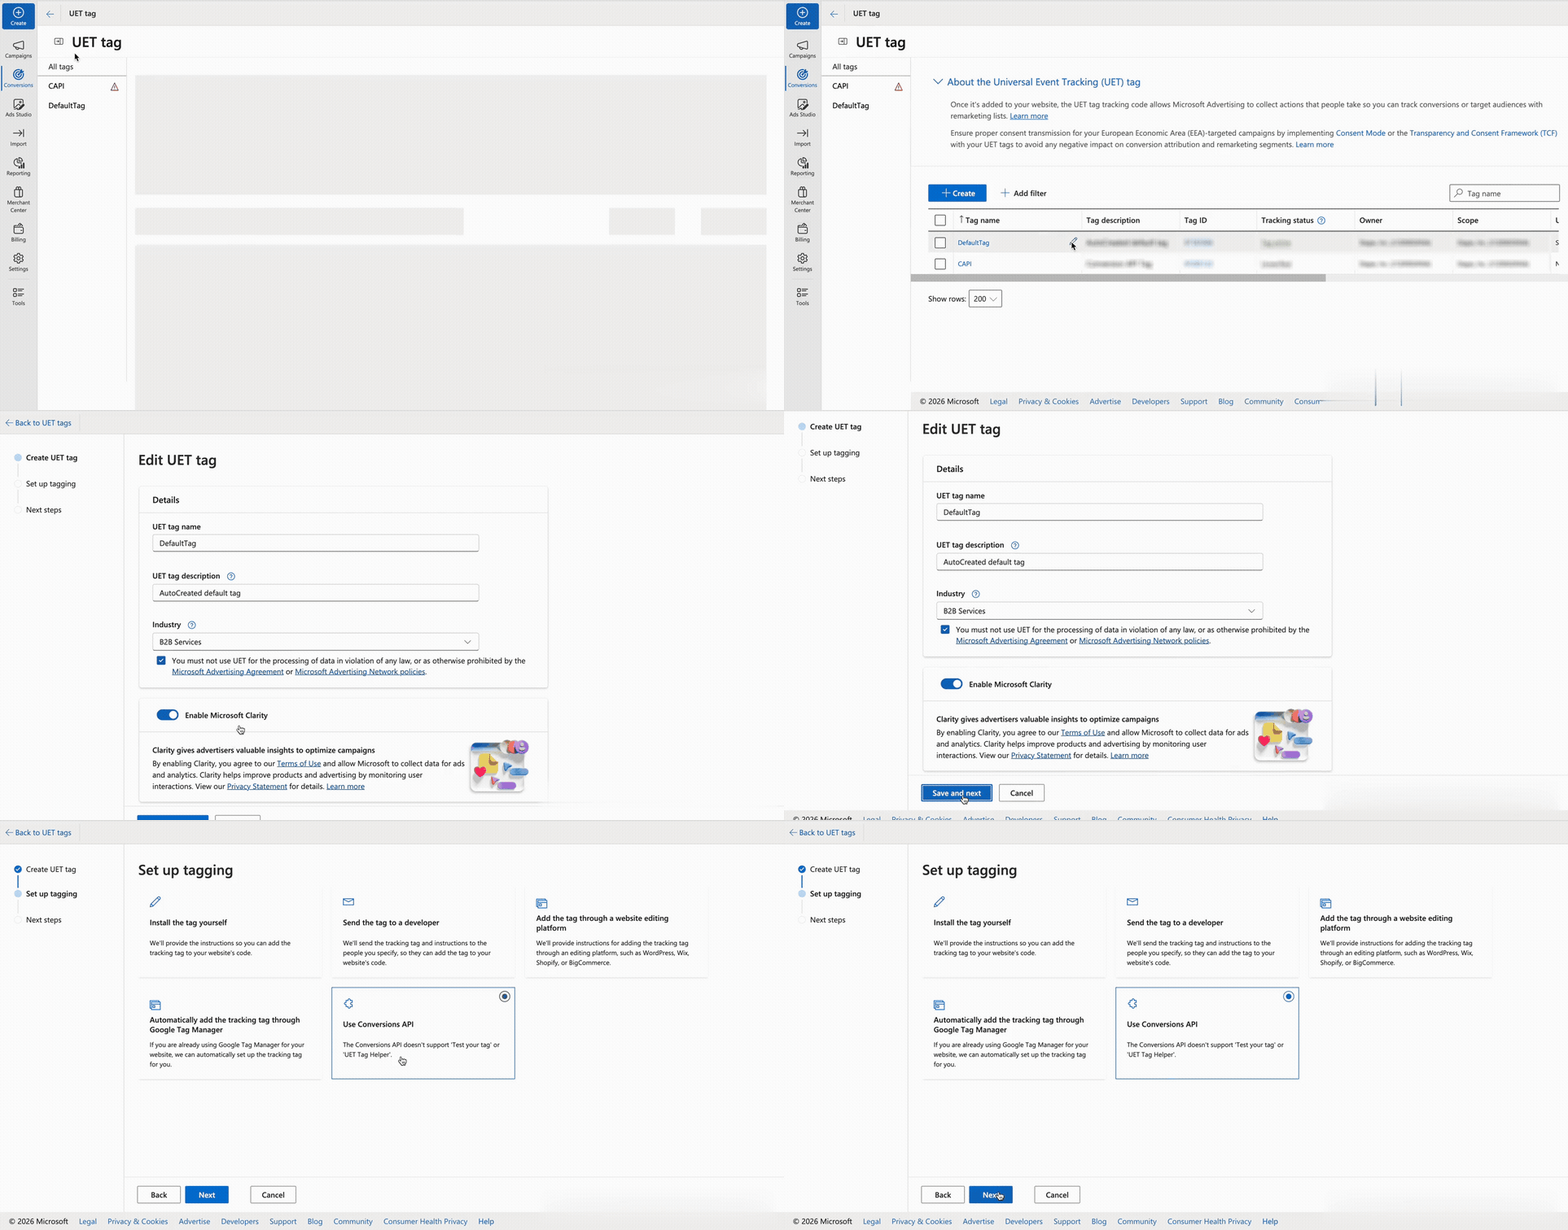
3.3 Authorization Token - enter the auth token generated in your Microsoft Ads account. To get the token value, follow the steps:
Make sure you generate the token for the same UET tag whose ID you use in this setup.
The token is tied to the specific UET tag you want to report events to. A token generated for a different UET tag won't work for the setup.
- Log into your Microsoft Advertising account → click Conversion on the left-side menu → go to the UET section → find your existing UET tag or create a new one.
- Select the UET tag you want to use → click the pencil icon to edit it.
- In the Edit UET tag section, select Save and Next.
- In the Set up tagging section, select Use Conversions API → click Next. Your Conversions API token will be generated on the next step; copy it and paste it into the tag settings.
3.4 Enable Client-Side ID Sync - strongly recommended. This allows your internal IDs to be mapped to Microsoft IDs for better user matching and remarketing via a browser pixel.
Add Microsoft Customer ID / Manager Account ID - if you have multiple Customer IDs, please use the primary Microsoft Customer ID (the one from the Manager Account). Please note, it's not the same as the UET Tag ID.
You can find the ID by looking for the cid URL parameter when visiting your Microsoft Advertising account.

3.6 Use Optimistic Scenario - if set to true, the tag will call gtmOnSuccess() without waiting for a response from the API. This will speed up sGTM response time; however, your tag will always return the status fired successfully even in cases where it is not.
Here is an example of a field configuration:
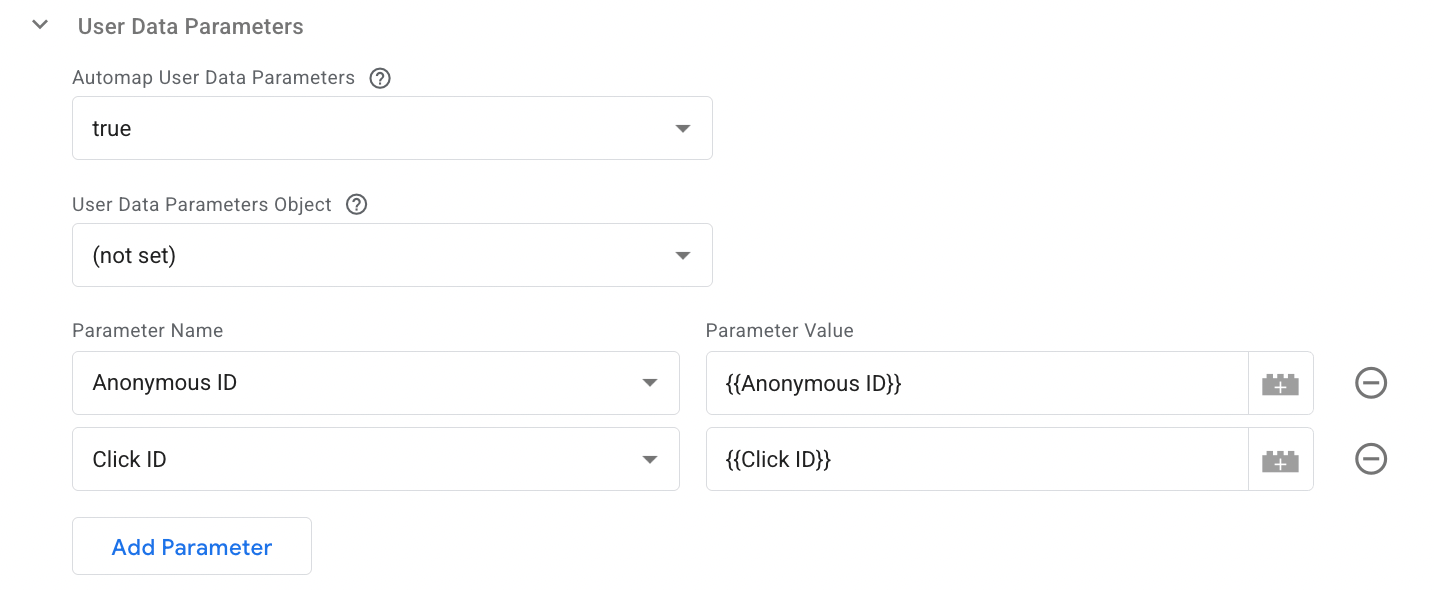
3.7 Add at least one User Data Parameter.
User Data Parameters include standard identifiers like Anonymous ID, Click ID, Email, Phone Number, and External ID (User ID). Other identifiers like IP Address and mobile device IDs (IDFA/GAID) can also be sent.
Optional tag settings
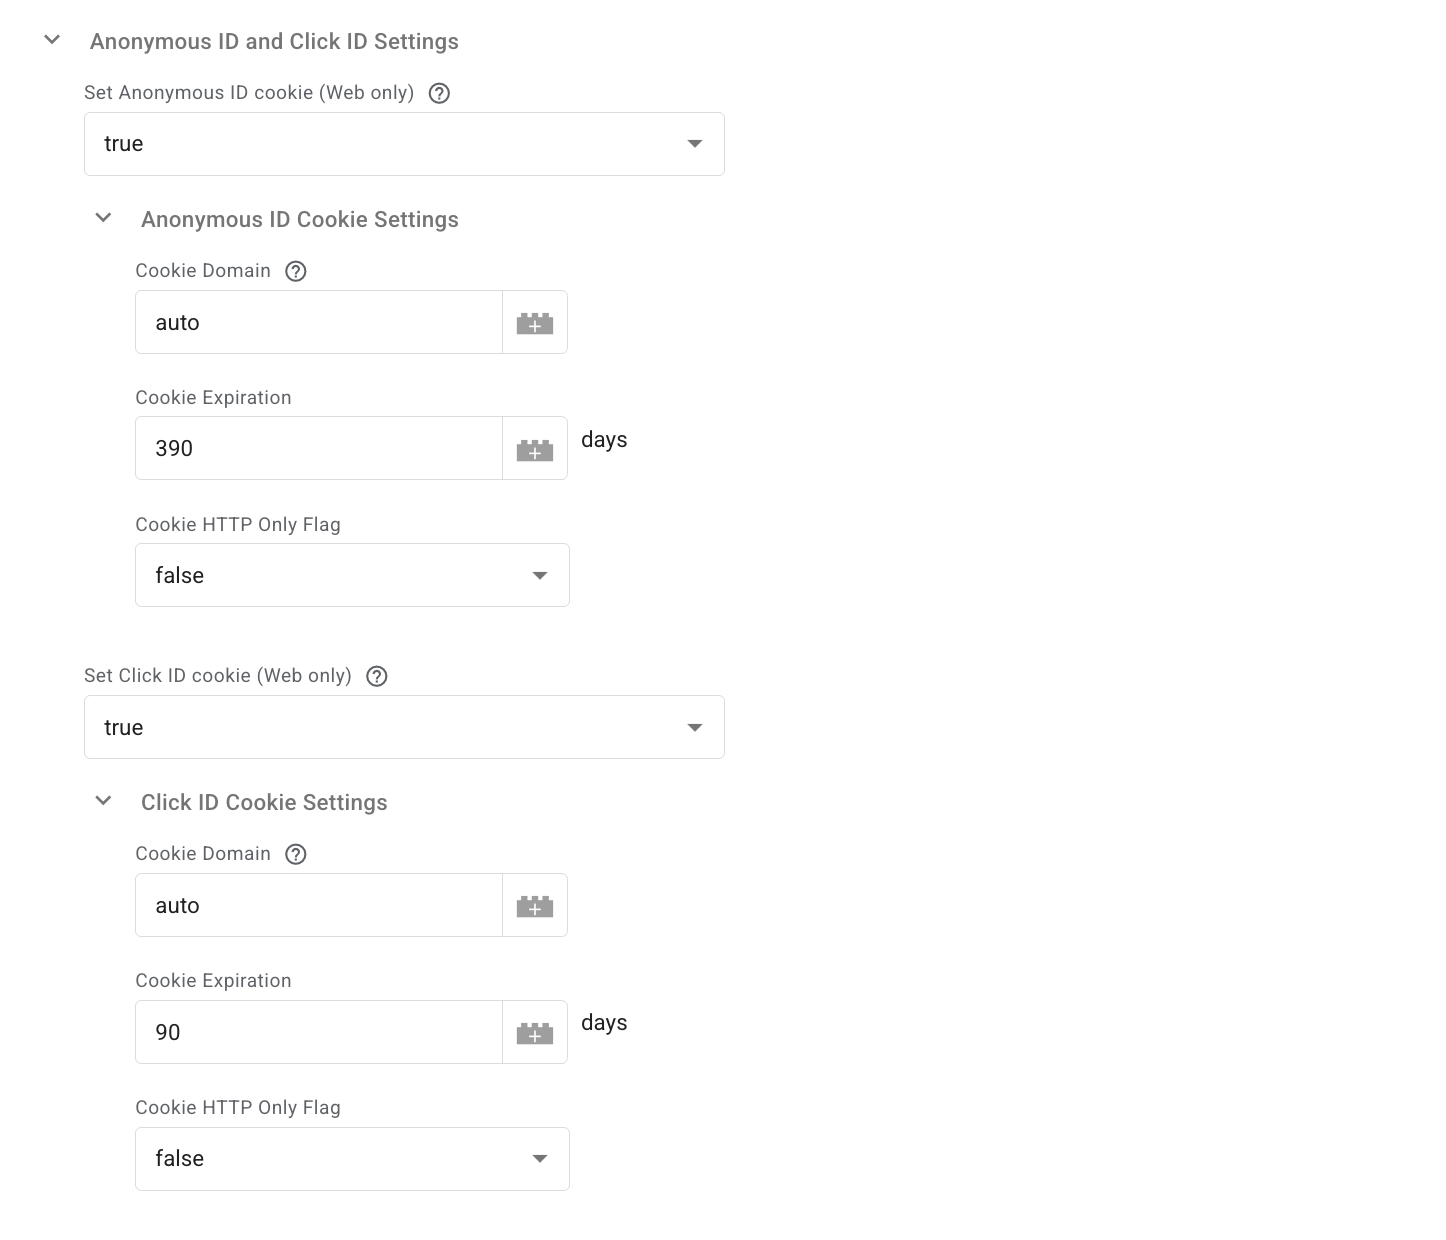
3.8 Anonymous ID and Click ID Settings section.
The tag automatically manages both the Microsoft Click ID (msclkid) and the Anonymous ID.
- Click ID (msclkid) - captured from either the URL parameter, the uet_msclkid cookie set by Server GTM, or the _uetmsclkid JavaScript cookie.
- Anonymous ID - retrieved from the uet_vid cookie set by Server GTM, the _uetvid JavaScript cookie, or auto-generated if none exists.
In this section, you can control whether the tag writes these values to cookies, as well as configure their expiration and domain.
When using server GTM, both identifiers are stored in separate cookies with names distinct from those used by the JavaScript implementation:
- Anonymous ID: uet_vid
- Click ID: uet_msclkid
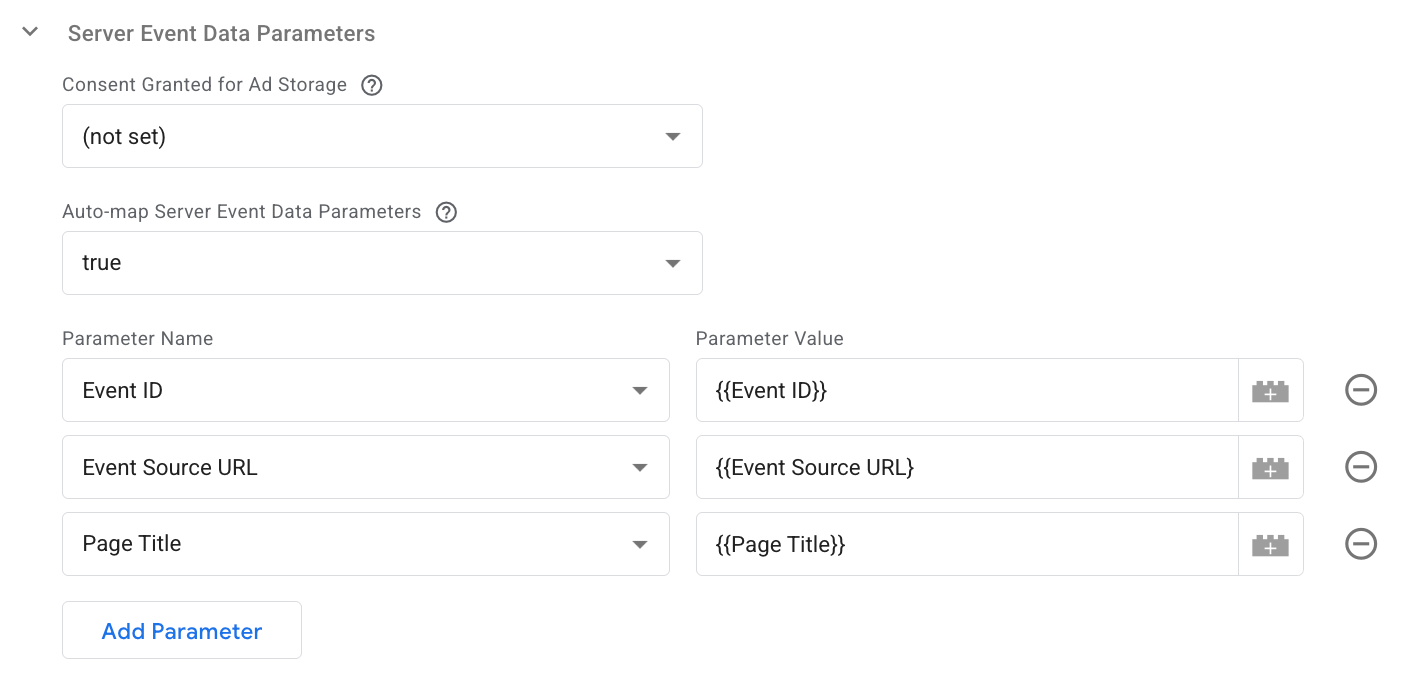
3.9 Server Event Data Parameters section.
- Parameters - includes standard fields such as Event ID, Event Source URL, Event Time, Page Title, and more.
- Auto-mapping - when enabled, the tag automatically fills these fields using incoming event data (for example, Event Source URL is derived from page_location).
- Consent - you can also indicate whether Ad Storage consent was granted for the event.
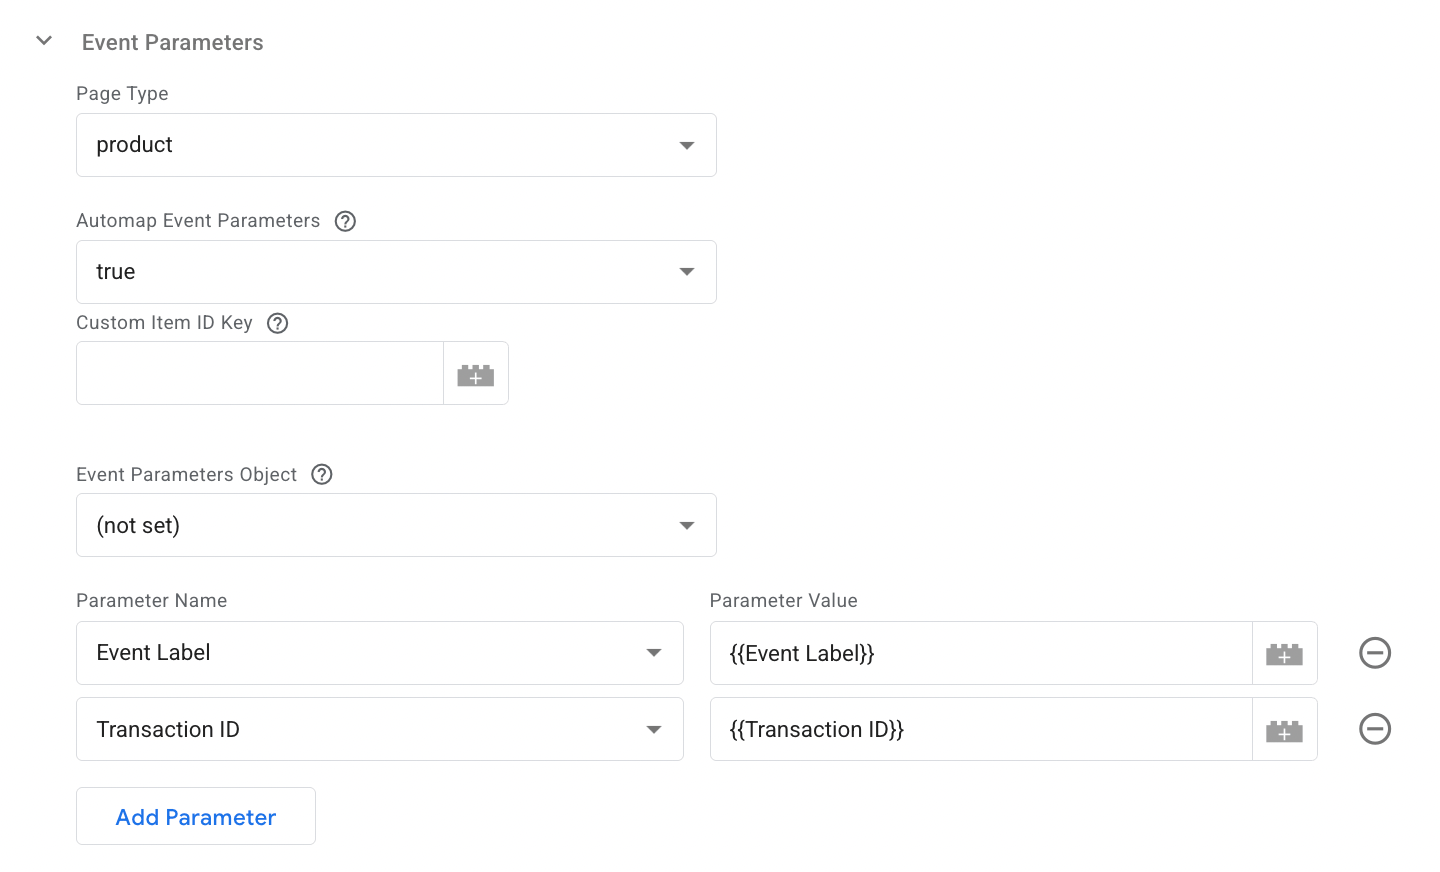
3.10 Event Parameters section.
In this section, you can specify parameters that will provide detailed information about the user’s actions.
- Page Type - select the type of page where the event occurred (e.g., home, product, cart, purchase). This is auto-mapped if inherited from a GA4 client.
- Automap Event Parameters - when enabled, the tag can automatically pull many of these fields from a standard GA4 or e-commerce event data structure (for example, Revenue Value maps directly from value).
- Event Parameters Object - cover elements such as Page Type, e-commerce details (e.g., Revenue Value, Currency, Items), and custom goal values (e.g., Event Category, Event Label), among others.
4. Add a trigger for the tag.
5. Test the configuration. You can do it in Google Tag Manager by clicking on Preview. Then trigger the event, and check whether the tag has fired.

Find out more about debugging and monitoring server-side tracking configuration in our guide.
Configure event deduplication
When you send the same conversion event through both the Microsoft UET tag and Microsoft CAPI, Microsoft Ads may receive the event twice. Without deduplication, this can result in duplicate conversions being reported and inaccurate campaign performance data.
Event deduplication allows Microsoft Ads to recognize that events received from different sources represent the same user action and count them only once. This helps keep your conversion data accurate when using both browser-side and server-side tracking.
Event deduplication can be configured via the web and server GTM tags. Follow the instructions below to configure it:
1. Go to your web GTM container → in the Tags section, locate Microsoft Advertising Universal Event Tracking.
2. Open the Tag settings section within the tag → click “Add row” / "Add parameter".
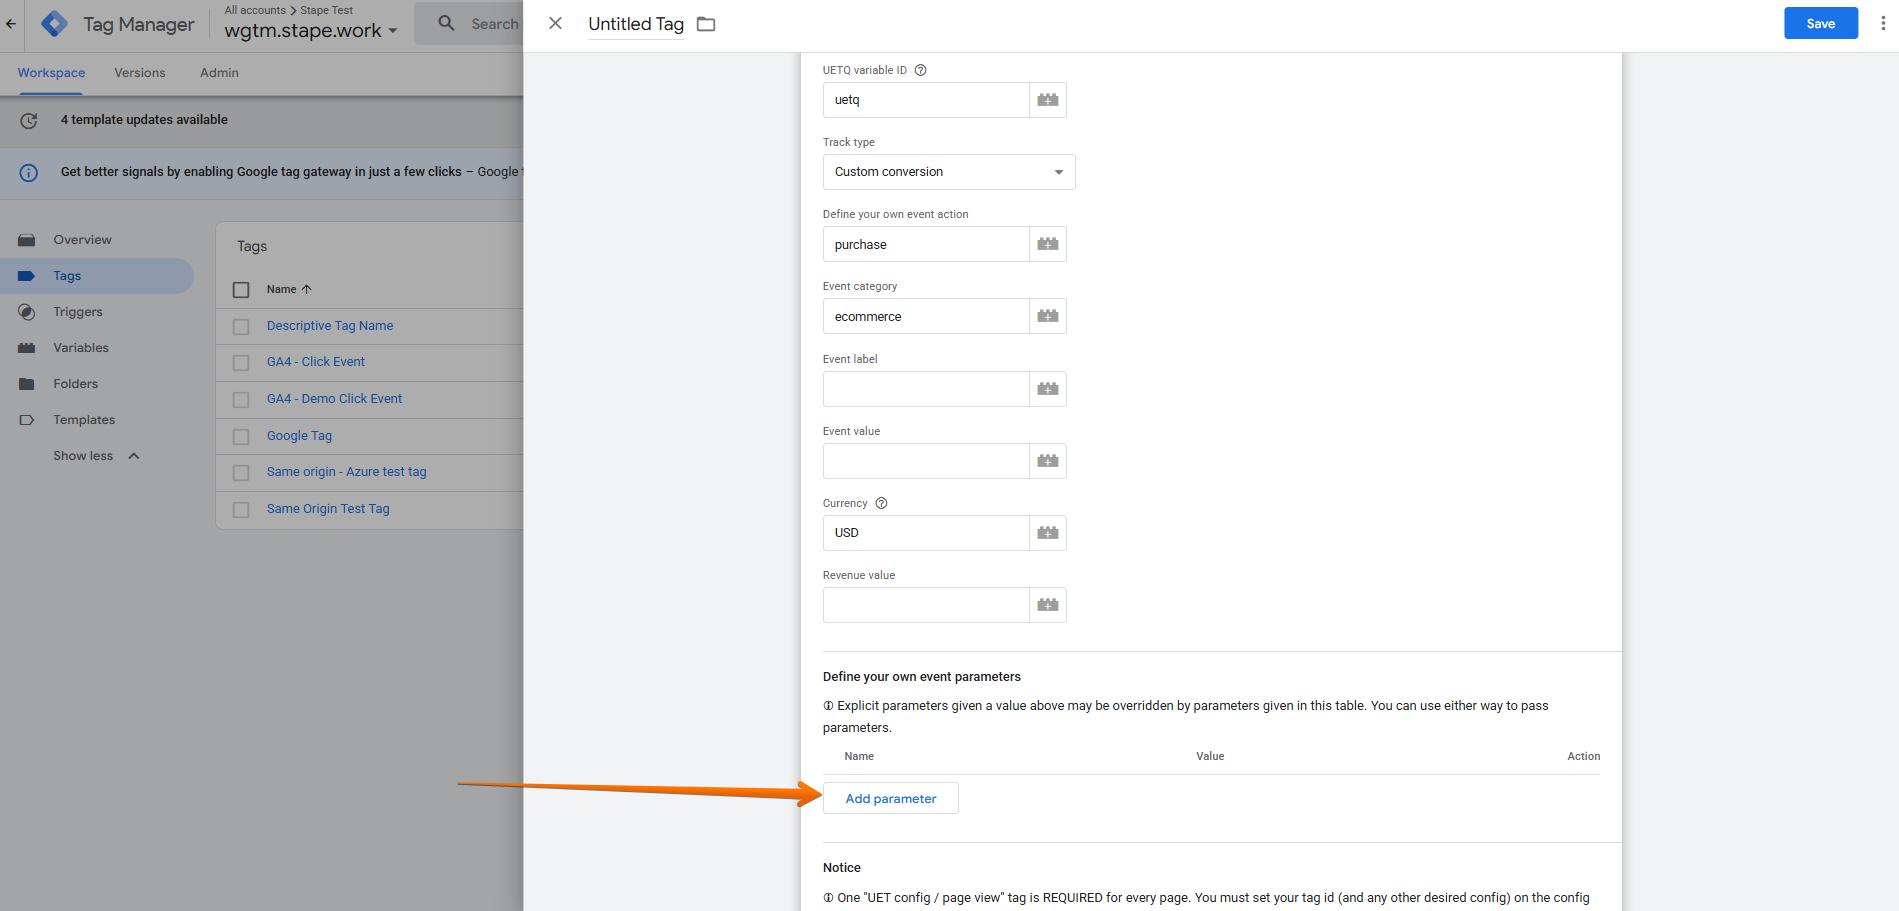
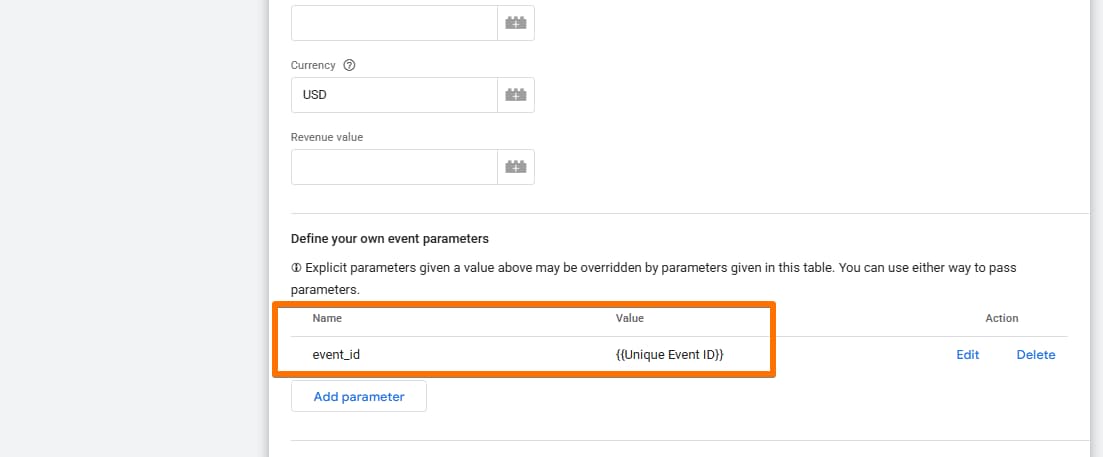
3. As the name, specify event_id as the value, and add a variable for a Unique Event ID.
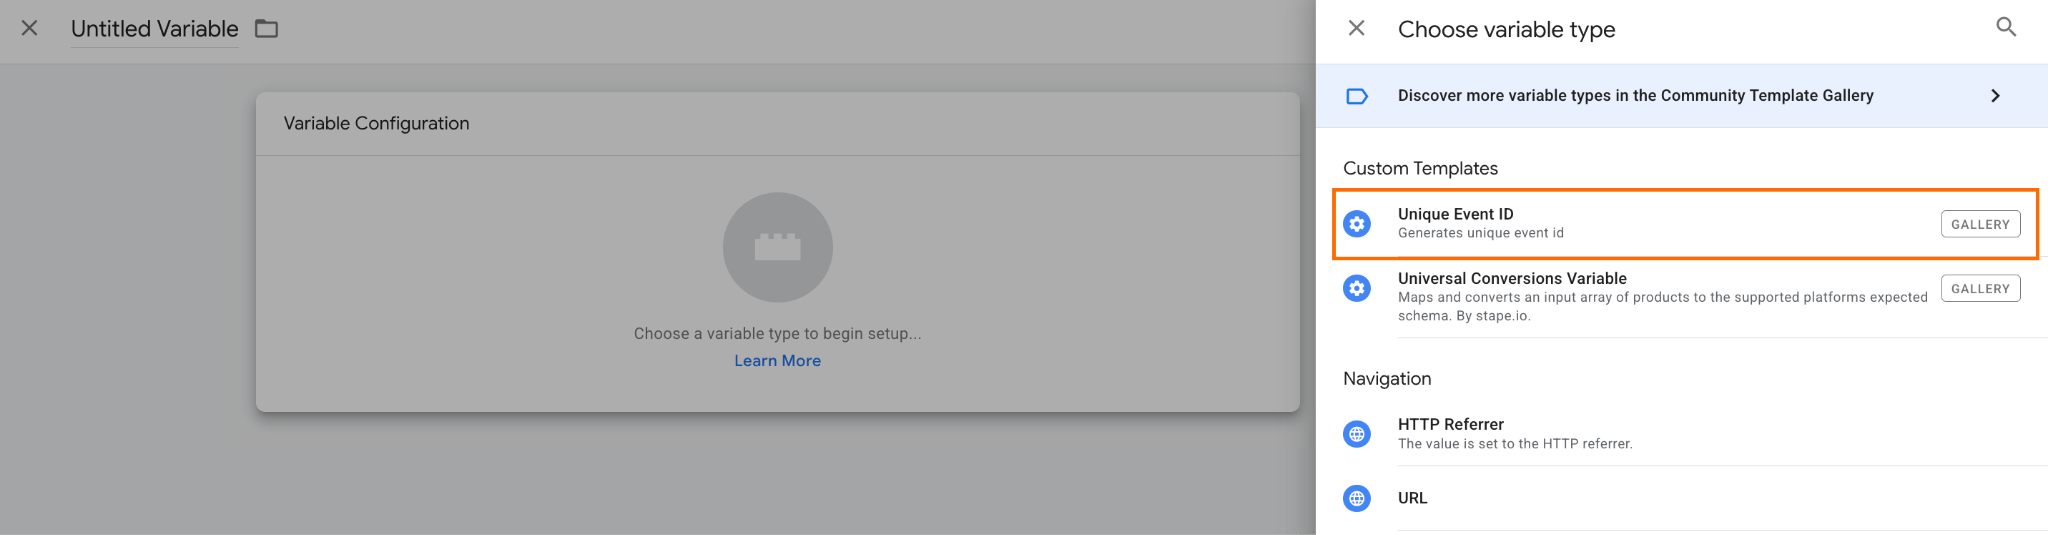
4. Click “Add”.
5. Go to the server GTM container → open Stape’s tag you’ve configured, “Microsoft Ads UET Conversion API by Stape” → click on the section Server Event Data Parameter → click “Add parameter”.
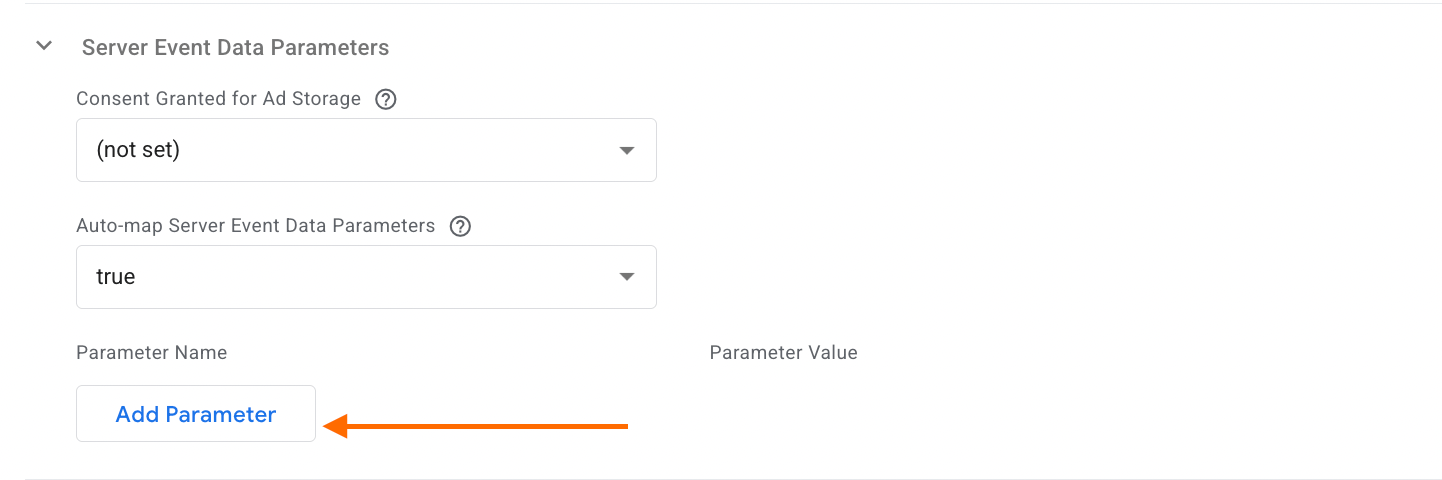
6. Select Event ID as the parameter name.
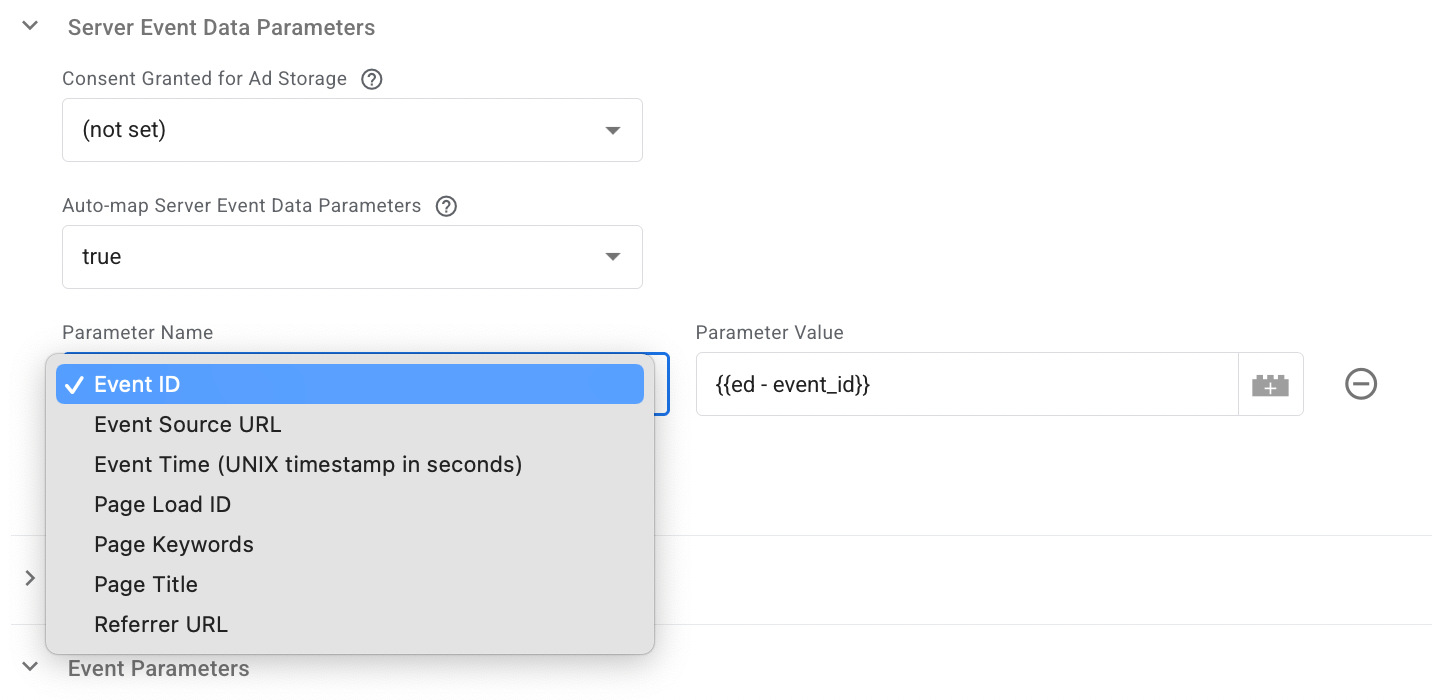
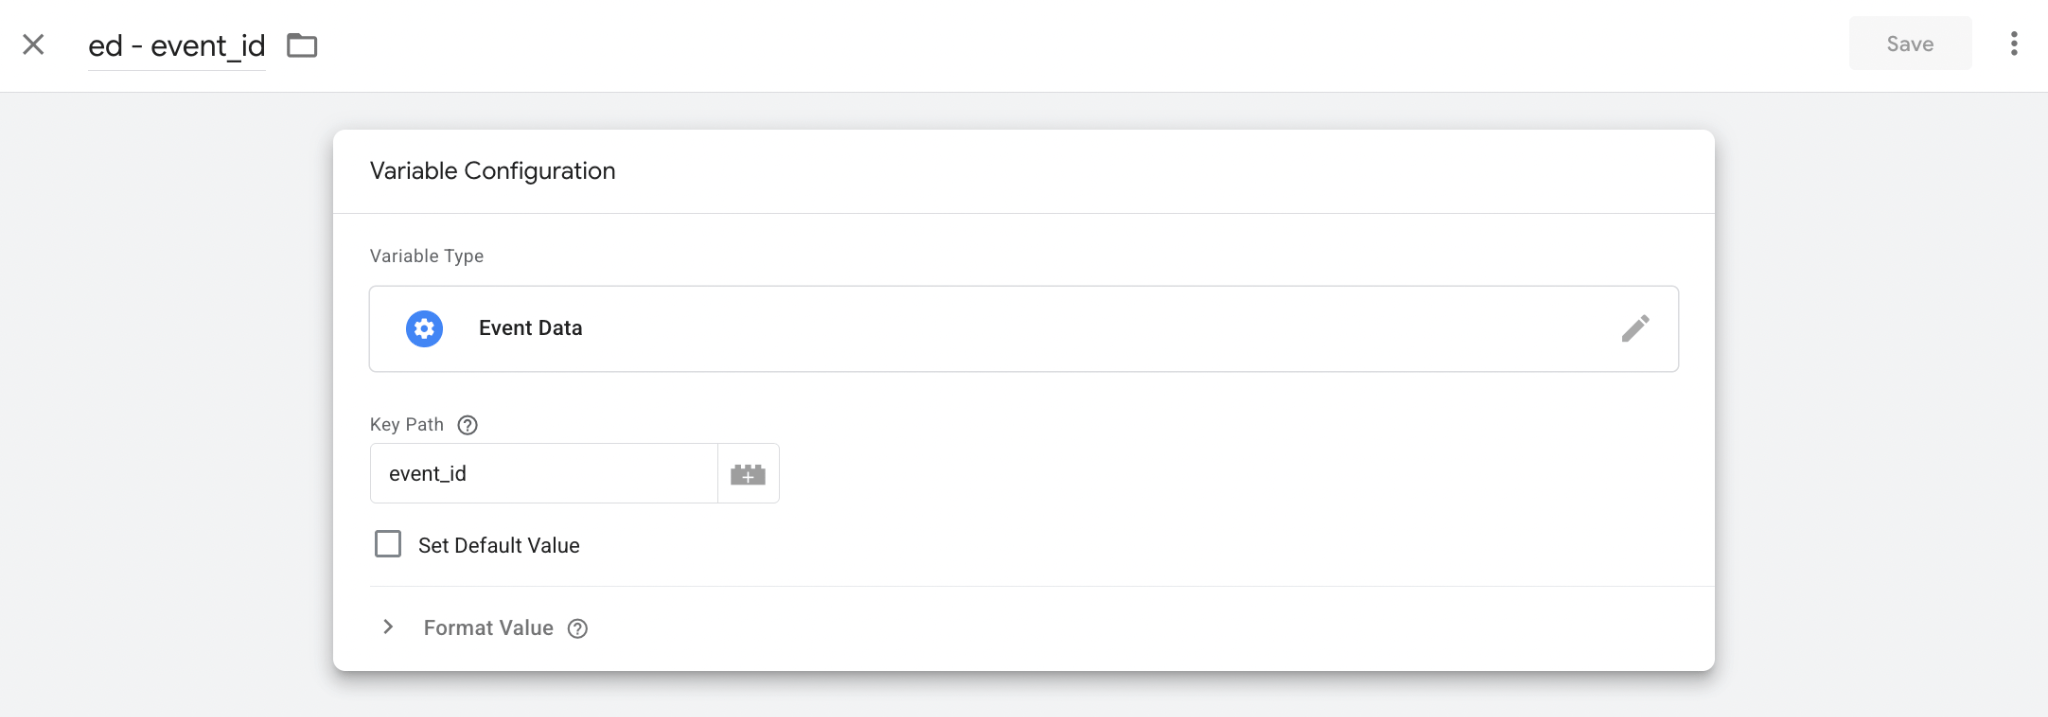
7. As a parameter value, add the variable with the following settings:
- Variable Type: Event Data
- Key path: event_id
Testing
You can test the configurations in Google Tag Manager. Click on Preview, trigger the event on your website with actions like viewing a page or completing a transaction, and check whether the tag has fired.

Find out more about debugging and monitoring server-side tracking configuration in our guide.
Was this article helpful?
🍽 Table of content:
Comments