Meta Custom Audience tag
Updated Mar 31, 2026
The Meta Custom Audience tag for sGTM is a solution designed by Stape to help businesses manage their Meta audiences directly from the server. Unlike traditional methods that rely on manual CSV uploads or browser-based scripts, this tag communicates with the Meta Marketing API to add or remove users from specific Custom Audiences in real-time.
Event-based (Pixel/CAPI) vs List-based (Custom Audience Tag)
Before configuring, consider the difference between event-based and list-based configuration. Both approaches are used to build audiences in Meta and ultimately serve the same purpose, but they work differently.
Using Pixel / CAPI (Event-based)
With this approach, you send events and parameters to Meta. Based on the events received, you create audiences directly within the Meta platform and define rules that determine which users should be included.
Meta automatically evaluates these rules and adds users to audiences according to the events they trigger.
One limitation of this method is the retention window. When creating the audience, you must specify how long users remain in it, with a maximum duration of 180 days.
Examples:
- People who triggered a Purchase event where content_id = 123
- People who triggered AddToCart but did not trigger Purchase within the last 7 days
Using the Custom Audiences Tag (List-based)
With this method, the audience logic is specified before the data is sent to Meta. Instead of Meta deciding whether a user belongs to an audience, your sGTM evaluates the conditions and sends the user to a specific audience.
In other words, the decision-making process moves from Meta to your tagging infrastructure.
Unlike event-based audiences, there is no built-in expiration window. Users stay in the audience until they are removed. This approach also allows you to actively remove users from audiences when certain conditions are met (Pixel/CAPI audiences do not provide it).
Examples:
- People who match a specific CRM condition are added to audience 123ABCD
- People who reach a specific lifecycle stage are removed from audience FOOBAR555
In general, event-based audiences created through Pixel/CAPI cover most common use cases and are simpler to manage. However, the Custom Audiences tag provides advantages when you need long-term audience retention or more precise inclusion and exclusion logic, particularly when the requirements extend beyond the 180-day retention limit.
Prerequisites
To set up the tag, you will need to complete the following steps:
- Configured Meta Custom Audience - if you don’t have one, check our guide on Meta Custom Audience.
- Set up the server GTM container.
- Set up data sending from the web to the server GTM container. You can set it up using server-side Google Analytics 4 or Data Tag/Data Client.
- Select and configure an authentication method.
You must choose and configure one of the following authentication methods:
- Use Stape’s connection (recommended) - the easiest option. Simply enable the Meta Connection in your Stape admin account.
- Use your own Meta credentials - select this if you’re not using Stape’s services or if you’re on a free Stape plan.
Pick the option that best fits your setup and follow the instructions below:
Meta Connection by Stape
Sign in to the Meta Connection from the Stape admin panel.
Log in to your Stape account, open the required container, go to the Connections tab, and click Sign in next to Meta. Use an account that has access to the Meta Ads where you need to update the custom audience.

Own Meta credentials
Step 1. Create Meta app
1.1 Create an account or log in to the Meta Portal for Developers.
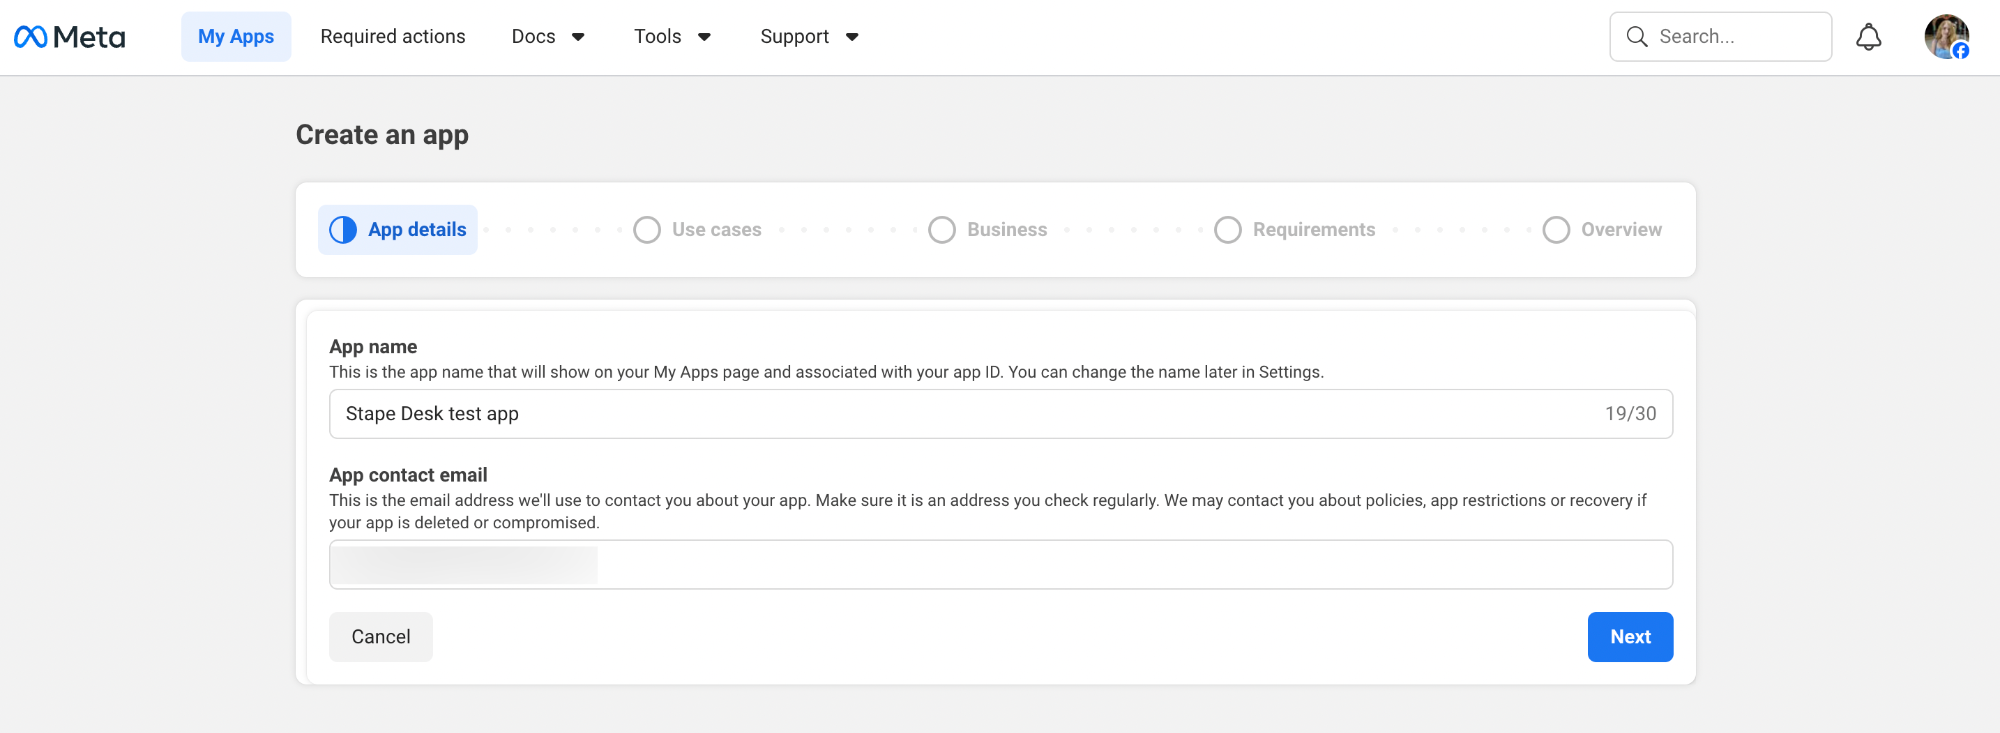
1.2 Click “Create App”.
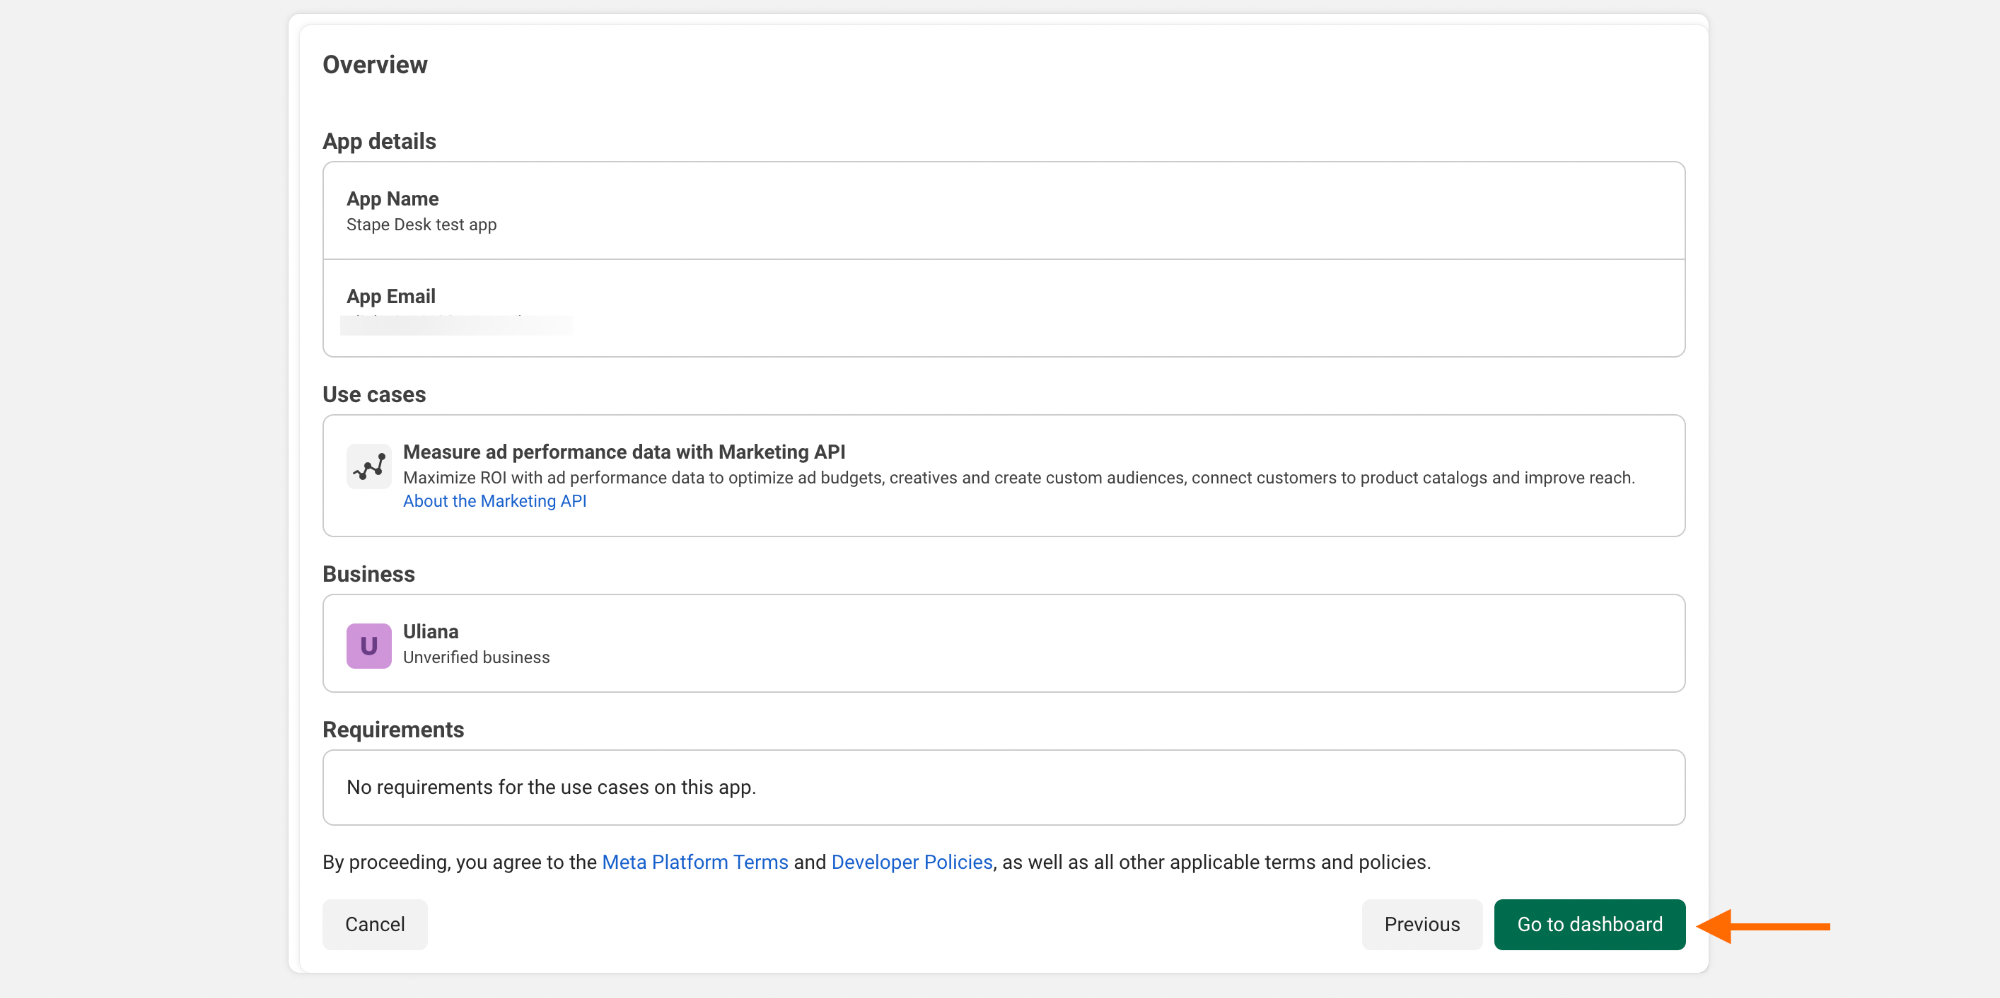
1.3 On the first step, add the name for the app you are creating and ensure your App contact email is correct.
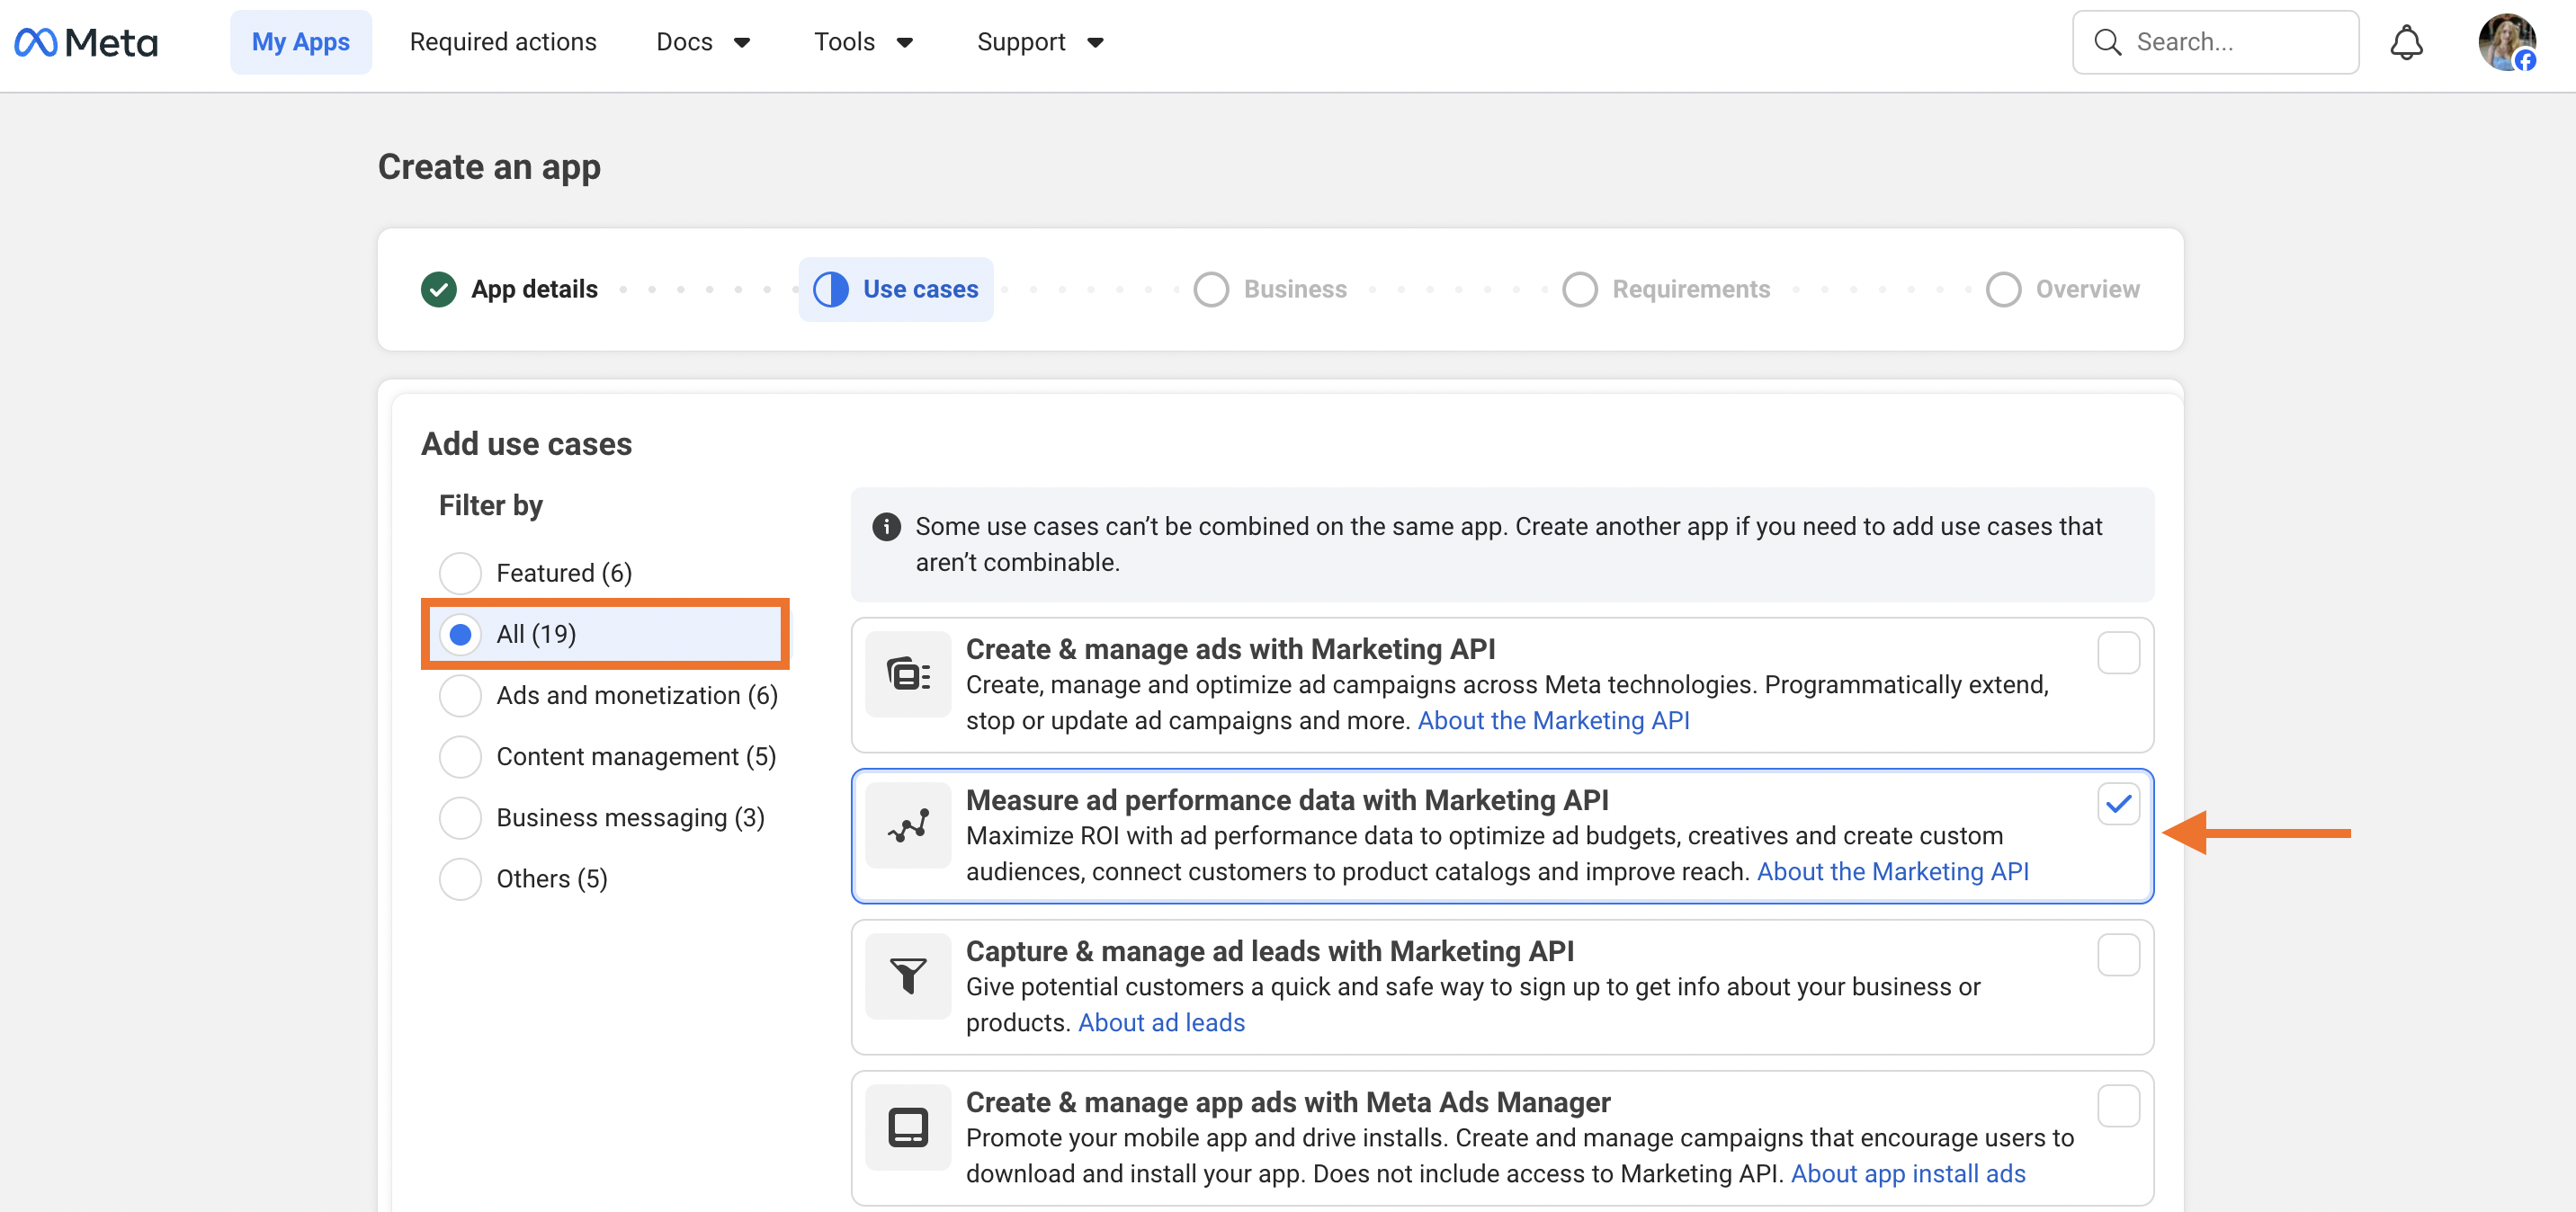
1.4 Click “All” on the next step and select the ”Measure ad performance data with Marketing API” as use case. Click “Next”.
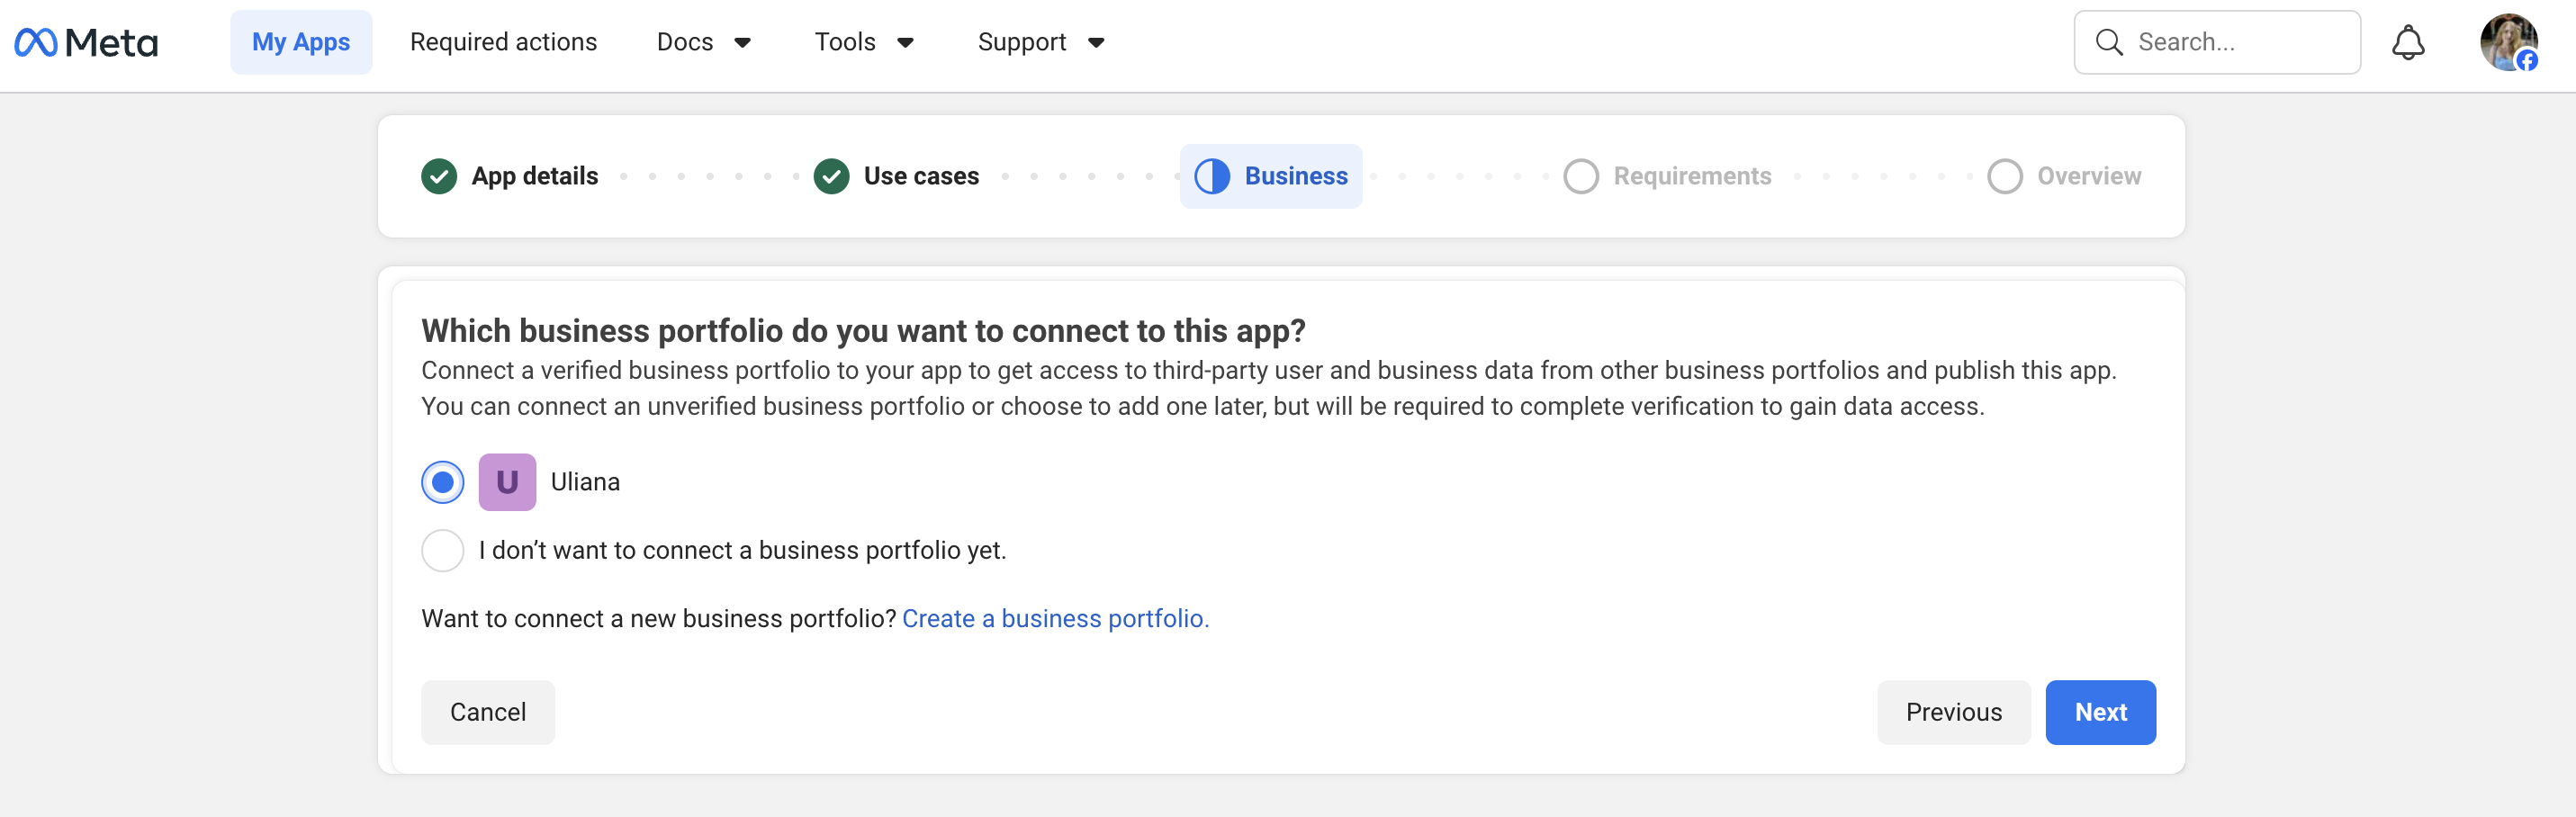
1.5 Select the business portfolio from the list if you have more than one. It must be the Business Account that owns the Ad Account and will contain the System User.
1.6 Once done, check the data and click “Go to dashboard”.
| Note: If you cannot create it, this likely means a system user already exists, and your account limit has been reached, or you do not have the necessary permissions (Admin access to the Business Manager account is required). |
Step 2. Generate the System User Token
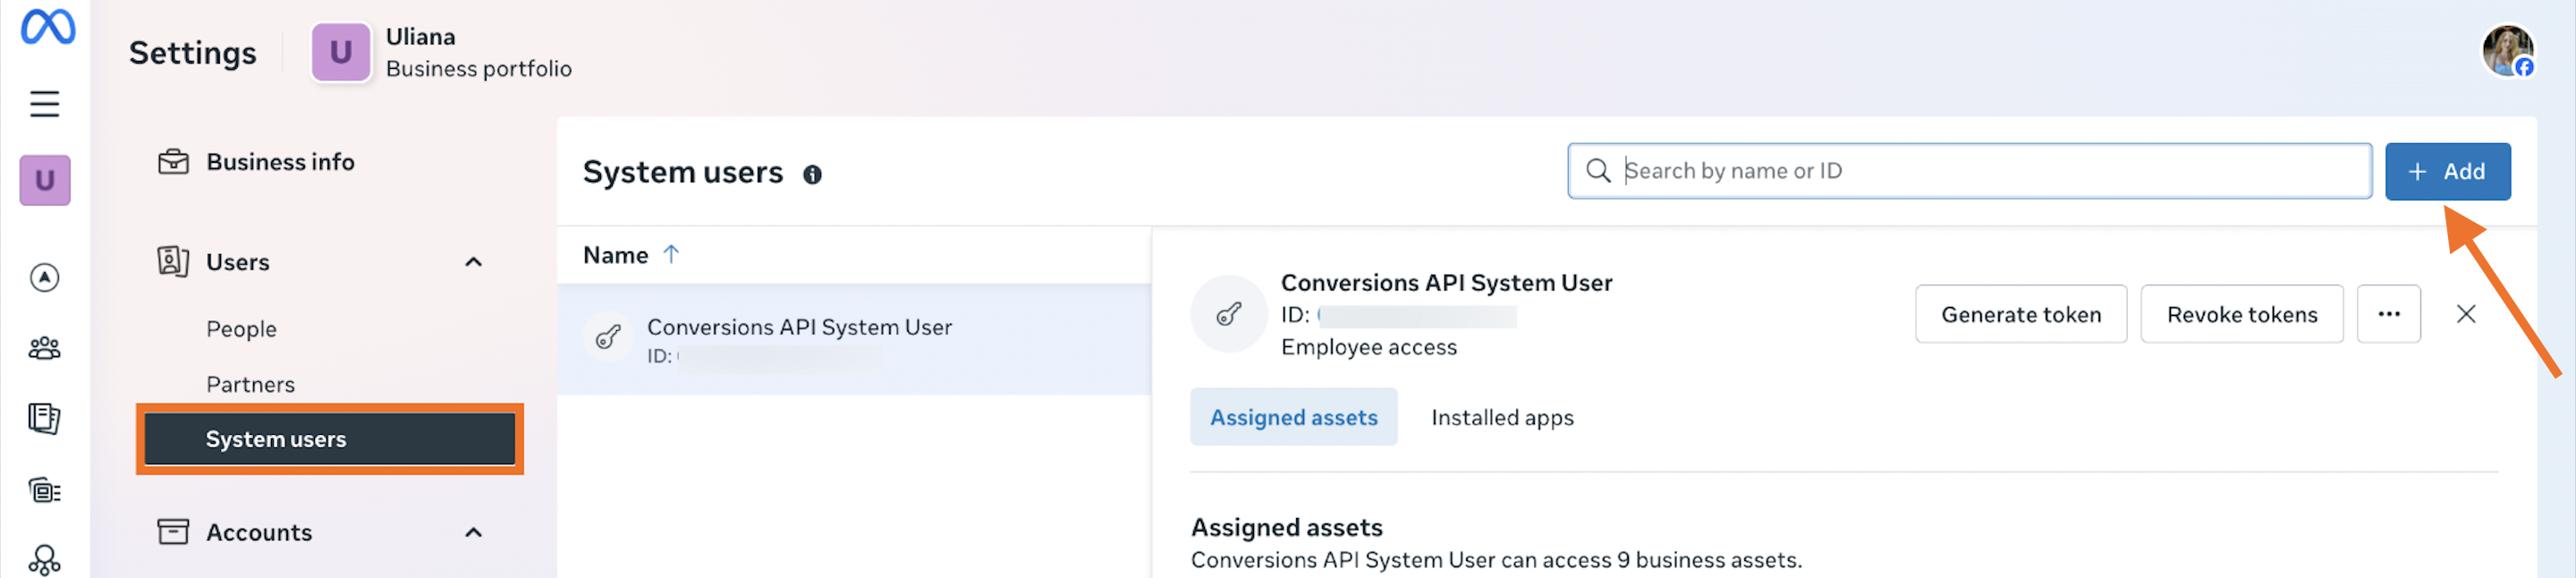
2.1 Go to Meta Business Settings → Users → System users → click “Add”.
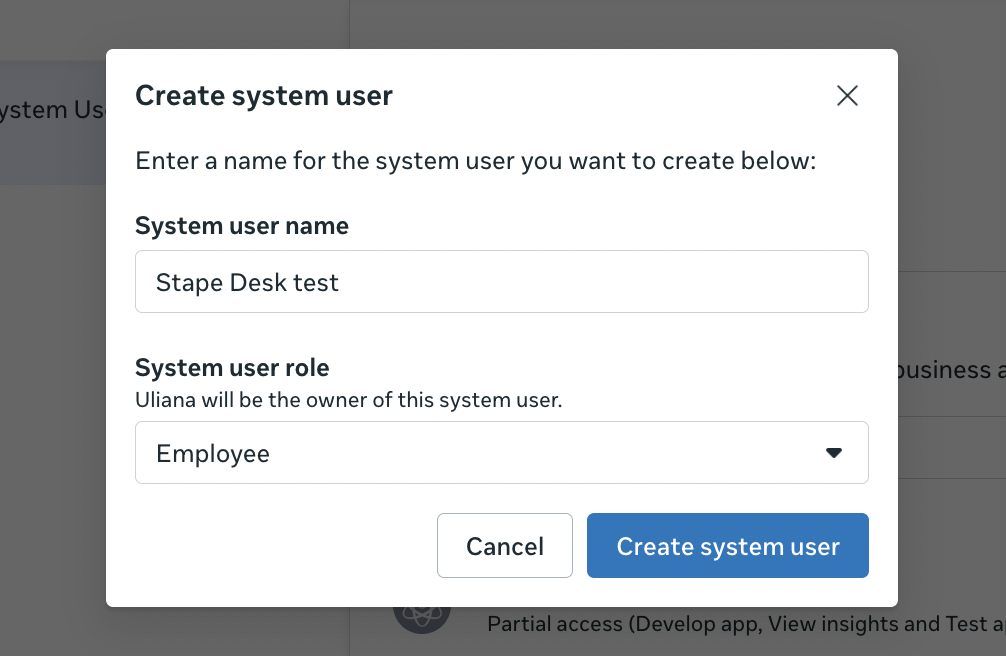
2.2 Add the name for your System User and assign it the Employee role. Employee role is sufficient for audience management. Use Admin if full ad account control is needed. Click “Create system user”.
| Note: If you can’t create it, you’ve either reached your account’s system user limit or you don’t have Admin permissions in the Business Manager account. |
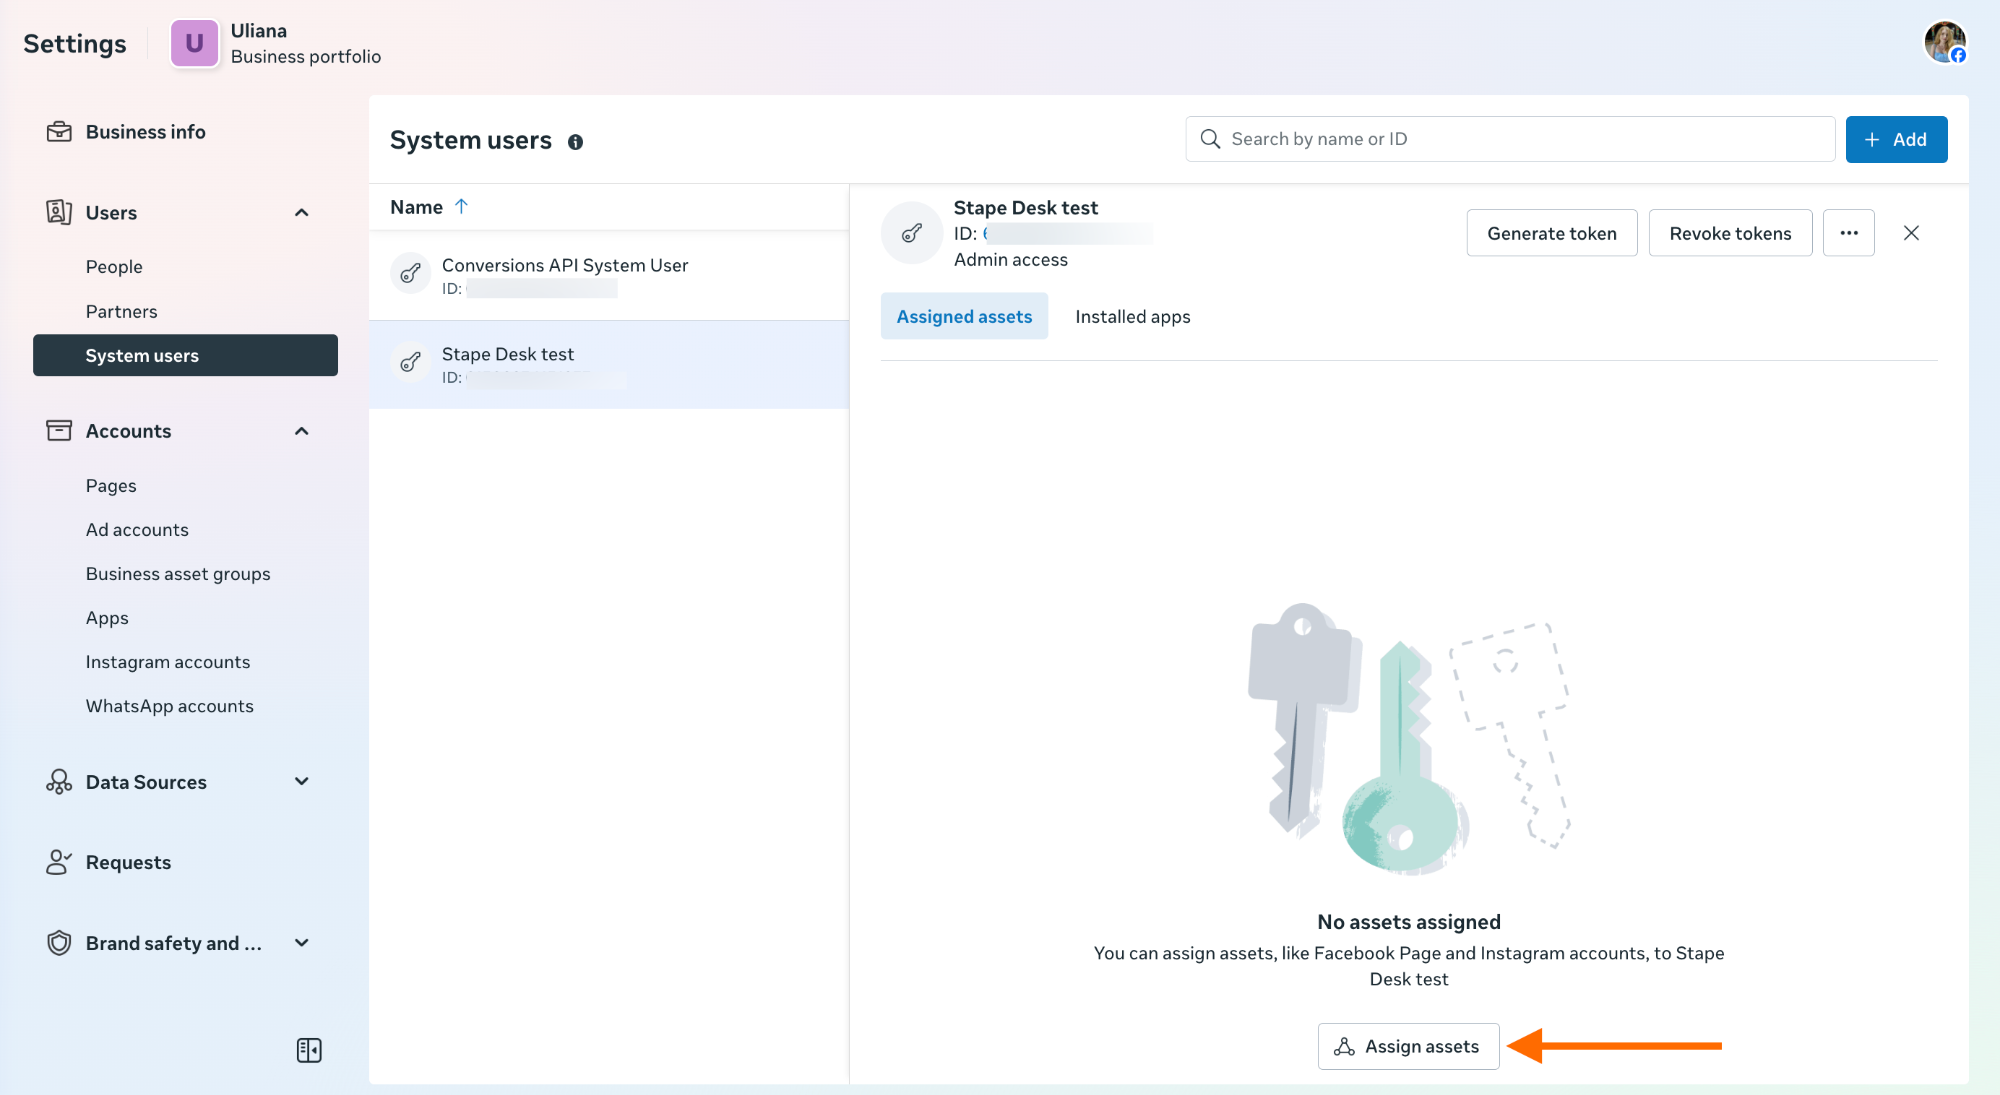
2.3 Open the system user you’ve just created and click “Assign assets”.
2.4 Click on the “Apps” on the left, choose the app you created in the previous step, and enable the “Develop app” permission. Click “Assign assets”.
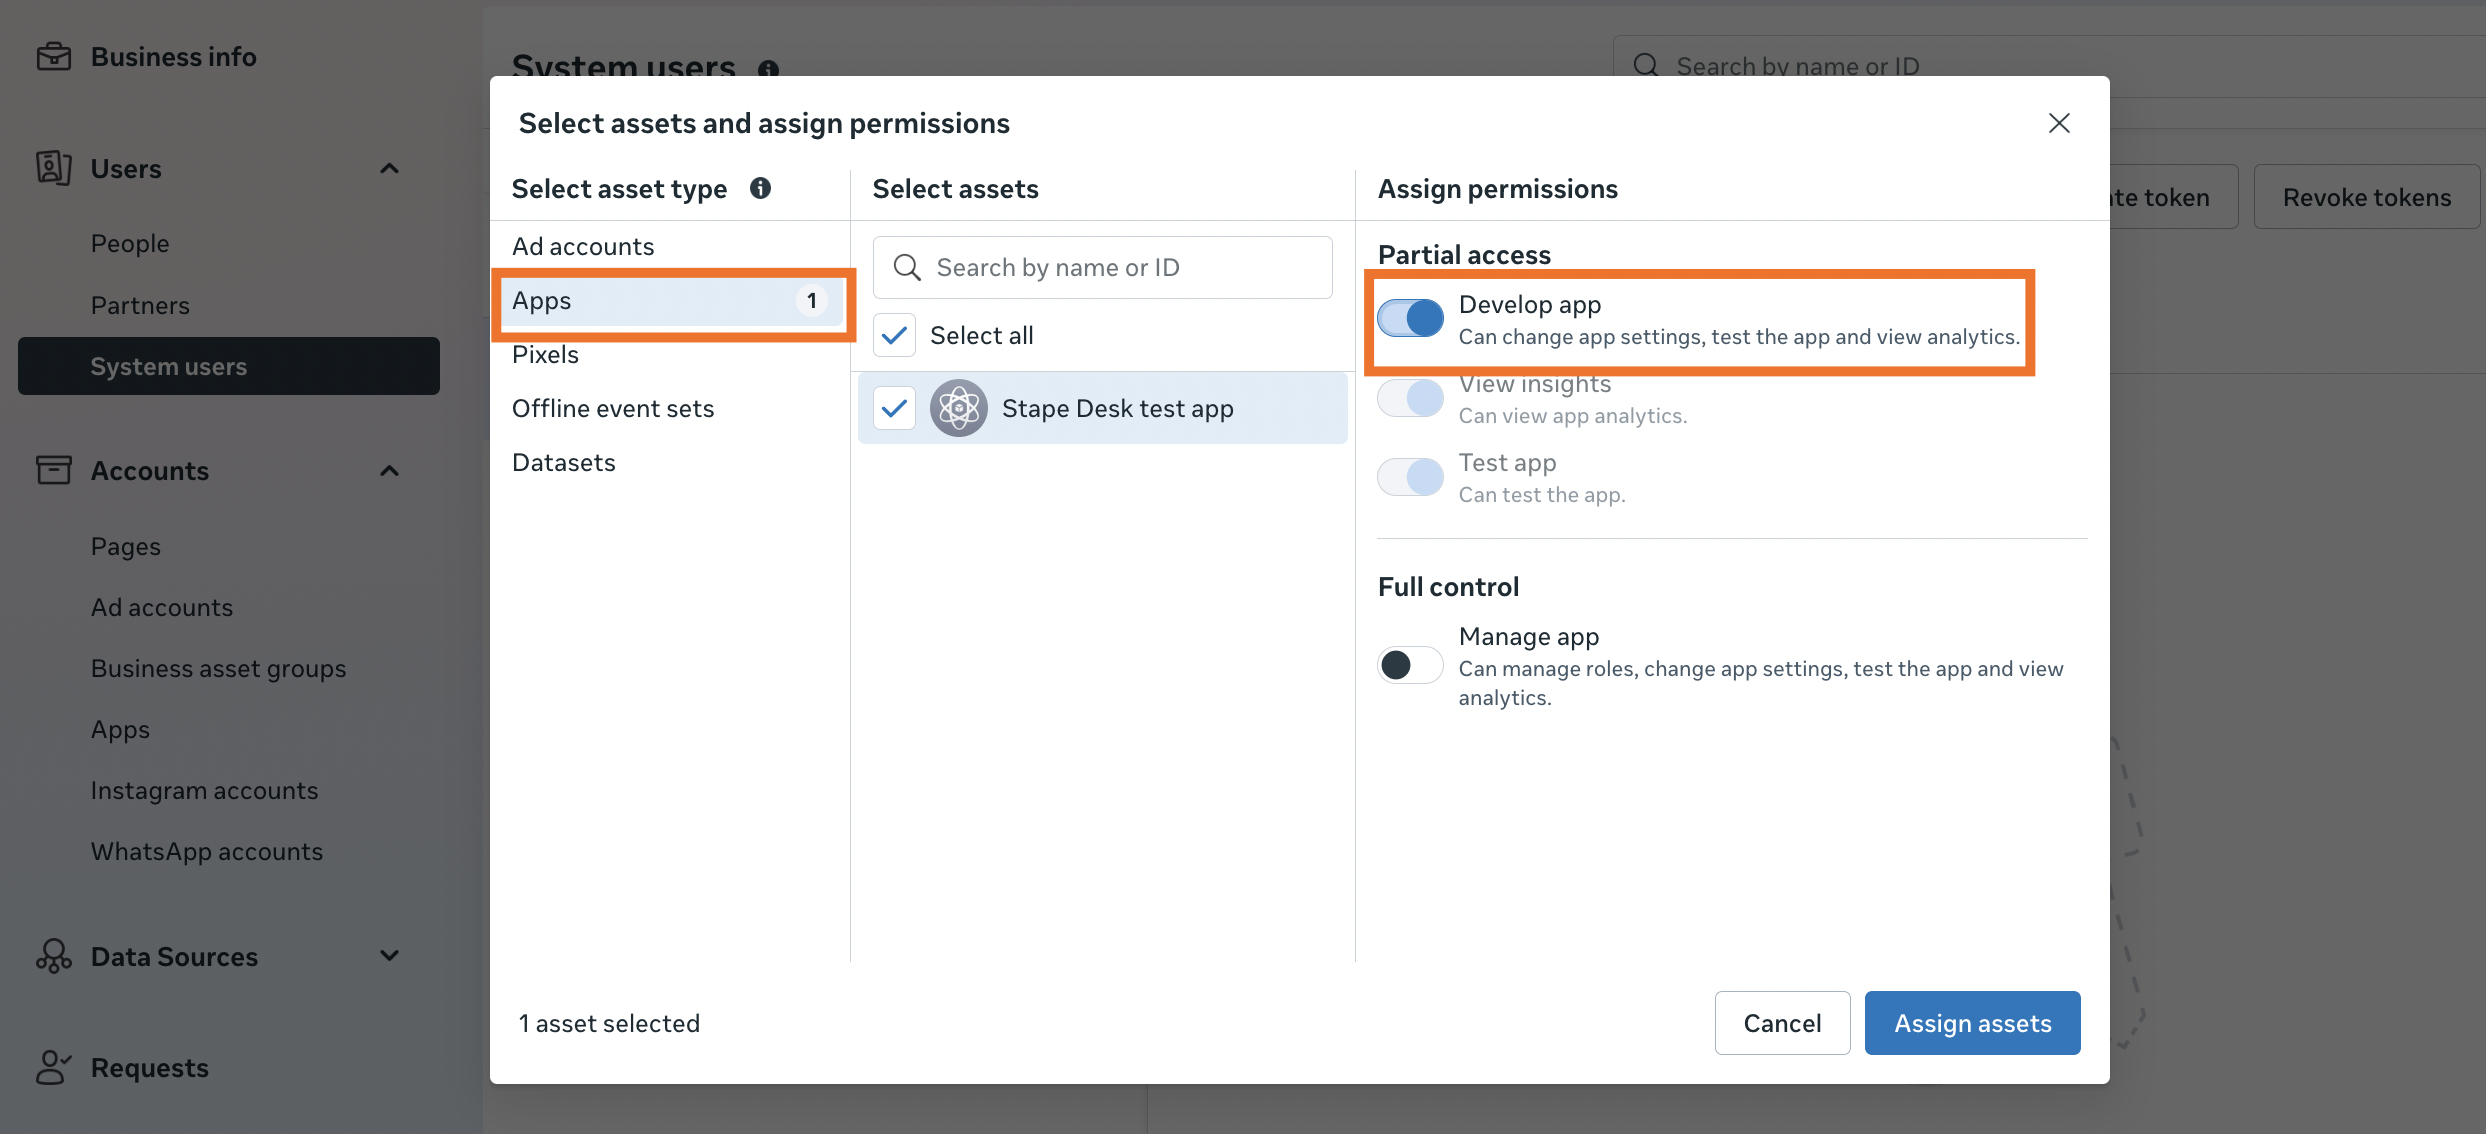
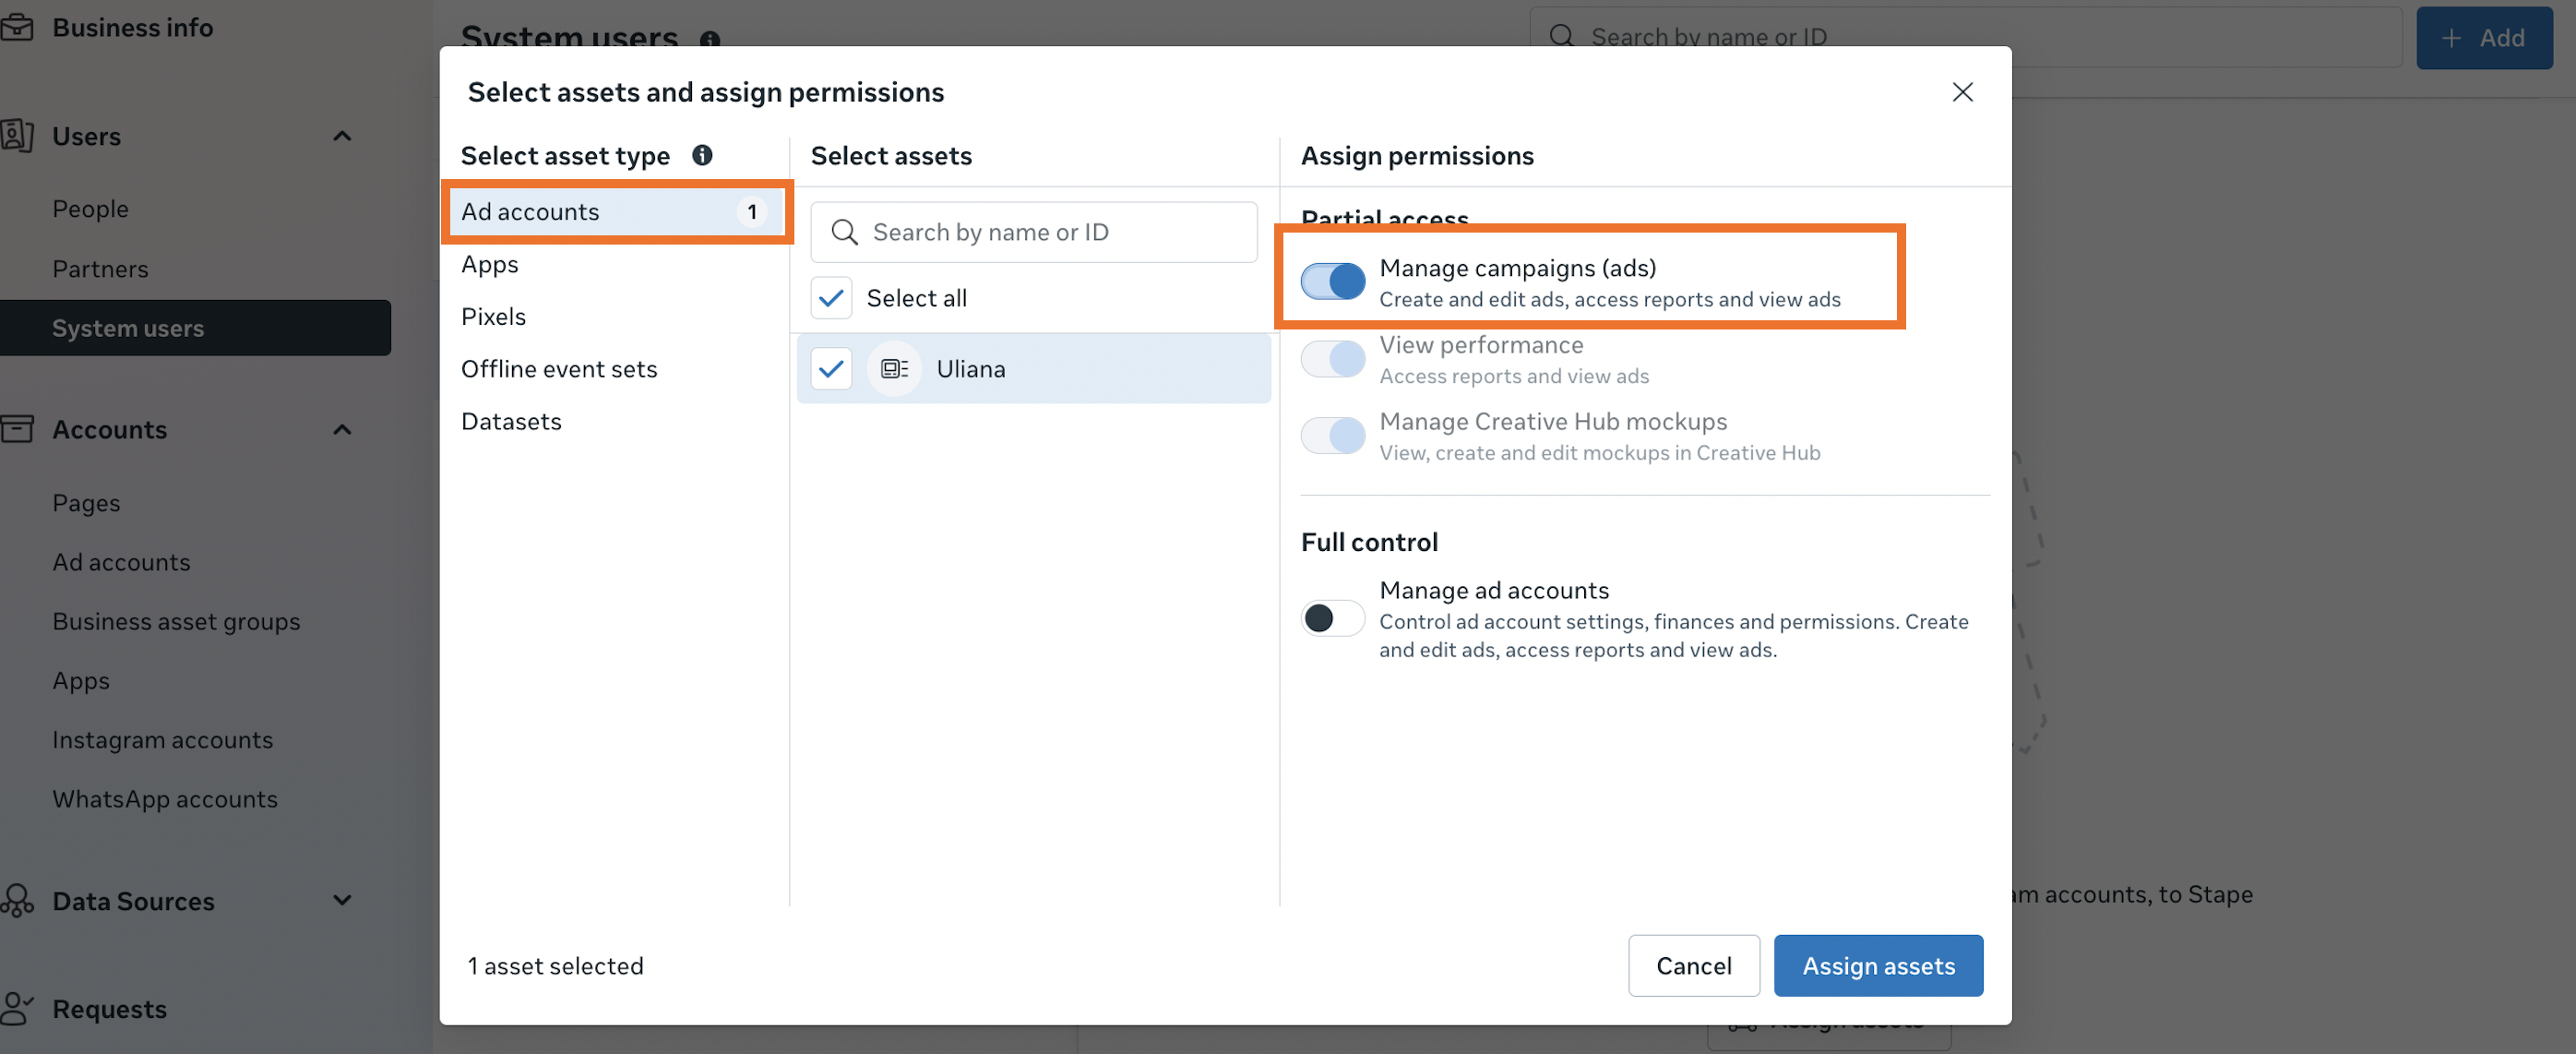
2.5 Click “Assign assets” again. Select the “Ad accounts” asset type, check the target Ad Account(s), and enable the “Manage campaigns (ads)” permission. Click “Assign assets”.
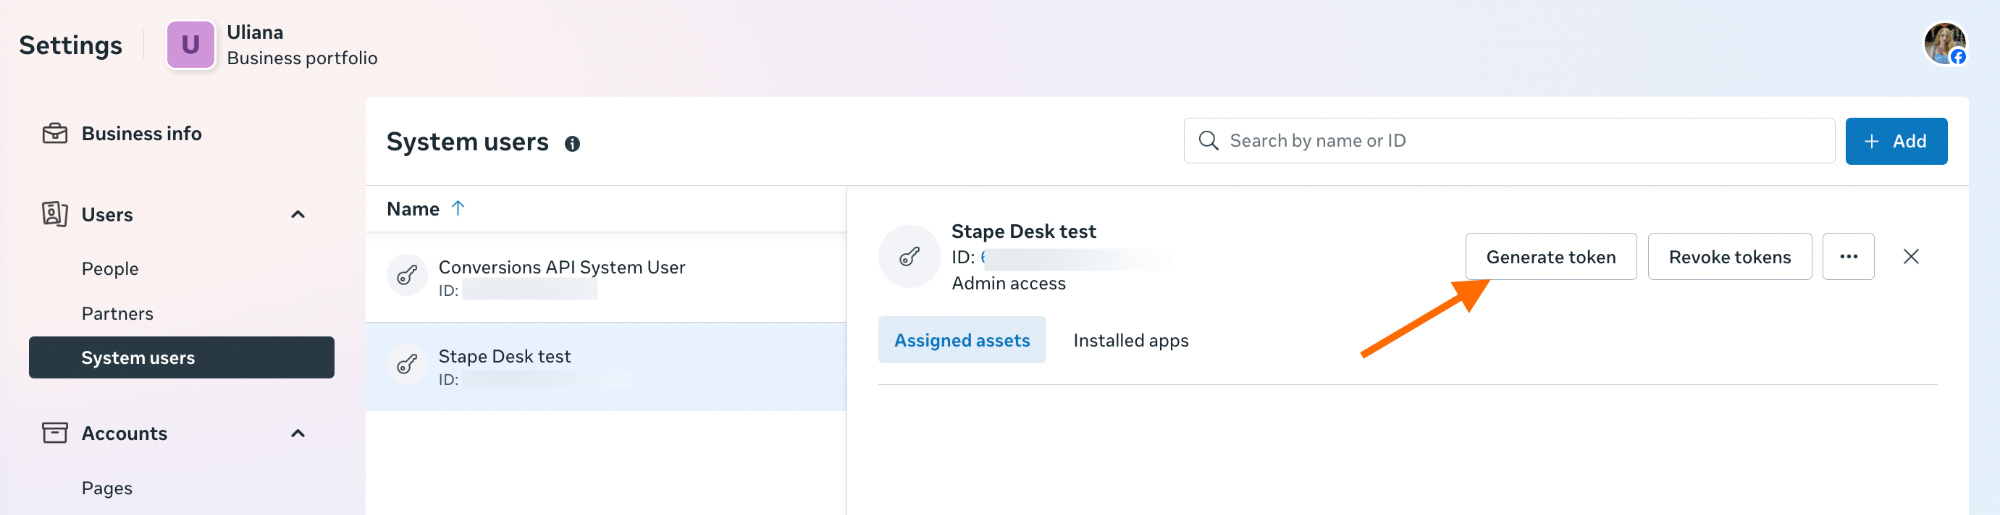
2.6 Within your system user, click “Generate token”.
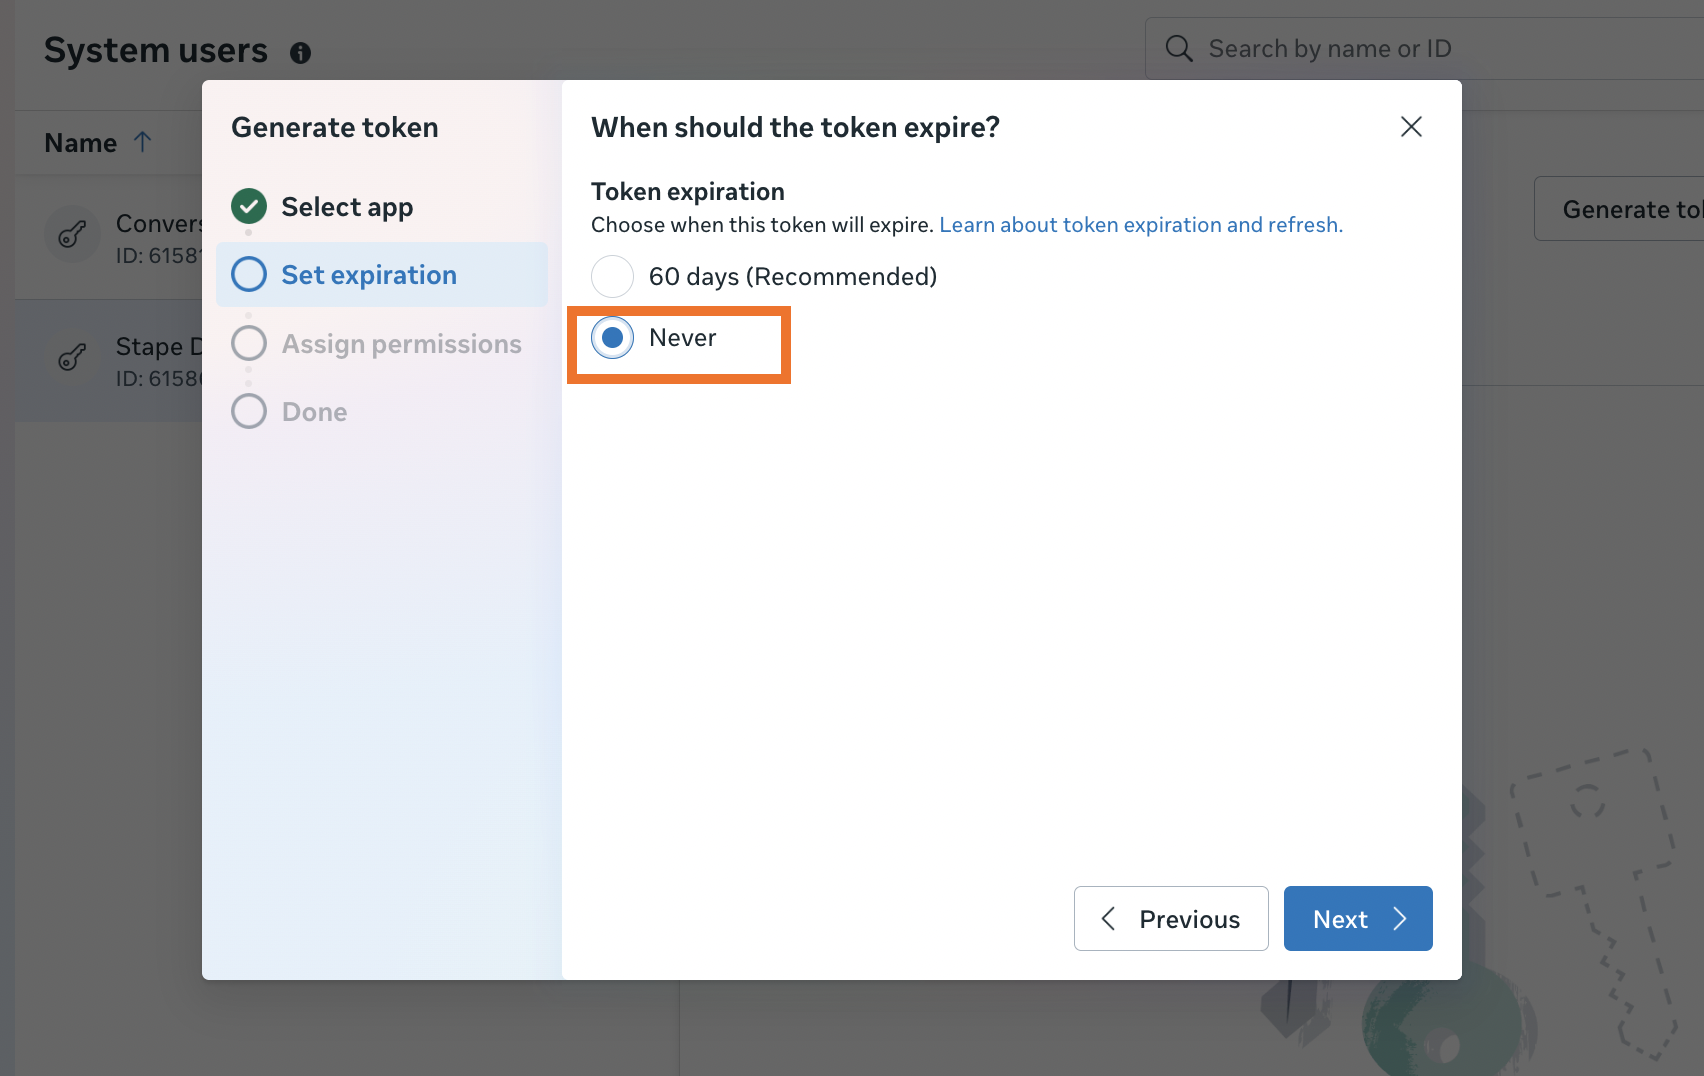
2.7 From the drop-down list, select an app you’ve created. On the next step, select “Never” as token expiration.
2.8 From the list, select “ads_management” permission.
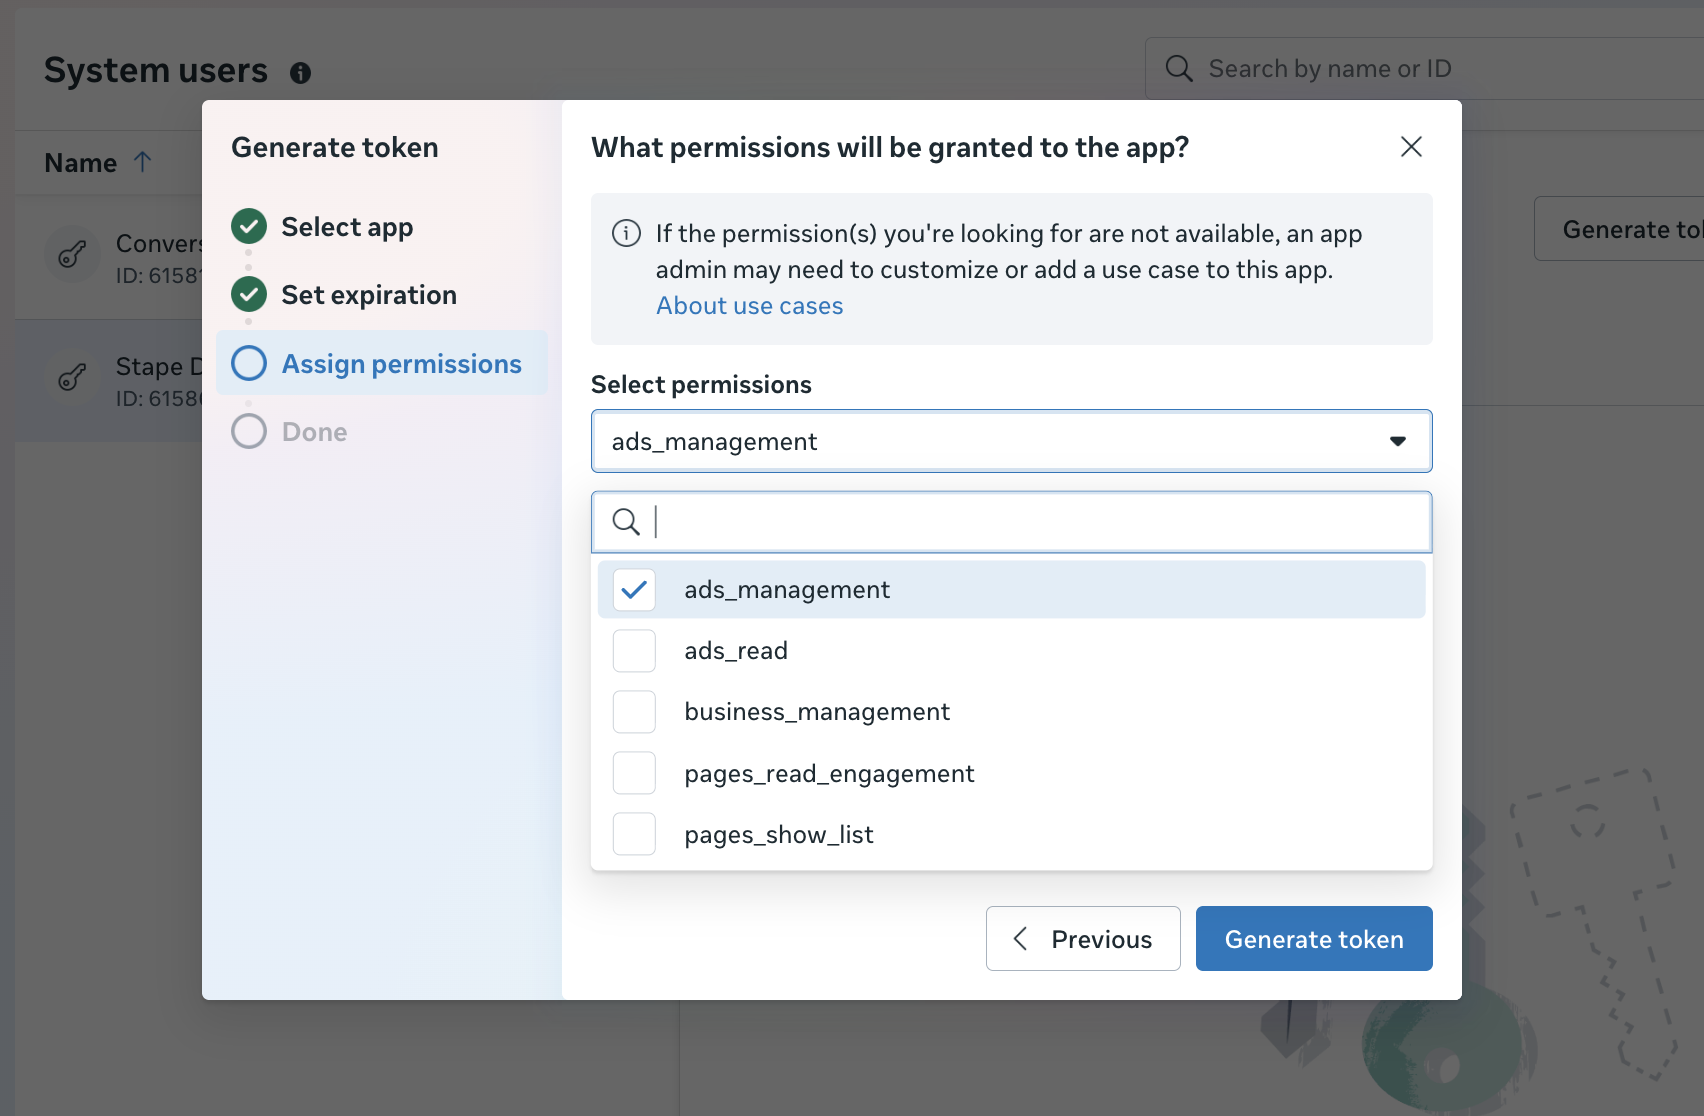
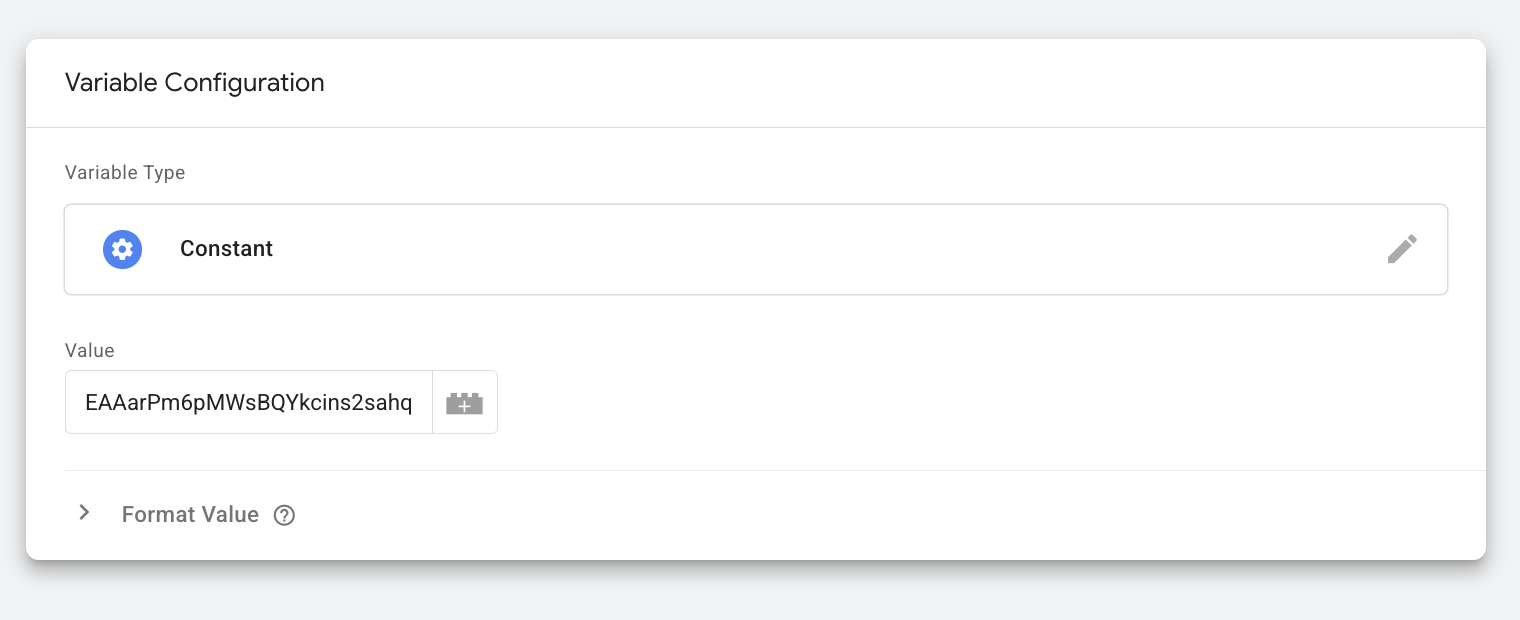
And click “Generate token”. Copy and save the token in a secure place. For example, add it as a constant variable in the server GTM container. You will need the token while configuring a tag.
How to configure the Meta Custom Audience tag?
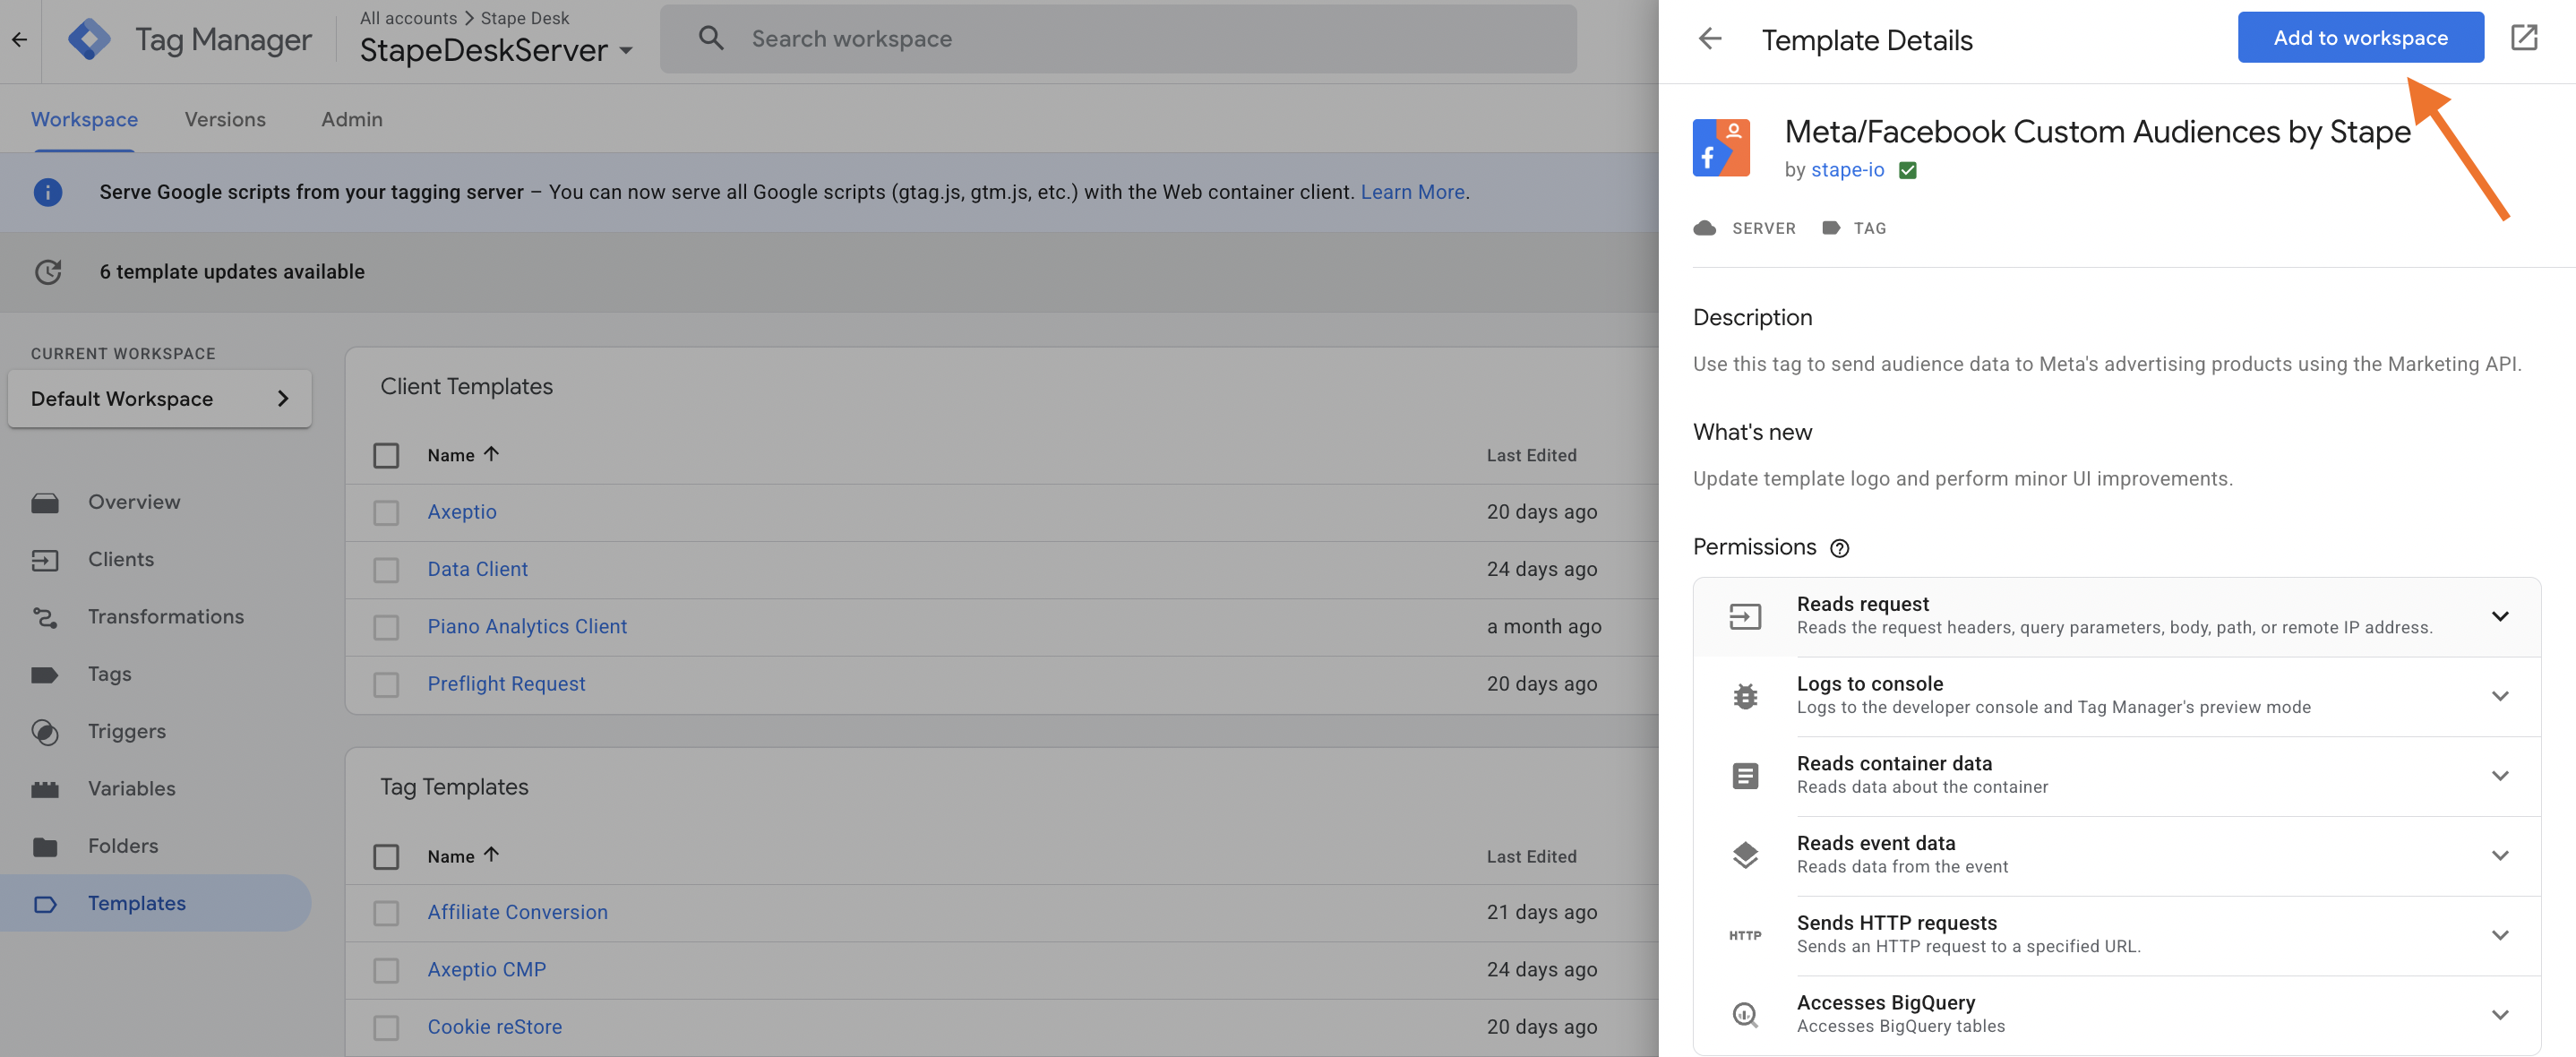
1. Add the Meta/Facebook Custom Audience tag.
Navigate to your server GTM container → Templates section → next to Tags click "Search Gallery" → find "Meta/Facebook Custom Audiences by Stape" → click "Add to workspace".
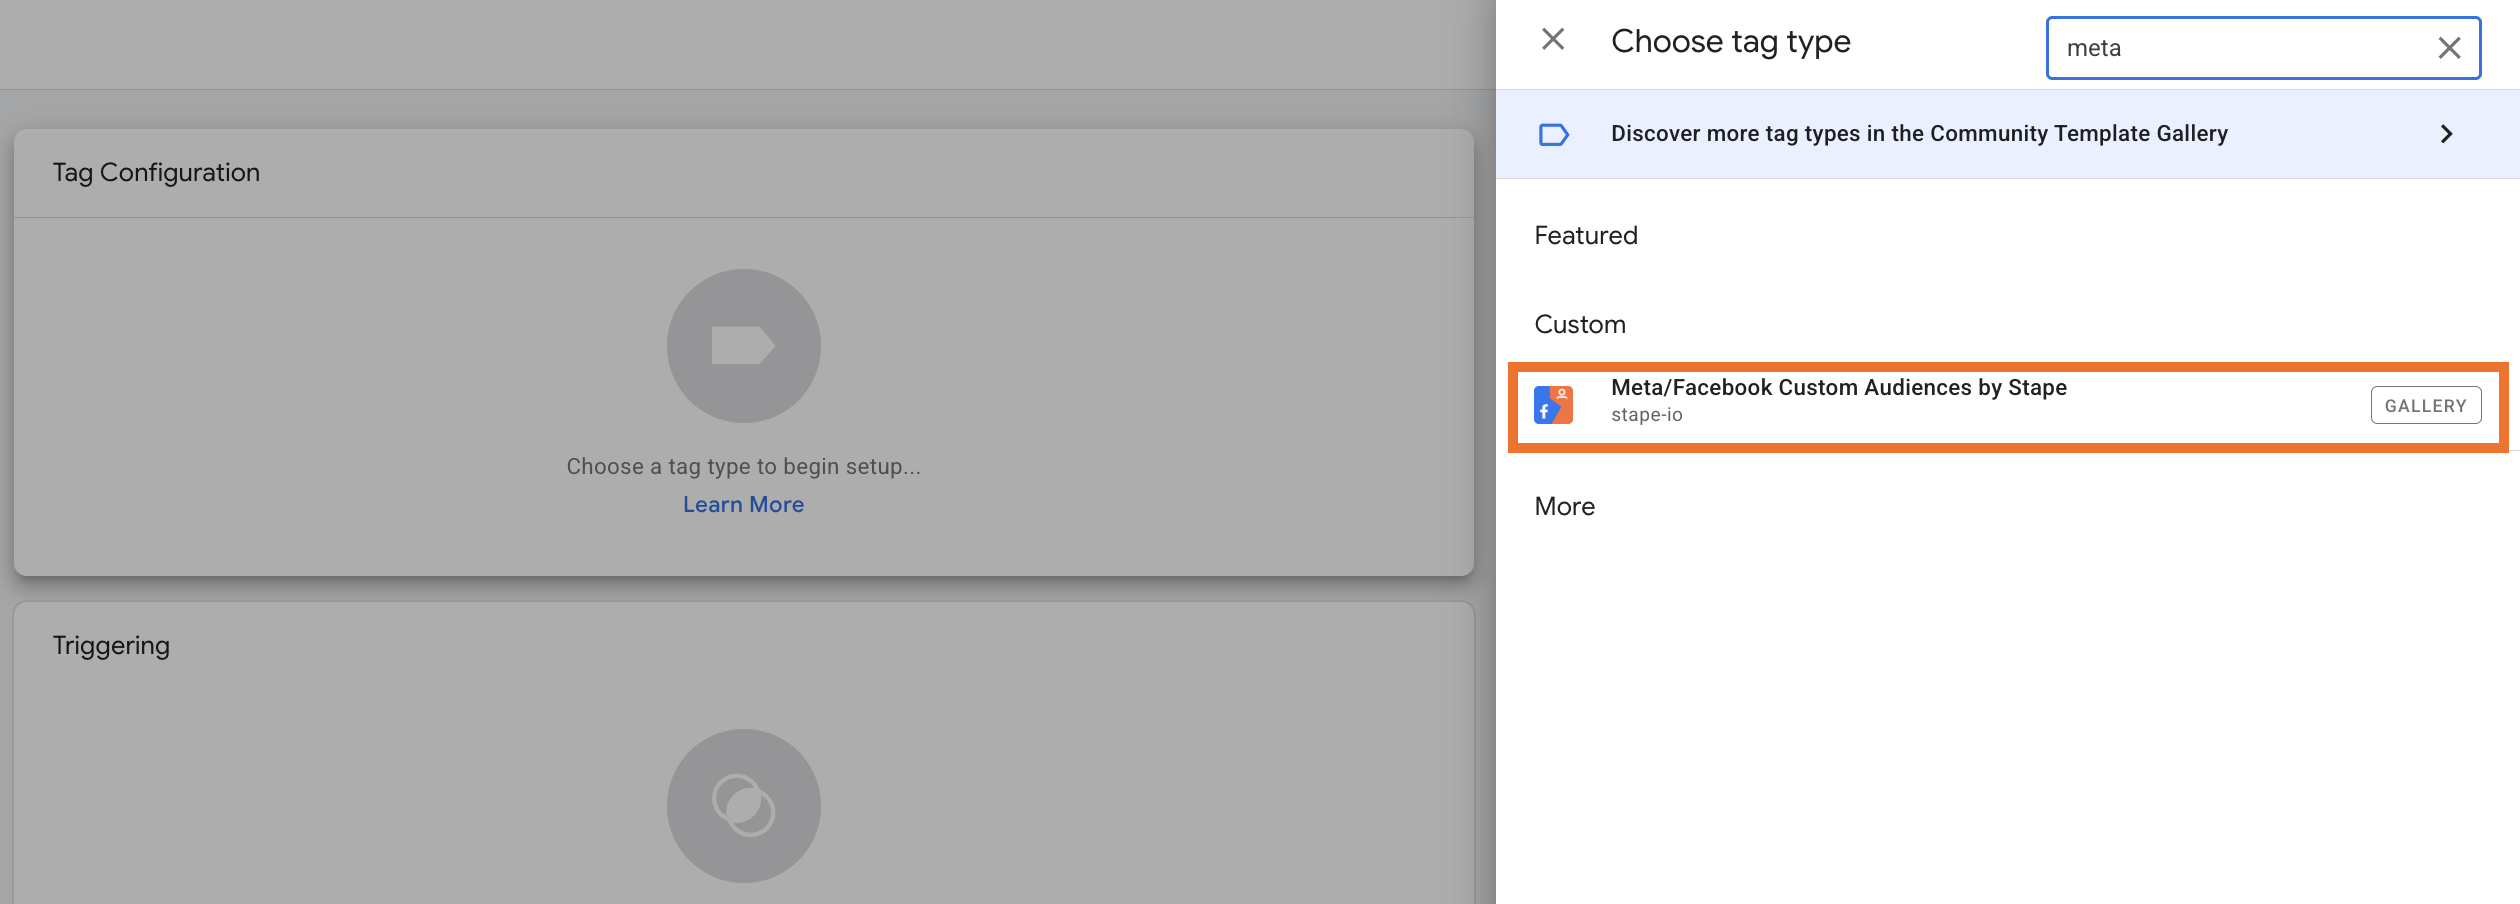
2. Create a new tag.
Go to the Tags section of the server GTM → New → choose Meta/Facebook Custom Audience as tag type.
3. Configure the tag.
3.1 Action - select the operation you want a tag to perform: add to audience data, remove from audience, or remove from all audiences.
3.2 Authentication Type - select the one based on your choice in step 3.
3.3 Add Audience ID and Access token.
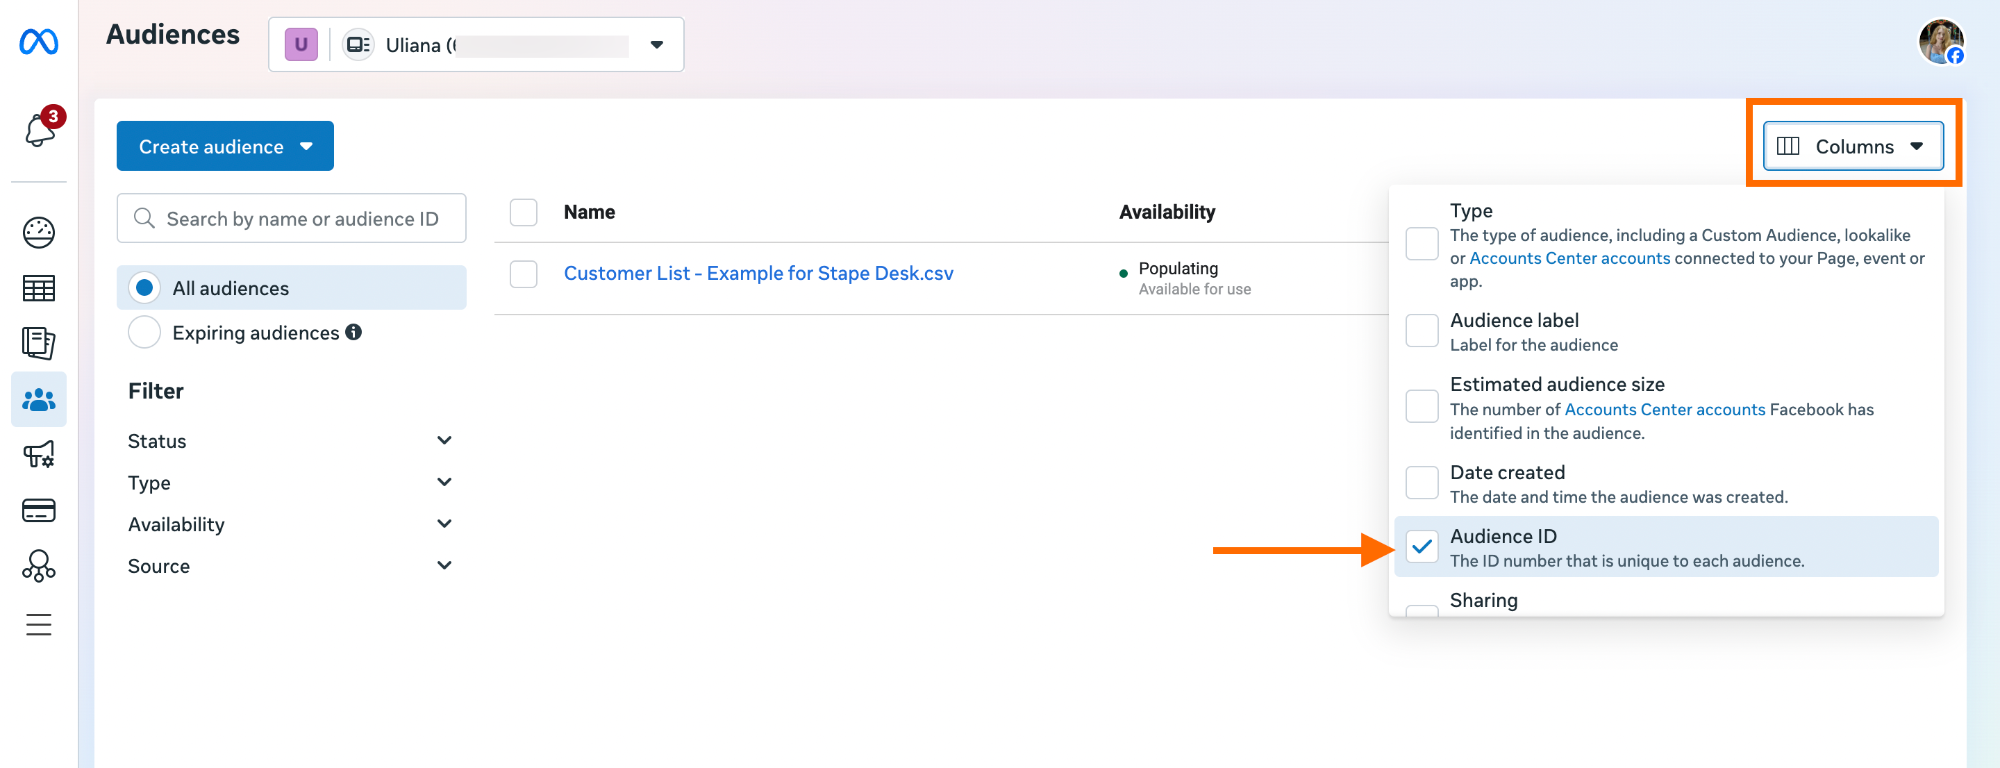
- Audience ID - go to the Audiences section, click Columns, enable Audience ID, then copy the ID of the required custom audience once the column appears.
- Access token - this is required only if you selected your own credentials as the authorization method. We've explained in detail how to obtain it in the prerequisites section in the collapse element "Own Meta credentials".
3.4 Audience members.
The tag can be set up to send data for either a single user or multiple users in a single request.
- Single User. Manually enter identifiers for one user using the UI input fields.
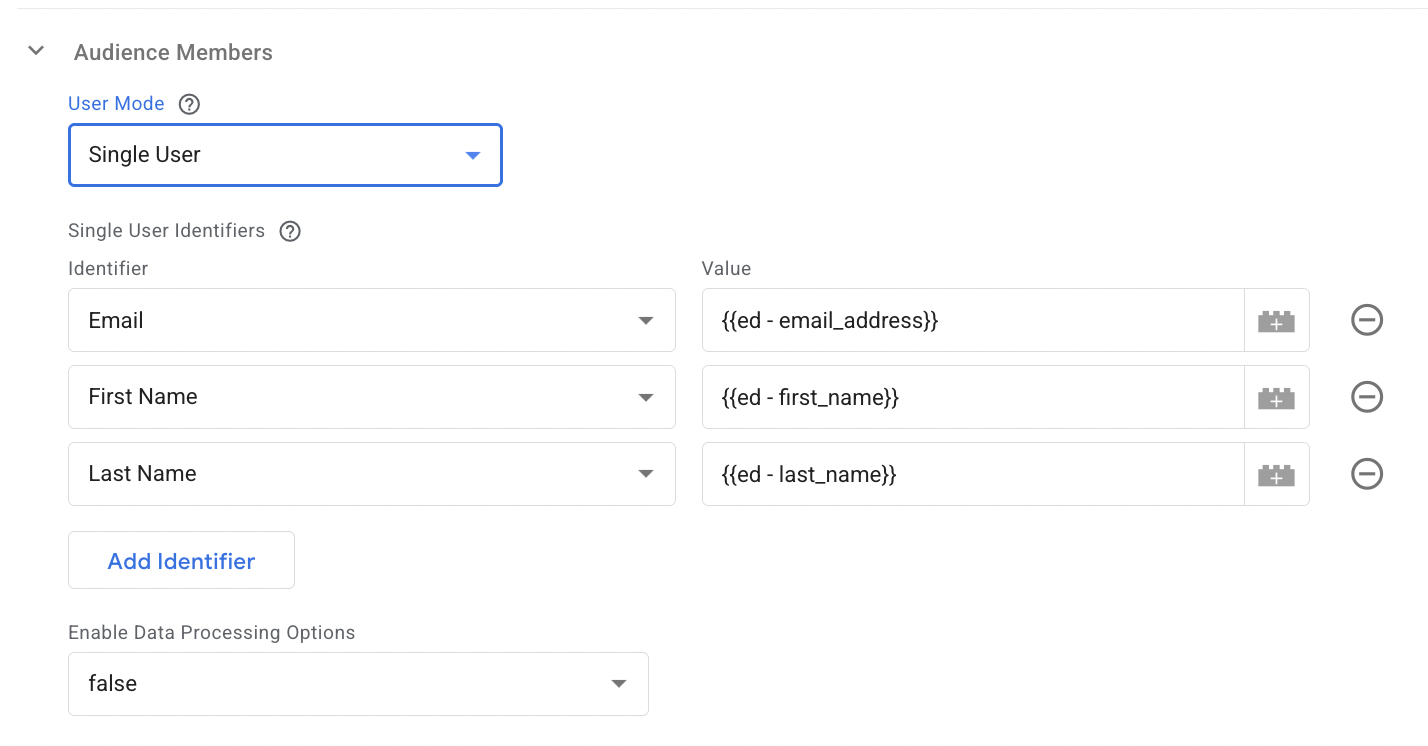
Enable Data Processing Options - to comply with U.S. state privacy regulations (Limited Data Use), you can enable data processing settings and define the relevant country and state.
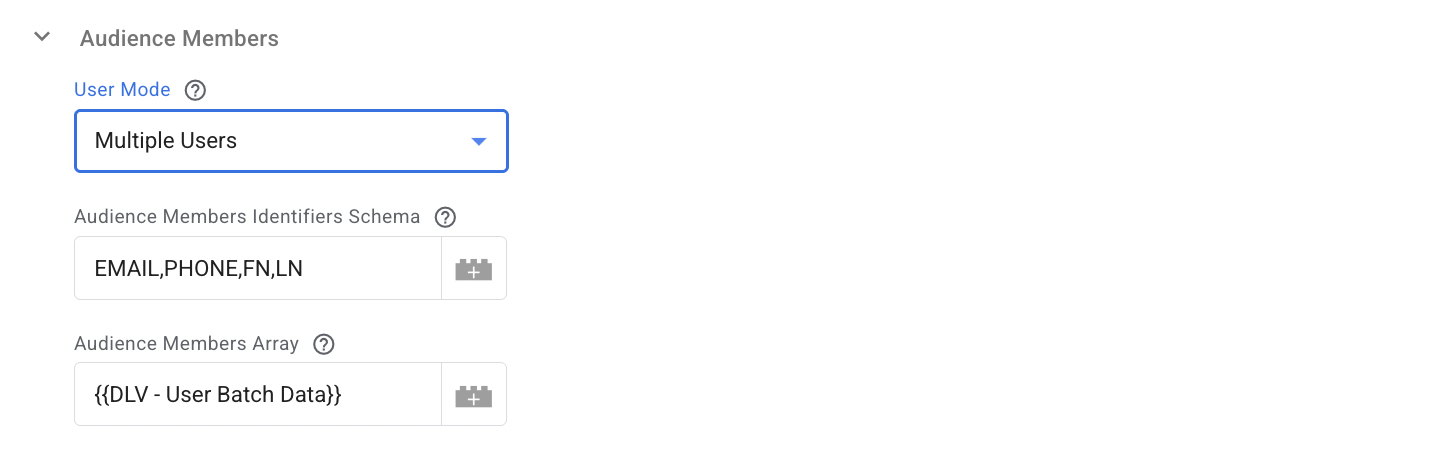
- Multiple Users. Submit a preformatted array of audience members along with a corresponding schema. Each request can include up to 10,000 audience members.
Provide a comma-separated list or array defining the order and type of user identifiers (e.g., EMAIL, PHONE, FN, LN).
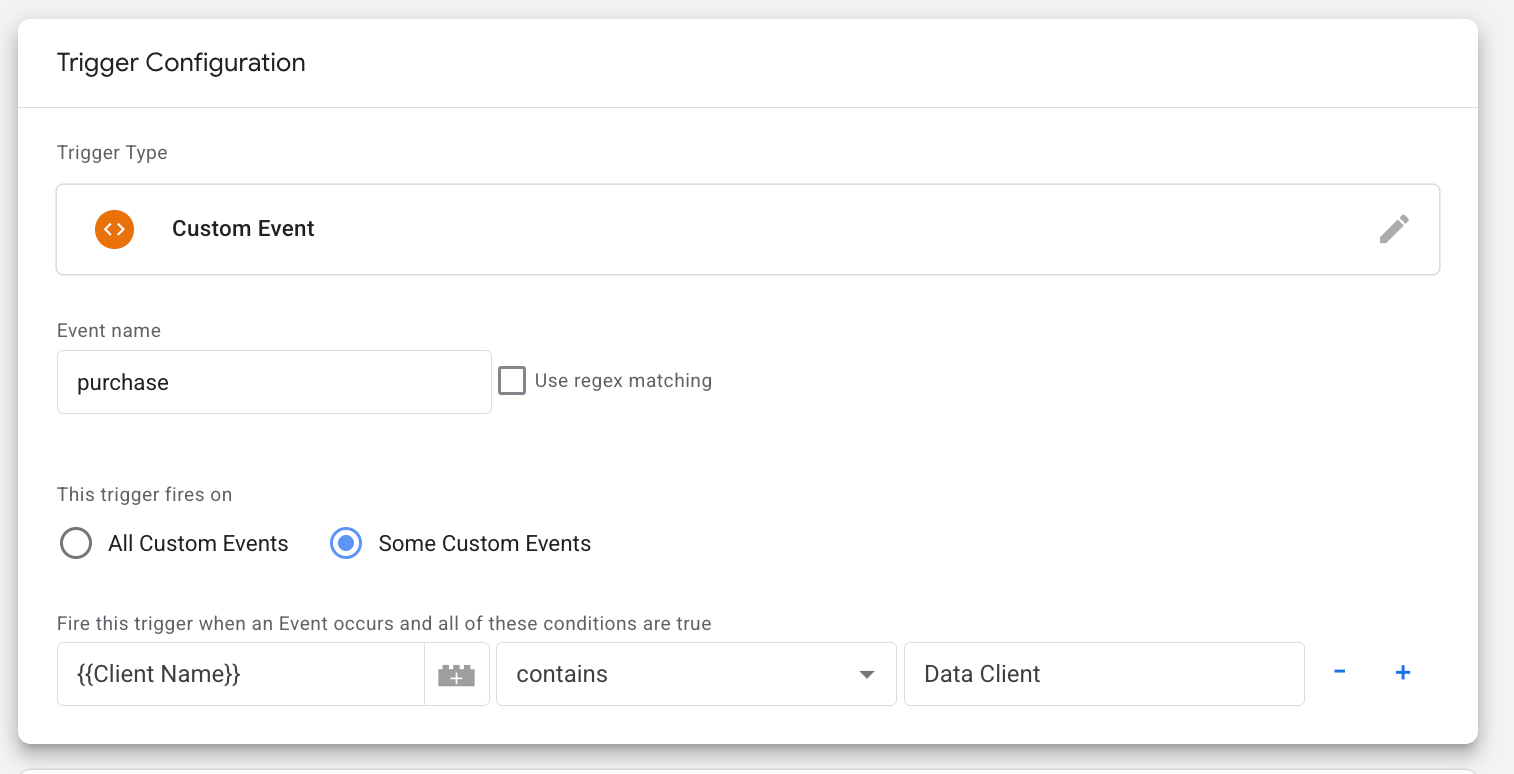
4. Add a trigger for the tag.
Define the condition under which the tag should fire and send data to the Meta custom audience. In this case, the trigger is a purchase.
We added the following configurations for a trigger:
- Trigger type: Custom Event
- Event name: purchase
- Trigger fires on: Client Name contains Data Client
Test the configuration
| 💡Tip: For easier GTM debugging, use the Stape GTM Helper Chrome extension, which enhances the Google Tag Manager debugging experience. It offers color-coded views for GTM tags and server-side requests and helps you quickly spot failed tags. Learn more about the Stape GTM Helper features in our post. |
1. Run Preview mode in both web and server GTM containers.

2. Trigger the event defined in your trigger configuration. In this case, it’s a purchase. Then locate the event in the left-hand menu and click the Stape tag you configured.
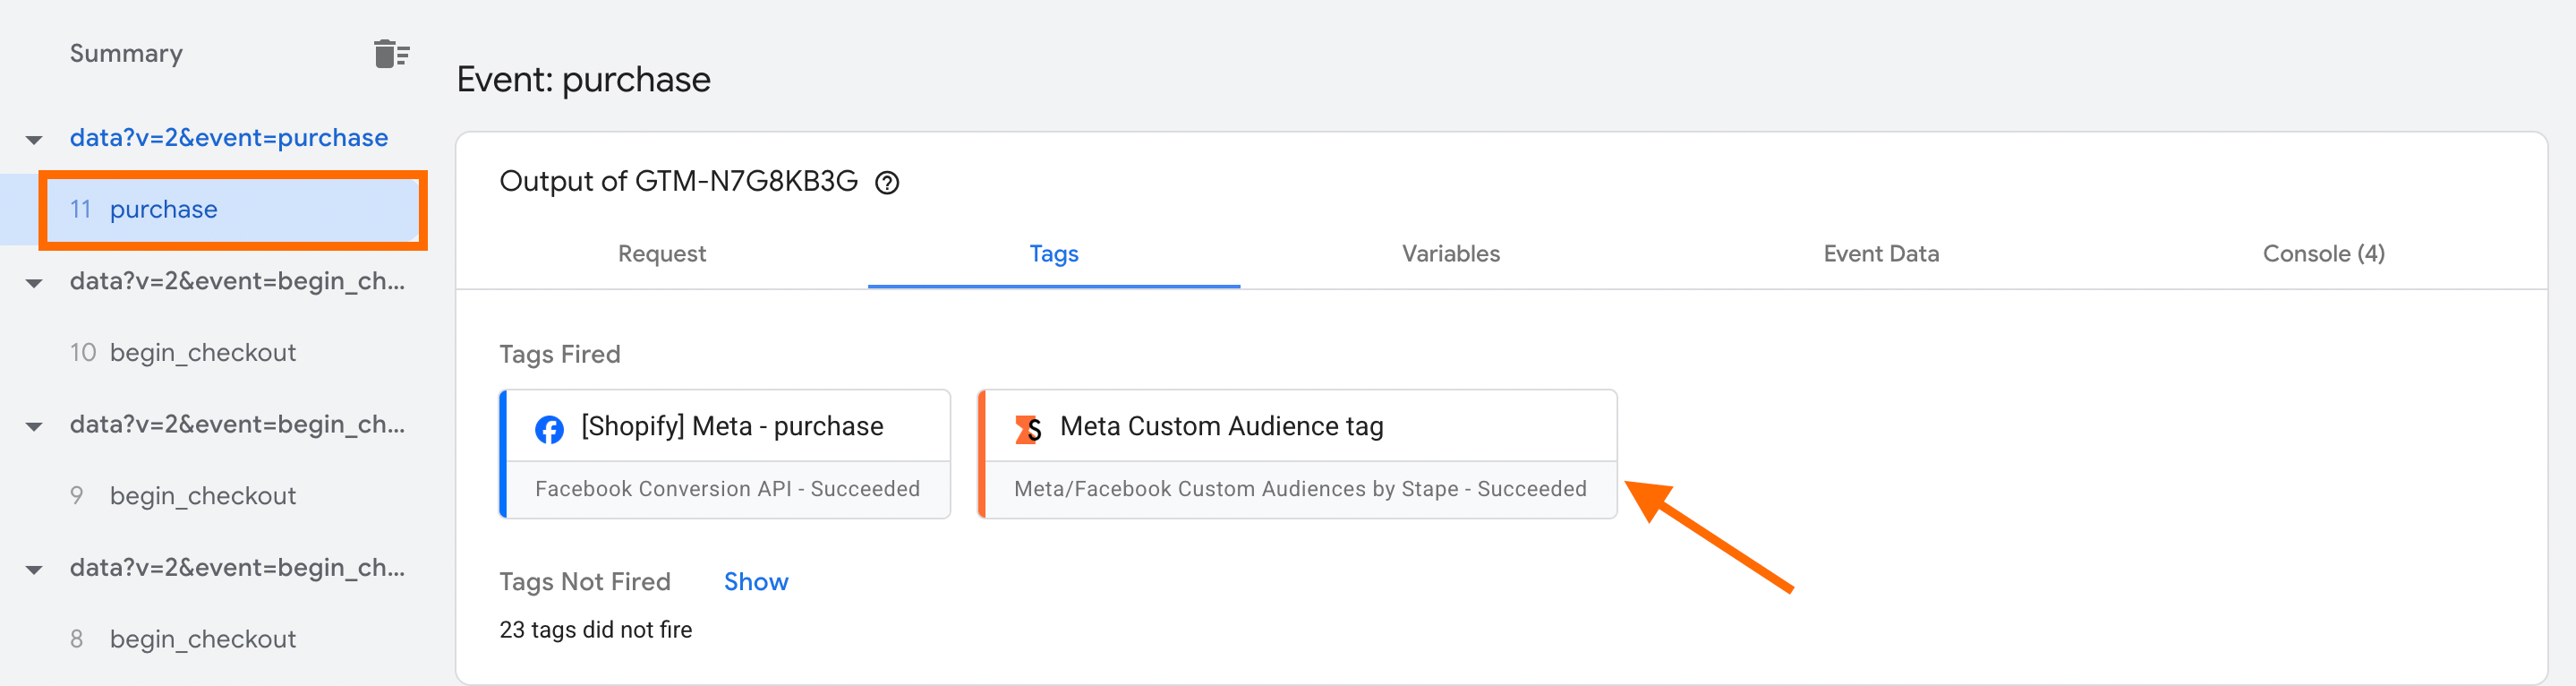
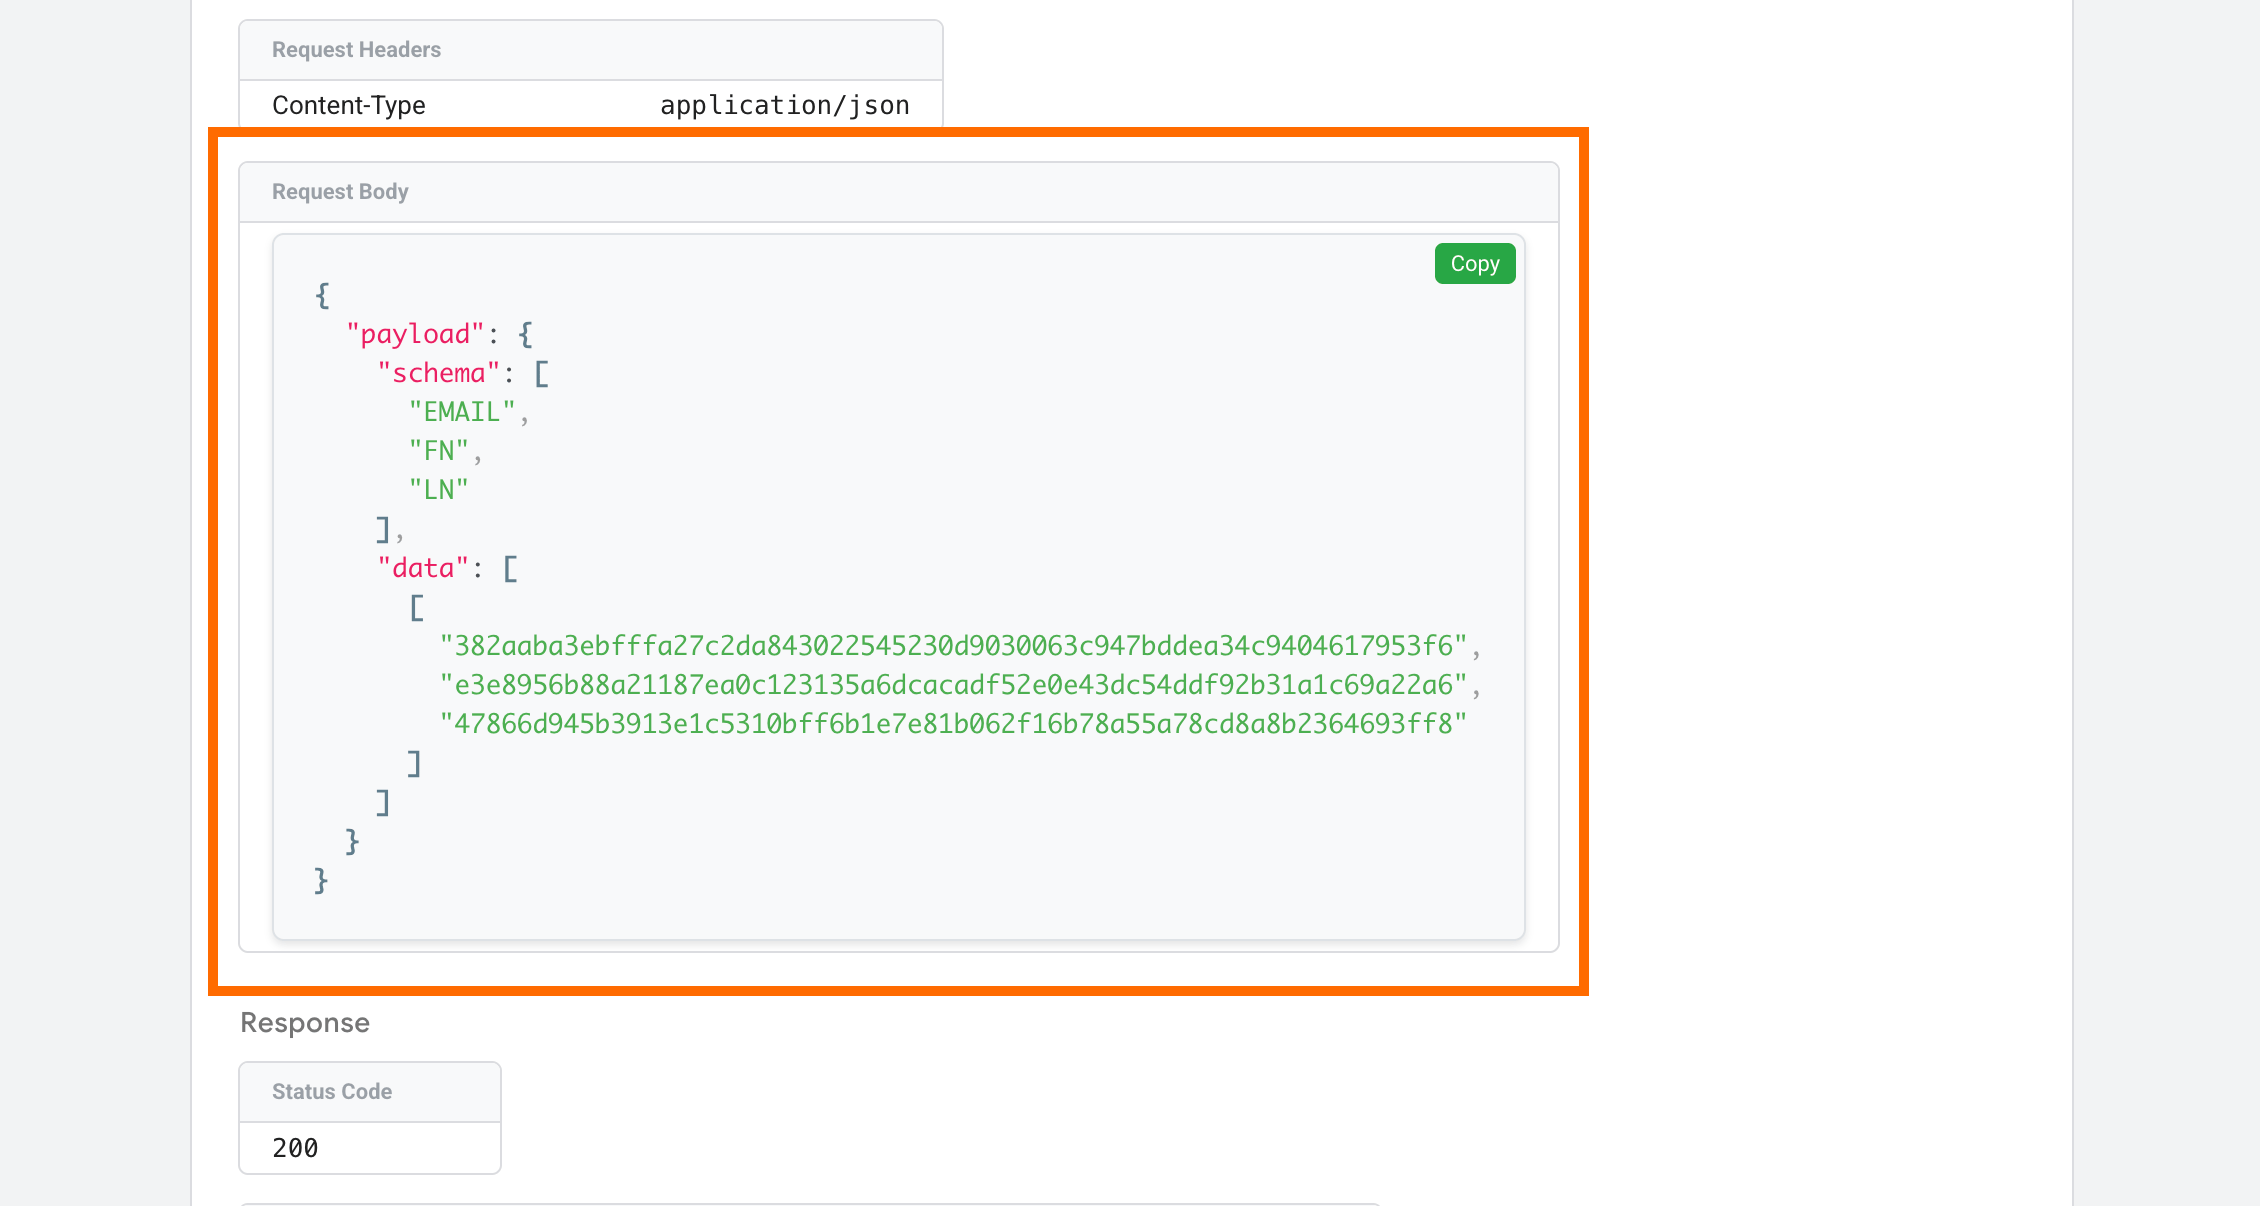
3. Click on "Outgoing HTTP Requests from Server" - this is the request that is being sent to Meta.
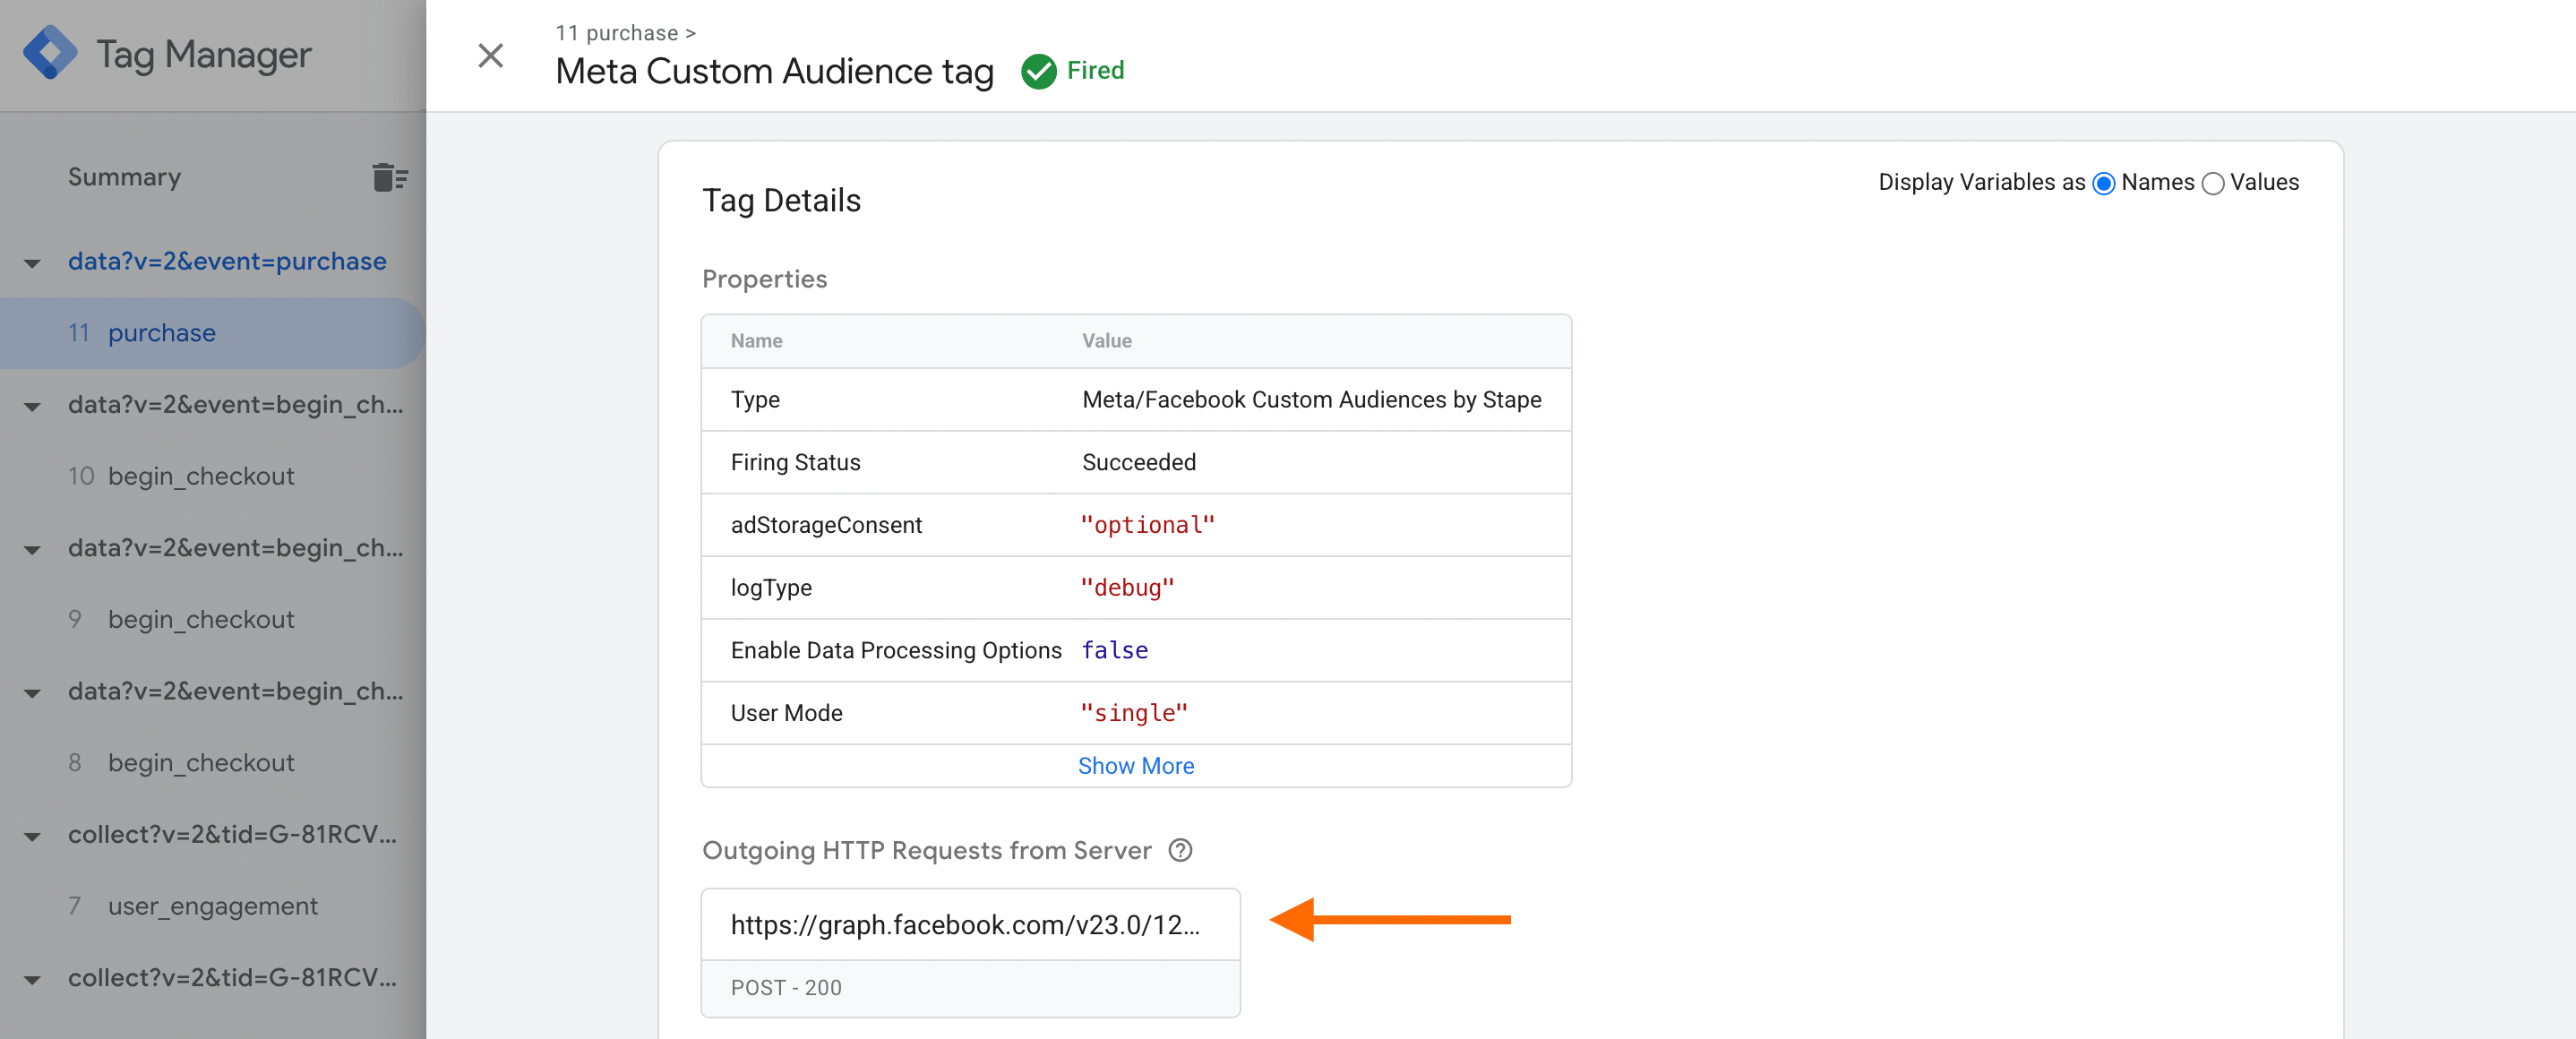
In the request body, you’ll see hashed values instead of actual emails or names. This hashing occurs before the data leaves the server, ensuring Meta receives the information in the required secure format.
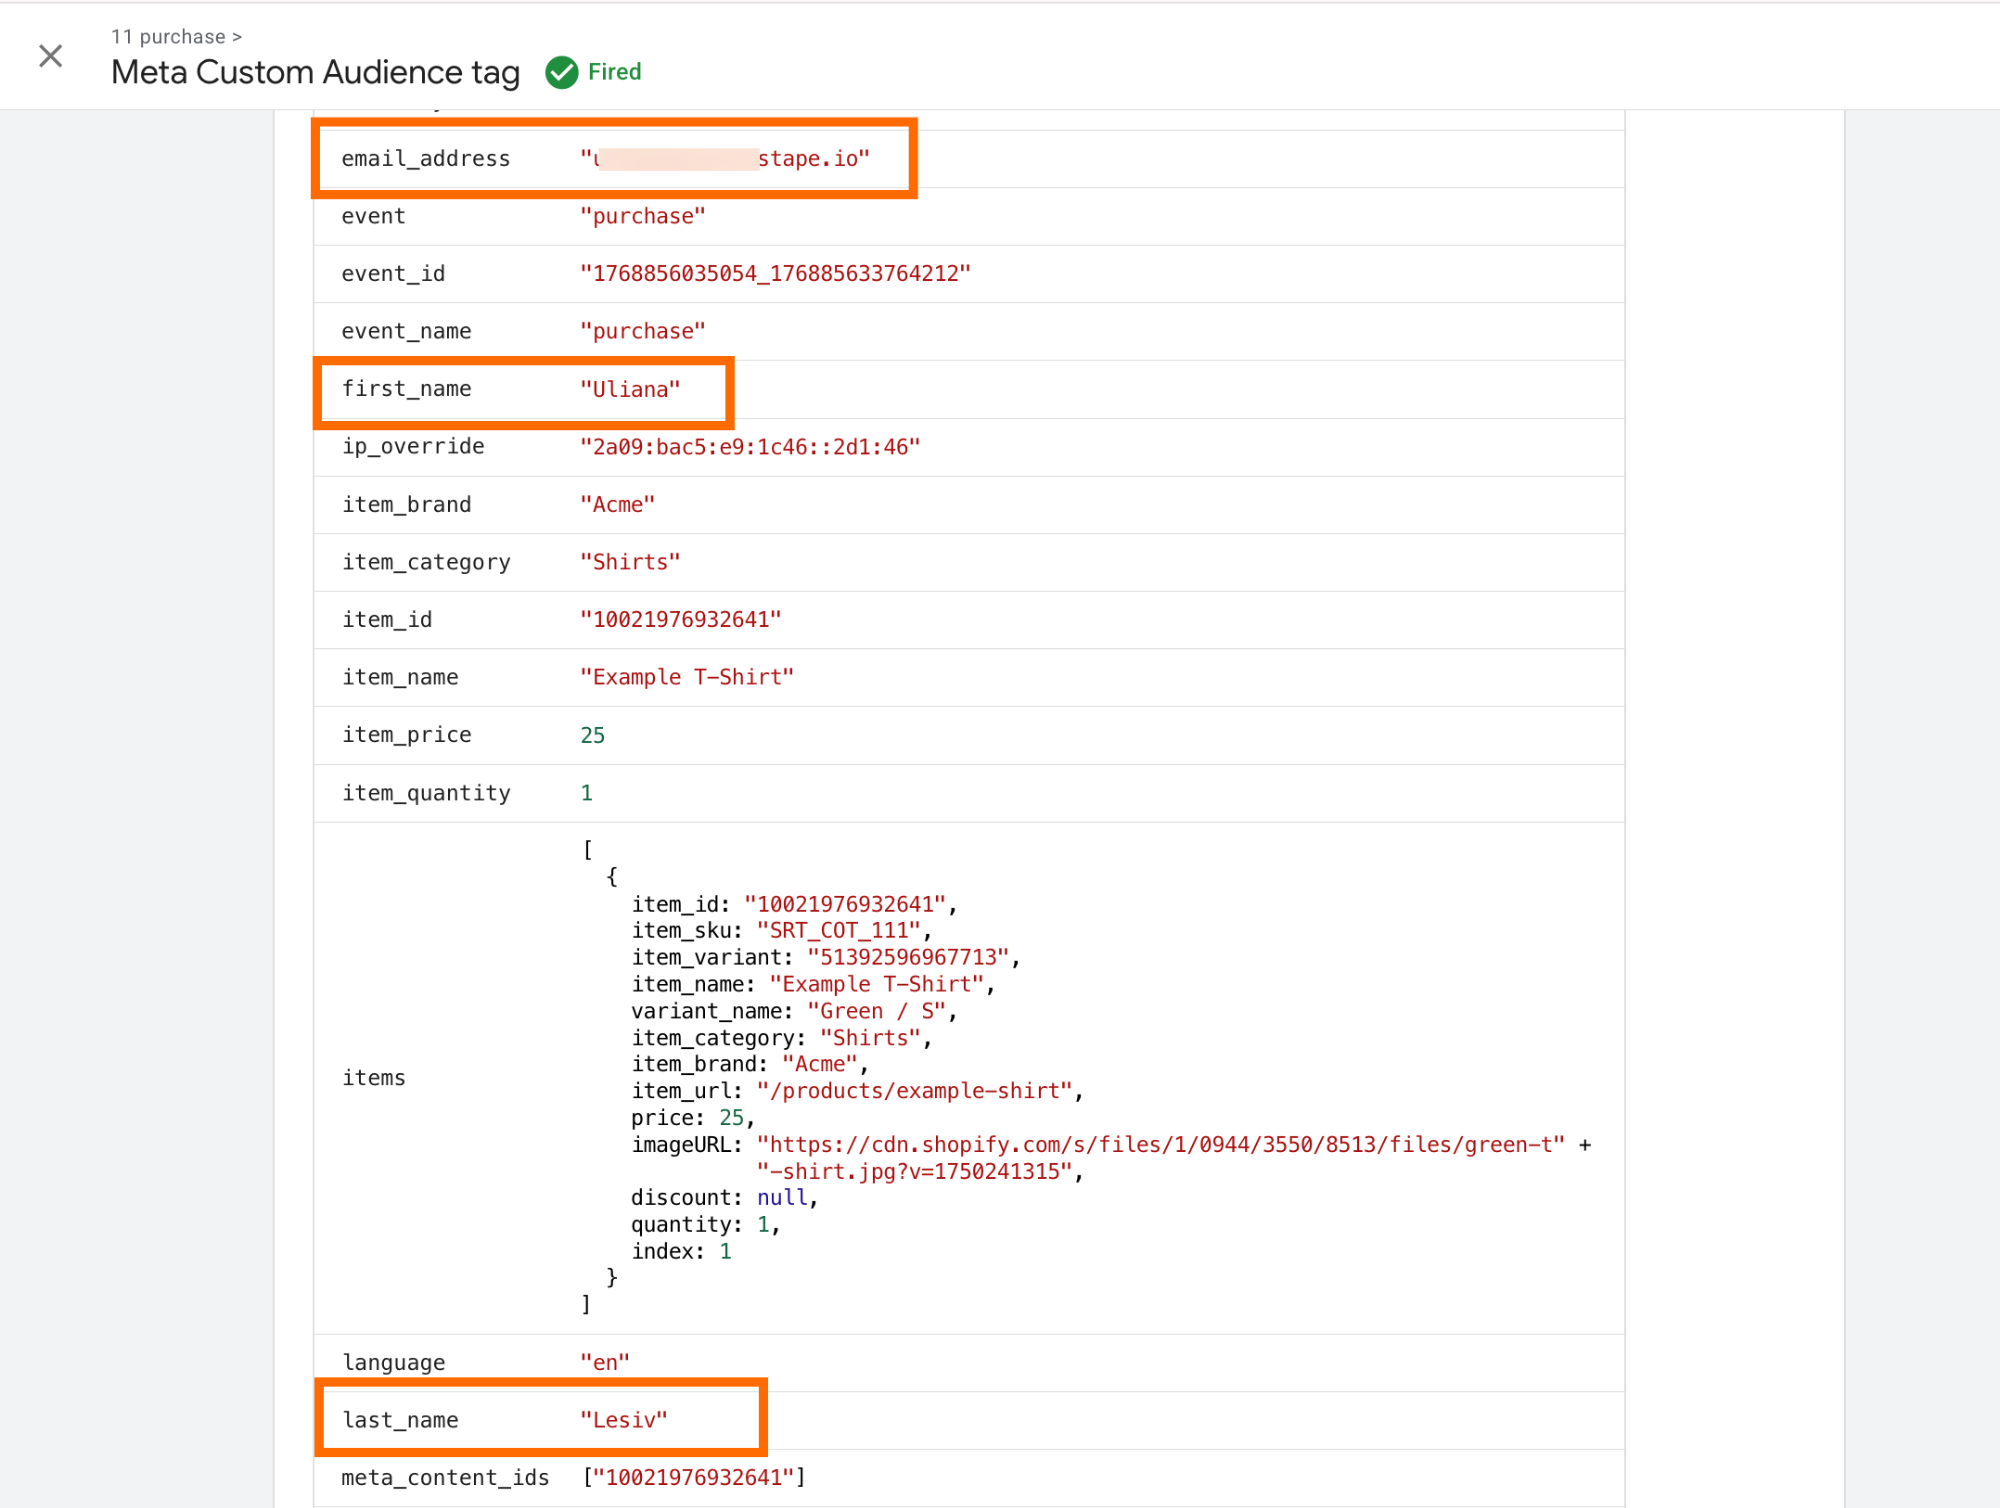
The actual data that Meta will receive and process can be viewed in the tag details:
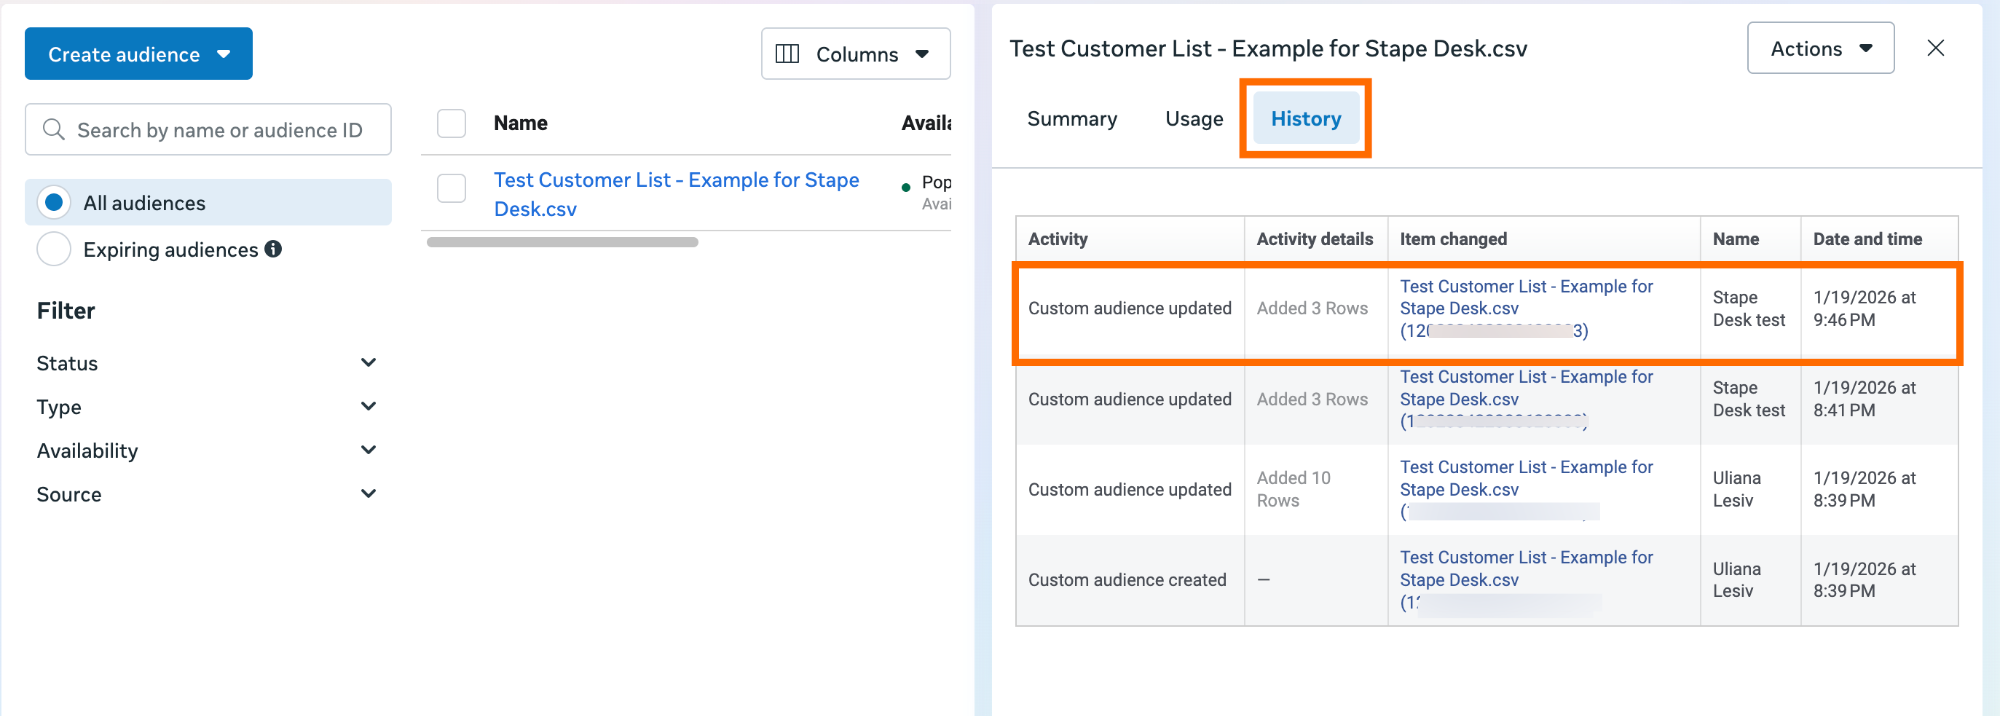
4. Check whether Meta actually receives the data.
Go to Audiences, select the custom audience you’re sending data to, then open the History tab - any updates should be visible there.
In case of difficulties with testing the configuration, refer to our guide on debugging and monitoring server-side configuration.
Was this article helpful?
Comments