Google Data Manager API Conversion Events tag
Updated Jul 8, 2026
The Google Data Manager API Conversion Events tag allows you to transmit conversion events directly to Google’s advertising platforms (such as Google Ads) via the Data Manager API. The tag supports submitting one or multiple conversion events within a single request and provides functionality for managing user data, consent signals, ad IDs, and custom parameters.
Benefits of using the Google Data Manager API Conversion Events tag
- Accurate click attribution. It supports all necessary ad identifiers, including gclid, gbraid, and wbraid, along with Landing Page User Agent and IP Address, which are important for accurate click attribution.
- Data enrichment. The tag allows for sending data, including Conversion Information (value, currency, transaction ID), User Data (email, address, phone), Device Information, User Properties (e.g., Customer Type), and detailed Cart Data (items, merchant ID) for eCommerce.
- Batch uploads. The tag supports a Multiple Conversion Events mode, allowing users to send a pre-formatted JSON array of up to 2,000 conversions in a single request. This is highly efficient for high-volume sites or batch uploads.
Precise data tracking. By sending data server-to-server, the tag ensures accurate conversion tracking that reduces the impact of client-side limitations, such as ad-blockers and Intelligent Tracking Prevention (ITP) from browsers (like Safari).
Pre-requisites
Regardless of the solution you choose to send data to Google Ads, you will need the following to get started:
- Configured the server GTM container.
- Set up data transfer from the web to the server GTM container. You can set it up using server-side Google Analytics 4 or Data Tag/Data Client.
- Select and set up an authentication method.
- Use Stape's connection (recommended) - the simplest way to manage authentication, just enable the Data Manager API Connection in your Stape admin account.
- Use your own Google credentials - choose this if you’re not using Stape’s services or are on Stape’s free plan.
Select the authentication option and follow the instructions:
Data Manager API connection
Sign in to the Data Manager API Connection from your Stape admin panel.
To do this, log in to your Stape account → open the relevant container → go to the Connections tab → and click Sign in next to Data Manager API. Make sure you use a Google account that has access to the Google Ads account you intend to send data to.
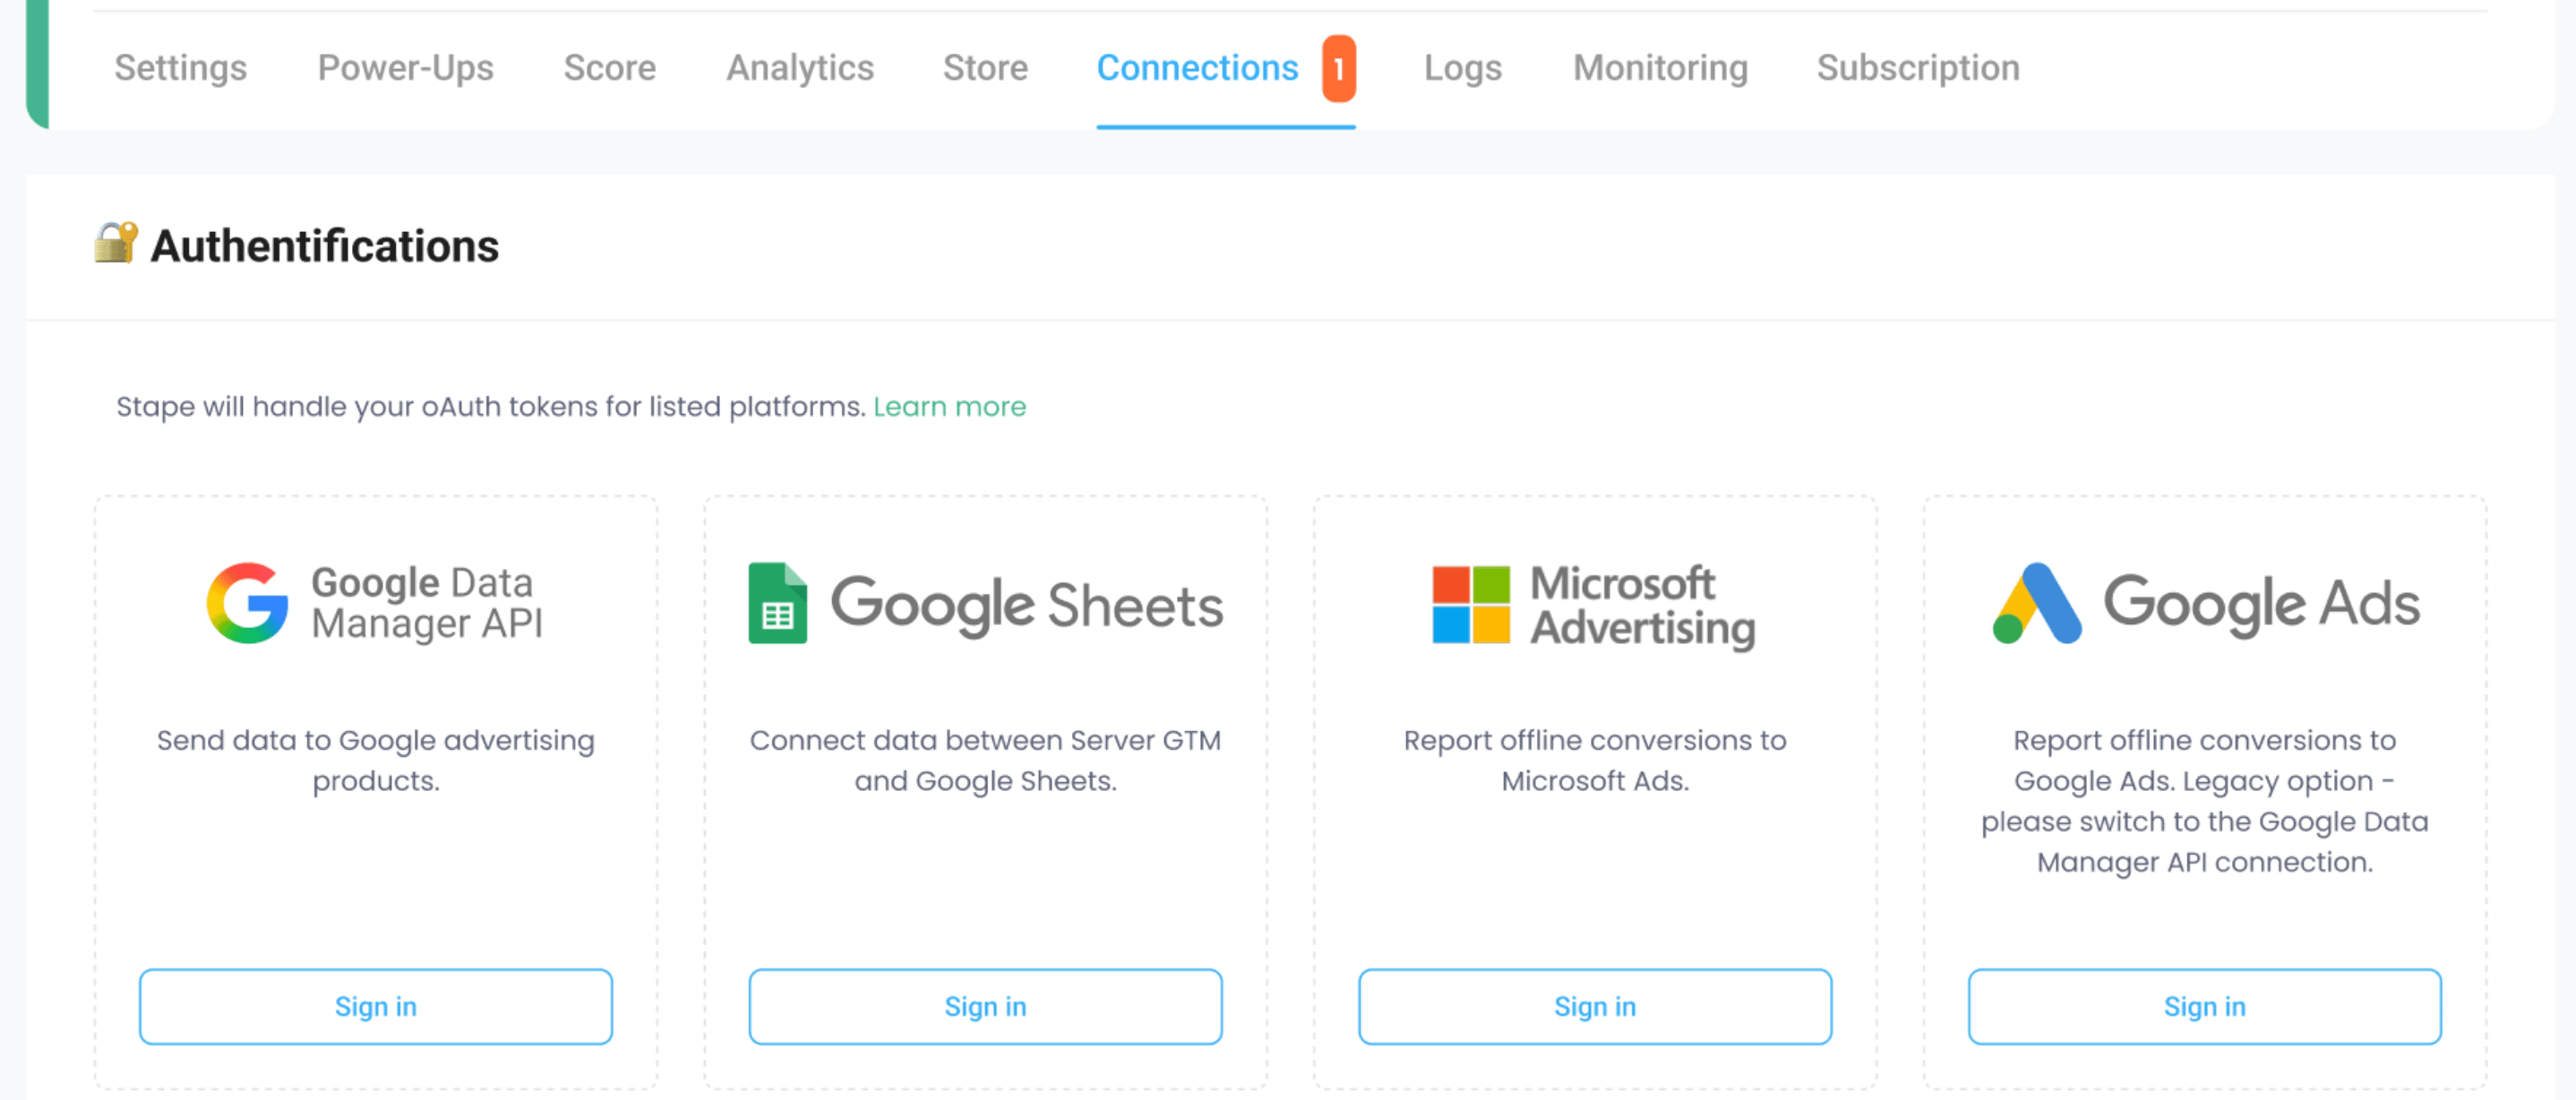
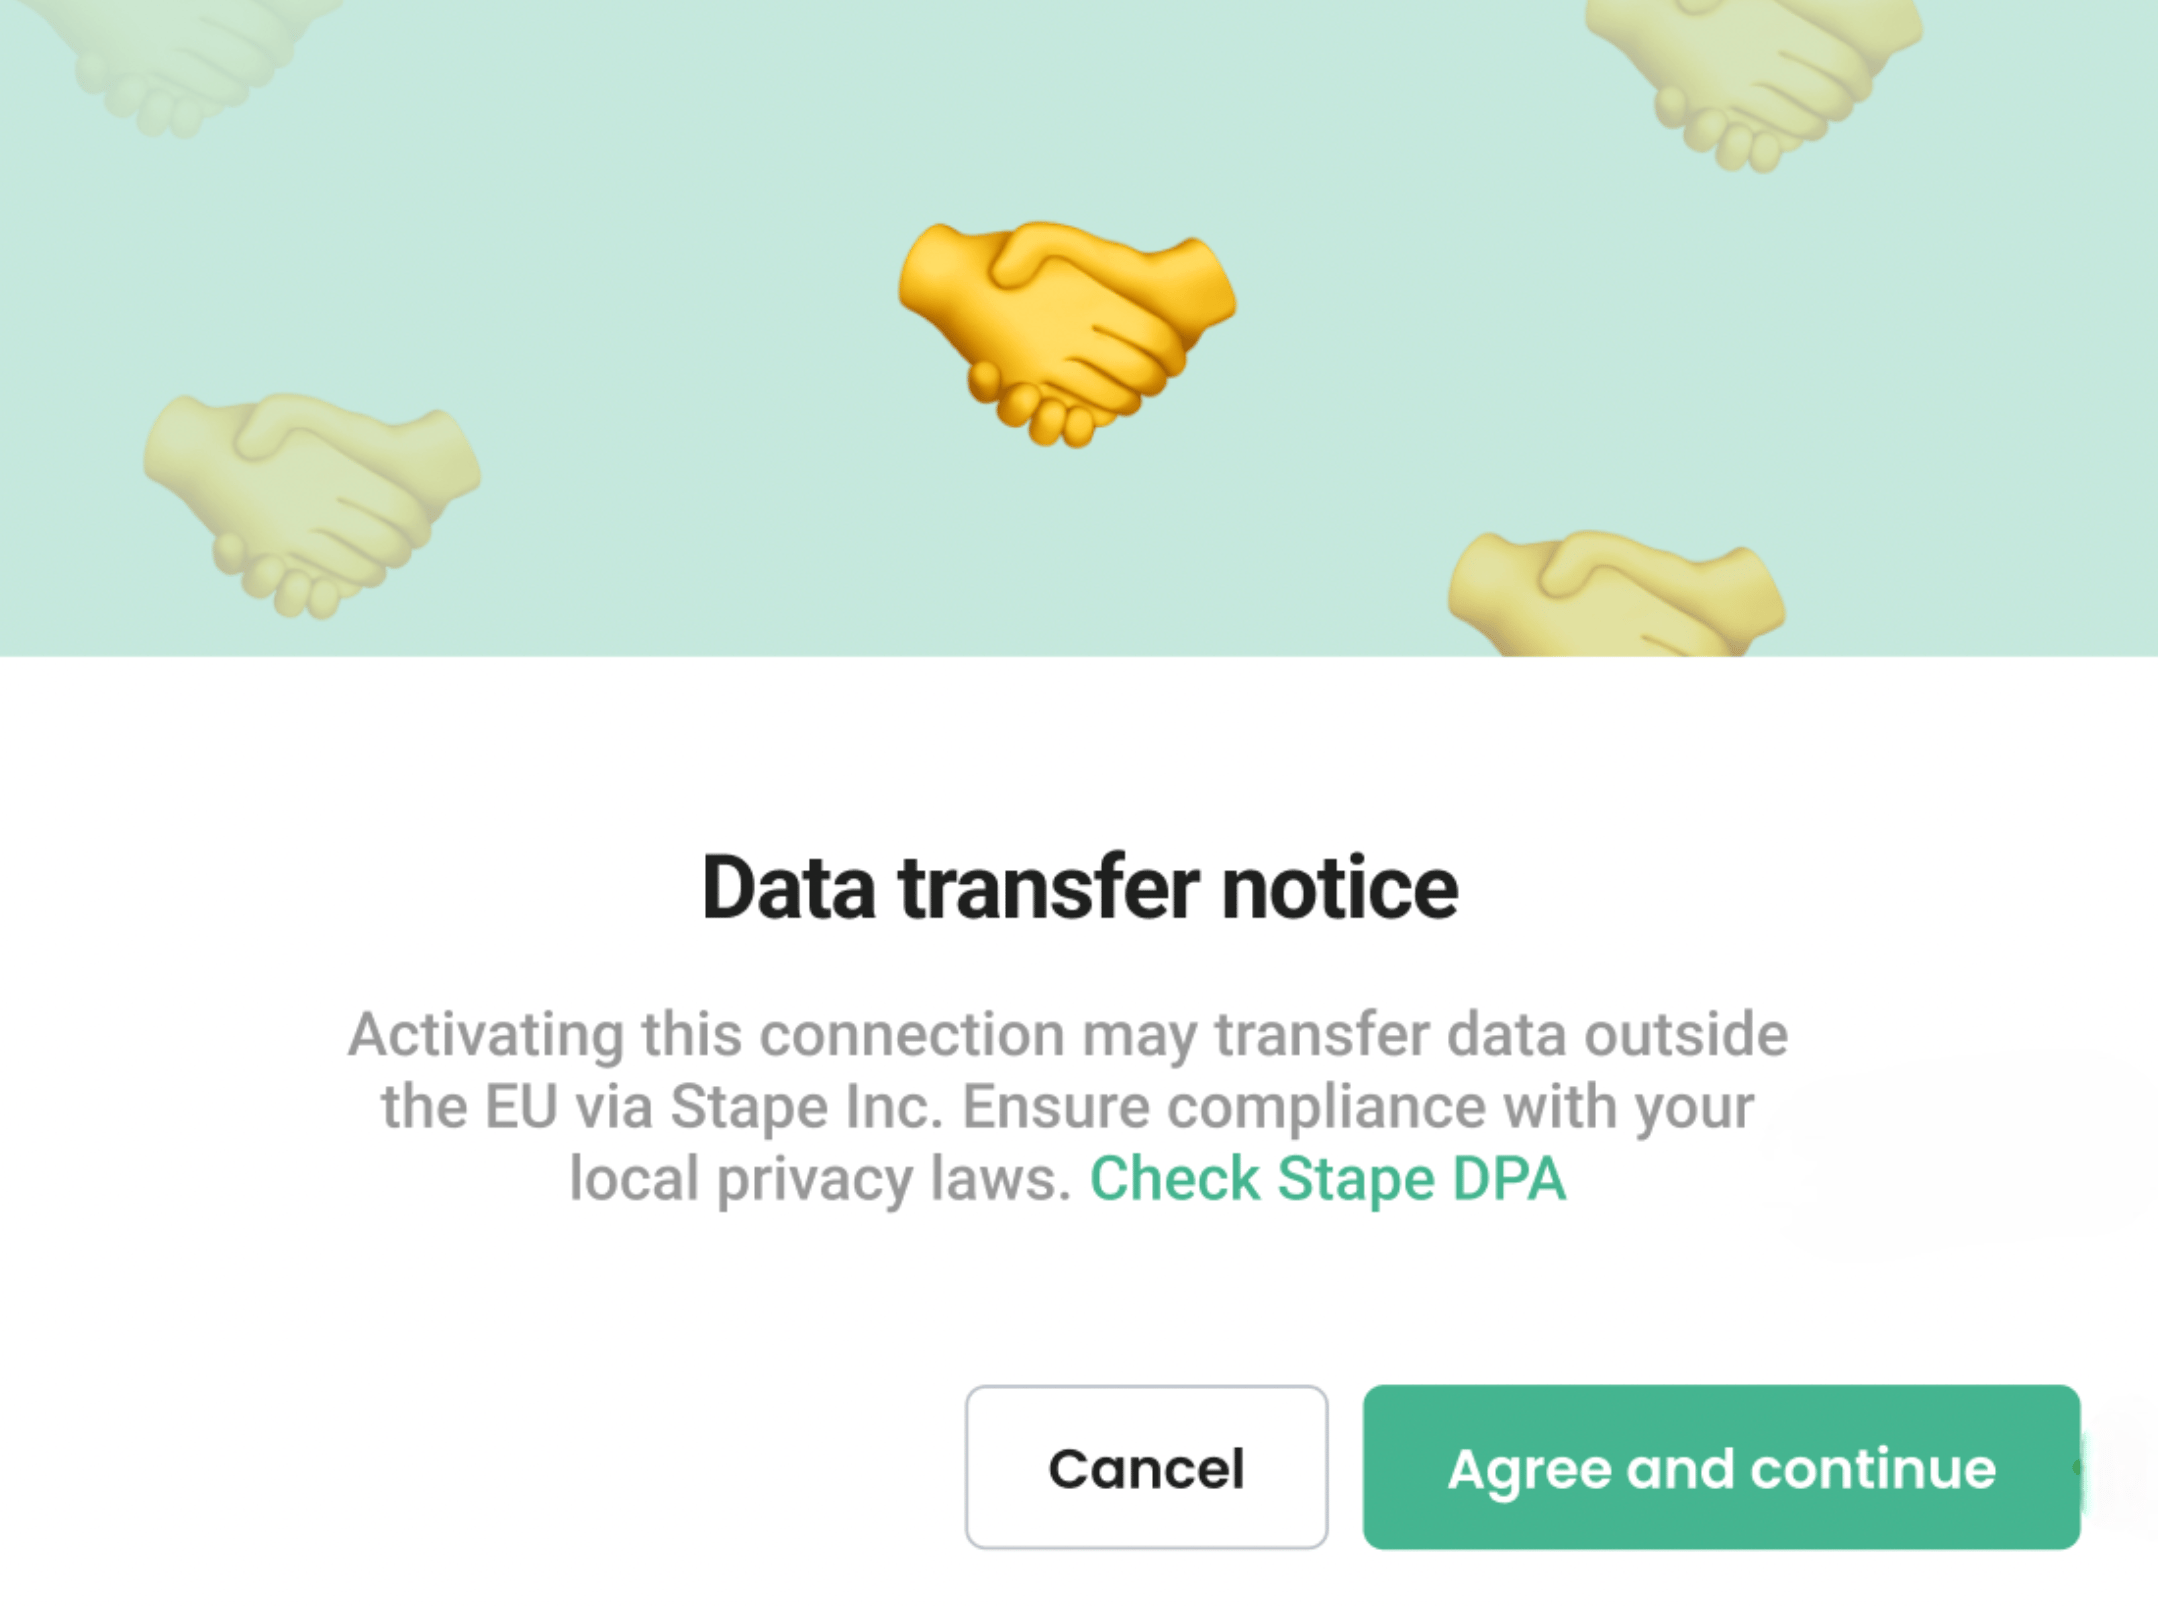
If you’re located in the EU, please review the Stape DPA, as enabling this connection may result in data being transferred outside the EU by Stape Inc.
Own Google Credentials
Using Service Account impersonation is the simplest way to authenticate when choosing the Own Google Credentials method.
Follow these steps to set it up:
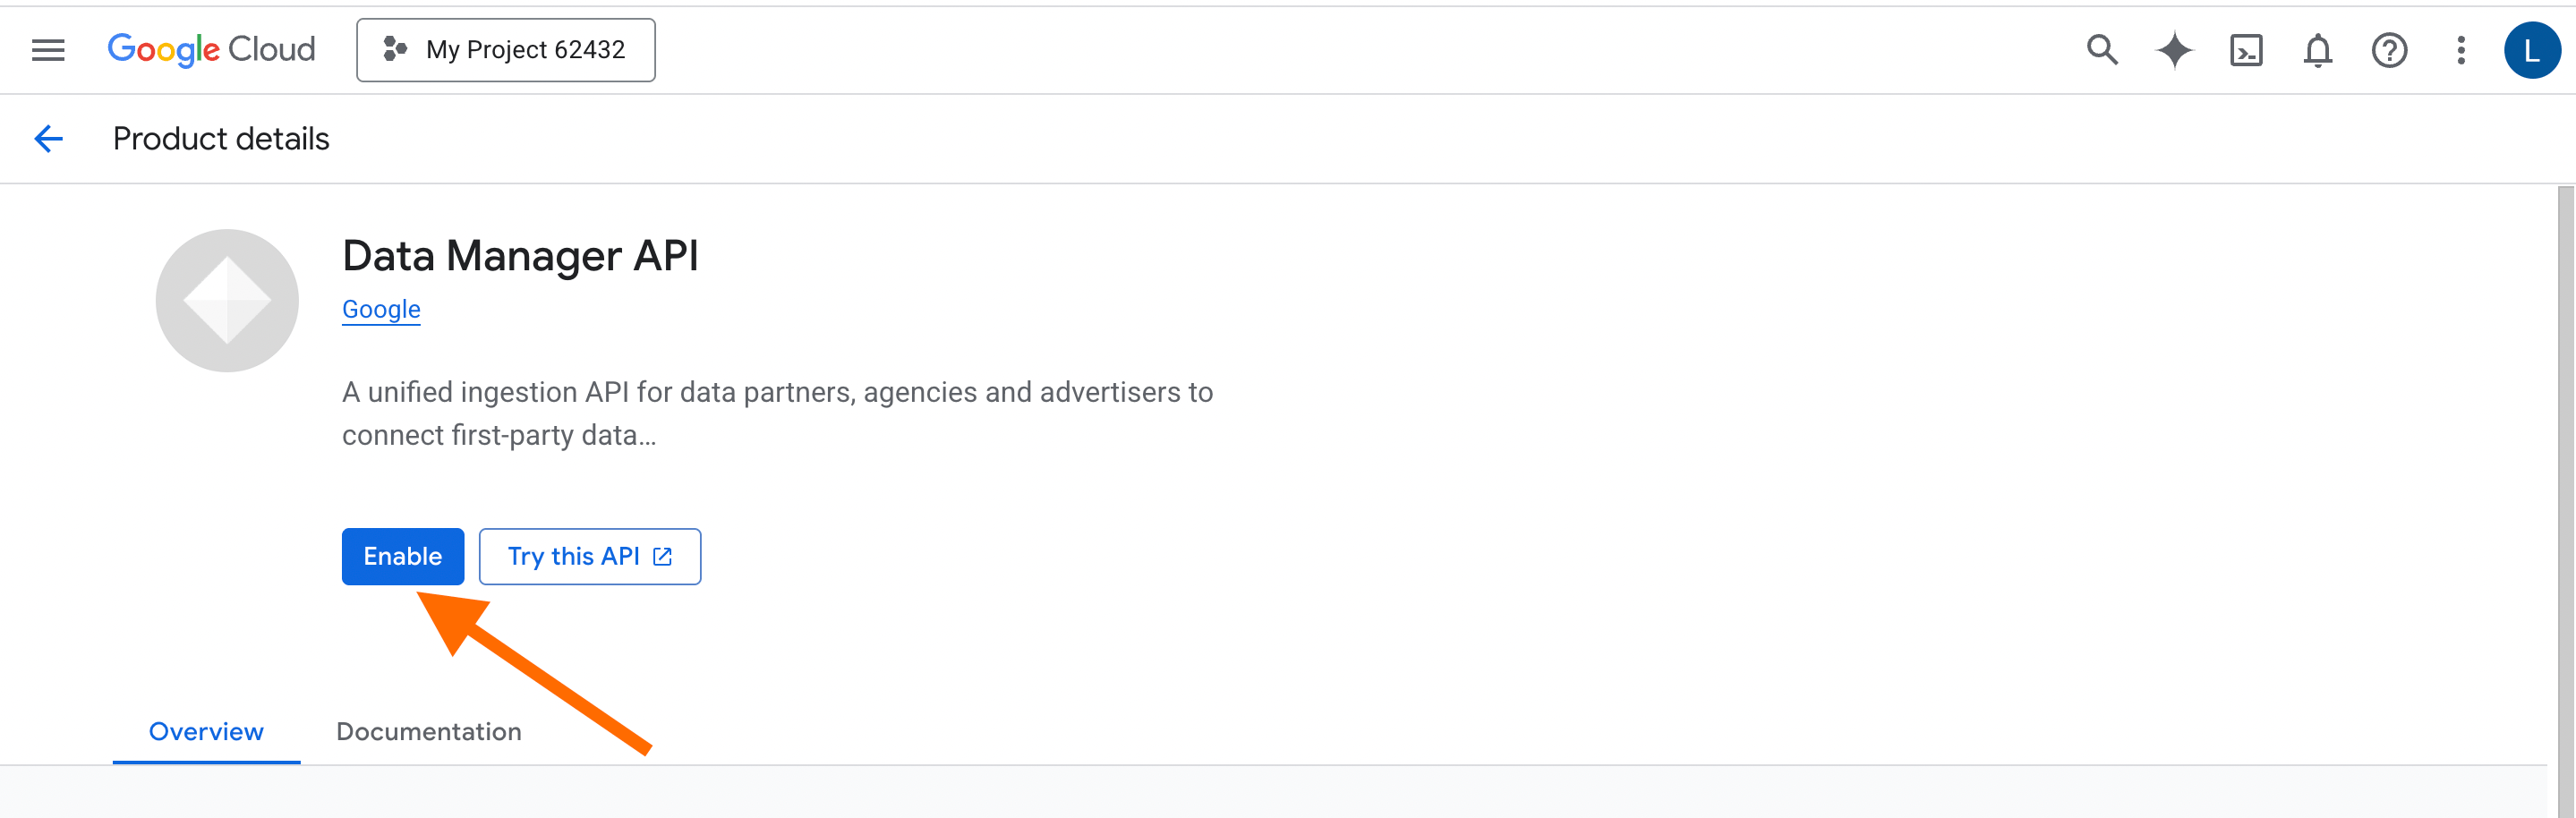
1. Open the API Console in Google Cloud Platform. Select your project → go to Library → search for Data Manager API → click Enable.
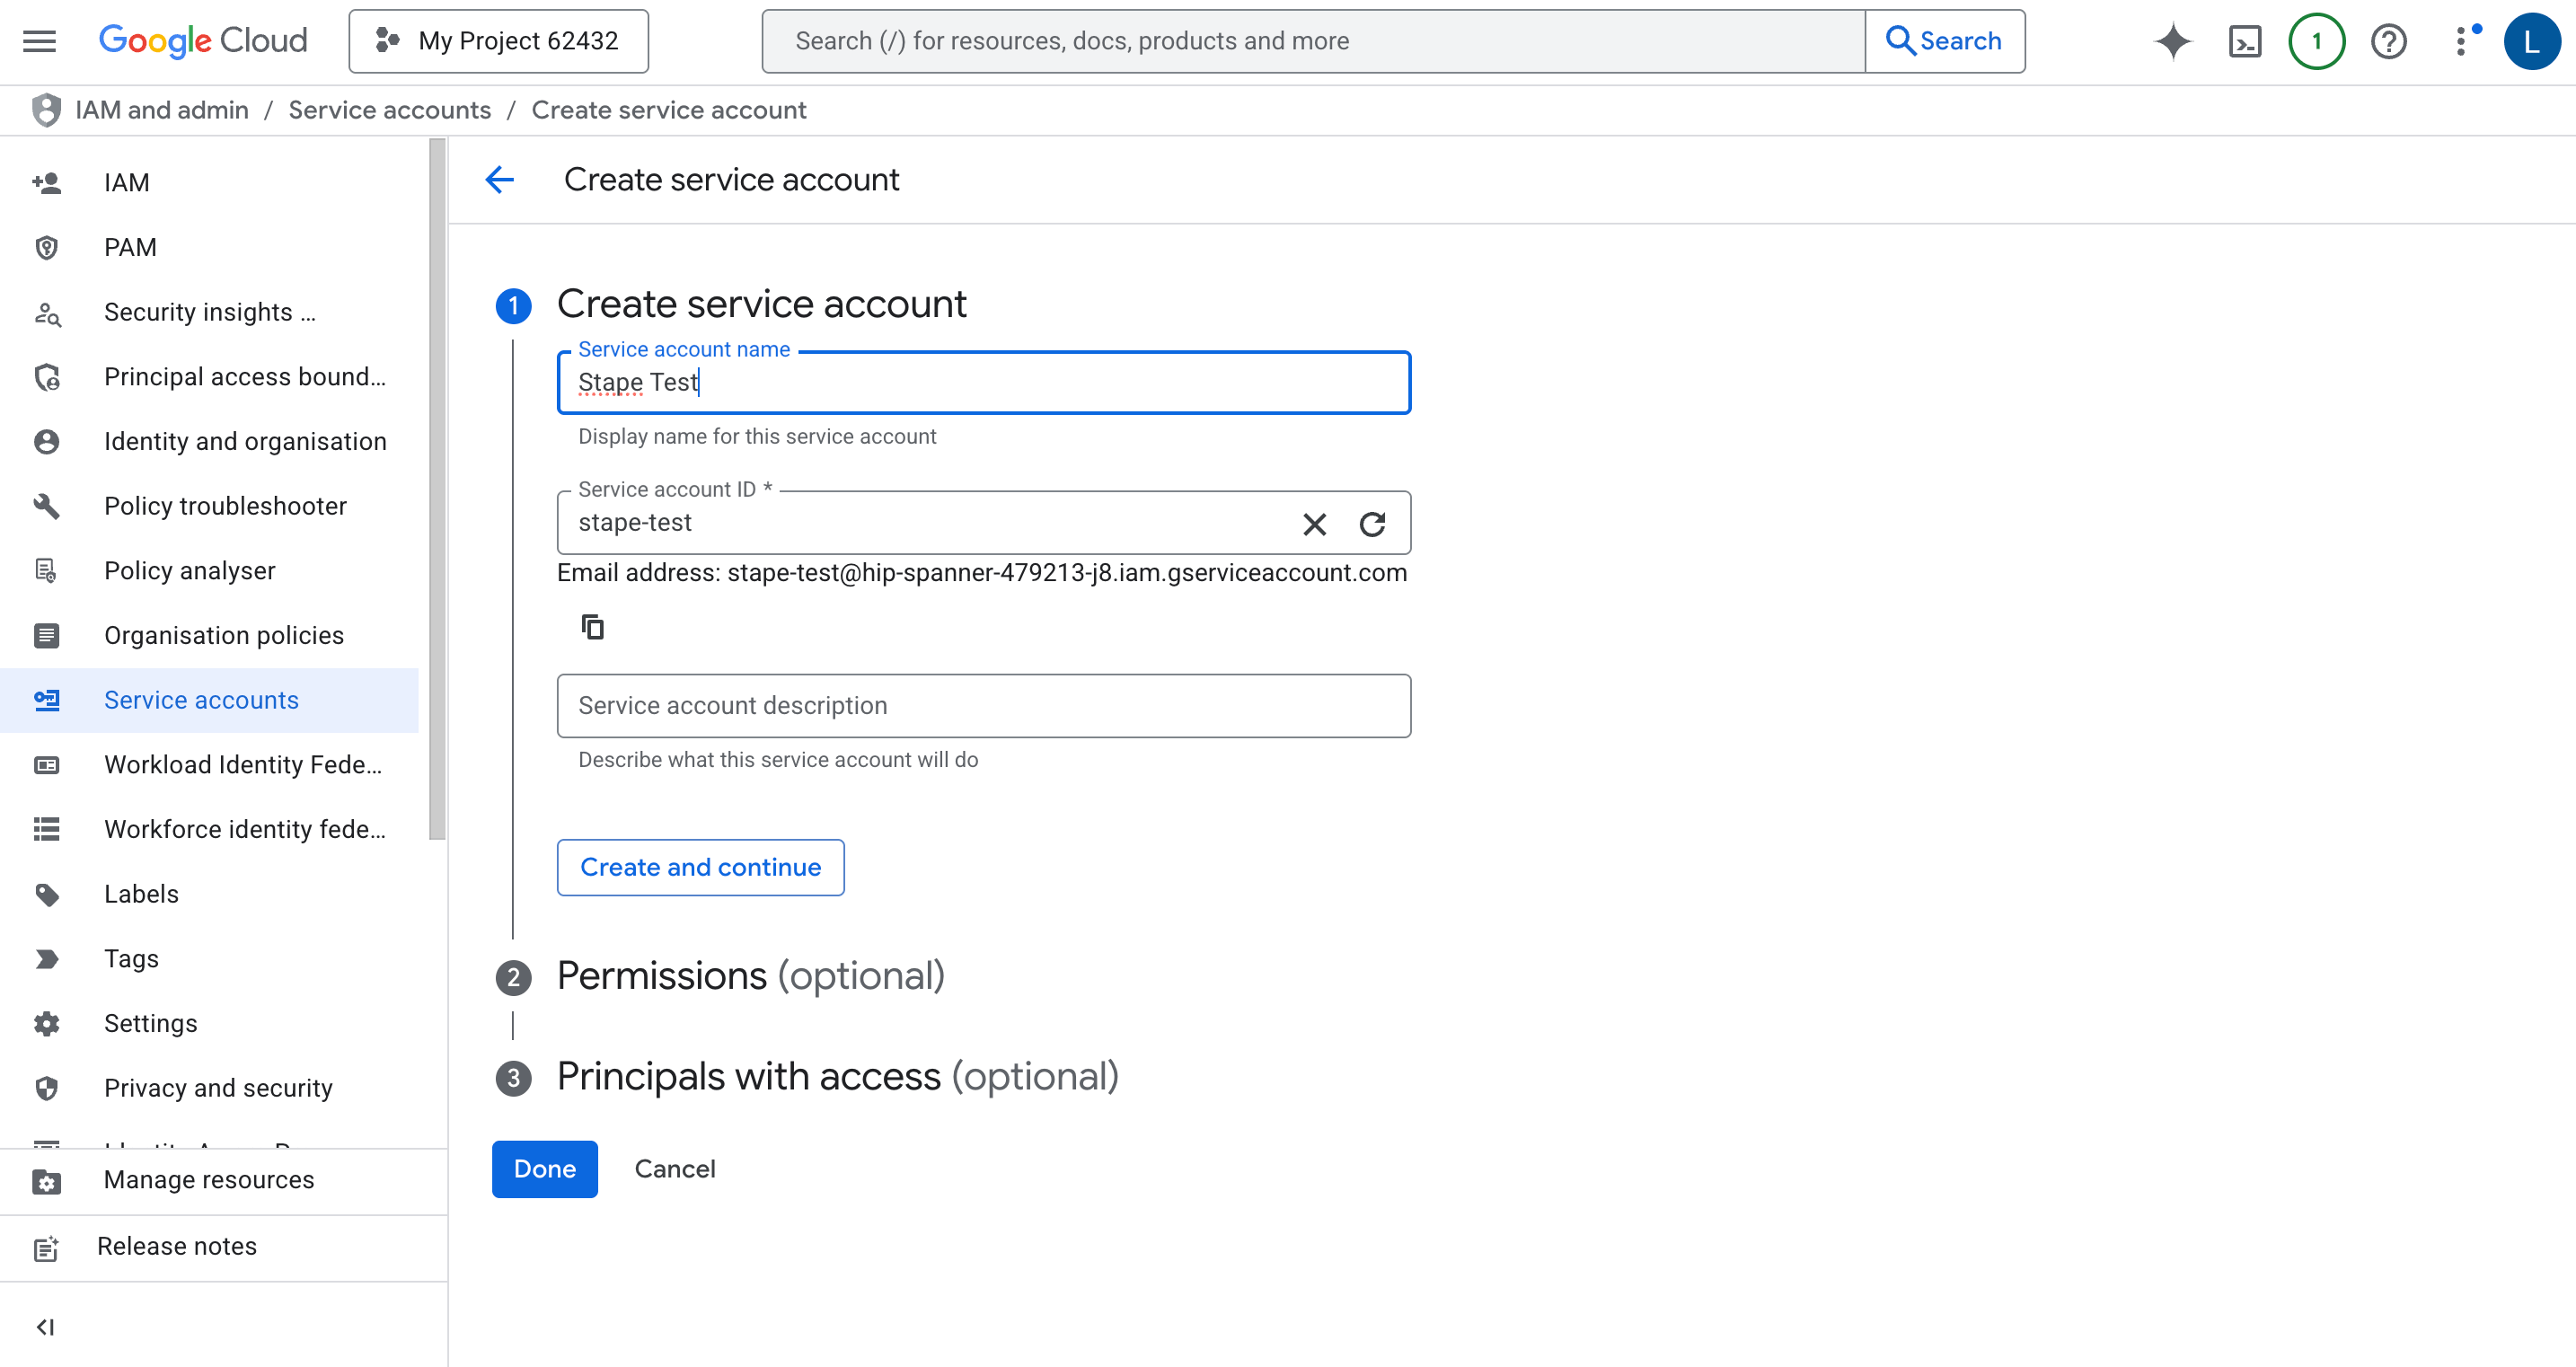
2. Create a Service Account within this project.
Go to Create Service Account → enter a name (the Service Account ID will be generated from it) → optionally assign permissions or principals → click Done.
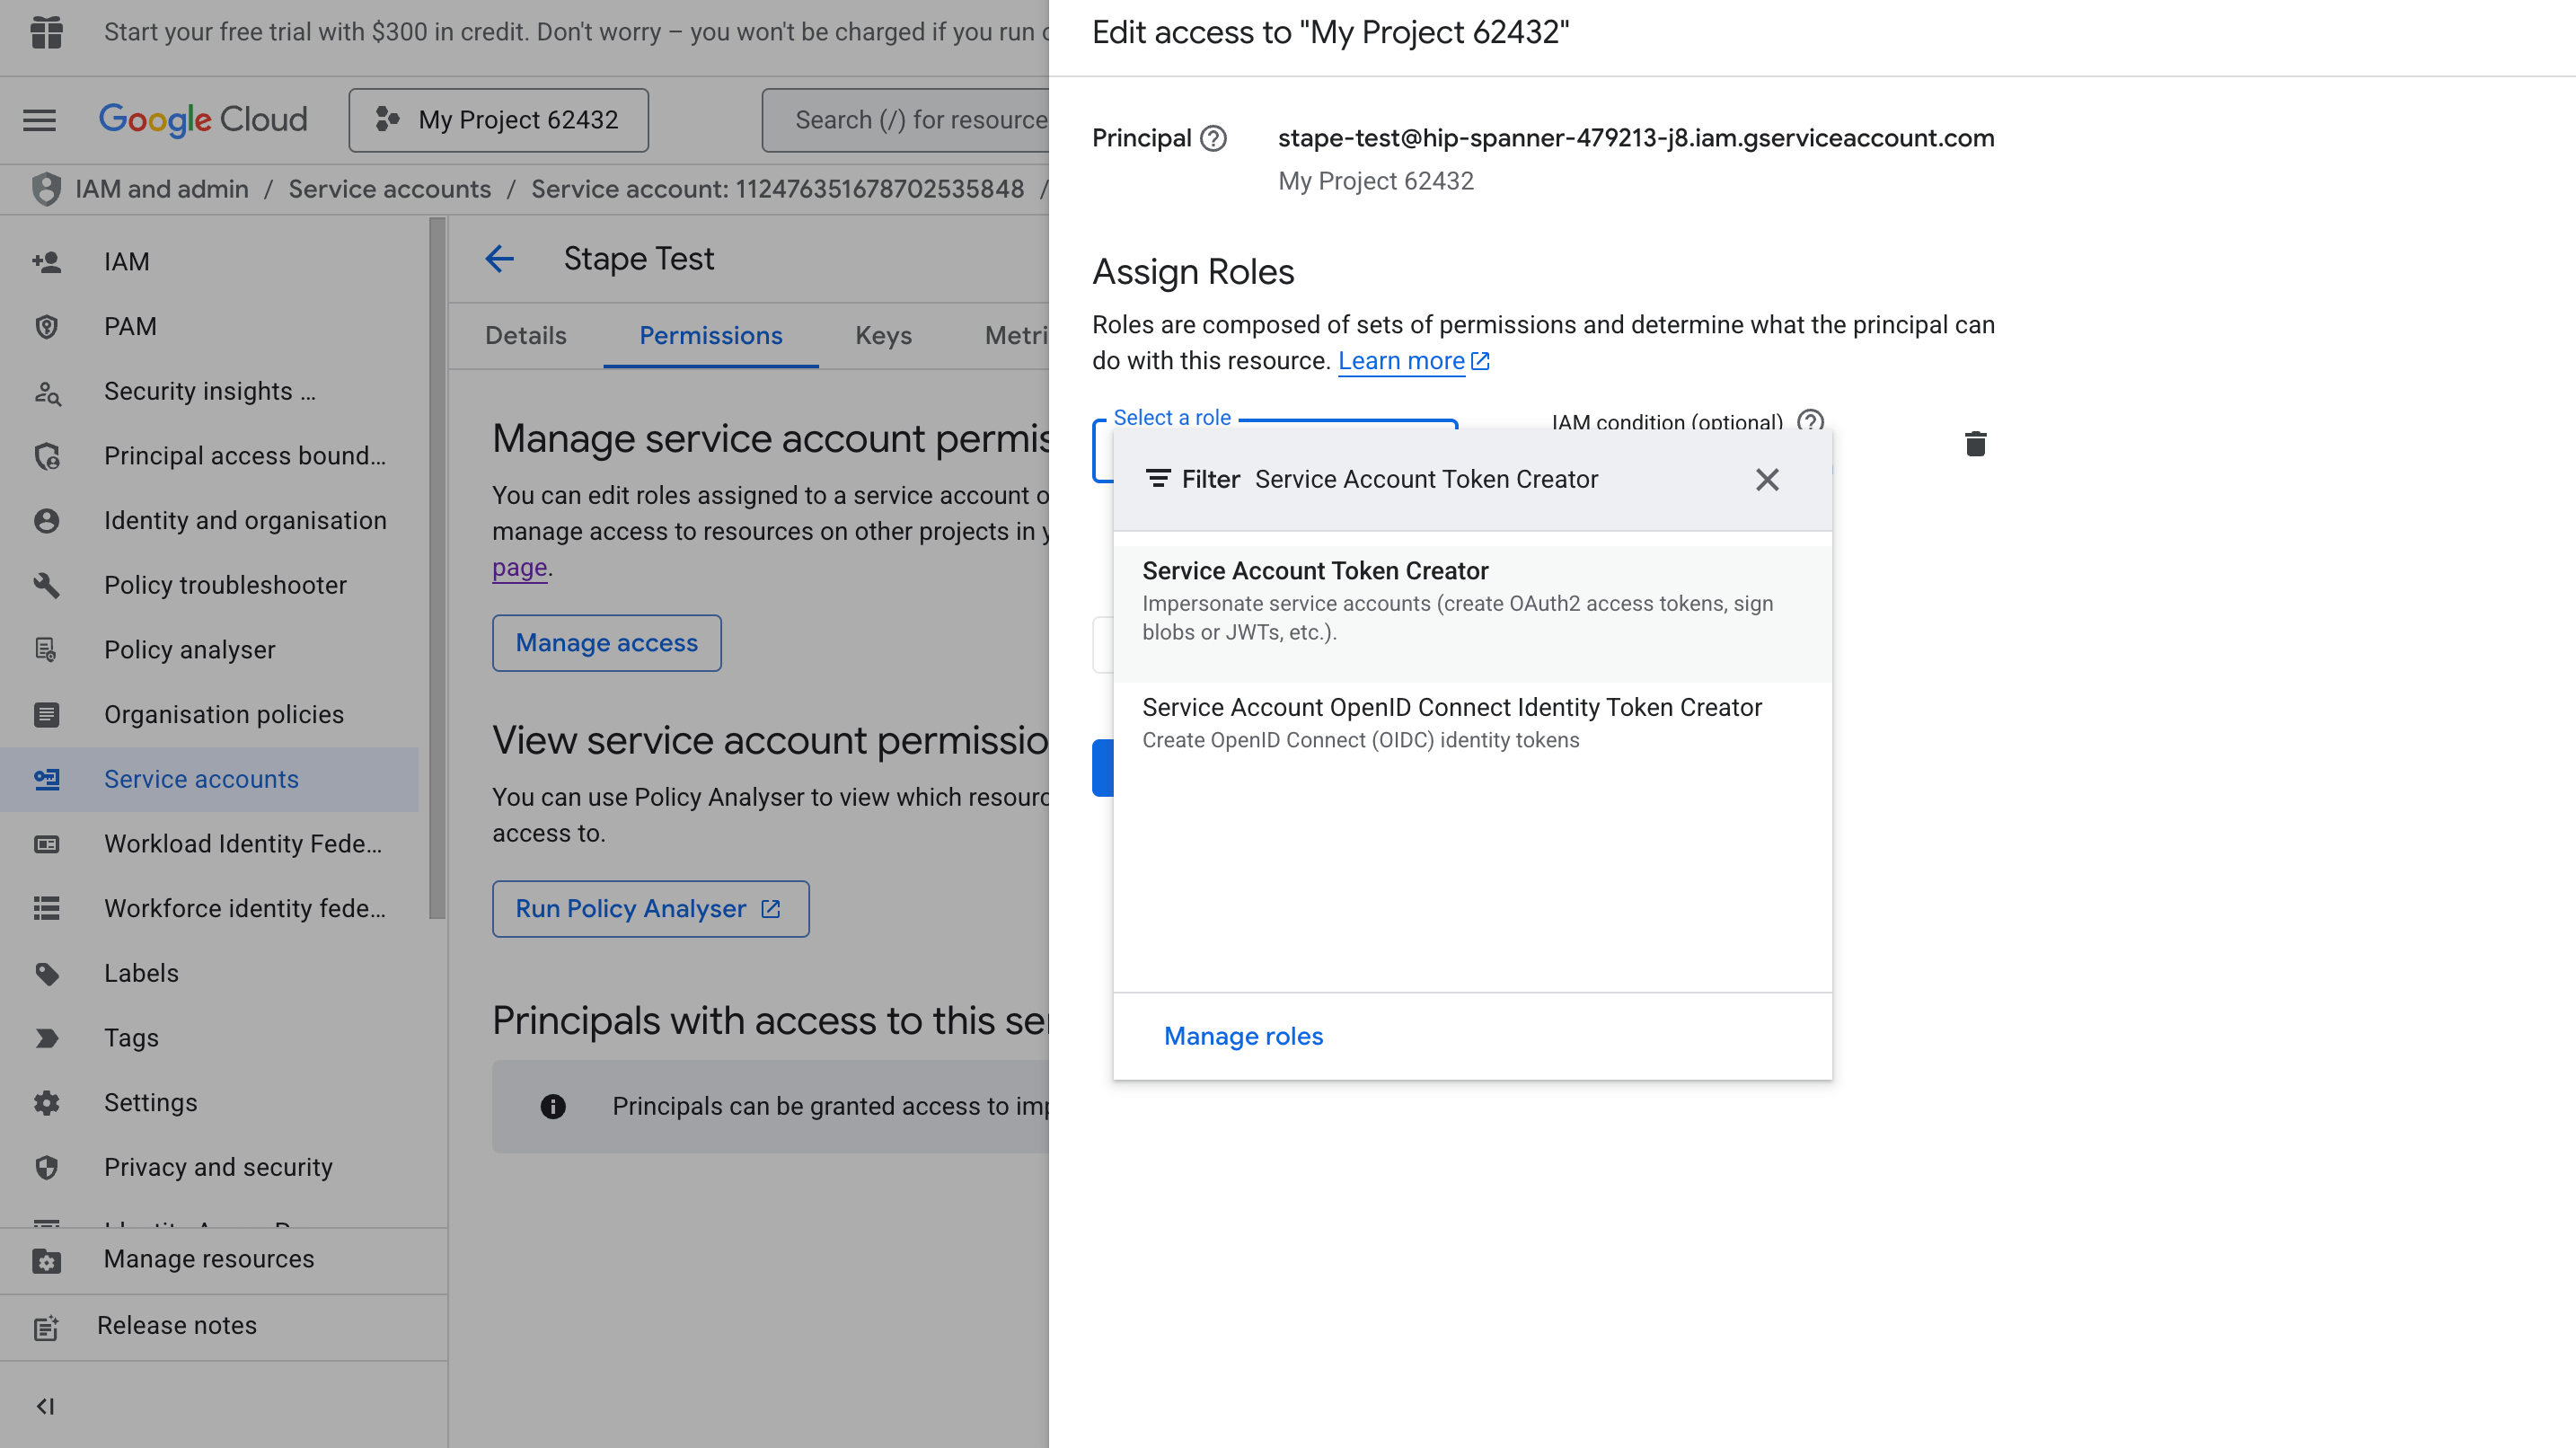
3. Assign the Service Account Token Creator IAM role (roles/iam.serviceAccountTokenCreator) to the Service Account.
In the Service Accounts list, click the three dots next to your newly created account → Manage Permissions → Manage Access → Add role → choose Service Account Token Creator → Save.
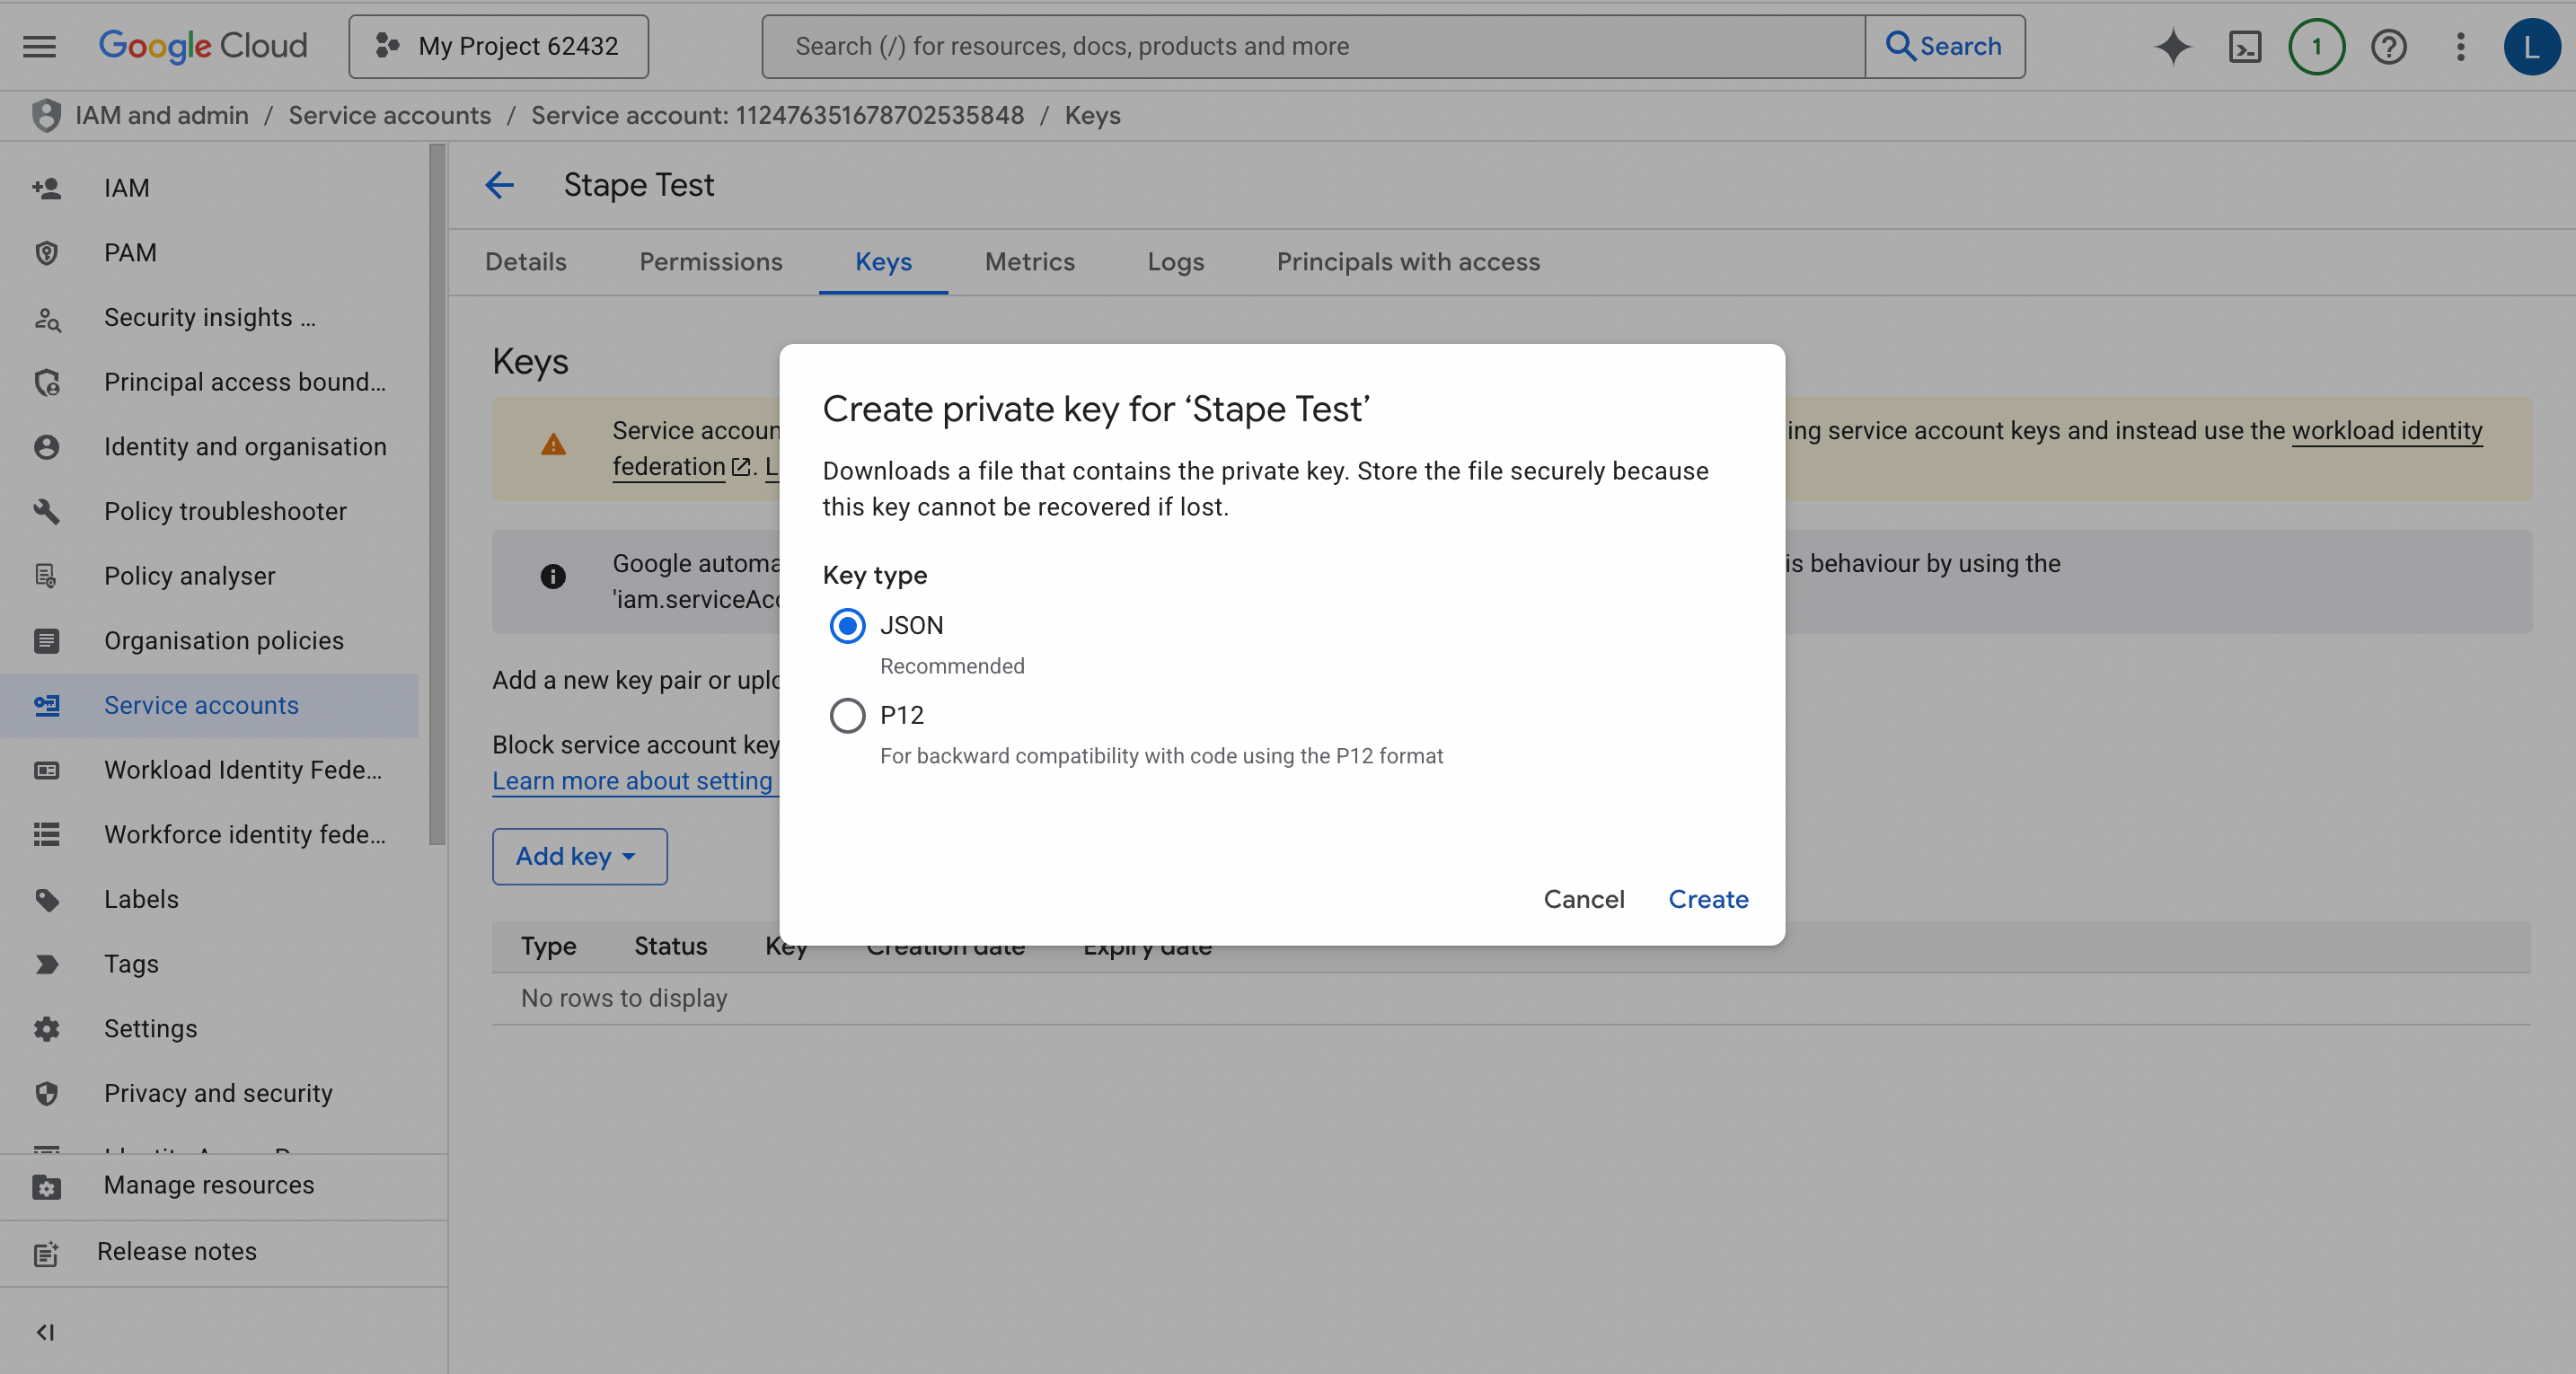
4. Generate and download a JSON key for this Service Account.
In the Service Accounts list, click the three dots → Manage Keys → Add key → Create new key → choose JSON → Create (the file will download automatically).
5. Connect the Service Account to your container using the JSON key:
- If you’re hosting on Stape, use the Service Account power-up.
- If you're hosting elsewhere, follow Google's setup instructions.
6. Give the Service Account access to the Google product you're integrating with (Google Ads, DV360, etc.). Refer to that product’s documentation for the required permissions.
How to configure the Google Data Manager API Conversion Events tag
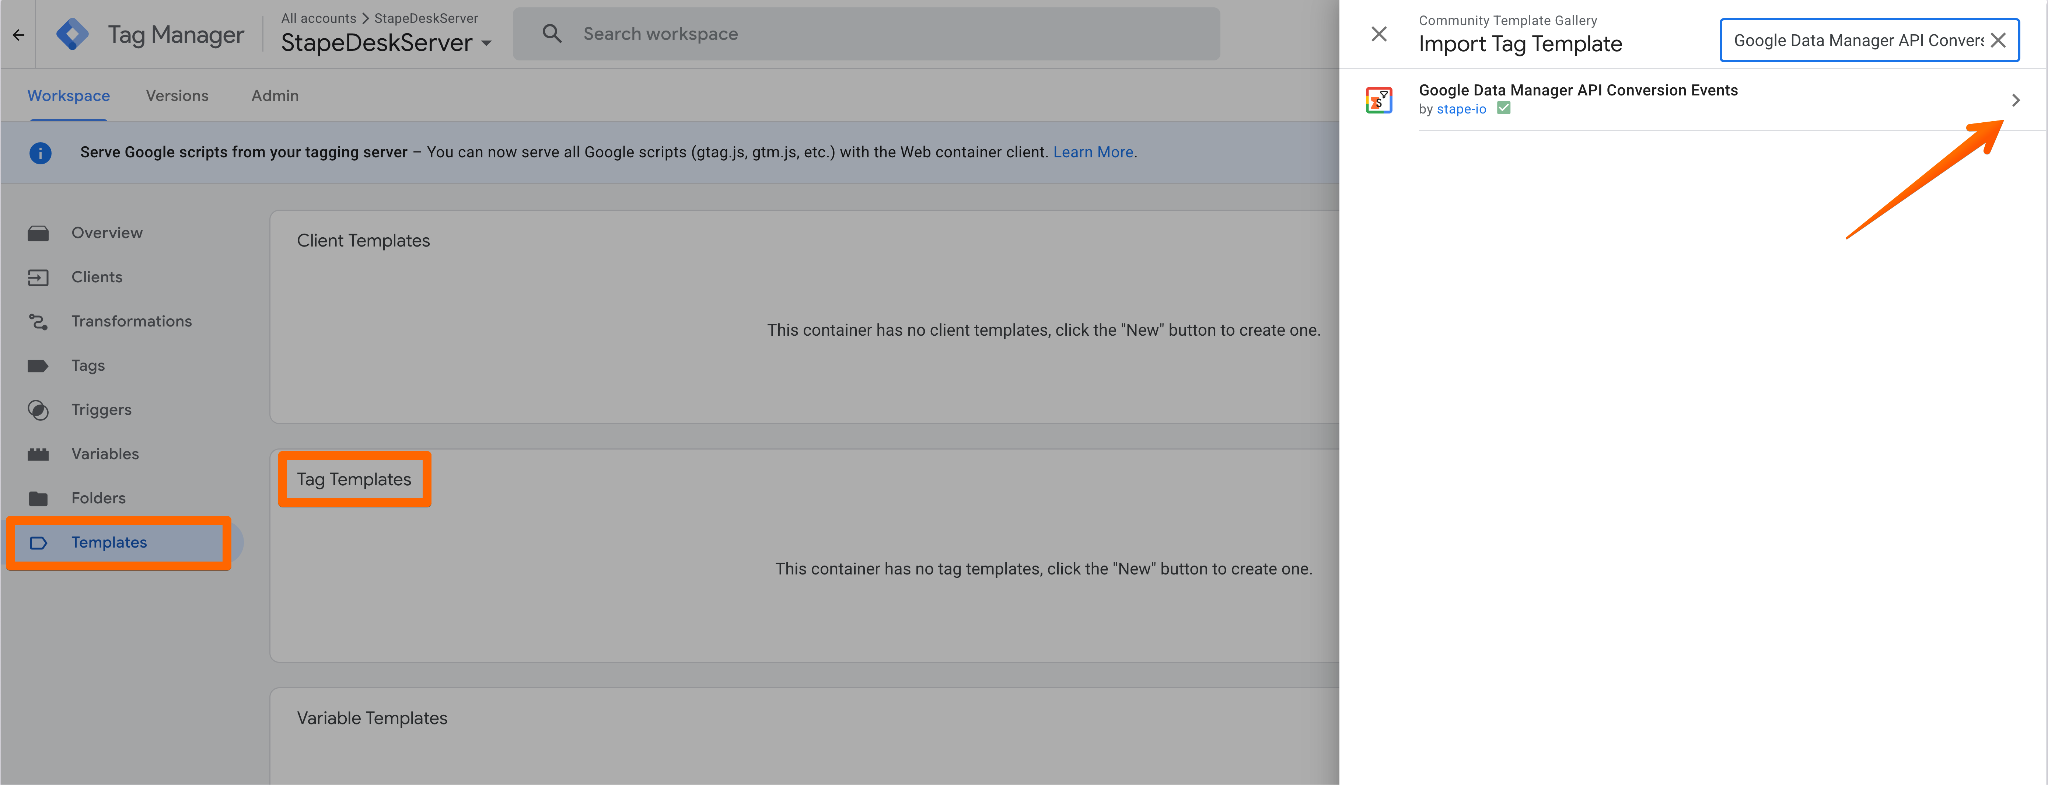
1. Add the tag to your workspace. Open your server GTM container → go to Templates → under Tag Templates, click Search gallery → find Google Data Manager API Conversion Events tag → click Add to workspace.
2. Create a new tag. Go to the Tags section → click New → choose Google Data Manager API Conversion Events as the tag type.

3. Configure the tag.
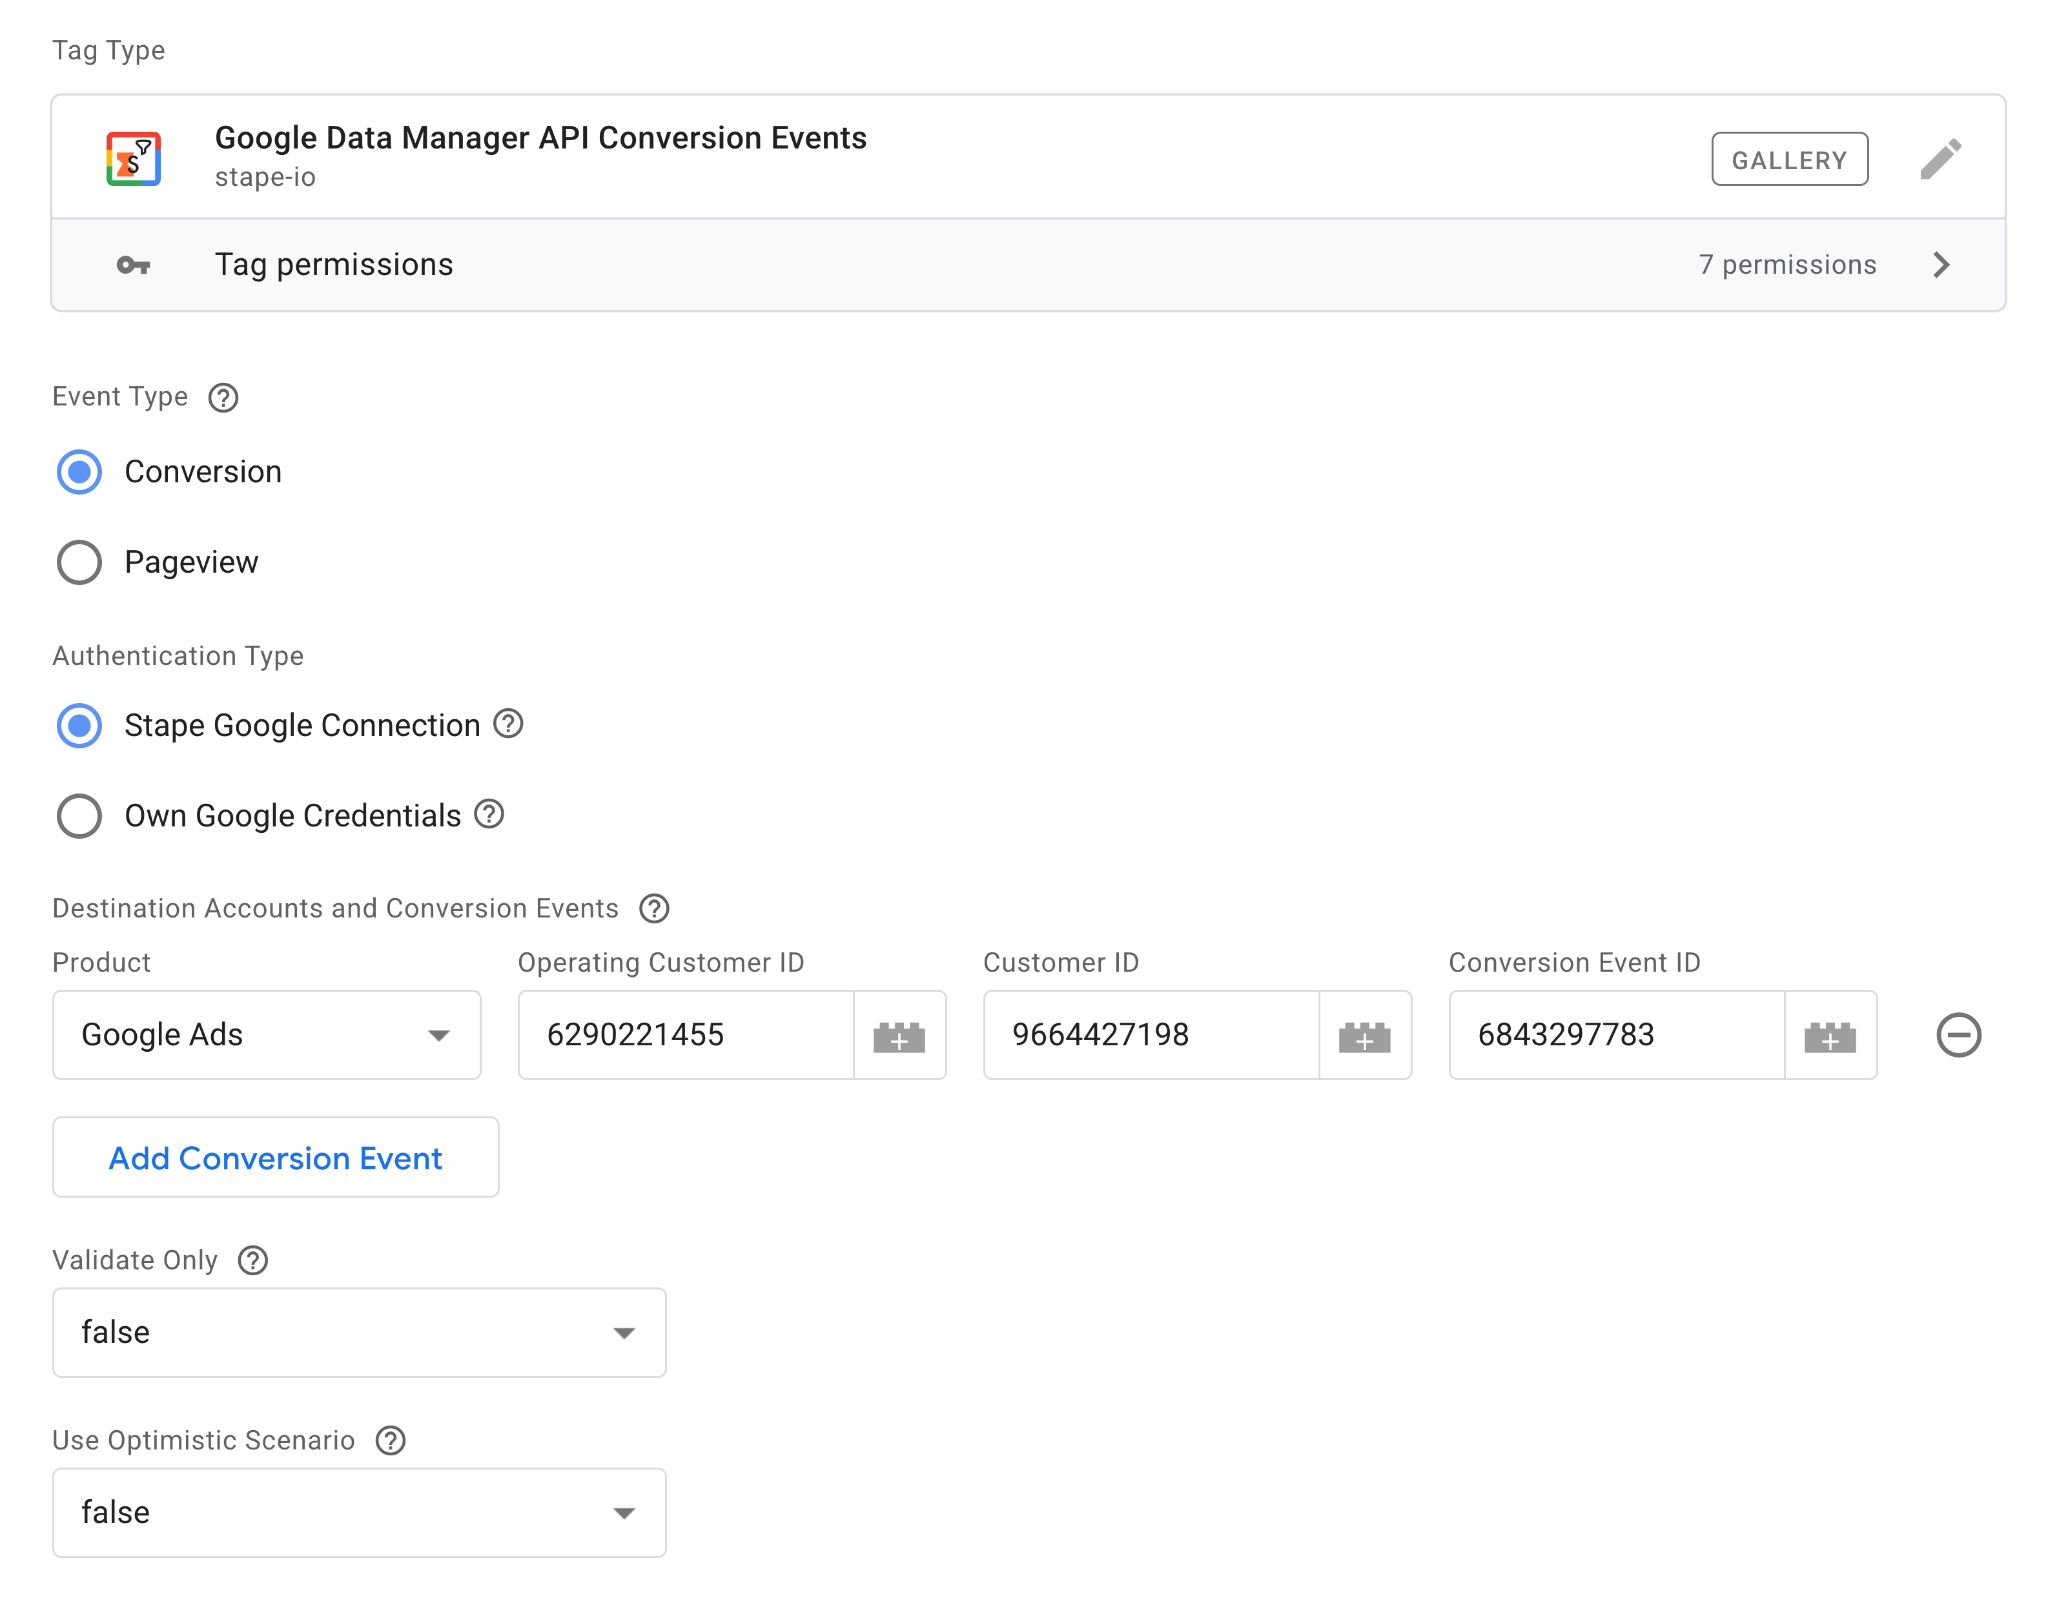
3.1 Product - defaults to Google Ads.
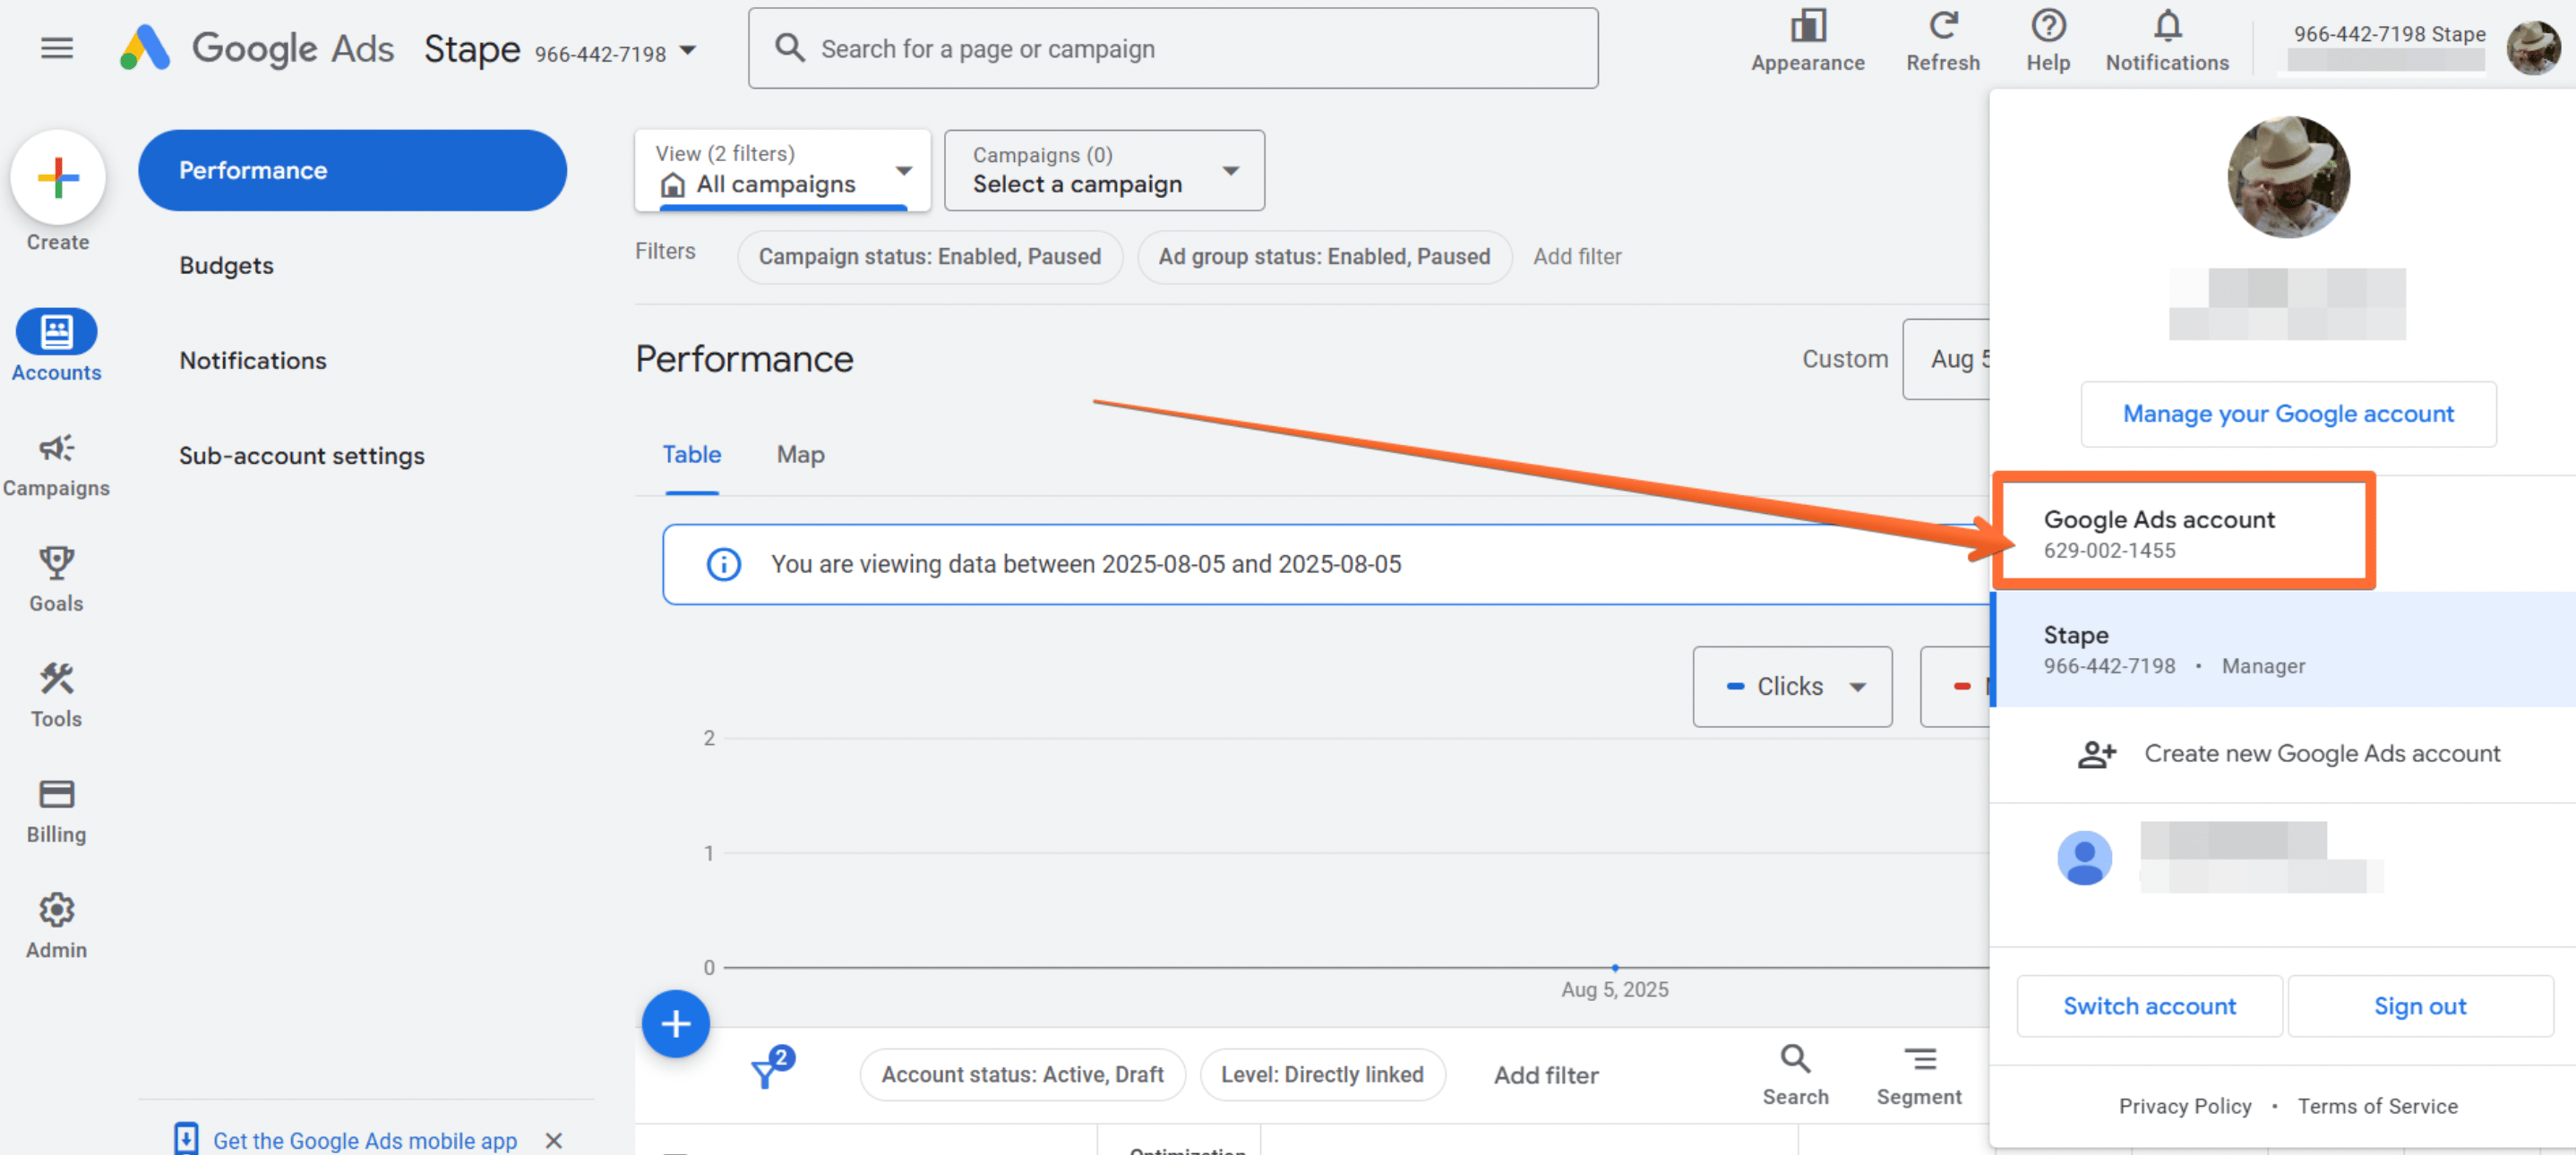
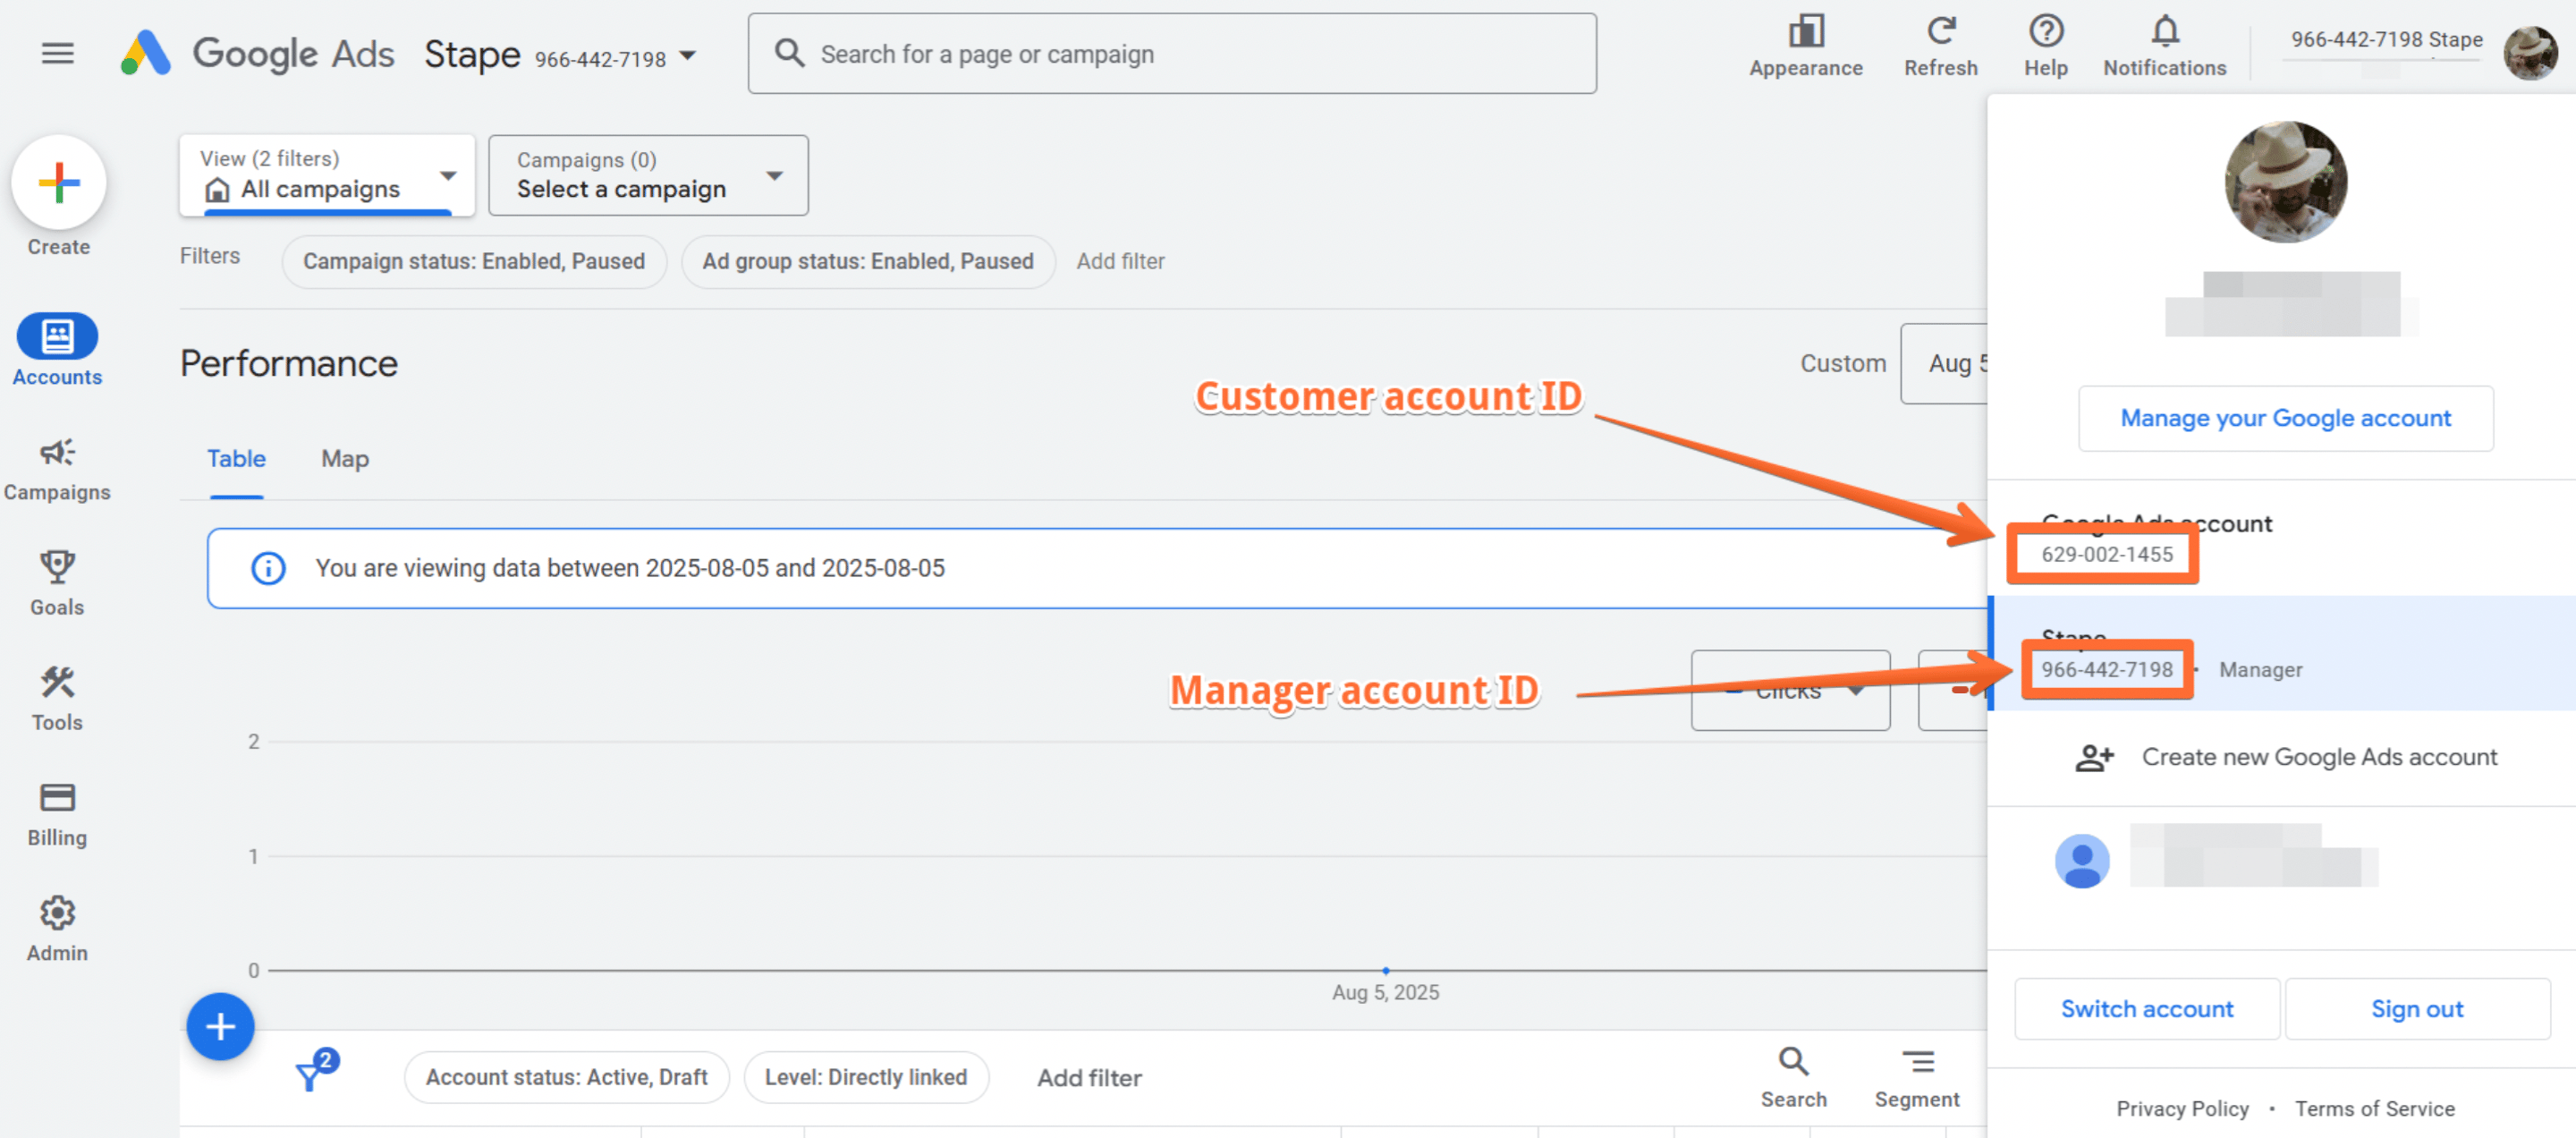
3.2 Operating Customer ID - the Google Ads account ID that should receive the conversion.Log in to Google Ads → click your profile icon → copy your account ID.
Use the same Google account that was used to sign in to the Data Manager API Connection.Remove all hyphens before entering the ID.
3.3 Customer ID - the account ID used for authorization:
- If you work directly in a customer account, use that account’s ID.
- If you access the customer account via a manager account, use the manager account’s ID.
Make sure the same account was used for the Data Manager API Connection.
Remove hyphens before entering it.
3.4 Conversion Event ID - the ID of the conversion action you want to track.
Create a conversion event first, then open Goals → Conversions → Summary → open the event.
The ID appears in your browser's URL under the ctId parameter.

3.5 Validate Only - when enabled, the request is validated but not executed. Only validation errors are returned.
3.6 Use Optimistic Scenario - triggers gtmOnSuccess() immediately without waiting for an API response.
This speeds up sGTM but always reports the tag as successfully fired even if the API call later fails.
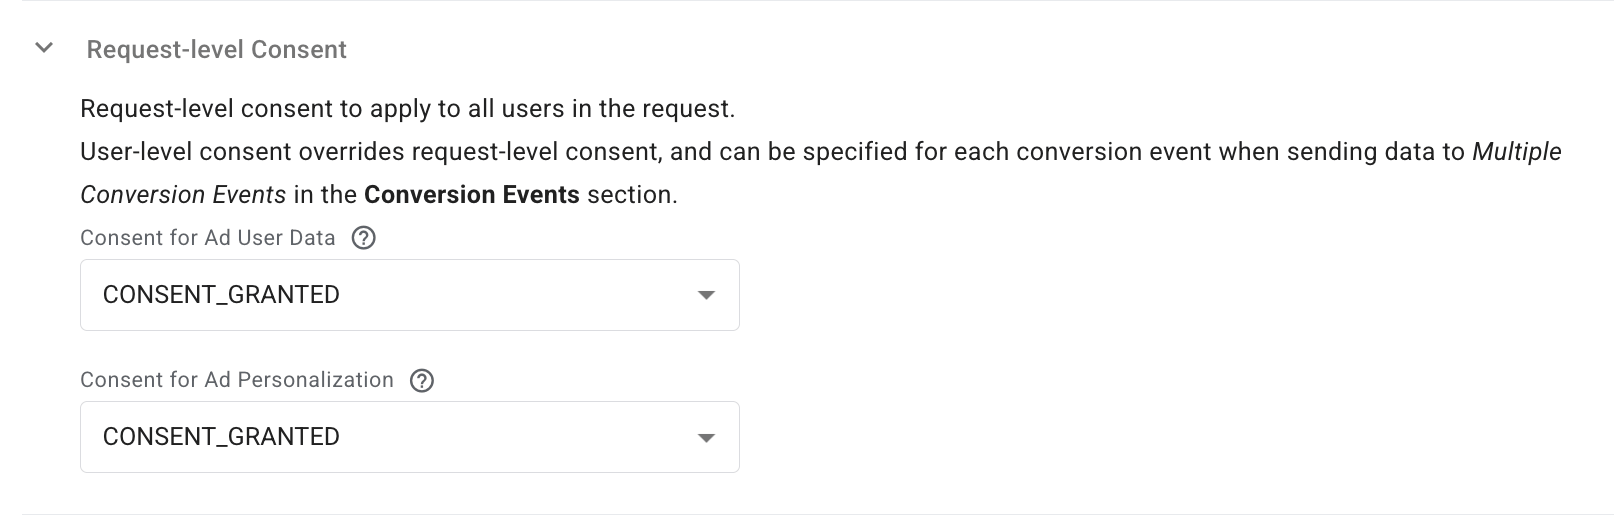
3.7 Request-level consent - define consent states for Ad User Data and Ad Personalization.
User-level consent (per conversion event) overrides request-level consent when using Multiple Conversion Events.
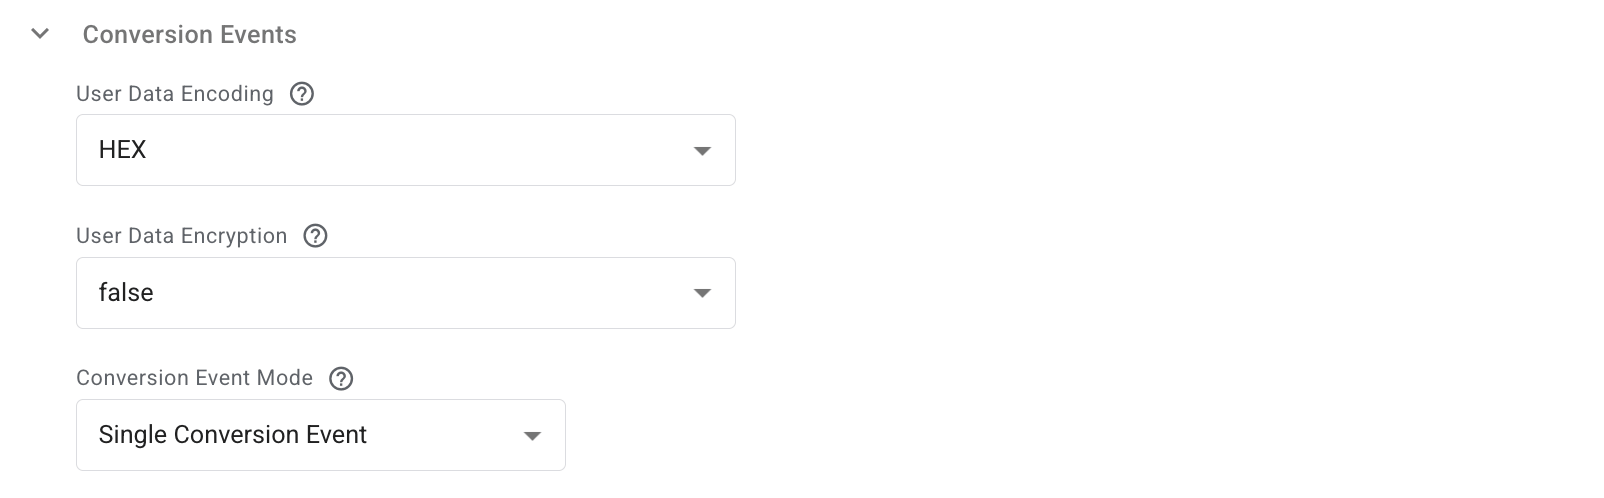
3.8 Conversion events section.
- User Data Encoding - select HEX or BASE64 for hashing user identifiers. Required when uploading UserData (email, phone, first/last name). For other fields (address region, postal code), encoding is ignored. Default: HEX — use this for raw (non-hashed) values or default GA4 values.
- User Data Encryption - choose whether identifying fields (email, phone, name) are encrypted before upload. If not specified, the system assumes they are hashed but not encrypted.
- Conversion Event Mode - choose whether to send a single conversion event or multiple events.
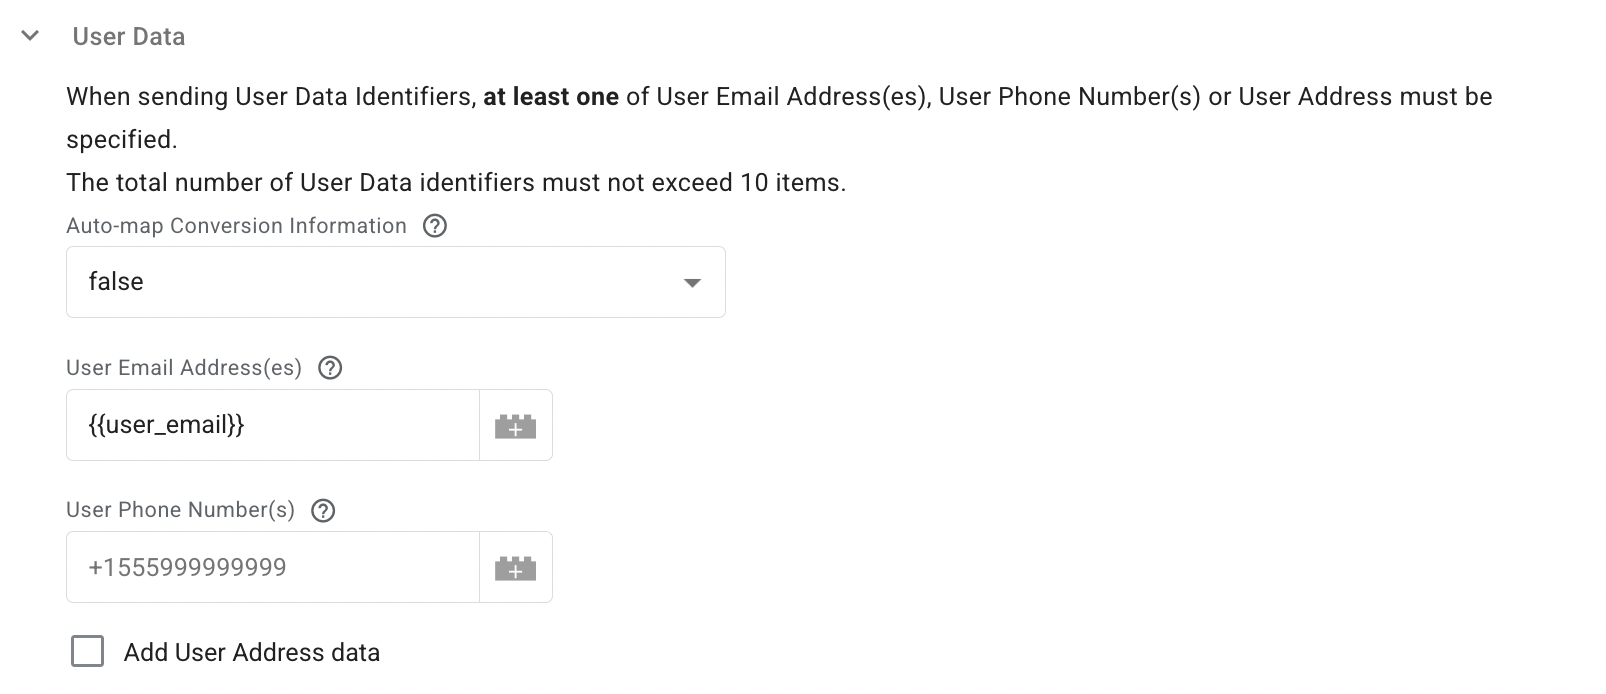
3.9 User Data Identifiers – specify up to 10 identifiers.
At least one of these must be provided:
- Email address(es)
- Phone number(s)
- Postal address
Auto-map Conversion Information - when enabled, the tag automatically maps values from event data. Any manually entered value overrides the auto-mapped one.
4. Add a trigger. Define when the tag should fire.
5. Test the configuration. Open Preview mode in both your web and server GTM containers and verify your setup. For more detailed debugging instructions, refer to our server-side tracking debugging guide.
Set the rules when the tag should fire.
5. Test the tag.
Click Preview in both the web and server GTM containers and test the configuration. For more details on the debugging process, please refer to our guide to debugging and monitoring server-side tracking configuration.

Was this article helpful?
Comments