Google Data Manager API Customer Match tag
Updated Jul 22, 2026
The Google Data Manager API Customer Match tag allows you to send audience data to Google advertising platforms through the Data Manager API. With this tag, you can manage your Customer Match lists by adding or removing users.
Benefits of the Google Data Manager API Customer Match tag
- Automatically manage Customer Lists in Google Ads/Display & Video 360. With the Google Data Manager API Customer Match tag, you can automate the creation and update of Customer Match lists. So, you won't need to repeat manual uploads of CVS files with audience data.
- Improved ad audience targeting. When first-party data is provided to Google Ads/Display & Video 360, the platform analyzes the information and generates audience lists that can be used in campaigns to reach high-intent audiences.
- Build detailed audience segments. Using the Google Data Manager API Customer Match tag, advertisers can transform first-party customer data into audience segments that can be included or excluded during campaign targeting.
Pre-requisites
To configure the tag, you will need to complete the following steps:
- Configured the server GTM container.
- Set up data transfer from the web to the server GTM container. You can set it up using server-side Google Analytics 4 or Data Tag/Data Client.
Choose and set up an authentication method:
- Use Stape's connection (recommended) - the easiest way to manage authentication. Simply enable the Data Manager API Connection in your Stape admin account.
- Use your own Google credentials - select this option if you are not using Stape's services or are on Stape's free plan.
Select your preferred authentication option and follow the instructions.
Data Manager API connection
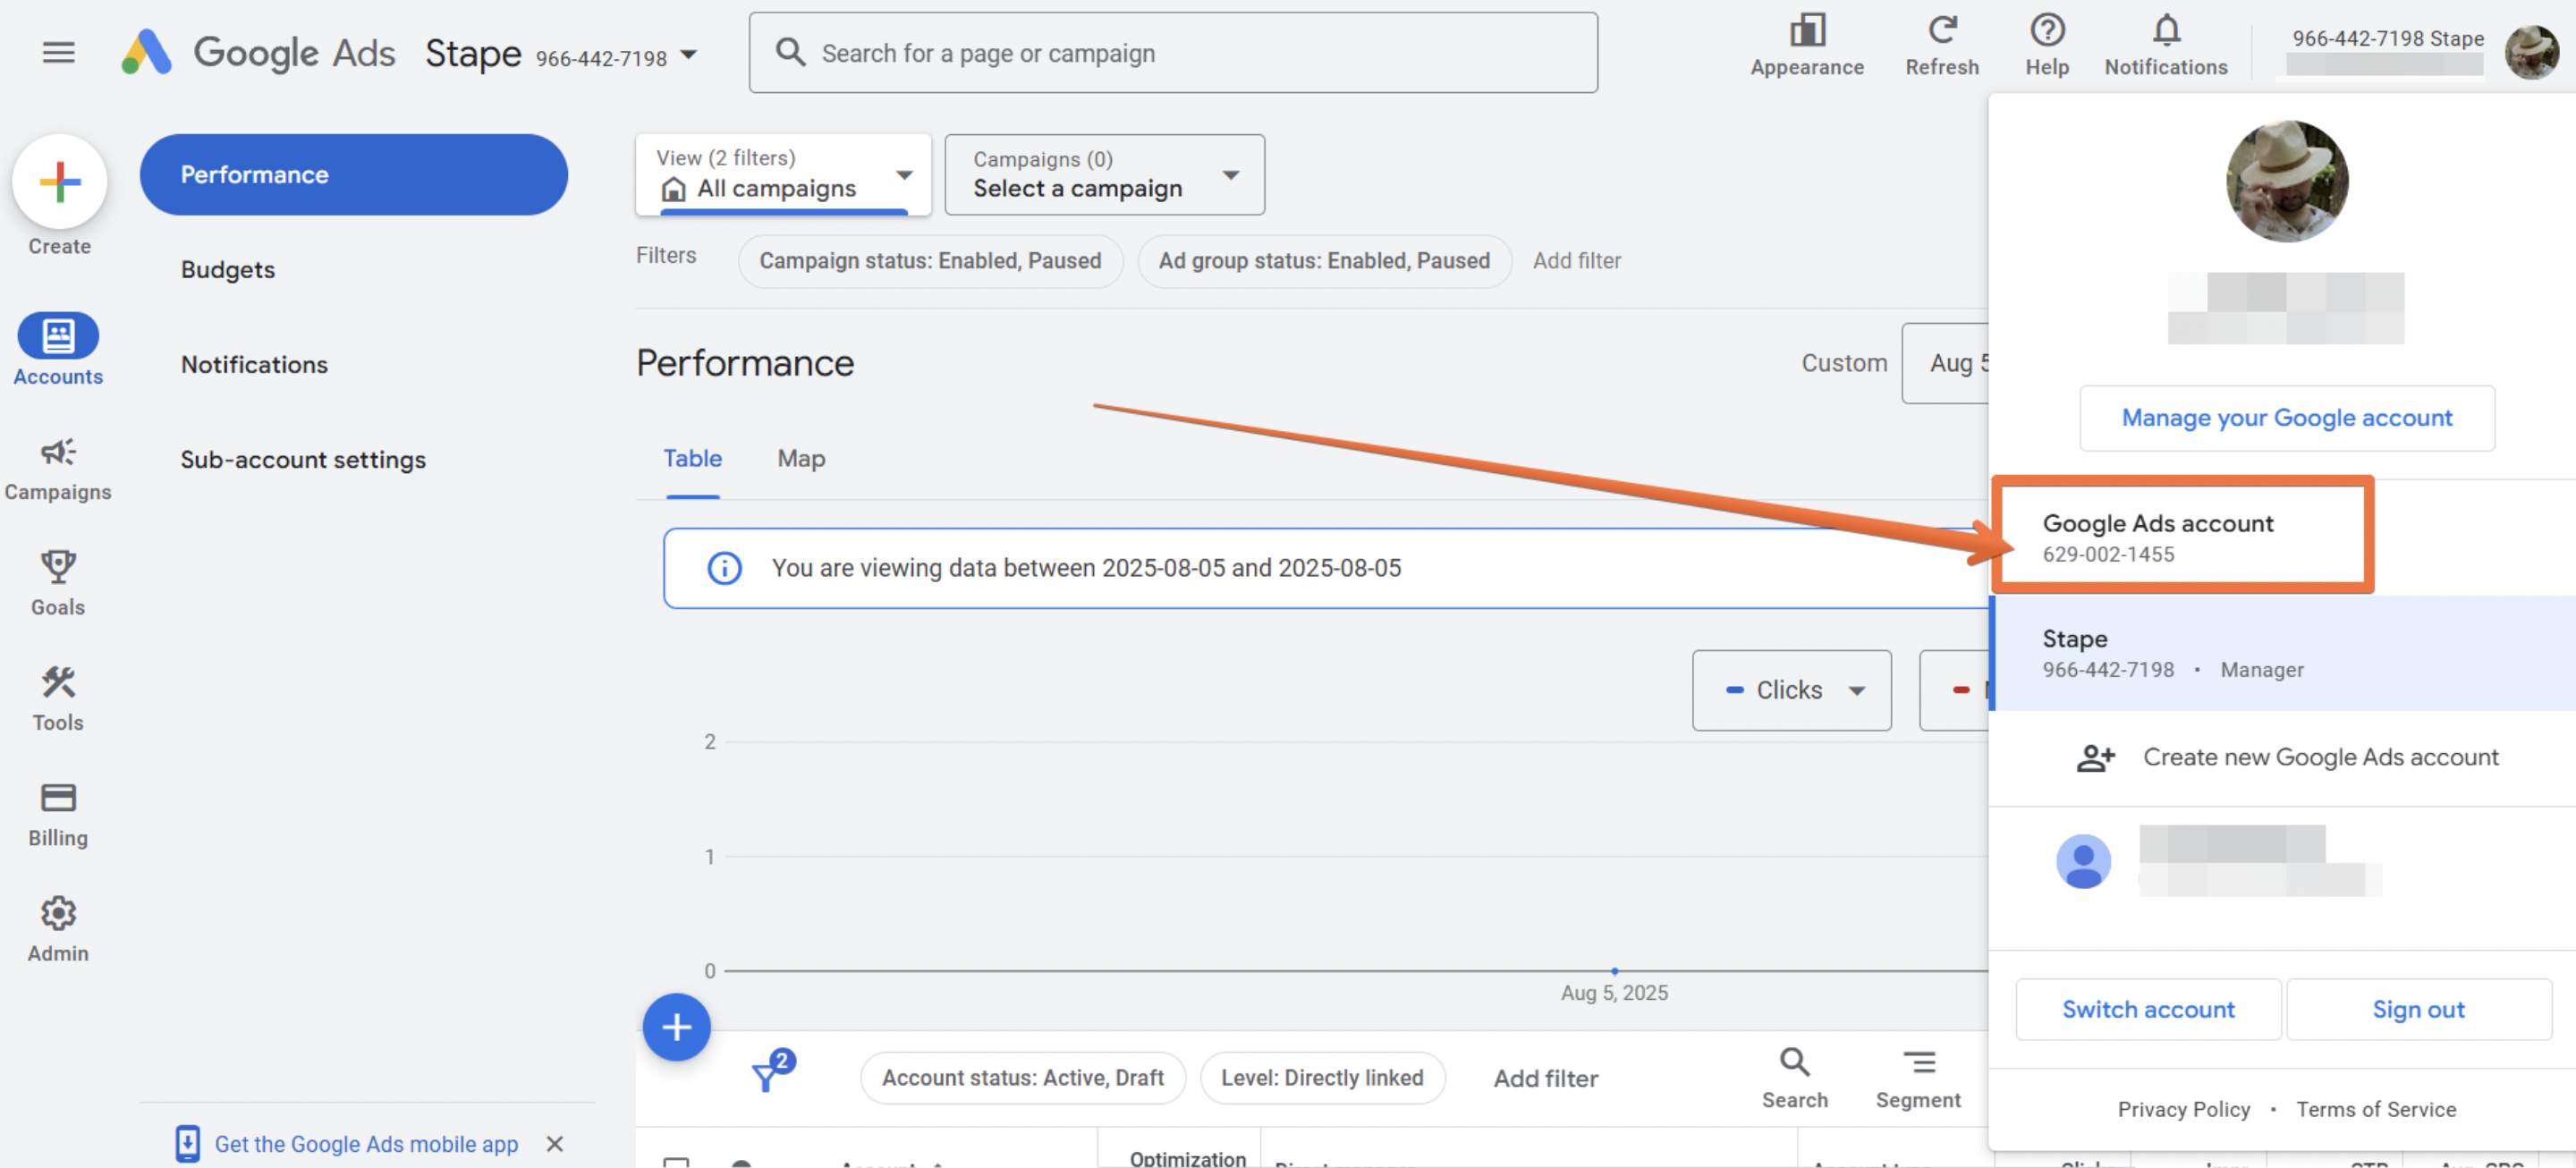
To configure Data Manager API Connection, log in to your Stape account → open the required container → Connections tab → click Sign in next to Data Manager API. Use a Google account with access to the Google Ads account for which you want to configure the Customer List.
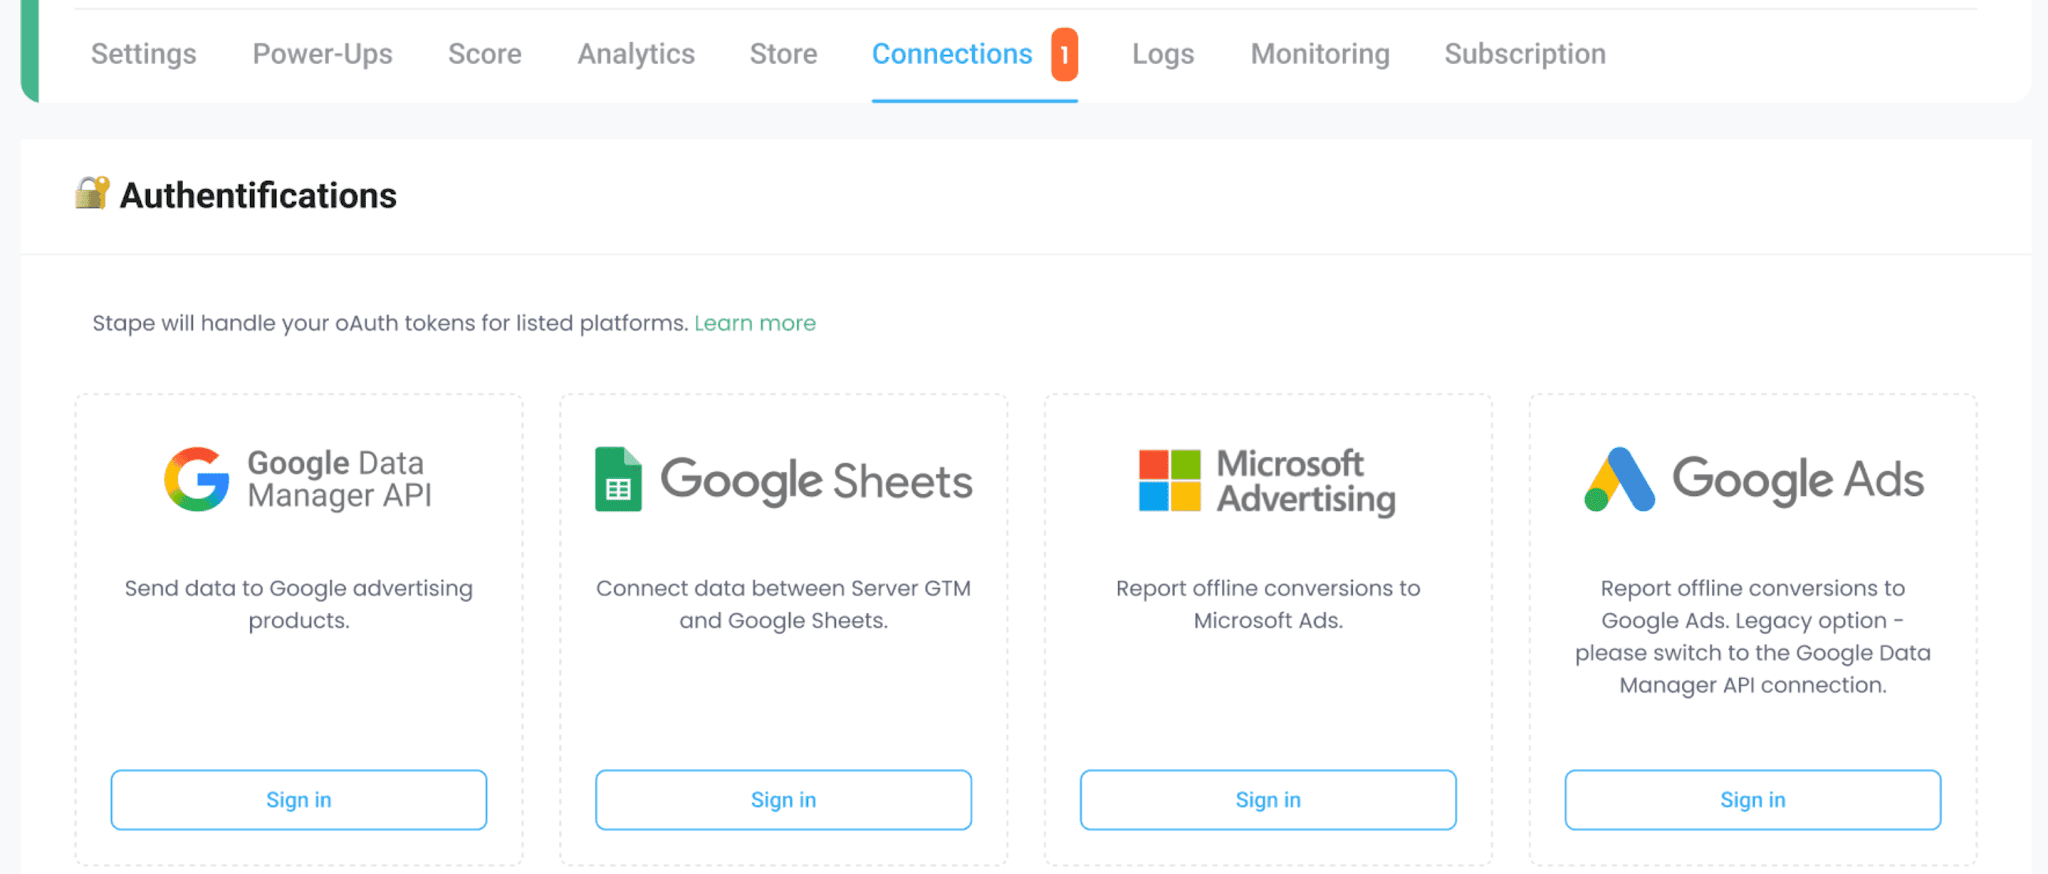
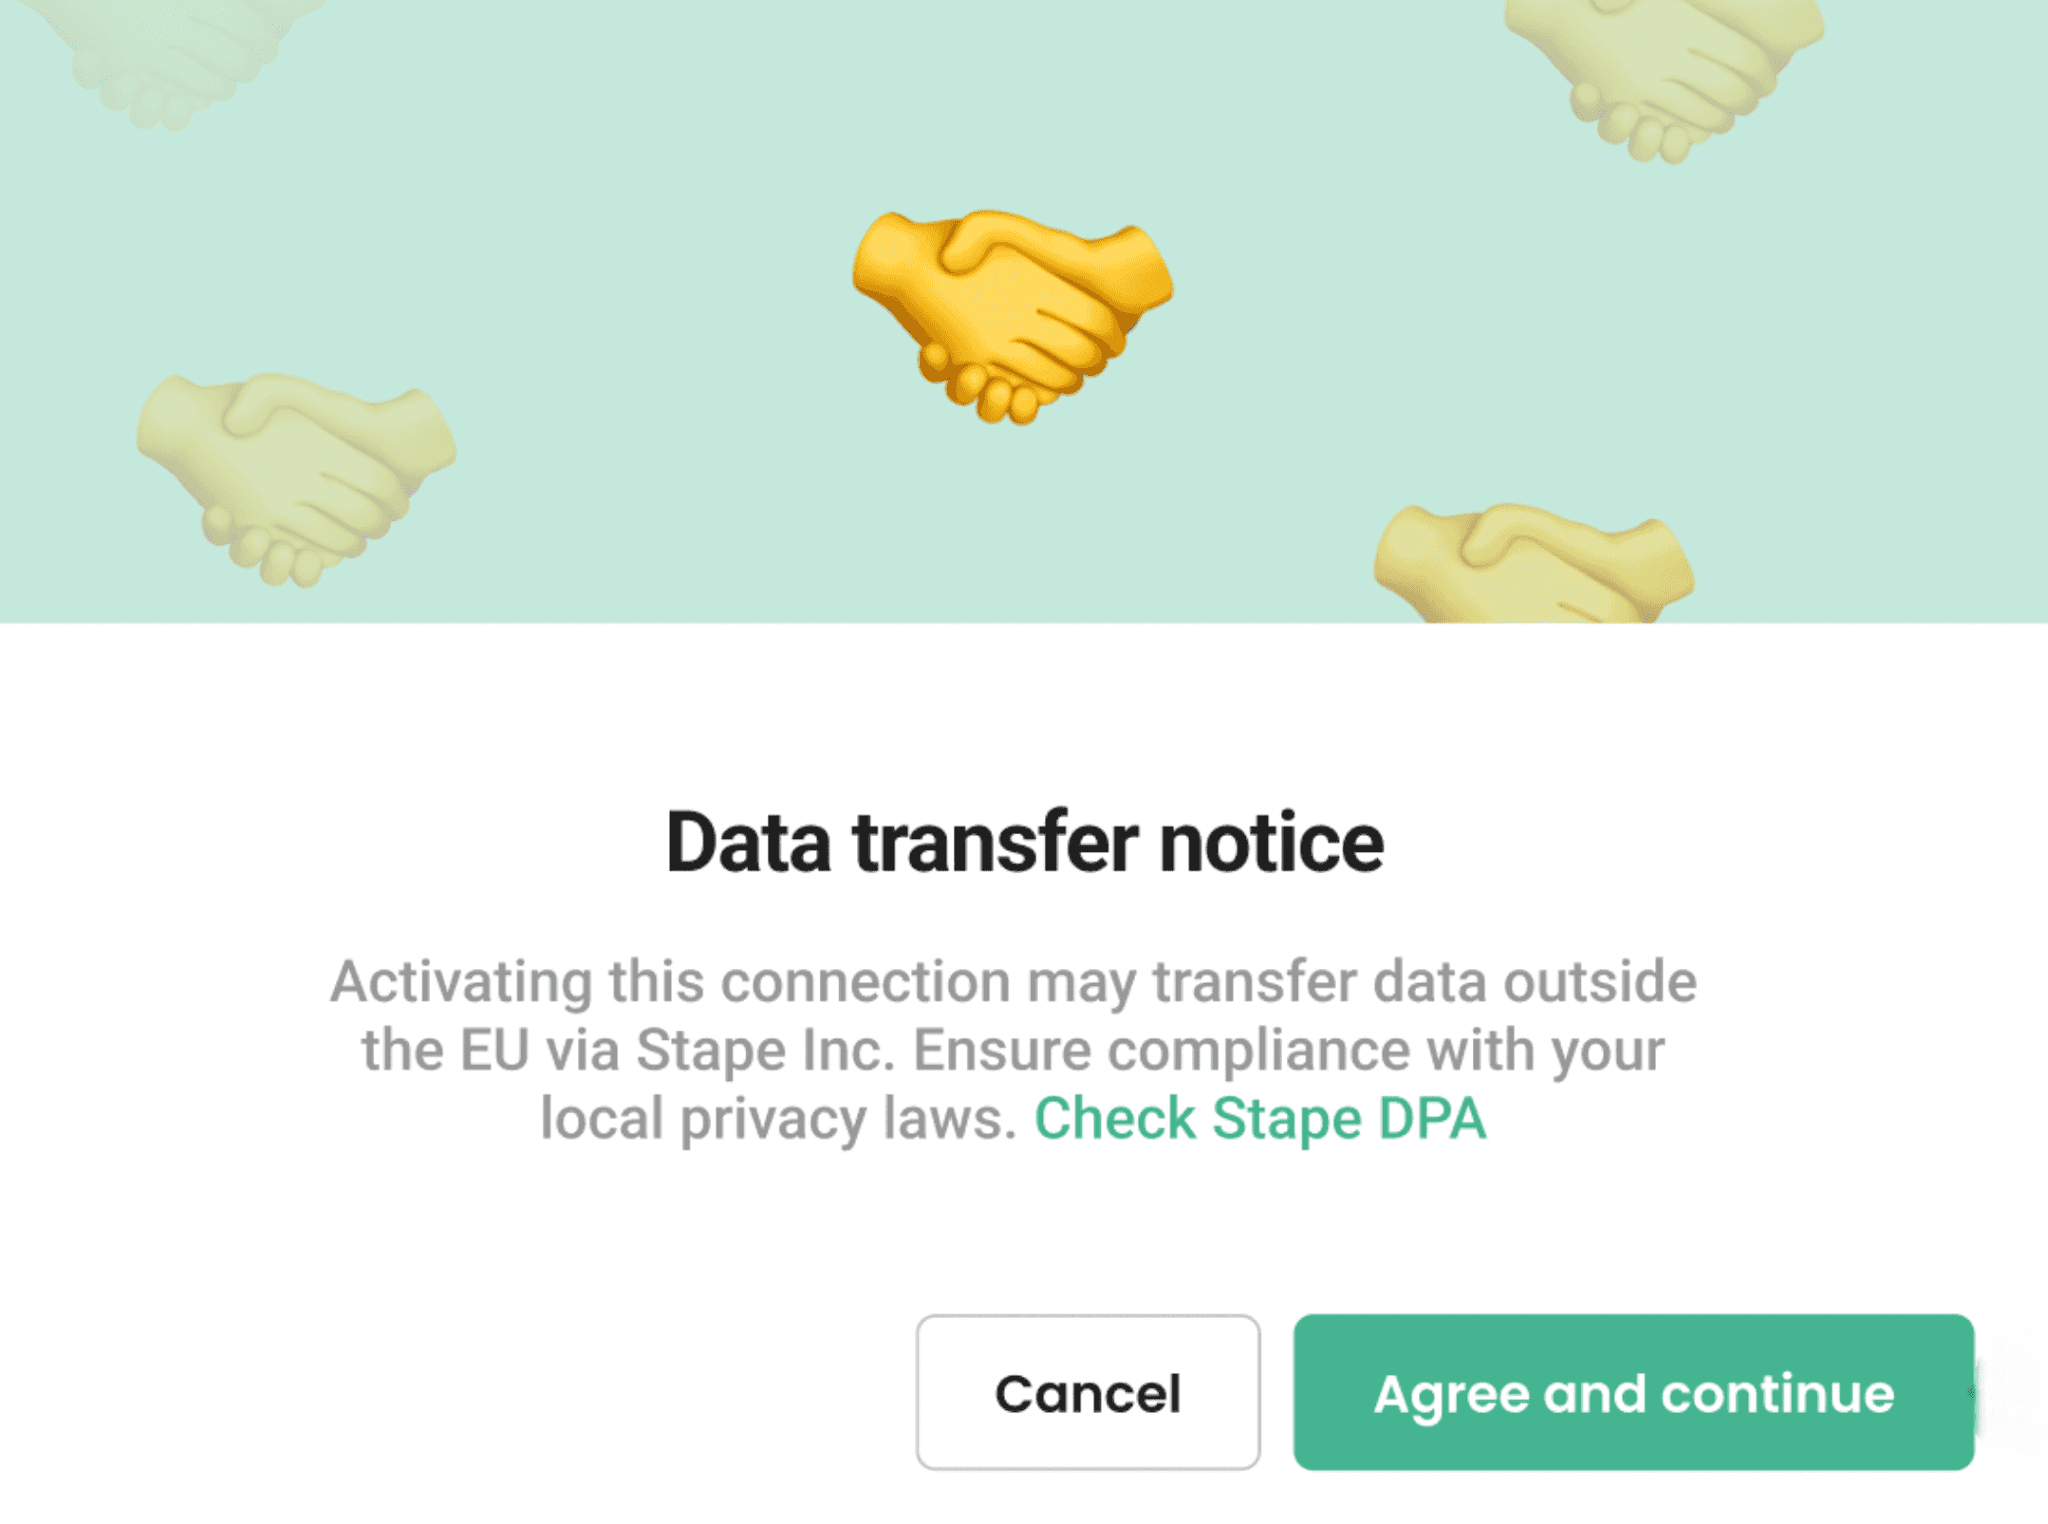
For EU users, please check the Stape DPA, as activating the connection may transfer data outside the EU via Stape Inc.
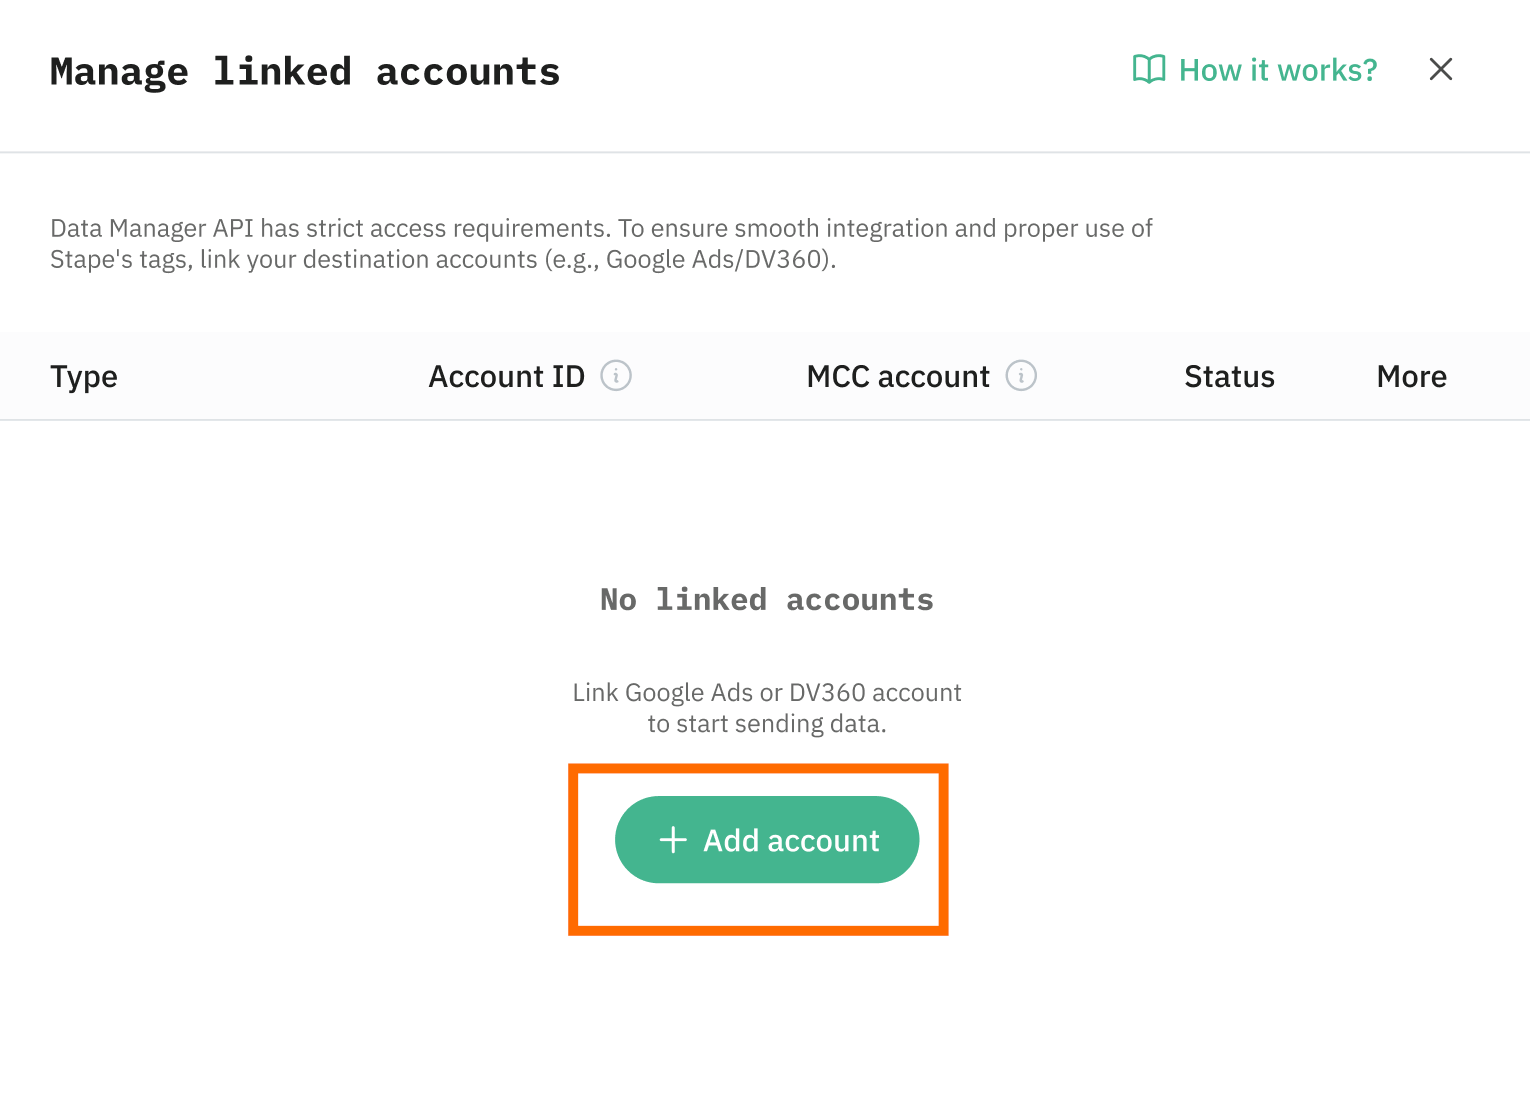
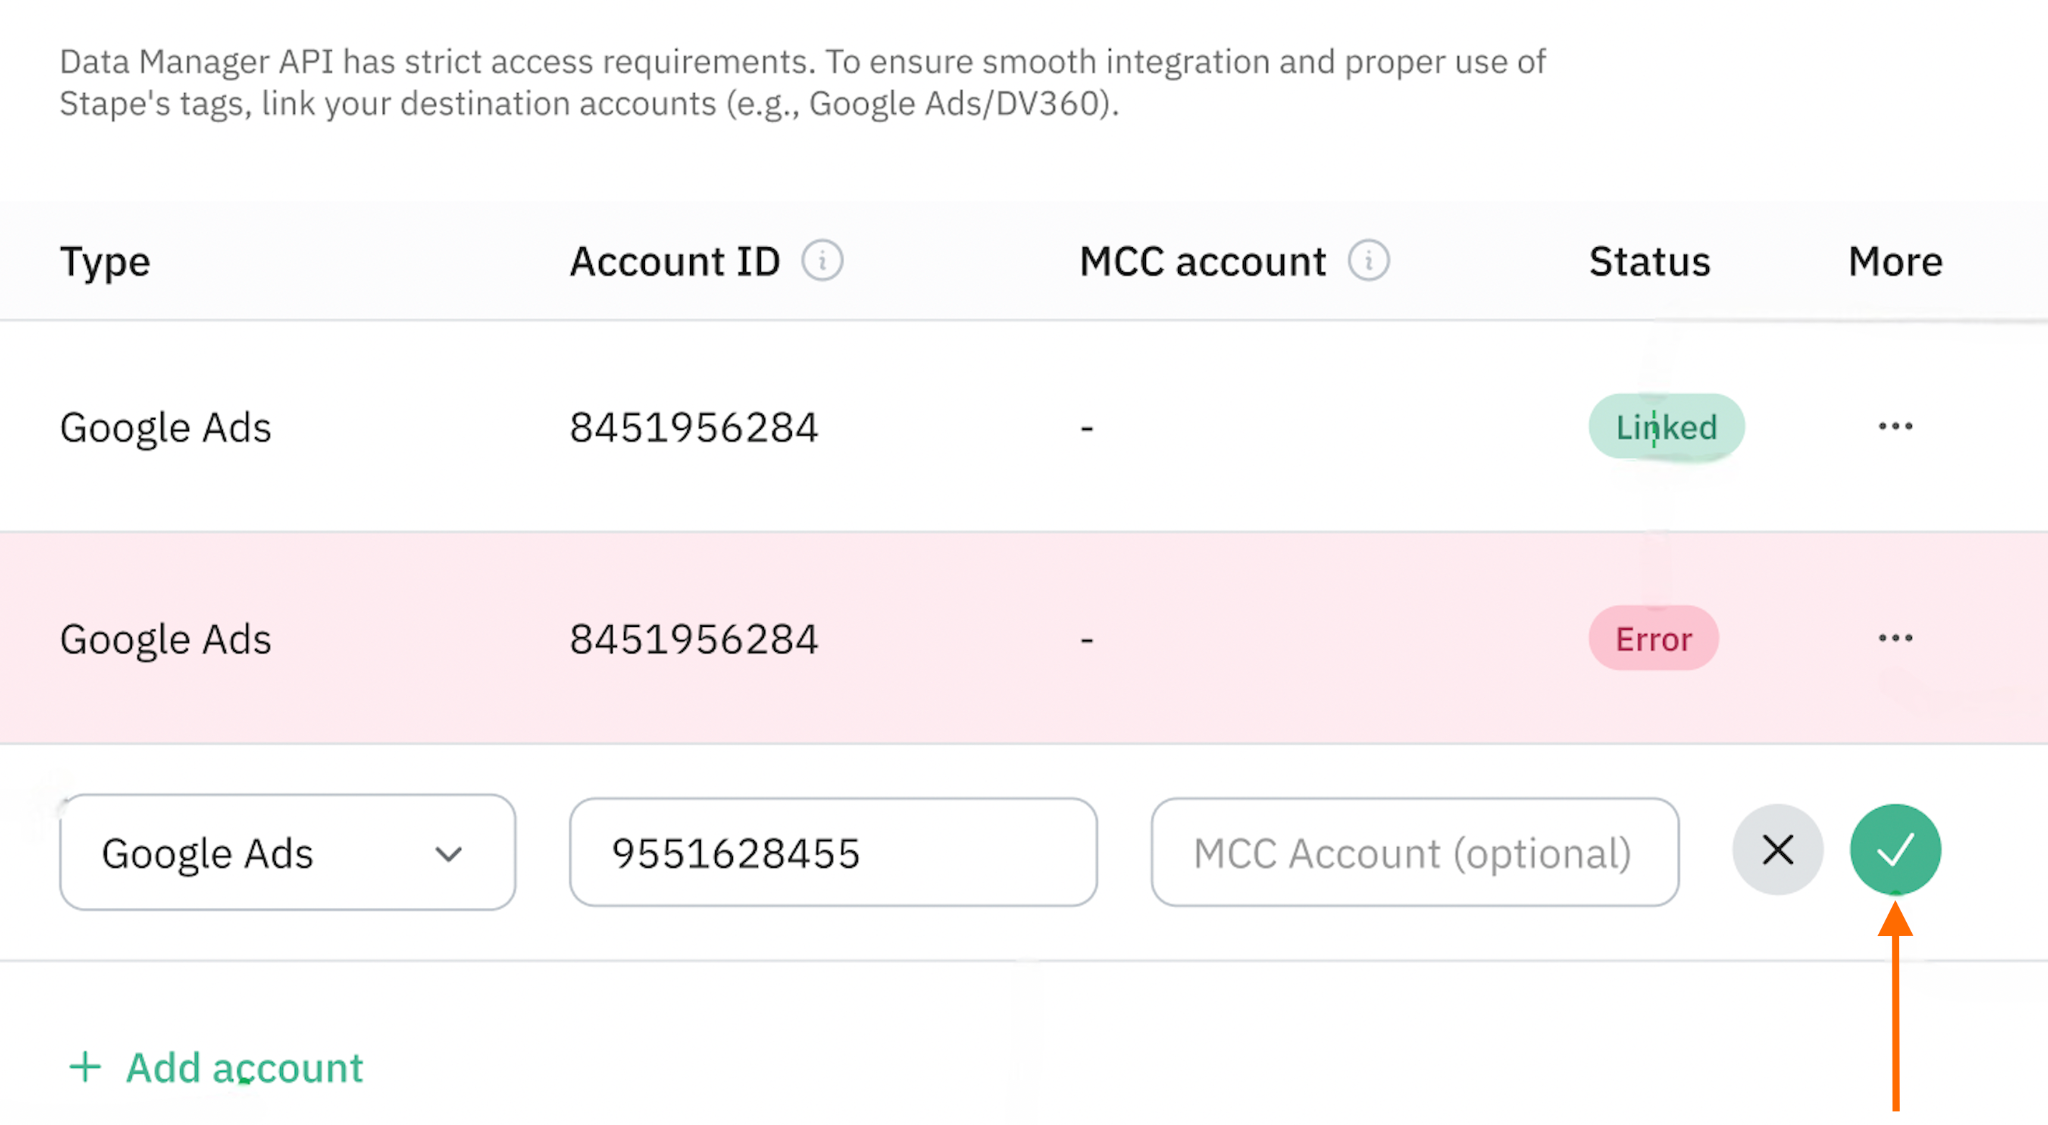
Add accounts in the “Manage Linked accounts” section. It will allow you to monitor whether the data is sent to the specified Google Ads/Display & Video 360 account.
To activate the option, follow the steps below:
1. Click “Add account”.
2. Change the type if needed.
By default, it’s set to Google Ads, but it can be changed to Google Marketing Platform 360.
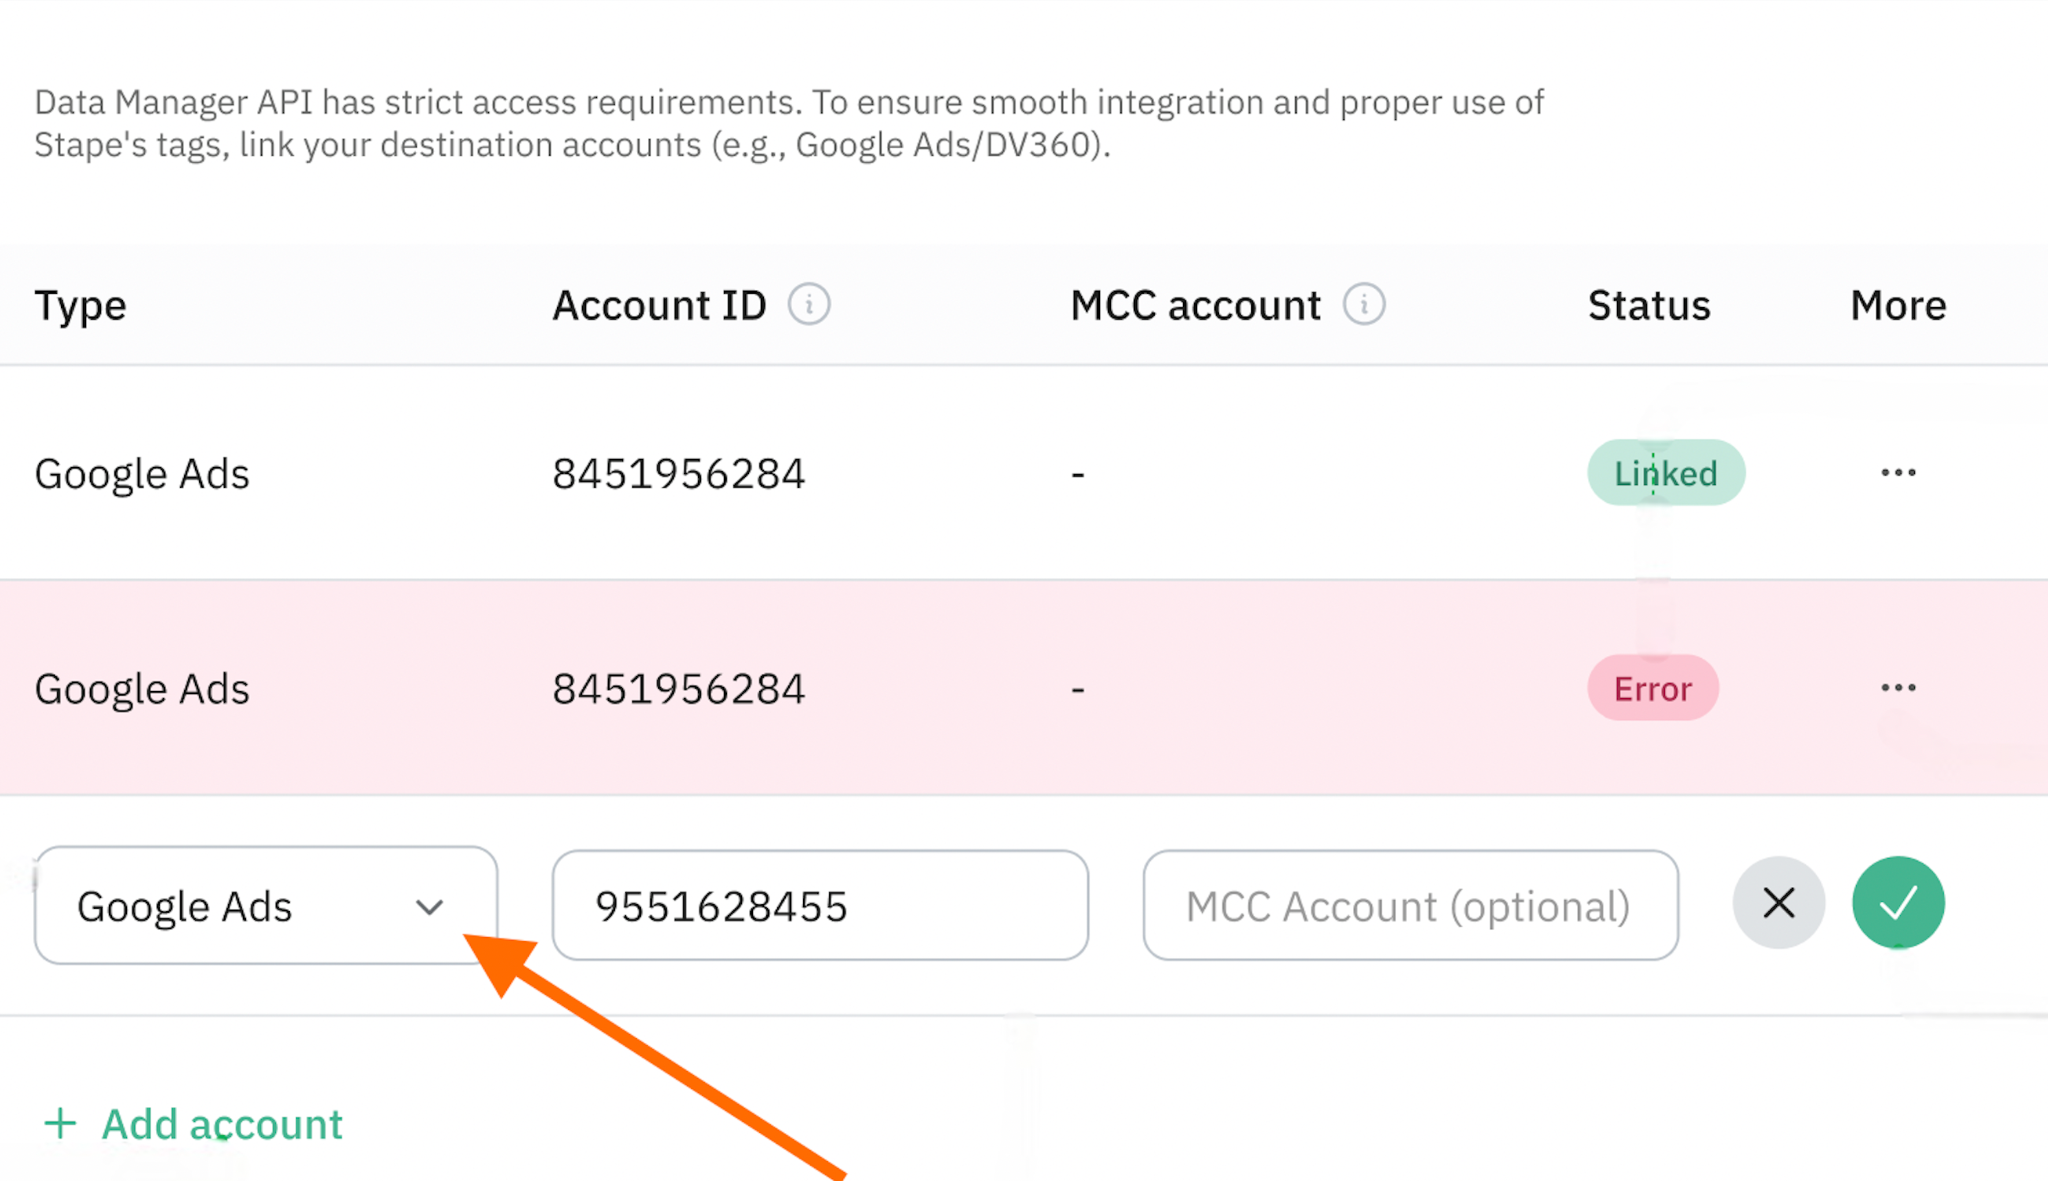
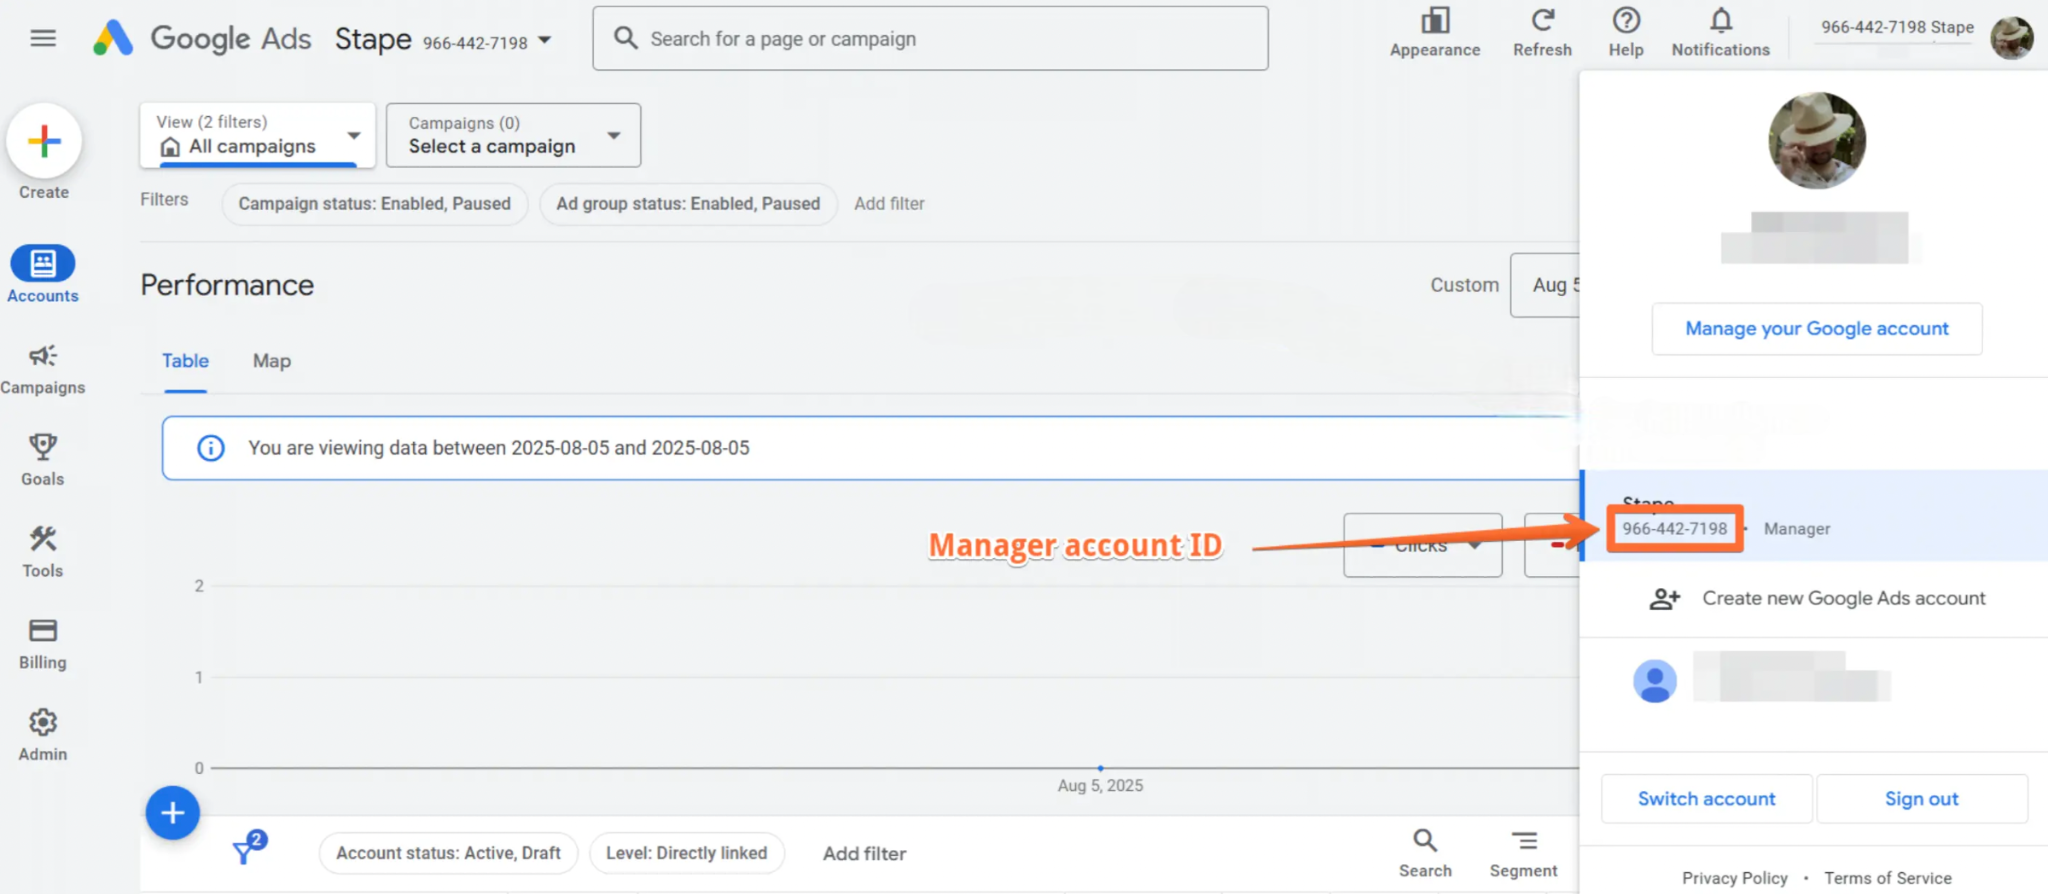
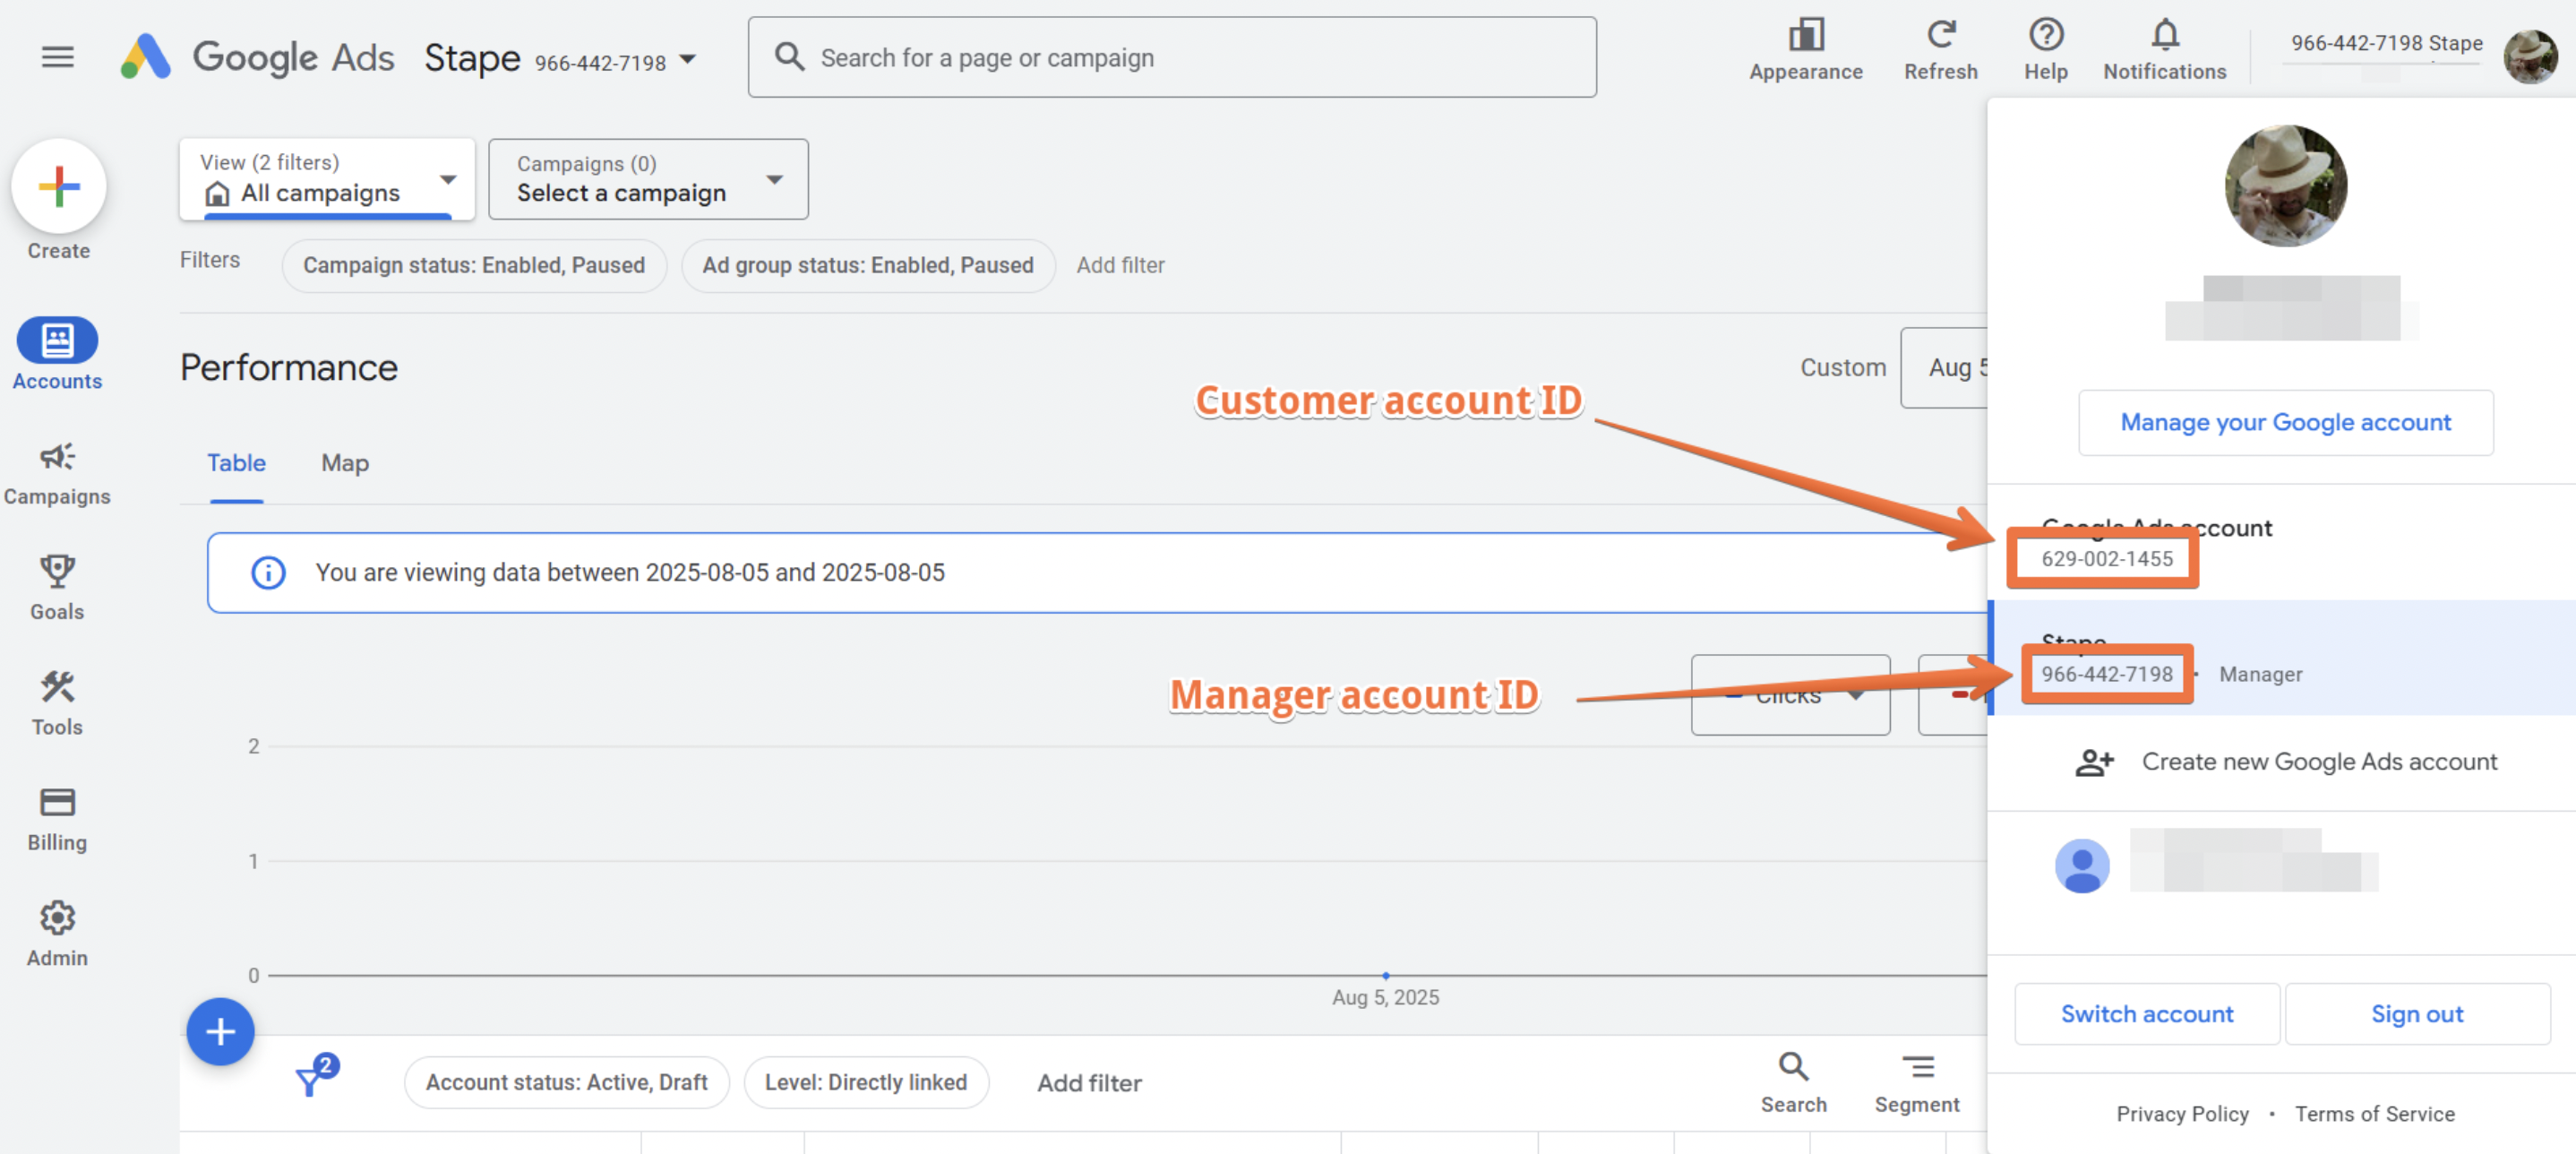
3. Specify “Account ID”.
To find it, log in to your Google Ads account, click on your profile picture in the top right corner, and copy the displayed ID. Ensure you use the same account that was used to sign in to the Data Manager API Connection.

4. (Optional) If you access the customer account via a manager account, enter the Manager Account ID (MCC).
Make sure the Google account you use to authorize the Data Manager API Connection has access to the specific Google Ads account you need.
5. Click on the green checkmark to submit the account. Once done, we will attempt to link the account and display the status of the account (Linked or Error).
Own Google Credentials
Service Account impersonation is the simplest way to authenticate if you selected the Own Google Credentials method.
Follow these steps to set it up:
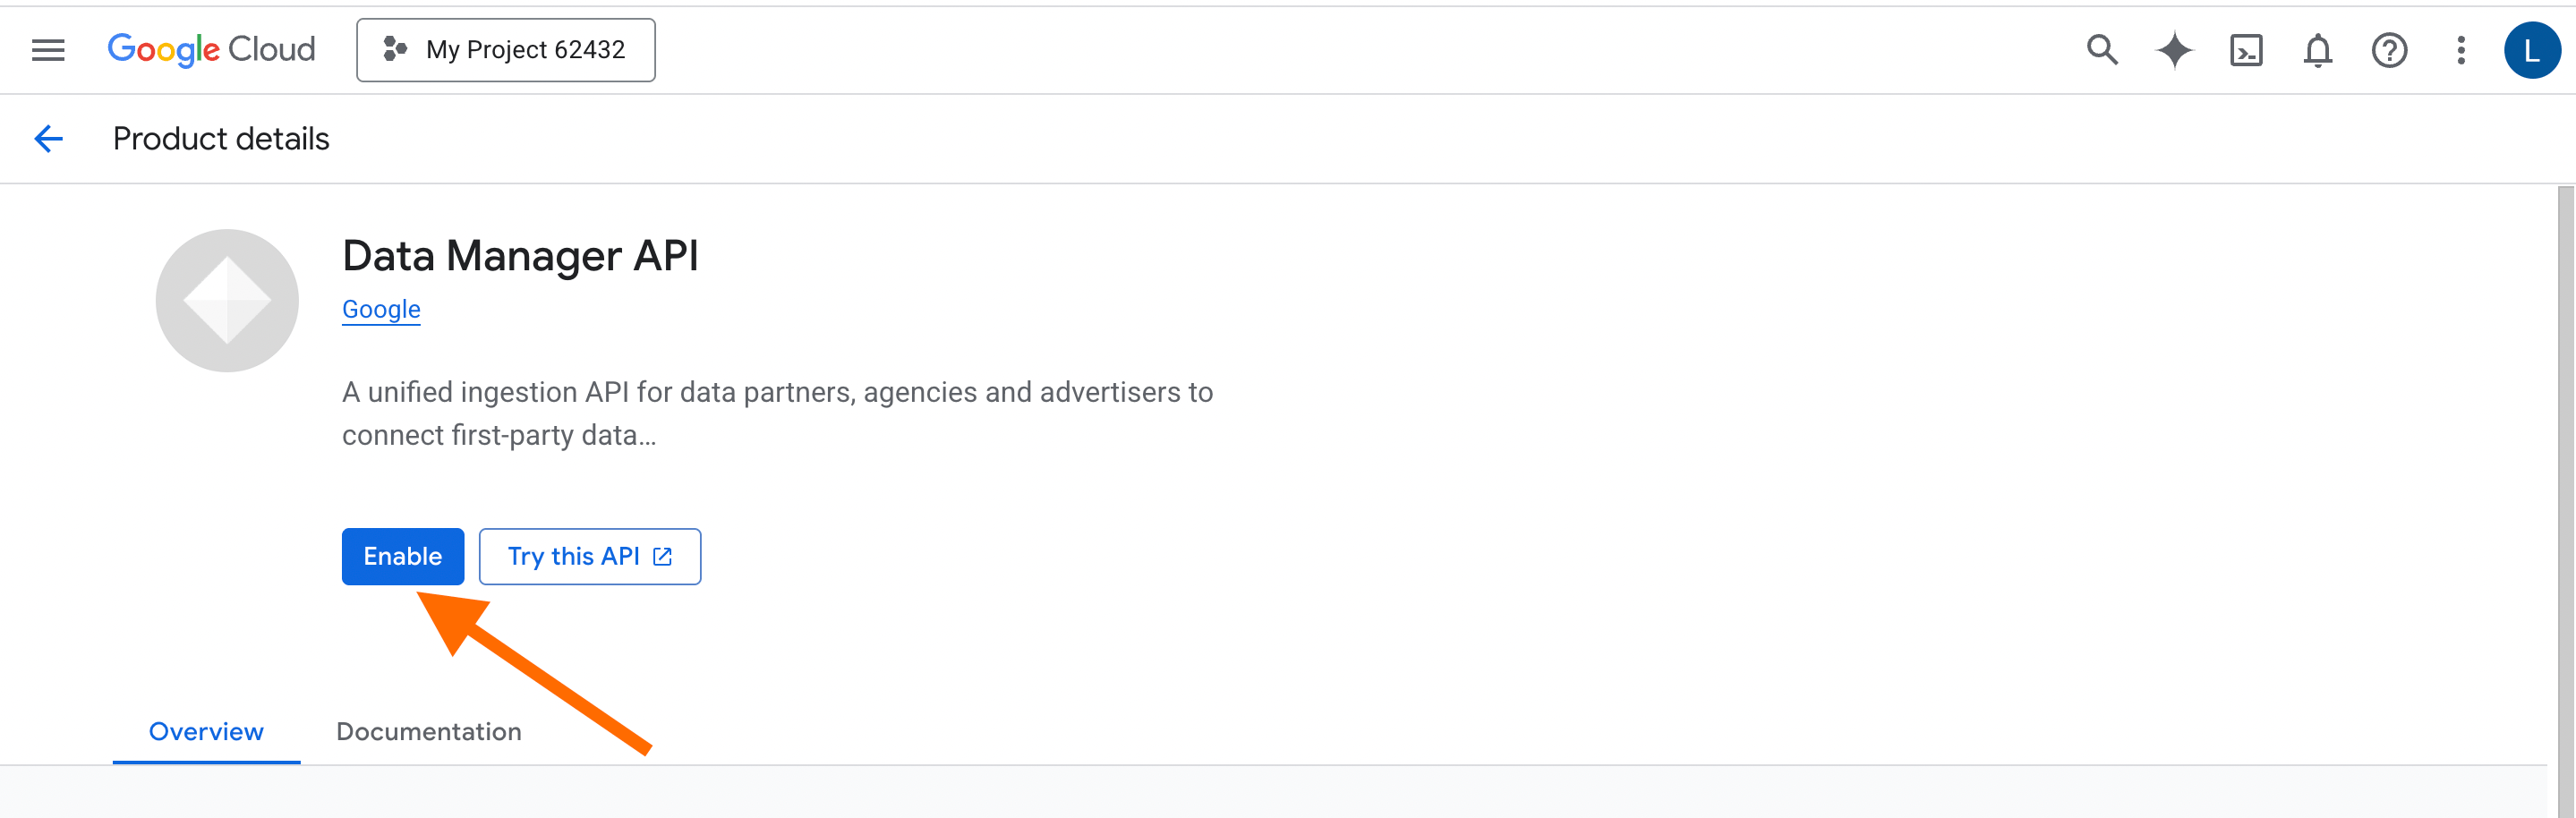
1. Open the API Console in Google Cloud Platform. Select your project → go to Library → search for Data Manager API → click Enable.
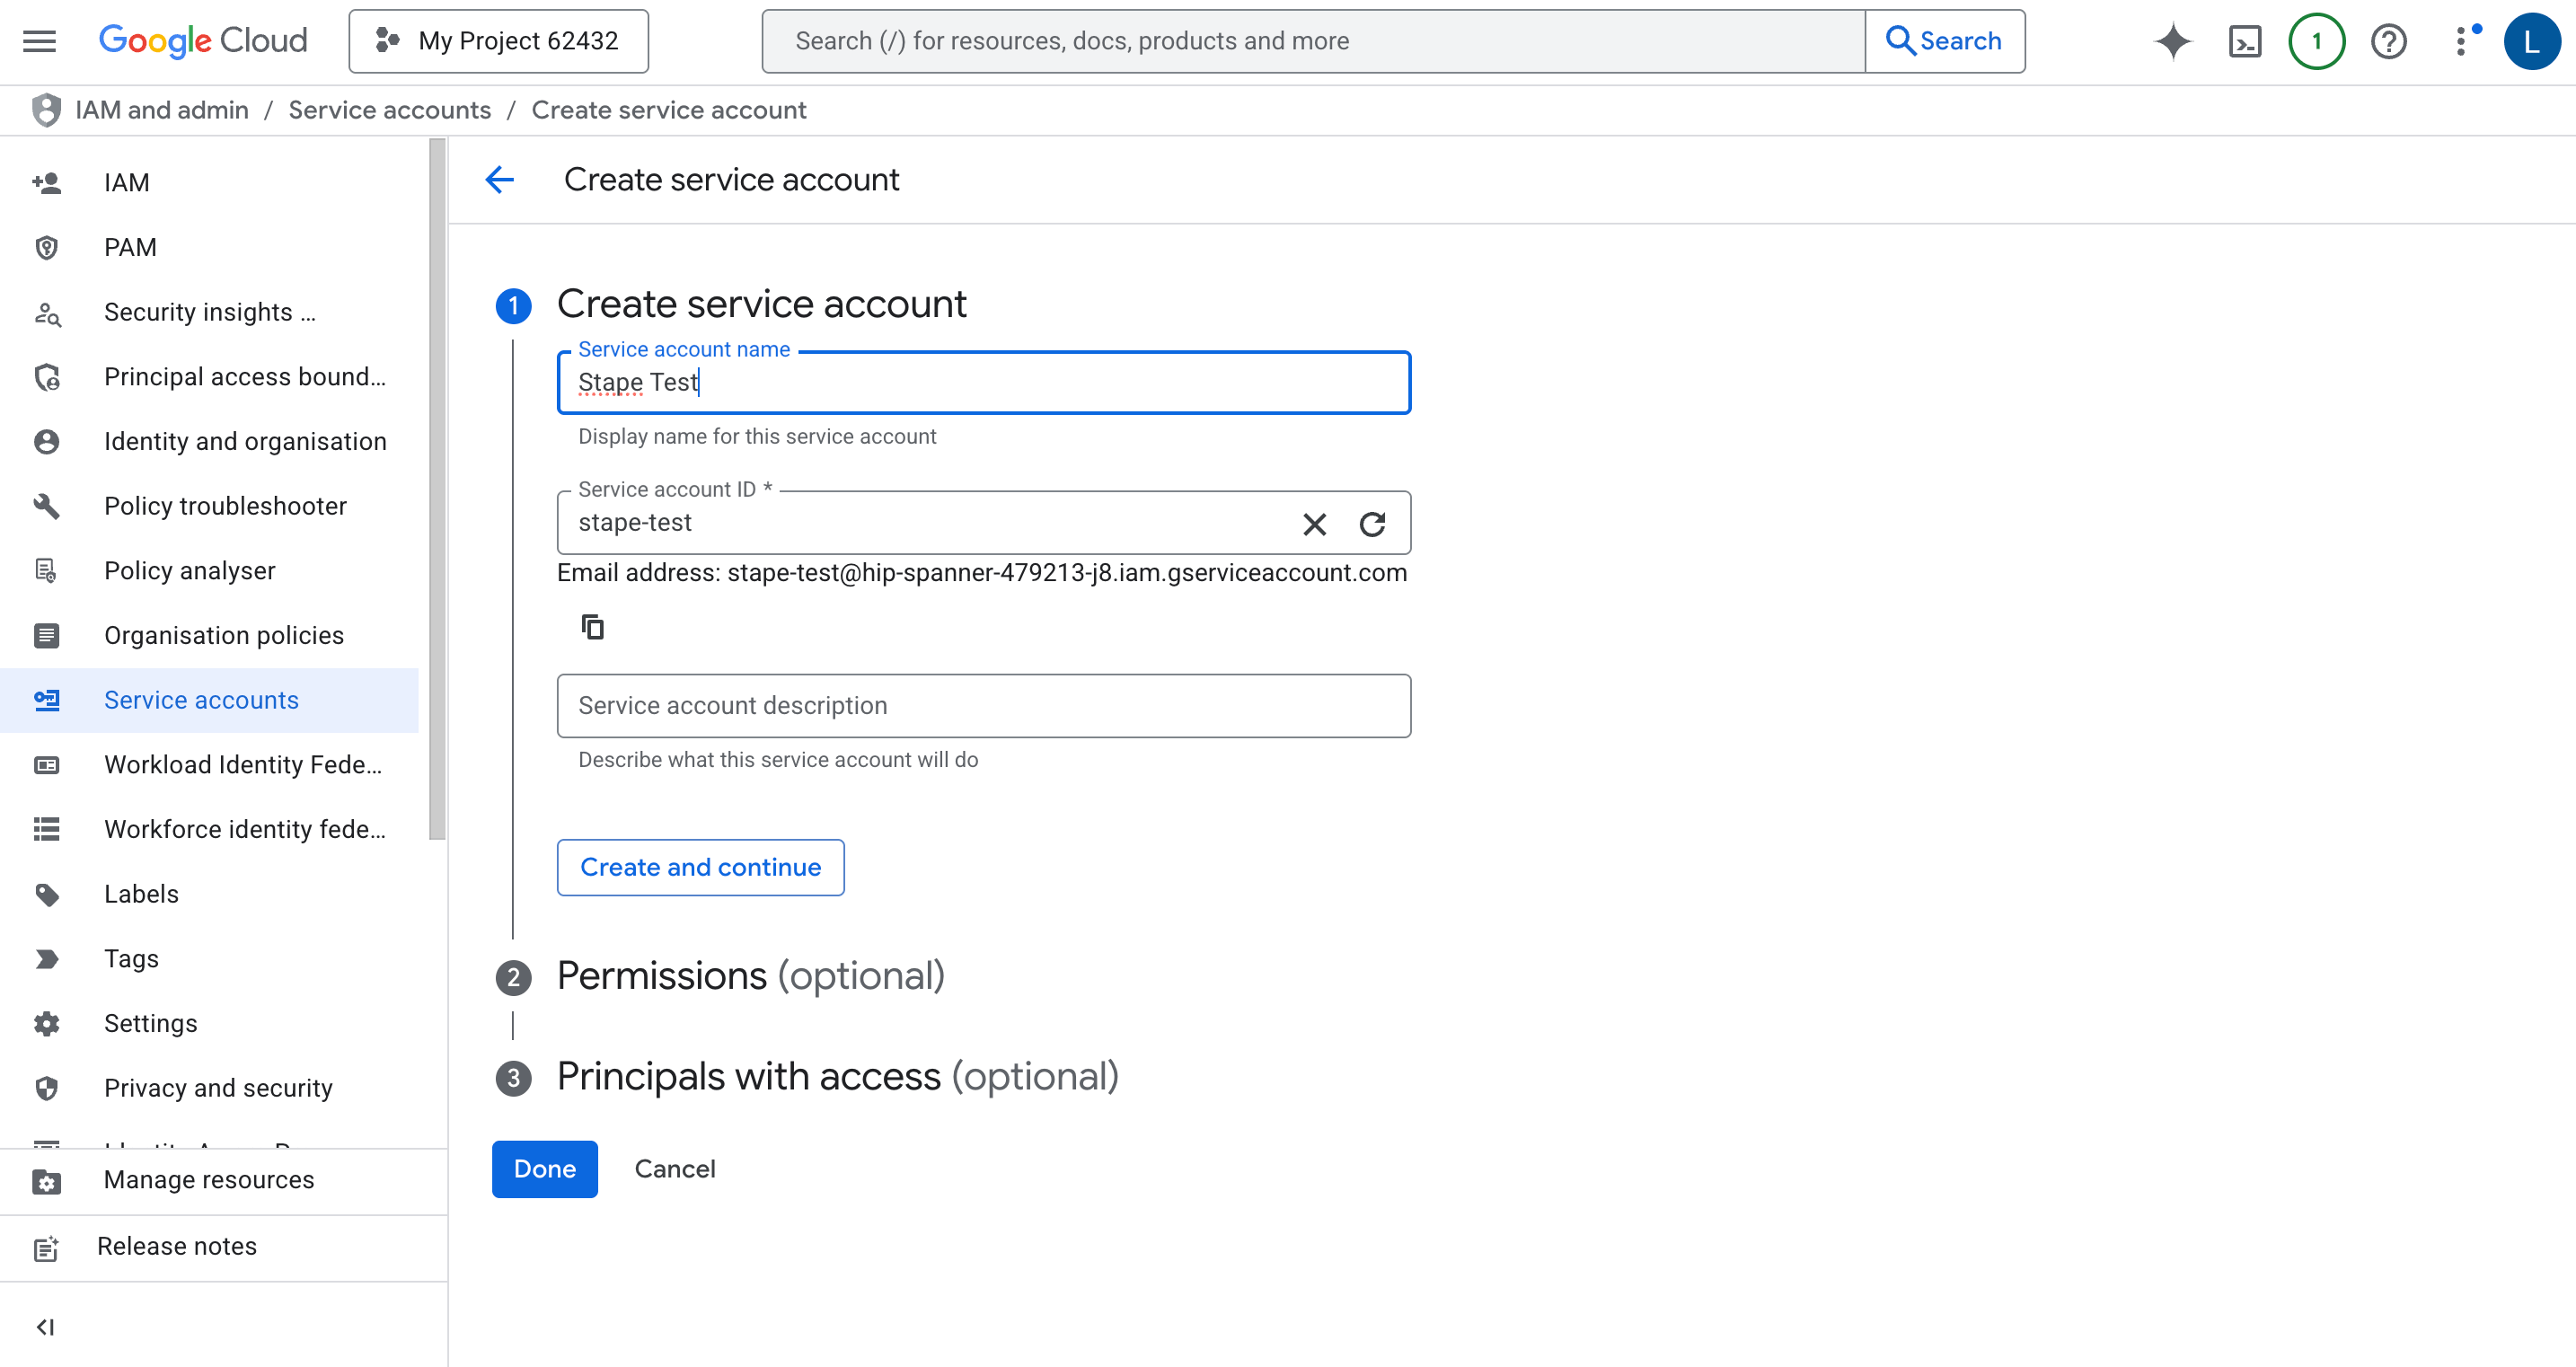
2. Create a Service Account within this project.
Go to Create Service Account → enter a name (the Service Account ID will be generated from it) → optionally assign permissions or principals → click Done.
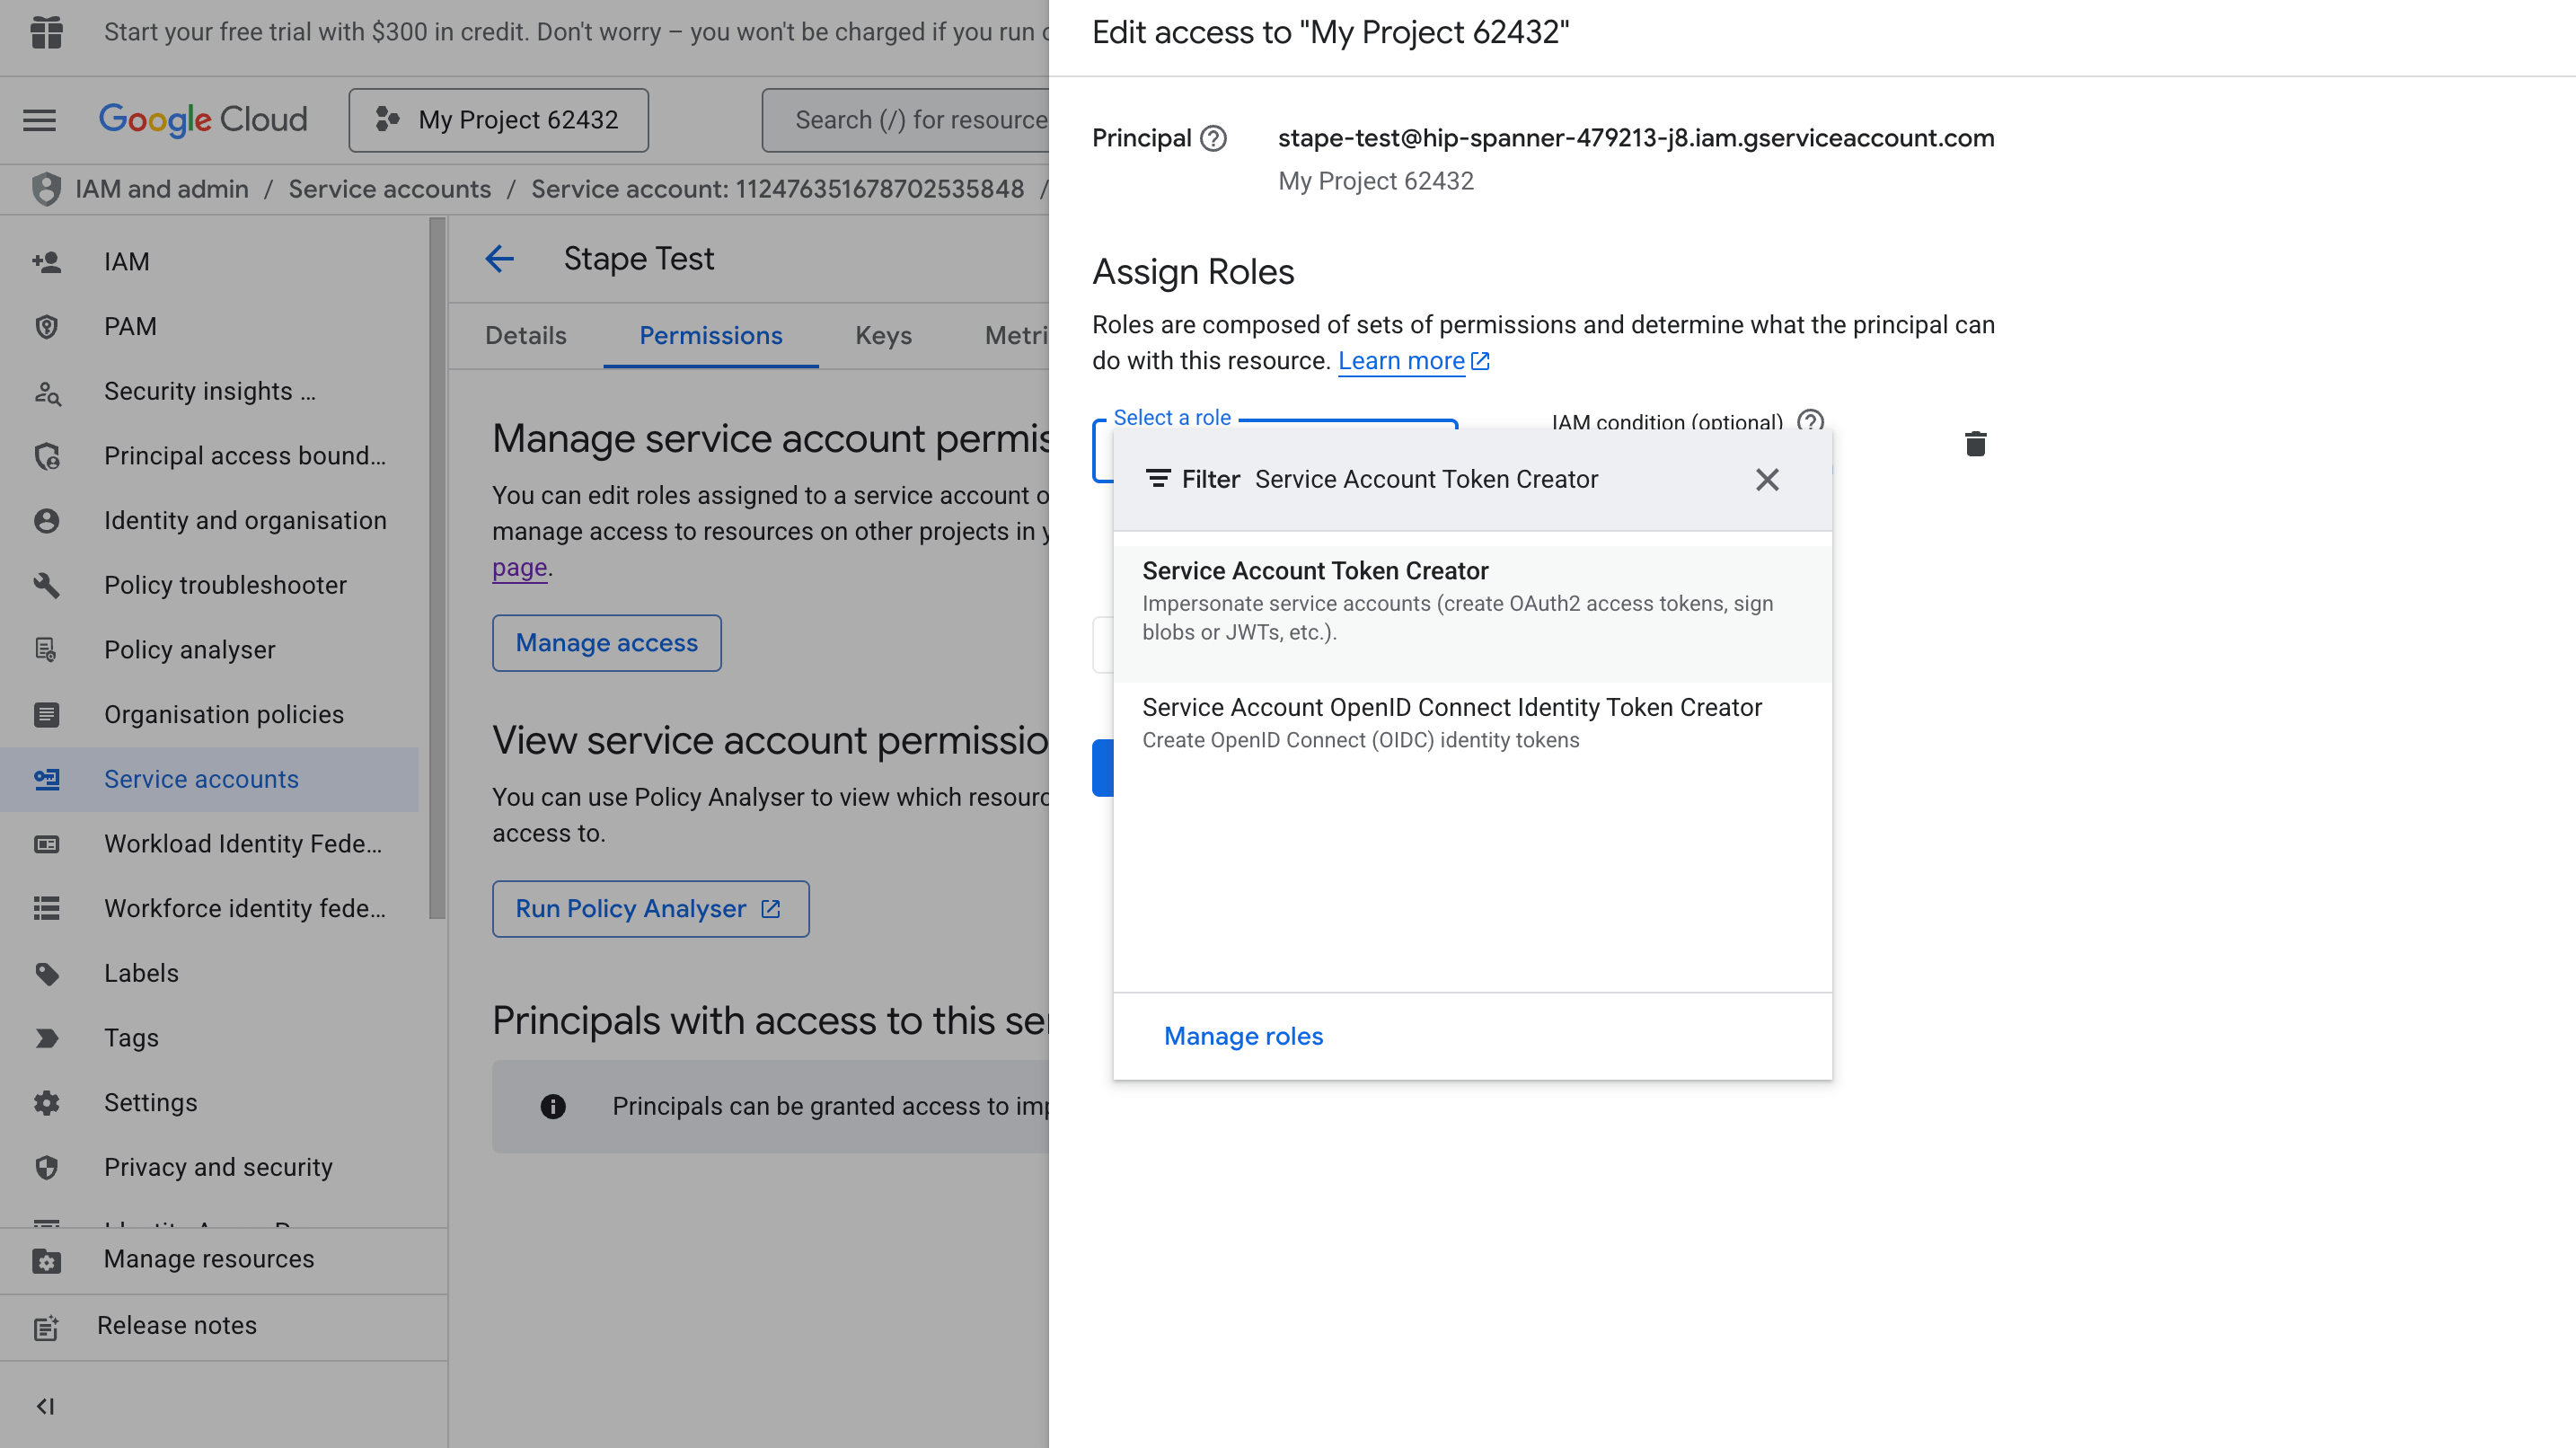
3. Assign the Service Account Token Creator IAM role (roles/iam.serviceAccountTokenCreator) to the Service Account.
In the Service Accounts list, click the three dots next to your newly created account → Manage Permissions → Manage Access → Add role → choose Service Account Token Creator → Save.
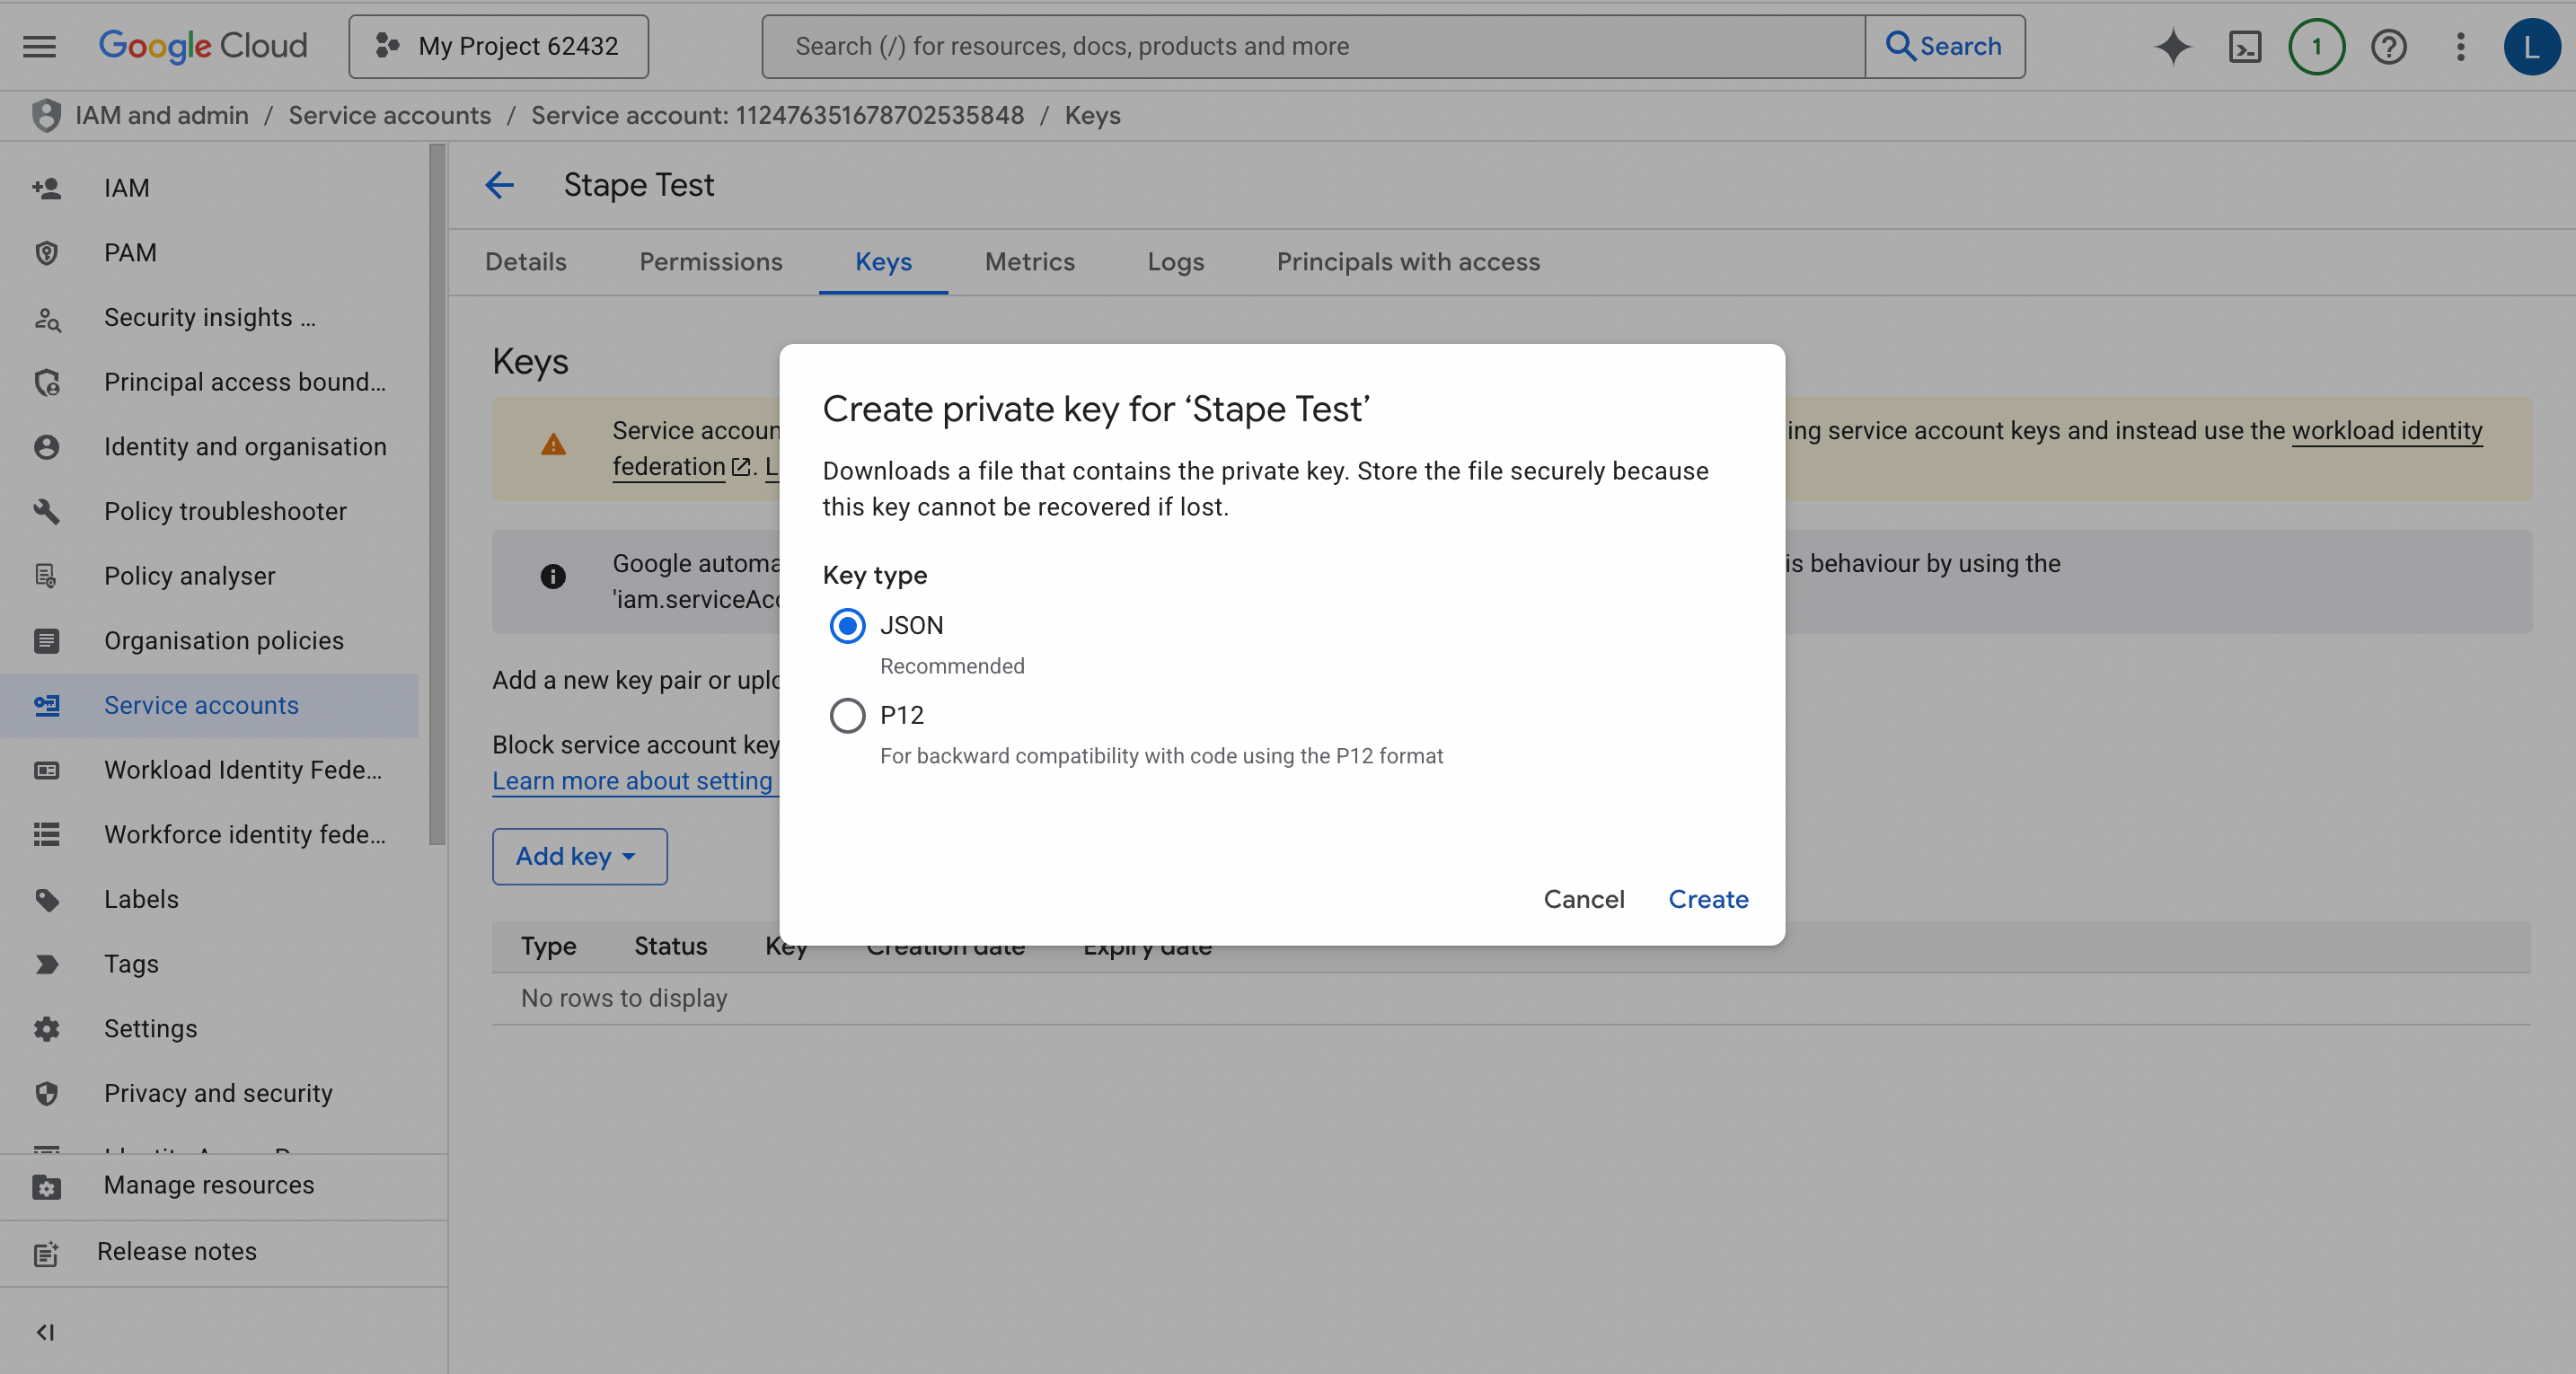
4. Generate and download a JSON key for this Service Account.
In the Service Accounts list, click the three dots → Manage Keys → Add key → Create new key → choose JSON → Create (the file will download automatically).
5. Connect the Service Account to your container using the JSON key:
- If you’re hosting on Stape, use the Service Account power-up.
- If you're hosting elsewhere, follow Google’s setup instructions.
6. Give the Service Account access to the Google product you're integrating with (Google Ads, DV360, etc.). Refer to that product’s documentation for the required permissions.
How to configure the Google Data Manager API Customer Match tag
1. Add the Google Data Manager API Customer Match tag to your server GTM Workspace.
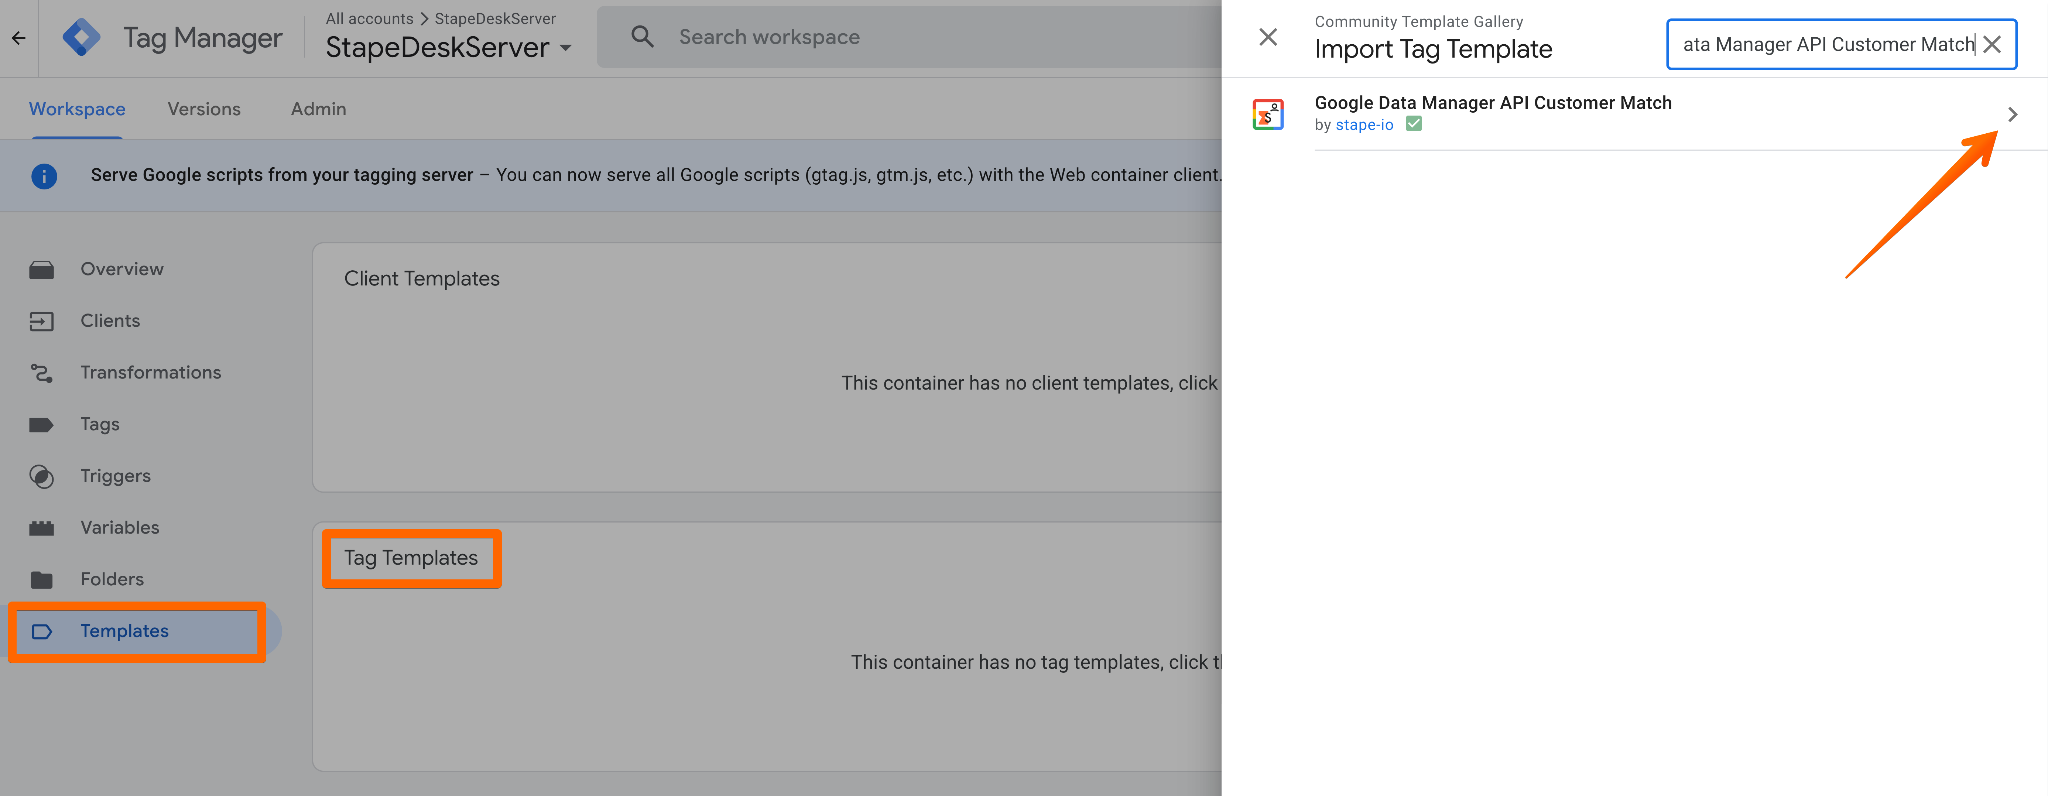
Open your Server GTM container. Navigate to Templates → next to Tag Templates, click Search Gallery. Find Google Data Manager API Customer Match and click Add to Workspace.
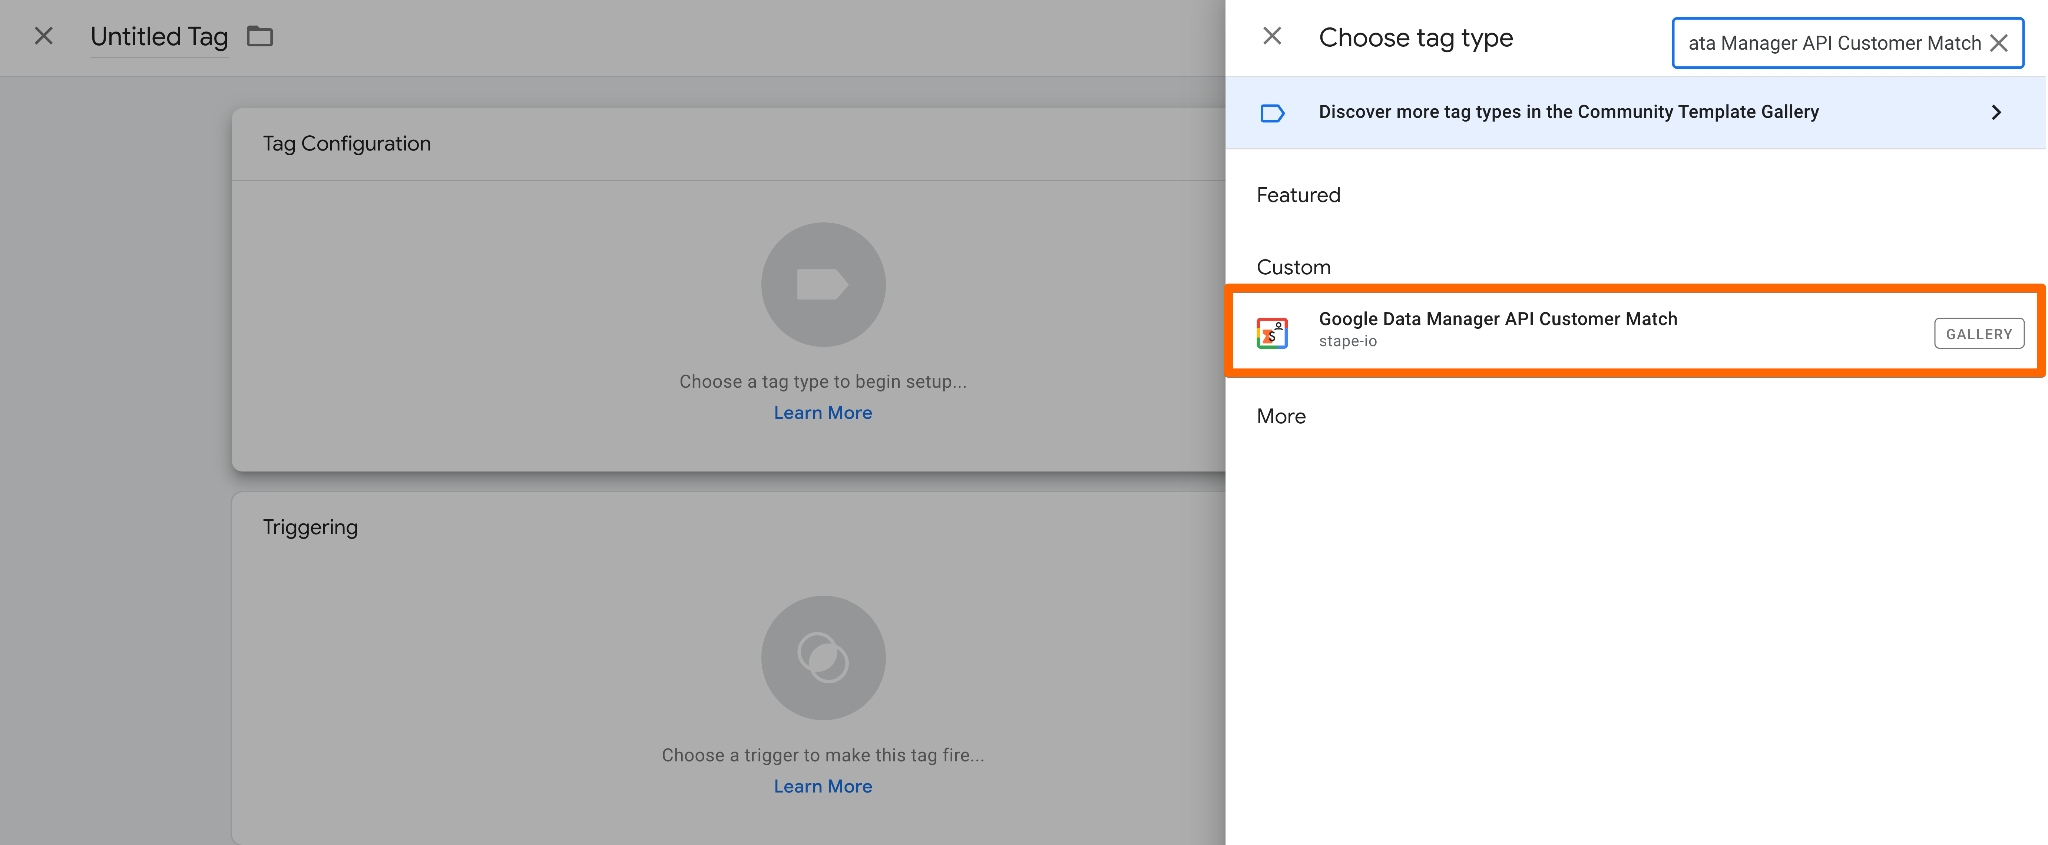
2. Create a new tag. Go to Tags → click New. Select Google Data Manager API Customer Match as the tag configuration.
3. Configure a tag.
3.1 Action - choose the action for the tag. For this guide, we select Add to Customer List. You can also choose to remove users from a customer list.
3.2 Product - select from the list the platform you configure Customer List for - Google Ads, or Display and Video 360.
3.3 Operating customer ID - enter the Google Ads account ID that will receive conversions. To find it: sign in to Google Ads → click your profile picture (top-right) → copy the value. Ensure this matches the account used for the Data Manager API connection.
Important: remove hyphens before using it.
3.4 Customer ID - ID of the account used for authorization.
- If you're using your customer account, use the customer account ID.
- If you access the customer account through a manager account, use the manager account ID.
Remove hyphens before using it.
3.5 Customer List Name - specify the customer list to interact with. Only lists created via Stape are supported.
The audience name format in Google products: stape_<Customer List Name> (e.g., entering “Purchasers” maps to stape_Purchasers).
3.6 Terms of Service Status - it must be accepted to upload to Customer Match. Requirements include good policy compliance and payment history. You should have:
- A good history of policy compliance
- A good payment history
For more details on Google's policy regarding Customer Match, please check their documentation.
3.7 Validate Only - if enabled, the request is validated but not executed. Only errors are returned.
3.8 Use Optimistic Scenario - if enabled, the tag calls gtmOnSuccess() without waiting for an API response. Speeds up sGTM response but always reports fired successfully, even if it hasn't.

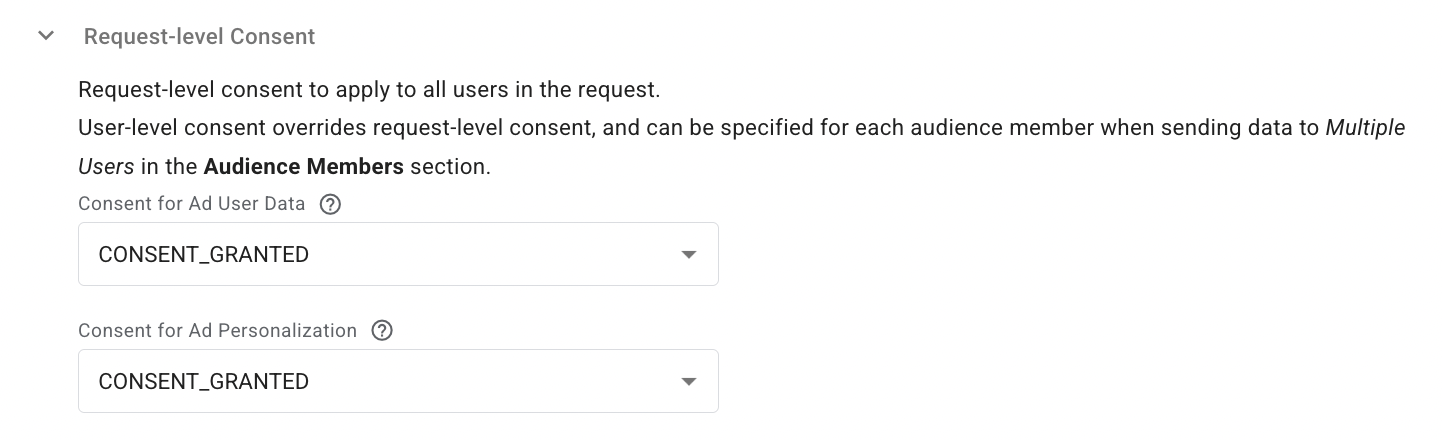
3.9 Request-level consent - specify consent for Ad User Data and Ad Personalization. User-level consent (set per audience member) overrides request-level consent.
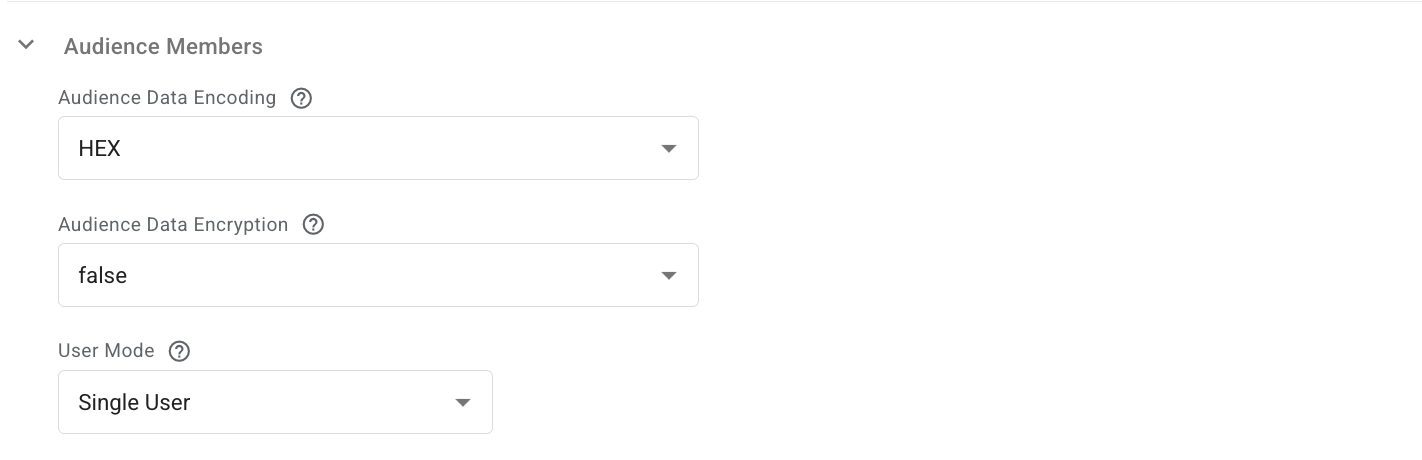
3.10 Audience member section.
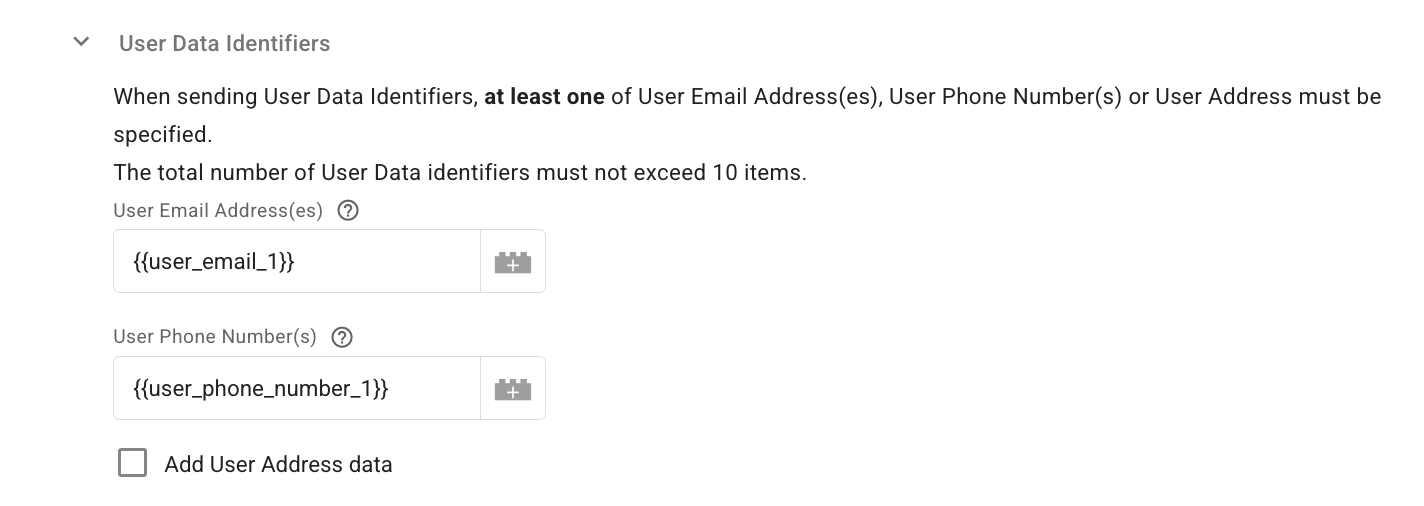
- Audience Data Encoding - choose HEX or BASE64 for user identifiers.
This field is required for UserData (User Email Address, User Phone Number, and User Given/Family Name) uploads. For other types (User Address Region and User Address Postal Code) uploads, this field is ignored.
- Audience Data Encryption - encrypts User Email, Phone, Given/Family Name. Assumes data is hashed but not encrypted if left blank.
- User Mode - choose to send data for a single user or multiple users.
3.11 User Data Identifiers - specify up to 10 identifiers. At least one of User Email, User Phone, or User Address must be provided.
4. Add a trigger for the tag. Configure when the tag should fire according to your workflow.
5. Test the configuration. Open Preview mode in both your web and server GTM containers and verify your setup. For more detailed debugging instructions, refer to our server-side tracking debugging guide.
Common configuration mistakes and their fixes
Terms not accepted
To populate the Customer Match list, you need to accept a few terms of use:
- Customer Match terms.
It's a legal agreement within Google Ads where you confirm that any data you upload has been collected in compliance with Google's policies (first-party only, clear opt-in). You can read more about the Customer Match policy on Google's end.
How to fix: the Customer Match terms usually pop up when you create the Customer Match list for the first time. Later, it must reappear; be sure to confirm that you comply with the policy.
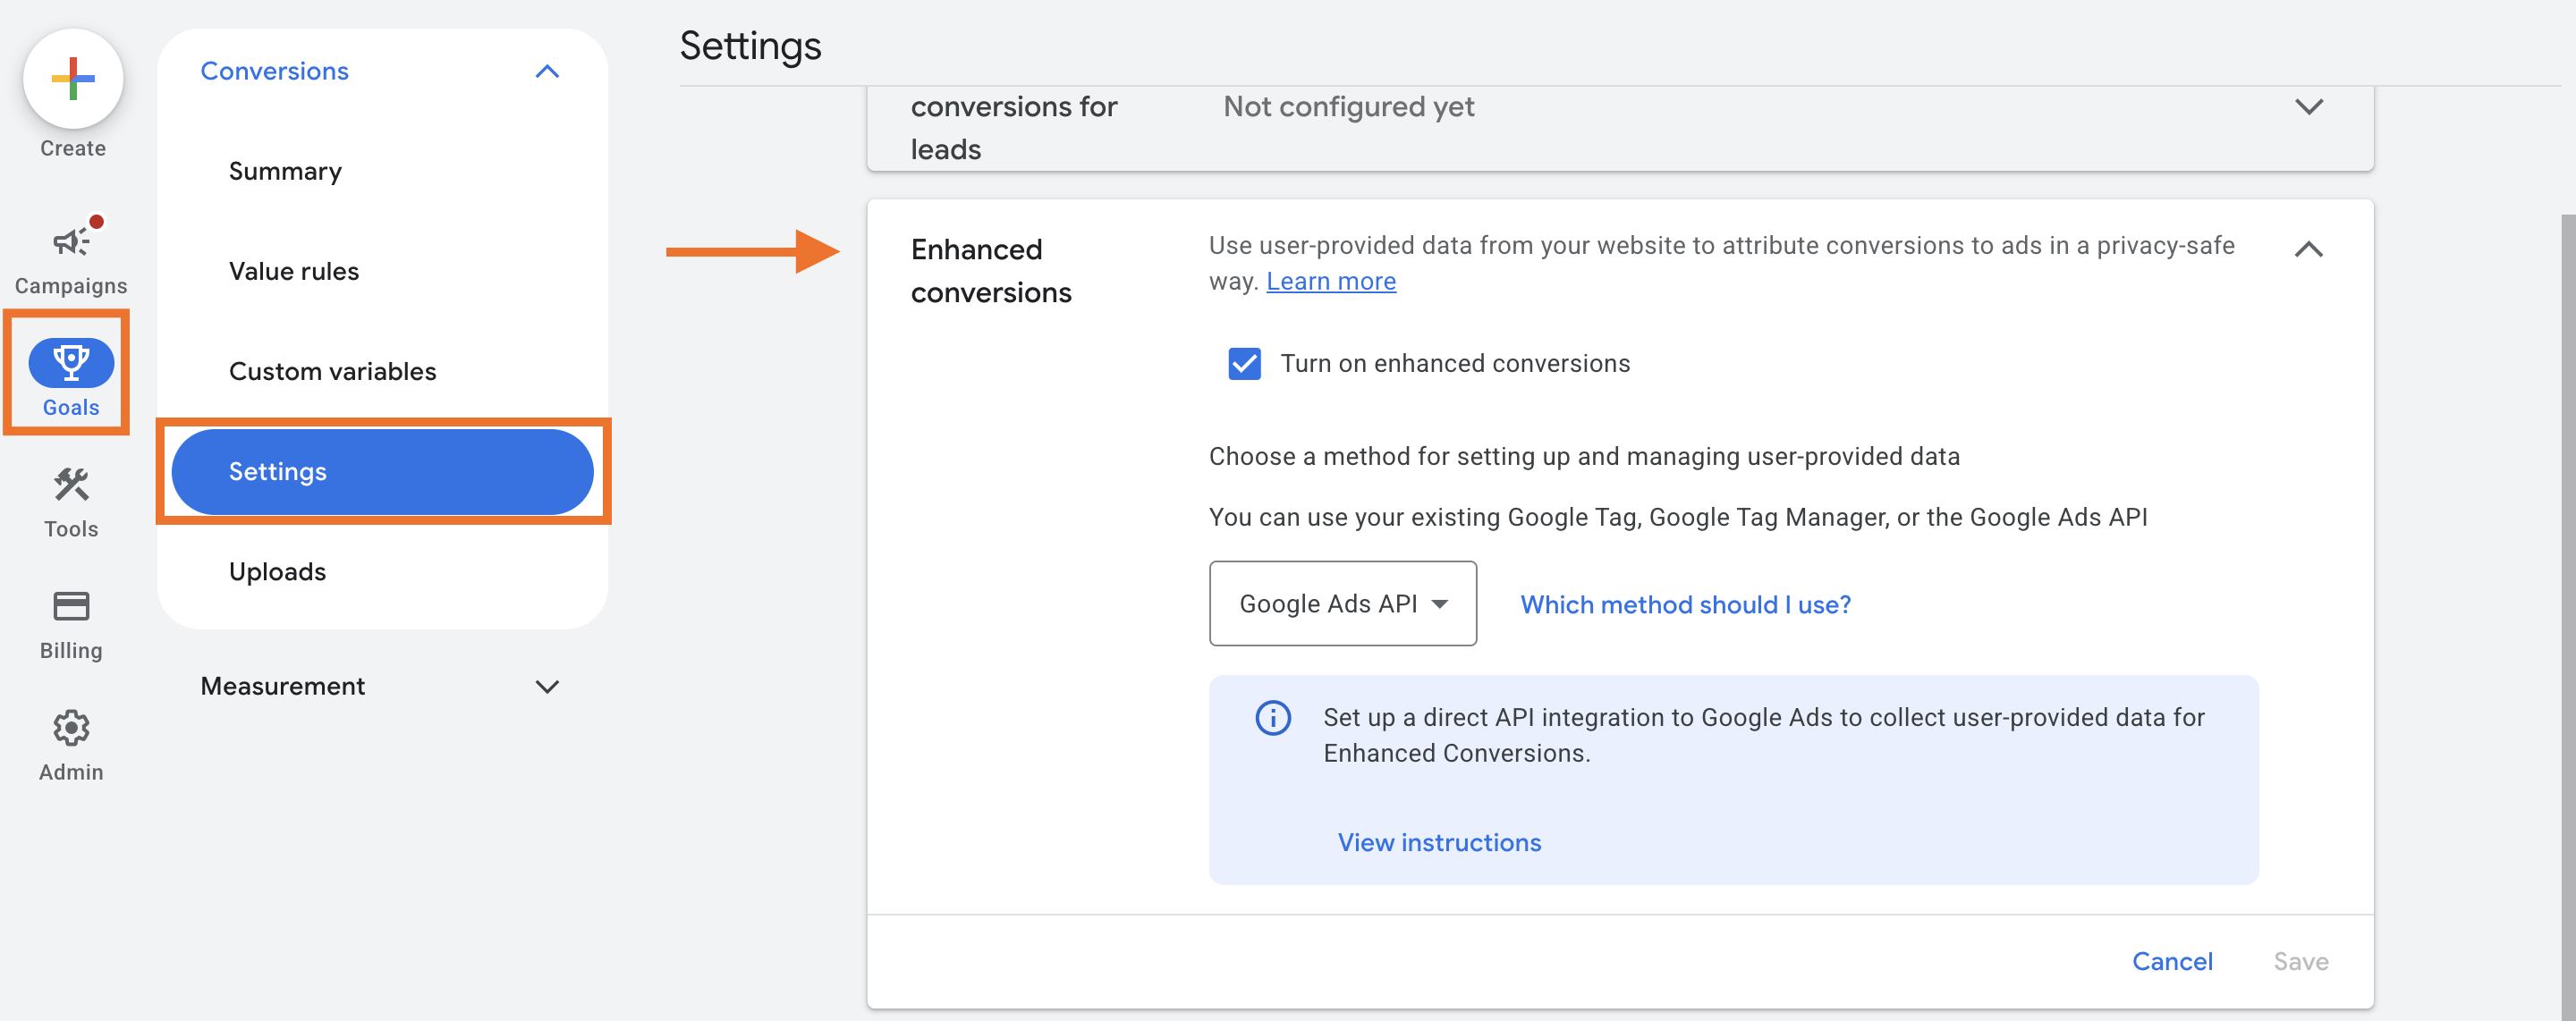
- Enhanced conversion terms.
Enhanced Conversions sends hashed first-party data (emails, phone numbers) from your website to Google to "fill in the gaps" when cookies are blocked. That's a list of terms that allows Google to use this hashed data to match conversions to signed-in Google accounts.
How to fix: go to the Goals section → Settings → Enhanced Conversions. Check the box next to Turn on enhanced conversions. A window with terms must pop up; be sure to accept the terms.
Note: if your conversions are managed via the Manager Account (MCC), the customer data terms must be accepted from the manager's account.
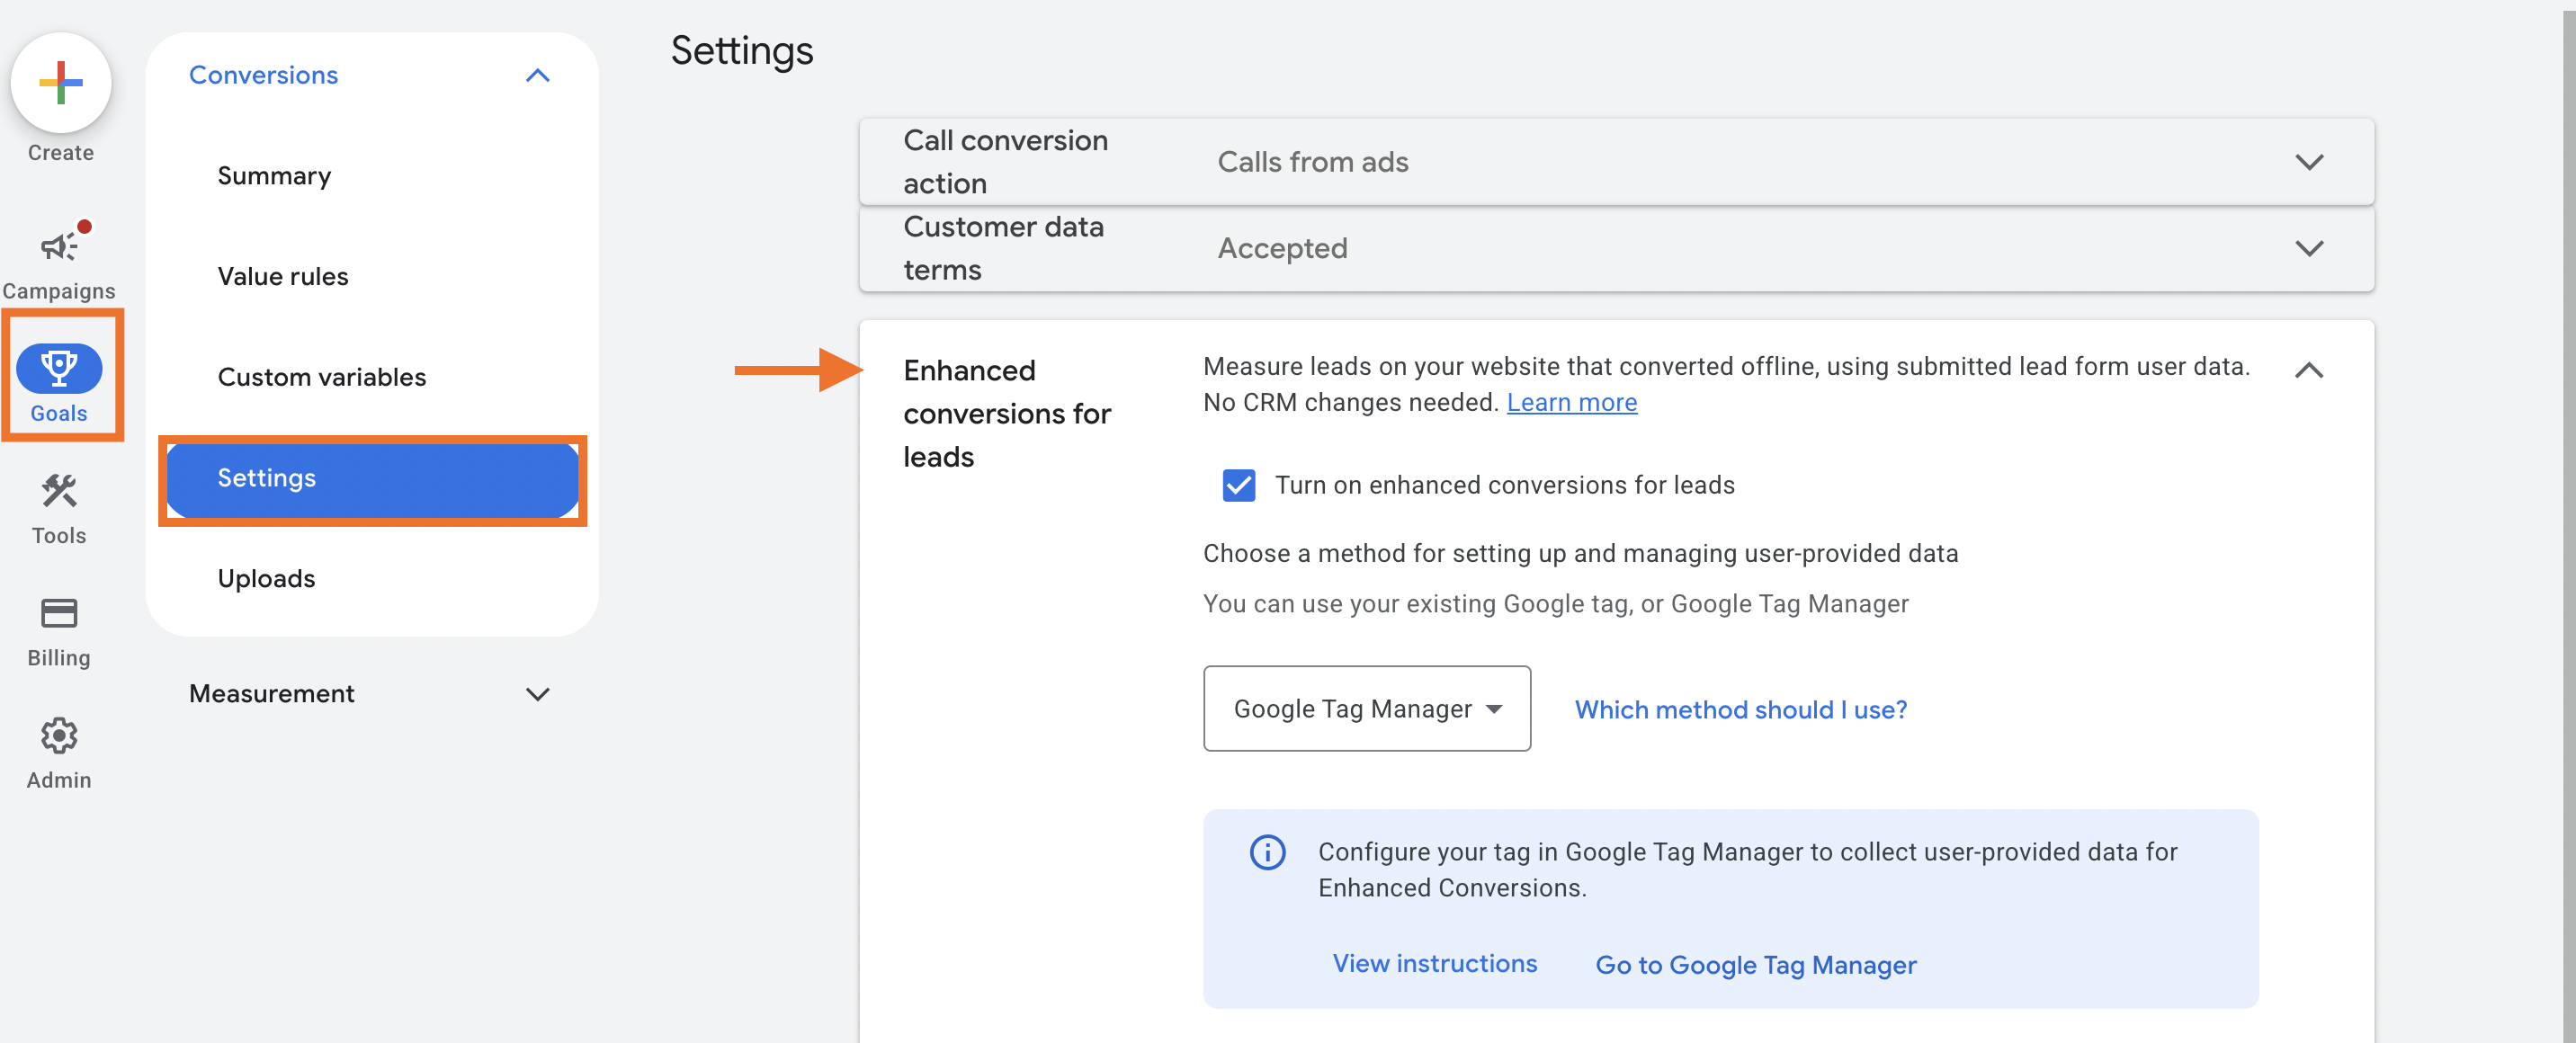
Enhanced conversions for leads aren't turned on
Enhanced Conversions for Leads (ECfL) is the specific feature that allows Google to attribute conversions using first-party data (like hashed emails) rather than just Google Click ID (GCLID). ECfL provides the framework to match CRM data using hashed first-party identifiers (like emails) instead of cookies or click IDs.
How to fix: go to the Goals section → Settings → Enhanced conversions for leads. Check the box next to Turn on enhanced conversions for leads. A window with terms must pop up; be sure to accept the terms.
Not an appropriate access level for the connection account
To link a third-party tool (like Stape) to your Google Ads account via the API, the user account needs specific permissions. Lower access levels (like Read-only or Billing) cannot grant the necessary scopes for the Data Manager API to "write" or "upload" data to the account.
How to fix: Obtain Standard or Admin access to authorize the OAuth flow.
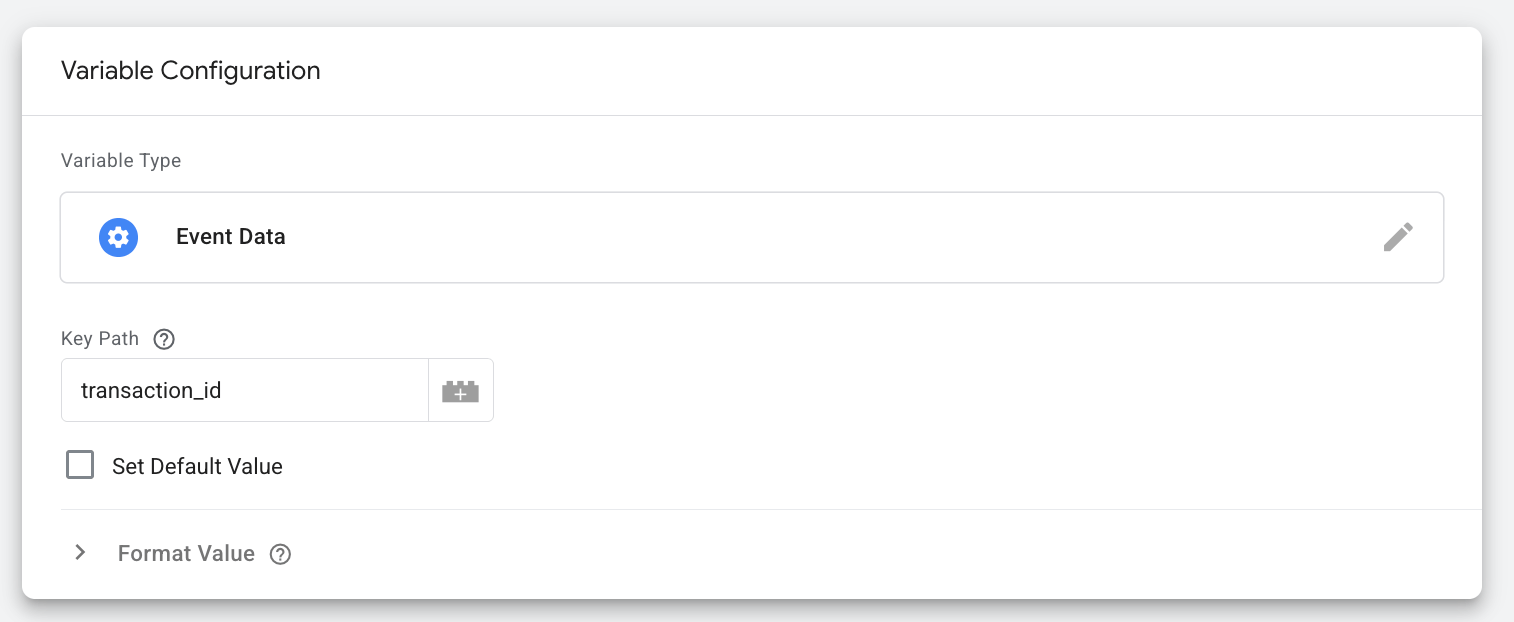
The transaction_id isn't sent with the event
transaction_id for Google's new feature that allows unifying and recovering lost conversions within Google Ads. The feature is required to match your external source's events with those already tracked by your website tag. For more information on Google's additional sources measurement feature, check our article. |
If you encounter the error says REQUIRED_FIELD_MISSINGThe reason is often that you selected a conversion type that requires a Transaction ID, but didn't provide one in the tag.
The requirement is determined by the Conversion Action Type:
- Website (any online conversions) - a
transaction_idis mandatory. - Offline (import from clicks) or enhanced conversions for leads - a
transaction_idis optional.
For more info on when transaction_id is required, refer to Google's documentation.
If you are reporting an online "Website" conversion, you must provide a transaction_id regardless of whether the event is a purchase, a lead, or any other type.
How to fix: You need to provide the transaction_id.
Be sure to have a variable that will grab transaction_id in your Google Data Manager API Conversion Events tag.
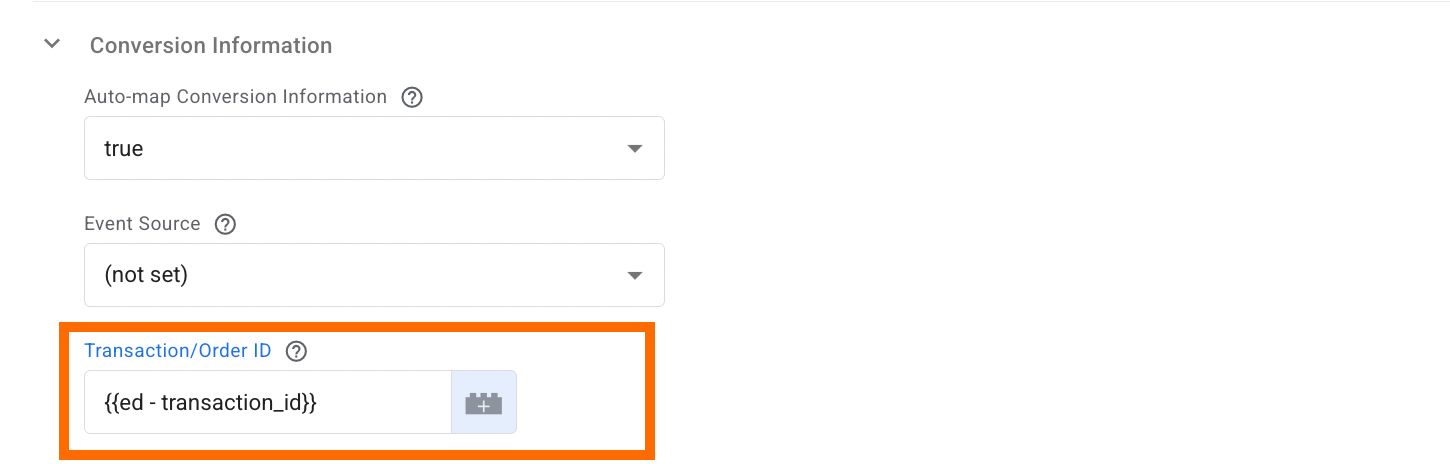
The variable configurations:
- Variable Type - Event Data
- Key Path -
transaction_id
Consent is not specified or has the wrong format
The error INVALID_ARGUMENT for ad_personalization or ad_user_data points to consent. It means that the consent signal was either missing or sent in a format the API didn't recognize.
Google can process only three values:
CONSENT_GRANTEDCONSENT_DENIEDCONSENT_STATUS_UNSPECIFIED
As provided in the tags:
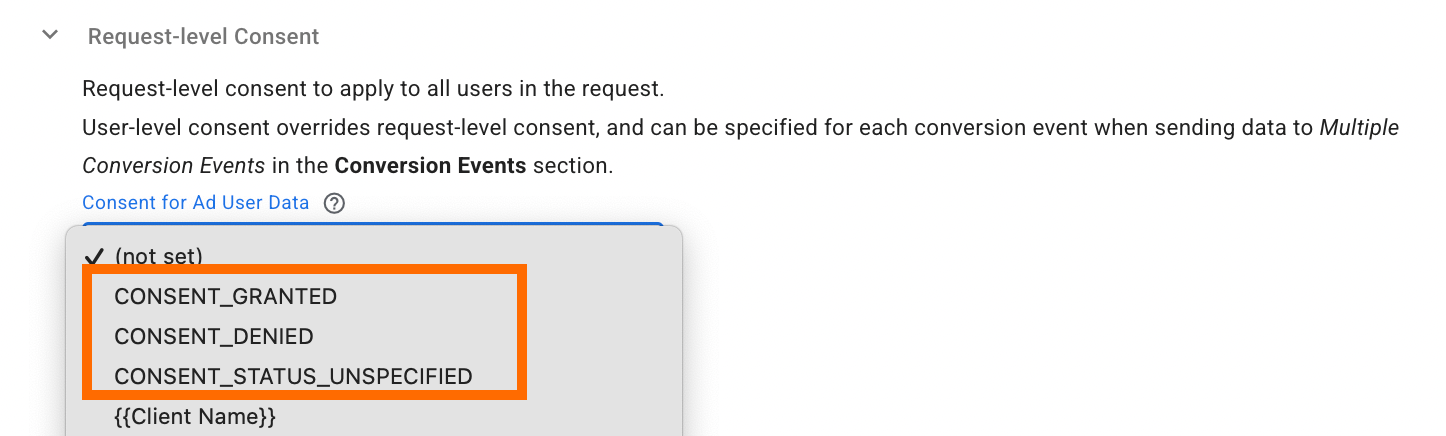
How to fix: check whether you specified the consent status in the Request-level Consent section of the tag.
If you are dynamically viewing the consent status and using a variable in the Request-level Consent section, you need to transform the values into the appropriate ones that will be understandable for Google. For this purpose, use the LookUp variable.
Was this article helpful?
Comments