Step 4. How to add a custom domain in Stape
Updated Nov 13, 2025
1. Log in to your stape.io account → choose a container → scroll down and click Add custom domain.

2. There are two ways of adding a custom domain:
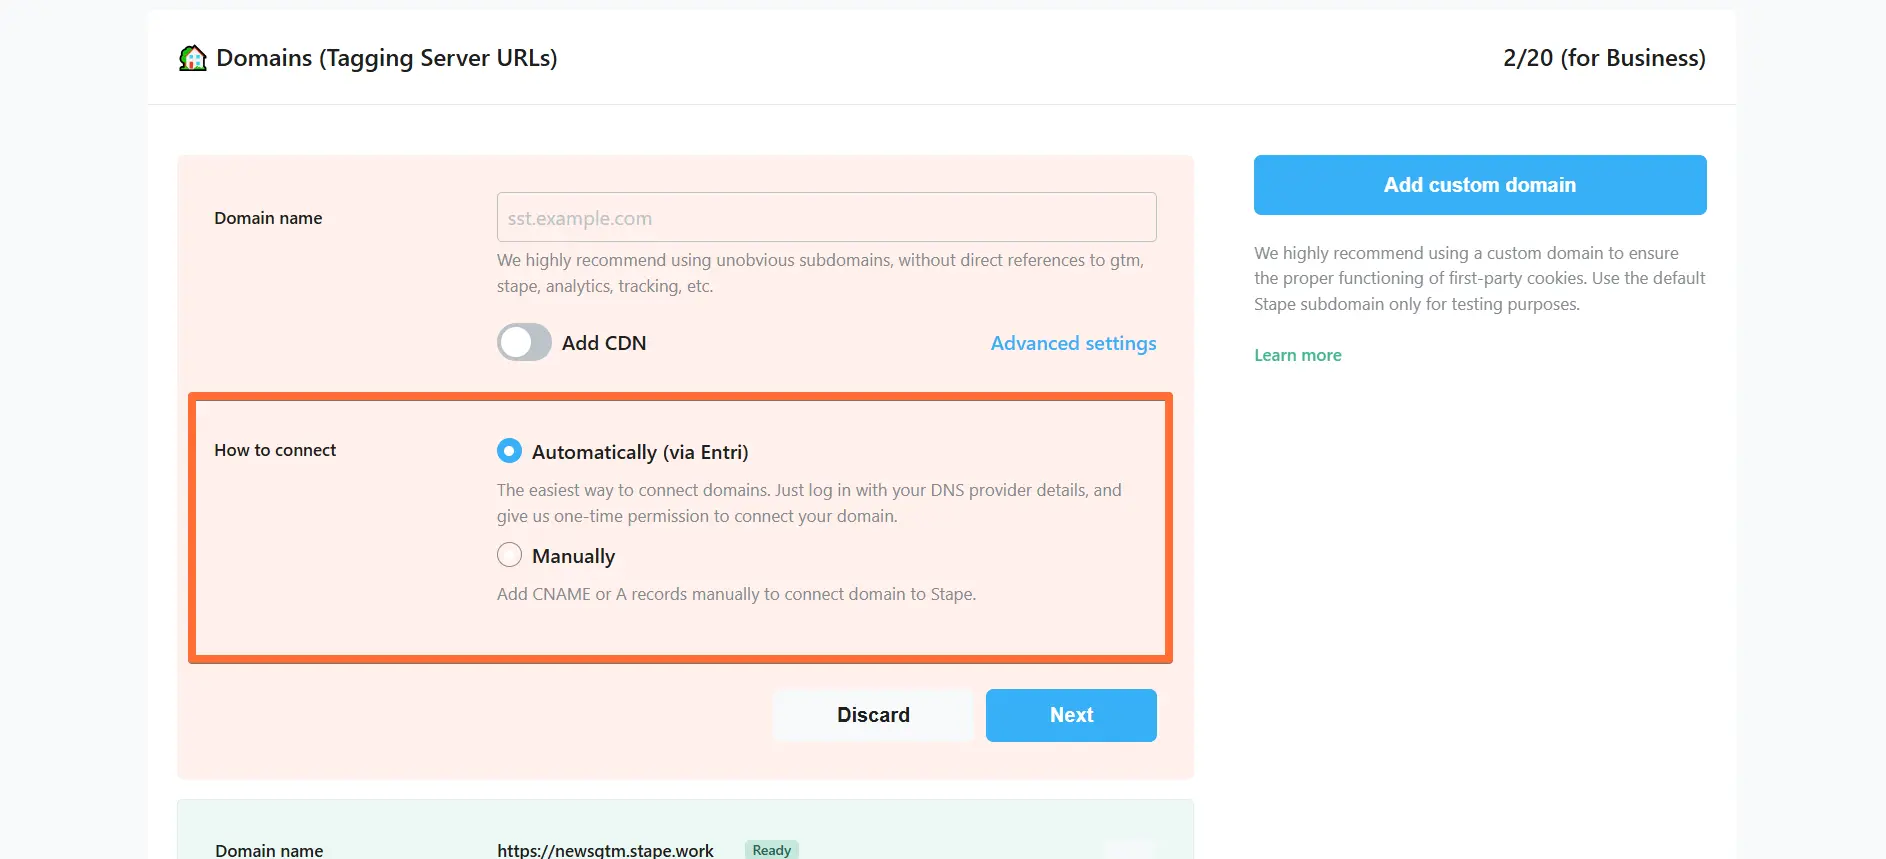
- Automatically (via Entri) - the easiest way to connect domains. Log in with your DNS provider details via Entri, and give us one-time permission to connect your domain. Check the full list of supported DNS providers by Entri.
- Manually - After you add a custom domain to your Stape container, you will see DNS records that should be added to your DNS provider to verify the custom domain. The DNS records depend on the server location and which CDN options you choose.
There is a DNS resource record type - CAA (Certificate Authority Authorization) - that allows to indicate which CAs are allowed to issue certificates for domains.
Stape uses the following Certificate Authorities: digicert.com, letsencrypt.org, pki.goog.
If you are using CAA records for your own domain, please make sure that you added these records:
- If you do not use the Stape CDN functionality:
gtm.example.com. IN CAA 0 issue "letsencrypt.org"
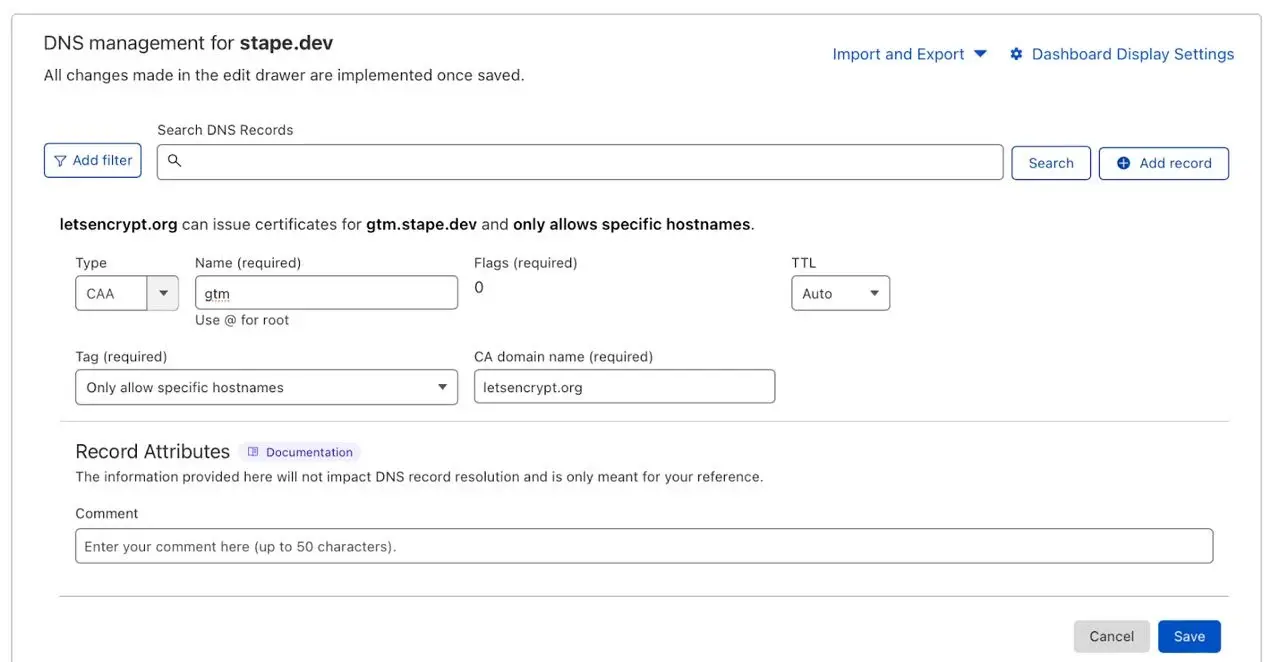
- If you use the Stape CDN functionality:
gtm.example.com. IN CAA 0 issue "digicert.com"
gtm.example.com. IN CAA 0 issue "letsencrypt.org"
gtm.example.com. IN CAA 0 issue "pki.goog"

- If you use the Disabled CDN functionality:
gtm.example.com. IN CAA 0 issue "sectigo.com"
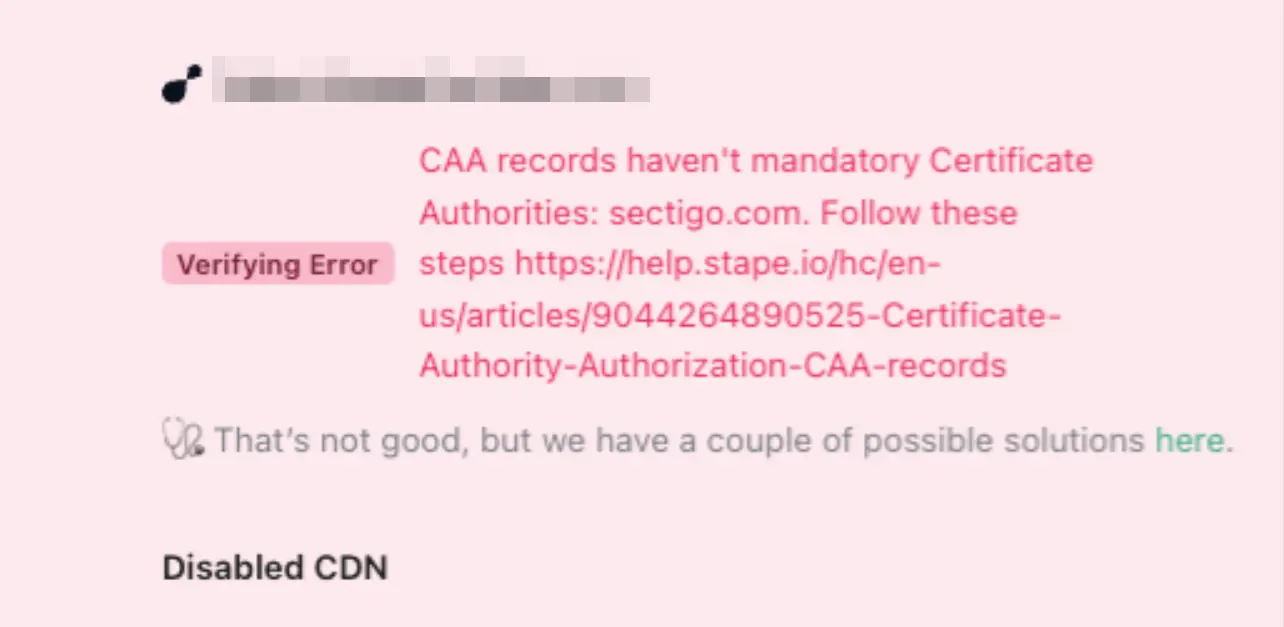
Here are all available configurations for your custom domain (don’t worry, we’ll cover the configuration process in later sections):
- Domain name - enter your tagging server domain (example: gtm.my-domain.com).
- Add CDN - toggle this switch if you want to load js files (gtm.js, gtag.js, analytics.js, etc.) from a server closer to your site’s visitors, resulting in a faster js file serving.
- Add CDN switch disabled - no type of CDN is used.
- Stape Global CDN - loads scripts from a server closer to a user visiting your website.
- Own CDN (incompatible with the Automatically (via Entri) connection option, see below) - routes sGTM custom domain and proxy sGTM traffic through the DNS provider of your website. In this case, the IP addresses of your website and the custom domain of the sGTM will match, and server-side cookies will be considered first-party. As a result, it gives the ability to increase cookie duration.
- Advanced settings - here you can tick the box to Use A records instead of CNAME records. If DNS providers restrict adding duplicate records, you should use CNAME record. If not, then choose A records. Please note that this setting is incompatible with the Add Global CDN setting.

Adding a custom domain with CNAME record
Enter your Domain name, select if you want to Add CDN or not, and whether you want to connect Automatically or Manually → click Next.
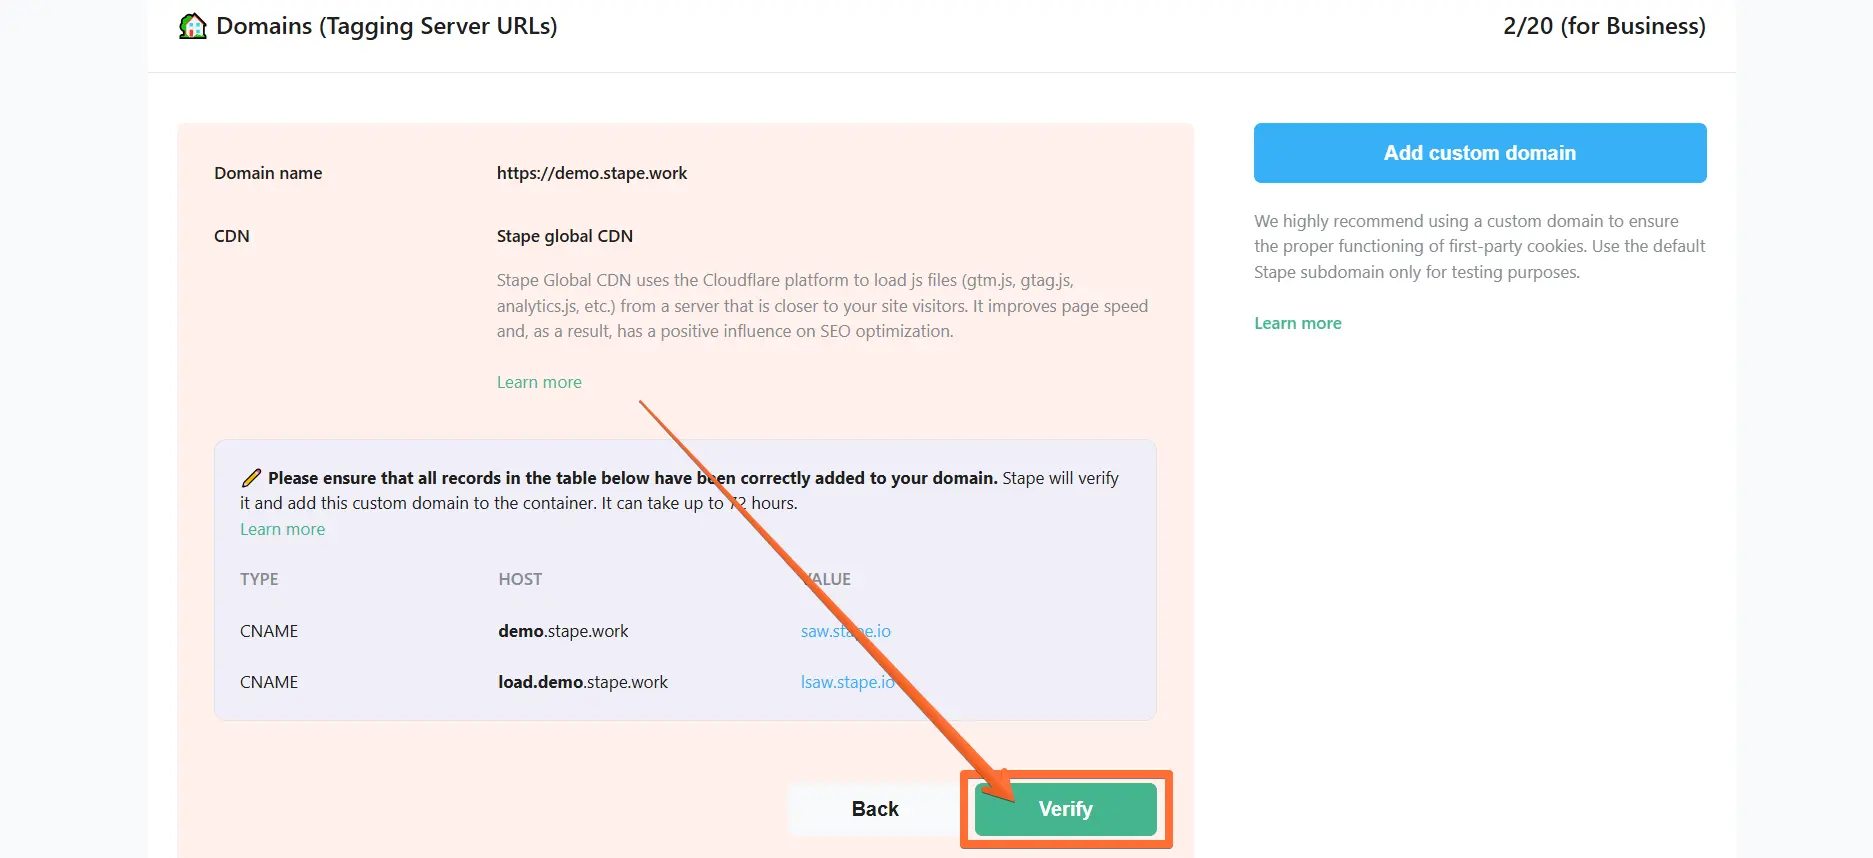
If you do not use the Stape Global CDN option, you will be provided with one CNAME record to add to your DNS provider. Otherwise, you will be provided with two CNAME records.

Here is an example of how to add these records to Cloudflare DNS provider, but you can do the same with any provider you use.
1. Visit your Cloudflare profile → open the DNS tab in the side menu → open the Records screen → click Add record.
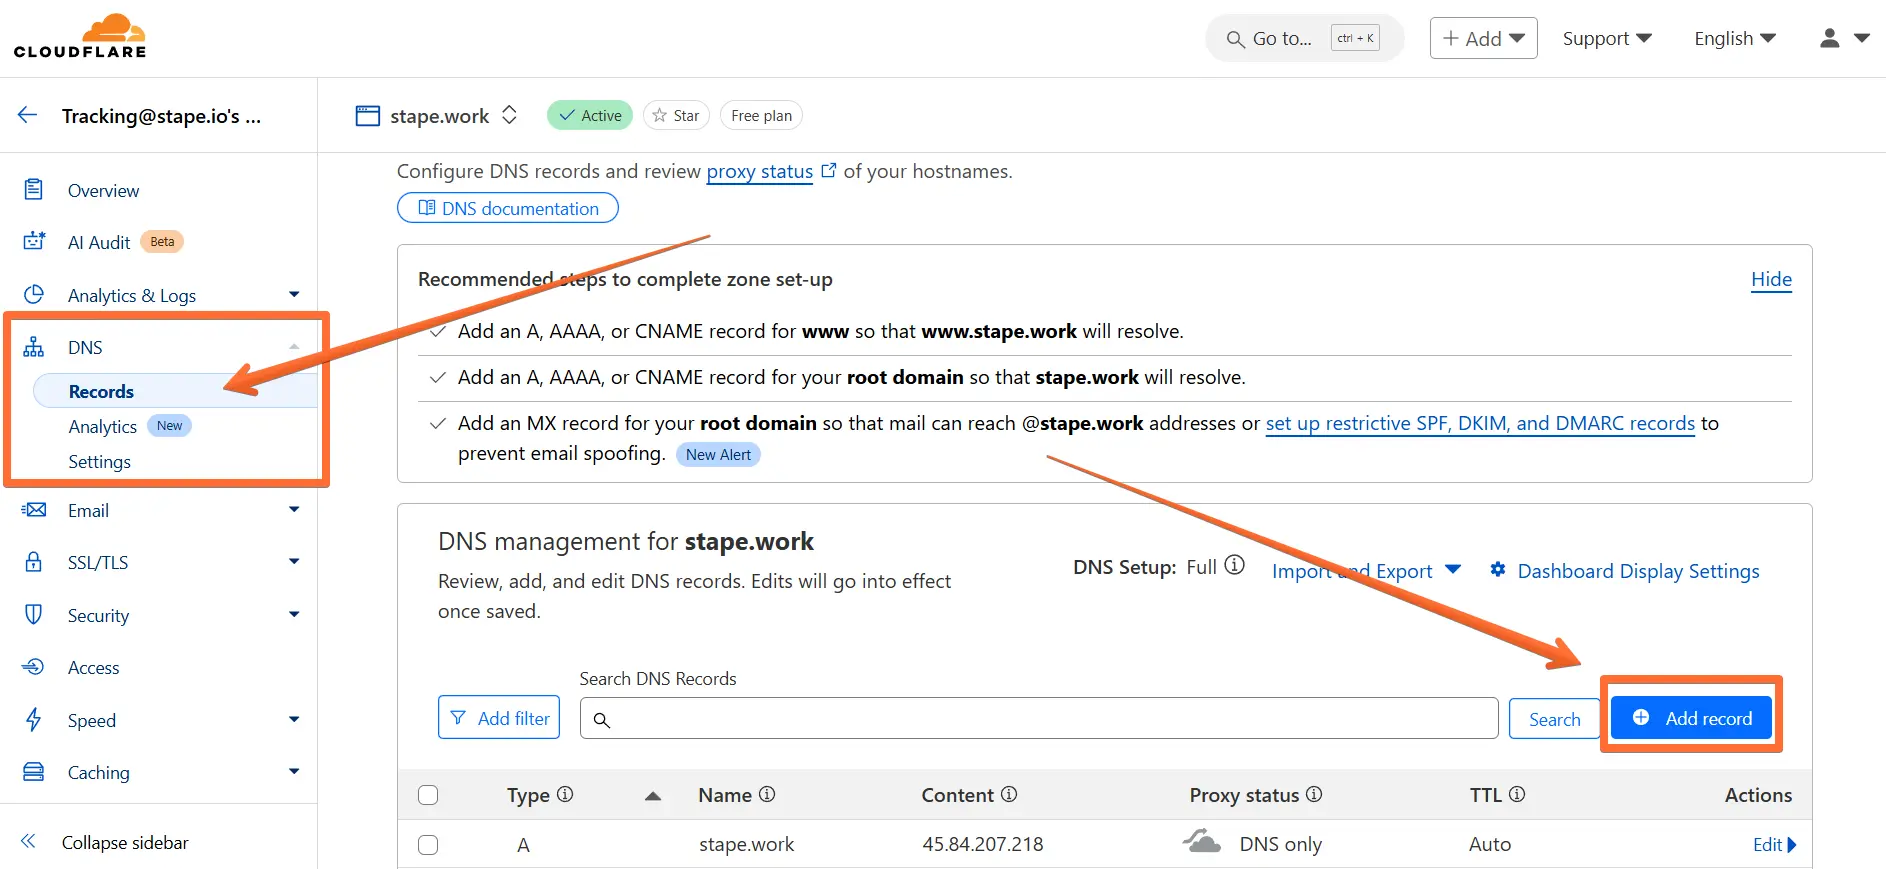
2. Enter the DNS records from Stape:
- Type - select CNAME.
- Name - copy the HOST parameter from Stape.
- Target - copy the VALUE parameter from Stape.
- Proxy status - make sure to toggle this OFF.
If Stape provided you with several CNAME records, repeat the process of adding records for each of them. After that, click Save.

3. Once you’ve entered the DNS records to your DNS provider, return to the Stape domain settings page and click Verify.
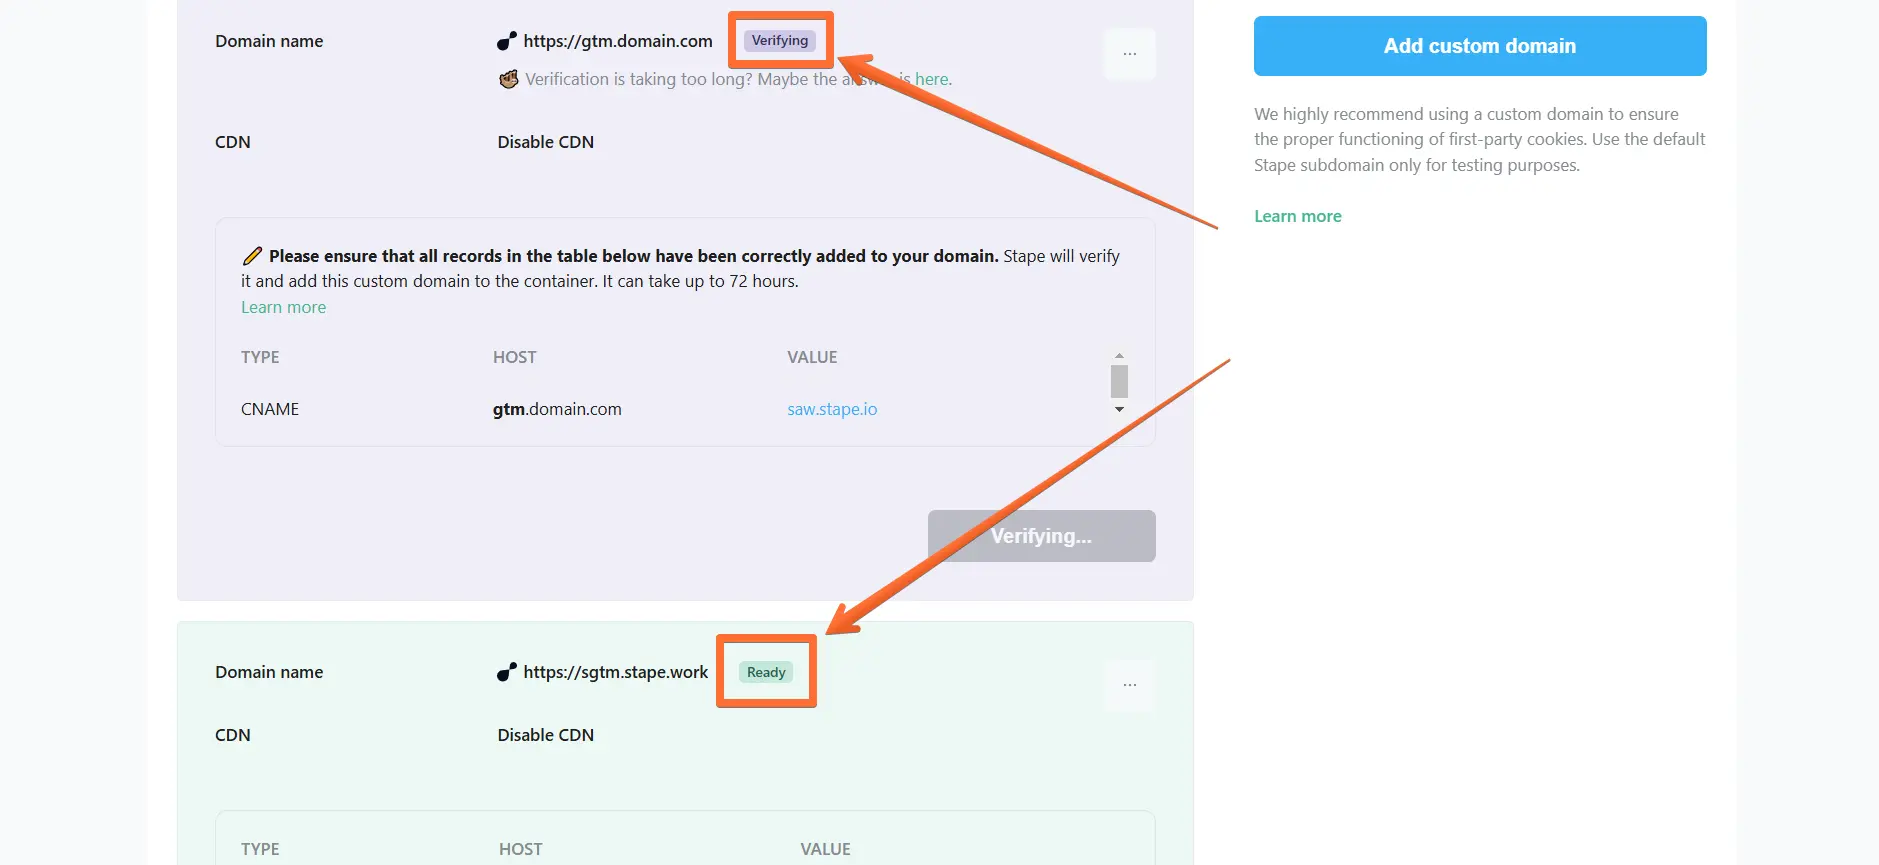
4. Wait for Stape to finish verifying your custom domain (when the container status bar changes from Verifying to Ready). Usually, it takes from 30 minutes to 2 hours, but in some cases it can take up to 72 hours.
5. Go to your Google Tag Manager Server container → click Admin → click Container Settings → change the Tagging server URL to your subdomain.

6. If you use a custom domain, updating the Web GTM script on your website is highly recommended. This tweak will load gtm.js from your domain. To do so, replace the default domain googletagmanager.com with the custom domain you set up in the previous step.

Adding a custom domain with A and AAAA records
If you want to set up your custom subdomain using A and AAAA records, you can do so using the option Use A records instead of CNAME records under Advanced settings.
Enter your Domain name, click Advanced Settings → tick the box Use A records instead of CNAME records, then select if you want to Add CDN or not and whether you want to connect Automatically or Manually → click Next.

You will be provided with a set of A and AAAA records to add to your DNS provider.
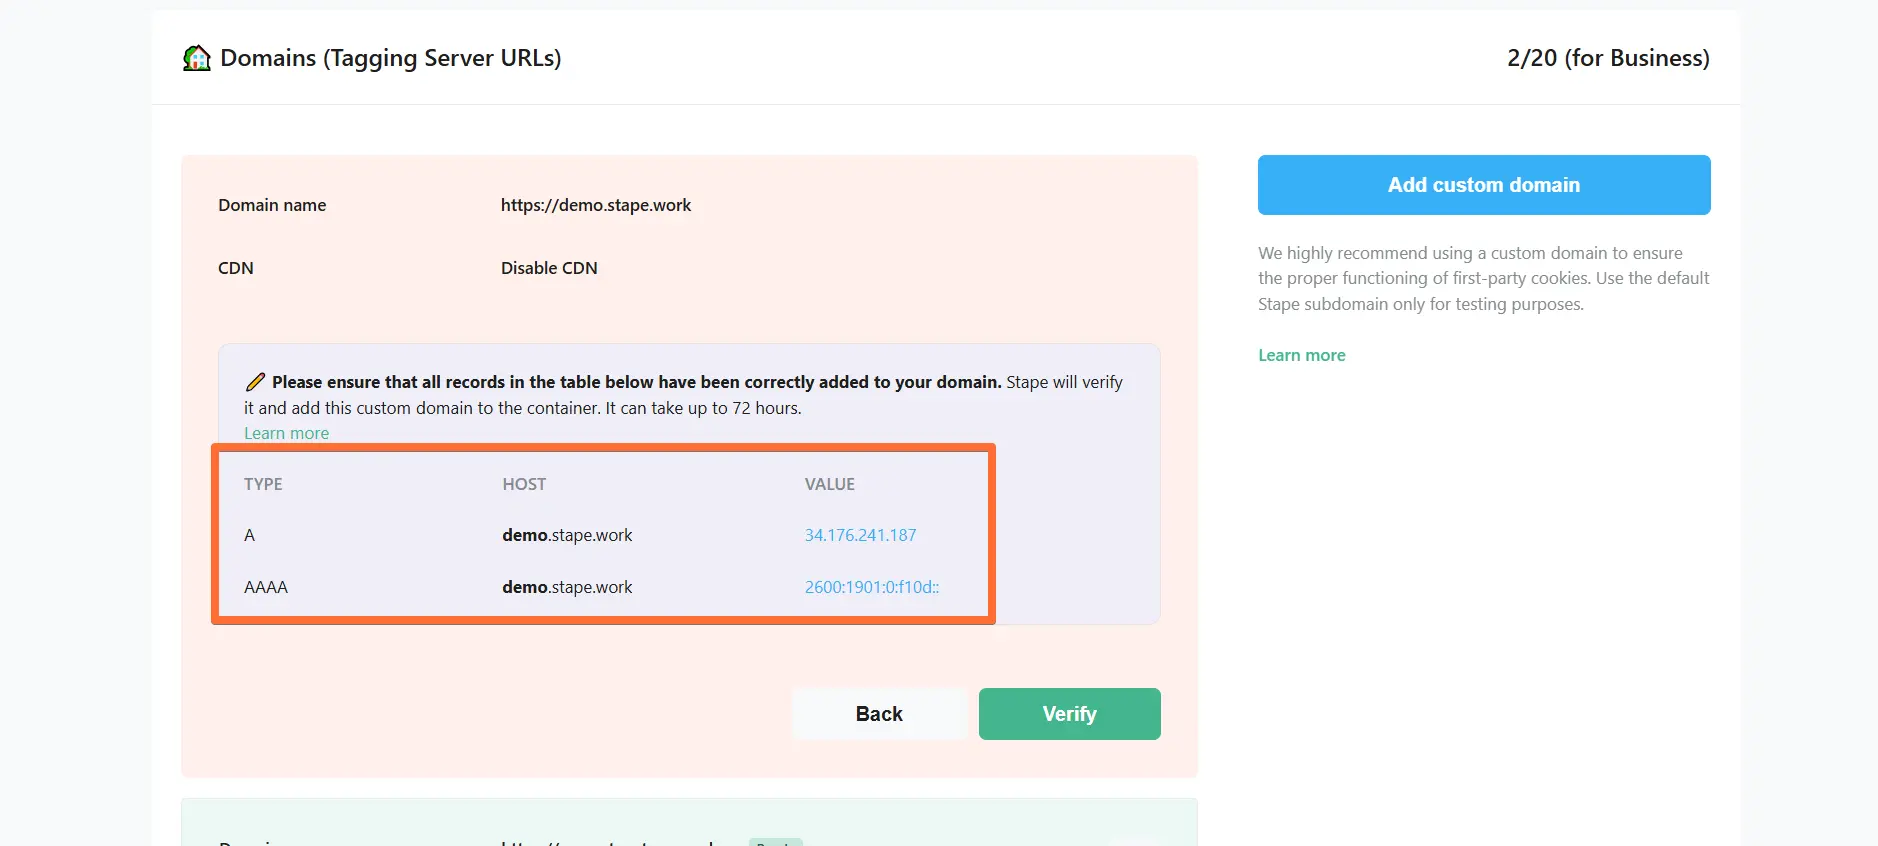
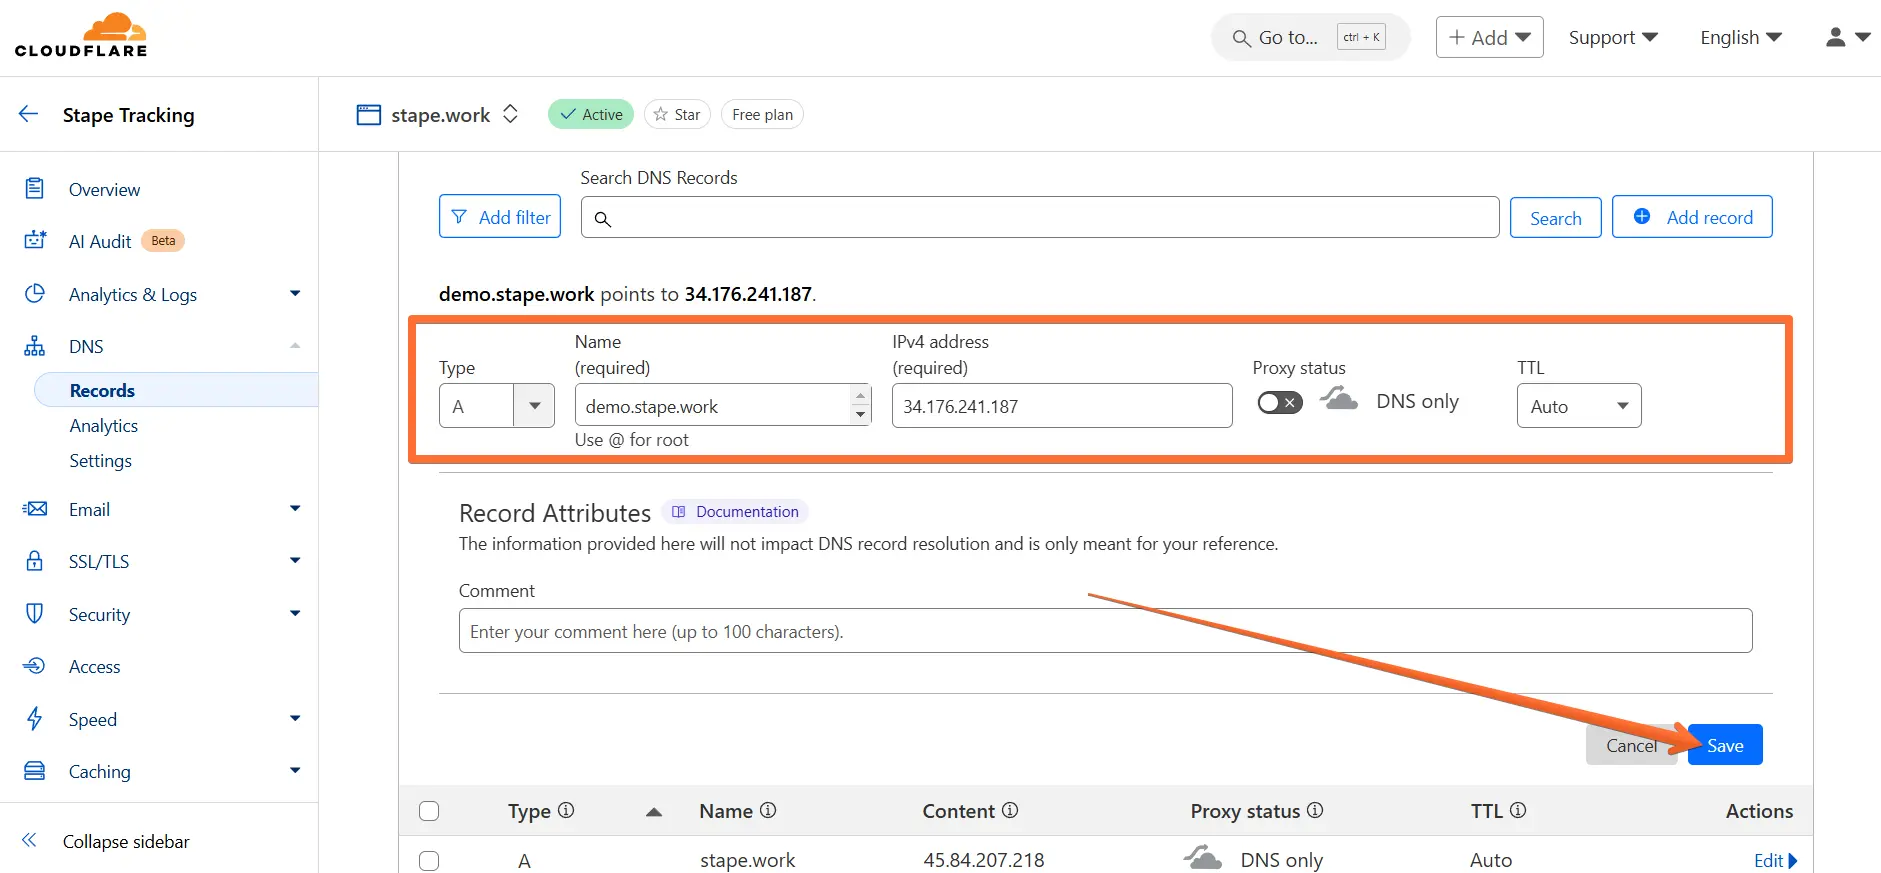
Here is an example of how to add these records to Cloudflare DNS provider, but you can do the same with any provider you use.
1. Visit your Cloudflare profile → open the DNS tab in the side menu → open the Records screen → click Add record.

2. Enter the DNS records from Stape:
- Type - select A or AAAA.
- Name - copy the HOST parameter from Stape.
- Target - copy the VALUE parameter from Stape.
- Proxy status - make sure to toggle this OFF.
Repeat the process for each DNS record provided to you by Stape. After that, click Save.
3. Once you’ve entered the DNS records to your DNS provider, return to the Stape domain settings page and click Verify.

4. Wait for Stape to finish verifying your custom domain (when the container status bar changes from Verifying to Ready). Usually, it takes from 30 minutes to 2 hours, but in some cases it can take up to 72 hours.

5. Go to your Google Tag Manager Server container → click Admin → click Container Settings → change the Tagging server URL to your subdomain.

6. If you use a custom domain, updating the Web GTM script on your website is highly recommended. This tweak will load gtm.js from your domain. To do so, replace the default domain googletagmanager.com with the custom domain you set up in the previous step.

Configuring a custom domain with adding own CDN
Own CDN allows serving custom domains (tagging server URL) from the same IP address as your website domain. It helps to set first-party cookies in browsers with ITP, like Safari and Firefox.
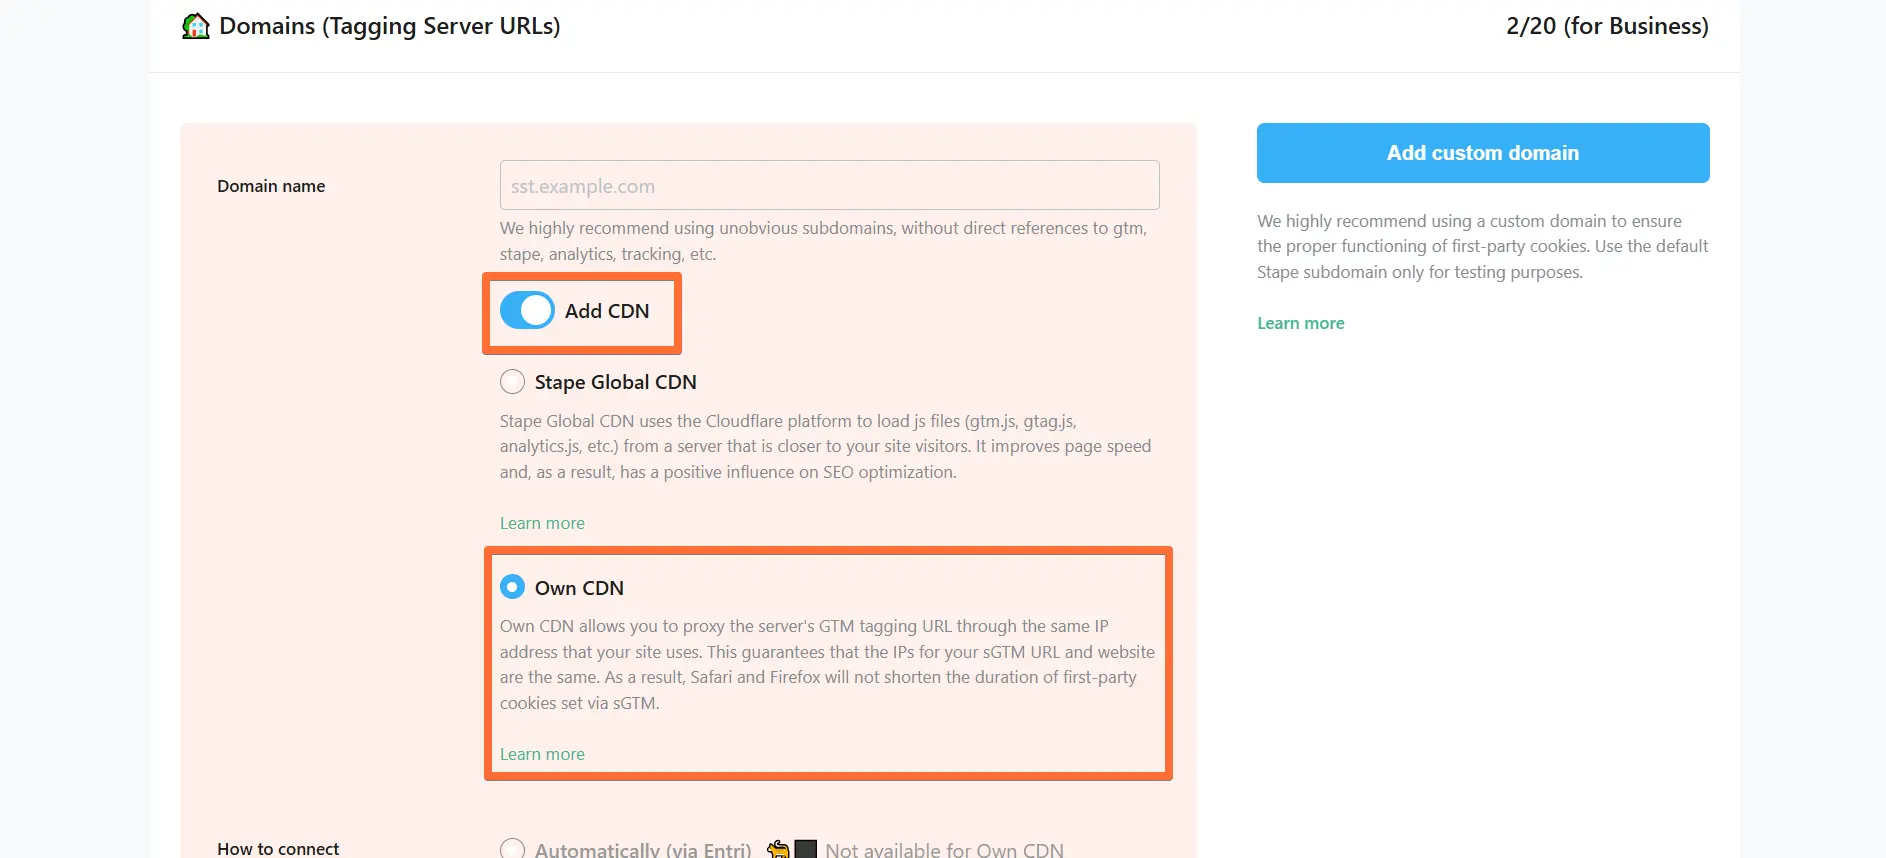
This example describes adding these records to Cloudflare DNS provider, but you can do the same with any provider you use.
1. Visit your Cloudflare profile → open the DNS tab in the side menu → open the Records screen → click Add record.
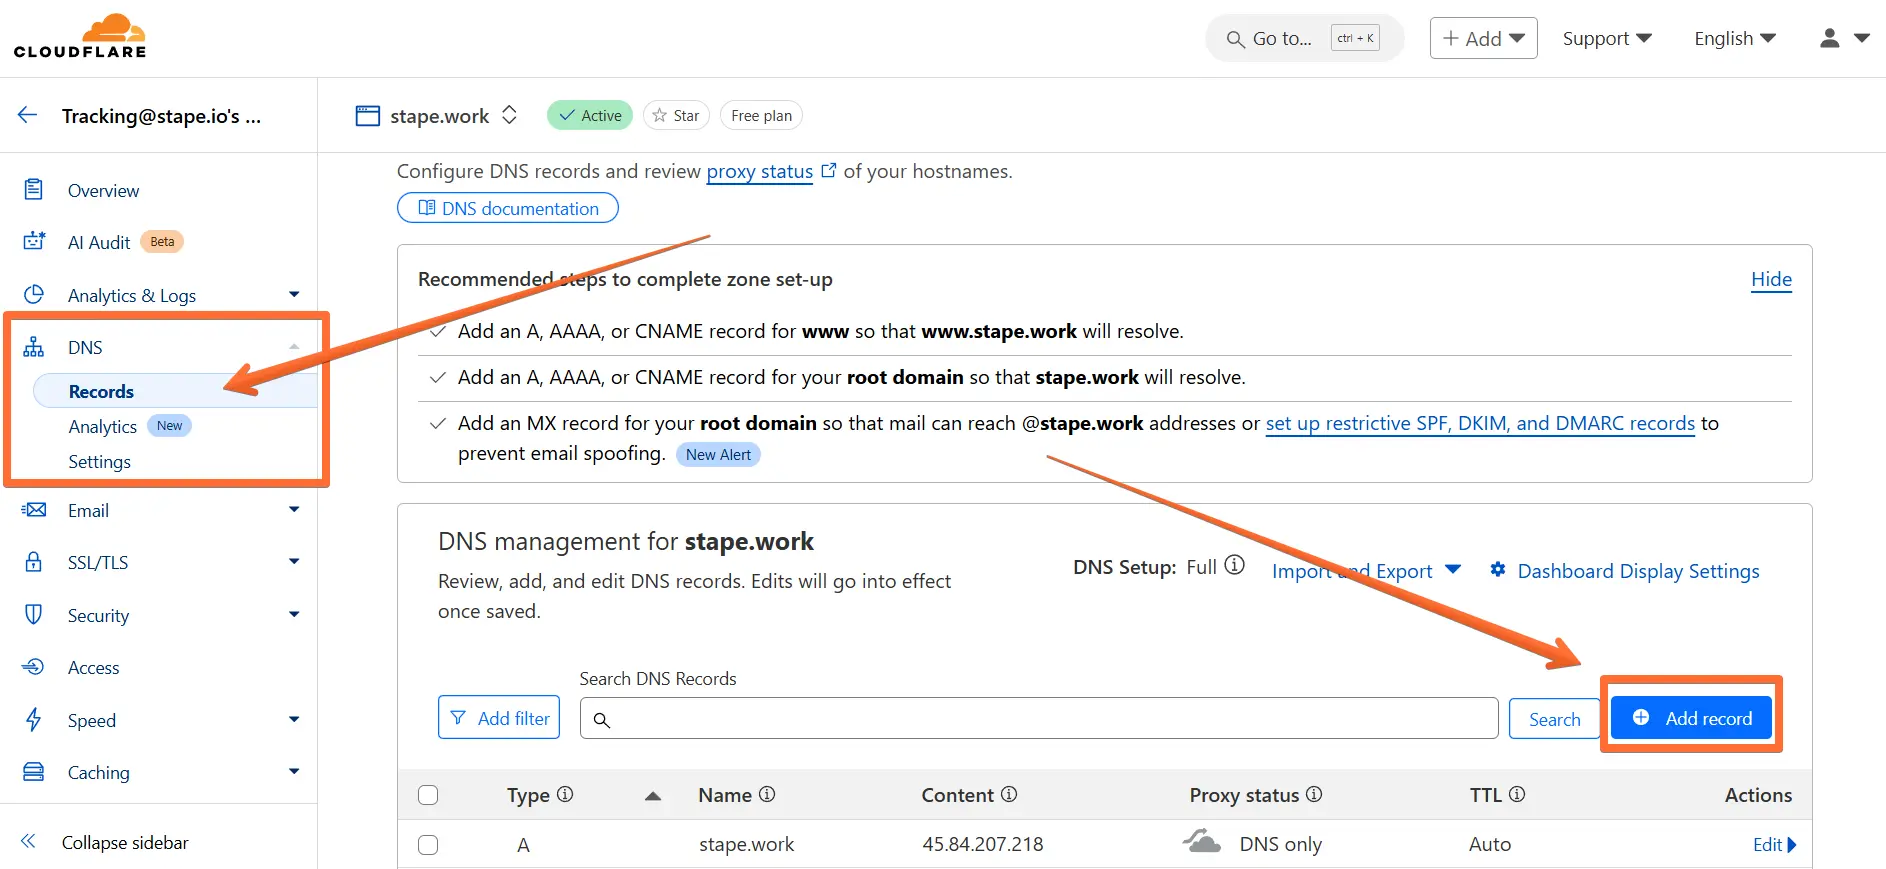
2. Enter the DNS records from Stape:
- Type - copy the TYPE parameter from Stape.
- Name - copy the HOST parameter from Stape.
- Target - copy the VALUE parameter from Stape.
- Proxy status - make sure to toggle this ON.
Click Save.

3. Once you’ve entered the DNS records to your DNS provider, return to the Stape container page where you’ve been configuring the custom domain and click Verify.
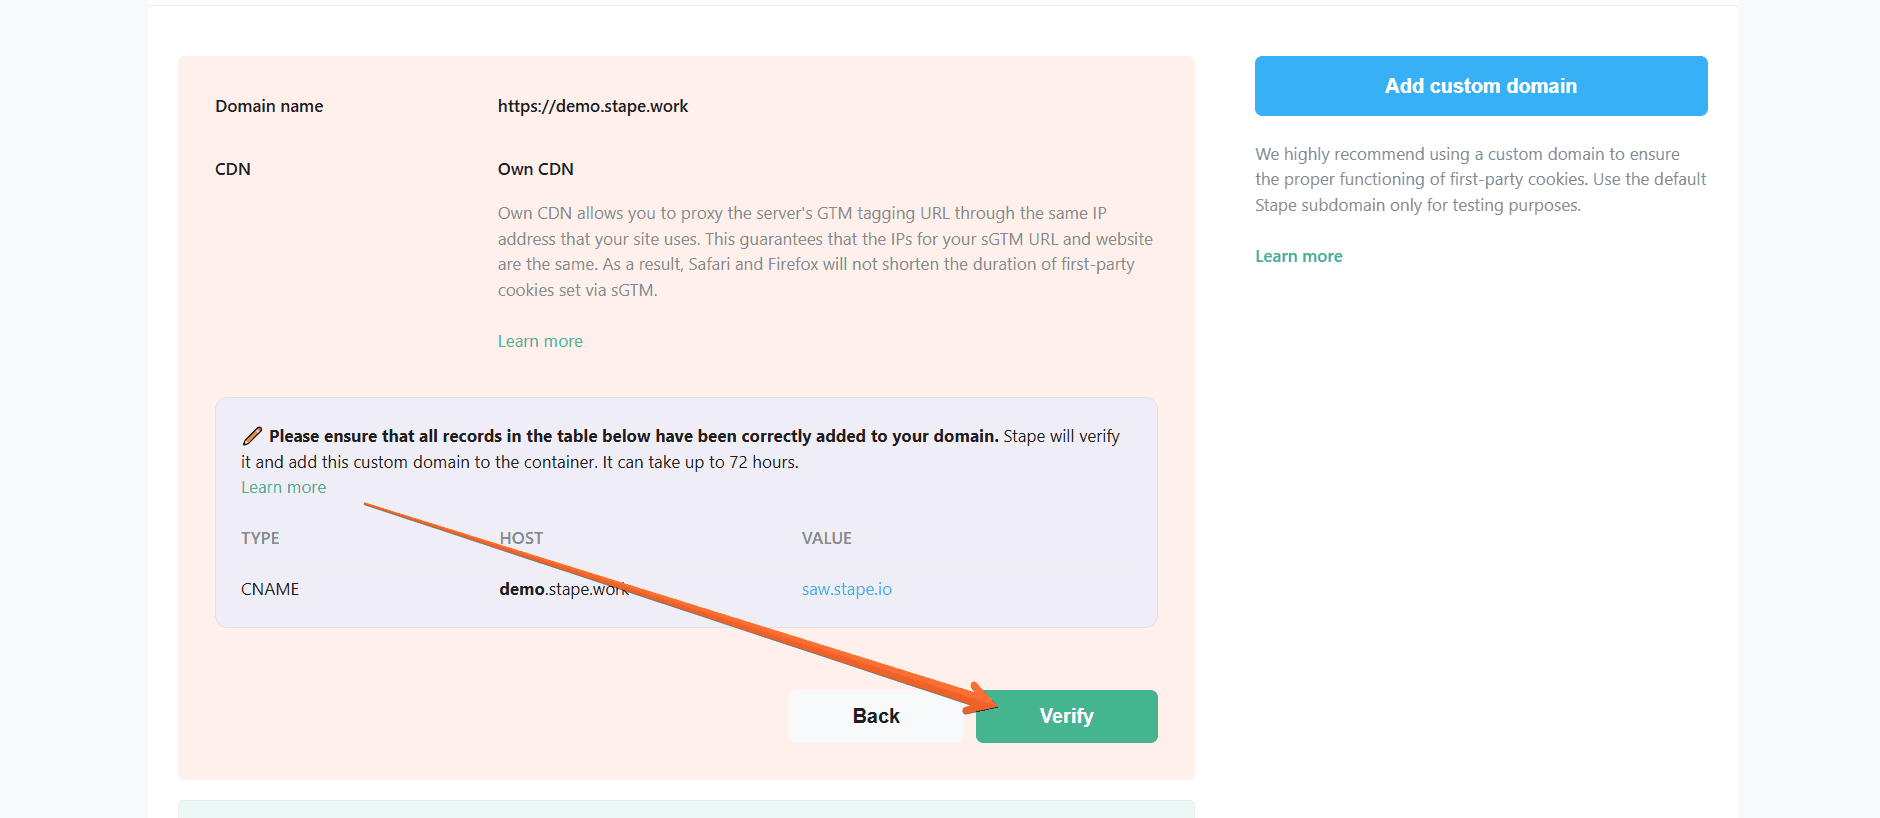
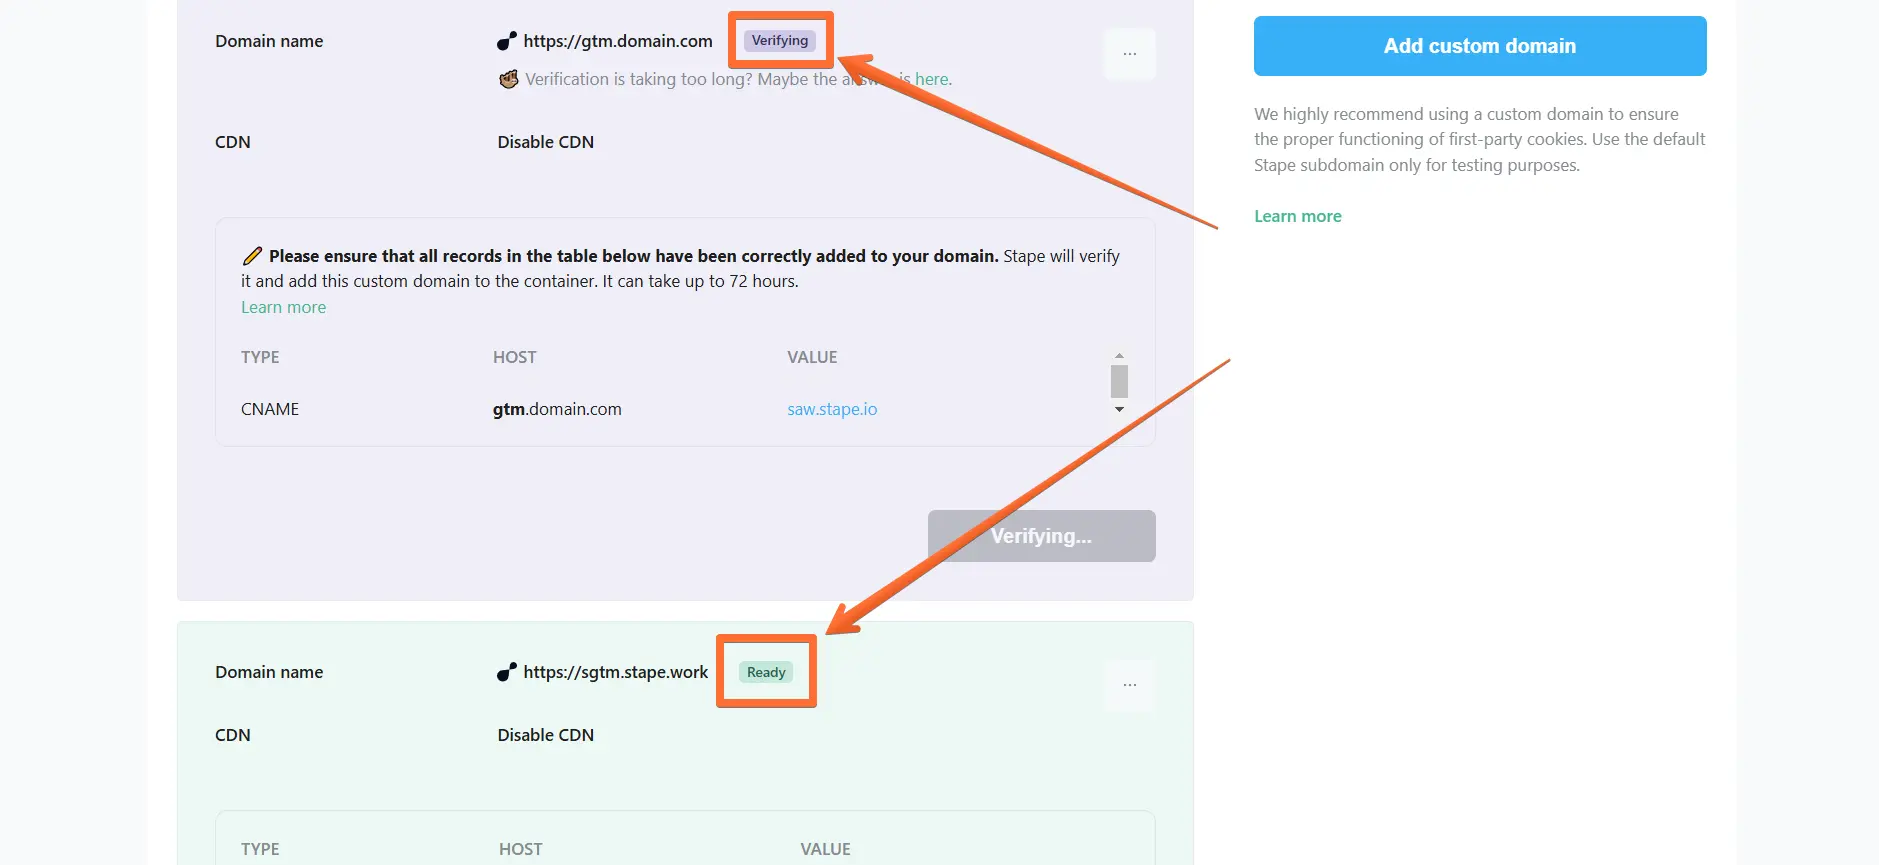
4. Wait for Stape to finish verifying your custom domain (when the container status bar changes from Verifying to Ready). Usually, it takes from 30 minutes to 2 hours, but in some cases it can take up to 72 hours.
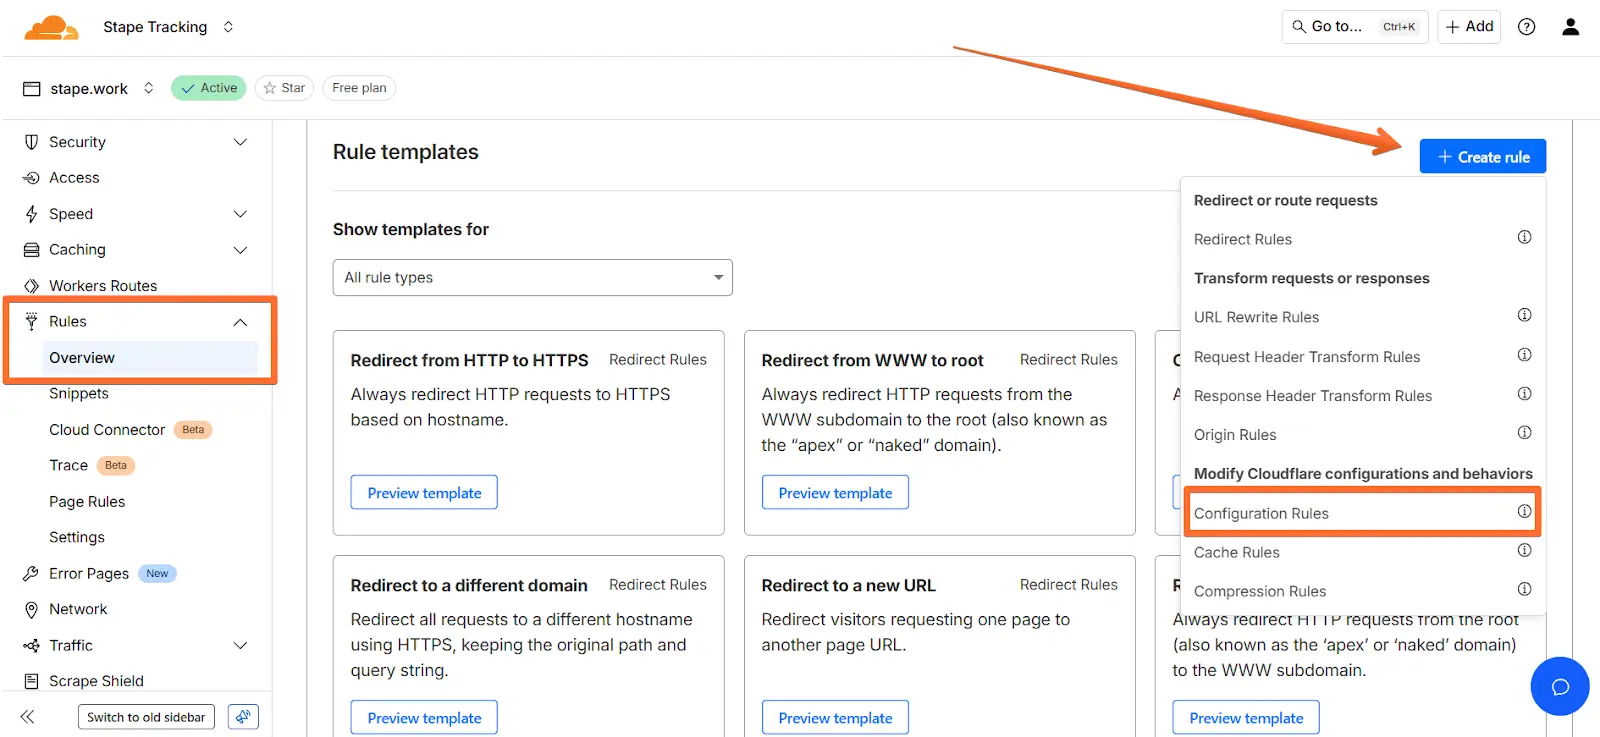
5. Next, return to Cloudflare and click Rules → click Overview → Create rule → Configuration Rules.
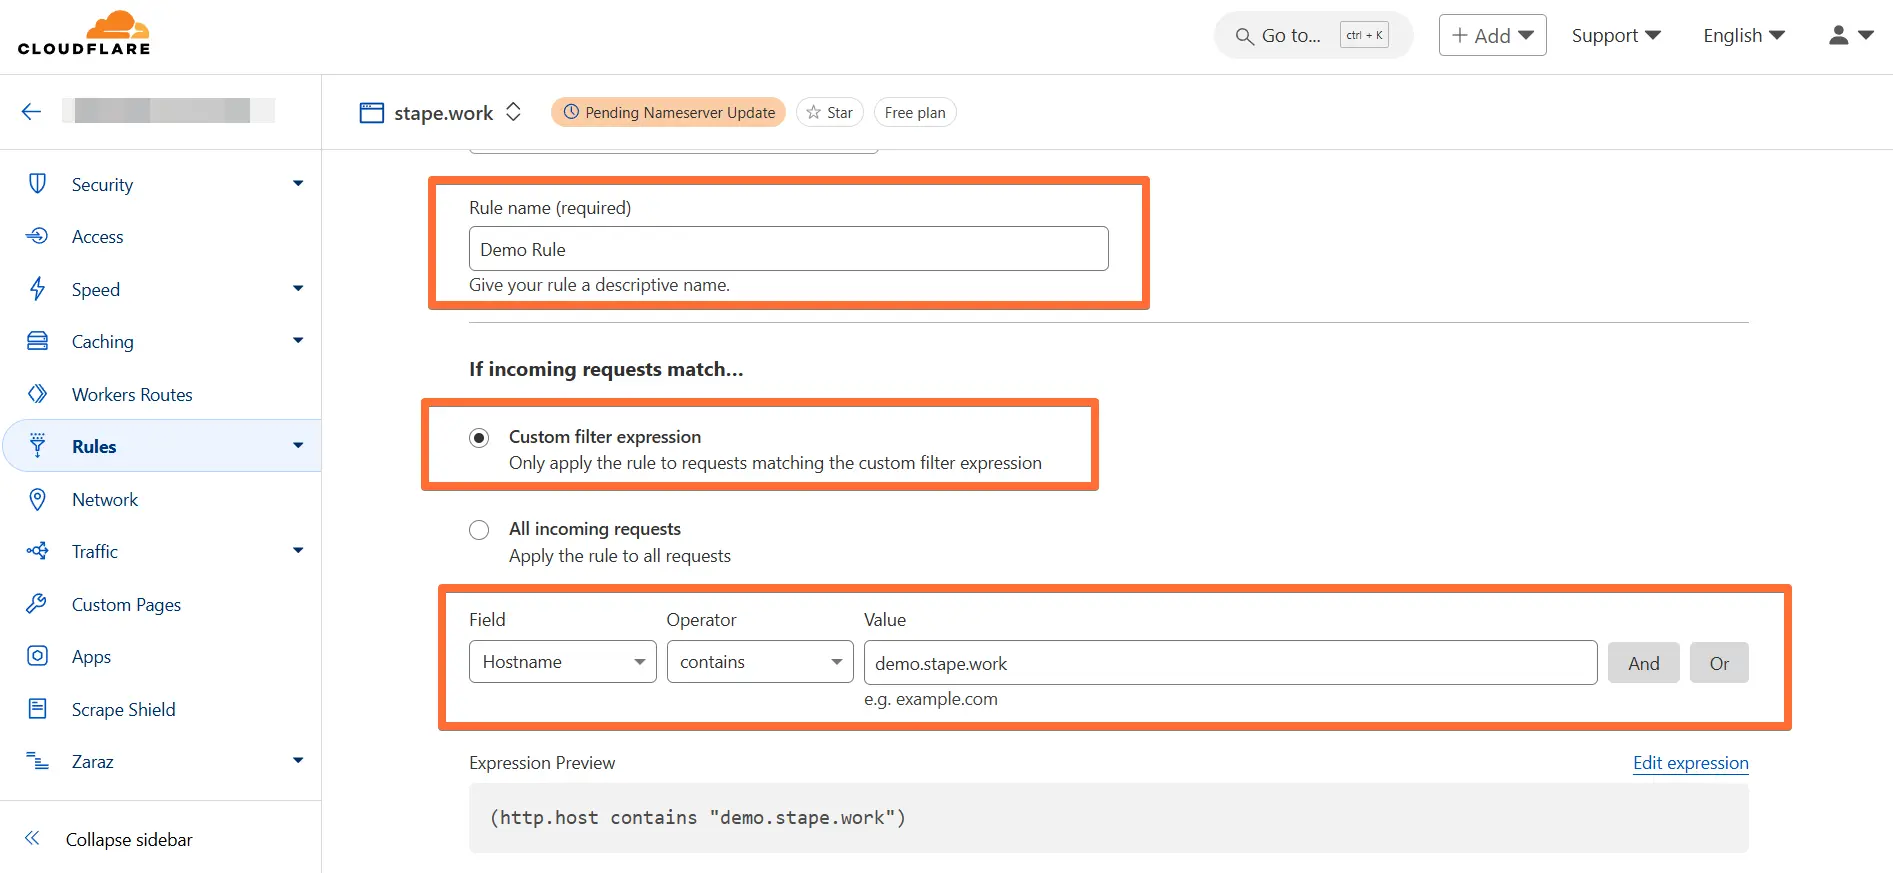
6. Fill in the required information:
- Enter a descriptive rule name.
- Select Custom filter expression and enter:
- Field - hostname.
- Operator - contains.
- Value - paste the custom domain that you configured with Stape.
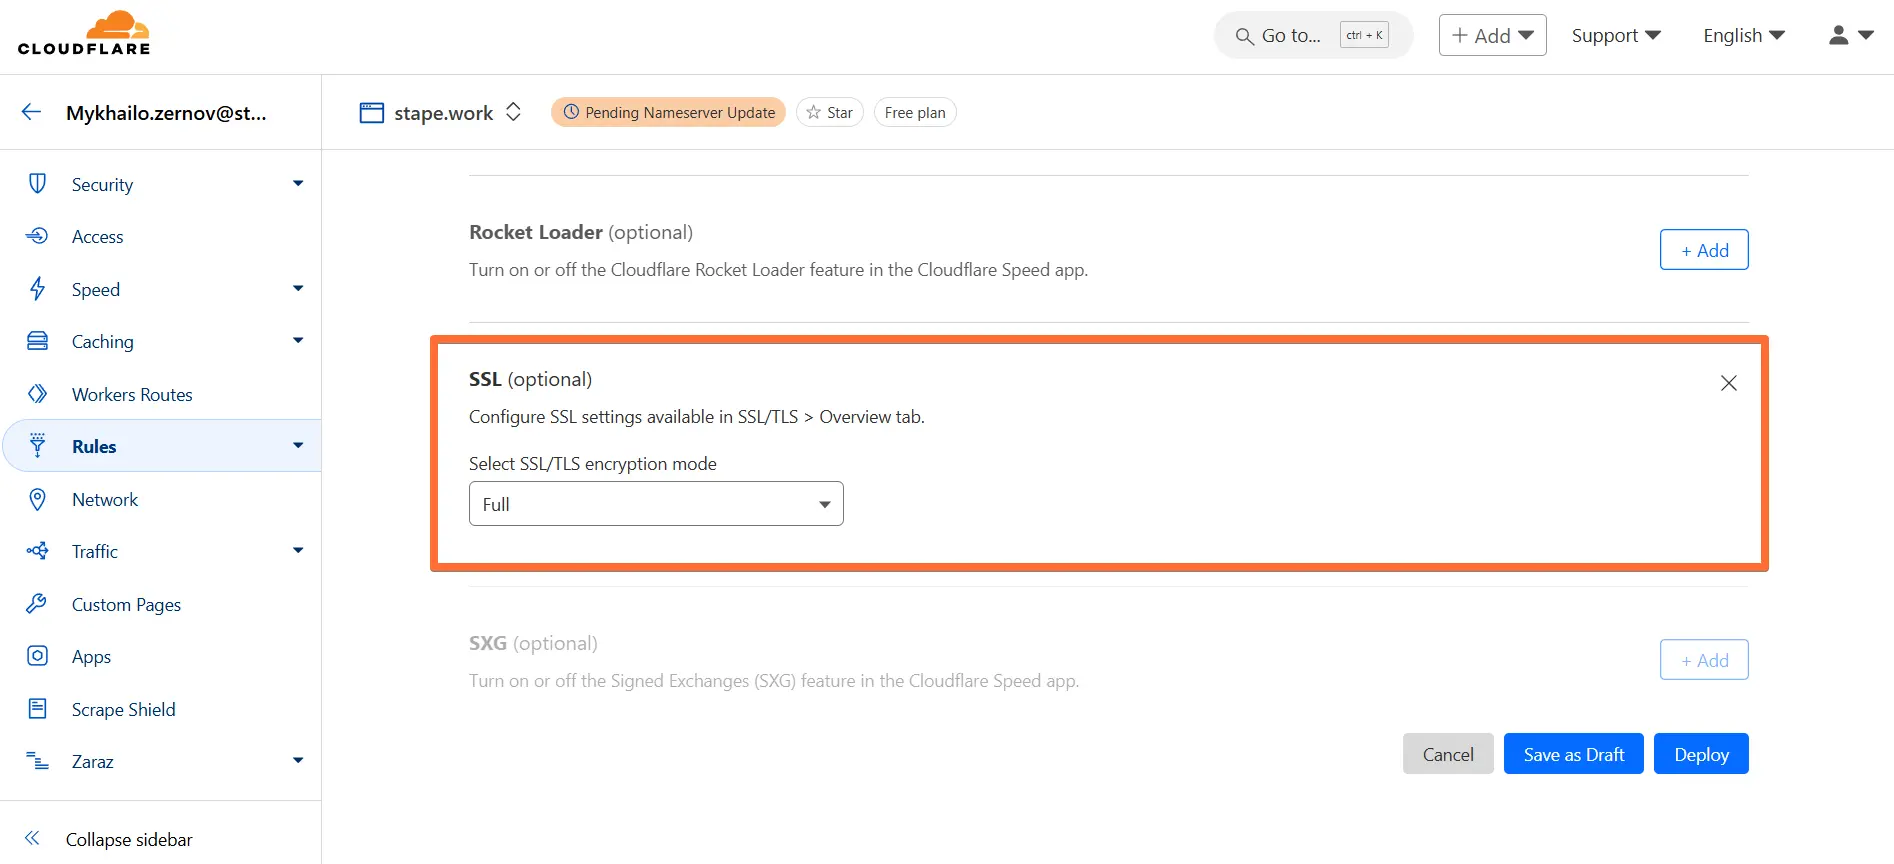
7. Scroll the page down to the SSL feature. Click Add next to it → select the Full option. Then click Deploy.
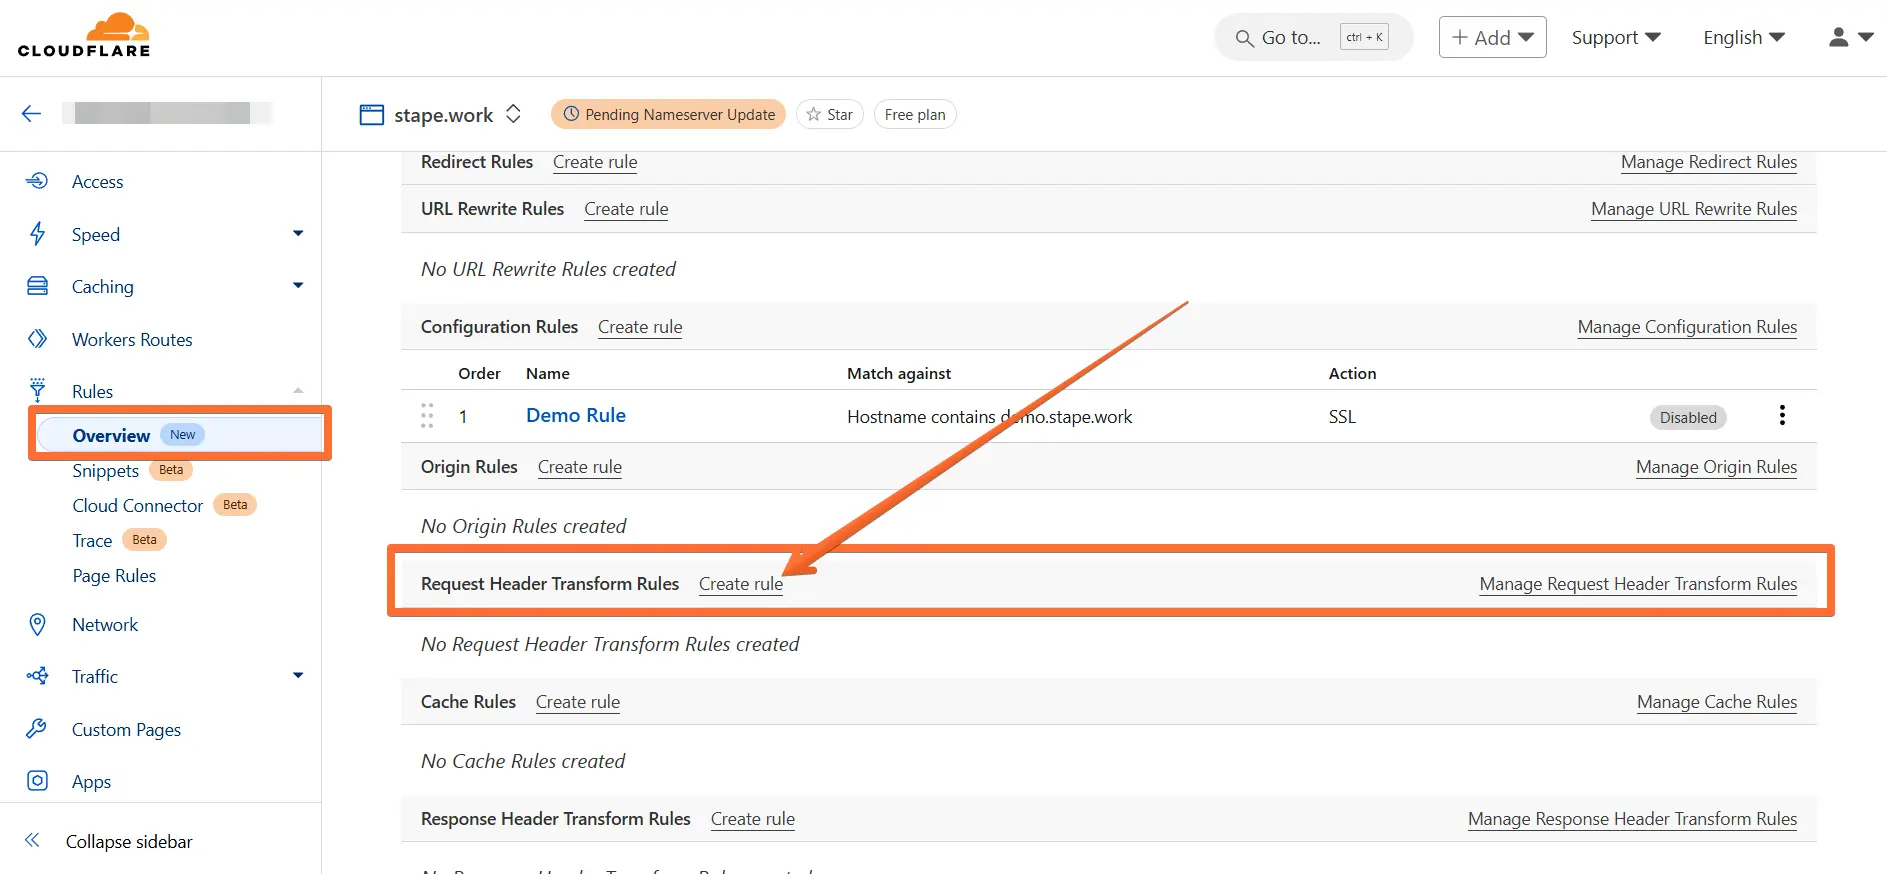
8. Next, go to the Rules → scroll to Request Header Transform Rules → click Create rule.
9. Fill in the required information:
- Enter a descriptive rule name.
- Select Custom filter expression and enter:
- Field - hostname.
- Operator - contains.
- Value - paste the custom domain that you configured with Stape.
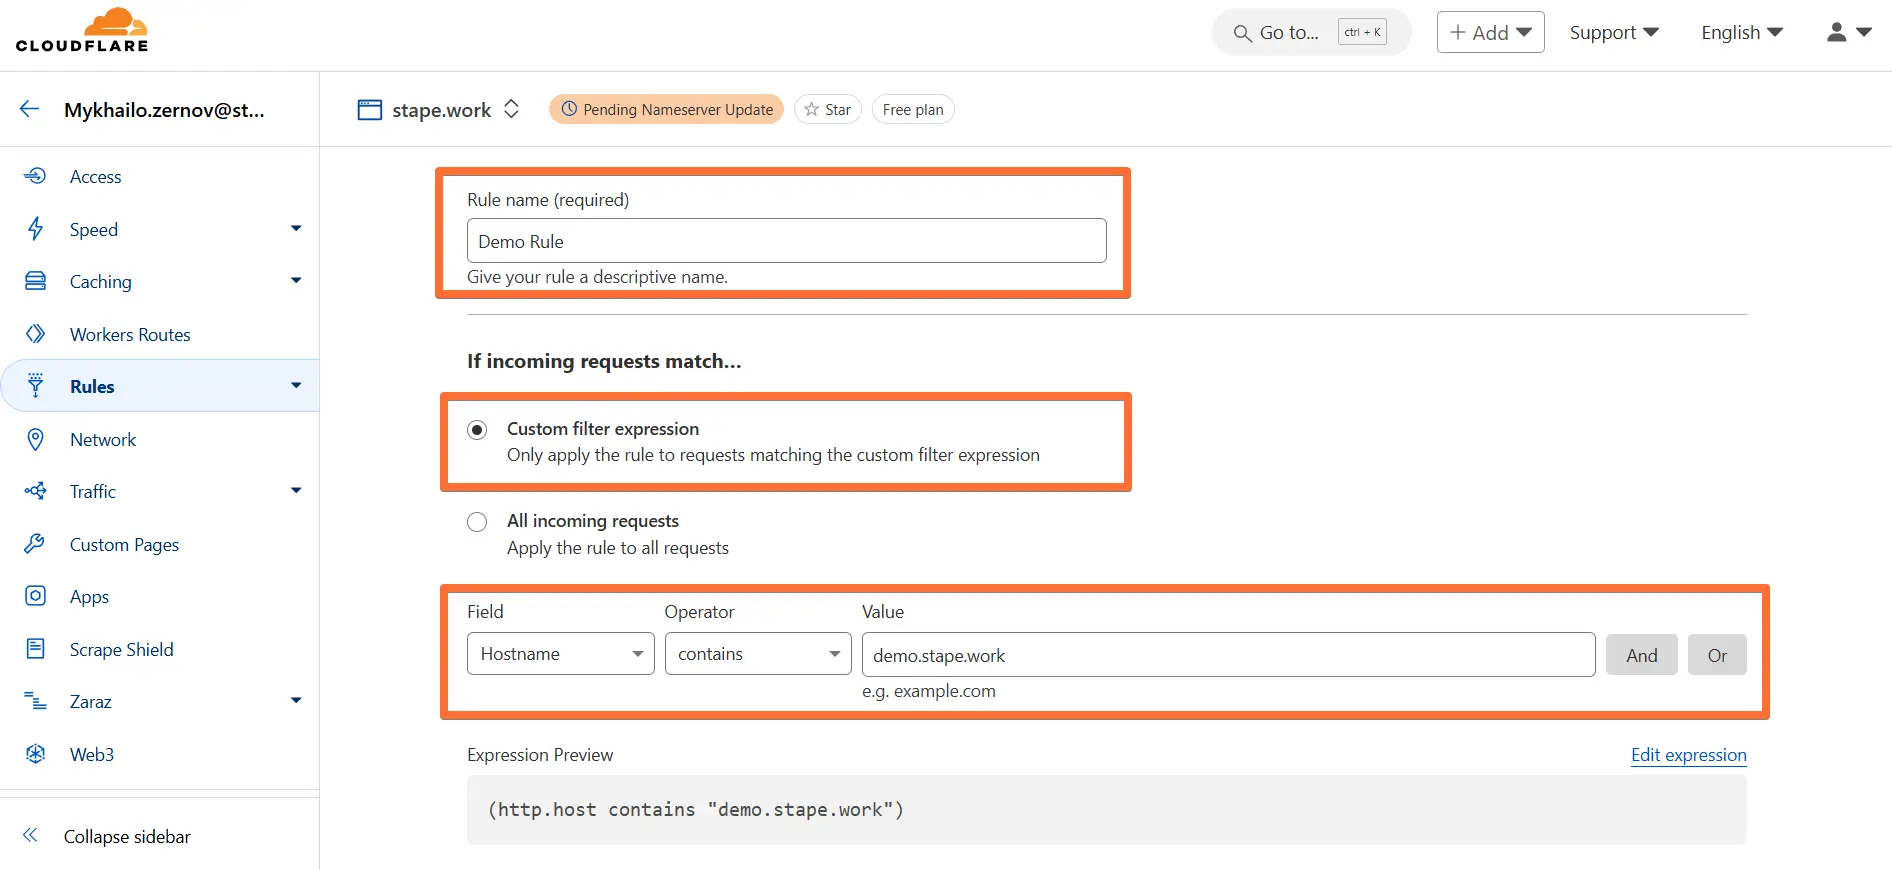
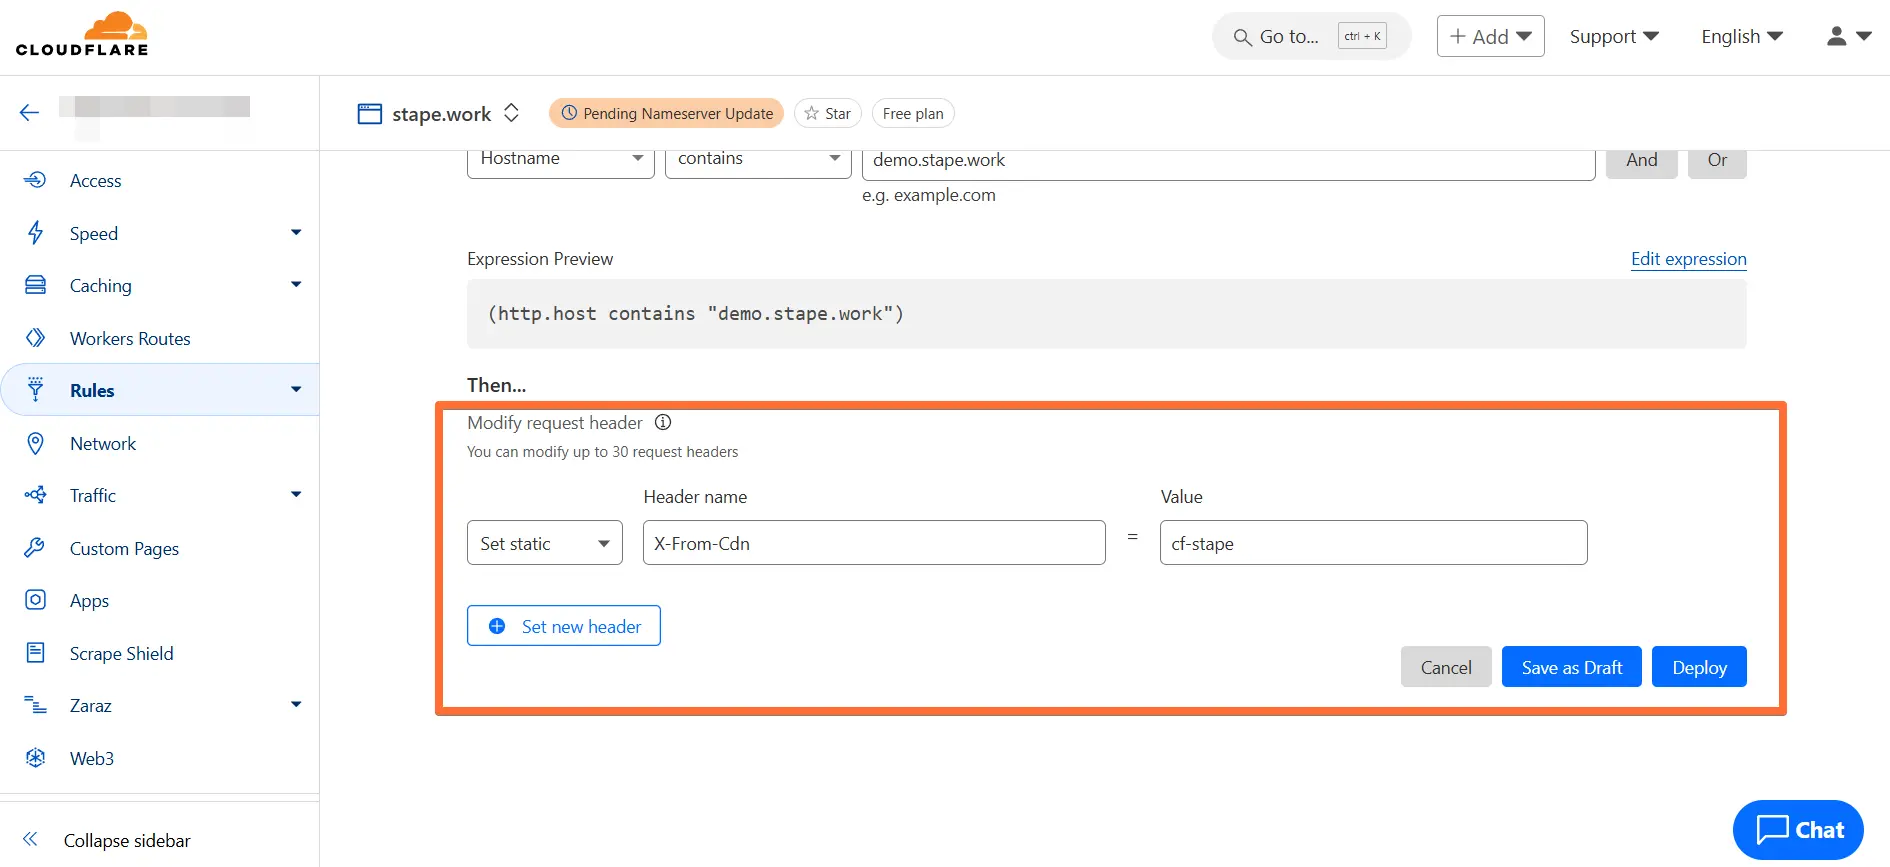
10. Scroll down to the Modify request headers section. Select Set static, then enter:
- Header name: X-From-Cdn
- Value: cf-stape
Then click Deploy.
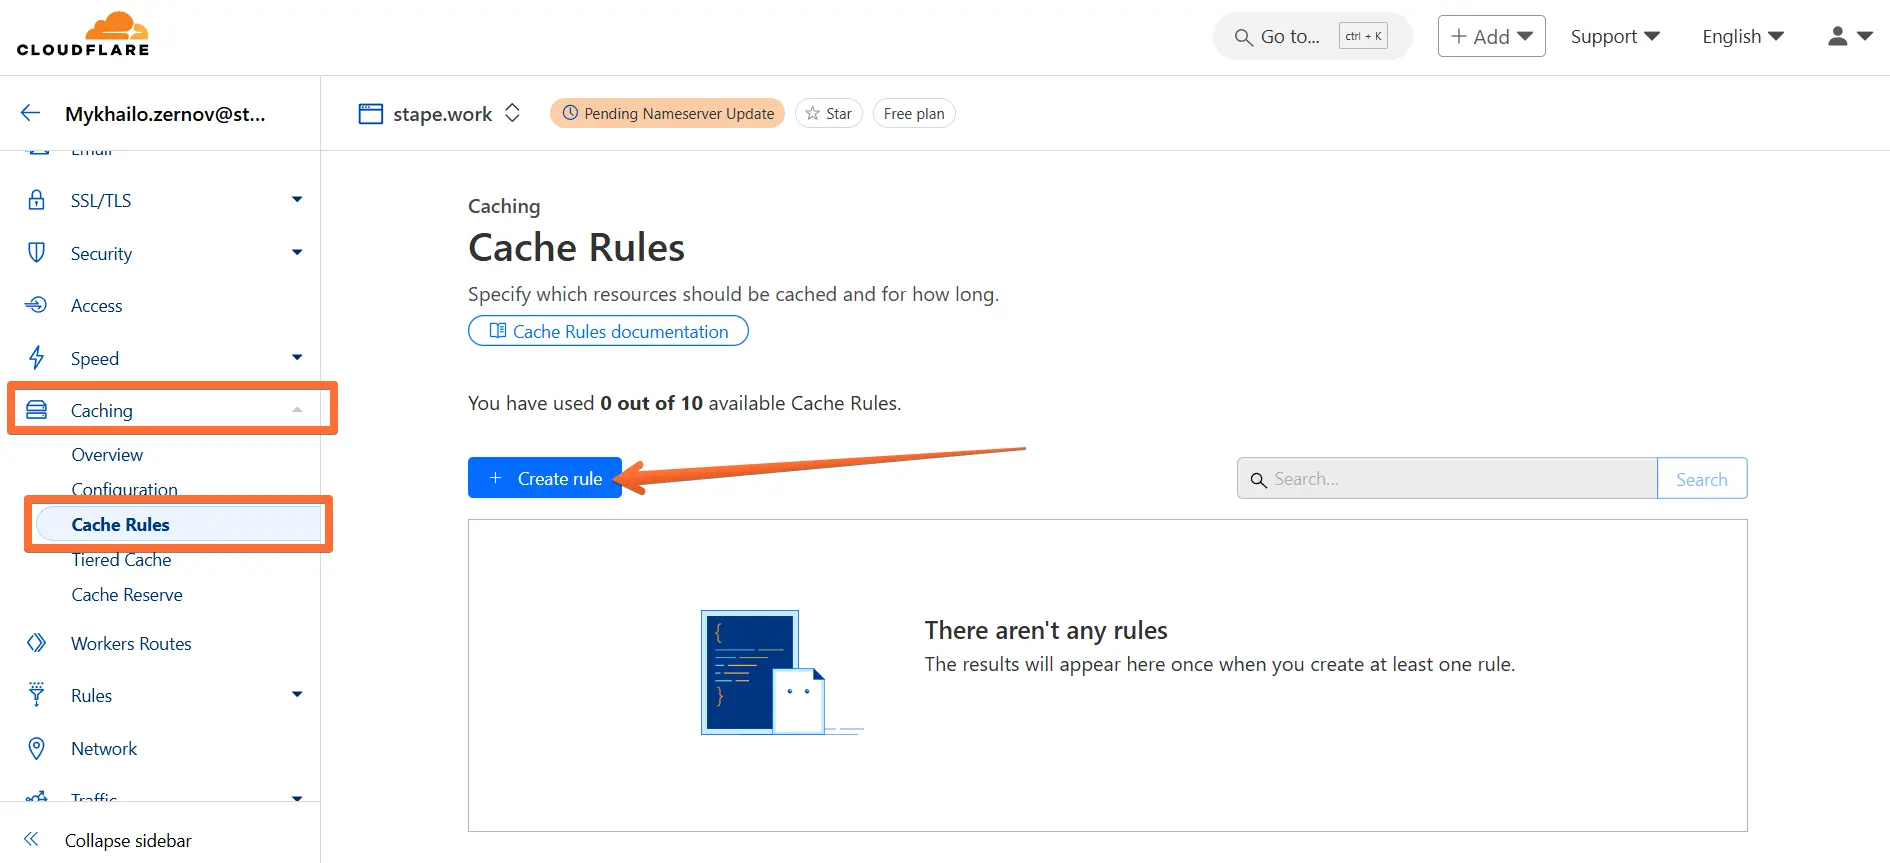
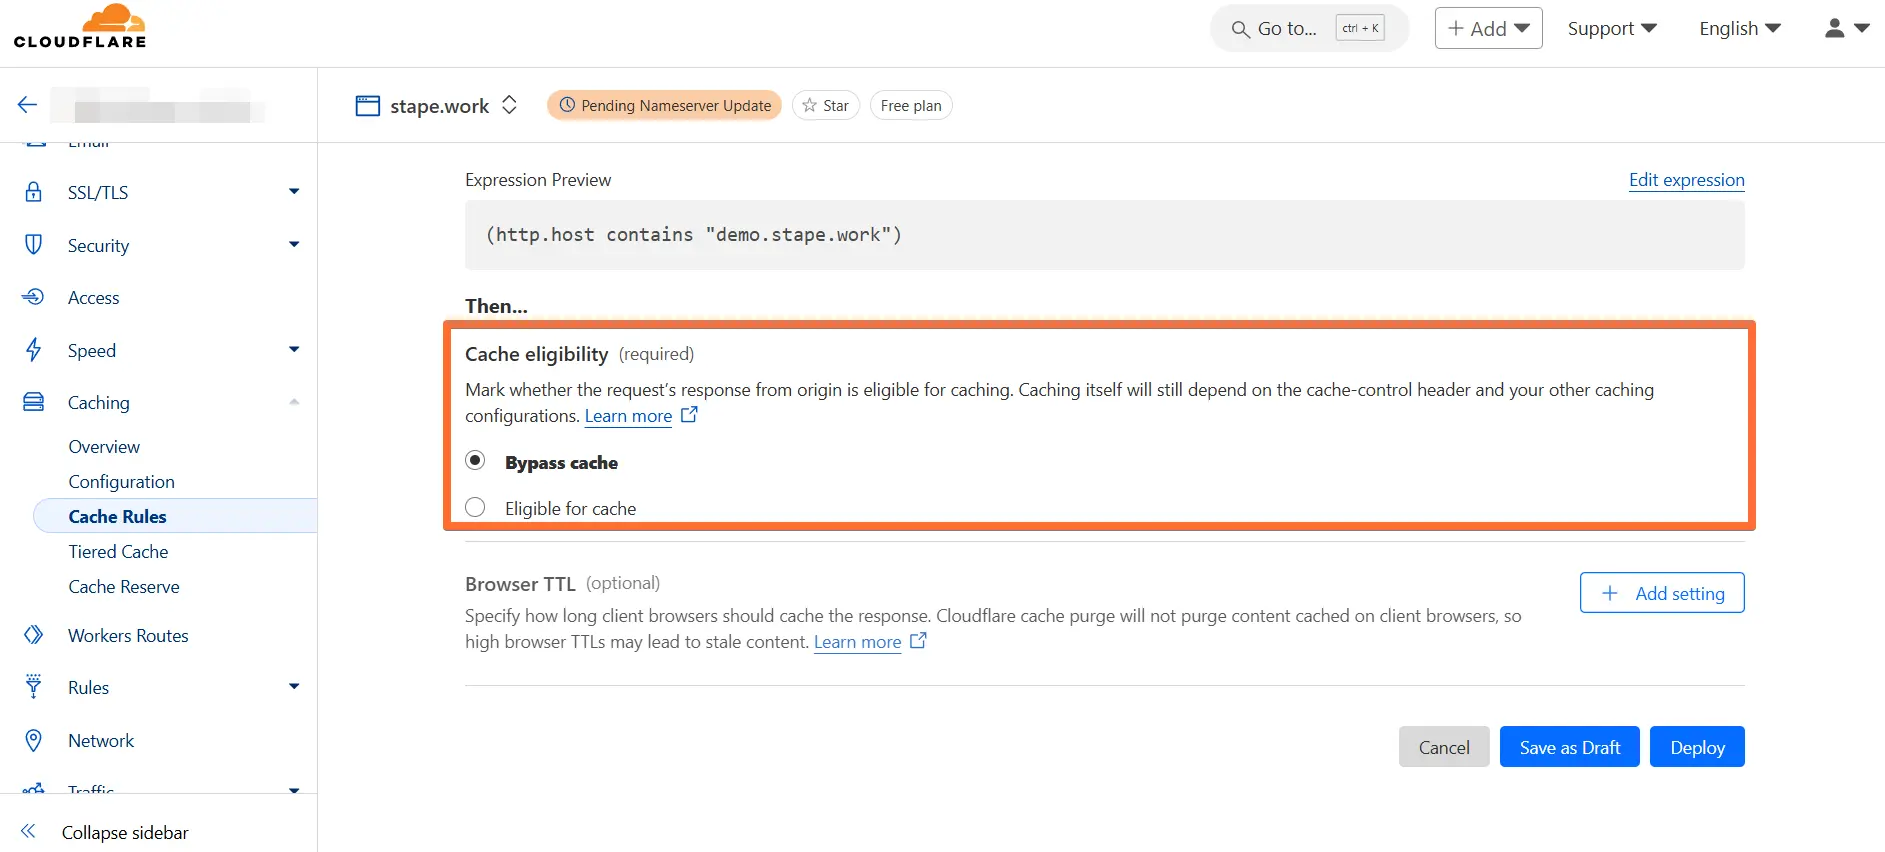
11. Next, go to Caching → click Cache Rules → click Create rule.
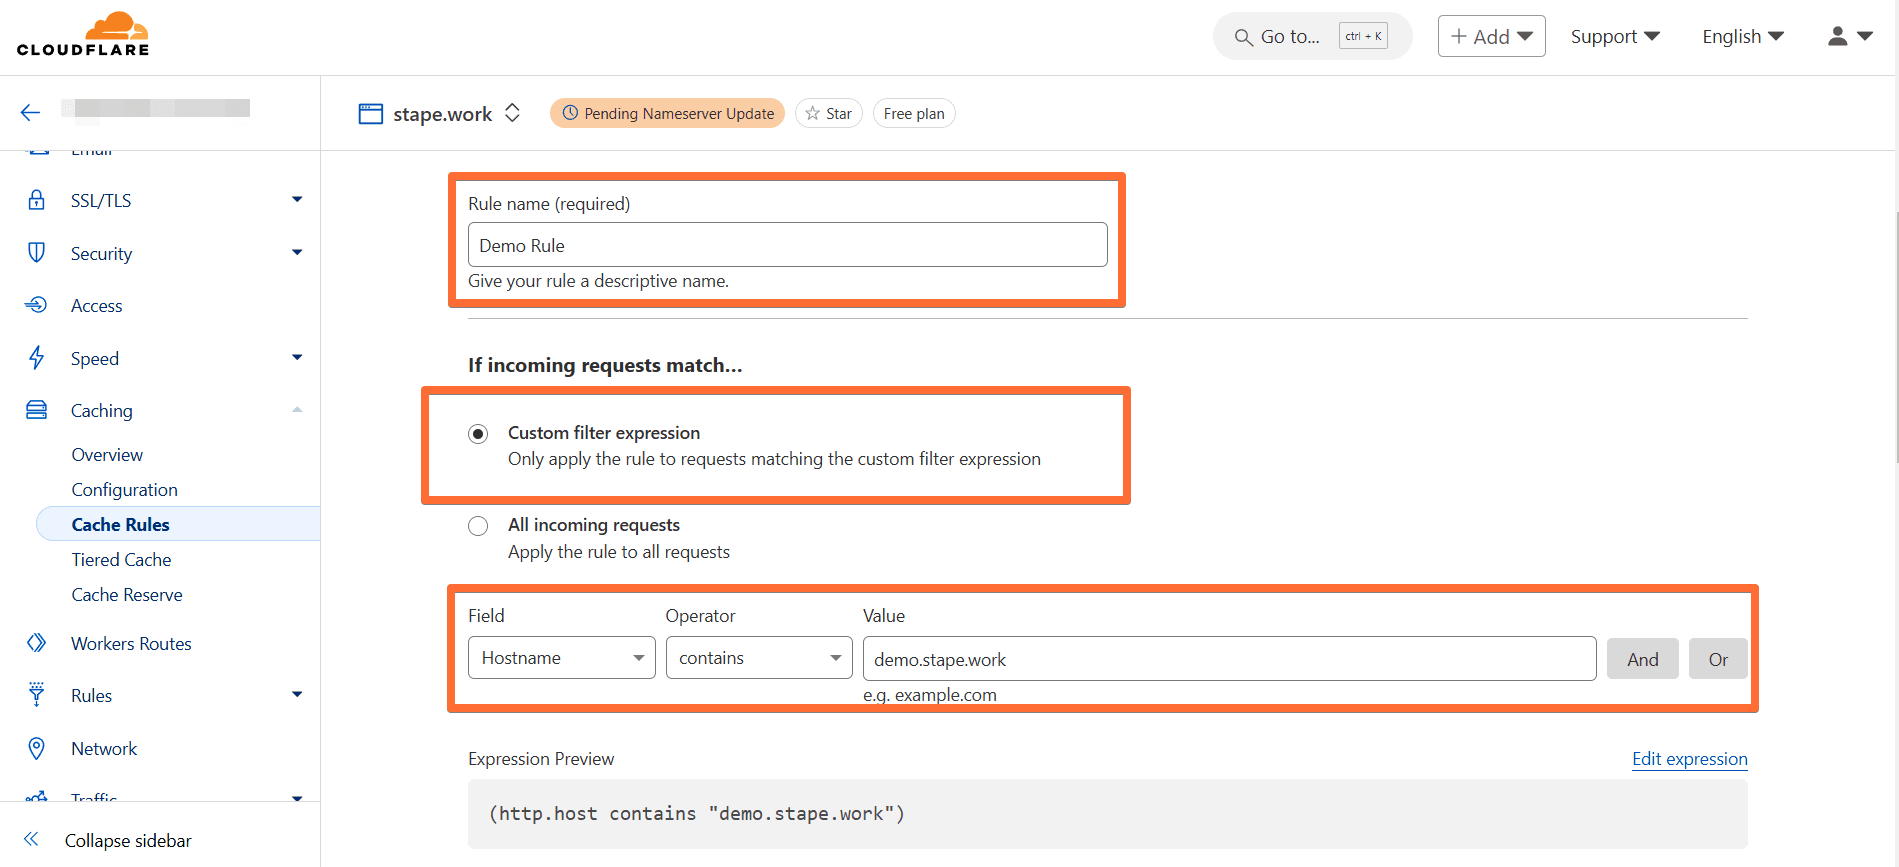
12. Fill in the required information:
- Enter a descriptive rule name.
- Select Custom filter expression and enter:
- Field - hostname.
- Operator - contains.
- Value - paste the custom domain that you configured with Stape.
13. Scroll down to Cache eligibility and select Bypass cache.
Then click Deploy.
Congratulations, now all your requests to and from sGTM will be proxied through Cloudflare. Please note that if you are using a Web Application Firewall, make sure that it does not block these requests.
Same origin custom domain for sGTM
Google has recently changed the preferred way of mapping a custom domain for the server Google Tag Manager container. Instead of using a subdomain (like sgtm.example.com) they encourage using the same origin (like example.com/sgtm).
With the same origin custom domain for sGTM, you will have the main benefit of server-side tagging - setting up first-party cookies. And with the tagging server using the same origin domain, you do not need to configure any additional settings to prolong cookies. However, mapping the same origin will be more complicated than configuring a subdomain.
You can learn more about this method in this article: https://stape.io/news/a-new-way-to-set-up-a-custom-domain-in-server-gtm
And that's it! You can find out more in our article on how to add a custom domain to the Google Tag Manager Server container and if you need help, just contact us.
Comments