Sep 28, 2026
Comprehensive guide to Lovable analytics: the easiest way to add Google Analytics, GTM, and Meta CAPI
Written by
Ieva Dubricke
Published Nov 11, 2026 comments
Key takeaways
- The built-in analytics of Lovable only include basic traffic data and are unable to track custom events or send conversions to ad platforms, which means that any projects that are running advertisements have to use Google Analytics together with Meta tracking via Google Tag Manager.
- Since Lovable apps display pages in the browser without having to reload them, any tags that are added directly to the app won’t record page views or events unless the setup takes this into account.
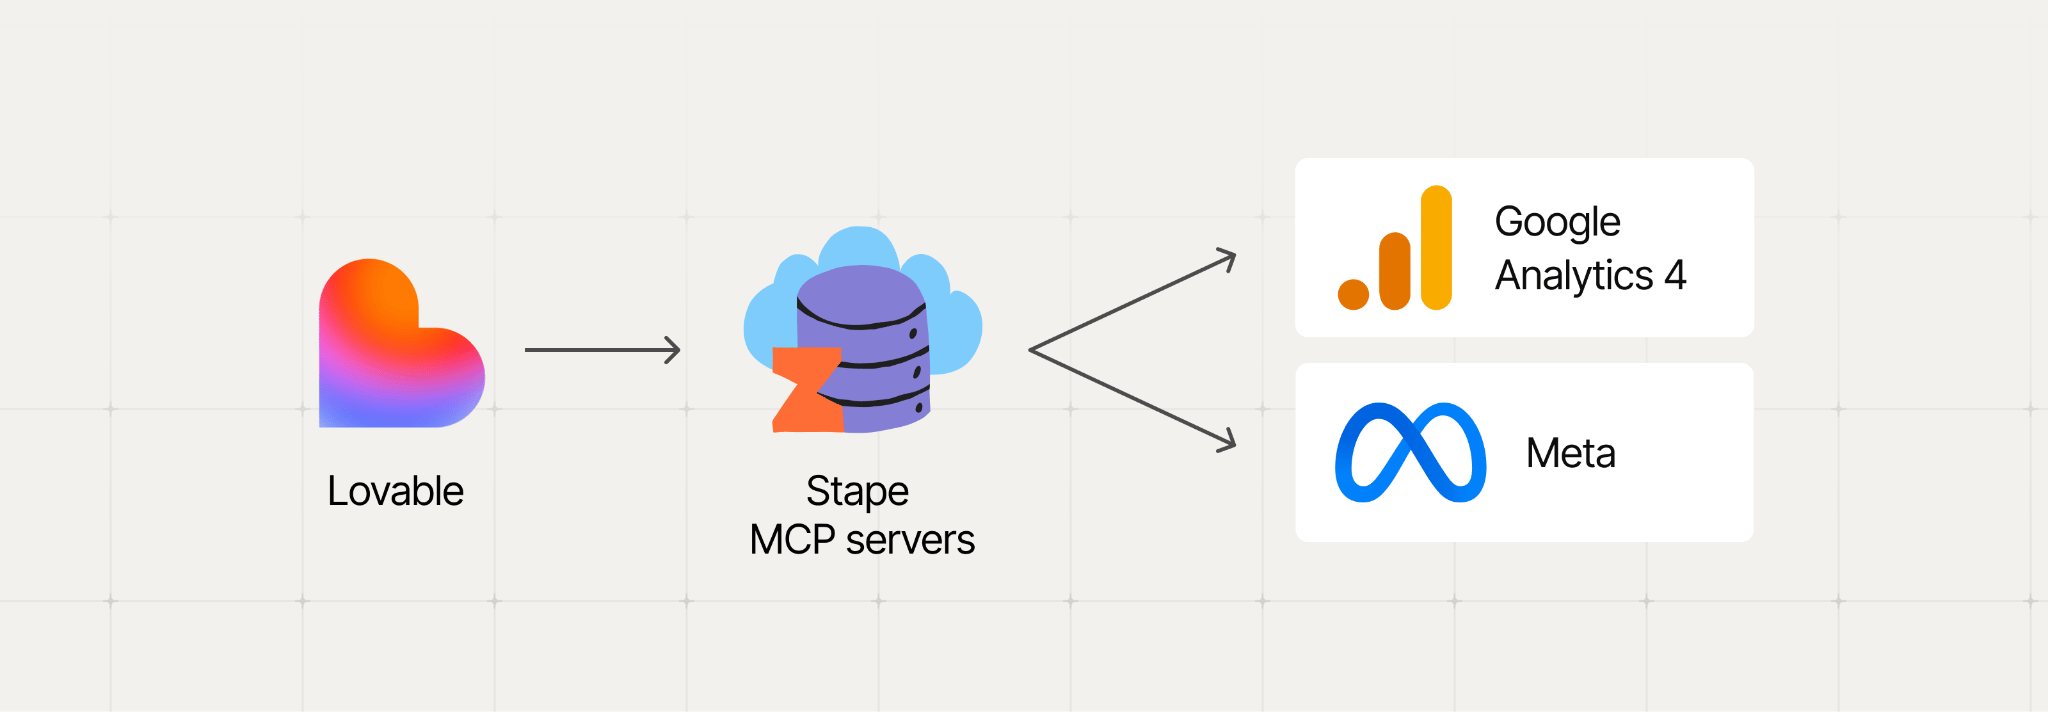
- Once the GTM and Stape MCP servers are connected, Lovable sets up the entire tracking stack through the chat, including the web and server GTM containers, server hosting on Stape, GA4 forwarding, and the Meta Pixel together with the Facebook Conversions API.
No matter if you are a founder, a marketer, or a member of an agency, this guide will show you how to add Google Analytics to Lovable and how to add the Meta Pixel to a Lovable website – with no or minimal manual work and amount of GTM setup. We’ll take you step by step through the process of setting up a demo project from the beginning, integrating Google Tag Manager, and routing the GA4 and Meta events through a server-side container. You can also easily carry out these exact steps with any project you already have.
What is Lovable and what analytical challenges does it have?
Lovable is an AI-powered app builder. You just need to express your vision in natural language, and it'll generate and deploy a React application – ranging from landing pages to fully featured web apps, including those with authentication and database integrations.
Lovable includes simple built-in analytics for published projects, giving a general view of visitors and page views. That's useful for a quick overview, but it can't track custom interactions like form submissions or purchases, and it can't send conversion data to ad platforms. For that, you need Google Analytics, Meta Pixel (or any other Pixel, like TikTok, Snapchat, etc.).
Whatever your choice is, you can add any of those to your page code directly through Lovable. In the case of GA4, Lovable's built-in connector puts in your measurement ID and loads gtag.js; with Meta, it includes the standard pixel snippet. Although this approach is a quick solution, setups on the client side do encounter some limitations:
- Tags rely entirely on the browser. Ad blockers and privacy protections (like Safari's Intelligent Tracking Prevention) frequently block tracking calls or shorten cookie lifetimes, leaving crucial conversions uncounted in GA4 and Meta.
- Full events are triggered only when the first page is loaded. The Meta Pixel base script records a PageView when the page loads. If subsequent navigation or client-side page views take place, they won't be registered unless you configure them to be sent as separate events.
- Each new event requires updates to the code. If you want to keep track of a new lead or purchase later, you'll have to write a new prompt, edit the codebase, and deploy it all once again.
Real-life example
Sengesnedkeren, a retailer of beds and mattresses based in Denmark, set up its shop on Lovable, with the checkout process being handled via a separate Shopify domain. The company had to face all of these problems directly: the platform tags were hardcoded into React, there were no GTM or data layers, and each time a tracking change was needed, a complete redeployment had to be carried out. Moreover, the ad-click IDs were lost during the process, which caused Google and Meta to greatly underreport the number of actual orders placed at the store.
After partnering with Obsidian Digital to rebuild tracking in GTM with a server container on Stape, orders now reach Meta and Google Ads with the click that produced them. Read the full case study.
Combining GTM with server-side tracking fully removes these limitations. The application loads one GTM script and pushes clean events into the data layer, with all the management remaining within GTM. The data then flows securely through your dedicated tagging server on Stape and is sent directly to a chosen platform using the Conversions API.
Although setting up GTM by hand takes time, Stape makes server-side tracking for Lovable far easier with free MCP servers you can connect to the project.
Stape MCP servers for Lovable Google Tag Manager setup
MCP (Model Context Protocol) is an open-standard solution designed to enable AI assistants to interact with external tools by means of direct API integration. In order to make your analytics setup easier, Stape provides free, open-source MCP servers for Google Tag Manager, Google Analytics 4, and Stape itself. For more information, check out our guide on Stape's AI Assistant and free MCP servers.
Lovable provides custom MCP servers as chat connectors on all of its plans. If you connect the GTM and Stape MCP servers to your project, you can configure GTM for Lovable entirely through chat prompts and let the AI carry out the setup:
- Create a web GTM container and a server GTM container.
- Create a Stape container and connect it to the server GTM container.
- Draft the GA4, Meta Pixel, and Meta Conversions API tags.
- Add the GTM snippet and events to the Lovable app code.
Since chat connectors function entirely within your development environment, they stay completely private to you. Although Lovable uses them when developing your application, they aren't included in the published site – thus keeping your GTM and Stape credentials both secure and hidden from visitors.
Offering server-side tracking in this case provides the same solid benefits as on any custom-built website. Since the tracking events are sent to GA4 or Meta through your own dedicated tagging server, your data becomes much more resistant to ad blockers and the strict privacy settings of browsers – this gives you complete ownership and control over the data that is transmitted.
How to add Google Analytics, Google Tag Manager, and Meta Pixel to Lovable
This Lovable analytics setup guide will walk you step-by-step through setting up full tracking for your project. As an example, we'll build Harbor, a one-page signup site for a fictional weekend workshop, and track two events: page_view and generate_lead.
Before you begin
You'll need to have the following:
- A Stape account, and you'll need to obtain your Stape API key. For the API key instructions read the Account API keys article.
- A web container in Google Tag Manager.
- A GA4 property with a web data stream. If you don't have the published site yet, just use the
lovable.appaddress for now when setting up. By the end of the tutorial you'll be able to replace it. Copy the measurement ID (G-XXXXXXXXXX). - A Meta Pixel ID. You'll also need a Conversions API access token from Meta Events Manager.
Step 1. Create the project
Skip this step if you're working on an existing project.
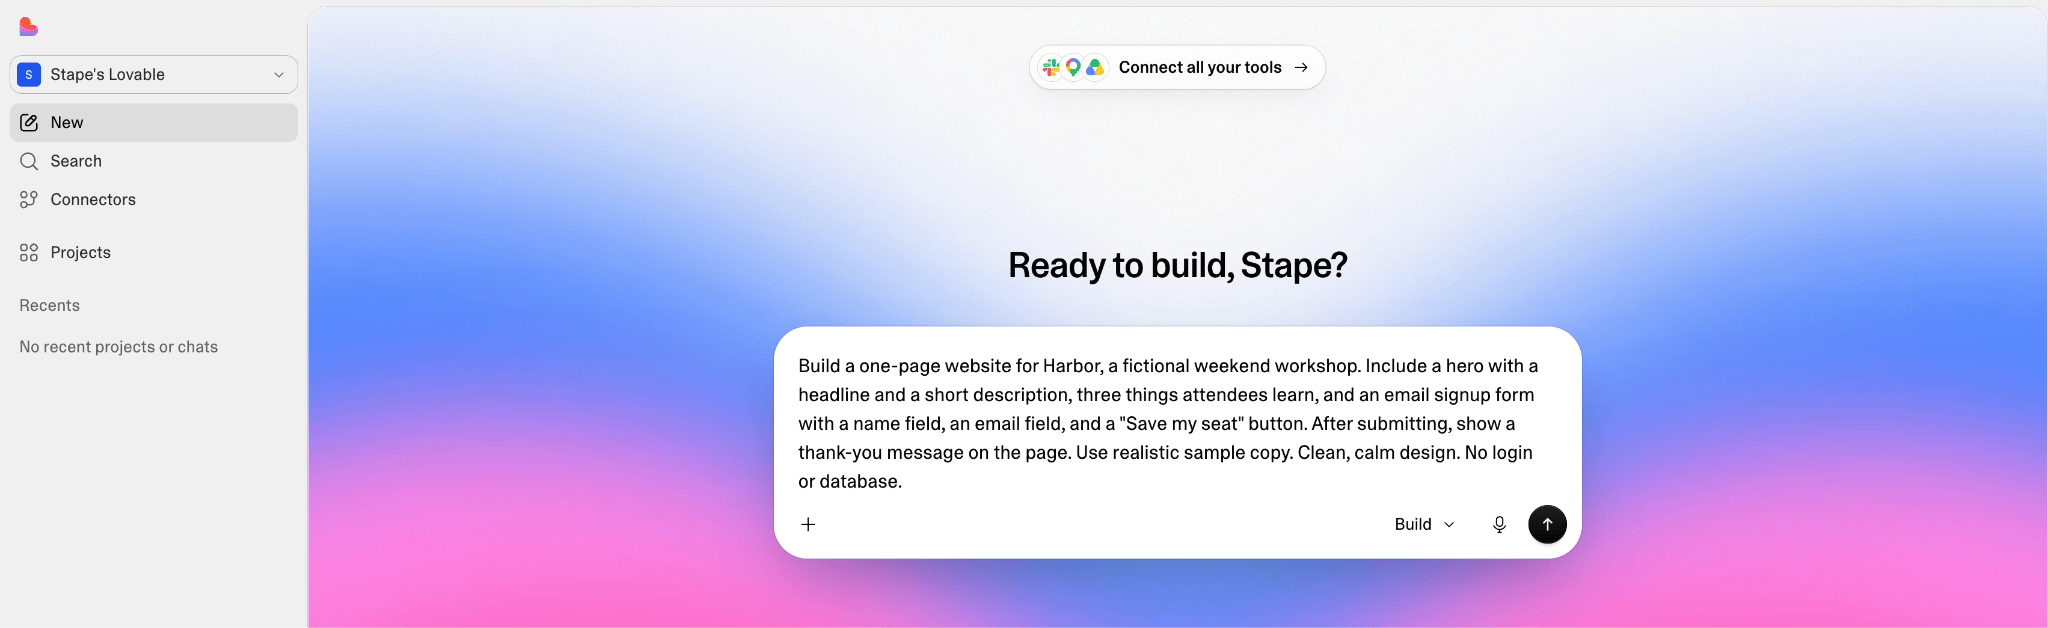
1. In Lovable, send this prompt:
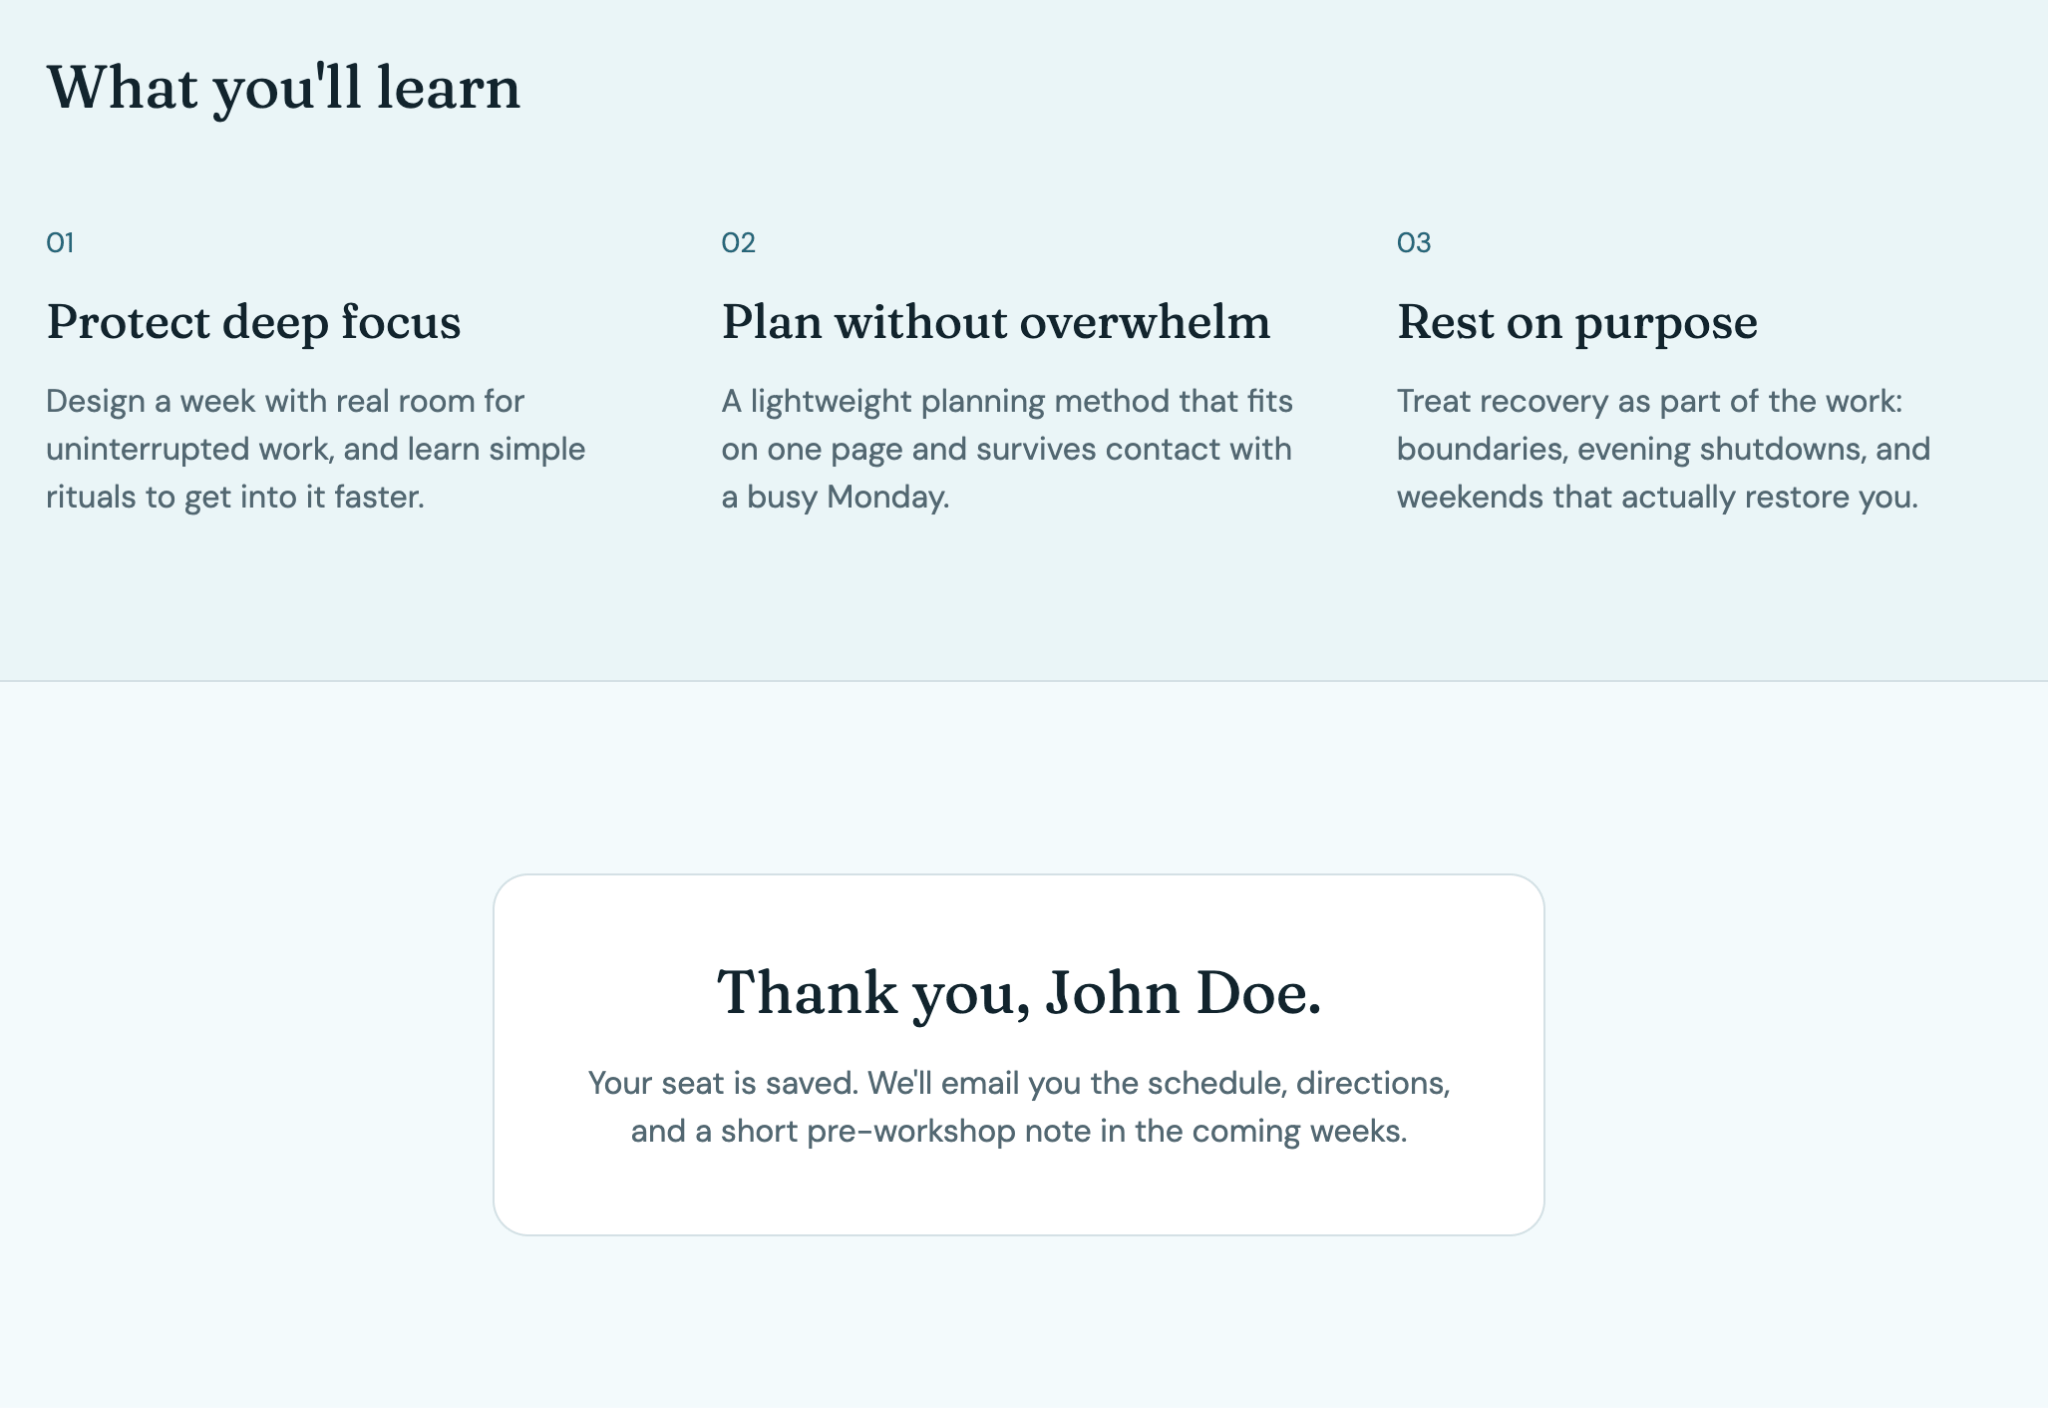
Build a one-page website for Harbor, a fictional weekend workshop. Include a hero with a headline and a short description, three things attendees learn, and an email signup form with a name field, an email field, and a "Save my seat" button. After submitting, show a thank-you message on the page. Use realistic sample copy. Clean, calm design. No login or database.
2. When the preview loads, fill in the form and check that the thank-you message appears.
Step 2. Connect the MCP servers
1. In the project, click Connectors → Add custom → MCP server.
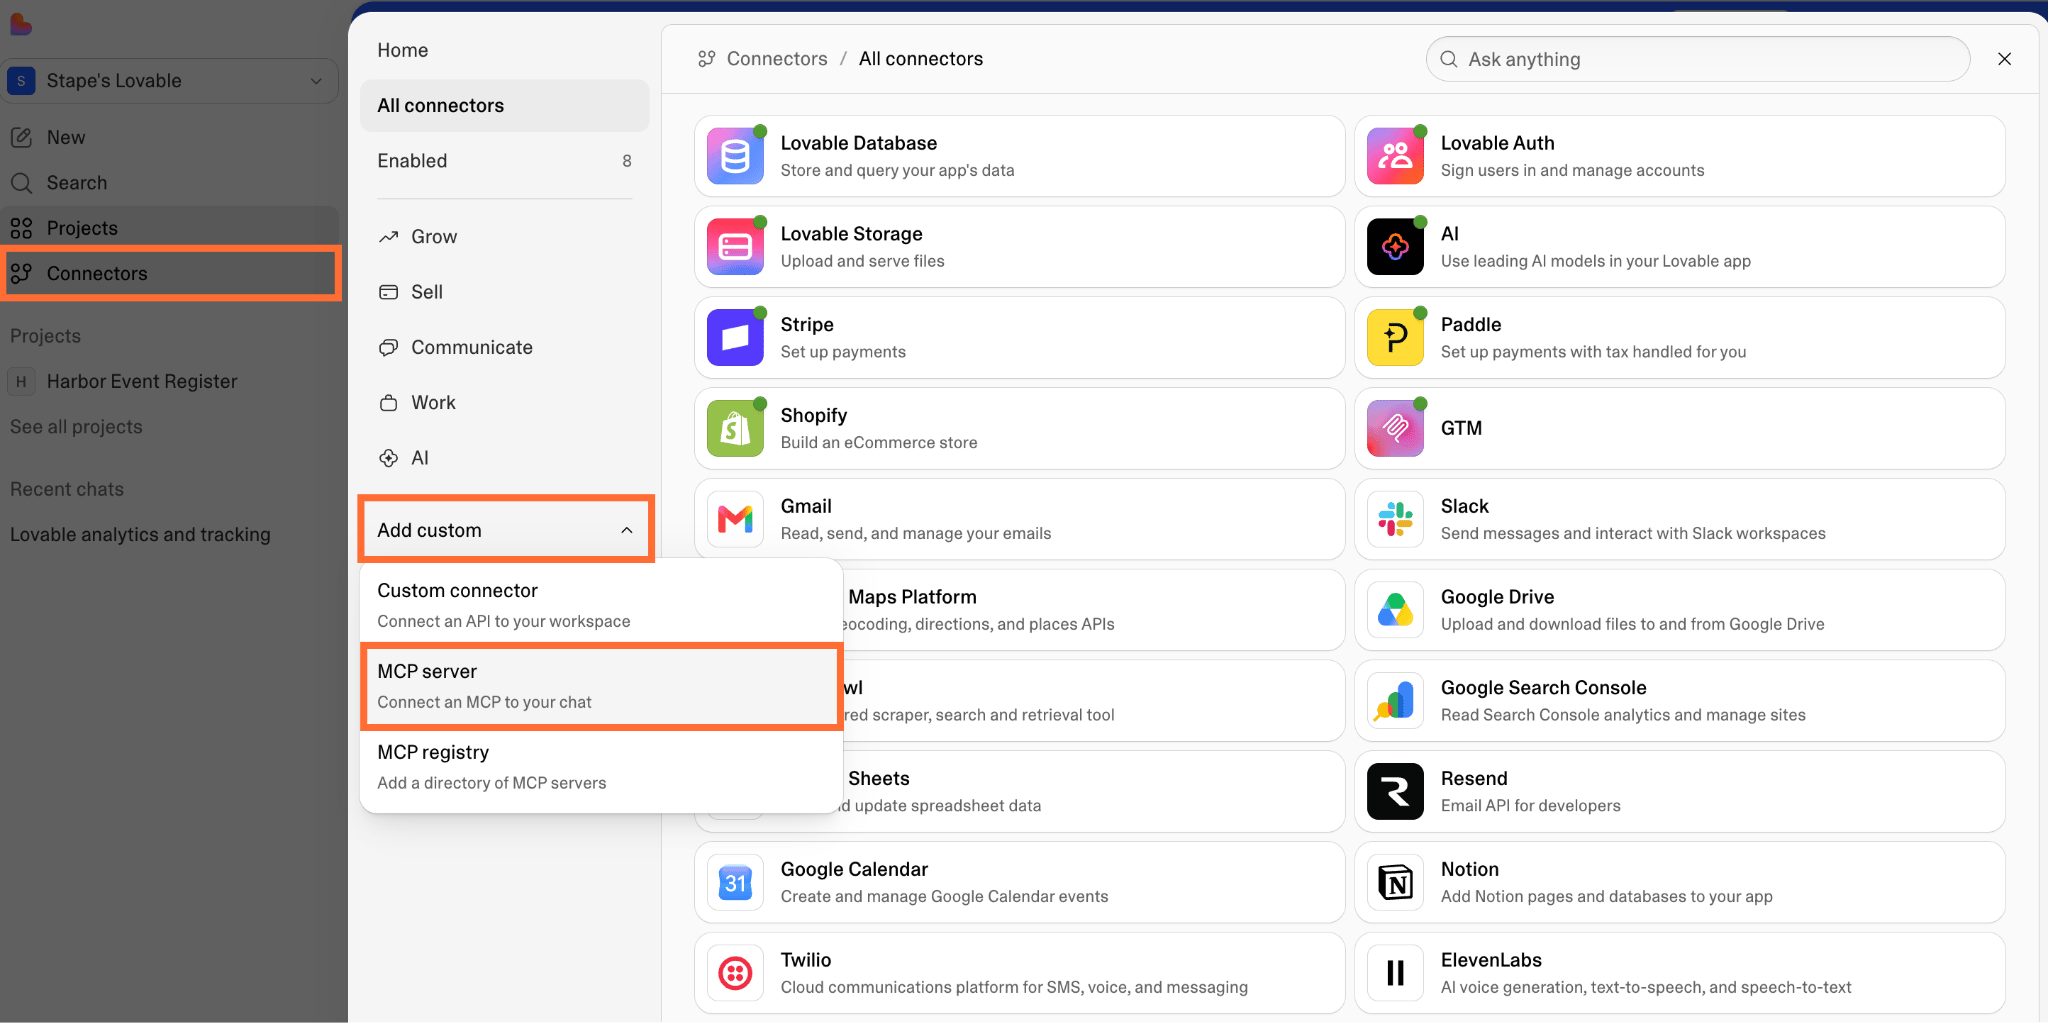
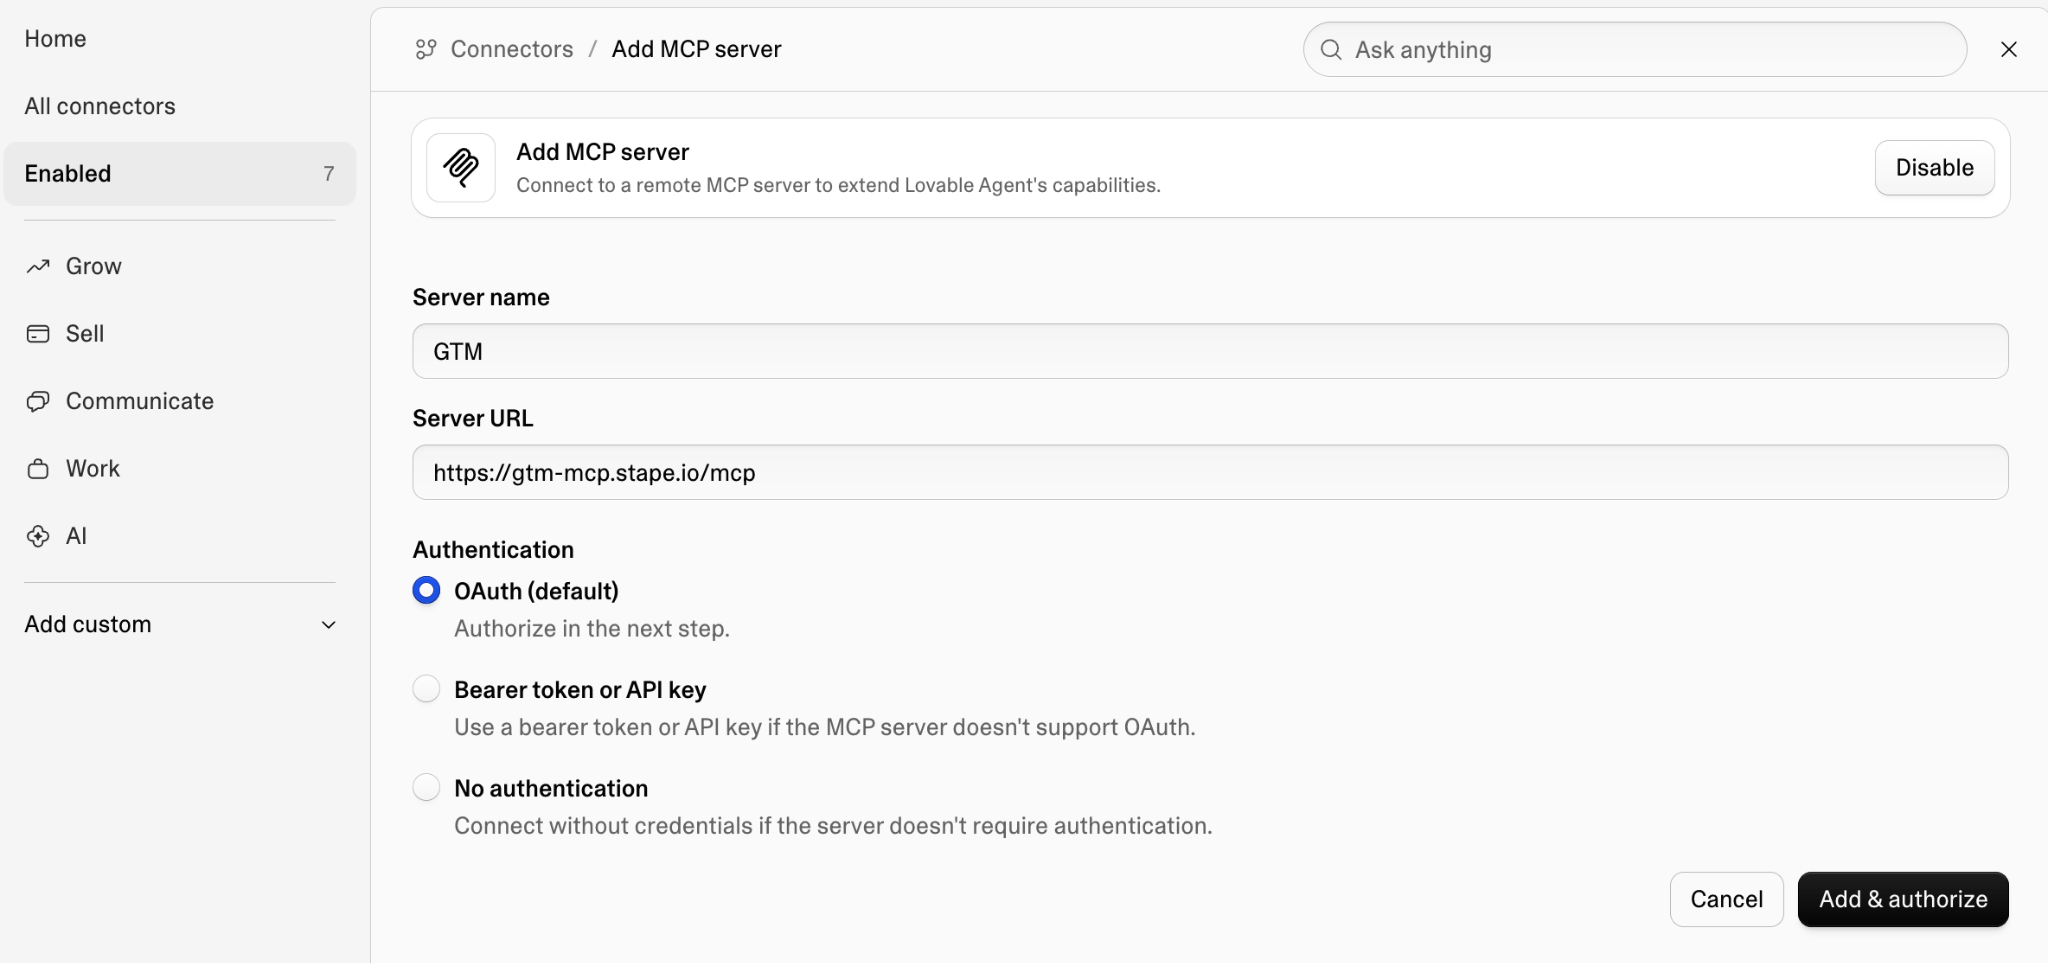
2. Fill in the following:
- Server name –
GTM - Server URL –
https://gtm-mcp.stape.io/mcp - Authentication –
OAuth
3. Click Add & authorize and sign in with the Google account that has access to GTM.
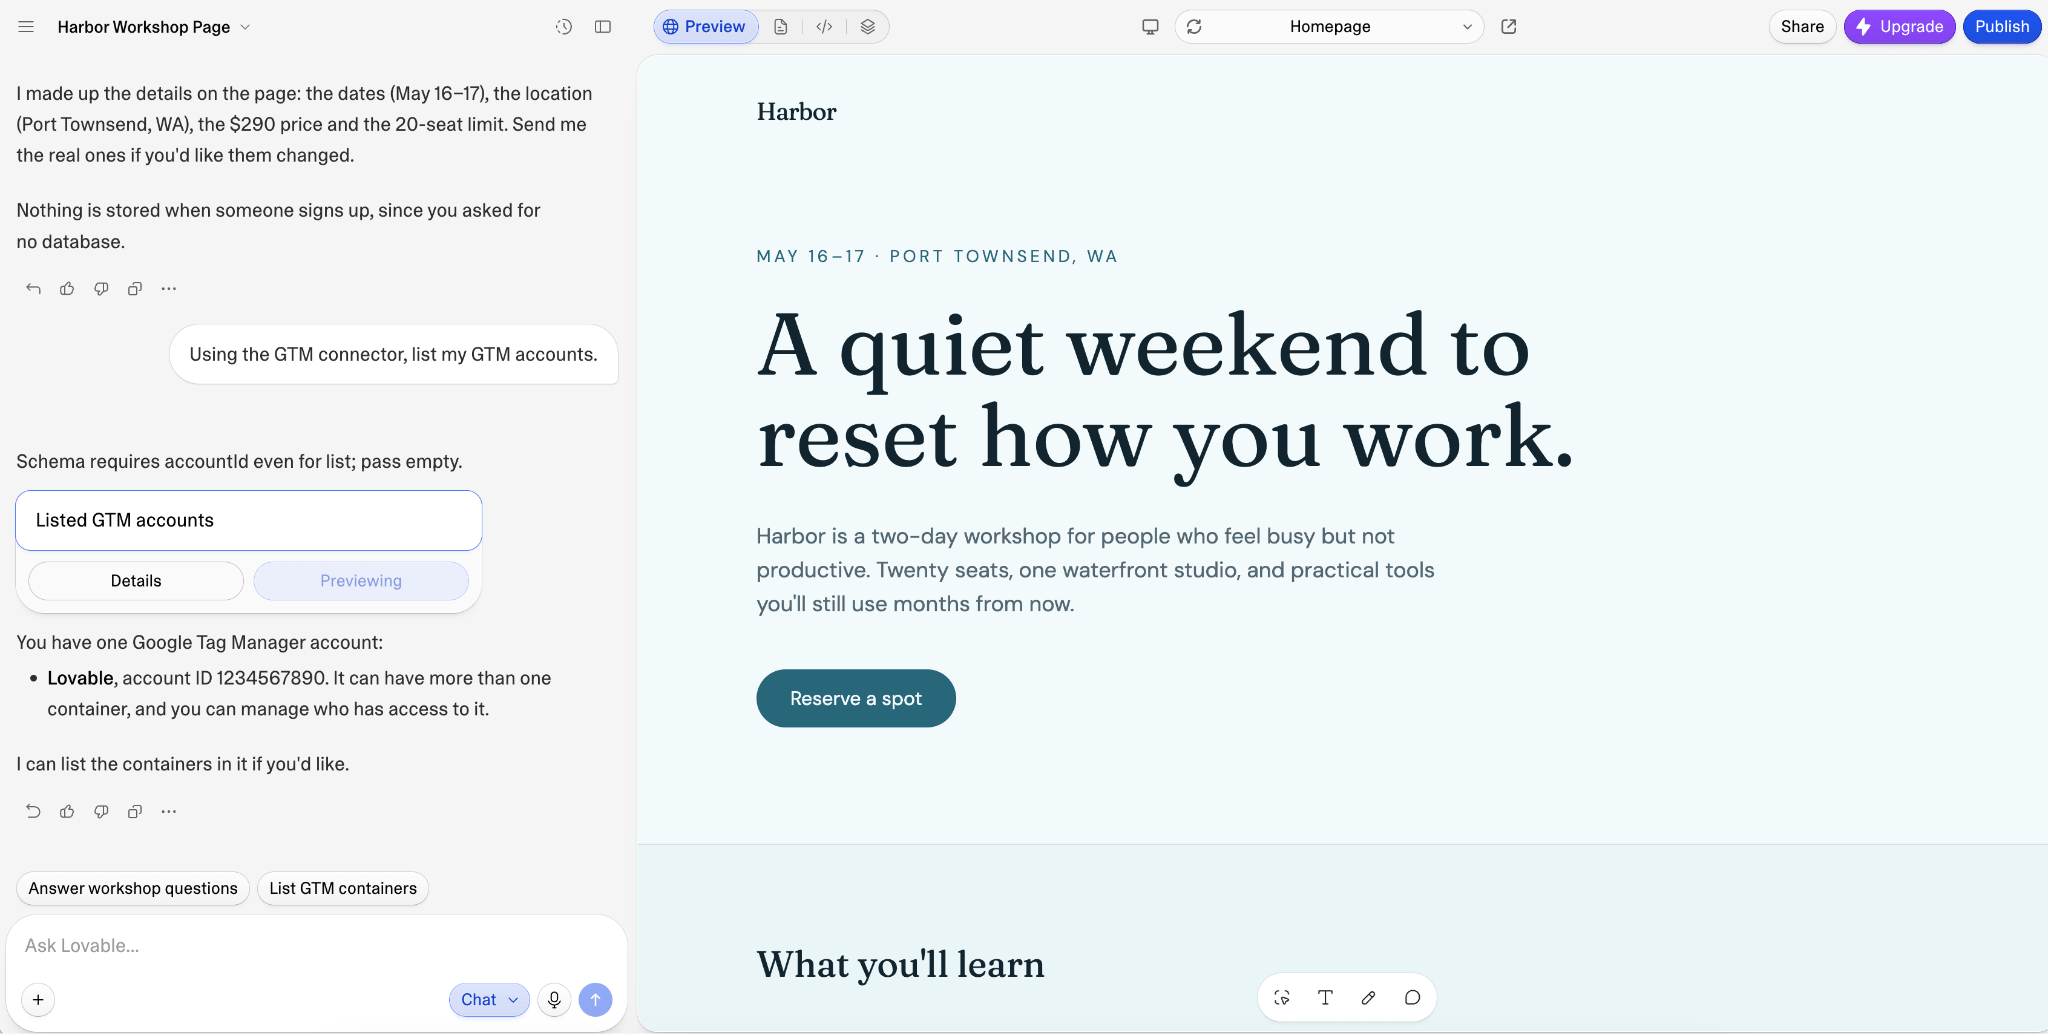
4. To check the connection, ask in the project chat:
Using the GTM connector, list my GTM accounts.
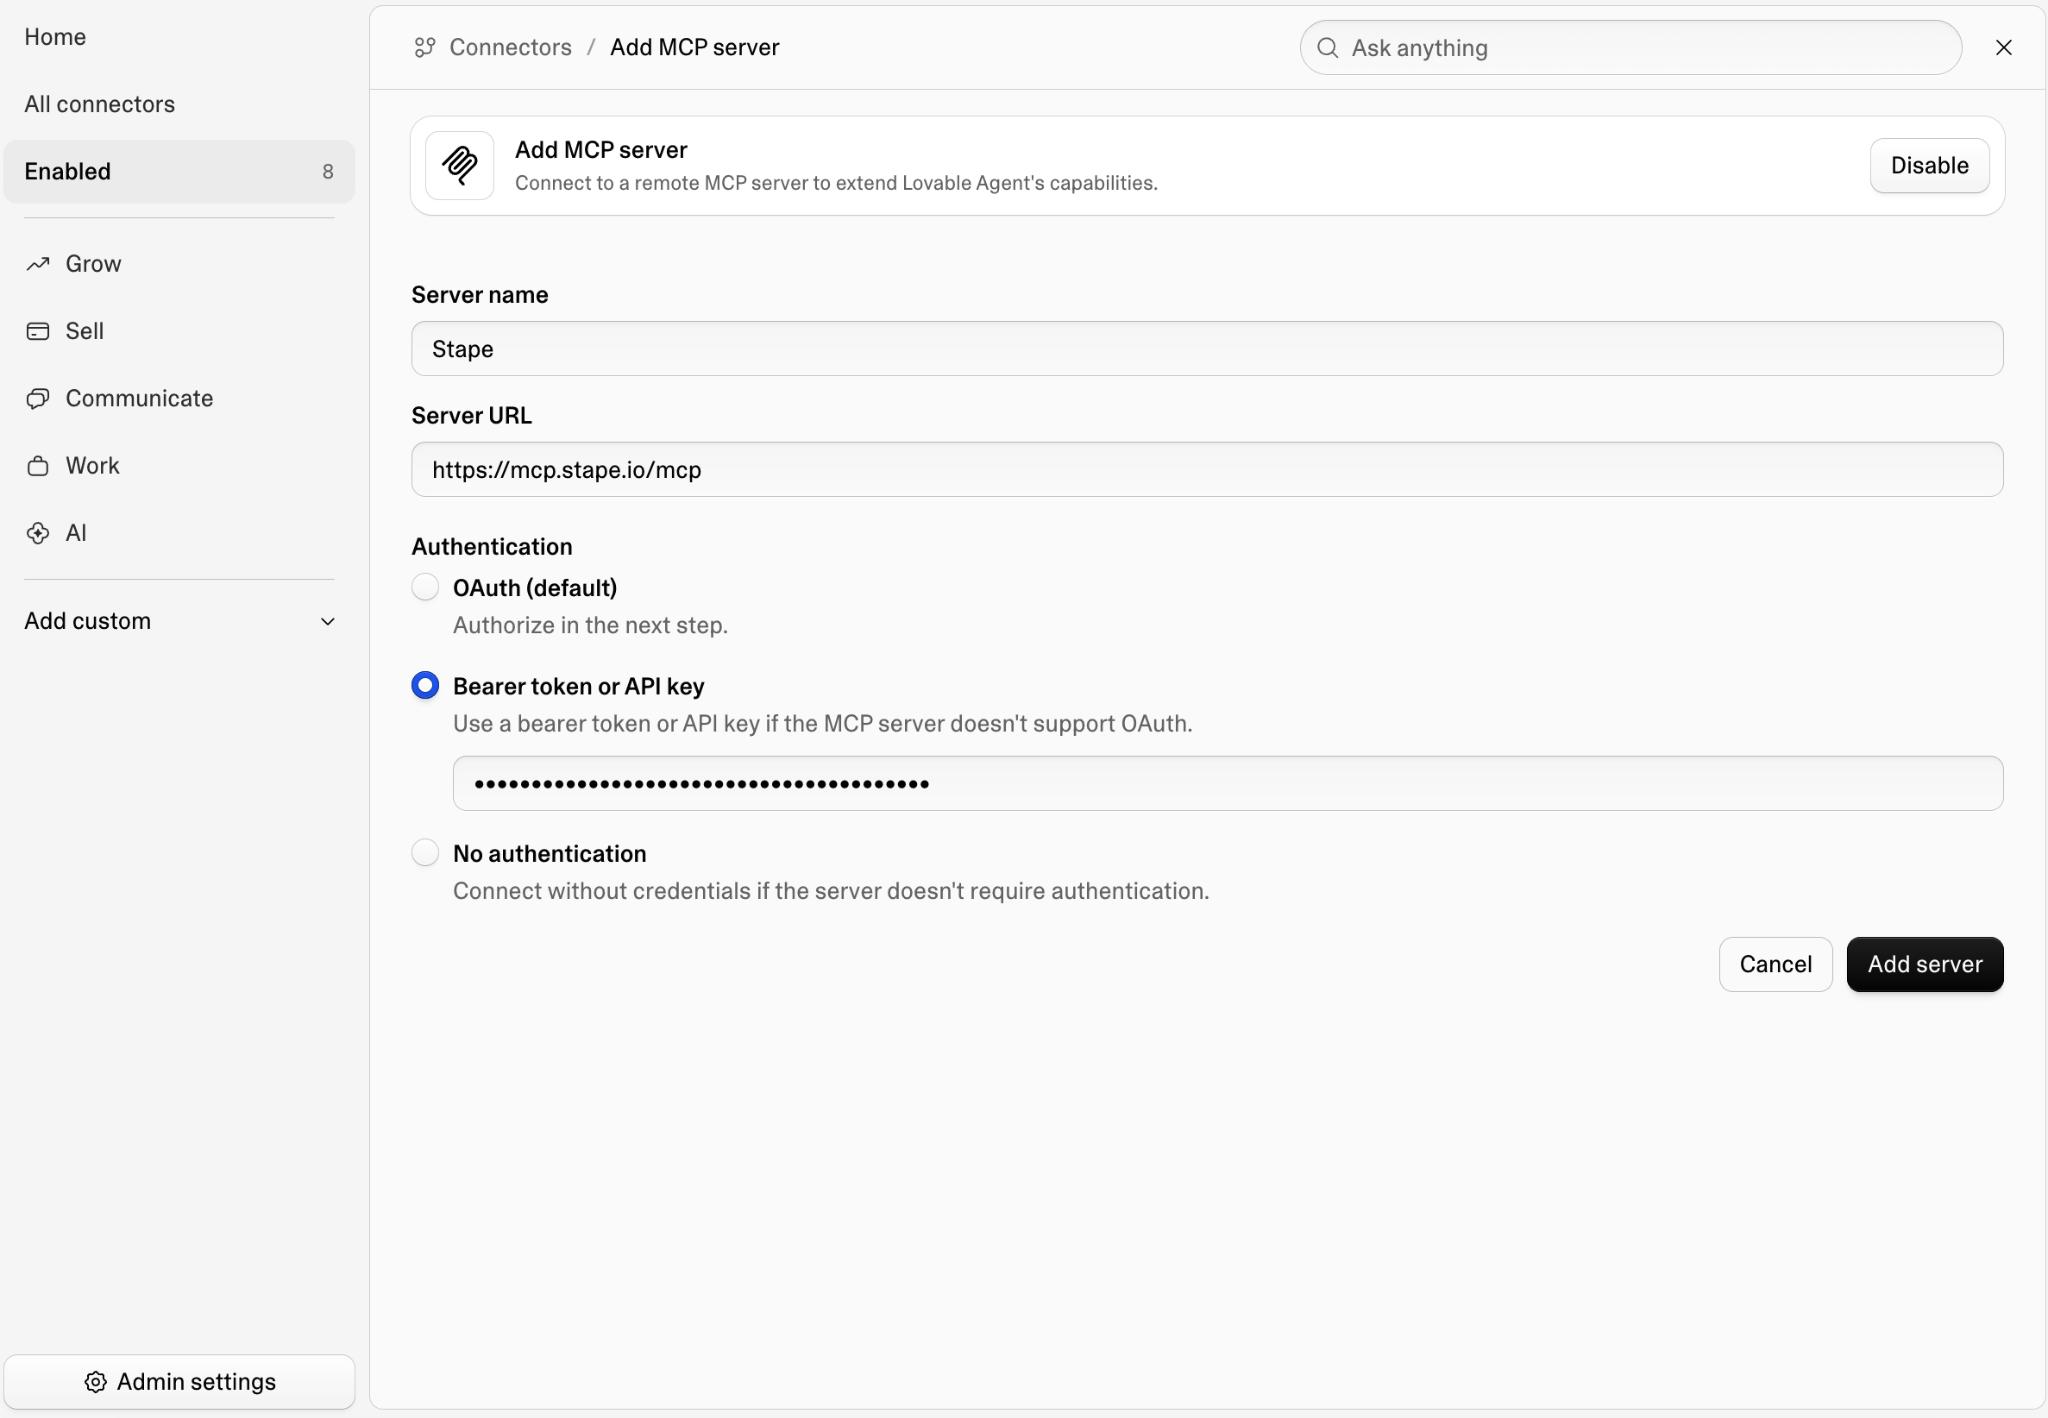
5. Repeat the first step and now add a Stape MCP:
- Server name –
Stape - Server URL –
https://mcp.stape.io/mcp - Authentication –
Bearer token or API key.Enter your Stape API key.
6. Click Add server.
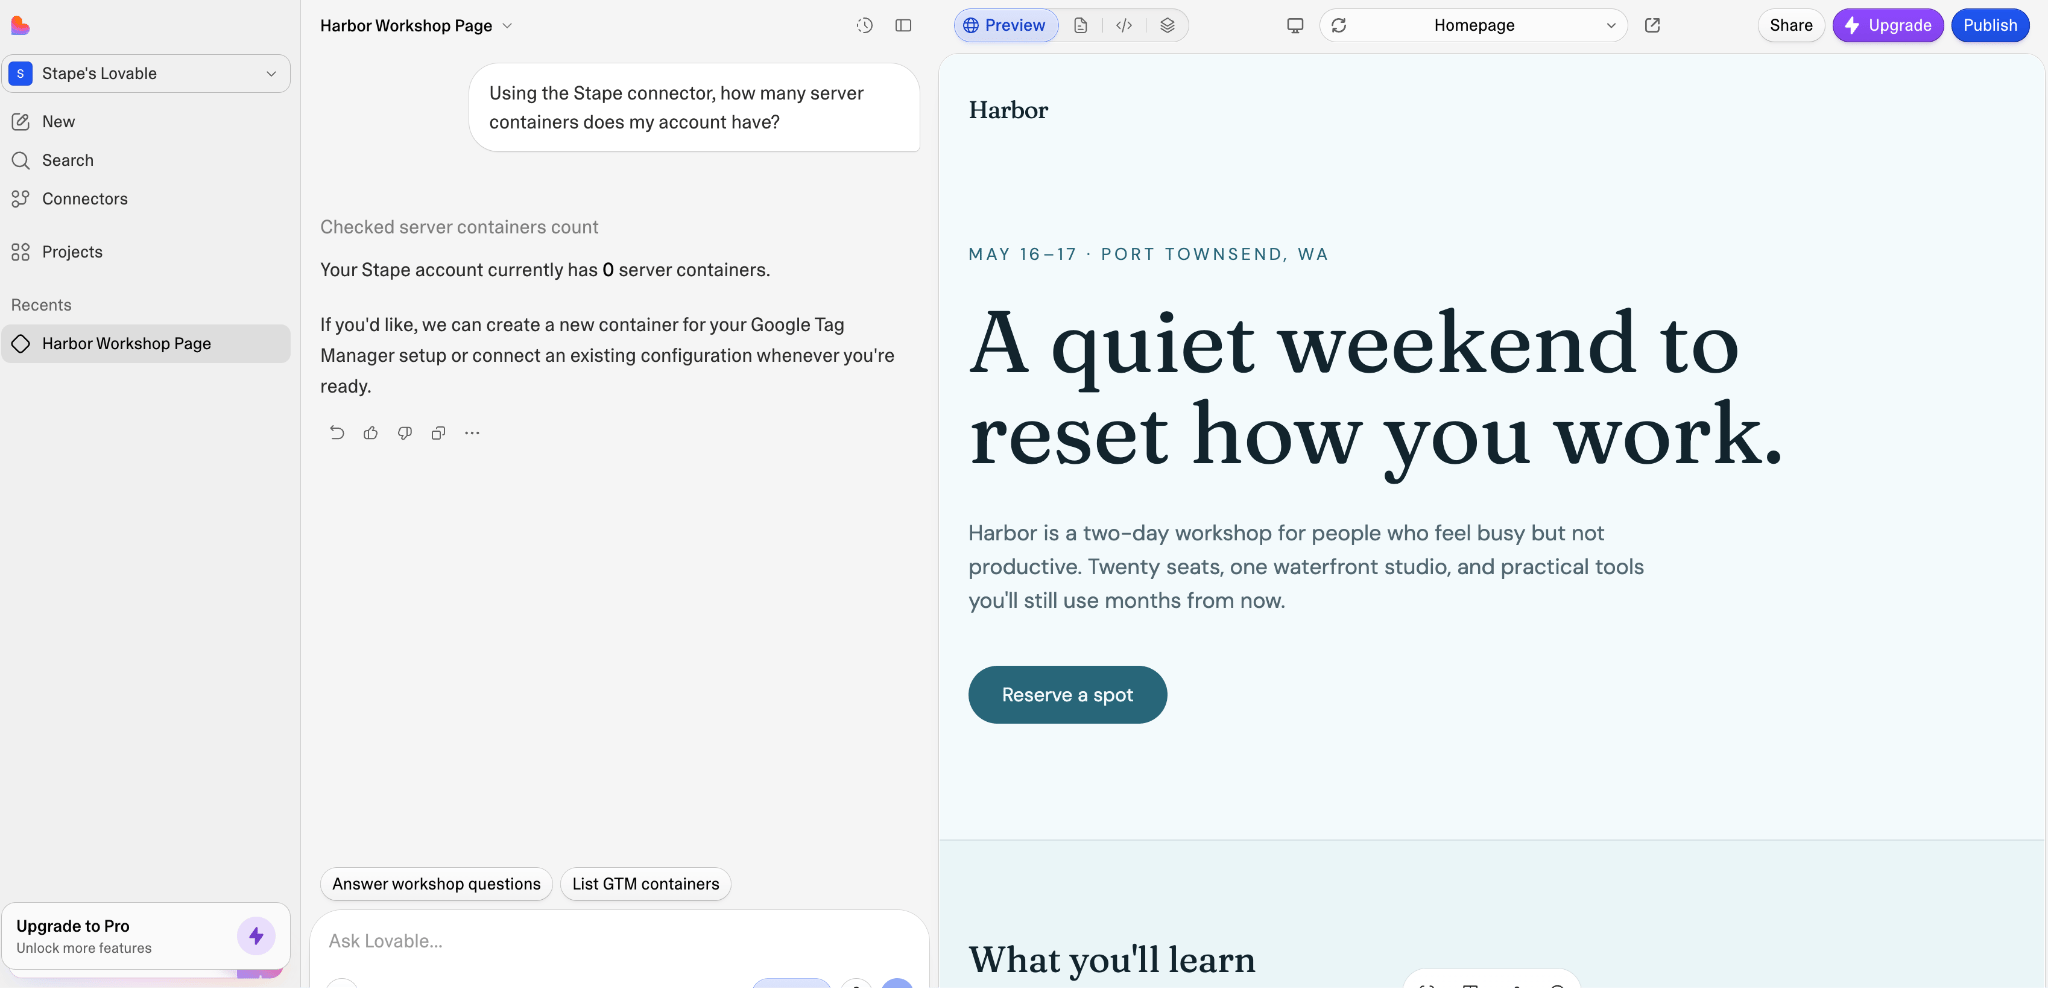
7. To check the connection, ask in the project chat:
Using the Stape connector, how many containers does my account have?
If you're starting with an empty Stape account, the answer is 0. The next step creates your first container.
Step 3. Create the Google Tag Manager, Google Analytics, and Meta setup
1. Enter the following prompt and replace the server zone, measurement ID and Meta Pixel ID with your own. Choose the server zone nearest most of your visitors so requests to your Stape container travel a shorter distance. This ensures faster data transmission, helping to prevent event loss – especially for users on slower connections. For the full list you can read the Server zones for sGTM article.
Using the GTM and Stape connectors, set up tracking for this project. Inside the Harbor account create a web GTM container called “Harbor web”, and server GTM container named “Harbor server”. Host the server container on Stape in the EU West zone, on the free plan. Configure GA4 server-side with measurement ID G-XXXXXXXXXX so the web container sends events to the server container and the GA4 client there receives them. Add a Meta Pixel tag to the web container, and draft a Meta Conversions API tag in the server container. Set the API tag to fire when the data from the website arrives at the server. Leave the access token empty. My Meta Pixel ID is 1234567890000000. Do not publish anything. When you finish, list the container IDs, the Stape hosting URL, what you drafted, and anything you still need from me.
Tip:
You can go to your GTM and Stape accounts and watch how everything appears in real-time.
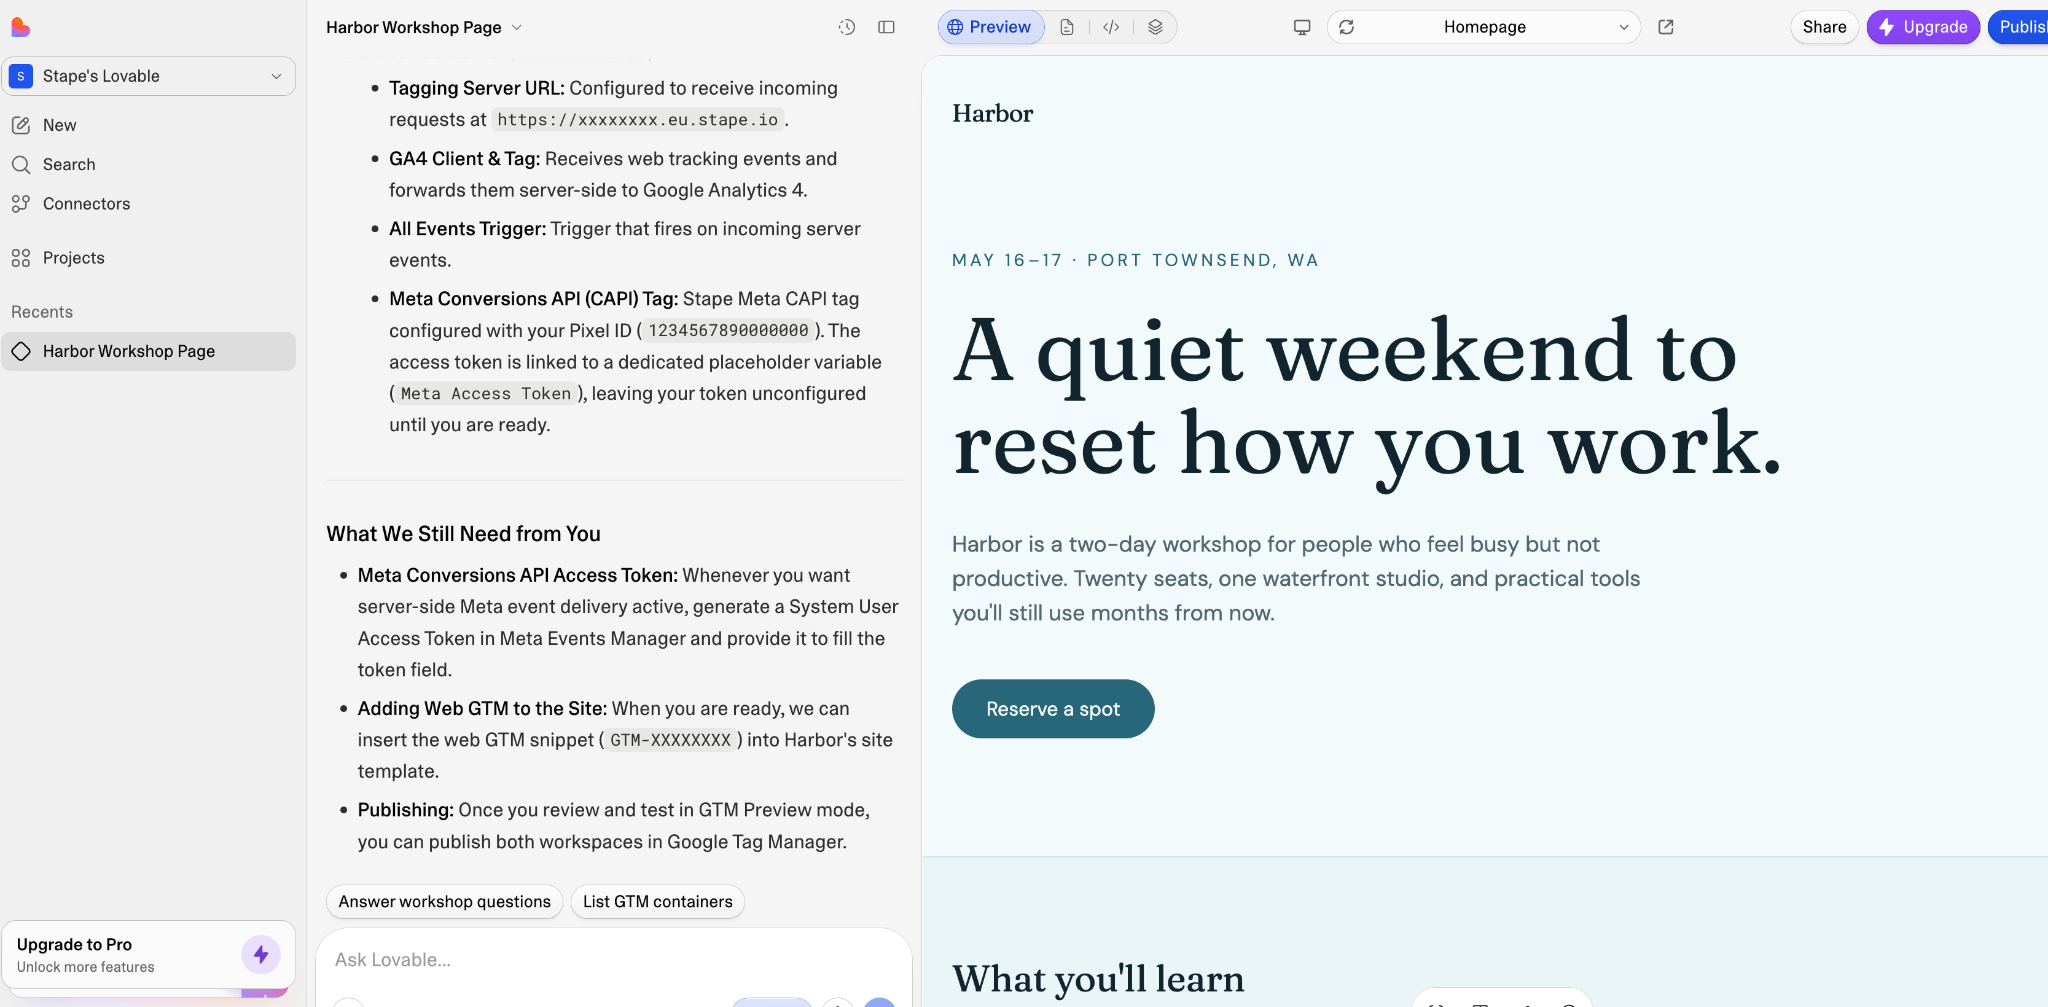
2. Lovable takes a few minutes, then replies with a summary like this:
- Web container ID (
GTM-XXXXXXX) and server container ID. - Stape container hosting the sGTM container, with its tagging server URL.
- A Google tag in the web container that sends data to the tagging server URL, plus a GA4 client and GA4 tag in the server container.
- The access token in the Conversions API tag is left empty.
- A short list of what needs your input.
Step 4. Add Meta Conversion API Access Token in GTM
Access tokens are sensitive information, and you should add this yourself.
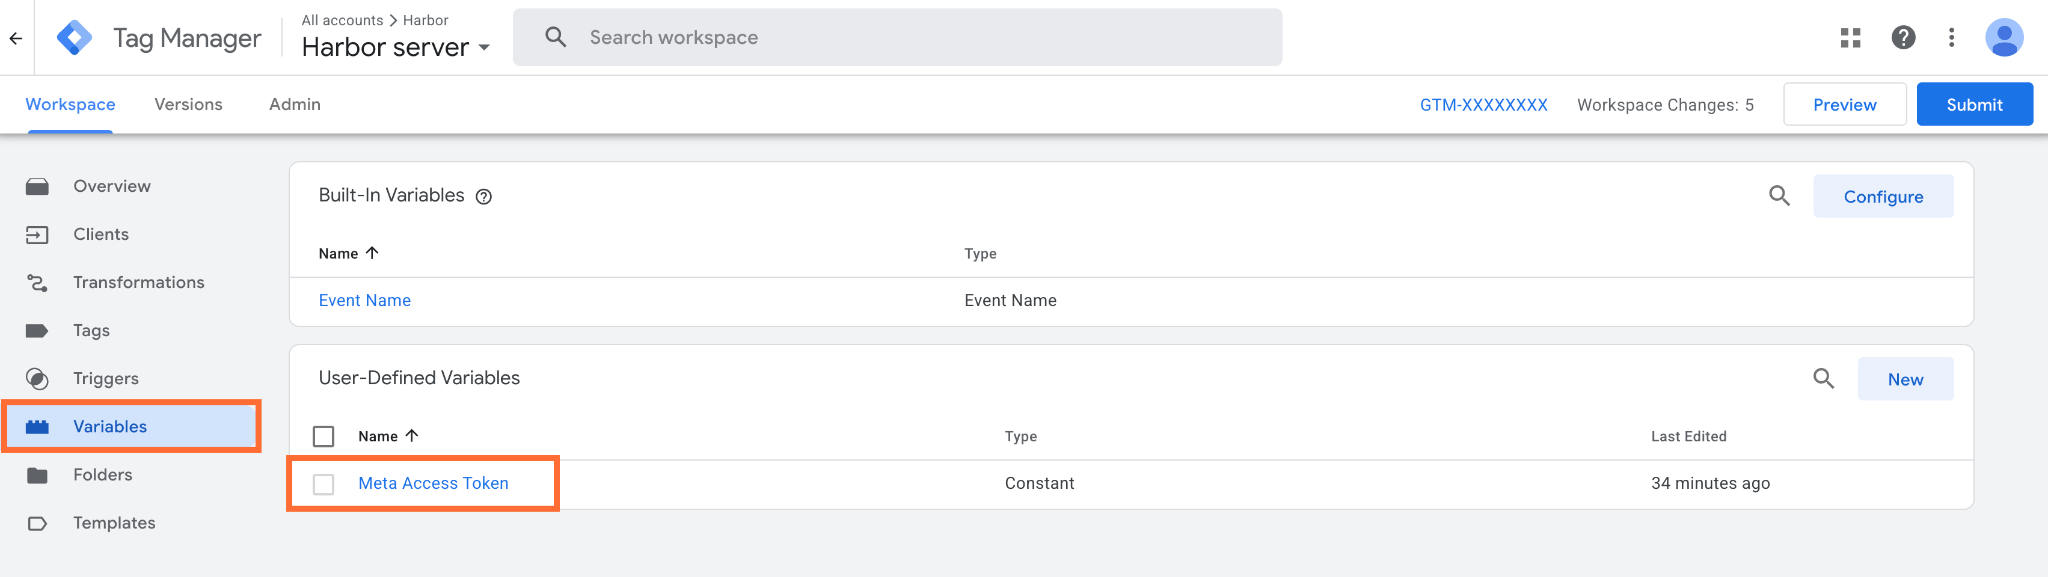
1. Go to Google Tag Manager → your server container.

2. Click Variables → Meta Access Token.
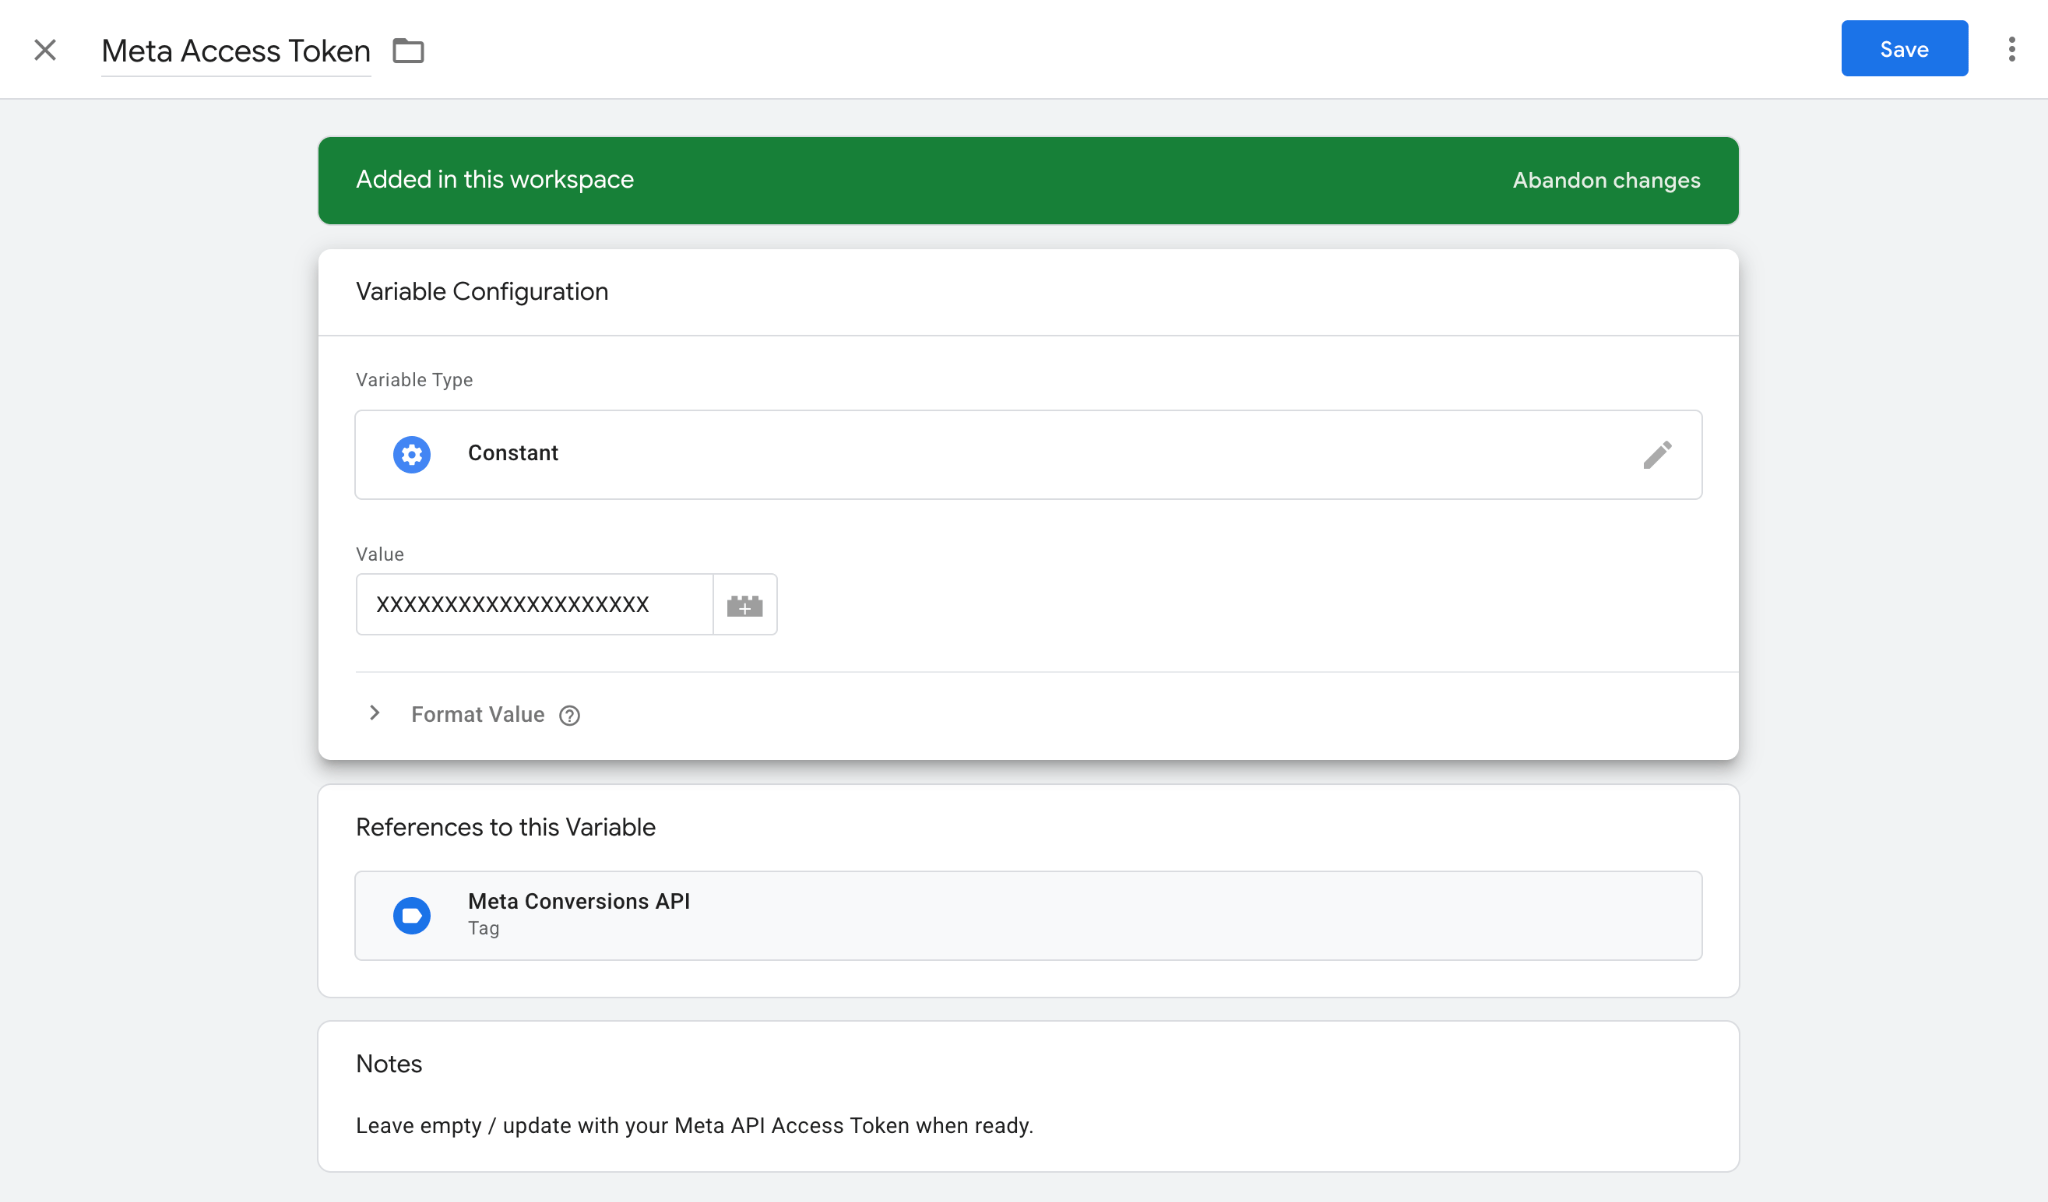
3. Enter the Value that you copied earlier from Meta Events Manager.
Step 5. Add Google Tag Manager to the Lovable app and publish
1. Now that the containers exist, ask Lovable to connect the app to them and set up firing events. Here you'll need to ask to add a unique event ID. When you track the same conversion in two places, the Meta Pixel in the browser and the Facebook Conversions API on the server, Meta receives two events for one lead. The event_id is how Meta knows they're the same action: when the browser event and the server event carry an identical ID, Meta merges them and counts as one conversion instead of two. This is called event deduplication, and without it your Lead numbers will inflate. For more information about deduplication you can read How to set up Facebook event deduplication in Google Tag Manager.
This prompt deliberately keeps personal data out of the event, which is the safest starting point. If sending customer data to ad platforms is acceptable for your business and you have a legal basis and consent for it, you can include that data to raise Event Match Quality (EMQ). The best way to do it is to pass the values to the server container and let the Meta Conversions API tag hash them (SHA-256) before they reach Meta. The Meta Conversions API tag automatically hashes the applicable parameters.
Add the Harbor web GTM container to this app, then set up these two things:
- 1.Track page views. Record a page view when someone opens a page and when they move to another page within the app.
- 2.Track signups. When someone successfully submits the signup form, record it as a "
generate_lead" event. Tag it with the name "harbor_waitlist", give each signup a unique ID, and include the person's email.
Send this data to both GA4 and Meta:
- Send it to GA4 through my server container.
- Send it to Meta two ways: once from the browser with the Meta Pixel, and once from the server container with the Meta Conversions API.
- Use the same unique ID in both the browser and the server versions, so Meta counts each signup once instead of twice.
Set everything up but do not publish the GTM containers.
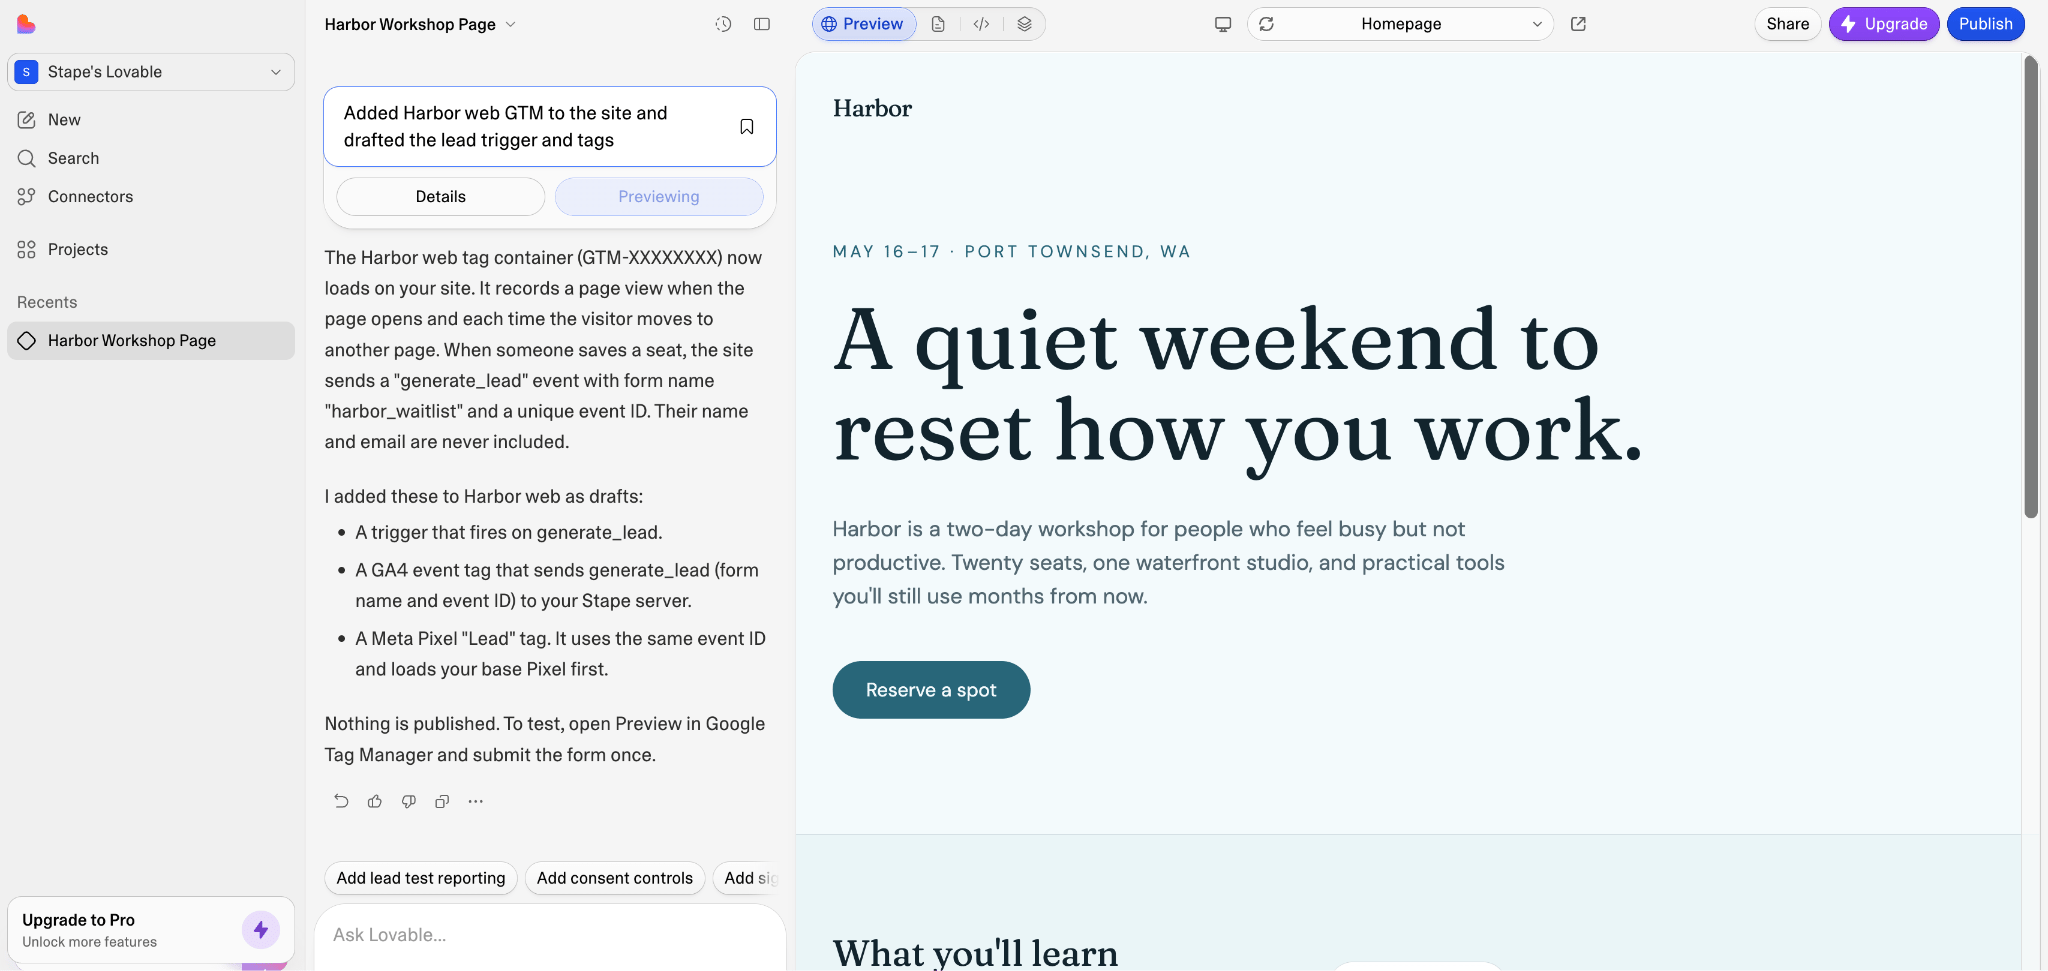
2. On the top-right of the screen, click Publish to publish your project.
Step 6. Add a custom subdomain (highly recommended)
Setting up a custom domain is highly recommended to unlock the full potential of server-side tracking. When your tagging server runs on your own subdomain, tracking cookies are treated as first-party data. While Safari's ITP restricts client-side cookies to just 7 days, server-side cookies issued from your domain maintain their longevity, allowing you to accurately recognize returning visitors and preserve long-term attribution. Additionally, routing data through a custom subdomain keeps tracking requests integrated with your first-party traffic, preventing ad blockers and browser privacy controls from dropping critical conversion signals.
To add a subdomain, your Lovable app will need its own domain, the free domain name that's provided by default won't work. If the domain is hosted on the external DNS provider, then you'll have to enter the values yourself, MCP server will only do the setup on Stape.
Simply ask
Using Stape connector, connect a custom subdomain.
And follow the conversation.
Once you've added the records at your DNS provider, head back to the chat and ask it to verify the domain status in Stape and update the server container URL inside your web GTM container. Finally, hit publish on your web container again once the domain verification is complete.
Testing
1. In Google Tag Manager, go to your server container, and click Preview. Then, go to your web container, and click Preview as well. Enter the live site URL when asked. You'll get a new screen with the Tag Assistant.
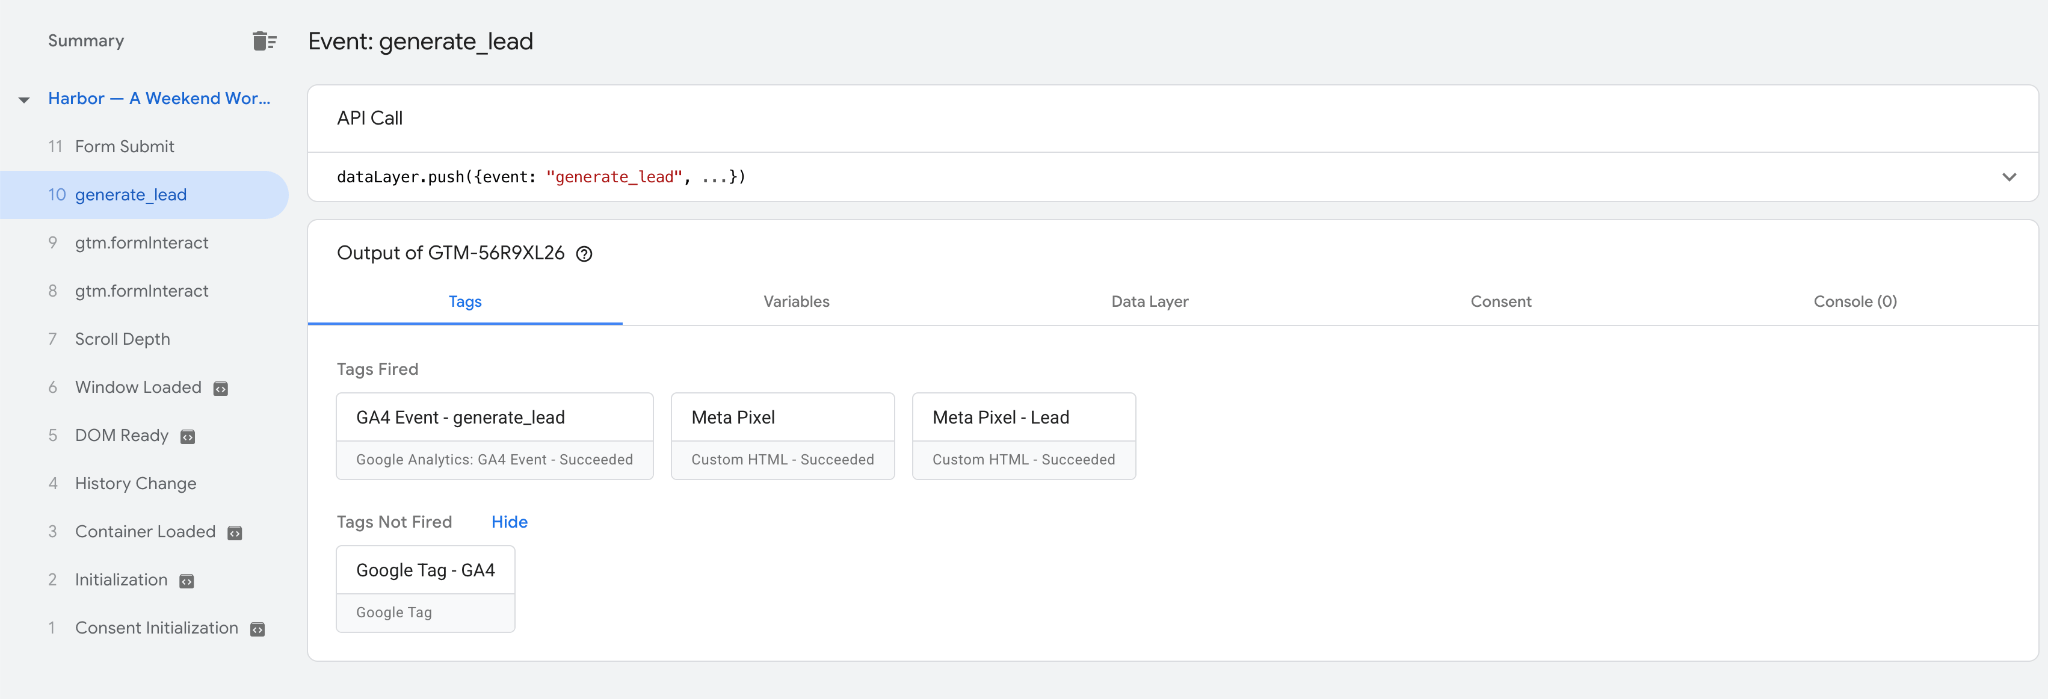
2. In the Tag Assistant screen fill in the form and submit it. In web preview, the generate_lead event should appear, click on it to check whether GA4 and Meta tags have successfully fired.
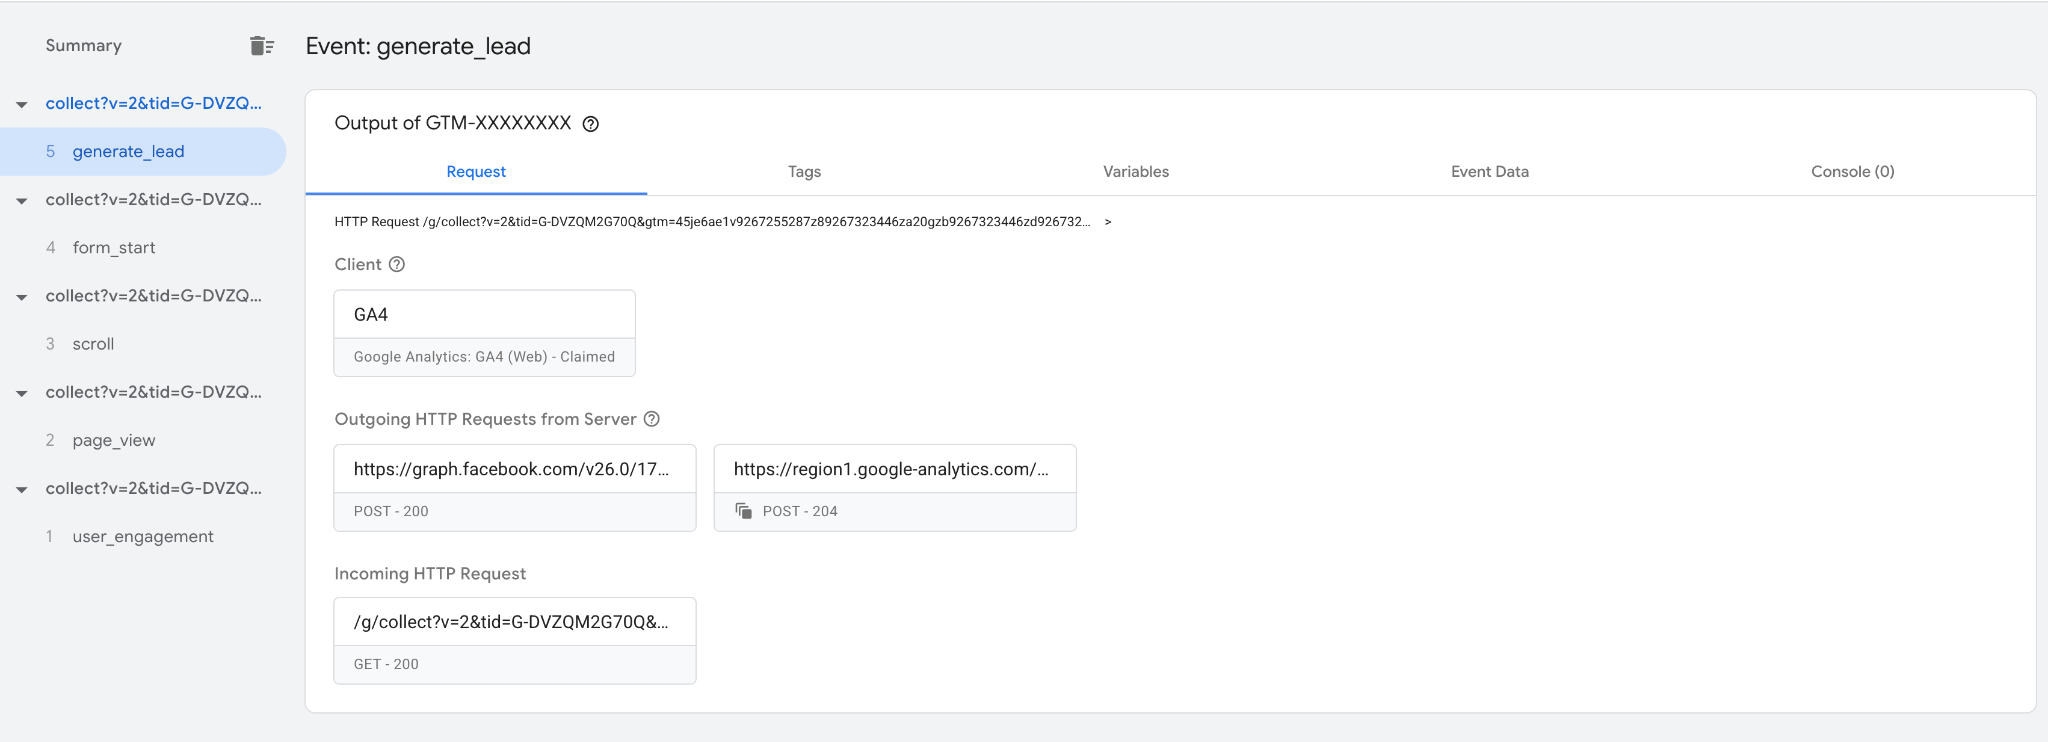
3. In the server container preview, open the generate_lead event. Check the incoming request from the web container and the outgoing HTTP requests. Everything should have the 200 status.
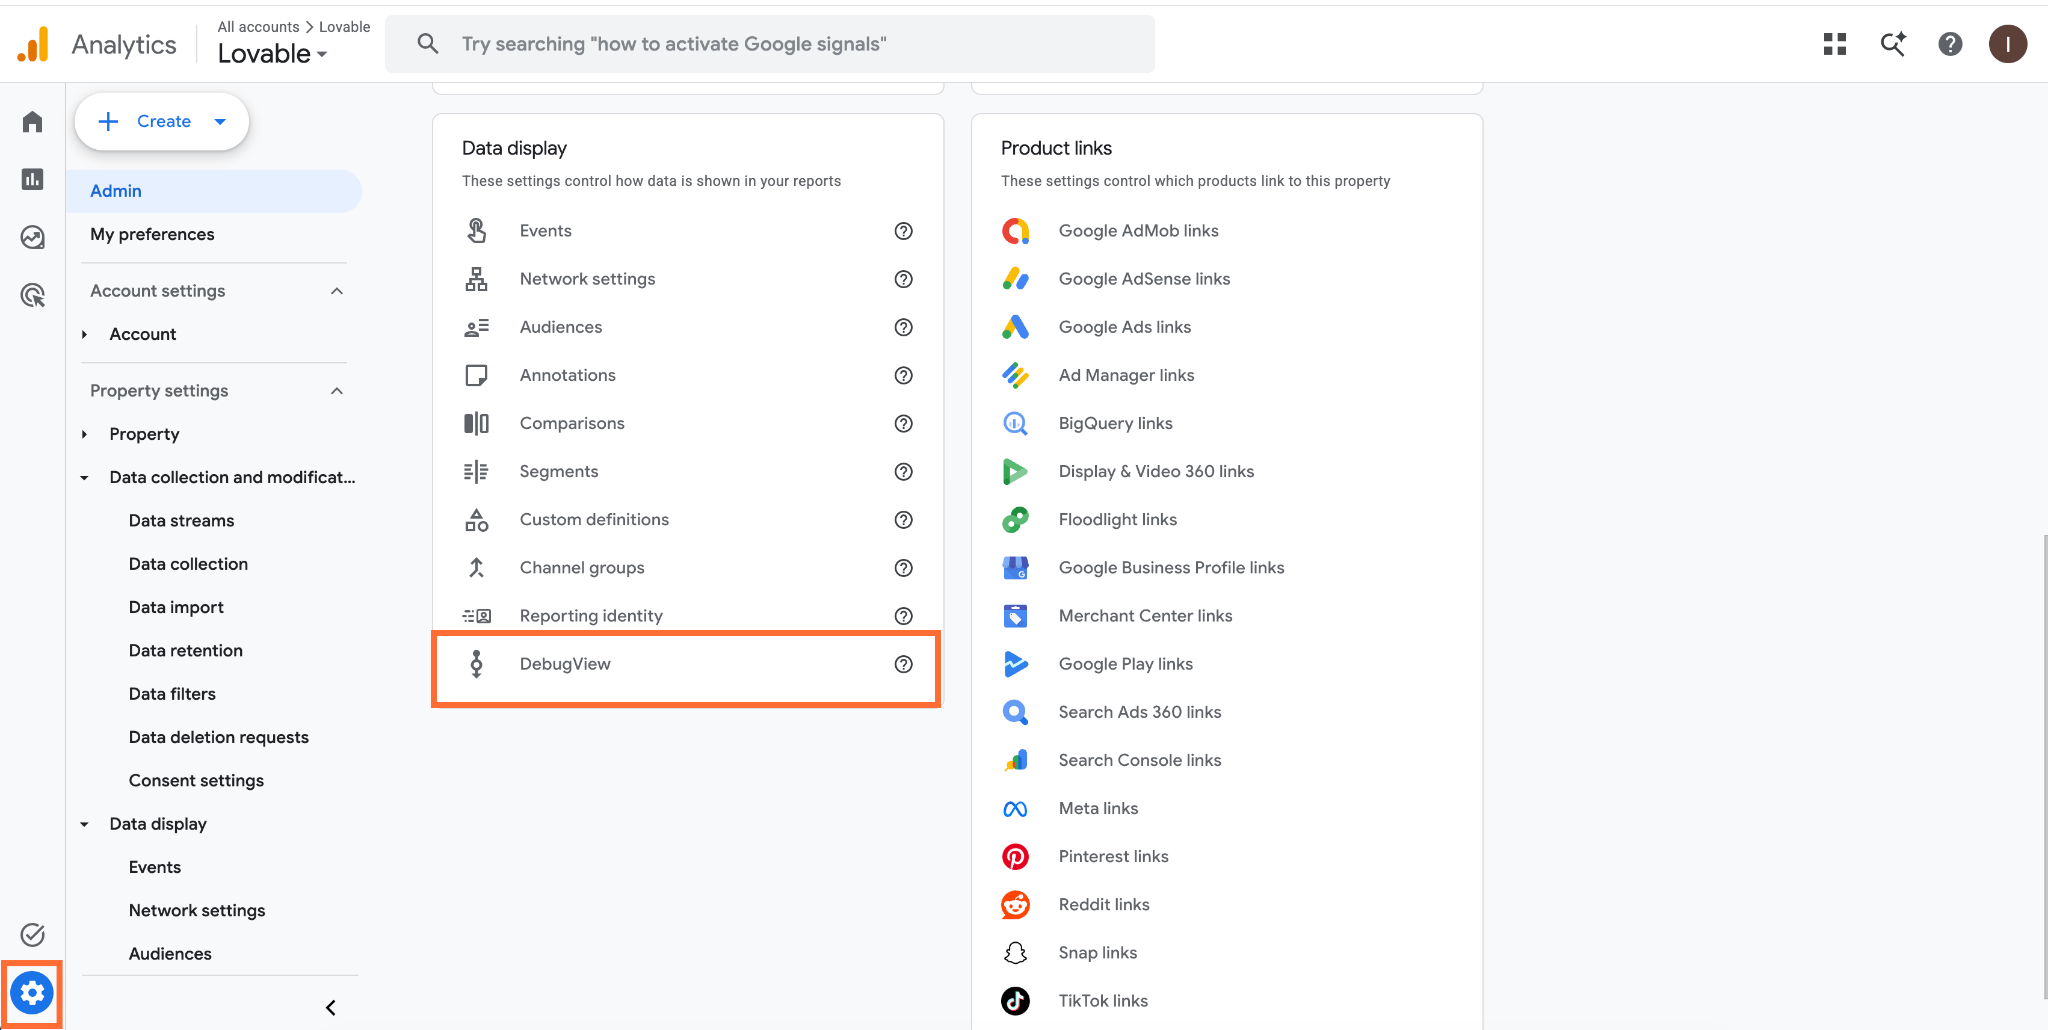
4. Go to GA4 → Admin → Debug view.
5. You should see your events.
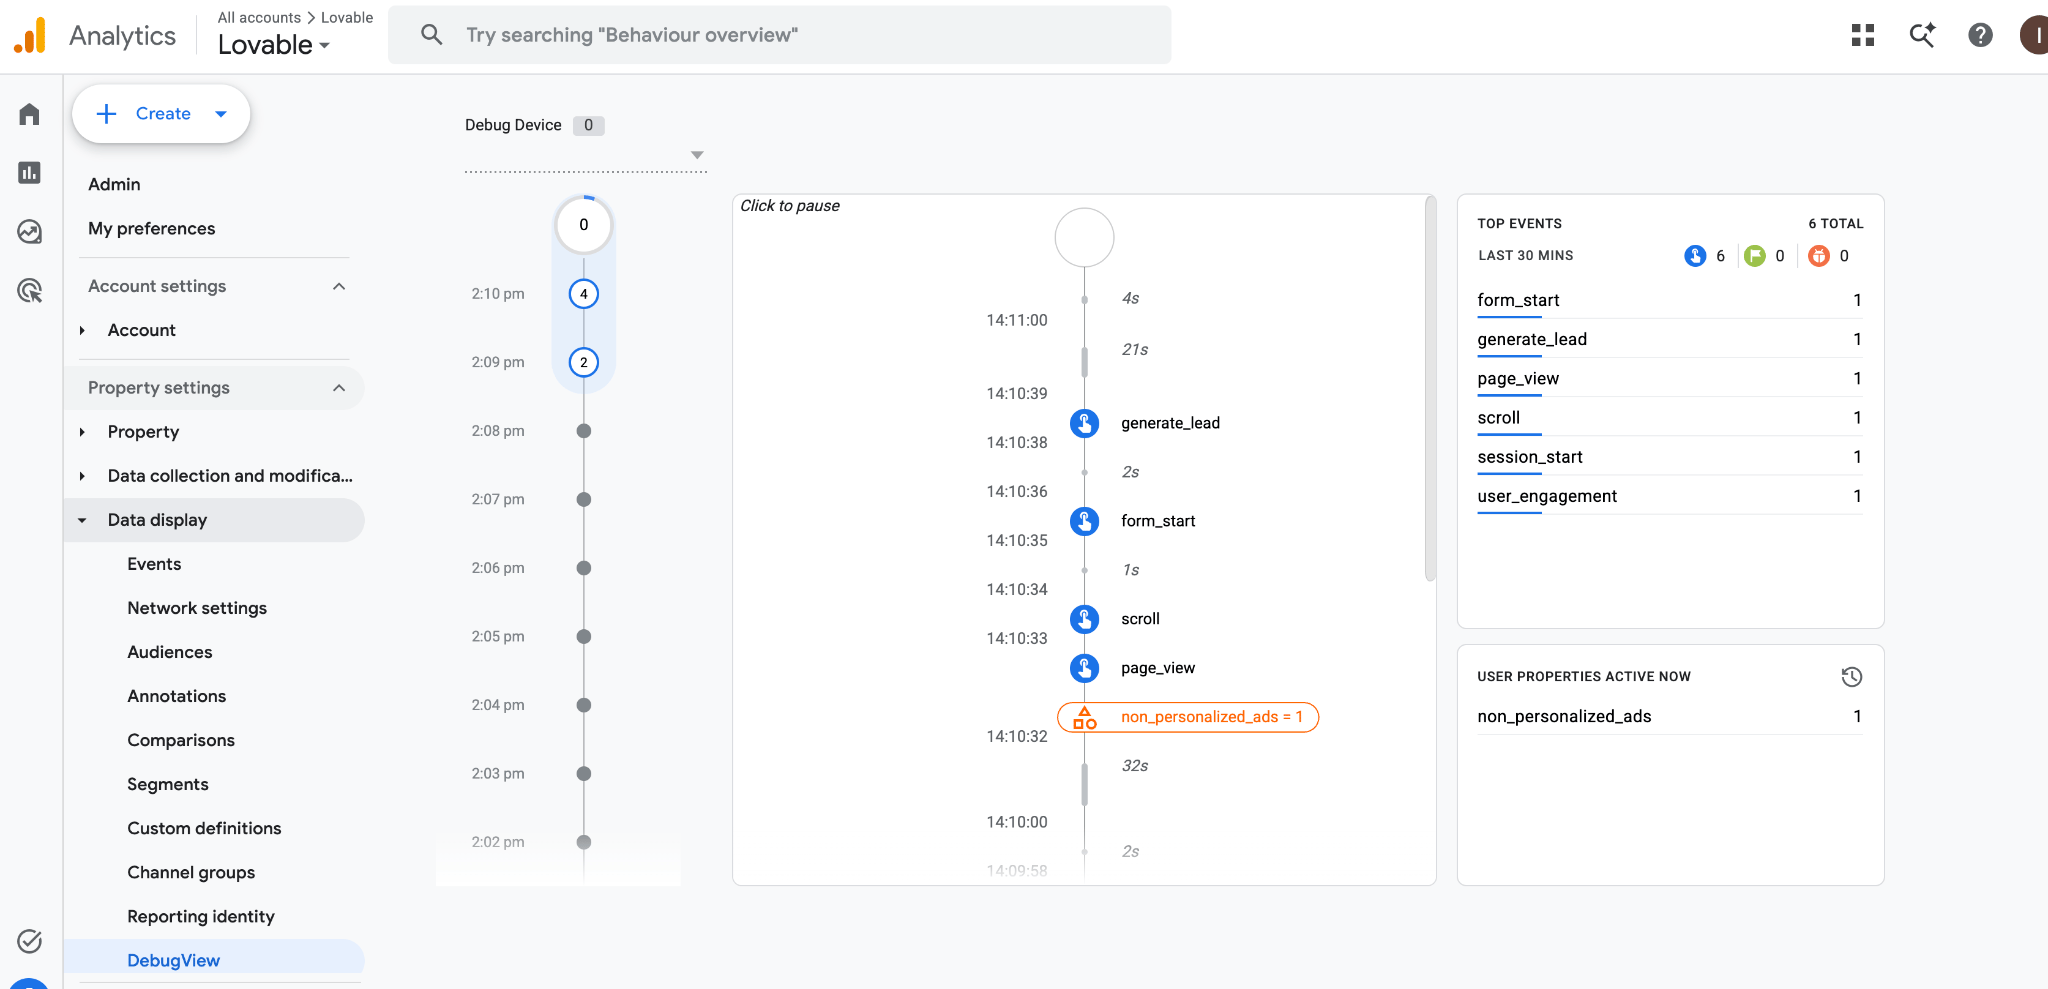
6. Go to Meta Events Manager → Datasets → select your dataset. You should see your events. It might take up to 30 minutes for events to appear, but you can test your events in the Test events tab right away.
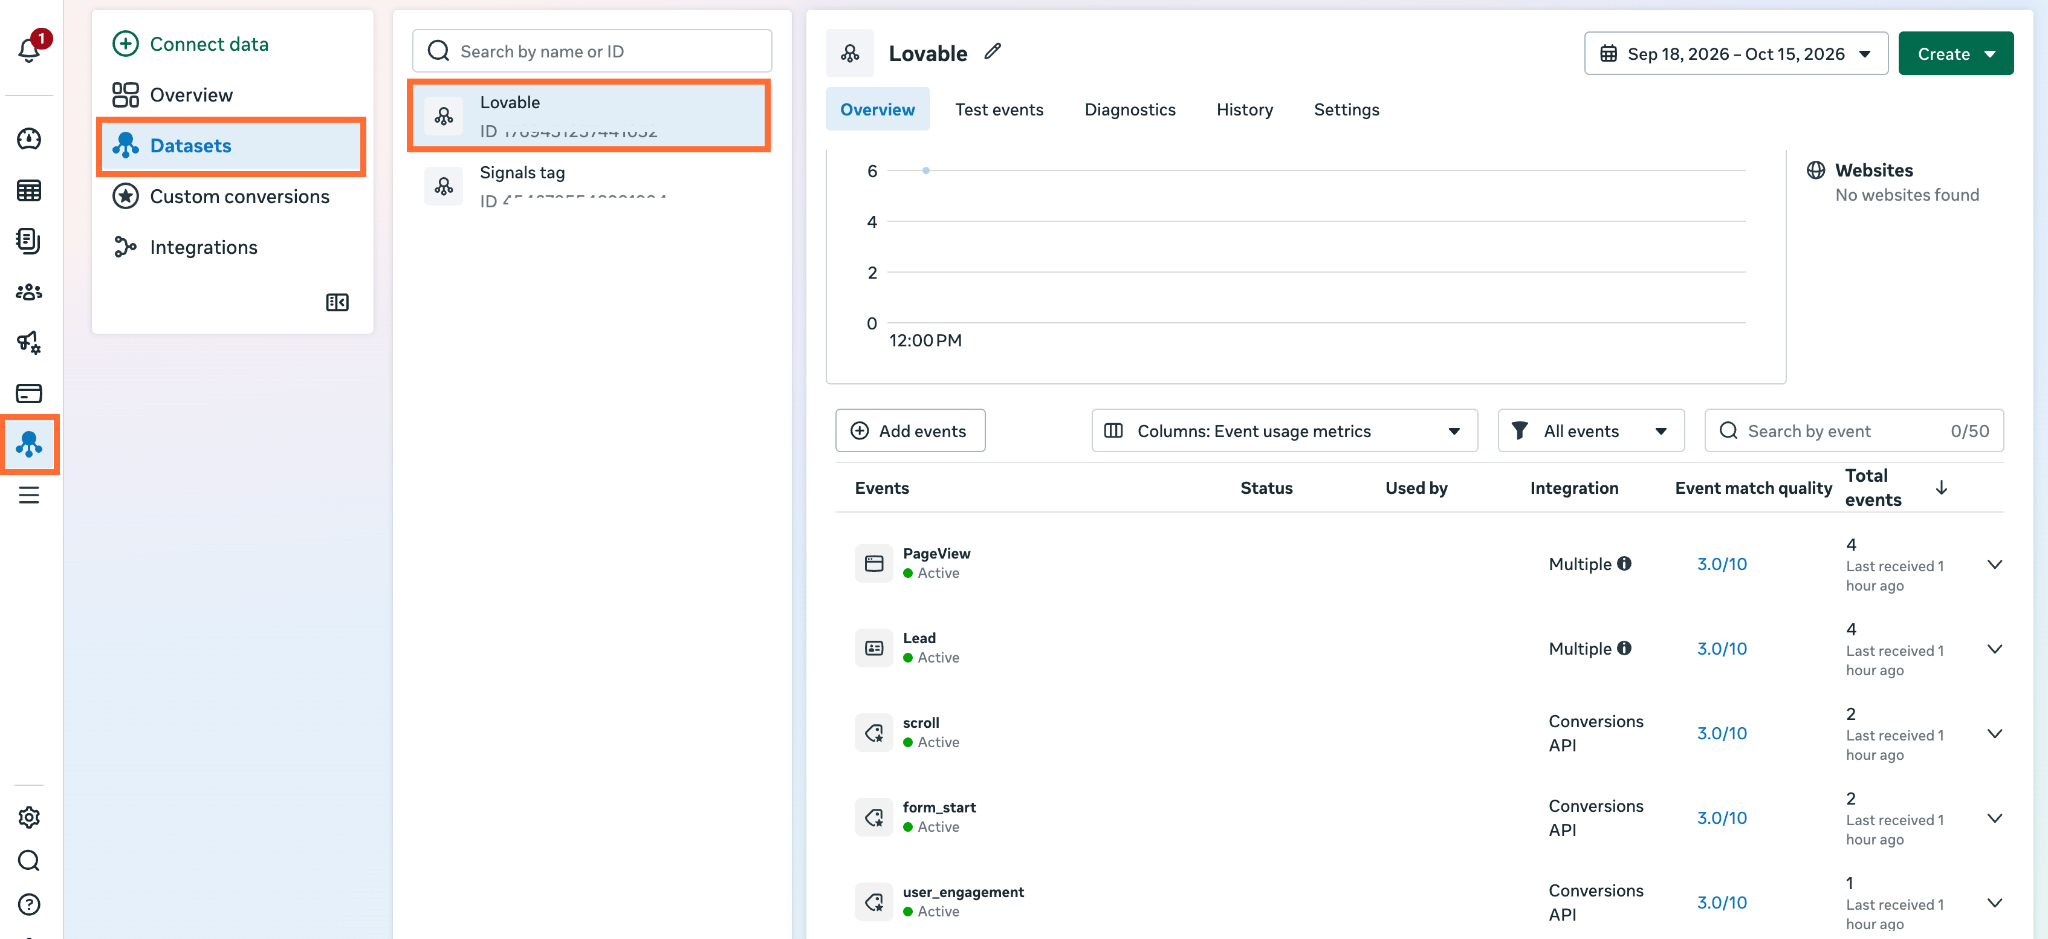
7. Go back to Lovable, and ask to publish the GTM containers:
Publish both GTM containers.
Tips:
- The Stape GTM Helper Chrome extension makes requests in sGTM preview easier to read, which helps when you're checking parameters.
- Once the basic setup works, an upgrade is worth considering: Stape power-ups such as Cookie Keeper or for longer cookie lifetimes, or Custom Loader for reducing ad blocker impact. You could say this:
Using the Stape connector, enable the Custom Loader, select 'Other' as the platform, enter web GTM container ID, and add the generated code to this project.
Using this setup on your own Lovable app
While Harbor serves as an illustrative model, you can adapt these instructions to your own application by incorporating the following:
- Container naming – name your GTM containers after your specific project.
- Custom event mapping – substitute
generate_leadwith core business conversion events relevant to your goals, such assign_up,begin_checkout,purchase, or demo bookings. - Precise event triggers – clearly define the exact conditions under which each event should trigger (for example, "upon receiving a successful API response" rather than simply "when the button is clicked").
FAQ
Final words
By incorporating strong analytics for apps built with Lovable, you can make sure that the event data is accurate, that attribution through the ad platforms works correctly, and avoid the need for hard-coded tags. With the use of Lovable GTM and Lovable Google Analytics through an MCP-driven method, the whole process is simplified down to just a few simple AI prompts: Lovable will automatically set up your GTM containers, host the server container on Stape, prepare your GA4 and Meta tags, and connect the tracking events directly inside your app. Yet you still retain full control, since all changes are made as drafts so that you can review them and test them in preview mode before they go live.
The end product is a dependable tracking system since the events pass through your dedicated Stape server container, ensuring that the data gets reliably sent to GA4 and Meta even if the client-side browser pixels are blocked – this gives you full control over the data that is shared with each platform. In the future, scaling can be easily achieved by mapping a custom domain, by extending cookie durations using Cookie Keeper, or by integrating further destinations such as Google Ads and TikTok, all without having to modify your codebase once again.
Want to start on the server side?
Try for freeRecommended for you
Blog
AI in Google Tag Manager: give it access, not control
Learn how to safely connect AI to Google Tag Manager with six key controls – from permission scoping to consent verification – before you publish live.
Aug 11, 2026

Comments