How to set up Facebook event deduplication in Google Tag Manager
Using Facebook server-side tracking (Meta Conversion API Gateway) is getting more popular due to its ability to prevent tracking pixel blocking by ITPs and AdBlockers. Another massive benefit of Facebook conversion API is that it increases FB cookie lifetime. If you haven’t yet implemented FB Conversions API on your site, follow this guide.
In this article, we will describe how to set up Facebook events deduplication if you are using both browser and server tracking methods for your site.
| Related: | Facebook ad tracking. |
| Facebook Lead generation. |
.
Why do you need to set up Facebook event deduplication?
The Facebook pixel and Conversions API lets you share standard and custom events with FB so that you can measure and optimize ad performance. The pixel enables you to share web events from a web browser, while the Conversions API lets you share web events directly from the cloud server.
Both Facebook pixel and Facebook conversion API let you send events. The difference is that pixel sends events from the browser, and CAPI sends events from the server. If you tell Facebook that the browser and server method send identical events, they will accept one and discard another.
There are several ways of setting up Facebook tracking, including the following:
- Using solely browser (pixel) method. It is not recommended by FB because of user tracking restrictions.
- Using only server tracking. The main benefit of having tracking only on the server is that FB pixel will not overload your website. Your site will load faster, and it will lead to a better user experience.
- Combine browser and server tracking. Here you have several options:
- “Send some events from the browser and another from server. For example, Facebook Conversions API Shopify integration will send all FB events through the browser and purchase events from the server. In this case, you do not need the deduplication.”
- Send all events from the browser and server.
If you decide to use both browser and server events tracking for all your events, in this case, you will need to set up event deduplication. With Facebook event deduplication, FB will receive all your events, understand that events are identical, clean some of them, and keep others. If you combine the browser and server method but do not set up event deduplication, your data will not be correct because all the events will be tracked twice.
Facebook requires sending two event parameters for event deduplication: its event name and event ID. You already sending the event name with the existing setup. This article will cover how to configure Facebook event ID inside the Google Tag Manager container.
How does Facebook event deduplication work?
Facebook has two way of identifying duplicated events that were sent from browser and server:
1. Event ID and event name
Facebook recommends this method, and we will cover it in our how-to. For this method, you must use event ID for all events you send via pixel and CAPI. FB will deduplicate Facebook Pixels and Conversion API events with identical event names and event IDs. Facebook gives more credit to the browser event, and if they see similar events and come within 5 minutes difference, they will keep browser events and clean server events.
2. FBP or External ID
This method exists but is not recommended by Facebook. In this case, you will need to send the event name, fbp, and/or external_id for all your browser and server events. Facebook compares all these parameters and identifies if they already have a browser event with these parameters, and if they do, they discard server events. FB does not recommend using these events since they can identify deduplication only if the browser event was sent first. It means that if you send a server event first, events will be duplicated.
Facebook also can merge events. For example, if you send some enriched data from the server, you can add the missing data to the browser event. That is not a default feature. To enable it, you should contact a Facebook representative.
How to set up Facebook event deduplication via Google Tag Manager?
We created a custom Google Tag Manager variable that generates unique event ID you can use it in your web and server Facebook events. It will allow you to track users both from browser and server and deduplicate events. This method will work if your Facebook pixel is set up inside the Google Tag Manager Web Container and if Facebook conversion API is set up via Google Tag Manager Server Container.
You need to have Facebook conversion API setup via Google Tag Manager server container. Please follow this how-to if it’s not yet set up on your site.
| Note: Stape and Facebook recommend using web + server-side tracking together. |
Facebook recommends using both Facebook pixel and Conversion API. But if your site will send the same events using both the pixel and Conversions API, events may be duplicated since FB will receive the same information from the browser and the server.
Facebook has a deduplication feature. If they know that the browser and the server events are identical, they can keep only one.
Setting up event deduplication is a must if you want to send all events from both the server and the browser. Without event deduplication, your data won’t be accurate, and it may affect your Facebook campaigns.
To set up FB Conversion API deduplication, you need to send unique event IDs from the browser and the server. The same events from both the browser and the server should have the same event ID.
We created a custom variable that generates a unique ID for each event. You can add it to your web container using this link to the template gallery. Use this variable to send event ID for Facebook pixel inside the web container and Facebook conversion API using server container.
You can pass unique event ID from the web container to the server container using Google Analytics custom dimension or Data Tag and Data Client.
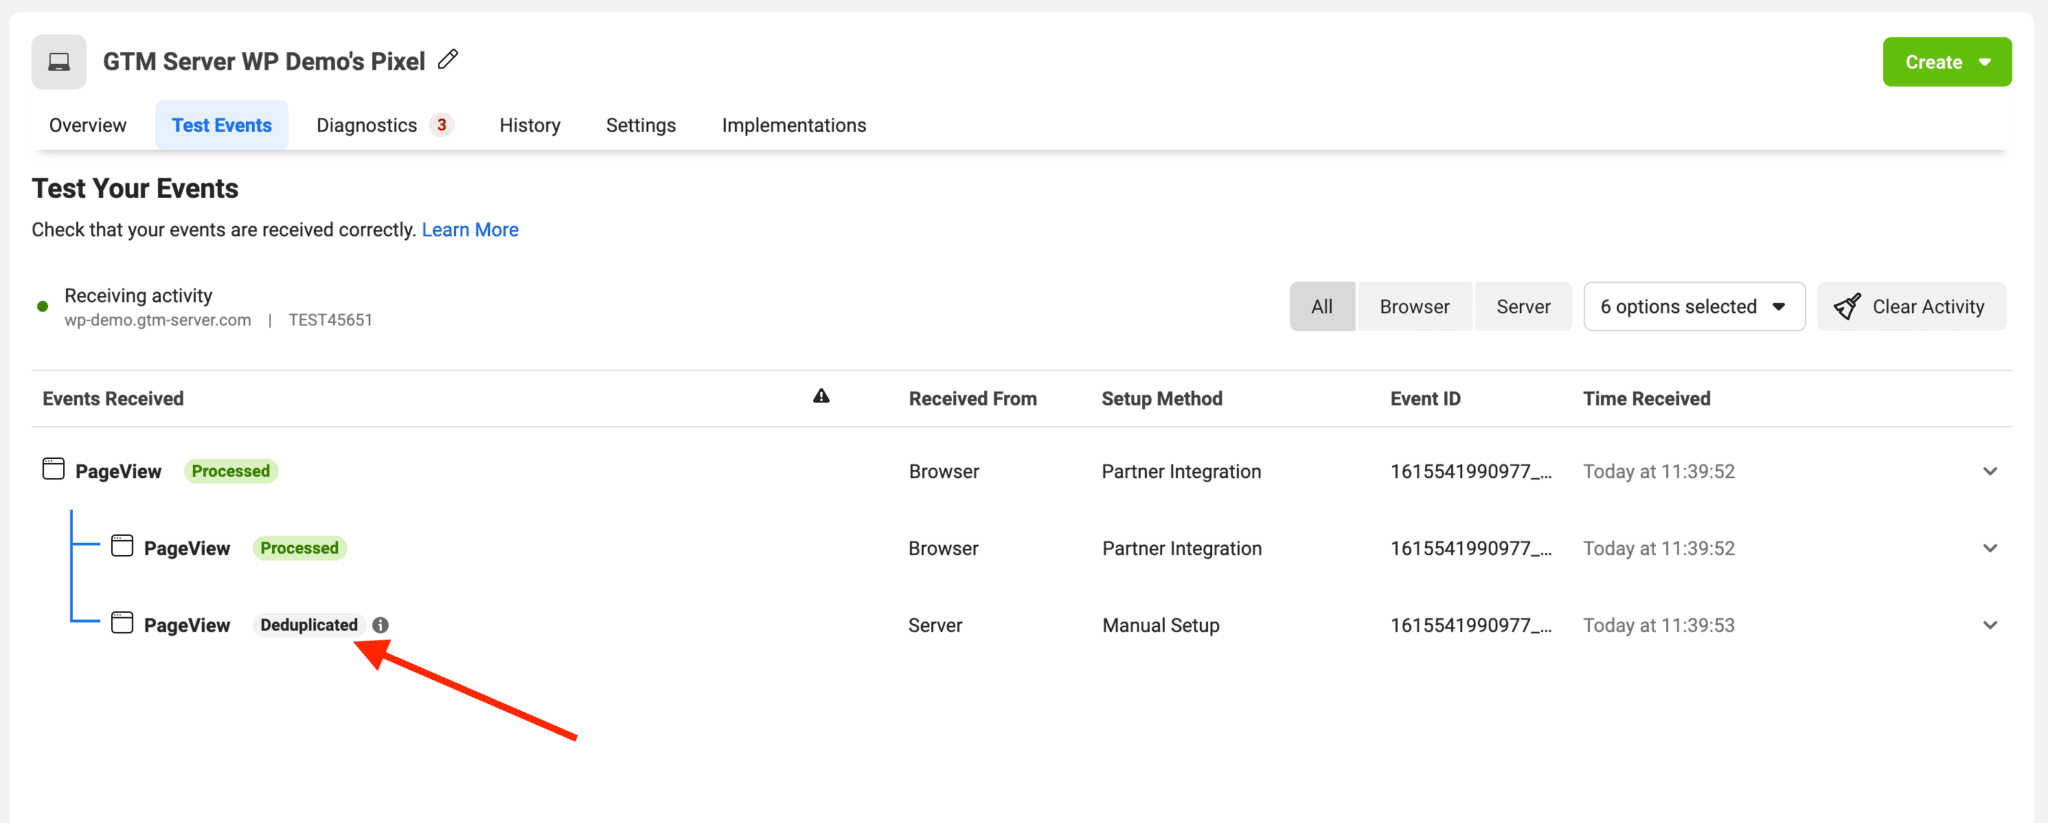
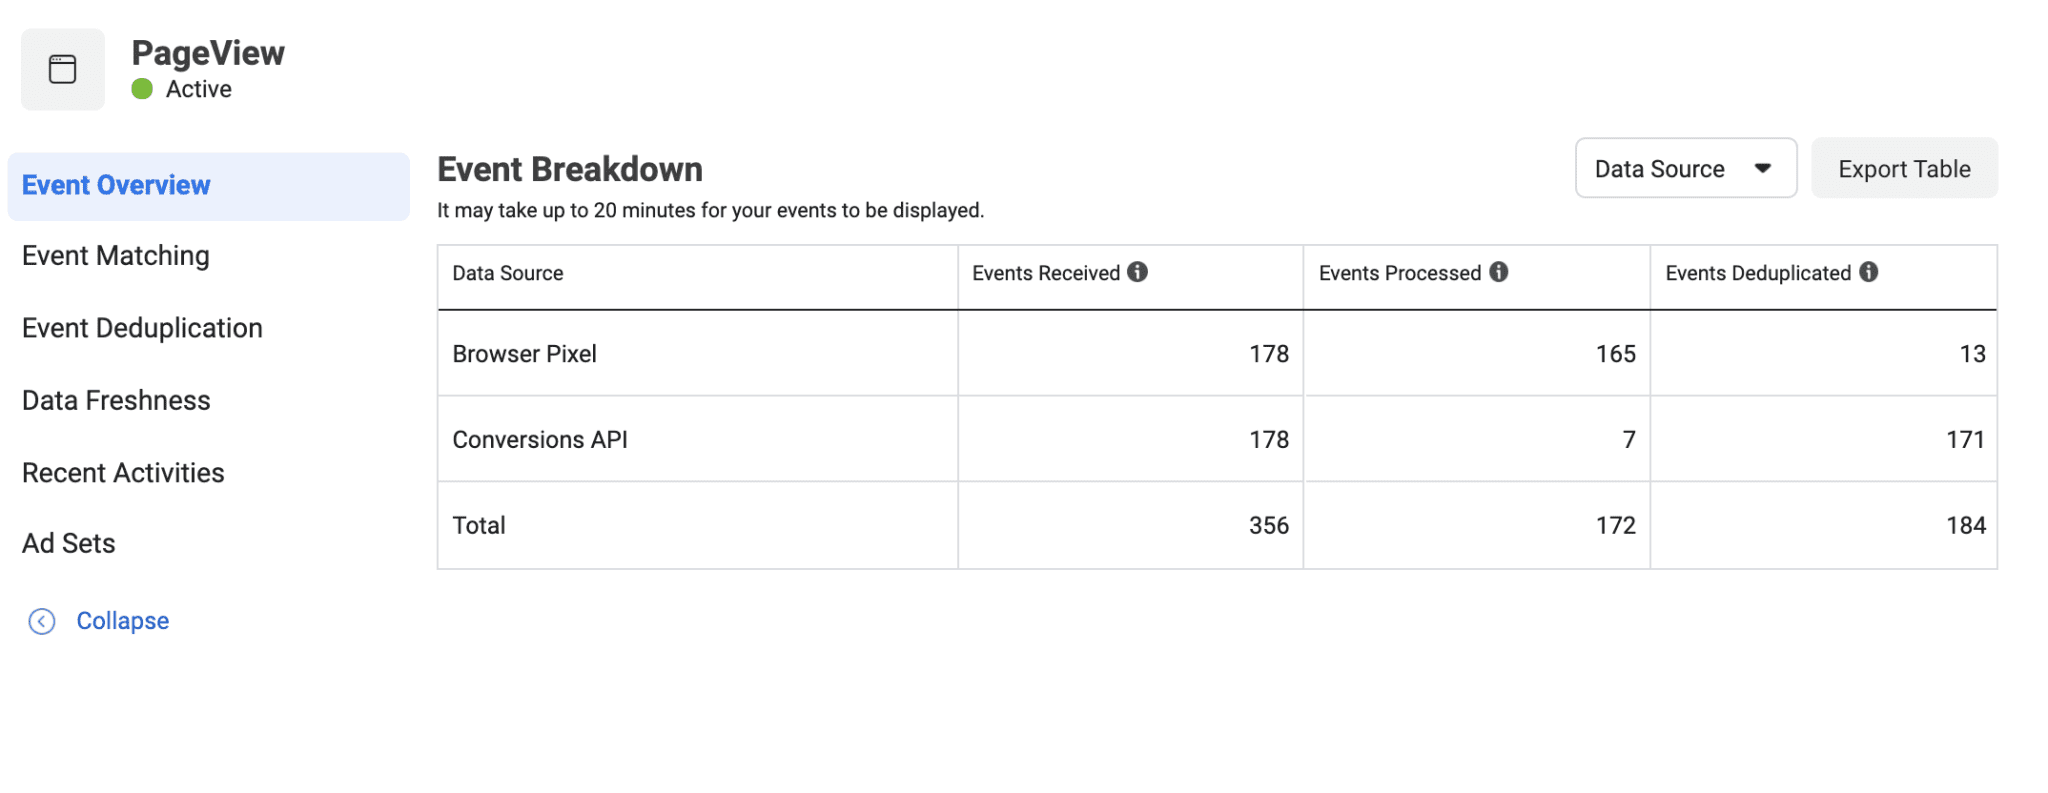
If deduplication is set up correctly, you should see it inside the events manager testing tool. And after you publish all changes to the production, you can click on the event details to see the number of events Facebook received from the browser and the server. How many events they processed and deduplicated.
Facebook event deduplication: real Stape users’ problems solved
A user saw huge gaps (30–80%) between Meta lead conversions and real submissions because Facebook event deduplication wasn’t working: only ~35% of browser events had an event_id, while all server events did, resulting in 0% deduplication. The root cause wasn’t timing (Meta’s dedupe window is long enough), but parallel browser-side tracking from other sources (plugins, hardcoded Meta snippets, or tools outside GTM) that sent events without event_id. The fix was to audit and remove extra browser event sources so all browser and server events shared the same event_id, ensuring proper deduplication.
One of our users experienced a situation where event deduplication wasn’t working correctly because GTM tag sequencing generated different event IDs for tags triggered by the same event. The solution is to store the event ID in the dataLayer and reuse it across tags instead of generating it multiple times. We explain how to configure such a setup if you’re using tag sequencing and fix inconsistent event IDs in our guide.
Conclusion
Facebook conversion API is an excellent solution if you want to track your site users more accurately, bypass ad blockers and ITPs, and extend cookie lifetime. With a combined server and browser method, you will still run Facebook pixels in the browser, making your site heavier. Using this method, you can be 100% sure that you did not miss any users or events on your site.
If you have some questions or comments about implementing Facebook event deduplication, please let us know in the comments.
Switching to server-side?
Click Try for free and check all the solutions and benefits of Stape at no cost!

Comments