Drupal module for server Google Tag Manager
Mykhailo Zernov
AuthorDrupal is a free, open-source content management system that allows you to build and manage anything from simple websites to complex digital platforms. It’s especially valued for its flexibility, scalability, and strong security, making it a popular choice for both small and large businesses, as well as government organizations.
When working with Drupal Google Tag Manager setups or implementing Google Tag Manager Drupal integrations, many users look for a reliable way to handle tracking on the server side. This is where server-side tracking for Drupal becomes especially valuable for improving data accuracy and control.
In this piece, we’ll take a look at a free solution that allows you to easily set up server-side tracking for your Drupal website – Stape’s Drupal module for server GTM. We will explore what it does, why it’s handy, how to set it up, and how to test that everything is working correctly.
Benefits of the Drupal module for server GTM
- Add your GTM container to a Drupal site in several clicks.
- Automatically generate key Data Layer events for conversion tracking.
- Send purchase and refund webhooks to your server GTM container.
The module is designed to simplify Drupal GTM implementations and make Google Tag + Drupal setups faster and more reliable, even for complex websites.
The Drupal module is available to all Drupal sites – you don’t have to be a user of Stape’s sGTM hosting services. However, Stape users will enjoy the additional benefits of Custom Loader, Custom Domain, and Cookie Keeper. These features reduce the impact of ad blockers, improve first-party data collection, and mitigate browser restrictions like ITP.
How to set up the Drupal module for server-side GTM tracking
1. Set up the server GTM container and host it on Stape.
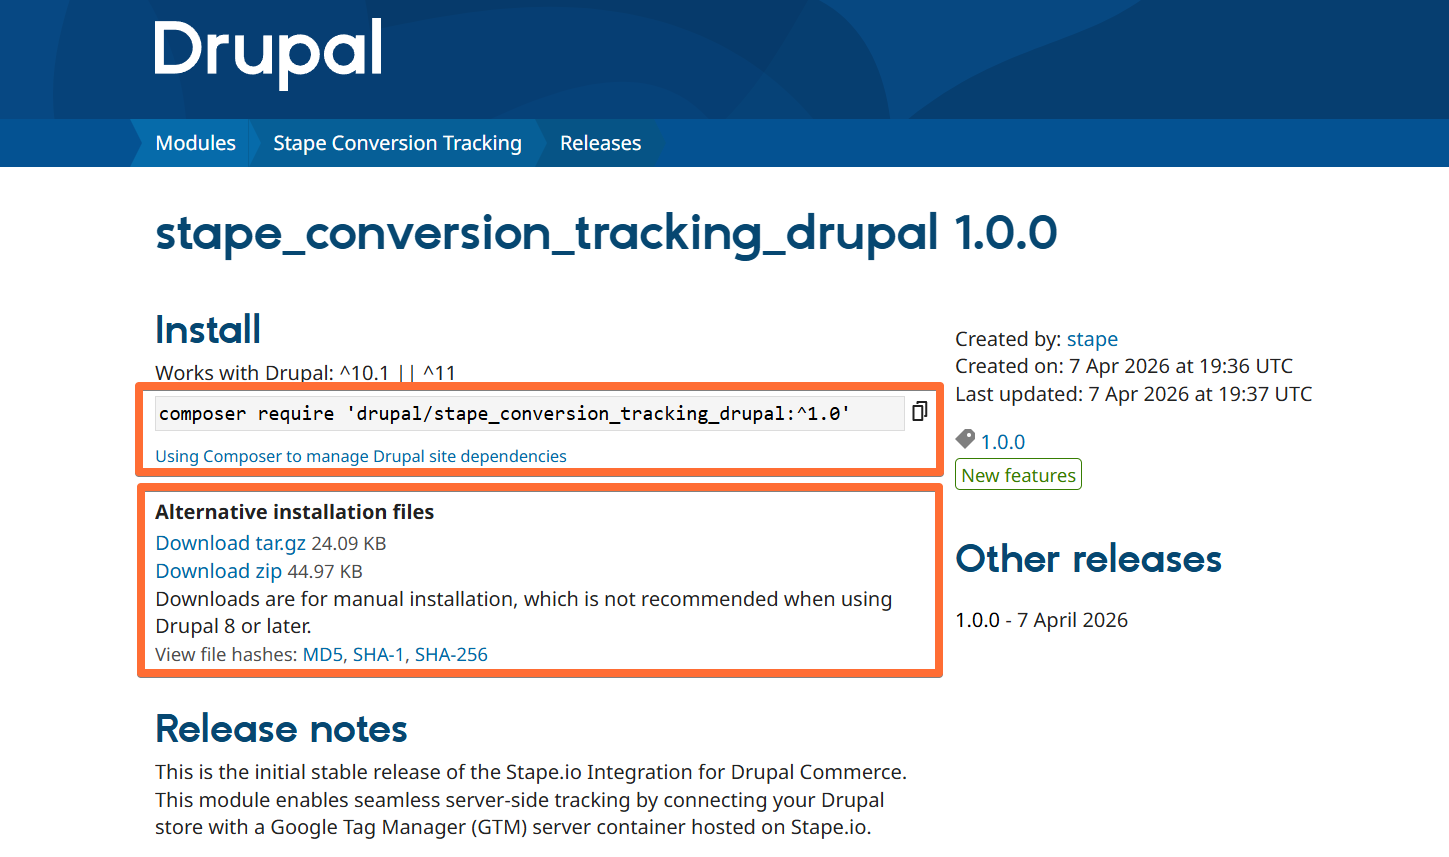
2. To install the module, select the version you need from the releases page and use one of the installation options.
3. Configure the module. You will need to configure three sections: General Settings, Data Layer, and Webhooks.
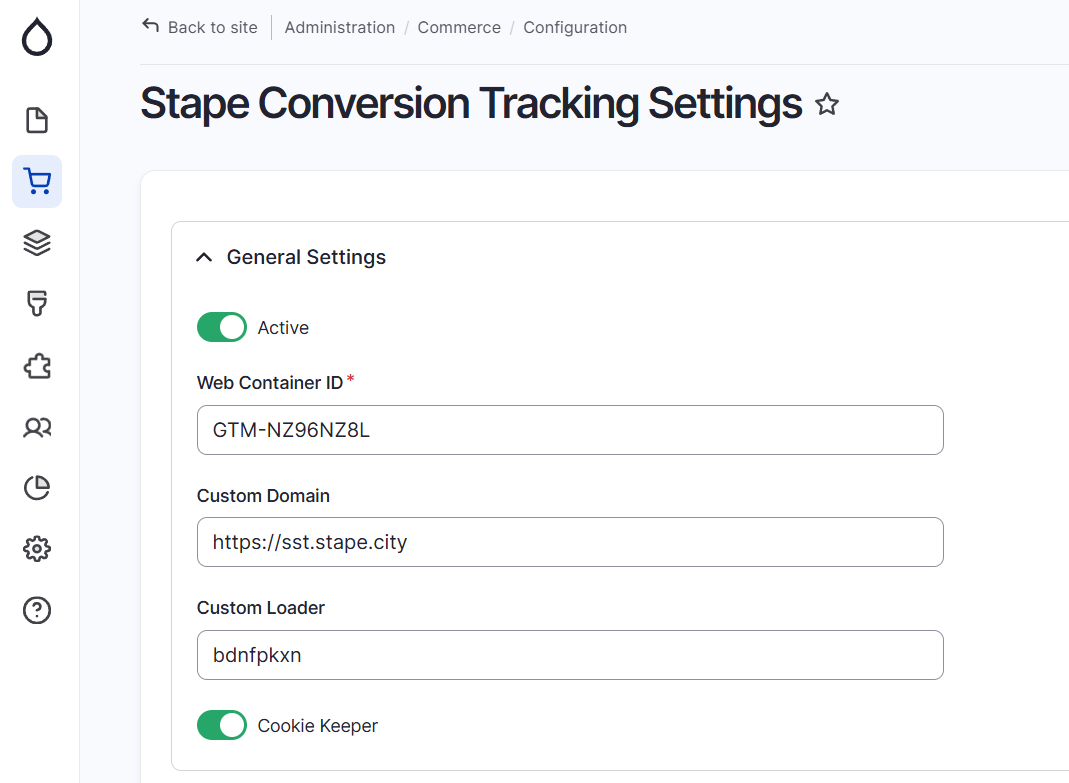
3.1. General Settings section.
This section contains all the options for configuring the GTM snippet installation on every page of your Drupal site.
Add the following data:
- Active - turn on the switch to add the GTM snippet to every page on your Drupal website.
- Web Container ID - add the GTM web container ID (you can find it in your GTM account in the tab Accounts). The format should be the following: GTM-XXXXXXX.
- Custom Domain - use the subdomain you have created for server-side tracking. It should start with https:// without any extra slashes at the end: https://gtm.example.com
| If you haven’t configured a custom domain yet, please check Stape’s guide on subdomain setup. |
- Custom Loader - this is Stape’s power-up used to minimize the impact of ad blockers on your tracking. This option is available only if you use Stape's sGTM hosting and set up the Custom Loader power-up. To enable this option, specify your container identifier in the Stape admin panel settings.
- Cookie Keeper - this is Stape’s power-up used to prolong cookie lifetime in Safari and other browsers with ITP. This option is available only if you use Stape's sGTM hosting and set up the Cookie Keeper power-up. Please also make sure to enable Stape User ID in your container power-ups. The User ID power-up creates a persistent, privacy-conscious user identifier and attaches it to each incoming request handled by your sGTM container.
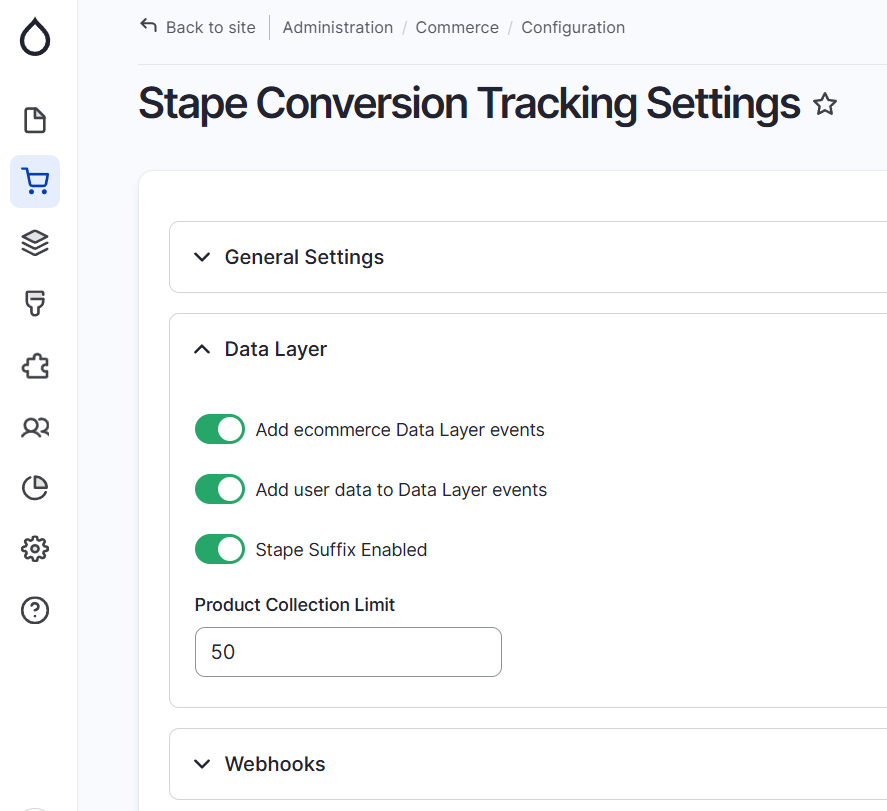
3.2 Data Layer section.
In this section, you can see toggles that enable Data Layer events. With their help, you can enrich the data by incorporating product and user details. You can configure event names to get the _stape suffix to prevent any clashes in GTM. If it’s off, events keep their normal names. Also in this section, you can set the Product Collection Limit.
Here you can find a list of events and their payload, which are added via the app for Drupal.
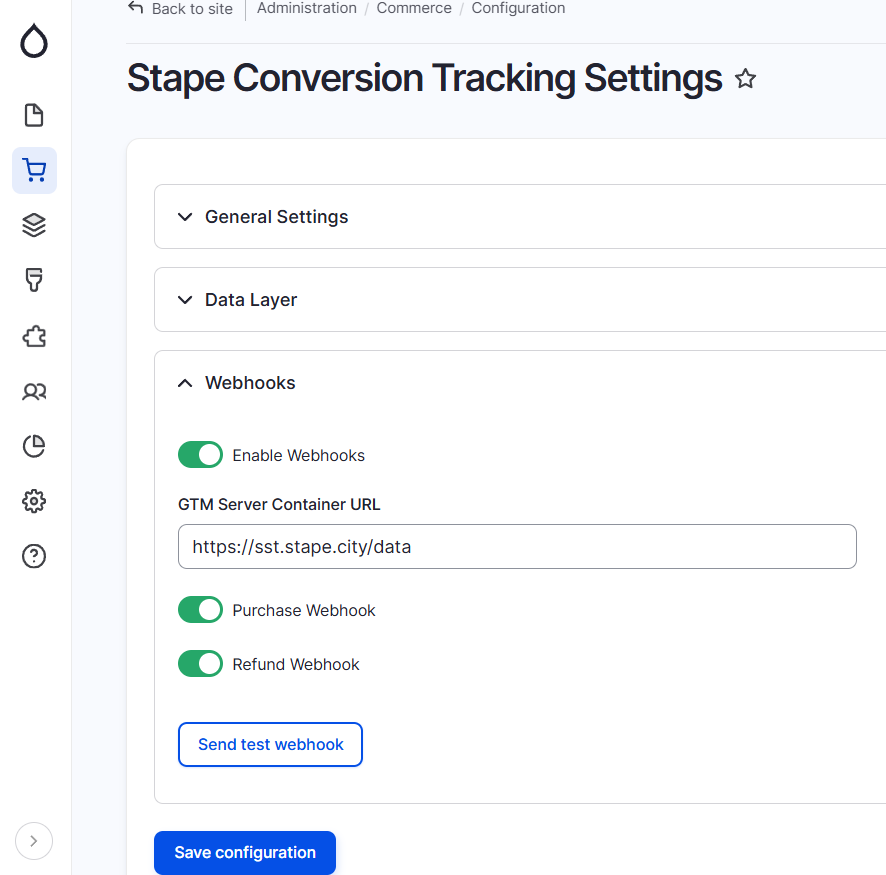
3.3 Webhooks section.
In this section, you can set up webhooks sending to a specified URL for various events, such as purchases and/or refunds.
To enable webhook configuration, turn on the Enable Webhooks switch. After that, provide the GTM Server Container URL and /path where the webhooks should be sent in the format: https://gtm.example.com/data
Turn on the appropriate toggles based on the event type - Purchase Webhook and/or Refund Webhook.
If you would like to find out more about webhooks and configure them, please check our blog posts:
Click Save configuration.
4. Send data from web to server-side Google Tag Manager container. The two most common approaches to this are:
5. Configure data tracking within the server Google Tag Manager container.
Most popular marketing and analytics tools offer support for server-side tracking and provide tags for sGTM.
Test Drupal module configuration
Verify your configuration on the website
To confirm your setup, open any page on your website and access your browser's developer console. Navigate to the Network tab and search for your subdomain. If you see a request returning a 200 status code, your configuration is working correctly.

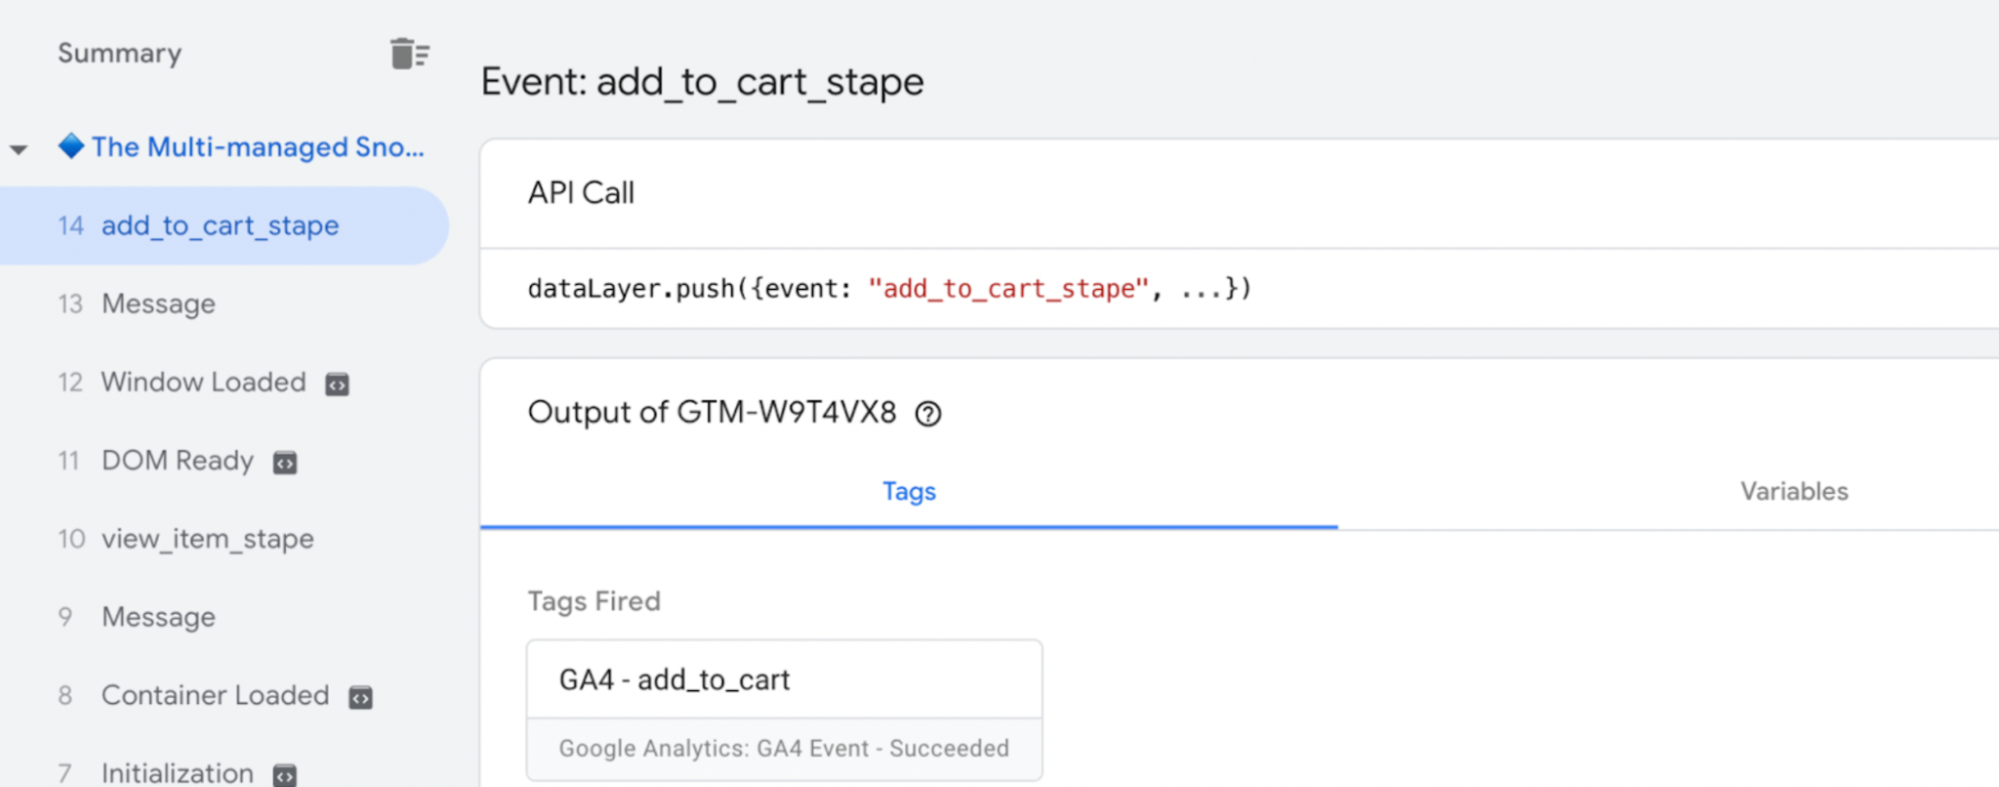
Debugging triggered events in GTM
Debugging events in GTM for a Drupal website follows the same process as with any other platform. To verify that your configured dataLayer events are being triggered, launch the GTM container in preview mode. Then, perform the necessary actions on your site (e.g., adding a product to the cart) and check if the corresponding tags are firing in GTM.
To sum up
Server-side tracking for Drupal reduces data loss and increases accuracy and reliability. Stape created the dedicated Drupal module to simplify its implementation. With this module, you can avoid the impact of ad blockers and browser limitations on your data quality, send webhooks, and enhance your tracking data.
Whether you are setting up Google Tag Manager on Drupal or improving an existing Drupal Google Tag Manager configuration, this module helps you implement Drupal server-side tracking with minimal effort. It also makes Google Tag setups on Drupal sites more resilient and efficient across modern browsers.
If you’re looking for a quick, straightforward way to set up server-side tracking for your Drupal website, this module is the perfect choice. And if you run into any issues, our support team is available to help with the setup.

Comments