Pandectes cookie banner setup for Shopify: complete guide

Uliana Lesiv
AuthorKey takeaways
Overview of Pandectes GDPR compliance for the Shopify store
Pandectes is a consent management platform created specifically for Shopify stores, which are mainly focused on EU countries and need to comply with GDPR and other data protection laws.
One of the key advantages of Pandectes that we would like to highlight is its integration with Shopify’s Customer Privacy API and Checkout Extensibility framework. For analytics specialists, it means that consent preferences collected on the storefront will be automatically pushed to the checkout page.
This is particularly important because consent synchronization between the storefront and checkout is a common challenge for Shopify online store owners. Many consent management platforms don't support this process automatically, and marketers need to implement custom workarounds to push the consent status to checkout pages.
From the experience of Stape's clients, such a problem can go unnoticed for a long time until the data discrepancies are detected and troubleshot with tools such as Stape Logs, which allow viewing the request history of your website.

Pandectes Shopify app vs web GTM container template + app
Pandectes offers two different approaches for implementing consent management on Shopify stores: using the Shopify app alone, or combining the app with a Google Tag Manager web container template.
The first (app-only) option is simpler to set up. In this configuration, the Pandectes app handles the cookie banner, consent collection, and Google Consent Mode integration directly within Shopify. This approach is usually suitable for merchants with a relatively simple tracking setup that relies on tools such as Google Analytics or basic advertising integrations.
The second option combines the Pandectes Shopify app with the official GTM container template. In this setup, the app is still responsible for collecting and storing user consent, but GTM manages how tracking tags behave based on the consent state. Instead of configuring marketing and analytics scripts directly in Shopify, all tags are centrally managed inside Google Tag Manager.
The app + GTM template setup provides more flexibility and control over how tags are triggered across the storefront and checkout experience.
Pandectes Consent Mode v2
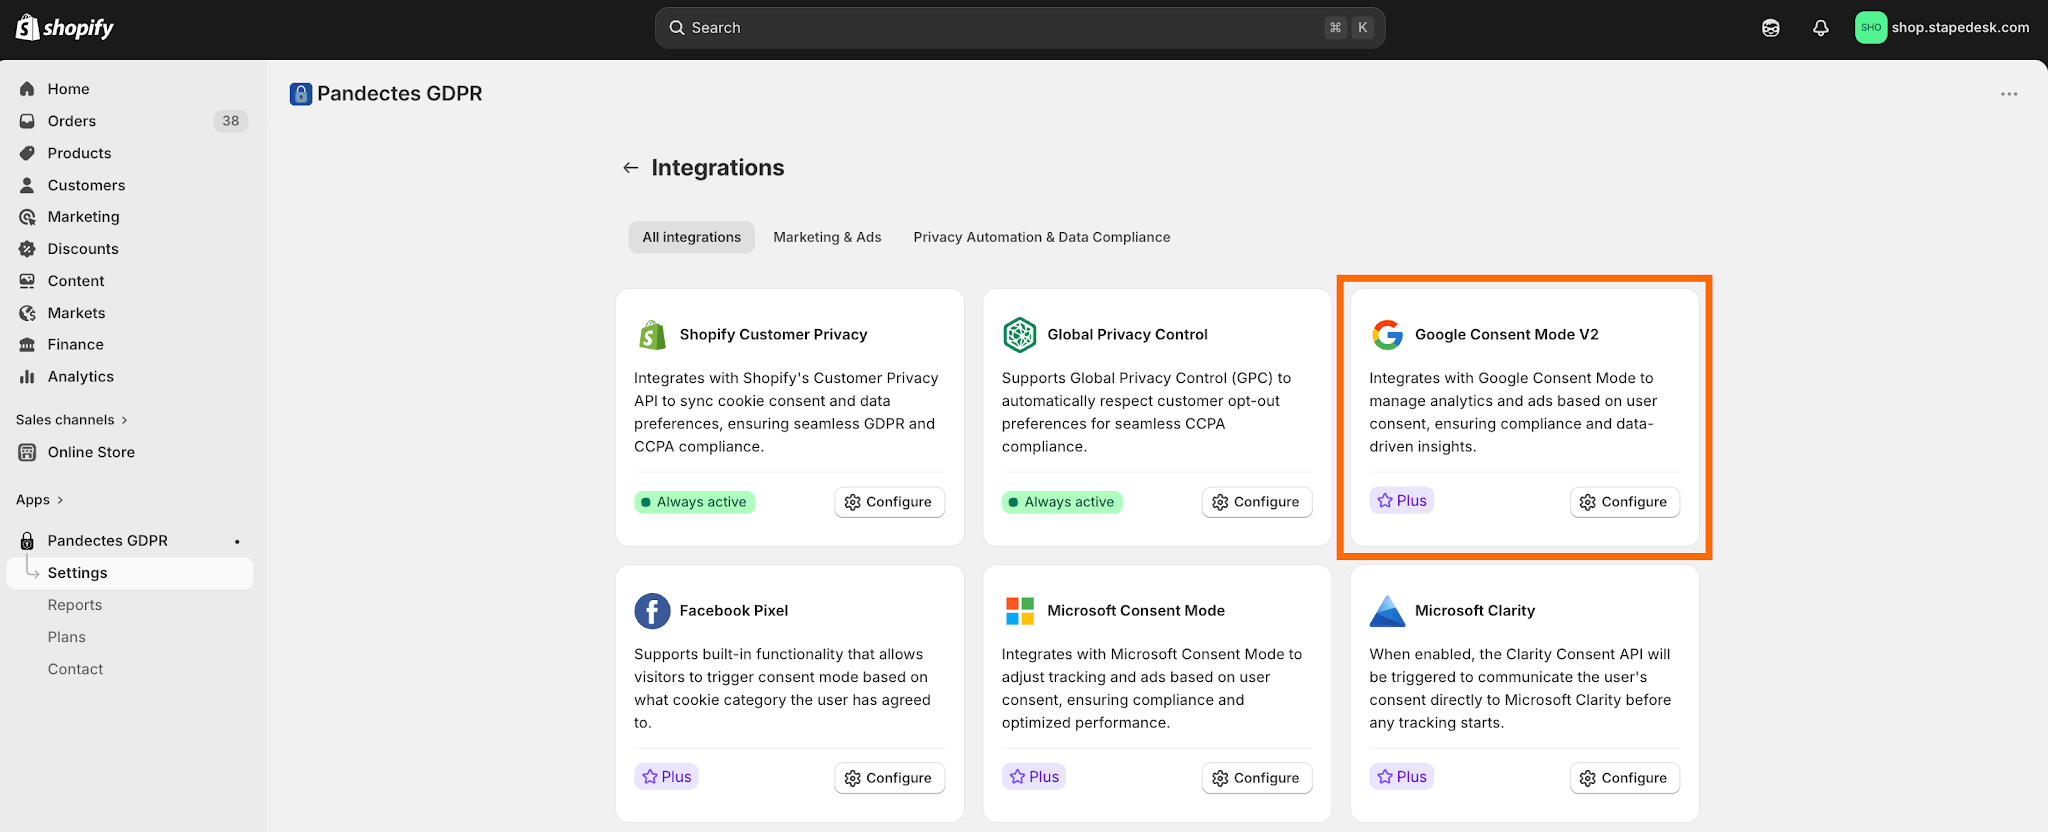
Pandectes provides built-in support for Google Consent Mode v2. It can be configured within the app (if you opt for the app-only option) and within your web GTM tags (in this case, no need for configuration within the app UI).
However, keep in mind that if you opt for Consent Mode v2 config via the app, you need to be on a Plus or higher plan on Pandectes.
The Pandectes CMP GTM template itself can be installed for free. However, real-time consent update signaling is available only on paid Pandectes plans. On the free plan, the Pandectes CMP tag reads the updated consent cookie after the next page load rather than immediately on the page where the visitor gives or changes consent.
If you’re new to this topic, refer to our articles on Consent Mode v2 for more details:
Benefits of server-side consent management with Pandectes
Server-side tracking provides important advantages that make consent management more effective and reliable.
But first things first, what's server-side tracking?
That's a data tracking method that provides an additional layer between the website and external marketing or analytics platforms. Instead of sending data directly from the browser to vendors, the data is first sent to a server-side endpoint (a Google Tag Manager server container), where it can be processed, filtered, anonymized, and enriched before being forwarded to analytics and advertising tools.
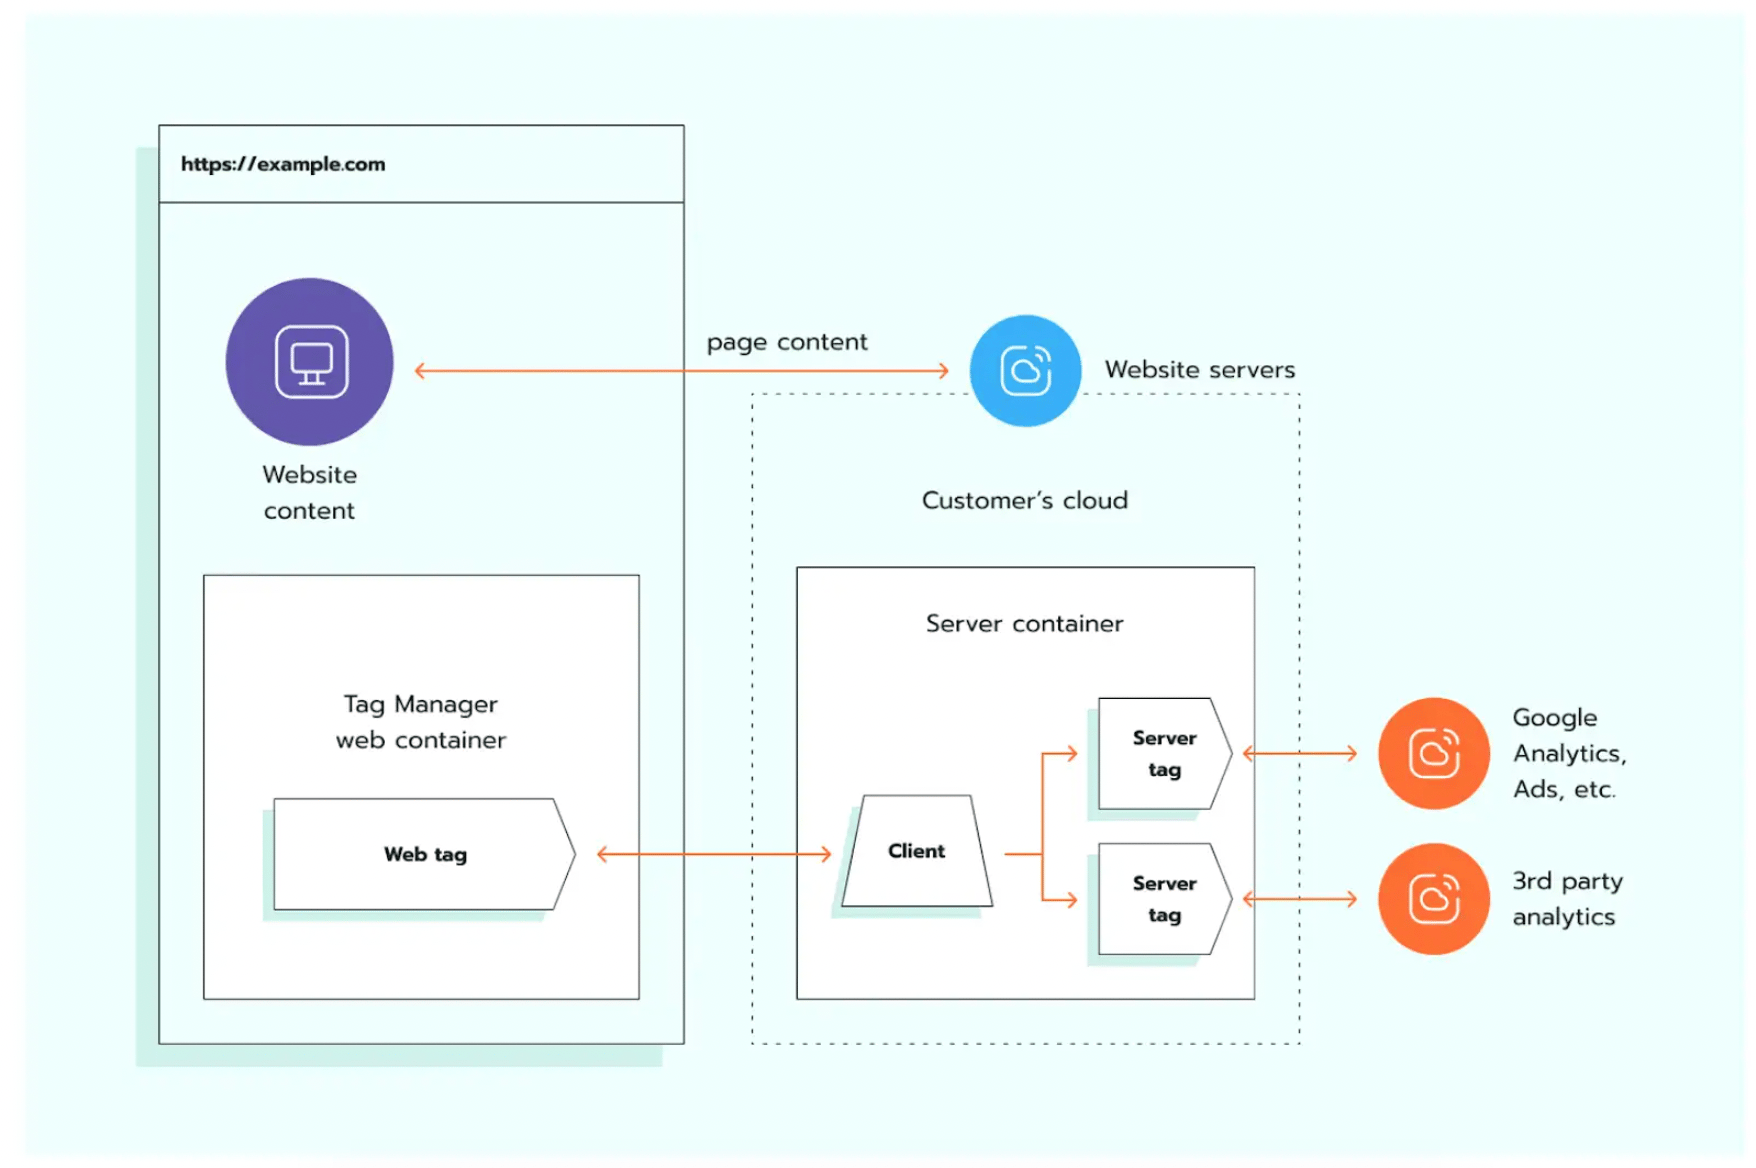
The architecture gives you more control over data collection and consent management. Since data processing happens at the server level, companies can better regulate which information is shared with third-party vendors and ensure that tracking behavior respects the visitor’s consent choices.
You can try server-side tracking for free with Stape. We provide a free plan to host a server GTM container if the number of requests per month is up to 10k requests. Find the request calculator as well as more details on our offer on the pricing page.
Here are some more benefits that you gain if you manage consent on the server-side:
- Improved data security. Since data is processed and transferred through a server environment rather than directly in the browser, the risk of data manipulation, leakage, or interception is reduced compared to client-side tracking.
- More reliable data collection. Server-side tracking is less affected by browser restrictions and ad blockers, so you receive more stable and accurate analytics data. In consent-restricted scenarios, anonymized data processing can still support aggregated reporting, machine learning models, and campaign optimization without relying on personally identifiable information.
- Centralized cross-platform consent management. Server-side consent management makes it easier to maintain consistent consent preferences across websites, mobile apps, and other digital platforms. By centralizing consent logic and synchronizing settings between different tools, you can create a more unified and scalable privacy infrastructure.
- Improve advertising performance and optimization quality. Ad platforms receive stronger and more complete signals. This helps advertising algorithms optimize campaigns more effectively, improve targeting accuracy, and maximize profit on ad spend (POAS). It’s especially important for Shopify merchants who rely on paid advertising channels.
Despite a common misconception, server-side tracking doesn't eliminate the need to obtain user consent for data collection. Just like with client-side tracking, websites still need to display a cookie consent banner and collect visitors' consent before processing customer data.
In the configuration guide below, we focus on this type of Pandectes GDPR compliance banner configuration, since that's a highly reliable solution for consent management.
How to configure the consent banner with Pandectes
Step 1. Install and configure the Pandectes Shopify app
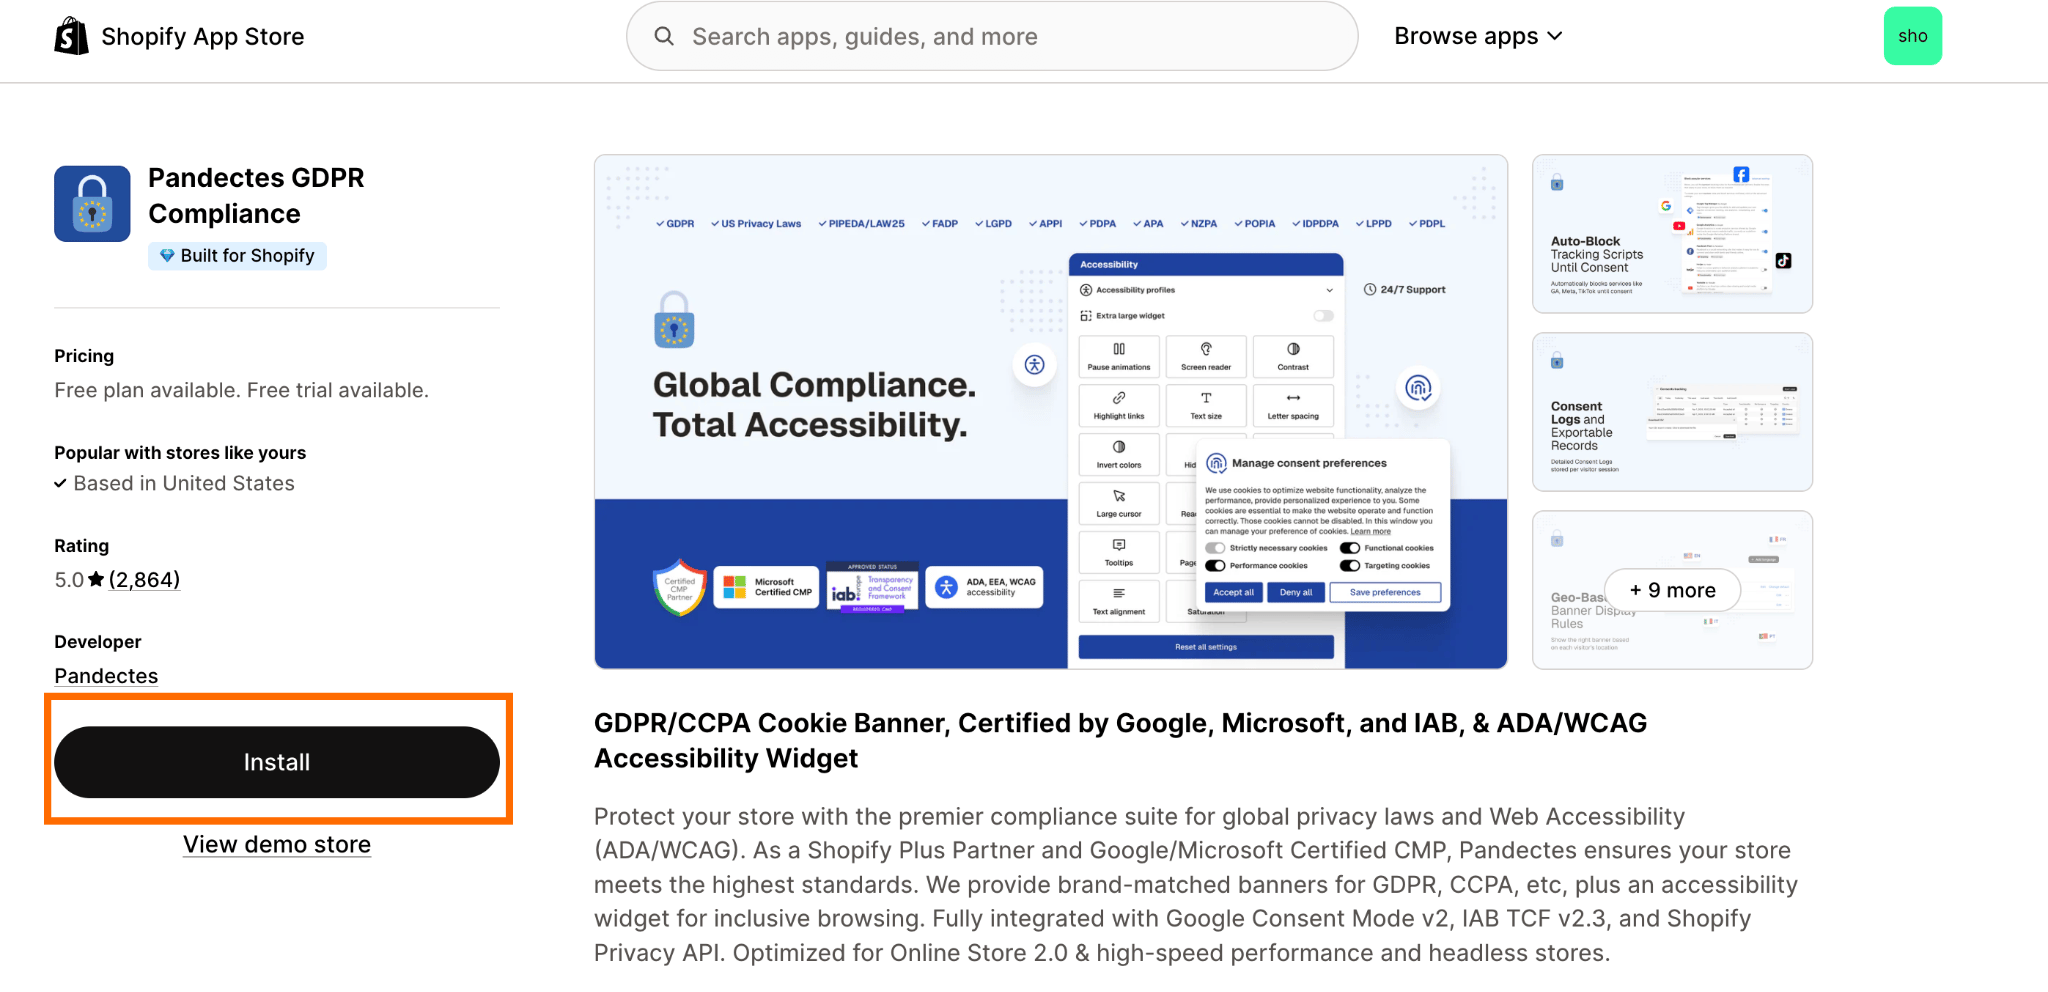
1.1 In the Shopify App Store, find the "Pandectes GDPR Compliance" app and click "Install".
1.2 Select the paid plan if you need some extra features for your consent banner, or proceed with a free option.
1.3 Embed the app on your website.
- Click on the "Open theme editor" button.
- Make sure the toggle next to Pandectes Core is enabled and click "Save".
- Return to the previous screen and click "Check again".
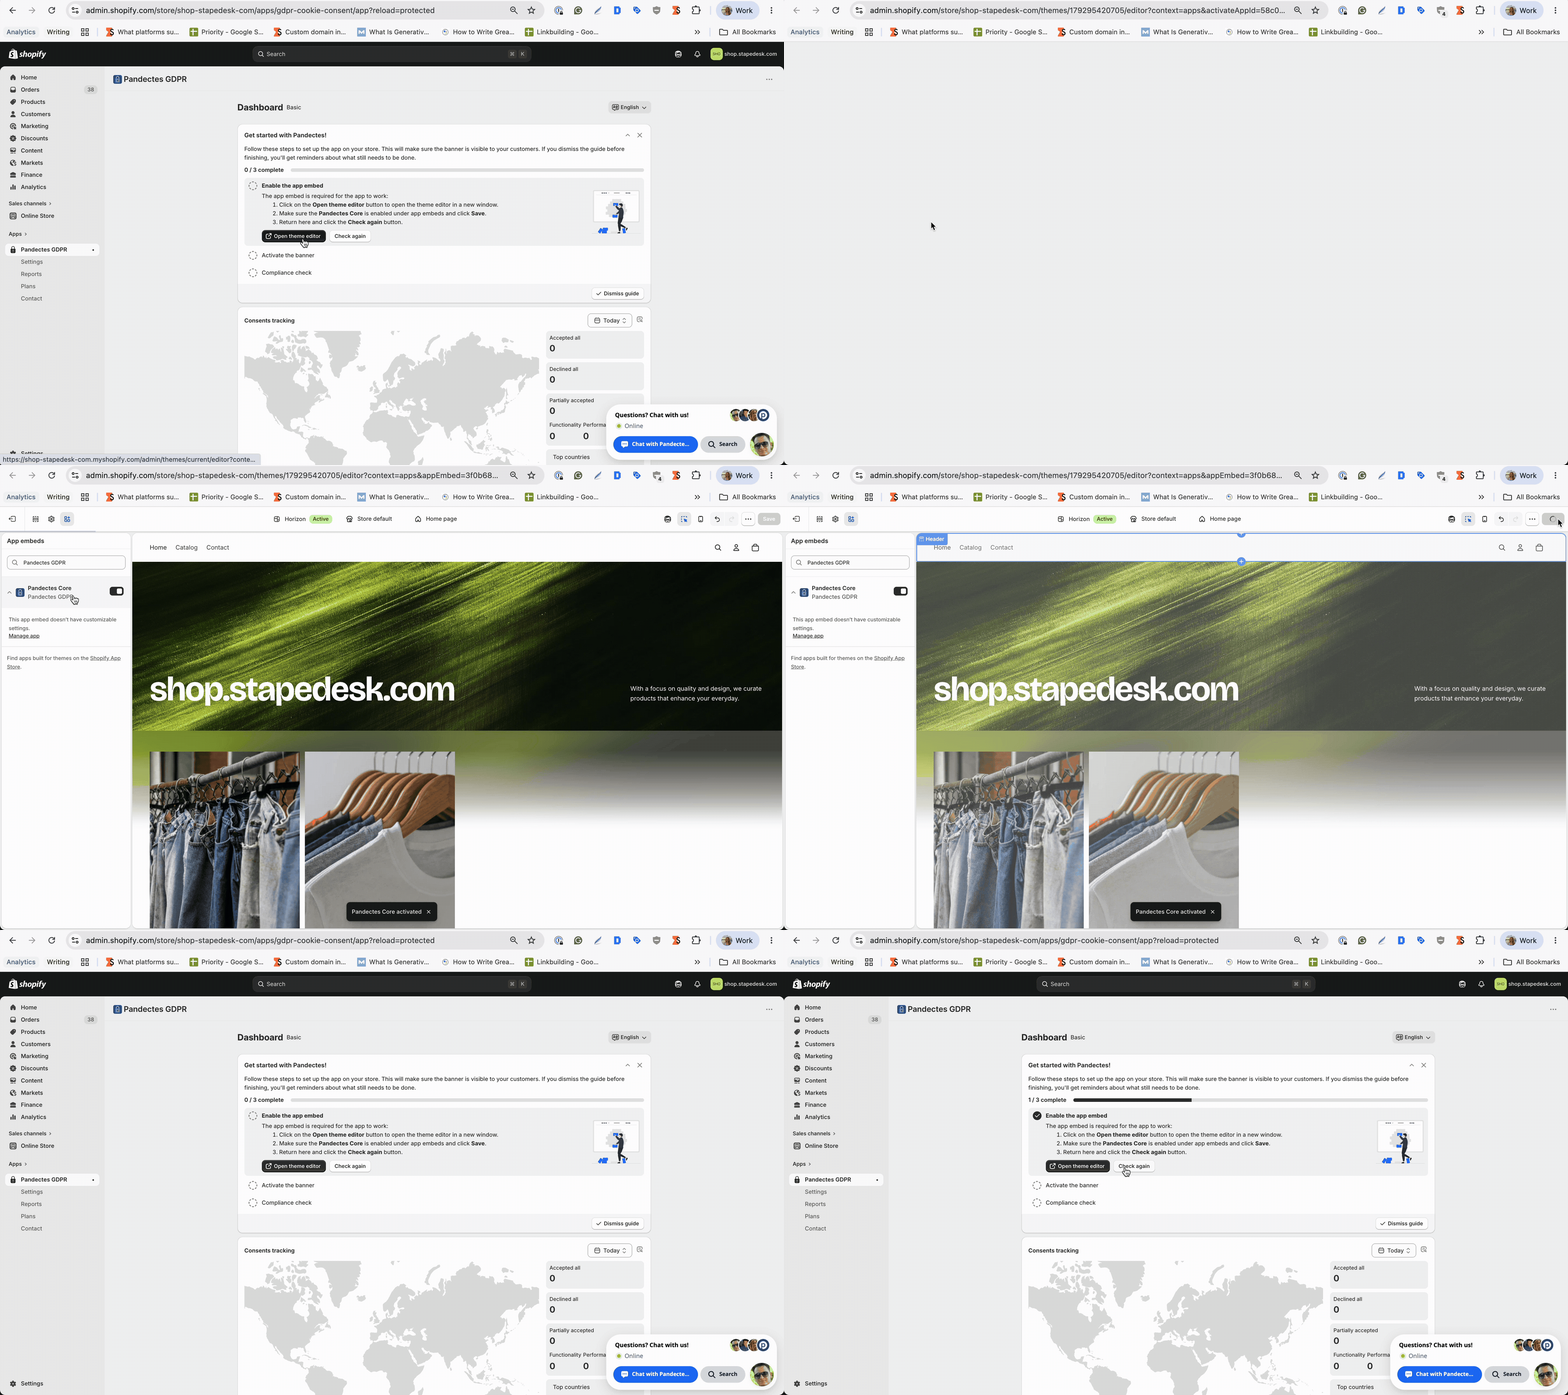
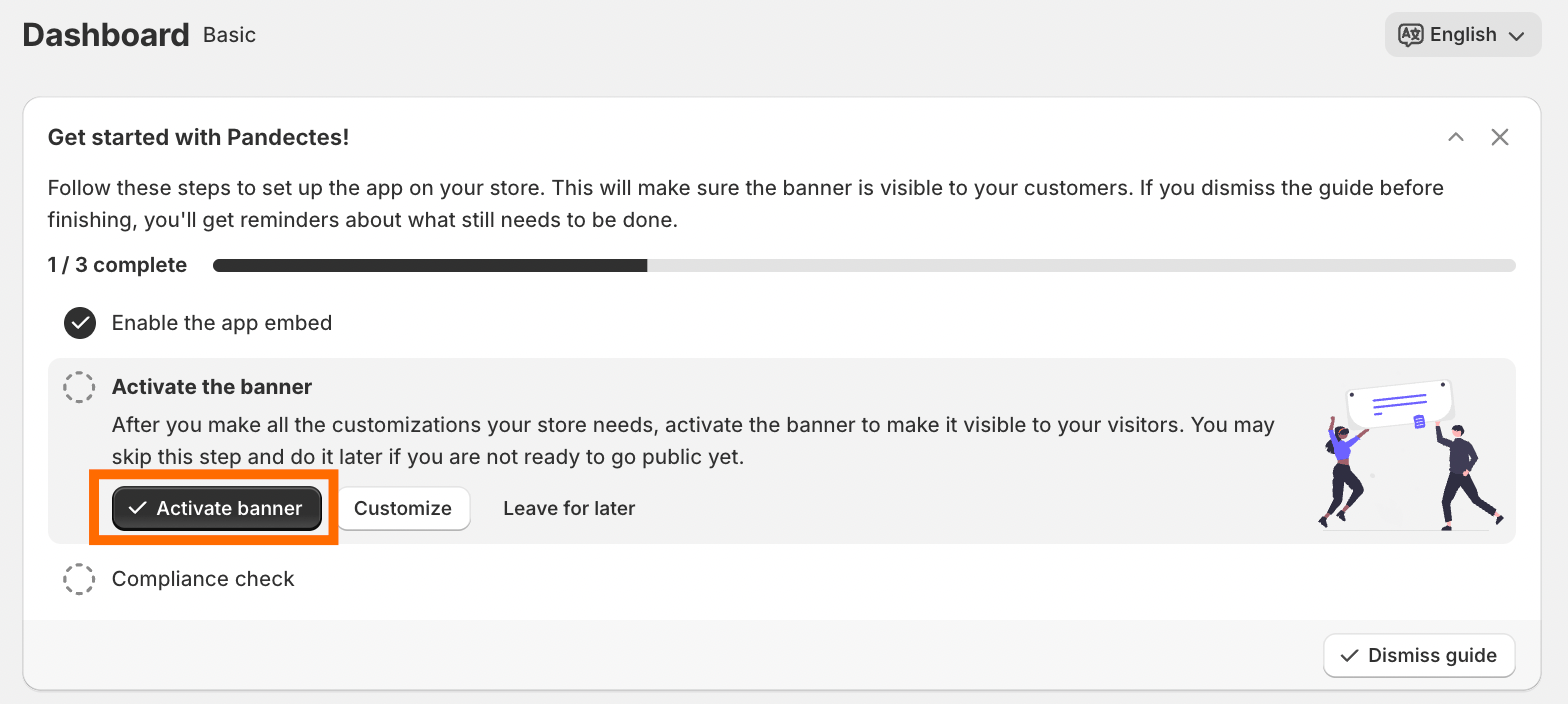
1.3 Open the next step and click "Activate banner”.
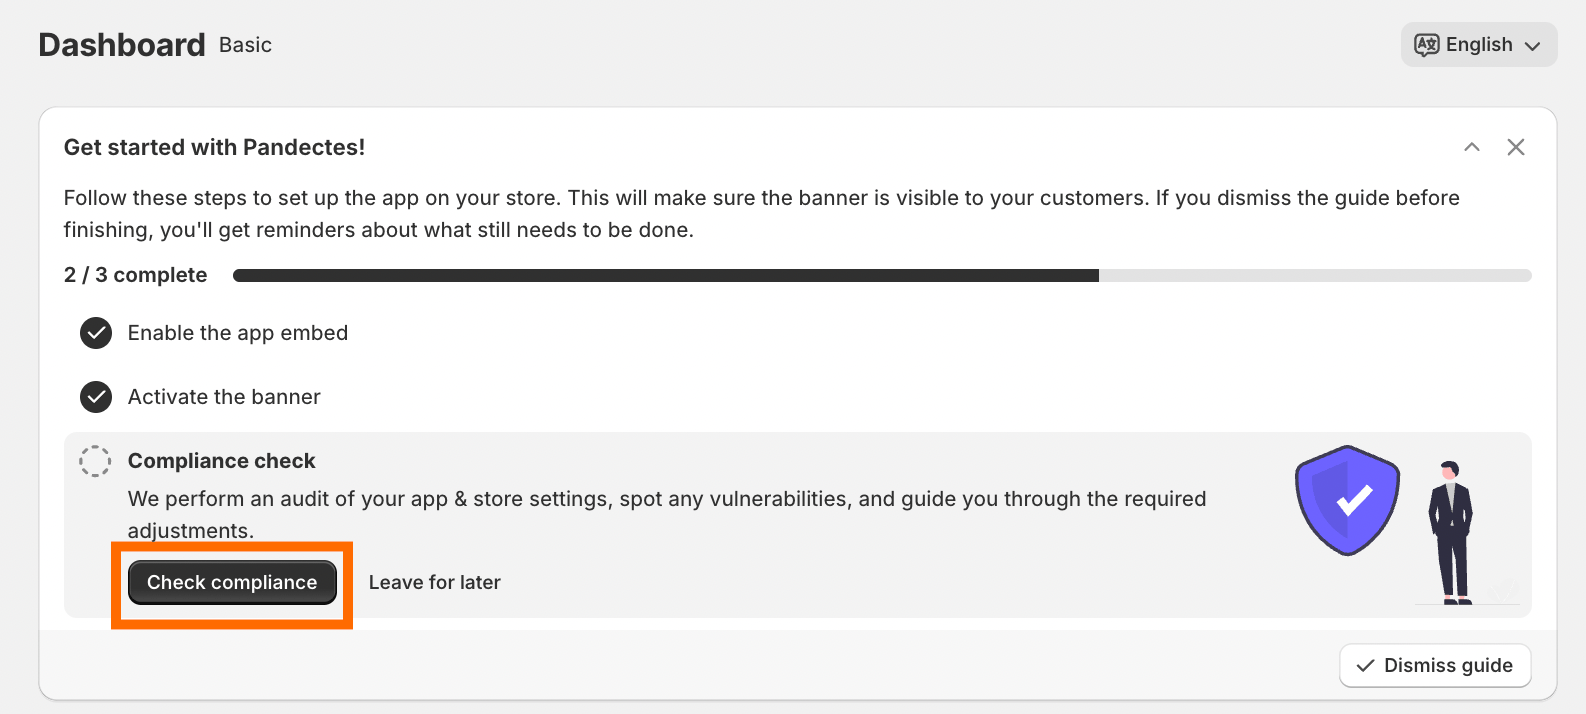
1.4 There is also an option to audit your settings to spot any vulnerabilities (optional step). If you click on "Check compliance", a chat on the same window will open, and the Pandectes support team will ask for the website URL to conduct the compliance check.
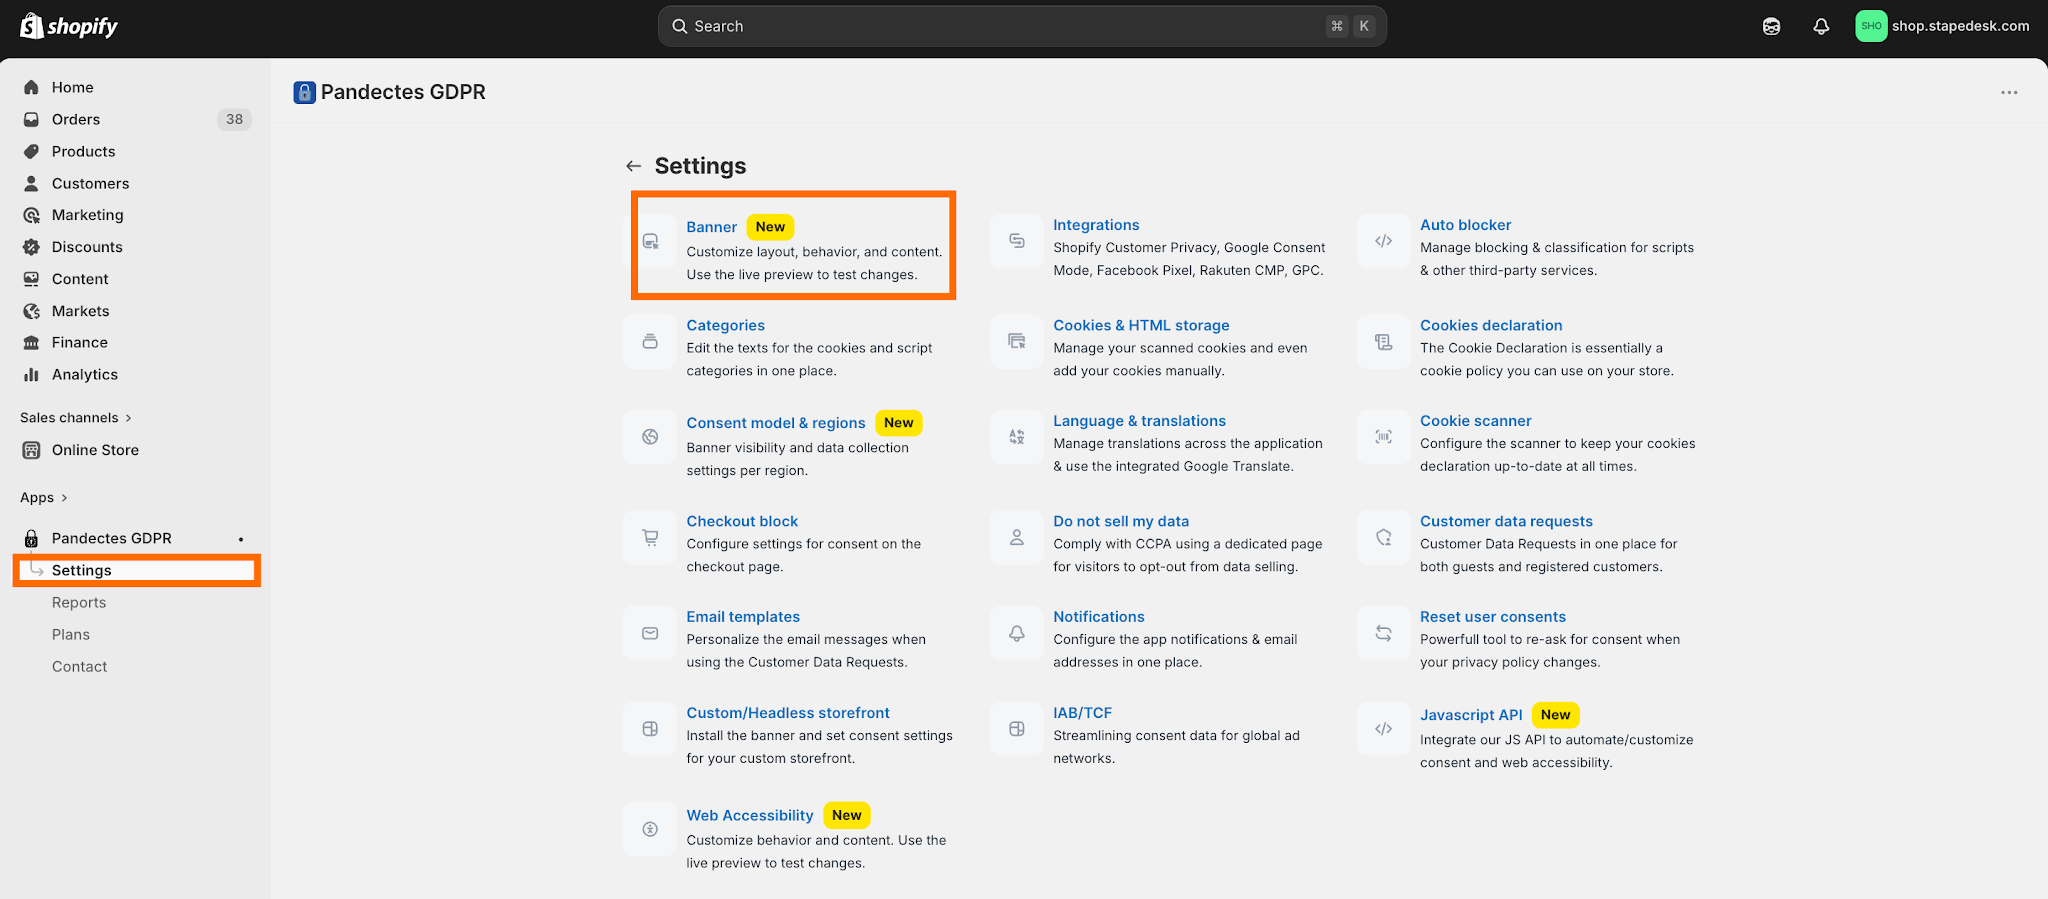
1.5 If you would like to change the way a cookie banner looks, navigate to the "Settings" → "Banner" and edit the banner according to your preferences.
Step 2. Add and set up the Pandectes CMP tag template
If you are still figuring out how to add GTM to Shopify, verify that your web container snippet is correctly injected into your theme files or through a custom pixel before moving forward with these tag configurations. Once your container is up and running, follow the steps below to integrate the consent template.
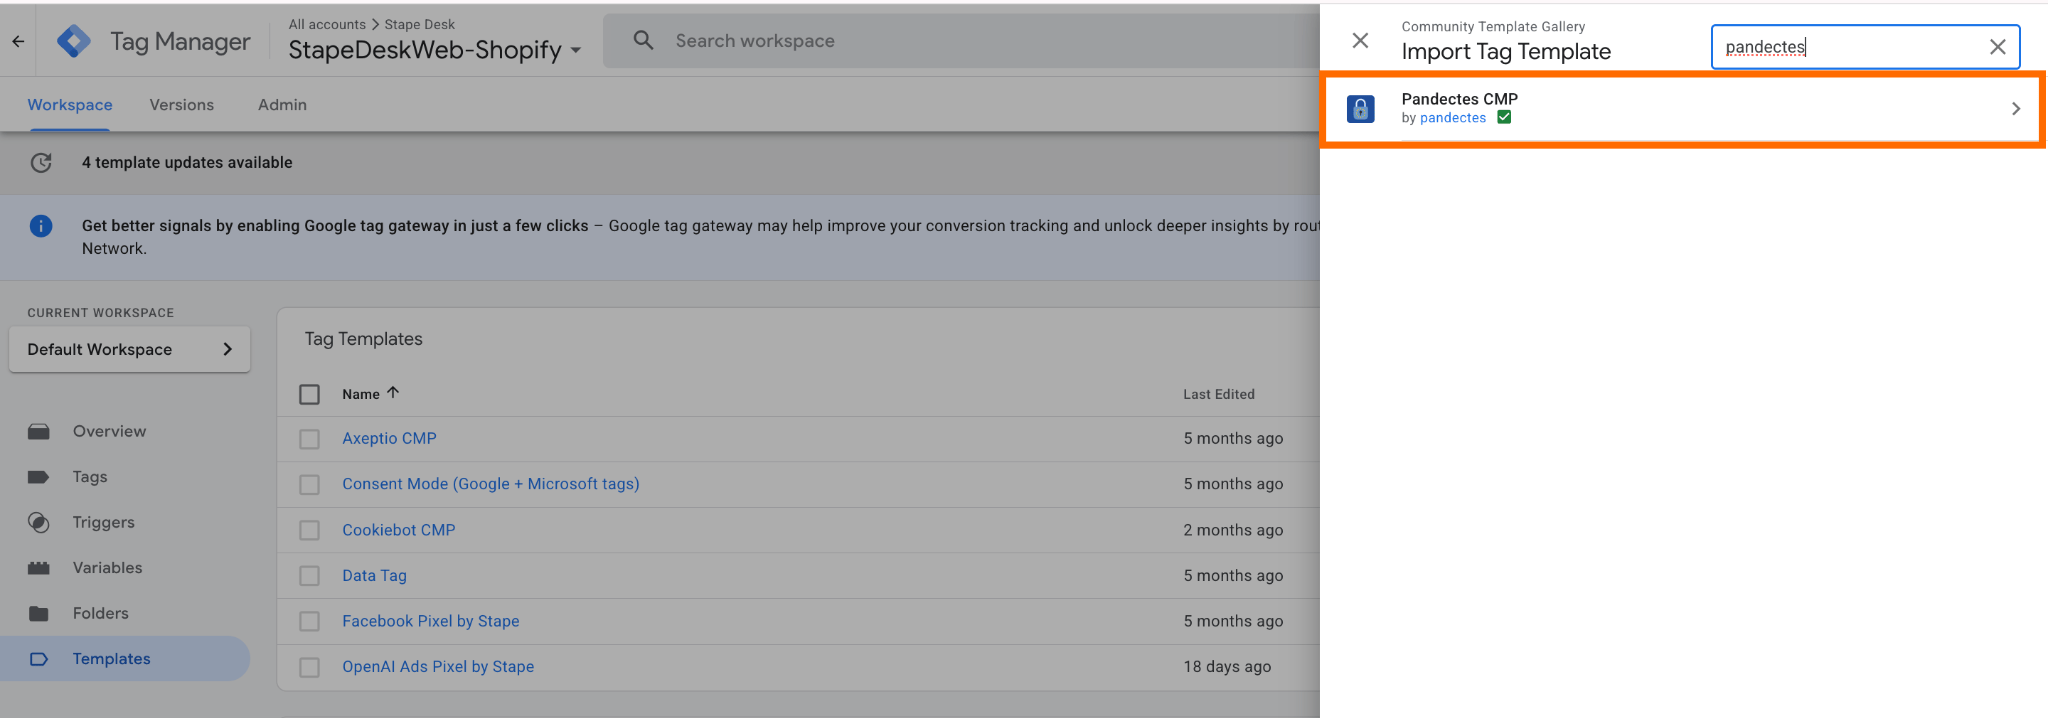
2.1 In your web GTM container, go to "Templates" → click "Search Gallery" → type "Pandectes CMP" in the search bar → add the tag template to your workspace.
2.2 Create a new tag with "Pandectes CMP" as a tag type.
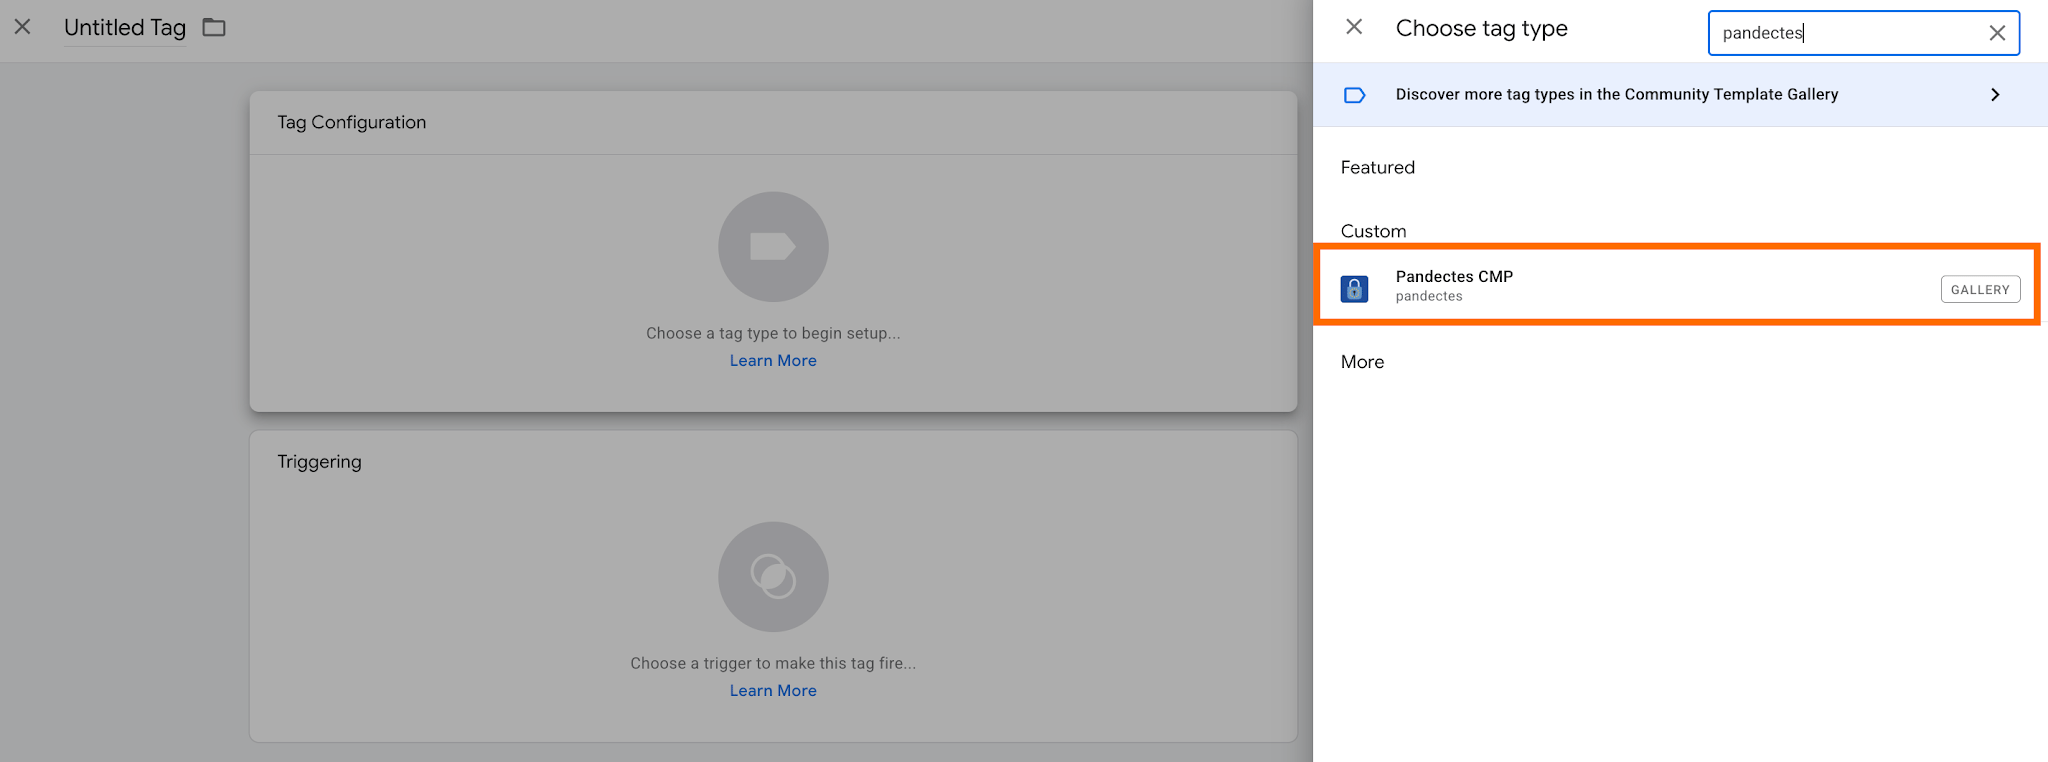
2.3 You can keep the tag configuration as it is when you just added the tag. This is the recommended approach unless your specific tracking requirements need a different implementation.
If you target people from different locations at the same time (e.g., in the EU and in the USA), you would need to apply default consent settings specifically to the regions where consent banners are shown to visitors.
Note:
The Pandectes CMP GTM template can be installed for free, but real-time consent update signaling from the banner is available only on paid Pandectes plans. If you use the free Pandectes plan, the CMP tag will read the updated consent cookie on the next page load rather than immediately after the visitor changes their consent on the current page.
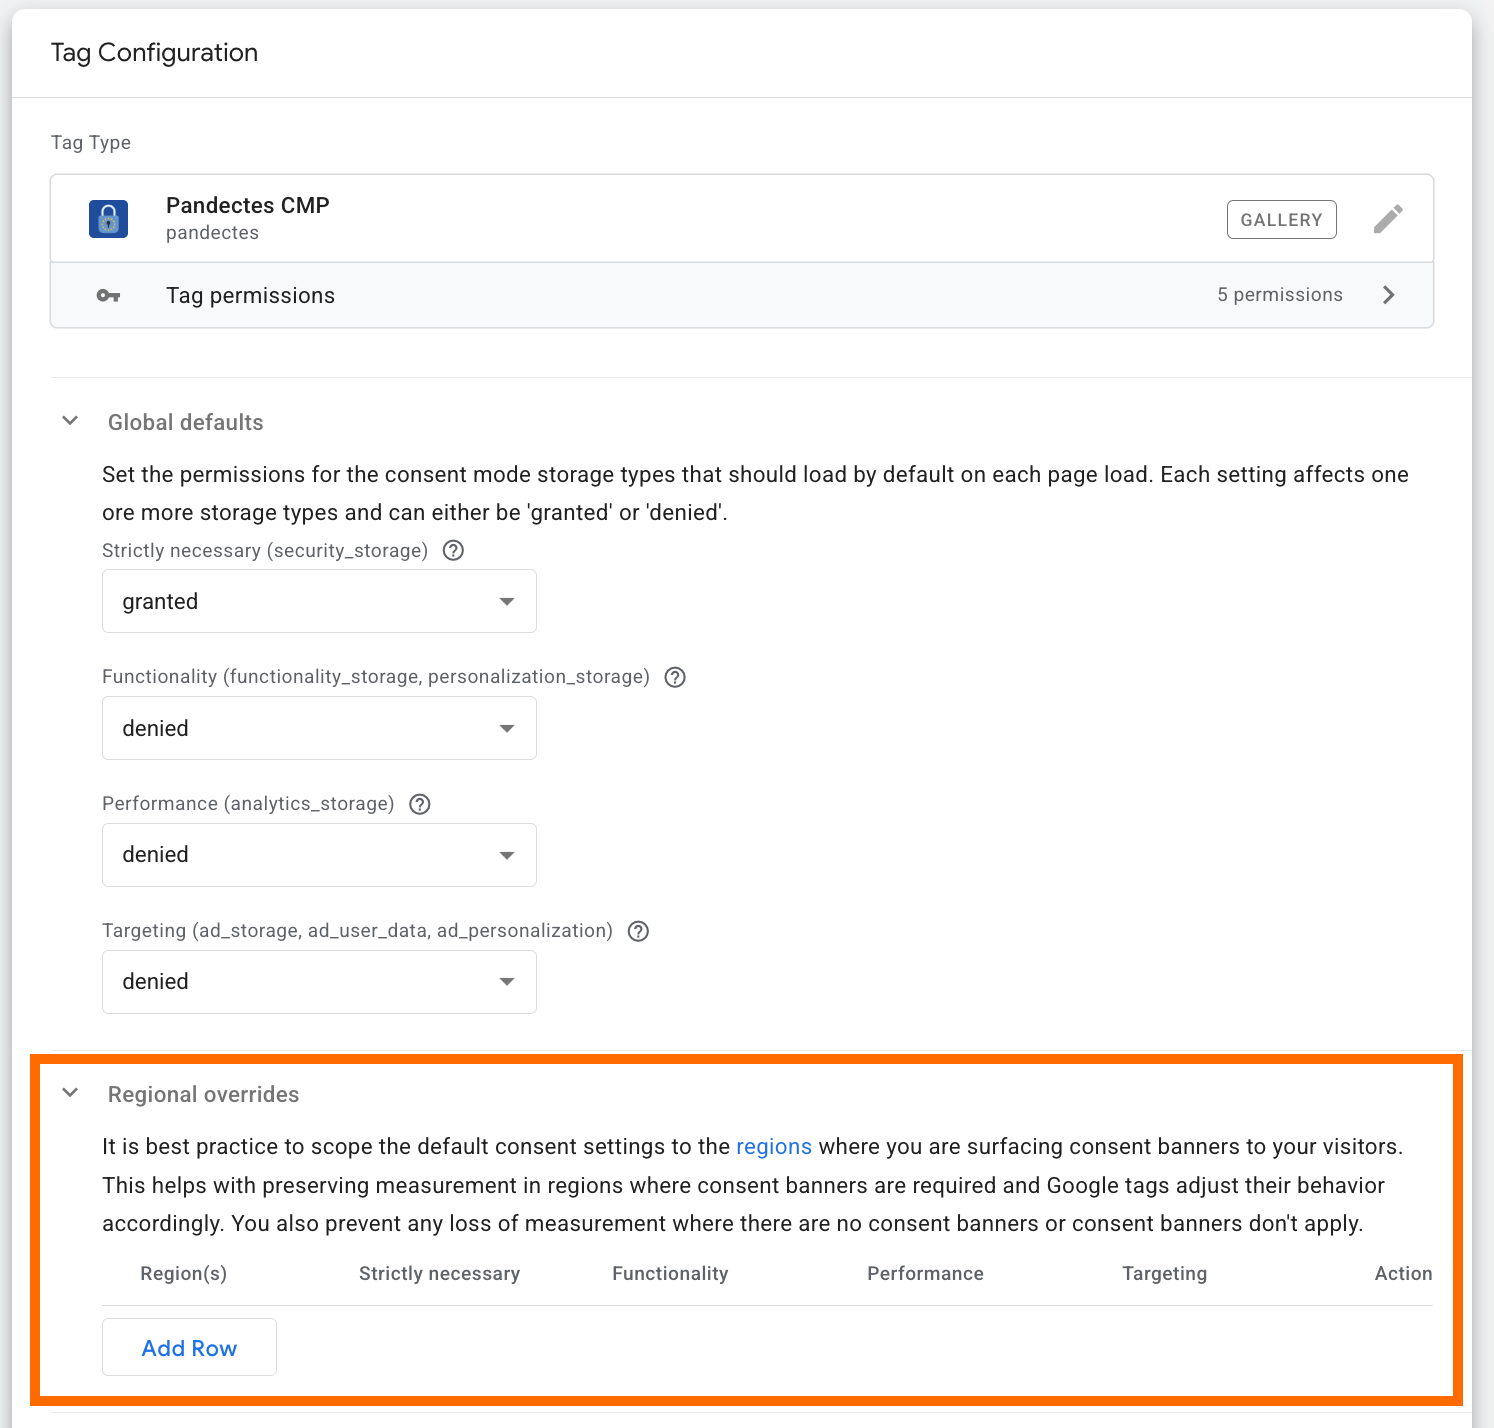
2.4 As a trigger for a tag, select "Consent Initialization - All pages".
Step 3. Adjust the consent categories to your existing tags in the web GTM container
3.1 Check the tags you have configured in your web GTM container to see whether they have built-in Consent Mode support.
For example, the native Google tags in Google Tag Manager already support Consent Mode. The Google tags belong to the following ones: Google Ads, Google Analytics/GA4, Floodlight, Conversion Linker. Also, some third-party tags have built-in consent support.
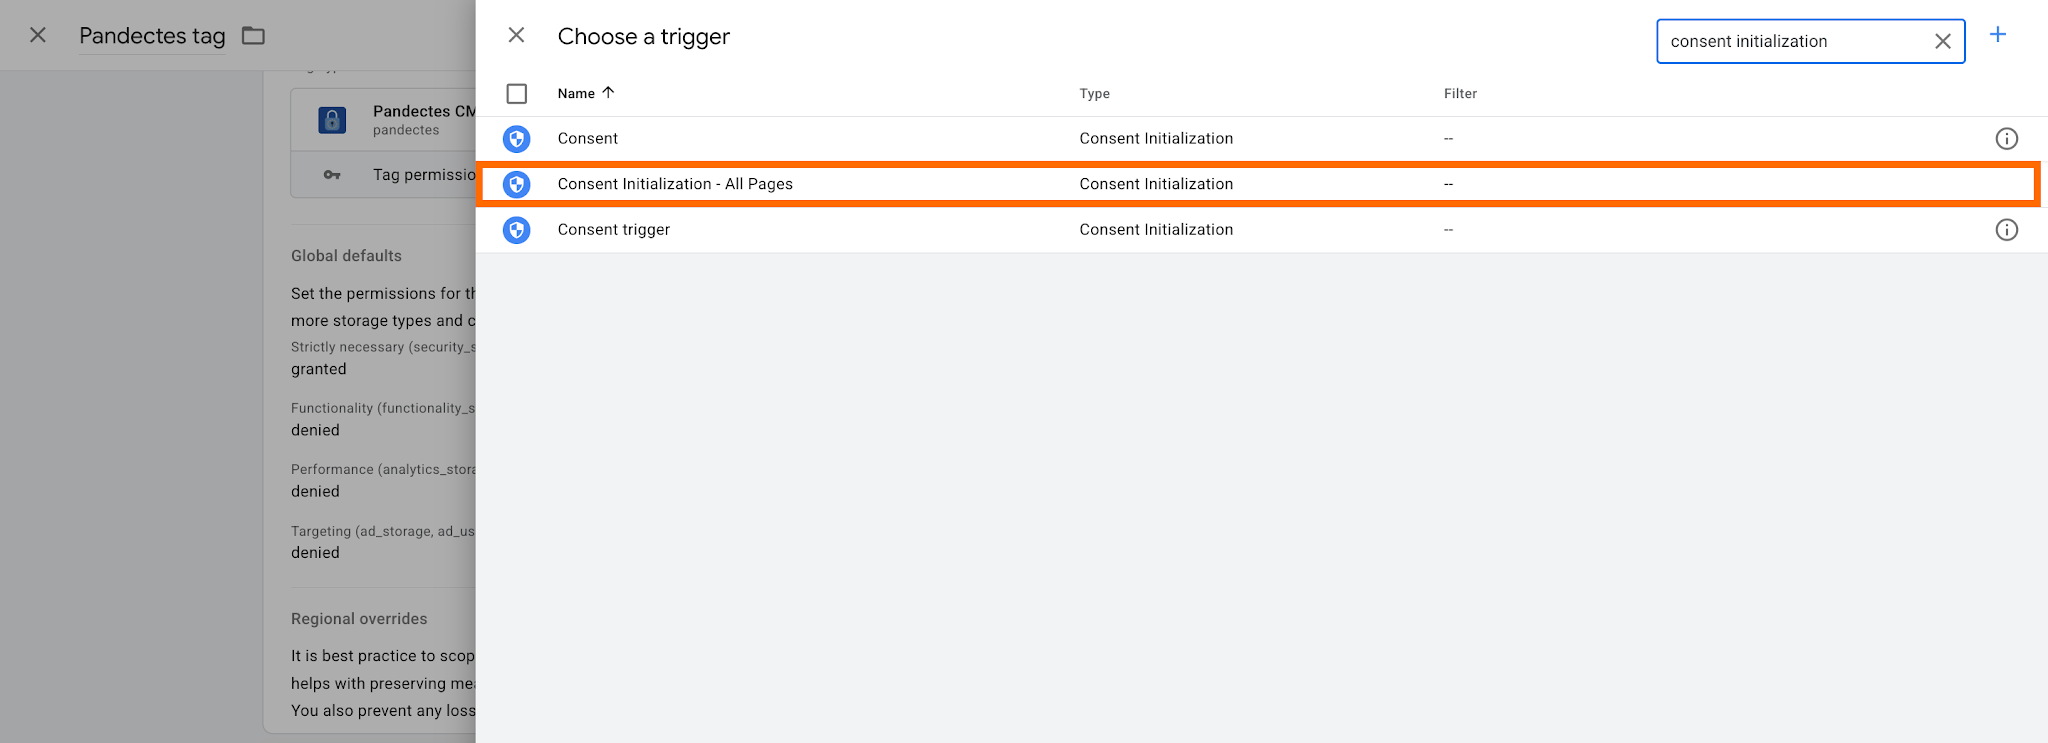
Let's consider how you can check whether there is consent support in the Facebook Pixel tag. Navigate to "Advanced Settings" → "Consent settings". If you see "Built-In Consent Checks" there, no other actions from your side are required. Such tags automatically read Consent Mode states.
⚠️Important: At the moment of writing the article, this feature is still in Beta, so to be 100% sure that the data won’t be collected without user consent, specify “Additional consent for the tag to fire” as we show in the next step.
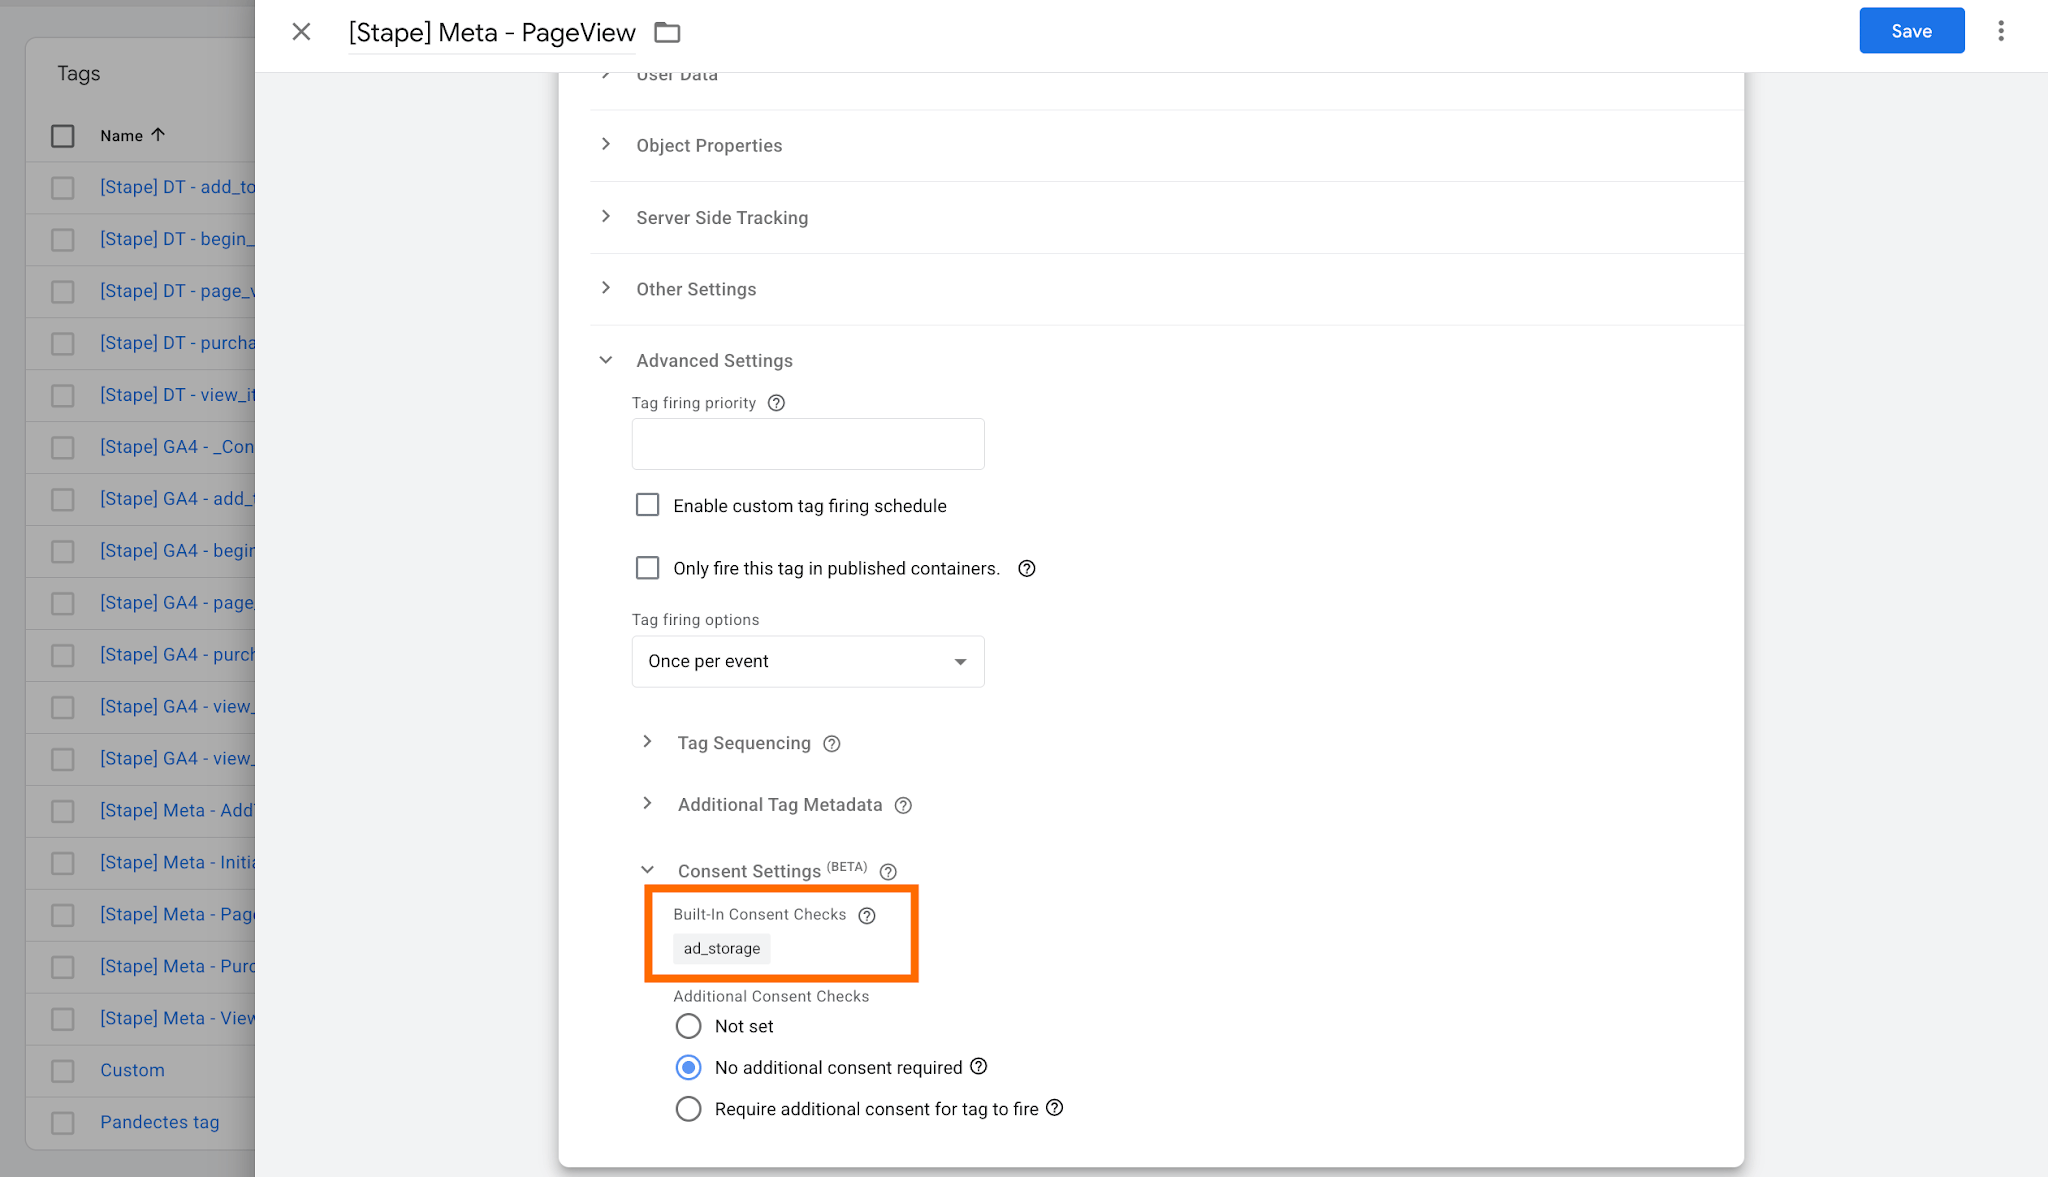
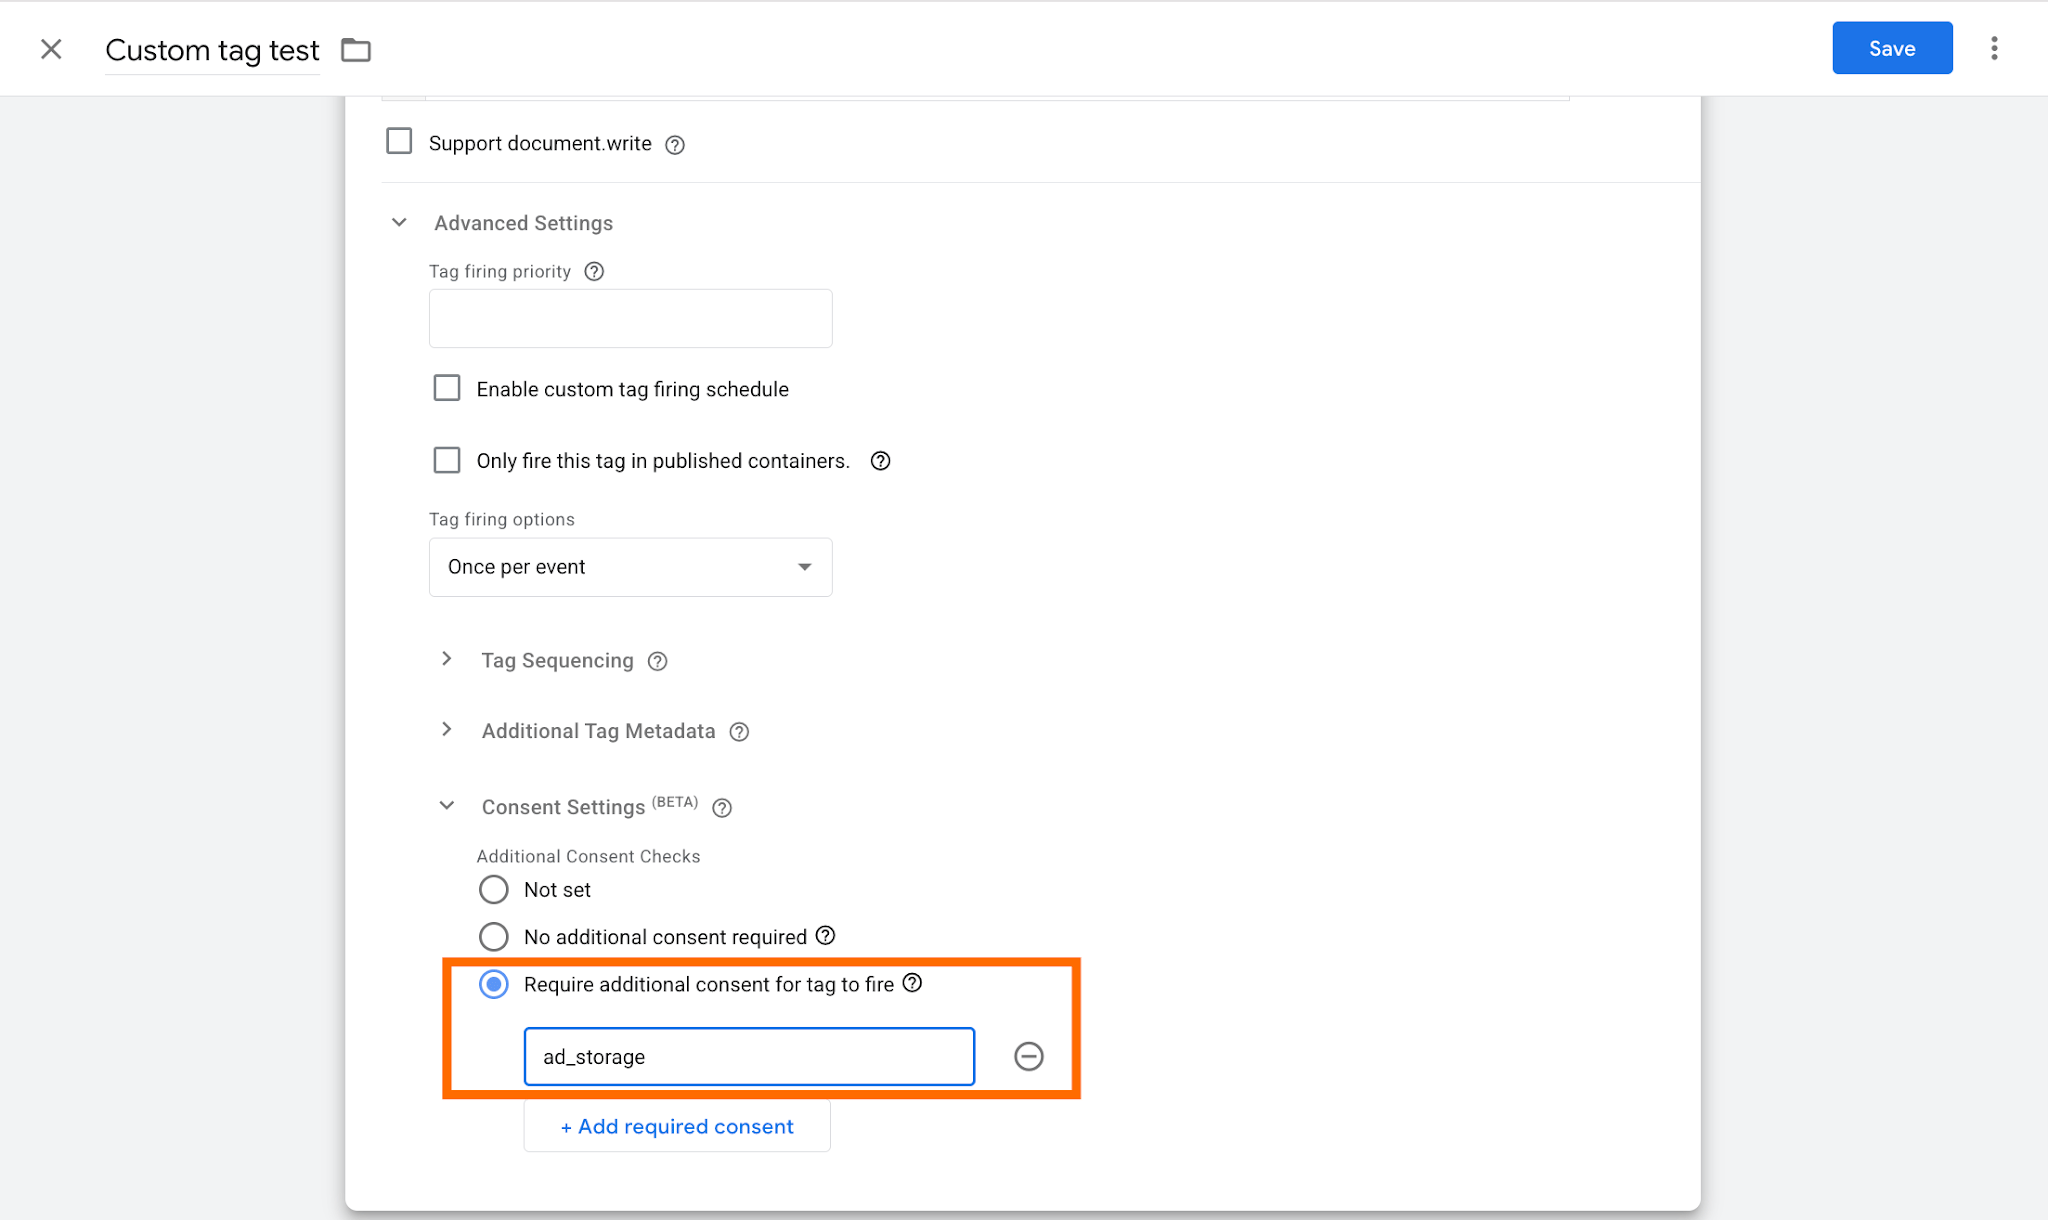
3.2 For the tags that have no "Built-in Consent Checks" feature, go to the Consent Settings section, select “Require additional consent for tag to fire,” and choose a purpose.
We've created a dummy custom HTML tag to show you how to do it. In this tag’s section, you need to add the consent type. In our case, it is "ad_storage". But you may need to specify another type. Please refer to Google’s documentation for a complete list of consent types.
Whenever possible, use Google's standard consent permissions to control whether tags can fire rather than using the Pandectes_Consent_Update event as a trigger. This keeps tag behavior aligned with Google Consent Mode and allows tags to respond to the actual consent state.
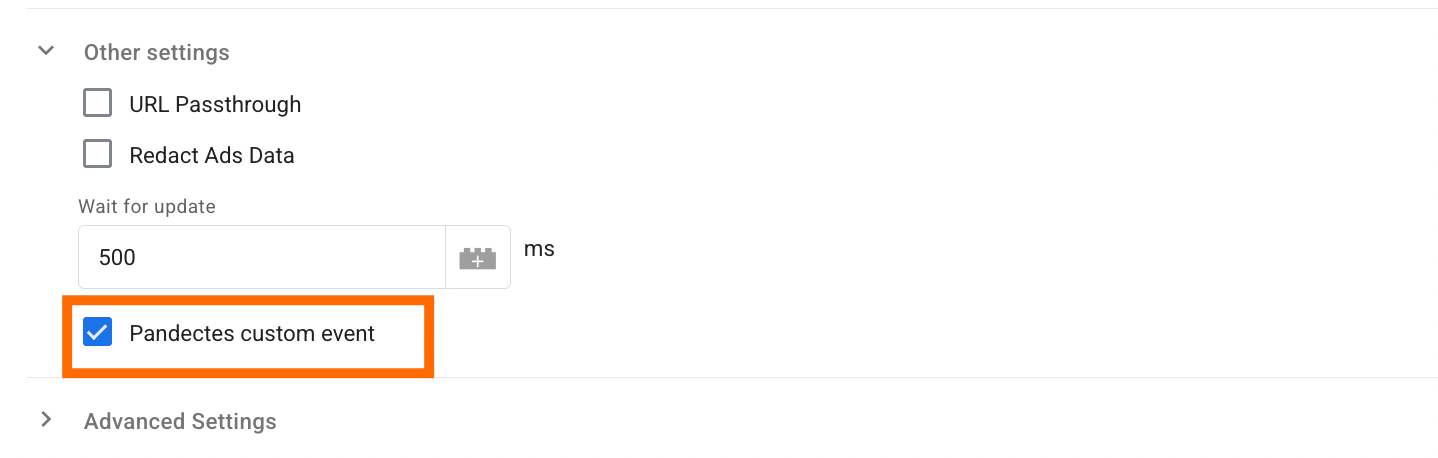
3.3 If you need to use the Pandectes_Consent_Update event as a trigger for a tag, you can enable this event from within the Pandectes CMP tag. In the Pandectes CMP tag settings, open "Other settings" and enable the option to fire the Pandectes custom event.
This option is free and doesn’t affect the consent configuration. However, it should generally be used only when you have a specific reason to trigger a tag or custom logic from the Pandectes consent update event.
3.4 Save the changes for the tags where you adjusted the consent settings.
Step 4. Prepare basic server-side configurations
😎If you are already on the server-side, please skip this step.
To make your consent management server-side, you need some basic configurations, which include:
- configuring the server GTM container and container on Stape
- activating Custom Loader to make data collection less affected by ad blockers
- sending data from the web to the server GTM container.
4.1 Set up the server GTM container and container on Stape
Create a Google Tag Manager server container.
Open your web Google Tag Manager container. Click Admin. Under the container column, click +
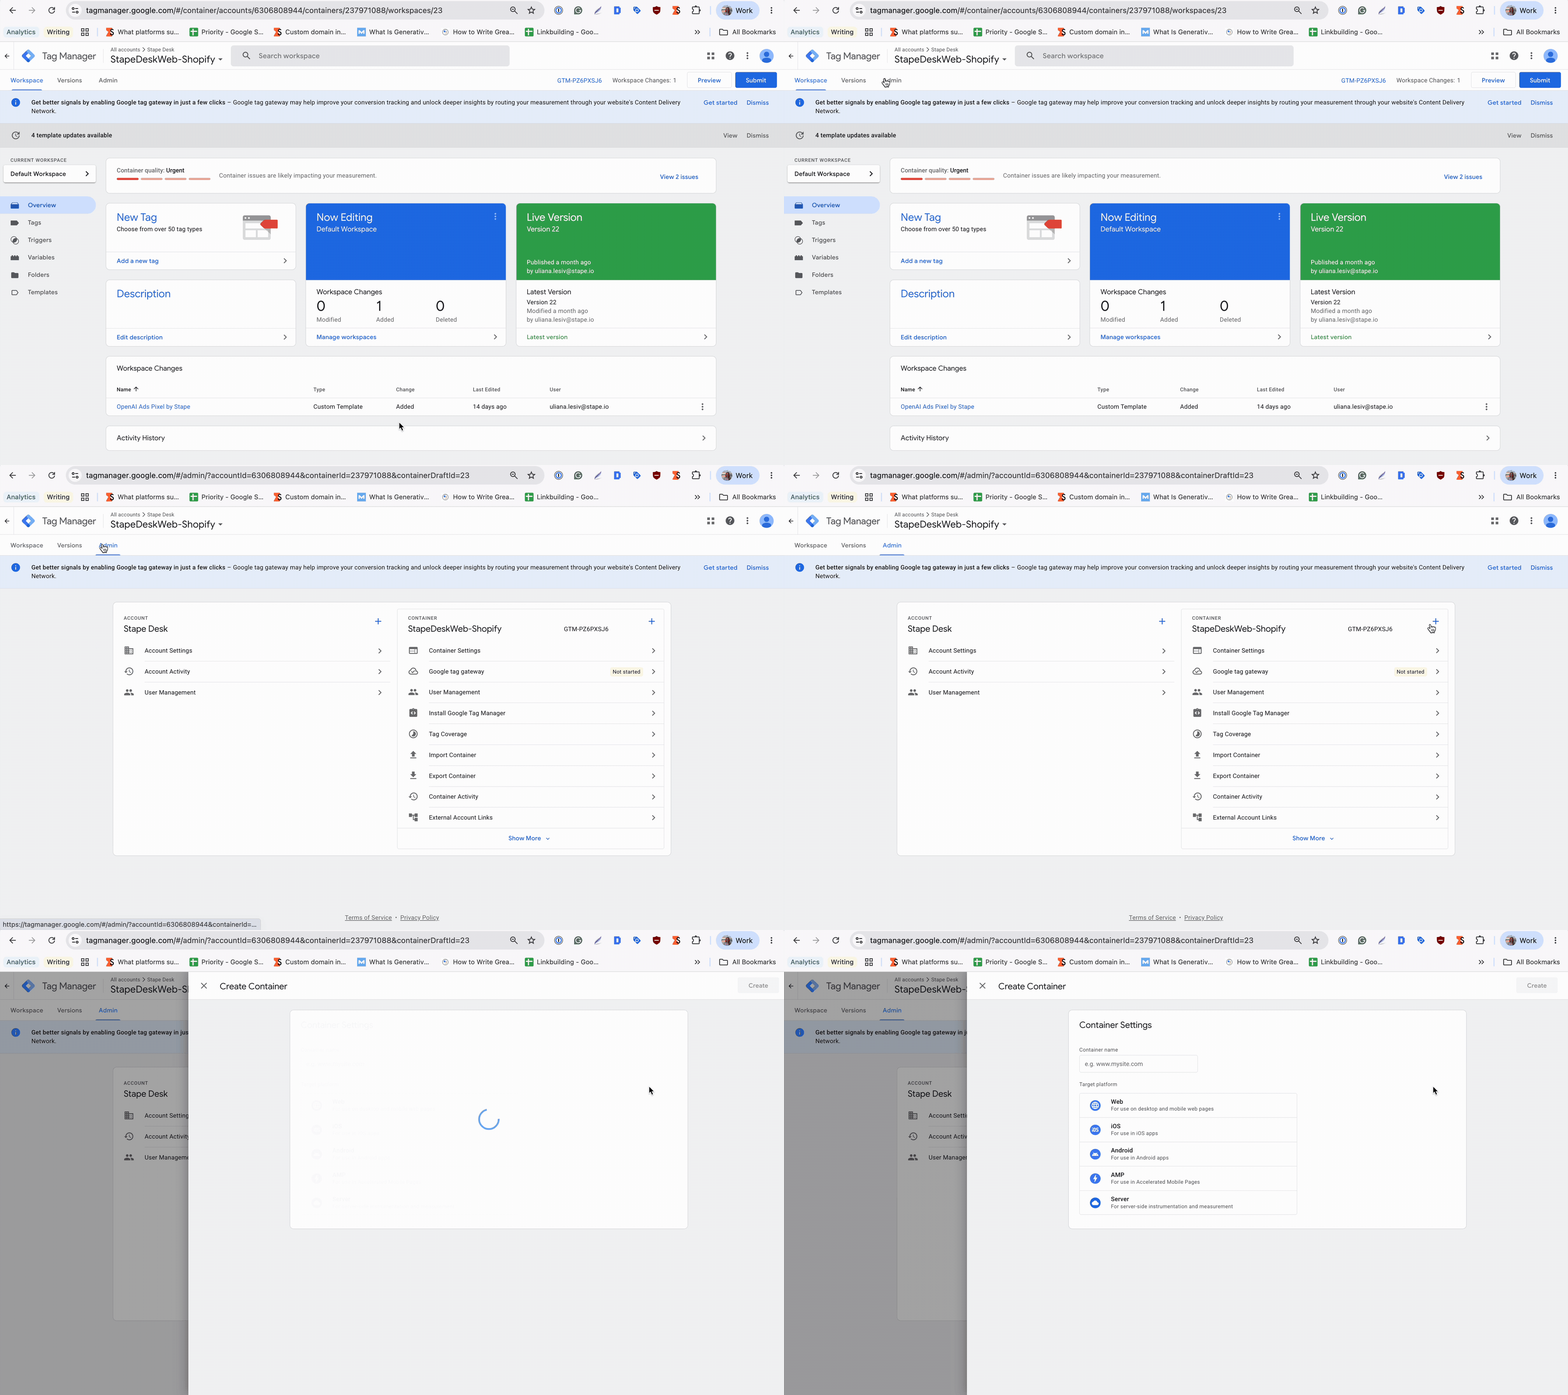
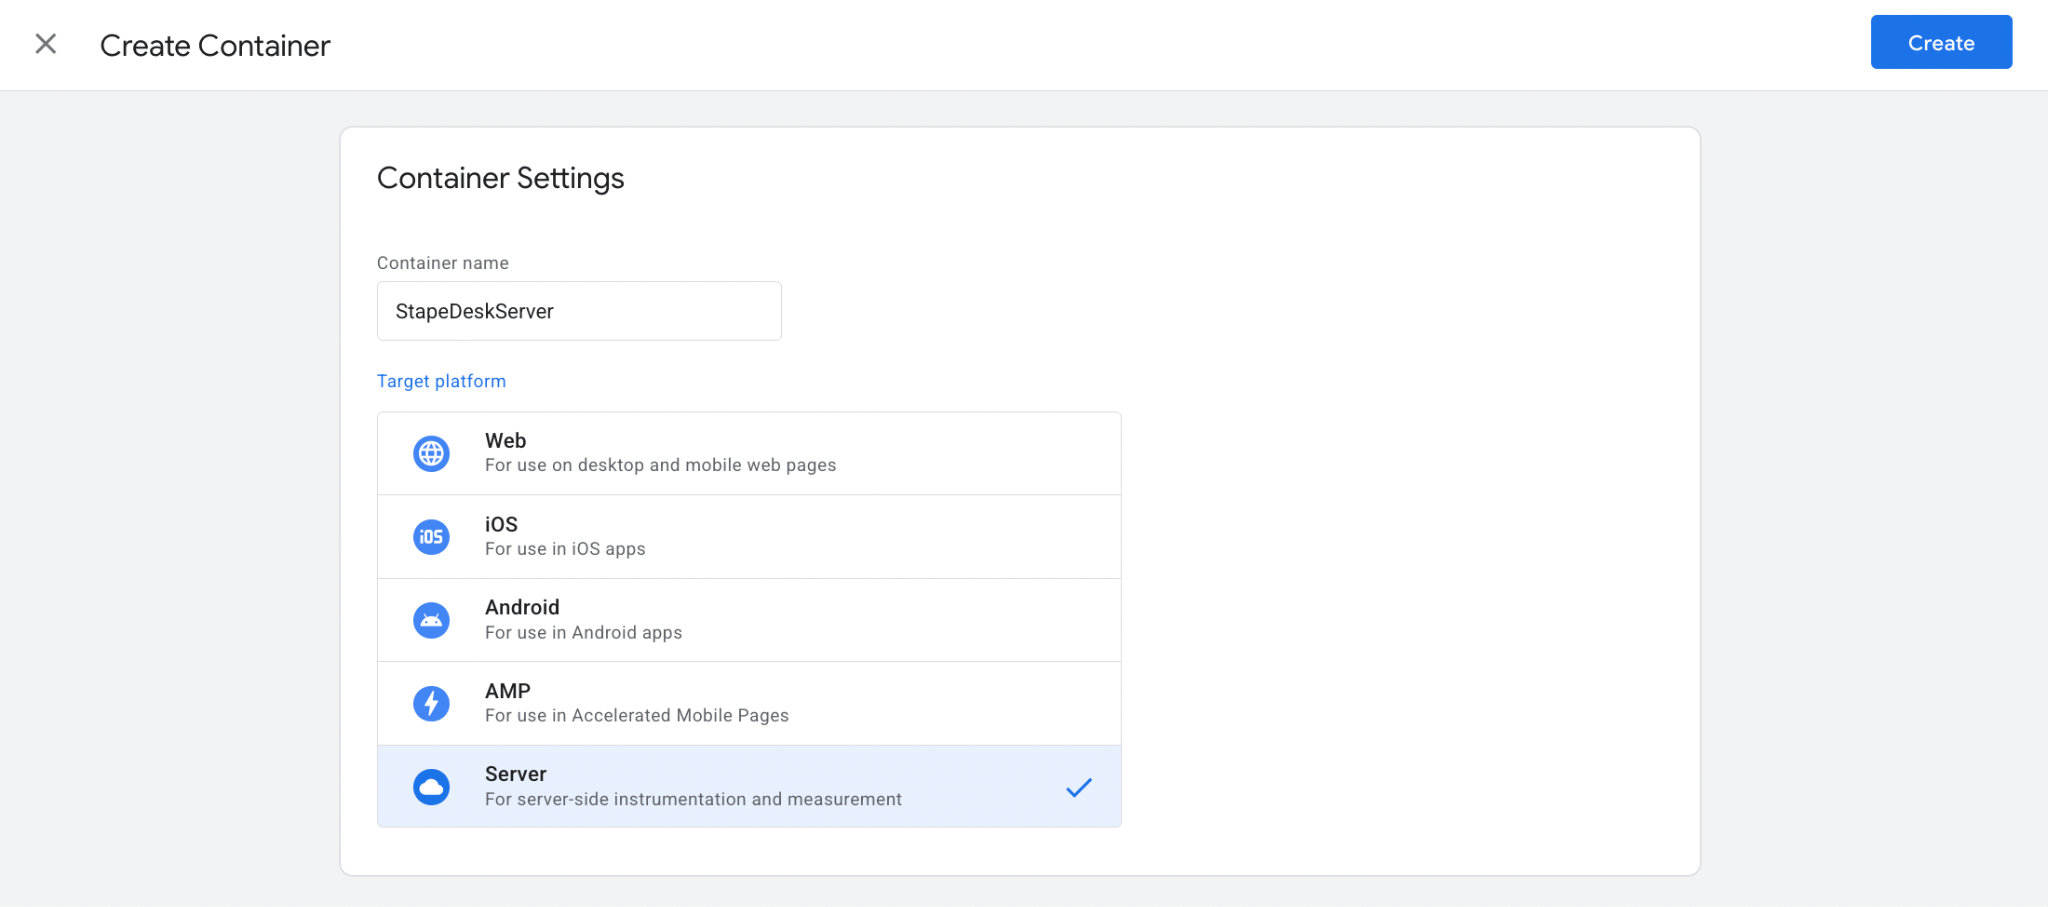
Type the container name, choose Server, and click Create.
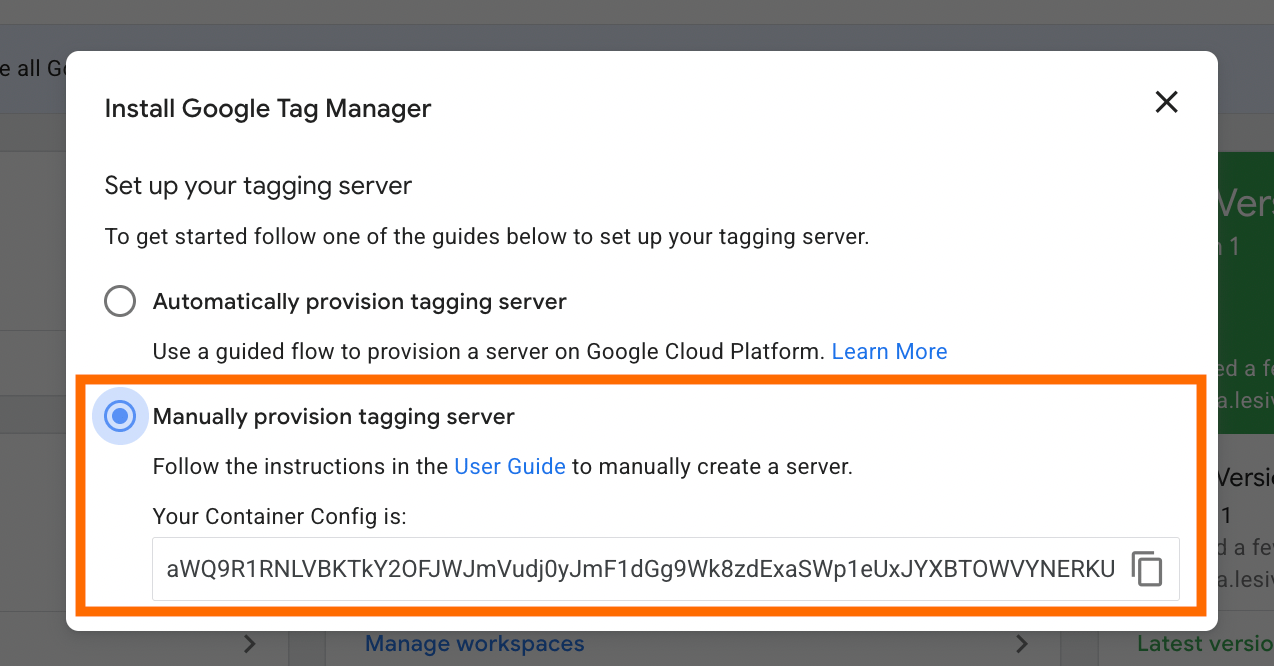
Choose Manually provision tagging server, copy your container config, and paste it into any text editor. We will need it for the next steps.
Create a Stape account to host your server GTM container.
Go to Stape and create an account or log in.
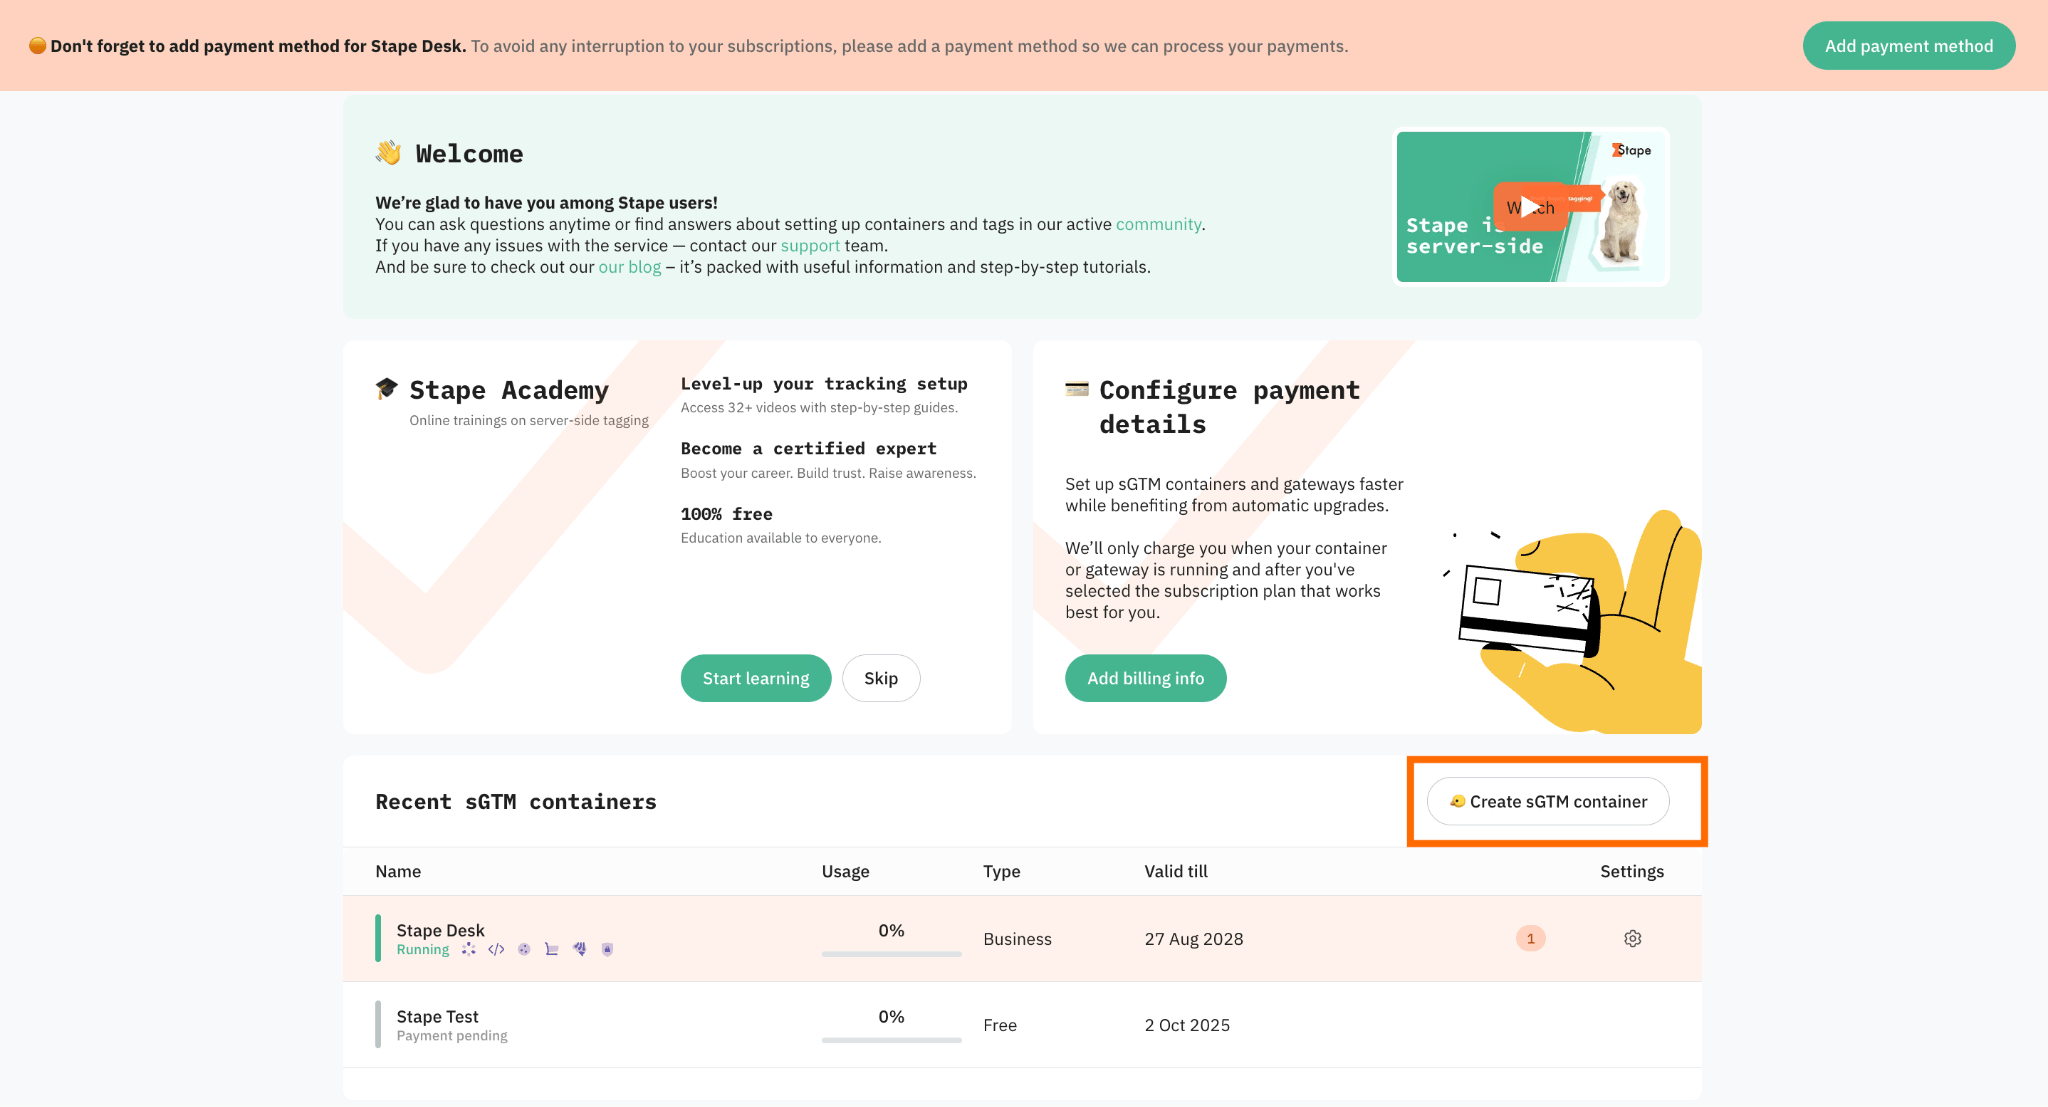
Click Create sGTM container on the main page.
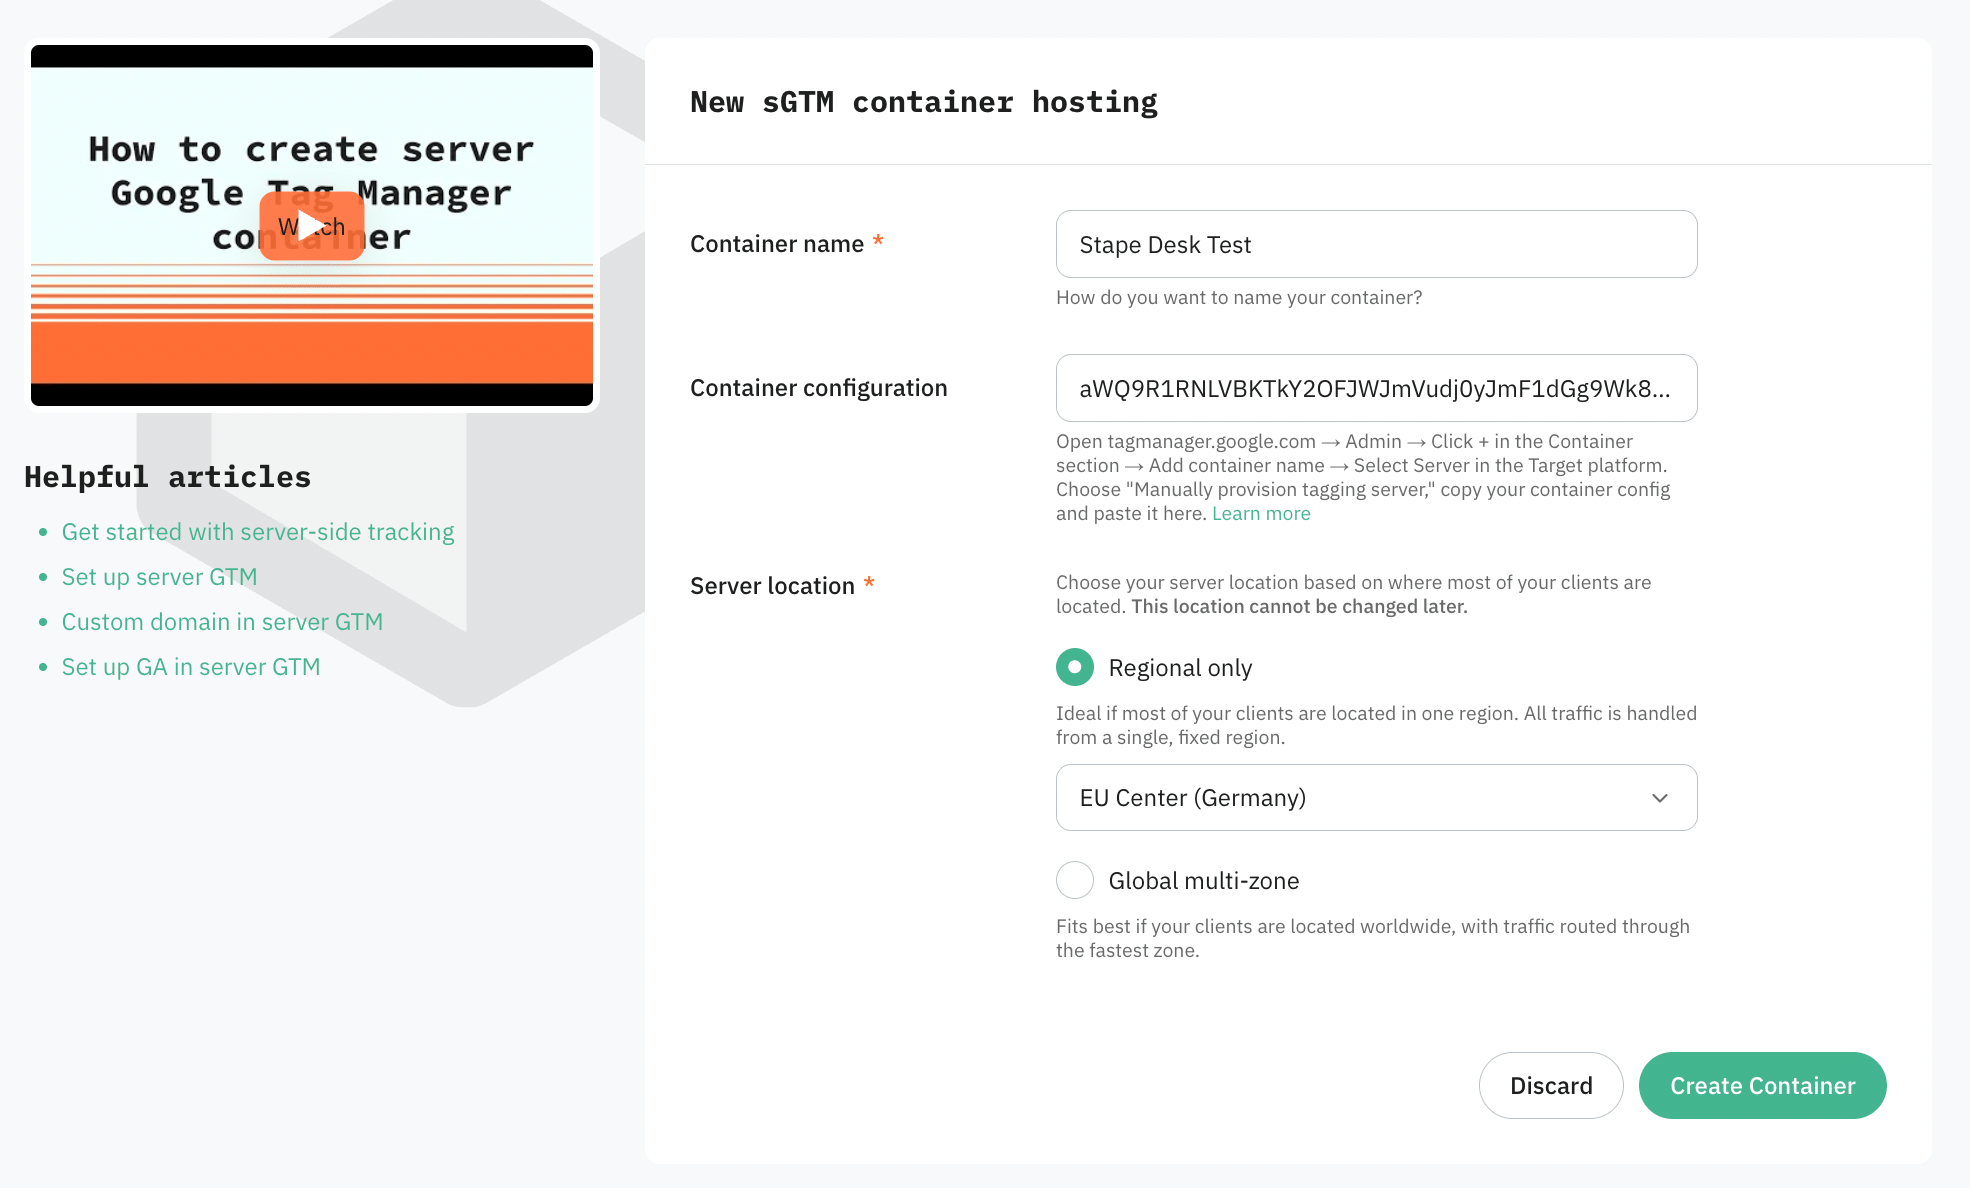
Enter your container details:
- Container name. The name does not necessarily have to be the same as the container name in your server GTM.
- Container configuration - paste the Container Config that you copied from your Google Tag Manager Server Container.
- Server location - for best performance, choose the server location that’s closest to where most of your clients are. See the list of available server locations in our documentation. If you have traffic from different regions, you can select the Global multi-zone server location option. It will automatically route incoming requests to the nearest available zone based on the user’s IP address.
Then click Create Container.
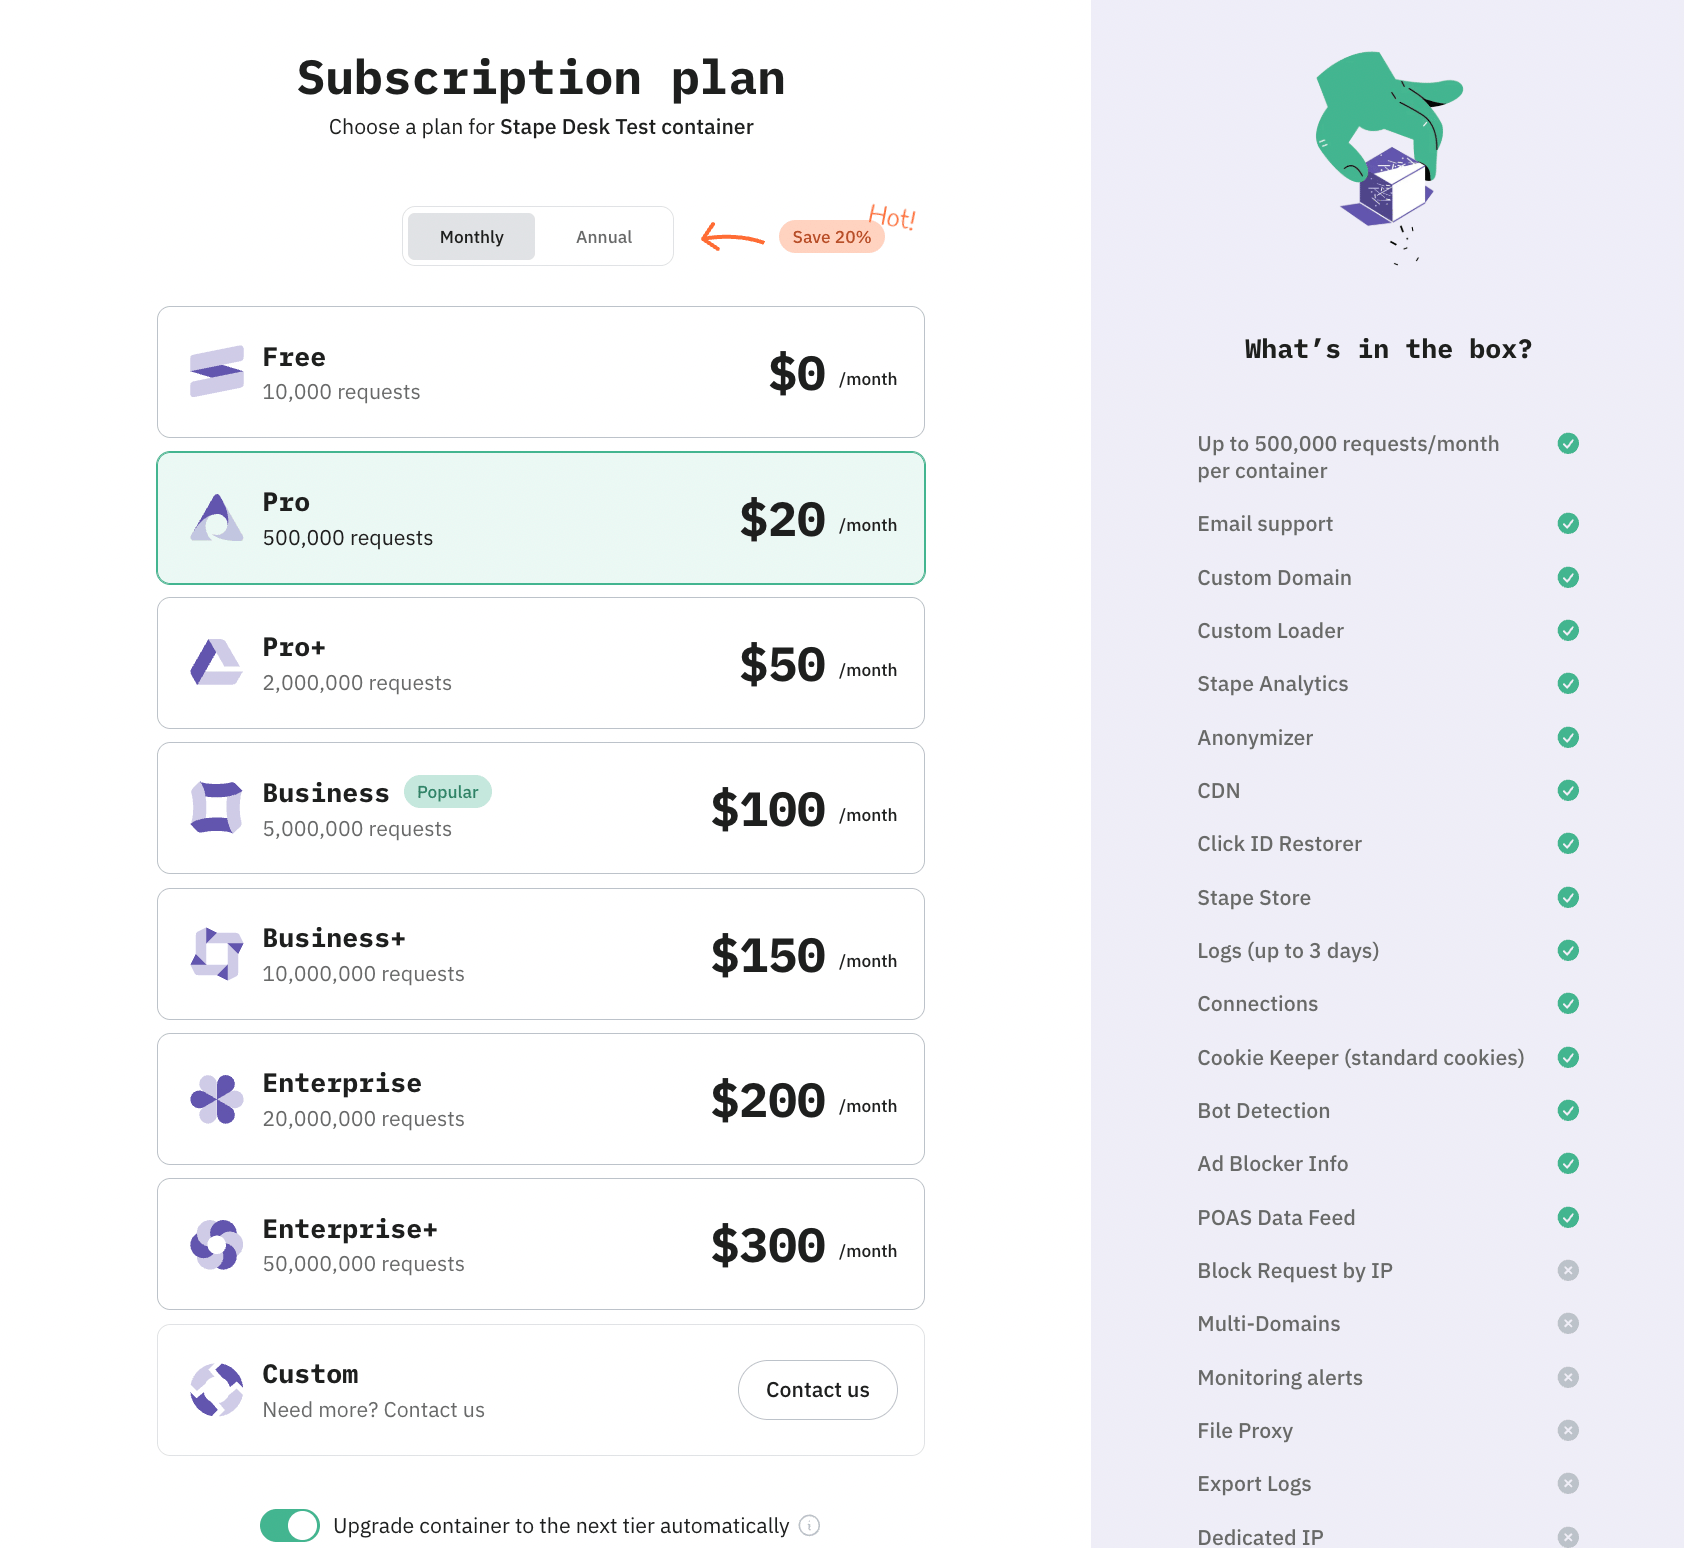
Choose a plan for your container. You can start with a Free plan. Click Continue with a Free plan.
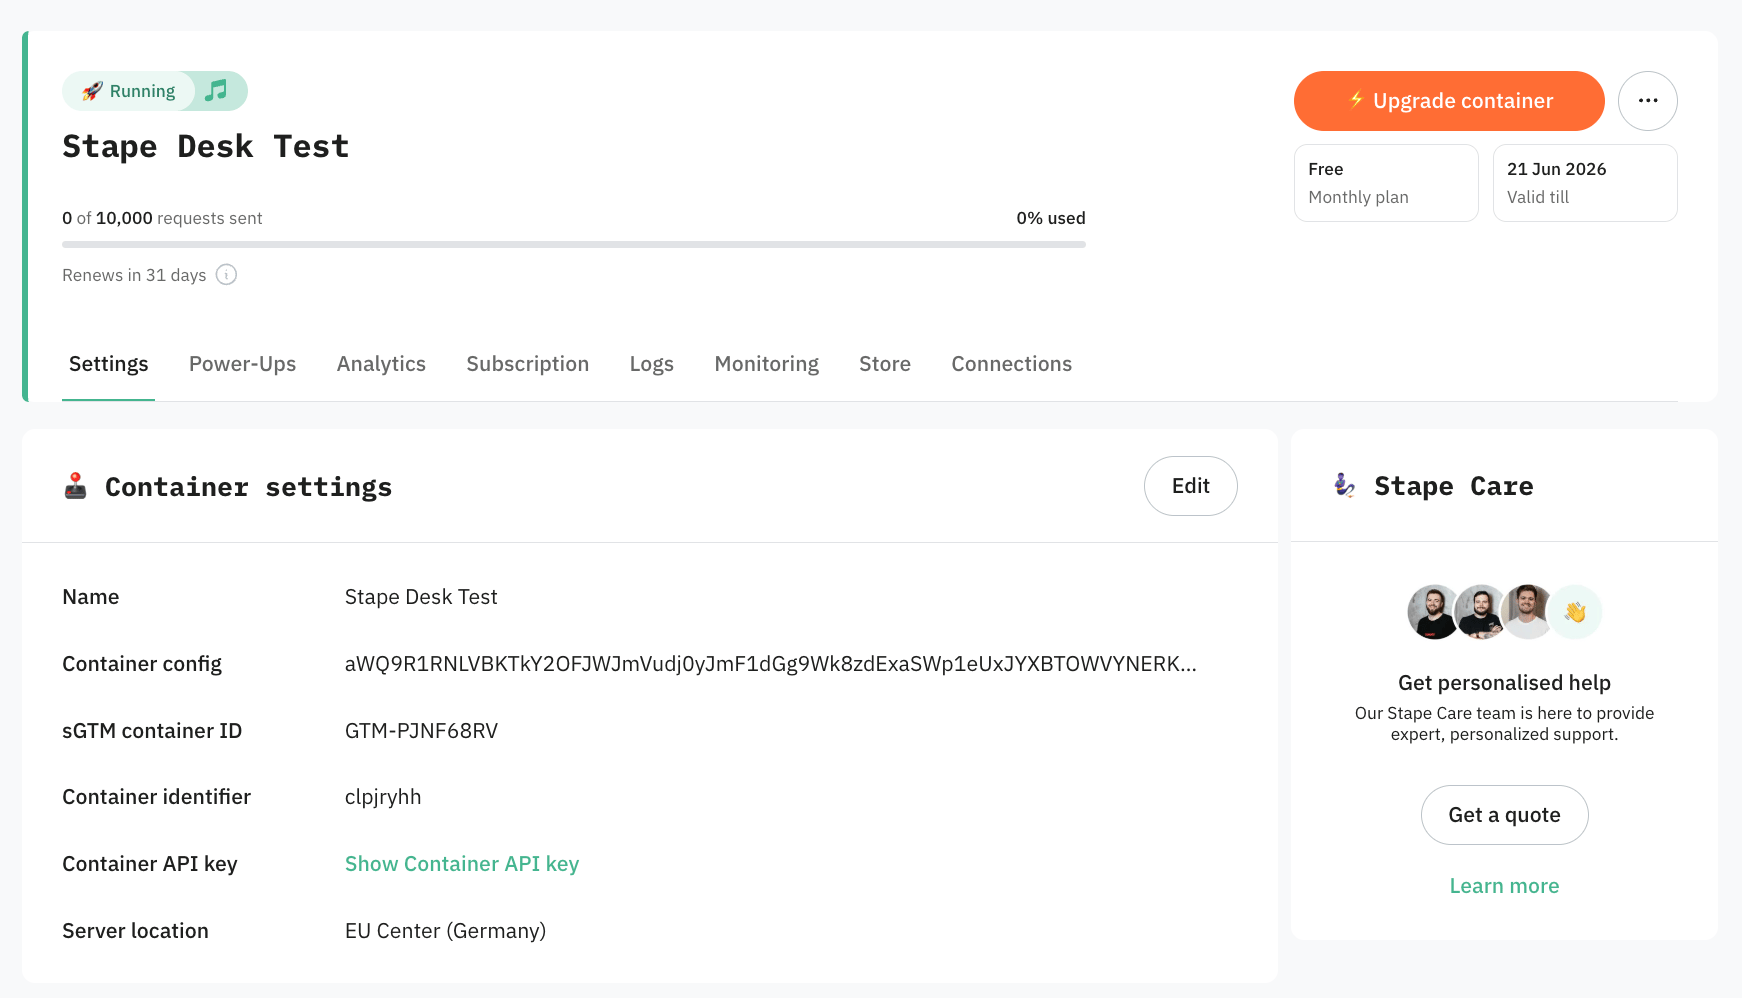
You will see the status of your container, container config, and plan name. It takes around 5 minutes to deploy a server container.
Please reload the page to update the status. If the Google Tag Manager server-side setup was done correctly, you should see the status Running.
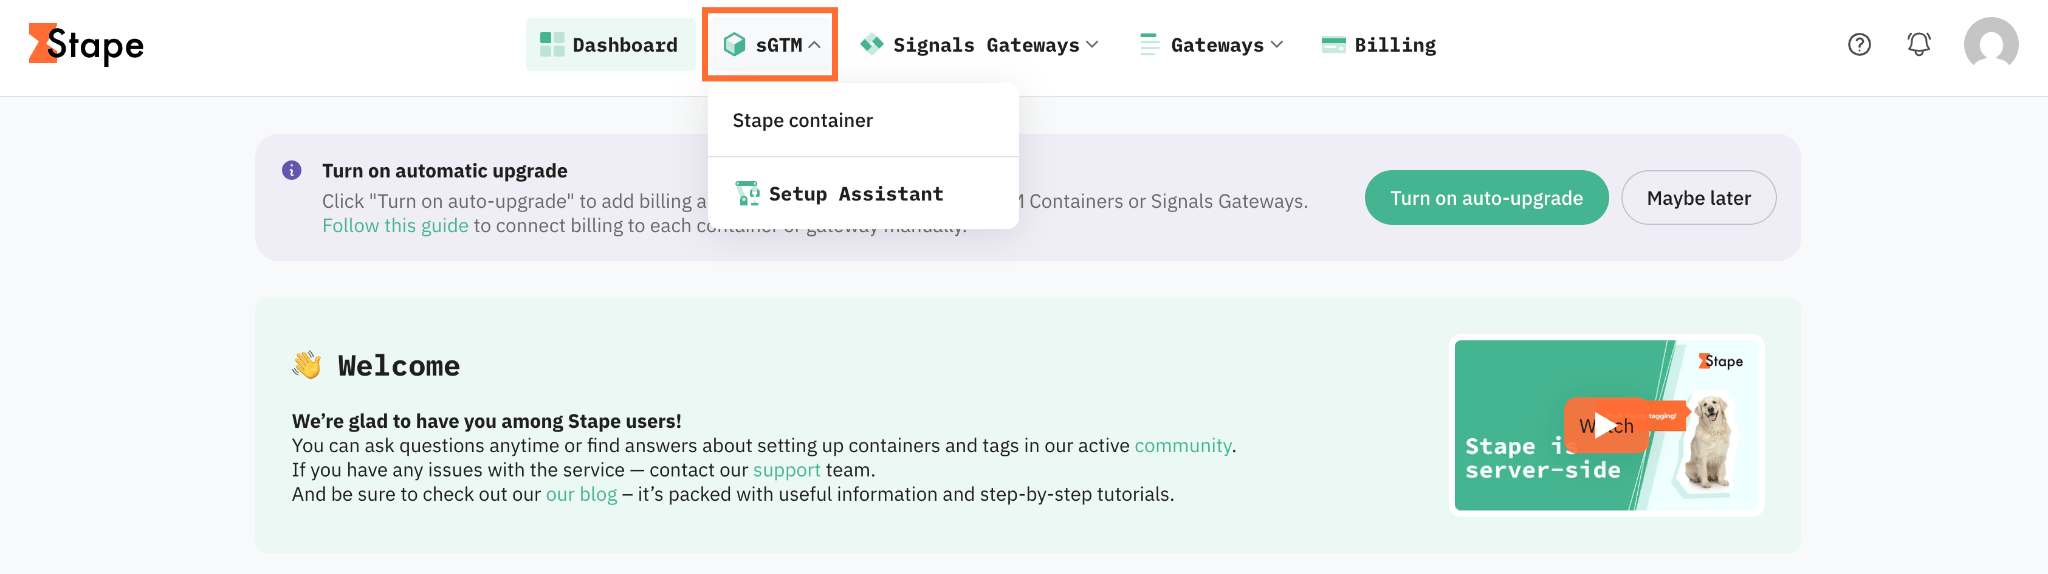
4.2 Configure Custom Loader
1. Log in to your Stape account and select your sGTM container from the dashboard.
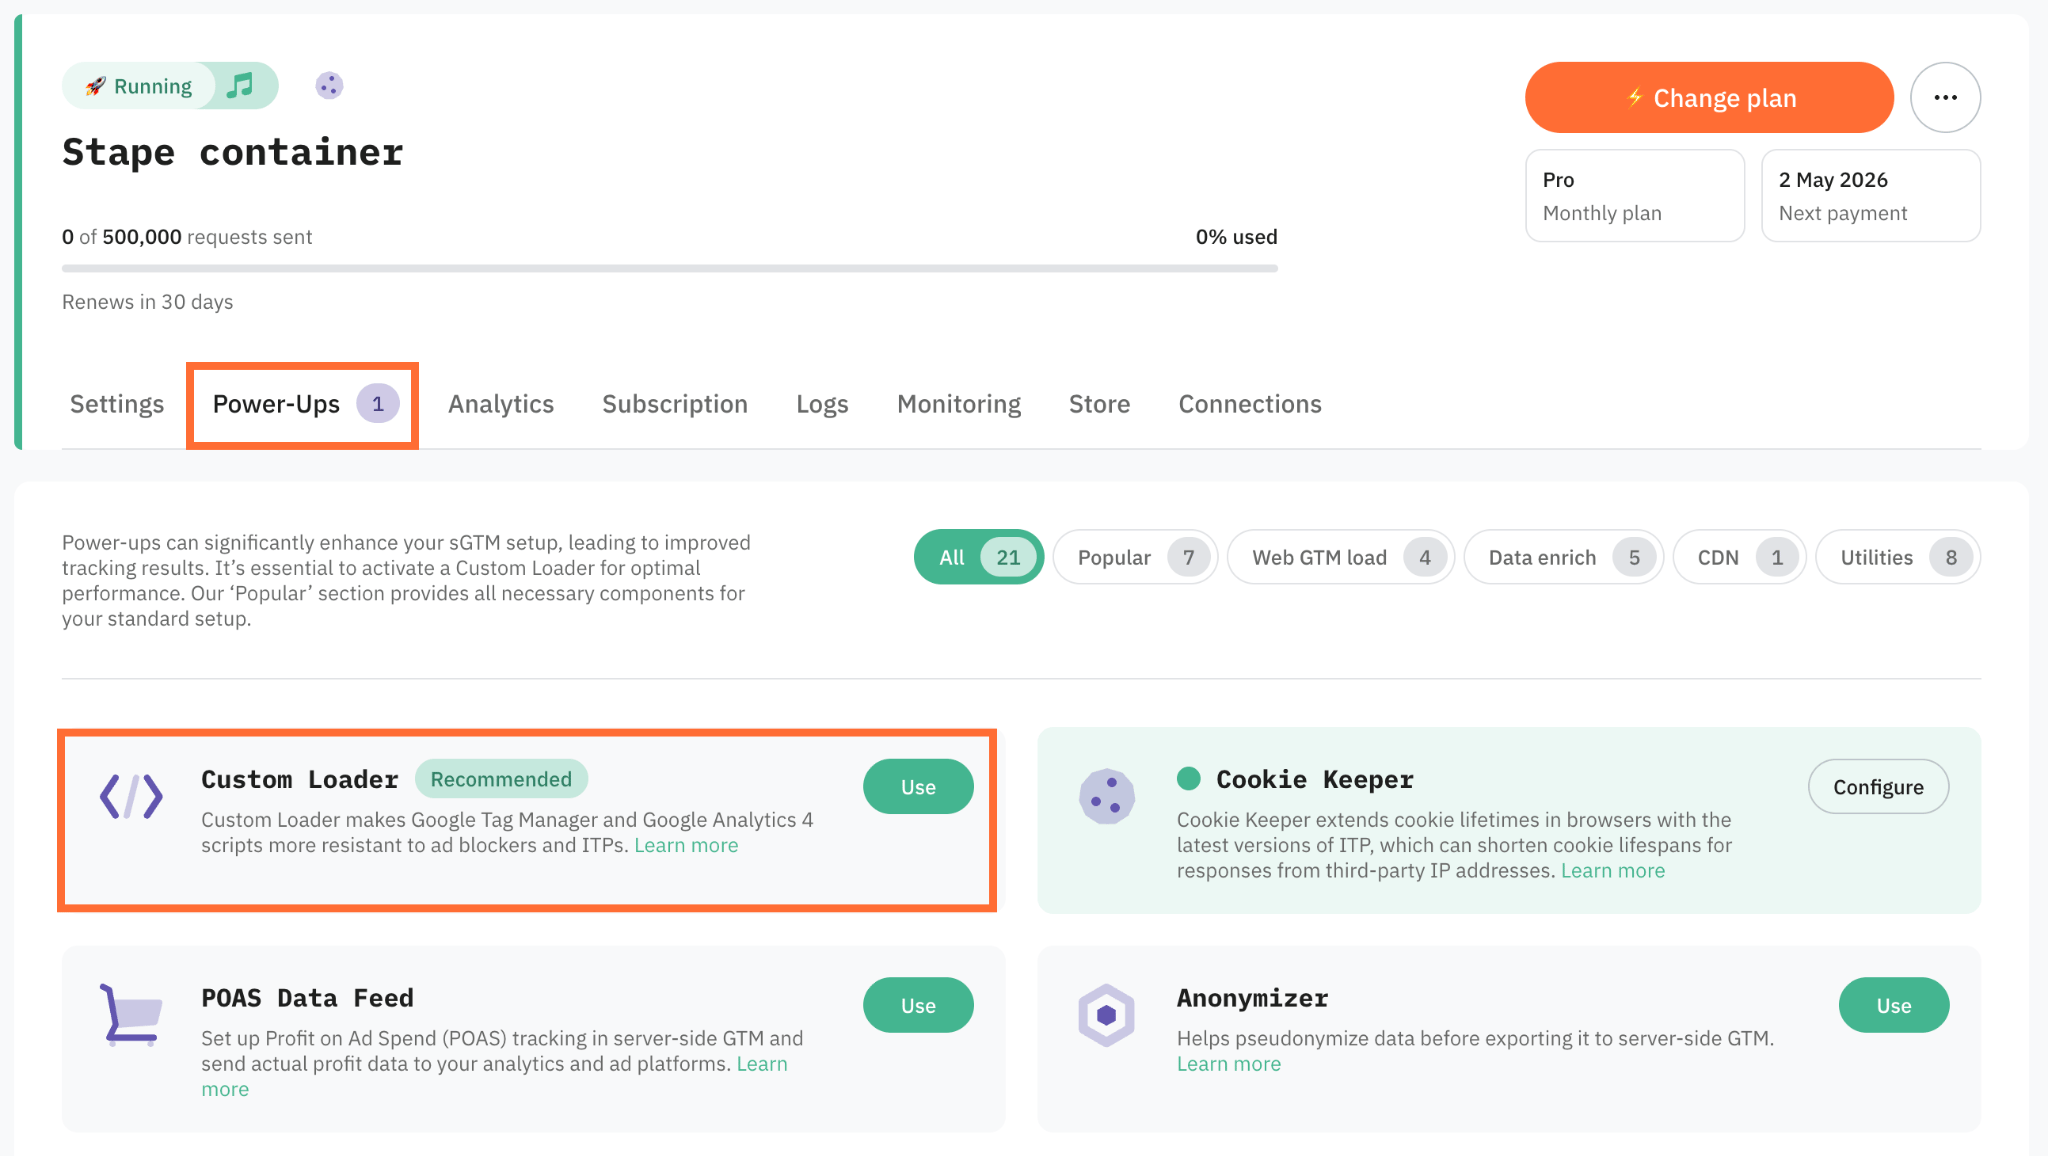
2. Go to Power-ups and click Use next to the Custom Loader panel.
3. Toggle the Custom Loader switch to enable it.
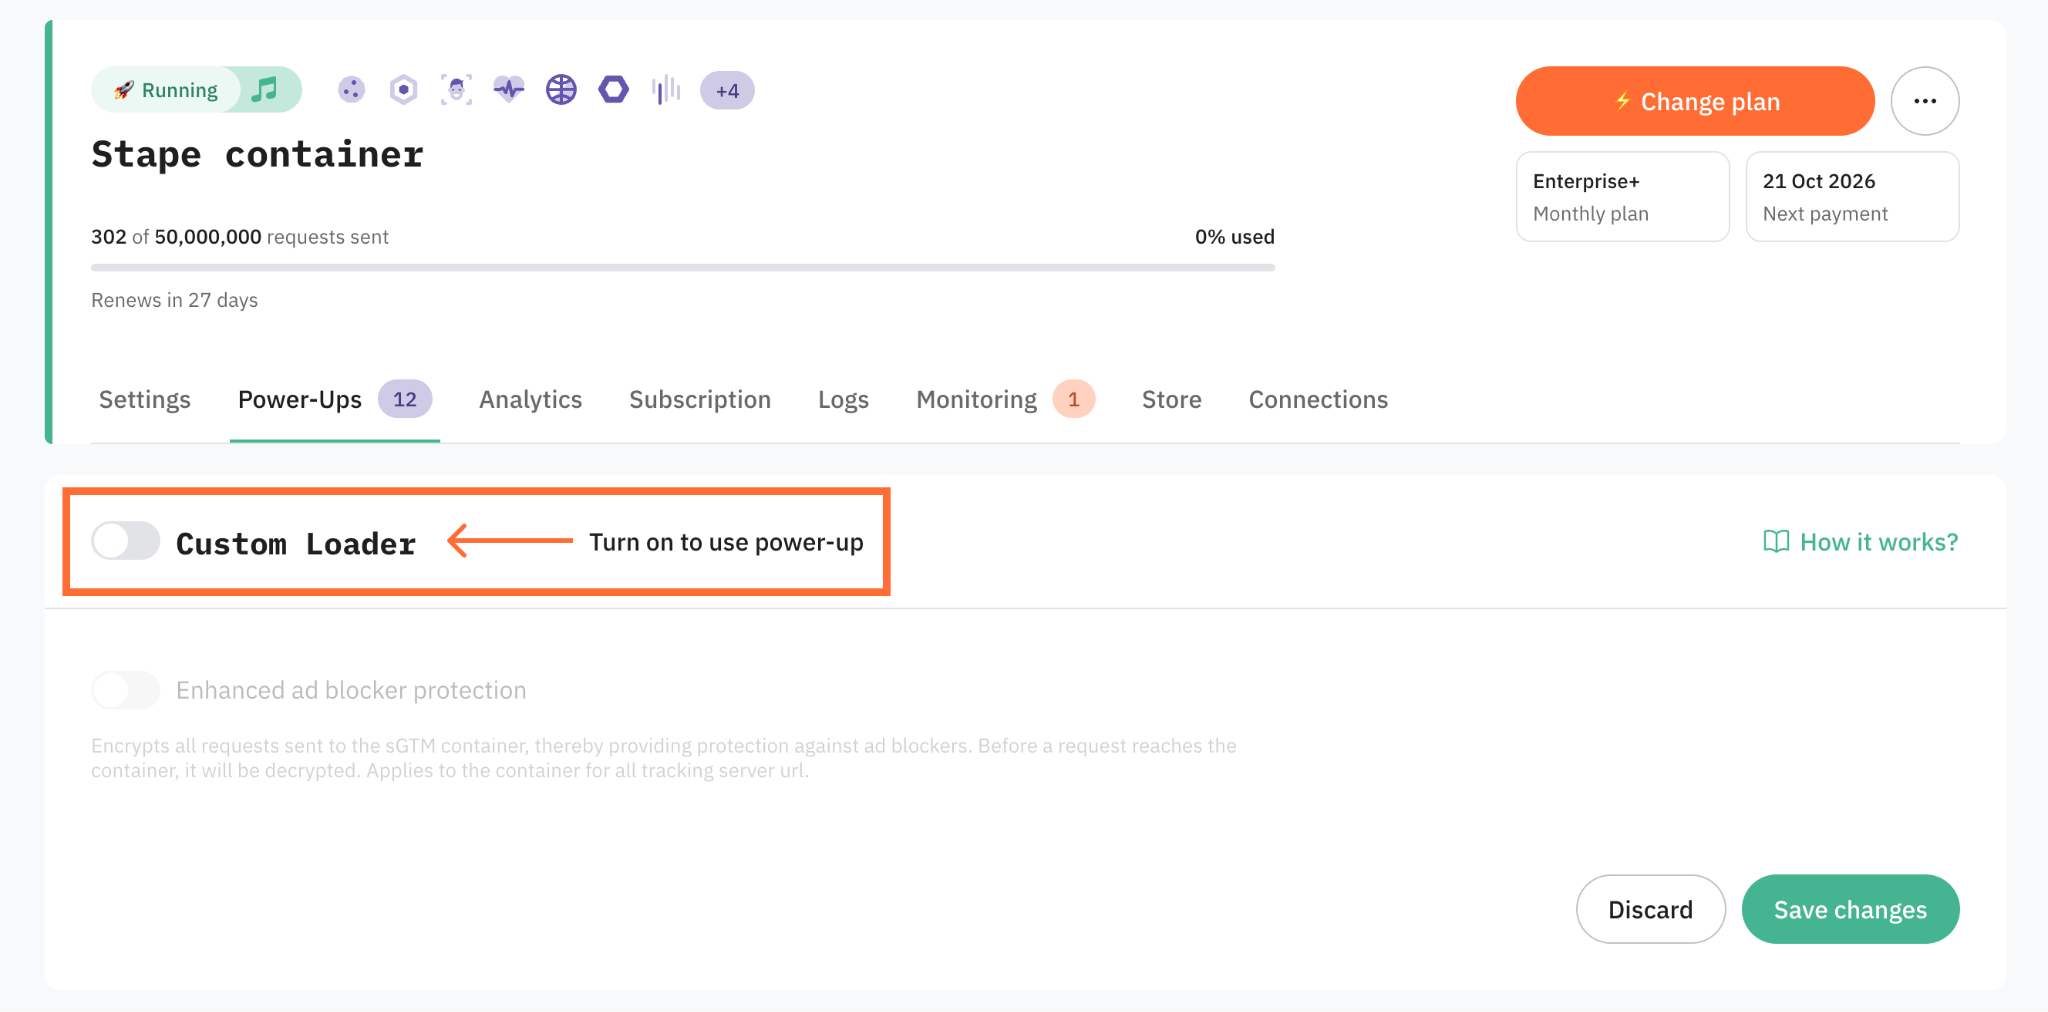
4. If you want to encode tracking requests sent from the browser to your sGTM container, toggle the Enhanced ad blocker protection. By masking recognizable URL patterns and tracking signatures, it prevents ad blockers from identifying and intercepting those requests.
5. Click Save changes.
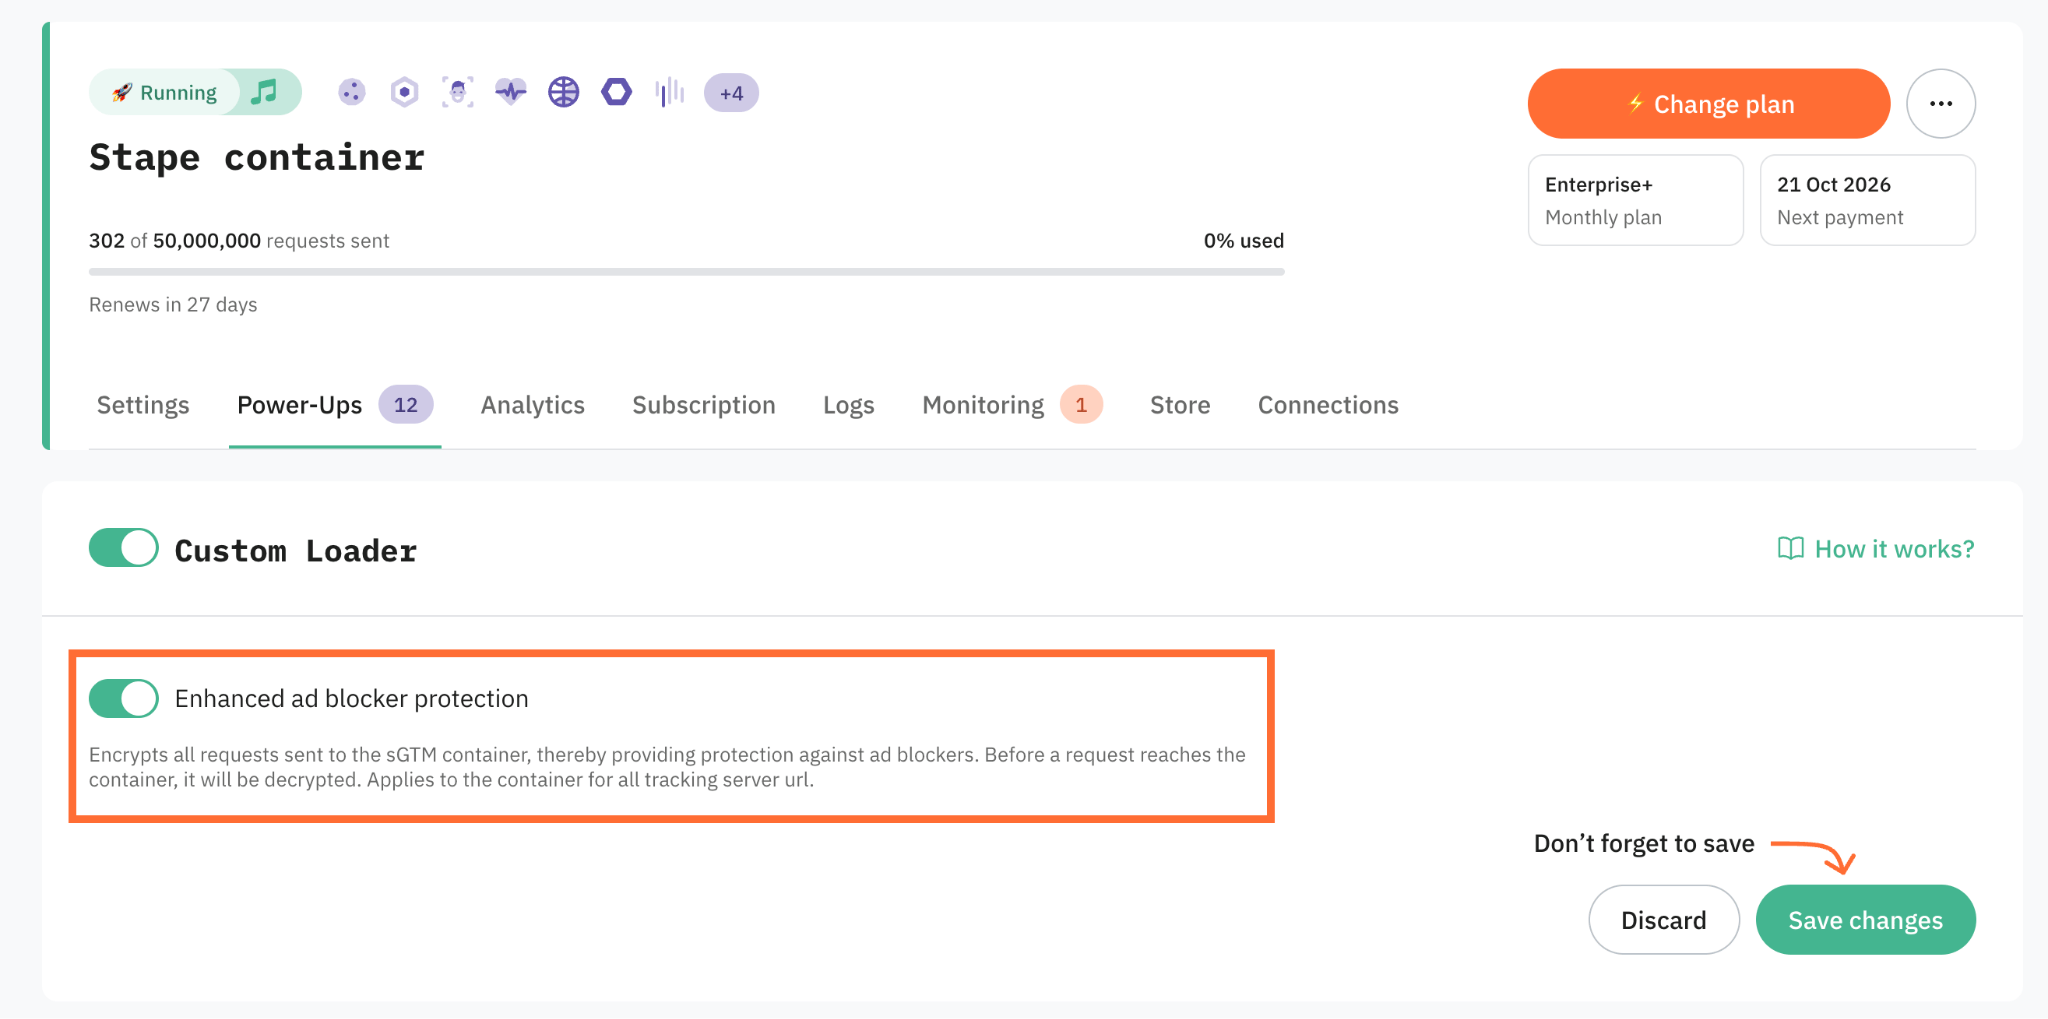
6. In the Code & Setup information section, choose the Platform - here you can either:
- Select your CMS platform (such as Shopify, Wordpress, etc.). In this case, you’ll be required to install and configure a Stape app.
- Select Other to receive a JS snippet in case you’re using another platform or a custom website.
Setup for a CMS platform
1. Configure the following settings:
- Web GTM ID – enter your web Google Tag Manager ID.
- Same Origin Path – if you use the same-origin approach, enter the path here so both GTM and
gtag.jsload through it.
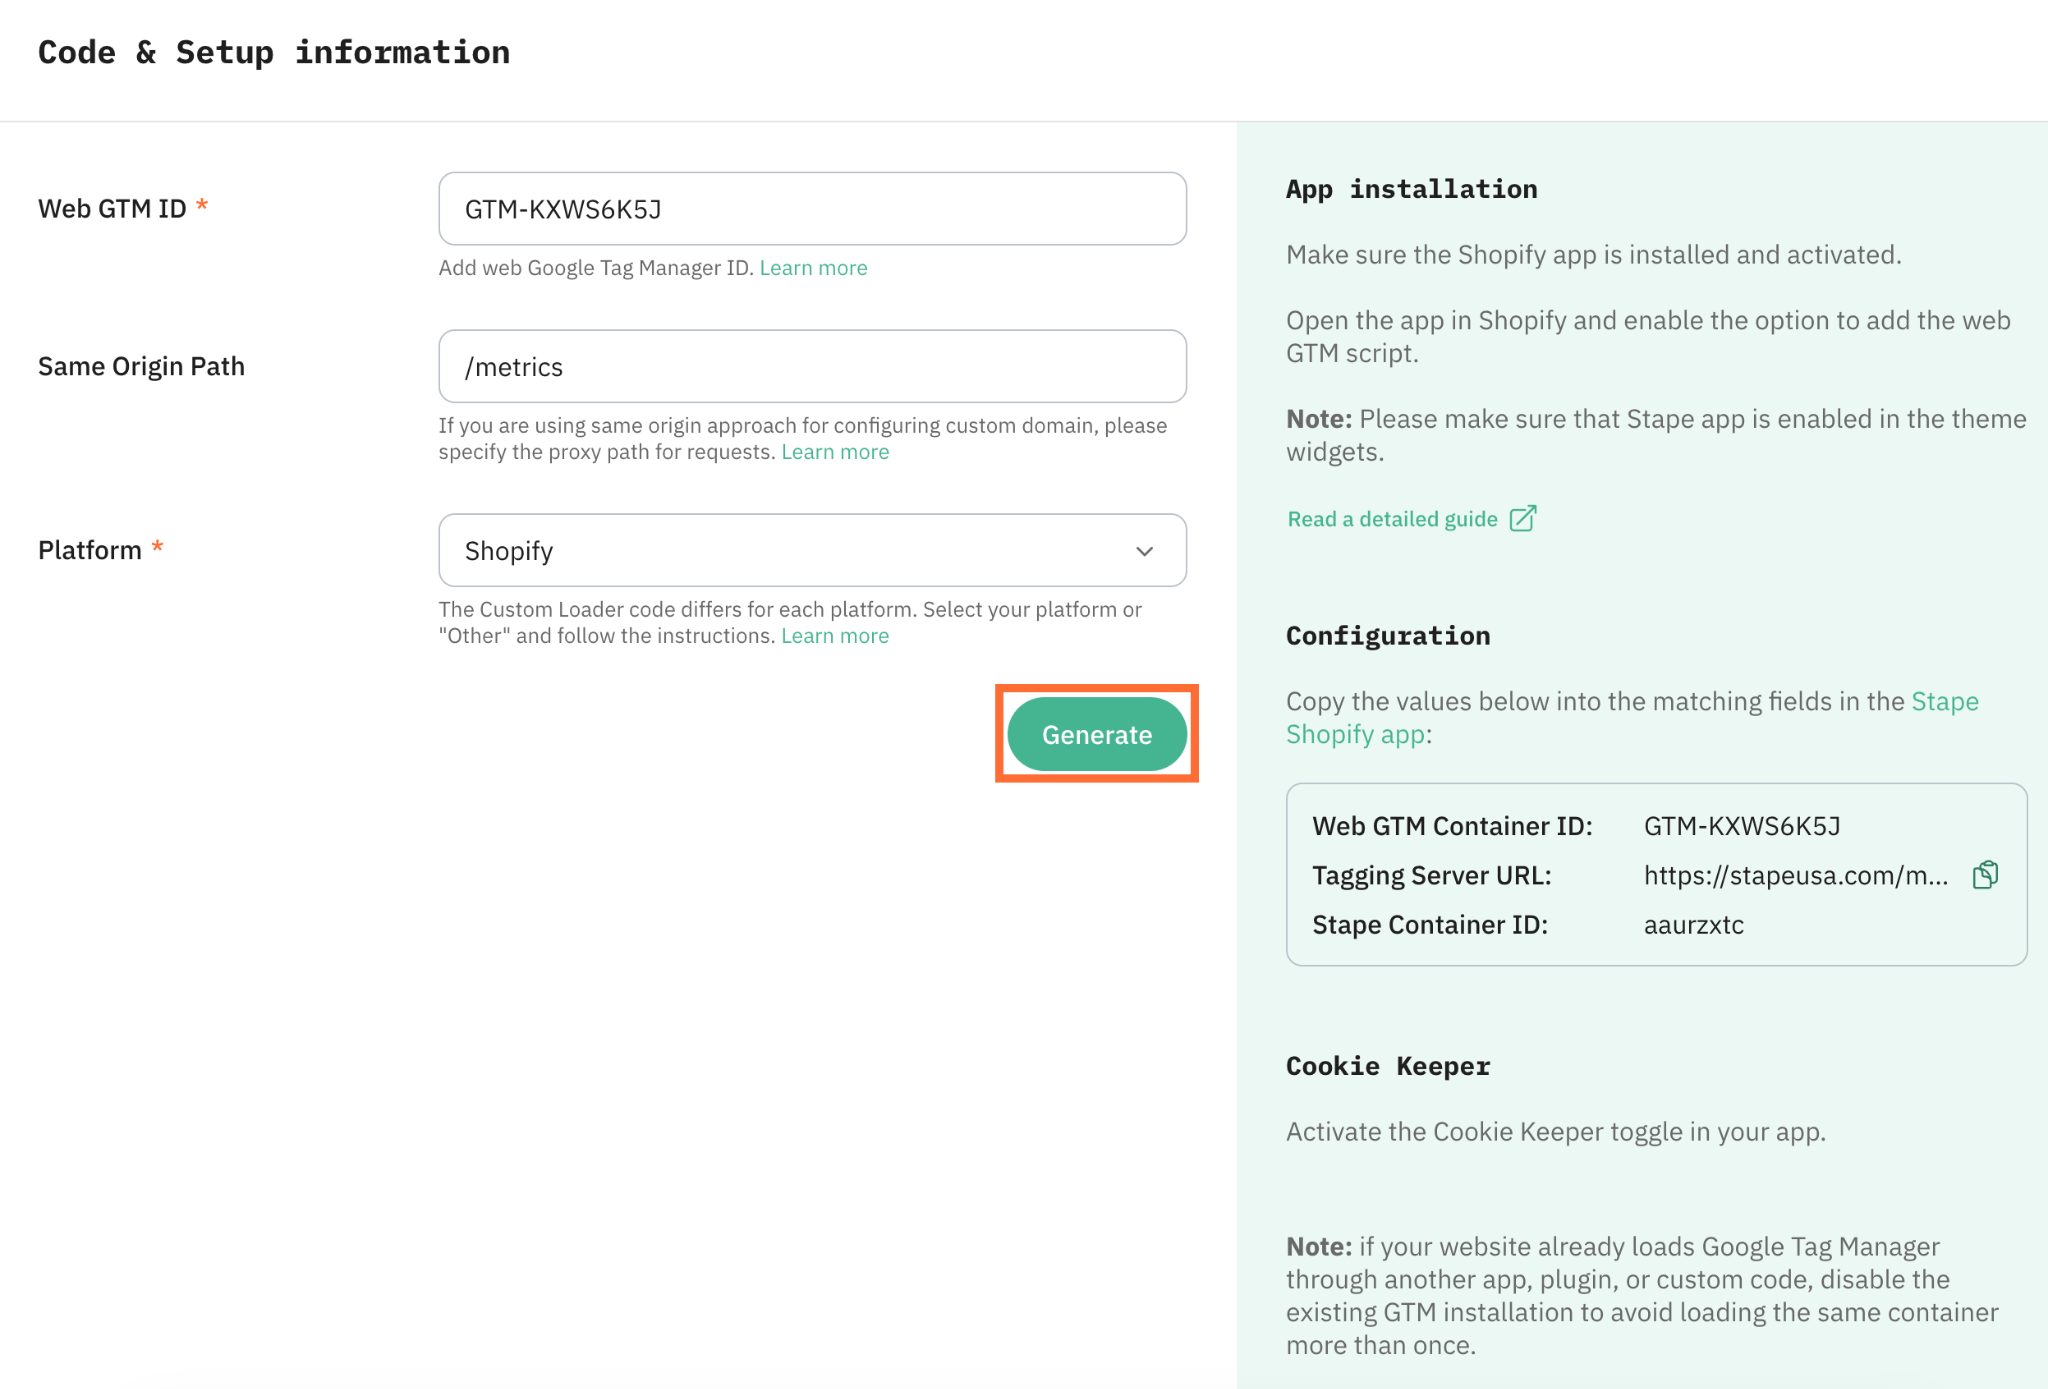
2. Click Generate. You’ll get configuration and app installation instructions on the right panel for your selected platform. Follow the app installation guide.
Setup for other platforms
1. Configure the following settings:
- Web GTM ID – enter your web Google Tag Manager ID.
- Same Origin Path – if you use the same-origin approach, enter the path here so both GTM and
gtag.jsload through it.
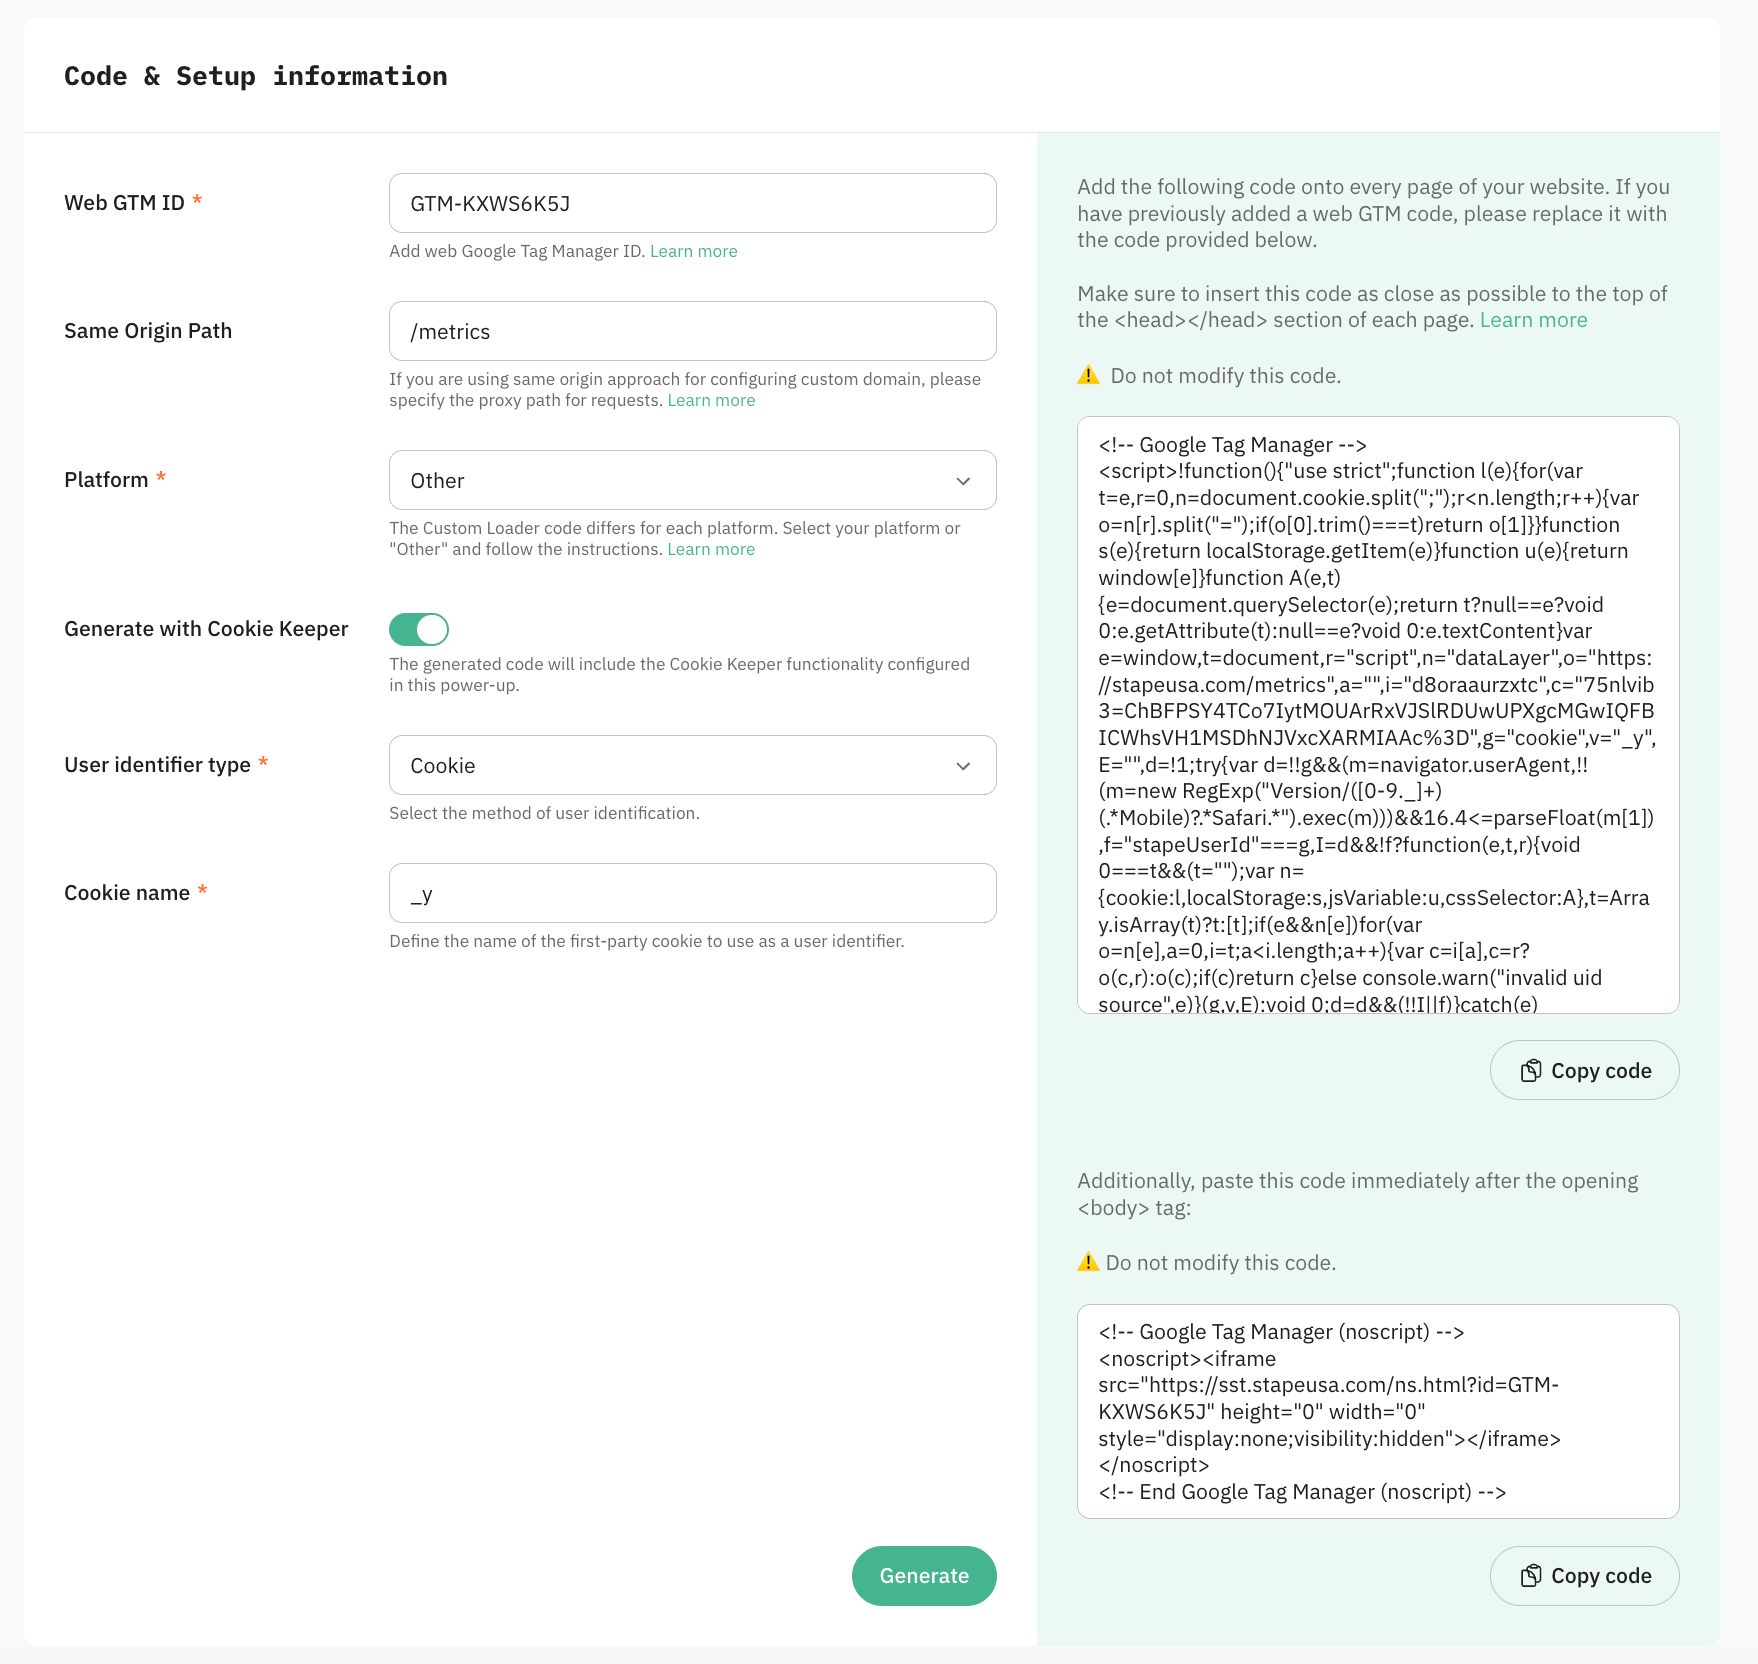
2. You can also configure Advanced settings:
- Generate with Cookie Keeper – includes Cookie Keeper functionality in the generated code.
- User identifier type – appears together with Generate with Cookie Keeper. Choose how to identify users, Cookie is recommended. When selected, enter the Cookie name of the first-party cookie to use as the identifier. For more information, read How to choose user identifier type in Cookie Keeper.
3. Click Generate and add the provided code to your website.
Warning:
Testing
To verify the setup is working:
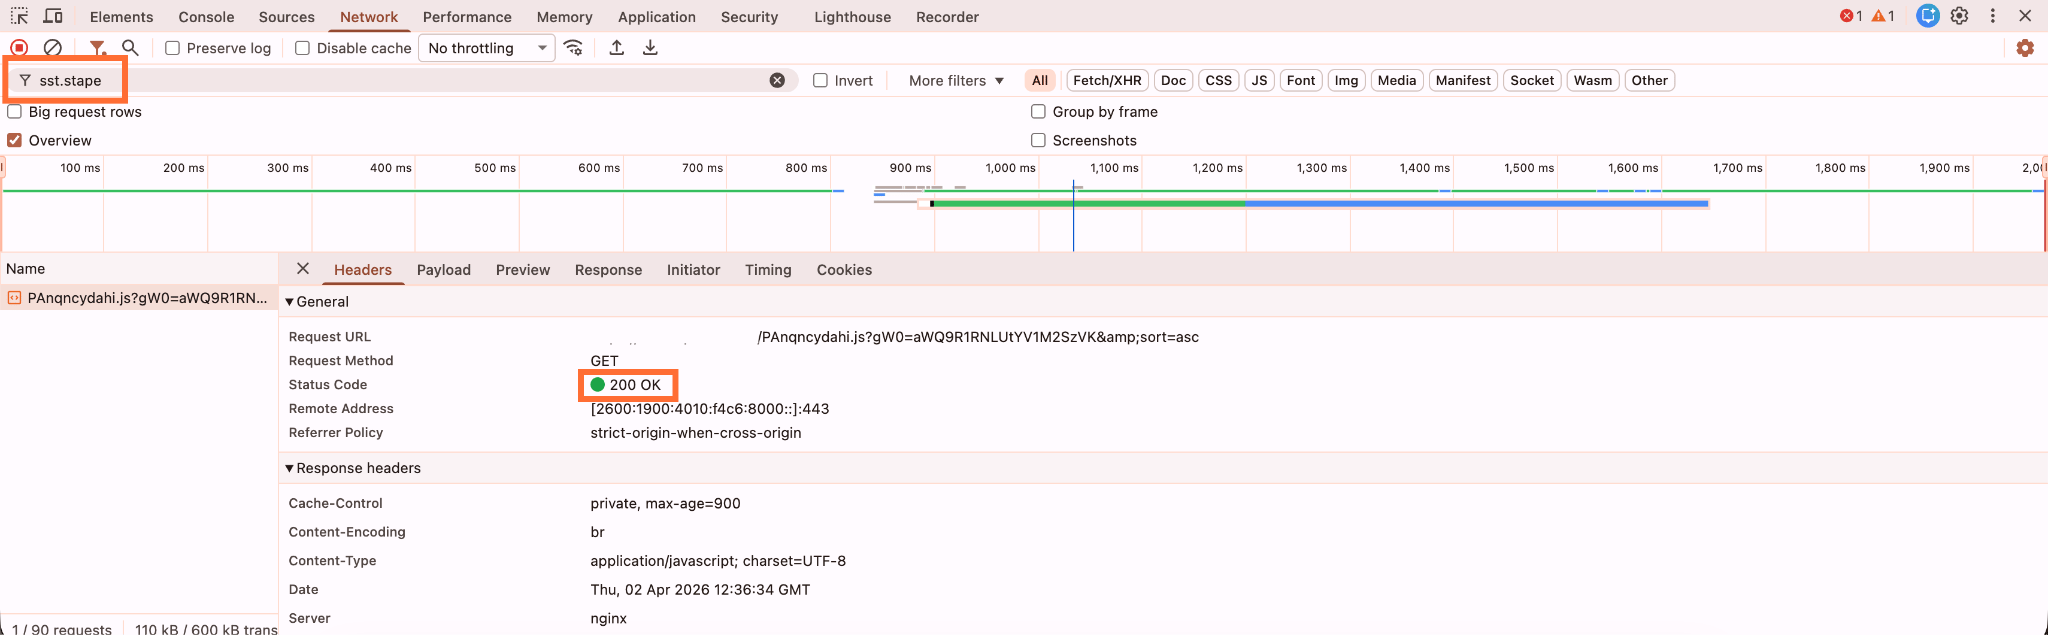
- Open any page on your website.
- Right-click → Inspect → open the Network tab.
- Filter requests by your custom subdomain or same-origin path.
- Look for the GTM request URL - it should return a
200 OKstatus code.
Note:
To track the data more precisely, it's also recommended to configure the custom domain. Using a custom domain for server-side tracking helps improve tracking reliability, attribution accuracy, and data quality. By moving tracking into a first-party context, you can extend cookie lifetime, reduce the impact of ad blockers, and get more complete user journeys for analytics and advertising platforms like Google Ads and Meta.
If you would like to speed up the configuration process for all the platforms you need, opt for Setup Assistant. It's a free tool by Stape that can automatically generate all the tags, clients, triggers, and variables for both web and server GTM containers and automatically add them to your workspace.
4.3 Send data from the web to the server GTM container
If you opt for a configuration with Setup Assistant, you can skip this step since everything required for catching data and forwarding it to the server container will be added automatically.
In GTM, Clients are responsible for sending data from the web to the server container. There are two popular ways to send data from the web to the server GTM: using GA4 Client and Data Client. Which one you choose depends on your tracking requirements and the level of flexibility you need in your server-side setup.
- GA4 Client is perfect if your primary goal is to send data to Google Analytics. GA4 automatically structures and sends requests to the server container.
- Data Client is created for more advanced and flexible server-side tracking architectures. GA4’s predefined structure does not limit it and is especially useful when you need to build a custom data pipeline or send information beyond standard analytics requirements.
Please refer to the corresponding guides for step-by-step instructions:
Step 5. Configure server-side consent settings
Note:
In this step, we assume that you already have GA4 configured in your web GTM container. If it's not the case, please refer to our guide on GA4 web and server-side configuration.
For the server GTM container to receive the correct consent status, you just need to update the Google Tag in the web GTM. To do it, opt for either Advanced or Basic Mode.
If you need more assistance on the difference between these two mode types, please click on the collapse element below to see the comparison of both:
Advanced vs Basic Mode
Basic Mode and Advanced Mode are ways in Google Consent Mode v2 to handle tag behavior before and after user consent. Both options are compliant with Google’s consent framework, but they differ in how early data is collected.
Advanced Mode allows Google tags to load even before consent is given. However, instead of collecting full user-identifiable data, tags operate in a limited, privacy-safe mode and send cookieless pings. Once consent is granted, full tracking begins automatically. This approach is good for attribution modeling.
👉Advanced Mode is best for ecommerce stores running paid advertising campaigns. This is the preferred option for most businesses that sell on Shopify because it improves data completeness and advertising performance without ignoring consent requirements.
With Basic Mode, all Google tags are blocked until the user explicitly provides consent. This means no analytics or marketing requests are sent before consent is granted. This ensures strict compliance and simplicity, but it also leads to a higher level of data loss.
👉 Basic Mode is best for businesses prioritizing strict legal compliance and brands operating in highly regulated environments (usually, healthcare, banking, or governmental).
Advanced Mode configuration
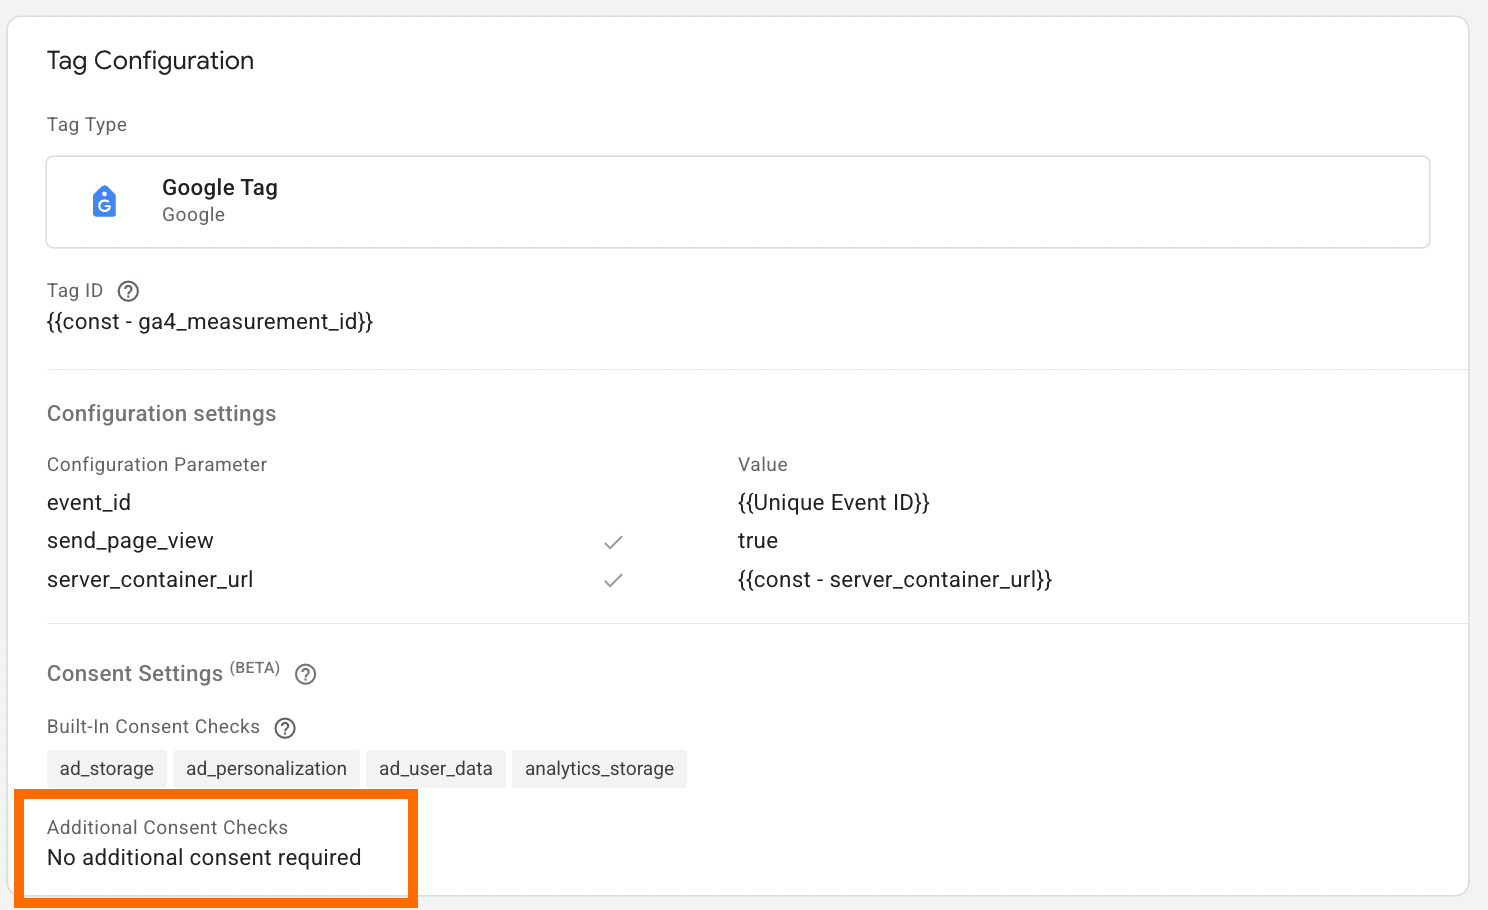
With Advanced Consent Mode enabled, Google Analytics can continue sending anonymized, cookieless pings even when users decline analytics cookies. To enable this behavior, you only need to update the Consent Settings in the web Google Tag Manager container. No additional consent configuration or extra setup is required in the server-side GTM container.
Basic Mode configuration
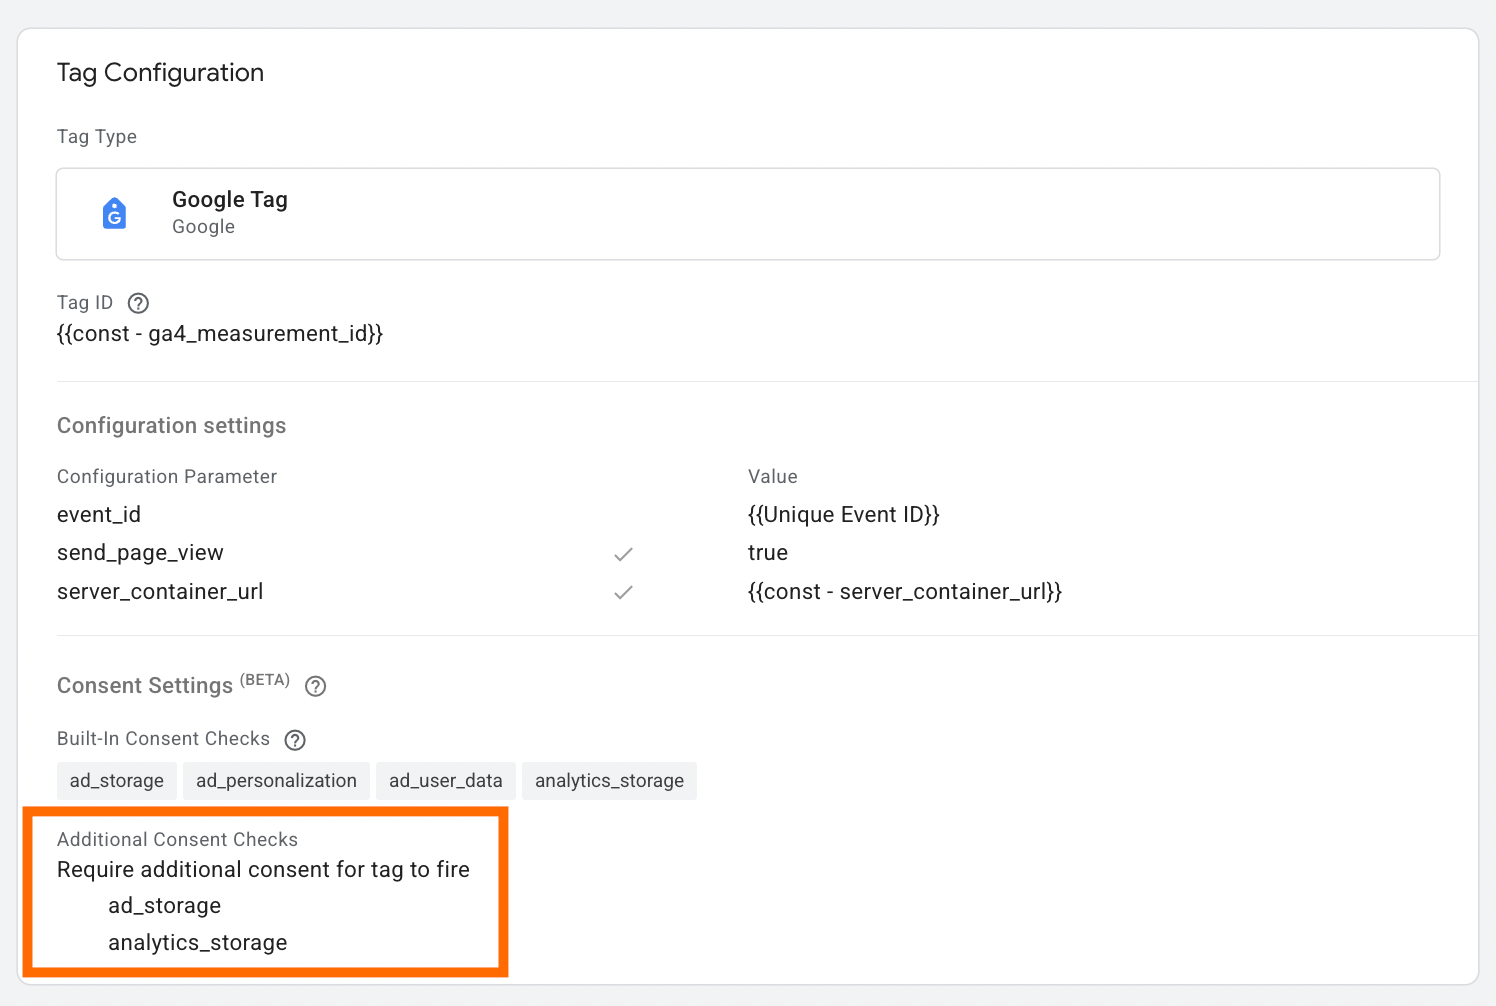
To prevent Google Analytics from collecting data before explicit user consent is granted, configure the tag to require additional consent in the web Google Tag Manager container. The server-side GA4 setup will automatically follow the consent rules specified in the web GTM configuration.
Debugging the Pandectes banner configuration
Debugging the cookie banners is challenging overall and in Shopify in particular due to the platform's restrictions on the checkout page. But in this section, we will show how to overcome the debugging problems in Shopify and ensure the cookie banner works correctly.
Follow the steps below:
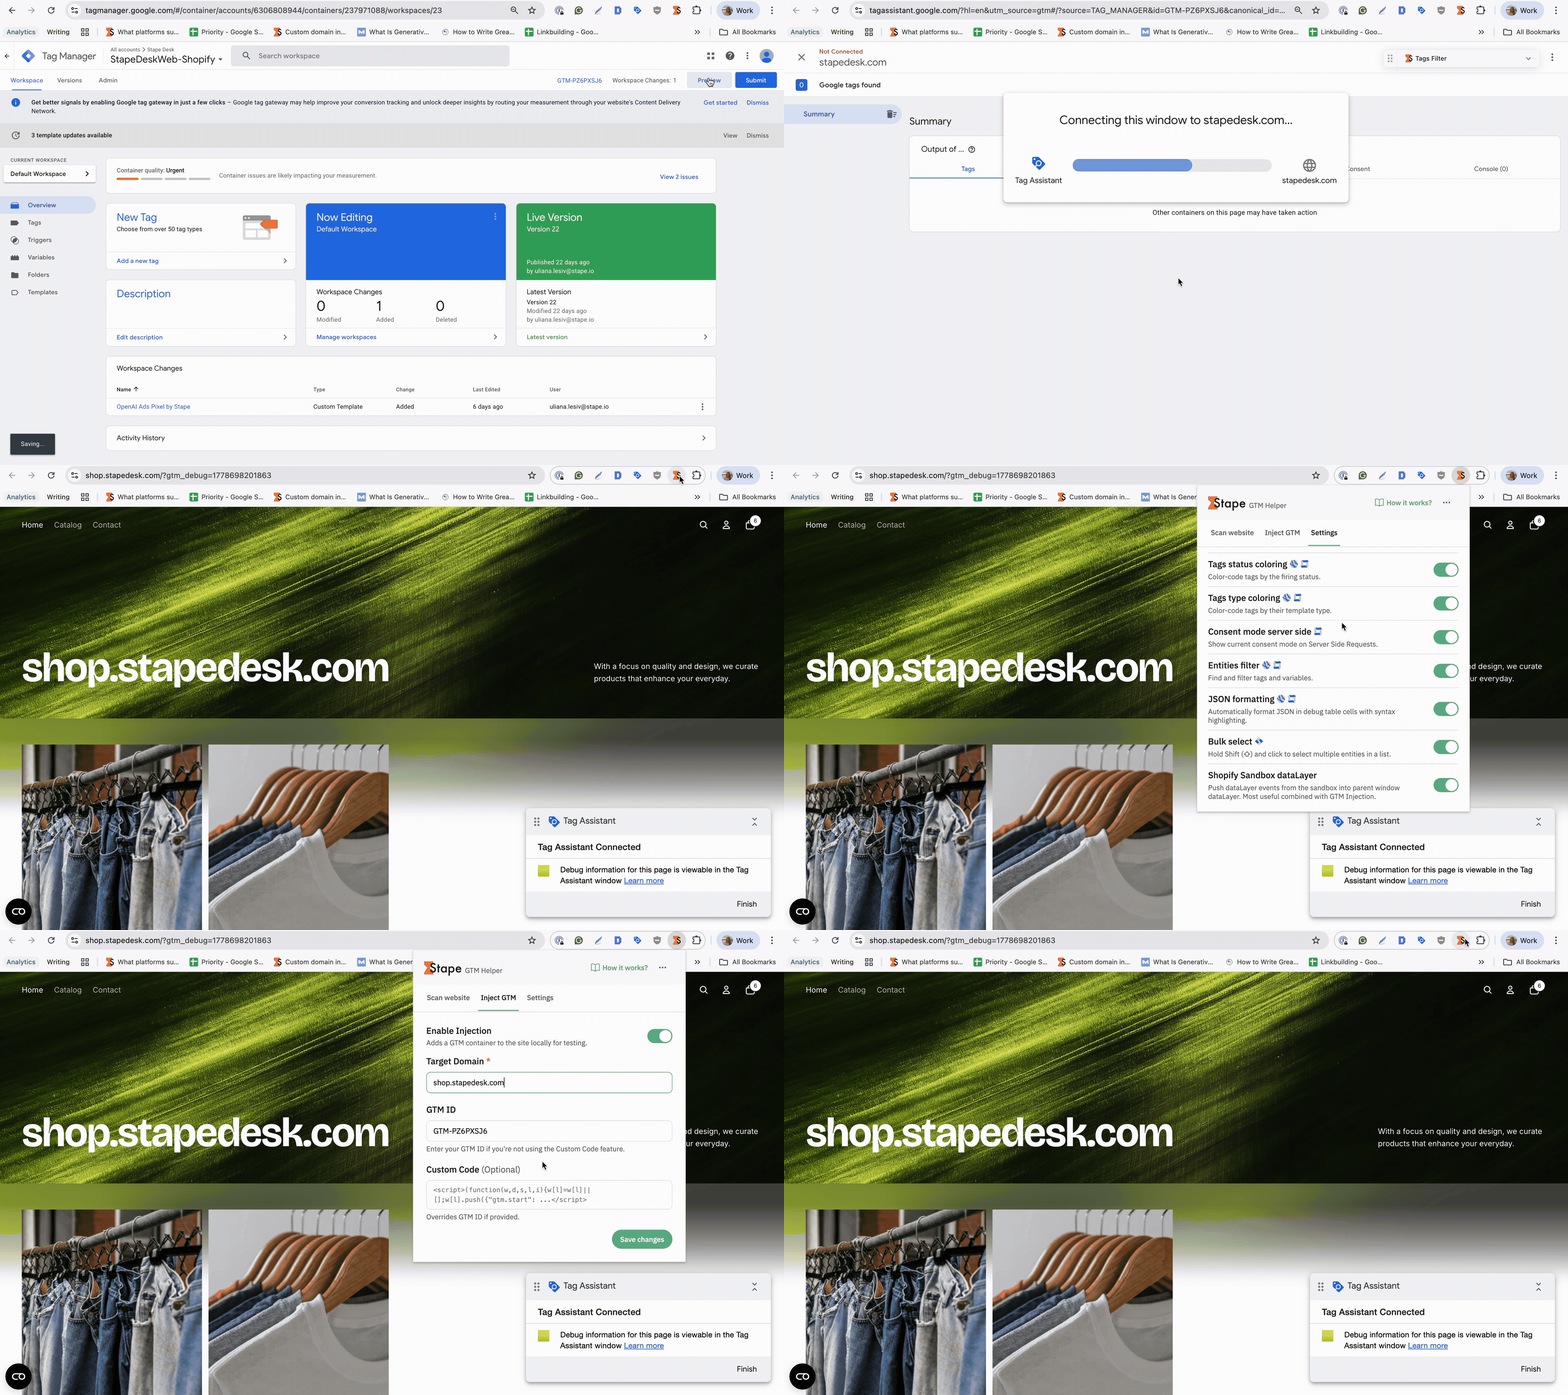
- Run Preview mode in both web and server GTM containers.
- Prepare for debugging the checkout page in Shopify. Due to the platform's restrictions (Shopify privacy API, Checkout Extensibility, Web Pixels sandboxing), you won't see the events from checkout in the GTM preview window if you don't embed the tracking snippet manually on this page.
Stape GTM Helper Chrome extension will help you do it. In the tab Inject GTM, click Enable injection, add your domain name, and GTM ID. Save changes.
Stape Chrome extension also provides other benefits to make the debugging process more convenient. Its features include, but are not limited to, entity filter, request URL formater, website tracking scanning and evaluation, and displaying consent status in server GTM. For more details on the Stape Chrome extension's features, refer to our guide.
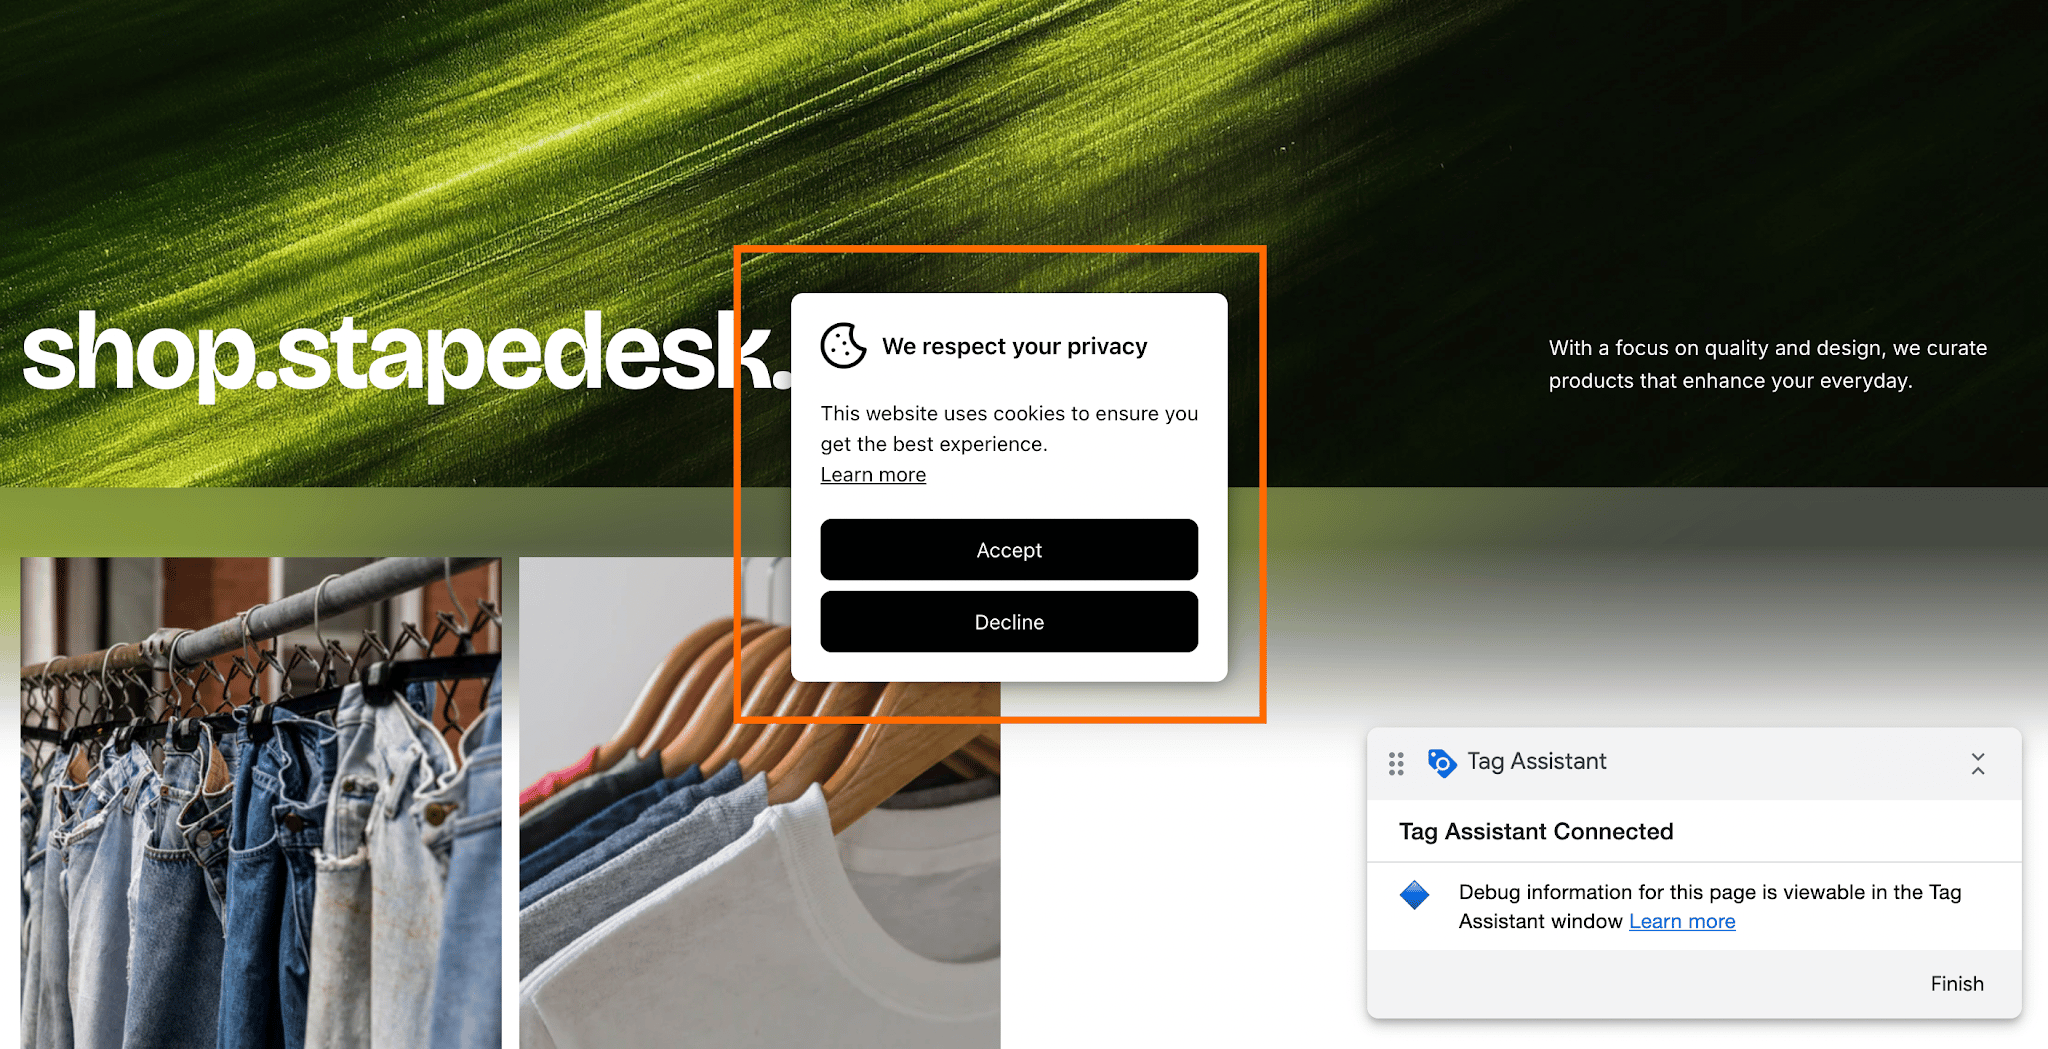
- Interact with your cookie banner. For example, accept all the cookies.
- Get back to the preview window in the web GTM container
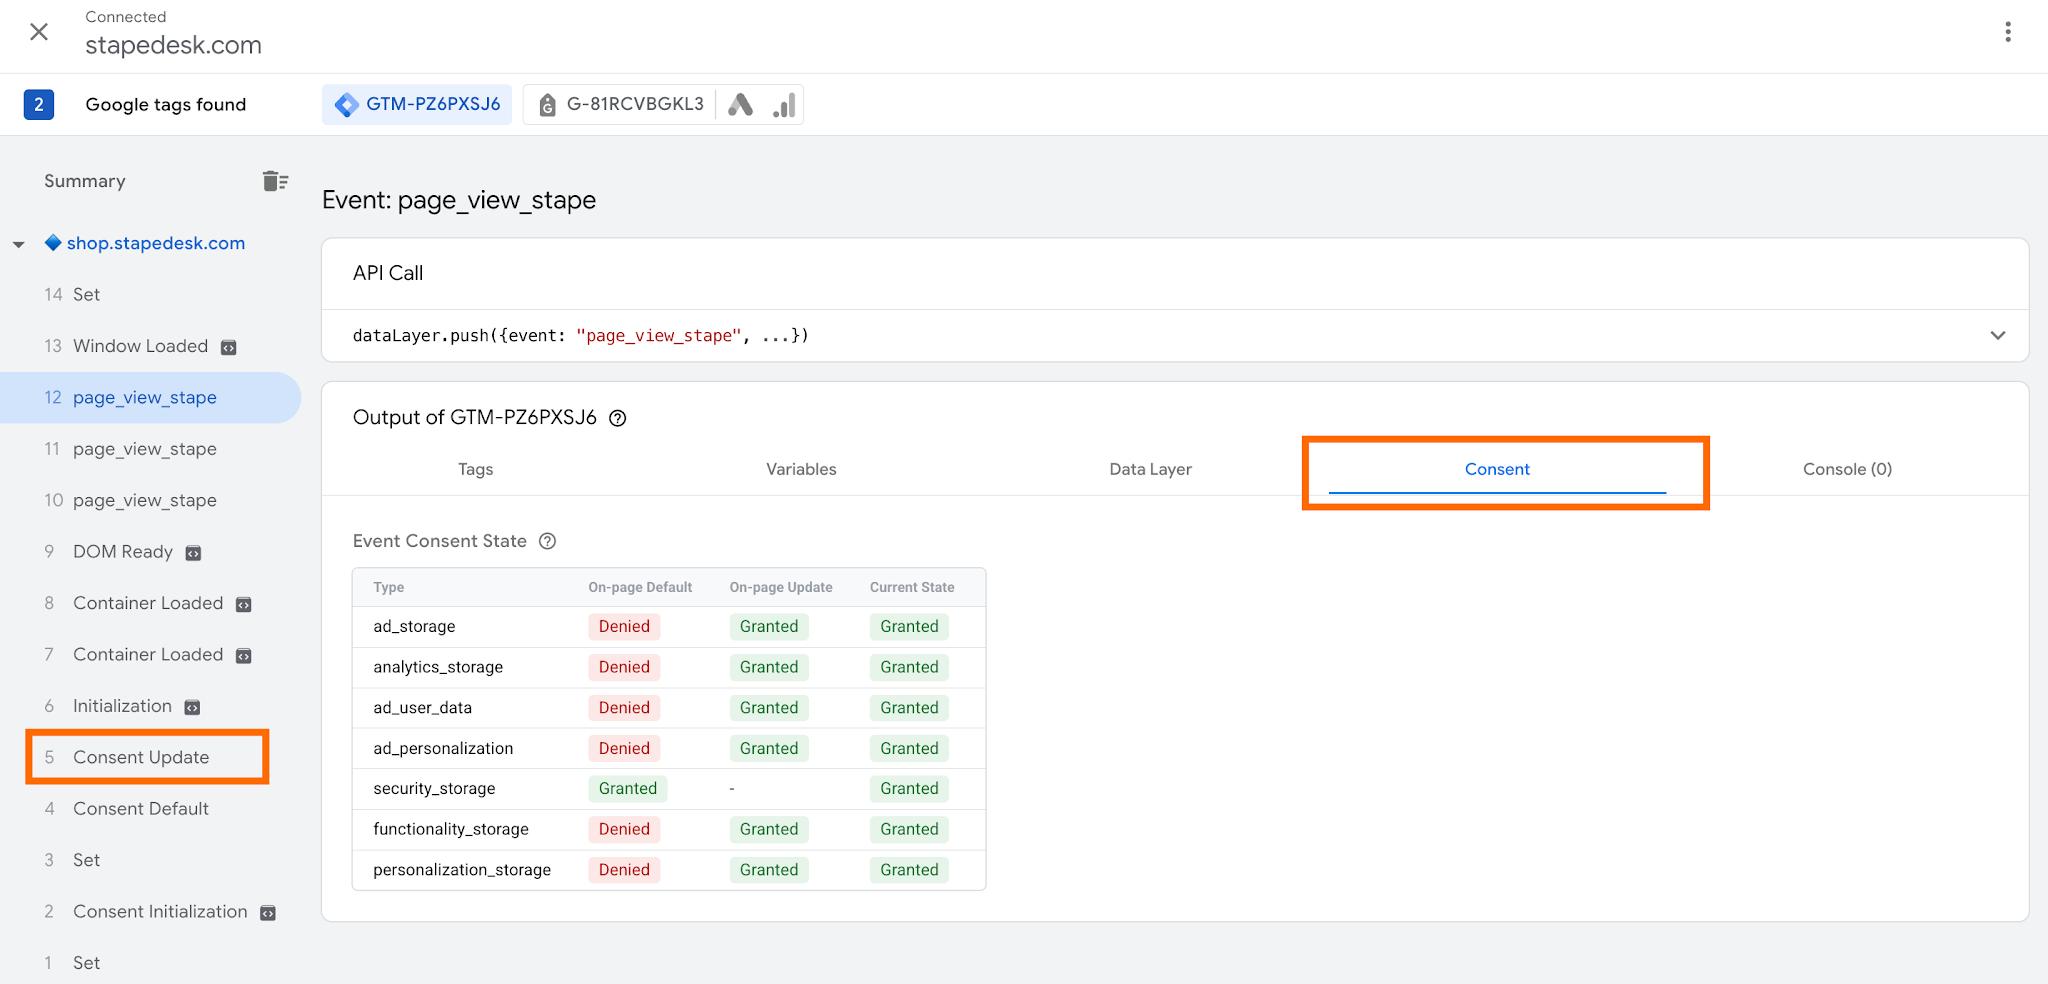
You must see that the event "Consent Update" fired before any other event you configured in the container (such as page view, clicks). It means that the consent state was initialized correctly before any tracking tags were triggered, so that analytics and marketing tools respect the visitor’s consent preferences from the very beginning of the session.
Click on the event triggered (page view in our case) and navigate to the tab "Consent". Here you can see how the consent was updated through the journey (started with default denied, as we earlier specified in the Pandectes tag, the status after updating the consent, and the current status).
If you have enabled the optional Pandectes custom event in the Pandectes CMP tag, you can also verify that this event is triggered when the visitor changes their consent (Pandectes_Consent_Update should fire).
If you change your consent settings on the banner (decline all the cookies), the "Consent Update" will launch once again, and all the columns in the Consent tab of the event will display "Denied".
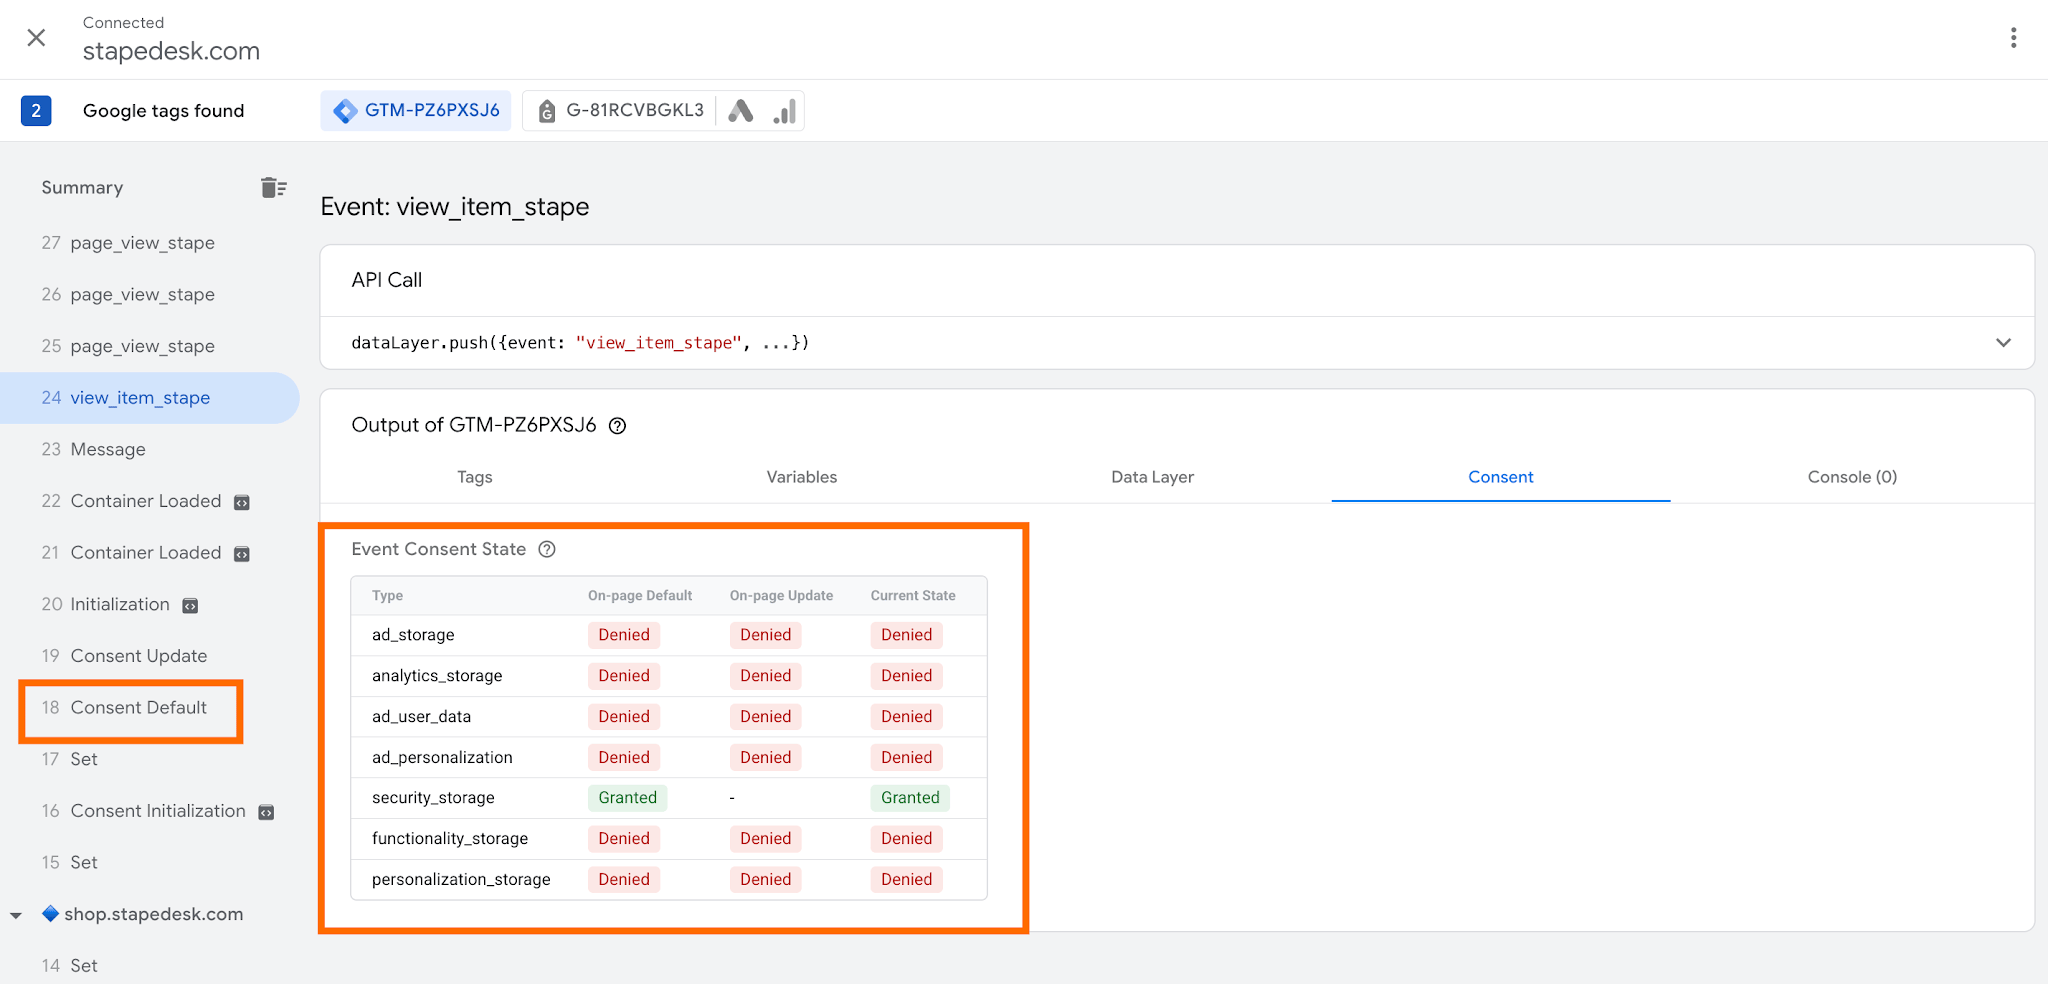
By default, the first column in the Consent tab must be set to the statuses you specified in the Pandectes tag. The other two should display the consent status you specified on the website.
- Check the consent status in the preview of the server GTM container.
Due to the limitation of sGTM, you can’t view the consent status in Preview at all. But it's important to check as well, since after receiving data on user browsing behavior, it will be sent to the third-party platforms.
Stape GTM Helper Chrome extension mentioned earlier can also help you "add" such functionality to the sGTM container. Just enable "Consent mode server side" in the "Settings" tab of the extension.
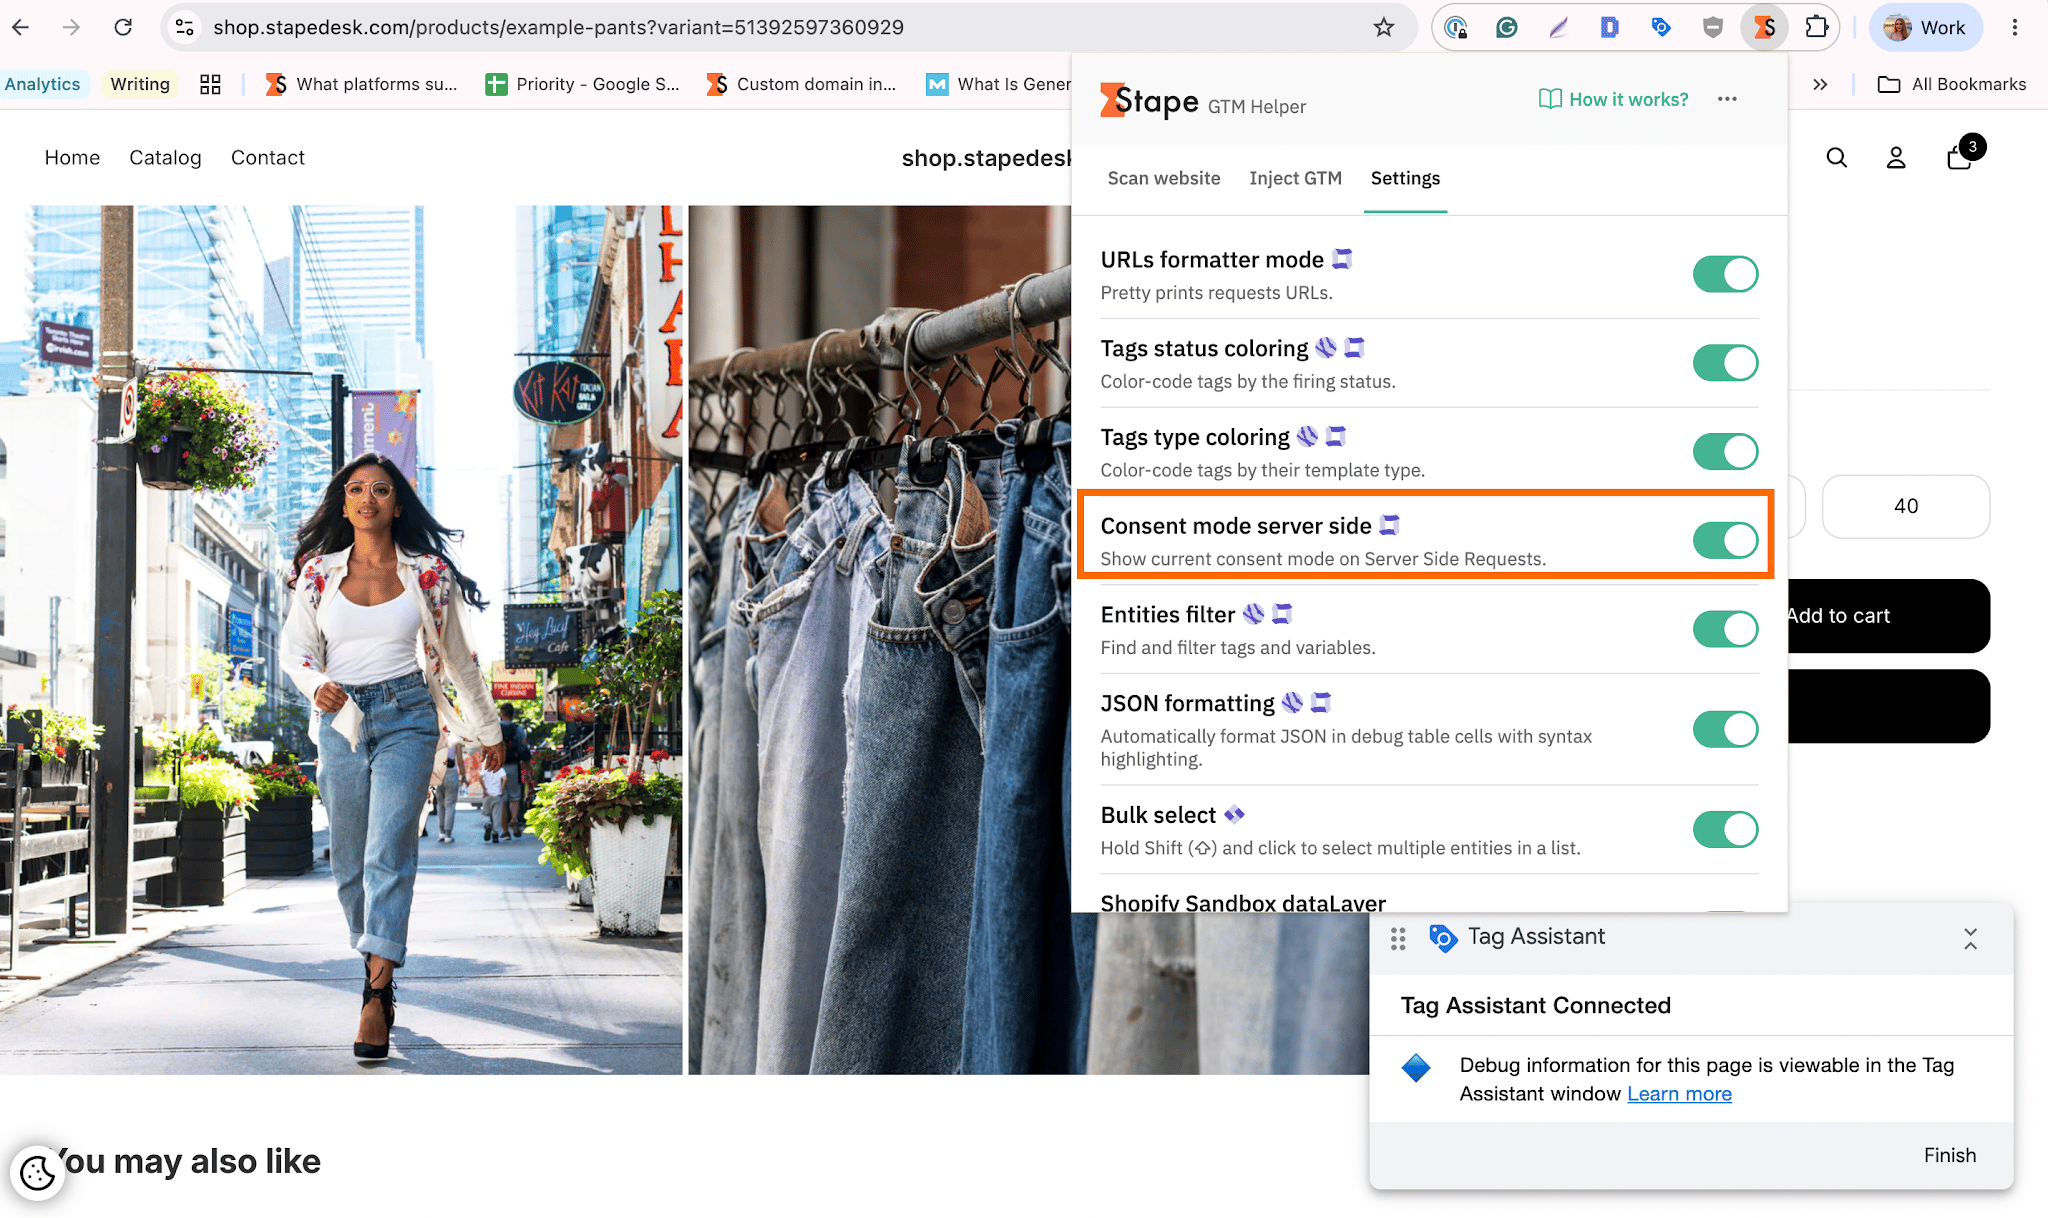
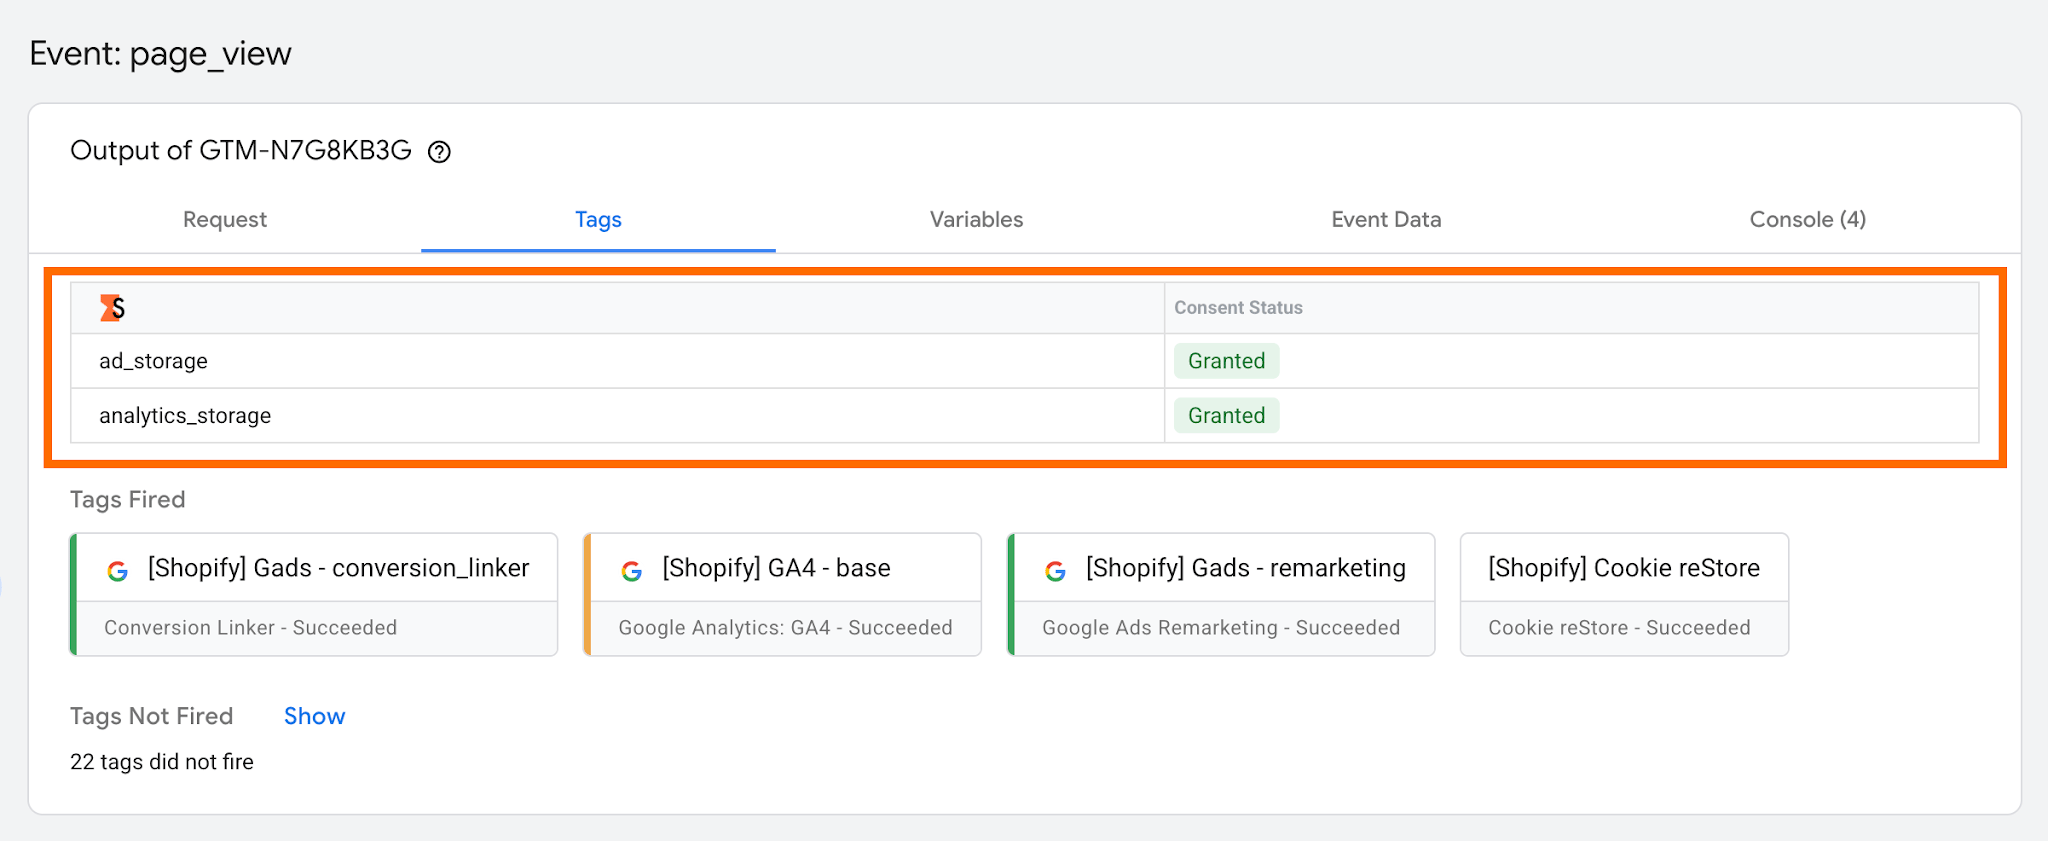
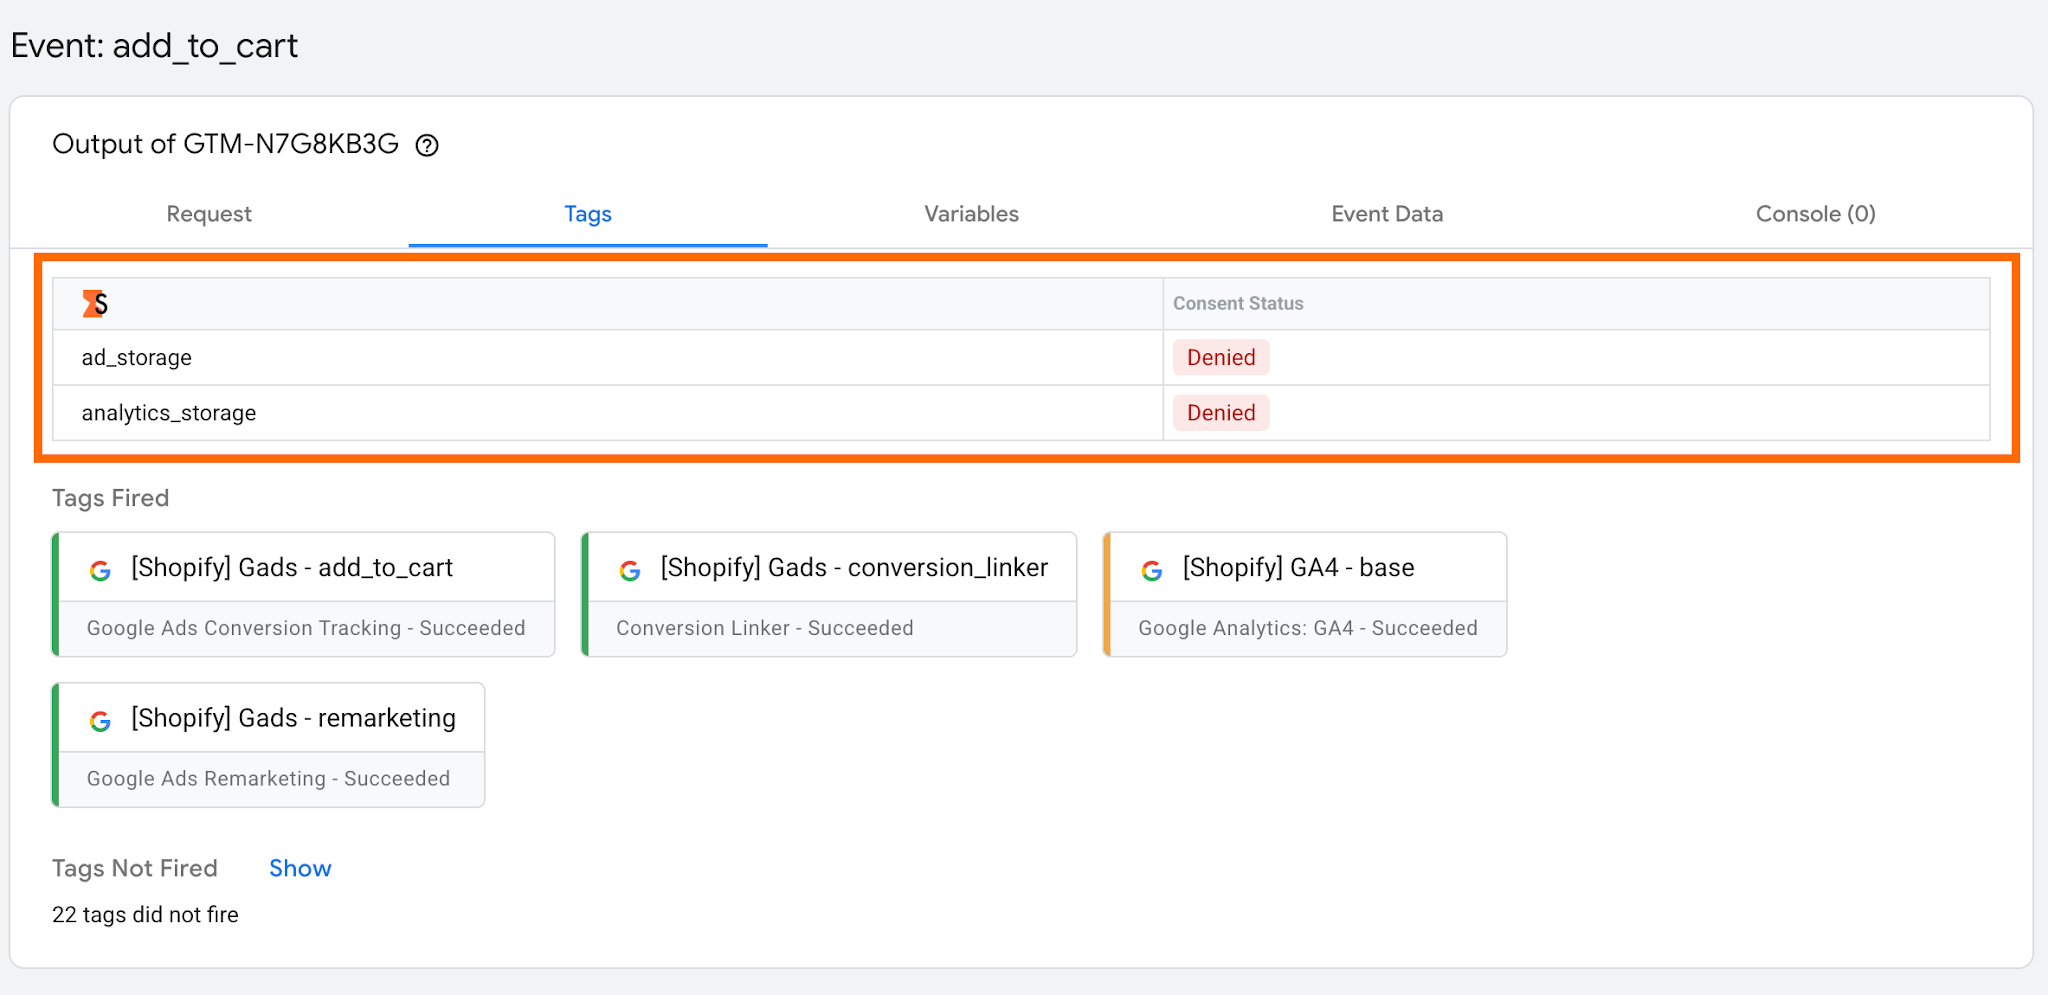
- See whether the server GTM preview receives the requests with the same consent status as in web GTM to ensure compliance.
In our case, the first event is a page view with granted status.
And denied status for the "add_to_cart" event.
Final words
Pandectes GDPR Compliance provides Shopify users with a reliable way to manage user consent and comply with GDPR requirements. The platform helps synchronize consent preferences between the storefront and checkout. This option solves one of the most common challenges in Shopify consent management.
Using server-side tracking with Stape strengthens this setup. The server-side configuration improves data quality, reduces the impact of browser restrictions and ad blockers. It creates a more secure infrastructure that gains user trust and helps you comply with data privacy regulations.

Comments