How to fix “Cart data needs attention” in Google Ads for Shopify
Written by
Abdul Kayium
Key takeaways
- "Cart data needs attention" means Google is missing the product-level data on your purchases.
- On Shopify, this usually happens when the product ID sent in your purchase tracking doesn’t match the product ID in Google Merchant Center.
- The standard Shopify feed format is
shopify_countrycode_productid_variantid. - Stape’s Conversion Tracking app for Shopify can now build this exact format for you in advanced Data Layer settings, so no custom JavaScript variable is needed.
- The warning clears in 24 to 48 hours once the format matches.
If your Google Ads account shows "Cart data needs attention" but purchases are still tracking, it can feel safe to ignore. But this warning is actually important. It means Google can see that a purchase happened, but it cannot understand what products were sold inside that order. As a result, Google is optimizing with less information than it should have.
On Shopify, this issue usually happens when the product IDs sent in your purchase tracking don’t match the product IDs in your Google Merchant Center feed.
Fixing this used to mean writing a custom JavaScript variable in Google Tag Manager. Stape has since added advanced Data Layer settings to its Conversion Tracking app for Shopify, so you can now build the exact Item ID format inside the app, with no code.
In this guide, we’ll show you how to identify the mismatch, fix the ID format in the Stape Conversion Tracking app for Shopify, and what to do if you are not using the app.
What "cart data needs attention" actually means
Google calls this feature Conversions with cart data. It is an extension of standard conversion tracking that adds product-level information to your purchase events.
A normal purchase conversion tells Google two things: a sale happened, and the total value. Cart data adds the products inside that order. For each item, it sends the item ID, the price, and the quantity.
This allows Google to understand what was sold, not just that something was sold.
The warning appears when your purchase event records, but the product data is missing or invalid. Google cannot match what you sold to the products in your feed, so it flags the goal.
You can find the status in:
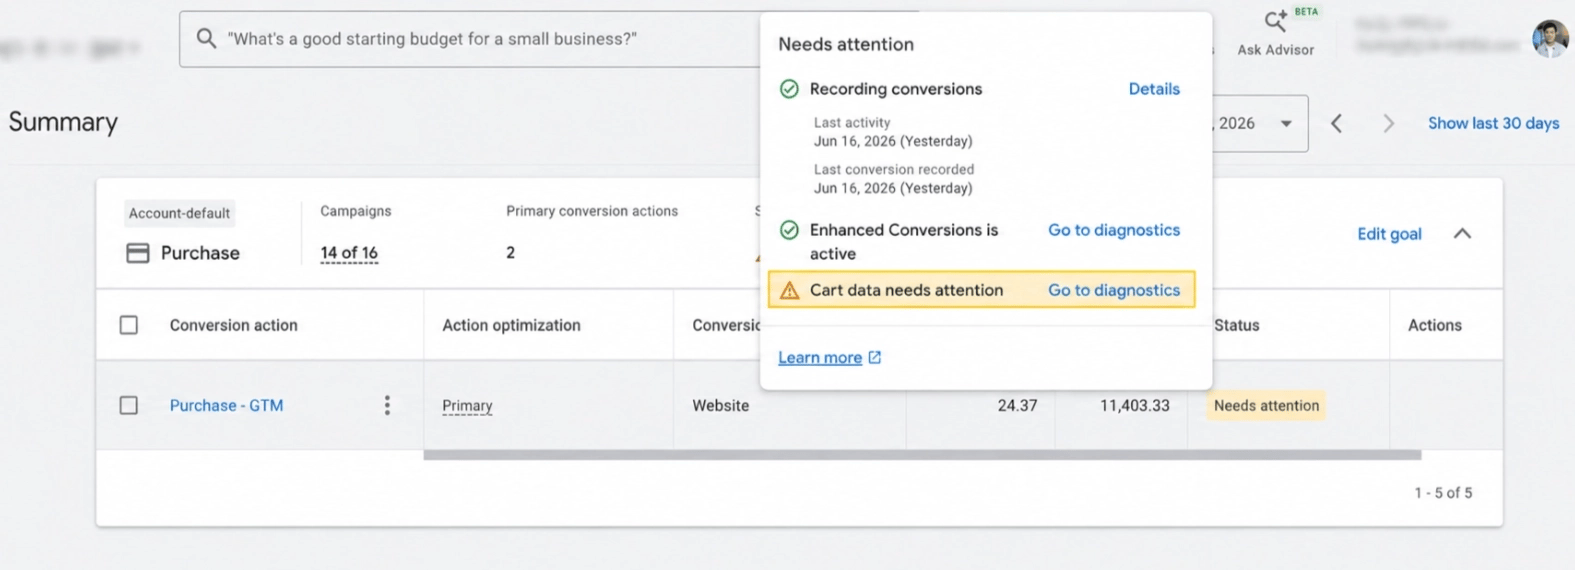
Go to Google Ads → Goals → Purchase goal. You’ll see “Needs attention”, and when you hover over it, it shows “Cart data needs attention”.
Why this matters for your sales
When Google cannot read your cart data, reporting and insights become limited.
- Product-level reporting. You cannot see which items were purchased after an ad interaction, so item performance, cart size, and average order value all stay hidden.
- Weaker optimization. Smart Bidding and remarketing get less signal to work with, because Google does not know which products actually drive your revenue.
Conversions with cart data parameters
To submit cart data, you'll need to add these additional parameters into the event snippet code:
| Parameter | Value Type | Example Value | Description |
event | String | “purchase” | Only “purchase” events will be processed for cart data. |
Items (required) | Array | 'P12345' | An array of price, quantity, and item IDs for each of the items that were purchased. |
items.id (required) | String | 'P12345' | The item ID of the purchased product. It must match the item ID used in the Merchant Center. Note: Supported only when using Google Ads as a conversion source. When using Google Analytics or Firebase as conversion source, the alternative parameter. items.item_id is supported. |
Items.item_id (required) | String | 'P12345' | The item ID of the purchased product. It must match the item ID used in the Merchant Center. Note: Supported only when using Google Analytics or Firebase as a conversion source. When using Google Ads as the conversion source, use items.id as an alternative. |
Items.price (required) | Float | 12.50 | Sales price of a single item, excluding tax, shipping, and any transaction level discounts. |
Items.quantity (required) | Integer | 2 | Number of units sold of the items. |
discount (optional) | Float | 1.50 | Discount, $1.50, applied to the whole order, for example: • Free shipping • Limited offer sale Note: When using Google Analytics as conversion source, the discount parameter is not supported. |
aw_merchant_id (optional) | Integer | 98765 | The Merchant Center ID. Provide this parameter if you submit an item in several Merchant Center accounts and you want to control from which Merchant Center the item’s data, for example, its COGS, should be read. |
aw_feed_country (optional) | String | “US” | The country associated with the feed where your items are uploaded. Use CLDR territory codes. Note: When using Google Analytics as a conversion source, please use the parameter aw_feed_label instead. |
aw_feed_language (optional) | String | “EN” | The language associated with the feed where your items are uploaded. Use ISO 639-1 language codes. |
aw_feed_label (optional) | String | “feed_label” | The label associated with the feed where your items are uploaded. Note: Supported only when using Google Analytics as conversion source. |
currency (optional) | String | “USD” | Currency of the purchase or items associated with the event, in 3-letter ISO_4217 format. Note: When using Firebase as conversion source, currency is required either at event or item level. |
items.currency (optional) | String | “USD” | Currency associated to the price of the item, in 3-letter ISO_4217 format. Note: Supported only when using Firebase as conversion source. For Firebase conversions, currency is required either at event or item level. |
Source: Google
Why it happens on Shopify
The usual cause is a product ID that does not match.
When Shopify sends your products to Google Merchant Center, every product and variant gets an Item ID. The normal Shopify format looks like this:
shopify_COUNTRYCODE_{product_id}_{variant_id}
Many tracking setups only send the raw product ID. They drop the shopify_COUNTRYCODE_ part or the variant. So when Google checks your sale against the feed, it finds no match and shows the warning.
A few other common causes:
- The product list is missing from the purchase event.
- The price or quantity is sent as text, not a string AND number.
- An old tracking script and a new one both fire, sending two different ID formats.
How to fix
Step 1: Identify the exact mismatch
The fix starts with one question. What is Google receiving, and what is your store sending? Check both ends, then make them match.
Check what Google received
- 1.Go to Google Ads → Goals → Diagnostics → Cart data.
- 2.Download the list of flagged Item IDs. These are the IDs Google received but could not match to your feed.
- 3.Open Google Merchant Center → Products, click any product, and copy its Item ID.
Now compare the two values side by side. They have to be exactly the same, not almost the same. One different character is enough for Google to miss the match.
Two more things to confirm while you are here:
- Your Merchant Center account is linked to Google Ads.
- Every product you sell is actually in the feed. A product that is not in the feed can never match.
Check what your store is sending
Next, see what your tracking sends on a real sale.
- 1.Open Google Tag Manager and turn on Preview mode.
- 2.Make a test purchase.
- 3.Find the purchase event and check the Item ID being sent.
Important
When debugging a Shopify setup, the GTM dataLayer is not visible on the checkout page because Shopify restricts access to the checkout environment. The checkout is isolated and does not allow unrestricted DOM manipulation or script injection, as on other Shopify pages.
But you can manually insert the GTM snippet on the checkout page to run preview mode for this part of your setup. It is easy to do with the Stape GTM Helper Chrome extension.
Stape has a full guide on debugging Shopify tracking with web and server GTM.
After the test purchase, check two things:
- What Item ID is sent to Google Ads.
- Whether it matches your Merchant Center format exactly.
Once you can see both sides, the mismatch is clear. Now you can fix it.
Step 2: Build the correct Item ID in the Stape Shopify app
If your data layer already comes from the Stape Conversion Tracking app, you can fix the ID inside the app itself. No Custom JavaScript variable, and no developer ticket.
Advanced Data Layer settings lets you choose what value goes into each product field. You build the ID in the app, and the data layer sends it in the correct format from the start. Because the fix happens at the data layer level and not inside a single tag, the corrected ID flows to your server GTM container as well.
1. Open advanced Data Layer settings
In the app, go to the Data Layer tab and check Advanced Data Layer settings.
The defaults match the app’s current behaviour, so nothing changes until you edit a field. By default, item_id sends the raw Shopify Product ID, for example 9143899914523. That is the value Merchant Center cannot match.
Note:
This assumes Add ecommerce Data Layer events is already enabled in the same tab. If it is not, turn it on first.
2. Build item_id to match Merchant Center
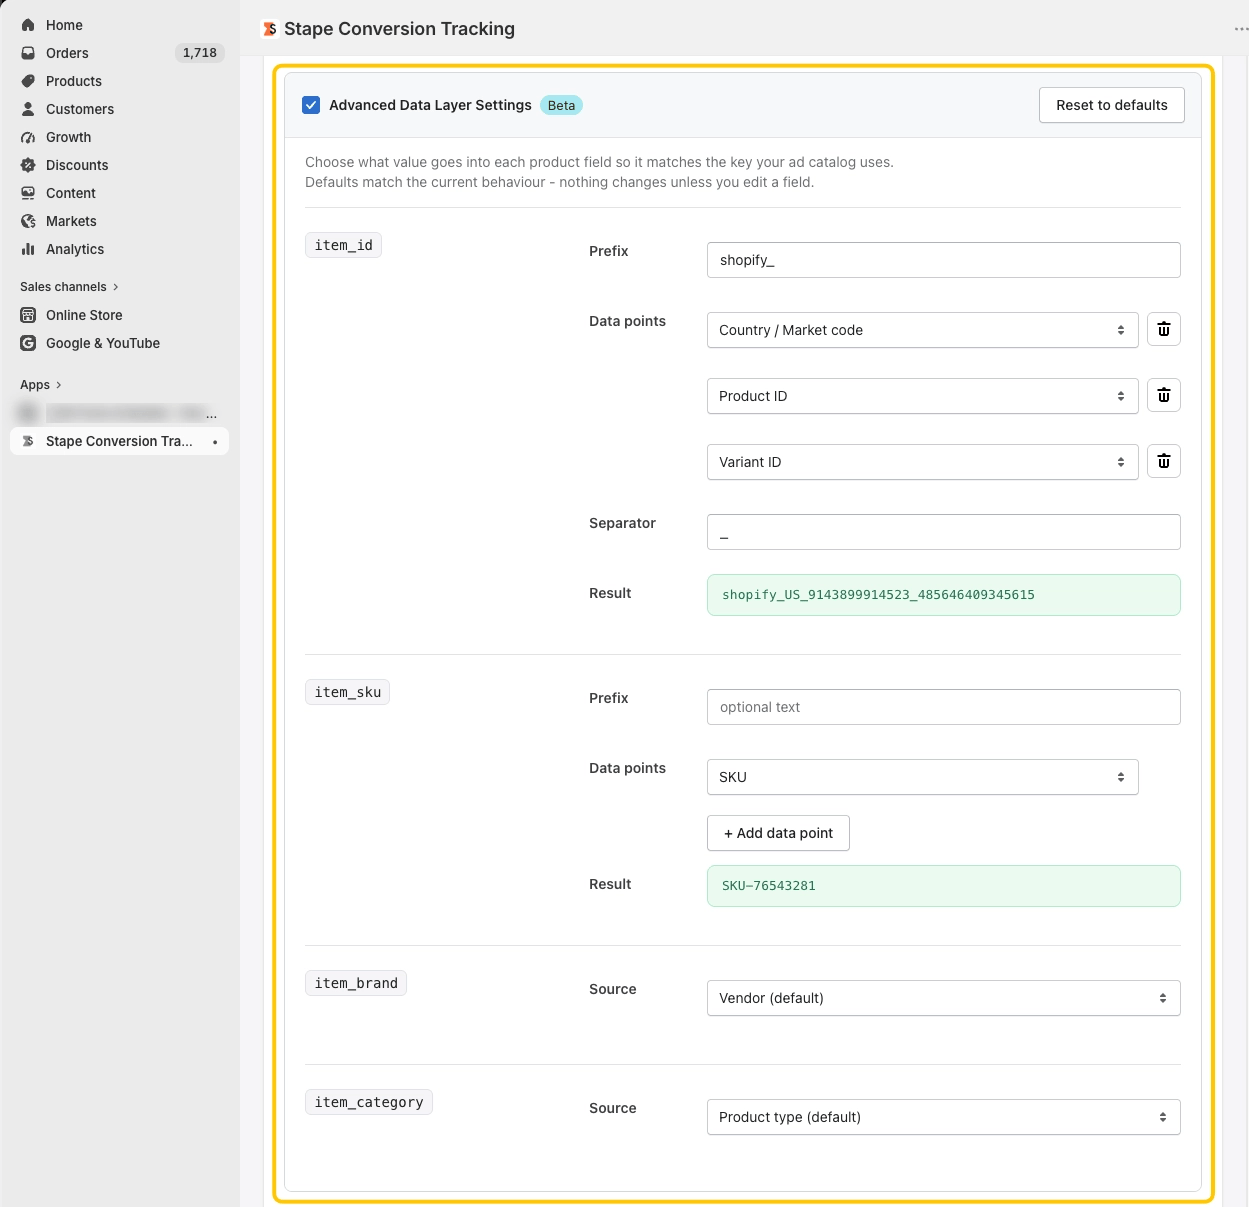
Under item_id, set the fields like this:
| Field | Value |
| Prefix | shopify_ |
| Data point 1 | Country / Market code |
| Data point 2 | Product ID |
| Data point 3 | Variant ID |
| Separator | _ |
Use + Add data point to add each value, in order. The Result field shows a live preview of the ID your store will send:
shopify_US_9143899914523_485646409345615
Compare that preview with the Item ID you copied from Merchant Center in Step 1. They should be identical, character for character.
Note:
The separator joins the data points only. It is not added after the prefix. So keep the underscore at the end of your prefix (shopify_), or you will end up with shopifyUS_....
3. Set the other product fields
The same panel controls item_sku and item_brand.
- item_sku: choose SKU as the data point if your feed uses SKUs.
- item_brand: choose the Source, for example a product Metafield, if your brand values are stored there.
If your Merchant Center Item ID is the SKU instead of the product and variant IDs, build item_id from the SKU data point and leave the prefix empty. Match whatever your feed actually uses.
4. Save and test
Save changes in the app, then make a test purchase and open GTM Preview.
Check the purchase_stape event and confirm each item now carries the full ID. Then confirm your Google Ads conversion tag reads that field, so item_id, price, and quantity are all mapped from the data layer.
Publish your web and server GTM containers once the preview looks correct.
Note: Advanced Data Layer Settings is currently in Beta. Always check the Result preview and run a test purchase before you publish.
If you are not using the Stape Shopify app
If your data layer comes from somewhere else, the ID still has to match. Pick the option below that fits your setup.
Option 1: fix it in the dataLayer (cleanest)
Ask your developer to push the correct Item ID format straight into the dataLayer on the purchase event. So instead of sending the raw ID, they send the exact format you saw in Merchant Center, for example shopify_US_{product_id}_{variant_id}.
Option 2: rebuild the ID in GTM
Use this when the dataLayer already has the product info, but not in the right format. You rebuild the ID inside GTM.
If your Merchant Center ID looks like: shopify_{countrycode}_{product_id/variant_id/sku}_{product_id/variant_id/sku} Then rebuild it inside GTM.
First, create a dataLayer variable for the items array, for example, {{DLV - ecommerce.items}} then create a Custom JavaScript Variable in GTM:
function() {
  var items = {{DLV - ecommerce.items}}; // your items array
  if (!items || !items.length) return undefined;

  var prefix = "shopify_countrycode_"; // change country code if needed

  return items.map(function(item) {
    return {
      item_id: prefix + item.item_id + "_" + item.item_variant, // adjust "item_id" to match your SKU/variant structure
      price: parseFloat(item.price) || 0,
      quantity: parseInt(item.quantity, 10) || 1
    };
  });
}
What to change:
- Replace
items variablewith your actual dataLayer path - Update
prefixto match your Merchant Center country code - Adjust
item_id / item_variantif you use SKU or product_id instead
Then set your Purchase tag's Items field to this variable, publish, and test again. That’s it, you’re just rebuilding the ID format so GTM matches Merchant Center exactly.
When your IDs already look “normal” (no need to rebuild format)
If your product IDs are already clean and you’re just using a different field like variant_id, sku, or product_id, then you don’t need the complex Merchant Center format rebuild.
Just map the correct field in a simple CJS variable (simple mapping):
function() {
  var items = {{Items Array}}; // your dataLayer items array

  if (!items || !items.length) return undefined;

  return items.map(function(item) {
    return {
      item_id: item.sku || item.variant_id || item.product_id, // pick the correct ID field
      price: parseFloat(item.price) || 0,
      quantity: parseInt(item.quantity, 10) || 1
    };
  });
}
Option 3: no matching ID in the dataLayer? Ask your developer
Sometimes the dataLayer does not have any ID that matches Merchant Center. GTM cannot fix what is not there. In that case, ask your developer to push the same ID you see in Merchant Center into the dataLayer. Then use Option 1 or 2.
Option 4: change the feed instead
If you cannot touch the dataLayer at all, go the other way. Change your product feed so the Merchant Center Item ID matches the ID your tracking already sends by default. Either side can move. They just have to meet.
Option 5: not technical? Let AI write the variable for you
You do not need to be a developer for Option 2. After your test purchase, copy two things: the items array you received, and the product ID you see in Merchant Center. Give both to an AI tool and ask it to write the Custom JavaScript variable and explain a bit more about your problem. You get a ready-to-paste variable built for your exact setup.
How to check it cleared
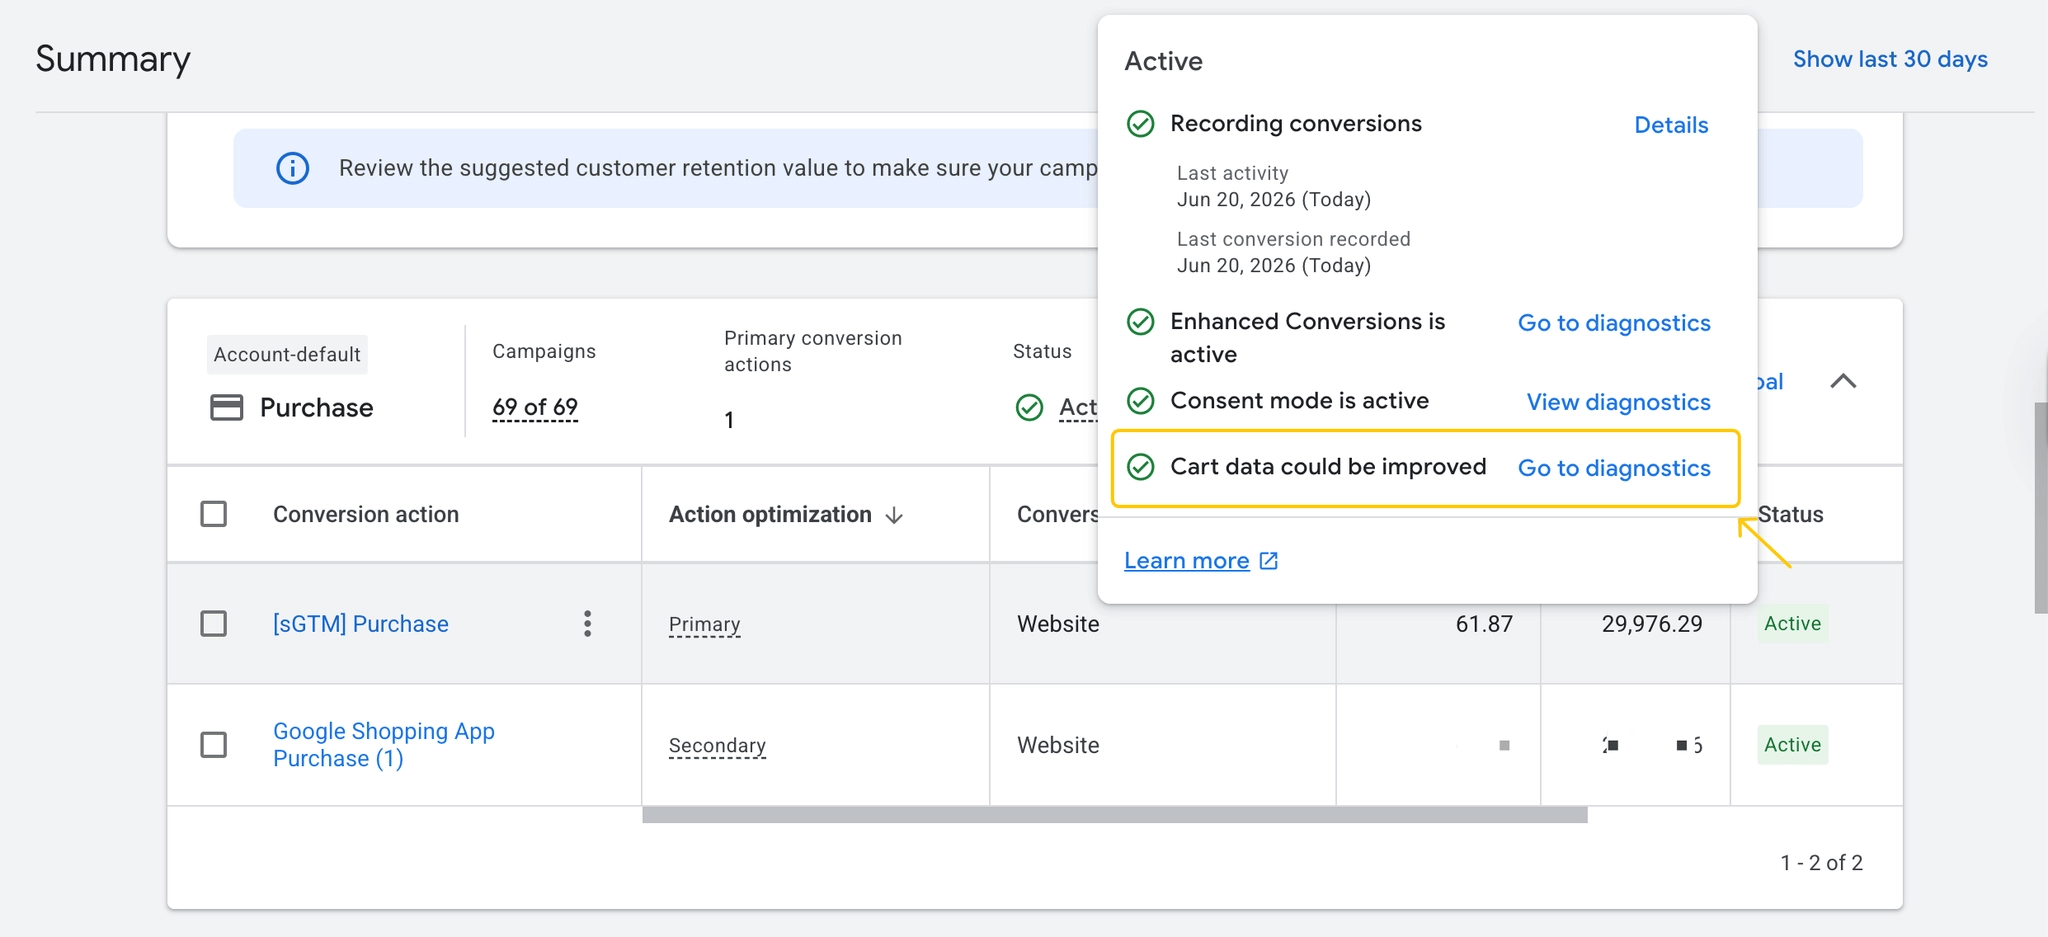
Once your tracking sends the right format and a new sale comes in, the warning usually clears in 24 to 48 hours. Check back in Goals → Diagnostics → Cart data. A green status means you are done.
Conclusion
"Cart data needs attention" usually means Google can see your purchases but cannot match the products to your Merchant Center feed. In most Shopify stores, this happens because the Item IDs don't match.
With advanced Data Layer settings in Stape’s Conversion Tracking app for Shopify, you build the exact Merchant Center format inside the app, check the live preview, and save.
Once the correct IDs are sent, the warning typically clears within 24 to 48 hours, giving you more accurate reporting, stronger remarketing signals, and better optimization for Google Ads.
Want to join the server side?
Try for freeRecommended for you
Blog
Shopify data layer guide: what it is, why it matters & best setup methods
Learn how a Shopify data layer works, what variables it contains, and compare the best setup methods for accurate eCommerce tracking.
Aug 4, 2026

Comments