Shopify store owners are finding it harder to track customer behavior accurately. Browser-based tracking is becoming less reliable due to privacy laws, ad blockers, and browser updates - often resulting in missing or incomplete data that weakens marketing and attribution.
This article explores how server-side tracking for Shopify can solve these issues by shifting data collection to your server. It helps you gather more accurate, reliable, and privacy-compliant insights, so you can make better decisions and get more value from your ad spend.
| Related: Advertising monitoring guide in 2025. |
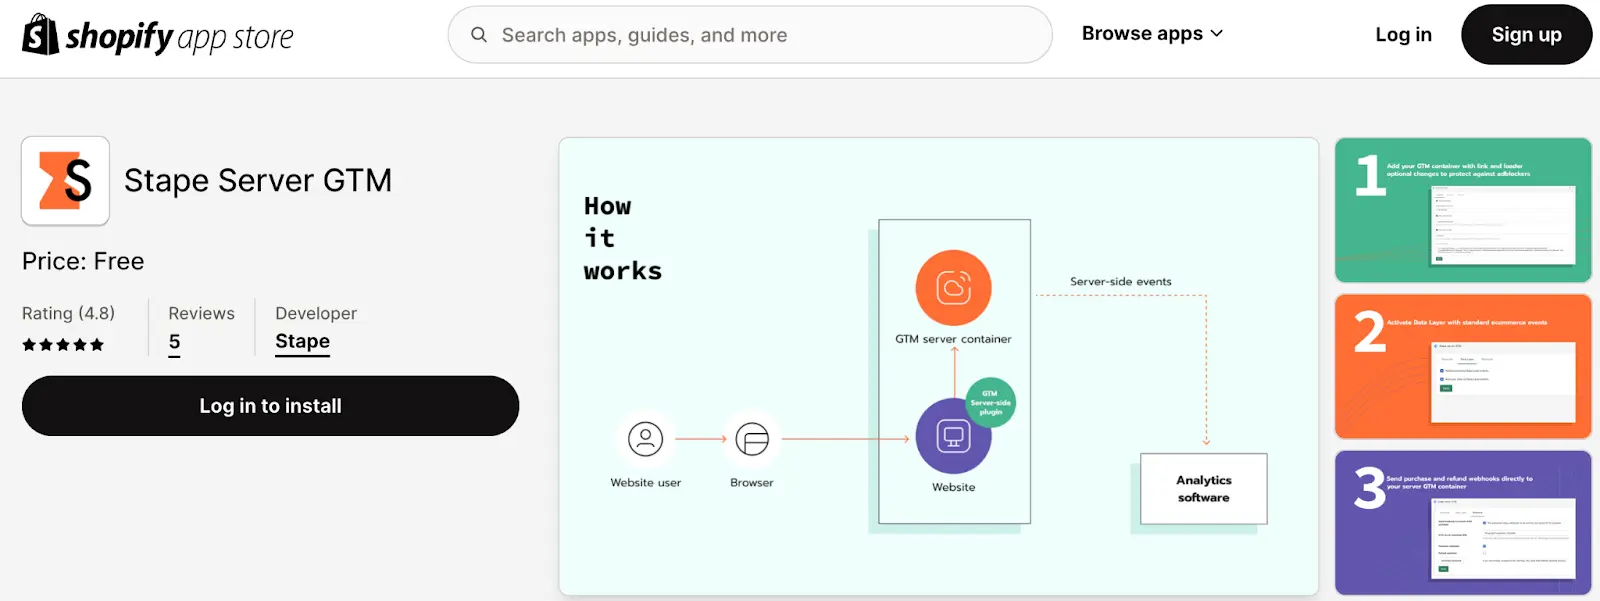
Server-side tracking is a modern approach to data collection that shifts the tracking process from a user’s browser to a secure server. Instead of sending information like pageviews, conversions, or clicks directly from the browser to analytics and advertising platforms, this data is first routed through your own cloud server. This extra step helps ensure more accurate data by reducing the impact of browser restrictions, third-party cookie limitations, and ad blockers. It also allows you to extend cookie lifetimes and streamline data delivery to platforms like Google Analytics, Meta, TikTok, and others.
It provides a stronger foundation for privacy compliance and lets you customize the data flow to match your business needs. Tools like Google Tag Manager’s server container make it easier to implement, especially when combined with services like Stape that handle the server setup. Overall, server-side tracking is a powerful way to future-proof your analytics and improve the reliability of your marketing data.
Server-side tagging can turbocharge the success of your marketing campaigns with precise conversion tracking and user analysis. However, taking full advantage requires a meticulous setup - something nobody should overlook.
1. Better data accuracy. Server-side tagging can help ensure more accurate data collection by reducing the risk of data loss or errors caused by ad blockers, browser extensions, or other client-side factors.
2. Accurate conversion attribution. Due to increased cookie lifetime and user data sent through the server, advertising networks can more accurately attribute conversions to marketing campaigns.
3. More flexibility in data handling and privacy management. Server-side tagging gives you more control over how data is processed and shared. You can apply filters, modify event data, and ensure that only necessary information is sent to third parties — all from a centralized tagging server. This flexibility makes it easier to align with privacy regulations like GDPR and CCPA while maintaining data quality and customer trust.
4. Consolidated data management. Route all your marketing and analytics data through one central server endpoint. This centralization reduces debugging and troubleshooting time by up to 50%, managing multiple integrations, reduces complexity from numerous tags, and ensures consistent, accurate information flows to all your advertising partners.
5. Enhanced data enrichment. Unlike browser-side tracking, server-side tagging lets you add more valuable data to your conversion events from sources like your CRM or inventory systems. Combining online and offline insights helps you build stronger audience segments and personalize your marketing more effectively.
6. Minimized risk of data manipulation. Since conversion events transmit directly from your secure server, they're far less vulnerable to external manipulation by malicious scripts or browser extensions. This direct, secure channel ensures the integrity and trustworthiness of your tracking data, providing a clean and reliable dataset for all your needs.
One of the most efficient ways to implement server-side tracking on Shopify is by using the Stape Shopify app. Its main purpose is to simplify the setup by injecting the Custom Loader and Cookie Keeper, and by configuring a reliable Data Layer based on native Shopify events. While the app itself doesn’t send data directly to the server container, it lays the groundwork for accurate tracking by enabling your web container to capture events and pass them to server-side GTM. This reduces manual coding, speeds up implementation, and helps ensure tracking works correctly even in environments with browser restrictions - improving data quality and conversion attribution.
A slightly more advanced method for Shopify server-side tracking is using Shopify's native capabilities like webhooks and Shopify Flow. This approach gives more flexibility for tracking backend-triggered events that may not be captured by browser-based tracking. However, both this method and solutions like Stape ultimately require server infrastructure and similar sGTM configuration.
The main difference lies in how events are triggered - with Shopify Flow or webhooks, events originate from Shopify’s backend, while with tools like Stape, events are still triggered in the browser but routed through your tagging server. Both options involve configuring server-side GTM and ensuring proper formatting, deduplication, and consistency of the data.
2. Add and configure Stape server GTM app for Shopify.
The purpose of the Stape server GTM app is to simplify the process of setting up the server Google Tag Manager and delivering data to server GTM. Our app can work either with Stape hosting for server Google Tag Manager or with any other, but the plugin's Custom Loader and Cookie Keeper features only work when using Stape hosting.
3. In the Generate tab are all the settings related to installing the GTM snippet on all pages of your Shopify shop.
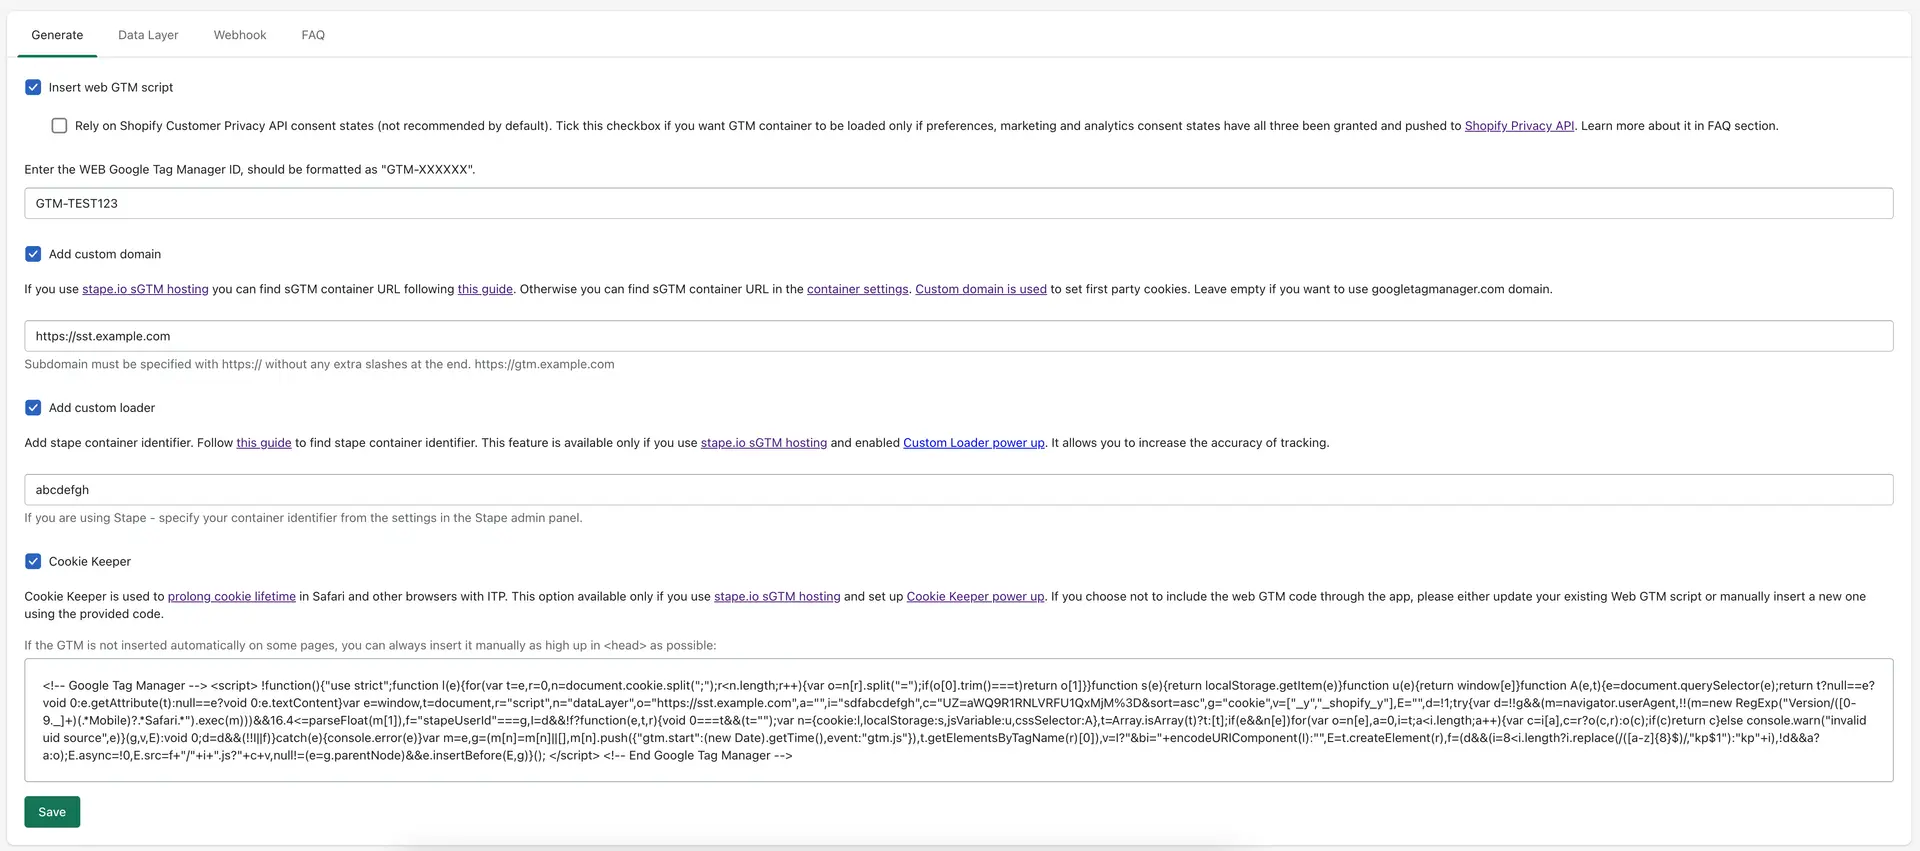
GTM web container id:
Here you need to specify your GTM WEB container ID.
Custom domain:
It is extremely important to use your own subdomain for first party cookies to work correctly and for tracking to work in general. If you do not already have a subdomain added to your sGTM container, you can use this guide to add it.
Custom Loader:
An optional parameter, but its use is highly recommended to increase protection against ad blockers.
Specify here your Stape container identifier. Follow this guide to find Stape container identifier.
Cookie Keeper:
You can learn more about Cookie Keeper power-up on our solutions page.
This allows you to minimize the impact of the latest ITP restrictions.
Before activating this feature, make sure you have it enabled in Stape, in your container.
GTM snippet block:
Here you can take the GTM snippet to install it on pages that are outside of your Shopify theme (such as pages made by third-party apps like Zipify).
In the Data Layer tab you can find the data layer events to activate and configure.
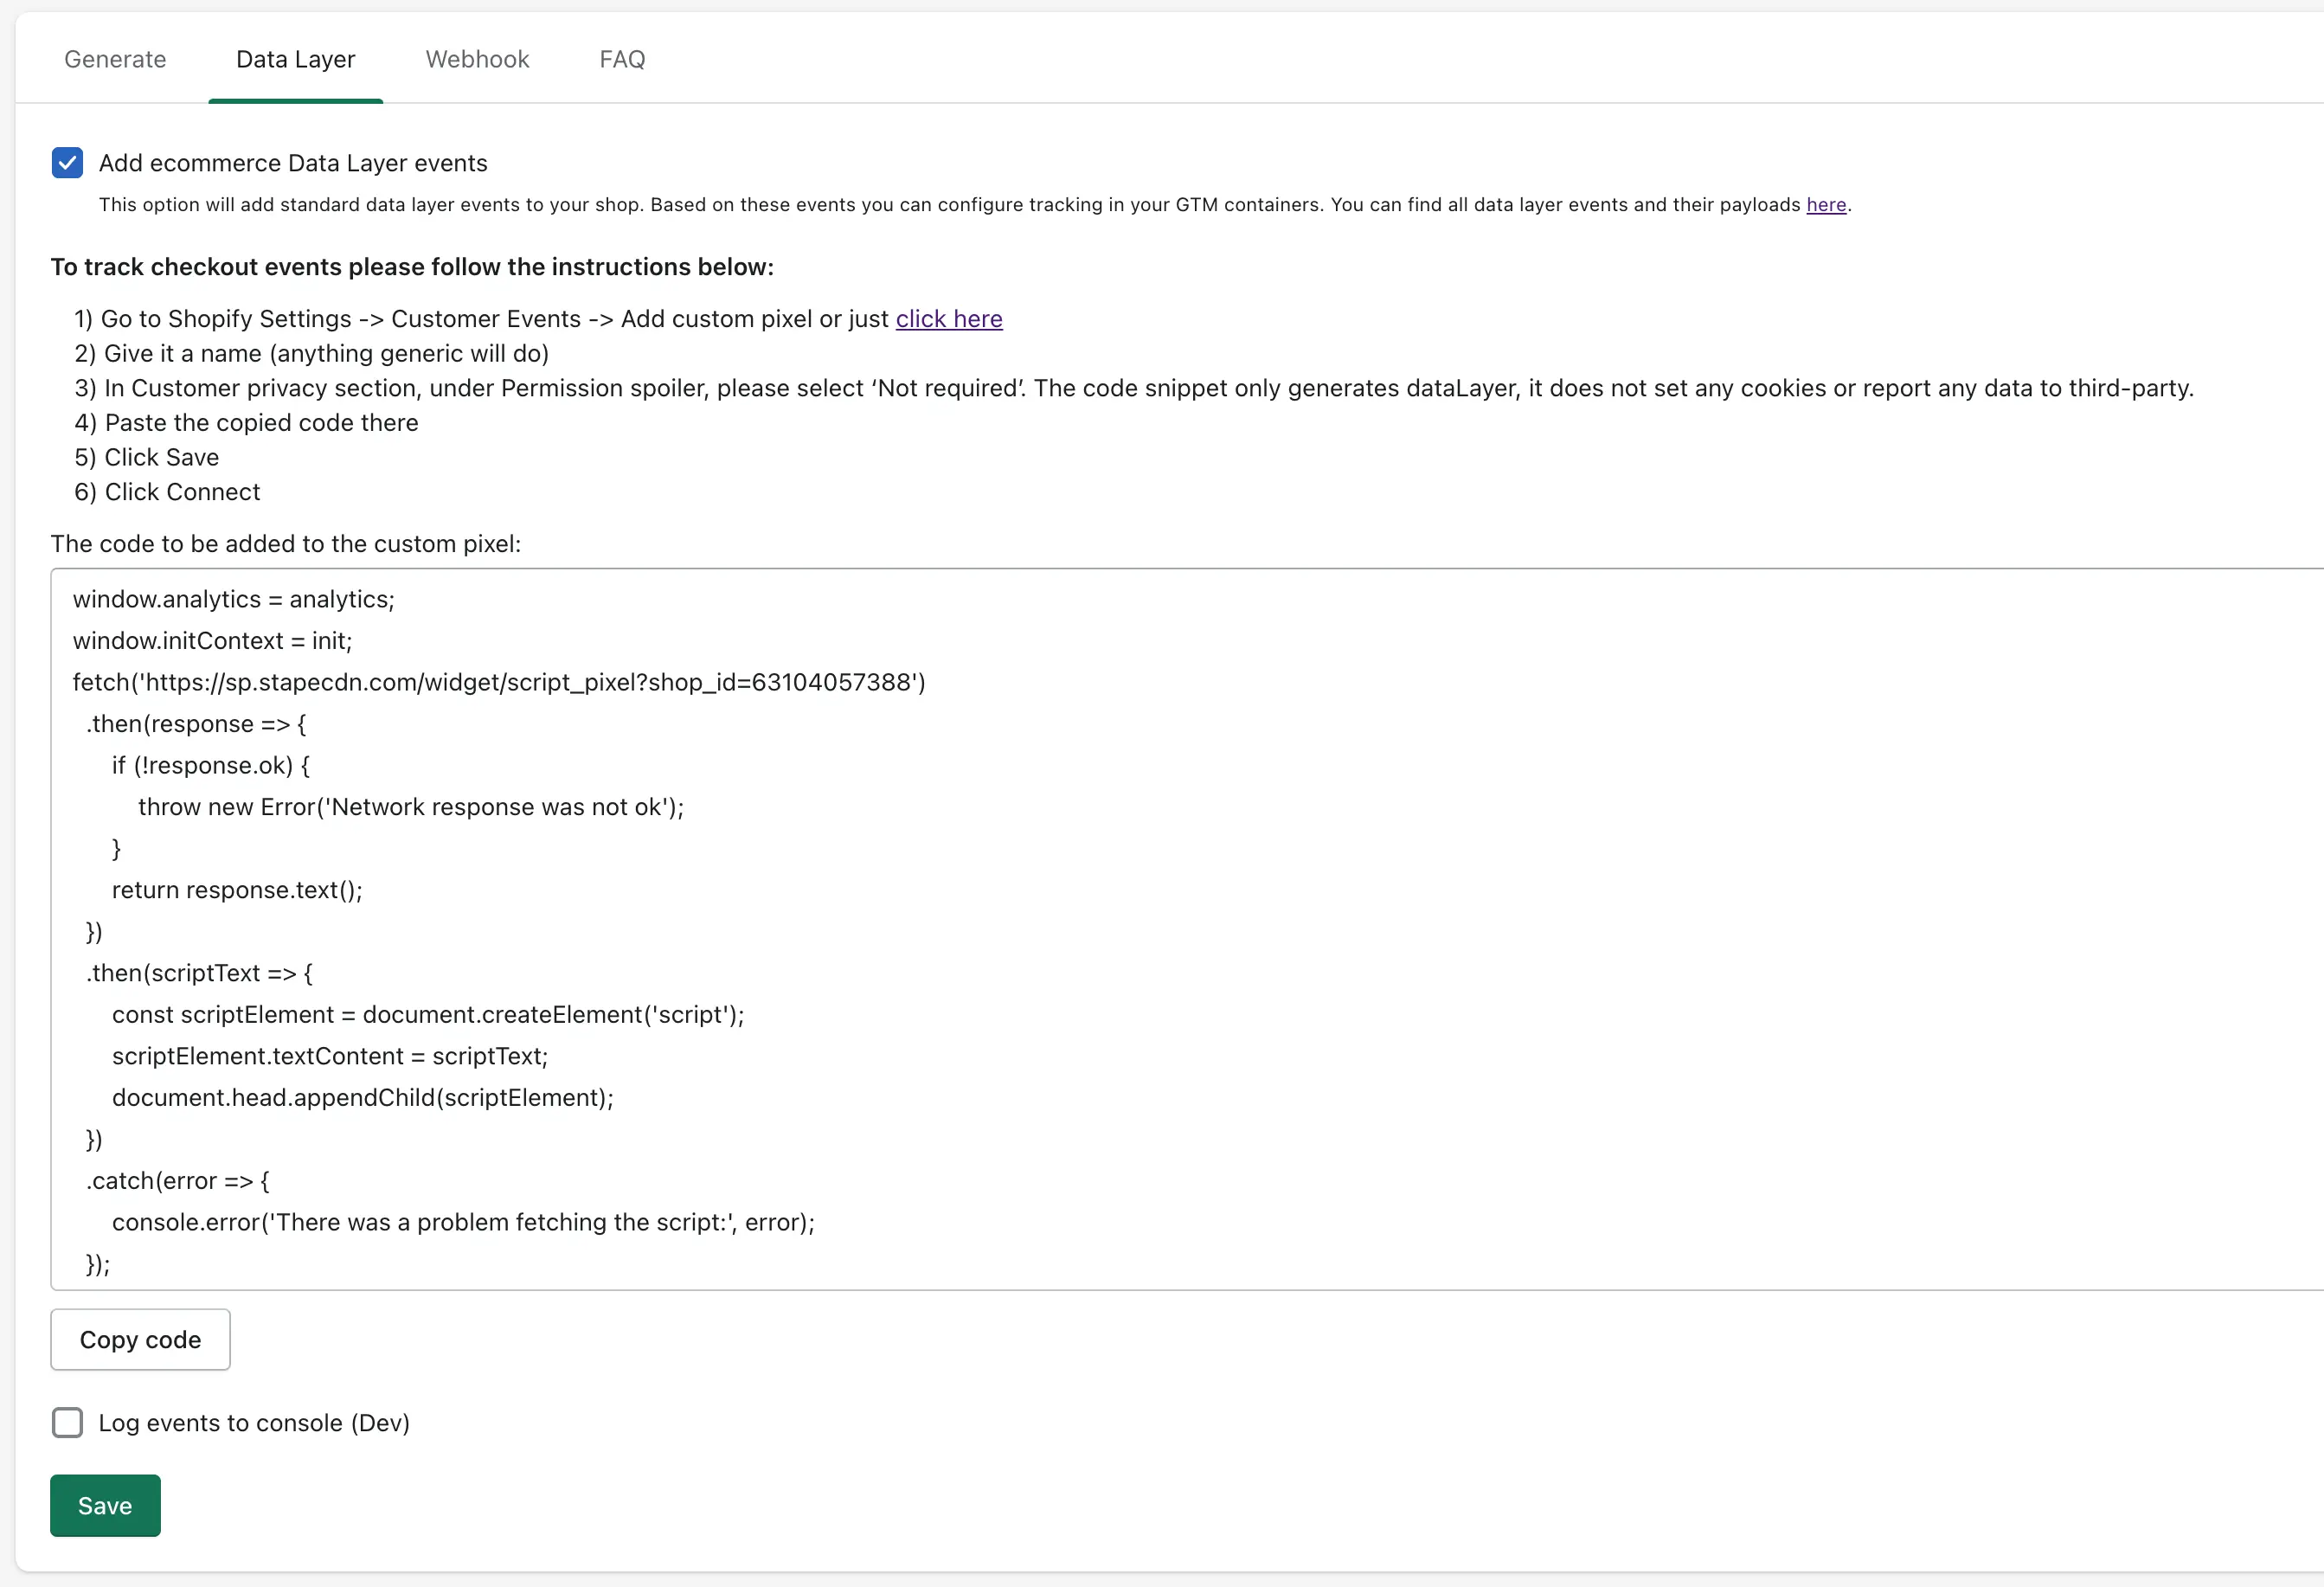
Here you can find a complete list of events and their payload which is added via the Stape app.
Data layer activation:
In Customer privacy section, under Permission spoiler, please make sure to select ‘Not required’. The code snippet only generates dataLayer, it does not set any cookies or report any data to third-party.
Webhook events are configured in the Webhook tab.
Note: the problem with webhooks on Shopify is that they don't contain any cookie data which is crucial for tracking any platform, so using webhook events is only recommended as a last resort if you for some reason can't track it online.
This tab is where the webhook events are configured.
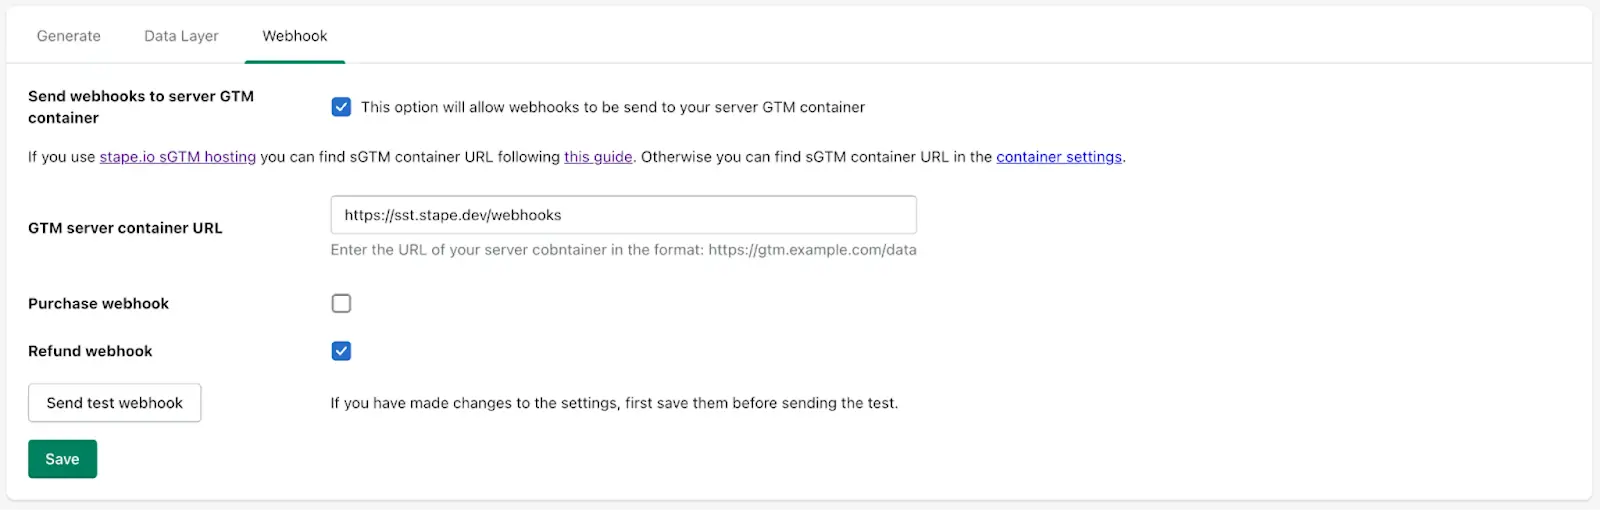
To activate a webhook you need to activate the checkbox, specify the url of the server GTM container and /path where the webhooks should be sent.
You can subscribe to webhooks when a new order is created or when a refund is made on an order.
Here are some useful blog posts we have about using and debugging webhooks:
4. Send data to the server Google Tag Manager container. There are two most popular ways to do that:
5. Configure tracking inside the server Google Tag Manager container. Most popular marketing and analytics tools already support server-side tagging and have tags for sGTM. You can find guides on our site to implement those, for example, Facebook CAPI, TikTok Events API, SnapChat Conversions API, Google Ads server-side tracking, etc. Besides, you can use sGTM to enrich sGTM data using Firestore write data or Google Sheets. Another helpful feature of sGTM is sending offline conversions to Facebook Offline Conversion tracking and Adwords Offline Conversions API.
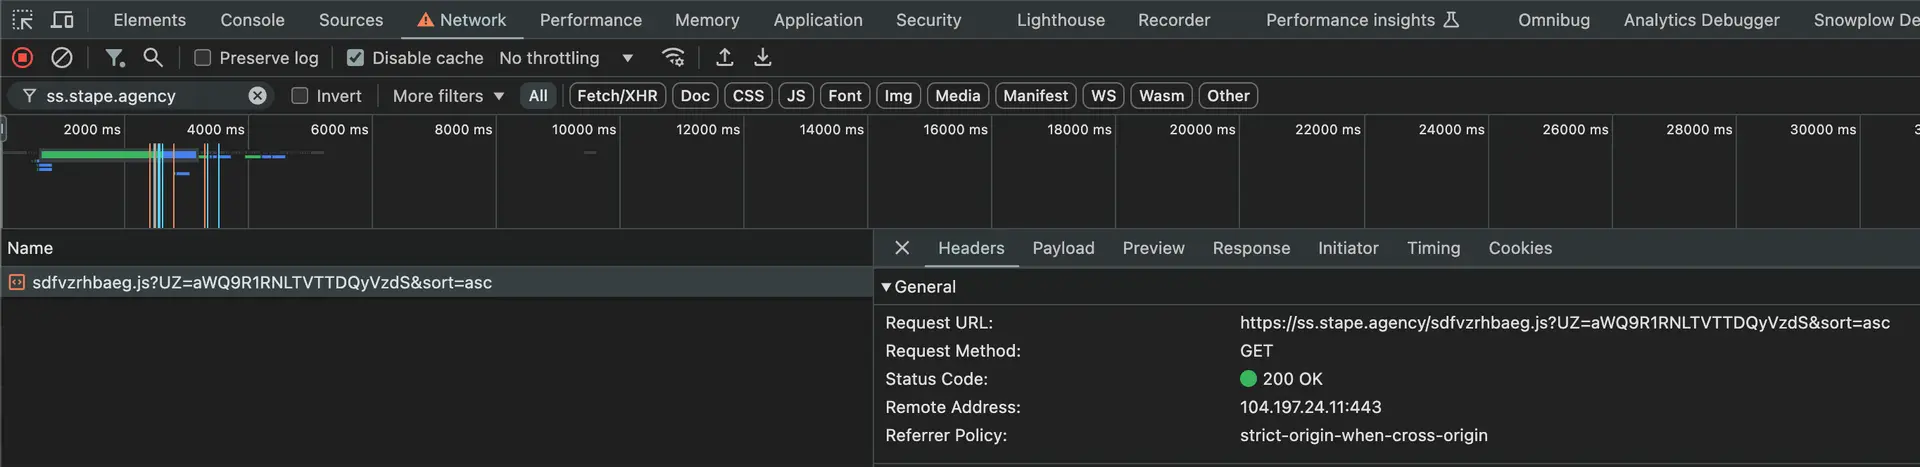
After activation or any changes, it is recommended to check if your container is actually uploaded to the site.
To do this, go to any page on your site, open your browser console and in the network tab filter by your subdomain/tagging server URL. You should see a request like on the following screenshot with a response status 200:
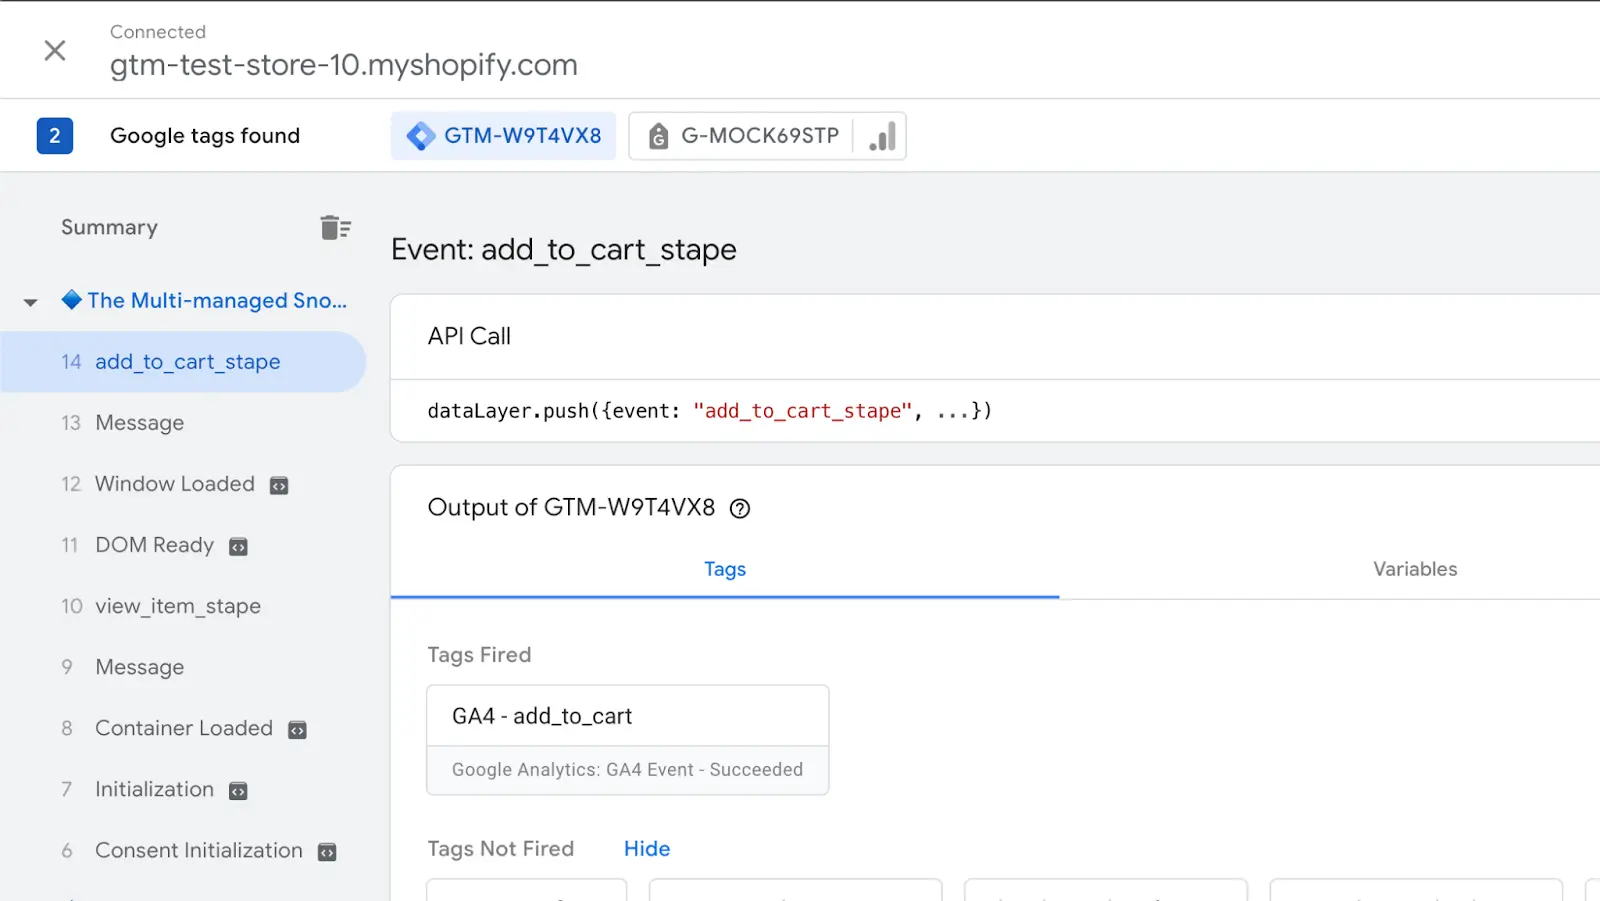
With events that happen before the checkout page everything works like on any other platform - you can launch a preview of your GTM web container and find there all the events you do:
The only option in Shopify to track events on checkout pages is to use the Shopify Pixel API so data layer events and GTM installation are implemented through this in our application.
But because of the way it's technically implemented (all code from pixel api is rendered as a separate iframe) - you can't run GTM previews on those pages, although technically your GTM container will load there.
So unfortunately at the moment you can't debug your checkout events in preview mode. This restriction also applies to purchase events if you use Checkout Extensibility for order status page.
The only option for debugging checkout events in Shopify is to publish your configuration or changes on your containers and check network requests in the browser console.
This way you can check if all the events you have configured go away and if they contain all the payload you have configured for them.
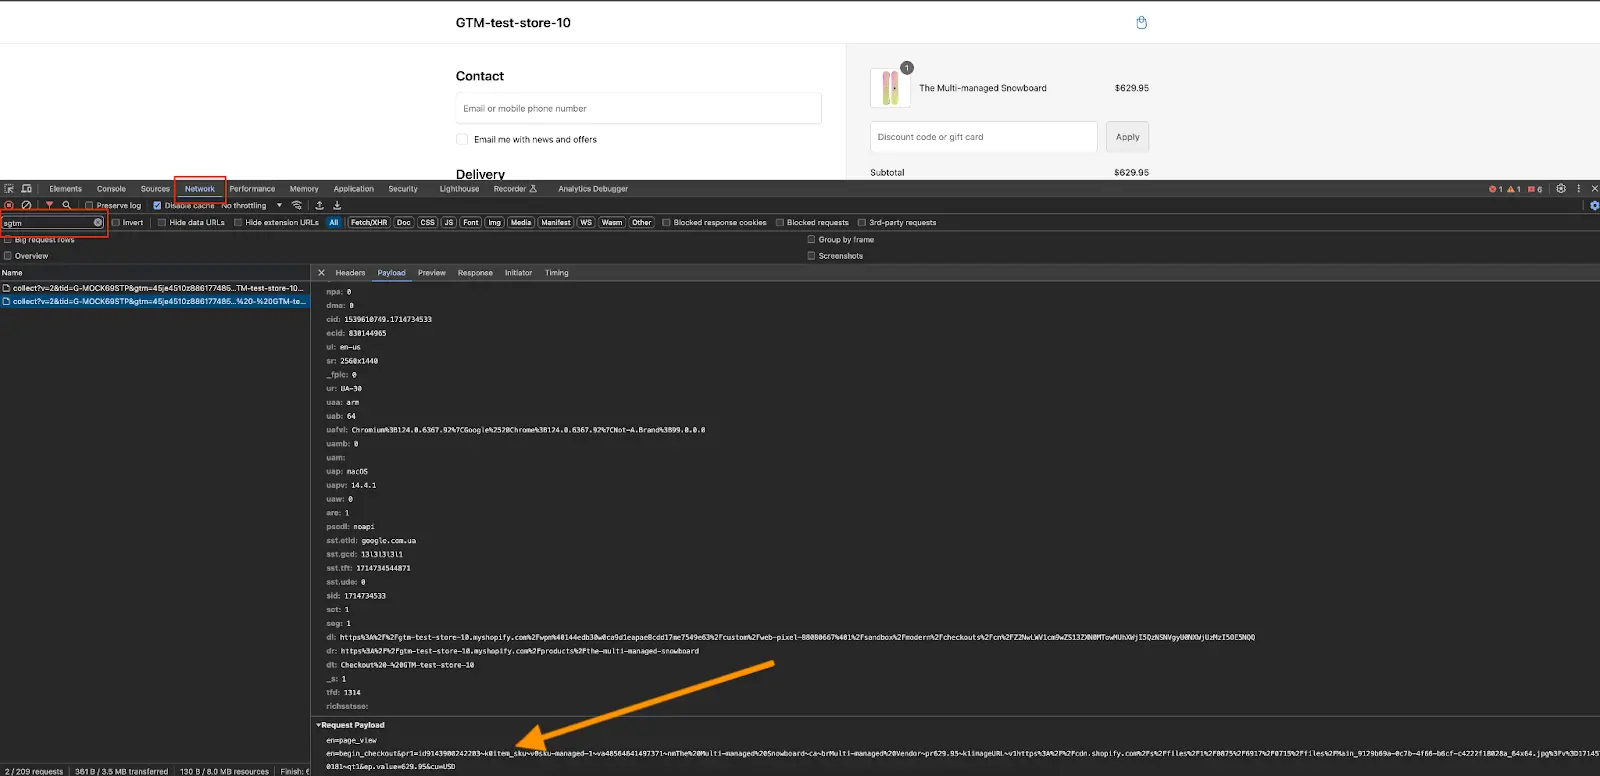
To make it easier to find GTM requests, you can specify the url or part of url of your server container in the filter.
Server-side tagging doesn’t fully replace client-side scripts, but it can reduce the number of third-party tags loaded in the browser by sending data through a server instead. This can make your tracking setup cleaner and slightly lighten page load. For bigger performance gains, you’ll need to use webhooks or move heavy scripts off the browser.
Additionally, with more accurate and reliable data being collected, your marketing campaigns can be optimized more effectively, leading to improved ad spend efficiency and return on investment.
Server-side tagging in Shopify routes tracking data through a server before sending it to platforms like Google Analytics 4 or Facebook Conversion API. This method improves data accuracy, enhances user privacy, and helps bypass browser restrictions. Shopify’s built-in analytics use their own data, but adding server-side tagging helps improve the data sent to external platforms like Google Analytics or Meta.
This gives you more complete and accurate conversion tracking, which you can compare with Shopify’s reports for a fuller picture of your performance. However, server-side tagging doesn't directly feed into or alter the data displayed within Shopify's built-in analytics dashboards.
The cost of Shopify server-side tracking depends on the setup. Using the Stape Shopify app with hosted GTM usually means a monthly hosting fee based on traffic. You might also pay a one-time or hourly fee for setup if you hire a specialist. A custom setup costs more. It requires developer time to build the server, set up webhooks, and manage API connections.
Setting up server-side tracking for Shopify with Stape is usually much quicker than building a custom setup. For a typical store using tools like GA4 or Facebook CAPI, the core setup can take a few hours to a couple of days. This covers the sGTM container, the Stape Shopify app, data layers, tags, and basic testing. If you have complex events, custom deduplication, or need to connect with many platforms, it might take longer to test and fine-tune everything.
Server-side tagging is quickly becoming an essential tool, making your conversion tracking and analytics much more precise. For Shopify users, the Stape server GTM app makes this powerful setup surprisingly straightforward. It helps you get tracking running fast, even with custom domains, and ensures your data moves smoothly.
By extending cookie life and pushing back against browser privacy features, these tools guarantee your advertising and marketing platforms get truly dependable information. If you're looking for an easy, quick way to get better tracking insights on Shopify, Stape is a solid choice. Test it out yourself now - we know you won't be disappointed!
Click Try for free , and configure your setup with Stape in no time.

Comments