Luc Nugteren
AuthorPlenty of Shopify stores never use the standard checkout. They display a full catalog, but instead of a Buy button, every product (and every custom request) leads to a form. The store then follows up, agrees on the details, and sends the customer a draft order to pay. This is the norm for B2B, made-to-order, and quote-driven businesses.
It is also a tracking black hole.
When that draft order is paid, whether the customer pays the invoice themselves or the store marks it as paid manually, there is no browser session, no dataLayer, and no pixel firing. The purchase happens entirely outside the website. So the conversion that actually matters, the one tied to real revenue, never reaches Google Ads or Meta. Your campaigns optimize toward form submissions, not paying customers, and your ROAS is built on the wrong event.
With server-side Google Tag Manager (sGTM) and Stape Store, you can close that gap. By storing attribution data the moment a lead is captured and retrieving it when the draft order is paid, you can send a fully attributed offline conversion for a purchase that happened days or weeks after the original click.
This guide walks through why this matters, how the system works, and the exact steps to implement it.
Why draft order tracking matters
For lead-gen Shopify stores, the form submission is not the goal. The paid draft order is.
Optimizing toward form submissions creates real problems:
- Ad platforms learn to find people who fill out forms, not people who buy.
- Tire-kickers and unqualified leads look identical to genuine buyers.
- Your reported conversion value bears no relation to actual revenue.
- Smart Bidding feeds on a signal that does not predict profit.
The paid draft order is the one event that proves the click was worth the spend. But it arrives with no browser context. Without a way to reconnect that payment to the original ad click, it stays invisible.
Feed platforms that real conversion, valued correctly and attributed to its click, and your bidding, budget allocation, and campaign evaluation all improve. Most importantly: you stop paying to generate leads that never become customers.
The fix is to capture the attribution data early, while the user is still on your site, and store it server-side until you need it.
System overview: what we're building
The core of this setup revolves around three components:
1. A first-party attribution store inside Stape Store
When a lead is captured, you write a small record keyed by the user's email. At minimum it holds the email and the click ID (GCLID for Google Ads, plus optionally wbraid, gbraid, and fbclid). This data lives server-side, independent of cookies or browser sessions.
2. A lookup at payment time
When the draft order is paid, a webhook reaches sGTM with the customer's email. You use that email to look up the stored click ID in Stape Store.
3. An offline conversion tag
With the click ID retrieved, you fire a Google Ads offline conversion, sending the real order value and the original attribution back to the platform.
High-level architecture
Here is the full flow in plain language:
- A user clicks an ad and lands on your Shopify store with a
gclidin the URL. - They submit a form (a quote request, a custom configuration, a contact form).
- Your web GTM container captures the email and the click ID and forwards them to your sGTM container.
- sGTM writes a record to Stape Store: the hashed email as the key, with the click ID stored as a field.
- Time passes. The store and the customer agree on the order.
- The store sends a draft order, and the customer pays (or it is marked as paid).
- Shopify Flow fires a webhook to your sGTM container containing the order details and the customer email.
- sGTM looks up that email in Stape Store and retrieves the stored click ID.
- An offline conversion tag sends the purchase, with its real value and the original GCLID, to Google Ads.
This gives you a deterministic conversion, independent of browser sessions: a purchase that happened entirely off-site, attributed back to the exact click that started it.
Step-by-step configuration
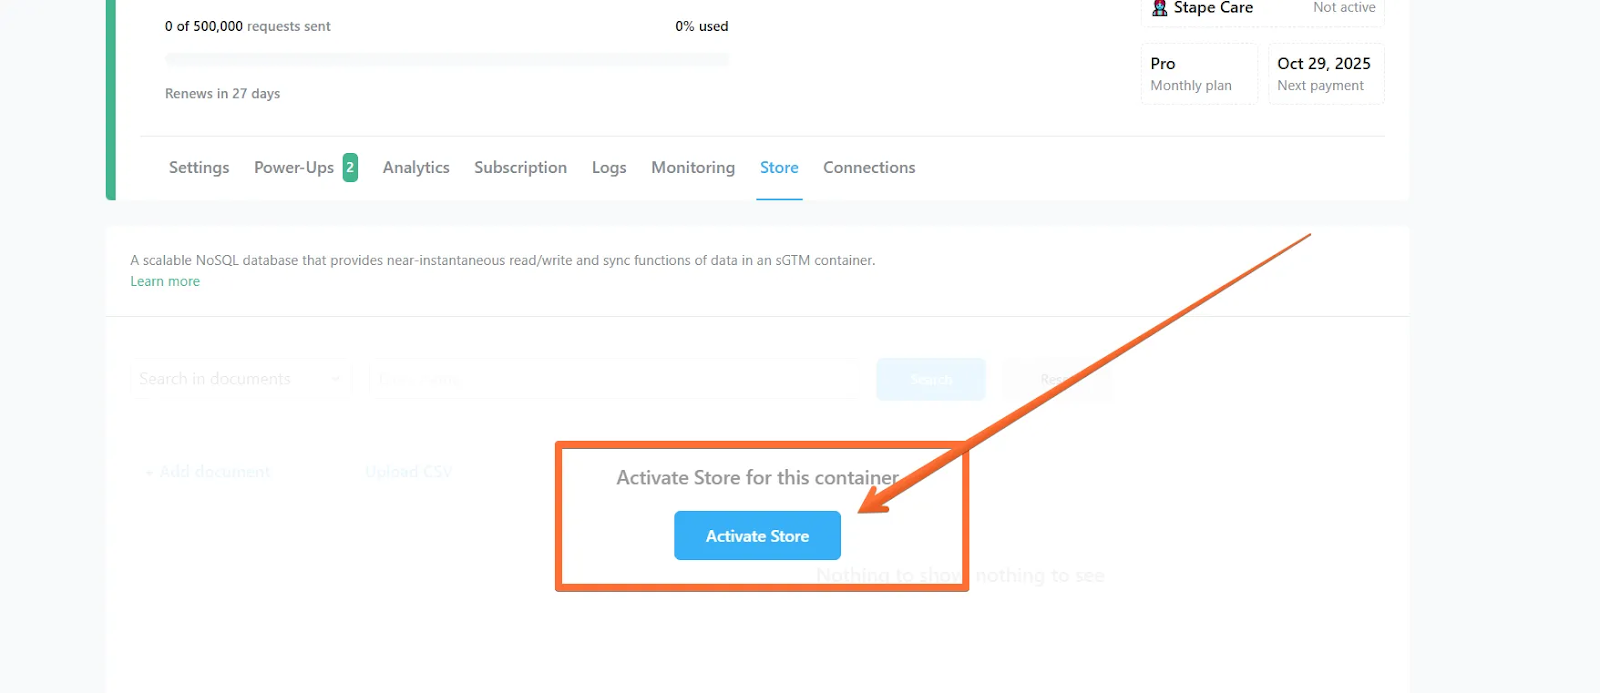
1. Activate Stape Store in your tagging server
To begin, enable Stape Store within your tagging server:
- Open your Stape account.
- Navigate to the server container settings.
- Open the Store tab and click Activate Store for this container.
2. Capture attribution on lead submission
The goal of this step is simple: at the moment a lead is captured, get two things to your server, the user's email and the click ID that brought them in.
Exactly how you do that depends on your stack, and there is more than one valid route. Two common ones:
- Client-side: a form-submission trigger in your web GTM container forwards the email and click ID to sGTM (e.g. via your GA4 client or a dedicated event).
- Webhook: if your forms run through a tool that can post on submission (Typeform, a Shopify form app, your own backend), that tool sends the data straight to your sGTM container.
However it reaches sGTM, the event carries the two values you need:
{
  "event": "lead_submitted",
  "email": "buyer@example.com",
  "gclid": "Cj0KCQjw...AvD_BwE"
}
The lead event arriving in sGTM, captured the moment the form is submitted.
Whichever route you take, two principles hold:
- Capture the click ID from the landing URL as early as possible, and persist it (e.g. in a first-party cookie) so it survives multiple page views before the form is submitted.
- Consent still applies. Only store identifiers when the user has granted the relevant consent.
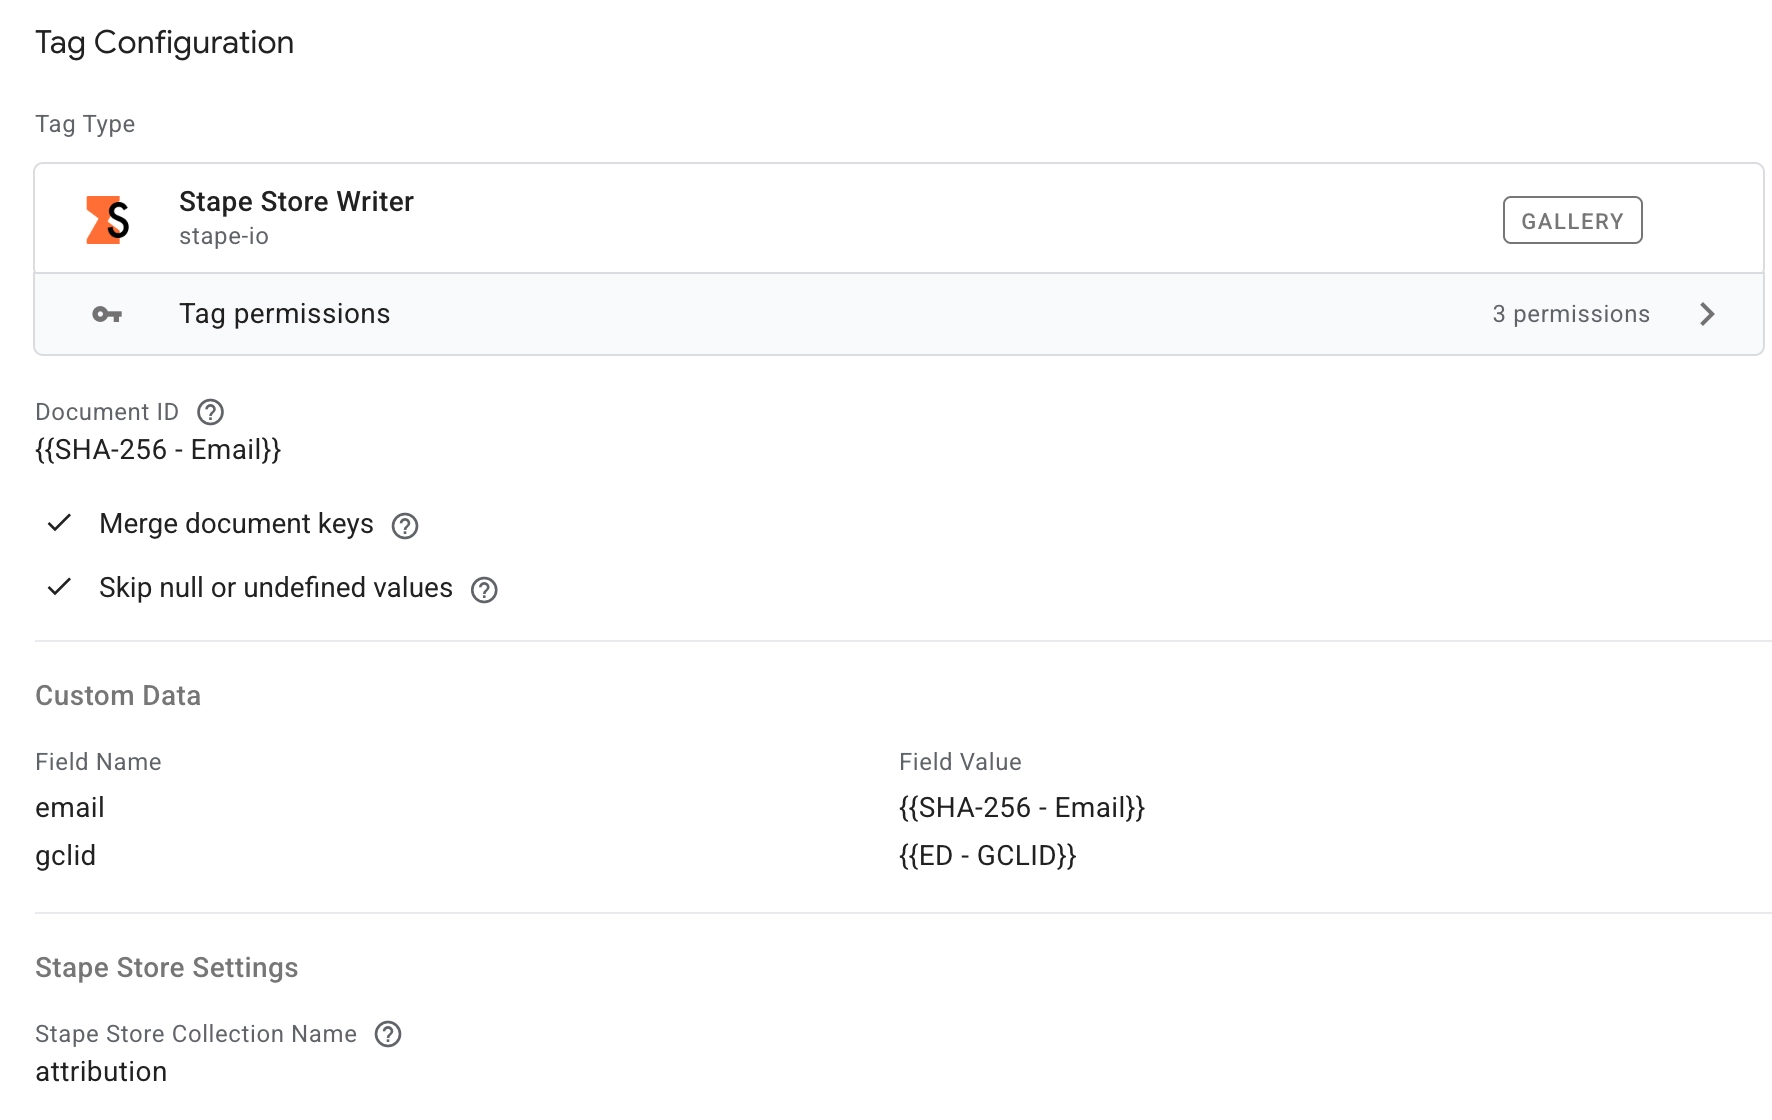
3. Write the attribution record to Stape Store
In sGTM, on the incoming lead event, add a Stape Store Writer tag that stores the click ID against the customer's email.
The one decision worth making here is your record key. The email is the natural choice, since it is the only identifier you will have again at payment time. Hashing it (e.g. with SHA-256) before storing is good practice, so no plain-text emails sit in your store. The only requirement is that you hash it the exact same way on write and on lookup, otherwise the two will never match.
One caveat follows from using email as the key: the lookup only succeeds if the email on the paid order matches the one captured at the form. In B2B that is not guaranteed, so capture the address you expect to invoice under.
A stored record then looks like this:
key:    7f3a9c...d2e1   (SHA-256 of buyer@example.com)
gclid:  Cj0KCQjw...AvD_BwE
The stored attribution record, keyed by the hashed email.
Store any additional click IDs you capture (wbraid, gbraid, fbclid) as extra fields on the same record.
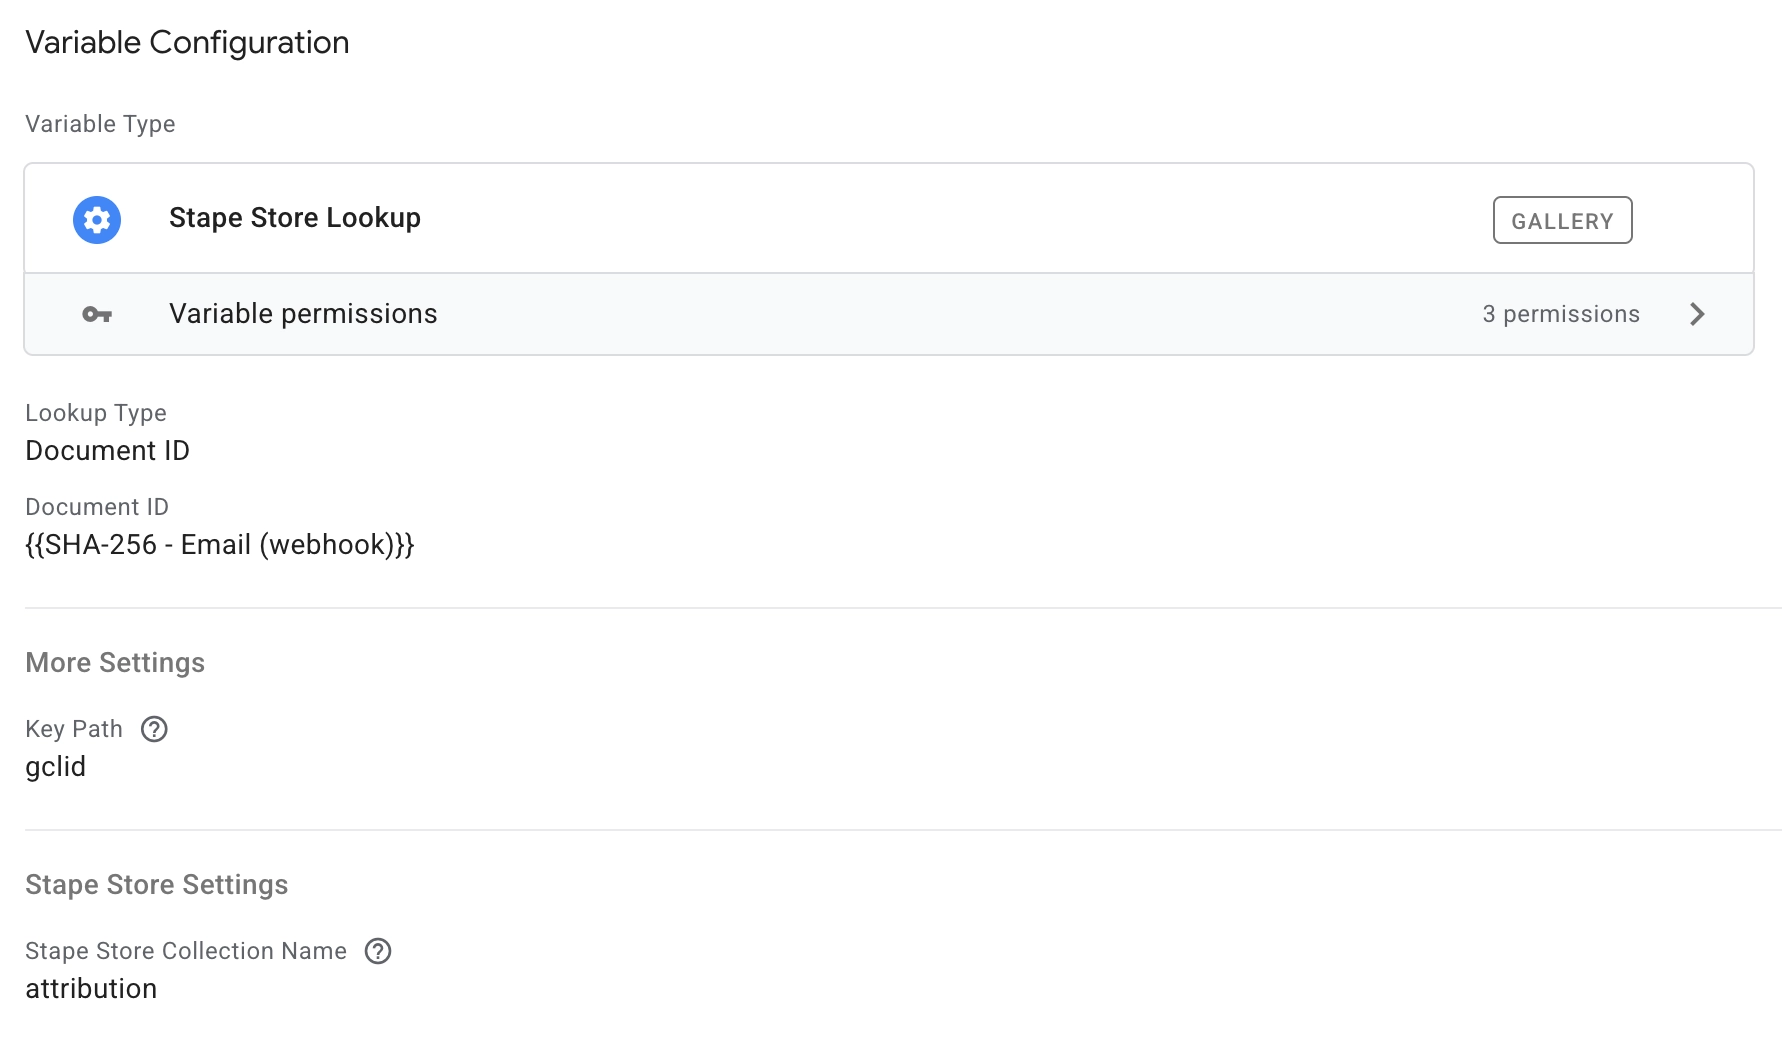
4. Create the Lookup Variable
Still in sGTM, create a Stape Store Lookup variable.
- Input: the hashed email received at payment time (from the webhook in step 5).
- Output: the stored
gclidfor that customer.
For the buyer from our example, that resolves to:
Input  (hashed email):  7f3a9c...d2e1
Output (stored gclid):  Cj0KCQjw...AvD_BwE
This is the bridge that reconnects the off-site payment to the original click.
5. Receive the Shopify draft order webhook
You now need sGTM to hear about the payment. On Shopify, the most reliable way is a webhook fired the moment the draft order is marked paid, carrying the customer email, the order ID, and the order value.
Shopify Flow is the simplest tool for this: build a Flow that triggers when an order is paid (scoped to your draft orders) and add an HTTP request action that posts the relevant fields to your sGTM container URL. A native webhook or a payment-triggered app works just as well; what matters is that a server-to-server call reaches sGTM with the email attached.
In Flow you build the request body yourself, mapping each value from the order object with Liquid (e.g. {{order.email}}, {{order.totalPriceSet.shopMoney.amount}}). A minimal payload only needs the fields the conversion tag will use:
{
  "email": "buyer@example.com",
  "order_id": "6210938472",
  "value": "1499.00",
  "currency": "EUR"
}
An example draft-order-paid payload. Keep it lean: the email to look up attribution, plus the order ID, value, and currency for the conversion.
In sGTM, set up a client or trigger that recognizes this incoming request so your tags can fire on it. Each field above becomes an Event Data variable you can reference in the lookup and the conversion tag.
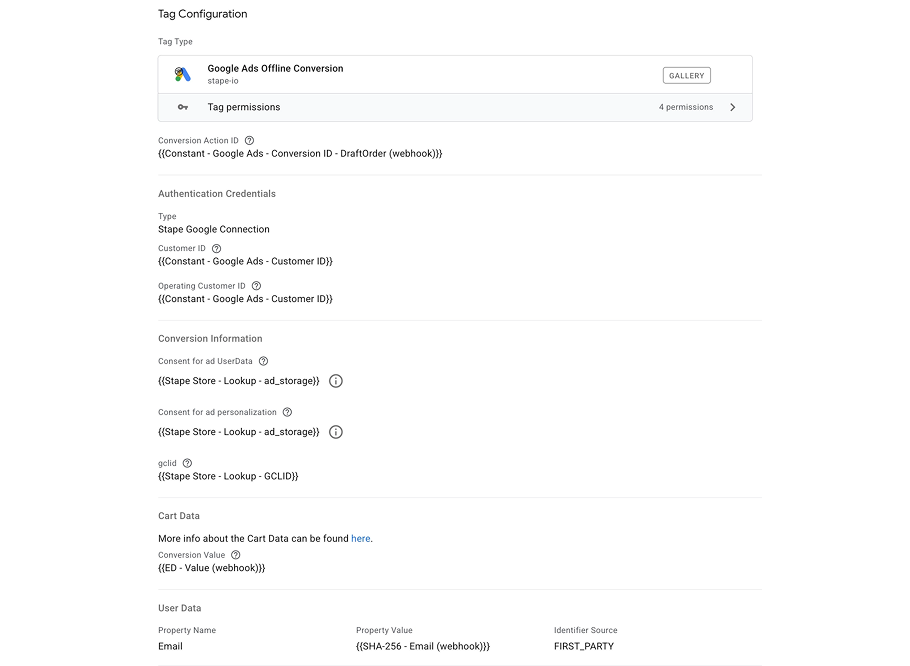
6. Fire the Google Ads Offline Conversion
Finally, add a Google Ads Offline Conversions tag firing on the webhook trigger. The fields that matter:
- GCLID:
{{Stape Store Lookup}}, the click ID retrieved in step 4. This is what attributes the conversion. - Conversion Value: the order value from the webhook payload.
- Order ID: the Shopify order ID, so repeated webhooks deduplicate cleanly.
- Hashed email as user data, so Enhanced Conversions can match even when no click ID was stored.
Point the tag at a dedicated offline conversion action in Google Ads so this paid-draft-order event stays separate from your on-site conversions and can be optimized toward on its own. One limit to respect: Google Ads only accepts offline conversions for clicks from the last 90 days, so very long sales cycles can fall outside the window.
Now Google Ads receives the paid draft order, valued correctly, attributed to the click that earned it.
Optional: send profit instead of revenue
If you maintain a product margin catalog in Stape Store (or use the POAS Data Feed power-up), you can pass profit rather than revenue as the conversion value, so your bidding optimizes toward your most profitable draft orders. See Profit Tracking With sGTM and Stape Store for that setup.
Firestore as an alternative
If you already run on Google Cloud, the same architecture works with Firestore in place of Stape Store: write the attribution document on lead capture, query it by email at payment time, and feed the result into the same offline conversion tag. Stape Store keeps everything inside your tagging server with no separate GCP project to manage, which is why it is the simpler default for most stores.
Validation and testing
Before going live:
- Submit a test form with a
gclidin the URL and confirm the record is written to Stape Store. - Verify the hashed email key matches between the write and the lookup.
- Fire a test draft order webhook and confirm the lookup returns the stored click ID.
- Confirm the Google Ads offline conversion tag fires with the correct GCLID, value, and order ID.
- Check that conversions appear in Google Ads (offline conversions can take up to a few hours to process).
- Confirm consent is respected on the write step.
Conclusion
Lead-gen Shopify stores lose their most important signal precisely because their best conversions happen off-site. The form is easy to track. The paid draft order, the event that actually represents revenue, slips through.
By combining:
- sGTM for server-side processing,
- Stape Store for first-party attribution storage,
- a Shopify Flow webhook to catch the payment,
- and an offline conversion tag to close the loop,
you give Google Ads or any other advertising platform the one thing it was missing: proof that the click led to a paying customer. From there, your bidding optimizes toward buyers instead of form fillers, and your reported conversions finally match your bank account.
If you run a quote-driven or made-to-order Shopify store, this is one of the highest-leverage tracking upgrades you can make.

Comments