Profit tracking with sGTM and Stape Store: a complete guide
Luc Nugteren
AuthorKnowing your revenue is good. Knowing your actual profit per transaction is better. Yet most tracking setups, whether browser-based, platform-based, or built on standard ecommerce events, report revenue only. They have no concept of product-level margins.
Ad platforms optimize toward total order value. But a $200 order with 8% margin is worth far less than a $80 order with 45% margin. Without profit data in your conversion tags, your bidding algorithms are flying blind.
With server-side Google Tag Manager (sGTM) and Stape Store, you can build a first-party profit tracking system that calculates actual margin per transaction, in real time, and feeds that data directly into Google Ads, Meta, and GA4.
This guide walks through why this matters, how the system works, and the exact steps to implement it. It also includes an advanced section on combining profit tracking with new customer data, enabling you to measure true acquisition profitability.
Why profit tracking matters
From a performance marketing standpoint, not all revenue is created equal.
A high-revenue, low-margin order:
- Inflates reported ROAS.
- Misleads bidding algorithms.
- Hides unprofitable campaigns behind big numbers.
A lower-revenue, high-margin order, however:
- Contributes more to bottom-line growth.
- Signals true demand for profitable products.
- Enables smarter budget allocation.
- Drives sustainable scaling.
But platforms like Google Ads and Meta don't know your margins. They optimize based on:
- Total transaction value
- Revenue-based ROAS targets
- Modeled conversion value
- Click-to-purchase revenue attribution
None of these reflect actual profitability.
By giving platforms a first-party, product-level profit signal, you dramatically improve:
- Bidding efficiency (optimize for profit, not vanity revenue)
- Budget allocation (shift spend toward high-margin products)
- Campaign evaluation (POAS instead of ROAS)
- Scaling decisions (grow what actually makes money)
Most importantly: you stop optimizing toward revenue that barely covers your costs.
System overview: what we're building
The core of this setup revolves around three components:
1. A product margin database stored inside Stape Store
This is where your product-level cost data lives.
It maps each product ID (or variant SKU) to its margin value.
It's secure, server-side, and invisible to the browser.
2. A real-time margin calculation triggered on each purchase
When a purchase event arrives in sGTM, the system looks up each product in the order, retrieves its margin, accounts for item quantities, and returns the total profit for that transaction.
3. Profit-specific conversion tags for each platform
Separate tags (or parameters) send profit data to Google Ads, Meta, and GA4, alongside your existing revenue-based tracking.
This gives you both views: revenue and profit, side by side.
High-level architecture
Here is the full flow in plain language:
- Prepare a product catalog with product IDs and margin values.
- Upload this catalog to Stape Store (either via the POAS Data Feed power-up or manually via CSV).
- When a purchase event arrives in your sGTM container, the Margin Lookup variable automatically matches each item in the order against the catalog.
- The variable returns the total profit for the entire transaction, accounting for quantities.
- This profit value is passed into dedicated conversion tags for Google Ads, Meta, and GA4.
- Platforms receive profit instead of (or alongside) revenue.
- You can now optimize campaigns based on POAS (Profit on Ad Spend) instead of ROAS.
This gives you deterministic profit measurement, independent of browser limitations.
Step-by-step configuration
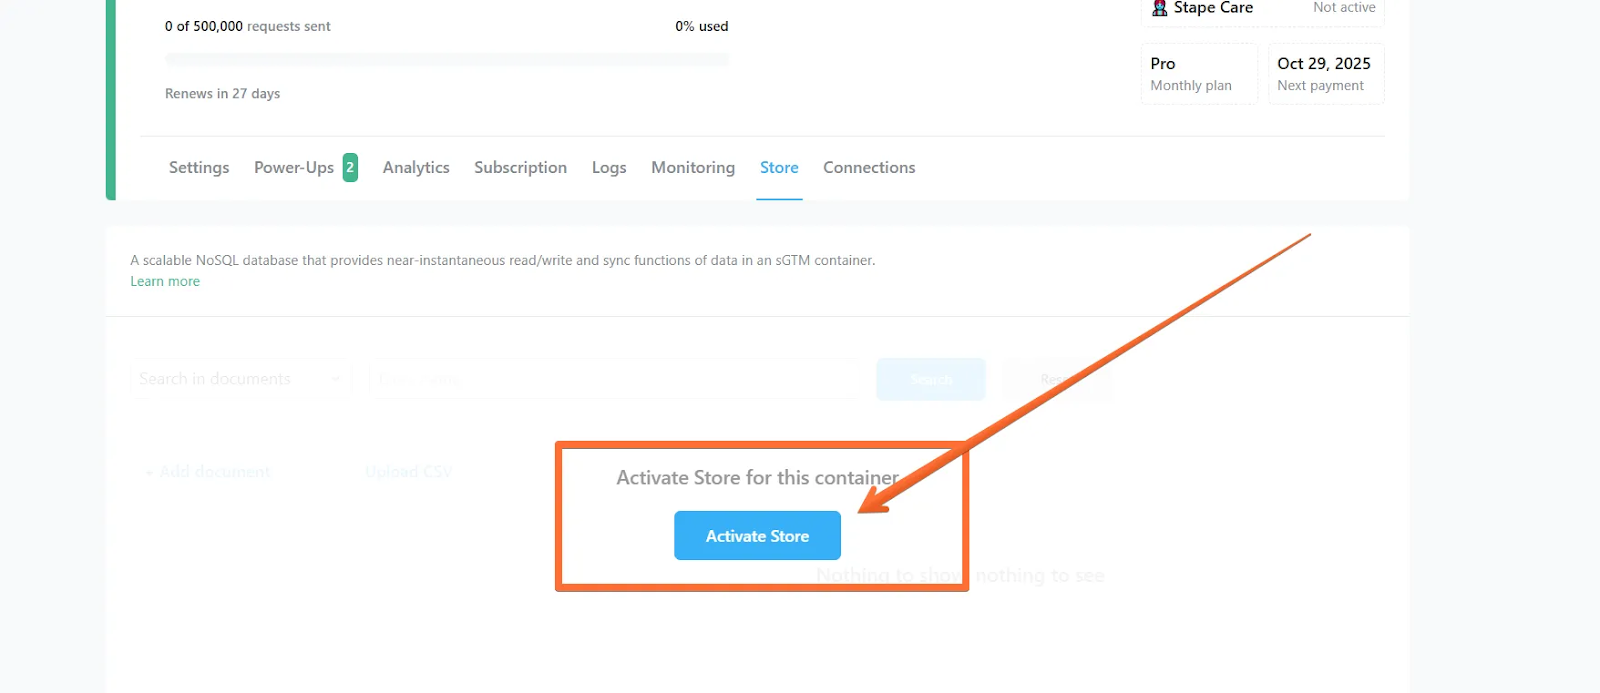
1. Activate Stape Store in your tagging server
To begin, enable Stape Store within your tagging server:
- Open your Stape account.
- Navigate to the server container settings.
- Click on the Store tab.
- Click Activate Store for this container.
2. Add product margin data to Stape Store
With the Store activated, you need to populate it with your product margin data.
There are two ways to do this:
Option A: POAS data feed power-up (recommended for large catalogs)
1. Navigate to your container's power-ups.
2. Activate the POAS Data Feed power-up.
3. Enable the Auto sync toggle if you want automated updates.
4. Input your catalog URL (or upload the CSV directly).
5. The system scans the file and presents a field mapping interface.
6. Map your fields:
- Product ID: Select the column that matches your tracking ID (e.g. variant SKU).
- Value type: Choose absolute or percentage.
- Value: Select the column containing your margin data.
7. The catalog downloads automatically and syncs on your configured schedule (daily or weekly).
Option B: manual CSV upload
1. Prepare a CSV file with your product data. At minimum, include a product ID column and a margin value column.
2. Go to the Store tab in your Stape container.
3. Click Upload CSV.
4. Map the fields to your Store document structure.
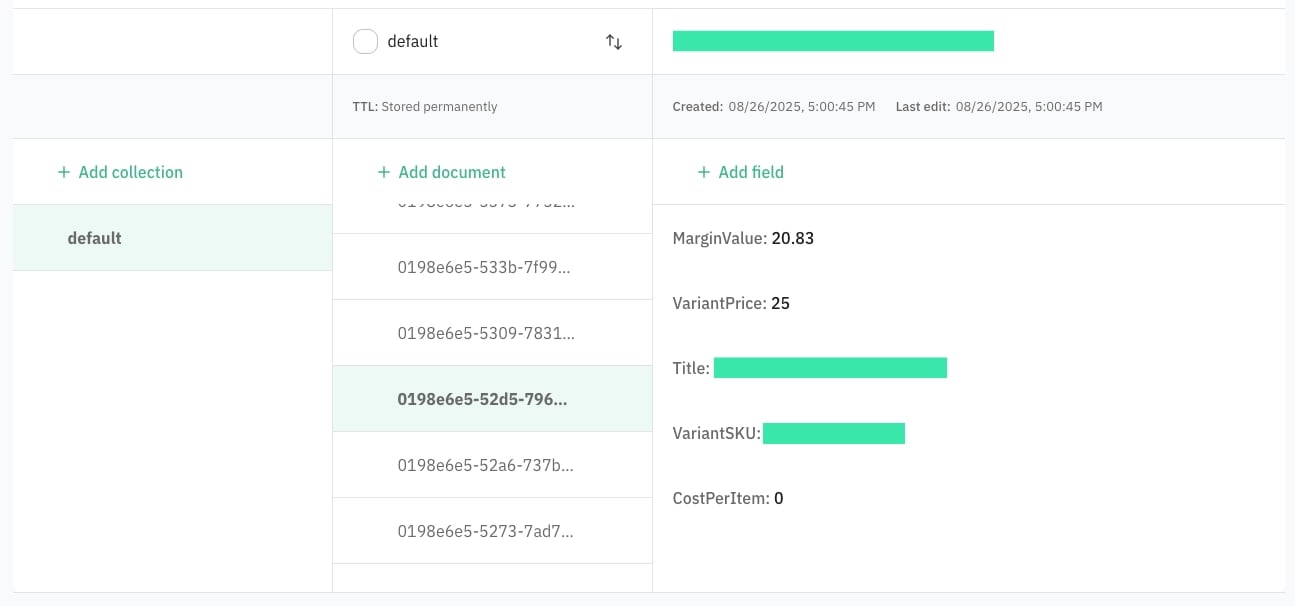
5. Each product becomes a document in the Store with its margin data stored as a field.
For either approach, your margin data should be as thorough as possible. Include product cost, average shipping cost, payment processing fees, and return rate adjustments. The more accurate your margin calculation, the more useful your profit data will be.
Each product document in the Store will contain fields like:
- VariantSKU: The product identifier that matches your tracking.
- MarginValue: The absolute profit value per unit.
- VariantPrice: The retail price (optional, for reference).
- CostPerItem: The cost price (optional, for reference).
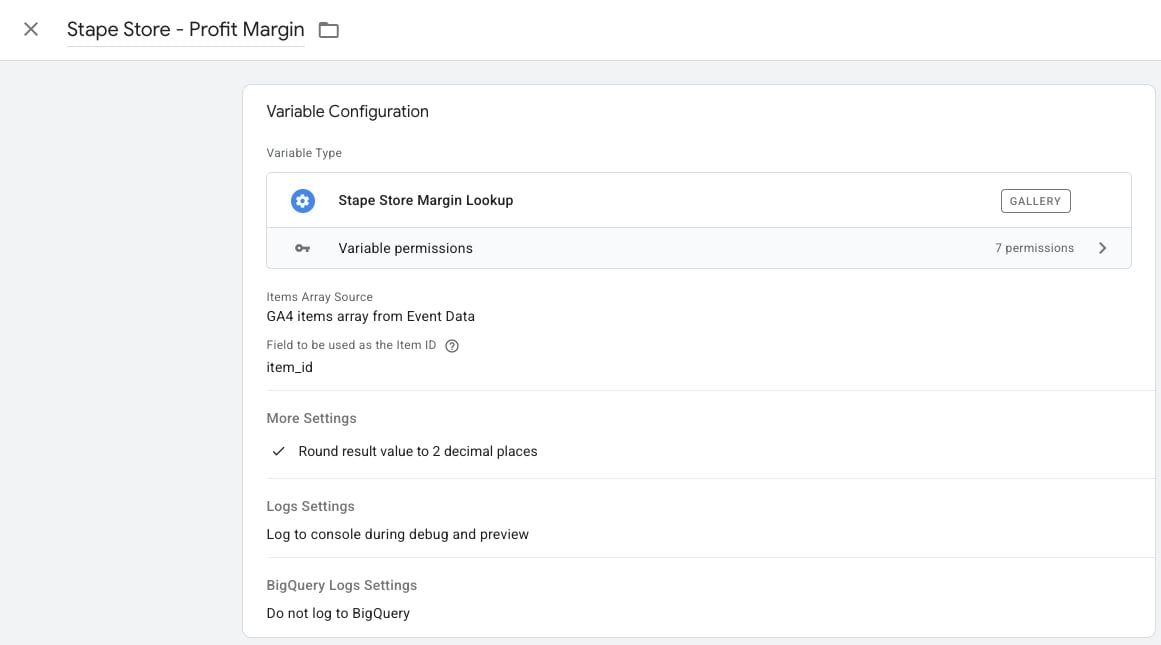
3. Install the margin Lookup Variable in sGTM
Now configure the server-side variable that retrieves margin data.
- In your sGTM container, go to Templates > Variable Templates.
- Import the Stape Store Margin Lookup template from the Community Template Gallery.
- Create a new variable using this template.
Configure the variable:
- Items Array Source: GA4 items array from Event Data.
- Field to be used as the Item ID: item_id (this must match the key in your GA4 items array).
- Under More Settings, enable Round result value to 2 decimal places.
When a purchase event fires, this variable:
- Reads the items array from the incoming GA4 event.
- Extracts the product ID from each item.
- Looks up each product in Stape Store.
- Retrieves the margin value for each product.
- Multiplies by quantity.
- Returns the total profit for the entire transaction.
Name this variable something clear, like Stape Store - Profit Margin.
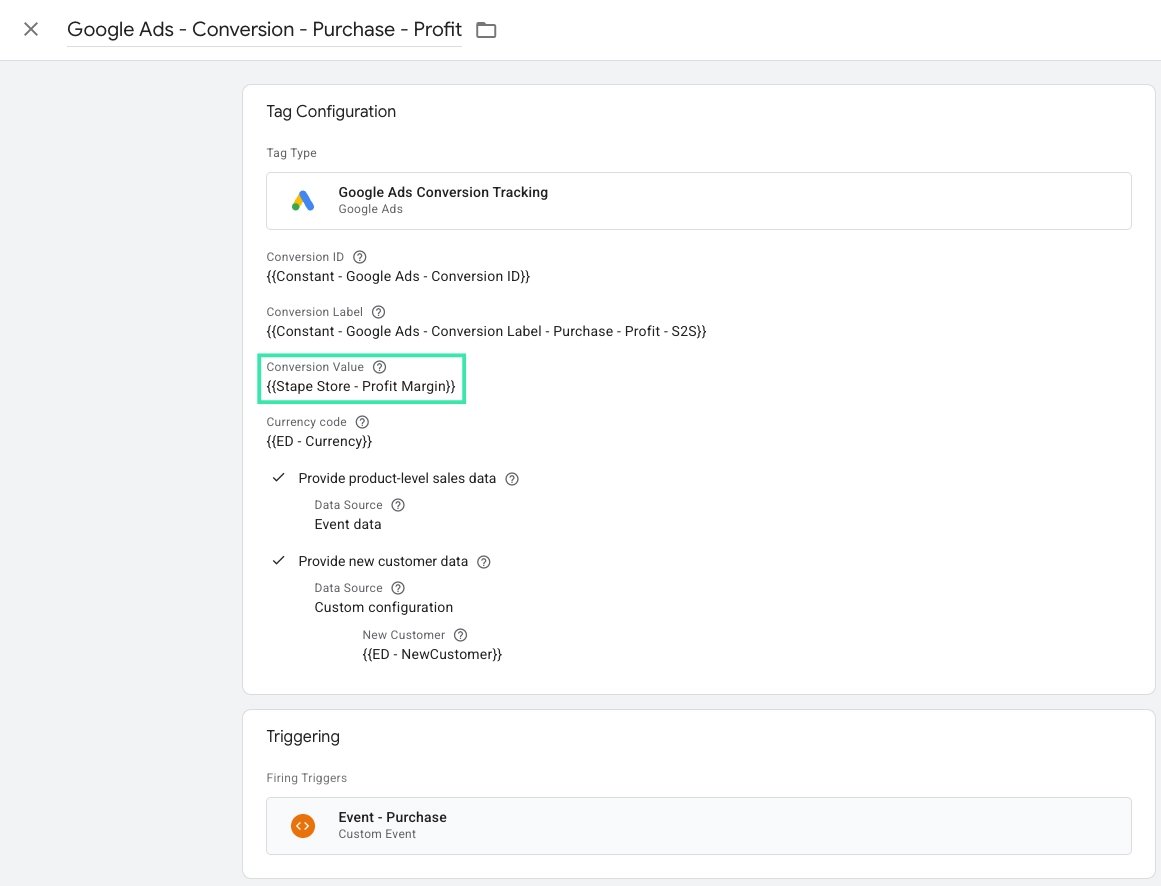
4. Create profit tags for Google Ads
Now make the profit data actionable in Google Ads.
The recommended approach: create a separate purchase conversion action specifically for profit tracking.
In Google Ads:
- Create a new conversion action (e.g. "Purchase - Profit").
- Note the Conversion ID and Conversion Label.
In sGTM:
- Create a new Google Ads Conversion Tracking tag.
- Set the Conversion ID to your account's conversion ID.
- Set the Conversion Label to the new profit-specific label.
- Set the Conversion Value to
{{Stape Store - Profit Margin}}. - Set the Currency Code from the event data.
- Enable Provide product-level sales data (Data Source: Event data).
- Enable Provide new customer data if you have new customer tracking in place.
- Fire on your purchase trigger.
- Set tag firing to Once Per Event.
You now have two purchase conversions in Google Ads:
- The original, tracking revenue.
- The new one, tracking profit.
This means you can switch your bidding strategy to optimize for profit (tROAS on the profit conversion) while keeping revenue data for reporting.
5. Create profit tracking for Meta
For Meta, there are two strategies:
Option A: separate custom event via Conversions API
- Create a new Facebook Conversions API tag in sGTM.
- Override the event name to something like
PurchaseProfit. - Set the value in custom data to
{{Stape Store - Profit Margin}}. - Include all standard user data parameters (fbp, fbc, external_id, client_ip_address).
- Include the event_id for deduplication.
- Fire on the same purchase trigger.
This gives you a completely separate event you can use for custom reporting and audience building inside Meta.
Option B: Meta's profit-based campaign optimization (beta)
Meta is rolling out native support for profit-based campaign optimization. This allows you to send profit margin data directly through the Conversions API and have Meta optimize your campaigns for POAS instead of ROAS.
To set this up:
- In Meta Ads Manager, create a Sales campaign.
- Select Advantage+ Shopping Campaign.
- Set the performance goal to Maximize the value of your conversions.
- Under conversion value, select Profit margin.
- In your sGTM container, configure your Facebook CAPI purchase tag to use the net_value event parameter, which includes profit data with the initial Purchase event.
This is currently in beta and requires access through your Meta representative. For the full setup guide, see Stape's Meta profit optimization guide.
6. Add profit data to GA4
For GA4, the simplest approach is adding profit as an event parameter:
- Open your GA4 Configuration tag in sGTM.
- Under Event Parameters, add a new parameter.
- Set the field name to
profit. - Set the value to
{{Stape Store - Profit Margin}}.
This sends profit data on every event that passes through the GA4 tag. In GA4, you can:
- Register
profitas a custom metric. - Build calculated metrics like Profit on Ad Spend.
- Create exploration reports comparing revenue vs. profit by campaign, source, or product category.
This gives you full visibility into where your profit actually comes from.
Advanced extension: combining profit with new customer tracking
Profit tracking becomes even more powerful when combined with new vs. returning customer data.
If you already have a new customer tracking system in place (e.g. using Stape Store to classify customers based on purchase history), you can create layered conversion actions. For a complete walkthrough of that setup, see New Customer Tracking With sGTM and Stape Store.
Why this matters
- A new customer purchase with 40% margin is your best possible outcome.
- A returning customer purchase with 5% margin barely covers costs.
- Platforms cannot differentiate between these without your data.
How to implement
- You already have
{{Stape Store - Profit Margin}}for profit values. - You already have a new customer flag (e.g.
{{ED - NewCustomer}}). - Create conversion tags that combine both signals.
For Google Ads:
- On your profit purchase tag, enable Provide new customer data.
- Set the data source to Custom configuration.
- Map the new customer value to your new customer variable.
- Google Ads now knows both the profit value and whether the customer is new.
For Meta:
- Send
PurchaseProfitevents with an additional custom data parameter for new_customer. - Or use the profit-based optimization beta with new customer audience signals.
- Build audiences and optimize around profitable new customer acquisitions.
The result: you can bid toward acquiring new customers profitably, not just acquiring them at any cost.
Validation and testing
Before going live:
- Enable GTM Preview mode on your sGTM container.
- Trigger a test purchase.
- Verify the Margin Lookup variable returns the expected profit value (check against your catalog).
- Confirm the Google Ads profit tag fires with the correct value.
- Confirm the Meta profit tag fires with the correct value and event name.
- Verify the GA4 profit parameter appears in the event.
- Cross-check: the profit value should be lower than the revenue value.
- Test with multi-item orders to verify quantity multiplication works correctly.
Once validated, this system requires minimal maintenance. Catalog syncs keep margin data current. The only ongoing task: keep your cost data accurate in your ecommerce backend.
Conclusion
Optimizing for revenue instead of profit is one of the most common and most costly mistakes in performance marketing. Every campaign that hits a 500% ROAS target but runs on 8% margins is a campaign that's scaling toward break-even.
By combining:
- sGTM for server-side processing
- Stape Store for secure, first-party product data
- The Margin Lookup variable for real-time profit calculation
- Dedicated profit tags for Google Ads, Meta, and GA4
...you create a system that gives your ad platforms the one signal they've never had: how much money you actually made.
The result:
- Smarter bidding
- Better budget allocation
- True profitability visibility
If you're already running sGTM, adding profit tracking is a no brainer. Especially if your product catalog contains items with varying margins.

Comments