Set up Facebook server-side tracking with Facebook Conversions API
Facebook Pixel lets you track user activity on your site, collect remarketing audiences, and create lookalike audiences. When implemented correctly, the Facebook Pixel feeds relevant information to Facebook's machine learning algorithms (FB ML), which use this data to show your ads to individuals most likely to convert.
For several years, we have tracked events on our sites using JavaScript code, the Facebook SDK within apps, or by uploading offline events. But how do you track users with ad blockers, monitor events outside your site, or extend a cookie's lifetime? This can be achieved by implementing the Facebook Conversions API or the Facebook Conversions API Gateway.
This article will focus on Facebook conversion tracking and guide you on setting up the Facebook Conversions API via Google Tag Manager Server Container. Additionally, check out Stape’s pre-configured templates for Meta CAPI. Configuring your setup has never been easier; everything is pre-configured and ready for you!
| Related: Facebook Lead Ads. |
What is Facebook Conversions API?
Let's take a look at what the Facebook Conversions API is and how we can use it to improve event tracking, attribution, and data collection on Facebook. The Facebook Conversions API allows you to send events directly from your server to Facebook's server.
Facebook CAPI serves the same purpose as the Facebook Pixel but relies on different technology. The policies and restrictions surrounding FB CAPI make it more suited to the needs of the modern tracking environment. Unlike the Facebook Pixel, the Conversions API does not rely on the user’s browser to send tracking information; everything is processed through the cloud server, enhancing data security and accuracy.
Unlike the Pixel, Facebook server-side tracking does not depend on what happens in the user's browser, meaning ad blockers, ITP, and iOS restrictions have little to no effect on data collection. This makes it a more stable foundation for conversion tracking, especially as browser privacy restrictions continue to grow.
When examining the URLs of Facebook ads, you'll notice that FB appends an additional parameter, fbclid, at the end of almost any URL. The pixel code on the landing page stores this parameter's value in a cookie and sends it along with any Facebook event. In addition to the click ID (fbclid), Facebook uses the browser ID (fbp). The fbp and fbc cookies help Facebook identify the type of user who landed on your site and who converted.
Facebook can match users through other parameters such as email, phone number, first/last name. The more user data you send to the Facebook Conversions API, the higher your match rate will be.
| 💡While most businesses focus on web events, Meta now allows you to sync a physical store with online data. Check our Meta omnichannel ads guide to learn how to combine online and offline conversions. |
What are the main benefits of Facebook Conversions API?
Facebook server-side tagging, or the Facebook Conversions API, has been available for several years. However, starting in 2021, Facebook began to promote the Conversions API more aggressively. If you have a dedicated Facebook representative managing your ad account, they will likely recommend setting up the Facebook Conversions API.
Here are the most important reasons to consider implementing the Facebook Conversions API. See the details below.
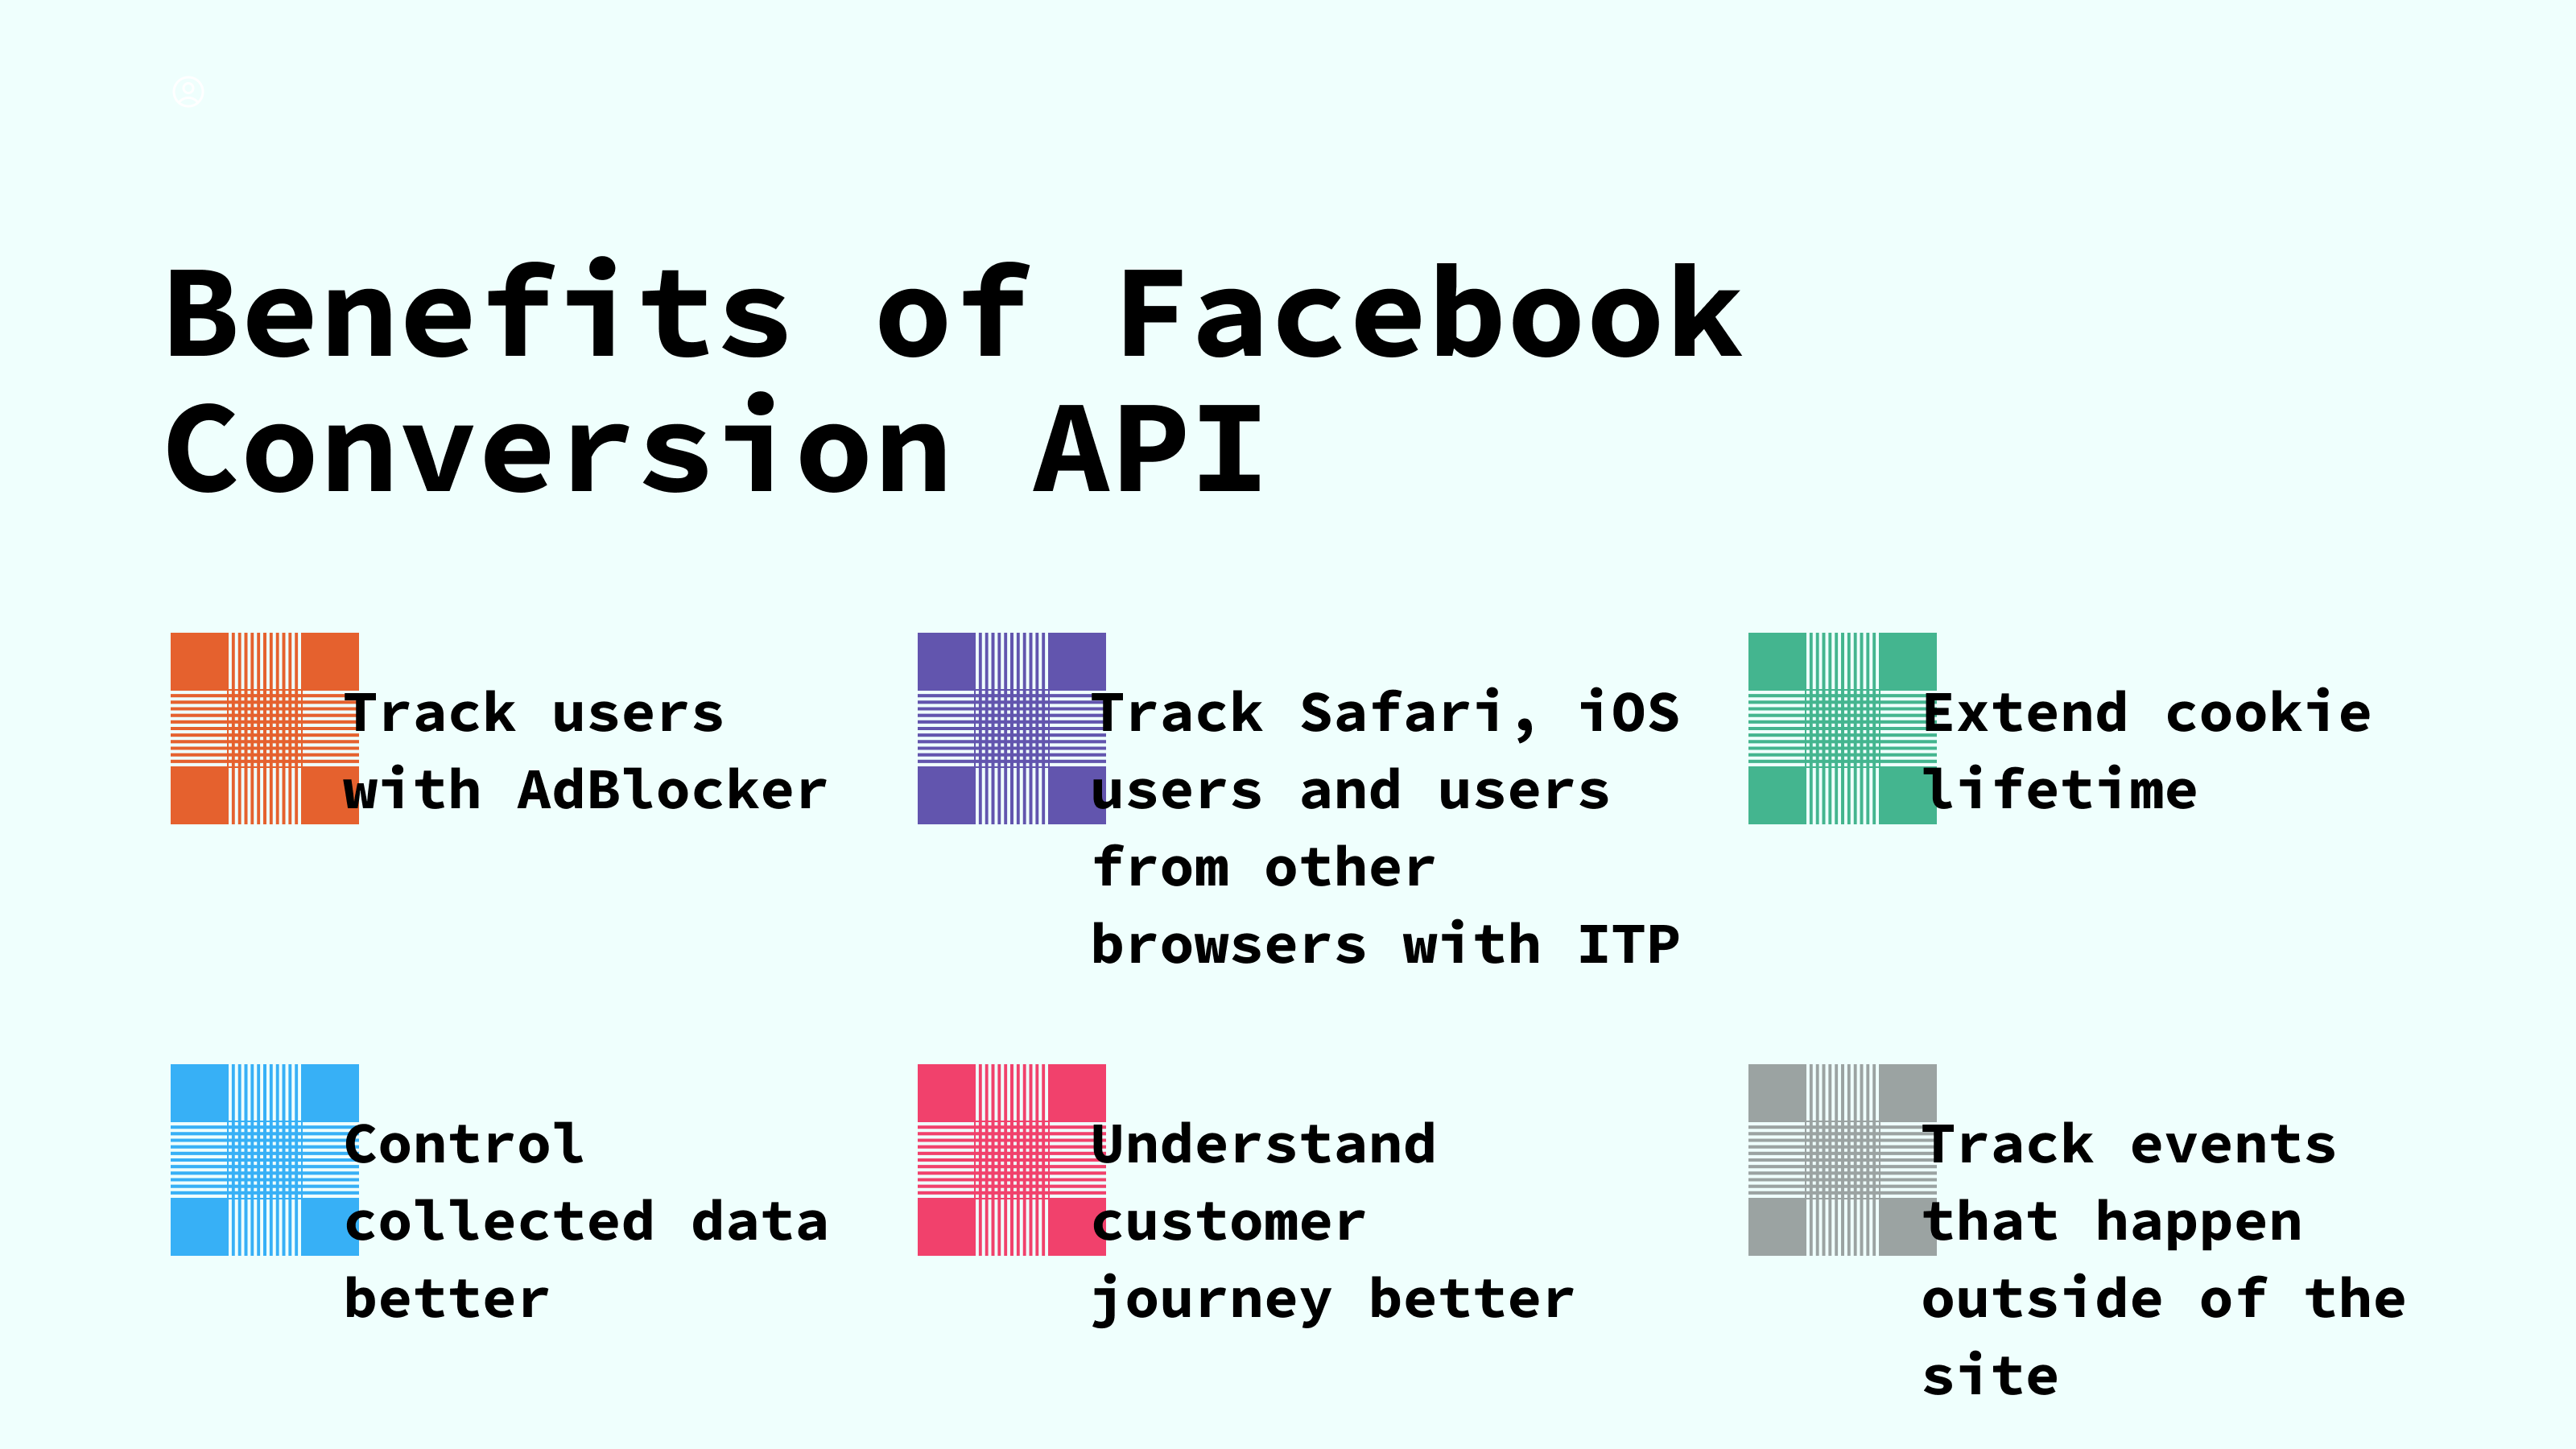
- It can help you track users who have installed ad blockers, those using Safari (or any other browser with intelligent tracking prevention algorithms), or people who opted out of FB tracking in iOS 14/15. This is possible because requests are sent from the server rather than the user's browser. And third-party cookies will not be blocked. With the help of user parameters you send together with FB CAPI events, FB will match events to users in their database. As a result, you will have more reliable data.
- Extended cookie lifetime. With the Facebook Conversions API, you can extend the Facebook cookie lifetime to 6 months. In contrast, if you do not use the FB Conversions API, Safari limits cookie lifetime to 1-7 days.
- The Conversions API gives you greater control over your data and a better understanding of the customer journey.
- You can use the Facebook Conversions API to track events that occur off your site. For example, phone calls or offline sales.
| Businesses that switch to Facebook server-side tracking typically notice an improvement in reported conversions, not because more conversions are happening, but because fewer are being lost due to tracking limitations. The difference is most noticeable among audiences that heavily use Safari, Brave, or ad blockers. |
Real-world example of Meta Conversions API value
By integrating the Conversions API alongside the Meta Pixel, Ray-Ban was able to significantly improve its advertising results. The combination led to a 36% greater reach on Facebook and Instagram compared to using the Meta Pixel alone.
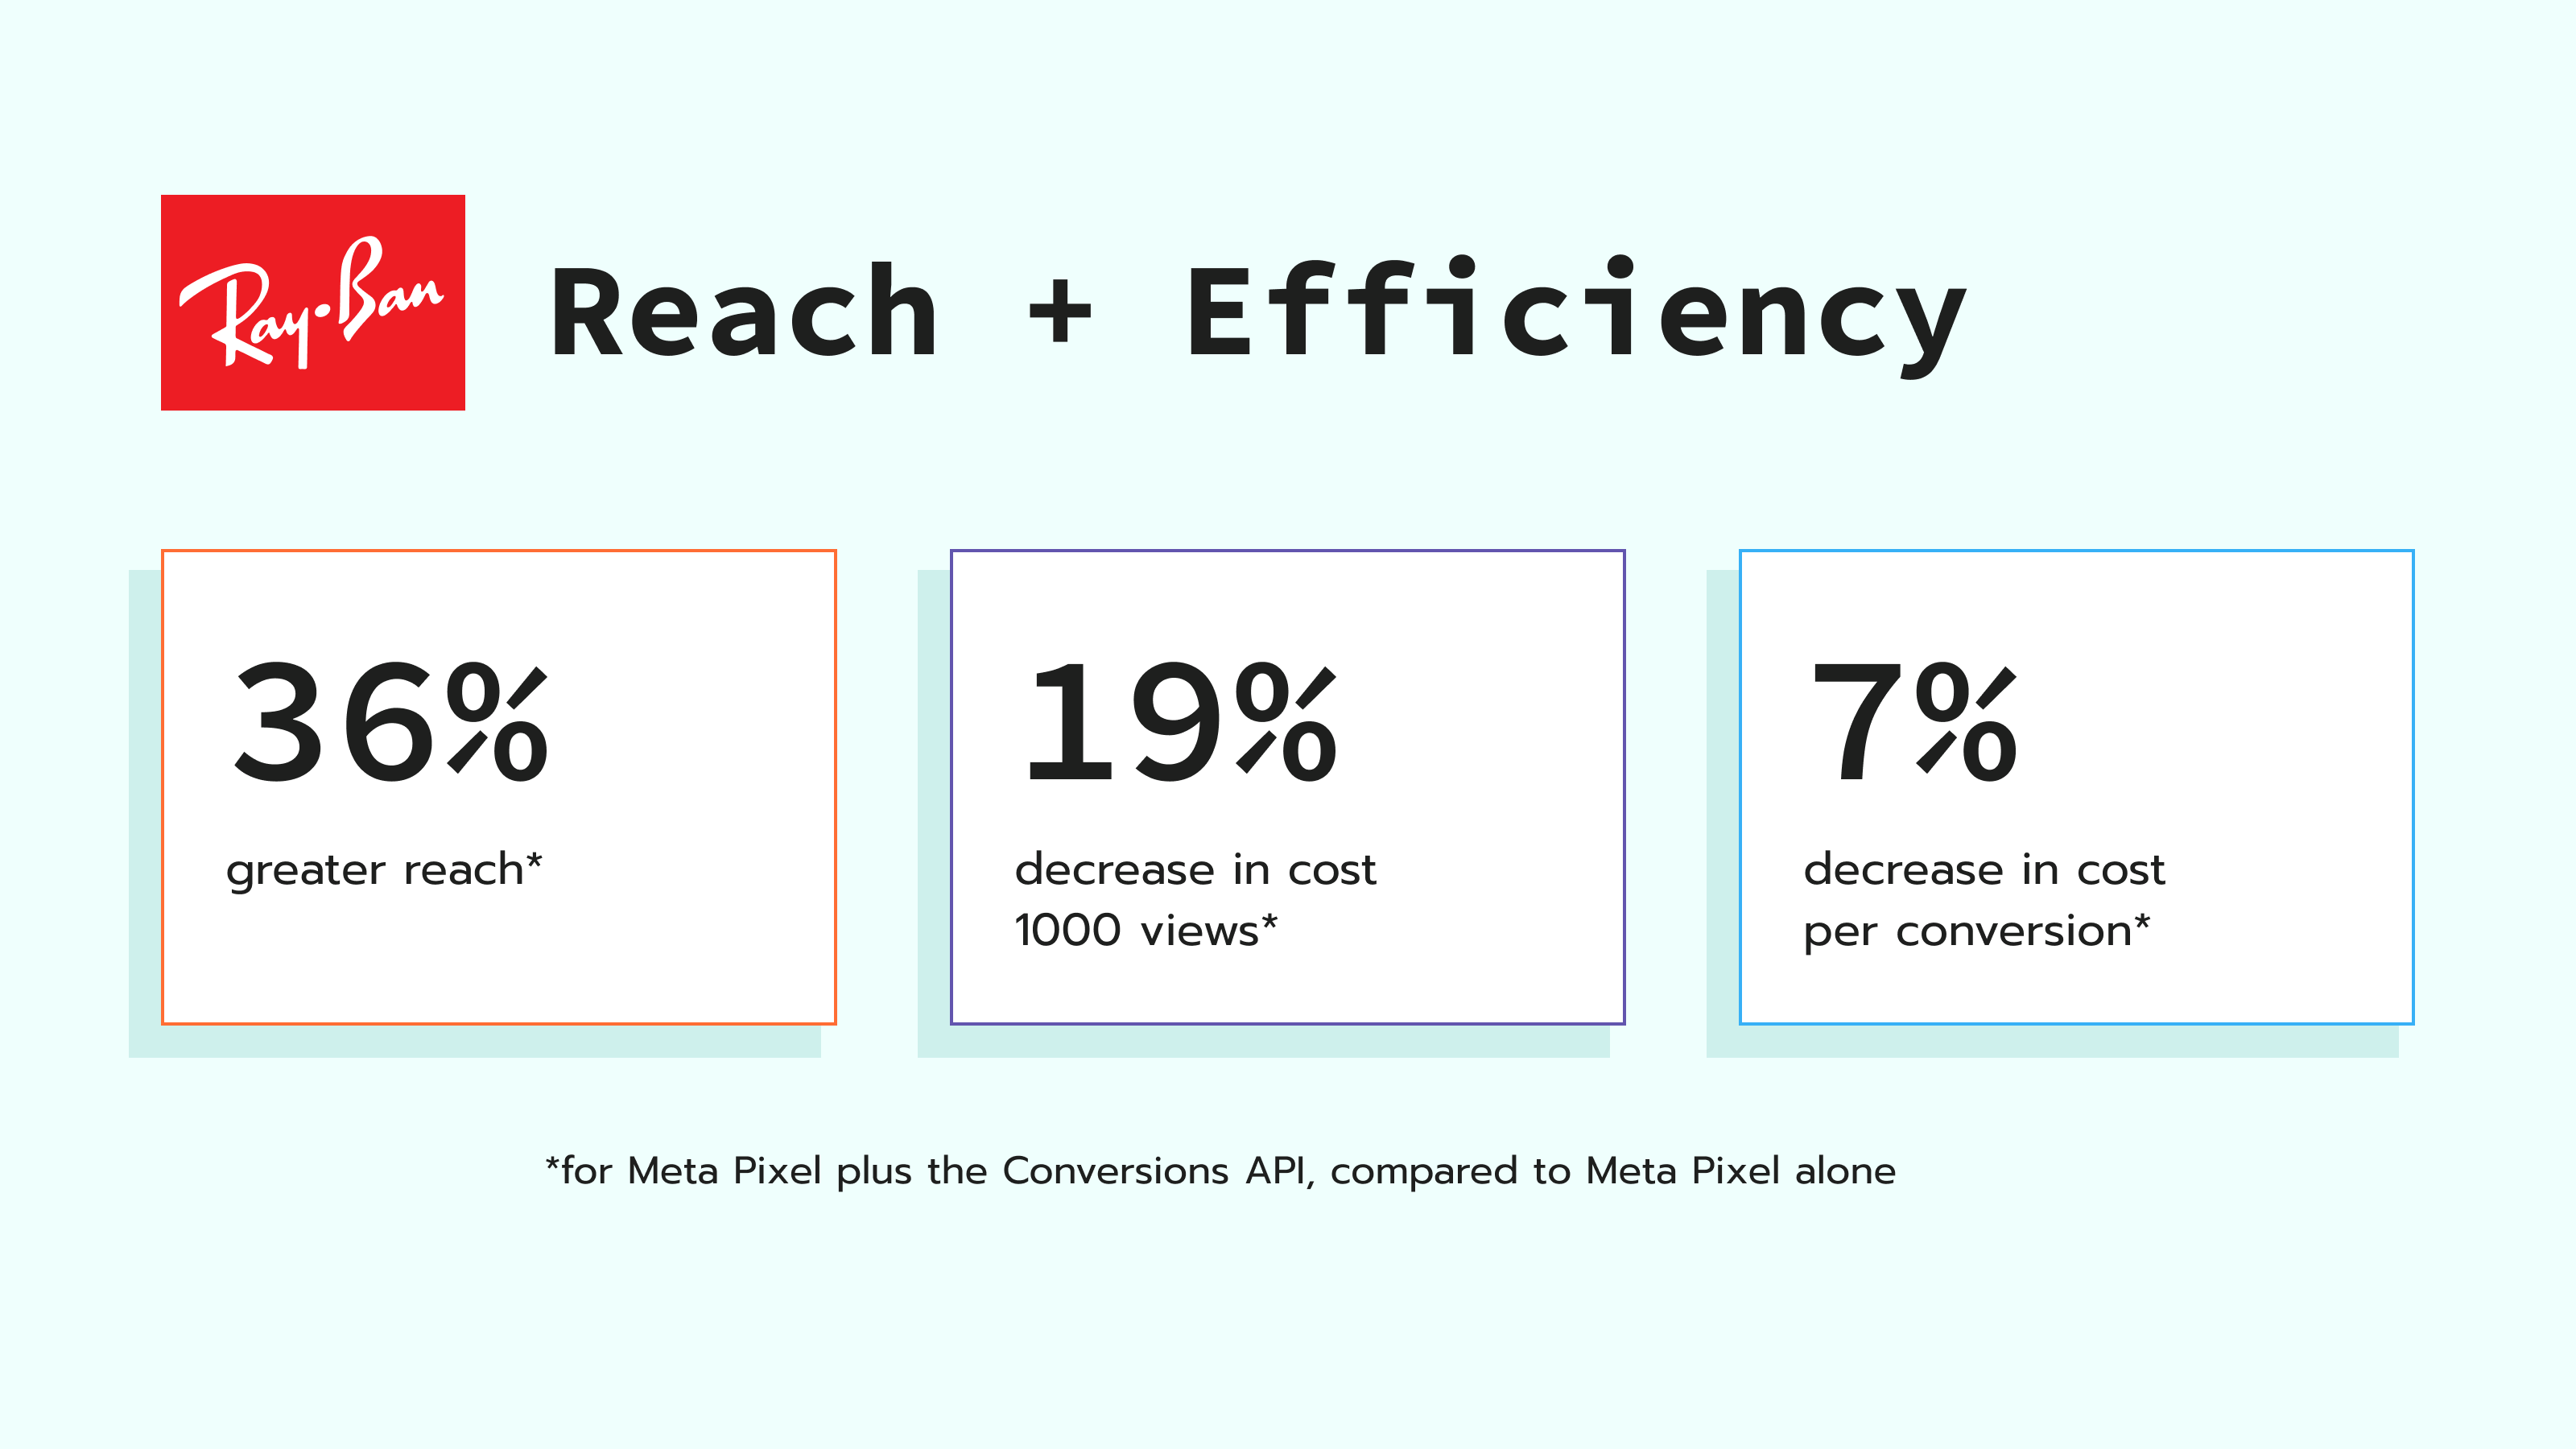
Additionally, the brand saw a 19% reduction in cost per 1,000 views and a 7% decrease in cost per conversion, demonstrating the effectiveness of the Conversions API in optimizing their campaigns and driving better performance.
Ways of setting up Facebook server-side tracking
Using Meta Conversions API Gateway
The Meta Conversions API Gateway is the fastest solution for implementing Meta server-side tracking and does not require any specialized knowledge.
How Conversions API Gateway works
The key feature of the Conversions API Gateway is its environment. Each Conversions API Gateway instance requires a cloud server to manage all communication processes between the Meta Pixel and the Conversions API. For a deeper understanding, check the Meta documentation on how the Conversions API Gateway works.
Once the Meta Pixel is connected to the Conversions API Gateway environment, it will use web events to track data from the server. Therefore, before implementing Conversions API Gateway, it's essential to ensure that web events are 100% accurate and contain all necessary user and product information before implementing the Conversions API Gateway.
With Stape, setting up and hosting the Conversions API Gateway is easier than ever. Simply create a Stape account and set up the Conversions API Gateway within Stape. Then, connect the required Meta Pixels to the Conversions API Gateway environment.
Conversions API Gateway pros and cons
Pros:
1. Low price. Stape hosting for Conversions API Gateway costs $10/month per pixel or $100/month for 100 pixels. We also offer a 7-day free trial.
Additionally, the Conversions API Gateway is the simplest way to implement the Conversions API, allowing you to save hundreds or even thousands of dollars compared to a manual implementation.
2. Easy setup. You don't need to hire developers or tracking specialists to set up the Conversions API Gateway. The setup process is straightforward and can take less than 1 minute, even for those without technical skills.
3. No maintenance. Updates for the Conversions API Gateway are installed automatically. There is no need to spend time manually updating settings or servers. Even when you add a new event, just set up proper web tracking, and the Conversions API Gateway will automatically start tracking events from the server.
Cons:
1. New. The Conversions API Gateway is new, and Meta will likely roll out new functionalities and updates to the existing ones. Therefore, it makes sense to prepare for changes to its features.
2. No support for other platforms. If you want to take full advantage of server-side tracking, server Google Tag Manager (sGTM) might be a better solution. You will still need an instance of Google Tag Manager to manage server Google Analytics (GA), Google Ads, etc.
Stape hosting for Conversions API Gateway
Stape offers hosting for the Conversions API Gateway at a cost of $10 per pixel per month or $100 for 100 pixels per month. Besides that, all users receive a 7-day free trial.

How to set up Meta Conversions API Gateway
To set up Conversions API Gateway with Stape, all you need to do is:
- Create a Stape account if you don't have one.
- Connect the Conversions API Gateway hub with Meta Pixel.
Once you create the Conversions API Gateway container on Stape, we will set up an Amazon Web Services cloud formation stack based on Meta requirements and manage all updates.
For a step-by-step guide, please refer to our post on how to set up the Meta Conversions API Gateway.
| Check out our article on comparing Meta CAPI and Meta CAPIG to choose the right solution for your needs. |
Using the server GTM
One of the most accessible ways is to use server Google Tag Manager (sGTM). With sGTM, businesses can send customer data directly to Facebook's servers. If you already use GA4, Facebook server-side tracking via sGTM requires minimal additional configuration, as GA4 events can be reused directly as a data source for the Facebook tag. This makes sGTM the most practical starting point for most setups.
Pros of setting up Facebook CAPI via sGTM:
- Flexible customization options
- Ability to implement both pure server-side and hybrid (web + server) tracking
- Opportunity for data enrichment
Cons of setting up Facebook CAPI via sGTM:
- Requires technical knowledge of the server Google Tag Manager
- Needs cloud infrastructure to host sGTM
In this article, we will focus on configuring Facebook server-side tracking via server GTM.
How to set up Facebook Conversions API with server GTM?
We will use the server Google Tag Manager container to set up Facebook Conversions API. You will need these things to configure Facebook Conversions API:
- A configured Google Tag Manager web container
- Server-side Google Analytics 4 or Data Tag/Data Client to deliver data to sGTM.
We also have a blog post about the Tag Manager server container and its benefits on our blog.
This video shows how to set up Facebook Conversions API using Google Analytics 4.
Steps to set up Facebook Conversions API
2. Send data to the server GTM container. The two most popular methods for sending data to sGTM are Google Analytics 4 and Data Client Stape.
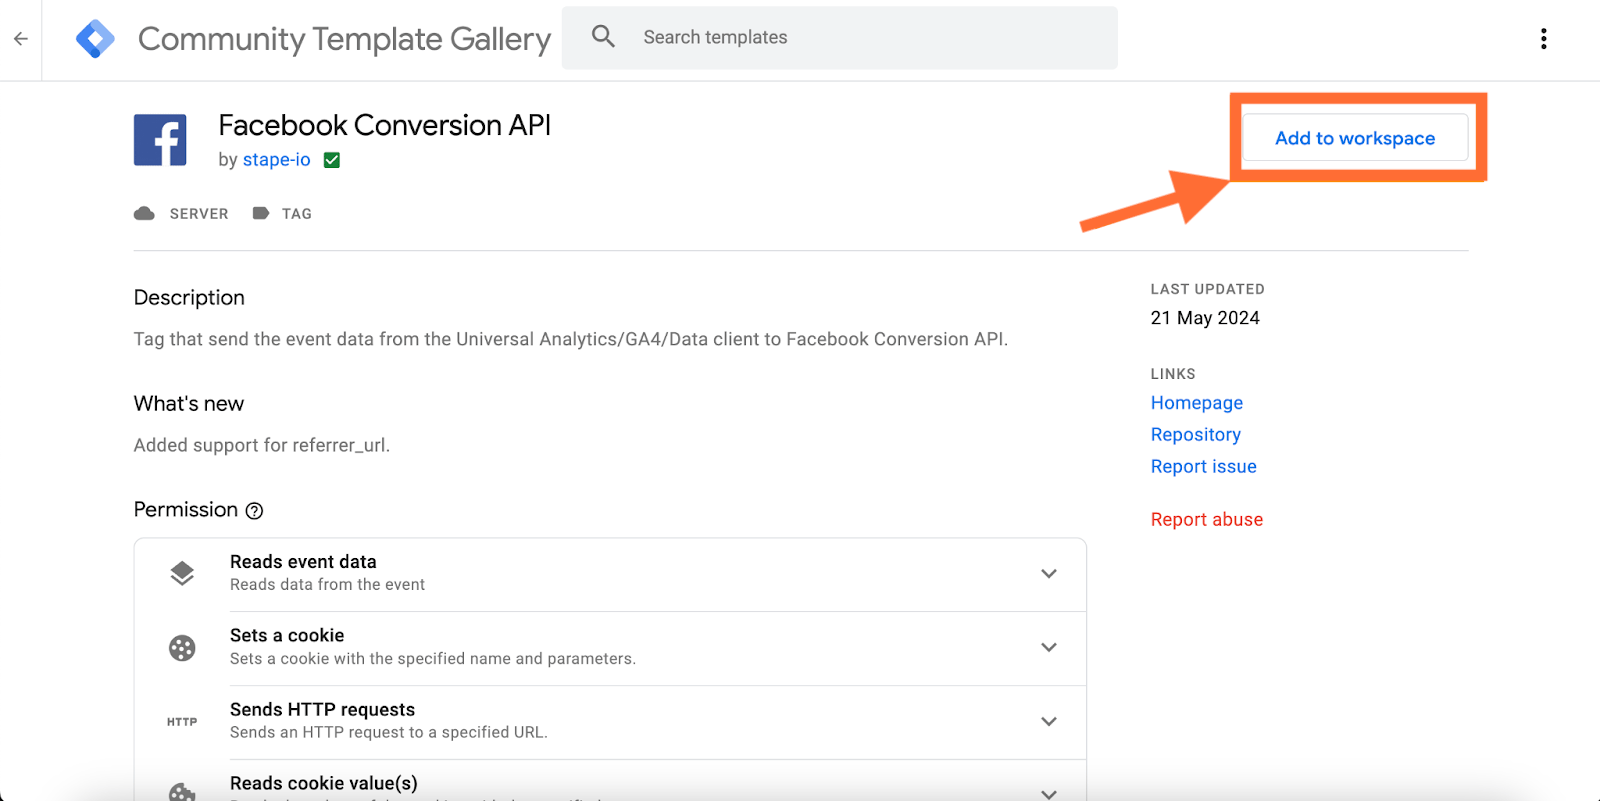
3. Go to your Google Tag Manager Server Container. Add the Facebook Conversions API tag from the Template Gallery.
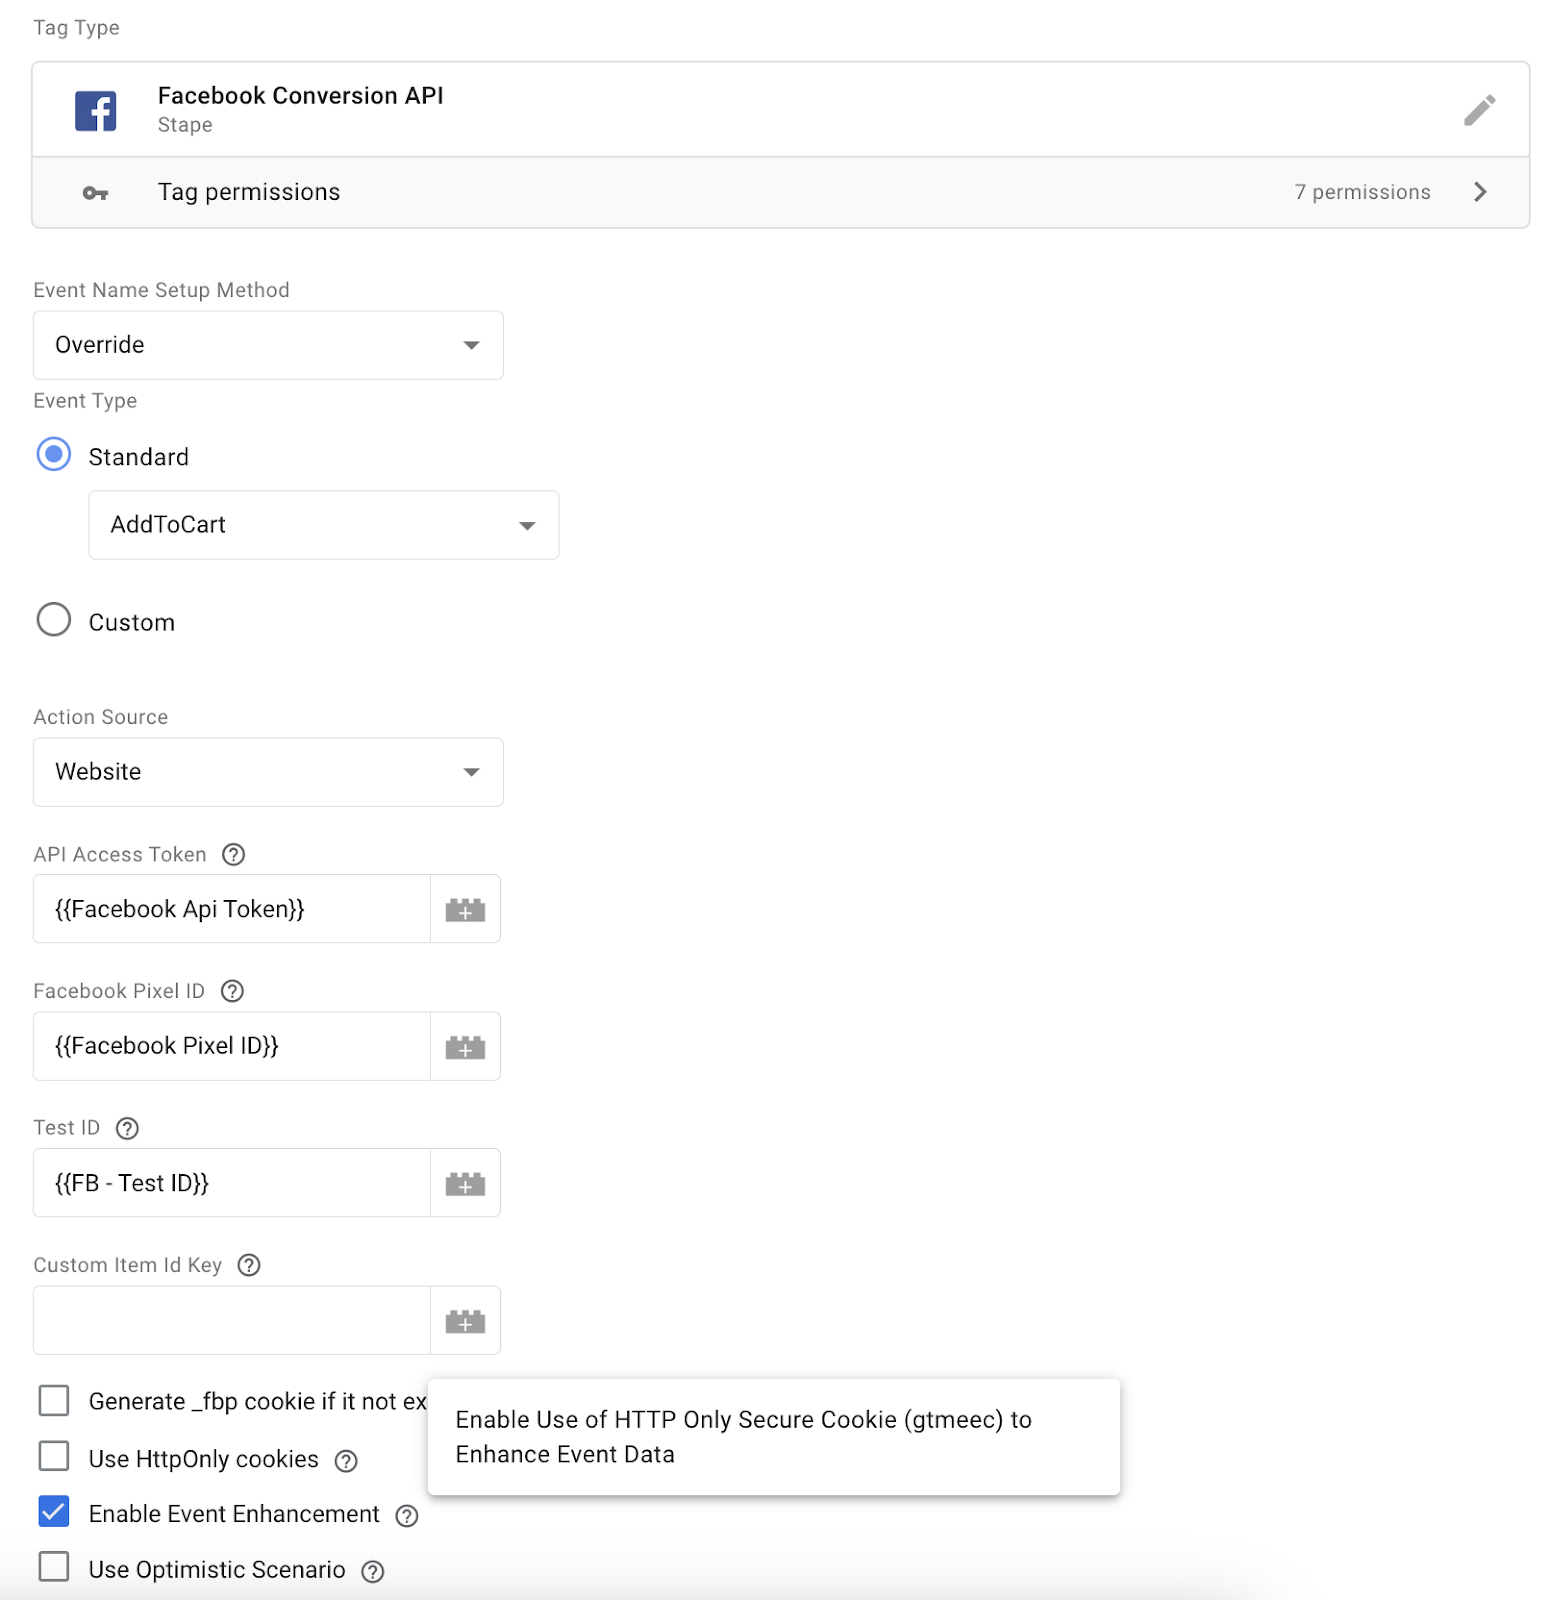
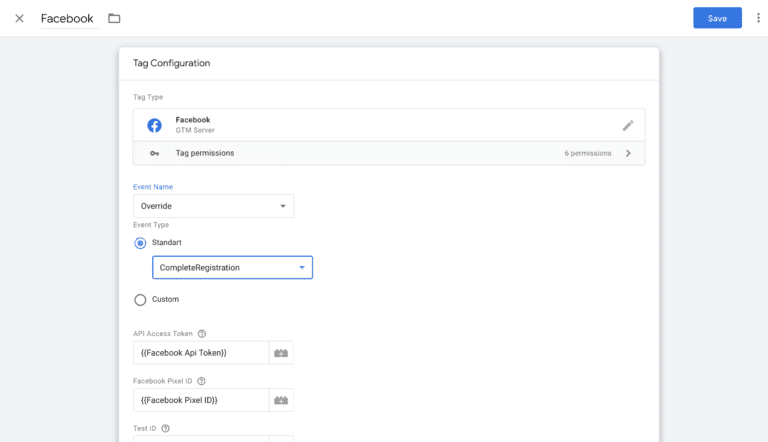
4. Create a Facebook Conversions API Tag inside sGTM. Select Tag → Click New → Choose the Facebook Tag that you've added in the previous step.
Add your Facebook Pixel ID and Facebook API Access Token (we recommend adding it as a variable since you will need these values for each Facebook event you want to track). If you don't know your Facebook API Access Token, please refer to Meta's documentation.
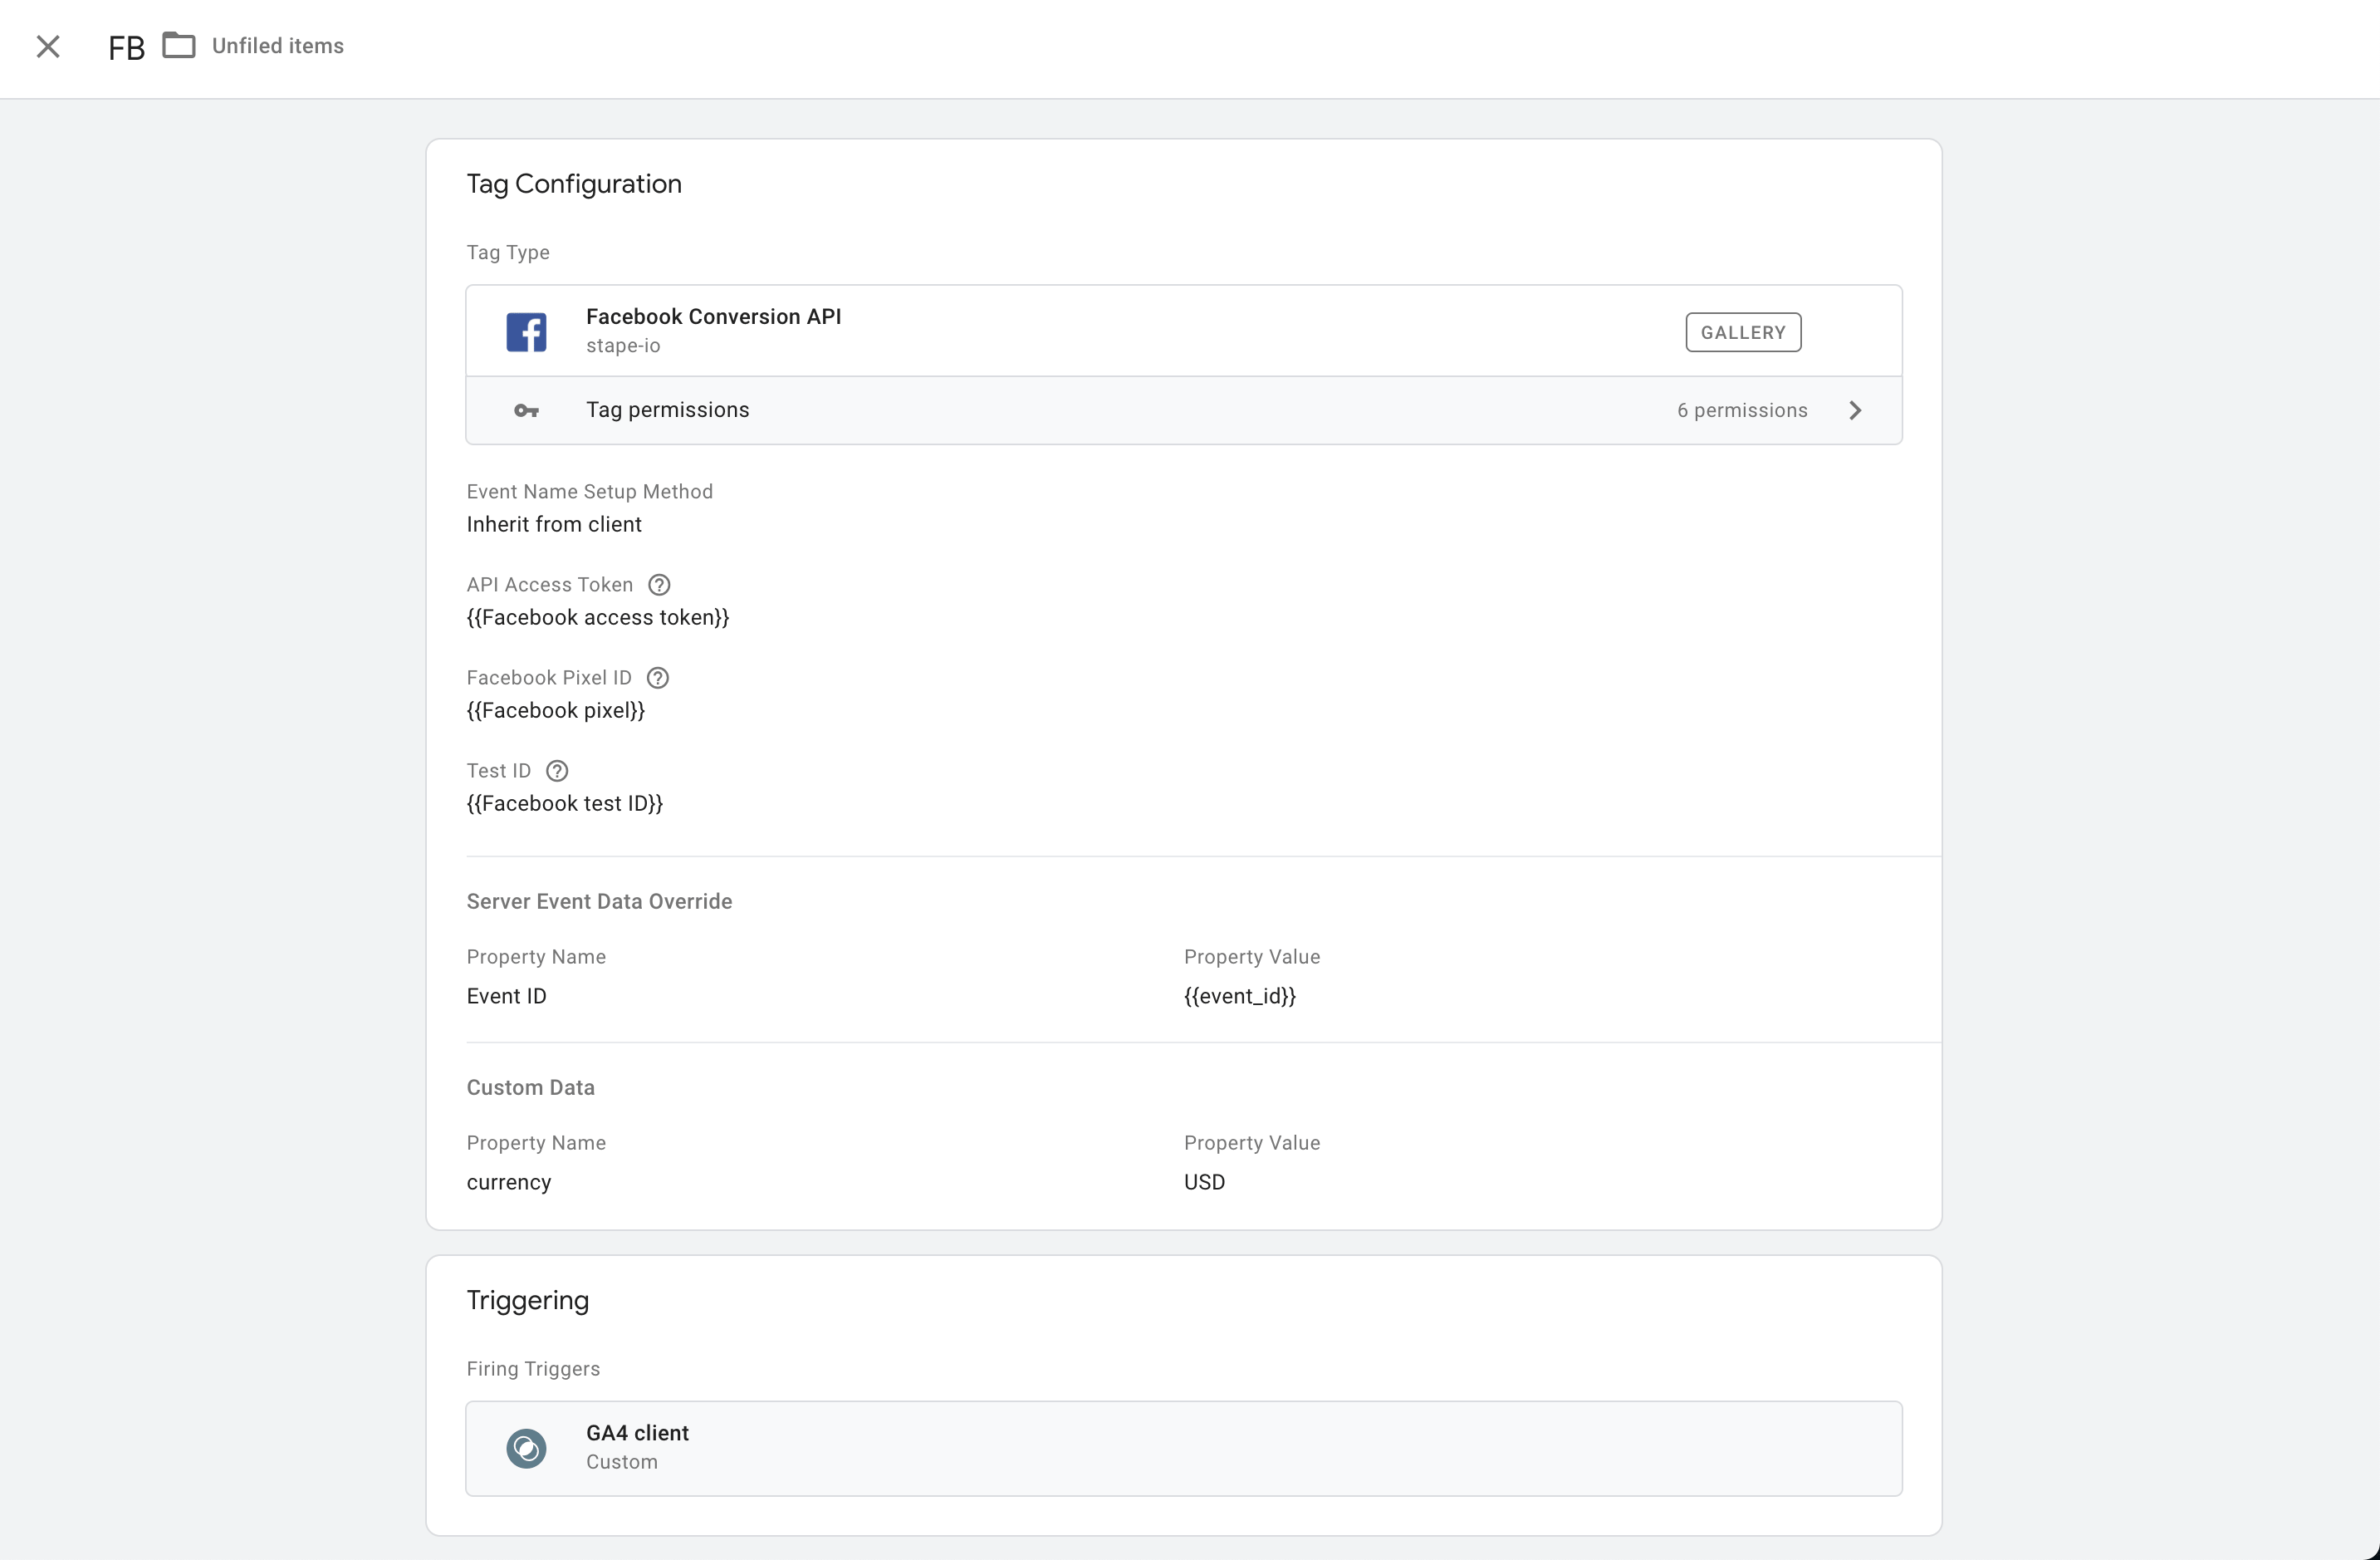
5. You have 2 options for configuring our Facebook Conversions API tag:
- Override. In this case, you'll need to set up Facebook events manually. We will cover how to manually set up Facebook server events in step six. This is the preferred option, but it requires more time and knowledge to implement. This allows you full control over the event’s payload and ensures that your web Facebook events and server Facebook events are identical.
- Inherit from client. In this case, the tag will match your GA4/Data event's payload to Facebook standard events. If the tag can't match the GA event to the standard FB event, it will send it as a custom event. Everything will be done automatically; there's no need to set up Facebook events.
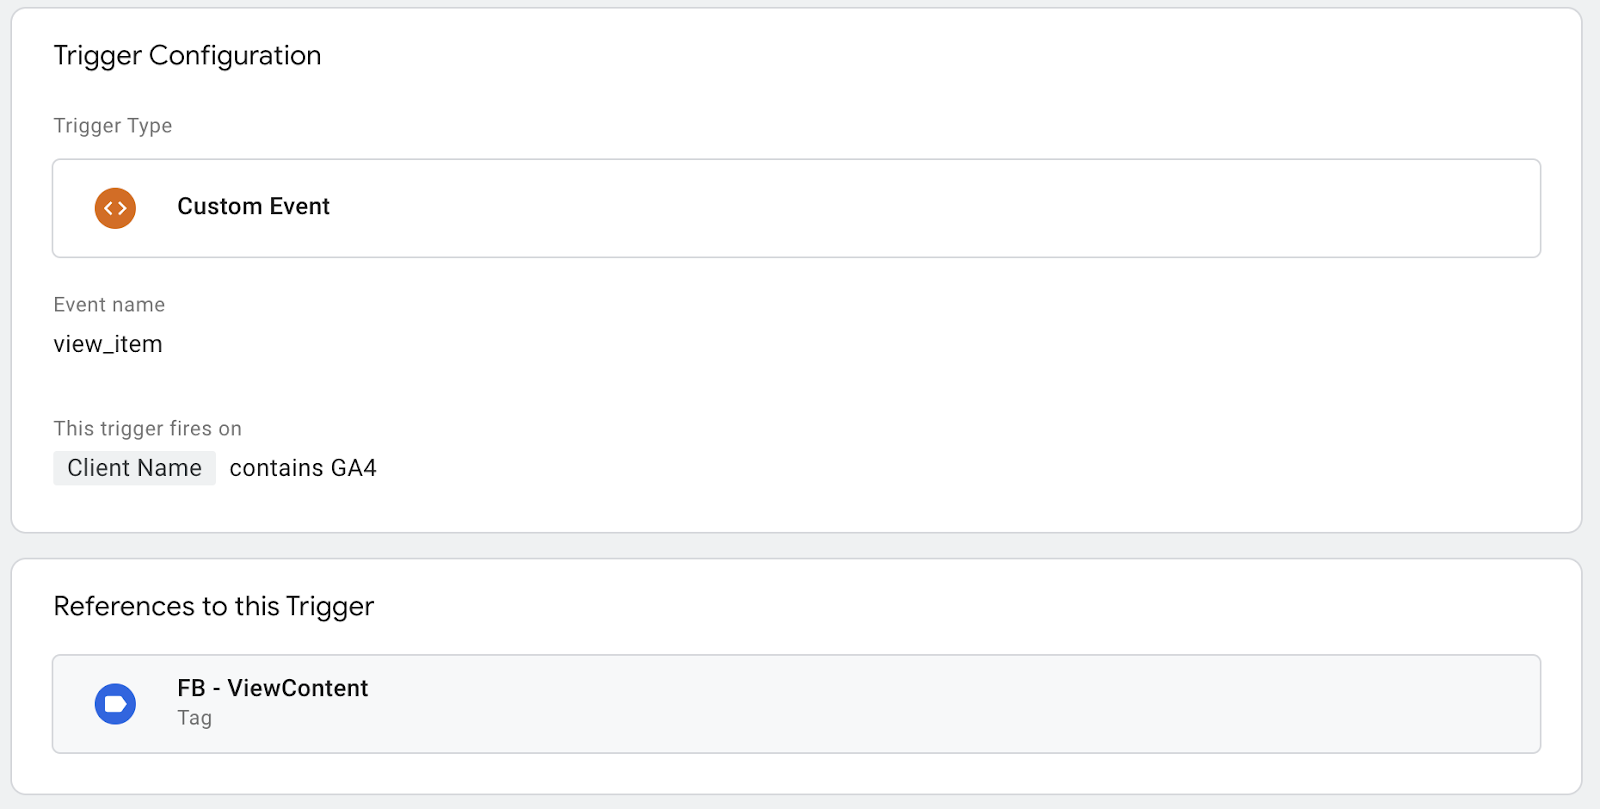
6. If you've selected the override option, you’ll need to use GA4 or Data Tag/Data Client events to trigger Facebook server events. The Facebook pageview event should trigger on a custom event page_view that was claimed by a specific client (for example, if you chose to use GA4 as a data source for the Server GTM, then you should use the page_view event when the client name equals GA4).
To set up other events, go to sGTM preview mode, perform an action on your site that you want to track inside Facebook, and check the event name that GA4 or Data Tag sends to your Server Container.
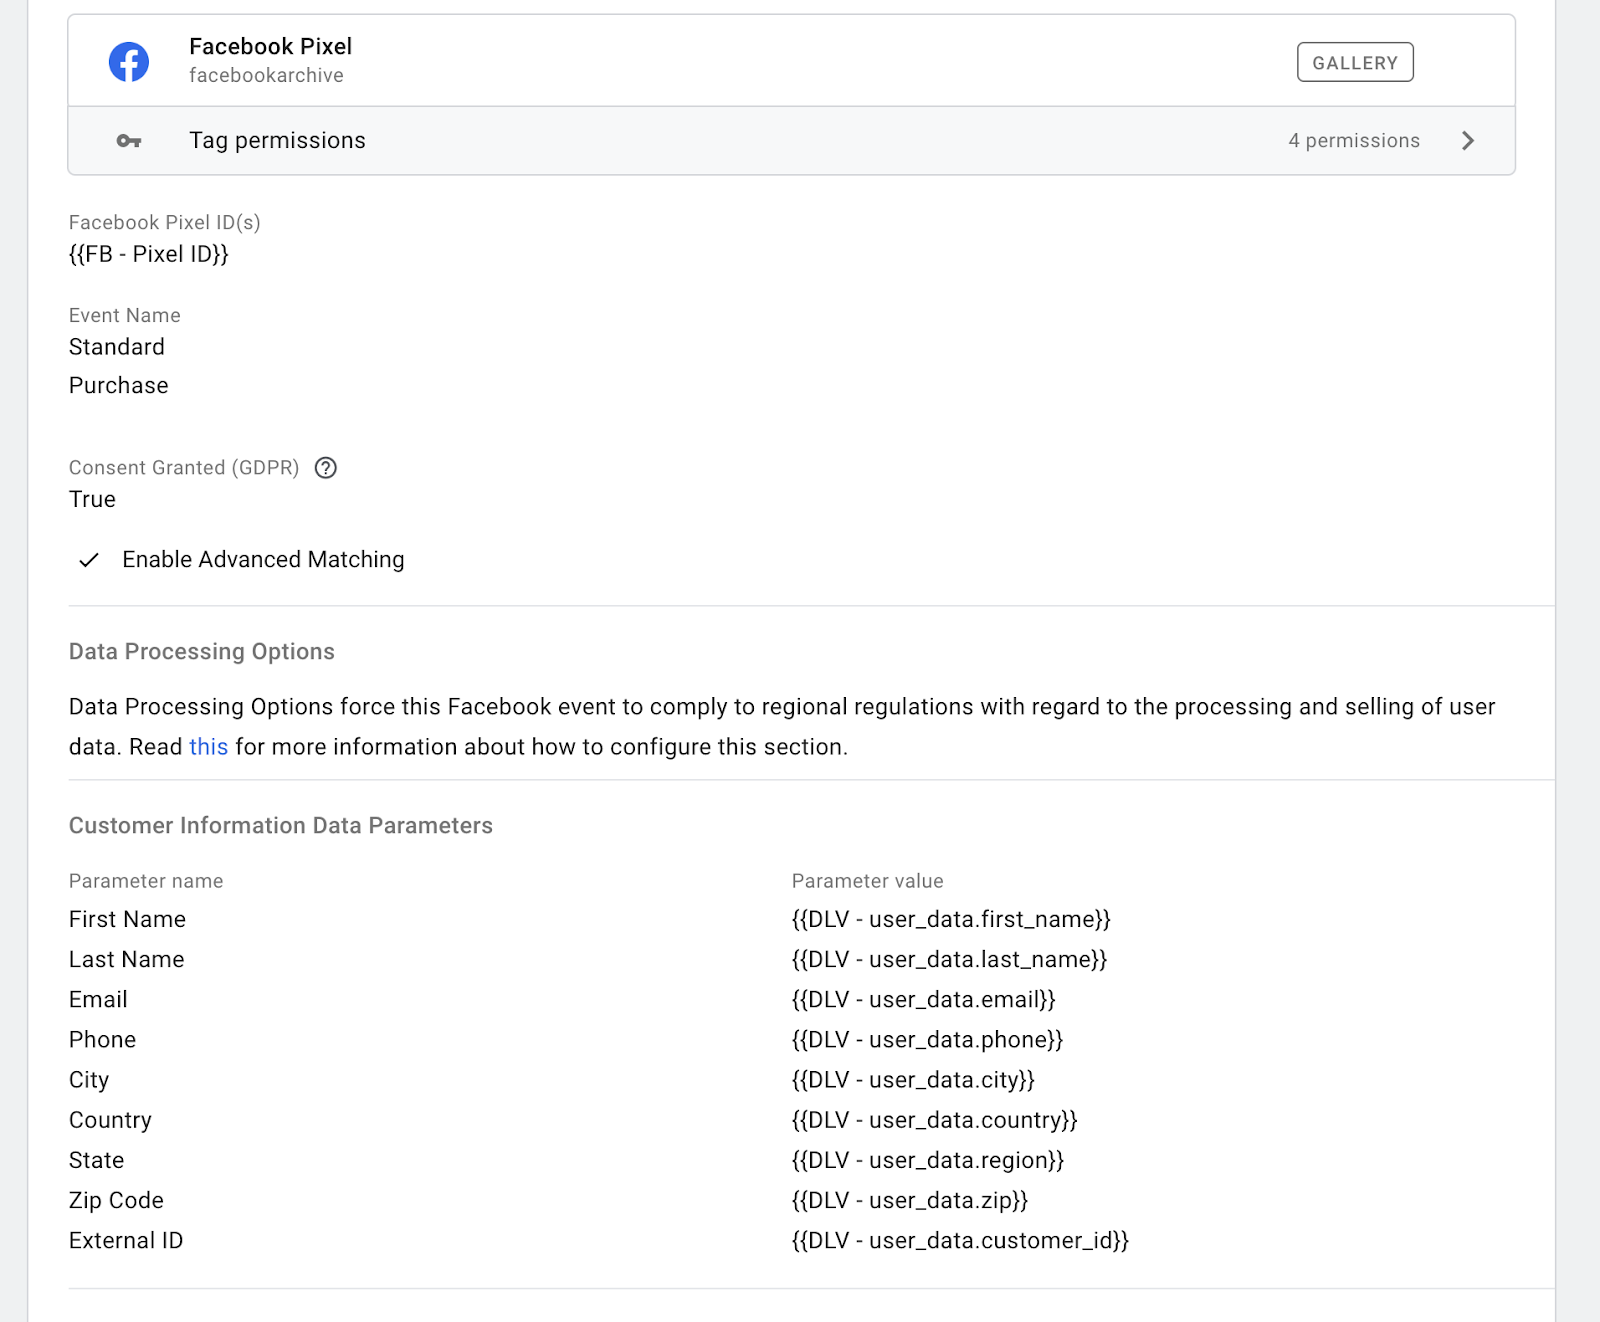
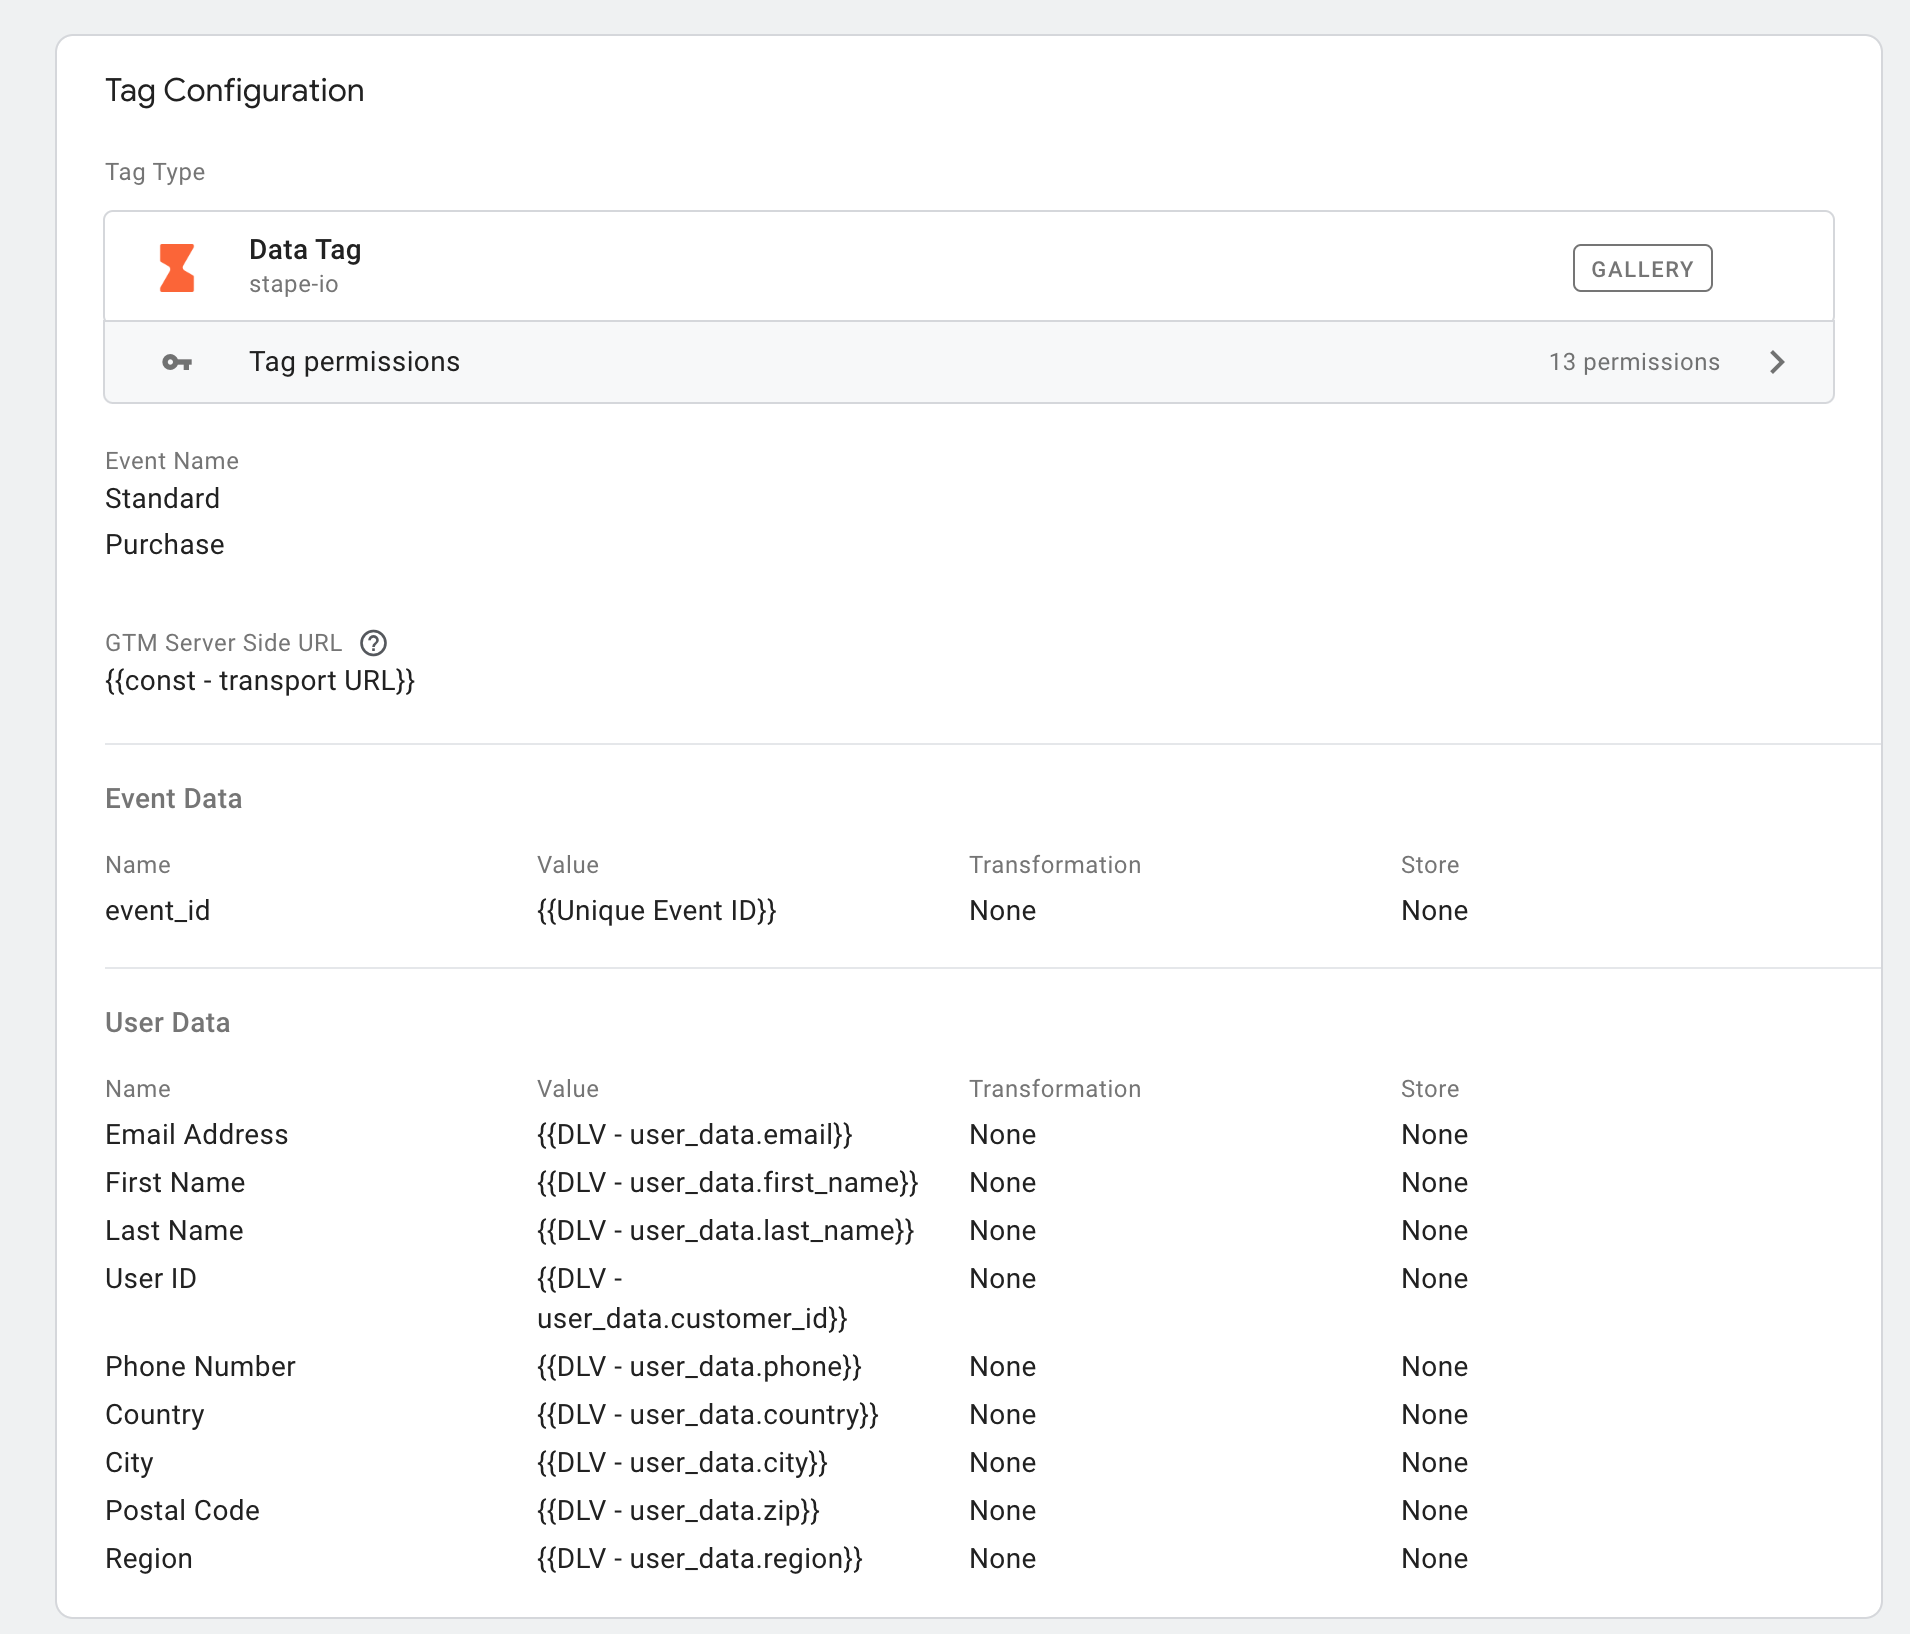
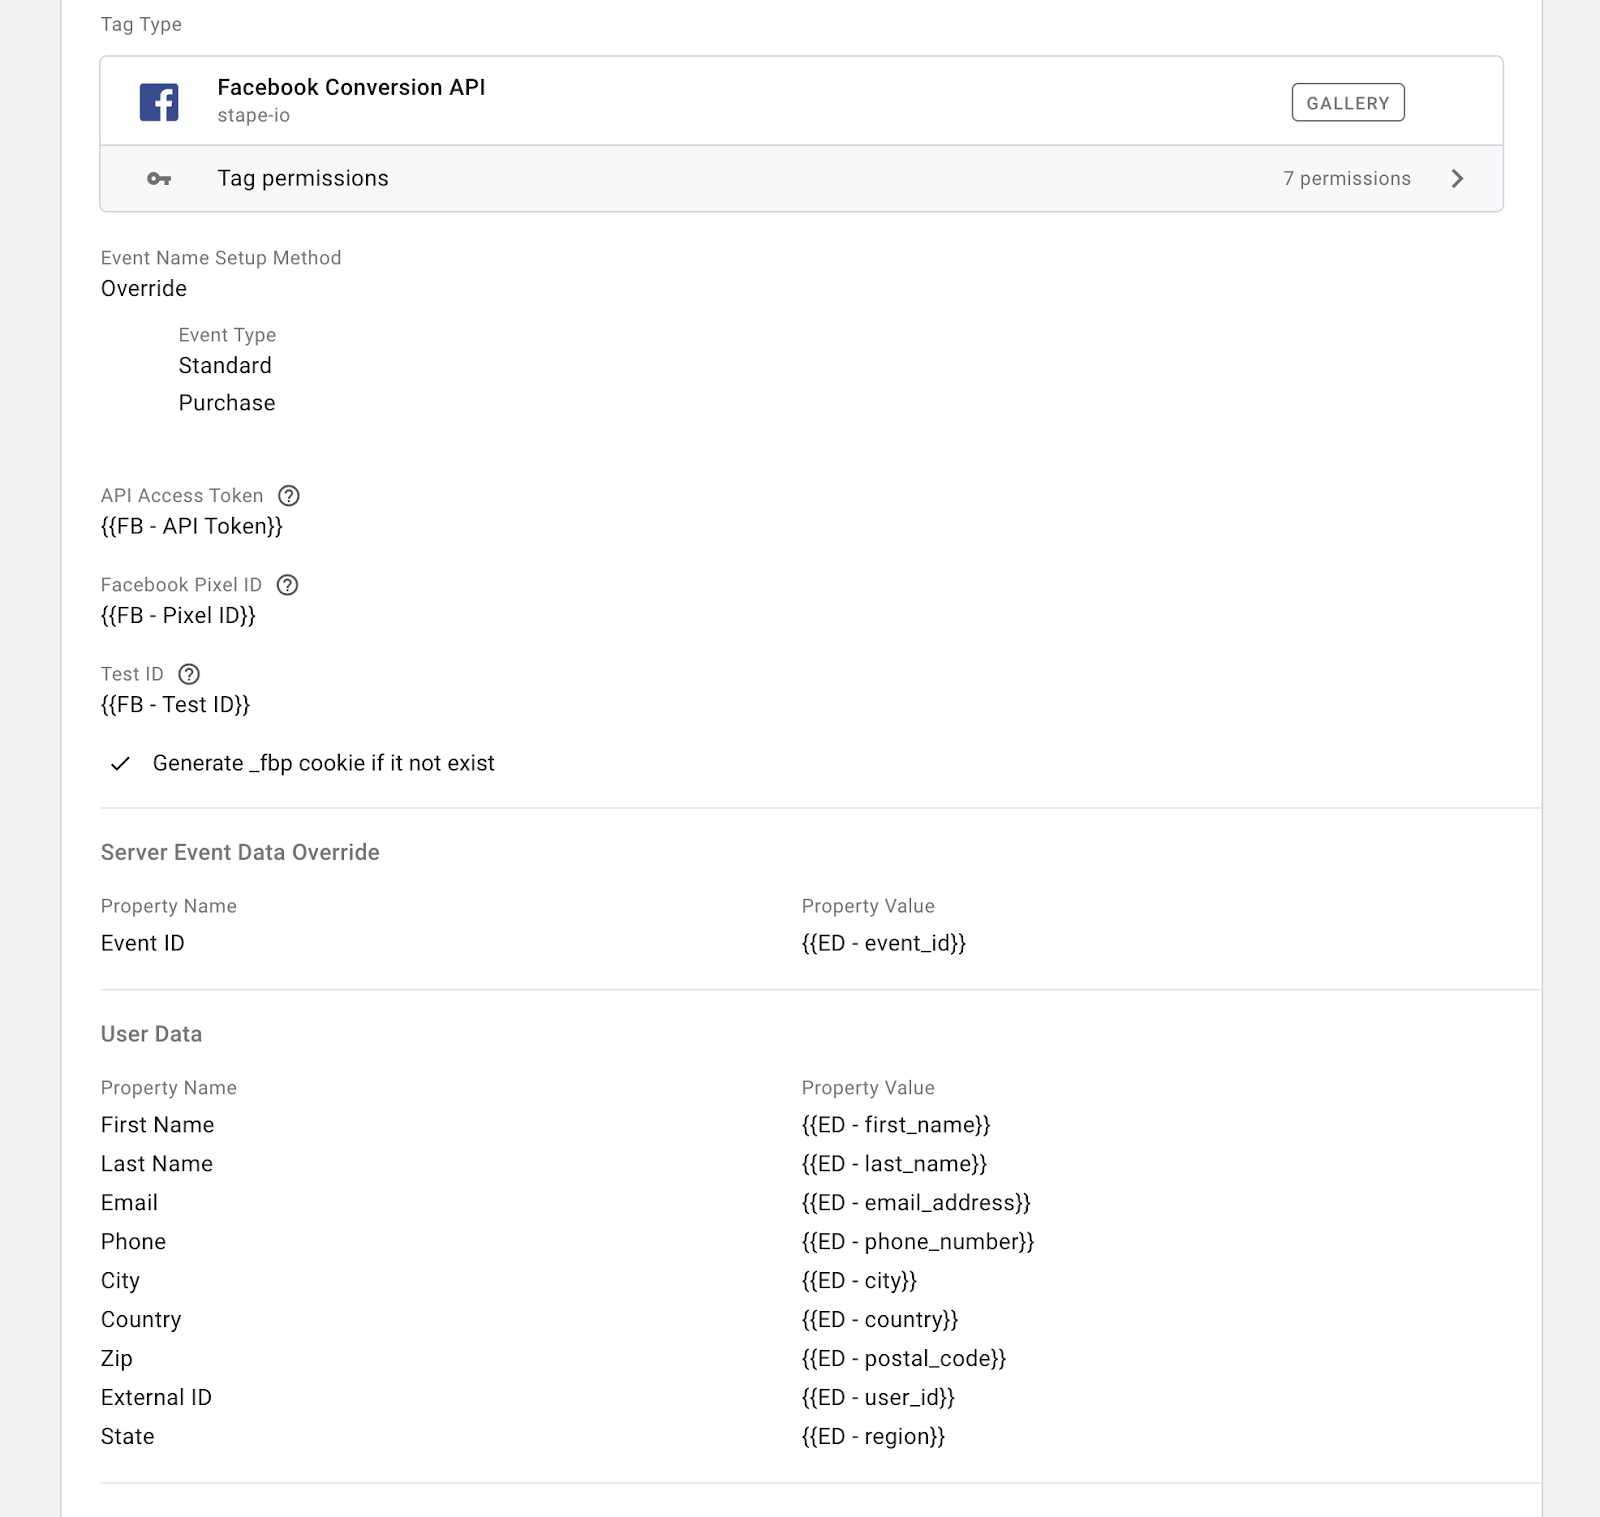
In the screenshot below, we want to set up a Facebook event ViewContent when someone opens the product page on our site. Ensure you also send with your GA4 event / Data Tag from the web container any additional data you want to use for the server event. The example below also uses standard Facebook eCommerce parameters and user data.
To do that, we created a new tag inside the Server container, set it to override, selected the standard event ViewContent, added the API Access Token, and Facebook Pixel ID. We also added User Data and created a new trigger with the event name equal to view_item and Client Name equal to GA4.

7. You can pass custom parameters using the fields Server Event Data Override, User Data, and Custom Data. You can send user data to increase the matching score on Facebook via the User Data field. Note that the user information you want to send to the Facebook Conversions API should be hashed. Our Facebook tag automatically hashes the necessary data.
You can also enable Event Enhancement to use the HTTP-only secure cookie (gtmeec) in order to enhance event data. When this feature is enabled, the tag will store user data in cookies and enrich events with user data when it is not available. This way, you can increase event match quality, which can improve conversion attribution to campaigns.
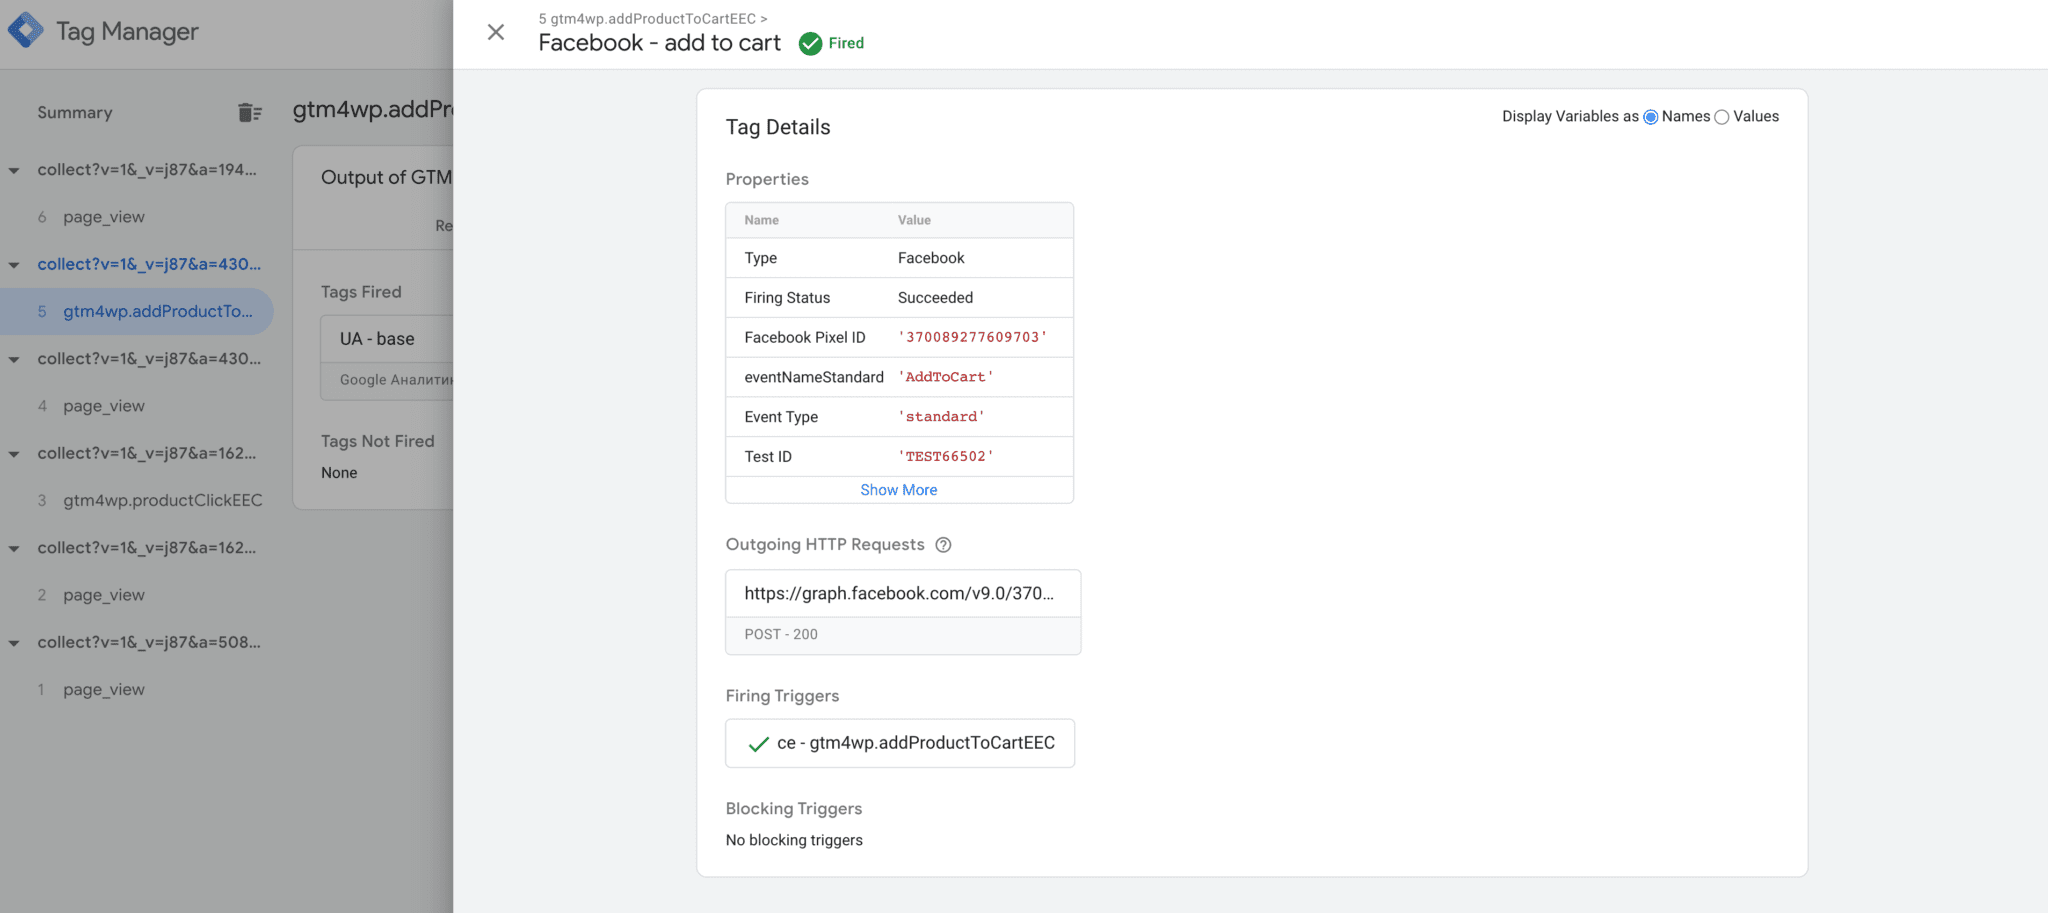
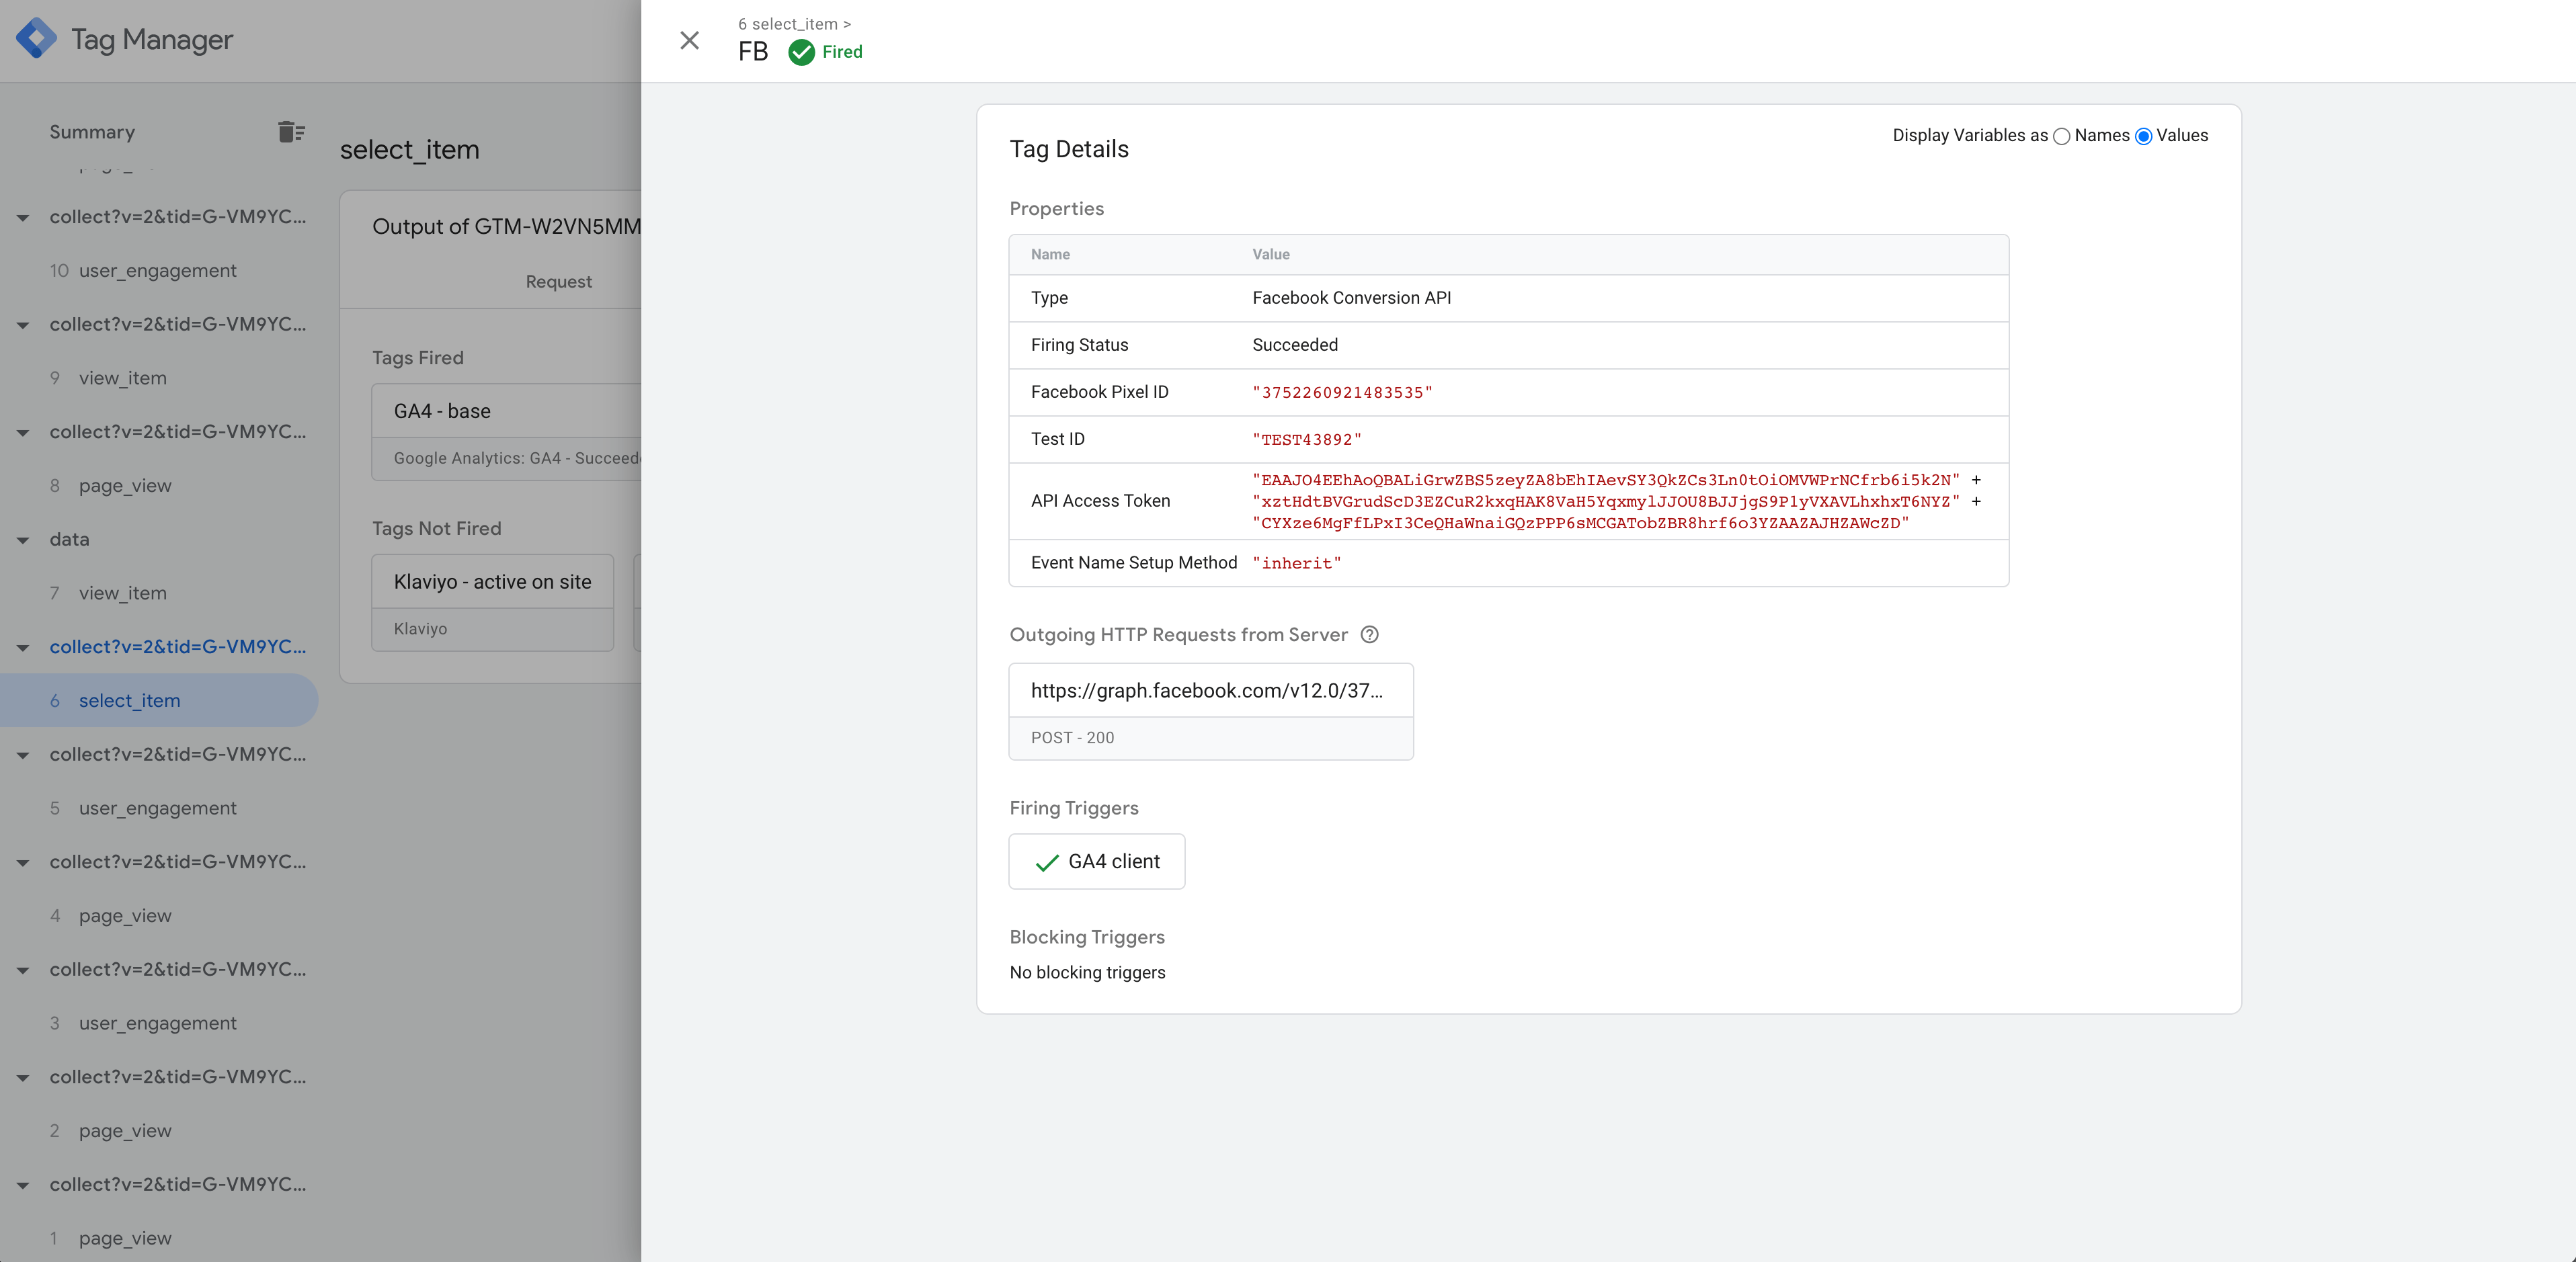
8. When you are done setting up all your Facebook events, open Google Tag Manager debug mode and test if Facebook events work correctly. You can also go to your Facebook tag inside the server container and add the Facebook test ID. You can find the test ID inside the Meta Events Manager under the Test Events tab.
9. Once you've set up and verified that Facebook Conversions API works correctly, you need to remove FB browser tracking or set up event deduplication. Otherwise, your events will be duplicated.
Test Facebook Conversions API
Use the GTM server debug tool to verify that base code and FB events are triggering correctly
The first step in testing Facebook server-side tracking is the same as for Google Analytics. You need to ensure that events are firing on the correct triggers. Open the GTM debug tool, navigate through your site's pages, and perform the events you want to test. Once you've done it, go to the Tag Manager debugger tab and check the results.
First, make sure that the FB base pixel is firing on a page view. If you see the tag status as Fail, check outgoing requests, which should indicate why the tag failed.
If you are using our FB server-side tracking tag, you have two options for sending FB events:
- Inherit from GA client. In this case, we automatically match GA events to FB standard events. If you are using the inherit option, you will see only the FB base tag inside the GTM debug mode.
- Override. Selecting the override option requires setting up FB server events manually inside the server container, making them visible in the server debug mode.
Facebook testing tool for Facebook Conversions API
Open the Events Manager inside your Facebook Business Manager and click on Test Events. You will see a test event code that you should add to your Facebook Tag inside Google Tag Manager. This code will allow you to test Facebook server events in real time.
Once you've added the test ID, open your site and perform actions that trigger your FB events. Then return to the Facebook Testing Tool and check the events displayed. In the Received From column, you should see Server. You can click on the event to view the recorded parameters.

Note that the Facebook Pixel Helper Chrome plugin you used to check Facebook browser events won't work for the Conversions API. That's why you need to check everything in the testing tool.
Check that Facebook cookies were extended
| Note: cookies will be extended only if you are using a custom subdomain inside the tagging URL. For example, your site's URL is example.com, then a custom domain for tagging URL should look like gtm.example.com. |
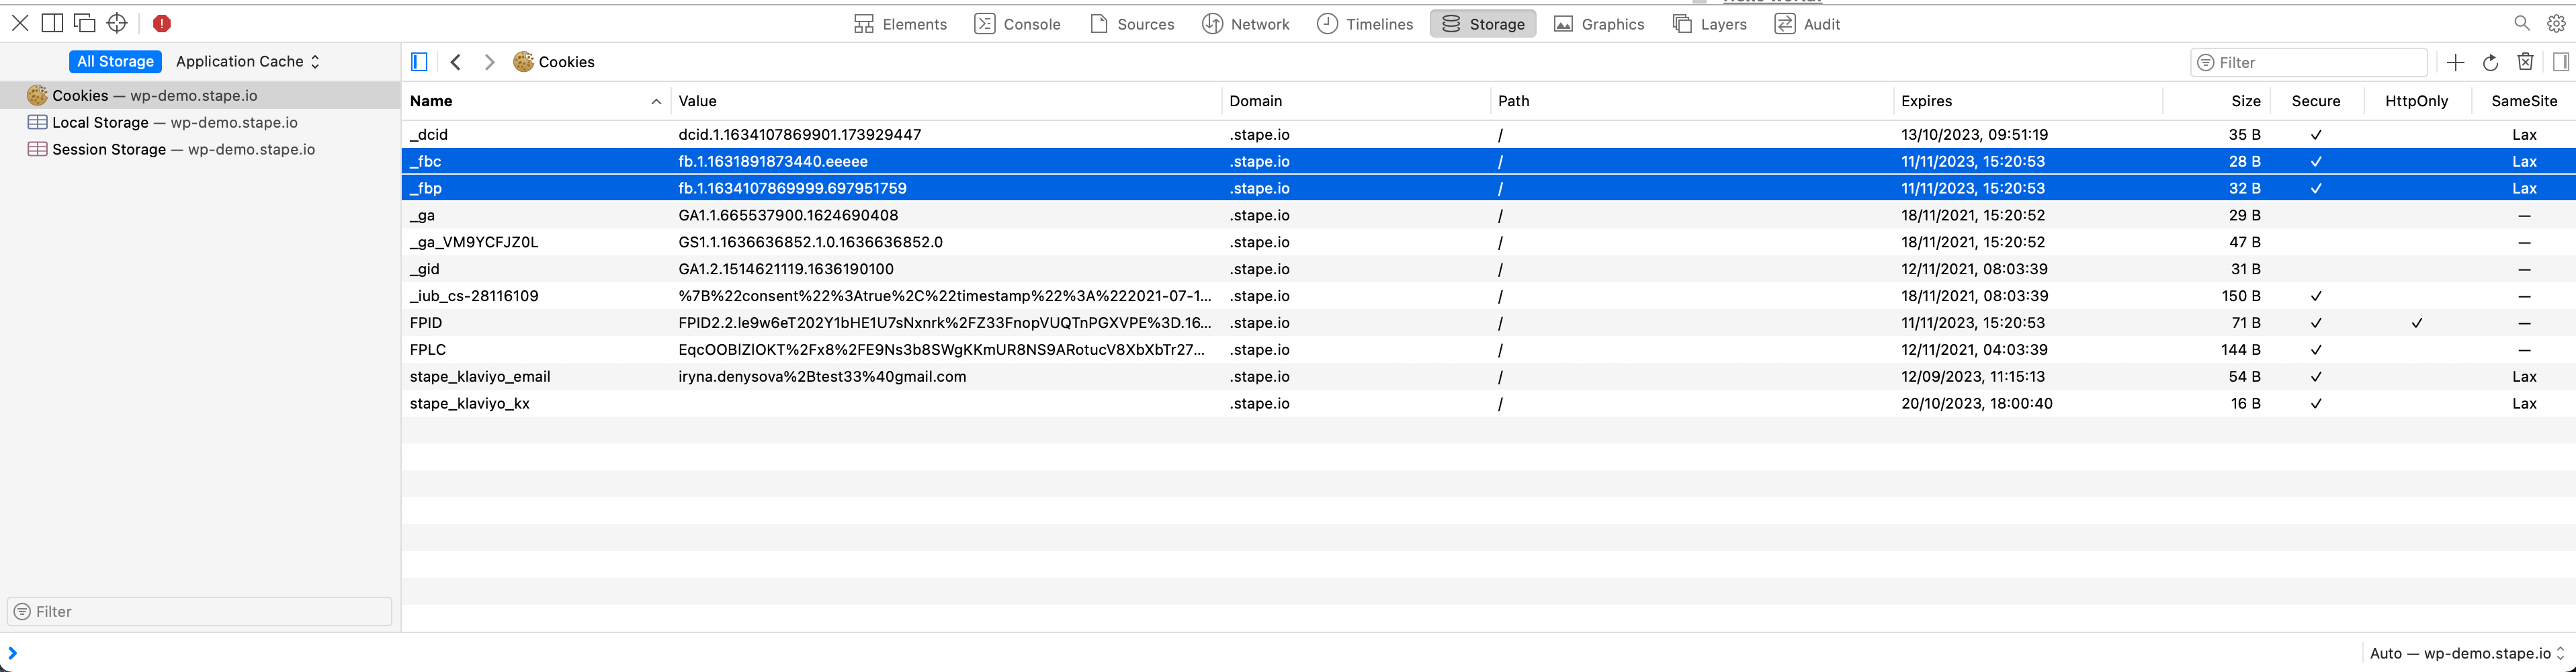
The third step is similar to what we did earlier, but with a few differences. To check the expiration date of the Facebook cookies, you first need to generate them. To do this, open your site and add fbclid.
Once you've done that, open the developer tools, go to Storage, and click on Cookies. Check that _fbc and _fbp have been extended.
You can also set up Facebook CAPI with GTM Templates
With Stape, you can boost tracking accuracy and campaign results with server-side tagging.
Based on the platform you use, you can set up tracking quickly and effectively with our custom templates. Follow the step-by-step guides to set up Meta CAPI using server GTM for:
Templates and guides for Wix, Shopware, PrestaShop, and more are coming soon. Let us know if you need a template for another CMS.
Event deduplication for Facebook pixel and Conversions API events
Facebook recommends using both the Pixel and Conversions API to track events, but without event deduplication, duplicated data from the browser and server can skew results. Deduplication ensures that only one event is kept by using unique event IDs shared between both sources. Proper setup requires generating and syncing these IDs across browser and server events, which can be tested in Facebook's Events Manager.
A common mistake with Facebook server-side tracking is sending events only from the server and skipping the Pixel entirely, as this reduces audience match rates since Facebook relies on browser-side signals like fbp and fbc cookies for user identification. Running both in parallel with proper deduplication gives you the best of both worlds. You get the reliability of server-side data collection combined with the browser signals that Facebook needs to build accurate audiences and optimize your campaigns effectively.
Additionally, sending user data via the Conversions API improves match quality and event match scores, enhancing ad performance. User data should ideally come from a data layer and comply with privacy policies. Tools like Stape plugins simplify integrating user data for better Facebook campaign optimization.
Send user parameters using Facebook Conversions API
To match users who visit your site with their database, Facebook uses User Data for the Conversions API.
Facebook requires you to hash some parameters before sending them, but you don't need to worry about that; Facebook's tag will automatically hash all the data before it's sent.
The more user parameters you send to Facebook, the higher the chances they will match a user, resulting in a higher event match score.
Sending user parameters from your site to Facebook is a sensitive topic since you'll be sharing user data with a third-party service. So before sending this data to Facebook, ensure it complies with your privacy policy.
Ideally, you should have the user data added to the data layer. If this isn’t possible, try to collect it from the page using custom JavaScript code and send it along with the conversions or events you are interested in.
For example all Stape plugins for CMS (for Facebook CAPI for Shopify, WordPress server-side tracking, Magento 2 Google Tag Manager, GTM app for BigCommerce) add a data layer that also contains user data.
You can easily retrieve it from the data layer and add this data to Facebook events in a web container.
Then, transfer the required data to the server container (in the payload GA4 or Data tag, depending on what you use).
Finally, add this data to your server-side Facebook event.
This way, you will achieve better match quality of your Facebook events, potentially improving the performance of your advertising campaigns, as Facebook will better understand your audience and optimize your advertising campaigns.
How to check if there are any Facebook Pixel or Conversions API errors
Facebook's Events Testing Tool is a powerful resource that allows you to debug and resolve issues with your Facebook Pixels or server events. If there are errors, they will be displayed in the Diagnostics tab on the toolbar for closer review.
Errors marked in red usually require immediate attention and should be fixed right away. Yellow errors are non-critical warnings that you should monitor and address eventually.
Facebook allows you to mark issues as resolved or ignore them. If you mark an error as resolved and it recurs, Facebook will show it again in three days. In contrast, ignored problems go to the Ignored section and remain there.
When you fix any issues with your Facebook tracking, we suggest marking them as resolved. This way, you notify Facebook that the problems were fixed, and the platform will alert you if these issues recur.
What are the most popular Facebook pixel and Conversions API errors, and how to fix them?
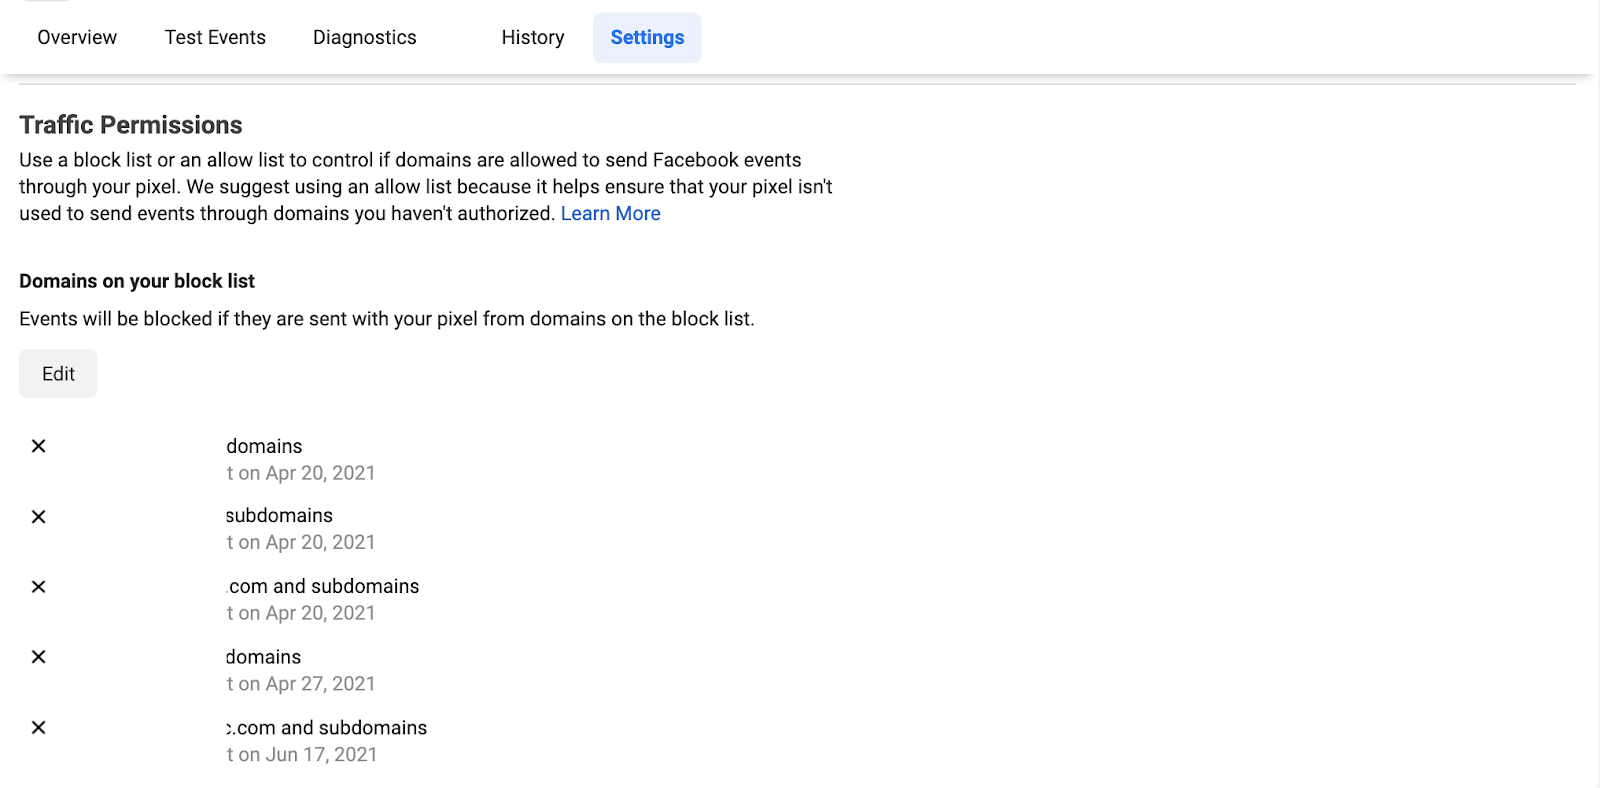
1. New Domains Sending Data

You can see all domains sending data to your Facebook Pixel. If Facebook detects traffic from a new subdomain or domain, it will send you a warning. You can whitelist or blacklist domains using this feature to block traffic from your testing sites or technical URLs.
Most likely, you will also see traffic from gtm-msr.appspot.com. This can happen when you run a debugging/publish container or when users visit your site with JavaScript disabled (some bots).
To create domain allow or block lists, open the Events Tool in Business Manager → click Settings → scroll down to Traffic Permissions.
2. Event Missing Some Deduplication Parameters
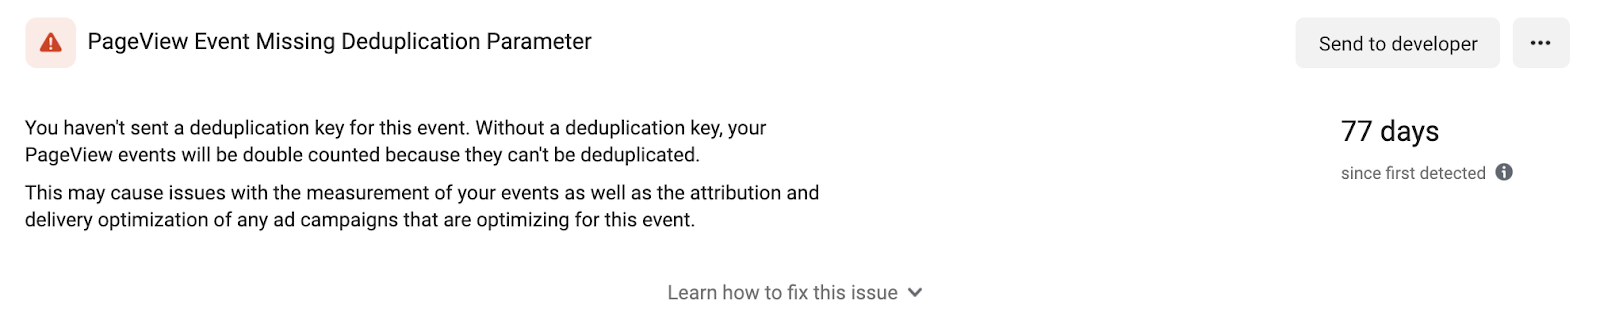
This is the second most common Facebook CAPI error based on our experience. This error indicates that you are not sending some deduplication keys for your server events. Facebook uses these deduplication keys: event name, event ID, _fbp, and external ID.

From our experience, missing Event ID parameters cause this error 80% of the time. Check if you are sending an event ID for both the Facebook Pixel and the Facebook Conversions API. This event ID should be the same for both the browser and server events, enabling Facebook to recognize the same event name and event ID for deduplication.
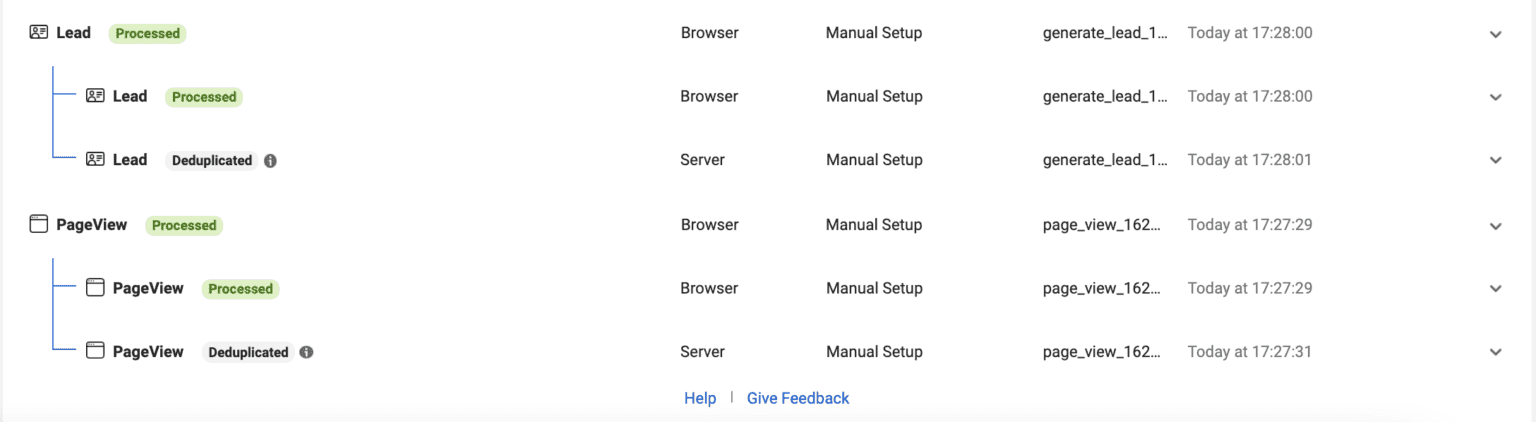
For example, for PageView events, send the same event ID and event name from both the Facebook Pixel and Facebook CAPI.
To test the event ID, open the Facebook Event Testing Tool. If everything is correct, your output should look similar to the screenshot below. That is how Facebook shows it recorded PageView events from both the browser and server, which had the same event ID, indicating that browser events were processed and server events were deduplicated.
But there may be situations where you see browser and server events triggered randomly. In this case, check the Facebook event ID; they are likely not identical. You can use our custom variable for the web container to configure the Facebook event ID. For more information on Facebook event deduplication, refer to the section above.
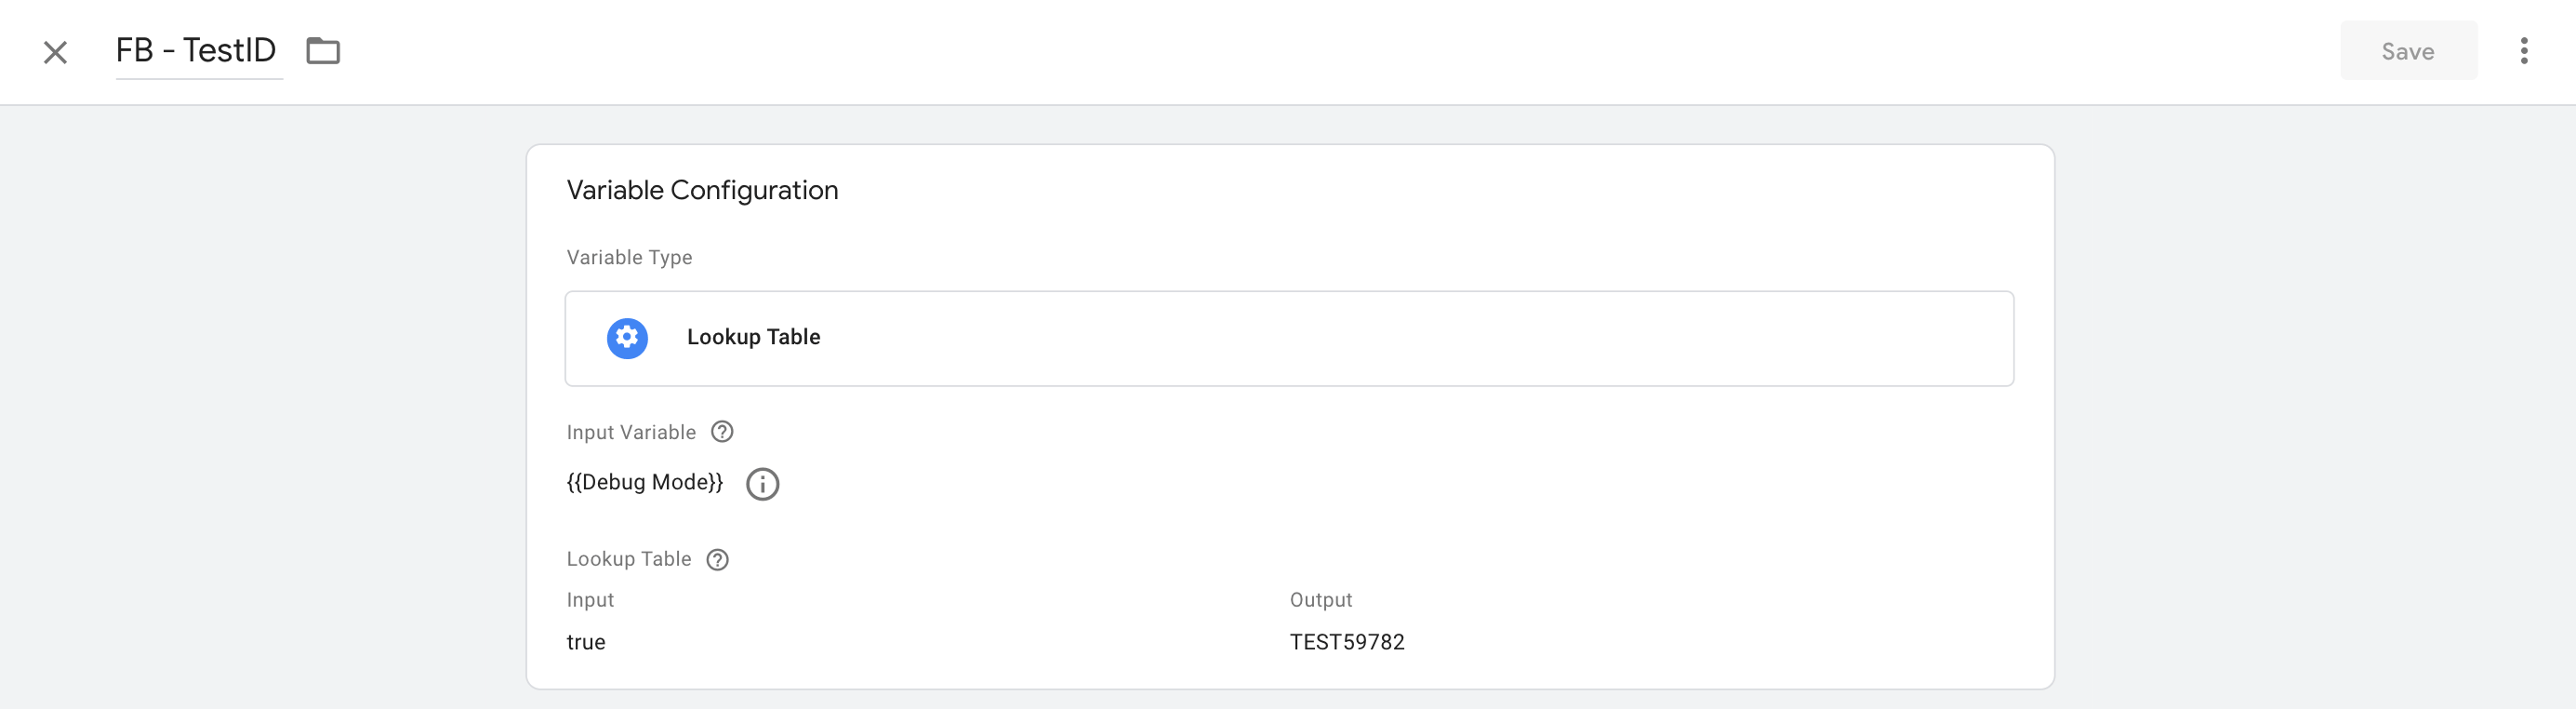
Sometimes this error can occur if you did not remove the Facebook test ID and published the Facebook CAPI tags to the production environment. We recommend setting up Test ID as a lookup table variable that only functions when debug mode is enabled to resolve this issue.
3. Server Sending Invalid Match Key Parameters for PageView Event

Here, Facebook alerts you that the values being sent from the server are not unique or are incorrectly formatted. For example, you might be sending a user IP that includes symbols as well as numbers, or you may have selected the wrong variable, such as sending a phone number in the email field.
To identify the issue, open the preview mode of the Google Tag Manager server and web container (if you used GTM to set up Facebook Conversions API). You should see what user parameters were sent to Facebook and whether they were formatted correctly. Test the event, click on the tag in debug mode, and check the values.
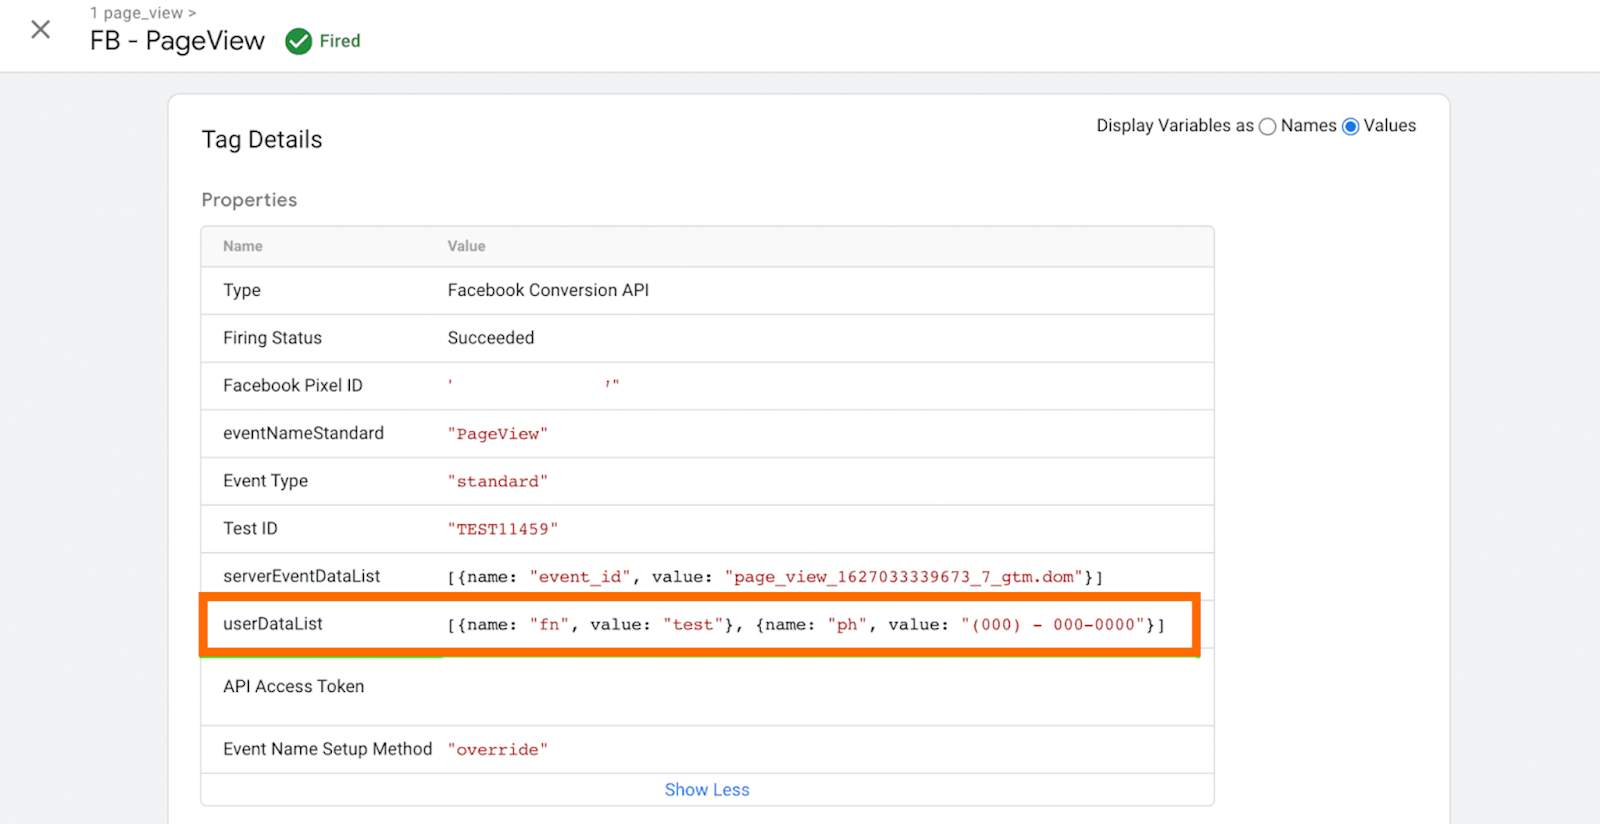
This error may also indicate that you forgot to include a parameter or that it is incorrectly formatted.
For instance, there was a client who wanted to send the user's country and city based on their IP address. Facebook expected to receive actual user address details entered on the site, not those automatically extracted from the IP. This setup led to an error about invalid key parameters.
4. Potentially Violating Personal Data Sent to Facebook
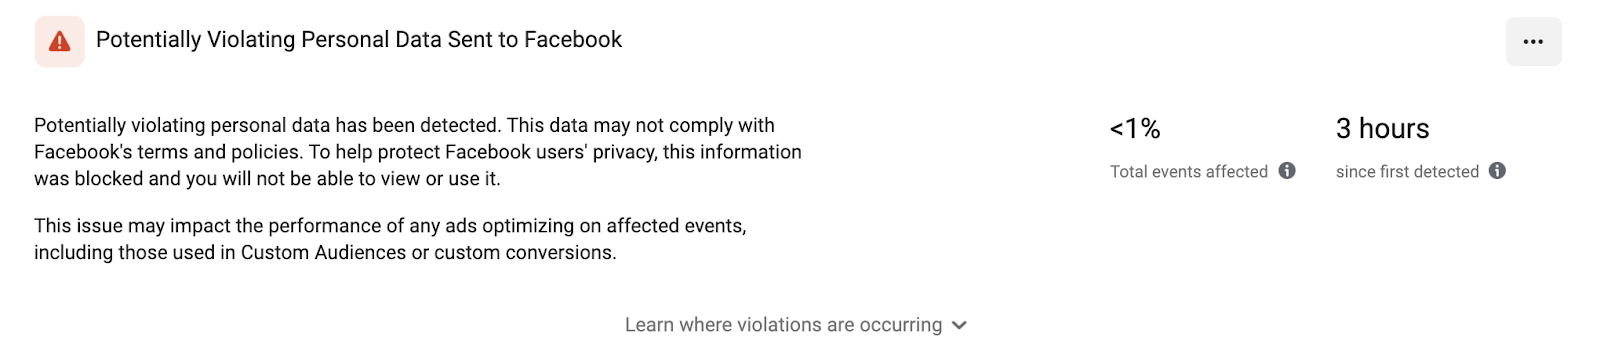
This error typically pertains to browser events and indicates that Facebook detected user data in the URL. Some CMSs and tools, like Calendly or PayPal, send user details in the URL after registration or purchase.
This error is difficult to resolve, and it requires your developers' attention. They should improve the URL query parameters and remove all user information from the URL. Alternatively, you can follow the Personally Identifiable Information (PII) removal instructions and attempt to fix the issue within GTM. Another option is to switch to server-side Facebook tracking only. This will allow you to modify the URL before sending it to Facebook.
5. Increase event match Quality
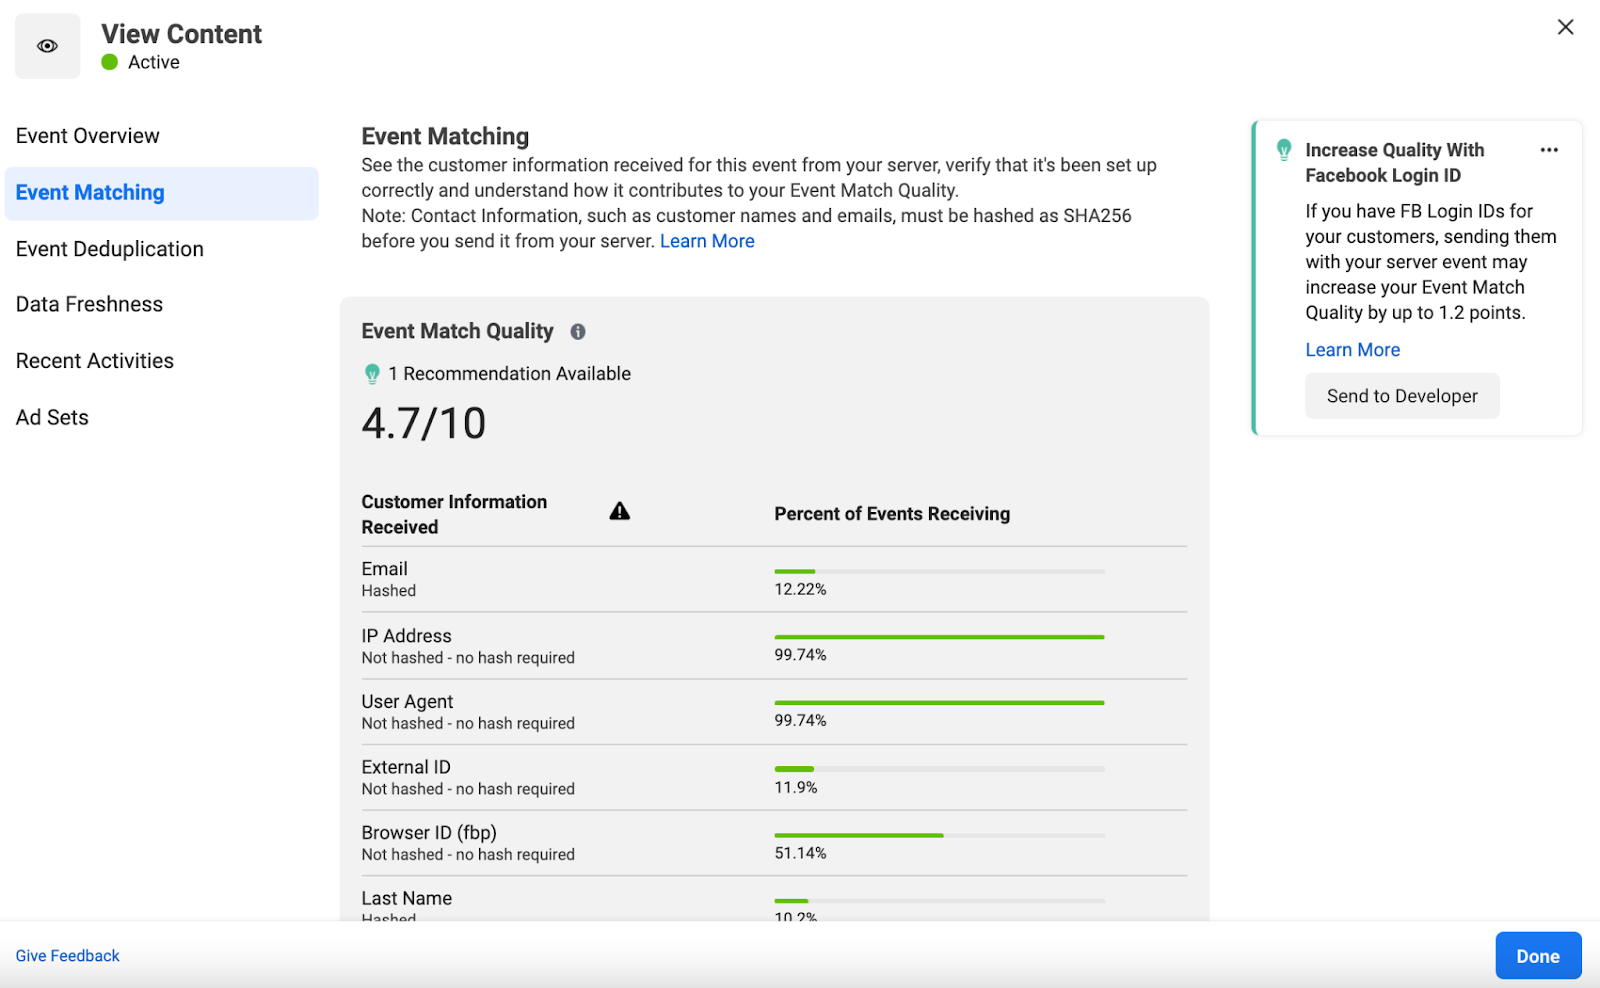
For each server event you send to Facebook, an event match quality score is generated. This score depends on the amount of user data you send to Facebook.
If you use a custom subdomain for your tagging server, only the User IP, browser ID, _fbp, and _fbc are sent to Facebook's CAPI. Sending only these user parameters results in a match quality score of around 4 out of 10.
To achieve a high-quality score, it is crucial to send as many parameters as possible. Facebook uses this data to match users on your site with those in their database. But before proceeding, ensure that sending user data to Facebook complies with your site's privacy policy and relevant regulations. Technically, sending more parameters is beneficial, as it leads to more accurate audience and conversion data, provides Facebook's algorithms with specific information about your users, and improves campaign performance.
How can you increase the event match quality score? The answer is simple: send more user data. However, the implementation can be complex. First, check if the data layer is implemented on your site and whether it contains all user data. For example, if users can log in to your site, verify that user details are sent to the data layer upon login.
If the data layer is not implemented, assign your developers to set it up.
Next, ensure that you pass all user parameters from the web to the server container.
Additionally, a new feature from the Data Tag can help increase match quality. We have added the ability to store user data. For instance, if a user submits a contact form on the site, you can use the Data Tag to store user data in local storage and use it on other pages.
6. Same Event ID Received for Many Event Instances
When tracking Facebook events from both the browser and server, Facebook requires a unique event ID for each event. For matching events, the Facebook Pixel event name must exactly match the server event name. The same applies to the event ID; events from the Facebook Pixel should equally match Facebook server events. This process is where deduplication occurs.
This error arises when you send the same event ID for multiple events. For example, when a user lands on the product page, two events should trigger: PageView and ViewContent. You must send a unique event ID for each event. The FB events and event IDs should appear as follows:
FB browser: PageView, eventID: ‘69’
FB server: PageView, eventID: '69'
FB browser: ViewContent, eventID: '79'
FB server: ViewContent, eventID: '79'Even though these events trigger on the same page and may use the same trigger in Google Tag Manager for both the web and server container, a unique event ID should be sent for each.
The error Same Event ID Received for Many Event Instances will occur in this scenario:
FB browser: PageView, eventID: ‘69’
FB server: PageView, eventID: '69'
FB browser: ViewContent, eventID: '69'
FB server: ViewContent, eventID: '69'In this example, we are sending eventID 69 for both PageView and ViewContent events. But Facebook expects to see a unique eventID for these two events.
Solution: add Facebook test ID, open the preview mode for the web and server containers, and test the setup. Once you determine when this error occurs, we can take further steps to resolve the issue.
We have created a custom variable that generates a unique event ID and recommend using it to set up Facebook event deduplication. You can add the event name to this variable to ensure that the event ID is unique. In this case, even if your events use the same trigger, the event ID will remain unique, as it consists of event_name_eventID. You can read more about Facebook event deduplication in the section above.
Event Name mapping
By default, the tag attempts to map GA standard events to Facebook standard events. If it cannot match them, the raw event name from the GA client will be used. For example, if you send an event name like this: gtag(‘event’, ‘UserLikedProduct’), you will see the event UserLikedProduct in the Facebook event manager.
Below is the mapping scheme from GA events to Facebook events that we use in this tag by default:
| page_view | PageView |
| add_payment_info | AddPaymentInfo |
| add_to_cart | AddToCart |
| add_to_wishlist | AddToWishlist |
| sign_up | CompleteRegistration |
| begin_checkout | InitiateCheckout |
| generate_lead | Lead |
| purchase | Purchase |
| search | Search |
| view_item | ViewContent |
| contact | Contact |
| customize_product | CustomizeProduct |
| donate | Donate |
| find_location | FindLocation |
| schedule | Schedule |
| start_trial | StartTrial |
| submit_application | SubmitApplication |
| subscribe | Subscribe |
Google Analytics to Facebook events
To simplify migrating your web Facebook GTM tag to the server-side container, we have mapped all data received by the GA client to the Facebook event without requiring additional setup on your part. This also supports GA Enhanced eCommerce events mapping, and of course, the tag can override any event parameters sent to Facebook.
For example, if the tag detects that the event type is Purchase, we will determine the product list, currency, and value.
In the following sections, we will describe how exactly the data is mapped in each parameter group.
Default mapping and overriding Server Event Data
Only a few parameters fall under the category of Server Event Data. Refer to Facebook's documentation on the available event parameters for more details.
Parameters set by default include:
| event_name | Event Name |
| event_source_url | Page Location |
| action_source | Where your conversions occurred. (For example: website, email, app) |
| event_time | Current Time |
Default mapping and overriding User Data
With the "User Data" tag option, you can override or add any user data that will be sent to Facebook. See Facebook's documentation on user data parameters for more details on what data you can add to the call. If the documentation calls for the parameter to be hashed, you must hash it with SHA256 or the hit will not be sent to Facebook.
| fbc | Cookie value ‘_fbc’ or ‘fbclid’ url parameter if exist |
| fbp | Cookie value ‘_fbp’ |
| external_id | external_id or user_id or userId |
| subscription_id | subscription_id or subscriptionId |
| lead_id | lead_id or leadId |
| ln | lastName or LastName or nameLast |
| fn | firstName or FirstName or nameFirst |
| em | |
| ph | phone |
| ge | gender |
| ct | city |
| st | state |
| zp | zip |
| country | countryCode |
Default mapping and overriding Custom Data
You can also override any other parameters or add your own using the "Custom Data" section in the tag setup. Check Standard parameters documentation for more details on the data parameters you can include.
If the Enhanced eCommerce parameter items exists, set the content_type to product. GA product parameters item_name and item_category map to Facebook content_name and content_category, respectively.
The tag also attempts to determine other product parameters, including:
| value | x-ga-mp1-ev or value |
| currency | currency |
| transaction_id | order_id |
If the event type is Purchase but the currency cannot be mapped, USD is used as the default value since Facebook does not accept Purchase events without the currency parameter.
Facebook server-side tracking: real Stape users' problems solved
1. A user in the Community noticed that after switching to Facebook server-side tracking, their retargeting audience was much smaller than GA4 traffic (about 15% match rate). The issue wasn’t broken tracking but unrealistic expectations: Facebook can’t reliably match users using only IP and User Agent. The solution was to follow Meta’s recommended hybrid setup(browser + server with deduplication) and send all available user data (like email or name when possible). This approach improves match quality and audience size, while pure server-side tracking alone limits retargeting potential.
2. Many users in this thread face issues with Facebook server-side tracking and FBP/FBC mapping, especially on third-party checkouts. Using Stape’s Facebook CAPI template on a first-party subdomain, firing key events on the main domain, implementing hybrid browser+server events for deduplication, and optionally using webhooks solves most problems. Always verify data via browser network tools rather than relying solely on Tag Assistant.
Conclusion
That's it. We hope you've successfully migrated Facebook tracking to the server side. The Facebook Conversions API is a powerful tool for understanding your customers, tracking their journey through conversion, and supplying more data to optimize Facebook’s machine learning algorithms.

Comments