Sep 14, 2026
Google Ads offline conversion tracking via Google Sheets: no paid CRM needed
Written by
Abdul Kayium
Published Jul 28, 2026 comments
Most offline conversion tracking guides start with the same requirement: a paid CRM, or a paid tool to move your data around. This one does not.
This setup sends your offline sales back to Google Ads using tools you can start with today: web GTM, server GTM, Stape, and a single Google Sheet. The Sheet acts as your CRM. No HubSpot, no Salesforce, no Zapier, and no custom development.
Before you build it, here is who it is for.
When this approach fits (and when it doesn't)
This setup is a strong fit if:
- You do not have a CRM yet, or your CRM does not connect to Google Ads.
- You want offline conversion tracking without paying for a CRM or an automation tool.
- You are comfortable working in GTM and Google Sheets.
It is not the best fit if:
- You already run a CRM like HubSpot, Salesforce, or Pipedrive. A direct CRM integration to Google Ads is cleaner and easier to maintain than a Sheets-based flow.
- Your sales data already lives in a system that can send conversions to Google Ads on its own.
Here is the honest trade-off. The Google Sheet works as a lightweight CRM. It is low cost, easy to debug, and good enough to run real campaigns on. But it is still a spreadsheet. If your team already treats a CRM as the single source of truth, build from that instead. This guide is for teams who need offline conversion tracking and do not want to add a paid tool to get it.
What you'll build
By the end of this guide, you'll have an offline conversion tracking system that:
- Works with any website and almost any form (except some embedded iframe)
- Requires no paid CRM or automation tools, just web GTM + sGTM, Stape, and Google Sheets.
- Supports dynamic consent mode for privacy-friendly tracking.
- Sends the actual deal value to Google Ads
- Automatically uploads conversions when a lead is marked as SQL, MQL, or Closed Deal.
- Syncs with Google Ads every 24 hours, no manual uploads required.
- Is easy to debug since every lead is stored in Google Sheets.
- You can use that as a CRM.
How the setup works
1. A user visits your website and submits the lead form or books an appointment.
2. Web GTM captures the user data and GCLID, then sends it to your server GTM container.
3. Server GTM forwards that lead data to your Google Sheet, which acts as your CRM.
4. The lead sits in the sheet as an open inquiry until your sales team works it.
5. When the deal closes, you add the real value and change the lead status to "Close Deal."
6. Two more sheets pull in your converted leads and your qualified leads (MQL or SQL), and those sync to Google Ads automatically.
Required tools:
- Google Tag Manager (web & server containers).
- Stape Pro (for Google Sheets integration).
- Google Spreadsheet.
- Google Ads account with auto-tagging enabled.
That's it, no paid CRM, no Zapier, and no custom development.
Required files (make a copy before you start):
Let's implement it
Google Ads offline conversion tracking via Google Sheets
Save Lead Data website to Google Sheets
Step 1: collect data in web GTM
1. The first step is to capture the lead information when a user submits your contact form.
To do this, your website needs to push a data layer event containing the lead details, such as the user's email, phone number, name, and any other information, depending on your form field.
If your website already pushes a data layer event when the form is submitted, you can skip this step. Otherwise, you'll need to ask your developer to implement it.
New to the data layer?
Read the guide on what the data layer is, how it works, and how to implement it before continuing.
Once the data layer event is available, create Data Layer Variables in Google Tag Manager for each field you'll use, such as email, phone, name, and any other required values.
2. Create a Custom JavaScript variable in your web GTM container:
Variables → New → Custom JavaScript.
Paste the code below and name the variable Conversion Time.
function() {
  // ---- CONFIG ----
  // Leave as '' to output UTC (works for every account, recommended).
  // Or set an IANA zone for this container, e.g. 'America/Toronto', 'Asia/Dhaka'.
  var TIMEZONE = '';

  // ---- GET TIMESTAMP ----
  // Reads ?timestamp= from URL, else uses current time.
  // Change this line if your timestamp lives somewhere else.
  function getParam(p) {
    var m = new RegExp('[?&]' + p + '=([^&]*)').exec(location.search);
    return m && decodeURIComponent(m[1].replace(/\+/g, ' '));
  }

  var raw = getParam('timestamp');
  var ts = raw ? Number(raw) : Date.now();
  if (!ts || isNaN(ts)) ts = Date.now();

  // seconds vs milliseconds, auto-detect
  if (String(Math.floor(ts)).length <= 10) ts = ts * 1000;

  var d = new Date(ts);

  function pad(n) { return ('0' + n).slice(-2); }

  // ---- UTC PATH ----
  if (!TIMEZONE) {
    return d.getUTCFullYear() + '-' + pad(d.getUTCMonth() + 1) + '-' + pad(d.getUTCDate()) +
      ' ' + pad(d.getUTCHours()) + ':' + pad(d.getUTCMinutes()) + ':' + pad(d.getUTCSeconds()) +
      '+00:00';
  }

  // ---- TIMEZONE PATH (auto DST) ----
  try {
    var parts = new Intl.DateTimeFormat('en-CA', {
      timeZone: TIMEZONE,
      year: 'numeric', month: '2-digit', day: '2-digit',
      hour: '2-digit', minute: '2-digit', second: '2-digit',
      hour12: false
    }).formatToParts(d);

    var map = {};
    for (var i = 0; i < parts.length; i++) map[parts[i].type] = parts[i].value;
    if (map.hour === '24') map.hour = '00';

    // correct offset for that exact date (handles -04:00 vs -05:00)
    var asUTC = new Date(d.toLocaleString('en-US', { timeZone: 'UTC' }));
    var asTZ = new Date(d.toLocaleString('en-US', { timeZone: TIMEZONE }));
    var offMin = Math.round((asTZ - asUTC) / 60000);
    var sign = offMin < 0 ? '-' : '+';
    var abs = Math.abs(offMin);

    return map.year + '-' + map.month + '-' + map.day + ' ' +
      map.hour + ':' + map.minute + ':' + map.second +
      sign + pad(Math.floor(abs / 60)) + ':' + pad(abs % 60);
  } catch (e) {
    // if zone is invalid, fall back to UTC so nothing breaks
    return d.getUTCFullYear() + '-' + pad(d.getUTCMonth() + 1) + '-' + pad(d.getUTCDate()) +
      ' ' + pad(d.getUTCHours()) + ':' + pad(d.getUTCMinutes()) + ':' + pad(d.getUTCSeconds()) +
      '+00:00';
  }
}
Note:
By default, this variable returns the conversion time in UTC, which Google Ads accepts for all accounts. If needed, set TIMEZONE to your Google Ads account's IANA time zone (for example, 'America/New_York' or 'Europe/Oslo').
Step 2: send data from web GTM to server GTM
Now that web GTM has collected the lead data, you need to send it to the server GTM container. We'll use the Stape Data Tag and Data Client method because it gives us full control over which lead fields and user data are sent.
For detailed instructions, follow the Stape Data Tag & Data Client setup guide.
Step 3: create variables and triggers in server GTM
Before sending data to Google Sheets, you need to create a few variables in the server GTM container.
1. Create Event Data variables.
Since the lead data is now available in the server request, you need to create Event Data variables to read it.
Go to Variables → New, choose Event Data, and enter the event data key (for example, email, phone, or time) as shown in the image below.
Repeat the same steps for any other fields you want to use.
2. Capture the GCLID.
First, create a Cookie Value variable to read the Google Ads cookie.Go to Variables → New, choose Cookie Value, and enter the cookie name:
gcl_aw
Save the variable.
Next, create a RegEx Table variable to extract only the GCLID from the cookie value.
Configure it as follows:
| Setting | Value |
| Variable Type | RegEx Table |
| Input Variable | {{CV - _gcl_aw}} |
| Pattern | GCL\.[^.]+\.(.+) |
| Output | $1 |
Save the variable as CV - _gcl_aw - extracted GCLID.
You can now use this variable whenever you need to send the GCLID to Google Ads.
Step 4: capture user consent status (EU only)
Note:
This step is only required if you're using Google Consent Mode for users in the European Economic Area (EEA), the UK, or Switzerland. If your website doesn't require Consent Mode, you can skip this step.
To upload offline conversions to Google Ads, we'll capture the user's consent status. Google Ads requires the following consent values:
- Ad Storage
- Ad Personalization
We'll first create Event Data variables to capture these values from the server request, then convert them into the format required by Google Ads.
1. Create Event Data variables.
Go to Variables → New, choose Event Data, and create the following variables:
| Variable Name | Event Data Key |
| ED - consent_state.ad_storage | consent_state.ad_storage |
| ED - consent_state.ad_personalization | consent_state.ad_personalization |
2. Create the Ad Storage Lookup table.
Go to Variables → New, choose Lookup Table, and configure it as follows:
| Setting | Value |
| Input Variable | {{ED - consent_state.ad_storage}} |
| Input | true |
| Output | granted |
| Default Value | denied |
Save the variable as Consent - Ad Storage.
3. Create the ad personalization Lookup Table.
Create another Lookup Table with the following settings:
| Setting | Value |
| Input Variable | {{ED - consent_state.ad_personalization}} |
| Input | true |
| Output | granted |
| Default Value | denied |
Save the variable as Consent - Ad Personalization.
When configuring your Google Sheets tag, use these two variables to populate the Ad Storage and Ad Personalization columns.
Step 5: connect and send data to Google Sheets
Now we'll save the lead data from server GTM to a Google Sheet. Before sending lead data to Google Sheets, you need to connect your Google account with Stape. In your Stape account, go to Connections, find Google Sheets connection, and click Sign in. Then sign in with the Google account that owns your spreadsheet.
Once connected, Stape will handle the authentication automatically, so you don't need to set up OAuth or Firebase manually.
Now we'll save the lead data from server GTM to a Google Sheet. Before configuring the tag, make sure you've connected your Google account to Stape as shown in the previous step.
1. Install the Google Sheets tag.
In your server GTM container, go to Templates → Tag Templates → New and install the Google Sheets tag. You can import it from GitHub or install it directly from the Template Gallery.
2. Configure the Google Sheets tag.
Create a new Google Sheets tag and configure it as follows:
| Setting | Value |
| Type | Add row |
| Sheet name | Enter your sheet name (for example, Sheet1) |
| Spreadsheet URL | Paste your Google Sheets URL |
| Authentication | Stape Google Connection |
Under the Data section, add each value in the same order as the columns in your spreadsheet.
For example:
| Spreadsheet column | GTM Variable |
| Status | Inquiry (Constant) |
{{ED - mail}} | |
| Phone | {{ED - phone}} |
| GCLID | {{CV - _gcl_aw - extracted GCLID}} |
| Conversion Name | Inquiry (Constant) |
| Conversion Time | {{ED - time}} |
| Conversion Value | 500 (Constant Value – set your default conversion value) |
| Currency | EUR (Constant Value – change this to your own currency, e.g., USD, GBP, BDT) |
| Ad Storage | {{Consent - Ad Storage}} |
| Ad Personalization | {{Consent - Ad Personalization}} |
3. Add the trigger.
Set the trigger to your Lead Submit event, then save the tag.
4. Test the setup.
Open server GTM Preview and submit a test lead.
You should see:
- The Google Sheets tag fires successfully.
- A new row is added to your spreadsheet with the lead data in the correct columns.
Set up Google Sheets automation
Now that all leads are being logged to your CRM Google Sheet, we can automatically create a separate spreadsheet for each lead stage (such as Marketing Qualified Lead, Sales Qualified Lead, or Opportunity). These spreadsheets will later be used to upload offline conversions to Google Ads.
Marketing Qualified Lead (MQL) Automation
1. Make a copy of the Marketing Qualified Lead spreadsheet template.
2. Update the Timezone ID to match your Google Ads account's timezone.
3. In the spreadsheet, paste the following formula A3 column:
=ARRAYFORMULA(
  FILTER(
    SUBSTITUTE(
      IMPORTRANGE("PASTE_YOUR_CRM_SHEET_URL_HERE", "Sheet1!D2:J"),
      "Inquiry", "Marketing Qualified (OCT)"
    ),
    INDEX(
      IMPORTRANGE("PASTE_YOUR_CRM_SHEET_URL_HERE", "Sheet1!A2:A"),
      0
    ) = "Marketing Qualified"
  )
)
4. Replace PASTE_YOUR_CRM_SHEET_URL_HERE with the URL of your CRM Google Sheet (the spreadsheet where all leads are logged).
5. The first time you use the formula, Google Sheets will display a #REF! error. Click Allow Access to connect the two spreadsheets.
That's it! Whenever a lead's status changes to Marketing Qualified in your CRM spreadsheet, it will automatically appear in this spreadsheet.
Follow the same process to create automation for your other lead stages, such as:
- Sales Qualified Lead (SQL).
- Opportunity.
- Converted Lead.
- Closed Won.
- Any other CRM stage you want to upload to Google Ads.
Automatically upload offline conversions to Google Ads
Now that each lead stage is automatically saved to its own Google Sheet, the final step is to upload those leads to Google Ads as offline conversions.
We'll connect each spreadsheet to a Google Ads conversion action and schedule an automatic upload. After the setup is complete, you won't need to upload anything manually. Simply update the lead status in your CRM Google Sheet, and Google Ads will automatically import the new conversions on the schedule you choose.
Step 1: create a Google Ads Conversion Action
First, create an Offline Conversion Action in Google Ads. This conversion action will receive the qualified leads imported from your Google Sheet.
1. Open Google Ads.
2. Click on Goals.
3. Click on Summary.
4. Click on Create conversion action.
5. Click on check_box_outline_blank.
6. Click on Edit data sources.
7. Click on Skip this step and set up a data source later.
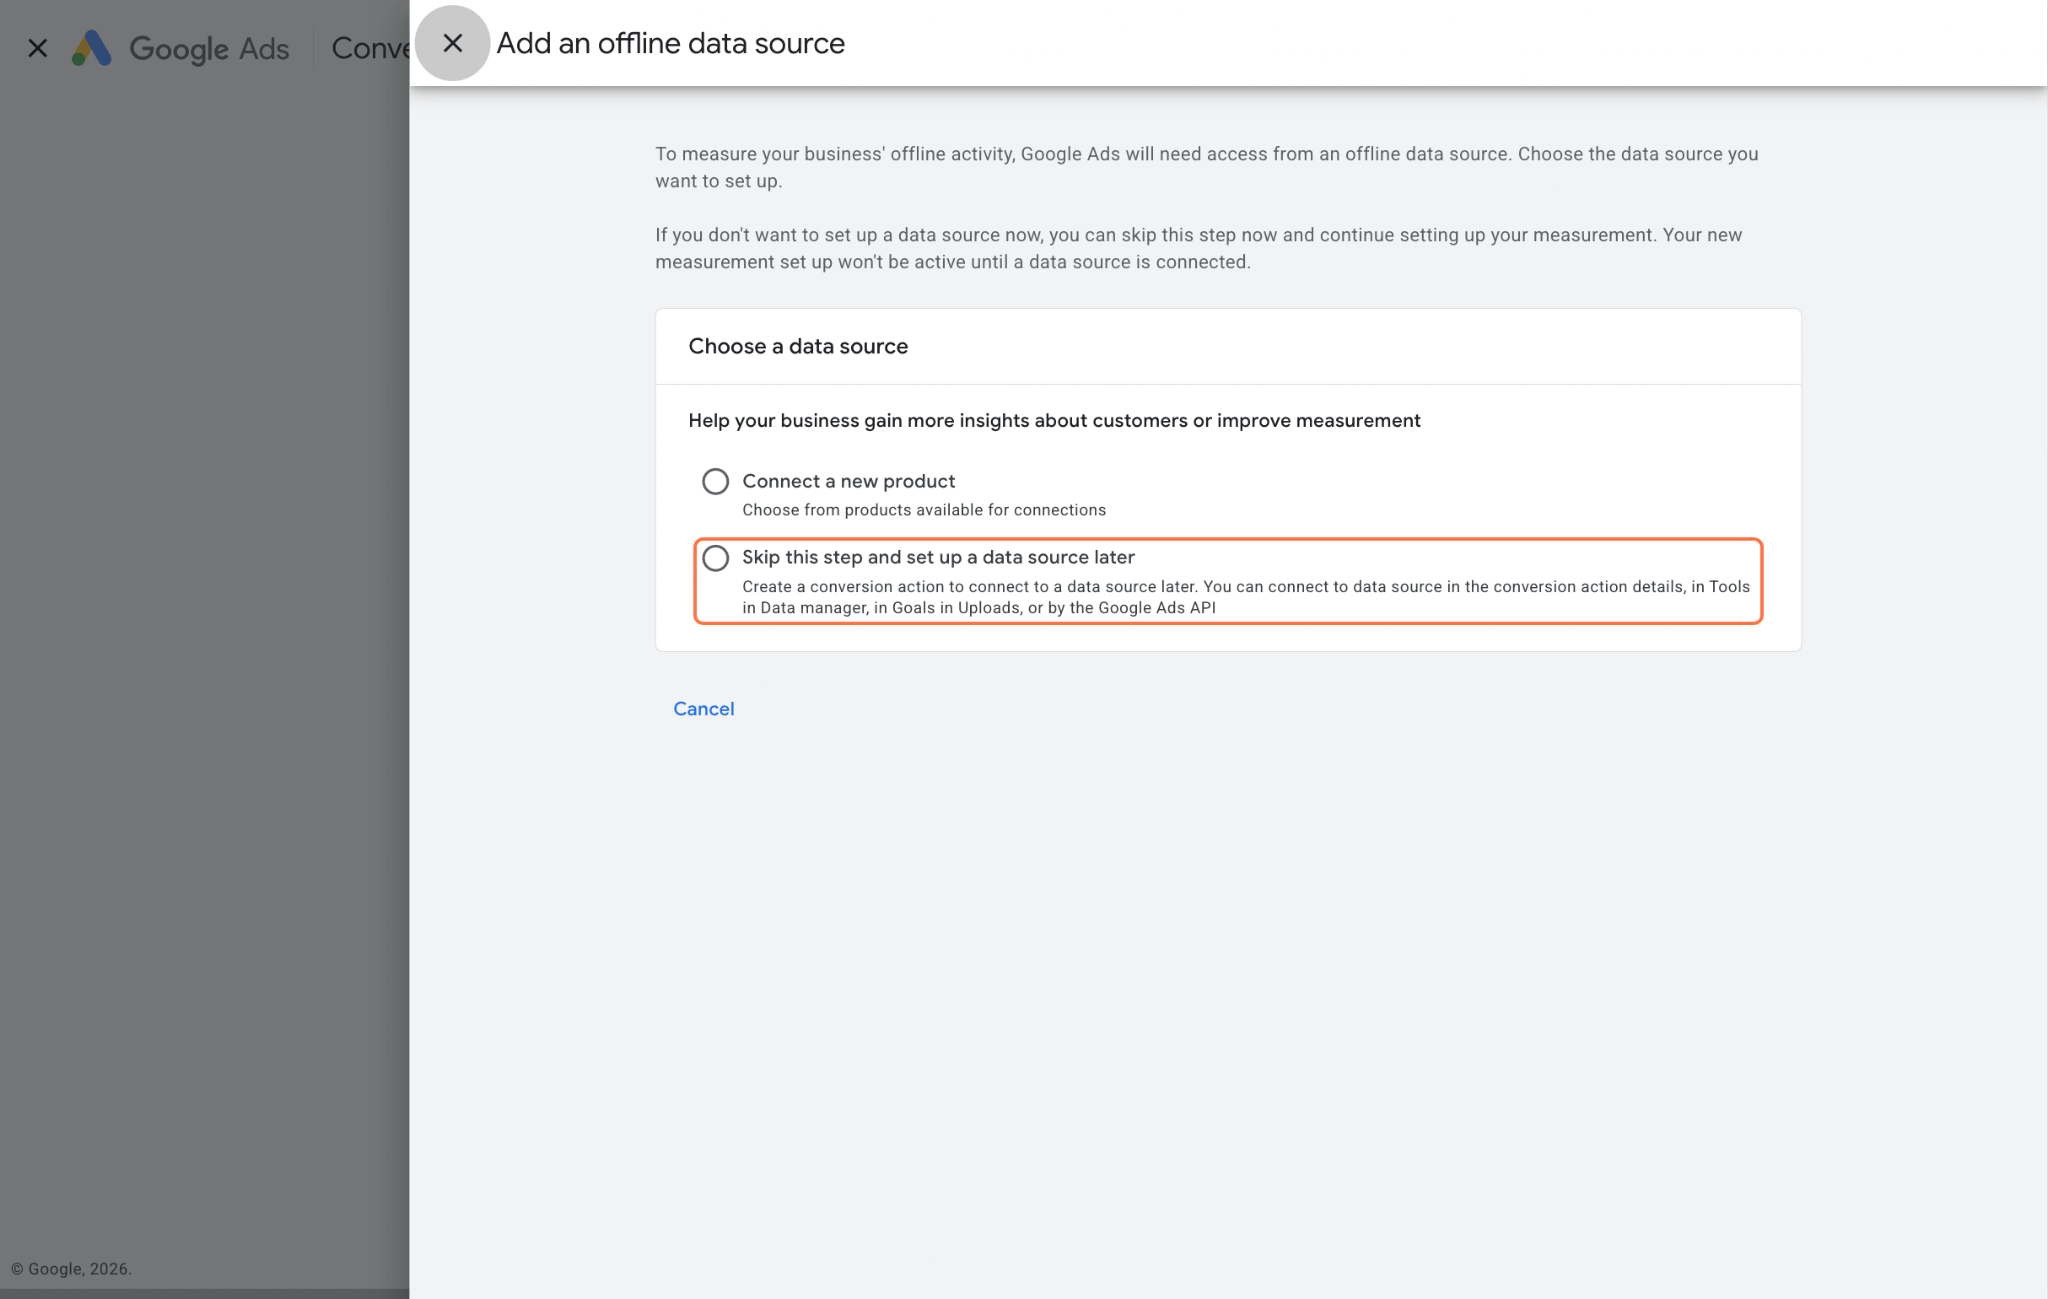
8. Click on This data was collected and is being shared with Google in compliance with Google's EU user consent policy and Customer data policies, as applicable.
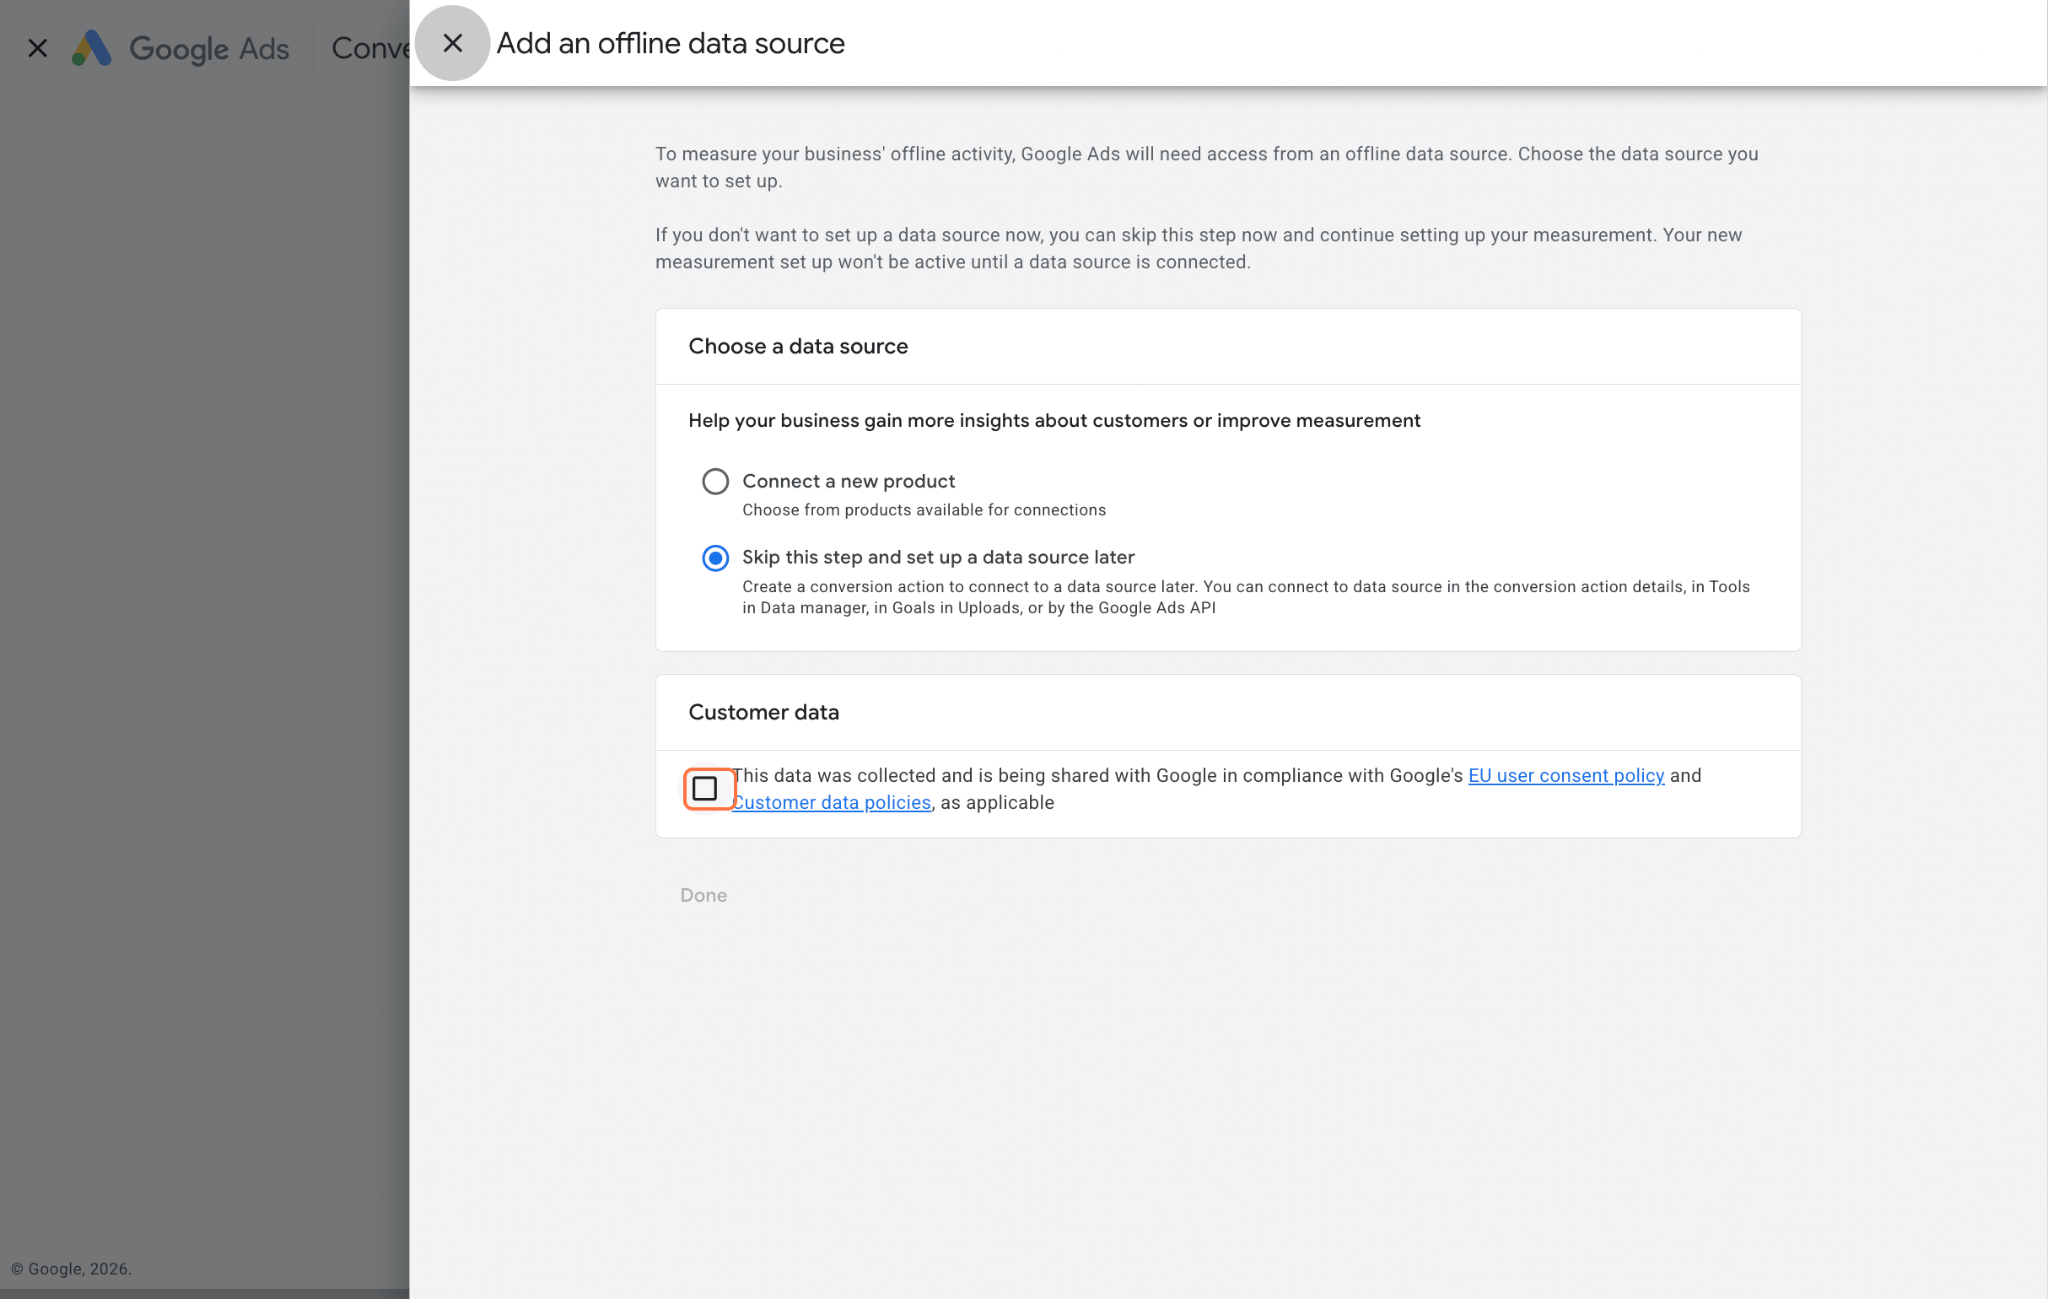
9. Click on Done.
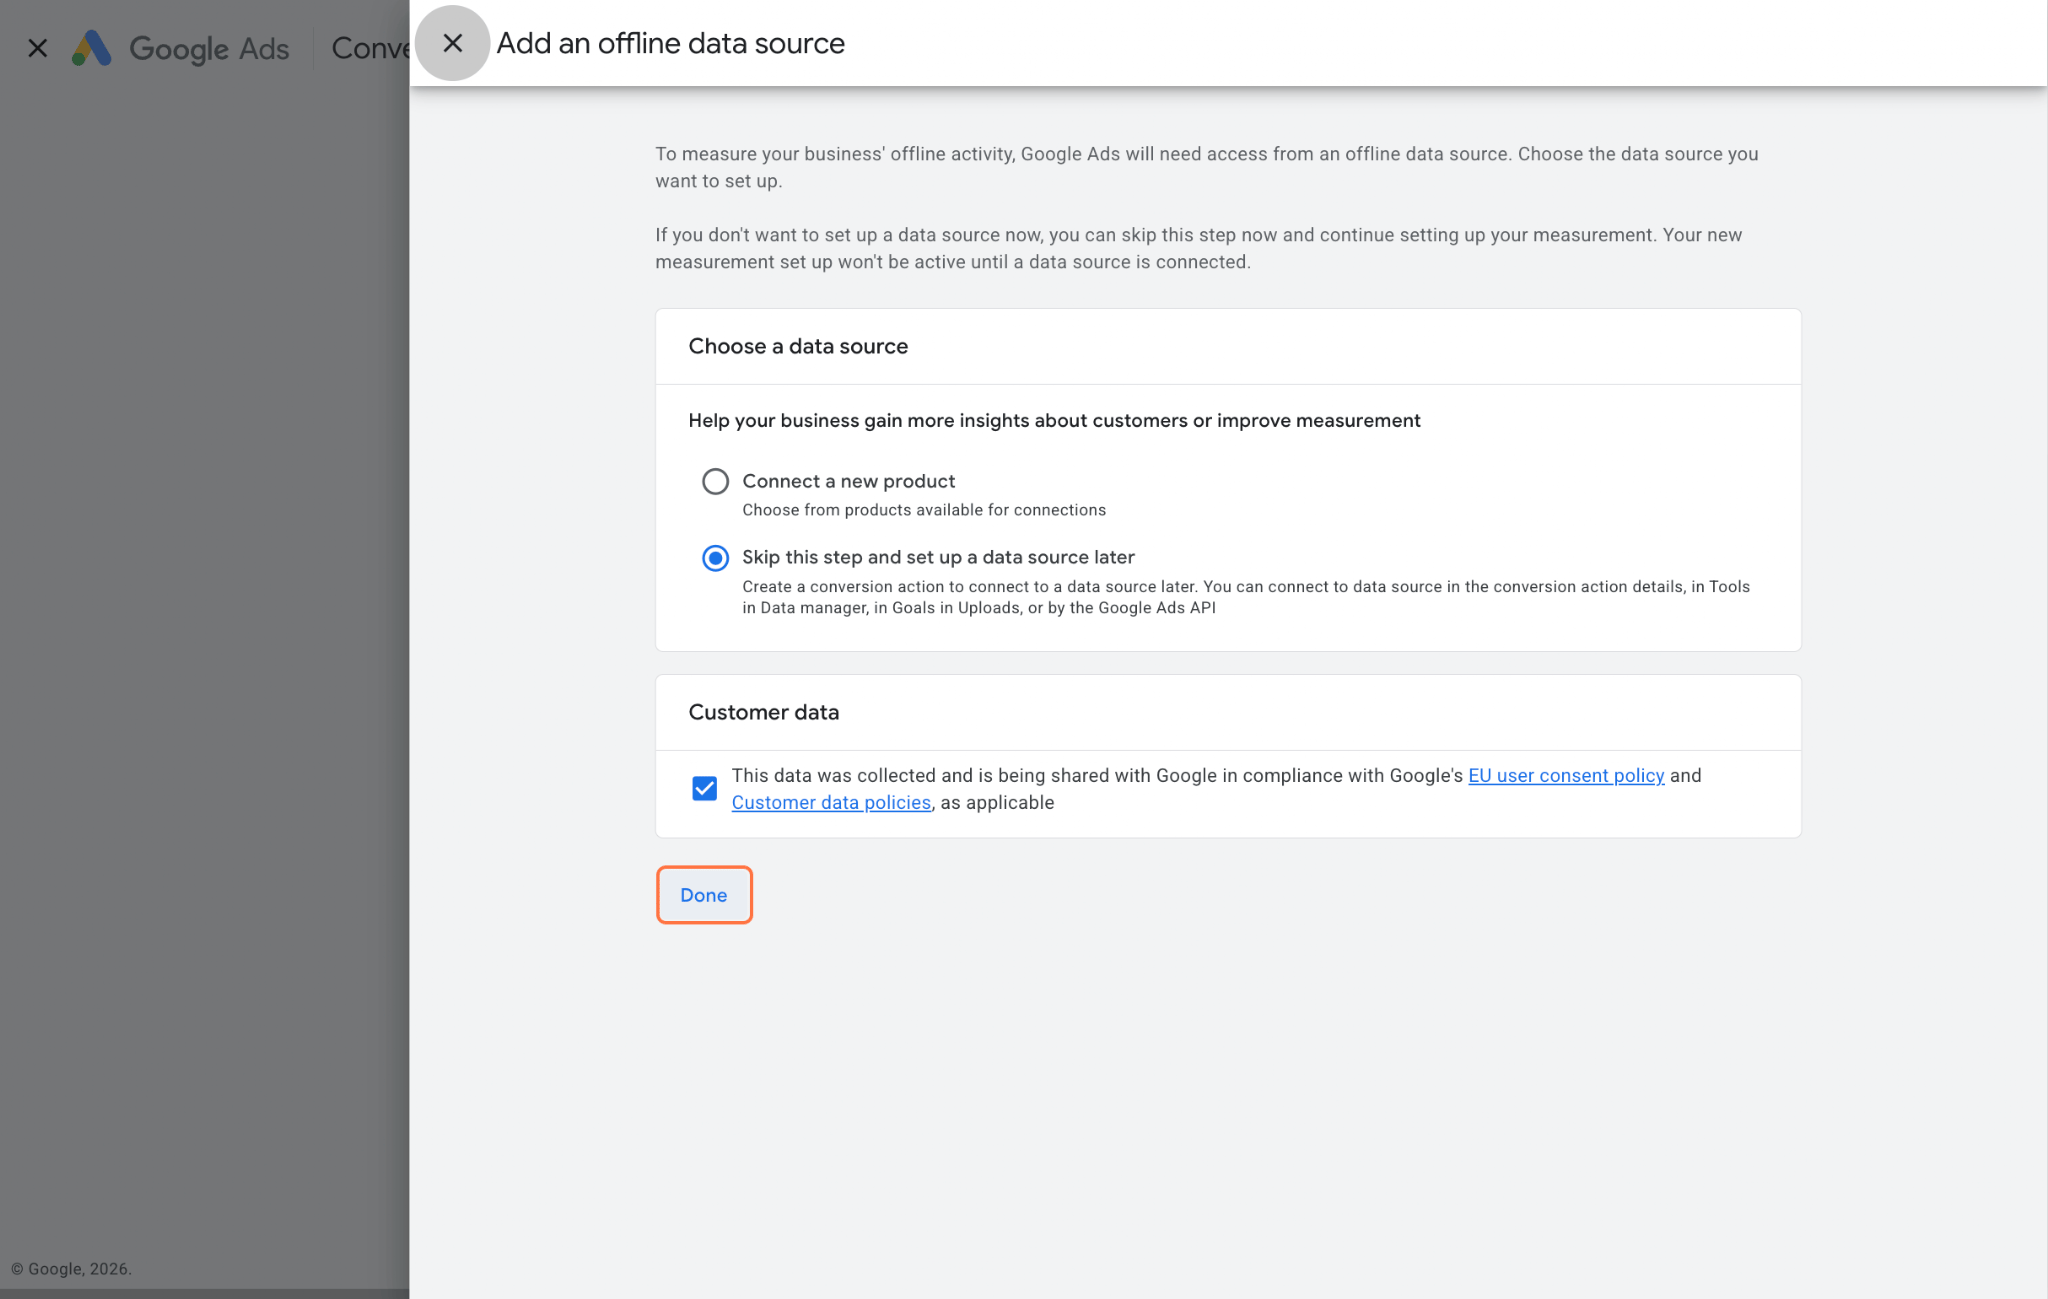
10. Click on Save and continue.
11. Click on See all.
12. Click on Qualified lead.
13. Click on Create conversion.
14. Click on Connect data source later.
15. Click on Edit settings.
16. Write the conversion action name "Marketing Qualified (OCT)”.
17. Click on Done.
18. Click on Save and continue.
19. Click on Finish.
Step 2: schedule the Google Sheets upload
Next, connect your Google Sheet to the conversion action you created.Google Ads will automatically check your spreadsheet for new conversions based on your upload schedule (for example, once every 24 hours). From then on, all you need to do is update the lead status in your CRM spreadsheet, and the new conversions will be imported automatically.
1. Click on Goals.
2. Click on Uploads.
3. Click on Schedules.
4. Click on Add.
5. Click on Select source.
6. Click on Google Sheets.
7. Copy the email address shown below. It should be different for your account.
8. Go to your Marketing Qualified Spreadsheets > Click on Quick sharing actions.
9. Click on Share > Paste "Mail you have copied from step 7" into the input.
10. Click on Send.
11. Then go back to Google Ads > Click on Link an existing Google Sheet…
12. Select your Marketing Qualified Spreadsheets > Click on Insert.
13. Click on Select frequency.
14. Click on Every 24 hours or Weekly a day.
15. Click on Select time.
16. Select a time that you want to run the schedules, like 1.00 AM, etc.
17. Click on Save & Preview.
18. Click on Ok.
Follow the same process to create automation for your other lead stages, such as:
- Sales Qualified Lead (SQL).
- Opportunity.
- Converted Lead.
- Closed Won.
- Any other CRM stage you want to upload to Google Ads.
The setup is now complete.
Before you finish
Before testing your setup, make sure the following are correct:
- Publish both GTM containers. Publish your web GTM and server GTM containers after making any changes.
- Use matching conversion names. The lead stage name in your Google Sheet must exactly match the Google Ads conversion action name (for example, Sales Qualified Lead (OCT)).
- Use the correct timezone. Make sure the timezone in your Google Sheets template matches your Google Ads account timezone.
- Allow access to imported spreadsheets. If you're using
IMPORTRANGE(), click Allow Access the first time you connect the spreadsheets. - Wait for the first sync. After creating the scheduled upload, Google Ads may take 24–48 hours to process the first import.
- Test with a real lead. Change a lead's status in your CRM spreadsheet and verify that it appears in the correct lead-stage spreadsheet before waiting for Google Ads to import it.
🎉 Congratulations! Your setup is now complete.
Conclusion
Offline conversion tracking is how you show Google what really happens after the click. A user clicks your ad, submits a form, and lands in your sheet with their GCLID attached. You close the deal, add the value, and Google Ads gets the conversion within 24 hours.
The result is smarter bidding, because Google finally optimizes for revenue instead of raw lead volume. And the best part is that it works on almost any website and any form, with no paid CRM and no Zapier.
If you run lead generation campaigns and your offline sales are invisible to Google, this is the gap worth closing first. If you need help setting it up, feel free to reach out.
FAQ
Want to join the server side?
Try for freeRecommended for you
Sep 12, 2025
Blog
Track CLTV conversions for lead generation with Google Sheets Reader
CLTV Conversions Tracking for Lead Generation measures the long-term value of leads, helping optimize marketing efforts and refine conversion strategies.
Aug 3, 2026

Comments