Improve Event Match & tracking quality with Enricher power-up
Uliana Lesiv
AuthorServer-side enrichment helps improve the quality and completeness of event data. With this approach, incoming requests are supplemented with additional user information that was collected earlier. This is especially valuable when events don't contain enough identifiers for analytics and advertising platforms to recognize and connect user interactions.
For example, a user may submit their email in one session, browse from another device later, or complete a purchase offline. Without sufficient identifiers in each request, platforms can't match events correctly or associate them with the right customer journey, resulting in fragmented data and less accurate attribution.
Enricher is a Stape power-up that enables server-side enrichment. It automatically stores selected user data from incoming requests and reuses it to enrich future requests when information is missing. This helps improve user matching and creates a more complete view of customer interactions across sessions, devices, and channels.
In this guide, we consider in detail the value that Enricher can bring to businesses as well as how to configure the power-up.
What value can it bring to a business?
Improved Event Match Quality
Problem: platforms such as Meta and Google perform better when more user identifiers are available in events. When identifiers are missing, match quality decreases.
How Enricher can solve it: Enricher helps solve this problem by enriching incoming requests with already known user information whenever available.
For businesses that invest in paid advertising, even small improvements in match quality can have a significant impact on campaign measurement and optimization.
Online and offline activity connected
Problem: many businesses generate revenue long after the first website visit.
A prospect may:
Download a lead magnet → Submit a form → Speak with sales → Become a customer weeks or months later
Without a way to connect these interactions, attribution data is lost.
How Enricher can solve it: Enricher helps fill the gap between different steps in the customer journey. It can connect fragmented touchpoints and enrich offline conversion events with known customer information.
This creates better visibility into which marketing activities actually influence revenue.
Cross-device tracking
Problem: customers frequently switch between devices. A person might discover a brand on mobile, research on a tablet, and finally purchase on a desktop.
Without shared identifiers, these interactions often appear as separate users.
How Enricher can solve it: Enricher helps unify activity across devices since it reuses previously known identifiers, making it easier to recognise the same user throughout their journey.
Before configuring
To configure Enricher power-up, you need to create a Stape account if you don't have one yet. The power-up is available on the Business or Enterprise plan. For Custom plans, Enricher is available at a separate price after consulting with our sales team.
However, you can start with the free plan to see how server-side tracking works and find out whether it's a good fit for your business before upgrading.
🤔Who is Stape?
Stape provides server-side tracking infrastructure that helps businesses collect, process, and send data to analytics and advertising platforms more reliably and securely.
Server-side tracking is especially valuable for businesses that invest in paid advertising. By moving tracking logic to the server, you can improve data collection reliability and make tracking more resistant to ad blockers and cookie limitations.
Real-life cases of our clients have shown impressive results after configuring server-side tracking:
✅ 36% more conversions recorded with server-side Google Ads tracking for the Shopify website
✅ 9+ Meta Match Quality score with server-side tracking
✅ 2.2% more GCLIDs parameters recovered on Safari iOS 26
Stape offers solutions such as:
Server-side Google Tag Manager (sGTM) hosting
Server-side Google Tag Manager (sGTM) hosting is the most flexible option if you need to configure server-side tracking for multiple platforms.
Additional tools designed to improve tracking quality and data accuracy
If you are new to tracking, Stape has a free tool called Setup Assistant. It creates GTM tags, triggers, variables, and a client based on your tracking needs and automatically sets them inside web and server GTM containers. As a result, you get ready to use the tracking setup without any manual configurations.
Stape develops power-ups that improve data quality and make data tracking configuration easier (such as Custom Loader to protect data from the impact of ad blockers, Cookie Keeper to prolong the lifetime of cookies, etc.).
In addition, you can use Stape's Website Checker for free to get a report on whether the website tracking and analytics setup is working correctly. It scans your site for common issues (like missing tags, misconfigured tracking, or blocked scripts) and highlights anything that could cause inaccurate data collection. As well, get a detailed step-by-step recommendation on how to fix the tracking problems.
How to configure server-side tracking and activate Enricher power-up
Step 1. Create a server GTM container
➡️ Note
Before setting up your server-side Google Tag Manager container, it's important to have a web GTM container configured, because:
- The web container collects events, parameters, and user interactions on your website.
- And sends this data to your server-side container.
Please follow the official Google documentation.
1.1 Open your web Google Tag Manager container. Click Admin. Under the container column, click +
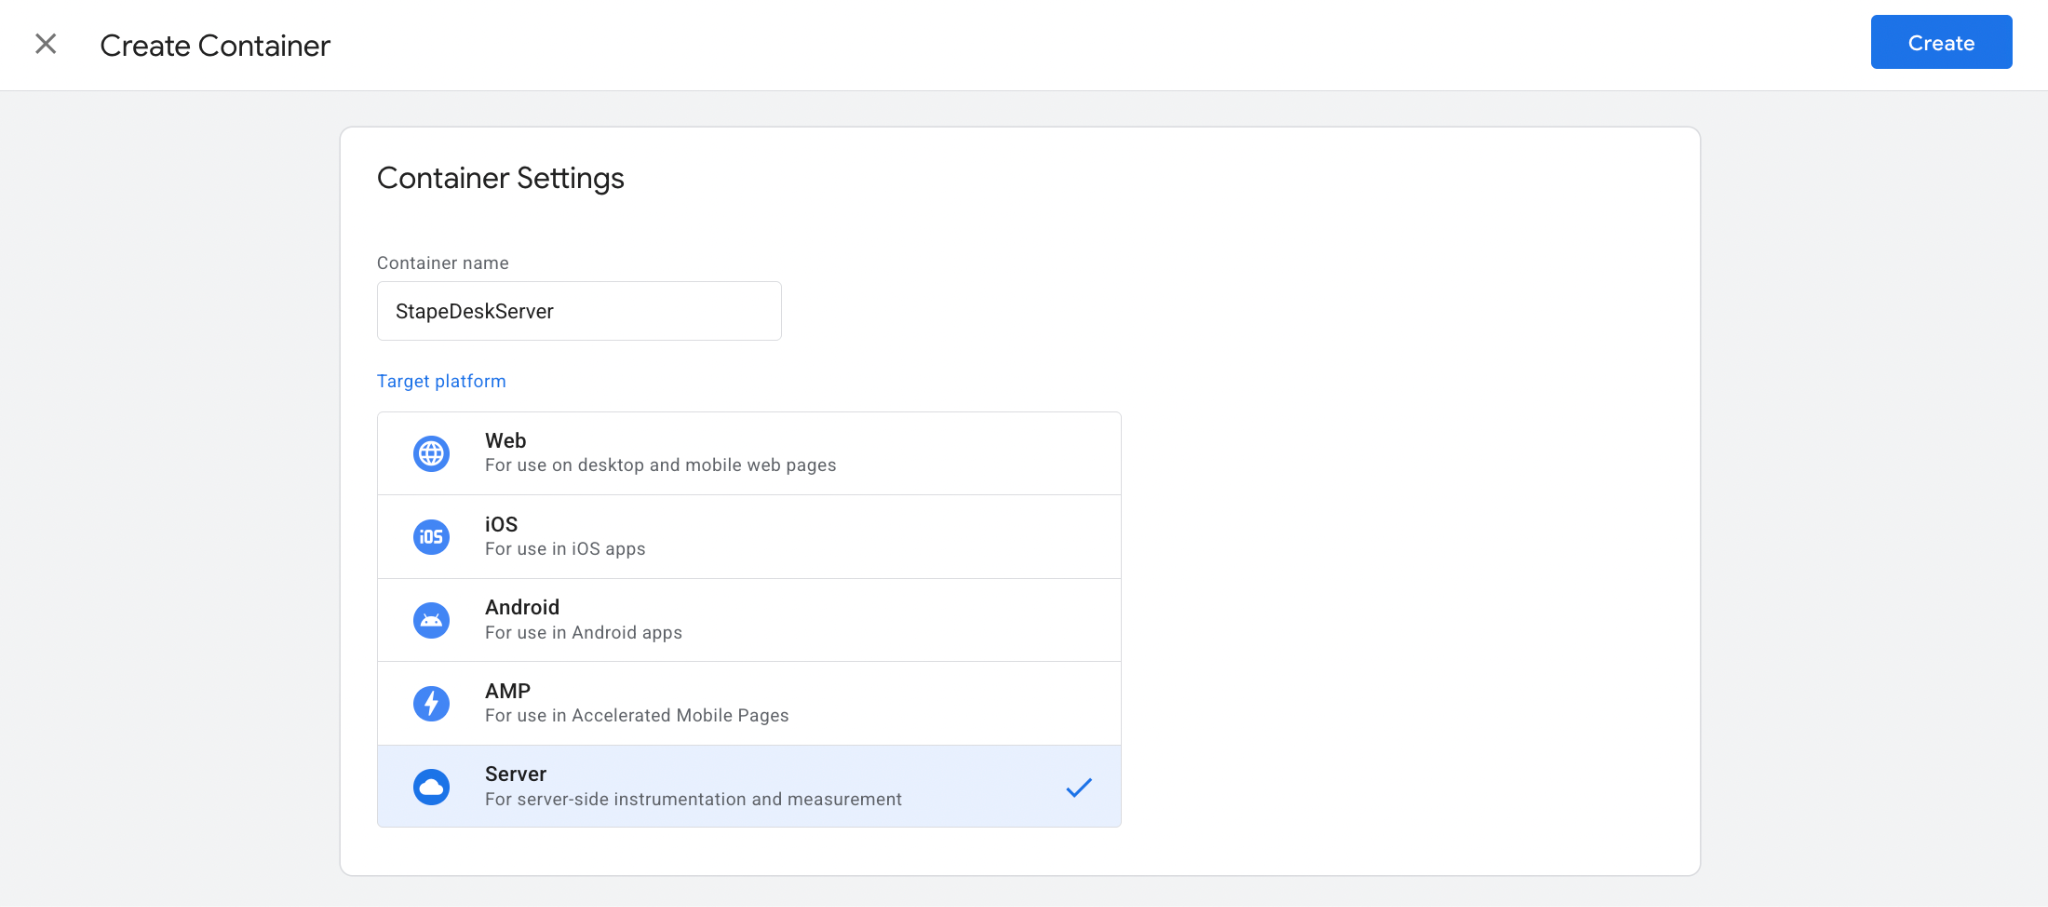
1.2 Type the container name, choose Server, and click Create.
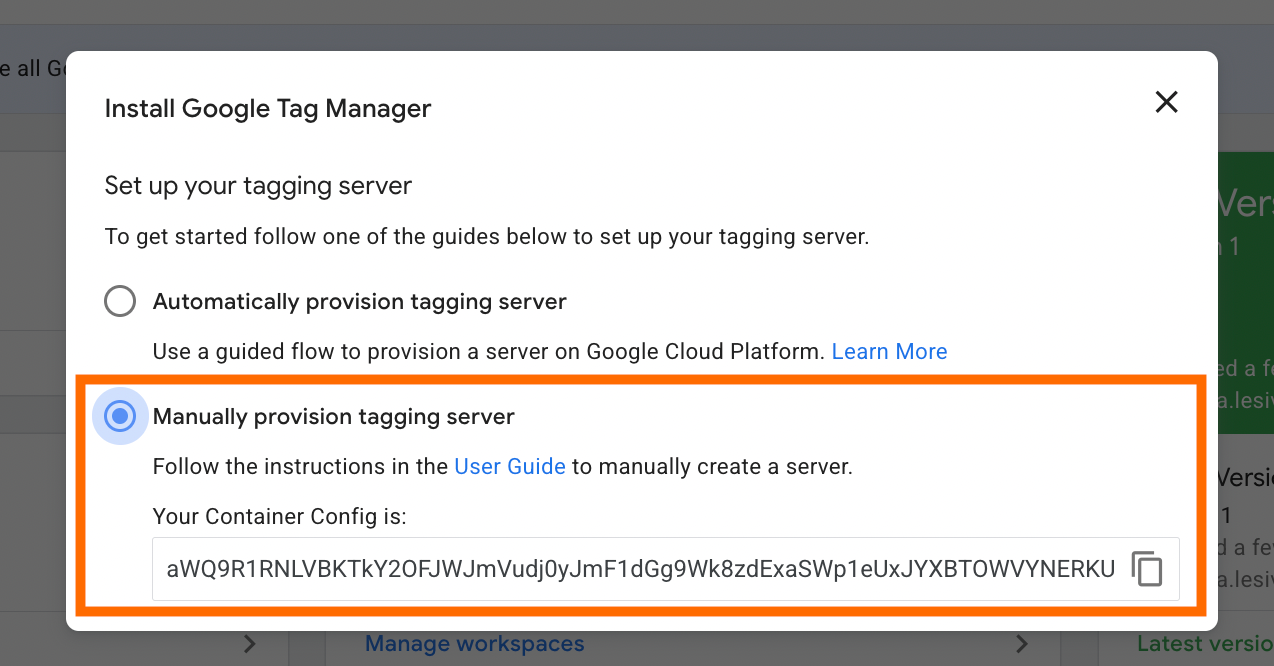
1.3 Choose Manually provision tagging server, copy your container config, and paste it into any text editor. We will need it for the next steps.
Step 2. Create a Stape account to host your server GTM container
2.1 Go to stape.io and create an account or log in.

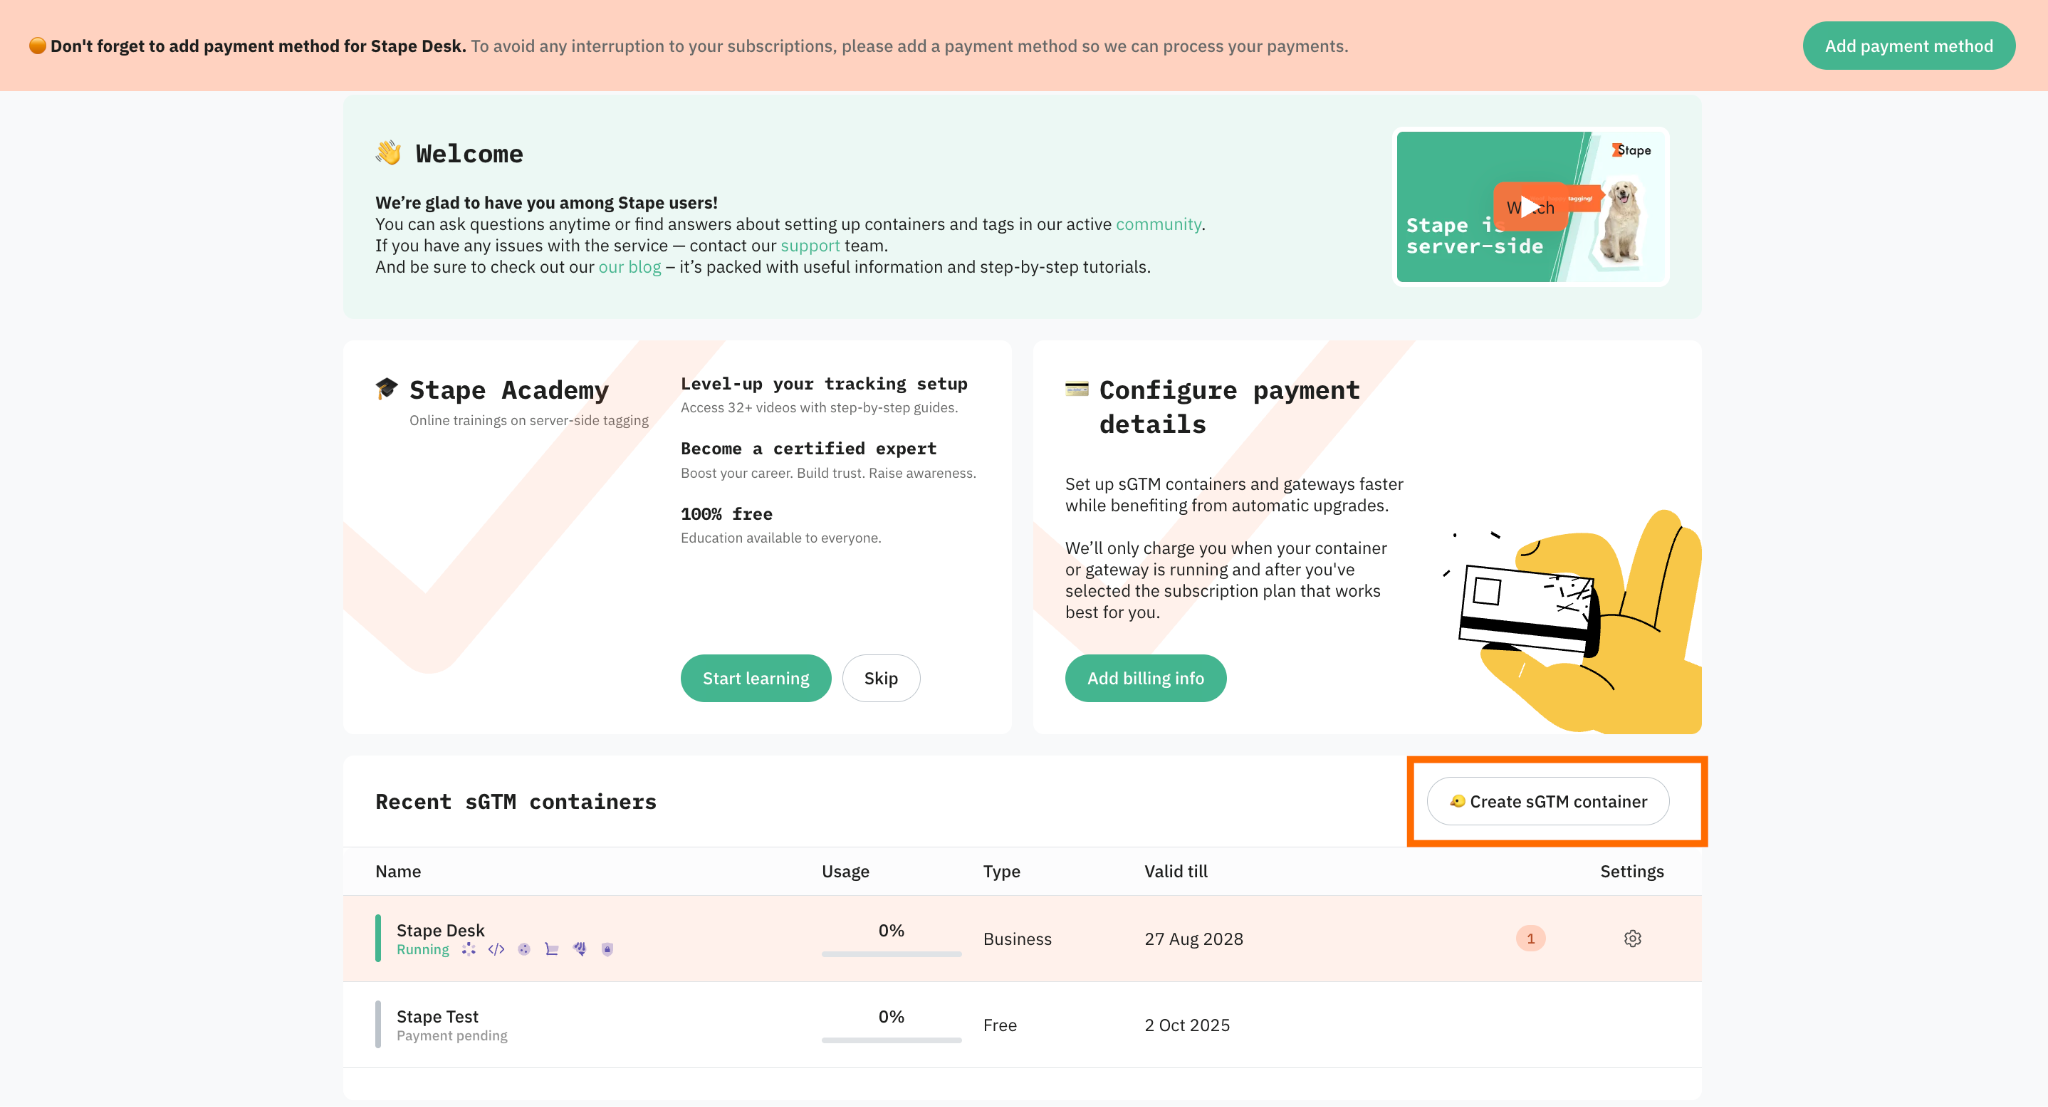
2.2 Click Create sGTM container on the main page.
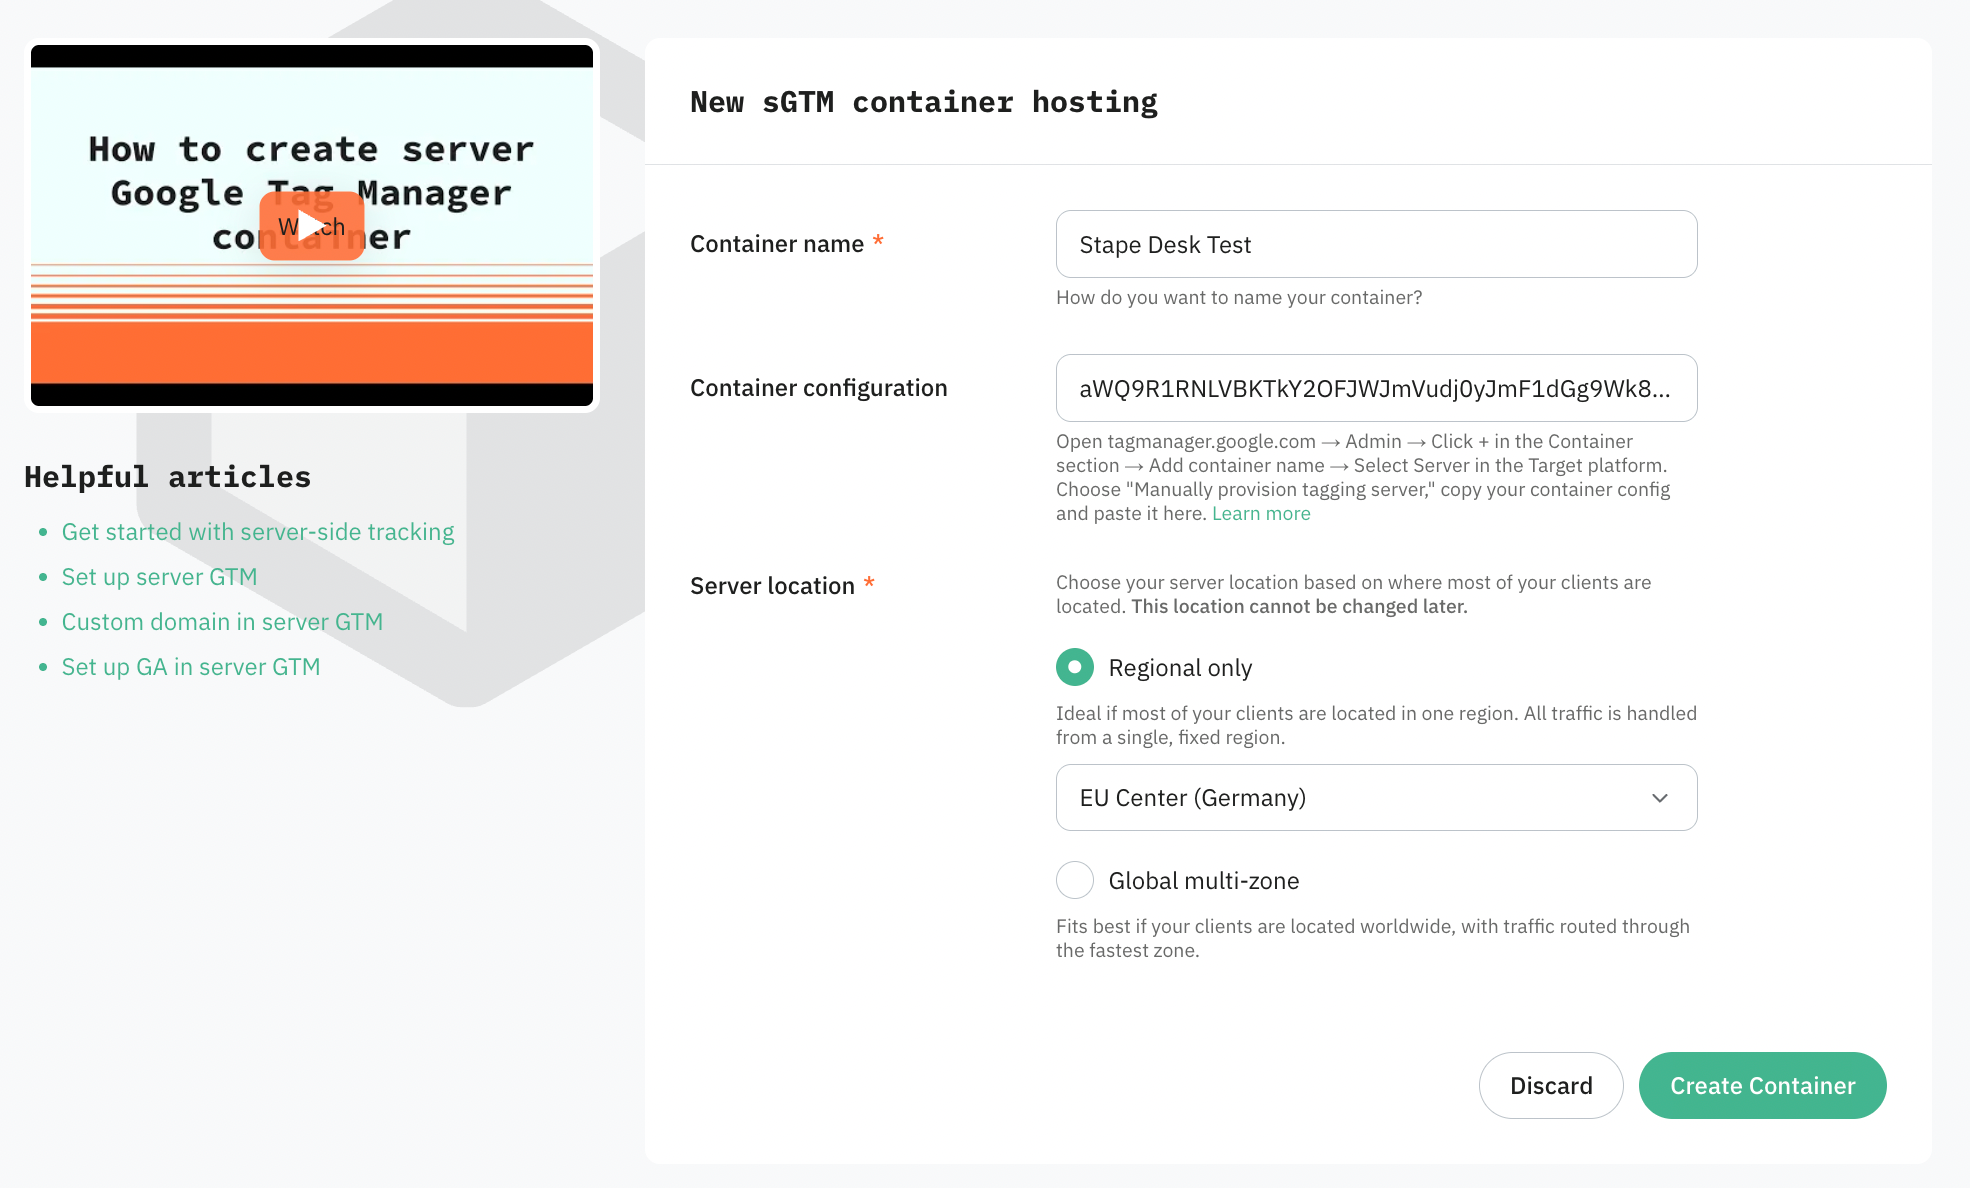
2.3 Enter your container details:
- Container name. The name does not necessarily have to be the same as the container name in your server GTM.
- Container configuration - paste Container Config that you copied from your Google Tag Manager Server Container.
- Server location - for best performance, choose the server location that's closest to where most of your clients are. See the list of available server locations in our documentation. If you have traffic from different regions, you can select the Global multi-zone server location option. It will automatically route incoming requests to the nearest available zone based on the user's IP address.
Then click Create Container.
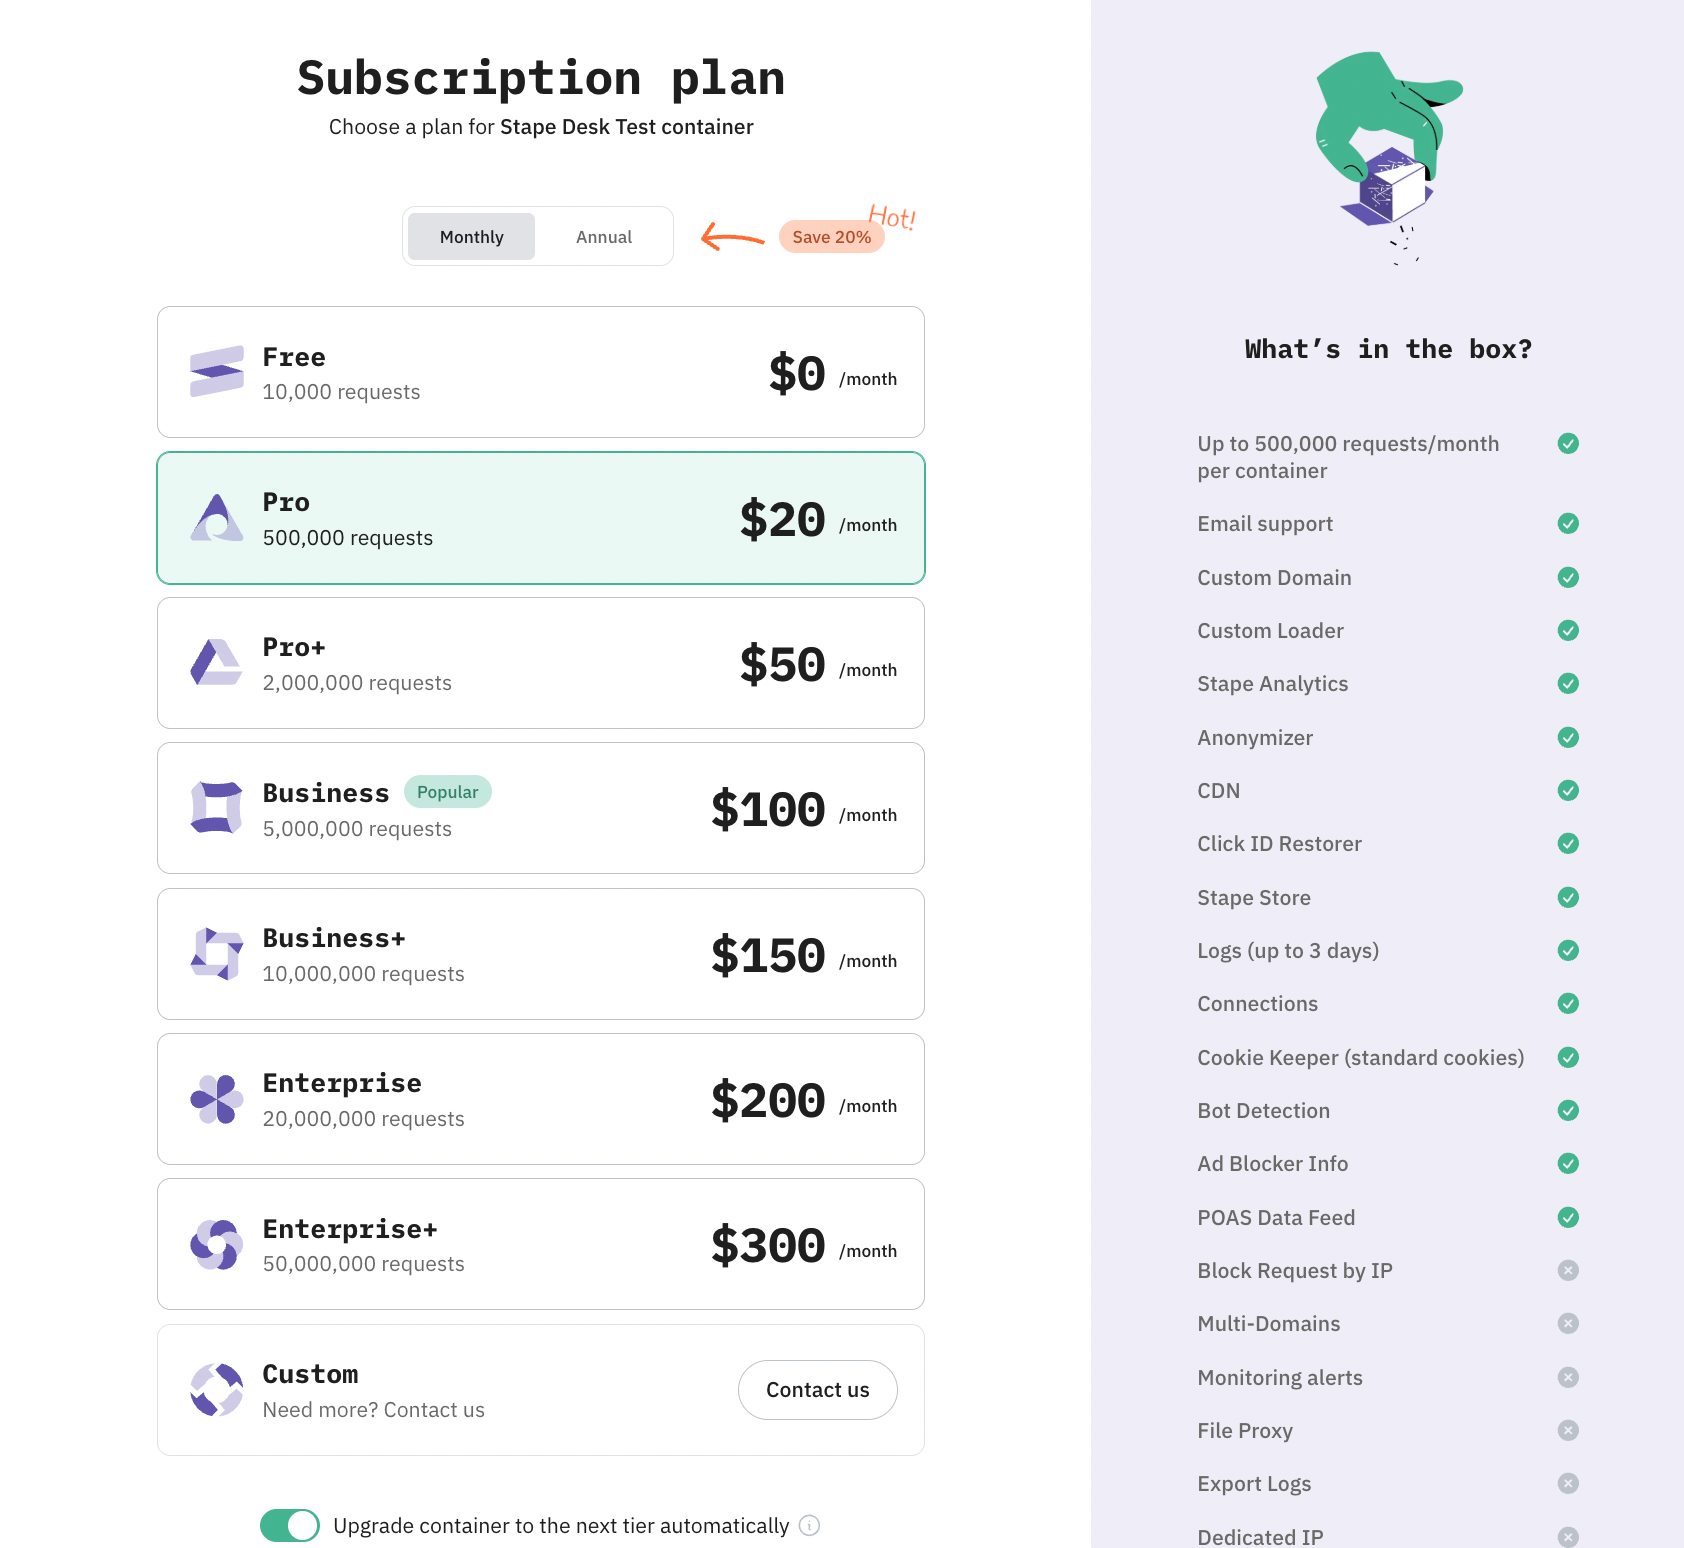
2.4 Choose a plan for your container. You can start with a Free plan. Click Continue with a Free plan.
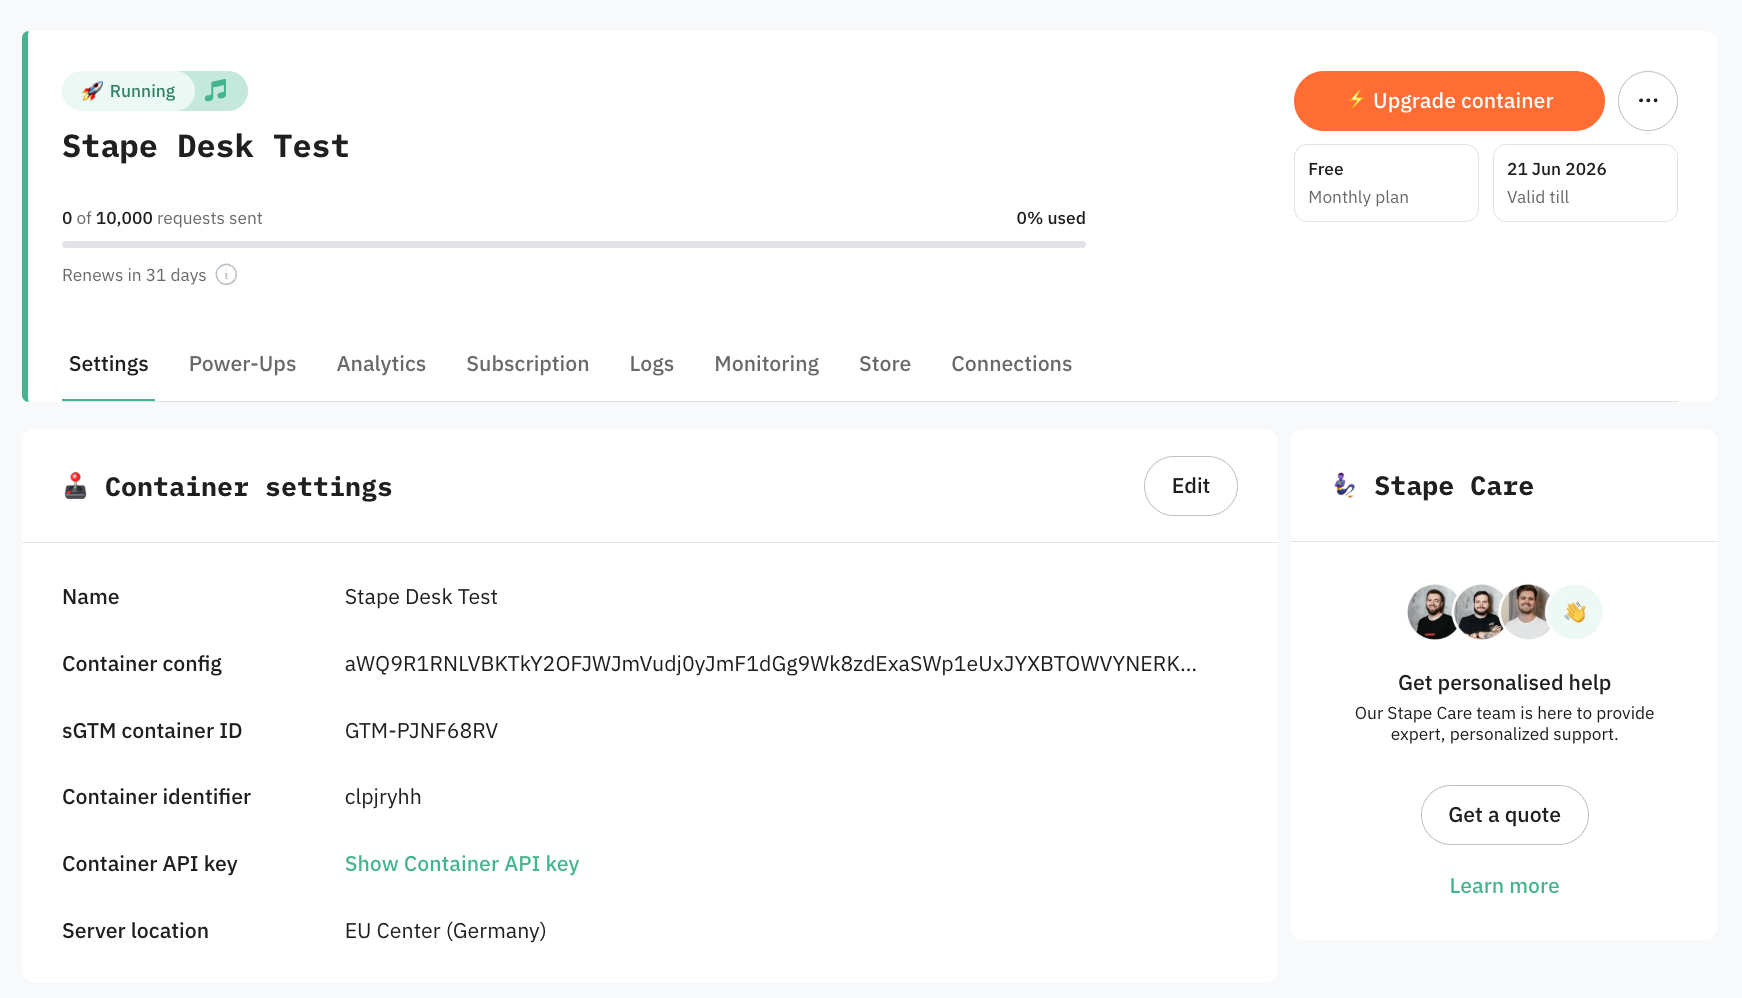
2.5 You will see the status of your container, container config, and plan name. It takes around 5 minutes to deploy a server container.
Please reload the page to update the status. If the Google Tag Manager server-side setup was done correctly, you should see the status Running.
Step 3. Configure custom domain
Configuring a custom subdomain for server-side tracking helps improve data accuracy. Instead of sending tracking data directly to a third-party vendor domain, requests are routed through a company-owned subdomain, which can reduce the impact of ad blockers and browser privacy restrictions.
For the instructions on how to configure the custom domain, click on the collapse element below:
How to configure a custom domain
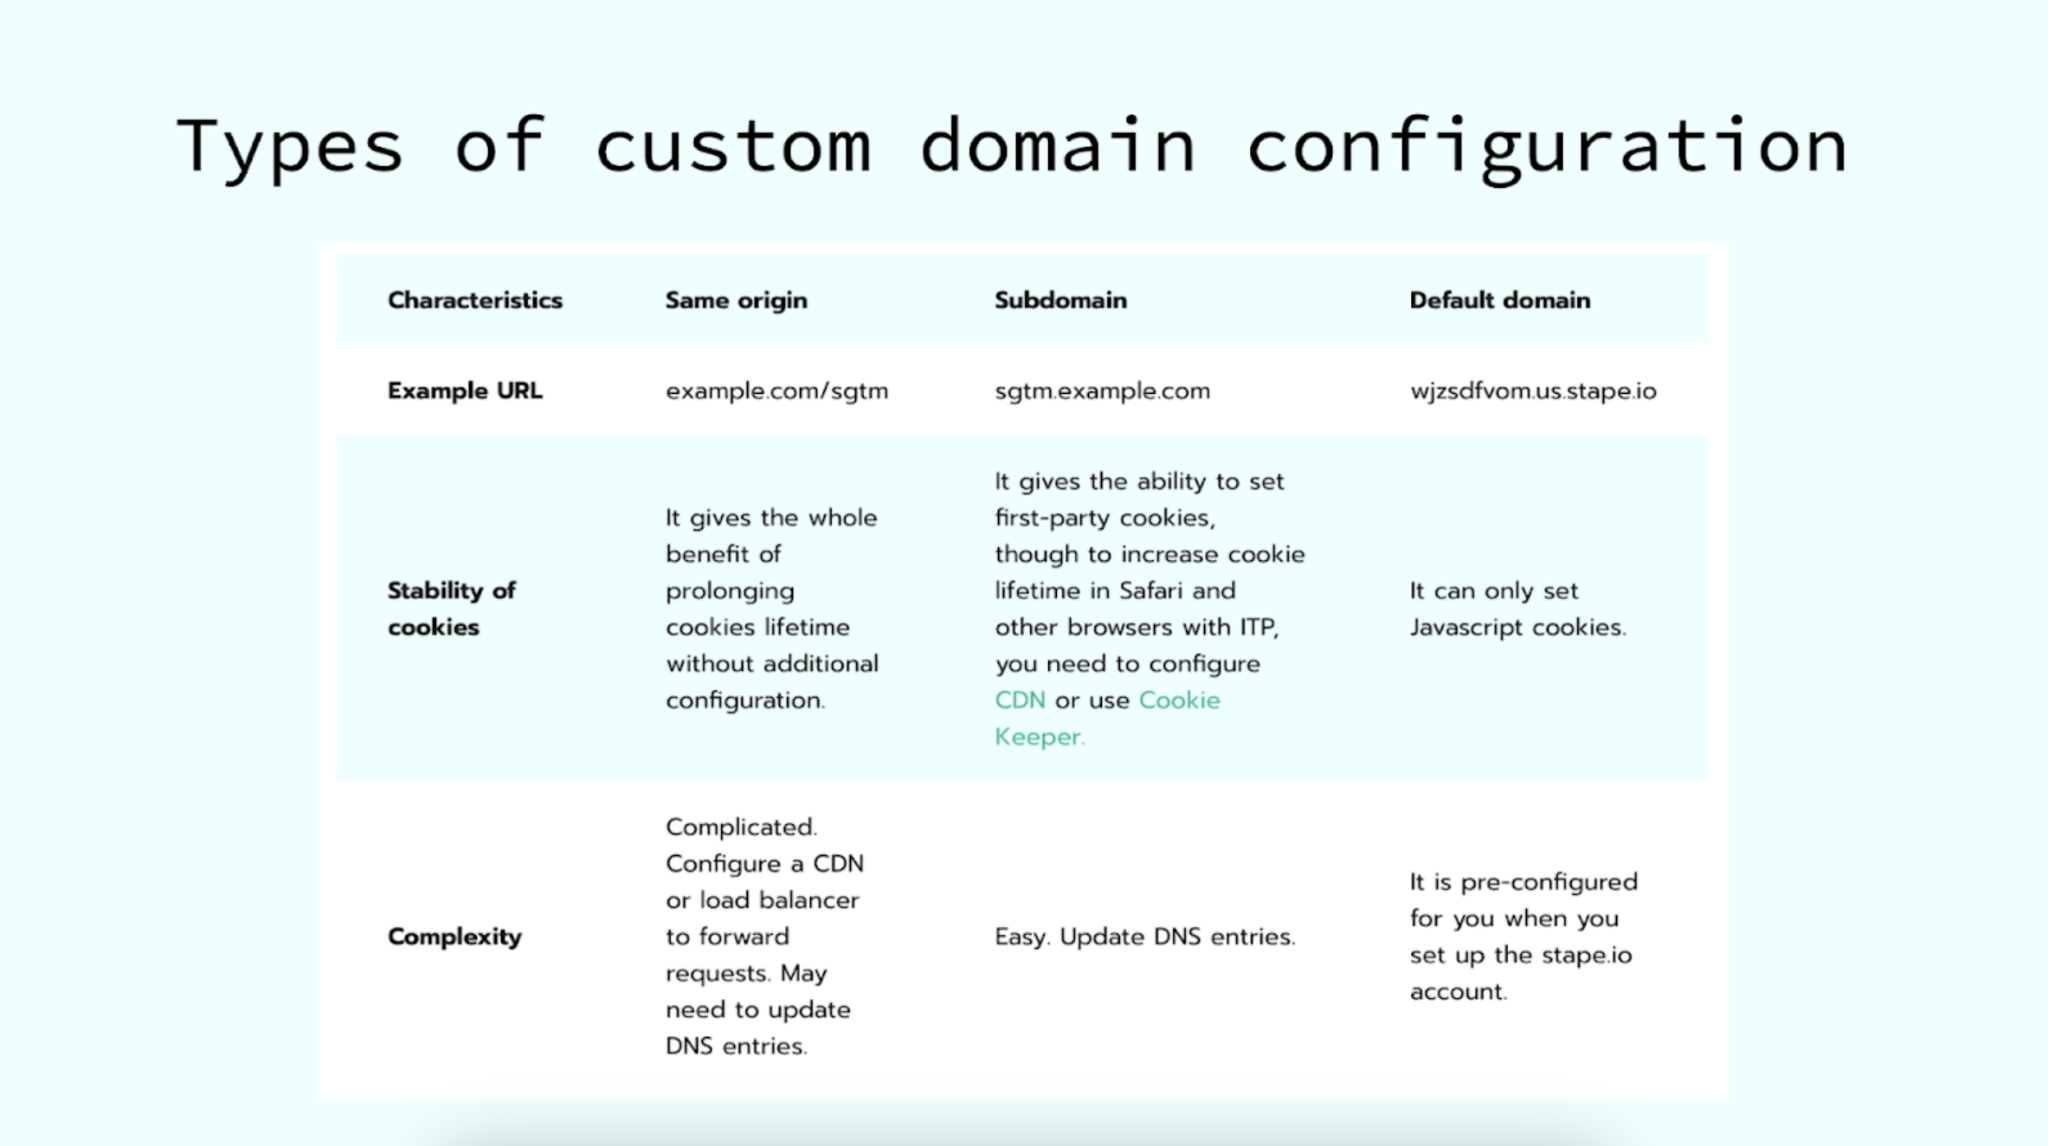
There are three ways to set up a custom domain:
- Same origin
- Subdomain
- Default domain
Based on the required custom domain type, follow the instructions below:
Step 4. Automatically configure server-side tracking for required platforms
Instead of manually setting up server-side infrastructure for the platforms you use (e.g., Meta, Google Ads, TikTok). You can use a free solution by Stape - Setup Assistant.
You just need to specify the platforms that you need to configure server-side tracking for - the web and server GTM components (tags, triggers, variables, clients) will be populated and automatically added to your containers.
Expand the collapse element below for more details:
How to configure Setup Assistant
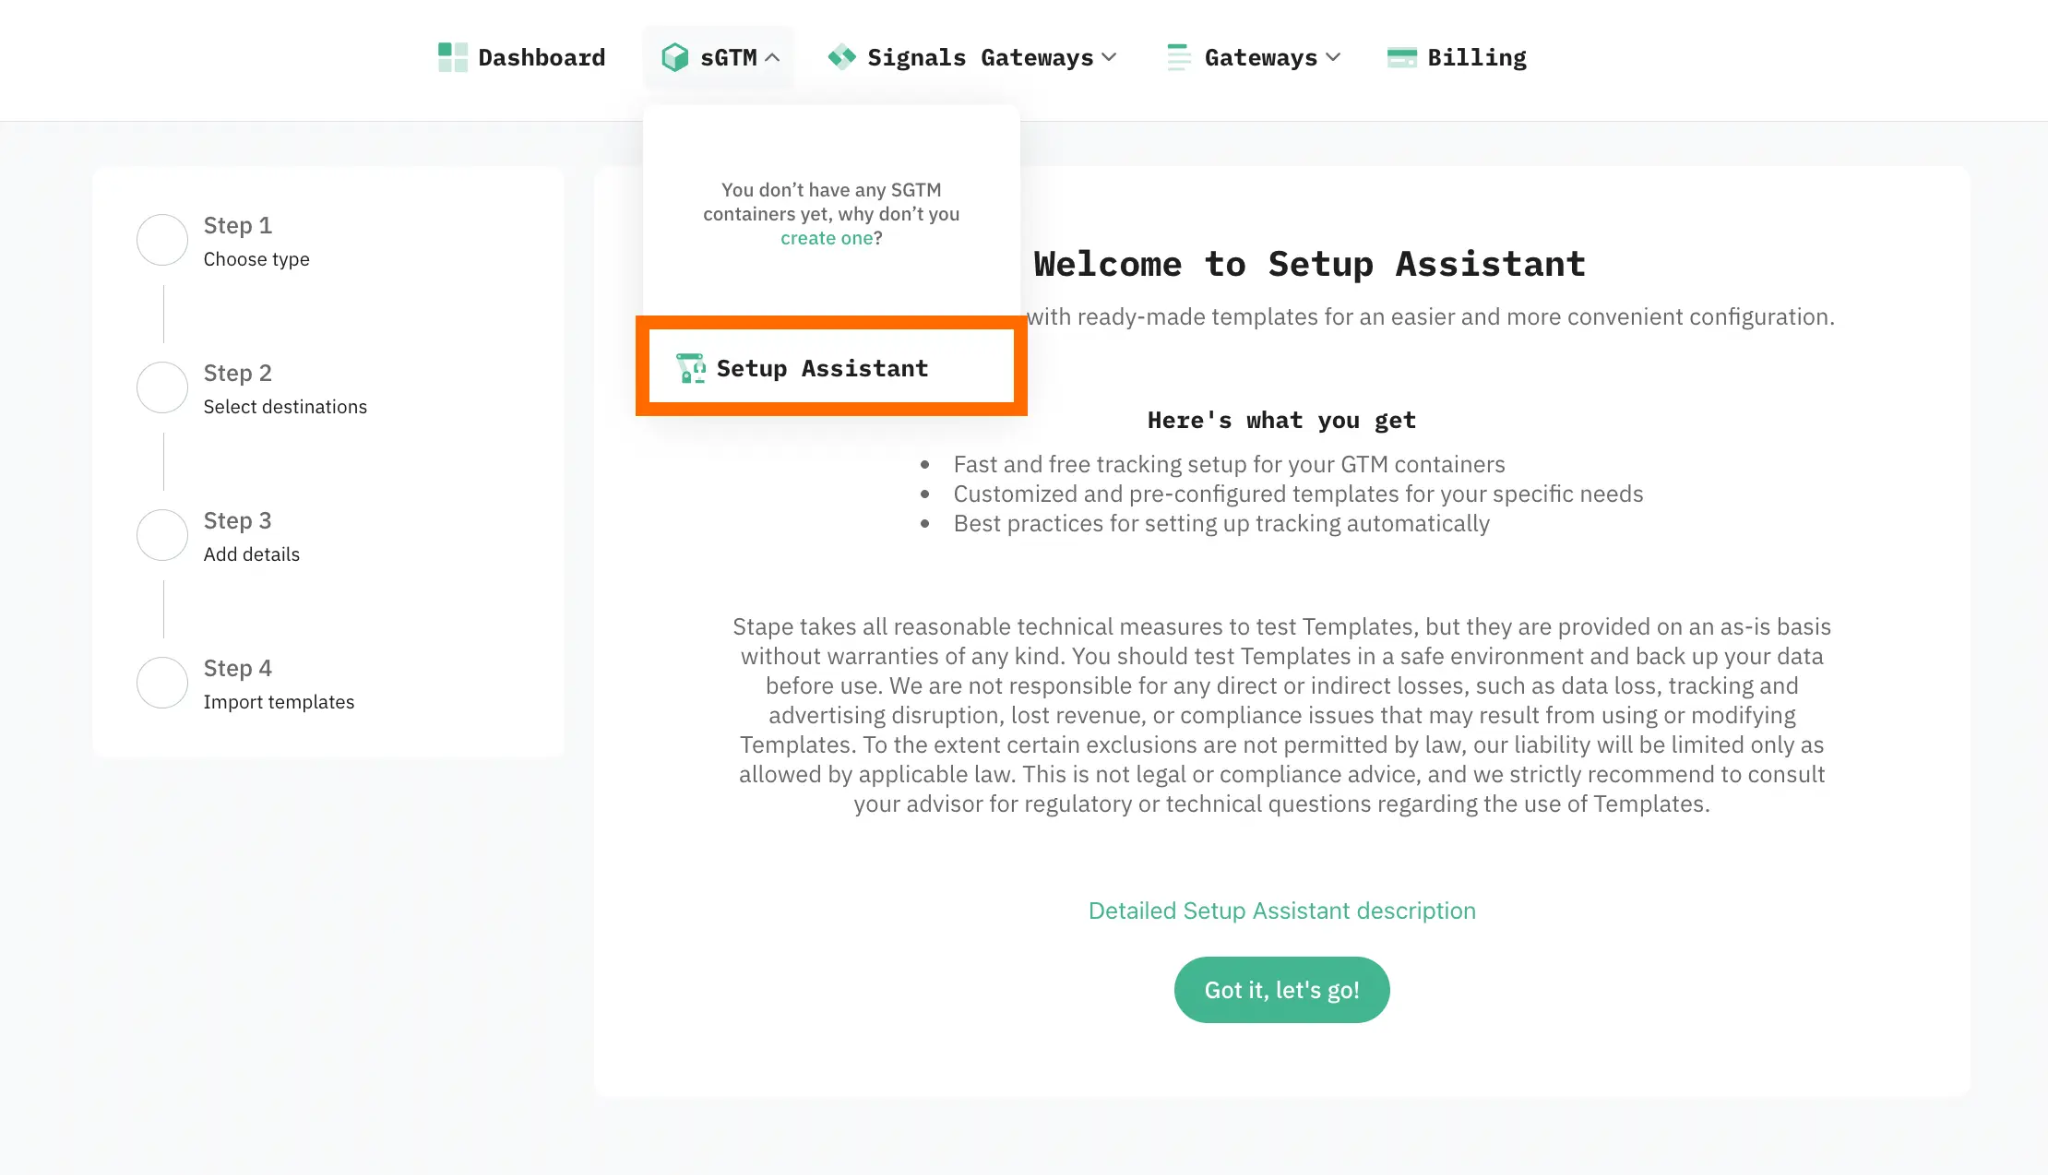
Where to find the Setup Assistant?
In the Stape admin, click on the sGTM section in the menu and locate Setup Assistant. Then, click on Got it, let's go! to start answering the questionnaire.
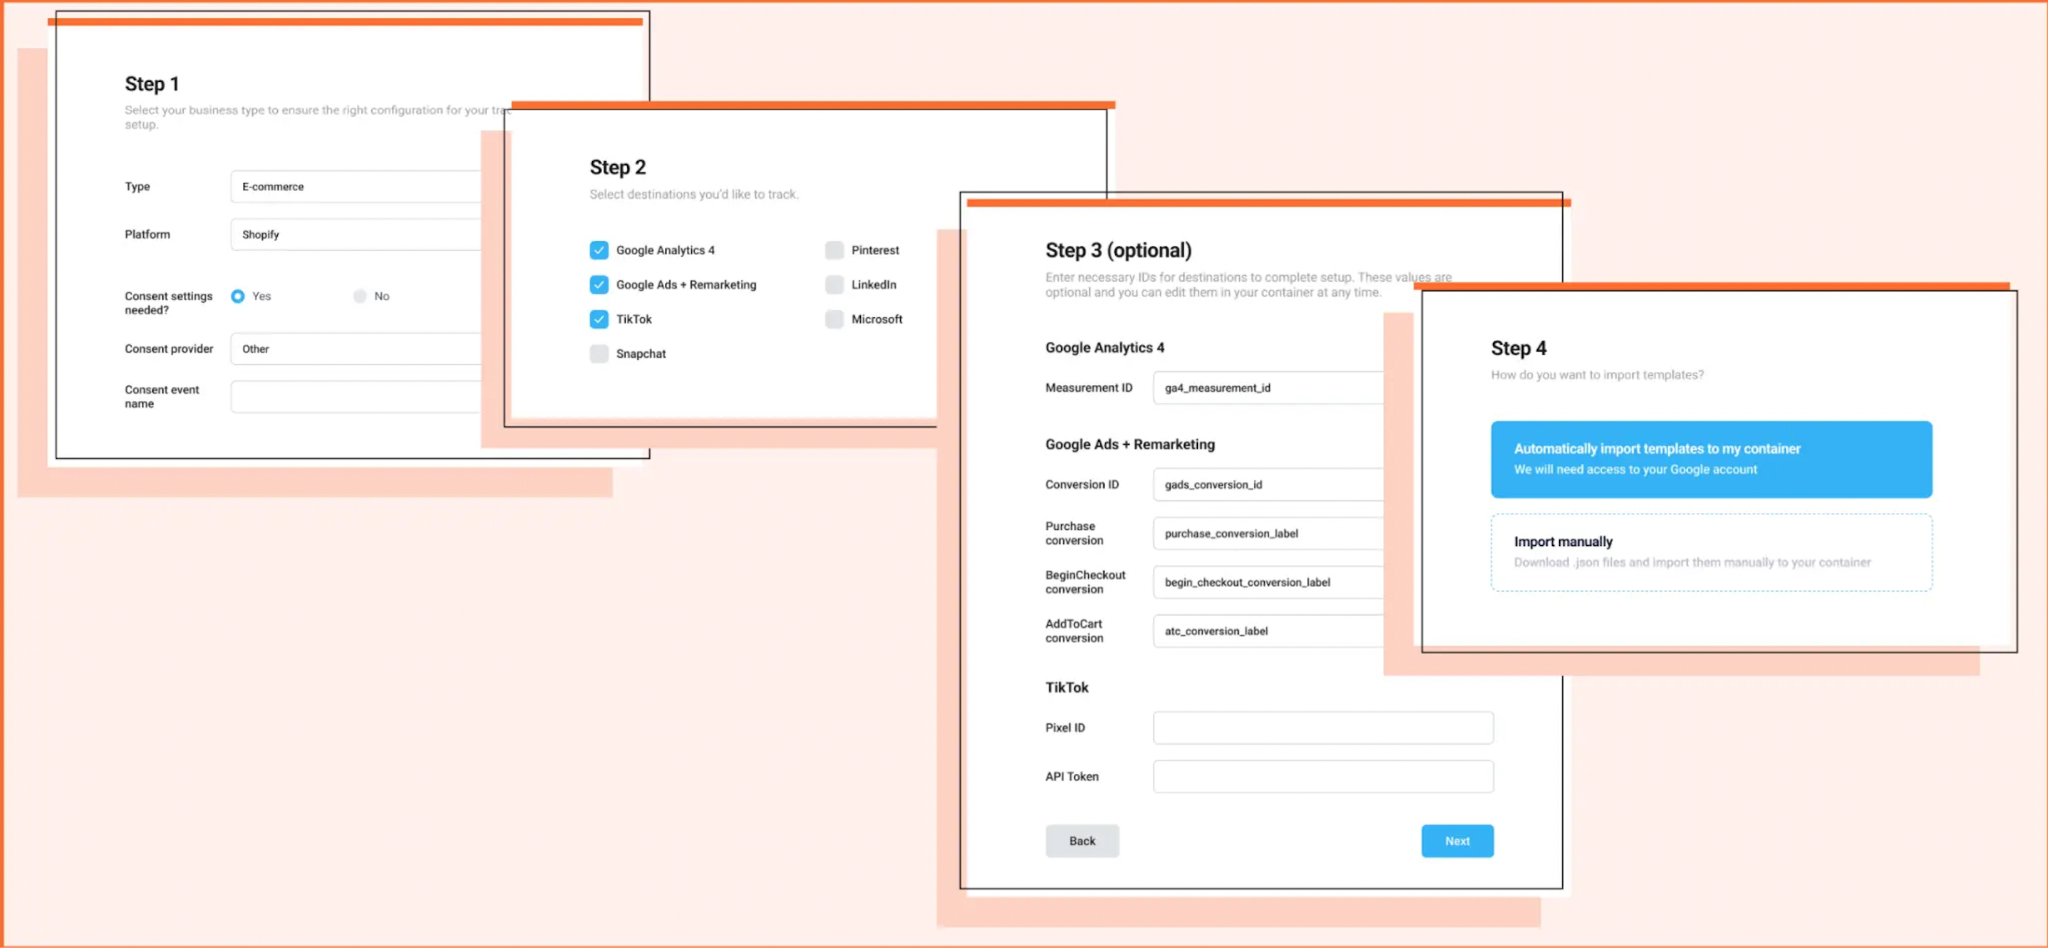
Step 1. Choose type
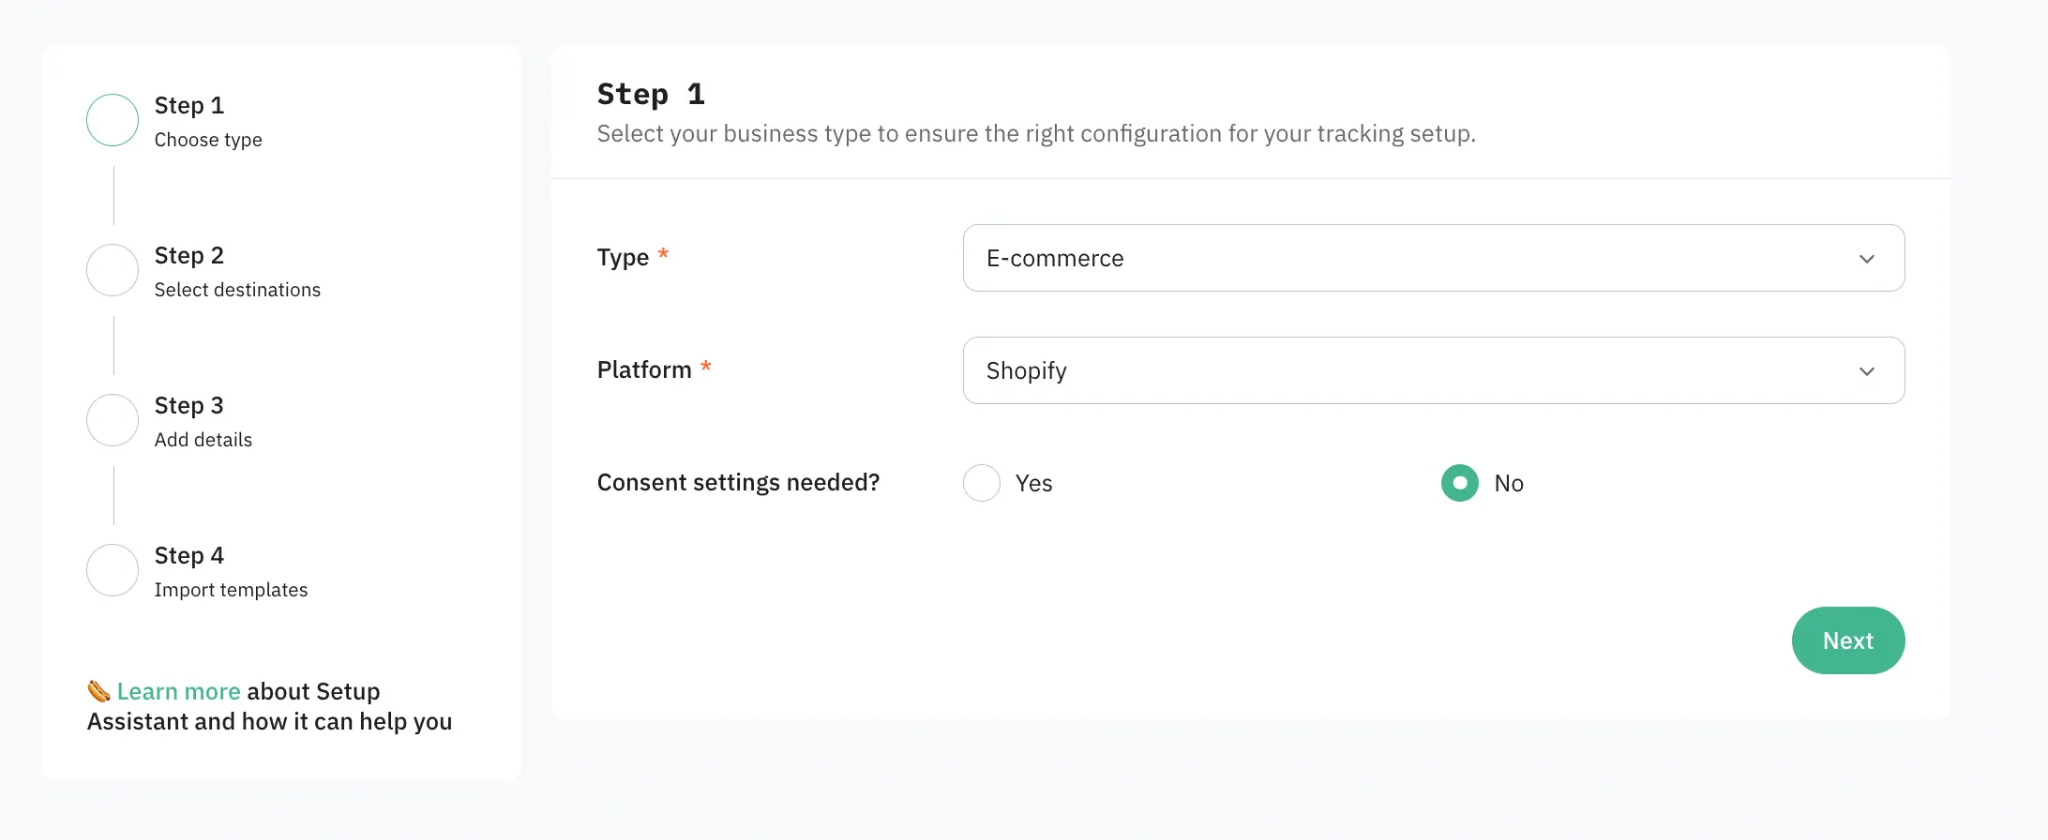
Type - indicate your setup type. eCommerce setups focus on product tracking, while Lead Generation setups focus on form submissions and conversions.
Platform (if you select eCommerce as a type) - specify the CMS platform you are using (e.g., Shopify, WordPress, etc.). Setup Assistant can provide the appropriate templates and settings for your site, ensuring that everything works seamlessly with your CMS. If your platform is not on the list, select Other.
Consent settings - check the box if you have a consent provider. Then, select one from the list.
Note:
If you choose Other as your consent provider, you need to specify an additional event in the dataLayer that signals a change in consent status. You can usually find this information from your consent provider or by checking the sdataLayer when the consent status changes.
Step 2. Select destinations
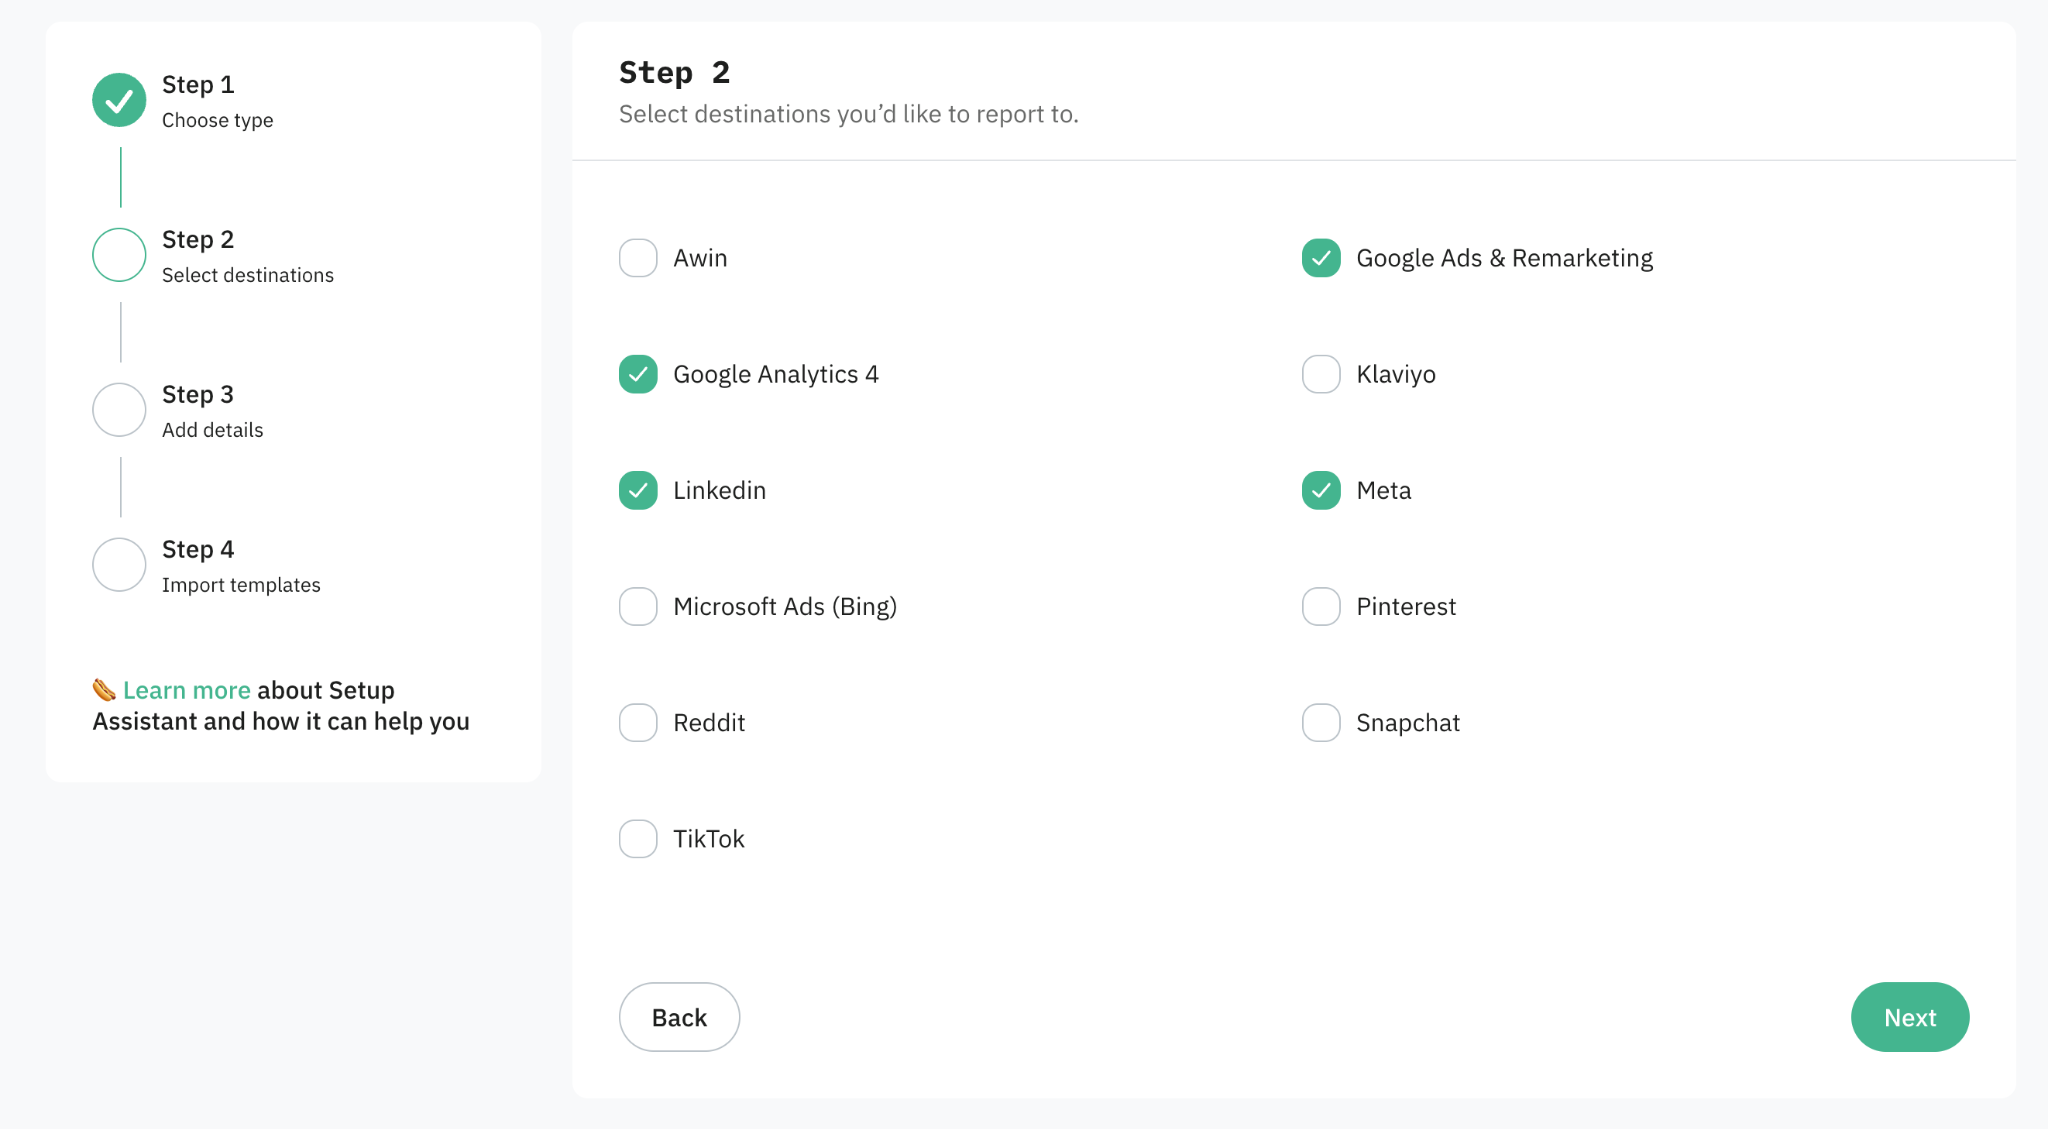
Select the advertising and analytics platforms you want to track (e.g., Google Ads, Meta, GA4, etc.).
Different platforms require specific tags and tracking settings. By selecting the platforms you want to track, the Setup Assistant customizes your GTM container with the necessary tags. This step ensures that your tracking setup aligns with the platforms you want to use.
Please note
Step 3. Add IDs details
Lead and Schedule events (for lead generation only)
If you selected the Lead generation type, enter the URLs of the "thank you" pages that users reach after completing the lead form (Lead event "Thank you" page URL) and/or after scheduling a call (Schedule event "Thank you" page URL).
Use the following format:
https://yourdomain.com/thank-you-page
To proceed, you must configure at least one field.
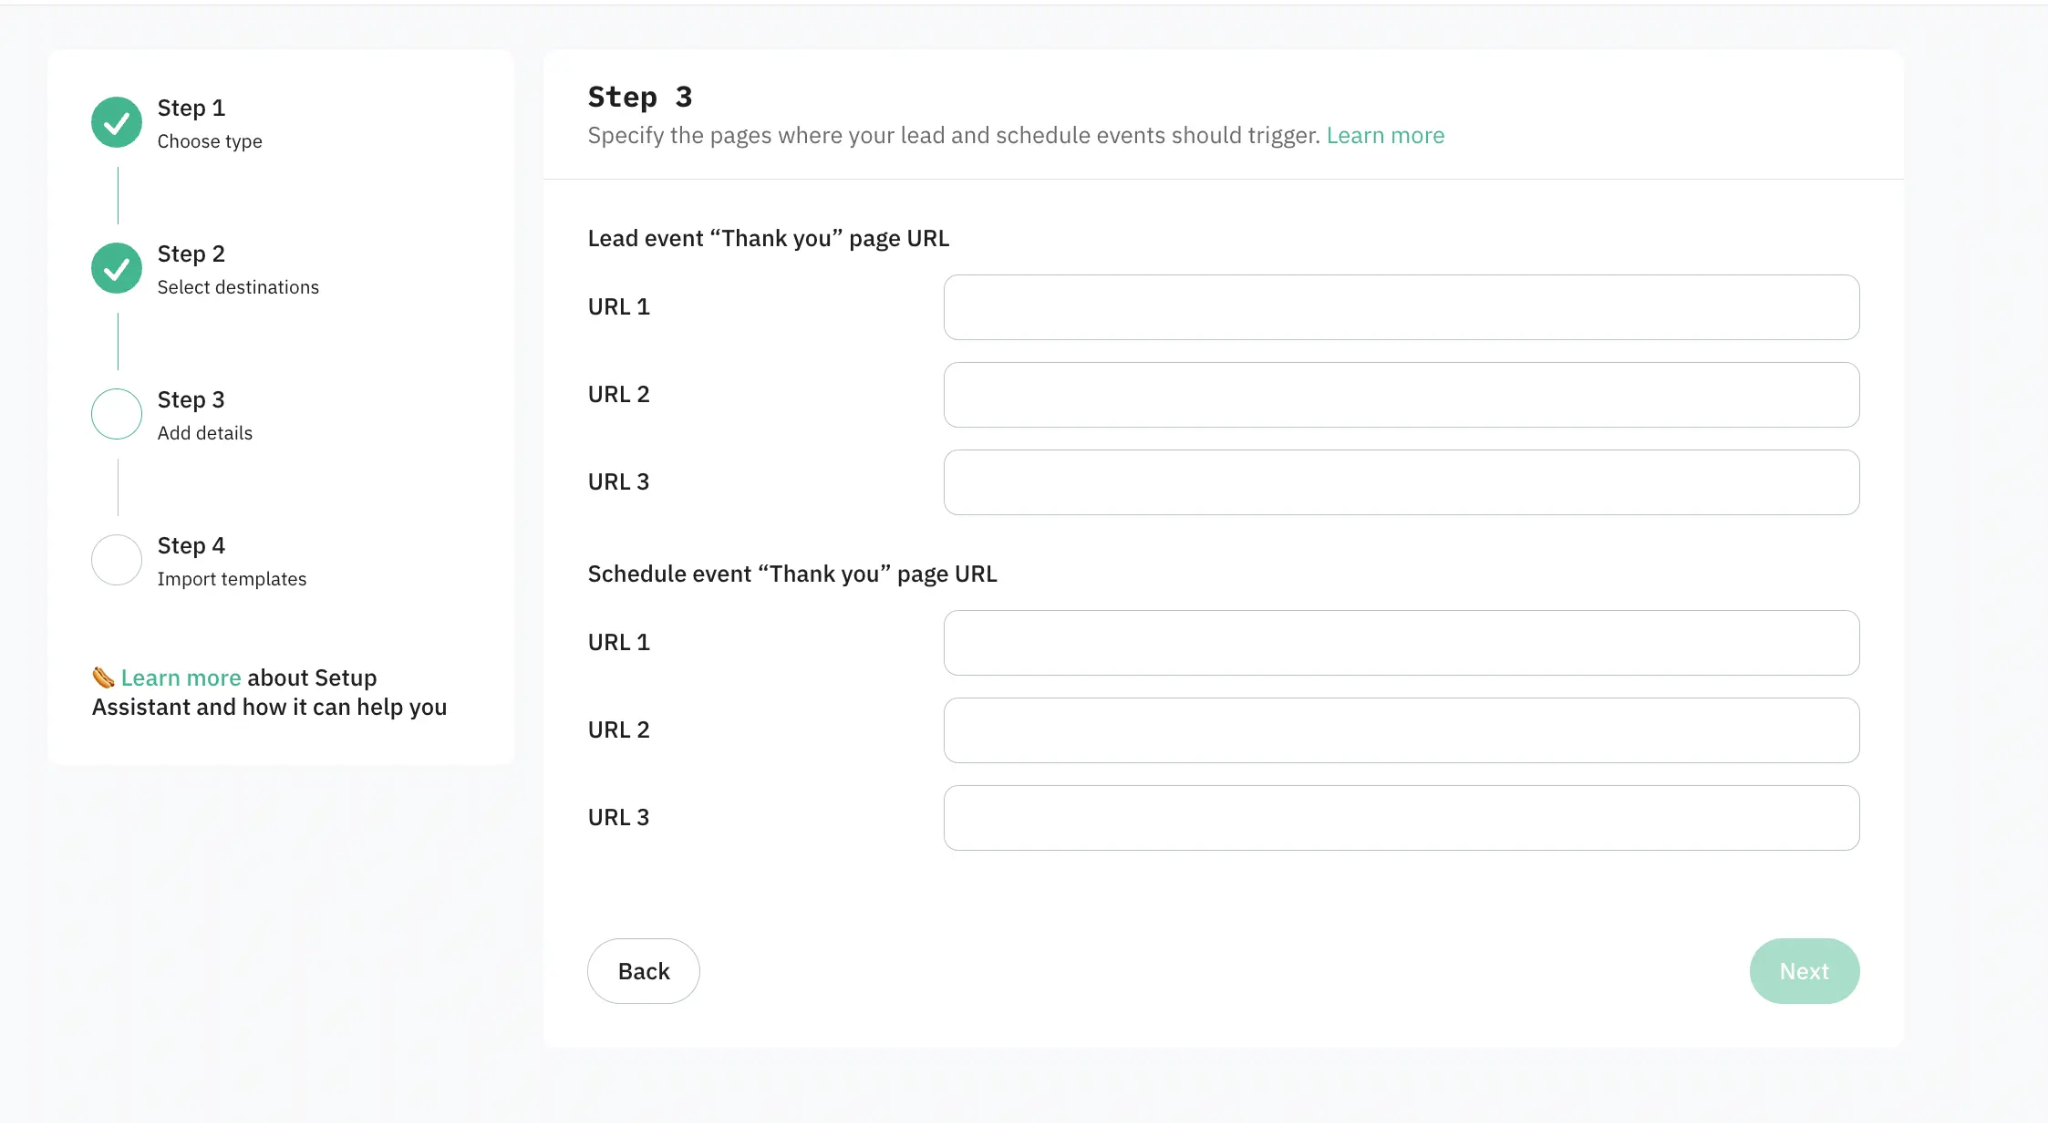
Please contact your developers and request the creation of a separate thank-you page if you don’t have one yet.
IDs for platforms you want to configure
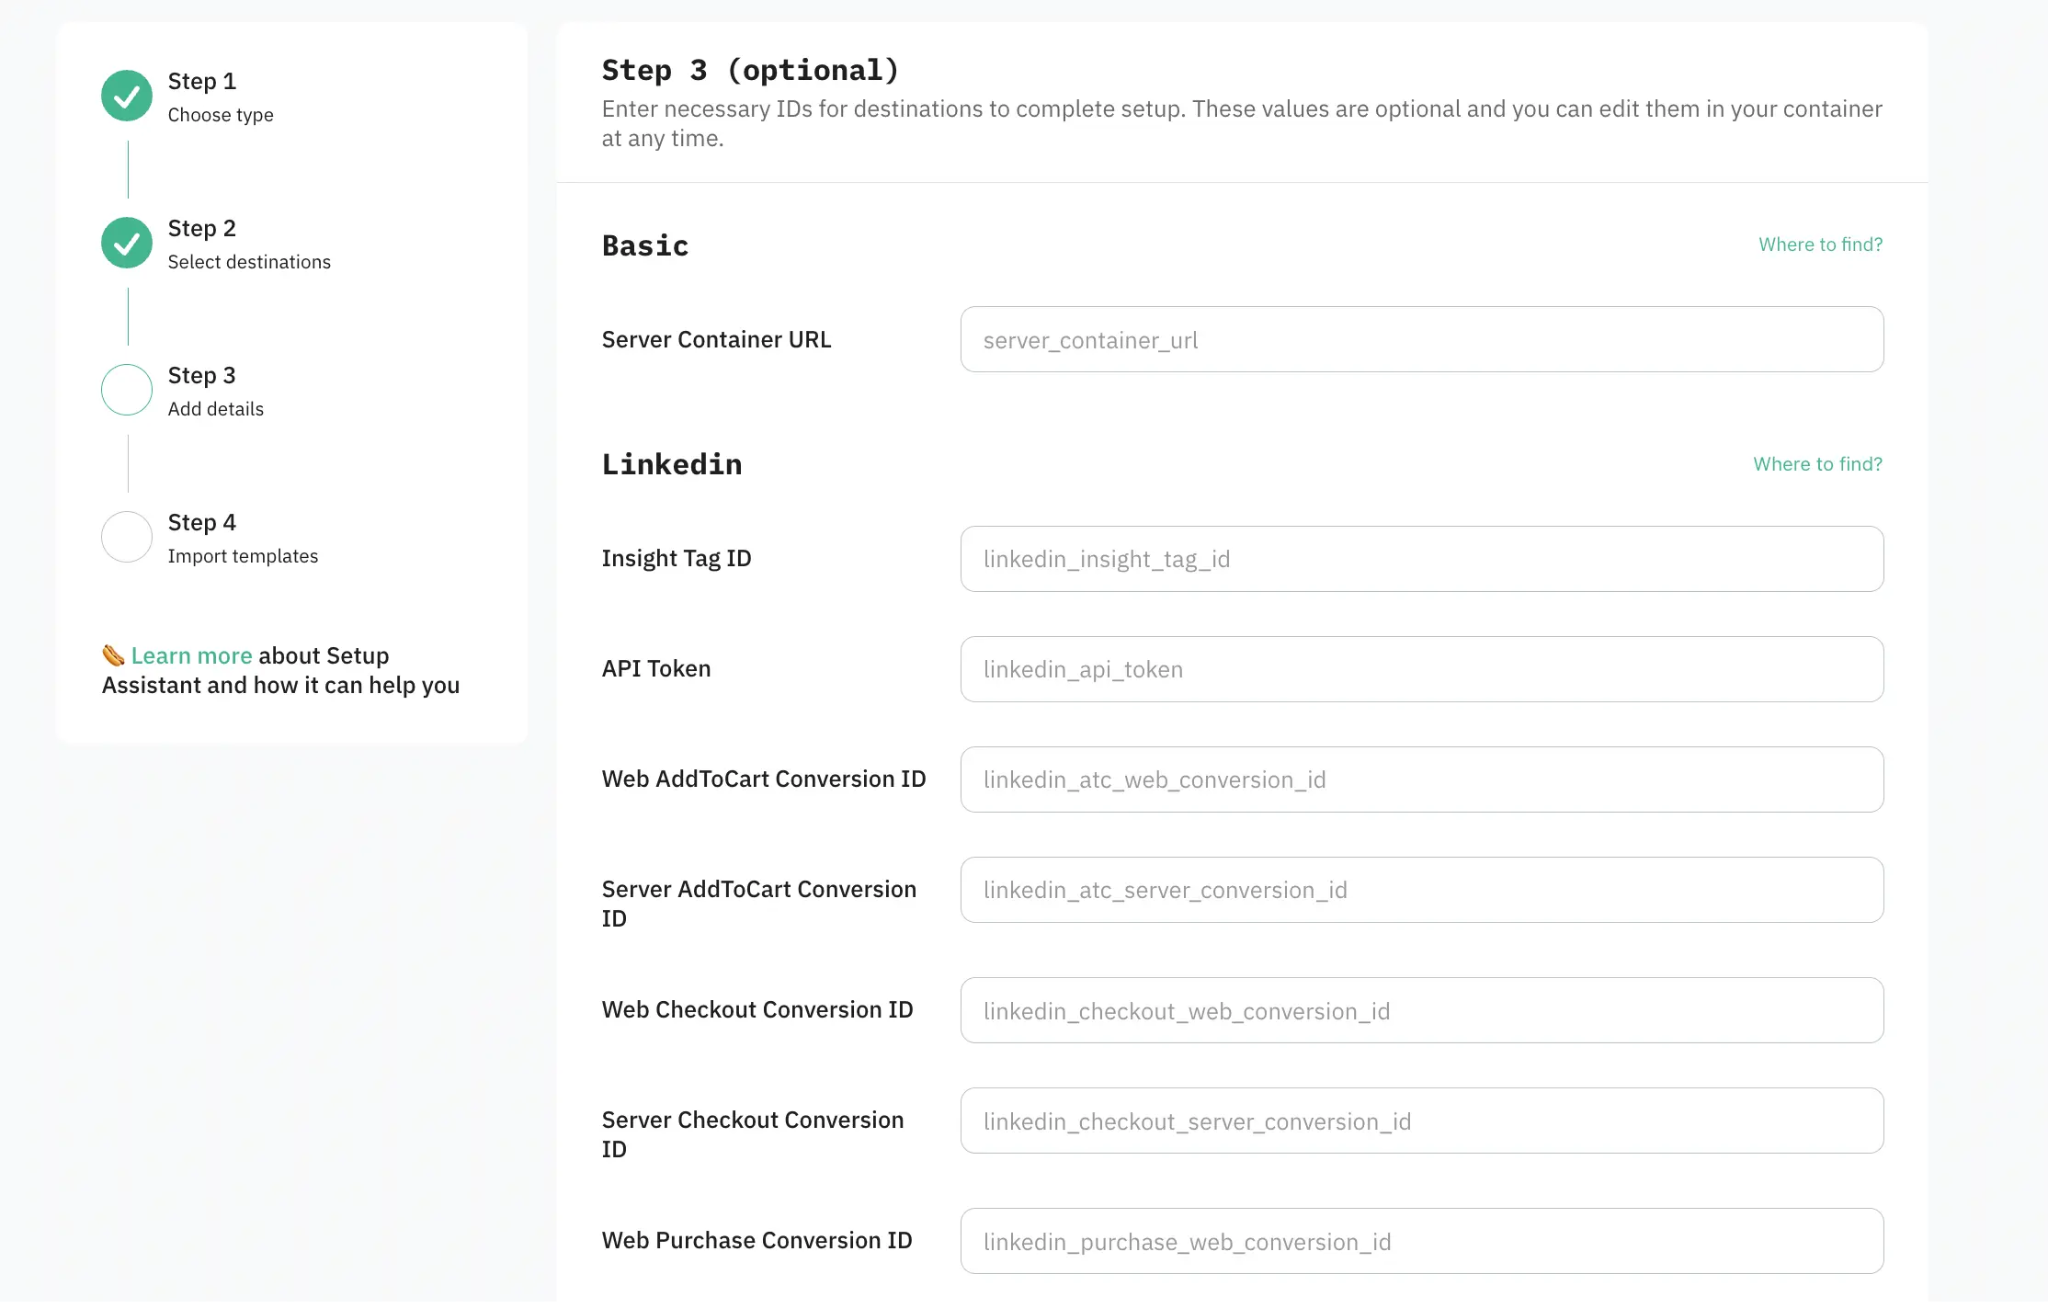
Enter the tracking details such as your Pixel ID, Analytics ID, or other required credentials.
This information is essential for the Setup Assistant to link your site to the respective platforms. It ensures that data is sent accurately from your website to the right destination and helps you to track conversions, user interactions, and more.
Without this step, the necessary data cannot be captured and sent to your platforms. Additionally, you can add IDs directly in your web and server containers at any time.
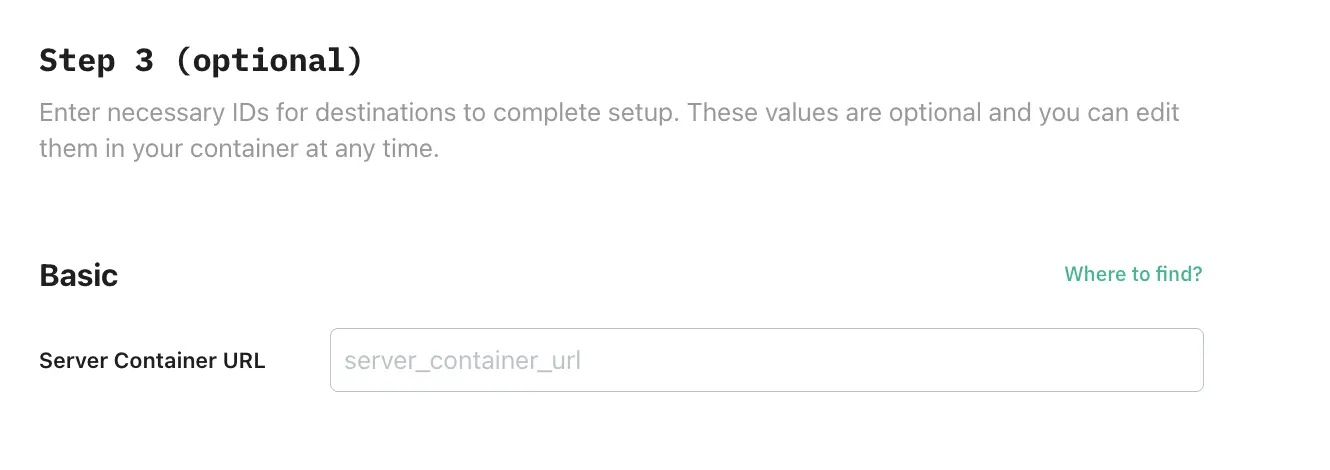
Regardless of the platform you need to configure, the Server Container URL field is required for all.
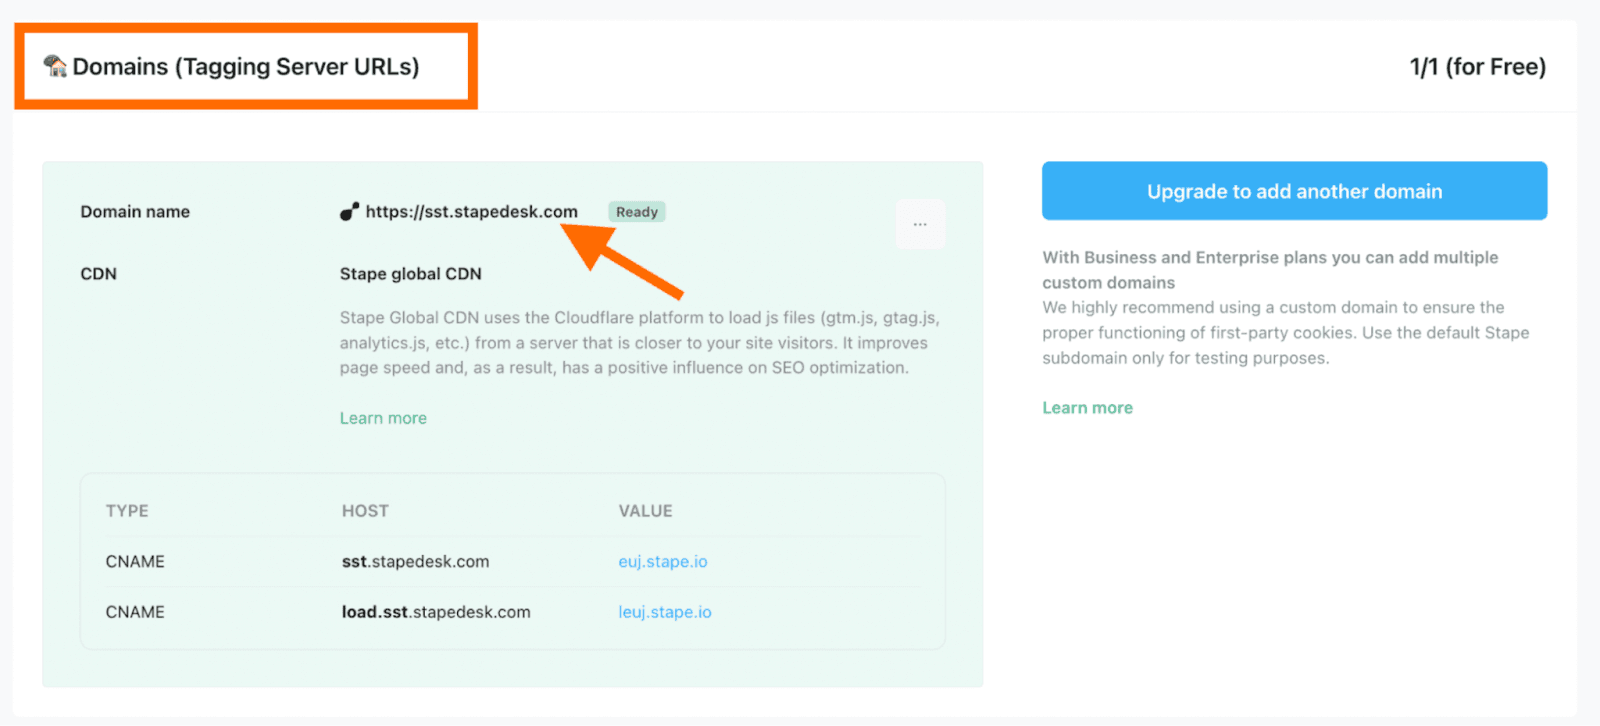
To find the Server GTM container URL, log in to your Stape account → navigate to the sGTM section of the menu → choose your container → Domains (Tagging Server URLs) → copy the domain name.
| We have prepared a quick guidance on how to find each necessary ID for destinations. Click on the collapse elements to see the instructions for each platform: |
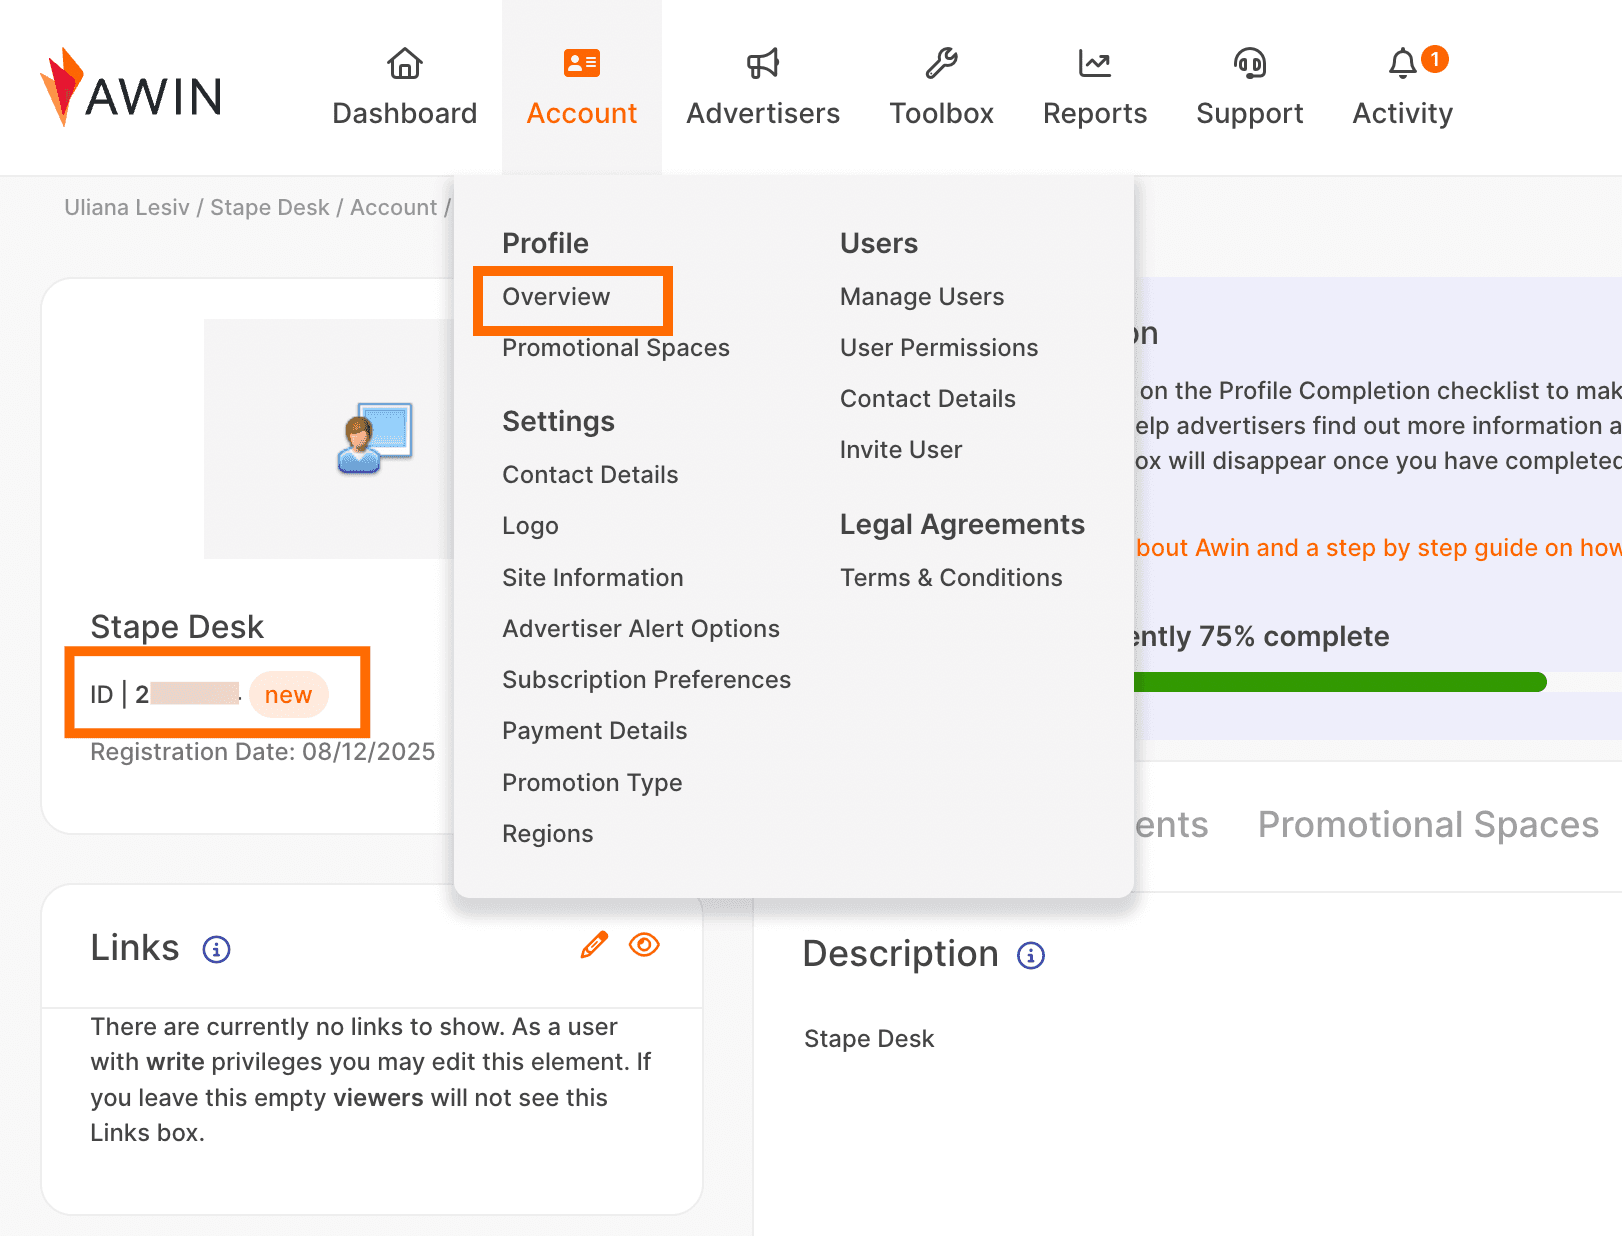
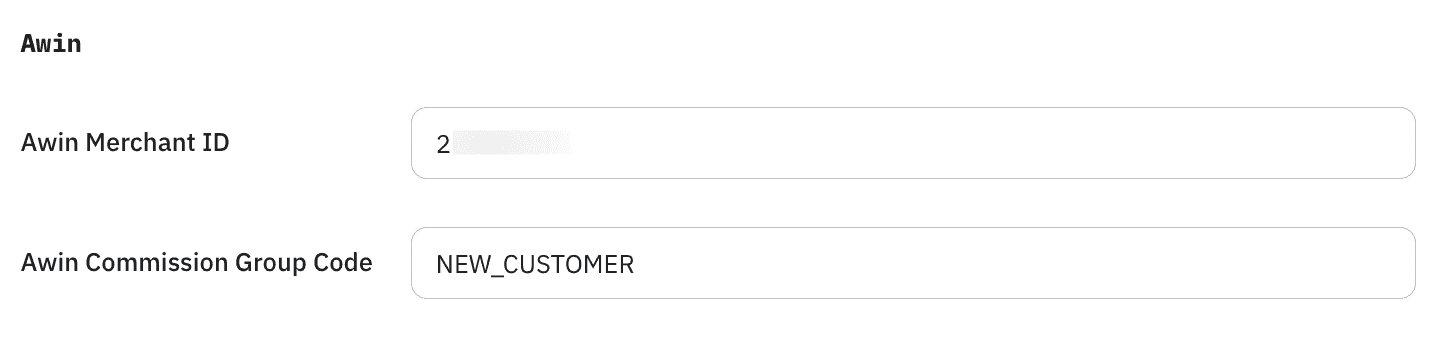
Awin
Awin Merchant ID - to get the ID, log in to your Awin account → click on Account → Overview → below your account name, you will see the ID.
- Awin Commission Group Code - to get the Commission Group Code, you need to log into your Advertiser account → navigate to Commission → Commission Manager → Commission Groups tab of the Commission Manager → in the column Commission Group Code, you will find the codes for all of your groups.
Klaviyo
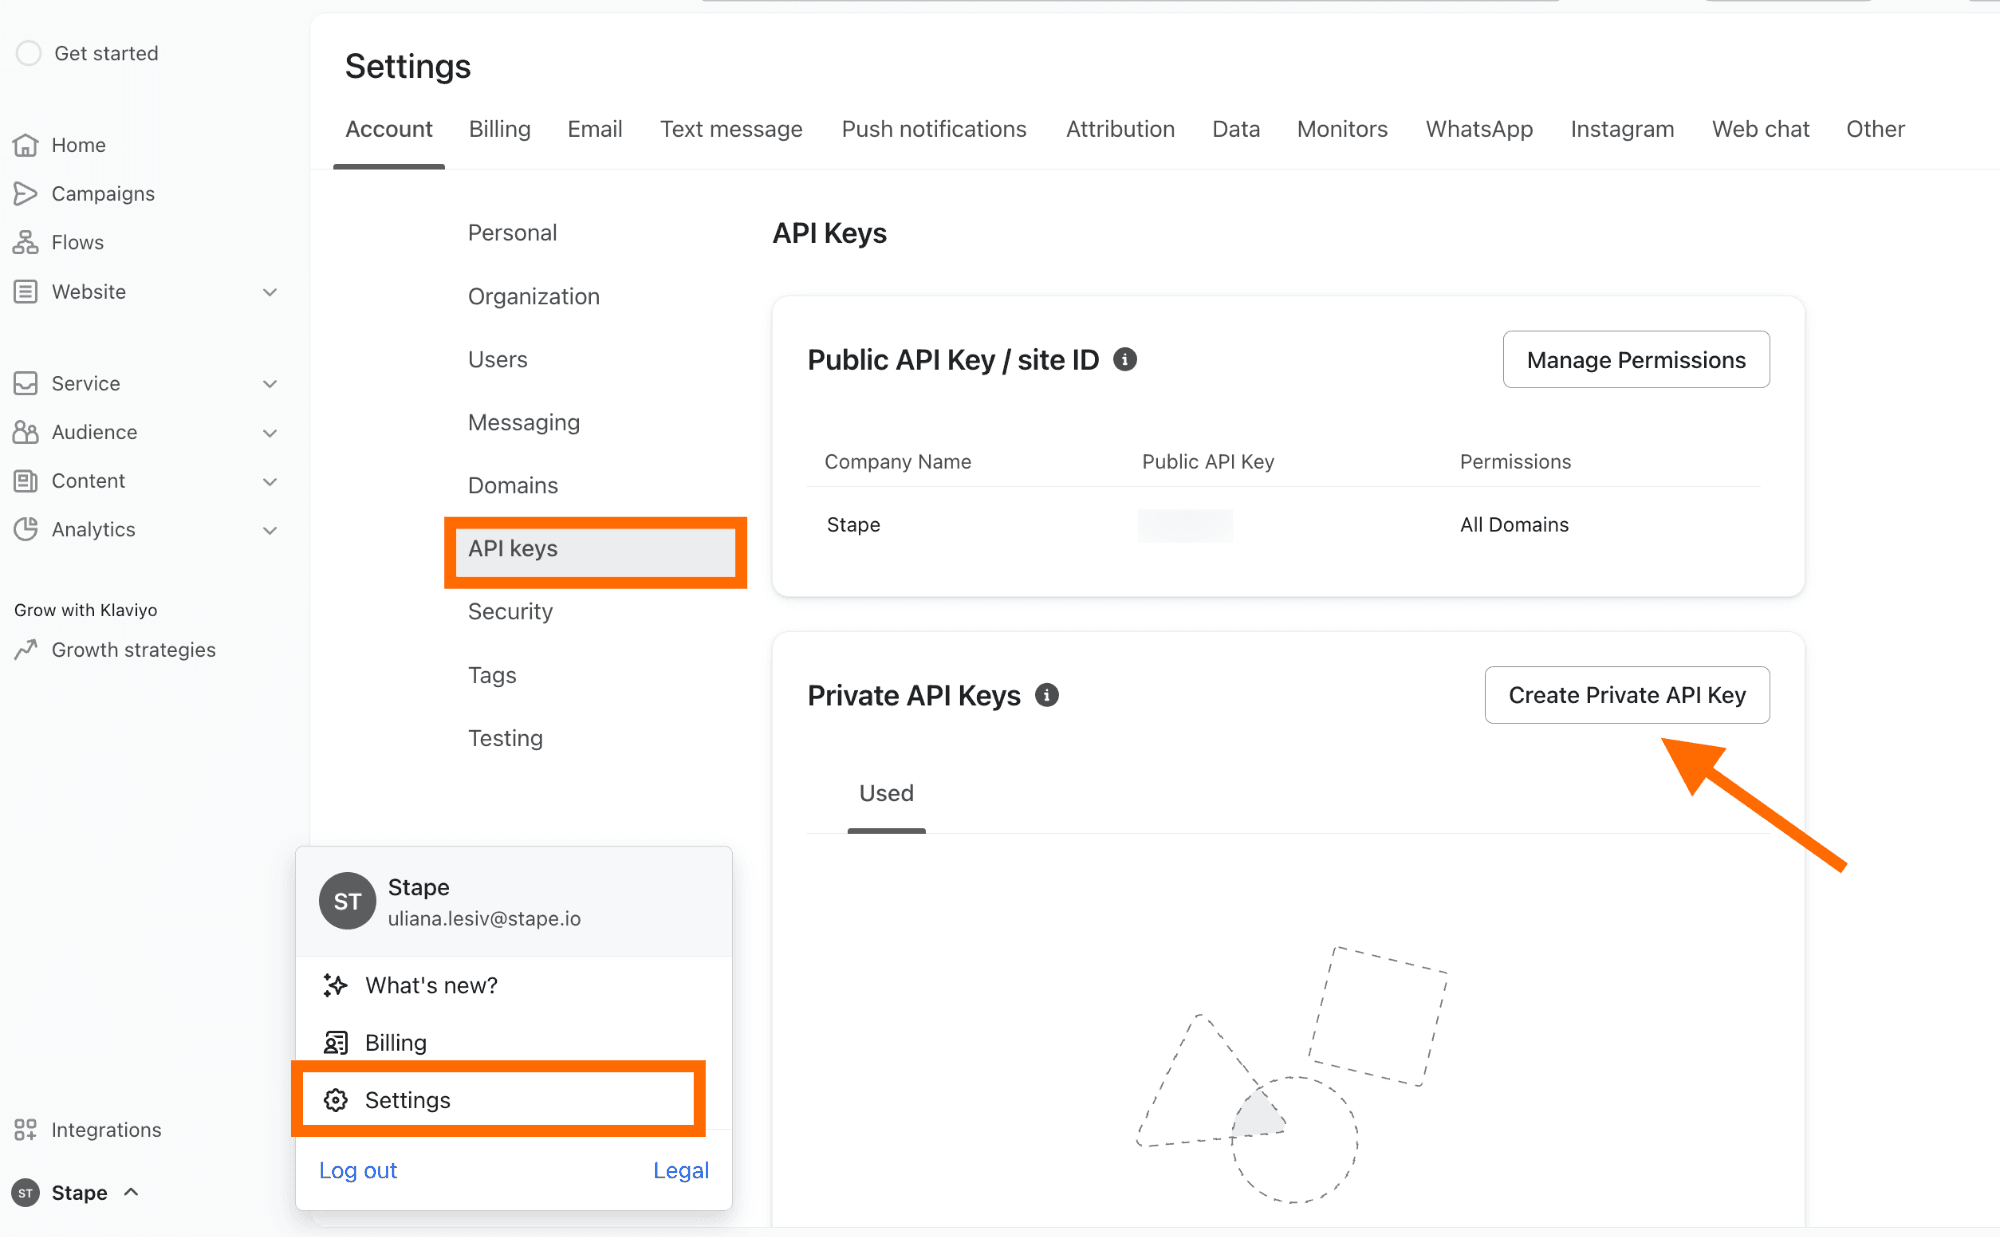
- To create the Klaviyo Private Key, click on the organization name in the bottom left corner → click Settings → API keys → click Create Private API Key → name the key → choose the scope: Read-only, Full, or Custom → click Create.
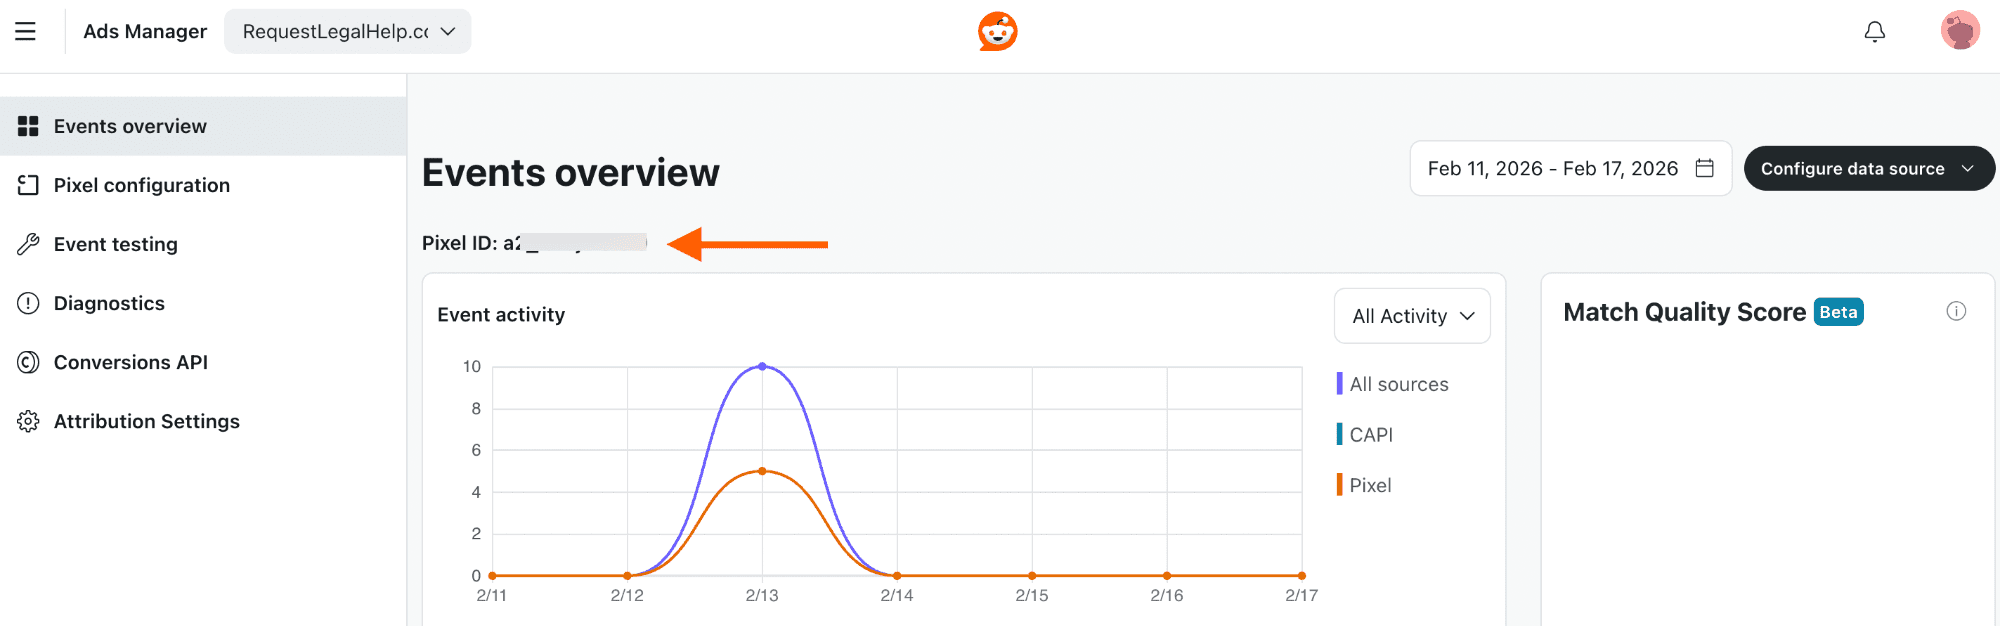
- Reddit Pixel ID - log in to your Reddit Ads account → on the left-hand menu, click Events Manager → below Events Overview, you will see the Pixel ID.
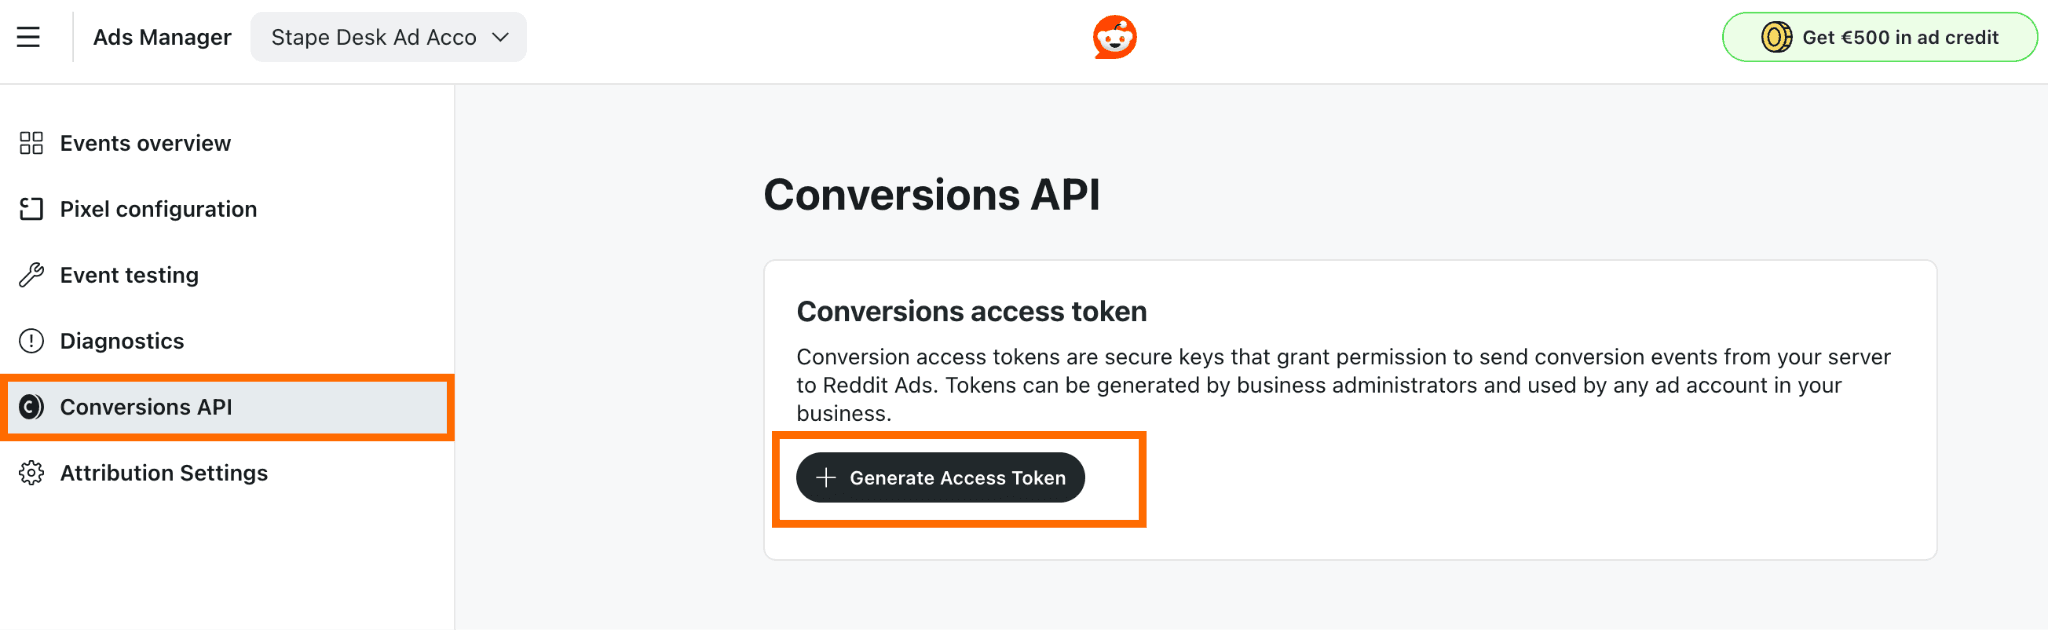
- Reddit API Token - go to the Reddit Events Manager → on the left-hand menu, click Conversions API → click Generate Access Token → add a name for the token → once generated, save the token in a secure place.
The configuration will slightly differ based on the type you’ve chosen (eCommerce or lead generation). Here, we show how to set up both.
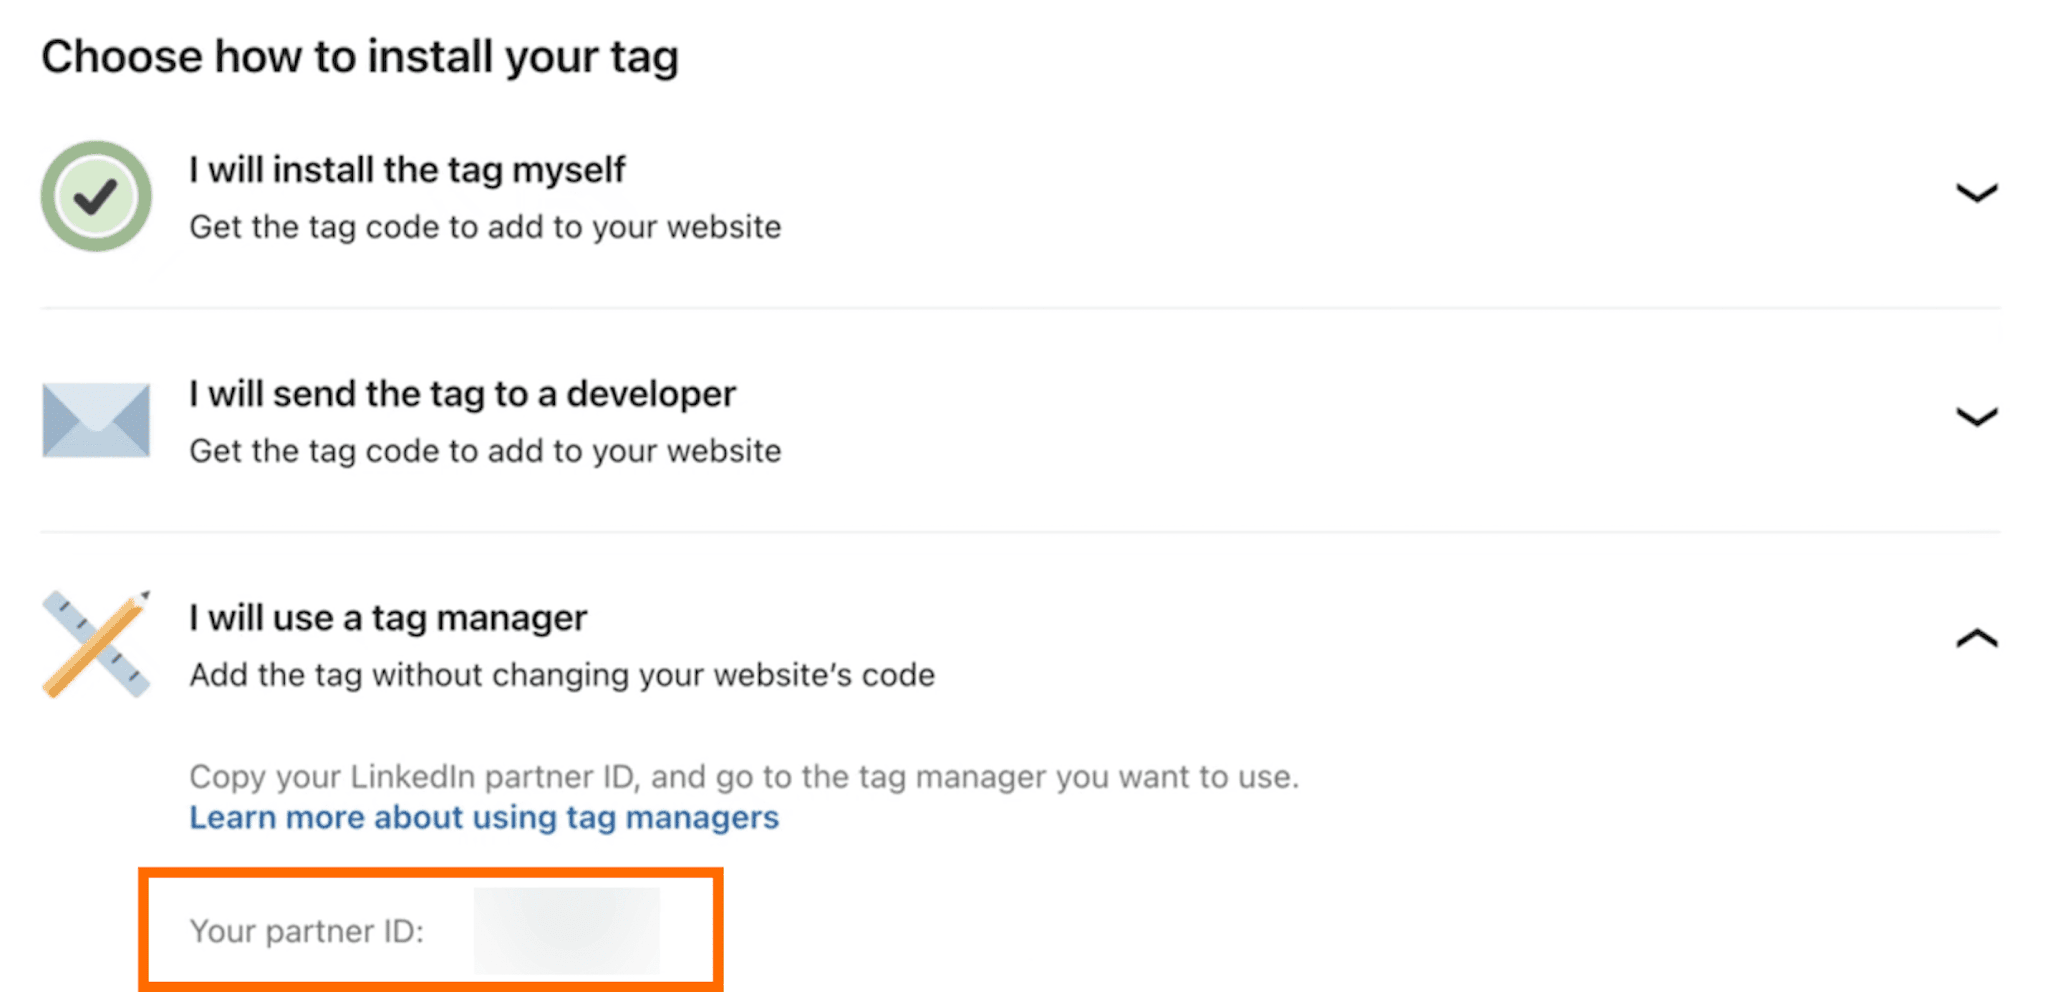
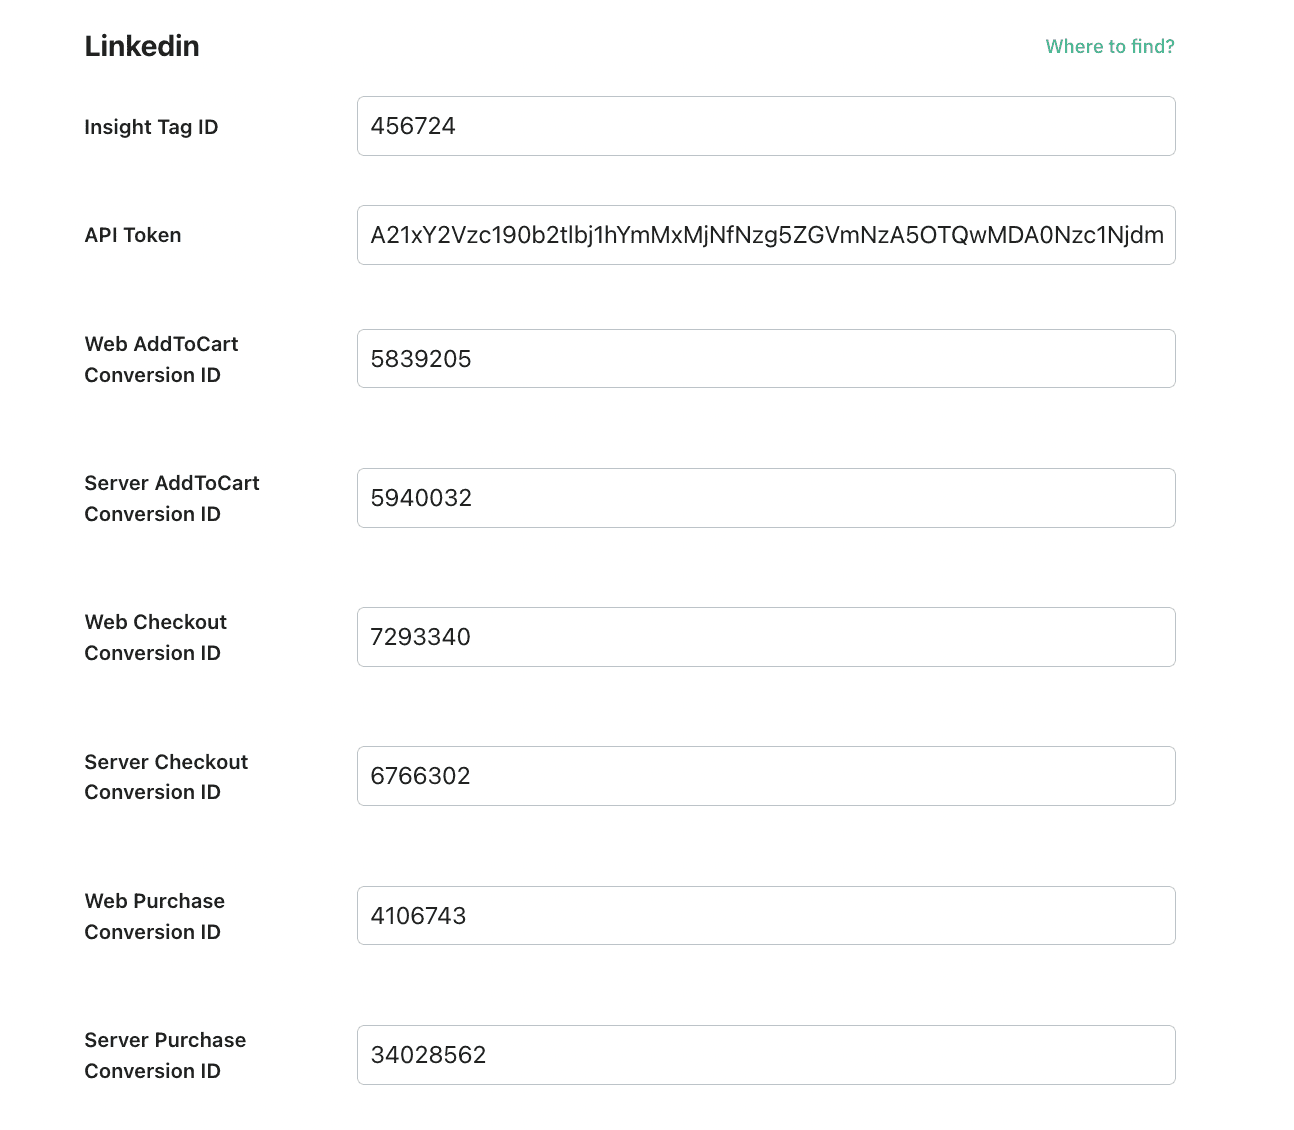
- Insight Tag ID - also called Partner ID is a 6-digit code that links your Ad Account and allows conversion tracking in tag managers. To get it, log in to LinkedIn Campaign Manager → Analyze → Signals manager → click on Insight Tag → Choose option: I will use a tag manager.
- API Token - in Campaign Manager, → click Data on the left menu → click Sources → Select Google Tag Manager → click Generate token.

- Server and web conversion IDs - each conversion ID can be found in Campaign Manager → Measurement on the left menu → click Conversion tracking → click on the name of the required conversion or create a new one.
Here is an example of the fields configuration for the eCommerce type:
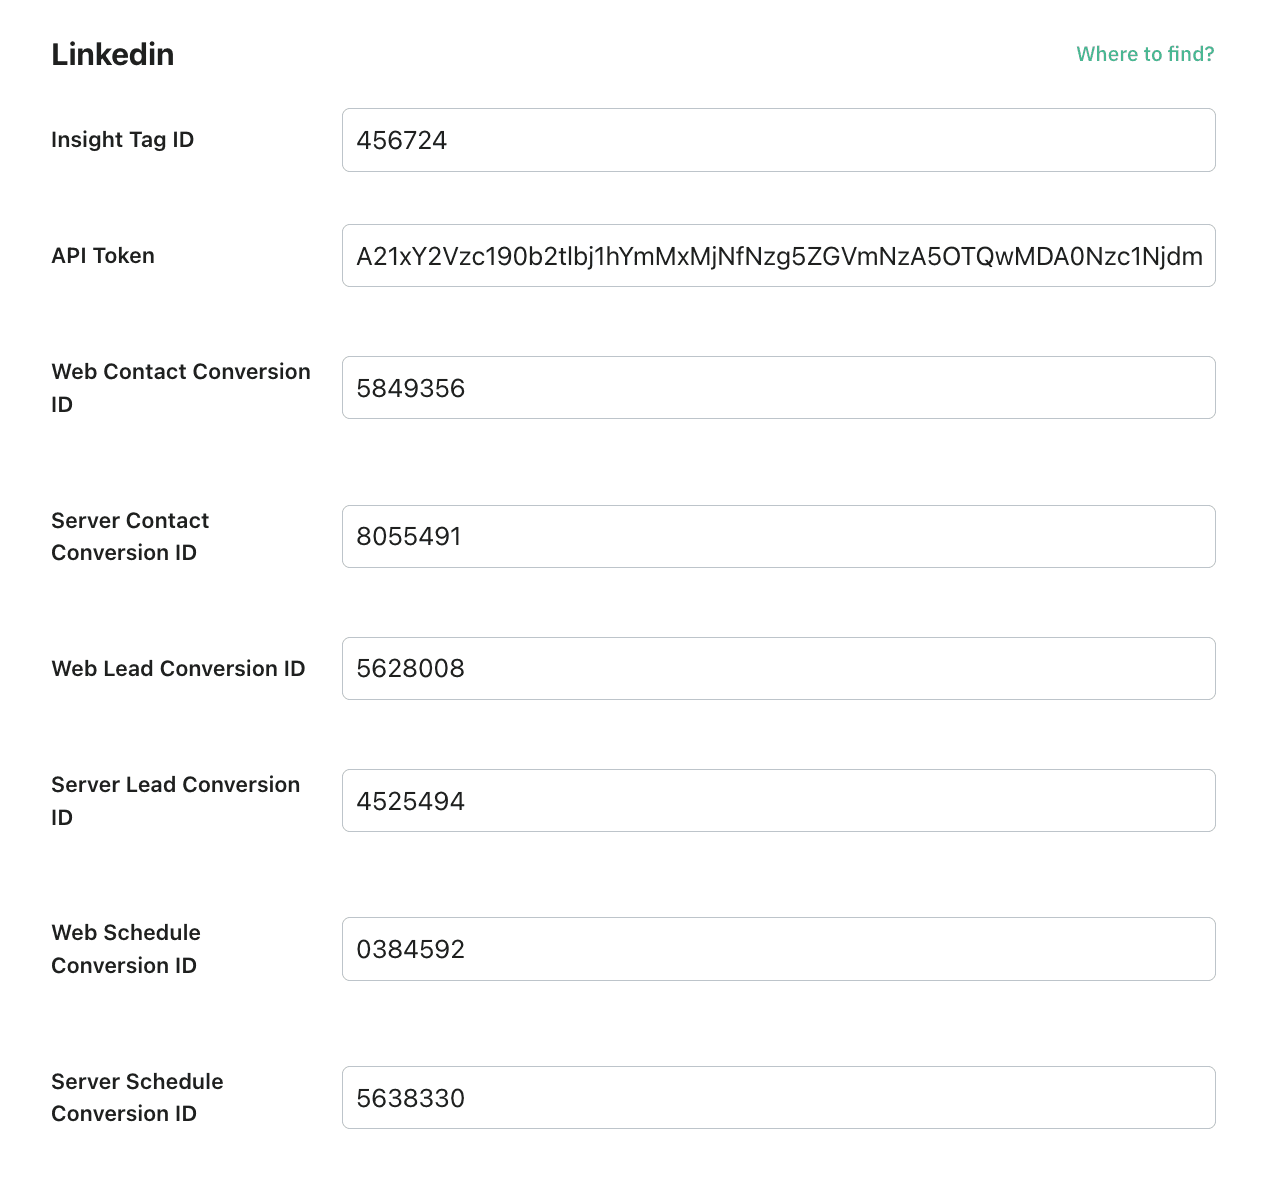
Here is an example of the fields configuration for lead generation type:
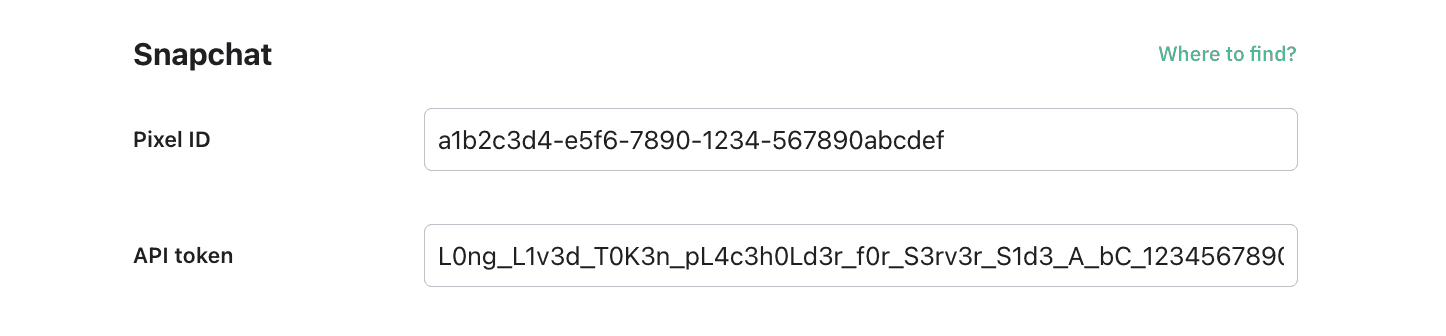
Snapchat
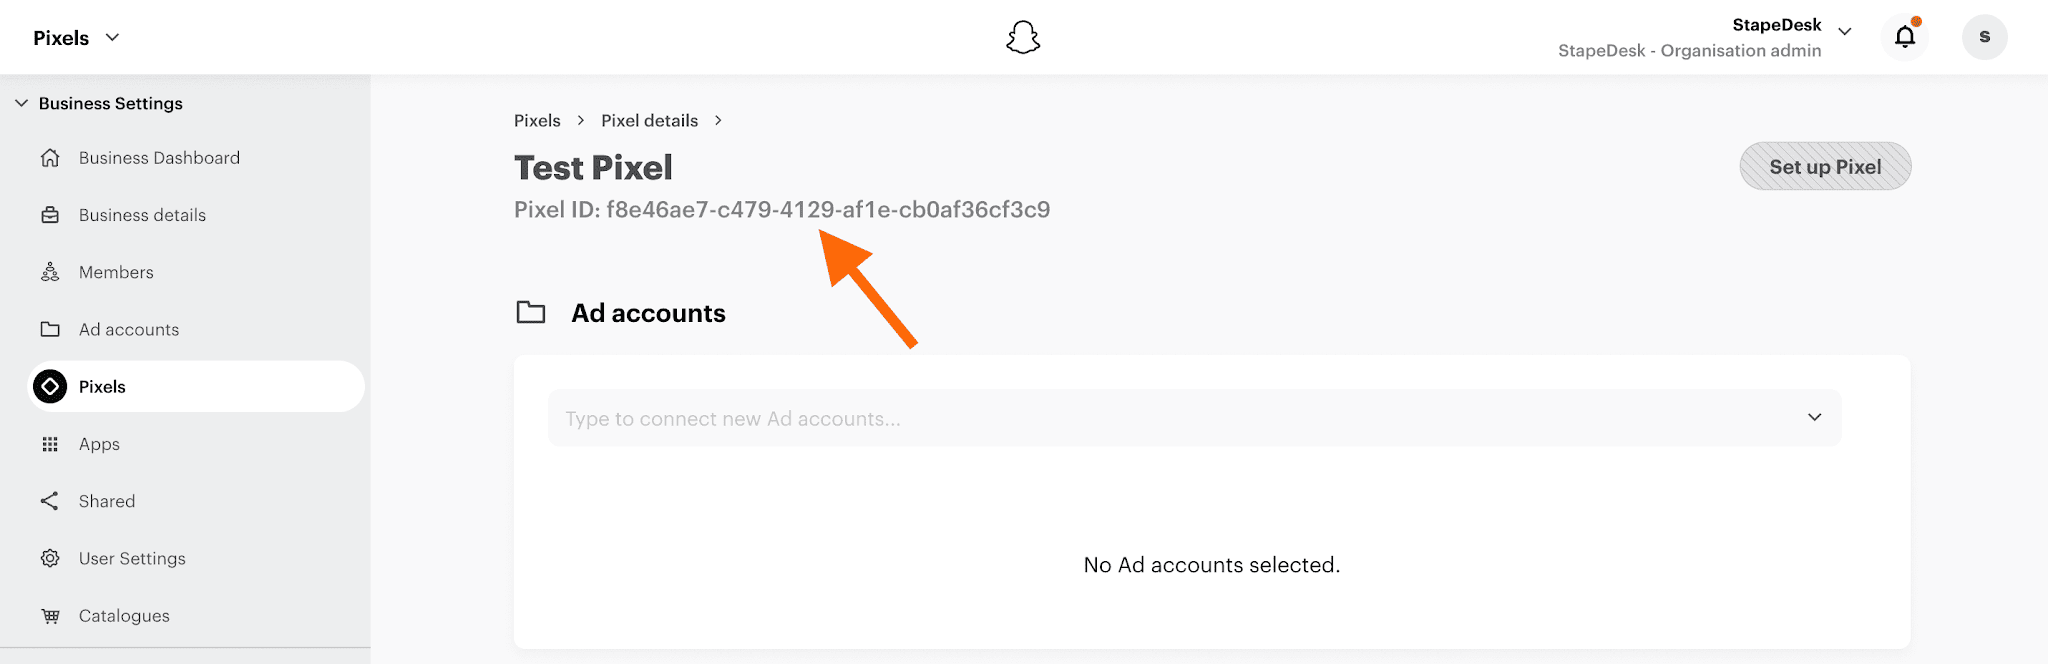
- Pixel ID - to get it, log in to Snapchat Business Manager → Assets → Pixels on the left-side menu → select the required pixel if you have several → copy Pixel ID.
- API token - to find Conversions API Tokens, go to Business Details → Conversions API Tokens. Here you will find all API tokens; you can copy the existing or create a new one.
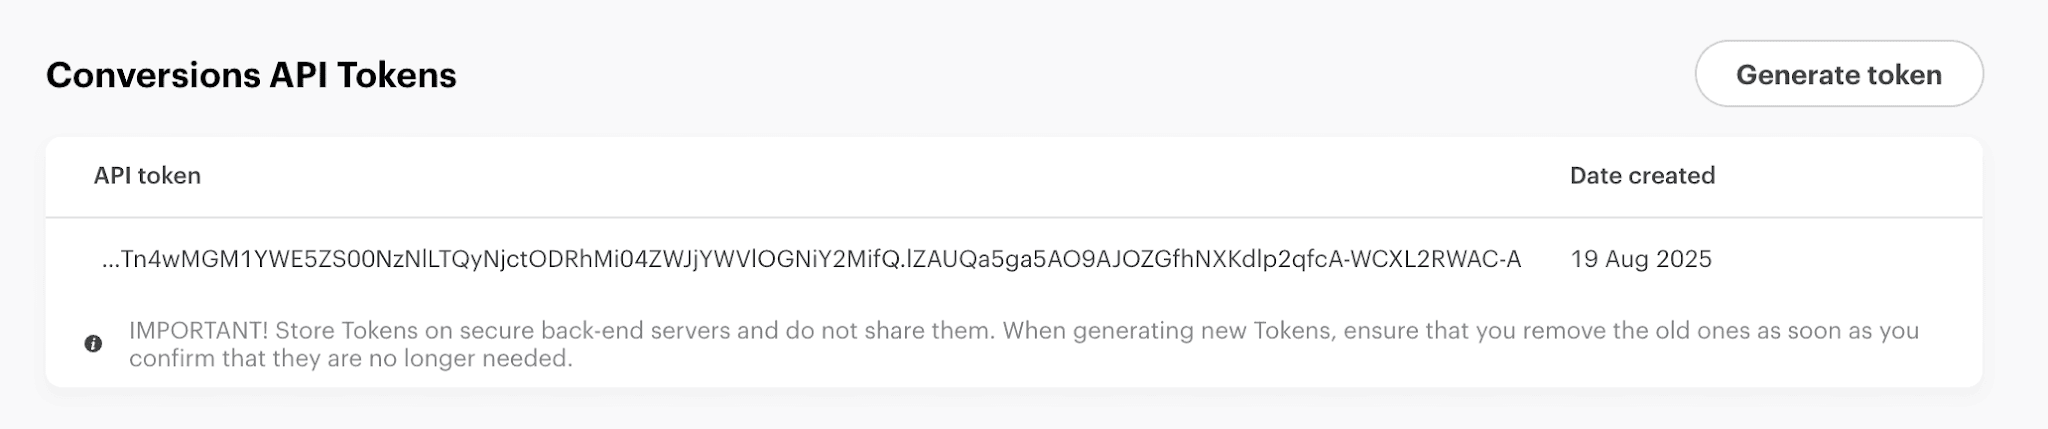
Here is an example of Snapchat fields configuration:
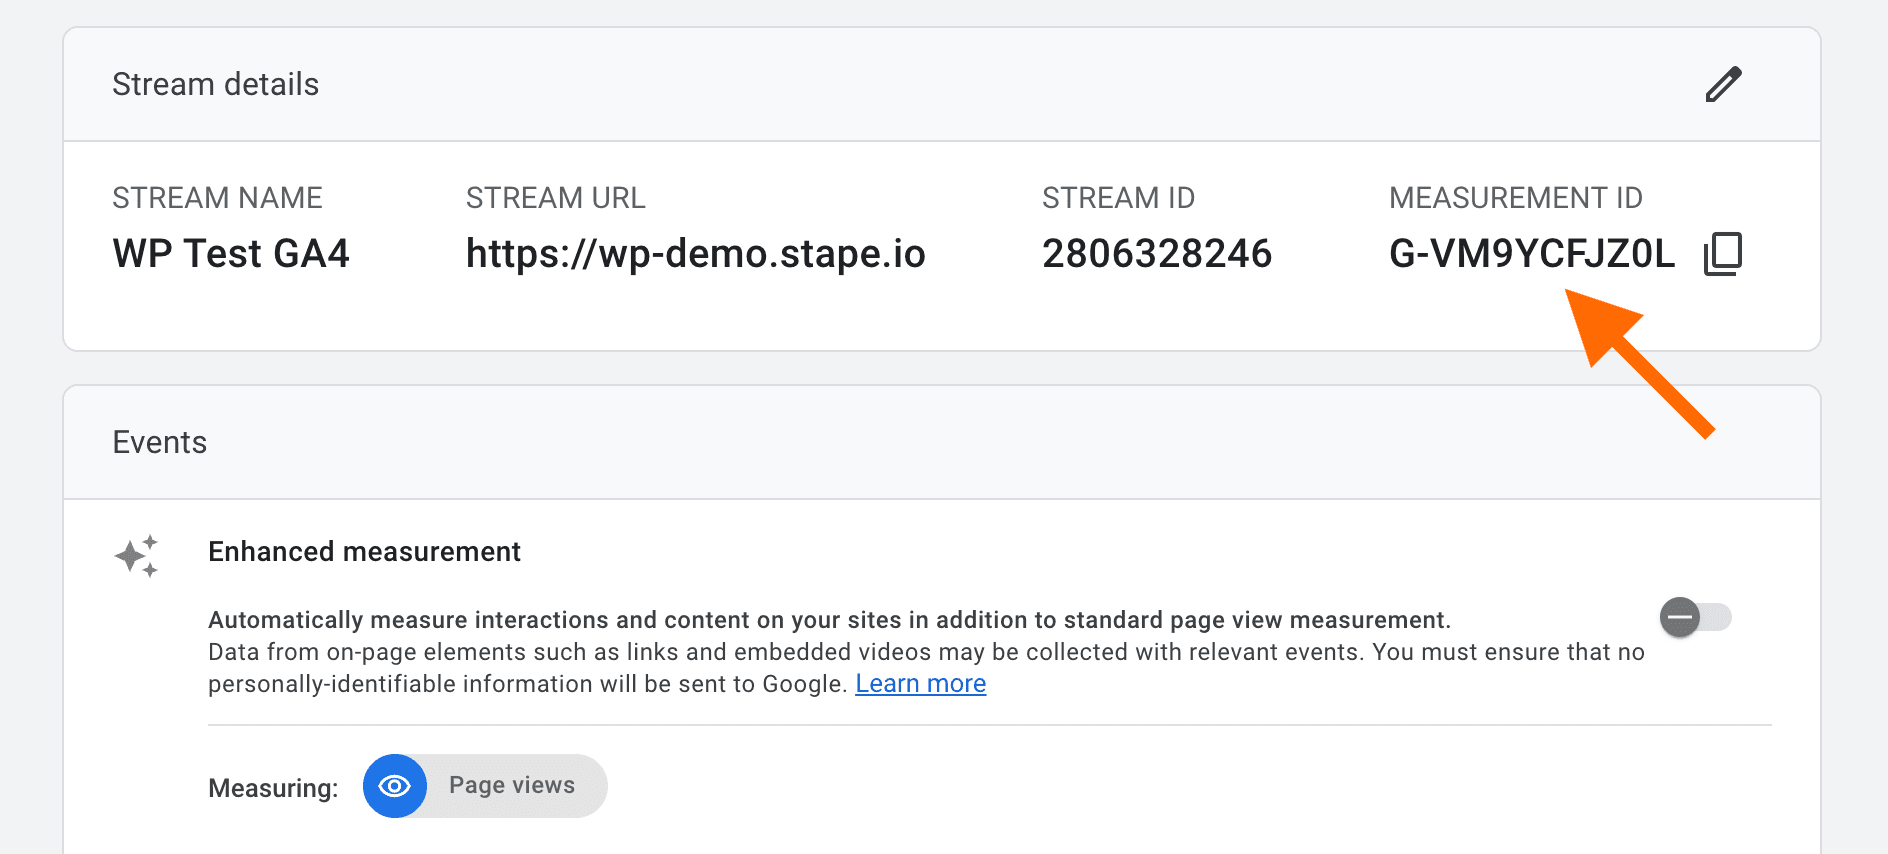
Google Analytics 4
- Measurement ID - go to Data Streams → click on the Data Stream → copy Measurement ID.
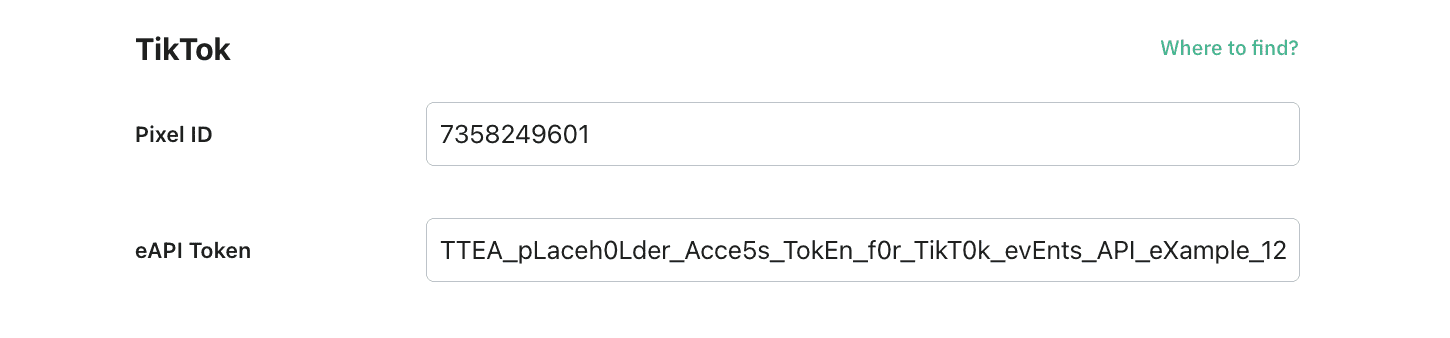
TikTok
- Pixel ID - to find the Pixel ID, log in to TikTok Ads Manager → choose the Ads Manager account → Click Tools → Events → from the side bar select Data sources.
- eAPI Token - to get an access token, click Assets → Web Events → open pixel → click Settings → copy an existing token or click Generate Access Token.

Here is an example of a field configuration for TikTok:
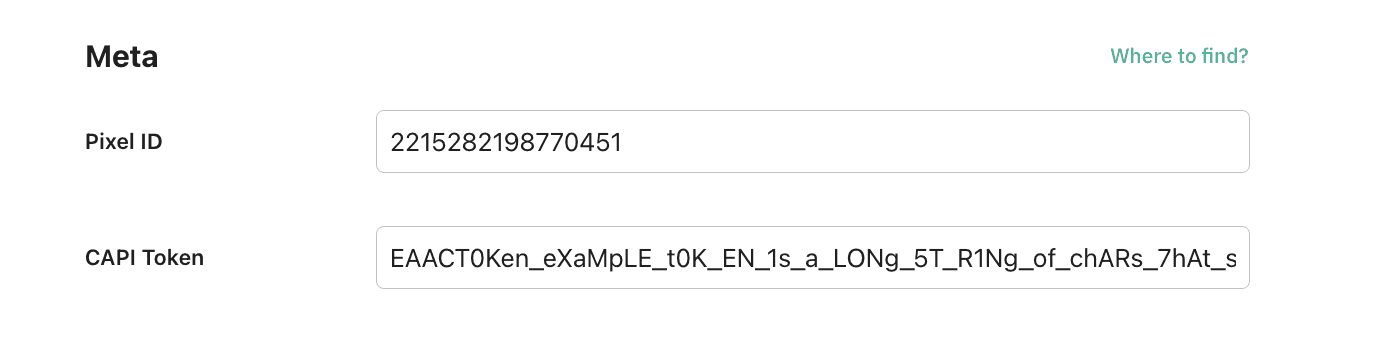
Facebook (Meta)
- Pixel ID - it can be found in your Meta Events Manager → Data Sources menu → see the string next to the Pixel’s name.
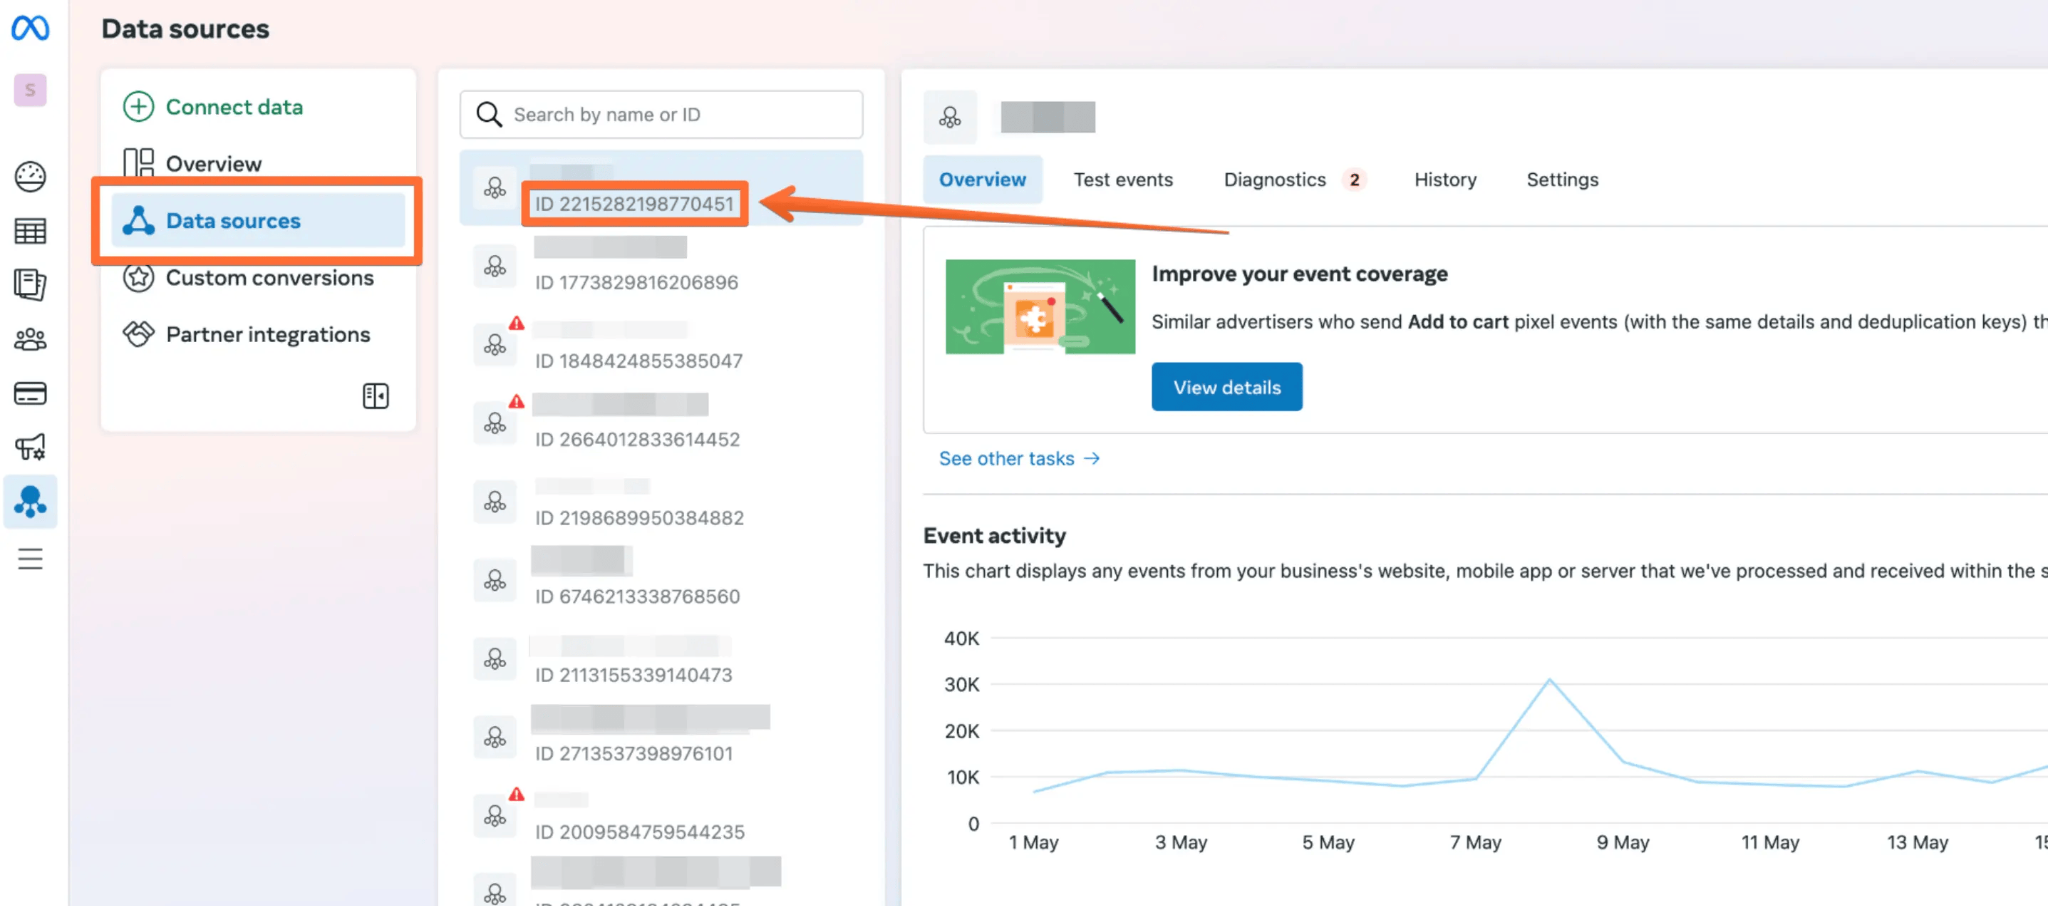
- CAPI Token - to get the value, choose the Pixel → Settings tab → find the Conversions API section → click on the Generate access token. For more details, check Meta’s documentation.
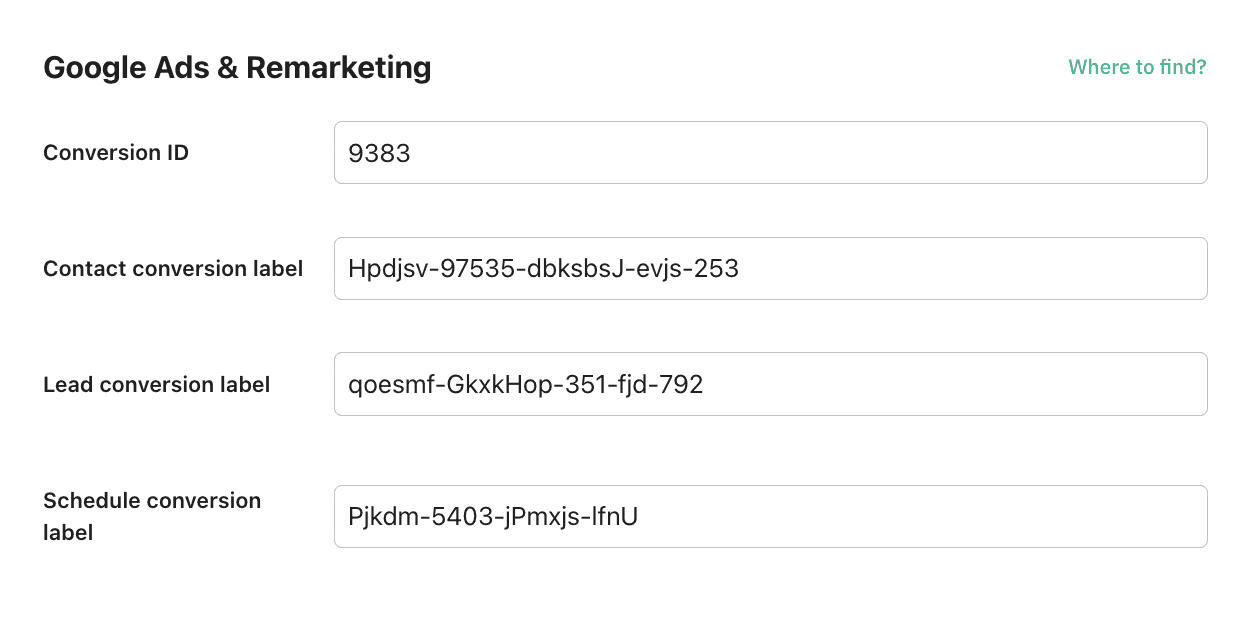
Google Ads & Remarketing
The configuration will differ based on the type you’ve chosen (eCommerce or lead generation). In this section, we show how to set up both, and we will start with the eCommerce fields.
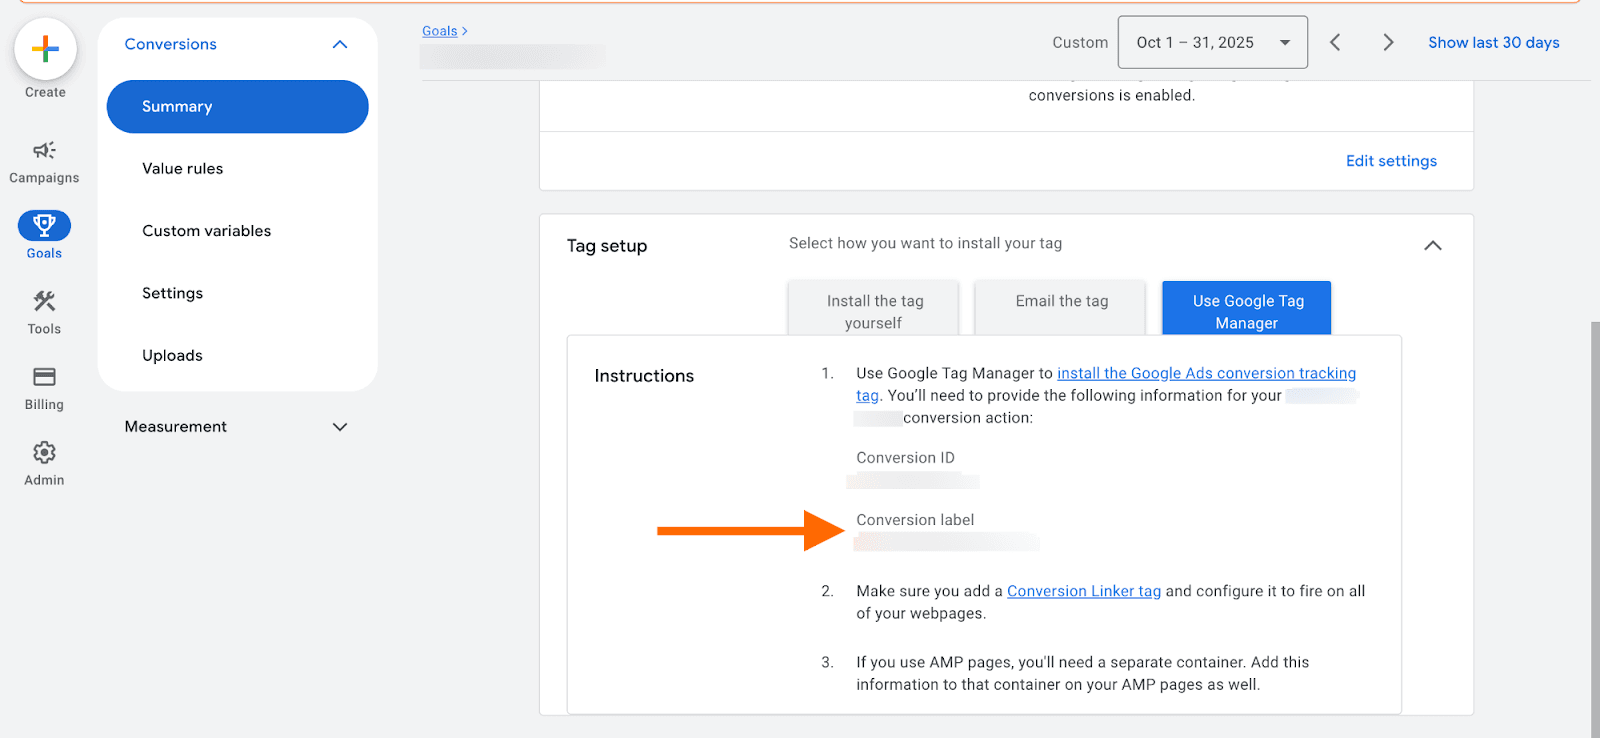
- Conversion ID - it can be found when creating/editing a conversion goal in Google Ads → choose Use Google Tag Manager → copy ID.
- Purchase conversion, BeginCheckout conversion, AddToCart conversion - here you should place conversion labels for corresponding conversion events. Conversion labels can be found in your Google Ads account → Goals → Conversions → choose the required conversion → expand Tag Setup → Select Use Google Tag Manager → copy Conversion label.
- Contact, lead & schedule conversion labels - the labels can be found, as well as the Conversion ID. Select/create the goal in Google Ads that corresponds to contact, lead, and/or schedule conversion tracking. When editing/creating a goal, choose Use Google Tag Manager → copy ID.
Here is an example of Google Ads fields configuration for the eCommerce type:

Here is an example of Google Ads fields configuration for lead generation type:
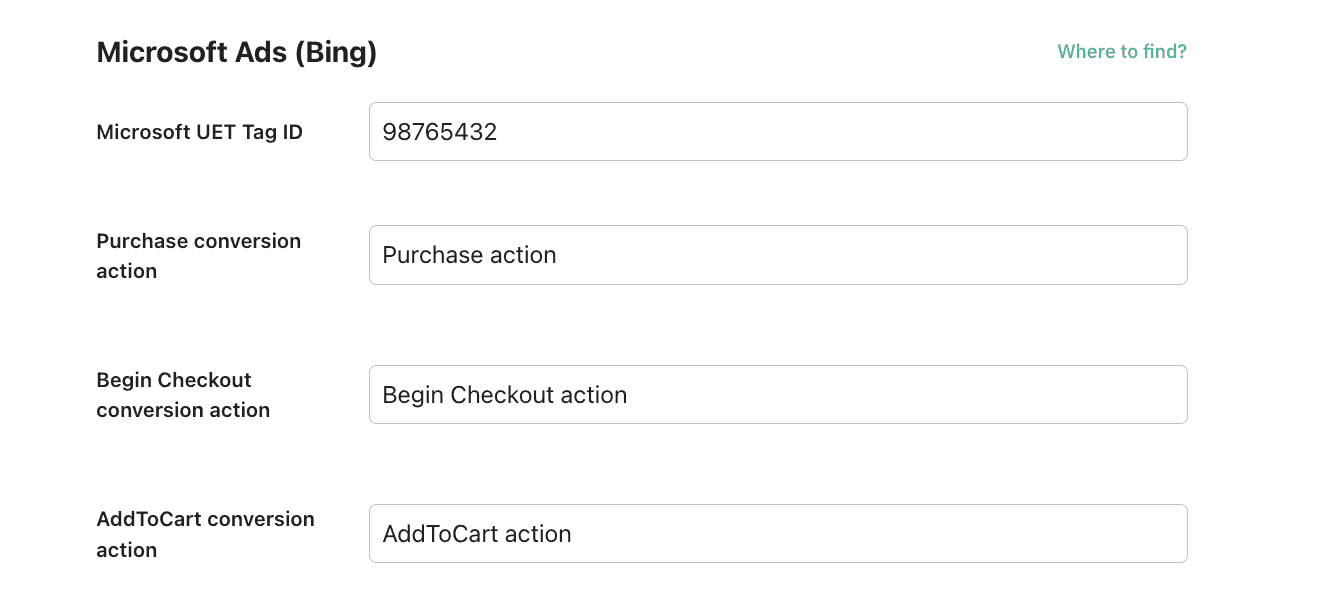
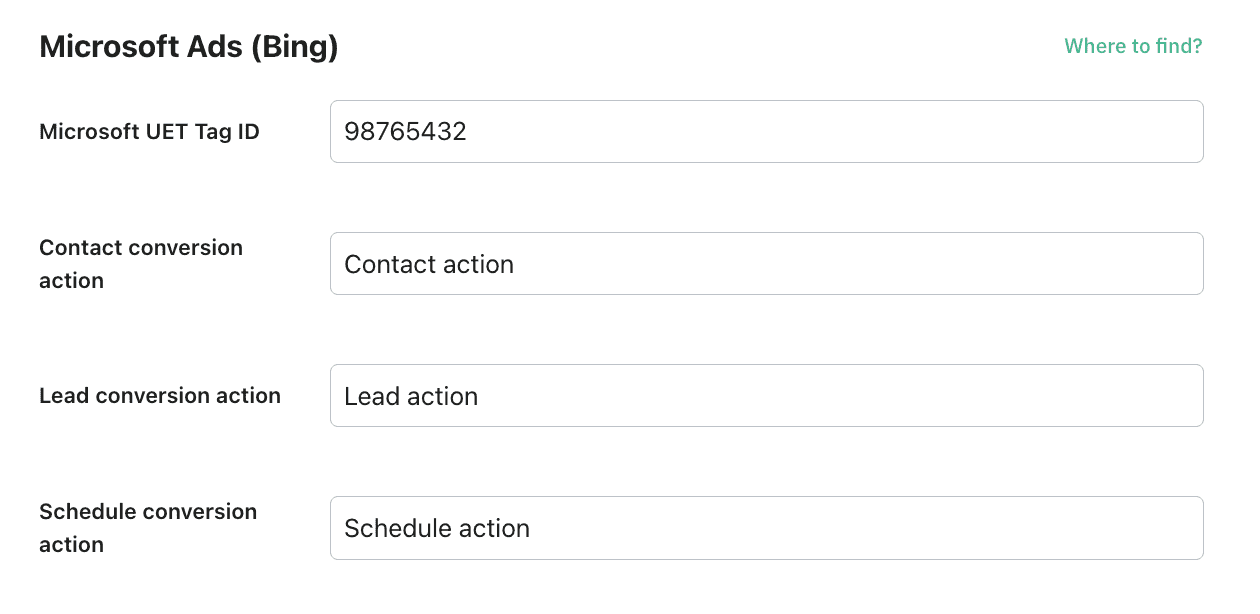
Microsoft Ads (Bing)
The configuration will slightly differ based on the type you’ve chosen (eCommerce or lead generation). Here, we show how to set up both. We will start with the eCommerce fields.
- Microsoft UET Tag ID - the value can be found in the Microsoft Ads account → Conversions → UET tag → Tag ID.

- Purchase conversion action, Begin Checkout conversion action, AddToCart conversion action - these fields are required for the eCommerce type. Specify the conversion action you’ve chosen when creating the conversion.
Here is an example of Microsoft fields configuration for the eCommerce type:
- Contact, lead & schedule conversion action - the fields for lead generation type. Specify the conversion action you’ve chosen when creating the conversion.
Here is an example of Microsoft fields configuration for lead generation type:
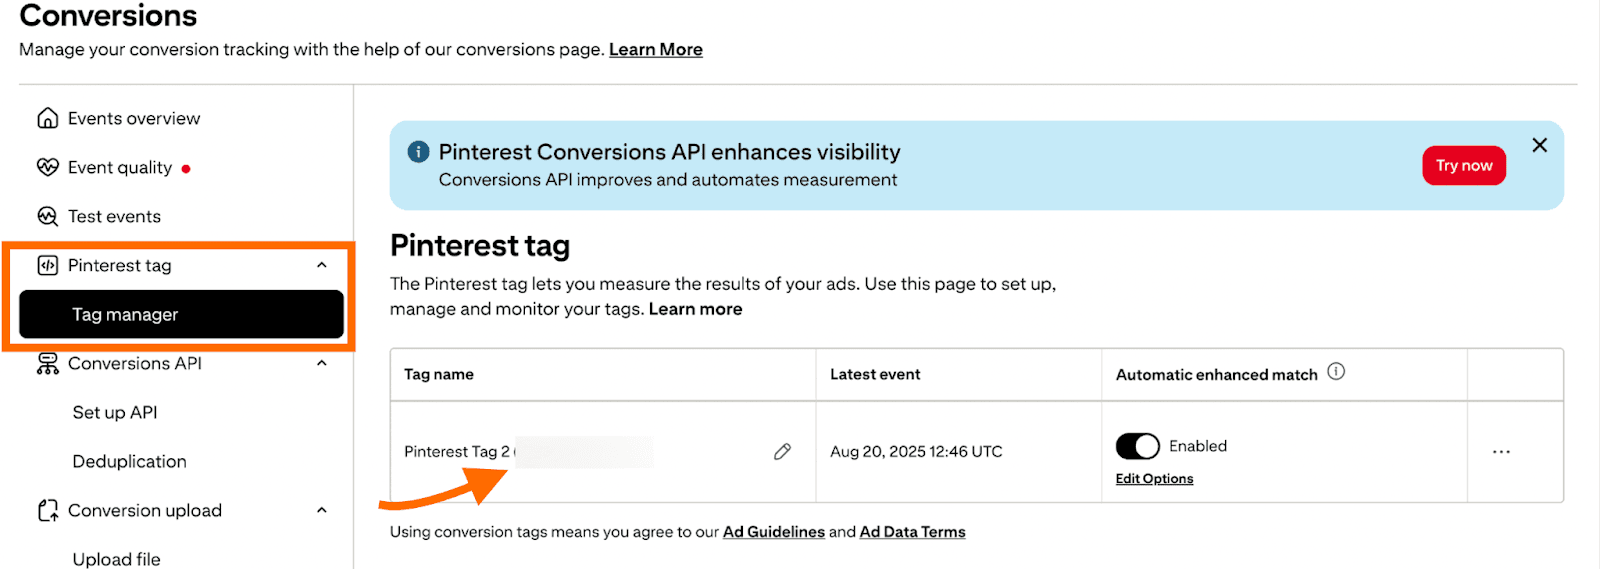
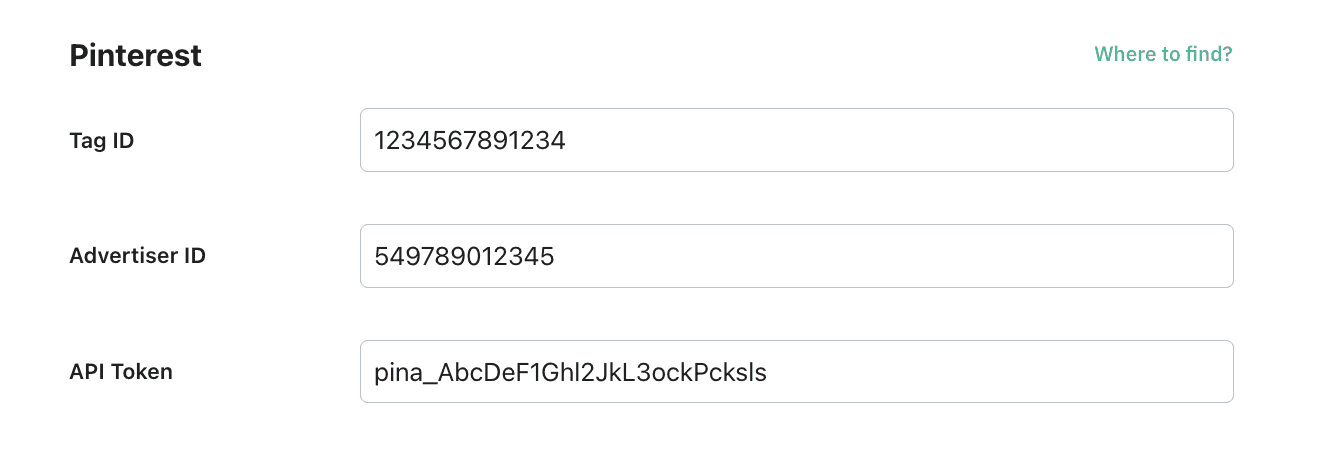
- Tag ID - to find the value, log in to your Pinterest Ads Manager → click on Conversions from the Manage Business section in the menu → on the left side menu, click on Pinterest tag → click on Tag Manager → copy ID.
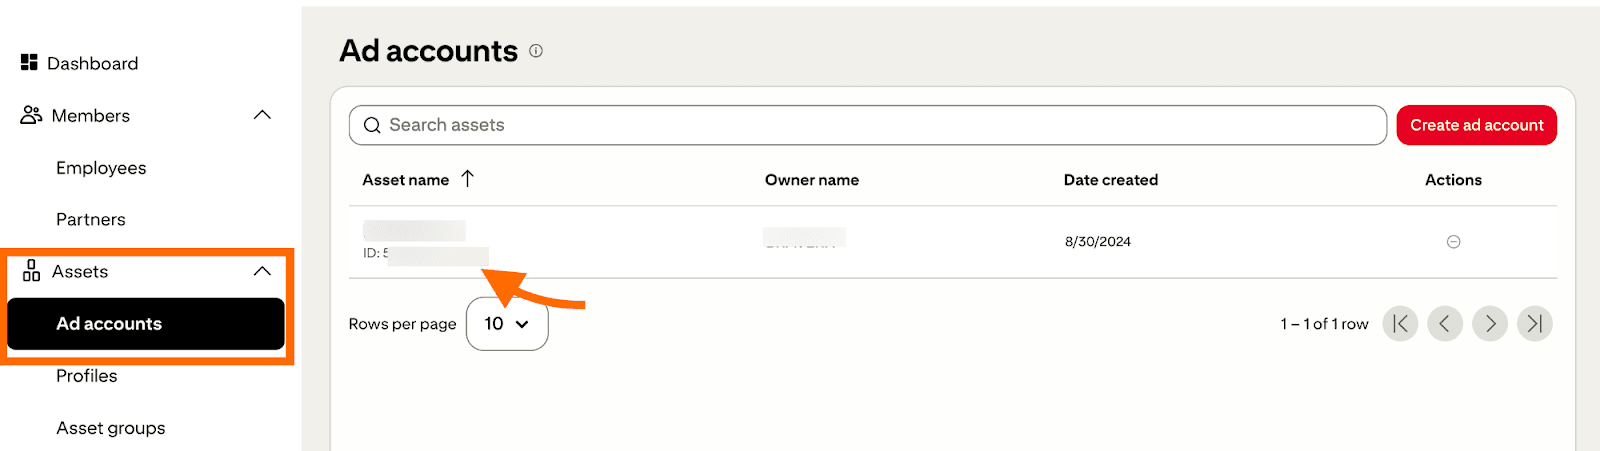
- Advertiser ID - to find this ID, log in to your Pinterest Ads Manager → click on Business manager from the Manage Business section in the menu → on the left side menu, click on Assets → click on Ad account → copy ID.
- API Token - to find the value, log in to your Pinterest Ads Manager → click on Conversions from the Manage Business section in the menu → on the left side menu, click on Conversions API → click on Set up API → Generate new token.
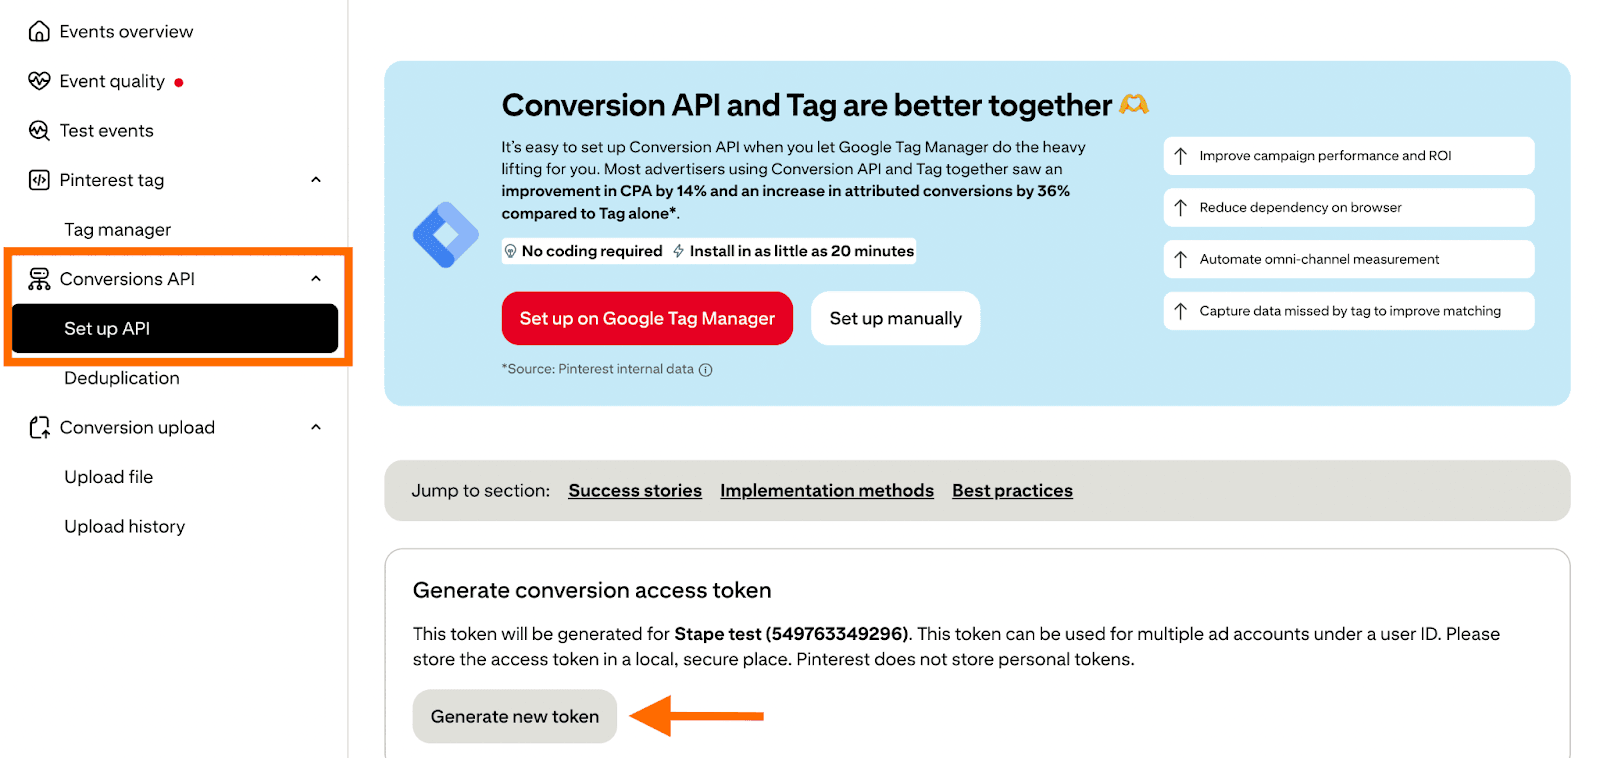
Here is an example of Pinterest fields configuration:
Step 4. Import templates
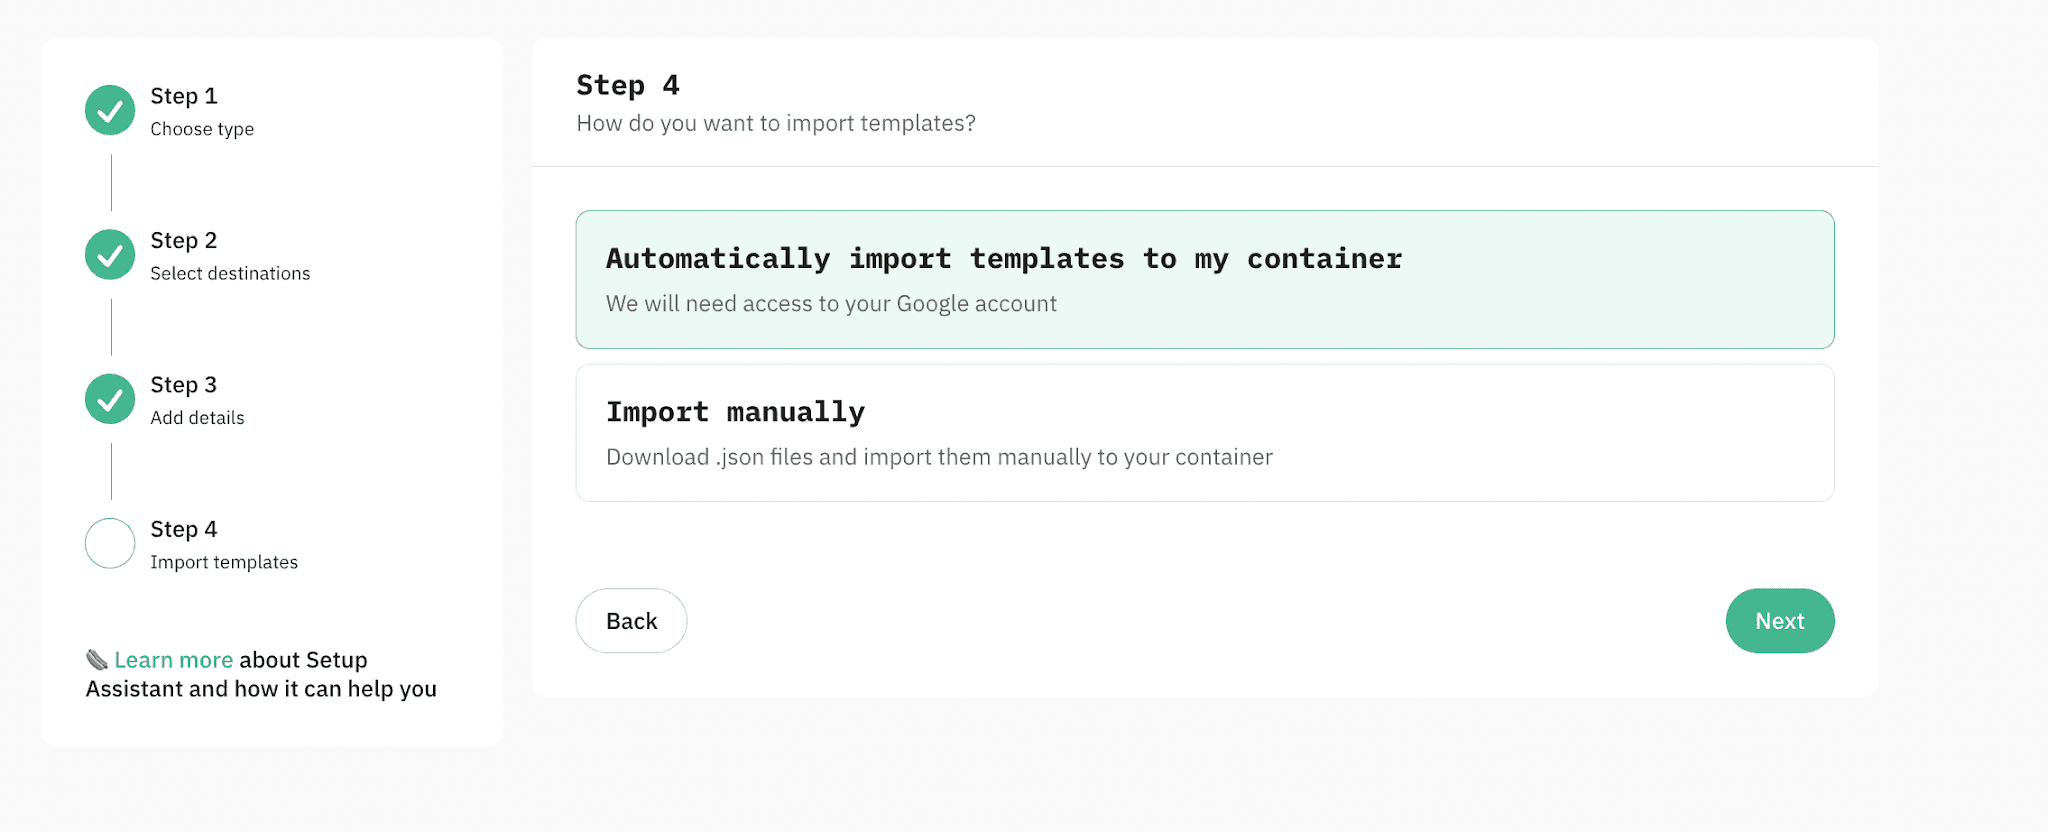
Choose how you want to import templates: automatically or manually. Click on Next.
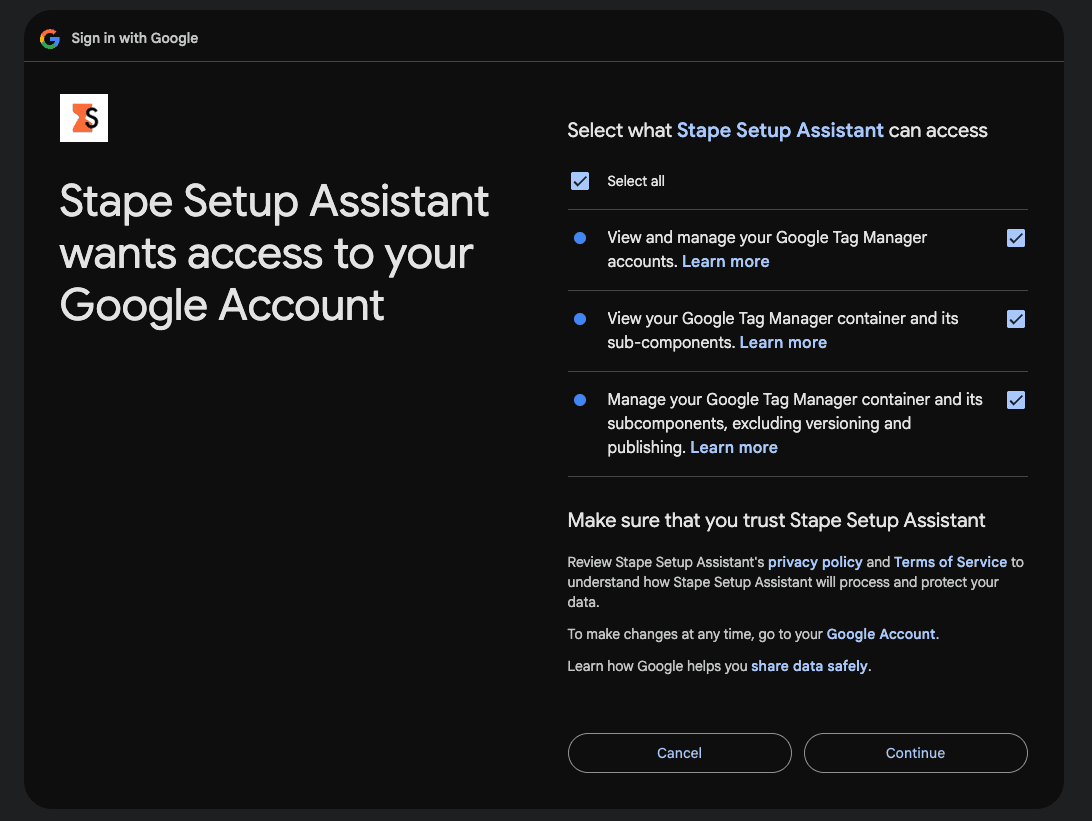
Automatically
1. Authorize with a Google account that has access to the GTM account you want to import templates into.
Please note
2. Select containers and corresponding workspaces into which you want to import templates and click Import templates.
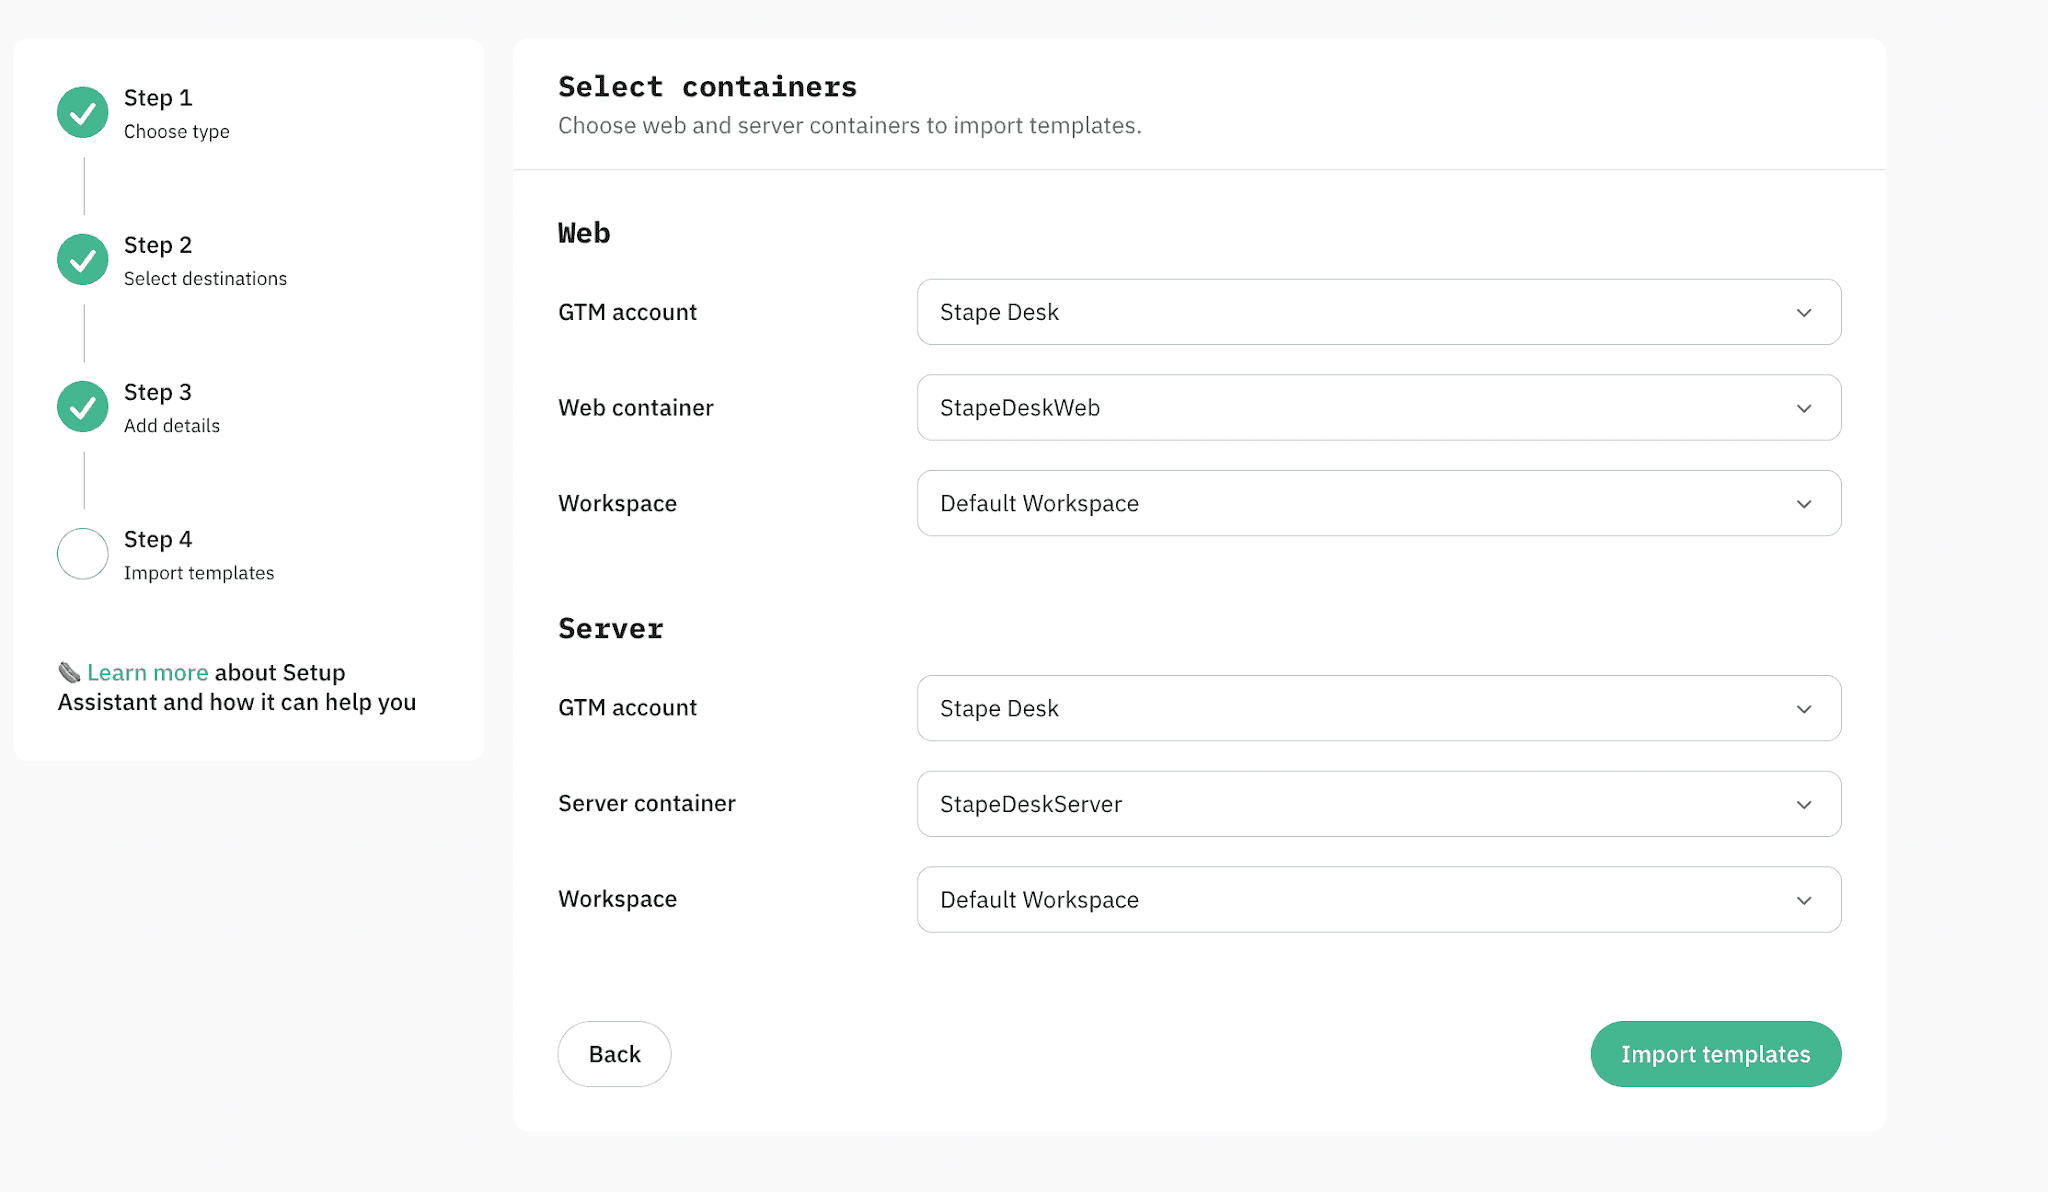
Please note
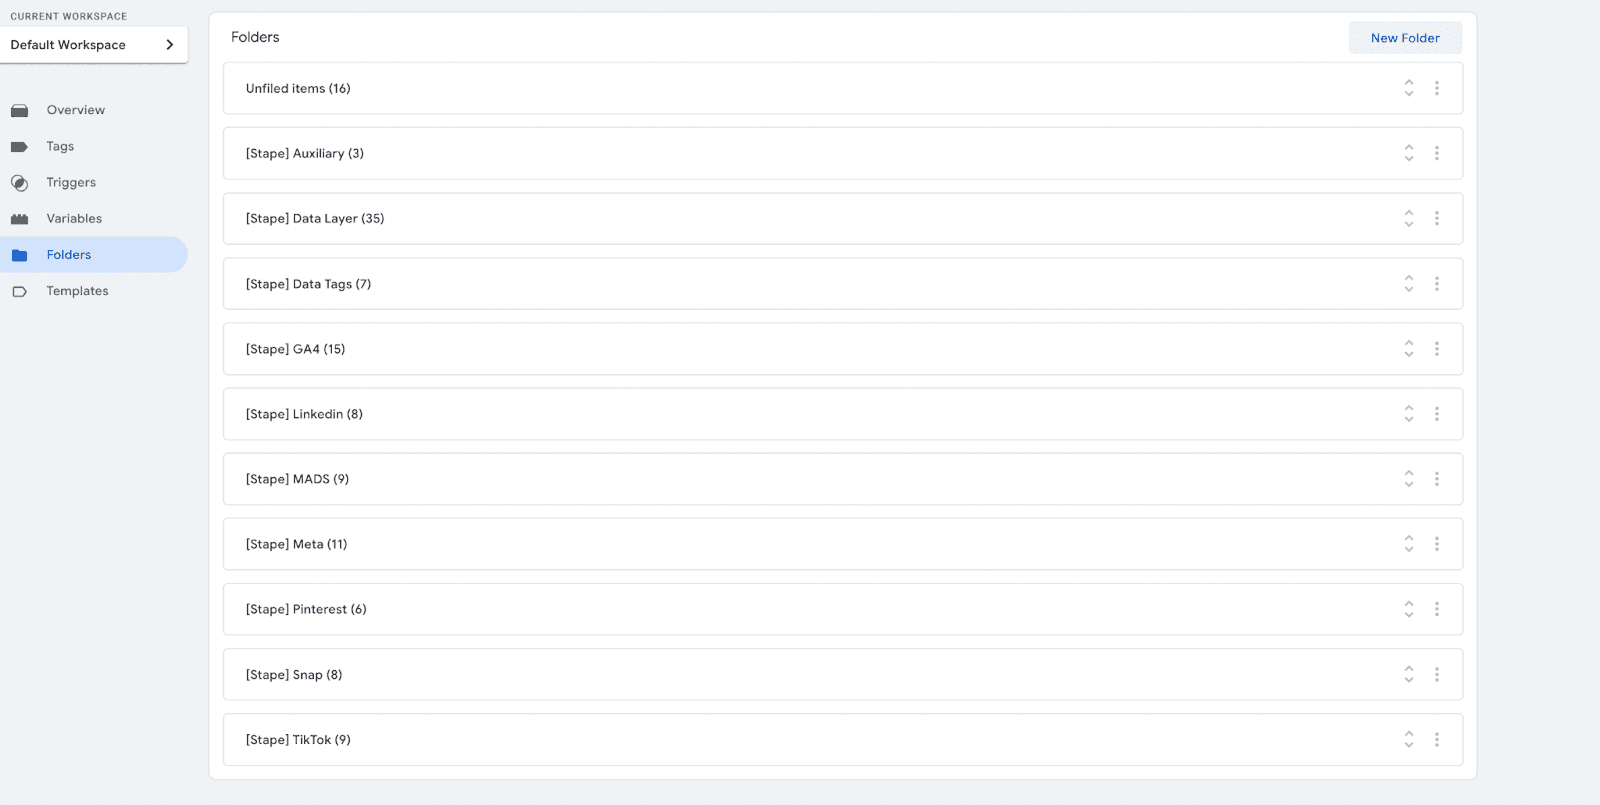
3. Make sure the templates are in your web and server GTM containers. The imported templates will be neatly organized into folders starting with [Stape].
If the templates weren't imported automatically, please try importing them manually by following the instructions.
Manually
1. Click on the green buttons to download the templates.
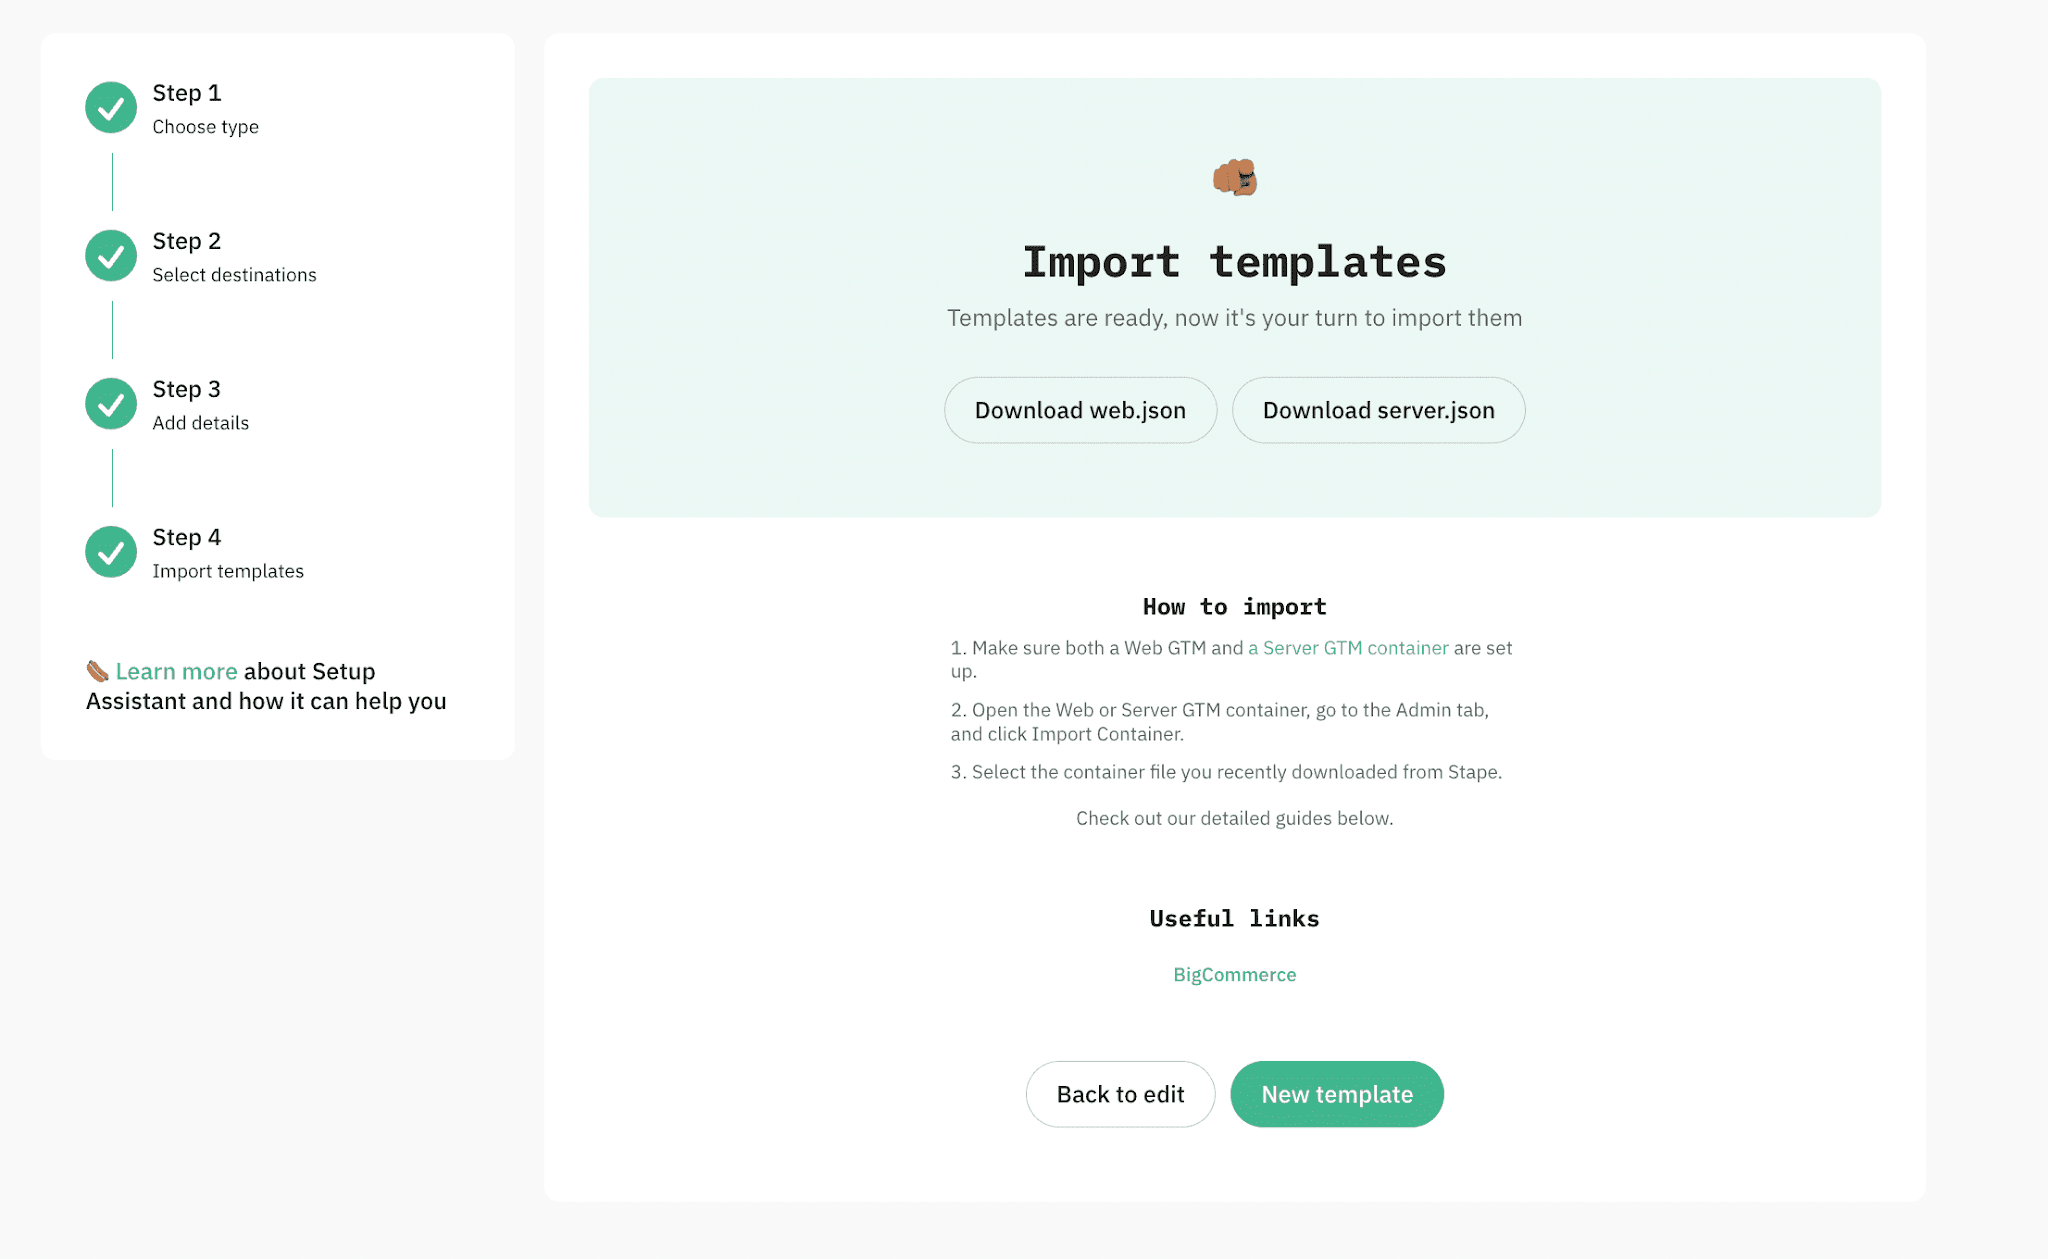
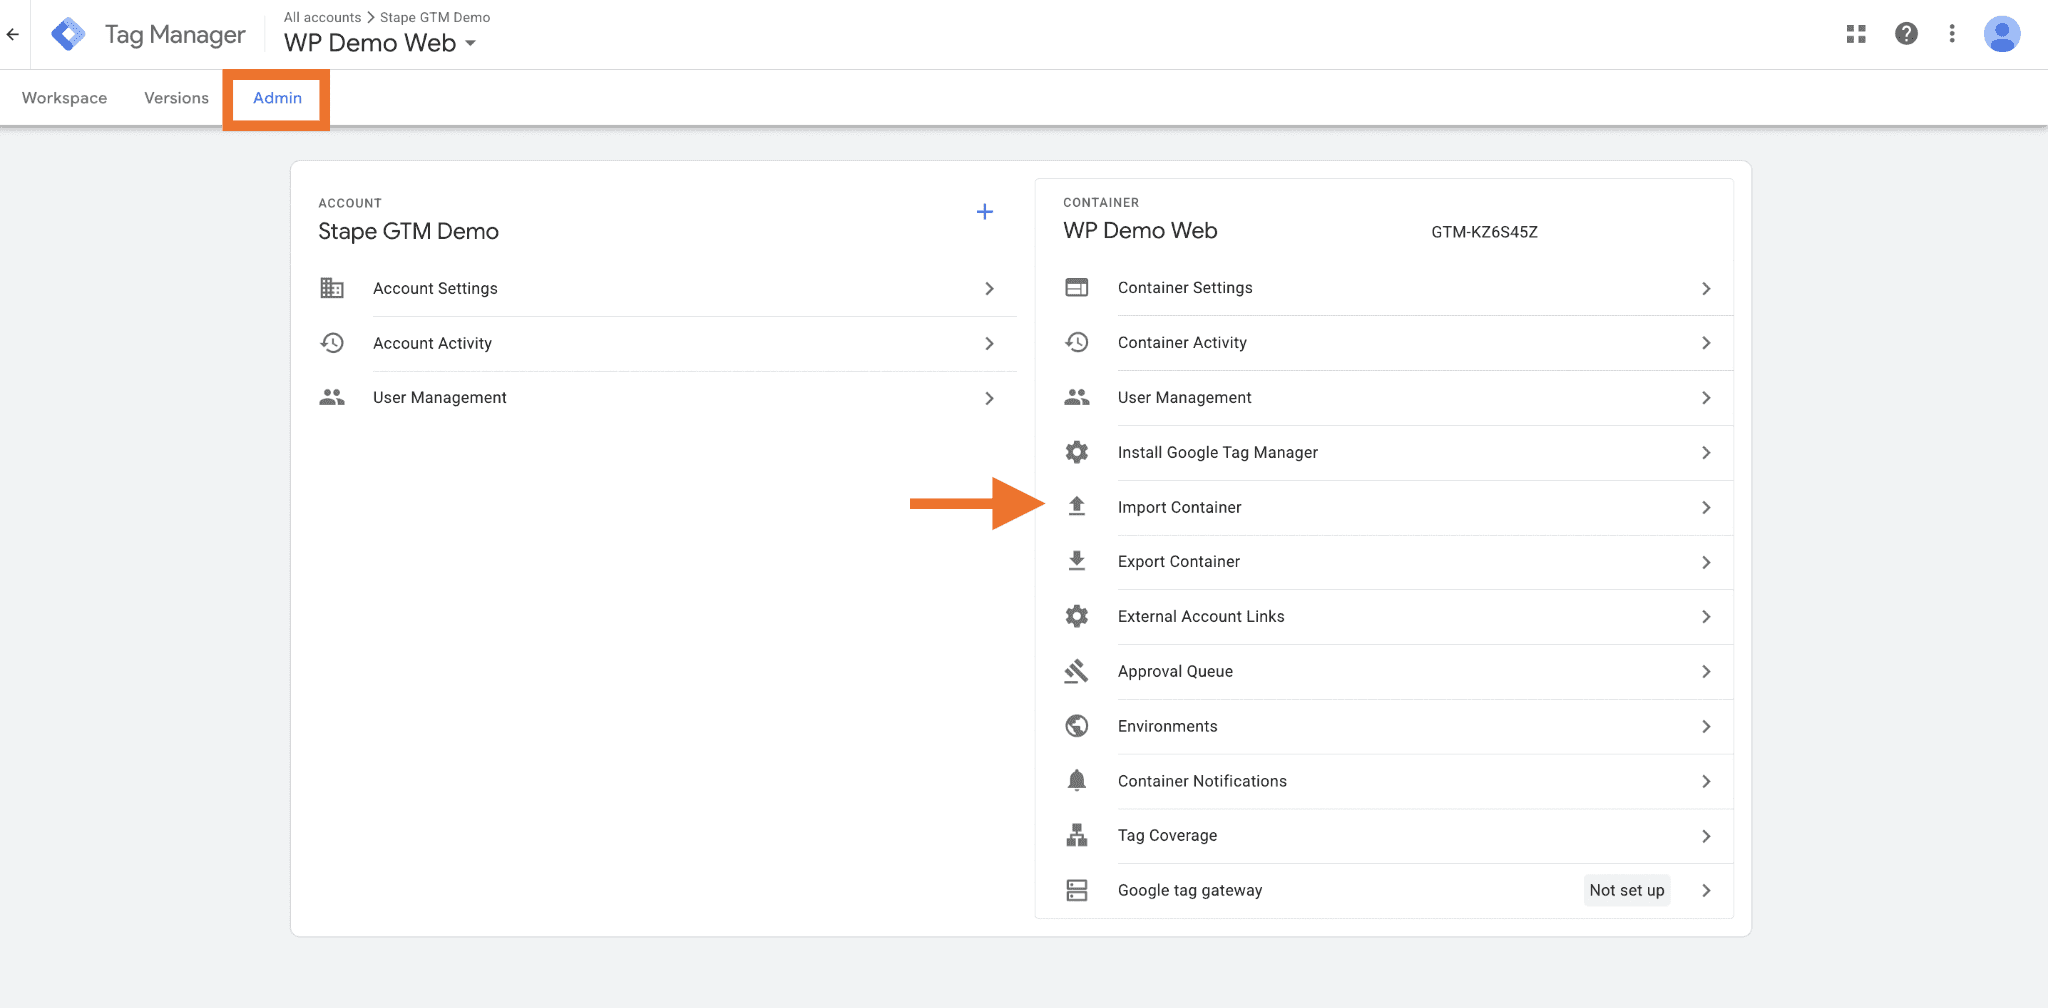
2. Open the Web or Server GTM container, go to the Admin tab, and click Import Container.
3. Select the file you recently downloaded from Stape.
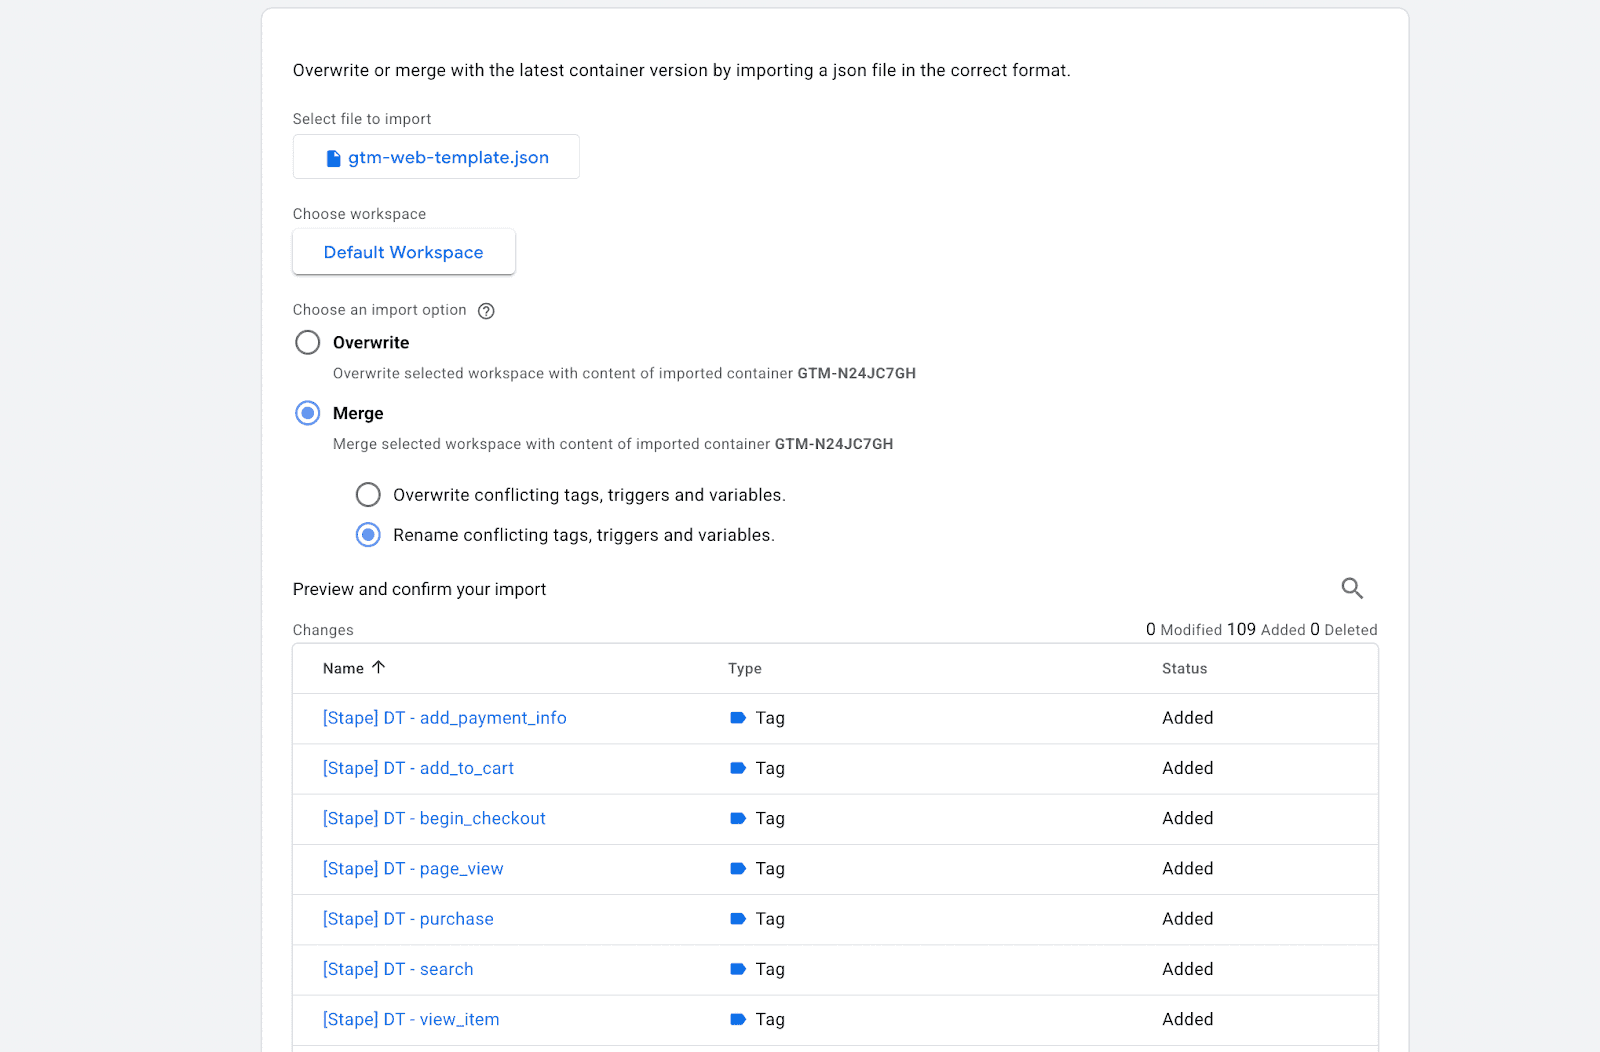
For example, the JSON file gtm-web-template you downloaded (make sure you upload the correct file that matches the container type - web or server).
Select the workspace for this import - new or existing.
4. Select Overwrite or Merge.
The Overwrite option should only be used with a new or empty container. For this demo, we are using the Merge option with the Rename conflicting tags, triggers, and variables setting enabled. This ensures that GTM will simply rename the tags without altering existing entities in your container if any conflicts arise.
5. Click Add to workspace.
6. Do the same within the server GTM container, making sure you import the JSON file named gtm-server-template.
Step 5. Activate Enricher power-up
Click on the collapse element below to see the detailed step-by-step instructions:
How to activate Enricher power-up
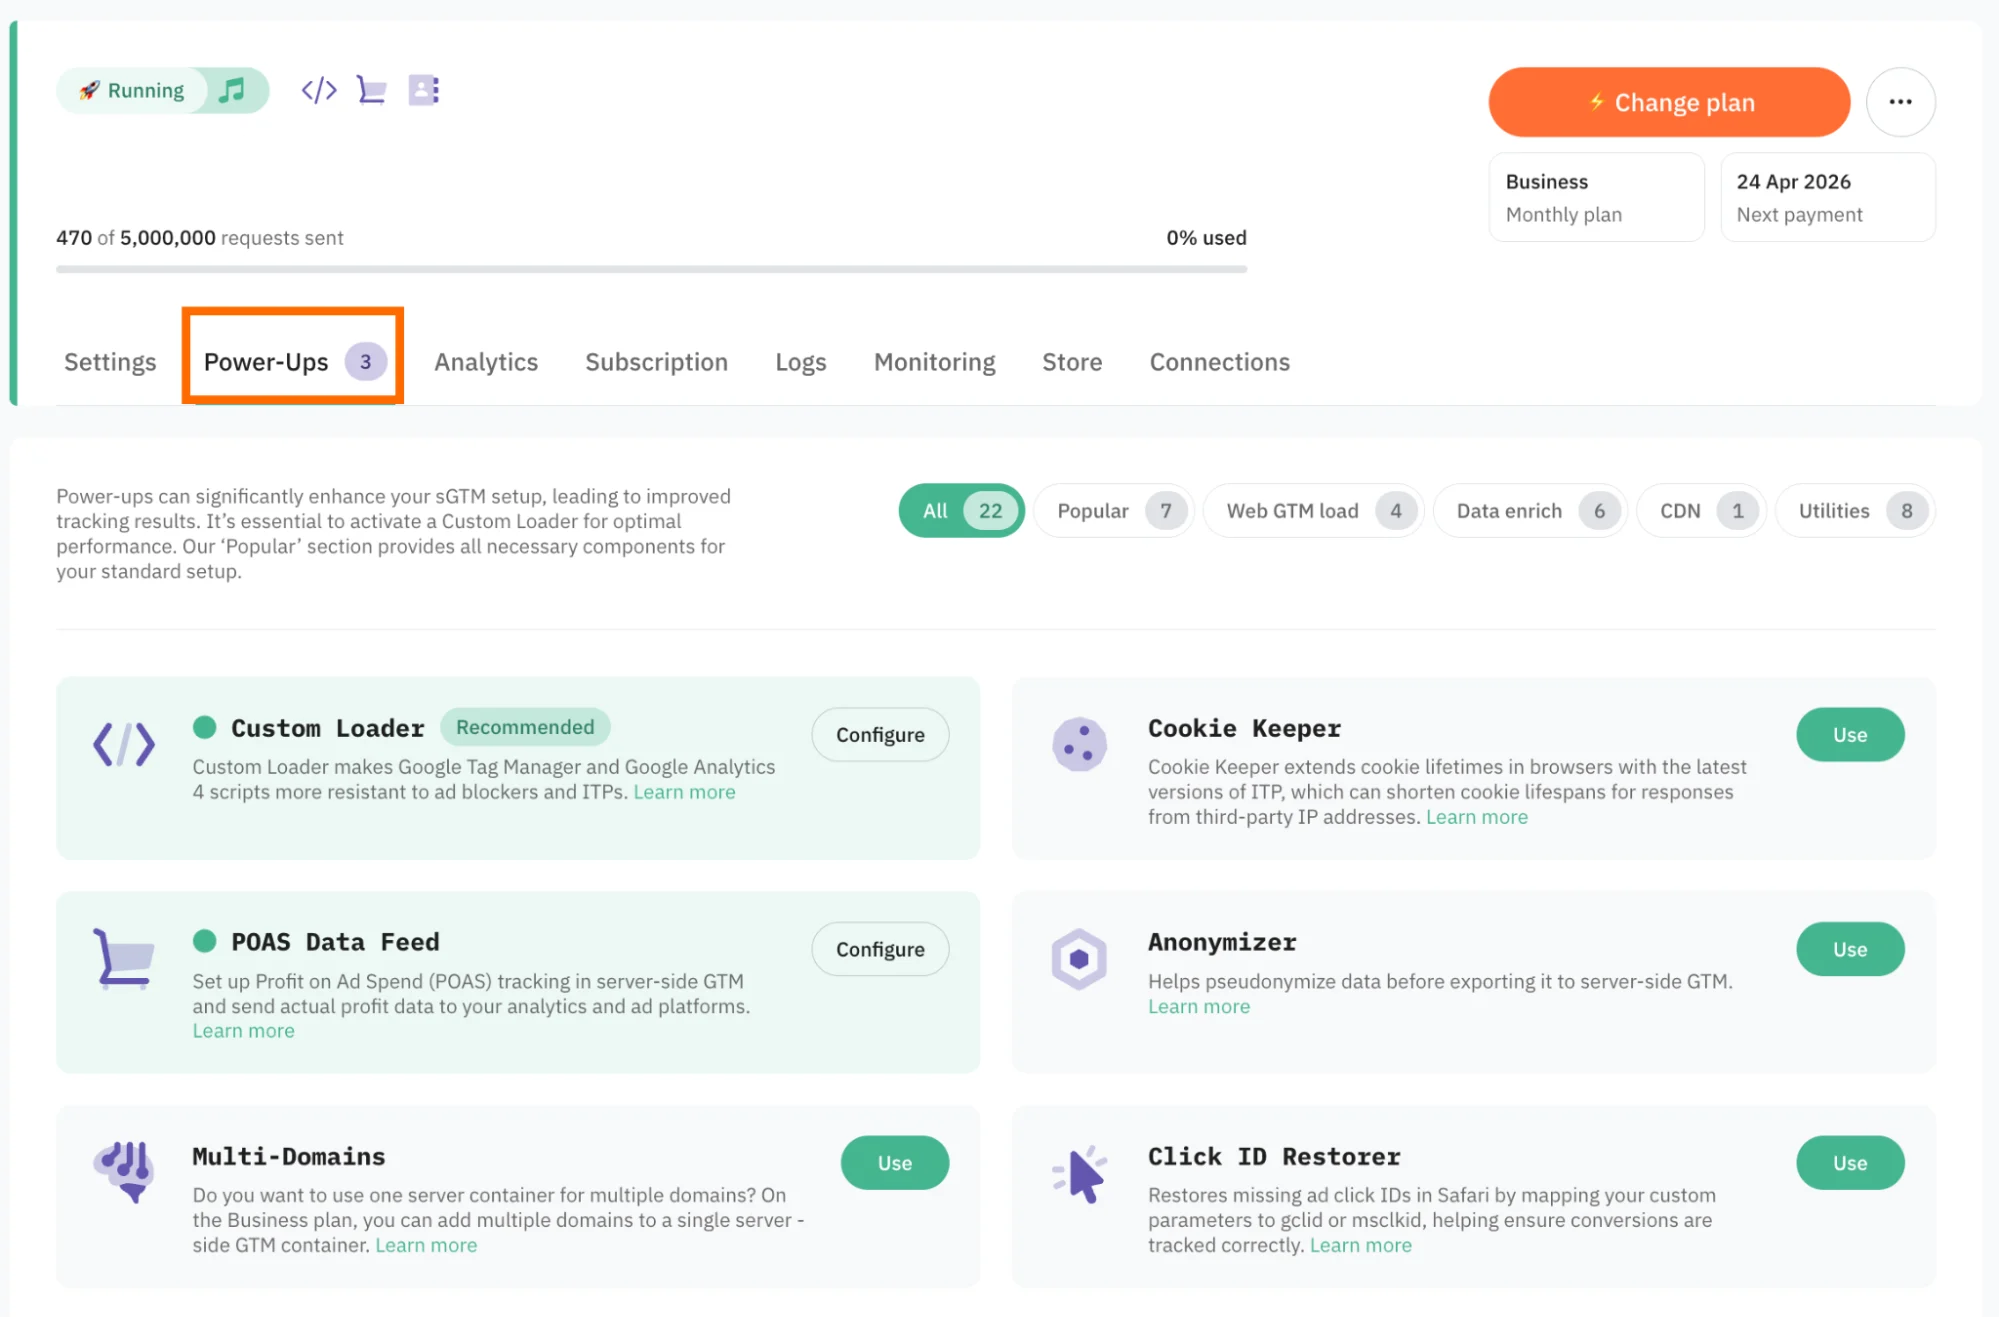
1. Log in to your Stape account and select your sGTM container from the dashboard.
2. Go to Power-ups and click Use next to the Enricher panel.
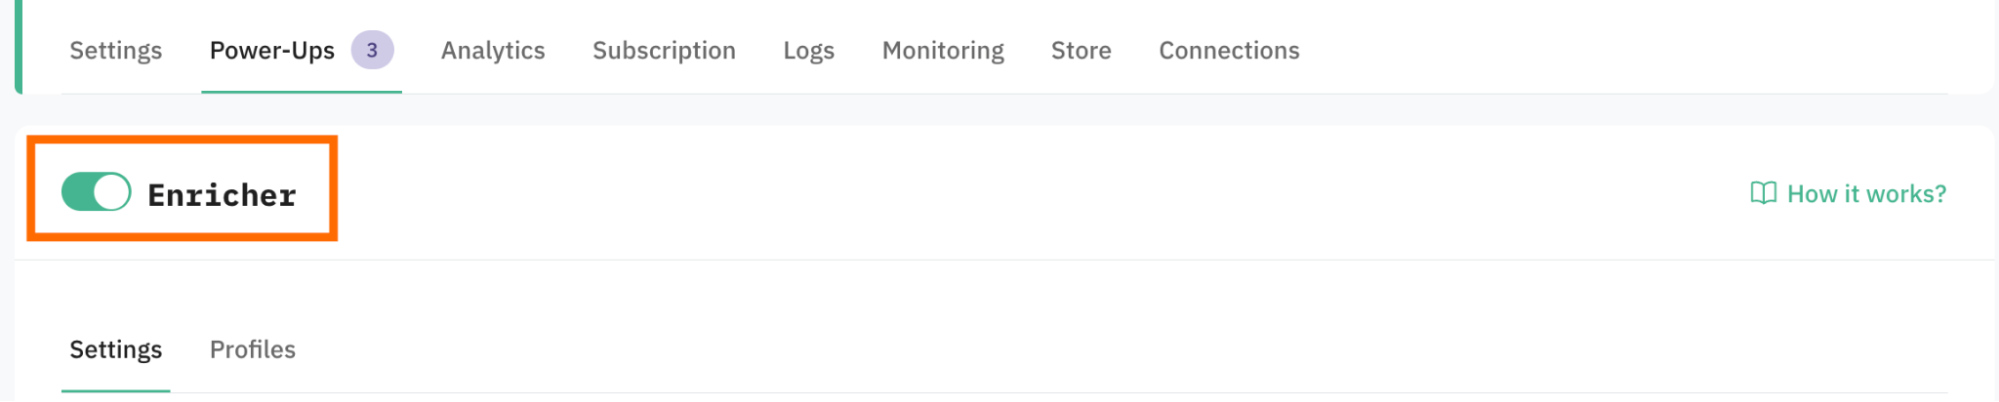
3. Toggle the Enricher switch to enable it.
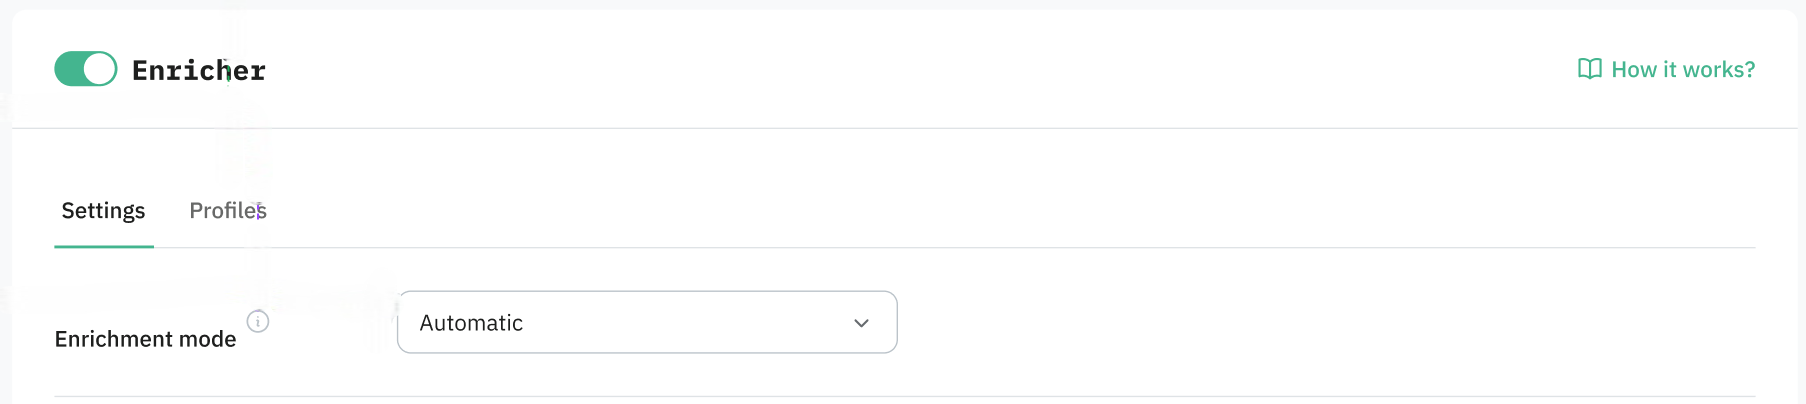
4. Select the Enrichment mode:
- Automatic (applied by default) - the data from the Enricher power-up will be mapped to standard parameters for /g/collect (GA4) and /data (Data Client) requests. As a result, the majority of tags will automatically parse and use this data without any additional configuration.
- Semi-automatic - the data from the Enricher power-up will be added as custom parameters prefixed with
‘enricher_{standard_parameter_name}’.These parameters will be available in the Event Data, allowing you to configure your own logic on how to use the enriched data points.
Note:
Based on the Enrichment mode, the data is added using the different parameter keys, which we outline further down this guide.
The following request parameters are currently used to identify a user. They are evaluated in the order listed below, from highest to lowest priority:
email_addressparameter (from the standard payload fields)_sbpcookie (set by Stape CMS apps)FPIDcookie (set by GA4)_gacookies (set by GA4)_dcidcookie (set by Data Client)stape-user-idheader (provided by the Stape Power-Up)
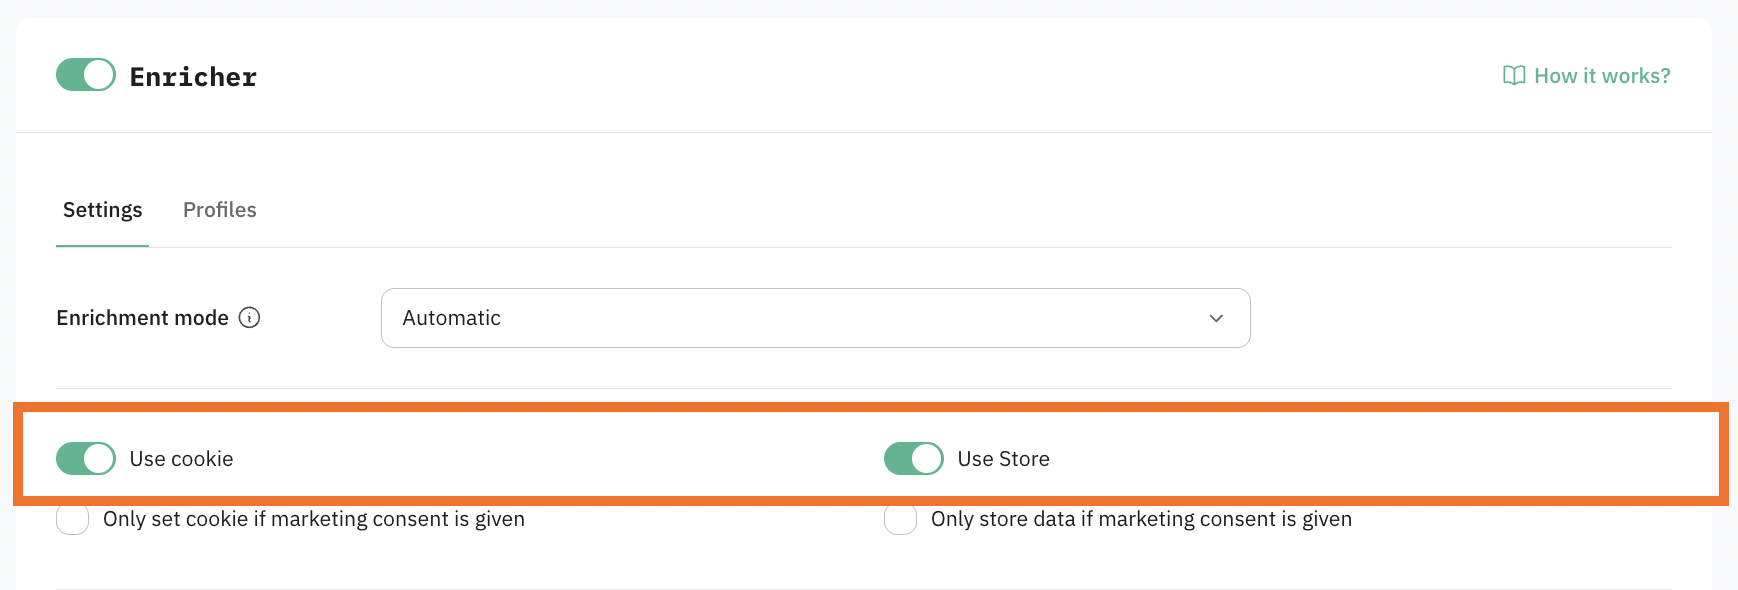
5. Select a method for storing user data by enabling the toggle next to the method. You can also use both.
- Cookies - if you opt for this method, a cookie called
_sbpeewill be generated, and the user's data will be stored in this cookie. This is a less reliable method than Stape Store, as cookies can be manually deleted by the user. - Stape Store - a built-in NoSQL database; with this method, users' data will be stored in the database and used to enrich incoming events. Storing data in a database is more consistent and reliable than using cookies, but it also comes at a cost - the stored data counts toward your usage quota within your subscription plan.
| Note: if you opt for Stape Store, you will need to activate the feature to start using it. We describe Stape Store in detail in our other article. |
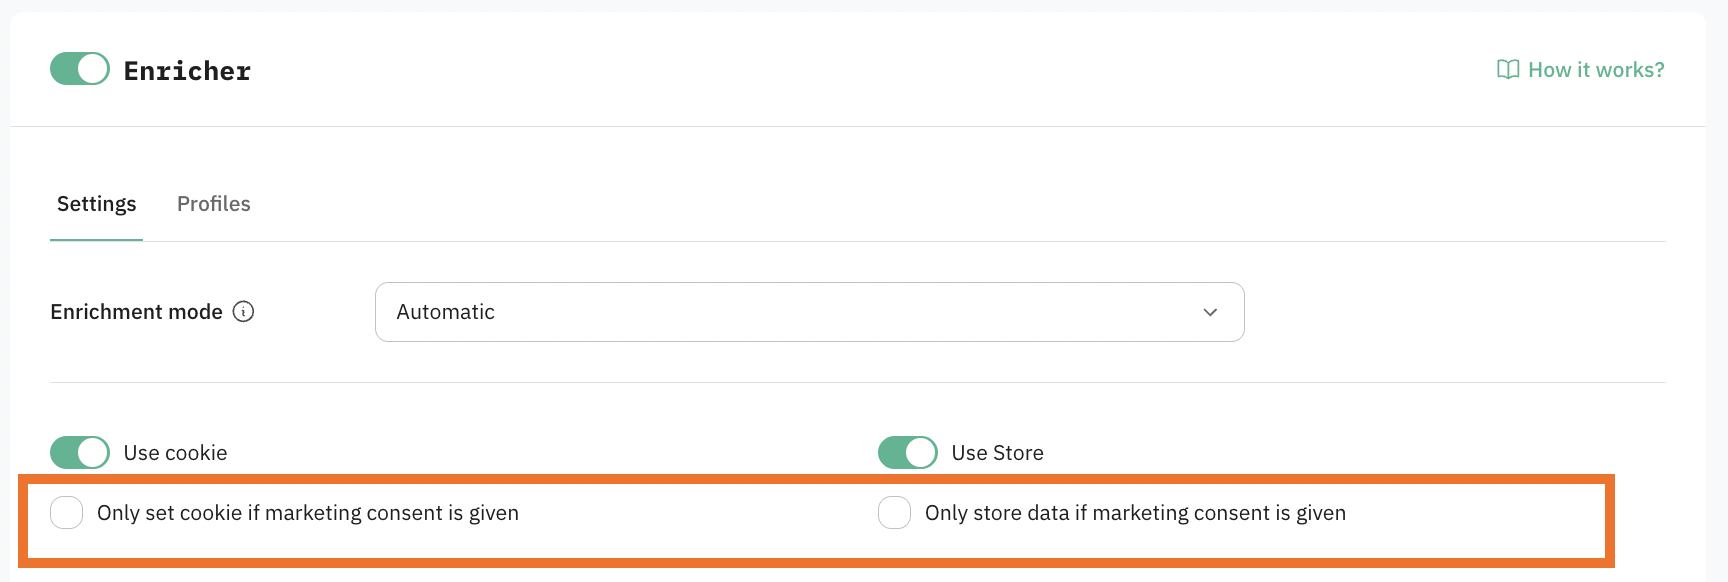
6. Configure how the power-up will work with consent.
If you need the power-up to be compliant with data regulations (especially if you target EU countries or some US states that have mandatory data protection laws), click on “Only set cookie/store data if marketing consent is given”. If enabled, Consent Mode V2 parameters are used for /collect requests, and the consent_settings object is used for /data requests.
After enabling this option, the event data won't be enriched with the user data you already have for cases when a user didn't give consent to process the data.
Be sure to update your cookie policy and cookie banner. Because the power-up sets a _sbpee cookie to store encrypted user data, you must provide users with an explicit opt-in choice.
7. Select data points from the list.
These are parameters that will be saved in a cookie/Stape Store (depends on the power-up configuration method you've selected). Later, the data will be used to enrich events/incoming requests.
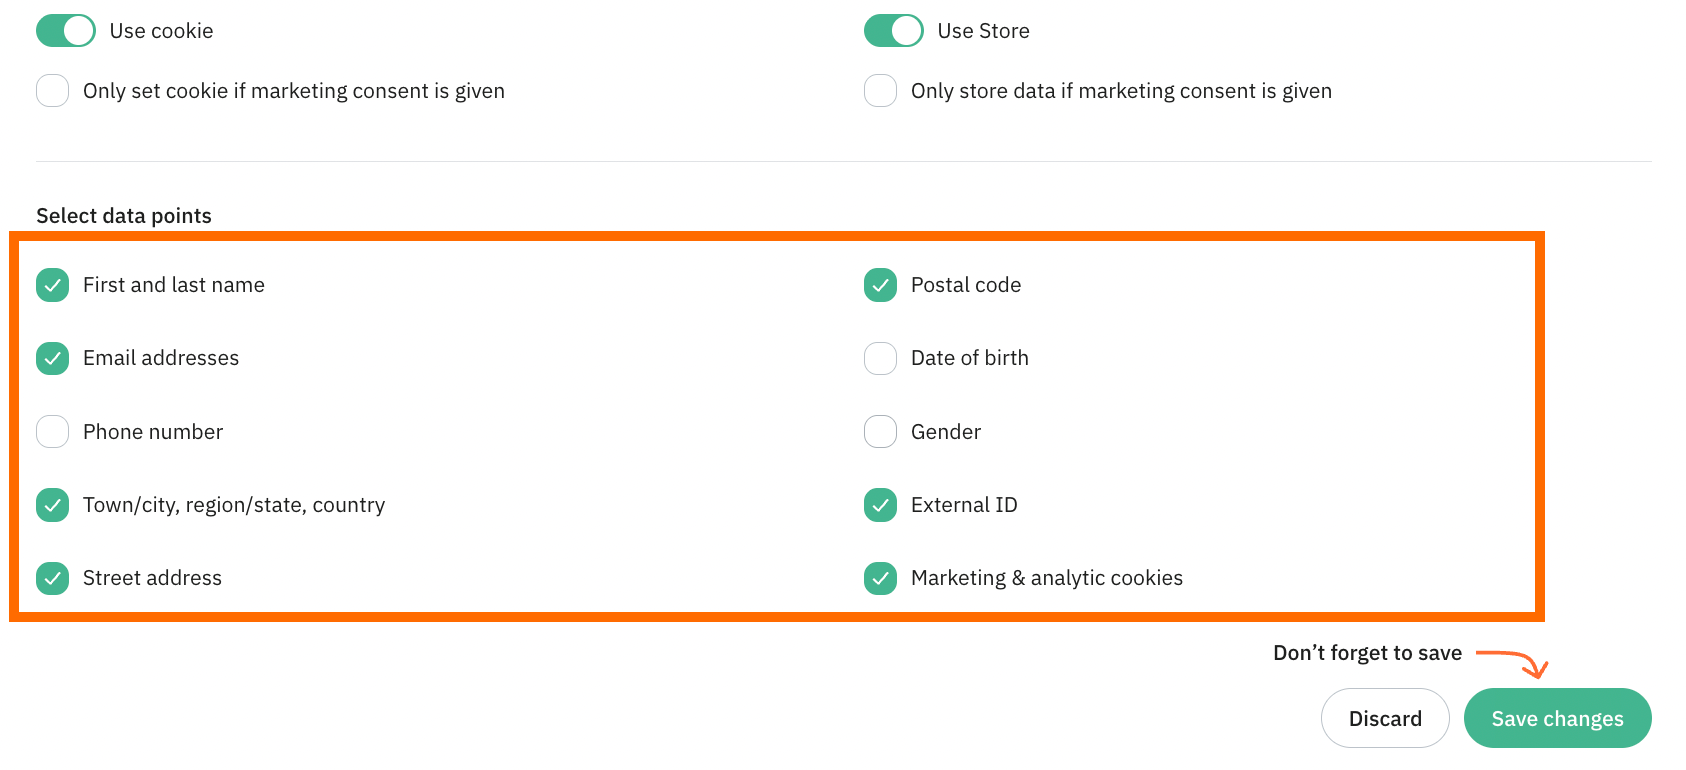
These parameters define what information will be available for event enrichment in both Automatic and Semi-automatic modes.
After selecting datapoints, the behavior depends on the enrichment mode:
- In Automatic mode, the selected data is automatically used to enrich incoming events in sGTM without any additional configuration.
- In Semi-automatic mode, the selected data is stored and attached to events, but you must explicitly map it in your sGTM tags using Event Data variables before it can be used.
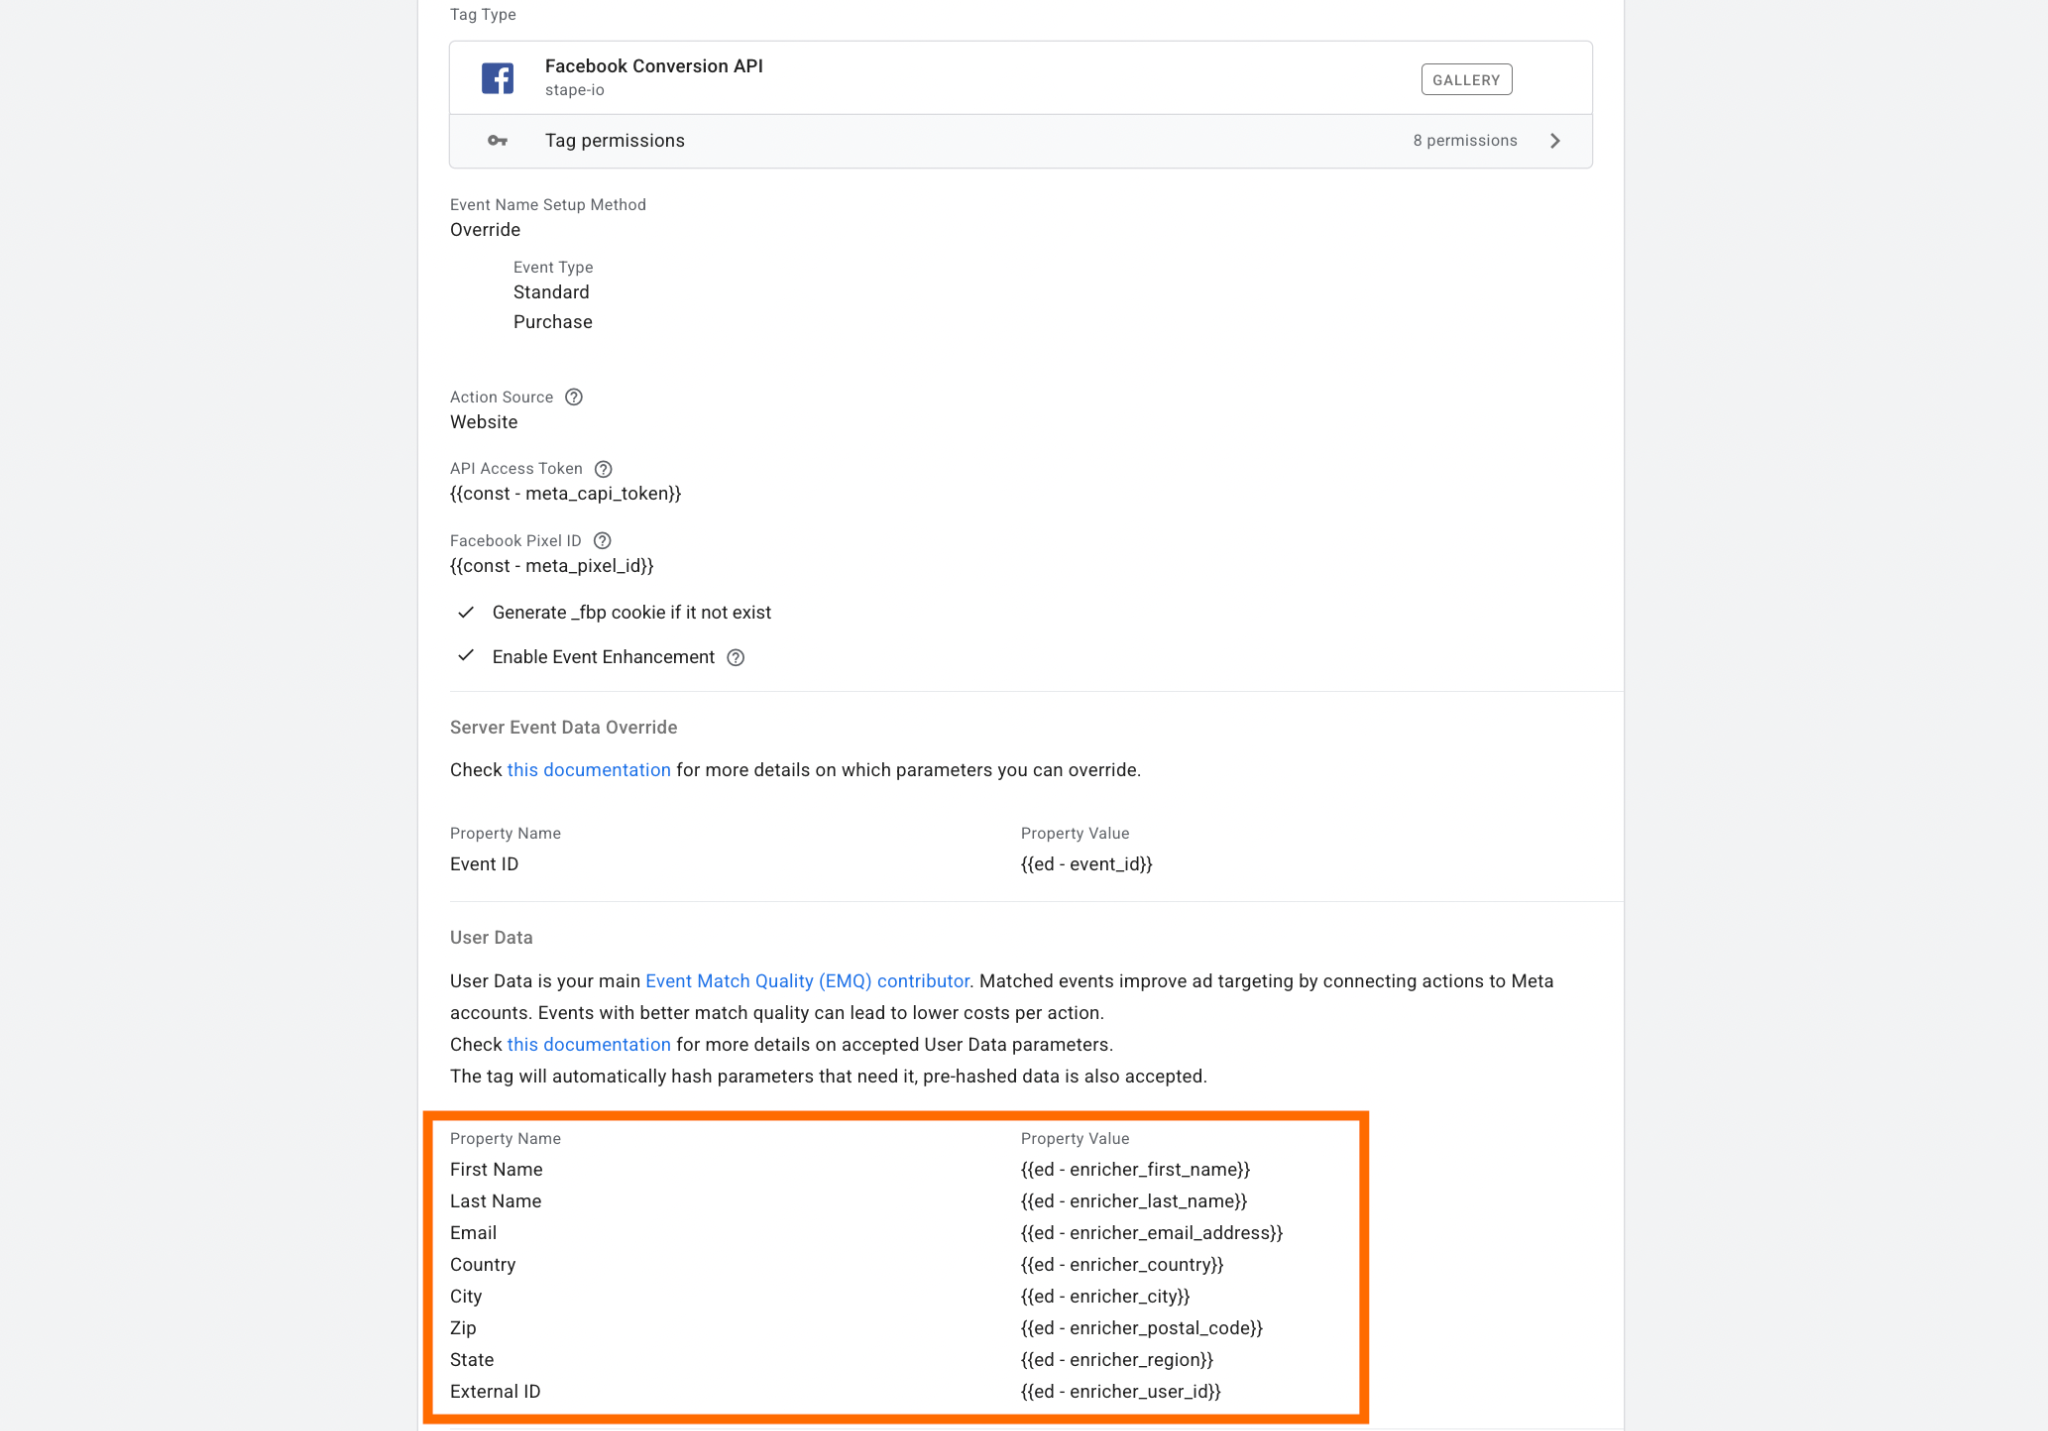
For the Semi-automatic mode, you must manually create and use Event Data variables in your sGTM tags. These variables must correspond to the datapoints selected in the Enricher power-up. Here is an example of sGTM tag config:
The Key Path in the Event Data variable must start with enricher_. Based on the request type (/g/collect or /data), the path will differ; refer to the table below:
| Stape Store/Cookie key | Event data parameters in /g/collect requests | Event data parameters in /data requests |
|---|---|---|
| email_address | enricher_ep.user_data.email | enricher_email_address |
| phone_number | enricher_ep.user_data.phone_number | enricher_phone_number |
| first_name | enricher_ep.user_data.address.0.first_name | enricher_first_name |
| last_name | enricher_ep.user_data.address.0.last_name | enricher_last_name |
| city | enricher_ep.user_data.address.0.city | enricher_city |
| country | enricher_ep.user_data.address.0.country | enricher_country |
| region | enricher_ep.user_data.address.0.region | enricher_region |
| postal_code | enricher_ep.user_data.address.0.postal_code | enricher_postal_code |
| street | enricher_ep.user_data.address.0.street | enricher_street |
| date_of_birth | enricher_db | enricher_db |
| gender | enricher_gender | enricher_gender |
| external_id | enricher_user_id | enricher_user_id |
For automated Enrichment mode, the enriched data is added using the following keys in the cookie/Stape Store. There are some differences between parameters for /g/collect and /data requests, displayed in the table below:
| Stape Store/Cookie key | Event data parameters in /g/collect requests | Event data parameters in /data requests |
|---|---|---|
| email_address | ep.user_data.email | email_address |
| phone_number | ep.user_data.phone_number | phone_number |
| first_name | ep.user_data.address.0.first_name | first_name |
| last_name | ep.user_data.address.0.last_name | last_name |
| city | ep.user_data.address.0.city | city |
| country | ep.user_data.address.0.country | country |
| region | ep.user_data.address.0.region | region |
| postal_code | ep.user_data.address.0.postal_code | postal_code |
| street | ep.user_data.address.0.street | street |
| date_of_birth | db | db |
| gender | gender | gender |
| external_id | user_id | user_id |
Among the data points, there is also Marketing & analytics cookies.
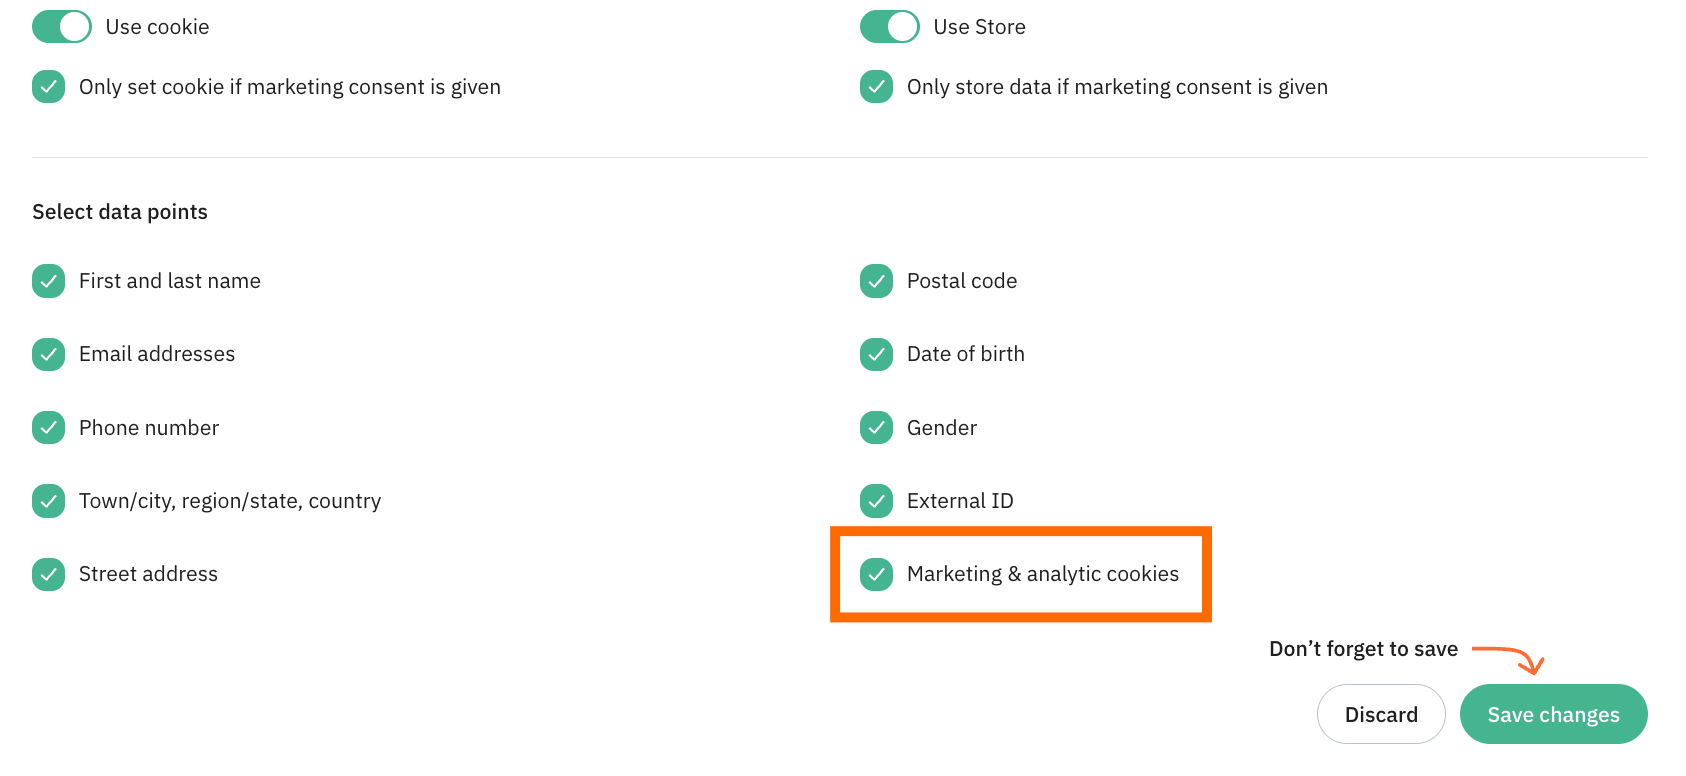
In the table below are listed the Marketing & analytics cookies we use to identify the user (if you opt for “Marketing & analytics cookies” as a data point), as well as the parameters that will be available in the incoming requests in sGTM.
| Cookie name | Event data parameters in /g/collect and /data requests for automated Enrichment mode | Event data parameters in /g/collect and /data requests for semi-automatic Enrichment mode |
|---|---|---|
| _fbp | _fbp | enricher_fbp |
| _fbc | _fbc | enricher_fbc |
| _ttp | _ttp | enricher_ttp |
| ttclid | ttclid | enricher_ttclid |
| li_fat_id | li_fat_id | enricher_li_fat_id |
| _epik | _epik | enricher_epik |
| _scclid | _scclid | enricher_scclid |
| _scid | _scid | enricher_scid |
| FPGCLAW | FPGCLAW | enricher_FPGCLAW |
| _gcl_aw | _gcl_aw | enricher_gcl_aw |
| FPID | FPID | enricher_FPID |
| _ga | _ga | enricher_ga |
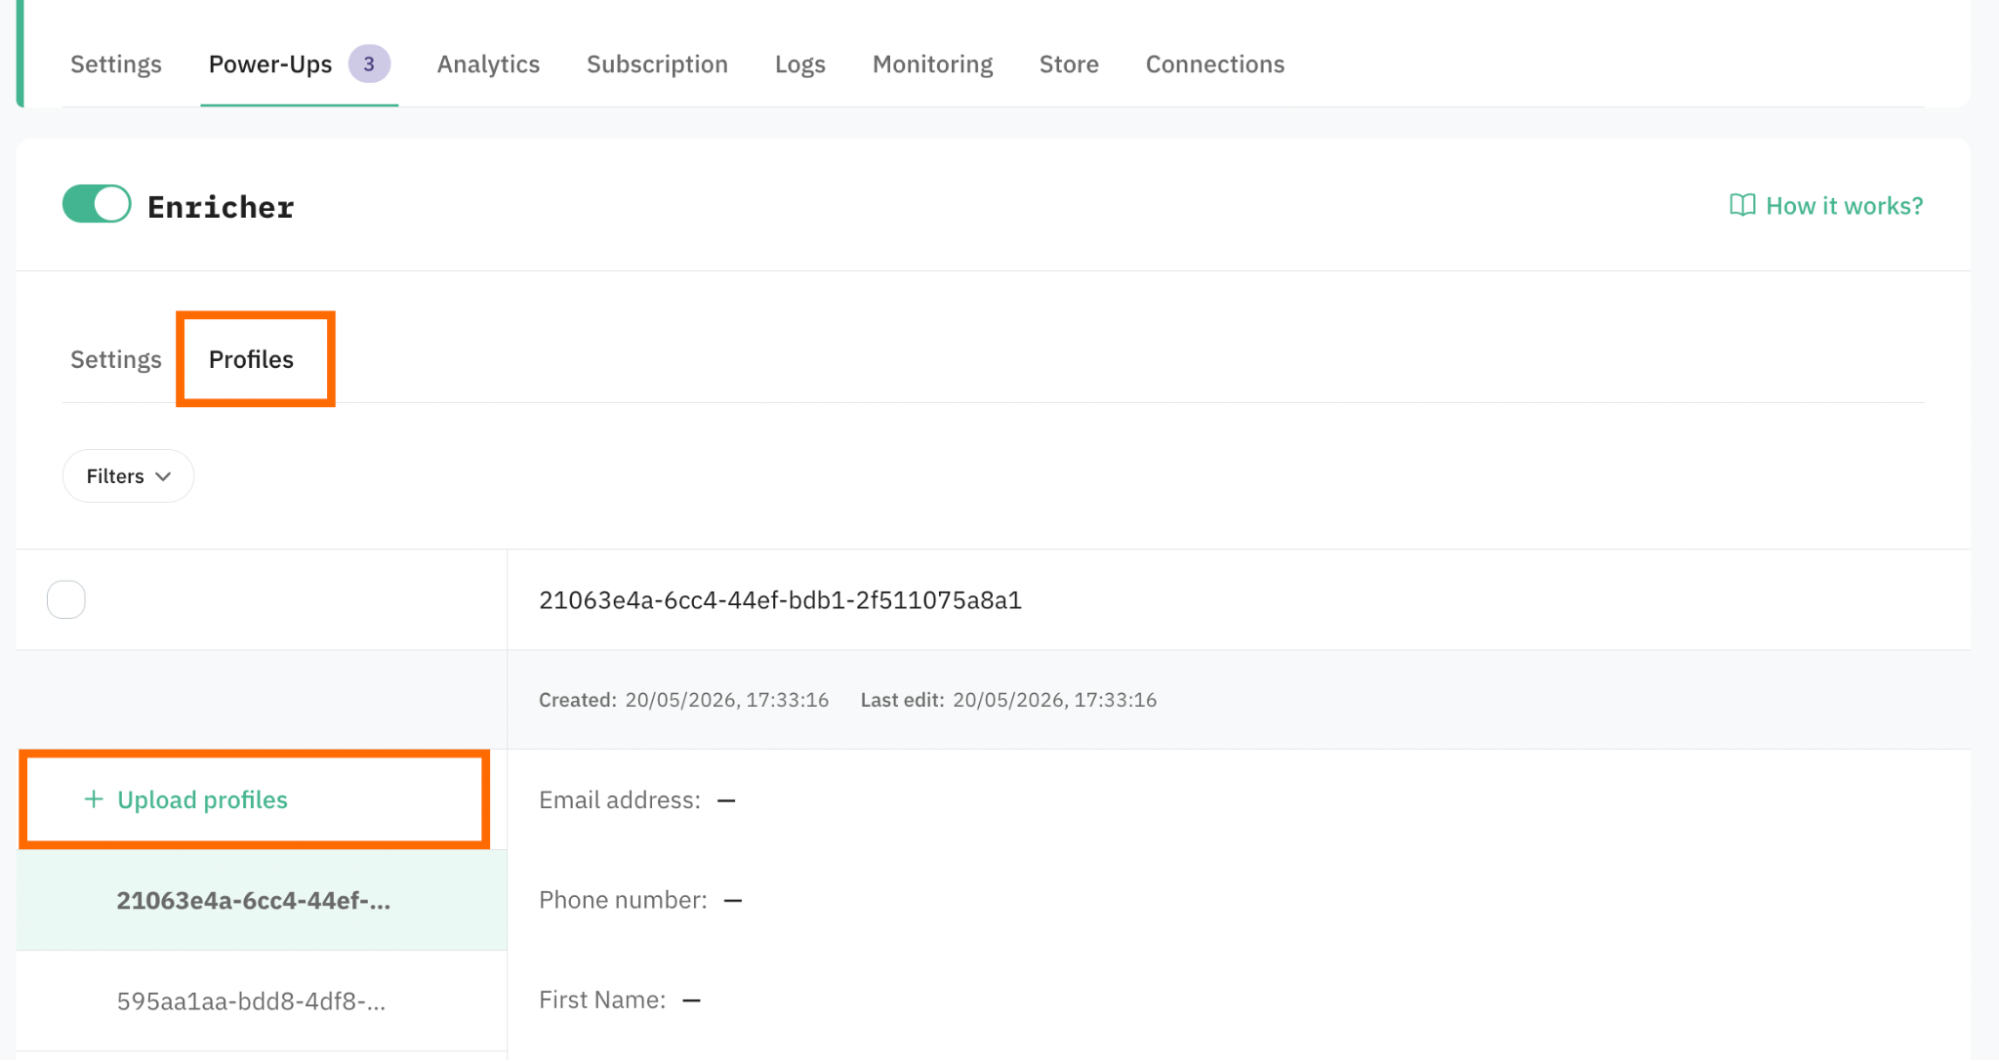
8. If you opt for the Use store option, the tab Profiles is available for you.
It gives the ability to upload a CSV with profile data (for example, uploaded from the CRM/CMS). If the profiles are uploaded, the power-up will take the data you provided and try to match it with online data activity, creating a more complete user journey.
To upload profile data, click Upload profiles and select your file.
Map the fields within the power-up with the dataset uploaded. Please note: the email address is a mandatory parameter, since it's a primary user identifier.

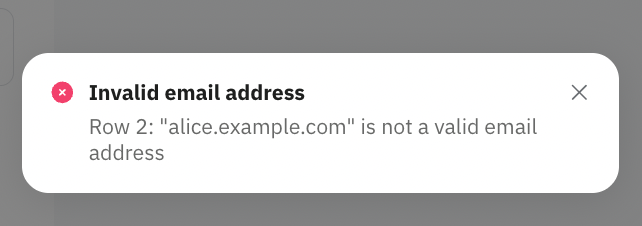
During CSV upload, email addresses are validated before the import starts. If the file contains invalid or unsupported email addresses, the upload will fail, and an error message will be displayed.
Also, during CSV upload, all field values are validated according to the limits defined in the table below. If a value exceeds the maximum allowed length, it will be silently truncated to fit within the limit (no error is returned).
| Parameter | Max allowed length |
|---|---|
| PhoneNumber | 32 chars |
| FirstName | 64 chars |
| LastName | 64 chars |
| City | 64 chars |
| Country | 64 chars |
| Region | 64 chars |
| PostalCode | 32 chars |
| Street | 128 chars |
| DateOfBirth | 32 chars |
| Gender | 16 chars |
| ExternalID | 64 chars |
9. Once configured, click Save changes.
Test the setup
To test the configuration, use the GTM preview.
- Authorize on your website and trigger some event. In the GTM preview, you should see your data available after authorization (email, phone, first and last name, etc., based on the configurations):
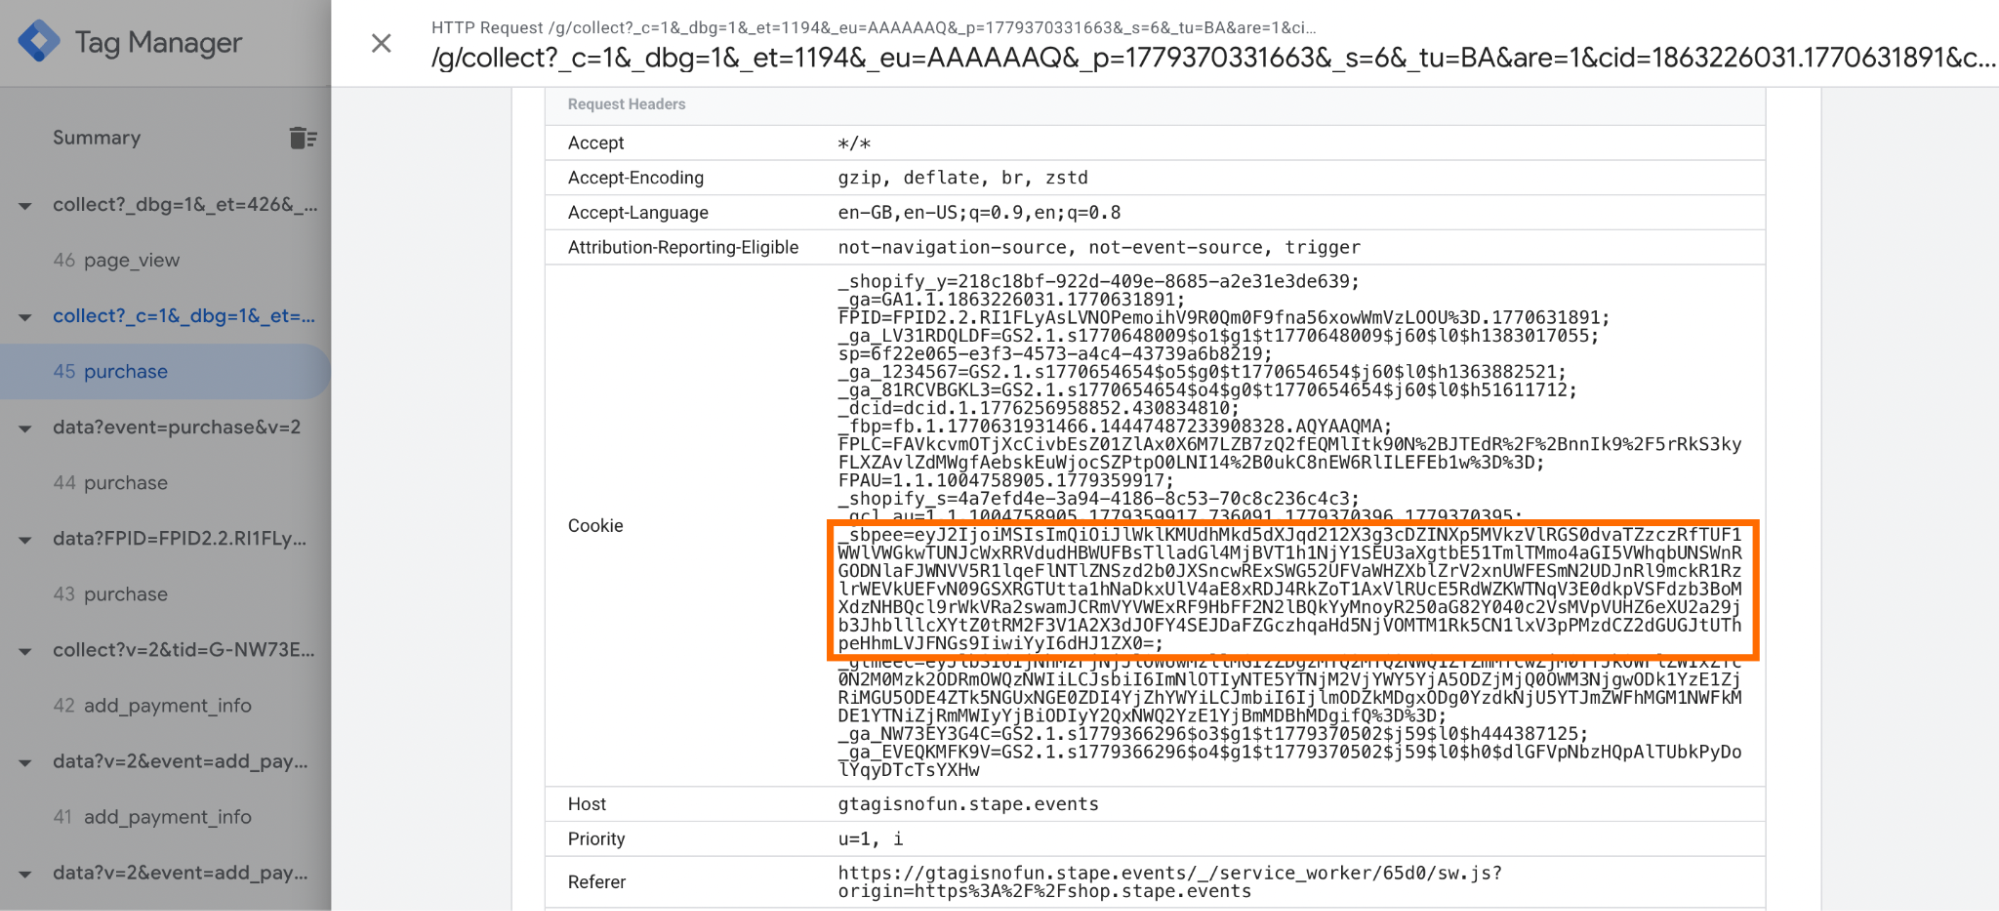
As well as the _sbpee cookie that stores the user data (all the user data is encrypted for security):
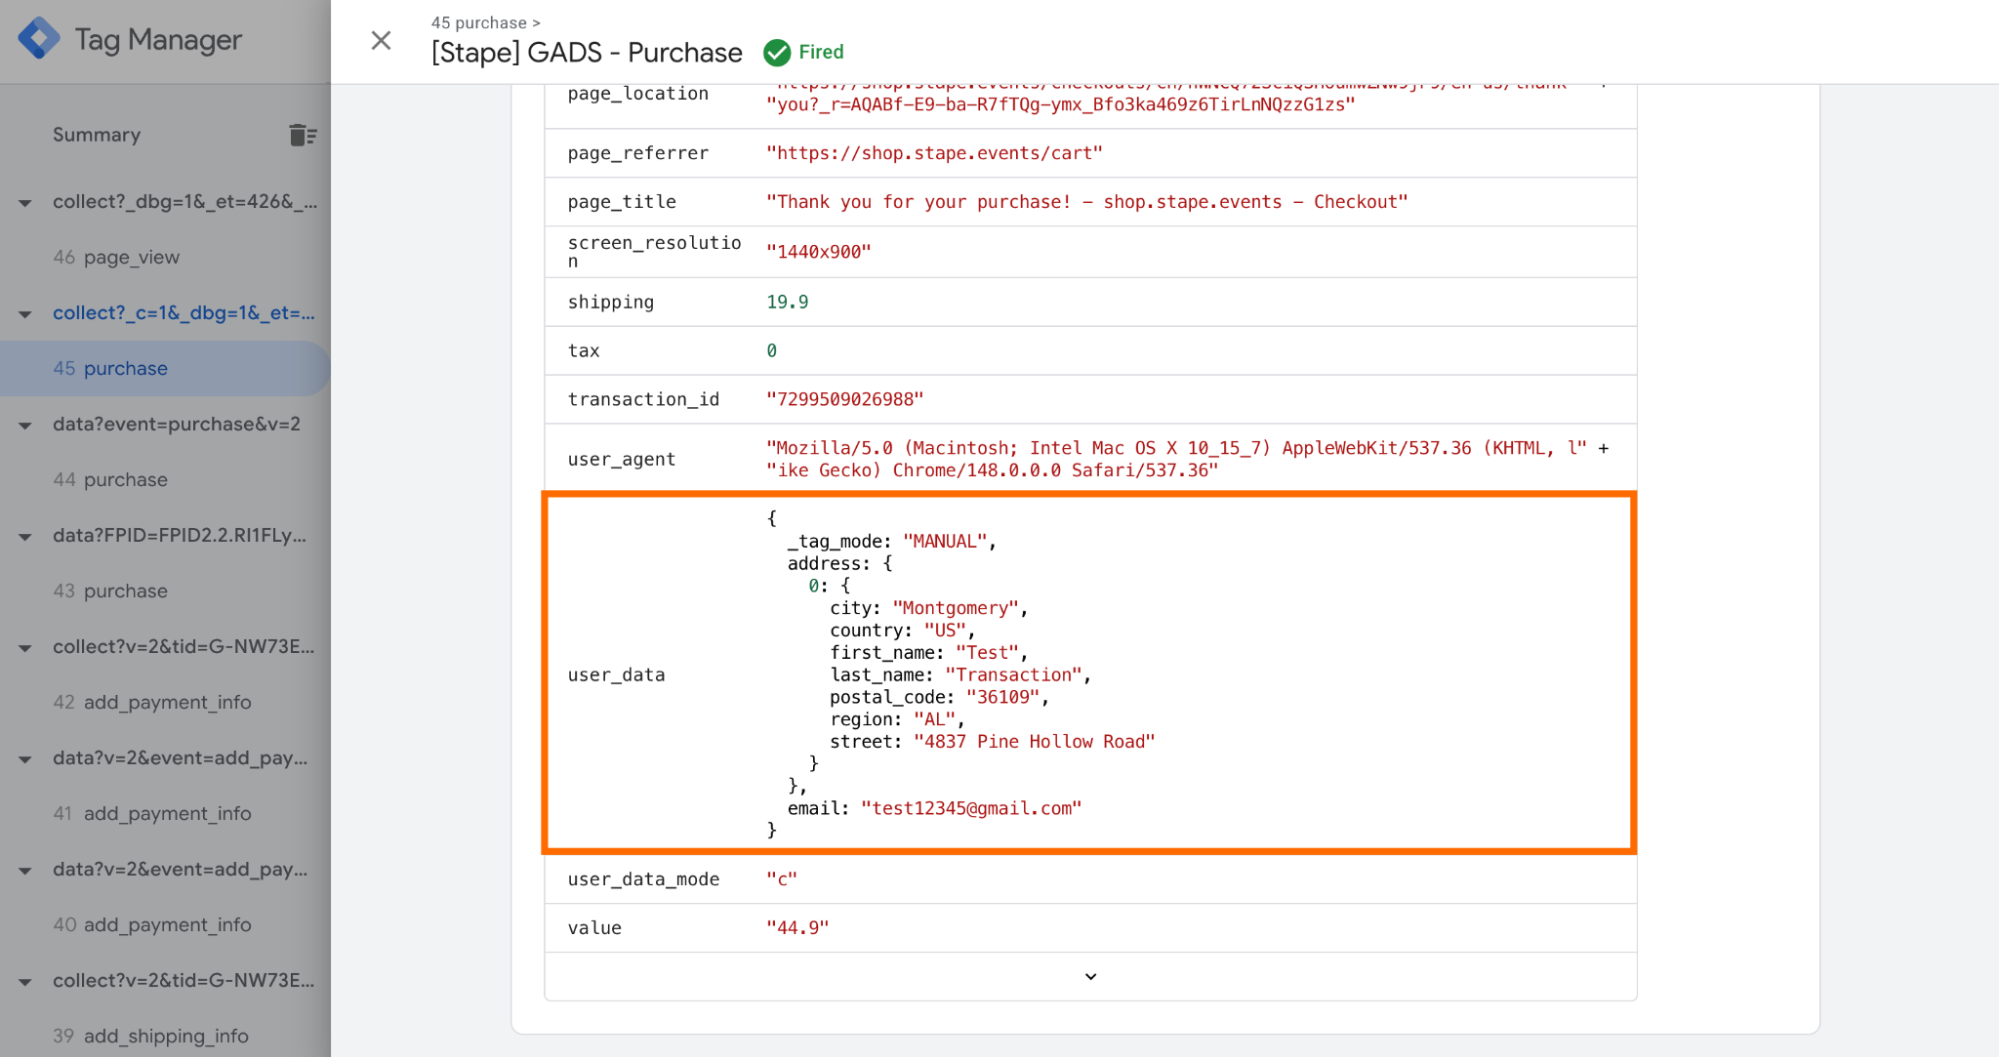
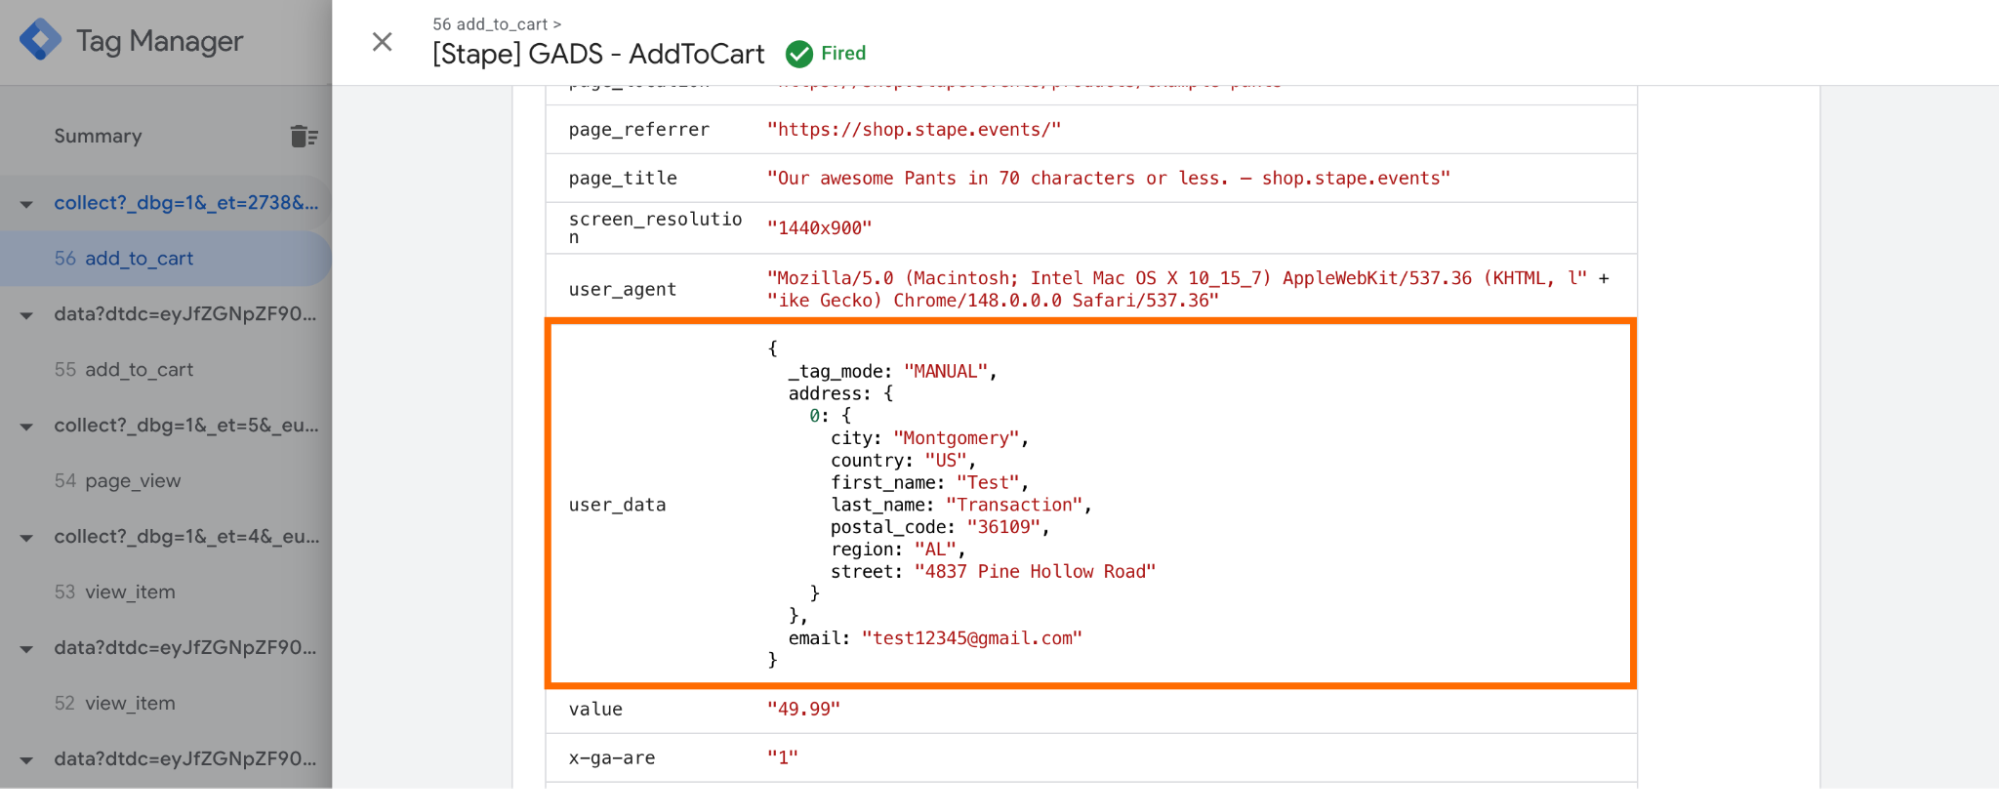
- Log out of your website and trigger another event, check the request you received. If everything is set correctly, you’ll see in the tag details additional parameters that you didn’t specify directly on the new page (like email, first, and last name - it depends on your configurations).
If you use Store as a config method, you can also use the Profiles tab within Enricher power-up to see that data was added to the Store.

Conclusion
Enricher is a useful addition for server-side tracking setups. It helps minimize data fragmentation and improve visibility across the customer journey.
Reusing previously collected identifiers, the power-up improves event match quality and connects online and offline interactions. The Stape's solution gives businesses a clearer understanding of user behavior and the real impact of their marketing efforts.

Comments