To set up a GTM server container, do the following steps:
By the end, you’ll have a fully functional GTM server-side container, capable of bypassing ad blockers, increasing cookie lifetimes, and much more.
There are many common elements between web and server containers, like tags, triggers, variables, preview mode, etc. However, the setup of the GTM server-side container is more complex than that of the standard Google Tag Manager web container.
The main complexity of setting up a GTM server container is configuring the cloud environment to run the sGTM container. With the help of Stape, configuring cloud servers for sGTM will take only 5 minutes, and there is no need to hire developers. Besides that, Stape offers additional features on top of the Google Tag Manager server, like bypassing adblockers, increasing cookie lifetime, sending offline data, etc.
This video shows how to set up a GTM server-side container
Below is the step-by-step guide on how to set up GTM server-side container.
1. Open your WEB Google Tag Manager container https://tagmanager.google.com/.
Click Admin. Under the container column, click +

2. Type the container name, choose Server, and click Create.

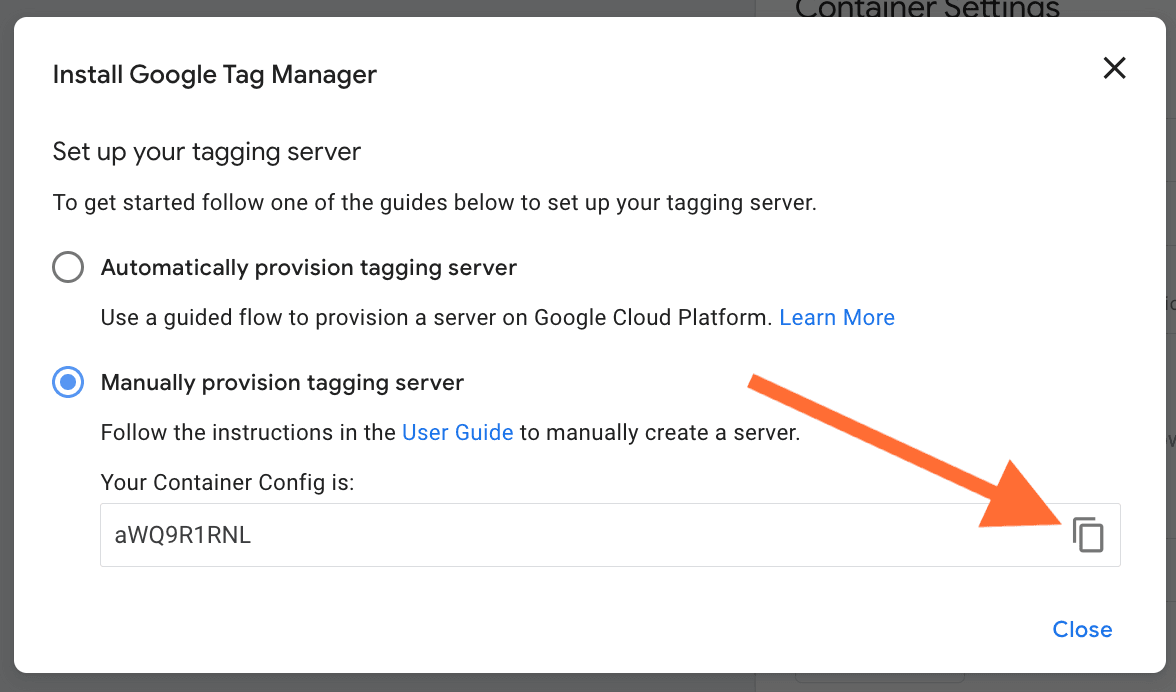
3. Choose Manually provision tagging server, copy your container config and paste it in any text editor. We will need it for the next steps.

1. Go to stape.io and create an account or log in.

2. Click Create container on the top right.

3. Enter your container details:
Then click Create Container.

4. Choose a plan for your container. You can start with a Free plan. Click Continue with a Free plan.

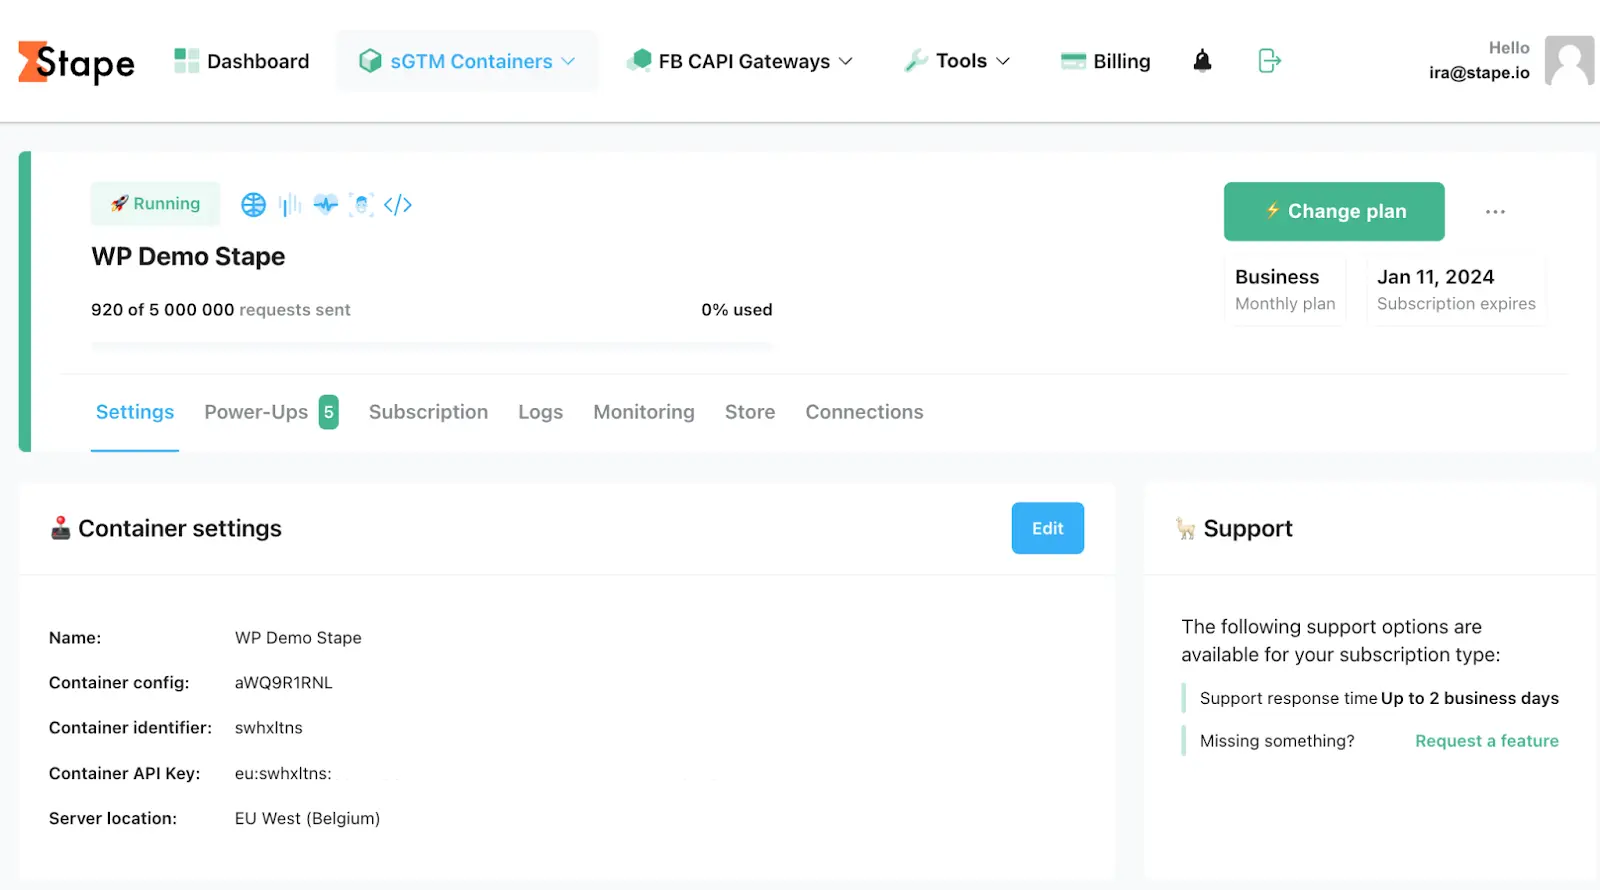
5. You will see the status of your container, container config, and plan name. It takes around 5 minutes to deploy a server container. Please reload the page to update the status. If the Google Tag Manager server-side setup was done correctly, you should see the status “Running”.

You can use a custom tagging server container URL to set up first-party cookies. Custom tagging server URL or custom domain should share the same domain as your website. For example, if your website domain is example.com, then the tagging server URL should look like ss.example.com.
There are three ways to set up a custom domain:

There is a detailed blog post where you can find a description of mapping a custom domain for the server Google Tag Manager container: using the same origin (Cloudflare and nginx).
But here, we will cover custom subdomain setup:
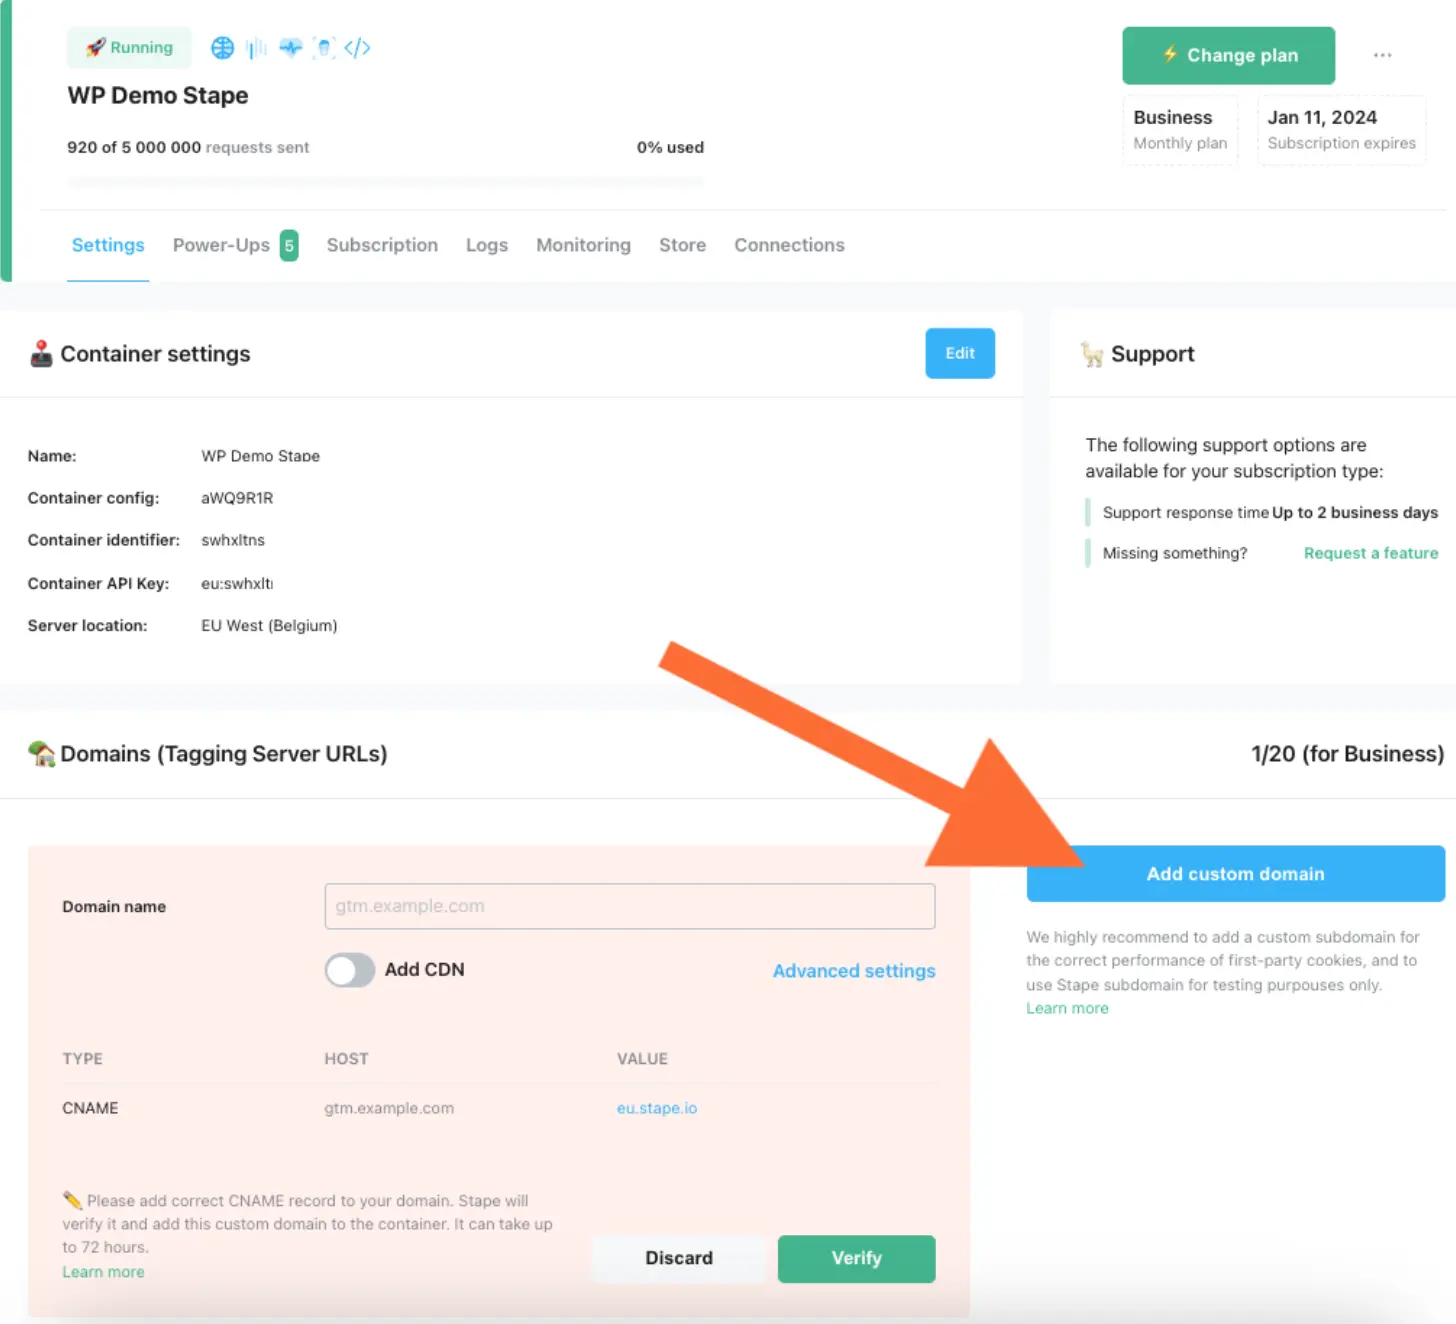
1. Open your sGTM container on Stape, scroll down to Domains and click Add custom domain.

2. Write a custom domain.
3. You will see DNS records that you should add.
The DNS record depends on the server location and CDN option you choose.


The DNS records you should configure vary depending on the server location and your selected CDN settings. You will see DNS records that you should add inside your stape.io container.

4. Log in to your DNS account and add records you see in your Stape.io account. Below is an example of DNS setup for CloudFlare. On the account home page next to your domain name click three dots and choose Configure DNS.

Click Add record.

Then, input the records you see in your Stape.io account. Ensure that the proxy is turned off.

Usually, it takes 2-3 hours to verify the custom domain. For some DNS providers, verifying records might take up to 72 hours. We will email you once the custom domain is verified or any error is detected. If there is an error with the verification, please follow this instruction on how to verify custom domain verification.
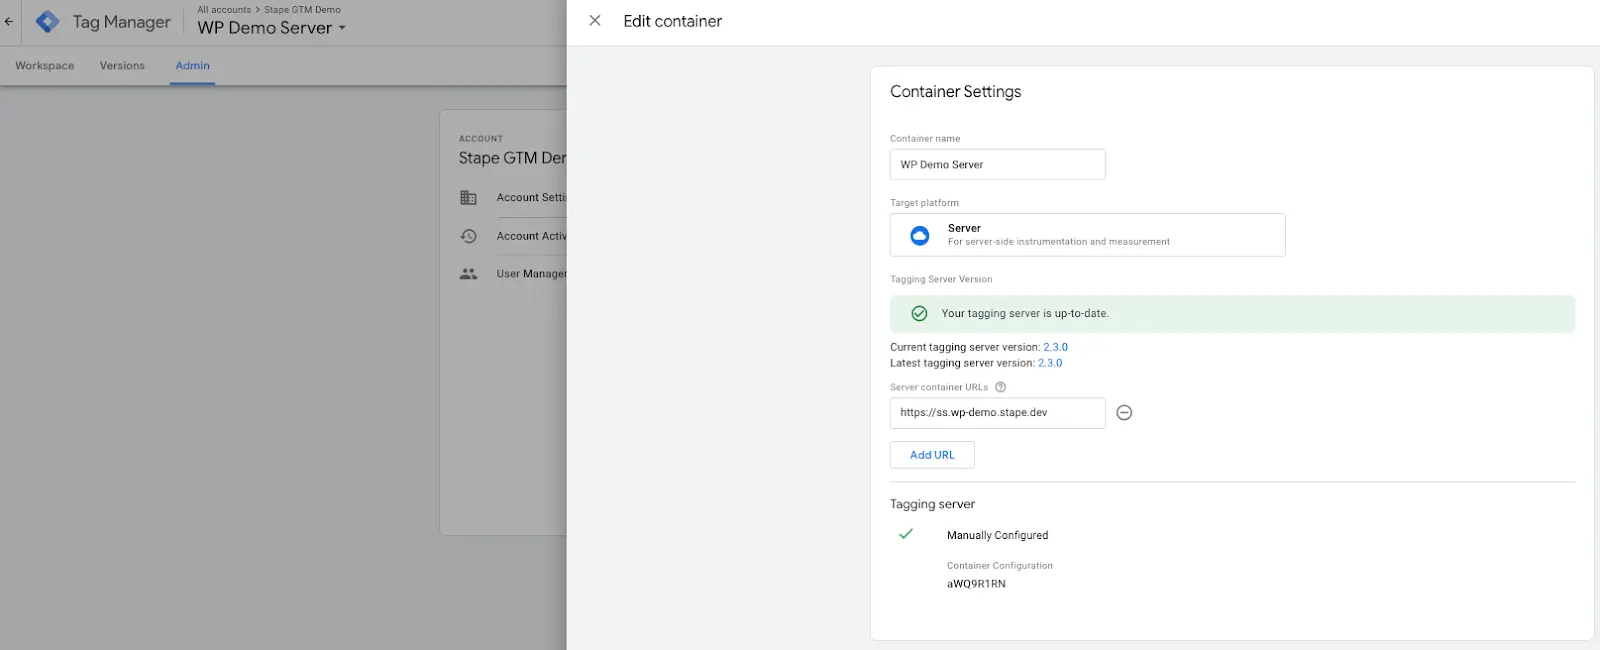
5. Once the custom domain is verified, go back to the Google Tag Manager Server container → Choose your server container → Admin → container settings → paste tagging server URL.

6. If you use a custom domain, updating the Web GTM script on your website is highly recommended. This tweak will load gtm.js from your domain. To do so, replace the default domain googletagmanager.com with the custom domain you set up in the previous step.

Open your Web container, create a new tag - Google Tag. Add your Google Tag ID.
In the section Configuration settings add the following parameters:
Add trigger to GA4 tag. Normally it should trigger on all page views.

Optional: You can also create a Google tag: Configuration settings variable that will predefine Google Tag settings if you need to use multiple Google Tags on your website and do not want to add settings for each of the tags manually.

These parameters can be, for example, a setting that defines whether you want to send a page view event every time a Google Tag triggers, set UTM parameters, client ID, etc. There is a list of standard Google Tags configuration parameters.
To set up the GA4 event, go to the tags section and create a new tag with the tag type Google Analytics: GA4 Event. Add your GA4 ID and the event name; there is a list of standard event names.

Open Google Tag Manager Server container → click Client → create GA4 client and save it → go to Tags and set up GA4 tag. Remember that GA4 automatically sends not only pageviews but also some other events.
Inside Event Name, choose variable {{Event Name}} → add trigger Client Name equals GA4.


How to publish the GTM container that you created on the server side? Open the Web and Server container preview modes and check that you see GA4 requests. Then, publish the update inside the server and web Google Tag Manager containers.

You can make Google Analytics 4 server-side tracking even more accurate by using a custom GA4 loader. This will allow GA4 to work around any blocking tools, such as ad blockers and other privacy-related technologies that aim to prevent trackers from gathering data about visitors' activities. As a result, you'll see the complete picture of users visiting your site and have more data for ad optimization and custom audiences.
How to set up Custom Loader:
1. Log in to your stape.io account.
2. Open the sGTM container → Click Power Up.
3. Click Config Custom loader power-up → add your WEB GTM ID → You will see updated web GTM code → Copy this web GTM script and add or replace existing web GTM script on your site.


4. Once you've updated the web GTM code and set up server-side GA4, you can check modified GTM and GA4 requests in the network.
Google Tag Manager request URL should look like this:
Tagging server URL/stape container identifier.js?st=web GTM ID without letters GTM.
In our case, it's https://load.gtm.stape.dog/covxbvwx.js?st=PMVQSJH

GA4 request URL should look like this:
Tagging server URL/gt+stape container identifier.js?id=GA4 identifier.....
In our case, it's https://load.gtm.stape.dog/gtcovxbvwx.js?id=G-0SME9XLYER

In this thread, a user was unsure how to configure their Google Tag Manager server container and asked whether there was a “correct” setup. The issue turned out to be a misunderstanding: there is no single right or wrong configuration - it depends entirely on what data you need to send and which platforms you’re integrating with. Because you can’t diagnose a setup from just a container ID or sGTM URL, the solution was to review the full container configuration, and the recommendation was to involve a tracking specialist if you’re unsure how to structure events.
That’s it. Now, you’ve set up a server container, and Google Analytics runs via your server container. If you want to load GA within your domain and make GA request 1st party follow these steps to use a custom subdomain. And our team of experts can help!
And if you also want proof of your skills, certification can help you stand out. It shows clients or employers that you understand both browser and server-side setups and that you’ve learned them in depth.
You can do it for free at Stape! Click Try for free and explore the advantages!
Comments