GA4 IP anonymization: when and how to go beyond defaults

Uliana Lesiv
AuthorThis article is for marketers, analysts, and tracking specialists who want to understand GA4 IP anonymization and its limitations. It will help businesses with stricter privacy requirements learn when additional IP protection is needed and how to implement it using server-side tracking.

How GA4 handles IP address anonymization by default
Unlike Universal Analytics, there is no need to configure an anonymize_ip setting with GA4. Everything is done automatically.
GA4 uses the IP address at the time of data collection to derive geographic information. The IP address is then discarded before the data is logged or stored. Because of this, there is no need to manually enable IP anonymization in your GA4 setup.
Here's what it looks like in the sGTM preview. The _uip (user IP) parameter gets stripped without any additional manipulation from your side.
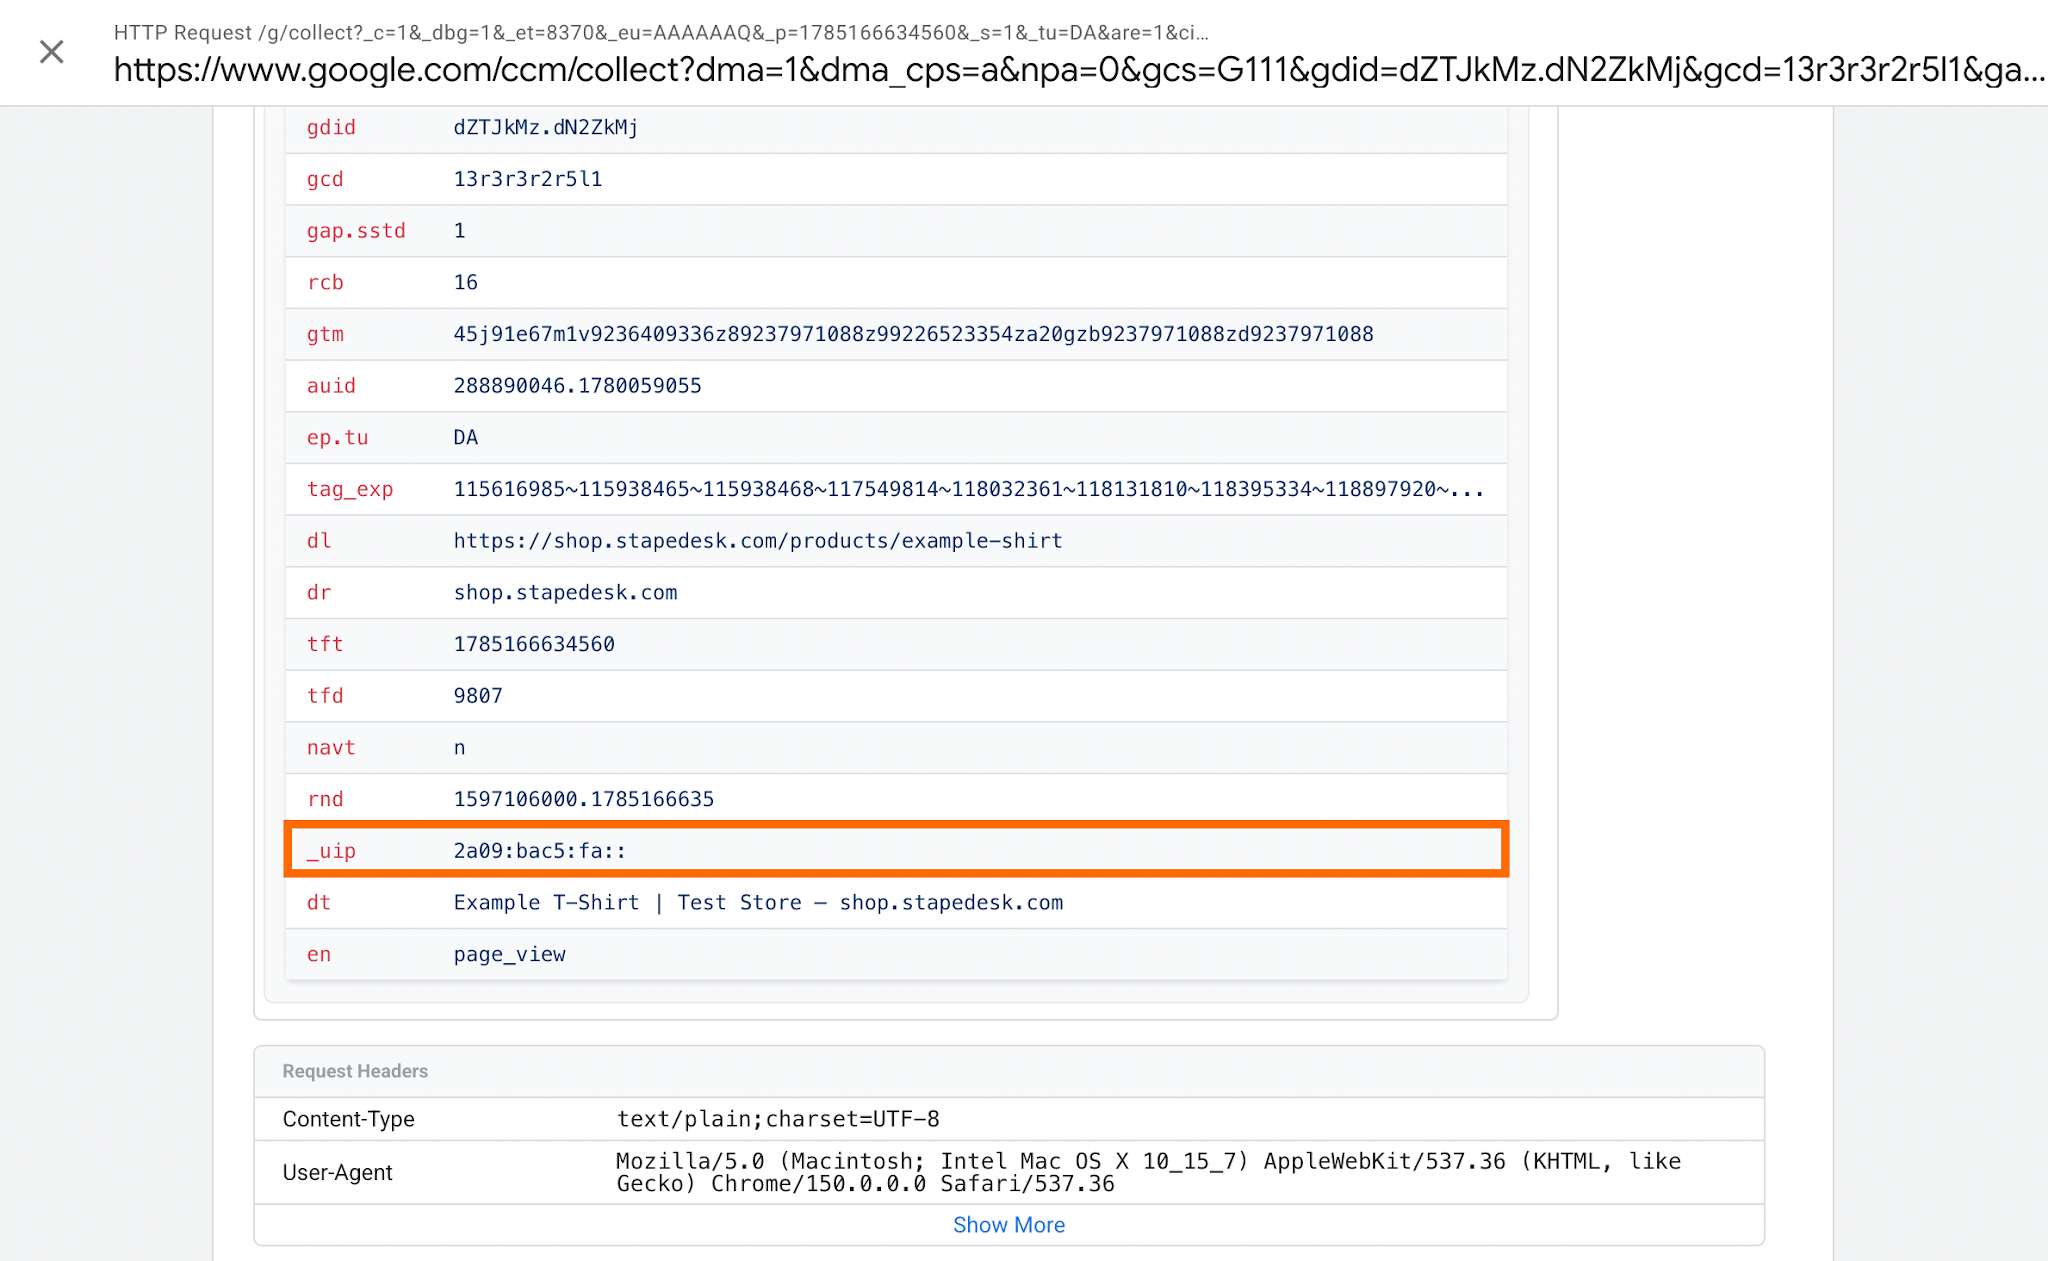
The IP anonymization helps reduce the amount of personally identifiable information processed by GA4 and get general geographic information at the same time.
GA4 IP anonymization and Consent Mode v2
The built-in IP anonymization is created to support data privacy regulations, but it doesn't guarantee that site owners comply with them. Whether your implementation complies with the regulations depends on the data collection process, what data is collected, your legal basis for processing, your consent implementation, and how data is shared with third parties.
Since March 2024, advertisers using certain Google advertising and measurement features in the EEA, the UK, and Switzerland have been required to provide certain consent signals to continue using those features (Consent Mode v2).
In this context, it's important to understand how Consent Mode v2 works.
When a user grants consent for analytics cookies, GA4 collects data as usual according to your configuration.
If a user declines analytics consent, with advanced Consent Mode, Google tags can continue sending cookieless pings to Google to support data modeling (Google's way of estimating user behavior when complete data isn't available because of privacy restrictions, consent choices, browser limitations, or missing identifiers). These requests don’t include analytics cookies, but they may still contain technical information required to process the request, such as an IP address, which Google then processes the IP address as part of the request but does not log or store it in GA4.
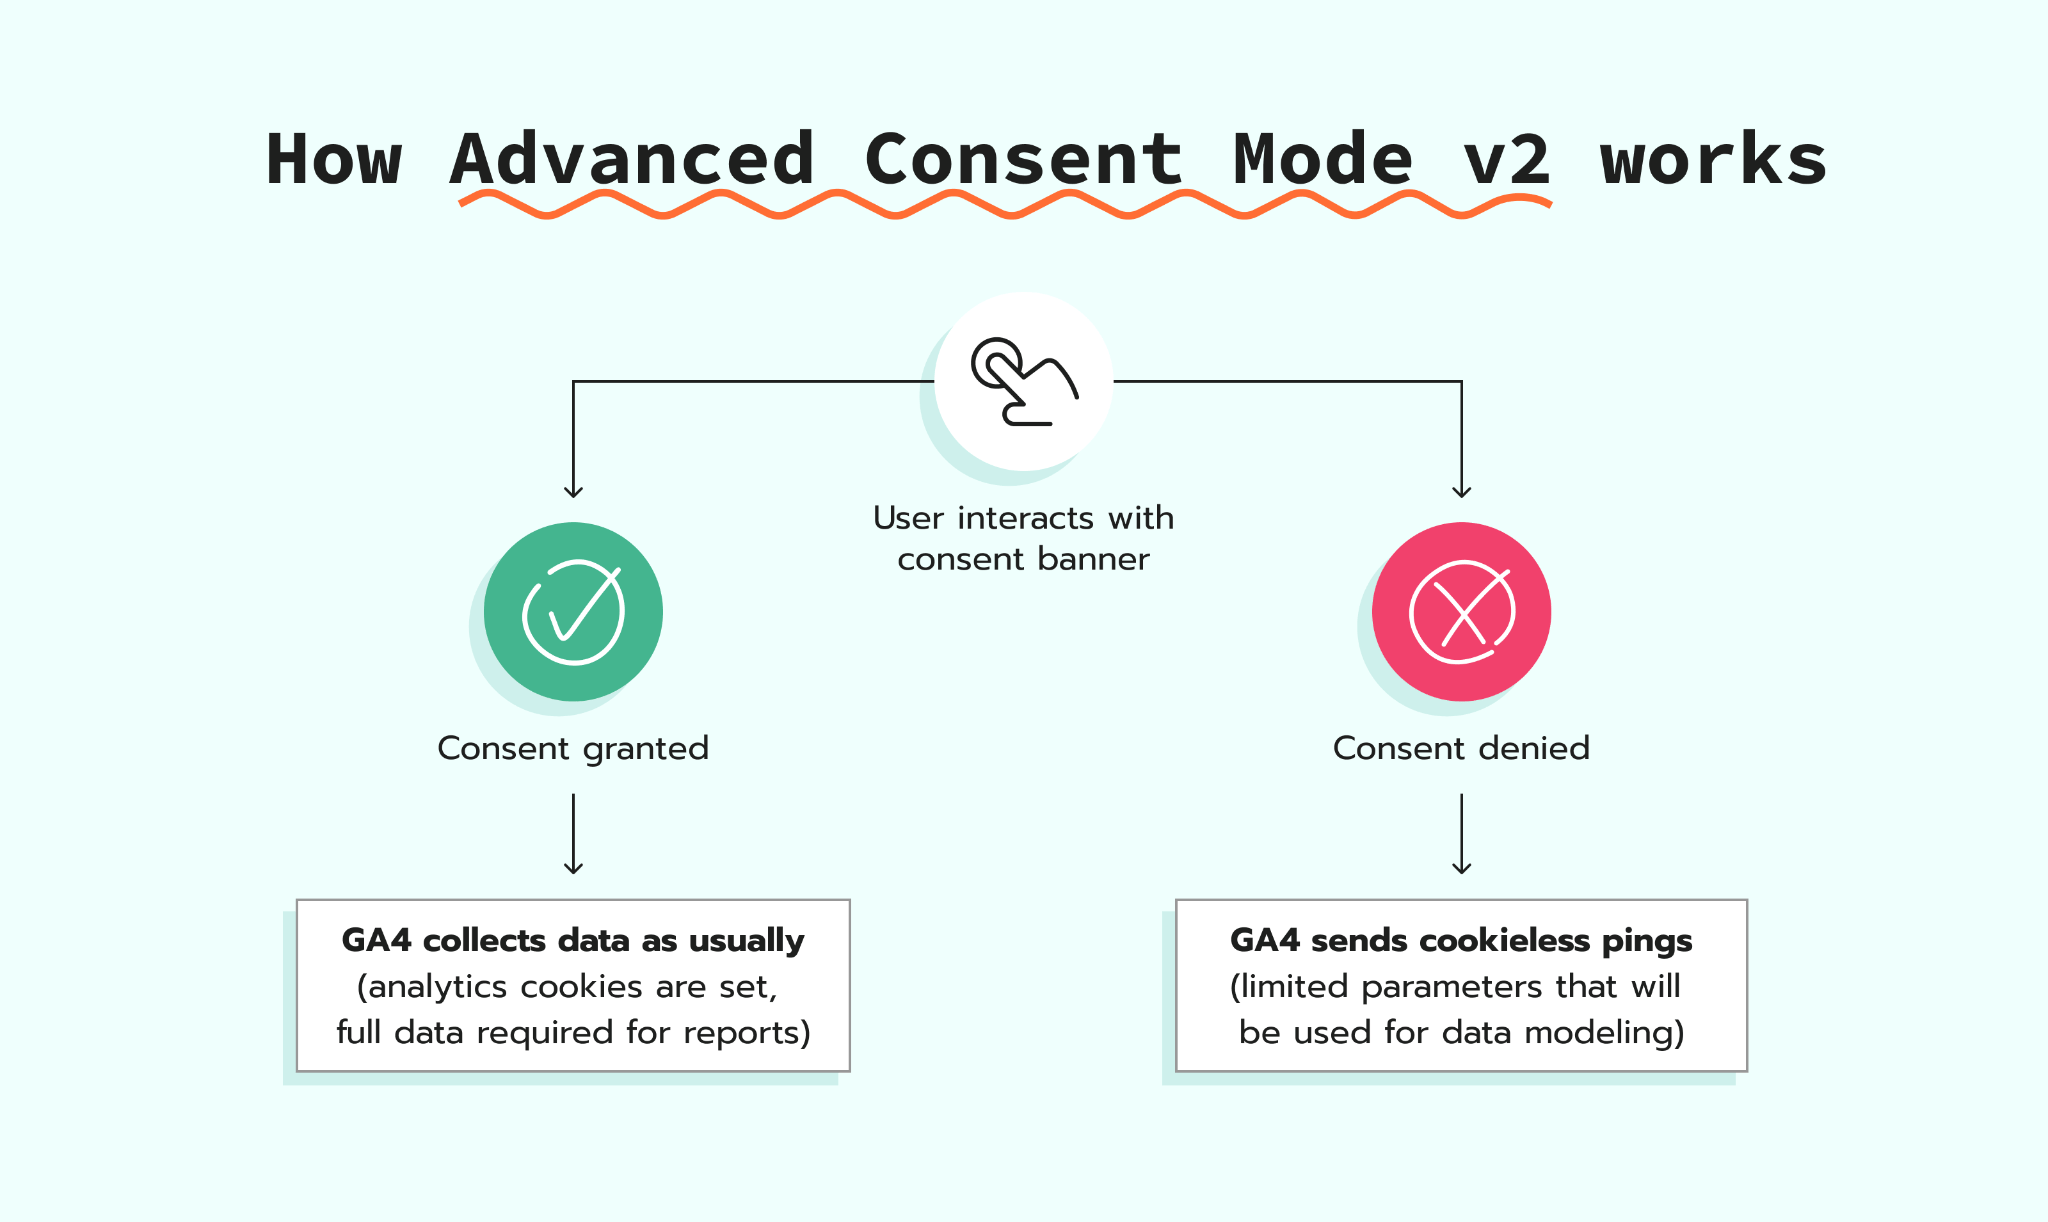
For many websites, this behavior is sufficient and aligns with Google's privacy-first measurement approach. However, for some businesses or organizations that operate under stricter internal policies or regulatory interpretations, this approach isn’t sufficient.
The limitation of GA4 IP address anonymization
A partially anonymized user's IP address can be considered personally identifiable information (PII) under certain privacy frameworks. For example, under GDPR, an IP address may be considered personal data, even when partially masked, depending on context. So, an IP address may be considered personal data even if it is truncated, especially when combined with other information that could help distinguish or identify a user.
That’s especially important when the user doesn’t provide consent to data collection and processing, since Google receives the IP address for processing and applies anonymization before storage or reporting.

When is GA4's default IP anonymization not enough?
A lot of businesses may need to ensure that the original IP address is removed or replaced before any data is sent to Google Analytics in case consent is not granted.
Examples of cases where additional IP anonymization may be needed include businesses that:
- have their own privacy policies that require anonymization before data is shared with third parties;
- work with enterprise customers that require additional security and privacy guarantees;
- handle sensitive topics or higher-risk user journeys (e.g., healthcare, MedTech, mental health, pharmaceutical, financial services, banking, and insurance, government, education websites). These organizations may prefer data architectures where analytics vendors never receive the original IP address at all;
- operate in countries where regulators have historically taken a stricter view of analytics implementations, such as Germany, Austria, France, the Netherlands, and other EEA countries.
Note:
To ensure that you need to configure the IP address replacement before sending it to GA4, consult with the legal team within your organization. The examples listed above are the commonly encountered cases among our clients.
Server-side tracking provides an additional control layer and can help you comply with data regulations. With a server-side setup, you can modify incoming requests, replace sensitive information such as IP addresses, and then send only the required data to platforms like GA4.
Below, we show how to replace the original IP address before the data is sent to GA4.
How to replace the original IP address before sending data to GA4
Before you begin
The configuration of IP address anonymization can be done even if you are on the free plan with Stape; the solutions we use are available either in the Stape admin account or in the server GTM container.
So, to start, make sure you have:
Hint:
The tags, triggers, variables, clients, and other GTM entities for multiple platforms can be automatically configured using a free solution by Stape – Setup Wizard.
- Consent management platform (CMP) configured (as an example, we use Iubenda, but it can be any other CMP that works for you);
Step 1. Enable Stape's GEO header power-up
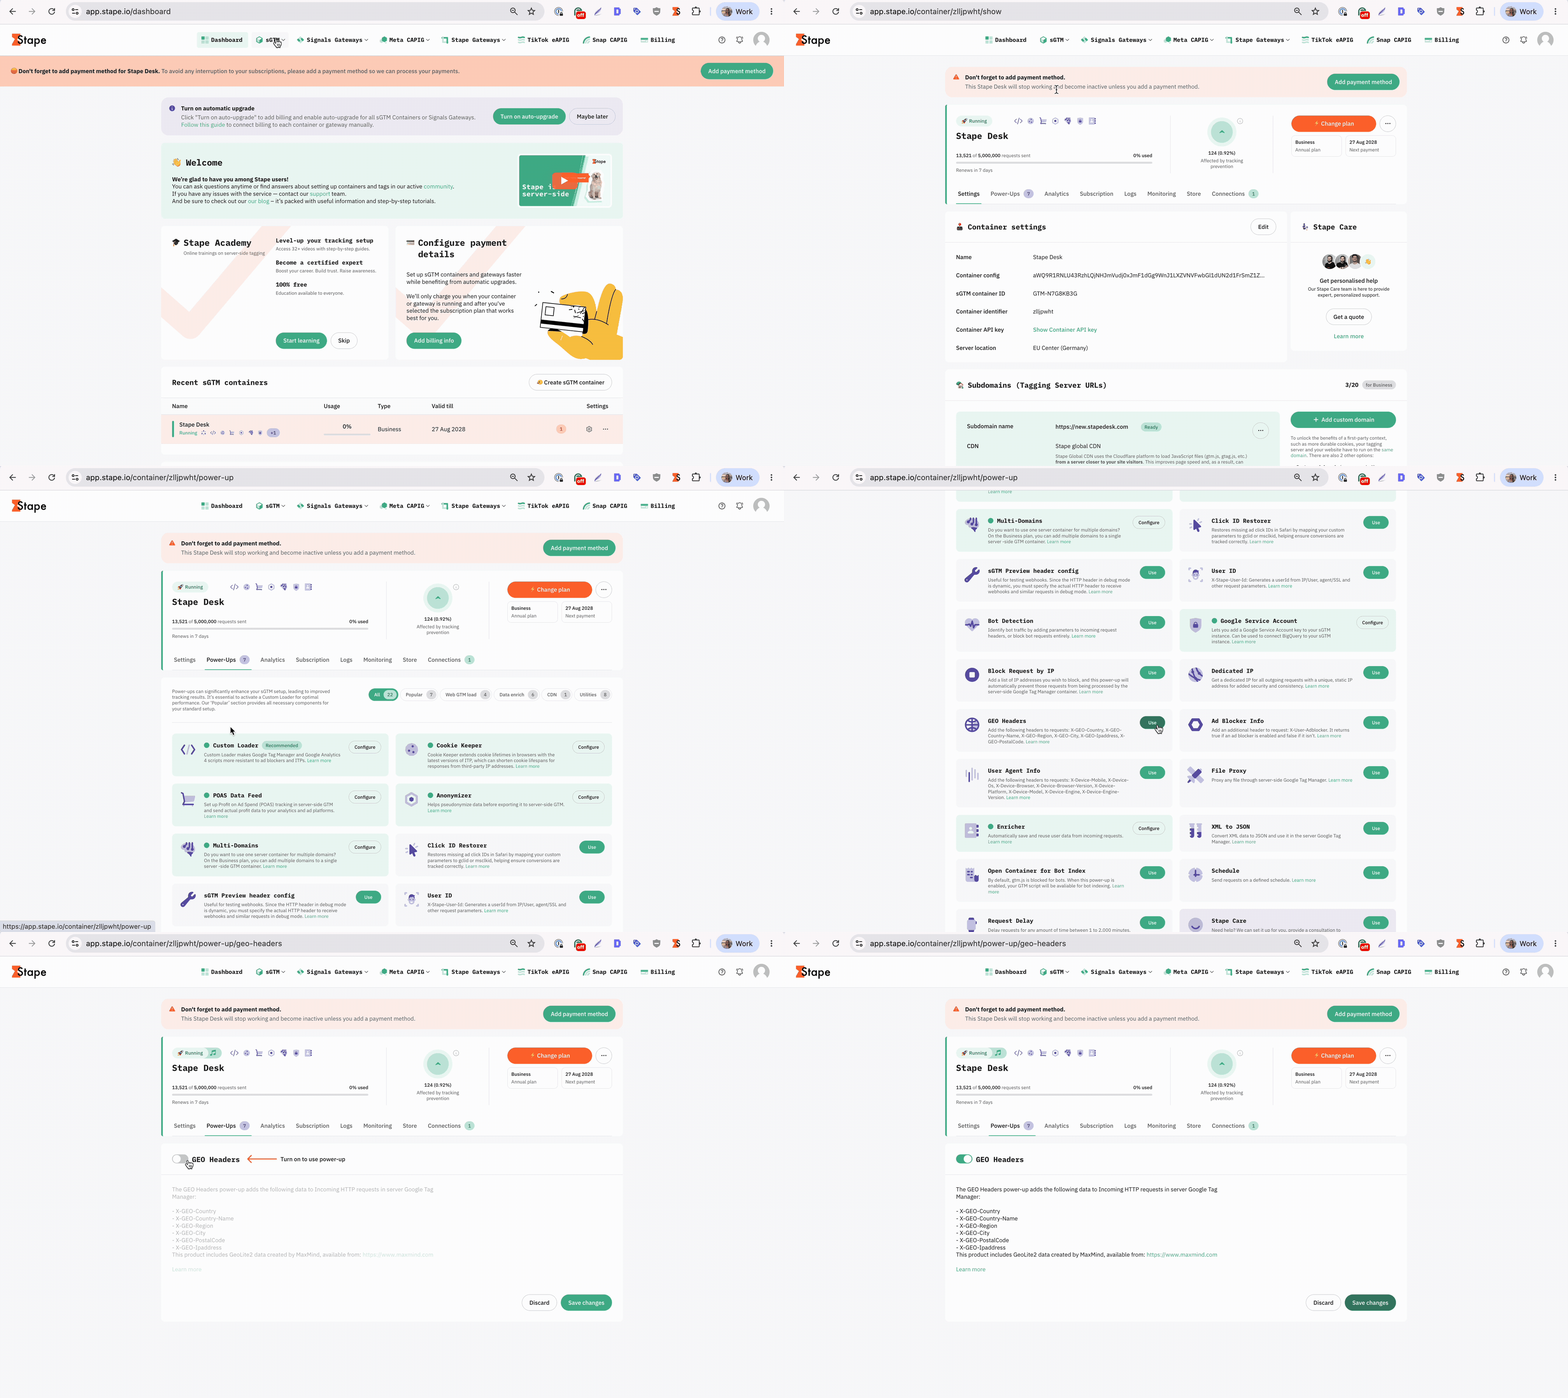
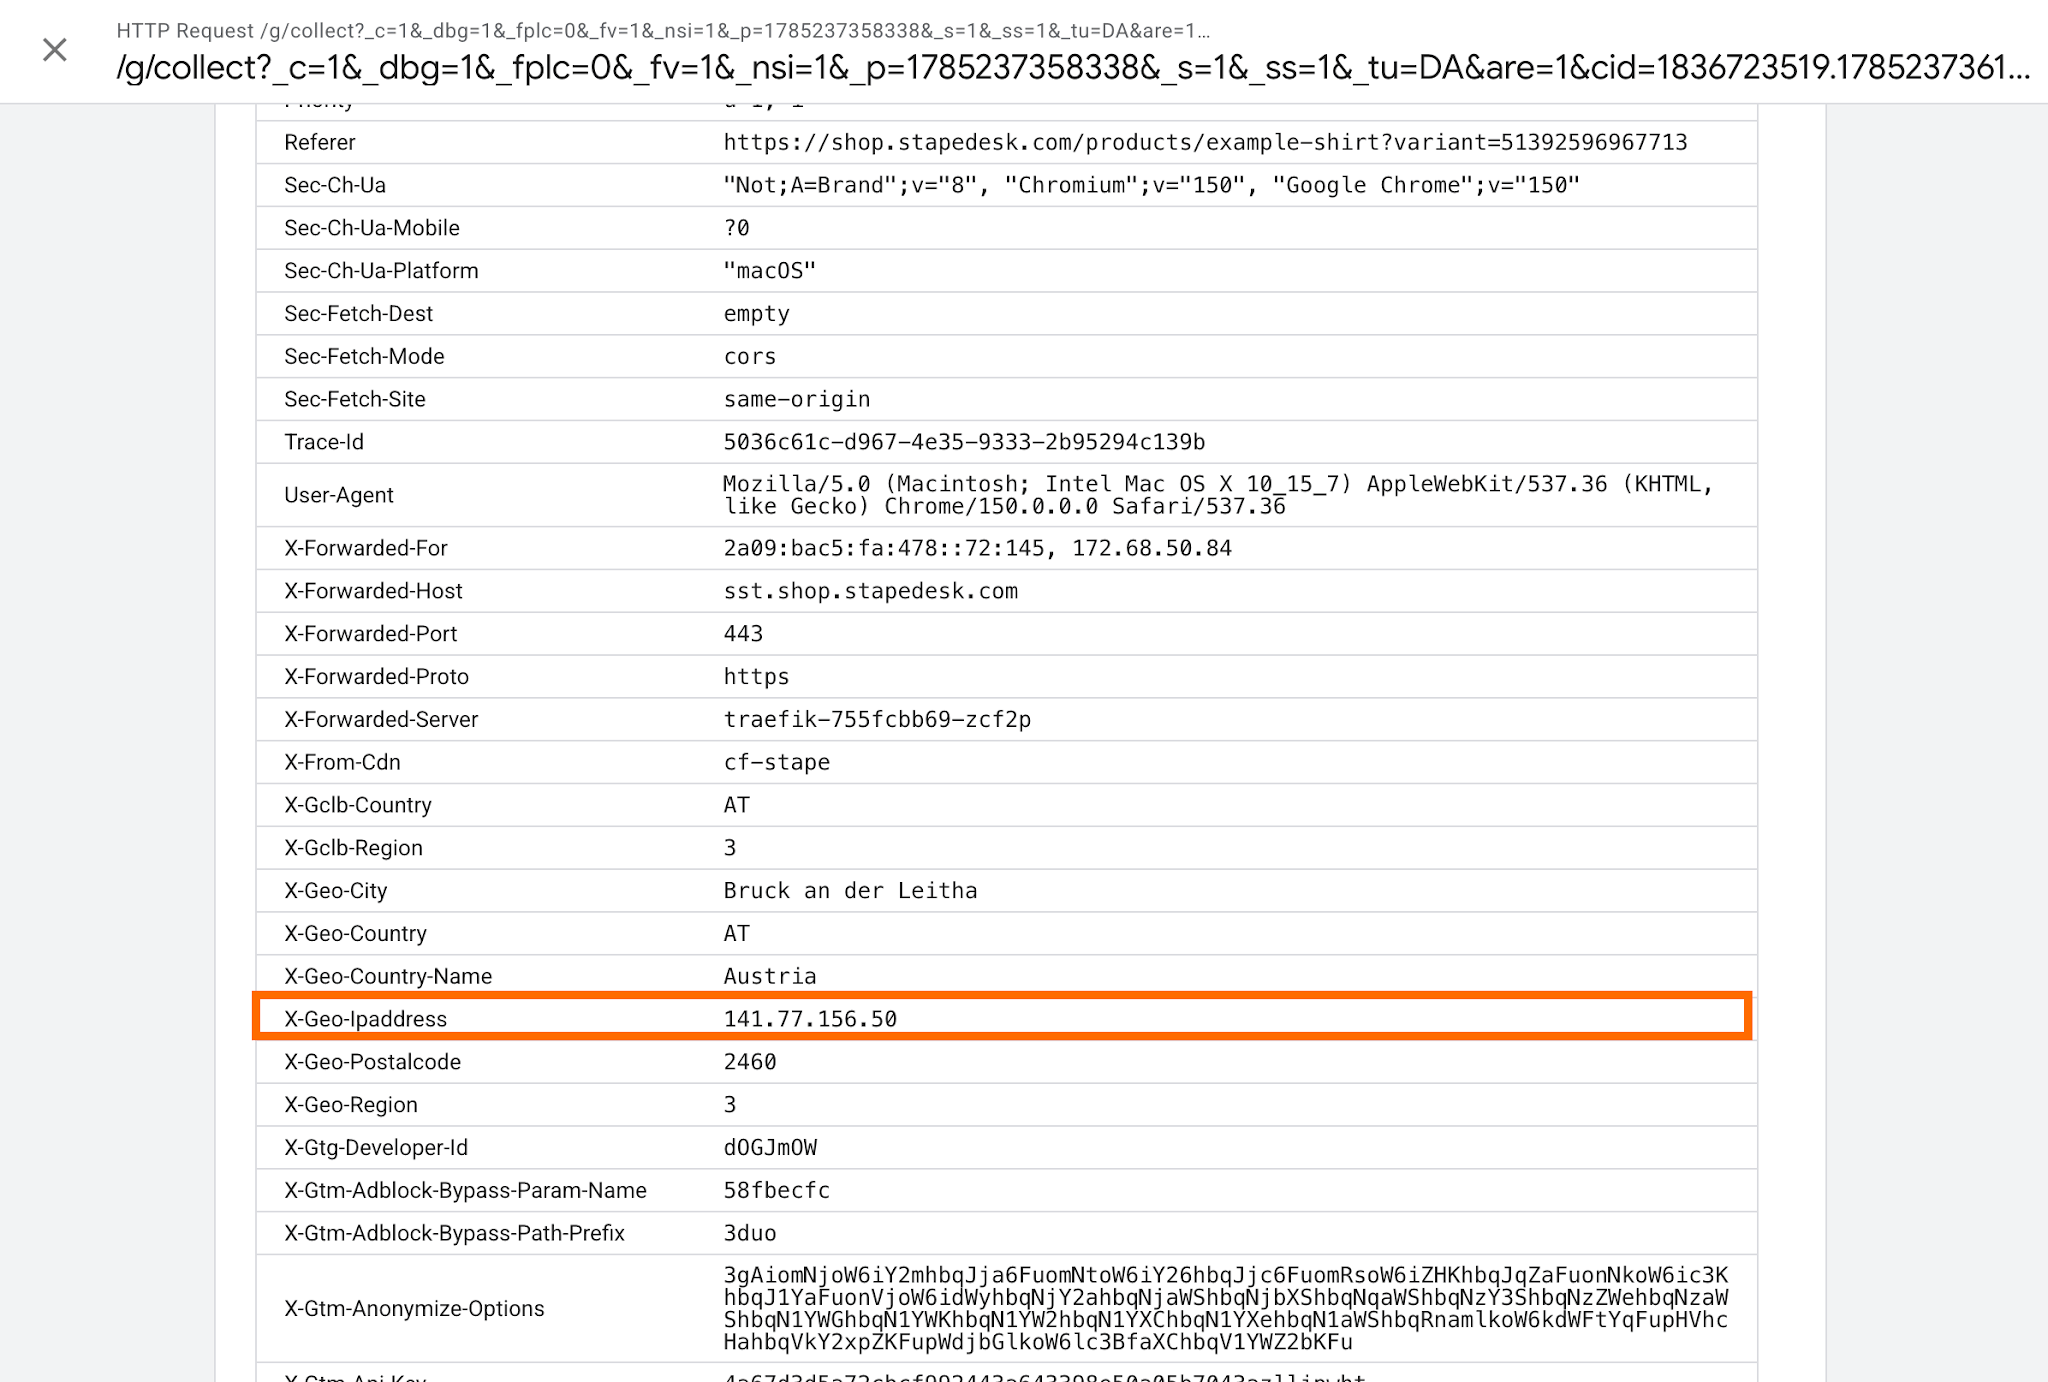
GEO Headers power-up provides the IP address with which the original users' IP addresses will be replaced. It populates geographical location headers based on the actual visitor's IP address from the incoming HTTP request.
The power-up is available on the free plan. To configure it, log into your Stape account → click on your container → go to the Power-ups tab → find GEO Headers, and click Use next to it → enable the toggle → click Save changes.
Step 2. Create a variable to determine which IP should be sent to GA4
In this step, you need to set the conditions that determine whether Google Analytics receives the user's original IP address or the IP address generated by the GEO Headers power-up. The logic is the following:
- If analytics consent is granted – GA4 processes the IP according to its own IP handling before it is stored or used in reporting;
- If the user doesn't provide consent to analytics_storage – the original IP is replaced with the one generated by our power-up, and only then it’s sent to GA4.
We'll use an Advanced Lookup Table variable for this purpose.
Start by adding the variable to your server GTM container. Go to your server GTM container → Templates section → click Search Gallery → look for Advanced Lookup Table → click Add to workspace.

Go to the Variables section in sGTM → click New → select Advanced Lookup Table as variable configuration.
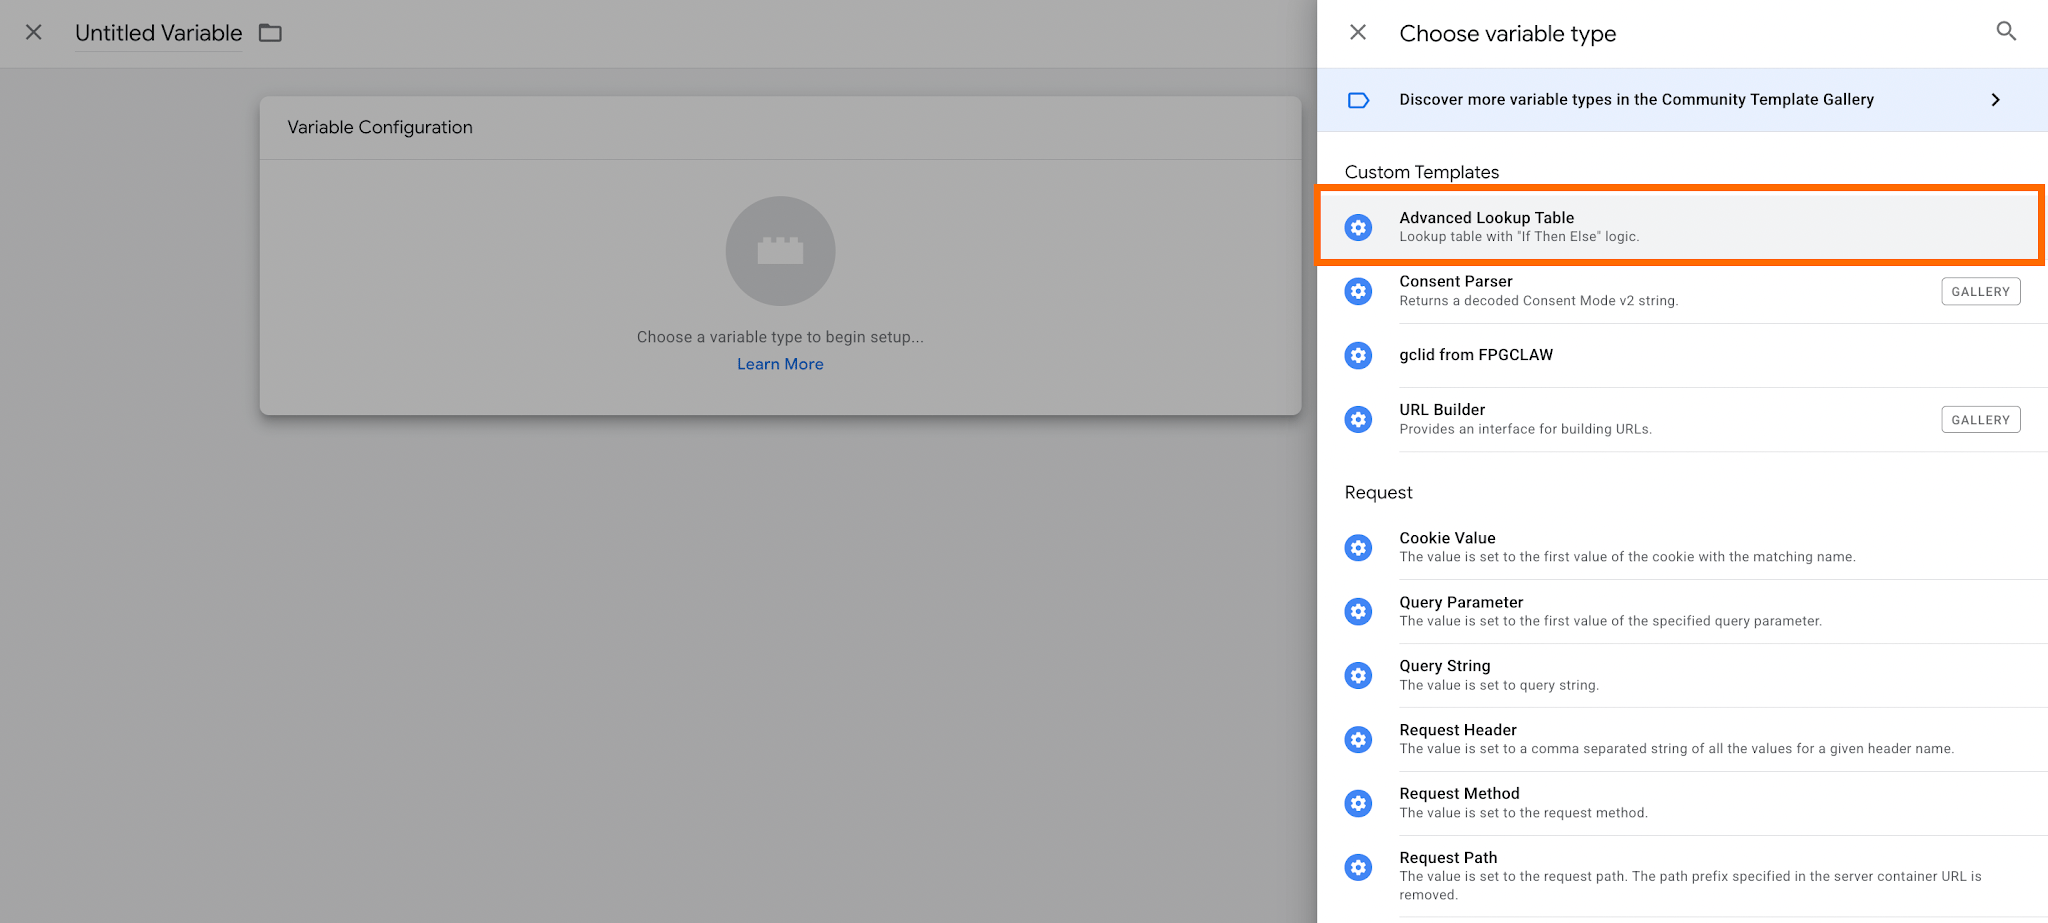
Add a row in a variable with the following condition:
| If the GCS parameter equals G101 or G111 (analytics_storage is granted), return the value from x-real-ip. |
Let's break down into small steps how to do it:
1. GCS parameter variable
The GCS parameter is a Google Consent State parameter used by Google Consent Mode to communicate a user's consent choices to Google services, such as GA4.
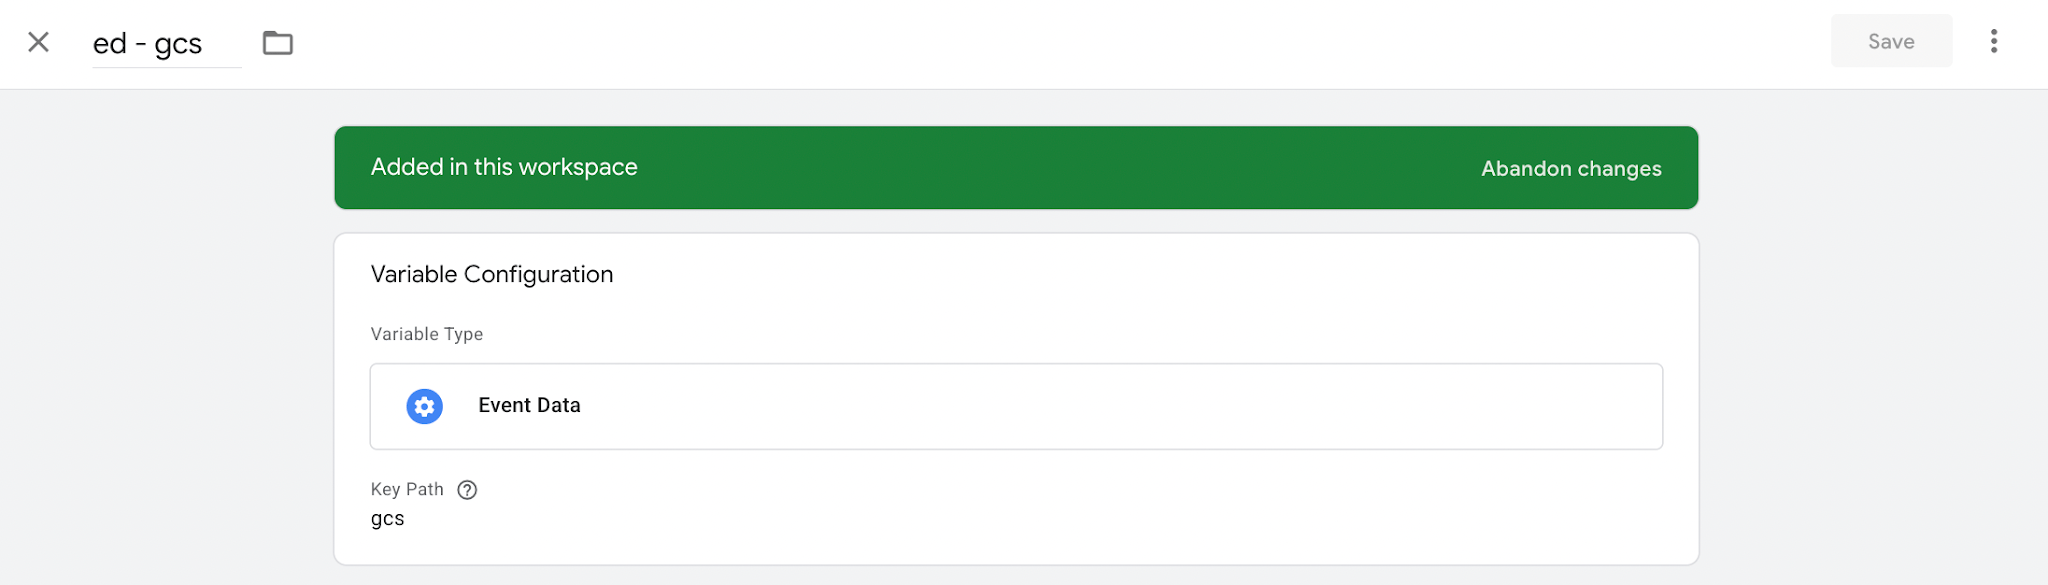
You need a variable that will read the value of the GCS parameter from the request that reaches your sGTM container. Set the following configs for the variable:
- Variable Type: Event Data
- Key Path: gcs
2. X-Real-IP value
X-Real-IP is an HTTP request header commonly used by proxies, load balancers, CDNs, and servers to pass the original client IP address to the backend server.
You can double-check whether this specific parameter is present in your Incoming request. To do it, run a preview in both web and server GTM containers, trigger some event, and navigate to the "Request" tab → open "Incoming HTTP Request".
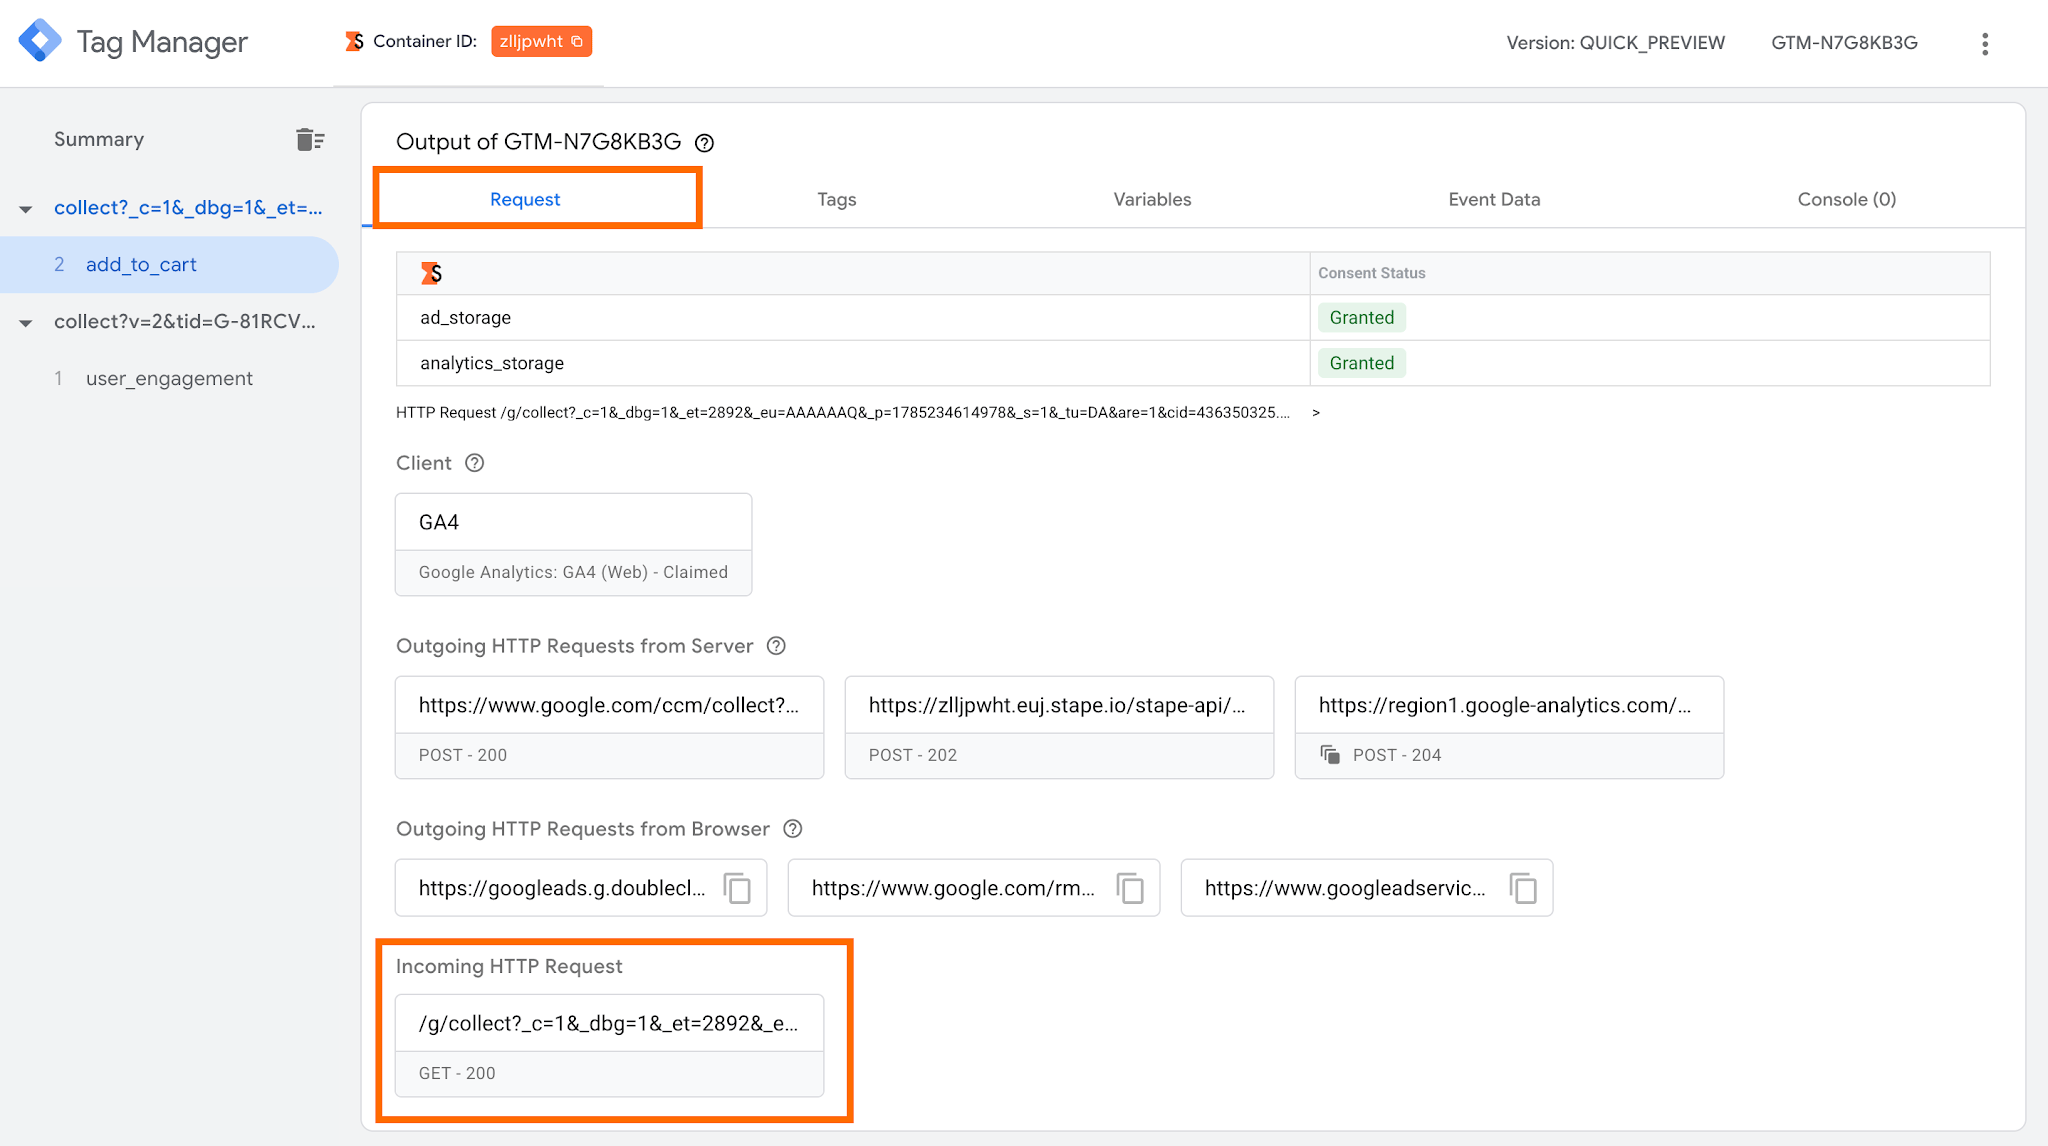
In the Incoming request, you'll see your IP address; the parameter where the original IP address is specified must be used for the variable.
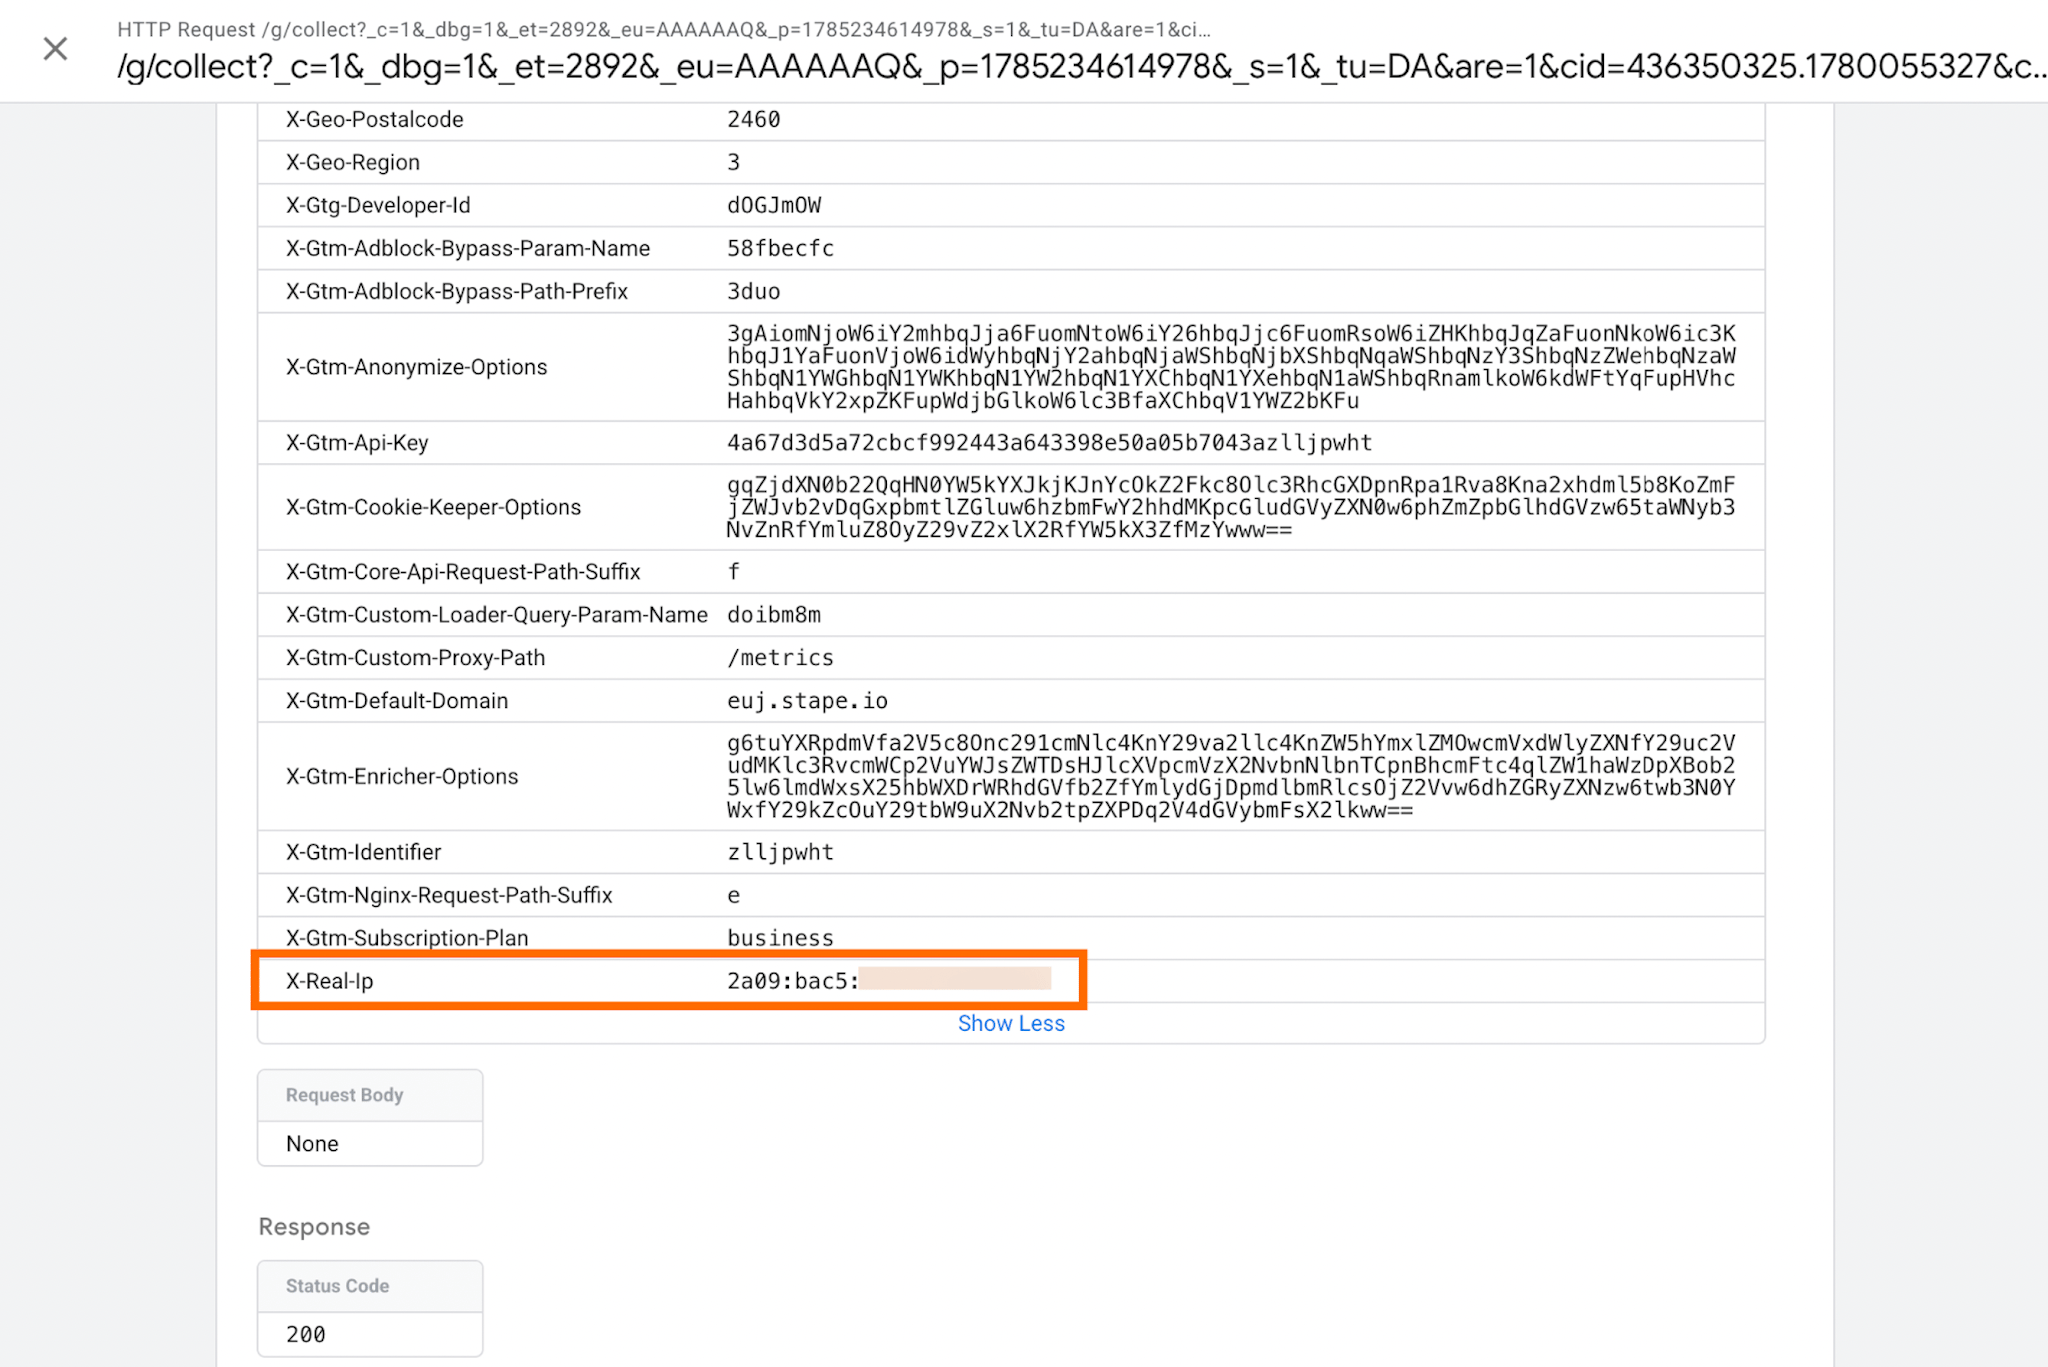
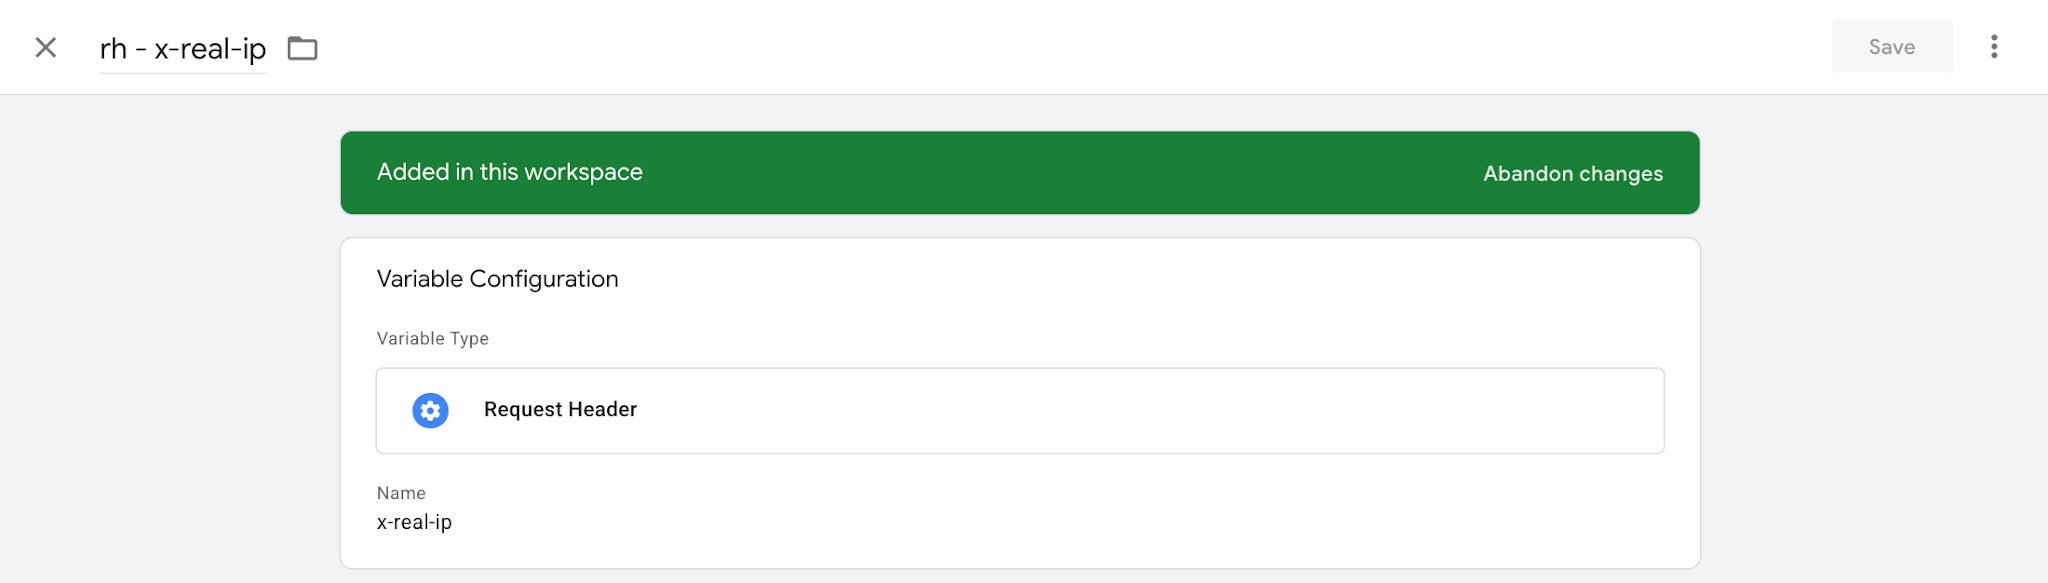
Set the following configs for the variable:
- Variable Type: Request Header
- Name: x-real-ip (in our case)
Now you have everything required to complete the variable with this condition. Here's how it looks in an Advanced Lookup Table variable:
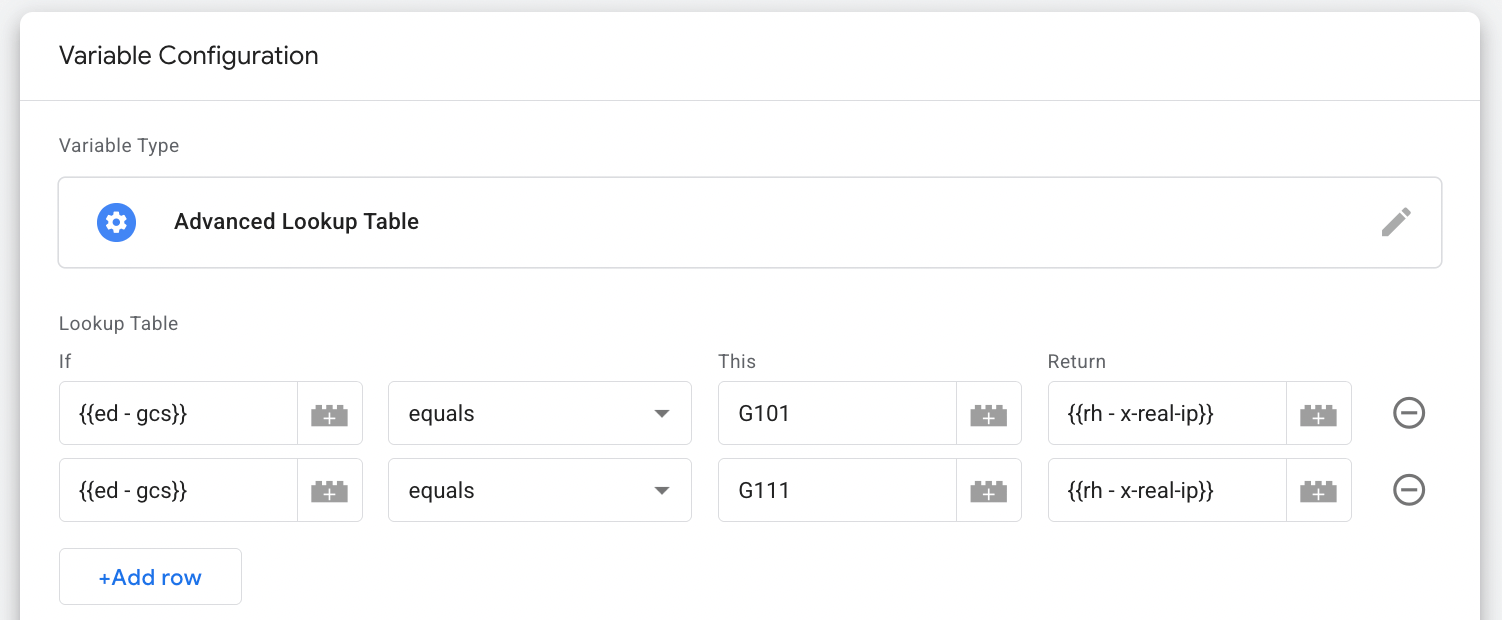
Also, you need to add a default condition for this variable:
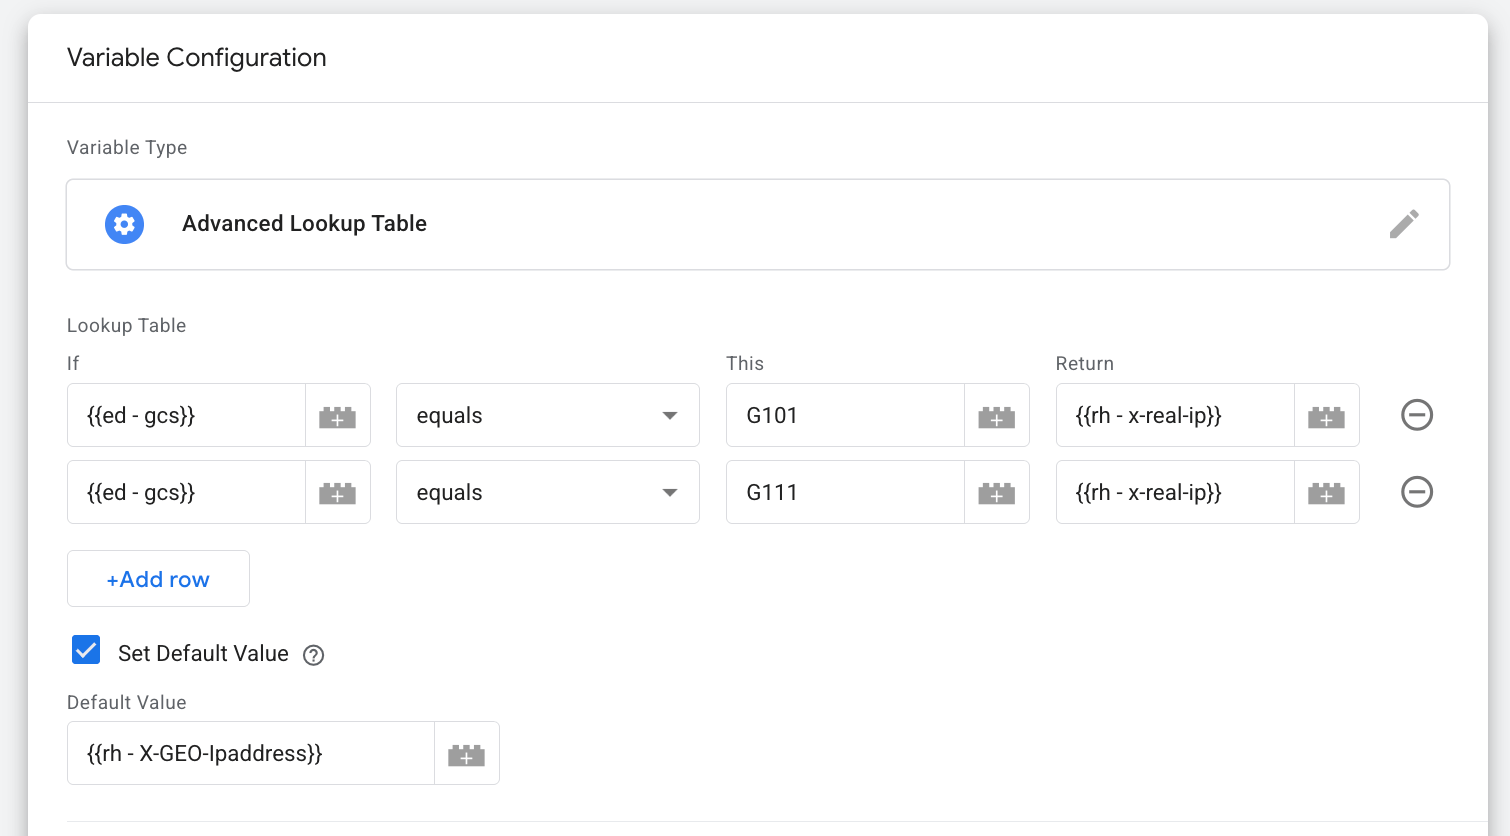
| For all other gcs values, return the value provided by X-GEO-Ipaddress. |
To do it, check the box next to Set Default Value within the Advanced Lookup Table variable and create the following variable:
- Variable Type: Request Header
- Name: X-GEO-Ipaddress
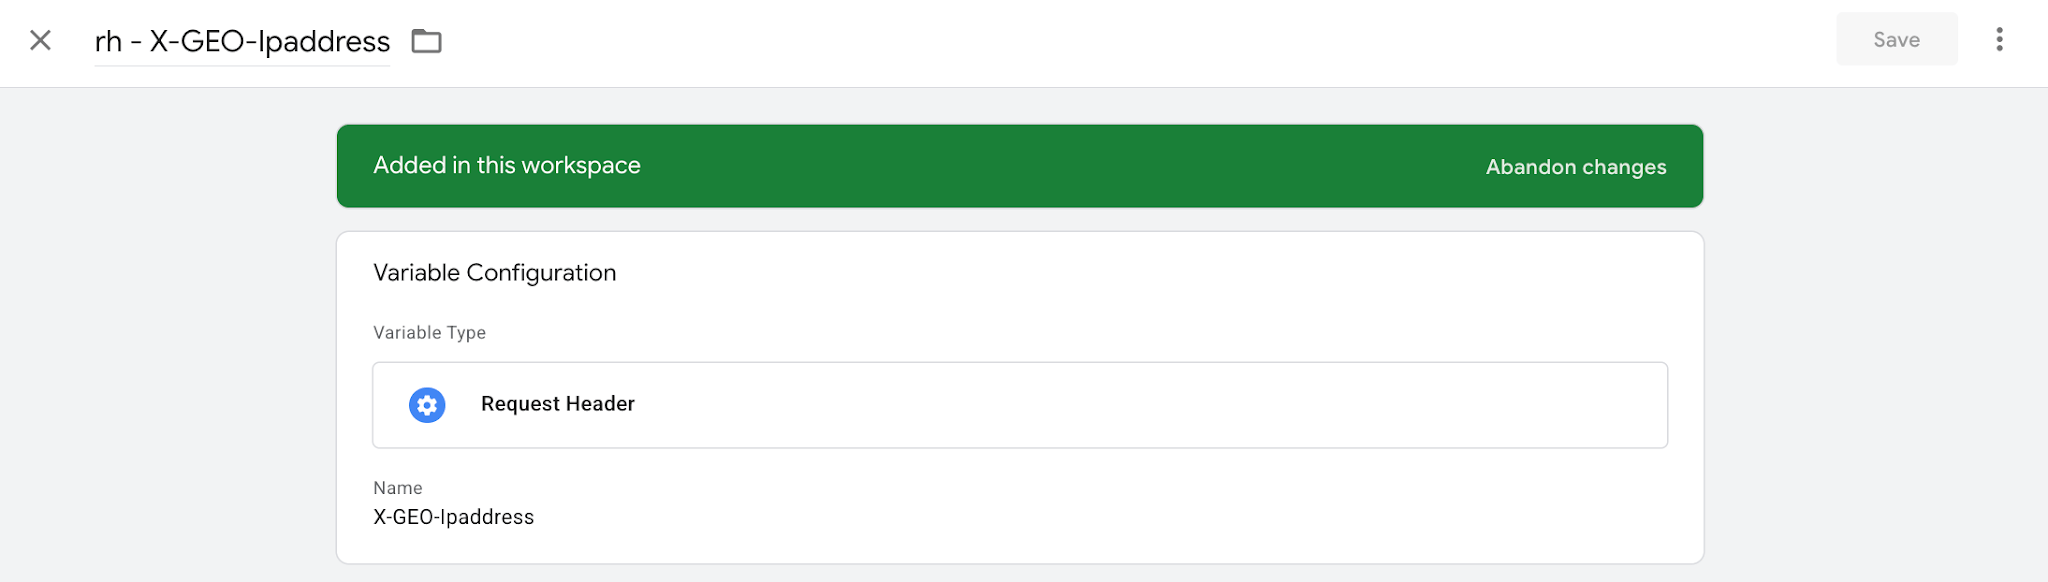
Here's how the configured Advanced Lookup Table variable looks:
Step 3. Pass the anonymized IP to Google Analytics 4
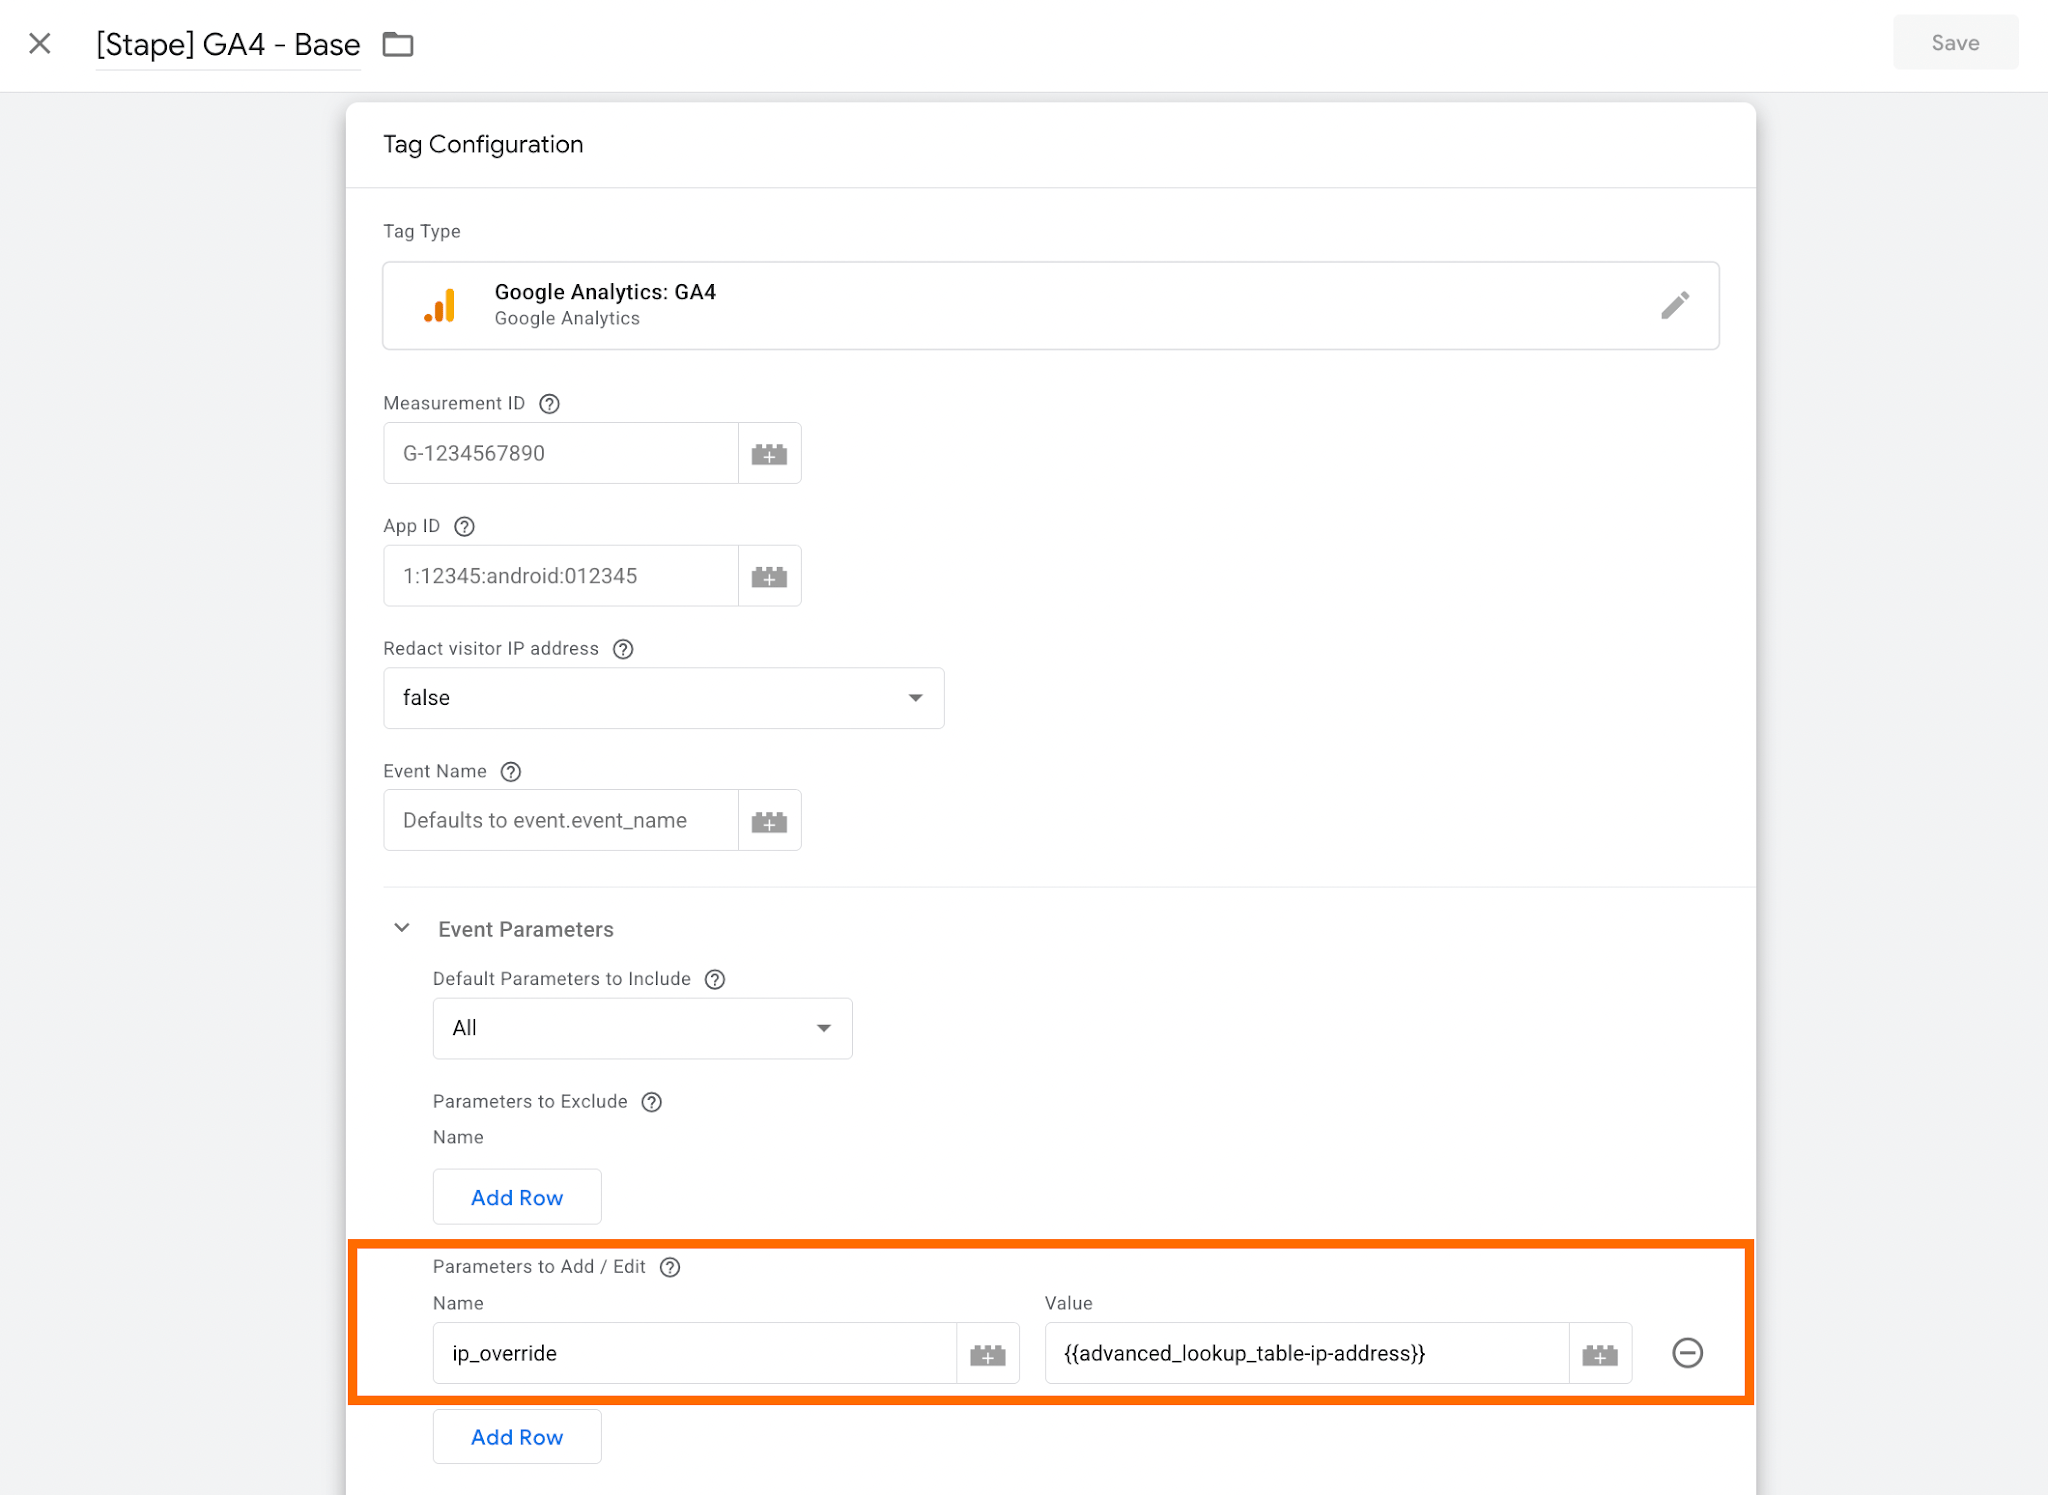
Now, you need to add the variable you created in the previous step to the GA4 base tag in the server GTM container, so the rules specified can be applied while collecting data.
To do it, go to the Tags section → find the GA4 tag → in the tag, open the Event Parameters section → as Parameters to Add/Edit, add ip_override and as value for it, select the Advanced Lookup Table variable you've configured in the previous step.
Save the changes.
How to verify GA4 IP anonymization is working properly
The setup verification can be done using web and server GTM previews. For more convenient troubleshooting, we recommend installing the Stape GTM Helper Chrome extension.
Why will Stape GTM Helper be beneficial for this specific config verification? For two main reasons:
- The extension allows you to see in the server GTM preview the current consent status. By default, GTM doesn't provide such an option.
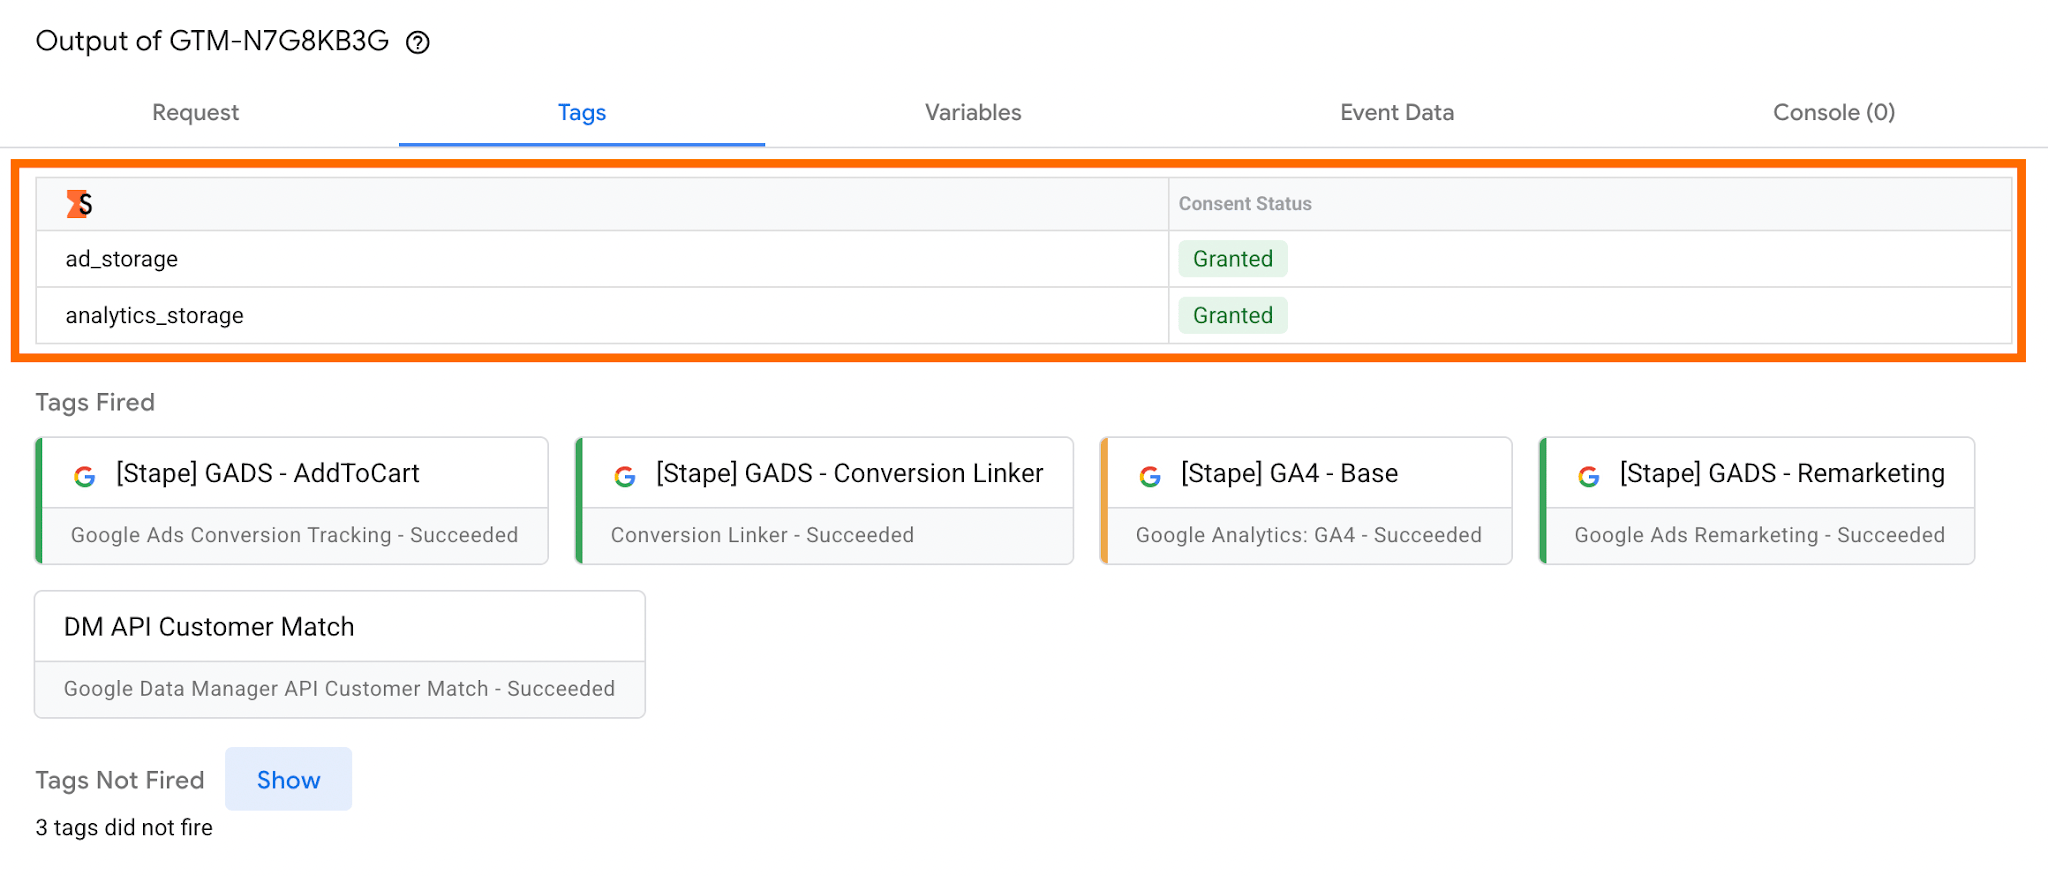
- The request data (where the IP is displayed) is listed in a more structured way, so you can easily navigate while debugging.
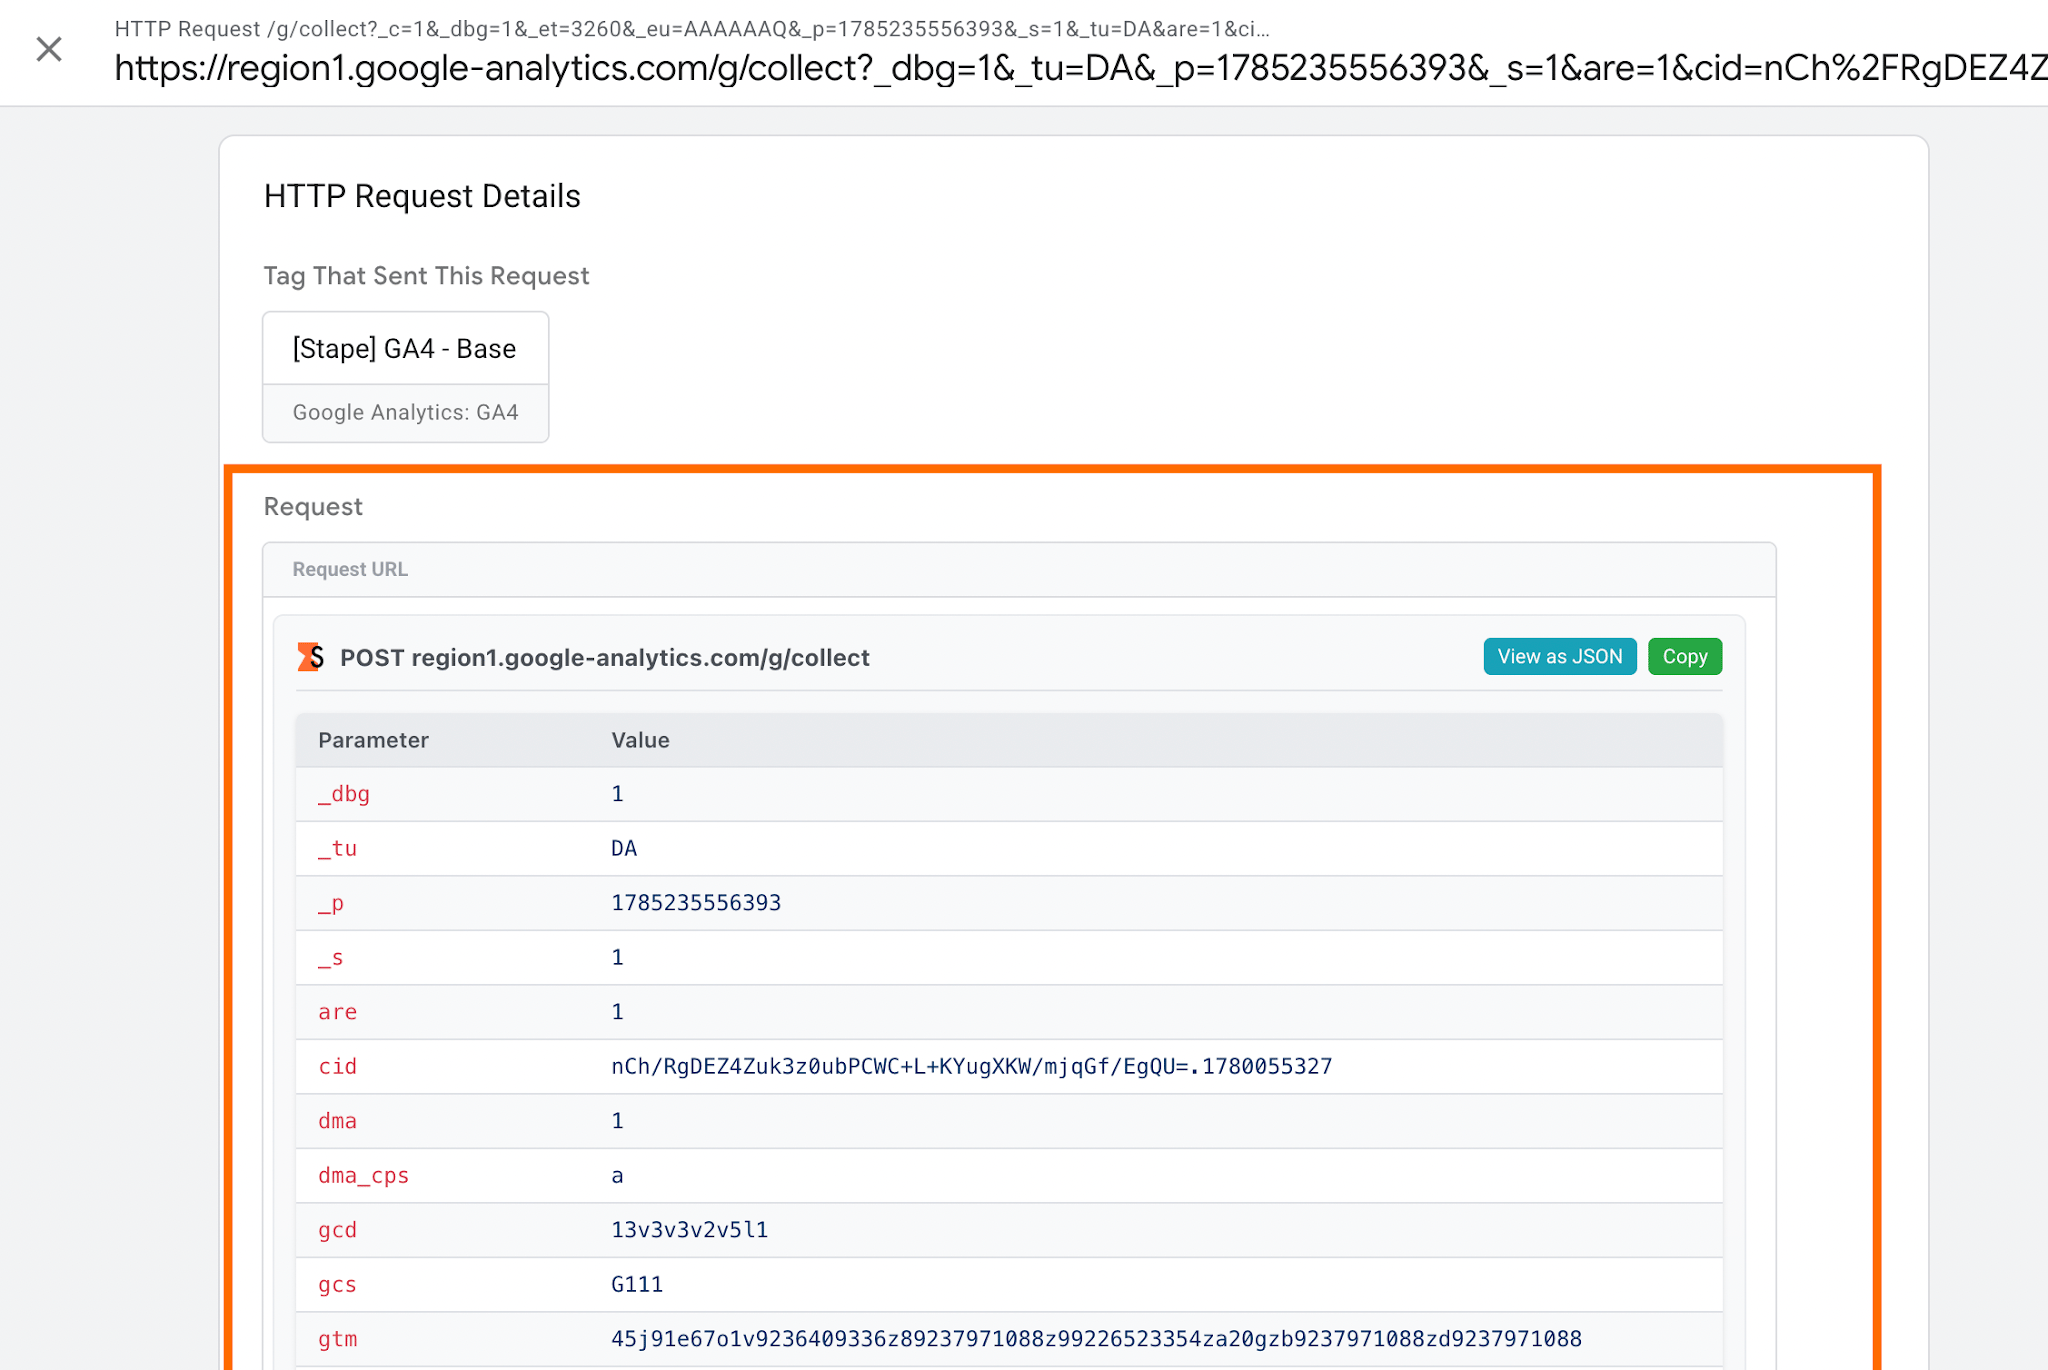
We've done the configuration for the Shopify website, so the extension allows us to troubleshoot the checkout page events as well (by default, it's not possible to do so with GTM preview due to a restricted environment).
Stape GTM Helper provides more features for easy debugging; you may check them in our other blog post.
Now, let's start with setup verification. Once you install Google Analytics 4 and implement the IP replacement logic outlined above, it is crucial to make sure the data flows correctly.
1. Run the Preview in both web and server GTM containers.

2. Interact with your consent banner and set the consent status to reject/deny and perform some action to trigger any tag.
3. Navigate to the server GTM debug window → Request tab → in the Outgoing HTTP Requests from Server section, find the request that contains Google Analytics (that's the request that is sent to GA4).
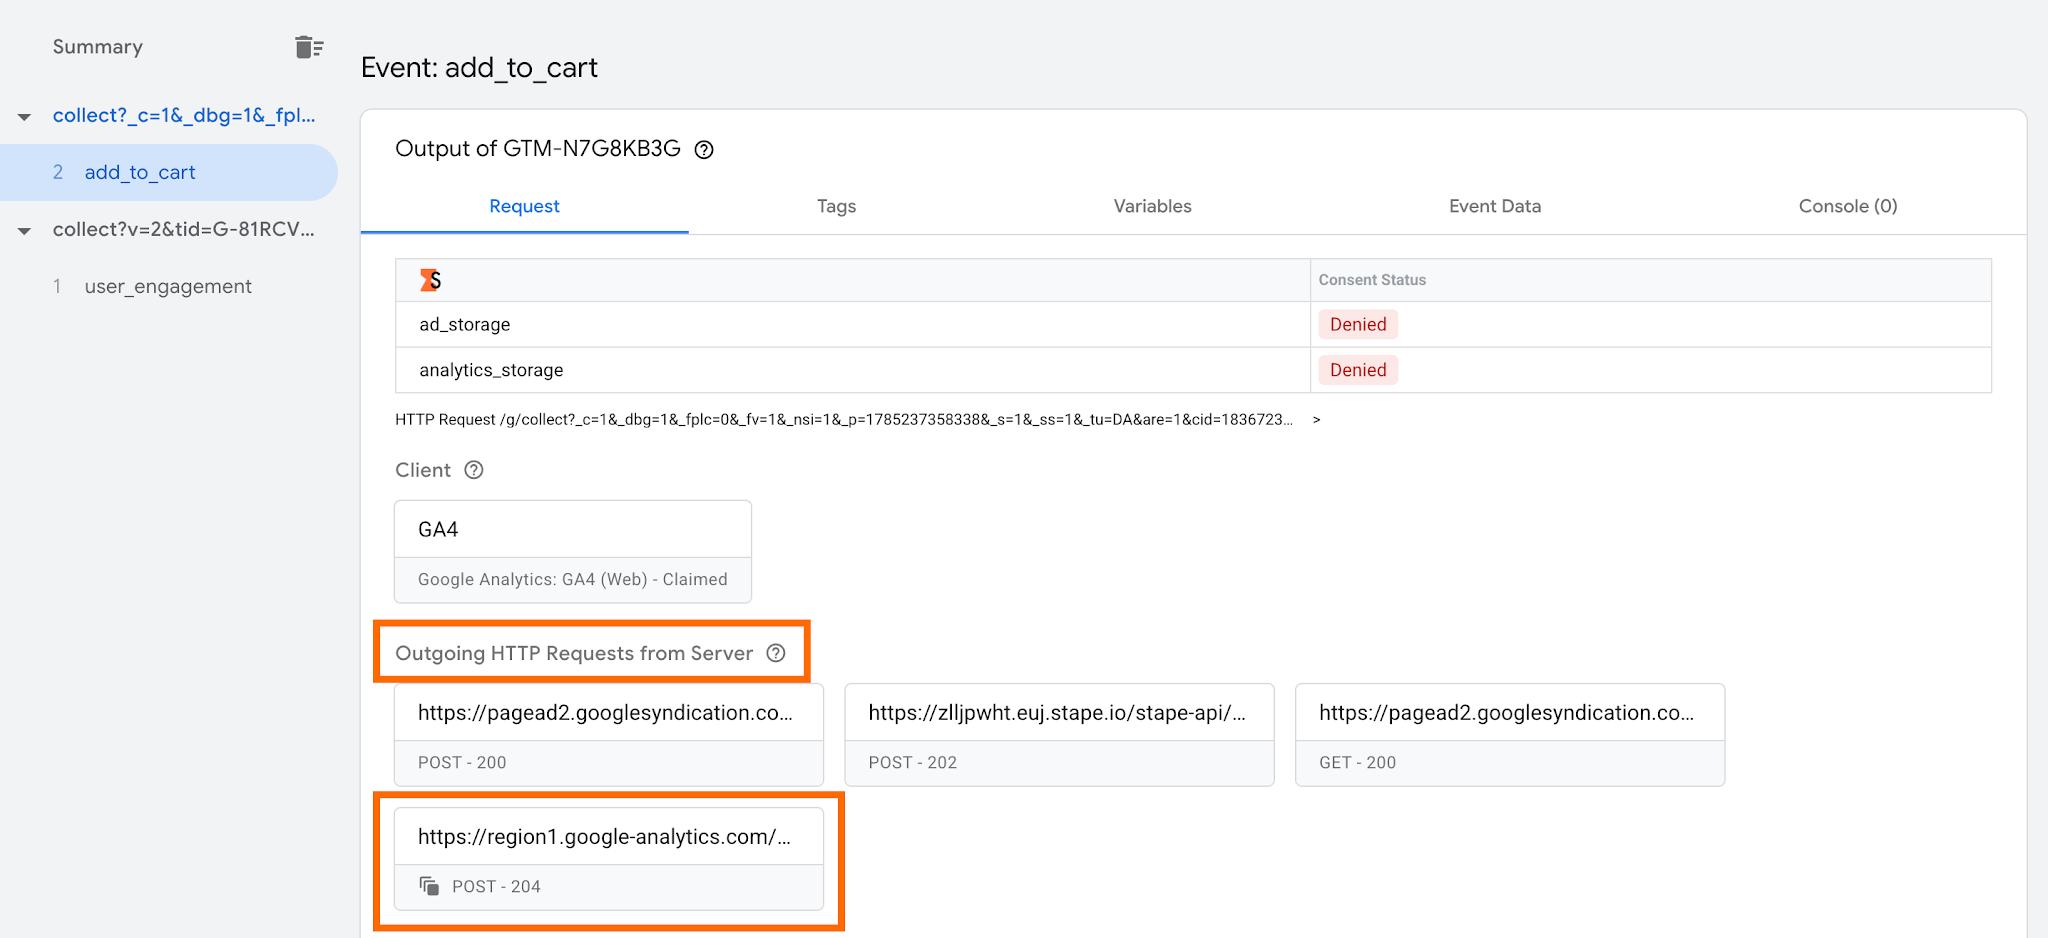
4. Check the parameter _uip. If everything is set up correctly, it must be different from your actual IP address.
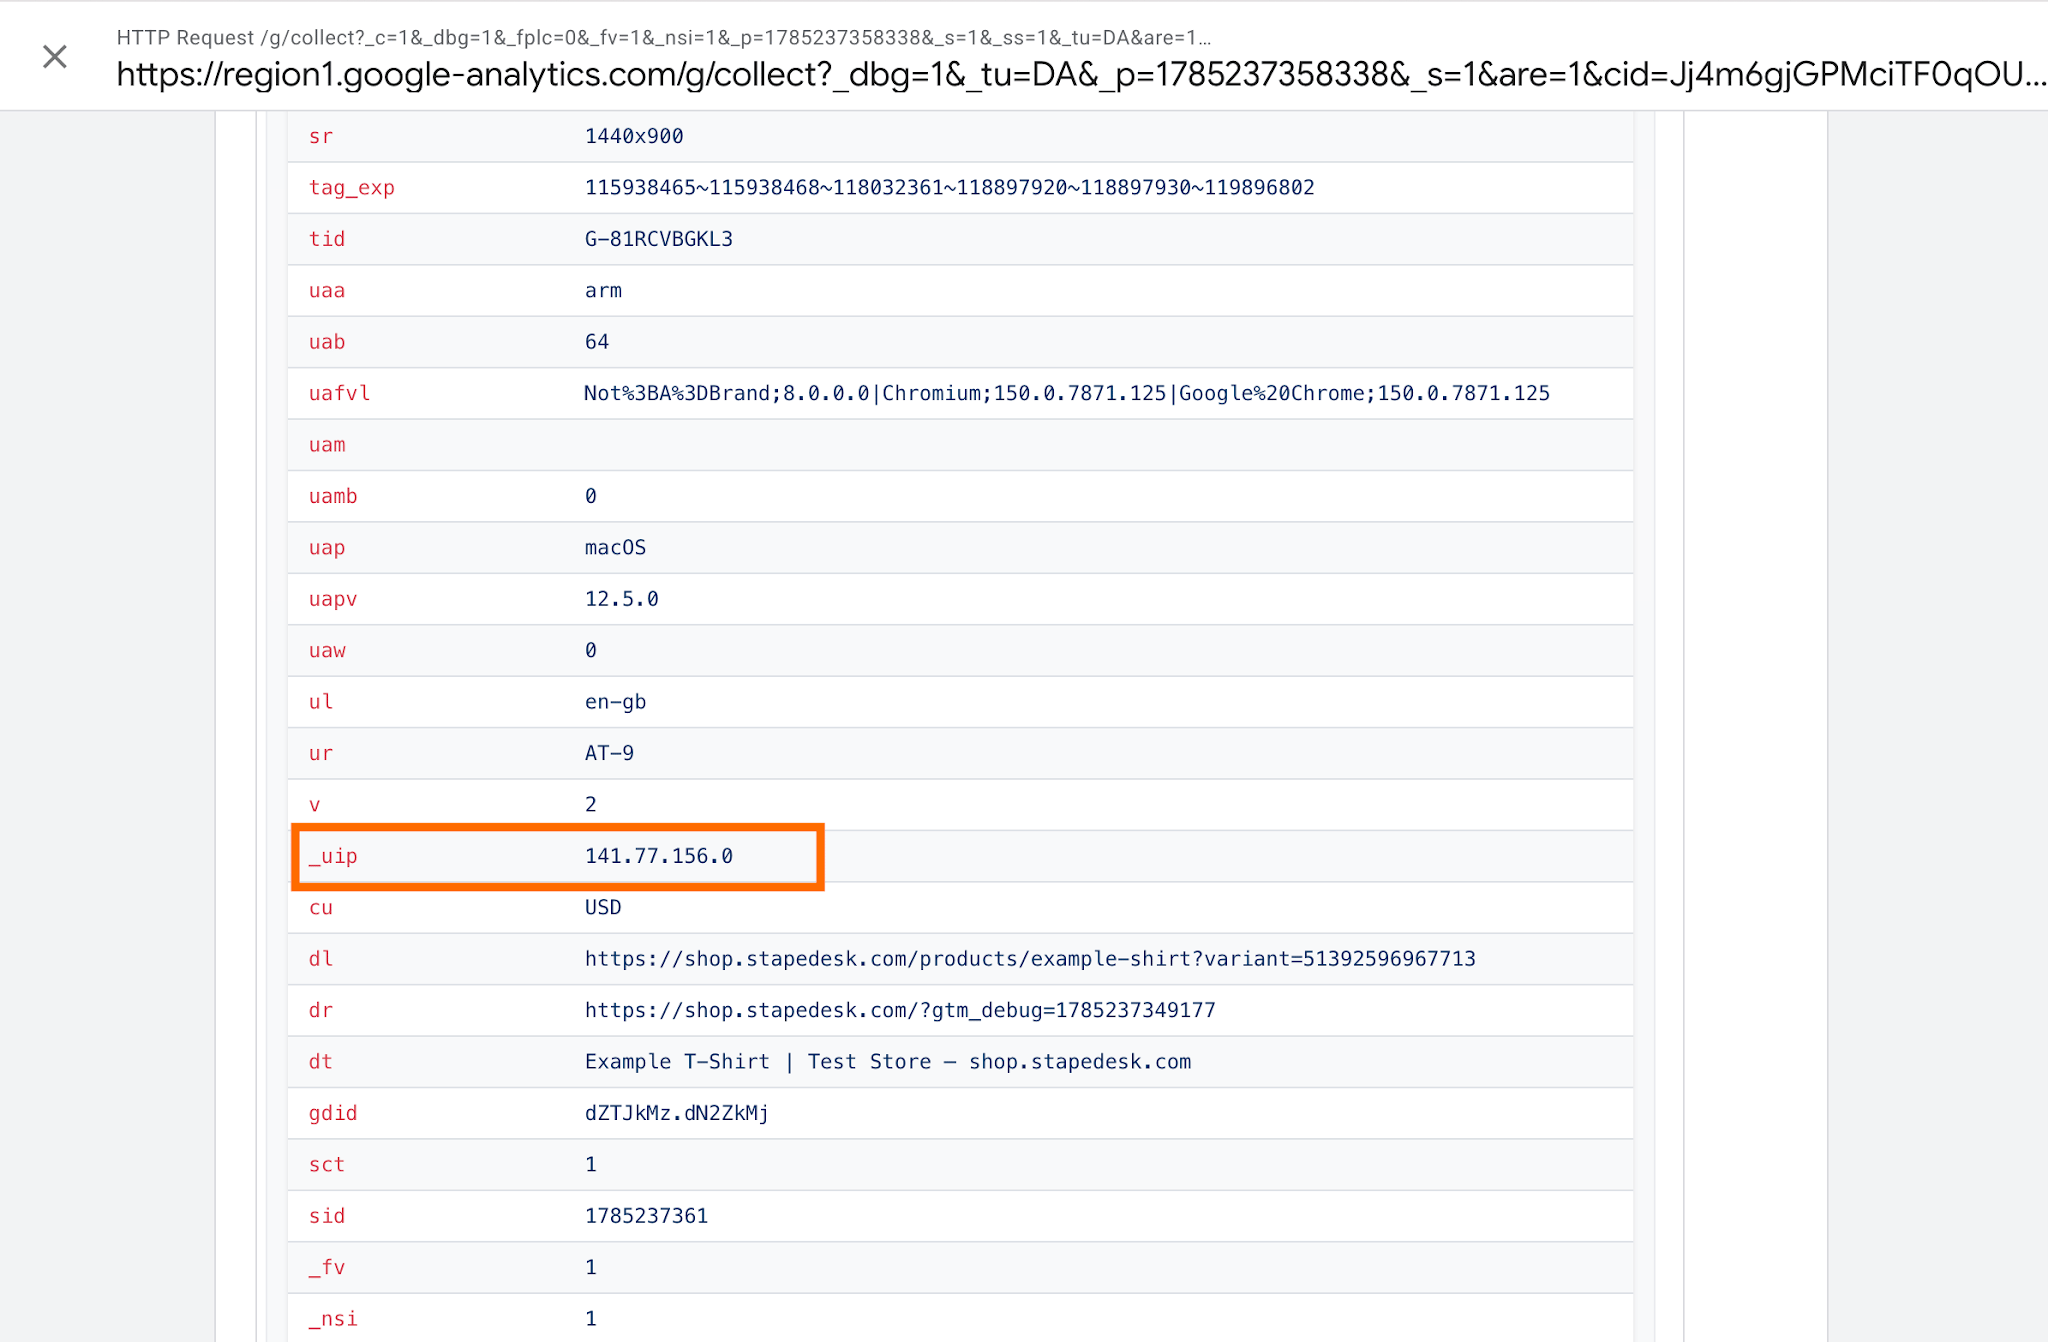
The _uip will be similar to the one you see in the Incoming request provided by the Stape GEO Headers power-up, but due to GA4's default IP anonymization, the value will be slightly modified, which is totally fine.
FAQ
Does GA4 still collect my visitors' IP addresses?
GA4 temporarily receives visitors' IP addresses during data collection to determine approximate geographic location. However, IP addresses are not logged or stored by Google Analytics. This processing occurs automatically within Google's infrastructure.
Can I turn IP anonymization off in GA4 for better location accuracy?
No. There is no setting in GA4 to manually enable IP anonymization or disable it. If your use case requires full IP address information, you must handle that outside GA4 – for example, in your own first-party server logs.
Is using GA4 without a cookie banner GDPR compliant if IPs are anonymized?
Anonymized IP handling alone doesn't eliminate the need for consent. Cookies, client IDs, and other identifiers used for analytics and marketing purposes still require a legal basis under GDPR and ePrivacy regulations.
Do I still need to mention IP anonymization in my privacy policy if GA4 does it automatically?
Yes. Best practice is to explain in your privacy policy how you use Google Analytics, including info that GA4 doesn't store full IP addresses and relies on anonymized location data. Transparency about your analytics collection network, consent practices, and use of server-side tracking reduces regulatory risk and builds user privacy trust with your visitors.

Comments