How to configure consent management using GTM and iubenda
Uliana Lesiv
AuthorSetting up consent management is more important than ever, taking into account regulations like GDPR and CCPA. In this article, we will guide you through configuring consent management using iubenda and Google Tag Manager (GTM). The setup includes the following steps, which we will describe in detail further in the article:
- Activating Privacy Controls and Cookie Solution in iubenda.
- Integrating iubenda with GTM and setting up consent via GTM.
- Setting up the server GTM container, custom domain, and Custom Loader.
- Configuring server-side GA4 and consent settings for GA4.
Besides the configuration process, we will also highlight the benefits of server-side consent management, how it works, and implementation options in Google Consent Mode v2.
Benefits of server-side consent management
Server-side tracking offers numerous benefits that make consent management easier:
- Improved data privacy compliance. Managing user consent on the server level makes meeting data regulations (such as GDPR, CCPA, and ePrivacy) easier, as you have high control over the data collected. Also, server-side connection minimizes unauthorized third-party access, improving data protection and user trust.
- High data security. Data is handled securely on servers, and there is a lower risk of tampering or interception than client-side methods.
- More reliable data collection. The data collected is not affected by browser restrictions and ad blockers. Besides, server-side tracking provides anonymized data handling, which means that in consent-restricted scenarios, the data is collected through anonymized methods, supporting machine learning and decision-making based on aggregated insights.
- Cross-platform consent management. To maintain consistent data handling, apply the same consent preferences across web and mobile platforms. With server-side consent management, creating centralized consent configurations by synchronizing settings across various tools and systems is easier.
How server-side consent management works
Despite the common misconception, using server-side tracking doesn't mean you shouldn't ask for consent to collect website visitors' data. Just like with client-side tracking, you need to add a cookie banner asking for consent to gather data.
The consent management within the server Google Tag Manager (GTM) works the following way:
- The consent banner captures the user's consent choices and relays them to a tag (e.g., Google Tag) that transmits consent status from the web to the server GTM.
- Google tag transmits a parameter reflecting the user’s consent status to the server container.
- Within the server GTM, tags behave depending on the value of that consent parameter.

Basic vs Advanced implementation options in Google Consent Mode v2
Basic Consent Mode
With this implementation option, user consent determines how data is handled. If users accept cookies, tags are triggered, and data is collected completely. If users decline, no data is collected, and cookieless pings are not sent. This approach is simple to implement but significantly restricts data collection when consent is denied.
Advanced Consent Mode
Advanced Consent Mode is a more flexible solution. The site can send anonymous, cookieless pings to Google even if users do not allow cookies. The anonymous pings allow data modeling, so that the website owners have a more complete picture of users' behavior.
Useful links on Consent Mode
Here is a list of our articles about consent. We have covered this topic extensively in other blog posts:
Before starting
Despite Basic or Advanced implementation, you will need the following to complete the Consent Mode:
- Consent Management Platform. In our case, it is iubenda.
- Configured web and server GTM containers.
- Set up server-side Google Analytics 4. This is required to send a user's consent status from the web to the server container.
How to configure consent management with GTM and iubenda
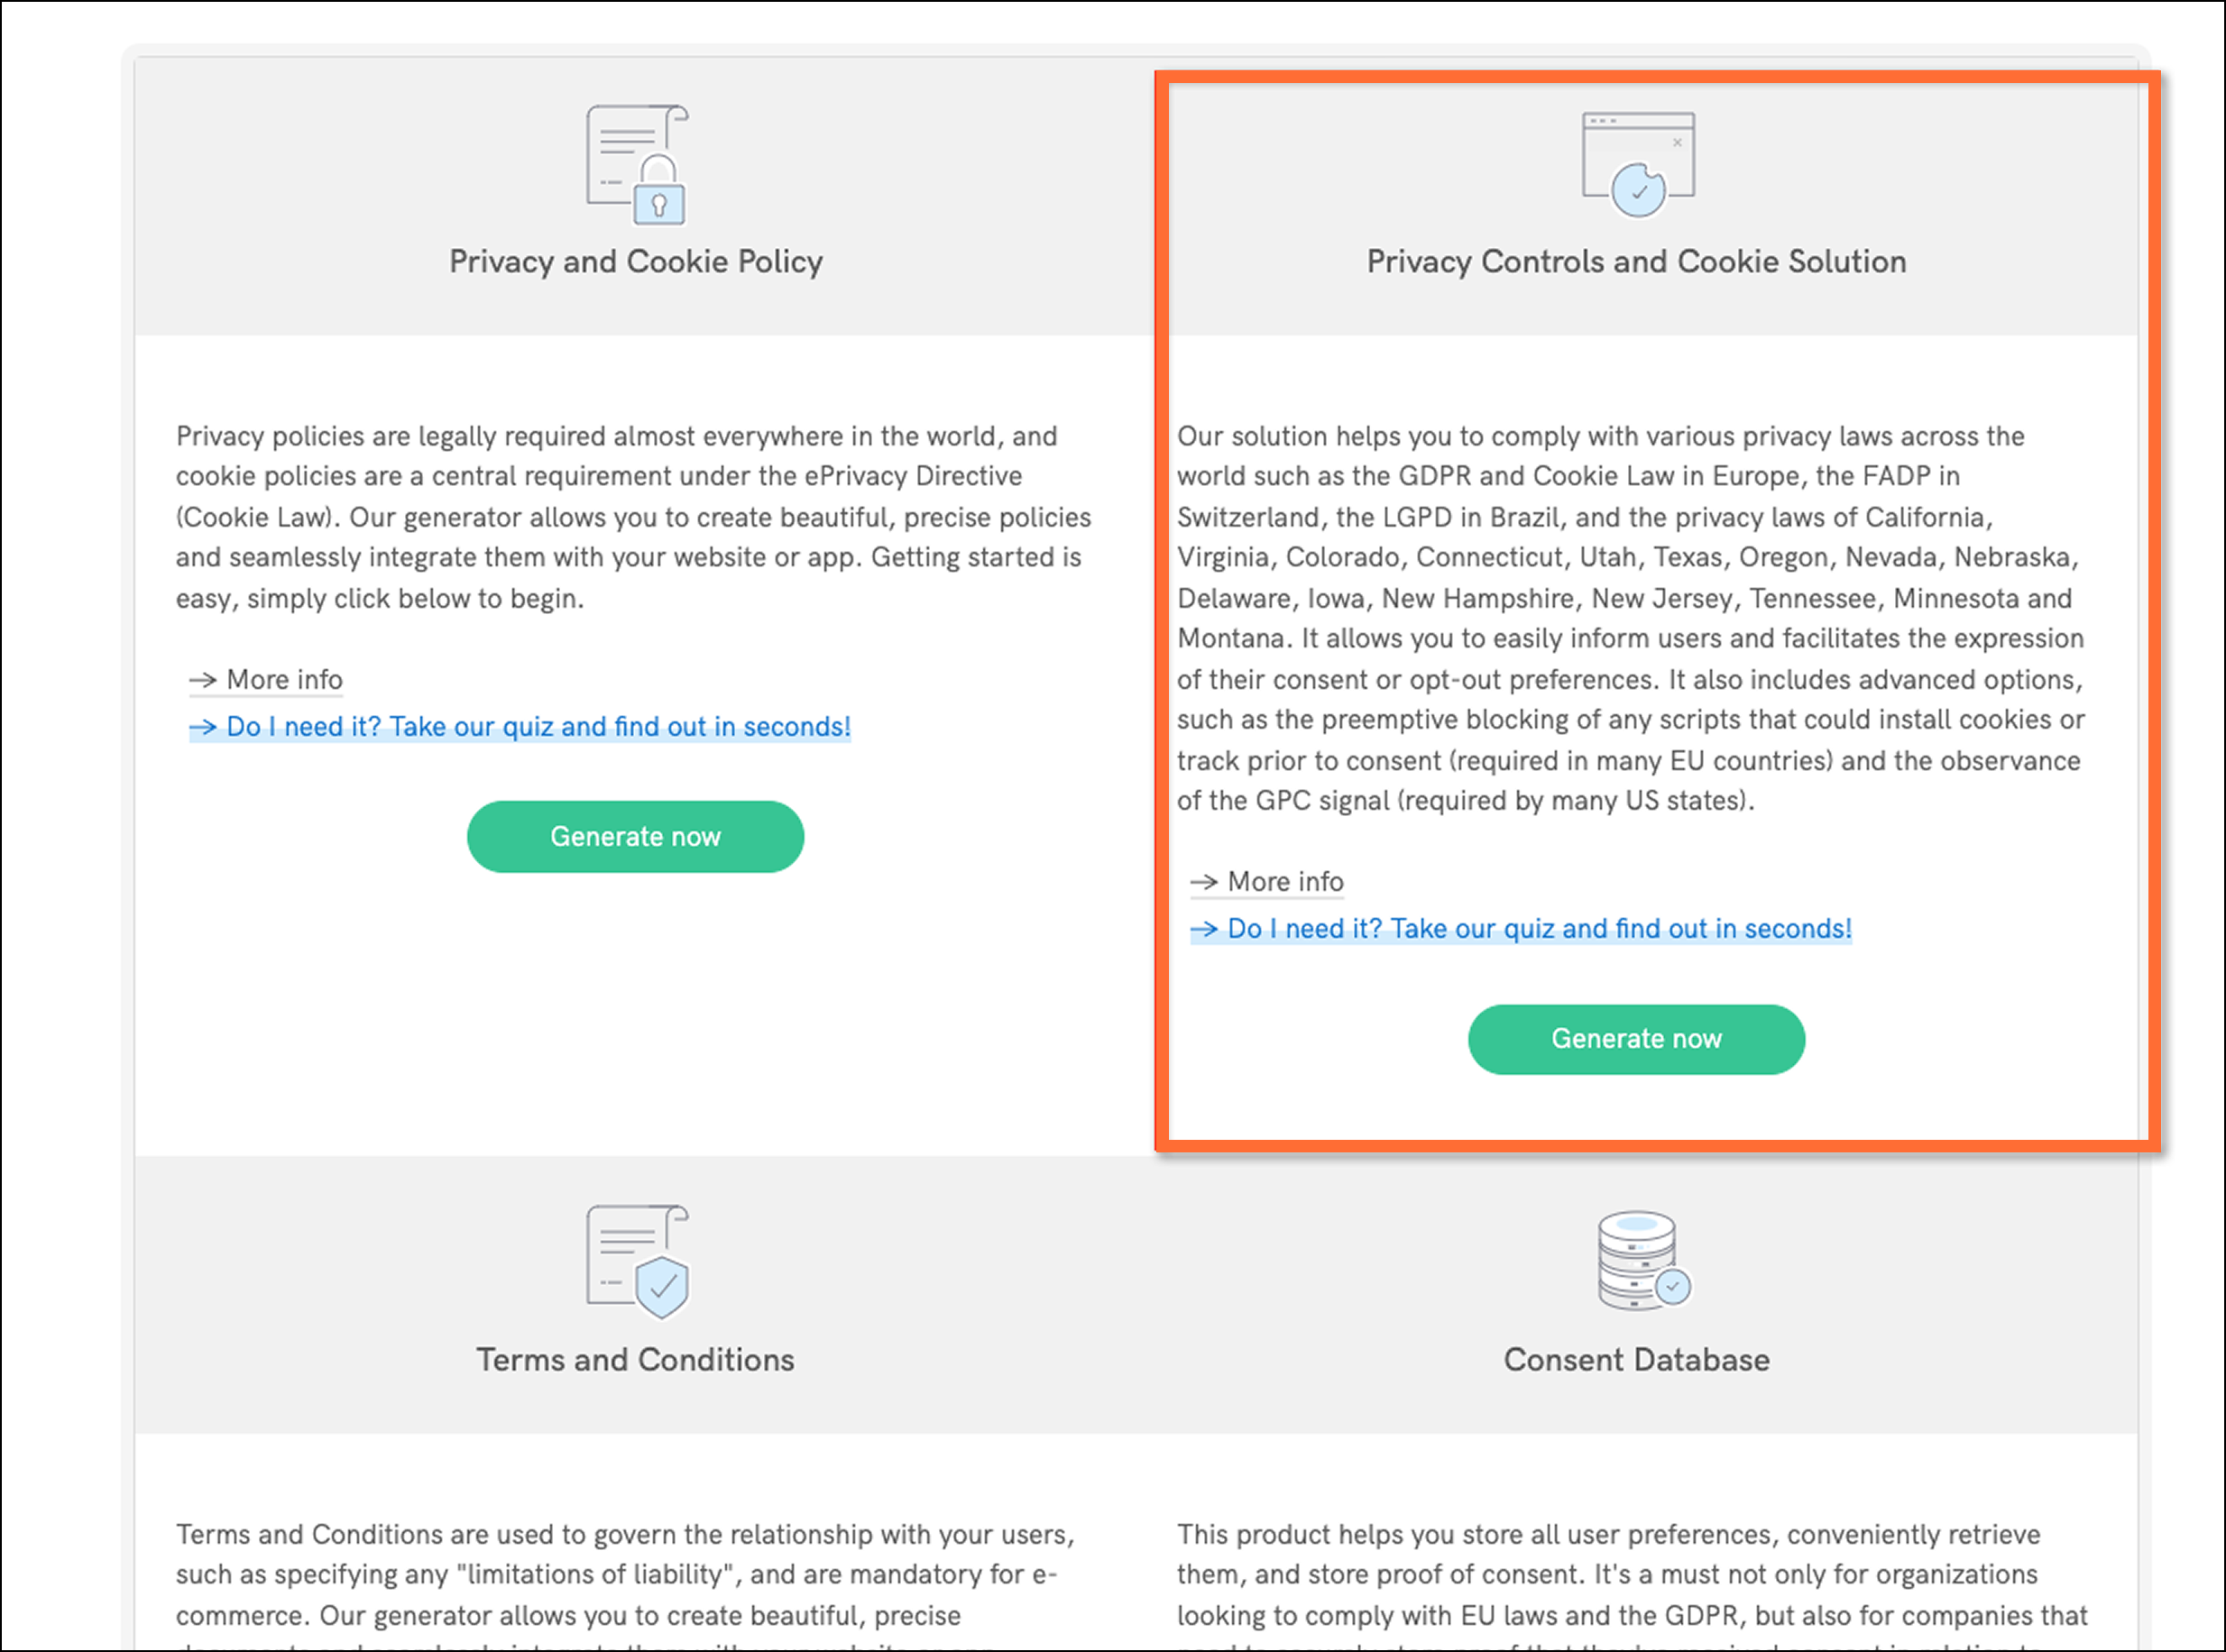
Step 1. Activate Privacy Controls and Cookie Solution in iubenda
1.1 Open your project on iubenda and click "Activate" on the Privacy Controls and Cookie Solution tile. Go through the configuration process and adjust the settings according to your needs. iubenda provides a detailed guide on cookie banner configuration.
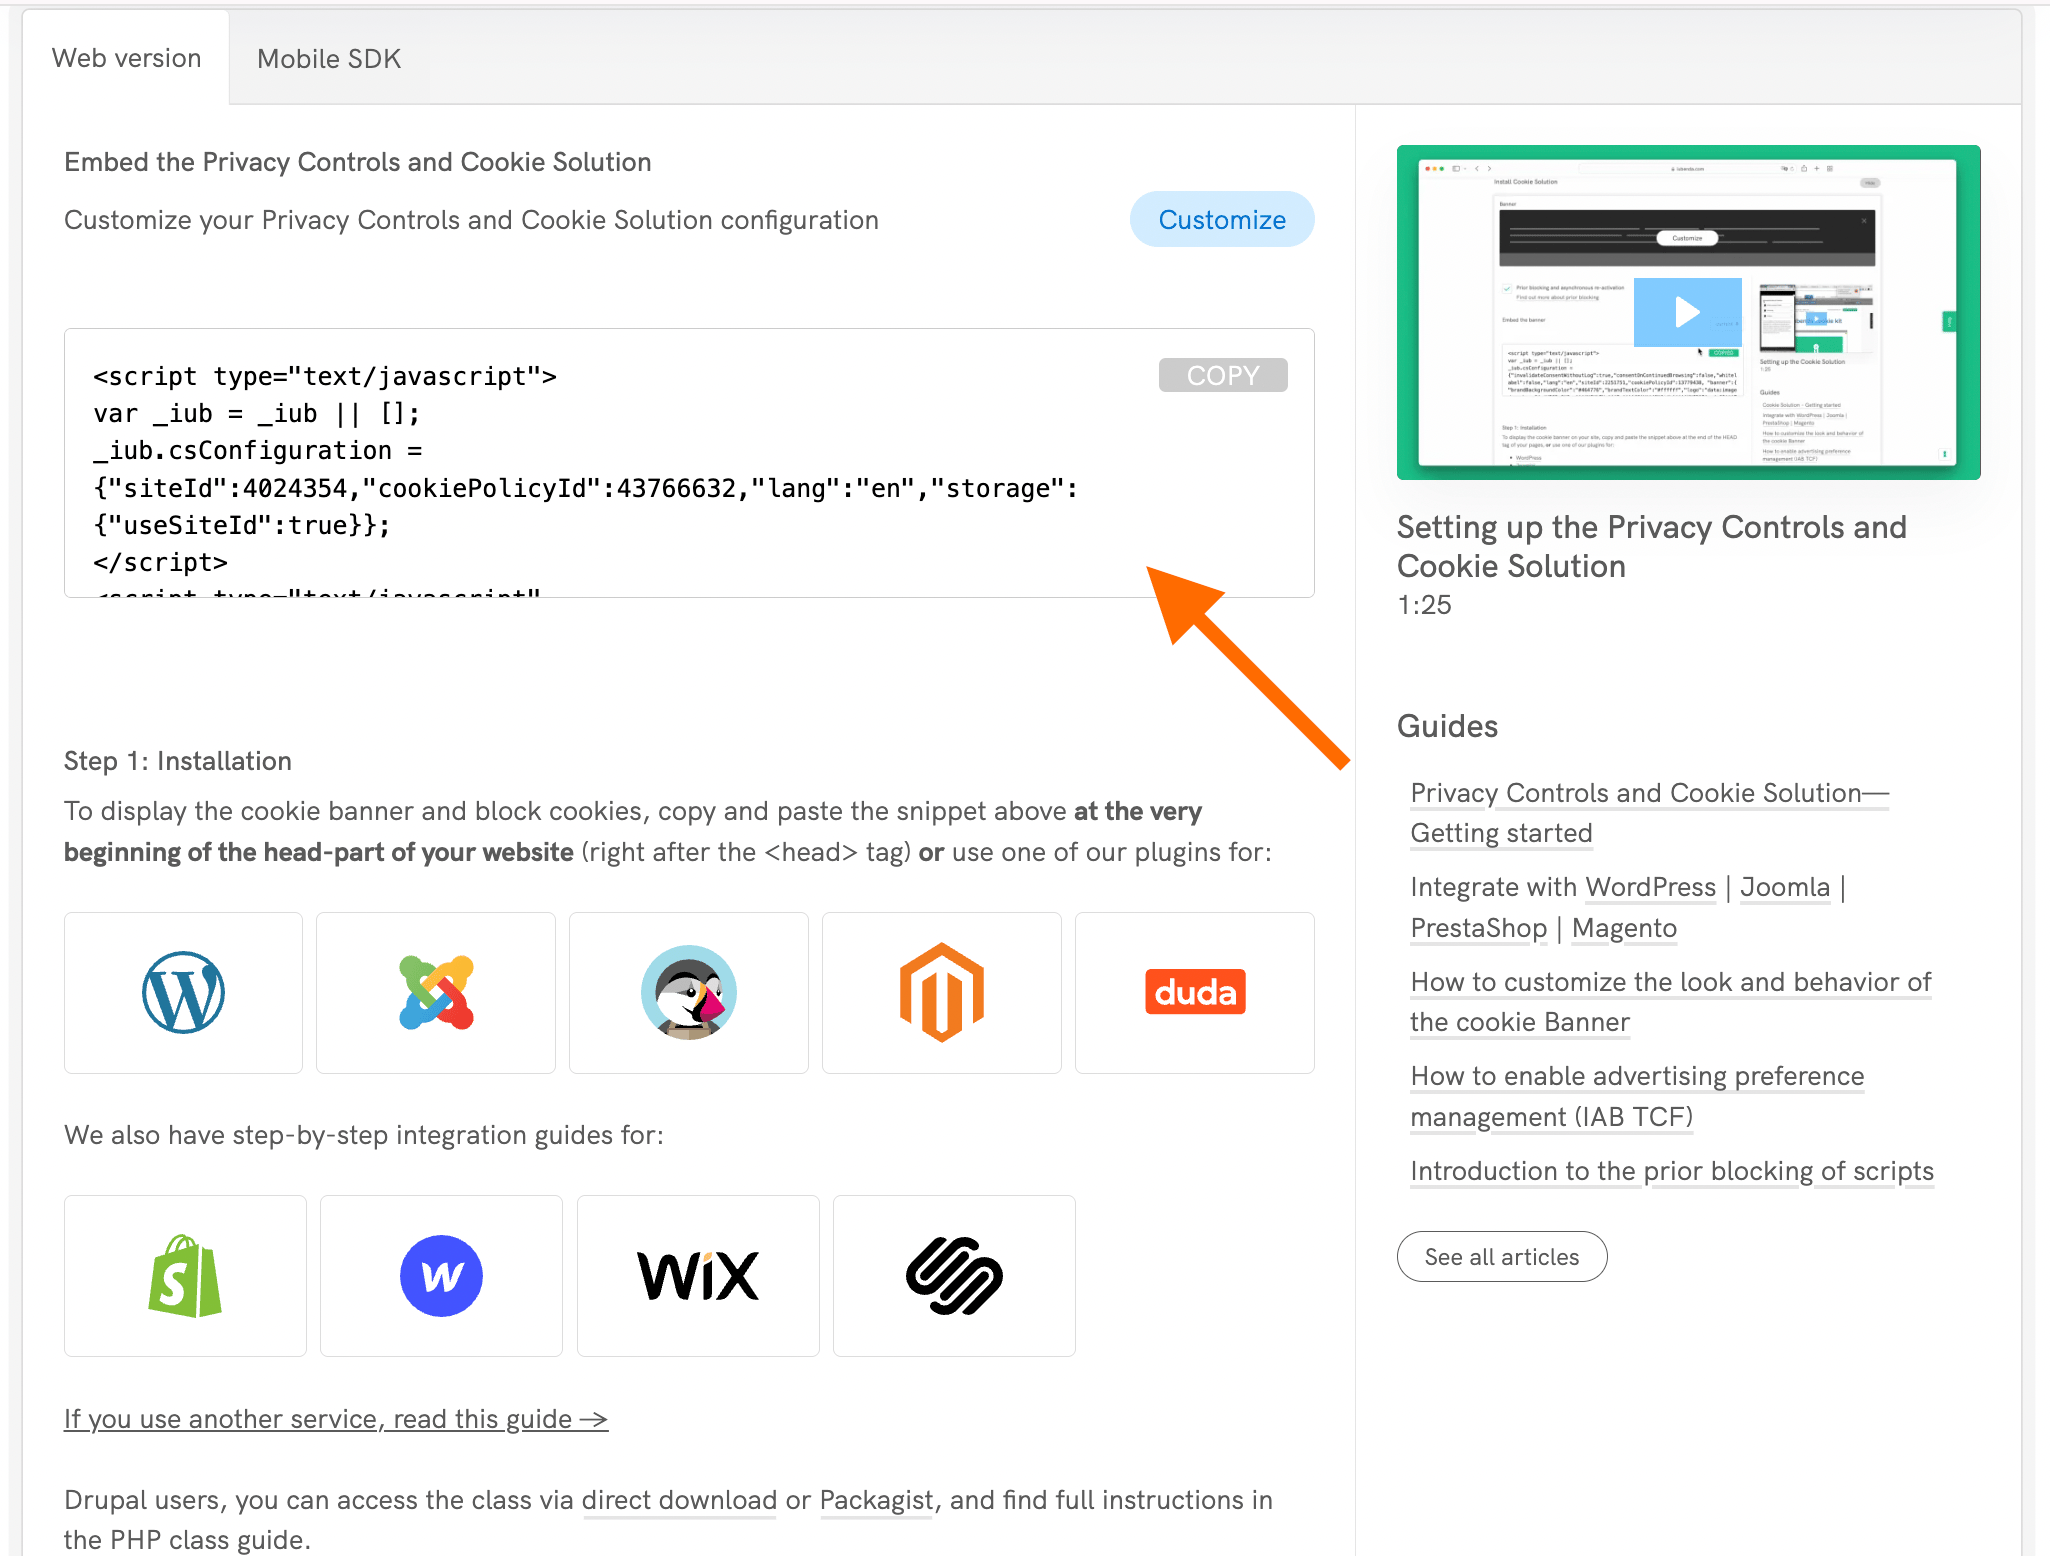
1.2 Once configured, add the code to your website so the banner can display on the website. You can do it manually by inserting the code after the <head> tag or using the plugins for CMS.
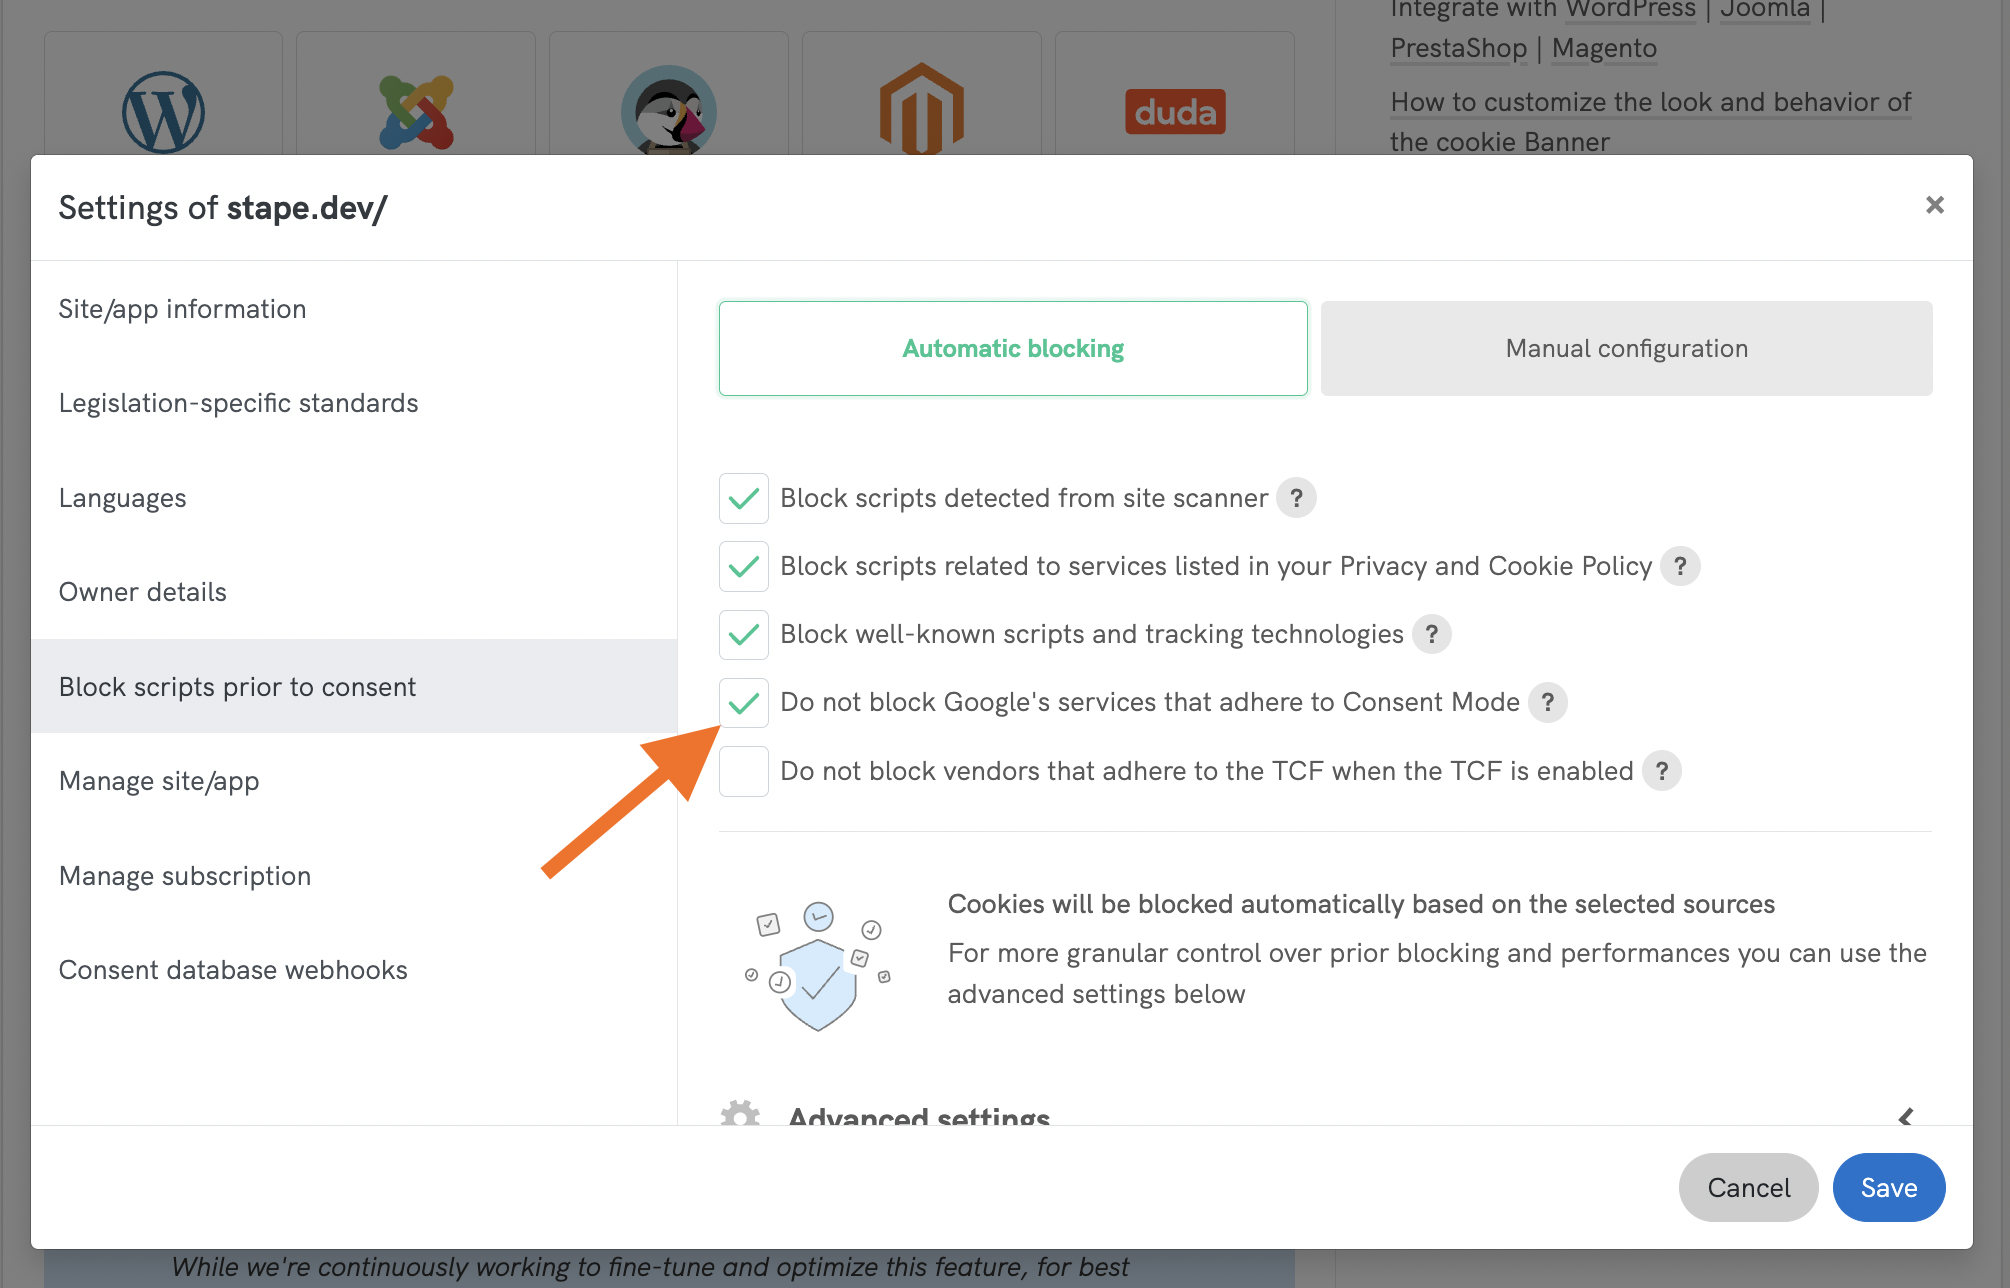
Basic and Advanced Consent Mode in iubenda
iubenda has an Automatic Blocking feature that can automatically restrict certain services until user consent is obtained. By default, it uses Advanced Consent Mode, where Google services are not entirely blocked upfront; their behavior is controlled through Consent Mode signals.
You can enable Basic Consent Mode by deselecting the option “Do not block Google’s services that adhere to Consent Mode.”
Step 2. Integrate iubenda with GTM and set up consent via GTM
2.1 Add the iubenda Privacy Controls and Cookie Solution tag from the template gallery and configure it:
- Use the tag's default consent options.
- Select "Extended snippet via GTM template."
- Paste the code of the iubenda cookie solution (the one you generated in step 1.2), the part from _iub.csConfiguration
- Paste the configuration part from _iub.csLangConfiguration
- Add the trigger “Consent Initialization – All Pages”.
For more details on tag setup and configuring a tag template for multilingual sites, check the iubenda guide on Consent Mode setup.
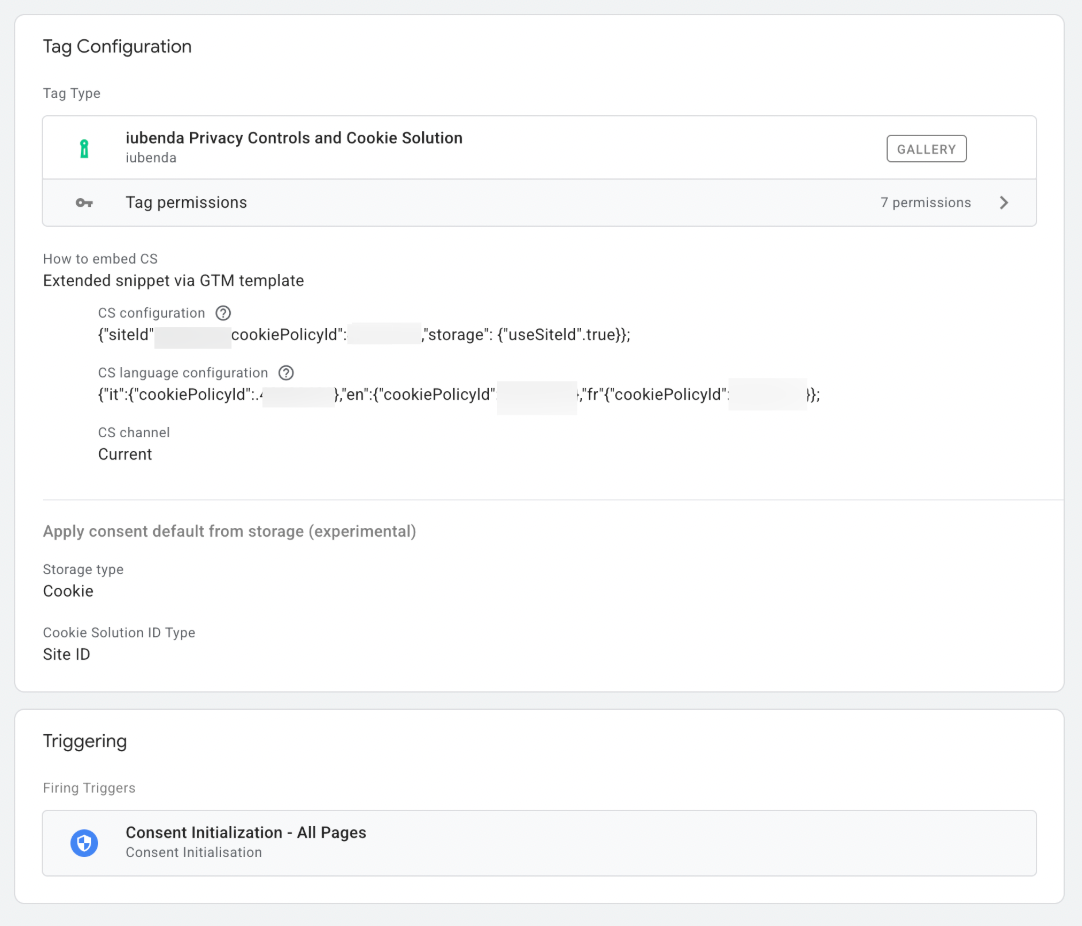
| Please note: if you set up Consent Mode for tags other than Google Ads, Analytics, Floodlight, and Conversion Linker, add the parameter "emitGtmEvents":true to the Privacy Controls and Cookie Solution script. |
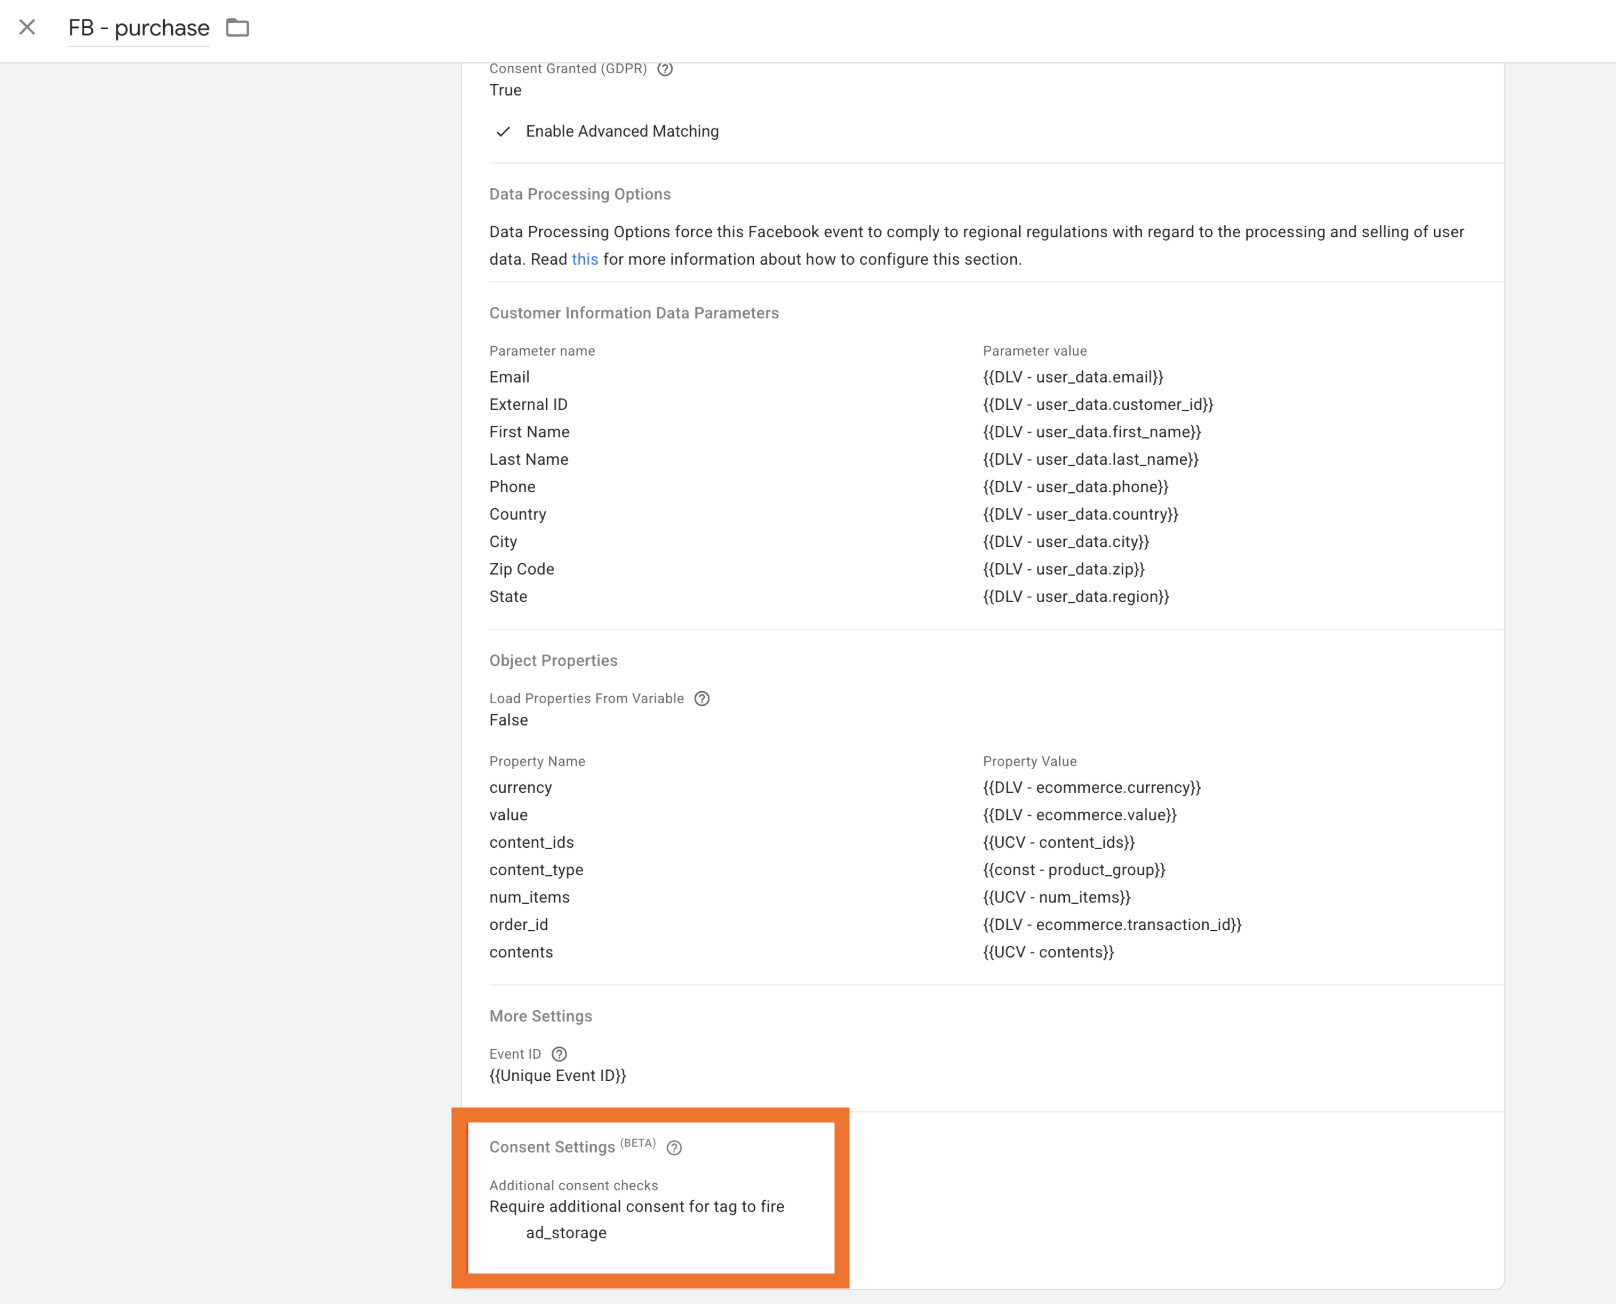
2.2 Set up consent for tags without built-in consent checks.
In the tag under Consent Settings section, select “Require additional consent for tag to fire” and choose a purpose, in our case, it is "ad_storage". Check the complete list of consent types in Google’s documentation.
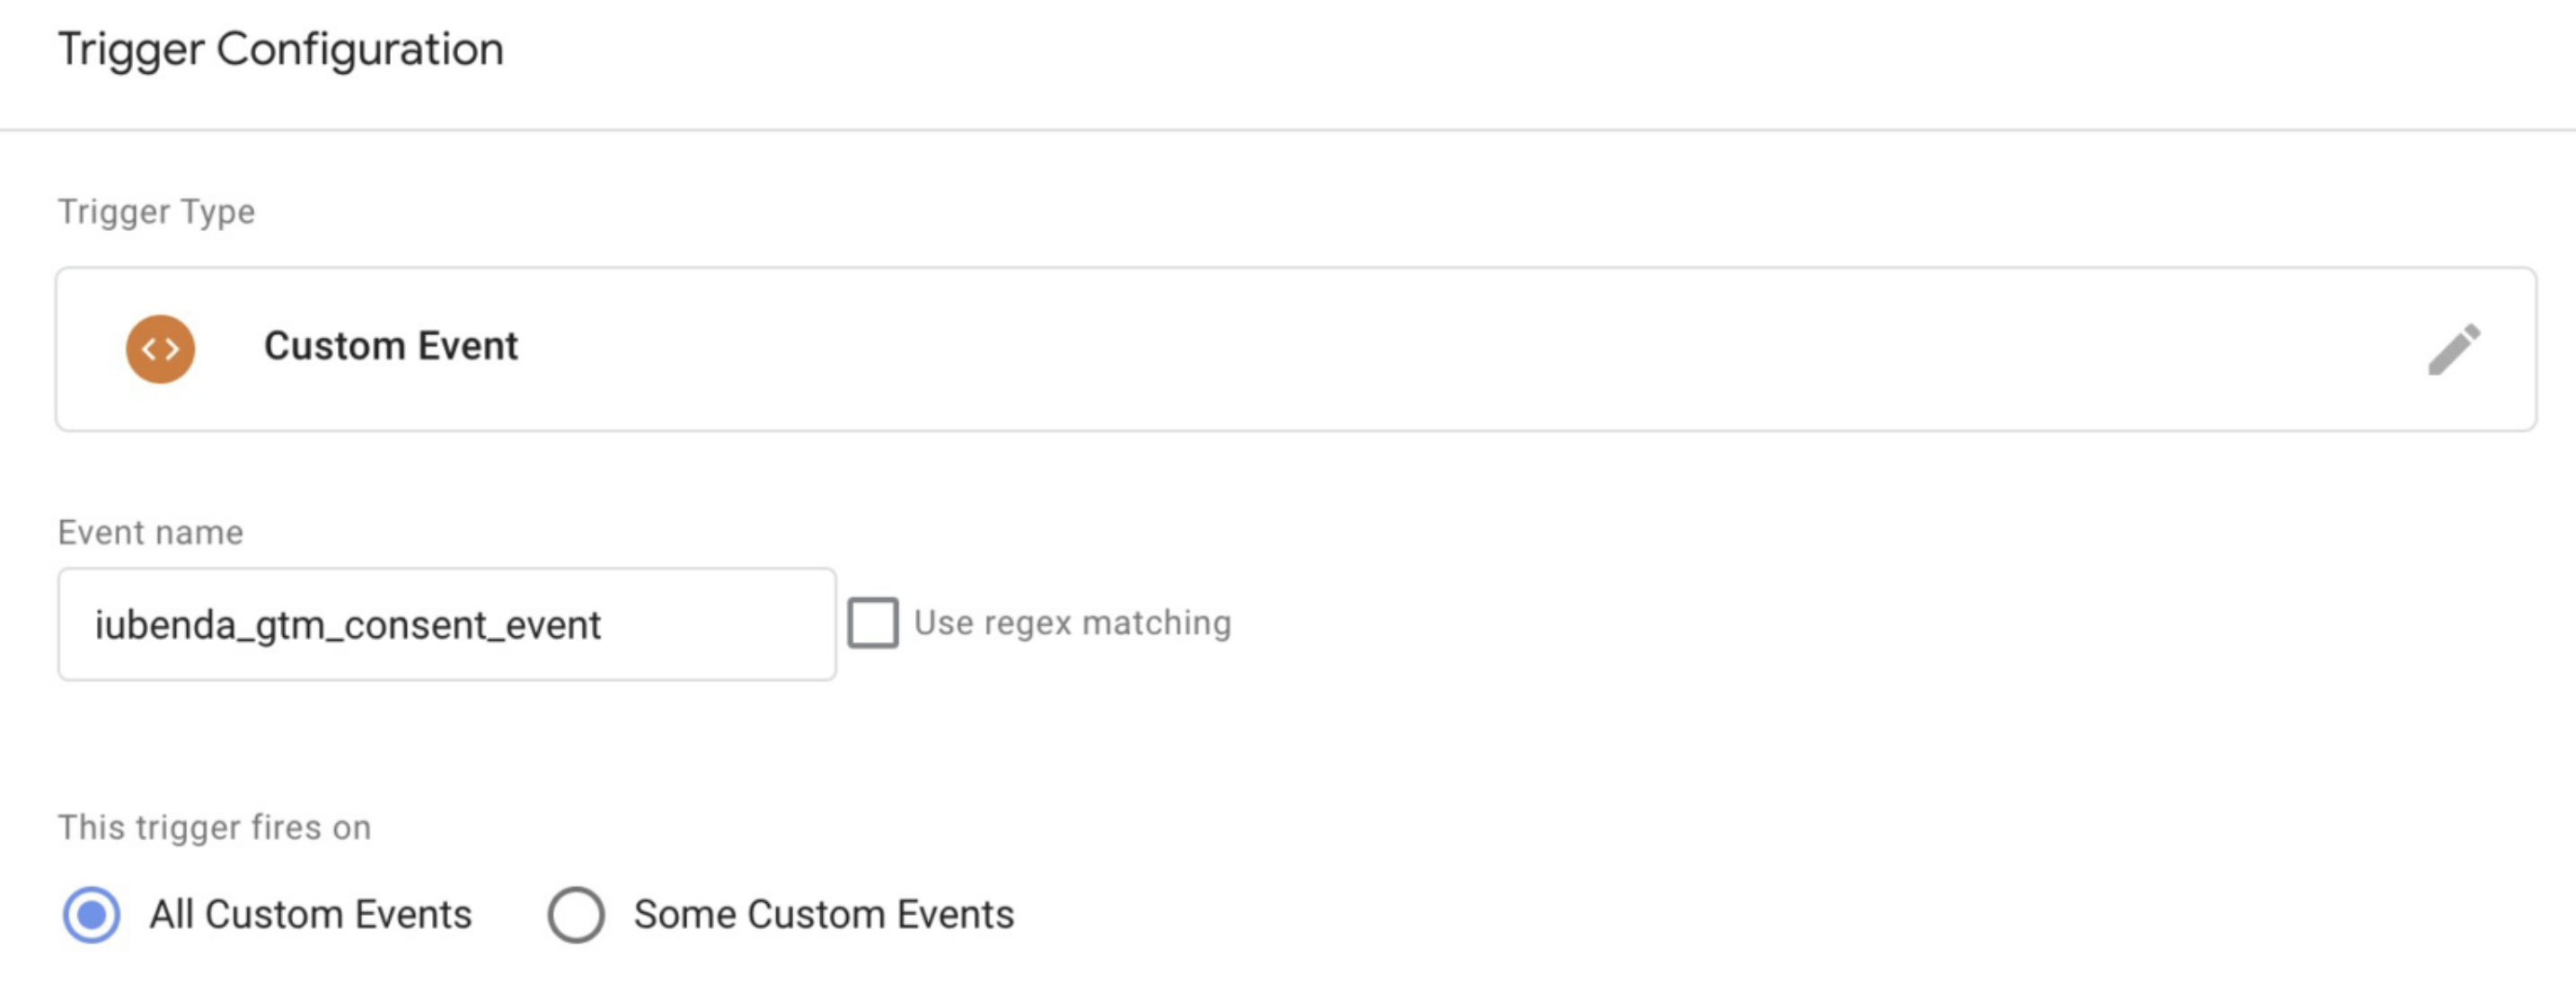
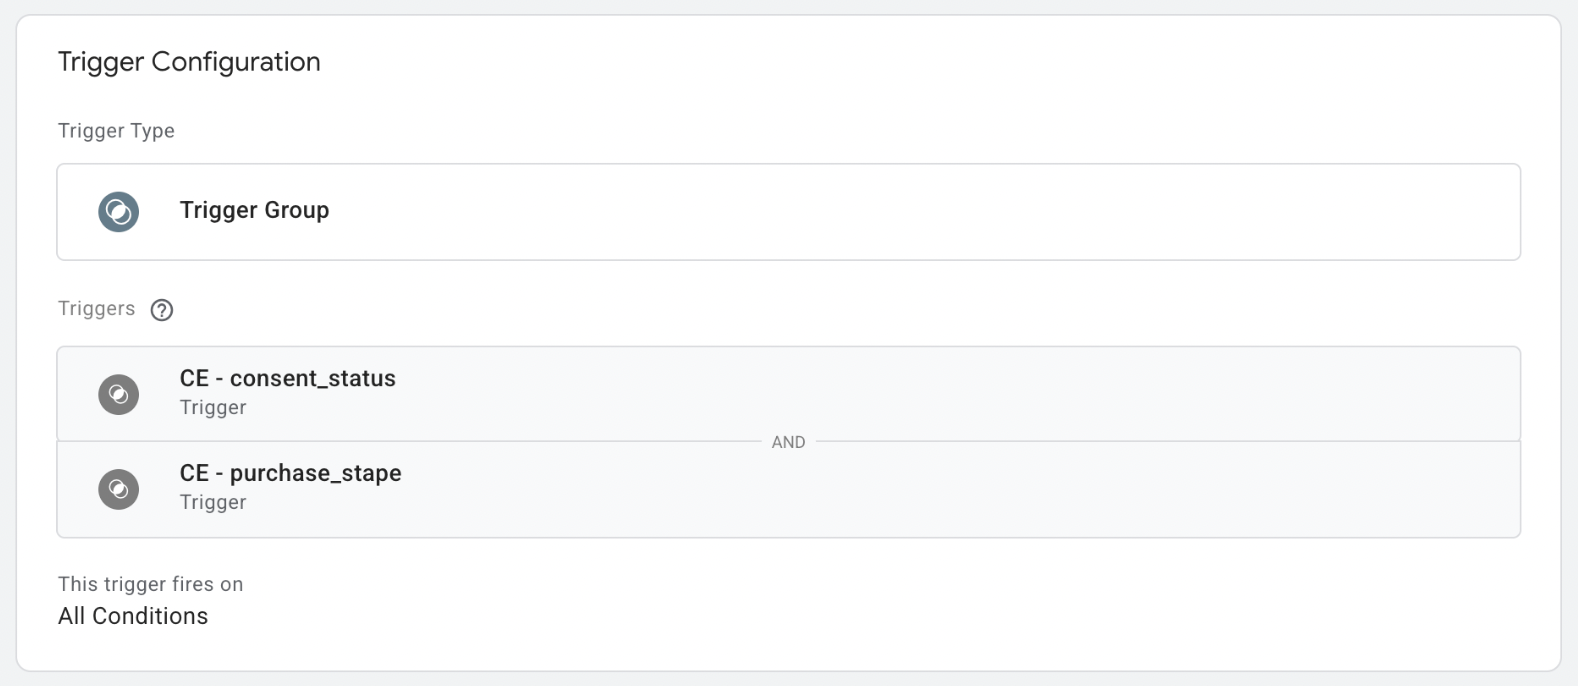
2.3 Add a trigger group for such tags.
The custom tag, which defines whether the consent was given, should have the following properties:
- Trigger type - Custom Event
- Event name - iubenda_gtm_consent_event
- Trigger fires on all custom events
As a result, you should have a few triggers for the tag — one for consent status and another for firing the tag after the event happens.
Step 3. Set up the server GTM container, custom domain, and Custom Loader
For each step, we have detailed guides on the configuration process:
3.1 Check our guide on how to set up the server GTM container if you don't have one.
3.2 Configure a custom domain for your server GTM container on Stape. Once the custom domain is added, you need to configure the DNS record you see in the Stape admin in the container. Domain verification can take up to 72 hours.
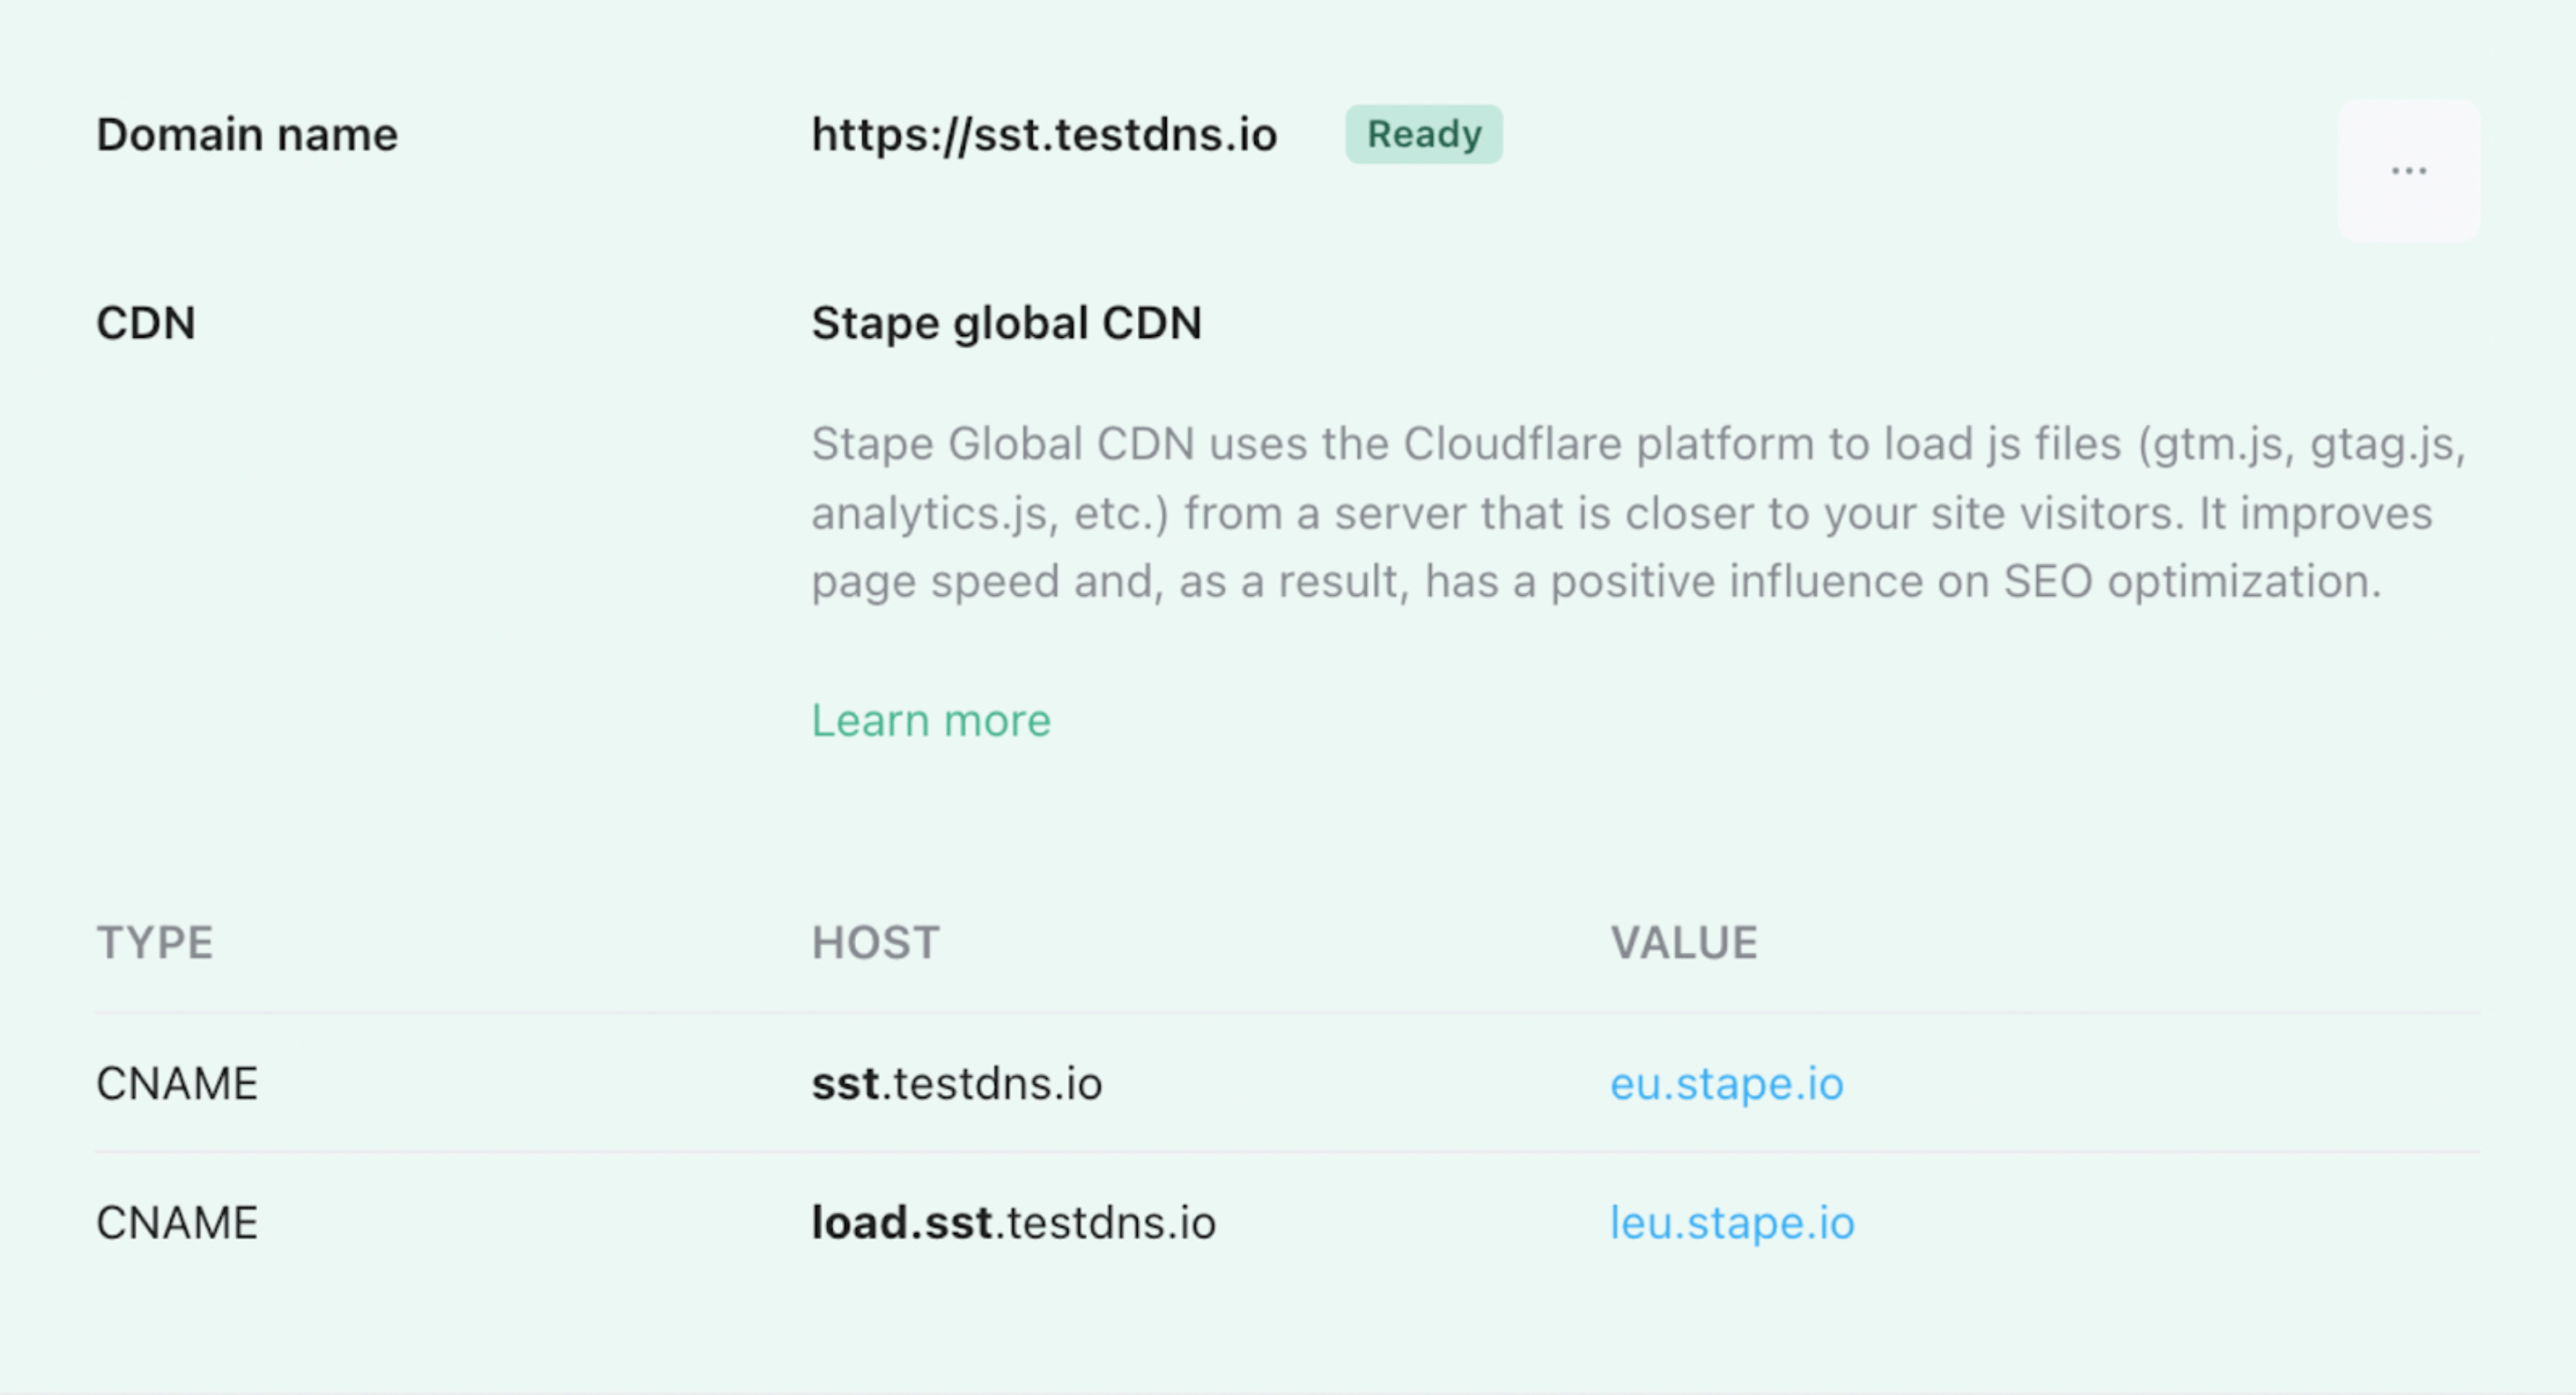
3.3 Go to the server Google Tag Manager container settings and add a custom domain inside the server GTM.
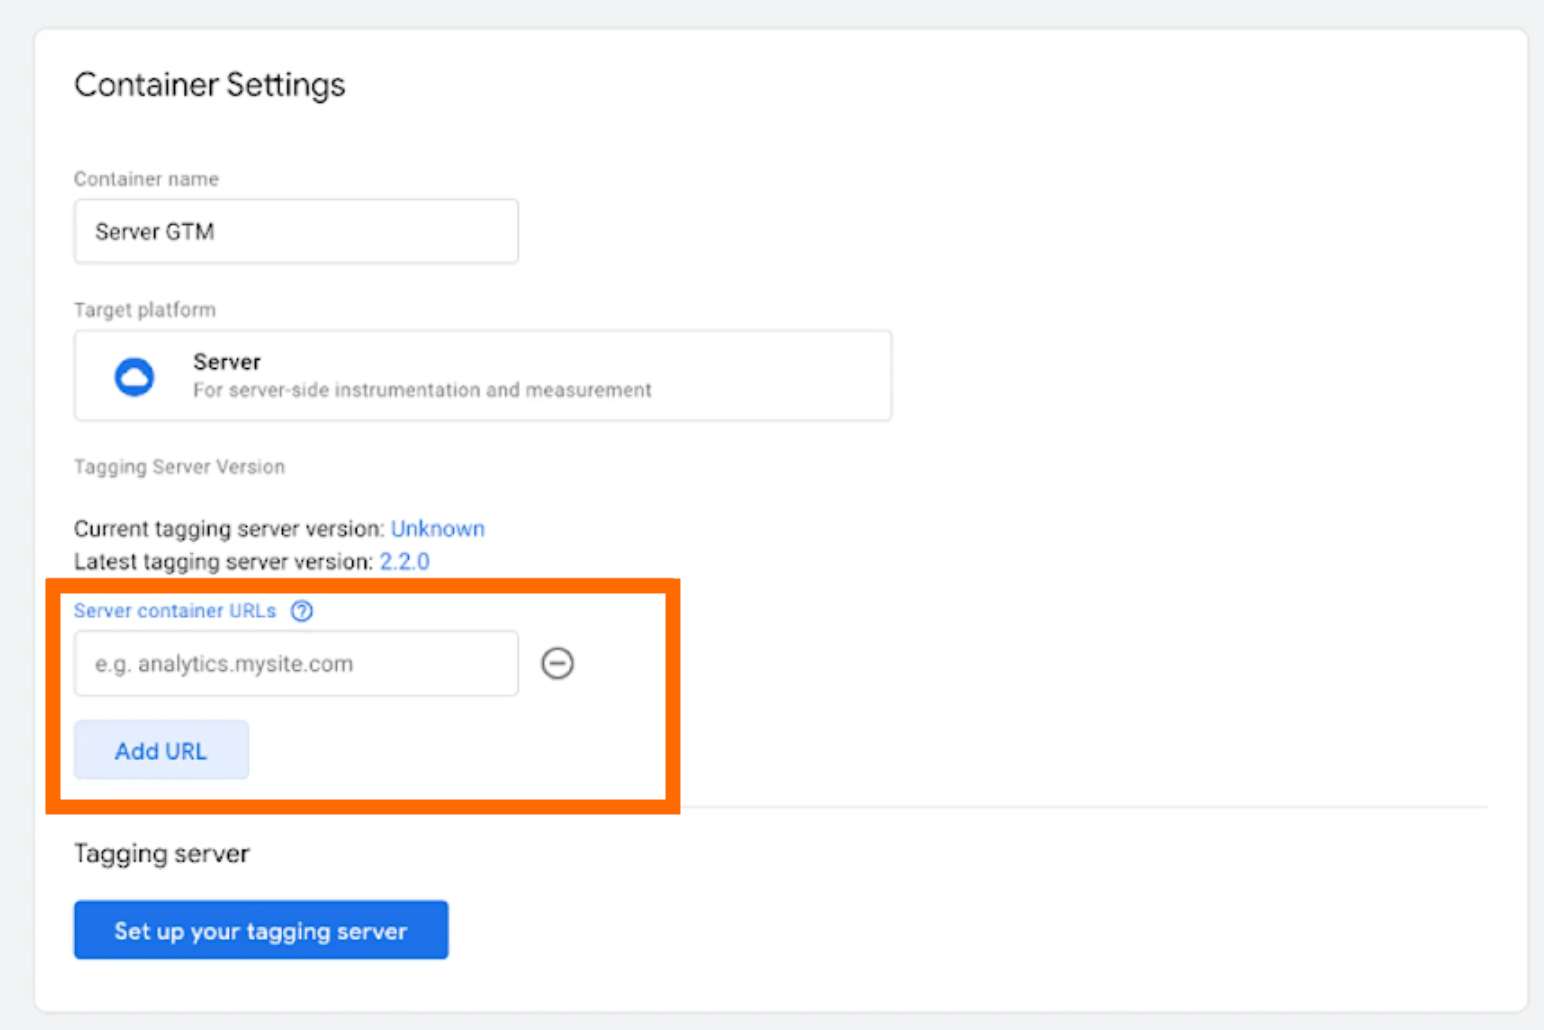
3.4 Update the web GTM script on your website with the Custom Loader.

Step 4. Configure server-side GA4 and consent settings for GA4
4.1 There are a few setup scenarios depending on whether you configured Google Analytics 4 inside your web GTM container. Follow the steps from the guide below:
- If you have already configured Google Analytics 4 inside your web GTM container;
4.2 Set up consent settings.
GTM works with consent management platforms like iubenda to modify tag behavior based on user consent. Google Tags, such as GA4, automatically adjust according to the user consent settings configured in the web GTM.
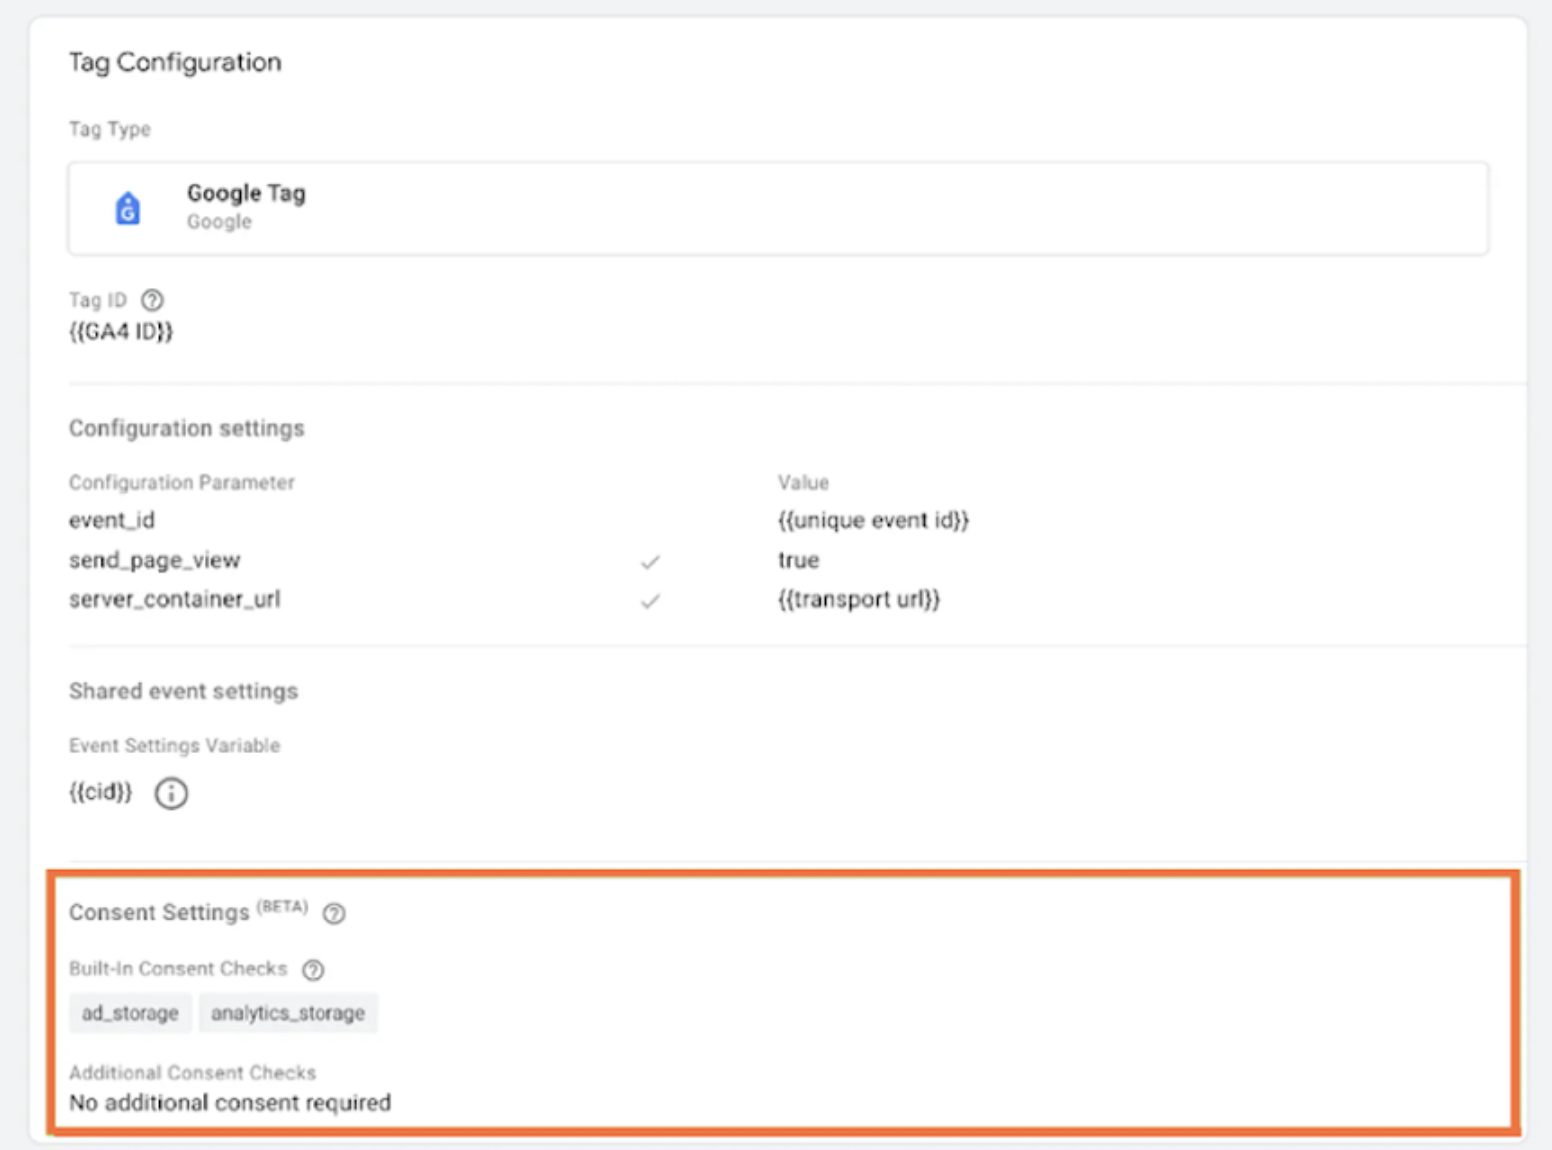
4.2.1 Advanced Consent Mode
For advanced consent, GA4 will continue sending anonymized pings even if users do not consent to analytics cookies. To activate this option, update the Consent Settings in web GTM. No additional consent is required, and there’s no need for any additional configuration in the server GTM for advanced consent.
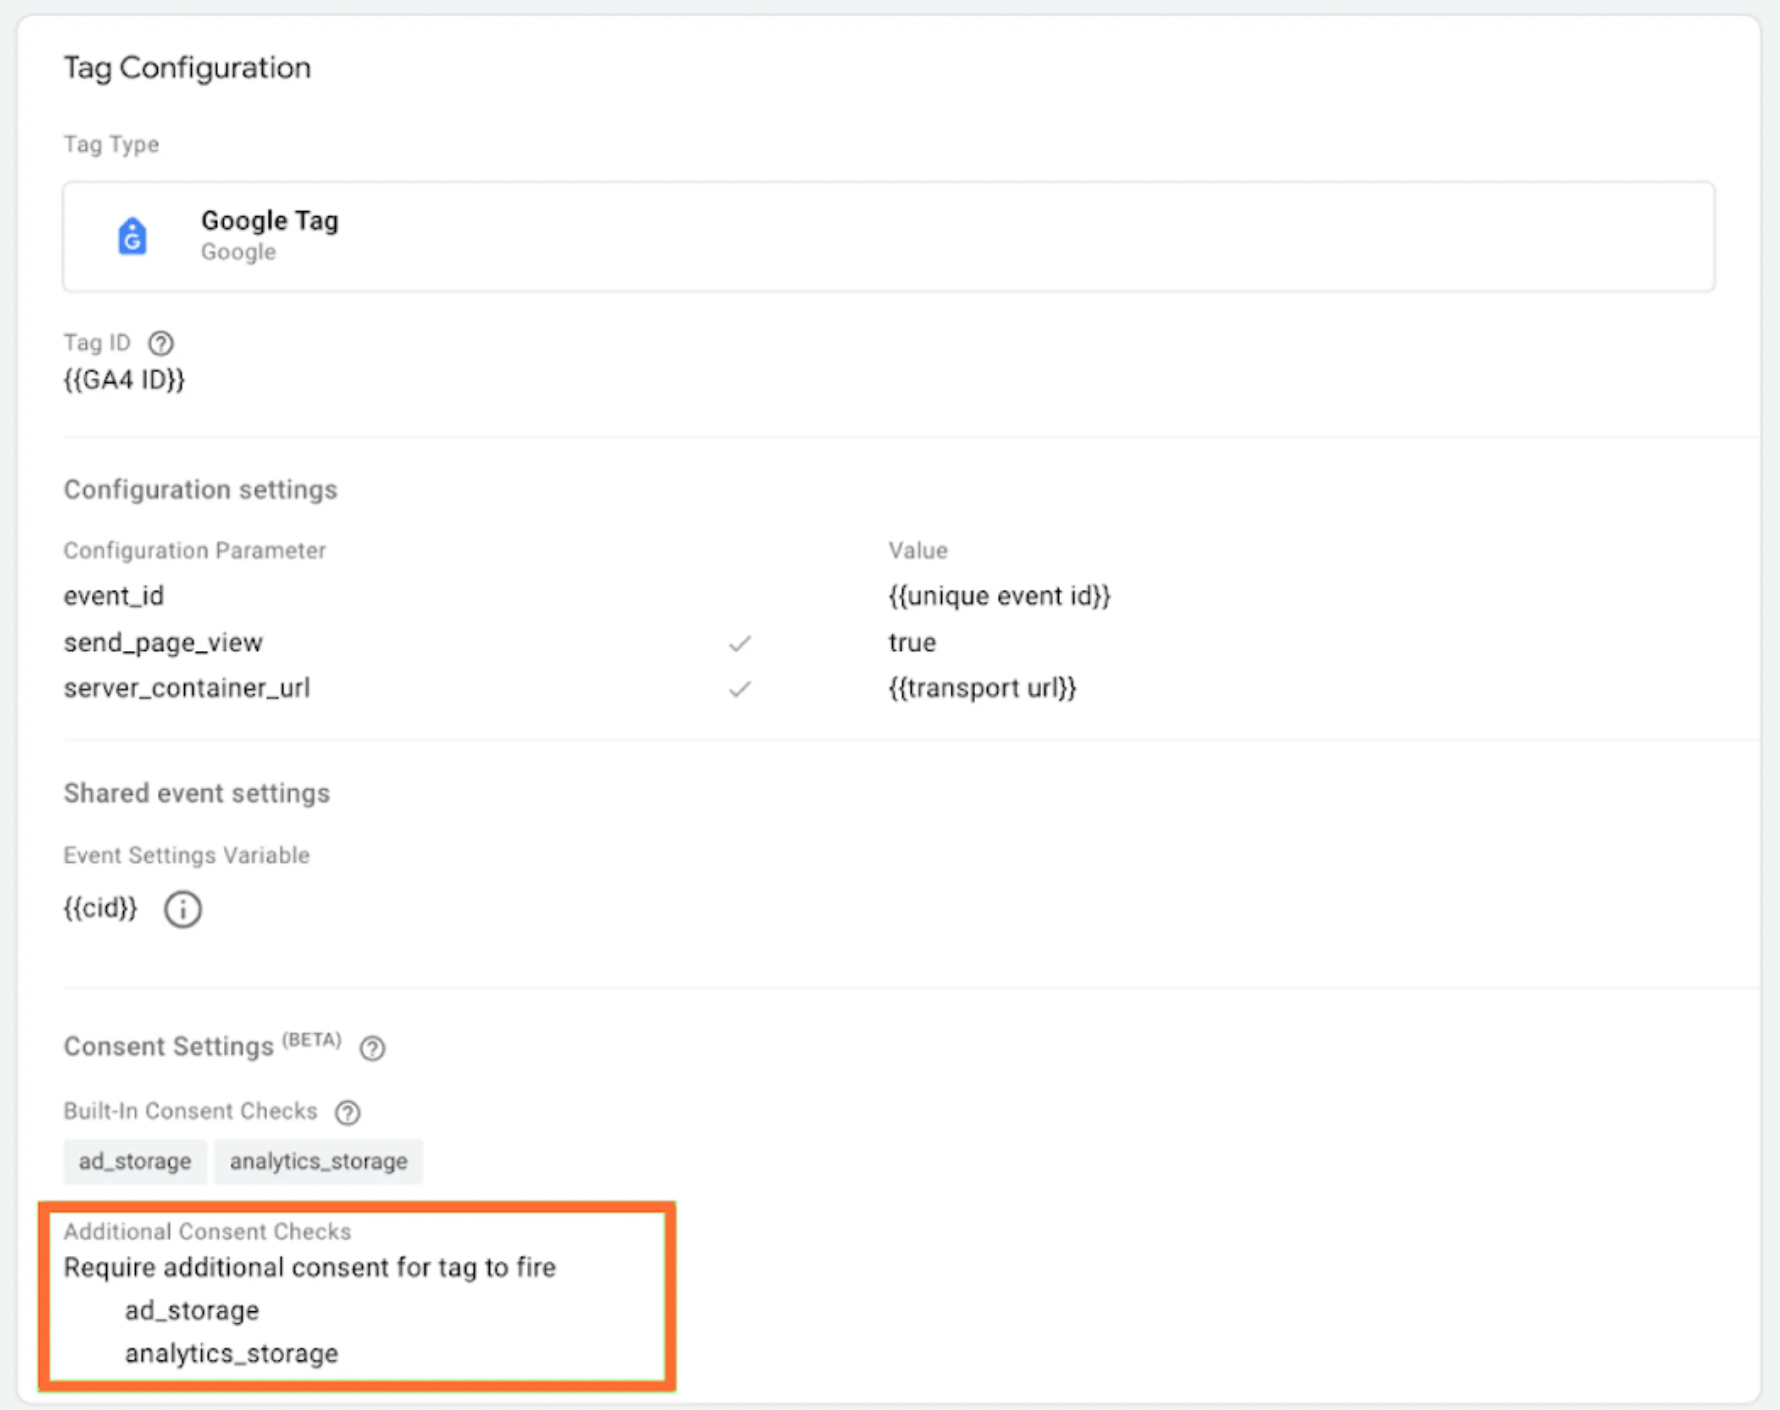
4.2.2 Basic Consent Mode
To limit all GA4 data collection without explicit consent, set the consent settings to Require additional consent in web GTM. Server-side GA4 will comply with the consent rules set in web GTM.
Conclusion
Server-side consent management platforms (such as iubenda) offer a privacy-conscious approach to collecting and processing user data. Businesses can achieve higher data privacy and security by shifting consent logic to the server.
Whether implementing Basic or Advanced Consent Mode, integrating tools like Google Tag Manager and iubenda provides a flexible solution that adapts to users’ consent preferences and allows staying compliant.

Comments