Simple tracking testing with Google Tag Manager Environments
Mykhailo Zernov
AuthorKey takeaways
Google Tag Manager Environments is a GTM feature that allows you to create different versions of a single GTM container across different website environments. You can have separate environments to test any changes in your tracking setup before releasing them to production. And you don’t need to create separate GTM containers for each website version – you can manage everything from a single container.
A typical GTM Environments setup might include:
- Production.
- Staging.
- Development.
This approach is particularly useful for ecommerce businesses and organizations that rely heavily on accurate conversion tracking, where even small data collection issues can impact optimization decisions. You can troubleshoot any changes on a test version of the container, and then publish the changes to production once you’re ready.
Using GTM Environments for server-side tracking with Stape
If you wish to use GTM Environments to test your Stape sGTM hosting setup, there is one additional step to keep in mind. GTM Environment parameters are not automatically included in the Custom Loader snippets, so you need to add them manually.
Custom Loader is Stape’s free power-up that helps reduce the impact of ad blockers by loading Google Tag Manager and Google Analytics 4 through your own domain instead of Google's default domains. This is a necessary part of any sGTM setup using Stape, as it can significantly improve data collection accuracy and reduce tracking loss.
In this guide, we'll show you how to use GTM Environments with server-side tracking via Stape, and how to verify that everything is working correctly.
Benefits of GTM Environments
Google Tag Manager Environments are particularly useful for larger organizations, agencies, and enterprise teams that manage complex tracking setups across multiple stakeholders, testing servers, and release cycles.
- Teams can collaborate across multiple environments: different teams can work on and validate separate versions of the same GTM container simultaneously. For example, developers can test new tracking implementations in a development environment while QA teams validate another version in staging, without affecting production tracking or each other's work.
- Use consistent, dedicated preview links: anyone using an environment’s preview link will see the most up-to-date published version assigned to that environment (unpublished changes will not appear). You do not need to generate and send a new link to your QA team or clients every time you publish a new staging version to the container.
- Simulate different user scenarios: you can recreate potential situations that may impact tracking performance in a safe setting, such as simulating various errors on the client’s side. Testing with Custom Loader in a non-production environment also helps identify any potential issues early and prevent inaccurate reporting after deployment.
- Prepare major tracking changes ahead of launch: when a significant website update, platform migration, or tracking overhaul is planned, you don't have to wait until launch day to configure and test everything. GTM Environments allow you to prepare changes weeks in advance, validate them in a staging environment, and keep them isolated from production traffic until the release date.
- Save time and money during future releases: once a testing workflow is established, teams can consistently validate new tracking updates, tags, and integrations before publishing them. Fixing issues before deployment is significantly faster and less costly than troubleshooting them after they impact live campaigns.
How to use Custom Loader with GTM Environments
How to configure Custom Loader power-up
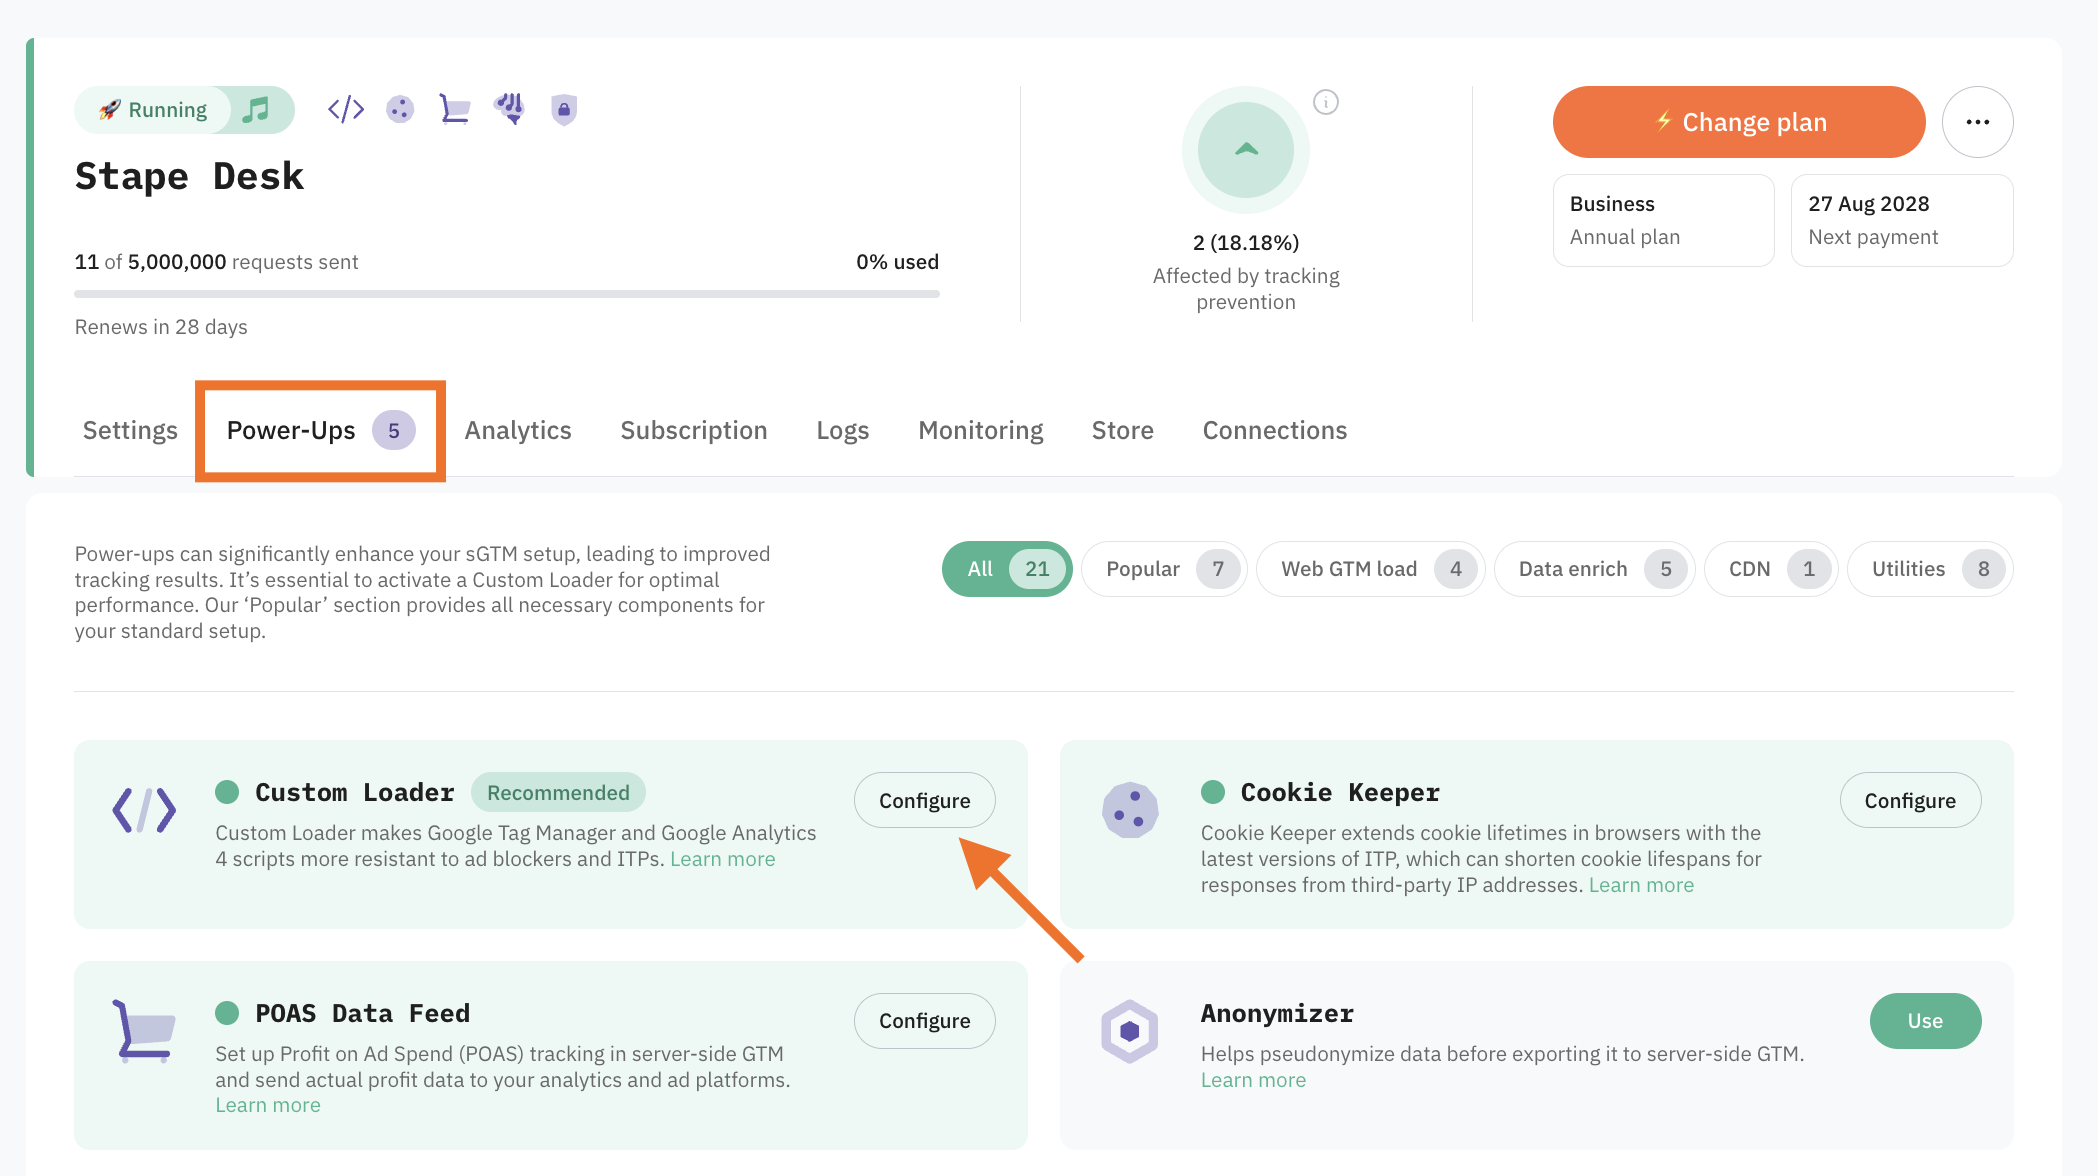
2. Select your sGTM container on the dashboard.
3. Click Power-ups, then click the “Use” button next to the Custom Loader panel.
4. Toggle the Custom Loader switch.
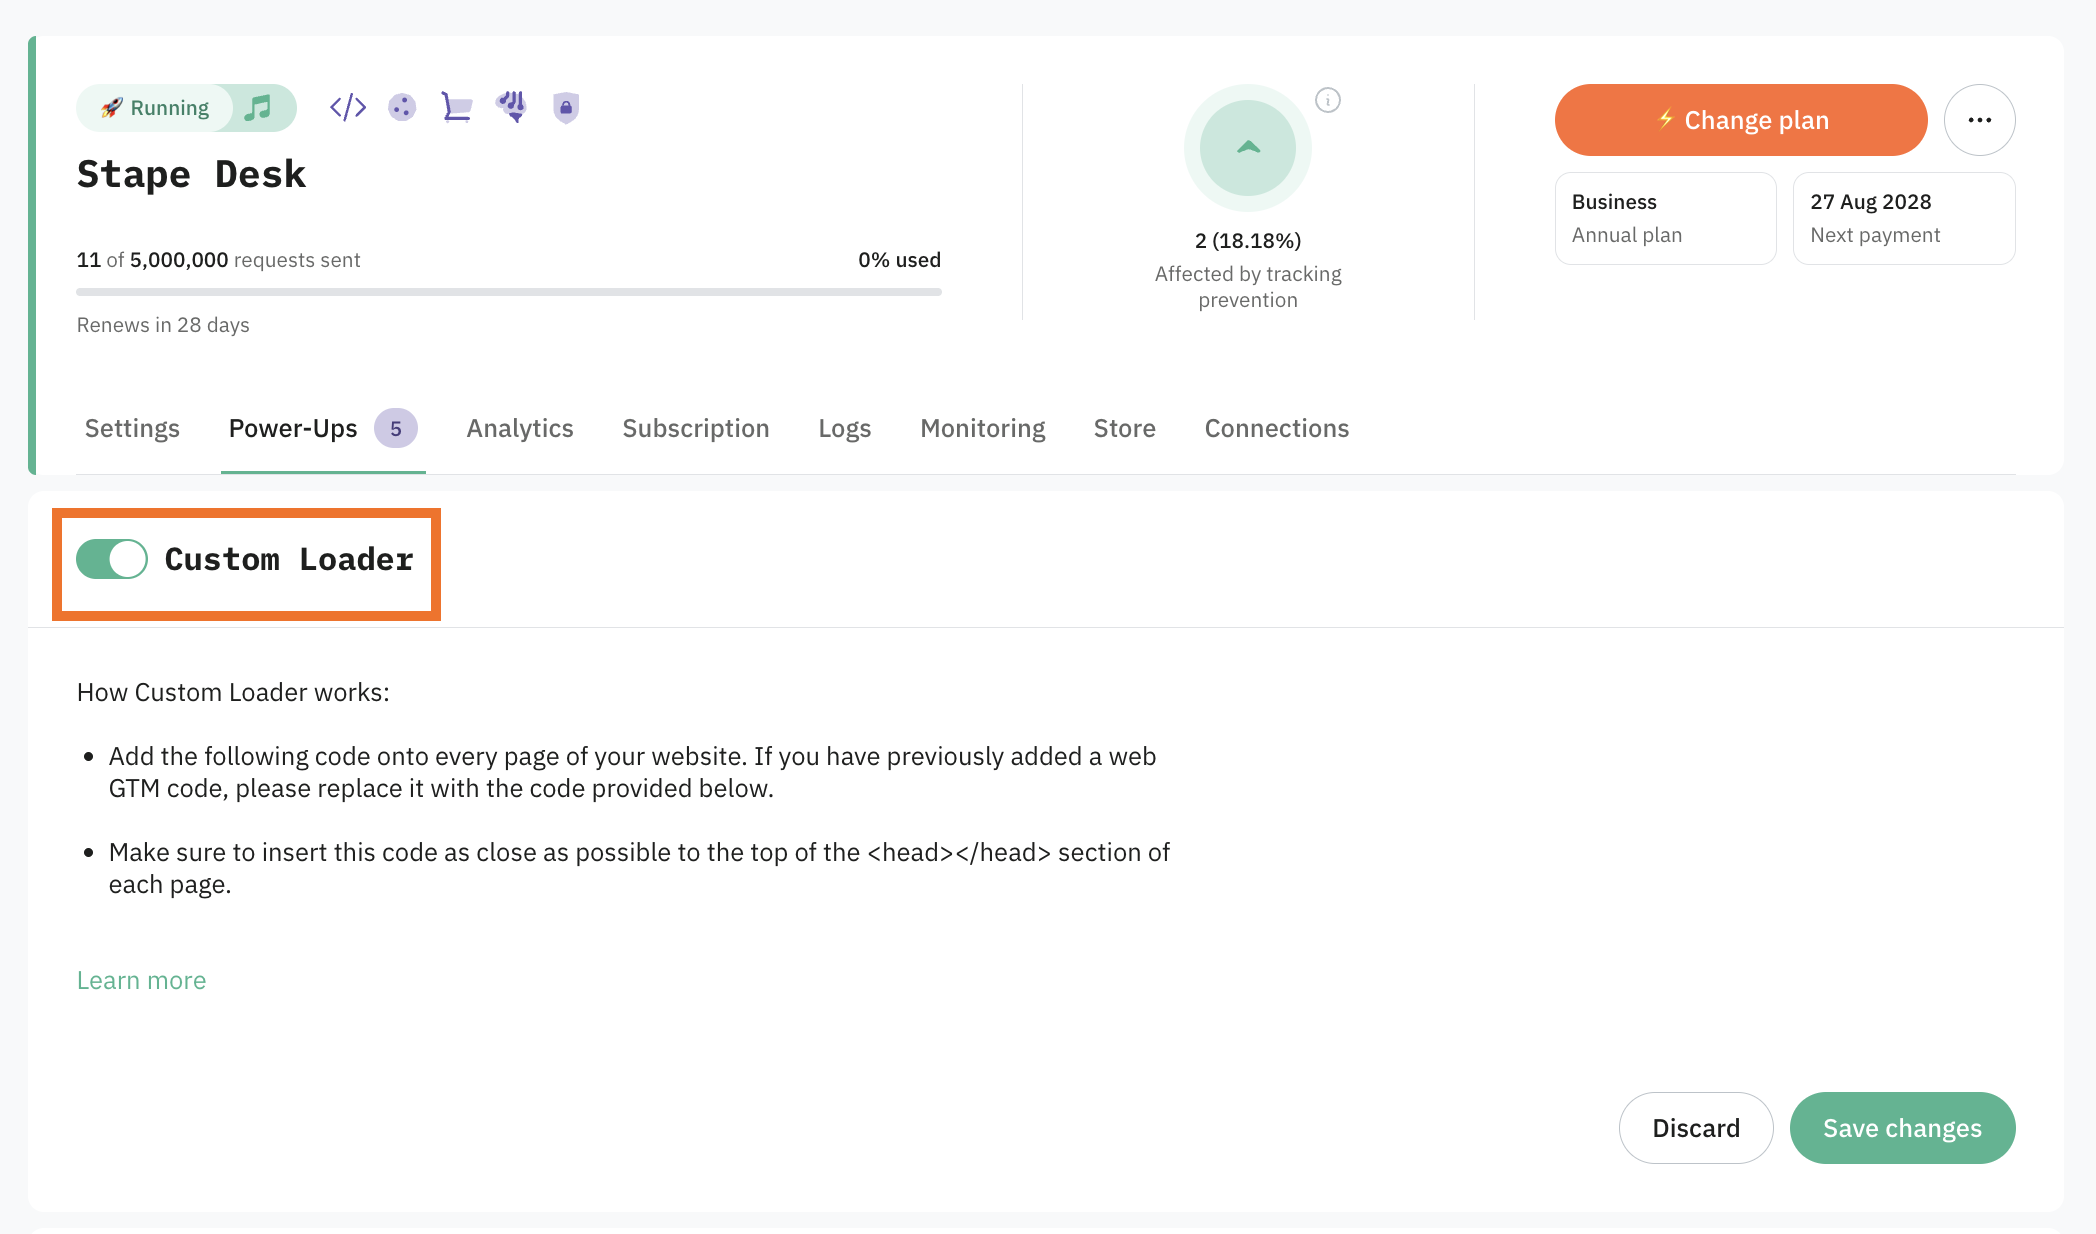
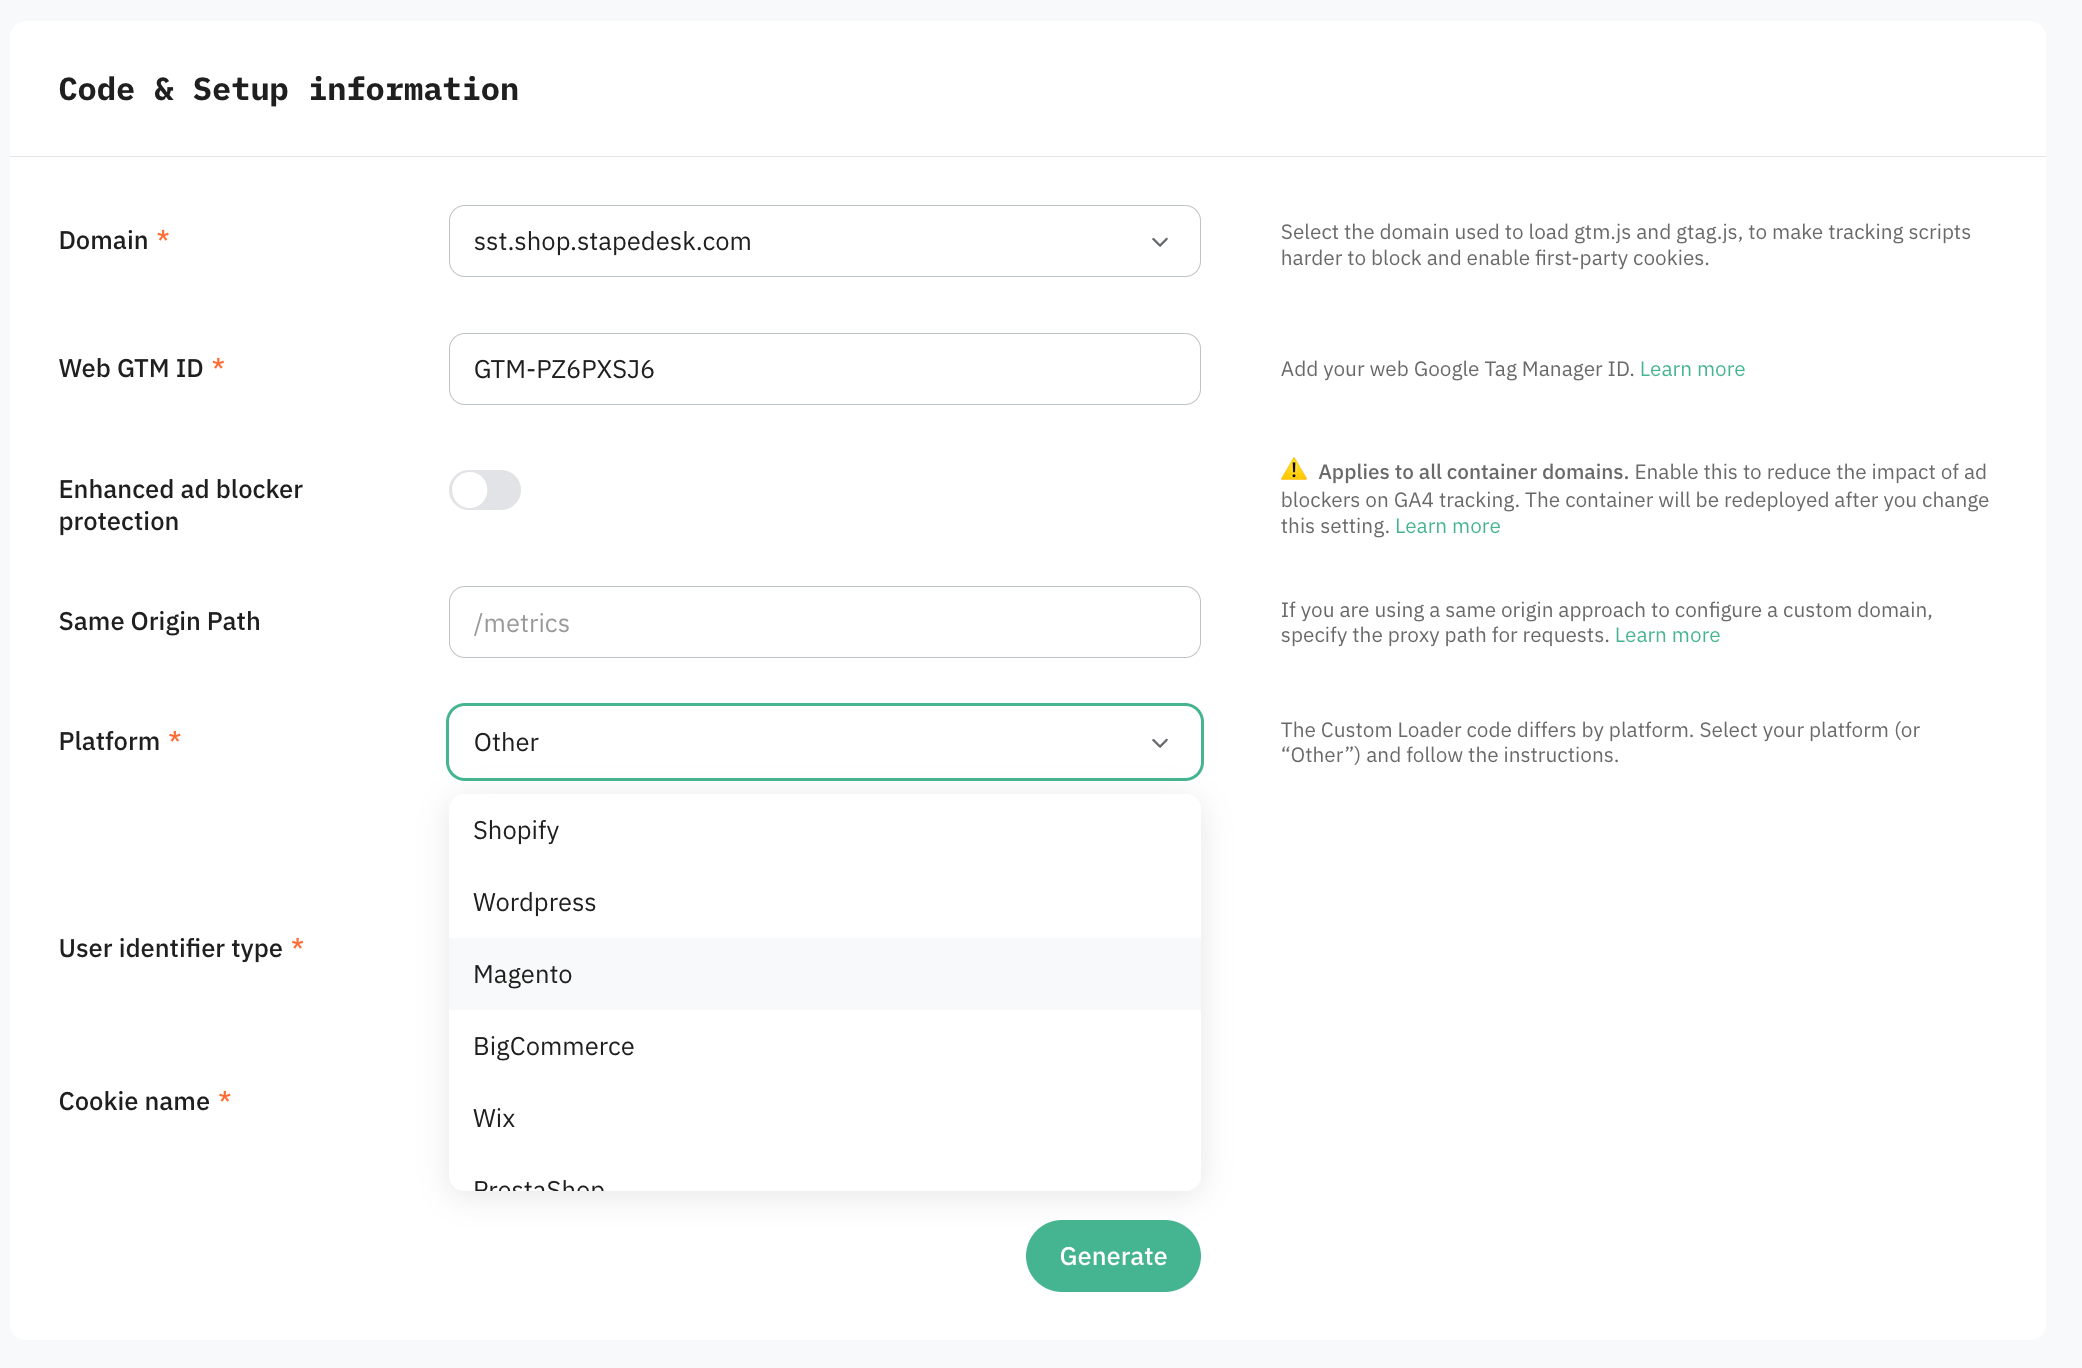
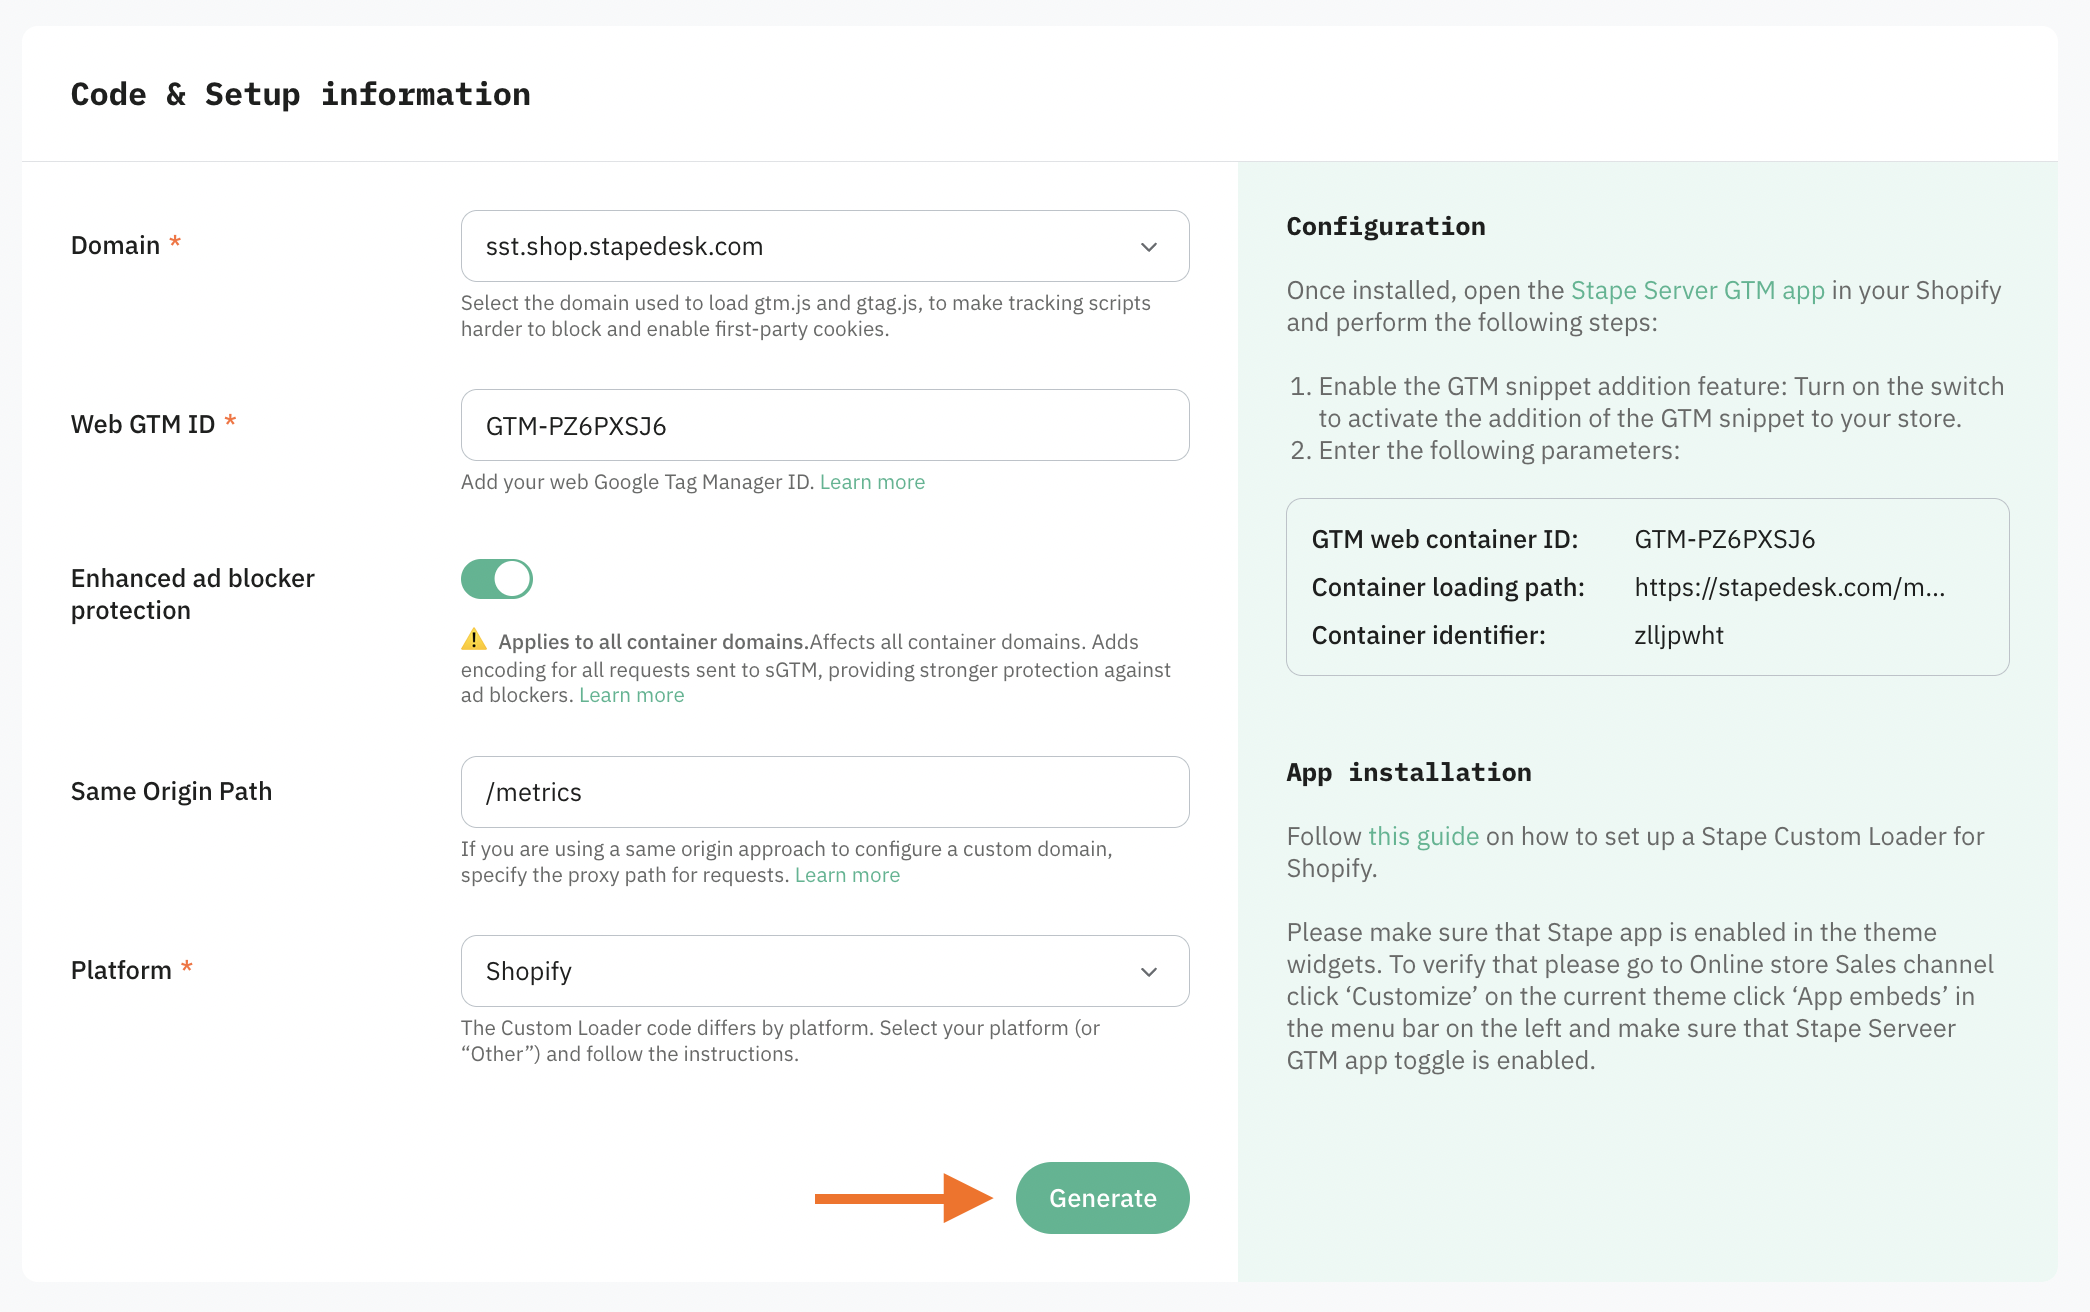
5. Configure Custom Loader with the following settings:
- Domain - choose one of the domains linked to your container.
- Web GTM ID - paste your web Google Tag Manager ID.
- Enhanced ad blocker protection - when this option is enabled, all your requests to the server sGTM will be encrypted so that ad blockers cannot block them based on request patterns.
- Same Origin Path - If you have the same origin configured, specify the path used, and both GTM and GTAG JS will be loaded via the same origin. Learn more about the same-origin approach for server GTM here.
- Platform - the web GTM code differs for each eCommerce platform. If you are using Stape applications for CMS, select the platform from the list. Otherwise, select the “Other” option to generate a JS snippet. You can find out more about Stape Conversion Tracking apps for CMS on our page.
Setup for popular platforms
If you use the Shopify, WordPress/WooCommerce, Magento, BigCommerce, Wix, or PrestaShop platform, you’ll need a respective app/plugin/extension developed by Stape to set up Custom Loader.
1. Download and configure the app for your platform:
- Shopify: download link, configuration guide.
- WordPress/WooCommerce: download link, configuration guide.
- Magento: download link, configuration guide.
- BigCommerce: download link, configuration guide.
- Wix: download link, configuration guide.
- PrestaShop: download link, configuration guide.

2. Go back to the Custom Loader setup page. Once you’ve entered all the Code & Setup information, click the Generate button.
3. Follow the instructions on the Configuration panel to set up Custom Loader in your app.
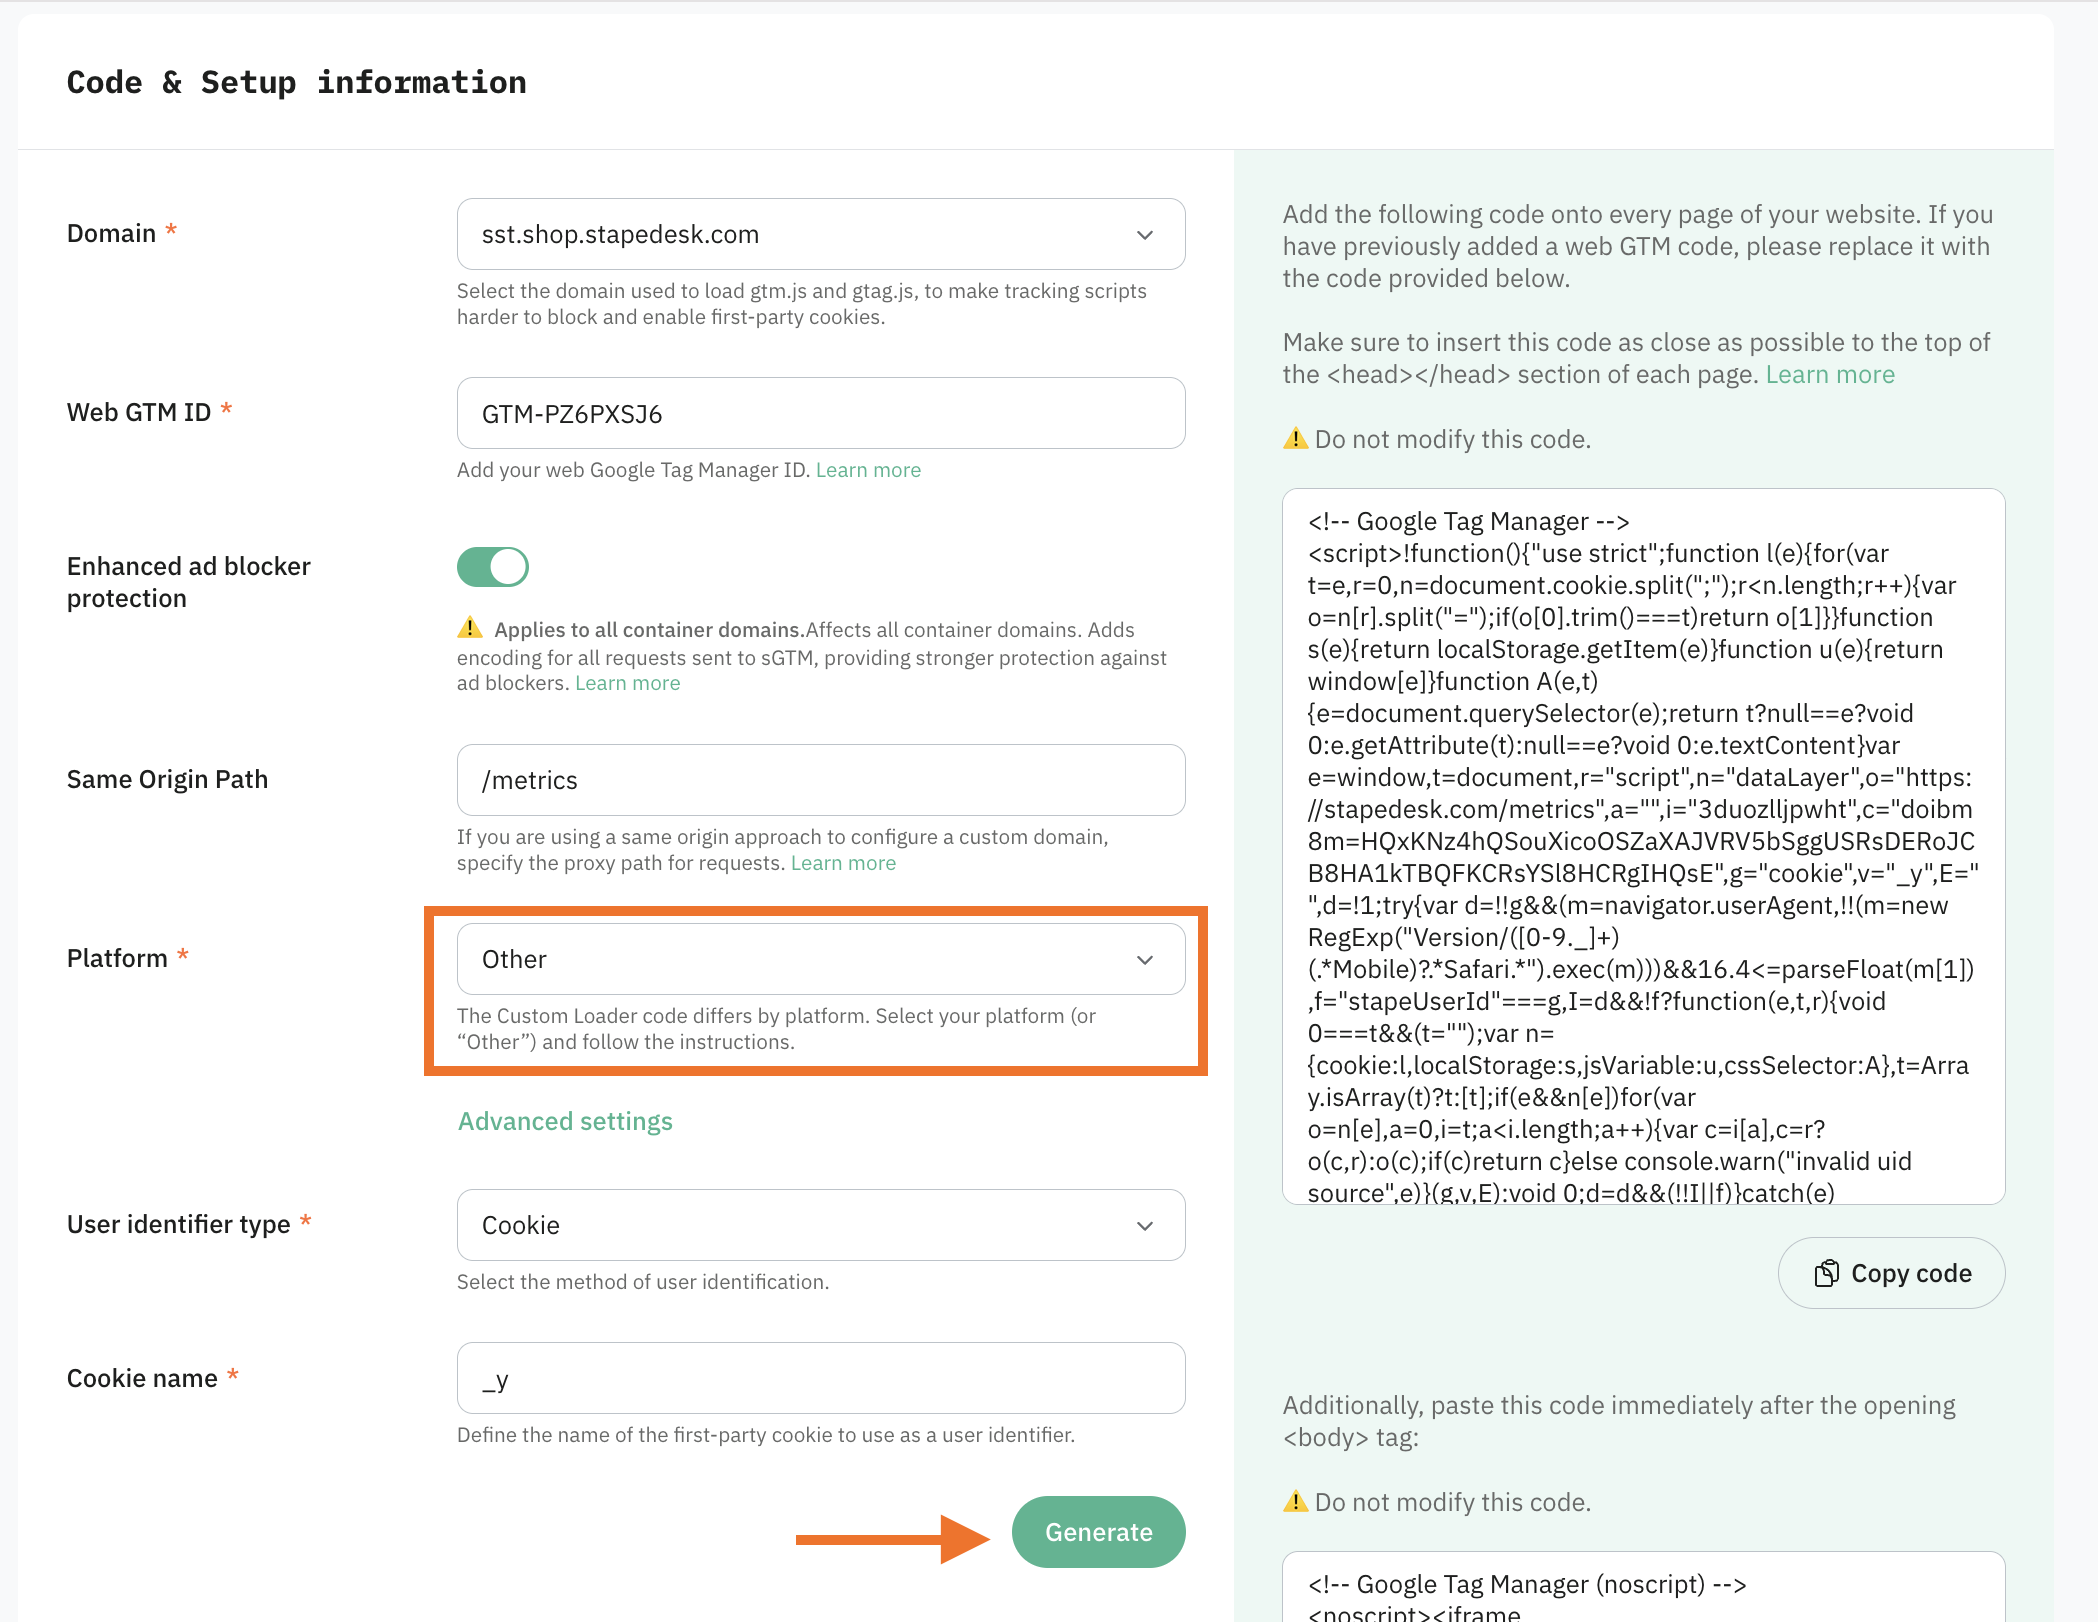
Setup for other platforms
If you select the Other platform, you will be given a JS code to use on your site instead of the standard GTM loader. To configure the code, enter the following extra information:
- User identifier type - available if the “Generate with Cookie Keeper” option is active (see below). The recommended method of identification is a cookie. For more details, see how to choose a User Identifier.
- Cookie name - define the name of the first-party cookie to use as a user identifier.
You can click Advanced settings to enter additional information:
- Data Layer variable name - specify if you use a non-standard ‘dataLayer’; otherwise, leave it empty.
- Generate with Cookie Keeper - available if you have the Cookie Keeper power-up active. If enabled, the code will also add the Cookie Keeper operation along with GTM loading.
- Set _xsd localStorage only after consent - when enabled, Stape stores the ad-blocker status in _xsd localStorage only after analytics_storage consent is granted in Google Consent Mode. Without consent, detection still runs, but the result is not saved between page visits. If disabled, saving to localStorage will occur regardless of the consent status.
6. Click Generate. You will then be given instructions on how to add a Custom Loader to your site (or a JS code if you selected the “Other” platform).
Make the necessary changes on your website (add the code), or in the Stape applications you use.
When adding the Custom Loader to the site, make sure you also remove the standard GTM loader if you have one.
Test the setup of Custom Loader
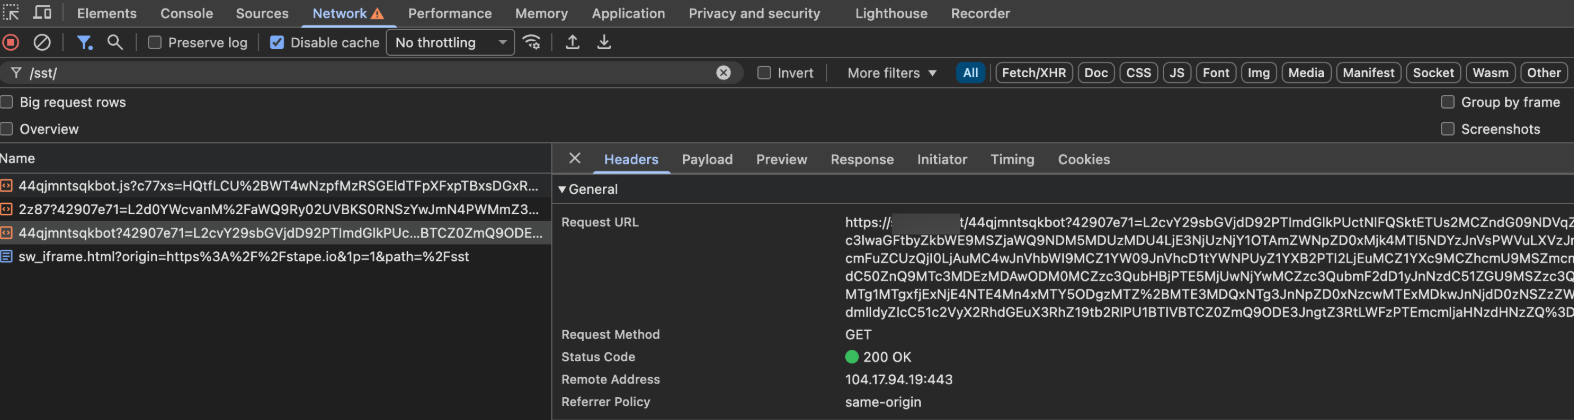
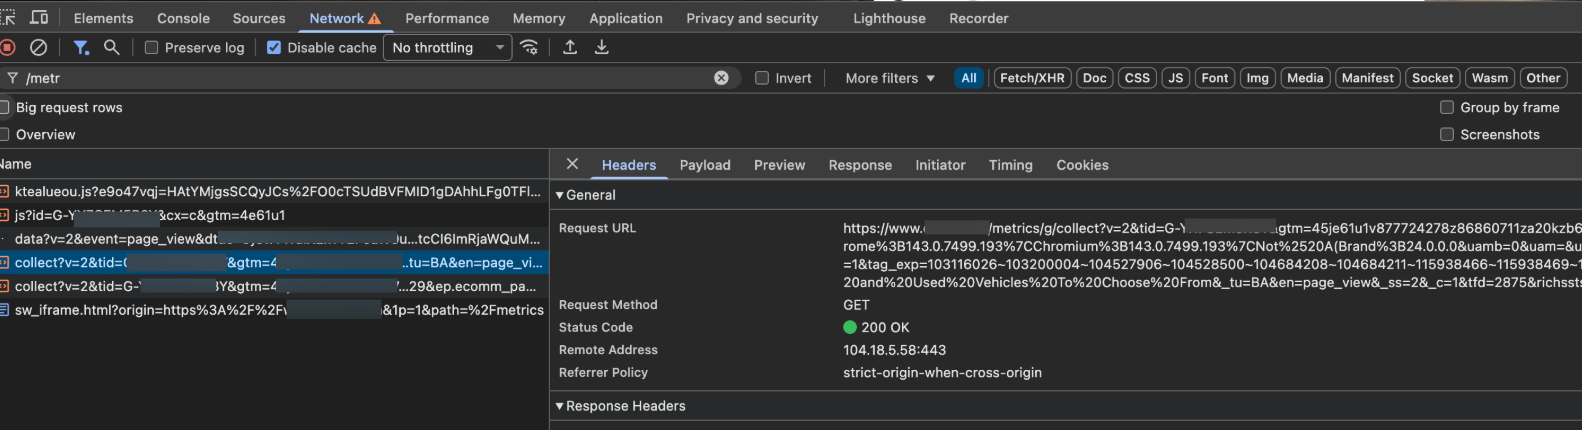
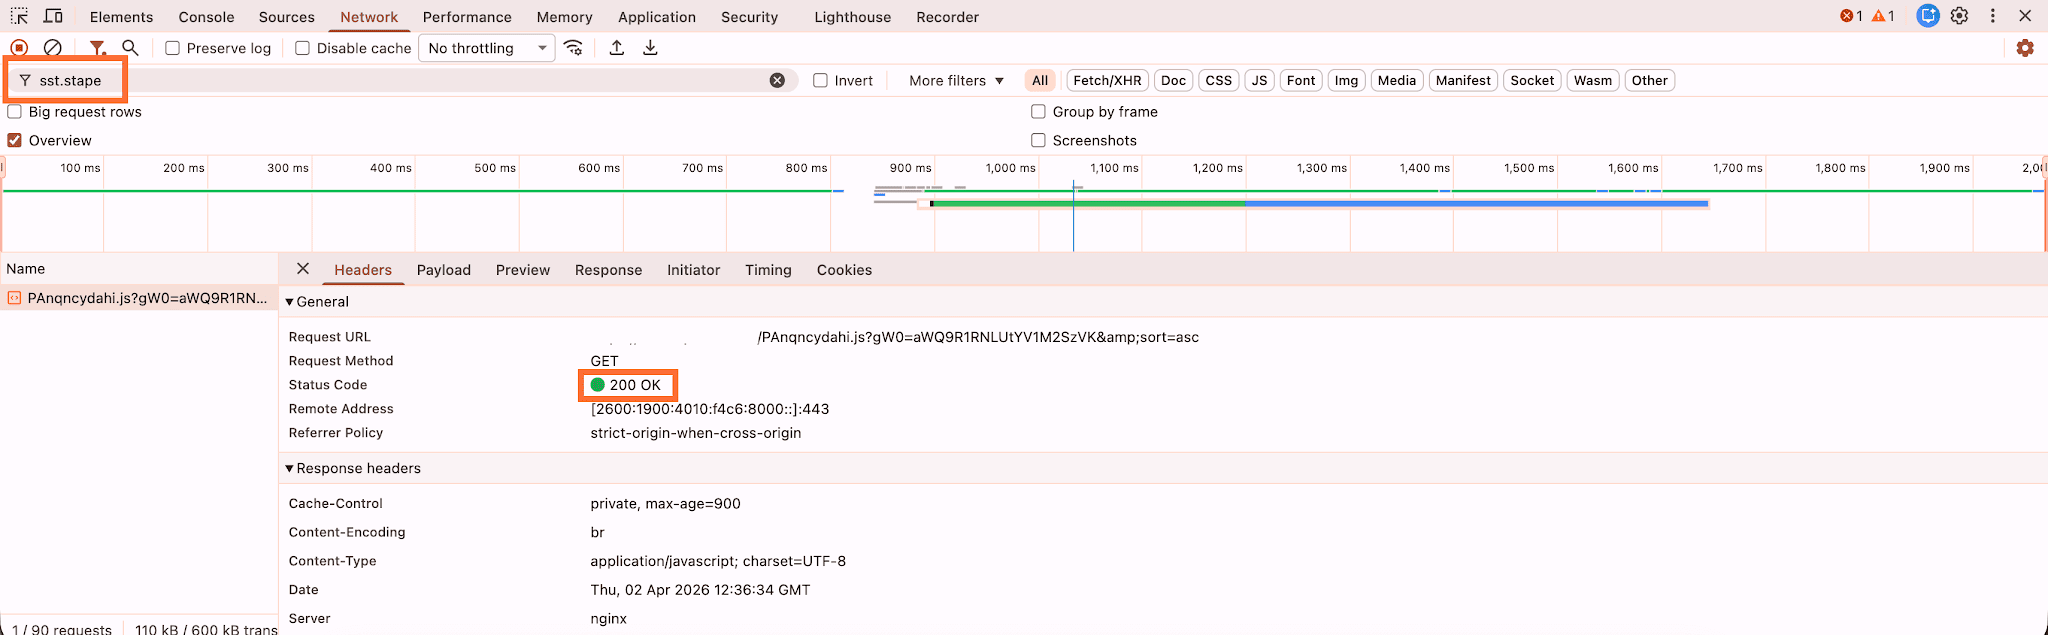
To check if everything works correctly, right-click on any website page → click Inspect → open the Network tab. Then, enter your custom subdomain or the same origin path if used.
If everything is correct, you should see the Google Tag Manager request URL and “200 OK” Status Code.
Below is an example of encrypting the GA4 request with the active Custom Loader and enhanced ad blocker protection toggle:
And here is what it looks like without the Custom Loader and without enhanced ad blocker protection configured:
GTM Environments let you load a specific version of your container (e.g., staging or development) instead of the published version. If you use environments, you need to manually add the environment parameters to your Custom Loader code.
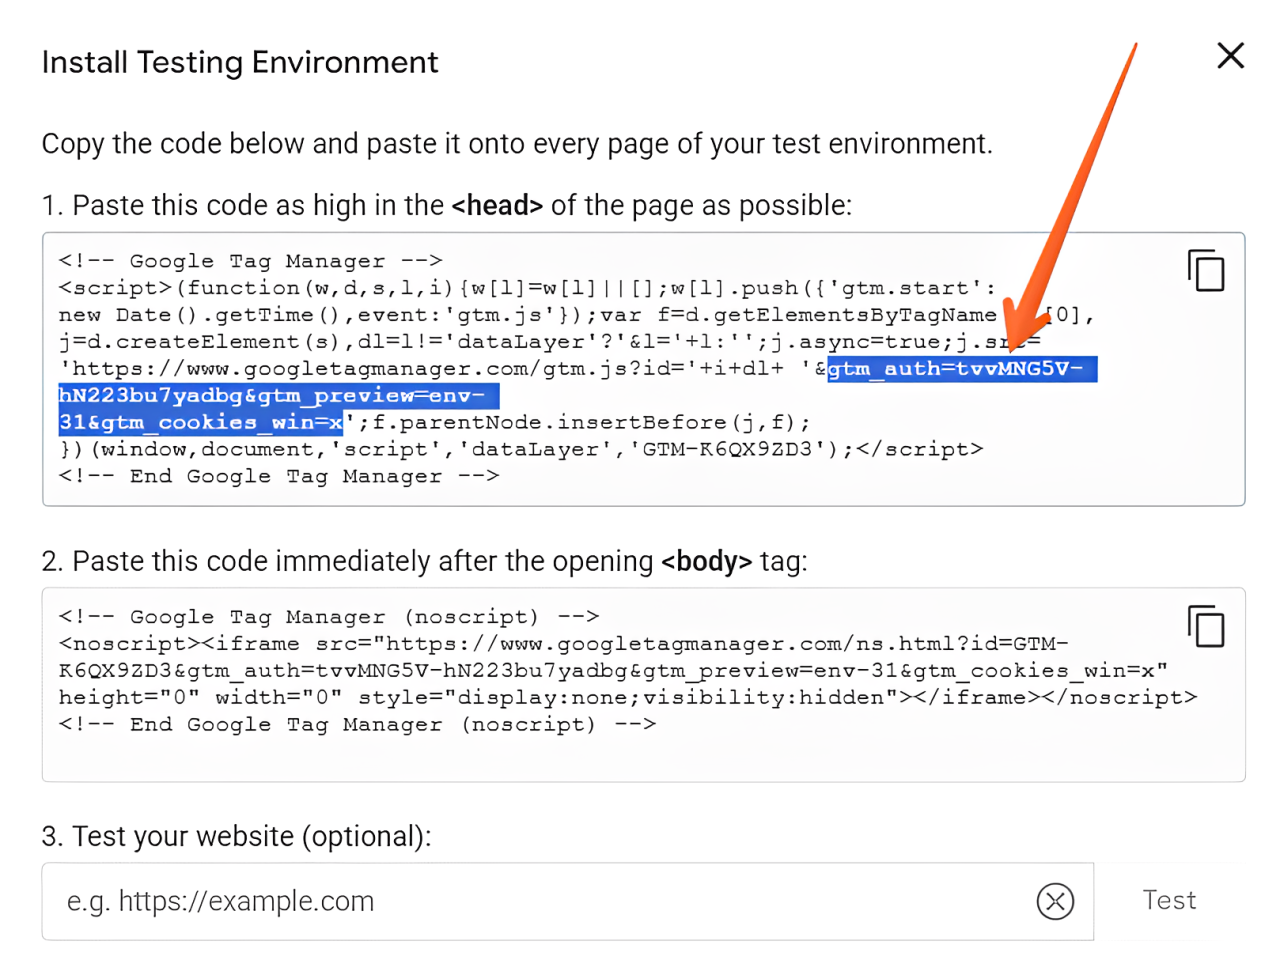
1. Get your environment parameters.
- In web GTM, go to Admin → Environments.
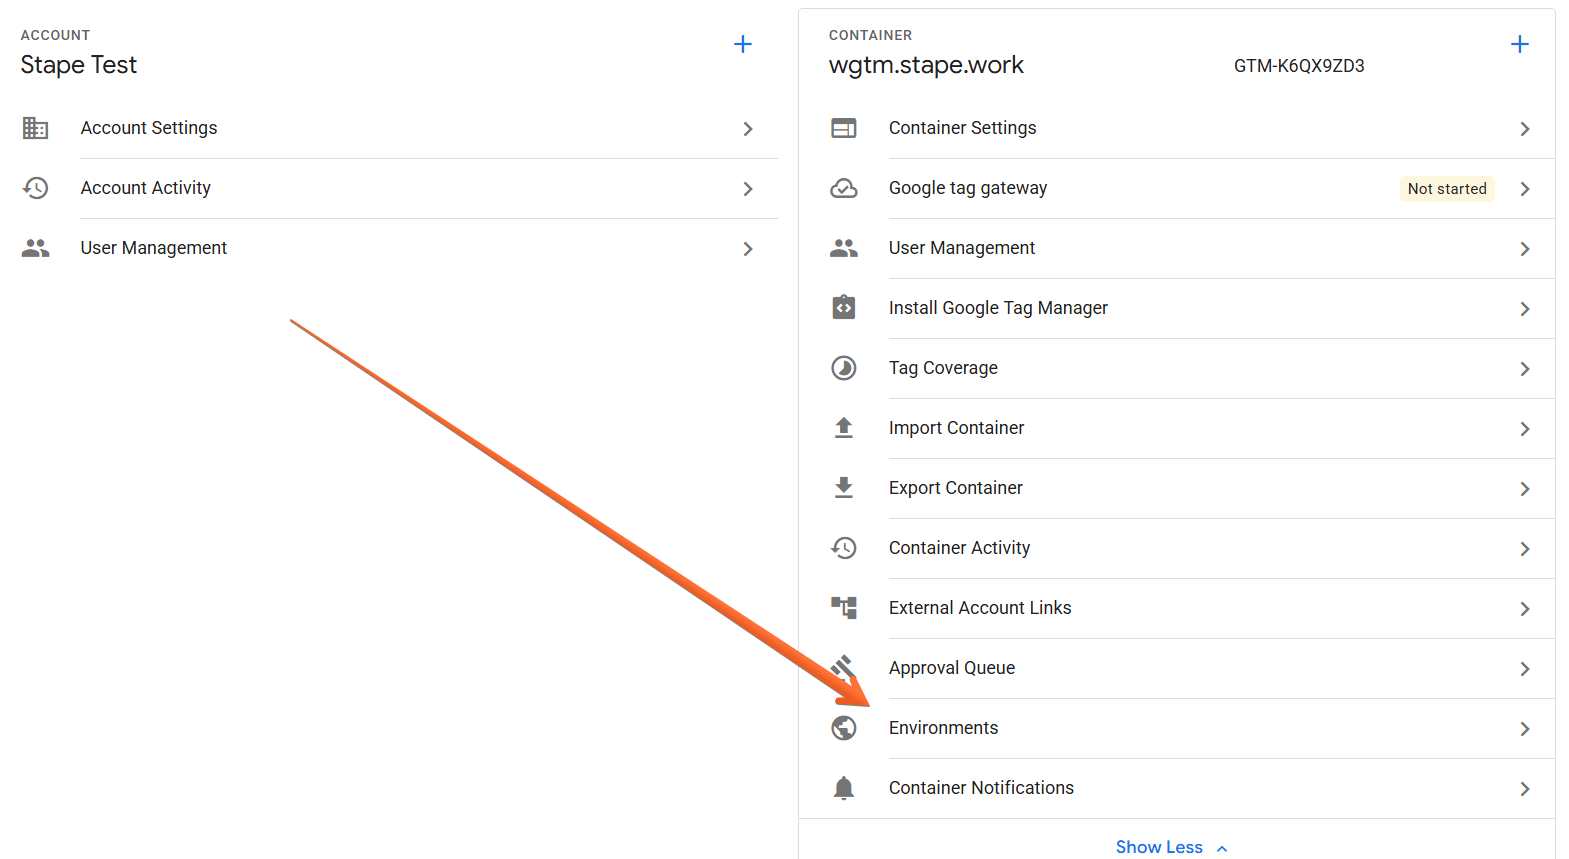
- Find your environment and click Actions → Get Snippet.

- Copy the three parameters from the snippet URL: gtm_auth, gtm_preview, and gtm_cookies_win.
2. Add the environment parameters to the head snippet.
In the generated Custom Loader head code, locate the E.src line.
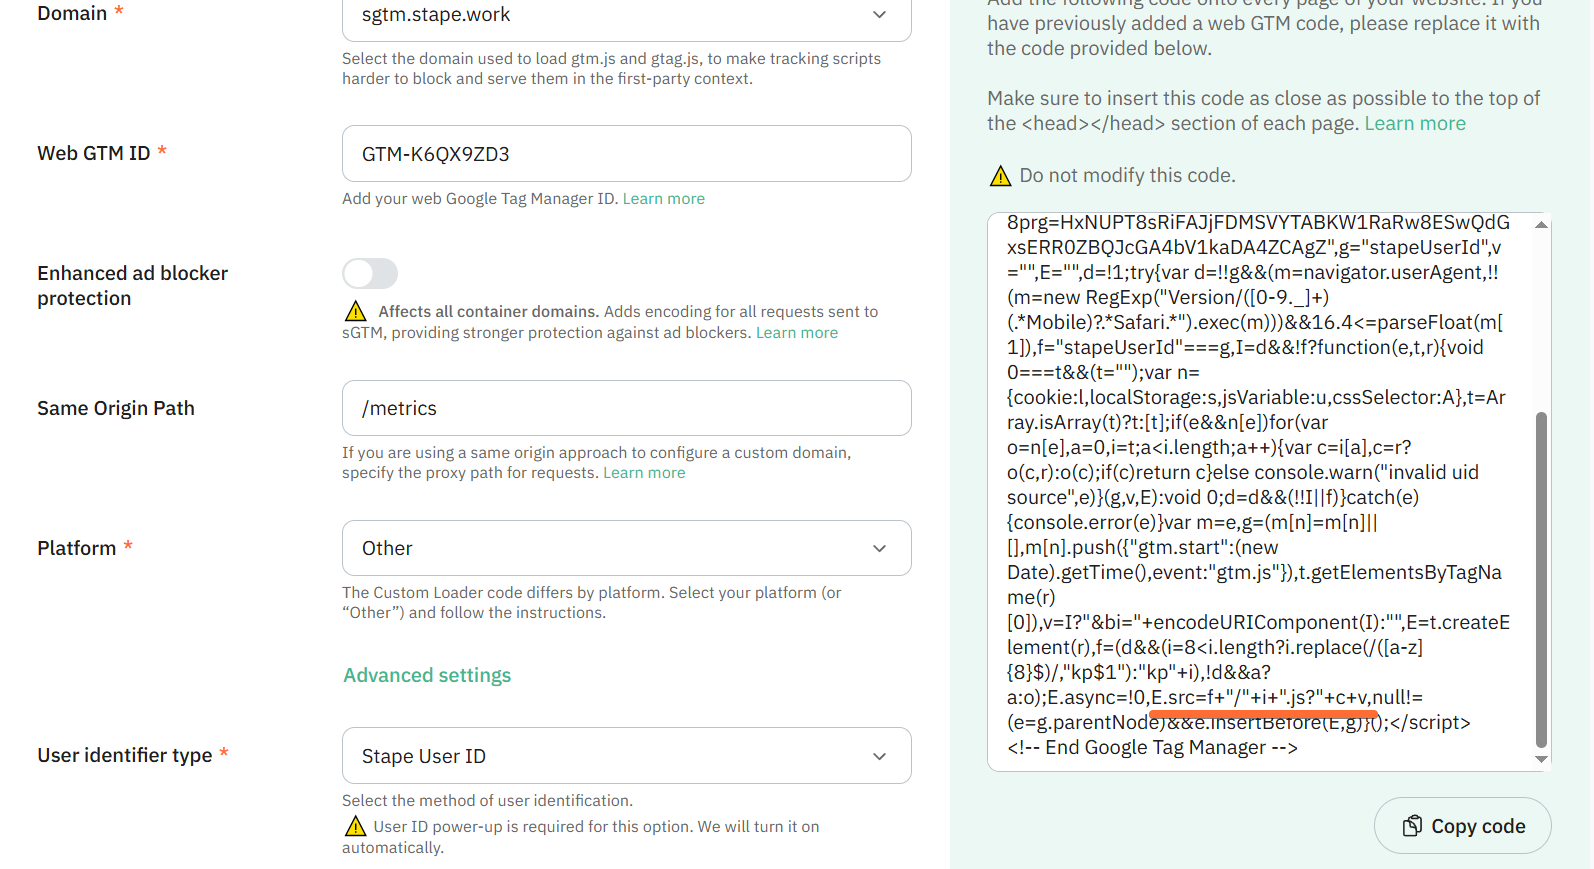
Append the parameters to the query string:
E.src=f+"/"+i+".js?"+c+v+">m_auth=XXXX>m_preview=env-N>m_cookies_win=x"Be sure to replace gtm_auth, gtm_preview, and gtm_cookies_win in the example with your own respective parameters. Also, it is highly recommended to add new parameters at the end of the URL string to avoid breaking anything (i.e., do NOT add them in the middle like E.src=f+"/"+i+".js?"+c+new parameters+v).
3. Add the environment parameters to the body snippet.
Do the same for the body snippet:
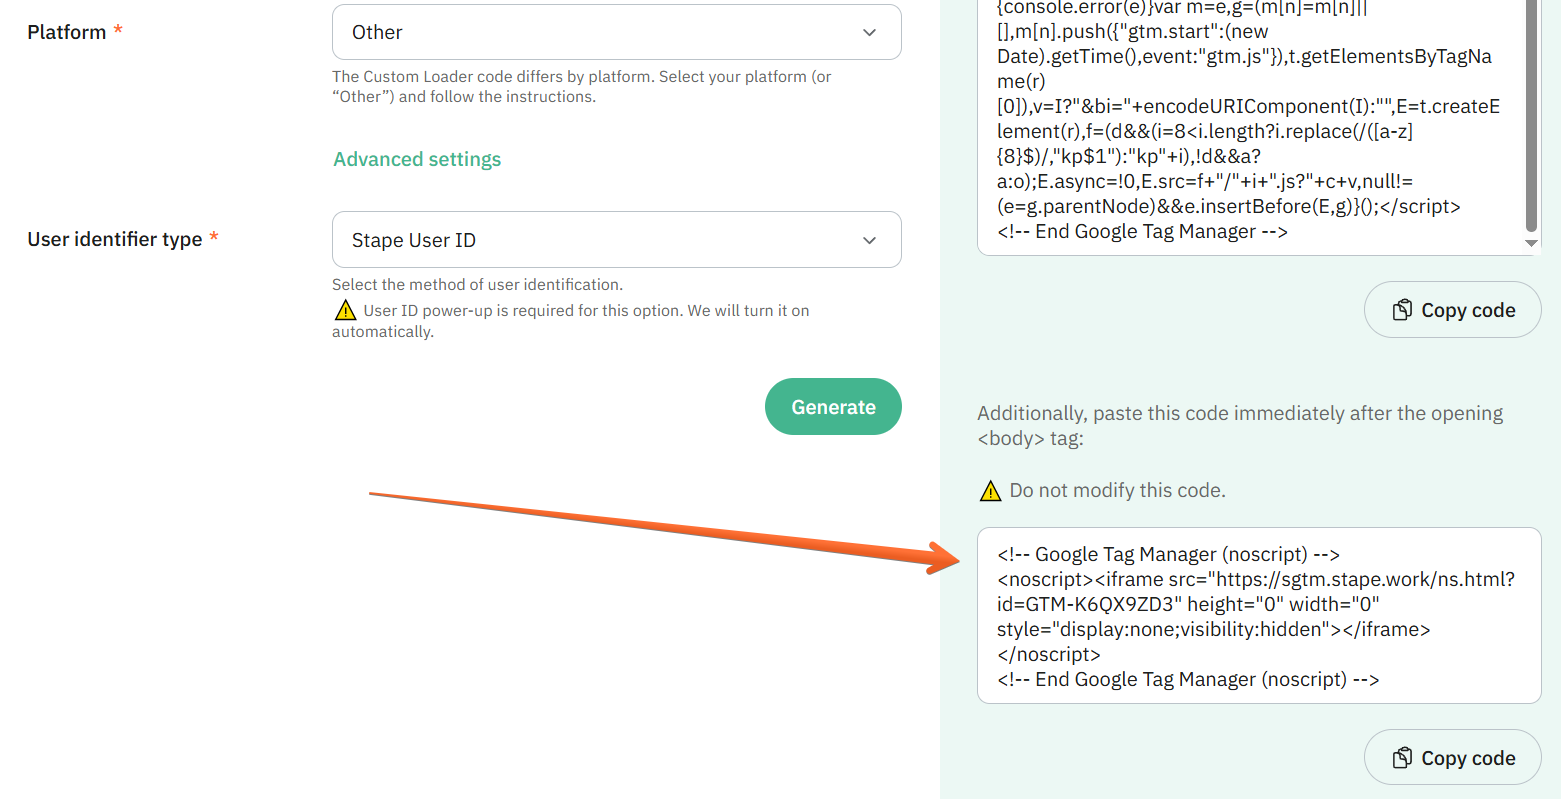
Append the same parameters to the iframe URL in the body snippet (replace the gtm_auth, gtm_preview, and gtm_cookies_win in the example with your own respective parameters):
<noscript><iframe src="https://your-subdomain.stape.work/ns.html?id=GTM-XXXXXX>m_auth=XXXX>m_preview=env-N>m_cookies_win=x" height="0" width="0" style="display:none;visibility:hidden"></iframe></noscript>| Environment parameters are tied to a specific environment. If you regenerate your Custom Loader snippet (e.g. after changing settings), you'll need to re-add the environment parameters manually, since they are not saved by Custom Loader. |
How to test the configuration
To verify the setup is working:
- Open any page on your website.
- Right-click → Inspect → open the Network tab.
- Filter requests by your custom subdomain or same-origin path.
- Look for the GTM request URL – it should return a 200 OK status code.
Example use case
Imagine an ecommerce website that uses a staging Google Tag Manager environment to test tracking changes before publishing them to production.
Without Custom Loader configured on such a staging environment, it is impossible to test how resilient your tracking setup is to ad blockers. As a result, when you release the changes to production, your users’ ad blockers may prevent GTM and GA4 scripts from loading, reducing your tracking performance accuracy.
By combining GTM Environments with Custom Loader, the team can validate tracking updates in a controlled environment before rolling them out to all users:
- Test tracking changes in staging.
- See the impact of ad blockers during validation by comparing backend data with GTM/GA4 events.
- Publish your tracking setup once you’re certain it is ad-blocker-proof.
Conclusion
Custom Loader and Google Tag Manager Environments work well together when you need reliable testing across staging, development, and production websites. The only extra requirement is manually adding the GTM environment parameters to the generated Custom Loader snippets.
Once configured, you can test GTM changes in isolated environments while still benefiting from Custom Loader's ability to reduce data loss caused by ad blockers and browser restrictions.

Comments