In this blog post, you will explore some advanced features of Google Analytics 4 and compare two methods to configure server-side GA4 - using Google Tag Manager and Stape Gateway. You will learn how to make it resistant to AdBlockers and tracking restrictions with the help of Stape Custom Loader power-up.

Server-side tracking collects data from a website or app by sending it to a server. The server processes and sends the data to Google Analytics. This approach offers several benefits, including improved data accuracy, enhanced data protection, and better performance. Businesses that want to reduce the impact of client-side tracking on page loading speed while still collecting valuable data benefit from server-side tracking.
Unlike client-side tracking, where data is collected and processed directly on the user’s device, server-side tracking shifts the data collection and processing to a server. This improves data security and ensures that the data collected is more accurate.
By implementing server-side tracking, businesses can gain deeper insights into user behavior, optimize their marketing strategies, and comply with data privacy regulations.

Server-side tracking has many benefits, including a prolonged cookie lifetime, increased tracking accuracy, improved page speed, better data security, bypassing ad blockers and ITPs, and many more.
| Related: Facebook tracking. |
Server GTM container is a tool used to set up server-side tracking. With its help, you can configure tracking for Google Analytics 4, server-side Google Ads tracking, and various other platforms on the server side.
Stape Gateway is another data tracking tool that eases the setup of server-side tracking for GA4 and Google Ads. How does it work? It captures data from the user's browser and sends it to a server.

Both the server GTM container and the Stape Gateway are used to track and collect data on the server side. Each of them provides enhanced data quality and protection. Each approach includes setting up a custom domain and a Custom Loader that help achieve the following benefits:
Stape Gateway can be used for Google Analytics and/or Google Ads (for conversion tracking and remarketing), while the server GTM container is more versatile and can be set up for a wide range of platforms.
To start using Stape Gateway, you only need a configured web Google Tag Manager container. For server GTM, the setup prerequisites are a bit more complicated - besides the web GTM container, you will also need to set up a server Google Tag Manager container.
Stape Gateway is easier to set up as it consists of three steps:
Given the greater flexibility of server GTM, it requires more technical skills to set up. Besides registration, adding a custom domain and Custom Loader, you will also need to create a server GTM container and do additional configurations based on the platforms you use.
Stape offers a wide range of power-ups, tags, variables, and clients to make configuration easier for you.
For your convenience, we provide a comparison table to highlight the main differences between the two ways of setting up server-side tracking:
| Stape Gateway | Server GTM container | |
|---|---|---|
| Setup complexity | Easier to set up; you only need to have a web GTM container | More complex configuration, you need web and server GTM containers |
| Ability to set up server-side tracking for other platforms | Setup is possible only for GA4 and Google Ads | More flexible, enabling setup for various platforms |
| Price | 10$/month for each domain or 100$/month for up to 20 domains | Depends on the number of requests, check the calculator to see the price for your website |
Although the final result is similar for Stape Gateway and the GTM server container, each may work better for different cases.
Choose the server GTM implementation if you:
✅ Want to improve data quality for Google Analytics, Google Ads, and/or any other platform;
✅ Need to set up complicated tracking infrastructure that involves various platforms and analytics tools;
✅ Have a higher marketing budget and can invest in high-quality data tracking.*
*Please note: If your website doesn't have high traffic volume, you can use Stape for server-side tagging for free. To see whether it's your case, check our pricing page.
Choose Stape Gateway if you:
✅ Need to enhance data quality for Google Analytics and/or Google Ads;
✅ Look for a quick and hassle-free way to improve the data you get;
✅ Have a lower marketing budget and need a cheaper solution.
| If the Stape Gateway looks like a great option for you, check our setup guide to start using it. In this article, we focus on the configuration process for the server GTM. |
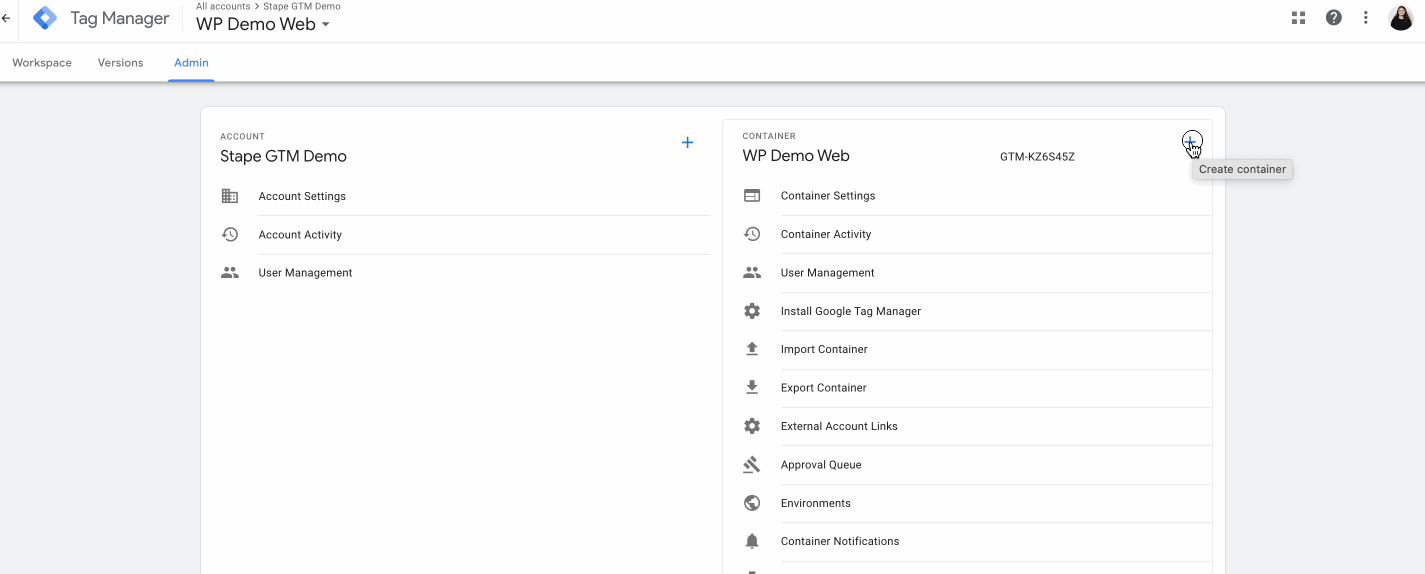
1.1 Select your GTM account → Click Admin → Click + next to the Container name.
1.2 Add Container Name → Under Target platform, choose Server. Click Create.
1.3 Choose Manually provision tagging server. Copy your container config. We will need it in the following steps.

2.1 Go to Stape and create an account or log in. You can try our service for free and explore the benefits of Stape hosting for the GTM server.

2.2 Press the button Create container in the top right corner.
2.3 Enter your container details:

2.4 Choose a plan for your container. You can start with a Free plan. Click Continue with a Free plan.

You will see the status of your container, container config, and plan name. It takes several minutes to deploy a server container. Please reload the page to update the status. If the setup was done correctly, you should see the status Running.

The critical feature of server-side tagging is setting first-party cookies, which requires a server-side setup. You need to use a custom tagging server URL or domain to enable this feature. The custom tagging server URL or custom domain should share the same domain as your website.
Due to cookie restrictions, configuring custom domains for sGTM has become more complex. ITP affects user tracking in Safari and Firefox.
To improve your tracking, you need to set up a custom domain. It will help you prolong your cookie lifetime in all browsers.
Let’s discuss ways to configure a custom domain for your sGTM tagging server URL.
There are three ways to set up a custom domain:
However, the “Same origin” method is technically advanced. You'll require a CDN or a load balancer to configure a same origin domain.

If you can't configure the same origin domain, we have solutions for prolonging cookie lifetime in Safari: Own CDN and Cookie Keeper.
By default, when you add your custom subdomain to your Stape container, it will be verified by the CNAME record.
Below is an example of a custom subdomain setup:
3.1 Log in to your Stape account, choose a container, scroll down and click Add custom domain.

3.2 You will see DNS records that should be added to verify the custom domain.
The DNS record depends on the server location and CDN option you choose.
You can also choose to connect custom domain:
The easiest way to connect domains. Log in with your DNS provider details via Entri, and give us one-time permission to connect your domain. Check the full list of supported DNS providers by Entri.

You must set one CNAME record if you do not use Global CDN.

You must set two CNAME records if you use Global CDN.

3.3 Log in to your domain name service (e.g. Cloudflare) and create a new DNS record for the subdomain you want to use.

If you use Global CDN, set additional CNAME record.

3.4 Once your custom domain is verified, you should see the status Ready next to the tagging server URL in the Stape admin.

3.5 Go to your Google Tag Manager Server container → Admin → Container Settings → Change Tagging server URL to your subdomain.

If you want to verify your custom subdomain using A and AAAA records, you can do so by clicking Advanced settings after adding the custom subdomain to the container and ticking the “Use A records instead of CNAME records” box.
1. Open your sGTM container on Stape, scroll down to Domains and click Add custom domain.

2. Enter a custom domain. Click Advanced settings after adding the custom subdomain to the container and ticking the “Use A records instead of CNAME records” box.
3. The DNS records you should configure vary depending on the server location. You will see DNS records that you should add inside your Stape container.

4. Log in to your DNS account and add records you see in your Stape account. Below is an example of DNS setup for Cloudflare. On the account home page next to your domain name click three dots and choose Configure DNS.

Click Add record.

Then, input the records you see in your Stape account. Ensure that the proxy is turned off.


Usually, it takes 2-3 hours to verify the custom domain. For some DNS providers, verifying records might take up to 72 hours. We will email you once the custom domain is verified or any error is detected. If there is an error with the verification, please follow this instruction on how to verify custom domain verification.
5. Once the custom domain is verified, go back to the Google Tag Manager Server container → Choose your server container → Admin → Container Settings → paste tagging server URL.

6. If you use a custom domain, updating the Web GTM script on your website is highly recommended. This tweak will load gtm.js from your domain. To do so, replace the default domain googletagmanager.com with the custom domain you set up in the previous step.

There can be two scenarios:
4.1.1 Add your server container URL to Google Tag settings. In the configuration settings, add the configuration parameter server_container_url and add your tagging server URL as a value.

4.1.2 Create Google Analytics 4 client in server GTM container. To do so, open the clients’ section → Create New client → Select client type Google Analytics: GA4 (Web) → Add client name and click Save.

If the "Default gtag.js paths for specific IDs" box is checked: the server container will handle requests for the Google Tag JavaScript library, in addition to individual event requests enabled by the previous setting. Use this option only if you've added the gtag.js snippet to your source code and updated its URL to point to your tagging server.
If the box is not checked: The GA4 client will ignore requests for the Google Tag JavaScript library. Enable this setting and specify all GA4 Measurement IDs (G-XXXXXXX) for which you want the JavaScript library to load through your server-side endpoint.
You can also read more on region-specific parameters in our blog.
4.1.3 In the server GTM container create a new tag with the tag type Google Analytics: GA4

4.1.4 Add Measurement ID and Event Name.
Measurement ID - follow this guide to find GA4 ID. You can add it as variable or if the event came from a GA4 web tag, you can leave this field blank to inherit the measurement ID of the event.
Event Name - the event name to send to Google. See the recommended events for more information. If this field is blank, the value of the event_name parameter will be sent.

4.1.5 Click Triggering and configure a trigger with the trigger type Custom that will fire every time when client name equals GA4 (or the name of the GA4 client that you’ve specified on the step 2.b) → Click Save.

4.2.1 Inside the Web container, create a new tag of the tag Type Google Tag. Add your Google Tag ID.
Add trigger to GA4 tag. It usually should trigger on all page views.

You can also create a Google Tag: Configuration Settings variable that will predefine Google Tag settings if you need to use multiple Google Tags on your website and do not want to add settings for each tag manually.
These parameters can, for example, define whether you want to send a page view event every time a Google Tag triggers, set UTM parameters, set client ID, etc. There is a list of standard Google Tags configuration parameters.
4.2.2 To set up the GA4 event tracking, go to the tags section and create a new tag with the tag type Google Analytics: GA4 Event. Add your GA4 ID and the event name; there is a list of standard event names.


4.2.3 Go to your Google Tag Manager Server container. Click Clients and New.
4.2.4 Choose Google Analytics: GA4 (web) and click Save.

4.2.5 Go to Tags and click New.
4.2.6 Choose Google Analytics: GA4.

4.2.7 Add Measurement ID and Event Name.
Measurement ID - follow this guide to find GA4 ID. You can add it as a variable or if the event came from a GA4 web tag, you can leave this field blank to inherit the measurement ID of the event.
Event Name - the event name to send to Google. See the recommended events for more information. If this field is blank, the value of the event_name parameter will be sent.

4.2.8 Click Triggering.

4.2.9 Create triggers for the tag. Client name should equal GA4. Example:
Click +

Choose Custom type → click Some events → choose Client Name in built-in variables → set Equals GA4 (the name of your GA4 client) → click Save.

4.2.10 Open web and server GTM debuggers and test the setup.
Open the Server container preview mode and check that you see GA4 requests. Publish updated inside server and web Google Tag Manager containers.

Custom Loader modifies gtag.js and gtm.js loading paths to resist ad blockers and ITPs, potentially increasing data volume by up to 40%.
5.1 Find and copy your web GTM ID in GTM. To find GTM ID log in to your Google Tag Manager account and open a Web GTM container. In the top right corner (next to the Submit and Preview buttons) you’ll see some short text that starts with "GTM-" and then contains some letters/numbers.

5.2 Open your sGTM container on Stape → Click Power-Ups.
Find Custom Loader and click Use.

5.3 Add the following settings:
Domain - from the list of domains connected to your container, select the necessary ones.
Web GTM ID - add web Google Tag Manager ID. Check out how to find web GTM ID in our guide.
GA4 ad block bypass - enables bypassing adblockers' impact on the GA4 tracking code. Note that this setting will affect all container domains. Be sure to debug both the web and server GTM containers after enabling this toggle.
Same Origin Path - if you are using same origin approach for configuring custom domain, please specify the proxy path for requests.
Platform - the Custom Loader code differs for each platform. Select your platform or "Other" if it is not on the list.

If you do not use any of these CMS or do not want to use the Stape plugins, select Other. You will see updated web GTM code → Copy this web GTM script and add or replace the existing web GTM script on your site.

Add the following record inside your Google Tag in the web Google Tag Manager container.
Configuration parameter: server_container_url
Value is your domain name in Stape admin


We suggest starting with the Tag Manager preview and debug mode to ensure that your tags are triggering when they should. GTM debug tool will show you which tags and events were added to the site and whether they fired or not on particular pages/triggers.
Tag manager server container debug mode works similarly to web debugger. Just click the preview button on the top right corner. Then, navigate to the different pages and click on the button or perform events set up in the server container.
Return to the Tag Manager debugger and check which tags and events were triggered and if all required parameters were sent to the dataLayer. If everything works correctly, we can move to the next step.

GA4 has it's debug view that will show you all events, event parameters and user data that we processed by GA4. To find GA4 debugger click Configure → Debug view.

To ensure that requests are sent from a custom tagging URL, you’ll need to dive deeper into the developer’s zone. We’ll need Chrome or Safari developer tools here (you can use other browsers as well).
On Mac, you can access the developer tool by clicking command+option+I or click the right mouse button, then Inspect.

Once you’ve opened the developer tool, go to the Network tab and refresh the page. When inside the filter, type collect. You should see GA4 requests. Click on GA4 request, and on the right side, you will see additional parameters.
Bear in mind that you need to double-check if you can see the tagging server URL inside the Request URL. It is the one that you’ve added to the server container and inside GA4 variable or tag.
Note: cookies will be extended only if you are using a custom subdomain inside the tagging URL. For instance, your website URL is example.com. Then, the custom domain for tagging URL should look like gtm.example.com.
Go to the application tab inside the developer tool that you’ve used in step two. Click Storage → Cookies. On the right side, you will find cookies named FPID; check the date in the column “expires”. This way, cookies should be extended up to 2 years. I am writing this post in February 2021, and my cookie will expire in February 2023. If you are not using server-side tracking and a custom tagging URL located under your main domain, Safari will decrease your cookie lifetime to 1 or 7 days. If you see that cookies were not extended, go to the GA4 client inside the server container, click more settings and check what Server Cookie Settings look like on the screenshot below. Or make sure that you are using a custom tagging URL that looks like gtm.yourdomain.com.

1. Event-driven data model
The event-driven data model allows you to create an event for any website activity you want to record inside GA4. You can also use parameters that add more value and description to each event. Google prepared the list of recommended event names to use inside GA4, but you can also create custom events and custom parameters.
2. Cross-device reporting
When it comes to traffic and sales analysis, cross-device user/conversion tracking is the main point. Let’s say a user saw your Adwords ad on the mobile and clicked on it. For some reason, they decided to proceed with the checkout on the desktop. The user, however, did not log into any of the Google services. So, Google cannot recognize them and give credit to that particular Adwords click. As a result, the conversion source is lost, and the information for Adwords optimization is incomplete.
To solve this problem, Google released Signals. Google integrated Signals functionality into GA4 and added machine learning. It is designed to identify users who are not logged into any Google services. Machine learning fills all the gaps if a user is not logged into the Google services or their device cannot be identified via fingerprinting.
By default, Google signals data collection is not enabled inside GA4. You need to enable it manually by going into Settings → click Data Settings → Data Collection.
Another essential setting (and a new one) that you should consider checking is how GA4 identifies users.
They have two options:
3. Predefined events
Google identified the most commonly used events that marketers and business owners track inside Google Analytics and GTM and added them to the enhanced measurement functionality.
Now, page views, scrolls, outbound link clicks, site searches, video engagement, and file downloads are tracked by default.
This feature is typically enabled for all GA4 properties. But you need to ensure it’s turned on for your account. To do that, go to Data Streams → choose Webstream details, and check if all events are enabled.
4. Analysis Hub and integration with BigQuery
Google completely redesigned the analytics/reporting hub inside GA4. It allows users to create pivots, tables, and filters easily. There is also a template gallery, similar to what they have in DataStudio. So you will be able to analyze data more efficiently and spend less time creating custom reports.
BigQuery export is available to all GA4 users. In a nutshell, you can export GA4 data to BigQuery, which can be integrated with other sources like your CRM.
5. Limit of Custom dimension and Custom metric
In GA4, the limit of custom dimensions and metrics increased. Google Analytics 4 allows to have 25 user scoped, and 50 events scoped custom dimensions. Custom metrics increased to 50. An increased number of custom metrics and dimensions gives more flexibility for the customization of GA4.
6. GA4 debug view
The GA4 debugger is extremely helpful for people setting up Google Analytics 4. The enabled preview lets you see what events, event properties, and user data GA4 processes. It makes configuring GA4 much faster and easier.
7. Other advantages
You might be already tired of reading about why GA4 is so cool. So here’s a quick round-up of other benefits: audience evaluation based on their probability of buying in the next several days, a combination of web and app analytics, and lots more.
GA4 and GTM server tagging was created to fit current world tracking rules, web technologies, restrictions, and data security. You’ll need time to get used to the new interface and features and understand how they can better suit your website and business needs. In the long run, server-side tracking in Google Analytics 4 can significantly improve data accuracy and give you greater control over what data is collected and how it's shared with third-party platforms.
If migrating to the GA4 and GTM server containers is complex or you realize that you need assistance, feel free to contact us. We can answer your questions and help you make sure your Google Analytics 4 server-side tracking is implemented correctly, efficiently, and is aligned with your goals.
Stape has lots of tags for server GTM! Click on Try for free to register and check them all.

Comments