Send Pipedrive Deal statuses to required platform with Stape's app
Uliana Lesiv
AuthorThe Stape Conversion Tracking Pipedrive CRM app is the solution that provides integration between Pipedrive CRM and the platform you need. It can send Deals' status updates to the platform through a secure, server-side connection. Additionally, the app supports sending data on offline conversions.
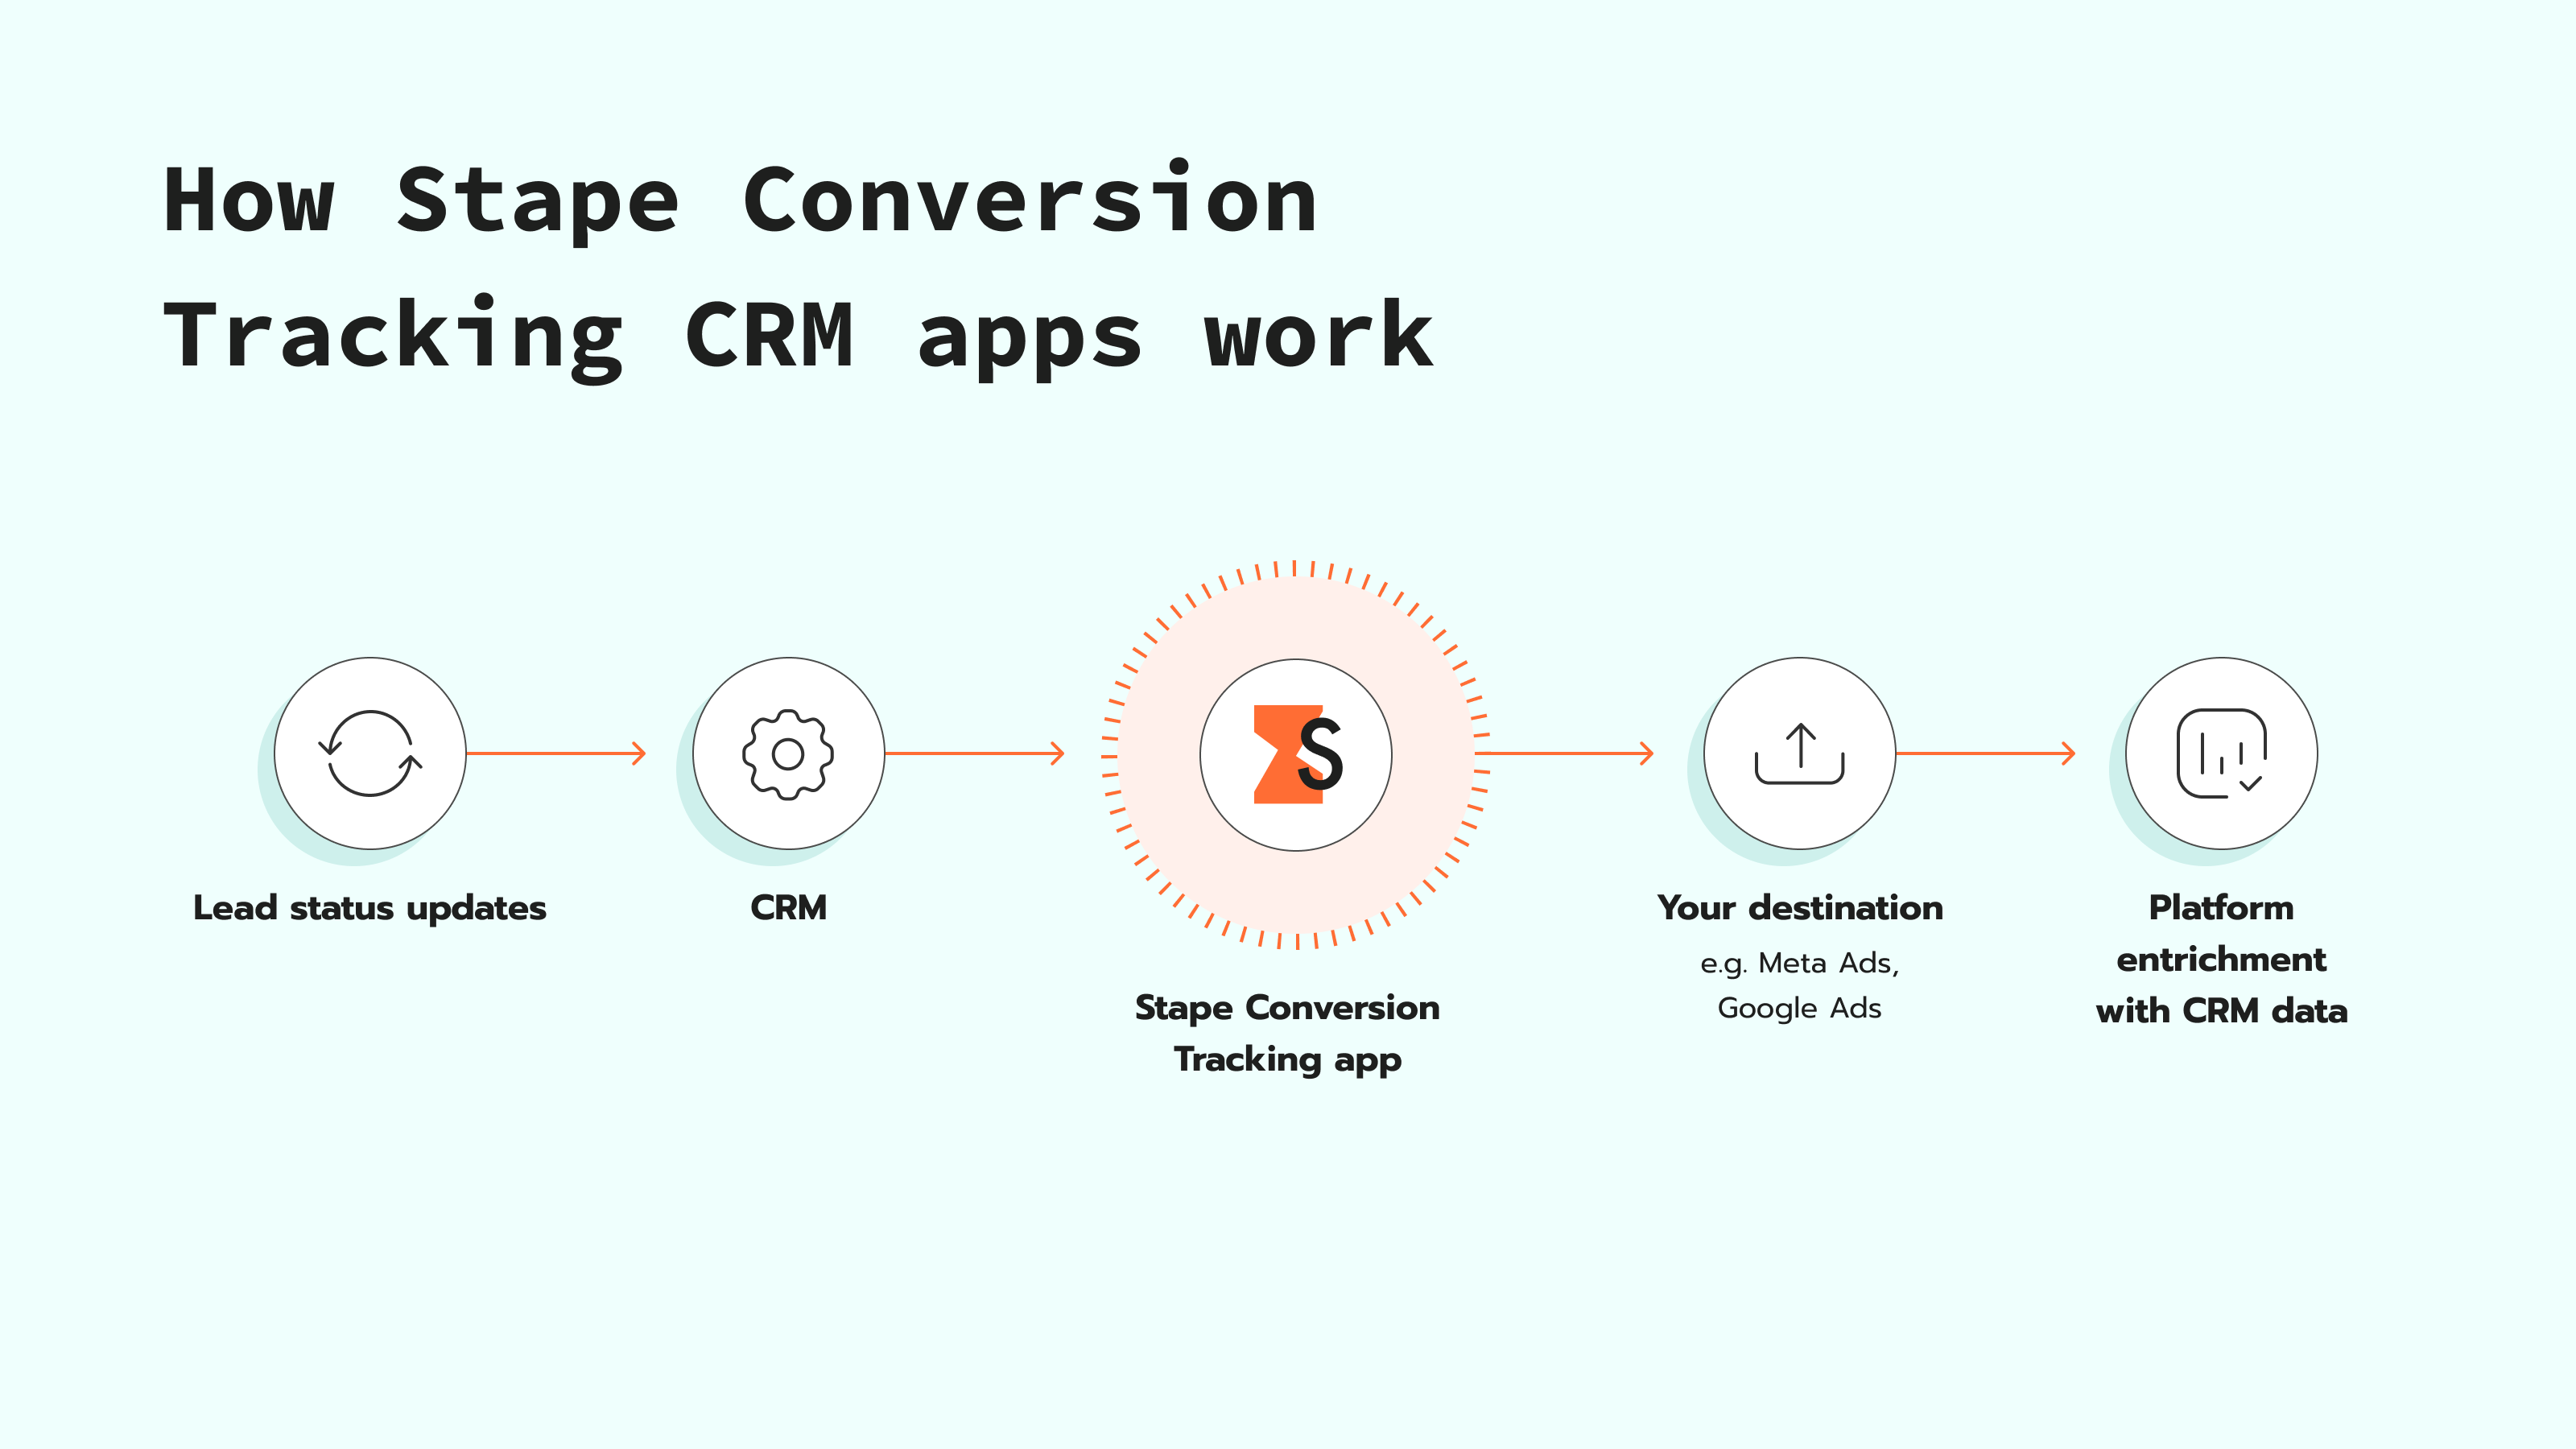
How does the Stape's app work?
After configuring the app, the system automatically starts tracking the status of your Deals in Pipedrive. Any status updates are transmitted as conversion events to your Meta Dataset. The use of server-side tracking guarantees accurate, reliable, and efficient monitoring of every conversion.
By receiving data on how Deals that initially interacted with an ad behaved afterward, Meta can better analyze user behavior and identify audiences most likely to make purchases.
Who can benefit from using the Stape Conversion Tracking Pipedrive app
The Stape Conversion Tracking for Pipedrive CRM app will be helpful for businesses that:
- Run Facebook Lead Ads campaigns. This app is ideal for companies focused on generating leads through Facebook Lead Ads. When a user submits a Facebook form, their information is automatically transferred to Pipedrive, allowing your team to follow up with leads. For tips on turning those deals into long-term customers, see our lead acquisition guide. Stape's app reports the status updates of your Deals back to Meta, providing data for the platform to optimize your campaigns.
- Use server GTM and need to supply platforms with data from Pipedrive CRM. If you choose server GTM as your app configuration method, you can send data from Pipedrive to any platform that supports server-side tracking.
- Manage a high volume of offline conversions. If your business drives sales through phone calls, online consultations, or in-store purchases after running Meta ads, this app will also be helpful. When a purchase is recorded in Pipedrive, Stape's app automatically sends that conversion data to Meta. In this way, your offline sales data contributes to campaign optimization, and you get a complete picture of campaign performance.
- Look for precise and secure data transfer from Pipedrive to Meta. The app uses server-side tracking, hosted on Stape. You can choose between integration methods like Meta CAPI Gateway, Signals Gateway, or server GTM. Whether you've already implemented server-side tracking or are just getting started, thanks to server-side tracking, this app provides precise data collection for your Facebook advertising.
App's features
| Feature | Description |
|---|---|
| Automated Lead Status Reporting from Pipedrive | No need for CSV file uploads - the app automatically syncs Deal status updates with Meta. |
| Meta campaign performance optimization | When the Meta receives data from a CRM account, it can analyze the behavior of various audience segments after engaging with the ad and focus on targeting users who are most likely to convert. |
| Offline conversion tracking to Meta | Send offline conversion data directly to Meta to improve audience targeting. |
| Flexible integration options | Choose the integration method that best suits your setup: Meta CAPI Gateway, Signals Gateway, or server GTM |
How to configure Meta Conversions API for Pipedrive CRM
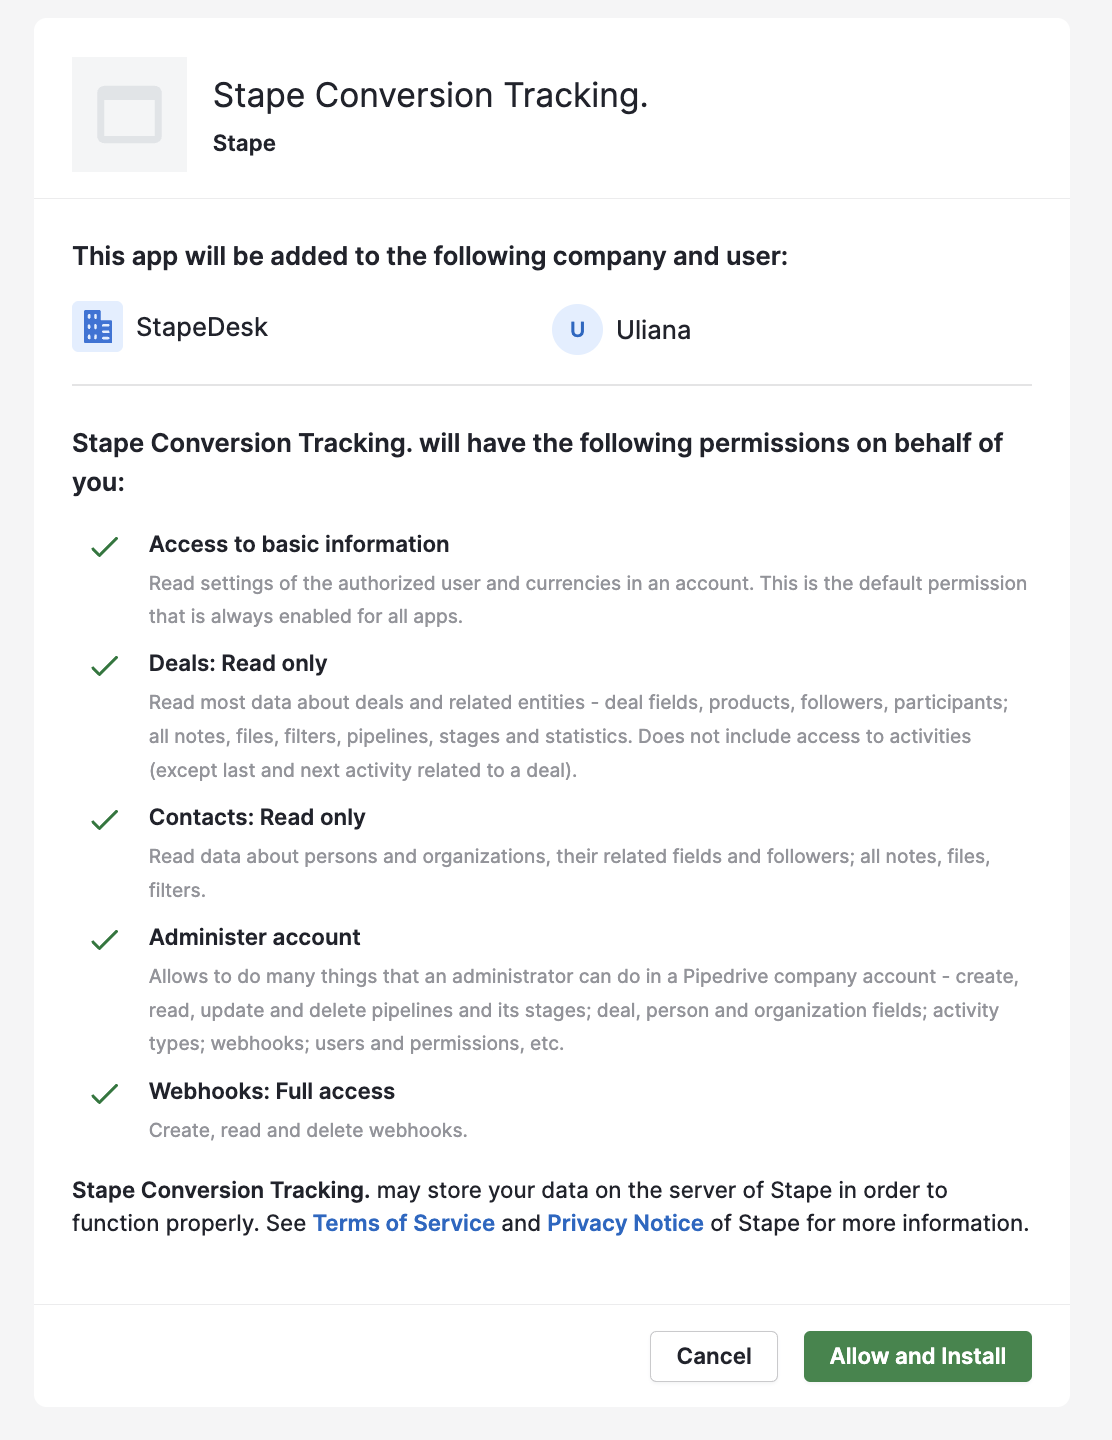
App installation
Install the Stape Conversion Tracking Pipedrive app.
Give the app the scopes it requires:
Integration methods: CAPI Gateway, Signals Gateway or server GTM
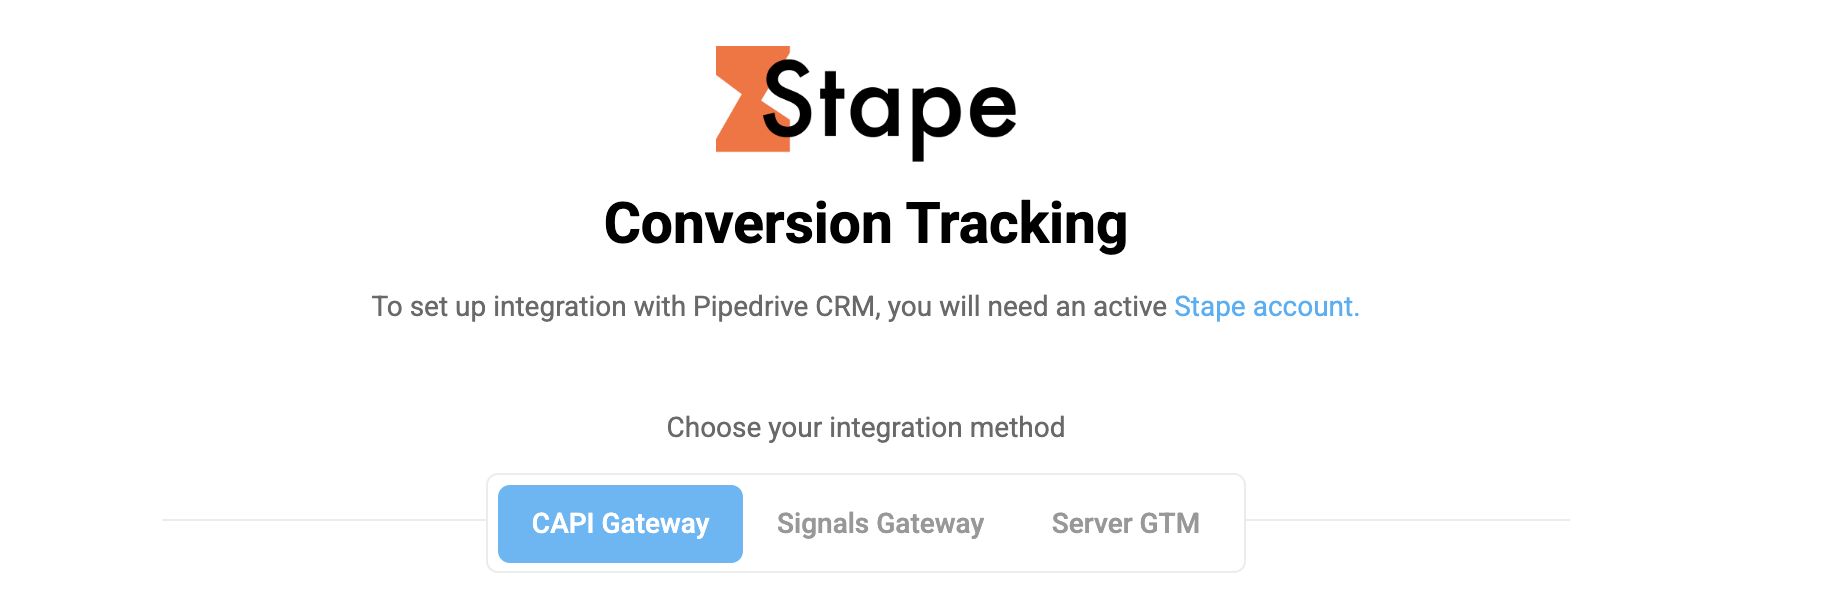
Integration method depends on your tracking setup and goals, and/or on your current experience with Stape. Click on the section below that corresponds to the tracking method you use:
CAPI Gateway
Before you start
Make sure you have an active Stape account with Meta Conversions API Gateway
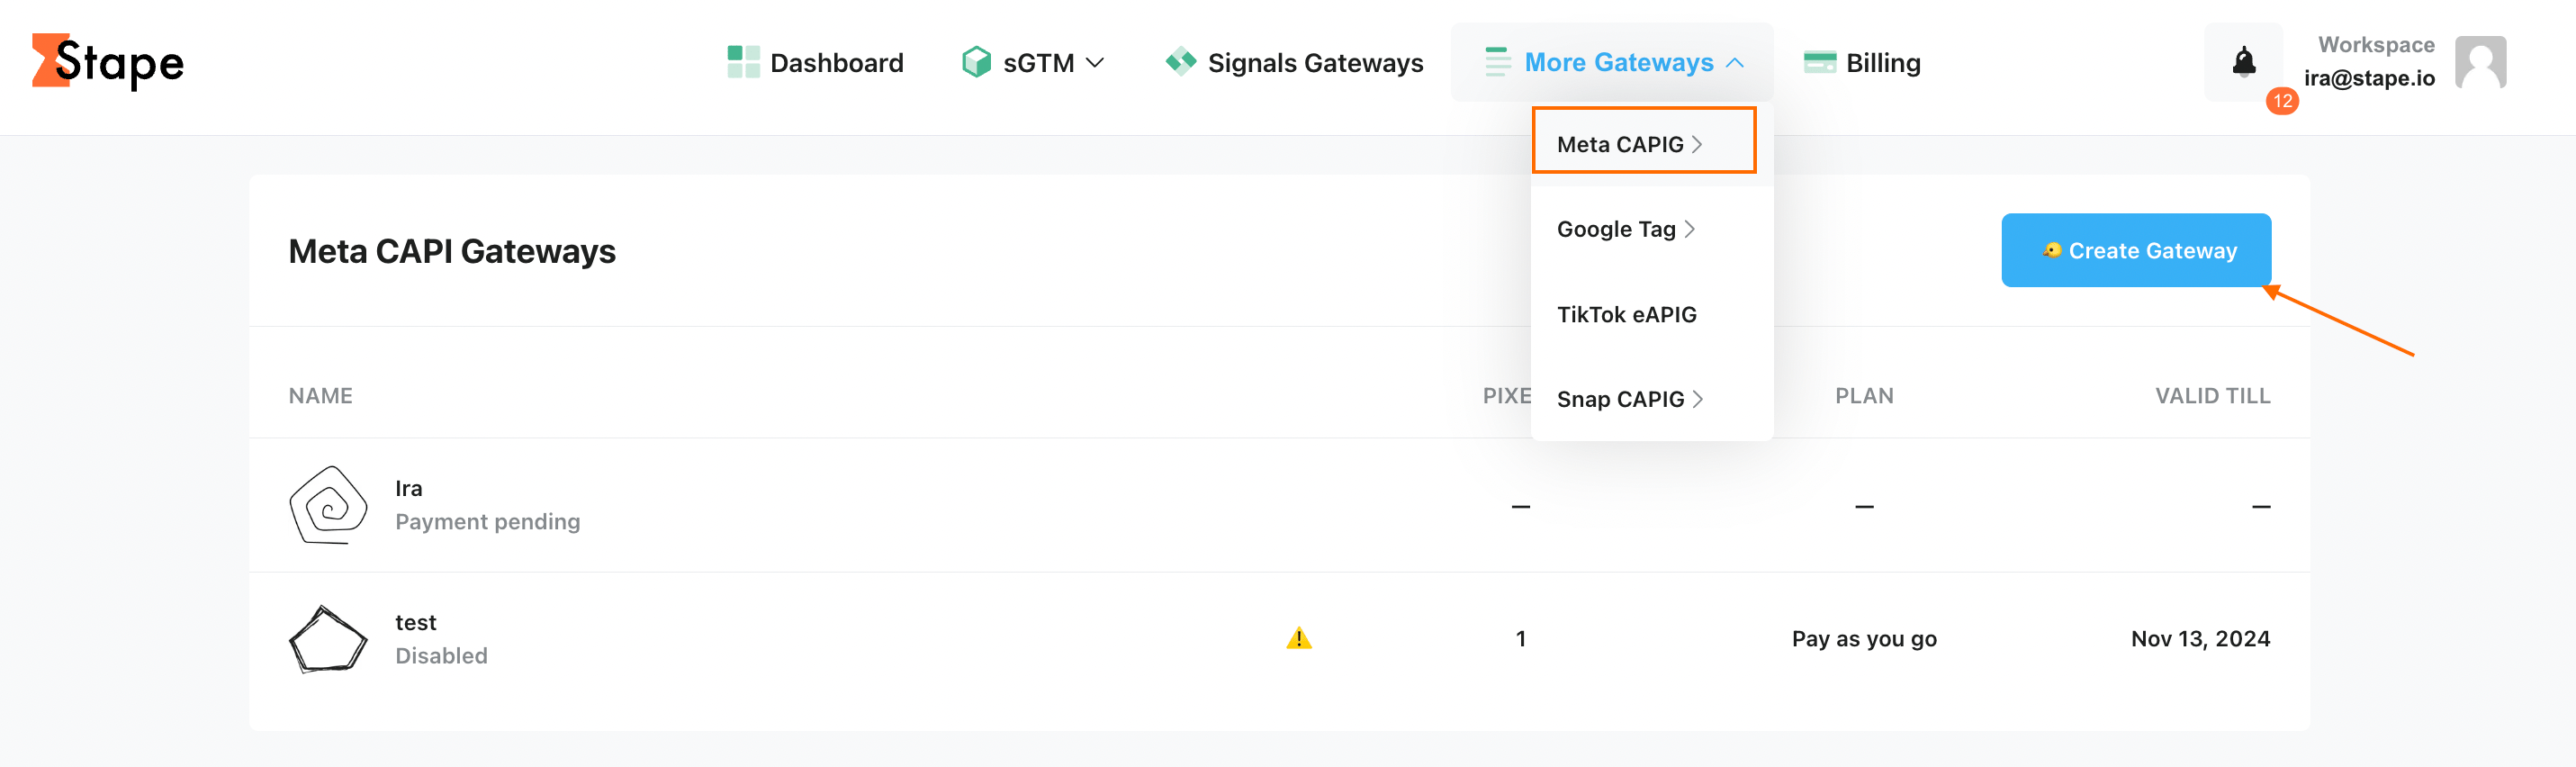
If you don't have an account on Stape, please create one or log in if you already have. In the main menu click More Gateways → Meta CAPIG → Create CAPIG on the top right.
Add name, email, and server location for new CAPIG. Then, choose the subscription plan and add billing details.
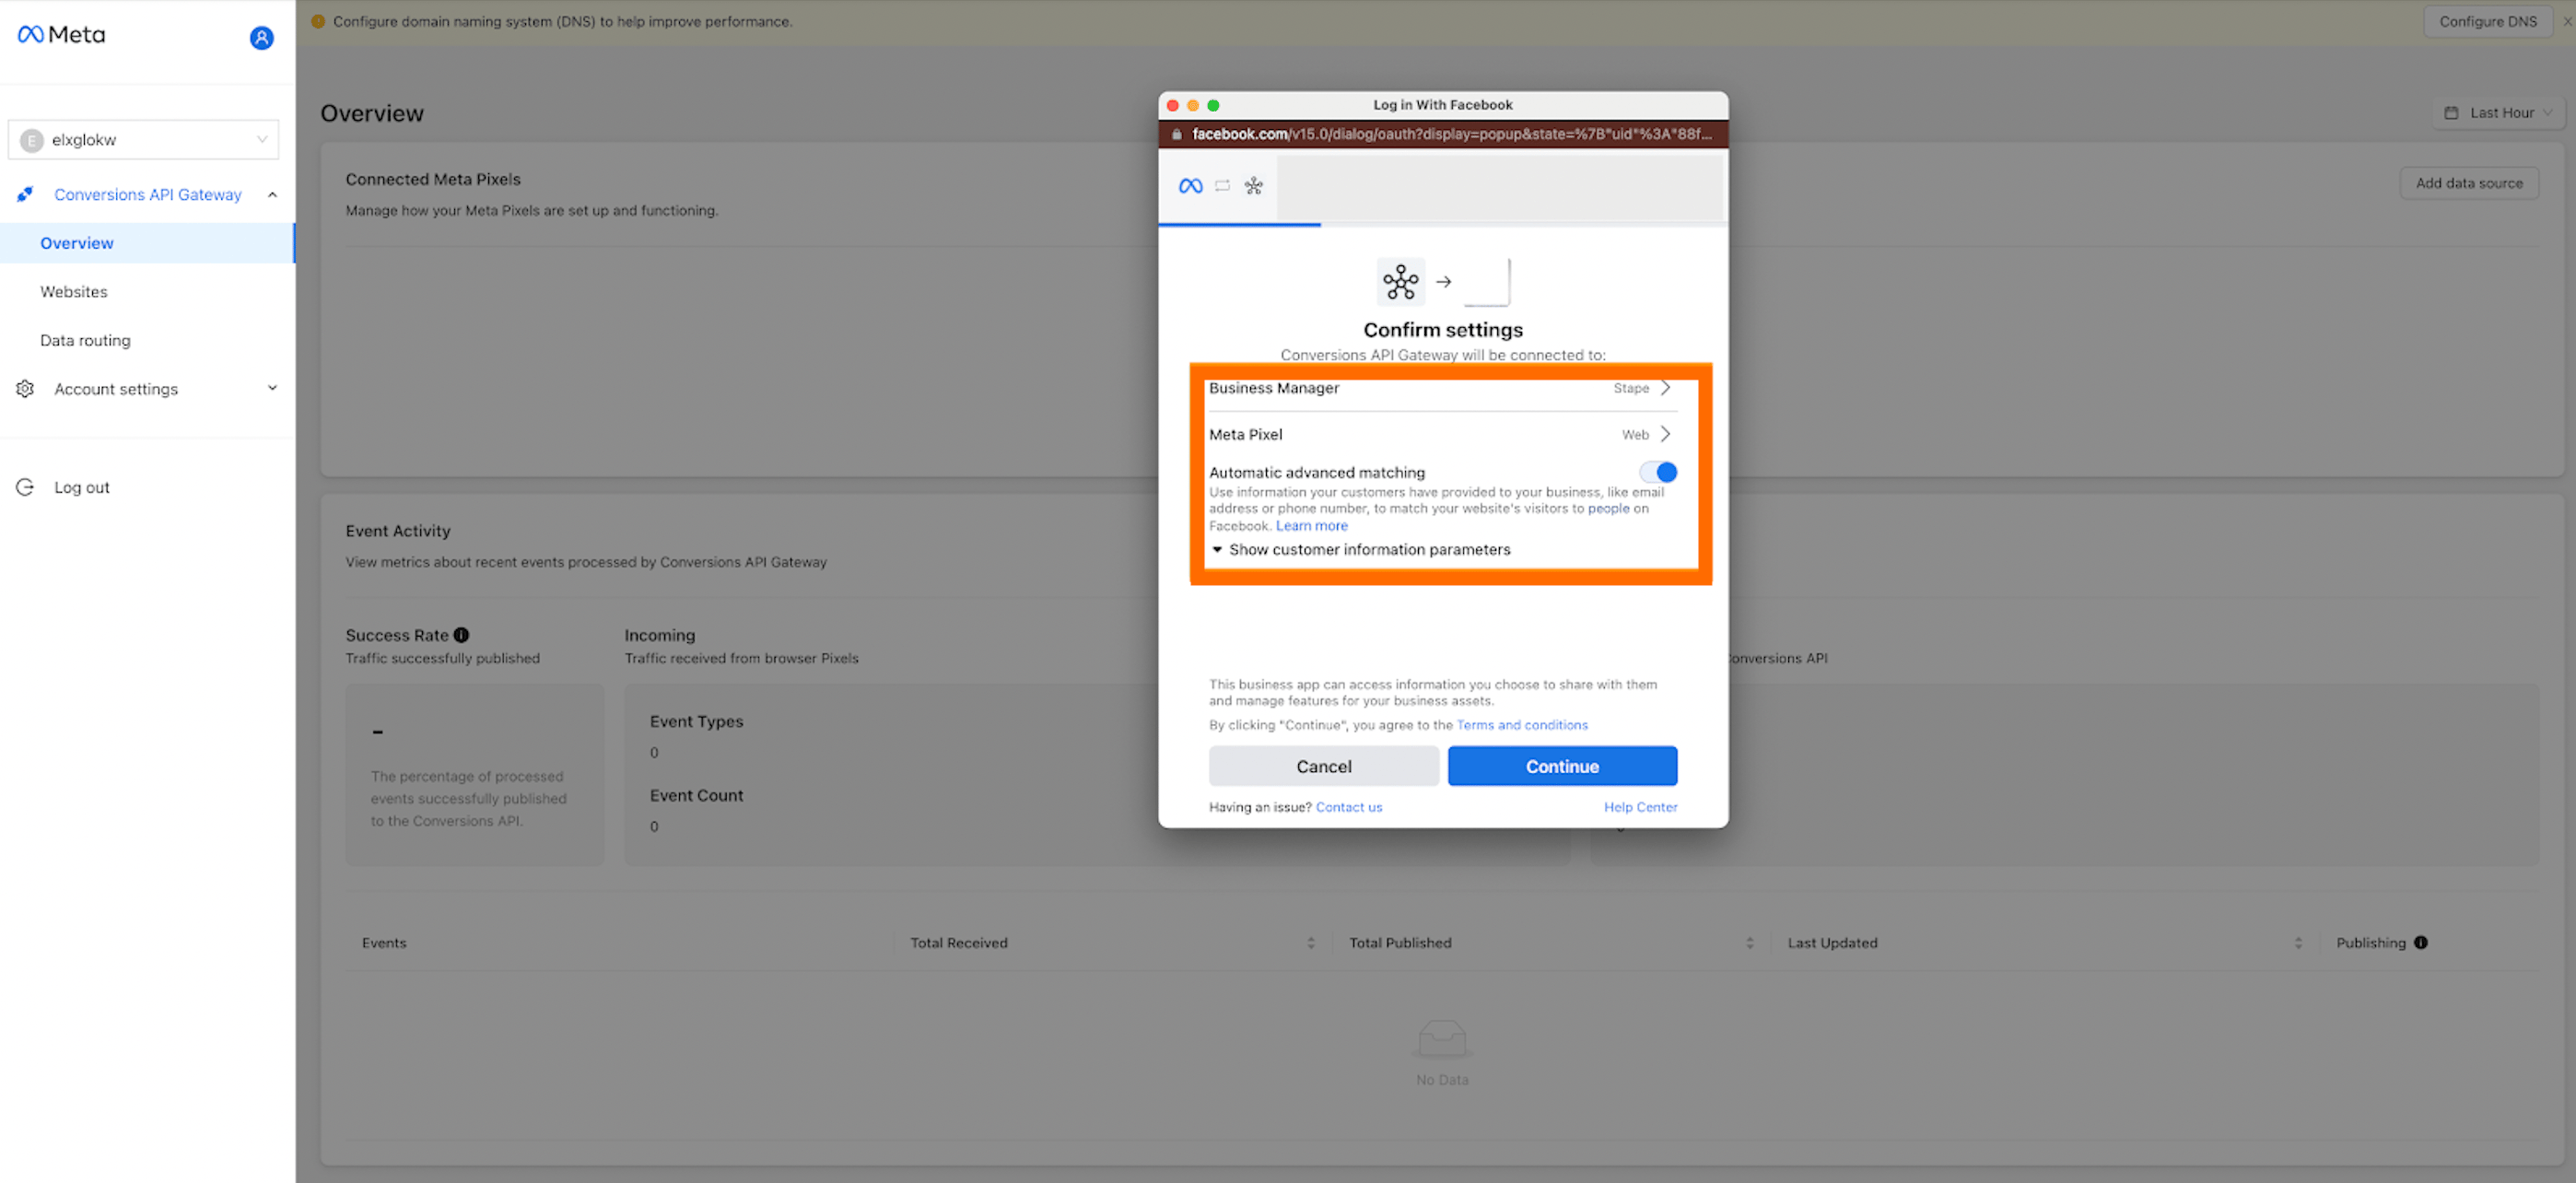
After creating Meta Conversions API Gateway in your Stape account, connect your Meta Dataset (Pixel) - just click Add data source → authorize in Meta → select the Business Manager and Dataset (Pixel) you want to connect.

To increase the events match quality, please enable Automatic advanced matching.
| For more detailed instructions, check Stape's article on how to set up Meta Conversions API Gateway. |
App configuration
The setting process can be divided into two parts:
- Meta and Stape accounts data
- PipeDrive CRM fields
Meta and Stape accounts data
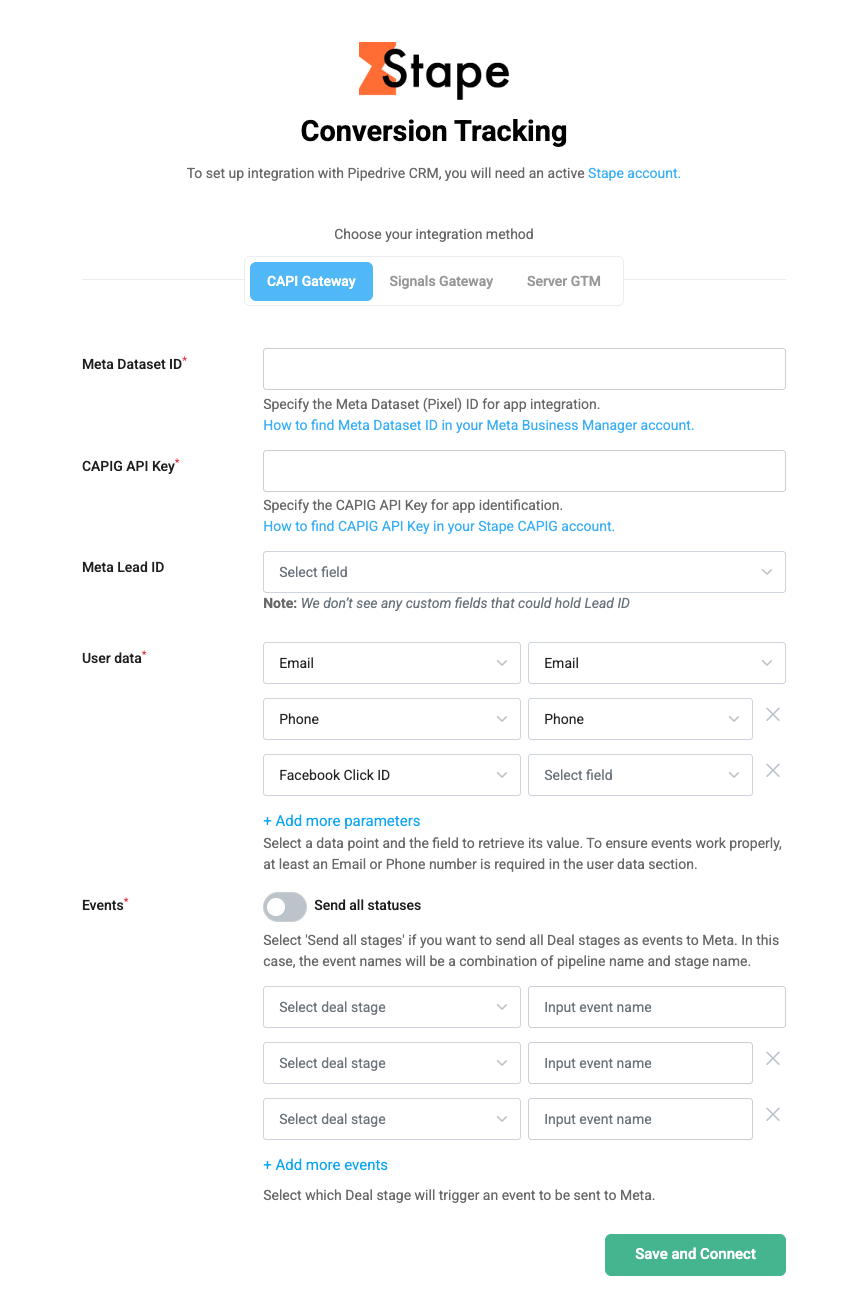
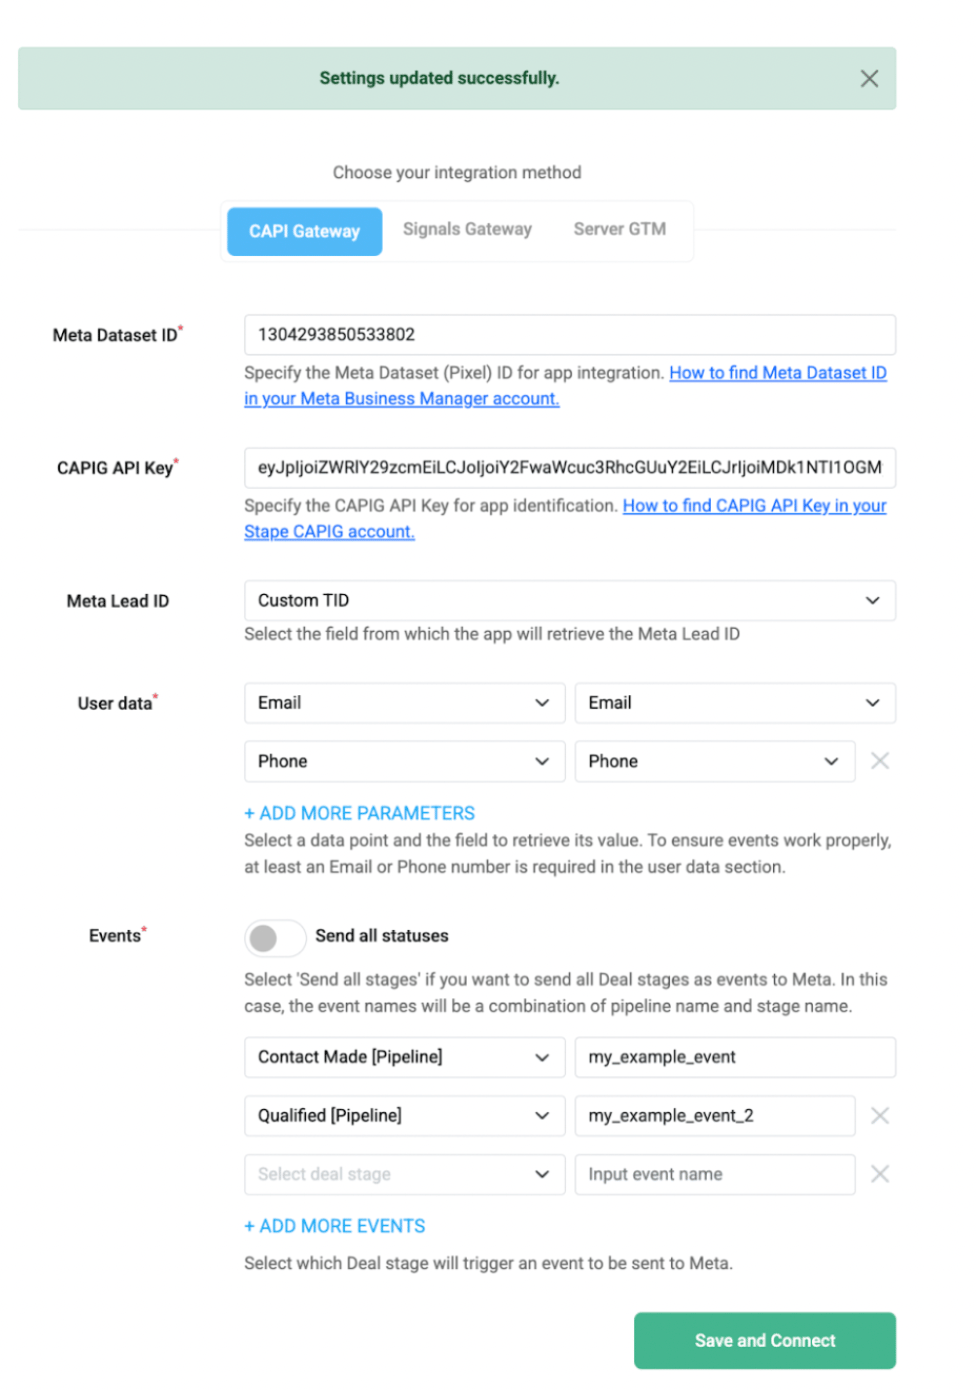
You will need to fill in the following fields:
- Meta Dataset (Pixel) ID - a unique identifier that is used to configure integrations and view events in Events Manager. You can find it in your Meta account in Data Sources' Settings tab. See the detailed instruction on how to find Meta Dataset (Pixel) ID.
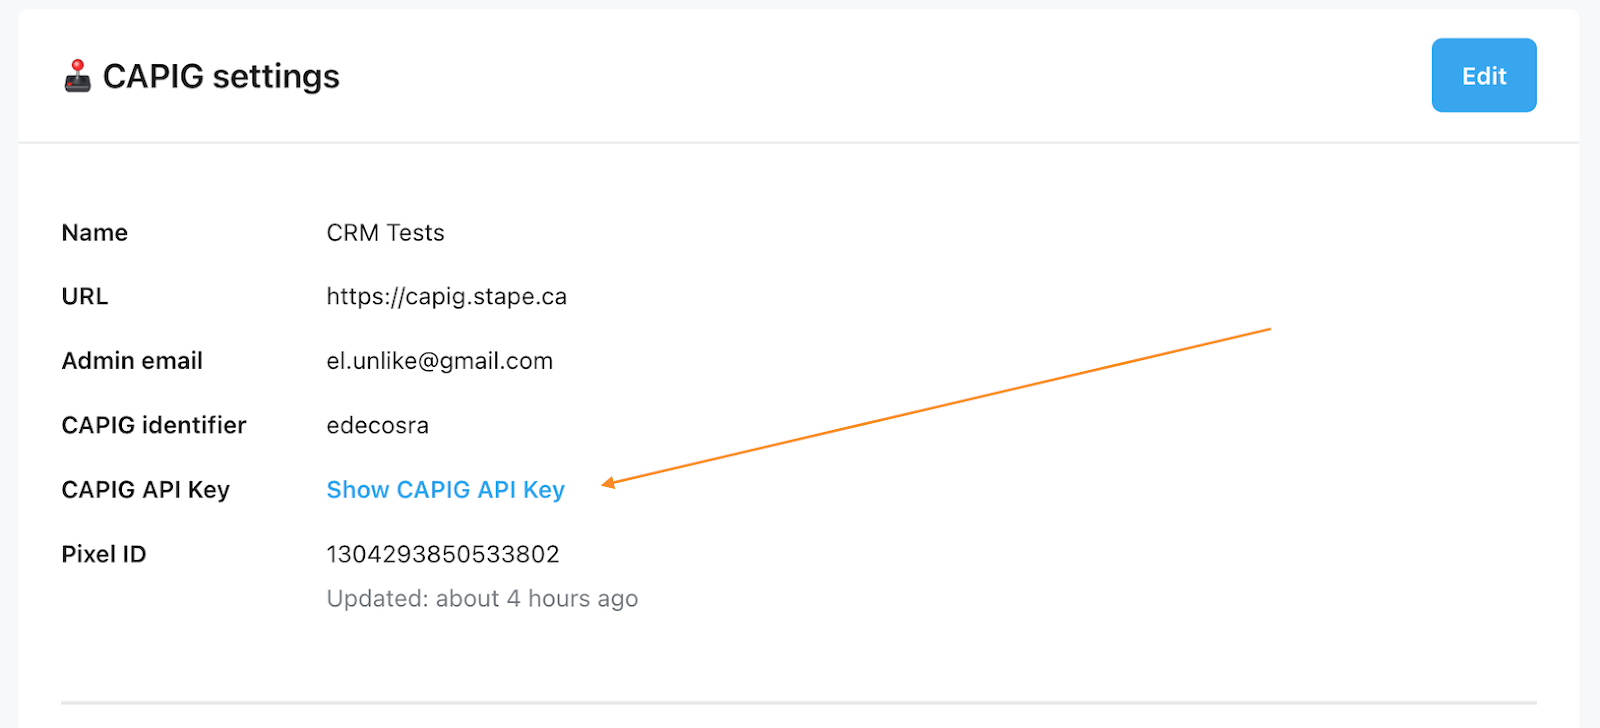
- CAPIG API Key - an alphanumeric string value that is needed for app identification. Find CAPIG API Key in the CAPIG settings section of your Stape account. See the detailed instructions on where to find CAPIG API Key.
If you haven't set up Meta Conversions API Gateway yet, see the section above.
Pipedrive CRM fields
Next you need to map your CRM fields to conversion event parameters.
- (Optional) Pick a field where Meta Lead ID is stored. Note dropdown will only reflect custom fields.
- Configure additional User data you'd like to send to Meta, by choosing a parameter in the left dropdown and selecting an appropriate field in the right-side one.

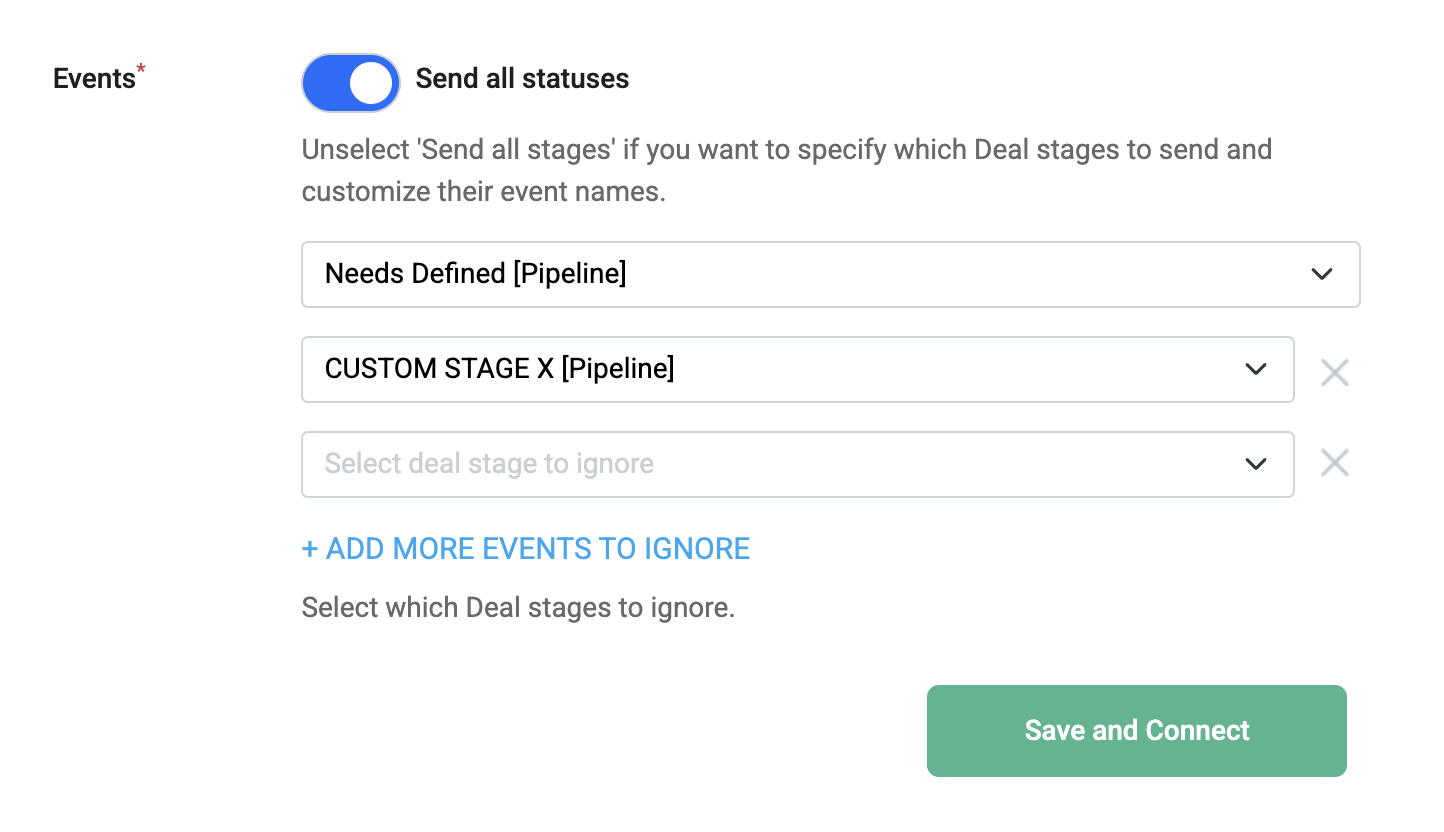
- Application sends conversion Events based on stages of your Deals, whenever a deal reaches a stage you define, a corresponding event will be sent towards your Meta Dataset (Pixel). So we need to configure it by choosing one of two approaches:
- In the left-side dropdown, select a Deal stage to trigger an event. In a box to the right, type the event name you'd like to send to Meta.
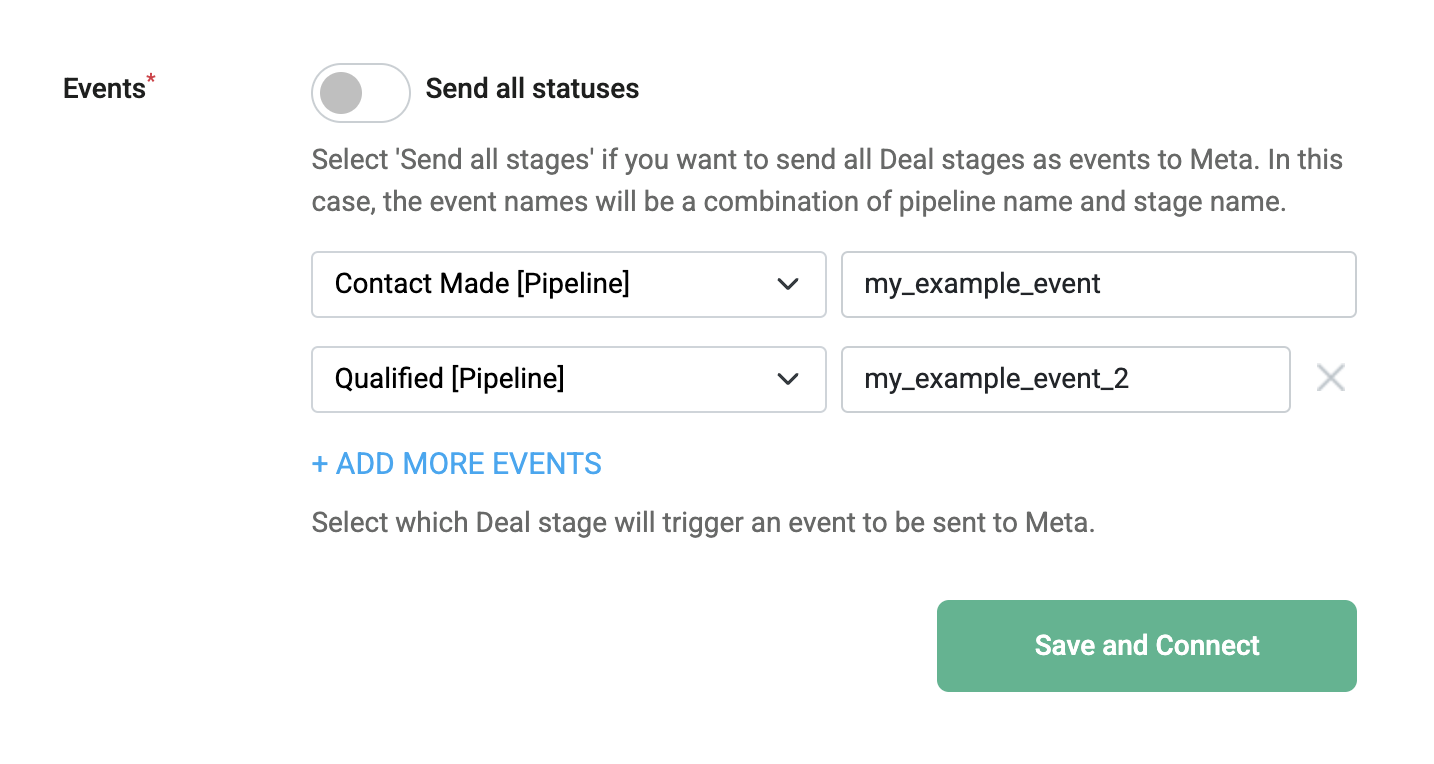
- Select the Send all statuses checkbox if you want to send all Deal stages as events to Meta. Events are then named automatically and consist of Pipeline + Deals stage name. You can also select statuses to ignore in this case.

Once done, click Save and Connect. Once you see a success message your installation is complete and the application will send conversion events in the background based on your settings.
Signals Gateway
Before you start
Make sure you have an active Stape account with Signals Gateway
If you don't have an account on Stape, please create one or log in if you already have. In the main menu click Signals Gateway → Create Signals Gateway on the top right.

Add name, email, and server location for new Signals Gateway. Then, choose the subscription plan.

| For more detailed instructions, check Stape's article on how to configure Signals Gateway. |
Set up the app
The setting process can be divided into two parts:
- Signals and Stape accounts data
- PipeDrive CRM fields

Signals and Stape accounts data
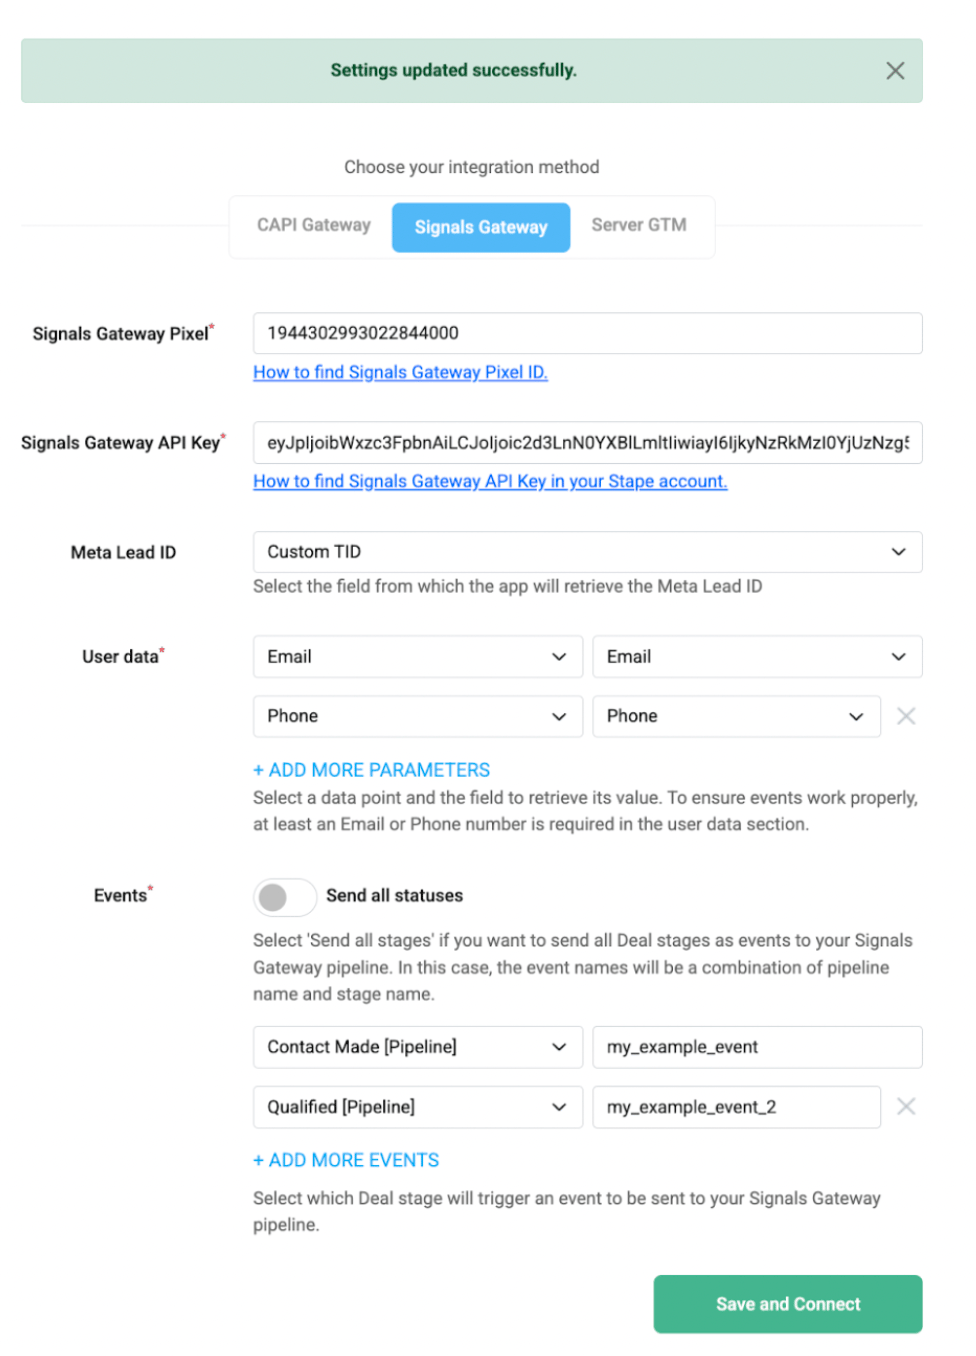
You will need to fill in the following fields:
- Signals Gateway Pixel - a unique identifier that is used to configure integrations and view events in Signals Gateway. You can find it in your Signals Gateway account in the Data Sources tab. See the detailed instruction on how to find Signals Gateway Pixel ID.
- Signals Gateway API Key - an alphanumeric string value that is needed for app identification. Find Signals Gateway API Key in the Gateway settings section of your Stape account. See the detailed instructions on where to find Signals Gateway API Key.

PipeDrive CRM fields
Next you need to map your CRM fields to conversion event parameters.
- (Optional) Pick a field where Meta Lead ID is stored.
- Configure additional User data you'd like to send to Meta, by choosing a parameter in the left dropdown and selecting an appropriate field in the right-side one.

- Application sends conversion Events based on stages of your Deals, whenever a deal reaches a stage you define, a corresponding event will be sent towards your Signals Gateway Pixel. So we need to configure it by choosing one of two approaches:
- In the left-side dropdown, select a Deal stage to trigger an event; in a box to the right, type the event name you’d like to send to Signals Gateway pipeline.
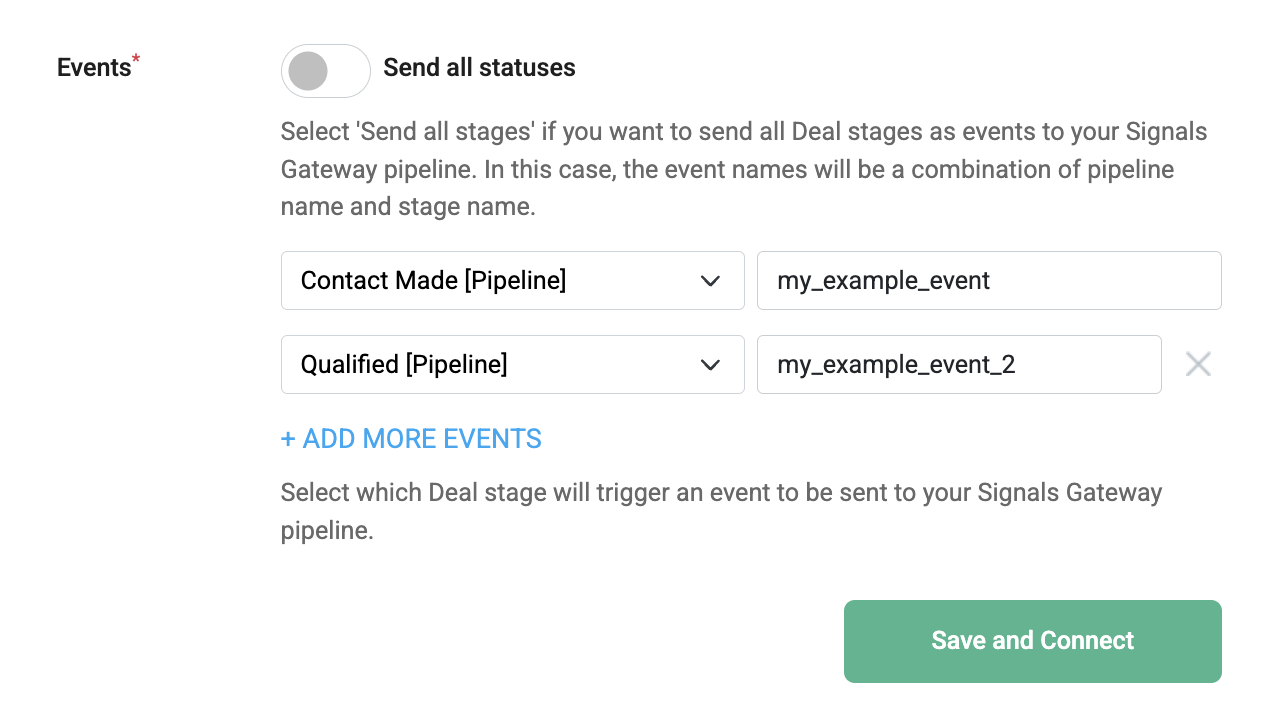
- Select the Send all statuses checkbox if you want to send all Deals stages as events to the Signals Gateway pipeline. Events are then named automatically and consist of a Deal stage name. You can also select statuses to ignore in this case.

Once done, click Save and Connect. Once you see a success message your installation is complete and the application will send conversion events in the background based on your settings.
Server GTM
Before you start
Make sure you have an active Stape account with a server GTM container hosted on Stape.
If you don't have an account on Stape, please create one or log in if you already have. In the main menu click sGTM → Create container on the top right.
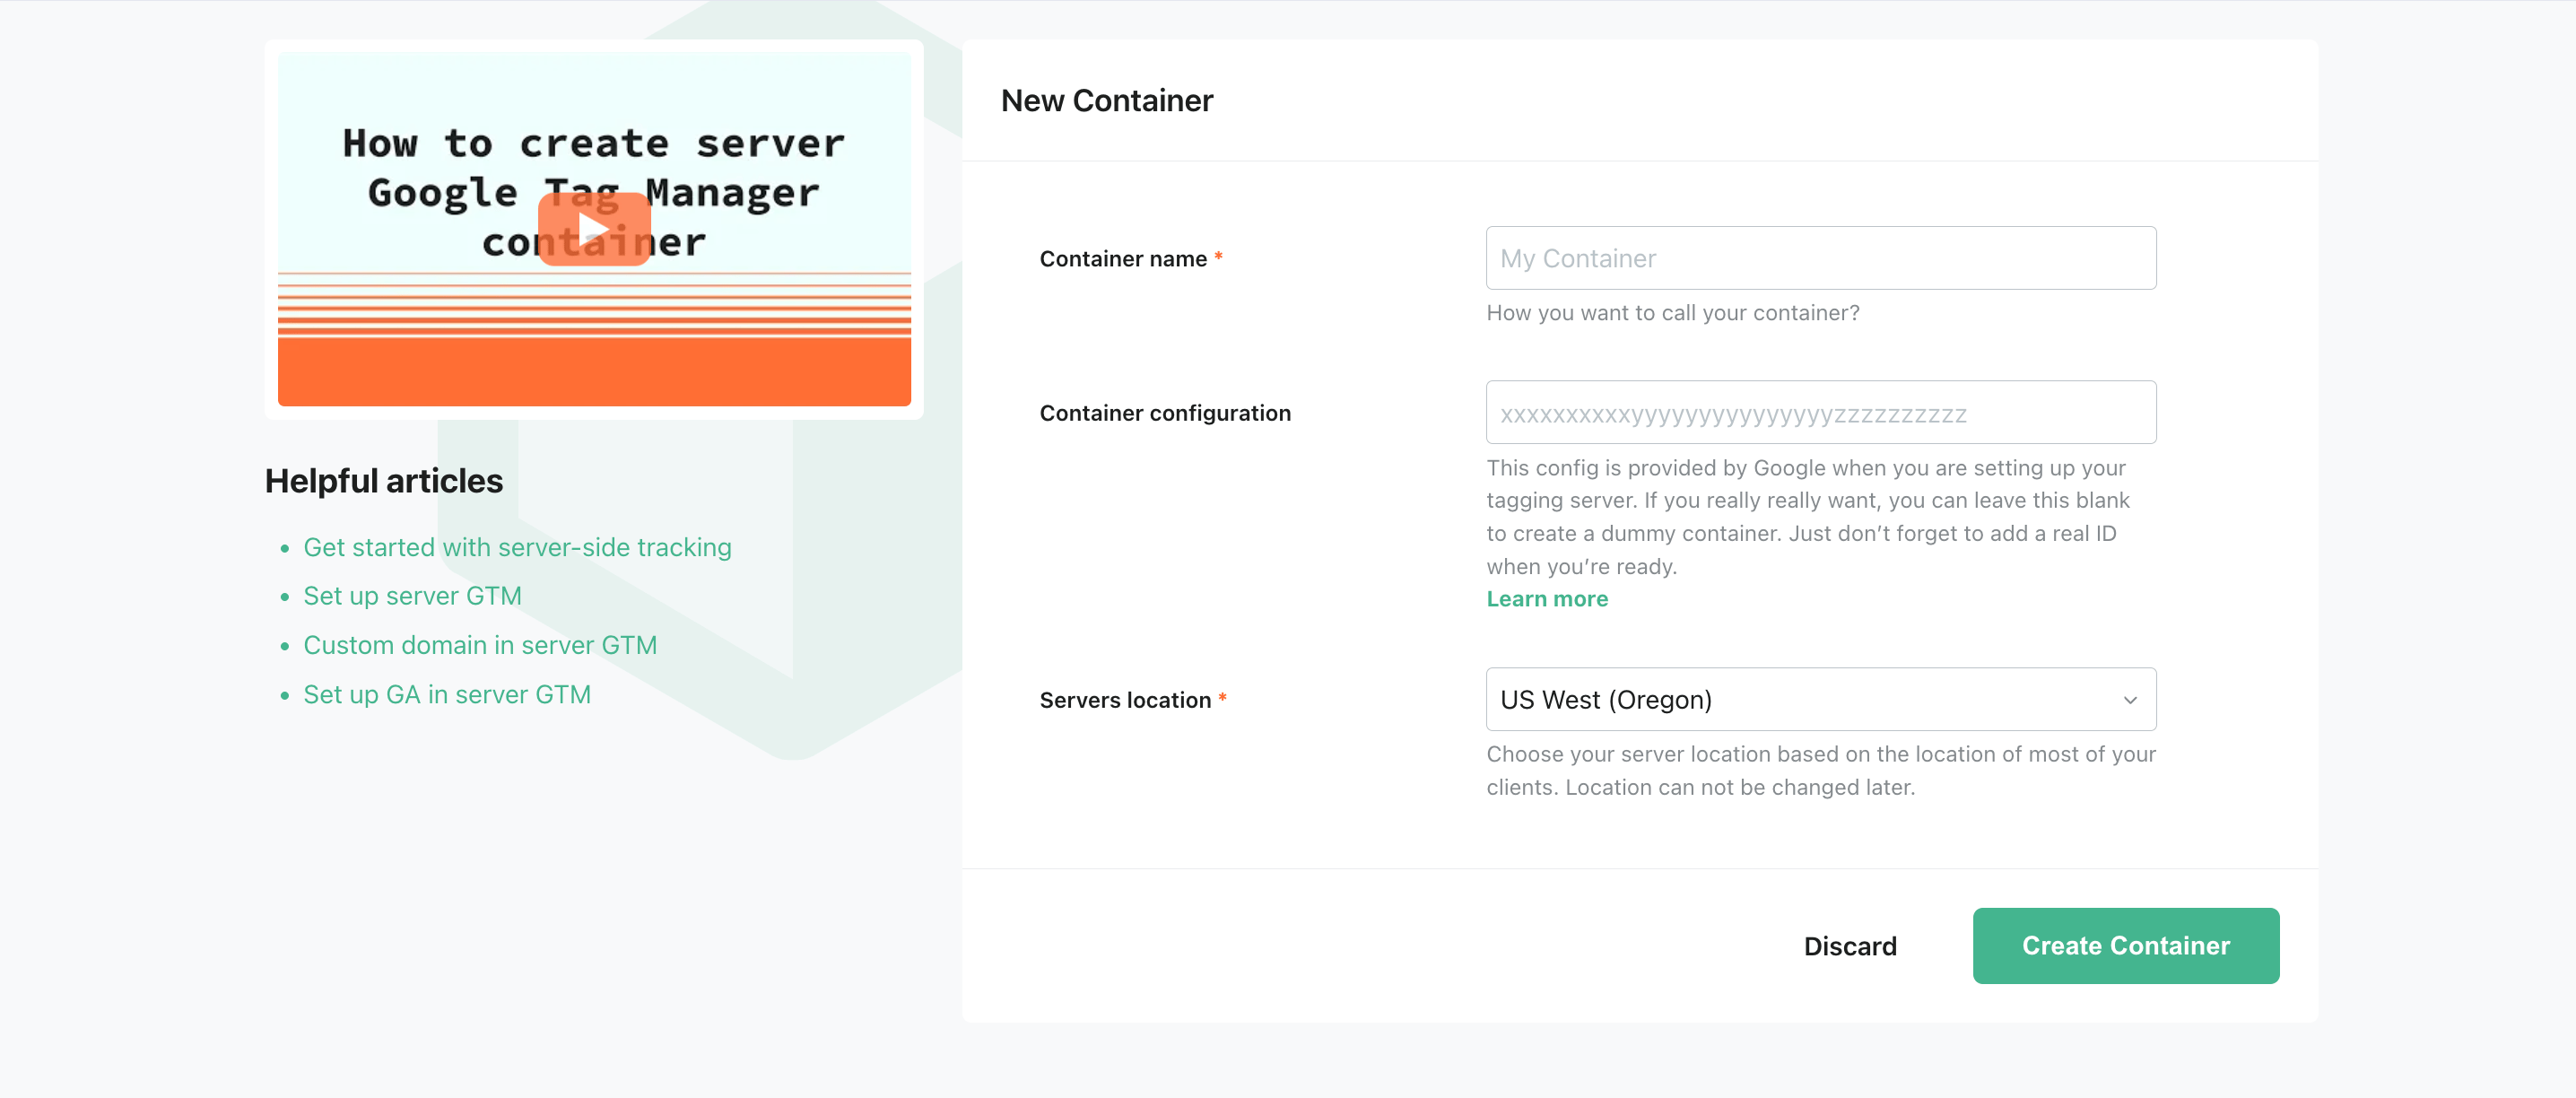
Add your container name, Container Configuration that you copied from your Google Tag Manager Server Container, and select server location. Click Create Container.
| For more detailed instructions, check Stape's article on how to set up a Google Tag Manager server container. |
App setup
The setting process can be divided into two parts:
- Stape account data
- PipeDrive CRM fields
Stape account data
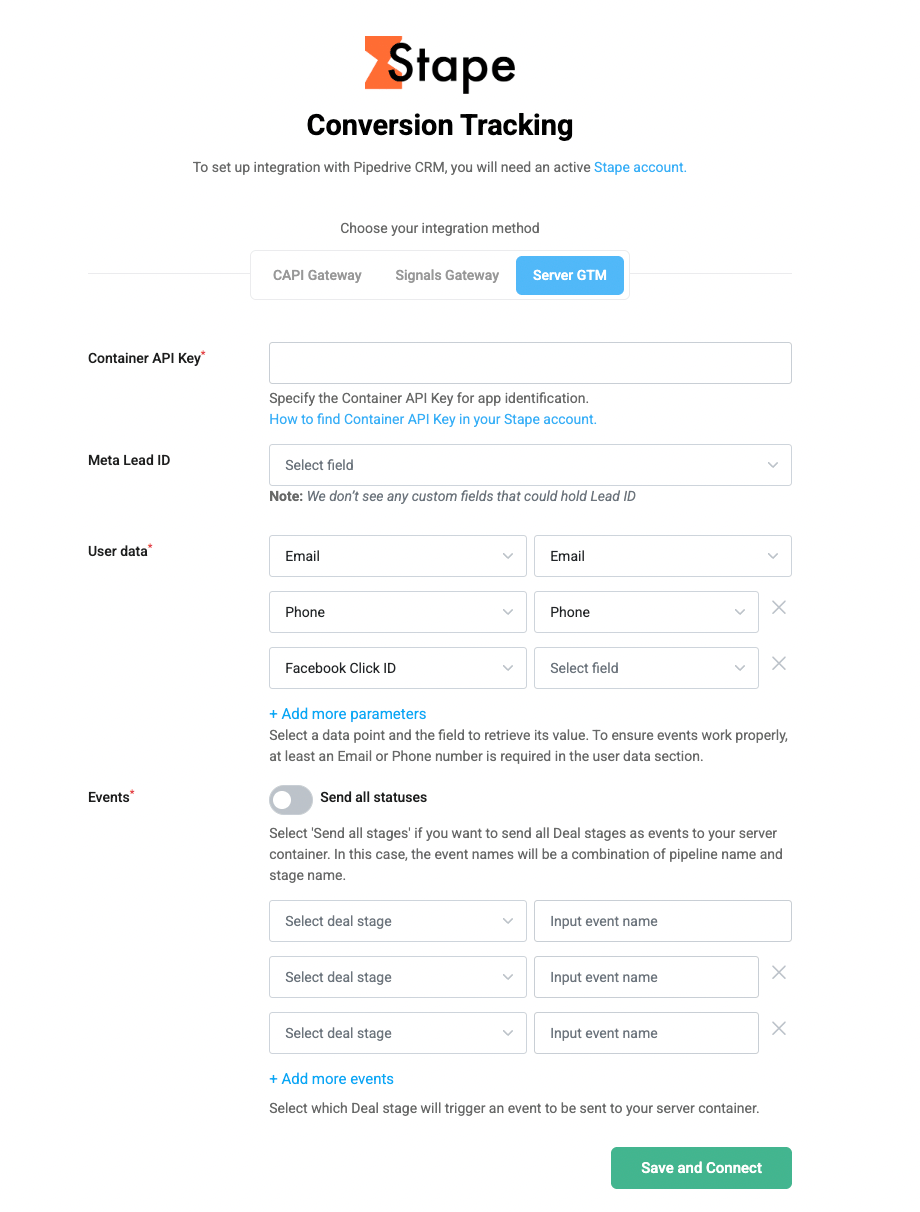
You will need to fill in the following field:
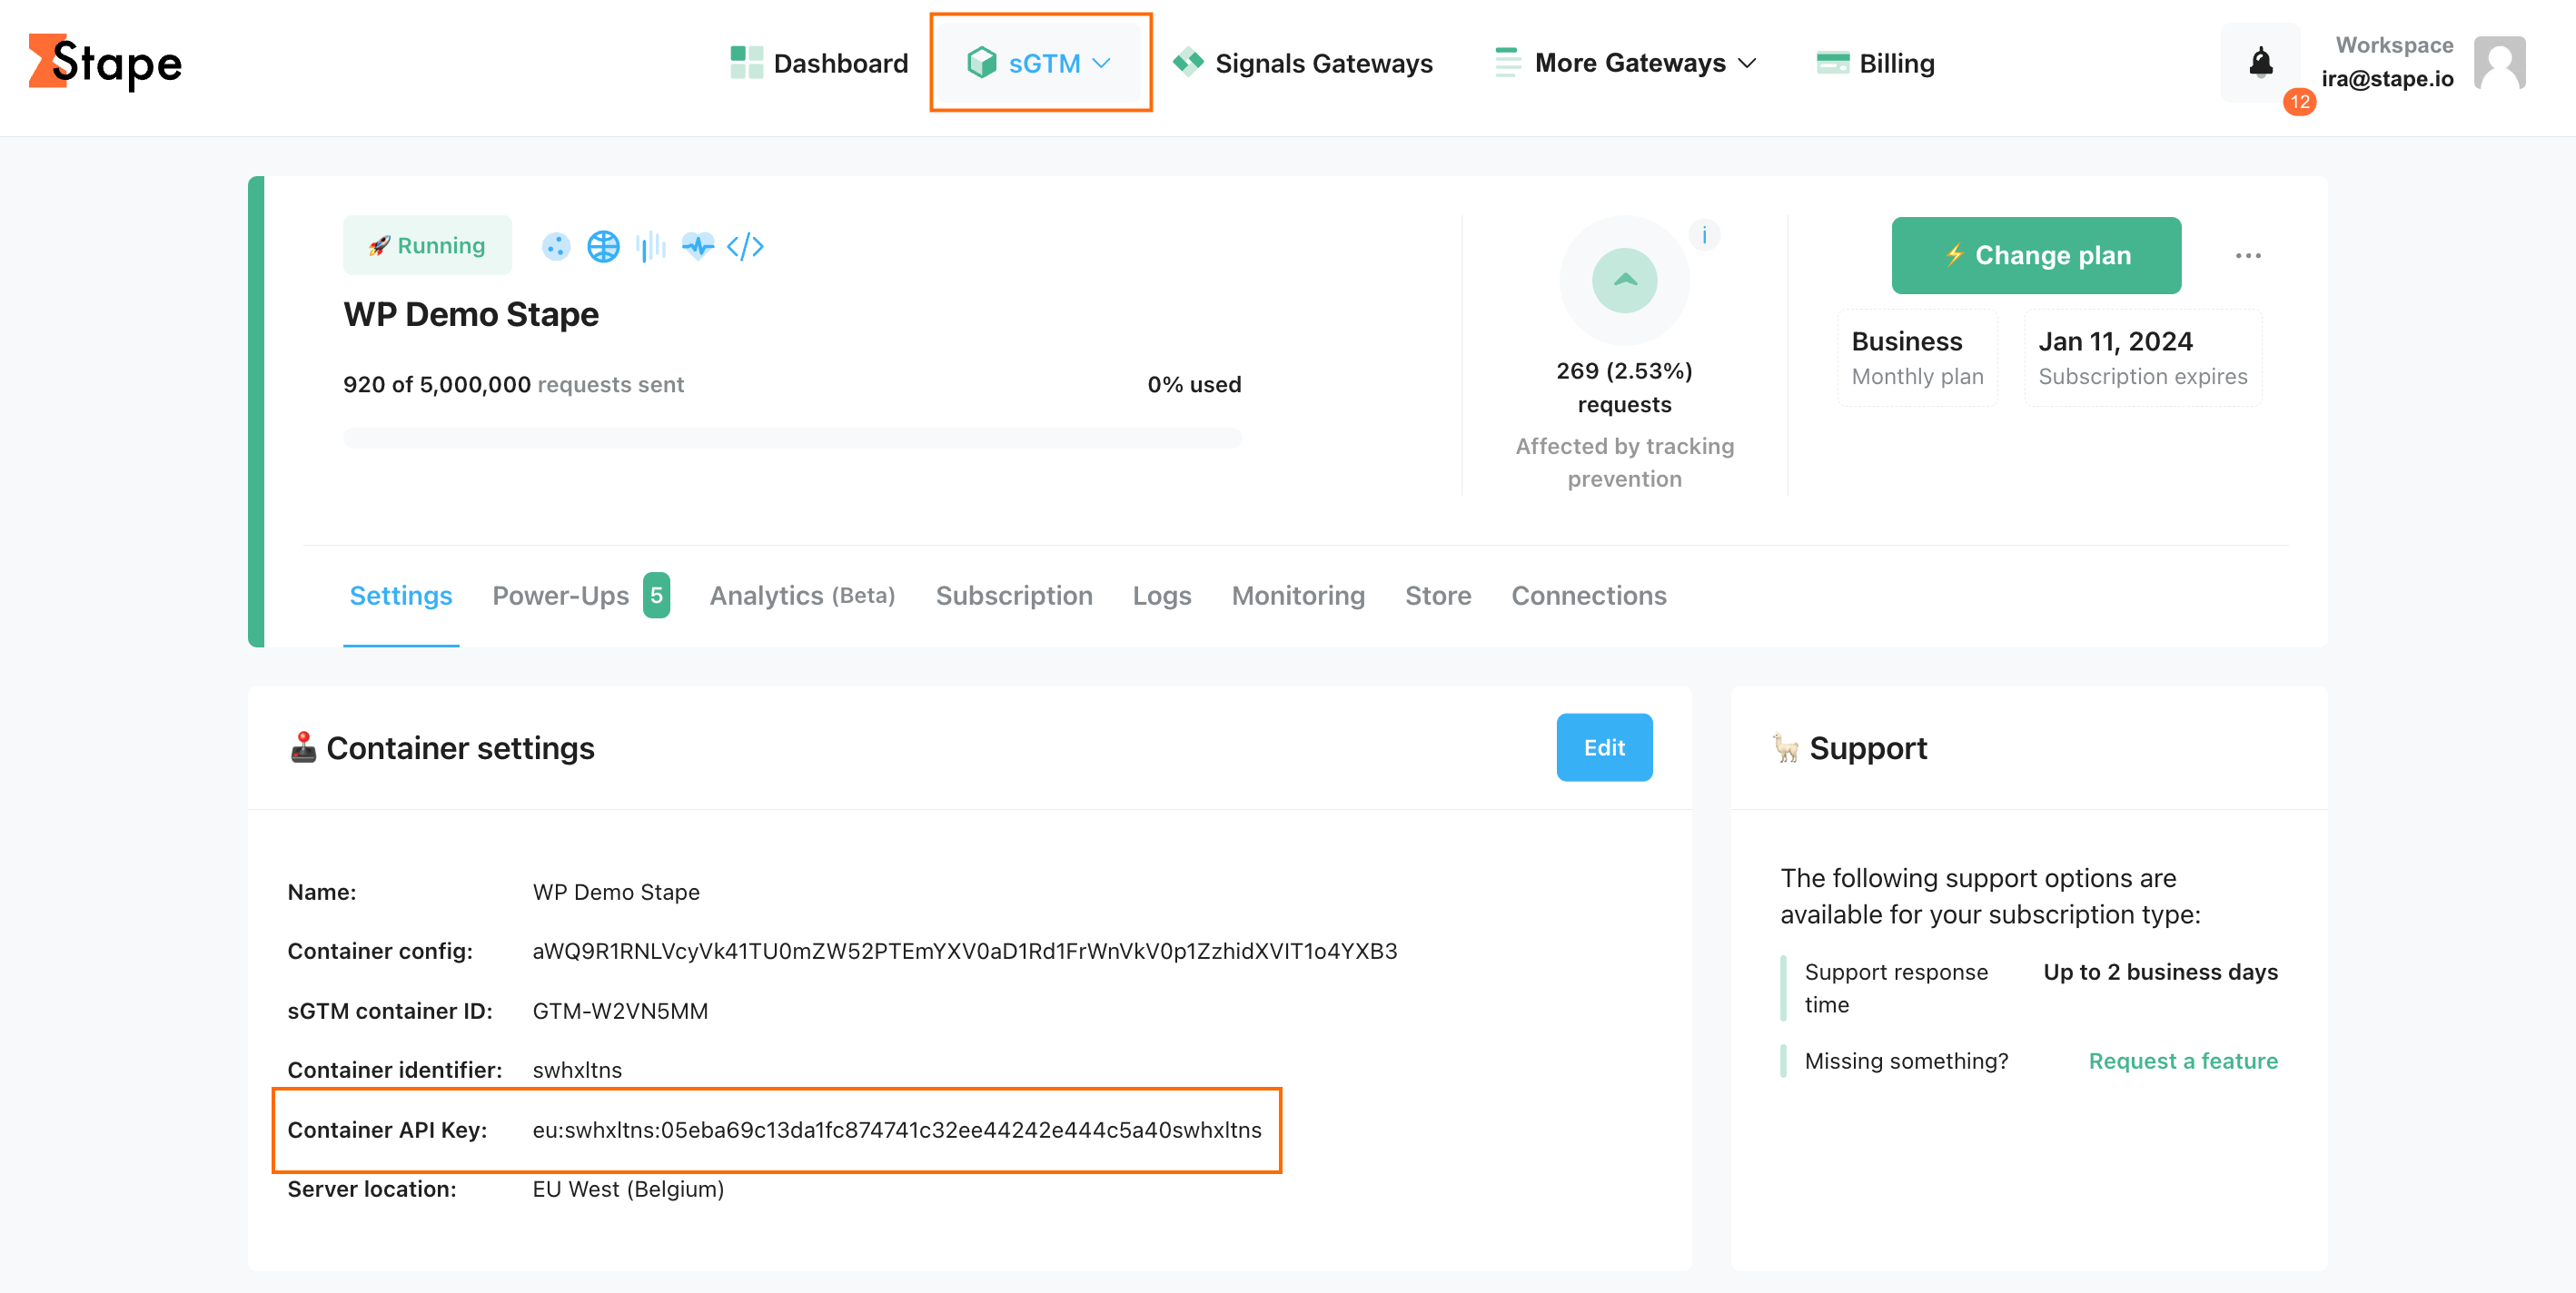
- Container API Key - an alphanumeric string value that is needed for app identification. Find Container API Key in the Container settings section of your Stape account. See the detailed instructions on where to find Container API Key.
PipeDrive CRM fields
Next you need to map your CRM fields to conversion event parameters.
- (Optional) Pick a field where Meta Lead ID is stored.
- Configure additional User data you'd like to send to server GTM, by choosing a parameter in the left dropdown and selecting an appropriate field in the right-side one.
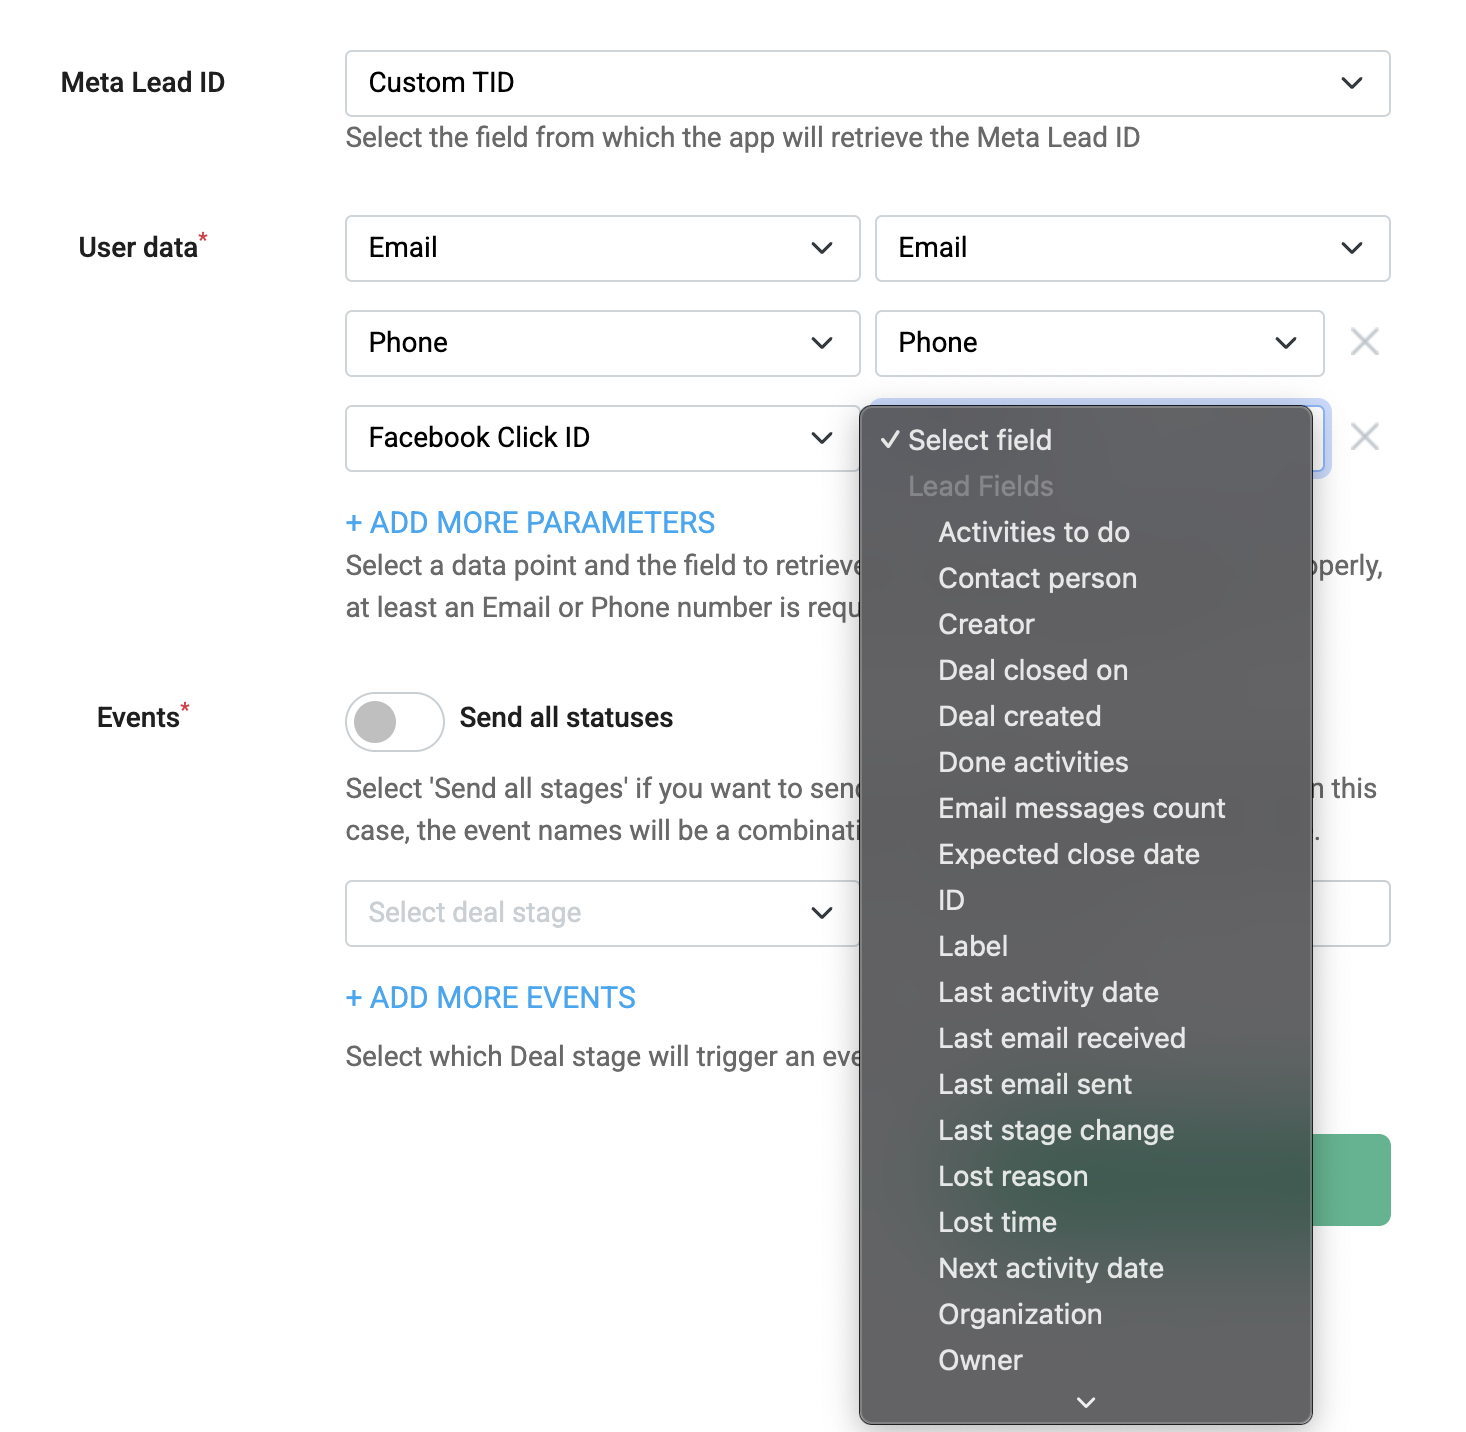
- Application sends conversion Events based on stages of your Deals, whenever a deal reaches a stage you define, a corresponding event will be sent towards your server GTM container. So we need to configure it by choosing one of two approaches:
- In the left-side dropdown, select a Deal stage to trigger an event; in a box to the right, type the event name you’d like to send to server GTM.
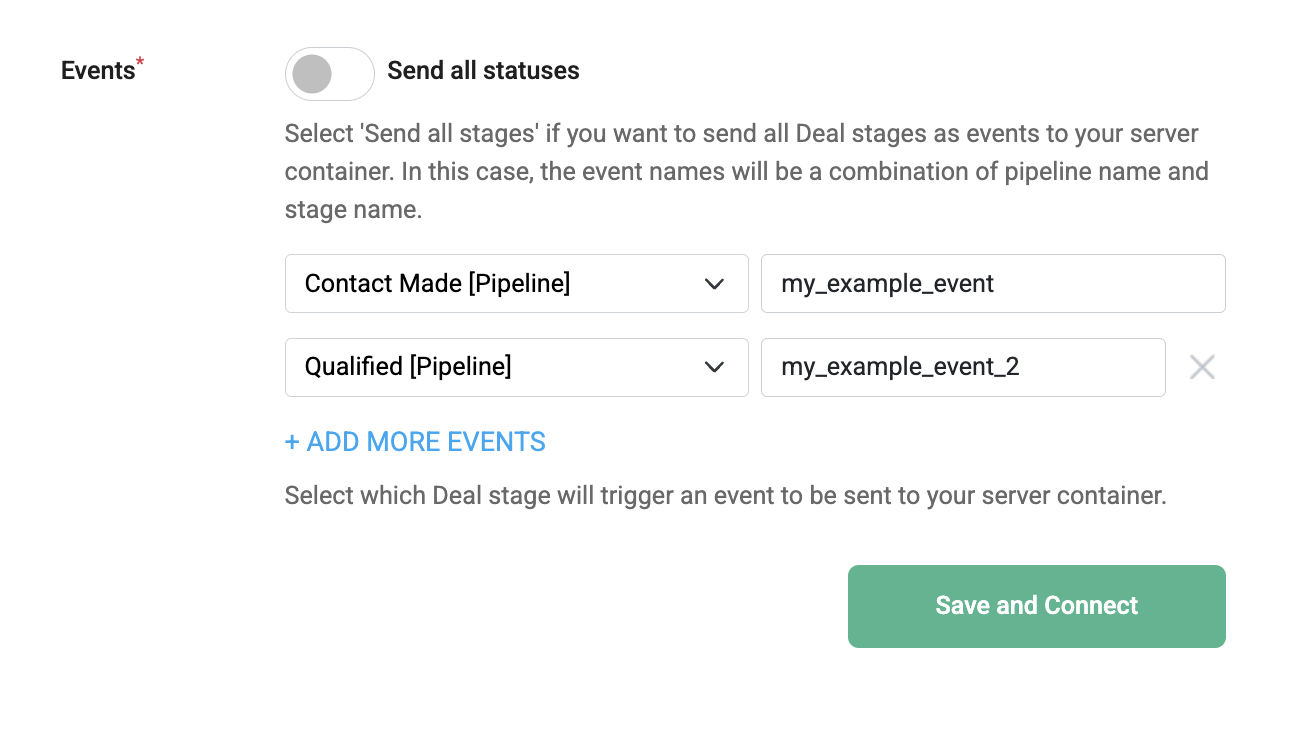
- Select the Send all statuses checkbox if you want to send all Deals stages as events to server GTM. Events are then named automatically and consist of a Deal stage name. You can also select stages to ignore in this case.
Once done, click Save and Connect. Once you see a success message your installation is complete and the application will send conversion events in the background based on your settings.

Configure sending data to the required platforms
With the current setup, the app will send events to your server GTM container, but to distribute them to platforms like Meta, TikTok, Google Ads, or any other, you need to configure the CAPI tags inside GTM to fire accordingly.
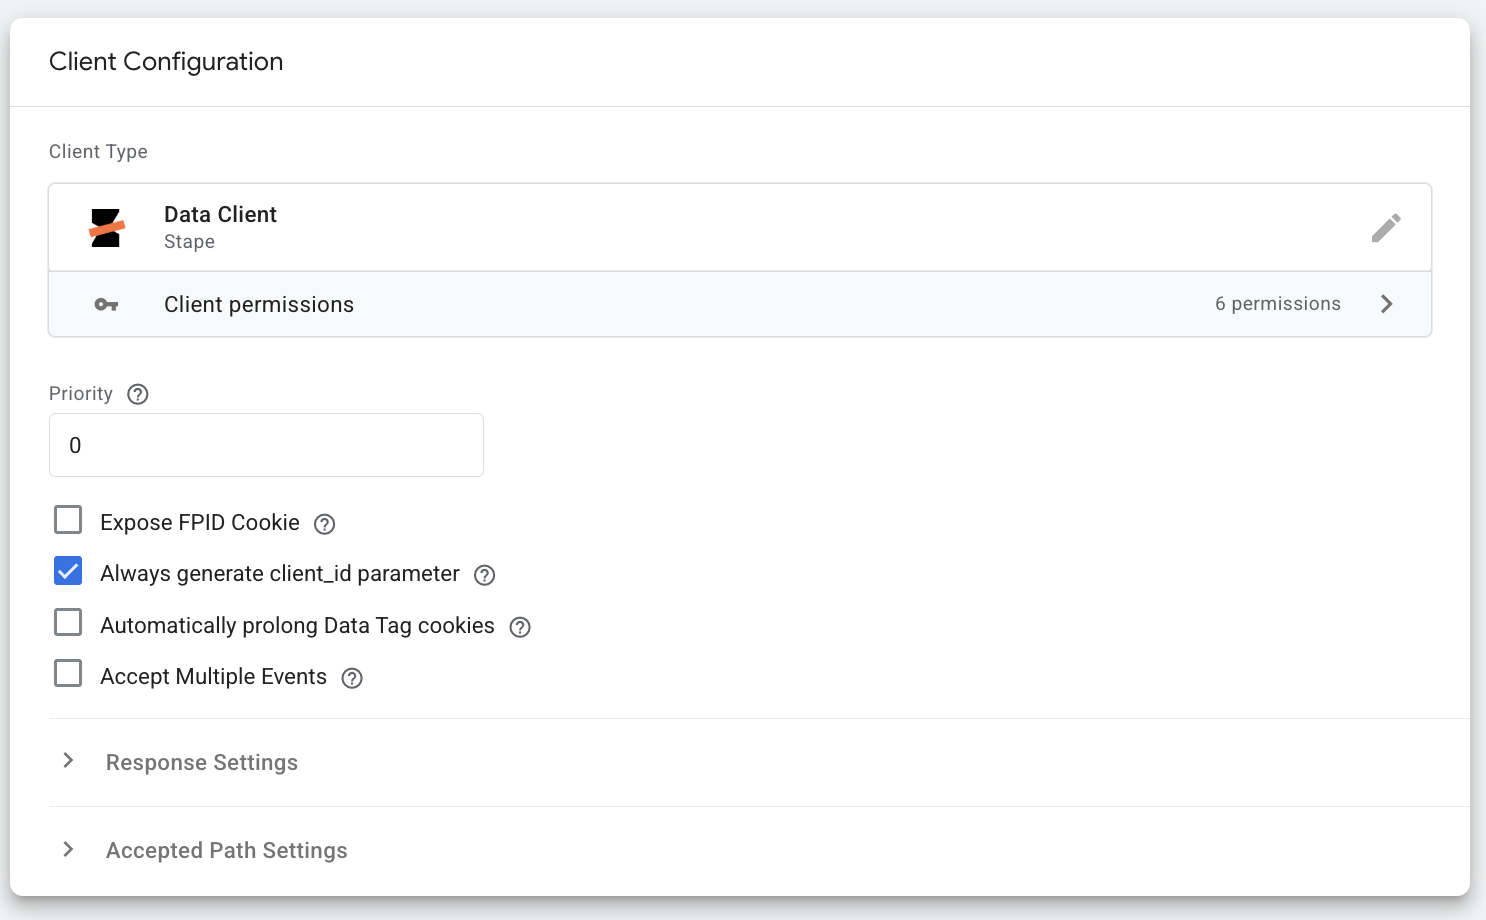
1. Configure the Data Client to claim the JSON requests sent from the CRM app. Go to the Templates → click “New” → upload the Data Client template you’ve previously downloaded from the Github.
2. Go to the Clients section of your sGTM container → click “New” → select Data Client. That’s basically it, your configuration will look like in the screenshot below. Click “Save”.
2. Select the platforms you need to send data to from sGTM. While setting up server-side tracking with sGTM, you might have already configured the CAPI tags for the required platforms, for example:
Or any other tags for platforms that support server-side tracking. You will need to use them to configure sending data from your CRM to the required platforms.
To give you an understanding of how to configure the tags this way, we will take the Facebook platform as an example. You should map the events according to the requirements of the platforms you use.
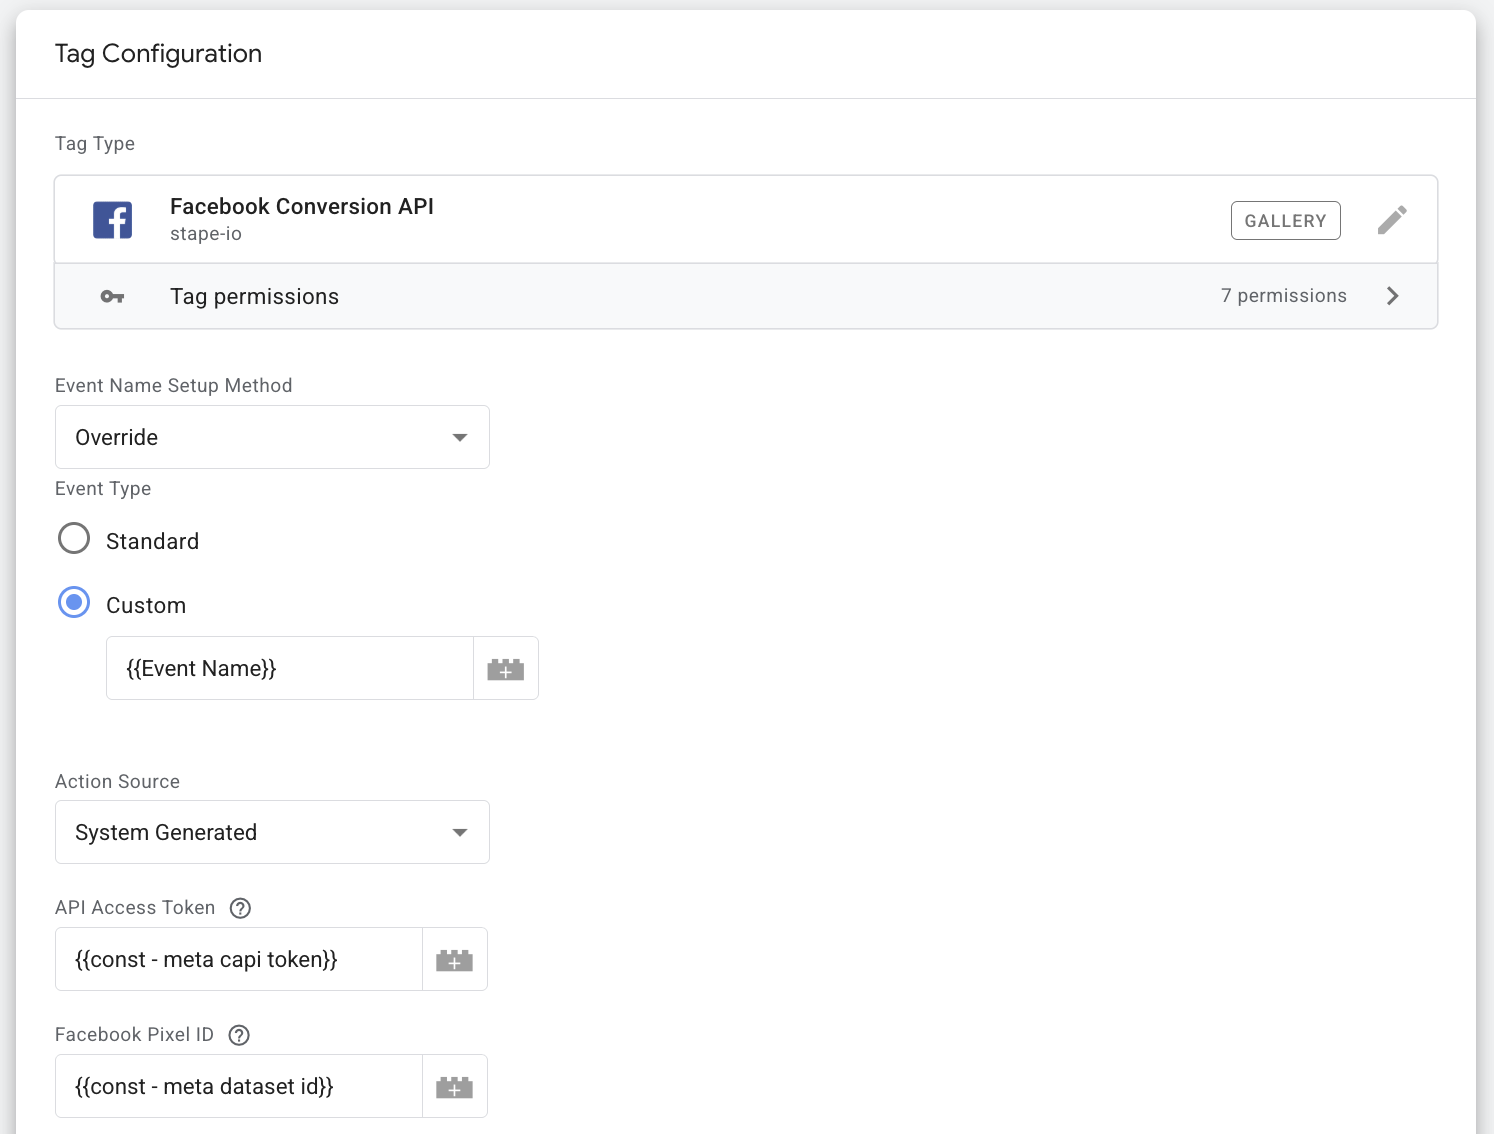
4. Create a new Facebook CAPI tag. Go to the Tags section in sGTM → add “Facebook Conversion API” as tag type.
5. Configure the tag.
Event Name Setup Method: Override
- Event Type: Custom. Select a built-in variable “Event name”.
- Action Source: System Generated.
- Add Pixel ID and generate API Access Token: for the detailed instructions on how to find these values, please refer to our guide on where to find Meta Pixel ID and API Token.
Here is an example of how your configuration will look at this point:
- User data section: select properties from the drop-down list - Lead ID, Browser ID, Click ID. These three are basic.
For each property, add a variable that will take the appropriate value from the request sent from the CRM app.
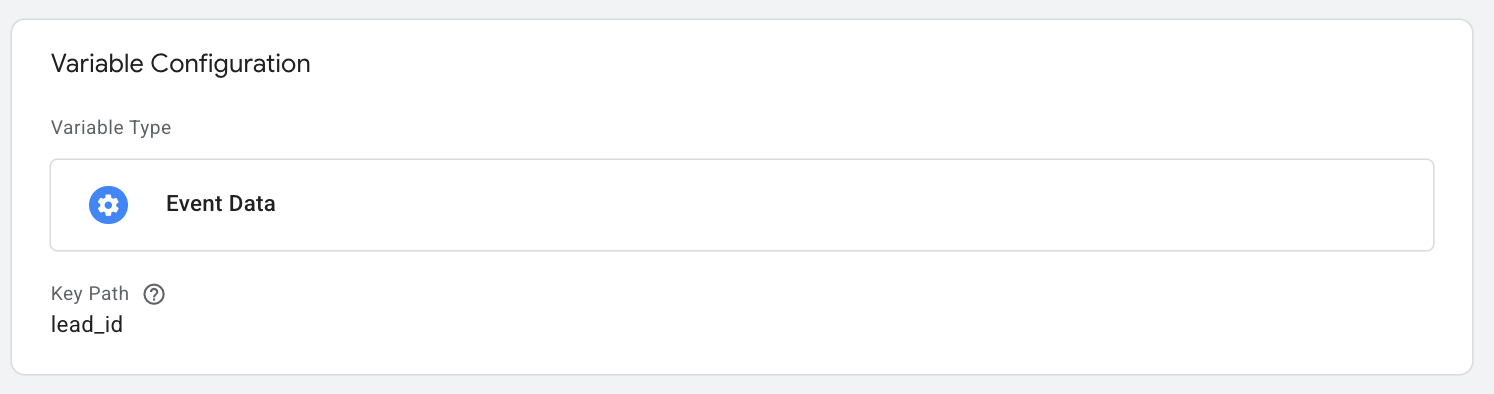
Create a following variable for Lead ID:
- Variable Type: Event Data
- Key Path: lead_id
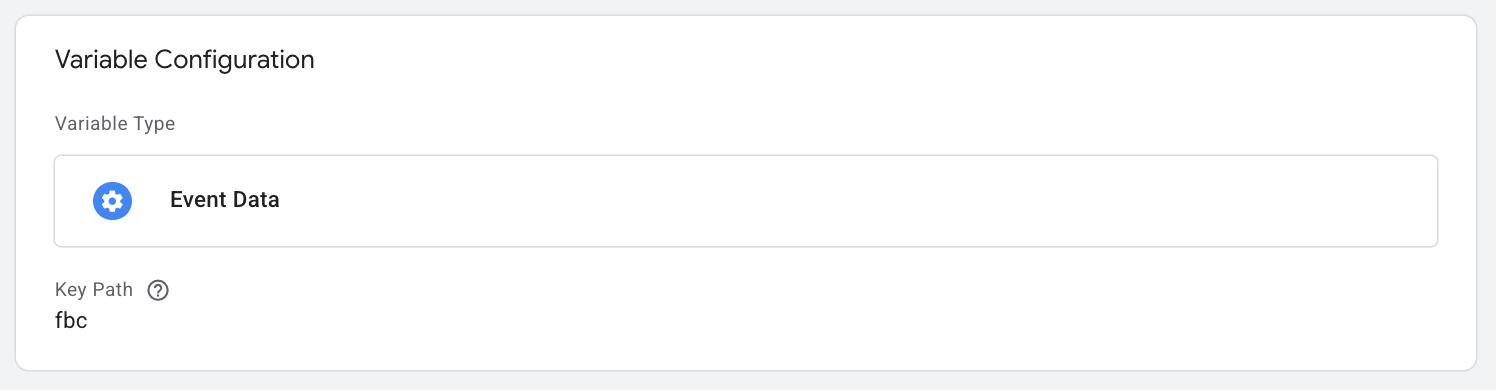
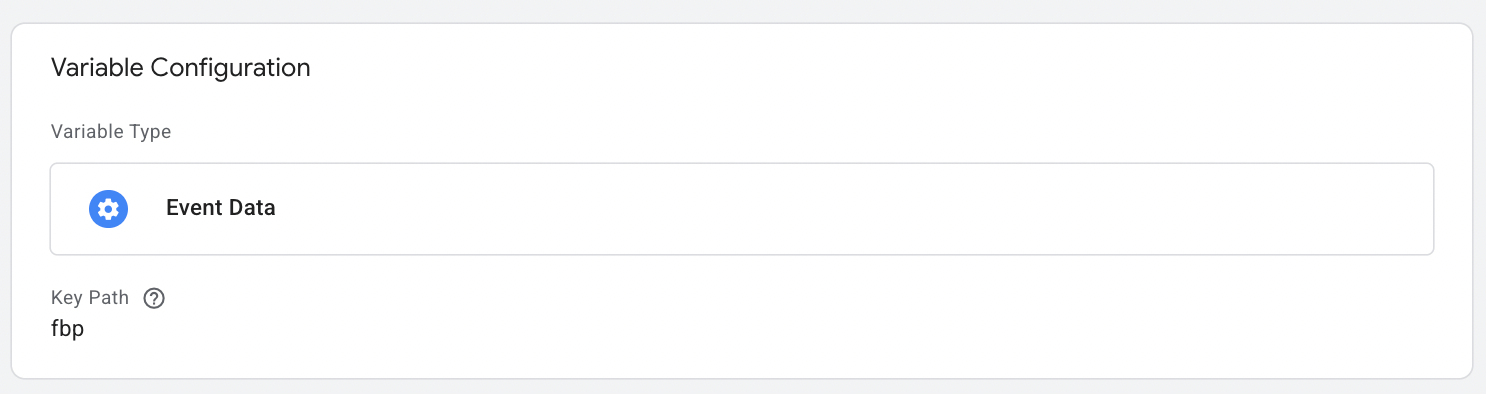
Create two different variables for Browser ID and Click ID:
- Variable Type: Event Data (for both), as the IDs will be retrieved from the event sent from CRM, not from the cookie.
- Cookie Name: fbp (for Browser ID variable) and fbc (for Click ID variable)
Here is an example of the user data section configuration:

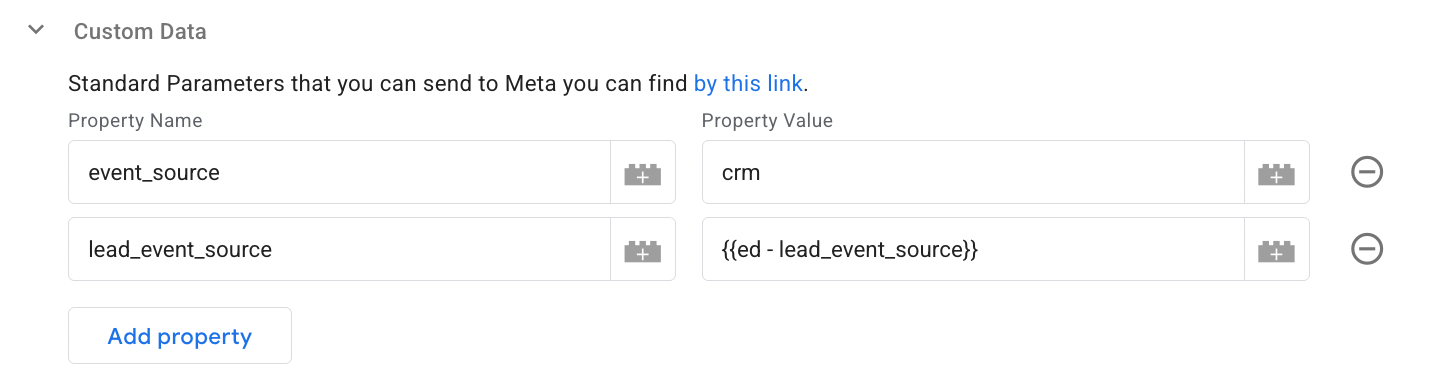
- Custom data section: add a few custom fields to identify the source of the event.
Event_source property name with crm value.
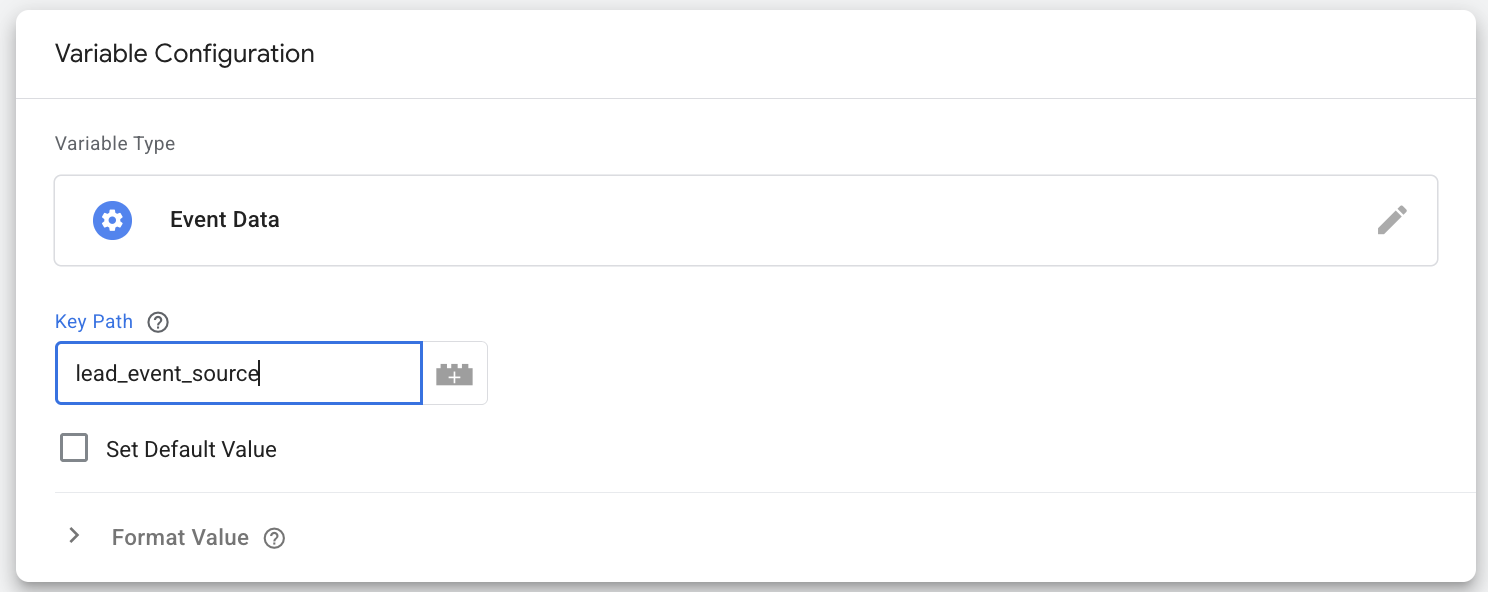
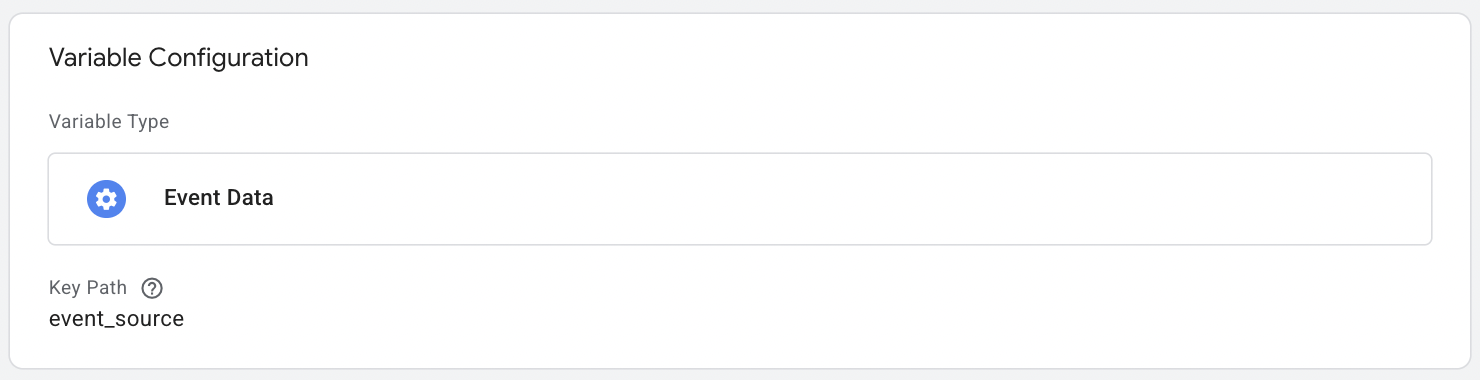
lead_event_source - as property value, add a variable with the following configurations:
- Variable Type: Event Data
- Key Path: lead_event_source
Here is how this configuration will look like in the tag:
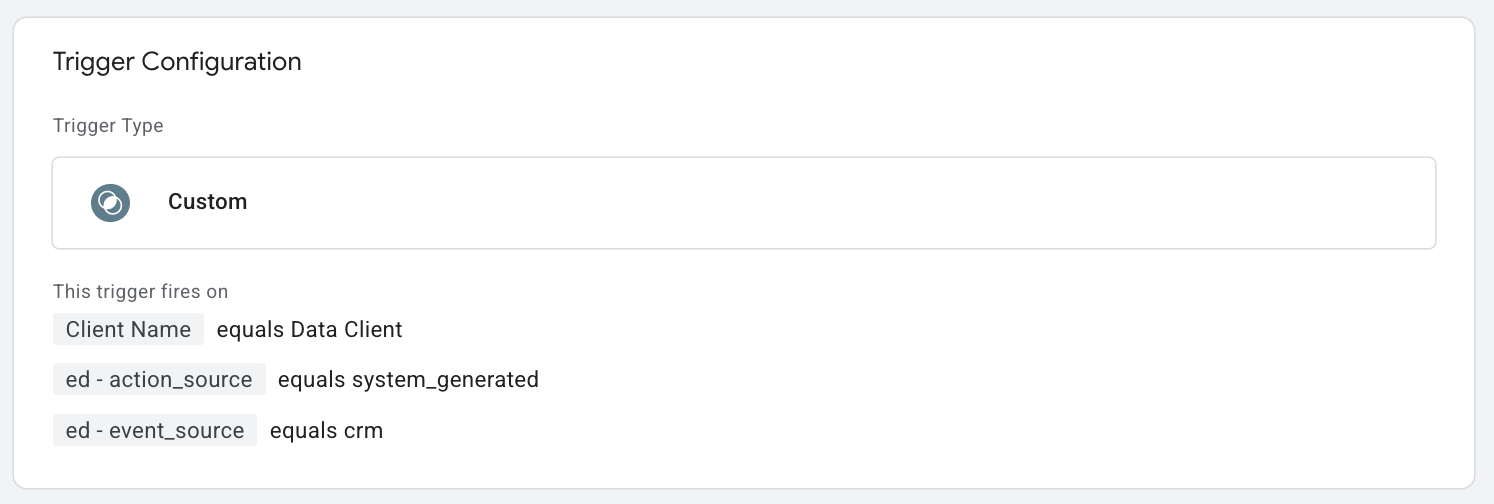
6. Add a trigger for a tag.
Use the following configurations:
- Trigger type: Custom
- This trigger fires on: Some events
Besides, add the following conditions for a tag to trigger:
- Client Name equals Data Client
- Action Source equals system_generated
The variable for action source must have configurations as on the screenshot below:
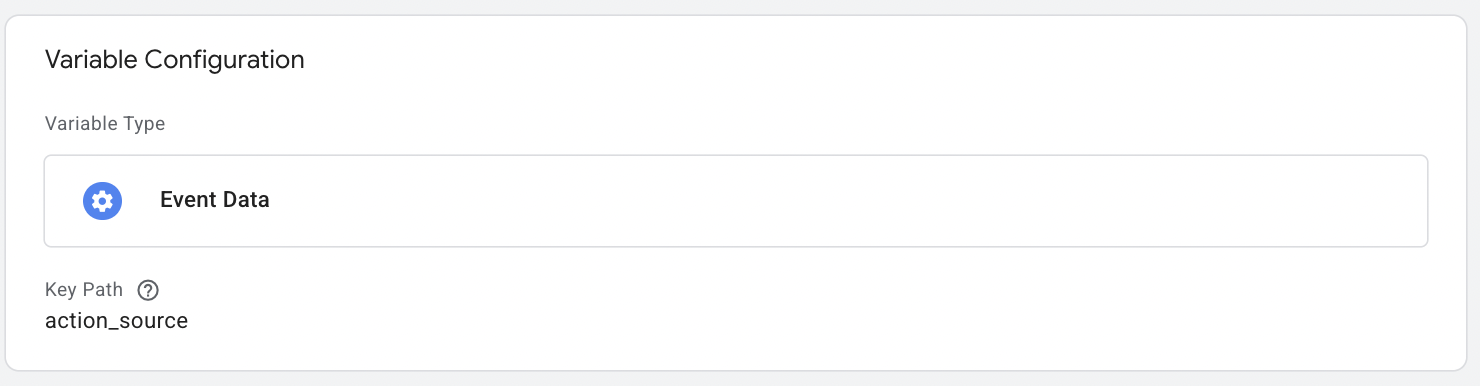
- Event Source equals crm
Configure the variable for the event source as shown in the screenshot:
As a result, your trigger will look similar to the example from the screenshot below:
7. Test the setup.
Since it is, in fact, a webhook that is sent from CRM to the server GTM, you can refer to the article on debugging incoming webhooks in server GTM for the detailed instructions.
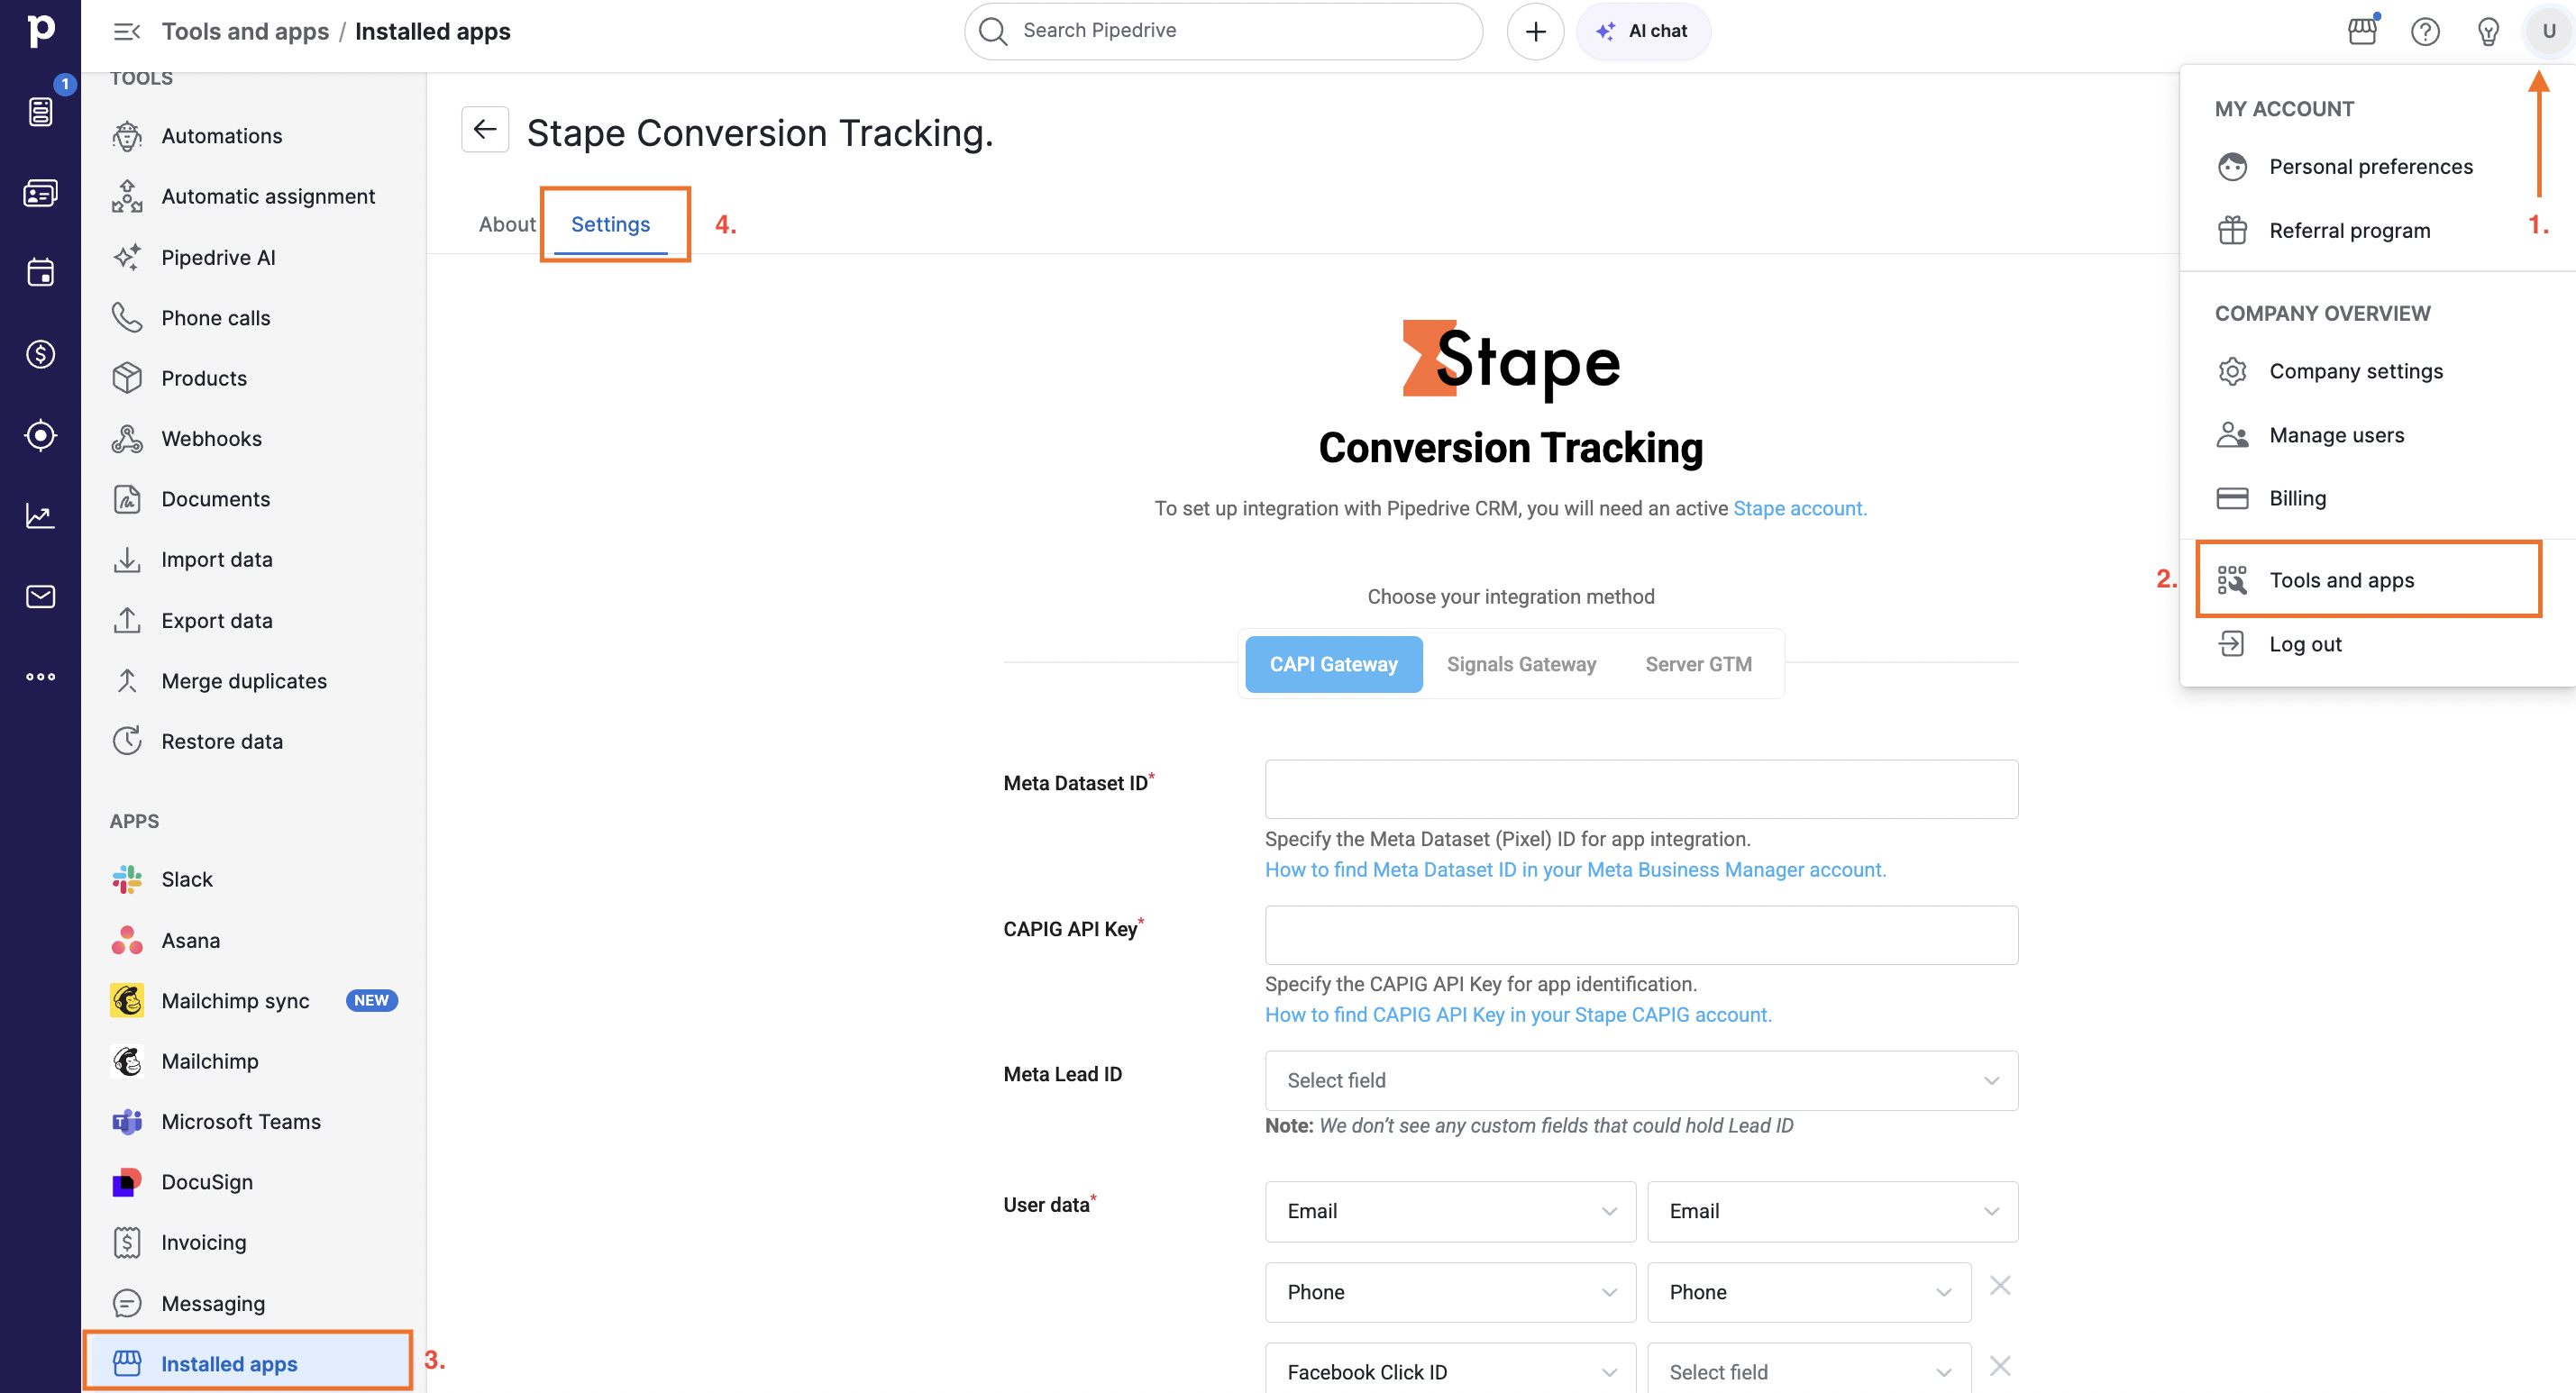
Settings editing
If you have some changes in the funnel or you want to change the events sent to your CAPI Gateway, server GTM container, or Signals Gateway, you can always edit your app configuration.
To do this, click on the menu button, then select Tools and apps. Navigate to Installed apps, select Stape Conversion Tracking and click on the Settings tab.
To sum up
The Meta Stape Conversion Tracking Pipedrive CRM app offers a simple and convenient way to send Deals' status data from Pipedrive to the platform you need.
With just a few steps, you can update Deals' statuses, send offline conversions, and enrich the platform with CRM data.

Comments