In this article, we will describe how to set up a custom domain within the server Google Tag Manager container. The main advantage of using a custom domain for sGTM is that it helps increase cookie lifetime by setting first-party cookies instead of third-party cookies.
The essential benefit of server-side tagging lies in setting first-party cookies, though this isn't enabled by default. To leverage this capability, it's necessary to implement a custom domain in your GTM server-side.
You can use a custom tagging server URL to set up first-party cookies. Custom tagging server URL or custom domain should share the same domain as your website. For example, if your website domain is example.com, then the tagging server URL should look like ss.example.com.
There are three ways to set up a custom domain:

First of all, you need to create and set up the Google Tag Manager server container.
If you don’t have a server container follow this instruction.
We will show two ways of mapping a custom domain for the server Google Tag Manager container:
1. Log in to your Stape account, choose a container, scroll down and click Add custom domain.

2. There are two ways of adding custom domain:
The easiest way to connect domains. Log in with your DNS provider details via Entri, and give us one-time permission to connect your domain. Check the full list of supported DNS providers by Entri.

After you add a custom domain to your container, you will see DNS records that should be created to verify the custom domain. The DNS record depends on the server location and CDN option you choose.
You must create one CNAME record if you do not use Global CDN.

You must create two CNAME records, if you use Global CDN.

Below there’s a step-by-step guidance on how to create records using Cloudflare.
1. Log in to your domain name service and create a new DNS record for the subdomain you want to use. To do it, click three dots and choose “Configure DNS” next to your domain name on the account home page.

Click “Add record”.


If you use Global CDN, set an additional CNAME record

2. Once your custom domain is verified, you should see the status ready below the tagging server URL in the Stape admin. If there are any problems with verifying a custom domain, please follow our guide on troubleshooting a custom domain.

3. Go to your Google Tag Manager Server container -> Admin -> Container Settings -> Change Tagging server URL to your subdomain.

If you want to verify your custom subdomain using A and AAAA records, you can do so by clicking Advanced settings after adding the custom subdomain to the container and ticking the “Use A records instead of CNAME records” box.
1. Open your sGTM container on Stape, scroll down to “Domains” and click Add custom domain.

2. Write a custom domain. Click Advanced settings after adding the custom subdomain to the container and ticking the “Use A records instead of CNAME records” box.
3. The DNS records you should configure vary depending on the server location. You will see DNS records that you should add inside your stape.io container.

4. Log in to your DNS account and add records you see in your Stape.io account. Below is an example of DNS setup for CloudFlare. On the account home page next to your domain name click three dots and choose “Configure DNS”.

Click “Add record”.

Then, create the records you see in your Stape.io account. Ensure that the proxy is turned off.


Usually, it takes 2-3 hours to verify the custom domain. For some DNS providers, verifying records might take up to 72 hours. We will email you once the custom domain is verified or any error is detected. If there is an error with the verification, please follow this instruction on how to verify custom domain verification.
5. Once the custom domain is verified, go back to the Google Tag Manager Server container → Choose your server container → Admin → Container Settings → paste tagging server URL.

If you use a custom domain, updating the Web GTM script on your website is highly recommended. This tweak will load gtm.js from your domain. To do so, replace the default domain googletagmanager.com with the custom domain you set up in the previous step.

An even better solution would be to use a Custom Loader power-up.
The prerequisites to configure the same origin custom domain:
We will show you 2 examples of configuring the same origin custom domain for sGTM using Cloudflare or nginx.
For this option to work all your site traffic must be proxied through CloudFlare. Thus, the functionality of CF Workers will allow you to proxy sGTM requests as well.
Keep in mind that for some tags to function properly, your CDN should not apply caching or query string sorting. For example Cloudflare’s Query String Sort in this documentation or URL normalization will interfere with sendPixelFromBrowser API, utilised by some server-side tags.
a. Create a worker in Cloudflare: open the Compute & AI tab → Workers & Pages → click Get started next in the Start with Hello World! option.

b. Add worker name → click Deploy.

c. In the worker settings, click 'Edit code’ and create js similar to the screenshot below, where:
/metrics/ - is a path you choose for your server container.
https://sgtm.stape.work/ - is your tagging server URL. There are two scenarios:
export default {
  async fetch(request, env, ctx) {
      let {pathname, search, host} = new URL(request.url);

      pathname = pathname.replace('/metrics/', '/');
      const domain = 'sgtm.stape.work';

      let newRequest = new Request((`https://` + domain + pathname + search), request);
      newRequest.headers.set('Host', domain);

      return fetch(newRequest);
  },
};
Deploy and save changes.
d. Go to your sGTM worker → Settings → Domains & Routes and create a new Route. Add the URL you use for server GTM ending with *. In my case, it’s stape.work/metrics* and select your domain in zone selection.

e. Next to your domain name click three dots → Configure Rules.

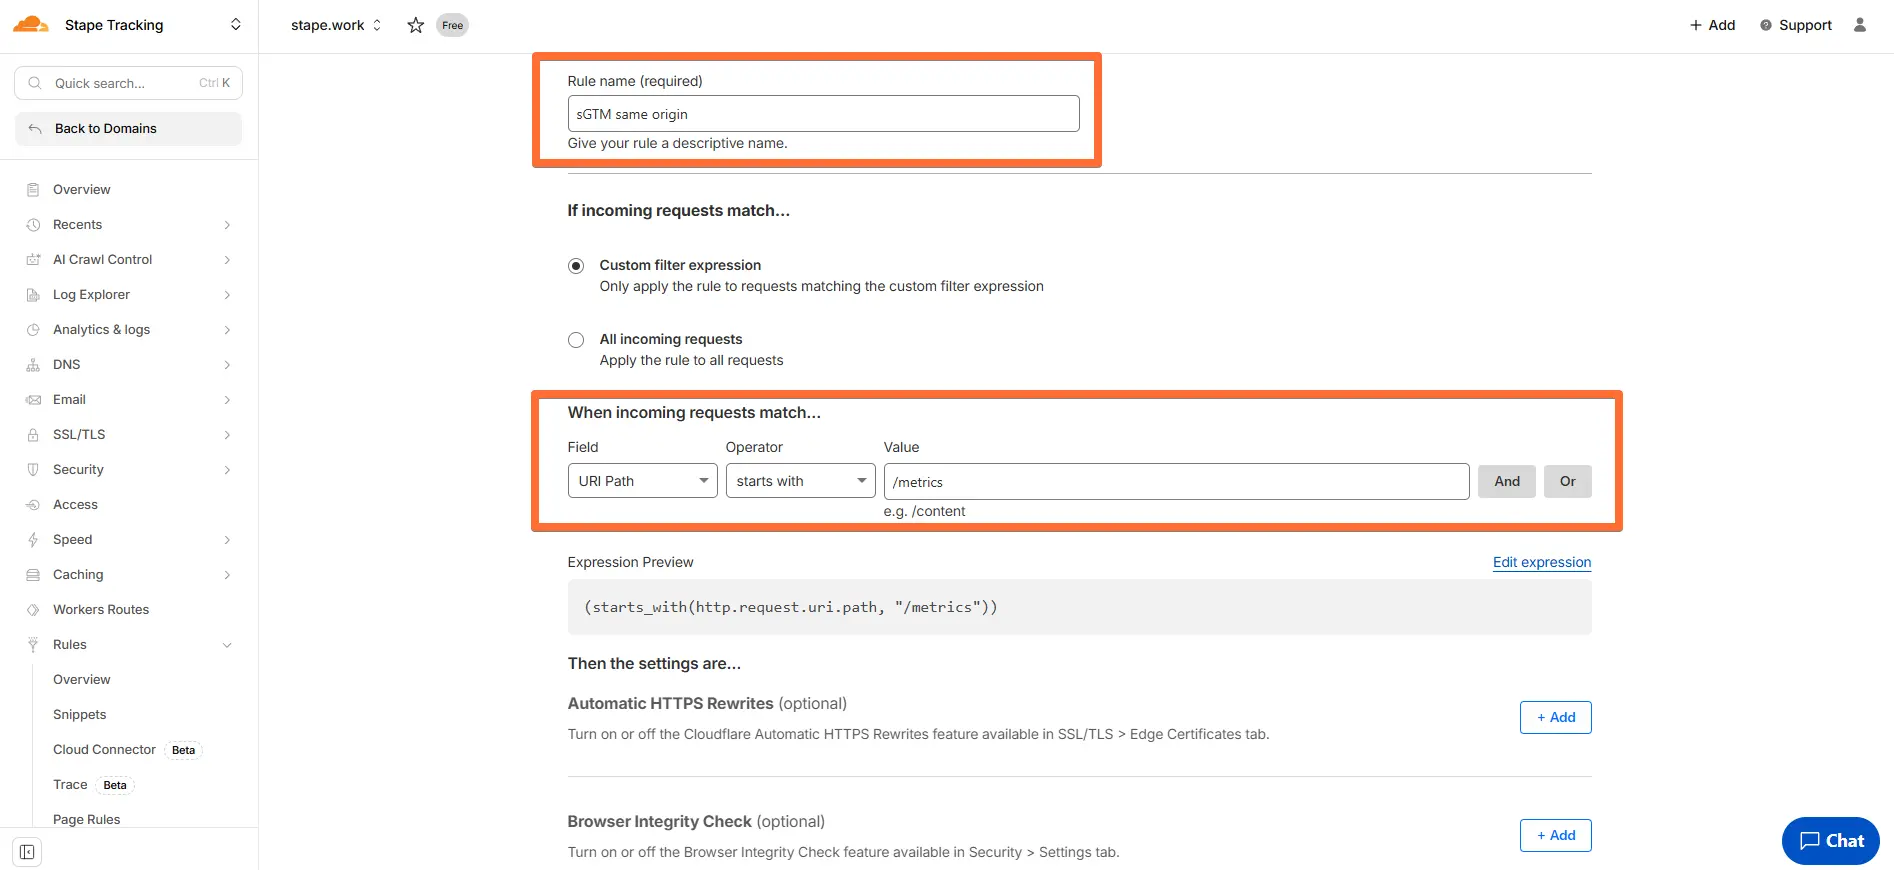
f. Create rule → Configuration Rules:
- Specify any understandable rule name, e.g. ‘sGTM same origin’
- Custom filter expression
- URl Path starts with‘/metrics’ (change to your origin if you’re using a different one)
- SSL → select option ‘Full’
Deploy Rule.


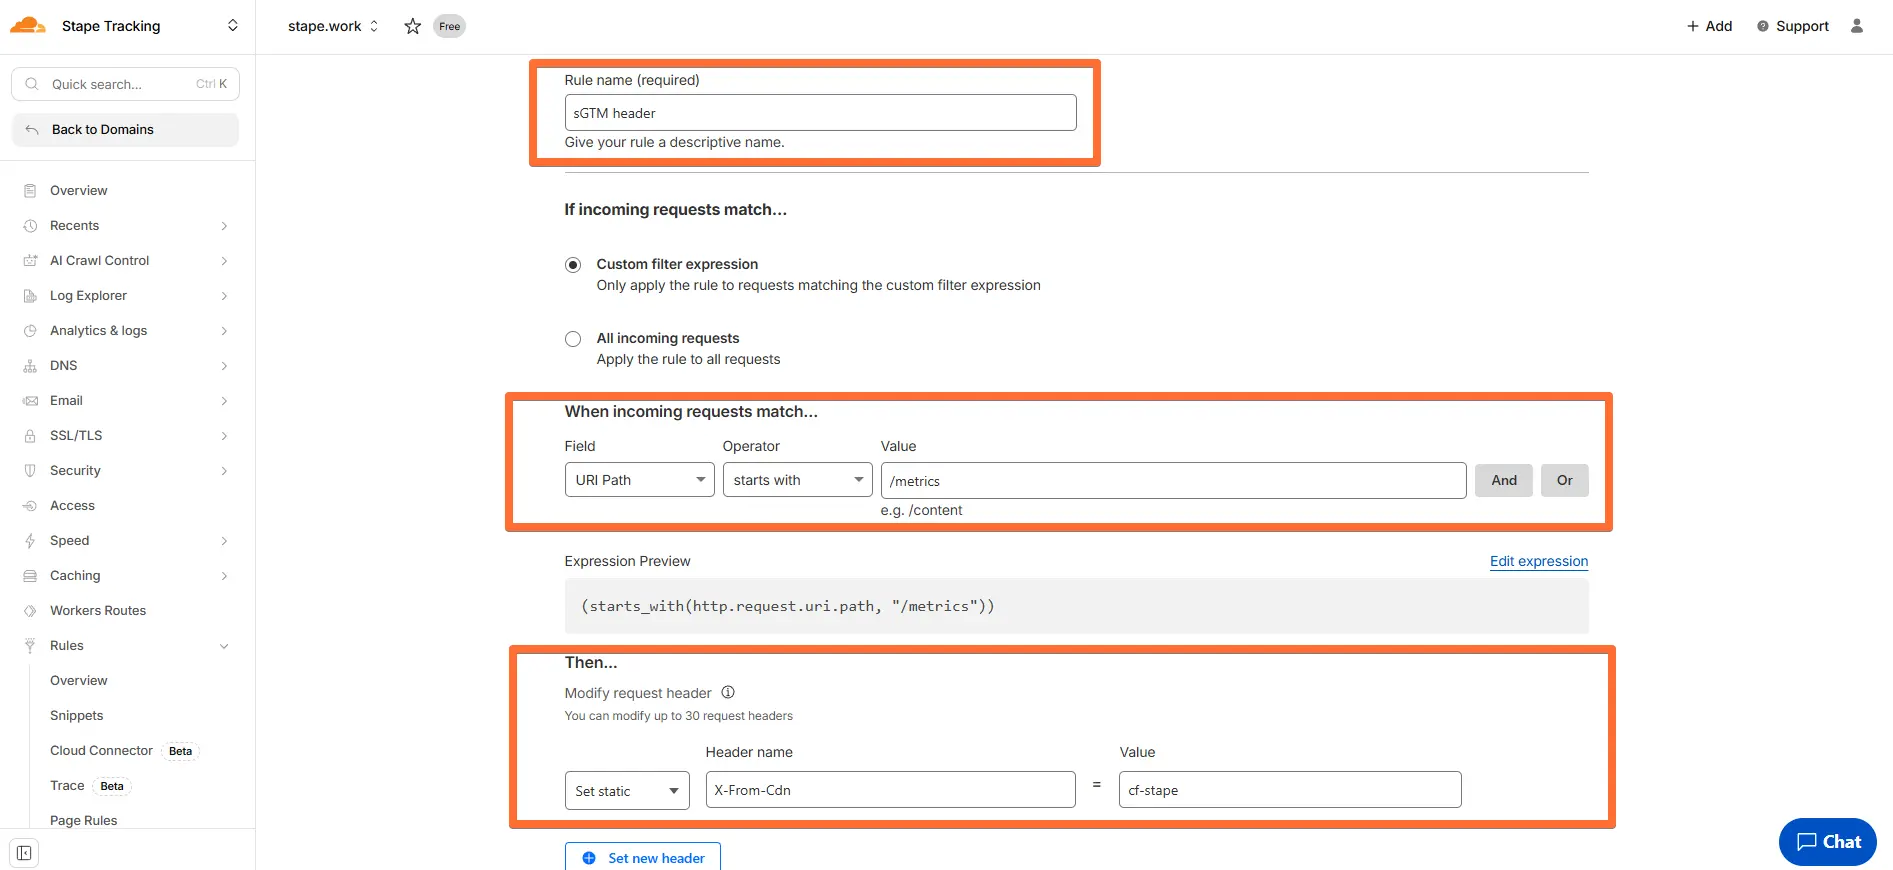
g. Go to Rules → Overview → Create Rule → Request Header Transform Rule:
- Specify any understandable rule name, e.g., ‘sGTM header’;
- Custom filter expression;
- URl Path starts with ‘/metrics’ (change to your origin if you’re using a different one);
- Set static, header name ‘X-From-Cdn’ with value ‘cf-stape’
Save the rule.

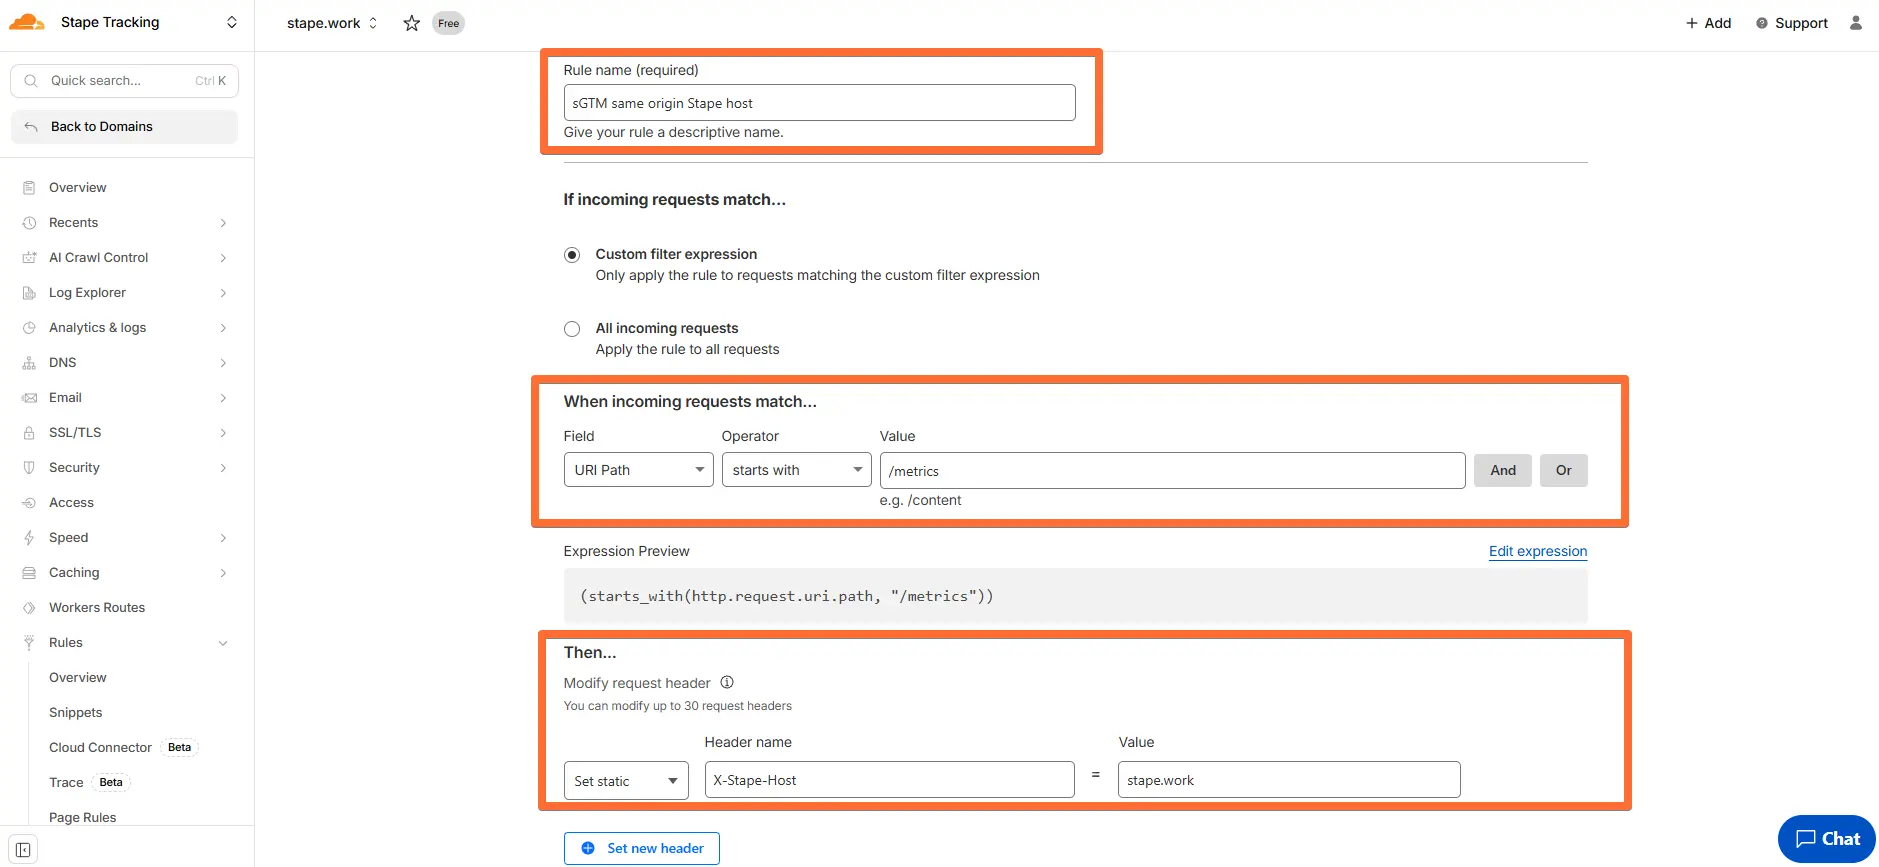
h. If you are not using your own subdomain and are proxying requests to the standard Stape subdomain, you also need to add the X-Stape-Host header with the value of the host where the events are taking place (for instance, X-Stape-Host: www.example.com).
Go to Rules → Overview → Create Rule → Request Header Transform Rule:
- Enter a descriptive rule name, e.g., sGTM same origin Stape host;
- Custom filter expression;
- URl Path starts with /metrics (change to your origin if you’re using a different one);
- Set a static header name X-Stape-Host with the value of the host of events (in the case of our example, it's stape.work).
Save the rule.

Add to your server config, where:
/metrics - path you selected for server GTM.
https://gtm.mysimple.name - custom domain of your sGTM.
location = /metrics { return 302 /metrics/; }
location ~ ^/metrics(.*) {
    resolver 8.8.8.8 valid=3600s;
    proxy_pass https://gtm.mysimple.name$1$is_args$args;
    proxy_set_header Host gtm.mysimple.name;
    proxy_set_header X-From-Cdn "cf-stape";
    proxy_set_header CF-Connecting-Ip $remote_addr; #If you do not use Cloudflare for your domain
    #proxy_set_header CF-Connecting-Ip $http_cf_connecting_ip; #If you use Cloudflare for your domain
}After you create your Cloudflare Worker and route, check that everything is configured correctly by sending a single test request using a GA4 tag.
1. Create a GA4 tag in your web GTM container.
Add your Measurement ID (any ID works for testing) and set the server_container_url to the same-origin path you configured (in our example, it is https://stape.work/metrics).

2. (Optional) To streamline testing, add your same-origin path (in our case, https://stape.work/metrics) to your server GTM settings. Click Admin → Container Settings → enter the path under Server container URLs.

3. Open Preview mode in both your web GTM container and your server-side GTM container. If everything is set up correctly, the server container should open in preview at the new path you created.

If, for some reason, the preview doesn’t open at the new path, you can manually enter it in the preview window’s URL. If the URL doesn’t work, potential solutions are:


4. Trigger a page view on your site. In the server container preview, you should now see an incoming page_view request from your website’s real domain.

Once the same origin setup is done by either option we also recommend updating Custom Loader for ad blocker protection and implementing this on your site.
Don’t forget to specify your same origin path in it.

You can find a description of Custom Loader power-up here: https://help.stape.io/hc/en-us/articles/6080917962397-Set-up-Custom-Loader-power-up
Adding a custom domain to a Google Tag Manager (GTM) server container can significantly impact the effectiveness and flexibility of your server-side tracking. In this article, we have provided two methods of custom domain implementation.
A same-origin approach offers increased security and simpler cookie management, ideal for singular, focused domains. A subdomain setup provides flexibility and performance optimization, suitable for complex or multiple domain structures. Each has its trade-offs in complexity, performance, and management. Carefully consider your technical requirements, security needs, and tracking objectives to select the most appropriate configuration for your server-side tracking.
If you have any questions, visit our helpdesk or write a ticket. Our team of experts will be happy to help you with any questions regarding Stape’s hosting and server-side tracking.
Comments