How to set up Admitad tag using server GTM
Uliana Lesiv
AuthorIn this guide, we'll walk you through setting up Admitad tracking with server GTM. To configure the Admitad tag, follow these steps:
- Set up a server GTM container.
- Enable data transmission from the web to the server GTM container.
- Add the Admitad tag from the GTM template gallery.
- Configure the tag to track pageviews or conversions.
- Assign a trigger to the tag.
- Test the configuration.
Below, we’ll describe the configuration process in more detail.
What is the Admitad tag for GTM?
Admitad is a tag created for the server GTM container allowing website owners to track user actions. The Admitad Template for Google Tag Manager allows you to track conversions. The template sends data to Admitad statistics, allowing website owners to monitor and analyze user behavior on their site.
Benefits of Using Admitad with Google Tag Manager
As Admitad tag works on the server GTM container, besides a convenient way to track conversions, you will get the following benefits:
- Accurate data collected that is not affected by ad blockers and browser restrictions.
- Faster page loads compared to client-side tracking, as server-side tracking processes tags without loading them in the user's browser.
- High data control, so you can easier comply with data regulations.
What you need to set up the Admitad tag
Before setting Admitad tag, ensure you:
- Establish data flow from the web to the server GTM container by setting up server-side Google Analytics 4 or Data Tag/Data Client.
How to set up the Admitad tag
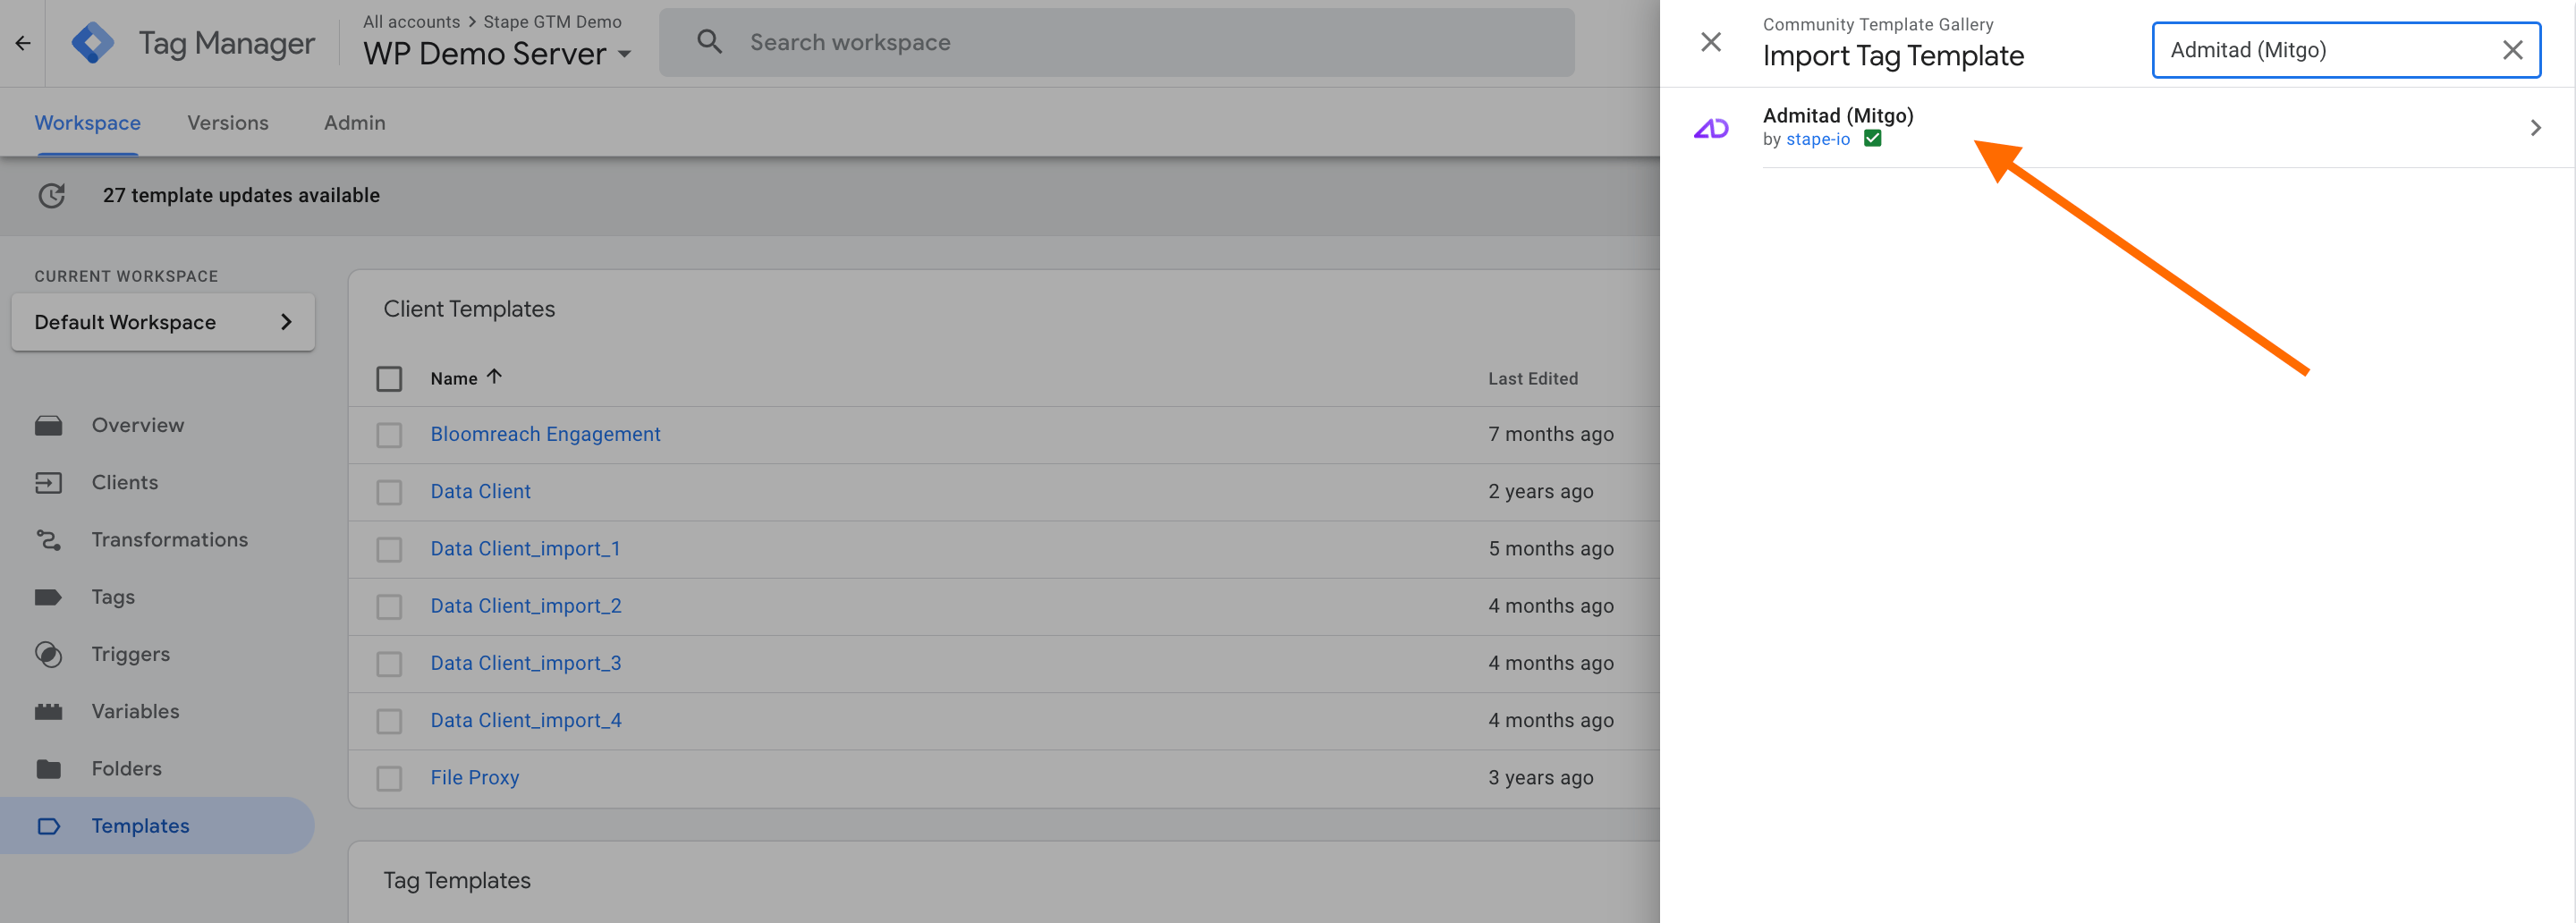
1. Add the Admitad tag to your workspace. To do it, go to your server GTM container → Templates → in the "Tag Templates" section, click "Search Gallery" → find "Admitad (Mitgo)" → click "Add to workspace".
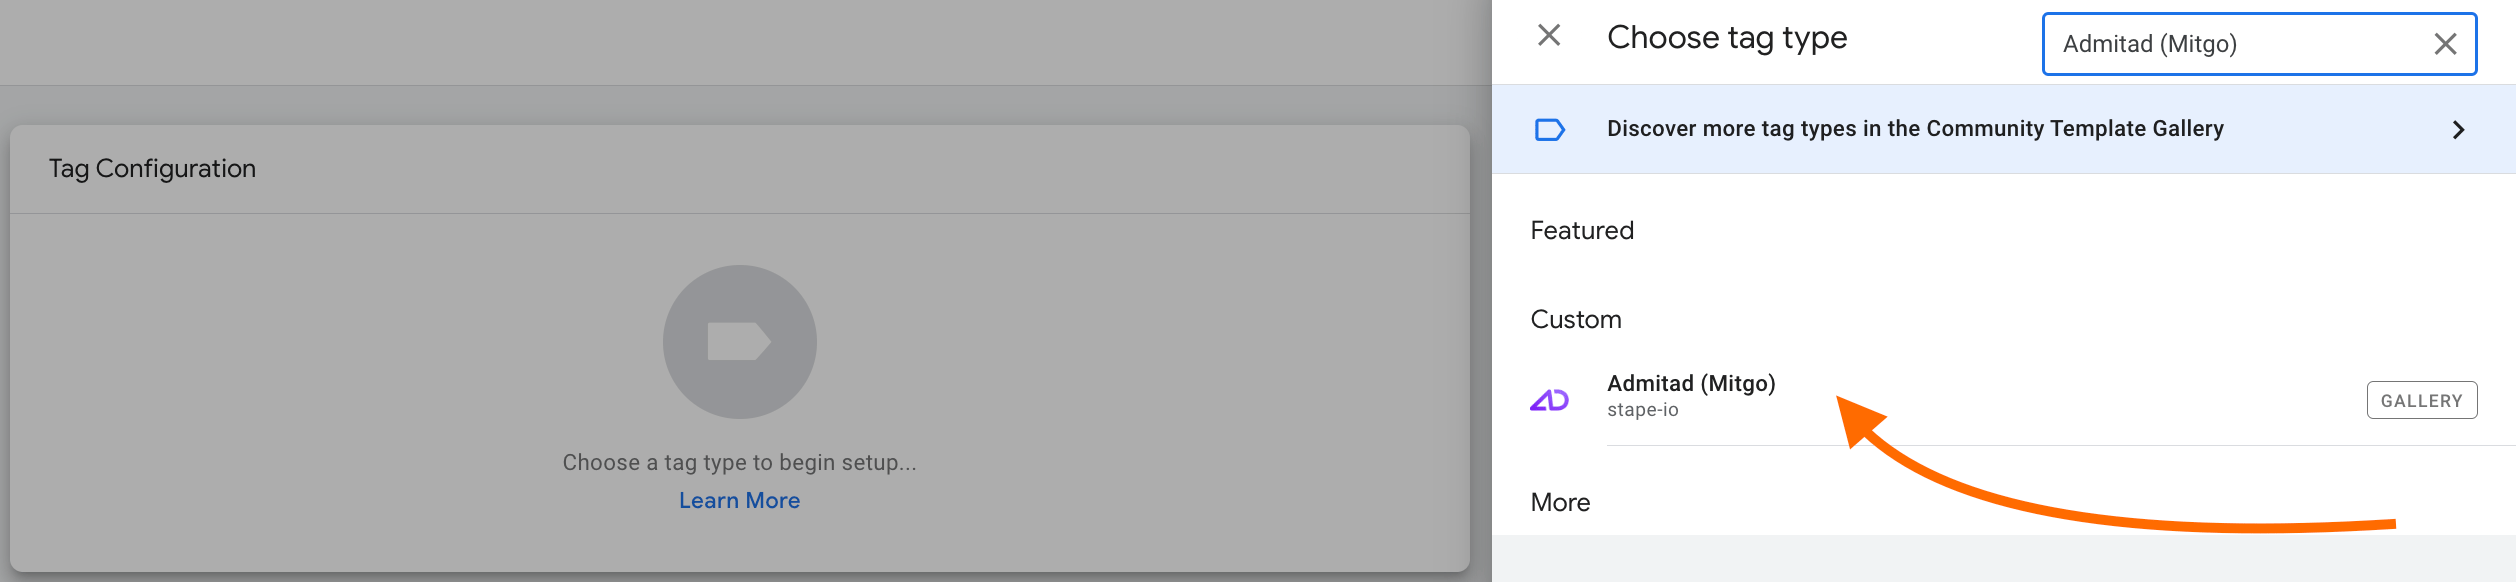
2. Create a new tag. Go to the section "Tags" → click "New" → choose as the tag type "Admitad (Mitgo)".
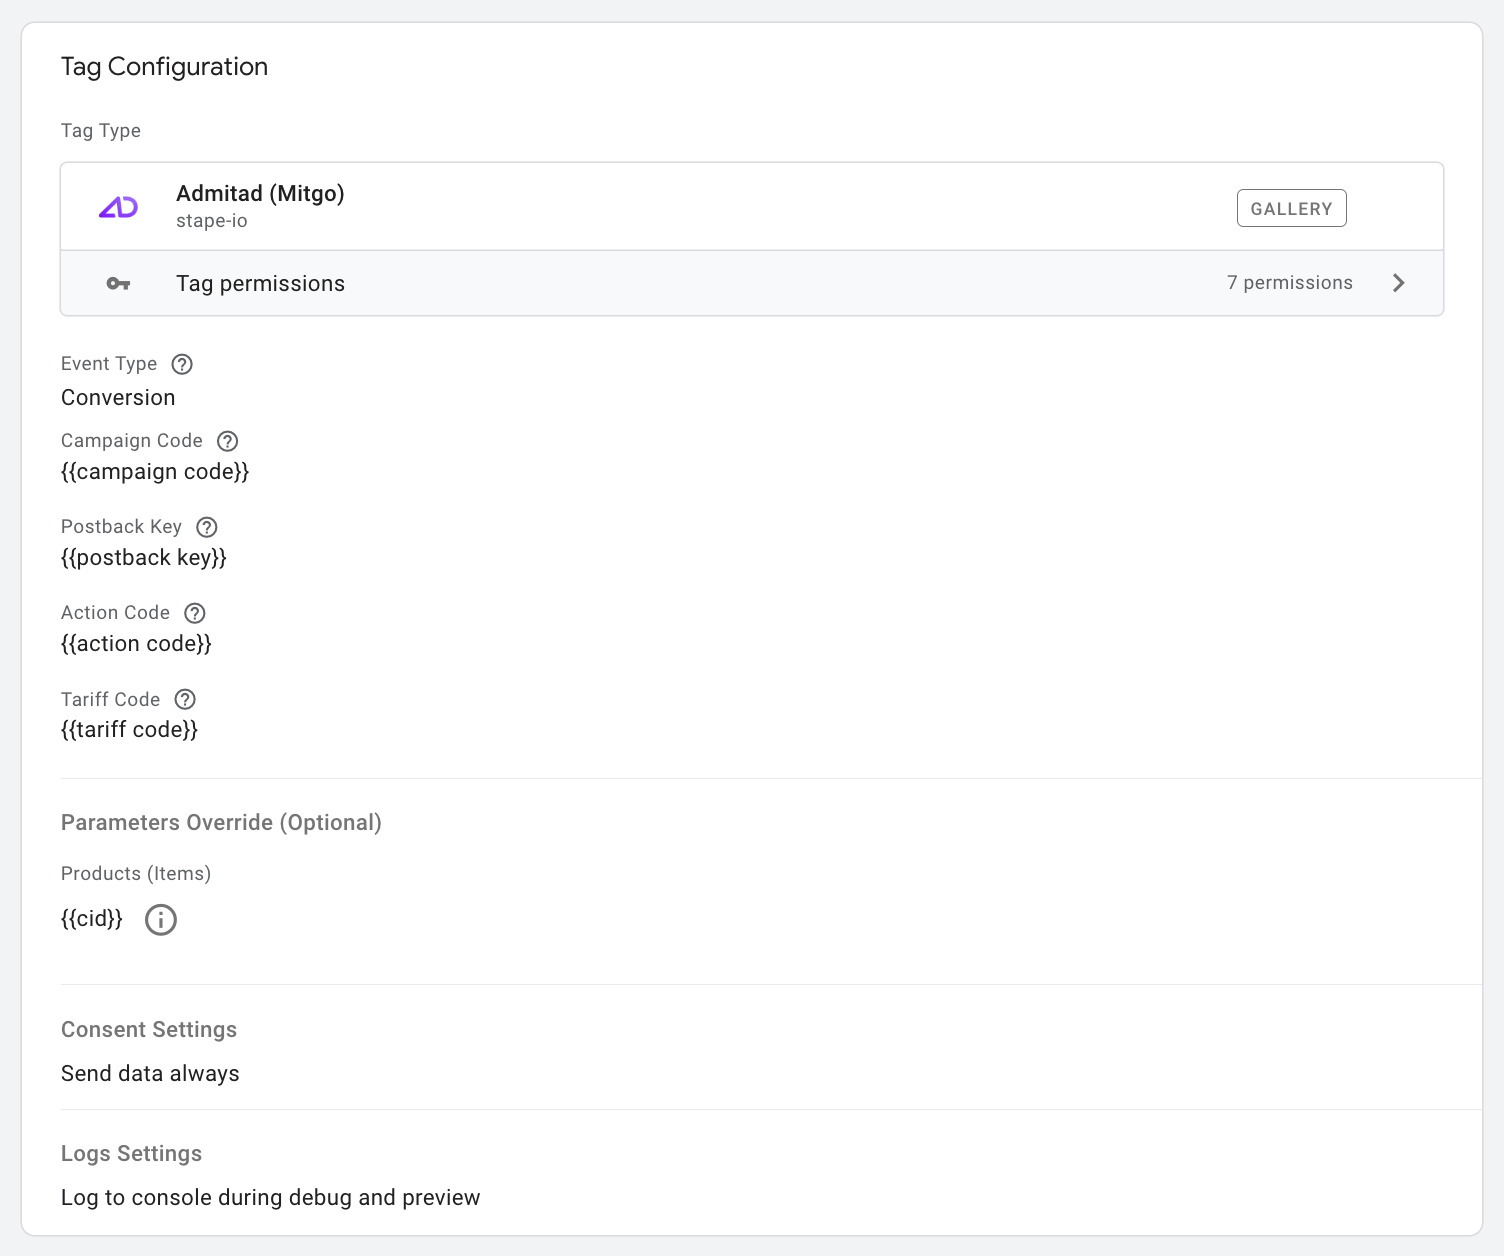
3 .Configure the tag.
3.1 Choose Event Type:
PageView - it stores the {admitad_uid} URL parameter inside the _aid cookie.
Conversion - with this option you send a request with data about the conversion to the Admitad.
If you opt for conversion option, you will need to configure the following fields:
- Campaign Code - that’s the target action code from your program settings. You can find the action_code value in your account → Integration section → Integration methods → Custom integration → Postback → in the Action column find the required value for this field.
- Postback Key - that’s a constant whose value is defined in the postback request.
- Action Code - a constant whose value is defined in the postback request. It can be found in the same location as Campaign Code.
- Tariff Code - a variable which is the rate code from your program settings. Find the tariff_code value in your account → Integration section → Integration methods → Custom integration → Postback → in the Rate column find the required value for this field.
- Payment Type - a constant with the value "sale".
| Check Admitad’s documentation for the detailed instructions on how to find the values required for tag configuration. |
3.2 Parameters override - that’s optional as Admitad tag attempts to retrieve all data from the event data using GA4 parameters.
Specify the parameters you want to override, the parameters include:
- Order ID
- Currency code
- Price
- Client ID
- Quantity
- Position ID
- Position count
- Product ID
- Country code
- City
- Promocode
4. Add a trigger for a tag.
5. Verify the tag configuration by triggering the event in the web and server GTM containers. If you encounter any issues with the tag setup, see the detailed guide on debugging and monitoring.
Summary
Setting up the Admitad tag with a server-side Google Tag Manager container allows you to track conversions accurately. Implementing server-side tracking improves data reliability and website performance. The setup process is simple and fast, allowing you to immediately take advantage of server-side tracking!
Want to start using server-side tags?
Stape has lots of tags for server GTM! Click on Try for free to register and check them all.

Comments