Ad tags & Click tags: everything you need to know about ad tracking
Ivanna Holubovska
AuthorMarketers who try to figure out why their CPAs are through the roof, should deeply understand the technical plumbing of ad tagging. If your tags aren't firing or your URLs are stripped of their data, you’re basically flying blind as a marketing specialist.
In our article, we’re going to nerd out on everything from basic advertising tags to the dreaded "broken clicktag" error. We’ll look at how these snippets communicate with servers and how you can use server-side tracking to make them bulletproof in 2026.
What is an ad tag?
At its core, an ad tag (or Creative tag) is a small snippet of code - usually HTML or JavaScript - placed on a publisher’s website. Its job is to tell the browser: "Hey, there should be an ad here. Go find the right one and show it."
Think of ad tags as the placeholders. Instead of hard-coding a specific image into a website, the publisher puts an ad tag there. It allows the advertiser to swap creatives, target different audiences, and track results without ever touching the publisher's site code again. In the world of tag advertising, these snippets are the bridge between the inventory and the demand.
You found the answer to your question “what are ad tags” - let’s see how ad tags work, what their types are, and how to set up them.
How does an ad tag work?
The ad tagging works in milliseconds, but there’s a high-speed race of data behind it. Here is the step-by-step technical flow:
- Trigger. A user visits a webpage where the publisher has placed an ad tag.
- Request. The browser executes the ad tag code and sends a request to the publisher’s ad server, like Google Ad Manager.
- Handshake. The publisher's ad server identifies the ad slot’s specs - size, location - and calls out to the advertiser's ad server or a Demand-Side Platform (DSP).
- Selection. The DSP runs an auction or selects the best creative based on targeting data.
- Delivery. The advertiser’s ad server sends back a URL containing the creative.
- Impression. The publisher’s ad server delivers that creative to the user's browser, and the advertising tags record a successful "impression."
Types of ad tags
Not all ad tags are the same. Depending on your goals and site performance needs, you may use these main types of ad tags:
- Synchronous ad tags. They load at the same time as the rest of your page. But if the ad server is slow, these ad tags can "freeze" your page load, leading to a bad user experience.
- Asynchronous ad tags. The modern asynchronous ad tags have become a modern standard. They load independently of the rest of the content. If the ad fails to load, the user can still read your article or buy your product.
How to generate and set up an ad tag?
Generating Ad tags happens within your Ad Server or DSP interface.
1. In Google Ad Manager or your DSP, create an Ad Unit or Placement.
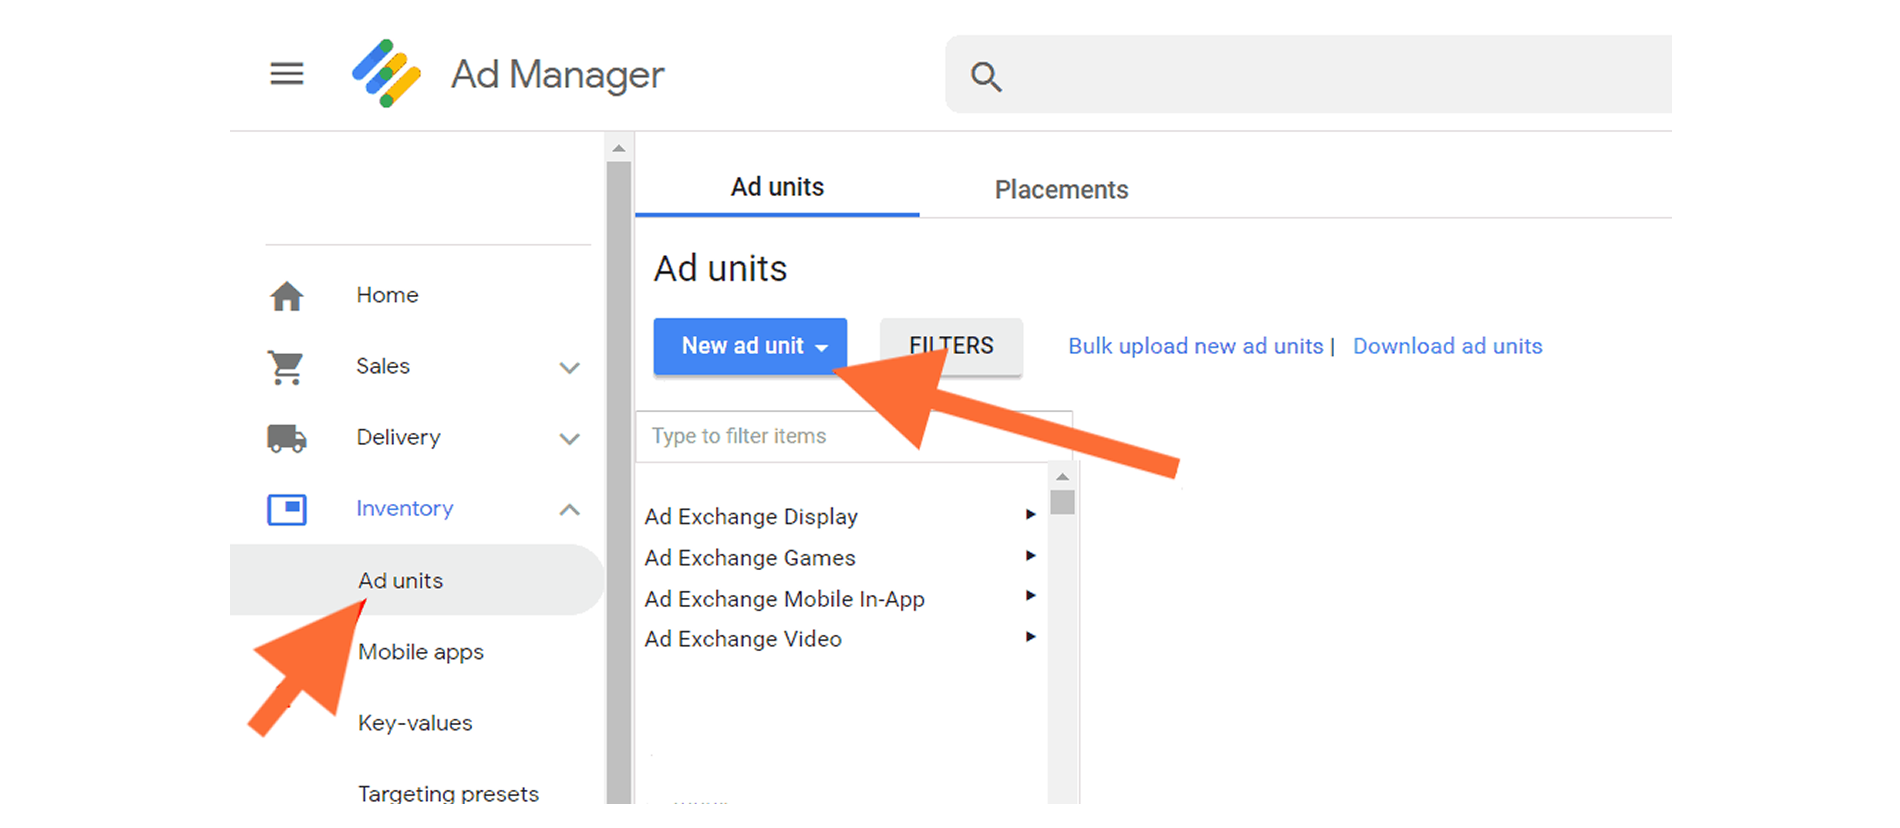
2. Choose the size (e.g., 300x250) and format (e.g., Display, Video).
3. Click the "Generate Tags" button → you’ll get a piece of JavaScript code.
4. Copy and paste this JavaScript code into the or the specific where you want the ad to appear.
5. Deploy advertising tags via GTM and use Stape as a hosting platform for your server-side GTM container to manage your tracking requests.
To ensure your infrastructure handles these requests with maximum reliability, you can set up professional GTM server hosting to manage your server-side container.
Advertising tags debugging
Browser developer tools
The first step is verifying if the browser is attempting to send data.
- Open your console with F12 → go to the Network tab → filter by your server-side endpoint or common ad server strings (e.g., “googleadservices”, “doubleclick”, or your custom GTM subdomain) → If the status code isn’t 200 OK (like a 403 or 404), or if you don’t see an outgoing hit at all, your Ad tag is likely blocked.
GTM preview mode
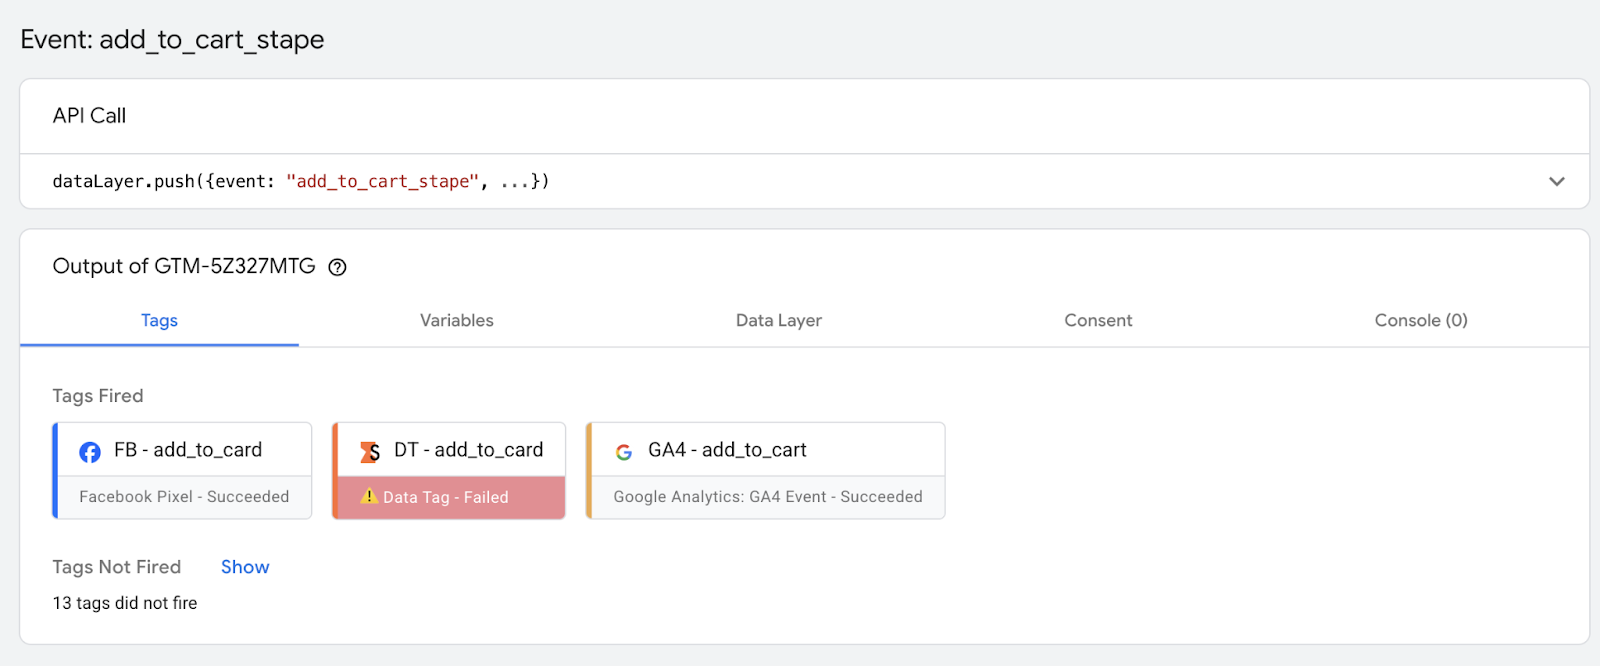
If you use Enhanced Conversions in Google Tag Manager, the Preview Mode is your best friend. It acts as a real-time monitor for your container logic.
- You can see which tags moved to the "Fired" section and which stayed in "Not Fired." → click a "Not Fired" tag to know which part of your trigger failed (indicated by an X).
- Do a step to identify if a JavaScript error prevented the advertising tags from executing → check the Errors tab within the Preview Mode interface.
What is a click tag?
A click tag is a variable used in HTML5 ad creatives to define the destination URL. Instead of hardcoding the destination URL, it is easier and faster to use a click tag.
Click tags allow the ad server to provide the landing page URL and wrap it in a tracking link. Without a click tag, you might get a click, but you won't know which campaign, ad group, or creative it came from. So, in marketing and ad tagging, the click tags make ROI measurable.
How does click tag work?
The banner creator defines a variable (e.g., “var clickTag = "https://www.stape.io";”) in the ad's HTML5 file.
When the ad is uploaded to the ad server, the server detects this variable. When the ad is served, the ad server replaces the generic URL with a unique tracking URL.
Then, when a user clicks, they are sent to the ad server first, which records the click, and then they are immediately redirected to the final landing page.
How to generate a click tag?
You don't "generate" a click tag in a dashboard - better to say that you write it into your creative.
Here is a simple example for a standard HTML5 banner:
// In the <head> of your HTML:
<script type="text/javascript">
var clickTag = "https://www.yourlandingpage.com";
</script>
// In the <body> on your clickable element:
<div id="ad-banner" onclick="window.open(window.clickTag)">
</div>
By following this structure, you make sure that any ad server (like Google Ads) can find your click tags and swap the URL for a tracking one.
What to do if my click tag is broken?
There is nothing more frustrating than seeing "0 clicks" on a high-traffic campaign. If your clicktag is broken, it’s usually because of the following common tech slip-ups.
1. Spelling & case sensitivity
- Why does it happen? Many ad servers, like Google Ad Manager, are really picky. In their logic, “clickTAG”, “clickTag”, and “clicktag” are completely different variables.
- How to fix it. Double-check your platform’s documentation. If they expect
clickTagand you wrote clicktag, the ad server won't recognize the variable, and the tracking "hook" will never fire.
2. Hard-coded URLs
- Why does it happen? If you hard-coded the link (e.g., “href="https://mysite.com") directly into the HTML5 banner, you’ve bypassed the ad server entirely.
- How to fix it. Use the click tag variable instead. The ad server needs to "intercept" the click to record it before redirecting the user. You may use “window.open(clickTag)” in your button's onclick attribute so the server can wrap your link in its tracking macro. This option is not recommended by many marketing experts, but possible.
3. Overlapping elements
- Why does it happen? Sometimes a transparent “div” or a UI overlay - like a close button or a progress bar - sits on top of your clickable area. The user thinks they are clicking the ad, but they are actually clicking an unlinked element.
- How to fix it. Use browser developer tools with F12 to inspect the banner. Make sure the clickable layer is at the top of the stack - check the “z-index” in your CSS.
4. Missing/broken macros
- Why does it happen? Ad tagging relies on "macros" - placeholders like “%%CLICK_URL_UNESC%%” - that the ad server fills with a real link at the moment of the impression. If the macro is formatted incorrectly, the user might click the ad and end up on a "404 Not Found" page.
- How to fix it. Perform a "Click Audit" in your DSP. If the landing page URL contains the word "undefined" or stays as a placeholder code, your macro setup is the culprit.
Pro-tip: how to verify the fix
Append “?clickTag=https://stape.io” to your banner's preview URL. If clicking the banner successfully redirects you to Stape, your internal code is perfect, and the issue lies with how the ad server is passing the data.
FAQs
What is the difference between a click tag and an impression tag?
The impression tag is another name for the ad tag, so it fires the moment the ad is displayed on the screen.
The click tag only fires when a user actively engages with the ad.
So the impression tag (the ad tag) measures visibility while the click tag measures interest and intent.
Can I use an ad tag and a click tag at the same time?
Absolutely – and you even should use them both. You need the ad tag to deliver the ad and track the impression, and the click tag to handle the landing page redirect and track the click. They work in tandem to give you a full funnel view.
Will my ad tag work for visitors from other search platforms?
Yes. Ad tags are platform-agnostic at the browser level. Whether your visitor comes from Google, Bing, or directly, the advertising tags will execute as long as the code is on the page.
However, if you are using platform-specific features (like Google's Protected Audience API), some features might only work within the Google ecosystem.

Comments