Facebook Conversions API for WordPress sites
If you run a WordPress site and advertise on Facebook or Instagram, you’ve probably seen data loss from browser restrictions or tracking blockers. That means Meta can’t always tell which campaigns actually drive sales or signups.
Meta Conversions API (CAPI) is a solution for that and it works best when you set it up server-side.
This guide shows how to install Meta CAPI on your WordPress site using server Google Tag Manager (sGTM) and Stape Conversion Tracking plugin. You’ll learn how to collect more accurate event data, improve ad performance, and stay compliant with privacy rules without relying on cookies or pixels alone.
Why use Meta Conversions API on your WordPress site
If you run Meta ads and use Pixel to measure results, you probably already see incomplete data. That’s because browser-based tracking can’t do the job right anymore. Browsers like Chrome, Safari, and Firefox limit cookies and use ad blockers to protect user privacy. Privacy updates like those in iOS 14 also keep a big part of user behaviors untracked.
Basically, you risk paying for clicks or conversions Meta doesn’t see: someone clicks your ad and takes action on your site, but that action isn’t reported back to Meta because of the new browser features, so it looks like nothing happened.
To address this, Facebook launched the Conversions API. This technology brings back data accuracy by bypassing all new browser blockers and sending users’ data from a cloud server rather than from the user's browser. Unlike browser tracking, server-side tracking can include events that happen after the page loads or across sessions, and is not affected by user device settings.
This is how Meta Conversions API will help your business:
- With more accurate data, you will get better optimization. Meta uses conversion data to decide who to show your ads to. If the data is incomplete, Meta can't learn properly. CAPI gives the algorithm more information to work with.
- You’ll get better attribution. If someone clicks your ad but converts hours later or on another device, that second visit might look like a new, unrelated user, not someone who came from your ad if you use browser tracking. Meanwhile, with server tracking because the data is sent from a cloud server and includes things like user IDs and email hashes, CAPI helps Meta connect the dots. It knows the person who made the purchase is the same one who clicked the ad, even if they came back hours later or on a different device.
- It helps with privacy. You control what data is shared and don’t have to rely fully on third-party cookies, which makes it easier to comply with current and future privacy rules.
How to set up Meta Conversions API for WordPress
The most reliable way to track data for Facebook Ads from your WordPress site is to combine client-side tracking via GTM and server-side tracking via sGTM. This approach ensures better tracking accuracy.
1. Set up a server Google Tag Manager container and host it on Stape.
1. Go to https://tagmanager.google.com/ and log in to your Google Tag Manager account. Click on the "Admin" button, and under the "Containers" column, click the "+ Create Container" button.
2. Choose a name for your server container, select "server" as the type of container, and click the "Create" button.

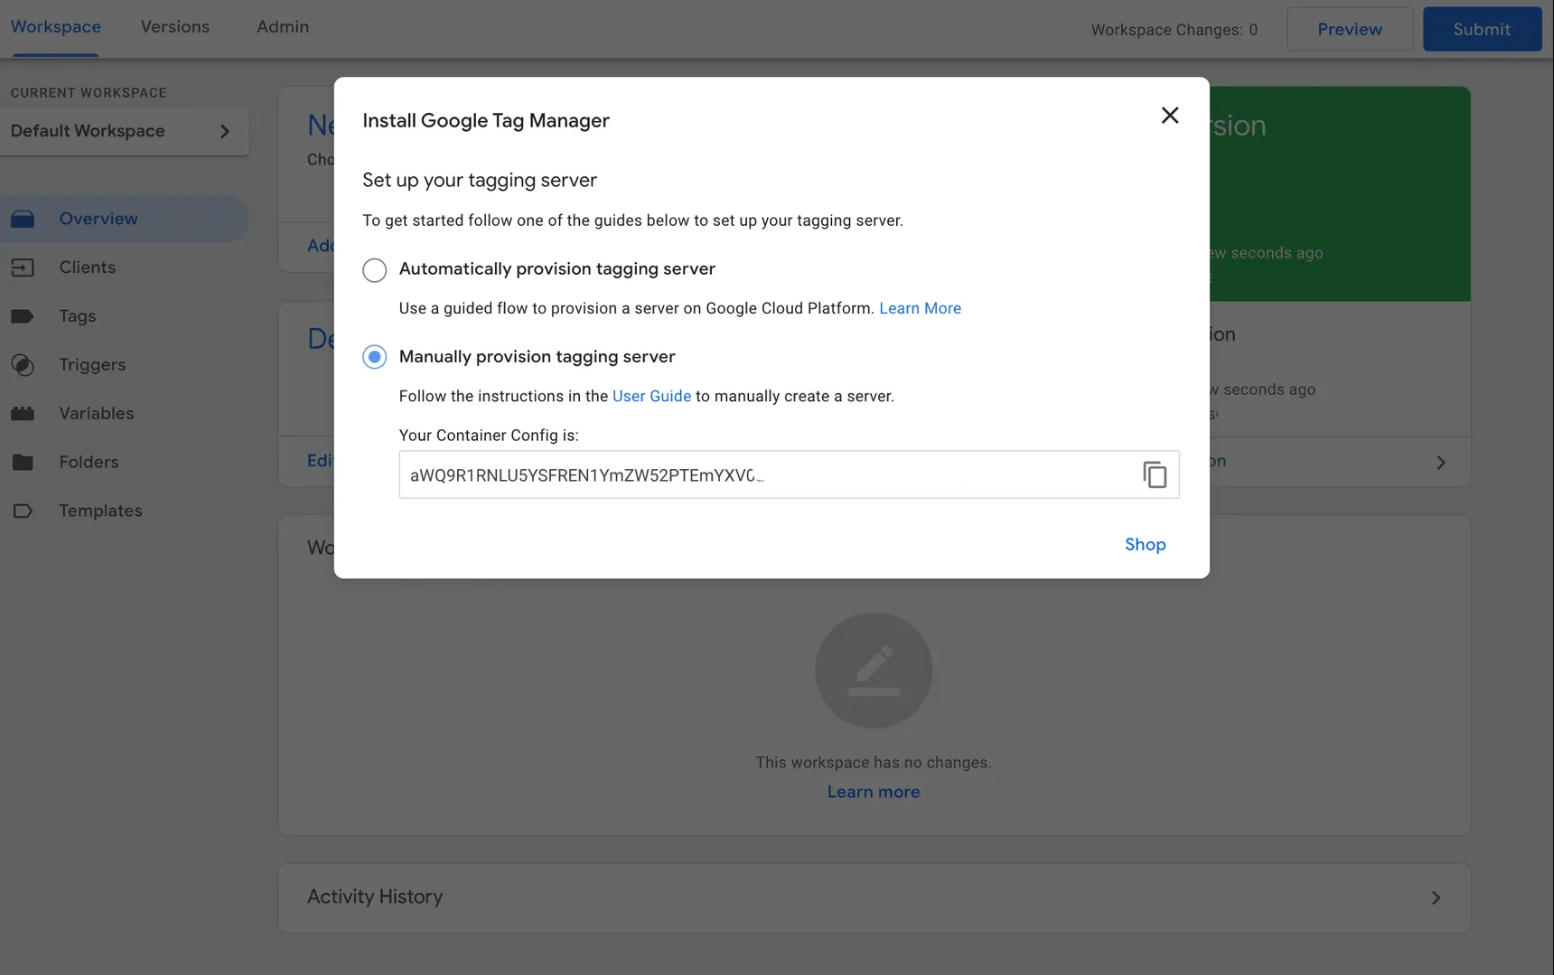
3. Select the option to "Manually provision tagging server," and copy the container configuration that appears. Save this configuration in a text editor as you will need it later.
4. Log in to your account on our service or create a new account if you haven't already.
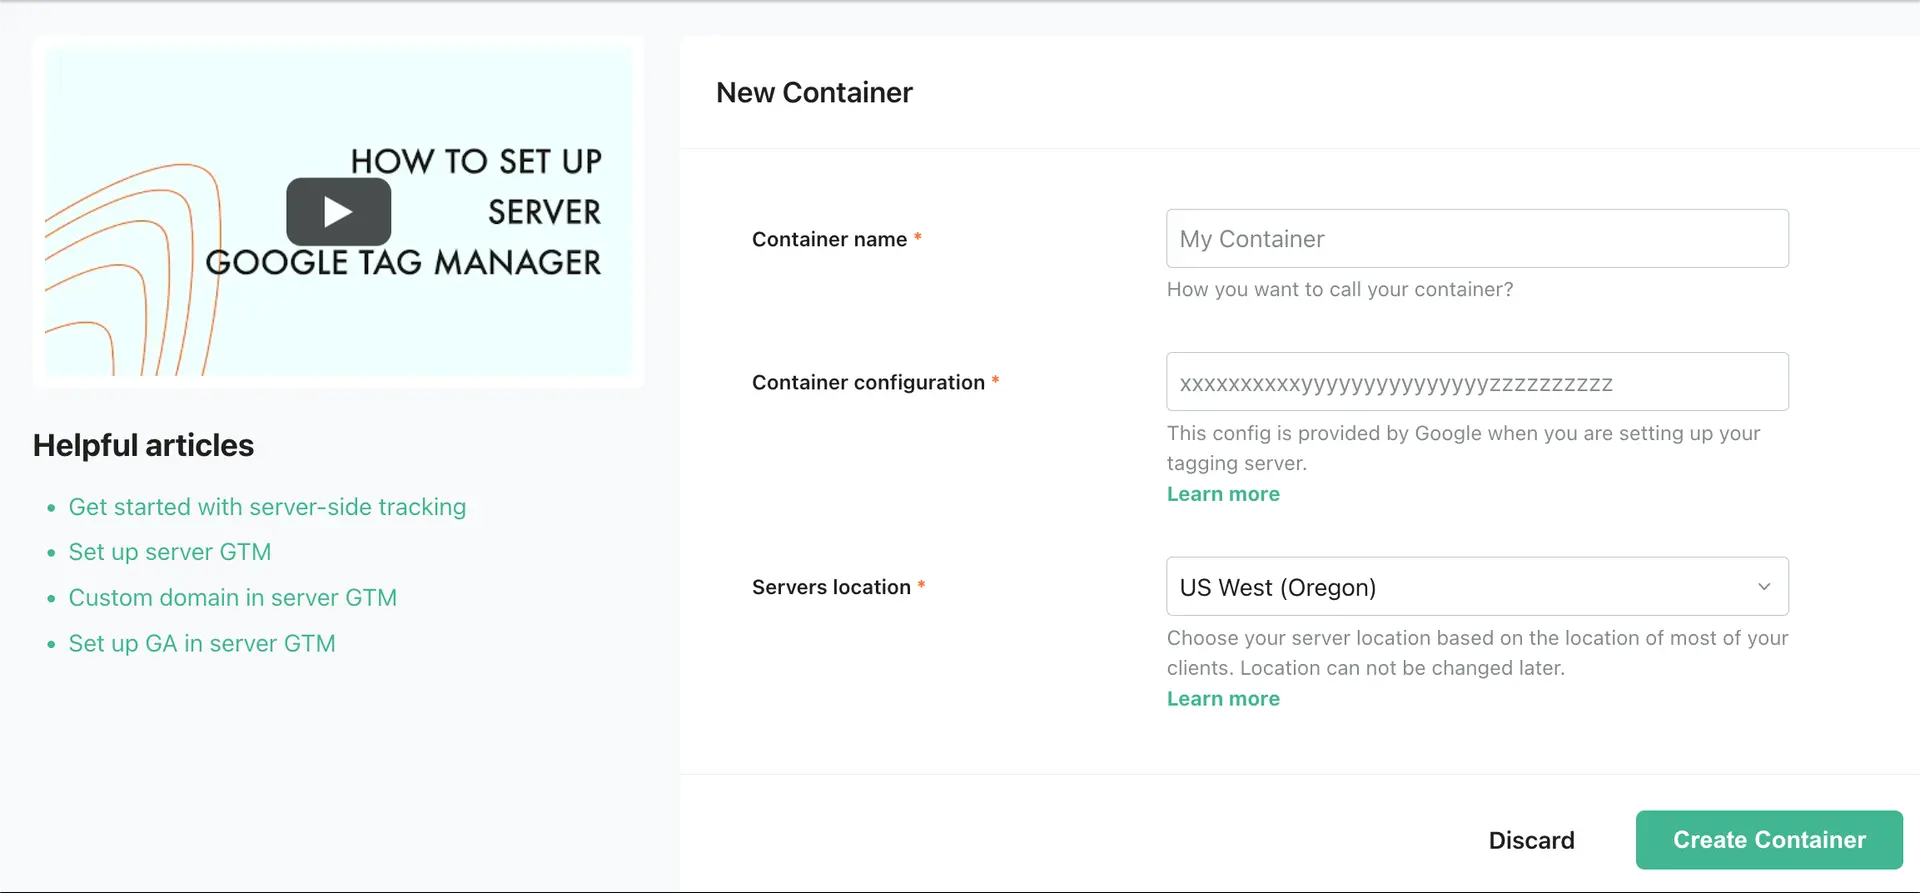
5. Once you're logged in, click on the "Create Container" button. Give your container a name, paste the Container Configuration that you copied from your Google Tag Manager Server Container, and select the server location. Click "Create Container."
6. Wait for around 5 minutes for the server container to deploy. Refresh the page to update the status. If the setup was done correctly, you should see the status "Running." If you see "Error," double-check that you've copied the correct container configuration. Contact support if the error persists.
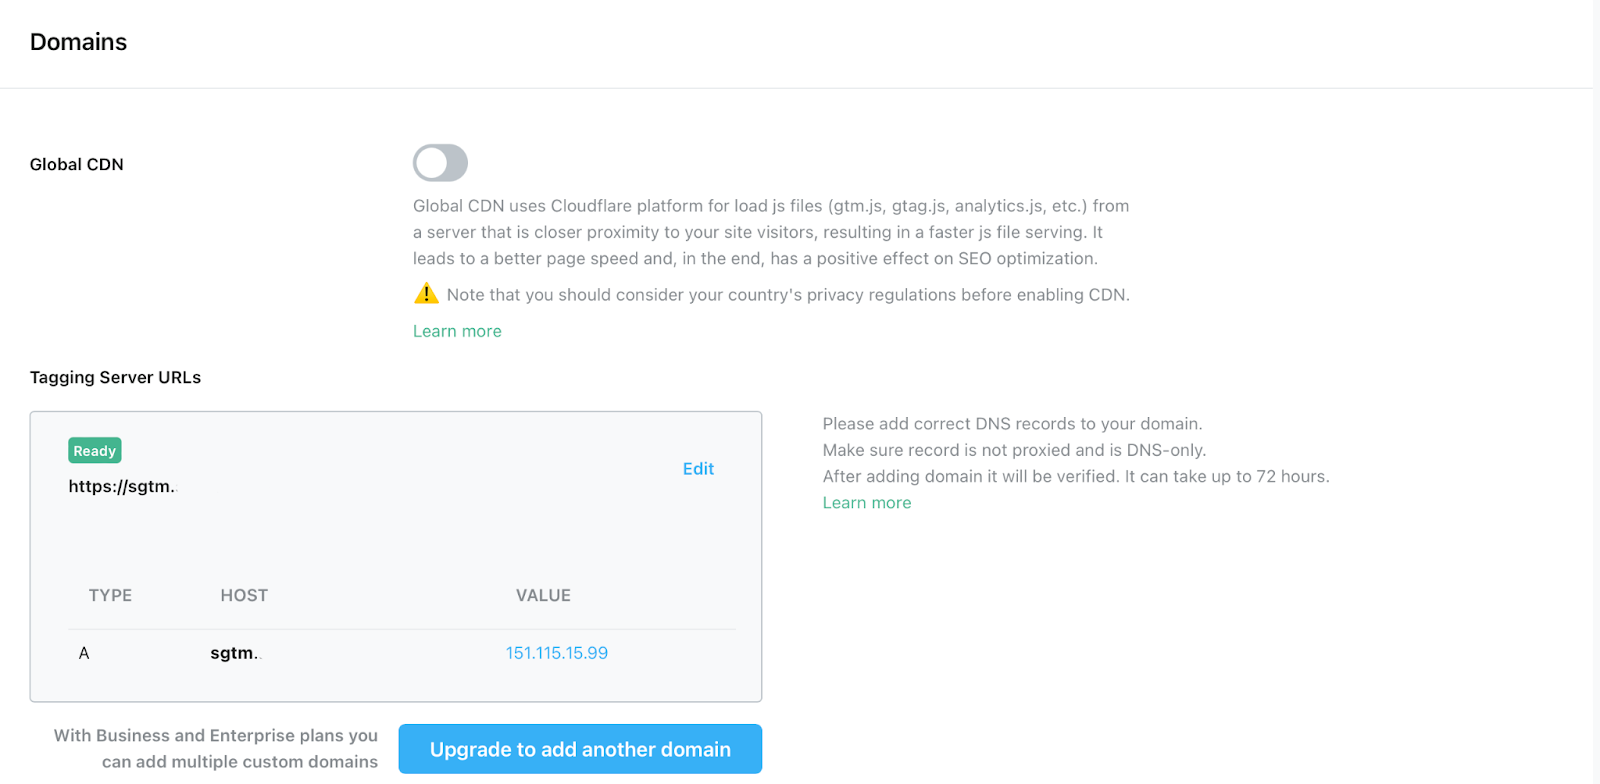
7. In this step, you need to set up a tagging URL.
You have two options:
- You can choose to use the tagging URL that was created for you and is hosted on our domain (stape.io)
- Or use a custom domain. we highly recommend using this option because it will help to prevent tracking from being blocked and increase cookie lifetime.
If you choose to go with the first option, move to step 9.
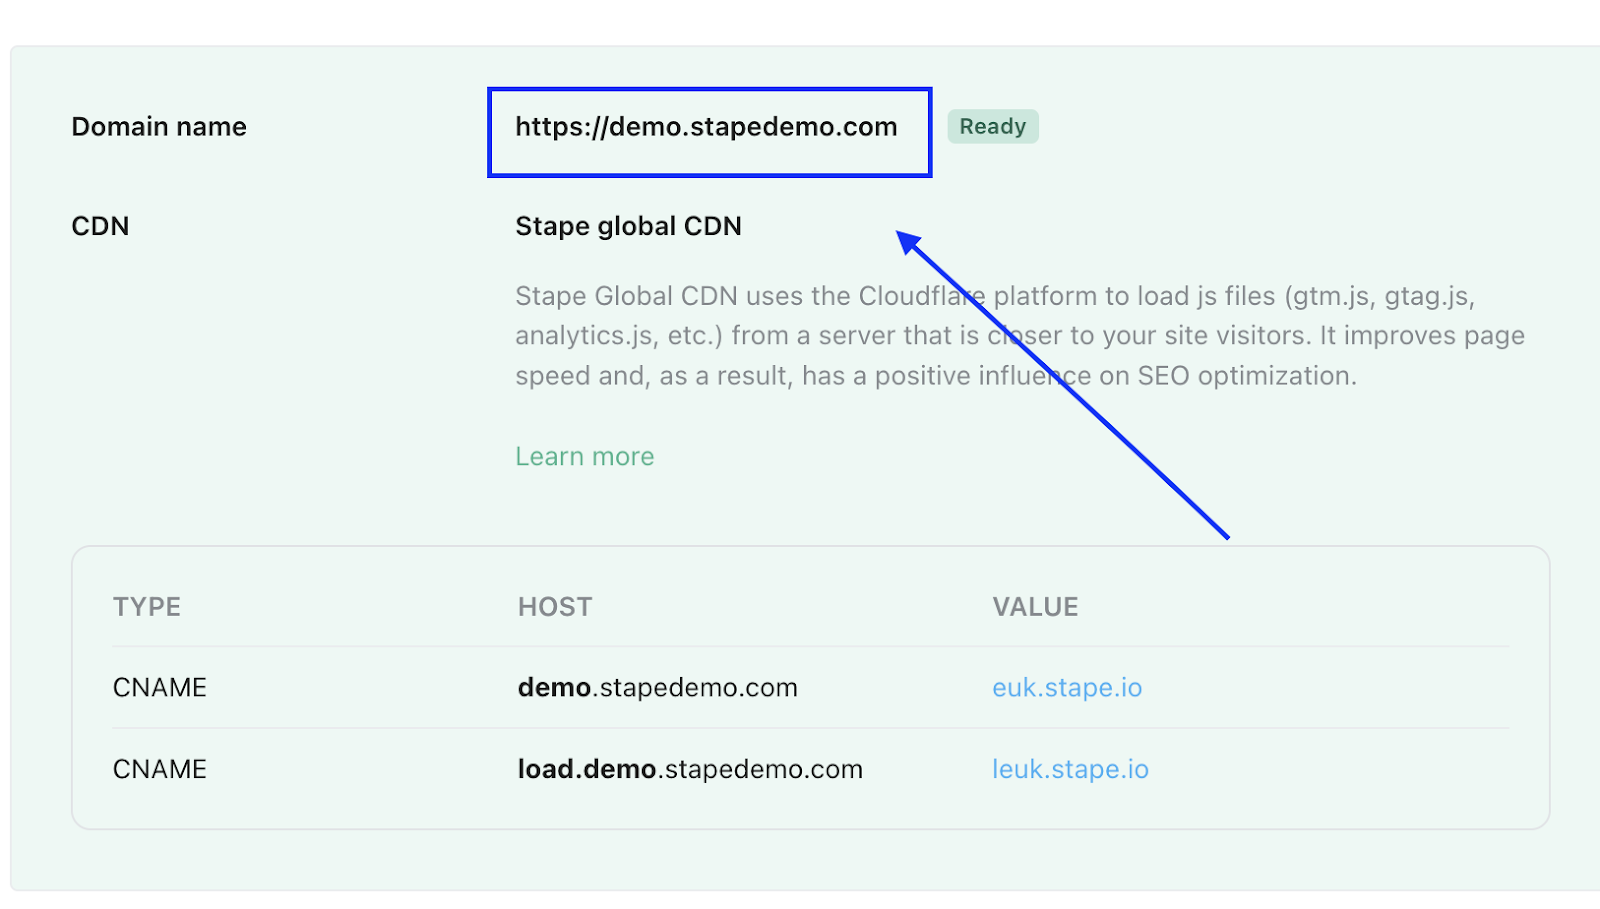
If you want to configure a custom tagging URL, click “Add domain” under the Stape-provided tagging URL.
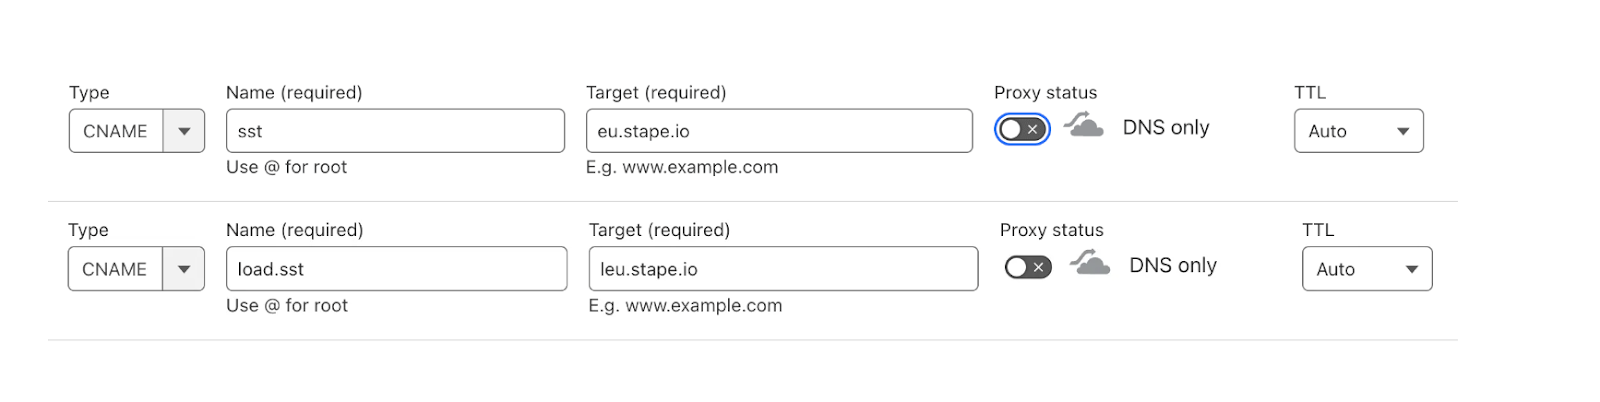
Then, log in to your domain registrar (like GoDaddy, Namecheap, etc.) and create a new CNAME record for the subdomain you want to use.
You can choose any subdomain (e.g., ss.yourdomain.com). Use the following settings:
- Type: CNAME
- Name: ss (or any other subdomain you want)
- Target: ghs.stape.io
- TTL: Auto
- Proxy status: Disable (make sure it’s DNS only if you’re using Cloudflare)
Your CNAME record should look like this:
Type: CNAME
Name: ss
Target: ghs.stape.io
TTL: Auto
Proxy: DNS only
Once the CNAME is saved and propagated, you can return to your Stape dashboard and finish the domain verification.
9. You can enable the Global CDN feature for the server container, which uses Cloudflare technology to load JavaScript files from a server closer to your site visitors. This can improve page speed and reduce latency.
After enabling Global CDN, add a CNAME as instructed in your Stape account to complete the setup.
10. Add the tagging server URL to the Google Tag Manager Server container by going to "Admin," then "Settings," and selecting "Container Settings.”
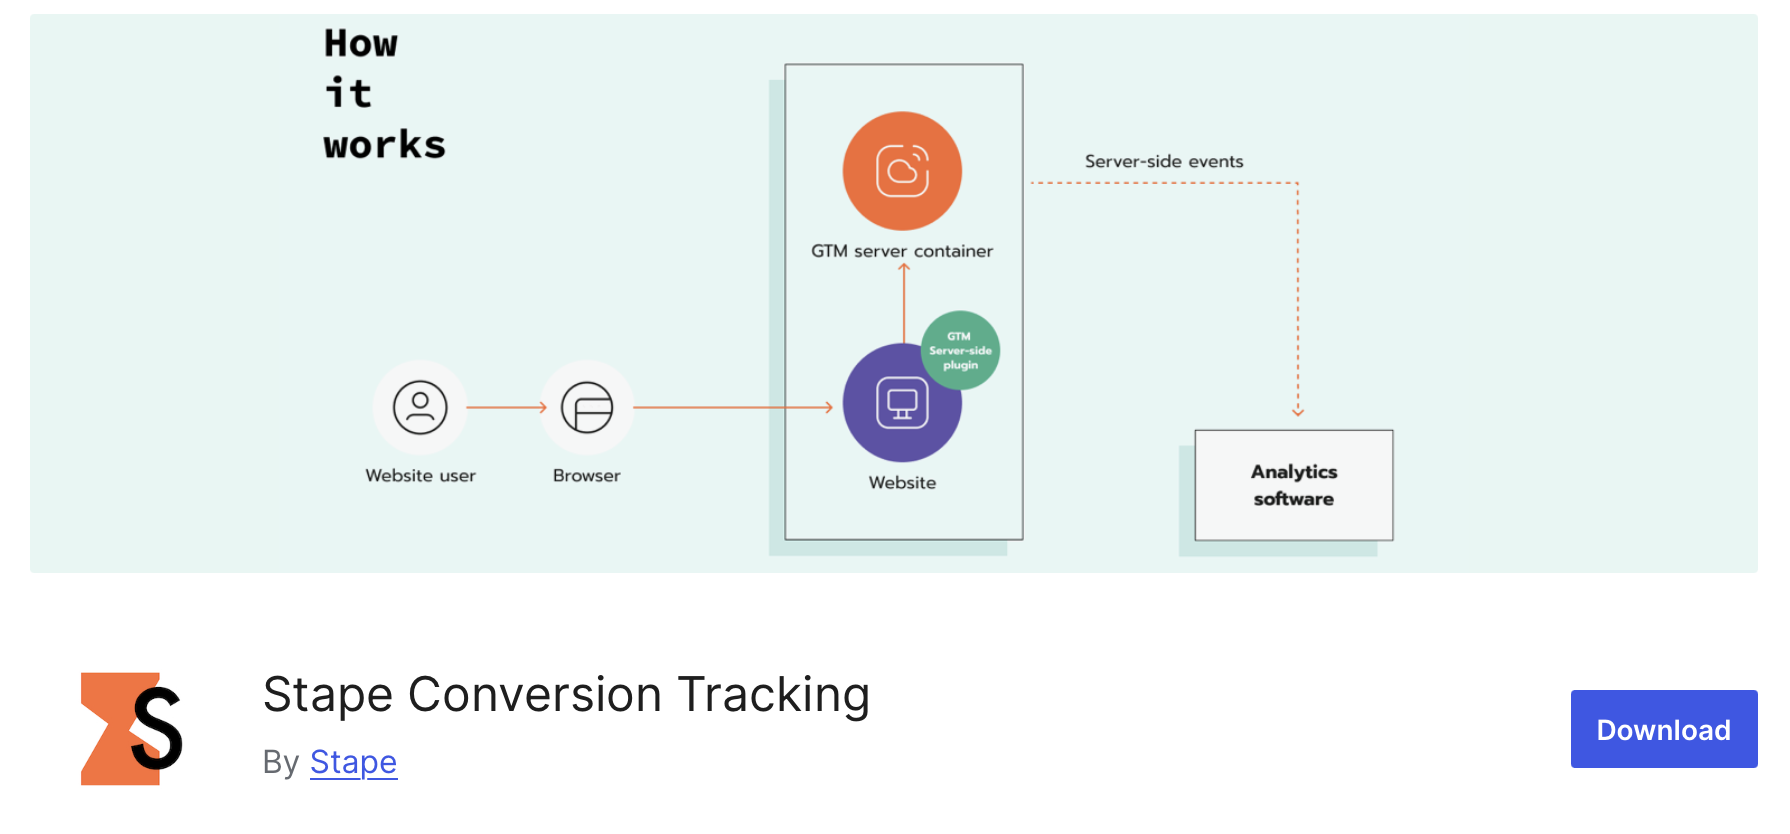
2. Configure Stape Conversion Tracking plugin for WordPress
1. Log into your WordPress Admin, and go to the plugins. Then, click Add New, type Stape Conversion Tracking, choose this plugin, and click Install now. Once established, click Activate.
2. Open the Stape Conversion Tracking plugin you installed in the first step and configure it.
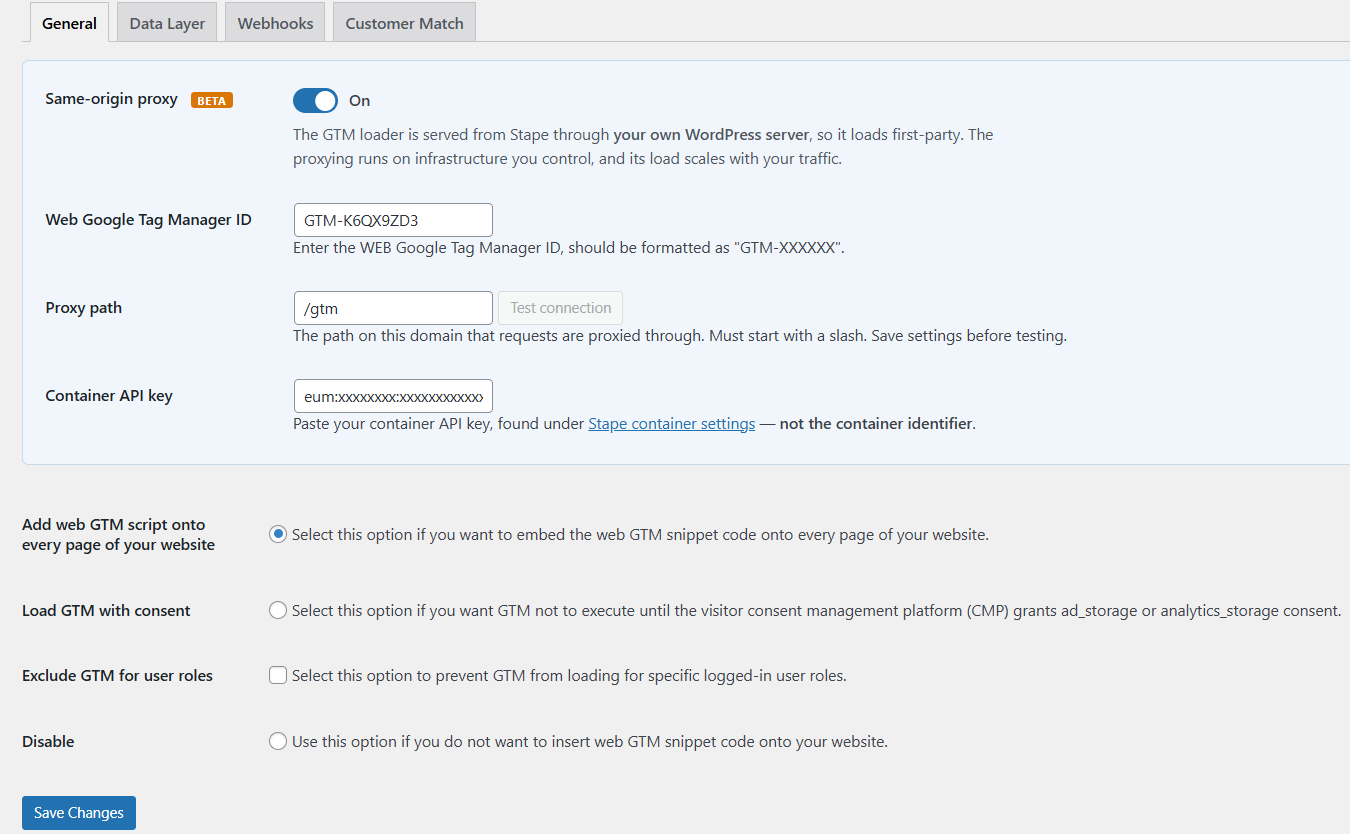
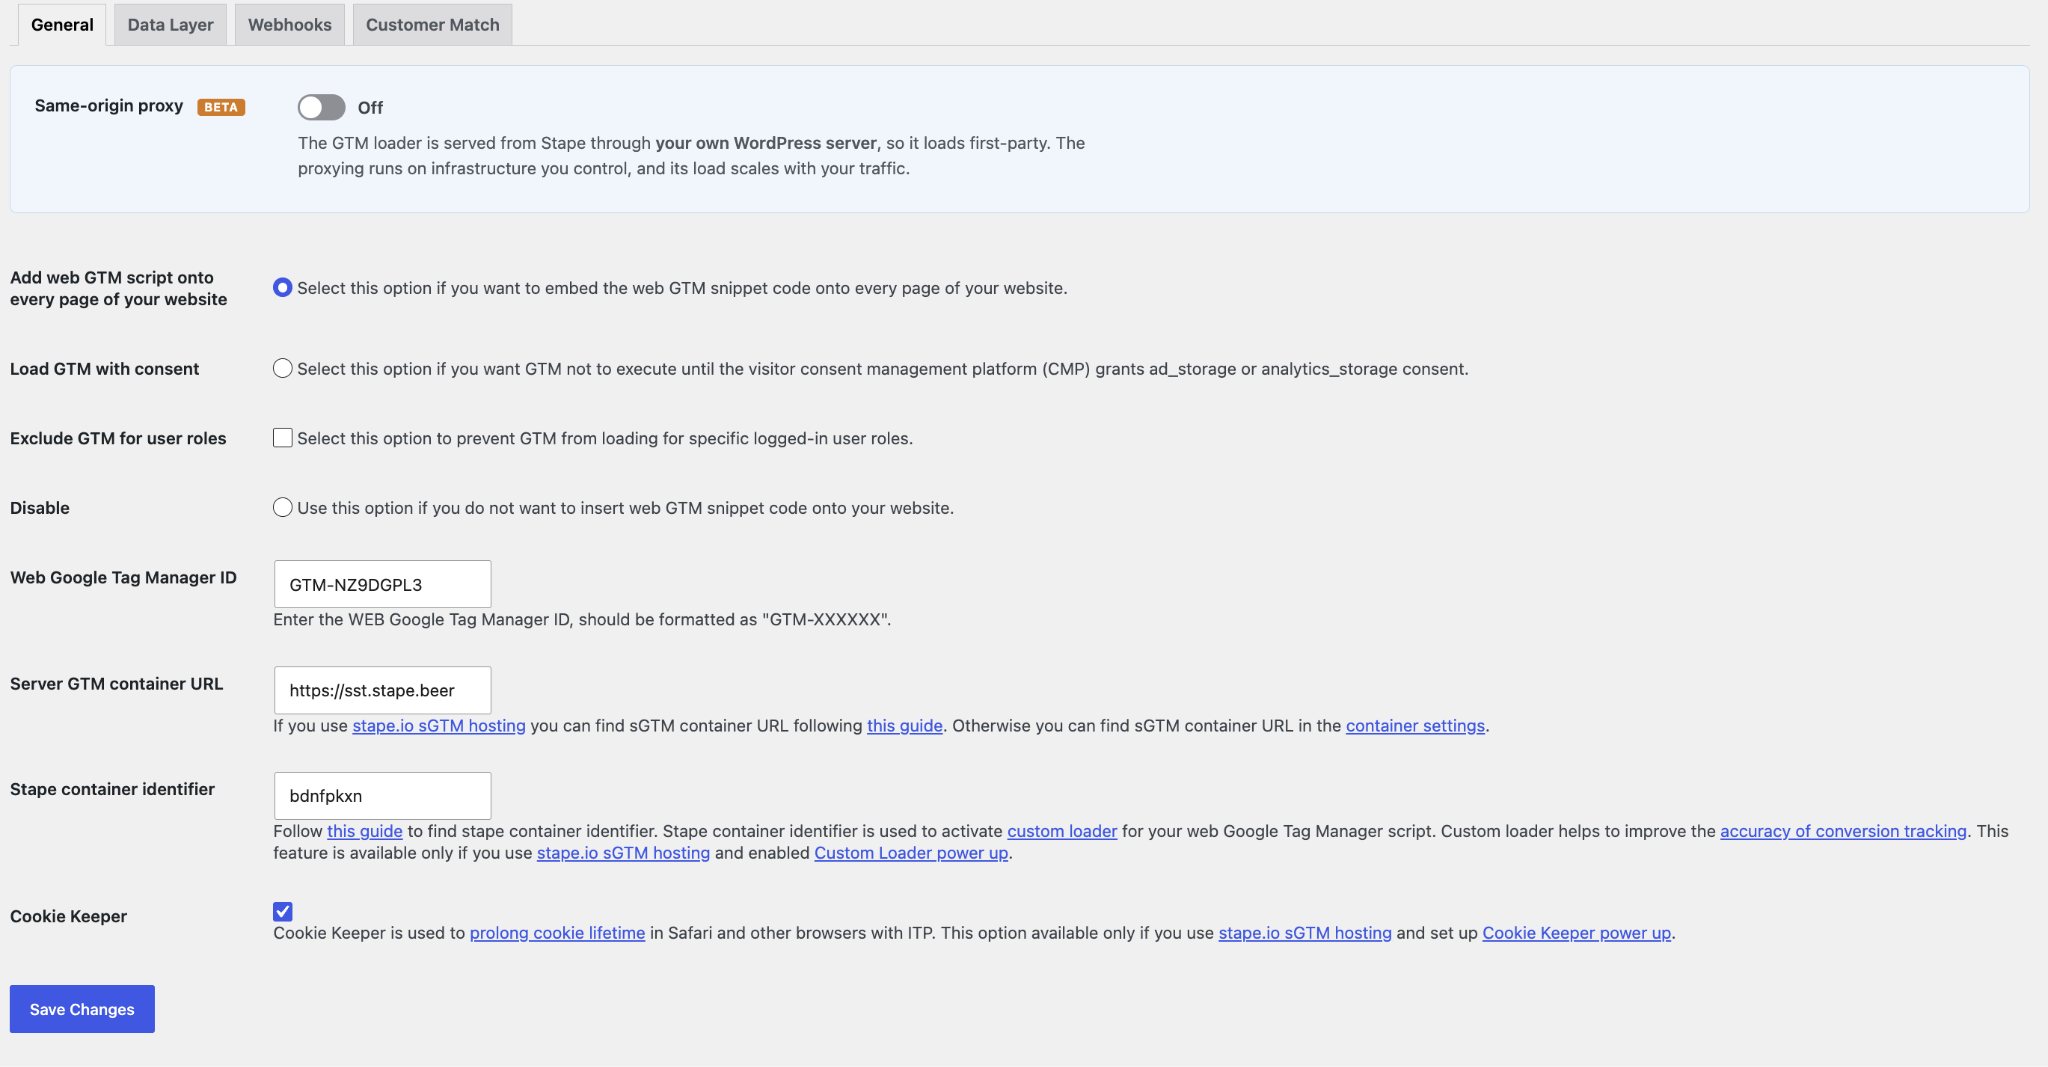
General tab:
- Same-origin proxy. Normally the GTM web loader is served from the customer's Stape subdomain (for instance, xxxx.stape.io). With same-origin on, that same loader is served from Stape but routed through the customer's own WordPress site. To the browser, it looks first-party, helping the loader work reliably in Safari and pass ad blockers. Note: it's still Stape's loader and Stape's container doing the work; WordPress is just the pass-through that makes it first-party.
Setup with Same-origin proxy enabled
- Web Google Tag Manager ID - be sure to add your web GTM container’s ID. Read how to find the web GTM container ID.
- Proxy path - enter a proxy path for requests, such as /gtm. Once you save the setup, click Test connection to confirm the path responds.
- Container API key - enter your container API key, located in your Stape account container settings. Read how to find the container API key.
- Add web GTM script onto every page of your website - select this if you want to add web GTM to all site pages. Make sure you are not using any other plugins that insert GTM script on the site to avoid conflicts or event duplication.
- Load GTM with consent - select this and GTM will wait for information about the user’s marketing consent before tracking any data.
- Exclude GTM for user roles - select user roles whose activities will not be tracked by GTM.
- Disable - select this to only add plugin functionality without adding GTM script (for example, if you are using another plugin that inserts GTM script on the site).
Setup with Same-origin proxy disabled
- Add web GTM script onto every page of your website - select this if you want to add web GTM to all site pages. Make sure you are not using any other plugins that insert GTM script on the site to avoid conflicts or event duplication.
- Load GTM with consent - select this and GTM will wait for information about the user’s marketing consent before tracking any data.
- Exclude GTM for user roles - select user roles whose activities will not be tracked by GTM.
- Disable - select this to only add plugin functionality without adding GTM script (for example, if you are using another plugin that inserts GTM script on the site).
- Web Google Tag Manager ID - be sure to add your web GTM container’s ID. Read how to find the web GTM container ID.
- Server GTM container URL - enter your tagging server URL. If you are using Stape’s sGTM hosting, read how to find your sGTM container URL on Stape. Otherwise, it can be found in your server GTM container’s settings.
- Stape container identifier - enter the Stape container identifier if you want to use a Custom Loader (highly recommended to improve the accuracy of conversion tracking).
- Cookie Keeper - select this if you wish to enable Cookie Keeper and prolong cookie lifetime.
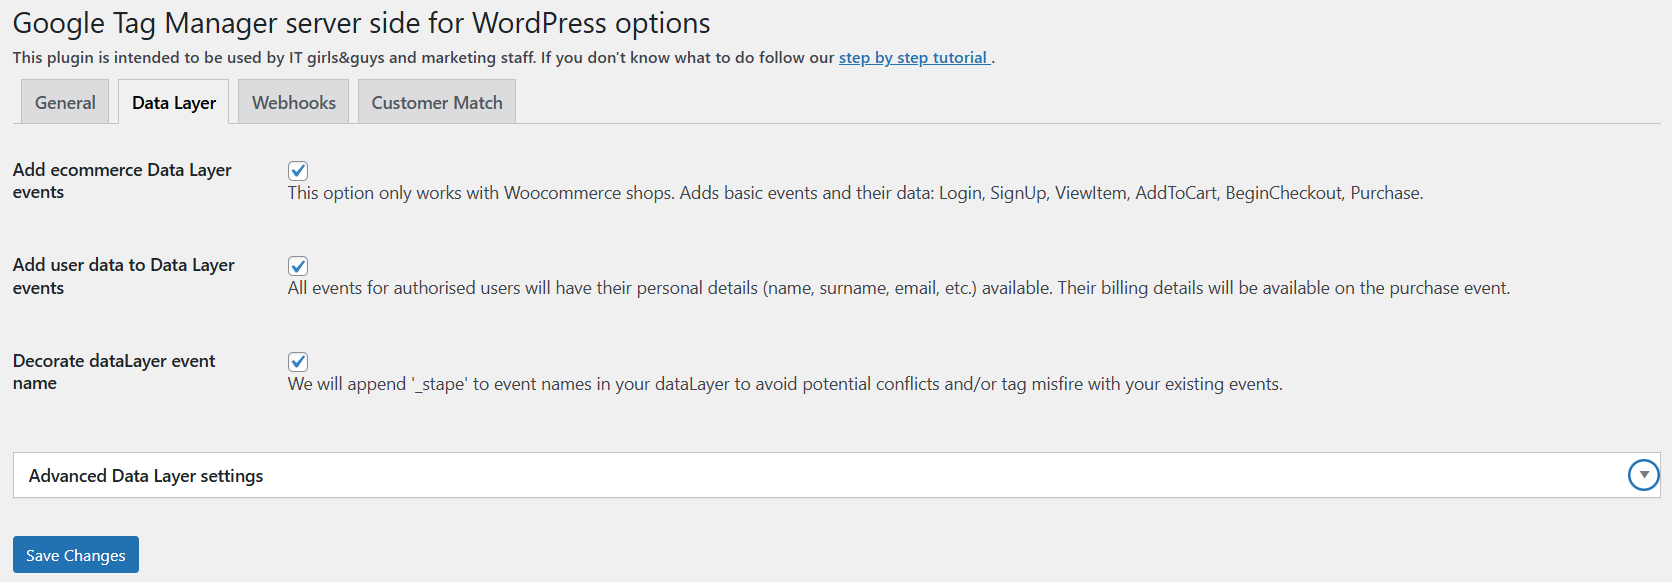
Data Layer tab:
- Add ecommerce Data Layer events - add basic ecommerce events and their data for shops built with Woocommerce.
- Add user data to Data Layer events - add data with personal details of authorised users to Data Layer events.
- Decorate dataLayer event name - add _stape to Data Layer event names.
- Advanced Data Layer settings - fine-tune your Data Layer event values.
Webhooks tab:
- Send webhooks to server GTM container - enable sending webhooks to your server GTM container. Be sure you understand what webhooks are and how to use them.
- Server GTM container URL - enter the URL of the server container where webhooks will be sent. If you are using Stape’s sGTM hosting, follow this guide to locate it. Otherwise, it can be found in your server GTM container’s settings.
- Purchase webhook - send a purchase event when a new order is created.
- Order paid webhook - processing - send an order_paid event when an order is paid.
- Order paid webhook - completed - send an order_completed event when an order is completed.
- Refund webhook - send a refund event when an order is refunded.
- Send test webhook - troubleshoot your webhook setup by sending a test webhook.

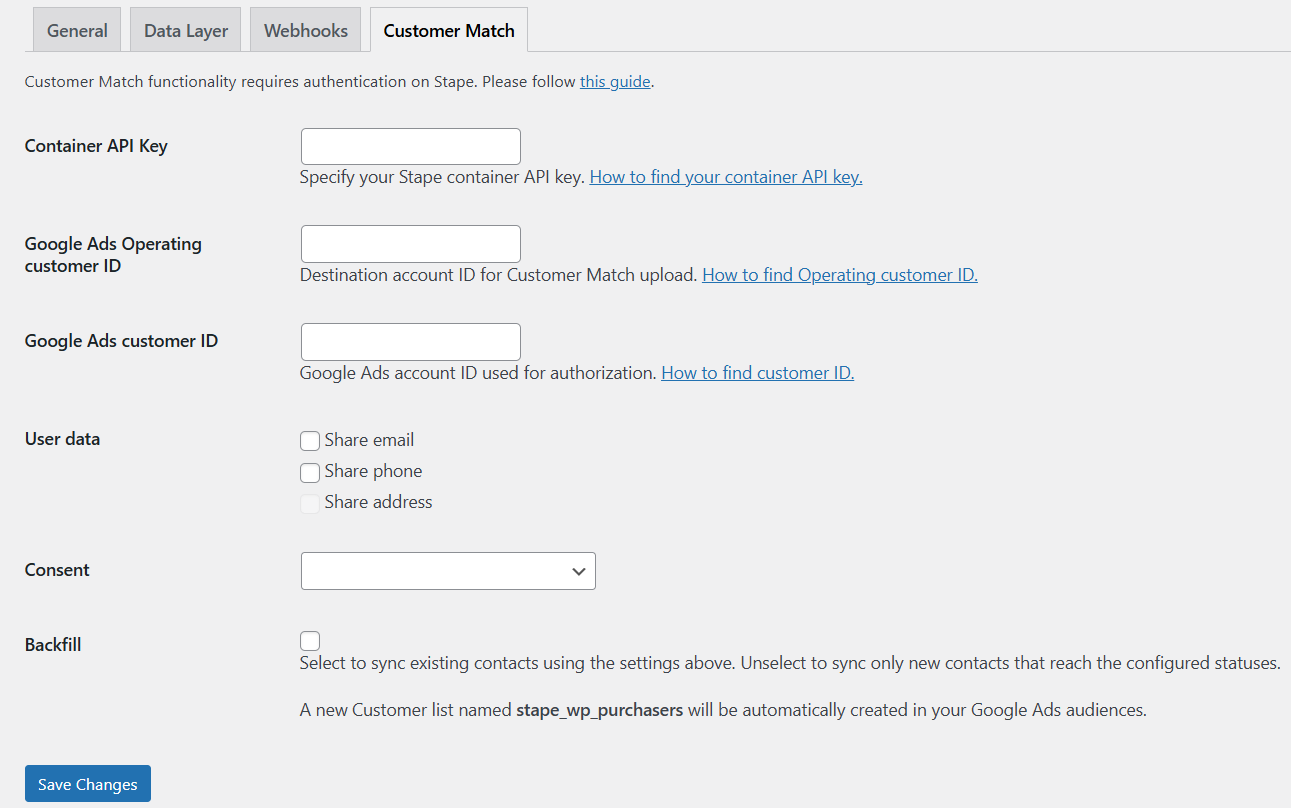
Customer Match tab:
- Container API Key - enter your container API key, located in your Stape account container settings. Read how to find the container API key.
- Google Ads Operating customer ID - enter the destination account ID for Customer Match upload. Read how to find your operating customer ID.
- Google Ads customer ID - enter your Google Ads account ID (NOT the operating one). Read how to find your customer ID.
- User data - select which user data to share with Google Ads’ Customer Match functionality.
- Consent - select one of the options if you wish to define the consent status of the user data.
- Backfill - select to update existing contacts using the settings above, or leave blank to synchronize only new contacts.
3. Set up Meta CAPI via server GTM using Data tag/Data Client
The most reliable way to implement Meta Conversions API for your WordPress website is by combining Data tag in web GTM with a Data Client in server GTM. This lets you track events on both the browser and server side and use event_id for deduplication.This setup lets you track events both in the browser and on the server side, and use event_id for deduplication.
1. Web container: send event data to the server and Meta
- Create a Data tag to send event details like event_name, value, currency, item_id, and event_id to your server GTM container.
This tag should send event details like event_name, value, currency, item_id, and event_id to your server GTM container.
✅ Important: in the tag’s settings, enter the GTM server-side URL. This is the custom subdomain you verified on Stape, such as:
https://ss.yourdomain.com
This URL sends event data from your web container to the server container.
- Set up a Meta web tag to send the same event details (including event_id) directly to Meta from the browser.
- Use variables to fetch each parameter from the Data Layer in both tags.
- Make sure both the Data tag and the Facebook web tag have the same event_id and are triggered by the same custom event (for example, add_to_cart or purchase). This allows Meta to deduplicate events between the browser and server, ensuring accurate reporting.
- Set up a custom event trigger for each event you want to track, and assign this trigger to both the Data tag and the Facebook web tag.
2. Server container: receive events and send to Facebook
- Install the Data Client in your server GTM container (from the Template Gallery).
- Create a trigger for the Data Client. The trigger name and event should match the custom event name used for the Data tag in your web container (for example, add_to_cart, purchase, etc.).
- Create a Meta Conversions API tag using:
- Event Name (use the same name as in your web container, e.g., AddToCart);
- API Access Token, Pixel ID, Test ID;
- Event data variables (set up in server GTM using type: "Event Data");
- event_id from the incoming Data tag (to support deduplication).
- Attach this tag to the Data Client trigger.
Verifying the setup is complete and correct
- Open both the web and server GTM preview modes.
- Trigger your test events (for example, add to cart) and check that all tags fire correctly:
- The Data tag fires in the web container.
- The Facebook (Meta) web tag fires in the web container.
- The Data Client receives the request in the server container.
- The Meta Conversions API tag fires in the server container, using the right parameters and event_id.
- Use the Meta Events Manager testing tool to confirm that both browser and server events are received correctly and that deduplication works as expected.
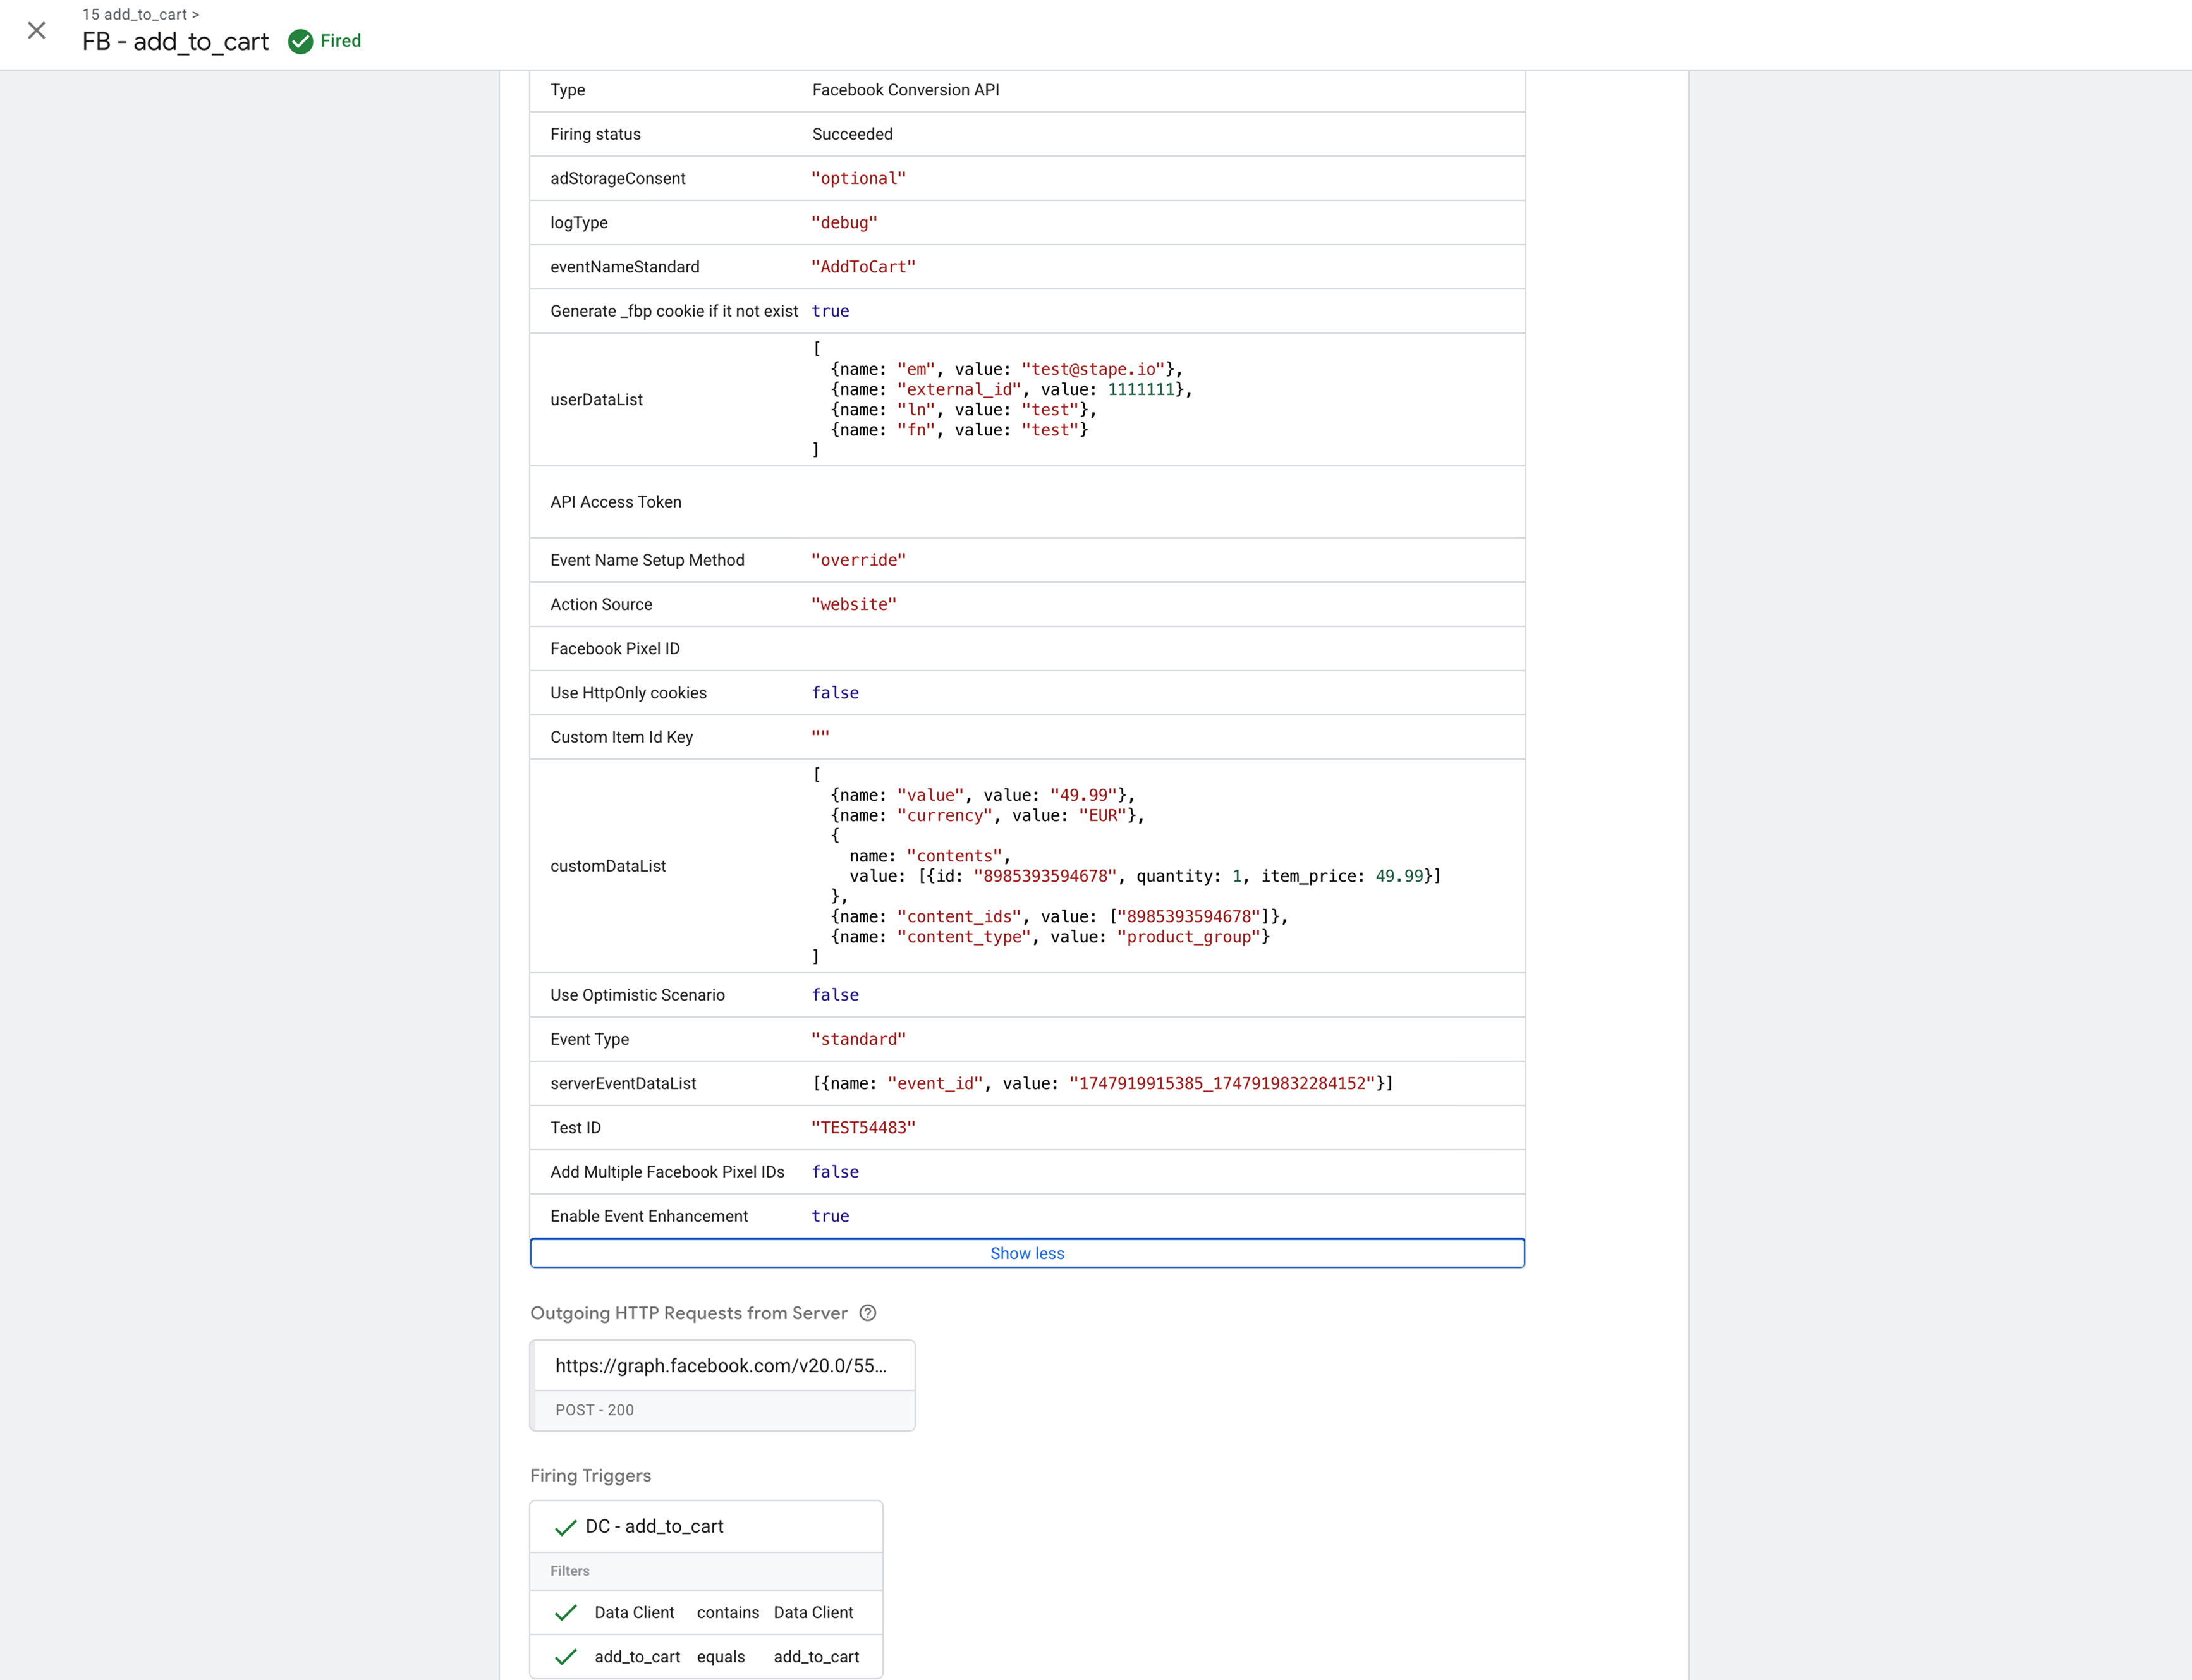
You can test this event inside the Meta testing tool as well.

Facebook Conversion API for WordPress: real Stape users' problems solved
In this thread, a WordPress user setting up the Facebook Conversion API for WordPress noticed warnings about missing user_data when sending events through server-side tracking. The issue wasn’t a real error - Meta was simply encouraging more user data to be sent, and yellow warnings don’t affect optimization. The setup was already better than using the Pixel alone, and the warning disappeared after moving the Facebook Pixel into GTM to properly deduplicate events and align web and server-side data.
Wrapping up
Setting up Meta Conversions API on WordPress with server GTM may sound technical, but it’s one of the most reliable ways to improve how your Meta ads perform.
With a precise server-side setup, your data stays accurate even when browsers limit tracking, helping Meta match conversions more reliably and show your ads to people who are more likely to convert.
You’ll need a verified subdomain, the Stape plugin configured on WordPress, and specific tags, triggers, and variables set up in both your web and server containers in GTM.
When everything is done, you’ll be able to improve attribution and run campaigns based on what’s actually working.

Comments