Server-side Google Analytics 4 for WordPress
Ivanna Holubovska
AuthorWith valuable insights into how customers interact with your site, you can track user trends, optimize responses to provide better customer experiences, and ultimately gain a competitive advantage in the ever-evolving digital landscape. With all of this in mind, using server-side Google Analytics 4 for WordPress has become increasingly popular due to its accuracy and ease-of-use.
This blog post will explore the advantages and setup of server-side Google Analytics 4 for WordPress sites with a Stape Conversion Tracking plugin and help identify ways it can benefit your clients' marketing efforts. Let's take a look at why you should seriously consider implementing server-side Google Analytics 4 into each WordPress site you manage!
Advantages to using server-side Google Analytics 4
More Accurate Data Collection
The main benefit of server-side Google Analytics 4 implementation over the client-side is that ss GA4 configured using sGTM using a custom domain sets 1st party cookies.
WebKit browsers (Safari, Firefox, etc.) limit 3rd party cookies lifetime to 1 or 7 days. Client-side GA4 implementation sets 3rd party cookies. It means that if a users view your website from any browser built on the WebKit, client-side GA4 cookies will live 7 days maximum.
Conversely, with ssGA4 and sGTM using a custom domain, cookies will be set from the subdomain located within the main domain and considered 1st party. 1st party cookies are not affected by WebKit yet and will live up to two years. However, there are some plans to limit the life of 1st party cookies set from the third-party IPs.
Increased Data Privacy and Security
Server-side provides an additional layer of privacy and security for sensitive information. This can be particularly important for organizations that collect personally identifiable information (PII) or financial data. By processing data on the server, businesses can reduce the risk of exposing sensitive data to potential security threats, ensuring that data is collected and processed in a more secure and protected manner.
Compliance with Regulations
Сomply with data protection regulations, such as the General Data Protection Regulation (GDPR) and the California Consumer Privacy Act (CCPA). Ensure that you are collecting and processing data in compliance with applicable regulations.
In the summer of 2022, several European countries (France, Denmark, Italy, etc.) concluded that using Google Analytics 4 is illegal since it transfers the personal data of EU users to the US. One of the solutions for the legal use of GA4 in these countries is server-side GA4 which uses a European proxy server.
How to set up server-side GA4
Step 1. Create a Google Tag Manager server container
➡️ Note
Before setting up your server-side Google Tag Manager container, it’s important to have web GTM container configured, because:
- The web container collects events, parameters and user interactions on your website.
- And sends this data to your server-side container.
Please follow the official Google documentation.
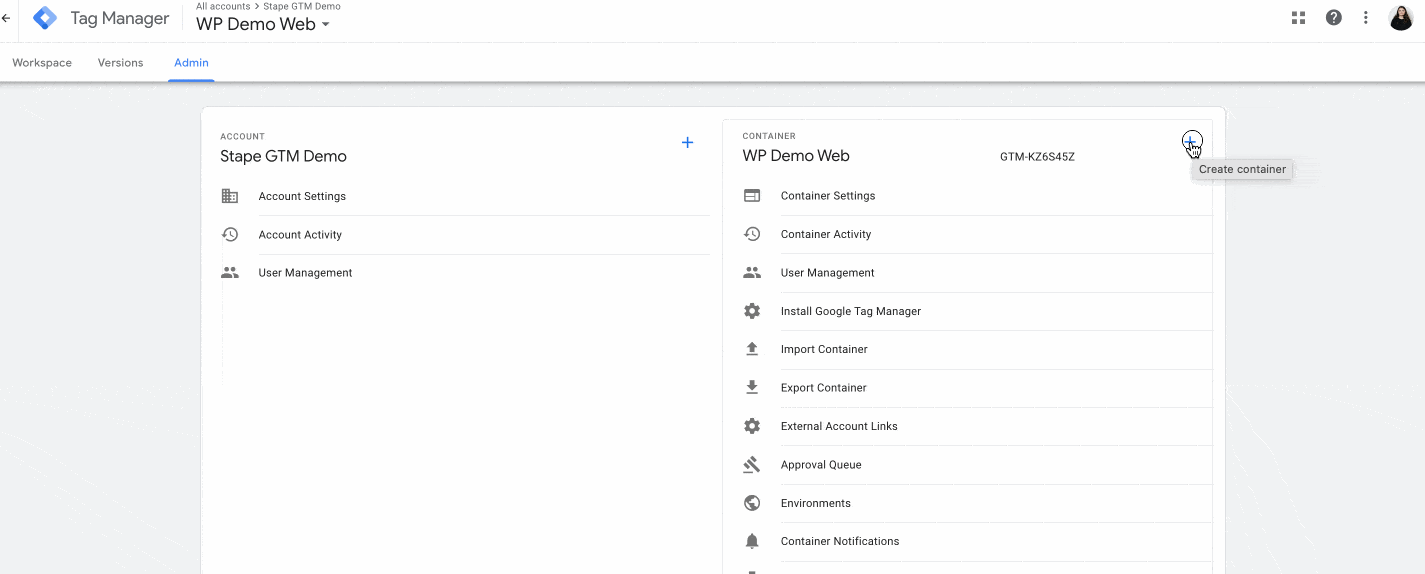
1. Select your GTM account → Click Admin → Click + next to the Container name.
2. Add Container Name → Under Target platform, choose Server. Click Create.
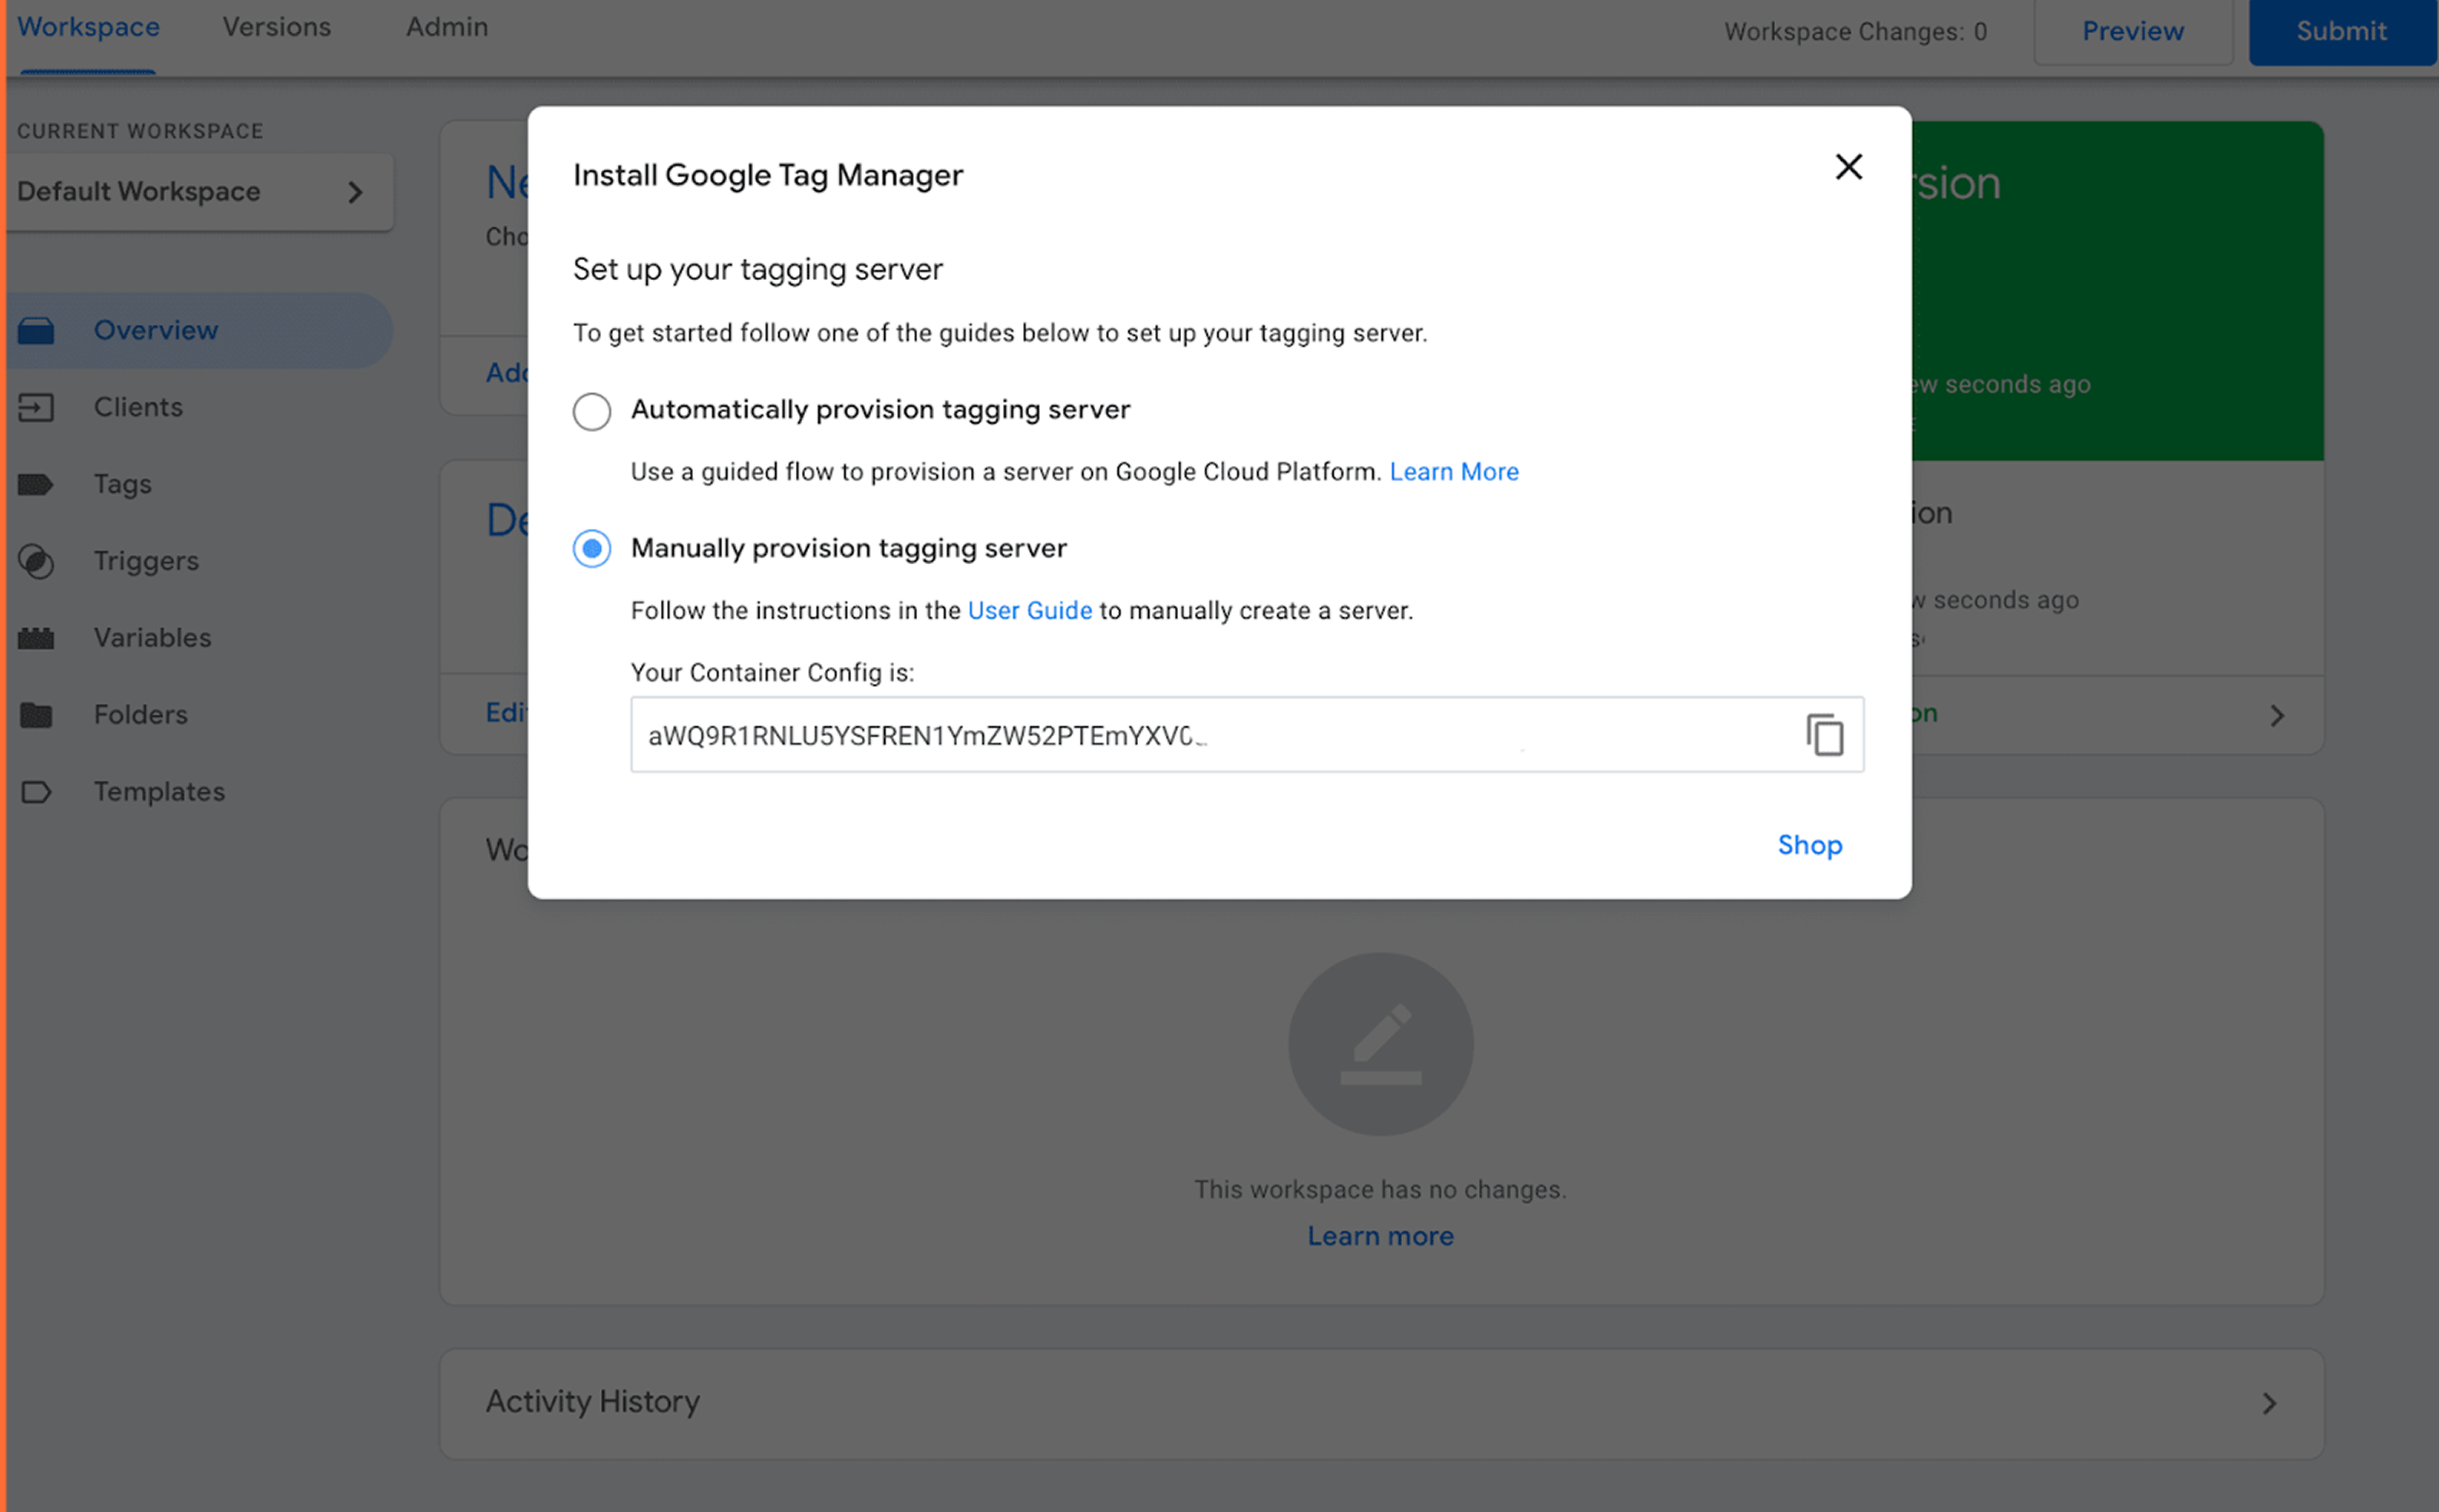
3. Choose Manually provision tagging server. Copy your container config. We will need it in the following steps.
Step 2. Create a Stape account to host your server GTM container
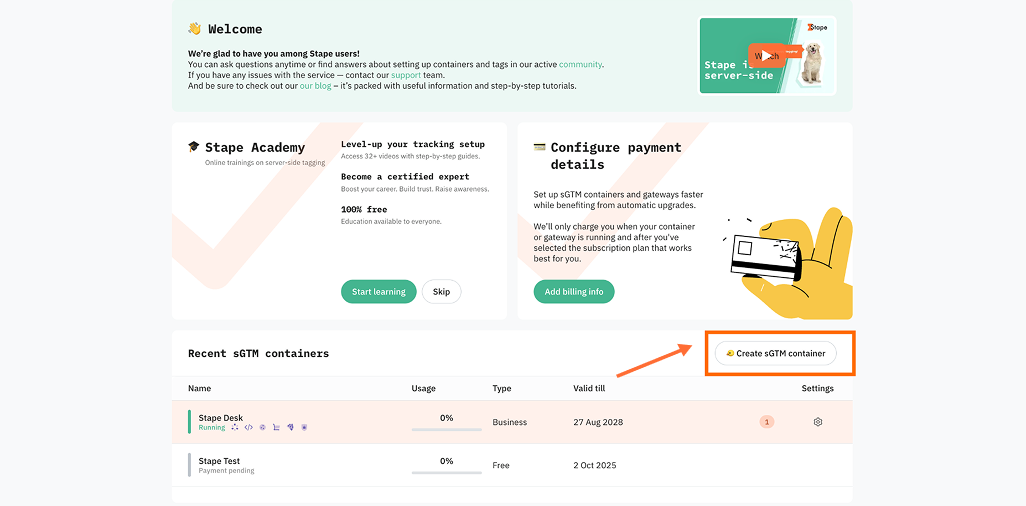
1. Go to stape.io and create an account or log in.
2. Click Create sGTM container on the main page.
3. Enter your container details.
- Container name - give your container a name (for convenience, we recommend using the same name you gave to the server container in GTM).
- Container configuration - paste the Container Config data that you copied from the Install Google Tag Manager pop-up. If you lost it, go to Google Tag Manager → click Admin → click Container settings → copy the string under Container Configuration.
- Server location - for best performance, choose the server location that’s closest to where most of your clients are. See the list of available server locations here. Also, you can opt for the Global multi-zone server location option if you have traffic from different regions. It will automatically route incoming requests to the nearest available zone based on the user’s IP address.
Then click Create Container.
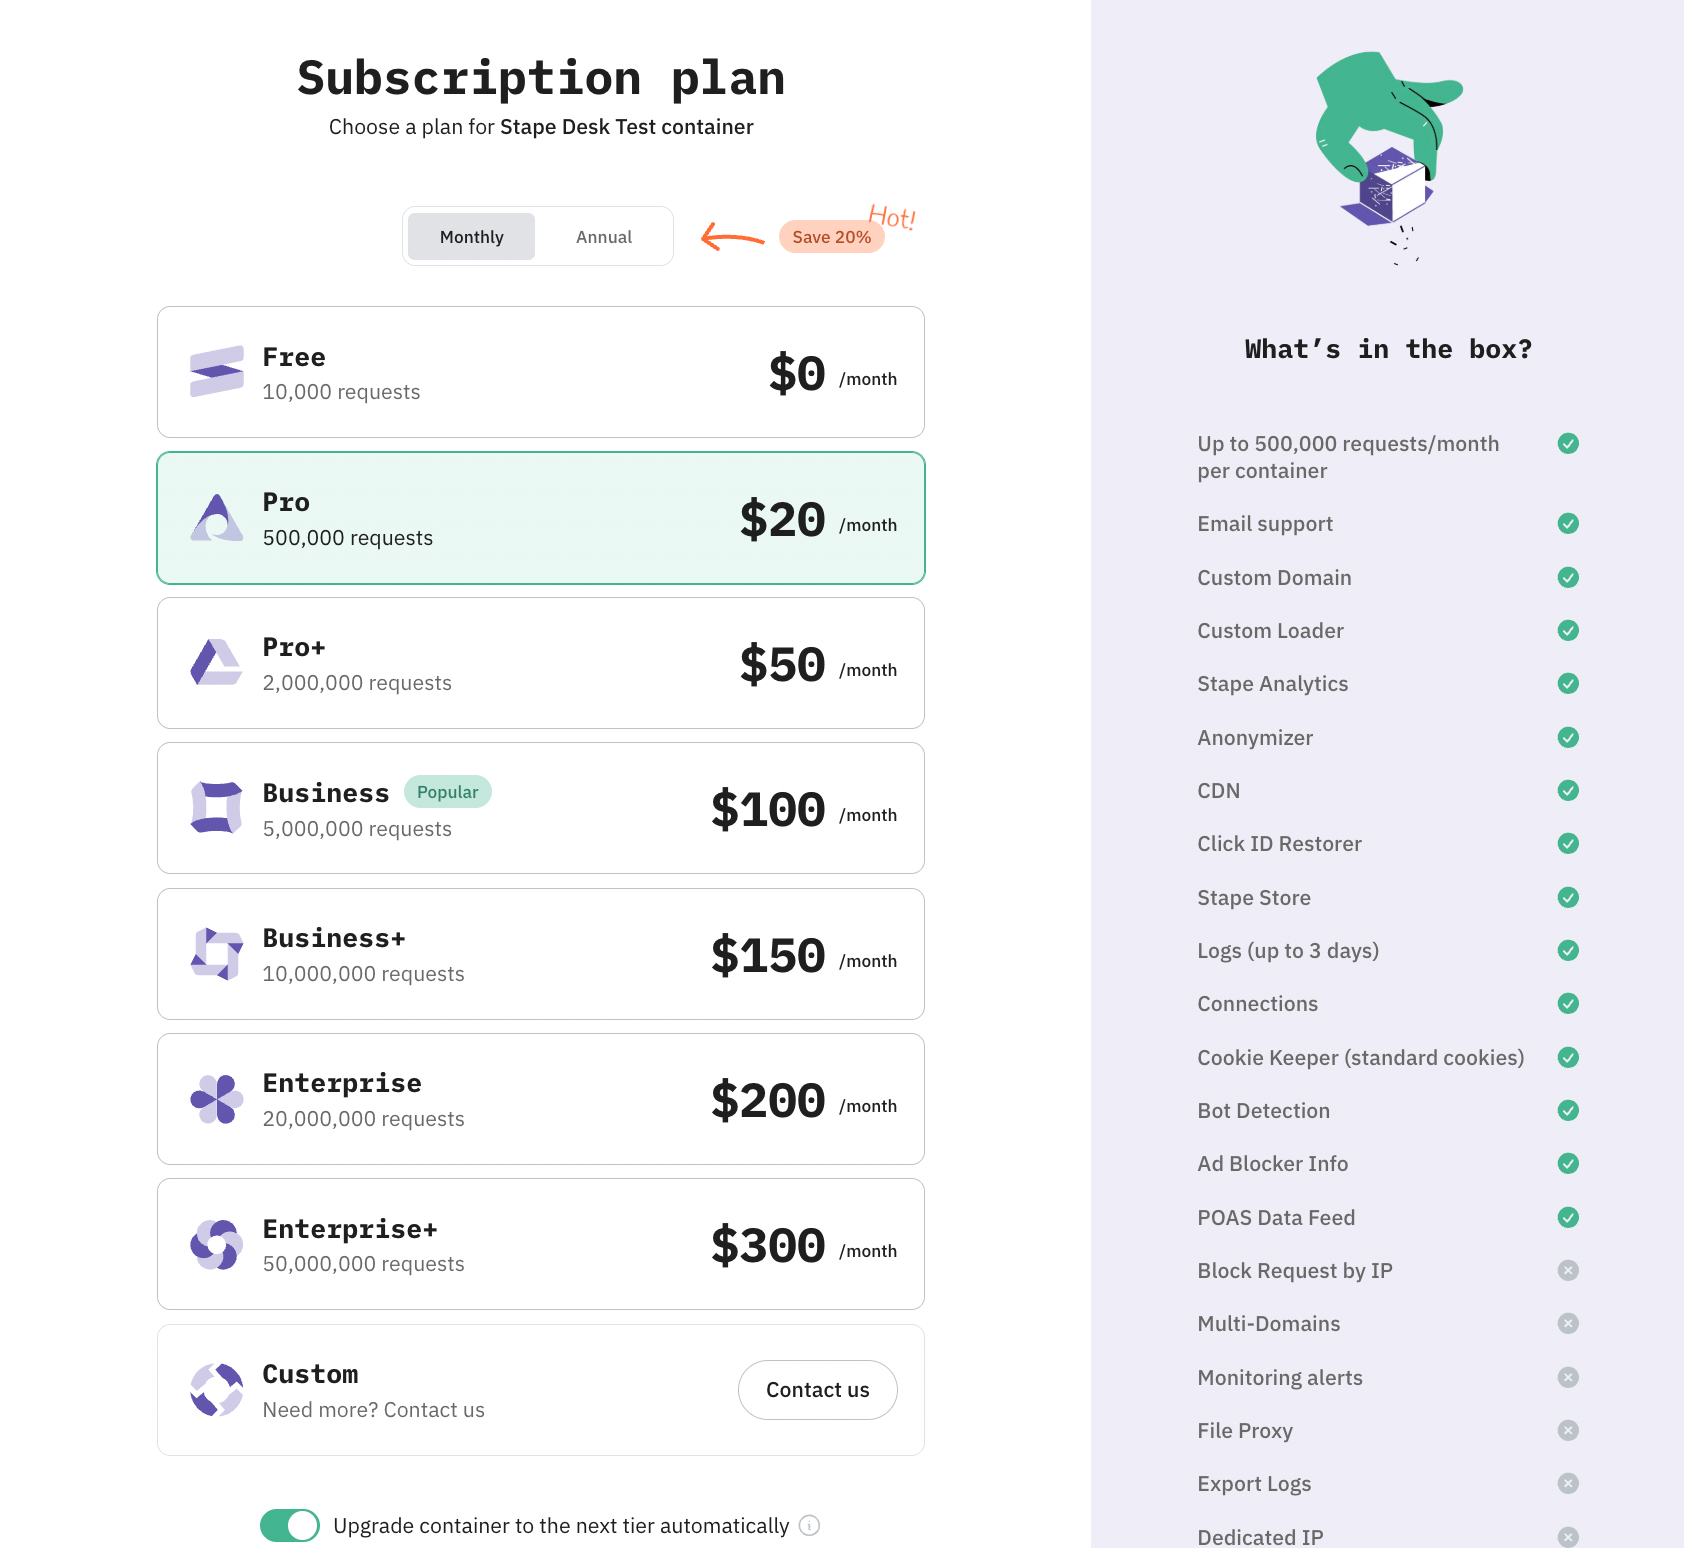
4. Choose a plan for your container. You can start with a Free plan. Click Continue with a Free plan.
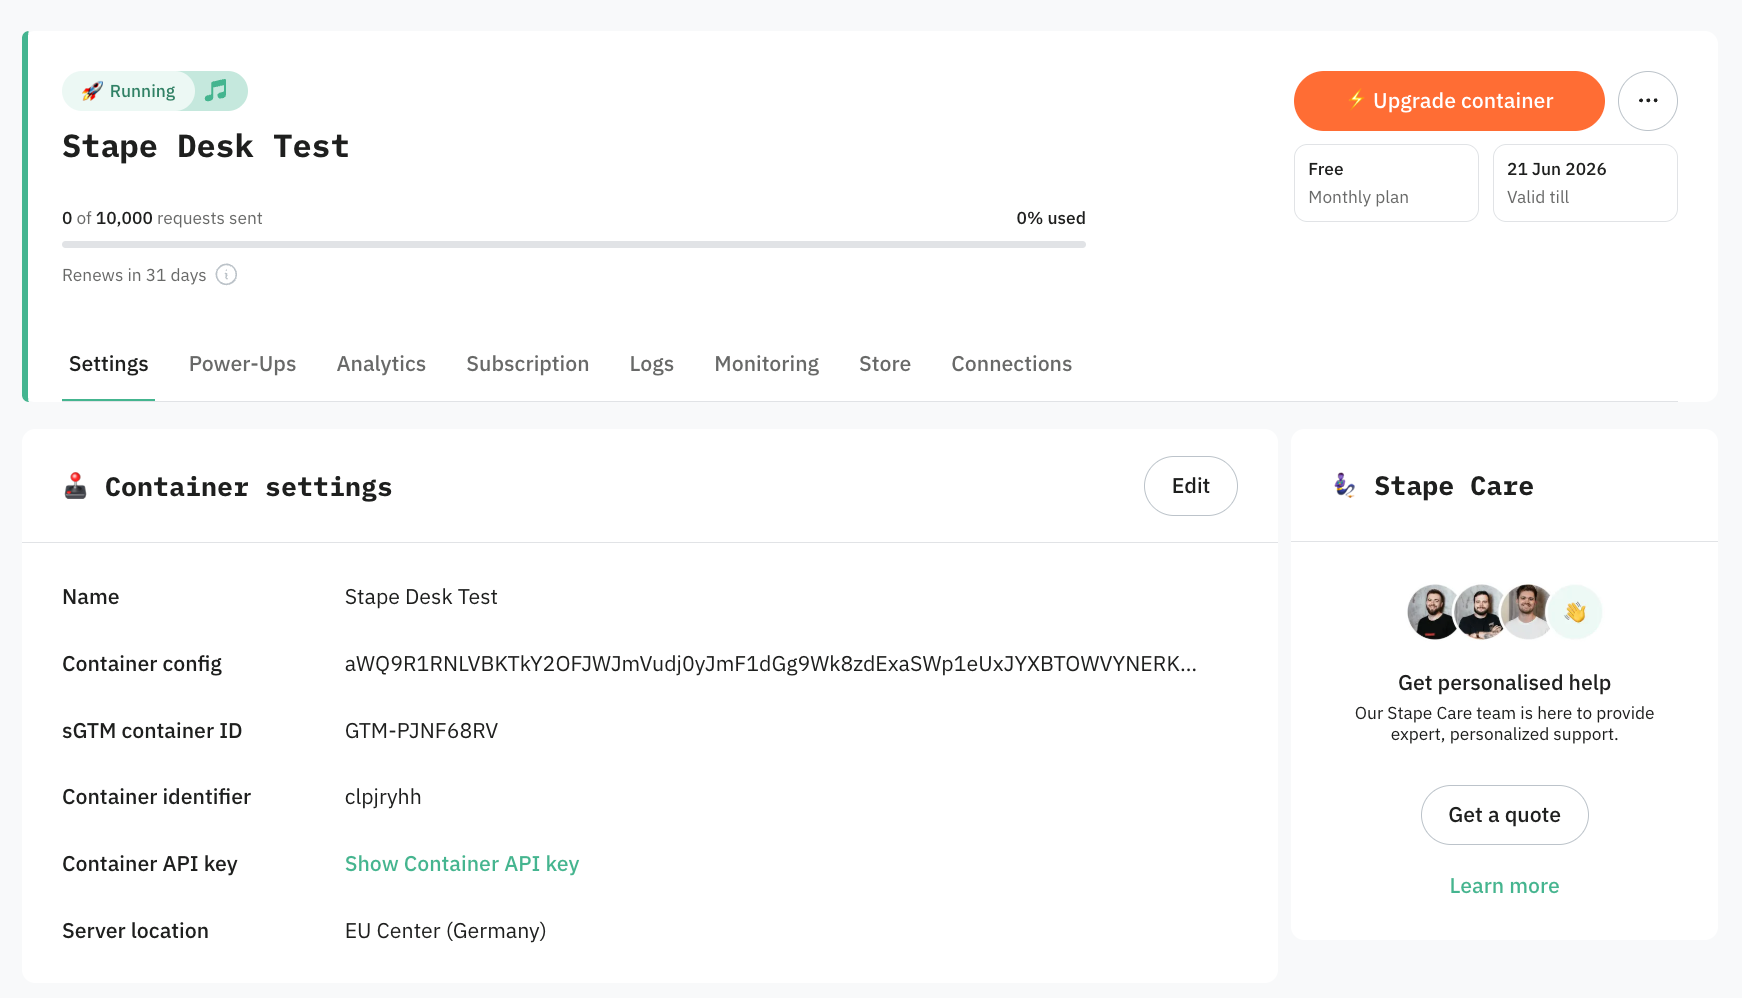
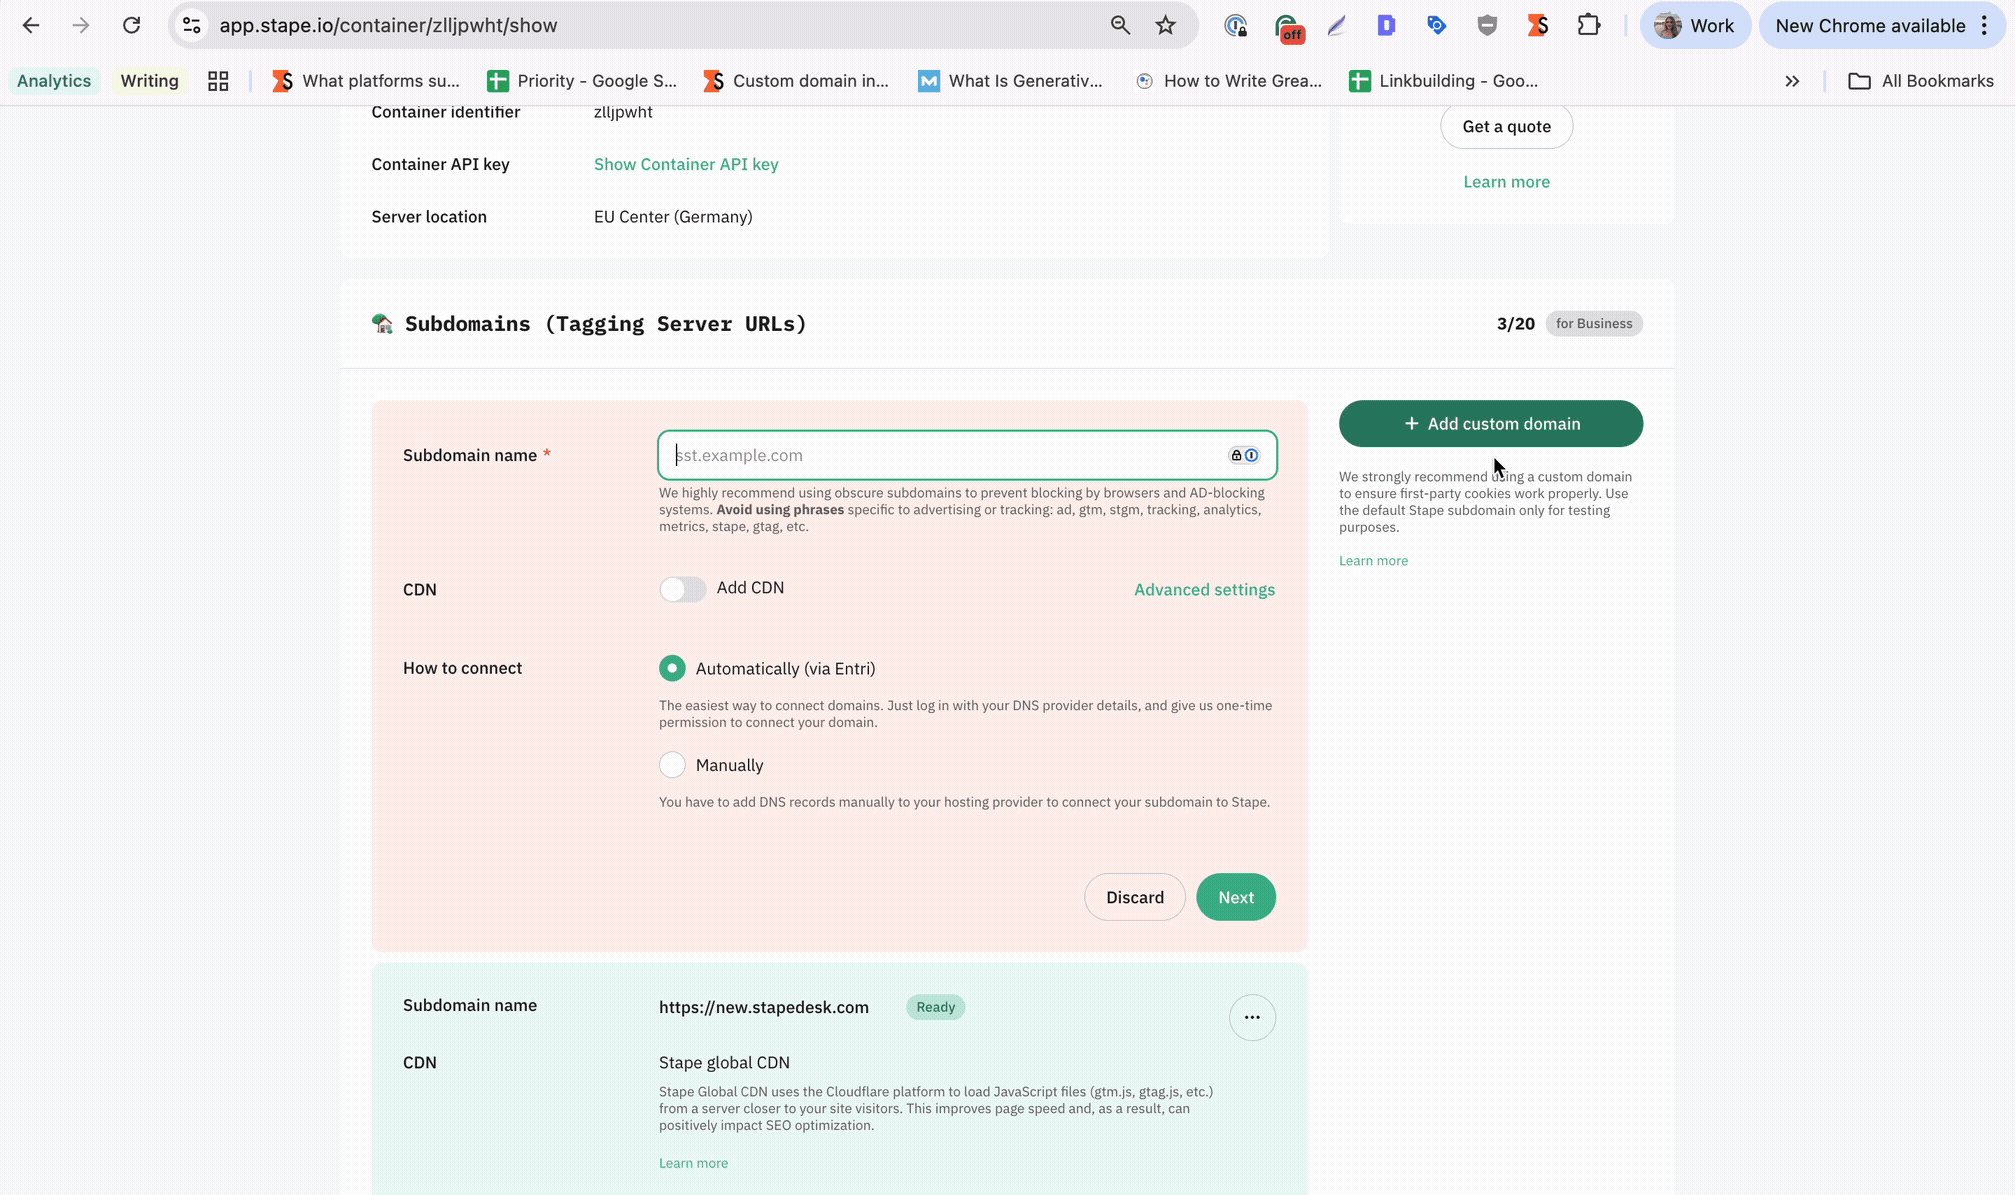
5. You will see the status of your container, container config, and plan name. It takes around 5 minutes to deploy a server container.
Please reload the page to update the status. If the Google Tag Manager server-side setup was done correctly, you should see the status Running.
Step 3. Create a Custom tagging server URL
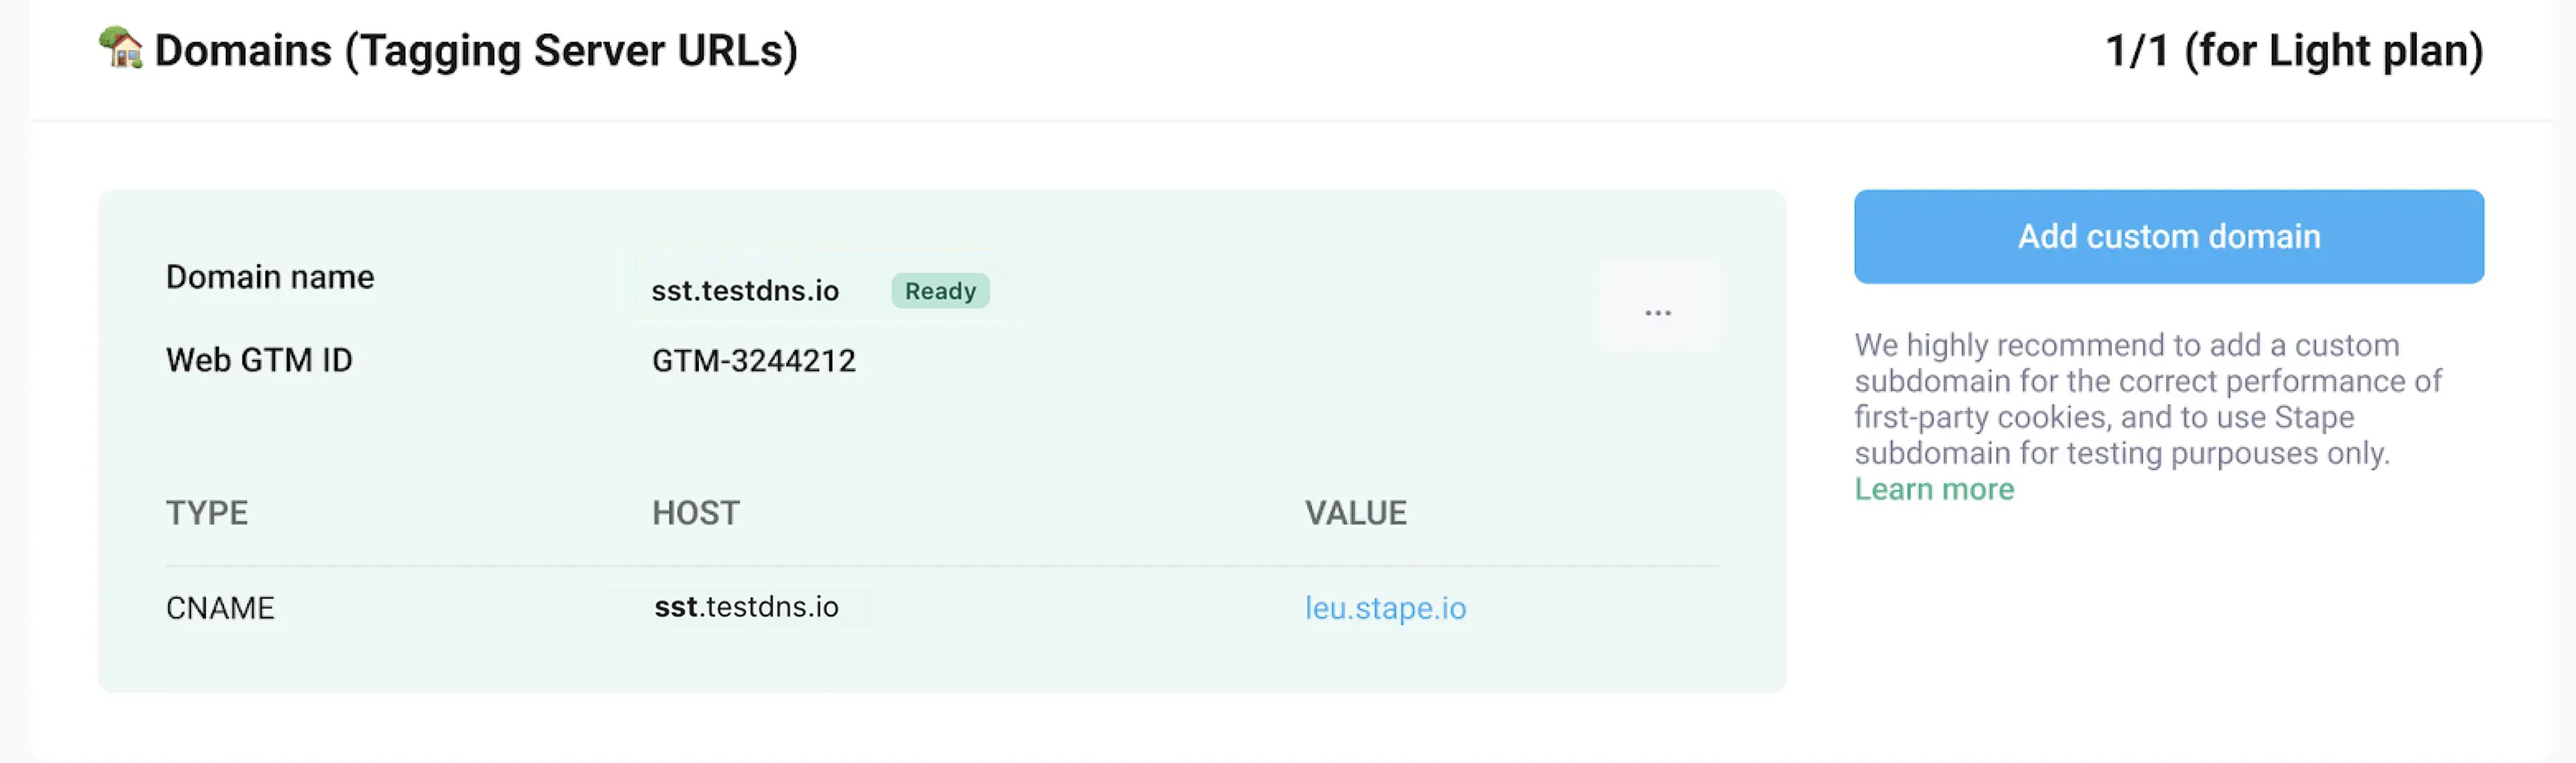
Use a custom tagging server URL, also called a custom domain, to set first-party cookies. This URL should use the same root domain as your website. For example, if your website is `example.com`, your tagging server URL can be `ss.example.com`.
There are three ways to set up a custom domain:
- Same origin – tagging server shares the exact domain and path with your site. Read more on how to set up a custom domain with the same origin.
- Subdomain – tagging server runs on a subdomain of your root domain. In this article we will guide you through this setup.
- Default domain – no custom domain; uses the standard Stape-provided address.

Step 1. Add your custom domain
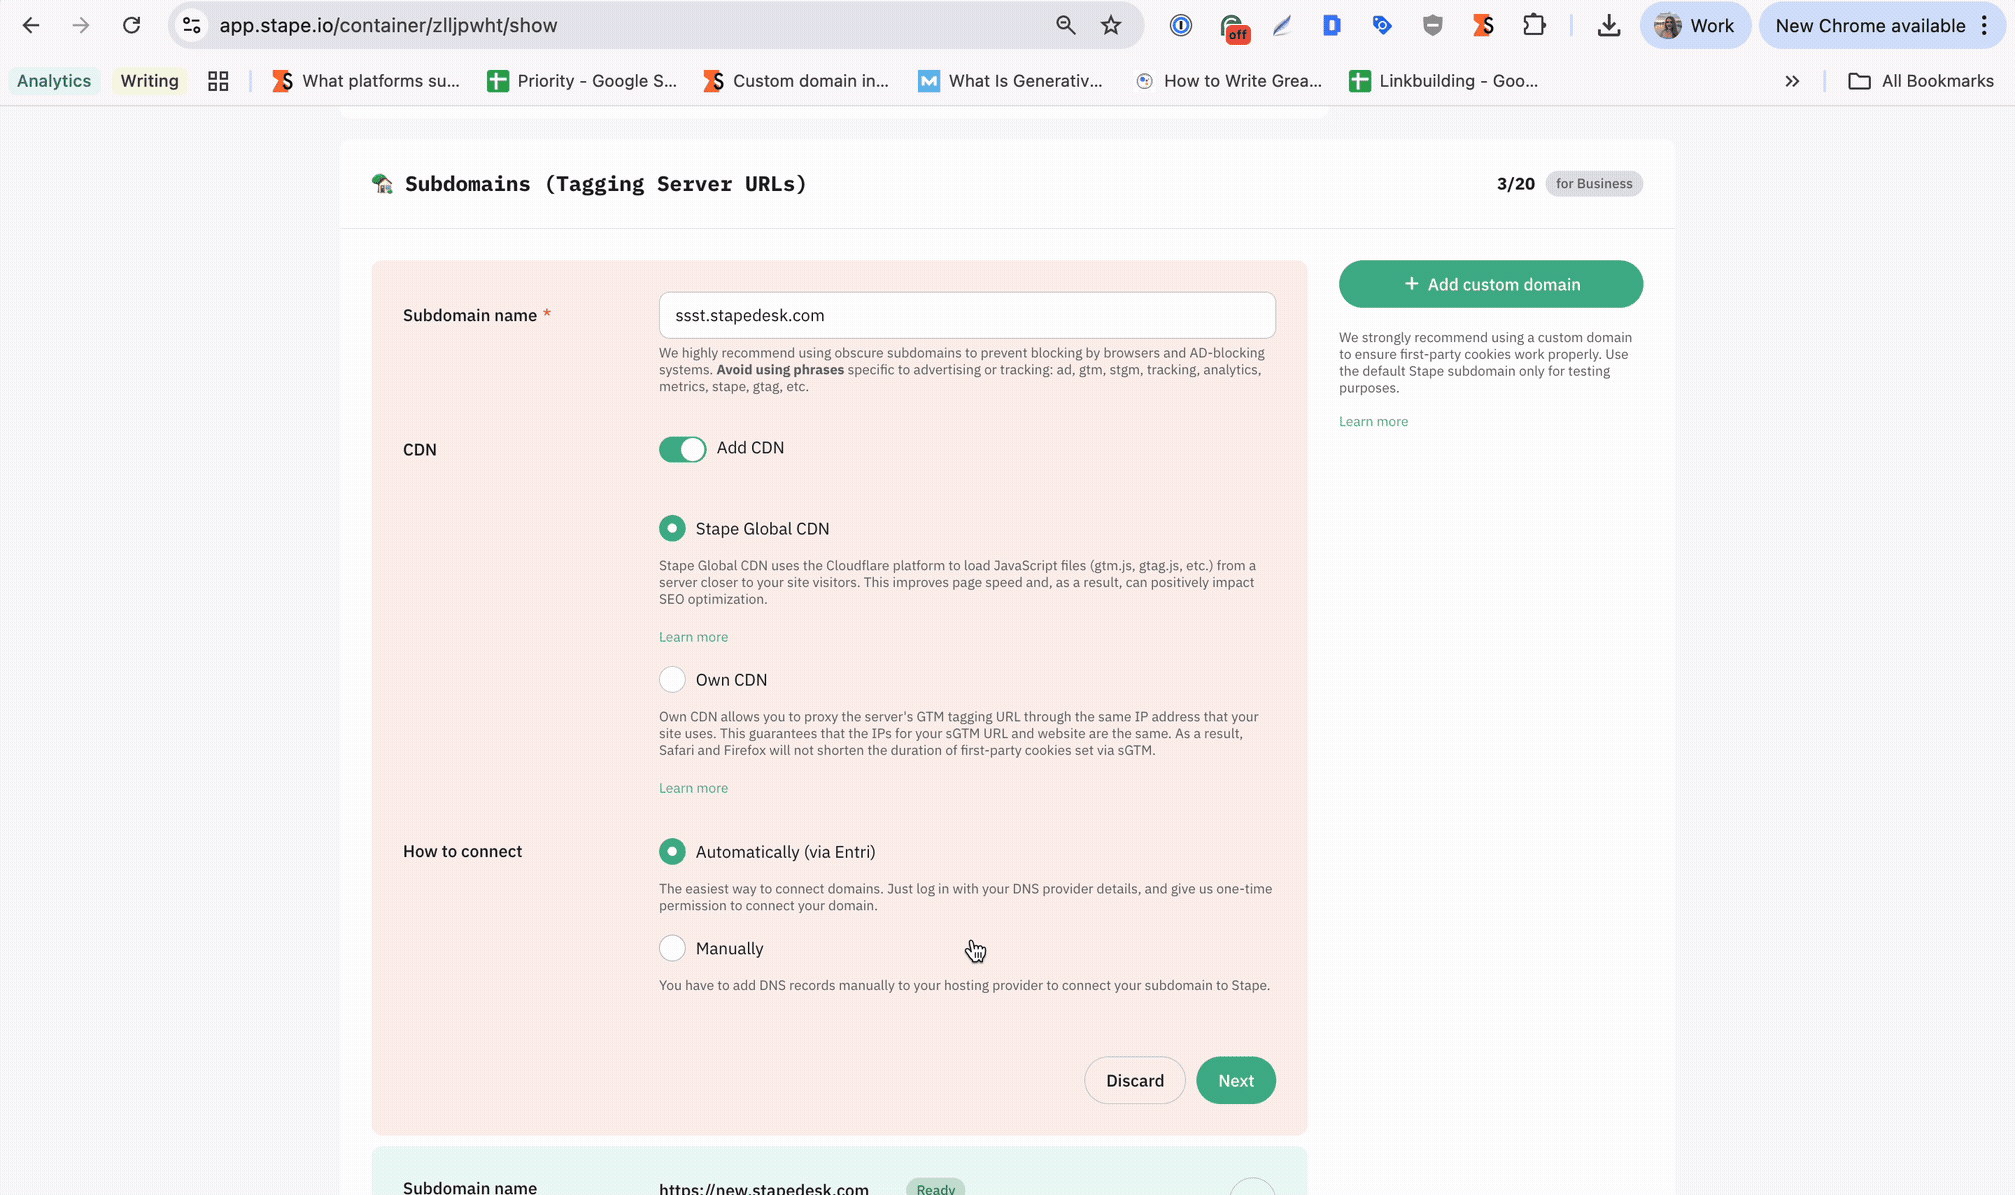
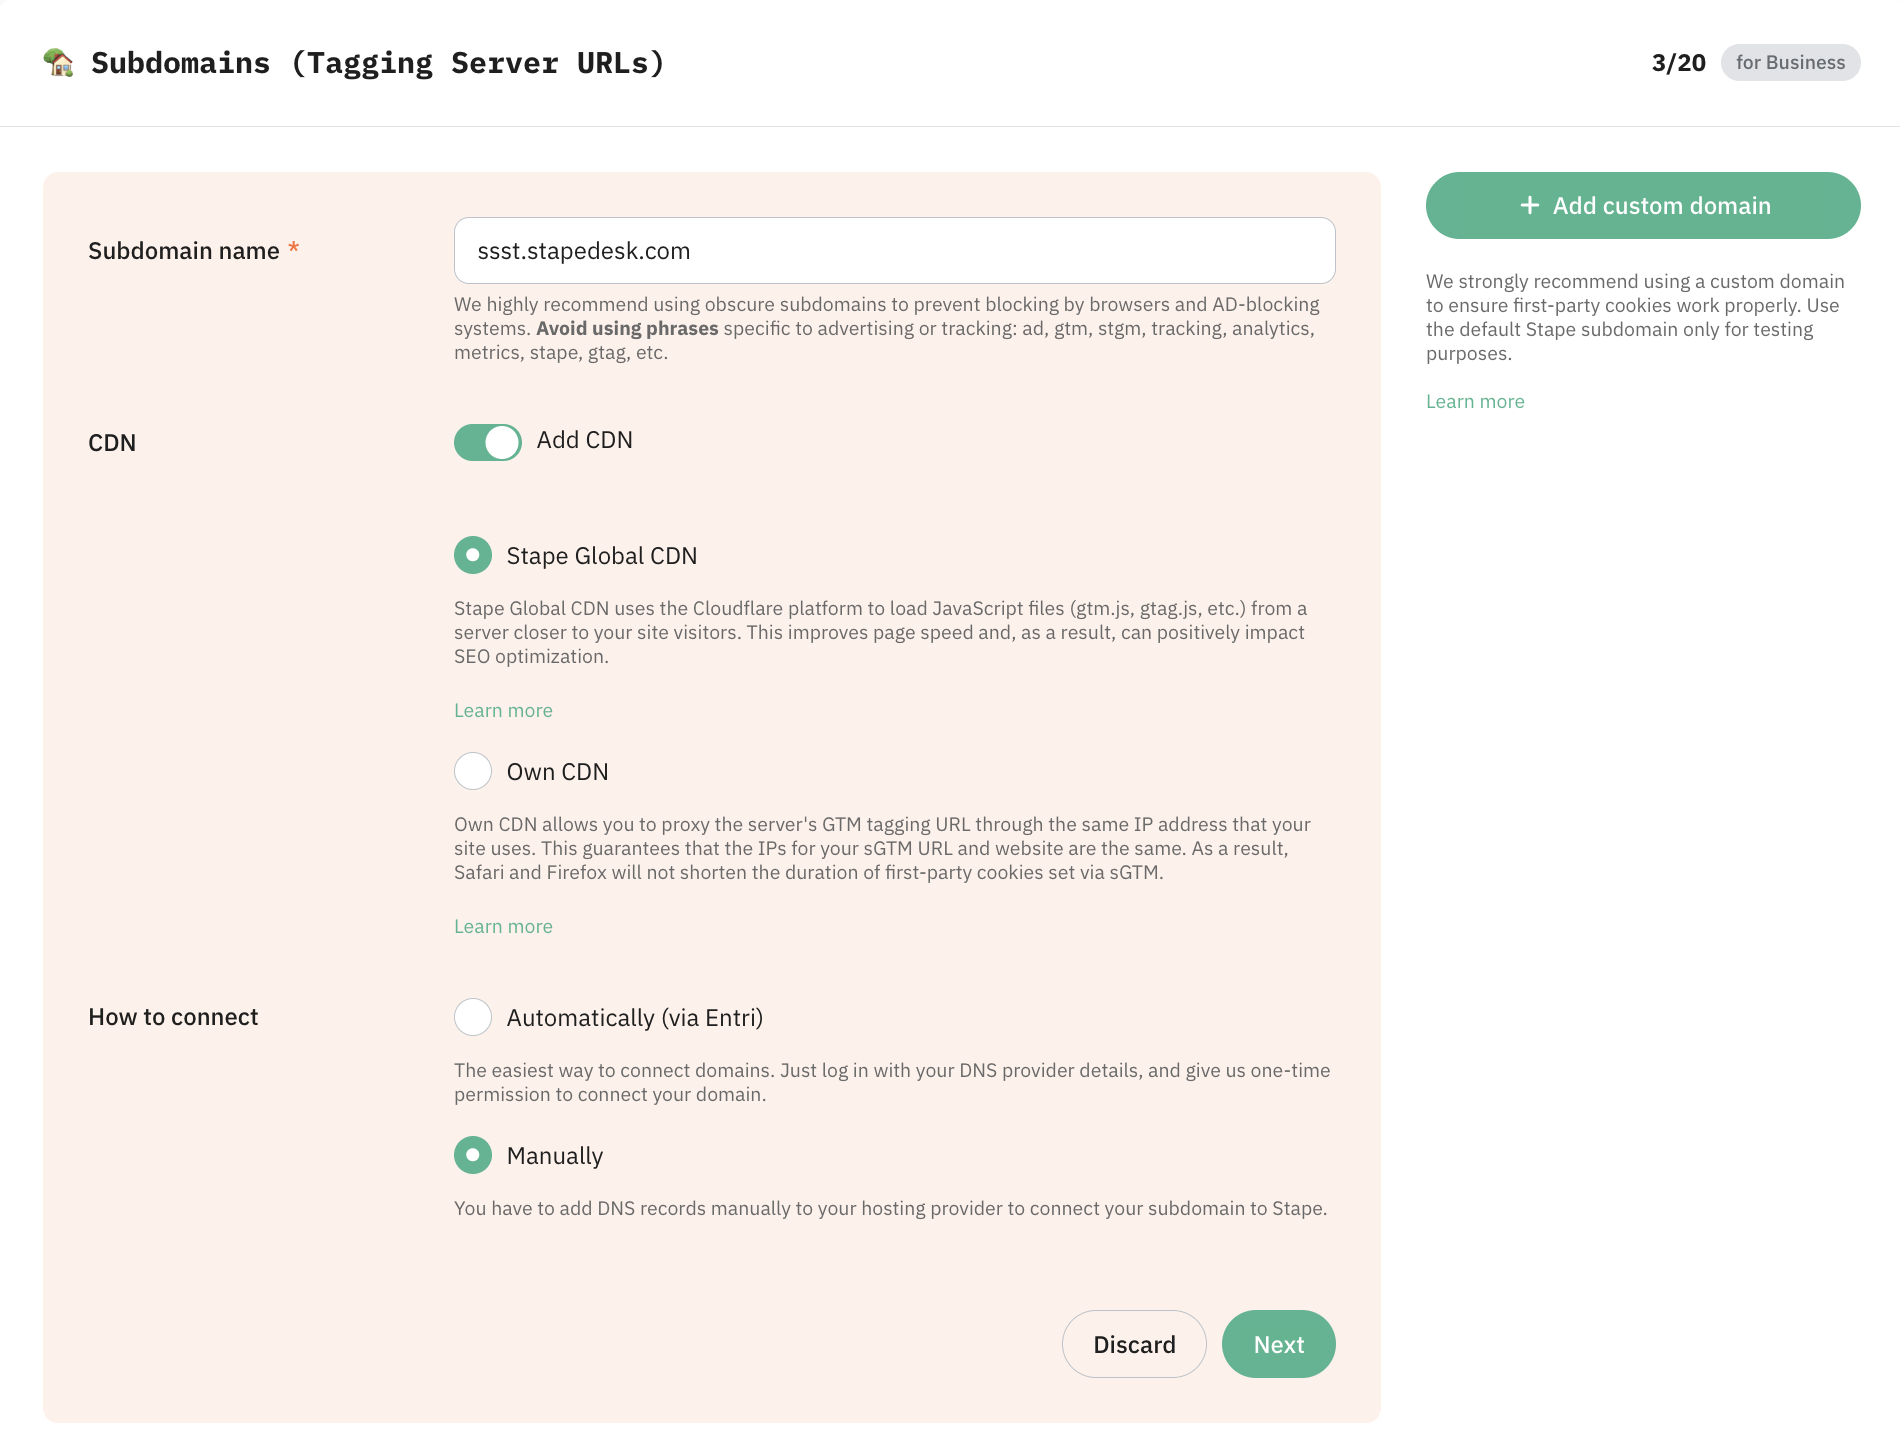
Сhoose your container on Stape, scroll down, and click Add custom domain.
Add Subdomain name - it can be any name that works for you, just be sure to avoid using phrases specific to advertising or tracking: ad, gtm, stgm, tracking, analytics, metrics, stape, gtag, etc.
Step 2. Add CDN
A Content Delivery Network (CDN) distributes your website's assets across a global network of servers to reduce latency and improve load times for users in different locations. It is useful if your audience is geographically distributed or if you want to improve cookie tracking and data accuracy.
By default, the CDN is disabled, which means JavaScript files (like gtm.js, gtag.js, and analytics.js) are served directly from the server location where your sGTM container is hosted. Effectively, it bypasses both Stape Global CDN and Own CDN options and gives you a direct, unproxied connection between your site and the sGTM container.
| Important: please consider your country's privacy regulations before setting up a CDN. |
To enable the CDN, click the Add CDN toggle and select one of the following options:
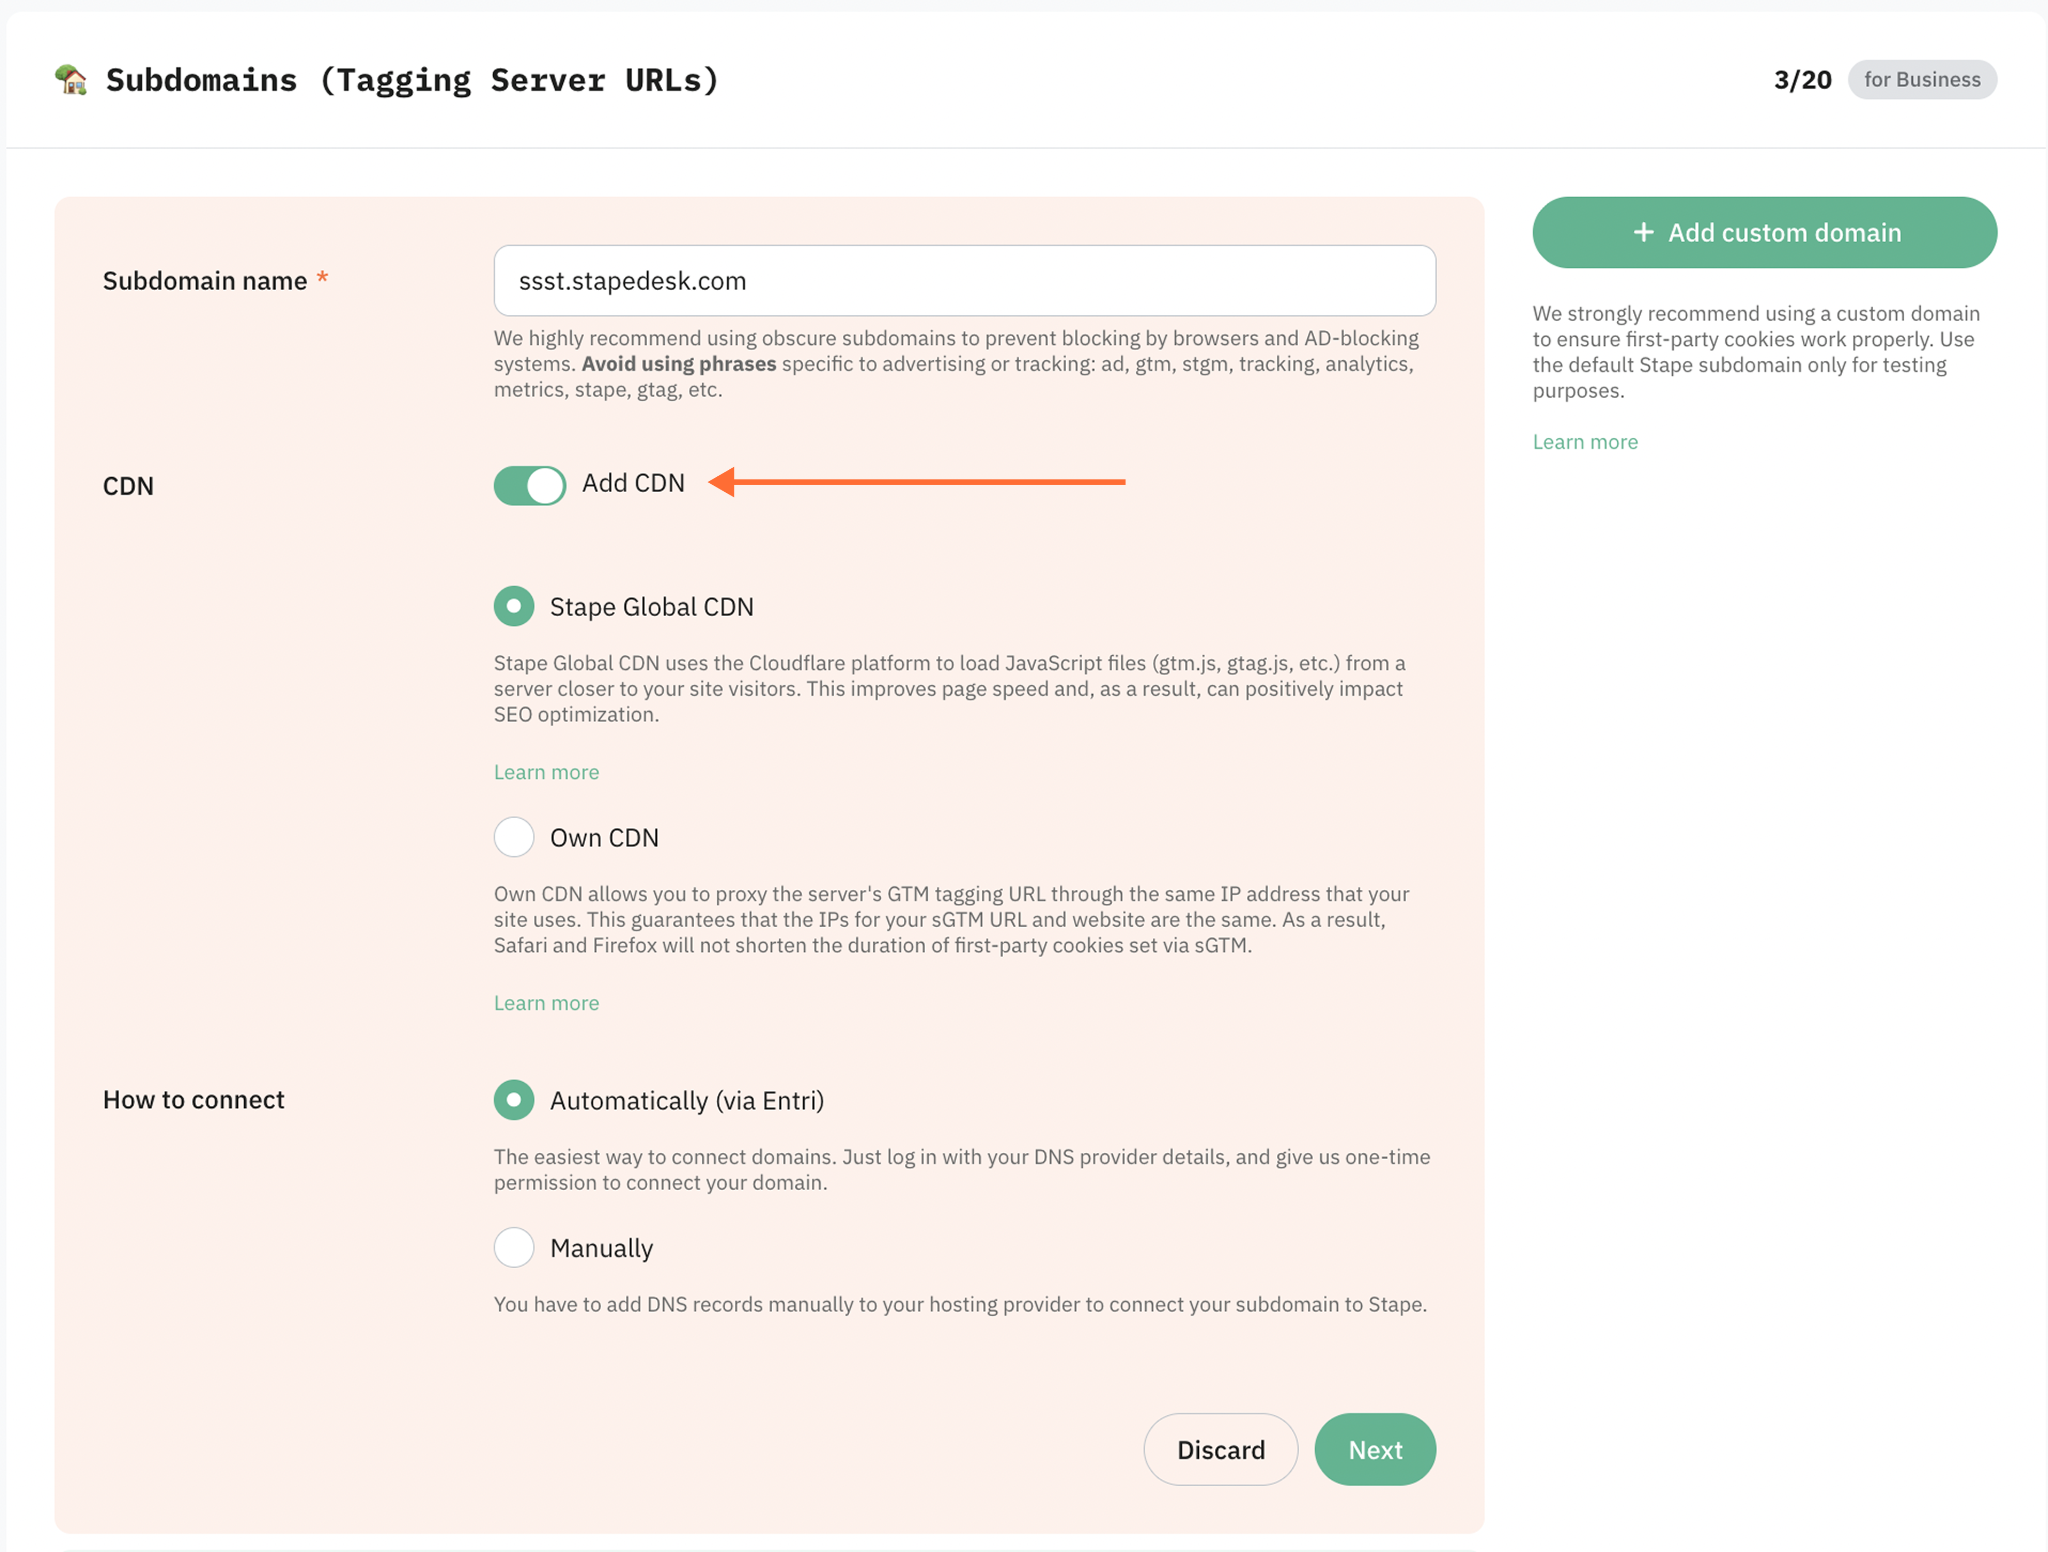
- Stape Global CDN - loads scripts from a server closest to your website visitor's location, which reduces latency and improves page load times for geographically distributed audiences. We will use the Stape Global CDN in our setup. This feature is free and available for all Stape sGTM containers.
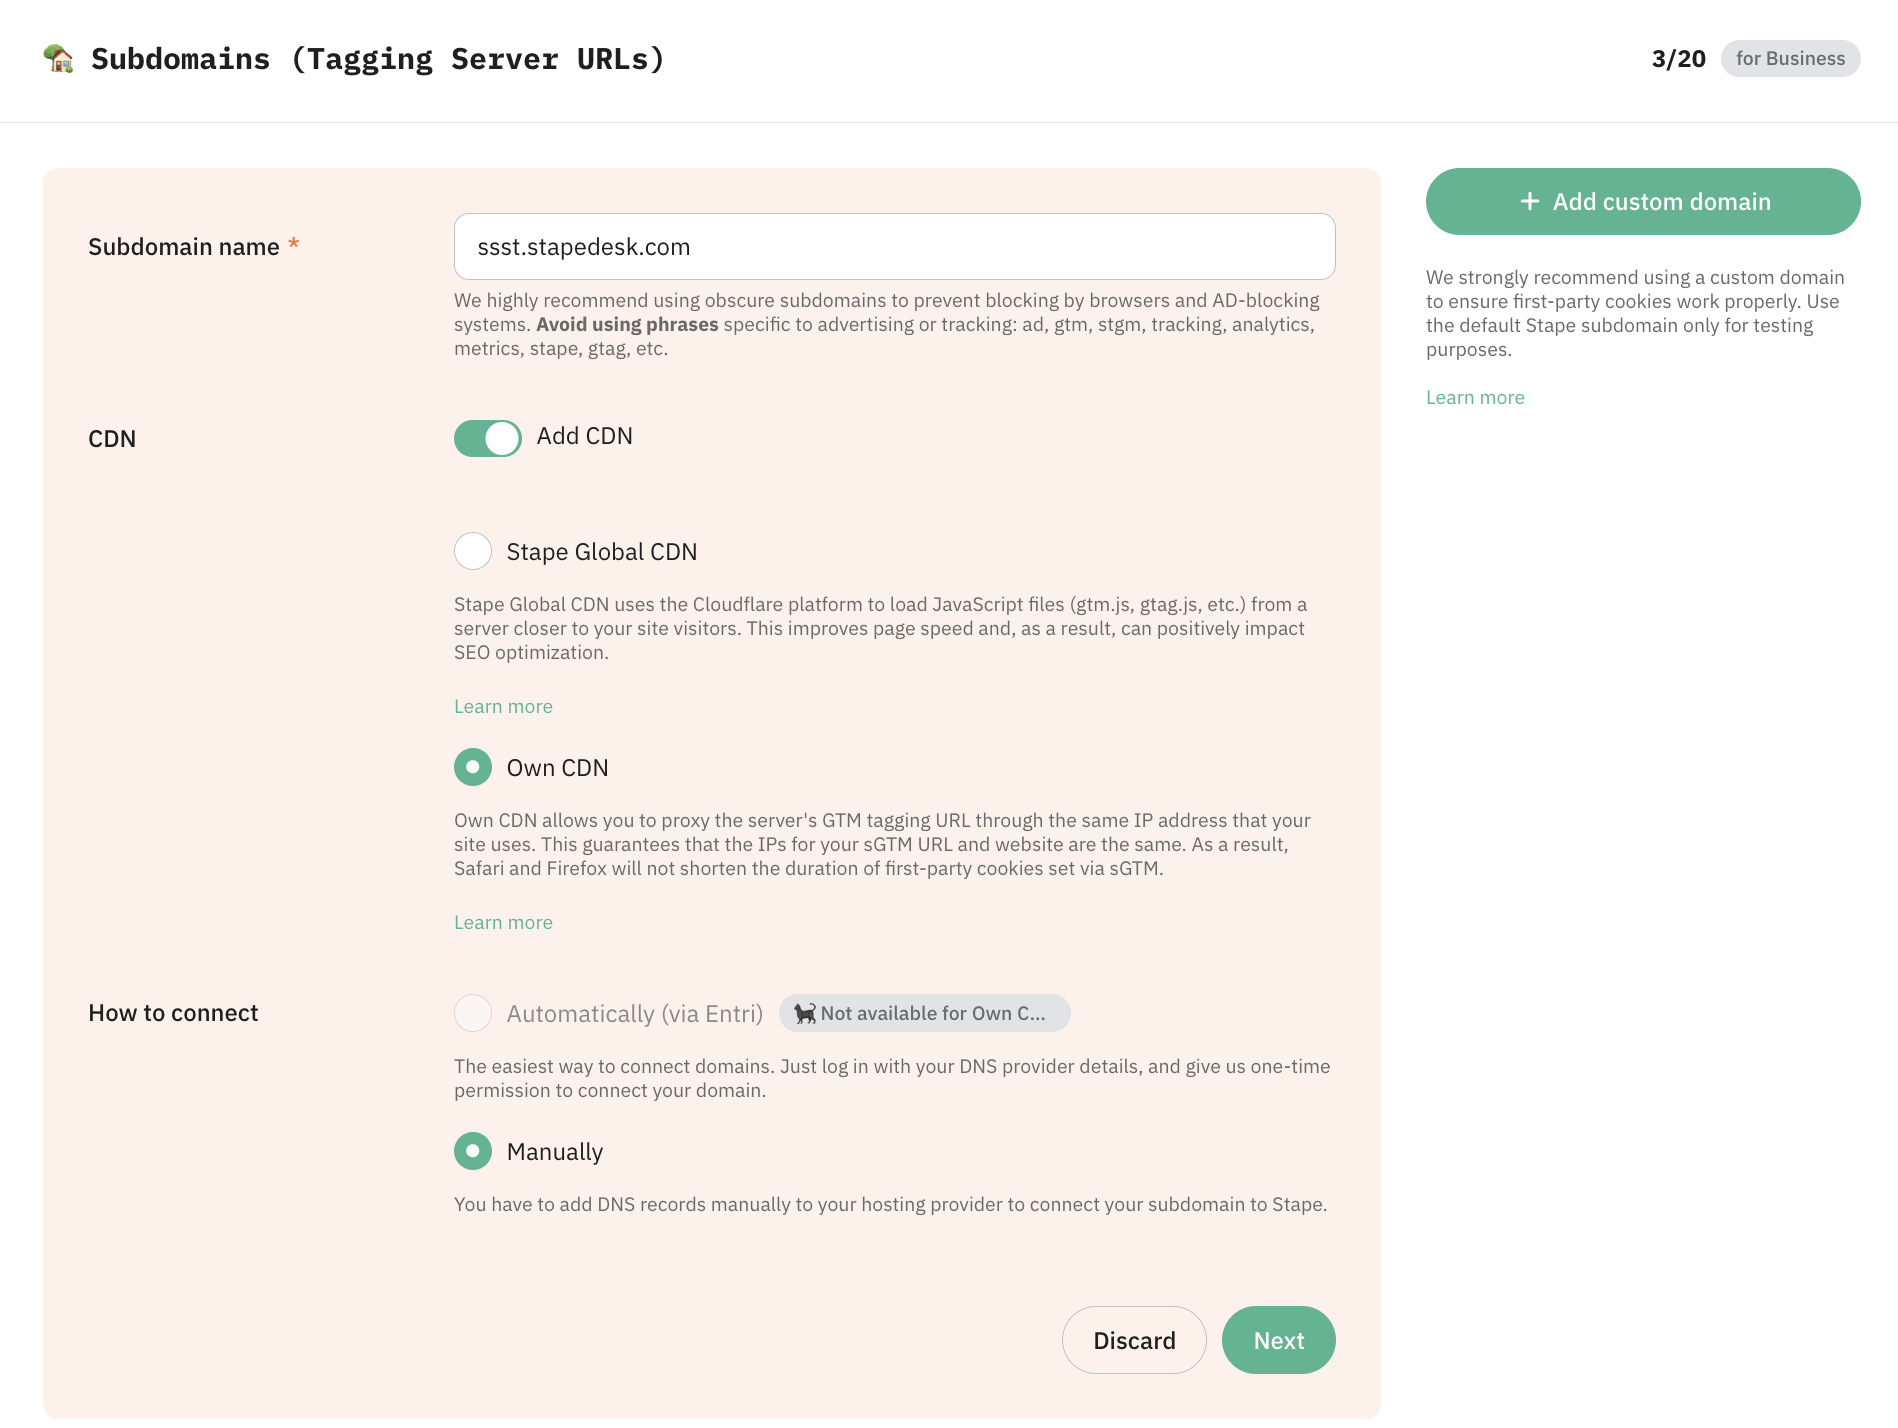
- Own CDN (incompatible with the Automatically (via Entri) connection option) - helps route sGTM custom domain and proxy sGTM traffic through the DNS provider of your website. In this case, the IP addresses of your website and the custom domain of the sGTM will match, and server-side cookies will be considered as first-party. As a result, it gives the ability to increase cookie duration.
Step 3. Select the "How to connect" method
Next, in the How to connect section, there are two ways of connecting a custom domain to your container:

- Automatically (via Entri)
The easiest way to connect domains. Log in with your DNS provider details via Entri, and give us one-time permission to connect your domain. That's it, you can proceed directly to Step 5 to verify your domain; no manual configuration is required.
- Manually
With this option, you have to add DNS records manually to your hosting provider to connect your subdomain to Stape.
After you add a custom subdomain to your container, you will see DNS records that should be created to verify the custom domain. The DNS record depends on the server location and the CDN option you choose. In the next step, we show how to add DNS records.
Step 4. Add DNS records (for the manual connection method)
By default, subdomain verification is performed with CNAME records, but you can verify your subdomain with A and AAAA records if you need to (usually in cases when you need to avoid adding duplicated records).
We will cover both options below with a step-by-step guide on how to create records using Cloudflare. But you can use any other provider.
Adding a custom domain with a CNAME record
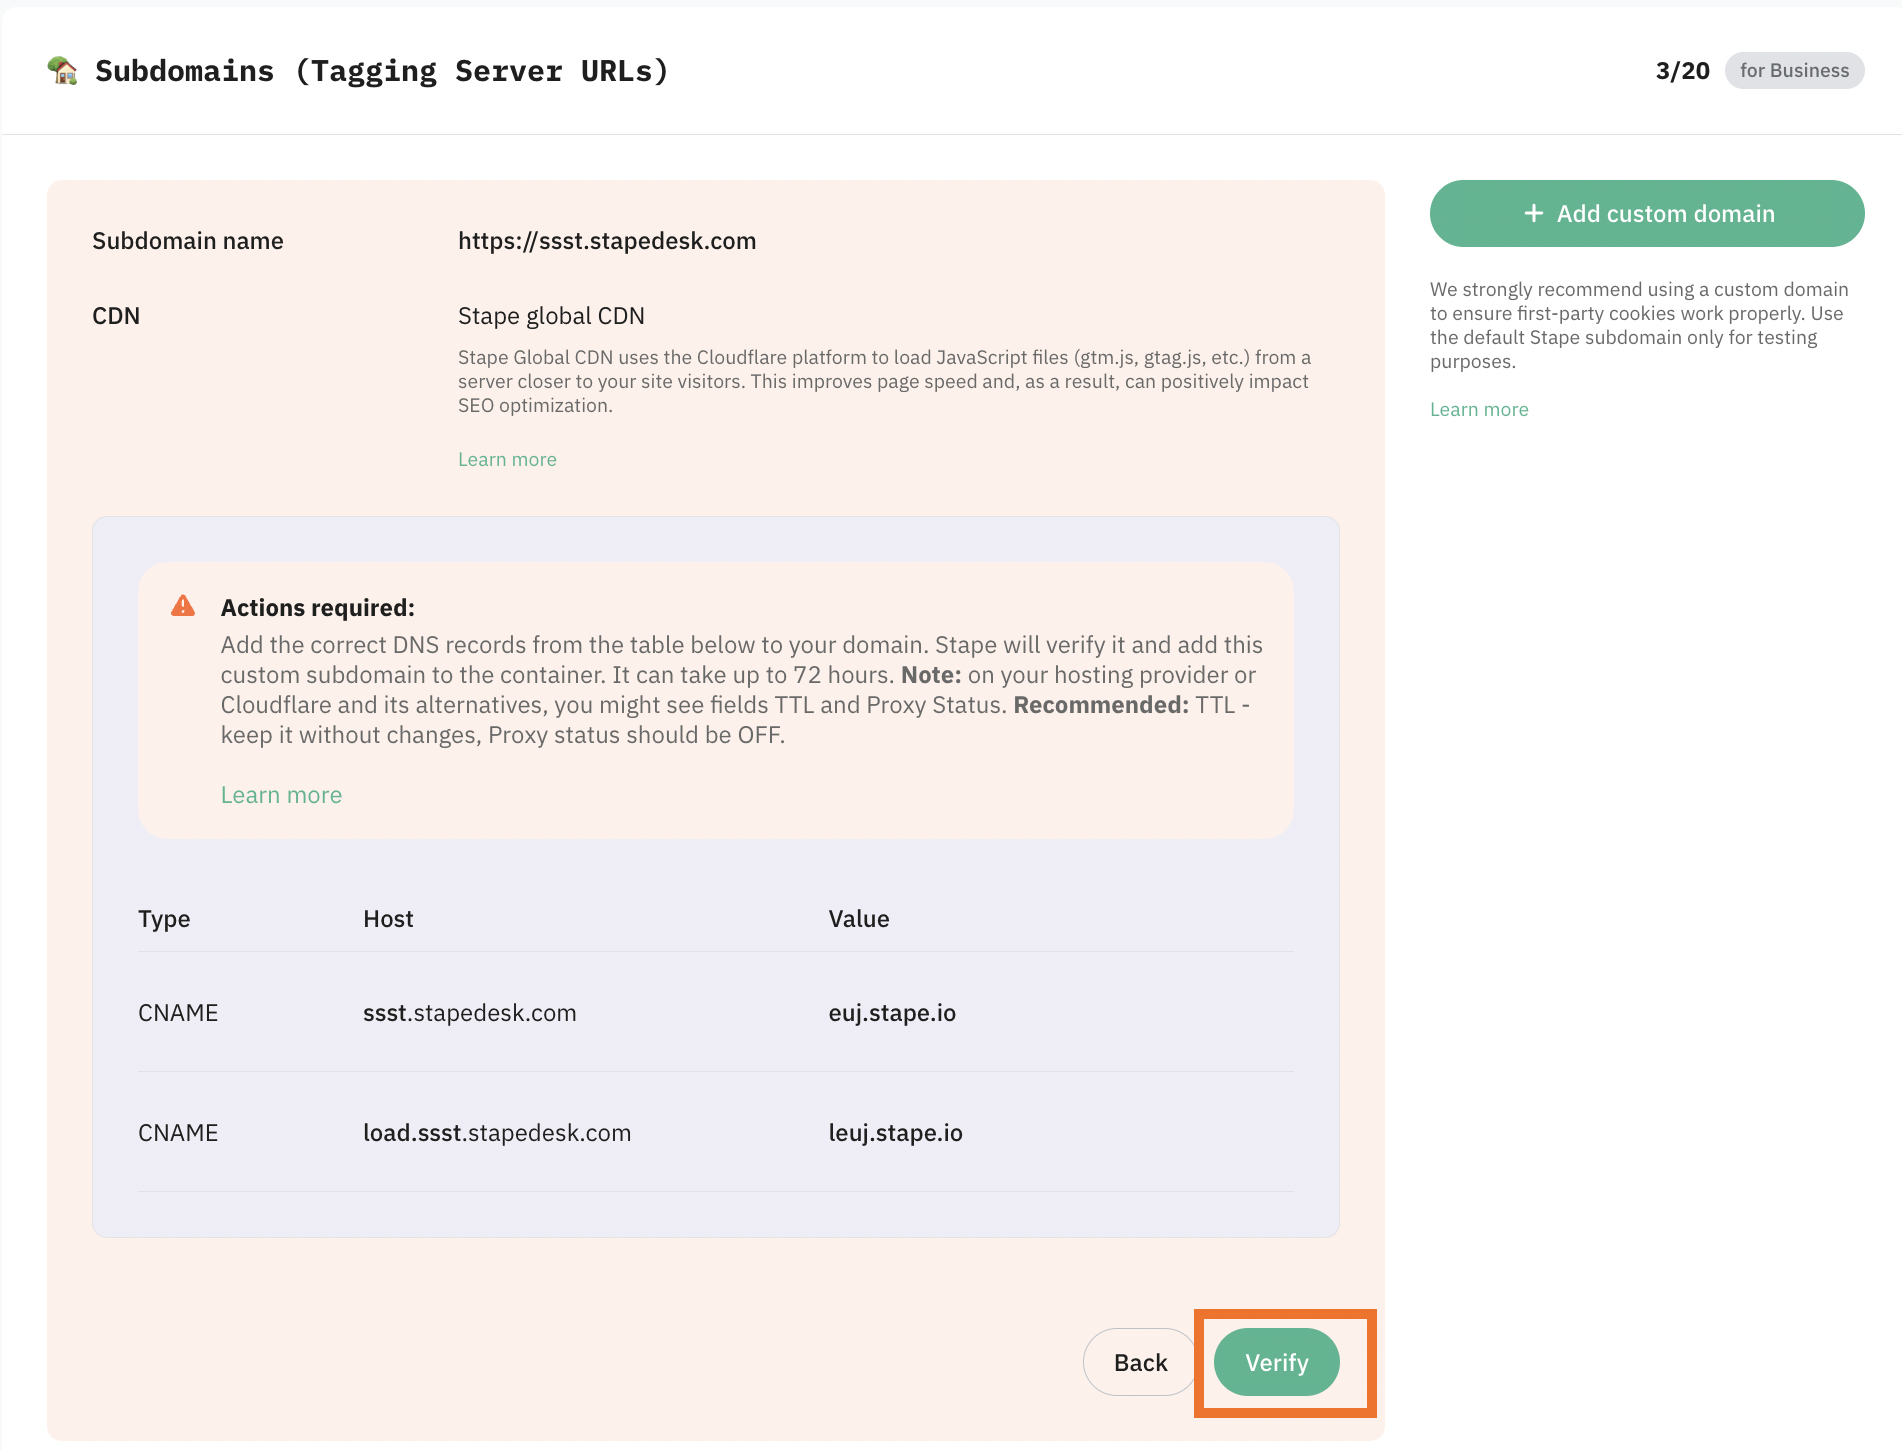
CNAME record(s) setup
You must create one CNAME record if you do not use Stape Global CDN and two records if you use Stape Global CDN.
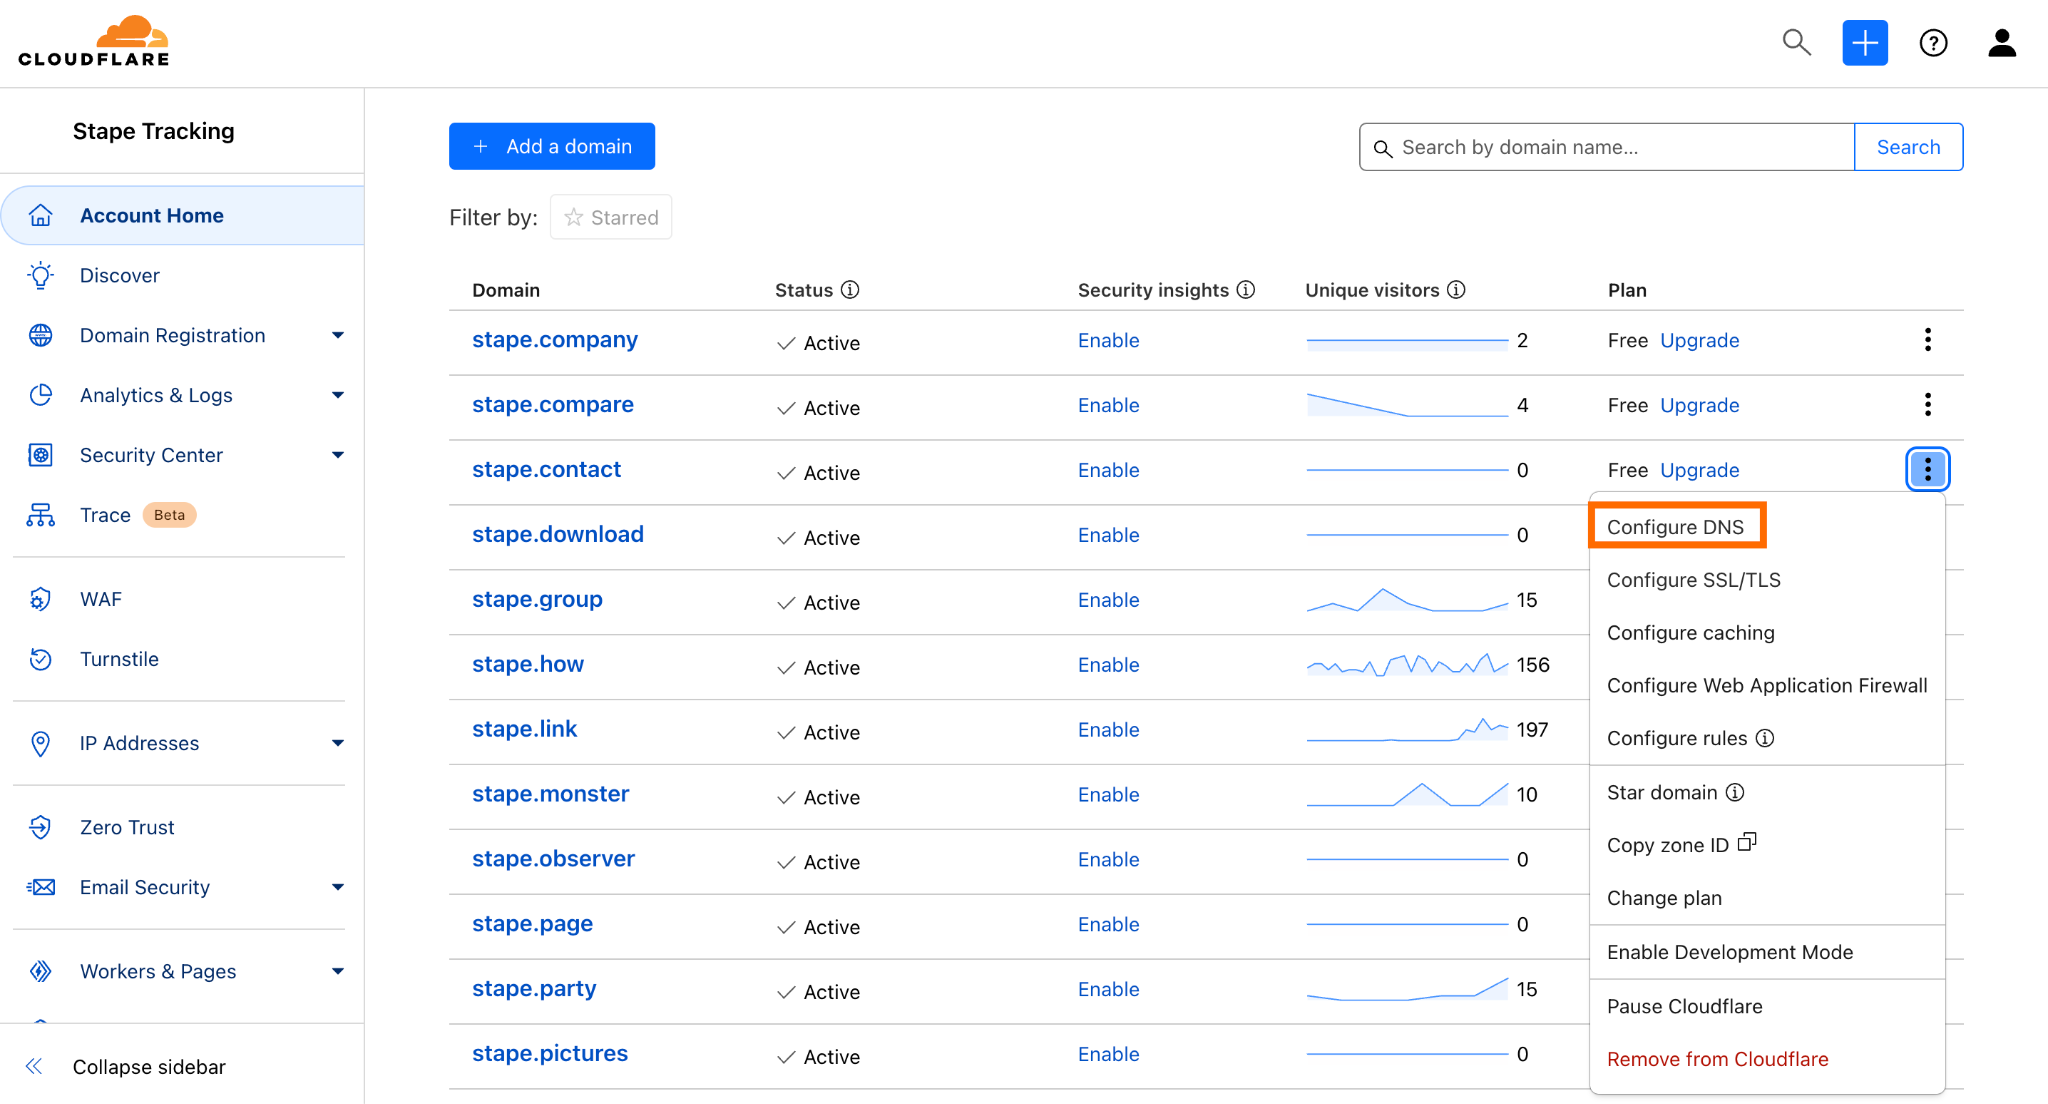
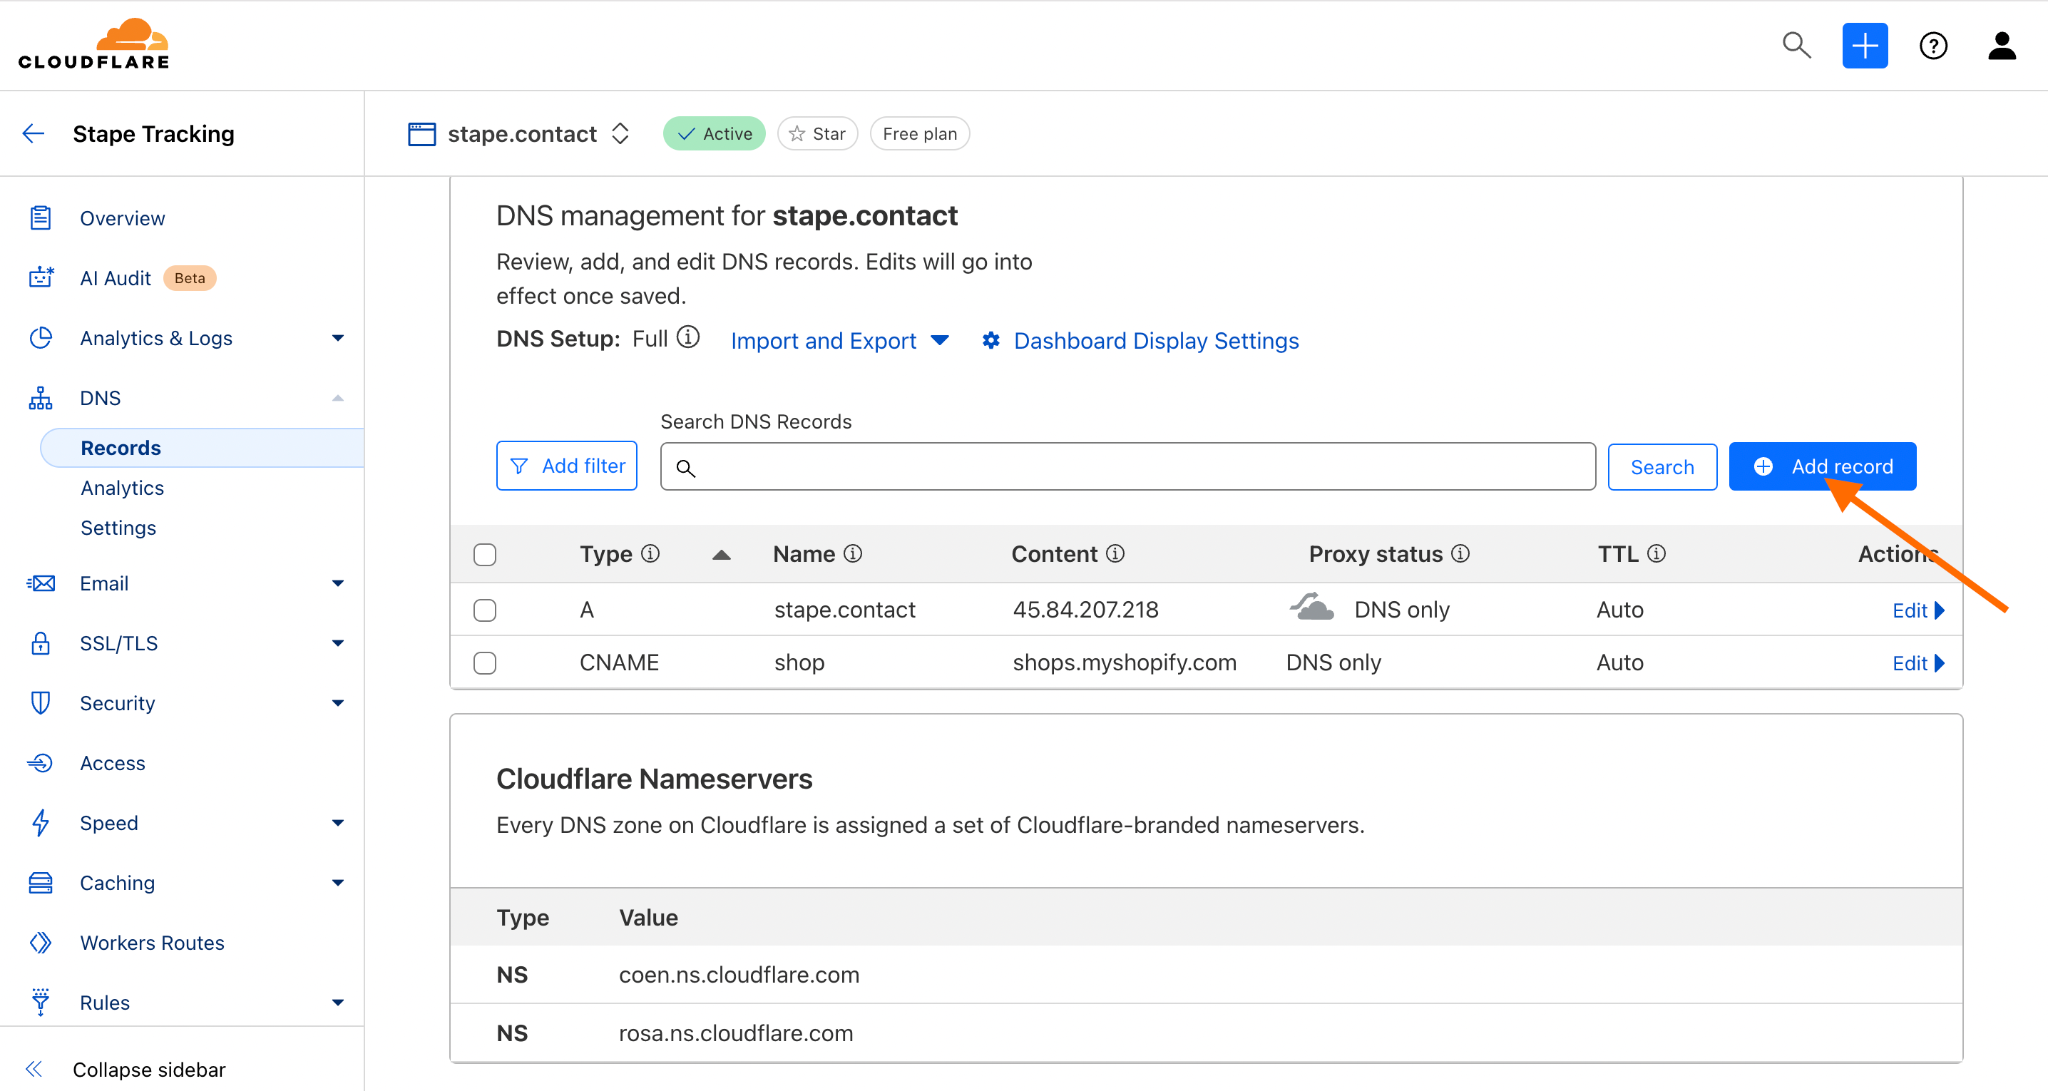
1. Log in to your domain name service and create a new DNS record for the subdomain you want to use. To do it, click three dots and choose Configure DNS next to your domain name on the account home page.
2. Click Add record.

3. Go back to your Stape account and input the record you see in the account. Make sure that the Proxy status is turned off.
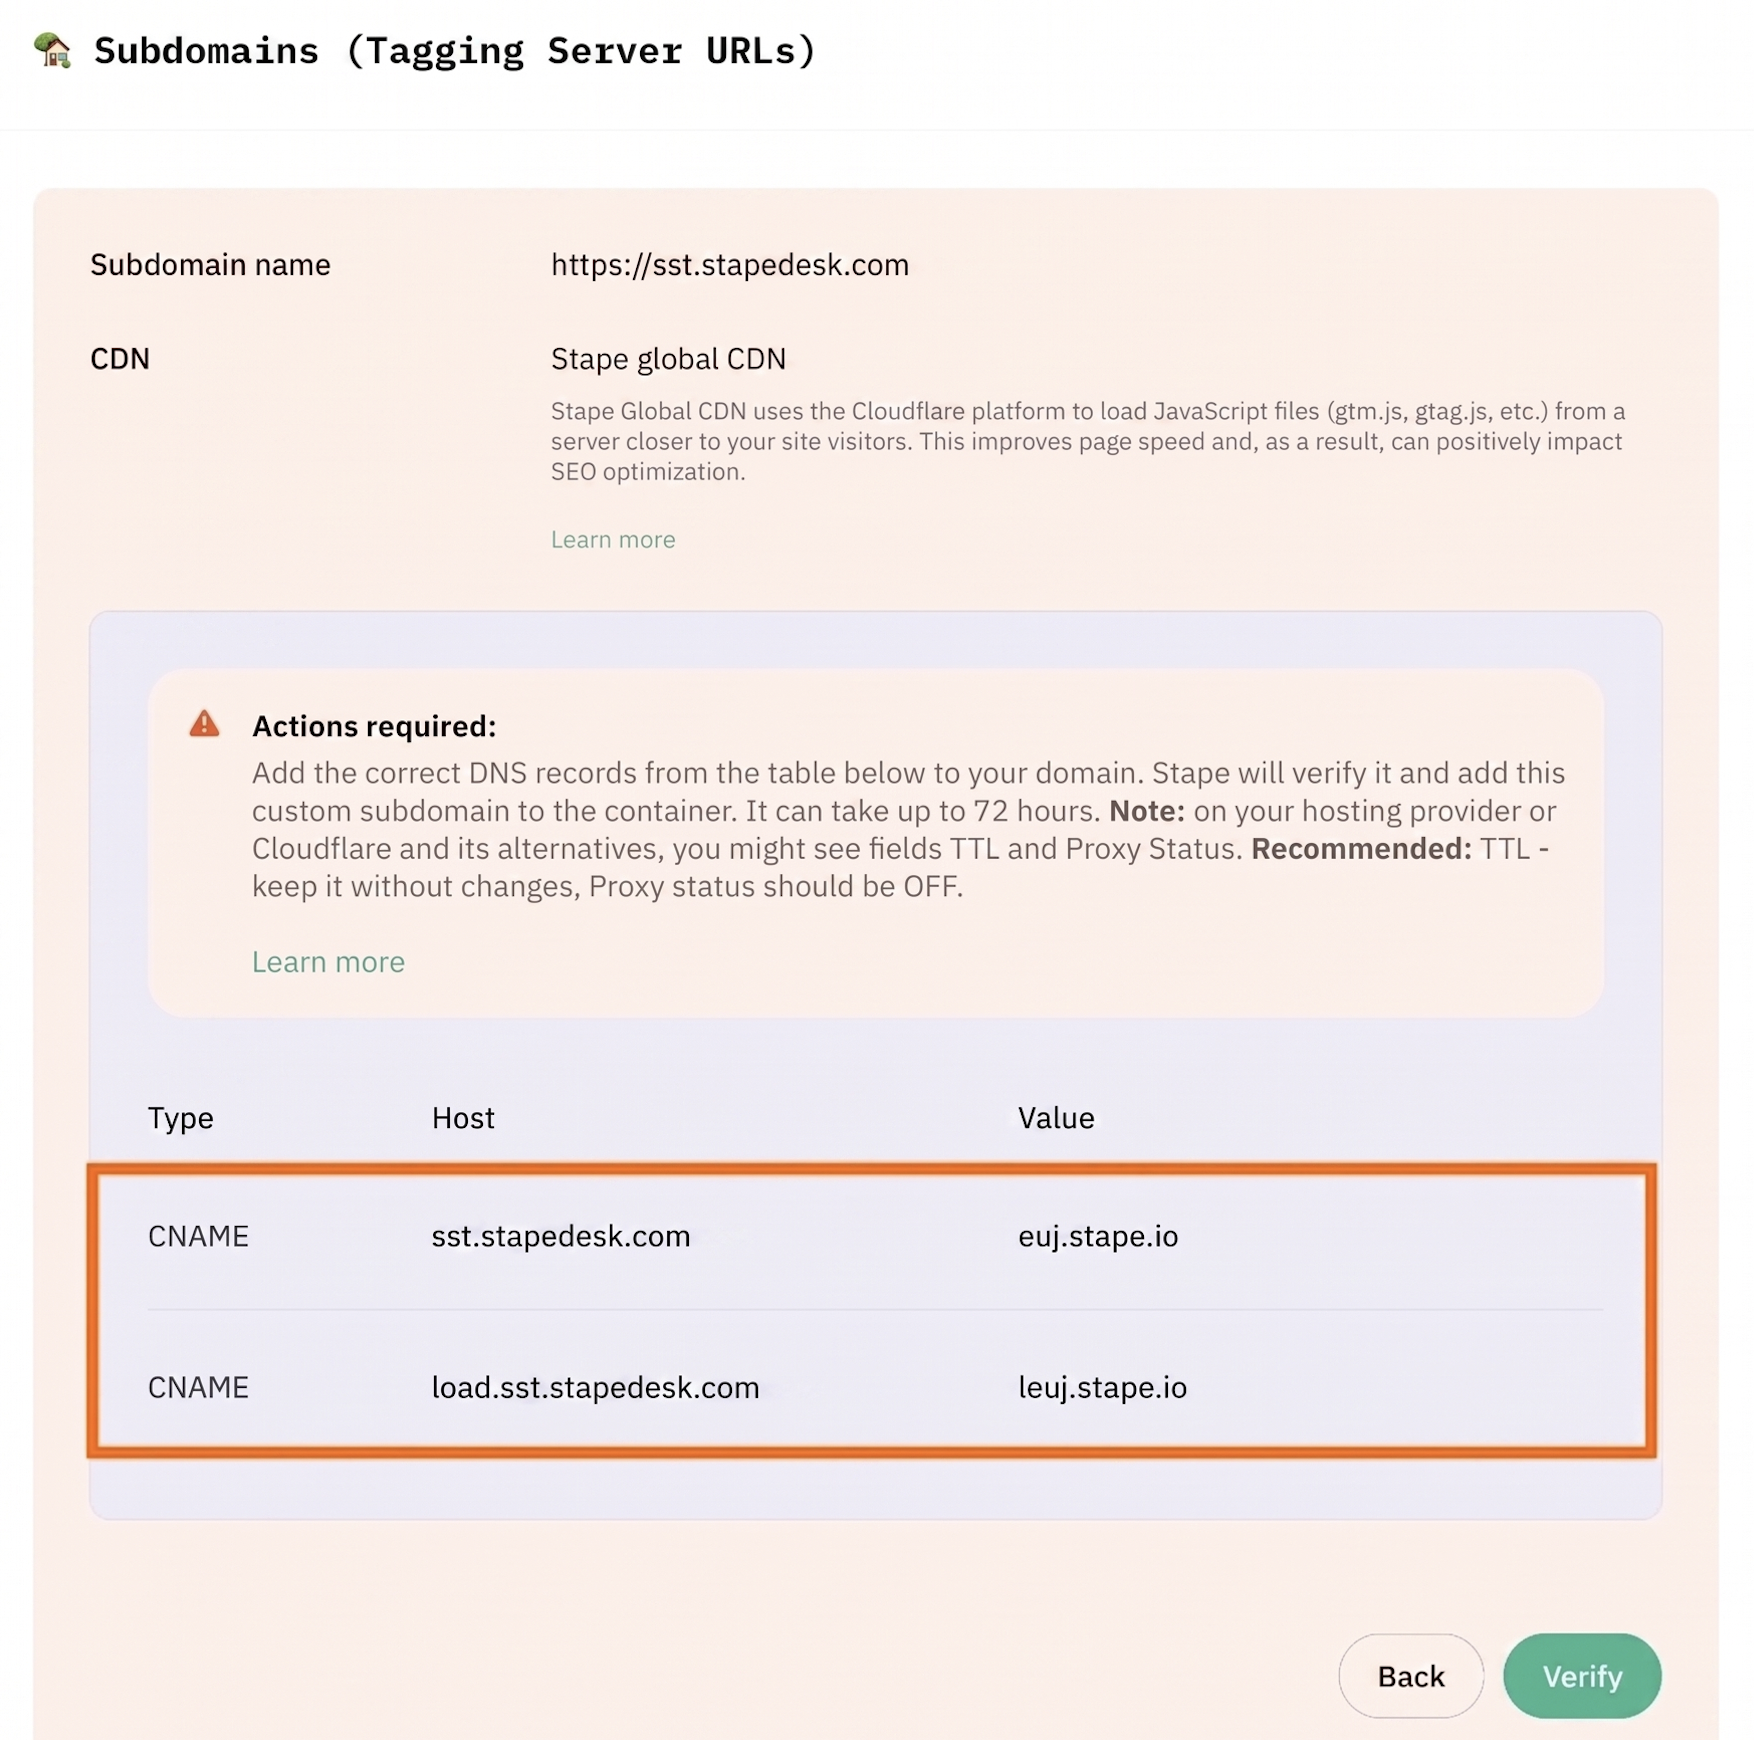
We use Stape Global CDN, so we create two CNAME records:


Adding a custom subdomain with A and AAAA records
| Please note that A/AAAA records are incompatible with enabled CDN. |
A/AAAA records setup
1. If you need to verify your custom subdomain using A and AAAA records, add the custom subdomain to the container and make sure that the CDN toggle is switched off.
Click Advanced settings and tick the Use A records instead of CNAME records box. You will see DNS records that you should add inside your Stape container. The DNS records you should configure vary depending on the server location.
2. Log in to your DNS account and add the records you see in your Stape account. On the account home page, next to your domain name, click three dots and choose Configure DNS.

3. Click Add record.
4. Then, create the records you see in your Stape account. Make sure that the Proxy status is turned off.
Take the values for your DNS records from the Stape account:
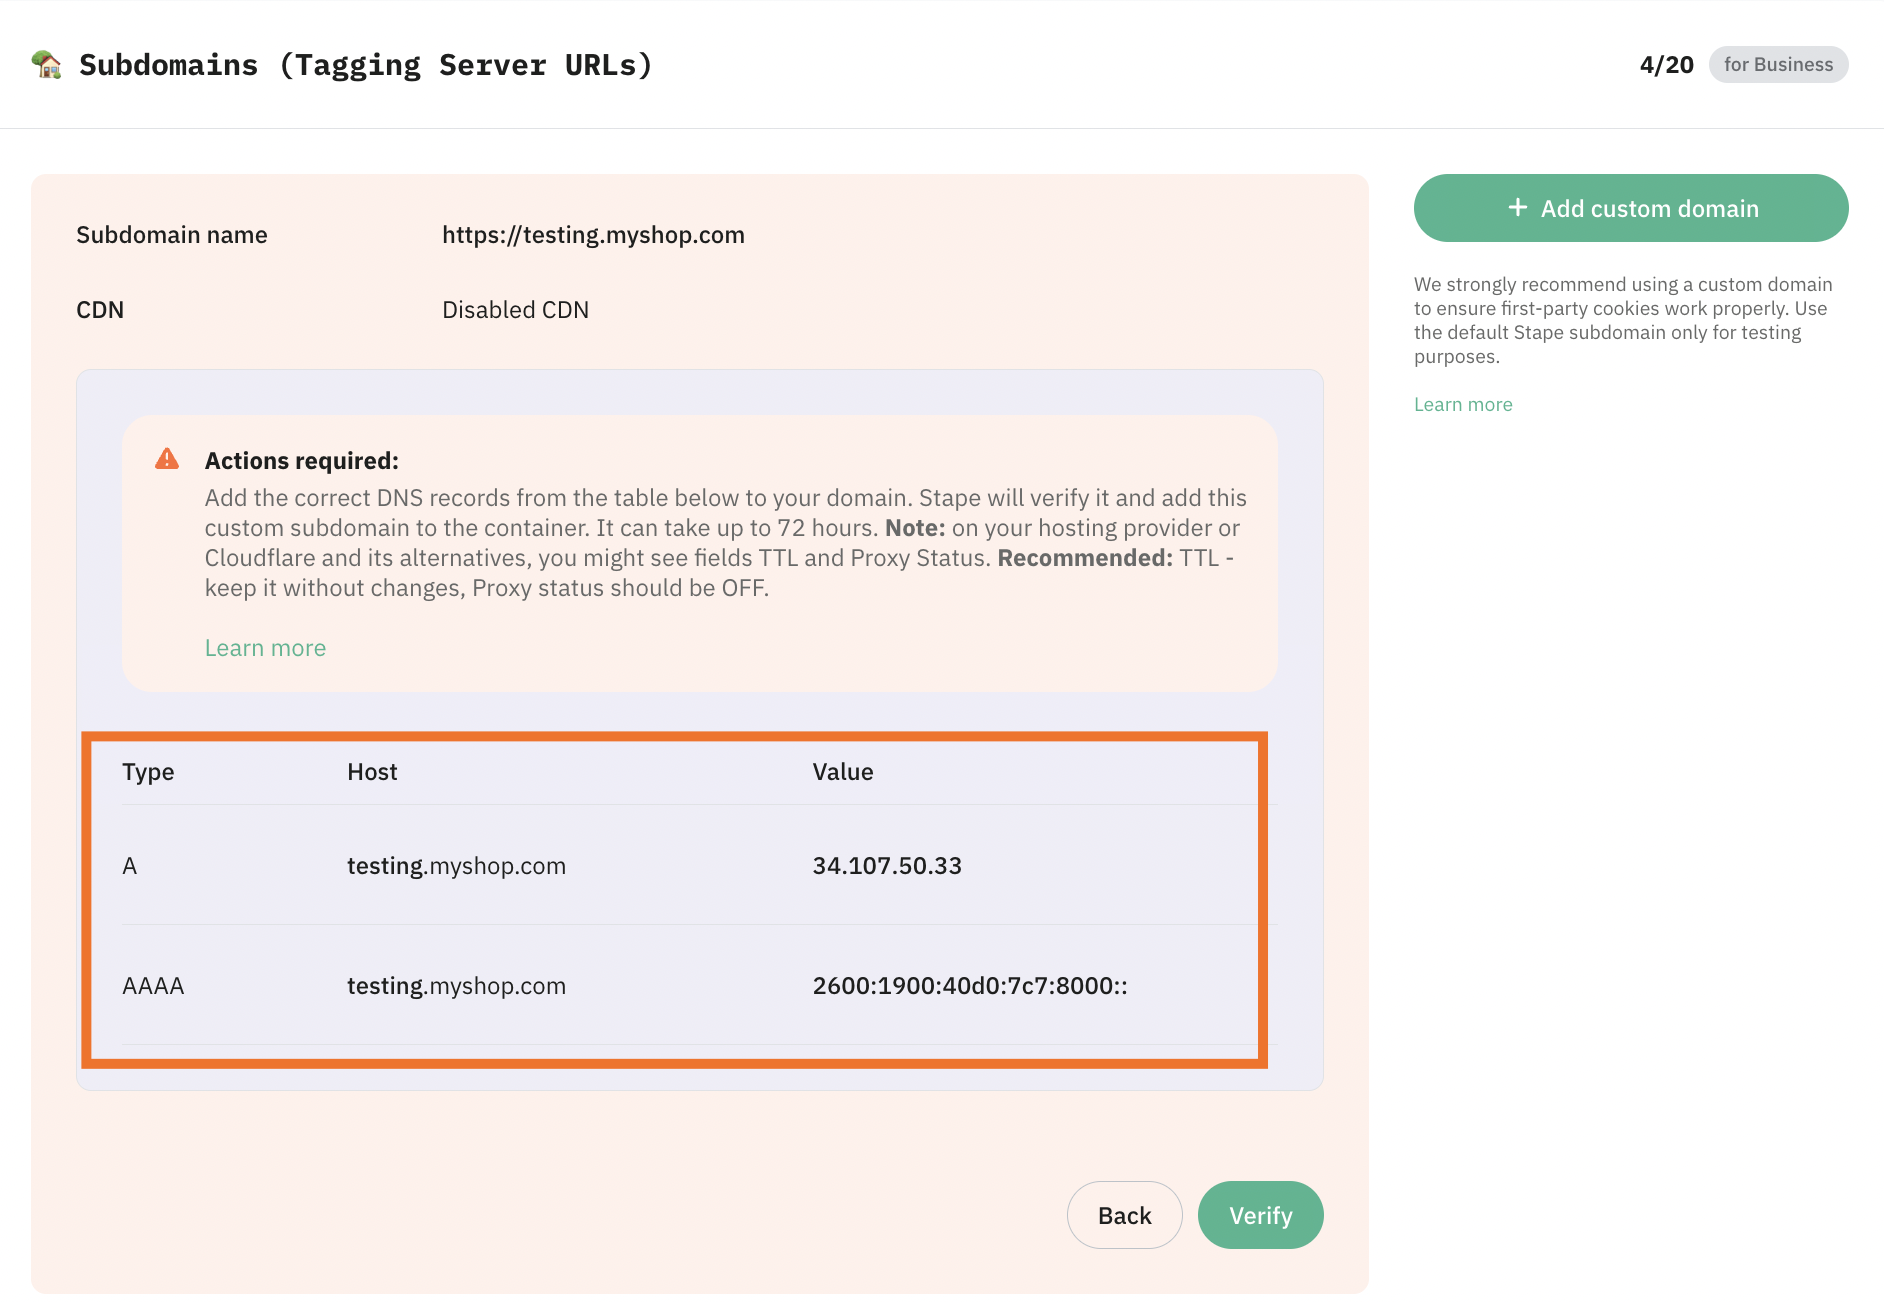
As a result, you will get two DNS records:


Step 5. Verify your domain
Once you've entered the DNS records to your DNS provider, return to the Stape container page where you've been configuring the custom domain and click Verify.
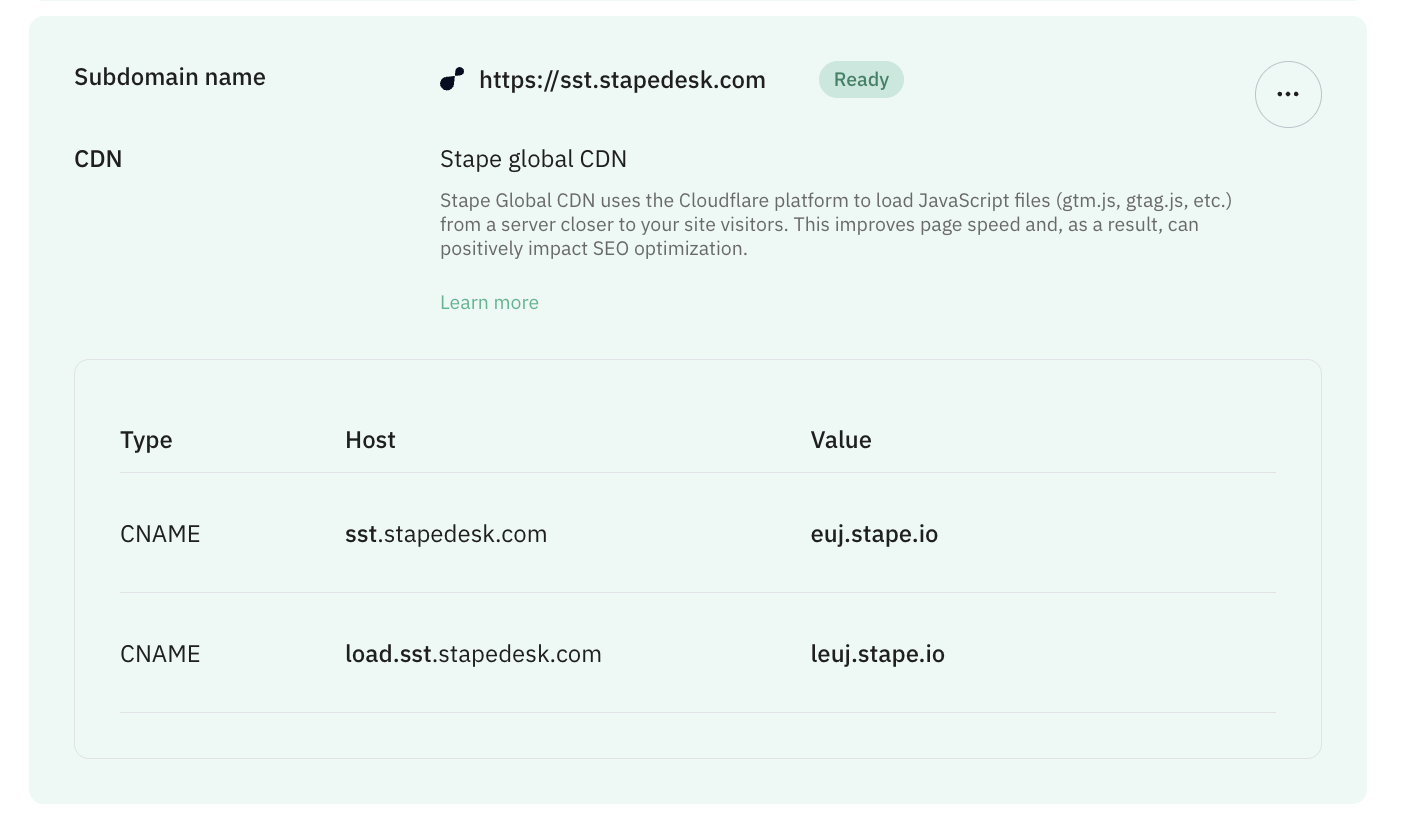
Wait for Stape to finish verifying your custom domain (when the container status bar changes from Verifying to Ready). Usually, it takes 2-3 hours to verify the custom domain. For some DNS providers, verifying records might take up to 72 hours. We will email you once the custom domain is verified or any error is detected.
If you face any problems with domain verification, please follow our guide on troubleshooting a custom domain.
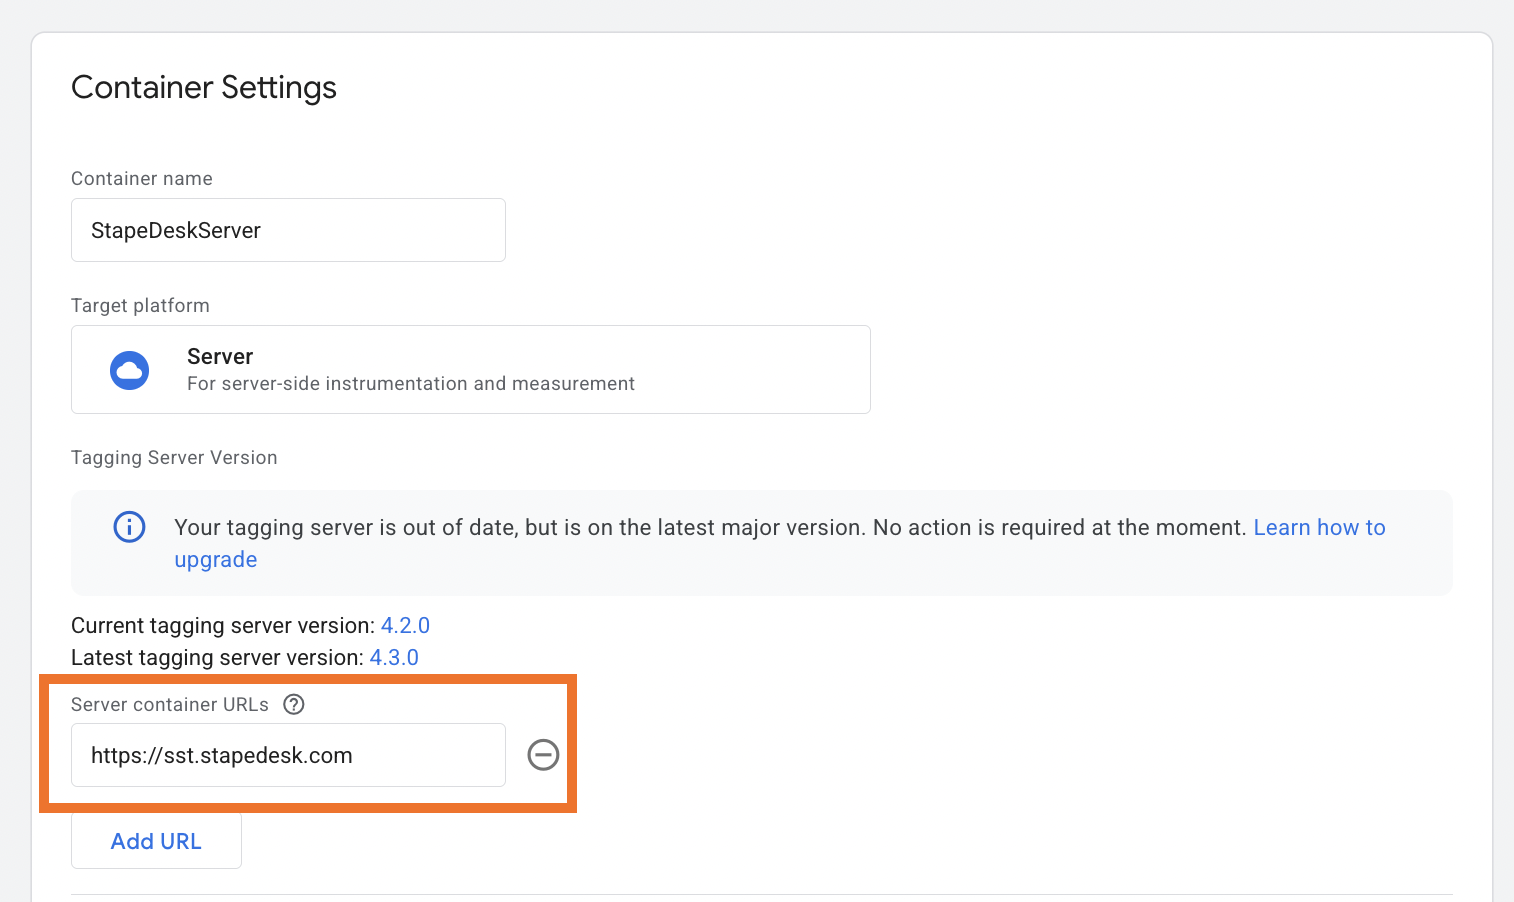
Step 6. Add tagging server URL and update your website script
Go to your Google Tag Manager server container → Admin → Container Settings → change Tagging server URL to your subdomain.
Update the script
If you use a custom domain, updating the Web GTM script on your website is highly recommended. This tweak will load gtm.js from your domain. To do so, replace the default domain googletagmanager.com with the custom domain you set up in the previous step.
Alternatively, you can automate this process with the Custom Loader power-up. Instead of manually editing the GTM script, Custom Loader generates a ready-to-use code snippet that loads GTM and GA4 scripts directly from your custom domain. This saves your time, makes your tracking scripts more resilient to ad blockers, and assures all cookies are treated as first-party.
Step 4. Set up a Custom Loader
Custom Loader modifies gtag.js and gtm.js loading paths to resist ad blockers and ITPs, potentially increasing data volume by up to 40%.
5.1 Find and copy your web GTM ID in GTM. To find GTM ID log in to your Google Tag Manager account and open a Web GTM container. In the top right corner (next to the Submit and Preview buttons) you’ll see some short text that starts with "GTM-" and then contains some letters/numbers.

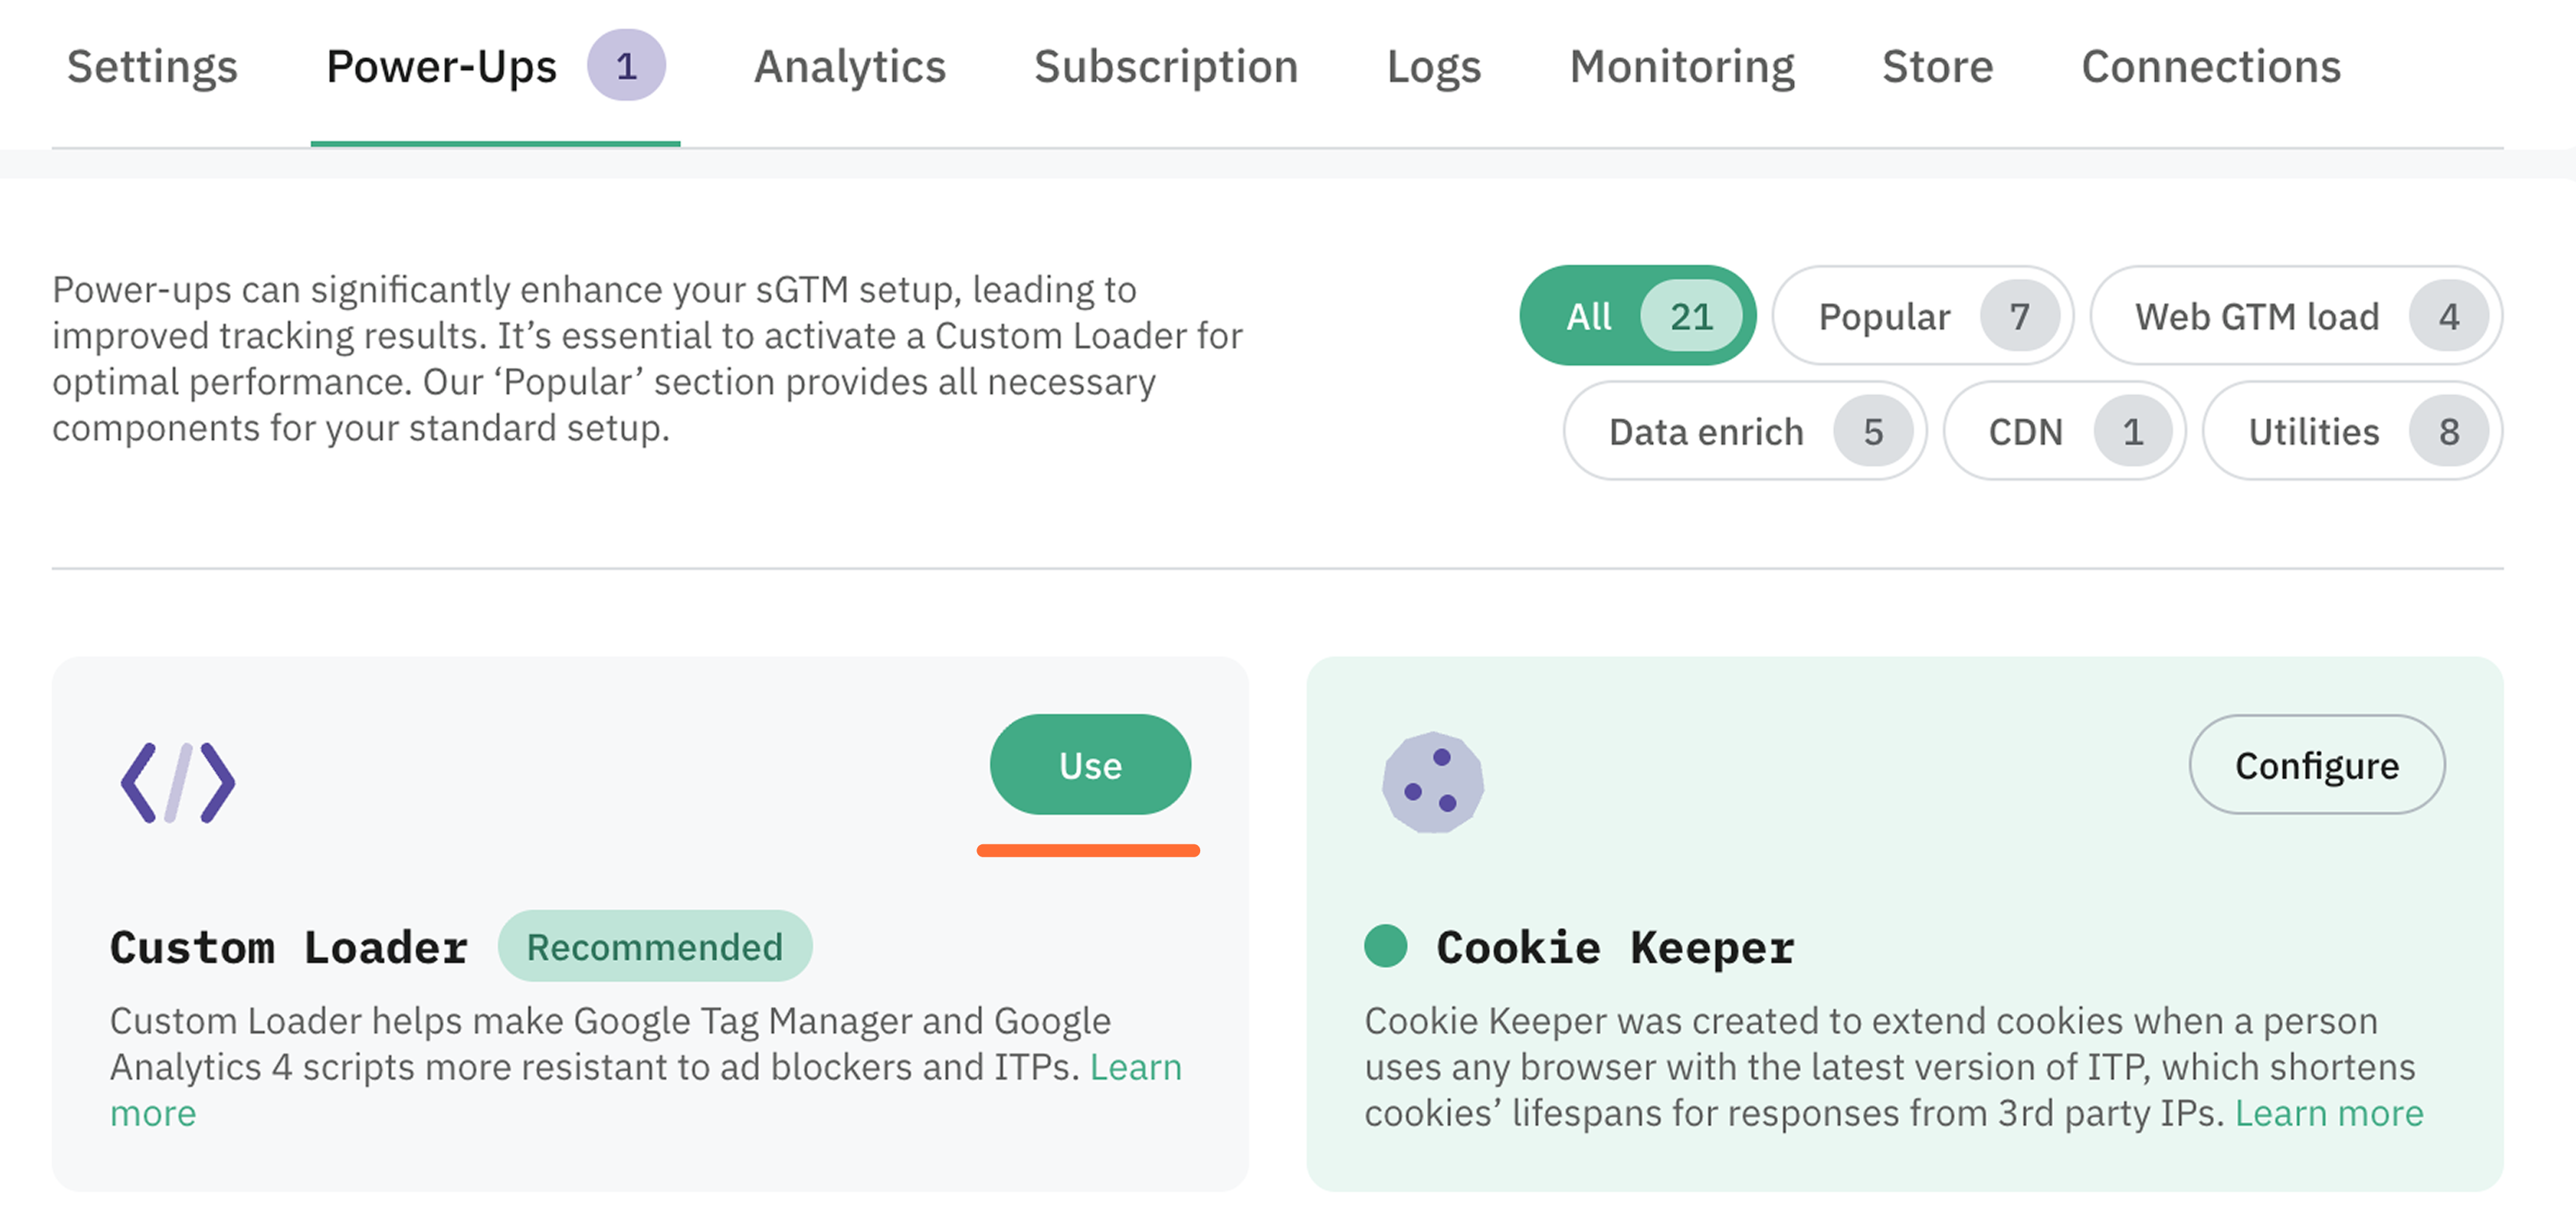
5.2 Open your sGTM container on Stape → Click Power-Ups.
Find Custom Loader and click Use.
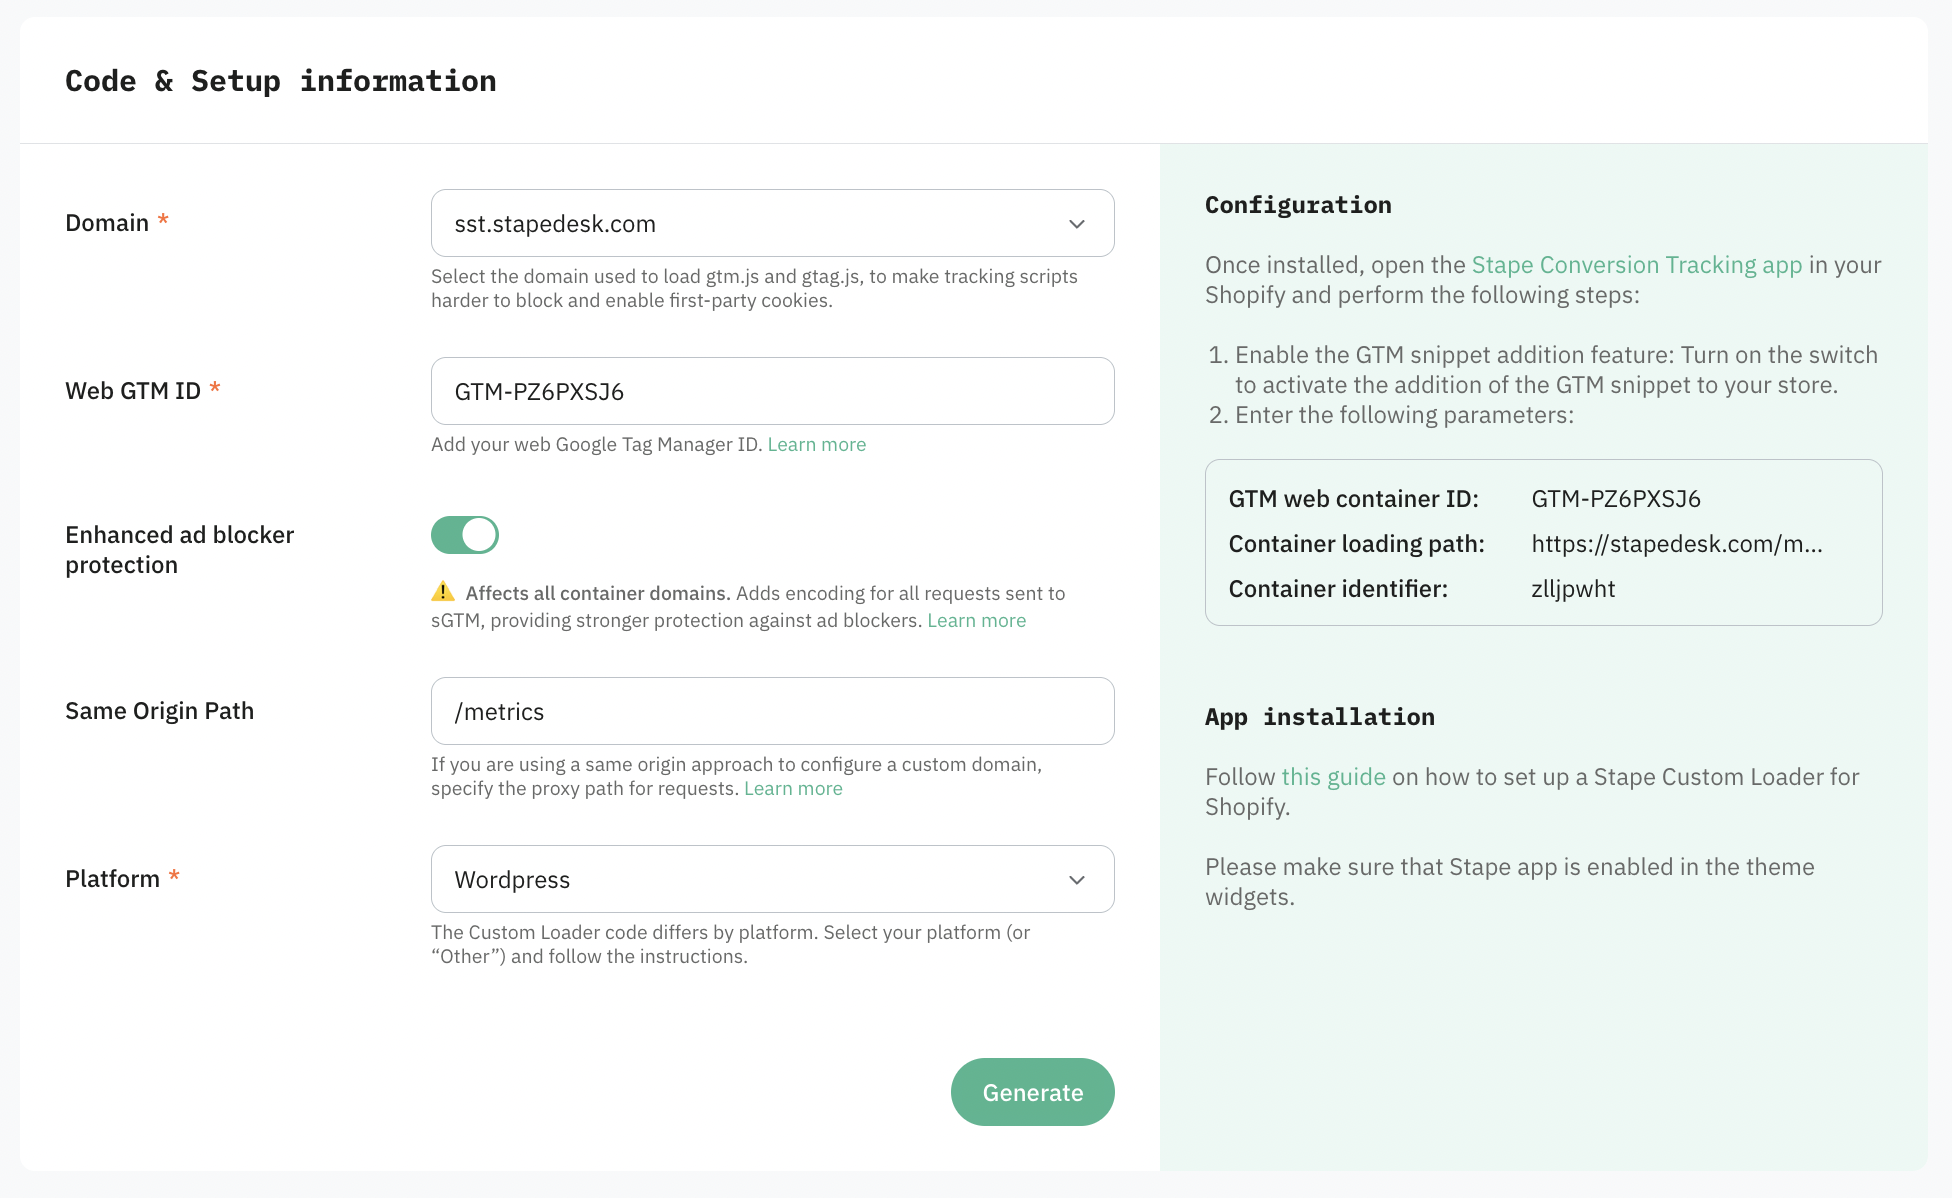
5.3 Add the following settings:
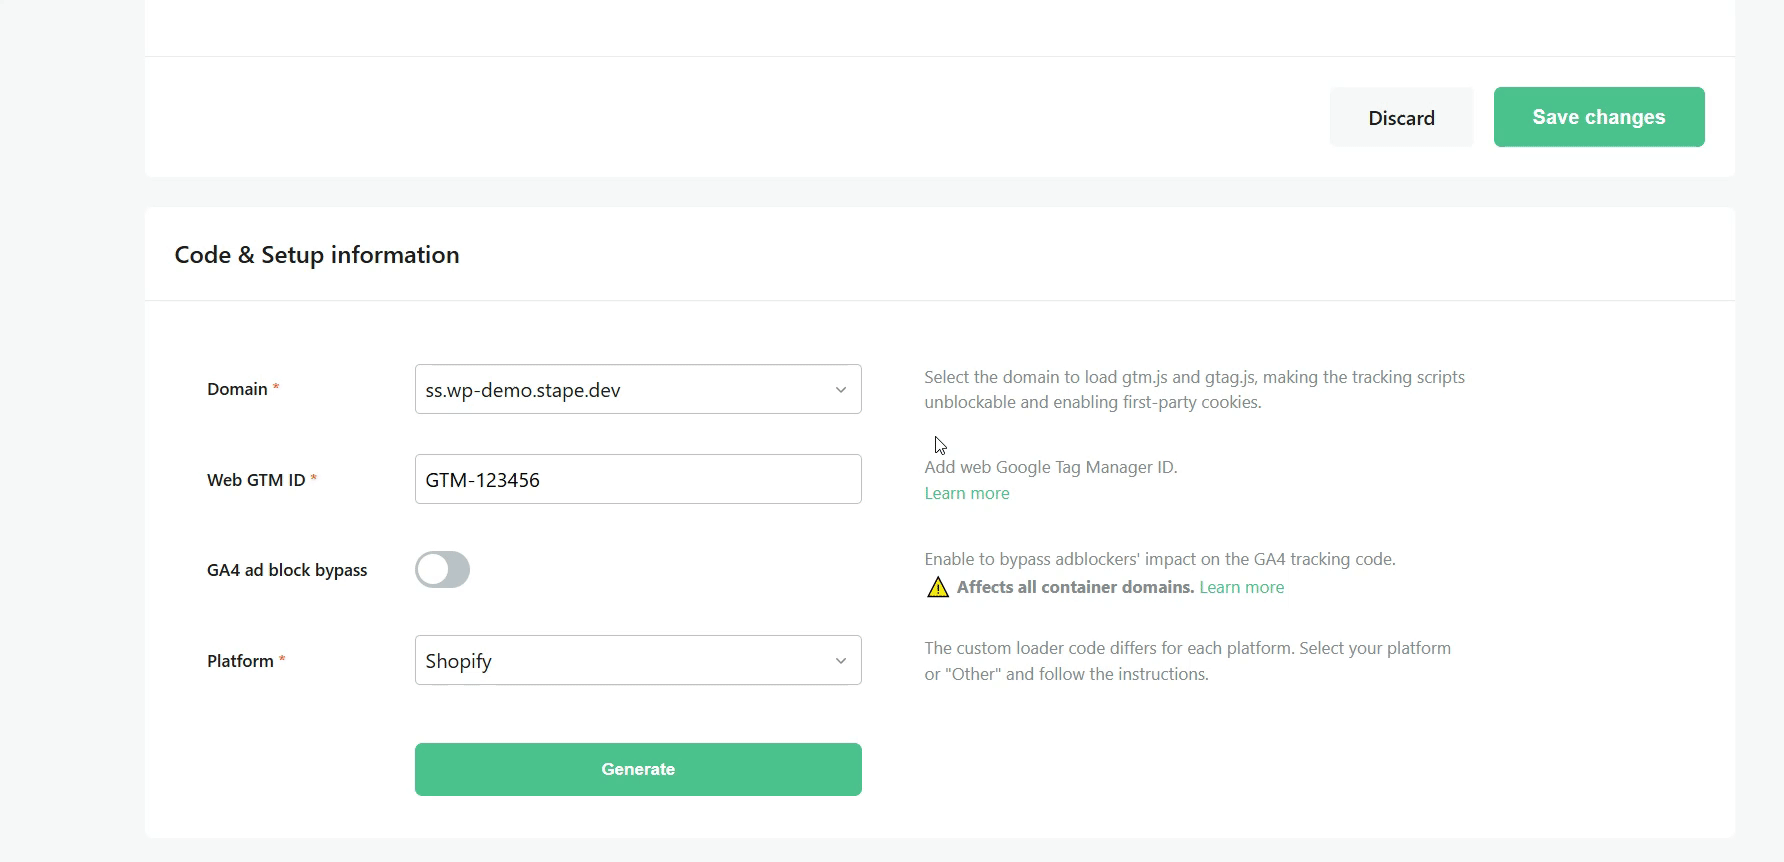
Domain - from the list of domains connected to your container, select the necessary ones.
Web GTM ID - add web Google Tag Manager ID. Check out how to find web GTM ID in our guide.
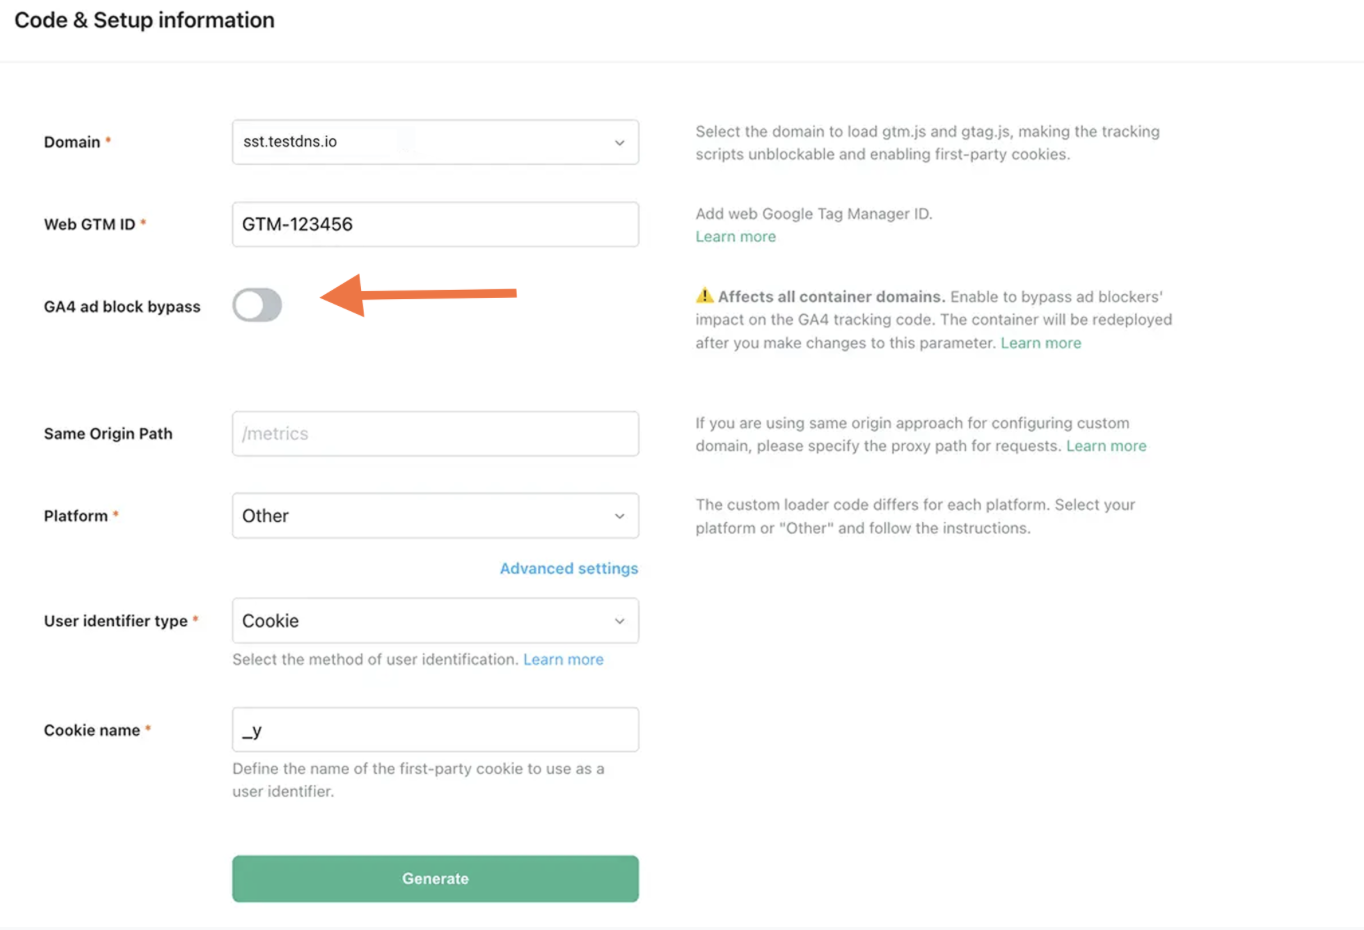
GA4 ad block bypass - enables bypassing adblockers' impact on the GA4 tracking code. Note that this setting will affect all container domains. Be sure to debug both the web and server GTM containers after enabling this toggle.
Same Origin Path - if you are using same origin approach for configuring custom domain, please specify the proxy path for requests.
Platform - the Custom Loader code differs for each platform. Select "Wordpress".
5.4 Once you’ve entered all the Code & Setup information, click the Generate button.
5.5 Follow the instructions on the Configuration panel to set up Custom Loader in your app.
Step 5. Configure Wordpress plugin
1. Log into your WordPress Admin, and go to the plugins. Then, click “Add New,” type Stape Conversion Tracking, choose this plugin, and click Install now. Once established, click Activate.

2. Open the Stape Conversion Tracking plugin you installed in the first step and configure it.
General tab:
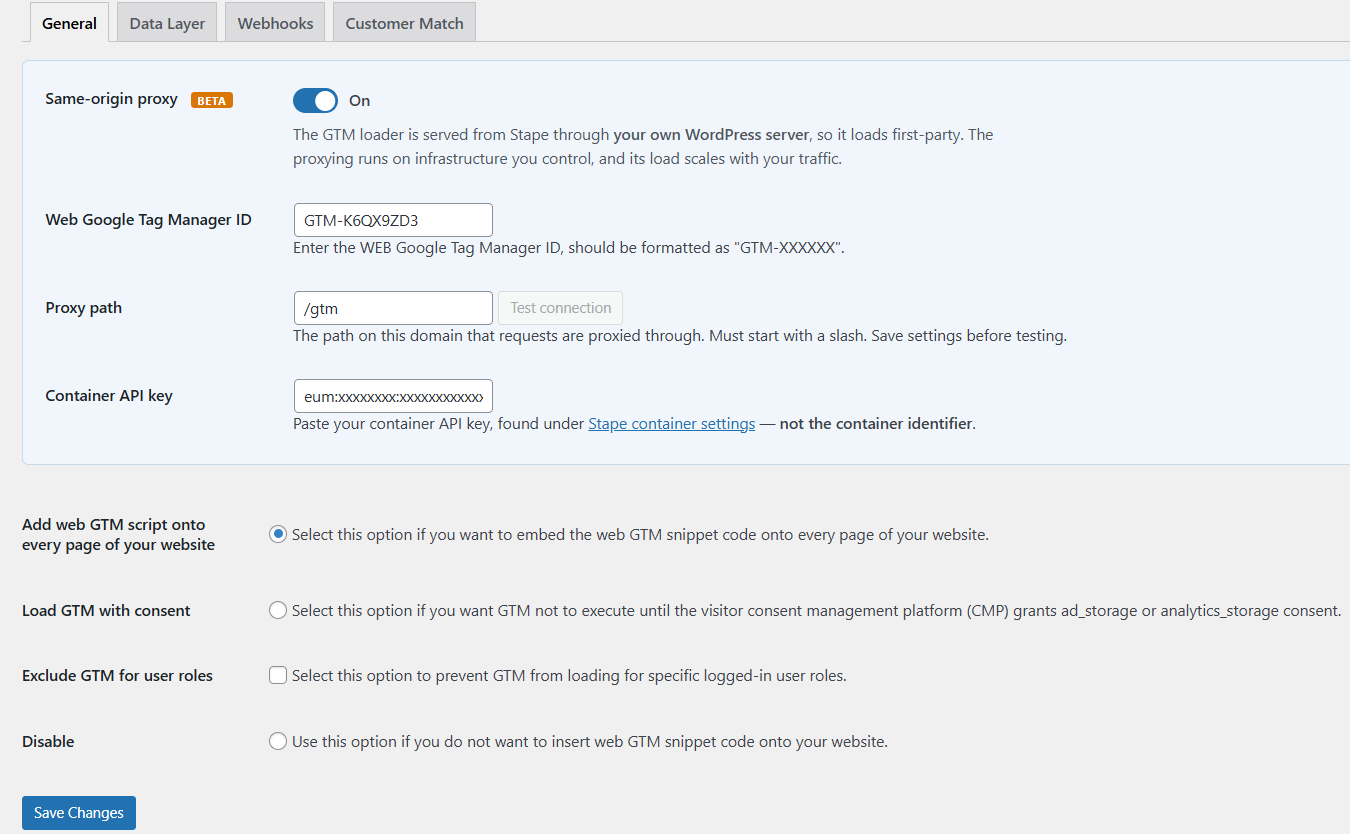
- Same-origin proxy. Normally the GTM web loader is served from the customer's Stape subdomain (for instance, xxxx.stape.io). With same-origin on, that same loader is served from Stape but routed through the customer's own WordPress site. To the browser, it looks first-party, helping the loader work reliably in Safari and pass ad blockers. Note: it's still Stape's loader and Stape's container doing the work; WordPress is just the pass-through that makes it first-party.
Setup with Same-origin proxy enabled
- Web Google Tag Manager ID - be sure to add your web GTM container’s ID. Read how to find the web GTM container ID.
- Proxy path - enter a proxy path for requests, such as /gtm. Once you save the setup, click Test connection to confirm the path responds.
- Container API key - enter your container API key, located in your Stape account container settings. Read how to find the container API key.
- Add web GTM script onto every page of your website - select this if you want to add web GTM to all site pages. Make sure you are not using any other plugins that insert GTM script on the site to avoid conflicts or event duplication.
- Load GTM with consent - select this and GTM will wait for information about the user’s marketing consent before tracking any data.
- Exclude GTM for user roles - select user roles whose activities will not be tracked by GTM.
- Disable - select this to only add plugin functionality without adding GTM script (for example, if you are using another plugin that inserts GTM script on the site).
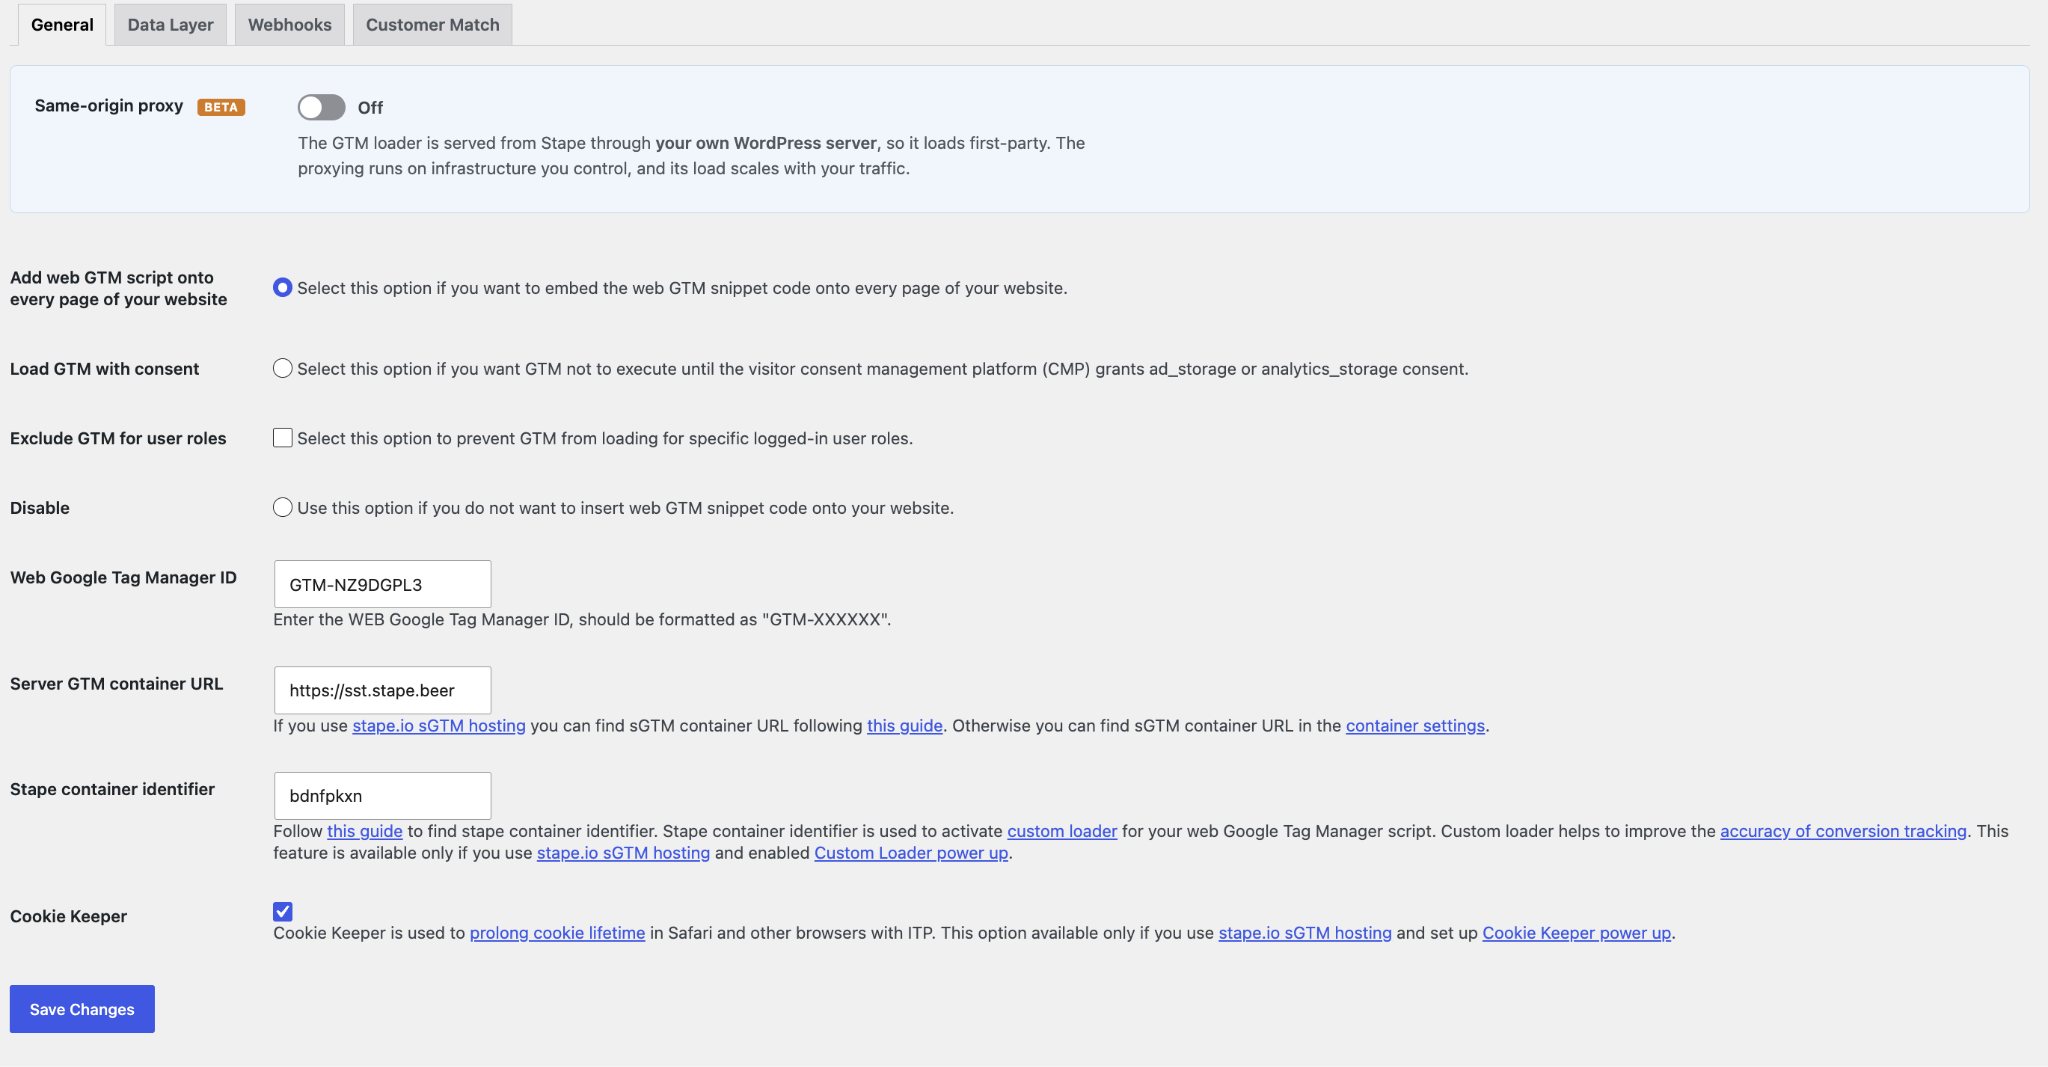
Setup with Same-origin proxy disabled
- Add web GTM script onto every page of your website - select this if you want to add web GTM to all site pages. Make sure you are not using any other plugins that insert GTM script on the site to avoid conflicts or event duplication.
- Load GTM with consent - select this and GTM will wait for information about the user’s marketing consent before tracking any data.
- Exclude GTM for user roles - select user roles whose activities will not be tracked by GTM.
- Disable - select this to only add plugin functionality without adding GTM script (for example, if you are using another plugin that inserts GTM script on the site).
- Web Google Tag Manager ID - be sure to add your web GTM container’s ID. Read how to find the web GTM container ID.
- Server GTM container URL - enter your tagging server URL. If you are using Stape’s sGTM hosting, read how to find your sGTM container URL on Stape. Otherwise, it can be found in your server GTM container’s settings.
- Stape container identifier - enter the Stape container identifier if you want to use a Custom Loader (highly recommended to improve the accuracy of conversion tracking).
- Cookie Keeper - select this if you wish to enable Cookie Keeper and prolong cookie lifetime.
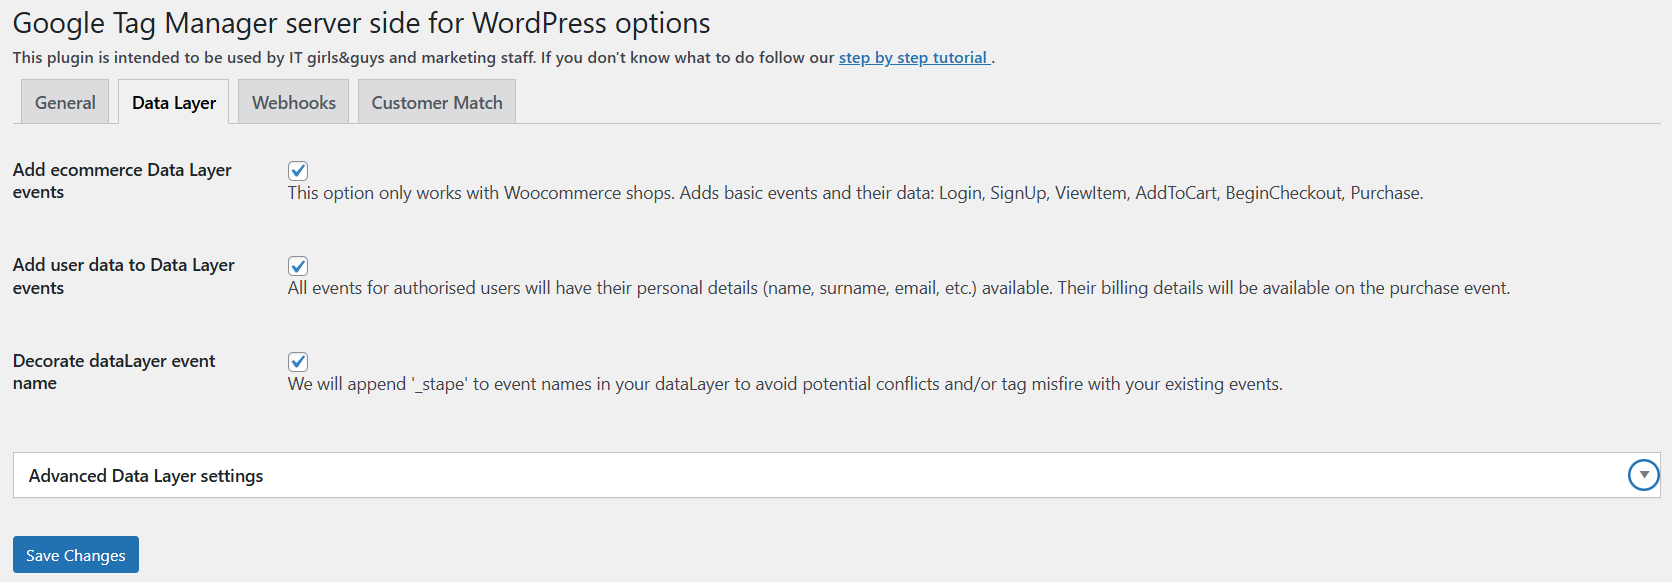
Data Layer tab:
- Add ecommerce Data Layer events - add basic ecommerce events and their data for shops built with Woocommerce.
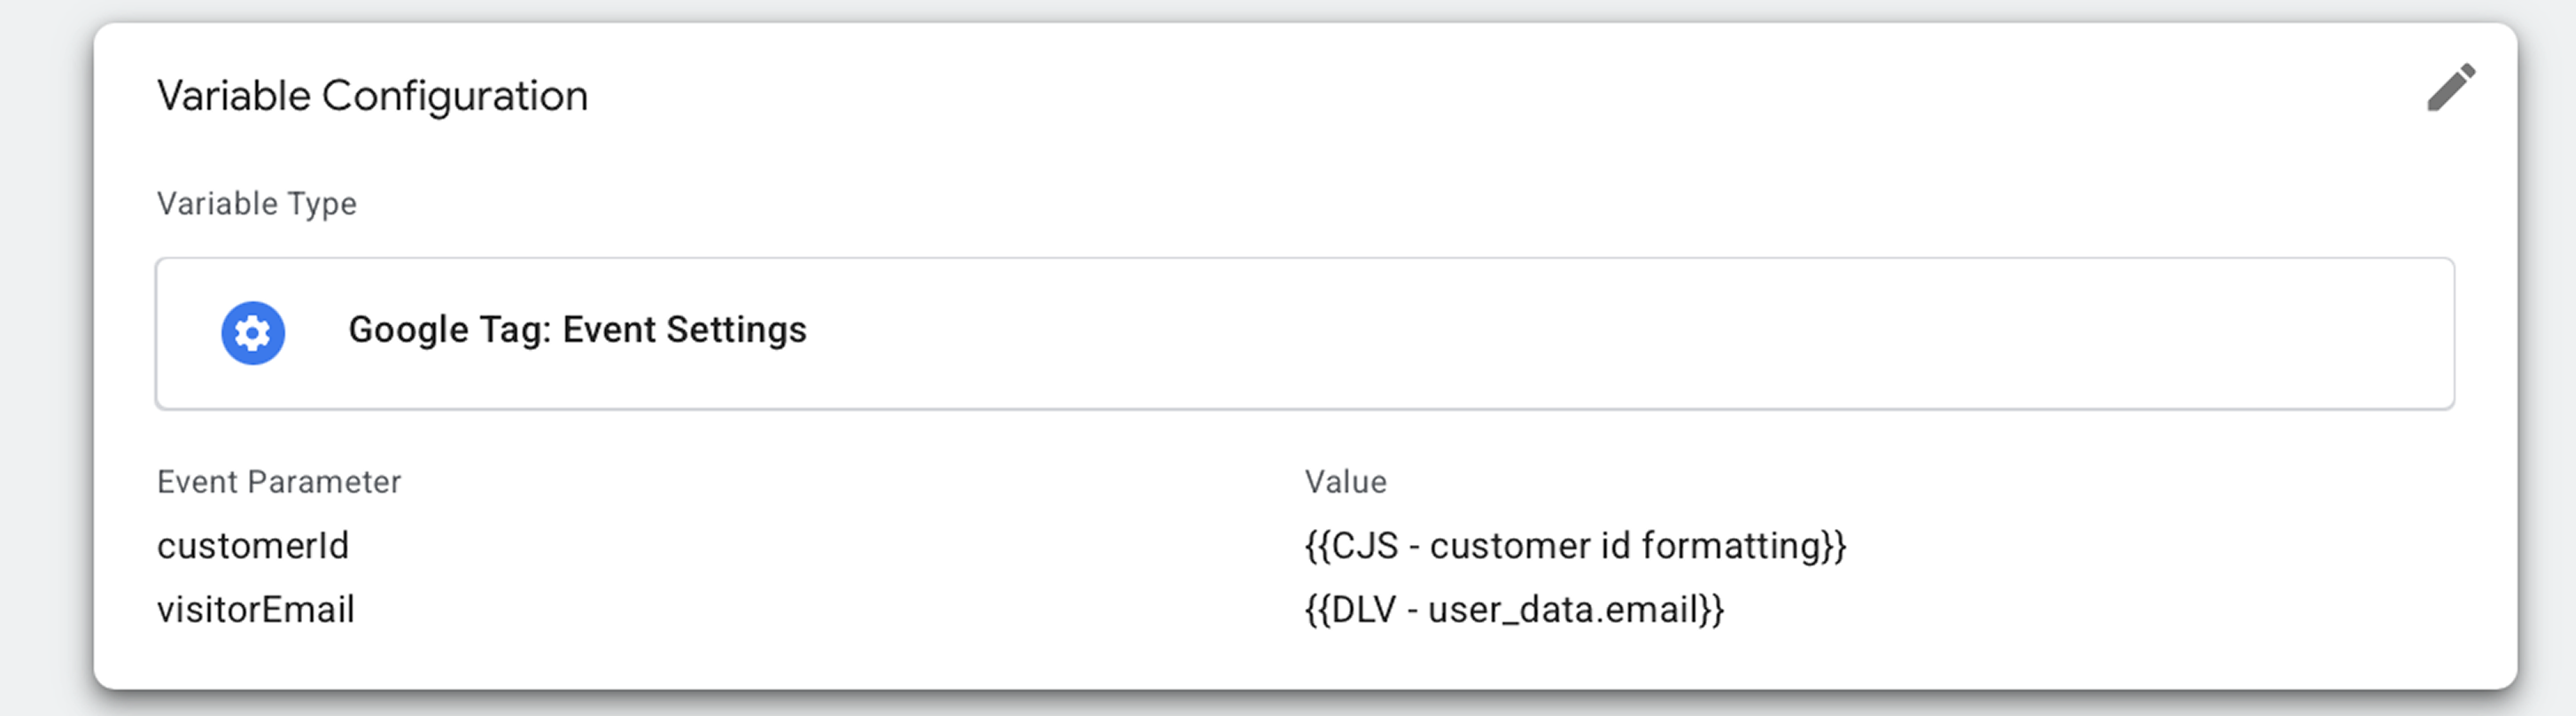
- Add user data to Data Layer events - add data with personal details of authorised users to Data Layer events.
- Decorate dataLayer event name - add _stape to Data Layer event names.
- Advanced Data Layer settings - fine-tune your Data Layer event values.
Webhooks tab:
- Send webhooks to server GTM container - enable sending webhooks to your server GTM container. Be sure you understand what webhooks are and how to use them.
- Server GTM container URL - enter the URL of the server container where webhooks will be sent. If you are using Stape’s sGTM hosting, follow this guide to locate it. Otherwise, it can be found in your server GTM container’s settings.
- Purchase webhook - send a purchase event when a new order is created.
- Order paid webhook - processing - send an order_paid event when an order is paid.
- Order paid webhook - completed - send an order_completed event when an order is completed.
- Refund webhook - send a refund event when an order is refunded.
- Send test webhook - troubleshoot your webhook setup by sending a test webhook.

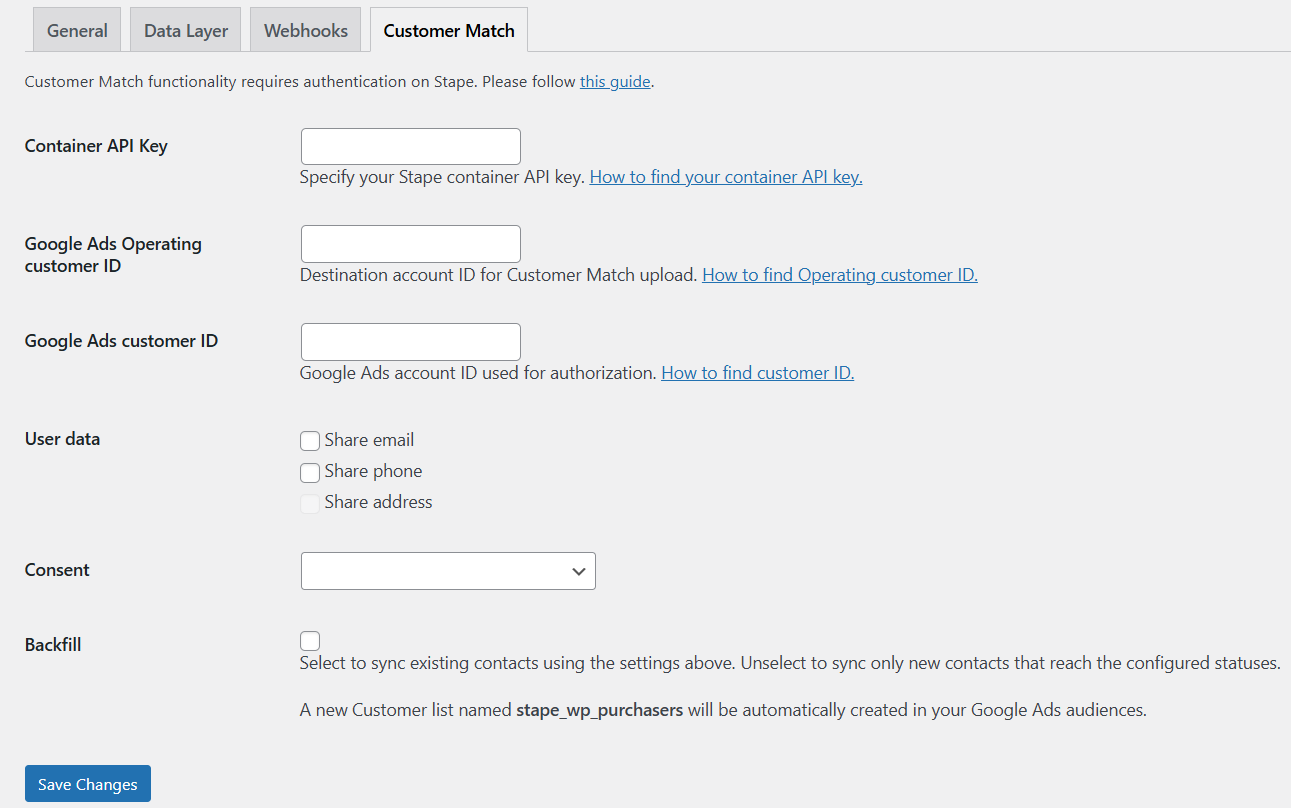
Customer Match tab:
- Container API Key - enter your container API key, located in your Stape account container settings. Read how to find the container API key.
- Google Ads Operating customer ID - enter the destination account ID for Customer Match upload. Read how to find your operating customer ID.
- Google Ads customer ID - enter your Google Ads account ID (NOT the operating one). Read how to find your customer ID.
- User data - select which user data to share with Google Ads’ Customer Match functionality.
- Consent - select one of the options if you wish to define the consent status of the user data.
- Backfill - select to update existing contacts using the settings above, or leave blank to synchronize only new contacts.
Step 6. Configure Google Analytics 4
There can be two scenarios:
4.1 If you already configured Google Analytics 4 inside your web GTM container, all you need to do is:
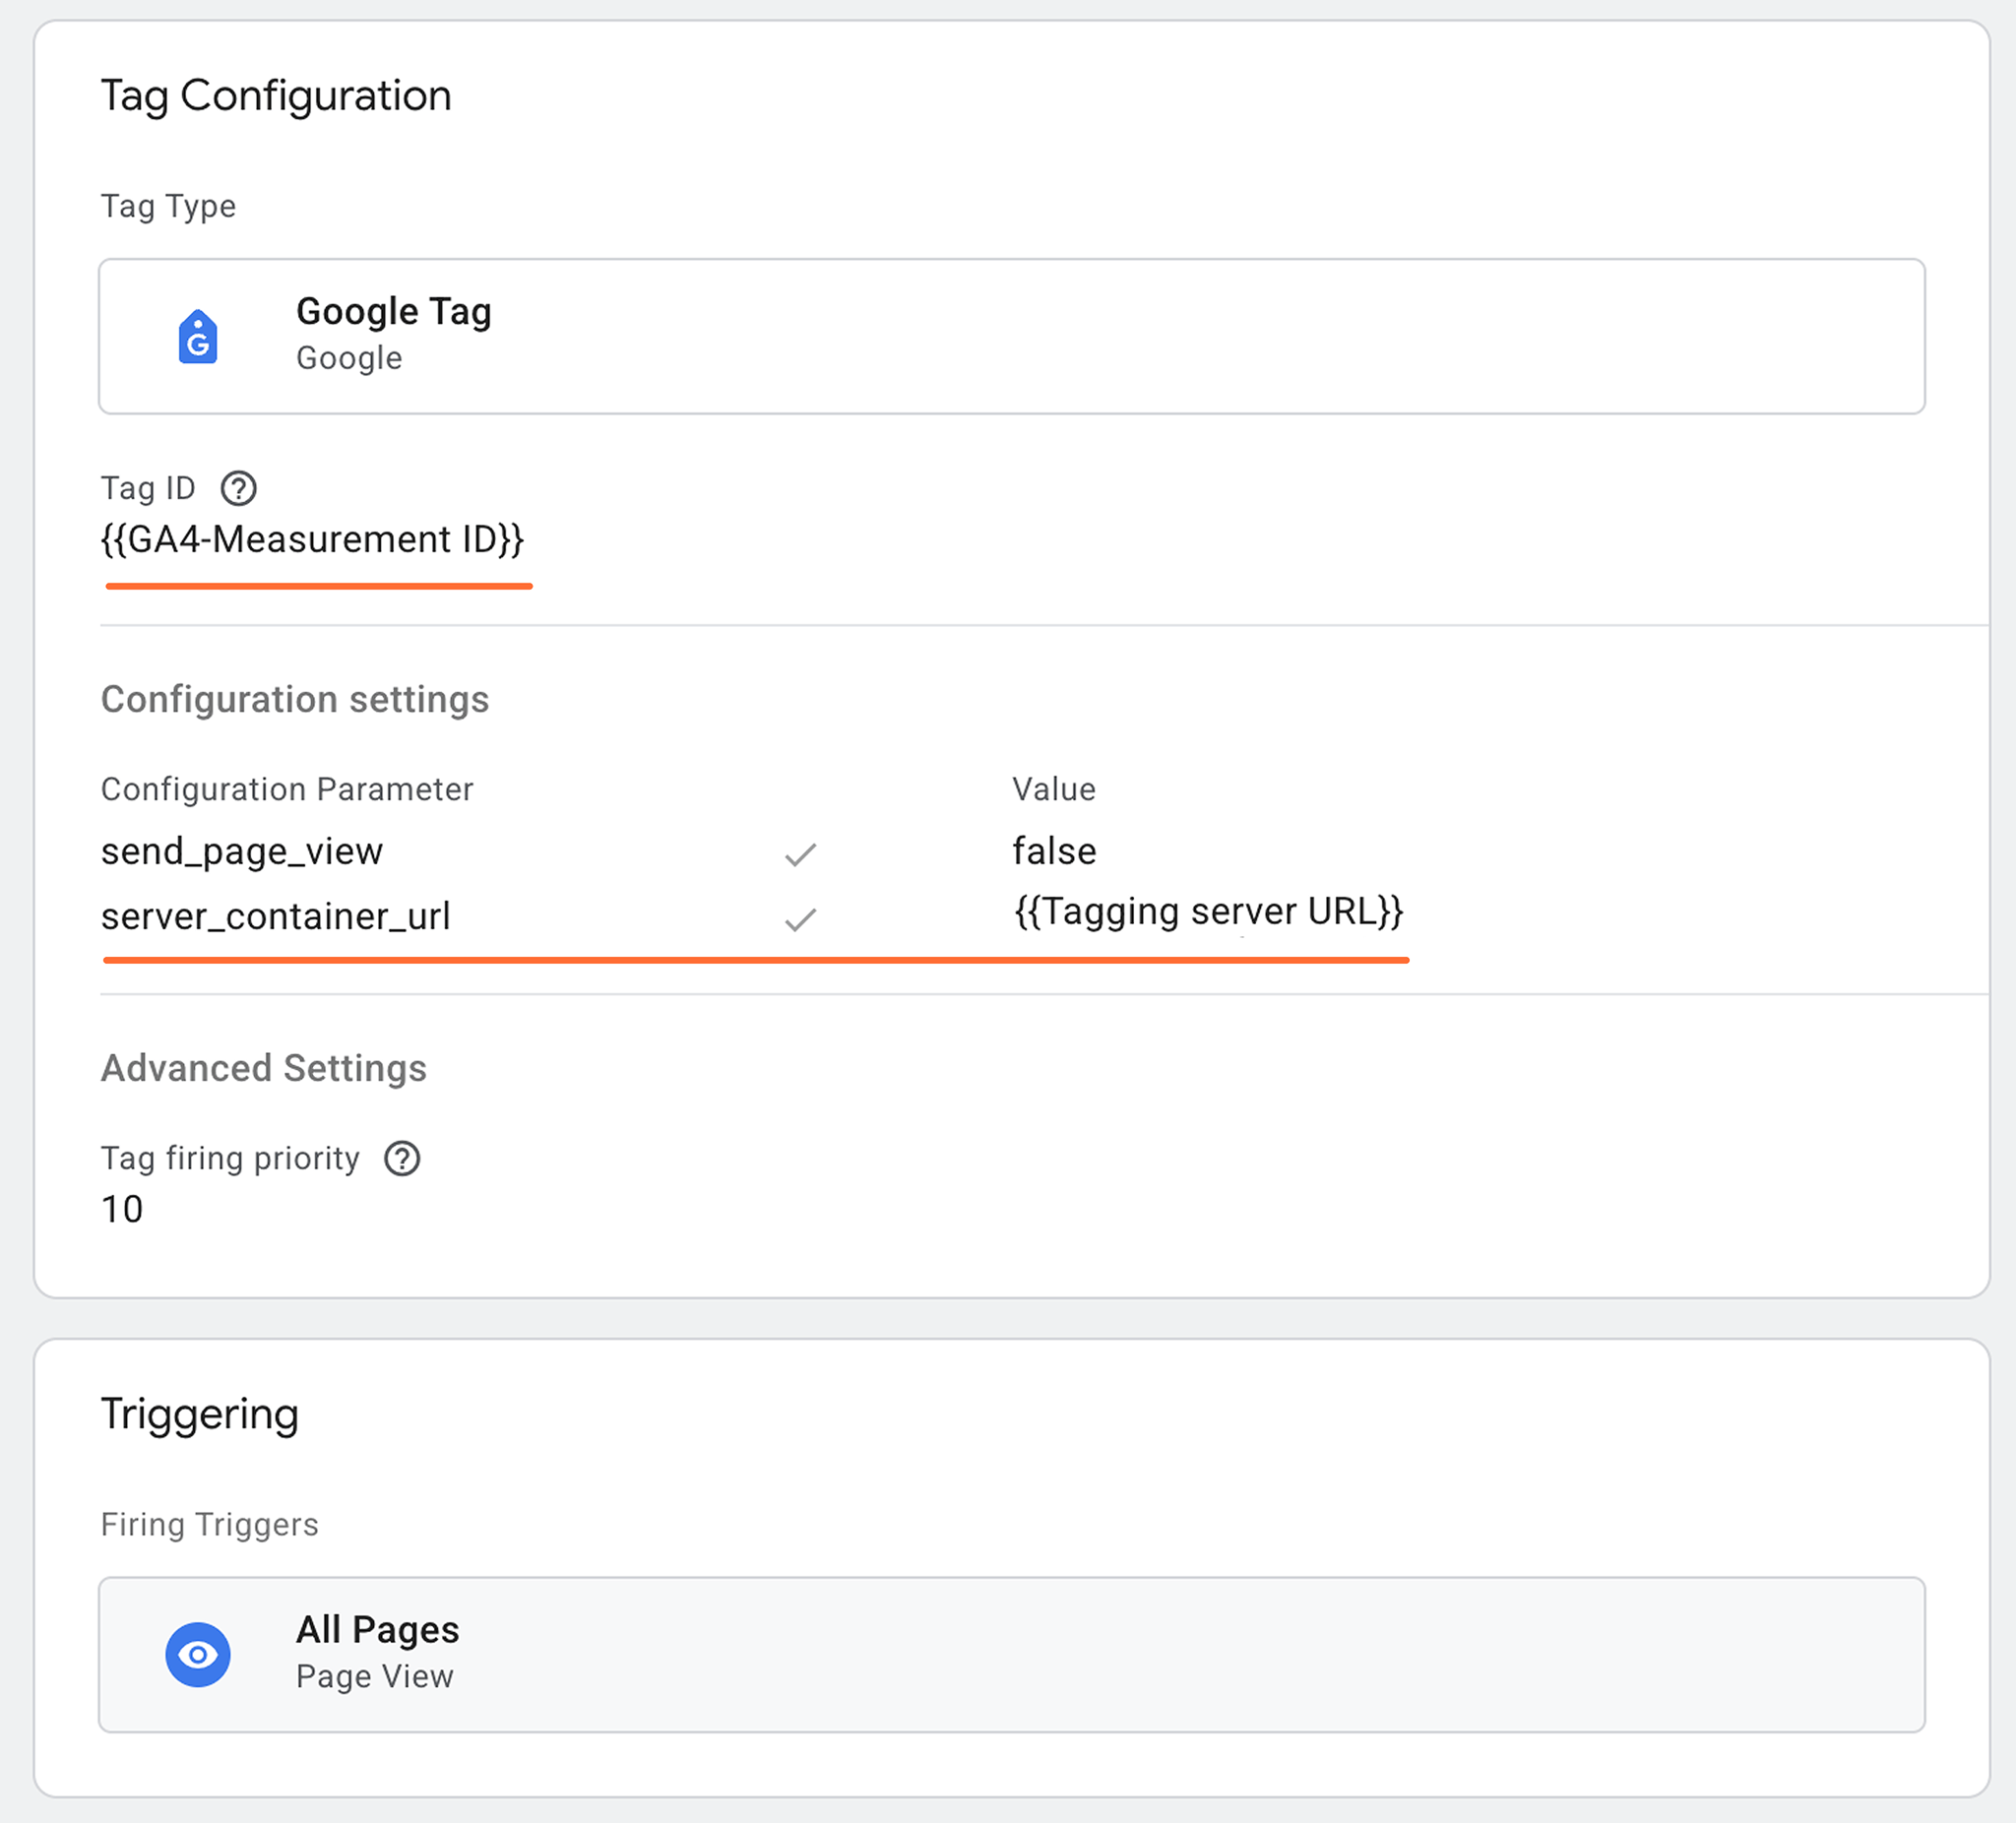
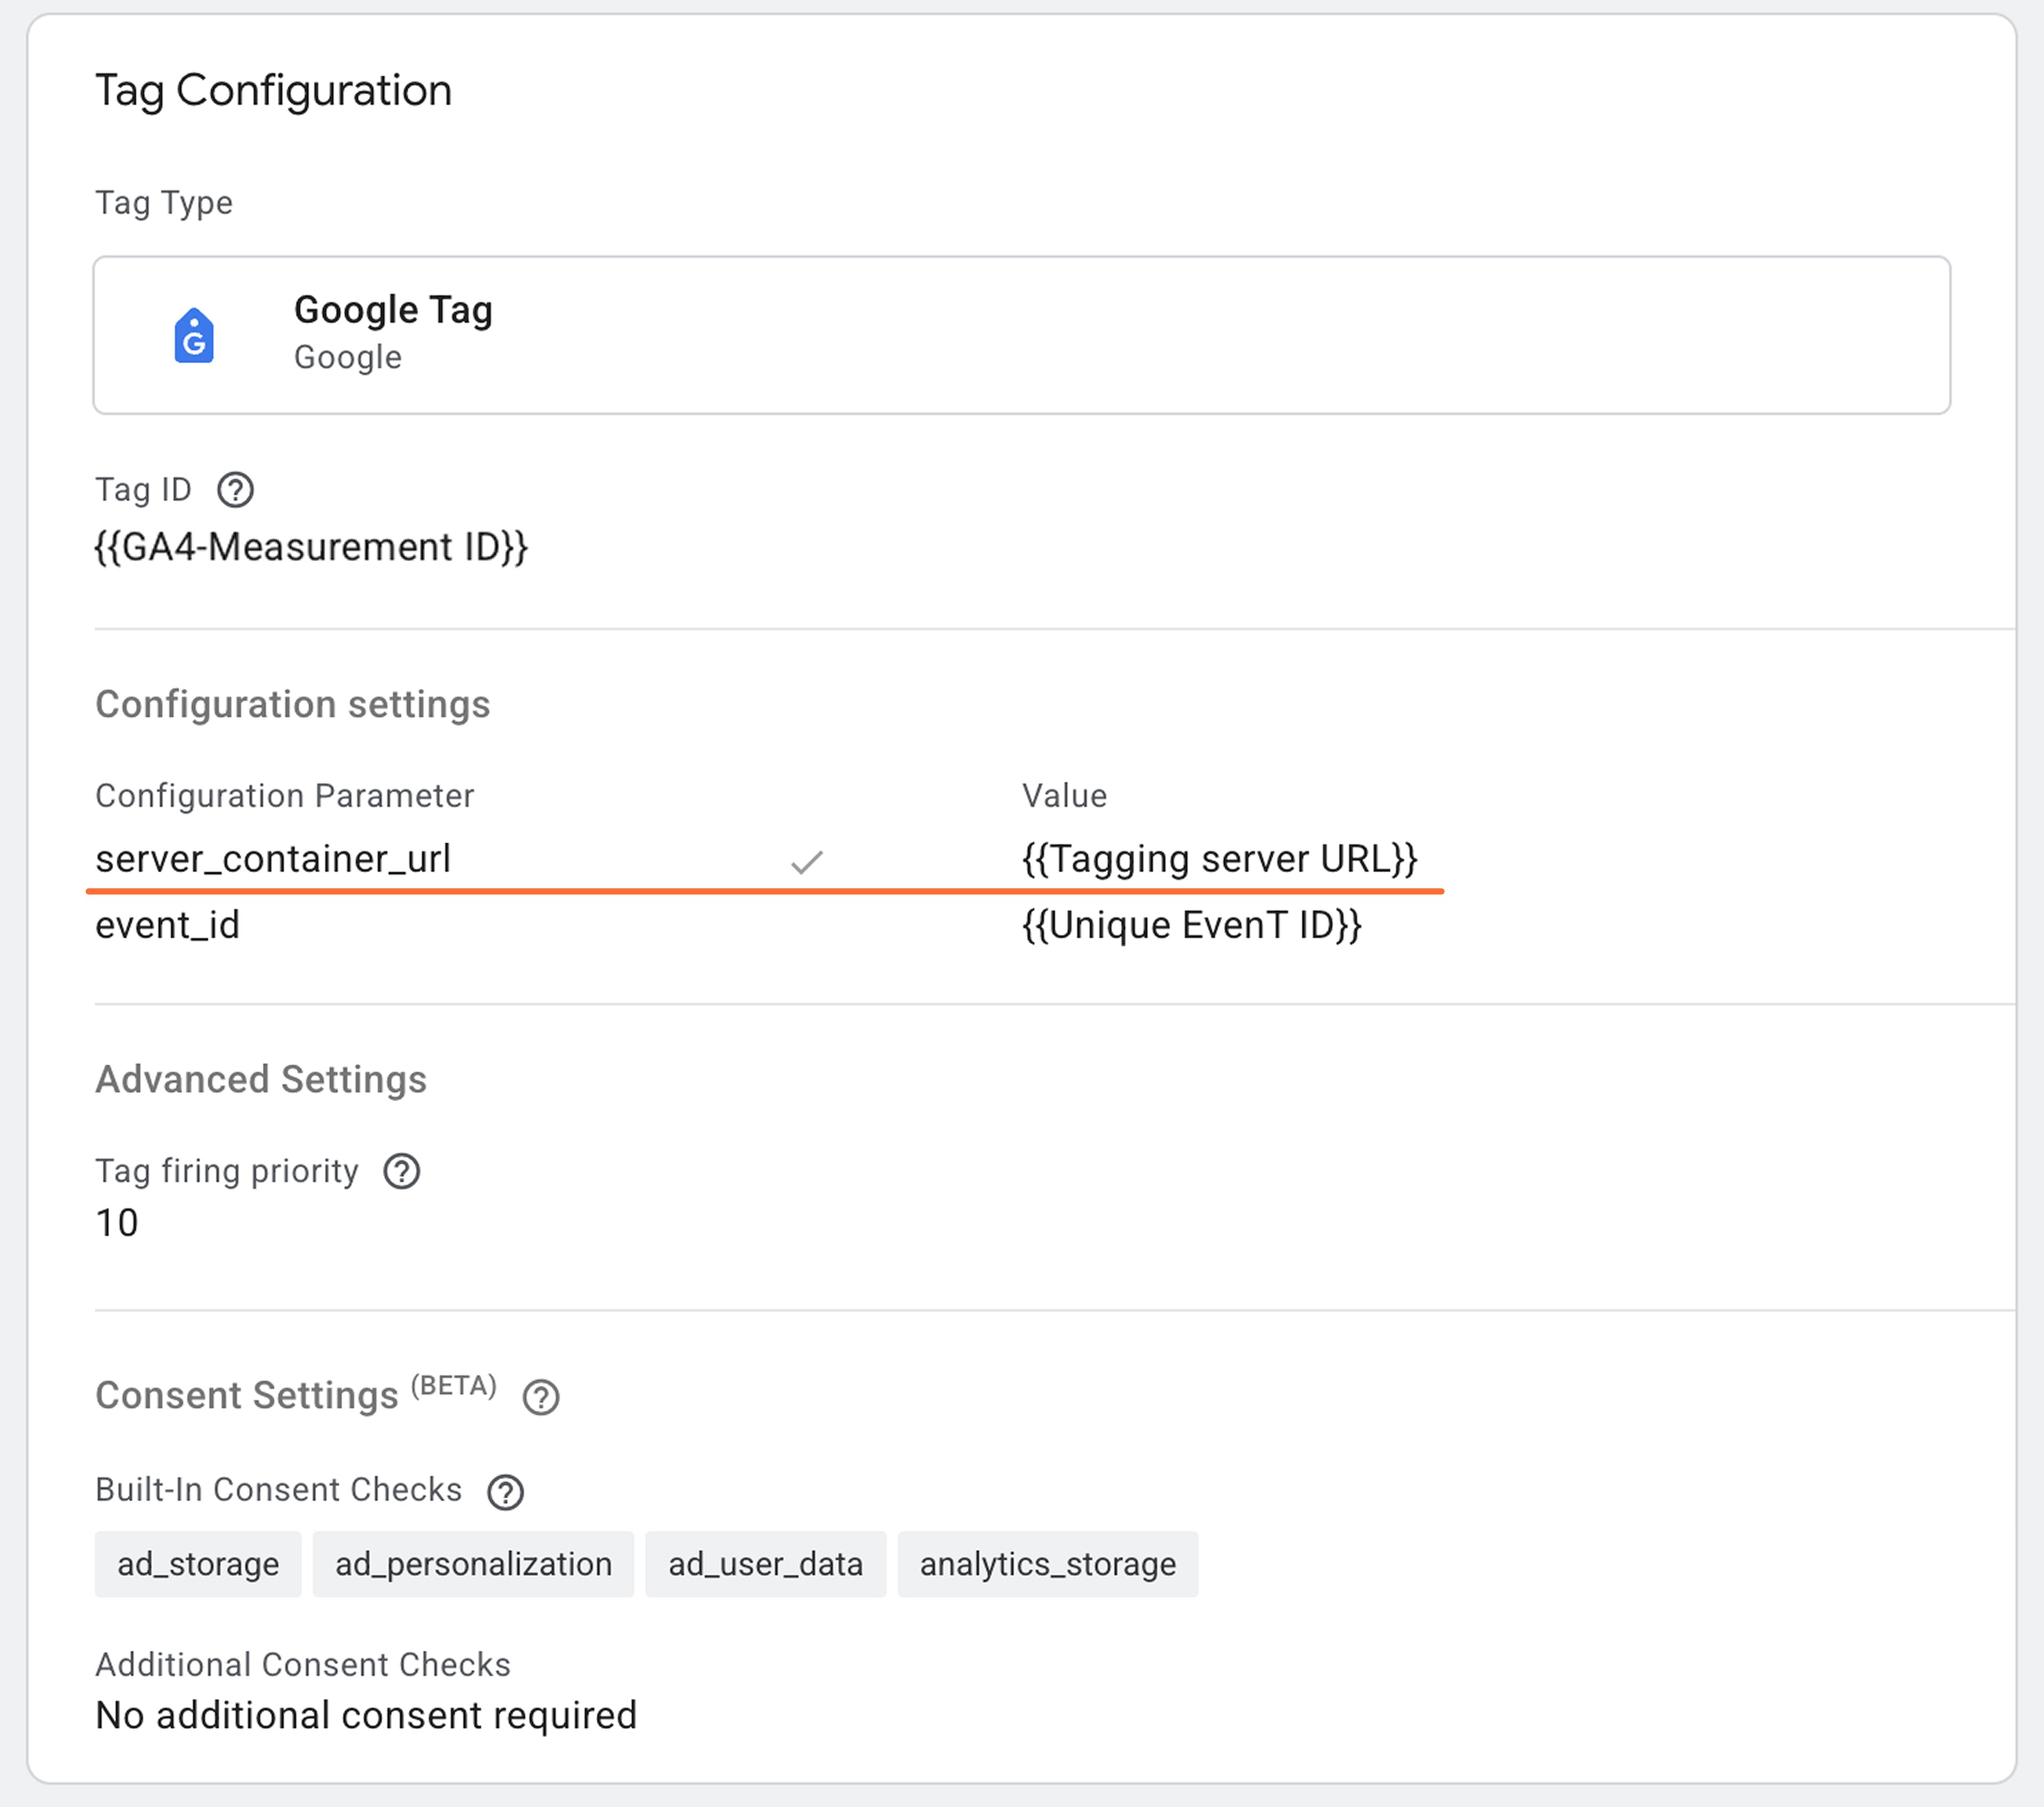
4.1.1 Add your server container URL to Google Tag settings. In the configuration settings, add the configuration parameter server_container_url and add your tagging server URL as a value.
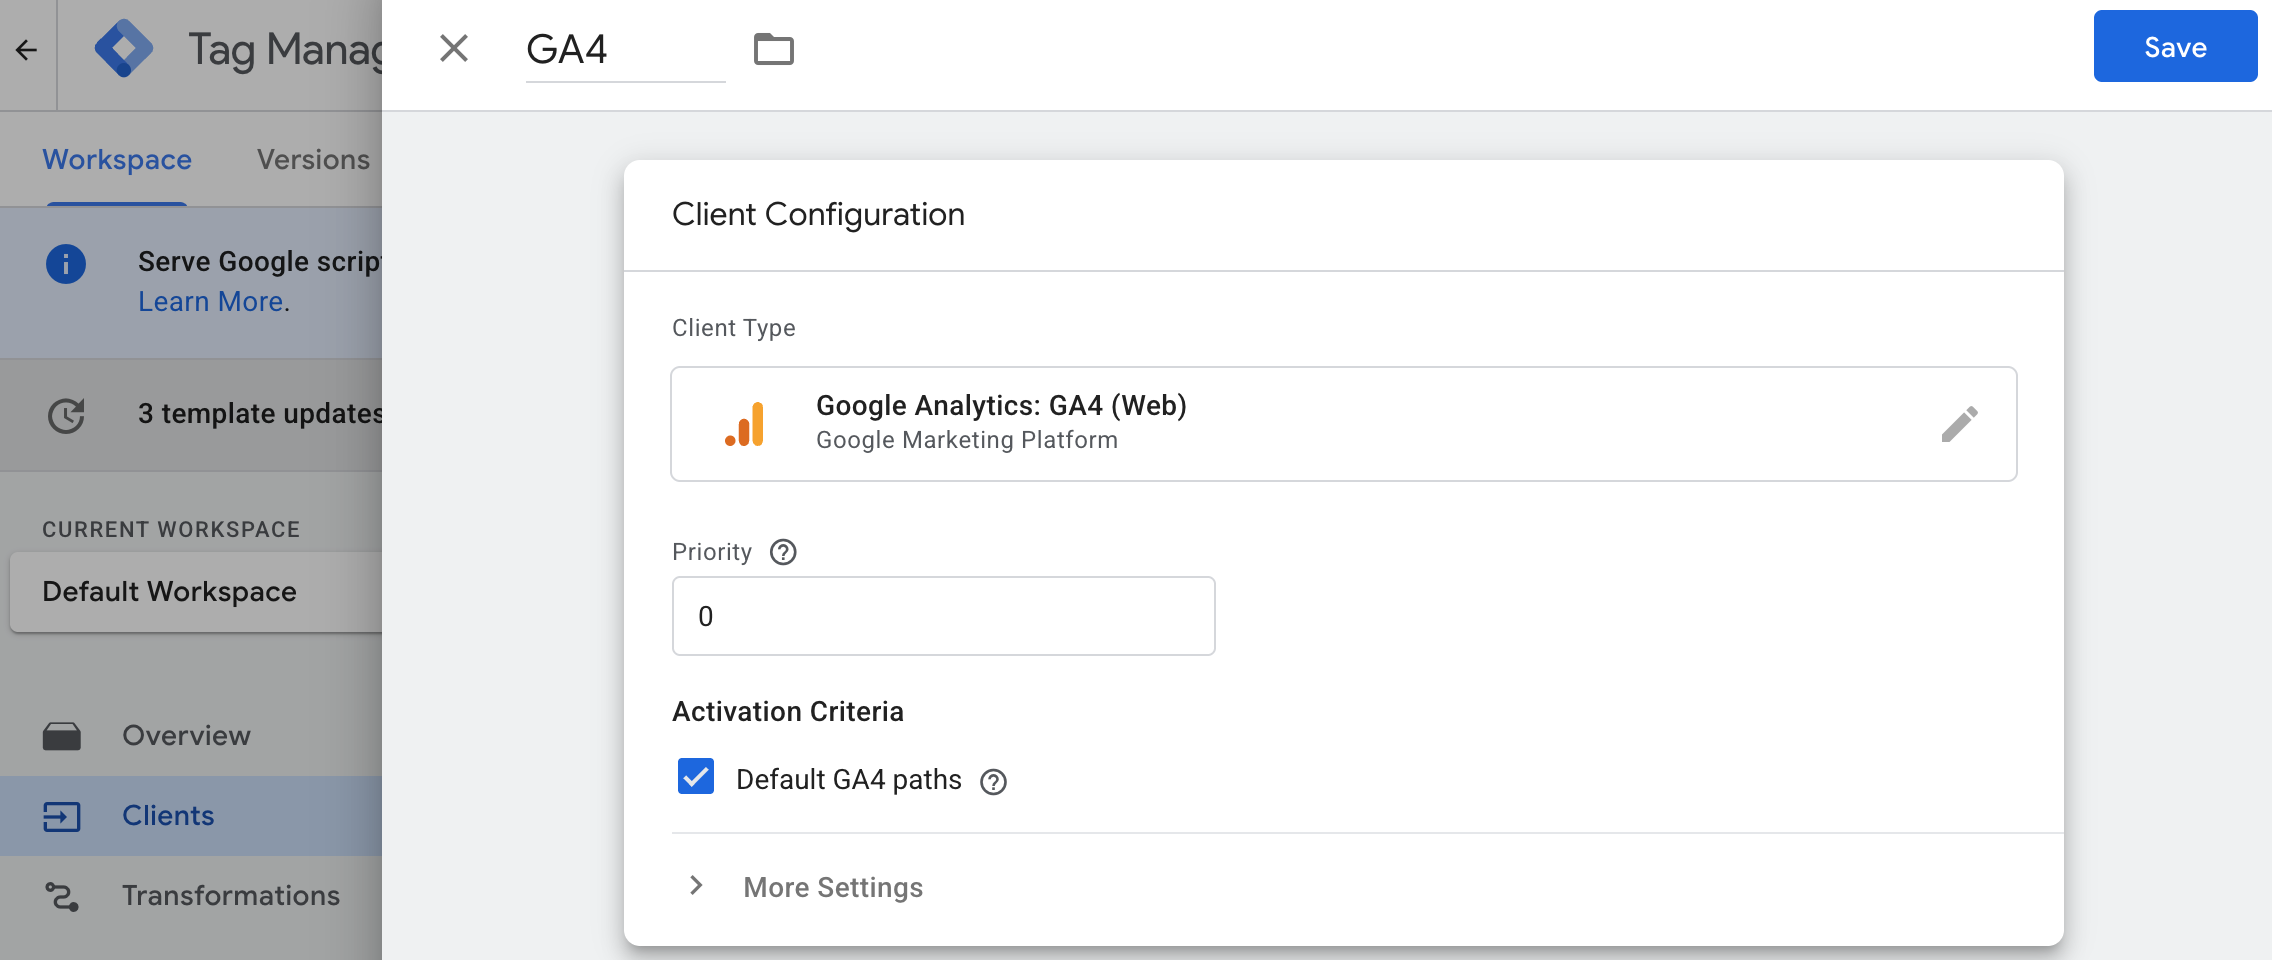
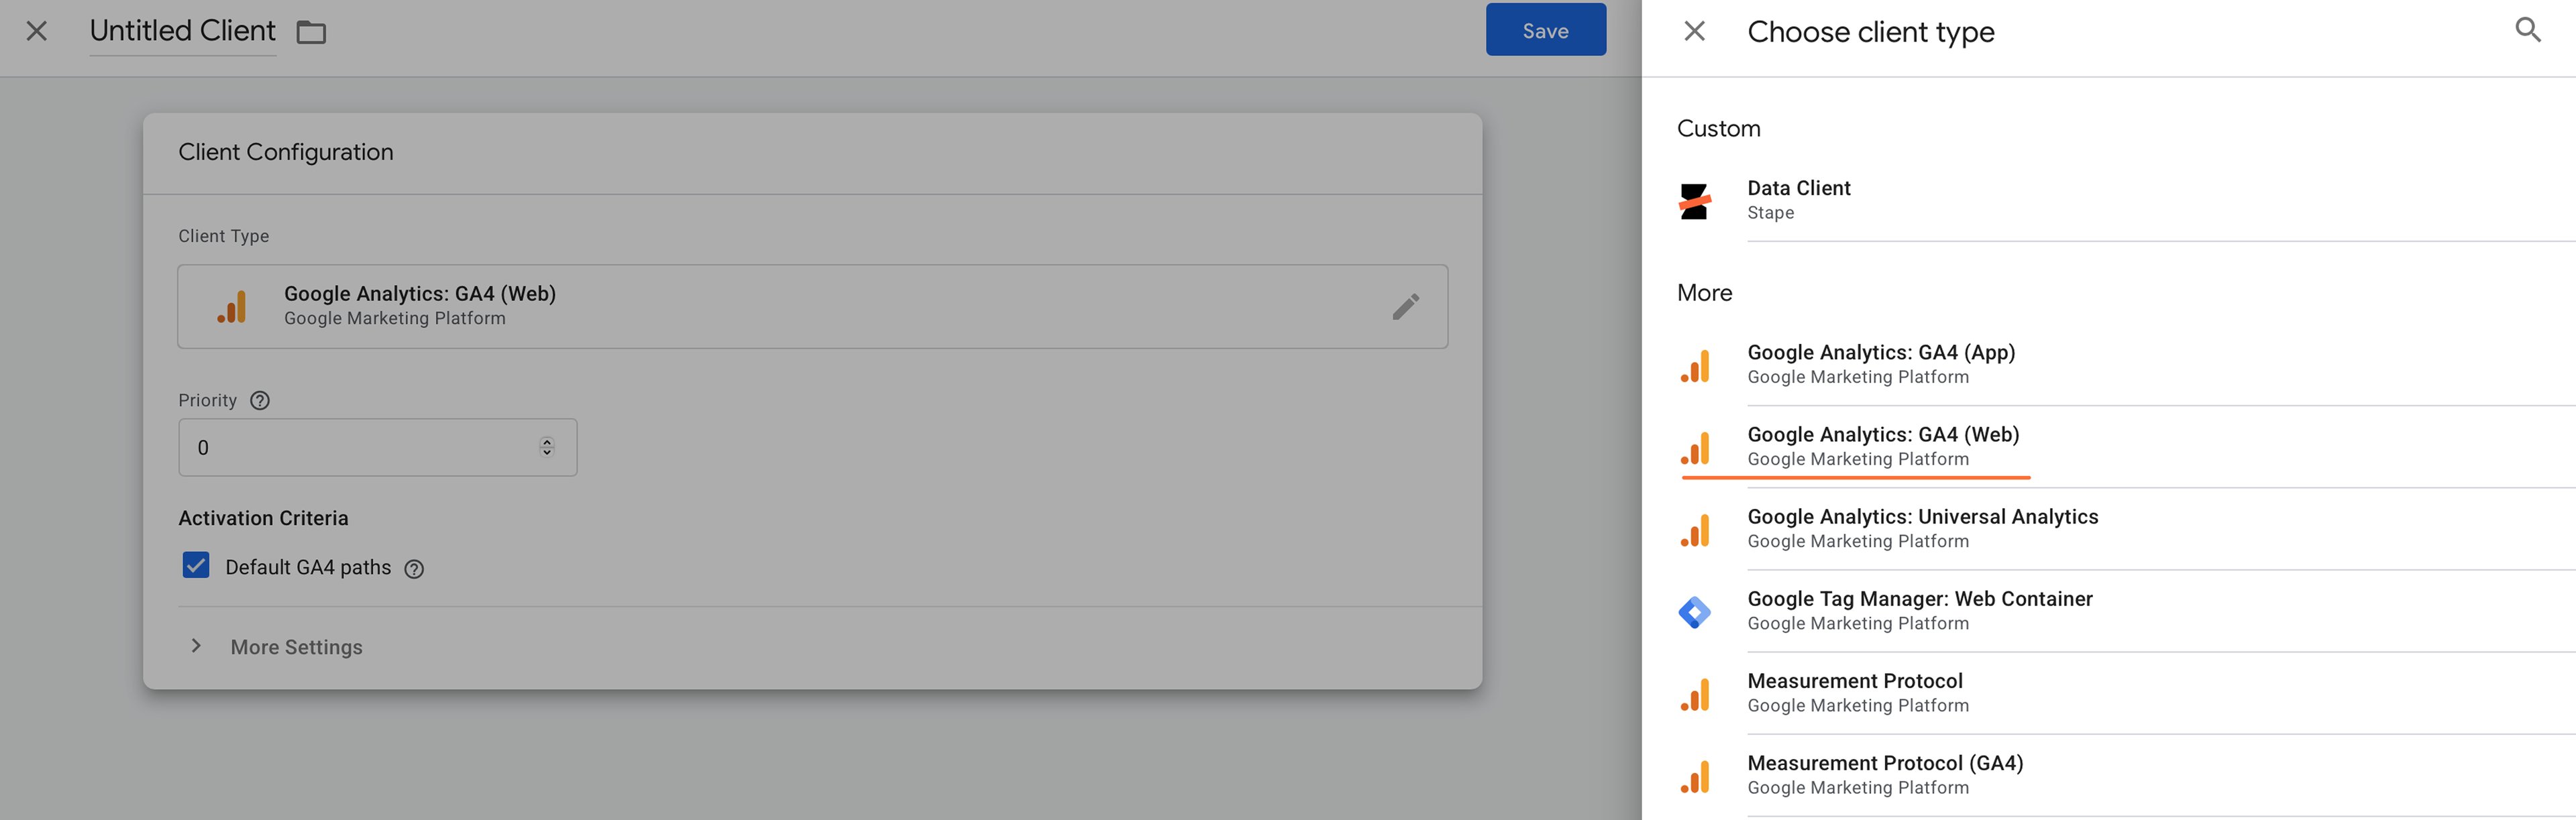
4.1.2 Create Google Analytics 4 client in server GTM container. To do so, open the clients’ section → Create New client → Select client type Google Analytics: GA4 (Web) → Add client name and click Save.
You can also read more on region-specific parameters in our blog.
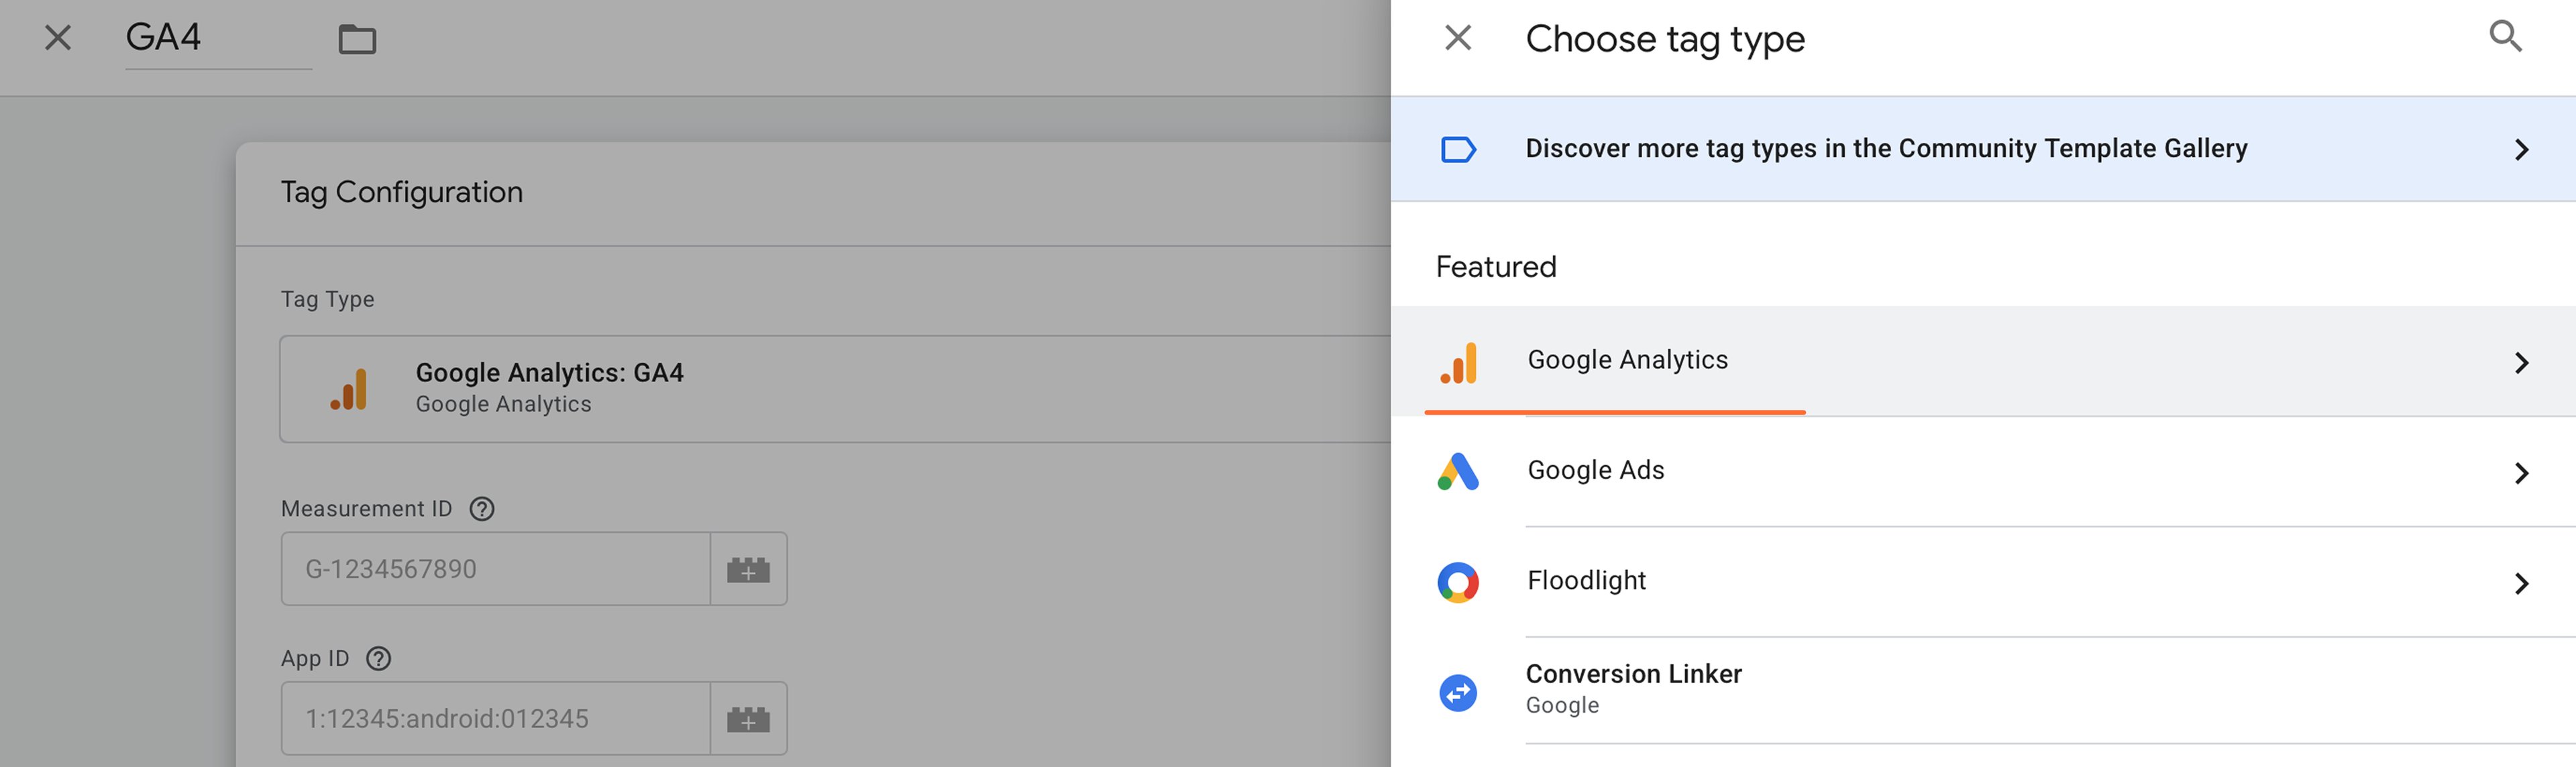
4.1.3 In the server GTM container create a new tag with the tag type Google Analytics: GA4
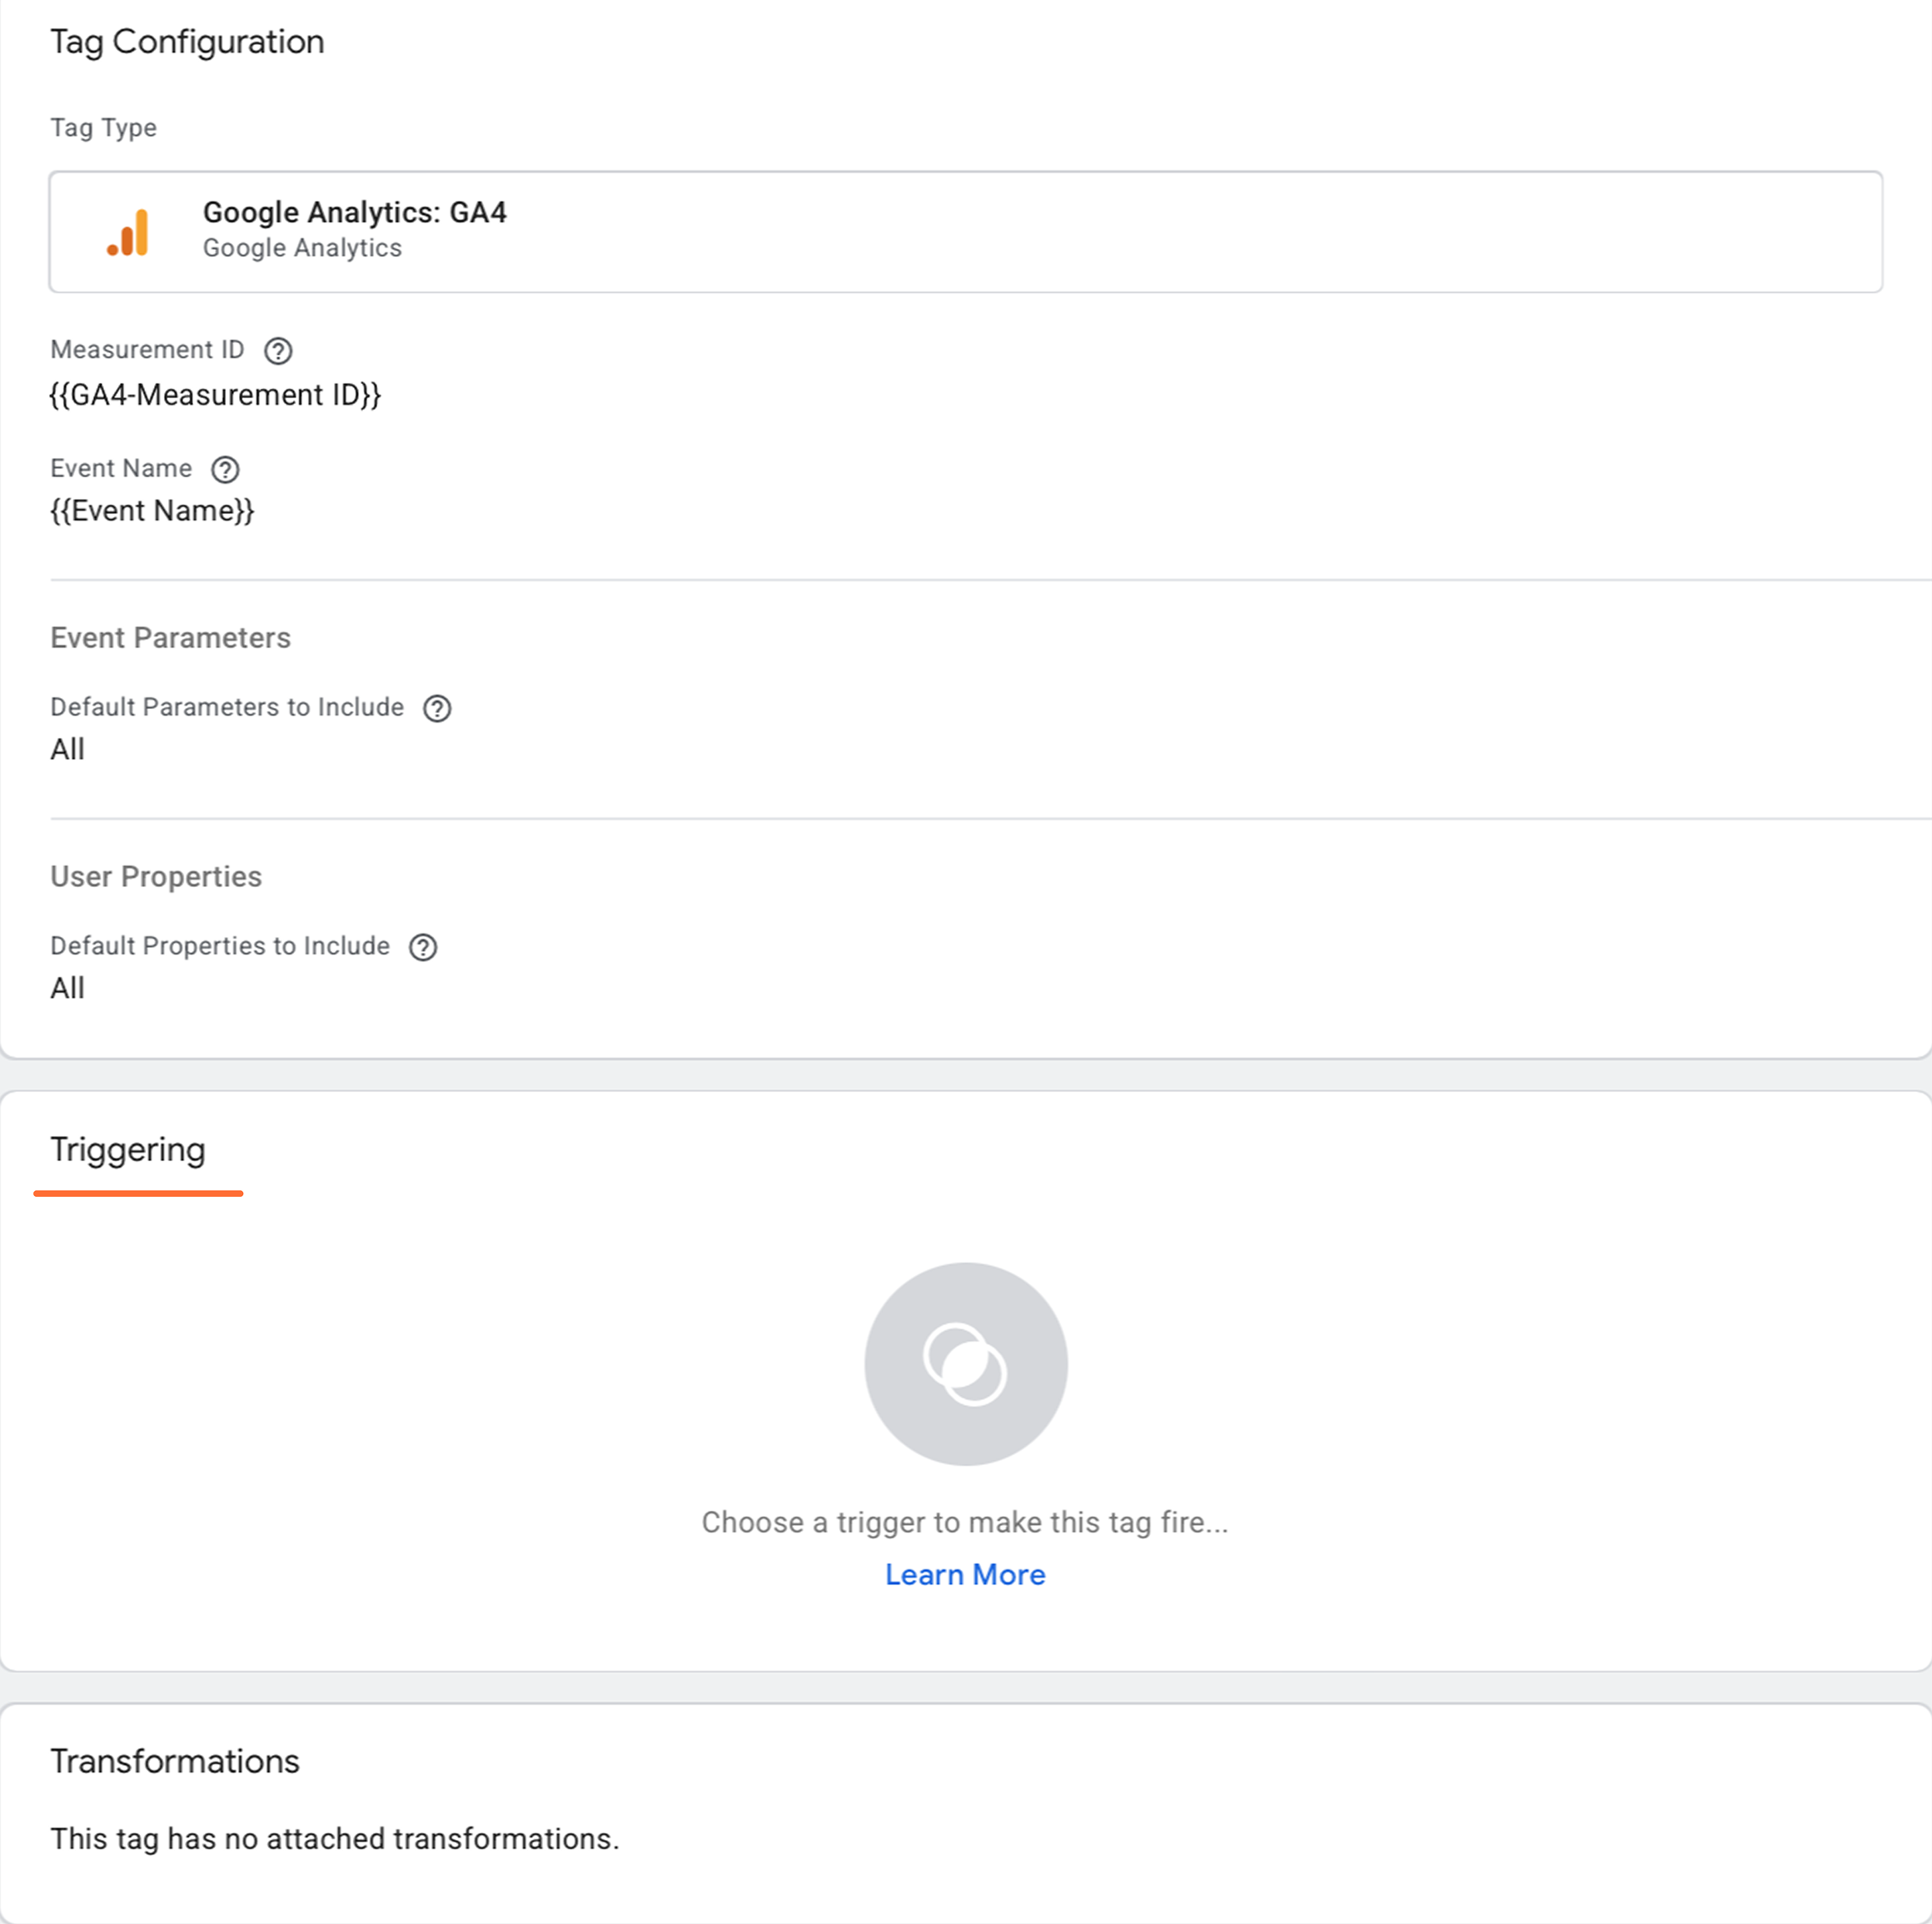
4.1.4 Add Measurement ID and Event Name.
Measurement ID - follow this guide to find GA4 ID. You can add it as variable or if the event came from a GA4 web tag, you can leave this field blank to inherit the measurement ID of the event.
Event Name - the event name to send to Google. See the recommended events for more information. If this field is blank, the value of the event_name parameter will be sent.

4.1.5 Click Triggering and configure a trigger with the trigger type Custom that will fire every time when client name equals GA4 (or the name of the GA4 client that you’ve specified on the step 2.b) → Click Save.

4.2 If you do not have GA4 configured, follow the below steps:
4.2.1 Inside the Web container, create a new tag of the tag Type Google Tag. Add your Google Tag ID.
Add trigger to GA4 tag. It usually should trigger on all page views.

You can also create a Google Tag: Configuration Settings variable that will predefine Google Tag settings if you need to use multiple Google Tags on your website and do not want to add settings for each tag manually.
These parameters can, for example, define whether you want to send a page view event every time a Google Tag triggers, set UTM parameters, set client ID, etc. There is a list of standard Google Tags configuration parameters.
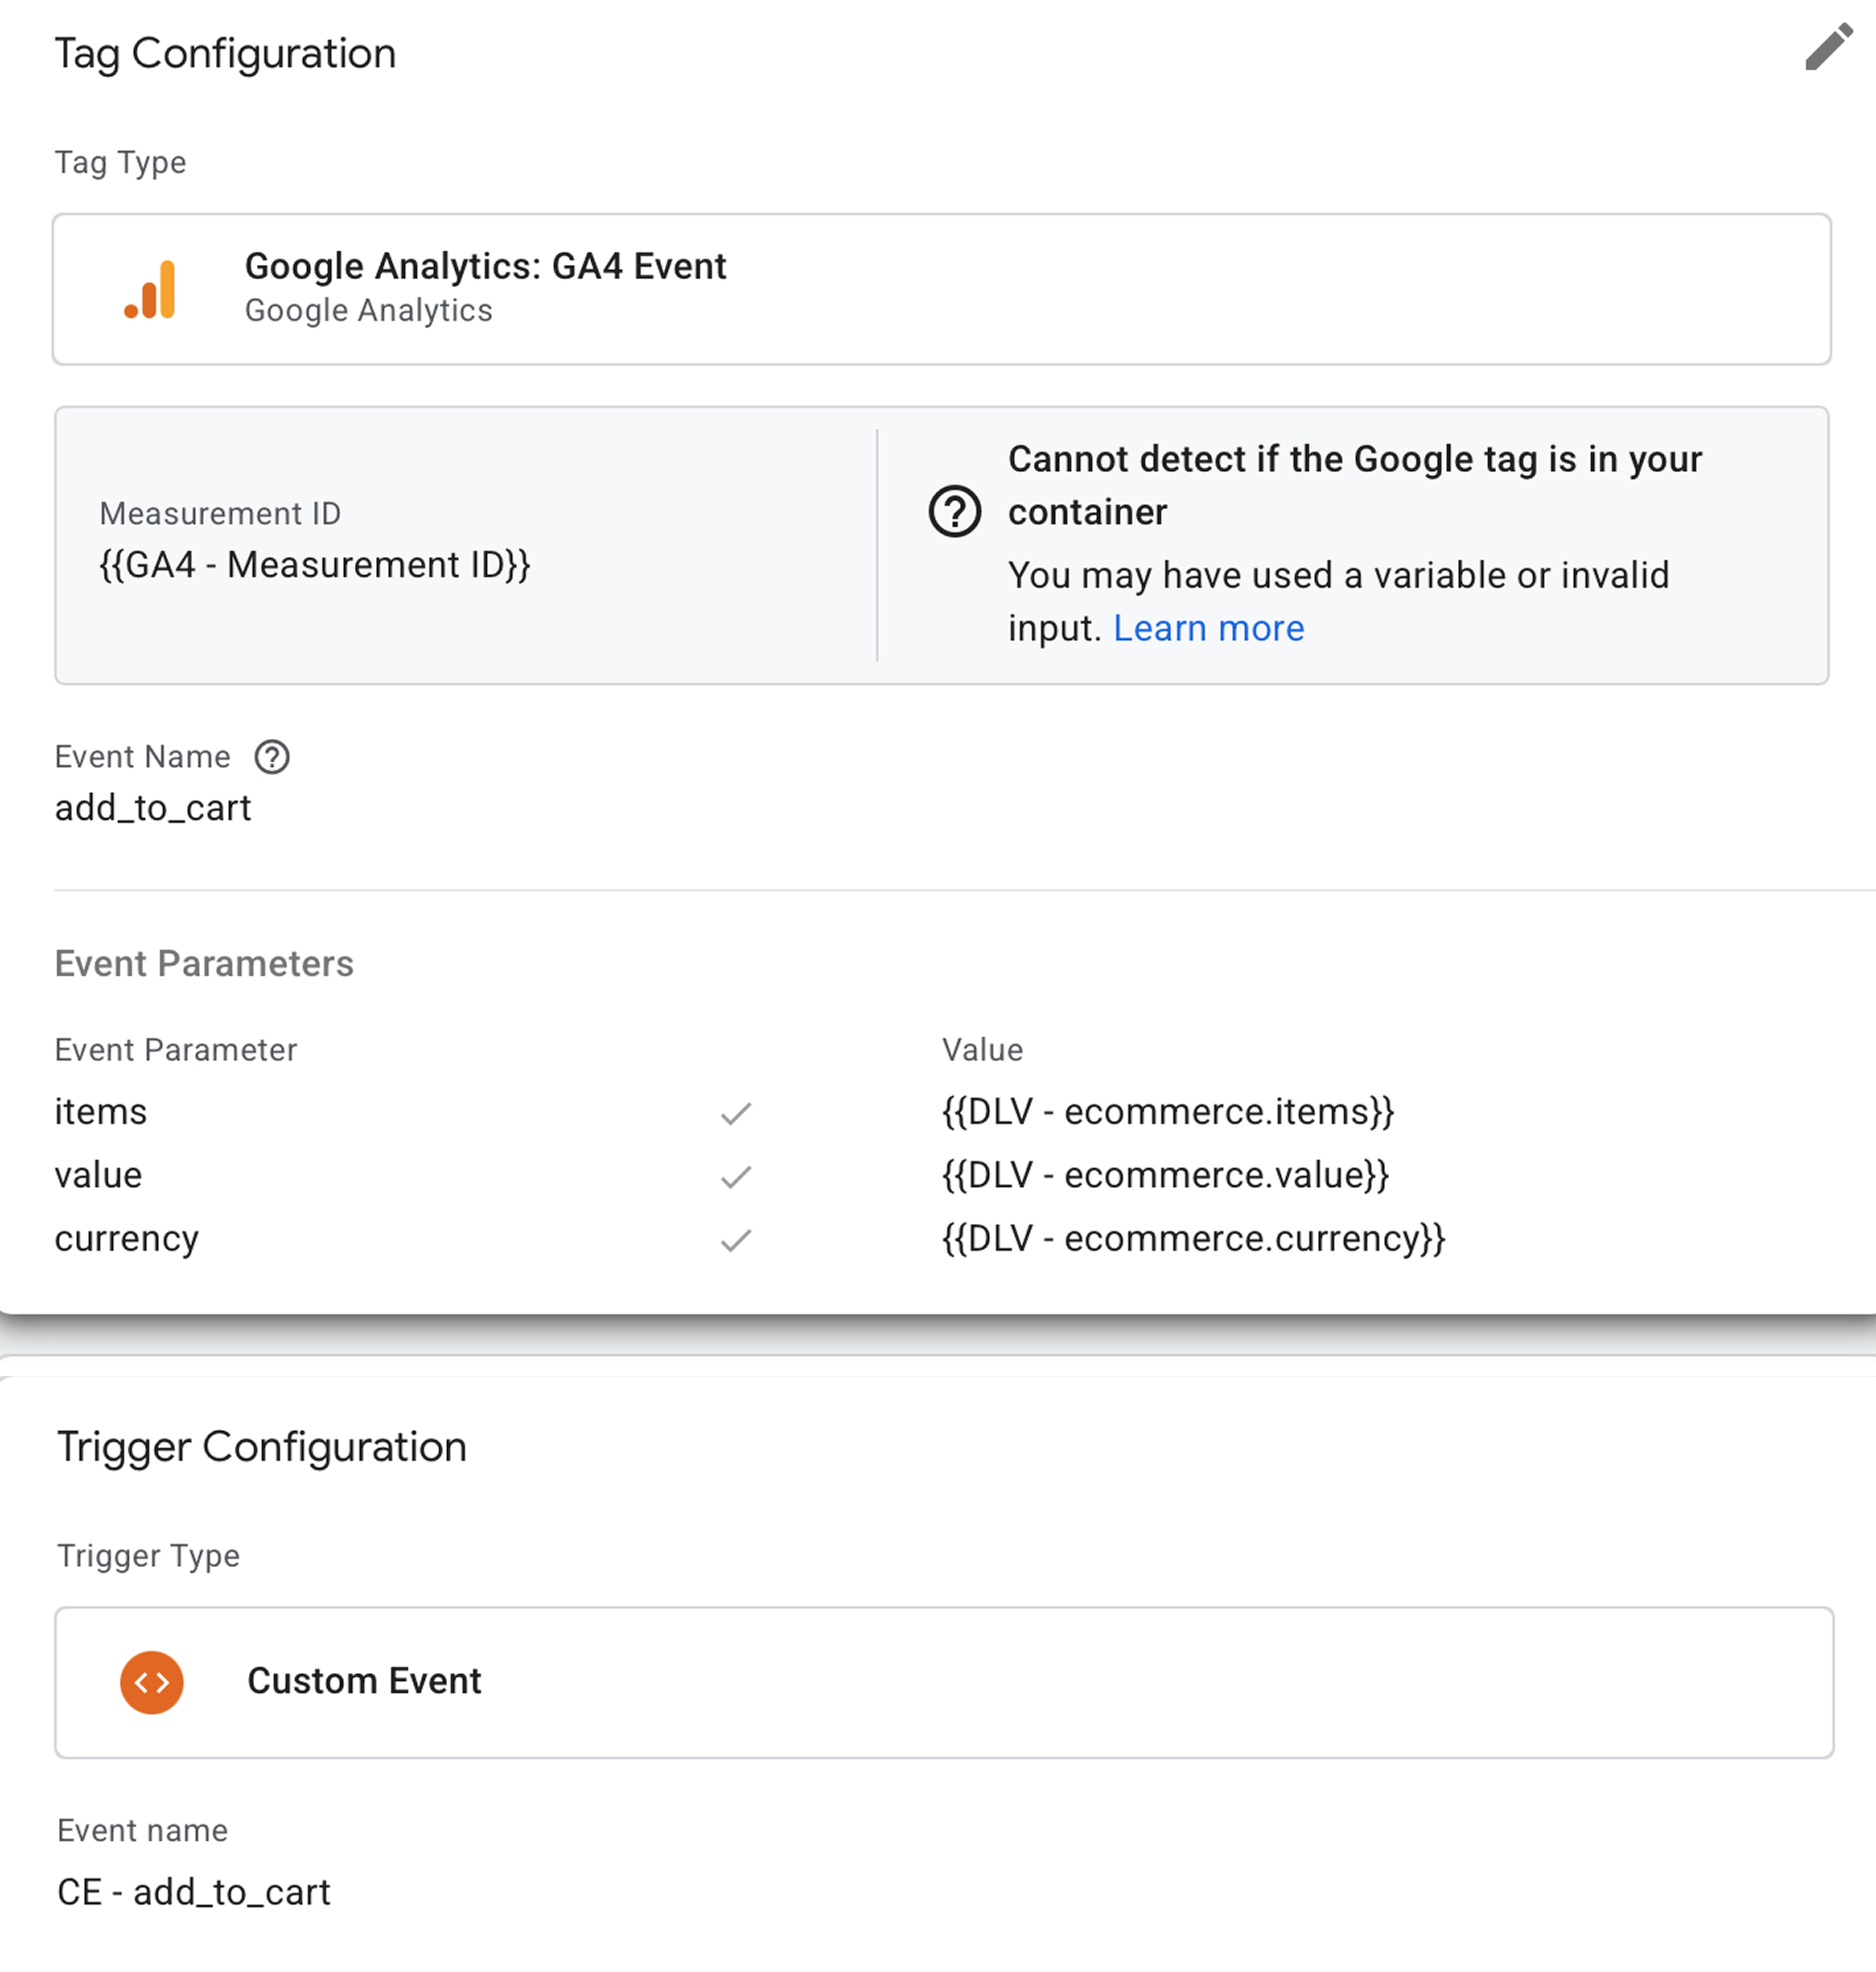
4.2.2 To set up the GA4 event tracking, go to the tags section and create a new tag with the tag type Google Analytics: GA4 Event. Add your GA4 ID and the event name; there is a list of standard event names.
4.2.3 Go to your Google Tag Manager Server container. Click Clients and New.

4.2.4 Choose Google Analytics: GA4 (web) and click Save.
4.2.5 Go to Tags and click New.

4.2.6 Choose Google Analytics: GA4.
4.2.7 Add Measurement ID and Event Name.
Measurement ID - follow this guide to find GA4 ID. You can add it as a variable or if the event came from a GA4 web tag, you can leave this field blank to inherit the measurement ID of the event.
Event Name - the event name to send to Google. See the recommended events for more information. If this field is blank, the value of the event_name parameter will be sent.

4.2.8 Click Triggering.
4.2.9 Create triggers for the tag. Client name should equal GA4. Example:
Click +

Choose Custom type → click Some events → choose Client Name in built-in variables → set Equals GA4 (the name of your GA4 client) → click Save.

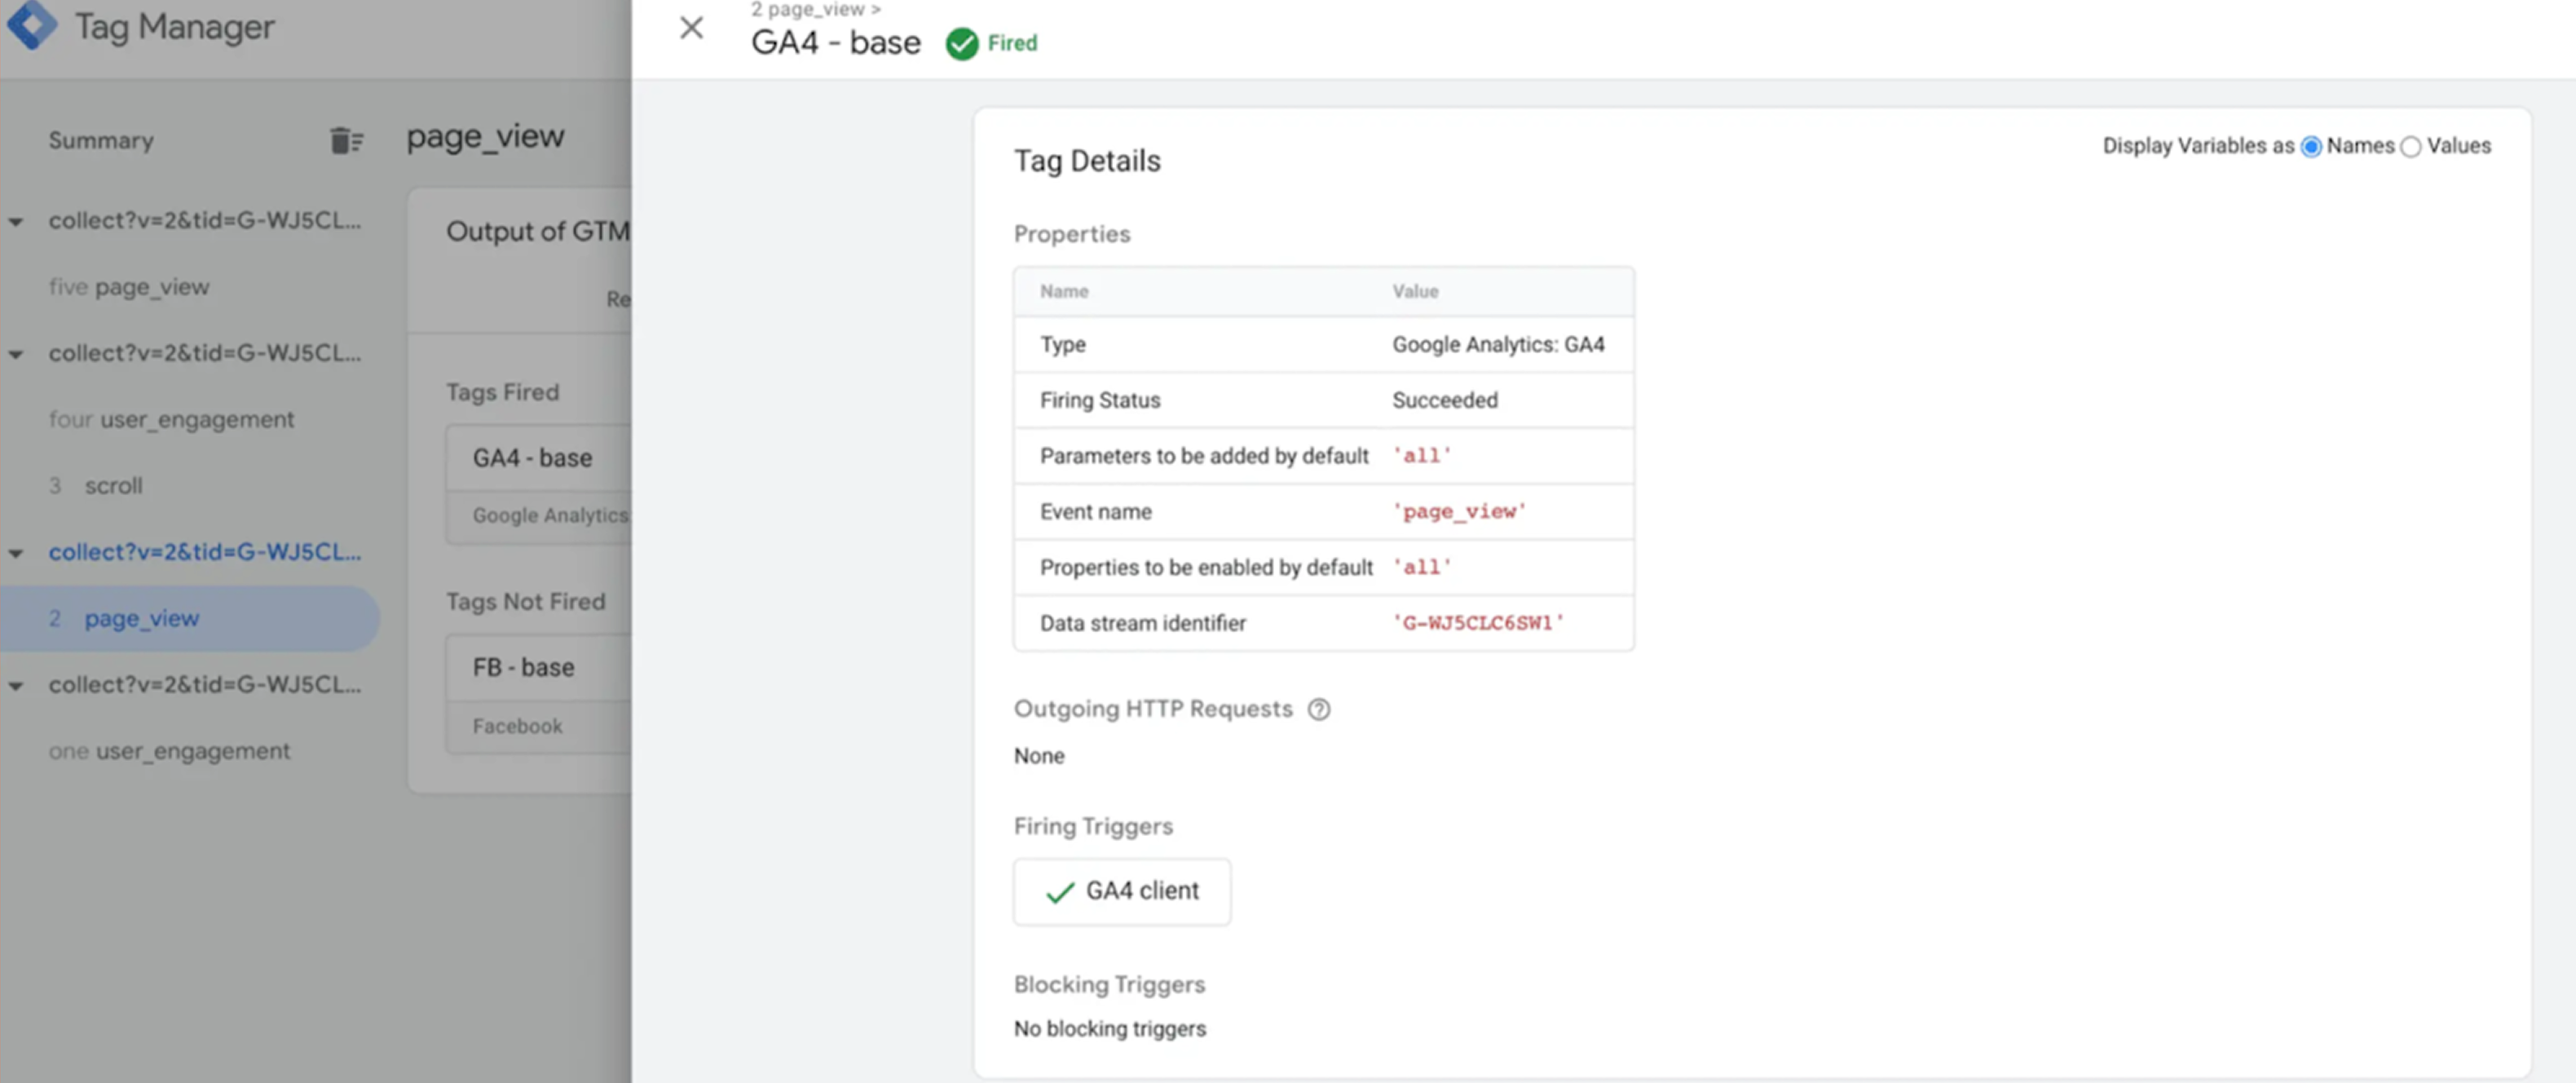
4.2.10 Open web and server GTM debuggers and test the setup.
Open the Server container preview mode and check that you see GA4 requests. Publish updated inside server and web Google Tag Manager containers.
Step 7. Update the tagging server URL of your Google Tag in the web GTM
Add the following record inside your Google Tag in the web Google Tag Manager container.
Configuration parameter: server_container_url
Value is your domain name in Stape admin
Step 8. How to test your GA4 server-side setup
7.1 Use Google Tag Manager Server-Side Container Preview and GA4 Debug Mode
We suggest starting with the Tag Manager preview and debug mode to ensure that your tags are triggering when they should. GTM debug tool will show you which tags and events were added to the site and whether they fired or not on particular pages/triggers.
Tag manager server container debug mode works similarly to web debugger. Just click the preview button on the top right corner. Then, navigate to the different pages and click on the button or perform events set up in the server container.
Return to the Tag Manager debugger and check which tags and events were triggered and if all required parameters were sent to the dataLayer. If everything works correctly, we can move to the next step.
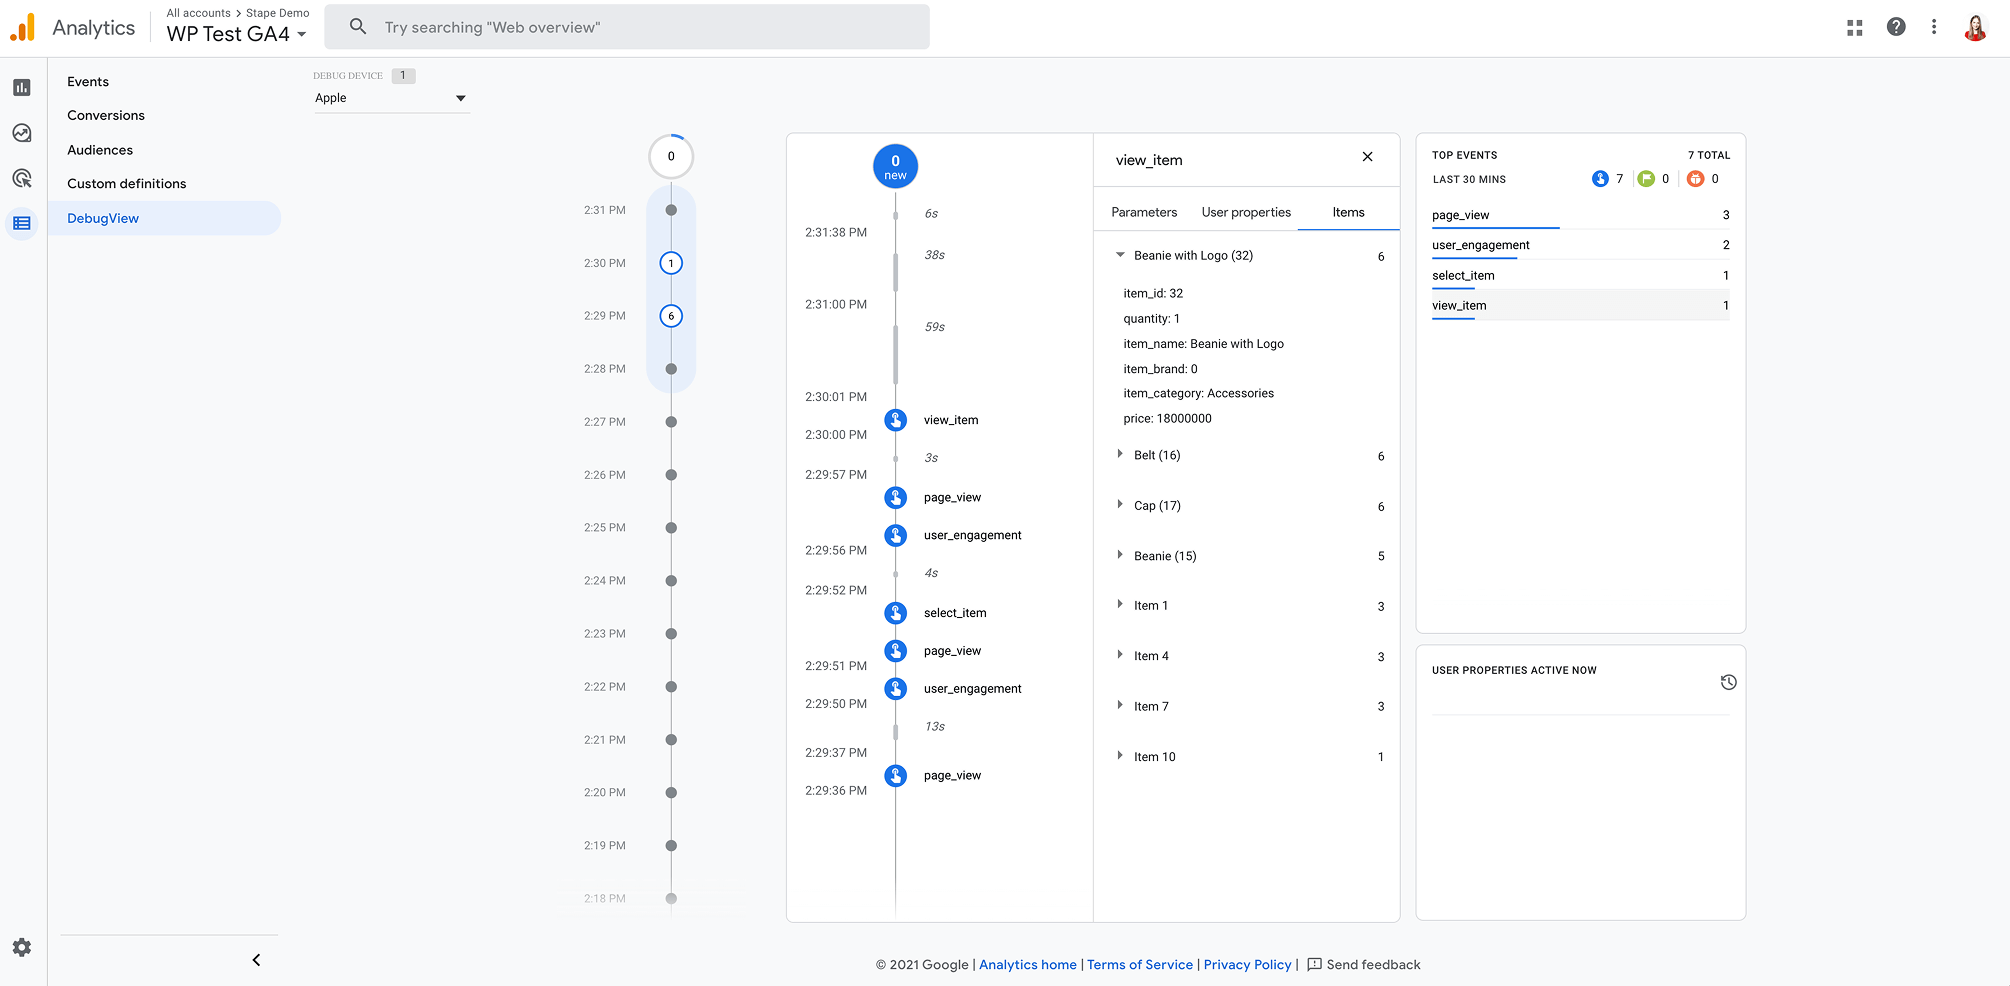
GA4 has it's debug view that will show you all events, event parameters and user data that we processed by GA4. To find GA4 debugger click Configure → Debug view.
7.2 Check if GA4 sends requests from the correct tagging URL
To ensure that requests are sent from a custom tagging URL, you’ll need to dive deeper into the developer’s zone. We’ll need Chrome or Safari developer tools here (you can use other browsers as well).
On Mac, you can access the developer tool by clicking command+option+I or click the right mouse button, then Inspect.
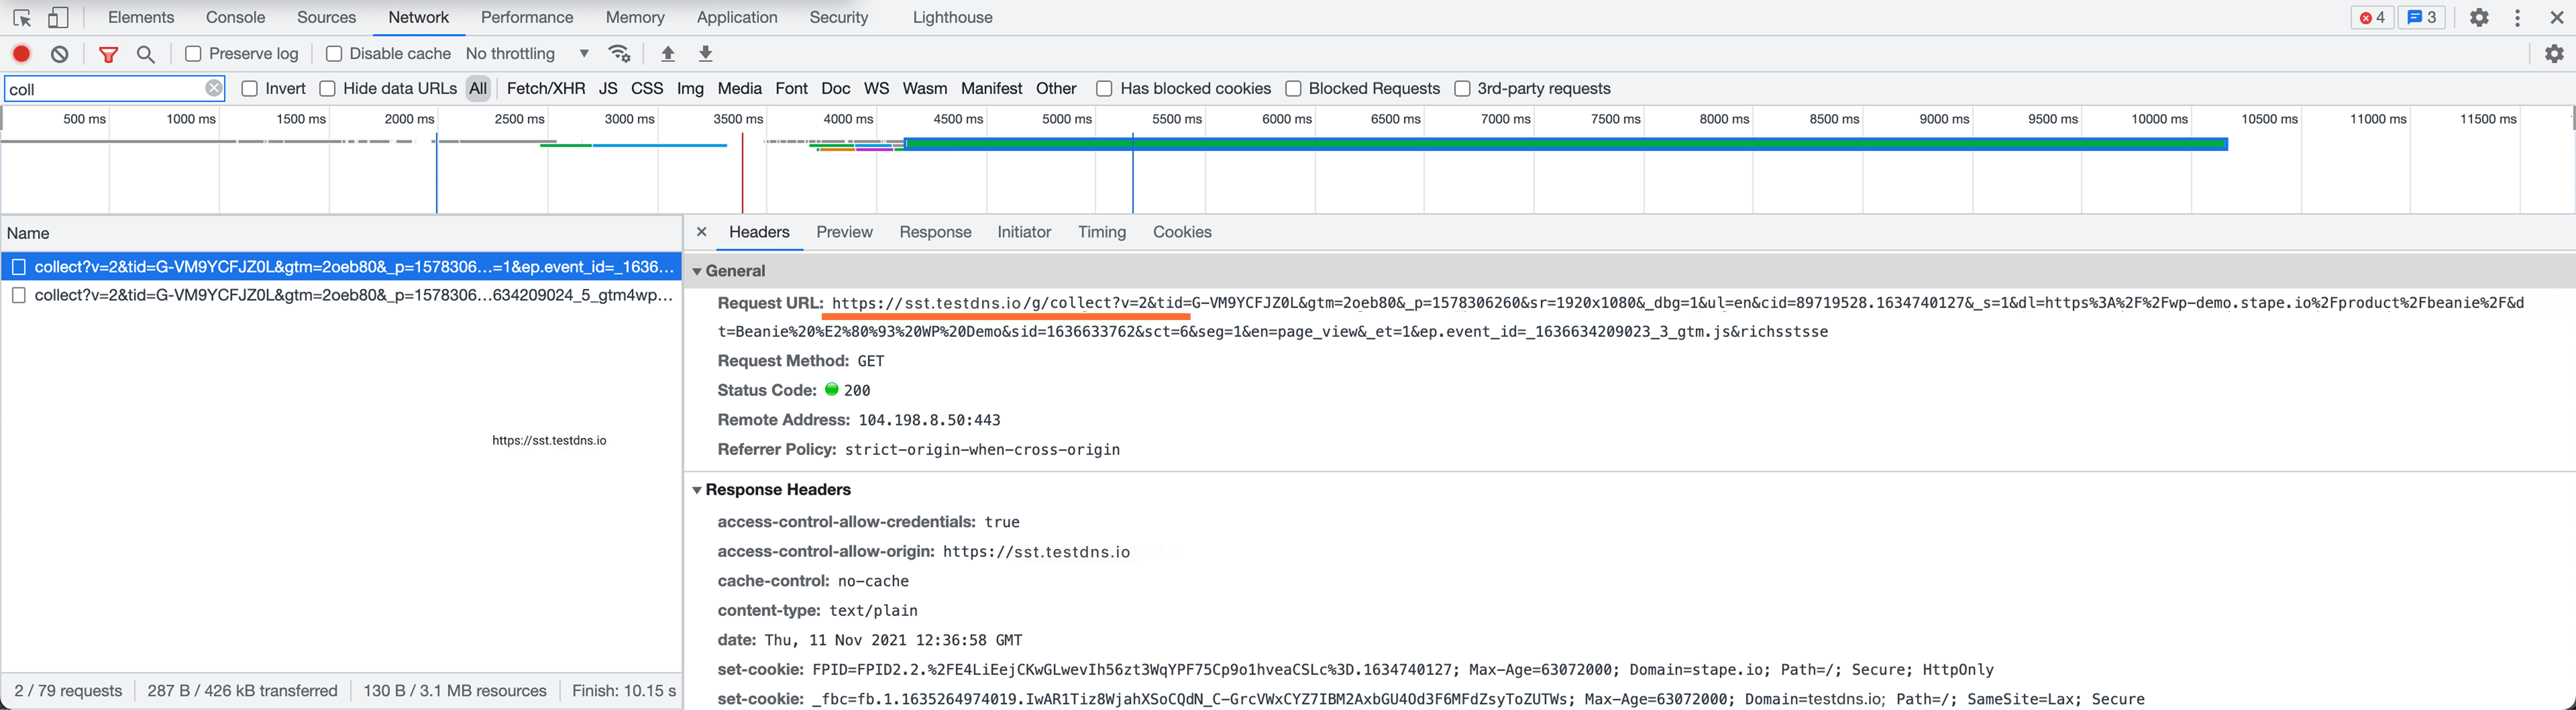
Once you’ve opened the developer tools, go to the Network tab and refresh the page. Use the filter and type collect to find GA4 requests. Click on a GA4 request and check the Request URL and parameters on the right to confirm that hits are being sent to your server-side tagging domain (the same URL configured in the server container and GA4 tag/variable).
Keep in mind that you may not see collect requests if GA4 ad block bypass is enabled. In that case, it’s recommended to look for requests directly via your server-side subdomain (for example, sst.testdns.io) instead of relying on the default collect filter.
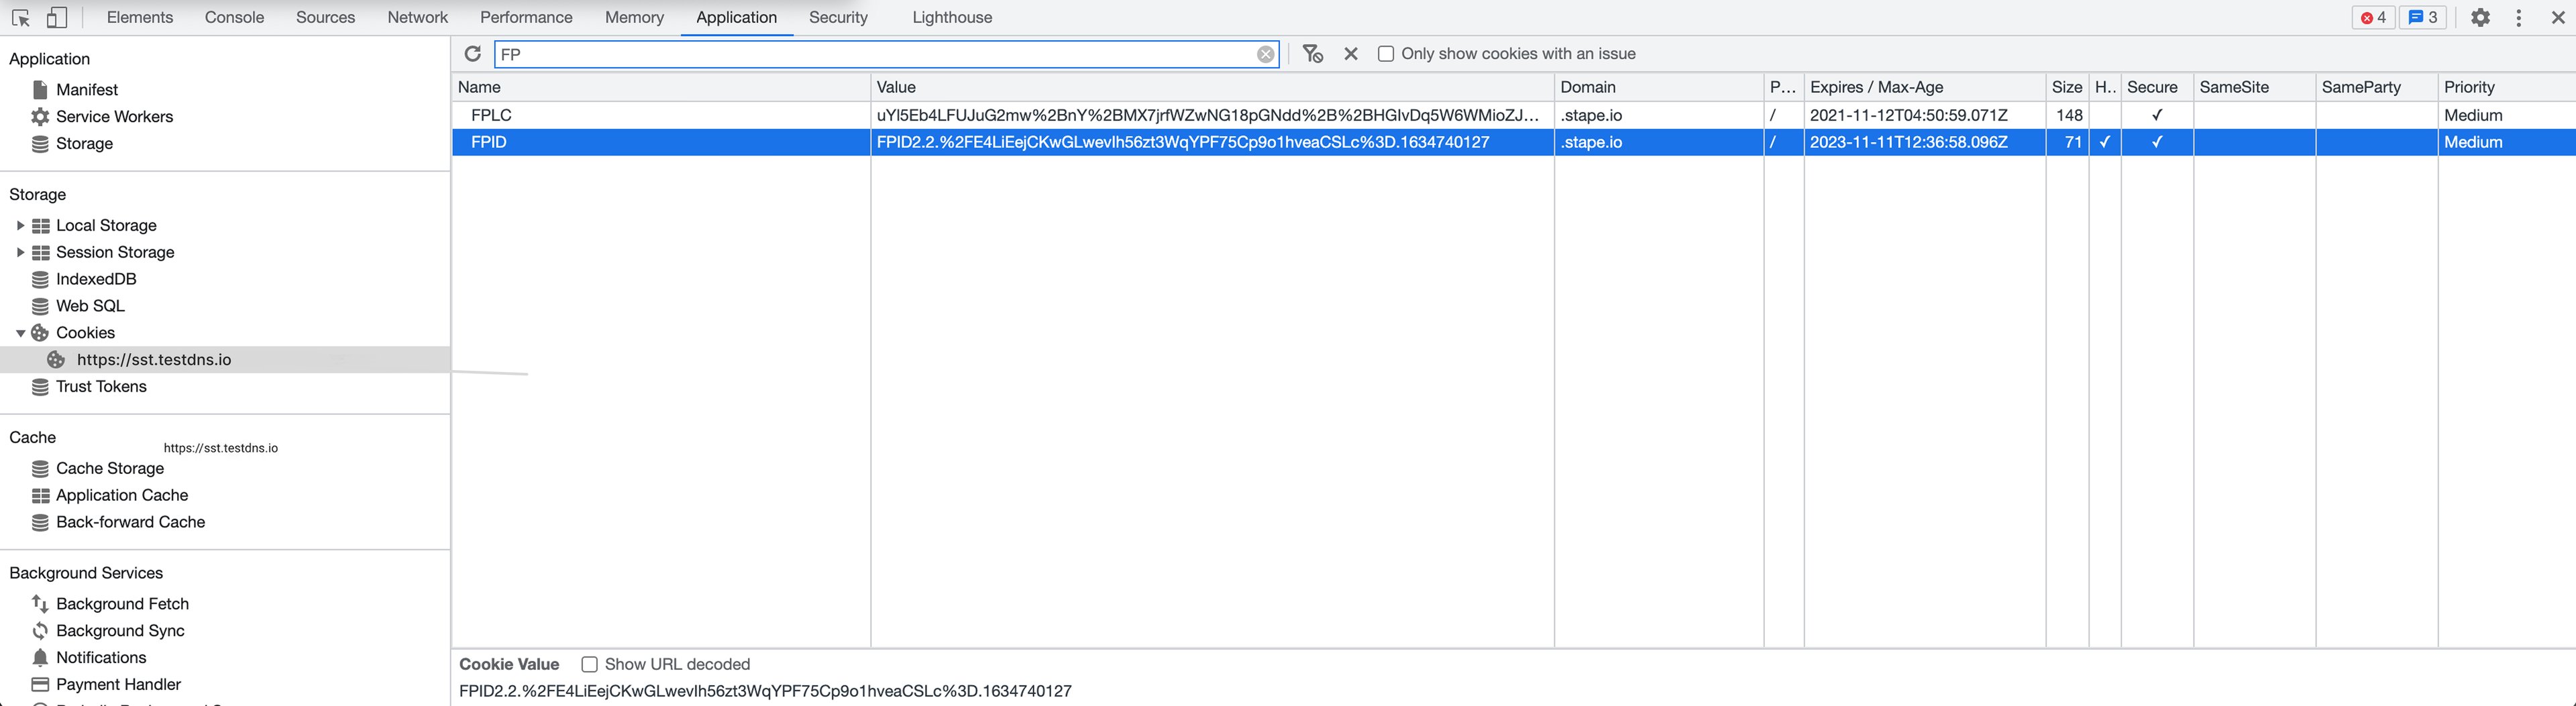
7.3 Check server-side cookies
Note: cookies will be extended only if you are using a custom subdomain inside the tagging URL. For instance, your website URL is example.com. Then, the custom domain for tagging URL should look like gtm.example.com.
Go to the application tab inside the developer tool that you’ve used in step two. Click Storage → Cookies. On the right side, you will find cookies named FPID; check the date in the column “expires”. This way, cookies should be extended up to 2 years. I am writing this post in February 2021, and my cookie will expire in February 2023. If you are not using server-side tracking and a custom tagging URL located under your main domain, Safari will decrease your cookie lifetime to 1 or 7 days. If you see that cookies were not extended, go to the GA4 client inside the server container, click more settings and check what Server Cookie Settings look like on the screenshot below. Or make sure that you are using a custom tagging URL that looks like gtm.yourdomain.com.
Conclusion
In conclusion, anyone can gain valuable insight into their customers' site interactions and use this to optimize the customer experience and gain a competitive advantage. Stape Conversion Tracking plugin for WordPress has made it much easier and more accurate than other methods of tracking user data.
If you have any questions left or just want some help with the setup of Google Analytics 4 for WordPress, do not hesitate to contact the Stape support team.

Comments