7 ott 2025
Cos’è Signals Gateway e guida all’installazione
Scritto da
Ivanna Holubovska
Aggiornato 26 set 2025 commenti
Signals Gateway è una soluzione completa che semplifica l’invio di dati di prima parte da qualsiasi origine a qualsiasi destinazione, ottimizzando il flusso di dati tra le varie piattaforme. Integra più fonti di dati in un unico strumento, garantendo un controllo continuo sul flusso di dati e una condivisione ottimale tra le varie piattaforme.
Benefici di Signals Gateway
1. Controllo completo.
Signals Gateway offre un ambiente centralizzato in cui tutte le esigenze di gestione e condivisione dei dati sono gestite in un unico luogo. Garantisce un flusso regolare ed efficiente di informazioni da qualsiasi fonte a qualsiasi destinazione, senza dover ricorrere a più strumenti o piattaforme.
2. Nessuna competenza tecnica richiesta.
Potete impostare e personalizzare velocemente le configurazioni per adattarle alle vostre esigenze specifiche senza alcuna esperienza di codifica. L’interfaccia intuitiva consente di gestire il monitoraggio dei dati senza problemi, eliminando la necessità di ricorrere a sviluppatori specializzati. Di conseguenza, potrete destinare il vostro budget in modo più efficace.
3. Massimizzazione dei dati di prima parte.
I dati di prima parte offrono un maggiore controllo sulla privacy e sulla conformità e, provenendo dal vostro stesso pubblico, contribuiscono a creare campagne più mirate che risuonano meglio con i vostri clienti, portando così a un maggiore engagement e a un maggiore ritorno sugli investimenti.
Come funziona Signals Gateway?
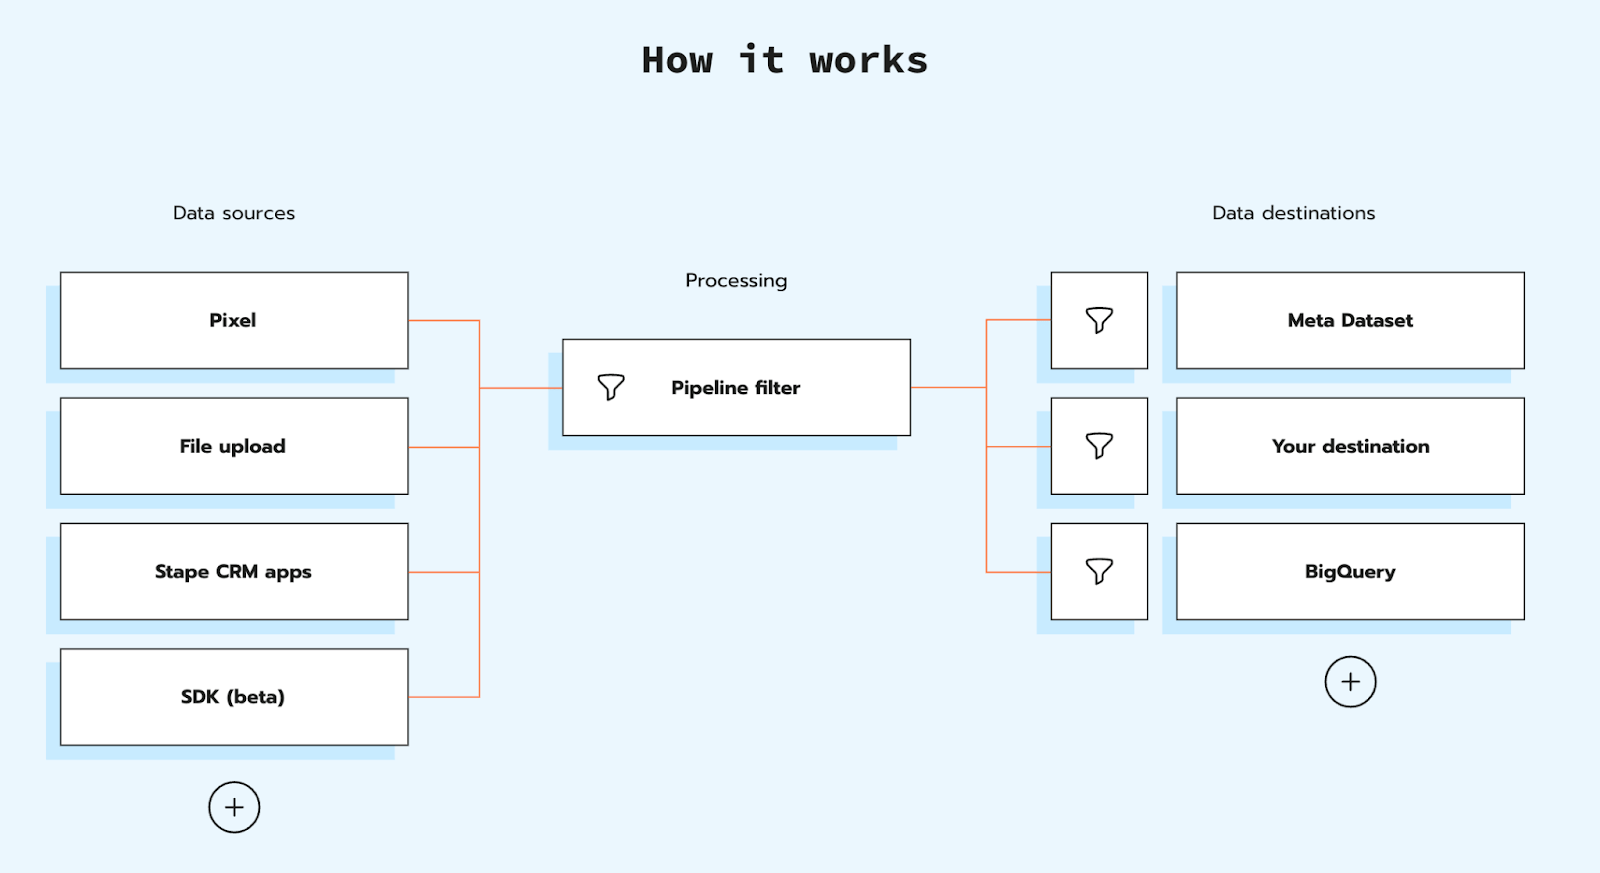
Il vostro pixel Signals Gateway, l’SDK, i caricamenti offline e le integrazioni CRM condividono i dati esclusivamente sul vostro server cloud. Queste fonti di dati sono centralizzate all’interno del vostro Signals Gateway, dandovi il pieno controllo su dove vengono inviati i dati, se a Meta o a un’altra destinazione. Grazie al connettore personalizzato, Signals Gateway semplifica la condivisione dei dati con qualsiasi piattaforma. In più, Signals Gateway offre un’integrazione con Google BigQuery, che permette di eseguire analisi dei dati.
In pratica, potete utilizzare il pixel Signals Gateway Meta per inviare eventi e dati utente raccolti a destinazioni non Meta. Al momento la varietà di destinazioni è limitata, ma si prevede un’espansione nel prossimo futuro. Potete scegliere quali eventi volete escludere dall’invio a queste destinazioni nella pipeline.
Hosting di Stape per Signals Gateway
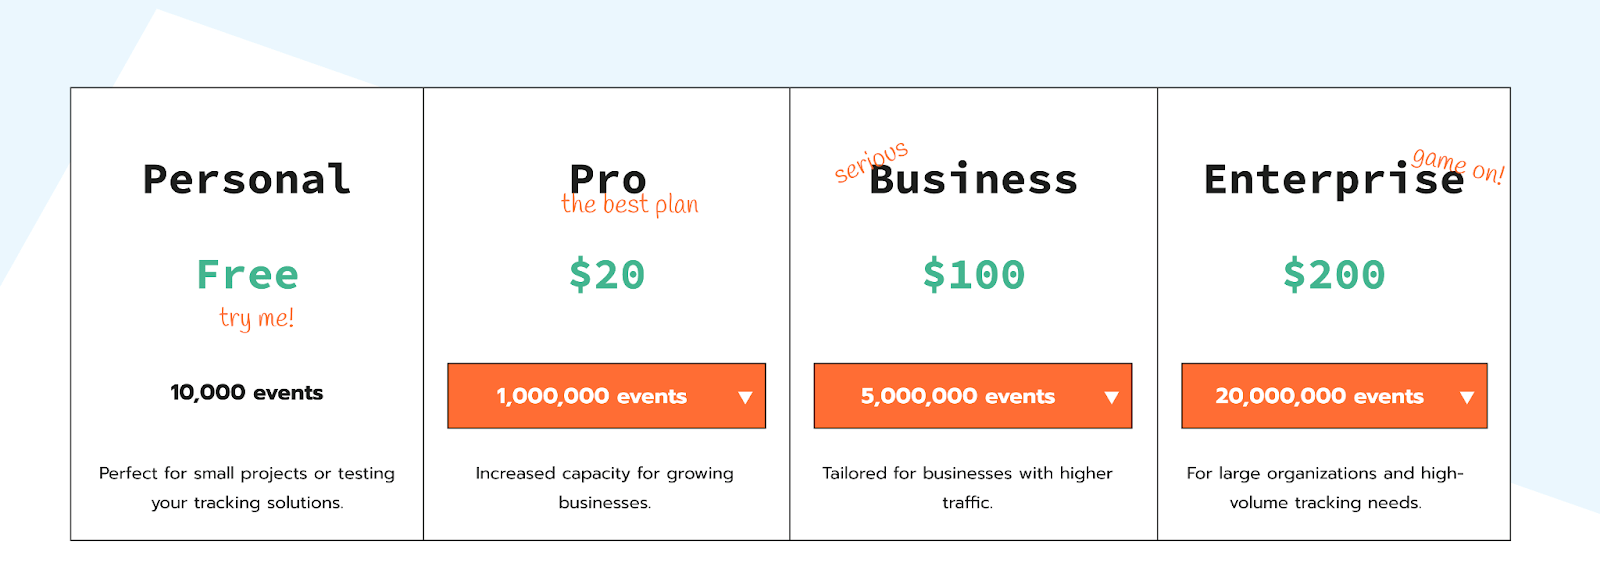
Stape offre una varietà di piani tariffari per soddisfare le vostre esigenze: Free, Pro, Business ed Enterprise.
I prezzi partono da 20 euro al mese per 1.000.000 di eventi. Se scegliete un piano annuale, il costo del piano Pro è di soli 17 euro al mese.
Il nostro piano Free consente fino a 10.000 eventi al mese. Non è richiesta la carta di credito!
Potete anche utilizzare il calcolatore dei prezzi sul nostro sito web per trovare il piano più adatto al vostro sito.
Come si configura Signals Gateway?
Per configurare Signals Gateway, seguite la seguente procedura:
- 1.Create Signals Gateway su Stape.
- 2.Accettate il link di invito per accedere al vostro ambiente Signals Gateway.
- 3.Impostate login e password.
- 4.Aggiungete l’origine dati e la destinazione dati nell’ambiente Signals Gateway.
- 5.Facoltativo: aggiungete un dominio personalizzato.
- 6.Testate la configurazione.
Guida dettagliata passo-passo
Fase 1. Creare Signals Gateway su Stape.
Se ancora non avete un account:
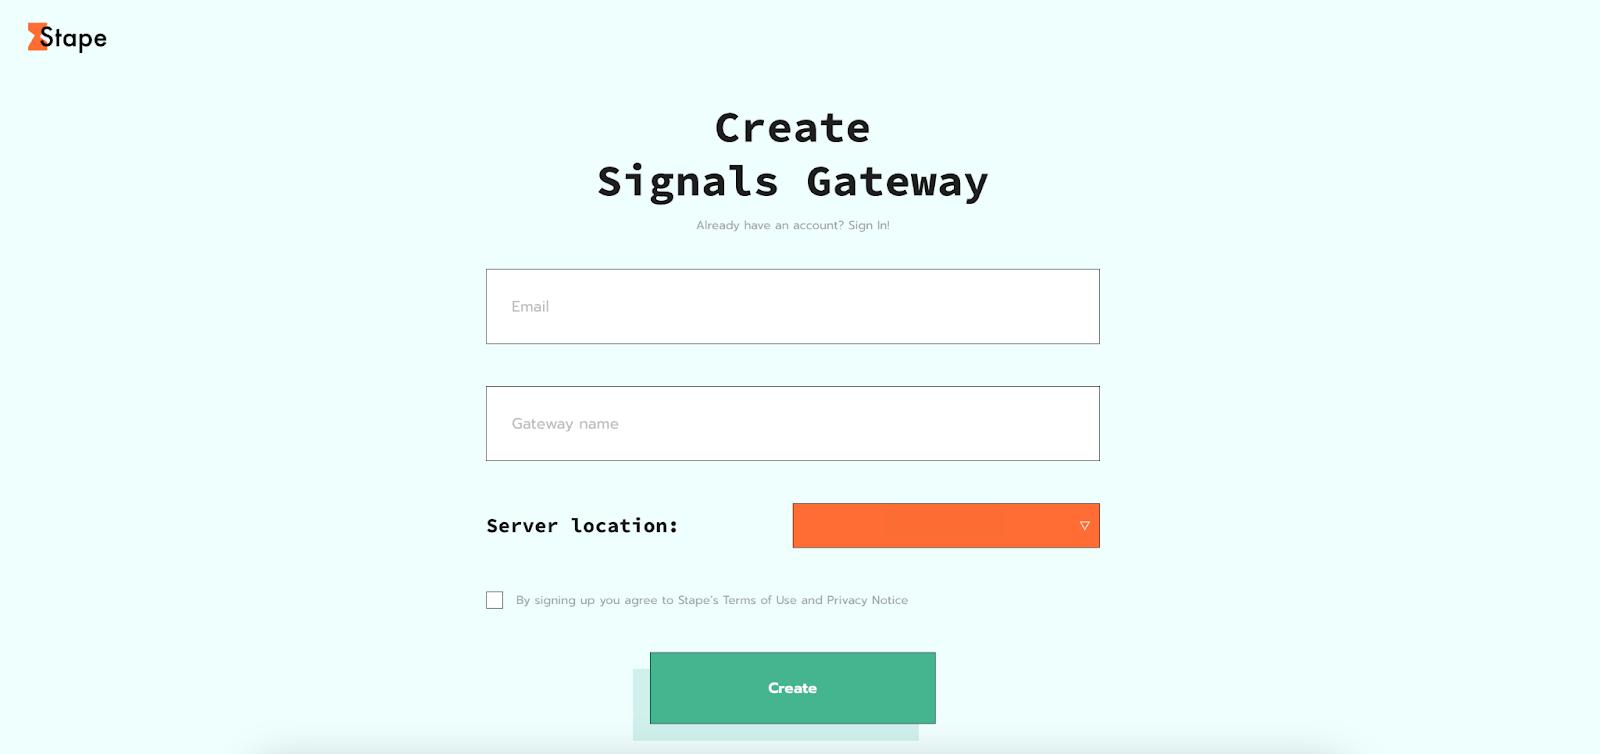
- Cliccate su questo link.
- Aggiungete l’indirizzo e-mail, il nome del gateway e selezionate la posizione del server. Sono disponibili diversi server: Stati Uniti, Europa, Sud America e Asia Pacifico.
- Cliccate su “Crea”.
Vi invieremo un’e-mail con il link per impostare una password per il vostro account Stape. Seguite il link dell’e-mail per impostare la password.
Se avete giù un account su Stape:
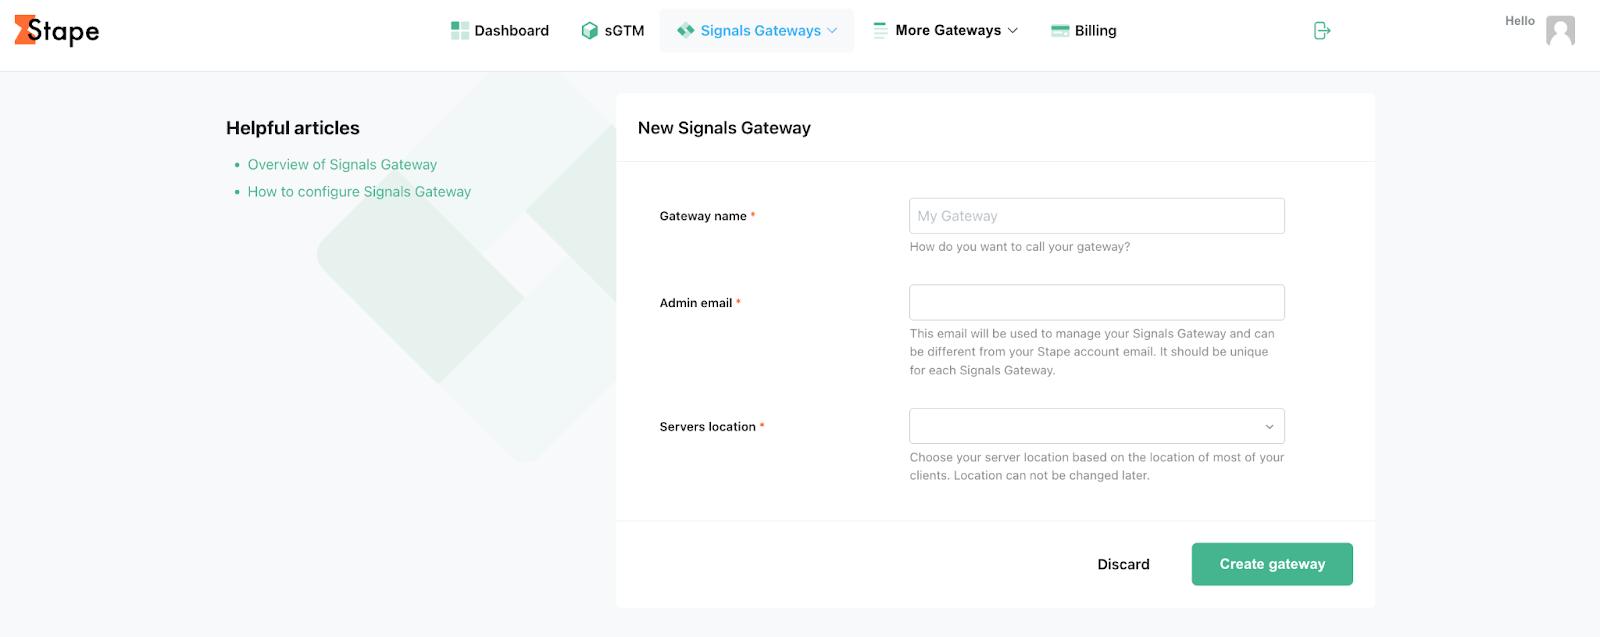
- Cliccate su Signals Gateways nel menu principale e su Crea Signals Gateway.
- A questo punto potete aggiungere il nome dell’istanza di Signals Gateway e l’indirizzo e-mail che volete utilizzare per la gestione dell’ambiente Gateway (può essere diverso dal login Stape) e selezionate la posizione del server.
- Cliccate su “Crea gateway”.

Fase 2. Scegliere un piano di abbonamento e completare la configurazione su Stape.
2.1. Selezionate l’abbonamento a Signals Gateway e aggiungete i dati di fatturazione.
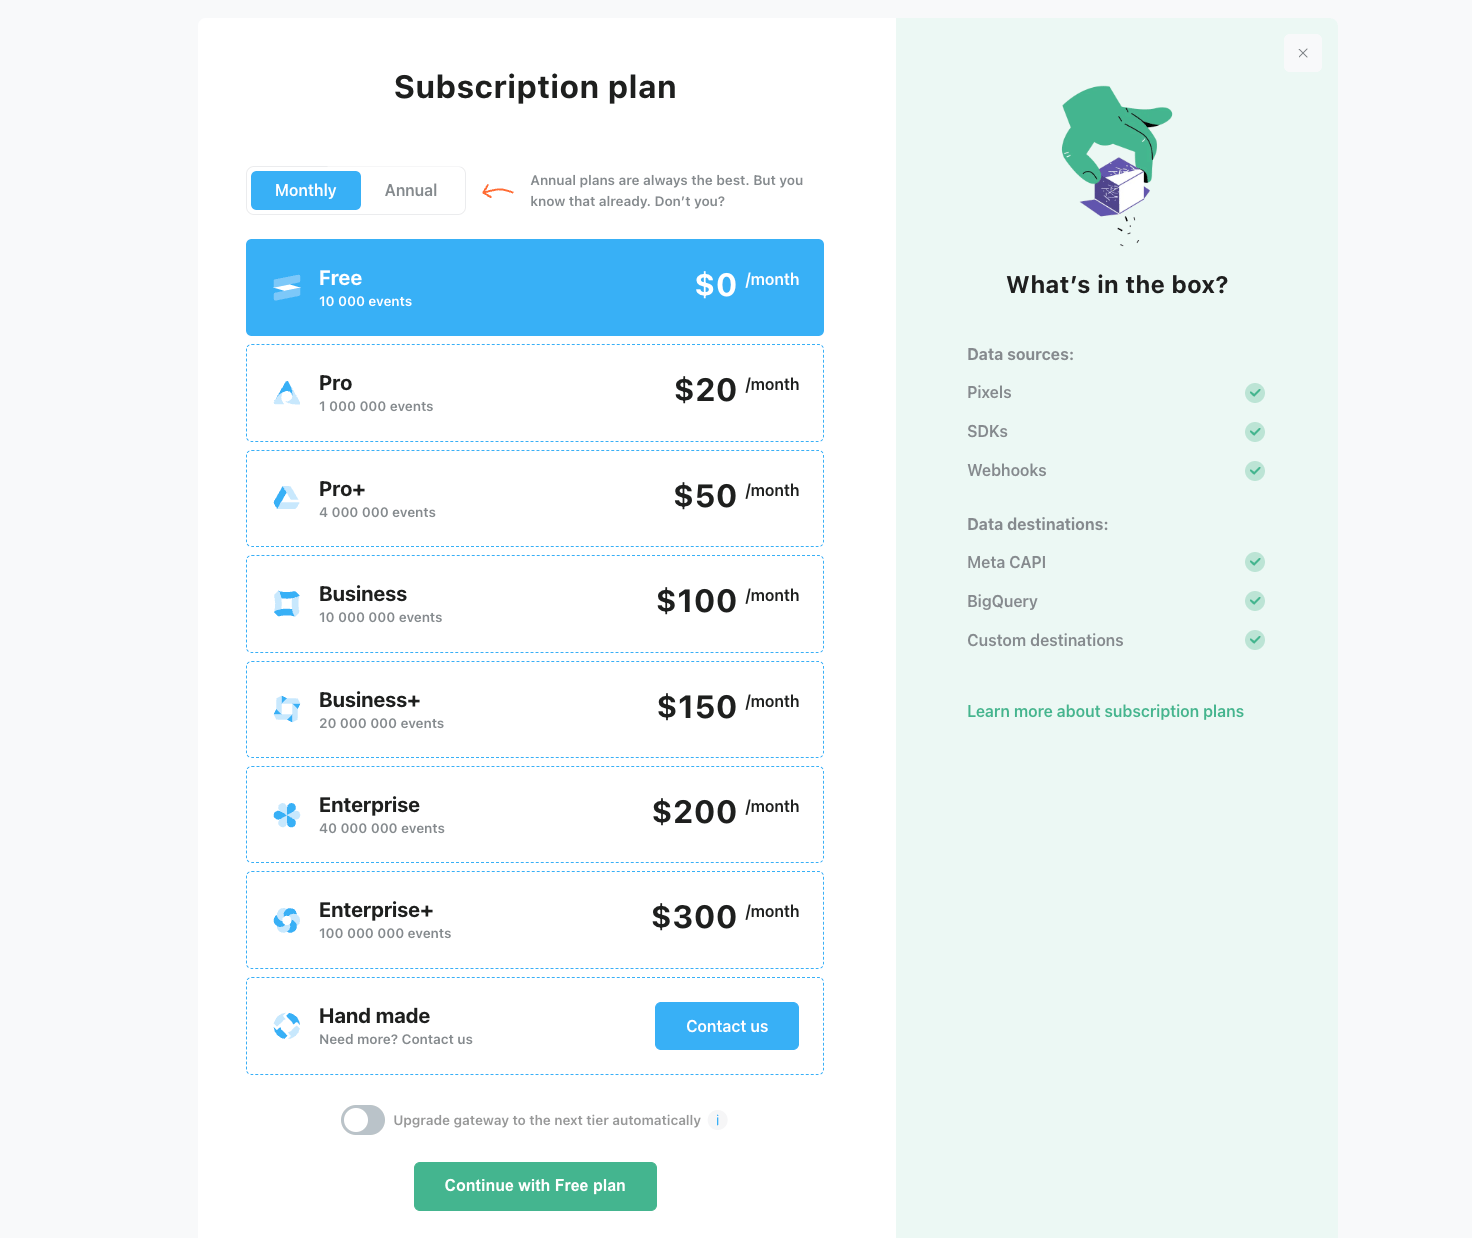
Stape offre un piano gratuito, per cui potete aggiungere la fatturazione in un secondo momento. Cliccate sulla croce in alto a destra se volete continuare gratuitamente.
2.2. Visualizzerete lo stato del Gateway “Implementazione”. Aggiornate la pagina finché lo stato non risulterà “In esecuzione”.
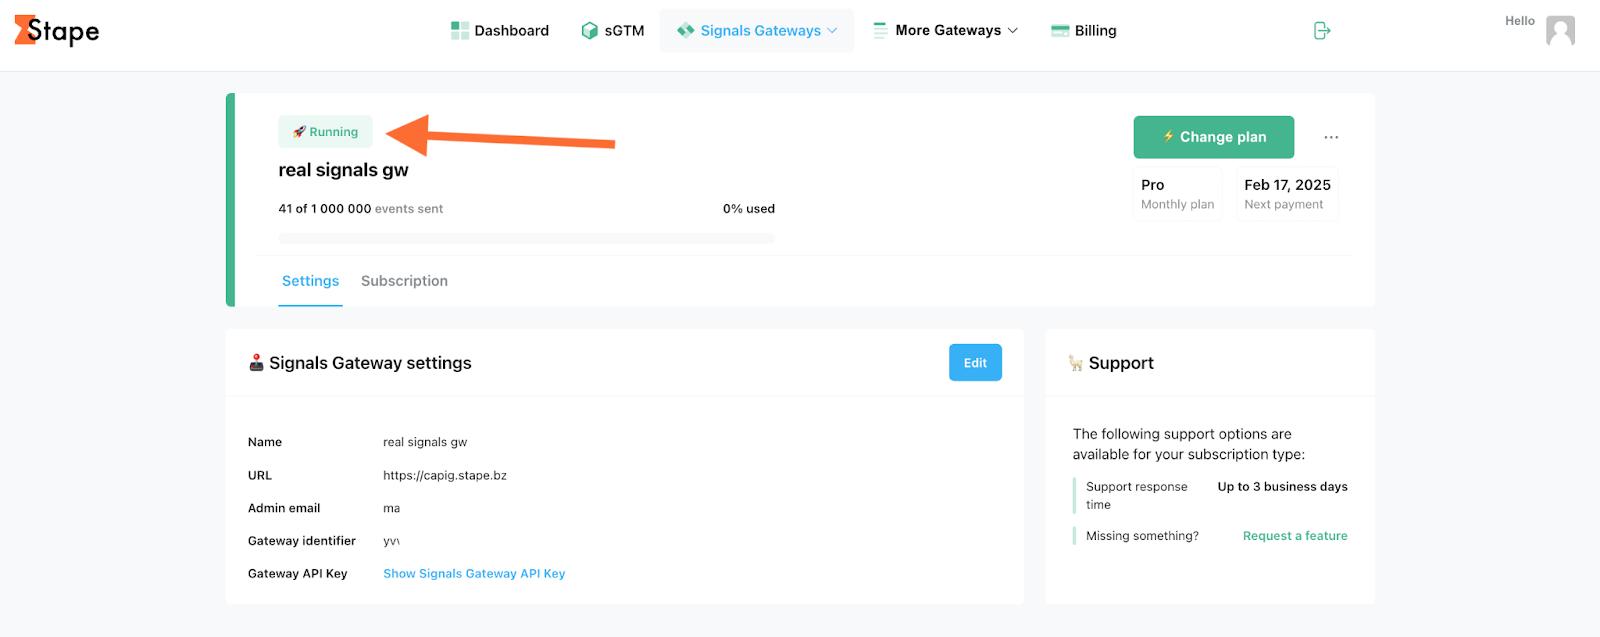
2.3. Vi invieremo un’e-mail per invitarvi a impostare una password per il vostro Signals Gateway. Controllate la vostra casella di posta elettronica e cliccate su Accetta l’invito.
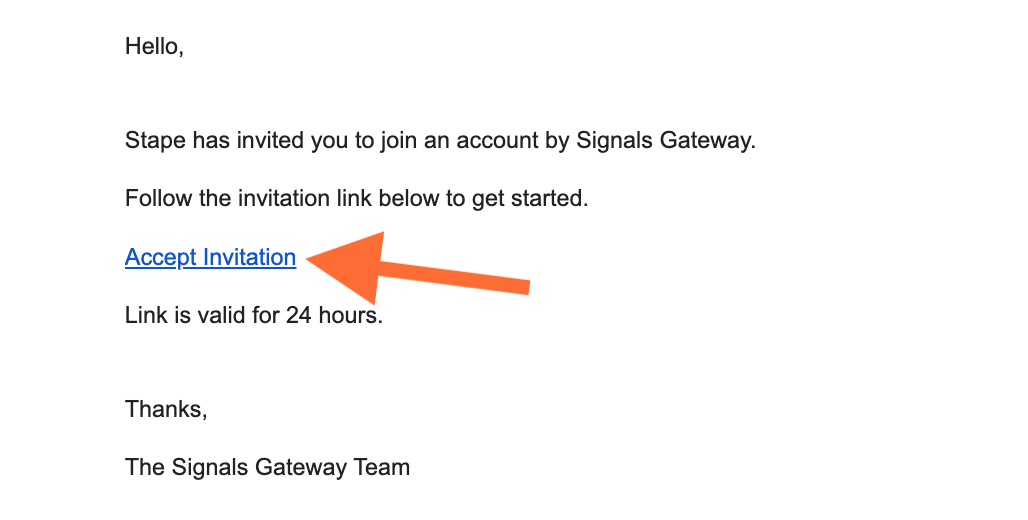
Oppure potete semplicemente cliccare su Termina la configurazione di Signals Gateway.

| Attenzione: in futuro, per accedere a Signals Gateway, cliccate sull’URL e incollatelo nel vostro browser per effettuare l’accesso. |
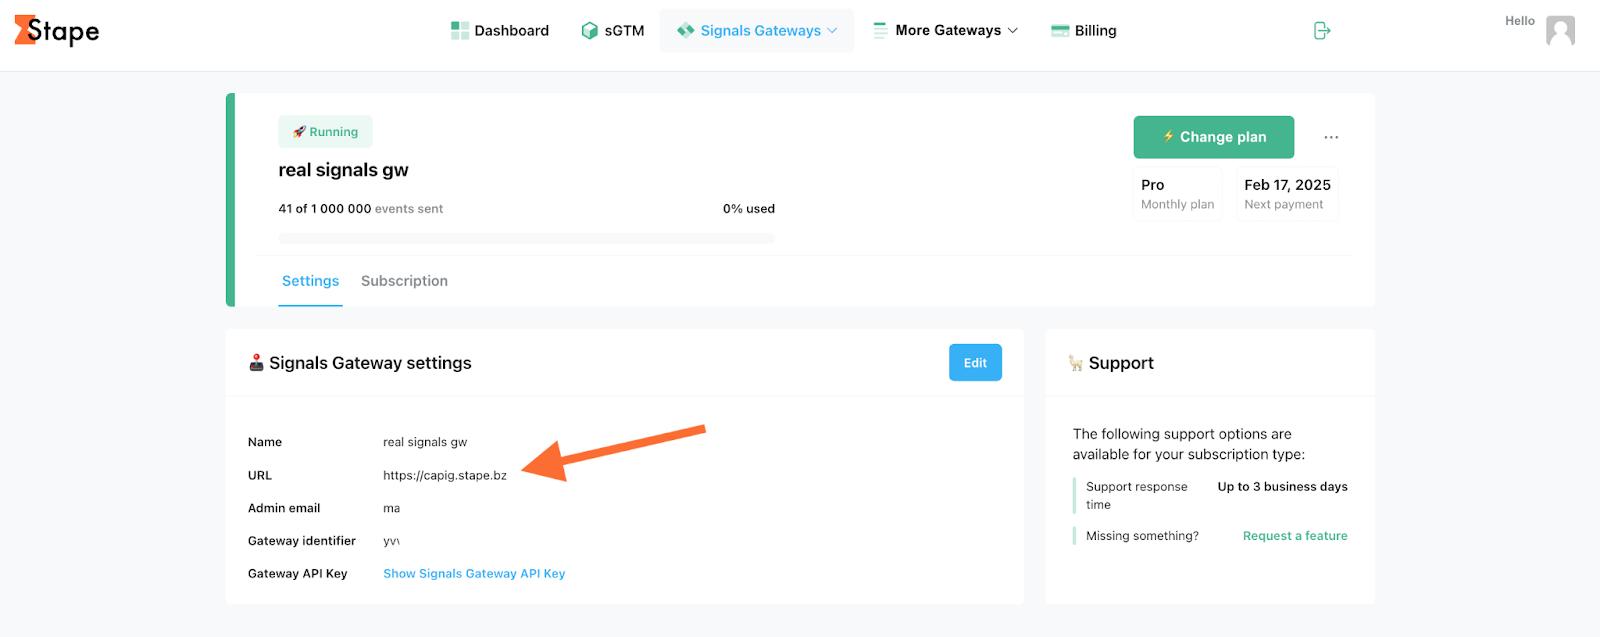
Fase 3. Configurare Signals Gateway.
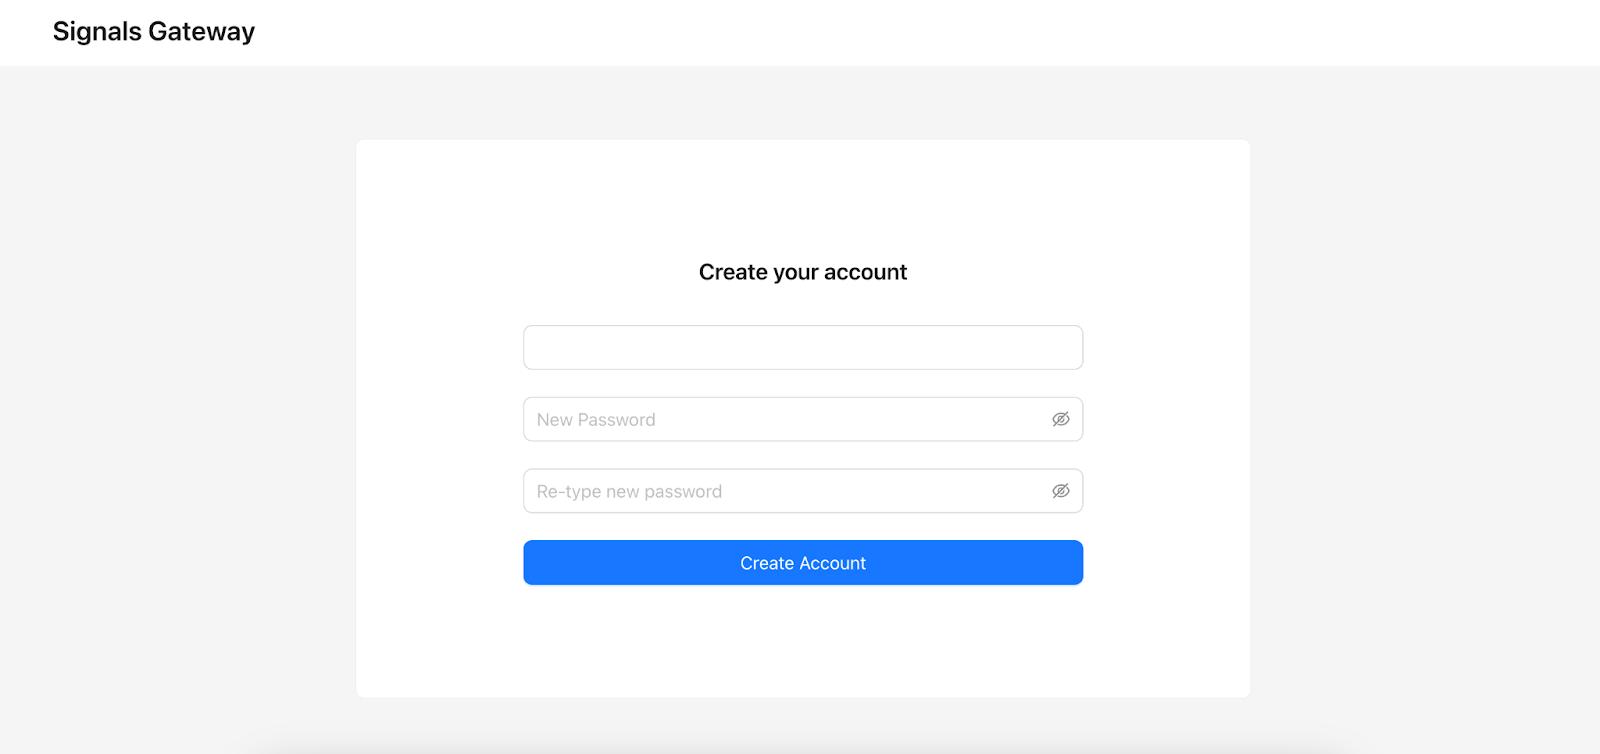
3.1. Aggiungete l’indirizzo e-mail indicato nell’e-mail di amministrazione della prima fase e impostate una password. Stape non memorizza le password di Signals Gateway: vi invitiamo a salvarle in un luogo sicuro. Cliccate su “Crea account”.
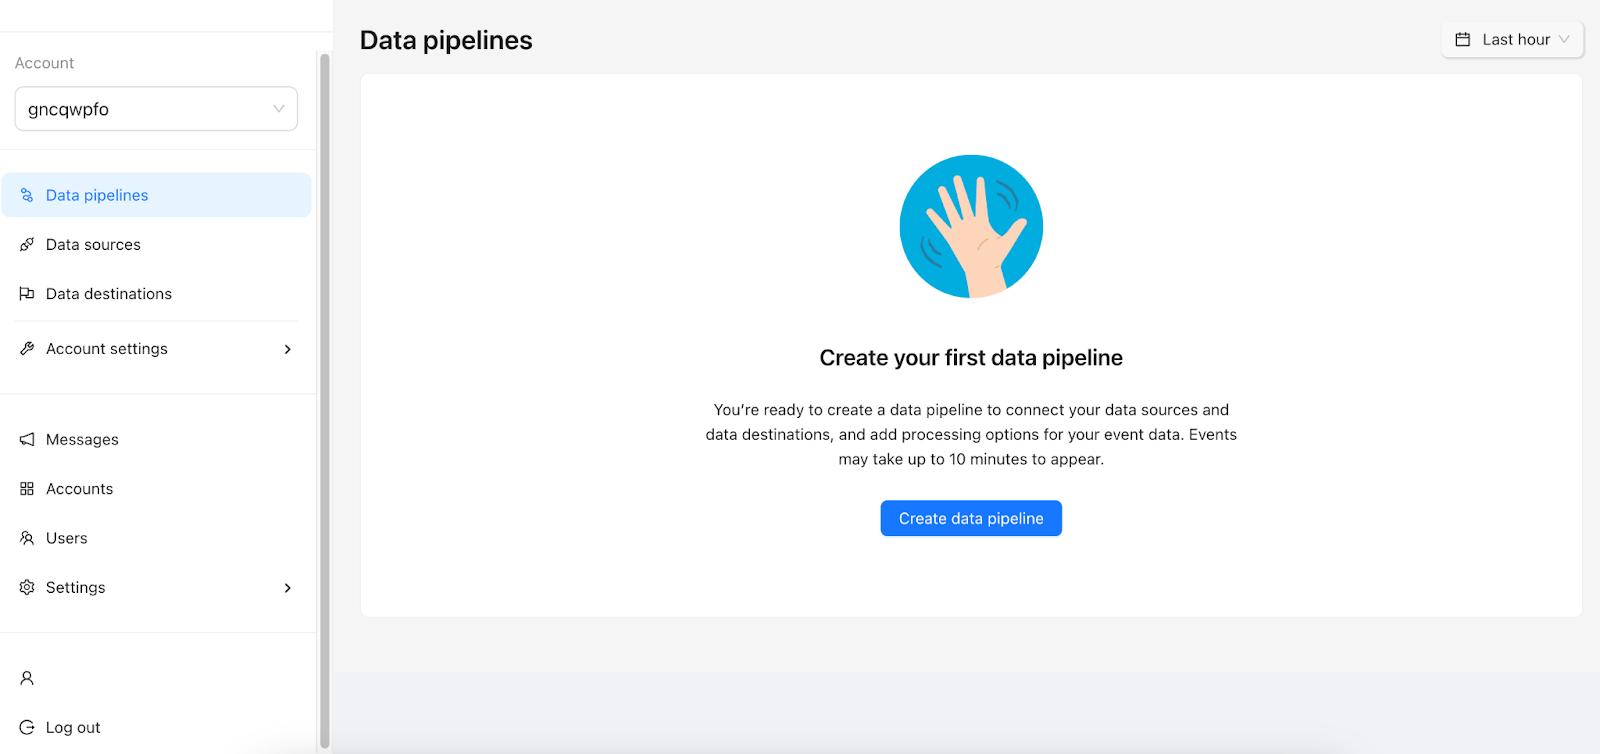
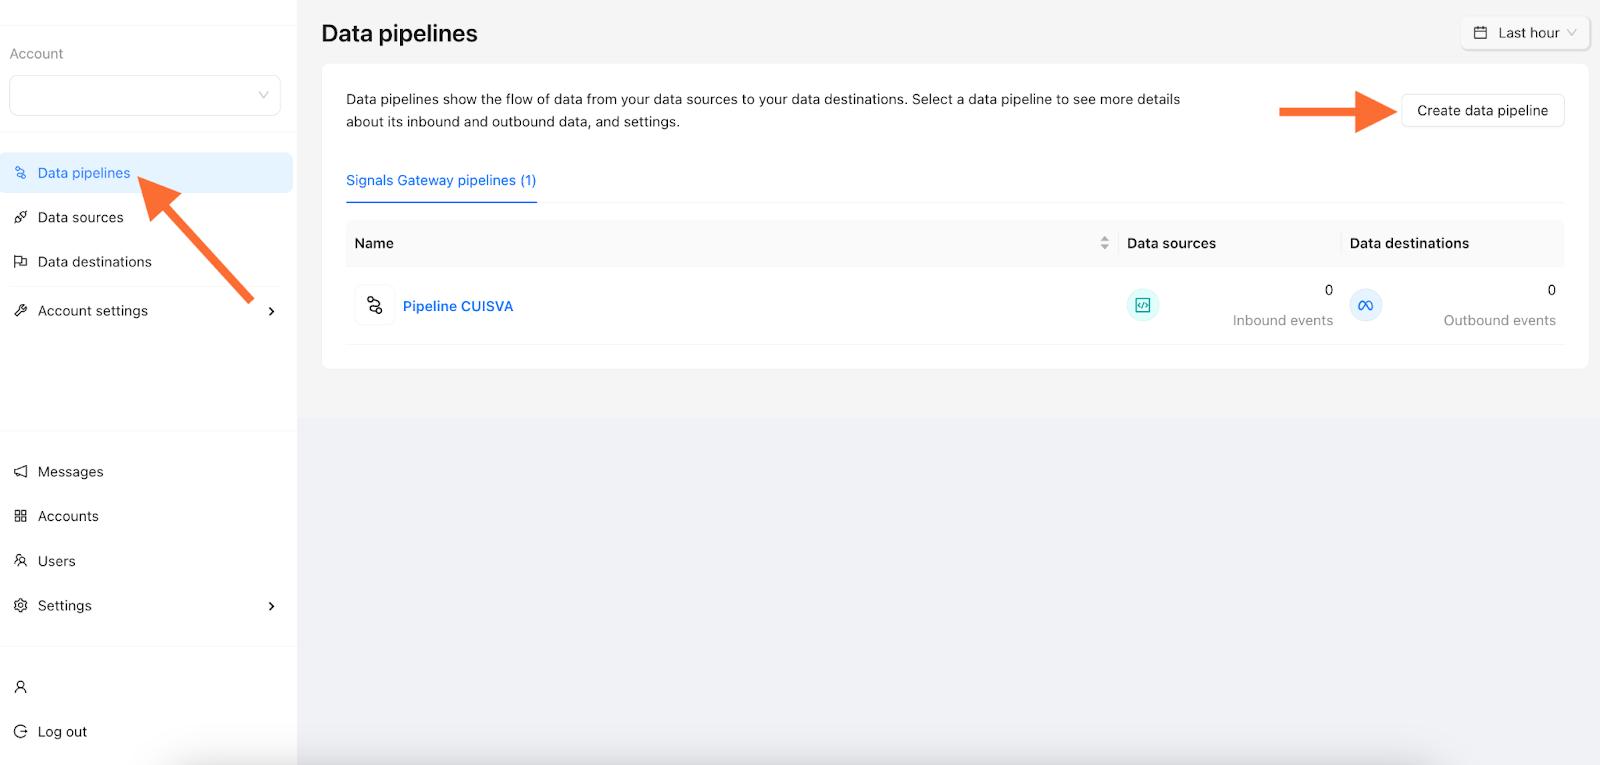
3.2. Avrete accesso al vostro ambiente Signals Gateway. Cliccate su "Crea pipeline di dati" per procedere.
3.3. Selezionate il tipo di pipeline che volete creare.
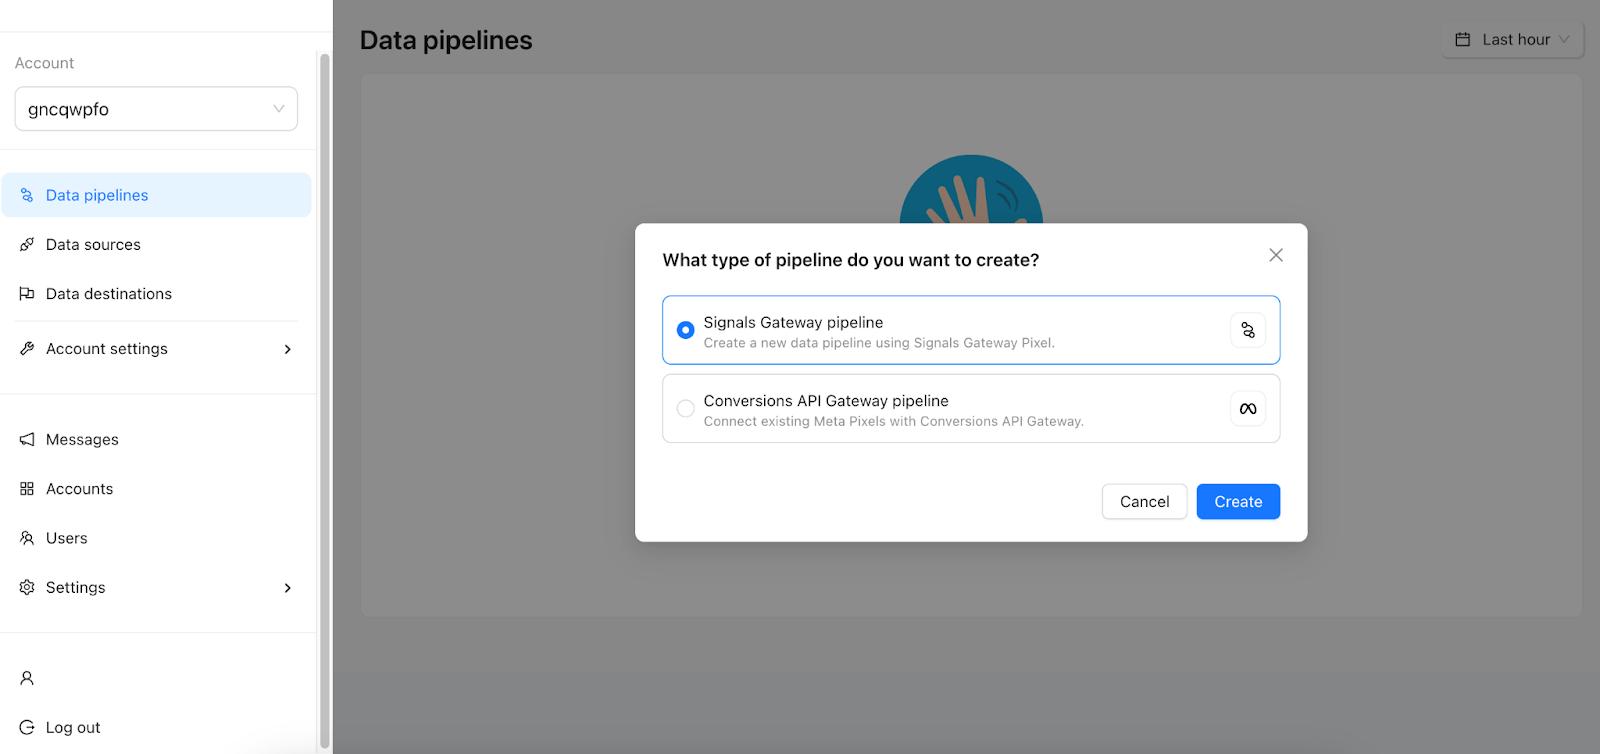
| Nella guida seguente, vi mostreremo come creare una pipeline Signals Gateway attraverso il pixel Signals Gateway con destinazione Meta. |
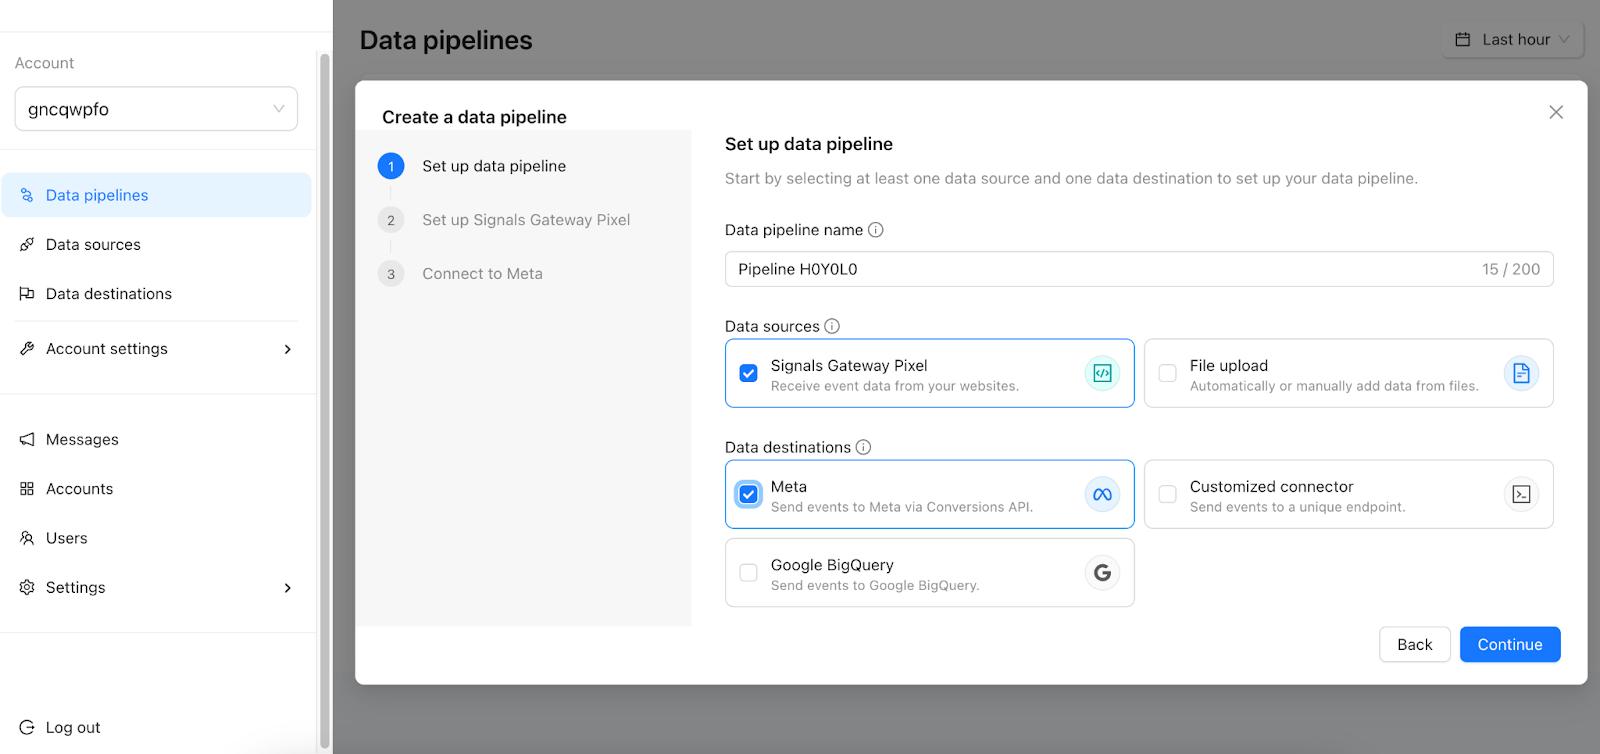
3.4. Impostare la pipeline di dati.
Scegliete il nome della pipeline di dati e selezionate le fonti di dati e le destinazioni di dati desiderate.
Sorgenti di dati: gli eventi in entrata provengono da fonti di dati associate a siti web, app e file di dati.
Destinazione dei dati: dopo l’elaborazione, i dati degli eventi in uscita vengono inviati a una destinazione preselezionata.
Cliccate su “Continua”.
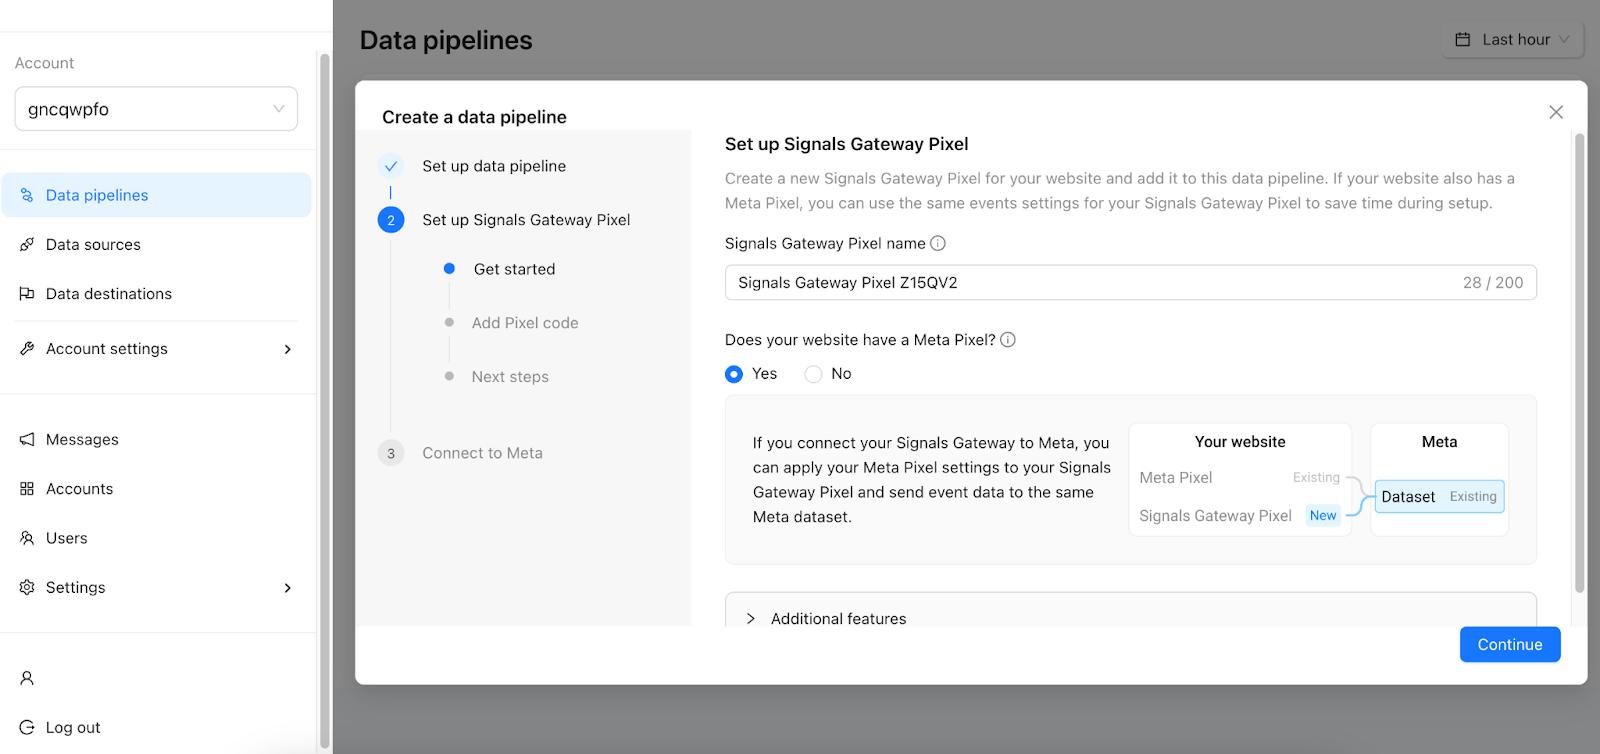
3.5. Impostare il pixel Signals Gateway.
Aggiungete un nome per il vostro nuovo pixel e indicate se il vostro sito web ha un pixel Meta.
Se avete un insieme di dati Meta che riceve eventi dal vostro sito web, un pixel Meta è installato sul sito web.
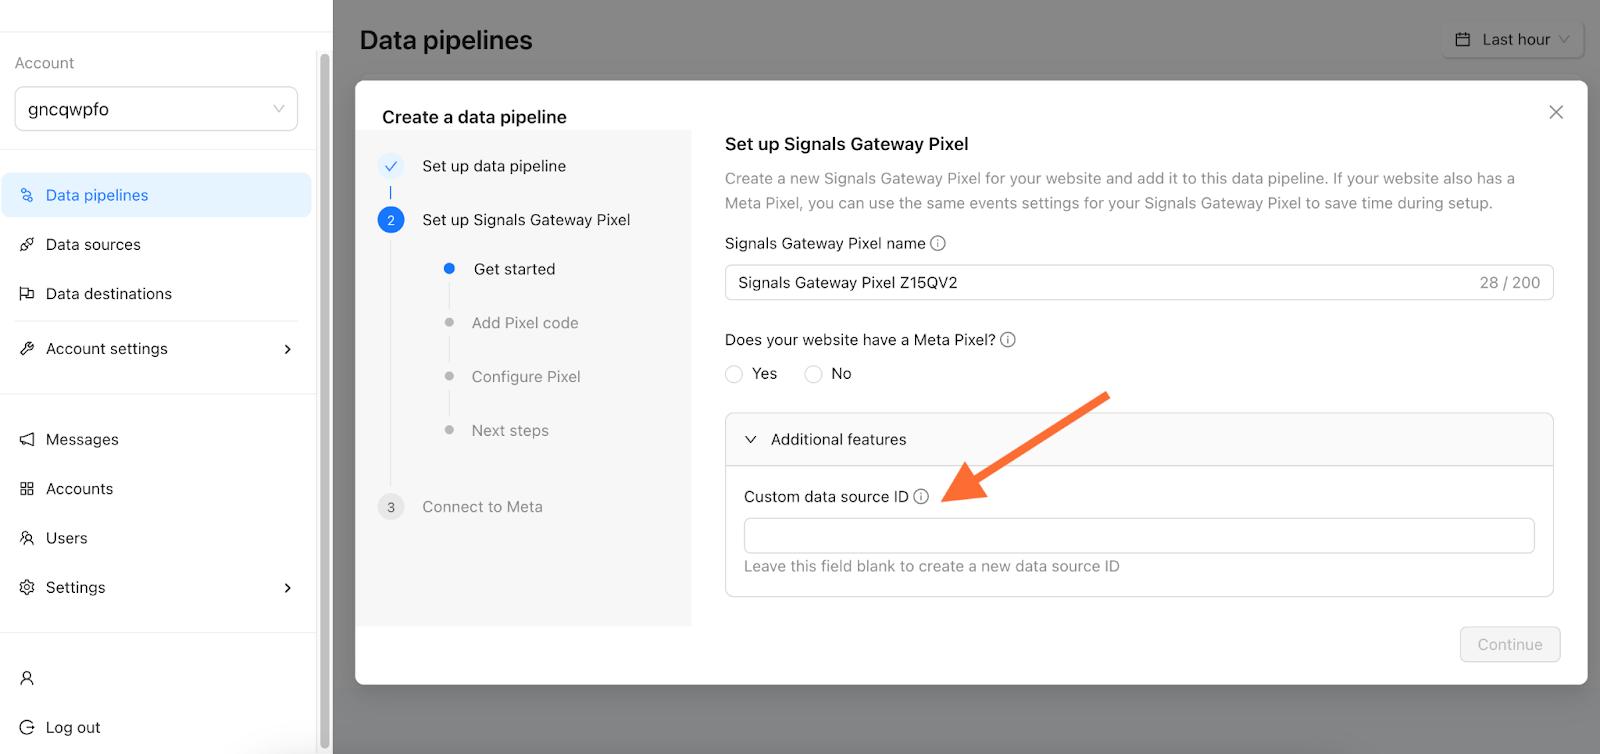
In Caratteristiche aggiuntive potete aggiungere l’ID dell’origine dati personalizzata.
Se avete già installato un codice pixel di Signals Gateway sul vostro sito web, potete inserire qui il suo ID per continuare a utilizzare il suo codice pixel.
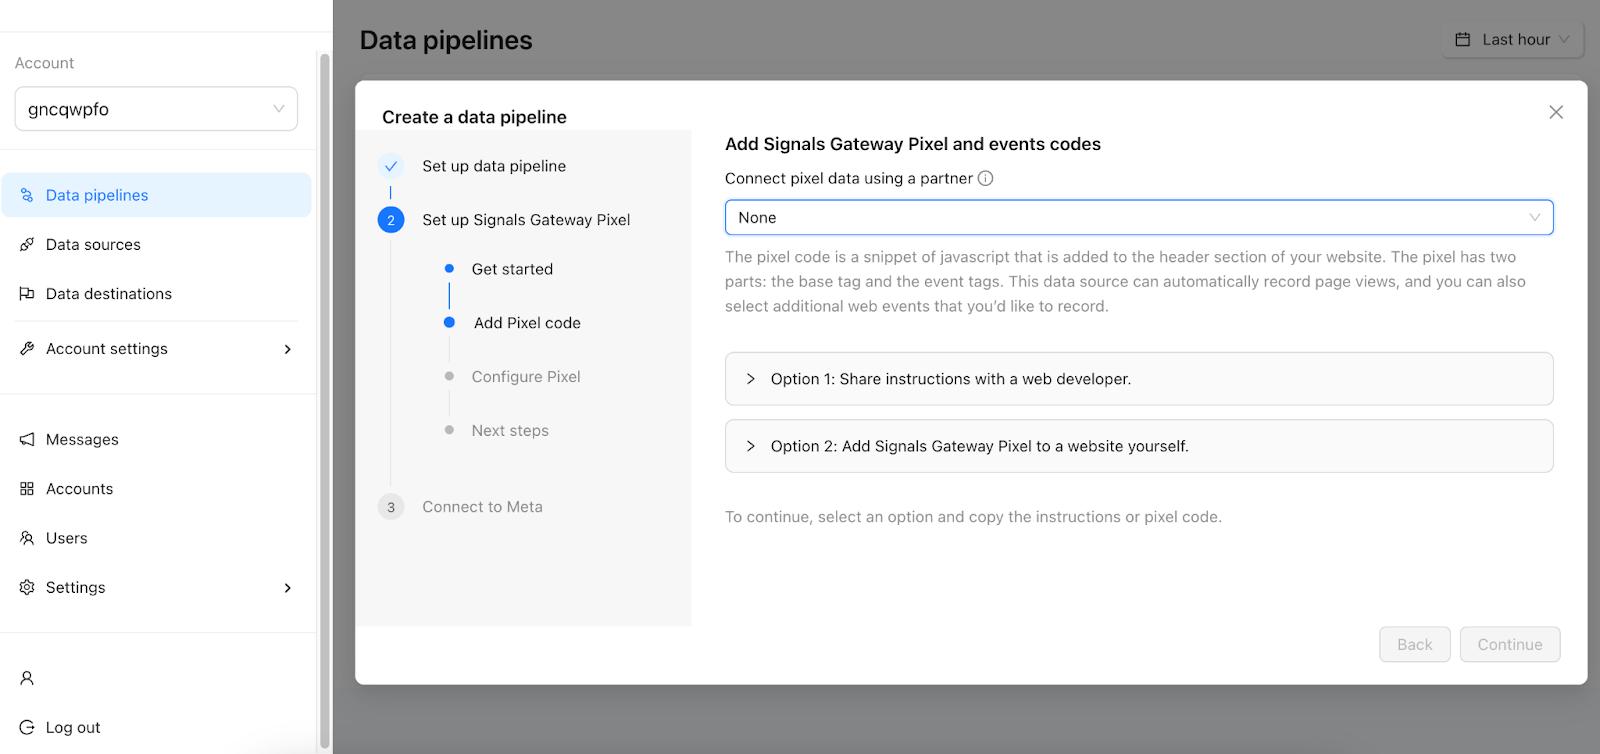
3.6. Aggiungete i codici del pixel Signals Gateway e degli eventi.
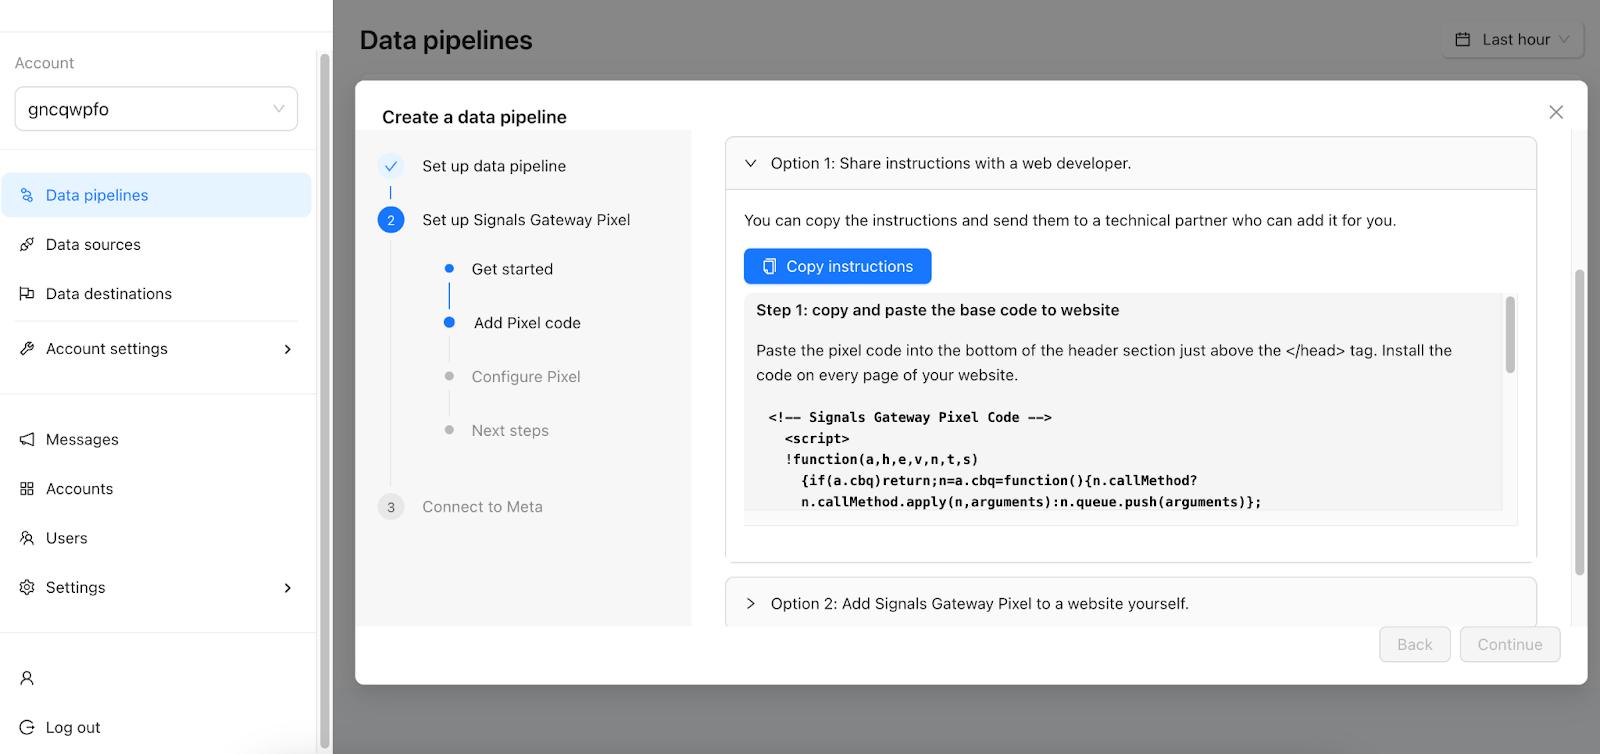
Opzione 1: Condividere le istruzioni con uno sviluppatore web.
È sufficiente fare clic su “Copia istruzioni” e inviare un messaggio allo sviluppatore.
Opzione 2: Aggiungere da soli Signals Gateway Pixel a un sito web.
Copiate e incollate il codice di base su un sito web → Configurate gli eventi di conversione sul vostro sito web, specificando i nomi degli eventi e inserendo i tag nel vostro codice.
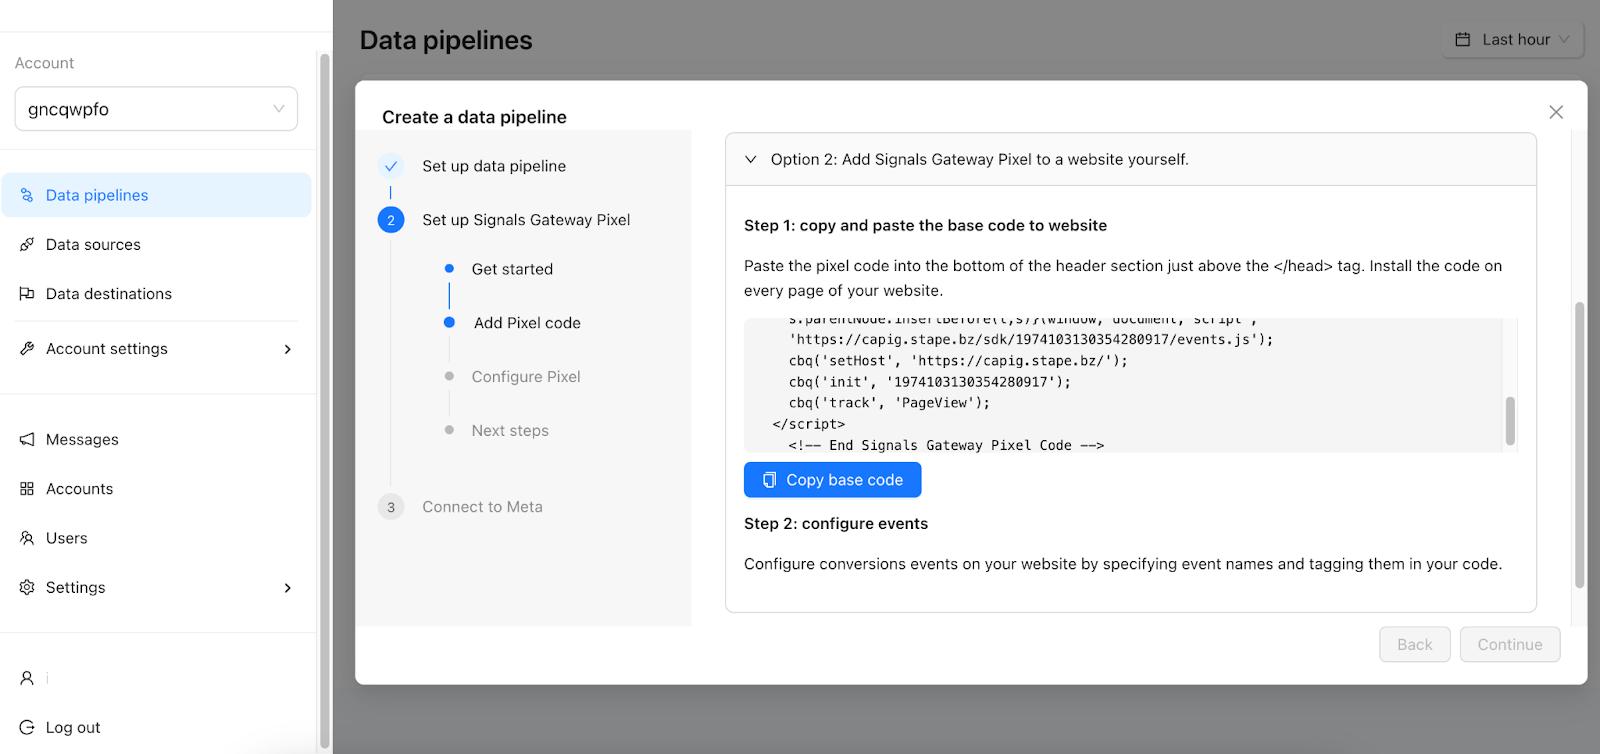
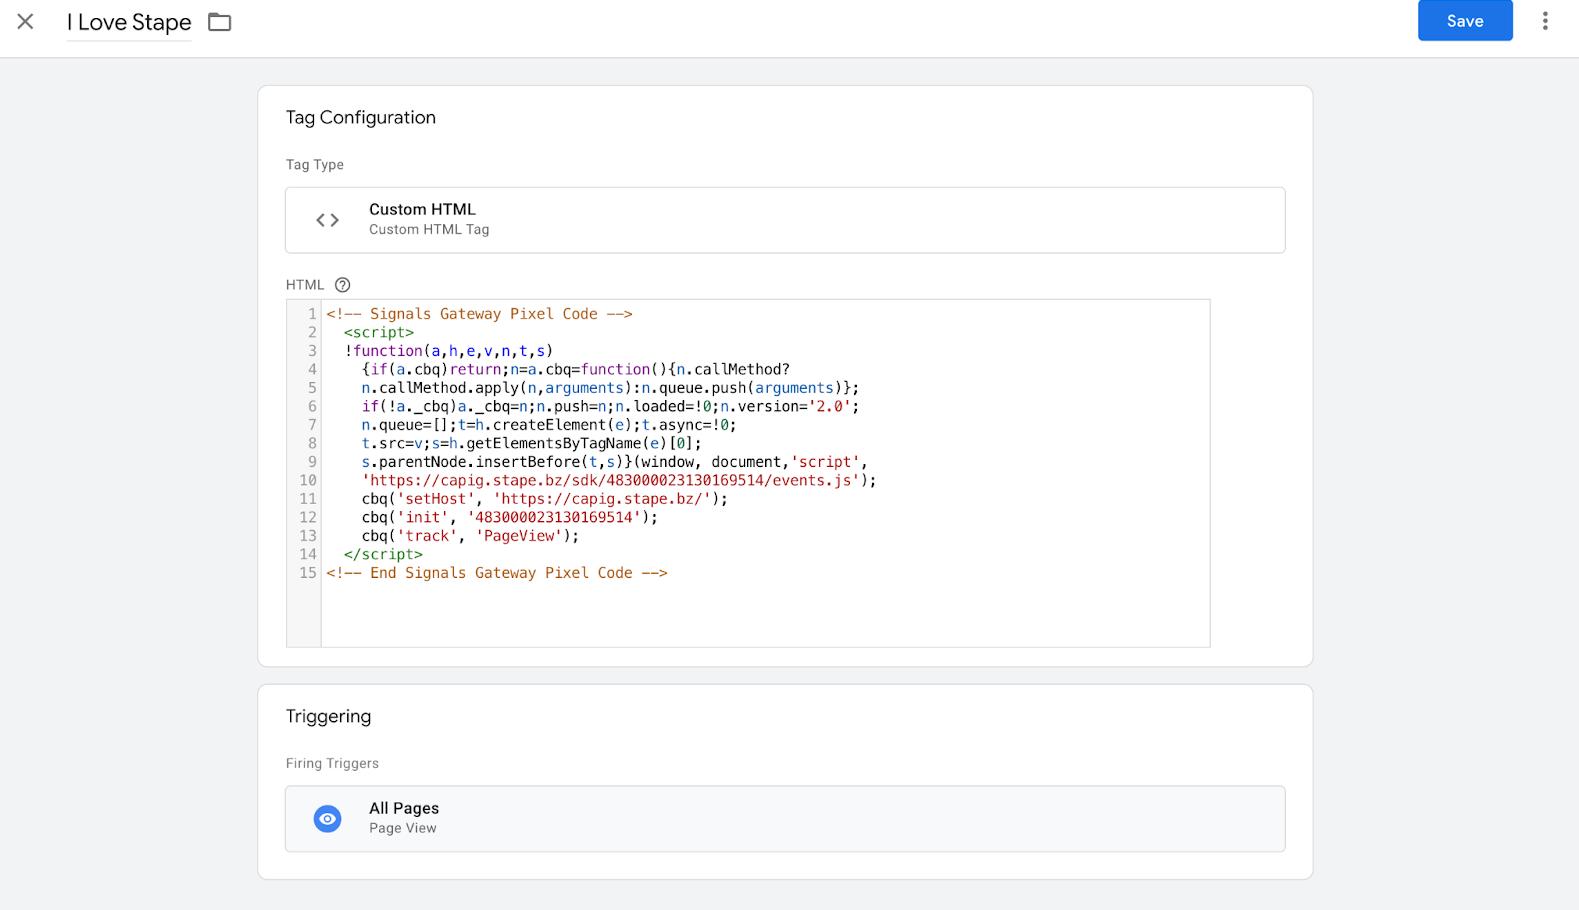
3.7. Per questa operazione, noi di Stape consigliamo di utilizzare Google Tag Manager. Aggiungete un tag HTML personalizzato → incollate il codice base del vostro pixel Signals → assegnategli un trigger e pubblicate.
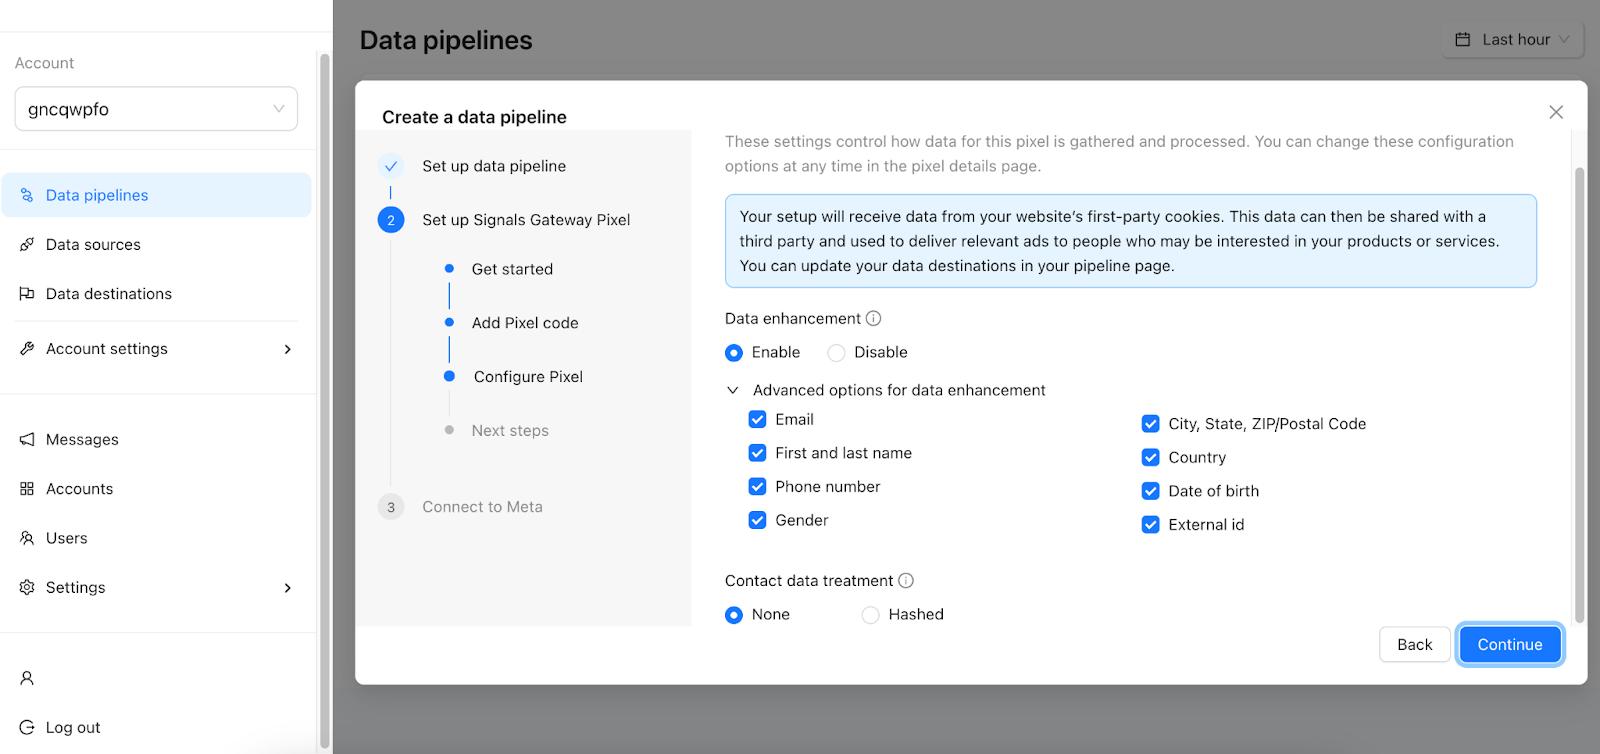
3.8. Configurate il pixel per controllare il modo in cui i suoi dati vengono raccolti ed elaborati.
Scegliete se attivare o disattivare il miglioramento dei dati e se scegliere il trattamento dei dati di contatto.
Miglioramento dei dati: inviate dati di corrispondenza avanzati con i vostri eventi.
Trattamento dei dati di contatto: eseguite l’hash dei dati di contatto al momento della raccolta, utilizzando il formato SHA-256. I dati sottoposti a hash non possono essere ripristinati nella loro forma originale e non possono essere utilizzati da alcune destinazioni di dati o per la creazione di pubblico.
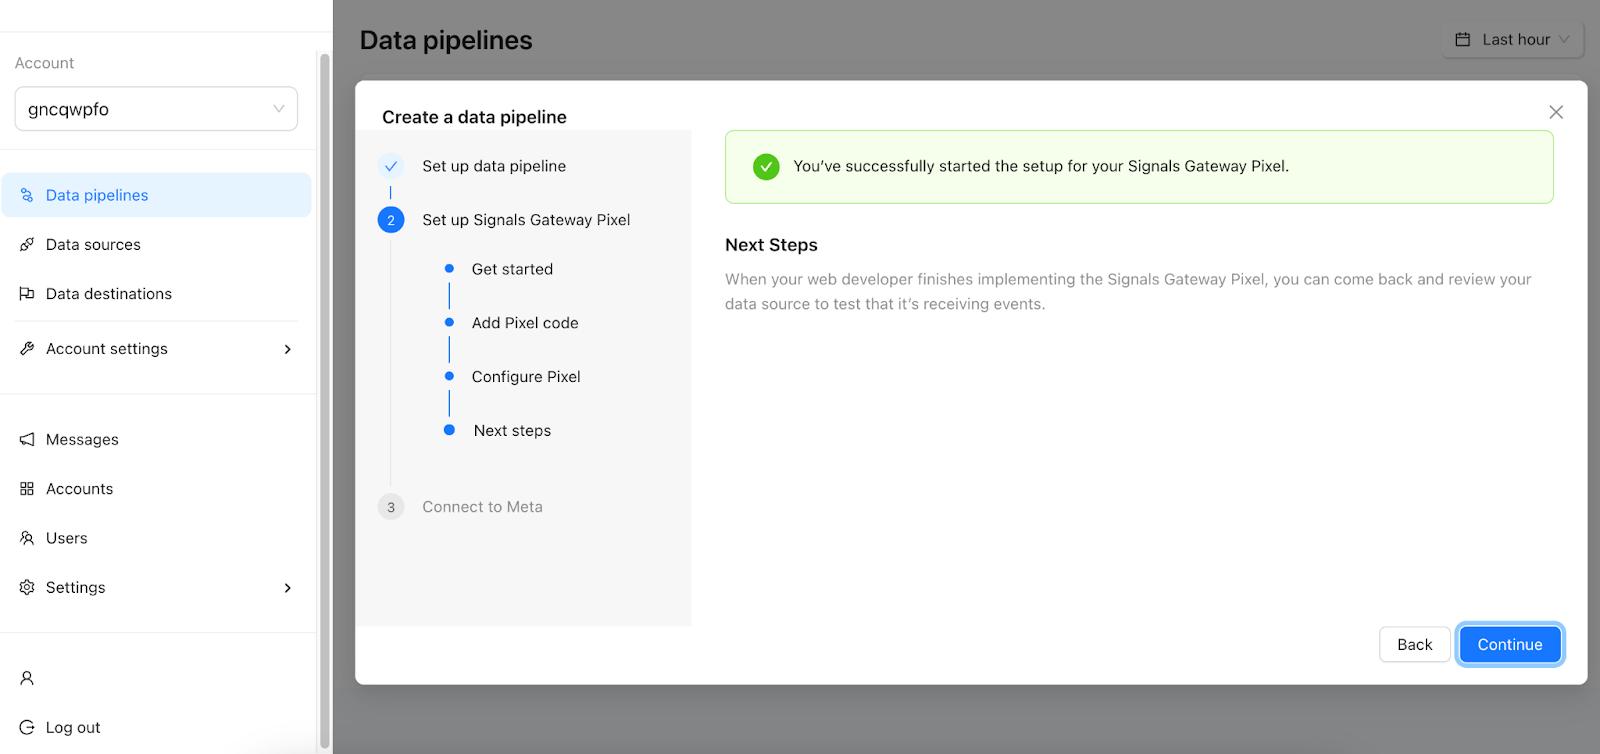
3.9. Dopo aver cliccato su “Continua”, noterete che la configurazione del vostro pixel Signals Gateway sarà stata avviata con successo.
3.10. Collegarsi a Meta con Conversions API.
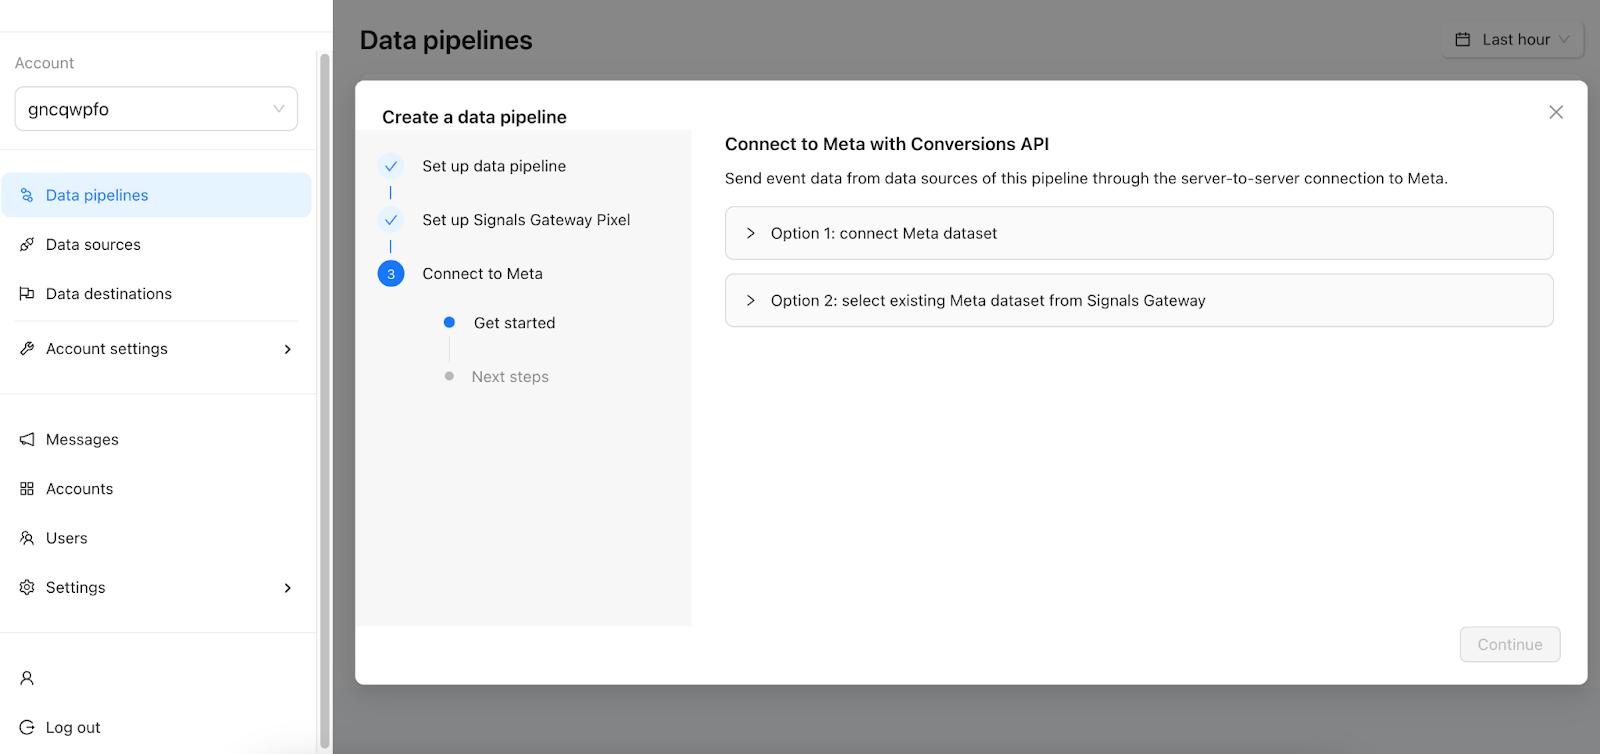
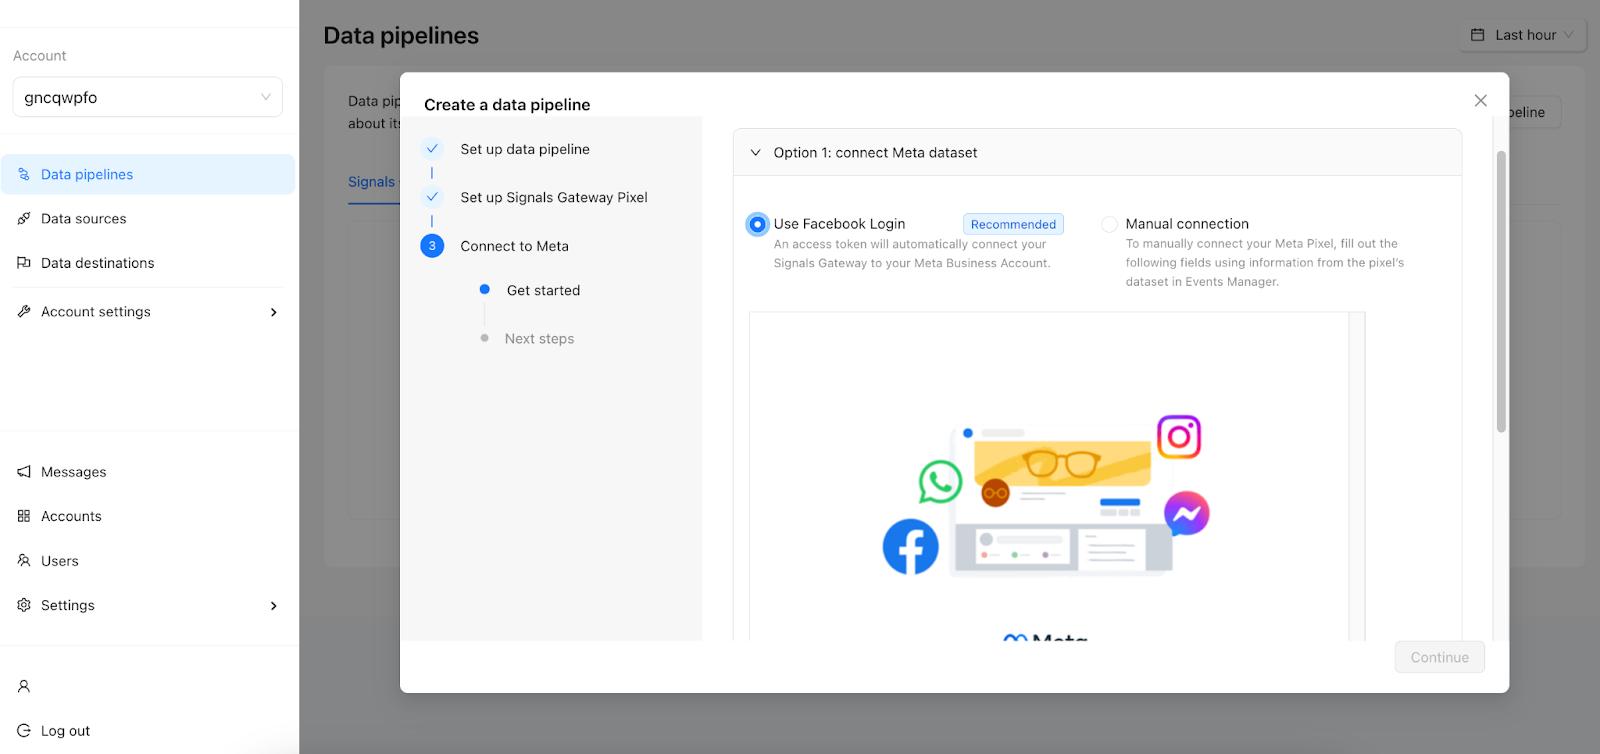
Opzione 1: collegare il dataset Meta.
Potete utilizzare il login di Facebook per collegare automaticamente il vostro Signals Gateway al vostro account Meta Business.
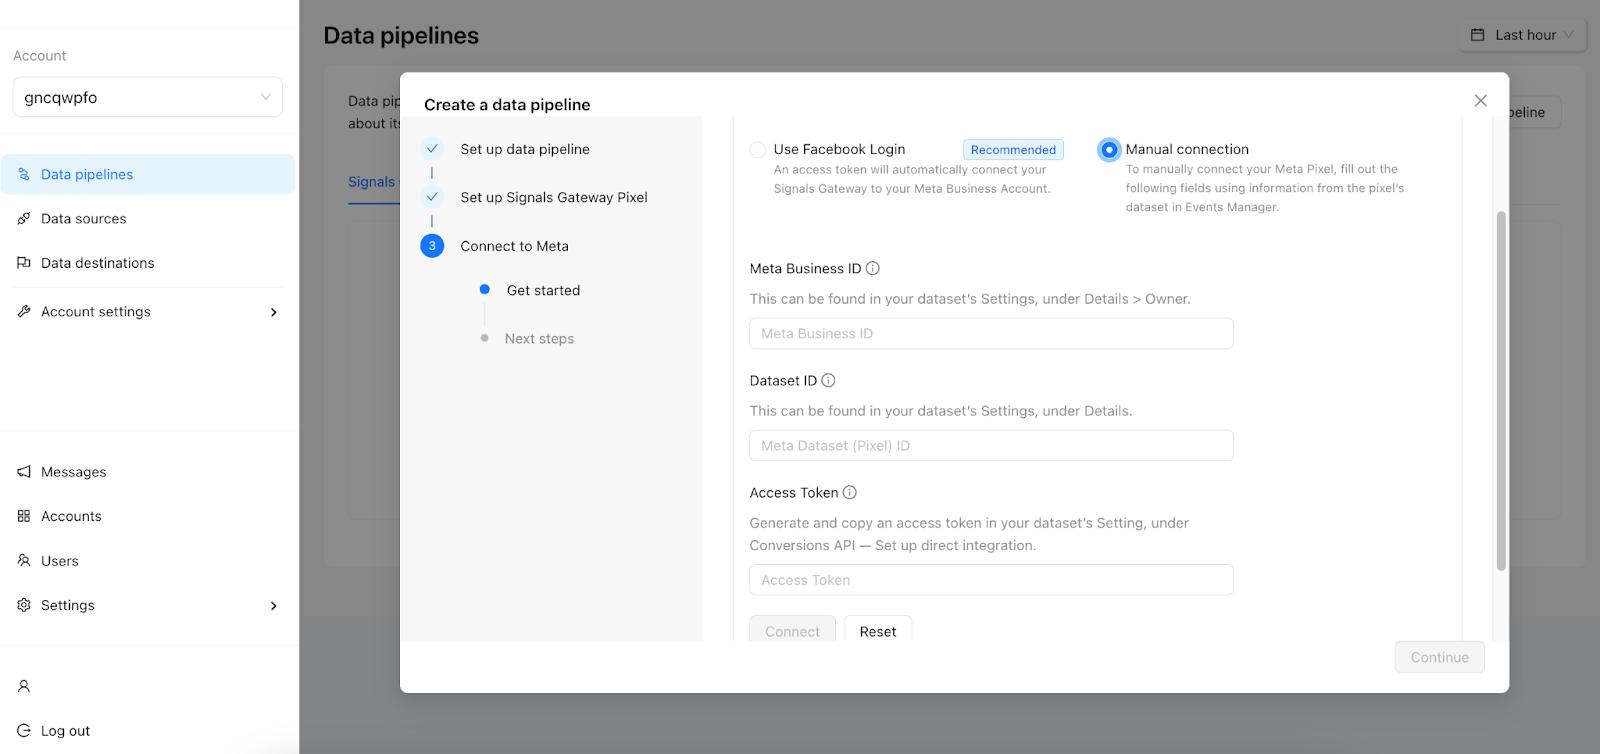
In alternativa, potete collegare manualmente il vostro pixel Meta compilando i campi con le informazioni contenute nel dataset del pixel in Events Manager.
ID business Meta: il numero univoco utilizzato per identificare un gruppo di asset Meta business, come un account pubblicitario, gestito da un’azienda.
ID set di dati: il numero univoco associato a un set di dati in Meta Events Manager. I pixel Meta associati al dataset condivideranno lo stesso ID.
Token di accesso: il codice che viene generato automaticamente per stabilire una connessione sicura con il dataset.
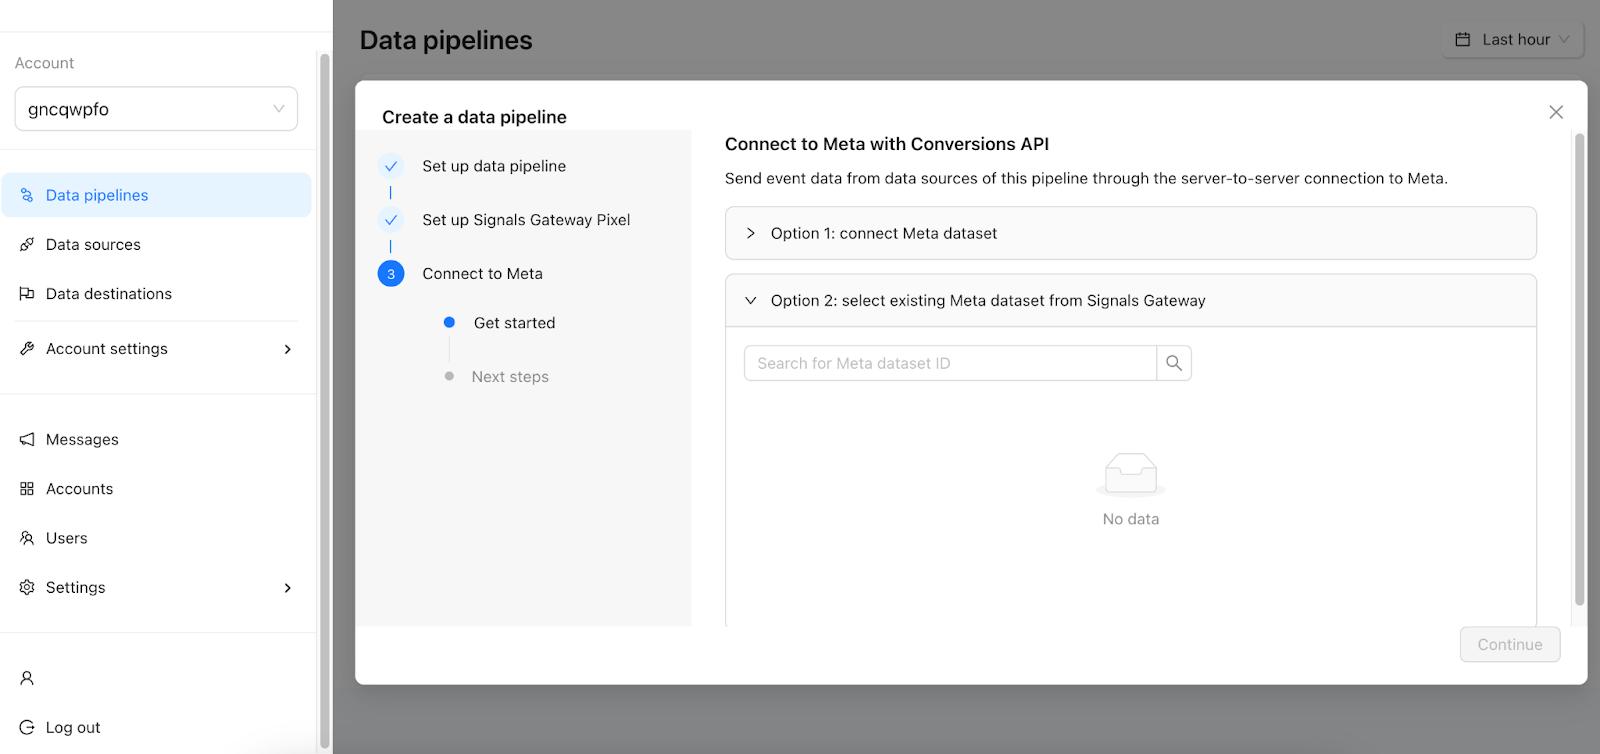
Opzione 2: selezionare il dataset Meta esistente da Signals Gateway.
| 3.11. La configurazione è completa! |
Fase 4. Come appare una configurazione finita.
Nella dashboard, vedrete una panoramica della vostra pipeline.
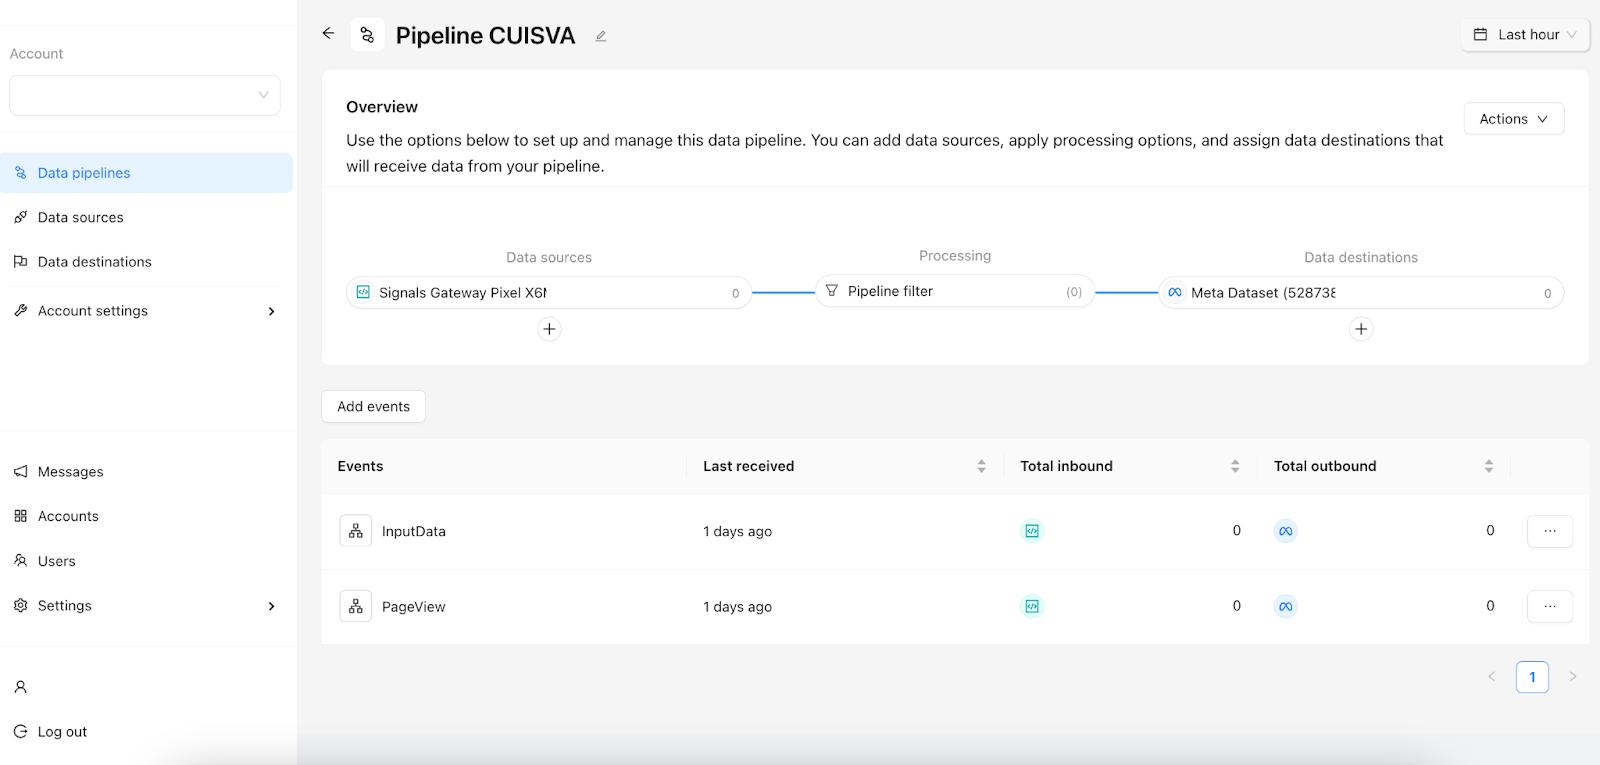
In questa fase potete modificare: Sorgenti di dati, Destinazioni di dati e impostare il filtro della pipeline.
Fase 5. Facoltativo: selezionare un’altra origine dati o modificarla.
Cliccando sull’origine dati corrente, potete regolare le impostazioni in base alle vostre preferenze.

Cliccando su “+” sotto la voce “Origini dati”, sarà possibile aggiungere automaticamente o manualmente i dati da file.
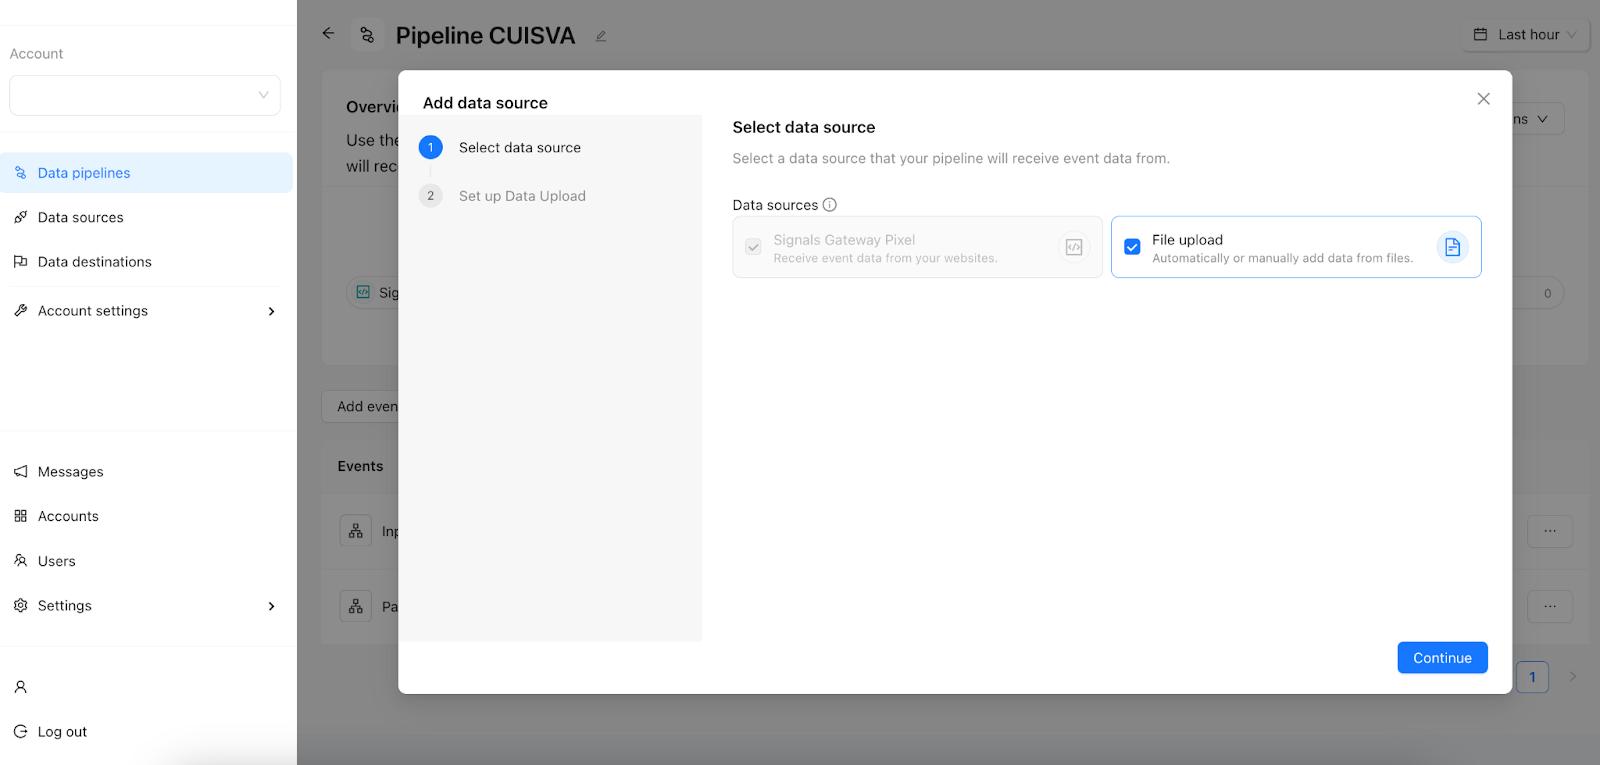
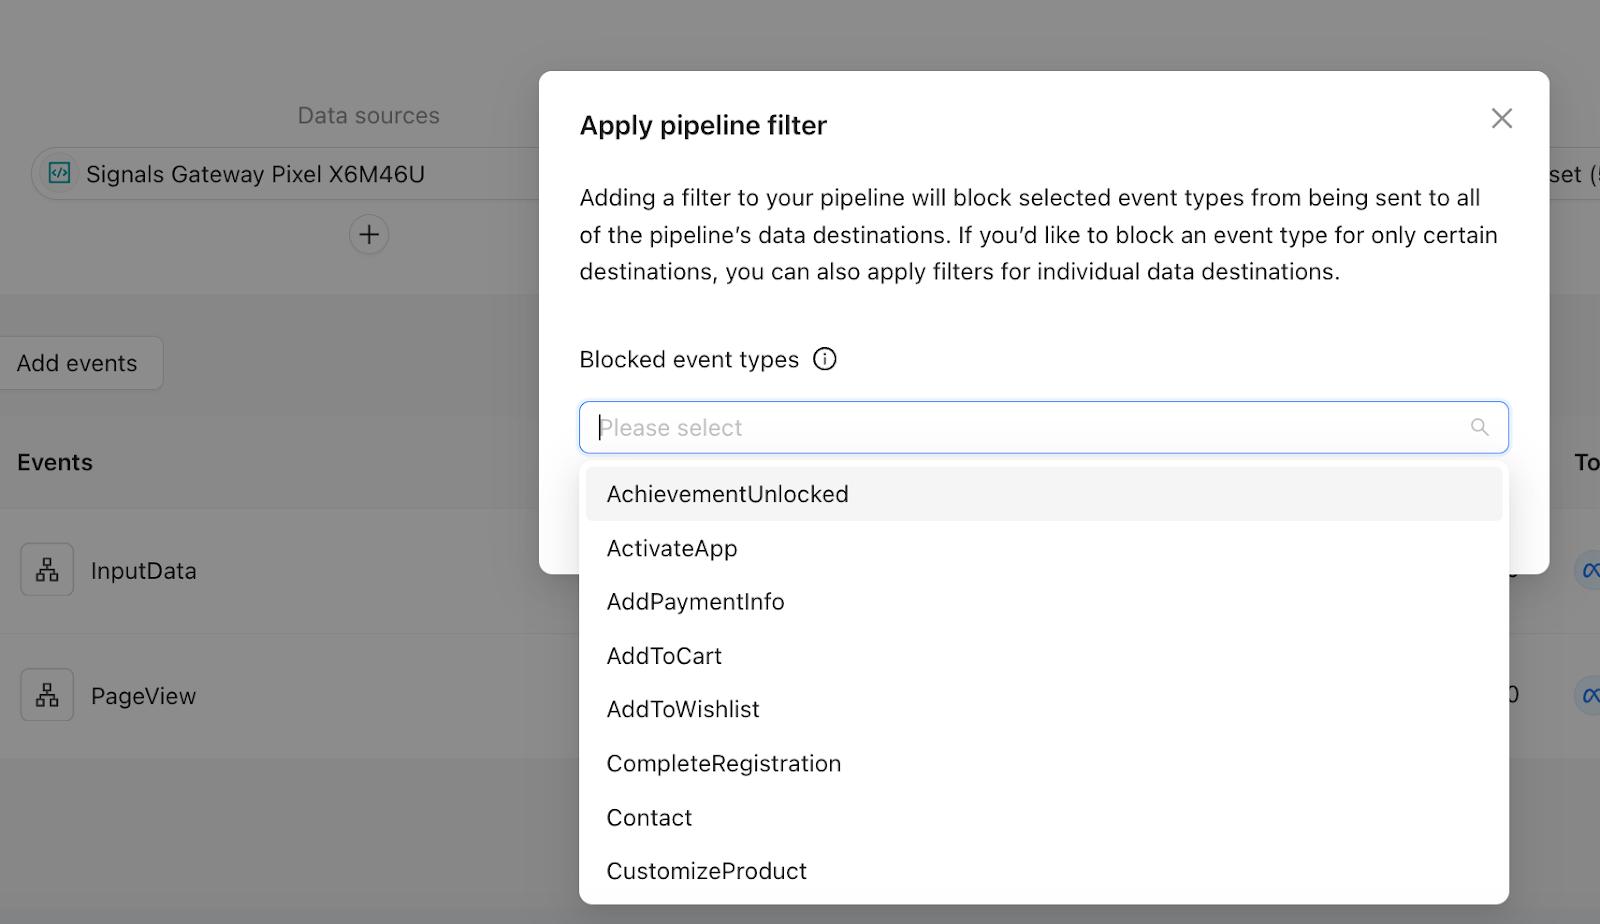
Fase 6. Facoltativo: modificare il filtro della pipeline.
Cliccando su filtro della pipeline, potete bloccare l’invio dei tipi di evento selezionati a tutte le destinazioni dei dati della pipeline.
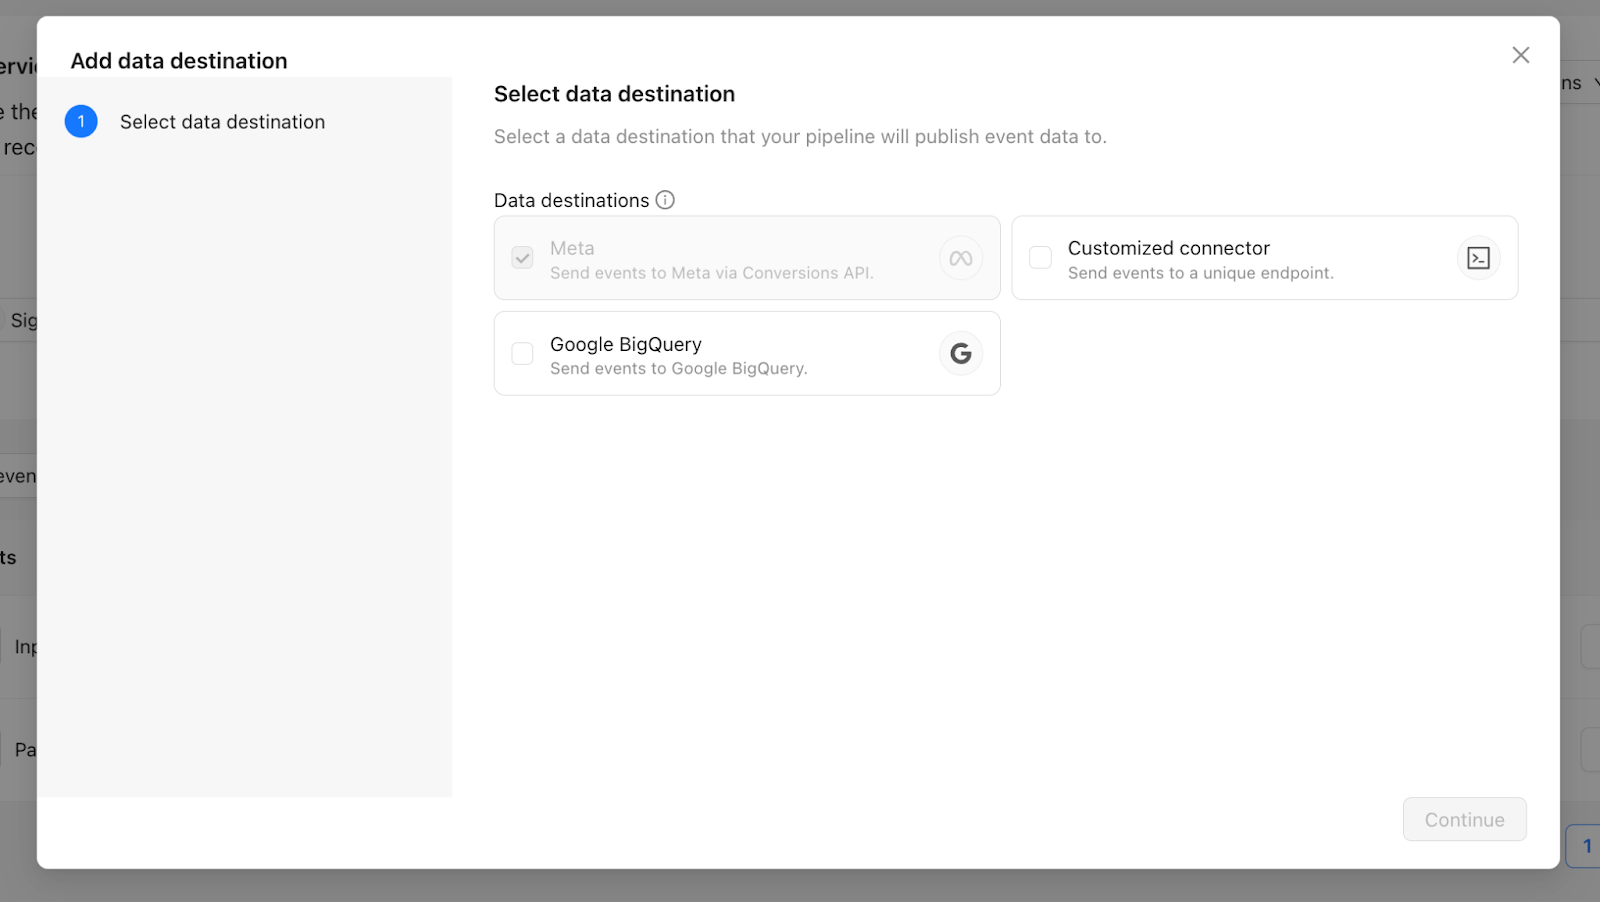
Fase 7. Facoltativo: selezionare un’altra destinazione dati o modificarla.
Cliccando sulla destinazione Dati attuali, potete regolare le impostazioni in base alle vostre preferenze.

Cliccando su “+” sotto la voce “Destinazioni dati”, potrete aggiungere automaticamente o manualmente i dati da file.
Fase 8. Facoltativo: aggiungere nuove pipeline.
Cliccate su “Pipeline di dati” e poi su “Crea pipeline di dati”.
Fase 9. Facoltativo: aggiungere un dominio personalizzato.
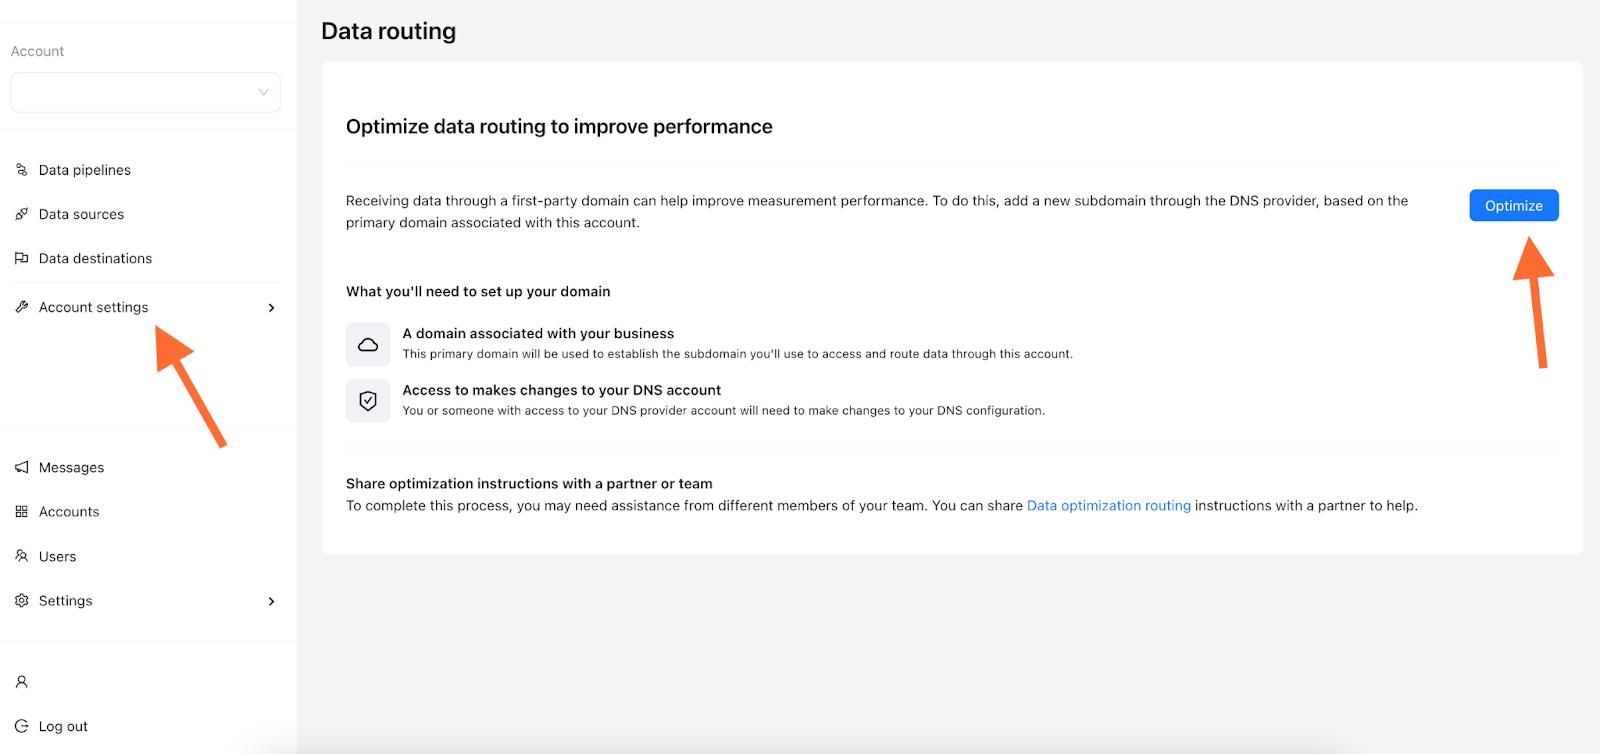
L’utilizzo di un dominio personalizzato o di un data routing all’interno del Signals Gateway può aumentare le prestazioni di misurazione.
Cliccate su “Impostazioni account” → “Data routing” → “Ottimizza”.
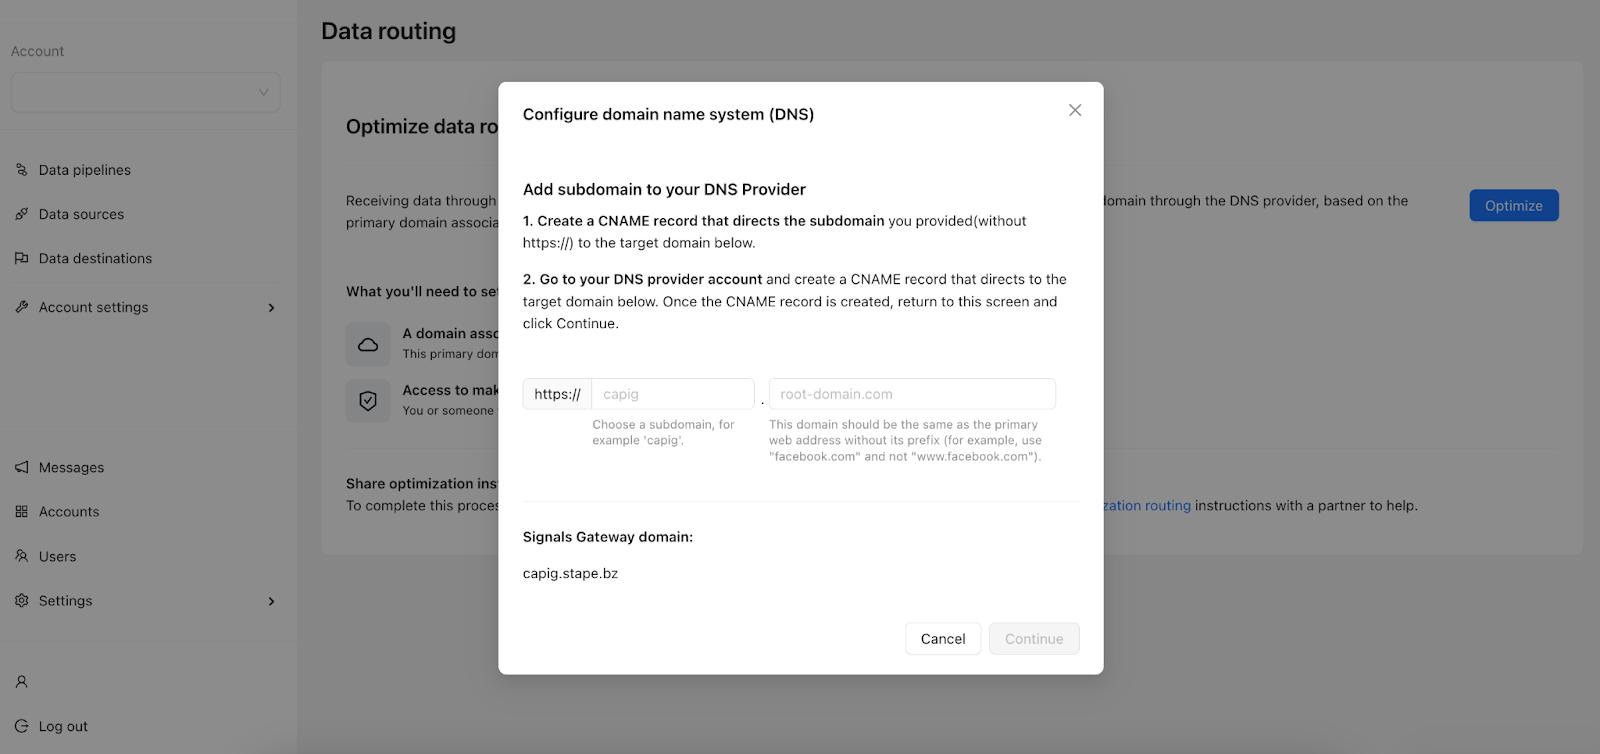
Scrivete i nomi dei sottodomini e dei domini.
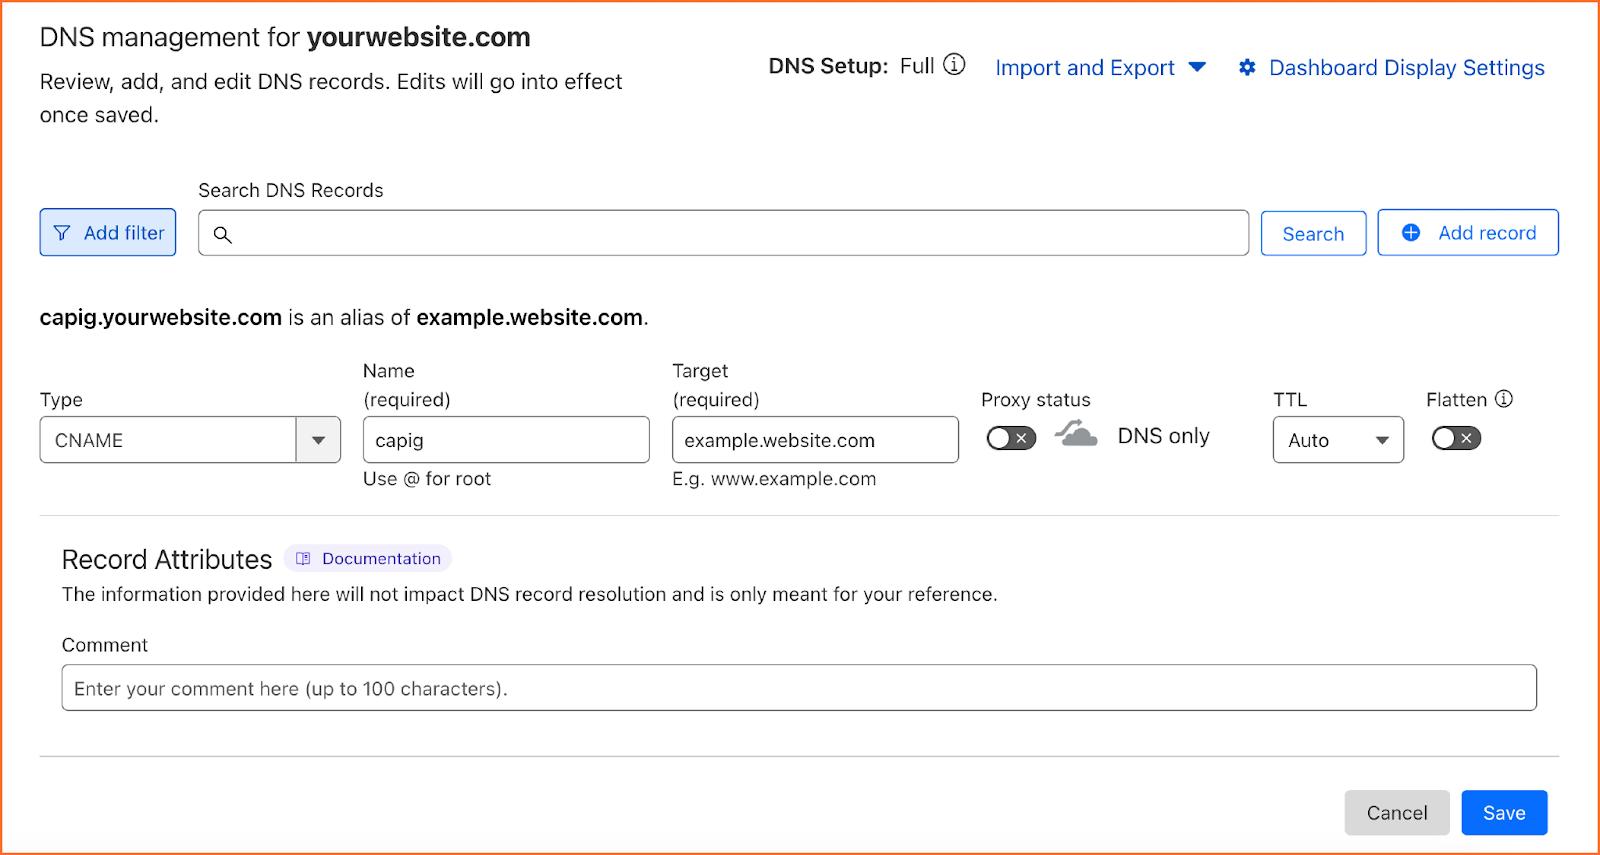
Il passo successivo richiede la definizione delle impostazioni DNS per il dominio personalizzato. Prima di procedere, assicuratevi di poter apportare modifiche attraverso il provider DNS.
Destinazione dei dati: connettore personalizzato.
Se volete inviare gli eventi a un endpoint unico, cliccate su “Connettore personalizzato” e create un nome di destinazione personalizzato.
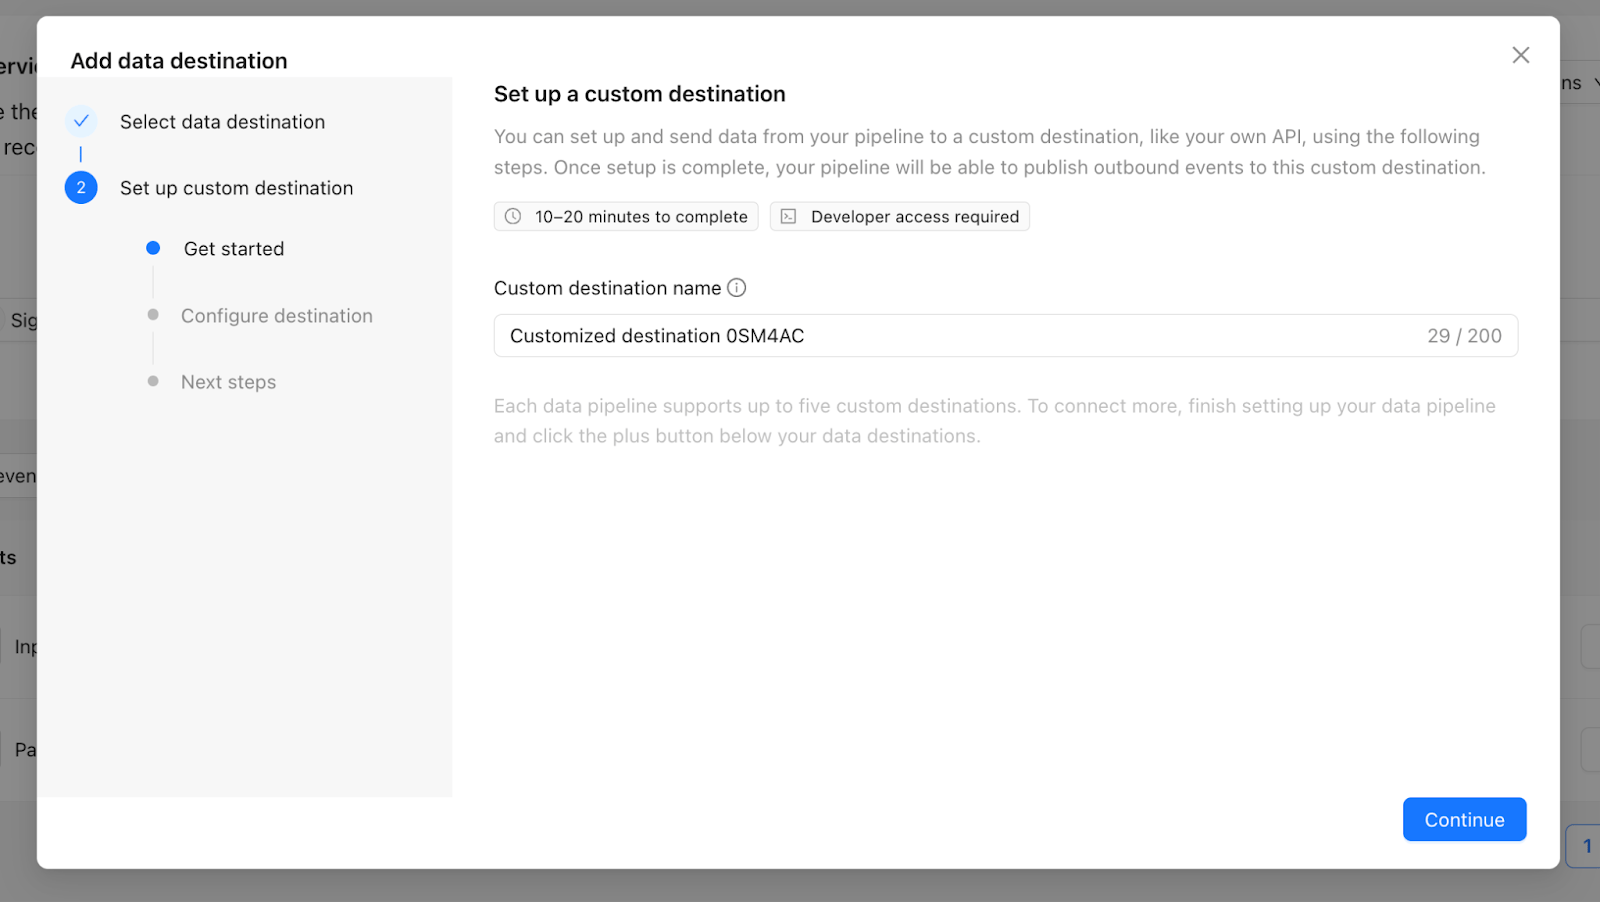
Digitate l’URL dell’endpoint di destinazione e scegliete un metodo di autenticazione.
Configurate le impostazioni a seconda del metodo.

Visualizzate l’anteprima del payload e delle impostazioni.
Il gioco è fatto!
Destinazione dei dati: Google BigQuery.
Se volete inviare gli eventi a Google BigQuery, cliccate su Google BigQuery e create un nome di destinazione.
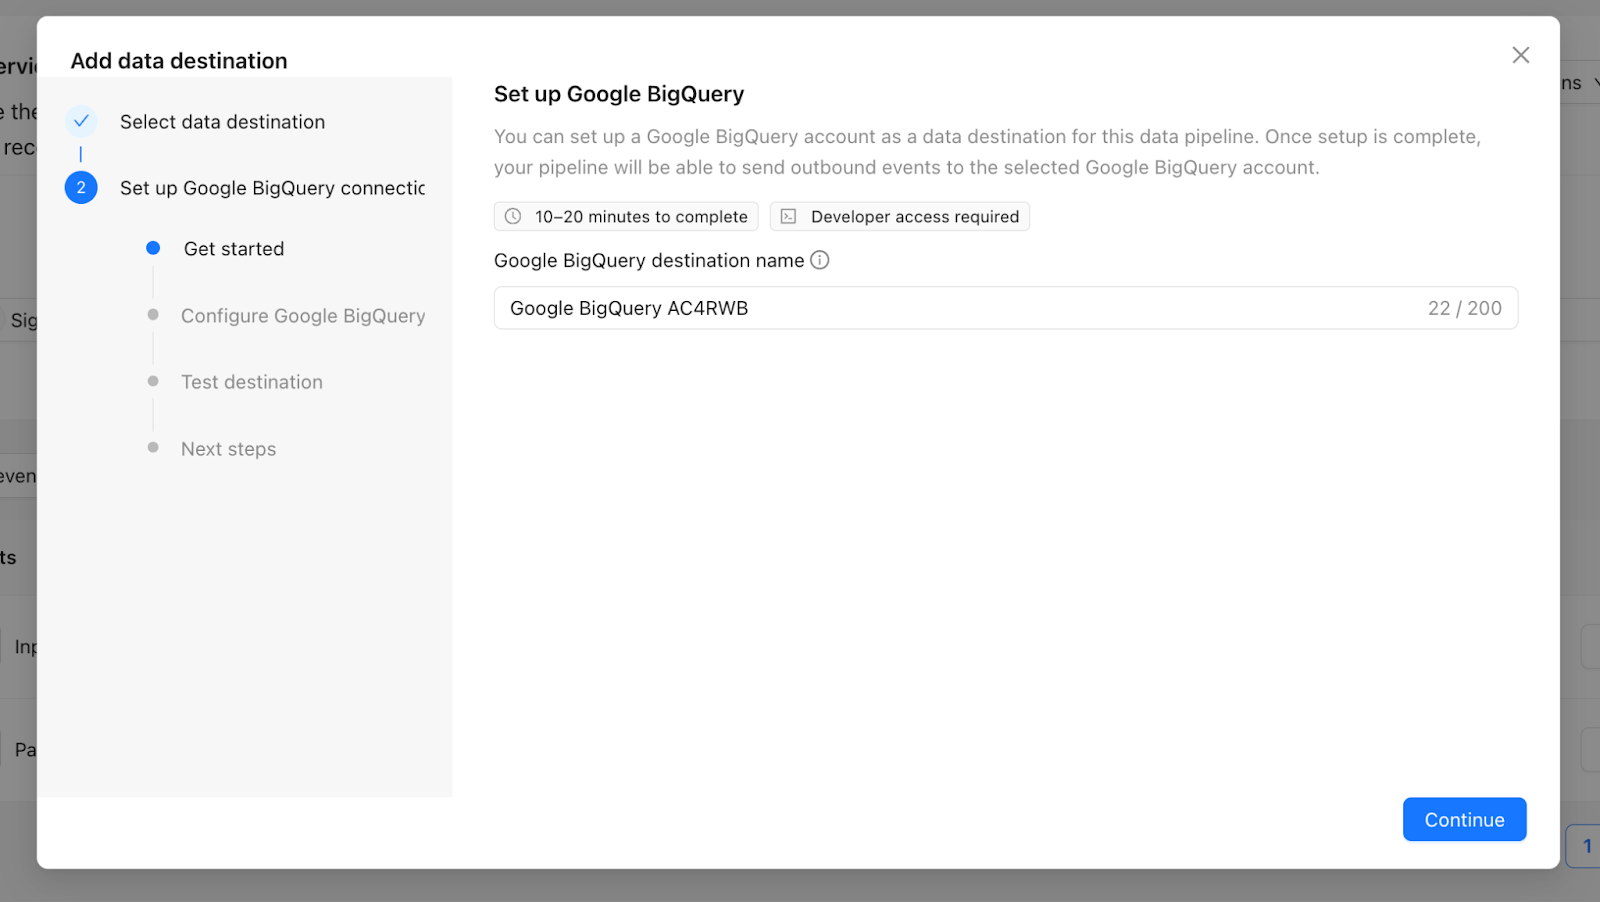
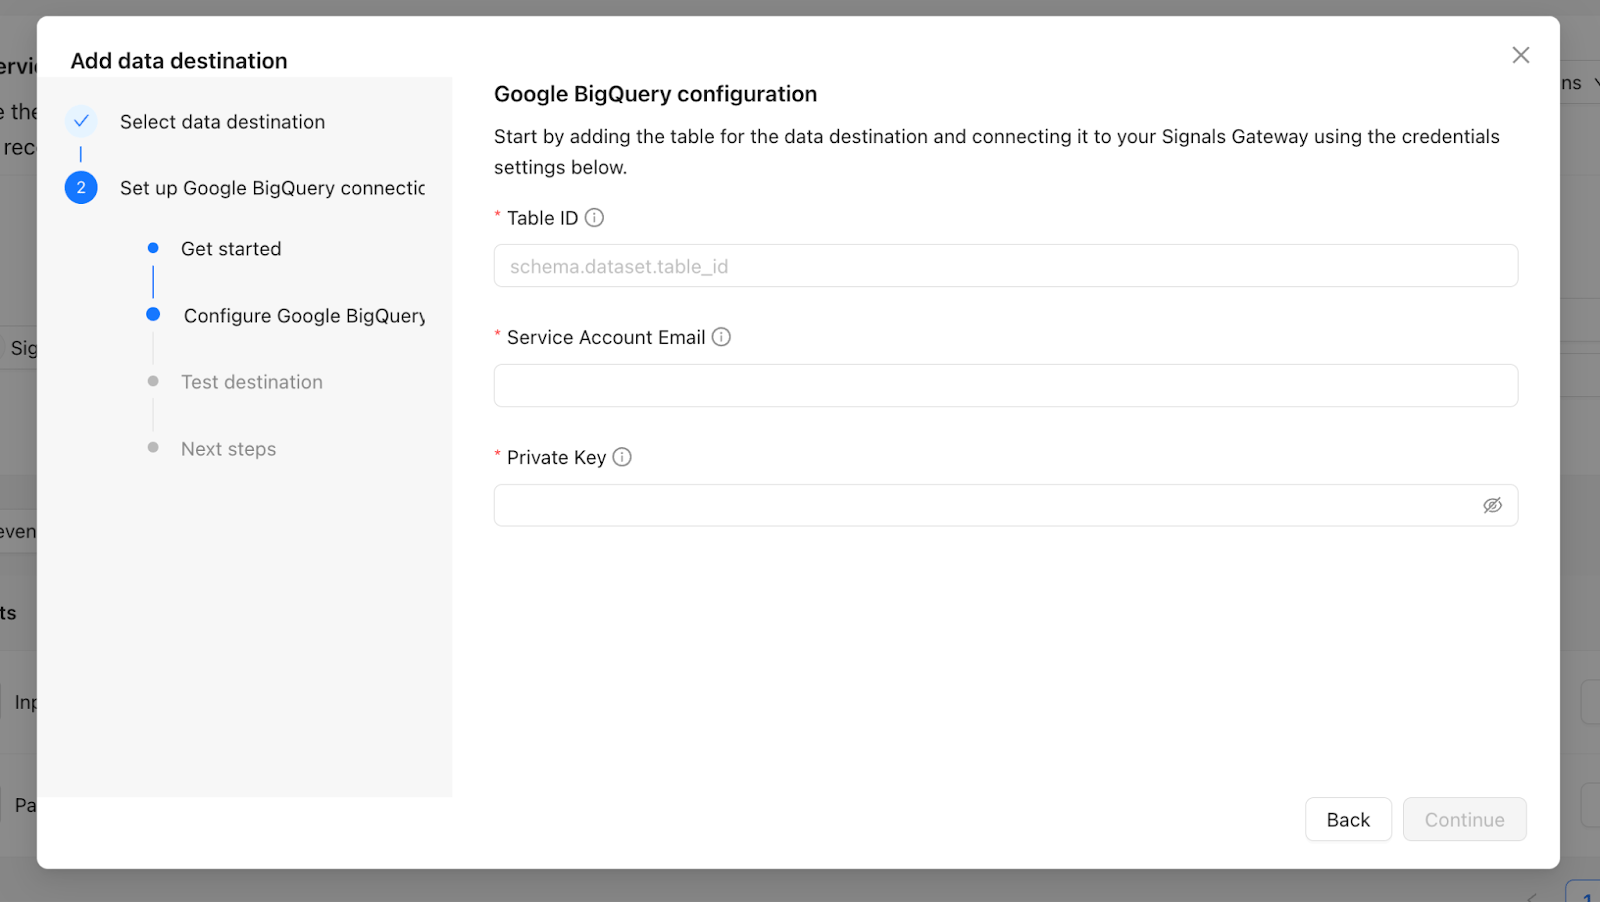
Compilate i campi per configurare la destinazione di Google BigQuery.
Table ID - si trova nel cloud di Google con il formato schema.dataset.table_id.
Service Account Email - inserite l’indirizzo e-mail associato al vostro account del servizio Google Cloud.
Private Key - inserite la chiave privata dell’account del servizio Google Cloud.
Cliccate su “Continua” e accedete al vostro account BigQuery per assicurarvi che i dati siano stati raccolti.
Plugin
Nel menu a sinistra, cliccando su “Plugin”, visualizzerete le app di Stape CRM.
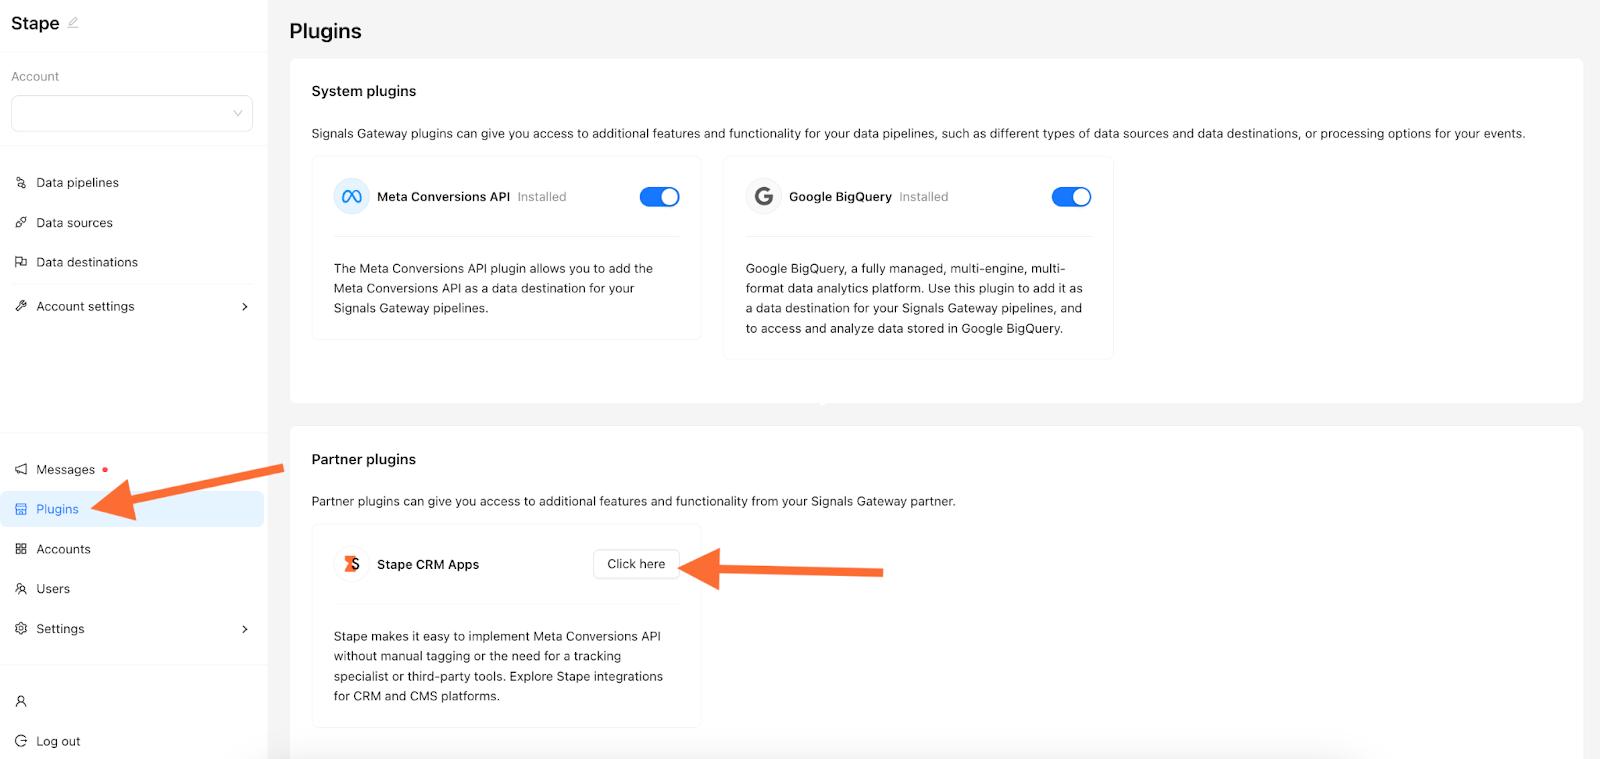
Le nostre app Meta Leads API riportano automaticamente la pipeline del CRM come eventi di conversione nel Meta Dataset (pixel). Al momento, Stape ha sviluppato applicazioni per i seguenti CRM:
| Scoprite di più sulle app CRM di Stape sul nostro blog. |
Conclusioni
Signals Gateway offre una soluzione semplice per stabilire il monitoraggio lato server. Dite addio alla seccatura e ai costi delle configurazioni complicate. Con Signals Gateway, sarete subito operativi, anche se non siete esperti di tecnologia. Siete pronti a provarlo? Iniziate oggi stesso con un piano gratuito!
Volete provare Signals Gateway?
Inizia con un piano gratuito! Cliccate su <BannerAnimation>Prova gratis </BannerAnimation> per registrarvi su Stape e creare Signals Gateway.
Prova gratisPost relativi
Blog
Come configurare Meta Conversions API Gateway
Scoprite come configurare il Meta Conversions API Gateway utilizzando Stape in questa guida passo passo.
4 ago 2025

Commenti